

Toyota KR 460 Instruction Manual
RIBBER
INSTRUCTION MANUAL
TOYOTA KR 460
CONTENTS
1. SETTING UP THE MACHINE 1
2. GENERAL GUIDE TO TENSION DIAL AND YARN 6
3. CASTING-ON : 7
4. FUNDAMENTAL RIB-KNITTING 8
1 x 1 RIB 8
SINGLE FISHERMAN'S RIB 9
RIPPLING 9
SKINNY RIB (TIGHTER) 10
SKINNY RIB 12
CLOSE RIB 14
CIRCULAR KNITTING 15
SWINGING RIB 17
CABLE KNITTING 18
TUCK PATTERN RIB 19
5. PUNCH CARD RIB
HONEY COMB PATTERN 20
PIN-TUCK KNITTING 21
FAIR-ISLE DOUBLE KNIT 22
6. INCREASING STITCHES 24
DECREASING STITCHES •................................ 25
7. USEFUL HINTS
CASTING-ON 26
HOW TO USE DOUBLE-EYED TRANSFER TOOL. 27
HOW TO MAKE A KNOT 28
BINDING OFF FOR THE RIB STITCHES 28
8. PARTIAL KNITTING
1x1 RIB 29
WHEN TUCK OR EMPTY BUTTONS ARE USED 30
WHEN RACKING HANDLE IS USED 31
9. HOW TO FIX THE MACHINE
CARRIAGE JAMMING 32
REPLACING THE NEEDLE 33
HOW TO USE MAIN KNITTER WITH SETTING RIBBER ON 33
WHEN END STITCHES ARE NOT KNITTED 34
HOW TO MOVE CARRIAGE WIHTOUT KNITTING 34
HOWTOTAKEOFFTHE KNITTED PIECE 34
10. NAMES AND FUNCTION
RIB KNITTER 35
RIB CARRIAGE 35
RIB YARN FEEDER 35
RIB YARN FEEDER BASE 35
ACCESSORIES 36
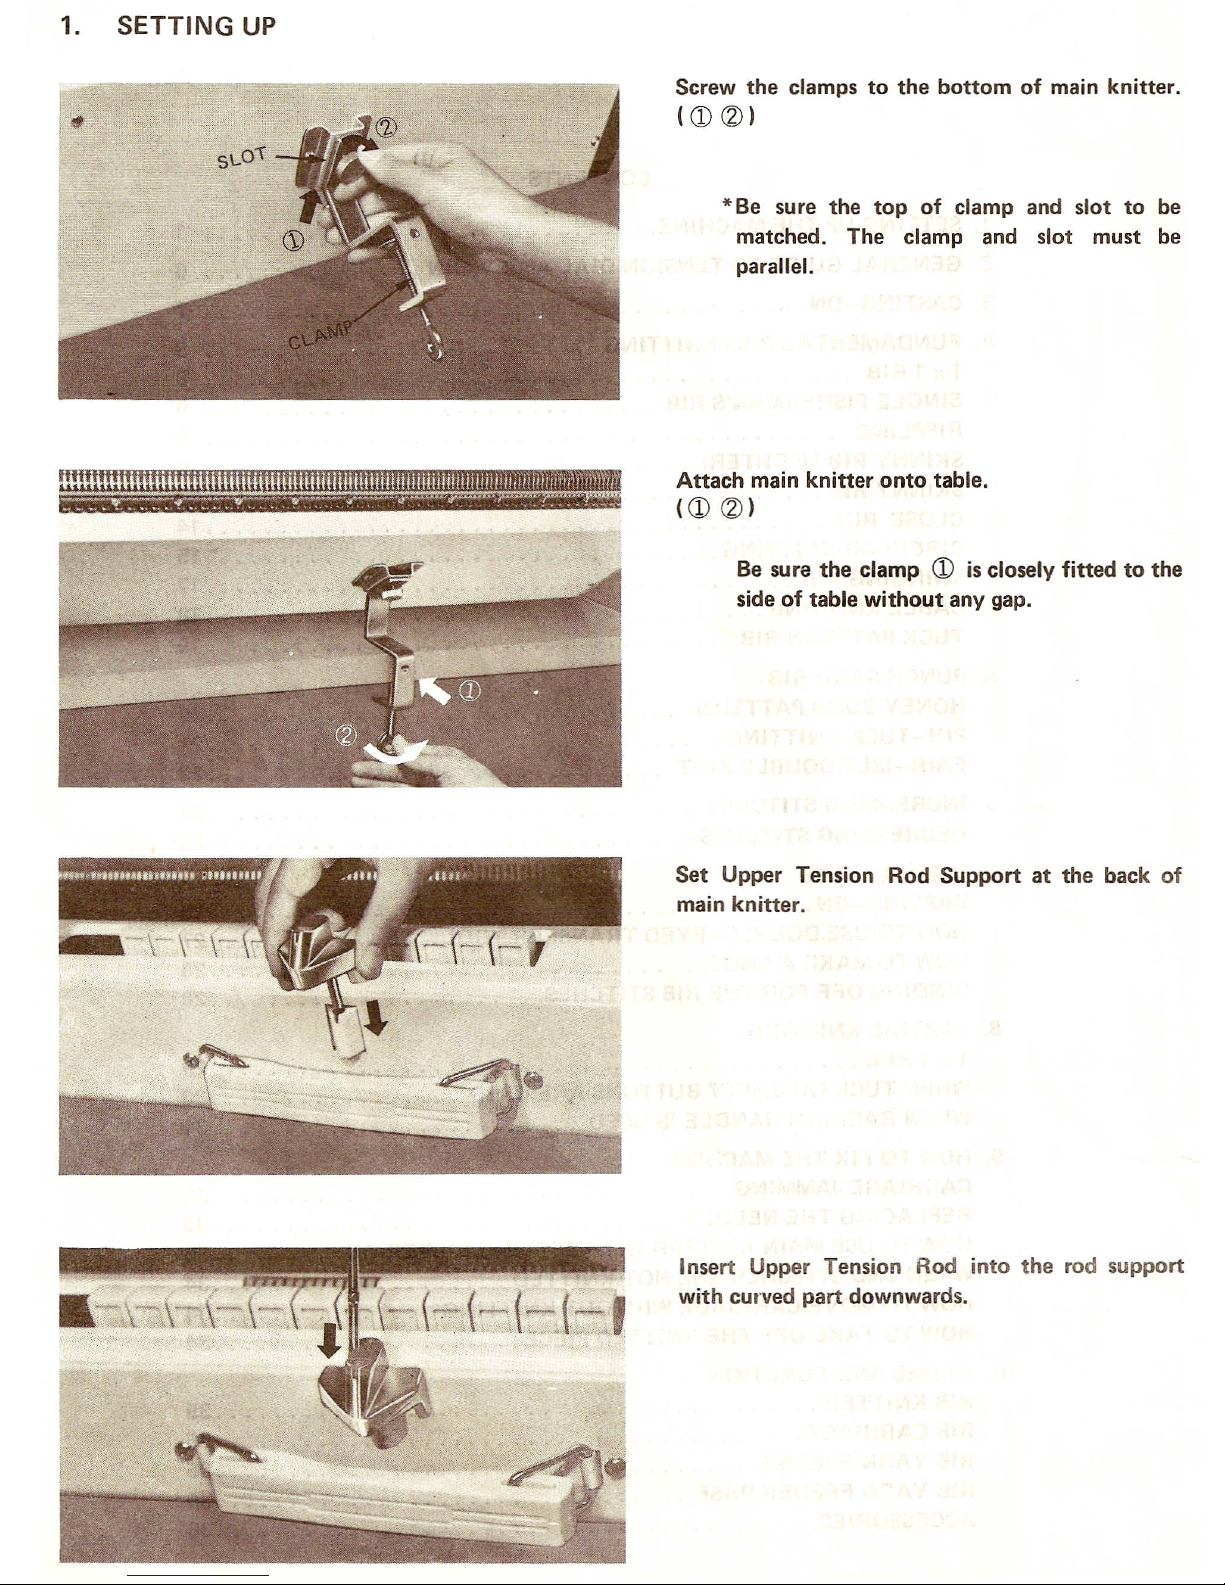
Screw the clamps to the bottom of main knitter.
(CD~)
*Be sure the top of clamp and slot to be
matched. The clamp and slot must be
parallel.
Attach main knitter onto table.
(CD ~)
Be sure the clamp
CD
is closely fitted to the
side of table without any gap.
Set Upper Tension Rod Support at the back of
main knitter.
Insert Upper Tension Rod into the rod support
with curved part downwards.
.
. • Ml"f!"
•• ,""a , "'_ •• ,.,. •••..•••
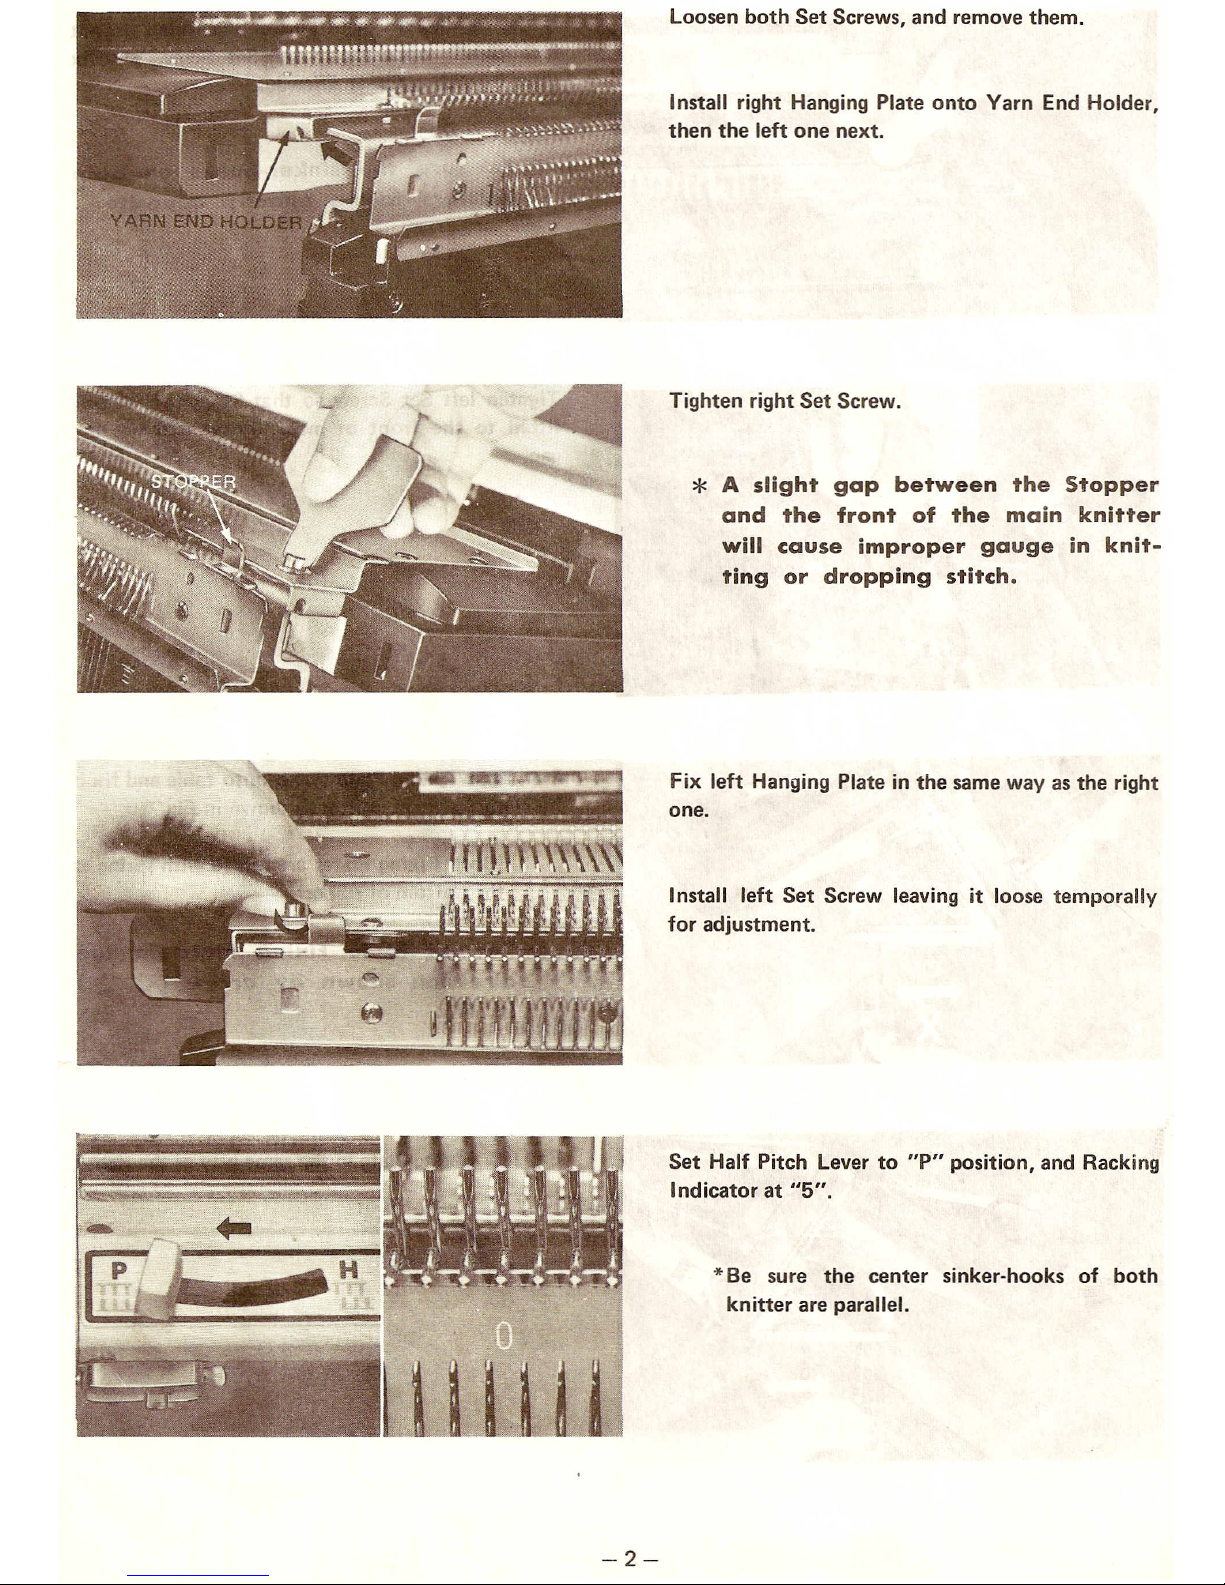
Install right Hanging Plate onto Yarn End Holder,
then the left one next.
*
A slight gap between the Stopper
and the front of the main knitter
will cause improper gauge in knit-
ting or dropping stitch.
Fix left Hanging Plate in the same way as the right
one .
Install left Set Screw leaving it loose temporally
for adjustment.
Set Half Pitch Lever to "P" position, and Racking
Indicator at "5".
*
Be sure the center sinker-hooks of both
knitter are parallel.
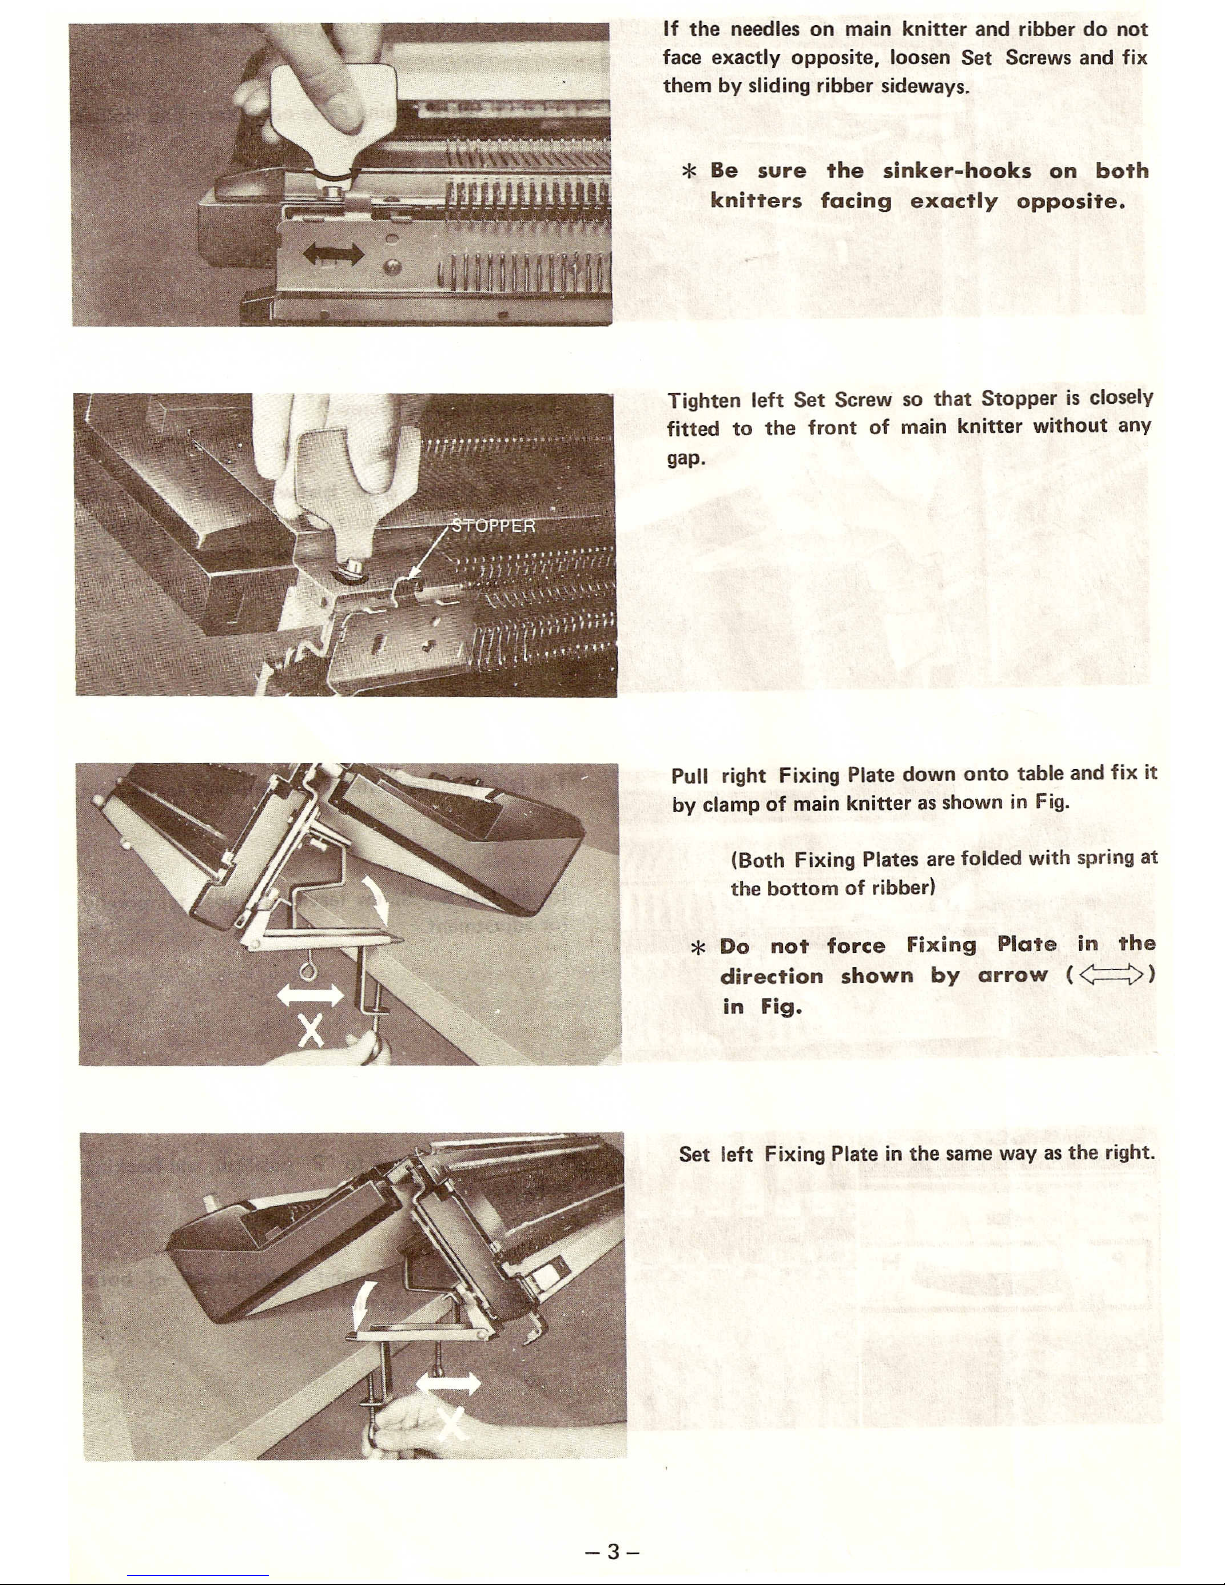
If
the needles on main knitter and ribber do not
face exactly opposite, loosen Set Screws and fix
them by sliding ribber sideways.
*
Be sure the sinker-hooks on both
knitters facing exactly opposite.
Tighten left Set Screw so that Stopper is closely
fitted to the front of main knitter without any
gap.
Pull
right Fixing Plate down onto table and fix it
by clamp of main knitter as shown in Fig.
(Both Fixing Plates are folded with spring at
the bottom of ribber)
*
Do not force Fixing Plate in the
direction shown by arrow
(<===»
in Fig.

Fix the handle to main carriage, and place carriage
correctly on the needle bed so that it slides
smoothly.
*Be sure Front Holder is correctly mounted
onto the needle bed.
Fix the handle to ribber carriage, and set carriage
in the following way.
1. Mount the bottom of ribber carriage onto
the rail, leaning it towards you.
CD
2. Slide carriage in side way, ensuring it won't
hit Stop Pin. (2)
3. Fix carriage by pushing up both Front
Holders. ®
*
Do not force carriage against Stop
Pin, which prevents carriage from
dropping.
Remove both Fabric Presser Knobs of main
carriage.
Set Rib Yarn Feeder Base so that the arrow marks
face to main knitter.
*Make sure both holes of Rib Yarn Feeder
Base are correctly fitted to pins of main
carriage.
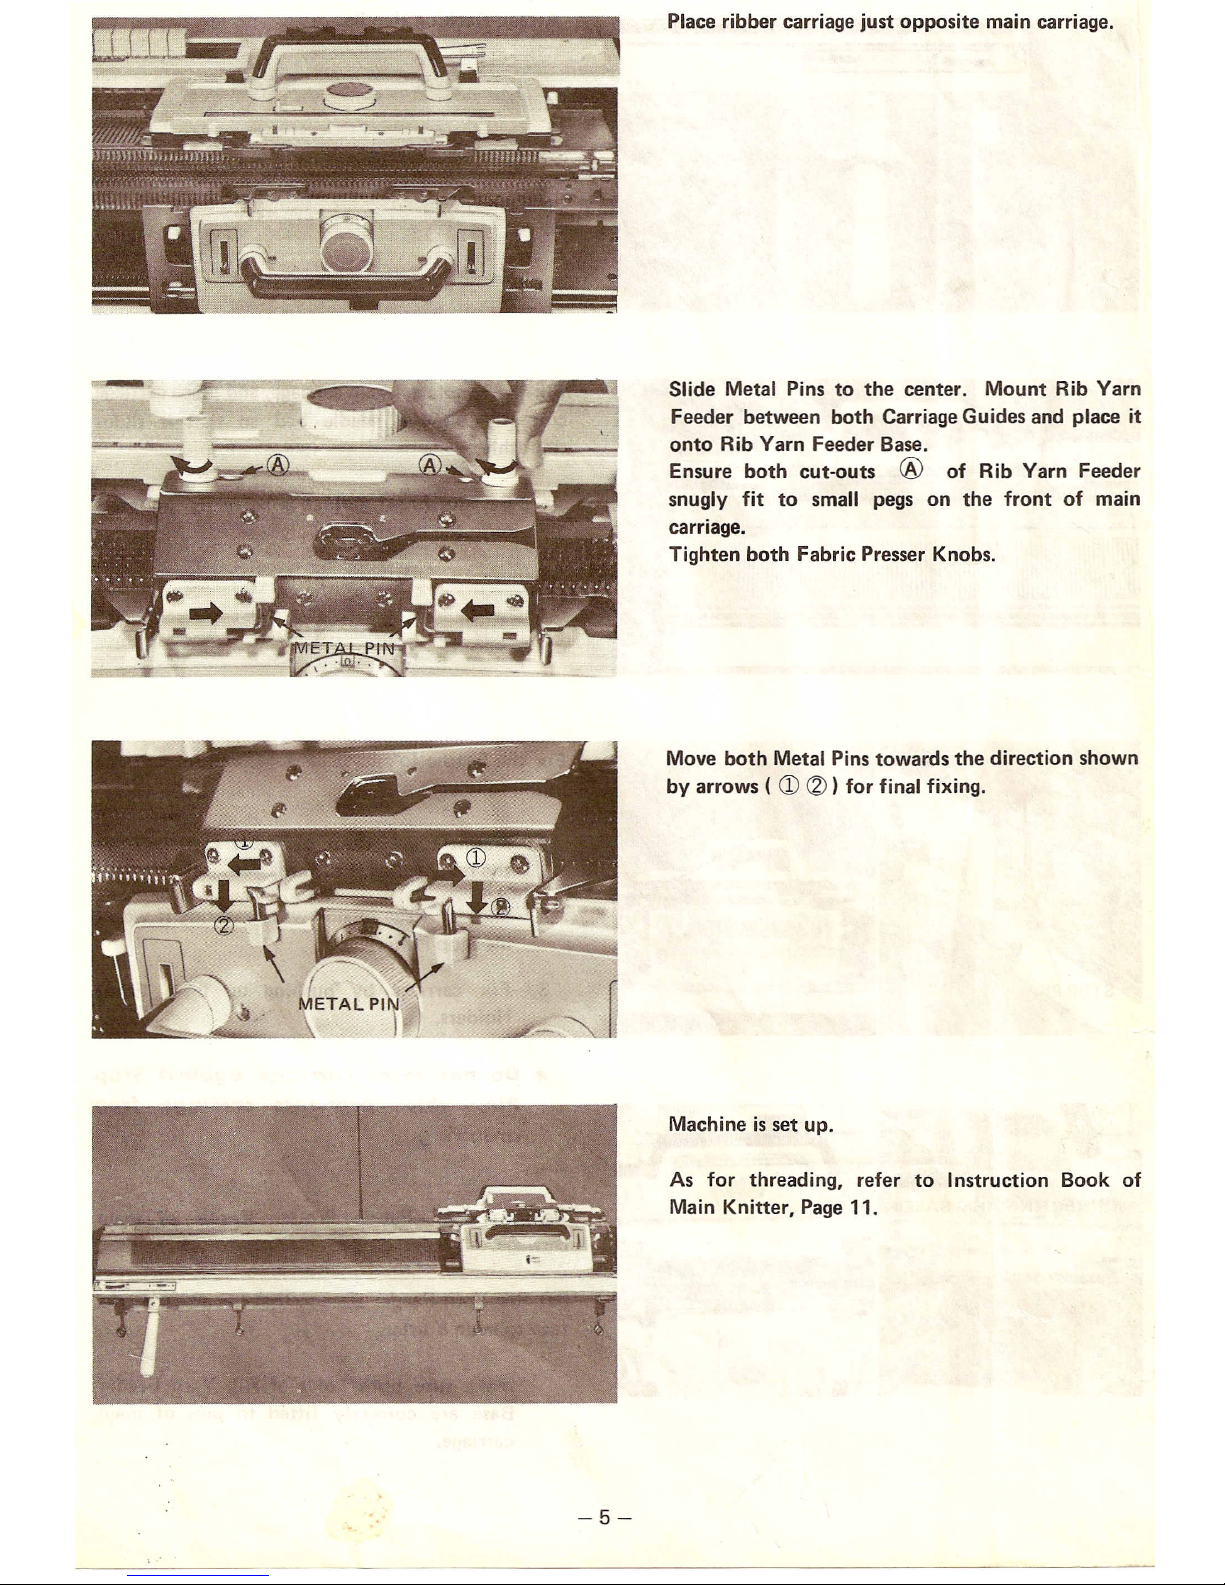
Slide Metal Pins to the center. Mount Rib Yarn
Feeder between both Carriage Guides and place it
onto Rib Yarn Feeder Base.
Ensure both cut-outs
®
of Rib Yarn Feeder
snugly fit to small pegs on the front of main
carriage.
Tighten both Fabric Presser Knobs.
Move both Metal Pins towards the direction shown
by arrows (
CD (2) )
for final fixing.
As for threading, refer to Instruction Book of
Main Knitter, Page 11.
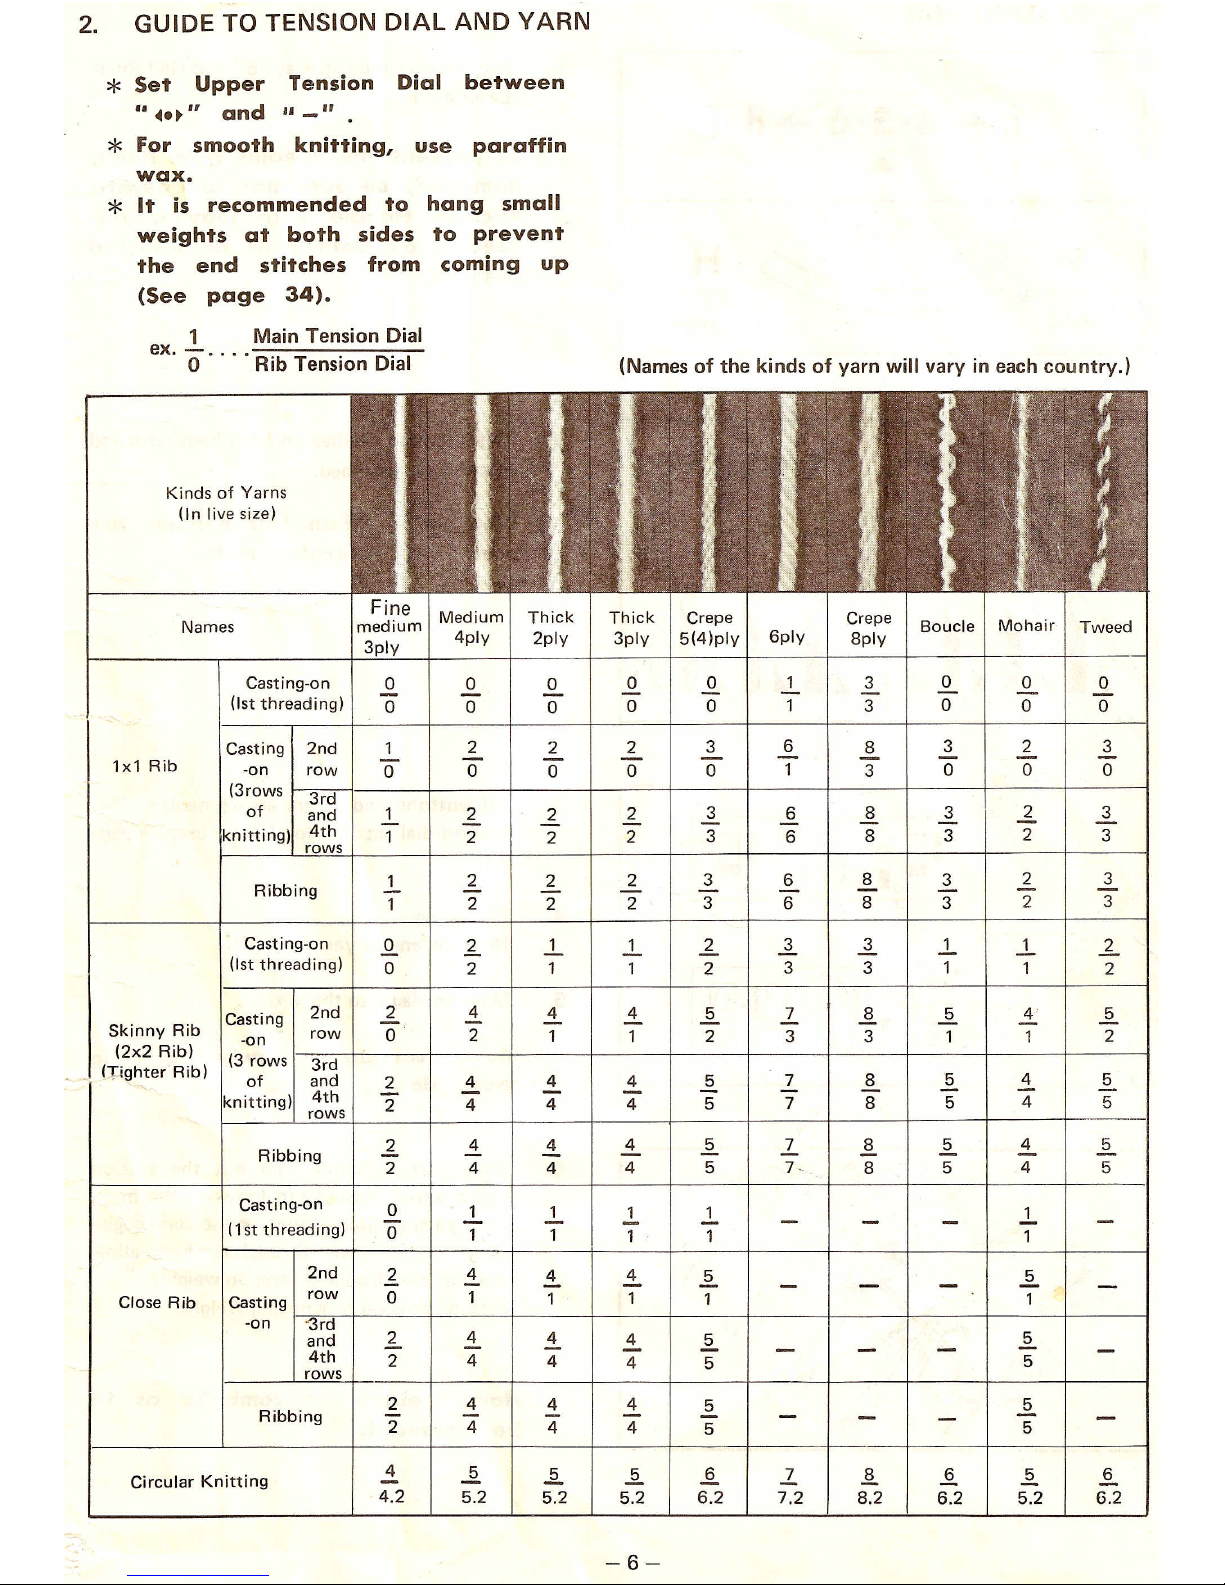
*
Set Upper Tension Dial between
II
-4.~"
and "_"
*
For smooth knitting, use paraffin
wax.
*
It is recommended to hang small
weights at both sides to prevent
the end stitches from coming up
(See page 34).
1 Main Tension Dial
ex. - .... -------
o
Rib Tension Dial
Kinds of Yarns
(In live size)
Fine
Medium Thick
Thick Crepe
Crepe
Names
medium
Boucle Mohair
Tweed
3ply
4ply
2ply 3ply
5(4)ply
6ply
8ply
Casting-on
0 0
0
0
0
1
3
0
0
0
(1stthreading)
0 0
0
0 0
1
3
0
0 0
Casting 2nd
1
2
2 2
3
6
8
3
2 3
1x1 Rib
-on
row
0
0
0
0 0
1
3
0
0
0
(3rows
3rd
of
and
1
2
2
2
3
6
8 3
2
3
knitting)
4th
1 2
2
2
3
6
8
3
2
3
rows
Ribbing
1
2
2
2
3 6
8
3
2 3
1
2
2
2
3
6
8 3
2
3
Casting-on
..Q..
1-
.l.
.l.
.l.
2 2
.l.
.l. .l.
(1stthreading)
0
2
1
1 2
3
3
1
1
2
Casting
2nd
2
4
4 4
2.
1..
Ji
2-
4
2.
Skinny Rib
-on
row
0
2
1
1
2
3 3 1 1
2
(2x2 Rib)
(3 rows
3rd
(J.:ighterRib)
of and
2
4
4 4 5
7 8
5
4
5
knitting)
4th
2
4
4 4
5
7 8
5
4
5
rows
Ribbing
1.
~
4
4
.§.
1..
.§. .§.
4 5
2 4 4
4 5
7 - 8
5
4
5
Casting-on
0
1
.l.
1 1
.1.
11st threading)
0"
1
1
1 1 1
2nd
2
4
4
.i.
.§.
2.
Close Rib Casting
row
0
1
1
1
1
1
-on
"3rd
and
2 4
4
4
5
.§.
4th
2
4
4
4
5
5
rows
2 4
4 4
5
2-
Ribbing
2 4
4 4
5
5
Circular Knitting
4
..§.
..§. ..§.
.§.
1..
l!.
.§.
.§.
.§.
4.2
5.2 5.2
5.2 6.2 7.2 8.2
6.2
5.2 6.2
-6-
L~t4.5.6~~ R
A
H
TTT
.LLL
~~~~~~~ j~~~~~~
WRONG SETTING
~JJJ]
JJ]L
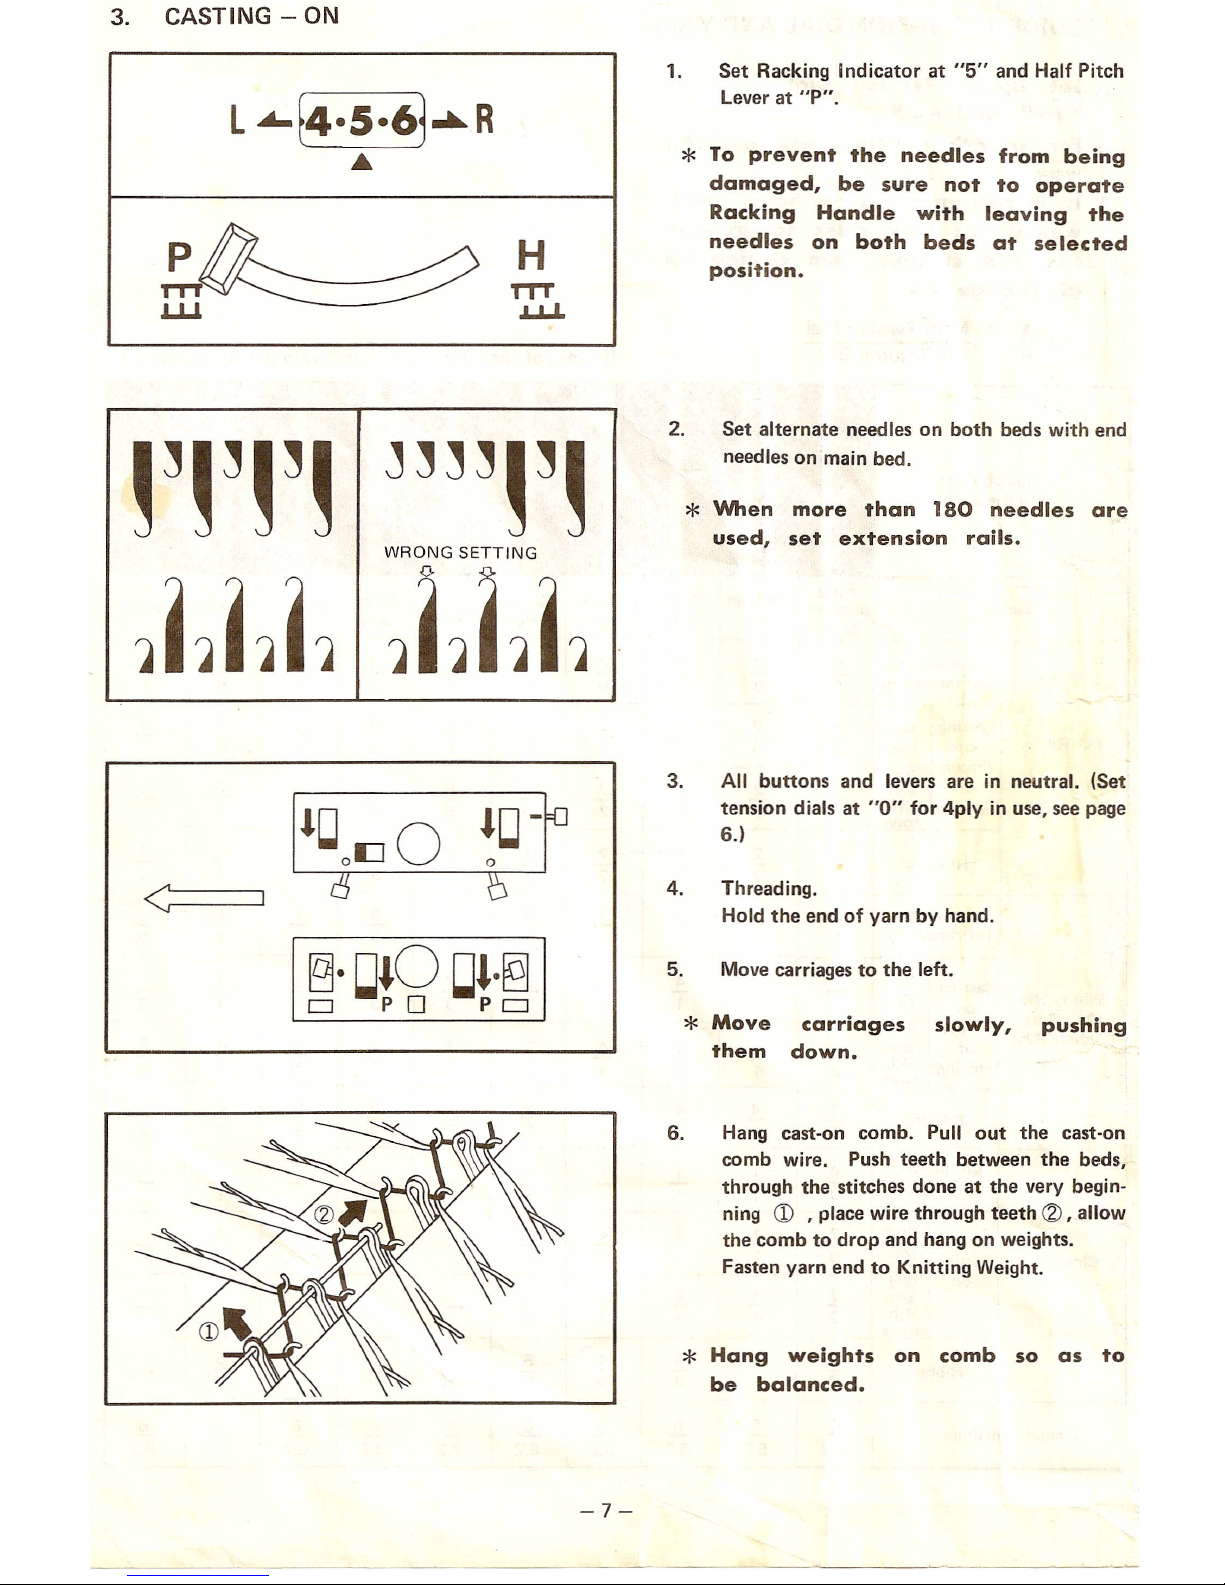
1. Set Racking Indicator at "5" and Half Pitch
Lever at "P".
*
To prevent the needles from being
damaged, be sure not to operate
Racking Handle with leaving the
needles on both beds at selected
position.
2. Set alternate needles on both beds with end
needles on main bed.
*
When more than 180 needles are
used, set extension rails.
All buttons and levers are in neutral. (Set
tension dials at "0" for 4ply in use, see page
6.)
Threading.
Hold the end of yarn by hand.
*
Move
them
carriages
down.
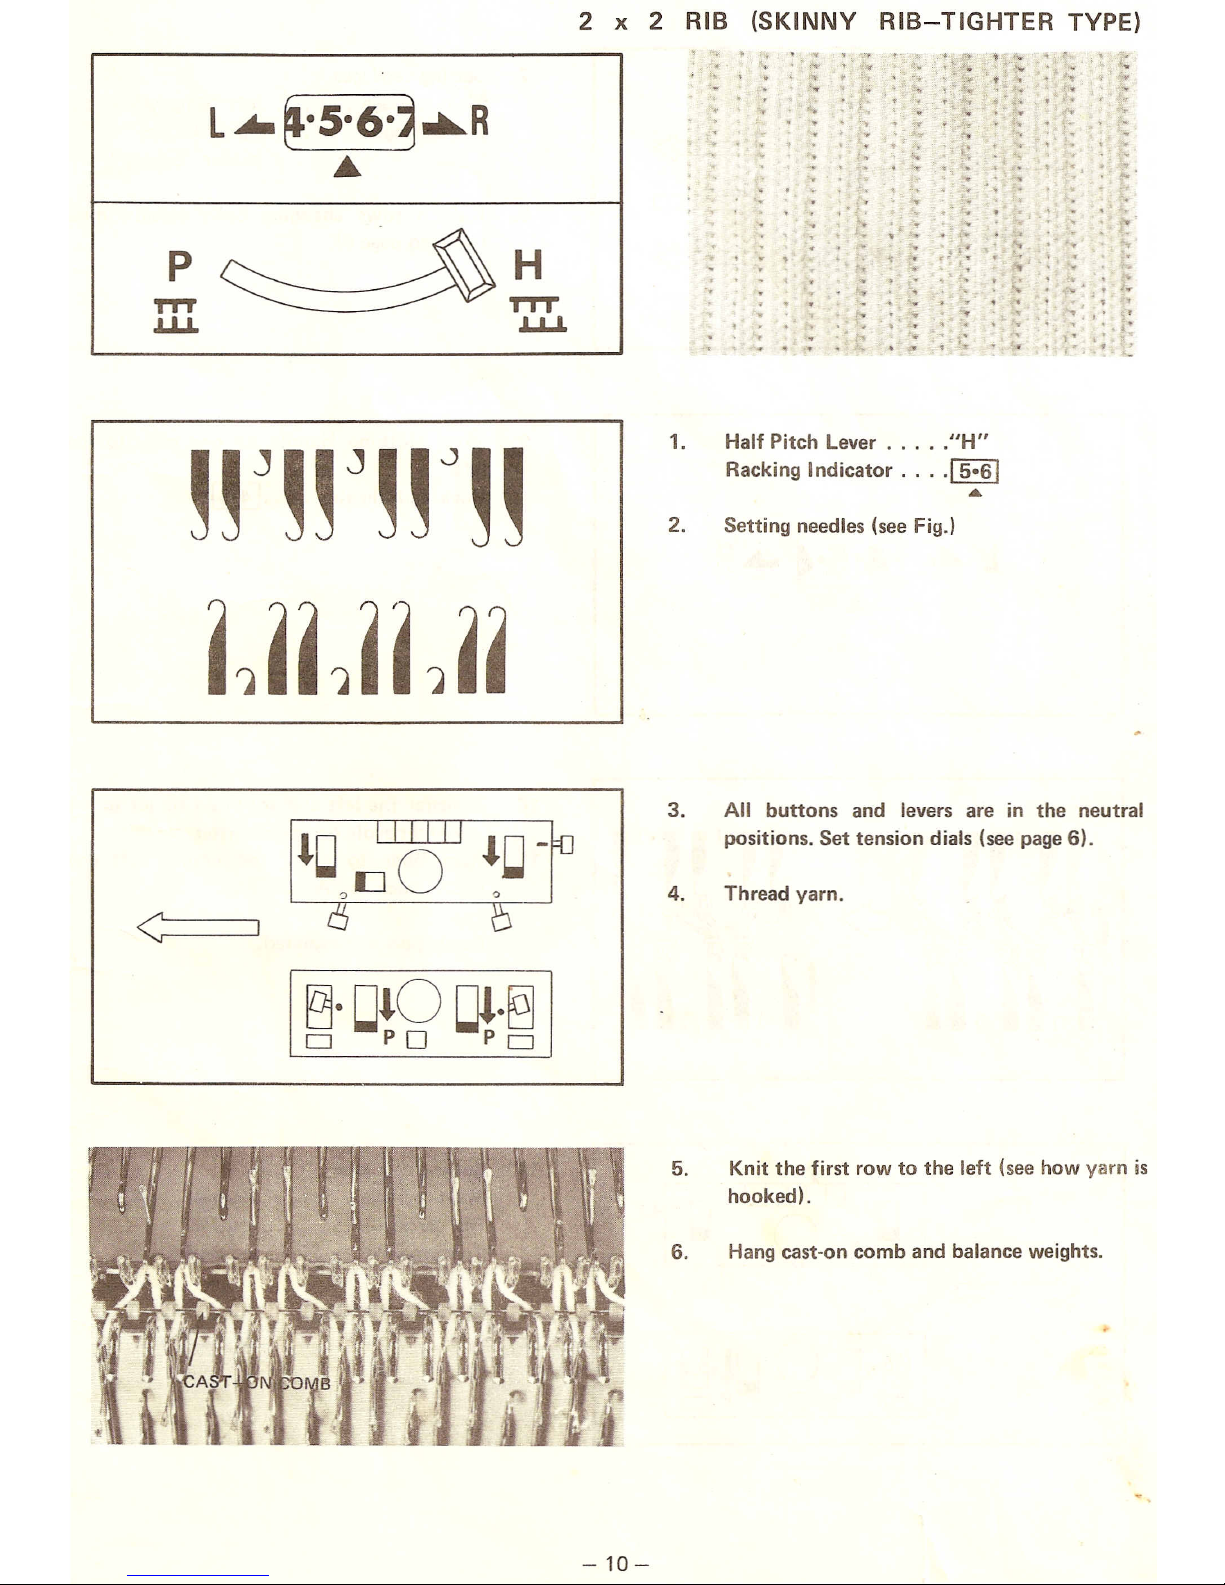
6. Hang cast-on comb. Pull out the cast-on
comb wire. Push teeth between the beds,
through the stitches done at the very begin-
ning
CD
,place wire through teeth ~ , allow
the comb to drop and hang on weights.
Fasten yarn end to Knitting Weight.
*
Hang weights on comb so as to
be balanced.
c===~>
<==="J
c===;>
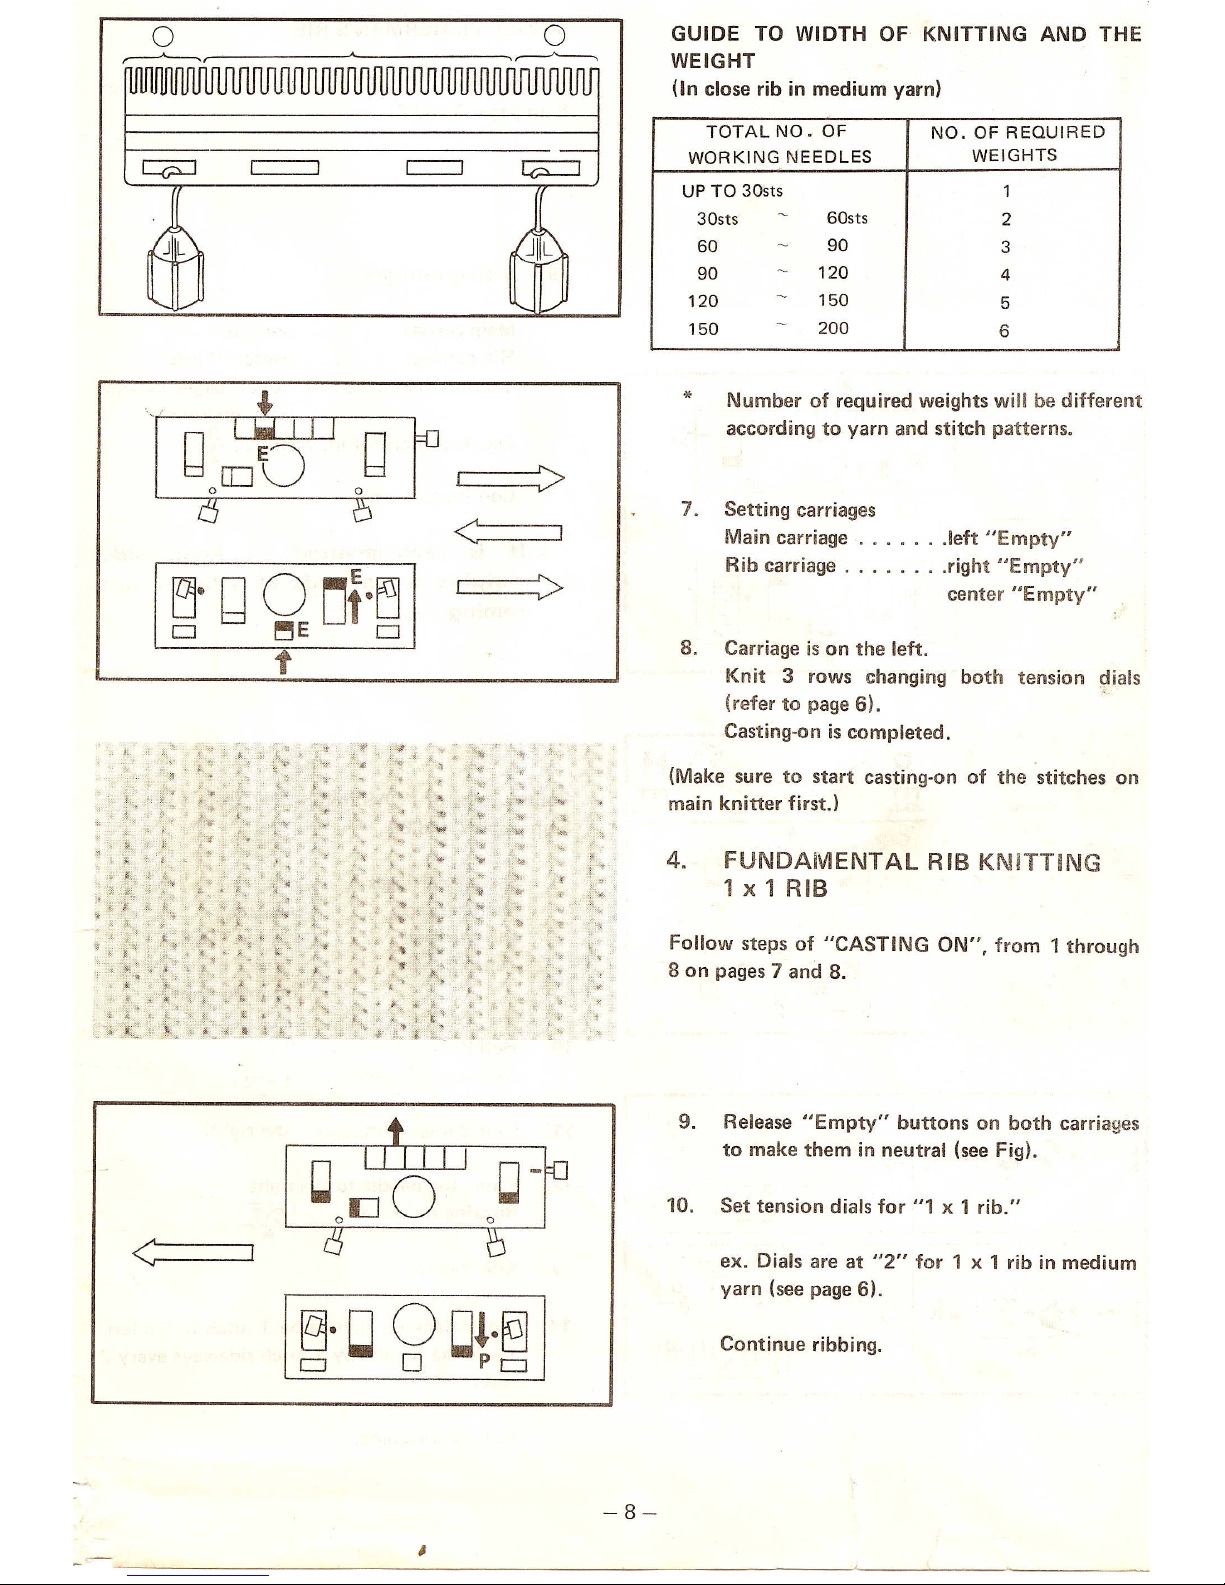
GUIDE TO WIDTH OF KNITTING AND THE
WEIGHT
(In close rib in medium yarn)
TOTAL NO. OF
NO. OF REQUIRED
WORKING NEEDLES
WEIGHTS
UP TO 30sts
1
30sts
~
60sts
2
60
~
90
3
90
~
120
4
120
~
150
5
150
-
200
6
Number of required weights will be different
according to yarn and stitch patterns.
Setting carriages
Main carriage .left "Empty"
Rib carriage right "Empty"
center "Empty"
Carriage is on the left.
Knit 3 rows changing both tension ~ials
(refer to page 6).
Casting-on is completed.
(Make sure to start casting-on of the stitches on
main knitter first.)
4. FUNDAMENTAL RIB KNiTTING
1x1RIB
Follow steps of "CASTING ON", from 1 through
8 on pages 7 and 8.
9. Release "Empty" buttons on both carriages
to make them in neutral (see Fig).
ex. Dials are at "2" for 1 x 1 rib in medium
yarn (see page 6).
""
'410_
.•.
4-
..•
...
..
;I.
-..,
•
.•. ...,
~~
-
*-
"
-~
~
.
..•
;.
+-
4
."
.•.
r
'"
t
I I I I I I
~IJO
o
C!3
'+
""
""
••
'"
'"
~
'I,;
-~
••
P
H
•••
••
...
II>
'"
,.
Tn'
TTT
••
.,.
.-
••
•
J.U.
LU
"
•.
~
t
'"
..
K'
~
••
"'-
,.
i
~
I
t
I
!
I I
o~-r
,.,
.-
""
.'
.,
."
olJ
0
••
"
..
.•.
..
•.
d
5
.•
\.
••
••
<#
.. ..
\i,
\
'"
•
~
,~
".,
.,
•.
#Ii
,..
,
..
'"
L
-(-S-6-)-R
••
L-
(-6-7-]-R
••
1~.~,Qr
6 15
I~'
Q
QO
'§I
I~,~,~r
6
6
1~'bJQLJ'~1
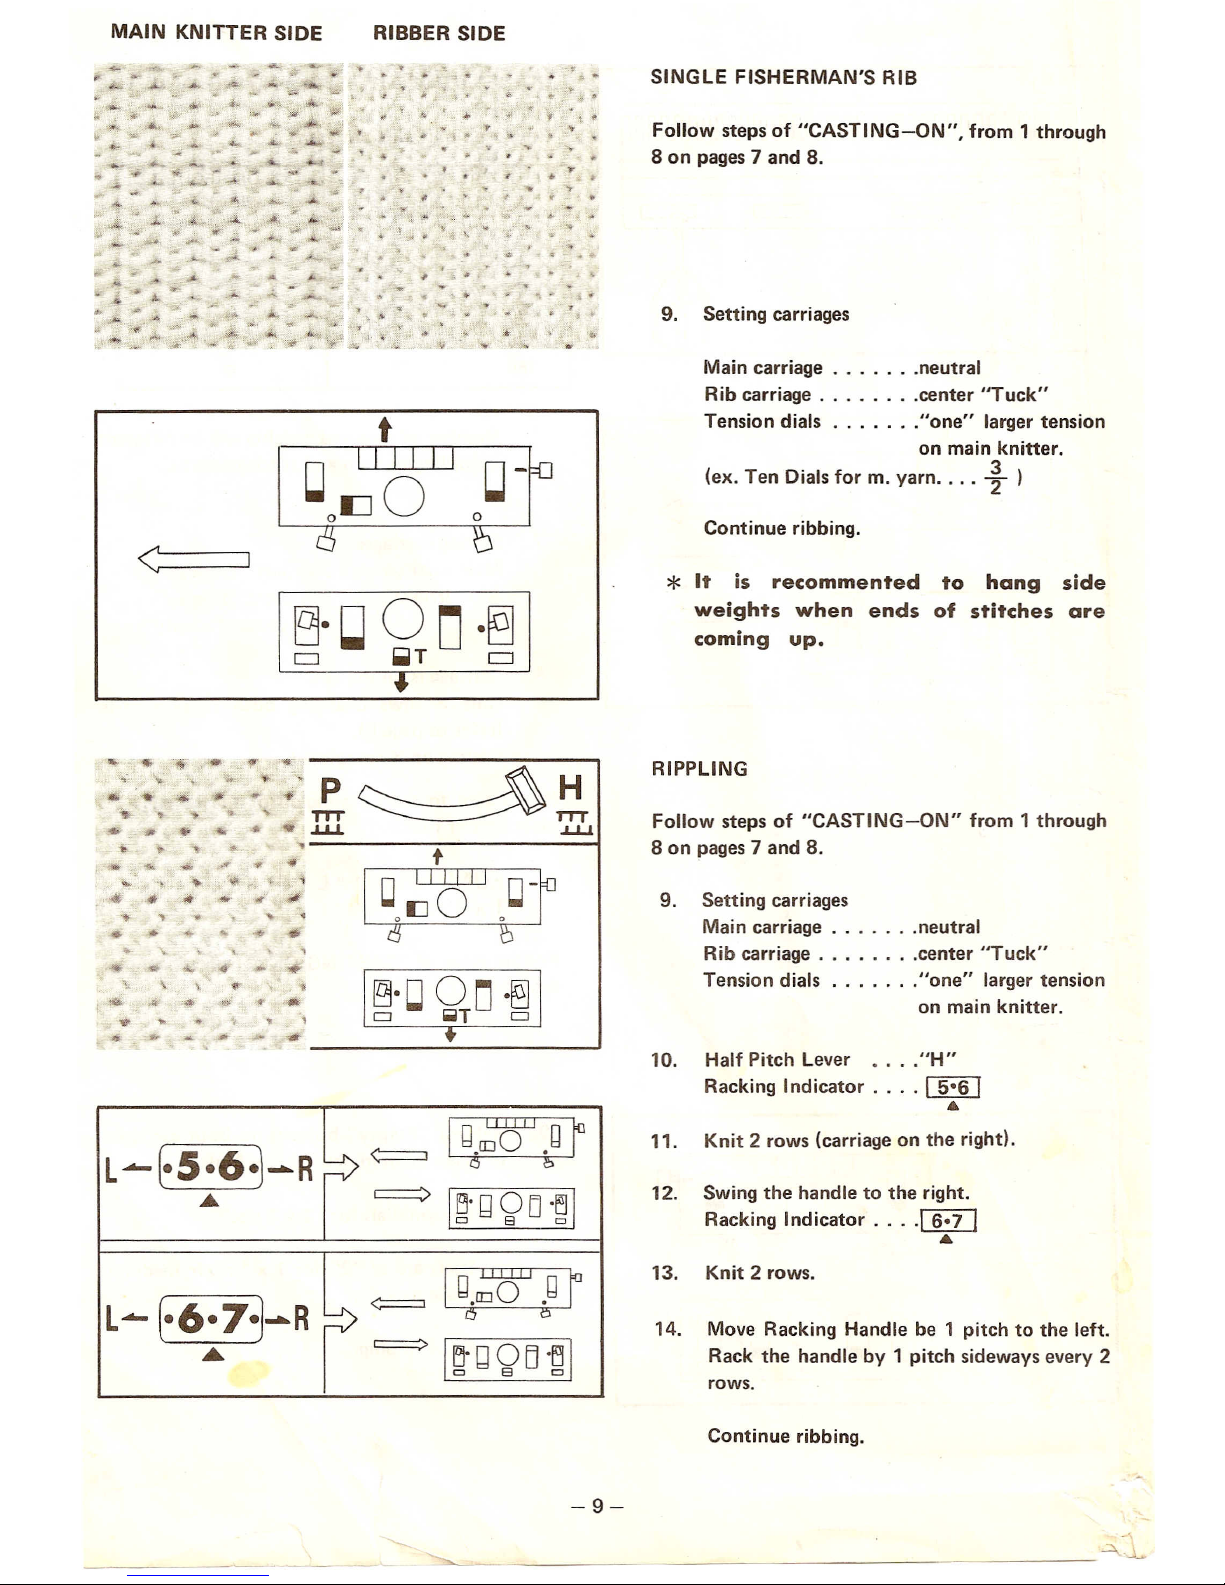
Follow steps of "CASTING-ON", from 1 through
8 on pages 7 and 8.
Main carriage neutral
Rib carriage center "Tuck"
Tension dials "one" larger tension
on main knitter.
(ex. Ten Dials for m. yarn .... ~ )
*
It is recommented to hang side
weights when ends of stitches are
coming up•
Follow steps of "CASTING-ON" from 1 through
8 on pages 7 and 8.
9. Setting carriages
Main carriage neutral
Rib carriage center "Tuck"
Tension dials "one" larger tension
on main knitter.
1
O.
Half Pitch Lever .. "H"
Racking Indicator ....
[E]
•
Swing the handle to the right.
Racking Indicator .... ~
•
Move Racking Handle be 1 pitch to the left.
Rack the handle by 1 pitch sideways every 2
rows.
L.• ~·5·6·~ •••..R
A
H
TTT
.LL.1
1. Half Pitch Lever "H"
Racking Indicator
15.61
...
3. All buttons and levers are in the neutral
positions. Set tension dials (see page 6).
5. Knit the first row to the left (see how yarn is
hooked).
 Loading...