


T C KLU
Not For Reproduction
--
-
8}2004-
OM
OWM
08/04
- - -
Pub No. OM48538E I
01999-48538
\
For
read carefully
your
and
safety
keep
in
and
comfort,
the vehicle .
----~---
------
--------------------
----------
•
--
-----
-------
Foreword
Not For Reproduction
Welcome to the growing group of
are proud of the advanced engineering and
build.
This
Owner's
it
thoroughly
Doing
For
ing
When it comes to service, remember that your Toyota dealer knows your
very
provide quality maintenance and any other assistance you may require.
owner
All information and specifications in this manual are current at the time of printing.
the right to make changes at any time without notice.
so
important
pages
well and is interested in your complete satisfaction. Your Toyota dealer will
Please
However, because of Toyota's
Please
including
not
leave
will
note
installed
Manual
and
will
help
information
carefully.
this
need
that
options.
on
explains
have
you
Owner's
this
information
this
manual
Therefore,
your
vehicle.
all
enjoy
value-conscious
quality construction
the
operation
the
occupants
many
years
about
this
manual
Manual
in
this
vehicle
also.
policy of continual product improvement, we reserve
applies
you
to
may
all
find
TOYOTA
people who drive Toyotas. We
of
each
of
your
new
Toyota.
follow
of
models
some
safe
and
your
at
and
explanations
MOTOR
the
instructions
and
trouble-free
Toyota,
the
time
explains
read
of
resale.
all
for
CORPORATION
vehicle
Please
carefully.
motoring.
the
follow-
The
equipment,
equipment
we
read
vehicle
next
© 2004 TOYOTA MOTOR CORPORATION
All
rights reserved. This material may not be reproduced or copied, in whole
part, without the written permission of Toyota Motor Corporation.
or
in
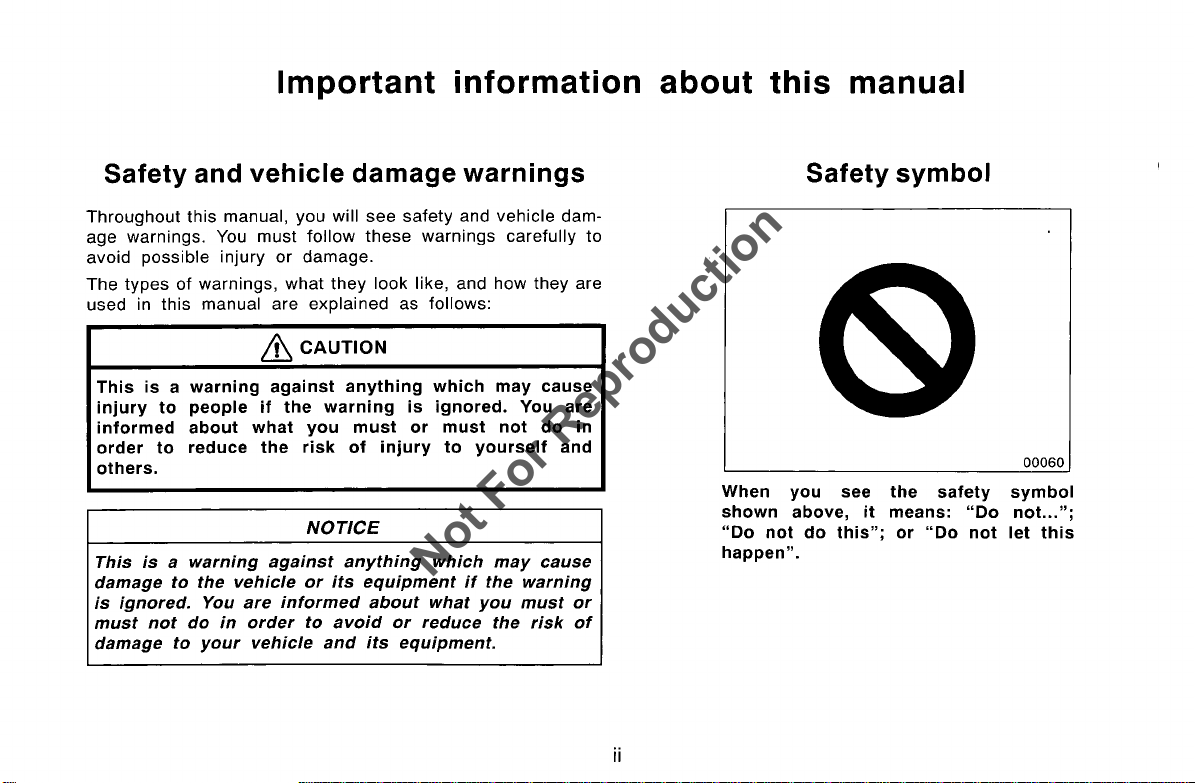
Important information about this manual
Not For Reproduction
Safety and vehicle damage warnings
Throughout this manual, you will see
age warnings. You
possible injury or damage.
avoid
The types of warnings, what
used in this
This
injury
informed
order
others.
This
damage
is
ignored.
must
damage
warning
is
a
people
to
about
reduce
to
is a warning
to
not
do
to
must
follow
they
manual are explained as follows:
&
CAUTION
against
if
the
warning
what
you
the
risk
NOTICE
against
the
You
in
your
vehicle
are
informed
order
vehicle
or
to
its
avoid
and
safety
these
look like, and how they are
anything
must
of
injury
anything
equipment
about
or
its
and vehicle dam-
warnings carefully to
which
is
ignored.
or
must
to
which
what
reduce
equipment.
may
not
yourself
may
if
the
you
the
cause
You
are
do
and
cause
warning
must
or
risk
of
in
Safety symbol
00060
When
shown
"Do
happen".
ii
not
you
above,
do
see
it
this";
the
safety
means:
or
"Do
"Do
not
symbol
not...";
let
this
Important information about your Toyota
Not For Reproduction
Accessories, spare parts and
modification of your Toyota
A wide variety of
for
Toyota vehicles are currently available in the market.
Using these spare parts and
genuine Toyota products may
vehicle, even though
your
certain authorities in your country. Toyota
accept any
ries which are not genuine Toyota products, nor for replacement or installation involving such parts.
This
vehicle should not be modified with
Toyota products. Modification with
products
and may even violate governmental regulations. In addition, damage or performance
modification may not be covered under warranty.
could affect its performance, safety or durability,
non-genuine
liability or guarantee spare parts and accesso-
spare
parts and accessories
accessories
adversely
these
parts may be approved by
problems resulting from
which are not
affect the safety of
therefore
non-genuine
non-genuine
cannot
Toyota
the
Installation of a mobile
two-way
As
the
installation of a mobile
vehicle
your
port fuel injection system/sequential multi port fuel injection
system,
system,
vehicle
seat
belt pretensioner system, be sure
Toyota
structions
could affect electronic
electronic
anti-lock
stability
dealer
regarding installation.
brake system, traction control system,
control system, SRS airbag system and
for
precautionary measures or special in-
radio system
throttle
control system,
two-way
systems
radio system in
such as multi-
cruise
to
check
with your
control
Maintenance schedule
Please refer to the separate "Warranty and Service
Booklet".
iii
Scrapping of your Toyota
Not For Reproduction
The SRS airbag and
Toyota contain
scrapped with the airbags and pretensioners
are, this may
have the
sioner removed and disposed of by the
shop or by your Toyota
vehicle.
systems
explosive
cause
of
seat
belt pretensioner devices in your
chemicals. If the vehicle is
an
accident
the
SRS airbag and seat belt preten-
dealer
such as fire. Be sure to
qualified
before you
dispose
left as
service
of your
they
On-pavement
and
off-road
driving tips
This vehicle belongs to the utility
hicles have a significantly higher rollover rate than other
types of
differently from an ordinary passenger car because it is
designed for
has a higher ground clearance and center
that of an ordinary passenger car. This
ture causes this type of
lover. Failure
loss of control, accidents or
or serious injury. Be sure to read
tions"
cautions" on page 203 in Section
vehicles. This vehicle will handle and maneuver
off-road
to operate this vehicle
on
page 184 in Section 2 and
use also.
vehicle to be more likely to rol-
In
vehicle
"Off-road
vehicle
3.
class. Utility ve-
addition, this vehicle
of
gravity
vehicle design fea-
correctly
rollover causing death
"Off-road
may result in
vehicle precau-
driving pre-
than
iv
Table of contents
Not For Reproduction
1 OPERATION OF INSTRUMENTS AND
Overview of instruments and controls . . • . . . . • . . • . . • . • • . . . . . . . . . . . 1
2 Keys and Doors . . . • . . . . . . . . . . . • . . . . . . . . . . . . . . . . . . . . . . . . . . . . . 9
3 Seats, Seat belts, Steering wheel and Mirrors
4 Lights, Wipers and Defogger
5 Gauges, Meters and Service reminder indicators
6 Ignition switch, Transmission and Parking brake
7 Audio system
8 Air conditioning system
9 Other equipment
2
INFORMATION BEFORE DRIVING YOUR TOYOTA
STARTING AND DRIVING
3
IN
CASE OF
4
CORROSION PREVENTION AND APPEARANCE CARE
5
MAINTENANCE REQUIREMENTS
6
7
DO-IT
8
SPECIFICATIONS
INDEX
9
-YOURSELF
l Introduction
2 Engine and Chassis
3 Electrical components
......................................................
......•...•...•..............................
..•.•..........................•...........
AN
EMERGENCY
MAINTENANCE
.•.•..............•......•.....•....•.......•..
••.......•.•....•..........•.•..........
...........................................
................•...•.........••..
.•...•.........•.........•..........
....................................
...............................
...•...•................•.............
CONTROLS
.•..•..•.....•.......
.•..•.........•.•
............•.•...
.............
........
............................
Page
33
99
111
123
135
157
169
183
199
213
237
245
249
255
267
279
287
v

Not For Reproduction
vi

SECTION
Not For Reproduction
OPERATION OF INSTRUMENTS AND CONTROLS
Overview of instruments and controls
Instrument panel overview
Instrument cluster overview
Indicator symbols on the instrument panel
....................................
...................................
......................
1-1
-
2
5
6
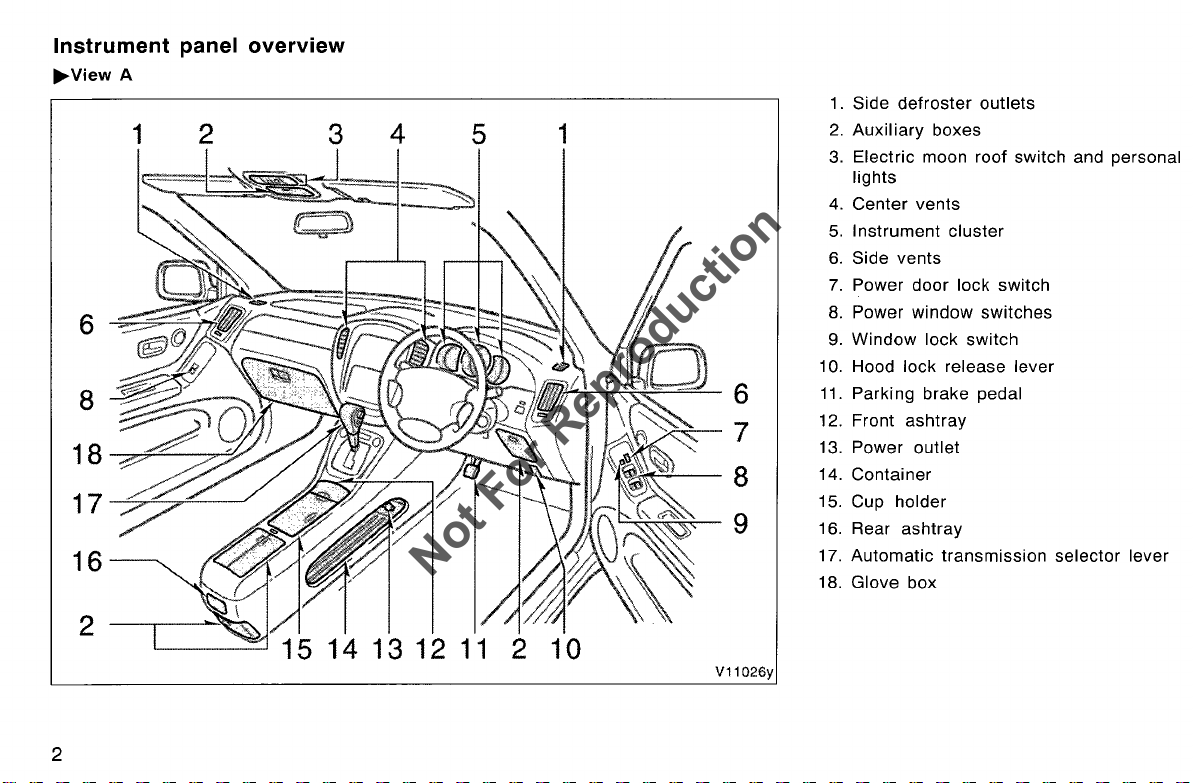
Instrument panel overview
Not For Reproduction
..,.View A
1 2
3
4
5
1
6
7
8
9
1. Side
2.
3.
4.
5.
6.
7.
8.
9.
1
0.
11.
12. Front
13. Power outlet
14. Container
15. Cup
16. Rear ashtray
17.
18. Glove box
defroster
Auxiliary
Electric moon roof switch and personal
lights
Center
Instrument cluster
Side vents
Power door lock switch
Power window
Window
Hood lock release lever
Parking brake pedal
Automatic
vents
ashtray
holder
outlets
boxes
switches
lock switch
transmission
selector lever
2
V11026y
~View
Not For Reproduction
B without navigation system
1
16-~!r+i
15~~~
14-----;~IVi
2
3
4
5
1. Front
2.
3.
4.
5.
6.
7.
8.
9.
10.
11.
12.
13.
14. Audio
15. Rear
16. Air conditioning
passenger's
light
Clock
Emergency
Wiper and washer switches
Headlight, turn signal and front fog
light
switches
Power
rear
view
Cruise
Ignition switch
Tilt
Rear
Cigarette
Theft
immobilizer
Snow
multi-information
control switch
steering
heater
lighter
deterrent
mode button
system
window
seat belt reminder
flasher switch
mirror control switches
lock release lever
main switch
system/engine
system indicator light
defogger switch
controls and
display
12
11
10
9 8 7
V11033y
3
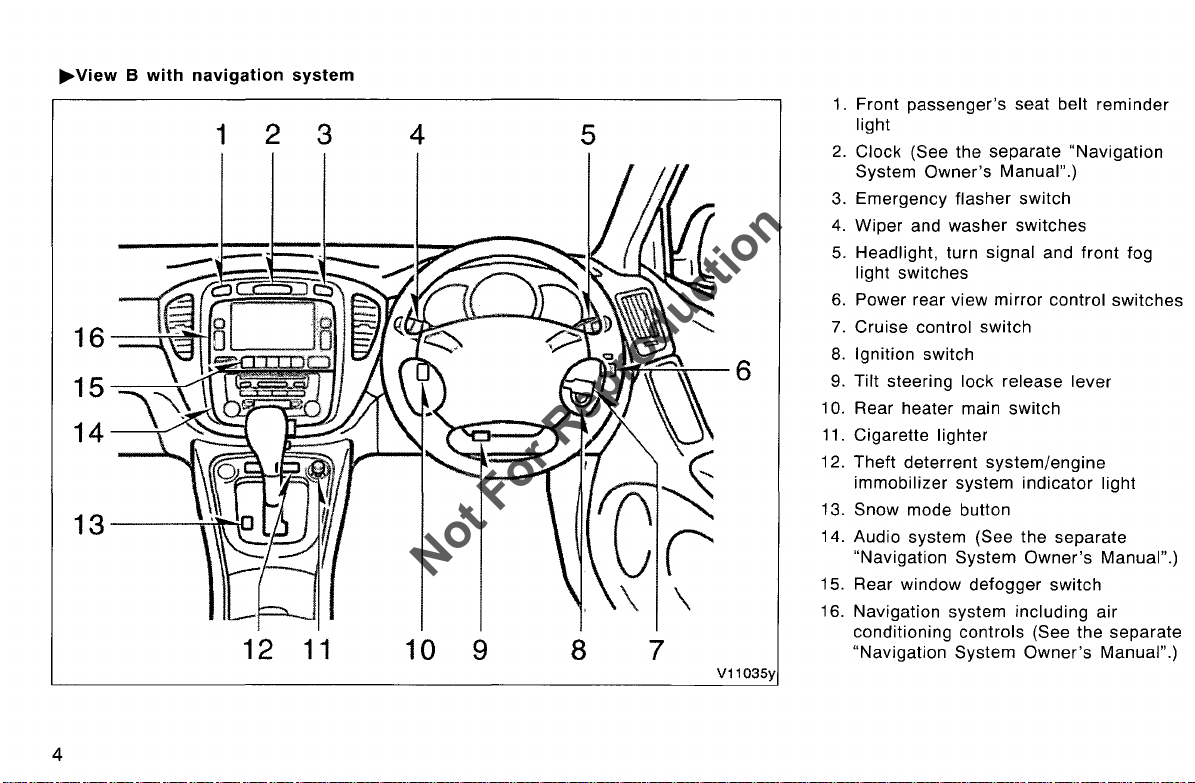
~View
Not For Reproduction
B with navigation system
2
1
12
3 4
11
10
5
9 8 7
V11035y
1. Front passenger's seat belt reminder
light
2.
Clock (See the separate "Navigation
System
3. Emergency flasher switch
4.
Wiper and washer switches
5.
Headlight, turn signal and front fog
light switches
6.
Power rear view mirror control switches
Cruise control switch
7.
8.
Ignition switch
9.
Tilt steering lock release
10. Rear heater main switch
11.
Cigarette lighter
12. Theft deterrent
immobilizer system
13. Snow mode button
14. Audio system
"Navigation System
15. Rear window defogger switch
16. Navigation system including air
conditioning
"Navigation System
Owner's
Manual".)
lever
system/engine
indicator
(See the separate
Owner's
controls (See the separate
Owner's
light
Manual".)
Manual".)
4
Instrument cluster overview
Not For Reproduction
1
2
3
4
5
:"'t'\--i;...-------2
_....,._
___
6
2
9 8
4.
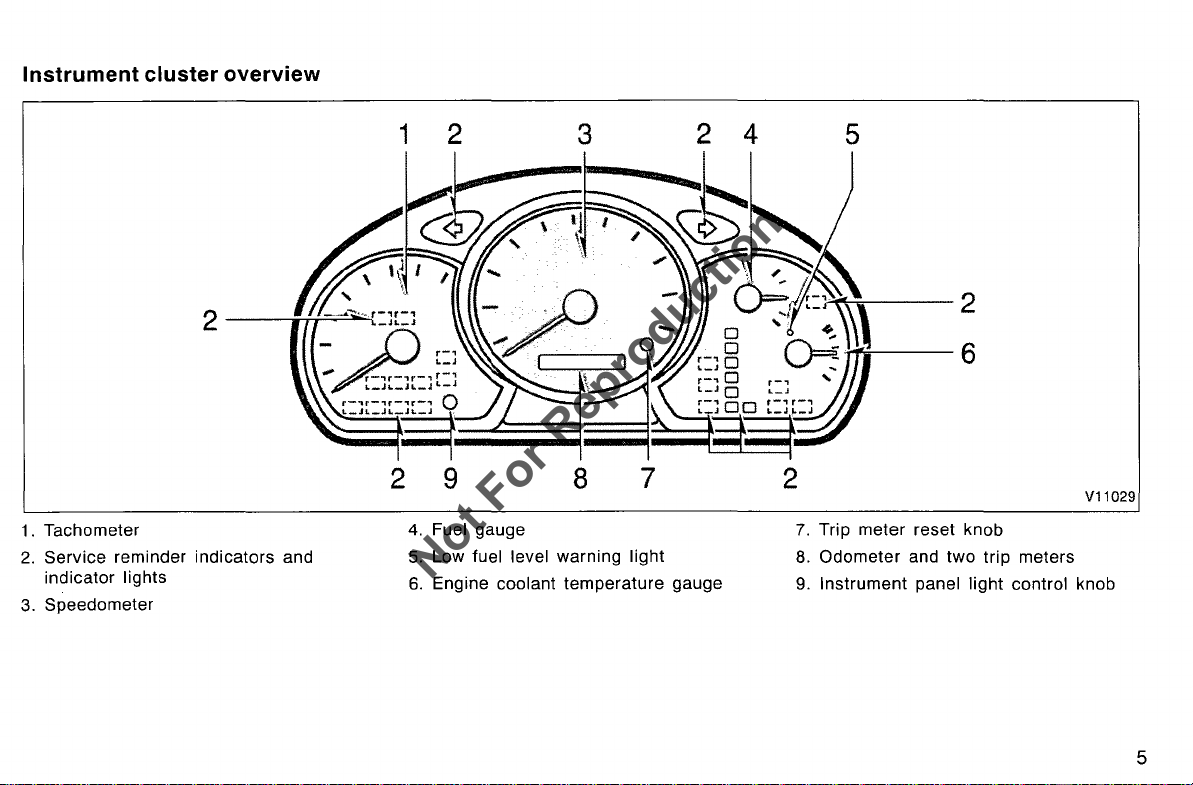
1. Tachometer
2.
Service reminder indicators and
indicator lights
3.
Speedometer
Fuel gauge
5.
Low fuel level warning light
6.
Engine coolant
7
temperature
gauge
2
7.
Trip meter reset knob
8.
Odometer
9.
Instrument panel
and two
trip
light
control knob
V11029
meters
5
Indicator symbols on
Not For Reproduction
the
instrument panel
Brake
Driver's
system
seat
CCD)
~
Front
~PASSENGER
0
~
0
(@)
-i'
A/TOIL
TEMP
passenger's
Discharge warning light*1
engine
Low
Malfunction
Anti-lock
Open door
Automatic
1
light*
oil pressure warning
indicator
brake
warning
transmission
warning light*
belt reminder light*1
seat belt reminder light*
system warning
light*1
1
1
lamp*
fluid temperature warning
light*
light*
....
,..'(
vsc
1
1
1
~
=D
¢~
$0
PRND
32L
OlD
OFF
ECT
SNOW
SRS warning
Vehicle stability control
Low windshield washer fluid level warning light*1
Headlight high beam
Turn signal indicator lights
Front fog light indicator light
Automatic transmission
Overdrive-off
Snow mode indicator light
1
light*
system
indicator
indicator
indicator light
warning light*
light
lights
1
6
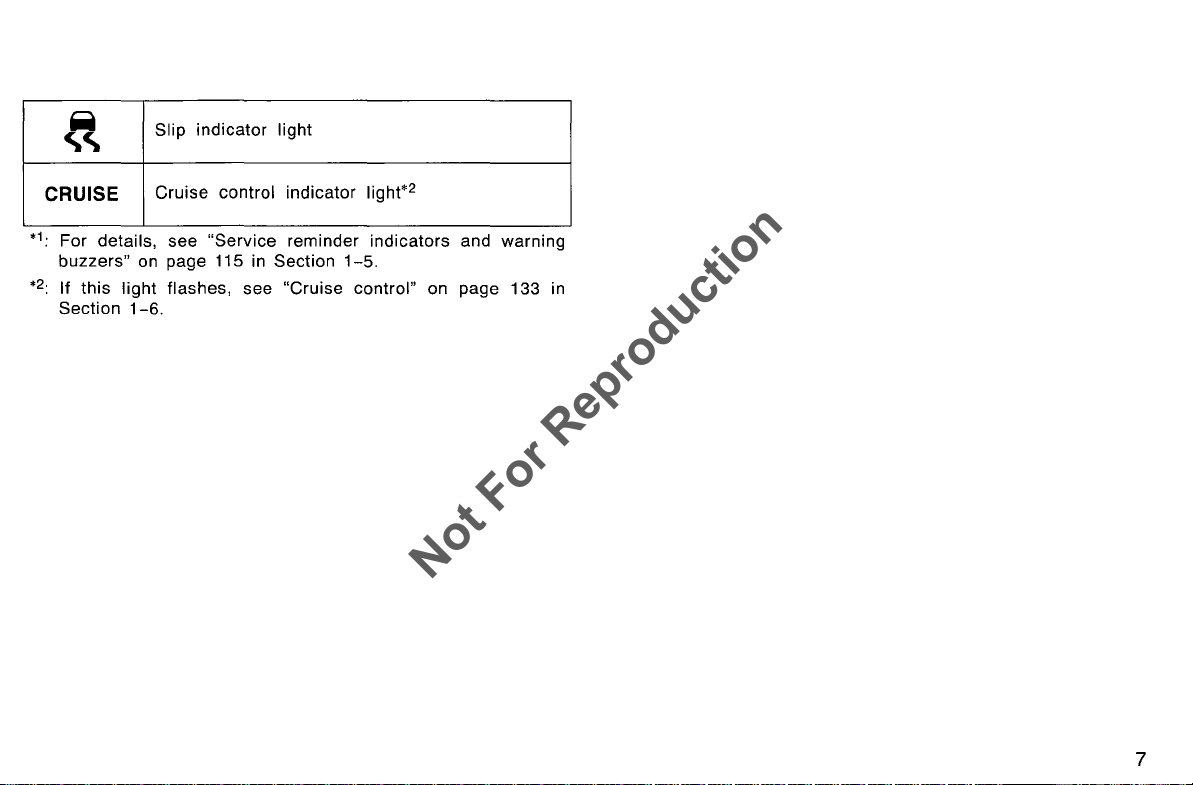
Slip indicator light
Not For Reproduction
CRUISE
1
·
*
For details, see "Service reminder indicators and warning
buzzers"
2
*
If this light flashes, see "Cruise control" on page 133 in
·
Section
Cruise control indicator light*
on
page 115 in Section
1-6.
1-5.
2
7

8
Not For Reproduction
SECTION
Not For Reproduction
1-2
OPERATION OF INSTRUMENTS AND CONTROLS
Keys and Doors
Keys
.......................................................
Engine
Wireless remote control
Side
Power windows
Back
Hood
Theft
Fuel
Electric moon roof
immobilizer
doors
..................................................
door
..................................................
.......................................................
deterrent
tank
cap
system
.............................................
system
...............................................
...........................................
...................................
.....................................
......................................
10
12
13
17
20
23
24
25
27
29
-
9
Keys
Not For Reproduction
1
V12023
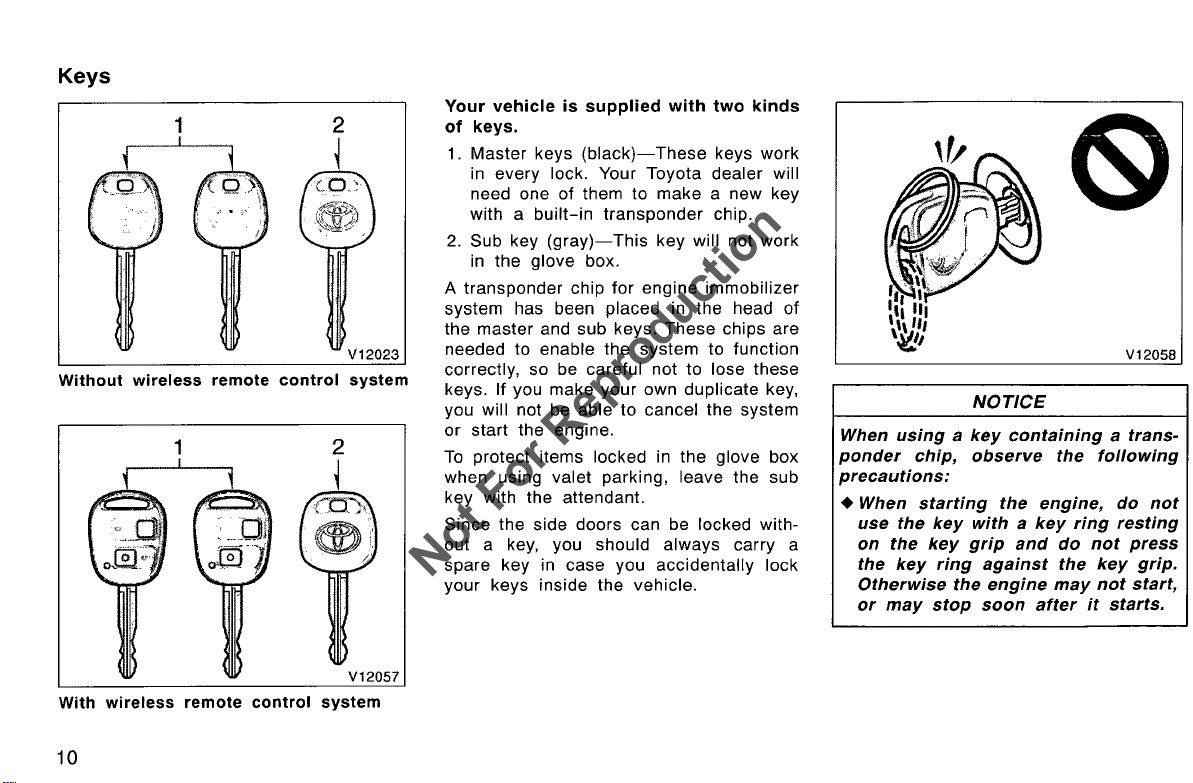
Without wireless remote control system
Your
vehicle
of
keys.
1. Master keys
in every
need one of them to
with a
2.
Sub key
in
the
A
transponder
system has been placed in the head of
the
master and sub keys.
needed to enable
correctly, so be
keys. If you make your own
you will not be able
or start the engine.
To
protect items locked in
when using valet parking, leave the sub
key with the attendant.
Since the side doors can be locked without a key, you should
spare key in case you accidentally lock
your keys inside the vehicle.
is
supplied
(black)-
lock. Your Toyota dealer will
built-in
glove box.
transponder
(gray)-
chip
the
careful not to lose
with
two
These
This key will not work
for
engine
system
to
cancel
make
These
duplicate
the
always
keys work
a new key
chip.
immobilizer
chips are
to function
the
system
glove box
carry a
kinds
these
key,
NOTICE
When using a
ponder
precautions:
key
containing a trans-
chip, observe the following
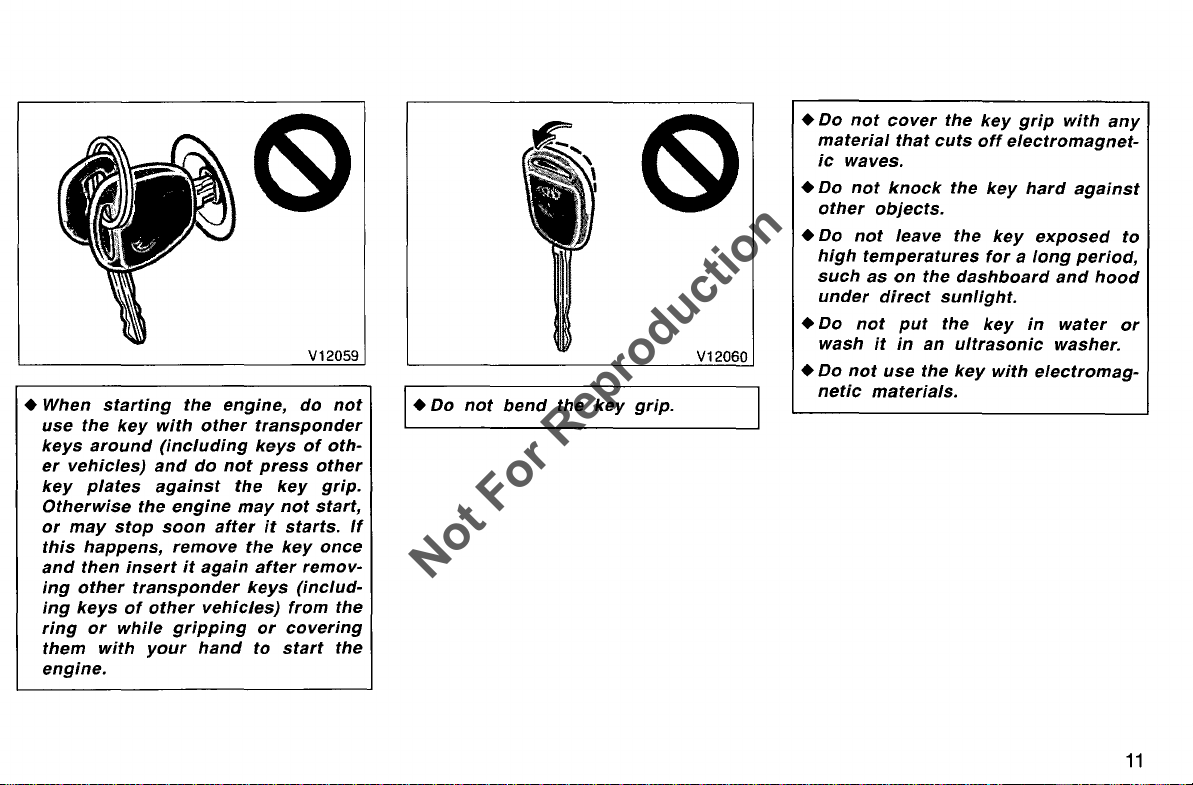
+ When starting the engine, do
use the
on the
the
Otherwise the engine
or
key
may
key
with a
key
grip
ring
against
stop soon
key
and
after
ring resting
do
not
the
key
may
not
it
starts.
V12058
not
press
grip.
start,
V12057
With wireless remote control system
10
+
Not For Reproduction
When
use
keys
er
vehicles)
key
Otherwise
or
may
this
and
ing
other
ing
keys
ring
them
engine.
starting
the
key
around
plates
the
stop
happens,
then
insert
transponder
of
or
while
with
the
with
other
(including
and
do
against
engine
soon
remove
it
again
other
vehicles)
gripping
your
hand
engine,
transponder
keys
not
press
the
may
after
it
the
after
keys
or
to
V12059
do
of
oth·
other
key
grip.
not
start,
starts.
key
once
remov-
(includ-
from
covering
start
not
the
the
If
I•
Do
not
bend
the
key
grip.
V12060
+Do
material
ic
+Do
other
+
Do
high
such
under
+Do
wash
+Do
netic
not
cover
that
waves.
not
knock
objects.
not
leave
temperatures
as
on
the
direct
not
put
it
in
an
not
use
the
materials.
the
key
cuts
off
the
key
the
for a long
dashboard
sunlight.
the
key
ultrasonic
key
grip
with
electromagnet-
hard
against
key
exposed
period,
and
in
water
washer.
with
electromag-
any
to
hood
or
11
V12061
Not For Reproduction
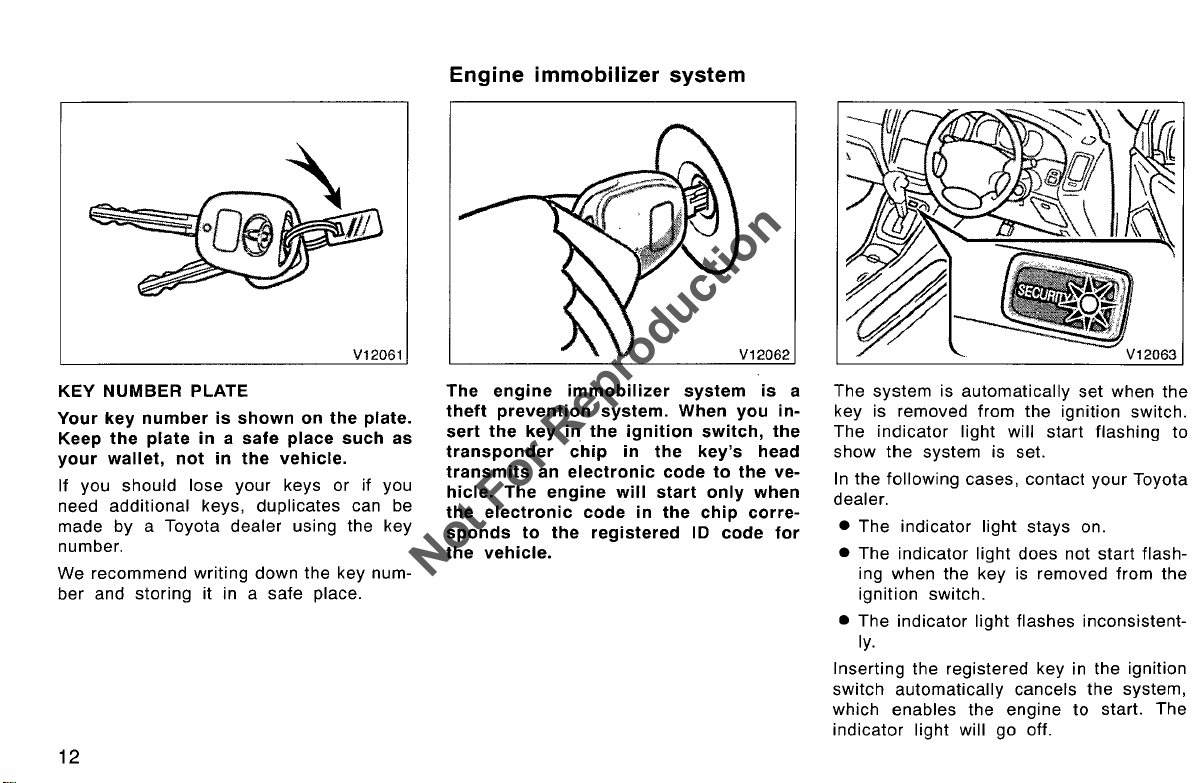
Engine immobilizer system
KEY NUMBER PLATE
Your key
Keep
your
If you should lose your keys or
need additional keys, duplicates can be
made by a Toyota dealer using the key
number.
We recommend writing down the key
ber and storing it in a safe place.
12
number
the
plate in a safe place such as
wallet,
is shown on the plate.
not
in
the
vehicle.
if
num-
you
The engine immobilizer system is a
theft
sert
transponder
transmits
hicle. The engine will start only when
the electronic code in the chip
sponds to the registered ID code for
the vehicle.
prevention system. When you in-
the
key in the ignition switch, the
chip in the key's head
an electronic code to the ve-
corre-
system
The
key is removed from
The
indicator
show
In
the following cases, contact your Toyota
dealer.
• The indicator
• The indicator light does not start flashing when the key
ignition switch.
• The indicator light flashes inconsistently.
Inserting the registered key in the ignition
switch automatically cancels the system,
which enables the engine
indicator
is automatically set when
the
light will start flashing
the
system is set.
light
stays on.
is
light will go off.
ignition switch.
removed from
to
start. The
the
to
the
For your Toyota
Not For Reproduction
new key with
your
dealer will need your key number
and master key. However, there is a
to the number of additional keys your
Toyota
If
you
tem or start the engine.
dealer can make
you make
will not be able
dealer
built-in
your
to make you a
transponder
for
own duplicate key,
to
cancel the sys-
chip,
limit
you.
NOTICE
Do
not
modify, remove
semble the engine immobilizer sys-
If
any
tem.
modifications
tion
of
teed.
unauthorized changes
are
made,
the system cannot
or
proper
be
disas-
or
opera-
guaran-
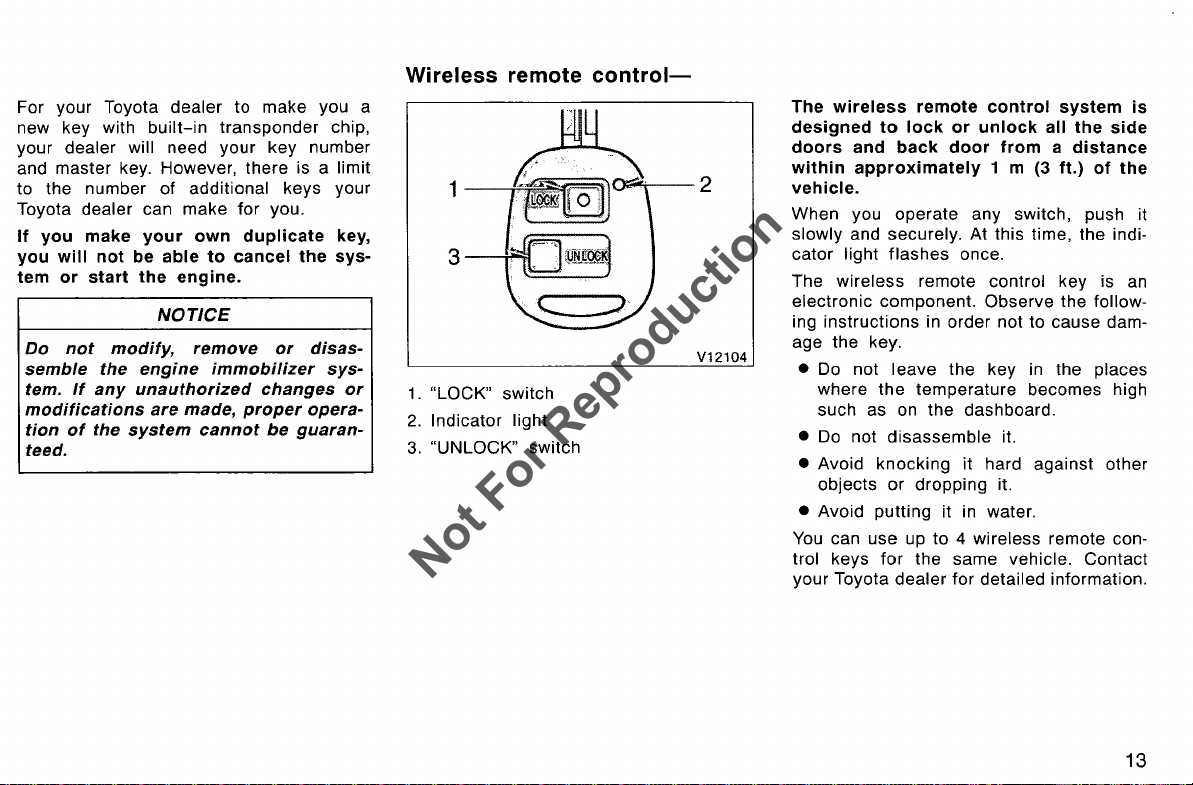
Wireless remote
1.
"LOCK" switch
2.
Indicator light
3.
"UNLOCK" switch
control-
V12104
The wireless remote control system is
designed
doors and back door from a distance
within
vehicle.
When you
slowly and securely. At this time, the indicator
The
electronic component. Observe the follow-
ing
age
• Do not
where
such as on
• Do not
• Avoid
objects
• Avoid putting it in water.
You can
trol keys
your Toyota
to
lock or unlock all the side
approximately
operate
light
flashes
wireless
instructions
the
key.
leave
the
disassemble
knocking
or
use
up
for
dealer
1 m (3 ft.) of the
any switch, push it
once.
remote control key is an
in order not to cause dam-
the
temperature
dropping it.
the same vehicle. Contact
key in
the
dashboard.
it hard against other
to
4 wireless remote con-
for detailed information.
the
becomes high
it.
places
13
If the wireless remote control key does
Not For Reproduction
not actuate the doors, or operate from a
normal distance, or
key is dimmed or does not come on:
• Check
mitter such as a radio station or an
airport which can interfere with
operation of
for
the
indicator
closeness to a radio trans-
the
key.
on the
normal
o The battery may have been consumed.
the
key.
Check the battery in
replace the battery, see
battery" on page 15.
If you lose your wireless remote control
key, contact your Toyota
as possible to avoid the
theft, or an accident.
your keys" on page 235 in Section 4.)
"-Replacing
dealer
possibility
(See "If you lose
To
as soon
of
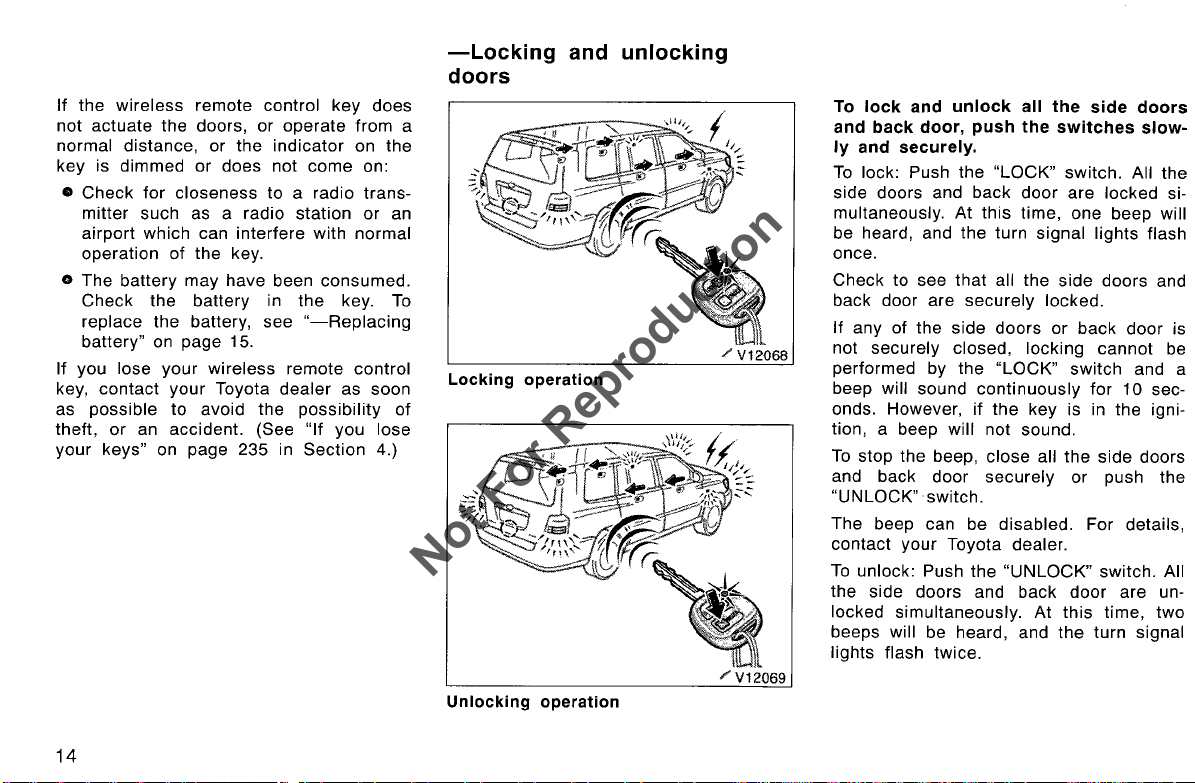
-Locking
and unlocking
doors
Locking operation
To
lock
and
unlock
and back door, push the
ly
and securely.
To
lock: Push the "LOCK" switch. All
side doors and back door are locked simultaneously.
be heard, and the turn signal lights flash
once.
Check to see that
back door are
any of the side doors or back door is
If
not securely closed, locking cannot be
performed by
will sound continuously for 10 sec-
beep
onds. However,
tion, a beep
To
stop the beep,
and back door
"UNLOCK" switch.
The beep can be
contact your Toyota dealer.
To
unlock: Push the
the side doors and back door are unlocked simultaneously.
beeps will be heard, and
lights flash twice.
At
the
will not sound.
all
the
side
doors
switches
this time, one beep will
all
the
side doors and
securely
if
securely
locked.
"LOCK" switch and a
the
key is in the igni-
close
all
the
or push the
disabled. For details,
"UNLOCK"
At
this
the
slow-
side doors
switch. All
time,
turn signal
the
two
Unlocking operation
14
When all
Not For Reproduction
are
less remote control key, the center
light, personal lights and ignition switch
light come on
fading out, even
(For
104, "Personal lights" on page 105 and
"Ignition switch light" on page 106 in Section
You have 30 seconds
using the
If a door is not opened by then, all
side doors and back door will be automatically locked
will be heard, and
flash
The timing
function can be changed. For details, contact
the
If
pressed in, the locking or unlocking operation is not repeated. Release the switch
and then push again.
The
function can be erased. For details, contact
the
side doors and back door
unlocked simultaneously with a wire-
interior
for
about 15 seconds before
if
the
door
is not opened.
details, see "Interior lights" on page
1-4.)
to
open a door after
wireless
once.
your Toyota dealer.
"LOCK" or "UNLOCK" switch is kept
wireless
your
Toyota dealer.
remote unlock feature.
the
again. At this time, one beep
the
turn signal lights
for
the automatic door lock
door locking or unlocking
-Switching
You can switch the beep on and off. (The
beep is on initially and after battery replacement.)
To
switch the beep on and off:
With the
1. Insert
2.
Within 5 seconds, insert the ignition
key again and turn it to
tion.
3.
After 10 seconds, push the same
"LOCK" or "UNLOCK" switch
within 10 seconds.
Two beep sounds inform you
program has been switched on or off.
If this procedure is not followed exactly,
the
beep will not operate as expected.
Check
pushing
procedure. If the beep does not operate
as expected, repeat this procedure from
step 1.
the
the
beep sound
driver's
the
door
opened-
ignition key and remove it.
the
"ON" posi-
that
beep ON/OFF operation by
switch after you finish this
twice
the
-Replacing
For replacement, use a CR1616 lithium
battery or equivalent and a special screw-
driver.
battery
& CAUTION
Special care should be taken to prevent small children from swallowing
the removed battery or components.
NOTICE
+ When replacing the battery, be care-
ful
not
to lose the components.
+Replace
equivalent type recommended
Toyota dealer.
+Dispose
to the local laws.
Replace
procedures:
only with the same
of
used batteries according
the
battery by following these
by
or
a
15
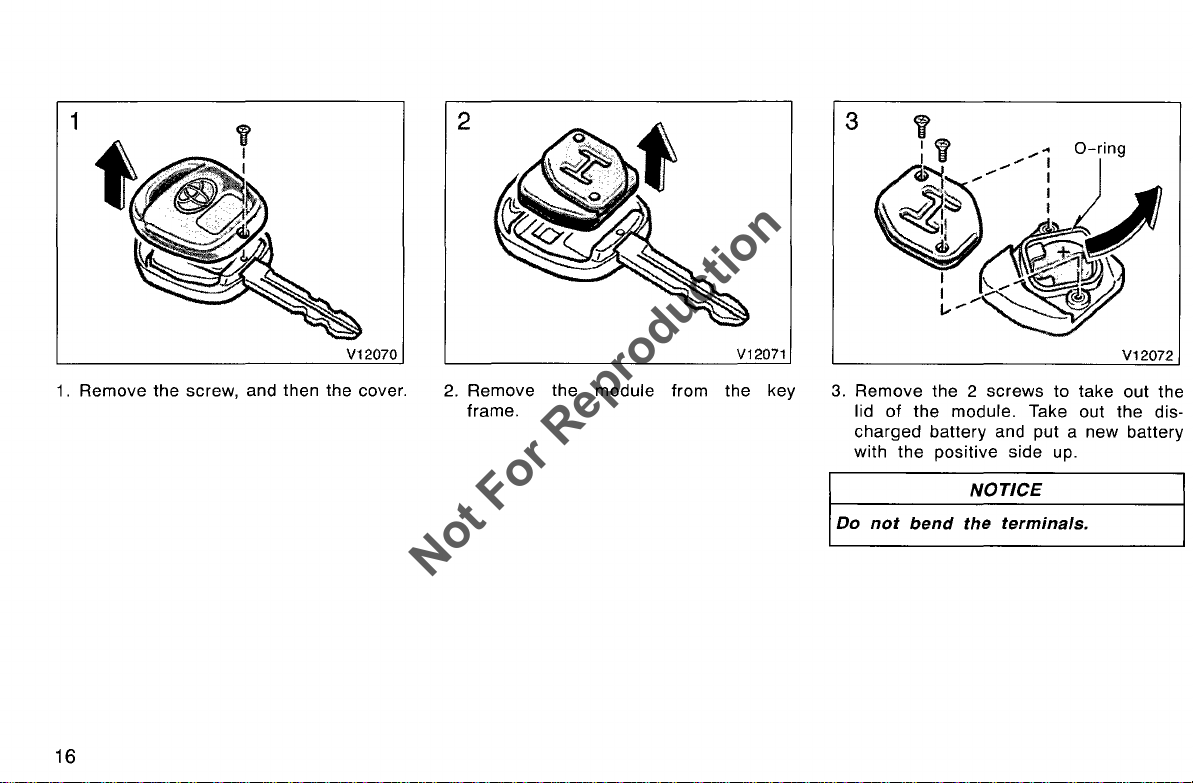
1
Not For Reproduction
2
3
1
f
f
IN
.........
~-1
....
0-ring
.........
)
I
l
Remove
16
the
and then the cover.
screw, 1.
_
2
Remove
frame.
V12071
the key the module from
~
I~
~u~~~e~
I
(_~.,...)l~
I
.....
~..-...-
3 Remove the 2 Take out
.
l"d
of
the
I d battery and pu
charge .t.ve side up.
the
with
not
ben
screws to
module. t a new battery
pOSI
I
NOTICE
the terminals.
d
&
V12072
ke out the
ta
the
d"
IS-
4.
Not For Reproduction
Install the lid with the 2 screws after
confirming that there is an
the module, as shown in the illustration.
5.
Install the module into the key frame
and secure the cover with the screw.
6.
When pushing any switch on the wire-
less key, make sure the indicator light
comes on.
NOTICE
+Make
+
+Do
+Be
+ Take
+
sure
negative
faced
correctly.
Do
not
hands.
rust.
not
nents
may
interfere
careful
when
inserting
dust
or
case.
care
and
0-ring.
Close
side
replace
Water
touch
inside
not
oils
not
the
cover
the
of
the
may
or
the
with
to
the
do
to
positive
the
battery
cause
move
transmitter,
proper
bend
battery
not
lose
securely.
0-ring
side
battery
with
unexpected
any
operation.
the
electrode
and
adhere
the
compo-
to
screws
and
or
that
on
are
wet
it
the
After replacing the battery, check that the
key operates
not operate
dealer.
properly. If the key still does
properly, contact your Toyota
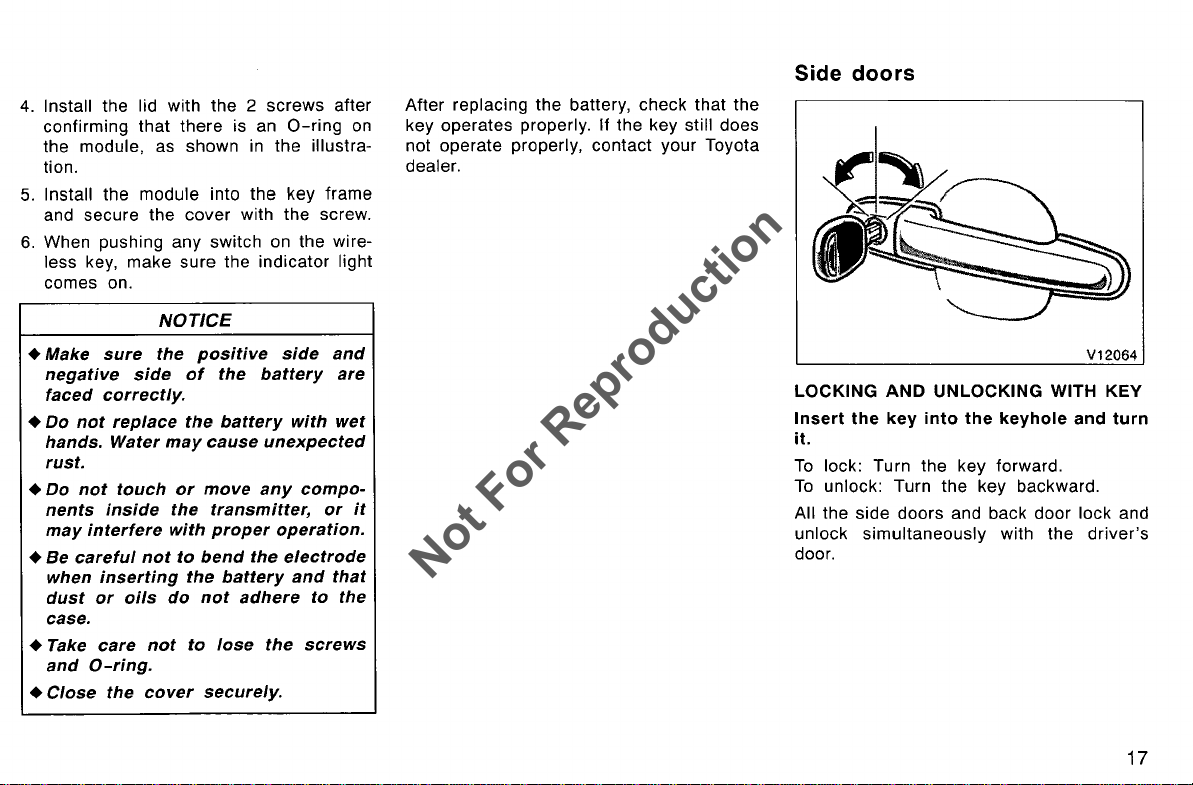
Side
doors
V12064
LOCKING
Insert
it.
To
To
All the side doors and back door lock and
unlock simultaneously with the driver's
door.
AND
UNLOCKING
the
key
into
the
lock: Turn the key forward.
unlock: Turn the key backward.
WITH KEY
keyhole
and
turn
17
When all the side doors and back door
Not For Reproduction
are unlocked simultaneously using a key,
the
center interior light, personal lights
and ignition switch light will come on and
remain on for about 15 seconds before
fading out. (For further information, see
"Interior
lights"
light" on page
The
closed with the key operation
er's
windows"
lights" on page
on page 105 and "Ignition switch
106
driver's
door keyhole. (For details, see "Power
window can be opened or
on page 20 in this Section.)
104,
in Section
"Personal
1-4.)
in
the driv-
The
driver's
inside even with the inside
the
lock position.
door can be opened from the
lock knob in
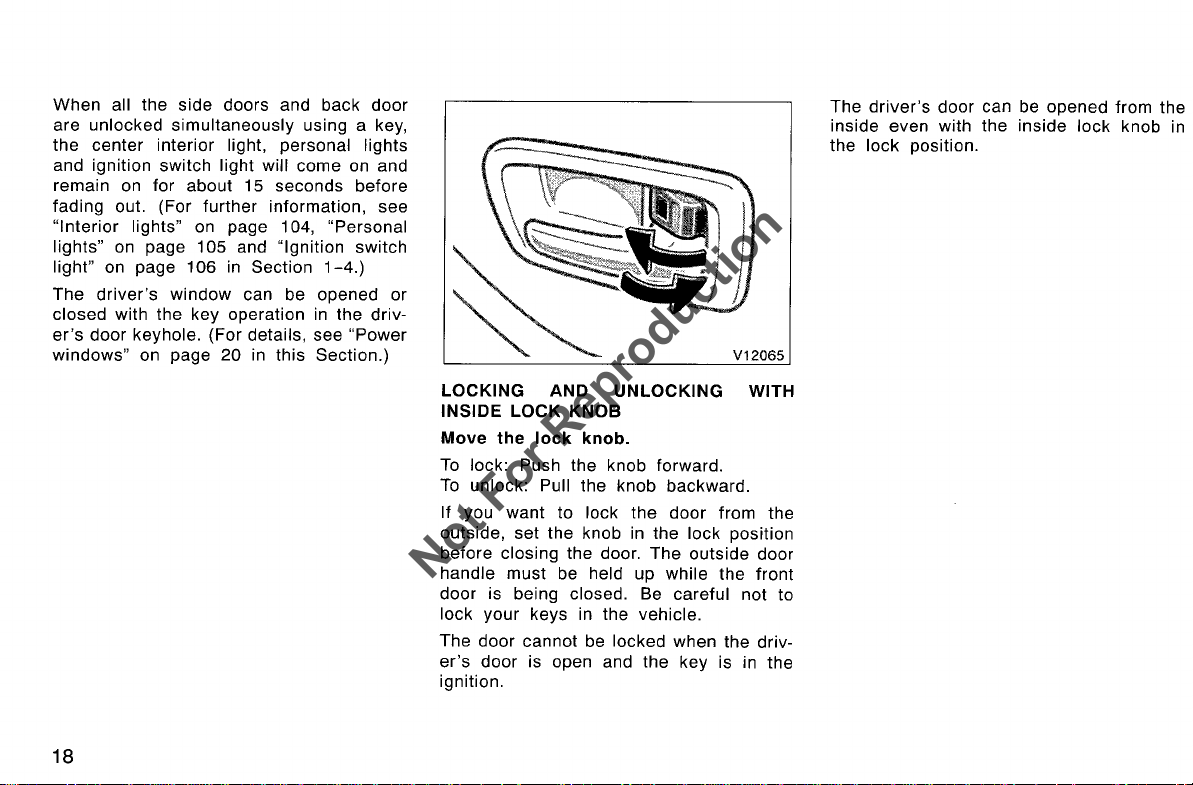
LOCKING AND UNLOCKING
INSIDE LOCK KNOB
Move the lock knob.
To
To
If you want to lock
outside, set the knob in the
before
handle must be held up while the front
door is being closed. Be careful not to
lock your keys in the vehicle.
The door cannot be locked when the driver's
ignition.
18
WITH
lock: Push the knob forward.
unlock: Pull the knob backward.
the
door from the
lock position
closing the door. The outside door
door is open and the key is in the
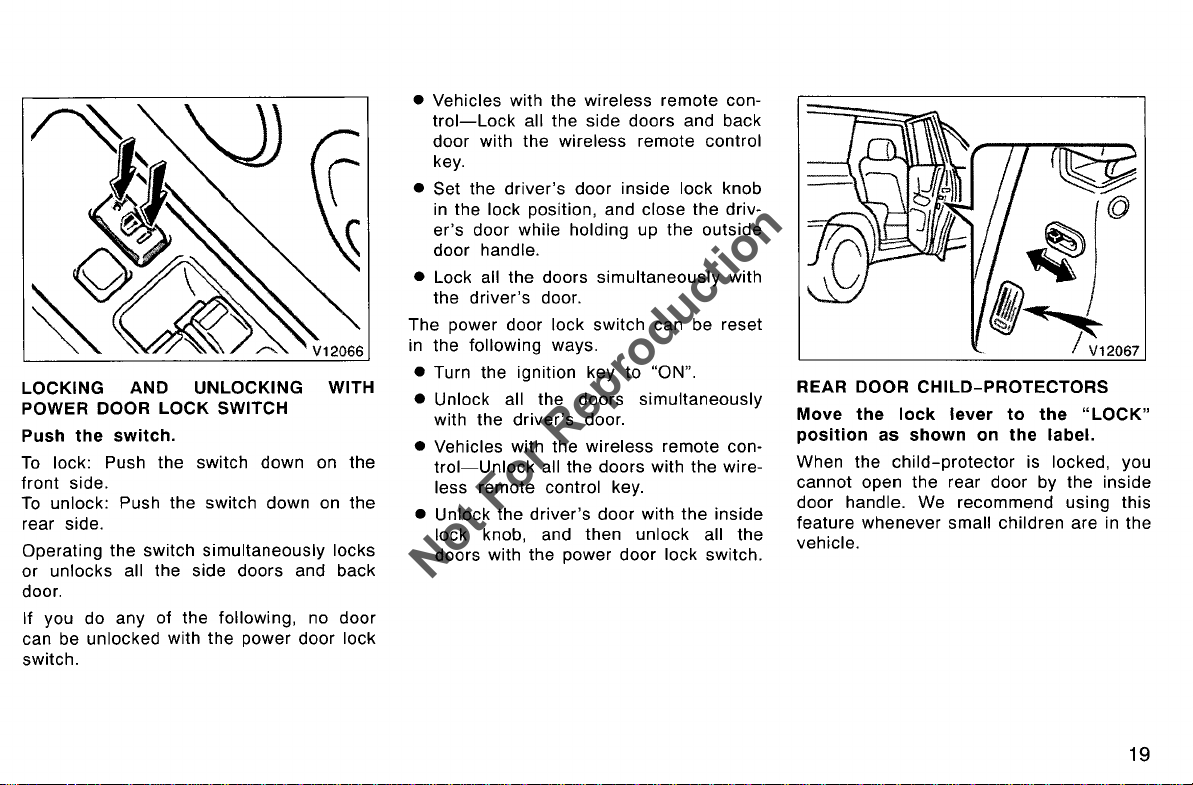
LOCKING AND UNLOCKING WITH
Not For Reproduction
POWER DOOR LOCK SWITCH
Push the switch.
To
lock: Push
front side.
To
unlock: Push the switch down on
rear side.
Operating
or unlocks all the side doors and back
door.
If you do any of the following, no door
can be unlocked with
switch.
the
switch down on
the
switch simultaneously locks
the
power door lock
the
the
• Vehicles with the wireless remote control-Lock
door with
key.
• Set the
in the lock position, and close the
er's
door handle.
• Lock all
the
The power door lock switch can be reset
in the
• Turn the ignition key
Unlock all the doors
•
with
• Vehicles with the wireless remote con-
trol-Unlock
less remote control key.
• Unlock
lock knob, and then unlock
doors with the power door lock switch.
all the side doors and back
the
wireless remote control
driver's
door while holding up
the
driver's
following ways.
the
driver's
the
door inside lock knob
doors
simultaneously
door.
to
simultaneously
door.
all the doors with the wire-
driver's
door with
the
"ON".
the
driv-
outside
with
inside
all
the
REAR DOOR
Move the lock lever
position as shown on the label.
When the
cannot open the rear door by the inside
door handle. We recommend using this
feature
vehicle.
CHILD-PROTECTORS
child-protector
whenever
small children are in the
to
the "LOCK"
is locked, you
19
&
Not For Reproduction
Power windows
CAUTION
Before
are
when small
hicle. Along with
seat
prevent
from being
hicle
prevent the
unintentionally.
driving,
closed and locked,
belts,
during
the
be
children
locking
driver
thrown
an
accident.
doors
sure
that
the doors
especially
are
the
from being opened
in the ve-
proper
the
and
out from the ve-
use
of
doors
It also helps
helps
passengers
The
windows
switch on each
The power windows work when the ignition
switch is in
Key
off
and back door are
43 seconds even
is turned off. They stop working when the
either front door is opened.
OPERATING
Use the
Normal operation: The window moves as
long as you hold
To
open: Lightly push down the switch.
To
close: Lightly pull up the switch.
can be operated with the
side
door.
the
"ON" position.
operation: If all the side doors
closed, they work for
after
the ignition switch
THE
switch
DRIVER'S
on the
the
driver's
switch.
WINDOW
door.
Automatic
completely down or pull it completely up,
and then release it. The window will fully
open or close.
way,
site direction and then release it.
Jam
protection
closing operation,
ic
opens
between
If the
this function may work even
caught.
operation:
To
lightly move the switch in the oppo-
function: During automat-
half
way
if
the
window and window frame.
window
receives a strong impact,
Push the switch
stop the window part-
the
window stops and
something gets caught
if
nothing is
20
•
Not For Reproduction
Never
body
function
• The
not
just
closed.
&
try
to
activate
intentionally.
jam
work
before
CAUTION
jamming
the
protection
if
something
the
any
part
jam
function
gets
window
of
your
protection
may
caught
is
fully
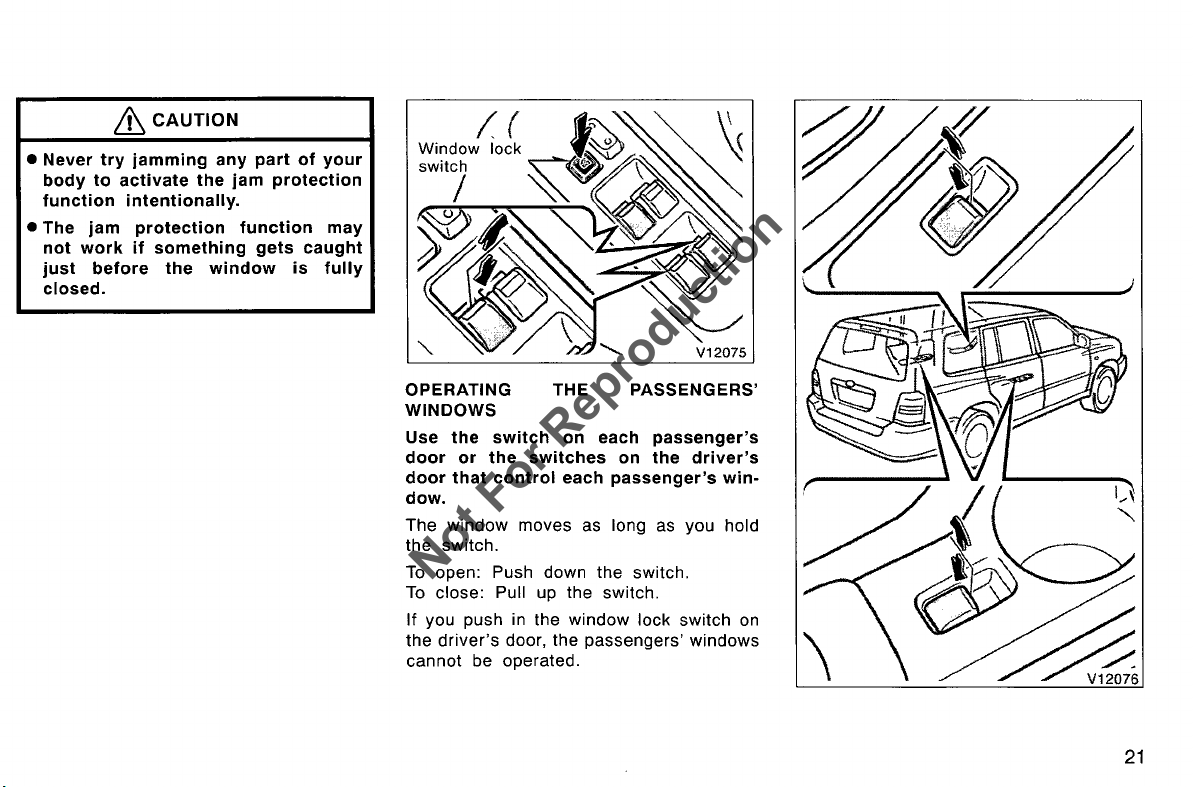
OPERATING
WINDOWS
Use
the
door
or
door
that
dow.
The window moves as long as you hold
the switch.
To
open: Push down the switch.
To
close: Pull up the switch.
If you push in the window lock switch
the driver's door, the passengers' windows \
cannot be operated.
switch
the
switches
control
THE
on
each
PASSENGERS'
each
passenger's
on
the
passenger's
driver's
win-
on
L---------------~--~--~~~
21
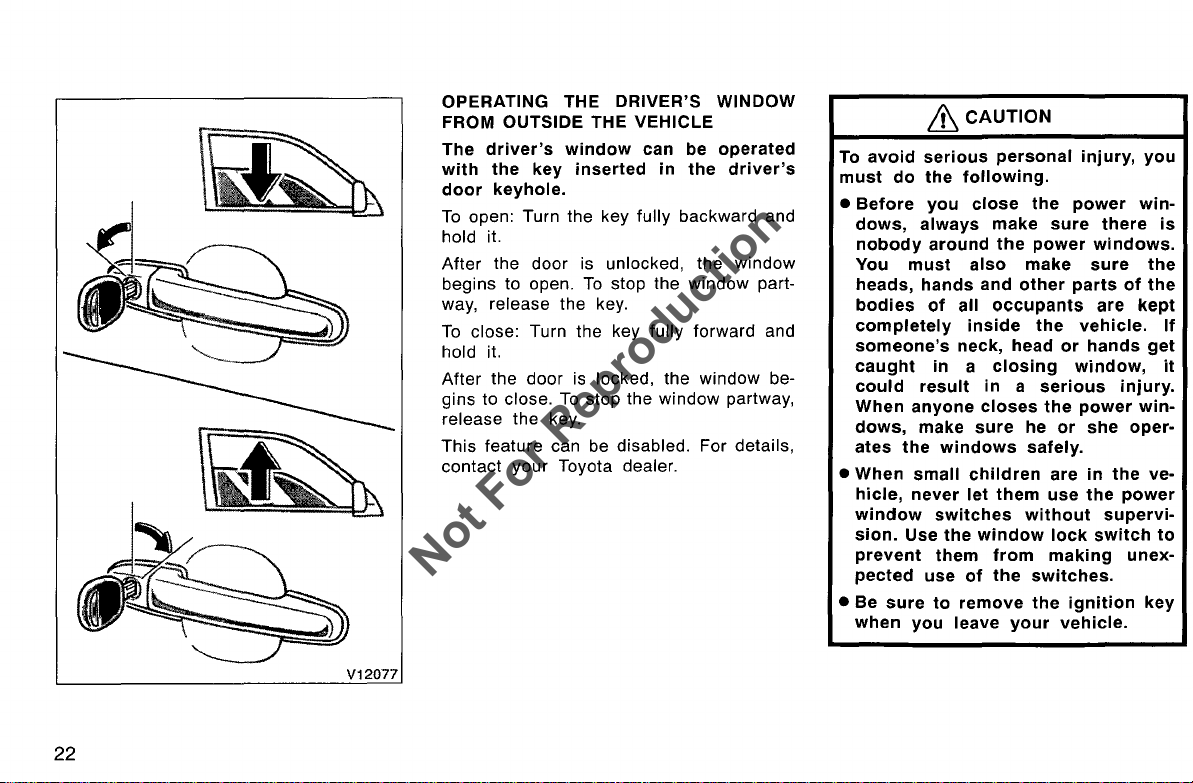
OPERATING THE
Not For Reproduction
FROM OUTSIDE THE
The
driver's
with
the
key
door
keyhole.
To
open: Turn the key fully backward and
hold it.
After
the door is unlocked,
begins to open.
way, release the key.
To
close: Turn the key fully forward and
hold it.
After
the door is locked, the window begins to close.
release the key.
This
feature can be disabled. For details,
contact
your Toyota dealer.
DRIVER'S
VEHICLE
window
inserted
To
can
To
stop the window part-
stop the window partway,
in
WINDOW
be
operated
the
the
driver's
window
To
avoid
must
do
•
Before
dows,
nobody
You
heads,
bodies
completely
someone's
caught
could
When
dows,
ates
•
When
hicle,
window
sion.
prevent
pected
•
Be
sure
when
&
CAUTION
serious
the
following.
you
close
always
around
must
the
Use
also
hands
of
all
inside
neck,
in a closing
result
anyone
make
sure
windows
small
children
never
let
switches
the
window
them
use
of
to
remove
you
leave
personal
make
the
and
other
occupants
head
in a serious
closes
them
from
the
your
injury,
the
power
sure
power
make
parts
the
vehicle.
or
window,
the
power
he
or
safely.
are
use
without
lock
making
switches.
the
ignition
vehicle.
you
win-
there
windows.
sure
of
are
kept
hands
injury.
win-
she
oper-
in
the
the
power
supervi-
switch
unex-
key
is
the
the
If
get
it
ve-
to
22
• Never leave anyone (particularly a
Not For Reproduction
small child) alone in your vehicle,
especially
inserted. Otherwise, he/she could
use the power window switches and
get trapped in a window. Unattended person (particularly a small
child)
accident.
with the ignition key still
can be involved in a serious
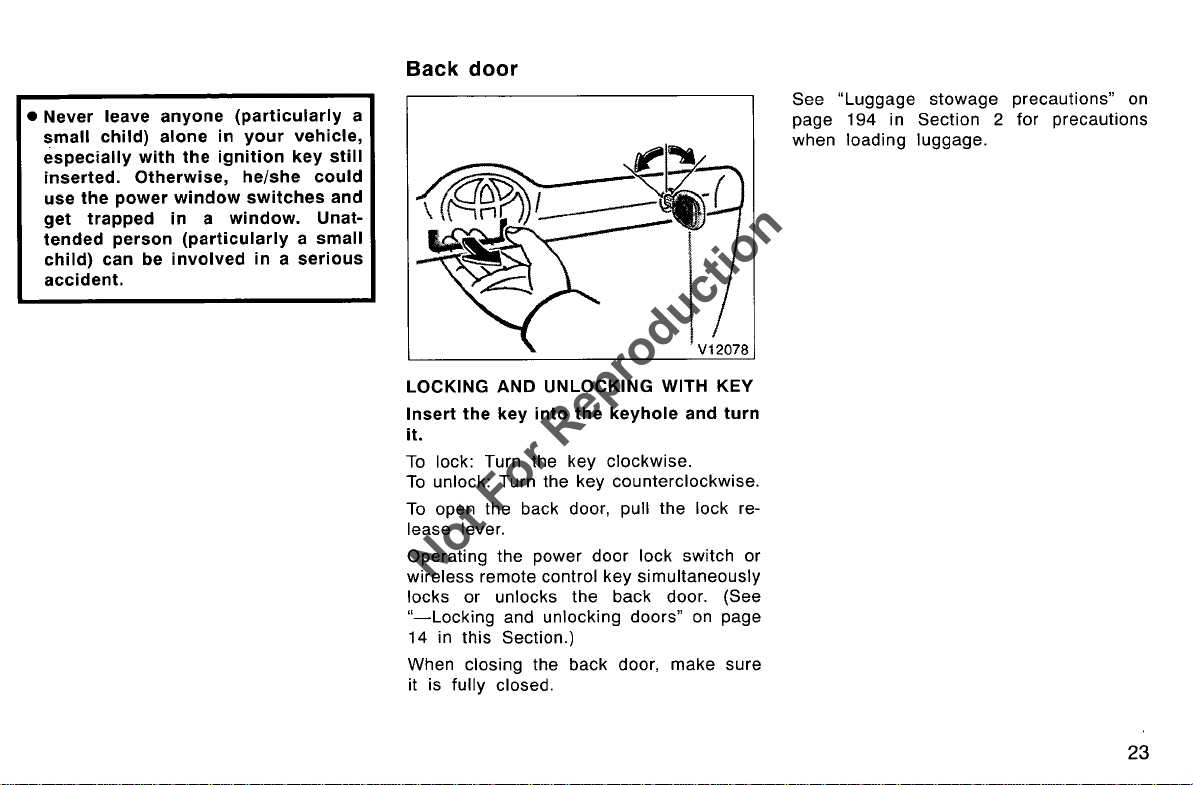
Back door
LOCKING AND UNLOCKING WITH KEY
Insert the key into the keyhole and turn
it.
To
lock: Turn the key clockwise.
To
unlock: Turn the key counterclockwise.
To
open the back door, pull the lock re-
lease lever.
Operating the power door lock switch or
wireless remote control key simultaneously
locks or unlocks the back door. (See
"-Locking
14 in this Section.)
When closing the back door, make sure
it is
and unlocking doors"
fully closed.
on
page
See "Luggage stowage precautions" on
page 194 in
when loading luggage.
Section 2 for precautions
23