

Toyota Highlander HV 2010 Owners Manual

Table of Contents
Quick guide —
— Overview buttons and guidance screen 5. . . . . . . . . . . .
— Registering home 7. . . . . . . . . . . . . . . . . . . . . . . . . . . . . . . .
— Registering preset memory points (Quick access) 9. .
— Operation flow: guiding the route 11. . . . . . . . . . . . . . . . .
— Setting home as the destination 12. . . . . . . . . . . . . . . . . .
1 Basic Functions
(Basic information before operation)
Initial screen 22. . . . . . . . . . . . . . . . . . . . . . . . . . . . . . . . . . . . . . . . . . . . . .
Touch screen operation 23. . . . . . . . . . . . . . . . . . . . . . . . . . . . . . . . . . . .
Inputting letters and numbers/list screen operation 24. . . . . . . . . . . . .
Function help 25. . . . . . . . . . . . . . . . . . . . . . . . . . . . . . . . . . . . . . . . . . . . .
Map screen operation 28. . . . . . . . . . . . . . . . . . . . . . . . . . . . . . . . . . . . .
Current position display 28. . . . . . . . . . . . . . . . . . . . . . . . . . . . . . . . .
Screen scroll operation 29. . . . . . . . . . . . . . . . . . . . . . . . . . . . . . . . .
Switching the screens 33. . . . . . . . . . . . . . . . . . . . . . . . . . . . . . . . . .
Map scale 35. . . . . . . . . . . . . . . . . . . . . . . . . . . . . . . . . . . . . . . . . . . . .
Foot print map 36. . . . . . . . . . . . . . . . . . . . . . . . . . . . . . . . . . . . . . . . .
Orientation of the map 37. . . . . . . . . . . . . . . . . . . . . . . . . . . . . . . . . .
Quick
Guide

2 Destination Search
Quick reference (“Destination” screen) 40. . . . . . . . . . . . . . . . . . . . . . .
Destination search 41. . . . . . . . . . . . . . . . . . . . . . . . . . . . . . . . . . . . . . .
Selecting the search area 42. . . . . . . . . . . . . . . . . . . . . . . . . . . . . . .
Destination search by Home 44. . . . . . . . . . . . . . . . . . . . . . . . . . . . .
Destination search by Quick access 44. . . . . . . . . . . . . . . . . . . . . .
Destination search by “Address” 45. . . . . . . . . . . . . . . . . . . . . . . . .
Destination search by “POI Name” 49. . . . . . . . . . . . . . . . . . . . . . .
Destination search by “POI Category” 52. . . . . . . . . . . . . . . . . . . . .
Destination search by “Emergency” 55. . . . . . . . . . . . . . . . . . . . . . .
Destination search by “Memory” 56. . . . . . . . . . . . . . . . . . . . . . . . .
Destination search by “Previous” 56. . . . . . . . . . . . . . . . . . . . . . . . .
Destination search by “Map” 57. . . . . . . . . . . . . . . . . . . . . . . . . . . . .
Destination search by “Intersection” 57. . . . . . . . . . . . . . . . . . . . . .
Destination search by “Freeway Ent./Exit” 58. . . . . . . . . . . . . . . . .
Destination search by “Coordinates” 59. . . . . . . . . . . . . . . . . . . . . .
Destination search by “Phone #” 60. . . . . . . . . . . . . . . . . . . . . . . . .
Starting route guidance 60. . . . . . . . . . . . . . . . . . . . . . . . . . . . . . . . . . . . .
3 Route Guidance
Route guidance screen 66. . . . . . . . . . . . . . . . . . . . . . . . . . . . . . . . . . . . .
Typical voice guidance prompts 69. . . . . . . . . . . . . . . . . . . . . . . . . . . . .
Distance and time to destination 71. . . . . . . . . . . . . . . . . . . . . . . . . . . . .
Setting and deleting destination 72. . . . . . . . . . . . . . . . . . . . . . . . . . .
Adding destinations 72. . . . . . . . . . . . . . . . . . . . . . . . . . . . . . . . . . . .
Reordering destinations 72. . . . . . . . . . . . . . . . . . . . . . . . . . . . . . . . .
Deleting destinations 73. . . . . . . . . . . . . . . . . . . . . . . . . . . . . . . . . . .
Setting route 74. . . . . . . . . . . . . . . . . . . . . . . . . . . . . . . . . . . . . . . . . . . . .
Search condition 74. . . . . . . . . . . . . . . . . . . . . . . . . . . . . . . . . . . . . . .
Detour setting 75. . . . . . . . . . . . . . . . . . . . . . . . . . . . . . . . . . . . . . . . .
Route preference 77. . . . . . . . . . . . . . . . . . . . . . . . . . . . . . . . . . . . . .
Starting route from adjacent road 77. . . . . . . . . . . . . . . . . . . . . . . . .
Map view 78. . . . . . . . . . . . . . . . . . . . . . . . . . . . . . . . . . . . . . . . . . . . . . . .
Display POI icons 78. . . . . . . . . . . . . . . . . . . . . . . . . . . . . . . . . . . . . .
Route overview 81. . . . . . . . . . . . . . . . . . . . . . . . . . . . . . . . . . . . . . . .
Route preview 82. . . . . . . . . . . . . . . . . . . . . . . . . . . . . . . . . . . . . . . . .
Route trace 83. . . . . . . . . . . . . . . . . . . . . . . . . . . . . . . . . . . . . . . . . . .

4 Advanced Functions
(Descriptions of functions for more effective use)
Quick reference (“Menu” screen) 86. . . . . . . . . . . . . . . . . . . . . . . . . . . .
Quick reference (“Setup” screen) 87. . . . . . . . . . . . . . . . . . . . . . . . . . . .
Suspending and resuming guidance 88. . . . . . . . . . . . . . . . . . . . . . . . .
Volume 89. . . . . . . . . . . . . . . . . . . . . . . . . . . . . . . . . . . . . . . . . . . . . . . . . .
User selection 90. . . . . . . . . . . . . . . . . . . . . . . . . . . . . . . . . . . . . . . . . . . .
My places 92. . . . . . . . . . . . . . . . . . . . . . . . . . . . . . . . . . . . . . . . . . . . . . . .
Registering memory points 93. . . . . . . . . . . . . . . . . . . . . . . . . . . . . .
Editing memory points 94. . . . . . . . . . . . . . . . . . . . . . . . . . . . . . . . . .
Deleting memory points 99. . . . . . . . . . . . . . . . . . . . . . . . . . . . . . . . .
Registering home 100. . . . . . . . . . . . . . . . . . . . . . . . . . . . . . . . . . . .
Deleting home 101. . . . . . . . . . . . . . . . . . . . . . . . . . . . . . . . . . . . . . .
Registering area to avoid 101. . . . . . . . . . . . . . . . . . . . . . . . . . . . . .
Editing area to avoid 102. . . . . . . . . . . . . . . . . . . . . . . . . . . . . . . . . .
Deleting area to avoid 105. . . . . . . . . . . . . . . . . . . . . . . . . . . . . . . .
Deleting previous points 106. . . . . . . . . . . . . . . . . . . . . . . . . . . . . .
Setup 106. . . . . . . . . . . . . . . . . . . . . . . . . . . . . . . . . . . . . . . . . . . . . . . . . .
5 Other Functions
Maintenance information 118. . . . . . . . . . . . . . . . . . . . . . . . . . . . . . . . .
Maintenance information setting 118. . . . . . . . . . . . . . . . . . . . . . . . .
Dealer setting 120. . . . . . . . . . . . . . . . . . . . . . . . . . . . . . . . . . . . . . .
Calendar with memo 122. . . . . . . . . . . . . . . . . . . . . . . . . . . . . . . . . . . .
Adding a memo 124. . . . . . . . . . . . . . . . . . . . . . . . . . . . . . . . . . . . . .
Editing a memo 125. . . . . . . . . . . . . . . . . . . . . . . . . . . . . . . . . . . . . .
Memo list 125. . . . . . . . . . . . . . . . . . . . . . . . . . . . . . . . . . . . . . . . . . .
Trip information 127. . . . . . . . . . . . . . . . . . . . . . . . . . . . . . . . . . . . . . . . .
Hands-free system (for cellular phone) 127. . . . . . . . . . . . . . . . . . . . .
Speech command system 174. . . . . . . . . . . . . . . . . . . . . . . . . . . . . . . .
Help screen 177. . . . . . . . . . . . . . . . . . . . . . . . . . . . . . . . . . . . . . . . . . . .
Screen adjustment 178. . . . . . . . . . . . . . . . . . . . . . . . . . . . . . . . . . . . . . .
Screen setting 180. . . . . . . . . . . . . . . . . . . . . . . . . . . . . . . . . . . . . . . . . .
Beep setting 183. . . . . . . . . . . . . . . . . . . . . . . . . . . . . . . . . . . . . . . . . . . .
Select language 183. . . . . . . . . . . . . . . . . . . . . . . . . . . . . . . . . . . . . . . . .

6 Audio/Video System
Quick reference 186. . . . . . . . . . . . . . . . . . . . . . . . . . . . . . . . . . . . . . . . .
Using your audio/video system 187. . . . . . . . . . . . . . . . . . . . . . . . . . . .
Audio/video remote controls 240. . . . . . . . . . . . . . . . . . . . . . . . . . . . . .
Audio/video system operating hints 241. . . . . . . . . . . . . . . . . . . . . . . .
7 Rear View Monitor System
Rear view monitor system 250. . . . . . . . . . . . . . . . . . . . . . . . . . . . . . . .
8 Appendix
Limitations of the navigation system 256. . . . . . . . . . . . . . . . . . . . . . . .
Map database information and updates 258. . . . . . . . . . . . . . . . . . . . .

HIGHLANDER_HV_Navi_U
Introduction
Thank you for your purchase of the Navigation System. Please read
this manual carefully to ensure proper use. Keep this manual in your
vehicle at all times.
The Navigation System is one of the most technologically advanced
vehicle accessories ever developed. The system receives satellite signals from the Global Positioning System (GPS) operated by the U.S.
Department of Defense. Using these signals and other vehicle sensors, the system indicates your present position and assists in locating
a desired destination.
The navigation system is designed to select efficient routes from your
present starting location to your destination. The system is also designed
to direct you to a destination that is unfamiliar to you in an efficient manner.
The system uses DENSO maps. The calculated routes may not be the
shortest nor the least traffic congested. Your own personal local knowledge or “short cut” may at times be faster than the calculated routes.
The navigation system’s database includes about 75 Point of Interest
categories to allow you to easily select destinations such as restaurants
and banks. If a destination is not in the database, you can enter the street
address or a major intersection close to it and the system will guide you
there. The system will provide both a visual map and audio instructions.
The audio instructions will announce the distance remaining and the direction to turn in approaching a fork or intersection. These voice instructions will help you keep your eyes on the road and are timed to provide
enough time to allow you to maneuver, change lanes or slow down.
1

HIGHLANDER_HV_Navi_U
Please be aware that all current vehicle navigation systems have
certain limitations that may affect their ability to perform properly.
The accuracy of the vehicle’s position depends on the satellite condition, road configuration, vehicle condition or other circumstances. For more information on the limitations of the system, refer to
pages 256 through 258.
2
Important information about
this manual
Safety Instruction
For safety reasons, this manual indicates
items requiring particular attention with the
following marks.
CAUTION
This is a warning against anything
which may cause injury to people if
the warning is ignored. You are informed about what you must or must
not do in order to reduce the risk of
injury to yourself and others.
NOTICE
This is a warning against anything
which may cause damage to the vehicle or its equipment if the warning
is ignored. You are informed about
what you must or must not do in order to avoid or reduce the risk of damage to your vehicle and its equipment.
INFORMATION
This provides additional information.
HIGHLANDER_HV_Navi_U
To use this system in the safest possible
manner, follow all the safety tips shown below.
This system is intended to assist in reaching the destination and, if used properly,
can do so. The driver is solely responsible
for the safe operation of your vehicle and
the safety of your passengers.
Do not use any feature of this system to the
extent it becomes a distraction and prevents safe driving. The first priority while
driving should always be the safe operation of the vehicle. While driving, be sure
to observe all traffic regulations.
Prior to the actual use of this system, learn
how to use it and become thoroughly familiar with it. Read the entire Navigation System Owner’s Manual to make sure you understand the system. Do not allow other
people to use this system until they have
read and understood the instructions in
this manual.
For your safety, some functions may become inoperable when driving. Unavailable touch−screen buttons are dimmed.
Only when the vehicle is not moving, can
the destination and route selection be
done.
3

HIGHLANDER_HV_Navi_U
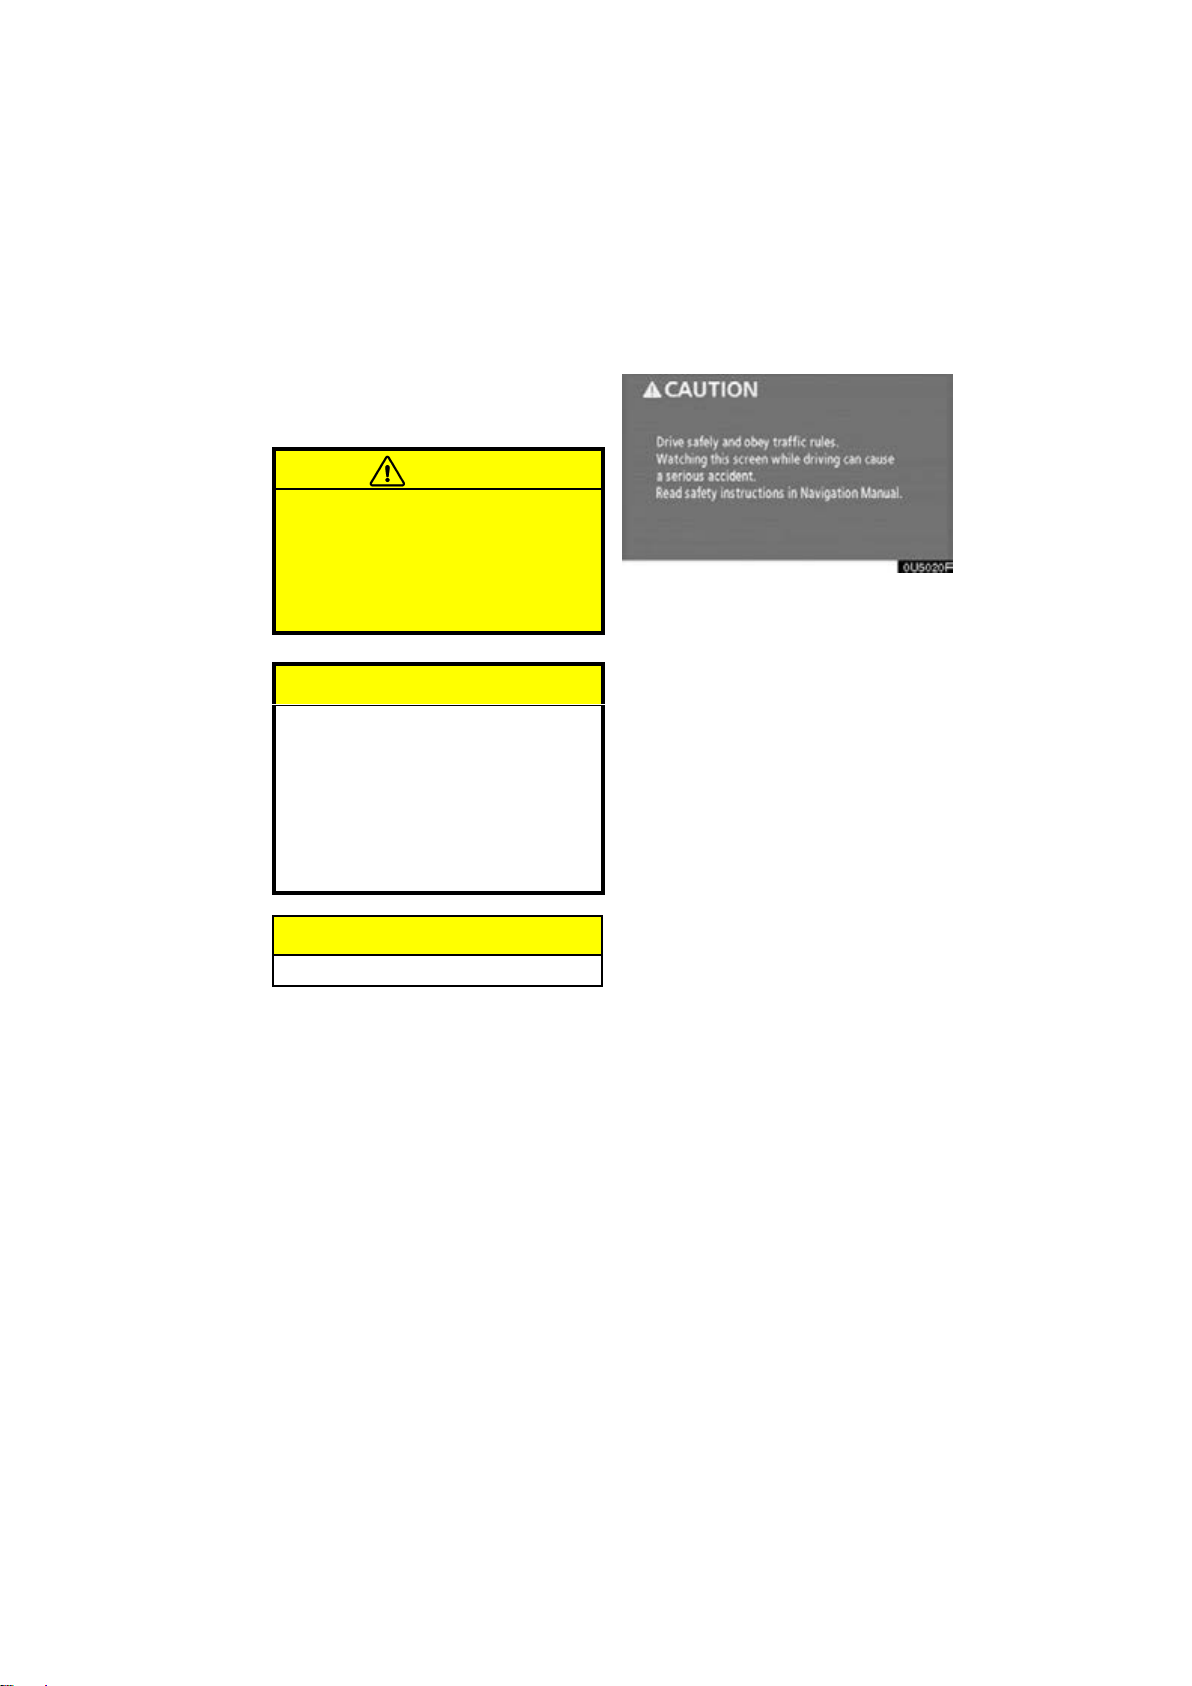
CAUTION
D For safety, the driver should not
operate the navigation system
while he/she is driving.
Insufficient attention to the road
and traffic may cause an accident.
D While you are driving, be sure to
obey the traffic regulations and
maintain awareness of the road
conditions. If a traffic sign on the
road has been changed, route
guidance may provide incorrect
information such as the direction
of a one way street.
While driving, listen to the voice instructions as much as possible and glance at
the screen briefly and only when it is safe.
However, do not totally rely on voice guidance. Use it just for reference. If the system cannot determine the current vehicle
position correctly, there is a possibility of
incorrect, late, or non−voice guidance.
The data in the system may occasionally
be incomplete. Road conditions, including
driving restrictions (no left turns, street closures, etc.) frequently change. Therefore,
before following any instruction from the
system, look to see whether the instruction
can be done safely and legally.
This system cannot warn about such
things as the safety of an area, condition of
streets, and availability of emergency services. If unsure about the safety of an
area, do not drive into it. Under no cir-
cumstances is this system a substitute
for the driver’s personal judgement.
Use this system only in locations where it
is legal to do so. Some states/provinces
may have laws prohibiting the use of video
and navigation screens next to the driver.
4
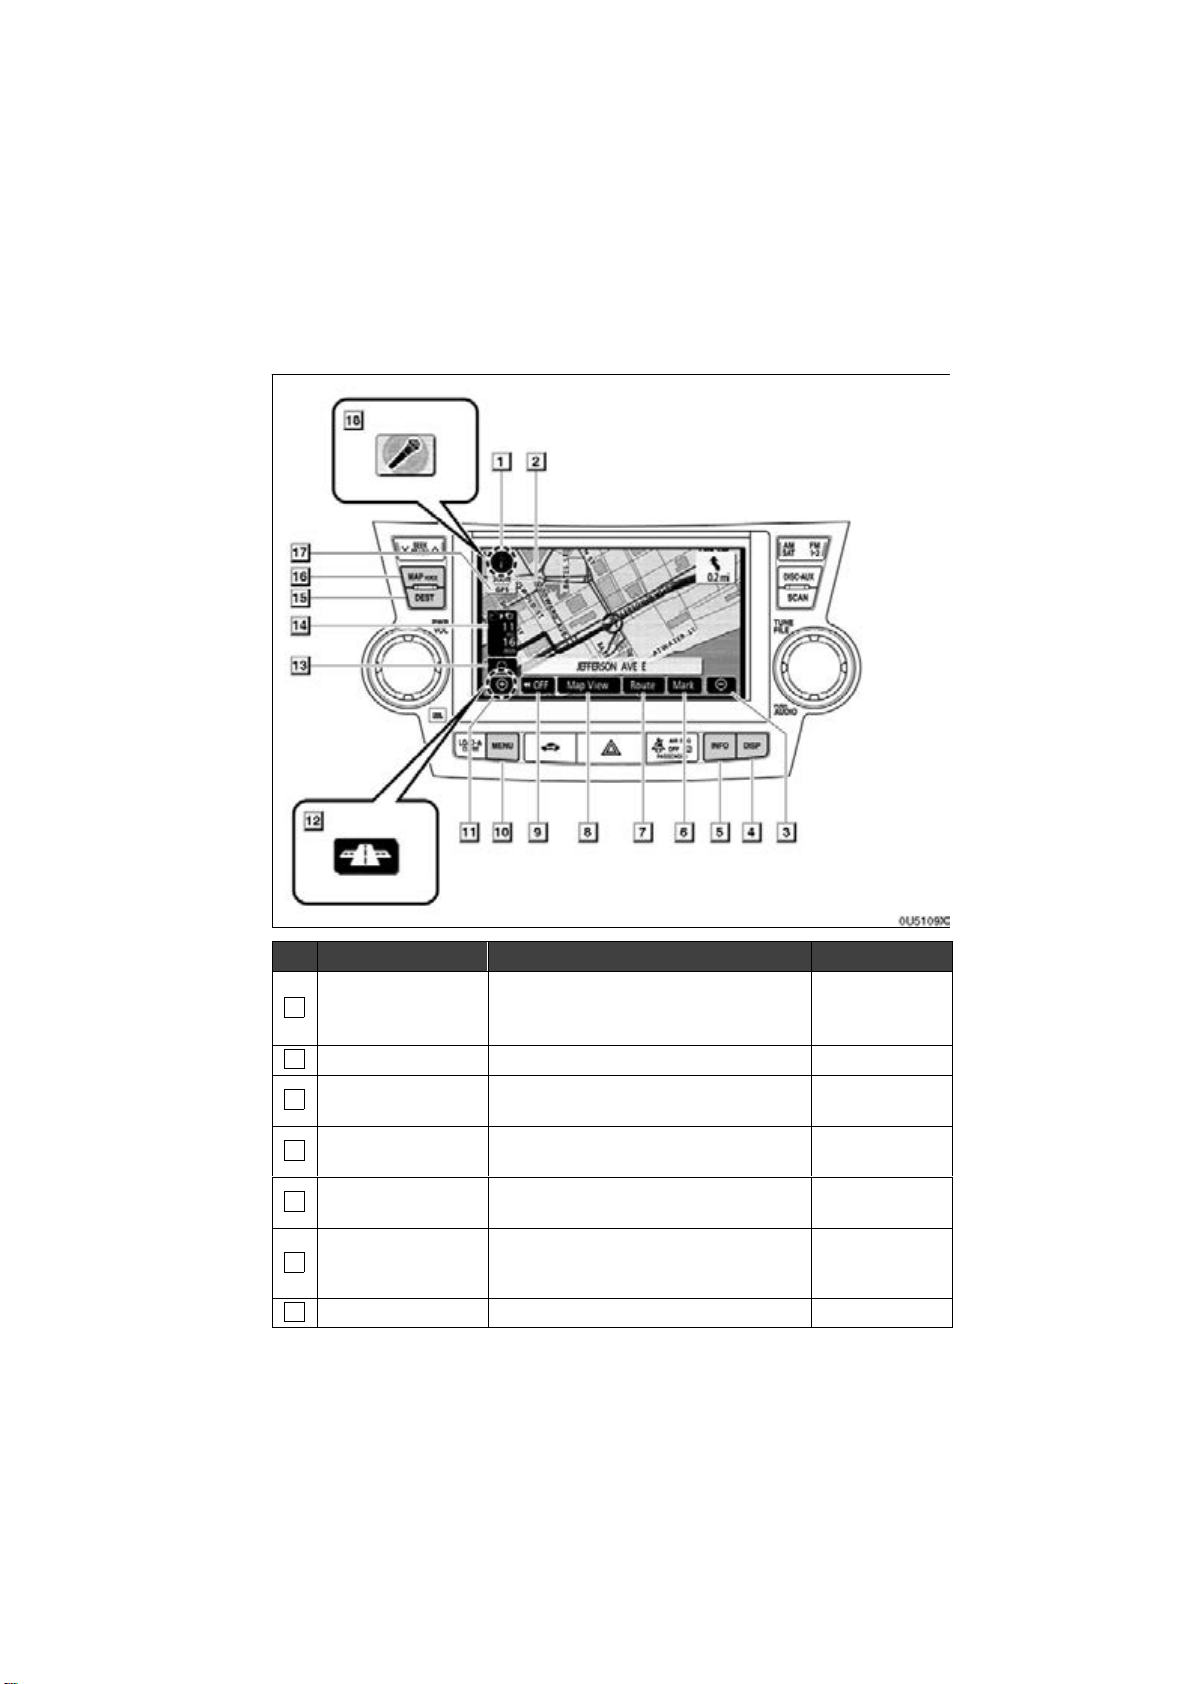
Quick guide —
— Overview buttons and guidance screen
No. Name Function Page
North−up or
1
heading−up
symbol
2
Scale indicator This figure indicates the map scale. 35
3
Zoom out button
4
“DISP” button
5
“INFO” button
6
“Mark”
7
“Route” Touch this button to change the route. 72, 74
This symbol indicates a map view with
north−up or heading−up. Touching this
symbol changes the map orientation.
Touch this button to reduce the map
scale.
Push this button to display the “Display”
screen.
Push this button to display the “Information” screen.
Touch this button to register the current
position or the cursor position as a
memory point.
37
35
178
118, 122, 132,
180, 183
30
5

No. Name Function Page
Touch this button to browse information
8
“Map View”
about guidance route, to set the Points
of Interest to be displayed on the
78, 81, 82, 83
screen, or to record the route.
Touch this button to obtain a broader
9
“AAOFF”
view. Some of the buttons on the screen
are not displayed. They are displayed
110
again by touching “ON""”.
10
“MENU” button
11
Zoom in button
Foot print map
12
button
Screen
13
configuration
button
Distance and time
14
to destination
15
“DEST” button
Push this button to display the “Menu”
screen.
Touch this button to magnify the map
scale.
Touch this button to display the foot print
map and the building information.
Touch this button to change the screen
mode.
Displays the distance, the estimated
travel time to the destination, and the
estimated arrival time at the destination.
Push this button to display the “Destination” screen.
7, 9, 88, 89,
90, 92, 106,
268
35
36
33
71
11, 12, 40, 41
Push this button to repeat a voice guid-
“MAP/VOICE”
16
button
ance, cancel one touch scroll, start
guidance, and display the current posi-
28, 70
tion.
“GPS” mark
(Global
17
Positioning
System)
Speech
18
command system
indicator
Whenever the vehicle is receiving signals from the GPS, this mark is displayed.
The microphone is shown by pushing
the talk switch. The speech command
system can be operated while this indicator is shown.
256
174
6
0U5074X
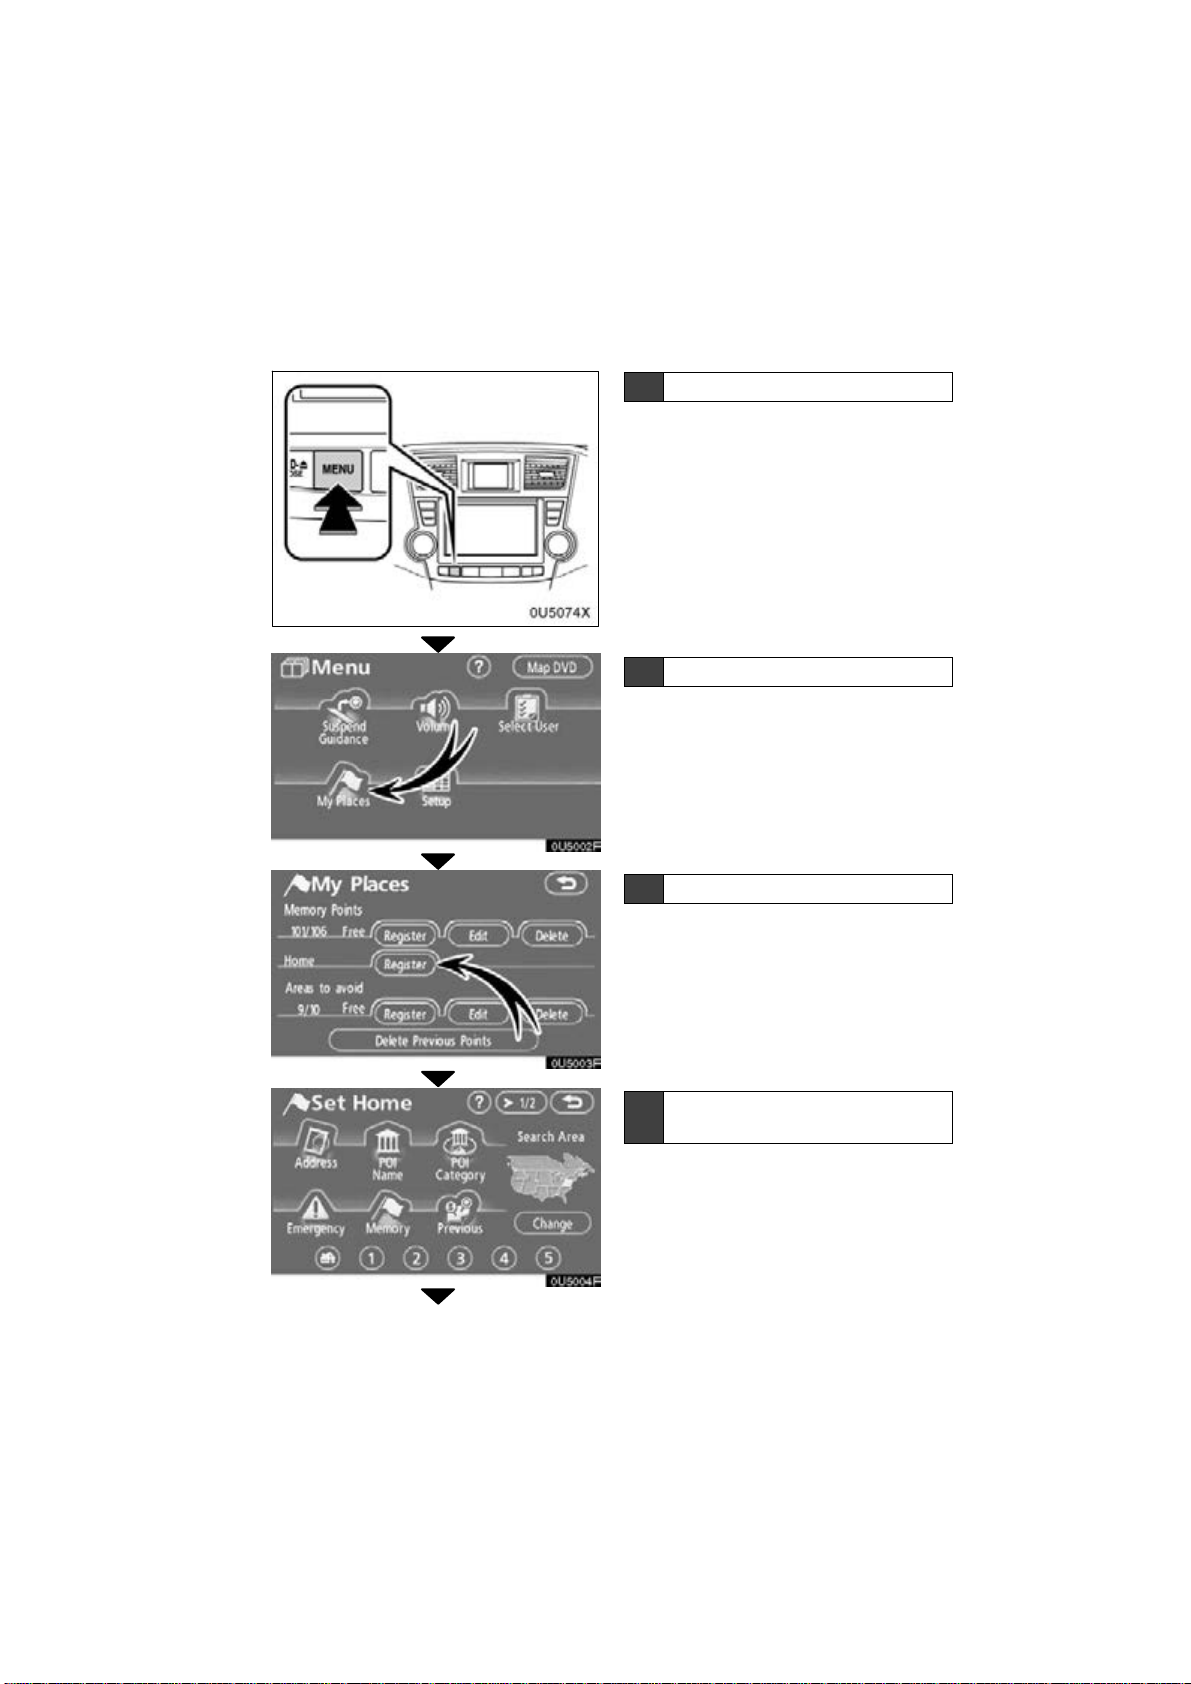
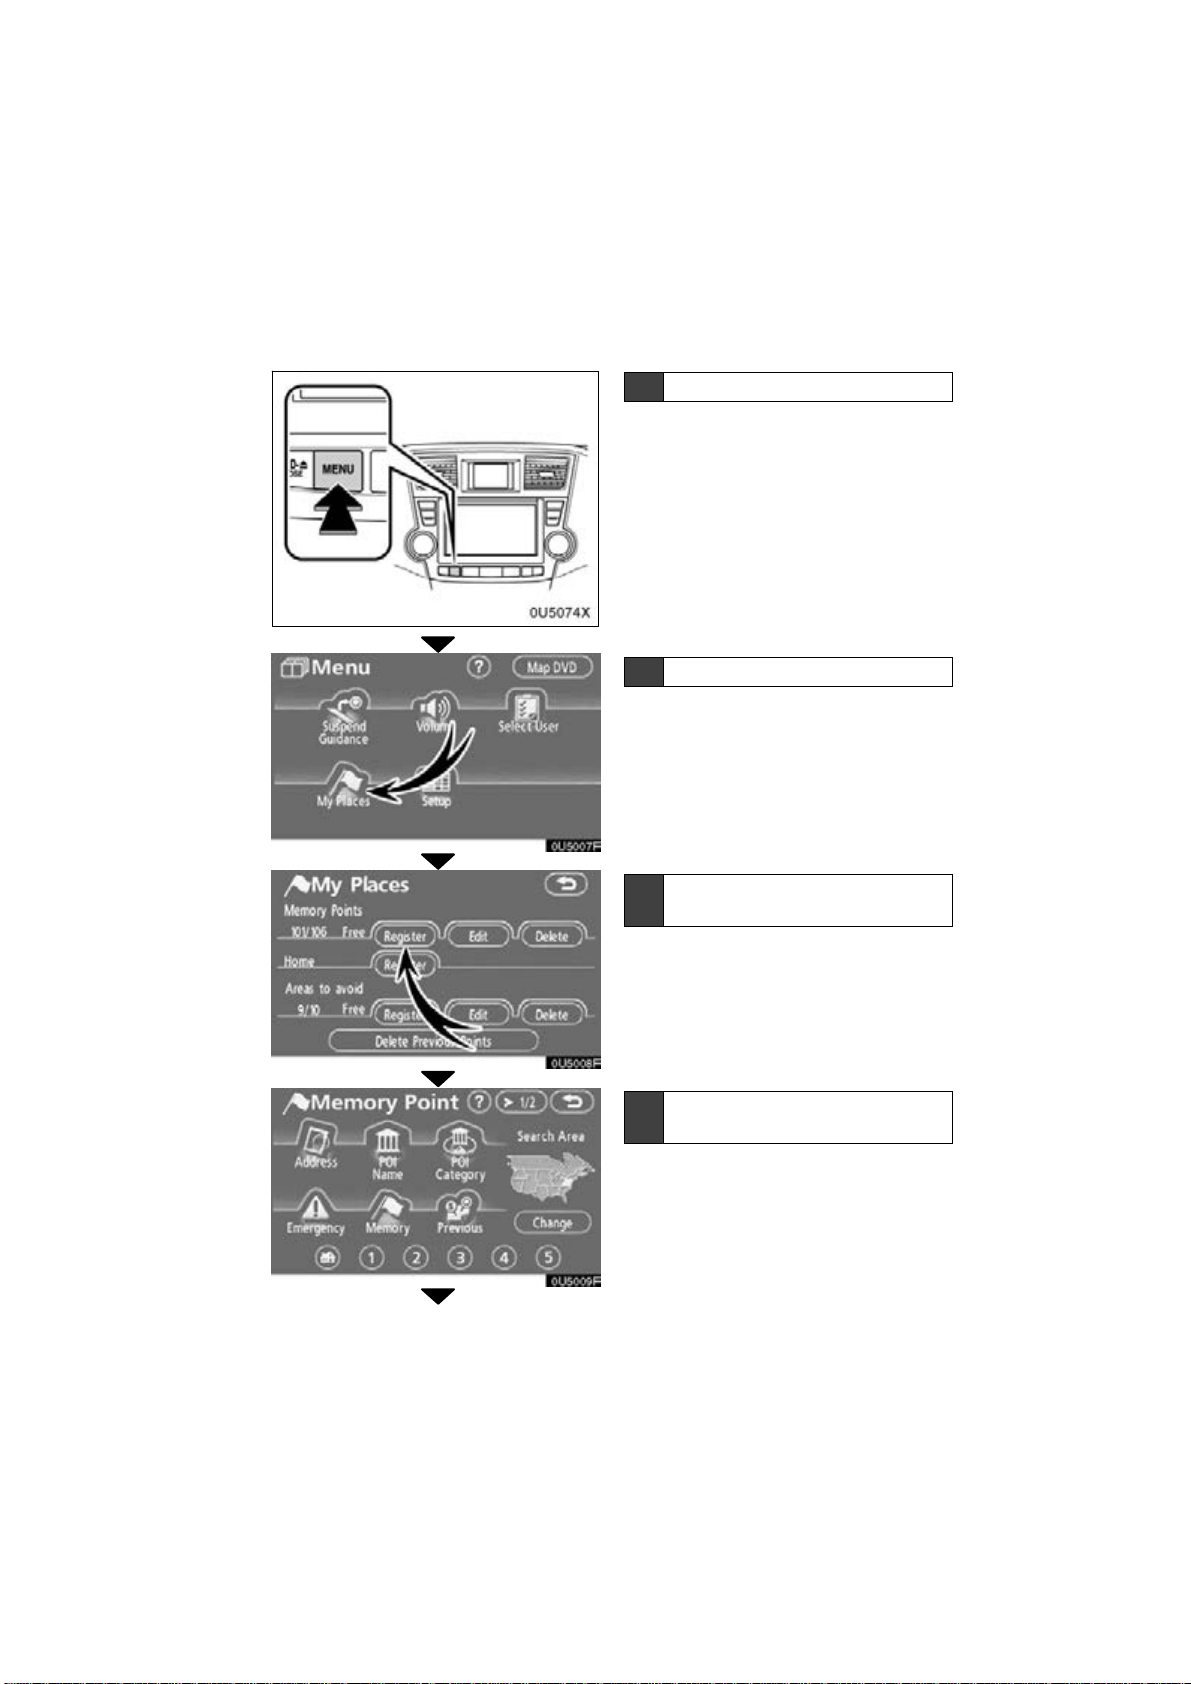
— Registering home
0U5002F
1 Push the “MENU” button.
2 Touch “My Places”.
3 T ouch “Register” of the home.
0U5003F
0U5004F
4 There are 12 different methods t o
search your home.
See “Destination search” on page 41.
7
0U5005F
0U5006F
5 T ouch “Enter”.
The “Memory Point” screen is displayed.
6 Touch “OK”.
Registration of home is complete.
You can change the icon, quick access,
name, location and phone number. (See
“ — Editing memory points” on page 94.)
8
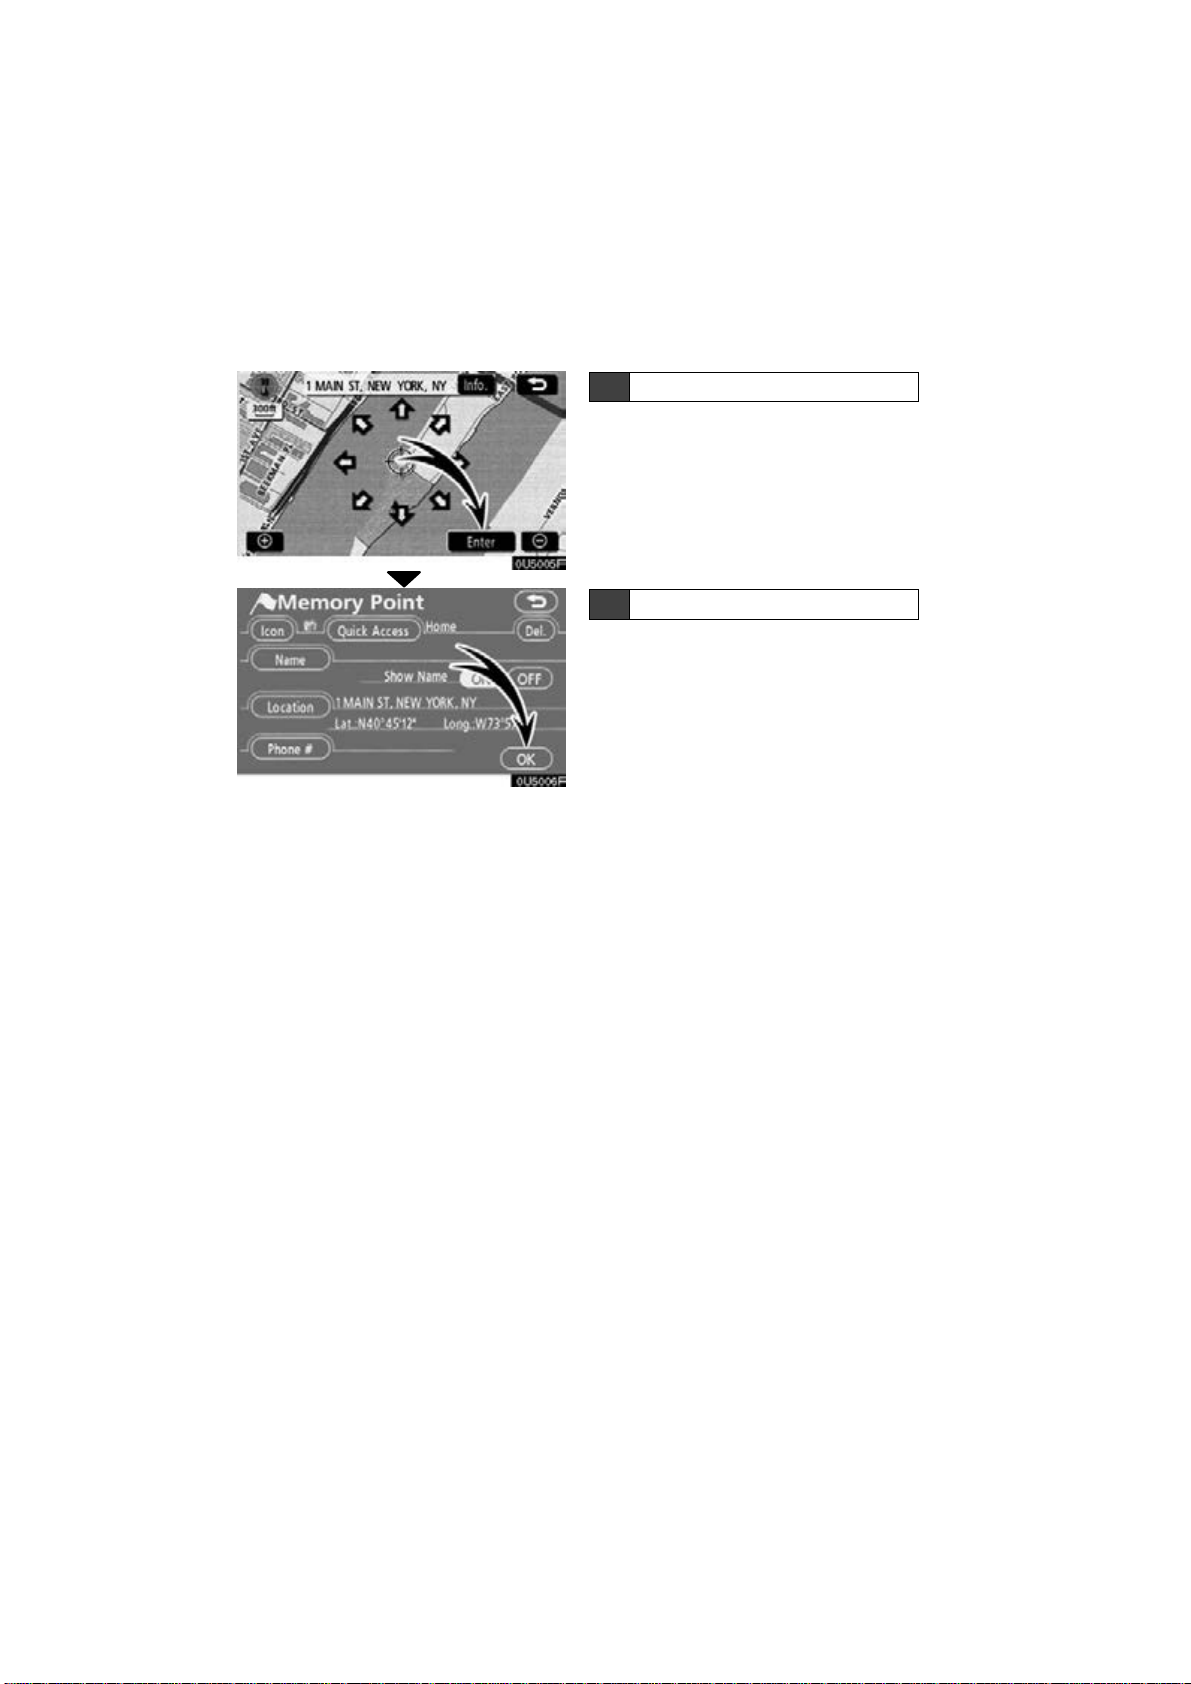
— Registering preset memory points
(Quick access)
0U5074X
0U5007F
1 Push the “MENU” button.
2 Touch “My Places”.
3 Touch “Register” of the memory
points.
0U5008F
0U5009F
4 There are 13 different methods t o
search preset memory points.
See “Destination search” on page 41.
9

0U5010F
0U5011F
0U5012F
5 T ouch “Enter”.
The “Memory Point” screen is displayed.
6 Touch “Quick Access”.
7 Touch one o f preset buttons 1 to
5.
0U5013F
10
8 T ouch “OK”.
Registration of preset memory points is
complete.
You can change the icon, quick access,
name, location and phone number. (See
“ — Editing memory points” on page 94.)
The registered points can be used on the
“Destination” screen. (See “ — Destination
search by Quick access” on page 44.)
0U5075X
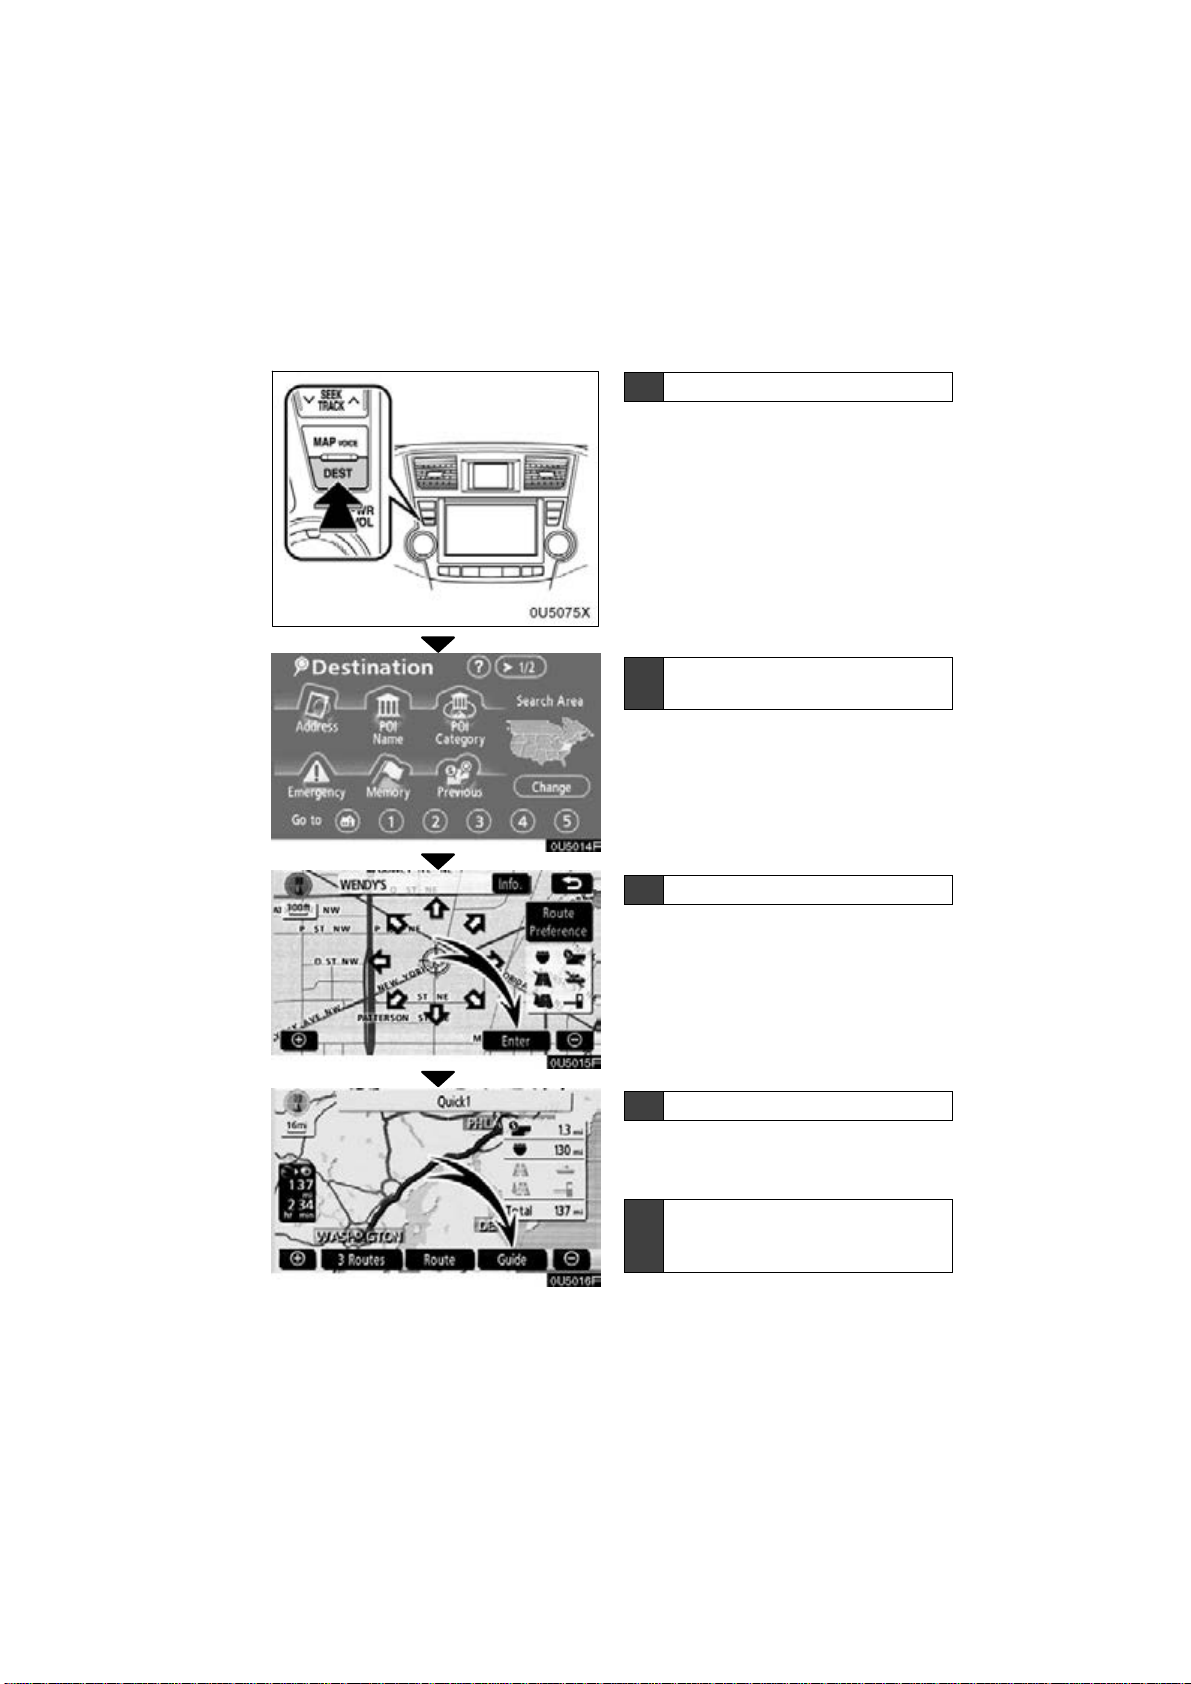
— Operation flow: guiding the route
0U5014F
0U5015F
1 Push the “DEST” button.
2 There are 13 different methods t o
search destinations.
See “Destination search” on page 41.
3 Touch “Enter”.
The navigation system performs a search
for the route.
0U5016F
4 Touch “Guide”, and start driving.
Routes other than the one recommended
can also be selected. (See “Starting route
guidance” on page 60.)
5 Guidance to the destination is
given via voice and on the guidance screen.
11
0U5075X
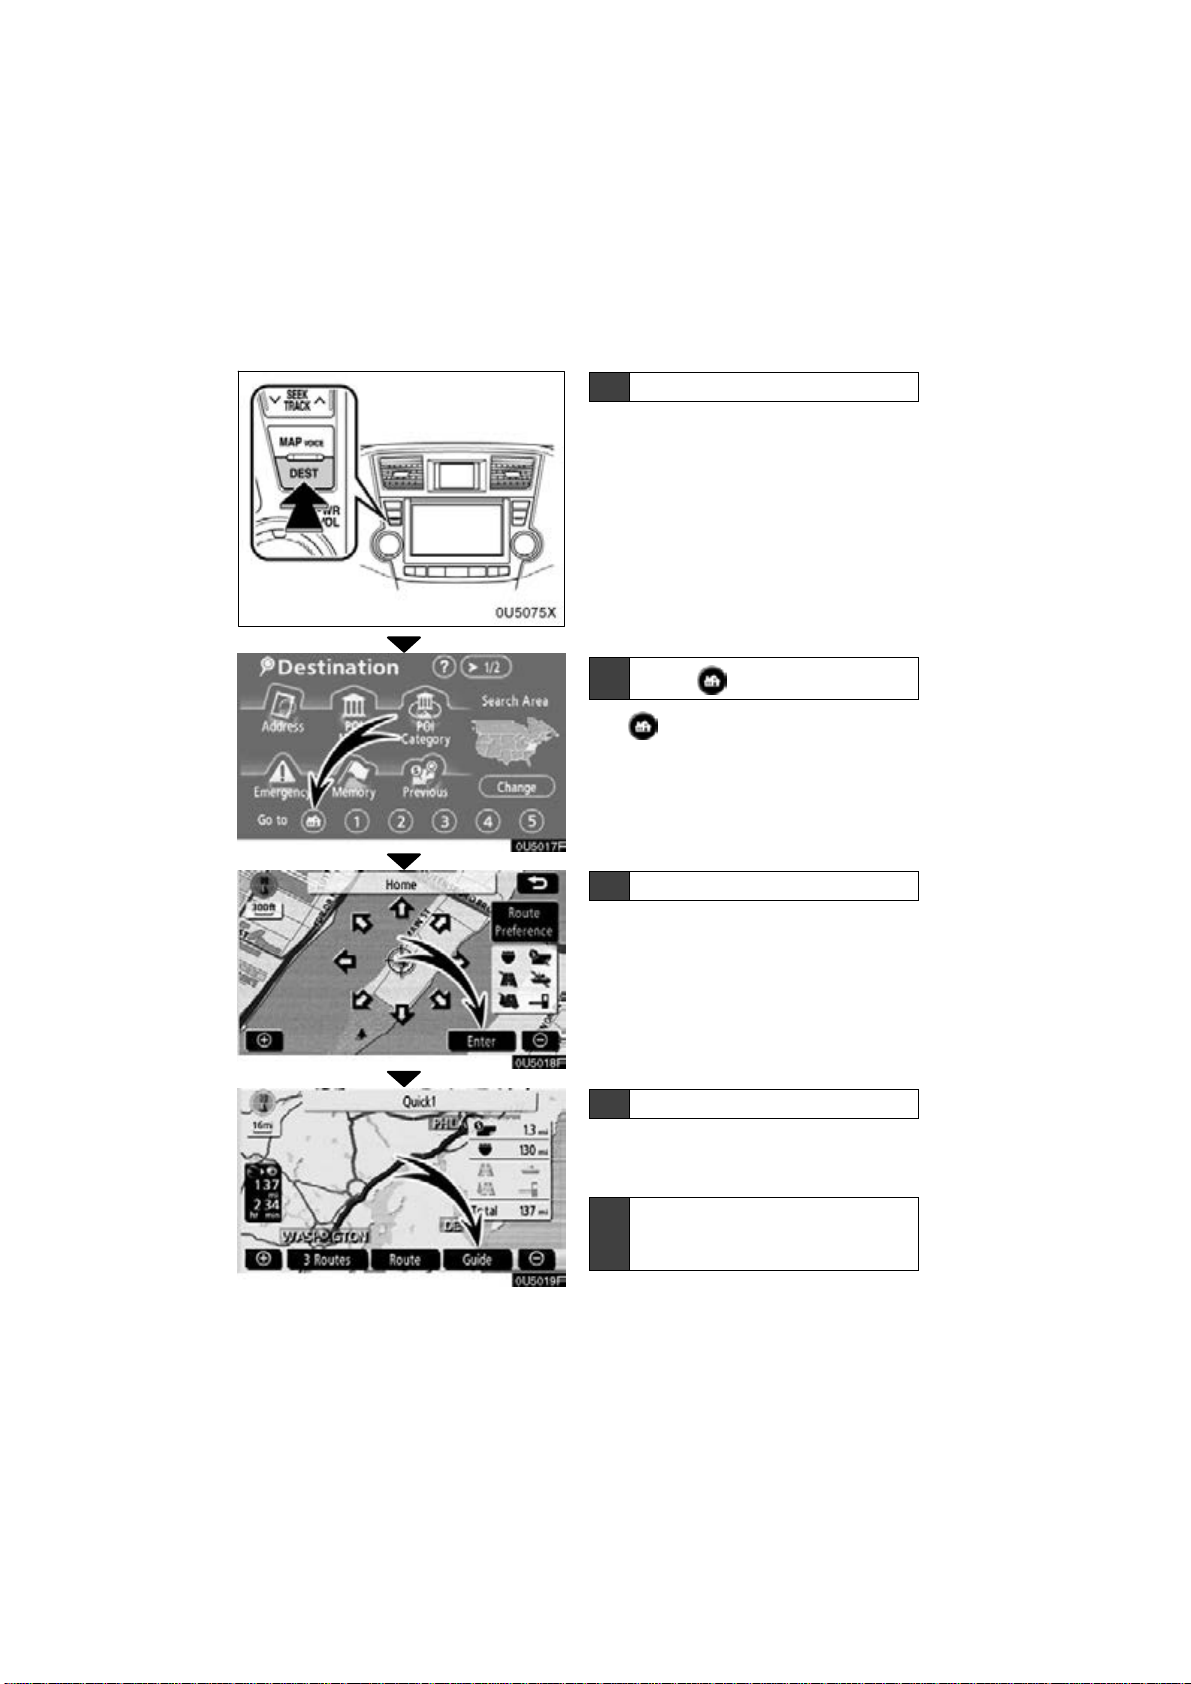
— Setting home as the destination
0U5017F
1 Push the “DEST” button.
2
Touch .
The can be used if your home has
been registered. (To register “Home”, see
“ — Registering home” on page 100.)
3 Touch “Enter”.
The navigation system performs a search
for the route.
0U5018F
0U5019F
12
4 Touch “Guide”, and start driving.
Routes other than the one recommended
can also be selected. (See “Starting route
guidance” on page 60.)
5 Guidance to the destination is
given via voice and on the guidance screen.

SECTION 1
BASIC FUNCTIONS
〈Basic information before operation〉
BASIC FUNCTIONS
D Initial screen 22
D Touch screen operation 23
D Inputting letters and numbers/list screen operation 24
D Function help 27
D Map screen operation 28
Current position display 28. . . . . . . . . . . . . . . . . . . . . . . . . . . . . . .
Screen scroll operation 29. . . . . . . . . . . . . . . . . . . . . . . . . . . . . . .
Switching the screens 33. . . . . . . . . . . . . . . . . . . . . . . . . . . . . . . . .
Map scale 35. . . . . . . . . . . . . . . . . . . . . . . . . . . . . . . . . . . . . . . . . . .
Foot print map 36. . . . . . . . . . . . . . . . . . . . . . . . . . . . . . . . . . . . . . .
Orientation of the map 37. . . . . . . . . . . . . . . . . . . . . . . . . . . . . . . .
. . . . . . . . . . . . . . . . . . . . . . . . . . . . . . . . . . . . . . . . . . .
. . . . . . . . . . . . . . . . . . . . . . . . . . . . . . . . .
. . . . . . . . . .
. . . . . . . . . . . . . . . . . . . . . . . . . . . . . . . . . . . . . . . . . .
. . . . . . . . . . . . . . . . . . . . . . . . . . . . . . . . .
21
BASIC FUNCTIONS
Initial screen
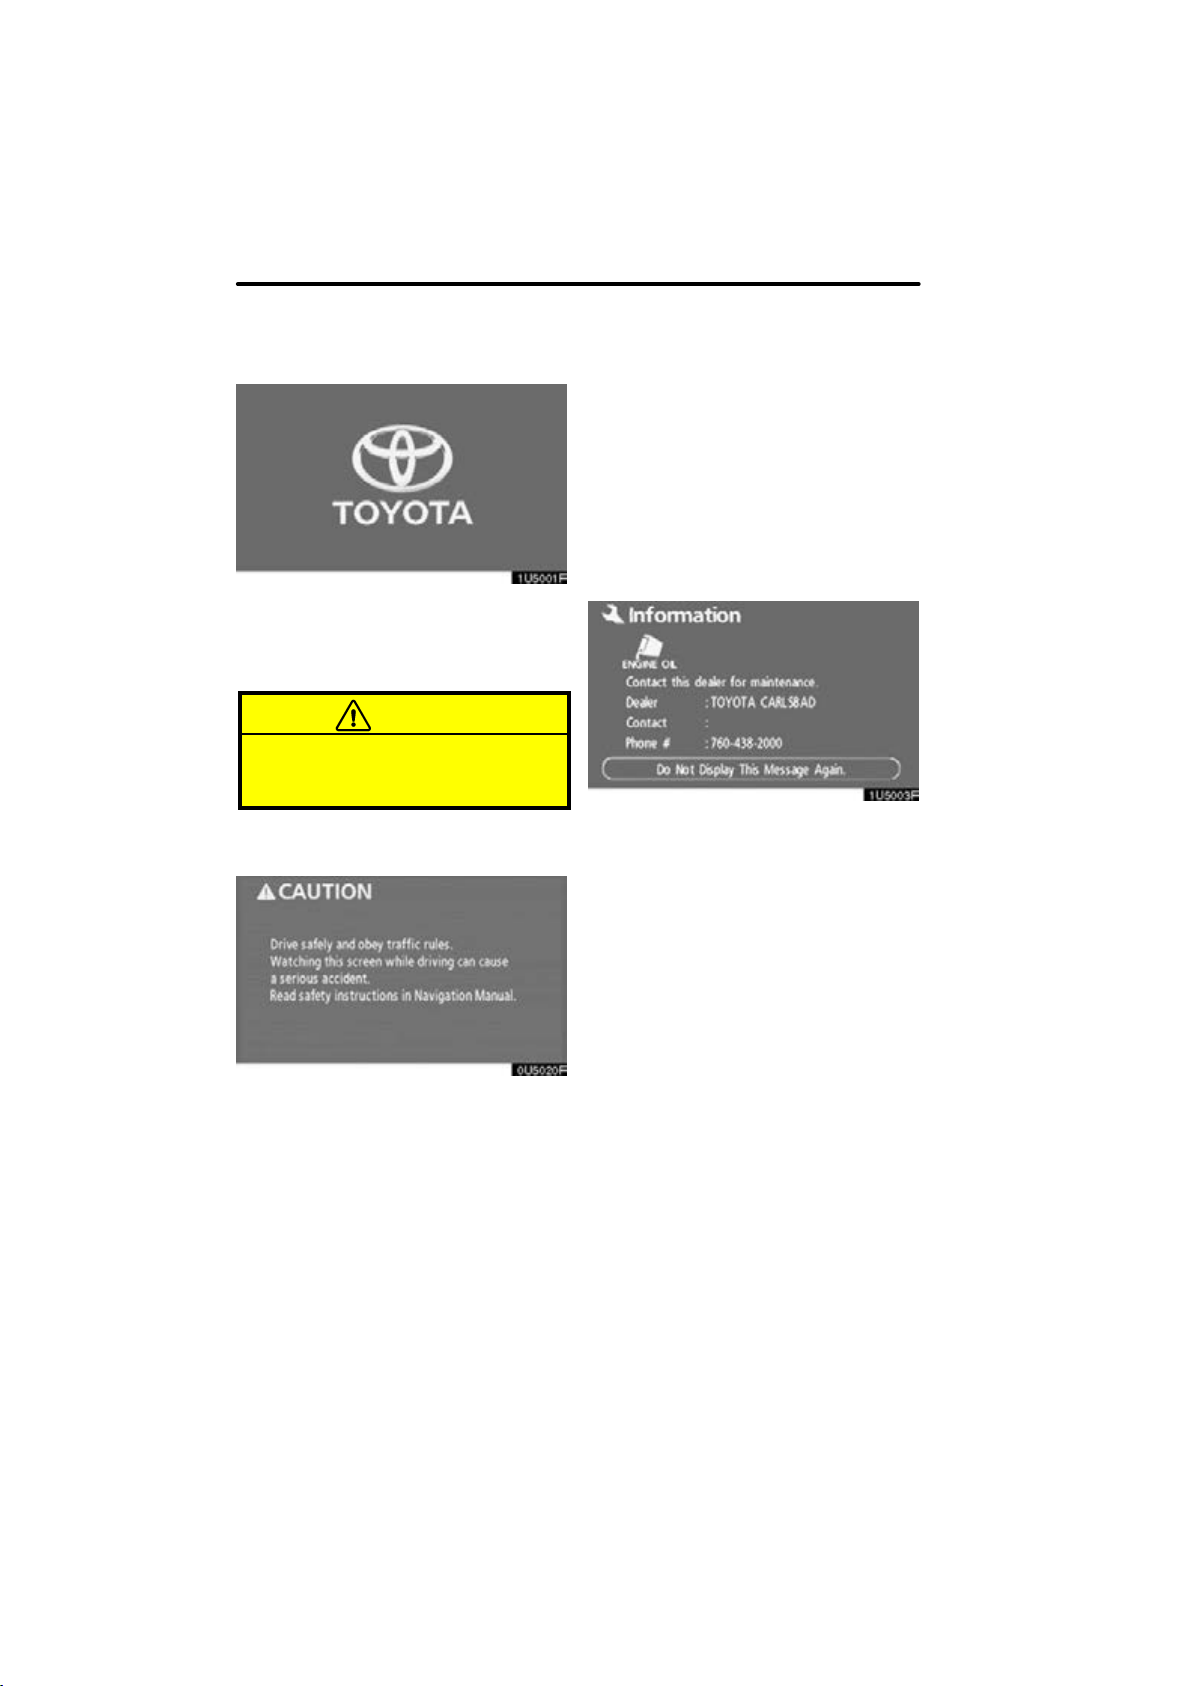
When the “POWER” switch is in ACCESSORY or ON mode, the initial screen will
be displayed and the system will begin
operating.
CAUTION
When the vehicle is stopped with the
hybrid system operating, always apply the parking brake for safety.
D Maintenance information
This system informs about when to replace
certain parts or components and shows
dealer information (if registered) on the
screen.
When the vehicle reaches a previously set
driving distance or date specified for a
scheduled maintenance check, the “Information” screen will be displayed when the
navigation system is in operation.
After a few seconds, the “CAUTION”
screen will be displayed.
After about 5 seconds, the “CAUTION”
screen automatically switches to the map
screen. When the “MAP/VOICE” button
is also pushed, the map screen is displayed.
While the “CAUTION” screen is displayed,
the “DEST” or “MENU” button cannot be
operated. And if the “Language”, “Cal-
endar” or “Maintenance” buttons on the
“Information” screen are touched, the
screen will change back to “CAUTION”
screen and then change to the map screen
in about 5 seconds later or if the “MAP/
VOICE” button is pushed.
To disable this screen, touch “Do Not
Display This Message Again.”. This
screen goes off if the screen is not operated for several seconds.
To prevent this information screen from being displayed again, touch “Do Not
Display This Message Again.”.
To register a maintenance information, see
“Maintenance information” on page 118.
22
D
Touch screen operation
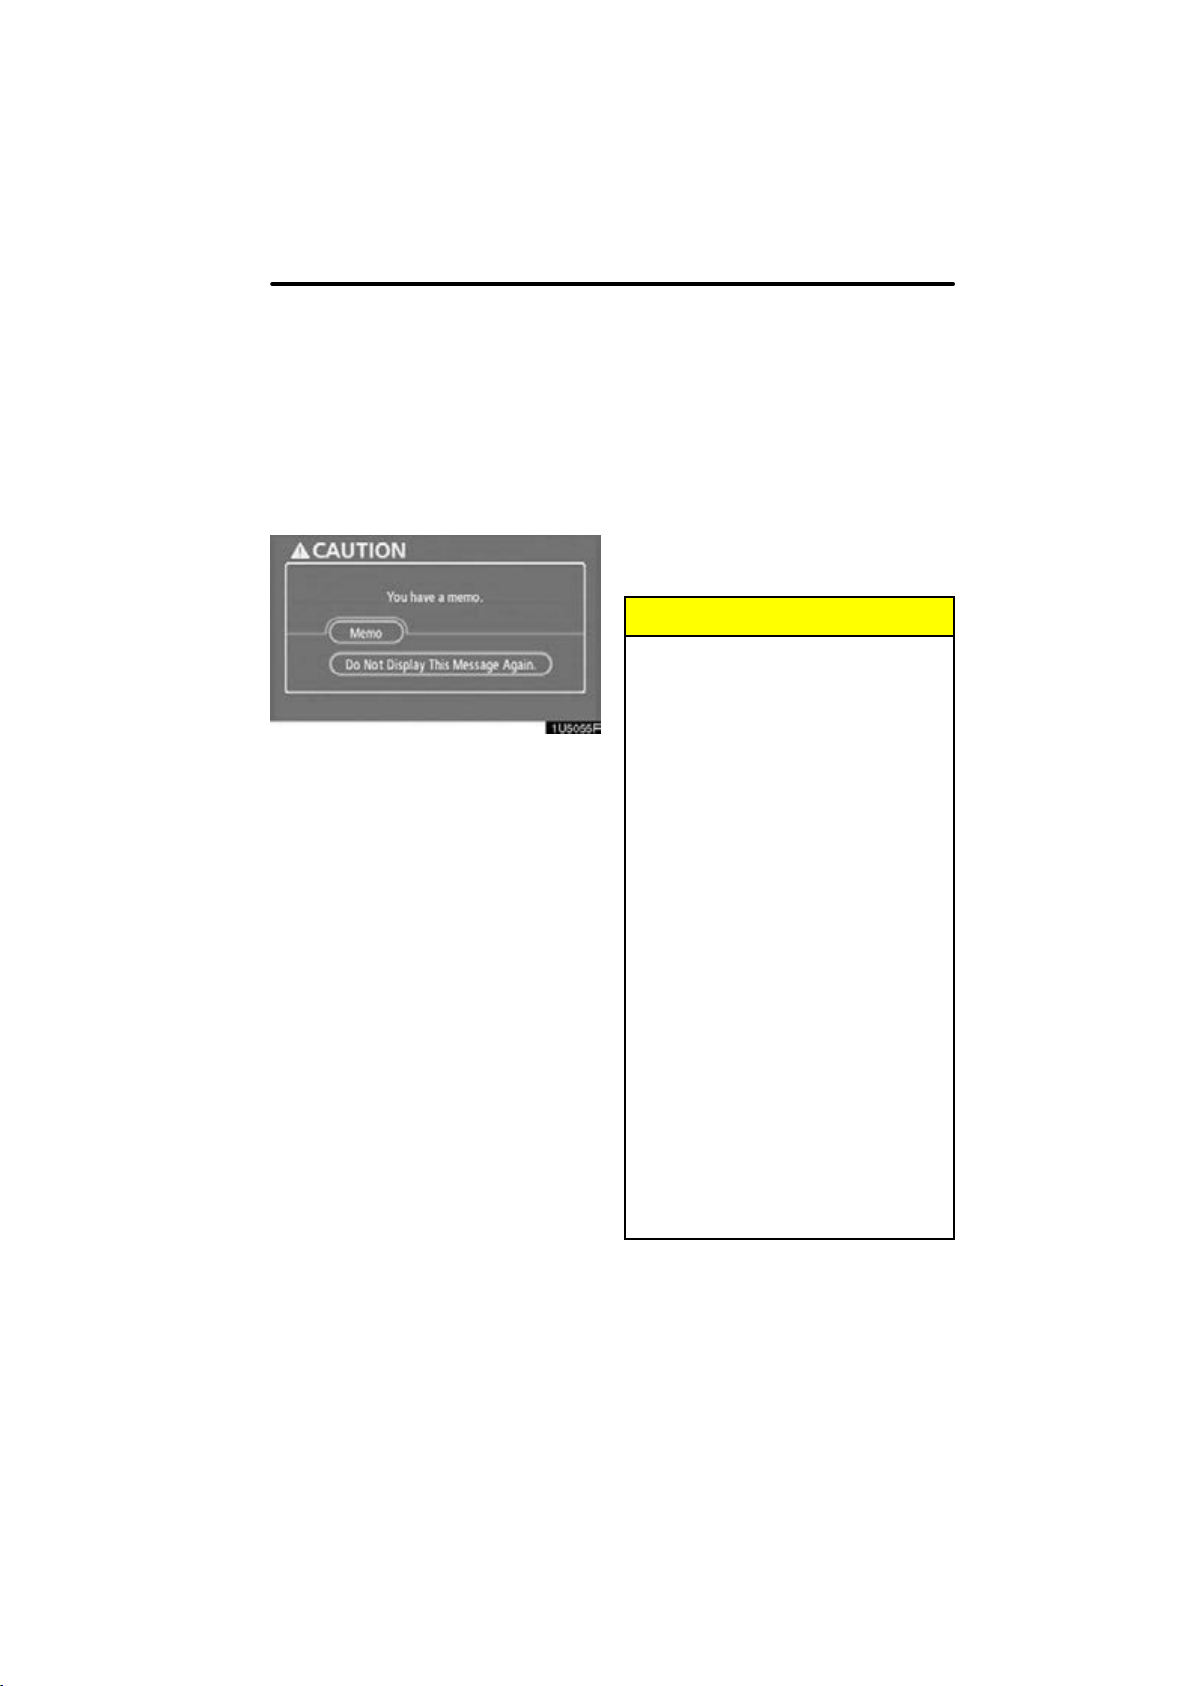
Memo information
This system notifies about a memo entry.
At the specified date, the memo information will be displayed when the navigation
system is in operation. The memo information screen will be displayed every time the
system is turned on.
The memo of the current date can be
viewed by touching “Memo”. (See “ —
Editing a memo” on page 125.)
To disable this screen, touch “Do Not
Display This Message Again.”. This
screen goes off if the screen is not operated for several seconds.
To prevent this information screen from being displayed again, touch “Do Not
Display This Message Again.”.
To register a memo information, see “Calendar with memo” on page 122.
BASIC FUNCTIONS
This system is operated mainly by the
touch−screen buttons on the screen.
To prevent damage to the screen, lightly touch the touch−screen buttons on
the screen with the finger. When a
touch−screen button on the screen is
touched, a beep sounds.
Do not use objects other than the finger
to touch the screen.
INFORMATION
D If the system does not respond to a
touch on a touch−screen button,
move the finger away from the
screen and then touch it again.
D Dimmed touch−screen buttons
cannot be operated.
D Wipe off fingerprints using a glass
cleaning cloth. Do not use chemical cleaners to clean the touch
screen.
D The displayed image may become
darker and moving images may be
slightly distorted when the display
is cold.
D Under extremely cold conditions,
the map may not be displayed and
the data input by a user may be deleted. Also, the touch−screen buttons may be harder than usual to
depress.
D When you look at the screen
through polarized material such as
polarized sunglasses, the screen
may be dark and hard to see. If so,
look at the screen from different
angles, adjust the screen settings
on the “Display” screen, or take off
your sunglasses.
23

BASIC FUNCTIONS
Inputting letters and
numbers/list screen
operation
When searching for an address or a name,
or entering a memo, letters and numbers
can be input via the touch screen.
INFORMATION
Key layout can be changed. (See “D
Input key layout” on page 108.)
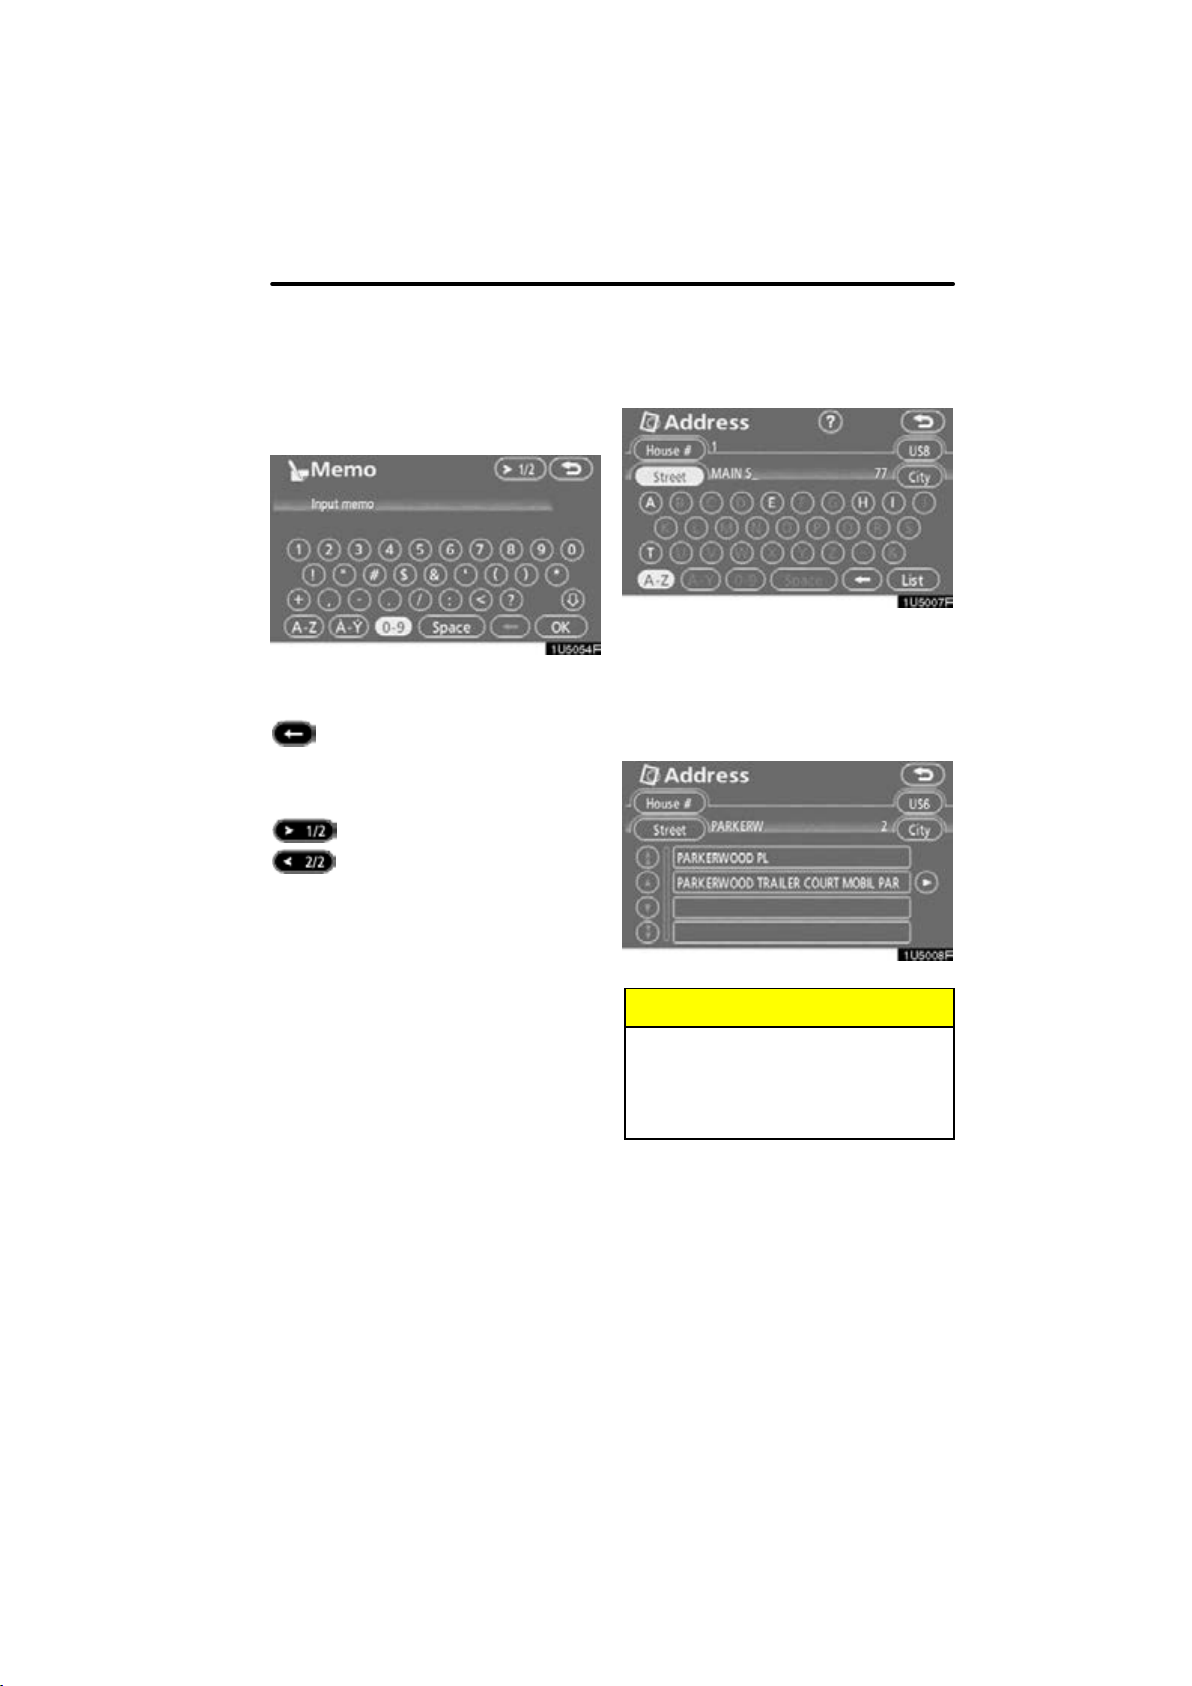
D To input letters
To display the alphabet keys, touch “A−Z”
or
“ ”.
Enter letters by touching the alphabet keys
directly.
: Touching this touch−screen but-
ton erases one letter. By holding
this touch−screen button, letters
will continue to be erase.
On certain letter entry screens, letters can
be entered in upper or lower case.
: To enter in lower case.
: To enter in upper case.
24
D
:
To input numerals and symbols
To display the number keys and symbol
keys, touch “0−9”.
Enter numerals and symbols by touching
the number keys and symbol keys directly.
Touching this button erases
one letter. By holding this
button, letters will continue to
be erased.
: Touching this button displays
other symbols.
BASIC FUNCTIONS
D To display the list
To search for an address or a name, touch
“List”. Matching items from the database
are listed even if the entered address or
name is incomplete.
If the number of matches is four or less, the
list is displayed without touching “List”.
INFORMATION
The number of matching items is
shown to the right side of the screen.
If the number of matching items is
more than 9,999, the system displays
∗∗∗∗” on the screen.
“
25
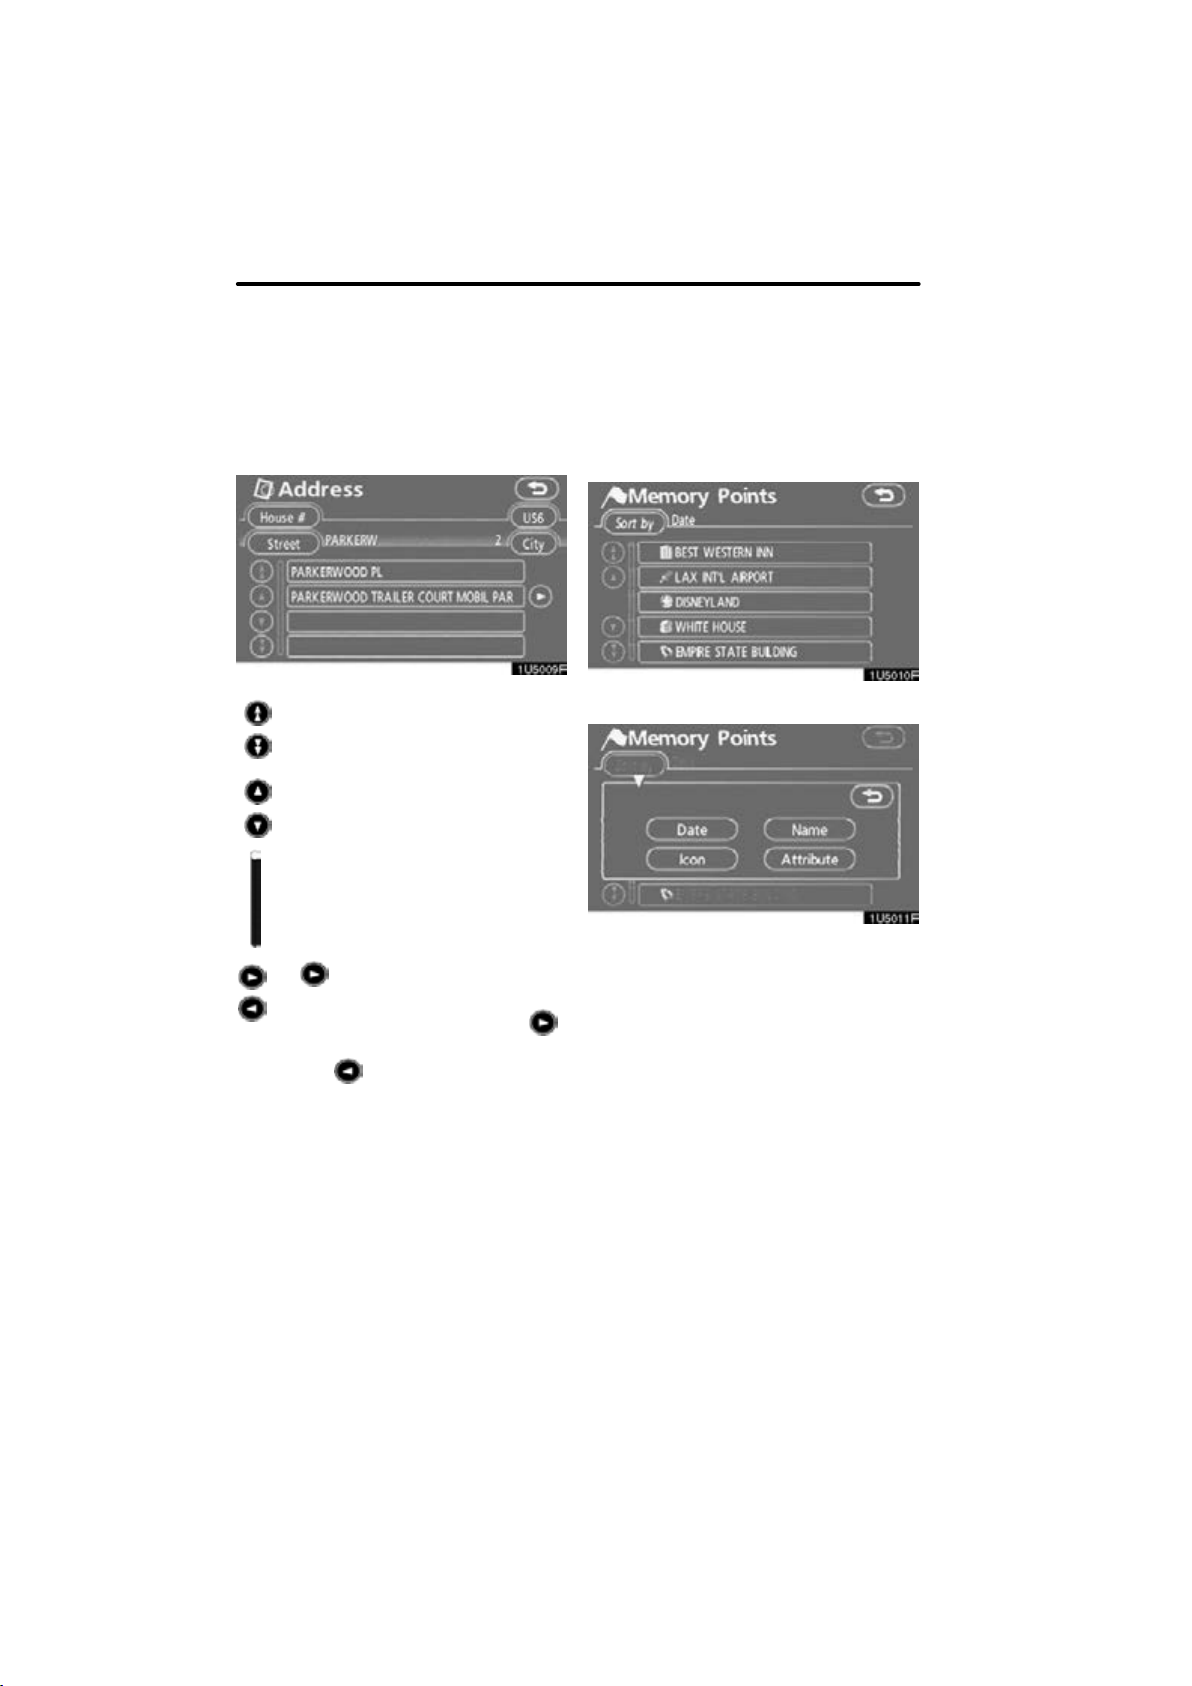
BASIC FUNCTIONS
D
List screen operation
When a list is displayed, use the appropriate touch−screen button to scroll through
the list.
D Sorting
The order of a list displayed on the screen
can be rearranged.
TYPE A
To shift to the next or previous
page.
To scroll up or down one item at a
time.
This expresses a displayed
screen position.
If appears to the right of the
item name, the complete name is
too long for the display. Touch
to scroll to the end of the name.
Touch to scroll to the beginning
of the name.
1. Touch “Sort by”.
2. Select the desired sorting criteria.
Sorting criteria are as follows:
“Distance”: To sort in the order of dis-
tance from your current location.
“Date”: To sort in the order of the date.
“Category”: To sort in the order of the
category.
“Icon”: To sort in the order of the icons.
“Name”: To sort in order by name.
“Attribute”: To sort in order by attribute.
26
BASIC FUNCTIONS
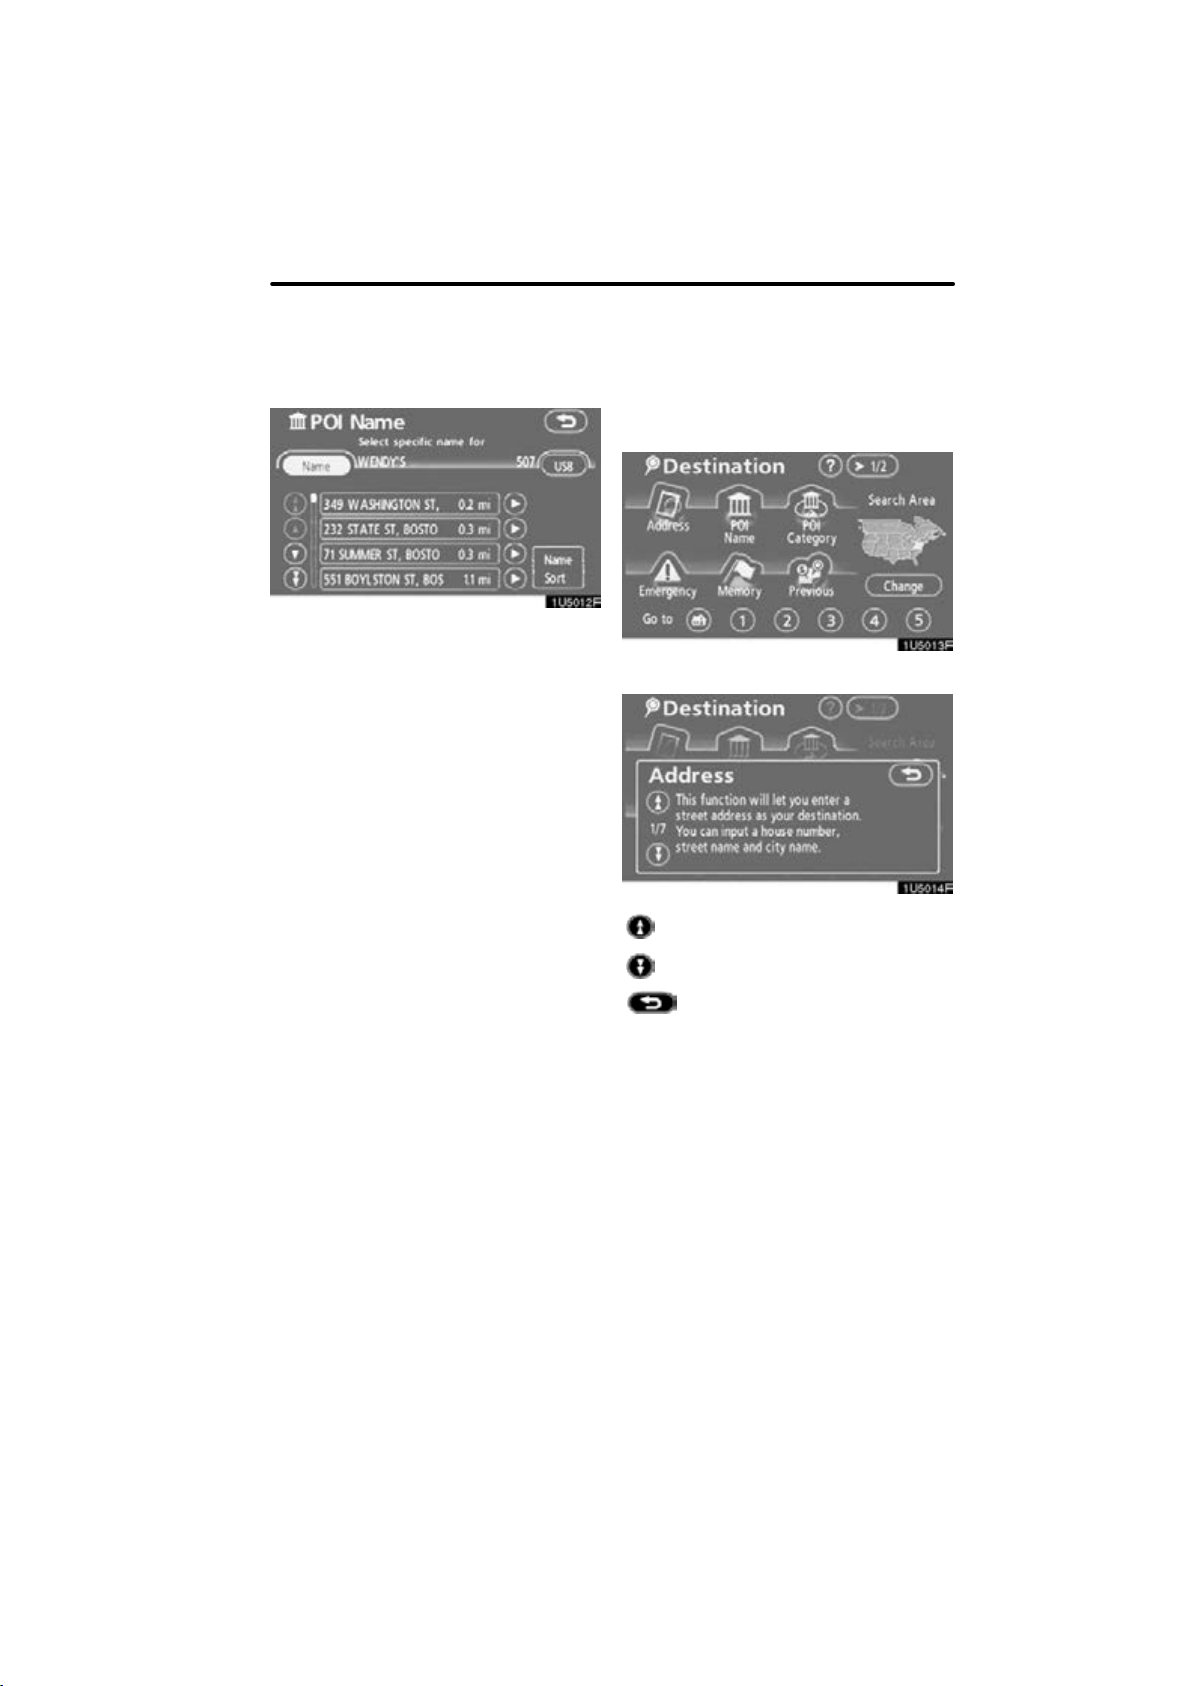
Function help
TYPE B
“Dist. Sort”: To sort in the order of dis-
tance from the current vehicle location.
The distance from current vehicle position
up to the destination is displayed to the
right of the name.
“Name Sort”: To sort in alphabetical order
by name.
Explanations for the functions of the “Destination”, “Setup”, and “Menu” screens can
be viewed.
Touch “?”.
: To view the previous page.
: To view the next page.
: To return to the previous screen.
27
BASIC FUNCTIONS
Map screen operation —
— Current position display
When starting the navigation system, the
current position is displayed first.
This screen displays the current vehicle
position and a map of the surrounding local
area.
INFORMATION
D After 12 volt battery disconnection,
or on a new vehicle, the current
position may not be correct. As
soon as the system receives signals from the GPS, the correct current position is displayed.
D To correct the current position
manually, see “
tire change calibration” on page
115.
D Current position/
The current vehicle position mark (
pears in the center or bottom center of the
map screen.
A street name will appear on the bottom of
the screen, depending on the scale of the
2
map (
You can return to this map screen that
shows your current position at any time
from any screen by pushing the “MAP/
VOICE” button.
While driving, the current vehicle position
mark is fixed on the screen and the map
moves.
The current position is automatically set as
the vehicle receives signals from the GPS
(Global Positioning System). If the current
position is not correct, it is automatically
corrected after the vehicle receives signals from the GPS.
).
1
) ap-
28
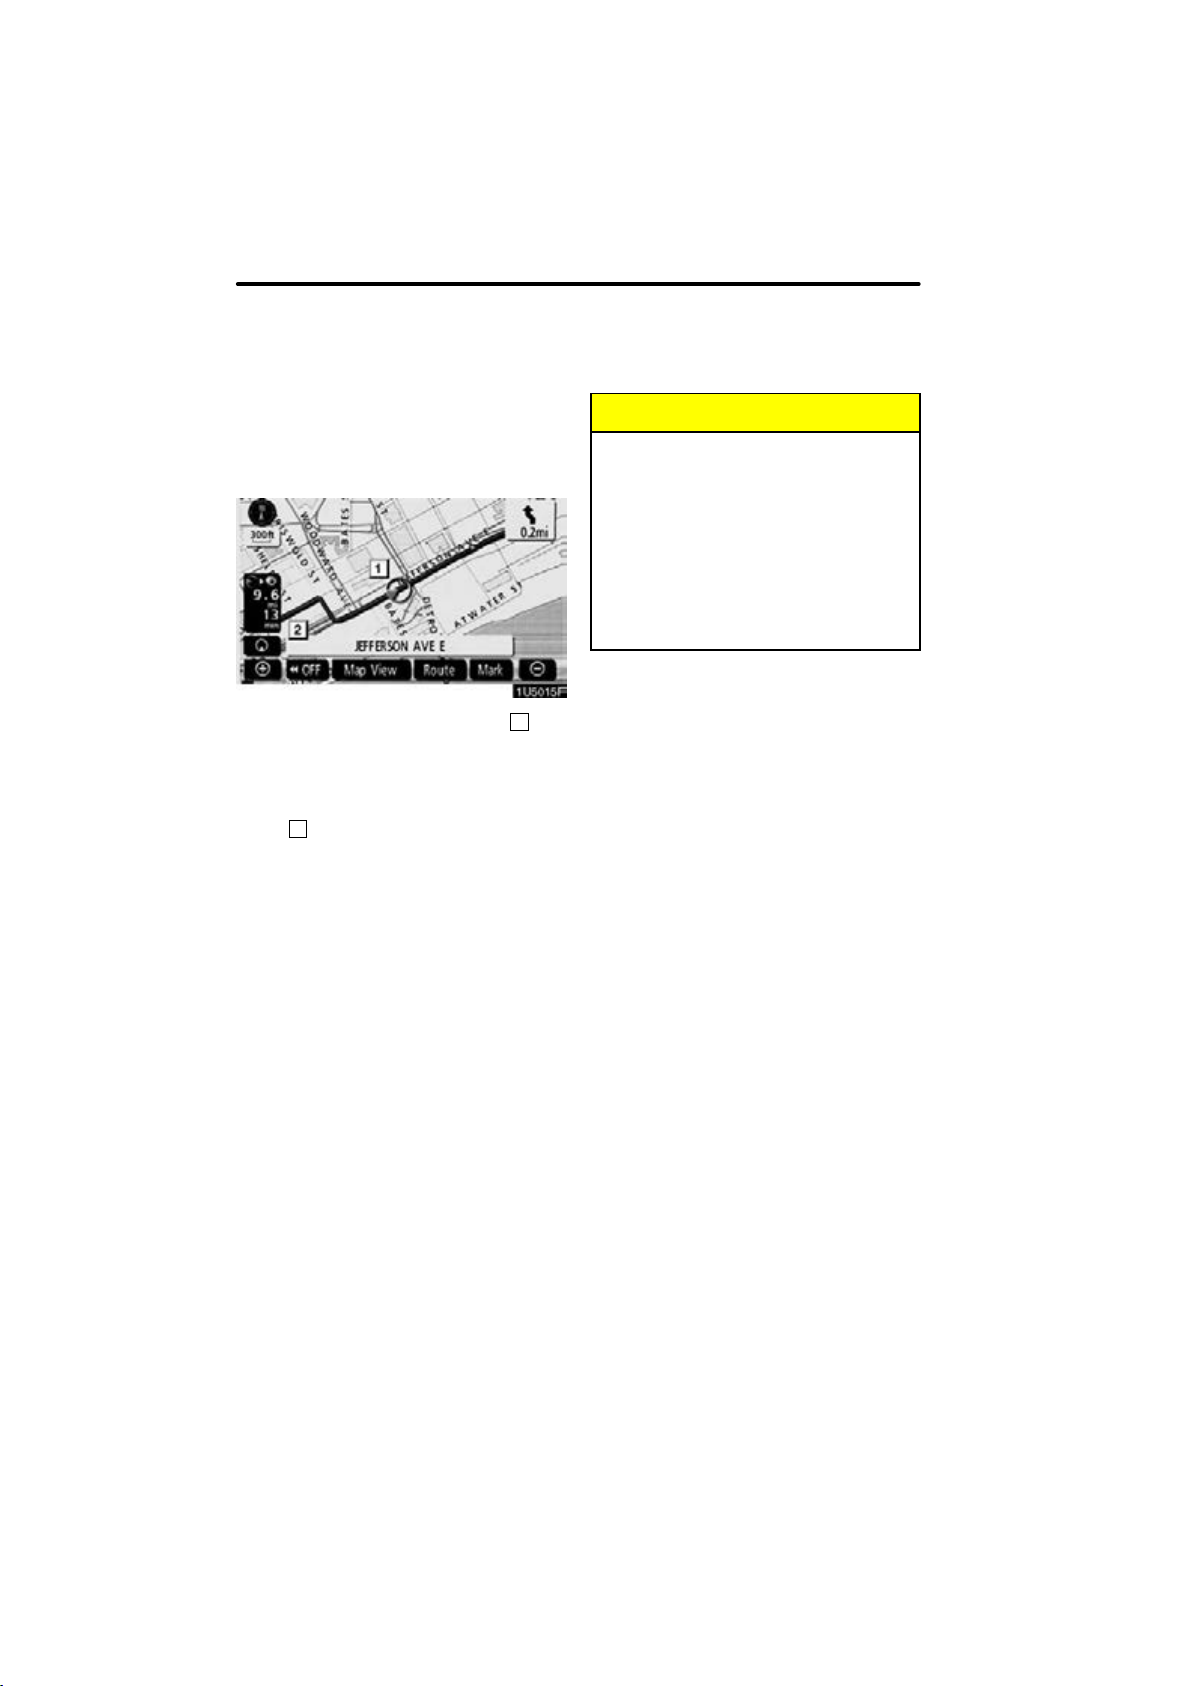
— Screen scroll operation
(one−touch scroll)
When any point on the map is touched,
that point moves to the center of the screen
and is shown by the cursor mark (
Use the scroll feature to move the desired
point to the center of the screen for looking
at a point on the map that is different from
the current position of the vehicle.
If the finger is continuously held on the
screen, the map will continue scrolling in
that direction until the finger is removed.
A street name, city name, etc. of the
touched point will be shown, depending on
the scale of the map (
the current position to
shown (
After the screen is scrolled, the map remains centered at the selected location
until another function is activated. The current vehicle position mark will continue to
move along your actual route and may
move off the screen. When the “MAP/
VOICE” button is pushed, the current vehicle position mark returns to the center of
the screen and the map moves as the vehicle proceeds along the designated route.
3
).
2
). Distance from
1
).
will also be
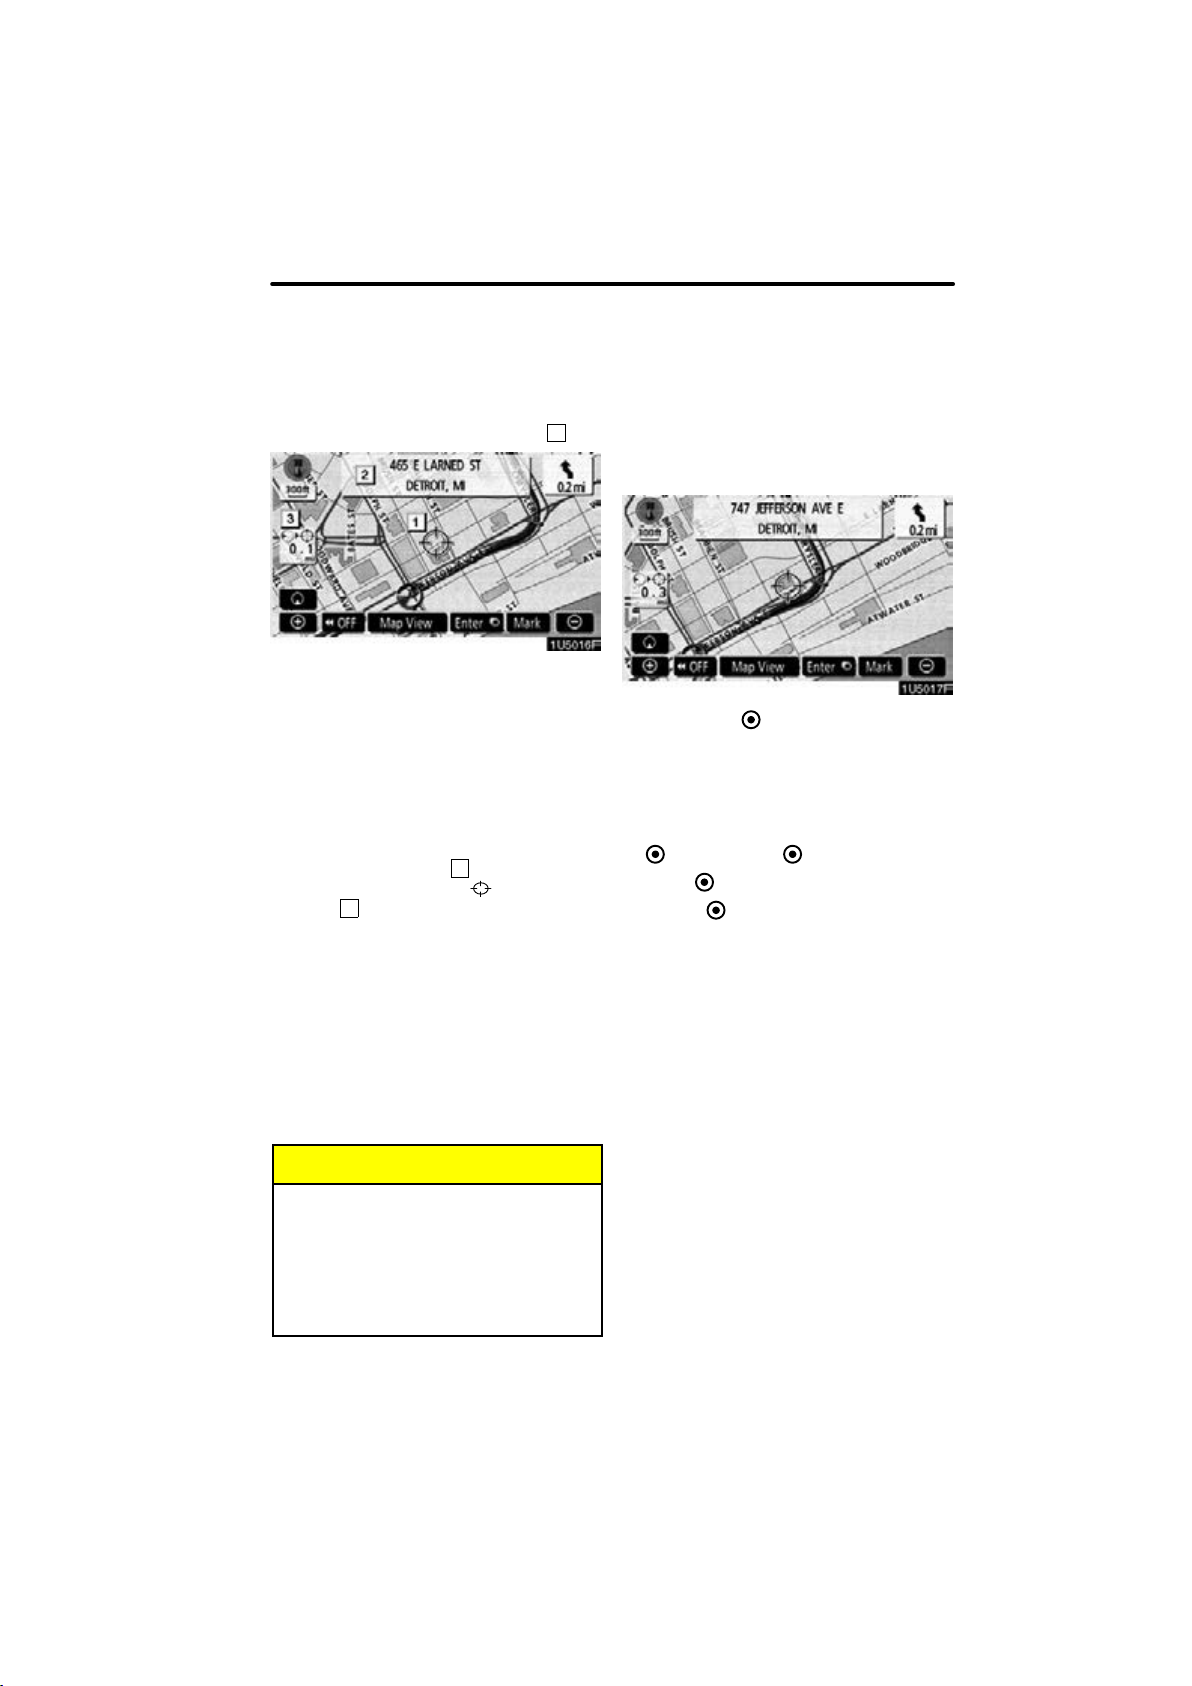
BASIC FUNCTIONS
D To set the cursor position as a des-
tination
A specific point on the map can be set as
a destination using the one−touch scroll
function.
Touch “Enter ”.
The screen changes and displays the map
location of the selected destination and the
route preference. (See “Starting route
guidance” on page 60.)
If there is already a set destination, “Add
” or “Replace ” are displayed.
to
“Add to
“Replace
tinations and set a new one.
”: To add a destination.
”: To delete the existing des-
When the one−touch scroll feature is
used, the current vehicle position
mark may disappear from the screen.
Move the map with a one−touch scroll
again or push the “MAP/VOICE” button to return to the current vehicle
position map location display.
INFORMATION
29
BASIC FUNCTIONS
D
To register the cursor position as a
memory point
Memory point registration enables easy
access to a specific point.
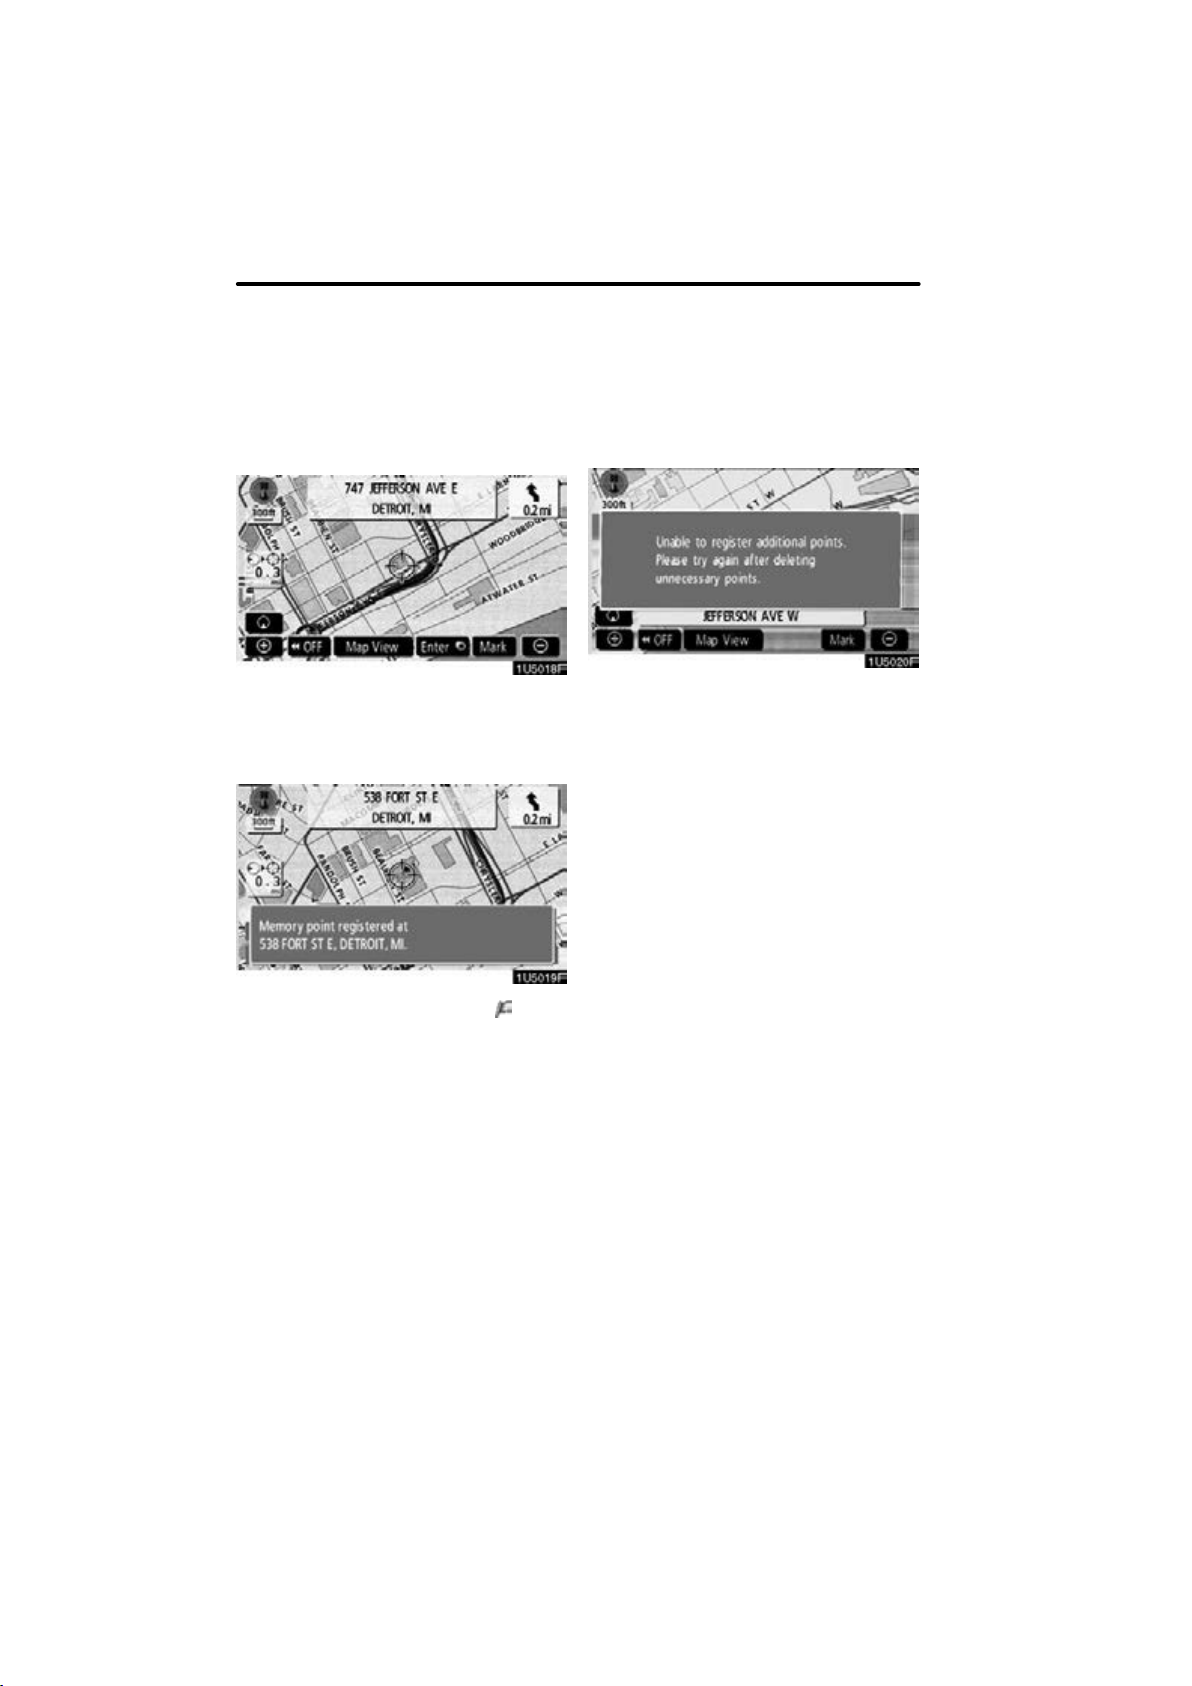
Touch “Mark”.
When you touch “Mark”, the following
screen appears for a few seconds, and
then the map screen returns.
Up to 106 memory points can be registered. If there is an attempt to register
more than 106, a message appears for
confirmation.
The registered point is shown by on the
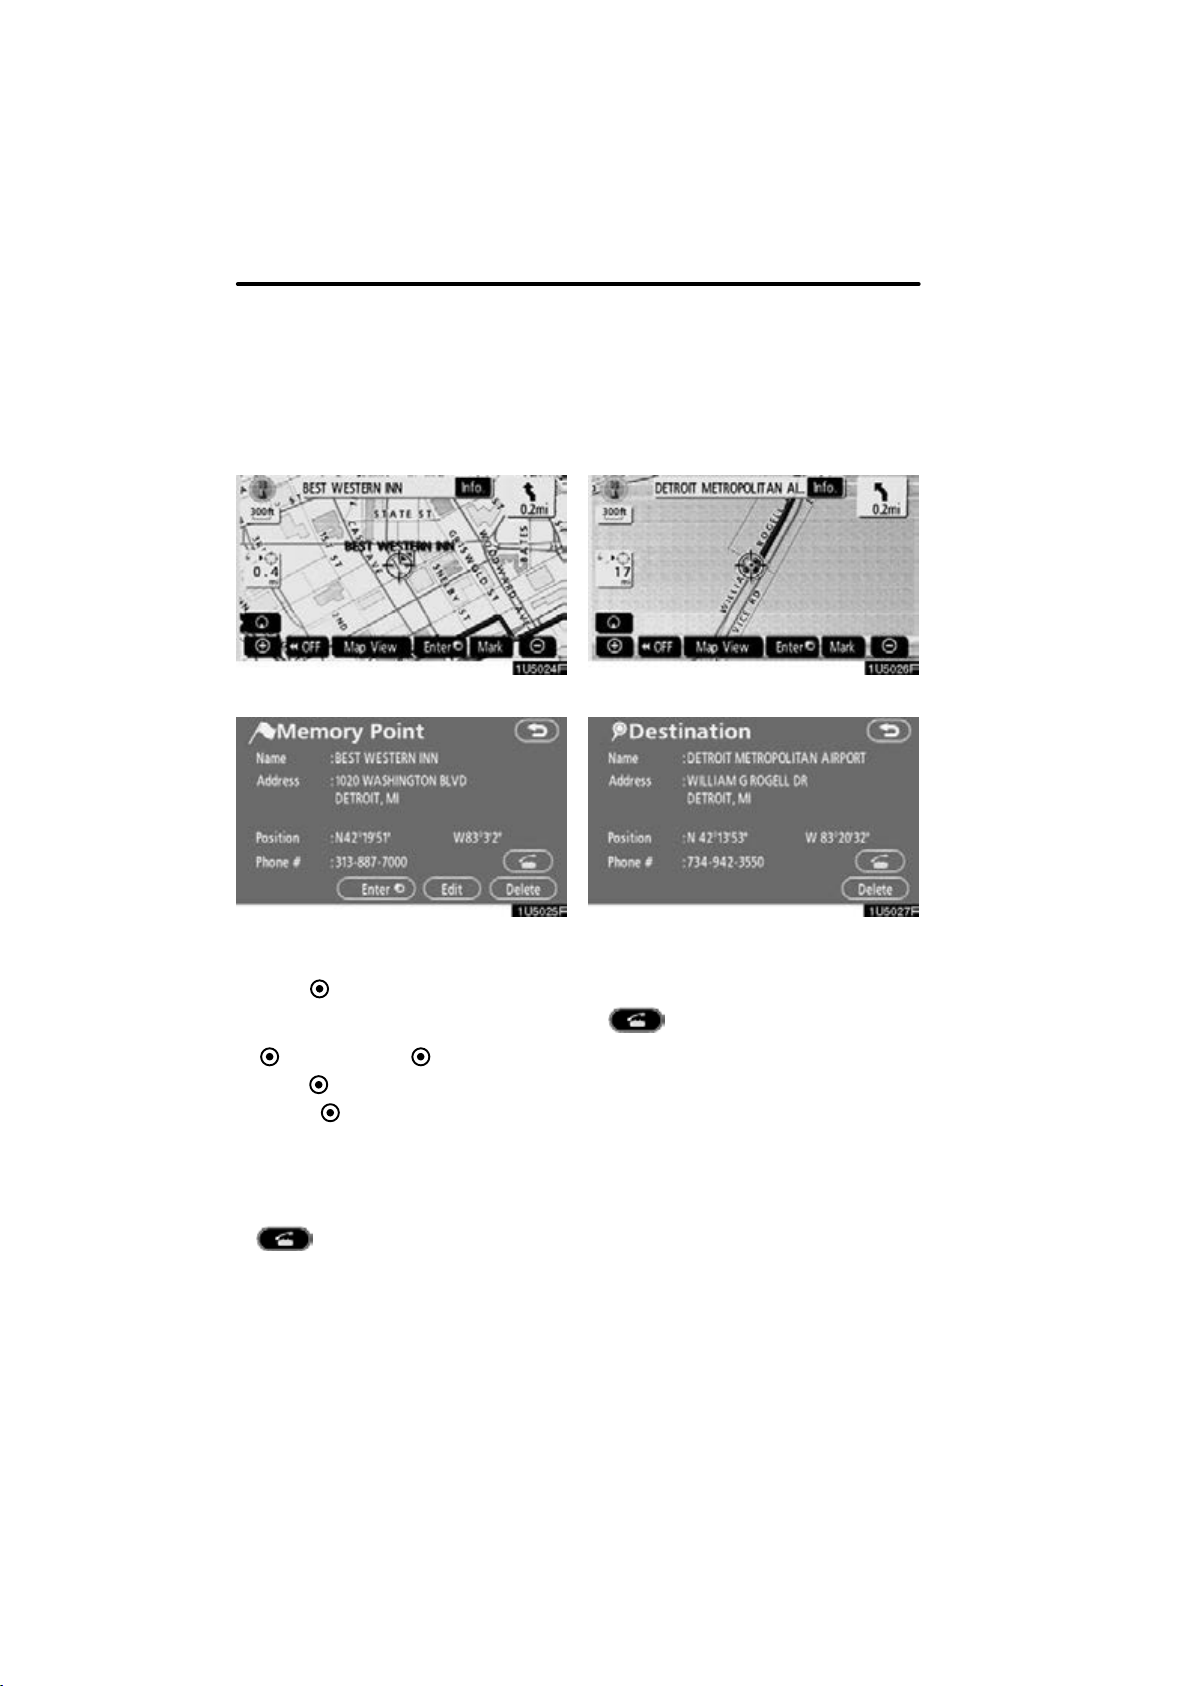
map.
To change the icon or name, etc., see “ —
Editing memory points” on page 94.
30
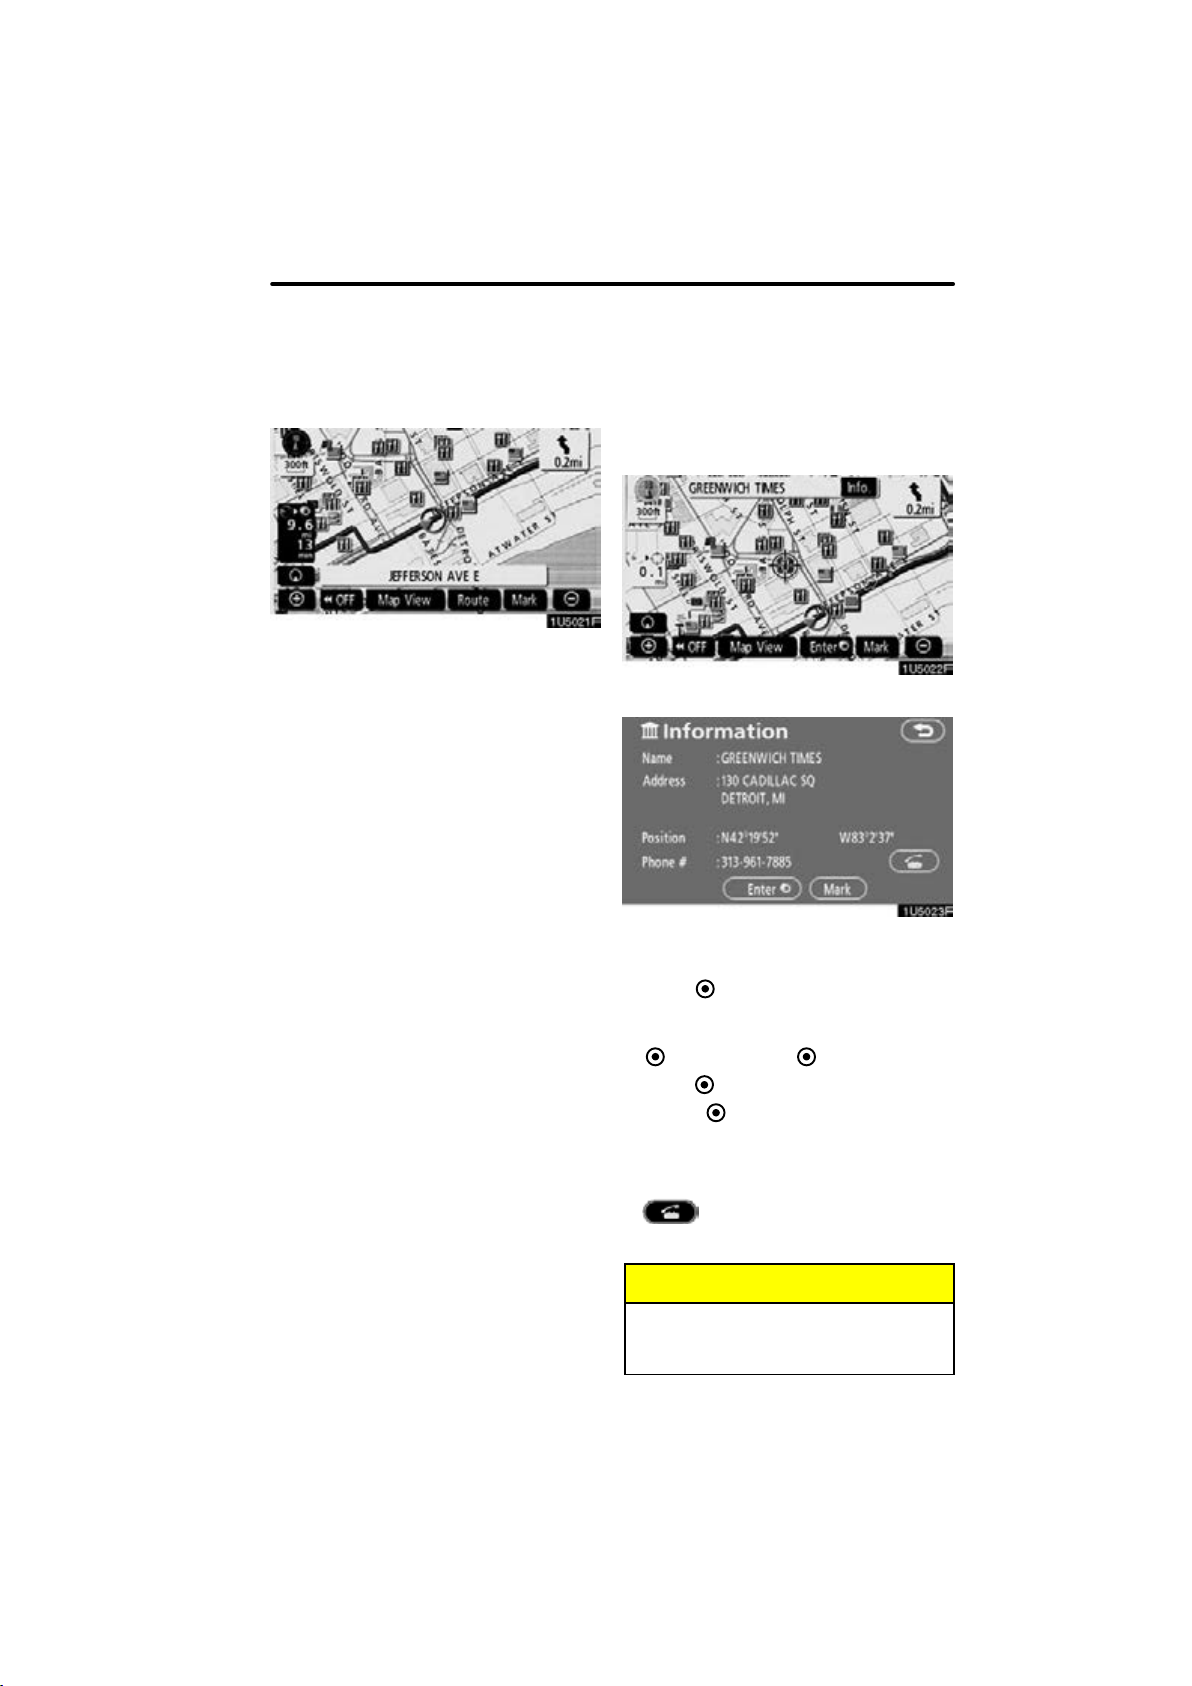
D
To see information about the icon
where the cursor is set
To display information about an icon, set
the cursor on it.
BASIC FUNCTIONS
POI INFORMATION
When the cursor is set on a POI icon, the
name and “Info.” are displayed on the top
of the screen.
Touch “Info.”.
Information such as the name, address,
and phone number are displayed.
If “Enter
cursor is set as a destination.
If there is already a set destination, “Add
to
“Add to
“Replace
tinations and set a new one.
To register this POI as a memory point,
touch “Mark”. (See page 93.)
If
phone number can be called.
” is touched, the position of the
” and “Replace ” are displayed.
”: To add a destination.
”: To delete the existing des-
is touched, the registered tele-
INFORMATION
The desired Point of Interest can be
displayed on the map screen. (See
“ — Display POI icons” on page 78.)
31
BASIC FUNCTIONS
MEMORY POINT INFORMATION
When the cursor is set on a memory point
icon, the name and “Info.” are displayed
on the top of the screen.
Touch “Info.”.
Information such as the name, address,
and phone number are displayed.
If “Enter
cursor is set as a destination.
If there is already a set destination, “Add
to
“Add to
“Replace
tinations and set a new one.
To edit a memory point, touch “Edit”. (See
“ — Editing memory points” on page 94.)
To delete a memory point, touch “Delete”.
If
phone number can be called.
” is touched, the position of the
” and “Replace ” are displayed.
”: To add a destination.
”: To delete the existing des-
is touched, the registered tele-
DESTINATION INFORMATION
When the cursor is set on a destination
icon, the name and “Info.” are displayed
on the top of the screen.
Touch “Info.”.
Information such as the name, address,
and phone number are displayed.
To delete a destination, touch “Delete”.
If
phone number can be called.
is touched, the registered tele-
32
BASIC FUNCTIONS
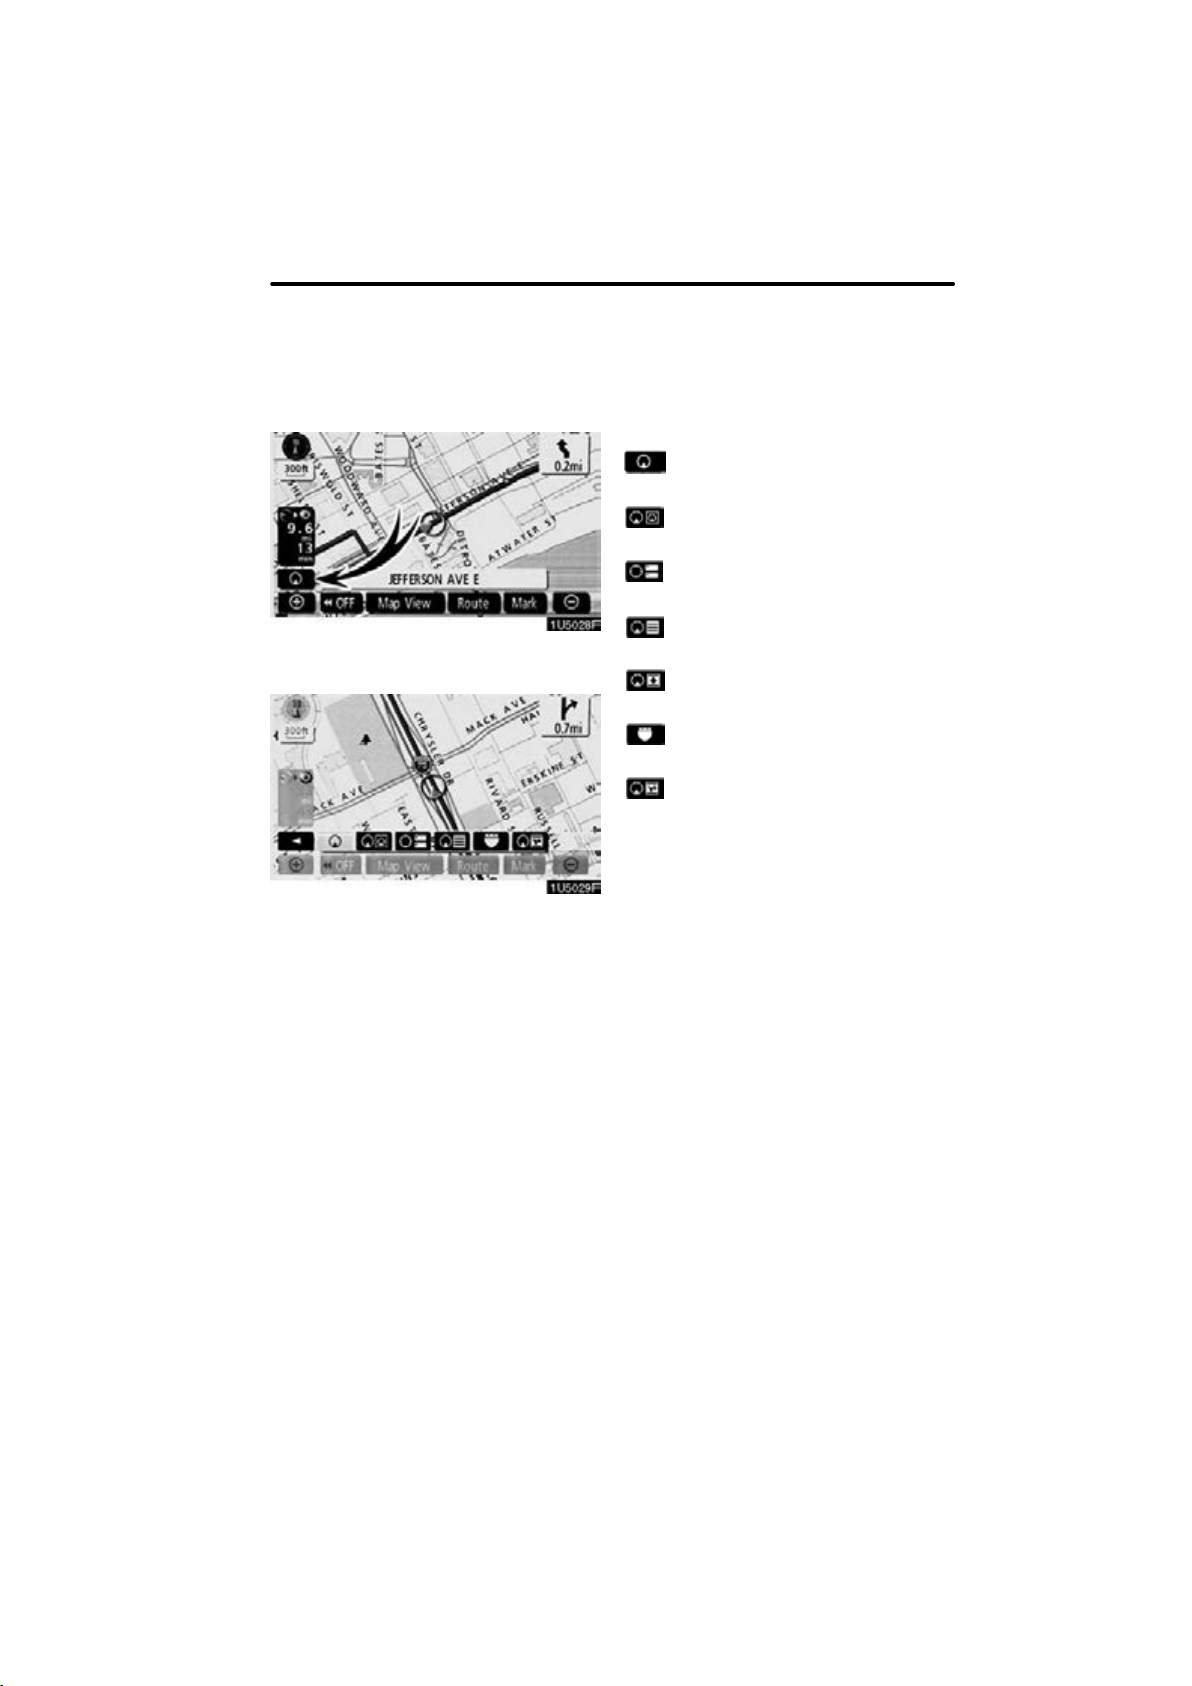
— Switching the screens
Any one of the screen configurations can
be selected.
1. Touch this touch−screen button to
display the following screen.
2. To select the desired screen configuration, touch one of the following
touch−screen buttons.
Depending on the conditions, certain
screen configuration buttons cannot be
selected.
: To display the single map screen.
(See page 34.)
: To display the dual map screen.
(See page 34.)
: To display the compass mode
screen. (See page 35.)
: To display the turn list screen.
(See page 68.)
: To display the arrow screen. (See
page 68.)
: To display the freeway information
screen. (See page 66.)
: To display the intersection guid-
ance screen or the guidance
screen on the freeway. (See page
67.)
33
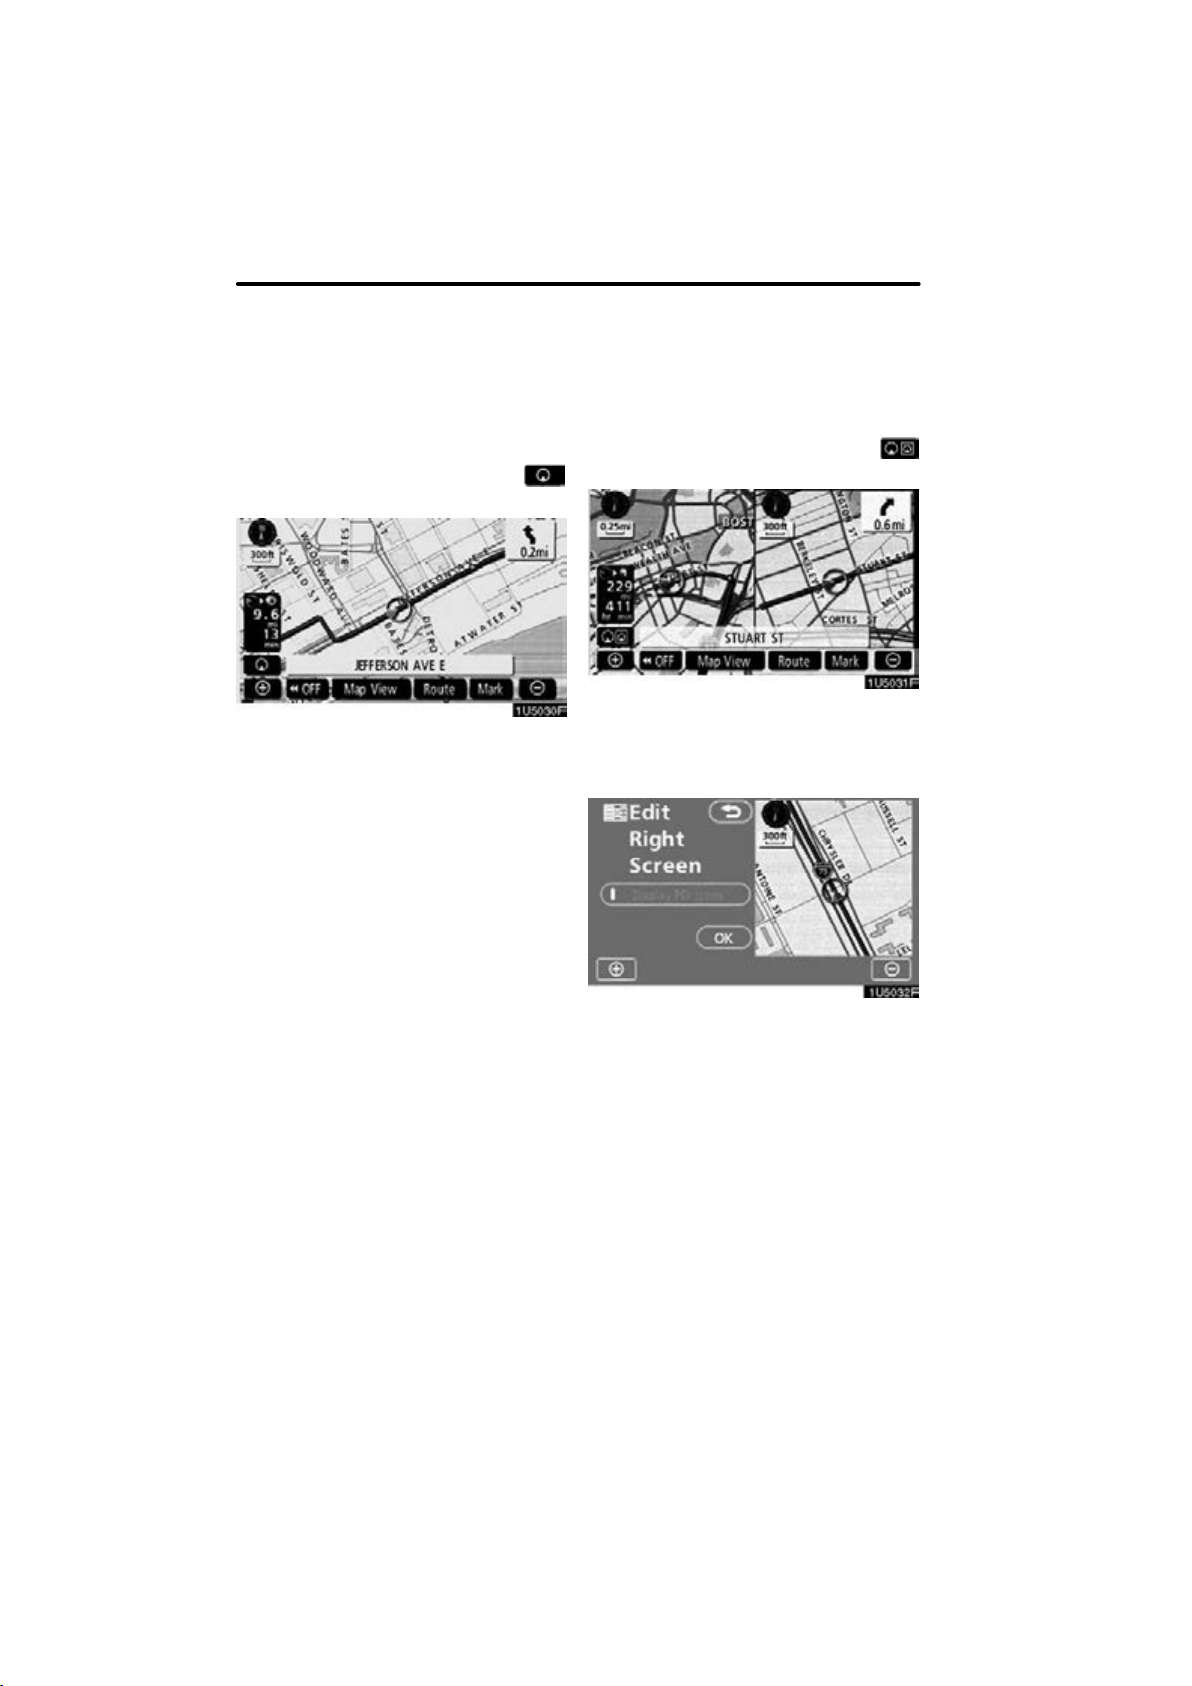
BASIC FUNCTIONS
D
Screen configurations
SINGLE MAP
This is a regular map screen.
While on a different screen, touching
will display the single map screen.
The screen shows the single map.
DUAL MAP
A map can be displayed split in two.
While on a different screen, touching
will display the dual map screen.
The screen shows the dual map. The map
on the left is the main map.
The right side map can be edited by touching any specific point on the right side map.
34
This screen can perform the following procedures:
1. Changing the map scale
2. Displaying the POI icon
3. Changing the orientation of the map
Touch “OK” when you complete editing.
The screen returns to the dual map screen.
 Loading...