

Page 1

TABLE OF CONTENTS
1
Before driving
2
When driving
Interior
3
features
Maintenance
4
and care
When trouble
5
arises
Vehicle
6
specifications
Adjusting and operating features such as door locks,
mirrors, and steering column.
Driving, stopping and safe-driving information.
Air conditioning and audio systems, as well as other
interior features for a comfortable driving experience.
Cleaning and protecting your vehicle, performing do-ityourself maintenance, and maintenance information.
What to do if the vehicle needs to be towed, gets a flat
tire, or is involved in an accident.
Detailed vehicle information.
7
For owners
Index
Reporting safety defects for U.S. owners, and seat belt
and SRS airbag instructions for Canadian owners
Alphabetical listing of information contained in this
manual.
1
Page 2

TABLE OF CONTENTS Index
1
Before driving
1-1. Key information
Keys..................................... 32
1-6. Theft deterrent system
Engine immobilizer
system.............................. 113
Alarm.................................. 116
Theft prevention labels
(U.S.A.)............................. 120
1-2. Opening, closing and
locking the doors
Smart key system................. 35
Wireless remote control ....... 48
Side doors............................ 54
Back door............................. 60
Glass hatch.......................... 70
1-3. Adjustable components
(seats, mirrors,
steering wheel)
Front seats........................... 74
Rear seats............................ 77
Head restraints..................... 85
Seat belts............................. 88
Steering wheel ..................... 94
Anti-glare inside rear
view mirror.......................... 95
Outside rear view mirrors..... 98
1-4. Opening and closing the
windows and moon roof
Power windows .................. 101
Moon roof........................... 104
1-5. Refueling
Opening the fuel tank
cap ................................... 109
1-7. Safety information
Correct driving posture....... 121
SRS airbags ....................... 123
Front passenger occupant
classification system......... 135
Child restraint systems ....... 142
Installing child restraints ..... 147
2
When driving
2-1. Driving procedures
Driving the vehicle.............. 160
Engine (ignition) switch
(vehicles with smart
key system) ...................... 170
Engine (ignition) switch
(vehicles without smart
key system) ...................... 174
Automatic transmission ...... 177
Turn signal lever................. 182
Parking brake ..................... 183
Horn.................................... 184
2-2. Instrument cluster
Gauges and meters............ 185
Indicators and warning
lights................................. 187
Multi-information display..... 191
2
Page 3

2-3. Operating the lights and
wipers
Headlight switch.................. 200
Fog light switch................... 206
Windshield wipers and
washer.............................. 208
Rear window wiper and
washer.............................. 212
2-4. Using other driving
systems
Cruise control...................... 215
Rear view monitor
system .............................. 219
Driving assist systems ........ 223
Hill-start assist control......... 228
Downhill assist control
system (4WD models) ...... 230
2-5. Driving information
Off-road precautions........... 233
Cargo and luggage ............. 238
Vehicle load limits............... 242
Winter driving tips ............... 243
Trailer towing ...................... 247
Dinghy towing ..................... 265
3
Interior features
3-1. Using the air conditioning
system and defogger
Front manual air
conditioning system.......... 268
Front automatic air
conditioning system.......... 275
Rear manual air
conditioning system.......... 283
Rear automatic air
conditioning system.......... 286
Rear window and
outside rear view
mirror defoggers............... 289
Windshield wiper de-icer.... 291
Using the steering wheel
climate remote control
switches ........................... 292
3-2. Using the audio system
Audio system...................... 293
Using the radio................... 297
Using the CD player........... 304
Playing back MP3 and
WMA discs....................... 312
Operating an iPod .............. 320
Operating a USB
memory............................ 327
Optimal use of the audio
system.............................. 335
Using the AUX port............. 339
Using the steering wheel
audio switches.................. 341
Detachable pole
antenna............................ 344
1
2
3
4
5
6
7
3
Page 4

TABLE OF CONTENTS Index
3-3. Using the Bluetooth® audio
system
Blue
Using the Bluetooth
audio system.... 347
®
®
tooth
audio system.................... 350
®
Operating a Bluetooth
enabled portable player ... 355
Setting up a Bluetooth
®
enabled portable player ... 357
Bluetooth
®
audio system
setup ................................ 362
3-4. Using the hands-free
phone system
(for cellular phone)
Hands-free phone system
(for cellular phone)
features............................ 363
Using the hands-free
phone system................... 367
Making a phone call........... 376
Setting a cellular phone...... 380
Security and system
setup ................................ 385
Using the phone book........ 389
3-6. Using the storage features
List of storage features....... 399
• Glove box ......................... 400
• Console box ..................... 401
• Overhead console ............ 402
• Cup holders...................... 403
• Bottle holders ................... 407
• Auxiliary boxes ................. 408
• Side table ......................... 410
3-7. Other interior features
Sun visors........................... 412
Vanity mirrors ..................... 413
Clock................................... 414
Conversation mirror............ 415
Power outlets...................... 416
Seat heaters....................... 420
Armrests............................. 422
Floor mat ............................ 423
Luggage compartment
features ............................ 424
Garage door opener........... 429
Compass ............................ 435
3-5. Using the interior lights
Interior lights list ................. 396
• P
ersonal/interior light
main switch ...................... 397
• Personal/interior lights...... 397
• Interior light ...................... 398
4
Page 5

4
Maintenance and care
5
When trouble arises
4-1. Maintenance and care
Cleaning and protecting
the vehicle exterior............ 440
Cleaning and protecting
the vehicle interior............. 443
4-2. Maintenance
Maintenance
requirements..................... 446
General maintenance.......... 449
Emission inspection and
maintenance (I/M)
programs........................... 452
4-3. Do-it-yourself maintenance
Do-it-yourself service
precautions....................... 453
Hood ................................... 457
Positioning a floor jack........ 459
Engine compartment........... 463
Tires.................................... 478
Tire inflation pressure ......... 487
Wheels................................ 490
Air conditioning filter............ 493
Wireless remote control/
electronic key battery........ 496
Checking and replacing
fuses................................. 499
Light bulbs........................... 510
5-1. Essential information
Emergency flashers............ 518
If your vehicle needs to
be towed........................... 519
If you think something
is wrong............................ 526
Fuel pump shut off
system.............................. 527
5-2. Steps to take in an
emergency
If a warning light turns on
or a warning buzzer
sounds... .......................... 528
If a warning message is
displayed.......................... 539
If you have a flat tire........... 540
If the engine will not start.... 554
If the shift lever cannot be
shifted from P................... 556
If you lose your keys/
wireless remote control
transmitter........................ 557
If the electronic key does
not operate properly......... 558
If the battery is
discharged........................ 560
If your vehicle overheats .... 564
1
2
3
4
5
6
7
5
Page 6

TABLE OF CONTENTS Index
If the vehicle becomes
stuck................................. 567
If your vehicle has to
be stopped in an
emergency ....................... 569
6
Vehicle specifications
6-1. Specifications
Maintenance data
(fuel, oil level, etc.)........... 572
Fuel information ................. 587
Tire information.................. 590
6-2. Customization
Customizable features ....... 602
6-3. Initialization
Items to initialize................. 606
Index
Abbreviation list........................ 622
Alphabetical index .................... 624
What to do if... .......................... 633
7
For owners
Reporting safety defects
for U.S. owners ................ 608
Seat belt instructions
for Canadian owners
(in French)........................ 609
SRS airbag instructions
for Canadian owners
(in French)........................ 611
6
Page 7

1
2
3
4
5
6
7
7
Page 8
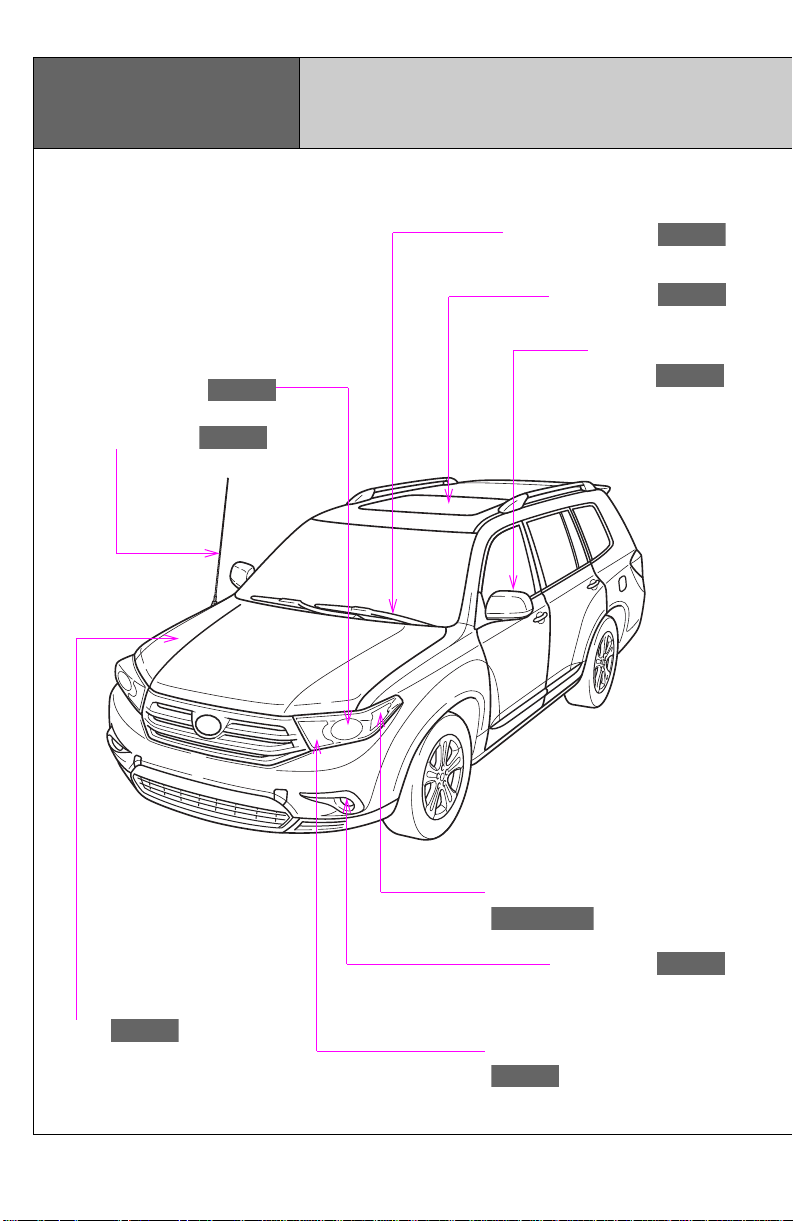
Pictorial index
P. 206
P. 182, 200
P. 457
P. 208
P. 104
P. 98
P. 200
P. 200
P. 344
Exterior
Windshield wipers
Moon roof
Headlights (low beam)
Pole antenna
Outside rear view
mirrors
Parking, front side marker and
front turn signal lights
Hood
8
Fog lights
Headlights (high beam) and
daytime running lights
Page 9
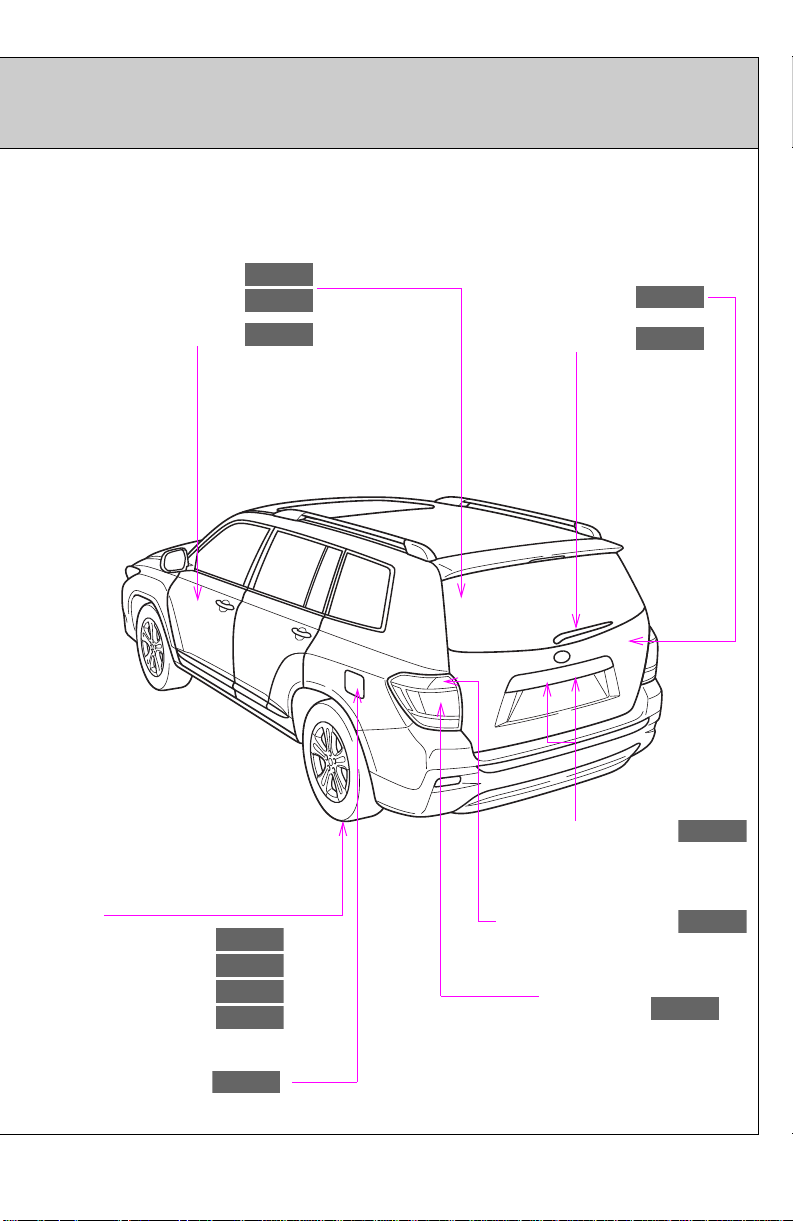
P. 478
P. 540
P. 584
P. 590
P. 60
P. 54
P. 200
P. 212
Rear window defogger
P. 289
P. 70
P. 200
P. 182
P. 109
Glass hatch
Side doors
Back door
Rear window wiper
License plate lights
Tires
●Rotation
●Replacement
●Inflation pressure
●Information
Fuel filler door
Rear turn signal lights
Stop/tail and rear side
marker lights
: If equipped
9
Page 10
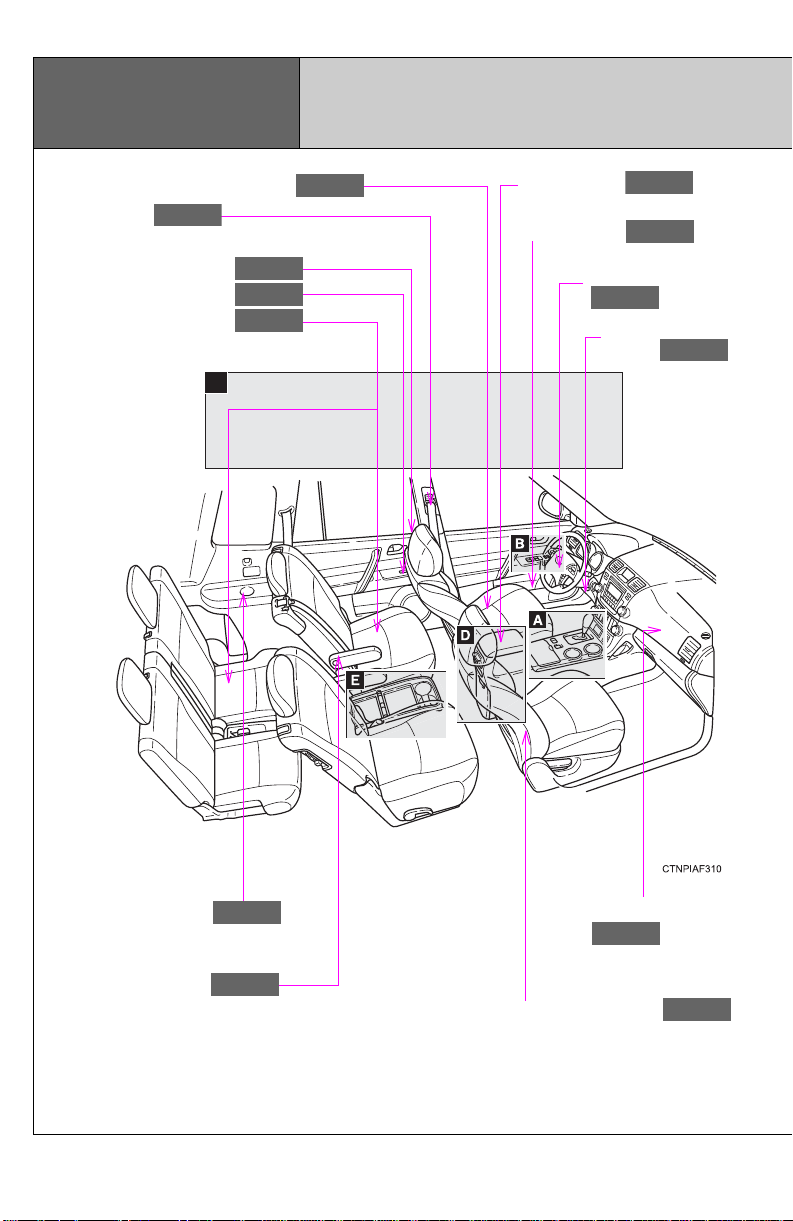
P. 123
P. 401
P. 403
P. 422
P. 123
P. 88
P. 74
P. 407
P. 123
P. 123
P. 85
P. 101
P. 77
Pictorial index
Interior
Front seats
Seat belts
Head restraints
Power window switches
Rear seats
C
Console box
Bottle holders
SRS driver airbag
SRS driver knee
airbag
10
Cup holders
Armrests
SRS front passenger
airbag
SRS side airbags
Page 11
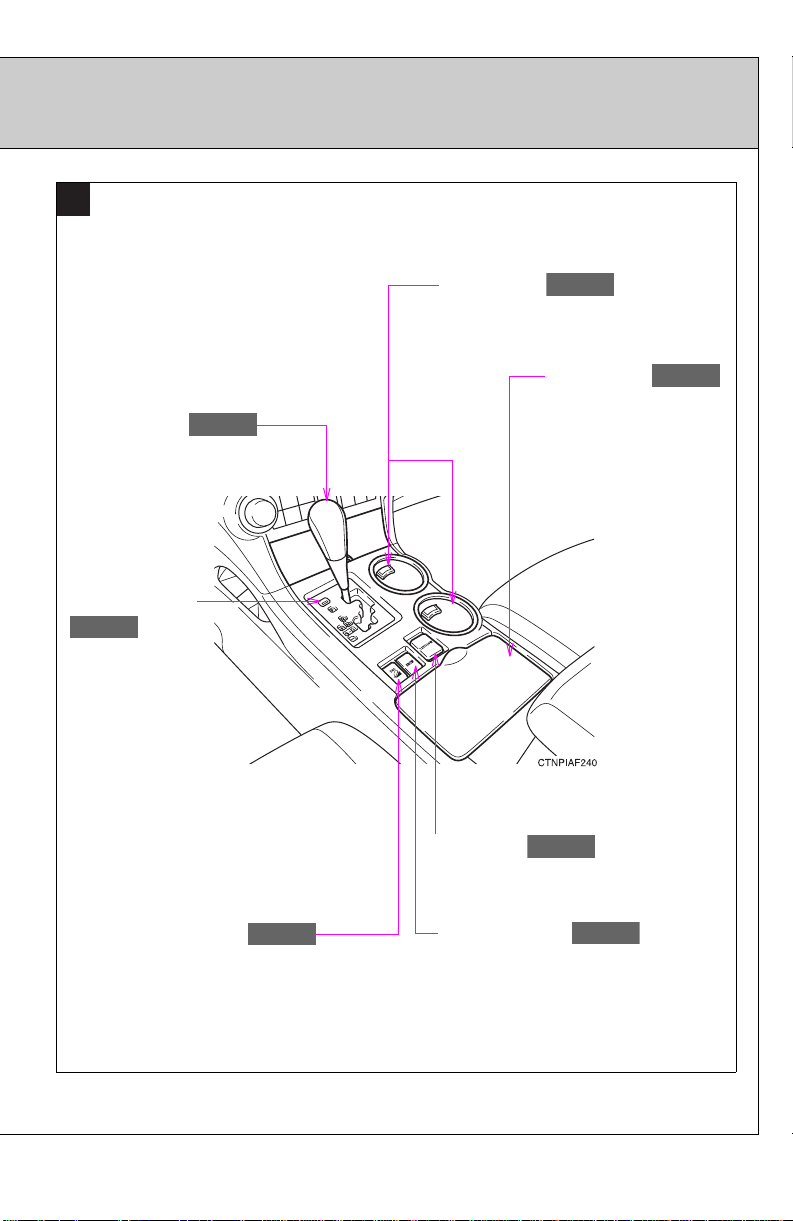
A
P. 416
P. 403
P. 403
P. 177
P. 178
P. 230
P. 556
Shift lever
Shift lock
override button
Cup holders
Cup holders
“DAC” switch*
Power outlet
1
“SNOW” switch
1
*
: 4WD models
11
Page 12
P. 55
Pictorial index
P. 101
P. 101
P. 55
B
Interior
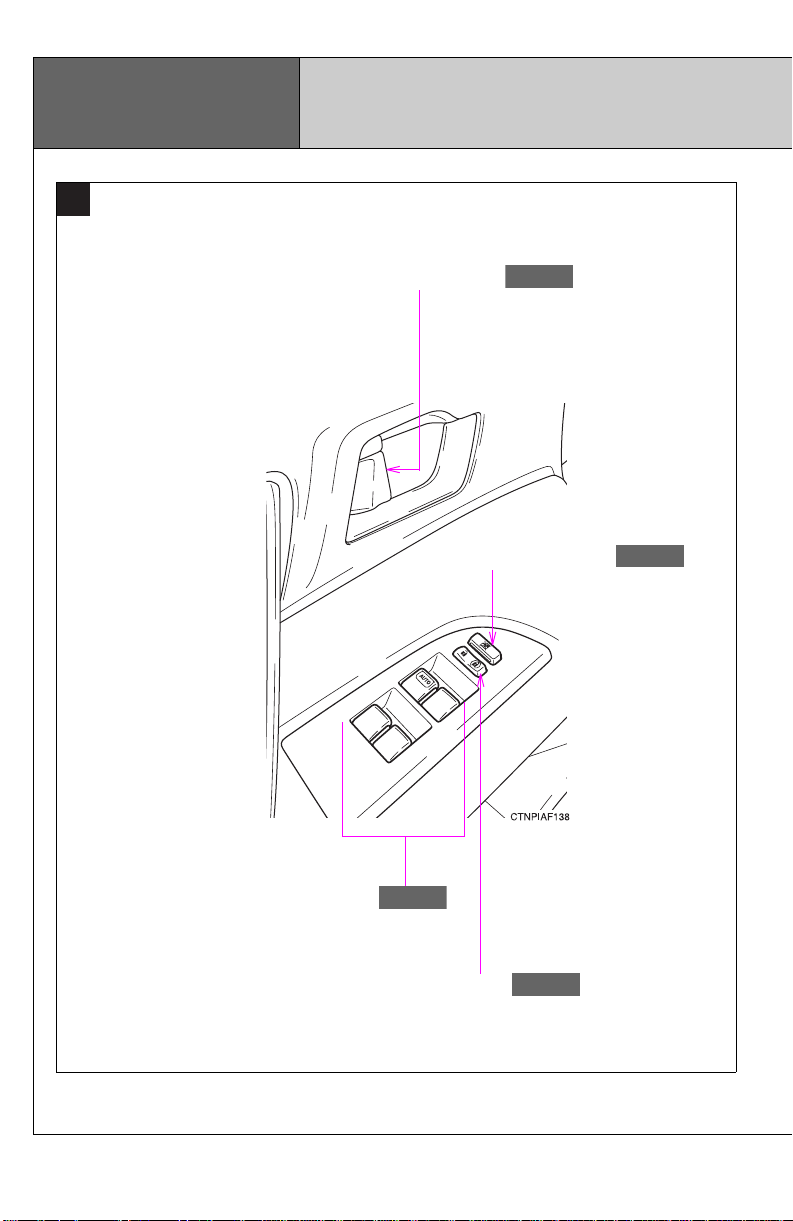
Inside door lock button
Window lock switch
Power window switches
Door lock switch
12
Page 13
C
P. 402
P. 415
P. 429
P. 104
P. 412
P. 397
P. 123
P. 435
P. 95
P. 413
P. 398
P. 397
P. 398
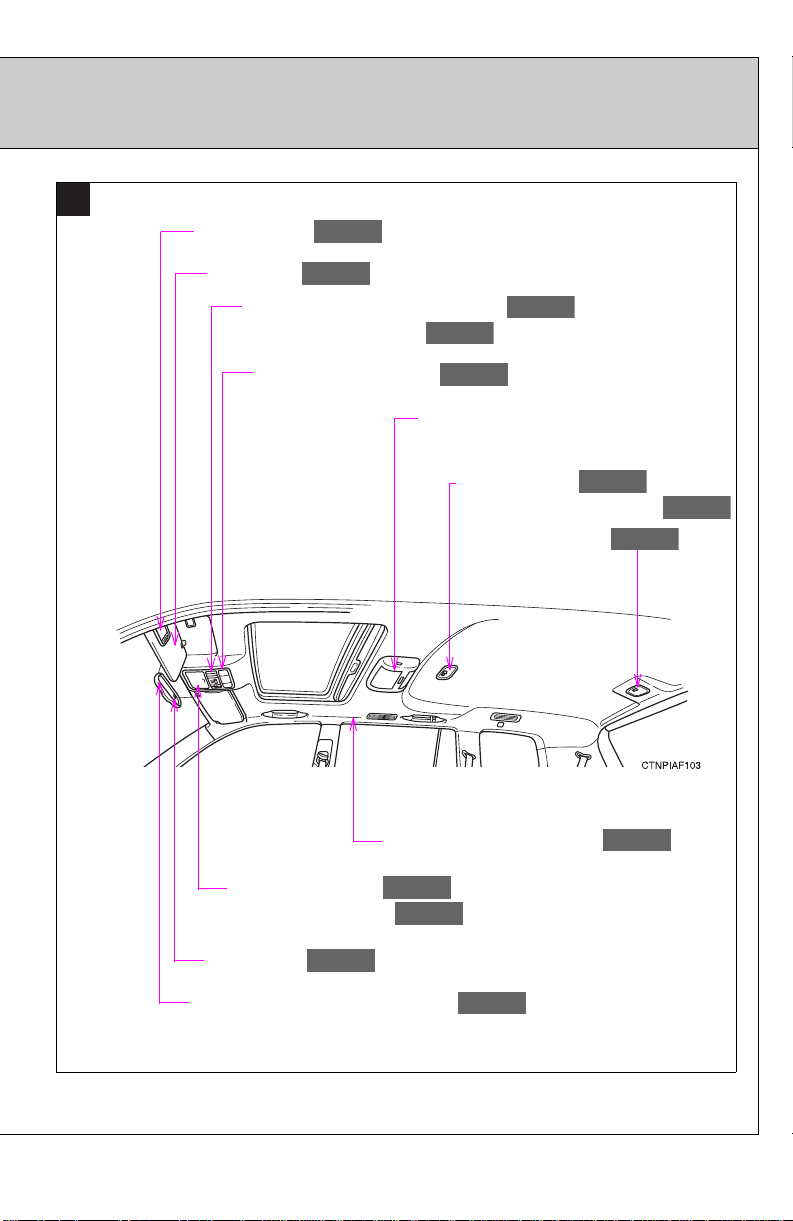
Vanity mirrors
Sun visors
Garage door opener switches
Moon roof switches
Personal/interior lights
Overhead console
Conversation mirror
Compass
Rear seat entertainment system , *
Interior light
Personal/interior lights
Interior light
SRS curtain shield airbags
2
Anti-glare inside rear view mirror
: If equipped
2
*
: Refer to “Navigation System Owner's Manual”.
13
Page 14
Pictorial index
P. 403
P. 283, 286
P. 401
D
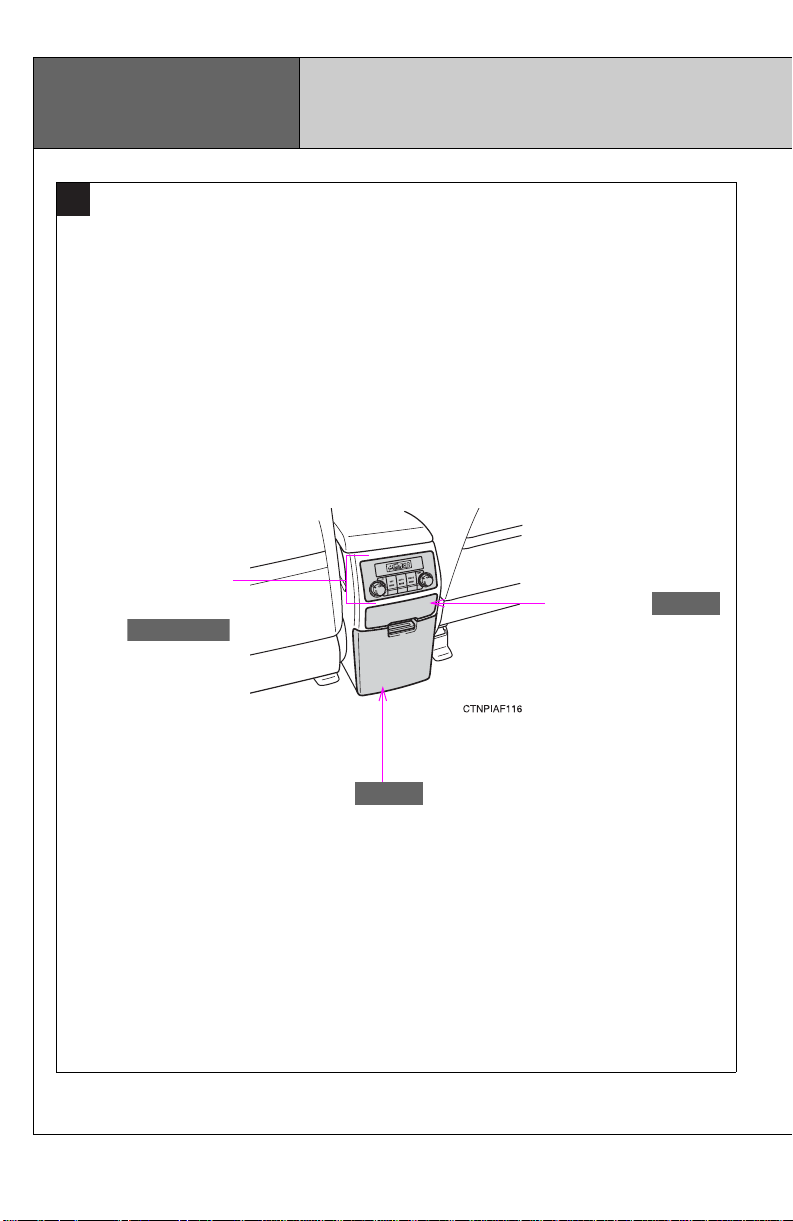
Rear air
conditioning
system
Interior
Cup holders
14
Console box
Page 15
E
P. 408
P. 410
P. 403
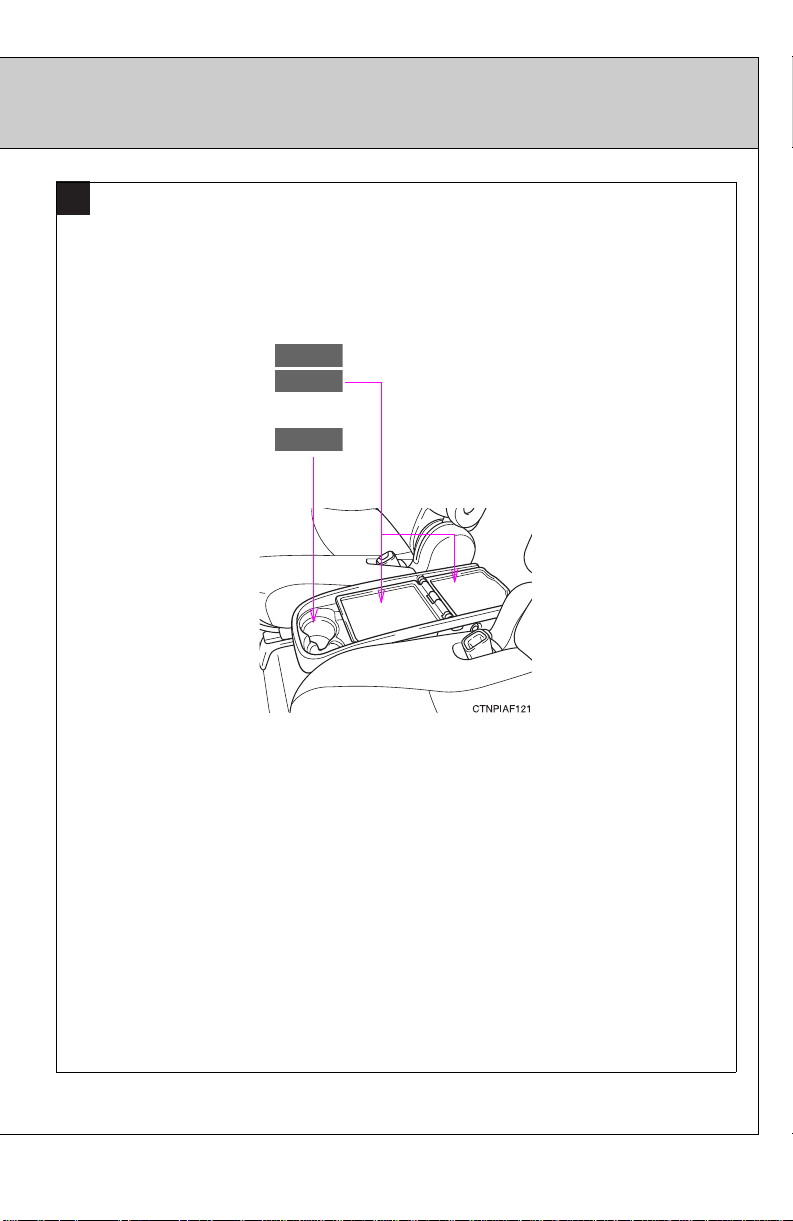
Auxiliary box
Side table
Cup holders
: If equipped
15
Page 16

P. 219
P. 191
P. 414
P. 185
P. 94
P. 400
Pictorial index
P. 62
P. 480
P. 183
P. 457
P. 408
P. 170
P. 206
P. 200
P. 182
P. 208
P. 212
P. 184
P. 423
P. 109
Engine (ignition) switch
(vehicles with smart key system)
Windshield wiper and
washer switch
Rear window wiper and
washer switch
Fog light switch
Headlight switch
Turn signal lever
Gauges and
meters
Instrument panel
Rear view monitor system
Multi-information display
Clock
Power back door
main switch
Glove box
16
Horn
Tire pressure warning reset switch
Floor mat
Tilt and telescopic steering lock release
lever
Parking brake pedal
Hood release lever
Fuel filler door opener
Auxiliary box
Page 17
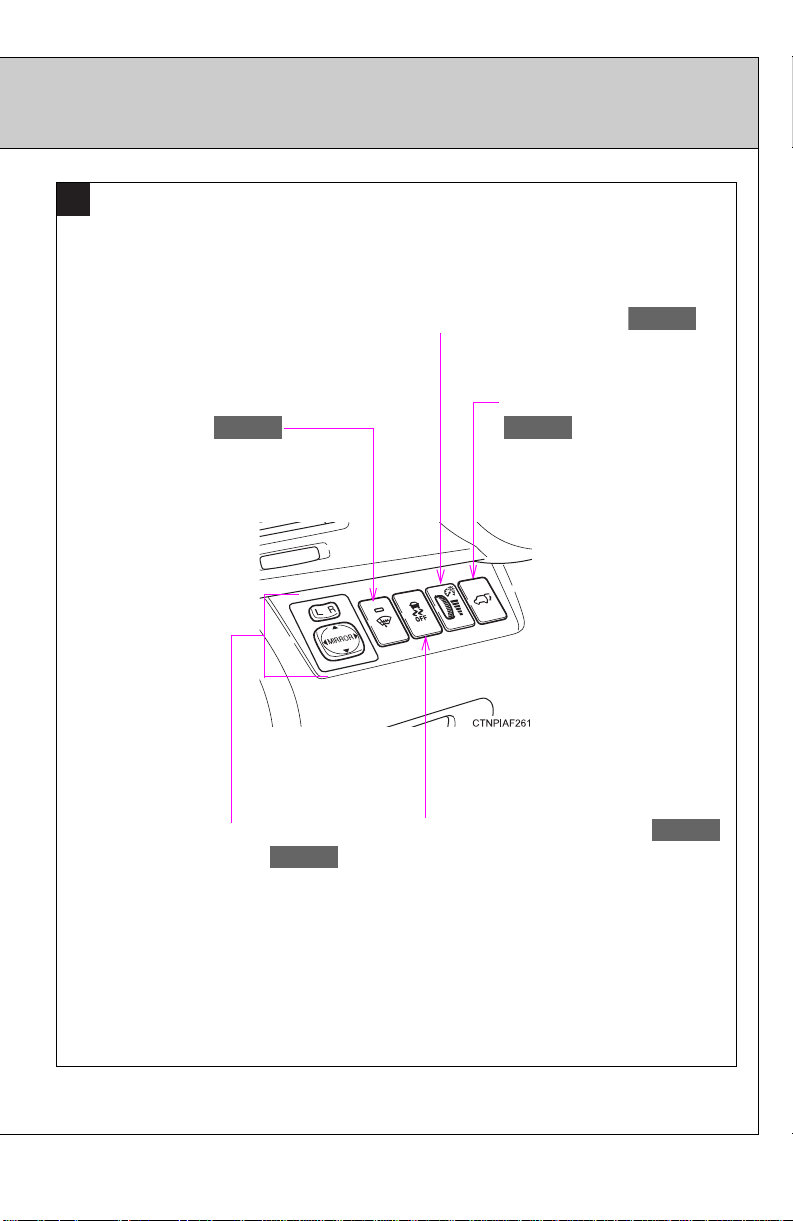
A
P. 60
P. 186
P. 291
P. 98
P. 224
Instrument panel light control dial
Windshield wiper de-icer
switch
Outside rear view
mirror switches
Power back door switch
Enhanced VSC/TRAC off switch
: If equipped
17
Page 18
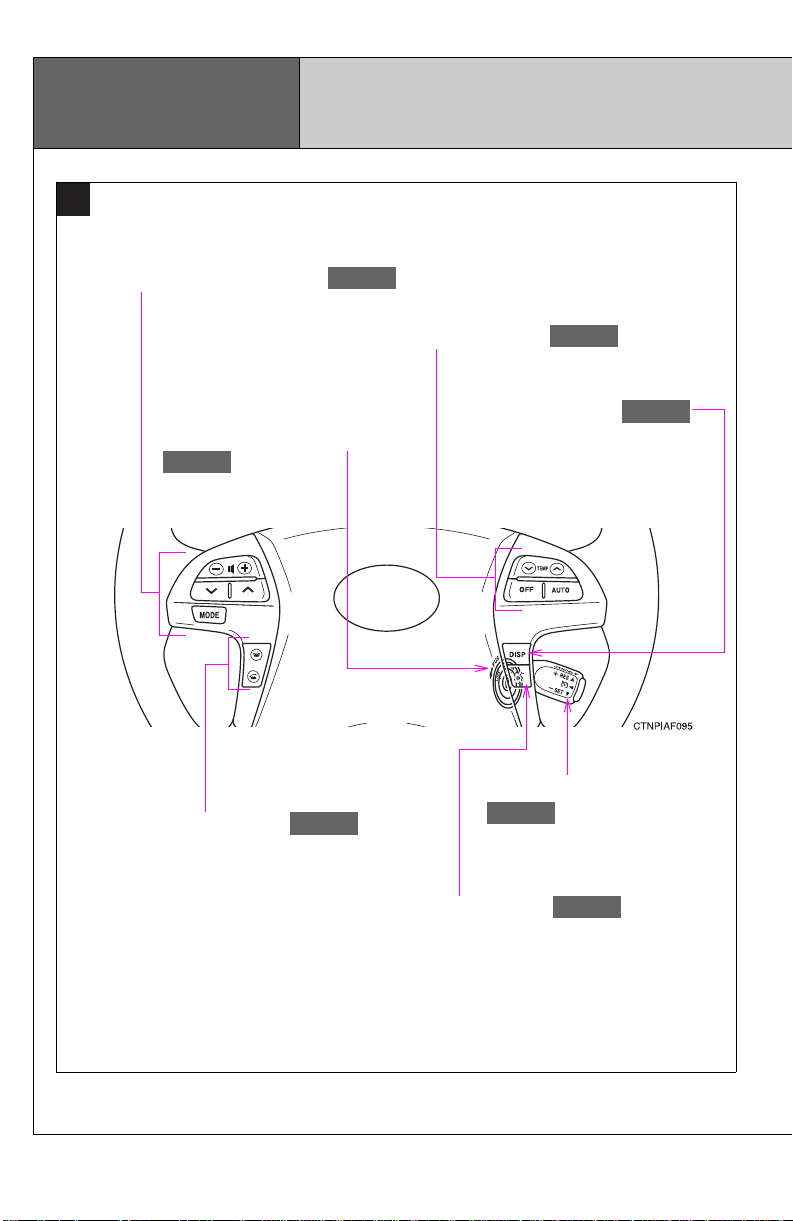
P. 368
Pictorial index
P. 341
P. 292
P. 215
P. 368
P. 174
P. 192
B
Audio remote control switches
Climate remote control switches
Instrument panel
Engine (ignition) switch (vehicles
without smart key system)
Telephone switch , *
“DISP” switch
Cruise control switch
2
Talk switch , *
2
18
Page 19
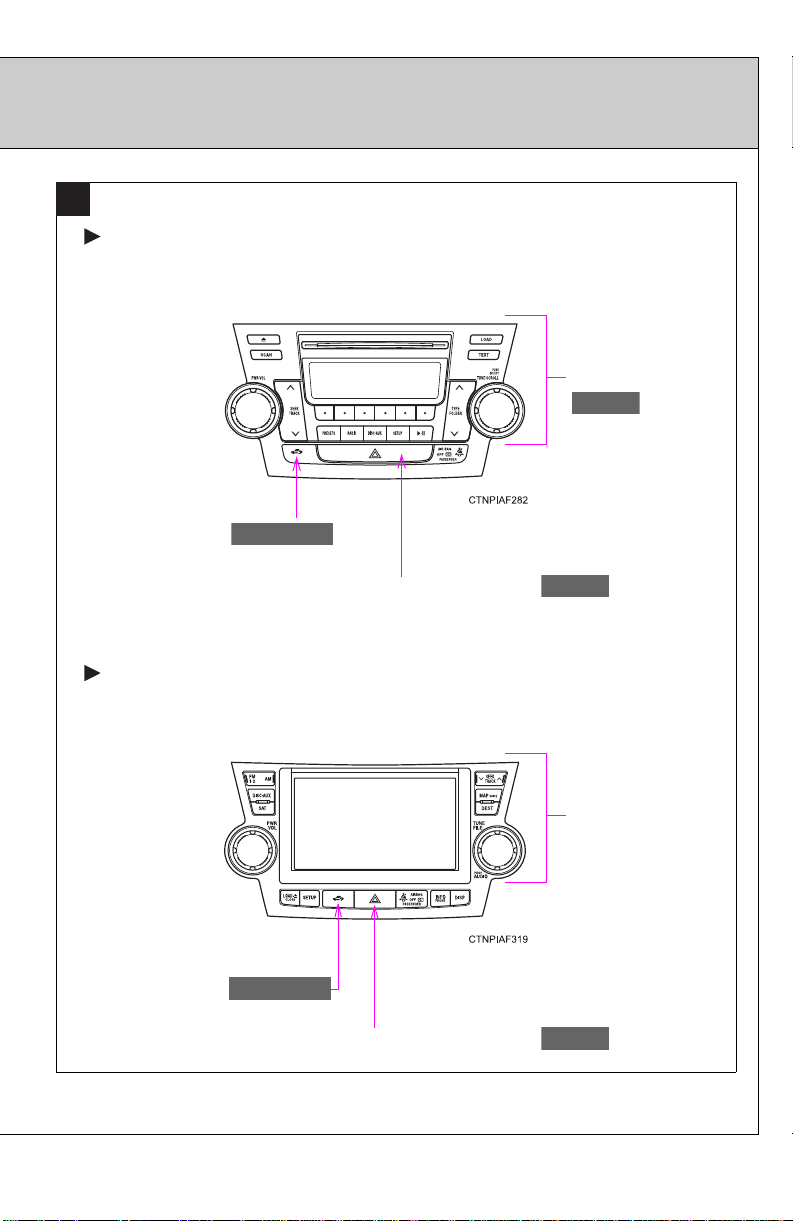
C
P. 293
P. 113, 116
P. 518
P. 518
P. 113, 116
Vehicles without navigation system
Security indicator
Vehicles with navigation system
Audio system
Emergency flasher switch
Security indicator
Rear view
monitor/navigation
system
Emergency flasher switch
: If equipped
2
*
: Refer to “Navigation System Owner's Manual”.
2
*
19
Page 20
Pictorial index
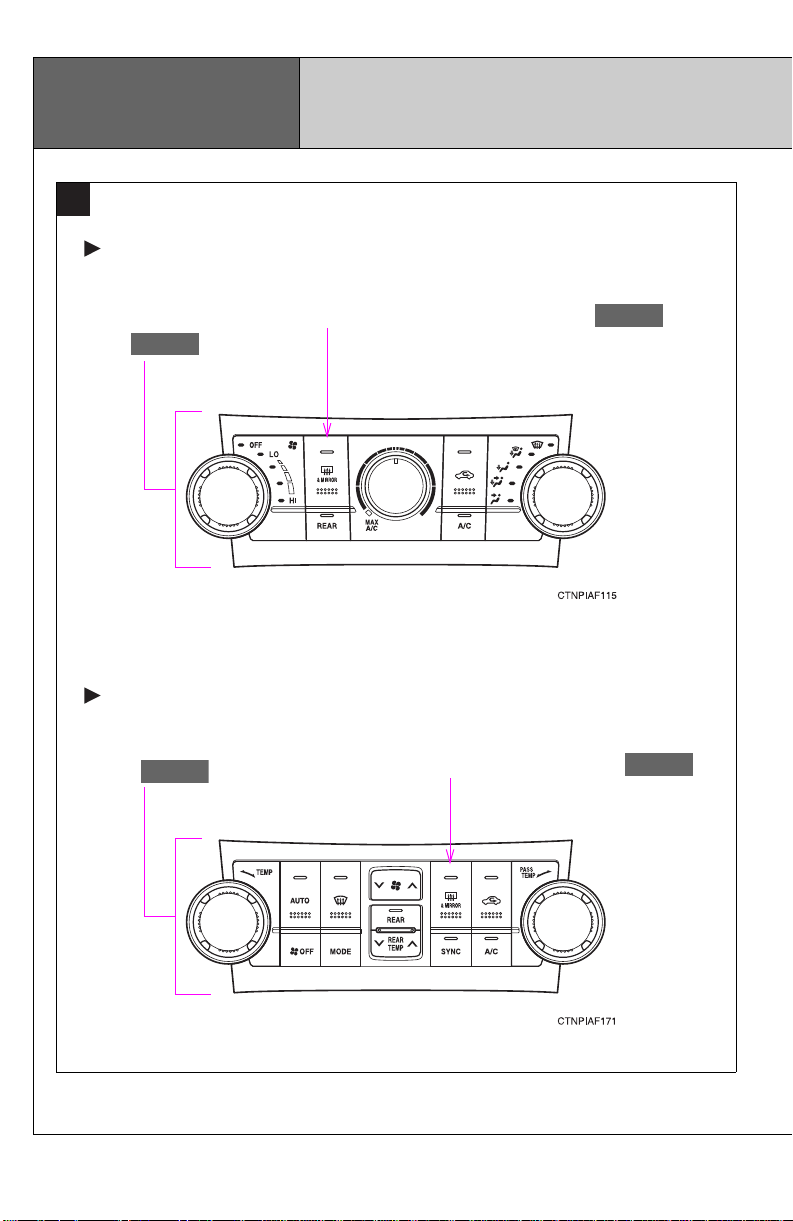
P. 289
P. 289
P. 275
P. 268
Instrument panel
D
Vehicles with a front manual air conditioning system
Rear window and outside rear view mirror defogger
Air conditioning
system
switch /rear window defogger switch
Vehicles with a front automatic air conditioning system
Air conditioning
system
20
Rear window and outside rear view mirror defogger
/rear window defogger switch
switch
Page 21
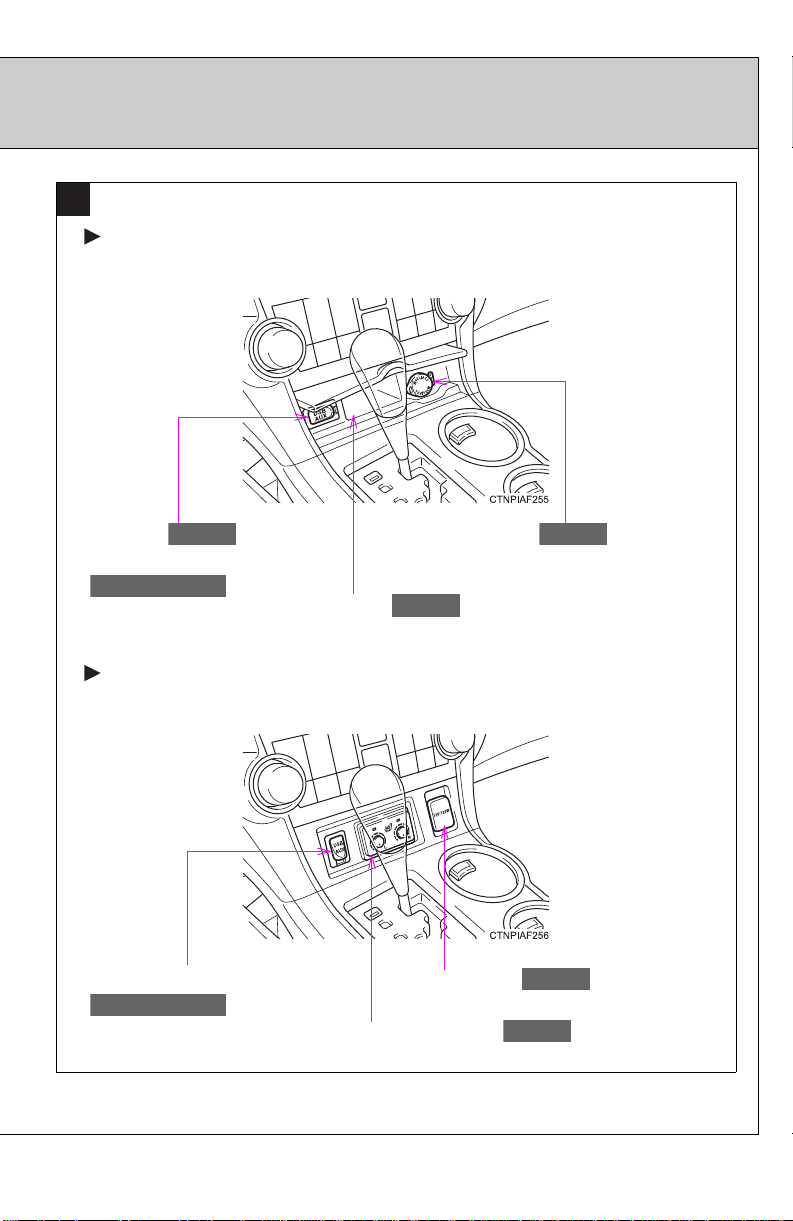
E
P. 339
P. 320, 327, 339
P. 408
P. 320, 327, 339
P. 420
P. 416
P. 416
Vehicles without seat heater
AUX port
AUX port/USB port
Vehicles with seat heater
AUX port/USB port
Power outlet
Auxiliary box
Power outlet
Seat heater knobs
: If equipped
21
Page 22
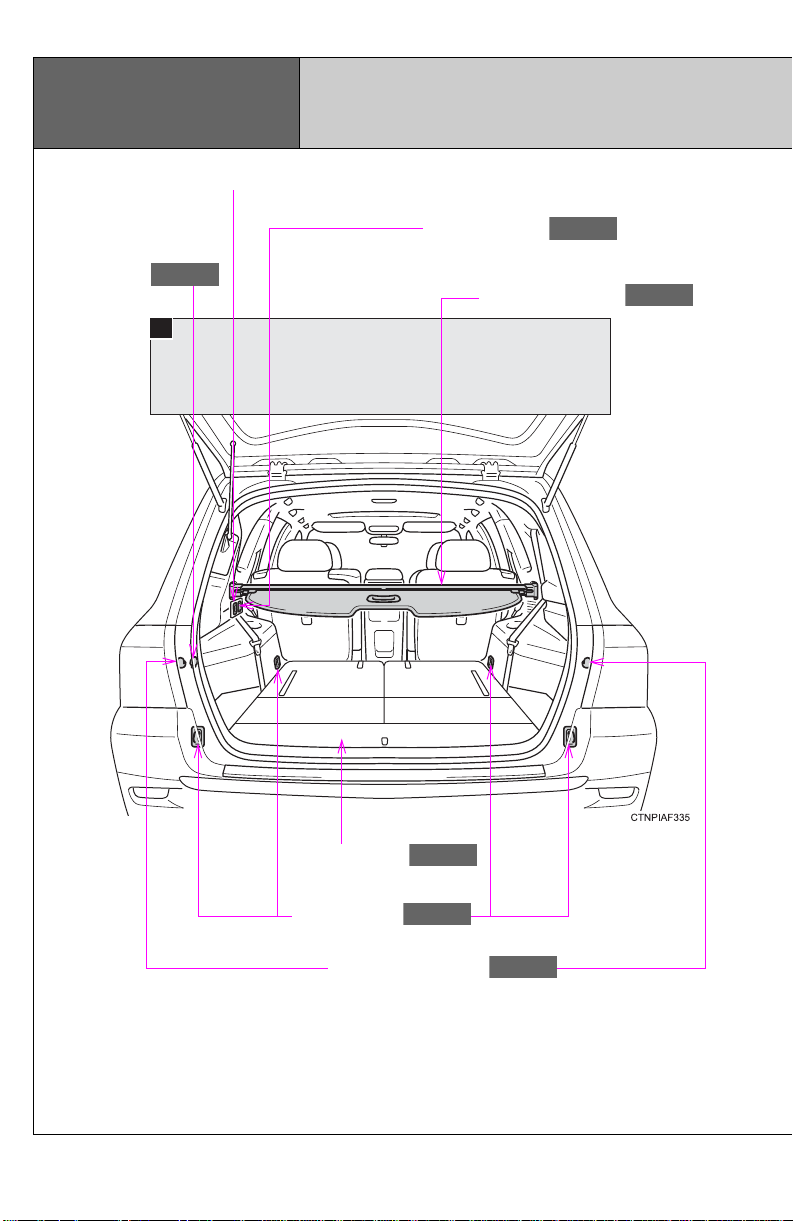
A
Pictorial index
P. 416
P. 425
P. 424
P. 424
P. 416
P. 424
Luggage compartment
A/V input port , *
Power outlet
2
Power outlet
Luggage cover
Auxiliary box
Cargo hooks
Grocery bag hooks
22
Page 23
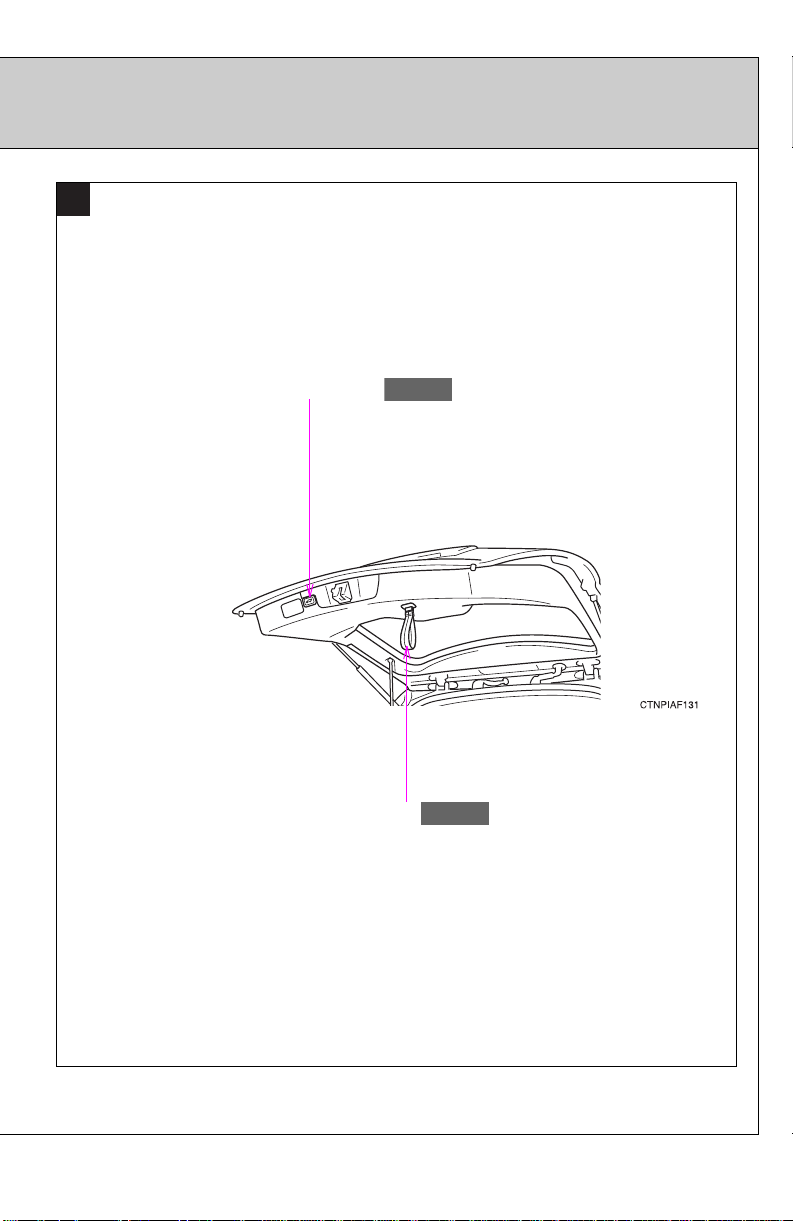
P. 61
P. 60
A
Power back door switch
Back door strap
: If equipped
2
*
: Refer to “Navigation System Owner's Manual”.
23
Page 24

For your information
Main Owner’s Manual
Please note that this manual covers all models and all equipment, including
options. Therefore, you may find some explanations for equipment not
installed on your vehicle.
All specifications provided in this manual are current at the time of printing.
However, because of the Toyota policy of continual product improvement, we
reserve the right to make changes at any time without notice.
Depending on specifications, the vehicle shown in the illustrations may differ
from your vehicle in terms of equipment.
Noise from under vehicle after turning off the engine
Approximately five hours after the engine is turned off, you may hear sound
coming from under the vehicle for several minutes. This is the sound of a fuel
evaporation leakage check and, it does not indicate a malfunction.
Accessories, spare parts and modification of your Toyota
A wide variety of non-genuine spare parts and accessories for Toyota
vehicles are currently available on the market. You should know that these
parts are not covered by Toyota warranty and that Toyota is not responsible
for their performance, repair, or replacement, or for any damage they may
cause to, or adverse effect they may have on, your Toyota vehicle.
This vehicle should not be modified with non-genuine Toyota products.
Modification with non-genuine Toyota products may affect performance,
safety or durability, and may even violate governmental regulations. In
addition, damage or performance problems resulting from the modification
may not be covered under warranty.
24
Page 25

Installation of a mobile two-way radio system
The installation of a mobile two-way radio system in your vehicle could affect
electronic systems such as:
●Multiport fuel injection system/sequential multiport fuel injection system
●Cruise control system
●Anti-lock brake system
●SRS airbag system
●Seat belt pretensioner system
Be sure to check with your Toyota dealer for precautionary measures or special instructions regarding installation of a mobile two-way radio system.
Scrapping of your Toyota
The SRS airbag and seat belt pretensioner devices in your Toyota contain
explosive chemicals. If the vehicle is scrapped with the airbags and seat belt
pretensioners left as they are, this may cause an accident such as fire. Be
sure to have the systems of the SRS airbag and seat belt pretensioner
removed and disposed of by a qualified service shop or by your Toyota
dealer before you scrap your vehicle.
Perchlorate Material
Special handling may apply, See www.dtsc.ca.gov/haza rdouswaste/perchlorate.
Your vehicle has components that may contain perchlorate. These compo-
nents may include airbag, seat belt pretensioners, and wireless remote control batteries.
25
Page 26

Vehicle Control and Operation Data Recording
Your Toyota is equipped with sophisticated computers that record certain
information about your vehicle’s operation, such as:
• Engine speed
• Accelerator status
• Brake status
• Vehicle speed
• Shift position
The data recorded varies according to the grade level and options the vehi-
cle is equipped with. The computers do not record conversations, sound or
pictures.
● Data usage
Toyota may use the data recorded in these computers to diagnose malfunc-
tions, conduct research and development, and improve quality.
Toyota will not disclose the recorded data to a third party except:
• With the consent of the vehicle owner or with the consent of the lessee if
the vehicle is leased
• In response to an official request by the police, a court of law or a government agency
• For research purposes where the data is not tied to a specific vehicle or
vehicle owner
26
Page 27

● Event data recorder
Your vehicle has computers that monitor and control certain aspects of your
vehicle. These computers assist in driving and maintaining optimal vehicle
performance.
Besides storing data useful for troubleshooting, there is an event data
recorder (EDR) that records data in a crash or near crash event.
The SRS airbag sensor assembly contains the EDR. In a crash or near crash
event, this device may record the following information:
• Engine speed
• Whether the brake pedal was depressed or not
• Vehicle speed
• To what extent the accelerator pedal was depressed
• The transmission shift position
• Whether the driver and front passenger wore seat belts or not
• Driver’s seat position
• SRS airbag deployment data
• SRS airbag system diagnostic data
• Front passenger’s occupant classification
The information above is intended to be used for the purpose of improving
vehicle safety performance. Unlike general data recorders, the EDR does
not record sound data such as conversation between passengers.
● Disclosure of the EDR data
Toyota will not disclose the data recorded in an EDR to a third party except
when:
• An agreement from the vehicle’s owner (or the leasing company for a
leased vehicle) is obtained
• Officially requested to by the police or other authorities
• Necessary, for use as a defense for Toyota in a lawsuit
• Ordered to by a court of law
However, if necessary, Toyota will:
• Use the data for research on Toyota vehicle safety performance
• Disclose the data to a third party for research purposes without disclosing
details of the vehicle owner, and that only when deemed necessary
• Disclose summarized data cleared of vehicle identification information to a
non-Toyota organization for research purposes
27
Page 28

CAUTION
■ General precautions while driving
Driving under the influence: Never drive your vehicle when under the influence of alcohol or drugs that have impaired your ability to operate your vehicle. Alcohol and certain drugs delay reaction time, impair judgment and
reduce coordination, which could lead to an accident that could result in
death or serious injury.
Defensive driving: Always drive defensively. Anticipate mistakes that other
drivers or pedestrians might make and be ready to avoid accidents.
Driver distraction: Always give your full attention to driving. Anything that distracts the driver, such as adjusting controls, talking on a cellular phone or
reading can result in a collision with resulting death or serious injury to you,
your occupants or others.
■ General precaution regarding children’s safety
Never leave children unattended in the vehicle, and never allow children to
have or use the key.
Children may be able to start the vehicle or shift the vehicle into neutral.
There is also a danger that children may injure themselves by playing with
the windows, the moon roof, or other features of the vehicle. In addition, heat
build-up or extremely cold temperatures inside the vehicle can be fatal to
children.
28
Page 29
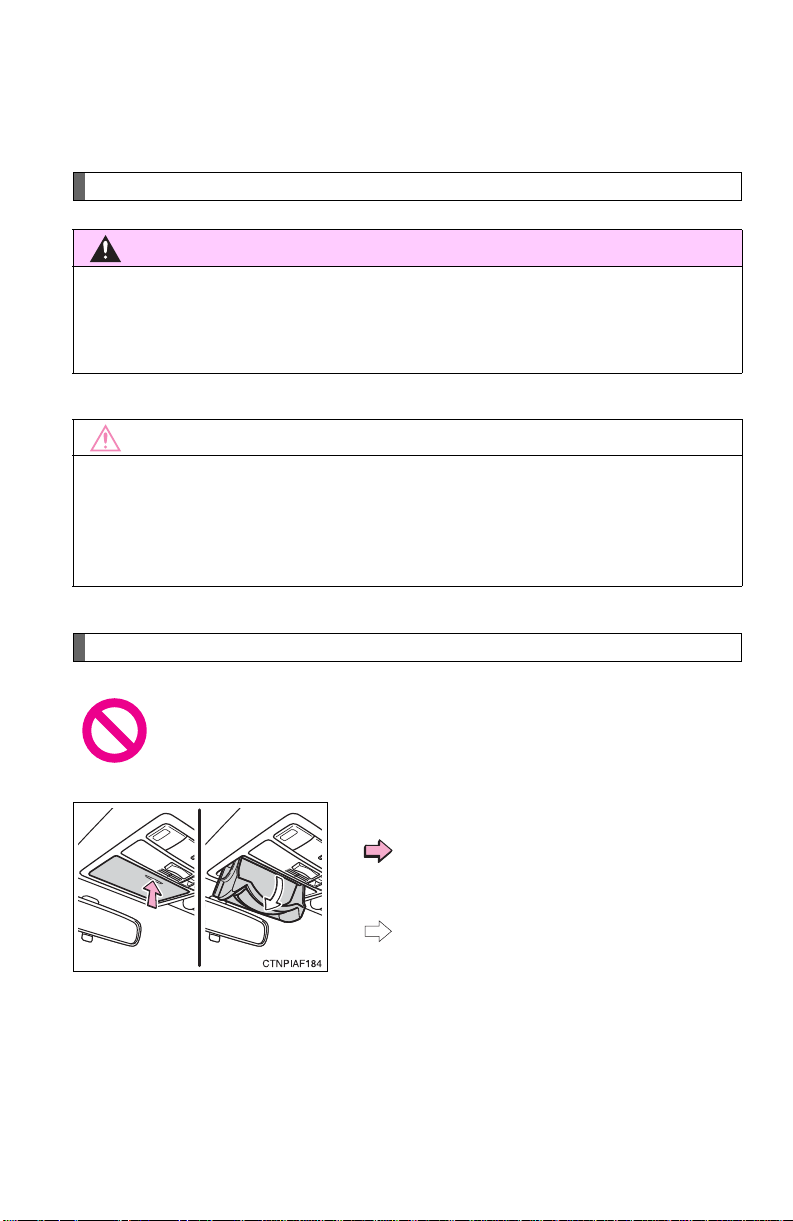
Symbols used throughout this manual
CAUTION
NOTICE
Cautions & Notices
This is a warning against anything which may cause death or injury to people if
the warning is ignored. You are informed about what you must or must not do
in order to reduce the risk of injury to yourself and others.
This is a warning against anything which may cause damage to the vehicle or
its equipment if the warning is ignored. You are informed about what you must
or must not do in order to avoid or reduce the risk of damage to your Toyota
and its equipment.
Symbols used in illustrations
Safety symbol
The symbol of a circle with a slash through it means “Do not”, “Do
not do this”, or “Do not let this happen”.
Arrows indicating operations
Indicates the action (pushing, turning,
etc.) used to operate switches and other
devices.
Indicates the outcome of an operation
(e.g. a lid opens).
29
Page 30

30
Page 31

Before driving
1
1-1. Key information
Keys................................... 32
1-2. Opening, closing and
locking the doors
Smart key system .............. 35
Wireless remote control..... 48
Side doors.......................... 54
Back door........................... 60
Glass hatch........................ 70
1-3. Adjustable components
(seats, mirrors,
steering wheel)
Front seats......................... 74
Rear seats.......................... 77
Head restraints................... 85
Seat belts........................... 88
Steering wheel................... 94
Anti-glare inside rear
view mirror....................... 95
Outside rear view
mirrors.............................. 98
1-4. Opening and closing the
windows and moon roof
Power windows................ 101
Moon roof......................... 104
1-5. Refueling
Opening the fuel tank
cap................................. 109
1-6. Theft deterrent system
Engine immobilizer
system ........................... 113
Alarm................................ 116
Theft prevention labels
(U.S.A.).......................... 120
1-7. Safety information
Correct driving posture..... 121
SRS airbags..................... 123
Front passenger occupant
classification system...... 135
Child restraint systems..... 142
Installing child
restraints........................ 147
31
Page 32
1-1. Key information
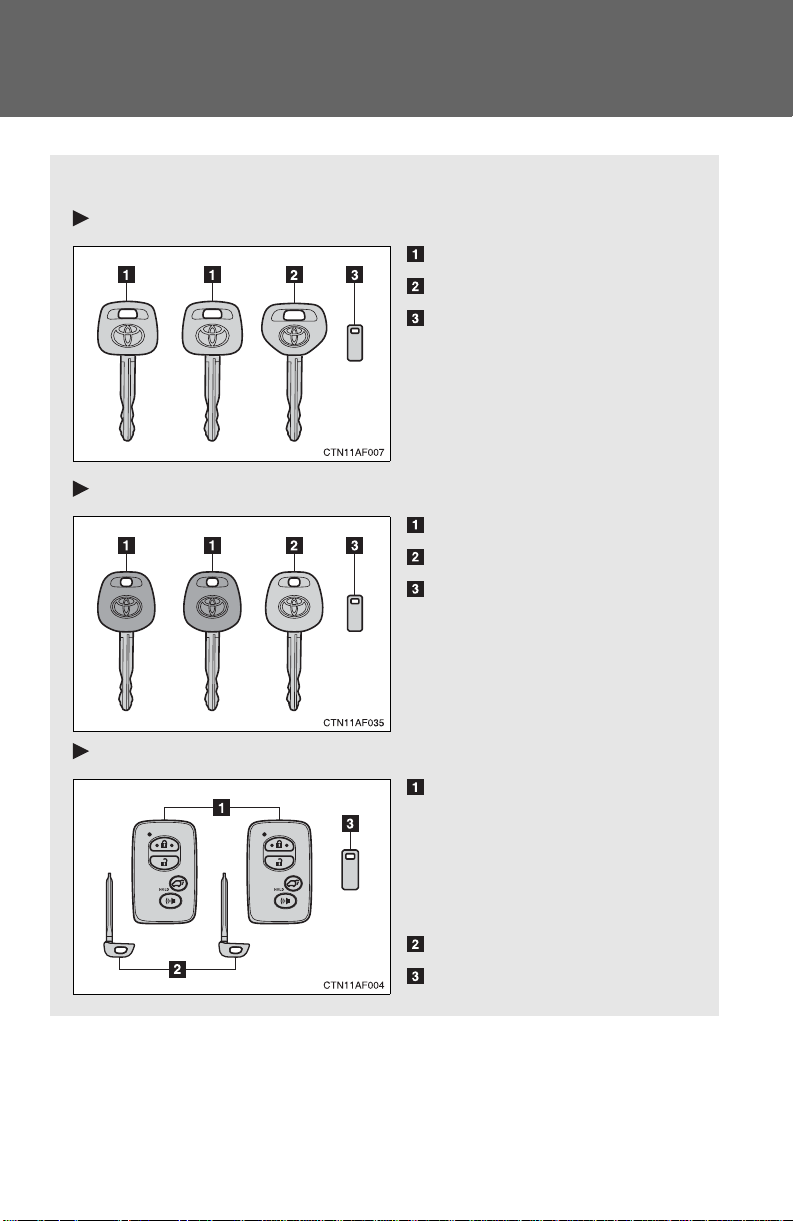
The following keys are provided with the vehicle.
Vehicles without smart key system (type A)
Master keys
Valet key
Key number plate
Vehicles without smart key system (type B)
Master keys
Valet key
Key number plate
Vehicles with smart key system
Electronic keys
• Operating the smart key
system (P. 35)
• Operating the wireless
remote control function
(P. 48)
Mechanical keys
Key number plate
Keys
32
Page 33
1-1. Key information
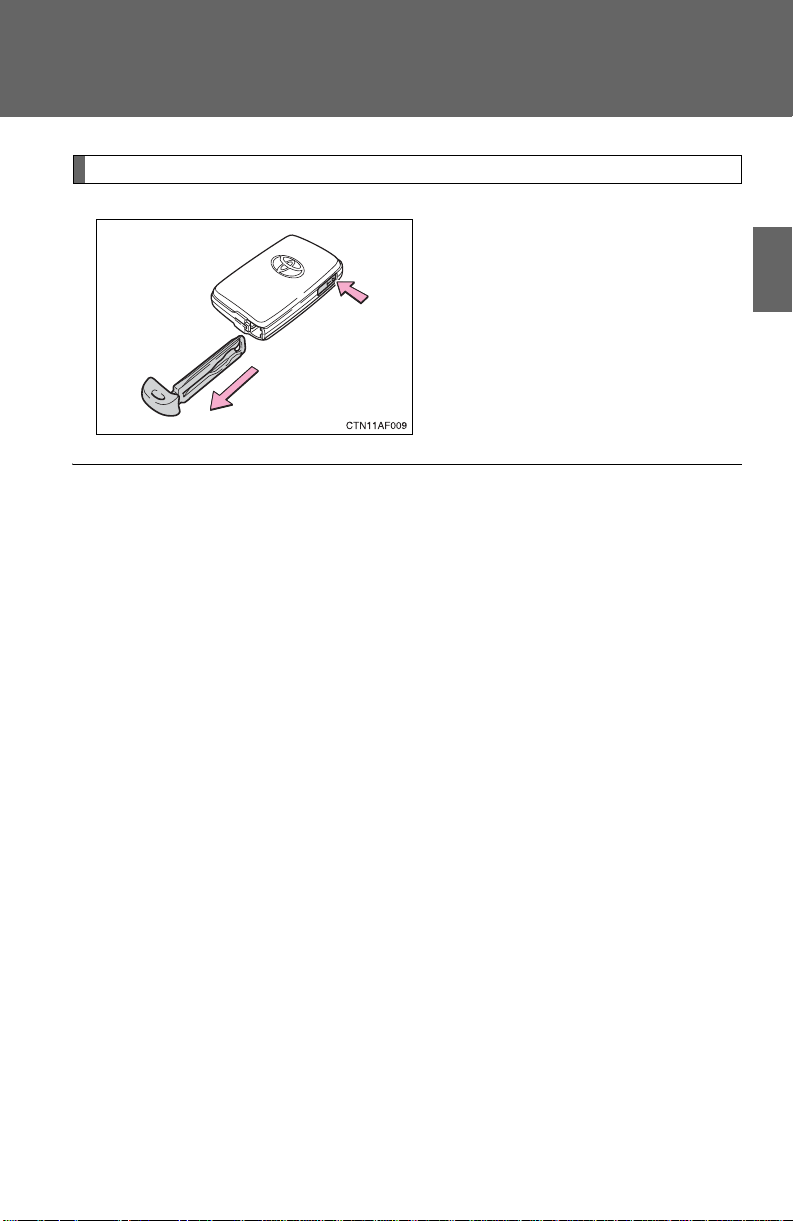
Using the mechanical key (vehicles with smart key system)
Take out the mechanical key.
After using the mechanical key,
store it in the electronic key. Carry
the mechanical key together with
the electronic key. If the electronic
key battery is depleted, you will
need the mechanical key.
(P. 558)
■ When required to leave a key to the vehicle with a parking attendant
Lock the glove box as circumstances demand. (P. 400)
Vehicles without smart key system: Carry the master key for your own use
and provide the attendant with the valet key.
Vehicles with smart key system: Remove the mechanical key for your own
use and provide the attendant with the electronic key only.
■ Key number plate
Keep the plate in a safe place such as your wallet, not in the vehicle. In the
event that a key is lost, a new key can be made by your Toy ota dealer using
the key number plate. (P. 557)
■ When riding in an aircraft (vehicles with smart key system)
When bringing an electronic key onto an aircraft, make sure you do not
press any buttons on the electronic key while inside the aircraft cabin. If you
are carrying an electronic key in your bag etc., ensure that the buttons are
not likely to be pressed accidentally. Pressing a button may cause the electronic key to emit radio waves that could interfere with the operation of the
aircraft.
1
Before driving
33
Page 34

1-1. Key information
NOTICE
■ To prevent key damage
● Do not subject the keys to strong shocks, expose them to high tempera-
tures by placing them in direct sunlight, or get them wet.
● Do not expose the keys to electromagnetic materials or attach any mate-
rial that blocks electromagnetic waves to the key surface.
● Do not disassemble the key.
34
Page 35
1-2. Opening, closing and locking the doors
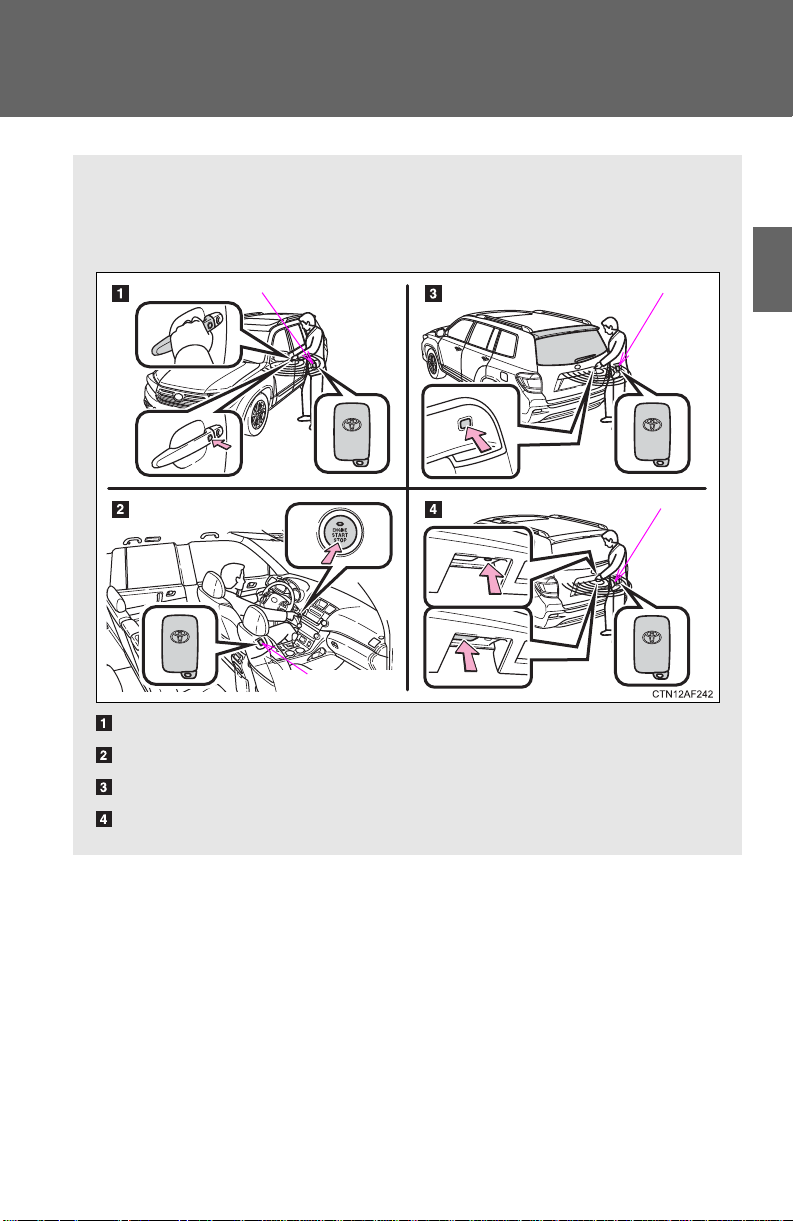
The following operations can be performed simply by carrying the
electronic key on your person, for example in your pocket.
(The driver should always carry the electronic key.)
Locks and unlocks the doors (P. 36)
Starts the engine (P. 170)
Opens the glass hatch (P. 37)
Locks and unlocks the doors (P. 36)
Electronic key
Electronic key
Electronic key
Electronic key
: If equipped
Smart key system
1
Before driving
35
Page 36
1-2. Opening, closing and locking the doors
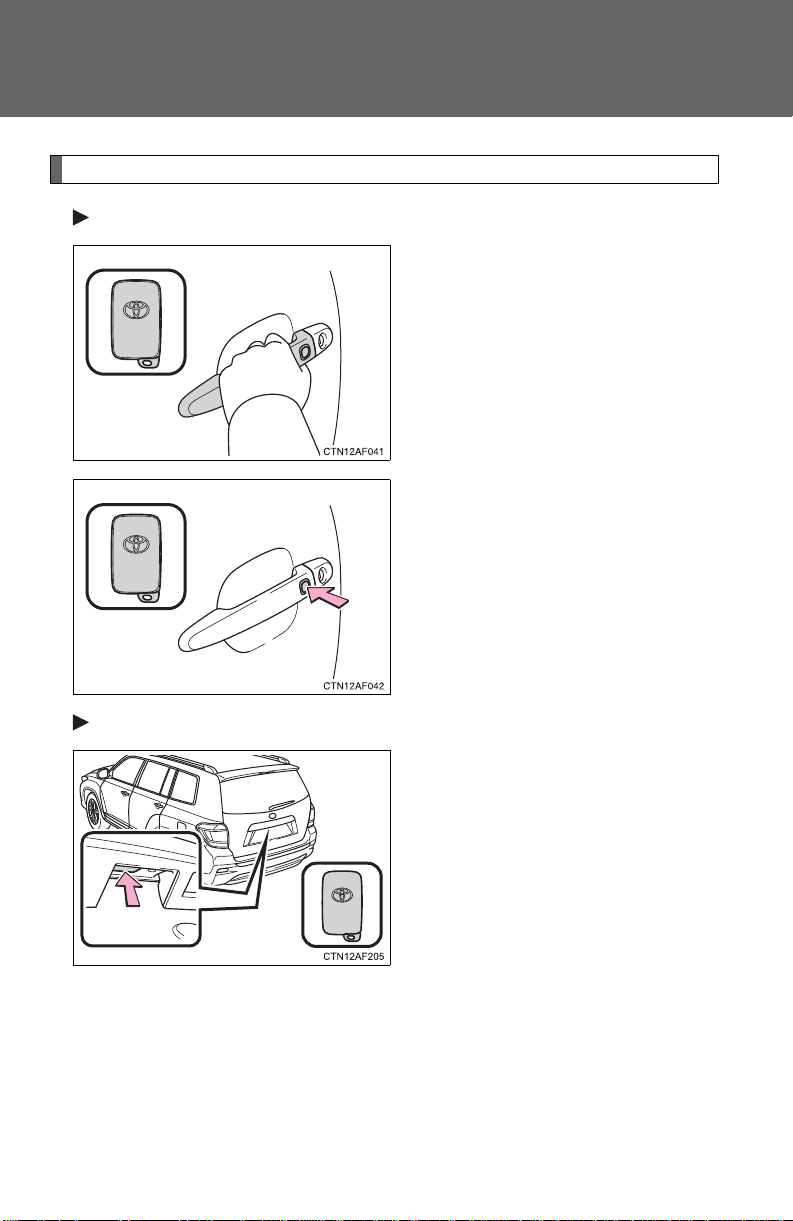
Unlocking and locking the doors
Front door handles
Grip the handle to unlock the
doors.
Make sure to touch the sensor on
the back of the handle.
The door cannot be unlocked for
3 seconds after the door is
locked.
Press the lock button to lock the
doors.
Back door handle
36
Press the button to unlock the
door.
The door cannot be unlocked for
3 seconds after the door is
locked.
If you carry the electronic key on
your person, the back door can
be opened even if it is locked.
Lock the back door again when
you leave the vehicle. The back
door will not lock automatically
after it has been opened and then
closed.
Page 37
1-2. Opening, closing and locking th e do o r s
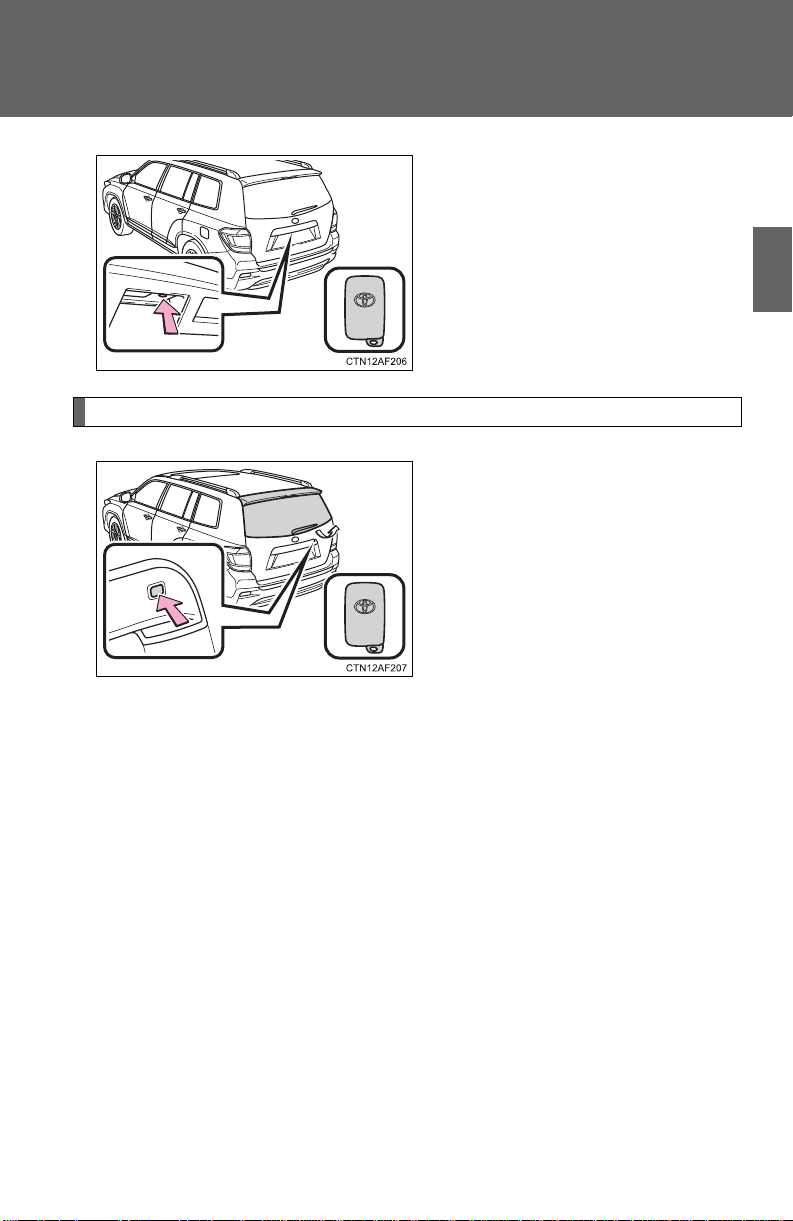
Press the button to lock the door.
Opening the glass hatch (if equipped)
Press and hold the button to
open the glass hatch. The glass
hatch will pop up.
1
Before driving
The glass hatch can be unlocked
only when the back door is
closed.
37
Page 38
1-2. Opening, closing and locking the doors
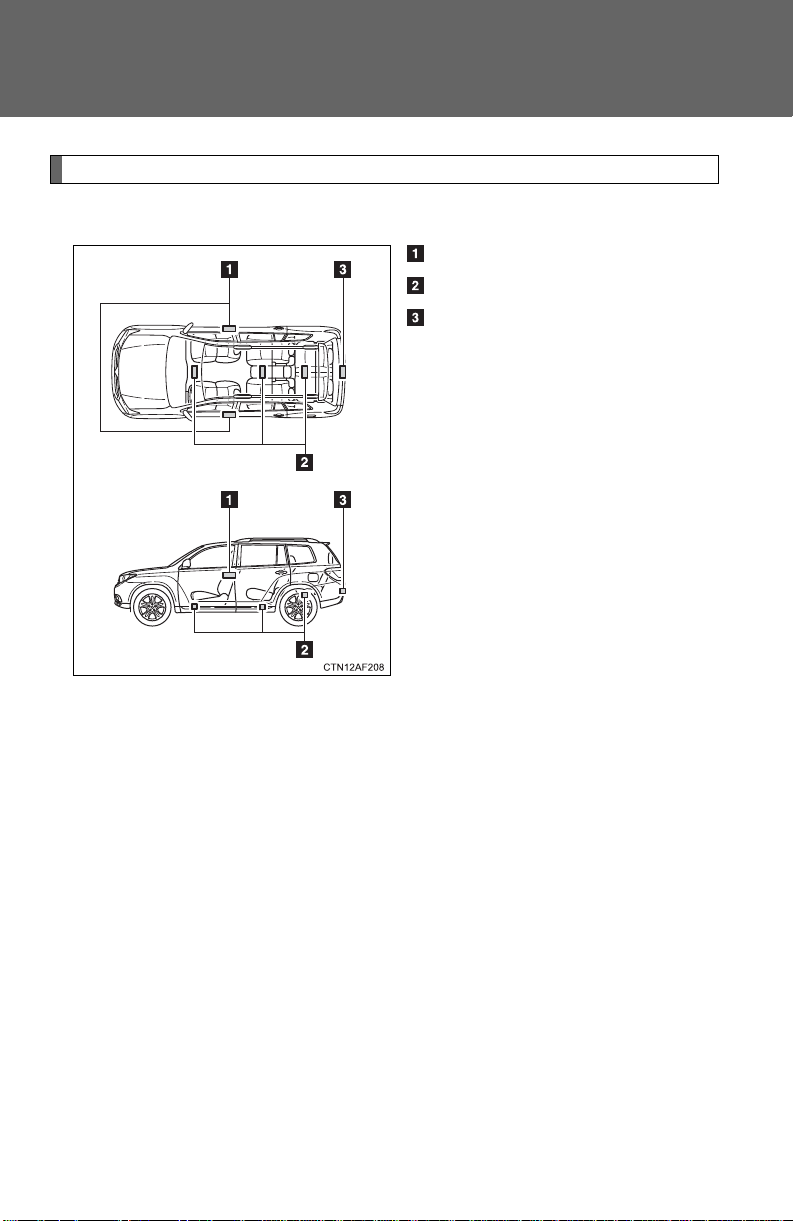
Antenna location and effective range
■ Antenna location
Antennas outside the cabin
Antennas inside the cabin
Antenna outside the luggage
compartment
38
Page 39
1-2. Opening, closing and locking th e do o r s
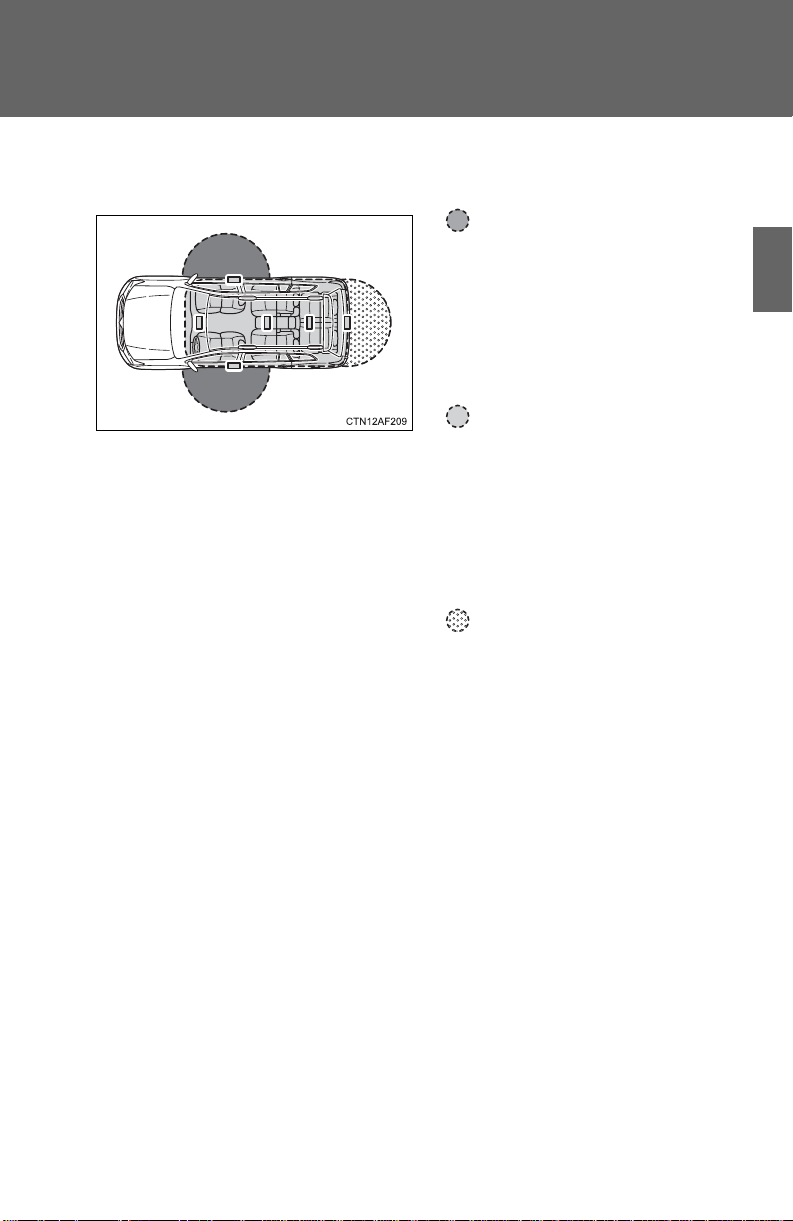
■ Effective range (areas within which the electronic key is
detected)
When locking or unlocking
the doors
This system can be operated
when the electronic key is
within about 2.3 ft. (0.7 m) of
either of the outside front
door handles.
When starting the engine
or changing “ENGINE
START STOP” switch
modes
This system can be operated
when the electronic key is
inside the vehicle.
When opening the glass
hatch and locking or
unlocking the doors
1
Before driving
This system can be operated
when the electronic key is
within about 2.3 ft. (0.7 m) of
the back door handle.
39
Page 40

1-2. Opening, closing and locking the doors
STEP
1
STEP
2
■ Operation signals
A buzzer sounds and the emergency flashers flash to indicate that the doors
have been locked/unlocked. (Locked: Once; Unlocked: Twice)
■ Conditions affecting operation
The smart key system uses weak radio waves. In the following situations,
the communication between the electronic key and the vehicle may be
affected, preventing the smart key system and wireless remote control from
operating properly. (Ways of coping: P. 558)
● When the electronic key battery is depleted
● Near a TV tower, electric power plant, gas station, radio station, large dis-
play, airport or other facility that generates strong radio waves or electrical noise
● When carrying a portable radio, cellular phone, cordless phone or other
wireless communication devices
● When the electronic key is in contact with, or is covered by a metallic
object
● When multiple electronic keys are in the vicinity
● When carrying or using the electronic key together with the following
devices that emit radio waves
• Another vehicle’s electronic key
• A wireless key that emits radio waves
• Personal computer
● If window tint with a metallic content or metallic objects are attached to
the rear window
■ Switching the door unlock function
It is possible to set which doors the entry function unlocks.
Turn the “ENGINE START STOP” switch OFF.
40
When the indicator on the key surface is turned off, push and hold
, or for approximately 5 seconds while pushing
on the key.
Page 41
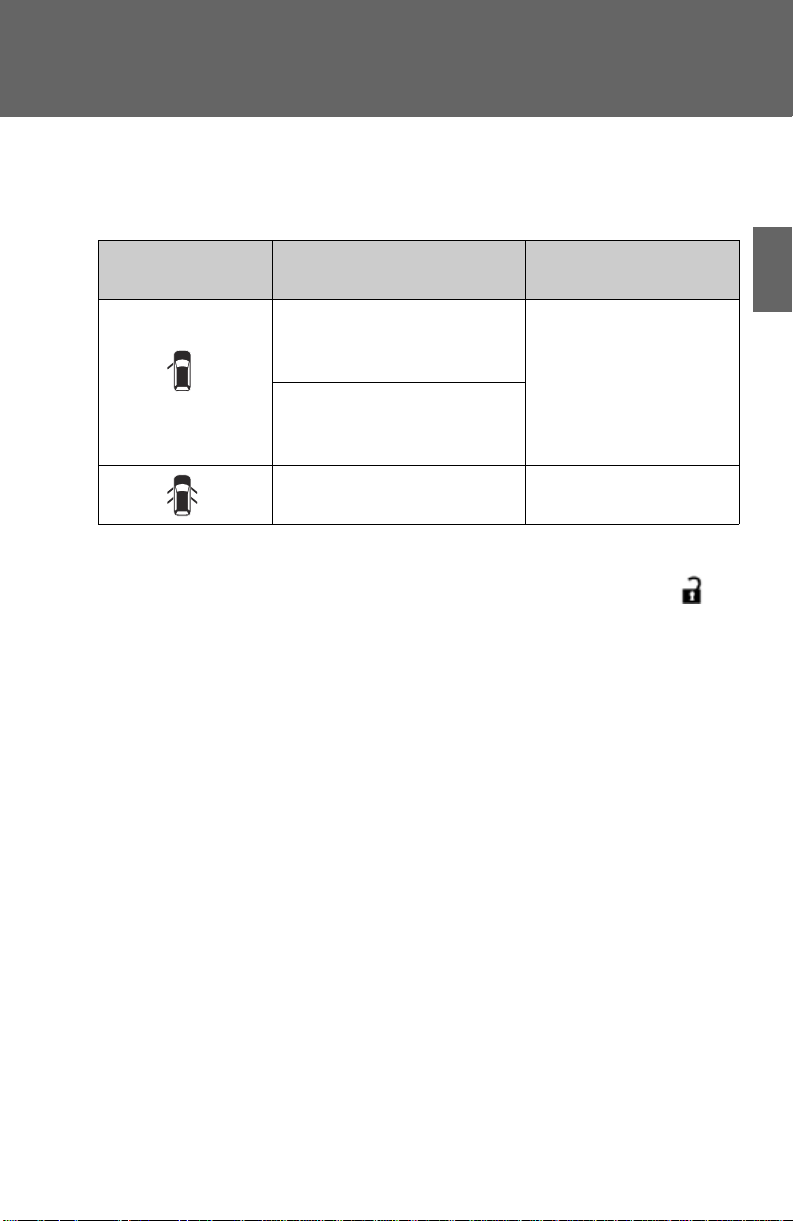
The setting changes each time an operation is performed, as shown below.
Multi-information
display
Unlocking doors Beep
Hold the driver's door handle to unlock only the
driver's door.
Exterior: Beeps three
times
Interior: Pings once
Hold the front passenger’s
door handle to unlock all
doors.
Hold either front door handle to unlock all doors.
Exterior: Beeps twice
Interior: Pings once
(When changing the setting continuously, release the buttons, wait for at
least 5 seconds, and repeat step 2.)
To prevent unintended triggering of the alarm, unlock the doors using the
wireless remote control and open and close a door once after the settings
have been changed. (If a door is not opened within 60 seconds after is
pressed, the doors will be locked again and the alarm will automatically be
set.)
In case that the alarm is triggered, immediately stop the alarm. (P. 116)
■ Battery-saving function
In the following circumstances, the entry function is disabled in order to prevent the vehicle and electronic key batteries from discharging.
● When the entry function has not been used for 2 weeks or more
● When the electronic key has been left within approximately 3 ft. (1 m) of
the vehicle for 10 minutes or more
The system will resume operation when...
● The vehicle is locked using the door handle lock button.
● The vehicle is locked/unlocked using the wireless remote control func-
tion. (P. 48)
● The vehicle is locked/unlocked using the mechanical key. (P. 558)
1-2. Opening, closing and locking th e do o r s
1
Before driving
41
Page 42

1-2. Opening, closing and locking the doors
■ Electronic key battery depletion
● The standard battery life is 1 to 2 years. (The battery becomes depleted
even if the electronic key is not used.) If the smart key system or the
wireless remote control function does not operate, or the detection area
becomes smaller, the battery may be depleted. Replace the battery when
necessary. (P. 497)
● If the battery becomes low, an alarm will sound in the cabin when the
engine stops. (P. 43)
● To avoid serious deterioration, do not leave the electronic key within 3 ft.
(1 m) of the following electrical appliances that produce a magnetic field.
•TVs
• Personal computers
• Recharging cellular phones or cordless phones
• Table lamps
■ To operate the system properly
Make sure to carry the electronic key when operating the system. Do not get
the electronic key too close to the vehicle when operating the system from
the outside of the vehicle.
Depending on the position and holding condition of the electronic key, the
key may not be detected correctly and the system may not operate properly.
(The alarm may go off accidentally, or the door lock prevention may not function.)
■ Note for the entry function
● Even when the electronic key is within the effective range (detection
areas), the system may not operate properly in the following cases.
• The electronic key is too close to the window or outside door handle,
near the ground, or in a high place when the doors are locked or
unlocked.
• The electronic key is on the instrument panel, luggage cover, floor or in
the glove box when the engine is started or “ENGINE START STOP”
switch modes are changed.
● Do not leave the electronic key on top of the instrument panel or near the
door pockets when exiting the vehicle. Depending on the radio wave
reception conditions, it may be detected by the antenna outside the cabin
and the door will become lockable from the outside, possibly trapping the
electronic key inside the vehicle.
42
Page 43

1-2. Opening, closing and locking th e do o r s
● As long as the electronic key is within the effective range, the doors may
be locked or unlocked by anyone.
● Even if the electronic key is not inside the vehicle, it may be possible to
start the engine if the electronic key is near the window.
● The doors may unlock if a large amount of water splashes on the door
handle, such as in the rain or in a car wash. (The doors will automatically
be locked after approximately 60 seconds if the doors are not opened
and closed.)
● Gripping the door handle when wearing a glove may not unlock the door.
● If the wireless remote control is used to lock the doors when the elec-
tronic key is near the vehicle, there is a possibility that the door may not
be unlocked by the entry function. (Use the wireless remote control to
unlock the doors.)
■ When the vehicle is not driven for extended periods
To prevent theft of the vehicle, do not leave the electronic key within 6 ft. (2
m) of the vehicle.
■ Security feature
If a door is not opened within approximately 60 seconds after the vehicle is
unlocked, the security feature automatically locks the vehicle again.
■ Alarms and warning indicators
A combination of exterior and interior alarms as well as warning lights and
warning messages shown on the multi-information display are used to
reduce the chance of vehicle theft and accidents resulting from erroneous
operation.
● When any warning lights come on:
Take appropriate measures according to which warning light comes on.
(P. 528)
● When a warning message is shown on the multi-information display:
Take appropriate measures according to the warning message on the
multi-information display. (P. 539)
1
Before driving
43
Page 44

1-2. Opening, closing and locking the doors
Alarm Situation Correction procedure
Exterior alarm
sounds once for
2 seconds
Tried to lock the doors
using the entry function
while the electronic key
was still inside the passenger compartment.
Retrieve the electronic key from the
passenger compartment and lock the
doors again.
Tried to close the glass
hatch with the electronic
key inside and all doors
locked.
Retrieve the electronic key and close
the glass hatch.
Exterior alarm
sounds once for
60 seconds
Tried to exit the vehicle
with the electronic key and
lock the doors without first
turning the “ENGINE
ST AR T ST OP” switch OFF.
Turn the “ENGINE
START STOP” switch
OFF and lock the
doors again.
Exterior alarm
sounds once for
10 seconds
Tried to lock the vehicle
using the entry function
while a door was open.
Close all of the doors
and lock the doors
again.
Interior alarm
sounds continuously
Tried to open the door and
exit the vehicle without
shifting the shift lever to P.
Shift the shift lever to
P.
Interior alarm
beeps repeatedly
Switched to ACCESSORY
mode while the driver's
door was open. (Opened
the driver's door when the
“ENGINE START STOP”
switch was in ACCESSORY mode.)
Turn the “ENGINE
START STOP” switch
OFF and close the
driver's door.
Turned the “ENGINE
ST ART STOP” switch OFF
while the driver's door was
open.
Close the driver's
door.
● When an alarm sounds:
Take appropriate measures according to the following table.
44
Page 45

1-2. Opening, closing and locking th e do o r s
Alarm Situation Correction procedure
Interior and exterior alarms sound
continuously.*
Tried to close the driver’s
door after carrying the key
outside the vehicle with the
“ENGINE START STOP”
switch in IGNITION ON or
ACCESSORY mode and
without the shift lever
being in P.
Shift the shift lever to
P, turn the “ENGINE
START STOP” switch
OFF and close the
driver’s door again.
Interior alarm
beeps once.*
The electronic key has a
low battery.
Replace the electronic
key battery.
Tried to start the engine
without the electronic key
being present, or when the
electronic key was not
functioning normally.
Start the engine with
the electronic key
present.
Interior alarm
beeps once and
exterior alarm
sounds 3 times.*
Tried to close the driver’s
door after carrying the key
outside the vehicle without
turning the “ENGINE
ST AR T ST OP” switch OFF.
Turn the “ENGINE
START STOP” switch
OFF and close the
driver’s door again.
An occupant carried the
electronic key outside the
vehicle and closed the
door when the “ENGINE
START STOP” switch was
in IGNITION ON or
ACCESSORY mode.
Bring the electronic
key back into the vehicle.
1
Before driving
*
: A message will be shown on the multi-information display.
■ If the smart key system does not operate properly
● Locking and unlocking the doors: Use the mechanical key. (P. 558)
● Starting the engine. (P. 558)
■ When the electronic key battery is fully depleted
P. 497
45
Page 46

1-2. Opening, closing and locking the doors
■ Customization that can be configured at Toyota dealer
It is possible to deactivate the smart key system etc.
(Customizable features P. 602)
■ Certification for the smart key system
For vehicles sold in the U.S.A.
FCC ID: NI4TMLF-3
HYQ14AAB
HYQ13BZS
HYQ14ABK
HYQ13CZA
NOTE:
This device complies with part 15 of the FCC Rules. Operation is subject to
the following two conditions: (1) This device may not cause harmful interference, and (2) this device must accept any interference received, including
interference that may cause undesired operation.
FCC WARNING:
Changes or modifications not expressly approved by the party responsible
for compliance could void the user's authority to operate the equipment.
For vehicles sold in Canada
NOTE:
Operation is subject to the following two conditions: (1) this device may not
cause interference, and (2) this device must accept any interference, including interference that may cause undesired operation of the device.
46
Page 47

1-2. Opening, closing and locking th e do o r s
CAUTION
■ Caution regarding interference with electronic devices
● People with implanted pacemakers or cardiac defibrillators should keep
away from the smart key system antennas. (P. 38) The radio waves may
affect the operation of such devices. If necessary, the entry function can
be disabled. Ask your Toyota dealer for details, such as the frequency of
radio waves and timing of emitting the radio waves. Then, consult your
doctor to see if you should disable the entry function.
● Users of any electrical medical device other than implanted pacemakers
and implanted cardiac defibrillators should consult the manufacturer of the
device for information about its operation under the influence of radio
waves.
Radio waves could have unexpected effects on the operation of such
medical devices.
Ask your Toyota dealer for details for disabling the entry function.
1
Before driving
47
Page 48
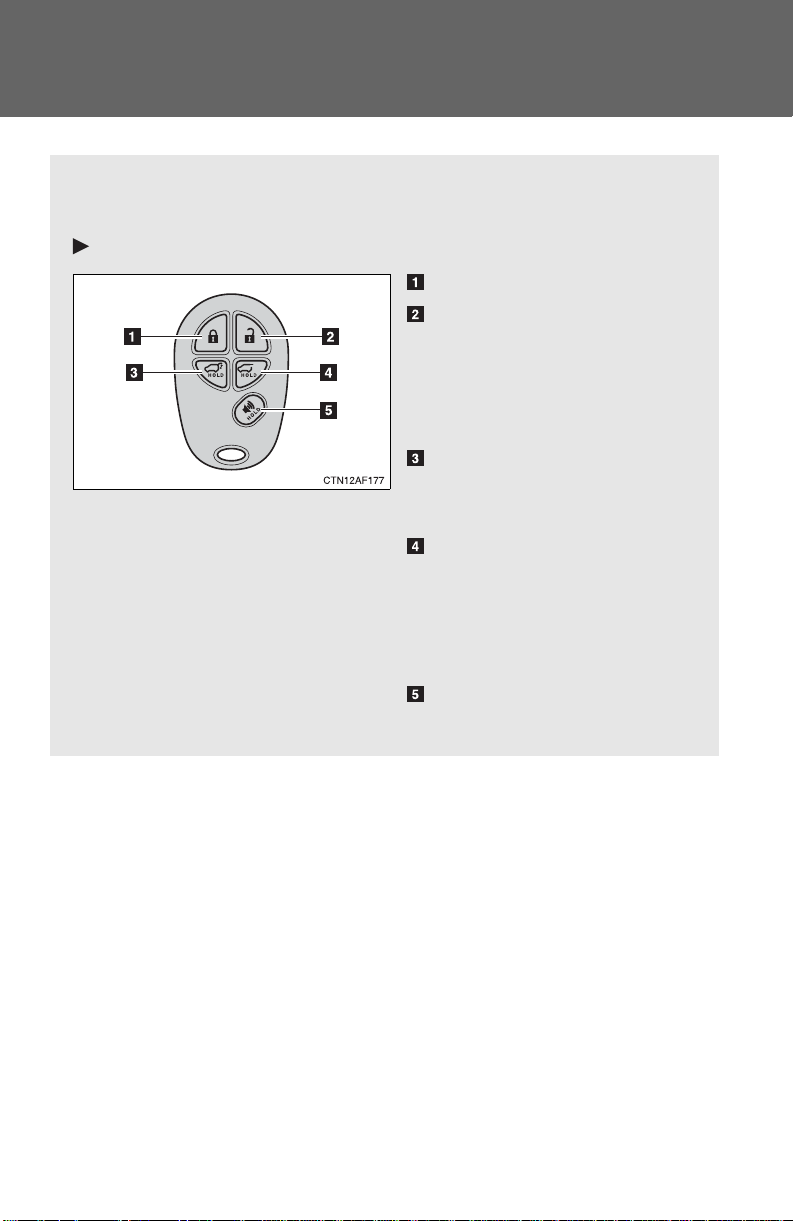
1-2. Opening, closing and locking the doors
The wireless remote control can be used to lock and unlock the vehicle from outside the vehicle.
Vehicles without smart key system (type A)
Locks all doors
Unlocks all doors
Pressing the button unlocks
the driver’s door. Pressing the
button again within 3 seconds
unlocks the other doors.
Pushing and holding:
Opens and closes the
power back door
Pushing and holding:
Opens the glass hatch
The glass hatch can be
opened only when the back
door is closed.
Pushing and holding:
Sounds alarm
Wireless remote control
48
Page 49
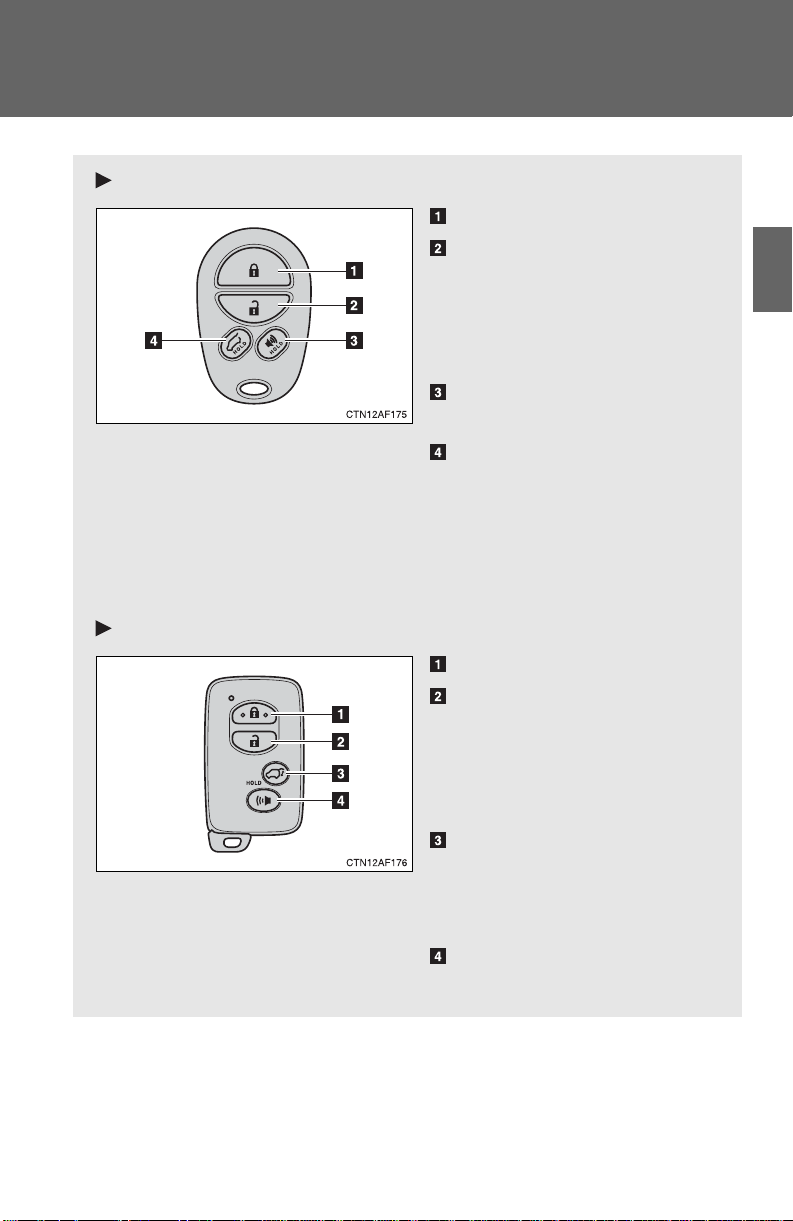
1-2. Opening, closing and locking th e do o r s
Vehicles without smart key system (type B)
Locks all doors
Unlocks all doors
Pressing the button unlocks
the driver’s door. Pressing the
button again within 3 seconds
unlocks the other doors.
Pushing and holding:
Sounds alarm
Pushing and holding:
Opens the glass hatch
(vehicles with glass hatch)
The glass hatch can be
opened only when the back
door is closed.
Vehicles with smart key system
Locks all doors
Unlocks all doors
Pressing the button unlocks
the driver’s door. Pressing the
button again within 3 seconds
unlocks the other doors.
Pushing and holding:
Opens and closes the
power back door (vehicles
with power back door)
Pushing and holding:
Sounds alarm
1
Before driving
49
Page 50
1-2. Opening, closing and locking the doors
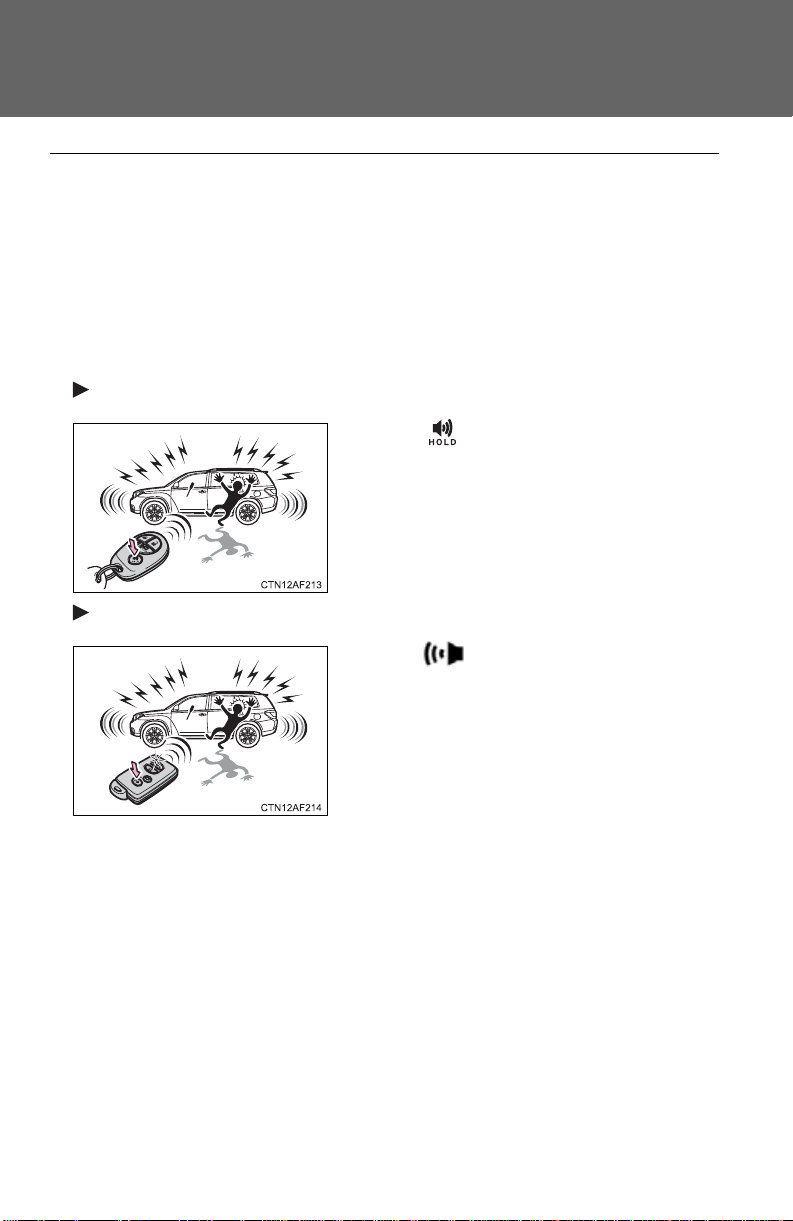
When is pushed for longer than
about one second, an alarm will sound for
about 60 seconds and the vehicle lights
will flash to deter any person from trying
to break into or damage your vehicle.
To stop the alarm, push any button on the
wireless remote control.
When is pushed for longer than
about one second, an alarm will sound for
about 60 seconds and the vehicle lights
will flash to deter any person from trying
to break into or damage your vehicle.
To stop the alarm, push any button on the
wireless remote control.
■ Operation signals
Doors: A buzzer sounds and the emergency flashers flash to indicate that
the doors have been locked/unlocked. (Locked: Once; Unlocked:
Twice)
Back door: A buzzer sounds and the emergency flashers flash twice to
indicate that the back door has been opened/closed.
■ Panic mode
Vehicles without smart key system
Vehicles with smart key system
■ Door lock buzzer
If a door is not fully closed, a buzzer sounds continuously if an attempt to
lock the door is made. Fully close the door to stop the buzzer, and lock the
vehicle once more.
50
Page 51

1-2. Opening, closing and locking th e do o r s
■ Key battery depletion
Vehicles without smart key system
The standard battery life is 1 to 2 years. (The battery becomes depleted
even if the key is not used.) If the wireless remote control function does not
operate, the battery may be depleted. Replace the battery when necessary.
(P. 496)
Vehicles with smart key system
P. 497
■ If the wireless remote control does not operate properly
Vehicles without smart key system
Locking and unlocking the doors: Use the key. (P. 54)
Vehicles with smart key system
● Locking and unlocking the doors: Use the mechanical key. (P. 558)
● Starting the engine. (P. 558)
■ Security feature
If a door is not opened within approximately 60 seconds after the vehicle is
unlocked, the security feature automatically locks the vehicle again.
■ Alarm
Using the wireless remote control to lock the doors will set the alarm system.
(P. 116)
1
Before driving
51
Page 52

1-2. Opening, closing and locking the doors
■ Conditions affecting operation
Vehicles without smart key system
The wireless remote control function may not operate normally in the following situations.
● Near a TV tower, radio station, electric power plant, airport or other facil-
ity that generates strong radio waves
● When carrying a portable radio, cellular phone or other wireless commu-
nication device
● When multiple wireless keys are in the vicinity
● When the wireless key is in contact with, or is covered by a metallic
object
● When a wireless key (that emits radio waves) is being used nearby
● When the wireless key has been left near an electrical appliance such as
a personal computer
Vehicles with smart key system
P. 40
■ Customization that can be configured at Toyota dealer
Settings (e.g. wireless remote control) can be changed.
(Customizable features P. 602)
■ Reversing the operation of the power back door
Pressing the wireless remote control switch again while the power back door
is operating will cause the operation to reverse.
■ When riding in an aircraft (vehicle without smart key system)
When bringing a wireless remote control onto an aircraft, make sure you do
not press any buttons on the wireless remote control while inside the aircraft
cabin. If you are carrying a wireless remote control in your bag etc., ensure
that the buttons are not likely to be pressed accidentally. Pressing a button
may cause the wireless remote control to emit radio waves that could interfere with the operation of the aircraft.
52
Page 53

1-2. Opening, closing and locking th e do o r s
■ Certification for wireless remote control
MODEL/FCC IDs:
Transmitter: GQ43VT20T
Receiver: GQ4-34R
IC (Canada) IDs:
Transmitter: 1470A-1T
Receiver: 1470A-6R
MADE IN U.S.A.
This device complies with Part 15 of the FCC Rules and with RSS-210 of
Industry Canada. Operation is subject to the following two conditions:
(1) This device may not cause harmful interference, and
(2) This device must accept any interference received, including interference
that may cause undesired operation.
WARNING:
Changes or modifications not expressively approved by the party responsible for compliance could void the user's authority to operate the equipment.
1
Before driving
53
Page 54
1-2. Opening, closing and locking the doors
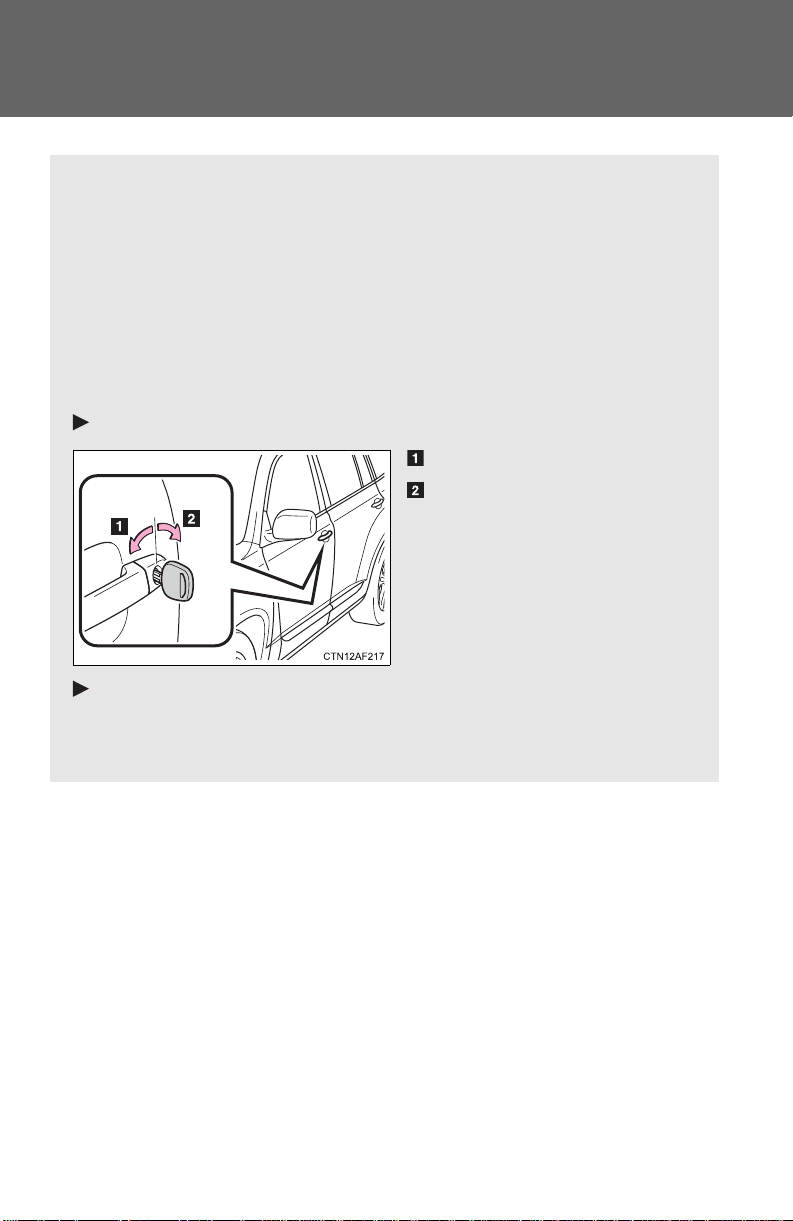
The vehicle can be locked and unlocked using the entry function,
wireless remote control, key or door lock switch.
■ Entry function (vehicles with smart key system)
P. 35
■ Wireless remote control
P. 48
■ Key
Vehicles without smart key system
Locks all doors
Unlocks all doors
Turning the key unlocks the
driver's door. Turning the key
again unlocks the other doors.
Vehicles with smart key system
The doors can also be locked and unlocked with the mechanical
key. (P. 558)
Side doors
54
Page 55
1-2. Opening, closing and locking th e do o r s
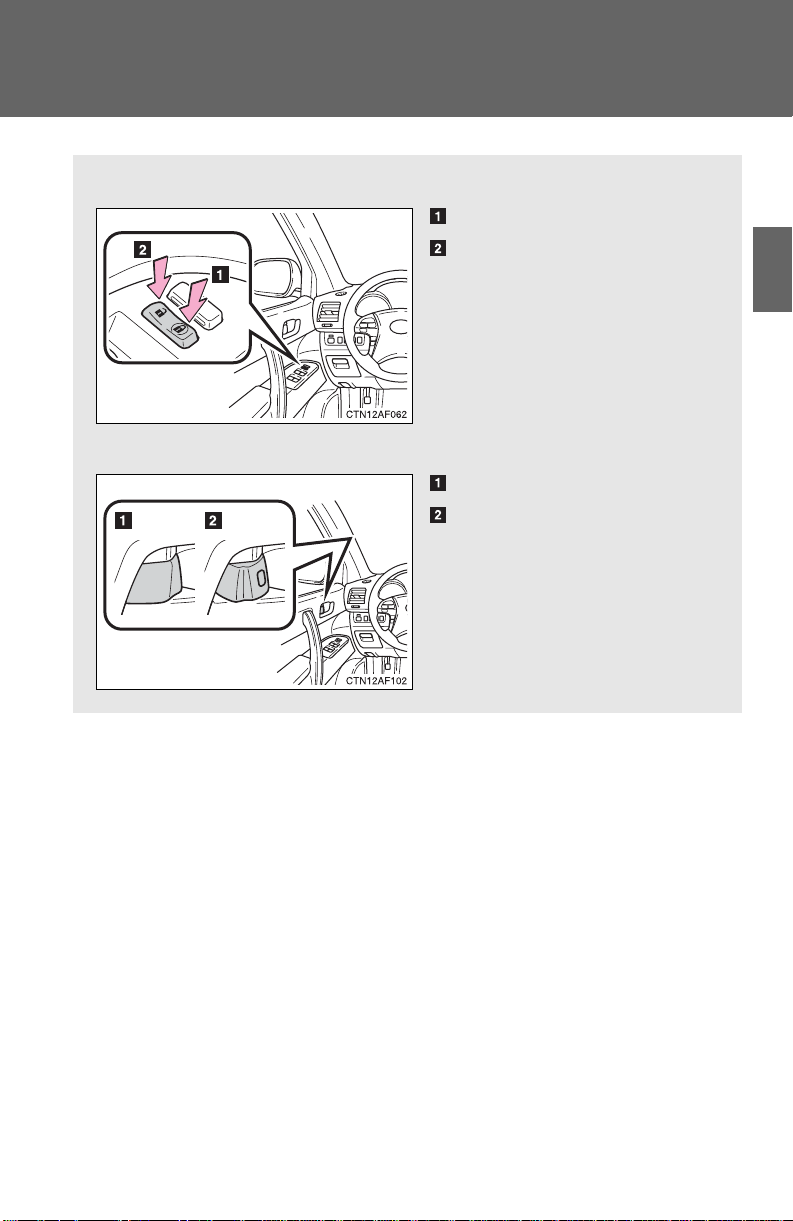
■ Door lock switch
Locks all doors
Unlocks all doors
■ Inside lock button
Locks the door
Unlocks the door
Pulling the door handle can
open the front door even if the
lock button is in the lock position.
1
Before driving
55
Page 56
1-2. Opening, closing and locking the doors
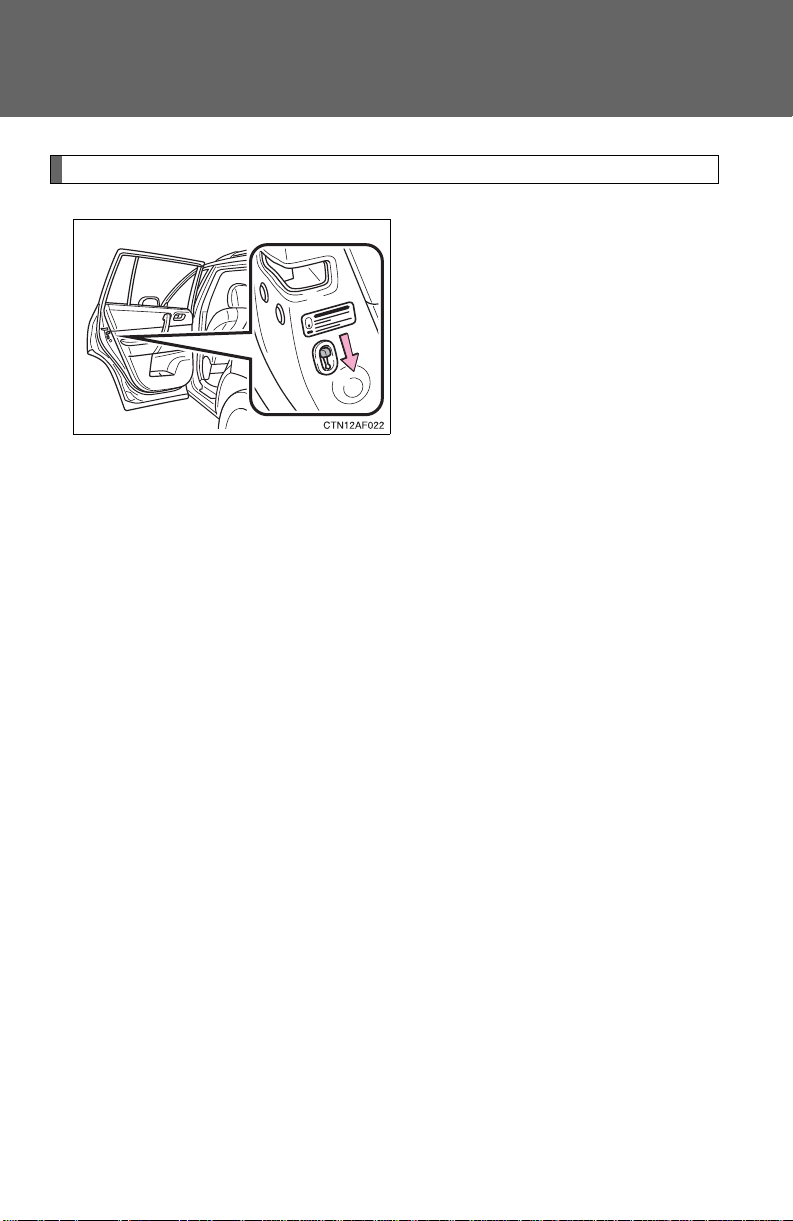
Rear door child-protector lock
The door cannot be opened from
inside the vehicle when the lock
is set.
These locks can be set to prevent
children from opening the rear
doors. Push down on each rear
door switch to lock both rear
doors.
56
Page 57
1-2. Opening, closing and locking th e do o r s
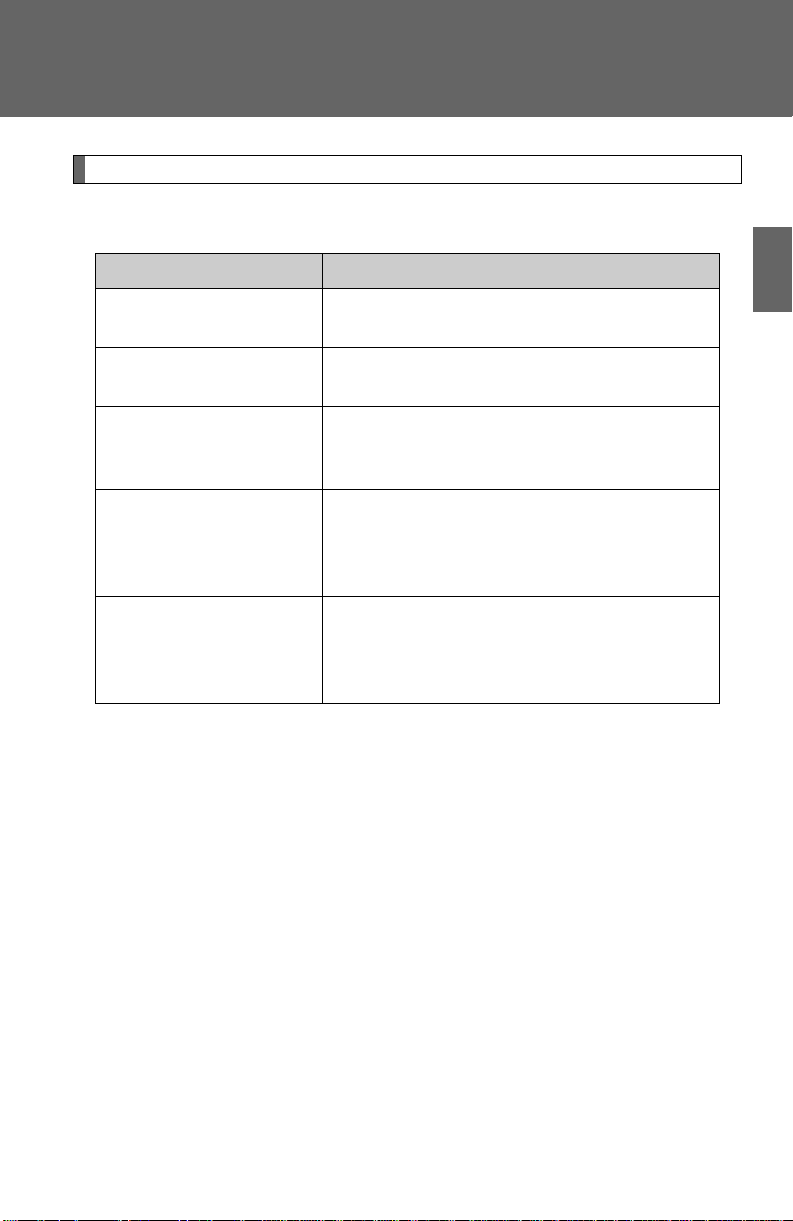
Automatic door locking and unlocking systems
The following functions can be set or canceled:
Function Operation
Shift position linked
door locking function
Shift position linked
door unlocking function
Speed linked door locking function
Driver's door linked door
unlocking function
vehicles without smart
(
key system
)
Driver's door linked door
unlocking function
vehicles with smart key
(
system
)
Shifting the shift lever out of P locks all
doors.
Shifting the shift lever to P unlocks all doors.
All
the
doors are locked when the vehicle
speed is approximately 12 mph (20 km/h) or
higher.
All
the
doors are unlocked when the driver's
door is opened within 10 seconds after turning
the engine switch to “ACC” or “LOCK”.
All
the
doors are unlocked when the driver's
door is opened within 10 seconds after turning
the “ENGINE START STOP” switch off.
1
Before driving
57
Page 58
1-2. Opening, closing and locking the doors
STEP
1
STEP
2
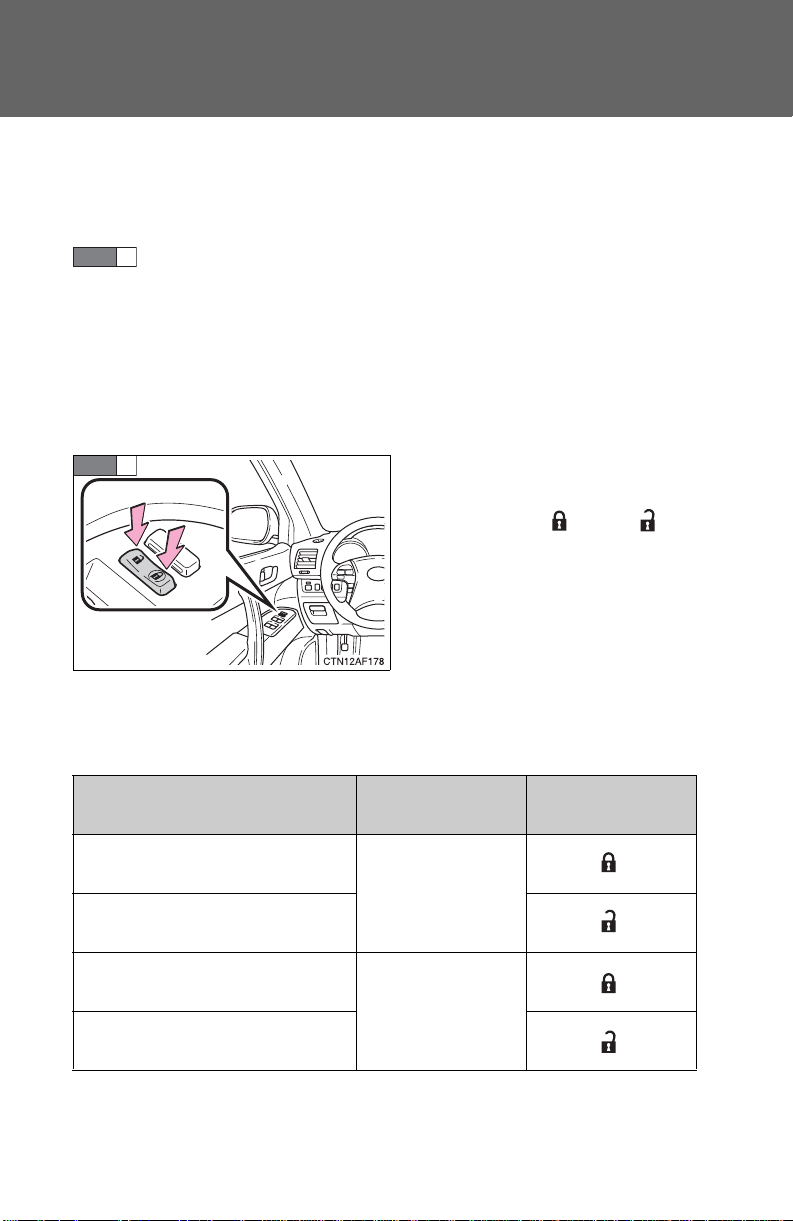
■ Setting and canceling the functions
To switch between setting and canceling, follow the procedure
below:
Vehicles without smart key system:
Close all the doors and turn the engine switch to the “ON”
position. (Perform step 2 within 10 seconds.)
Vehicles with smart key system:
Close all the doors and switch the “ENGINE START STOP”
switch to IGNITION ON mode. (Perform step 2 within 10 seconds.)
Shift the shift lever to P or N, and
press and hold the driver's door
lock switch (
or ) for
approximately 5 seconds and
then release it.
The shift lever and switch positions corresponding to the
desired function to be set are
shown as follows.
Use the same procedure to cancel the function.
Function Shift lever position
Shift position linked door locking function
Shift position linked door
unlocking function
Speed linked door lo cking function
Driver's door linked door unlocking function
58
Driver’s door lock
switch position
P
N
Page 59
1-2. Opening, closing and locking th e do o r s
CAUTION
When the setting or canceling operation is complete, all doors are
locked and then unlocked.
■ When locking the doors using the key
Vehicles without smart key system
The door cannot be locked if the key is in the engine switch.
Vehicles with smart key system
The door cannot be locked if the “ENGINE START STOP” switch is in
ACCESSORY or IGNITION ON mode, or the electronic key is left inside
the vehicle.
Depending on the position of the electronic key, the key may not be
detected correctly and the door may be locked.
■ Customization that can be configured at Toyota dealer
Settings (e.g. door unlocking function) can be changed.
(Customizable features P. 602)
■ To prevent an accident
Observe the following precautions while driving the vehicle.
Failing to do so may result in a door opening and an occupant falling out,
resulting in death or serious injury.
● Always use a seat belt.
● Always lock the doors.
● Ensure that all doors are properly closed.
● Do not pull the inside handle of the doors while driving.
The doors may be opened and the passengers are thrown out of the vehicle and it may result in serious injury or death.
Be especially careful of the front doors, as they may be opened even if the
inside lock buttons are in the locked position.
● Set the rear door child protector locks when children are seated in the rear
seats.
1
Before driving
59
Page 60
1-2. Opening, closing and locking the doors
The back door can be locked/unlocked and opened by the following
procedures.
■ Locking and unlocking the back door
Door lock switch
P. 55
Entry function (vehicles with smart key system)
P. 36
Wireless remote control
P. 48
Key
P. 54
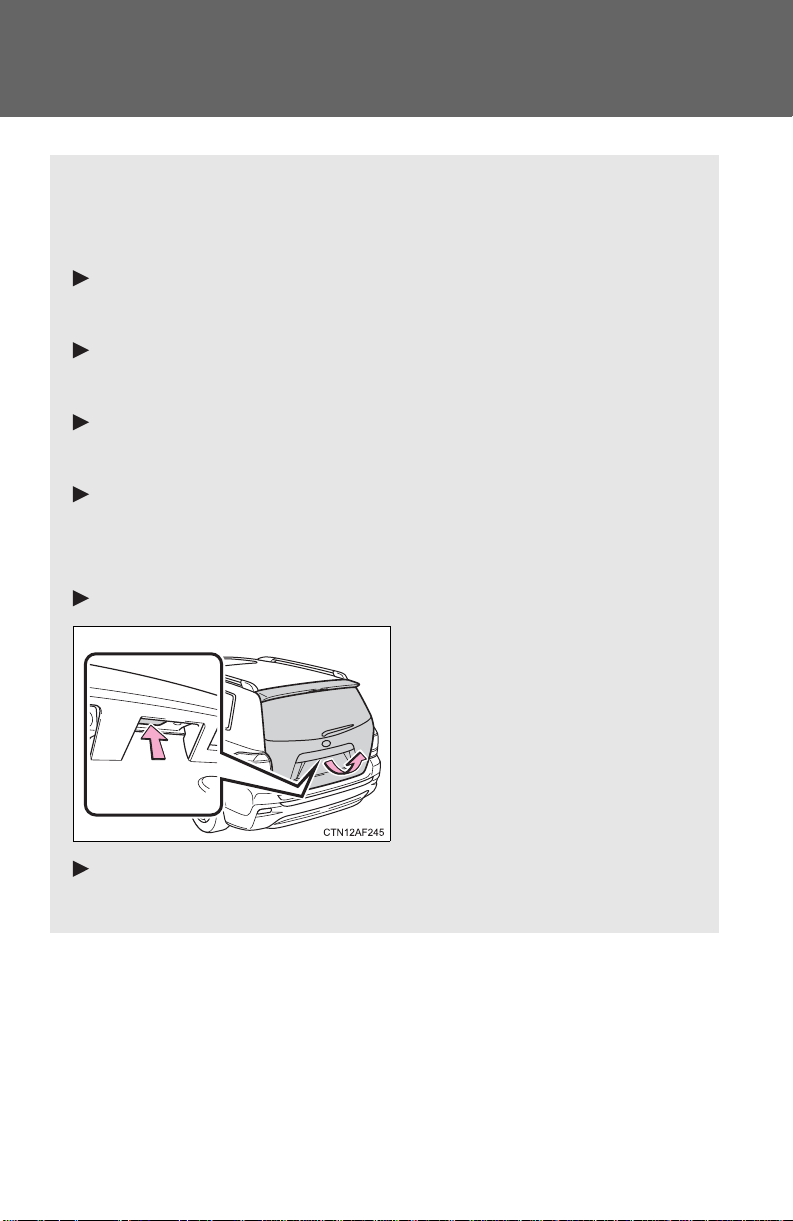
■ Opening the back door from outside the vehicle
Back door opener
Raise the back door while
pushing up the back door
opener switch.
Wireless remote control (vehicles with power back door)
P. 48
Back door
60
Page 61
1-2. Opening, closing and locking th e do o r s
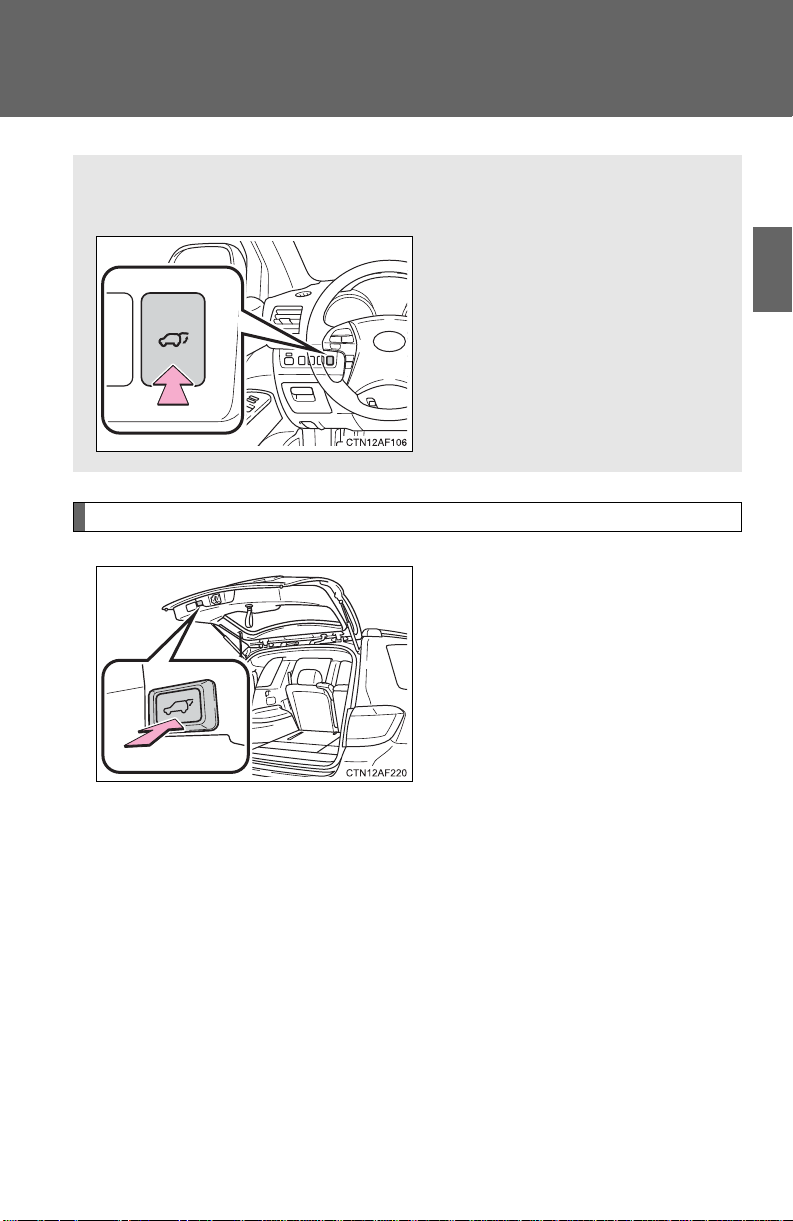
■ Opening the back door from inside the vehicle (vehicles
with power back door)
Push and hold the switch to
open/close.
Pushing the switch again while
the power back door is operating will cause the operation to
reverse.
Power back door switch (vehicles with power back door)
Push the switch to close.
Pushing the switch again while
the power back door is closing
will cause it to open again.
1
Before driving
A buzzer sounds and the emergency flashers flash twice to indicate
that the back door has been opened/closed.
The back door can be opened even if it is locked. Lock the back door
again when you leave the vehicle. The back door will not lock automatically after it has been opened and then closed.
61
Page 62
1-2. Opening, closing and locking the doors
Use the strap when closing.
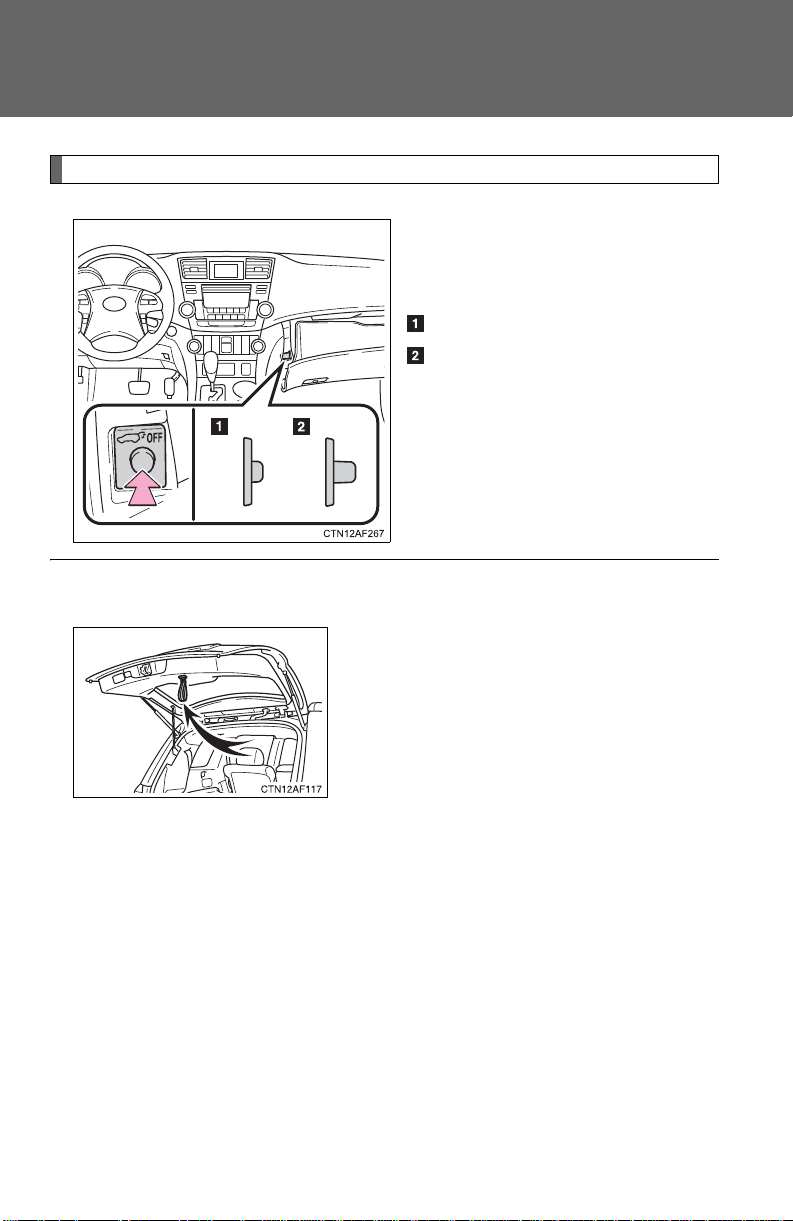
Canceling the power back door system (vehicles with power back door)
Turn the main switch in the glove
box off to disable the power back
door system.
On
Off
A buzzer sounds twice and the
back door can then not be
opened with the wireless remote
control or power back door
switch.
■ Back door strap
62
Page 63
1-2. Opening, closing and locking th e do o r s
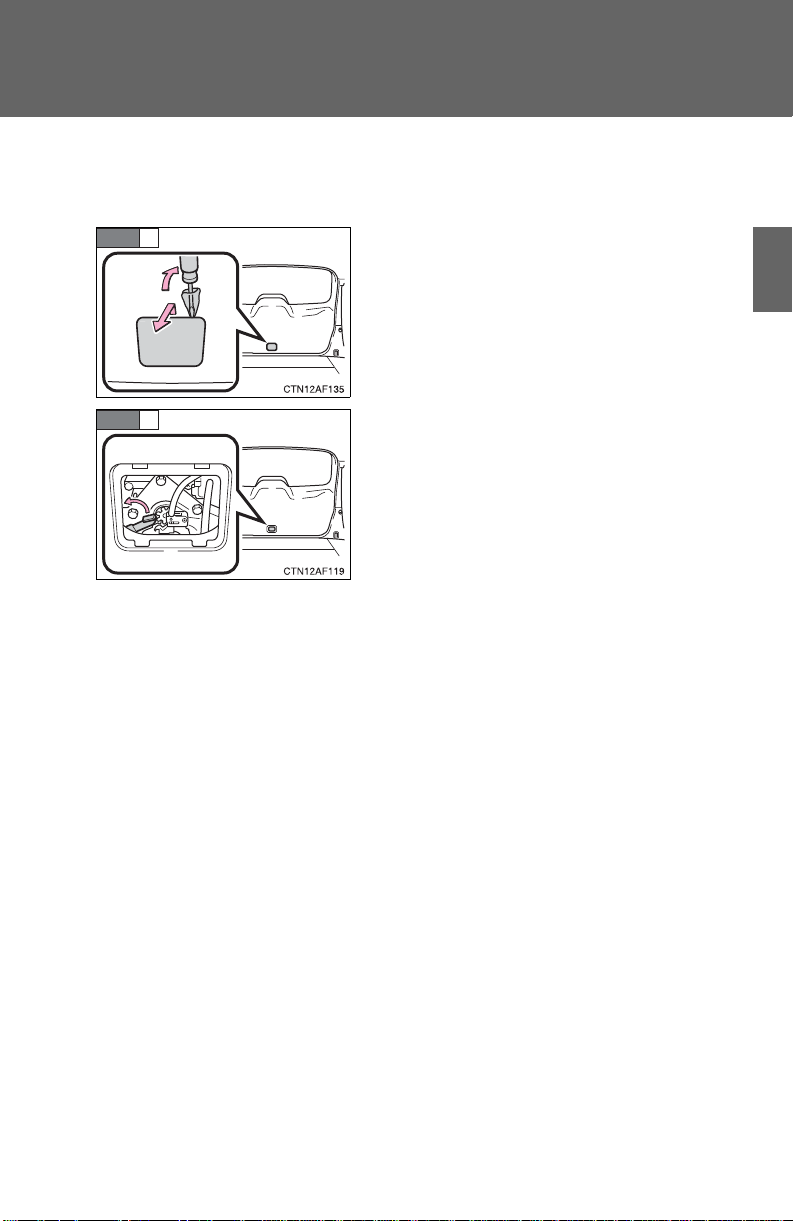
Remove the cover.
Turn the lever.
STEP
1
STEP
2
■ If the back door opener is inoperative
The back door can be operated from the inside.
■ The power back door can be opened when
● The “ENGINE START STOP” switch is in IGNITION ON mode, and the
shift lever is in P.
● The “ENGINE START STOP” switch is in OFF or in ACCESSORY mode.
The power back door can be opened even when the glass hatch is opened.
The glass hatch will not be closed when the power back door is being
closed. Close the glass hatch manually.
■ Jam protection function (vehicles with power back door)
If anything obstructs the power back door while it is closing/opening, the
back door will automatically operate in the opposite direction.
1
Before driving
63
Page 64

1-2. Opening, closing and locking the doors
■ If the power back door does not work
The back door must be initialized. To initialize, close the back door completely by hand.
■ Back door closer (vehicles with power back door)
In the event that the back door is left slightly open, the back door closer will
automatically close it to the fully closed position.
■ Fall-down protection function (vehicles with power back door)
If excessive force is applied to the back door while it is opening automatically, the power back door will stop at that position, preventing it self from falling down.
■ Customization that can be configured at Toyota dealer
Settings (e.g. wireless remote control) can be changed.
(Customizable features P. 602)
64
Page 65

1-2. Opening, closing and locking th e do o r s
CAUTION
■ Caution while driving
● Keep the back door closed while driving.
If the back door is left open, it may hit near-by objects while driving or luggage may be unexpectedly thrown out, causing an accident.
In addition, exhaust gases may enter the vehicle, causing death or a serious health hazard. Make sure to close the back door before driving.
● Before driving the vehicle, make sure that the back door is fully closed. If
the back door is not fully closed, it may open unexpectedly while driving,
causing an accident.
● Never let anyone sit in the luggage compartment. In the event of sudden
braking or a collision, they are susceptible to death or serious injury.
■ When children are in the vehicle
Observe the following precautions.
Failure to do so may result in death or serious injury.
● Do not leave children alone in the luggage compartment.
If a child is accidentally locked in the luggage compartment, they could
have heat exhaustion.
● Do not allow a child to open or close the back door.
Doing so may cause the back door to operate unexpectedly, or cause the
child’s hands, head, or neck to be caught by the closing back door.
1
Before driving
65
Page 66
1-2. Opening, closing and locking the doors
CAUTION
● The back door may fall if it is not
opened fully. It is more difficult to open
or close the back door on an incline
than on a level surface, so beware of
the back door unexpectedly opening or
closing by itself. Make sure that the
back door is fully open and secure
before using the luggage compartment.
● When closing the back door, take extra
care to prevent your fingers etc. from
being caught.
● When closing the back door, make sure
to press it lightly on its outer surface. If
the back door strap is used to fully
close the back door, it may result in
hands or arms being caught.
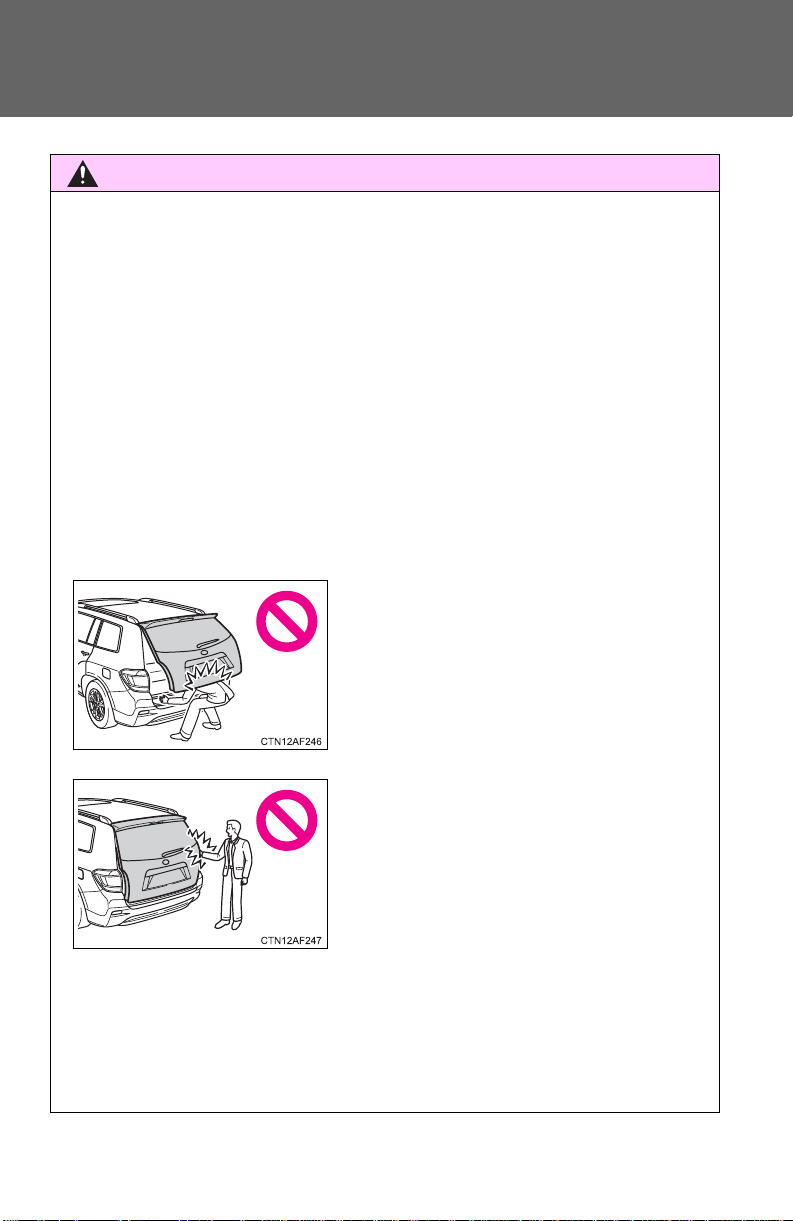
■ Operating the back door
Observe the following precautions.
Failure to do so may cause parts of the body to be caught, resulting in death
or serious injury.
● Remove any heavy loads, such as snow and ice, from the back door
before opening it. Failure to do so may cause the back door to fall closed
again after it is opened.
● When opening or closing the back door, thoroughly check to make sure
the surrounding area is safe.
● If anyone is in the vicinity, make sure they are safe and let them know that
the back door is about to open or close.
● Use caution when opening or closing the back door in windy weather as it
may move abruptly in strong wind.
● Do not pull on the back door damper stay to close the back door, and do
not hang on the back door damper stay.
Doing so may cause hands to be caught or the back door damper stay to
break, causing an accident.
66
Page 67
1-2. Opening, closing and locking th e do o r s
CAUTION
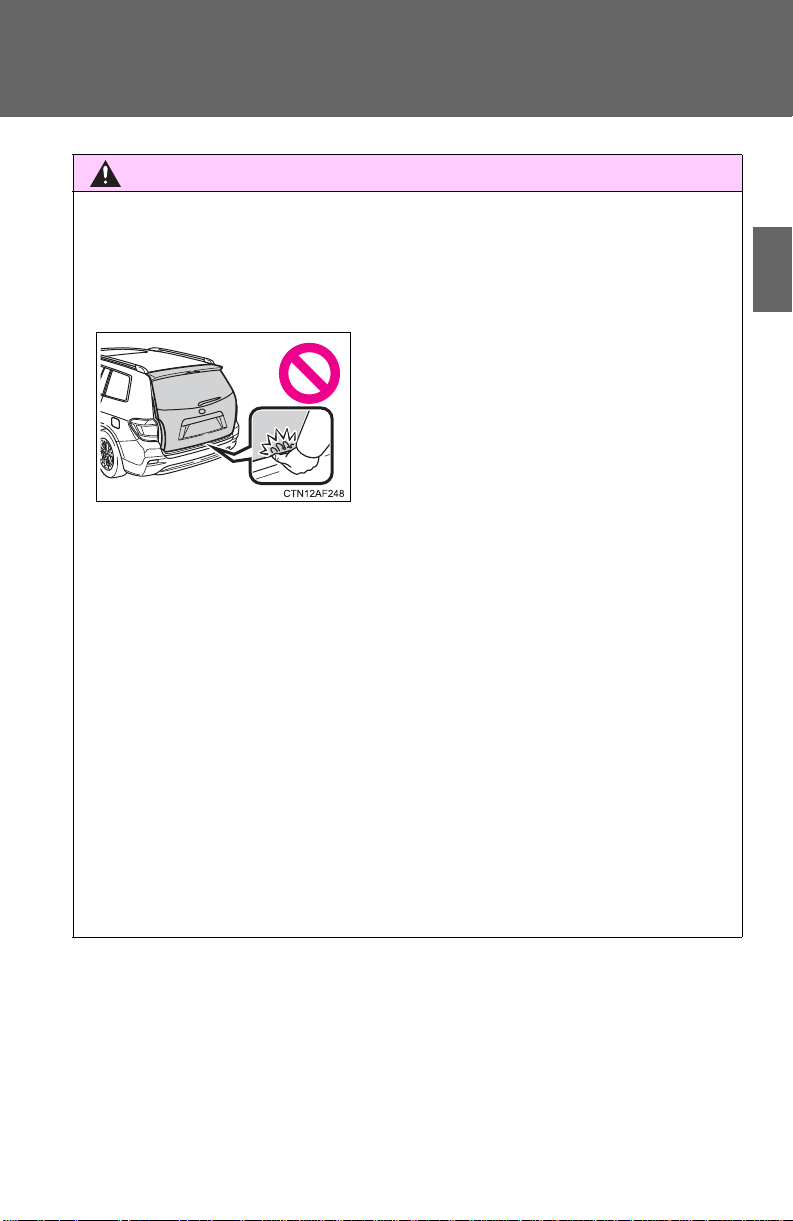
● In the event that the back door is left
slightly open, the back door closer will
automatically close it to the fully closed
position. It takes several seconds
before the back door closer begins to
operate. Be careful not to catch fingers
or anything else in the back door, as
this may cause bone fractures or other
serious injuries.
● Do not attach any accessories other than genuine Toyota parts to the back
door. Such additional weight on the back door may cause the back door to
fall closed again after it is opened.
■ Back door closer (vehicles with power back door)
● Use caution when using the back door closer as it still operates when the
power back door system is canceled.
■ Power back door
Observe the following precautions when operating the power back door.
Failure to do so may cause death or serious injury.
● Check the safety of the surrounding area to make sure there are no obsta-
cles or anything that could cause any of your belongings to get caught.
● If anyone is in the vicinity, make sure they are safe and let them know that
the back door is about to open or close.
● If the power back door main switch is turned off while the back door is
operating during automatic operation, the back door stops operating. Take
extra care when on an incline, as the back door may open or close suddenly.
1
Before driving
67
Page 68

1-2. Opening, closing and locking the doors
CAUTION
● On an incline, the back door may fall after it opens automatically. Make
sure the back door is fully open and secure.
● In the following situations, the power back door may detect an abnormality
and automatic operation may be stopped. In this case, the back door has
to be operated manually. Take extra care in this situation, as the stopped
back door may suddenly fall, causing an accident.
• When the back door contacts an obstacle
• Vehicles without smart key system: When the battery voltage suddenly
drops, such as when the engine switch is turned to the “ON” position or
the engine is started during automatic operation
• Vehicles with smart key system: When the battery voltage suddenly
drops, such as when the “ENGINE START STOP” switch is turned to
IGNITION ON mode or the engine is started during automatic operation
● Do not attach any accessories other than genuine Toyota parts to the back
door. The power back door may not operate, causing itself to malfunction,
or the back door may fall closed again after it is opened.
■ Jam protection function (vehicles with power back door)
Observe the following precautions.
Failure to do so may cause death or serious injury.
● Never use any part of your body to intentionally activate the jam protection
function.
● The jam protection function may not work if something gets caught just
before the back door fully closes. Be careful not to catch fingers or anything else.
● The jam protection function may not work depending on the shape of the
object that is caught. Be careful not to catch fingers or anything else.
68
Page 69
1-2. Opening, closing and locking th e do o r s
NOTICE
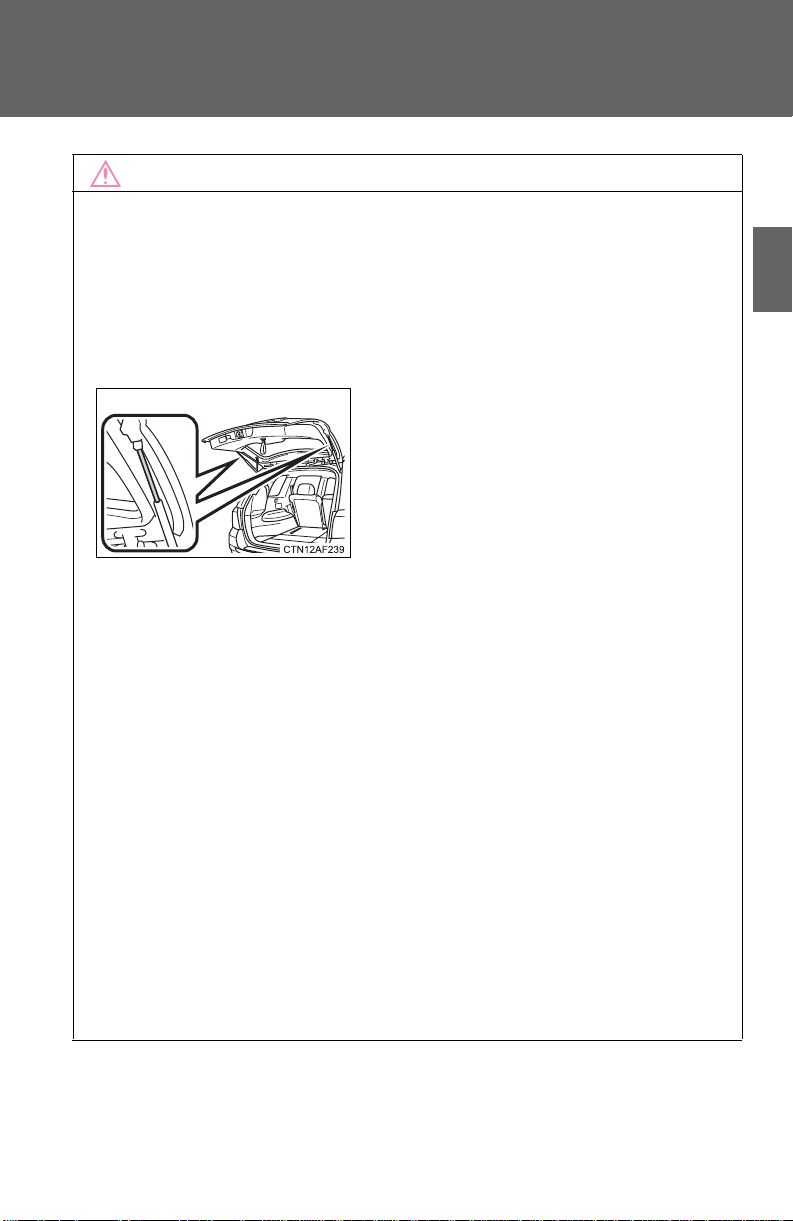
● Do not attach any foreign objects, such
as stickers, plastic sheets, or adhesives
to the damper stay rod.
● Do not touch the damper stay rod with
gloves or other fabric items.
● Do not attach any accessories other
than genuine Toyota parts to the back
door.
● Do not place your hand on the damper
stay or apply lateral forces to it.
■ Back door damper stays
The back door is equipped with damper stays that hold the back door in
place.
Observe the following precautions.
Failure to do so may cause damage to the back door damper stay, resulting
in malfunction.
1
Before driving
■ To prevent back door closer malfunction
Do not apply excessive force to the back door while the back door closer is
operating.
■ To prevent damage to the power back door
● Make sure that there is no ice between the back door and frame that
would prevent movement of the back door. Operating the power back door
when excessive load is present on the back door may cause a malfunction.
● Do not apply excessive force to the back door while the power back door
is operating.
● Take care not to damage the sensors (installed on the right and left edges
of the power back door) with a knife or other sharp object. If the sensor is
disconnected, the power back door will not operate in automatic operation.
69
Page 70
1-2. Opening, closing and locking the doors
The glass hatch can be opened using the glass hatch opener or wireless remote control.
■ Wireless remote control (vehicles without smart key sys-
tem)
P. 48
■ Entry function (vehicles with smart key system)
P. 36
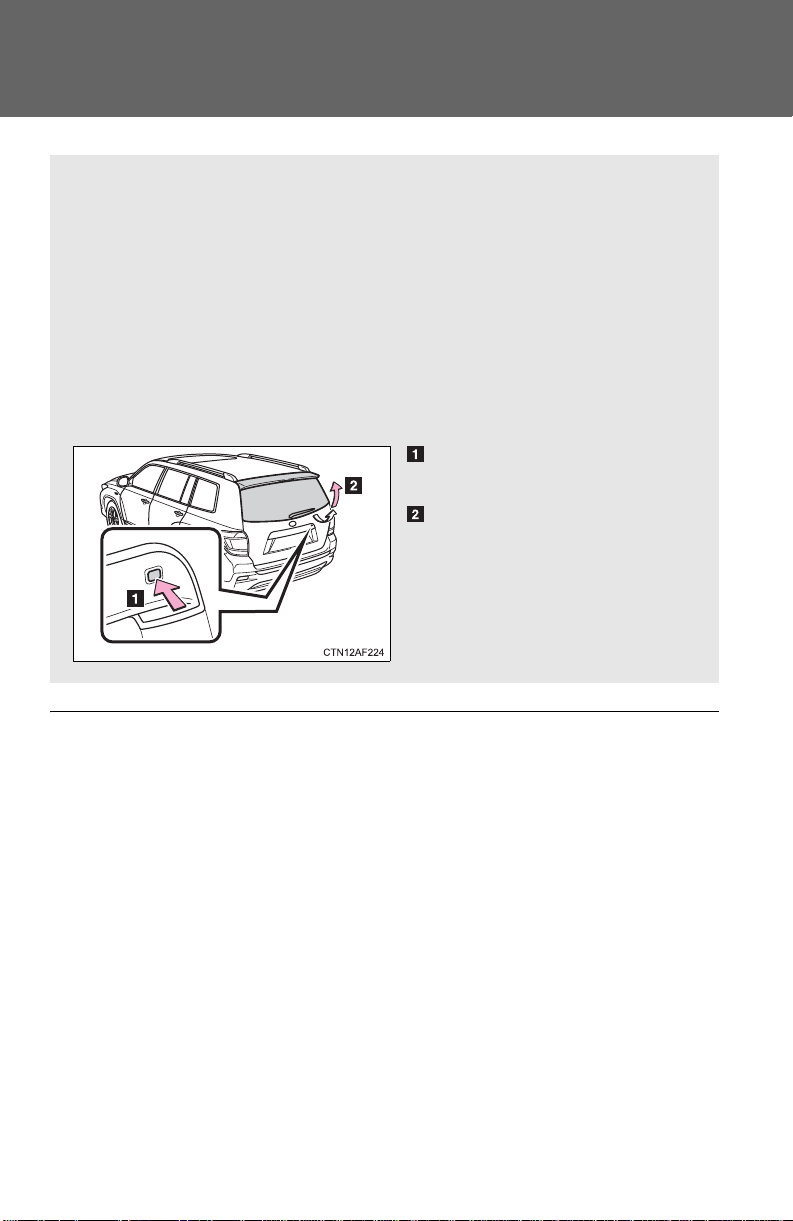
■ Glass hatch opener
Press and hold the button to
pop up the glass hatch.
Raise
The glass hatch can be
opened only when the back
door is closed.
: If equipped
Glass hatch
■ Opening and closing the glass hatch
● Make sure that the rear wiper is switched off.
● Do not rotate the rear wiper arm while the glass hatch is opening. (If the
rear wiper arm is rotated, close the glass hatch as it is then switch on the
wiper. The rear wiper arm will return to the correct position automatically
after wiping.)
● Make sure that the back door is closed before closing the glass hatch.
70
Page 71

1-2. Opening, closing and locking th e do o r s
CAUTION
■ While driving
● Keep the glass hatch closed while driving.
If the glass hatch is left open, it may hit near-by objects while driving or
luggage may be unexpectedly thrown out, causing an accident.
In addition, exhaust gases may enter the vehicle, causing death or a serious health hazard. Make sure to close the glass hatch before driving.
● Before driving the vehicle, make sure that the glass hatch is fully closed. If
the glass hatch is not fully closed, it may open unexpectedly while driving,
causing an accident.
■ When children are in the vehicle
Do not allow a child to open or close the glass hatch.
Doing so may cause the glass hatch to operate unexpectedly, or cause the
child's hands, head, or neck to be caught by the closing glass hatch.
■ Operating the glass hatch
Observe the following precautions.
Failure to do so may cause parts of the body to be caught, resulting in death
or serious injury.
● Remove any heavy loads, such as snow and ice, from the glass hatch
before opening it. Failure to do so may cause the glass hatch fall closed
again after it is opened.
● When opening or closing the glass hatch, thoroughly check to make sure
the surrounding area is safe.
● If anyone is in the vicinity, make sure they are safe and let them know that
the glass hatch is about to open or close.
● Use caution when opening or closing the glass hatch in windy weather as
it may move abruptly in strong wind.
1
Before driving
71
Page 72
1-2. Opening, closing and locking the doors
CAUTION
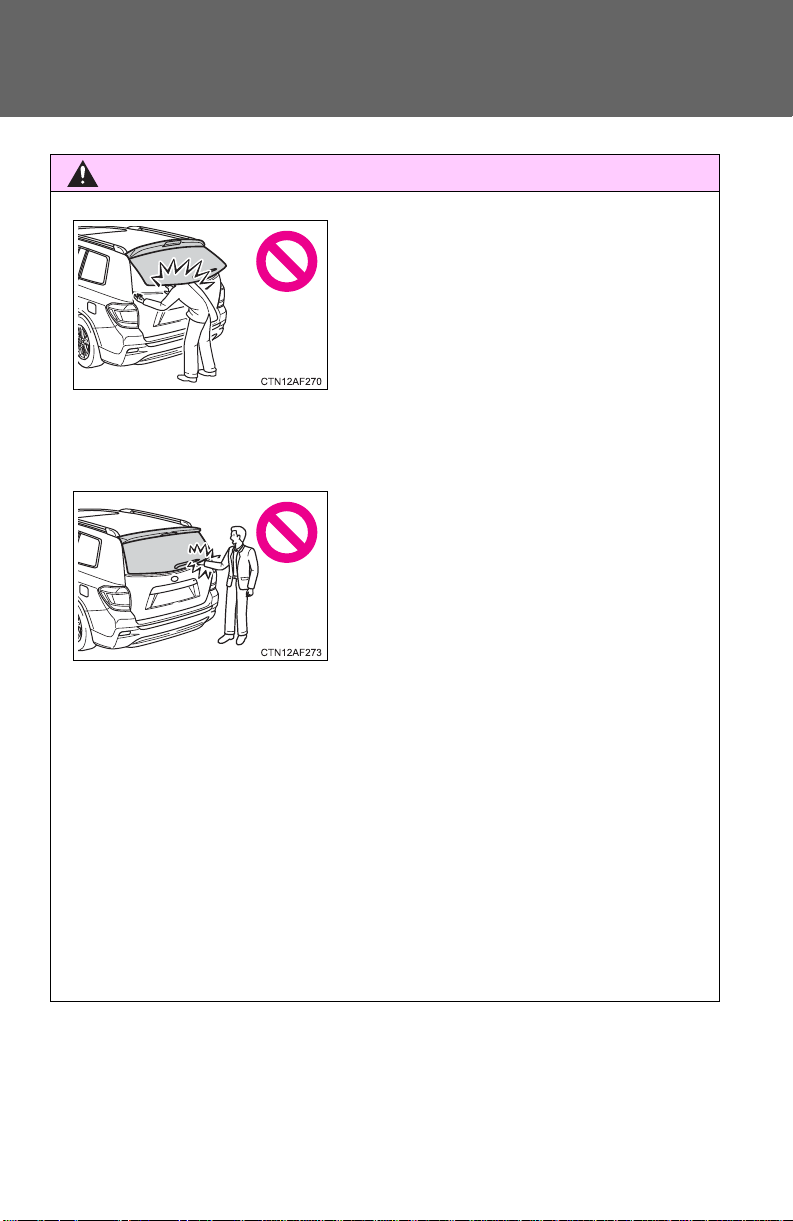
● The glass hatch may fall if it is not
opened fully. It is more difficult to open
or close the glass hatch on an incline
than on a level surface, so beware of
the glass hatch unexpectedly opening
or closing by itself. Make sure that the
glass hatch is fully open and secure
before using the luggage compartment. Also pay attention to your personal belongings such as bags and
ties.
● When closing the glass hatch, take
extra care to prevent your fingers etc.
from being caught. Also pay attention to
your personal belongings such as bags
and ties.
● When closing the glass hatch, make
sure to press it lightly on its outer surface.
● Do not pull on the glass hatch damper stay to close the glass hatch, and
do not hang on the glass hatch damper stay.
Doing so may cause hands to be caught or the glass hatch damper stay to
break, causing an accident.
● Do not attach any accessories other than genuine Toyota parts to the
glass hatch. Such additional weight on the glass hatch may cause the
glass hatch to fall closed again after it is opened, resulting in death or serious injury.
● Do not open the glass hatch while the rear wiper is switched on. (If the rear
wiper is switched on while the glass hatch is opening, the wiper motor
drive disc is swinging at the door panel.)
72
Page 73
1-2. Opening, closing and locking th e do o r s
CAUTION
NOTICE
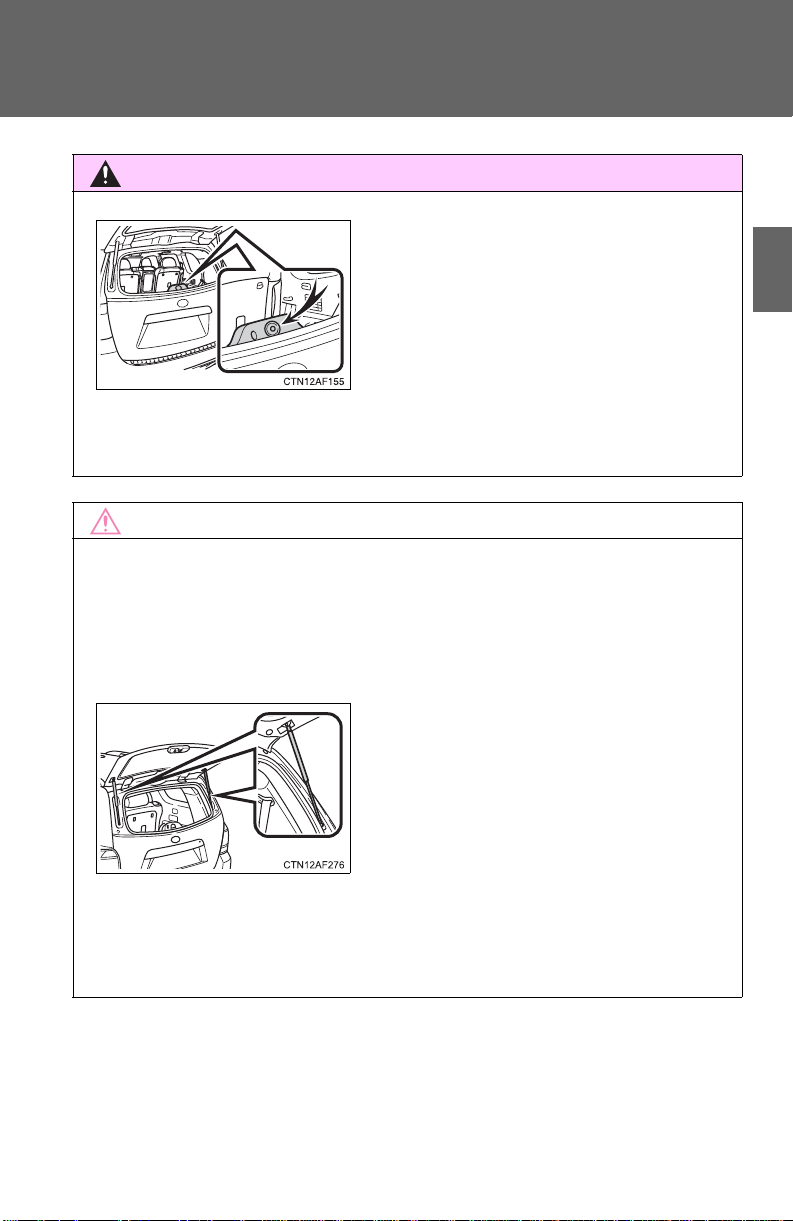
● Do not insert any object in the wiper
motor drive disc.
● Do not attach any foreign objects, such
as strikers, plastic sheets, or adhesives
to the damper stay rod.
● Do not touch the damper stay rod with
gloves or other fabric items.
● Do not attach any accessories other
than genuine Toyota parts to the glass
hatch.
● Do not place your hand or foot on the
damper stay or apply lateral forces to it.
● Do not close the glass hatch while the rear wiper is switched on. The rear
wiper arm may be restarted suddenly after closing the glass hatch.
■ Glass hatch damper stays
The glass hatch is equipped with damper stays that hold the glass hatch in
place. Observe the following precautions.
Failure to do so may cause damage to the glass hatch damper stay, resulting in malfunction.
1
Before driving
73
Page 74
1-3. Adjustable components (seats, mirrors, steering wheel)
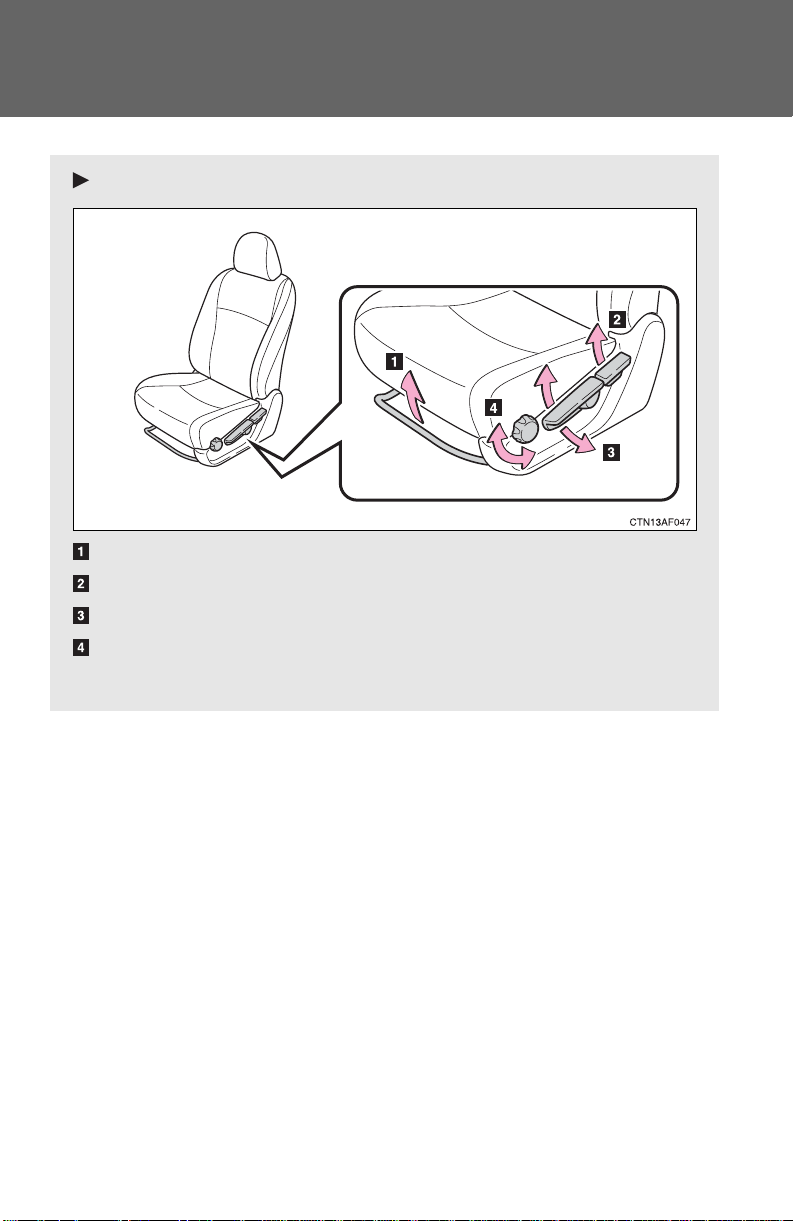
Manual seat
Seat position adjustment lever
Seatback angle adjustment lever
Vertical height adjustment lever (driver’s side only)
Seat cushion (front) angle adjustment knob (driver’s side only)
Pull up the lever until the lock is completely released.
Front seats
74
Page 75
1-3. Adjustable components (seats, mirrors, steering wheel)
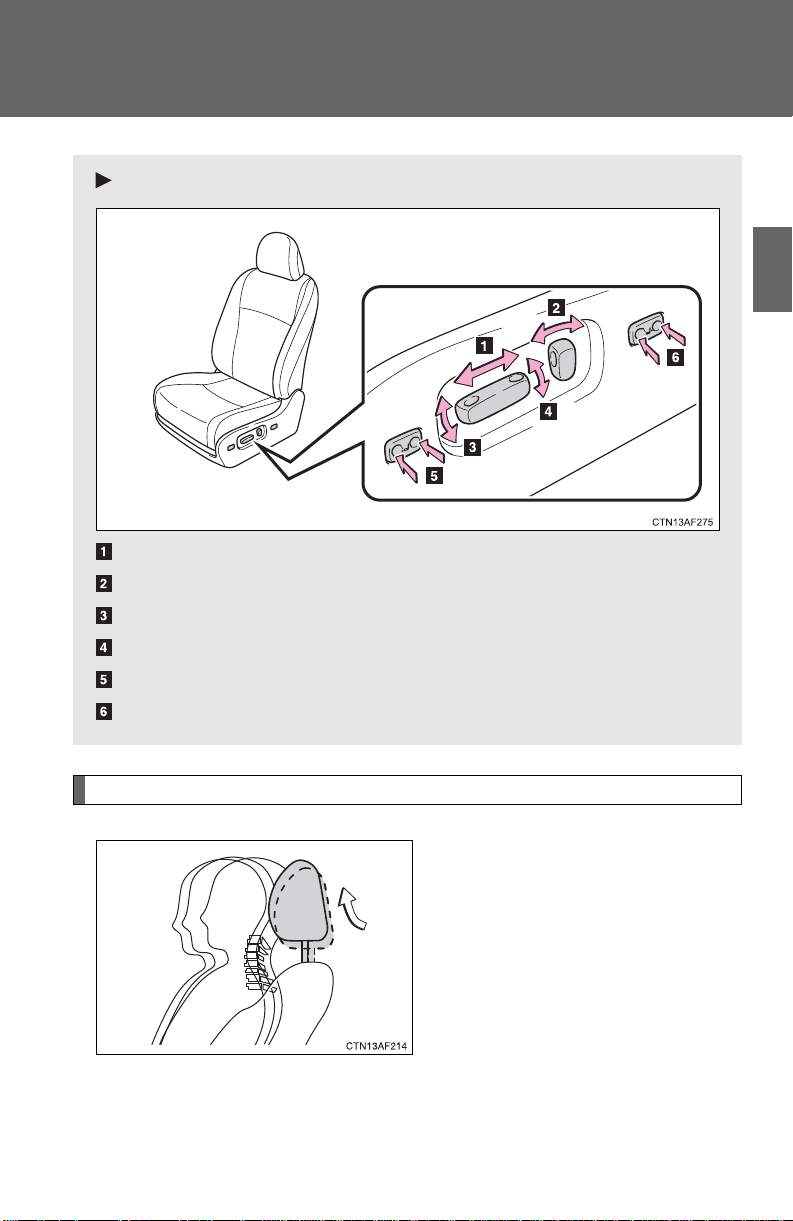
Power seat
Seat position adjustment switch
Seatback angle adjustment switch
Seat cushion (front) angle adjustment switch (driver’s side only)
Vertical height adjustment switch (driver’s side only)
Driver’s seat leg support adjustment switch (if equipped)
Seat lumbar support adjustment switch (driver’s side only)
1
Before driving
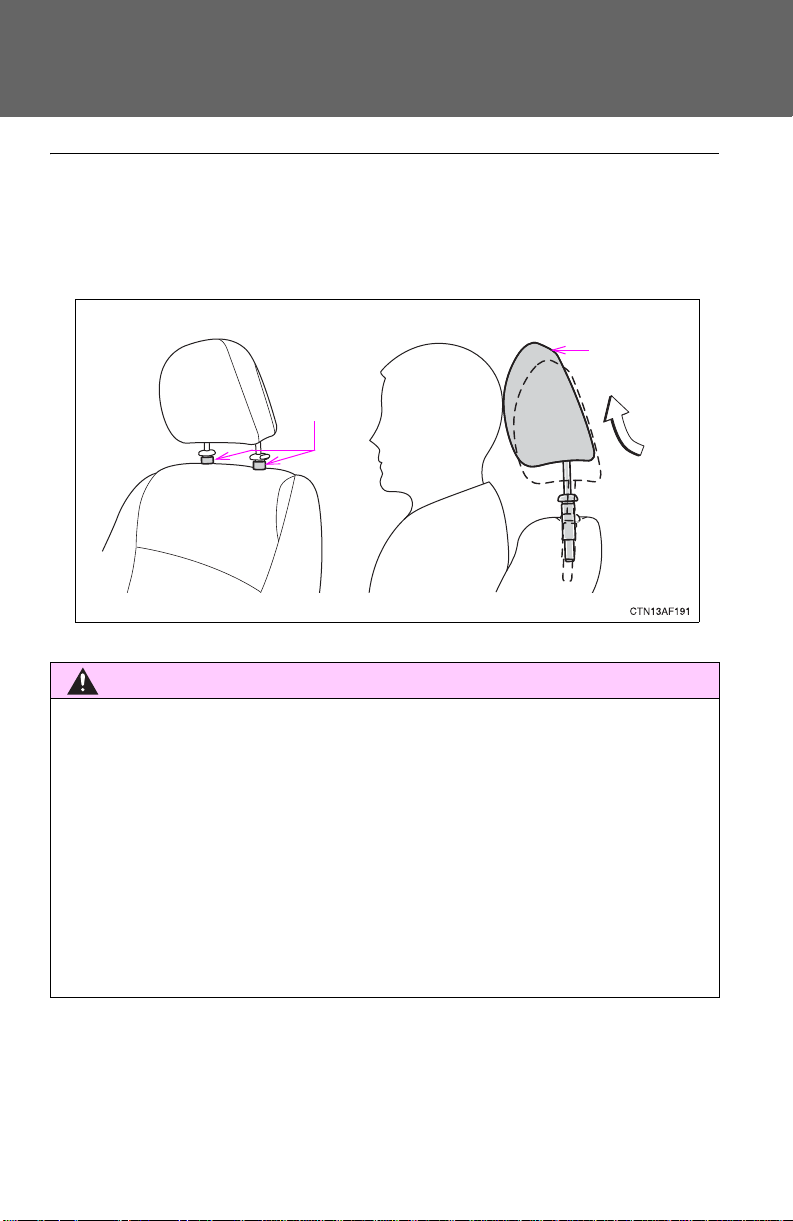
Active head restraints
When the occupant’s lower back
presses against the seatback
during a rear-end collision, the
head restraint moves slightly forward and upward to help reduce
the risk of whiplash to the seat
occupant.
75
Page 76
1-3. Adjustable components (seats, mirrors, steering wheel)
CAUTION
Inner
structure
During
rear-end
collision
■ Active head restraints
Even small forces applied to the seatback may cause the head restraint to
move. Pushing up a locked head restraint forcibly may cause the inner structure of the head restraint to appear. This does not indicate a problem.
■ Seat adjustment
● Be careful that the seat does not hit passengers or luggage.
● Do not recline the seat more than necessary when the vehicle is in motion
to reduce the risk of sliding under the lap belt.
If the seat is too reclined, the lap belt may slide past the hips and apply
restraint forces directly to the abdomen or your neck may contact the
shoulder belt, increasing the risk of death or serious injury in the event of
an accident.
● Manual seat only: After adjusting the seat, make sure that the seat is
locked in position.
76
Page 77
1-3. Adjustable components (seats, mirrors, steering wheel)
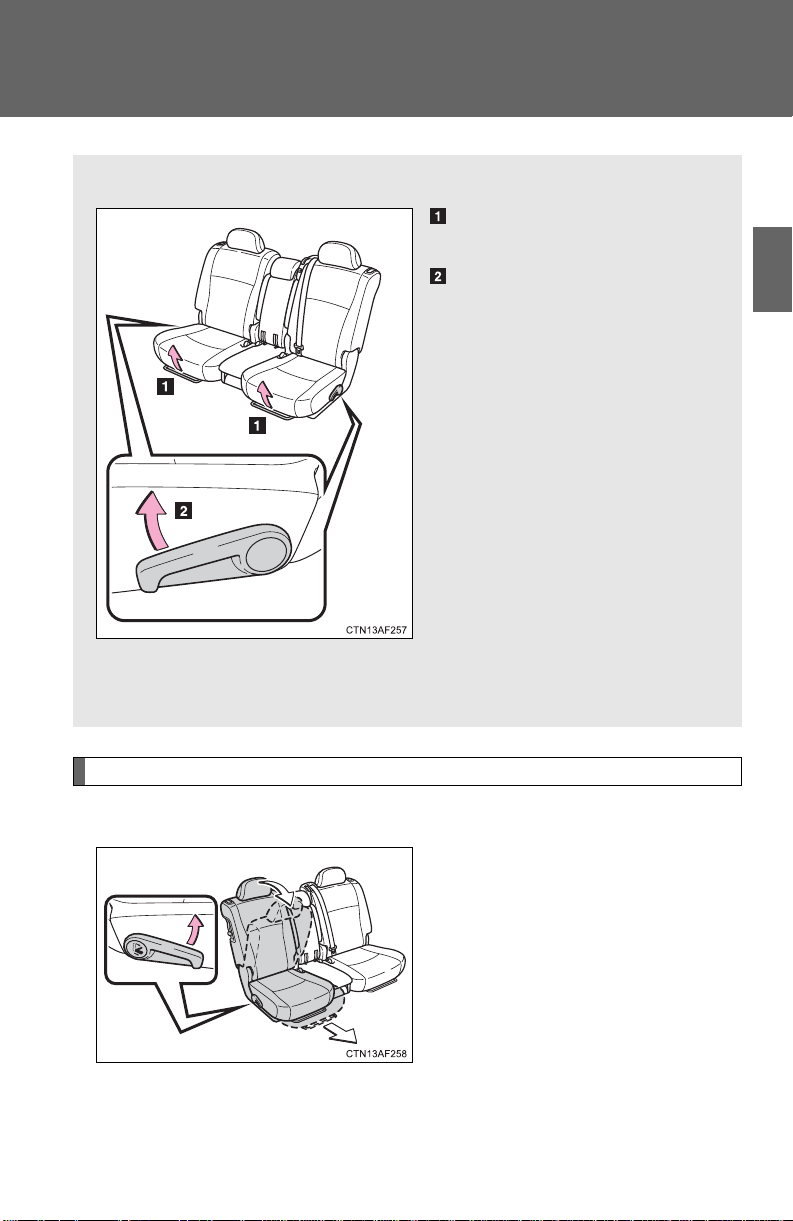
■ Second seats
Seat position adjustment
lever
Seatback angle adjustment
lever
Pull up the lever until the lock
is completely released.
■ Third seats
The third seats do not have a seat adjustment function.
Rear seats
1
Before driving
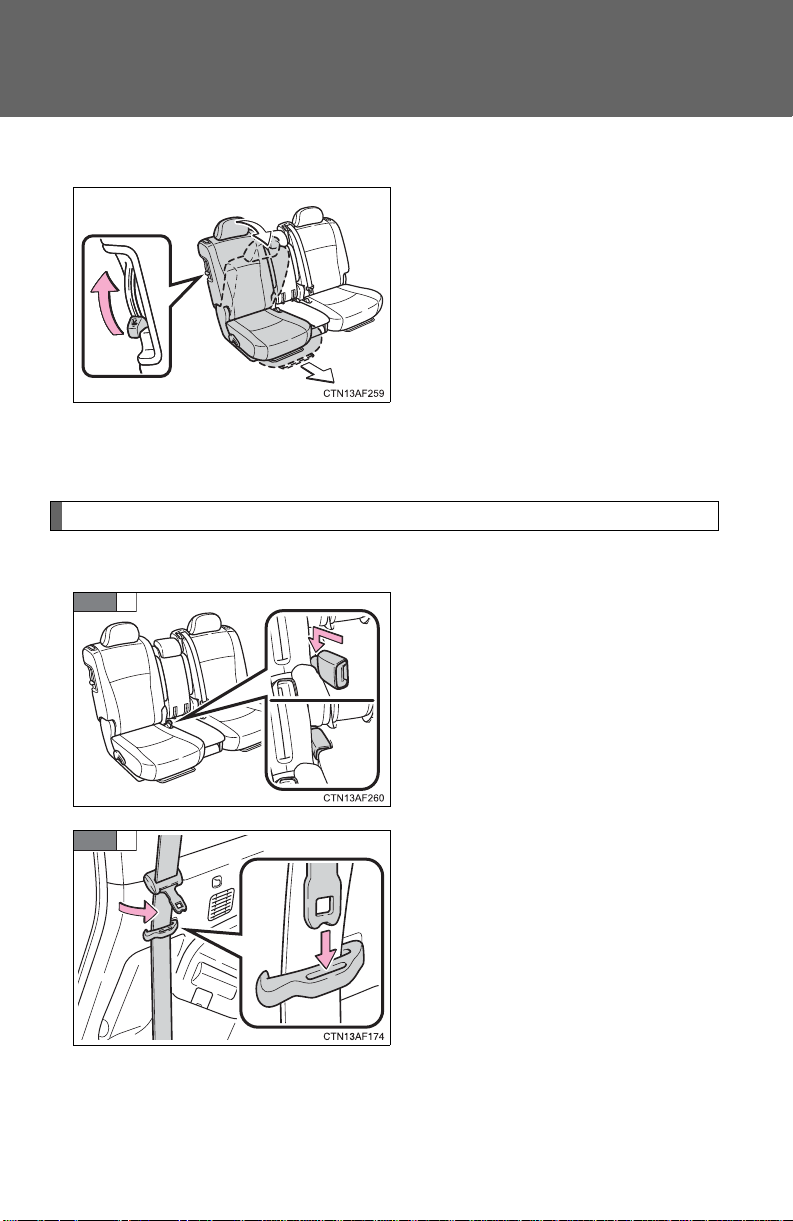
Moving a second seat for third seat access
■ Getting in the vehicle (right side only)
Pull up the lever and fold down
the seatback. The seat will slide
forward.
Move the seat to the front-most
position.
77
Page 78
1-3. Adjustable components (seats, mirrors, steering wheel)
STEP
1
STEP
2
■ Getting out of the vehicle (right side only)
Lift the lever on the side of the
seatback and fold down the seatback. The seat will slide forward.
Move the seat to the front-most
position.
■ After passengers have entered/exited the vehicle
Lift up the seatback and slide the seat backward until it locks.
Folding down the second seats
■ Before folding down the second seats
Stow the rear center seat belt
buckle.
78
Pass the outer seat belts through
the seat belt hangers and secure
the seat belt plates.
This prevents the shoulder belt
from being damaged.
Make sure that the seat belts are
removed from the hangers before
using them.
Page 79
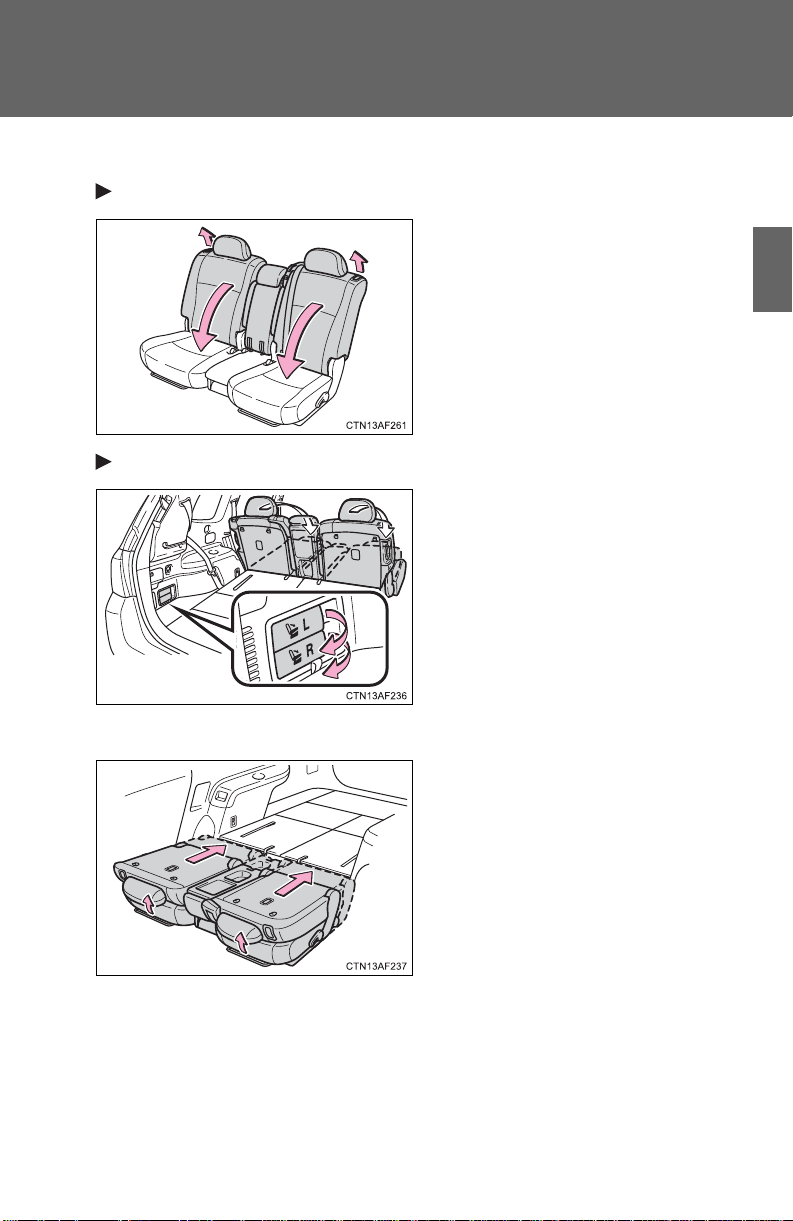
1-3. Adjustable components (seats, mirrors, steering wheel)
■ Folding down the second seats
From inside
From outside (if equipped)
Pull the lever to unlock the seatback and then fold the seatback
down.
Pull the lever.
L: Left side and center second
seats
R:Right side second seat
1
Before driving
■ After folding down the second seats
Slide the folded second seats to
the rear-most position.
79
Page 80
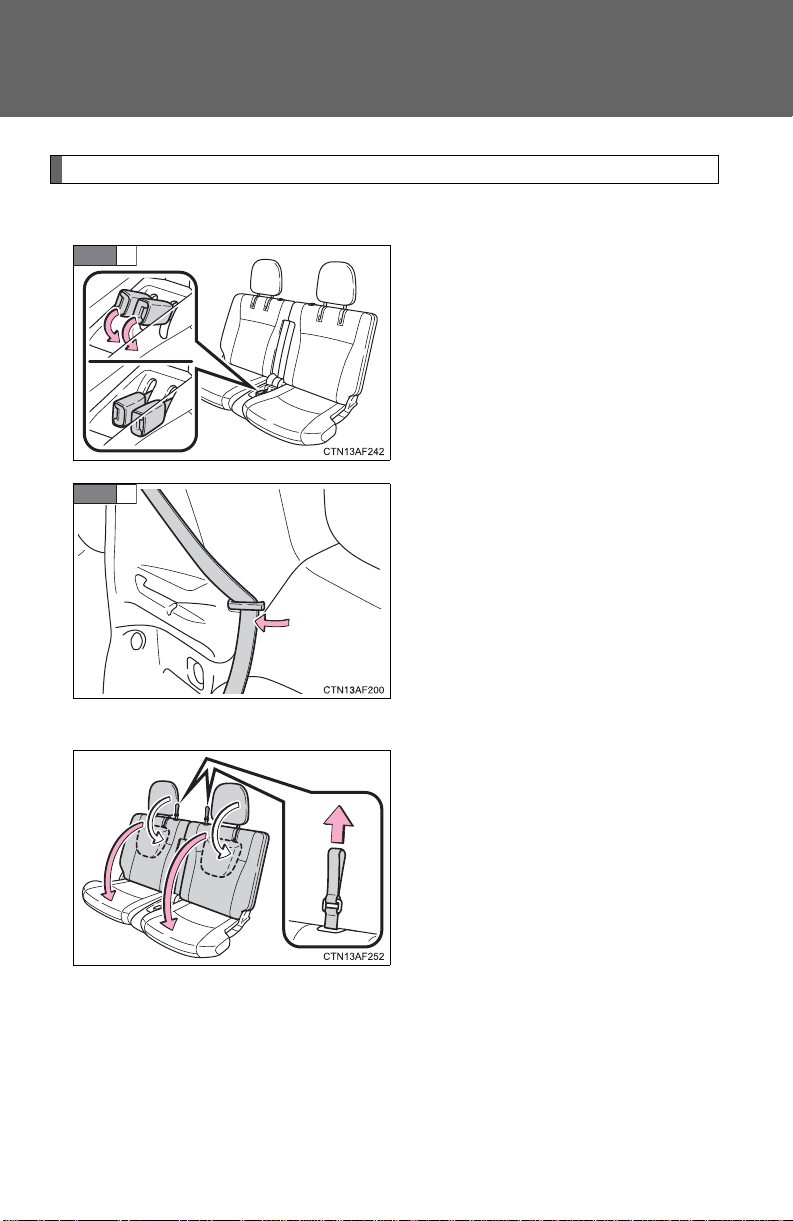
1-3. Adjustable components (seats, mirrors, steering wheel)
STEP
1
STEP
2
Folding down the third seats
■ Before folding down the third seats
Stow the third seat belt buckles.
Pass the seat belts through the
seat belt hangers.
This helps to prevent the shoulder
belts from being damaged.
Make sure that the seat belts are
removed from the hangers before
using them.
■ Folding down the third seats
80
While pulling the straps, fold
down the seatbacks.
The head restraints will fold down
automatically when the straps are
pulled.
Page 81
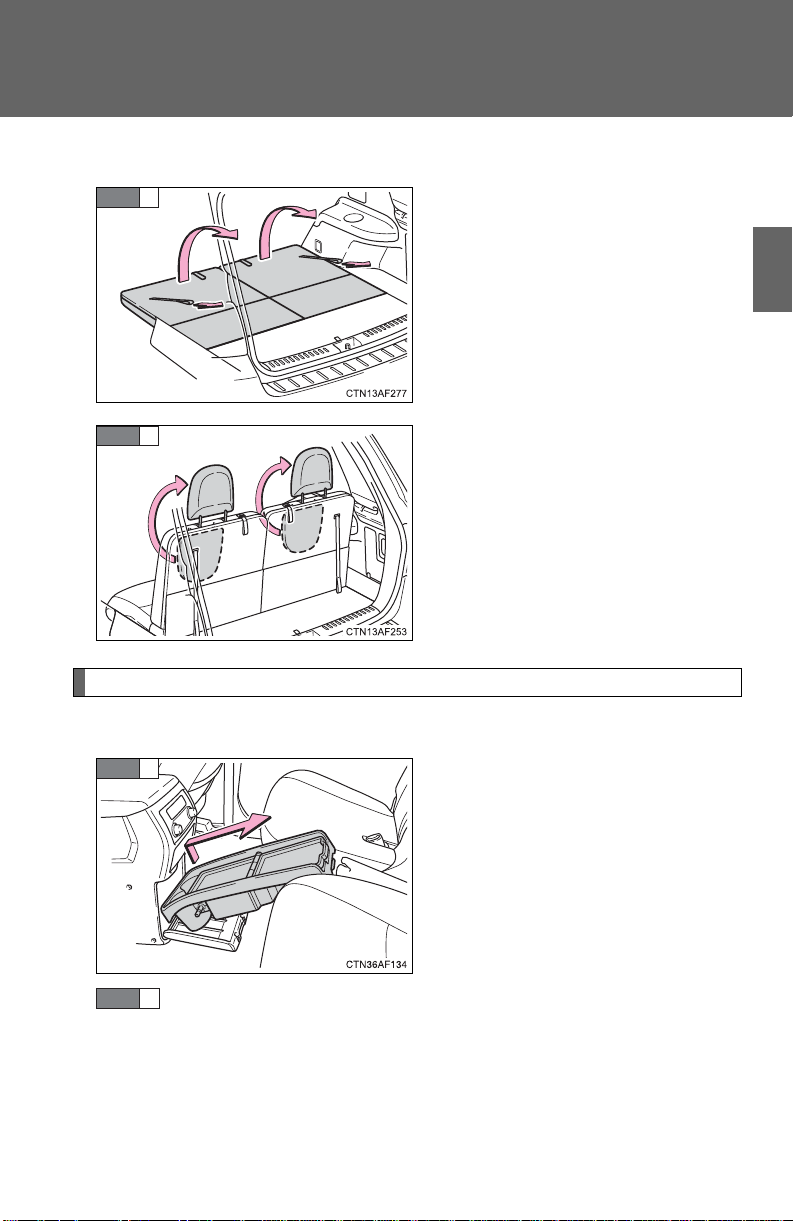
1-3. Adjustable components (seats, mirrors, steering wheel)
STEP
1
STEP
2
STEP
1
STEP
2
■ Returning the third seats
Pull the straps and raise the
seatbacks until they lock.
1
Before driving
Raise the head restraints.
Removing the second center seat
■ Before removing the second center seat
Lower the second center seat head restraint to the lowest
position. (P. 85)
Take out the side table from the
console box.
81
Page 82
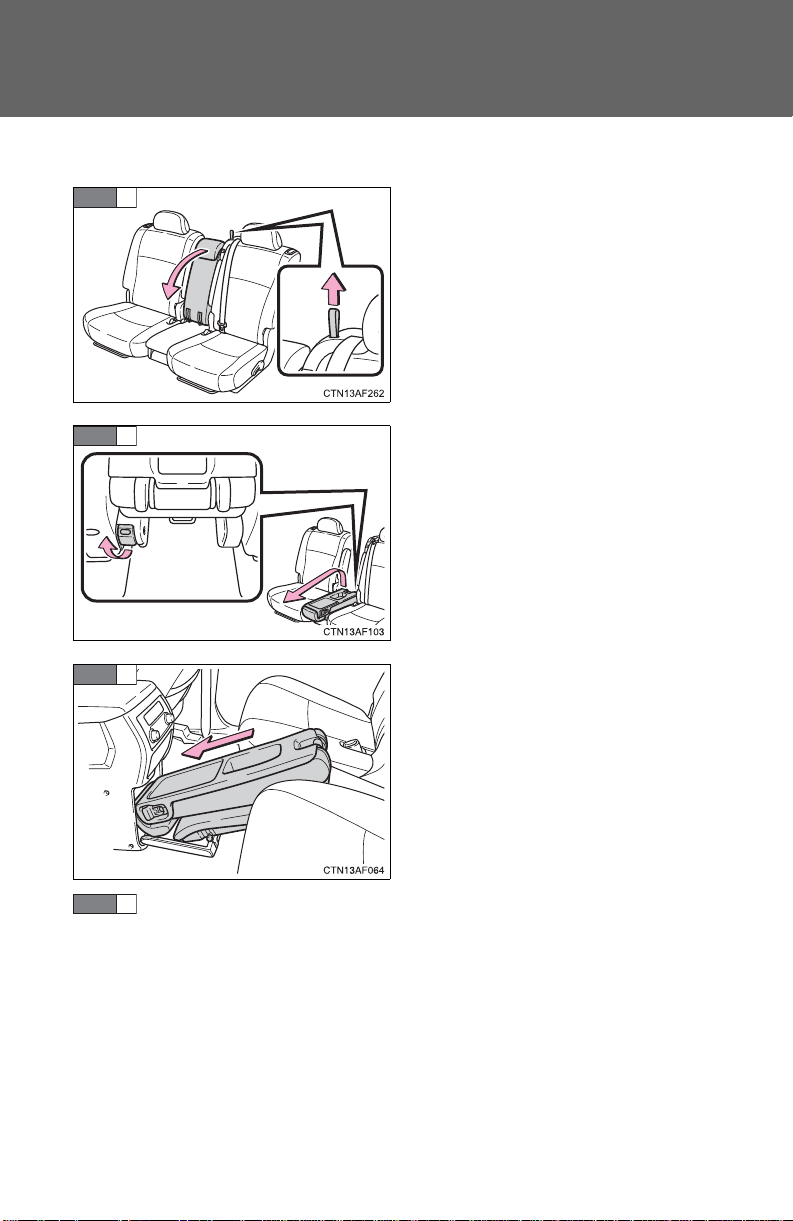
1-3. Adjustable components (seats, mirrors, steering wheel)
STEP
1
STEP
2
STEP
3
STEP
4
■ Removing the second center seat
Fold down the second center
seatback while pulling the seatback lock release strap.
Pull the lock release lever to
remove the second center seat.
82
Stow the second center seat in
the console box.
Make sure that the seat is securely locked in position and
close the console box door.
Page 83
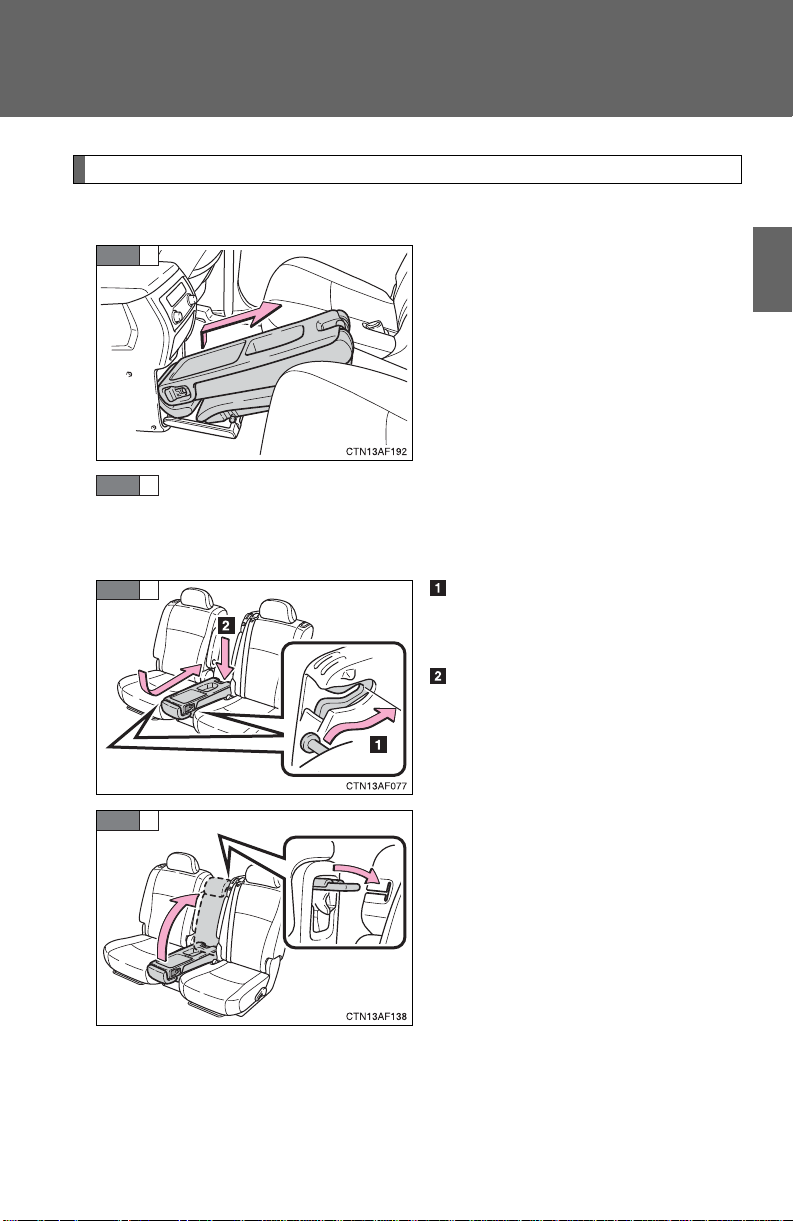
1-3. Adjustable components (seats, mirrors, steering wheel)
STEP
1
STEP
2
STEP
1
STEP
2
Installing the second center seat
■ Before installing the second center seat
Remove the side table, if used, from the second seat.
(P. 410)
■ Installing the second center seat
Take out the second center seat
from the console box.
Fully engage the front pins
with the hooks, and swing the
second center seat downward.
Push down on the second
center seat to engage the rear
pin locks.
Unfold the seatback and lock it.
1
Before driving
Stow the side table in the console
box.
83
Page 84

1-3. Adjustable components (seats, mirrors, steering wheel)
CAUTION
NOTICE
■ When adjusting a rear seat or removing the second center seat
● Be careful that the seat does not hit passengers or luggage.
● Do not recline the seat more than necessary when the vehicle is in motion
to reduce the risk of sliding under the lap belt. If the seat is too reclined,
the lap belt may slide past the hips and apply restraint forces directly to the
abdomen or your neck may contact the shoulder belt, increasing the risk of
death or serious injury in the event of an accident.
● Be careful not to get your hands or feet caught in the seat.
■ Before folding down the rear seats
Do not fold down a rear seat when there are passengers sitting in the rear
seats or when there is luggage placed on the rear seats.
■ After adjusting the seats
Observe the following precautions. Failure to do so may result in death or
serious injury.
● Make sure that the seat and seatback are securely locked in position by
lightly rocking them back and forth.
● Second center seat: Make sure the seat is locked in place by trying to
shake the seatback and lift up the rear part of the seat cushion.
● Check that the seat belts are not twisted or caught under the seat.
■ Caution while driving
Keep the console box closed.
Injuries may result in the event of an accident or sudden braking.
■ When folding down the second seats
Do not fold the seatback forward with the luggage cover hooks attached.
■ Removed second center seat
Avoid putting heavy loads on the seat. The metallic seat pins may be damaged, and you may be unable to correctly reinstall the seat.
84
Page 85
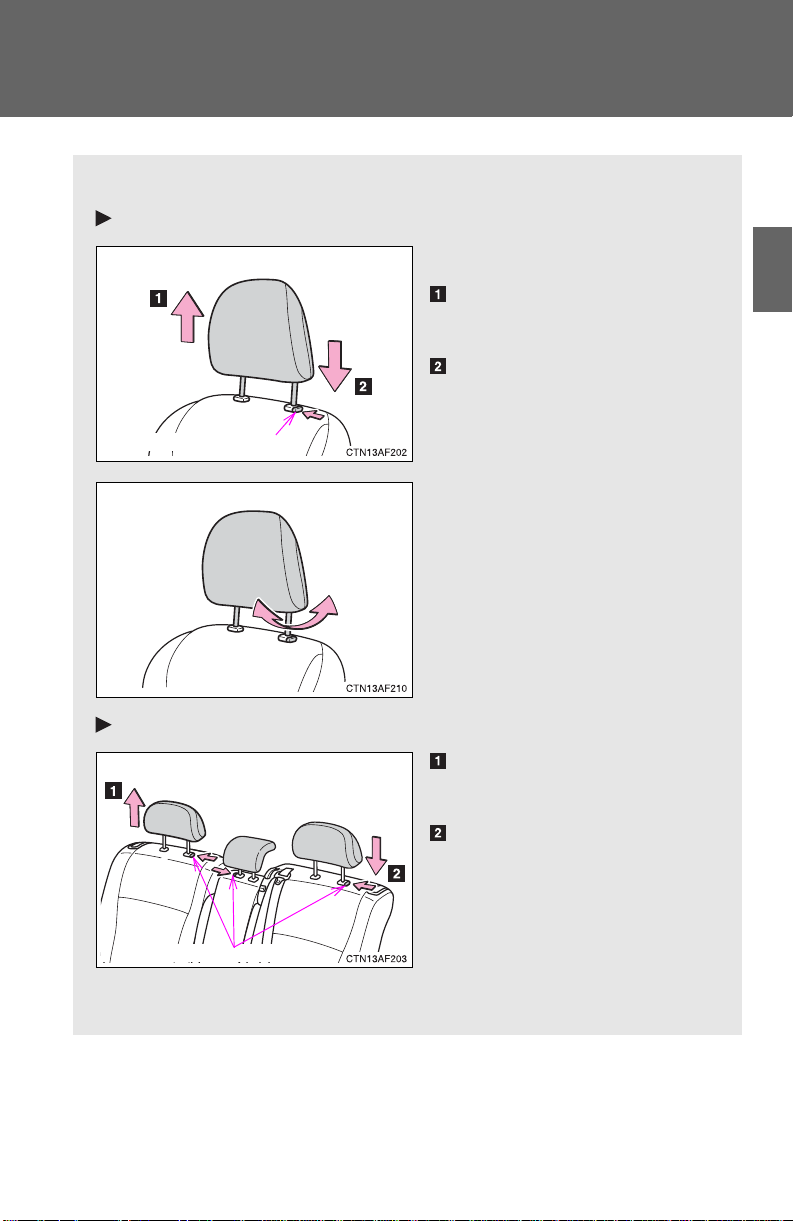
1-3. Adjustable components (seats, mirrors, steering wheel)
Head restraints are provided for all seats.
Front seats
Vertical adjustment
Up
Pull the head restraints up.
Down
Push the head restraint down
while pushing the lock release
button.
Angle adjustment (if equipped)
Second seats
Up
Pull the head restraints up.
Down
Push the head restraint down
while pushing the lock release
button.
When using the center seat,
raise the head restraint from
the stowed position.
Lock release button
Lock release buttons
Head restraints
1
Before driving
85
Page 86
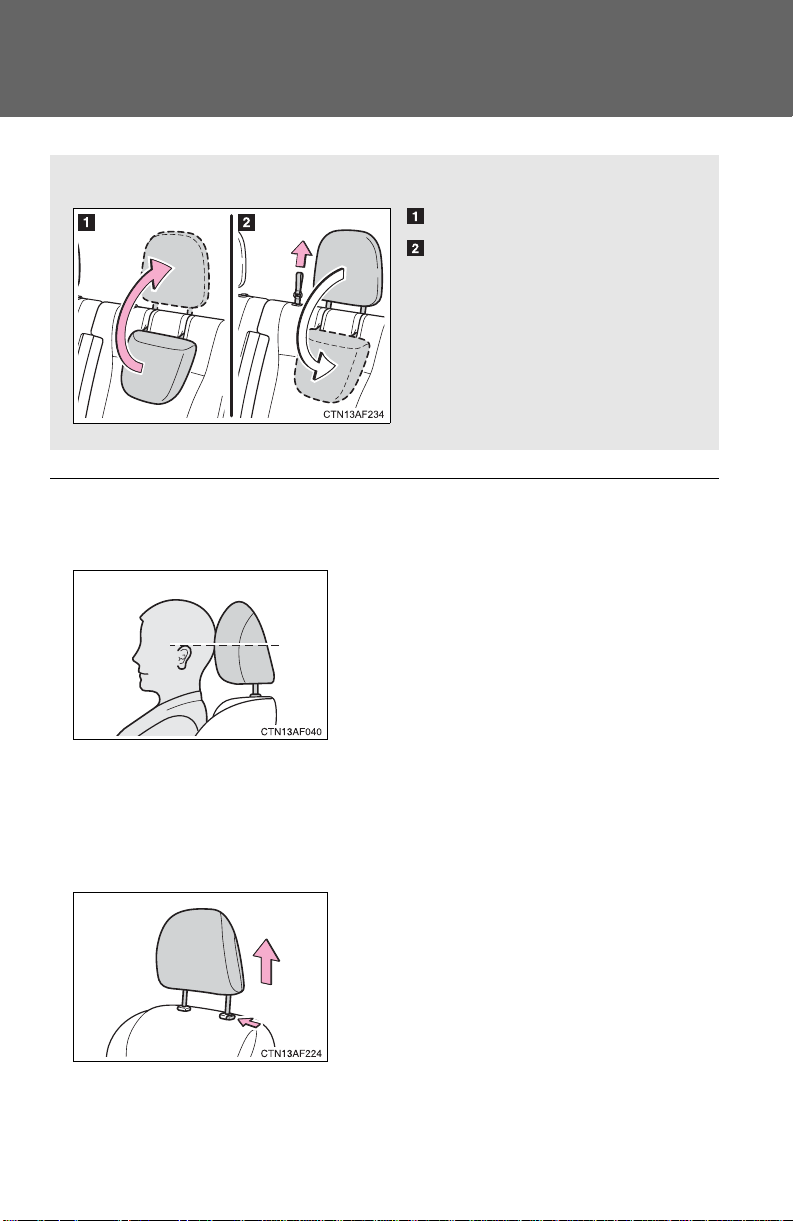
1-3. Adjustable components (seats, mirrors, steering wheel)
■ When using the third seat head restraints
To use
To fold
Make sure that the head restraints are
adjusted so that the center of the head
restraint is closest to the top of your ears.
Pull the head restraint up while pushing
the lock release button.
■ Adjusting the height of the head restraints (except second center seat
and third seats)
■ Adjusting the rear center seat head restraint
Always raise the head restraint one level from the stowed position when
using.
■ Removing the front and second seat outer head restraints
86
Page 87
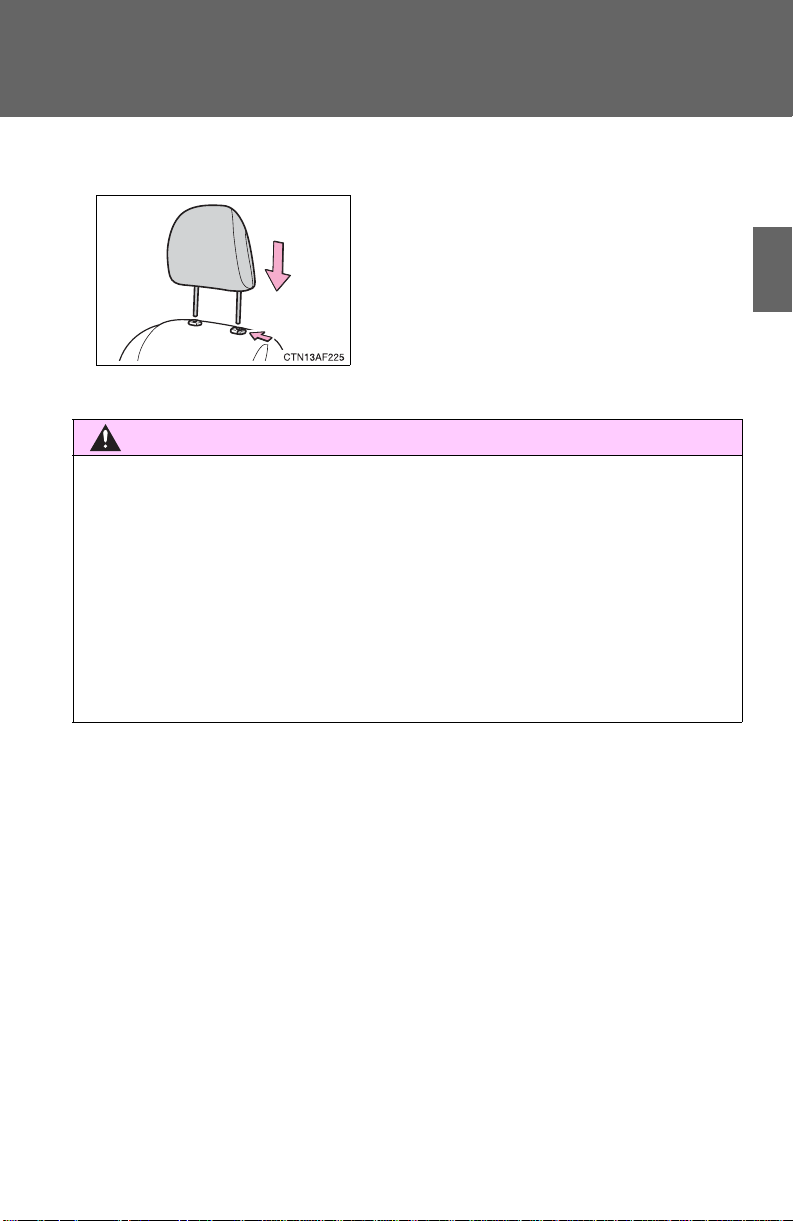
1-3. Adjustable components (seats, mirrors, steering wheel)
CAUTION
Align the head restraint with the installation holes and push it down to the lock
position.
Press and hold the lock release button
when lowering the head restraint.
■ Installing the front and second seat outer head restraints
■ Head restraint precautions
Observe the following precautions regarding the head restraints. Failure to
do so may result in death or serious injury.
● Use the head restraints designed for each respective seat.
● Adjust the head restraints to the correct position at all times.
● After adjusting the head restraints, push down on them and make sure
they are locked in position.
● Do not drive with the head restraints removed.
1
Before driving
87
Page 88
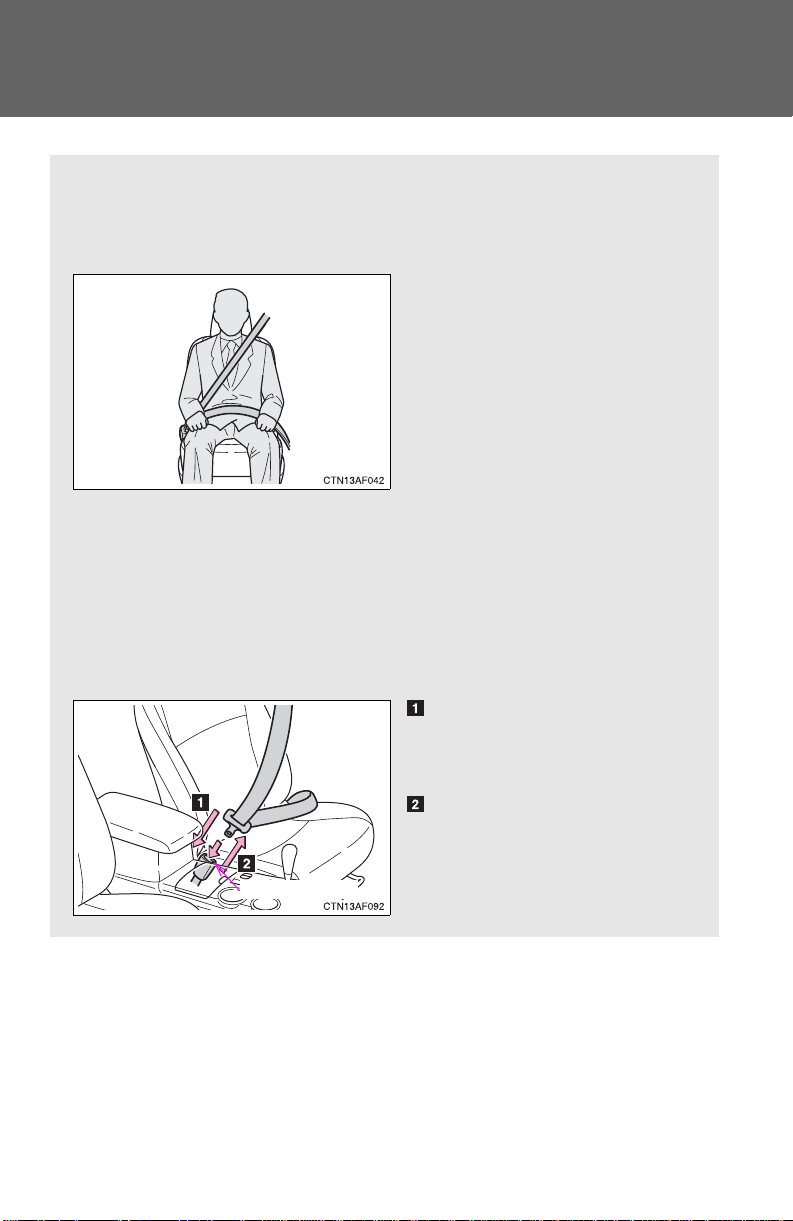
1-3. Adjustable components (seats, mirrors, steering wheel)
Make sure that all occupants are wearing their seat belts before driving the vehicle.
■ Correct use of the seat belts
● Extend the shoulder belt so
that it comes fully over the
shoulder, but does not
come into contact with the
neck or slide off the shoulder.
● Position the lap belt as low
as possible over the hips.
● Adjust the position of the
seatback. Sit up straight
and well back in the seat.
● Do not twist the seat belt.
■ Fastening and releasing the seat belt
Fastening the belt
Push the tab into the buckle
until a clicking sound is heard.
Releasing the belt
Press the release button.
Release button
Seat belts
88
Page 89
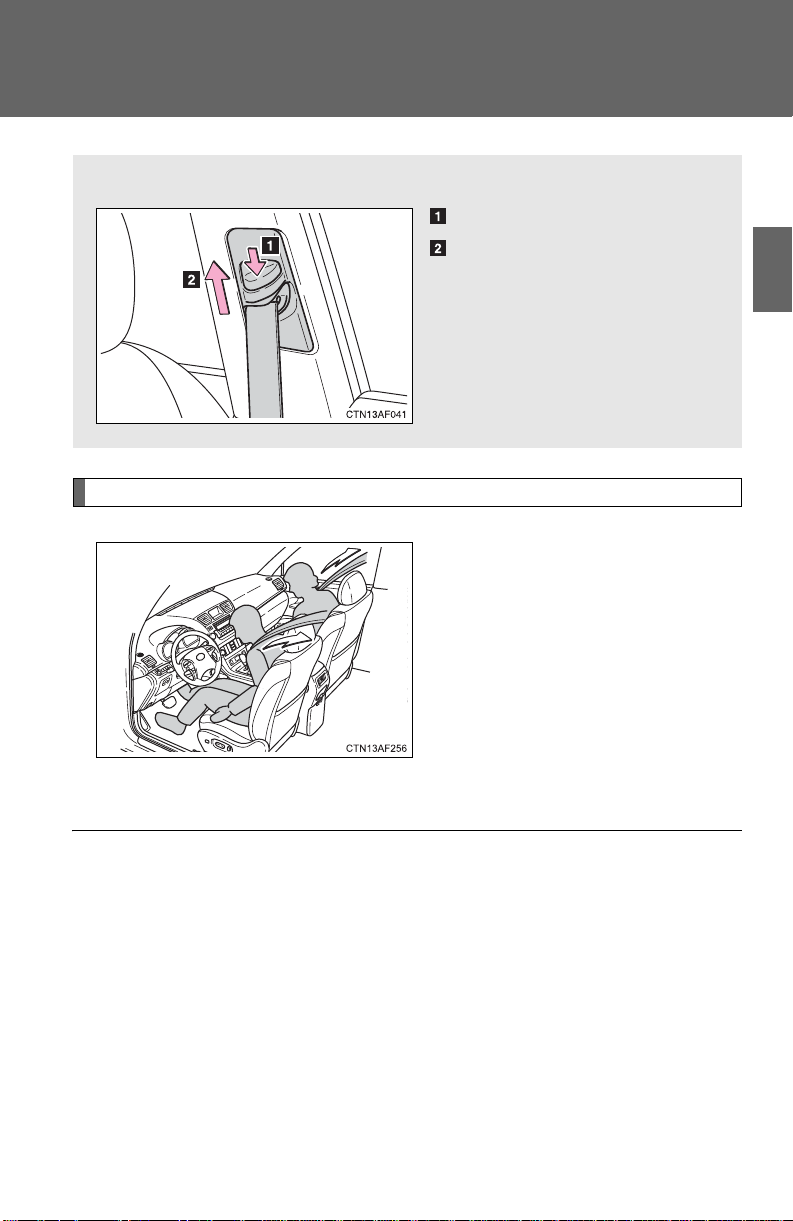
1-3. Adjustable components (seats, mirrors, steering wheel)
■ Adjusting the height of the belt (front seats)
Down
Up
Move the height adjuster up
and down as needed until you
hear a click.
Seat belt pretensioners (front seats)
The pretensioner helps the seat
belt to quickly restrain the occupant by retracting the seat belt
when the vehicle is subjected to
certain types of severe frontal
collision or a vehicle rollover.
1
Before driving
The pretensioner may not activate in the event of a minor frontal
impact, a side impact or a rear
impact.
■ Emergency locking retractor (ELR)
The retractor will lock the belt during a sudden stop or on impact. It may also
lock if you lean forward too quickly. A slow, easy motion will allow the belt to
extend so that you can move around fully.
■ Automatic locking retractor (ALR)
When a passenger's shoulder belt is completely extended and then
retracted even slightly, the belt is locked in that position and cannot be
extended. This feature is used to hold the child restraint system (CRS) firmly .
To free the belt again, fully retract the belt and then pull the belt out once
more. (P. 147)
89
Page 90
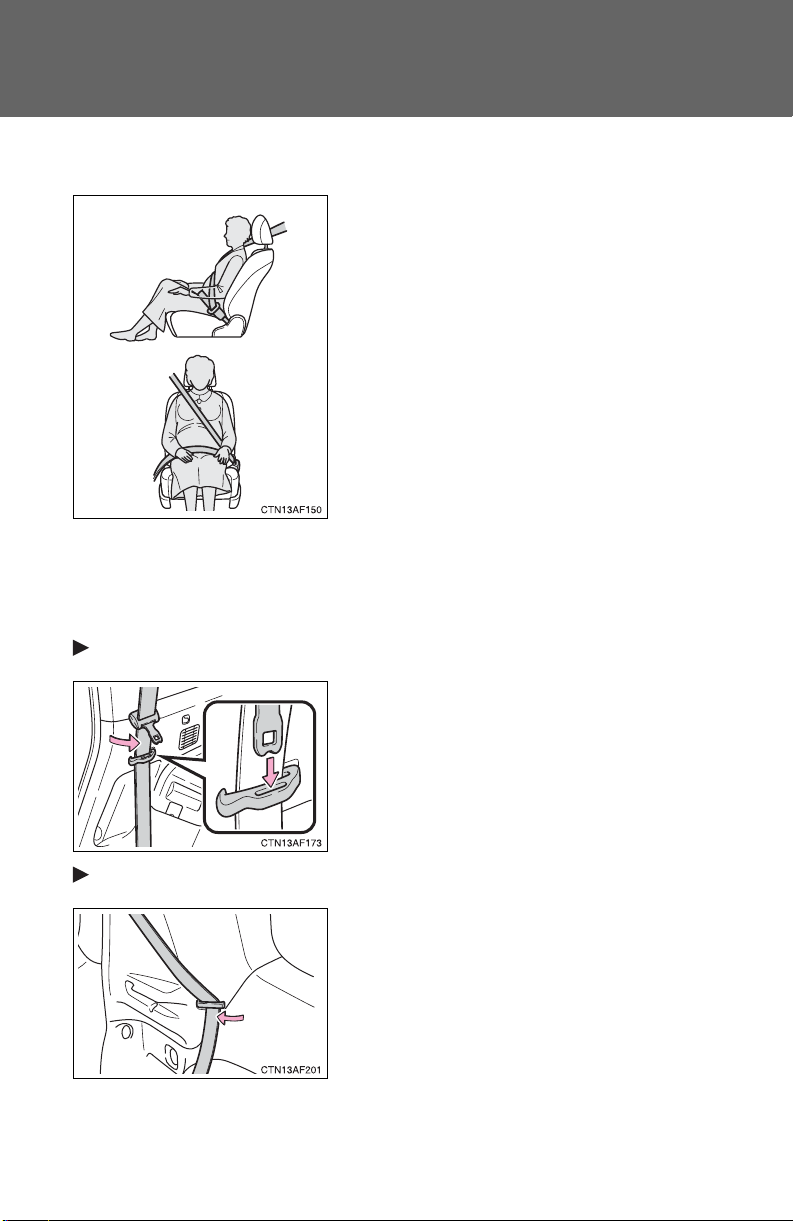
1-3. Adjustable components (seats, mirrors, steering wheel)
Obtain medical advice and wear the seat
belt in the proper way. (P. 88)
Women who are pregnant should position
the lap belt as low as possible over the
hips in the same manner as other occupants. Extend the shoulder belt completely over the shoulder and position the
belt across the chest. Avoid belt contact
over the rounding of the abdominal area.
If the seat belt is not worn properly, not
only a pregnant woman, but also the fetus
could suffer death or serious injury as a
result of sudden braking or a collision.
Pass the outer seat belts through the seat
belt hangers and secure the seat belt
plates to prevent the shoulder belts from
being damaged.
Pass the outer seat belts through the seat
belt hangers to help prevent the shoulder
belts from being damaged.
■ Pregnant women
■ People suffering illness
Obtain medical advice and wear the seat belt in the proper way.
■ When not using the rear seat belts
Second seat belts
Third seat belts
90
Page 91
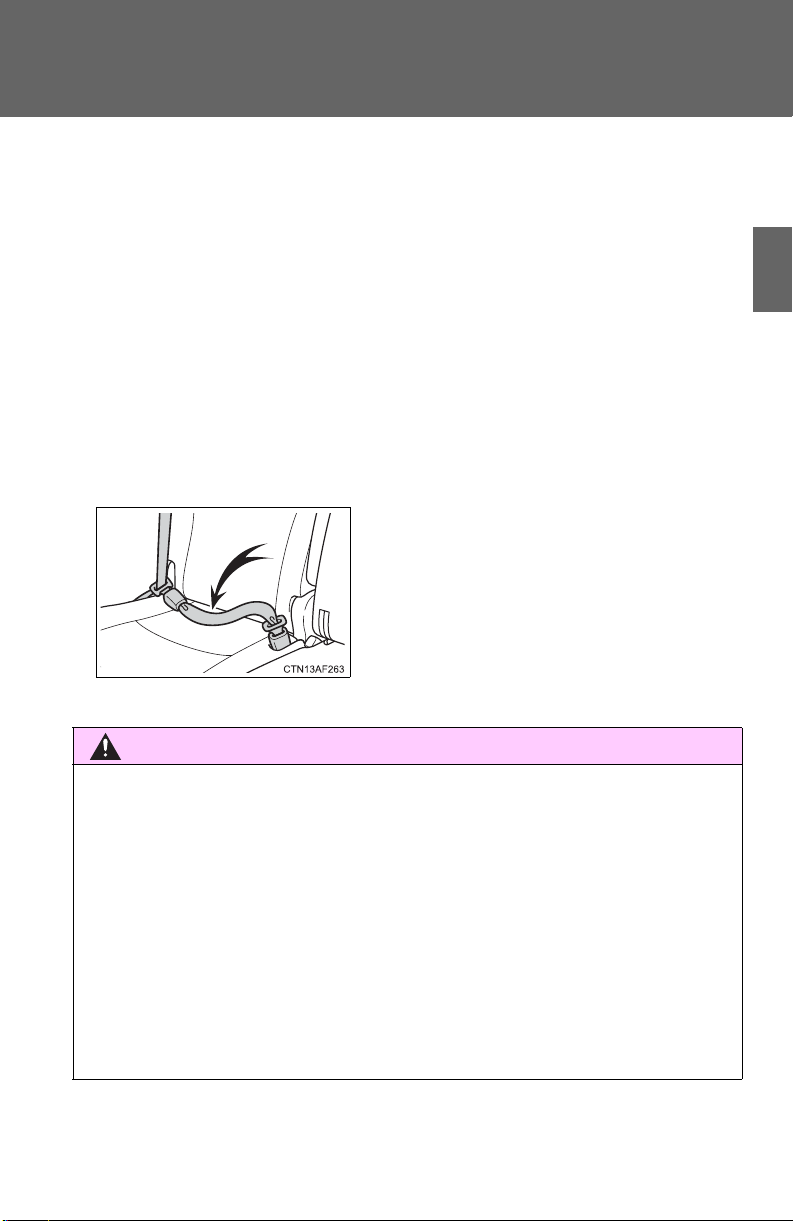
1-3. Adjustable components (seats, mirrors, steering wheel)
CAUTION
If your seat belts cannot be fastened
securely because they are not long
enough, a personalized seat belt
extender is available from your Toyota
dealer free of charge.
■ Child seat belt usage
The seat belts of your vehicle were principally designed for persons of adult
size.
● Use a child restraint system appropriate for the child, until the child
becomes large enough to properly wear the vehicle's seat belt. (P. 142)
● When the child becomes large enough to properly wear the vehicle's seat
belt, follow the instructions on P. 88 regarding seat belt usage.
■ Replacing the belt after the pretensioner has been activated
If the vehicle is involved in multiple collisions, the pretensioner will activate
for the first collision, but will not activate for the second or subsequent collisions.
■ Seat belt extender
1
Before driving
Observe the following precautions to reduce the risk of injury in the event of
sudden braking, sudden swerving or an accident.
Failure to do so may cause death or serious injury.
■ Wearing a seat belt
● Ensure that all passengers wear a seat belt.
● Always wear a seat belt properly.
● Each seat belt should be used by one person only. Do not use a seat belt
for more than one person at once, including children.
● Toyota recommends that children be seated in the rear seat and always
use a seat belt and/or an appropriate child restraint system.
91
Page 92

1-3. Adjustable components (seats, mirrors, steering wheel)
CAUTION
● Do not recline the seat any more than necessary to achieve a proper seat-
ing position. The seat belt is most effective when the occupants are sitting
up straight and well back in the seats.
● Do not wear the shoulder belt under your arm.
● Always wear your seat belt low and snug across your hips.
■ When children are in the vehicle
Do not allow children to play with the seat belt. If the seat belt becomes
twisted around a child’s neck, it may lead to choking or other serious injuries
that could result in death. If this occurs and the buckle cannot be unfastened, scissors should be used to cut the belt.
■ Adjustable shoulder anchor
Always make sure the shoulder belt is positioned across the center of your
shoulder. The belt should be kept away from your neck, but not falling off
your shoulder. Failure to do so could reduce the amount of protection in an
accident and cause death or serious injuries in the event of a sudden stop,
sudden swerve or accident. (P. 89)
■ Seat belt pretensioners
● Do not place anything, such as a cushion, on the front passenger's seat.
Doing so will disperse the passenger's weight, which prevents the sensor
from detecting the passenger's weight properly. As a result, the seat belt
pretensioner for the front passenger's seat may not activate in the event of
a collision.
● If the pretensioner has activated, the SRS warning light will come on. In
that case, the seat belt cannot be used again and must be replaced at
your Toyota dealer.
92
Page 93

1-3. Adjustable components (seats, mirrors, steering wheel)
CAUTION
NOTICE
■ Seat belt damage and wear
● Do not damage the seat belts by allowing the belt, plate, or buckle to be
jammed in the door.
● Inspect the seat belt system periodically. Check for cuts, fraying, and loose
parts. Do not use a damaged seat belt until it is replaced. Damaged seat
belts cannot protect an occupant from death or serious injury.
● Ensure that the belt and tab are locked and the belt is not twisted.
If the seat belt does not function correctly, immediately contact your Toyota
dealer.
● Replace the seat assembly, including the belts, if your vehicle has been
involved in a serious accident, even if there is no obvious damage.
● Do not attempt to install, remove, modify, disassemble or dispose of the
seat belts. Have any necessary repairs carried out by your Toyota dealer.
Inappropriate handling of the pretensioner may prevent it from operating
properly resulting in death or serious injury.
■ Using a seat belt extender
● Do not wear the seat belt extender if you can fasten the seat belt without
the extender.
● Do not use the seat belt extender when installing a child restraint system
because the belt will not securely hold the child restraint system, increasing the risk of death or serious injury in the event of an accident.
● The personalized extender may not be safe on another vehicle, when
used by another person, or at a different seating position other than the
one originally intended.
1
Before driving
■ When using a seat belt extender
When releasing the seat belt, press on the buckle release button on the
extender, not on the seat belt.
This helps prevent damage to the vehicle interior and the extender itself.
93
Page 94
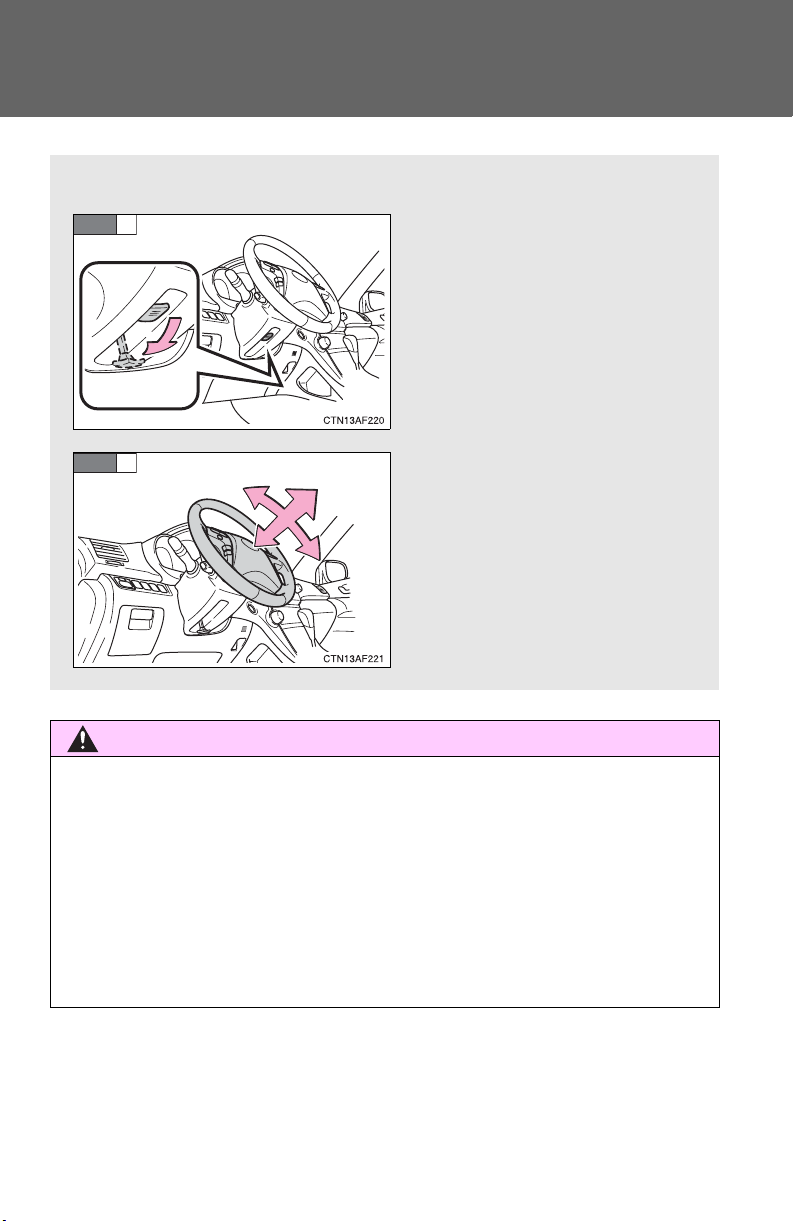
1-3. Adjustable components (seats, mirrors, steering wheel)
CAUTION
The steering wheel can be adjusted to a comfortable position.
Hold the steering wheel and
press the lever down.
Adjust to the ideal position by
moving the steering wheel
horizontally and vertically.
After adjustment, pull the lever
up to secure the steering
wheel.
STEP
1
STEP
2
Steering wheel
■ Caution while driving
Do not adjust the steering wheel while driving.
Doing so may cause the driver to mishandle the vehicle and an accident,
resulting in death or serious injury.
■ After adjusting the steering wheel
Make sure that the steering wheel is securely locked.
Otherwise, the steering wheel may move suddenly, possibly causing an
accident and resulting in death or serious injury.
94
Page 95
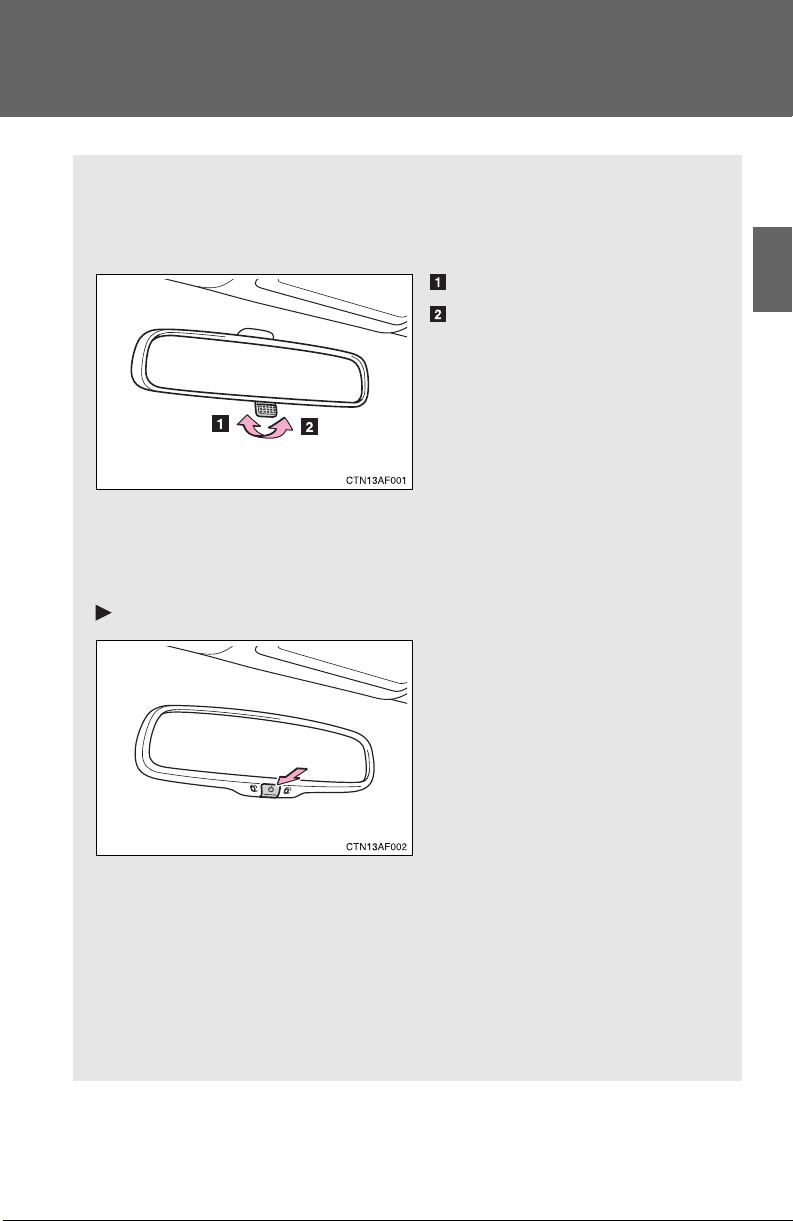
1-3. Adjustable components (seats, mirrors, steering wheel)
Glare from the headlights of vehicles behind can be reduced by
using the following functions.
■ Manual anti-glare inside rear view mirror
Normal position
Anti-glare position
■ Auto anti-glare inside rear view mirror
In automatic mode, sensors are used to detect the headlights of
vehicles behind and the reflected light is automatically reduced.
Type A
Turns automatic mode on/off
The indicator comes on when
automatic mode is turned on.
Vehicles without smart key
system:
The mirror will revert to automatic mode each time the
engine switch is turned to the
“ON” position.
Vehicles with smart key system:
The mirror will revert to automatic mode each time the
“ENGINE START STOP”
switch is turned to IGNITION
ON mode.
Anti-glare inside rear view mirror
1
Before driving
95
Page 96
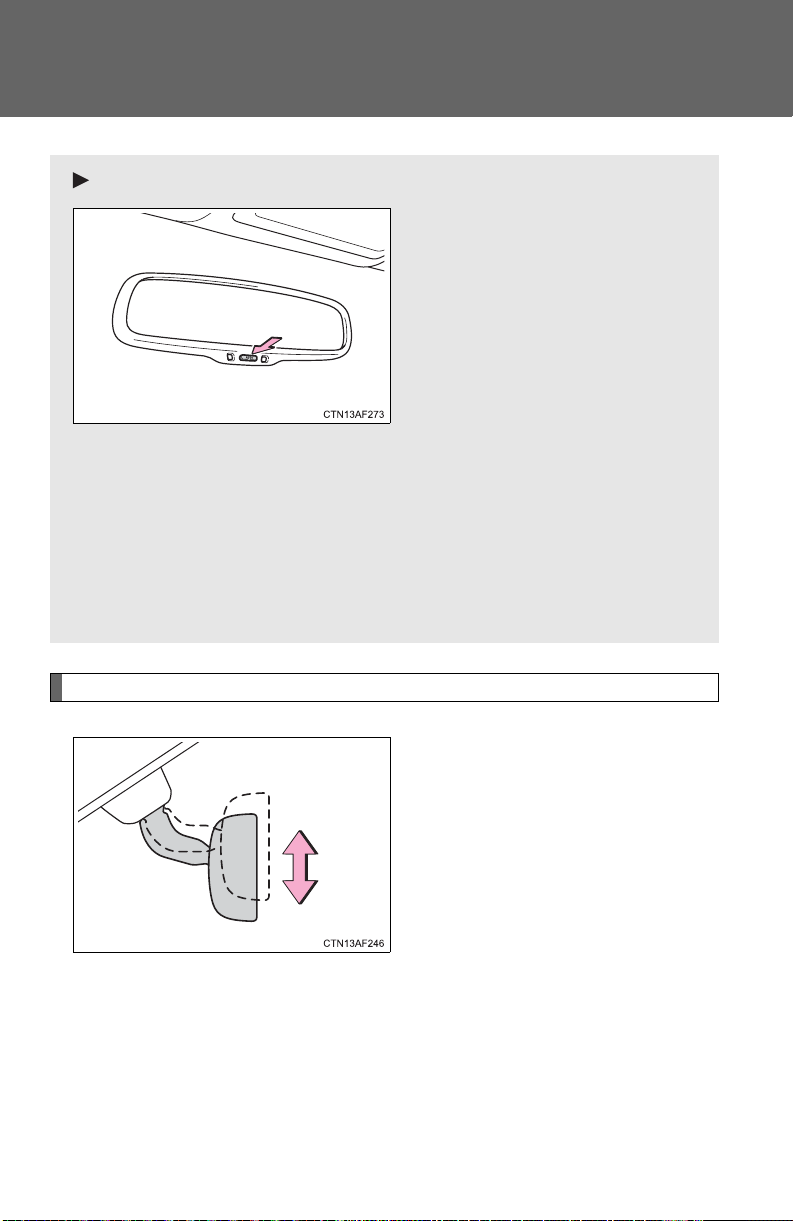
1-3. Adjustable components (seats, mirrors, steering wheel)
Type B
Turns automatic mode on/off
The indicator comes on when
automatic mode is turned on.
Vehicles without smart key
system:
The mirror will revert to automatic mode each time the
engine switch is turned to the
“ON” position.
Vehicles with smart key system:
The mirror will revert to automatic mode each time the
“ENGINE START STOP”
switch is turned to IGNITION
ON mode.
Adjusting the height of the rear view mirror
Adjust the height of the rear view
mirror by moving it up and down.
96
Page 97
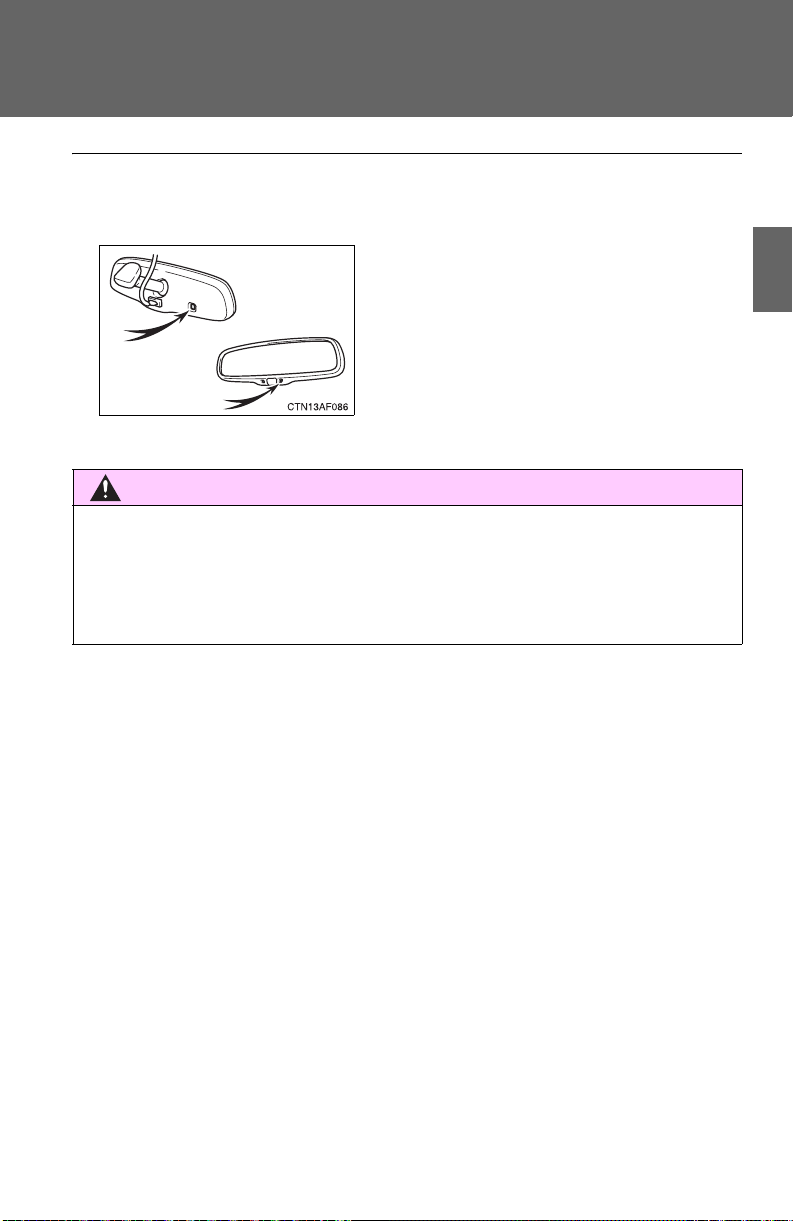
1-3. Adjustable components (seats, mirrors, steering wheel)
CAUTION
To ensure that the sensors operate properly, do not touch or cover them.
■ To prevent sensor error (vehicles with auto anti-glare inside rear view
mirror)
■ Caution while driving
Do not adjust the position of the mirror while driving.
Doing so may lead to mishandling of the vehicle and an accident, resulting in
death or serious injury.
1
Before driving
97
Page 98
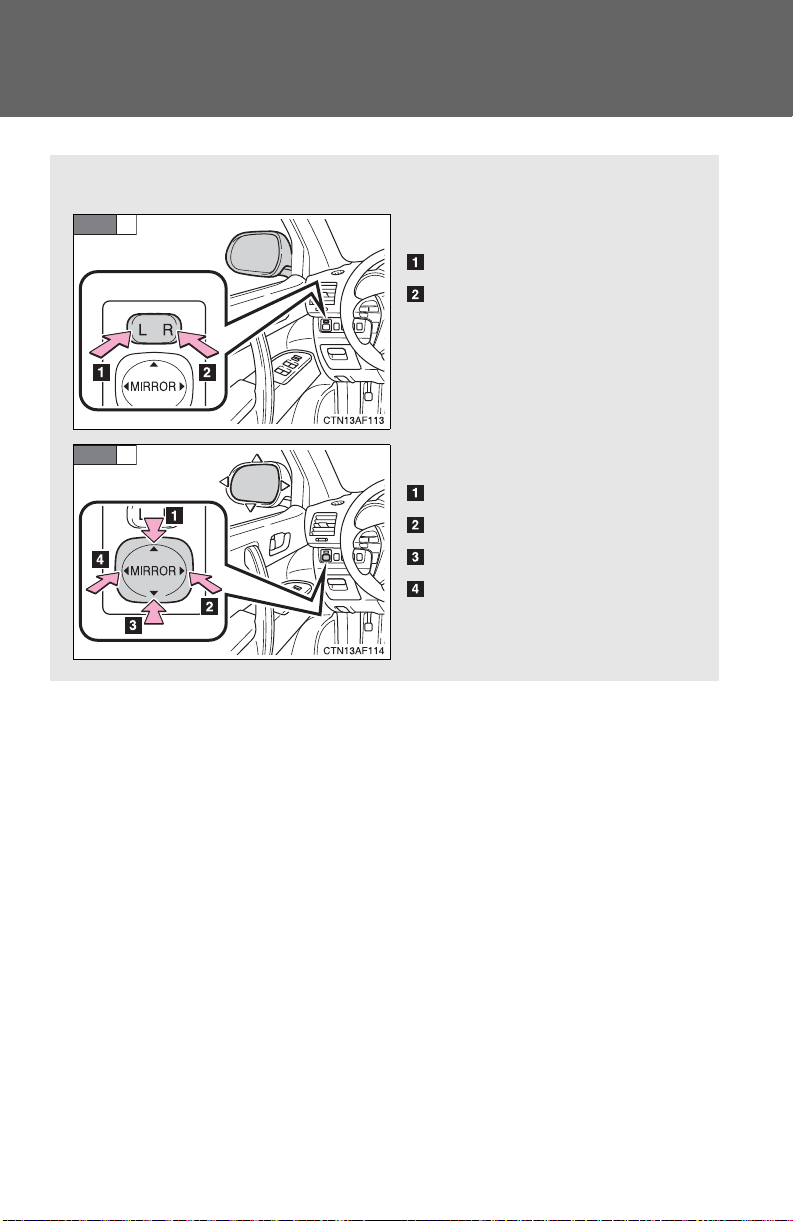
1-3. Adjustable components (seats, mirrors, steering wheel)
Mirror angle can be adjusted using the switches.
Select a mirror to adjust.
Left
Right
Adjust the mirror.
Up
Right
Down
Left
STEP
1
STEP
2
Outside rear view mirrors
98
Page 99
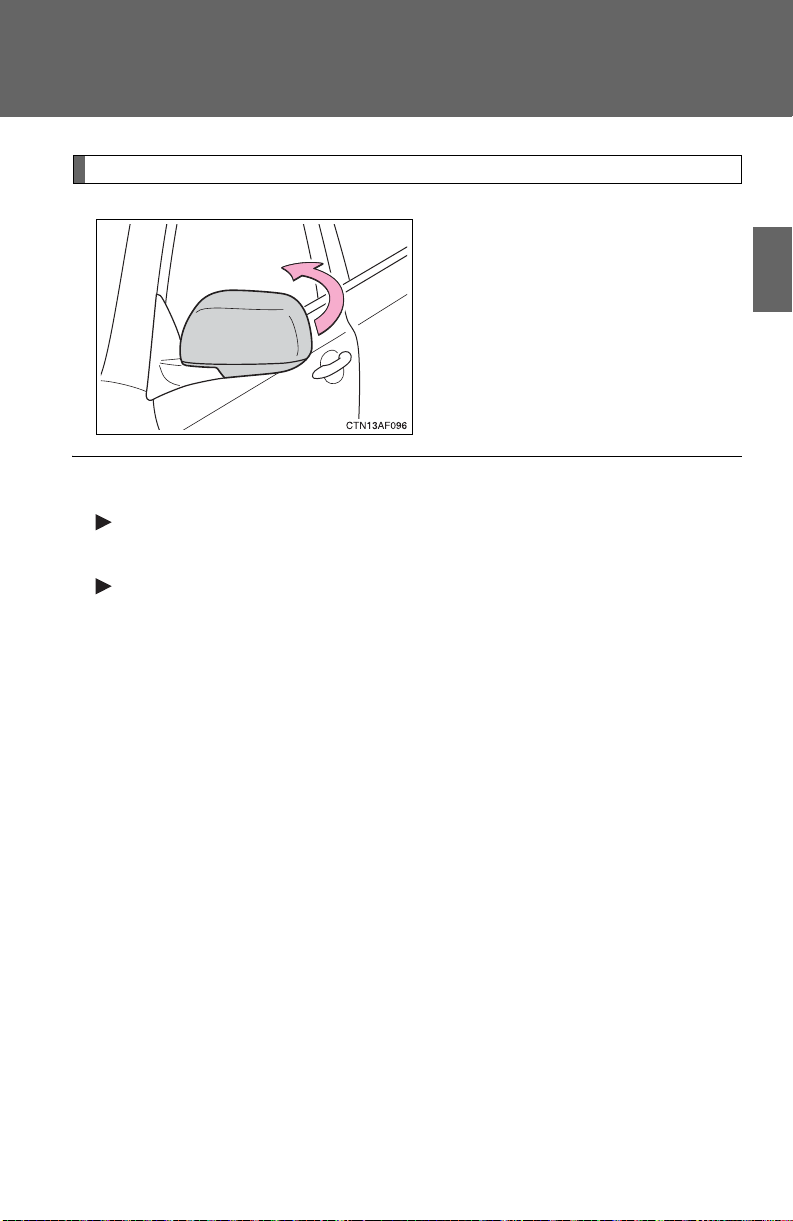
1-3. Adjustable components (seats, mirrors, steering wheel)
Folding back the mirrors
Push backward to fold the mirrors.
■ The outside rear view mirrors can be operated when
Vehicles without smart key system
The engine switch is in the “ACC” or “ON” position.
Vehicles with smart key system
The “ENGINE START STOP” switch is in ACCESSORY or IGNITION ON
mode.
■ When the mirrors are fogged up (vehicles with outside rear view mirror
defoggers)
Turn on the mirror defoggers to defog the mirrors. (P. 289)
1
Before driving
99
Page 100

1-3. Adjustable components (seats, mirrors, steering wheel)
CAUTION
■ When driving the vehicle
Observe the following precautions while driving.
Failing to do so may result in loss of control of the vehicle and cause an accident, resulting in death or serious injury.
● Do not adjust the mirrors while driving.
● Do not drive with the mirrors folded back.
● Both the driver and passenger side mirrors must be extended and properly
adjusted before driving.
■ When the mirror defoggers are operating (vehicles with outside rear
view mirror defoggers)
Do not touch the rear view mirror surfaces, as they can become very hot and
burn you.
100
 Loading...