

Page 1

TOSHIBA Telecommunication Systems Division
IP Telephone, Messaging and
Call Manager User Guide
Title Page
November 2011
Page 2

Publication Information
Toshiba America Information Systems, Inc.
Telecommunication Systems Division
Publication Information
Toshiba America Information Systems, Inc., Telecommunication Systems Division, reserves the right,
without prior notice, to revise this information publication for any reason, including, but not limited to,
utilization of new advances in the state of technical arts or to simply change the design of this document.
Further, Toshiba America Information Systems, Inc., Telecommunication Systems Division, also reserves
the right, without prior notice, to make such changes in equipment design or components as engineering or
manufacturing methods may warrant.
IPedge-UG-VB
Version B, November 2011
Our mission to publish accurate, complete and user accessible documentation. At the time of printing the
information in this document was as accurate and current as was reasonably possible. However, in the
time required to print and distribute this manual additions, corrections or other changes may have been
made. To view the latest version of this or other documents refer to the Toshiba FYI web site.
Toshiba America Information Systems shall not be liable for any commercial losses, loss of revenues or
profits, loss of goodwill, inconvenience, or exemplary, special, incidental, indirect or consequential
damages whatsoever, or claims of third parties, regardless of the form of any claim that may result from the
use of this document.
THE SPECIFICATIONS AND INFORMATION PROVIDED HEREIN ARE FOR INFORMATIONAL
PURPOSES ONLY AND ARE NOT A WARRANTY OF ACTUAL PERFORMANCE, WHETHER
EXPRESSED OR IMPLIED. THE SPECIFICATIONS AND INFORMATION ARE SUBJECT TO CHANGE
WITHOUT NOTICE. ACTUAL PERFORMANCE MAY VARY BASED ON INDIVIDUAL
CONFIGURATIONS, USE OF COLLATERAL EQUIPMENT, OR OTHER FACTORS.
© Copyright 201 1
This document is copyrighted by Toshiba America Information Systems, Inc. with all rights reserved. Under
the copyright laws, this document cannot be reproduced in any form or by any means—graphic, electronic,
or mechanical, including recording, taping, photocopying, without prior written permission of Toshiba. No
patent liability is assumed, however, with respect to the use of the information contained herein.
Trademarks
Tos hi ba , I Pedge, CIX, SoftIPT and Strata are trademarks of Toshiba Corporation or Toshiba America
Information Systems, Inc.
Appcritical is a registered trademark of Apparent Networks, Inc.
Linux is a registered trademark of Linus Torvald.
AudioCodes is Registered trademark of AudioCodes Ltd.
Cisco is a registered trademark of Cisco Technology, Inc.
SonicWALL is a registered trademark of SonicWALL, Inc.
Mozilla and Firefox are registered trademarks of Mozilla Foundation Corp.
Windows, Outlook, and Microsoft are registered trademarks of Microsoft.
Trademarks, registered trademarks, and service marks are the property of their respective owners.
Page 3

IPedge General End User Information
FCC Requirements
Means of Connection: The IPedge does not connect directly to the telephone network. All direct
connections are made to a gateway. Please refer to the gateway manufacturer's documentation.
Radio Frequency Interference
Warning: This equipment generates, uses, and can radiate radio frequency energy and if not installed and
used in accordance with the manufacturer’s instruction manual, may cause interference to radio
communications. It has been tested and found to comply with the limits for a Class A computing device
pursuant to Subpart J of Part 15 of FCC Rules, which are designed to provide reasonable protection
against such interference when operated in a commercial environment. Operation of this equipment in a
residential area is likely to cause interference, in which case, the user, at his/her own expense, will be
required to take whatever measures may be required to correct the interference.
Underwriters Laboratory
This system is listed with Underwriters Laboratory (UL). Secondary protection is required, on
any wiring from any telephone that exits the building or is subject to lightning or other electrical
surges, and on DID, OPS, and Tie lines. (Additional information is provided in the IPedge
Install Manual.)
CP01, Issue 8, Part I Section 14.1
Notice: The Industry Canada label identifies certified equipment. This certification means that the
equipment meets certain telecommunications network protective, operational and safety requirements as
prescribed in the appropriate Terminal Equipment Technical Requirements document(s). The Department
does not guarantee the Equipment will operate to the user’s satisfaction.
Repairs to Certified Equipment should be coordinated by a representative designated by the supplier.
Any repairs or alterations made by the user to this equipment, or equipment malfunctions, may give the
telecommunications company cause to request the user to disconnect the equipment.
Users should ensure for their own protection that the electrical ground connections of the power utility,
telephone lines and internal metallic water pipe system, if present, are connected together. This precaution
may be particularly important in rural areas.
301756
I.T.E
Before installing this equipment, users should ensure that it is permissible to be connected to the facilities
of the local telecommunications company. The equipment must also be installed using an acceptable
method of connection. The customer should be aware that compliance with the above conditions may not
prevent degradation of service in some situations.
CAUTION! Users should not attempt to make such connections themselves, but should
contact the appropriate electric inspection authority, or electrician, as appropriate.
Important Notice — Music-On-Hold
In accordance with U.S. Copyright Law, a license may be required from the American Society of
Composers, Authors and Publishers, or other similar organization, if radio or TV broadcasts are
transmitted through the music-on-hold feature of this telecommunication system. Toshiba America
Information Systems, Inc., strongly recommends not using radio or television broadcasts and hereby
disclaims any liability arising out of the failure to obtain such a license.
Hearing Aid Compatibility Notice: The FCC has established rules that require all installed business
telephones be hearing aid compatible. This rule applies to all telephones regardless of the date of
manufacture or installation. There are severe financial penalties which may be levied on the end-user for
non-compliance.
Page 4

Toshiba Telecommunication Systems Warranty and License Agreements
For information relating to the End User Limited Warranty and License Agreements, please refer to http://
www.telecom.toshiba.com/Telephone_Systems_Support/warranty.cfm
WARRANTIES FOR NON-TOSHIBA BRANDED THIRD PARTY PRODUCTS
A valuable element of Toshiba’s product strategy is to offer our customers a complete product portfolio. To
provide this value to our customers at the most optimal prices, we offer both Toshiba-branded and thirdparty manufactured products that support our Toshiba IPedge product portfolio. Similar to other resellers of
software, hardware and peripherals, these third-party manufactured products carry warranties independent
of our Toshiba limited warranty provided with our Toshiba-branded products. Customers should note that
third-party manufacturer warranties vary from product to product and are covered by the warranties
provided through the original manufacturer and passed on intact to the purchaser by Toshiba. Customers
should consult their product documentation for third-party warranty information specific to third-party
products. More information may also be available in some cases from the manufacturer’s public website.
While Toshiba offers a wide selection of software, hardware and peripheral products, we do not specifically
test or guarantee that the third-party products we offer work under every configuration with any or all of the
various models of the Toshiba IPedge. Toshiba does not endorse, warrant nor assume any liability in
connection with such third party products or services. If you have questions about compatibility, we
recommend and encourage you to contact the third-party software, hardware and peripheral product
manufacturer directly.
Page 5

Content s
Organization.......................................................................................................................................... 9
Conventions ........................................................................................................................................ 10
Related Documents/Media.................................................................................................................. 10
Chapter 1 – The Grand Tour
IP5000-series Telephone Overview .................................................................................................... 13
Fixed Buttons .................................................................................................................................... 13
Programmable Feature Buttons........................................................................................................ 16
Key Strip ........................................................................................................................................... 16
LCD ..................................................................................................................................................... 16
9-Line LCD Display ........................................................................................................................... 16
4-Line LCD Display ........................................................................................................................... 17
Soft Keys............................................................................................................................................. 18
Chapter 2 – The Basics
Customizing Your Telephone.............................................................................................................. 19
Volume Control .................................................................................................................................19
LCD Contrast ...................................................................................................................................... 20
Brightness Control ............................................................................................................................20
Backlight On/Off................................................................................................................................ 21
Dial Pad and Button Beeps...............................................................................................................21
Speakerphone/Microphone Sensitivity Adjustment ..........................................................................21
Telephone Terminology ...................................................................................................................... 22
Making a Call ...................................................................................................................................... 23
Handset ............................................................................................................................................23
Spkr Button ....................................................................................................................................... 23
Hot Dialing ........................................................................................................................................ 23
Dial Directory....................................................................................................................................... 23
Answering a Call ................................................................................................................................. 25
Handset ............................................................................................................................................25
Speaker ............................................................................................................................................25
Shift Button ....................................................................................................................................... 25
Handsfree Answerback..................................................................................................................... 25
On a Call ............................................................................................................................................. 26
Switching Between Handset and Speakerphone.............................................................................. 26
Microphone (Mic/Mute) Button..........................................................................................................26
Hold ..................................................................................................................................................26
Message Waiting................................................................................................................................. 27
Responding to a Lit Msg LED ........................................................................................................... 27
Turning On/Off MW LED on Another Extension ............................................................................... 27
LED Indicator Details .......................................................................................................................... 28
IPedge UG 11/11 TOSHIBA 1
Page 6

Contents
Chapter 3 – SoftIPT
Chapter 3 – SoftIPT
SoftIPT Icons ....................................................................................................................................29
Fixed Buttons .................................................................................................................................... 30
Flexible Buttons ................................................................................................................................30
Liquid Crystal Display .......................................................................................................................30
Configuring SoftIPT............................................................................................................................. 31
Configure the SoftIPT .......................................................................................................................31
Basic SoftIPT Functions...................................................................................................................... 34
Start the SoftIPT ............................................................................................................................... 34
Answering a Call............................................................................................................................... 35
Switching a Call to Your Headset ..................................................................................................... 35
Labeling Feature Buttons..................................................................................................................35
Using the Directory ...........................................................................................................................35
Using Echo Canceller.......................................................................................................................... 36
Chapter 4 – Feature Operations
Account Codes.................................................................................................................................... 37
Voluntary Account Codes ................................................................................................................. 38
Advisory Message............................................................................................................................... 38
Alarm Notification ................................................................................................................................ 40
Automatic Callback ............................................................................................................................. 40
Background Music (BGM) ................................................................................................................... 41
Call Forward........................................................................................................................................ 41
Call History.......................................................................................................................................... 43
Call Park.............................................................................................................................................. 44
Call Pickup .......................................................................................................................................... 46
Group Pickup ....................................................................................................................................46
Ringing, Page or Held Call Pickup....................................................................................................46
Call Transfer........................................................................................................................................ 47
Call Waiting ......................................................................................................................................... 48
Caller ID .............................................................................................................................................. 48
Conference Call .................................................................................................................................. 49
Direct Station Selection (DSS) ............................................................................................................ 51
Do Not Disturb..................................................................................................................................... 51
Setting DND for Another Extension .................................................................................................. 52
Emergency Call................................................................................................................................... 52
Emergency Monitoring Station.......................................................................................................... 52
Emergency Ringdown ......................................................................................................................... 52
Message Waiting................................................................................................................................. 53
Microphone Cut-Off............................................................................................................................. 54
Off-Hook Call Announce (OCA) .......................................................................................................... 54
Override .............................................................................................................................................. 55
Paging................................................................................................................................................. 56
Privacy ................................................................................................................................................ 57
Redial.................................................................................................................................................. 58
Speed Dial........................................................................................................................................... 58
Time and Date Setting (Local) ............................................................................................................ 60
Tone First / Voice First Signalling ....................................................................................................... 60
Tone First Signalling .........................................................................................................................60
Voice First Signalling ........................................................................................................................60
Uniform Call Distribution ..................................................................................................................... 61
Login/Logout ....................................................................................................................................... 61
2 TOSHIBA IPedge UG 11/11
Page 7

Chapter 5 – Messaging Features
Chapter 5 – Messaging Features
Access your Mailbox by Phone ........................................................................................................... 63
Set up Your Mailbox for the First Time................................................................................................ 63
Check New Messages ........................................................................................................................ 64
Review saved messages .................................................................................................................... 64
Envelope Information .......................................................................................................................... 64
Volume /Speed Control....................................................................................................................... 65
Reply to a Message ............................................................................................................................ 65
Call Back Directly ................................................................................................................................ 65
Redirect a Message ............................................................................................................................ 66
Erase / Delete and Retrieve a Deleted Message ................................................................................ 67
Delete a Message............................................................................................................................. 67
Retrieve a Deleted Message ............................................................................................................ 67
Number of Messages .......................................................................................................................... 67
Send A Message Directly To A Subscriber’s Mailbox ......................................................................... 67
To Mark a Message as Confidential.................................................................................................... 68
To Mark a Message as Priority ........................................................................................................... 68
To Mark a Message as Priority and Confidential ................................................................................ 69
To Request a Return Receipt for a Message...................................................................................... 69
To Request Notification of Non-receipt ............................................................................................... 69
To Schedule a Message for Future Delivery....................................................................................... 69
To Send a Message Using Directory Assistance ................................................................................ 70
To Send a Message to a Group Distribution ....................................................................................... 71
Delete a Message after Sending......................................................................................................... 71
Contents
Chapter 6 – Greetings
Manage your Default Greeting ............................................................................................................ 73
Activate your Extended Absence Greeting ......................................................................................... 73
Deactivate your Extended Absence Greeting ..................................................................................... 74
Manage your Busy Greeting ............................................................................................................... 74
Manage your Custom Greetings ......................................................................................................... 74
Change your Recorded Name ............................................................................................................ 74
Chapter 7 – Other Messaging Applications
Group Distributions ............................................................................................................................. 75
Set up a Private Group Distribution List.............................................................................................. 75
Add Members to a Private Group Distribution List .............................................................................. 75
Delete Members from a Private Group Distribution List...................................................................... 76
Delete a Private Group Distribution List .............................................................................................. 76
Listen to Members in a Private Group Distribution List ....................................................................... 76
Using a Private Group Distribution List ............................................................................................... 76
Using a Global Group Distribution List ................................................................................................ 76
Personal Options................................................................................................................................. 77
Message Notification........................................................................................................................... 77
To Activate or Deactivate Message Notification.................................................................................. 77
Set a Wake up Call ............................................................................................................................. 78
Change your Mailbox Password ......................................................................................................... 78
Personal Assistant .............................................................................................................................. 79
Follow me............................................................................................................................................ 79
Setting up Follow me ........................................................................................................................79
Accepting or rejecting calls at a call-out ...........................................................................................80
Transfering to an Operator or another Extension ............................................................................. 80
Setting up Call Screening.................................................................................................................... 80
IPedge UG 11/11 3
Page 8

Contents
Chapter 8 – Fax Capabilities
Setting up “Do not Disturb”.................................................................................................................. 80
Setting up a Personal Schedule.......................................................................................................... 81
Recording a Scheduled Greeting ........................................................................................................ 81
Unified Messaging............................................................................................................................... 81
Access your Voicemails through Email ............................................................................................... 81
Chapter 8 – Fax Capabilities
Sending a Fax from your desktop ....................................................................................................... 83
Recipient........................................................................................................................................... 84
My Info .............................................................................................................................................. 84
Options .............................................................................................................................................85
Server Info ........................................................................................................................................ 85
Setting up the Internal address book ................................................................................................ 85
Fax options.......................................................................................................................................... 86
Fax Settings...................................................................................................................................... 86
Incoming Faxes ................................................................................................................................86
Fax Confirmation ..............................................................................................................................87
Auto Print .......................................................................................................................................... 87
Fax Contacts.....................................................................................................................................87
Fax Log............................................................................................................................................. 87
Fax Queue ........................................................................................................................................ 87
Cover Information .............................................................................................................................87
Redirect fax messages........................................................................................................................ 88
Chapter 9 – Call Manager Basics
The Main Screen................................................................................................................................. 90
The Compact View ........................................................................................................................... 90
Expanded View.................................................................................................................................93
Screen Docked Views....................................................................................................................... 94
Call Manager Main Menu.................................................................................................................. 94
Shortcuts ............................................................................................................................................. 95
Quick Access Toolbar (QAT) ............................................................................................................ 95
KeyTips............................................................................................................................................. 95
Hot Keys ........................................................................................................................................... 95
The Side Window Screen.................................................................................................................... 96
Call Handler Mode ............................................................................................................................96
Buttons Mode.................................................................................................................................... 96
Companion Application Windows........................................................................................................ 97
Screen Colors ..................................................................................................................................... 97
Chapter 10 –Using Call Manager Features
Call Handling Features........................................................................................................................ 99
Making Outgoing Calls...................................................................................................................... 99
Answering Calls ..............................................................................................................................100
Hang Up.......................................................................................................................................... 101
Holding Calls................................................................................................................................... 101
Transferring Calls ........................................................................................................................... 101
Call Forwarding............................................................................................................................... 102
Status Messages and DND ............................................................................................................ 103
Viewing Extra Call Information........................................................................................................ 104
Call Center Features ......................................................................................................................... 105
Logging In or Out ............................................................................................................................105
Changing Agent Status...................................................................................................................106
4 TOSHIBA IPedge UG 11/11
Page 9

Chapter 11 – Preferences
Chapter 11 –Preferences
PREFERENCES ............................................................................................................................... 107
Config Settings.................................................................................................................................. 107
General ........................................................................................................................................... 108
Dialing Tab...................................................................................................................................... 112
Docking Tab.................................................................................................................................... 117
Advanced Tab................................................................................................................................. 118
Setting Up Hot Key Dialing & Popup................................................................................................. 121
Setting Shortcut Keys ..................................................................................................................... 121
Skin Editor......................................................................................................................................... 122
Skins Files ......................................................................................................................................123
Saving/Creating New/Deleting Skins ..............................................................................................123
The Skin Editor ...............................................................................................................................124
LCD Background and Text Colors ..................................................................................................124
Insert your Logo into the Skin ......................................................................................................... 125
Changing Call Windows Appearance ............................................................................................. 125
Changing the Button/ACD Button Appearance............................................................................... 125
Email skins...................................................................................................................................... 126
Tab Settings...................................................................................................................................... 127
Add Tab .......................................................................................................................................... 127
Update Tab .....................................................................................................................................127
Delete Tab ......................................................................................................................................128
Revert ............................................................................................................................................. 128
Contents
Chapter 12 –Buttons
Programmable Buttons ..................................................................................................................... 129
User Programmable Keys ................................................................................................................. 130
To Initialize Key .............................................................................................................................. 130
To Swap Keys................................................................................................................................. 130
To Copy This Key ...........................................................................................................................130
To Change Key...............................................................................................................................130
Chapter 13 –Actions
Creating Actions................................................................................................................................ 137
Attach Account Code ......................................................................................................................138
Export Call Info ...............................................................................................................................138
Log Info to File ................................................................................................................................139
Lookup in Outlook........................................................................................................................... 139
Minimize Phone Screen..................................................................................................................140
Modify Call Information ................................................................................................................... 140
Play WAV File................................................................................................................................. 141
Pop External Web Browser.............................................................................................................141
Pop Internal Web Browser ..............................................................................................................142
Popup Call Info Screen...................................................................................................................143
Popup Phone Screen......................................................................................................................144
Run another Program ..................................................................................................................... 144
Send DDE Msg ...............................................................................................................................145
Send Keystrokes to a Program .......................................................................................................146
Set Phone Status Message ............................................................................................................ 148
Set Phone Forwarding .................................................................................................................... 149
System/PBX Command .................................................................................................................. 150
Transfer Call ................................................................................................................................... 151
IPedge UG 11/11 5
Page 10

Contents
Chapter 14 – Personal Call Handler
Action Variables ................................................................................................................................ 152
Call Variables.................................................................................................................................. 152
System Variables............................................................................................................................ 154
Exporting Actions............................................................................................................................155
Importing Actions ............................................................................................................................155
Testing Actions ...............................................................................................................................156
Chapter 14 –Personal Call Handler
Personal Call Handler ....................................................................................................................... 157
Creating Personal Call Handling Rules............................................................................................. 158
Like Matches ..................................................................................................................................... 165
Unlike Matches.................................................................................................................................. 165
Export Rules...................................................................................................................................... 166
Importing Rules ................................................................................................................................. 166
Chapter 15 –Using Microsoft Outlook
Dialing from within Outlook ............................................................................................................... 167
Incoming Calls................................................................................................................................... 167
While on a Call .................................................................................................................................. 168
Integrating with Outlook Calendar..................................................................................................... 169
Create Actions to set and clear the DSS Message......................................................................... 169
Create Personal Call Handler Rules ...............................................................................................170
The Final PCH Rules ......................................................................................................................170
Chapter 16 –Using Companion Applications
Contacts ............................................................................................................................................ 171
Sorting Entries ................................................................................................................................171
Searching Entries ........................................................................................................................... 171
CIX Directory ..................................................................................................................................172
Personal / Speed Dial Directory......................................................................................................173
Presence Viewer............................................................................................................................. 173
History ............................................................................................................................................... 176
ACD Viewer....................................................................................................................................... 180
Logging In or Out ............................................................................................................................181
ACD Group Status .......................................................................................................................... 183
Notifications ....................................................................................................................................184
CM LCD .......................................................................................................................................... 185
Miscellaneous .................................................................................................................................186
Using ACD Viewer ..........................................................................................................................186
Requesting Supervisor Help ........................................................................................................... 189
Chat................................................................................................................................................... 190
Chat Operation ...............................................................................................................................190
Using Chat Messaging.................................................................................................................... 190
To Send a Broadcast Message ......................................................................................................193
Chat Feature Operation ..................................................................................................................195
Response Buttons .......................................................................................................................... 196
Personal Groups ............................................................................................................................. 197
Whiteboard Operation.....................................................................................................................198
Whiteboards Setup .........................................................................................................................199
Configuring Chat............................................................................................................................. 200
Interfacing with Other Programs ..................................................................................................... 204
Format of the DDE Command Interface .........................................................................................205
6 TOSHIBA IPedge UG 11/11
Page 11

Chapter 17 – Enterprise Manager Personal Administration
Dialer................................................................................................................................................. 210
Main Screen.................................................................................................................................... 210
Calls Display Area ..........................................................................................................................210
Functions ........................................................................................................................................211
Sorting Entries ................................................................................................................................212
Dialer Operation.............................................................................................................................. 212
Adding Calls to the Dialer ............................................................................................................... 213
Configuration Settings .................................................................................................................... 216
Adding Action Buttons to Ready to Dial and Results Screens........................................................ 217
Advanced Topics ............................................................................................................................218
Buttons .............................................................................................................................................. 219
Web Browser..................................................................................................................................... 220
Chapter 17 –Enterprise Manager Personal Administration
Prerequisites ..................................................................................................................................... 221
Log In ................................................................................................................................................ 222
To change your Security Code/Password ......................................................................................222
Log Out ............................................................................................................................................. 222
Home................................................................................................................................................. 223
Keystrip Labels.................................................................................................................................. 224
DND Activating.................................................................................................................................. 225
One Touch Buttons ........................................................................................................................... 225
Changing a One Touch Button ....................................................................................................... 225
To Use a One Touch Button ........................................................................................................... 226
Ring Tones........................................................................................................................................ 227
Settings ............................................................................................................................................. 228
Call Forward...................................................................................................................................... 229
CF Internal and Line Calls .............................................................................................................. 229
CF Direct Line Calls ........................................................................................................................229
To set up Station Call Forward ....................................................................................................... 229
Speed Dial......................................................................................................................................... 232
System Speed Dial .........................................................................................................................232
System Info ....................................................................................................................................... 232
Display Advisory Messages............................................................................................................232
Voice Mail.......................................................................................................................................... 233
Account Code.................................................................................................................................... 233
Preferences....................................................................................................................................... 234
Meeting ............................................................................................................................................. 234
Contents
IPedge UG 11/11 7
Page 12

This page is intentionally left blank.
Page 13

Introduction
This guide describes the Toshiba IP5000-series telephones and various other
user operations for applications that are integrated with the IPedge system.
Organization This guide is divided as follows:
• Chapter 1 – The Grand Tour is an overview of the telephones supported
by the IPedge system.
• Chapter 2 – The Basics covers thebasic operations of the IP5000-series
telephones
• Chapter 3 – SoftIPT describes the SoftIPT software client functions.
• Chapter 4 – Feature Operations covers the details about the IP5000-
series telephone’s advanced features.
• Chapter 5 – Messaging Features contains user instructions for the basic
Messaging features.
• Chapter 6 – Greetings has procedures for the Message Greeting
functions.
• Chapter 7 – Other Messaging Applications has instructions for
advanced messaging functions, such as Group Distributions, Adding and
deleting members of groups lists, Setting up personal options and
message notifications, Changing mailbox passwords, Personal Assistant,
Follow me, etc.
• Chapter 8 – Fax Capabilities describes how to send faxes from your
desktop, redirect fax messages and automatically send faxes to a printer.
• Chapter 9 – Call Manager Basics covers the basics of using Call
Manager.
• Chapter 10 – Using Call Manager Features contains user instructions
for call handling features for personal as well as ACD calls in Call
Manager.
• Chapter 11 – Pre ferences covers the Preferences options in Call
Manager.
• Chapter 12 – Buttons discusses the various buttons and options
available in Call Manager and how to change, edit, etc.
• Chapter 13 – Actions defi nes the powerful actions that can used with
Call Manager.
• Chapter 14 – Personal Call Handler covers the setting up of call
handling rules and other personal call handling options.
• Chapter 15 – Using Microsoft Outlook provides user instructions for
Microsoft Outlook integration using Call Manager.
IPedge UG 11/11 TOSHIBA 9
Page 14

IPedge
Conventions
• Chapter 16 – Using Companion Applications contains procedures for
Companion applications available with Call Manager, such as, Contacts,
History, ACD Viewer, Chat, Dialer, Buttons, and Web Browser.
• Chapter 17 – Enterprise Manager Personal Administration familiarizes
you with the web-based Enterprise Manager personal administration tool.
Conventions Description
Elaborates specific items or references other information. Within
Note
some tables, general notes apply to the entire table and numbered
notes apply to specific items.
Important!
Extension
Number
Arial bold
Calls attention to important instructions or information.
Press to answer a call to the Extension Number. Each station can have
multiple extension buttons. Incoming calls ring the extension button(s)
from the top down. For example, station 10's extensions ring 10-1 first,
then 10-2, 10-3, and 10-4. A station is considered busy when all
extensions are being used.
Represents telephone buttons.
Courier Shows a computer keyboard entry or screen display.
“Type” Indicates entry of a string of text.
“Press”
Indicates entry of a single key. For example: Type prog then press
Enter.
Shows a multiple PC keyboard or phone button entry. Entries
Plus (+)
without spaces between them show a simultaneous entry. Example:
Esc+Enter. Entries with spaces between them show a sequential
entry. Example:
# + 5.
Tilde (~) Means “through.” Example: 350~640 Hz frequency range.
Denotes a procedure.
Denotes the step in a one-step procedure.
Grey words within the printed text denote cross-references. In the
See Figure 10
electronic version of this document (Library CD-ROM), crossreferences appear in blue hypertext.
Related Documents/Media
Some documents listed below may appear in different versions on the Toshiba
FYI site or in print. To find the most current version, check the version/date in the
Publication Information on the back of the document’s title page. The following are
related documents for IPedge systems.
•IPedge General Description
•IPedge Installation Manual
•IPedge Feature Description and Implementation
•IPedge IP5000-Series Telephone Quick Reference Card
Important! This document may contain references to features that are for future implementation.
10 TOSHIBA IPedge UG 11/11
Page 15
The Grand Tour 1
The IP5000-series telephones connected to a Strata CIX telephone system,
running Release 5.2 or higher software, include a selection of IP telephone
models and matching IP add-on modules, as well as a 60 button DSS Console.
See Table 1 for more details.
Some IP5000 telephones offer a built-in gigabit ethernet switch allowing the
telephone to autosense the network speed, 10/100/1000Mbps. The IP5522-SD,
IP5622-SD, IP5531-SDL, and IP5631-SDL telephone models do not support
1000Mbps.
Through dynamic soft key assignments, the LCD telephones provide easy access
to frequently-used features by prompting specific tasks, providing Outside Line
Identification, User Name/Number, Call Duration, Date/Time of Day displays, and
Name and number displays of incoming callers.
The full-duplex speakerphone on these telephones enables you to place and
receive calls without lifting the handset.
The LCD telephones with 10 and 20 buttons are available with LCD backlight.
However, the IP5022-SD, IP5522-SD and IP5531-SDL telephones do not have
the backlight. To change the backlight settings, refer to Chapter –Feature
Operations.
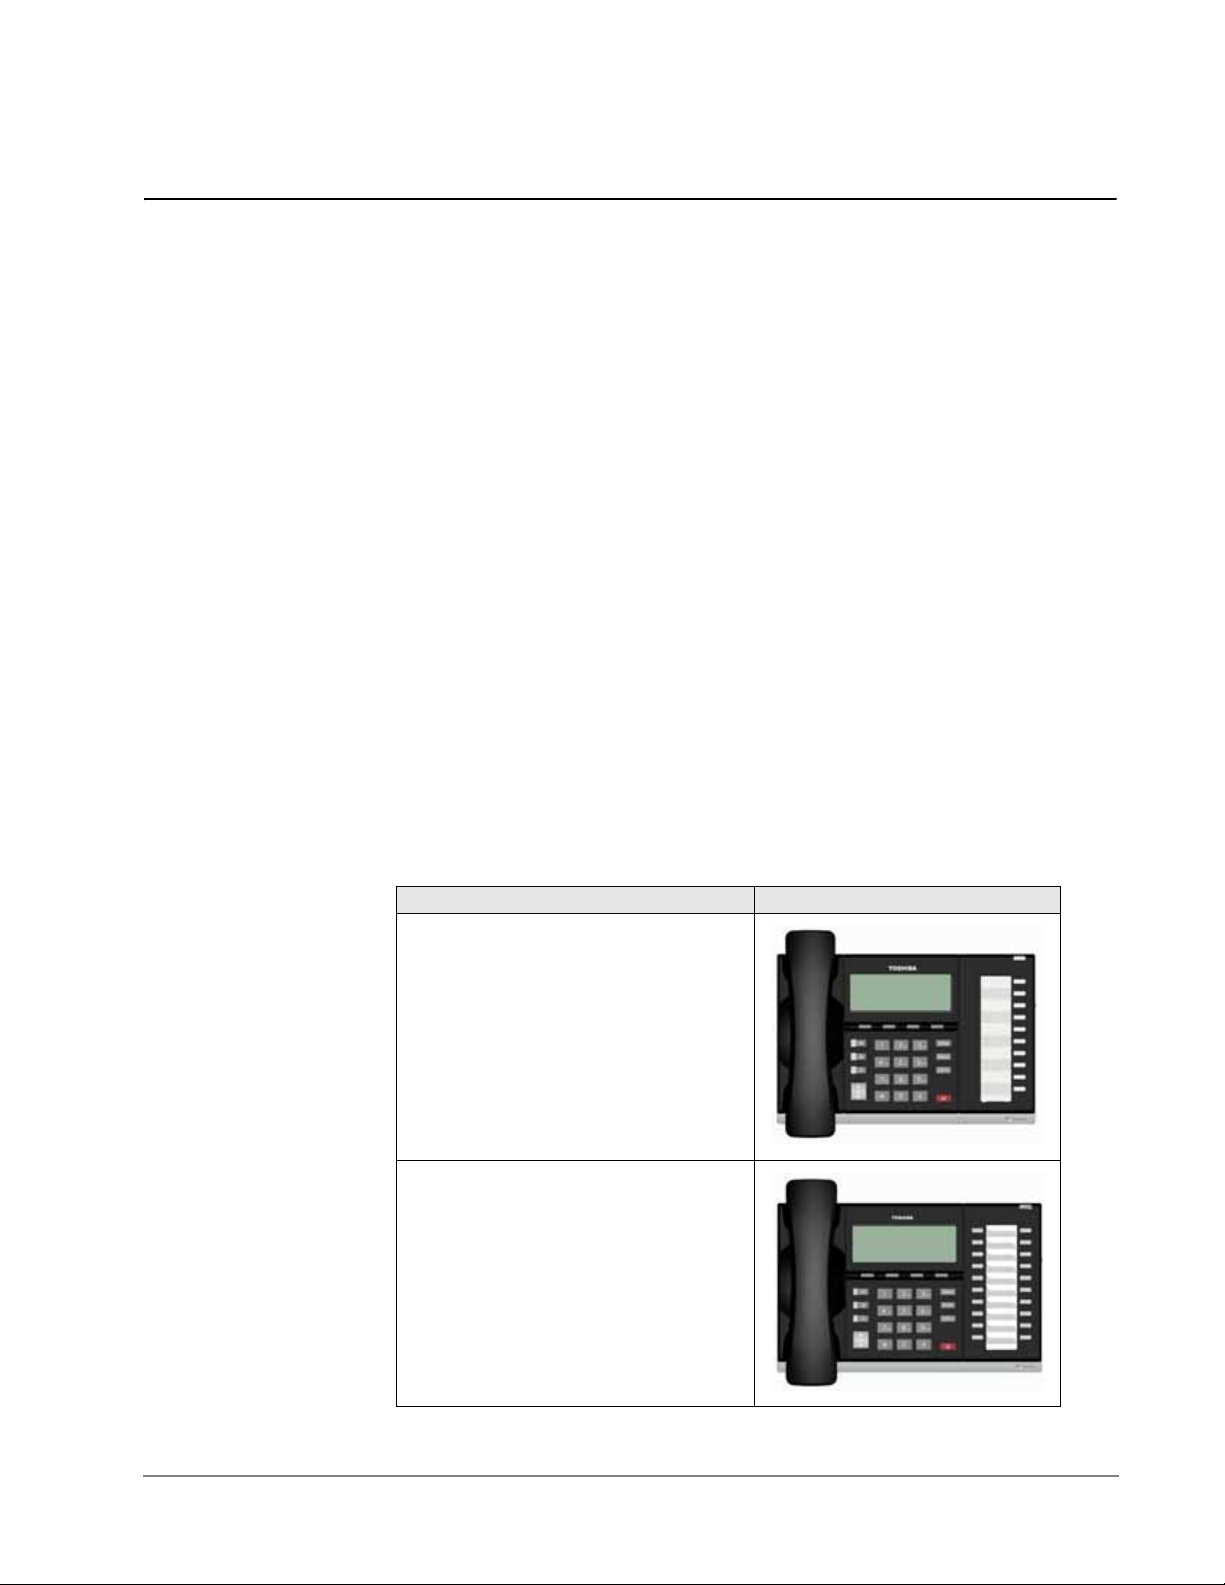
Table 1 IP5000 Series Telephones
Description Image
10 Button IP Telephone:
• 4 line LCD with back light option
• Full duplex Speakerphone
• Headset I/F
• Ringing LED
20 Button IP Telephone:
• 4 line LCD with back light option
• Full duplex Speakerphone
• Headset I/F
• Ringing LED
IPedge UG 11/11 TOSHIBA 11
Page 16
IPedge
The Grand Tour
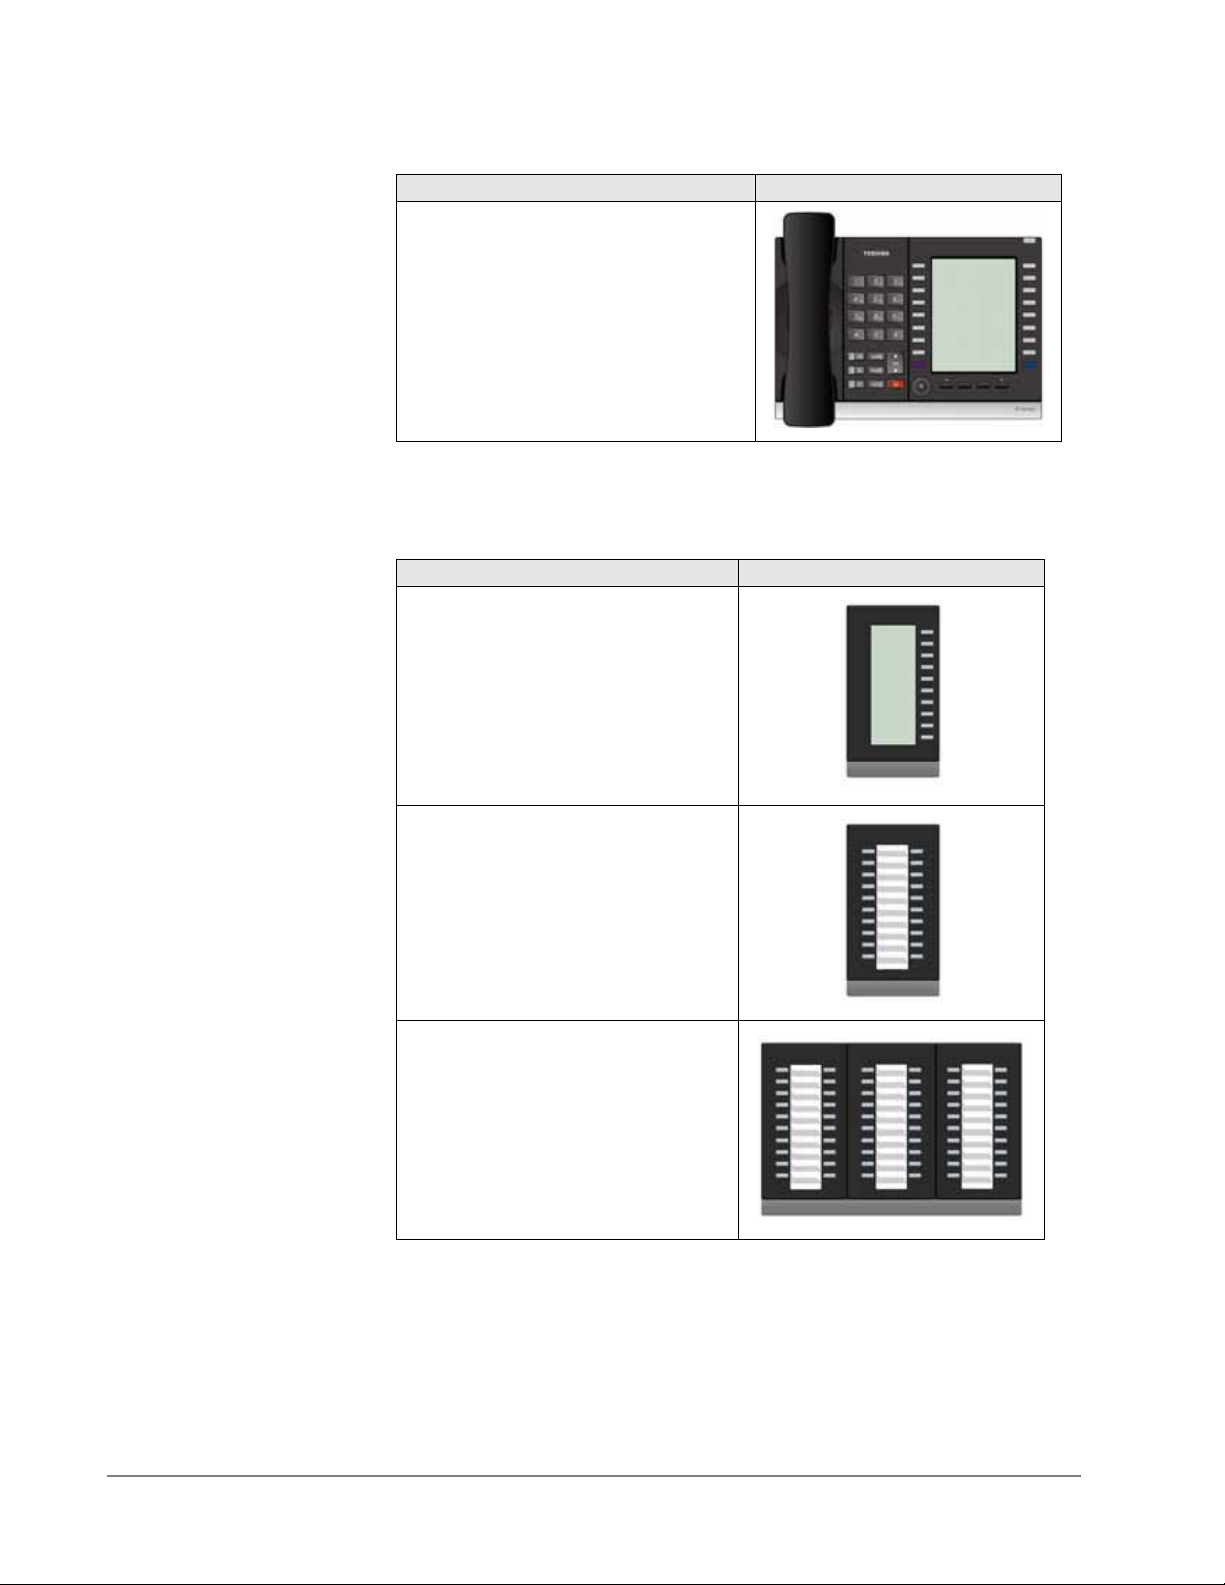
Table 1 IP5000 Series Telephon es (continued)
Description Image
20 Button with Electronic LCD Labels:
• 9 line LCD with back light
• Full duplex Speakerphone
• Headset I/F
• Ringing LED
The IP5000-series telephone upgrade options include:
Table 2 IP5000 Series Add-on Modules
Description Image
10 Button ADM for IP5000-series
• LCD programmable key strip with
back light
20 Button ADM for IP5000-series
• Paper Key Strip
60 Button DSS for IP5000-series
• Paper Key Strip
Note: IP5522-SD, IP5531-SDL and IP5622-SD can not connect ADM/DSS.
12 TOSHIBA
IPedge UG 11/11
Page 17
IPedge
A
B
C
E
F
G
H
I
J
K
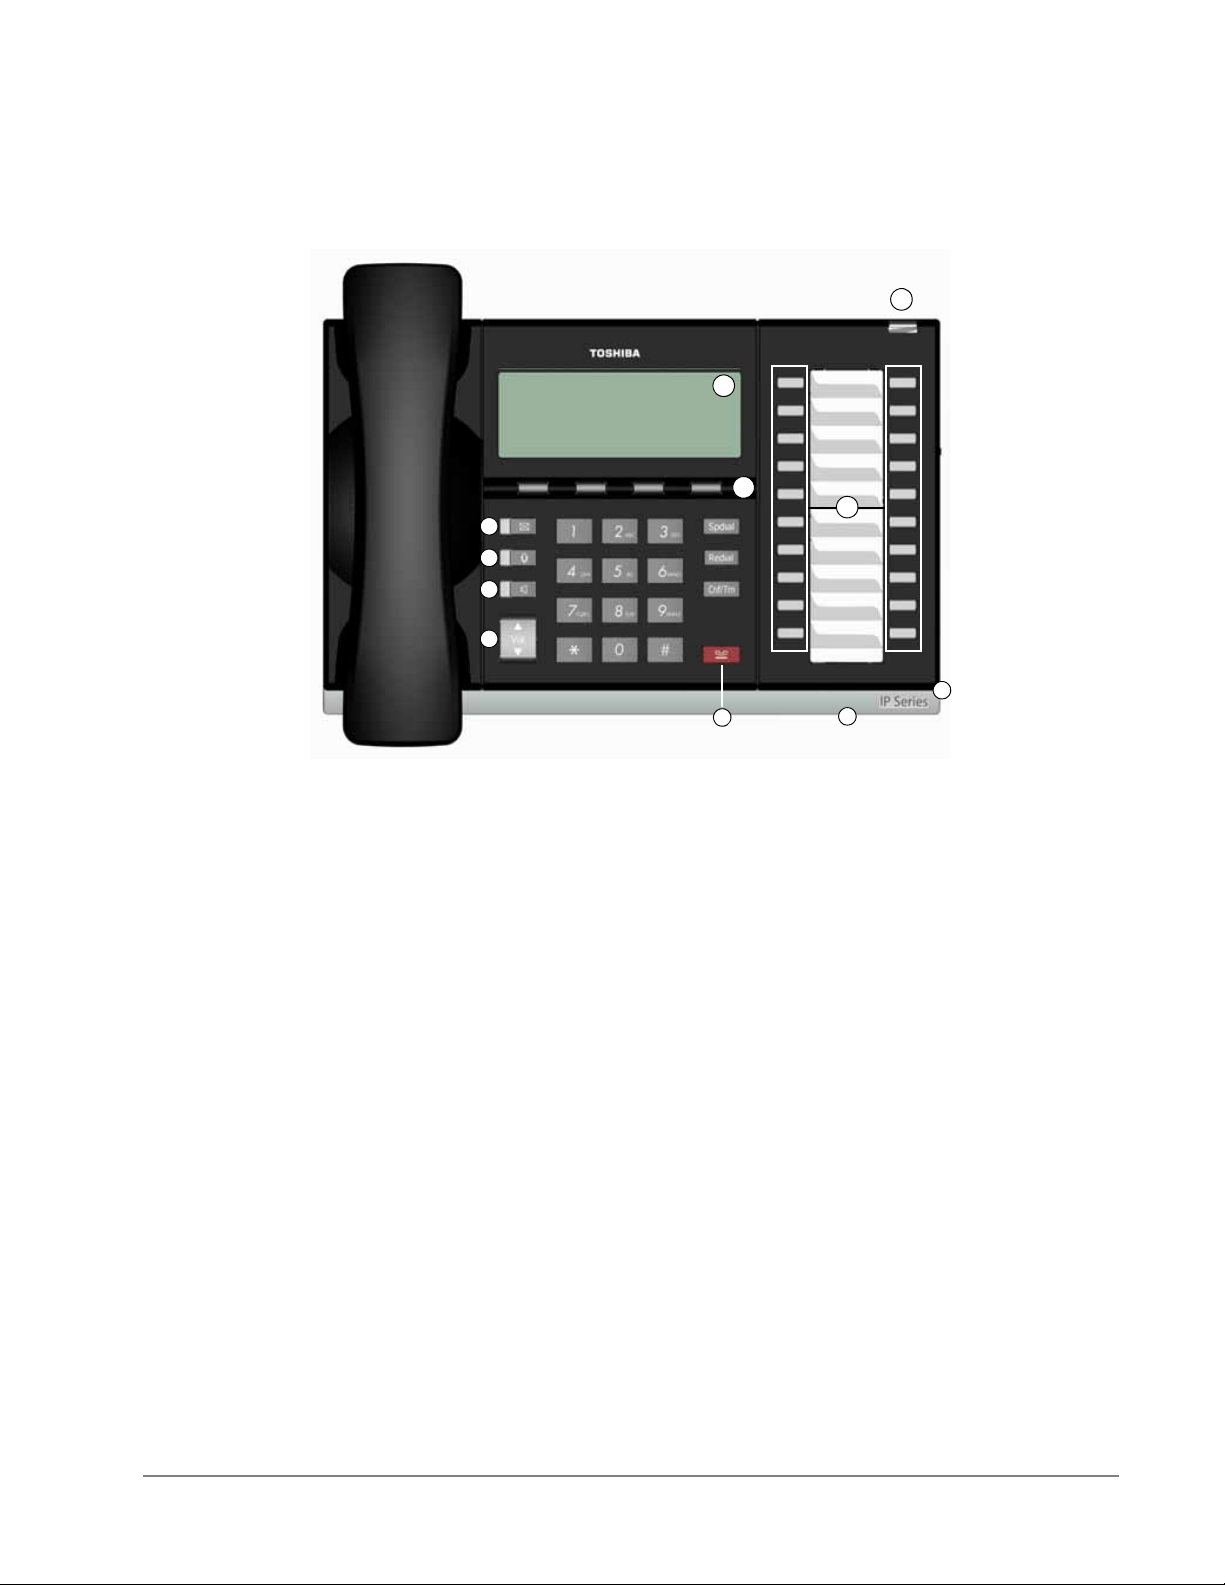
20 Programmable Feature Buttons 4-Line LCD Telephone
D
The Grand Tour
IP5000-series Telephone Overview
The illustration of the IP5000-series telephone shown below gives a general idea
of the basic attributes found on most of these telephones. The positioning of the
buttons varies per telephone model.
Legend
A Status LED (message and ringing)
B. LCD Display
C. Softkeys
D. Programmable Feature Buttons
E. Message Waiting LED Button
F. Microphone LED Button
Fixed Buttons The fixed buttons on the dial pad help perform standard functions quickly and
G. Speaker LED Button
H. Volume Button
I. Hold Button
J. Microphone
K. Tilt stand
easily.
IPedge UG 11/11 TOSHIBA 13
Page 18
IPedge
The Grand Tour
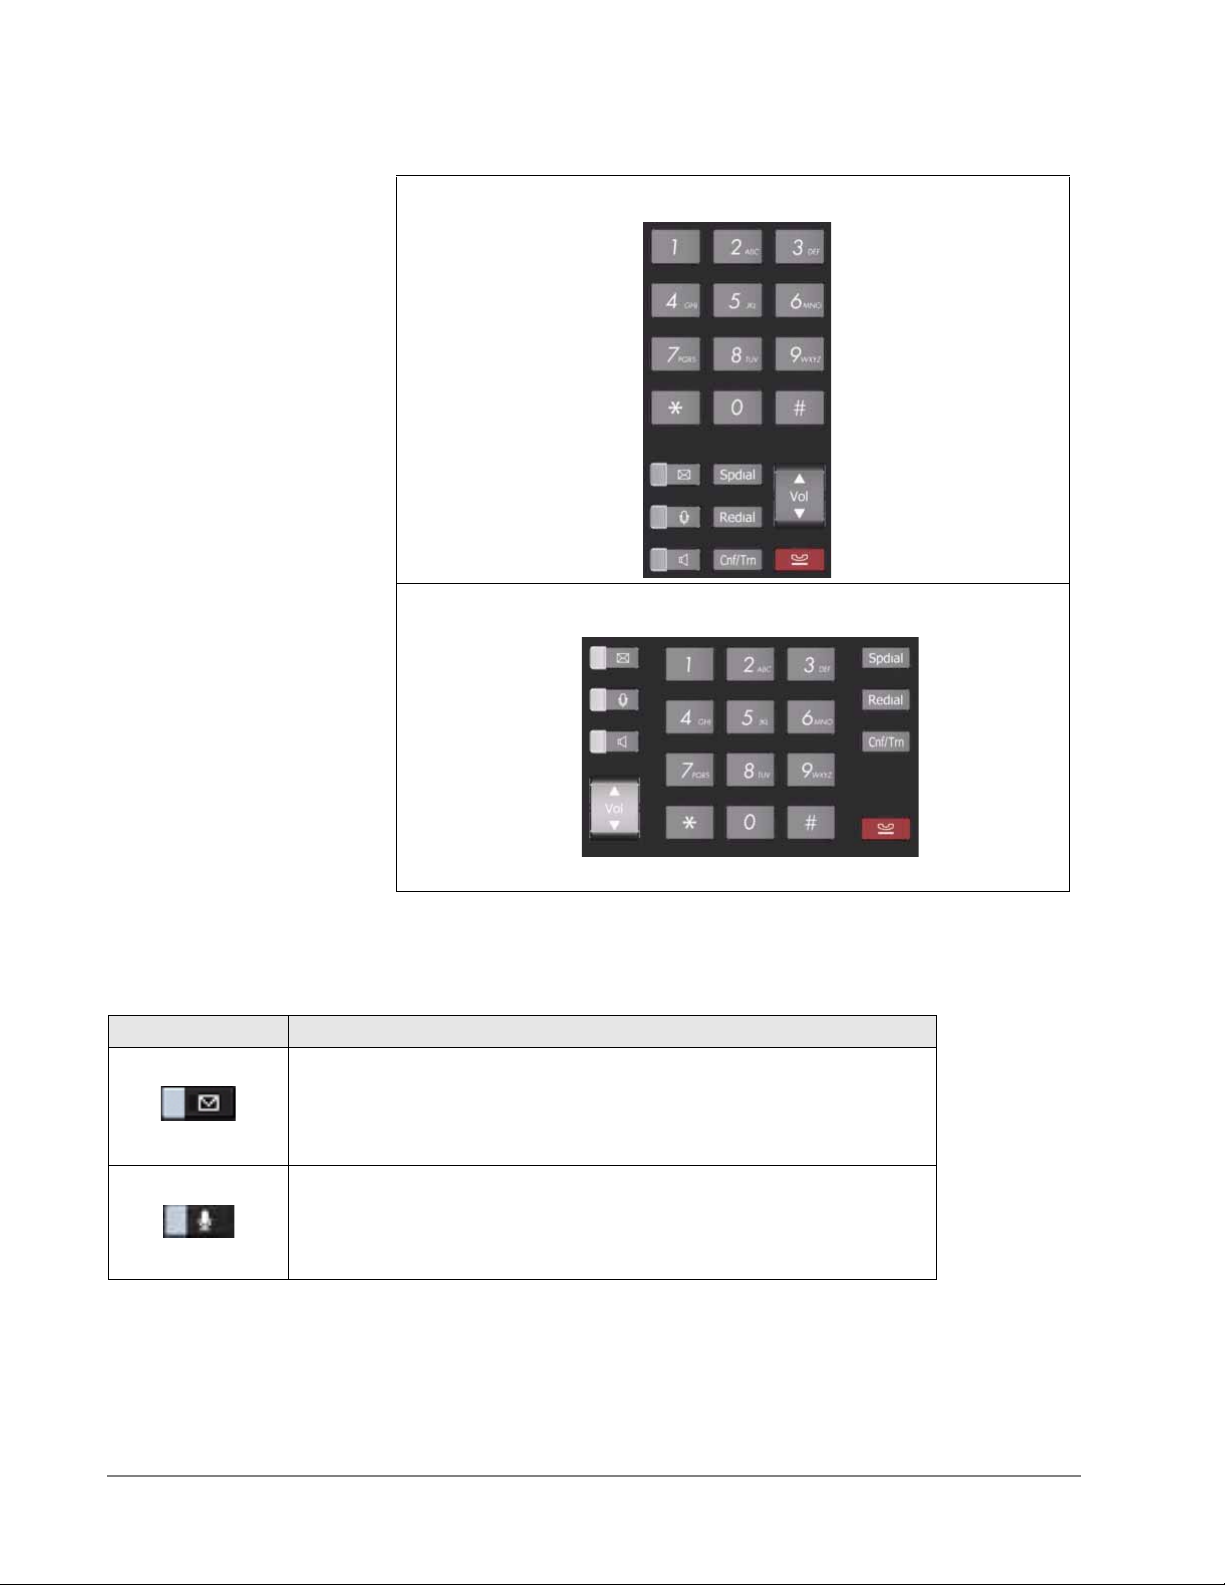
Layouts Fixed buttons are laid out differently on the IP5000-series telephones.
9-line LCD Telephone
10 and 20 Button 4-line LCD Telephones
Fixed buttons are located on either side of the dial pad.
The Fixed buttons are described below.
Table 3 Fixed Button Definitions
Button Definitions
Message (Msg): When Msg LED flashes, press
station or voice mail device that activated the LED. This is the telephone’s [PDN] message waiting button.
Important! Red LED must be on in order for button to function.
Microphone (Mic/Mute) button toggles between Mic and Mute. When
Mic key is lit, Mute is disabled. When Mic is pressed again and light is
off, Mute is enabled on the microphone in the telephone and the microphone in the handset.
Msg to call back the
14 TOSHIBA
IPedge UG 11/11
Page 19

Table 3 Fixed Button Definitions (continued)
Button Definitions
Speaker: Press to toggle the speaker ON/OFF. When red Speaker LED
is lit handsfree communications is supported.
To start a handsfree conversation; press the Speaker button, this turns
the red Speaker LED on. To terminate this call press the Speaker button
again (Speaker LED off).
During a handset conversation, press the Speaker button to start
hands-free communications (red Speaker LED on). Press the Speaker
button again to transfer the conversation back to the handset (Speaker
LED off).
Press and release the volume control bar to adjust volume levels.
Shift Key: Purple button on the IP5131 telephone. Press Shift at any
time to alternate between display of feature keys 1~10 and feature keys
11~20.
IPedge
The Grand Tour
Web Browser Key: Blue button on the IP5131 telephone. Press this key
to access the web.
Navigation Key: Round button on the IP5131 telephone is a navigation
key used for moving the cursor on html pages and in the programming
screens. Center of the button is the “select” function. The arrows are
used to scroll up, down, left or right.
Spdial Press Spdial and enter 3-digit Speed dial access code. Speed dial
access codes must be setup before they can be accessed.
Redial
Press Redial to dial the last telephone number called (internal or external).
If you have Automatic Line Selection, lift the handset first.
Cnf/Trn (Con-
ference/Transfer)
Press Cnf/Trn to add internal or external parties to a conference call
(up to 8 parties).
Press
Cnf/Trn and enter a number to transfer a call to another party (on
the CIX system).
Hold Press Hold to place an internal or external call on hold.
Press
Hold Hold to place an internal or external call on Exclusive hold.
If your telephone is programmed for Automatic Hold, existing calls are
automatically placed on hold when you answer a call or make another
call.
IPedge UG 11/11 TOSHIBA 15
Page 20

IPedge
Programmable Feature Button
Layout
01
02
03
04
05
06
07
08
09
10
11
12
14
15
16
17
18
19
20
13
The Grand Tour
Programmable
Feature Buttons
Key Strip The key strips on the IP5000-series telephones and add-on modules are
Programmable Feature Buttons are
programmed by the System
Administrator and can be customized on
a per user basis.
Note: Programmable Feature Buttons
are numbered bottom to top, left
to right (shown right).
either electronic (programmable) or paper (refer to Ta bl e 1 and Ta b l e 2 ).
LCD
9-Line LCD Display The LCD on the 9-Line LCD telephone (shown below) in idle state shows:
Top to Bottom
Line 1 or the top line of the LCD will display your user name (if programmed)
and your extension number.
Line 2 will show the Date and time.
Line 3 will show information related to your telephone set: VM New/Saved
messages, Call Forward, or if a certain feature is enabled on your telephone
set.
Browser Note: This feature applies to the IP5131-SDL telephone.
A plus sign + on the LCD indicates there is more data to display. Press NEXT
to advance through the information.
Lines 4~8 will indicate Programmable Feature Button labels.
Page -16
Line 9 will display the Soft Keys (See “Soft Keys” on page 1-18).
Toshiba’s IP5131-SDL with it’s large display screen also supports an HTML
browser to allow navigation on the World Wide Web or a company’s intranet.
The phone can have a homepage setup that allows navigation to begin just
like a homepage in your internet browser.
“Browser”on
16 TOSHIBA
IPedge UG 11/11
Page 21
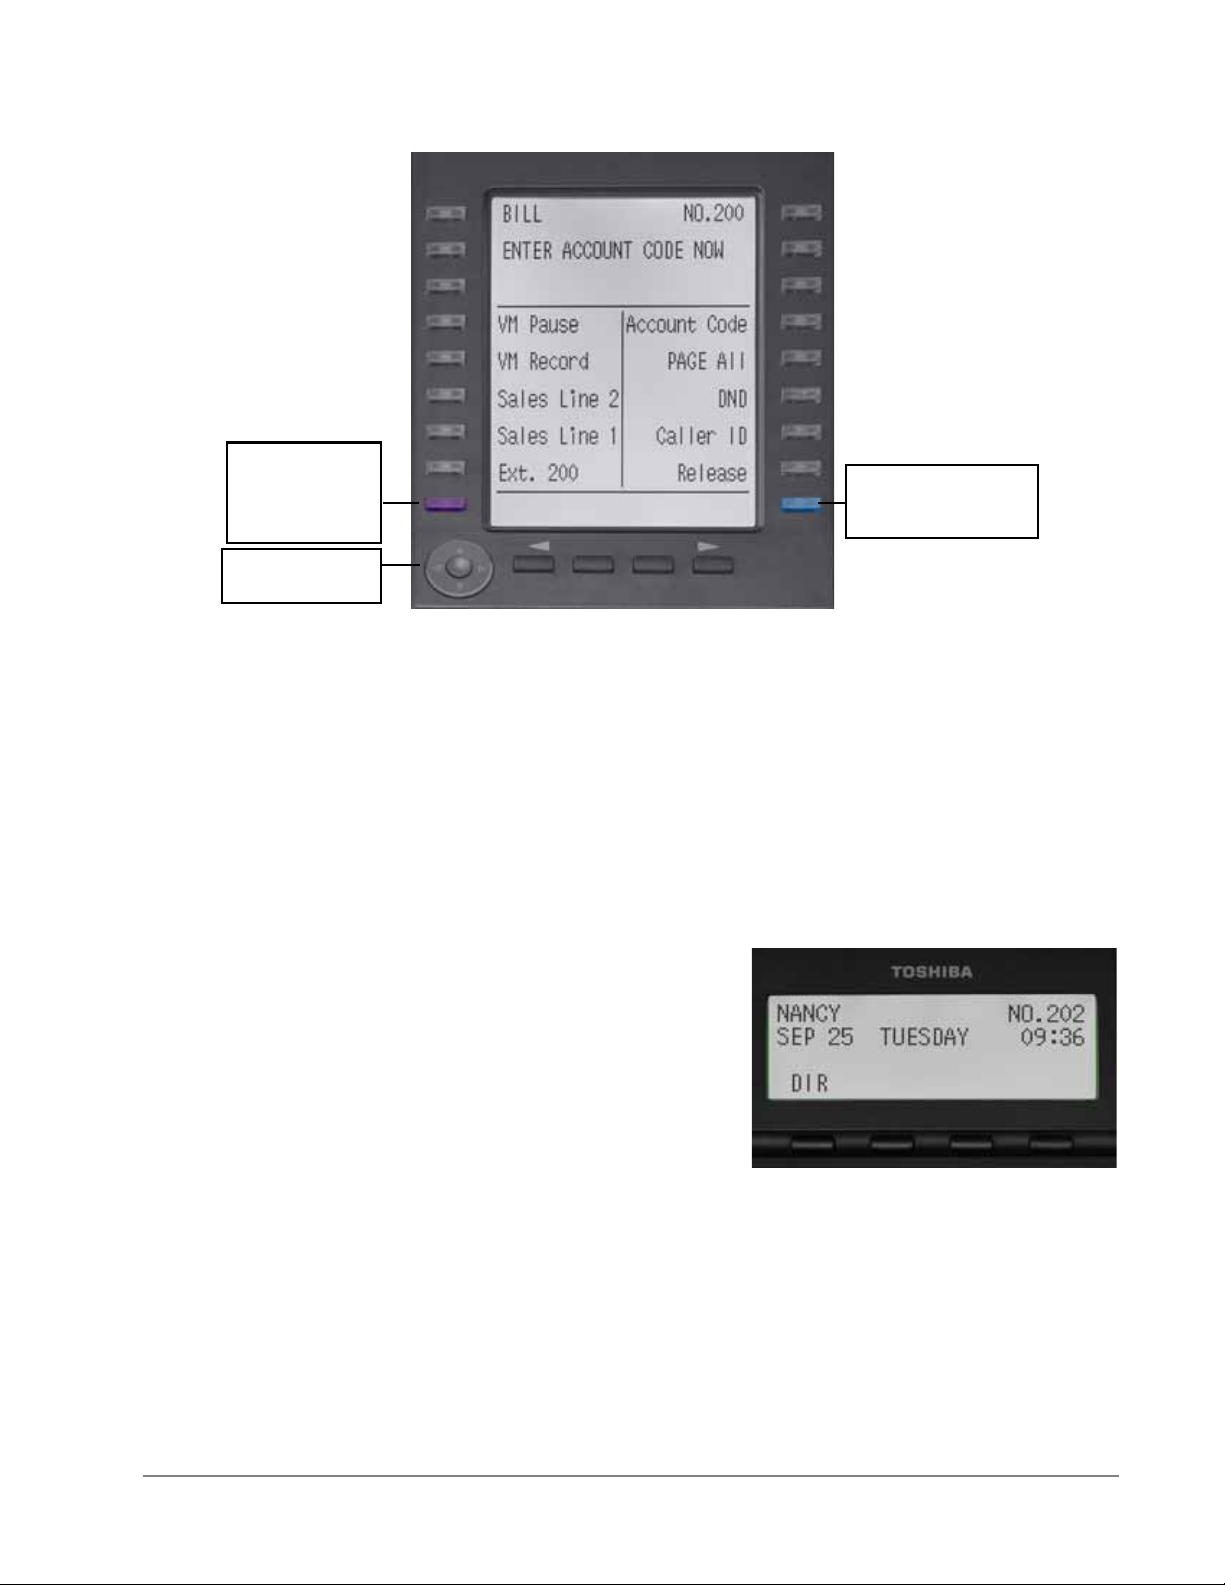
IPedge
Shift Button
toggles between
Programmable
Feature Buttons
1~10 and 11~20.
Navigation Button See “Browser” on
Page 10
Blue Button – toggles in-
between call processing
screen and HTML
browser or programming.
IP5000 4-line LCD display in Idle Mode
The Grand Tour
Web pages display basic HTML but do not support ASP or Flash. The 18 buttons
that surround the screen can be used to highlight selections in the browser. The
Navigation Button can be used to move the viewing window across the website;
the center of the navigation button can be pressed to select a field that is
highlighted.
4-Line LCD
Display
The browser allows navigation through various pages of content and is not static
to just one site. Navigation is as easy as highlighting a link and selecting it to
move to the next webpage. All IP5131-SDL telephones come with the browser
enabled. In order to access the browser, press the blue button on the bottom
right-hand side of the phone; this allows you to switch between your call
processing screen and the browser window.
The LCD in it's idle state (shown
right) displays:
Line 1 or the top line of the LCD will
display your user name (if
programmed) and your extension
number.
Line 2 will show the Date and time.
Line 3 will show information related to
your telephone set: VM New/Saved
messages, Call Forward, or if a
certain feature is enabled on your
telephone set. A plus sign + on the LCD indicates there is more data to display.
Press NEXT to advance through the information.
Line 4 will display the soft keys available in idle state. Press DSPLY to switch
from the Call Forward display to the User Name display.
IPedge UG 11/11 TOSHIBA 17
Page 22
IPedge
SK1 SK2 SK3 SK4
The Grand Tour
Soft Keys Softkeys (SK1 - SK4) refer to
the four buttons directly below
the LCD screen (shown right).
Soft Keys dynamically change
their functions and label
depending on the state of the
telephone. The dynamic
feature associated with the Soft
Key is displayed on the bottom
line of the LCD display directly
above each Soft Key button.
18 TOSHIBA
IPedge UG 11/11
Page 23

The Basics 2
This chapter reviews the basic operations of the IP5000-series telephones. The
instructions apply to all telephone models, except when noted otherwise.
Customizing Your Telephone
Volume Control
To adjust the Handset Volume
Press the Vol
call. When you hang up, the volume returns to the default setting.
To adjust the speaker volume for internal/external calls and background
music
1. Press Spkr.
2. Press an extension button - you hear dial tone.
3. Press the Vol
volume setting applies to all calls until changed.
To adjust Ring Tone, Hands free Answerback and Speaker Off-hook Call
Announce
Make sure the telephone is idle and the handset is on-hook. Press the Vol
increase volume and Vol
telephone’s ring tone, Hands free Answerback and Speaker Off-hook Call
Announce simultaneously.
To adjust handset Beep Tone
1. With the handset off-hook, dial the Beep Tone Adjustment Code #6101
(default code). You hear beep tone.
to increase volume and Vol to decrease volume during the
to increase volume and Vol to decrease volume. This
to
to decrease volume. This adjusts volume for your
2. Press Vol
IPedge UG 11/11 TOSHIBA 19
or Vol to reach the desired level.
Page 24

IPedge
The Basics
LCD Contrast Available on backlit telephones and backlit add-on module.
To adjust the LCD contrast on the backlit telephones
1. Press and hold down the Mic button.
2. Press and release Vol
or Vol repeatedly.
Note: Holding the Vol button does not continue to change the setting. The
button must be pressed for each step of contrast change.
To adjust the LCD contrast on the Add-on Module
1. Press Hold+3+6+9 (simultaneously).
2. Press
3. Press
Contrast + button to increase contrast.
Contrast - button to decrease contrast.
4. Lift the handset off-hook / on-hook to save settings.
Note: Holding the softkey does not continue to change the setting. The
softkey must be pressed for each step of contrast change
Brightness Control Available on backlit telephones with 4-line LCD’s and backlit add-on module.
To change the LCD back light brightness
1. Press Hold+3+6+9 (simultaneously).
2. Press
3. Press
Bright softkey to increase brightness.
Dim softkey to decrease brightness.
4. Lift the handset off-hook / on-hook to save the settings.
Note: Use the
BL BRIGHT and BL DIM buttons in steps 2 and 3 on the 10
button LCD Add-on Module.
To change the LCD backlight brightness for IP5131-SDL or
IP5631-SDL
1. Press Hold+3+6+9 (simultaneously).
2. Press the
3. Press the
Others softkey.
BL Bright softkey.
4. Enter a value of 0~3 using the dialpad. (0 = dim; 3 = brightest)
5. Press the
Set softkey twice.
20 TOSHIBA
IPedge UG 11/11
Page 25

Backlight On/Off Available on backlit telephones and backlit add-on module.
To change Backlight Settings
1. Press Hold+3+6+9 (simultaneously).
2. Press the Mic button.
3. Press Hold.
4. Use table below to choose preferred settings.
5. Press Hold Hold to save settings
Table 4 Backlight Settings
Button Input Meaning
1 Always Off
FB1
FB2 1~30
Note: FB1 is the lower left key, FB2 in the next up, FB3 is above FB2, and FB4
is above FB3.
2 Always On
3 On-demand
Backlight
Timer [ x10 seconds]
Example: 1 = 10 seconds; 30 = 300 seconds.
IPedge
The Basics
Dial Pad and
Button Beeps
Speakerphone/
Microphone
Sensitivity
Adjustment
IP telephones can emit a “beep” whenever a dial pad or feature button is pressed.
The “beeps” are On by default. Follow these steps to turn the “beeps” On or Off.
1. Press 3+6+9+Hold (simultaneously).
2. Press 0.
3. Press Hold.
4. Press Programmable Feature Button 1 (FB1) to toggle On/Off.
5. FB1, LED On: buttons beep.
6. FB1, LED Off: buttons do not beep.
7. Press Hold to set the option.
8. You must also go off-hook, then on-hook to exit the program mode.
When you are using the speakerphone, high ambient noise levels may cause the
party you are talking with to be to cut off frequently. If this happens, follow these
steps to lower the sensitivity of the microphone on a IP5000-series telephone. The
default is normal sensitivity.
1. Press 3+6+9+Hold (simultaneously).
2. Press 0.
3. Press Hold.
4. Press Programmable Feature Button 3 (FB3) to toggle On/Off.
5. FB3, LED On: Lower sensitivity
IPedge UG 11/11 TOSHIBA 21
Page 26

IPedge
The Basics
6. FB3, LED Off: Normal sensitivity
7. Press Hold to set the option.
8. Go off-hook, then on-hook to exit the program mode.
Telephone Terminology
When making or receiving calls on your IP5000-series telephone you may
experience one or more of the following call features depending on how your
telephone is configured.
•Line – is synonymous with trunk which is the line that connects you to the
PSTN (Public Switched Telephone Network). Line can be:
• a button on your telephone set designated for outgoing calls
• your DN button followed by dialing 9.
• Automatic Line Selection (ALS) – ALS is engaged on outgoing calls.
Lift the handset or press Spkr to hear dial tone, the steady green Line
LED indicates ALS in enabled. The second line of the LCD will display the
method of dialing available, followed by the digits dialed.
• Ringing Line Preference – Answer any incoming call by lifting the
handset or pressing Spkr. There is no need to press the ringing line
button to answer the call when ringing line preference is enabled.
• Tone First Signaling – Internal incoming calls only: telephone rings in
standard ring tone, lift handset or press Spkr to answer call.
• V oice First Sign aling – Internal incoming calls only: a long tone is heard,
followed by the caller's voice, this will automatically engage the Spkr to
allow for hands free communications. Lift the handset if desired (for
privacy). When Voice First Signaling is enabled the telephone does not
ring on internal incoming calls.
• Hot Dialing – Dial a telephone number from the dialpad, the telephone
automatically selects a line, shown with a green LED, and turns on the
Spkr and Mic LED's. When Hot Dialing is not turned on the handset
should be lifted or Sprk should be pressed in order to make a call.
22 TOSHIBA
IPedge UG 11/11
Page 27

Making a Call There are three ways to originate a call from the telephone:
TOM EDISON NO.2004
DIR
APR 05 WEDNESDAY 1:01PM
4 Line LCD Display
Handset 1. To make a call, lift the handset, then dial the number.
A line may be automatically selected or choose a line manually. Dial tone is heard
through the handset. The Speaker and Microphone LEDs do not light.
Digits display as they are dialed. Call progress tones (Ringback Tone, Busy Tone,
etc.) are heard through the handset.
2. When connected, continue using the handset or switch to speakerphone by
holding down Spkr and placing the handset in the cradle.
Spkr Button 1. To make a call, press Spkr.
A line may be selected automatically or choose a line manually. The extension or
Line button lights (depending on system programming). Dial tone is heard
through the speaker. The Speaker and Microphone LEDs light.
2. Dial the number.
IPedge
The Basics
Hot Dialing 1. To make a call using Hot Dialing, start dialing the number.
Dial Directory Calls can be made by selecting a name from the alphabetical telephone directory.
Digits display as they are dialed. Call progress tones (Ringback Tone, Busy Tone,
etc.) are heard through the speaker.
When connected, continue using the speakerphone or lift the handset to continue
the conversation.
The extension button, Spkr and Mic LEDs light. Digits display as they are dialed.
Call progress tones (Ringback Tone, Busy Tone, etc.) are heard through the
speaker.
2. When connected, continue using the speakerphone or lift the handset to
continue the conversation.
To access the Directory
1. Press DIR soft key (shown
right).
Select Directory menu
appears.
The soft keys on the Select
Directory are:
My = Personal Speed Dial Names
EXTR = System Speed Dial
Names
INTR = Directory Number Names
Dial = Cancel directory, get dial tone.
2. Choose the directory you wish to access and use the dial pad to enter the
name.
IPedge UG 11/11 TOSHIBA 23
Page 28
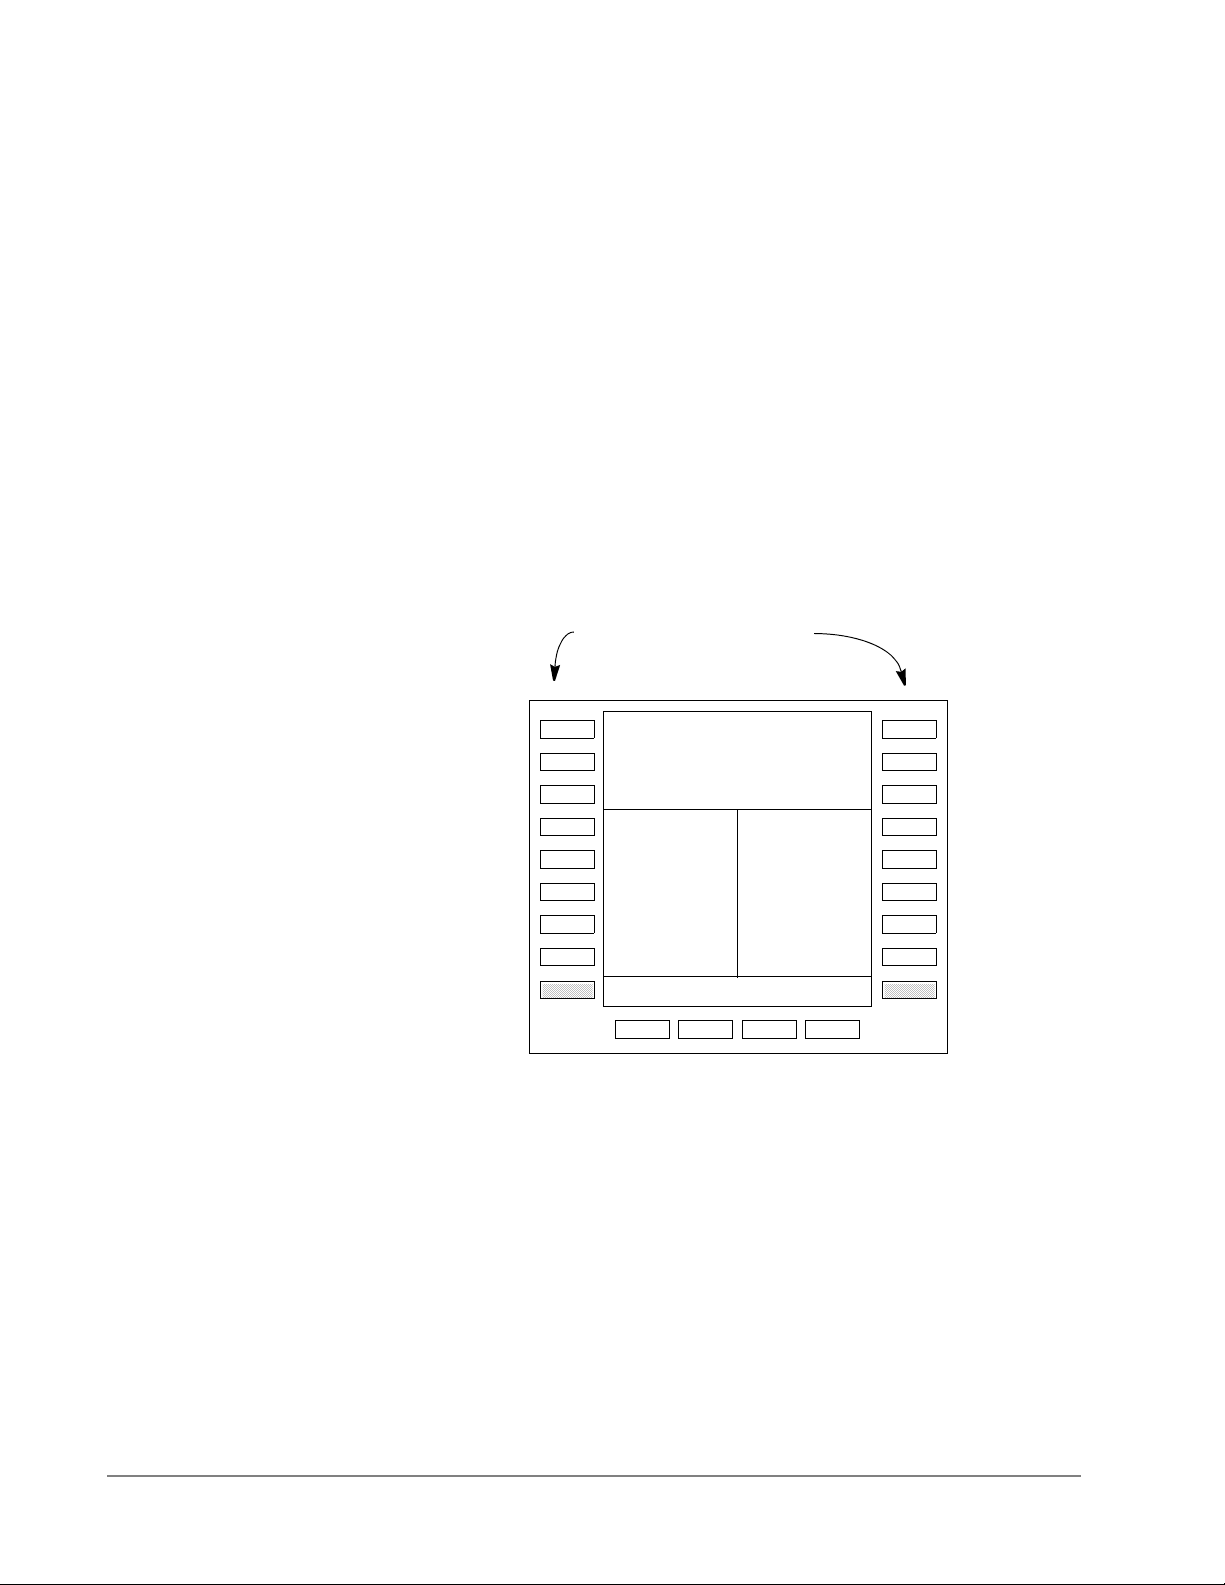
IPedge
BOB L (PRI)
BOB LAWVER BRAD FISHER
ONE TOUCH ONE TOUCH
PICKUP ONE TOUCH
CFAC
ONE TOUCH
NEXT
DND
Ext. 4227 ONE TOUCH
ONE TOUCH
BACK CNCL
BILL THOMAS
BRAD FERRIS
BRIAN SMITH
Press the key next to the displayed
name to call that person.
9 Line LCD Display - Dial by Name Screen
The Basics
Notes:
• If a directory is not selected and a name is entered, all directories will be
searched.
• To enter names from the dial pad, press the dial pad button associated
with the letter to be entered. Press the button once for the first letter, twice
for the second letter, etc. Left and Right Soft Keys are available to move
the cursor.
1. Press FIND to start the directory search.
2. Press NEXT to move forward through the directory.
3. Press BACK to move backwards through the directory.
4. Press Call to connect to the directory entry selected.
5. On the 9-line LCD Display, press the button next to the displayed name.
See figure on following page.
6. Press CNCL to quit the directory search.
24 TOSHIBA
IPedge UG 11/11
Page 29

Answering a Call There are several ways to answer a call:
Handset When the telephone is programmed for Ringing Line Preference, pick up the
handset and the telephone automatically answers the ringing line.
... or press the button associated with the ringing line (flashing green LED).
Speaker When the telephone is programmed for Ringing Line Preference, press Spkr and
the ringing line is answered.
... or press the button associated with the ringing line (flashing green LED). Once
connected, continue using the speakerphone or lift the handset.
Shift Button Available on a 9-line display telephone only.
If the LCD screen is set to view Buttons 11~20 and a call comes in on Button 1 the
phone will ring and Caller ID information will display on the top of the screen,
press the “Shift” Button to view Buttons 1~10 and answer the call.
IPedge
The Basics
Handsfree
Answerback
With speakerphone enabled, the telephone may be programmed for Handsfree
Answerback. The called party hears a single long tone, followed by the caller’s
voice. Begin hands free conversation. If Handsfree Answerback were not
programmed, the called party could hear the calling party speak but would not be
able to answer them without answering the call manually.
Notes:
• The extension LED flashes green, the Microphone LED lights steady red and
the Speaker LED flashes Red.
• In order to perform any additional functions with this call (like a transfer or
hold) the call must be properly answered to gain full call control. Perform the
same steps you normally would to answer a call: press the Spkr button, the
flashing DN button or lift the handset.
• Handsfree MIC setting needs to be enabled by your System Administrator.
IPedge UG 11/11 TOSHIBA 25
Page 30

IPedge
The Basics
On a Call While on a call you can perform the following:
Switching Between
Handset and
Speakerphone
Microphone (Mic/
Mute) Button
Press Spkr and place the handset on-hook to switch from handset to
speakerphone mode.
Take the handset off-hook to switch from speakerphone to handset mode.
This button toggles between Mic and Mute. When Mic button is lit, handsfree
communication is supported, when Mic is pressed again and light is off, Mute
is enabled and mutes both the microphone and the handset.
Hold To place a call on hold, press Hold. Your LCD shows the line on hold. The
held Line’s LED flashes green while appearances of the line at other stations
flash red.
• To return to the held call, press the flashing held Line button.
• If you do not return to the held call within a specified time, it rings back to
your telephone. The call remains camped-on to your station.
• If the held party hangs up, the call is released.
• See the Call Pickup section to pick up a call on hold from another
extension.
Exclusive Hold This feature enables you to place a call on hold so that only you can retrieve
it.
While on a call, press Hold twice. That line’s LED flashes green while
appearances of the line at other stations are steady red (in use).
Automatic Hold This features enables you to move from one Line button to another Line
button without pressing Hold.
Check with your System Administrator to make sure this setting is turned on.
If Automatic Hold is not enabled, calls will drop when moving from one line to
another without pressing Hold.
While on a call, press another extension button to receive/originate a new
call. The accessed line’s LED flashes (in-use). The first call is put on hold and
your extension’s LED flashes.
Consultation Hold 1. While on a call, press Cnf/Trn. The call goes on hold.
2. Dial another line.
3. Transfer the call or return to the held call by pressing its Line button.
26 TOSHIBA
IPedge UG 11/11
Page 31

Message Waiting Use your Msg LED/button and LCD to see/retrieve message(s).
An extension can receive up to four simultaneous Message Waiting indications
and LCD messages. One message is reserved for the Message Center.
Your telephone can be programmed to have up to four additional (flexible)
Message Waiting buttons/LEDs. Check with your System Administrator to see if
these buttons have been programmed on your telephone. If so, substitute them
when the Msg button/LED is mentioned in the following steps.
IPedge
The Basics
Responding to a
Lit Msg LED
Turning On/Off
MW LED on
Another
Extension
1. On an LCD telephone, if you see a “+,” press SK3 to display additional
messages; otherwise, go to Step 2. The “+” indicates additional messages.
The LCD can show up to three station messages for your extension and three
for each additional (phantom) extension that you may have.
2. Press Msg, then lift the handset. Your telephone rings the extension or voice
mail device that sent the indication. The LED continues to flash red.
3. After answering the message(s), place the handset back on-hook.
4. If the Msg LED continues to flash, you have more messages; repeat Steps
1~3 above to retrieve them. Voice mail devices turn off the LED/LCD
indications after a short delay, after you checked all messages.
5. To manually turn off your Msg LED, press your extension button, then press
#409. Do this step for each message received.
If you call an extension and it’s busy or there is no answer, you may be able to
light that extension’s Message Waiting LED and enable that extension to call you
back. The ability to perform this feature is set in system programming.
1. Dial an internal extension. You hear busy tone or there’s no answer.
2. Press Msg or 7. The Msg LED flashes red on the called telephone. At your
telephone, the Msg LED lights steady red and the LCD shows the station
number where you set a Message Waiting light. Example: “MW SET TO
3620.”
3. If you decide to cancel the Message Waiting light at this point, press Msg or 7
again while ring-over tone is playing and the light will be cancelled.
4. Press Spkr. Your Msg LED turns Off. The Msg LED on the called telephone
flashes until the called party presses the flashing Msg button which calls you
back.
5. To turn Off a Message LED that you have set on another extension, press
#64 plus the extension number that has the message light set. Then press
Spkr or hang up to release your telephone. Your LCD shows the extension
and “MW CANCEL.”
...or dial the extension that you set the Message LED on, then press
77. Then press Spkr or hang up to release your telephone.
IPedge UG 11/11 TOSHIBA 27
Page 32

IPedge
The Basics
LED Indicator Details Each line and Programmable Feature Button has a LED next to it
which indicates the status of the line or feature associated with the
button. Line LEDs light red or green and flash at varying rates to
indicate call status (see Table 5).
Table 5 LED Indicators
LED
Extension In-Use
(access outside line)
Incoming Call
(while ringing)
Hold (outside line) If using Pooled Line
Grp, the hold indication is only at the
station that places the call on hold.
Hold – Consultation
(during consultation/transfer to another
station)
Hold – Exclusive (outside line)
Hold – Recall
(when held call recalls your idle station)
Hold – Exclusive Recall
Internal Call
(while station ringing)
Busy Station Transfer
(outside call transferred to your busy
station from a designated station or AA)
After disconnecting first call...
Conference
Your S tation (Green) Other Station (Red)
Interval Rates
2 seconds On, 1/8 second Off
steady
— 1/8 second On/Off
1 second on at 10 pulses/sec-
one second On/Off
ond —1 second Off
4 pulses/second for 1/8 second
1/2 second On/Off
On/Off
10 pulses/second steady
10 pulses/second steady
1 second at 2 pulses/second,
flashes
1 second at 10 pulses/second
1 second at 2 pulses/second,
steady
1 second at 10 pulses/second
Your extension button flashes
10 pulses/second—1 second
[SDN] red flashing or
green ringing
Off
4 pulses/second, 1/8 second
On/Off
3/4 second on, 1/8 second Off
10 pulses/second 2 pulses/second
10 pulses/second steady
Note: LEDs on the telephone flash at different speeds depending on the
function performed. Flash rates can be found under “LED Indicator
Details” on page 2-28.
28 TOSHIBA
IPedge UG 11/11
Page 33

SoftIPT 3
The SoftIPT is a software phone client that runs on appropriately equipped wired
or wireless laptops, tablets and desktop PCs with all versions of Microsoft
TM
Windows 7, Windows Vista
(OS).
SoftIPT on a PC integrates the power of the PC with most of the features available
on an IP5000-series telephone. You can use most of the features described in this
User Guide. .
and Microsoft® Windows XP® operating software
®
Important! The SoftIPT functions in the same manner as a desktop IP
telephone. Use this manual as a guide to the SoftIPT
functions.
SoftIPT Icons The special buttons relating to the SoftIPT screen are described below.
Table 6: SoftIPT Button Definitions
Button Definitions
SoftIPT Directory – Clicking this icon enables you to access the
directory you create using MS Outlook. Refer to “Using the Directory” on
page 3-35.
SoftIPT Configurations – Double click this icon to open the
Configuration window. This enables you to view and change SoftIPT
settings.
IPedge UG 11/11 TOSHIBA 29
Page 34

IPedge
SoftIPT
Table 6: SoftIPT Button Definitions (continued)
Button Definitions
Audio Settings – Click this button to adjust the audio properties when
connected to a USB handset.
Help – Clicking this icon enables you to access Help as a user or find
information on Setting Audio Properties, etc. Click Help to view all
SoftIPT information.
Shift Button (Purple) – Press Shift at any time to alternate between
display of feature keys 1~10 and feature keys 11~20.
Fixed Buttons The fixed buttons on your telephone enable you to perform standard functions
quickly and easily. These buttons are described in Chapter –The Basics.
Flexible Buttons All Flexible Buttons must be programmed for your telephone in system
programming and vary for individual telephones. If a button does not appear
on your display or telephone keystrip label, see your System Administrator for
button assignments.
Line Buttons You may have buttons designated as Line and/or Pooled Line Grp which
enable you to directly access outside lines. Pooled Line Grp enables you
to access available CO Lines from a group of lines appearing under one
button.
Liquid Crystal
Display
LCD Control Buttons There are two types of LCD button functions: LCD Control Buttons and Soft
The Liquid Crystal Display (LCD) on the SoftIPT will display information
similar to the large 9-line IP telephone display:
• Desk Clock and Calendar in idle mode
• Call Duration during an outside call
•
Operational, Advisory, and Notification messages
Keys.
When the Soft Key prompts appear on the LCD, the LCD Control Button just
below the prompt offers access to that feature.
30 TOSHIBA
IPedge UG 11/11
Page 35

Configuring SoftIPT
IPedge
SoftIPT
Configure the
SoftIPT
1. After you have installed SoftIPT, double-click the SoftIPT icon on the desktop.
The SoftIPT Configuration window opens.
Important! See the illustration below. You will need to enter items A-E
to configure SoftIPT. Check with your Telephone System
Administrator to make sure that you have this
information. After entering this information, print the
screen for future reference.
Figure 1 SoftIPT Configurations
2. In the SoftIPT Configuration window, enter the following:
Fields Description
Phone No. This is the SoftIPT extension.
Password Password for IP user mobility
Node By default, leave blank.
Outgoing prefix When a call is made using the SoftIPT directory, SoftIPT
automatically attaches the outgoing prefix for local calls, or long-
Long distance prefix
IPedge UG 11/11 TOSHIBA 31
distance prefix for long-distance calls, respectively. See “Using the
Directory” on page 3-35 for details.
Page 36

IPedge
SoftIPT
Fields Description
IP address
SoftIPT tries to connect to the IPedge using the following
addresses:
• Primary IPedge server IP address
• Secondary IPedge server IP address.
Notes
If Broadcast is selected, SoftIPT tries to search for the IP address
by sending broadcast messages. SoftIPT skips the Primary IP
address or the Secondary one if it is not set. In either case, if
SoftIPT successfully connects, the IP address is shown in the
“Connected IP Address” field. See your System Administrator for
IP address of the IPedge system.
If Broadcast is selected, the broadcast message is sent on the
same subnet, which means SoftIPT can connect to the IPedge on
the same subnet using Broadcast mode without designating the
IPedge IP address. However, in some PC environments, SoftIPT
cannot complete this broadcast registration sequence because
the lower network module does not notify SoftIPT, through
Windows, of receiving a reply message after sending a broadcast
message. Therefore, Toshiba recommends using Manual mode if
SoftIPT cannot find the IPedge by Broadcast.
Network If there are multiple network adapters, select the one for SoftIPT.
Check this box to automatically startup SoftIPT after starting your
PC.
Automatic startup
Popup window The SoftIPT window pops up when receiving a call.
Use Default
Microsoft Outlook
Profile
Auto-Login on startup
Note If Automatic startup is unchecked and SoftIPT continues
to start up, use the MSCONFIG utility screen > Startup tab
and uncheck Toshiba SoftIPT. Consult your System
Administrator on using the MSCONFIG utility.
As shown below in Using the Directory, SoftIPT can use MS
Outlook (not Outlook Express) as its directory. If multiple Outlook
profiles are set, you can select one of the profiles when launching
SoftIPT if this box is unchecked. See “To check how many Outlook
profiles are on your PC” on page 33.
If you have only one profile, select “Always use this profile” and
check the “Use Default Microsoft Outlook Profile” box. If you have
several profiles and choose one of them, select “Prompt for a
profile to be used” (see Figure on page 34), and uncheck the “Use
Default Microsoft Outlook Profile” box (See Figure ).
If you uncheck this box, you can input an extension number every
time you log in. See “IP User Mobility” in the CIX General
Description and Programming Manual, Volume 1 for details.
32 TOSHIBA
IPedge UG 11/11
Page 37

Fields Description
Allow SoftIPT to run
in the background
3. Click OK.
1. Go to Start > Control Panel > Mail
2. Double-click the Mail icon
3. Click the Show Profiles... button
4. Here are all the profiles setup on your PC (see Figure on page 34)
This option dictates what happens when you press the close (X)
button in the upper right corner of the SoftIPT main window.
• Run in the background if this box is checked.
• Exit SoftIPT software if this box is unchecked.
Note If the SoftIPT icon is still on the system tray at the bottom
right corner of the PC, then SoftIPT is still running in the
background, even after pressing the Close (x) button.
To check how many Outlook profiles are on your PC
IPedge
SoftIPT
Figure 2 Mail Setup - Outlook
IPedge UG 11/11 TOSHIBA 33
Page 38

IPedge
SoftIPT
Figure 3 Mail Profiles
Basic SoftIPT Functions
Start the SoftIPT Double-click the SoftIPT icon on your desktop.
Making a Call To make a call
1. Click Speaker then select the on-screen dial pad buttons to dial a call.
2. When connected to a call, you can select any of the call buttons, such as
Redial, Hold or Conf.
3. Click Speaker to end the call.
Note: Do not use BGM (#490) on the SoftIPT. It conflicts with incoming calls.
To make a Call using a USB Handset
To install a USB handset, refer to the vendor's documentation and/or website.
1. Go off-hook (pick up the receiver or press the hookswitch button on the USB
Handset) to get dial tone.
2. Dial the phone number - click the on-screen dial pad buttons, input numbers
(asterisk key, pound key) from PC keyboard, or use the key pad on the USB
handset, if available.
3. To end the call, go on-hook (put down the receiver or press the hookswitch
button).
34 TOSHIBA
IPedge UG 11/11
Page 39

Answering a Call To answer a call using the Shift button
If the LCD screen is set to view keys 11~20 and a call comes in on key
1, the phone will ring and Caller ID information displays on the top of
the screen - press the Shift key to view keys 1~10 and answer the call.
IPedge
SoftIPT
Switching a Call to Your Headset
Labeling Feature
Buttons
Using the
Directory
You can switch a call from your IP telephone to the SoftIPT by placing the call on
Hold and using the Call Pickup feature.
1. Press Hold.
2. On the SoftIPT, dial #5#72 + the extension number of your telephone.
Note: You can also add this dialing string to a flexible button on your SoftIPT
phone as a One-touch Speed Dial button for ease of call switching.
SoftIPT Version 3.0 provides soft labels preset by the Strata CIX system. If you
wish to change them, contact your system administrator.
You can create a directory with MS Outlook (not Outlook Express).
1. Close SoftIPT if you are using it.
2. Open MS Outlook.
3. Double click on the Contacts icon, click on the New contact icon.
4. Type in the contact information, click Save and Close. Add as many entries as
desired. To edit an entry, double click on the name to open.
5. Start Soft Phone.
6. Click Directory icon. The directory displays (see below).
7. Click on the name. The SoftIPT calls the contact.
IPedge UG 11/11 TOSHIBA 35
Page 40

IPedge
SoftIPT
Using Echo Canceller If you have a headset plugged into the microphone/speaker jack of the PC,
you do not have to always enable echo canceller. We recommend you to
enable echo canceller in the event you want to use the PC's embedded
microphone/speaker as a speakerphone device and not attach a headset to
the microphone/speaker jack of the PC. If the PC does not have an
embedded microphone even if it has embedded speaker, you do not have to
enable echo canceller because a headset would be plugged into the
microphone/speaker jack, see figure below.
To use Echo Canceller, click the Audio Setting of SoftIPT and check the Using
Echo Canceller box as shown below.
Enabling Echo Canceller
36 TOSHIBA
IPedge UG 11/11
Page 41

Feature Operations 4
This chapter gives you more details about your IP5000-series telephone’s
advanced functions. An alphabetical list of supported features has been compiled
in this chapter for fast and easy reference.
Account Codes Account Codes (Forced or Voluntary) can be used for a variety of reasons
including billing, tracking, and line restriction applications. Account Codes are
assigned in the system as a fixed length (default is six digits) and are recorded by
the system, along with the details of the calls, which can be printed on a Station
Message Detail Recording (SMDR) report.
Verified/Non-Verified
Account Codes
Forced Account
Codes
Dial using Forced
Account Codes
Verified Account Codes ensure that the system checks the account code you
entered against a list created by the System Administrator. If the code is not in the
list, the call will not go through.
Non-Verified Account Codes must be a uniform length but any digits are accepted.
Account Codes and Lengths are set up and managed by the System
Administrator.
Some applications require you to enter an Account Code. These Forced Account
Codes may be verified or non-verified, depending upon the application, but in
either case the caller must enter a code before proceeding.
1. Place a call using the normal method.
If the call requires an Account Code, a burst of tone (Entry Tone) is heard (after
dialing the telephone number) alerting you to enter the Account Code.
2. Enter the account number.
When the number of digits designated for account codes has been entered, the
number is checked against the verified list, if chosen, and the call continues
normal. If the number of digits entered for the account code is not reached or the
verified code does not match, then re-order tone is heard and the call is rejected.
You can bypass Forced Account Code requirements with three emergency
numbers, including 911. See your System Administrator for these numbers:
1) 911 2) _______ 3) _______
Voluntary Account
Codes (Verified/Non-
Verified)
IPedge UG 11/11 TOSHIBA 37
Voluntary Account Codes are optional. They can be entered during a call and are
used for tracking selected calls using Station Message Detail Report (SMDR) call
detail recording option.
Page 42

IPedge
Feature Operations
If the system is set for Verified Account Codes, station users must enter a
specific code when entering the Voluntary Account Code(s) or the code is not
validated for the SMDR call report. This does not affect the call.
Voluntary Account
There are two ways to dial using a Voluntary Account Code:
Codes
Using the Account Code
Button
Using Access Codes Note: It’s a good idea to warn the other party that you will be disconnected
Note: This requires a Programmable Feature Button to be programmed on
your telephone set with the Account Code feature access code (#46).
1. After accessing a Group Central Office (GCO) line, press the Account
Code button. LCD telephones prompt you to “ENTER ACCOUNT CODE
NOW.”
2. Enter the account code digits. The LCD prompt disappears upon entry of
the first account code digit. After the account code is entered, the time
indicator is restored to the LCD.
3. If your station is set for Verified Account Codes, you hear a confirmation
tone when the code is valid. If the code is invalid, you hear two short
tones.
4. Enter the Account Code. Your conversation is not interrupted.
momentarily when you enter the access code. Once the code is
entered, you will be connected again.
1. After accessing a GCO line, press Cnf/Trn. Once you press Cnf/Trn,
your call is interrupted; you and the other party cannot hear each other.
You will hear feature dial tone.
2. Dial #46. LCD telephones prompt you to “ENTER ACCOUNT CODE
NOW.”
3. Enter the account code digits. The prompt disappears upon entry of the
first account code digit. After the account code is entered, the connection
is restored and the LCD shows the time.
Advisory Message Advisory messaging enables you to store a message for IP5000-series
telephones with a display that call your telephone. The messages can be up
to 16 characters long. The IPedge Net system provides a number of
predefined messages, shown in the table below. Message numbers 5~9 can
be defined by your System Administrator.
Advisory Message Default Code Table
Msg No. Characters Displayed Additional Digits
0
1
2
3
4
38 TOSHIBA
OUT TO LUNCH
IN A MEETING
CALL _____________ Directory Number (e.g.,220)
BACK AT __________ Time (e.g., 1030)
RETURN ON________ Date (e.g., 10 20)
IPedge UG 11/11
Page 43

Feature Operations
Advisory Message Default Code Table
Msg No. Characters Displayed Additional Digits
5
6
7
8
9
Advisory Messages can only be set using the IP5000-series telephone. The
preset advisory messages can be displayed using the Enterprise Manager
Personal Administration (EMPA).
Set Advisory Message 1. Go off-hook or press your extension button to hear the dial tone.
2. Press #411
3. Enter Message number (see table above)
4. Enter additional digits if required.
5. Go on-hook or press Spkr to release the line.
IPedge
Clear Registered
Message
Display Preset
Advisory Messages
1. Go off-hook or press your extension button to hear the dial tone.
2. Press #412.
3. Go on-hook or press Spkr to release the line.
1. Login to the EMPA.
2. Select System Info then the Advisory Message tab.
IPedge UG 11/11 TOSHIBA 39
Page 44

IPedge
Feature Operations
Alarm Notification The Alarm Notification Button must be set up by your System Administrator
on your station.
When the Alarm Notification button displays
• Call your System Administrator.
This button stops displaying when the alarm clears or when you press the
flashing button. If the alarm has not been cleared the Alarm Notification
Button flashes every 10 minutes.
Automatic Callback When you reach a busy station, you can set Automatic Callback to have the
system monitor the busy extension and notify you when it becomes idle.
Automatic Callback can place you in queue for an available outside line, if you
reach a line group in which all lines are busy. When a station or line becomes
available, the system rings your telephone; when you answer the system
automatically rings the intended destination. The amount of time the system
will wait for an idle destination is set in system programming. Automatic
Callback is also known as “CO Line Queuing.”
Set Automatic Callback 1. If you hear a busy tone after dialing an outside line access code or a
station number, press Auto Callback or 4. Busy tone stops, followed by
success tone, then busy tone resumes.
2. Hang up. You can make other calls while waiting.
Cancel Automatic
Callback
Deactivate Automatic
Callback
3. When the called station or outside line becomes idle, your telephone rings
and you will see a fast flashing LED.
• If you called a busy station, the extension LED flashes green
(incoming call) and the called number displays.
• If you called a busy outside line, the extension LED flashes green
(incoming call rate). The seized line’s number displays.
4. Answer within about three rings (can be programmed to ring up to three
minutes) to prevent the callback from being cancelled. After you answer,
you hear ring back tone, and the LED flashes green (in-use).
If you hear a busy tone after answering a callback, the called party is already
on another call or the line has already been seized or has received an
incoming call. Your request is not cancelled. You will be called again the next
time a line becomes idle.
If you were attempting to make an outside call, the telephone number is
automatically dialed, including the account code or override codes that were
used.
Press Auto Callback or extension button + #431.
To deactivate Automatic Callback, press the ACB button while its lamp is lit.
When a predetermined time (overall timer) passes after Automatic Callback is
activated, the system automatically cancels Automatic Callback. If the
activator does not answer Automatic Callback for a predetermined time,
Automatic Callback is automatically canceled. In either case, when Automatic
Callback is completed or canceled, the ACB lamp button turns off.
40 TOSHIBA
IPedge UG 11/11
Page 45

IPedge
Feature Operations
Background Music (BGM)
Enable Background Music
on your Telephone
Speaker
Cancel Background Music
on your Telephone
Speaker
Adjust Volume The phone is in an idle state when listening to BGM. Attempting to adjust the
You can set background music over your telephone speaker. At least one
music source must be connected to your system. Up to 16 different music
sources can be applied to the IPedge Net system: the first source is Quiet
Tone, all others can be music or recorded information. If media resources are
exhausted, the user will temporarily be unable to hear BGM.
Press BGM. LED turns on. Or,
Press an extension button + #490 + n + #, where n is the music source 1~15.
Press BGM. LED turns off. Or,
Press an extension button + #491.
BGM volume at this point will result in only a ringer tone adjustment and the
BGM will restart at the beginning of the music source.
BGM volume can only be adjusted when the phone is in use. The ‘in use’
state is when a call is being received or dialed.
To change the volume of the BGM, press the PDN key, this interrupts the
BGM and initiates the ‘in use’ state. When you hear the dial tone, use the Vol
key to adjust the tone up or down. Press the PDN key again to return to the
BGM in progress.
Call Forward There are two types of Call Forwarding that you can set. One is System Call
Forward (set in System Programming) which automatically directs calls to a
predefined location, such as Voice Mail. See your System Administrator to
determine or change your System Call Forward destination.
The other type is Station Call Forwarding. You can use Station Call
Forwarding to replace your System Call Forward destination with a custom
Call Forward setting made from your station. However, a Voice-first call will
not be forwarded.
Important! Check with your System Administrator to determine if
the system uses Basic Survivability, if yes, do not
change your station call forward settings.
System Call Forward System Call Forward directs calls to a destination preset by an Administrator
for each telephone, commonly set to voice mail.
• To turn on System Call Forward for your telephone, press #620.
Confirmation tone (three short tones) and display shows “DATA
PROGRAMMED.” This indicates the data is set.
• To turn off System Call Forward for your telephone, press #621.
Confirmation tone (three short tones) and display shows “DATA
PROGRAMMED.” This indicates the data is set.
Station Call Forward Station Call Forward enables you to assign Call Forward destinations for each
extension on your telephone to override the telephone’s System Call Forward
settings. Each extension can be independently set up to Station Call Forward
to a unique destination. You can set a Programmable Feature Button to
IPedge UG 11/11 TOSHIBA 41
Page 46

IPedge
Feature Operations
perform any Call Forward function using Enterprise Manager Personal
Administrator (EMPA) User Administration tool. Call Forward must be set prior
to receiving the call.
Important! Check with your System Administrator to determine if
the system uses Basic Survivability, if yes, do not
change your station call forward settings.
The following calls to your station can be forwarded:
• Internal calls
• Auto Attendant calls
• Outside lines that ring only your station
• Transferred internal or incoming line calls
Station Call Forward
Categories
Call Forward Settings •
You can set Call Forward for the following categories of calls. Within these
categories, you can use five different types of Call Forward Settings (as
detailed in the next section).
•
Call Forward Any Call – Forwards any call, whether an internal call or
incoming line call.
•
Call Forward - Incoming Line – Forward incoming line calls only.
•
Call Forward Any Call - Set for Another Station – Enables you to set
forwarding of all calls for another telephone within your telephone system.
•
Call Forward - Incoming Line Set for Another Station– Enables you
to set forwarding of incoming line calls for another telephone within your
telephone system.
Notes:
• Call Forward Any Call and Call Forward-Incoming line can be set
simultaneously on a telephone. This allows incoming line calls to be
forwarded to a different destination than all of the other types of calls.
• Call Forward destinations can be set to internal destinations or an
outside telephone number.
Call Forward All Calls – Forwards all calls immediately.
•
Call Forward Busy/Do Not Disturb – Forwards calls immediately when
your extension is busy or in Do Not Disturb (DND) mode.
• In Tone-first systems with multiple lines, Call Forward Busy forwards calls
only when all line appearances are in use. In Voice-first systems, Call
Forward Busy forwards all calls any time your telephone is in use.
•
Call Forward - No Answer – Forwards unanswered calls after a preset
number of rings. The preset number of rings can be set on a per user
basis.
•
Call Forward Busy/Do Not Disturb/No Answer – Forwards all calls
when you are busy, in DND mode or when you don't answer a call within
a preset number of rings.
•
Call Forward Cancel – Cancels the set Call Forward feature. Notice that
each category of Call Forward has a different code for canceling.
42 TOSHIBA
IPedge UG 11/11
Page 47

IPedge
Feature Operations
Station Call Forward
Procedures
You can register a Call Forward function by entering the button sequence as
described or by programming a Programmable Feature Button to perform the
sequence.
To use the Call Forward button sequence:
• Follow the instructions in See “Call Forward Examples” on page 4-43,
shown under the “Button Sequence” heading. Some features require
additional input, such as:
•
Dest. Ext. or Telephone No. – Call Forward destination numbers
can be internal extension numbers or outside telephone numbers.
If the destination is an outside number, enter the access code
used for dialing out (such as 9) + the telephone number +
#. The
telephone system accepts destination numbers of up to 32 digits.
•
Timer – Enter the number of seconds (08~60) your telephone
should ring before forwarding the call. (This is the Call ForwardNo Answer timer.)
•
Call Forward Pass Code – A four-digit Call Forward pass code
can be set up by your System Administrator and will allow one
station to activate the call forward setting for another station.
Users must enter the Call Forward pass code for the station to be
forwarded.
To program call forward button destination using the EMPA.
Login to your EMPA and select Call Forward to turn selections on and off.
Select Home to program the button.
Call Forward Examples To set your telephone to Call Forward Busy-No Answer to an internal
extension number:
• Press your extension button + #6041 + 3000# + 10
#6041
3000#
10
= Call Forward Access Code sequence
= Internal Extension Number
= Ring time in seconds before Call Forwards
To set another telephone to Call Forward Busy-No Answer to an outside
destination number after a set time:
• Press your extension button + #6042 + 1234 + 1111 + # + 9
5873000 + # + 08
#6042
1234
1111
9
1 949 5553000
#
08
= Call Forward Busy No Answer Access Code sequence
= Other telephone’s extension number
= Call Forward Passcode for other telephone + #
= Outside Line Access Code
= 1 + Area Code + Telephone Number
= Must press after entering an outside destination number
= Ring time in seconds before Call Forwards
+1 949
Call History Incoming calls with Caller ID or ANI information can be optionally recorded
into a rolling list for the station where the call is ringing. The call is placed in
the list along with the number, name (if provided), time and date of the call,
IPedge UG 11/11 TOSHIBA 43
Page 48

IPedge
Feature Operations
and status of the call (answered, abandoned, or redirected). You can access
this list from an LCD telephone with a flexible Caller ID button.
View Call History • When your station is idle, press the Caller ID button. The Caller ID LED
lights green and the latest record displays.
• Press Vol +
record.
• To view the call date, time, and status, press SK2 (press again to toggle
to call name/number).
▲for the next record; press Vol + ▼ for the previous
Call Park The Call Park feature enables you to hold a call temporarily in a location other
than your telephone. These areas are called orbits. You or another telephone
user can retrieve a parked call from its orbit by specifying the orbit number.
You can specify one of 20 General Park Orbits (7000~7019) or a valid
extension number within the system.
Once you have parked a call in an orbit, you can:
• Hang up and retrieve the parked call at a later time.
• Originate another call.
• Access a voice paging device to announce the parked call for pickup from
another station.
If you park a call and it is not retrieved, it will recall to the parking station and
one of the following occurs:
• If your station is idle when the system Call Park recall timer expires, the
parked call automatically recalls to your station.
• If your station is busy, the parked call camps on.
If you have an LCD telephone, you can let the system automatically select an
available orbit number which displays on your LCD.
Park a Call 1. While on a call, press Park in Orbit or press Cnf/Trn + #33. The LED
flashes green (consultation-hold). If you were on an extension during the
call, and you have line button on your telephone, the line LED will flash
until the call is picked up (depending on programming).
2. Specify the Park Orbit using one of the following:
• Press
Orbit between 7000~7019. The chosen orbit appears on the
LCD.
• Enter a valid extension.
• Press # and the system automatically selects your extension as
the orbit.
3. Hang up. The caller’s extension or line number and the orbit number are
shown. If the parked call is not retrieved within a specified time, the call
rings back to your telephone. When a parked call recalls your telephone,
the LCD shows the line or extension that is recalling and the orbit number.
and the system automatically selects a General Park
*
Retrieve a Parked Call 1. Press Park in Orbit or press your extension button + #32.
44 TOSHIBA
IPedge UG 11/11
Page 49

IPedge
Feature Operations
2. Enter the Orbit Number where the call is parked or # for the extension
from which you are calling. You cannot use
The extension LED flashes at the in-use rate when the call is retrieved.
to retrieve a parked call.
*
IPedge UG 11/11 TOSHIBA 45
Page 50

IPedge
Feature Operations
Call Pickup You can pick up a call that is ringing another station’s extension, a call placed
on hold at another station and other types of calls. When you pick up an
internal call, the calling station and the called station displays on your LCD.
Group Pickup One or more stations can be assigned to a pickup group, there are a total of
48 pickup groups available. You can easily pick up ringing calls on other
extensions. Ringing calls include: new, transferred, internal, or external calls.
You will have the ability to pick up calls for other extensions in your group and
other groups as well. See your System Administrator for group assignments.
Ringing, Page or
Held Call Pickup
This feature picks up ringing or held calls, including Group Page and All Call
Page calls. If these types of calls occur at the same time, the pickup priority is
station-to-station and then Page calls in the order of occurrence. In some
systems, this feature can be applied to pick up All Call Page exclusively.
To perform Call Pickup
• Press the buttons shown in the table below for the desired Pickup feature.
Table 7 Call Pickup Feature Codes
Ringing or
Page Calls
Directed DN
Group A call ringing a member of your pickup group.
Directed Ext.
Directed Group
Ext. No.
Outside Calls Any incoming outside line call.
Held Calls To Pick U p:
Local Retrieve A call held on this telephone.
Remote
Retrieve
Directed Ext.
Retrieve
T o Pick Up:
A call ringing or held at the Extension Number. #5#6 + Ext. No.
A call Ringing, held or parked at the Ext. No. #5#29 + Ext. No.
A call ringing on any line of this Primary Ext.
No.
A call ringing an extension in this Pickup
Group.
A call ringing this Ext. No. only. Other lines
ringing on the same phone are unaffected.
A call held on another Primary Ext. No.
A call held on for this Ext. No., regardless of
where this Ext. No. appears.
Press Ext. Button, then dial
the access sequence below:
#5#34
#5#5 + Primary Ext. No.
#5#32 + Group No.
#5#22 + Ext. No.
#5#9
Press Ext. Button, then dial
the access sequence below:
#5#71
#5#72 + Primary Ext. No.
#5#74 + Ext. No.
Notes:
• The Primary extension number is the directory number by which the
telephone set is defined. Other, non-primary extension numbers may also
appear on the telephone. By convention, the Primary extension number is
assigned to the first button (on the bottom left-hand side) of a multi-button
telephone.
• If more than one call is on hold, the call on the telephone’s lowest button
number is picked up.
Ringing calls are picked up over held calls as a priority.
46 TOSHIBA
IPedge UG 11/11
Page 51

IPedge
Feature Operations
Call Transfer Call transfer allows a call to be directed from one telephone to another on
IPedge Net.
External transfers to telephone numbers or network extensions off IPedge Net
are also supported, please check with your System Administrator to see if this
is enabled.
There are two types of call transfer:
• Blind transfer – The call is directly transferred to another extension
without announcing the call or waiting to see if the caller is available.
• Supervised transfer – The call is “supervised” during the transfer process
so the call can be announced to the receiving party before completing the
transfer. A supervised transfer also allows the person originating the
transfer to take back or cancel the transfer.
Perform Call Transfer
Immediate
1. While on a call, press the TRNS Soft Key.
2. Dial the extension where you want to transfer the call.The call rings the
destination station and your telephone returns to the idle state. If your
telephone does not go idle, the destination may be located in a remote
node, so you need to hang up to return to idle state.
Transfe r Using The Cnf/trn
Button
Transfer A Call Directly To
Voice Mail (Vm)
Transfer A Call Directly To
Vm With A Dss Button
Note: For DN in remote node, the user can transfer by entering # after DN is
entered.
1. While on a call, press Cnf/Trn. Your Line LED flashes green and you
hear an internal dial tone.
2. Dial the extension where the call will be transferred. You can remain on
the line and announce the call or hang up to complete a “blind transfer.”
Note: If the privacy option has been disabled, then if you use a Line button
when you transfer the call, the LED will flash red until the receiving
party answers. While the LED is flashing, you can press the Line
button to return to the call. If the receiving party answers the call, the
LED turns solid red and you cannot reconnect to the original caller.
During call transfer, you can connect all three parties by pressing the
Cnf/Trn button or by pressing the JOIN soft key. This allows the
three parties to talk together.
3. Transfer with Camp On: If the station where you want to transfer the call is
busy, you may hang up and the transferred trunk or station will be camped
on to the busy destination.
1. While on a call, press Cnf/Trn.
2. Enter #407.
3. Enter the VM mailbox number (usually the same as the extension
number) + #.
4. Hang up and the caller is connected to the VM mailbox. This feature does
a blind transfer to VM.
1. While on a call, press Cnf/Trn.
2. Press the DSS button programmed to the voice mail number.
3. Hang up and the caller is connected to the VM mailbox.
IPedge UG 11/11 TOSHIBA 47
Page 52

IPedge
Feature Operations
Call Waiting You can answer a call that is transferred to your station, even when your
station is busy. When another call is camped onto your station, you hear two
Camp-on tone beeps and the extension or Line LED flashes red (on-hold).
If a call is sent to your station when busy, and your station does not have an
extension button available to receive the call, two camp-on tone beeps are
sent to your telephone. You must disconnect or transfer the existing call to
answer the waiting call.
Place Current Call on Hold
to Answer Waiting Call
Using the Flashing
Extension Call to Answer
Waiting Call
Press Hold. The existing call is placed on hold. The camped-on line rings
your station (the Line LED flashes green - incoming call) or, if your telephone
has the Auto Hold feature, just press the flashing extension button.
You are connected to the transferred call. The extension or Line LED flashes
green (in-use).
Note: See your System Administrator to find out if you have Auto Hold.
Press the flashing extension or Line. The existing call is placed on hold. The
camped-on line rings your station (the Line LED flashes green - incoming
call). This disconnects the current call and connects you to the transferred
call. The extension or Line LED flashes green (in-use).
Caller ID Incoming calls to your extension with Caller ID can be recorded into a rolling
list that is saved on your telephone. The call information is placed in the list
along with the number, name (if provided), time and date of the call, and
status of the call (answered, abandoned, or redirected). You can access this
list from an LCD telephone with a flexible Caller ID button.
Caller Information The caller’s number and name can be displayed on the IPT or attendant
console’s LCD. The caller information is stored in the system, retrieved at
relevant extension stations, recorded on SMDR, and sent to an external
server and client through CTI link, if necessary.
Caller information can also be sent to a voice mail device integrated into the
IPedge system.
Display Caller Information When the caller information is provided from a station, it is indicated at a
destination station (IPT or attendant console).
The caller information displays at the relevant station even when the
destination differs from the original destination due to transfer or Call
Forward.
On the line where the caller information is not provided temporarily or it is not
provided originally, “LN xxx” will display.
Notification of Caller
Information
View Saved Caller ID
Information
48 TOSHIBA
Automatic Number Identification (ANI), CLASS, Calling Line Identification
Presentation (CLIP) and Calling Name Identification (CNIP) are the services
used to send the caller number from a public telephone network.
1. When your station is idle, press the Caller ID button.The Caller ID LED
lights green and the latest record displays.
2. Use the soft keys (Next, Prev, Call or Exit).
Note: Caller ID is displayed when a call is first answered and displays for
the first 15 seconds of the telephone call.
IPedge UG 11/11
Page 53

IPedge
Feature Operations
Conference Call You can conference together up to eight parties (including yourself). The
actual number of conference parties with acceptable volume levels depends
on the local and far end telephone line conditions.
The person who initiates the conference call is the Master. If, after the
conference is established, the Master exits the conference, the first station to
have been added to the conference becomes the Master.
Set up a Conference Call 1. While on a call, press Cnf/Trn. You hear a dial tone and your Line LED
flashes green.
2. Call another station or outside line.
3. When the called party answers, press Cnf/Trn. If you receive a busy
tone or no answer, press Cnf/Trn again to return to the original
connection.
4. All parties are conferenced. If the second call was placed on a Line that
appears on your telephone, the LED also flashes green.
5. Repeat steps 1~3 until all parties are added or the maximum number of
parties is reached.
6. When the Master of the conference hangs up, the control is automatically
transferred to the first internal station added to the conference call. If no
other internal stations are included in the conference call, the call will be
disconnected.
Note: An SLT or SIP station cannot be a Master for a conference call.
Transfer Conference
Control
Hold a Conference Call If you are the Conference Master, press the Hold button once (or twice for
Adding Voice Mail to a
Conference
Add Voice Mail to a
conference call
(performed by Conference
Master)
1. Complete Steps 1 and 2 above to add the line where you want to transfer
conference control. See previous Note.
2. Announce the call and hang up to transfer it. This station now becomes
the conference Master with the ability to add or delete parties.
Executive Hold) to place the conference call on hold. The other parties can
continue with the conference. Music-on-hold is suppressed and your
extension LED flashes green. You can rejoin the conference at any time by
pressing your extension button. When you return, you retain Master status.
The Conference Master can add voice mail to a conference. This feature
enables participants in a conference to listen to or leave a voice mail message
during a conference call.
1. Press Cnf/Trn to place the current call on Consultation Hold.
2. Dial the voice mail (VM) extension number, then enter the VM mailbox
and security code. This adds the voice mailbox to the conference.
3. Press Cnf/Trn to reconnect to the original party. (You can continue to
add conference members by pressing Cnf/Trn and dialing another
extension.)
Now, all parties in the conference can listen to or record a message to
this voice mailbox. Only the Master can control the VM with Soft
Keys.
Supervising a Tandem
Call
IPedge UG 11/11 TOSHIBA 49
1. While talking on an outside call, press Cnf/Trn. You hear a dial tone. The
extension LED flashes (conference rate).
2. Dial an outside telephone number.
Page 54

IPedge
Feature Operations
3. After the party answers, press Cnf/Trn. The extension LED flashes (in-
use rate) and all parties are conferenced.
4. If you receive a busy tone or if the station does not answer, press the
flashing extension button to return to the original connection.
5. Press Cnf/Trn and hang up. The extension LED flashes (exclusive-hold
rate) and the two lines are connected. The LED turns Off when the parties
hang-up.
6. To supervise a tandem call, press the extension button. If the parties have
finished, hang up. If the parties are still talking, press Cnf/Trn and hang-
up. Both Line LEDs turn Off and the connection is released.
If your telephone company provides automatic disconnect
supervision, the connection will release automatically when the
parties hang up. If not, the lines must be supervised to be
disconnected.
Conference Add/Split/
Join/Drop
Add an Incoming call to
the Conference
If you initiate a conference with two or more parties, you can continue to add
outside callers to conference; or you and another member of the conference
can leave (Split) the conference for a private conversation. During this time,
other conference members remain connected.
You can then Join both of you back into the conference, or you can Drop
(disconnect) the member you are connected to. This feature is performed with
Soft Keys if you have a LCD phone or with a Split button programmed on one
of your Programmable Feature Buttons.
This feature also works for remote stations which are connected through
IPedge Net.
Important! You must be a conference master to perform the Add,
Split, and Drop features. The conference master is the
person that initiates the conference call. If that person
drops from the conference, the first person added to
the conference becomes the conference master.
1. Place the first caller/Conference on hold.
2. Answer the incoming ringing call.
3. While speaking to the incoming caller, press Cnf/Trn button.
4. Press the blinking DN where the first caller/Conference was placed on
hold.
5. Press Cnf/Trn twice to join all parties together.
Split from a conference 1. While in a conference call on an IP5000-series phone, press the
(Split) soft key or Split button.
2. Press the
NEXT soft key until you see the extension number for the party
that you want to Split out of the conference.
3. You can return both yourself and the other Split party back into the
conference by pressing
RTRN terminates a feature operation and returns to the previously
JOIN.
displayed state.
Drop the Split party from a
conference
Press the
DROP Soft Key. The party that you are talking to privately (the party
which you have Split from the conference) will be disconnected (Dropped)
and you will rejoin the conference.
50 TOSHIBA
SPLT
IPedge UG 11/11
Page 55

IPedge
Feature Operations
If you are in a three-way conference and Split with one of the parties, the
remaining party will essentially be “on hold” until you return to the conference.
Direct Station Selection (DSS)
Connect Directly to
Another Station’s
Extension
This optional feature enables you to use a DSS button to connect directly to
another station’s line extension. The DSS LED shows the status (idle/busy) of
the station and/or the station’s primary extension. For example, a station’s
DSS button LED shows busy (light steady red) when the station is:
• Busy on a call on any button.
• Idle but all appearances of the station’s extension are in use by other
stations.
• When the station is in DND, the LED flashes red.
1. When connected to a line or another station, press DSS.
The original party is put on hold. You can call a station even if the
DSS LED shows busy (steady red).
2. Announce the call or transfer the call by hanging up or pressing
Release.
Note: You can transfer the call to an idle or busy station.
Do Not Disturb If your station is in Do Not Disturb (DND) mode, internal, external and
transferred calls do not ring your station and Off-hook Call Announce calls are
denied. You can continue to make calls while in the DND mode. When
originating a call in DND mode, you will hear a short burst of interrupted dial
tone followed by continuous dial tone. You can start dialing at any time during
either tone.
If you put your Primary extension into DND mode, all calls to that telephone
are rejected. If your extension is set for Call Forward-Busy or Call ForwardBusy/No Answer, the call is redirected to the forwarding destination
immediately.
If you put an extension other than the Primary extension into DND, only calls
to that extension on your telephone will be blocked. Appearances of that
extension on other telephones continue to ring.
To activate DND on your Primary extension
• Press Do Not Disturb or #6091 (hear Success Tone). The LED lights
steady red and DND mode is activated for the entire station.
To activate DND on a non-Primary extension
• Press the desired extension appearance and Do Not Disturb or
#6091 (hear Success Tone). The LED lights steady red and DND mode
is activated for that extension on your telephone.
To deactivate DND
•
Press Do Not Disturb or #6092 (hear Success Tone). The LED lights
goes out and DND mode is de-activated.
IPedge UG 11/11 TOSHIBA 51
Page 56

IPedge
Feature Operations
Setting DND for
To activate DND for another extension
Another Extension
• Enter #6191 (hear Entry Tone) + the Primary extension of the remote
extension + the pass code + # (hear Success Tone). This sets DND as if
activated by the Primary extension on the target telephone.
To deactivate DND for another extension
• Enter #6192 (hear Entry Tone) + the Primary extension of the remote
extension + the pass code + # (hear Success Tone). This removes DND
from the target telephone.
To change your DND Pass Code
• Enter #670 (hear Entry Tone) + ext. no. (hear Entry Tone) + old pass
code + # (hear Entry Tone) + new pass code + # (hear Success Tone).
If you activate DND while a call is ringing, the ringing stops. The LED
continues to flash on your telephone and ring on other appearances.
Emergency Call To make an emergency call, dial 911 or Access Code + 911. This
depends on off-hook preference set up for your telephone.
Note: Check with your System Administrator for the Access Code because
this code may be different from the one used to get an outside line.
Emergency
Monitoring Station
Your system may have one IP telephone assigned as an emergency
monitoring station. If your telephone has this assignment, your line LED will
flash green when someone makes a 911 call. When you answer the call, you
can listen in and participate in the conversation. See your System
Administrator for more information on this feature.
Emergency Ringdown If a station remains off-hook for a programmable period, it can be
automatically treated as an Emergency Call and directed to an emergency
destination. The station may have partially dialed a number or have dialed no
digits at all. Each station is programmed with its specific emergency ringdown
destination.
A station number or a group pilot number can be specified as an emergency
ringdown destination. In a private network, the station or pilot number must be
in the same network node.
52 TOSHIBA
IPedge UG 11/11
Page 57

IPedge
Feature Operations
Message Waiting Message Waiting is shown on the Msg button which flashes red when there
are messages waiting. The waiting message indicators can come from the
voice mail system or they can be internal messages sent from other
extensions.
The messages from other extensions are notifications that someone has
called your extension and wants you to call them back.
An extension can receive up to three Message Waiting indications, one
additional indicator will always be reserved for the voice mail system.
Note: If there are Phantom DNs (PhDNs) programmed on an extension,
each PhDN can receive up to three message waiting indicators.
Responding to a Lit Msg
LED
Turning On/Off MW LED
on Another Extension
1. Press the Red flashing Msg button. The telephone will dial the message
source (the voice mail or another extension). See Note below.
2. When the call is finished, hang up and the message waiting indicator will
clear.
3. If the Msg LED continues to flash, there are additional messages to
check, repeat steps 1-2.
Voice mail devices have a short delay in turning off the message waiting
indicators.
4. To manually turn off the Msg LED, press your extension button, then enter
#409. Repeat this sequence until all the messages are cleared.
Notes:
• If there is a + on the LCD, press the Next Soft Key to scroll through the
messages sent to that extension.
• To see who has sent you messages, or to retrieve the messages, press
the flashing Msg button.
When an extension is called, the calling party can choose to send a message
to the called party. This is a notification to say that a call has been missed and
the calling party would like to be called back.
By sending a message to another extension you turn on their Msg LED.
1. Dial an internal extension. You may hear ringing or busy tone.
2. Press Msg or 7. The Msg LED flashes red on the called telephone. At
your telephone, the Msg LED lights steady red and the LCD shows the
station number where the Message Waiting light was sent.
3. If you decide to cancel the Message Waiting light at this point, press Msg
or 7 again while ring-over tone is playing and the light will cancel. If you
want to cancel the message later, call the telephone where you set the
message and press 7 twice.
4. Press Spkr. Your Msg LED turns Off. The Msg LED on the called
telephone flashes until the called party presses the flashing Msg button
which calls you back.
5. Turn off the Message LED.
The two ways to turn Off a Message LED are:
Method 1
IPedge UG 11/11 TOSHIBA 53
Page 58

IPedge
Feature Operations
1. Press #64 plus the extension number that has the message light
set.
2. Press Spkr or hang up to end the call.
Method 2
1. Dial the extension that has the Message LED.
2. Press 77.
3. Press Spkr or hang up to release your telephone.
Microphone Cut-Off This feature prevents callers from monitoring the sounds near your telephone
when your telephone receives a Handsfree Call or cuts-off the telephone
microphone while on a speakerphone call. When the feature is ON, the
Microphn Cut-off LED lights steady red and the Mic and Spkr LEDs do not
light when your telephone is called. When the feature is OFF, the Microphn
Cut-off LED is not lit and your microphone works. The Microphn Cut-off
functions on Handsfree Answerback and speaker OCA calls for privacy.
To turn the microphone ON/OFF
Off-Hook Call Announce (OCA)
Make an OCA Call •
Answer a Speaker OCA
Call
•
Press Microphn Cut-off to toggle between ON/OFF.
Off-hook Call Announce (OCA) enables you to complete a call to a busy
telephone. Your telephone must be programmed to either announce
automatically or to announce after you press a button on your dial pad. The
destination telephone must be programmed to accept an OCA. The
announcement may be delivered over the speaker.
Manual – Dial an extension. When you hear a busy tone press 5 and,
after one long tone, you can talk through the speaker of the destination
telephone. The person you are calling has answering options as
described below.
•
Automatic – If your telephone and the extension you are calling have
been programmed for Automatic OCA, you can talk through the speaker
of the destination telephone without hearing the busy tone and without
dialing 5.
1. If you have a handset call in progress and you hear one tone, this
indicates that a second station is calling. The second caller connects to
the speaker in your telephone. The Spkr LED flashes and the Mic LED
lights. You will be speaking to the first caller through your handset and the
second caller through the microphone.
2. To turn off your microphone speaker to the second party, you can press
Mic or Microphn Cut-off; the Mic LED turns Off. You will no longer be
talking to the second caller, although the caller can still speak through
your speaker.
3. Press Mic or Microphn Cut-off again to reconnect to the second
caller. You can toggle as often as you choose. If you do not want the first
54 TOSHIBA
IPedge UG 11/11
Page 59

IPedge
Feature Operations
caller to hear your conversation with the second caller, cover the
mouthpiece of your handset.
Speaker Off-hook Call
Override
Override Calls The available override features are:
Busy Override Ring Over Busy Override enables you to send a muted ring tone to a busy
Announce
IP5000-series telephones can receive Speaker OCA which enables stations
to receive internal calls over their speaker while on another call using the
handset.
• Busy Override
• Do Not Disturb Override
• Executive Override
• Destination Restriction/Traveling Class Override
• Class of Service Override
• Privacy Override
station to indicate a call is waiting. The Busy Override (BOV) muted ring can
be programmed for each station to be two muted rings only or continued
muted rings until the call is answered. This option applies to the station
receiving the muted ring. The muted ring can be sent to the telephone
speaker or to the telephone handset/headset and speaker.
To use Busy Override
• After reaching a busy station, press 2. A muted tone is heard at the busy
station, indicating that a call is waiting. The station number displays.
Do Not Disturb Override Do Not Disturb (DND) Override lets you send a call waiting tone or ringing to a
station in DND mode to indicate that a call is coming in. Your telephone may
be programmed to block DND Override from other telephones. Your station’s
LCD shows that the station you have called is in the DND mode.
OCA is possible to DND stations from stations that are programmed for DND
Override.
To use DND Override
• After reaching a station in DND mode, press 2. A tone signal is heard at
the DND station, indicating a call is coming in. On your station, the LCD
shows the station number you have overridden.
Your LCD displays DND OVR DENY if the station you called denies
DND Override.
Executive Override Executive Override enables you to enter an established conversation. Your
telephone can also be programmed to block Executive Override from other
telephones.
To perform Executive Override
• After reaching a busy station, press 3
IPedge UG 11/11 TOSHIBA 55
Page 60

IPedge
Feature Operations
Or, if you have an LCD telephone, use the OVRD Soft Key. You enter
a conference with the busy station and the party to whom he was
talking. The called parties may hear an optional tone signal prior to
your entering the conversation.
Your LCD displays EXEC OVR DENY if the station you called denies
Executive Override. If you do not have Override privileges, you will
camp on.
Destination Restriction/
Traveling Class Override
Class of Service Override By dialing a Class of Service (COS) Override code, a user can change a
Enables a station user to override the Destination Restriction or Traveling
Class of a particular telephone by entering a pre-determined account code.
To use Destination Restriction or Traveling Class Override
1. Press #471. A Confirmation tone plays and the LCD shows “Enter OVR
Code.”
2. Enter the trunk access code or LCR access code.
3. Dial the external telephone number.
station’s set of privileges to one associated with the override code. When the
call is terminated and another is attempted from the same station, the original
COS is applied. This allows selected users to override restrictions that are
placed on any telephone in the system.
To perform Class of Service Override
1. Access a Primary or Phantom DN. You hear a dial tone and the LED
flashes at the in-use rate.
2. Press #471. Dial tone stops. Your LCD prompts you to enter a code.
3. Enter the COS Override Code (four digits). You hear a dial tone.
4. Dial a telephone number.
Note: For security reasons, the override codes are only available on a
selected basis. See your System Administrator.
Privacy Override This feature enables you to enter an established call on a line you share with
another telephone. Up to two station users can enter an existing Central
Office (CO) line-to-station call (i.e., up to three stations can be connected to a
CO line). You can also use this feature if the station that is already connected
to the CO line is in the Privacy Release mode.
Station users with Privacy Release can allow stations with the shared
button appearance to enter their conversations, even if the station entering
the conversation is not programmed for Privacy Override.
Paging Station users can make page announcements to telephones. Check with your
System Administrator to find out the zone numbers for various paging groups.
Verify with your System Administrator if there are sufficient vacant media
resources for successful paging.
To make a Page announcement to telephones:
56 TOSHIBA
IPedge UG 11/11
Page 61

IPedge
Feature Operations
1. Lift the handset, press your extension button and enter a paging access
code.
2. Make your announcement, then hang up.
To make a Group Page
• Press Group Page and enter the Group number (01~24)
— or —
• Press extension + #31 and enter the zone number.
Answering a Page To answer a Group Page, lift the handset off-hook, dial #5#36 and enter the
Page Zone number (01~08, depending on your telephone system).
All Call Page You can make an All Call Page to telephones assigned to the “All Call Page
Group.” Stations are assigned to the “All Call Page Group” in system
programming.
To make an All Call Page:
1. With the handset off-hook, press All Call Page
— or —
Dial #30. This pages all telephones in the All Call Page Group, not the
external speakers. Paging external speakers requires a separate action.
2. Make your announcement then hang up.
Answer All Call Page 1. Lift the handset off-hook, dial #5#36.
2. Enter the Page Zone Number (01~08, depending on your telephone
system).
Emergency Page An Emergency Page overrides Group Pages or All Call Pages to telephones
only.
• To make an Emergency Page, lift the handset off-hook, dial #37.
• To make an Emergency Page to a group, lift the handset off-hook, dial
#38 and enter the Group number.
Privacy Privacy controls the ability of more than one person to use the same
extension at the same time. Privacy applies to multiple appearances of
extensions, Phantom extensions, outside Lines, and outside Line Group
buttons. The application of Privacy to individual telephones is controlled in
system programming.
By default, the system is private. If you are in a conversation, another
telephone with an appearance of the line on which you are talking cannot
intrude unless that telephone has been programmed for Privacy Override. In
that event, the other telephone may enter and leave the conversation at will. If
all users are provided with Privacy Release in Class of Service, the system
will function as non-private.
Your telephone may be equipped with a Privacy Release and/or a
Privacy on Line button. On a normally private telephone, Privacy
Release allows other appearances of your line to join the conversation. On a
IPedge UG 11/11 TOSHIBA 57
Page 62

IPedge
Feature Operations
normally non-private telephone, Privacy on Line allows you to exclude
others. The Privacy condition may be toggled at any time during a
conversation. At the end of the conversation, the line’s privacy condition
returns to its original state.
Use Privacy Release • While on a CO line call, press Privacy Release. The LED lights red.
The outside line flashes at all appearances. When another station user
enters the outside line call by pressing a common outside Line, the
Privacy Release LED turns Off.
• To add a third station, press Privacy Release again; the process
repeats.
Set/Cancel Privacy • Press Privacy on Line to set privacy. The LED lights steady red.
Others are blocked from entering your outside line calls when they press
a common Line.
• Press Privacy on Line again to cancel the feature. The LED turns Off.
Redial Use this button to redial the last number dialed from your telephone.
•
To redial the last number, press Redial or
0.
*
Speed Dial Speed Dial (SD) enables you to dial a sequence of up to 32 digits with a
shorter code. Dial sequences can include telephone numbers, authorization
codes, passwords feature activation codes, and pauses. Speed Dial may be
used to originate a call or invoked after a call is established. There are two
types of Speed Dial:
•
System SD – All telephones in your system can share a list of up to 800
System Speed Dial numbers under the exclusive control of the System
Administrator. In some cases, System Speed Dial enables you to reach
numbers that you would not be allowed to dial directly from your
telephone.
•
Station SD – Your System Administrator allocates a block of up to 100
personal SD numbers (10 per telephone). You have exclusive use of
them and you can create and change them from your own telephone. If
you have a 9-Line LCD telephone, you can assign names to your station
SD numbers to appear on the Personal SD Directory display (see your
System Administrator or use the procedure for “Storing Personal Speed
Dial Names” on page 4-59.)
Personal Speed Dial 1. See your System Administrator to check how many personal Speed Dial
numbers are allocated to your telephone and if you have Speed Dial
capabilities enabled on your telephone.
2. Set up / Store your personal Speed Dial numbers.
3. Assign names to personal Speed Dial numbers (on supported models).
Making a Call Using Speed
Dial
58 TOSHIBA
There are two ways to begin a Speed Dial Call.
IPedge UG 11/11
Page 63

Table 8:
IPedge
Feature Operations
1. Press Spdial on an IP5000-series digital telephone
or press the
button on any telephone.
*
2. Dial the Station or System Speed Dial Number. Station Speed Dial
numbers occupy numbers 100~199. System Speed Dial numbers occupy
numbers 200~999.
Feature Feature Access Code Sequences
Speed Dial (Dialing an SD number)
Station
System
a. Stations must be assigned/enabled Speed Dial capabilities in system programming.
b. If your telephone does not have a Spdial button, press the * button, then dial the three digit Speed Dial
a
1
bin number (nnn).
Spdialb + nnn
nnn = 100~199 Station SD numbers
2
Spdial
+ nnn
nnn = 200~999 System SD numbers
Speed Dial Capabilities Go to Enterprise Manager.
1. Click on Station > Station Assignment.
2. Click on the Basic tab.
3. Enter the desired number of SpDial Bins.
4. Set System Speed Dial to enable/disable. Default is Disable.
5. Click on the Save icon.
Long SD Numbers Up to 32 digits can be stored in one SD location. If you exceed 32 digits, the
excess digits are automatically stored in the next sequential SD location. If SD
100 contains 40 digits, then 8 of those digits would be stored in SD 101. If you
save other digits to SD101 they will over-write the eight digits automatically
stored there.
Storing Personal Speed
Dial Names
You can store names with Personal Speed Dial numbers. These names will
display as Soft Keys which can be used for dialing from the telephone LCD
directories.
Notes:
• Speed Dial locations must be assigned to your telephone by your System
Administrator before you can store names. Your System Administrator
can also associate names with Station Speed Dial numbers.
• Only the Administrator telephone can store System Speed Dial numbers.
Assign Station Speed Dial
Names
Web-based User Administration
1. Login and select Speed Dial, then select or enter the desired Speed Dial
Index and set the number and name.
IPedge UG 11/11 TOSHIBA 59
Page 64

IPedge
Feature Operations
2. Enter a Speed Dial location number (100~199 for personal speed dial or
200~999 for System speed dial, depending on system programming).
3. Enter the telephone number to be stored. If you normally dial a line
access code (such as 9) and/or an area code, enter the codes before the
telephone number.
4. Input the name you want to appear in the Personal SD directory (nine
characters max).
5. Click on Save icon to register the information.
Time and Date Setting (Local)
IP telephones will display the time, day and date of the time zone of the
telephone system location it is connected to. If the IP telephone is not located
in the same time zone as the telephone system, the IP telephone can be used
to change the time, day and date of the IP Telephone to the local time zone in
which the telephone is located.
T o change the Date
• From the IP telephone, dial #653 and enter YYMMDD#
Example: To set the date to March 12, 2008.
YY = Year, example 08
MM = Month, example 03
DD = Day, example 12
Note: The IP telephone date can only be changed one day before or after
the telephone system date. The day will change automatically when
the date is changed.
To change the time
• From the IP telephone, dial #654 and enter HHMMSS#
Example: To change the time to 01:30 PM
HH = Hour, example 13 (range is 00~23, 24 hour clock must be
entered)
MM = Minutes 30 (range is 00~60. It must be within 15 minutes of
system time.)
SS = Seconds (range is 00~60).
Note: The time set must be within 15 minutes of system time.
Tone First / Voice
To determine the signalling on the telephone circuit.
First Signalling
Tone First Signalling When the telephone rings and the called party must press Spkr or lift the
handset in order to receive the call.
Voice First
Signalling
60 TOSHIBA
The telephone does not ring when it is being called, rather a long tone is
heard, followed by the caller's voice coming through the speaker. This method
automatically starts in a hands free mode and allows both parties to speak
with each other.
IPedge UG 11/11
Page 65

IPedge
Feature Operations
Note: The calling party has control over whether Tone First or Voice First
Signaling is being used. The ability to switch between the two is setup
by the System Administrator.
To change the signalling method while placing the call
1. Enter the extension number
2. Press 1 to turn on Tone First Signaling.
3. Press 2 to turn on Voice First Signaling.
Uniform Call Distribution
Uniform Call Distribution (UCD) provides ACD-like service based on the
simplified Distributed Hunt feature. Incoming calls are answered by Voice Mail
as the Auto Attendant function or they can be directly routed to the UCD
(Distributed Hunt) Pilot number. The caller will dial the UCD Pilot station in
response to a prompt. The call will go to the next agent or, if all agents are
busy, the call will camp-on to the Distributed Hunt pilot and ring-back tone or
Music-on-Hold (MOH) will be sent.
This feature distributes incoming calls to available agents. Agents must be
logged into the group to receive UCD calls. The following illustration shows
the typical call flow for this service.
1. Agent logs into the UCD group.
The call is received from PSTN or extension.
2. The call is routed to voice mail which provides the initial greeting using the
auto attendant service.
3. The voice mail can be configured to prompt callers to enter the
destination number or to route the call to the pre-determined destination.
4. The voice mail transfers the call to the UCD pilot group.
5. According to the hunting rule (distribute), the call is delivered to an idle
agent who logs in to this hunting group.
If no agent is available in the hunting group, the call is queued to the UCD
pilot group. The caller may hear the Music on Hold (MOH) or Ring Back Tone
(RBT) depending on the configuration. If the call cannot be answered within
the preconfigured time, the call is routed to an overflow destination.
Login/Logout Login and Logout is controlled by the Login key assigned to the agent phone.
The Log status is displayed on the Login key as shown below
•Login - Key is On Steady
• Logout - Key is Off
The Login/Logout feature is applied to the call which terminates to UCD pilot
only. Therefore, the call can terminate to agent Prime or Phantom PDN
IPedge UG 11/11 TOSHIBA 61
Page 66

IPedge
Feature Operations
directly even if the agent is in Logout state. Also, Login/Logout can be
activated by an access code. The default numbering plan is shown below.
Access Code Feature
#6061 Login - from Agent Station
#6062 Logout - from Agent Station
#6161
#6162
+ DN + # Login - Agent Station (DN) from another station
+ DN + # Logout – Agent Station (DN) from another sta-
tion
where DN = the Directory number of the agent station.
62 TOSHIBA
IPedge UG 11/11
Page 67

Messaging Features 5
Access your Mailbox by Phone
Set up Your Mailbox for the First Time
The following information is required:
• Phone number to call the voice messaging system (this may be different from
inside and outside of the organization)
• Your mailbox number
• Your security code (password)
Many organizations allow you to access your mailbox directly from your office
phone by pressing the “Message” button. When using this button, you are
prompted for your password. If you don’t see this button on your phone, contact
your system administrator to see if it is available.
The first time you access your mailbox, the system asks you a few questions to
set up your mailbox.
1. Enter your initial default password.
If you do not have this, it can be obtained from your system administrator.
Once you enter your default password you are prompted to change it for
security purposes.
2. Record your first and last name.
This identifies your mailbox when you log in, as well as identifies your mailbox
to other internal subscribers.
3. Record your personal greeting.
This is the greeting callers hear when directed to your mailbox. You can
change your personal greeting at any time in the future, or set up a temporary
(extended absence) greeting. Refer to Chapter 4 – Greetings for more
information on personal greetings.
If your mailbox is enabled with voice commands, the first time you access your
mailbox you also hear a short tutorial that guides you on using spoken commands
to navigate your mailbox.
Once you have completed this set up process, the system notifies you there are
any new messages in your mailbox.
To access the New User Setup at any time in the future, press 7 from the main
system options menu.
IPedge UG 11/11 TOSHIBA 63
Page 68

IPedge
Messaging Features
Check New Messages Most organizations have a message indicator light on office phones. By
default the message indicator will light up when you have a new voice
message, but some system administrators will also set it up to indicate when
you have a new fax message.
To check new messages and access your voicemail box:
1. You will need the following information:
• Phone number to call the voice messaging system (this may be
different from inside and outside of the organization)
• Your mailbox number
• Your security code (password)
2. From the Subscriber’s menu, press 1 to review new messages. The
system will play any priority stamped messages first.
You can also receive a text message to your cell phone or pager when a new
message arrives, or set up a “call-out” where the system will call any
designated phone number (e.g. a cell phone or home phone) when a
message has been left in your voicemail box. To learn how to activate and
deactivate these Message Notification options, review Chapter 6 – Personal
Options.
Review saved messages
Saved messages are messages you have already heard and saved. A
message is moved to your saved messages when you press 1 during or after
message playback. The length of time a saved message is kept before being
permanently deleted (for example, 30 days) is set by your system
administrator. Your system administrator will also designate if you receive
notification that a saved message is about to be permanently deleted,
providing you with the opportunity to save it again if you wish to keep it for a
longer period of time.
To review saved messages:
1. Call the voice messaging system
2. Press 1 2 from the subscriber’s menu to review saved messages.
Envelope Information Press 8 while listening or after listening to the message to find out who sent
the message as well as the date and time sent.
While listening to a message, you can press 4 to rewind or 6 to fast forward
(in increments of five seconds or as programmed by the system
administrator). You can also press 5 to pause the message and 5 again to
resume it (it automatically resumes after 60 seconds or as programmed by
the administrator).
64 TOSHIBA
IPedge UG 11/11
Page 69

IPedge
Messaging Features
Volume /Speed Control
You can use the following keys at any time during message playback to
change message volume or message speed.
Press 9 then one of the following keys:
1 Low Volume
2 Normal Volume
3 High Volume
4 Low speed
5 Normal speed
6 High speed
Reply to a Message During message playback or after the message has finished playing, you can
reply to the sender of the message. The message will be delivered directly to
the sender’s voicemail box.
1. Press 7 1 while listening to a message or after the message has finished
playing.
You can use the following keys at any time during message playback:
1 Save the message
2 Listen to next message
3 Erase the message
# Repeat the message
7 Reply / Redirect the message
8 Envelope information
9 Speed or volume control
2. The system will prompt you to record a message. Use the following
options to send the message.
1 Delivery message
2 Review message
3 Rerecord message
0 Delivery options (see Chapter 3 – Sending Messages for more
information on delivery options)
Cancel and exit
*
Call Back Directly In addition to replying directly to a mailbox, you can also call back the sender
of a message. This option will ring their phone rather than send a message to
their mailbox.
1. Press 7 while listening to a message or after the message has finished
playing.
2. You now have a few options:
IPedge UG 11/11 TOSHIBA 65
Page 70

IPedge
Messaging Features
• To call the number and delete the message, press 3
• To call the number and save the message, press 4
• To call the number and keep the message as new, press 5
3. The system will place you on hold while it transfers your call.
Redirect a Message During message playback or after the message has finished playing, you can
redirect (forward) a message to another subscriber’s voicemail box.
1. Press 7 2 while listening to a message or after the message has finished
playing.
2. The system will prompt you to enter the mailbox to which you wish to
forward the message. You can also use a private or public group
distribution list at this time.
See Chapter 5 – Using Group Distributions for more information on
setting up and using group distribution lists.
3. After you have made your selection, press 1 to confirm or 2 to change.
4. Press 1 to send without a comment, or 2 to attach a comment to the
beginning of the message. You can send the message with normal
delivery, return receipt and/or priority; see Chapter 3 – Sending
Messages to learn about these delivery options.
5. The message is now sent. Press
destinations, or 7 to additional destinations with the same comment.
to continue, 2 to send to additional
*
66 TOSHIBA
IPedge UG 11/11
Page 71

IPedge
Messaging Features
Erase / Delete and Retrieve a Deleted Message
Delete a Message Press 3 during or after message playback. The message will be moved to a
Retrieve a Deleted
Message
While you are listening to a message, or after a message has finished playing,
you can delete the message from your inbox or saved box.
deleted folder.
Note: You will have a minimum of one day to recover this deleted message;
some system administrators may extend this recovery period.
You may also retrieve a deleted message and move it back into your saved
messages folder.
1. Press 6 from the main subscriber’s menu. If you are currently reviewing
messages press * 6.
2. You now have three options:
• To listen to your deleted messages, press 1
• To move the message back to your saved messages, press 2
• To delete the message, press 3
Note: Erasing a message permanently deletes your message from the
system and you will no longer be able to recover it.
Number of Messages To check how many messages you haves:
The system can tell you how many new and saved voicemail messages you
have. If you have fax and email capabilities, the system will also inform you
how many fax and email messages you have.
From the Subscriber’s menu, press 1 4 to hear your message count.
Send A Message Directly To A Subscriber’s Mailbox
You can send a message directly to another subscriber’s mailbox from your
voicemail.
To record and send a message:
1. Access your voicemail box.
You will need the following information:
• Phone number to call the voice messaging system (this may be
different from inside and outside of the organization)
• Your mailbox number
• Your security code (password)
2. From the subscriber’s menu, press 2 to record a message.
3. Press any key when you are done recording.
• Press 2 to review your message before sending
IPedge UG 11/11 TOSHIBA 67
Page 72

IPedge
Messaging Features
• Press 3 to Re-record your message
•Press
• Press 1 to send.
• Press 0 for delivery options such as confidential, urgent or
message confirmation.
4. The system will prompt you to enter the mailbox to which you wish to
send the message. You can also use a private or public group distribution
list at this time; see Chapter 5 – Using Group Distributions for more
information on setting up and using group distribution lists.
5. Press 1 to confirm or 2 to change your entry.
When sending a message, the system will also provide you with the option to
send the message with return receipt and/or schedule it for future delivery.
See this chapter for more information on these options and follow the prompts
in the system to use these features.
Note: You can press any key to interrupt the system voice prompt
explaining how to leave a message.
to cancel without sending
*
T o Mark a Message as Confidential
T o Mark a Message as Priority
When you mark a message as confidential, you inform the recipient that it is
confidential before the message plays.
1. Call the voice messaging system, then press 2 from the subscriber’s
menu to record a message. Press any key when you are done recording.
2. Press 0 3 1 to mark your message as confidential.
3. The system will then ask you to address your message.
When sending a message as confidential, the system will also provide you
with the option to send the message with return receipt and/or schedule it for
future delivery. This chapter contains more information on these options and
follow the prompts in the system to use the features.
When you mark a message as priority, it will be sent to the front of the
subscriber’s message inbox.
1. Call the voice messaging system and select 2 from the subscriber’s menu
to record a message. Press any key when you are done recording.
2. Press 0 3 2 to send your message as priority.
3. Address your message.
When you send a message as priority, you will also be provided with the
option to send the message with return receipt and/or schedule it for future
delivery. See this chapter for more information on these options and follow the
prompts in the system to use these features.
68 TOSHIBA
IPedge UG 11/11
Page 73

IPedge
Messaging Features
T o Mark a Message as Priority and Confidential
To Request a Return Receipt for a Message
1. Call the voice messaging system and press 2 from the subscriber’s menu
to record a message. Press any key after recording.
2. Press 0 3 4 to send the message as priority and confidential.
3. Address your message.
When you send a message as priority and confidential, the system will also
provide you with the option to send the message with return receipt and/or
schedule it for future delivery. See this chapter for more information on these
options and follow the prompts in the system to use these features.
When sending a message to a subscriber’s inbox you can request a
confirmation that the recipient received and listened to the message. A
notification will be delivered to your inbox after the message has been listened
to.
1. Call the voice messaging system and press 2 from the subscriber’s menu
to record a message. Press any key when you are done recording.
2. Press 0 5 to send your message with return receipt.
3. Address your message.
To Request
Notification of Nonreceipt
To Schedule a Message for Future Delivery
You can request that the system notify you if a message you send to a
subscriber is not heard. A notification will be delivered to your inbox if the
message is not listened to by a date and time that you designate.
1. Call the voice messaging system and press 2 from the subscriber’s menu
to record a message. Press any key when you are done recording.
2. Press 0 6 to send your message with return receipt.
3. The system will ask you to use your keypad to input a 2-digit month, 2-
digit date and 4-digit time. The system will confirm the date and time you
specify.
4. To confirm and continue sending press 1.
5. Select the mailbox destination and press 1 to confirm and send.
You can schedule a message for future delivery with any delivery option
(normal, priority, confidential, receipt and non-receipt). After you select your
delivery options and address the message you can send the message
immediately or mark it for future delivery.
1. Call the voice messaging system and select 2 from the subscriber’s menu
to record a message. Press any key when you are done recording.
2. Select your delivery option.
3. Select the mailbox destination and confirm.
4. Press 2 for future delivery.
IPedge UG 11/11 TOSHIBA 69
Page 74

IPedge
Messaging Features
5. The system will ask you to use your keypad to input a 2-digit month, 2digit date and 4-digit time. The system will confirm the date and time you
specify.
6. Press 1 to confirm and send, or 2 to change your delivery time.
To Send a Message Using Directory Assistance
If you do not know a subscriber’s mailbox number you can use directory
assistance to find it.
1. From the subscriber’s menu, press 2 to record a message.
2. Press any key when you are done recording and press 1 to continue.
3. Follow the voice prompts to select directory assistance. Many
organizations use 9 but some system administrators change this key
press.
70 TOSHIBA
IPedge UG 11/11
Page 75

IPedge
Messaging Features
T o Send a Message to a Group Distribution
Delete a Message after Sending
You can send a message to a group distribution list. This option allows you to
send a message to multiple individuals without having to enter in individual
mailbox numbers. For example, if you are a manager, you may wish to set up
a distribution list that includes your team members.
You can set up private (personal) group lists while a system manager will set
up global (public) group lists. See Chapter 5 – Using Group Distributions for
more information on setting up group distribution lists.
1. From the subscriber’s menu press 2 to record a message. Press any key
when you are done recording and press 1 to continue.
2. Press # to send to a Private Distribution list or # # to send to a global
Distribution list.
3. Enter the group number.
4. Press 1 to confirm or 2 to change your destination.
5. Press 1 to send.
You have the option of deleting a message from a subscriber’s mailbox if a
message you sent to the subscriber has not yet been listened to.
1. Call the voice messaging system and select 5 from the subscriber’s
menu.
2. Enter in the mailbox number you wish to check and the system will play
the first unheard message you left for the recipient.
3. To delete the message press 3, to replay the message press 1, to hear
the next message press 2.
IPedge UG 11/11 TOSHIBA 71
Page 76

This page is intentionally left blank.
Page 77

Greetings 6
Messaging offers a variety of greeting options for your mailbox. Below is a list of
the different greeting options and their intended purpose.
• Default Greeting – The default greeting is the principal greeting for your
mailbox. Once recorded, it is played each time a call is sent to your mailbox.
• Extended Absence Greeting – The extended absence greeting is used
when you are away from the office for an extended period of time; for instance
a business trip or vacation. Because it is separate from your Default
Greeting, you can simply deactivate it and reactivate your Default greeting
without re-recording.
• Busy Greeting – Depending on how your telephone extension is configured,
the busy greeting can be used for when calls arrive at your mailbox, either
because the auto attendant dialed your extension and received a busy signal,
or if your extension is programmed with a busy forward to voice mail. You can
record a custom greeting advising callers that you are on the phone and you
will return their call promptly. If you are not busy on the phone, callers will
receive your Default Greeting.
• Custom Greetings – Each mailbox can have up to nine custom greetings.
Custom greetings can be used for special advisements to callers for which
you don’t want to rerecord your default greeting or use an extended absence
greeting. For example, you may use a custom greeting to advise callers that
you are not in the office due to weather conditions, or to give callers other
special instructions.
Manage your Default Greeting
Activate your Extended Absence Greeting
IPedge UG 11/11 TOSHIBA 73
When you access your mailbox for the first time you will be asked to record a
personal greeting. You have the option of changing this greeting at any time.
1. Call the voice messaging system and select 3 2 1 from the subscriber’s
menu to change your default greeting. Press any key when you are done
recording.
2. To listen to the greeting you have recorded press 2, to record the greeting
press 3.
You can set up your extended absence greeting which will replace your default
greeting when activated.
1. Call the voice messaging system and select 3 2 2 from the subscriber’s
menu to access your extended absence greeting. The system will advise you
whether your Extended Absence Greeting is activated or deactivated.
2. If an Extended Absence greeting has already been recorded, you can press 1
to activate the greeting.
Page 78

IPedge
Greetings
3. To listen to the greeting you have recorded press 2, to record the greeting
press 3.
Deactivate your Extended Absence Greeting
Manage your Busy Greeting
Manage your Custom Greetings
Call the voice messaging system and select 3 2 2 from the subscriber’s
menu. The system will advise you whether your Extended Absence Greeting
is activated. To deactivate your Extended Absence Greeting, press 1. This
will restore your Default Greeting.
To manage your Busy Greeting:
1. Call the voice messaging system and select 3 2 3 from the subscriber’s
menu to access your Busy Greeting.
2. To listen to the greeting you have recorded press 2, to record the greeting
press 3.
To manage your Custom Greetings:
1. Call the voice messaging system and select 3 2 5 from the subscriber’s
menu to access your Custom Greetings.
2. Press 1~ 9 to select the Custom Greeting you wish to manage.
3. To listen to the greeting you have recorded press 2, to record the greeting
press 3.
Change your Recorded Name
74 TOSHIBA
When you access your mailbox for the first time you will be asked to record
your name. This will identify your mailbox to you when you log in, as well as
identify your mailbox to other internal subscribers. You can re-record your
name at any time.
1. Call the voice messaging system and press 3 3 2 from the subscriber’s
menu to change your recorded name. Press any key when you are done
recording.
2. To listen to your name before saving, press 1.
3. To record your name, press 2.
4. To delete your name, press 3.
5. To save your recorded name simply hang up or press
to exit.
*
IPedge UG 11/11
Page 79

Other Messaging Applications 7
Group Distributions
Set up a Private Group Distribution List
You can send a new message or redirect a message to a group distribution list.
This option allows you to send a message to multiple individuals without having to
enter in individual mailbox numbers. For example, if you are a manager you may
wish to set up a distribution list that includes all members of your team, especially
if you send them frequent voice messages.
There are two options for distribution lists: private and global (public). When you
set up a private group distribution list, only you can access and manage this list. A
global group distribution list is set up by a system administrator for everyone to
use, but only the system administrator may add or delete members, delete the list,
or listen to members of the list.
1. From the Subscriber’s menu, enter 3 6 1 to create a new group.
2. Select a number to save the list under, followed by #. You can select any
number from 1 to 5 digits.
3. The system will prompt you to record a list name. The list name will help you
identify the list in the future. To save the name and continue, press
to your recorded name, press 1, to re-record press 2, to delete press 3.
4. After you save the recording you will add members to the list you just created.
Select prompt 4 and the list number, followed by #.
5. To add members, press 2
. To listen
*
6. Enter the first mailbox of the person you wish to add. The system will confirm
the addition.
7. Continue entering any additional members. Press
Add Members to a Private Group Distribution List
IPedge UG 11/11 TOSHIBA 75
You can add members to a pre-existing distribution list at any time.
1. From the Subscriber’s menu, enter 3 6 4.
2. Enter the list number you wish to make changes to, followed by #
3. To add a new member, press 2 and the new mailbox number. The system will
confirm the addition.
4. Continue entering any additional members. Press
when finished.
*
when finished.
*
Page 80

IPedge
Other Messaging Applications
Delete Members from a Private Group Distribution List
Delete a Private Group Distribution List
Listen to Members in a Private Group Distribution List
You can delete members from a pre-existing distribution list at any time.
1. From the Subscriber’s menu, enter 3 6 4.
2. Enter the list number you wish to make changes to, followed by #
3. To delete a member, press 3 and then the mailbox number followed by #.
The system will confirm the deletion.
4. Continue entering any additional mailbox numbers you wish to delete.
Press
In addition to deleting individual members from a private group distribution
list, you can also delete an entire distribution list.
1. From the Subscriber’s menu, enter 3 6 3.
2. Enter the list number you wish to delete, followed by #
3. The system will play the name of the list and prompt you to press # to
confirm the deletion.
You can listen to a list of members in a distribution list at any time.
1. From the Subscriber’s menu, enter 3 6 4.
2. Enter the group list number you wish to listen to, followed by #
when finished.
*
Using a Private Group Distribution List
Using a Global Group Distribution List
3. Press 1 to listen to a list of the members of the group.
You can use a private group distribution list when sending a new message or
redirecting a received message.
1. Call the voice messaging system and record a new message or forward a
received message.
2. When you address the message for delivery, you have the option of
inputting a mailbox number or selecting # for a private group distribution
list.
3. Enter the group number you wish to use followed by a #
4. Press 1 to confirm, or 2 to change your entry.
You can use a global group distribution list when sending a new message or
redirecting a received message.
1. Call the voice messaging system and record a new message or forward a
received message.
2. When you address the message for delivery, you have the option of
inputting a mailbox number or selecting # # for a public distribution list.
76 TOSHIBA
IPedge UG 11/11
Page 81

Personal Options
IPedge
Other Messaging Applications
3. Enter the group number you wish to use followed by a #
4. Press 1 to confirm, or 2 to change your entry.
Some Personal Options are optional features which may or may not be available
to your organization. Check with your System Administrator if any of these
features are available to you.
• Send notification to additional devices when a message is left in your mailbox
• Set a wake-up call
• Change your mailbox password
• Set up your personal assistant
• Forward a call to another phone number using follow-me
• Set up call screening
• Set up do not disturb
• Set up a personal schedule
Message Notification
To Activate or Deactivate Message Notification
Message notification allows you to set up a schedule where you are notified
through additional devices when new messages are received to your mailbox.
Examples of message notification include:
• Receiving a text message to your cell phone
• A notification to a pager
• A call-out to another phone number (e.g., home phone)
Message notification enables you to set a day/time schedule whereby these
notifications are sent. For example, if you work from home one day a week, you
may wish to be notified at your home number if a message is left in your office
mailbox. On the weekends you may still want to know when a new message
arrives, but only wish to be notified by a text message to your cell phone. Each
separate notification is set up through a separate “notification Line.”
Depending on your organization, you may have access to set up message
notification directly, or your system administrator may need to set up message
notification for you. Once message notification is set up, you can activate and
deactivate this feature through your mailbox.
You can use your phone to activate or deactivate message notification once the
schedule has been set up.
1. Call the voice messaging system and select 3 1 1. The system will tell you
whether or not your message notification is activated.
2. If it is not already activated, press 1.
You may also activate or deactivate individual schedule lines. You will need to
know the notification schedule each schedule line refers to.
IPedge UG 11/11 TOSHIBA 77
Page 82

1. Call the voice messaging system and select 3 1 1. The system will tell
you whether or not your entire message notification is activated.
2. To activate or deactivate a specific schedule line, press 2.
3. Enter the schedule line number
4. The system informs you if this schedule line is activated or deactivated.
To change, press 1.
Set a Wake up Call You can set a wake up call to ring a phone (for example, your cell phone) at a
specific time during the day. The wake-up ring will repeat everyday until you
turn it off.
1. Call the voice messaging system and select 3 1 3
2. To set a weekday wake-up call, press 1; to set a weekend wake-up call
press 2
3. The system will tell you whether wake up call is activated or deactivated.
To change, press 1.
4. Once the wake-up call is activated, select 2 1 to enter in a time when you
would like to receive the call.
5. Enter in a 4-digit time followed by a
6. The system will confirm the wake up time.
7. Set up the call-out number. This is the number the system will ring at your
scheduled time. Press 3 and the system will inform you if there is already
This page is intentionally left blank.
a call-out number saved (this allows you to reuse a number without
having to enter it every time you set up a wake up call). To change the
call-out number press 1.
8. Enter the phone number followed by #
9. The system will confirm the number.
for AM or # for PM.
*
Change your Mailbox Password
Your mailbox password is initially set when you access your mailbox for the
first time and complete the mailbox setup process. However, you can change
your mailbox password at any time.
To change your mailbox password:
1. Call the voice messaging system and select 3 4 1
2. Enter a new password
3. The system will ask you to confirm the password.
You can also delete your mailbox password without entering a new one:
1. Call the voice messaging system and select 3 4 2
2. The system will ask you to press # to confirm deletion
Important! If you delete your mailbox password your mailbox will not be
password-protected.
Page 83

IPedge
Other Messaging Applications
Personal Assistant With Personal Assistant you can designate buttons that callers can press
when listening to your voicemail message that will automatically transfer them
to another extension. For example, you may wish to inform callers they can
reach your assistant by pressing a number on their keypad.
A Personal Assistant must first be set up by your system administrator to
define the key press. Once the key press is set up you can change the
transfer extension through your phone. Check with your system administrator
to see if any keys are pre-defined in your organization.
To change your Personal Assistant transfer extension:
1. Call the voice messaging system and select 3 7 2
2. Enter the mailbox of the person you wish the call to be transferred to,
followed by #.
3. Change your personal message greeting (see Chapter 4 – Greetings) to
indicate to the caller that they can use this key press. For example, “Press
1 to be transferred to my assistant.”
Follow me Follow-me enables you to set up your mailbox to forward a call to another
phone number before the call is transferred to your voicemail. For example,
you may be out of the office but are expecting an important call and want all
calls to be transferred to your cell phone.
Setting up Follow
me
Follow-me is an optional feature that may or may not be available in your
organization and depending on how it is set up can also allow you to:
• Accept a call or reject it and send it to voicemail
• Record the conversation once the call is accepted
• Conference in the operator and stay on the call or drop out
• Conference in another extension and stay on the call or drop out
1. Call the voice messaging system and select 3 1 2 2 from the
subscriber’s menu.
2. Enter a phone number (the call-out number), followed by #, the system
will then repeat the number back for confirmation.
3. To activate this call-out number, press 1 or to enter a new call-out
number, press 2.
Once the call-out number is activated, all calls stop ringing at your office
phone and will automatically be forwarded to your call-out number.
IPedge UG 11/11 TOSHIBA 79
Page 84

IPedge
Other Messaging Applications
Accepting or
rejecting calls at a
Transfering to an
Operator or
another Extension
Setting up Call Screening
call-out
Once a call rings through to your call-out number you have the option of
accepting or rejecting the call.
1. Once the Follow me has been set up and a call is redirected to your callout number and you answer the phone, you will hear a message that
indicates you are receiving a transferred call from the voicemail system.
2. Press # to accept the call or
If available in your organization, you can transfer to an operator or to another
extension once you accept a transferred call.
1. Once the Follow me has been set up and a call is redirected to your callout number and you answer the phone, you will hear a message that
indicates you are receiving a forwarded call from the voicemail system.
2. Press # to accept the call.
3. At any time during the conversation, press # again to trigger the call
options. You can press 0 for the operator or # and another extension
number, then hang up.
When call screening is set up, a caller is asked to state their name before the
call is transferred to your extension. You then have the opportunity to accept
the call or send it to voicemail. If call screening is available in your
organization, you may activate or deactivate it through your phone.
to reject the call and send it to voicemail.
*
Setting up “Do not Disturb”
1. Call the voice messaging system and select 3 5.
2. The system informs you if call screening is activated or deactivated.
3. To change, press 1.
You can have calls sent directly to your voicemail when you do not want your
office phone to ring.
1. Call the voice messaging system and select 4 1
2. To deactivate and have calls transferred back to your phone, press 1
again.
80 TOSHIBA
IPedge UG 11/11
Page 85

IPedge
Other Messaging Applications
Setting up a Personal Schedule
Recording a Scheduled Greeting
The personal schedule allows you to manage calls according to a schedule
you define. With the personal schedule you can:
• Route a call to one or multiple destinations based on caller ID, time, or a
combination of the two.
• Play different greetings based on caller ID, time, or a combination of the
two.
• Set up alternate dialing menus (allows callers to press digits on the
keypad during your message to be transferred to a personal assistant or
other extension/phone number, skip the greeting, replay the greeting or
page you).
For example, when on a business trip you want your cell phone and a
colleague’s office phone to ring when a call comes into your extension. If
voice mail picks up, you want an alternate greeting played that tells callers
you are out of the office, but directs them to press 1 to reach an operator, 2 to
leave a voicemail, and 3 to ring a different colleague’s extension.
Your personal schedule is set up your system administrator, however your
messages are recorded through your voicemail box.
1. Call the voice messaging system and select 3 8
Unified Messaging
Access your Voicemails through Email
2. Select a greeting number on your keypad between 1 and 9
3. To listen to the greeting select 2; to record a greeting select 3
If Unified Messaging is available in your organization, you will be able to
access all of your voice and fax messages directly through your email inbox.
You can listen to your voice messages with any audio player and fax
messages can be viewed with a standard image viewer. The subject line of
voice and fax messages will include caller ID; voice messages will include the
duration of voicemail (in seconds), while faxes will show fax sender and
number of pages.
If Unified Messaging is available in your organization all of your voicemails will
be accessible through your email inbox. Each time you receive a voicemail an
email will be sent to your inbox with an attachment that includes a recording of
IPedge UG 11/11 TOSHIBA 81
Page 86

IPedge
Other Messaging Applications
the voicemail. You can open this attachment with any audio player installed
on your computer to listen to the recording or on your telephone as shown
below.
Click the “Link to message” to play your message using the telephone. The
following options display. Click on the appropriate button.
82 TOSHIBA
IPedge UG 11/11
Page 87

Fax Capabilities 8
This section describes how to:
• Send faxes from your desktop
• Redirect fax messages
• Automatically send faxes to a printer
Sending a Fax from your desktop
Fax allows you to send faxes directly from your desktop by using the “print” option
®
from any Microsoft
and you must have the Fax Driver installed. Contact your System Administrator to
find out if you have this capability and whether the fax driver is installed.
Note: Fax is supported on Windows XP Professional, Vista Business and
Windows 7 professional.
1. Launch the Fax application, accessible from your Start menu, under TAIS >
Messaging Fax Driver. Once launched, a icon will appear in your System
Tray.
2. Navigate to the program your document is created in (for example MS Word)
and open the document you wish to fax.
3. Select File > Print from the program’s menu bar, and from the printer dialog
box select the MessagingFax option from the Printer Name drop-down.
4. The Fax dialog screen (web-based) will open. Complete the following fax
sending information.
Windows® program. This functionality is an optional service
IPedge UG 11/11 TOSHIBA 83
Page 88

IPedge
Address Book
icon
Fax Capabilities
Note: To use the Address Book, Microsoft Outlook must be installed on the
client PC. If you do not see the address book icon, you need to install
the latest version of Java Virtual Machine from java.sun.com. Contact
your system administrator.
Recipient You can enter recipients in one of three ways:
• Manually enter name, fax number, and/or email in the available text
boxes.
• Select from your Outlook contacts by clicking the address book icon and
selecting Outlook Contacts from the drop down box.
• Select from the internal address book by clicking the address book icon
and selecting internal contacts from the drop-down box (see “Setting up
the Internal address book” on page 85 on how to add members to this
list).
My Info • This section asks you to input your name, company name, phone
number, fax, email address, date, and number of pages of the fax. This
information will be used in the fax cover letter if you choose to send one.
• This section will also show you the size (in kilobytes/KB) of your fax.
84 TOSHIBA
IPedge UG 11/11
Page 89

IPedge
Fax Capabilities
• Check “Keep user settings on this computer” if you wish to save this
information for future faxes.
Options • Check the “send cover page” checkbox to input content to be sent in a cover
page.
• “Fax quality” allows you to select Standard or Fine resolution.
• If you have a long distance sending code, enter it in the account code field.
• “Billing code” allows you to track internal codes (e.g., codes assigned to
different clients) which you can later view through the fax log for reporting
purposes.
• “Request CSID” is an additional security feature which allows you to input the
CSID you expect the receiving fax to send back. The fax will be transmitted
only if this code is received back from the receiving fax.
Server Info • Obtain the server address from your System Administrator.
• “Username” refers to your mailbox number.
• “Password” refers to your numeric mailbox password.
• Check “Keep user settings on this computer” if you wish to save this
information for future faxes.
Setting up the
Internal address
book
5. Once you complete the form, select the “Send fax” button and a confirmation
page will display. From this page you can view the queue and the log.
• “Queue” allows you to view all faxes you have in the queue and their status
(number of tries, any error messages). From this page you can resubmit a fax
if an error was encountered as well as delete a fax from the queue.
• “Log” allows you to view details of past faxes you have sent. From this page
you can also view a copy of your fax.
If you have access in your organization, you may also view queue and log
information through Web Access.
Note: Faxes sent to an email address will be sent as a TIFF (image) file. Faxes
sent only to an email address will not display in the Queue or Log files
The internal address book allows you to store fax recipient information directly on
the server. To set up the internal address book you must have access to Web
Access.
1. Log into Web Access
2. Select Mailboxes > Fax > Fax Contacts from the drop down menu.
3. From this screen you can input new contacts
IPedge UG 11/11 TOSHIBA 85
Page 90

Fax options 1. Log into your Personal Administration page.
Contact your System Administrator for the IP address and log in
instructions.
2. Select Mailboxes > Fax. The following options display :
Fax Settings
Fax Contacts
Fax Log
Fax Queue
Cover Information
Fax Settings The details for each of the settings is explained below.
This page is intentionally left blank.
• Busy/Err Delay – Number of minutes to wait between attempts when
faxing out, if the previous attempt failed because of a busy signal or a
transmission error.
• No Answer Delay – Number of minutes to wait between attempts when
faxing out, if the previous attempt failed because of no answer.
• Retries – Total number of attempts to transmit a fax.
• No. of rings before No Answer – Number of rings before a fax call times
out.
• Incoming Format – The format of the fax document that will be sent as
an attachment to an email. Select between TIF or PDF. This field also
applies to the format of the faxes sent as an attachment to the fax
verification email when sending outbound faxes.
• Personal CSID (Identification Phrase) – The CSID, both for outgoing
faxes and incoming faxes, transmitted for this mailbox.
Incoming Faxes • Accept Incoming Faxes Y/N – This option allows you to select whether
to receive or deny faxes. If you select not to receive faxes, this mailbox
Page 91

IPedge
Fax Capabilities
will not receive any faxes unless there is a Fax DID defined in the mailbox
properties. In this case the fax will only be accepted if the call was
received on the Fax DID number of the mailbox. This is to minimize spam
faxes to non fax users.
Fax Confirmation Outgoing faxes – This field defines the type of confirmation the user will
receive for outbound faxes. The confirmation will be sent as an email to the
email address defined in Mailbox-Email Settings under the send mail frame.
• Deactivate: No email confirmation.
• Successful Only: Notification will be sent only if the fax transmission was
successful.
• Failed Only: Notification will be sent only if the fax transmission failed.
• All: Notification will be sent for every fax attempt, both successful and
failed.
Auto Print Active – Select this box if you wish to have all faxes automatically sent to a
printer. Requires that auto print service is running on a Windows machine on
the local office network. See “Automatically print faxes to a network printer” on
page 28 for more details.
Printer Name – Select the printer name you wish the faxes to print to from the
drop down list.
Fax Contacts This list is used by the Printer driver (clicking on the Phone Book Icon).
Fax Log Record of past Faxes sent using the printer driver.
Fax Queue Displays any faxes currently being processed.
Cover Information Cover page Information (entered when printing a fax). You can use this page
to maintain cover page information that is used when sending a fax from your
desktop.
IPedge UG 11/11 TOSHIBA 87
Page 92

IPedge
Fax Capabilities
Redirect fax messages
Depending on your organization’s licensed features, you can check if you
have fax messages in your message box. The system will tell you how many
faxes you have and will allow you to redirect all of them at once to a fax
machine for printing, or review them one by one to redirect to a fax machine.
1. Call the voice messaging system and select 1 3 from the subscriber’s
menu.
2. Press 1 to redirect all faxes to a fax machine or press 2 to review each
fax one by one and decide if you wish to redirect to a fax machine.
3. Once you make your selection of the faxes you wish to have redirected to
a fax machine, the system will prompt you to enter in the phone number
of the fax machine to which you wish to redirect the faxes to; then press
#.
4. Press 1 to send to the fax machine; press 2 to enter a different number.
88 TOSHIBA
IPedge UG 11/11
Page 93

Call Manager Basics 9
The IPedge Call Manager works with Net Server to provide a powerful "PCPhone" to enhance productivity for telephone users.
The Call Manager is designed to run on a PC with Microsoft® Windows XP,
Windows Vista, Windows Server 2003, Windows Server 2008, or Windows 7
operating systems connected to a standard TCP/IP network with the Net Server.
The Net Server must be installed with the proper software license(s) for Call
Manager to operate correctly. Call Manager will operate in Demo Mode if the
appropriate licenses are unavailable. Demo mode lets you use the software for
Demonstration purposes only for a limited period of time.
There are two levels of IPedge Call Manager:
• Call Manager Standard version is free to all users of the IPedge system. The
license (I-CM-STD1) for Call Manager Standard is included in the user license
bundle at no additional charge.
• Call Manager Advanced version provides enhanced functionality, including full
Unified Communications (UC). Purchase Call Manager Advanced license
(I-CM-1) when full UC capabilities are required.
Note: All Call Manager user features are described. They may or may not work
depending on the license.
Call Manager provides the following major functions:
• It allows you to place, answer, handle, view, and manage phone calls using
your computer screen, keyboard, and mouse.
• Using the VoIP Audio capabilities can provide a complete speech path when
using a PC with the proper speech component support.
• Rules and actions can be set up to automatically activate when calls arrive
even while you are away.
• It can easily interface with many popular programs (like Microsoft Outlook,
Goldmine, ACT, etc.). This allows you to dial from and “screen-pop” into these
programs or the Internet / Intranet.
IPedge UG 11/11 TOSHIBA 89
Page 94

IPedge
Main Menu
Button
Expand Button
Companion Application tabs
Call Manager Basics
The Main Screen This section gives an overview of the main user interface of the Call Manager,
including the buttons, displays, and indicators, which allow you to easily and
efficiently operate your phone. Call Manager provides two views, Compact
and Expanded, allowing you to operate using only the space on your screen
that you want.
Note: You can easily change the color scheme of your Call Manager by
clicking drop down next to the Set the color scheme icon. The color
options are Blue, Silver or Black.
The Compact View In “Compact” view Call Manager consumes minimal screen space but still
provides the user with indictors, information, and buttons to effectively
operate the phone. This view is most effective when users handle one call at
a time, or have very little available screen space. Below is a sample view and
information about the various parts of Call Manager.
Note: The button information below is independent of the compact or
expanded view. However, the buttons that are visible in the compact
view are explained first and the additional buttons are explained in
the Expanded view section.
Button / Icon Description
Main Menu Click this button to access Call Manager configuration
menus and Help.
Minimize Button Hides Call Manager into the system tray. Double-
click on the Call Manager icon (shown right) in the
system tray to return the Call Manager to the
screen.
Maximize Button Used to change the phone to/from its “Compact” view and
its “Expanded” view.
90 TOSHIBA
IPedge UG 11/11
Page 95

Button / Icon Description
IPedge
Call Manager Basics
Tabs – Home, Actions,
Preferences, Tools
The tabs control various functions and settings.
• Home – has some of the basic telephone functions,
such as Make Call, Answer, Hold, Transfer, Hangup,
Forward, DND On/Off.
• Actions – contains the tools to create, copy, edit/test,
and delete user defined actions.
• Preferences – contains General configuration, Hot
Keys, Dialing, and Docking. It also has tab settings,
such as Add, Update, Delete, and Revert.
• Tools – contains calls and events information.
Icons on the Right (L to R): Toggles compact and expanded mode, color
scheme, voice message indicator, open personal call handler. These functions are explained below or in other
chapters.
Information LCD Display
This window simulates a phone LCD and provides different types of information depending on current status. If
your phone is idle, it shows the date/time, Extension number, and current Name. While a call is active on your
phone it shows information about the call – Duration, CallerID or Name (if present.) When a call is active in the window, right-click on the LCD to access to popup a menu of
call control options.
Message Waiting Indicator
This indicator blinks a Red light above the envelop icon
(shown left) when you have messages waiting.
Side Window Rollout
Button
Companion Application
tabs
Press this button to show a side window that has additional programmable buttons.
A number of optional companion programs can be configured to add significant functionality to the Call Manager.
Each Companion Application is docked in the pane at the
bottom of Call Manager to provide easy access to the fea-
tures/functions of the application.
Home Phone tab The first four keys allow you to (from left to right) Answer,
Hold, Transfer, and Hang up a call. Should you forget, you
can hover your mouse over a key to be reminded what
function a key performs.
Do-Not-Disturb Key
and Indicator
Displays the current Do Not Disturb status of your phone.
Hover the mouse over this area to see the current DND
status message. Click to change your DND status and
message.
Call Forward Key and
Indicator
Displays the current “PBX call forwarding” status for your
phone. Hover the mouse over this area to see the entire
FWD status. Click to change your PBX forwarding status
and destination.
IPedge UG 11/11 TOSHIBA 91
Page 96

IPedge
Call Manager Basics
Button / Icon Description
Dial Pad Button Click the dial pad button to expose and
Make Call Button Click the Make Call button to dial the number shown in the
hide the popup Dial Pad. Use the Dial
Pad when you reach a recording that
says “...Press 1 for sales, 2 for support,...”. When this dial pad is displayed
you can use your mouse to click the digits to dial or use the number keys or
NumLock keypad on your computer
keyboard to dial digits.
Dial Buffer.
Dial Buffer and Redial
Selection
Type a number into this space and press Enter or click the
“Dial” button to the left of the box. Click the drop-down
arrow to view the last 10 outside phone numbers you
dialed. Select a number from the drop-down and press
Enter or click Dial to redial that number. You can even
Copy/Paste phone numbers from other programs into this
window to dial. You may also include letters in the dial
number – Call Manager automatically converts the letters
to the matching numbers on the telephone keypad (i.e. 1800-IFLYSWA).
Volume Controls These buttons control the volume when the VoIP audio
interface is used.
Audio Control The audio control is your line button with a status indicator
for that line when using the VoIP audio interface. Right
click the button to see the Audio Configuration menu.
Recording Button &
Indicator
The indicator light works in conjunction with OAISYS
Tracer and OAISYS Auto Call Record. Users with appropriate permissions will have this indicator on their Call
Manager. If the light is red, this means the user’s call is
currently being recorded. If the light is gray, it is not being
recorded. The user can click on this button and select
‘Start Recording’ to initiate recording of the call. If the call
is being recorded the user can click on the button to terminate the recording.
A number of shortcut keys allow you to use the keyboard in place of the
mouse to control Call Manager. The list of Shortcut keys can be found using
the menu selection Setup>Shortcut Keys. Note: The F1 key is the HELP key
a can be pressed at any time to access the Help document.
92 TOSHIBA
IPedge UG 11/11
Page 97

IPedge
Call Manager Basics
Expanded View In “Expanded” view the Call Manager is enlarged beyond the compact view to
provide the user with additional buttons, indictors, information to manage multiple
simultaneous calls and to access many other features. The follow describes the
additional items in the “Expanded” view.
• Streamline Button – Used to change Call Manager back to its “Compact” view.
• Calls Window – This window displays that status and associated information
for each active phone call on the phone. Thus you can easily view and
manage multiple phone calls. Right click the mouse on any call to view a
menu of options for handling the call (like Hold, Transfer to Voice Mail, Hang
Up, etc.).
• Call Info Indicators – on the right side of the Call Window is a “Call Info
Indicator” that indicates if Extra call information is attached to a call. A gray
notebook icon means no information is attached, a blue notebook icon means
standard information is attached, and a red notebook icon indicates priority
information is attached to the call. Press the Call Notes icon to view or change
Notes information on the call. Notes are retained with the call even when you
transfer it to another person. You may use Call Notes with an IVR to attach a
Customer Name, Credit Card Number, and Zip Code to the call before you
answer, saving you from asking the caller for this information.
IPedge UG 11/11 TOSHIBA 93
Page 98

IPedge
Call Manager Basics
• Programmable Buttons – A number of keys can be easily configured by
the user as “Feature” keys, “Speed Dial” keys, “Call” keys, “User Action”
keys, etc. To change one of these keys simply Right-click the mouse over
the key and use the Setup Key window to configure the settings for the
key.
• ACD Buttons – ACD keys are programmable buttons that would give
ACD agents easy login/logout of ACD groups. These keys also display
the current ACD agent status, and allow agents to control their Wrap-Up
mode.
Screen Docked
Views
Screen-docked profile
Call Manager Main
Menu
Call Manager provides a screen-docking feature where the Call Manager can
dock to the top or bottom of your PC screen. When screen docked the Call
Manager takes on a very low profile using only a small portion of the screen,
and stays accessible even when other applications are maximized. This
allows user’s to access the features of Call Manager while consuming a
minimal amount of PC screen space as shown below. This is not the default,
the default docked profile is the regular expanded view.
Most of the phone display, buttons, and controls that appear on each screendocking profile can be chosen by the user from the “Docking Tab” in Call
Manager Preferences.
To reach Call Managers Main Menu, click on the SCM icon/menu in the upper
left-hand corner. The Main Menu opens as shown below:
The Main menu screen menu item expands into an ability to Change the
Login settings, an ability to reset the phone to its default settings, access help,
and check the Call Manager version and serial number.
94 TOSHIBA
IPedge UG 11/11
Page 99

IPedge
Quick Access Toolbar
Regular Mode
Compact Mode
Call Manager Basics
Shortcuts You can use the Quick Access Toolbar or KeyTips to execute various commands.
The QAT and KeyTips available in SCM are explained below.
Quick Access
Toolbar (QAT)
The QAT (shown below) consists of frequently used tools that can be added to the
top of the screen for easy access. You can add as many tools as you like. If there
are too many to fit on your bar, the remaining ones will go into overflow.
In Compact mode the Answer, Hang up, and Dial Box tools are always available in
the QAT. These three cannot be removed, but more tools can be added. However,
you can change this configuration in Compact/Docked mode if you wish.
To add tools to the QAT, right click on an icon, then select “Add to Quick Access
Toolbar.” To remove a tool from the QAT, right click on the icon, then select
“Remove from Quick Access Toolbar.”
Note: Any pop up menu tools, such as Companion docking and color schemes
cannot be added to the QAT.
KeyTips KeyTips allow for easier keyboard navigation. Each tool on the Ribbon has a
KeyTip assigned to it which you can navigate with using your keyboard. To begin,
press Alt. Small boxes with letters inside appear over various tools on the ribbon.
To use that tool, press the letter. For example, press 'Alt + C' to use the
“Compact” button.
If the tool is a container-type tool (such as a Ribbon Tab, Drop-down menu, or the
Application menu), pressing the associated KeyTip will show the KeyTips of tools
in that container. From there, you can press another KeyTip to use a tool in that
container, or press Escape to return “up” one level, showing the keytips from
before. For example, press 'Alt + A' to transfer to the Actions ribbon tab, then
press 'N' to launch the New Action dialog box.
Note: If you want a tool to be available without having to navigate the ribbon,
you can add it to the Quick Access Toolbar. Tools on the QAT respond to
Alt+1, Alt+2, etc.
Hot Keys SCM also has “Hot Keys” for dialing and popping up (to quickly answer calls),
which can be set in Preferences > Hot Keys.
IPedge UG 11/11 TOSHIBA 95
Page 100

IPedge
Call Manager Basics
The Side Window
Screen
Call Handler Mode
Click the “Side Window” button on the main screen to cause the side window
to appear just to the right side of the main window or below when the main
window is docked. The side window provides access to the Personal Call
Handler window and additional programmable buttons can also be reached.
This window is docked to the side of the main window. You can move the side
window around the screen, but whenever the main window is moved the side
window will move with it. And likewise whenever the main window is
minimized (into the system tray) or restored, the side window will move with it.
• Call Handler Management Buttons – Used to Add, Change, or Delete
Personal Call Handler rules.
• Close Button – Use to close the Call Handler window.
• Call Handler Rules Window – Displays the current Call Handler rules
along with an enabled (checked) and disabled (unchecked) box per rule.
The triggering event is show in blue text while the action to take place is
shown in red text for easier viewing.
• Buttons tab – Use to switch the window from the “Call Handler” mode to
the “Buttons” mode.
Buttons Mode Below is a sample view of the side window screen in Buttons mode, which
provides 25 user-programmable buttons for the user.
• User Programmable Buttons – A number of keys can be easily configured
by the user as Feature keys, Speed Dial keys, Call keys, User Action
keys, ACD keys, etc.
96 TOSHIBA
IPedge UG 11/11
 Loading...