


ZMaster
®
RidingMower
For3000Through7000SeriesModels
Setup
LooseParts
Usethechartbelowtoverifythatallpartshavebeenshipped.
FormNo.3434-244RevB
SetupInstructions
ProcedureDescription
1
2
3
4
5
6
7
8
9
10
11
12
13
Rearwheels(woodencrateonly)
Nopartsrequired
Nopartsrequired
Nopartsrequired
Nopartsrequired
Nopartsrequired
J-bolt2
Wingnut2
Hold-downclamp1
Clamp
Wingnut(1/4inch)
Batteryhold-down2
Nopartsrequired
Seat
Seatplate(xedseatsonly)
Flangenuts(3/8inch)—xedseatsonly
Spacers(3/8inch)—xedseatsonly
Flangenuts(3/8inch)—tiltingseatsonly
Longspacers(tilting,deluxeseatsonly)
Shortspacers(tilting,deluxeseatsonly)
Nopartsrequired
Rightcontrollever1
Leftcontrollever
Bolt(3/8x1inch)—2areassembled
Nut(3/8inch)—2areassembled
Carriagebolt(3/8x1-1/2inches)
Flangelocknut(3/8inch)
Qty.
Use
2
–
–
–
–
–
1
2
–
1
1
8
4
4
2
4
–
1
4
4
1
1
Removethemachinefromacrate.
Addfueltothemachine.
Checktheengine-oillevel.
Checkthetirepressure.
Checkthewheellugnuttorque.
Checkthegrassdeector .
Installabattery(dieselmachinesonly).
Installabattery(gasolinemachines
only).
Chargethebattery.
Installtheseat(internationalmachines
usinggasolineonly).
Checktheseatbelt(international
machinesusinggasolineonly).
Installthemotion-controllevers
(internationalmachinesusinggasoline
only).
Installthelift-assistpedal(international
machinesusinggasolineonly).
©2021—TheToro®Company
8111LyndaleAvenueSouth
Bloomington,MN55420Registeratwww.T oro.com.
OriginalInstructions(EN)
PrintedintheUSA.
AllRightsReserved
*3434-244*

ProcedureDescription
14
15
16
17
18
Air-cleanercap1
Hoseclamp1
RolloverProtectionSystem(ROPS)Kit
Rollbar,rightsection1
Rollbar,leftsection
Rollbar,centersection1
Bolt(3/8x1inch)
Curvedwasher
Flangenut(3/8inch)
Bolt(1/2x3-1/4inches)
Flangenut(1/2inch)
No.2lithiumormolybdenumgrease.
(Purchaseseparately.)
Nopartsrequired
1tube
Qty.
Use
Installtheair-cleanercap(international
machinesusinggasolineonly).
1
1
8
8
8
2
2
–
InstalltheROPS(internationalmachines
usinggasolineonly).
InstalltheROPS(dieselmachinesonly).
Checkthemachineforgrease.
Removetheshippingstraps(for
machineswithMyRide™suspension
systemonly).
19
20
Nopartsrequired
Operator'sManual
EngineOwner'sManual
Registrationcard1
Operatortrainingmaterial
Key2
1
RemovingtheMachine
fromaCrate
Partsneededforthisprocedure:
2
Rearwheels(woodencrateonly)
RemovingaMachinefromaMetal
–
1
1
1
Checkthemachinebeforedeliveryto
thecustomer(allmachines).
Deliverthemachinetothecustomer(all
machines).
g010179
Figure1
GasolineMachineShown
Crate
Ifyouareremovingthemachinefromametalcrate,
refertotheDealer/DistributorPortalforfurther
information.
RemovingtheMachinefroma
WoodenCrate
1.Removethescrewsholdingtherightangle
retainingplatetothecrate.
2
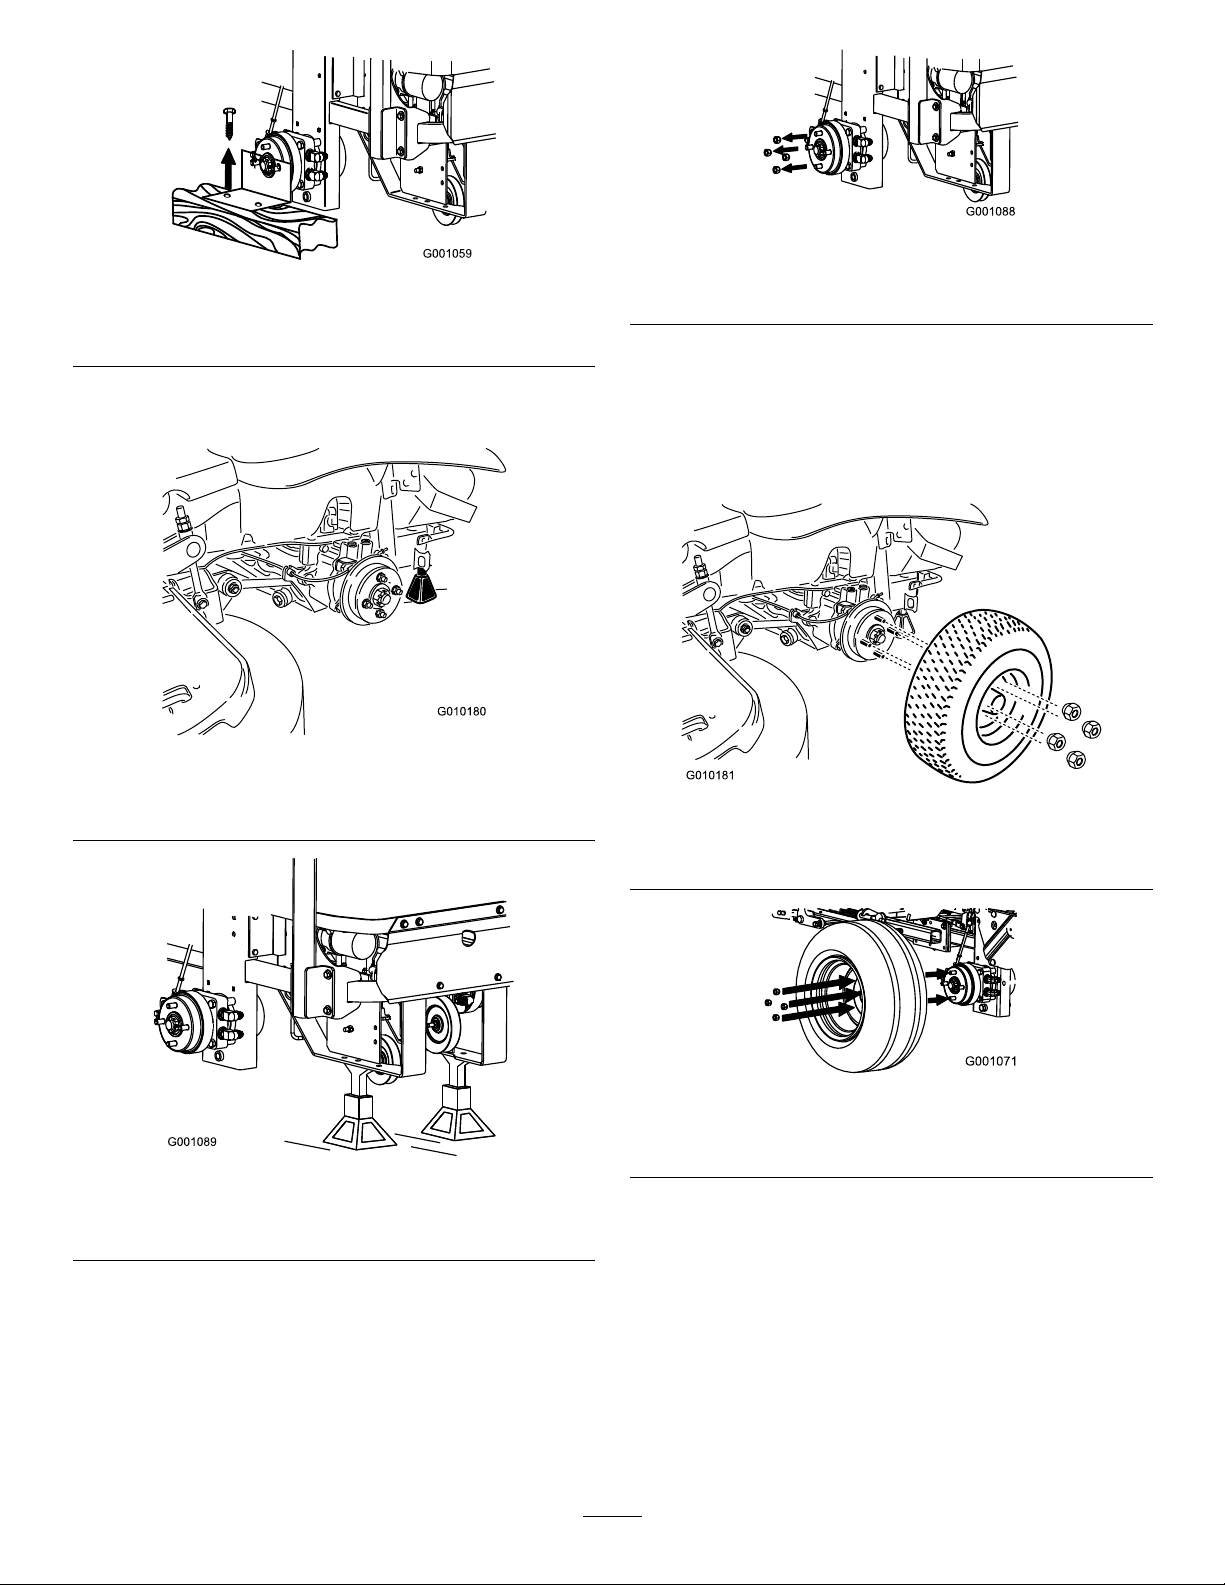
Figure2
DieselMachineShown
2.Raisetherearofthemachineandsupportit
withjackstands.
Figure3
GasolineMachineShown
g001088
Figure5
g001059
DieselMachineShown
4.Mountthewheelswiththevalvestemtothe
outsideandsecurethemwiththewheelnuts
previouslyremoved.
5.Torquethewheelnutsto128N∙m(95ft-lb).
6.Removethejackstands.
g010180
g010181
Figure6
GasolineMachineShown
Figure4
DieselMachineShown
3.Removethewheelnutsfrombothsidesofthe
machineandremovetherightangleretaining
plate.Discardthescrewsandretainingplate.
g001071
Figure7
DieselMachineShown
g001089
3

2
5
AddingFueltotheMachine
NoPartsRequired
Procedure
Addfueltothemachinebeforestartingit.Refer
toyourOperator’sManualforthecorrectfueland
procedure.
3
CheckingtheEngine-Oil
Level
NoPartsRequired
Procedure
CheckingtheWheelLug
NutTorque
NoPartsRequired
Procedure
Beforeyoustarttheengineandusethemachine,
checkthewheellugnuttorque;refertoCheckingthe
WheelLugNutsintheOperator'sManual
6
CheckingtheGrass
Deector
NoPartsRequired
Beforeyoustarttheengineandusethemachine,
checktheoillevelintheenginecrankcase;referto
theOperator'sManual.
4
CheckingtheTirePressure
NoPartsRequired
Procedure
Airpressurespecication:90kPa(13psi)
Note:Checkthetirepressurebeforestartingthe
machine.RefertoyourOperator’sManualforthe
correcttiretype,correctairpressureneeded,and
procedure.
Procedure
Ifthereareplastictiesholdingthegrassdeectorup,
removethemandlowerthedeectorintoplace.
WARNING
Anuncovereddischargeopeningcouldallow
themachinetothrowobjectsintheoperator's
orbystander'sdirectionandresultinserious
injuryordeath.Also,contactwiththeblade
couldoccur.
Neveroperatethelawnmowerunlessyou
installacoverplate,amulchplate,grass
deectororbagger.
1.Ensurethat1endofthespringisinstalled
behindthedeckedgebeforeinstallingthebolt
asshowninFigure8.
2.Placetheotherendofthespringaroundthe
grassdeector(Figure8).
Important:Thegrassdeectormustbefree
torotatewithdownwardtension.Liftthe
deectoruptothefullyopenpositionand
ensurethatitrotatesfreely,withoutbinding
intothefullydownposition.
4
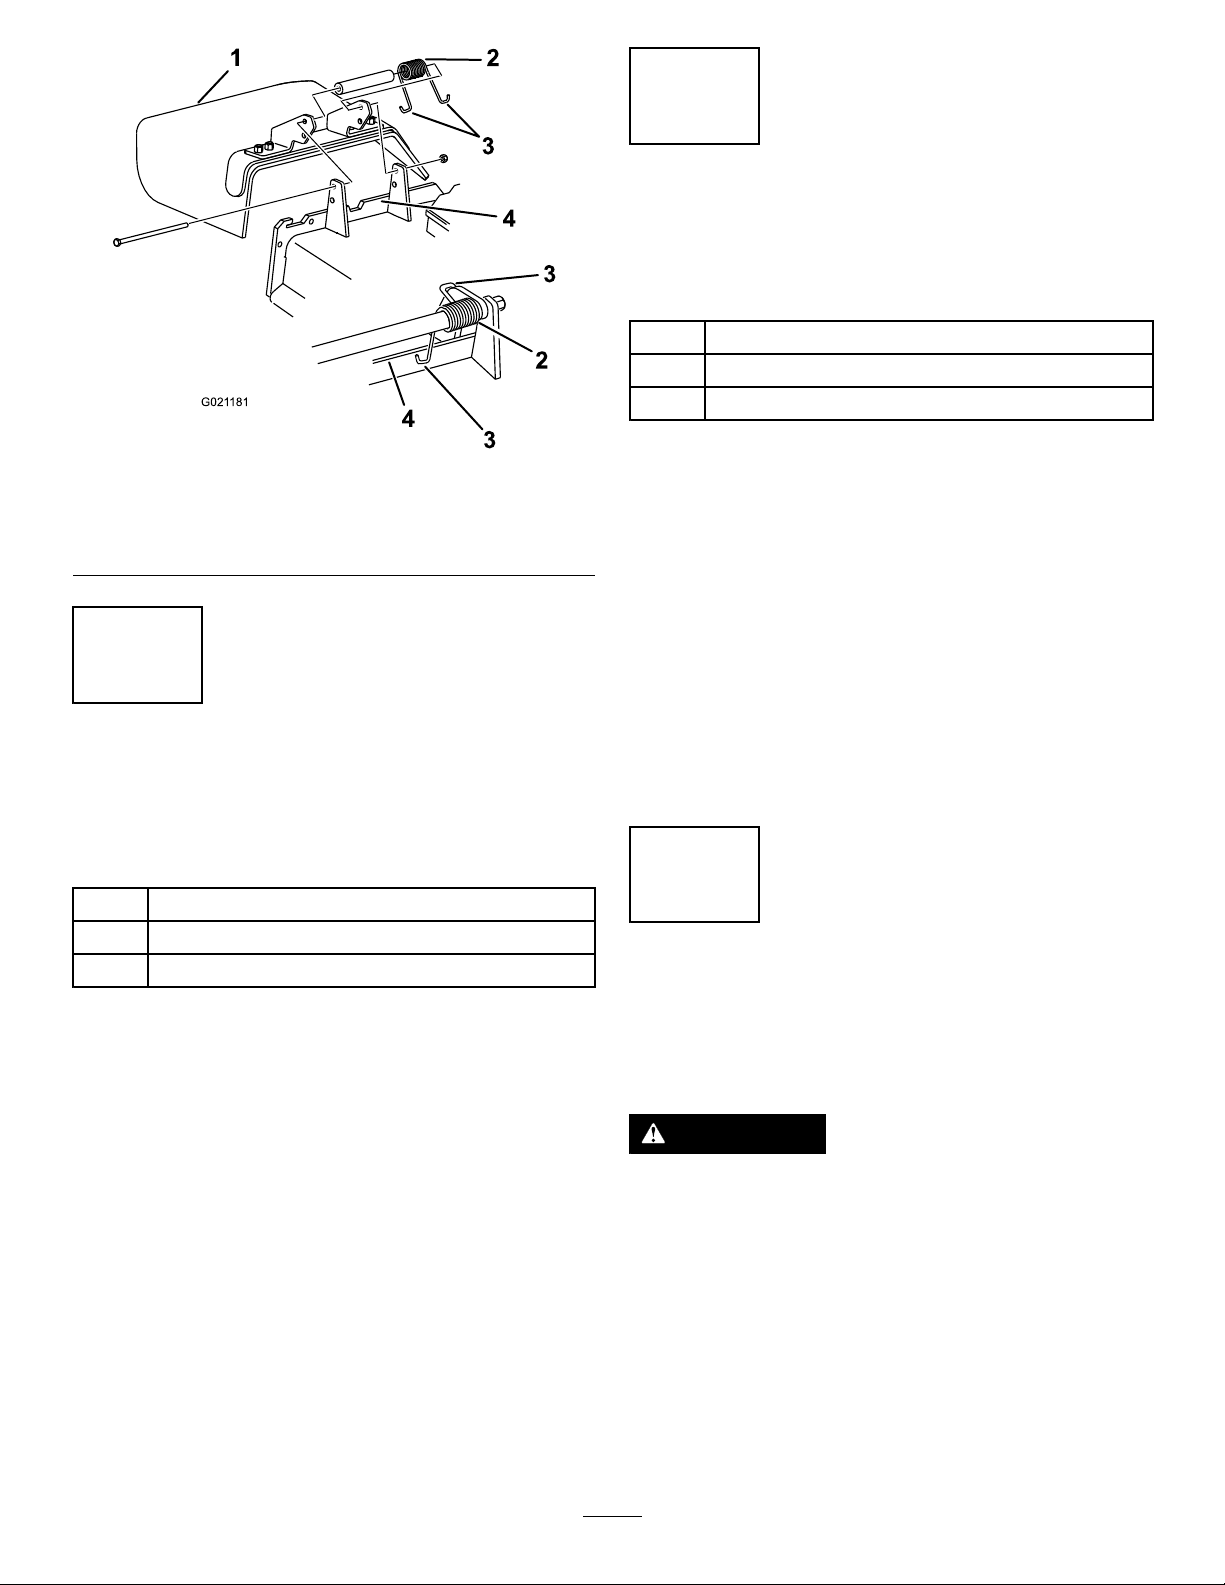
Figure8
8
InstallingaBattery
GasolineMachinesOnly
Partsneededforthisprocedure:
1
Clamp
2
Wingnut(1/4inch)
2Batteryhold-down
g021181
Procedure
1.Grassdeector3.Endofthespring
2.Spring
4.Deckedge
7
InstallingaBattery
DieselMachinesOnly
Partsneededforthisprocedure:
2J-bolt
2Wingnut
1Hold-downclamp
Procedure
Important:Thisprocedureonlyappliesto
machinesthatdonotcomewithabattery
installed.
Important:Thisprocedureappliesonlyto
machinesthatdonotcomewithabattery
installed.
1.Purchasea12Vbattery.
Modelswitha29hpengineandbelowrequirea
batterywithaminimumof260CCA.
Modelswitha30hpengineandhigherrequirea
batterywithaminimumof340CCA.
2.Locatethebattery-mountinghardwareand
installitintothemachine.RefertoInstallingthe
BatteryintheOperator'sManual.
9
ChargingtheBattery
NoPartsRequired
Procedure
WARNING
Purchasea12Vbatteryandinstallitintothemachine.
Theenginerequiresaminimumof540CCA.
Usethehardwareincludedtoinstallthenewbattery.
RefertoInstallingtheBatteryintheOperator's
Manual.
Chargingthebatteryproducesgassesthat
canexplodeandcauseseriousinjury.
•Keepcigarettes,sparksandamesaway
fromthebattery.
•Makesuretheignitionswitchisoff.
•Ventilatewhenchargingorusingthe
batteryinanenclosedspace.
Important:Donotrunthemachinewiththe
batterydisconnected;electricaldamagemay
occurtotheengine.
5
 Loading...