

Page 1

GPS Hiper Ga with FC-2000 Network RTK (NTRIP)
SURVEY PROCEDURE GUIDE
Prepared By
Abdul Jaleel K.M.
Technical Support Engineer/Service centre in charge
Mobile: 050-6944728, Tel:04-2823145 Ext: 160
E-mail:topconsc@fajerest.ae
Page 2

TOPCON Hiper Ga with FC-2000
GPS RTK (NTRIP) SURVEY PROCEDURE GUIDE
Introduction:
Real Time Kinematic surveying used for topographic survey and
stakeout, and is the most precise method of Real Time surveying.
Network Reference Stations allows us to eliminate/reduce systematic errors in reference
station data,
wider areas.
by eliminating the need to set up a base station.
to provide high-accuracy, real-time kinematic (RTK) GNSS positioning for
A VRS network improves productivity while at the same time reduces costs,
The purpose of this guide is to provide a step-by-step procedure for
completing RTK topographic surveys using the Topcon hardware and software. This
guide consists of following sections:
Initial Setup
Topography Surveying
Importing Job
Exporting Job
Localization
Hardware Required:
Topcon Hiper Ga Dual-frequency receiver
Topcon Controller FC-2000 with Bluetooth Card (Data Collector)
Mobile with SIM Card
Software Required:
TopSurv running in Windows CE operating system (on FC-2000)
Top Link software for PC (Download)
Our Related Guides:
TopSurv User Manual
TopSurv Reference Manual
3
Operator’s Manual
GR
Top Link Reference Manual
Additional information such as Bluetooth operation, radio frequency,
etc. is not included in this guide. Contact our Technical support Engineers for assistance.
Page 2 of 20
Prepared By: Abdul Jaleel, Mobile: 050-6944728, E-mail: topconsc@fajerest.ae
The concept of GPS
Page 3
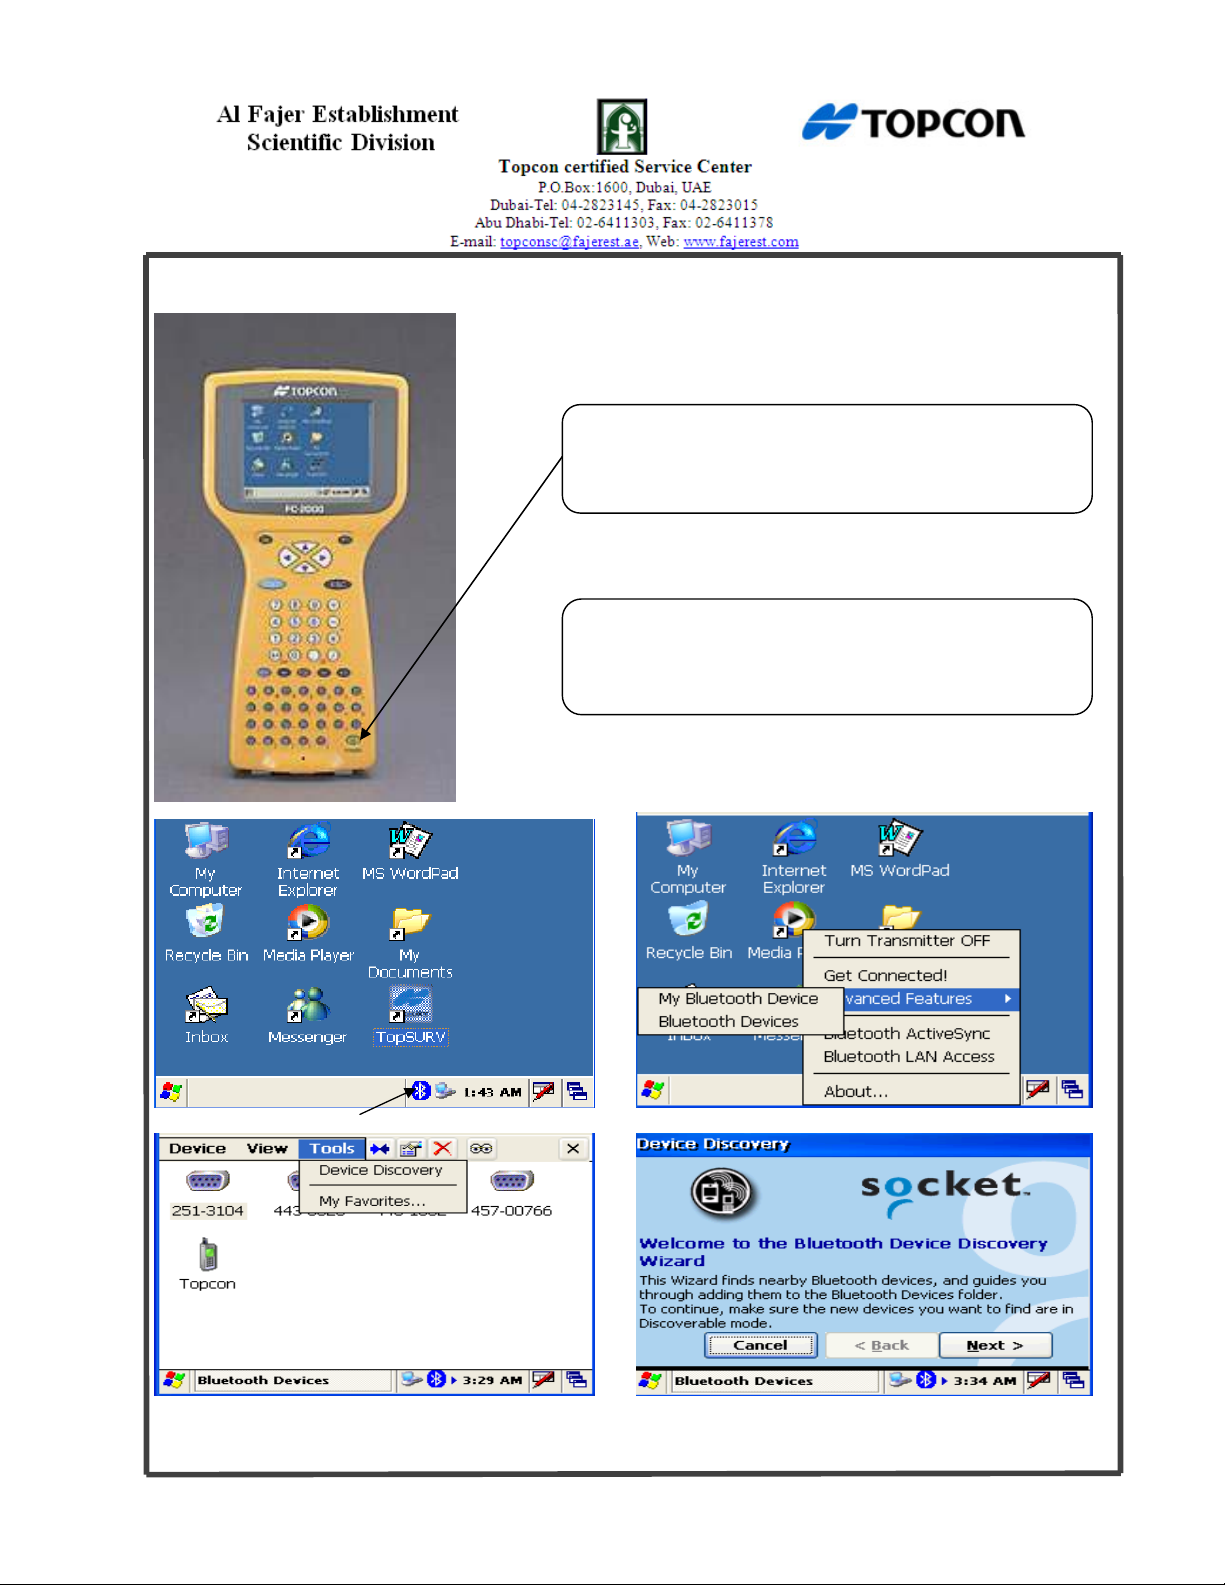
Turn on the FC-2000 by pressing the green Power Button for more than 1 second.
Tab Here Select Advanced Features – Select Bluetooth Devices
Select Tools – Select Device Discovery Tab Next
If you want to reset the controller PRESS
Turn Power ON
Green Button
(Shift + Func + ESC)
Page 3 of 20
Prepared By: Abdul Jaleel, Mobile: 050-6944728, E-mail: topconsc@fajerest.ae
Page 4
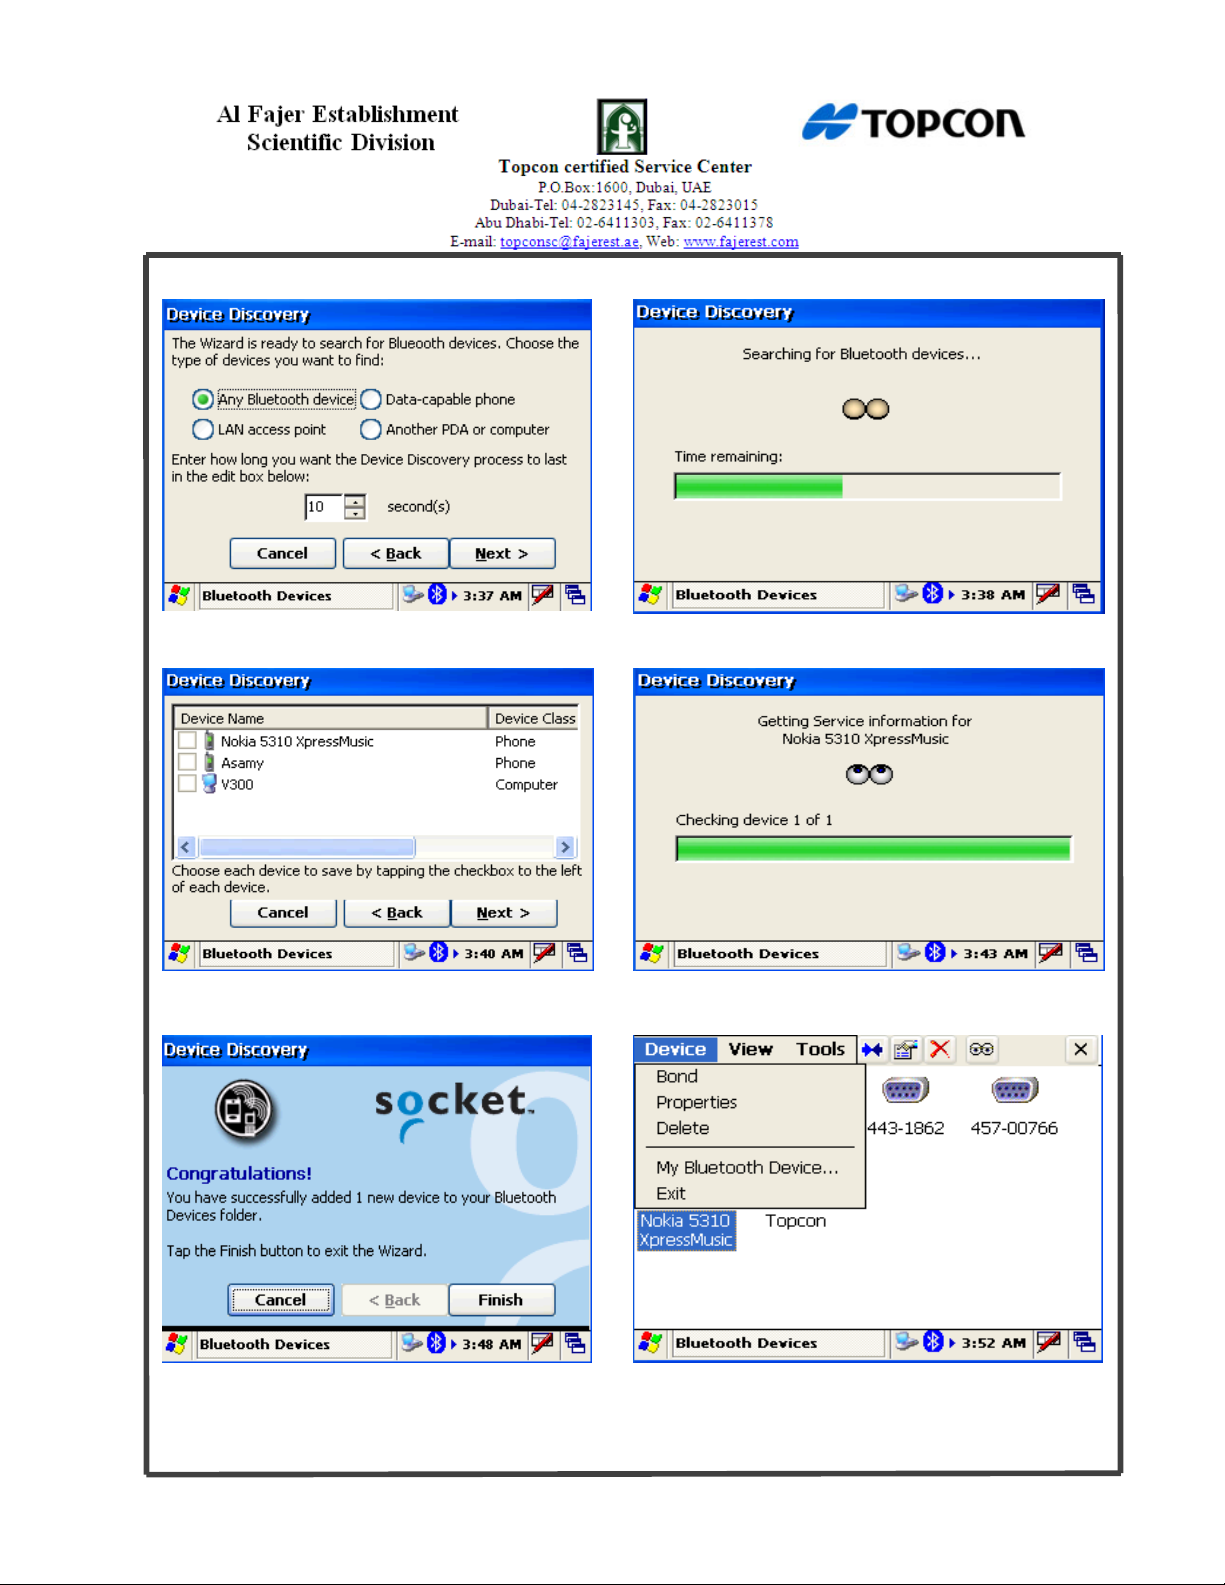
Tab Next
Select Phone - Tab Next
Tab Finish Select Required Mobile – Go to Device – Select Bond
Page 4 of 20
Prepared By: Abdul Jaleel, Mobile: 050-6944728, E-mail: topconsc@fajerest.ae
Page 5
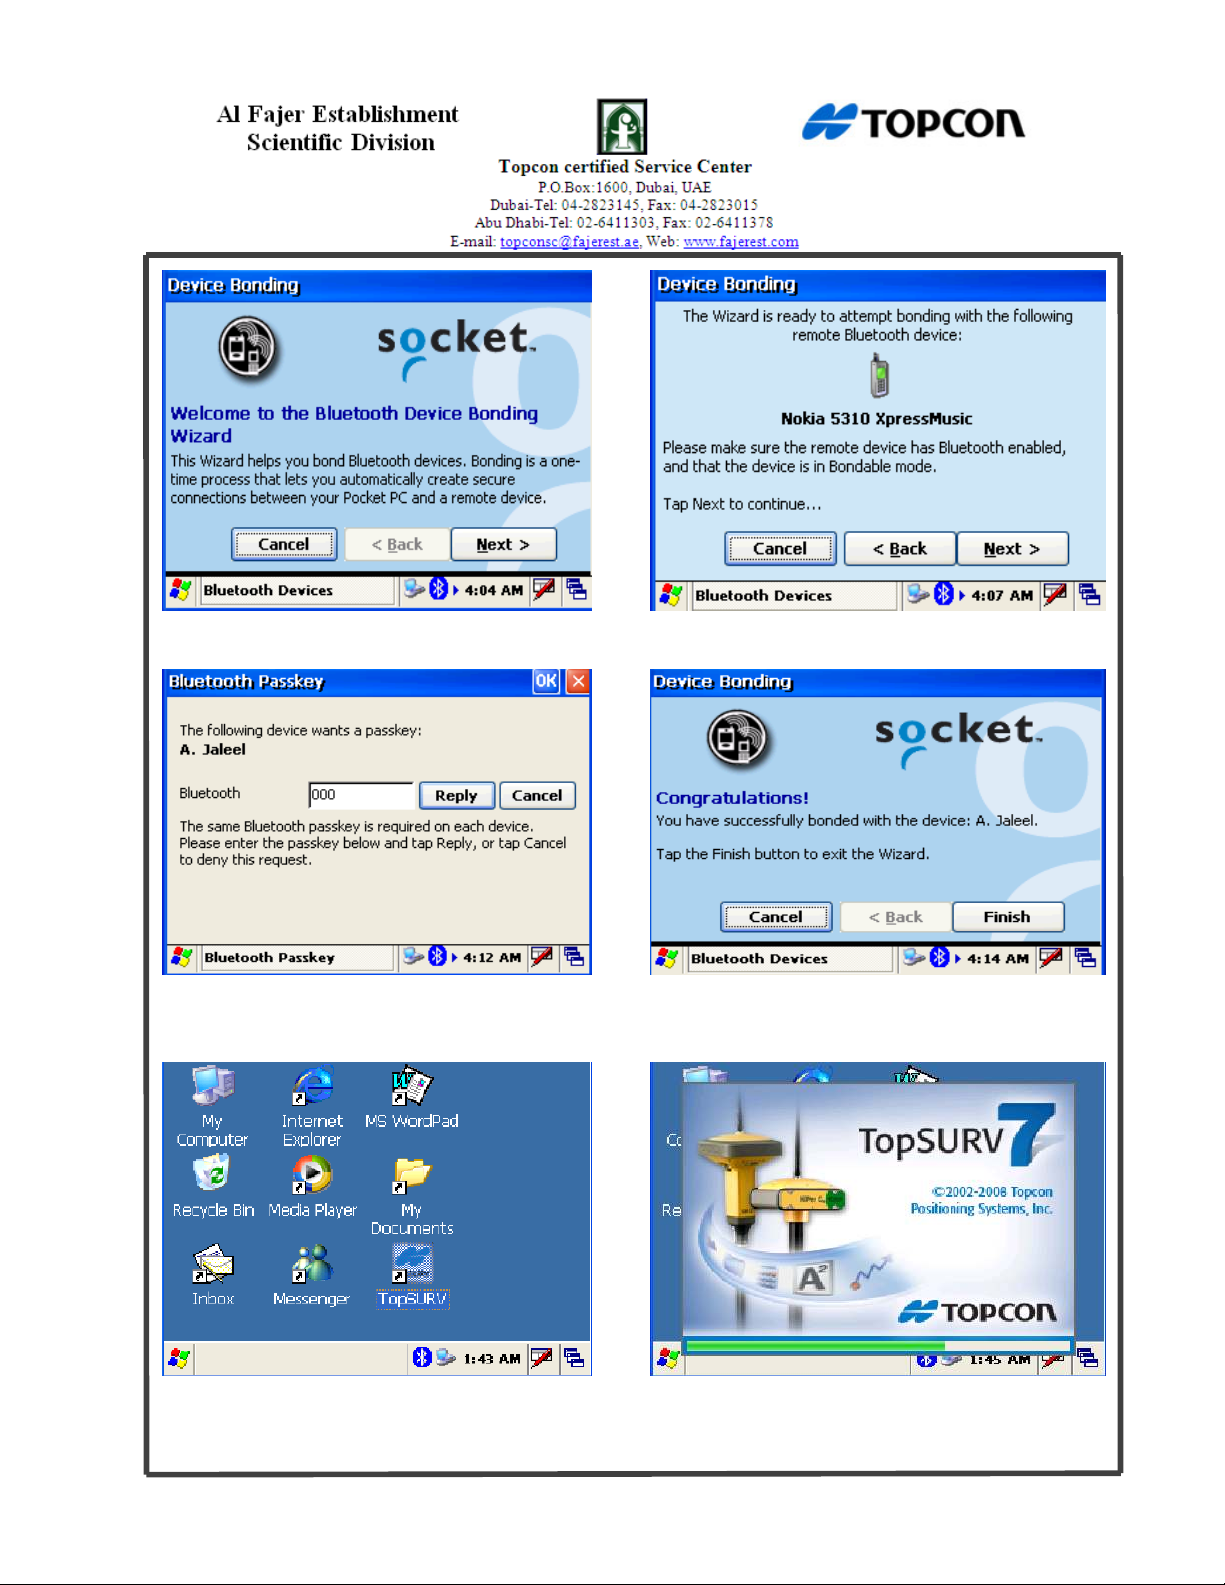
Tab Next Tab Next
Enter passkey and Tab reply Tab Finish and Exit
(Note: Enter same Passkey in Mobile also)
Double click the “TopSURV” icon
Page 5 of 20
Prepared By: Abdul Jaleel, Mobile: 050-6944728, E-mail: topconsc@fajerest.ae
Page 6
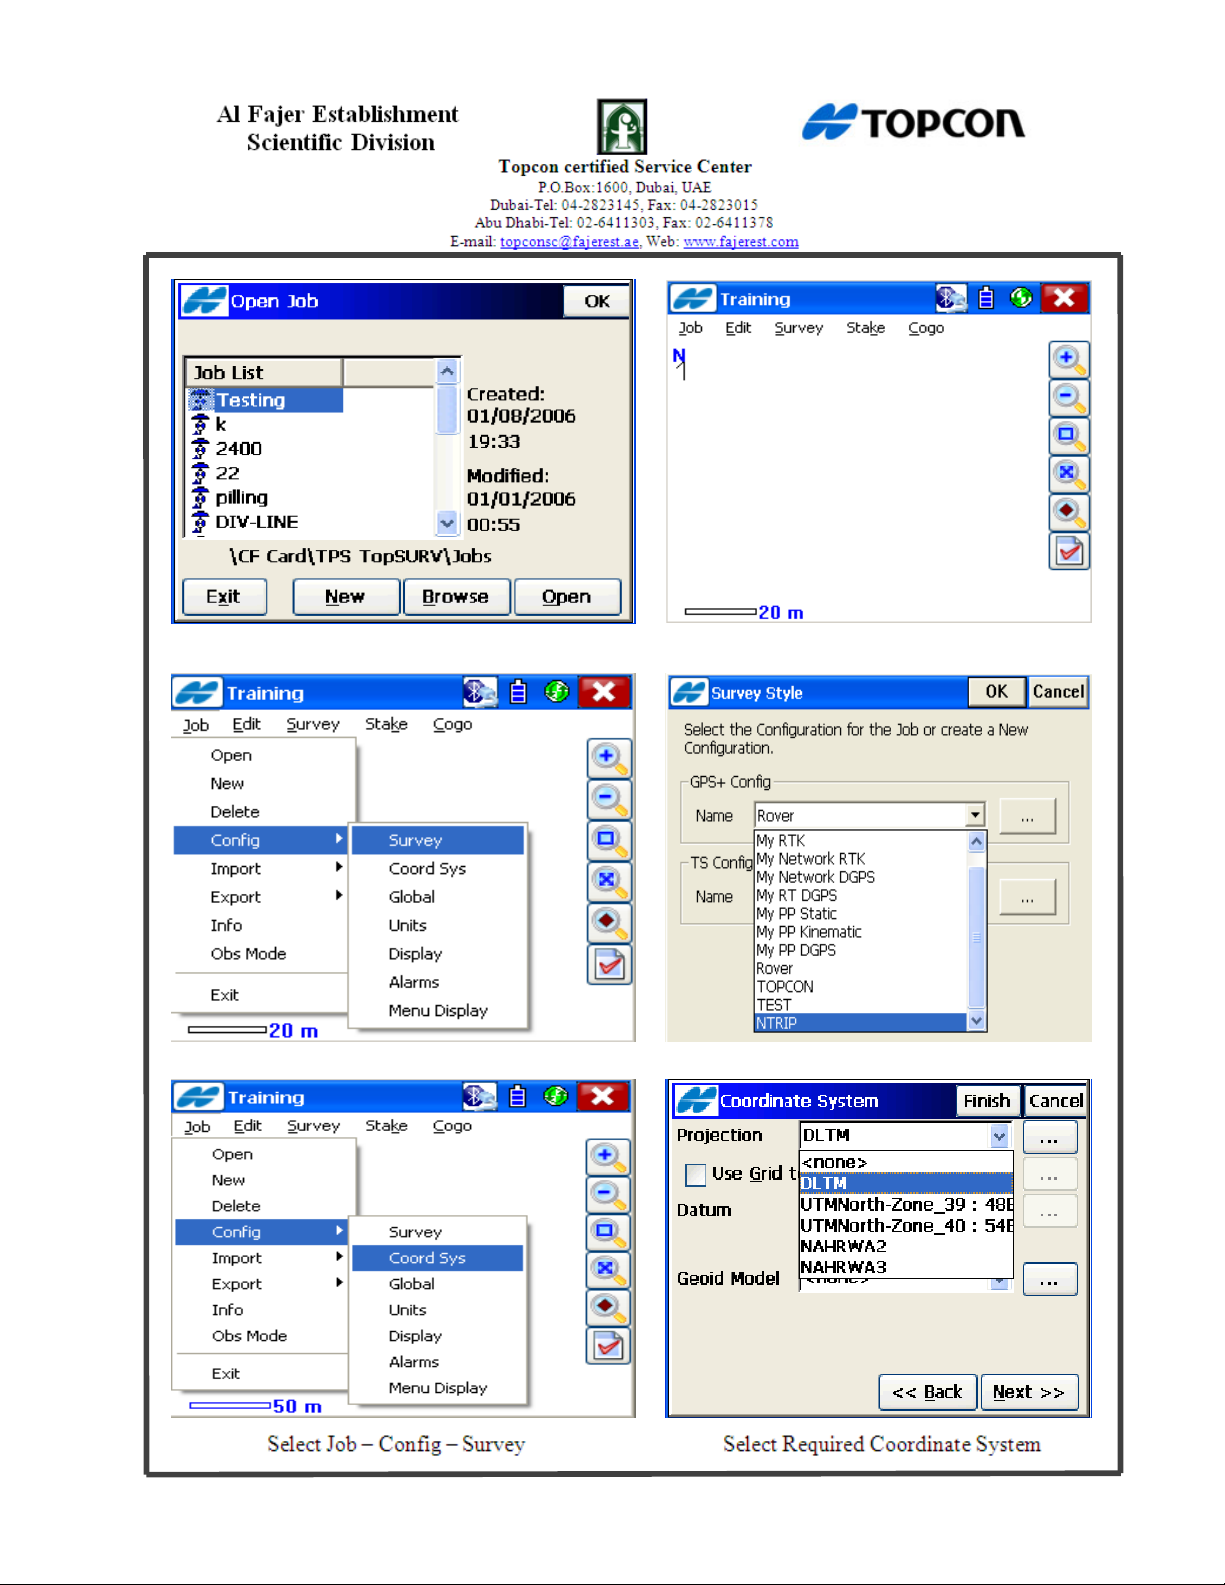
Create New Job Enter Job Name or File Name
Select Job – Config – Survey Select NTRIP
Page 6 of 20
Prepared By: Abdul Jaleel, Mobile: 050-6944728, E-mail: topconsc@fajerest.ae
Page 7

NTRIP Configuration
Tab Here Tab Here
Select Following Configuration Parameters
Page 7 of 20
Prepared By: Abdul Jaleel, Mobile: 050-6944728, E-mail: topconsc@fajerest.ae
Page 8

Page 8 of 20
Prepared By: Abdul Jaleel, Mobile: 050-6944728, E-mail: topconsc@fajerest.ae
Page 9

Tab Here Tab Here
Page 9 of 20
Prepared By: Abdul Jaleel, Mobile: 050-6944728, E-mail: topconsc@fajerest.ae
Page 10

When the connection is established you will be hearing a sound and sees green icon
connection comes to dark green colour. Then automatically searching mount point & PPP
Connection. Finally a message will appear “commands sent successfully”.
Page 10 of 20
Prepared By: Abdul Jaleel, Mobile: 050-6944728, E-mail: topconsc@fajerest.ae
Page 11

will not be “
Fixed
”
Note:
and the common and initialized satellites
fields will populate with the number of
satellites being tracked, as on the screen
The position should become “Fixed”
.
The Radio Link should be 100% and the RTKage should be 0 or 1sec. This means the radio
is communicating the base station information
to the rover receiver. If either of these values
is something different, the “Positioning Type”
Page 11 of 20
Prepared By: Abdul Jaleel, Mobile: 050-6944728, E-mail: topconsc@fajerest.ae
Page 12

Note: If you want to reconnect the Network, do the following steps:
The Red icon shows, there is no GPRS
Connection Currently. So, to establish GPRS
Connection. Select Provider, Input User ID &
Password and APN.
The Virtual Radio must be D. Port C is
occupied by the Radio modem.
Tab Here
Page 12 of 20
Prepared By: Abdul Jaleel, Mobile: 050-6944728, E-mail: topconsc@fajerest.ae
Page 13

Press Connect Close Here
Select “Update” and then all the mount
points’ shows will be in the Mount point
List.
Select Required Mount Point from the
list and connect it.
The position should become “Fixed”
and the common and initialized satellites
fields will populate with the number of
satellites being tracked, as on the screen.
Page 13 of 20
Prepared By: Abdul Jaleel, Mobile: 050-6944728, E-mail: topconsc@fajerest.ae
Page 14

distance, slope distance, or time
).
Topo Survey:
Go to Survey - Select Topo
If you want to see the Topo survey points Go to Edit – Select Points.
Note:
Give point Number – Click Start (Data store automatically)
Auto Topo:
Go to survey – Select Auto Topo Give point Number-Log Now – Click start
Click here for changing the parameters. Set the Auto Topo method and interval (either by horizontal
Prepared By: Abdul Jaleel, Mobile: 050-6944728, E-mail: topconsc@fajerest.ae
Page 14 of 20
Page 15

Click here
(Topcon icon)
and
Show auto Topo Points
Note: If you want to see the Auto Topo survey points Go to Edit – Select Point
select
Stake out/Setout/Layout the Points:
If you wish to add points go to edit/ points/add then edit point coordinates then press ok
Page 15 of 20
Prepared By: Abdul Jaleel, Mobile: 050-6944728, E-mail: topconsc@fajerest.ae
Page 16

Click here and select required point and setout point
Go to Stake – Select Point
Click here (If you want to see the coordinates)
Prepared By: Abdul Jaleel, Mobile: 050-6944728, E-mail: topconsc@fajerest.ae
Page 16 of 20
Click here (If you want to save the stakeout point)
Page 17

Go to Job
– Import
– From File
- Select
Import File
Export File
required Data – Select required Format -
Click Next- Find File - Select required File
style – Select Projection-Finish
Page 17 of 20
Prepared By: Abdul Jaleel, Mobile: 050-6944728, E-mail: topconsc@fajerest.ae
Page 18

Go to Job
– Export
– To File
– Select
Projection
-
Finish
Required Data - Select required Format -
Click Next- Select Location and give file
name - Select required File style – Select
Localization:
Localization is used for transforming coordinates between local system
and a WGS84 system. The more points used, the more precise the localization.
Localization is performed on a site where you wish to work with the existing local
coordinate system. To ensure an accurate localization you need at least 4 known points.
Select a position for your base that will give the best radio range for
your project. This may be a known point or you may wish to create a new station a more
suitable location. This point does not need to be part of your current survey network.
Setup the base over the point, connect with controller and start base and after that connect
rover. Localization file should be keep separately.
Page 18 of 20
Prepared By: Abdul Jaleel, Mobile: 050-6944728, E-mail: topconsc@fajerest.ae
Page 19

Local point select from the list
Give WGS84 Point number
Start Meas
Continue to each local point and survey as above saving as you go. The localization
screen displays the Horizontal and vertical residuals for each point you can see which
points may not be good.
Localization file should be keep separately. If you want to export a Localization
Note:
file, go to export, select data is Localization and format is Topcon 3D (.gc3).As you
create a new job and import localization file (gc3) and continue survey.
Known point Initialization:
station. Setup the base with required coordinate system and after that connect rover and
Prepared By: Abdul Jaleel, Mobile: 050-6944728, E-mail: topconsc@fajerest.ae
It means, Initializes the receiver using known coordinates for the rover
Page 19 of 20
Page 20

make the fixed solution. Add your control point and its coordinate and then go to survey,
select Known point initialization. After open this window, Select required control point
from the list and initialize the point and continue the survey.
Select required Point from the list
Initialize
Once you are initialized the control
point, you can continue the survey.
Page 20 of 20
Prepared By: Abdul Jaleel, Mobile: 050-6944728, E-mail: topconsc@fajerest.ae
 Loading...