

Page 1
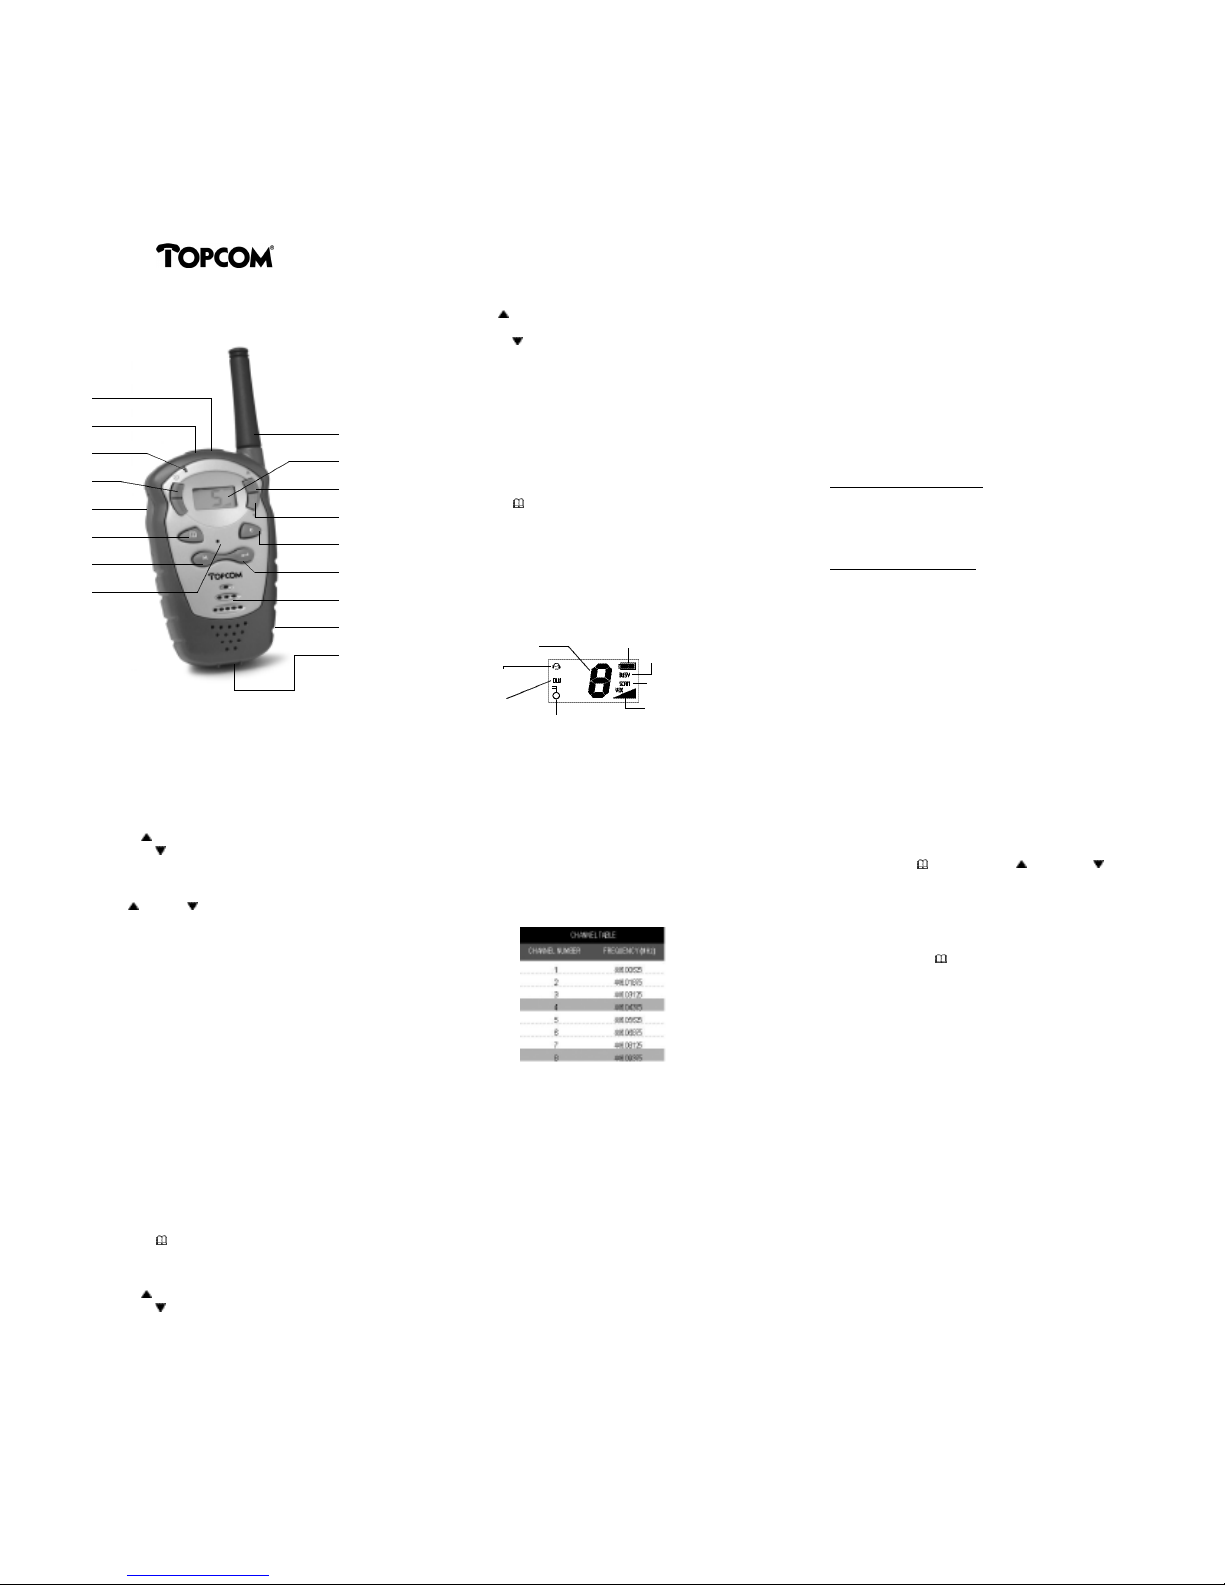
1. BUTTONS/LED
1. Antenna
2. LCD Screen: Displays current channel selection and other radio
status symbols.
3. Up key (VOLUME/CHANNEL): Press to adjust volume level and
change channels.
4. Down key (VOLUME/CHANNEL): Press to adjust volume level
and change channels
5. Call key ‘C’: Press to transmit call tones.
6. Enter key: Used to turn LCD Screen lamp ON/OFF keys are locked
when pressed and held.
7. Speaker
8. Battery compartment (located at the rear): houses 4 x "AAA"
alkaline or Ni-MH rechargeable batteries (not included).
9. Battery compartment cover latch (located at the rear): Secures
Battery Compartment cover.
10. Mic: Microphone.
11. Monitor ‘M’ key: Press to tune in and hold onto weak signals.
12. Menu key : Allows you to change channels.
13. PTT key (Push to Talk): Press to transmit.
14. Power On/Off key: Press and hold the button to switch your unit
ON/OFF.
15. TX (Transmission) LED indicator: Red light shows when
transmitting.
16. Sp. /Mic. / Battery charge jack
17. Belt clip (located at the rear)
2. DISPLAY
Vox: Displayed when vox mode is ON
3. INSTALLATION
3.1 Batteries
• Release the battery compartment cover latch located at the rear of
the unit and remove the battery compartment cover from the
compartment.
• Install 4 x 1. 5V AAA alkaline batteries or Ni-MH rechargeable
batteries.
• Reinstall the battery compartment cover and lock the battery
compartment cover latch in position.
The receiver has a built-in Power Save feature for maximum battery life.
But when the communicator is not being used, conserve battery power
by pressing the On/Off key to Off. Remove the batteries if the unit will
be out of use for long periods.
3.2 Belt clip
3.2.1. Removing the belt clip
• Release the lock of the belt clip latch on the top and pull it away
from the unit.
• While pulling the belt clip catch, push up on the belt clip to remove it
from the unit.
3.2.2 Installing the belt clip
• Slide the belt clip into the belt-clip slot.
• A click indicates the belt clip is locked in position.
4. OPERATION
4.1 Switching the unit ON
Press and hold the On/Off key down. The unit will beep with a dual
tone.
4.2 Switching the unit OFF
Press and hold the On/Off key. The unit will beep with a single tone and
the LCD screen will turn blank.
4.3 Adjusting speaker volume
• Press the Up key to increase speaker Volume.
• Press the Down key to reduce speaker Volume.
• Speaker volume level is indicated by the number of bars displayed in
the lower right corner of the LCD screen.
NOTE: Volume Up and Down keys are disabled during BUTTON LOCK
mode
4.4 Receiving a signal
The unit is continuously in RECEIVE mode when the unit is ON and not
transmitting. When you receive a signal on the current channel, the RX
icon (BUSY) is displayed. (See “LCD SCREEN” for details).
4.5 Transmitting a signal
• Check channel activity by pressing and holding the MONITOR key
‘M’. You’ll hear static if the channel is unoccupied. Don’t transmit if
someone is talking on the channel. Press and hold the PTT key to
transmit. The TX LED indicator will show red. Hold the unit in a
vertical position with the microphone 5 cm from the mouth.
• While holding the PTT key down, speak into the unit using a normal
tone of voice.
• Release the PTT key when you have finished transmitting.
NOTE: For other people to receive your transmission, they must also be on the
same channel you are currently using. Refer to the “Changing Channels” section
for more information.
4.6 Changing channels
The receiver has 8 channels. To change channels:
• Press the Menu key until the current channel number flashes up
on the LCD screen.
While the channel number is flashing:
• Press the Up key to move to a higher channel.
• Press the Down key to move to a lower channel.
The channel changes from 1 to 8, or from 8 to 1.
• Press the Enter button to confirm the selected channel and return to
normal mode.
• Channel change operations are disabled during KEY LOCK mode.
NOTE: Refer to the “Channel Table” section of this owner manual for detailed
frequency listings.
4.7 Monitor
You can use the MONITOR feature to check for weak signals in the
current channel.
• Press the Monitor button ‘M ’ for activating or deactivating.
4.8 Enter / Back-light / Key lock
• Press and immediately release the Enter button to light up the LCD
Screen. The backlight will automatically shut off after
4 seconds if no other keys are pressed.
• Press and hold the Enter key until the KEY LOCK icon is displayed on
the LCD screen.
NOTE: Volume and channel change operations are disabled when in KEY LOCK
mode.
• Press and hold the ENTER key down again to deactivate KEY LOCK
mode.
4.9 Channel scan
CHANNEL SCAN performs searches for active signals in an endless loop
from 1 to 8.
• Press Menu key twice and Up key or Down key to activate
CHANNEL SCAN. The channel number on the LCD screen changes
rapidly until an active signal is detected.
• During CHANNEL SCAN mode.
• Press Enter key or PTT key to confirm the selected channel.
• Press the CALL key ‘C’ to change to CALL function and send a call
tone on that active channel.
• Press the Menu key 4 times to deactivate CHANNEL SCAN mode.
• When an active signal (one of 8 channels) is detected. CHANNEL
SCAN pauses, keeping the active signal broadcast.
• Press the PTT key to communicate through the active signal channel
and CHANNEL SCAN is deactivated.
• If an active signal (one of 8 channels) is detected but you want a
different channel, press the Monitor key ‘M ’ twice to by-pass the
current channel and continue searching for another active channel.
4.10 Sending call tones
You can use call tones to alert the other person when you are
attempting to contact them. You can also use call tones to signal the
beginning or end of a transmission.
• Press the Call key ‘C’; the red TX LED indicator will show and CALL
TONE continues for 3 seconds.
4.11 Battery level indicator
1.The battery level is indicated by the number of squares present inside
the Battery icon on the LCD Screen.
2.When the battery level is low, the Battery icon will flash to indicate
the batteries need to be replaced.
3.Do not charge this unit using an AC/DC adaptor with regular
“AAA” alkaline batteries installed. Only use optional AC/DC
adaptor with “AAA” Ni-MH rechargeable batteries (not
included).
USER GUIDE
TwinTalker 2000
17
16
15
14
13
12
11
10
1
2
3
4
5
6
7
8
9
Channel Number
Battery Indicator
Channel Scan Selection
RX Icon
Volume Level
Headset Icon
Dual Watch
Button Lock
Page 2
Note: Ensure the unit is switched off when in battery charge mode.
4.12 To charge the receiver (optional)
Should you wish to use the unit with rechargeable batteries (not
Included) you will be required to use an AC/DC adaptor - Input 230
VAC 50 Hz - Output 6 VDC 100Ma (not included).
• Insert 4 “AAA” NI-MH rechargeable batteries (not included)
• Switch the unit OFF
• Plug the adaptor into the wall and insert the round end into the
charge jack marked CHG on the top of the receiver.
Note: It takes approximately 6 hours to charge the batteries fully if they are at
their lowest level, and around 14 hours to charge new batteries fully.
4.13 To enter Dual Watch mode (2 channel monitor).
• Press Menu key 3 times.
• Press Up key or Down key to select the desired second channel.
• The unit will scan between the 2 channels, which are shown on the
display.
• Press Enter, PTT or Call button ‘C’ to exit Dual Watch mode.
4.14 VOX control function
In VOX mode, you can transmit and receive signals without pushing the
ptt button. It will start transmitting when you start speaking.
4.14.1. To switch on the VOX function
• Press Menu button 4 times to enter VOX mode;
• While the VOX icon is flashing -
• Press Up key to select higher VOX sensitivity;
• Press Down key to select lower VOX sensitivity;
• Press Menu key twice to confirm the selected mode.
Note:
1. VOX sensitivity is indicated by the number of bars displayed at the lower right
corner of the LCD Screen.
2. You can press the Enter key twice to stop transmitting for 4 seconds and adjust
the VOX sensitivity to a lower level if the surroundings are too noisy, causing
continuous transmitting.
4.14.2. To turn off the VOX function
• While the VOX icon is flashing, press the Down key until the bars
disappear.
• Press the Menu key twice to confirm VOX off mode.
4.15 Second counter function
Use this to count from 0 to 99 seconds.
4.15.1. To enter second-counter mode
• Press Menu key 5 times to enter second-counter mode.
• While the second counter meter is flashing:
• Press Up key to run second counter continuously;
• Press Down key to pause the second counter.
• Press Menu key to confirm the second counter and return to the
original default channel automatically;
• If an active signal is detected while in second-counter mode, the unit
will return to RECEIVE mode automatically;
4.15.2. To reset the second-counter meter
Enter second-counter mode and while it is flashing, press 2 times the
Enter key to reset the second counter to 00 status and press the Menu
key to confirm.
5. TOPCOM WARRANTY
• This equipment comes with a 24-month warranty. The warranty will
be honoured on presentation of the original bill or receipt, provided
the date of purchase and the unit type are indicated.
• During the time of the warranty Topcom will repair free of charge any
defects caused by material or manufacturing faults. Topcom will at its
own discretion fulfil its warranty obligations by either repairing or
exchanging the faulty equipment.
• Any warranty claims will be invalidated as a result of intervention by
the buyer or unqualified third parties.
• Damage caused by inexpert treatment or operation, and damage
resulting from the use of non-original parts or accessories not
recommended by Topcom is not covered by the warranty.
• The warranty does not cover damage caused by outside factors, such
as lightning, water and fire, nor does it apply if the unit numbers on
the equipment have been changed, removed or rendered illegible.
Note: Please do not forget to enclose your receipt if you return the equipment.
6. SAFETY INSTRUCTIONS
6.1 Damaged antenna
Do not use any receiver that has a damaged antenna. If a damaged
antenna comes in contact with the skin, a minor burn may result.
6.2 Batteries
As batteries can cause property damage and/or bodily injury such as
burns if conducting material such as jewellery, keys or beaded chains
touches exposed terminals. The conductor may complete an electric
circuit (short-circuit) and become quite hot. Exercise care in handling any
charged battery, particularly when placing it inside a pocket, purse or
other container with metal objects.
6.3 For vehicles with air-bag
Do not place your receiver in the area over an air-bag or in the air-bag
expansion area. Air-bags inflate with great force. If a receiver is placed
in the bag expansion area and the air bag inflates, the receiver may be
propelled with great force and cause serious injury to vehicle occupants.
6.4 Potentially combustible atmospheres
Switch your receiver off when in any area with a potentially combustible
atmosphere, unless it is a type specifically designed for such use. Sparks
in such areas could cause an explosion or fire resulting in bodily injury or
even death.
6.4.1. Batteries
Do not replace or charge batteries in a potentially combustible
atmosphere. Contact sparking may occur while installing or removing
batteries and cause an explosion.
6.4.2. Blasting caps and areas
To avoid possible interference with blasting operations, turn your
receiver off near electrical blasting caps, in a ‘blasting area’ or in areas
marked: ‘Turn off two-way radios’. Obey all signs and instructions.
Note: Areas with potentially combustible atmospheres are often, but
not always, clearly marked. They include fuelling areas such as below
deck on boats, fuel or chemical transfer or storage facilities; areas
where the air contains chemicals or particles, such as grain, dust or
metal powders; and any other area where you would normally be
advised to switch off your vehicle engine.
7. CARE AND MAINTENANCE
To clean the unit, wipe with a soft cloth moistened with water. Don’t
use a cleaner or solvents on the unit; they can harm the case and leak
inside, causing permanent damage. Battery contacts may be wiped with
a dry lint-free cloth.
If the unit gets wet, switch it off and remove the batteries immediately.
Dry the battery compartment with a soft cloth to minimise potential
water damage. Leave the cover off the battery compartment overnight
or until completely dry. Do not use the unit until completely dry.
To ensure optimal unit performance, the following operating procedures
should be observed:
7.1 For Portable Two-way Communicators
When transmitting with a communicator, hold the communicator in a
vertical position with its microphone 2.5 to 5.0 cm away from your
mouth. Keep the antenna at least 2.5 cm from your head and body.
If you wear a communicator on your body, ensure that the antenna is at
least one 2.5 cm from your body when transmitting.
7.2 Electromagnetic Interference/Compatibility
Nearly every electronic device is susceptible to electromagnetic
interference (EMI) if inadequately shielded, designed or otherwise
configured for electromagnetic compatibility.
Turn your unit OFF in any facilities where posted notices instruct you to
do so. Hospitals or health care facilities may be using equipment that is
sensitive to external RF energy.
Turn your unit OFF when on board an aircraft when instructed to do so.
Any use of the unit must be accordance with airline regulations or crew
instructions.
U 7 0 0 3 0 0 7
 Loading...