

Topcom TE-5751 Butler E751 Twin, TE-5751 Butler E751 TRIPLE ECO User Manual
This product is in compliance with the essential requirements and other relevant provisions of the R&TTE directive 1999/5/EC. The Declaration of con formity can be found on: www.tristar.eu Printed in Vietnam U01UF291ZZZ(0)
TOPCOM BUTLER E751 TWIN - TRIPLE ECO MANUAL TE-5751 1
WWW.TRISTAR.EU
MD20800393
1 Getting started
Thank you for purchasing this TOPCOM product. This product has been designed and
assembled with utmost care for you and the environment. Because we at TOPCOM like to think
of the future of our planet and our children, we aim to do our best to help saving the environment.
This is why we decided to reduce the number of pages of our user guides and product manuals. In
this short manual provided with your TOPCOM device you can find a brief explanation of how
to install and use your TOPCOM device. If you would still like to discover all the features of
your new TOPCOM device, please visit our website (www.topcom.net) where you can download
the complete user manual in your language. By doing this TOPCOM hopes to do its share to
make our planet a better place, but we can only succeed with your help!
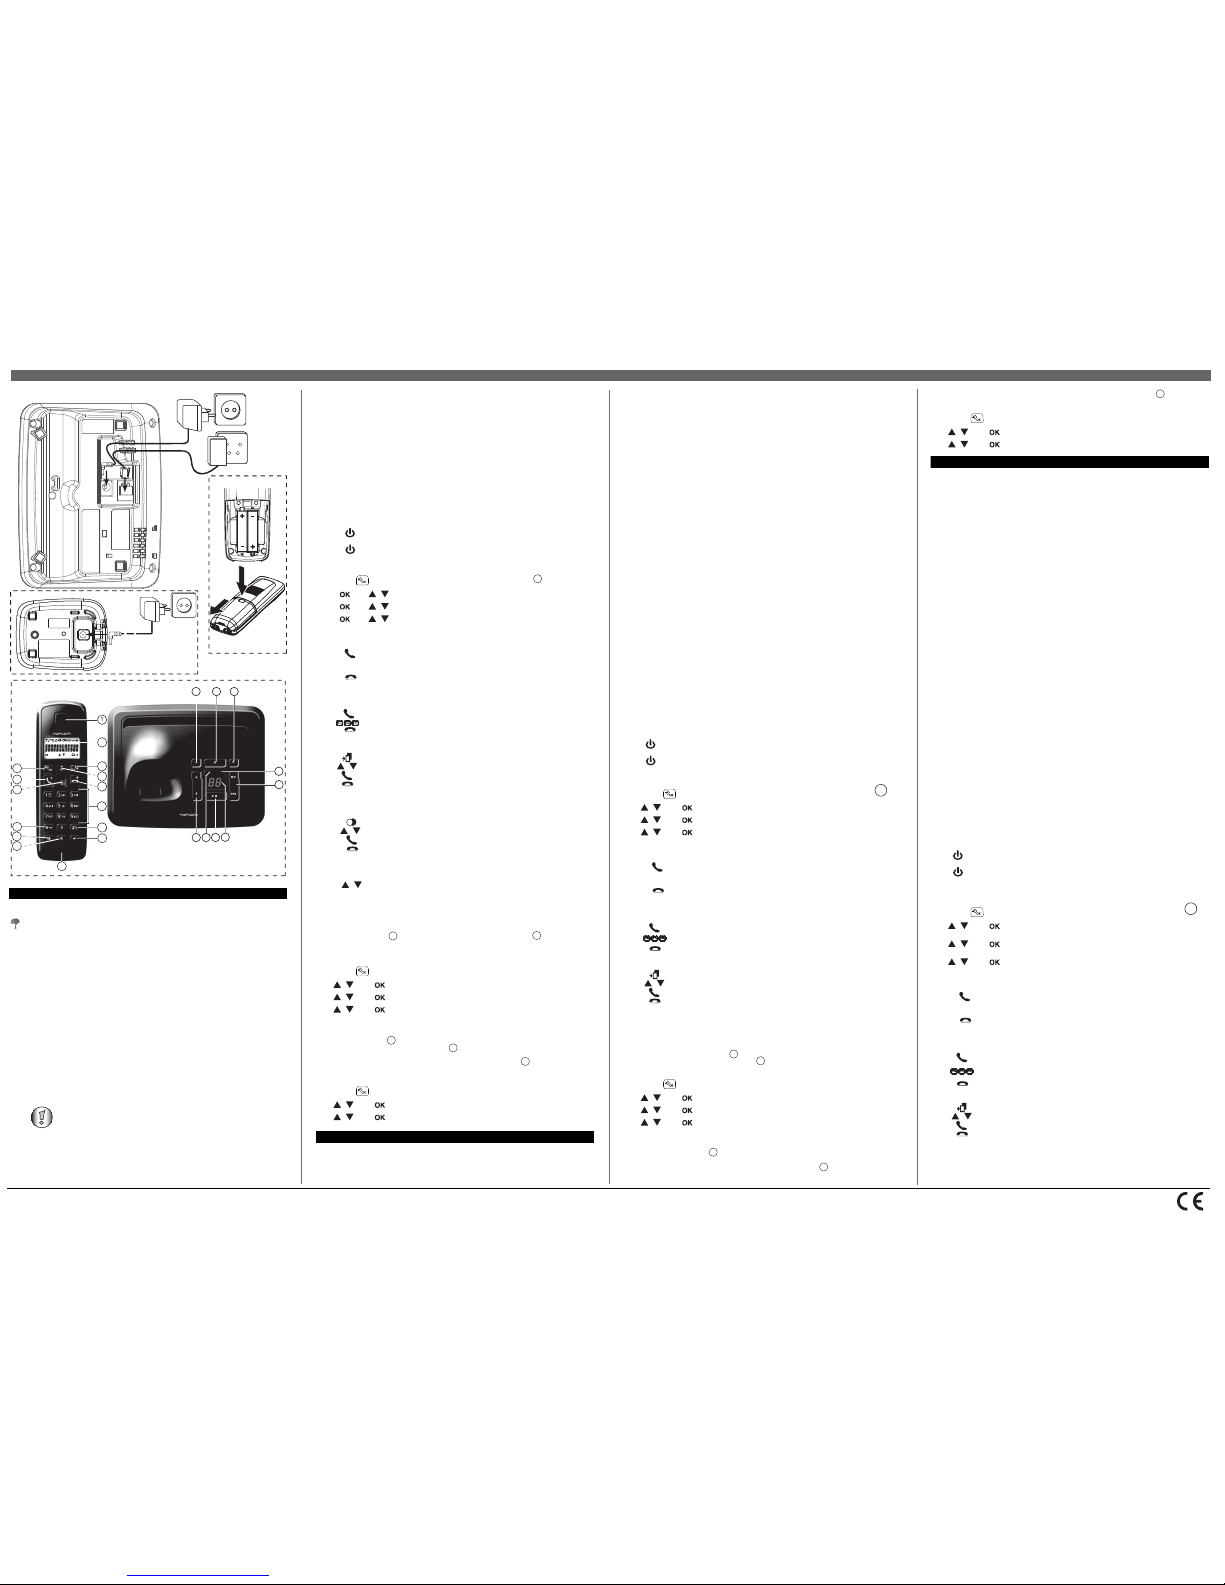
1.1 Installing the base
For installation, do the following (see picture 1A Back view base):
1 Plug one end of the adaptor into the outlet an d the other end into the adaptor jack on the
back of the base.
2 Connect one end of the telepho ne cord with the wall phone jack and the other end to the
bottom of the base.
3 Put the telephone- and AC power line cord in the base guides as sh own on picture 1A.
1.2 Installing the handset
1 Open the battery compartm ent as shown on picture 4A.
2 Insert the batteries respecting the po larity (+ and -).
3 Close the battery compartment.
4 Leave the handset on the base unit for 15 hours.
1.3 Installing the charger (Only for Butler E751 Twin/Triple/Quattro)
Plug one end of the adaptor in the power outlet and the other end into the adaptor jack at the
bottom of the charger (see picture 2A).
1.4 Keys / LED’s
Handset (see picture 3A handset & base)
2 Using the telephone
2.1 Switching the handset on/off
2.2 Changing the menu language
2.3 Receiving a telephone call
To take the call:
2.4 Making an external telephone call
Direct dialing
Call from the call log list
Call from the redial list
You can redial to 5 of the last numbers called.
2.5 Speaker volume during call
3 Answering machine
3.1 Turning it On/Off
By the base
Press the on/off key at the base shortly. When the message counter lits the answering
machine is turned on.
By the handset
3.2 Playback messages
On the base
Press the playback key on the base. The messages will be played one by one.
Press the skip forward or skip backward key to jump t o the previous or next message.
Press the playback/Stop key again to stop the playback.
During playback you can erase the message by pressing the erase key.
On the handset
1 Om te beginnen
Hartelijk dank voor de aankoop van dit TOPCOM-toestel. Dit product is met de uiterste zorg
voor u en het milieu ontworpen en gemonteerd. Bij TOPCOM zijn we begaan met de toekomst
van onze planeet en onze kinderen, en daarom doen we ons uiterste best om het milieu te sparen.
Daarom hebben we besloten het aantal pagina's van onze gebruikershandleidingen en
producthandleidingen te beperken. In deze beknopte handleiding die u samen met uw TOPCOMtoestel ontvangt, wordt u in het kort uitgelegd hoe u uw TOPCOM-toestel kunt installeren en
gebruiken. Als u alle eigenschappen van uw nieuwe TOPCOM-toestel wilt ontdekken, raden wij
u aan om naar onze website te gaan (www.topcom.net); daar kunt u de volledige
gebruikershandleiding in uw taal downloaden. Op die manier hoopt TOPCOM een bijdrage aan
een betere toekomst voor onze planeet te leveren, maar dat kan alleen met uw hulp!
1.1 Het basisstation installeren
Ga voor de installatie als volgt te werk (zie afbeelding 1A Onderaanzicht van het
basisstation):
1 Steek de stroomstekker van de adapter in het stopcontact en de stroomp lug in de
aansluiting aan de onderkant van het basisstation.
2 Steek de telefoonstekker i n het telefoonstopcontact en de telefoonplug in de connector
aan de onderkant van het basisstation.
3 Steek de telefoon- en stroomkabel in de aansl uitingen van het basisstation, zoals
weergegeven in afbeelding 1A.
1.2 De handset installeren
1 Open het batterijvak zoals weergegeven in afbeelding 4A.
2 Plaats de batterijen en let da arbij op de polariteit (+ en -).
3 Sluit het batterijvak.
4 Laat de handset 15 uur in h et basisstation staan.
1.3 De lader installeren (alleen voor Butler E751 Twin/Triple/Quattro)
Steek één uiteinde van de adapter in het stopcontact en het andere uiteinde in de
adapteraansluiting op de onderkant van de lader (zie afbeelding 2A).
1.4 Toetsen / LED’s
Handset (zie afbeelding 3A handset & basisstation)
2 De telefoon gebruiken
2.1 De handset aan- en afzetten
2.2 De menutaal veranderen
2.3 Een oproep ontvangen
Om de oproep aan te nemen:
2.4 Een externe oproep doen
Direct kiezen
Een nummer bellen uit de oproeploglijst
3 Antwoordapparaat
3.1 In-/uitschakelen
Via het basisstation
Druk even op de Aan/Uit-toets van het basi sstation. Het antwoordapparaat wordt
ingeschakeld wanneer de berichtenteller knippert.
Via de handset
Berichten afspelen
Op het basisstation
Druk op de afspeeltoets op het basisstation. De berichten wo rden achtereenvolgens
afgespeeld.
Druk op de toets voor vooruit overslaan of achteruit overslaan om naar het vo rige of
volgende bericht te gaan.
Druk opnieuw op de afspeel/stop-toets om het afspelen te stoppen.
Bij het afspelen kunt u de berichten wissen door op de toets voor wissen te drukk en.
Op de handset
1 Erste Schritte
Vielen Dank, dass Sie sich zum Kauf dieses Produkts von TOPCOM entschieden haben. Dieses
Produkt wurde mit der höchsten Sorgfalt für Sie und die Umwelt entwickelt und hergestellt. Wir
bei TOPCOM machen uns Gedanken über die Zukunft unseres Planeten und unserer Kinder.
Daher geben wir unser Bestes, um die Umwelt zu schützen. Aus diesem Grund haben wir uns
entschieden, die Seitenzahlen unserer Bedienungsanleitungen und Produkthandbücher zu
reduzieren. In dem Kurzhandbuch, das Ihrem TOPCOM-Gerät beiliegt,finden Sie eine kurze
Anleitung zur Installation und Bedienung Ihres TOPCOM-Geräts. Wenn Sie gern mehr über die
Funktionen Ihres neuen TOPCOM-Gerätes erfahren möchten, besuchen Sie uns bitte im Internet
(www.topcom.net). Dort können Sie die vollständige Bedienungsanleitung in Ihrer Sprache
herunterladen. Mit diesem Schritt möchte TOPCOM seinen Beitrag dazu leisten, unseren
Planeten Erde zu verbessern. Doch das gelingt nur mit Ihrer Hilfe!
1.1 Basisstation installieren
Zur Installation gehen Sie bitte wie folgt vor (siehe Abb. 1B Rückseite Basisstation):
1 Verbinden Sie das eine Ende des Netzadapters mit der Steckdose und das andere Ende
mit der Adapterbuchse auf der Rückseite der Basisstation.
2 Verbinden Sie das eine Ende des Telefonkab els mit dem Telefonwandanschluss und das
andere Ende mit dem Anschluss auf der Unterseite der Basisstation.
3 Befestigen Sie das Telefon- und das Netzkabel , wie in Abbildung 1A dargestellt.
1.2 Mobilteil installieren
1 Öffnen Sie das Akk ufach, wie in Abbildung 4A dargestellt.
2 Legen Sie die Akkus ein. Achten Sie dabei auf die Polarität (+ und -).
3 Schließen Sie das Akkufach.
4 Lassen Sie da s Mobilteil 15 Stunden in der Basisstation.
1.3 Ladegerät installieren (nur bei Butler E751 Twin/Triple/Quattro)
Verbinden Sie das eine Ende des Netzadapters mit der Steckdose und das andere Ende mit
der Adapterbuchse auf der Unterseite des Ladegerätes (siehe Abb. 2A).
1.4 Tasten/LEDs
Mobilteil (siehe Abb. 3A Mobilteil und Basisstation)
2 Verwenden des Telefons
2.1 Mobilteil ein- und ausschalten
2.2 Menüsprache ändern
2.3 Einen Anruf annehmen
Gehen Sie folgendermaßen vor, um den Anruf anzunehmen:
2.4 Einen externen Anruf tätigen
Direkt wählen
Eine Nummer aus der Anrufliste wählen
Before you use the telephone for the first time, you must first make sure
the battery is charged for 15 hours. If you do not do this, the telephone
will not work optimally.
1
2
3
4
5
7
8
9
10
6
11
12
15
14
13
-1A Back view base-
- 2A Back view charger-
- 3A Handset & base
- 4A Battery -
2
3
5
6
16 17 18
19
20
22
24 23
21
ENGLISH
1 Press and hold the on/off key until the display turns on. The hands et will
search the base.
2 Press and hold the on/off key for 5 seconds . The display will go off.
1 Enter the menu by pressin g the menu key .
2 Select “HS SETTINGS” and confirm.
3 Select “LANGUAGE” and confirm.
4 Select a language and confirm.
1 Press the off-hook key.
You are connected to your correspondent.
2 Press the on-hook key to han g up or put the handset back on the base.
1 Press the off-hook key to start the call.
2 Dial the telephone number.
3 Press the on-hook key to hang up or put the handset back on the base.
1 Press the call log key to access the call log key.
2 Select the desired call log entry
3 Press the off-hook key to dial out the selected number.
4 Press the on-hook key t o hang up or put the handset back on the base.
1 Press the redial key to access the redial list.
2 Select the desired redial number.
3 Press the off-hook key to dial out the selected number.
4 Press the on-hook key to han g up or put the handset back on the base.
1 During a conversation, press the up or down key to change the
volume accordingly.
1 Enter the menu by pressin g the menu key.
2 Select “ANSW MACHINE
” and confirm.
3 Select “ANSW, ON/OFF”and confirm.
4 Select “ON” or “OFF” and confirm.
1 Enter the menu by pressin g the menu key.
2 Select “ANSW MACHINE
” and confirm.
3 Select “PLAY”
and confirm.
1 Earpiece speaker
2Display
3 Esc / Mute key
4 Up / call log ke y
5 Power on-off / on-hook key
6 Alphanumeric keys
7 Ringer on-off
8 INT key
9 Microphone
10 Handsfree-key
11 Redial key
12 Keypad lock key
13 Down / Phonebook key
14 Off-hook / Recall key
15 Menu / OK key
16 Paging key
17 Message erase key
18 Answering On/Off key
19 Charge LED
20 Skip forward/backwards key
21 Message counter
22 Playback messages/Stop key
23 In-use LED
24 Volume Up/down
15
18
21
22
20
17
NEDERLANDS
1 Druk op de aan/uit-toets en houd deze ing edrukt totdat de display wordt
ingeschakeld. De handset zoekt nu het basisstation.
2 Houd de aan/uit-toets 5 seconden ing edrukt. De display wordt
uitgeschakeld.
1 Selecteer het menu door op de menu-toets te druk ken .
2 Selecteer "HANDSET INST” en bevestig.
3 Selecteer "TAAL” en bevestig.
4 Kies een taal en bevestig.
1 Druk op de opnemen-toets.
U bent verbonden met de beller.
2 Druk op de opleggen-toets om de oproep te beëindigen of zet de handset
terug op het basisstation.
1 Druk op de opnemen-toets om het n ummer te bellen.
2 Voer het telefoonnummer in.
3 Druk op de opleggen-toets om de oproep te beëindigen of zet de handset
terug op het basisstation.
1 Druk op de oproeplog-toets om toegang te krijgen tot de oproepl og.
2 Selecteer de gewenste oproeploginvoer
3 Druk op de opnemen-toet s om het geselecteerde nummer te bellen.
4 Druk op de opleggen-toets om de oproep te beëindigen of zet de handset
terug op het basisstation.
1 Selecteer het menu door op de menu-toets te druk ken.
2 Selecteer “ANTWRD APP” en bevestig.
3 Selecteer “ANTW. AAN/UIT” en bevestig.
4 Selecteer “AAN” of “UIT” en bevestig.
1 Luidspreker
2Display
3 Toets Esc / Microfoon uit
4 Toets Omhoog / Oproeplog
5 Toets Aan-Uit / Opleggen
6 Alfanumerieke toetsen
7 Beltoon aan/uit
8INT-toets
9Microfoon
10 Toets Handenvrij
11 Nummerherhalingstoets
12 Toets voor
toetsenbordvergrendeling
13 Toets Omlaag / Telefoonboek
14 Toets Opnemen / Opnieuw bellen
15 Toets Menu / OK
16 Toets Paging
17 Toets wissen
18 Toets Aan/Uit antwoordapparaat
19 Laadt LED
20 Toets Voor-Achteruit afspelen
21 Berichtenteller
22 Toets Afspelen/Stop
23 In gebruik LED
24 Volume Up/down
15
18
21
22
20
1 Selecteer het menu door op de menu-toet s te drukken.
2 Selecteer “ANTWRD APP”en bevestig.
3 Selecteer “AFSPELEN”en bevestig.
1 Drücken Sie die EIN-/AUS-Taste, bis das Display erscheint. Das Mobilteil
sucht die Basisstation.
2 Halten Sie die Ein-/Aus-Tast e 5 Sekunden lang gedrückt. Die Anzeige
erlischt.
1 Drücken Si e die Menütaste, um ins Menü zu gelangen.
2 Wählen Sie MT-EINSTEL. (HS SETTINGS)und bestätigen
Sie die Auswahl.
3 Wählen Sie SPRACHE (LANGUAGE) und bestätigen Sie die
Auswahl.
4 Wählen Sie die gewünschte Sprache aus und bestätigen Sie.
1 Drücken Sie die Taste für Gespräch annehmen.
Sie sind mit Ihrem Gesprächspartner verbunden.
2 Drücken Sie die Auflegen-Taste oder stellen Sie das Mobilteil in die
Basisstation, um das Gespräch zu beenden.
1 Drücken Sie die Taste für Gespräch annehmen, um das Gespräch
zu beginnen.
2 Die Telefonnummer eingeben.
3 Drücken Sie die Auflegen-Taste oder stellen Sie das Mobilteil in die
Basisstation, um das Gespräch zu beenden.
1 Drücken Sie die Anrufliste-Taste.
2 Wählen Sie den gewünsch ten Eintrag aus.
3 Drücken Sie die Gespräch-annehmen-Taste, um die ausgewählte Nummer
zu wählen.
4 Drücken Sie die Auflegen-Taste oder stellen Sie das Mobilteil in die
Basisstation, um das Gespräch zu beenden.
17
DEUTSCH
1 Hörer, Lautsprecher
2Display
3 Esc-Taste/S tummschaltung
4 Nach-oben-Taste/Anrufliste-Taste
5 Ein- und Ausschalten/Auflegen-
Taste
6 Alphanumerische Tasten
7 Rufton ein - aus
8INT-Taste
9 Mikrofon
10 Freisprechtaste
11 Wahlwiederholung
12 Tastatursperre
13 Taste für Nach-unten/Telefonbuch
14 Gespräch-annehmen-/Rückruf-
Taste
15 Menü/OK-Taste
16 Paging-Taste
17 Lösch-Taste
18 Anrufbeantworter AN/AUS
19 Ladeanzeige (Leuchtdiode)
20 Vorwärts/Rückwärts- springen
21 Nachrichtenzähler
22 Abspielen/Stopp taste
23 LED In Betrieb
24 Lautstärketasten
15
This product is in compliance with the essential requirements and other relevant provisions of the R&TTE directive 1999/5/EC. The Declaration of con formity can be found on: www.tristar.eu Printed in Vietnam U01UF291ZZZ(0)
TOPCOM BUTLER E751 TWIN - TRIPLE ECO MANUAL TE-5751 2
WWW.TRISTAR.EU
MD20800393
Eine Nummer aus der Wahlwiederholungsliste wählen
Sie können die letzten 5 gewählten Nummern erneut wählen.
3 Anrufbeantworter
3.1 Ein-/Ausschalten
An der Basisstation
Drücken Sie kurz die Ein-/Aus-Taste an der Basisstation. Wenn der Nachrichtenzähler
aufleuchtet, ist der Anrufbeantworter eingesch altet.
Am Mobilteil
3.2 Nachrichten abspielen
An der Basisstation
Drücken Sie die Wiedergabe-Taste an der Basisstation. Die Nachrichten werden
nacheinander abgespielt.
Drücken Sie die Vorwärts- oder Rückwärtstaste , um zur nächsten oder vorherigen
Nachricht zu springen.
Drücken Sie erneut die Wiedergabe/Stopp-Taste, um die Wiedergabe anzuhalten.
Während der Wiedergabe können Sie die Nachricht mit der Löschtaste löschen.
Am Mobilteil
1 Avant de commencer
Nous vous remercions d'avoir choisi ce produit TOPCOM. Cet appareil a été conçu et monté
avec le plus grand soin pour répondre à vos besoins et dans le respect de l'environnement.
Soucieux de l'avenir de notre planète et de nos enfants, nous tentons de faire le maximum pour
préserver l'environnement. C'est la raison pour laquelle nous avons réduit le nombre de pages de
nos manuels d'utilisation et de nos guides de produits. Dans ce petit manuel fourni avec votre
appareil TOPCOM, vous trouverez un résumé du mode d'installation et d'utilisation de celui-ci.
Toutefois, si vous souhaitez découvrir toutes les fonctionnalités de votre nouvel appareil
TOPCOM, vous pouvez visiter notre site web (www.topcom.net) et télécharger le manuel
d'utilisation complet dans votre langue. De cette manière, TOPCOM espère contribuer à la
préservation de notre planète, mais nous ne pouvons y arriver sans votre aide !
1.1 Installation de la base
Pour installer la base, procédez comme suit (voir image 1A Vue arrière de la base) :
1 Branchez un e extrémité de l'adaptateur sur la prise de courant et l'autre extrémité sur la
prise d'adaptateur située à l'arrière de la base.
2 Branchez un e extrémité du câble téléphonique sur la prise téléphonique mura le et l'autre
extrémité sur la prise située sous la base.
3 Placez le câble téléphonique et le câble d'alimentation CA dans les guides de la base
comme indiqué sur la figure 1A.
1.2 Installation du combiné
1 Ouvrez le c ompartiment à piles comme illustré sur la figure 4A.
2 Insérez les pi les en respectant les polarités (+ et –).
3 Refermez le compartiment à piles.
4 Laissez le combiné sur la base pendant 15 heures .
1.3 Installation du chargeur (Uniquement pour les modèles Butler E751 Twin/
Triple/Quattro)
Branchez une extrémité de l'adaptateur sur la prise de courant et l'autre extrémité sur la prise
d'adaptateur située sous le chargeur (voir image 2A).
1.4 Touches/voyants
Combiné (voir image 3A combiné et base)
2 Utilisation du téléphone
2.1 Mise en / hors service du combiné
2.2 Modification de la langue des menus
2.3 Réception d'un appel
Pour prendre l'appel:
2.4 Passer un appel téléphonique externe
Composition directe
Passer un appel à partir du journal des appels
Passer un appel à partir de la liste des derniers numéros composés
Vous pouvez recomposer un numéro quelconque parmi les 5 derniers numéros appelés.
3 Répondeur
3.1 Activation/Désactivation
Depuis la base
Appuyez brièvement sur la touche on/off de la base. Lorsque le compteur de message
s'allume, cela signifie que le répondeur est activé.
Depuis le combiné
Lire les messages
Depuis la base
Appuyez sur la touche de lecture de la base. Les messages son t lus l'un après l'autre.
Appuyez sur la touche d'avance ou de recul pou r passer au message suivant ou précédent.
Appuyez à nouveau sur la touche de lecture/stop pour interrompre la lecture.
Durant la lecture, vous pouvez effacer le message en appuyant sur la touche de
suppression.
Sur le combiné
1 Introducción
Gracias por adquirir este producto de TOPCOM. Este producto ha sido diseñado y montado
teniendo el máximo cuidado para con usted y el medio ambiente. En TOPCOM, nos gusta pensar
en el futuro de nuestro planeta y nuestros hijos, por lo que hacemos lo que está en nuestras manos
para ayudar a conservar el medio ambiente. Por esta razón, hemos decidido reducir el número de
páginas de nuestras guías del usuario, así como de nuestros manuales de producto. En este breve
manual, que se incluye con el dispositivo de TOPCOM, encontrará una breve descripción de la
instalación y el uso de este producto de TOPCOM. Si desea más información sobre todas las
funciones del nuevo dispositivo de TOPCOM, visite nuestro sitio web (www.topcom.net). En él,
podrá descargarse el manual del usuario completo en su idioma. Gracias a esta opción, TOPCOM
espera contribuir a la mejora de nuestro mundo, ¡aunque solo podremos lograrlo con su ayuda!
1.1 Instalación de la base
Para instalarla, siga estas instrucciones (véase la figura 1A Vista trasera de la base):
1 Conecte un extremo del adaptador a la toma y el otro extremo a la conexión del
adaptador de la parte trasera de la base.
2 Conecte un extremo del cable telefónico a la toma telefónica de pared y el otro extremo
a la parte inferior de la base.
3 Coloque el cable telefónico y el cable de alimentación de CA en l as guías de la base,
como se muestra en la imagen 1A.
1.2 Instalación del terminal
1 Abra el co mpartimiento de las pilas, como se muestra en la imagen 4A.
2 Inserte las pilas re spetando la polaridad (+ y -).
3 Cierre el c ompartimiento de las pilas.
4 Deje el terminal en la unidad b ase durante 15 horas.
1.3 Instalación del cargador (solo para el Butler E751 Doble / Triple /
Cuádruple)
Conecte un extremo del adaptador a la toma de corriente y el otro a la conexión del adaptador
de la parte inferior del cargador (véase la imagen 2A).
1.4 Teclas / LED
Terminal (véase la imagen 3A Terminal y base)
2 Uso del teléfono
2.1 Encender / apagar el terminal
2.2 Cambio del idioma de los menús
2.3 Recepción de una llamada telefónica
Para contestar a la llamada:
2.4 Realización de una llamada telefónica externa
Marcación directa
Llamada del registro de llamadas
Llamada de la lista de rellamada
Puede volver a marcar los 5 últimos números a los que haya llamado.
3 Contestador
3.1 Activar y desactivar el contestador
En la base
Pulse brevemente la tecla activar / desactivar de la base. El contestador estará activado
cuando se encienda el contador de mensajes .
En el terminal
3.2 Reproducir mensajes
En la base
Pulse la tecla de reproducción de la base. Se reproducirán los mensajes uno a uno.
Pulse la tecla avanzar o retroceder para pasar al mensaje siguiente o al mensaje anterior.
Pulse la tecla de reproducción / paro de nuevo para detener la reproducción.
Durante la reproducción, puede eliminar el mensaje pulsando la tecla eliminar .
En el terminal
1 Käytön aloittaminen
Kiitos, että ostit tämän TOPCOM-tuotteen. Tämä tuote on suunniteltu ja valmist ettu mitä
huolellisimmin sinua ja ympäristöä varten. TOPCOM haluaa ajatella planeettamme ja lastem me
tulevaisuutta, ja siksi pyrimme säästämään ympäristöä parhaamme mukaan. Siksi olemme
päättäneet vähentää käyttöoppaidemme ja tuotekäsikirjojemme sivumäärää. Tästä TOPCOMlaitteen mukana toimitetusta käyttöohjeesta löydät TOPCOM-laitteesi lyhyet asennus- ja
käyttöohjeet. Jos haluat kuitenkin tutustua kaikkiin uuden TOPCOM-laitteesi ominaisuuksiin,
käy verkkosivuillamme (www.topcom.net), joilta voit ladata täydellisen käyttäjän käsikirjan
omalla kielelläsi. Tällä TOPCOM pyrkii osaltaan tekemään planeetastamme paremman paikan,
mutta voimme onnistua siinä vain sinun avullasi!
1.1 Tukiaseman asentaminen
Suorita asennus seuraavasti (katso kuva 1A, Tukiasema takaa):
1 Kytke sovittim en toinen pää pistorasiaan ja toinen tukiaseman takana olevaan
sovitinliitäntään.
2 Kytke puhelinjohdon toinen pää puhelinpistorasiaan ja toinen tukiaseman pohjaan.
3 Aseta puhelin- ja vai htovirtaverkkojohto tukiaseman ohjaimiin kuvan 1A mukaisesti.
1.2 Luurin asentaminen
1 Avaa akkukotelo ku van 4A mukaisesti.
2 Aseta akut koteloon siten, et tä navat (+ ja –) tulevat oikein päin.
3 Sulje akkukotelo.
4 Jätä luuri tukiasemaan 15 tunniksi.
1.3 Laturin asentaminen (vain Butler E751 Twin/Triple/Quattro)
Kytke sovittimen toinen pää pistorasiaan ja toinen laturin alla olevaan sovit inliitäntään
(katso kuva 2A).
1.4 Näppäimet ja merkkivalot
Luuri (katso kuva 3A, Luuri ja tukiasema)
2 Puhelimen käyttö
2.1 Luurin kytkeminen päälle / pois päältä
2.2 Valikkokielen vaihtaminen
2.3 Puhelun vastaanottaminen
Puheluun vastaaminen:
2.4 Ulkoisen puhelun soittaminen
Suoravalinta
Soittaminen puhelutiedoissa olevaan numeroon
Soittaminen uudelleenvalintaluettelossa olevaan numeroon
Voit valita uudelleen enintään 5 viimeksi valittua numeroa.
3 Vastaaja
3.1 Virran kytkeminen päälle / pois päältä
Tukiaseman avulla
Paina tukiaseman virtanäppäintä lyhyesti . Kun viestilaskurin valo syttyy, vastaaja
on päällä.
Luurin avulla
1 Drücken Sie die Wahlwiederholungstaste, um auf die
Wahlwiederholungsliste zuzugreifen.
2 Wählen Sie die gewünschte Telefonnummer aus.
3 Drücken Sie die Gespräch-annehmen-Taste, um die ausgewählte
Nummer zu wählen.
4 Drücken Si e die Auflegen-Taste oder stellen Sie das Mobilteil in die
Basisstation, um das Gespräch zu beenden.
1 Drücken Sie die Menütaste, um ins Menü zu gelangen.
2 Wählen Sie ”ANRUFBEANTW“ und bestätigen Sie.
3 Wählen Sie “AB EIN/AUS”,und bestätigen Sie.
4 Wählen Sie “EIN” oder “AUS” und bestätigen Sie.
1 Drücken Sie die Menütaste, um ins Menü zu gelangen.
2 Wählen Sie”ANRUFBEANTW“ und bestätigen Sie.
3 Wählen Sie “ABSPIELEN” und bestätigen Sie.
1 Appuyez sur la touche Marche/Arrêt jusqu'à ce que l'écran s'allum e. Le
combiné se met à chercher la base.
2 Appuyez sur la touche Marche/Arrêt et main tenez-la enfoncée pendant 5
secondes. L'écran s'éteint.
18
21
22
20
17
FRANÇAIS
1 Écouteur
2 Écran
3 Touche ESC / Muet
4 Touche Haut / journal des appels
5 Touche marche-arrêt / fin d'appel
6 Touches alphanumériques
7 Activation / Désactivation de la
sonnerie
8 Touche INT
9Micro
10 Touche Mains-libres
11 Touche Recomposition
12 Touche de verrouillage du clavier
13 Touche Bas / Répertoire
14 Touche Prise d'appel / Rappel
15 Touche Menu / OK
16 Touche Recherche
17 Touche effacer
18 Répondeur marche/arrêt
19 Indicateur (DEL) de charge
20 Bouton Avancer/Skip back
21 Compteur de messages
22 Bouton lecture / arrêt
23 DEL en service
24 Touches Volume
1 Accédez au menu en appuyant sur la touche Menu .
2 Sélectionnez « REGL. COMBINÉ » et confirmez.
3 Sélectionnez «LANGUE » et confirmez.
4 Sélectionne z la langue de votre choix et validez.
1 Appuyez sur la tou che Prise d'appel.
Vous êtes en communication avec votre correspondant.
2 Appuyez sur la touche Fin d'appel pour raccrocher ou replacez
le combiné sur sa base.
1 Appuyez sur la touche Prise d'appel pour la ncer l'appel.
2 Composez le numéro de téléphone.
3 Appuyez sur la touche Fin d'appel pour raccrocher ou replacez
le combiné sur sa base.
1 Appuyez sur la touche Journal des appels pour accéder à la liste d'appels.
2 Sélectionnez l'entrée désirée dans le journal des appels.
3 Appuyez sur la touche Prise d'appel pour composer le numéro sélectionné.
4 Appuyez sur la touche Fin d'appel pour raccrocher o u replacez
le combiné sur sa base.
1 Appuyez sur la touche Recomp osition pour accéder à la liste des
derniers numéros composés.
2 Sélectionnez le numéro que vous souhaitez recomposer.
3 Appuyez sur la tou che Prise d'appel pour composer le numéro
sélectionné.
4 Appuyez sur la touche Fi n d'appel pour raccrocher ou replacez
le combiné sur sa base.
1 Accédez au menu en appuyant sur la touche Menu.
2 Sélectionnez “RÉPONDEUR“et validez.
3 Sélectionnez “RÉP. ON/OFF “et validez.
4 Sélectionnez "ACTIVÉ" ou "DÉSACTIVÉ" et validez.
1 Accédez au menu en appuyant sur la touche Menu.
2 Sélectionnez "RÉPONDEUR
""
et validez.
3 Sélectionnez ”ÉCOUTER “et validez.
15
18
21
22
20
17
ESPAÑOL
1 Mantenga pulsada la tecla de encendido-apagado hasta que se encienda la
pantalla. El terminal buscará la base.
2 Manteng a pulsada la tecla de encendido-apagado durante
5 segundos. La pantalla se apagará.
1 Acceda al menú pulsando la tecla de menú .
2 Seleccione «CONF. TELEF.» y confirme la selección.
3 Seleccione «IDIOMA» y confirme la selección.
4 Seleccione un idioma y co nfirme la selección.
1 Pulse la tecla Descolgar.
Ya puede comunicarse con el interlocutor.
2 Pulse la tecla Colgar para finalizar la llamada o coloque el terminal otra
vez en la base.
1 Pulse la tecla Des colgar para iniciar la llamada.
2 Marque el número de teléfono.
3 Pulse la tecla Co lgar para finalizar la llamada o coloque el terminal otra
vez en la base.
1 Pulse la tecla Registro de llamadas para acceder al mismo.
2 Seleccione el número deseado del Registro de llamadas.
3 Pulse la tecla Descolgar para llamar al número selecci onado.
4 Pulse la tecla Colgar para finalizar la llamada o coloque el terminal otra
vez en la base.
1 Pulse la tecla de rellamada para acceder a la lista de rellamada.
2 Seleccione el número de teléfono al que desea volver a llamar.
3 Pulse la tecla Descolgar para llamar al número seleccionad o.
4 Pulse la tec la Colgar para finalizar la llamada o coloque el terminal ot ra
vez en la base.
1 Acceda al menú pulsando la tecla de menú.
2 Seleccione “CONTESTADO” y confirme la selección.
3 Seleccione “CONT ACT/DES” y confirme la selección.
4 Seleccione «ACTIV» u «DESACT» y confirme la selección.
1 Acceda al menú pulsando la tecla de menú.
2 Seleccione “CONTESTADO”y confirme la selección.
3 Seleccione «» y confirme la selección.
1 Altavoz del auricular
2 Pantalla
3 Tecla Esc / Silencio
4 Tecla Arriba / Registro de
llamadas
5 Tecla de encendido-apagado /
Colgar
6 Teclas alfanuméricas
7 Encendido / Apagado de timbre
8 Tecla INT
9 Micró fono
10 Tecla de manos libres
11 Tecla de rellamada
12 Tecla de bloqueo de teclado
13 Tecla Bajar / Agenda
14 Tecla Descolgar / Rellamada
15 Tecla de menú / OK
16 Tecla de búsqueda
17 Tecla borrar
18 Contestador Encendido/Apagado
19 Indicador de carga (LED)
20 Salto hacia delante/atrás
21 Contador de mensajes
22 Tecla de Reproducción/Pausa
23 Indicador de carga (LED)
24 Teclas de volumen
15
18
21
22
20
17
SUOMI
1 Paina virtanäppäintä ja pidä sitä painettuna, k unnes näyttö syttyy. Luuri
etsii tukiasemaa.
2 Paina virtanäppäintä ja pidä sitä painettuna 5 sekuntia. Näyttö sammuu.
1 Siirry valikkoon painam alla valikkonäppäintä .
2 Valits e “HS SETTINGS”ja vahvista valinta.
3 Valits e “LANGUAGE” ja vahvista valinta.
4 Valitse kieli ja vahvista valinta.
1 Paina luuri poissa tukiasem asta -näppäintä.
Sinut yhdistetään soittajalle.
2 Katkaise puhelu painamalla luuri tukiasemassa -näppäintä tai aseta luuri
takaisin tukiasemaan.
1 Aloita puhelu p ainamalla luuri poissa tukiasemasta -näppäintä.
2 Näppäile puhelinnumero.
3 Katkaise puhelu painamalla lu uri tukiasemassa -näppäintä tai aseta luuri
takaisin tukiasemaan.
1 Paina puhelutietojen näppäintä siirtyäksesi puhelutietoihin.
2 Valitse haluamasi puhelinnumero.
3 Soita valitsemaasi numeroon pai namalla luuri poissa tukiasemasta -
näppäintä.
4 Katkaise puhelu painam alla luuri tukiasemassa -näppäintä tai aseta luuri
takaisin tukiasemaan.
1 Paina uudelleenvalintanäppäintä siirtyäksesi
uudelleenvalintaluetteloon.
2 Valitse haluam asi puhelinnumero.
3 Soita valitsem aasi numeroon painamalla luuri poissa tukiasemasta -
näppäintä.
4 Katkaise puhe lu painamalla luuri tukiasemassa -näppäintä tai aseta
luuri takaisin tukiasemaan.
1 Siirry valikkoon pain amalla valikkonäppäintä.
2 Valits e ”ANSW MACHINE
” ja vahvista valintasi.
3 Valits e ”ANSW, ON/OFF” ja vahvista valintasi.
1 Kuulokkeen kaiutin
2Näyttö
3 ESC- ja mykistysnäppäin
4 Nuoli ylös- ja puhel utietojen
näppäin
5 Virta- ja luuri tukiasemassa -
näppäin
6 Aakkosnumeeriset näppäimet
7 Soittoääni päälle / pois päältä -
näppäin
8 Keskeytysnäppäin
9 Mikrofoni
10 Handsfree-näppäin
11 Uudelleenvalintanäppäin
12 Näppäimistön lukitusnäppäin
13 Nuoli alas- ja
puhelinluettelonäppäin
14 Luuri poissa tukiasemasta- ja
uudelleenvalintanäppäin
15 Valikko- ja OK-näppäin
16 Hakunäppäin
17 Viestin poistonäppäin
18 Vastaaja päälle/pois -näppäin
19 Latauksen merkkivalo
20 Pikakelaus eteen/taakse -näppäin
21 Viestilaskuri
22 Viestien toisto/pysäytys -näppäin
23 Käytössä-merkkivalo
24 Äänenvoimakkuuden lisääminen/
vähentäminen
15
18
21
 Loading...