

Page 1
BABYTALKER 3500 SEDS
USER GUIDE / HANDLEIDING / MANUEL D’UTILISATEUR
BEDIENUNGSANLEITUNG / MANUAL DE USUARIO / BRUKSANVISNING
BRUGERVEJLEDNING / ANVÄNDARHANDBOK / KÄYTTÖOHJE
MANUALE D’USOMANUAL DO UTILIZADOR / UŽIVATELSKÁ PŘÍRUČKA
Ο∆ΗΓΙΕΣ ΧΡΗΣΗΣ /
HASZNÁLATI ÚTMUTATÓ / INSTRUKCJA OBSŁUGI
UŽÍVATEL’SKÝ MANUÁL
V1.0 - 11/09
UK The features described in this manual are published with reservation to
modifications.
NL De in deze handleiding beschreven mogelijkheden worden gepubliceerd onder
voorbehoud van wijzigingen.
F Les possibilités décrites dans ce manuel sont publiées sous réserve de
modifications.
D Die in dieser Bedienungsanleitung umschriebenen Möglichkeiten, werden
vorbehaltlich Änderungen publiziert.
ES Las características descritas en este manual pueden ser objeto de futuras
modificaciones.
S Funktionerna i denna bruksanvisning publiceras med reservation för ändringar.
DK Vi forbeholder os retten til ændringer af de specifikationer, der er beskrevet i denne
brugsanvisning.
N Funksjoner beskrevet i denne manualen kan endres uten nærmere informasjon.
SF Tässä ohjekirjassa julkaissut tiedot voivat muuttua ilman ennakkoilmoitusta.
IT Le caratteristiche descritte nel presente manuale vengono pubblicate con riserva di
modifica.
PT As características descritas neste manual são publicadas sob reserva de
modificação.
CZ Možnost úpravy funkcí popsaných v této p
íru ce vyhrazena.
GR ,
.
HU A jelen használati útmutatóban leírt adatokra a gyártó fenntartja a változtatás jogát.
PL W
a ciwo ci opisane w niniejszej instrukcji obs ugi s publikowane z zatrze eniem
prawa wprowadzenia zmian.
SK Vlastnosti popísané v tejto príru
ke sú publikované s vyhradeným právom na
zmenu.
Page 2
9
716
8
11 10
21
24
28
29
30
12
23
25
2627
31
A
1
2
3
4
15
17 18
19
B
SEDS
LONG
ECO
6V/300mA
13
14
15
16
20
22
32
33
C
a
c
d
e
f
g
b
Page 3
Babytalker 3500 SEDS
ENGLISH
1 General
Dear customer,
We request that you read this information in order to quickly become familiar with this equipment and learn how to
use its functions.
2 Information Regarding This User Guide
This user guide contains information on the Babytalker 3500 SEDS babyphone (referred to as ‘the equipment’ in
the following) and provides important instructions on the initial use, safety, proper use and maintenance of this
equipment.
Always keep the user guide available near the equipment. Every person responsible for operating, repairing or
cleaning the equipment must read and/or consult the user guide.
Keep this user guide in a safe place and give it to the next owner of the equipment.
3 Copyright
This document is protected by copyright legislation.
All rights are reserved, including rights of photomechanical reproduction, copying or distribution using specific
means such as data processing, data storage media or data networks, either in full or in part, as well as technical
changes and changes to the contents.
4 Warnings
DANGER
This warning points out an imminent hazardous situation.
Death or severe injuries may result if the hazardous situation cannot be avoided.
CAUTION
This warning points out a potentially hazardous situation.
Injuries and/or material damage may result if the hazardous situation cannot be avoided.
• This symbol points out information that makes it easier to use the equipment.
5 Proper use
This equipment is exclusively intended for private (non-professional) use in closed rooms for monitoring babies. All
other forms of use are improper and can lead to hazards.
Always follow the instructions provided in this user guide.
No liability is accepted for any loss or damage resulting from improper use.
The user of the equipment is exclusively responsible for all risks.
6 Safety
6.1 Risk of Electric Shock
DANGER
Contact with conductors or components under electrical tension can be lethal.
Observe the following safety instructions in order to avoid the risk of electric shock:
• To avoid the risk of damage to the equipment, use only the AC mains adapter supplied with the
equipment.
• Do not use the equipment if the AC mains adapter, the power cable or the plug is damaged.
• Never open the enclosure of the AC mains adapter. There is a risk of electric shock if you touch any
contacts or connections under electrical tension or if you modify the electrical or mechanical
construction.
• Protect the equipment against moisture and moisture penetration, and keep it free of dust. Unplug the
AC mains adapter immediately in case of contact with moisture.
• Unplug the AC mains adapter in case of malfunctions, during thunderstorms, and when cleaning the
equipment.
• Protect the cable against contact with hot surfaces or other sources of hazard, and do not allow it to be
pinched.
3
Page 4
Babytalker 3500 SEDS
6.2 Using Batteries (regular or rechargeable)
CAUTION
Failure to use batteries according to instructions can be hazardous.
• Always use batteries (regular or rechargeable) of the same type.
• Ensure that batteries are installed with correct polarity. Damage to the batteries and the equipment
can result from installation with incorrect polarity.
• Never toss batteries into a fire, due to the risk of explosion.
• Never allow battery terminals to come into contact with each other or with metal objects, either
intentionally or accidentally. This can cause overheating, fire or explosion.
• Keep batteries out of the reach of children. Consult a doctor immediately in case of swallowing.
• Fluid from leaking batteries can cause permanent damage to the equipment. Take particular care
when handling damaged or leaking batteries, due to the risk of corrosion. Wear safety gloves.
• Remove the batteries if the equipment will not be used for an extended period.
6.3 General Rules for Safe Use
To ensure safe use of the equipment, always observe the following safety instructions:
– The equipment must always be assembled by an adult. During assembly, keep small parts out of the reach
of children.
– Do not allow children to play with the equipment or parts of the equipment.
– Ensure that the babyphone and power cable are always out of the reach of the baby.
– Do not cover the babyphone with a towel, blanket, or the like.
– Defective components must always be replaced by original replacement parts, as other components may
not fulfil the safety standards.
– Switch off your babyphone whenever this is requested by a sign, poster, or other message. The equipment
used in hospitals and other health care facilities may be sensitive to high-frequency signals from external
sources.
7 Operation
The babyphone consists of two units: one for the parents and one for the baby. They are connected by a wireless
link compliant with the DECT standard.
Thanks to DECT technology, this equipment is protected against eavesdropping and immune to interference from
other equipment.
The baby unit starts transmitting as soon as the microphone picks up a sound. The sound is reproduced by the
parent unit. The microphone sensitivity can be adjusted by the user (see “9.8.7 Setting the Microphone Sensitivity
(VOX)”).
• The babyphone can never replace proper supervision by an adult; it only provides support.
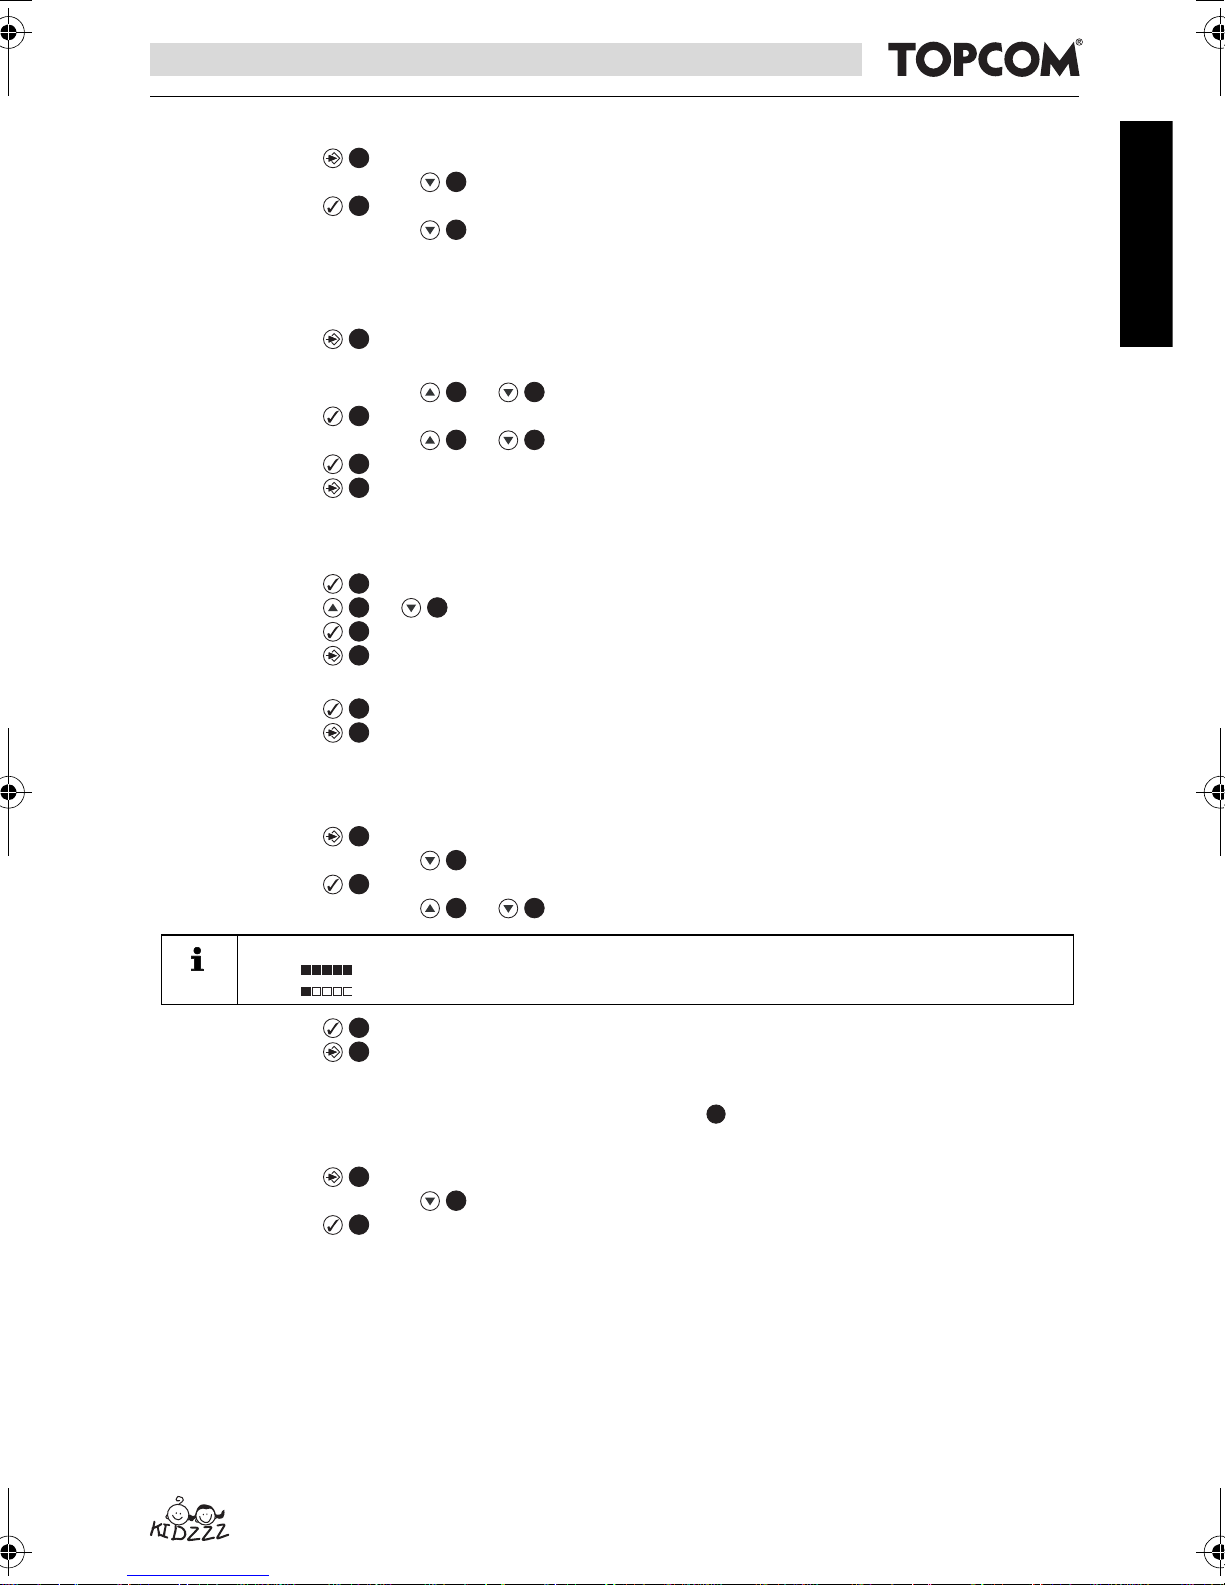
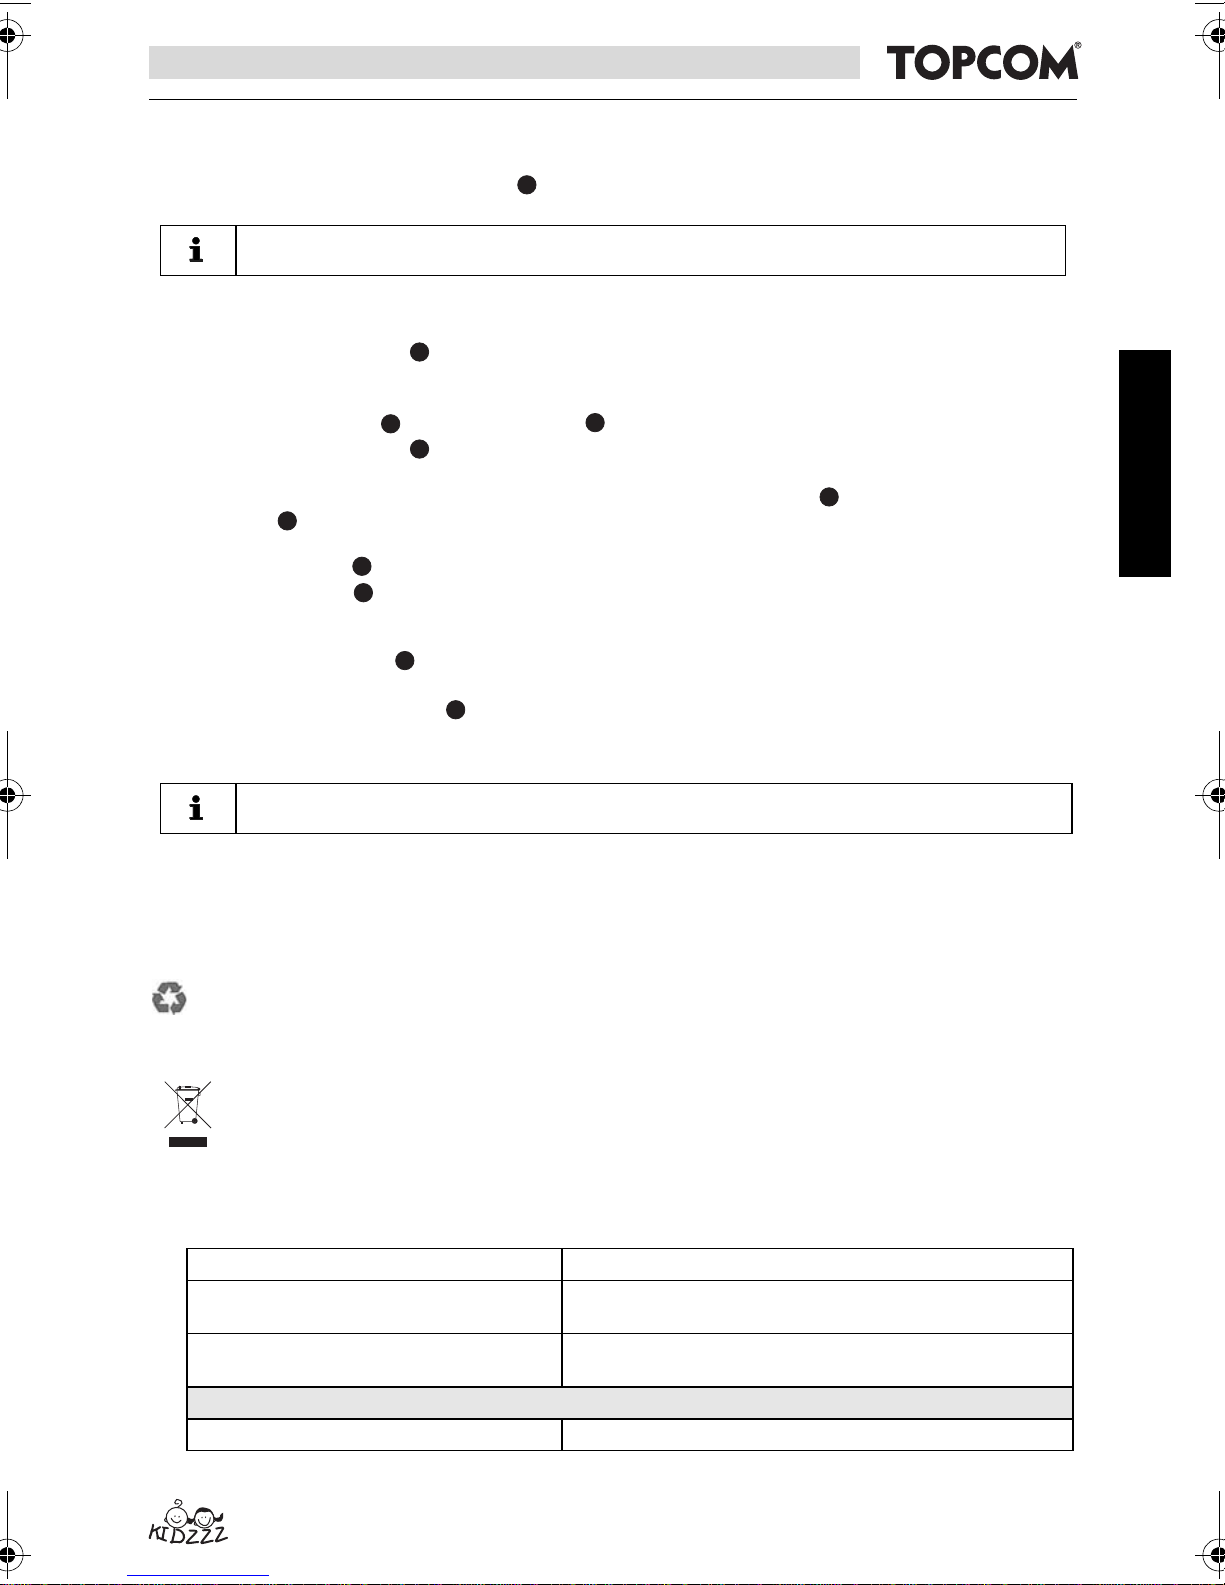
7.1 Baby Unit Components
See Figure on the fold-out page.
A
1 Antenna
2 Night light
3 Display
4 Loudspeaker
5 Microphone
6 Paging button
7 Lullaby button
8 Night light button
9 Increase volume
10 Play button
11 Decrease volume
12 On/Off switch
13 Battery cover
14 Connector for AC mains adapter
15 Fixing clips
16 SEDS radiation switch
4
Page 5
Babytalker 3500 SEDS
ENGLISH
PTT
C
90° MA
OPEN
15
7.2 Parent Unit Components
See Figure on the fold-out page.
B
17 Volume LEDs
18 Loudspeaker
19 LED Torch
20 Microphone
21 Link LED
22 Display
23 Paging button
24 Talk button
PTT
25 LED torch button
26 Increase volume / Next menu item
27 Confirm button
28 Decrease volume / Previous menu item
29 On/Off switch
30 Belt/wall fastening clip
31 Battery compartment cover
32 AC mains adapter
33 Charging indicator
7.3 Display Description
See Figure on the fold-out page.
Temperature (a) Shows the temperature measured by the baby unit. Blinks when the
temperature is outside the set range.
Feed time alert (b) Visible when the feed time alert is on.
Lullaby (c) Visible when a lullaby is playing.
Information line (d) Provides more information on various settings, such as the date and time on the
parent unit or the selected lullaby on the baby unit.
Battery indicator (e) Shows the status of the rechargeable battery.
- battery fully charged
- battery nearly empty
Check (f) Visible when the baby unit night light is on.
Sensitivity (g) Visible on the parent unit while the sensitivity is being set.
8 Initial use
8.1 Package Contents
The equipment is supplied as standard with the following items:
- 1 baby unit
- 1 parent unit
- 1 charging station
- 2 AC mains adapters
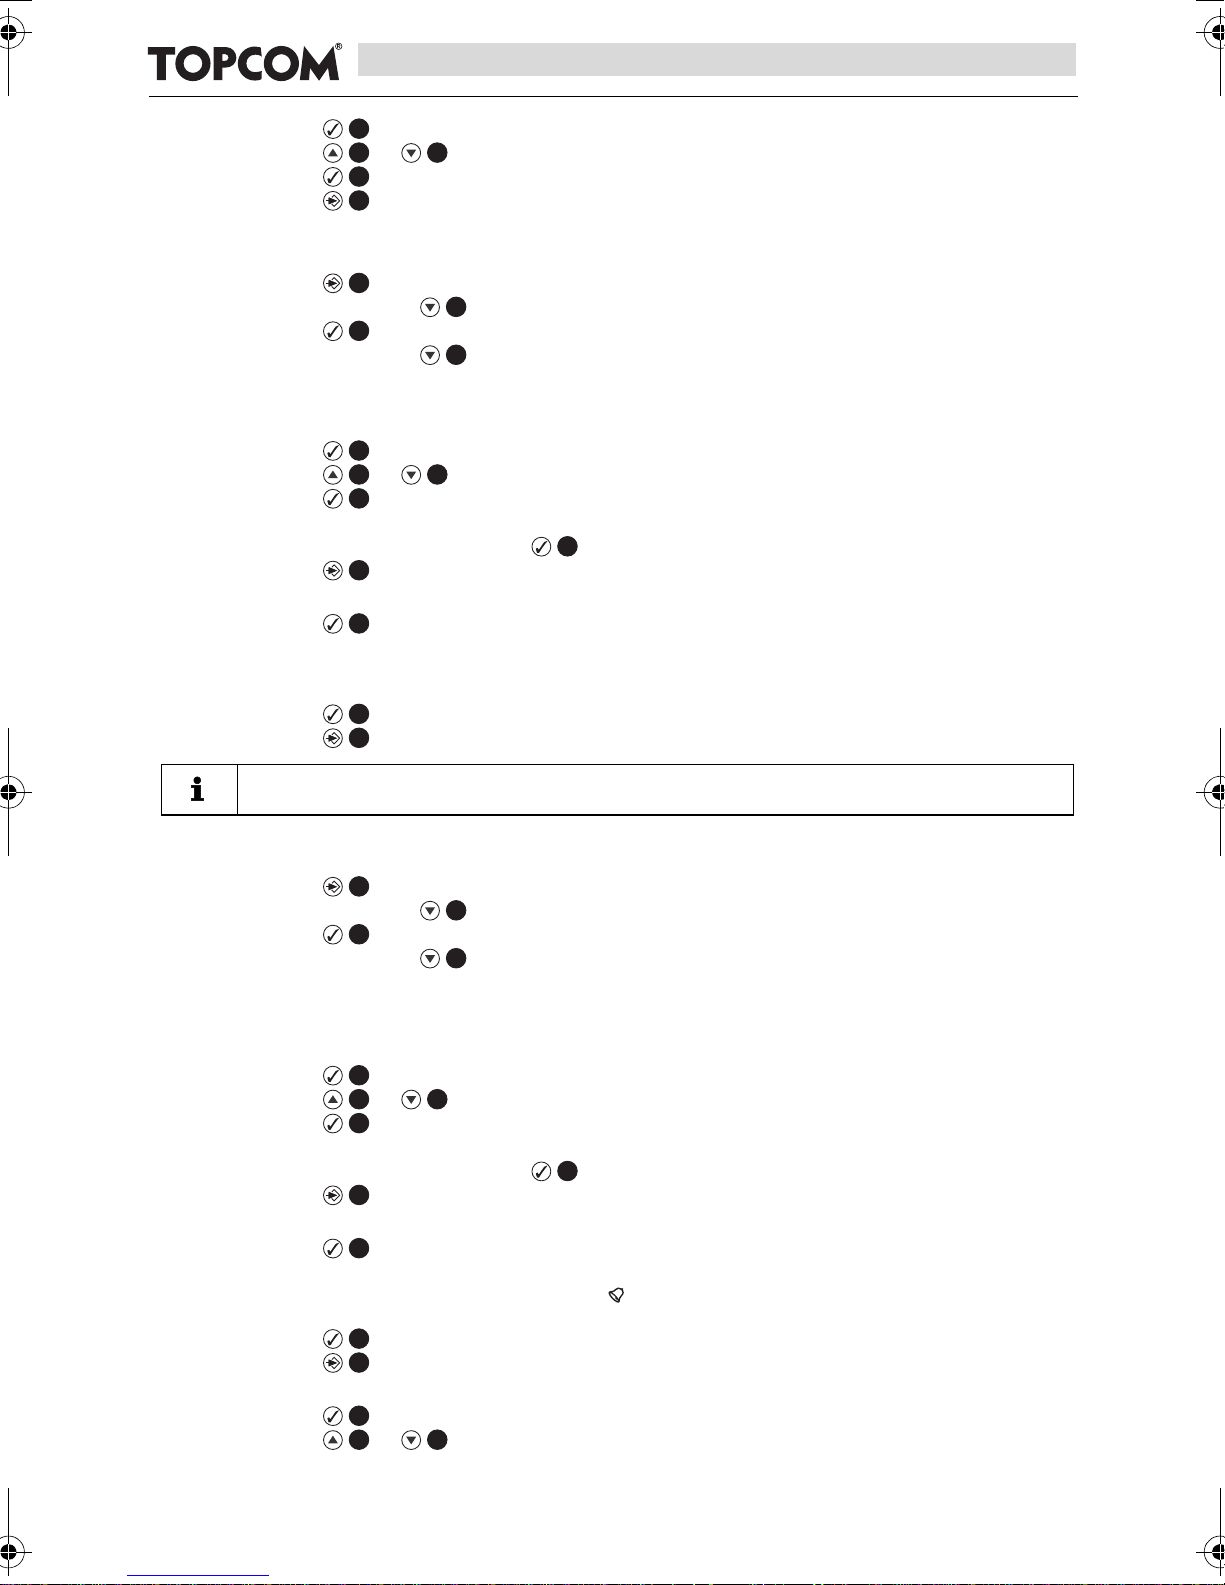
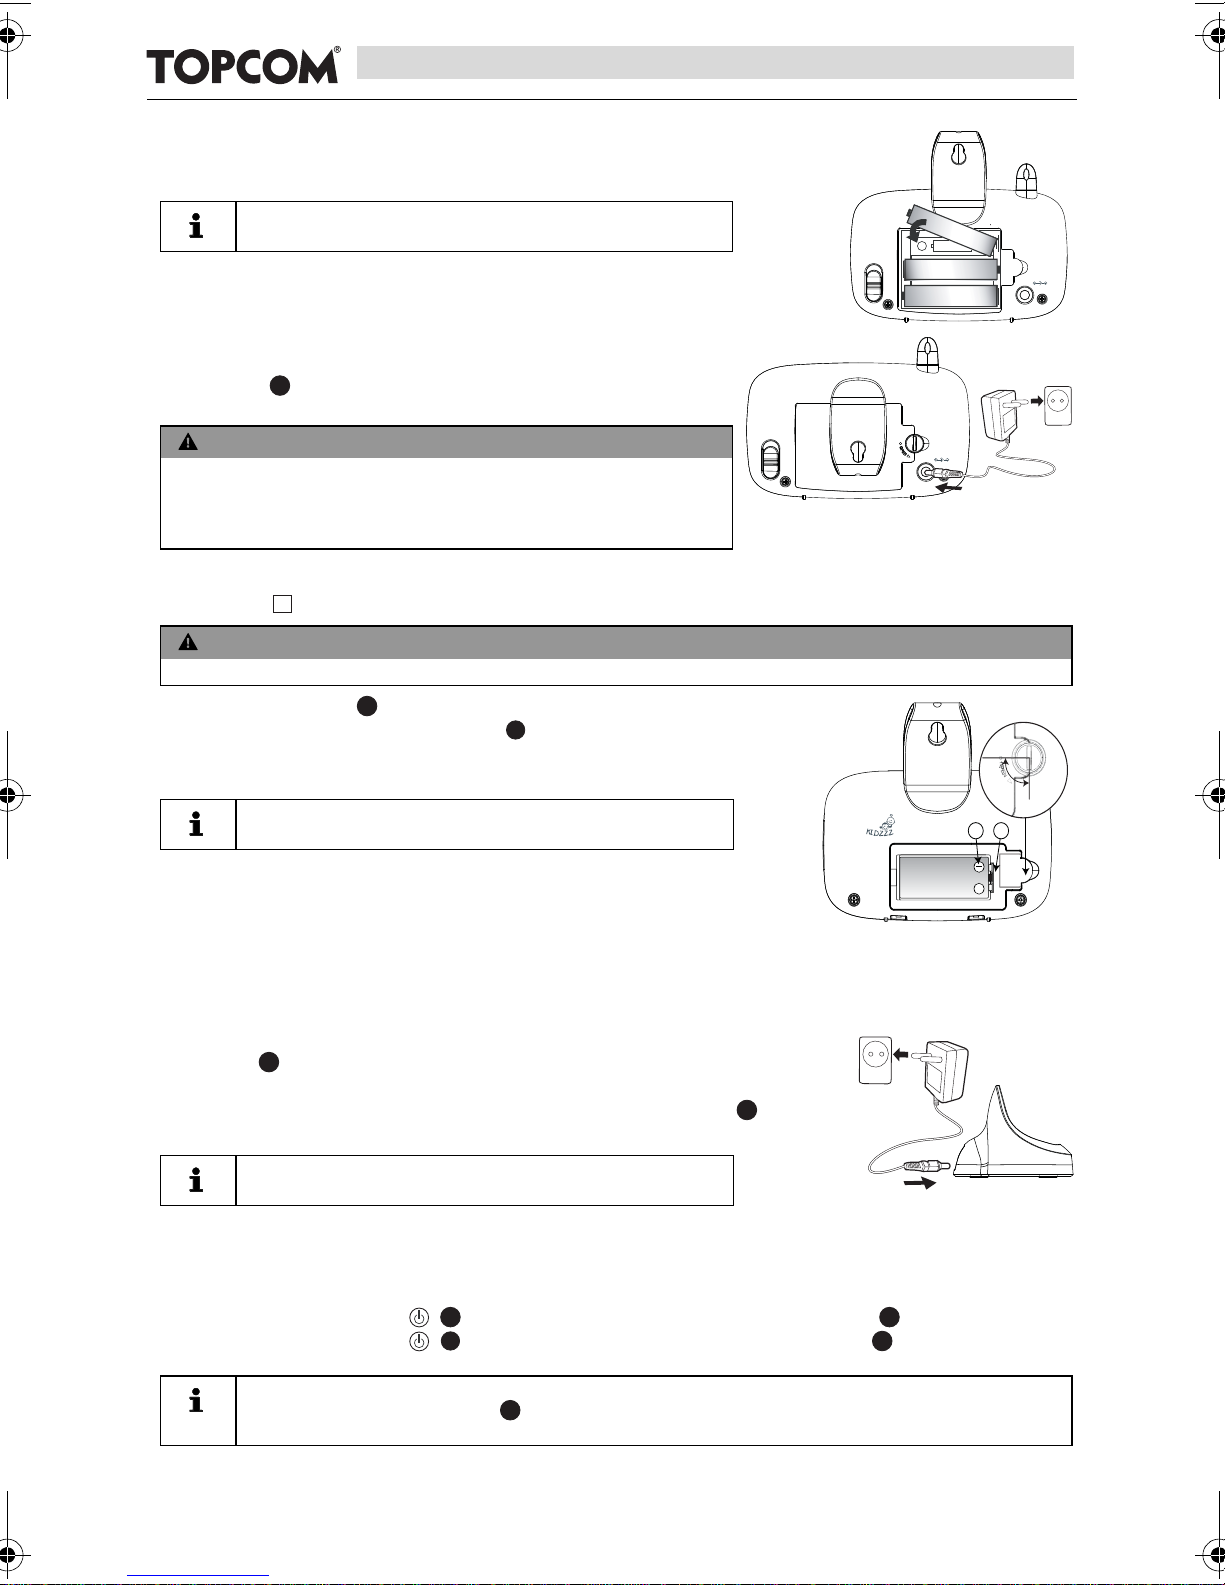
8.2 Installing Batteries in the Baby Unit
• You can operate the baby unit with three AA cells (LR06/Mignon; we recommend alkaline
cells) or the included AC mains adapter.
• The baby unit cannot recharge batteries.
• It is recommended to always leave the batteries in the unit, even if you use the AC mains
adapter. The unit will automatically switch to battery power in case of a mains power
interruption.
– Rotate the belt clip upward.
– Turn the screw on the cover of the battery compartment at the back of the baby
unit 90° counterclockwise and remove the battery compartment cover.
• Do not turn the screw past the ‘Open’ point.
- 1 user guide
- 1 service card
- 1 NiMH rechargeable battery pack
13
5
Page 6
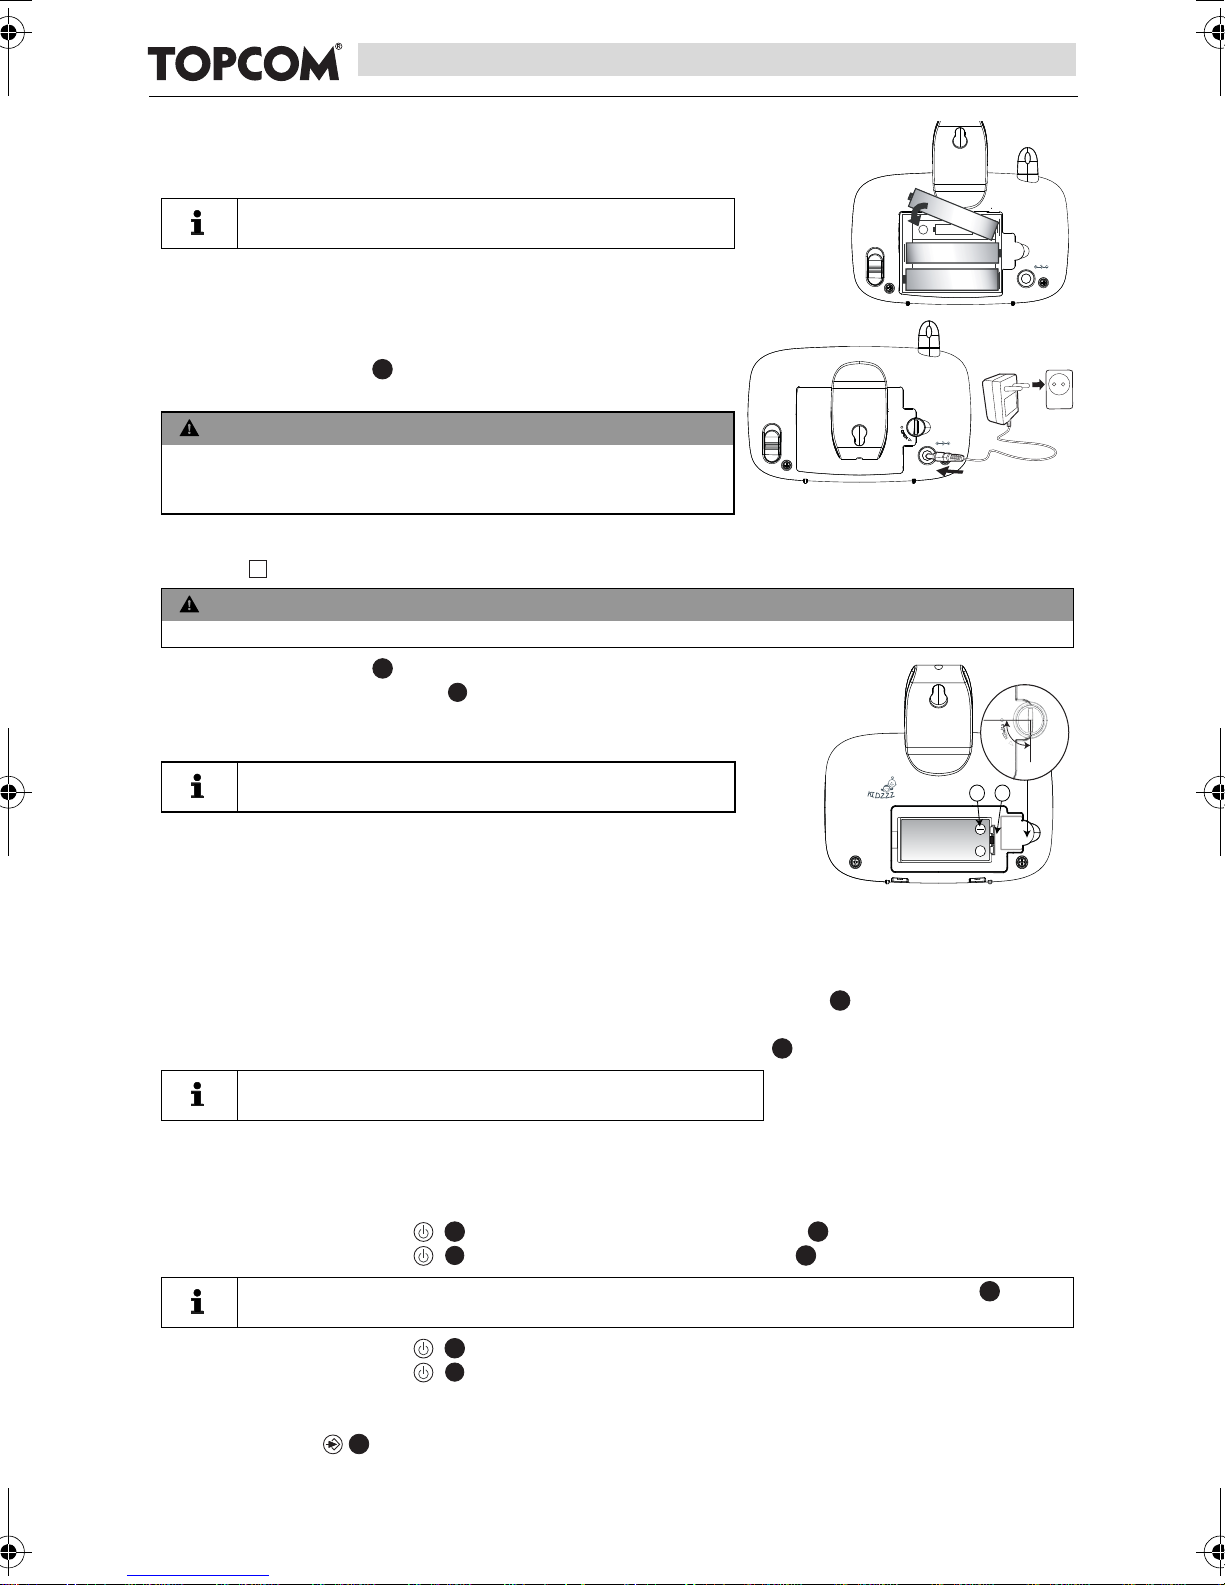
– Fit three AA alkaline cells (LR06/Mignon) in the battery compartment.
SEDS
LONG
ECO
6V/300mA
+
+
+
+
-
AA x 1
+
-
AA
x 1
+
-
A
A
x
1
SEDS
LONG
ECO
6V/300mA
90° MAX
OPEN
30
33
29
22
12
21
29
12
23
Ensure that the polarity is correct.
– Close the battery compartment.
• Never mix used cells with fresh cells.
8.3 Connecting the Baby Unit to the AC Mains
Insert the small plug of the AC mains adapter in the mains power
connector of the baby unit and plug the AC mains adapter into a
14
mains connector (230 V / 50 Hz).
CAUTION
• The mains connector must be within easy reach so you can
quickly unplug the power cable in an emergency.
• Use only the supplied AC mains adapter (6 V DC / 300 mA).
8.4 Installing Rechargeable Batteries in the Parent Unit
See Figure on the fold-out page.
• Use only the supplied NiMH battery pack in the parent unit.
B
CAUTION
Babytalker 3500 SEDS
– Rotate the belt clip upward.
– Turn the screw on the cover of the battery compartment at the back
31
of the parent unit 90° counterclockwise and remove the battery
compartment cover.
• Do not turn the screw past the ‘Open’ point.
– Place the NiMH battery pack in the battery compartment.
Ensure that the tab of the battery pack fits in the corresponding recess
+
and that the polarity matches the figure (B).
– Carefully close the battery compartment and rotate the belt clip back
downward.
8.5 Installing Rechargeable Batteries in the Parent Unit
– Insert the small plug of the AC mains adapter in the mains power connector of the charging station and
plug the AC mains adapter into a mains connector (230 V / 50 Hz).
– Place the parent unit in the charging station. The red Charging LED will go on.
• It takes around 10 hours to fully charge the batteries.
32
9 Operation and Use
9.1 Switching the Baby Unit and Parent Unit On and Off
– Press the On/Off switch to switch on the parent unit. The display is activated.
– Press the On/Off switch to switch on the baby unit. The display is activated.
3
AB
• The parent unit will try to establish a connection with the baby unit. If the Link LED goes
on, a connection has been established. If it does not, see page 12.
– Press the On/Off switch to switch off the parent unit (press and hold until the display goes blank).
– Press the On/Off switch to switch off the baby unit (press and hold until the display goes blank).
9.2 Setting the Display Language
– Press button . ‘Night light’is displayed.
6
Page 7
Babytalker 3500 SEDS
ENGLISH
26
27
26
27
23
21
21
20
6
29
SEDS
LONG
ECO
16
16
PTT
24
PTT
26
28
– Repeatedly press button until ‘Language’ is displayed.
– Press button . The current language is displayed.
– Repeatedly press button or until the desired language is displayed.
28
– Press button to confirm the language.
– Press button to exit the menu.
9.3 Checking the Link Between the Parent Unit and the Baby Unit
You should always check the wireless link when you use the babyphone for the first time.
– Put the parent unit in the same room as the baby unit, separated by at least two metres.
– Switch on both devices. The parent unit will try to establish a connection with the baby unit.
– The green Link LED on the parent unit blinks while it is trying to establish a connection.
The LED stays on continuously after a connection has been established.
– The sounds picked up by the microphone are reproduced by the parent unit.
– The volume of the reproduced sound is indicated by the volume LEDs at the top of the parent unit.
17
The higher the volume, the more LEDs are on.
– An audible tone is generated when the maximum volume is reached.
– If no connection is established, a double beep tone is generated as a warning and the Link LED blinks.
– Reduce the distance between the parent and baby units until a new connection is established.
9.4 Finding the Parent Unit (Paging function)
– Press the Paging button on the baby unit and hold it pressed for at least 2 seconds before releasing
it.
– In response, the parent unit will emit a high-pitched tone for 30 seconds. This makes it easier to find the
parent unit.
– Briefly press the On /Off switch on the parent unit to switch off the tone.
21
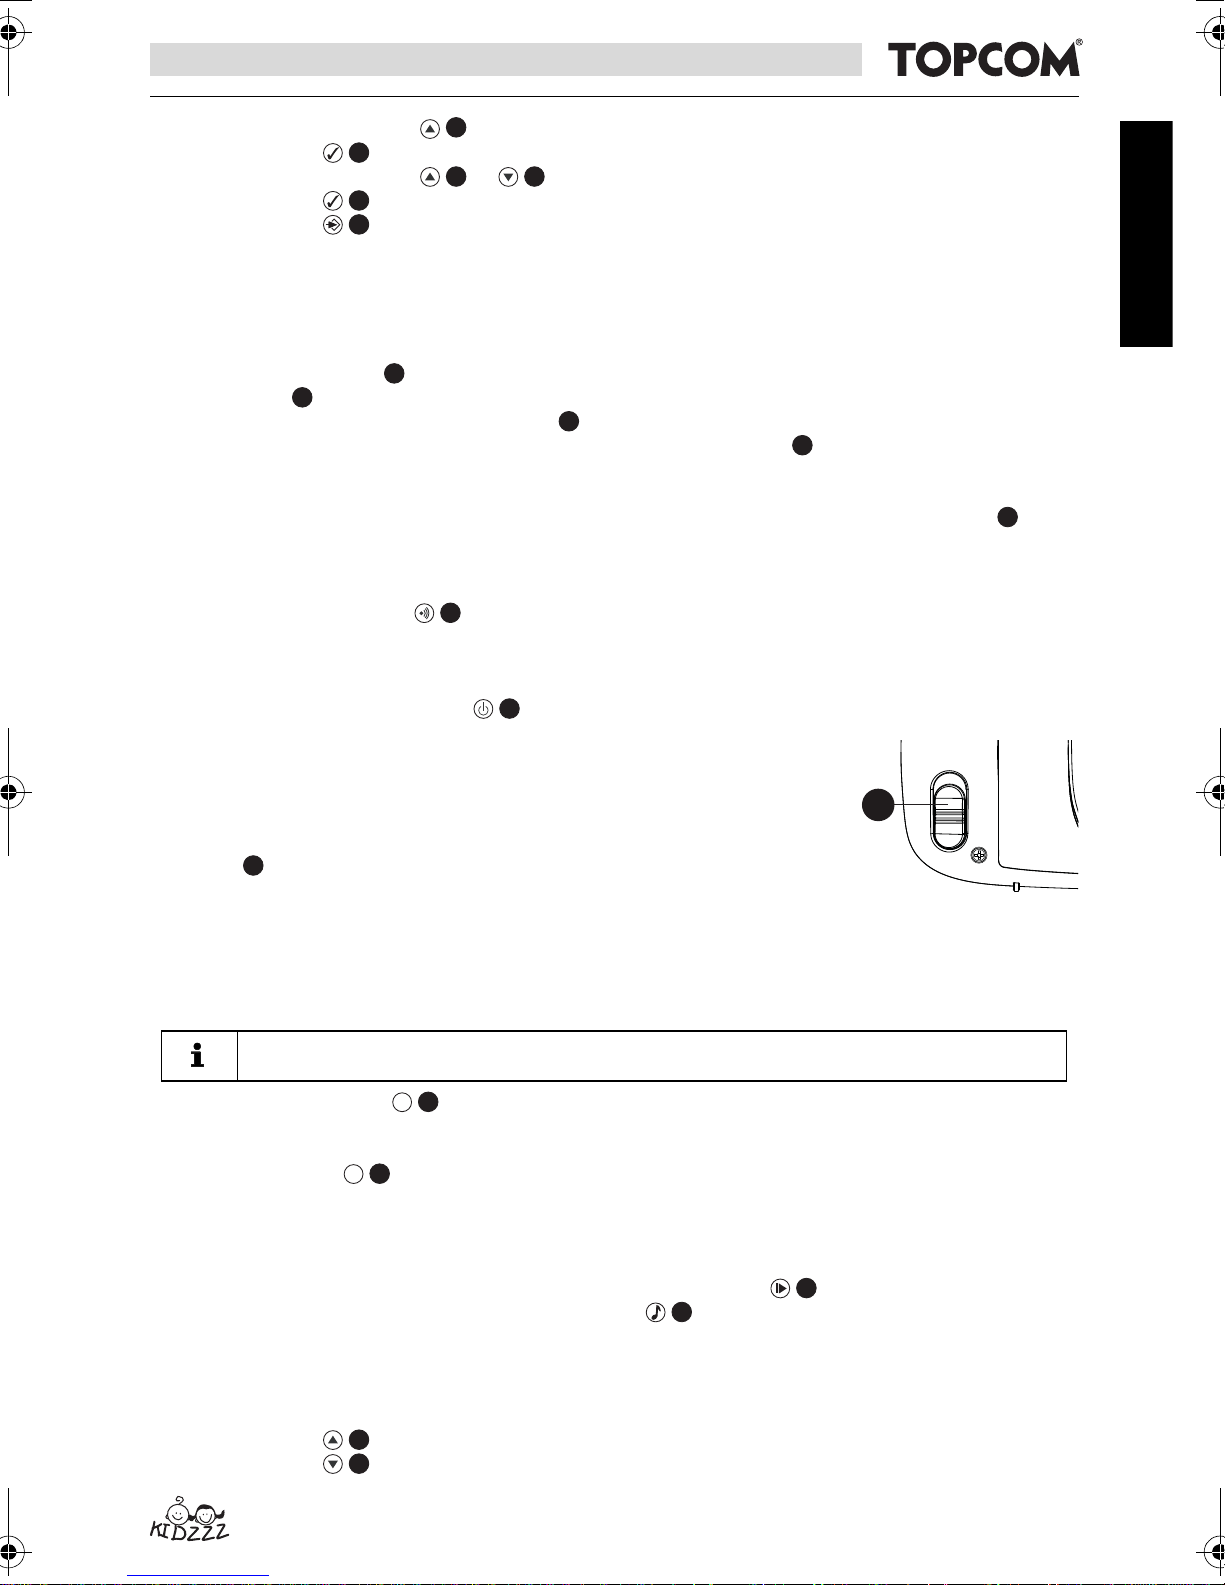
9.5 SEDS Switch Setting
The Babytalker 3500 SEDS is based on the unique Smart ECO Distance Switch
(SEDS) technology, which lets parents set the radiated power of the equipment. There
are two choices: ‘long distance mode’ or ‘ECO’ mode with reduced power consumption
and lower radiation.
Set switch to:
– ‘LONG’ for a maximum range of 600 m (free space).
– ‘ECO’ to reduce the radiated power by half and reduce power consumption. With this setting, the range is
reduced to a maximum of 300 m (free space).
9.6 Talking With Your Baby
You can use the babyphone to talk with your baby.
• Allow your baby to get used to the talk function before you use it in practice.
– Press the Talk button on the parent unit and hold it pressed.
PTT
– Hold the parent unit vertical with the microphone approximately 10 cm from your mouth, and speak into
the microphone.
– Release button when you have finished talking.
PTT
24
9.7 Playing a Lullaby
There are three pre-programmed lullabies that you can play on the baby unit.
You can configure lullaby playback on the parent unit (see “9.8.5 Setting the Lullaby”) or on the baby unit.
– To play the currently selected lullaby or stop playback, press button on the baby unit.
– To select a different lullaby, repeatedly press button until the desired lullaby is displayed.
7
10
9.8 Settings
9.8.1 Setting the Reproduction Volume of the Parent Unit
There are six volume settings. The lowest setting is ‘Volume Off’.
– Press button to increase the volume.
– Press button to decrease the volume.
7
Page 8
Babytalker 3500 SEDS
17
9
11
23
27
232727
23
23
28
27
262827
26
27
23
• If the ‘Volume Off’ setting is selected, the sounds picked up by the baby unit are only
indicated by the volume LEDs .
9.8.2 Setting the Reproduction Volume of the Baby Unit
• This setting applies to the “Talking With Your Baby“ and “Playing a Lullaby“ functions.
– Press button to increase the volume.
– Press button to decrease the volume.
9.8.3 Other Settings
The following settings can be configured from the menu (button ) of the parent unit:
• Night light
• Lullaby
• Microphone sensitivity ‘Sensitivity’
• Audible alert ‘Sound Alert’
• Temperature (units, allowed range, alert)
• Clock
• Feed time
• Display language ‘Language’
(see “9.2 Setting the Display Language”)
To navigate between menu items, use button or button .
26 28
To select the indicated setting, press button .
To return to a previous menu item or exit the menu, press button .
23
9.8.4 Switching the Night Light On and Off
– Press button . ‘Night light’ is displayed.
– Press button . You will see:
‘On?’ if the night light is off;
‘Off?’ if the night light is on.
– Press button to select the indicated option.
– Press button to exit the menu.
• You can also switch the night light on and off directly on the baby unit by pressing button
8
.
9.8.5 Setting the Lullaby
– Press button . ‘Night light’ is displayed.
– Repeatedly press button until ‘Lullaby’ is displayed.
– Press button .
– Repeatedly press button or . until the desired option is displayed:
‘Stop?’ if you want to stop the lullaby (only available if a lullaby is playing);.
‘Select New’ if you want to select a different lullaby (you have a choice of 3 lullabies);
‘Play?’ if you want to play the currently selected lullaby on the baby unit (not available when a lullaby is
playing).
– Press button to select the indicated option.
Option ‘Select New’ selected:
– Repeatedly press button or until the desired lullaby or ‘Play All’ is displayed.
28
• If ‘Play All’ is selected, all three lullabies will be played in succession.
– Press button to select the indicated option.
– Press button to exit the menu.
9.8.6 Setting the Temperature Monitor
In standby mode, the temperature measured by the baby unit (+/– 2 °C) is shown on the parent unit. You can
configure the following settings in this submenu:
• Temperature Range: allowable temperature range setting. If the measured temperature is outside this
range, this is indicated on the display (‘High’ or ‘Low’ and blinking temperature display).
• Temperature Alert: controls whether a double beep is generated when the temperature goes outside the
allowable range.
8
Page 9
Babytalker 3500 SEDS
ENGLISH
23
28
27
28
23
26
27
26
27
23
27
26
27
23
27
23
23
28
27
26
28
27
23
23
28
27
• Temperature Unit: selects temperature display in °C (Celsius) or °F (Fahrenheit).
– Press button . ‘Night light’ is displayed.
– Repeatedly press button until ‘Temperature’ is displayed.
– Press button .
– Repeatedly press button until the desired option is displayed:
‘Set Range’, for setting the temperature range;
‘Temp Alert’, for setting the temperature alert;
‘Degree F’, to display the temperature in °F (Fahrenheit);
‘Degree C’, to display the temperature in °C (Celsius).
– Press button to select the indicated option.
Option ‘Set Range’ selected:
– Repeatedly press button or until the desired upper limit is shown (max. 39 °C).
– Press button .
– Repeatedly press button or until the desired lower limit is shown (min. 10 °C).
– Press button .
– Press button to exit the menu.
If you select the option ‘Temp Alert’, you will see:
‘On?’ if the alert is off;
‘Off?’ if the alert is on.
– Press button to select the indicated option.
– Press button or to select the desired alert volume.
28
– Press button .
– Press button to exit the menu.
Option ‘Degree F’ or ‘Degree C’ selected:
– Press button to select the indicated option.
– Press button to exit the menu.
28
28
9.8.7 Setting the Microphone Sensitivity (VOX)
You can configure the sound detection sensitivity (VOX) of the babyphone. If the sensitivity is set high, the baby
unit will pick up weaker sounds.
– Press button . ‘Night light’ is displayed.
– Repeatedly press button until ‘Sensitivity’ is displayed.
– Press button .
– Repeatedly press button or until the desired sensitivity is shown.
• The VOX sensitivity is indicated by a black bar on the display:
- high sensitivity
- low sensitivity
– Press button .
– Press button to exit the menu.
9.8.8 Setting the Sound Alert
The sound detection sensitivity is indicated by the number of LEDs at the top of the parent unit. If the volume
control of the unit is set to‘Volume Off’, an alert signal can be generated when the sound level picked up by the
baby unit reaches the range of the red LEDs.
– Press button . ‘Night light’ is displayed.
– Repeatedly press button until ‘Sound Alert’ is displayed.
– Press button .
– You will see:
‘On?’ if the alert is off;
‘Off?’ if the alert is on.
17
9
Page 10
Babytalker 3500 SEDS
27
26
27
23
23
28
27
28
27
26
27
23
27
27
232328
27
28
27
26
27
23
27
27
23
27
26
– Press button to select the indicated option.
– Press button or to select the desired alert volume.
– Press button .
– Press button to exit the menu.
9.8.9 Setting the Clock
In standby mode, the time is shown on the display of the parent unit.
– Press button . ‘Night light’ is displayed.
– Repeatedly press button until ‘Clock’ is displayed.
– Press button .
– Repeatedly press button until the desired option is displayed:
‘Set Time’, for setting the clock;
‘Hour Format’, for selecting 12-hour or 24-hour format.
Option ‘Set Time’ selected:
– Press button to select the indicated option. The year is displayed.
– Press button or to select the year.
– Press button .
– Repeat the previous two steps for each of the following settings: month, day, hour, and minutes.
– After setting the minutes, press button to confirm the setting.
– Press button to exit the menu.
Option ‘Hour Format’ selected:
– Press button .
– You will see:
‘12Hrs?’ if the clock is set to 24-hour format and you want to change to 12-hour format;
‘24Hrs?’ if the clock is set to 12-hour format and you want to change to 24-hour format.
– Press button to select the indicated option.
– Press button to exit the menu.
28
28
27
• The clock, displayed on the parent unit, is transmitted by the baby unit. When the baby unit is
switched off, the clock on the parent unit will reset and you have to set the clock again.
9.8.10Setting the Feed Time
You can set an alert time on the Babytalker 3500 SEDS for your baby’s feed time.
– Press button . ‘Night light’ is displayed.
– Repeatedly press button until ‘Feed Time’ is displayed.
– Press button .
– Repeatedly press button until the desired option is displayed:
‘Set Time’, for setting the feed time;
‘Alarm’, for switching the alert on or off;
‘Set Interval’, if you want to hear feed time alerts at fixed intervals during the day.
Option ‘Set Time’ selected:
– Press button to select the indicated option. The hour is displayed.
– Press button or to select the hour.
– Press button .
– Repeat the previous two steps to set the minutes.
– After setting the minutes, press button to confirm the setting.
– Press button to exit the menu.
Option ‘Alarm’ selected:
– Press button .
– You will see:
‘On?’, for switching the alert on; the icon will appear on the display;
‘Off?’, for switching the alert off.
– Press button to select the indicated option.
– Press button to exit the menu.
Option ‘Set Interval’ selected:
– Press button to select the indicated option. The hour is displayed.
– Press button or to select the hour.
28
27
28
10
Page 11
Babytalker 3500 SEDS
ENGLISH
27
23
25
– Press button .
– Repeat the previous two steps to set the minutes.
– After setting the minutes, press button to confirm the setting.
– Press button to exit the menu.
27
9.9 LED Torch
The parent unit has a built-in LED torch .
– Press button to switch on the LED torch.
19
10 Cleaning and Maintenance
This section contains important instructions for cleaning and maintaining the equipment.
Follow these instructions to ensure trouble-free use and prevent damage to the equipment due to improper
maintenance.
10.1 Safety Instructions
DANGER
Risk of fatal injury due to electric shock!
• Before cleaning the equipment, switch it off and unplug the power cable from the mains receptacle.
CAUTION
Risk due to leaking battery fluid
Fluid from leaking batteries (regular or rechargeable) can cause injuries (skin irritation) or damage to the
equipment. Wear safety gloves.
CAUTION
• Do not use cleaning products or solvents. They can damage the case or seep into the equipment and
cause permanent damage.
10.2 Cleaning
– Clean the equipment with a soft, slightly dampened cloth.
– Clean soiled connectors and contacts with a soft brush.
– Clean the battery contacts and battery compartment with a dry, lint-free cloth.
– If the equipment gets wet, switch it off and remove the batteries immediately.
Wipe the battery compartment dry with a soft cloth in order to minimise potential water damage.
Leave the battery compartment open until it is completely dry.
Do not use the equipment before it is completely dry.
10.3 Maintenance
– Check the batteries (regular or rechargeable) in the equipment regularly and replace them when necessary.
– Check the connectors and cables for defects.
CAUTION
• If you suspect that the equipment is damaged, always have it checked by an expert before using it
again.
11 Troubleshooting
This section provides important instructions for localising and correcting problems.
Follow these instructions in order to avoid hazards and damage.
11.1 Safety Instructions
DANGER
Risk of fatal injury due to electric shock!
• Unplug the power cable before attempting to correct a problem.
11
Page 12
Babytalker 3500 SEDS
21
12
2
17
29
CAUTION
Risk of hazard due to incorrect repairs
Incorrect repairs can expose users to serious hazards and cause damage to the equipment.
• Never attempt to modify or repair the equipment.
• Always have repairs to equipment or cables performed by a specialist or the service centre.
• If you suspect that the equipment is damaged (for example, if it has fallen on the floor), have it
checked by a specialist before you use it again.
11.2 Problem Causes and Solutions
The following table is intended to help you localise and solve minor problems.
Problem Possible cause Solution
The rechargeable
battery pack of the
parent unit does not
charge
Parent unit does not
switch on (display
remains blank)
‘NOT LINKED’ appears
on the parent unit
display
The parent unit does
not reproduce the
sounds picked up by
the baby unit
Limited range and
interference during
transmission
The equipment emits a
high-pitched whistle
Charging station plug not connected Connect plug
Dirty contacts Clean the battery terminals and
charging station contacts with a soft
cloth
The rechargeable battery pack is
Replace the battery pack
defective
The rechargeable battery pack is not
Charge the battery pack
charged
Equipment defective Contact customer service
Baby unit not switched on Switch on the baby unit
The parent unit and baby unit are too
far apart
The parent unit is not registered with
the baby unit
Reduce the distance between the
parent unit and the baby unit
Register the parent unit with the baby
unit (see “11.3 Registering the Parent
Unit with the Baby Unit”
The volume setting of the parent unit
may be too low or switched off.
The microphone sensitivity of the baby
unit may be set too low.
Increase the volume setting of the
parent unit
Check the VOX sensitivity and the
volume setting of the parent unit and
increase if necessary.
The range of the equipment depends
Avoid obstacles as much as possible.
on the surroundings.
Steel structures and concrete walls
can impair transmission.
The parent unit and baby unit are too
close together
Increase the distance to at least
2 metres
11.3 Registering the Parent Unit with the Baby Unit
If the night light of the baby unit blinks and/or no connection can be established between the parent unit and the
baby unit (blinking green LED on the parent unit), the parent unit needs to be registered with the baby unit.
• Check that the AC mains adapter of the baby unit is connected and plugged into a mains
receptacle and that the batteries in the parent unit are charged.
– Unplug the AC mains adapter of the baby unit from the mains receptacle and remove the batteries from
the parent unit.
– Press the On/Off switch of the baby unit and hold it pressed while plugging the AC mains adapter into
the mains receptacle.
The baby unit will start up in registration mode.
– Release the On/Off switch . The night light of the baby unit will blink for 60 seconds.
– Press the On/Off switch of the parent unit and hold the button pressed while installing the batteries.
The parent unit will start up and the 2 red volume LEDs will blink. Release the On/Off switch .
12
12
29
Page 13

Babytalker 3500 SEDS
ENGLISH
17
29
– Registration mode ends after successful registration or after 60 seconds.
The night light of the baby unit will stop blinking;
The 2 red LEDs of the parent unit will go off.
– You will hear a long beep when registration is successful or three short beeps if it is not.
Checking the link between the parent unit and the baby unit:
– Press and hold the Paging button on the baby unit for 2 seconds.
– In response, the parent unit will emit a high-pitched tone for 30 seconds.
– Briefly press the On /Off switch on the parent unit to switch off the tone.
2
6
12 Storage and Disposal Instructions
• We recommend that you keep the box and packing materials so you can use them to
transport the equipment in the future if necessary.
12.1 Storage
Remove the batteries (regular or rechargeable) from the parent unit and the baby unit.
Store the equipment in a dry location.
12.2 Waste Disposal of Package Materials
The package materials are environmentally friendly materials that can be given to your local waste collector
for recycling.
12.3 Waste Disposal (environmental protection)
Dispose of the equipment in accordance with the provisions of European Directive 2002/96/EC, Waste
Electrical and Electronic Equipment (WEEE), regarding discarded electrical and electronic equipment.
Contact your municipal waste disposal department for information.
Dispose of batteries (regular or rechargeable) in an environmentally friendly manner in accordance with
local regulations.
13 Technical data
Frequency 1880 GHz to 1900 GHz
Range Outdoors: up to 600 m (up to 300m in SEDS mode)
Indoors: up to 50 m (up to 25 m in SEDS mode)
Operating temperature 15 °C to 35 °C
20 % to 75 % relative humidity
Parent unit
Rechargeable batteries Battery pack (3.6 V NiMH) (included)
AC mains adapter (KSS 05-060-0300G) Input: 230 V AC / 50 Hz / 150 mA
Output: 6 V DC / 300 mA
Dimensions approx. 117 x 62 x 72 mm
Weight 98 g (without rechargeable batteries)
Baby unit
Batteries 3 alkaline cells (LR06/AA) (not included)
AC mains adapter (KSS 05-060-0300G) Input: 230 V AC / 50 Hz / 150 mA
Output: 6 V DC / 300 mA
Dimensions approx. 137 x 60 x 101 mm
Weight 141 g (without batteries)
14 EC Conformity Declaration
TOPCOM EUROPE NV hereby declares that this device is in compliance with the essential requirements and other
relevant provisions of Directive 1999/5/EC.
The declaration of conformity can be found at http://www.topcom.net/cedeclarations.asp
13
Page 14

Babytalker 3500 SEDS
15 Topcom Warranty
15.1 Warranty period
The Topcom units have a 24-month warranty period. The warranty period starts on the day the new unit is
purchased. There is no warranty on standard or rechargeable batteries (AA/AAA type).
Consumables or defects causing a negligible effect on operation or value of the equipment are not covered.
The warranty has to be proven by presentation of the original or copy of the purchase receipt, on which the date
of purchase and the unit-model are indicated.
15.2 Warranty handling
A faulty unit needs to be returned to a Topcom service centre including a valid purchase note.
If the unit develops a fault during the warranty period, Topcom or its officially appointed service center will repair
any defects caused by material or manufacturing faults free of charge, by either repairing or exchanging the faulty
units or parts of the faulty units. In case of replacement, colour and model can be different from the original
purchased unit.
The initial purchase date shall determine the start of the warranty period. The warranty period is not extended if
the unit is exchanged or repaired by Topcom or its appointed service centre.
15.3 Warranty exclusions
Damage or defects caused by incorrect treatment or operation and damage resulting from use of non-original parts
or accessories are not covered by the warranty.
The warranty does not cover damage caused by outside factors, such as lightning, water and fire, nor any damage
caused during transportation.
No warranty can be claimed if the serial number on the units has been changed, removed or rendered illegible.
Any warranty claims will be invalid if the unit has been repaired, altered or modified by the buyer.
14
Page 15
Babytalker 3500 SEDS
NEDERLANDS
1 Algemeen
Beste klant,
Wij verzoeken u om de bijgevoegde informatie te lezen om u snel vertrouwd te maken met dit apparaat, zodat u
alle functies ervan kunt gebruiken.
2 Informatie over deze gebruiksaanwijzing
Deze gebruiksaanwijzing hoort bij de babyfoon Babytalker 3500 SEDS. (in wat volgt 'het apparaat' genoemd) en
geeft u belangrijke aanwijzingen voor de ingebruikname, veiligheid, het juiste gebruik en onderhoud van dit
apparaat.
De gebruiksaanwijzing moet altijd in de bu urt van het apparaat beschikbaar zijn. Ze mo et gelezen en geraadpleegd
worden door iedereen die opdracht heeft gekregen om het apparaat te bedienen, te repareren en/of te reinigen.
Bewaar deze gebruiksaanwijzing goed en geef haar met het apparaat door aan een vo lgende eigenaar.
3 Auteursrecht
Deze documentatie wordt beschermd door het auteursrecht.
Alle rechten, ook die van de fotomechanische weergave, verveelvoudiging en verspreiding met behulp van
bijzondere procedés (bijvoorbeeld gegevensverwerking, gege vensdragers en datanetwerken), ook gedeeltelijk, en
inhoudelijke en technische wijzigingen voorbehouden.
4 Waarschuwingen
GEVAAR
Een waarschuwing van dit niveau verwijst naar een dreigende gevaarlijke situatie .
Als de gevaarlijke situatie niet kan worden vermeden, kan dit tot de dood of to t zwar e verwondingen leiden.
LET OP
Een waarschuwing van dit niveau verwijst naar een mogelijke gevaarlijke situatie.
Als de gevaarlijke situatie niet kan worden vermeden, kan dit tot verwondingen en/of tot materiële schade
leiden.
• Dit teken wijst op aanvullende gegevens die de omgang met het apparaat vergemakkelijken.
5 Reglementair gebruik
Dit apparaat is uitsluitend bestemd voor niet-professioneel gebruik in gesloten ruimten om over baby's te waken.
Andere vormen van gebruik zijn niet reglementair en kunnen gevaar opleve ren.
Houd u aan de handelwijze die in deze gebruiksaanwijzing wordt beschreven.
Vorderingen van welke aard ook wegens schade ten gevolge van niet-reglementair gebruik zijn uitgesloten.
Het risico wordt alleen door de gebruiker gedragen.
6 Veiligheid
6.1 Gevaar door elektrische stroom
GEVAAR
Contact met draden of onderdelen die onder spanning staan is levensgevaarlijk!
Houd u aan de volgende veiligheidsaanwijzingen om gevaar door elektrische stroom te vermijden:
• Gebruik uitsluitend de netadapters die bij de levering zijn inbegrepen omdat de apparatuur anders
beschadigd kan worden.
• Neem het apparaat niet in gebruik wanneer de netadapter, de netkabel of de stekker beschadigd zijn.
• Open in geen geval de behuizing van de netadapter. Als u aansluitingen aanra akt di e onde r sp annin g
staan en als u de elektrische en mechanische opbouw verandert, bestaat er gevaar voor elektrische
schokken.
• Bescherm de apparatuur tegen vochtigheid, het i ndringen van vocht e n houd de app aratuur stofvrij . Bij
contact met vocht moet u de netadapter onmiddellijk uit de wandcontactdoos verwijderen.
• Bij storingen, tijdens onweer en als u het apparaat wilt schoonmaken, moet u de netadapter uit de
wandcontactdoos verwijderen.
• Kabel beschermen tegen hete oppervlakten of andere bronnen van gevaar en niet afklemmen.
15
Page 16
Babytalker 3500 SEDS
A
6.2 Omgang met batterijen/oplaadbare batterije n
LET OP
Als u (oplaadbare) batterijen niet gebruikt zoals voorgeschreven, kan dit gevaarlijk zijn.
• Gebruik alleen (oplaadbare) batterijen van hetzelfde type.
• Let bij het plaatsen van de (oplaadbare) batt er ijen op de juiste polariteit. Als u ze verkeerde
polariseert, kunnen de (oplaadbare) batterijen en het apparaat beschadigd raken.
• Gooi (oplaadbare) batterijen nooit in het vuur, want dan kunnen ze ontploffen.
• De polen van (oplaadbare) batterijen mogen niet per ongeluk of opzettelijk aan elkaar worden
gekoppeld of met metalen voorwerpen in aanraking komen. Dat leidt tot oververhitting, ontploffing of
brand.
• Batterijen/oplaadbare batterijen buiten het bereik van kin deren bewaren . Bij insli kken on middellijk e en
arts raadplegen.
• Gelekt batterijzuur kan blijvende schade veroorzaken aan het apparaat. Bijzonder voorzichtig
optreden bij het behandelen van beschadigde of lekkende (oplaadbare) batterijen. Corrosiegevaar!
Draag veiligheidshandschoenen.
• Verwijder de (oplaadbare) batterijen wanneer de apparaten gedurende l angere tijd niet worden
gebruikt.
6.3 Vuistregels voor een veilig gebruik
Voor een veilig gebruik van het apparaat moet u zich houden aan de volgende veiligheidsaanwijzingen:
– Het apparaat mag alleen door volwassenen in elkaar worden gezet. Tijdens het monteren moet u kleine
onderdelen buiten het bereik van kinderen houden.
– Laat kinderen niet spelen met het apparaat of met onderdelen ervan.
– Zorg ervoor dat de babyfoon en de netkabel zich altijd buiten het bereik van de baby bevinden.
– Dek de babyfoon niet af (met een handdoek, deken, enz.).
– Defecte onderdelen mag u alleen vervangen door originele vervangstukken. Alleen dan is gewaarborgd
dat ze voldoen aan de veiligheidsnormen.
– Schakel uw babyfoon overal uit waar dit van u gevraagd wordt via affi ches of andere mededelingen.
Ziekenhuizen en gezondheidsinstellingen gebruiken mogelijk apparaten die gevoelig reageren op hoge
frequenties van buitenaf.
7 Functie
De babyfoon bestaat uit twee eenheden, een voor de ou ders en een voor de baby, die via draadloze communicatie
volgens de DECT-standaard met elkaar verbonden zijn.
Dankzij de DECT-technologie is dit apparaat beveiligd tegen aflu isterpraktijken en ongevo elig voor storingen door
andere apparatuur.
De baby-eenheid begint uit te zenden zodr a de microfoon een ge luid opvangt. Deze geluiden worden dan door de
eenheid voor de ouders weergegeven. De gevoeligheid van de microfoon kan door de gebruiker worden ing esteld
(zie “9.8.7 Microfoongevoeligheid (VOX) instellen ”).
• De babyfoon kan nooit een verantwoordelijke volwassene die correct toezicht uitoefent
vervangen, maar dient slechts ter ondersteuning.
7.1 Onderdelen van de baby-eenheid
Zie afbeelding op het uitvouwblad.
1 Antenne
2 Nachtlampje
3 Display
4 Luidspreker
5Microfoon
6 Paging-toets
7 Toets voor slaapliedje
8 Toets voor nachtlampje
9 Geluidsvolume verhogen
10 Afspeeltoets
11 Geluidsvolume verminderen
12 Aan/uittoets
13 Batterijdeksel
14 Aansluiting voor netadapter
15 Bevestigingsclips
16 SEDS-stralingsschakelaar
16
Page 17
Babytalker 3500 SEDS
NEDERLANDS
PTT
C
90° MA
OPEN
15
13
7.2 Onderdelen van de ouder-eenheid
Zie afbeelding op het uitvouwblad.
17 LED's voor geluidsvolume
18 Luidspreker
19 LED-lamp
20 Microfoon
21 Verbindings-LED
22 Display
23 Menutoets
24 Toets ‘spreken’
25 LED-lamp toets
B
26 Geluidsvolume verhogen of volgende menupunt
27 Bevestigingstoets
28 Geluidsvolume verminderen of vorige menupunt
29 Aan/uittoets
30 Riem/muur bevestigingsclip
31 Deksel van batterijvak
32 Netadapter
PTT
33 Laad indicator
7.3 Display beschrijving
Zie afbeelding op het uitvouwblad.
Temperatuur (a) Geeft de temperatuur die door de baby-eenheid wordt gemeten. Knippert
wanneer de temperatuur buiten een ingesteld bereik ligt.
Etenstijd alarm (b) Is zichtbaar wanneer het etenstijd alarm ingeschakeld is.
Slaapliedje (c) Is zichtbaar wanneer er een slaapliedje wordt gespeeld.
Informatielijn (d) Geeft extra informatie bij de verschillende instellingen, zoals datum en tijd bij de
ouder-eenheid of de geselecteerde melodie op de baby-eenheid.
Batterijcontrole (e) Toont de toestand van de oplaadbare batterijen.
- oplaadbare batterij volledig geladen
- oplaadbare batterij bijna leeg
Controle (f) Is zichtbaar wanneer het nachtlampje op de baby-eenheid ingeschakeld is.
Gevoeligheid (g) Is zichtbaar op de ouder-eenheid tijdens de instelling van de gevoeligheid.
8 Inbedrijfstelling
8.1 Inhoud verpakking
Het apparaat wordt standaard geleverd met de volgende eleme nten:
- 1 x baby-eenheid
- 1 x ouder-eenheid
- 1 x oplaadstation
- 2 x adapter
8.2 Batterije n plaatsen in de baby-eenheid
• U kunt de baby-eenheid gebruiken met 3 AA-batterijen (LR06 – Mignon, wij adviseren
alkalinebatterijen) of via de meegeleverde netadapter.
• De baby-eenheid heeft geen batterij oplaad mogelijkheid.
• Aanbevolen wordt om de batterijen altij d i n de eenheid te laten zitten, zelfs als u de
netadapter gebruikt. Bij een st roomonderbreking zal de eenheid dan automatisch op de
batterijen gaan werken.
– Draai de riemclip naar boven.
– Draai de schroef die u vindt op het deksel van het batterijvak achteraan op de
baby-eenheid 90° in tegenwijzerzin en verwijder het deksel van het batterijvak.
• Draai de schroef ten hoogste tot aan de positie
"open".
- 1 x gebruiksaanwijzing
- 1 x servicekaart
- 1 x Ni-MH oplaadbare batterijpak
17
Page 18
– Leg de 3 AA - Alkalinebatterijen (LR06 - Mignon) in het batterijvak. Let
SEDS
LONG
ECO
6V/300mA
+
+
+
+
-
AA x 1
+
-
AA x 1
+
-
AA x 1
14
90° MAX
OPEN
30
31
32
33
22
12
3
21
daarbij goed op de aangegeven polariteit.
– Sluit het batterijvak.
• Gebruik nooit gebruikte en nieuwe batterijen samen.
8.3 Baby-eenheid aansl uiten op het net
Steek de kleine stekker van de stroomadapter in de netaansl uiting van de
baby-eenheid en sluit de netadapter aan op een wandcontactdoos
(230 V / 50 Hz).
LET OP
• De wandcontactdoos moet gemakkelijk bereikbaar zijn
SEDS
LONG
ECO
zodat u het netsnoer in geval van nood vlot kunt uittrekken.
• Gebruik uitsluitend de meegeleverde netadapter (6 V DC /
300 mA).
8.4 Oplaadbare batterijen plaatsen in de ouder-eenheid
Zie afbeelding op het uitvouwblad.
LET OP
• Gebruik uitsluitend het meegeleverde Ni-MH batterij p ak in de ouder-eenheid.
B
Babytalker 3500 SEDS
6V/300mA
– Draai de riemclip naar boven.
– Draai de schroef, die u vindt op het deksel van het batterijvak
achteraan op de ouder-eenheid 90°, in tegenwijzerzin en verwijder het
deksel van het batterijvak.
• Draai de schroef ten hoogste tot aan de positie
‘OPEN’.
– Leg het Ni-MH batterijpak in het batterijvak.
Let daarbij goed op dat de lip van het batterijpak in de bijhorend e
uitsparing past en dat de aang egeven polariteit klopt met de illustratie
(B)!
– Sluit het batterijvak voorzichtig en draai de riemclip weer omlaag.
8.5 Oplaadbare batterijen in de ouder-eenheid opladen
– Steek de kleine stekker van de st roomadapter in de netaansluiting van
lader en sluit de netadapter aan op een wandcontactdoos (230 V /
50 Hz).
– Plaats de ouder-eenheid op het laadstation. De rode Laad-LED brandt
nu.
• Het duurt ongeveer 10 uur voor de batterijen
volledig opgeladen zijn.
9 Bediening en gebruik
AB
+
9.1 Ouder- en baby-eenheid in- en uitschakelen
– Druk op de aan/uittoets om de ouder-eenheid in te schakelen. De display wordt ingeschakeld.
– Druk op de aan/uittoets om de baby-eenheid in te schakelen. De display wordt ingeschakeld.
• De ouder-eenheid probeert een verbinding met de ba by-eenheid to t stand te brenge n. Als de
verbindings-LED brandt , is de verbinding succesvol tot stand gebracht. In andere
gevallen, zie pagina 25.
18
29
Page 19

Babytalker 3500 SEDS
NEDERLANDS
12
21
20
17
21
6
29
SEDS
LONG
ECO
16
16
PTTPTT24PTTPTT
24
– Druk op de aan/uittoets om de ouder-eenheid uit te schakelen en hou de toets ingedrukt tot alle
29
meldingen op de display verdwenen zijn.
– Druk op de aan/uittoets om de baby-eenheid uit te schakelen en hou de toets ingedrukt tot alle
meldingen verdwenen zijn.
9.2 Displaytaal instellen
– Druk op toets . ‘Night light’ (Nachtlamp) wordt weergegeven.
– Druk herhaaldelijk op toets tot ‘Language’ (Taal) wordt weergegeven.
– Druk op toets . De huidige taal wordt weergegeven.
– Druk herhaaldelijk op de toets of tot de gewenste taal wordt weergegeven.
– Druk op toets om de taal te bevestigen.
– Druk op toets om he t m e nu te ver laten.
23
26
27
26 28
27
23
9.3 Verbinding tussen ouder- en baby-eenheid testen
Wanneer u de babyfoon voor de eerste keer gebruikt, moet u de draadloze verbinding testen.
– Plaats de ouder-eenheid in dezelfde kamer als de baby-eenheid, maar hou tussen beide apparaten
minstens 2 meter afstand.
– Schakel beide apparaten in. De ouder-eenheid probee rt een verbinding met de baby-eenheid tot stand te
brengen.
– Tijdens deze poging knippert de groe ne verbindings-LED op de ouder-eenheid.
Zodra de verbinding tot stand is gebracht, blijft de LED continu branden.
– De door de microfoon opgenomen geluiden worden door de ouder-eenheid weergegeven.
– Het geluidsvolume van de opgenomen geluiden wordt aangegeven door de geluidsvolume-LED's
bovenaan de ouder-eenheid.
Hoe hoger het geluidsvolume, hoe meer LED's er branden.
– Als het maximale geluidsniveau bereikt is, hoort u een signaal.
– Als er geen verbinding tot stand komt, krijgt u als waarschuwing een dubbele signaaltoon te horen en ziet
u de verbindings-LED knipperen.
– Verminder de afstand tussen de ouder- en baby-eenheid totdat de verbinding opnieuw tot stand komt.
21
9.4 Ouder-eenheid vinden (paging-functie)
– Druk op de paging-toets op de baby-eenheid en hou de toets minstens 2 seconden ingedrukt
voordat u hem weer loslaat.
– De ouder-eenheid laat nu 30 seconden lang een hoger signaal horen. Daardoor kunt u de ouder-eenheid
gemakkelijker vinden.
– Druk kort op de aan/uittoets op de ouder-eenheid om dit signaal uit te schakelen.
9.5 SEDS schakelaar instellen
De Babytalker 3500 SEDS is gebaseerd op de unieke SEDS "Smart ECO Distance
Switch" technologie, waarbij ouders de strali ng van het apparaat zelf kunnen bepalen.
Ze hebben hierbij de keuze tussen “long distance mode” of “ECO” mode met een
verminderde energie consumptie en met lage straling.
Zet schakelaar op:
– ‘LONG’ voor een maximaal bereik van 600m (open ruimte).
– ‘ECO’ om het uitgestraalde vermogen te halveren en de tevens het verbruik te verminderen. Het bereik
wordt beperkt tot maximaal 300m (open ruimte).
9.6 Spreken met baby
Via de babyfoon kunt u praten met uw baby.
• Laat uw baby aan de spraakfunctie wennen voordat u deze daadwerkelijk gebruikt.
– Druk op de toets ‘spreken’ op de ouder-eenheid en houd de toets ingedrukt.
– Houd de ouder-eenheid verticaal met de microfoon op ca. 10cm van uw mond en spreek in de microfoon.
– Laat toets los als u de spraakverbinding wilt beëindigen.
19
Page 20
Babytalker 3500 SEDS
10
26
28
23
26
28
23
9.7 Slaapliedje spelen
Er zijn 3 slaapliedjes geprogrammeerd die u op de baby-eenheid kunt afspelen.
U kunt de weergave van de slaapliedjes zowel op de ouder-eenheid (zie “9.8.5 Slaapliedje instellen”) als op de
baby-eenheid instellen:
– Als u het huidige ingestelde slaapliedje wilt weergeven of de weergave wilt stoppen, drukt u op de toets
van de baby-eenheid.
– Als u een ander slaapliedje wilt kiezen, moet u herhaaldelijk op de toets drukken totdat het
7
gewenste slaapliedje wordt weergegeven.
9.8 Instellingen
9.8.1 Weergavevolume van ouder-eenheid instellen
Er zijn 6 trappen in het geluidsvolume. De laagste trap is ‘Volume uit’.
– Druk op de toets om het geluidsvolume te verhogen.
– Druk op de toets om het geluidsvolume te verlagen.
• Bij de instelling 'Volume uit' worden de geluiden die van de baby-eenheid worden
opgevangen uitsluitend weergegeven via de geluidsvolume-LED's .
9.8.2 Weergavevolume van baby-eenheid instellen
• Deze instelling geldt voor de functies “Spreken met baby“ en “Slaapliedje spelen“.
17
– Druk op toets om het geluidsvolume te verhogen.
– Druk op toets om het geluidsvolume te verlagen.
9
11
9.8.3 Andere instellingen
De volgende instellingen kunt u via het menu (toets ) van de ouder-eenheid regelen:
• Nachtlamp
• Slaaplied
• Microfoongevoeligheid ‘Gevoeligheid’
• Geluidsalarm ‘--GELUID--’
• Temperatuur (eenheid, toegestaan bereik, alarm)
•Klok
• Etenstijd
• Displaytaal ‘Taal’ (zie “9.2 Displaytaal instellen”)
U kunt van het ene menupunt naar het andere overschakelen via de toets of .
Als u de aangegeven instelling wilt selecteren, drukt u op toets .
27
Als u naar een hoger menu wilt terugkeren of als u het menu wilt verlaten, drukt u op toets .
9.8.4 Nachtlampje in- en uitschakelen
– Druk op toets . ‘Nachtlamp’ wordt weergegeven.
– Druk op toets . U krijgt het volgende te zien:
‘Inschakelen?’ wanneer het nachtlampje uitgeschakeld is
‘Uitschakel?’ wanneer het nachtlampje ingeschakeld is
– Druk op toets om de aangegeven optie te selecteren.
– Druk op toets om he t m e nu te ver laten.
• U kunt het nachtlampje ook meteen op de baby-eenheid in- en uitschakelen door te drukke n
23
27
27
23
op toets .
8
9.8.5 Slaapliedje instellen
– Druk op toets . ‘Nachtlamp’ wordt weergegeven.
– Druk herhaaldelijk op toets tot ‘Slaaplied’ wordt weergegeven.
– Druk op toets .
– Druk herhaaldelijk op toets of . tot de gewenste optie wordt weergegeven:
‘Stoppen?’ als u de weergave wilt doen stoppen (alleen beschikbaar tijdens weergave)
‘Kies Liedje’ als u een ander slaapliedje wilt kiezen (u kunt kiezen uit 3 verschillende liedjes)
‘Afspelen?’ als u het momenteel gekozen slaapliedje wilt weergeven op de baby-eenheid (niet
beschikbaar tijdens weergave).
– Druk op toets om de aangegeven optie te selecteren.
23
28
27
26 28
27
20
Page 21
Babytalker 3500 SEDS
NEDERLANDS
26
28
27
23
23
28
27
28
Bij selectie van de optie ‘Kies Liedje’:
– Druk herhaaldelijk op toets of tot het gewenste slaapliedje of ‘Allemaal’ wordt weergegeven.
• Bij selectie van ‘Allemaal’ worden de slaapliedjes alle 3 na elkaar gespeeld.
– Druk op toets om de aangegeven optie te selecteren.
– Druk op toets om he t m e nu te ver laten.
9.8.6 Temperatu urbewaking instellen
In stand-by modus wordt op de ouder-eenheid de temperatuur aangegeven die door de baby-eenheid wordt
gemeten (+/- 2 °C). In dit submenu kunt u de volgende instellingen regelen:
• Temperatuurbereik: Instelling van het toegestane temperatuurbereik. Als de gemeten temperatuur buiten
dit bereik ligt, dan wordt dit op de display weergegeven (‘--TE WARM--’ of ‘--TE KOUD--’ en de
temperatuurweergave knippert).
• Temperatuuralarm: Instelling om bij het verlaten van het temperatuurbereik al dan niet een dubbel signaal
te laten horen.
• Temperatuureenheid: Instelling om de temperatuur in °C (Celsius) of °F (Fahrenheit) weer te geven.
– Druk op toets . ‘Nachtlamp’ wordt weergegeven.
– Druk herhaaldelijk op toets tot ‘Temperatuur’ wordt weergegeven.
– Druk op toets .
– Druk herhaaldelijk op toets tot de gewenste optie wordt weergegeven:
‘Bereik’ waarmee u het temperatuurbereik kunt instellen
‘Temp alarm’ waarmee u het temperatuuralarm kunt instellen
‘Fahrenheit’ om de temperatuur in °F (Fahrenheit) weer te geven
‘Celsius’ om de temperatuur in °C (Celsius) weer te geven.
– Druk op toets om de aangegeven optie te selecteren.
Bij selectie van de optie ‘Bereik’
– Druk herhaaldelijk op toets of tot de gewenste bovengrens wordt weergegeven (max 39°C).
– Druk op toets .
– Druk herhaaldelijk op toets of tot de gewenste ondergrens wordt weergegeven (min 10°C).
– Druk op toets .
– Druk op toets om he t m e nu te ver laten.
Bij selectie van de optie ‘Temp alarm’ krijgt u het volgende te zien:
‘Inschakelen?’ wanneer het alarm uitgeschakeld is
‘Uitschakel?’ wanneer het alarm ingeschakeld is
– Druk op toets om de aangegeven optie te selecteren.
– Druk op toets of om het gewenste geluidsvolume voor het alarm te kiezen.
– Druk op toets .
– Druk op toets om he t m e nu te ver laten.
Bij selectie van de optie ‘Fahrenheit’ of ‘Celsius’:
– Druk op toets om de aangegeven optie te selecteren.
– Druk op toets om he t m e nu te ver laten.
23
26 28
27
26 28
27
23
27
26 28
27
23
27
23
9.8.7 Microfoongevoeligheid (VOX) instellen
U kunt de gevoeligheid van de geluid sherkenning (VOX) van de babyfoon instellen. Met een grotere gevoel igheid
kunnen zachtere geluiden van de baby-eenheid worden opgenomen.
– Druk op toets . ‘Nachtlamp’ wordt weergegeven.
23
– Druk herhaaldelijk op toets tot ‘Gevoeligheid’ wordt weergegeven.
– Druk op toets .
27
– Druk herhaaldelijk op toets of tot de gewenste gevoeligheid wordt weergegeven.
• De VOX-gevoeligheid wordt op het display weergegeven door een zwarte balk:
- Hoge gevoeligheid
- Lage gevoeligheid
– Druk op toets .
– Druk op toets om he t m e nu te ver laten.
27
23
28
26 28
21
Page 22
Babytalker 3500 SEDS
17
27
27
27
9.8.8 Geluidsalarm instellen
De gevoeligheid van de geluidsherkenning wordt weergegeven aan de hand van het aantal LED's bovenaan
de ouder-eenheid. Wanneer het geluidsvolume van die eenheid op ‘Uit’ staat, kan een signaal worden gegeven
wanneer het geluidsniveau dat door de baby-eenheid word t ontvangen het bereik van de rode LED's heeft bereikt.
– Druk op toets . ‘Nachtlamp’ wordt weergegeven.
– Druk herhaaldelijk op toets tot ‘--GELUID--’ wordt weergegeven.
– Druk op toets .
– U krijgt het volgende te zien:
‘Inschakelen?’ wanneer het geluidsalarm uitgeschakeld is
‘Uitschakel?’ wanneer het geluidsalarm ingeschakeld is.
– Druk op toets om de aangegeven optie te selecteren.
– Druk op toets of om het gewenste geluidsvolume voor het alarm te kiezen.
– Druk op toets .
– Druk op toets om he t m e nu te ver laten.
9.8.9 Klok instellen
In stand-by wordt de tijd weergegeven op het scherm van de ouder-eenheid.
– Druk op toets . ‘Nachtlamp’ wordt weergegeven.
– Druk herhaaldelijk op toets tot ‘Klok’ wordt weergegeven.
– Druk op toets .
– Druk herhaaldelijk op toets tot de gewenste optie wordt weergegeven:
‘Instel tijd’ om de klok in te stellen
‘Uur formaat’ om te kiezen tussen 12uur en 24 uur formaat.
Bij selectie van de optie ‘Instel tijd':
– Druk op toets om de aangegeven optie te selecteren. Het jaar wordt weergegeven.
– Druk op toets of om het jaar te selecteren.
– Druk op toets .
– Herhaal de instelling vorige 2 stappen om achtereenvolgens de maand, dag, uur en minuten in te stellen.
– Na de instelling van de minuten, druk op toets om de instelling te bevestigen.
– Druk op toets om he t m e nu te ver laten.
Bij selectie van de optie ‘Uur formaat’:
– Druk op toets .
– U krijgt het volgende te zien:
‘12-uur?’ wanneer het 24 uur formaat is ingesteld en u wenst over te schakelen op 12 uur formaat.
‘24-uur?’ wanneer het 12 uur formaat is ingesteld en u wenst over te schakelen op 24 uur formaat.
– Druk op toets om de aangegeven optie te selecteren.
– Druk op toets om he t m e nu te ver laten.
23
28
27
27
26 28
27
23
23
28
27
28
27
26 28
27
23
27
23
• De klok, weergegeven op de ouder- eenheid, wordt uitgezonden door de baby-eenheid.
Wanneer de baby-eenh eid uitgescha keld wordt , zal de klok op de o uder-eenheid re setten en
opnieuw moeten worden ingesteld.
9.8.10Etenstijd instellen
Op de Babytalker 3500 SEDS kan u een alarmtijd instellen wanneer het etenstijd is voor uw baby.
– Druk op toets . ‘Nachtlamp’ wordt weergegeven.
– Druk herhaaldelijk op toets tot ‘Etenstijd’ wordt weergegeven.
– Druk op toets .
– Druk herhaaldelijk op toets tot de gewenste optie wordt weergegeven:
‘Instel tijd’ om de etenstijd in te stellen.
‘Alarm’ om het etenstijd alarm in- of uit te schakelen.
‘Intervaltijd’ wanneer u op vaste tijdsintervallen doorheen de dag een etenstijd alarm wil horen.
Bij selectie van de optie ‘Instel tijd’:
– Druk op toets om de aangegeven optie te selecteren. Het uur wordt weergegeven.
– Druk op toets of om het uur te selecteren.
– Druk op toets .
– Herhaal de instelling vorige 2 stappen om de minuten in te stellen.
– Na de instelling van de minuten, druk op toets om de instelling te bevestigen.
– Druk op toets om he t m e nu te ver laten.
22
23
27
27
26 28
27
23
28
28
Page 23
Babytalker 3500 SEDS
NEDERLANDS
27
25
Bij selectie van de optie ‘Alarm’:
– Druk op toets .
– U krijgt het volgende te zien:
‘Inschakelen?’ om het etenstijd alarm in schakelen. Het icoon verschijnt in de display.
‘Uitschakel?’ om het etenstijd alarm uit te schakelen.
– Druk op toets om de aangegeven optie te selecteren.
– Druk op toets om he t m e nu te ver laten.
Bij selectie van de optie ‘Intervaltijd’:
– Druk op toets om de aangegeven optie te selecteren. Het uur wordt weergegeven.
– Druk op toets of om het uur te selecteren.
– Druk op toets .
– Herhaal de instelling vorige 2 stappen om de minuten in te stellen.
– Na de instelling van de minuten, druk op toets om de instelling te bevestigen.
– Druk op toets om he t m e nu te ver laten.
27
27
23
27
26 28
27
23
9.9 LED-lamp
De ouder-eenheid is voorzien van een LED-lamp .
– Druk op toets om de LED-lamp te activeren.
19
10 Schoonmaak en onderhoud
In dit hoofdstuk leest u belangrijke aanwijzingen voor het schoonmaken en ond erhouden van de apparaten.
Houd u aan deze instructies om beschadigingen door een onjuist onderhoud van de apparaten te voorkomen en
een probleemloos gebruik te garanderen.
10.1 Veiligheidsaanwijzingen
GEVAAR
Levensgevaar door elektrische stroom!
• Schakel het apparaat uit voordat u het schoonmaakt en trek de stekker uit de wandcontactdoos.
LET OP
Gevaar door lekkend batterijzuur!
Als de (oplaadbare) batterijen lekken, kan de lekvloeistof verwondi ngen (huidirritatie) of schade aan het
apparaat veroorzaken. Draag veiligheidshandschoenen.
LET OP
• Gebruik geen schoonmaak- of oplosmiddelen. Deze kunnen de behuizing beschadigen, in het
apparaat doordringen en zo blijvende schade veroor za ken.
10.2 Schoonmaken
– Maak het apparaat schoon met een zachte, licht vochtige doek.
– Maak vuile aansluitingen en contacten schoon met een krasvrije borstel.
– Maak de batterijcontacten en het batterijvak schoon met een droge, niet pluizende doek.
– Als het apparaat nat wordt, moet u het uitschakelen en de (oplaadbare) batterijen onmiddellijk
verwijderen.
Veeg het batterijvak droog met een zachte doek om mogelijke waterschade zoveel mogelijk te beperken.
Laat het batterijvak openstaan totdat het volledig droog is.
Gebruik het apparaat pas wanneer het volledig droog is.
10.3 Onderhoud
– Controleer regelmatig de (oplaadbare) batterijen van het apparaat en vervang de batterijen tijdig.
– Controleer de aansluitingen en kabels op defecten.
LET OP
• Wanneer u schade vermoedt, moet u het apparaat door een vakman laten controleren voordat u het
opnieuw in gebruik neemt.
23
Page 24
Babytalker 3500 SEDS
11 Storingen verhelpen
In dit hoofdstuk leest u belangrijke aanwijzingen voor het lokaliseren en verhelpen va n storingen.
Houd u aan de volgende aanwijzingen om gevaar en schade te vermijden.
11.1 Veiligheidsaanwijzingen
GEVAAR
Levensgevaar door elektrische stroom!
• Trek de stekker uit de contactdoos voordat u de storing gaat verhelpen.
LET OP
Gevaar door onjuiste reparaties!
Door onjuiste reparaties kunnen de gebruikers groot gevaar lopen en kan het apparaat beschadigd raken.
• U mag de apparaten niet wijzigen of herstellen.
• Reparaties aan apparaten of kabels mag u uitsluitend door een vakman van het servicecentrum laten
uitvoeren.
• Wanneer u schade vermoedt (bv. als het app araa t gevallen is), moet u het app ara at door ee n vakma n
laten controleren voordat u het opnieuw in gebruik neemt.
11.2 Oorzaken en oplossing van storingen
De volgende tabel helpt u bij de lokalisering en oplossing van kleine storingen:
Probleem Mogelijke oorzaak Oplossing
Het oplaadbare
batterijpak van de
ouder-eenheid laadt
niet op
U kunt de oudereenheid niet
inschakelen (display
geeft niets weer)
Op de display van de
ouder-eenheid wordt
"GEEN CONTACT"
weergegeven
De ouder-eenheid geeft
geen geluiden weer die
door de baby-eenheid
zijn opgevangen
Beperkte reikwijdte en
storingen tijdens de
transmissie
Er wordt een hoge
fluittoon weergegeven
Stekker van laadst at i on ni e t
ingestoken
Vuile contacten Batterij- en laadstationcontacten
Het oplaadbare batterijpak
functioneert niet meer
Het oplaadbare batterijpak is niet
opgeladen
Apparaat defect Klantendienst informeren
Baby-eenheid is niet ingeschakeld Baby-eenheid inschakelen
De afstand tussen de ouder- en de
baby-eenheid is te groot
De ouder-eenheid is niet aangemeld
bij de baby-eenheid
Het geluidsvolume van de oudereenheid is mogelijk te laag ingesteld
of volledig uitgeschakeld.
De microfoongevoeligheid van de
baby-eenheid is mogelijk te laag
ingesteld.
De reikwijdte van het apparaat hangt
af van de omgeving.
Staalstructuren en betonnen muren
kunnen een negatieve invloed hebben
op de transmissie.
De afstand tussen de ouder- en de
baby-eenheid is te klein
Stekker insteken
schoonmaken met een zachte doek
Batterijpack vervangen
Oplaadbaar batterijpak opladen
Afstand tussen ouder- en babyeenheid verkleinen
Ouder-eenheid aanmelden bij babyeenheid, zie “11.3 Ouder-eenheid
aanmelden bij baby-eenheid”
Geluidsvolume van de ouder-eenheid
verhogen
VOX-gevoeligheid en geluidsvolume
van de ouder-eenheid controleren en
eventueel verhogen.
Zoveel mogelijk hindernissen
vermijden.
Afstand tot minstens
2 meter verhogen
24
Page 25
Babytalker 3500 SEDS
NEDERLANDS
21
17
29
17
29
11.3 Ouder-eenheid aanmelden bij baby-eenheid
Wanneer het nachtlampje van de baby-eenheid knippe rt e n/ of er geen ve rbind ing t ot stand ka n komen t ussen de
ouder- en de baby-eenheid (de groene LED op de ouder-eenheid knippert), dan moet de ouder-eenheid
aangemeld worden bij de baby-eenheid.
• Controleer of de netadapter van de baby-eenheid aangesloten is in een wandcontact doos
en of de oplaadbare batterijen in de ouder-eenheid zijn opgeladen.
– Trek de netadapter van de baby-eenheid uit de contactdoos en verwijder de oplaadbare batterijen uit de
ouder-eenheid.
– Druk op de aan/uittoets van de baby-eenheid, hou de toets ingedrukt en steek de netadapter in de
contactdoos.
De baby-eenheid wordt ingeschakeld en staat in aanmeldmodus.
– Laat de aan/uittoets los. Het nachtlampje van de eenheid voor baby knippert 60 seconden lang.
– Druk op de aan/uittoets van de ouder-eenheid, hou de toets ingedrukt en plaats de opgeladen
batterijen.
De ouder-eenheid wordt ingeschakeld en de 2 rode geluidsvolume-LED's knipperen. Laat de aan/
uittoets los.
– Na geslaagde aanmelding of na 60 seconden wordt de aanmeldmodus beëindigd.
Het nachtlampje van de baby-eenheid knippert niet langer.
De 2 rode LED's van de ouder-eenheid doven.
– Als de aanmelding geslaagd is, krijgt u een lang signaal te horen; anders hoort u drie korte signalen.
Verbinding tussen ouder- en baby-eenheid testen:
– Houd de paging-toets op de baby-eenheid 2 seconden ingedrukt.
– De ouder-eenheid laat nu 30 seconden lang een hoog signaal horen.
– Druk kort op de aan/uittoets op de ouder-eenheid om dit signaal uit te schakelen.
12
12
29
2
6
2
12 Instructies voor bewaring/afvalverwerking
• Wij adviseren u om het karton en de verpakkingsmaterialen te bewaren zodat u deze kunt
gebruiken voor een eventueel transport van het apparaat in de toekomst.
12.1 Bewaring
Haal de (oplaadbare) batterijen uit de ouder- en de baby-eenhei d.
Bewaar het apparaat in een droge ruimte.
12.2 Afvalverwerking van verpakking
De verpakking bestaat uit milieuvriendelij ke materialen die u via u w plaatselijke afval ophaling te r recyclage
kunt meegeven.
12.3 Afvalverwerking (milieubescherming)
Verwijder het apparaat volgens Europese ri chtlijn 2002/96/EG - WEEE (Waste Electrical and Electronic
Equipment) betreffende afgedankte elektrische en elektronische apparatuur. Voor inlichtingen kunt u
zich wenden tot de gemeentelijke dienst voor afvalverwerking.
De (oplaadbare) batterijen moet u op milieuvriendelijke wijze volgens de plaatselijke voorschriften
verwijderen.
13 Technische gegevens
Frequentie 1.880 GHz tot 1.900 GHz
Reikwijdte Buiten: tot 600 m / in SEDS mode tot 300m
Binnen: tot 50 m / in SEDS mode tot 25m
Bedrijfstemperatuur 15 °C - 35 °C
20 % - 75 % relatieve luchtvochtigheid
Ouder-eenheid
Oplaadbare batterijen Batterijpak (3,6V Ni-MH) (meegeleverd)
25
Page 26
Babytalker 3500 SEDS
Netadapter (KSS 05-060-0300G) Ingang: 230 V AC / 50 Hz / 150 mA
Uitgang: 6 V DC/ 300 mA
Afmetingen ca. 117 x 62 x 72 mm
Gewicht 98 g (zonder oplaadbare batterijen)
Baby-eenheid
Batterijen 3 x alkalinebatterijen (LR06/AA) (niet meegeleverd)
Netadapter (KSS 05-060-0300G) Ingang: 230 V AC / 50 Hz / 150 mA
Uitgang: 6V DC/ 300 mA
Afmetingen ca. 137 x 60 x 101 mm
Gewicht 141 g (zonder batterijen)
14 EG Conformiteitsverklaring
Hereby, TOPCOM EUROPE N.V., declares that this device is in compliance with the essential requirements and
other relevant provisions of Directive 1999/5/EC.
The Declaration of conformity can be found on: http://www.topcom.net/cedeclarations.asp
15 Topcom-garantie
15.1 Garantieperiode
Op de Topcom-toestellen wordt een garantie van 24 maande n ver l eend. De garantieperiode gaat in op de dag
waarop het nieuwe toestel wordt gekocht. Er is geen garantie op standaard of oplaadbare bat terijen (type AA/AAA).
Kleine onderdelen of defecten die een verwaarloosbaar ef fect hebben op de werking of waarde van het toestel zijn
niet gedekt door de garantie.
De garantie moet worden bewezen door voorlegging van het originele aankoopbewijs of kopie waarop de datum
van aankoop en het toesteltype staat.
15.2 Afwikkeling van garantieclaims
Een defect toestel moet, samen met een geldig aankoopbewijs worden teruggestuurd naar een Topcomhersteldienst.
Als het toestel tijdens de garantieperiode een defect vertoo nt, zal Topcom of diens offi ci eel erkende herst eldienst
eventuele defecten te wijten aan materiaal- of productiefouten gratis herstellen, door defecte toestellen of
onderdelen van defecte toestellen ofwel te herstellen ofwel te vervangen. In het geval dat het toestel wordt
vervangen, kan de kleur en het model verschillend zijn van het oorspronkelijk gekochte toestel.
De oorspronkelijke aankoopdatum is bepalend voor het begin van de garantieperiode. De garantieperiode wordt
niet verlengd als het toestel wordt vervangen of hersteld door Topcom of diens officieel erkende hersteldienst.
15.3 Garantiebeperkingen
Schade of defecten te wijten aan onoordeelkundig gebruik of bedienin g en schade te wijten aan het gebruik van
niet-originele onderdelen of accessoires worden niet gedekt door de garantie.
De garantie dekt geen schade te wijten aan externe factoren, zoals bliksem, water en brand, noch enige
transportschade.
Er kan geen garantie worden ingeroepen als het serie nummer op het toestel is gewij zigd, verwijderd of onleesbaar
gemaakt.
Garantieclaims zijn ongeldig indien het toestel hersteld, gewijzigd of aangepast werd door de koper.
26
Page 27
Babytalker 3500 SEDS
FRANÇAIS
1 Généralités
Cher client,
Veuillez lire attentivement les informations contenues dans ce manuel d'utilisation afin de vous familiariser
rapidement avec cet appareil et d'apprendre à utiliser ses fonctions.
2 Informations relatives à ce manuel d'utilisation.
Ce manuel d'utilisation contient des informations sur l'écoute-bébé Babytalker SEDS 3500 (dénommé ci-après
«l'appareil») et fournit d'importantes instructions sur la première utilisation, la sécurité, l'utilisation correcte et
l'entretien de cet appareil.
Veillez à toujours à conserver le manuel d'utilisation près de l'appareil. Toutes les personnes responsables de son
fonctionnement, de sa réparation ou de son nettoyage doivent lire et/ou consulter ce manuel d'utilisation.
Conservez ce manuel d'utilisation en lieu sûr et confiez-le à son nouveau propriétaire.
3 Copyright
Cette documentation est protégée par la législation sur le copyright.
Tous droits, y compris de reproduction, duplication et distribution photomécaniques, totales ou partielles, par le
biais de procédés particuliers tels que traitement de données, supports de données et réseaux de données, ainsi
que de modifications techniques et de contenus, sont réservés.
4 Avertissements
DANGER !
Cet avertissement indique une situation dangereuse immédiate.
Si cette situation dangereuse ne peut pas être évitée, elle peut entraîner la mort ou des blessures graves.
ATTENTION!
Cet avertissement indique une situation potentiellement dangereuse.
Si cette situation dangereuse ne peut pas être évitée, elle peut entraîner des blessures et/ou des dégâts
matériels.
• Ce symbole indique une information qui facilite l'utilisation de l'appareil.
5 Utilisation correcte
Cet appareil est exclusivement destiné à un usage privé (non professionnel) dans des pièces fermées pour la
surveillance des bébés. Toutes les autres formes d'utilisation sont incorrectes et peuvent conduire à des situations
dangereuses.
Suivez toujours les instructions indiquées dans ce manuel d'utilisation.
La responsabilité du fabricant ne saurait être engagée pour toute perte ou dommage résultant d'une utilisation
incorrecte.
L'utilisateur de l'appareil est seul responsable de tous les risques.
6 Sécurité
6.1 Risque de choc électrique
DANGER !
Tout contact avec des conducteurs ou des composants électriques sous tension peut être mortel.
Respectez les instructions de sécurité ci-dessous pour éviter tout risque de choc électrique:
• Pour éviter tout risque d'endommager l'appareil, utilisez uniquement l'adaptateur secteur fourni avec
l'appareil.
• N'utilisez pas l'appareil si l'adaptateur secteur, le câble d'alimentation ou la prise est endommagé.
• N'ouvrez jamais le boîtier de l'adaptateur secteur. Tout contact avec des connexions ou des contacts
sous tension ou une altération des structures électriques et mécaniques peut engendrer un risque de
choc électrique.
• Protégez l'appareil de l'humidité, de la pénétration de l'humidité ainsi que de la poussière. Débranchez
immédiatement l'adaptateur secteur en cas de contact avec l'humidité.
27
Page 28
Babytalker 3500 SEDS
• Débranchez l'adaptateur secteur en cas de dysfonctionnements, pendant les orages, et lors du
nettoyage de l'appareil.
• Protégez le câble d'alimentation des surfaces chaudes ou d'autres sources de danger et veillez à ce
qu'il ne se coince pas.
6.2 Utilisation des piles (courantes ou rechargeables)
ATTENTION!
Le non-respect des instructions d'utilisation des piles peut être dangereux.
• Utilisez toujours des piles (courantes ou rechargeables) de même type.
• Assurez-vous d'insérer les piles en respectant la polarité indiquée. Les dommages causés aux piles et
à l'appareil peuvent résulter d'une mauvaise polarité des piles.
• Ne jetez jamais les piles dans le feu, en raison du risque d'explosion.
• Veillez à ce que les bornes des piles ne puissent jamais entrer en contact l'une avec l'autre ou avec
des objets métalliques, que ce soit intentionnellement ou accidentellement. Cela peut provoquer une
surchauffe, un incendie ou une explosion.
• Gardez les piles hors de portée des enfants Consultez immédiatement un médecin en cas d'ingestion.
• Des fuites au niveau des piles peuvent causer des dégâts irréversibles sur l'appareil. Manipulez avec
précaution les piles endommagées ou qui fuient, en raison du risque de corrosion. Portez des gants
de protection.
• Retirez les piles si vous n'allez pas utiliser l'appareil pendant une longue période.
6.3 Consignes générales pour une utilisation sûre
Pour utiliser votre appareil en toute sécurité, respectez toujours les instructions de sécurité suivantes:
– Le montage de l'appareil doit toujours être effectué par un adulte. Gardez les petites pièces hors de portée
des enfants lors du montage.
– Ne laissez pas les enfants jouer avec l'appareil ou des éléments de celui-ci.
– Veillez à ce que l'écoute-bébé et le câble d'alimentation soient toujours hors de portée du bébé.
– Ne couvrez pas l'écoute-bébé avec une serviette, une couverture ou tout autre élément similaire.
– Tout composant défectueux doit être remplacé par une pièce de rechange d'origine, les autres
composants pouvant être non conformes aux normes de sécurité.
– Éteignez votre écoute-bébé lorsque vous y êtes invité par un symbole, une affiche ou tout autre message.
Les hôpitaux et les établissements de soins peuvent utiliser des équipements sensibles aux signaux haute
fréquence provenant de sources extérieures.
7 Fonctionnement
L'écoute-bébé se compose de 2 unités: une unité pour les parents et une unité pour le bébé. Ces deux unités sont
reliées par une liaison sans fil conforme à la norme DECT.
Grâce à la technologie DECT, cet équipement est protégé contre les écoutes électroniques et est insensible aux
interférences émises par d'autres équipements.
L'unité Bébé commence à transmettre dès que le micro détecte un son. Le son est reproduit par l'unité Parent. La
sensibilité du microphone peut être réglée par l'utilisateur (voir “9.8.7 Réglage de la sensibilité du micro (VOX)”).
• L'écoute-bébé ne pourra jamais remplacer la surveillance appropriée par un adulte; il ne
constitue qu'une aide.
7.1 Composants de l'unité Bébé
Voir illustration sur la page rabattable.
1 Antenne
2 Veilleuse
3Écran
4 Haut-parleur
5Micro
6 Touche de recherche
7 Touche Berceuse
8 Touche de la veilleuse
9 Augmentation du volume
A
10 Touche de lecture
11 Diminution du volume
12 Commutateur marche/arrêt
13 Couvercle du compartiment des piles
14 Connecteur pour adaptateur secteur
15 Clips de fixation
16 Commutateur rayonnement SEDS
28
Page 29
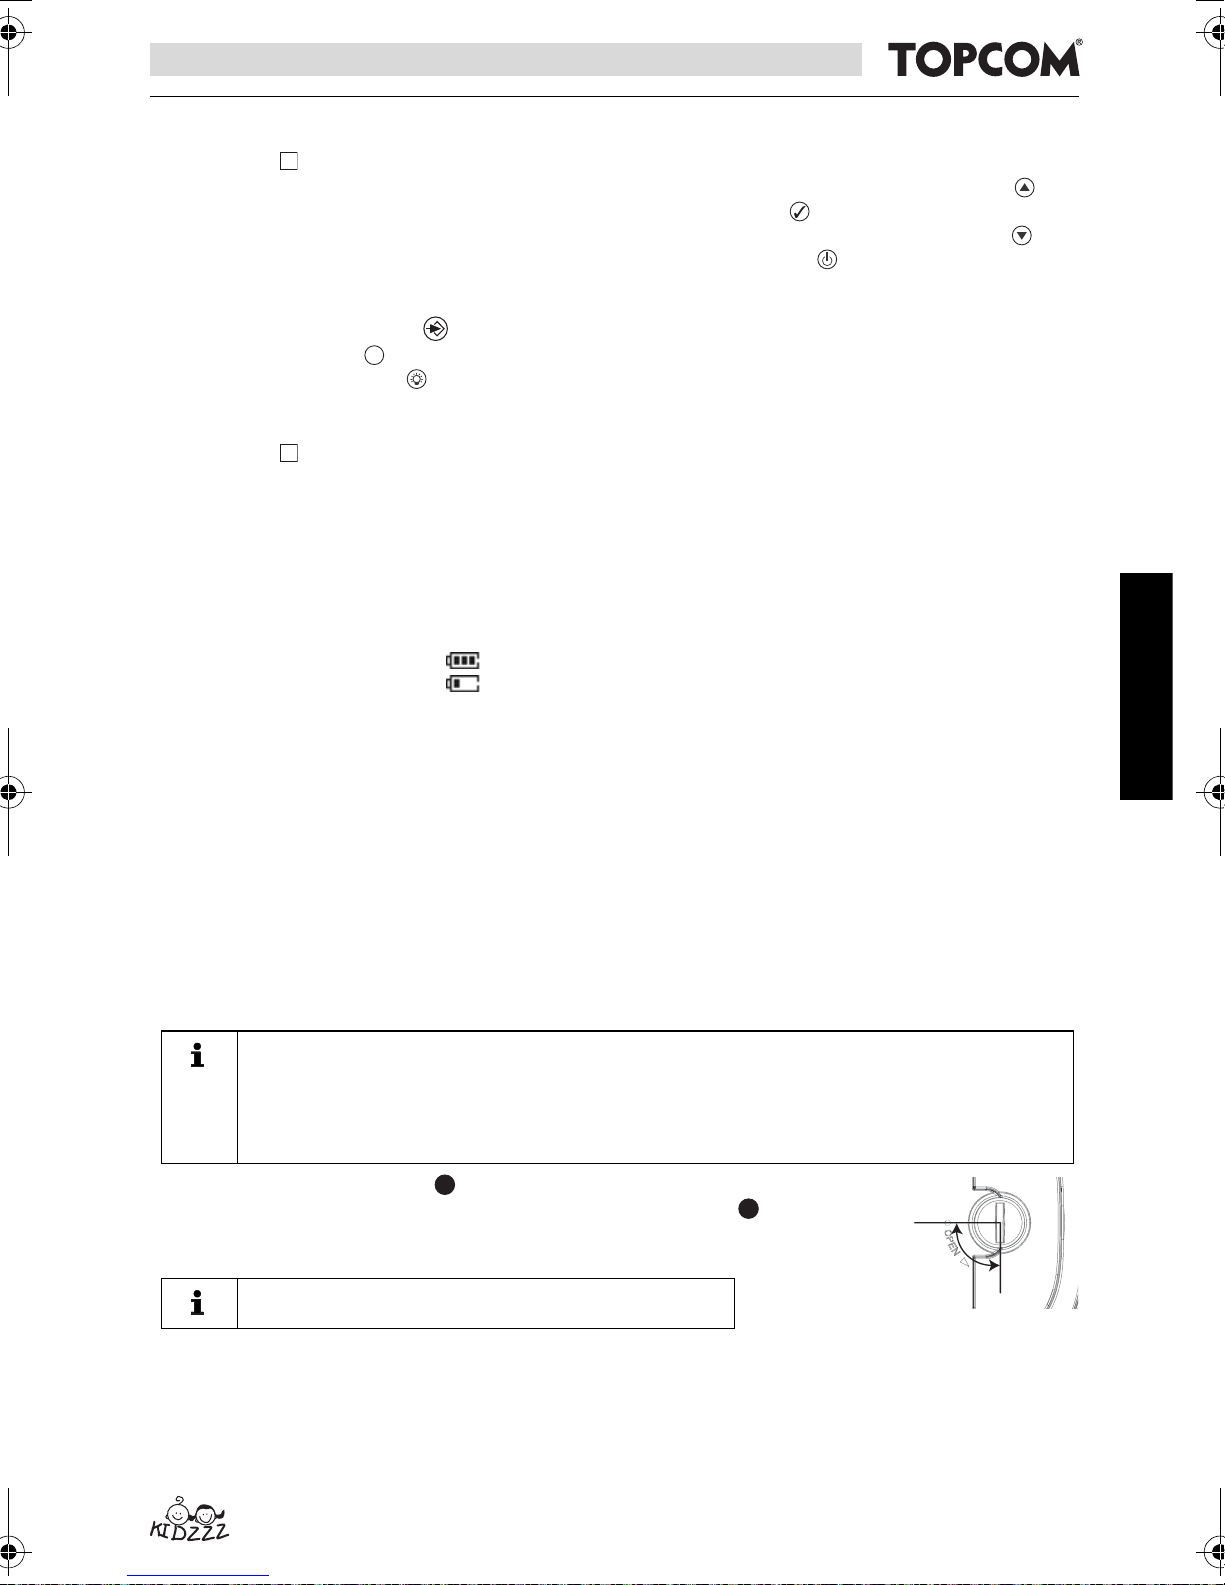
Babytalker 3500 SEDS
FRANÇAIS
PTT
C
90° MA
OPEN
15
13
7.2 Composants de l'unité Parent
Voir illustration sur la page rabattable.
17 Voyants Volume
18 Haut-parleur
19 Lampe DEL
20 Micro
21 Voyant indicateur de liaison
22 Écran
23 Touche de recherche
24 Touche Parler
25 Touche lampe DEL
B
26 Augmentation du volume/Option de menu suivante
27 Touche de confirmation
28 Diminution du volume/Option de menu précédente
29 Commutateur Marche/Arrêt
30 Clip de ceinture/crochet de fixation mural
31 Couvercle du compartiment des piles
32 Adaptateur secteur
PTT
33 Indicateur de charge
7.3 Description de l'affichage
Voir illustration sur la page rabattable.
Température (a) Affiche la température mesurée par l'unité Bébé. Clignote lorsque la
température est en dehors de la plage définie.
Alerte Délai repas (b) Visible lorsque l'alerte Délai repas est activée.
Berceuse (c) Visible lorsque la berceuse est en cours de lecture.
Ligne d'information (d) Fournit plus d'informations sur les différents réglages tels que la date et
l'heure sur l'unité Parent ou la berceuse sélectionnée sur l'unité Bébé.
Témoin de charge des
piles (e)
Témoin (f) Visible lorsque la veilleuse de l'unité Bébé est activée.
Sensibilité (g) Visible lorsque vous régler la sensibilité sur l'unité Parent.
Indique l'état des piles rechargeables.
- piles complètement chargées
- piles presque déchargées
8 Première utilisation
8.1 Contenu
L'appareil est fourni de série avec les éléments suivants:
- 1 unité Bébé
- 1 unité Parent
- 1 station de charge
- 2 adaptateurs secteur
8.2 Mise en place des piles de l'unité Bébé
• L'unité Bébé fonctionne avec trois piles AA (LR06/penlight; nous recommandons l'utilisation
de piles alcalines) ou sur l'alimentation secteur grâce à l'adaptateur secteur inclus.
• L'unité Bébé ne permet pas de recharger les piles.
• Il est recommandé de toujours laisser les piles en place dans l'unité, même si vous utilisez
l'alimentation secteur. L'unité passera automatiquement sur piles en cas d'interruption du
courant électrique.
– Tournez le clip de ceinture vers le haut.
– Tournez la vis à 90° sur le couvercle du compartiment des piles situé à l'arrière
de l'unité Bébé, dans le sens inverse des aiguilles d'une montre, puis retirez le
couvercle du compartiment des piles.
• Ne tournez pas la vis au-delà du point «Open».
- 1 manuel d'utilisation
- 1 fiche de service
- 1 bloc de piles rechargeables NiMH
29
Page 30
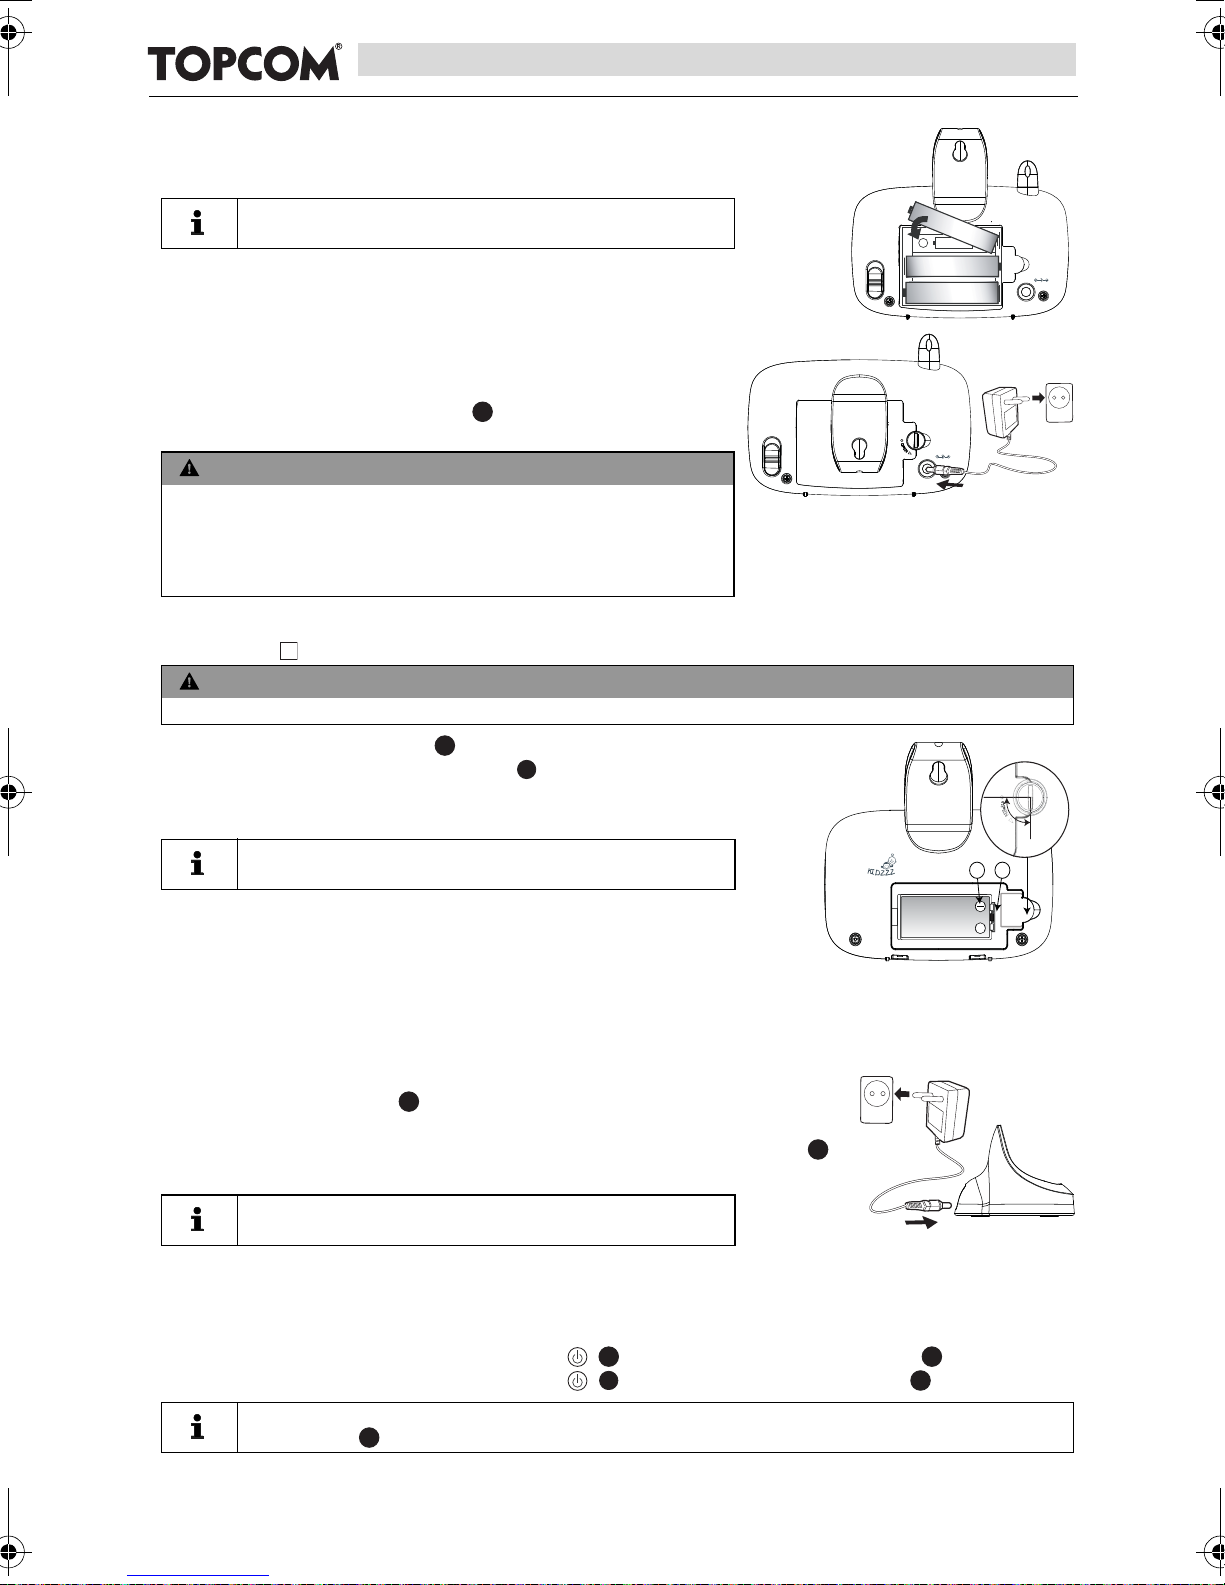
Babytalker 3500 SEDS
SEDS
LONG
ECO
6V/300mA
+
+
+
+
-
AA x 1
+
-
AA
x 1
+
-
A
A
x
1
90° MAX
OPEN
30
32
29
12
21
– Insérez trois piles alcalines AA (LR06/penlight) dans le compartiment des
piles. Assurez-vous que la polarité est correcte.
– Refermez le compartiment des piles.
• Ne mélangez jamais des piles neuves et usagées.
8.3 Connexion de l'unité Bébé à l'alimentation
secteur
Raccordez la petite fiche de l'adaptateur secteur au connecteur
d'alimentation secteur de l'unité Bébé ( et branchez l'adaptateur
secteur à la prise électrique (230V/50Hz).
ATTENTION!
14
SEDS
LONG
ECO
• La prise électrique doit être facilement accessible afin de
pouvoir débrancher rapidement le câble d'alimentation en
cas d'urgence.
• Utilisez uniquement l'adaptateur secteur fourni (6 VCC/
300 mA).
8.4 Mise en place de la batterie rechargeable de l'unité Parent
Voir illustration sur la page rabattable.
ATTENTION!
• Utilisez uniquement la batterie NiMH fournie pour l'unité Parent.
B
6V/300mA
– Tournez le clip de ceinture vers le haut.
– Tournez la vis à 90° sur le couvercle du compartiment des piles
31
situé à l'arrière de l'unité Parent, dans le sens inverse des aiguilles
d'une montre, puis retirez le couvercle du compartiment des piles.
• Ne tournez pas la vis au-delà du point «Open».
– Insérez la batterie NiMH dans le compartiment des piles.
Assurez-vous que la languette de la batterie est bien insérée dans
l'emplacement prévu, tout en respectant la polarité illustrée ci-contre
(B).
– Refermez soigneusement le compartiment des piles et tournez le clip de ceinture vers le bas.
8.5 Mise en place de la batterie de l'unité Parent
– Raccordez la petite fiche de l'adaptateur secteur au connecteur
d'alimentation secteur du chargeur et branchez l'adaptateur secteur sur
la prise électrique ( (230 V/50 Hz).
– Placez l'unité Parent sur la station de charge. Le voyant de charge rouge
33
s'allume.
• Il faut environ 10 heures pour recharger
complètement la batterie.
9 Fonctionnement et utilisation
AB
+
9.1 Marche/Arrêt des unités Bébé et Parent
– Appuyez sur le commutateur Marche/Arrêt pour allumer l'unité Parent. L'écran s'allume.
– Appuyez sur le commutateur Marche/Arrêt pour allumer l'unité Bébé. L'écran s'allume.
• L'unité Parent va tenter d'établir la connexion avec l'unité Bébé. Si le voyant indicateur de
liaison s'allume, une connexion est établie. S'il ne s'allume pas, voir à la page 37.
30
22
3
Page 31

Babytalker 3500 SEDS
FRANÇAIS
29
12
21
20
17
21
6
29
SEDS
LONG
ECO
16
PTT
PTT
24
– Appuyez sur le commutateur Marche/Arrêt pour éteindre l'unité Parent (maintenez le commutateur
enfoncé jusqu'à ce que l'écran s'éteigne).
– Appuyez sur le commutateur Marche/Arrêt pour éteindre l'unité Bébé (maintenez le commutateur
enfoncé jusqu'à ce que l'écran s'éteigne).
9.2 Réglage de la langue d'affichage
– Appuyez sur la touche . «Veilleuse» s'affiche.
– Appuyez plusieurs fois sur la touche jusqu'à ce que «Choix langue» s'affiche.
– Appuyez sur la touche . La langue actuelle s'affiche.
– Appuyez plusieurs fois sur la touche ou jusqu'à ce que la langue souhaitée s'affiche.
– Appuyez sur la touche pour valider la langue.
– Appuyez sur la touche pour quitter le menu.
23
26
27
26 28
27
23
9.3 Vérification de la liaison entre l'unité Parent et l'unité Bébé
Avant la première utilisation de l'écoute-bébé, vous devez toujours vérifier la liaison sans fil.
– Installez l'unité Parent dans la même pièce que l'unité Bébé, à une distance d'au moins deux mètres l'une
de l'autre.
– Allumez les deux appareils. L'unité Parent va tenter d'établir la connexion avec l'unité Bébé.
– Le voyant indicateur de liaison vert sur l'unité Parent clignote pendant que cette dernière tente d'établir
une connexion.
Le voyant reste allumé une fois la connexion établie.
– Les sons détectés par le micro sont reproduits par l'unité Parent.
– Le volume du son reproduit est indiqué par les voyants Volume situés sur le dessus de l'unité Parent.
Plus le volume est élevé, plus il y a de voyants allumés.
– Un signal sonore est émis lorsque le volume maximal est atteint.
– Si aucune connexion n'est établie, un double signal sonore d'avertissement est émis et le voyant
indicateur de liaison clignote.
– Réduisez la distance maximale entre l'unité Parent et l'unité Bébé jusqu'à ce qu'une nouvelle connexion
soit établie.
21
9.4 Localisation de l'unité Parent (fonction de recherche)
– Maintenez la touche de recherche de l'unité Bébé enfoncée pendant au moins 2 secondes, puis
relâchez-la.
– L'unité Parent réagit en émettant un signal sonore aigu pendant 30 secondes. Cela permet de retrouver
plus facilement l'unité Parent.
– Appuyez brièvement sur le commutateur Marche/Arrêt de l'unité Parent pour arrêter le signal.
9.5 Réglage du commutateur SEDS
L'écoute-bébé Babytalker 3500 SEDS repose sur une technologie unique appelée
«Smart ECO Distance Switch (SEDS)», qui permet aux parents de régler la puissance
de rayonnement de l'appareil. Deux options s'offrent à vous: le mode «longue
distance» et le mode «ECO» avec une consommation électrique réduite et un
rayonnement plus faible.
Réglez le commutateur sur:
16
– «LONG» pour une portée maximale de 600 m (sans obstacle).
– «ECO» pour diminuer de moitié le rayonnement émis et réduire la consommation électrique. Avec ce
réglage, la portée est réduite à 300 m maximum (sans obstacle).
9.6 Parler à votre bébé
Vous pouvez utiliser l'écoute-bébé pour parler à votre bébé.
• Habituez votre bébé à cette fonction avant de l'utiliser régulièrement.
PTT
24
– Appuyez sur la touche Parler sur l'unité Parent et maintenez-la enfoncée.
– Tenez l'unité Parent à la verticale en plaçant le micro à 10 cm de votre bouche, puis parlez dans le micro.
– Relâchez la touche lorsque vous avez terminé de parler.
PTT
31
Page 32

Babytalker 3500 SEDS
17
26
23
9.7 Jouer une berceuse
L'unité Bébé peut jouer trois berceuses pré-programmées.
Vous pouvez configurer la lecture de berceuses sur l'unité Parent (voir “9.8.5 Réglage de la berceuse”) ou sur
l'unité Bébé.
– Pour jouer la berceuse actuellement sélectionnée ou arrêter la lecture, appuyez sur la touche sur
l'unité Bébé.
– Pour sélectionner une berceuse différente, appuyez plusieurs fois sur la touche jusqu'à ce que la
berceuse souhaitée s'affiche.
7
10
9.8 Réglages
9.8.1 Réglage du volume de restitution de l'unité Parent
Six réglages de volume sont disponibles. Le volume le plus faible est «Vol. désact.».
– Appuyez sur la touche pour augmenter le volume.
– Appuyez sur la touche pour baisser le volume.
• Si le réglage «Vol. désact.» est sélectionné, les sons détectés par l'unité Bébé sont
uniquement indiqués par les voyants Volume .
9.8.2 Réglage du volume de restitution de l'unité Bébé
• Ce réglage s'applique aux fonctions “Parler à votre bébé“ et “Jouer une berceuse“.
26
28
– Appuyez sur la touche pour augmenter le volume.
– Appuyez sur la touche pour baisser le volume.
9
11
9.8.3 Autres réglages
Les réglages suivants peuvent être configurés à partir du menu (touche ) de l'unité Parent:
• Veilleuse
• Berceuse
• Sensibilité du micro «Sensibilité»
• Signal d'alerte «Alerte son»
Pour naviguer entre les différentes options, utiliser la touche ou la touche .
Pour sélectionner le réglage indiqué, appuyez sur la touche .
Pour revenir à l'option précédente du menu ou bien quitter le menu, appuyez sur la touche .
• Température (unités, plage autorisée, alerte)
• Heure
• Délai repas
• Langue d'affichage «Choix langue» (voir “9.2
Réglage de la langue d'affichage”)
27
23
28
9.8.4 Marche/Arrêt de la Veilleuse
– Appuyez sur la touche . «Veilleuse» s'affiche.
– Appuyez sur la touche . Vous verrez apparaître:
«Allumé?» si la veilleuse est éteinte et
«Éteint? si la veilleuse est allumée.
– Appuyez sur la touche pour sélectionner l'option indiquée.
– Appuyez sur la touche pour quitter le menu.
• Vous pouvez également allumer et éteindre directement la veilleuse à partir de l'unité Bébé
en appuyant sur la touche .
23
27
27
23
8
9.8.5 Réglage de la berceuse
– Appuyez sur la touche . «Veilleuse» s'affiche.
– Appuyez plusieurs fois sur la touche jusqu'à ce que «Berceuse» s'affiche.
– Appuyez sur la touche .
– Appuyez plusieurs fois sur la touche ou . jusqu'à ce que l'option souhaitée s'affiche:
«Stop?» si vous souhaitez arrêter la berceuse (fonction uniquement disponible si une berceuse est en
cours de lecture);
«Sel. nouveau» si vous souhaitez sélectionner une autre berceuse (vous disposez d'un choix de trois
berceuses) ;
«Lecture?» si vous souhaitez lire la berceuse actuellement sélectionnée sur l'unité Bébé (fonction non
disponible au cours de la lecture d'une berceuse).
23
28
27
26 28
32
Page 33

Babytalker 3500 SEDS
FRANÇAIS
28
26
28
26
– Appuyez sur la touche pour sélectionner l'option indiquée.
27
Option «Sel. nouveau» sélectionnée :
– Appuyez plusieurs fois sur la touche ou jusqu'à ce que la berceuse souhaitée ou «Lire tout»
26
s'affiche.
• Si l'option «Lire tout» est sélectionnée, les trois berceuses seront lues successivement.
– Appuyez sur la touche pour sélectionner l'option indiquée.
– Appuyez sur la touche pour quitter le menu.
27
23
9.8.6 Réglage du moniteur de température
En mode Veille, la température mesurée par l'unité Bébé (+/– 2 °C) s'affiche sur l'unité Parent. Vous pouvez
configurer les réglages suivants dans ce sous-menu:
• Plage de températures : réglage de la plage de températures autorisées. Lorsque la température mesurée
dépasse la plage autorisée, l'écran indique «Haut» ou «Bas» et la température clignote sur l'écran.
• Alerte de température : permet de contrôler l'émission d'un double bip lorsque la température dépasse la
plage autorisée.
• Unité de température : permet de sélectionner l'affichage de la température en °C (Celsius) ou en °F
(Fahrenheit).
– Appuyez sur la touche . «Veilleuse» s'affiche.
– Appuyez plusieurs fois sur la touche jusqu'à ce que «Température» s'affiche.
– Appuyez sur la touche .
– Appuyez plusieurs fois sur la touche jusqu'à ce que l'option souhaitée s'affiche:
«Déf. plage», pour définir la plage de température;
«Alerte Temp.», pour régler l'alerte de température;
«Degrés F», pour afficher la température en °F (Fahrenheit);
«Degrés C», pour afficher la température en °C (Celsius).
– Appuyez sur la touche pour sélectionner l'option indiquée.
Option «Déf. plage» sélectionnée :
– Appuyez plusieurs fois sur la touche ou jusqu'à ce que la limite supérieure souhaitée
s'affiche (39°C maximum).
– Appuyez sur la touche .
– Appuyez plusieurs fois sur la touche ou jusqu'à ce que la limite inférieure souhaitée s'affiche
(10 °C minimum).
– Appuyez sur la touche .
– Appuyez sur la touche pour quitter le menu.
Si vous sélectionnez l'option «Alerte temp.», vous verrez apparaître:
«Allumé?» si l'alerte est désactivée;
«Éteint?» si l'alerte est activée.
– Appuyez sur la touche pour sélectionner l'option indiquée.
– Appuyez sur la touche ou pour sélectionner le volume d'alerte souhaité.
– Appuyez sur la touche .
– Appuyez sur la touche pour quitter le menu.
Option «Degrés F»ou «Degrés C» sélectionnée:
– Appuyez sur la touche pour sélectionner l'option indiquée.
– Appuyez sur la touche pour quitter le menu.
23
28
27
28
23
26 28
27
27
23
27
28
27
23
27
23
9.8.7 Réglage de la sensibilité du micro (VOX)
Vous pouvez configurer la sensibilité de la détection des sons (VOX) de l'écoute-bébé. Si la sensibilité est réglée
sur un niveau élevé, l'unité Bébé détectera les sons les plus faibles.
– Appuyez sur la touche . «Veilleuse» s'affiche.
– Appuyez plusieurs fois sur la touche jusqu'à ce que «Sensibilité» s'affiche.
– Appuyez sur la touche .
– Appuyez plusieurs fois sur la touche ou jusqu'à ce que la sensibilité souhaitée s'affiche.
• La sensibilité VOX est indiquée par une barre noire sur l'écran:
- haute sensibilité
- basse sensibilité
23
28
27
26 28
33
Page 34

Babytalker 3500 SEDS
17
26
28
27
23
28
– Appuyez sur la touche .
– Appuyez sur la touche pour quitter le menu.
27
23
9.8.8 Réglage de l'Alerte son
La sensibilité de la détection du son est indiquée par le nombre de voyants situés sur le dessus de l'unité
Parent. Si le contrôle du volume de l'unité est réglé sur «Vol. désact.», un signal d'alerte peut être émis lorsque
le niveau du son détecté par l'unité Bébé atteint la zone des voyants rouges.
– Appuyez sur la touche . «Veilleuse» s'affiche.
– Appuyez plusieurs fois sur la touche jusqu'à ce que «Alerte son» s'affiche.
– Appuyez sur la touche .
23
28
27
– Vous verrez apparaître:
«Allumé?» si l'alerte est désactivée;
«Éteint?» si l'alerte est activée.
– Appuyez sur la touche pour sélectionner l'option indiquée.
– Appuyez sur la touche ou pour sélectionner le volume d'alerte souhaité.
– Appuyez sur la touche .
– Appuyez sur la touche pour quitter le menu.
27
28
27
23
9.8.9 Réglage de l'heure
En mode Veille, l'heure est affichée sur l'écran de l'unité Parent.
– Appuyez sur la touche . «Veilleuse» s'affiche.
– Appuyez plusieurs fois sur la touche jusqu'à ce que «Heure» s'affiche.
– Appuyez sur la touche .
– Appuyez plusieurs fois sur la touche jusqu'à ce que l'option souhaitée s'affiche:
«Régler délai», pour le réglage de l'heure ;
«Format heure», pour sélectionner un format 12 ou 24 heures.
Option «Régler délai» sélectionnée :
– Appuyez sur la touche pour sélectionner l'option indiquée. L'année s'affiche.
– Appuyez sur la touche ou pour sélectionner l'année.
– Appuyez sur la touche .
– Répétez les deux étapes précédentes pour chacun des réglages suivants : mois, jour, heure et minutes.
– Après avoir réglé les minutes, appuyez sur la touche pour confirmer le réglage.
– Appuyez sur la touche pour quitter le menu.
Option «Format heure» sélectionnée :
– Appuyez sur la touche .
– Vous verrez apparaître :
«12 heures?» si l'heure est réglée sur un format 24 heures et que vous souhaitez passer à un
format 12 heures;
« 24 heures?» si l'heure est réglée sur un format 12 heures et que vous souhaitez passer à un
format 24 heures.
– Appuyez sur la touche pour sélectionner l'option indiquée.
– Appuyez sur la touche pour quitter le menu.
23
28
27
28
27
26
27
27
23
27
• L'heure affichée sur l'unité Parent est transmise par l'unité Bébé. Si l'unité Bébé est éteinte,
l'heure affichée sur l'unité Parent sera réinitialisée et vous devrez la régler à nouveau.
9.8.10Réglage du Délai repas
Vous pouvez régler une alerte horaire sur le Babytalker 3500 SEDS pour le repas de votre bébé.
– Appuyez sur la touche . «Veilleuse» s'affiche.
– Appuyez plusieurs fois sur la touche jusqu'à ce que «Délai repas» s'affiche.
– Appuyez sur la touche .
– Appuyez plusieurs fois sur la touche jusqu'à ce que l'option souhaitée s'affiche :
«Régler délai», pour le réglage de l'heure du repas ;
«Alarme», pour activer ou désactiver l'alerte;
«Intervalle», si vous souhaitez que des alertes repas retentissent à des intervalles fixes durant la
journée.
Option «Régler délai» sélectionnée :
– Appuyez sur la touche pour sélectionner l'option indiquée. L'heure s'affiche.
– Appuyez sur la touche ou pour sélectionner l'heure.
34
23
28
27
28
27
26
Page 35

Babytalker 3500 SEDS
FRANÇAIS
28
19
– Appuyez sur la touche .
– Répétez les deux étapes précédentes pour régler les minutes.
– Après avoir réglé les minutes, appuyez sur la touche pour confirmer le réglage.
– Appuyez sur la touche pour quitter le menu.
Option «Alarme» sélectionnée:
– Appuyez sur la touche .
– Vous verrez apparaître :
«Allumé?», pour activer ou désactiver l'alerte ; l'icône s'affichera à l'écran.
«Éteint?», pour désactiver l'alerte.
– Appuyez sur la touche pour sélectionner l'option indiquée.
– Appuyez sur la touche pour quitter le menu.
Option «Intervalle» sélectionnée :
– Appuyez sur la touche pour sélectionner l'option indiquée. L'heure s'affiche.
– Appuyez sur la touche ou pour sélectionner l'heure.
– Appuyez sur la touche .
– Répétez les deux étapes précédentes pour régler les minutes.
– Après avoir réglé les minutes, appuyez sur la touche pour confirmer le réglage.
– Appuyez sur la touche pour quitter le menu.
27
27
23
27
27
23
27
26
27
27
23
9.9 Lampe DEL
L'unité Parent est équipée d'une lampe DEL intégrée .
– Appuyez sur la touche pour activer la lampe DEL.
25
10 Nettoyage et maintenance
Cette section contient d'importantes instructions concernant le nettoyage et la maintenance de l'appareil.
Respectez ces instructions afin d'assurer un fonctionnement parfait et prévenir tout dommage de l'appareil dû à
une maintenance inappropriée.
10.1 Instructions de sécurité
DANGER !
Risque de blessure mortelle due à un choc électrique !
• Arrêtez l'appareil et débranchez-le du secteur avant de le nettoyer.
ATTENTION !
Risque dû à des fuites au niveau des piles
Des fuites au niveau des piles (courantes ou rechargeables) peuvent causer des blessures (irritations
cutanées) ou des dégâts sur l'appareil. Portez des gants de protection.
ATTENTION !
• N'utilisez pas de produits de nettoyage ou de solvants. Ils pourraient endommager le boîtier et couler
à l'intérieur, provoquant ainsi des dégâts irréversibles.
10.2 Nettoyage
– Nettoyez l'appareil avec un chiffon doux et légèrement humide.
– Nettoyez les connecteurs souillés avec une brosse douce.
– Nettoyez les contacts des piles à l'aide d'un tissu sec non pelucheux.
– Si l'appareil entre en contact avec un liquide, éteignez-le immédiatement et retirez les piles.
Essuyez le compartiment des piles à l'aide d'un chiffon doux pour réduire les risques de dégradation.
Laissez le couvercle du compartiment ouvert jusqu'à ce qu'il soit totalement sec.
Attendez que l'appareil soit entièrement sec avant de le réutiliser.
10.3 Maintenance
– Vérifiez les piles (courantes ou rechargeables) de l'appareil et remplacez-les si nécessaire.
– Vérifiez que les connecteurs et les câbles fonctionnent correctement.
35
Page 36

Babytalker 3500 SEDS
ATTENTION !
• Si l'appareil vous semble endommagé, faites-le vérifier par un spécialiste avant de l'utiliser à nouveau.
11 Dépannage
Cette section contient d'importantes instructions concernant la localisation et la correction des problèmes.
Pour éviter tout danger et tout dommage, respectez les instructions suivantes :
11.1 Instructions de sécurité
DANGER !
Risque de blessure mortelle due à un choc électrique !
• Débranchez le câble d'alimentation avant d'essayer de corriger un problème.
ATTENTION !
Risque de danger dû à des réparations incorrectes.
Des réparations incorrectes peuvent exposer les utilisateurs à de sérieux dangers et causer des dégâts sur
l'appareil.
• Ne tentez pas de modifier ou de réparer l'appareil.
• Confiez les réparations sur l'appareil ou les câbles à un spécialiste ou au service après-vente.
• Si vous suspectez que l'appareil est endommagé (par exemple, s'il est tombé au sol), faites-le réviser
par un spécialiste avant de le réutiliser.
11.2 Causes des problèmes et solutions
Le tableau suivant a été conçu pour vous aider à localiser et résoudre les problèmes mineurs.
Problème Cause possible Solution
La batterie de l'unité
Parent ne se recharge
pas.
L'unité Parent ne
s'allume pas (l'écran
reste éteint)
«PAS CONNECTÉ»
s'affiche sur l'écran de
l'unité Parent.
L'unité Parent ne
reproduit pas les sons
détectés par l'unité
Bébé.
Portée limitée et
interférences durant la
transmission.
L'appareil émet un
sifflement aigu.
La prise de la station de charge n'est
pas branchée.
Contacts souillés Nettoyez les contacts de la batterie et
La batterie est défectueuse. Remplacez la batterie.
La batterie n'est pas chargée. Rechargez la batterie.
Appareil défectueux Contactez le service après-vente.
L'unité Bébé n'est pas allumée. Allumez l'unité Bébé.
L'unité Parent et l'unité Bébé sont trop
éloignées.
L'unité Parent n'est pas enregistrée
sur l'unité Bébé
Le volume de l'unité Parent est peut
être réglé sur un niveau trop bas ou il
est éteint.
La sensibilité du micro de l'unité Bébé
est peut être réglée sur un niveau trop
bas.
La portée de transmission de
l'appareil dépend de l'environnement.
Les structures en acier et les murs en
béton peuvent compromettre la
transmission.
L'unité Parent et l'unité Bébé sont trop
rapprochées.
Branchez la prise
de la station de charge avec un chiffon
doux.
Réduisez la distance entre l'unité
Parent et l'unité Bébé.
Enregistrez l'unité Parent sur l'unité
Bébé (voir “11.3 Enregistrez l'unité
Parent sur l'unité Bébé”)
Augmentez le volume de l'unité Parent
Vérifiez la sensibilité VOX et le
réglage du volume de l'unité Parent et
augmentez si nécessaire.
Evitez autant que possible les
obstacles.
Augmentez la distance d'au moins
2 mètres.
36
Page 37

Babytalker 3500 SEDS
FRANÇAIS
211212
2
2
29
11.3 Enregistrez l'unité Parent sur l'unité Bébé
Lorsque la veilleuse de l'unité Bébé clignote et/ou qu'aucune connexion ne peut être établie entre l'unité Parent et
l'unité Bébé (le voyant vert de liaison sur l'unité Parent clignote), l'unité Parent doit être enregistrée sur l'unité
Bébé.
• Vérifiez que l'adaptateur secteur de l'unité Bébé est connecté et branché sur une prise
électrique et que les piles de l'unité Parent sont bien chargées.
– Débranchez l'adaptateur secteur de l'unité Bébé de la prise électrique et retirez la batterie de l'unité
Parent.
– Appuyez sur le commutateur Marche/Arrêt de l'unité Bébé et maintenez-le enfoncé tout en branchant
l'adaptateur secteur sur la prise électrique.
L'unité Bébé s'allume en mode enregistrement.
– Relâchez le commutateur Marche/Arrêt . La veilleuse de l'unité Bébé se met à clignoter pendant 60
secondes.
– Appuyez sur le commutateur Marche/Arrêt de l'unité Parent et maintenez-le enfoncé tout en insérant la
batterie.
L'unité Parent s'allume et les 2 voyants rouges indicateurs du volume se mettent à clignoter. Relâchez
le commutateur Marche/Arrêt .
– Le mode enregistrement s'arrête lorsque l'enregistrement est réussi ou après 60 secondes.
La veilleuse de l'unité Bébé arrête de clignoter ;
Les 2 voyants rouges de l'unité Parent s'éteignent.
– Vous entendrez un long bip une fois l'enregistrement réussi ou bien trois bips courts s'il ne l'est pas.
Vérifiez la liaison entre l'unité Parent et l'unité Bébé.
– Appuyez sur la touche de recherche sur l'unité Bébé et maintenez-la enfoncée pendant 2 secondes.
– L'unité Parent réagit en émettant un signal sonore aigu pendant 30 secondes.
– Appuyez brièvement sur le commutateur Marche/Arrêt de l'unité Parent pour arrêter le signal.
17
29
29
17
6
12 Instructions concernant le stockage et la mise au rebut
• Nous vous conseillons de conserver la boîte et les matériaux d'emballage pour le cas où
vous devriez transporter l'appareil.
12.1 Stockage
Retirez les piles (courantes ou rechargeables) de l'unité Parent et de l'unité Bébé.
Rangez l'appareil dans un endroit sec.
12.2 Mise au rebut des matériaux d'emballage
L'emballage est fabriqué en matériaux écologiques que vous pouvez déposer dans votre point local de
collecte de déchets pour recyclage.
12.3 Mise au rebut (protection environnementale)
Éliminez l'appareil conformément aux dispositions de la directive 2002/96/CE relative aux déchets
d'équipements électriques et électroniques (DEEE), concernant les appareils électriques et
électroniques mis au rebus. Contactez votre service municipal chargé des collectes de déchets pour en
savoir davantage.
Éliminez les batteries (courantes ou rechargeables) de manière écologique, selon les réglementations
en vigueur dans votre pays.
13 Caractéristiques techniques
Fréquence 1880 GHz à 1900 Ghz
Portée Extérieur: jusqu'à 600 m (jusqu'à 300 m en mode SEDS)
Intérieur : jusqu'à 50 m (jusqu'à 25 m en mode SEDS)
Température de fonctionnement 15 °C à 35 °C
Humidité relative comprise en 20 % et 75 %
37
Page 38

Babytalker 3500 SEDS
Unité Parent
Piles rechargeables Batterie (3,6 V NiMH) (fournie)
Adaptateur secteur (KSS 05-060-0300G) Entrée : 230 V CA/50 Hz/150 mA
Sortie : 6 V CC/300 mA
Dimensions 117 x 62 x 72 mm environ
Poids 98 g (sans batterie)
Unité Bébé
Piles 3 piles alcalines (LR06/AA) (non fournies)
Adaptateur secteur (KSS 05-060-0300G) Entrée : 230 V CA/50 Hz/150 mA
Sortie : 6 V CC/300 mA
Dimensions 137 x 60 x 101 mm environ
Poids 141 g (sans les piles)
14 Déclaration de conformité CE
TOPCOM EUROPE NV déclare par la présente que ce produit est conforme aux conditions essentielles et aux
autres dispositions pertinentes de la directive 1999/5/CE.
La déclaration de conformité peut être consultée sur http://www.topcom.net/cedeclarations.asp
15 Garantie Topcom
15.1 Période de garantie
Les appareils Topcom bénéficient d'une période de garantie de 24 mois. La période de garantie prend effet le jour
de l'achat du nouvel appareil. Il n'y a aucune garantie sur les piles standard ou rechargeables (de type AA/AAA).
Les accessoires et les défauts qui ont un effet nuisible sur le fonctionnement ou la valeur de l'appareil ne sont pas
couverts.
La garantie s'applique uniquement sur présentation du reçu d'achat original ou une copie de celui-ci sur lequel
figurent la date de l'achat et le modèle de l'appareil.
15.2 Mise en œuvre de la garantie
Tout appareil défectueux doit être retourné à un centre de service après-vente Topcom, accompagné d'un ticket
d'achat valable.
En cas de panne pendant la période de garantie, Topcom ou son centre de service après-vente officiel réparera
gratuitement les dysfonctionnements dus à un vice de matière ou de fabrication, en réparant ou en remplaçant les
appareils ou les pièces défectueux. En cas de remplacement, la couleur et le modèle peuvent être différents de
ceux de l'appareil acheté initialement.
La date d'achat initiale détermine le début de la période de garantie. La période de garantie n'est pas prolongée si
l'appareil est remplacé ou réparé par Topcom ou son centre de service après-vente officiel.
15.3 Exclusions de garantie
Les dommages et les pannes causés par un mauvais traitement ou une utilisation incorrecte et les dommages qui
résultent de l'utilisation de pièces et d'accessoires non originaux ne sont pas couverts par la garantie.
La garantie ne couvre pas les dommages causés par des éléments extérieurs tels que la foudre, l'eau et le feu, ni
les dommages provoqués par le transport.
Aucune garantie ne pourra être invoquée si le numéro de série indiqué sur les appareils a été modifié, supprimé
ou rendu illisible.
Aucune garantie ne peut non plus être invoquée si l'appareil a été réparé ou modifié par l'acheteur.
38
Page 39

Babytalker 3500 SEDS
DEUTSCH
1 Allgemein
Sehr geehrte Kundin, sehr geehrter Kunde, wir empfehlen das Lesen der hier gebotenen Informationen. Auf diese
Art und Weise lernen Sie die Geräte und deren Funktionen am besten kennen.
2 Informationen zu dieser Bedienungsanleitung
Diese Bedienungsanleitung enthält Informationen zu dem Babyfon Babytalker 3500 SEDS (im Folgenden als „die
Geräte“ bezeichnet) und bietet wichtige Anweisungen zu Inbetriebnahme, Sicherheit, korrekter Verwendung und
Wartung der Geräte.
Bewahren Sie Bedienungsanleitung stets in der Nähe der Geräte auf. Jede Person, die die Geräte verwendet,
repariert oder reinigt, sollte die Bedienungsanleitung lesen und/oder hinzuziehen.
Bewahren Sie die Bedienungsanleitung an einem sicheren Ort auf, und übergeben Sie sie zusammen mit den
Geräten an den nächsten Besitzer.
3 Urheberrecht
Dieses Dokument ist urheberrechtlich geschützt.
Alle Rechte, einschließlich die der gesamten oder teilweisen photomechanischen Wiedergabe, Vervielfältigung
und Verbreitung mittels bestimmter Verfahren (wie Datenverarbeitung, Datenträger und Datennetzwerke) sowie
inhaltlicher und technischer Änderungen, bleiben vorbehalten.
4 Achtung
GEFAHR
Dieses Warnzeichen weist auf eine unmittelbar drohende Gefahrensituation hin.
Diese Gefahrensituation kann zu schweren oder tödlichen Verletzungen führen und ist daher unbedingt zu
vermeiden.
VORSICHT
Dieses Warnzeichen weist auf eine mögliche Gefahrensituation hin.
Diese Gefahrensituation kann zu Verletzungen oder materiellen Schäden führen und ist daher unbedingt zu
vermeiden.
• Dieses Zeichen weist auf Informationen hin, die die Verwendung der Geräte erleichtern.
5 Korrekte Verwendung
Diese Geräte sind ausschließlich für den privaten (nicht-kommerziellen) Gebrauch zur Überwachung von Babys in
geschlossenen Räumen vorgesehen. Andere Verwendungsarten sind nicht geeignet und können zu
Gefahrensituationen führen.
Befolgen Sie stets die Anweisungen in dieser Bedienungsanleitung.
Wenn die Geräte nicht ordnungsgemäß verwendet werden, erlischt die Garantie für Schäden oder Verluste.
Der Benutzer der Geräte haftet für alle Risiken.
6Sicherheit
6.1 Stromschlaggefahr
GEFAHR
Der Kontakt mit Strom führenden Leitungen und Teilen kann tödlich sein.
Beachten Sie die folgenden Sicherheitsanweisungen, um die Gefahr von Stromschlägen zu vermeiden:
• Verwenden Sie ausschließlich das Netzteil, das im Lieferumfang der Geräte enthalten ist.
• Verwenden Sie die Geräte nicht, wenn Netzteil, Netzkabel oder Stecker beschädigt sind.
• Das Gehäuse des Netzteils darf unter keinen Umständen geöffnet werden. Bei Berührung von Strom
führenden Kontakten oder Verbindungen oder durch Änderungen an den elektrischen oder
mechanischen Teilen entsteht Stromschlaggefahr.
• Schützen Sie die Geräte vor Feuchtigkeit und dem Eindringen von Feuchtigkeit. Schützen Sie die
Geräte zudem vor Staub. Trennen Sie das Netzteil unverzüglich von der Stromversorgung, wenn das
Gerät mit Feuchtigkeit in Kontakt kommt.
• Trennen Sie das Netzteil von der Stromversorgung, wenn es nicht ordnungsgemäß funktioniert,
während eines Gewitters oder wenn es gereinigt werden soll.
39
Page 40

Babytalker 3500 SEDS
• Schützen Sie das Kabel vor heißen Oberflächen oder anderen Gefahrenquellen. Achten Sie darauf,
dass das Kabel nicht geklemmt wird.
6.2 Verwenden von Batterien und Akkus
VORSICHT
Wenn die Anweisungen zur Verwendung der Batterien/Akkus nicht beachtet werden, können
gefährliche Situationen entstehen.
• Verwenden Sie stets Batterien oder Akkus des selben Typs.
• Achten Sie darauf, dass die Batterien/Akkus mit richtiger Polarität eingelegt werden. Falsche Polarität
bei dem Einlegen der Batterien/Akkus kann zu Schäden an den Batterien/Akkus und den Geräten
führen.
• Werfen Sie Batterien/Akkus niemals in Feuer, es besteht Explosionsgefahr.
• Achten Sie darauf, dass die Batterie-/Akkuklemmen niemals einander oder andere
Metallgegenstände, sei es versehentlich oder vorsätzlich, berühren. Dies führt möglicherweise zu
Überhitzung, Explodieren oder Feuer.
• Bewahren Sie Batterien/Akkus außerhalb der Reichweite von Kindern auf. Wenden Sie sich
unverzüglich an einen Arzt, wenn eine Batterie/ein Akku verschluckt wurde.
• Wenn Flüssigkeit aus den Batterien/Akkus austritt, kann diese die Geräte dauerhaft beschädigen.
Besondere Vorsicht ist bei dem Handhaben von beschädigten oder auslaufenden Batterien/Akkus
geboten, da Verätzungsgefahr besteht. Tragen Sie Sicherheitshandschuhe.
• Entfernen Sie die Batterien/Akkus aus den Geräten, wenn diese über einen längeren Zeitraum nicht
verwendet werden.
6.3 Grundlegende Sicherheitshinweise
Beachten Sie zur sicheren Verwendung der Geräte stets die folgenden Sicherheitshinweise:
– Die Geräte müssen stets von Erwachsenen zusammengebaut werden. Achten Sie während des
Zusammenbauens darauf, dass sich kleine Teile außerhalb der Reichweite von Kindern befinden.
– Lassen Sie Kinder nicht mit den Geräten oder seinen Teilen spielen.
– Achten Sie darauf, dass sich das Babyfon und das Netzkabel stets außerhalb der Reichweite des Babys
befinden.
– Bedecken Sie das Babyfon nicht mit einem Handtuch, einer Decke oder Ähnlichem.
– Defekte Teile müssen stets durch Original-Ersatzteile ausgetauscht werden. Andere Teile erfüllen
möglicherweise die Sicherheitsstandards nicht.
– Schalten Sie Ihr Babyfon aus, wenn Sie durch ein Warnzeichen, eine Anzeige oder einen anderen
Hinweis dazu aufgefordert werden. Die Geräte in Krankenhäusern und anderen Einrichtungen des
Gesundheitswesens reagieren möglicherweise empfindlich auf Hochfrequenzsignale von externen
Quellen.
7 Verwendung
Das Babyfon besteht aus zwei Geräten: Elterneinheit und Babyeinheit Sie werden über eine Drahtlosverbindung
gemäß DECT-Standard miteinander verbunden.
Dank der DECT-Technologie sind die Geräte vor Abhören und Interferenzen durch andere Geräte geschützt.
Die Babyeinheit beginnt mit der Übertragung, sobald das Mikrofon ein Geräusch ermittelt. Das Geräusch wird von
der Elterneinheit wiedergegeben. Die Empfindlichkeit des Mikrofons kann durch den Benutzer eingestellt werden
(siehe ‚9.8.7 Einstellen der Mikrofonempfindlichkeit (VOX)‘).
• Ein Babyfon kann niemals die Aufsicht eines Erwachsenen ersetzen und dient lediglich der
Unterstützung.
7.1 Übersicht über die Babyeinheit
Siehe Abbildung auf der Ausklappseite.
1 Antenne
2 Nachtlicht
3 Display
4 Lautsprecher
5Mikrofon
6 Paging-Taste
40
A
7 Schlaflied-Taste
8 Nachtlicht-Taste
9 Lautstärke erhöhen
10 Abspiel-Taste
11 Lautstärke verringern
12 Ein-/Aus-Schalter
13 Batterie-/Akkufachabdeckung
14 Netzteilanschluss
15 Befestigungsclips
16 SEDS-Strahlungsschalter
Page 41

Babytalker 3500 SEDS
DEUTSCH
PTT
C
90° MA
OPEN
13
7.2 Übersicht über die Elterneinheit
Siehe Abbildung auf der Ausklappseite.
17 Lautstärke-LEDs
18 Lautsprecher
19 LED-Taschenlampe
20 Mikrofon
21 Verbindungs-LED
22 Display
23 Paging-Taste
24 Sprech-Taste
25 LED-Taschenlampen-Taste
B
26 Lautstärke erhöhen / Nächstes Menüelement
27 Bestätigungs-Taste
28 Lautstärke verringern / Vorheriges Menüelement
29 Ein-/Aus-Schalter
30 Gürtel/Wandbefestigungscllip
31 Batterie-/Akkufachabdeckung
32 Netzteil
PTT
33 Ladeanzeige
7.3 Display-Beschreibung
Siehe Abbildung auf der Ausklappseite.
Temperatur (a) Zeigt die Temperatur an, die von der Babyeinheit gemessen wird. Blinkt, wenn
sich die Temperatur außerhalb des eingestellten Bereichs befindet.
Fütterungsalarm (b) Wird bei Fütterungsalarm angezeigt.
Schlaflied (c) Wird bei Wiedergabe eines Schlafliedes angezeigt.
Informationszeile (d) Zeigt Informationen zu verschiedenen Einstellungen wie beispielsweise Datum
und Uhrzeit auf der Elterneinheit oder das auf der Babyeinheit ausgewählte
Schlaflied an.
Batterieanzeige (e) Zeigt den Ladestand des Akkus an.
- Akku vollständig aufgeladen
- Niedriger Akkustand
Überprüfen (f) Wird bei Aktivierung des Nachtlichts an der Babyeinheit angezeigt.
Empfindlichkeit (g) Wird bei Einstellung der Empfindlichkeit auf der Elterneinheit angezeigt.
8 Inbetriebnahme
8.1 Inhalt des Pakets
Die Geräte werden standardmäßig mit folgenden Teilen geliefert:
- 1 Babyeinheit
- 1 Elterneinheit
- 1 Ladestation
- 2 Netzteile
8.2 Einlegen der Batterien in die Babyeinheit
• Die Babyeinheit kann mit 3 AA-Batterien (LR06/Penlight, wir empfehlen Alkali-Batteriezellen)
oder dem im Lieferumfang enthaltenen Netzteil betrieben werden.
• Es können keine Akkus mit der Babyeinheit aufgeladen werden.
• Es empfiehlt sich, auch bei Verwendung des Netzteils die Batterien stets im Gerät zu lassen.
Das Gerät schaltet dann bei einer Unterbrechung der Stromversorgung automatisch auf
Batteriebetrieb um.
– Drehen Sie den Gürtelclip nach oben.
– Drehen Sie die Schraube auf der Abdeckung des Batteriefachs an der
Rückseite der Babyeinheit um 90° gegen den Uhrzeigersinn. Entfernen Sie
anschließend die Abdeckung des Batteriefachs.
• Lösen Sie dabei die Schraube nicht vollständig.
15
- 1 Bedienungsanleitung
- 1 Service-Karte
- 1 NiMh-Akkusatz
41
Page 42

– Legen Sie 3 AA-Alkali-Batteriezellen (LR06/Penlight) in das Batteriefach
SEDS
LONG
ECO
6V/300mA
+
+
+
+
-
AA x 1
+
-
AA
x 1
+
-
A
A
x
1
14
90° MAX
OPEN
30
31
32
33
29
22
12
3
ein. Achten Sie dabei auf die korrekte Polarität.
– Schließen Sie das Batteriefach.
• Verwenden Sie niemals zugleich gebrauchte und
neue Batteriezellen.
8.3 Anschließen der Babyeinheit an die
Stromversorgung
Stecken Sie den kleinen Stecker des Netzteils in den Netzanschluss der
Babyeinheit und das andere Ende des Netzteilkabels in die
Steckdose (230 V / 50 Hz).
VORSICHT
• Die Steckdose muss leicht zugänglich sein, damit das
Netzkabel im Notfall schnell von der Stromversorgung
getrennt werden kann.
• Verwenden Sie nur das im Lieferumfang enthaltene Netzteil
(6 V DC / 300 mA).
8.4 Einlegen der Akkus in die Elterneinheit
Siehe Abbildung auf der Ausklappseite.
B
Babytalker 3500 SEDS
SEDS
LONG
ECO
6V/300mA
VORSICHT
• Verwenden Sie für die Elterneinheit ausschließlich den im Lieferumfang enthaltenen NiMH-Akkusatz
– Drehen Sie den Gürtelclip nach oben.
– Drehen Sie die Schraube auf der Abdeckung des Akkufachs an der
Rückseite der Elterneinheit um 90° gegen den Uhrzeigersinn. Entfernen
Sie anschließend die Abdeckung des Akkufachs.
• Lösen Sie dabei die Schraube nicht vollständig
– Legen Sie den NiMH-Akkusatz in das entsprechende Fach ein.
Achten Sie darauf, dass die Lasche des Akkusatzes in die
entsprechenden Aussparungen passt und der Polarität der Abbildung
(B) entspricht.
– Schließen Sie das Akkufach vorsichtig, und drehen Sie den Gürtelclip nach unten.
8.5 Akkus in die Elterneinheit einlegen
– Stecken Sie den kleinen Stecker des Netzteils in den Netzanschluss der
Ladestation, und stecken Sie den Stecker des Netzteils in eine Steckdose
(230 V / 50 Hz).
– Setzen Sie die Elterneinheit in die Ladestation ein. Die rote Ladeanzeige
beginnt zu leuchten.
• Die Ladezeit der Akkus beträgt etwa 10 Stunden.
AB
+
9 Bedienung und Verwendung
9.1 Ein- und Ausschalten der Baby- und Elterneinheit
– Drücken Sie an der Elterneinheit den Ein/Aus-Schalter , um das Gerät einzuschalten. Das Display
wird aktiviert.
– Drücken Sie an der Babyeinheit den Ein/Aus-Schalter , um das Gerät einzuschalten. Das Display
wird aktiviert.
42
Page 43

Babytalker 3500 SEDS
DEUTSCH
21
23
27
28
27
23
21
21
20
17
21
6
29
SEDS
LONG
ECO
16
• Die Elterneinheit versucht nun, ein Verbindung mit der Babyeinheit herzustellen. Wenn die
Verbindungs-LED aufleuchtet, wurde eine Verbindung hergestellt. Wenn dies nicht der
Fall ist, siehe Seite 49.
– Drücken Sie den Ein/Aus-Schalter , um die Elterneinheit auszuschalten (gedrückt halten, bis die
29
Anzeige auf dem Display erlischt).
– Drücken Sie den Ein/Aus-Schalter , um die Babyeinheit auszuschalten (gedrückt halten, bis die
12
Anzeige auf dem Display erlischt).
9.2 Einstellen der Displaysprache
– Drücken Sie die Taste . ‚Nachtlicht‘ wird angezeigt.
– Drücken Sie wiederholt die Taste , bis ‚Sprache‘ angezeigt wird.
26
– Drücken Sie die Taste . Die aktuelle Sprache wird angezeigt.
– Drücken Sie wiederholt die Taste oder , bis die gewünschte Sprache angezeigt wird.
26
– Bestätigen Sie die ausgewählte Sprache mit der Taste .
– Drücken Sie die Taste , um das Menü zu verlassen.
9.3 Überprüfen der Verbindung zwischen Elterneinheit und Babyeinheit
Bei der ersten Verwendung des Babyfons sollte stets die Drahtlosverbindung überprüft werden.
– Bringen Sie die Elterneinheit und die Babyeinheit in den selben Raum, aber stellen Sie sie in einem
Abstand von mindestens 2 Metern auf.
– Schalten Sie beide Geräte ein. Die Elterneinheit versucht nun, eine Verbindung mit der Babyeinheit
herzustellen.
– Die Verbindungs-LED an der Elterneinheit blinkt grün, während das Gerät versucht, eine Verbindung
herzustellen.
Die LED leuchtet dauerhaft auf, wenn eine Verbindung hergestellt wurde.
– Die von dem Mikrofon ermittelten Geräusche werden von der Elterneinheit wiedergegeben.
– Die Lautstärke der wiedergegebenen Geräusche wird von den Lautstärke-LEDs oben an der
Elterneinheit angezeigt.
Je höher dabei die Lautstärke ist, desto mehr LEDs leuchten auf.
– Wenn die maximale Lautstärke erreicht ist, wird ein Signalton ausgegeben.
– Wenn keine Verbindung hergestellt wurde, wird als Warnsignal ein zweifacher Signalton ausgegeben und
die Verbindungs-LED blinkt.
– Verringern Sie den Abstand zwischen Elterneinheit und Babyeinheit, bis erneut eine Verbindung
hergestellt wurde.
9.4 Suchen nach der Elterneinheit (Paging-Funktion)
– Drücken Sie die Paging-Taste auf der Babyeinheit, und halten Sie diese mindesten 2 Sekunden
lang gedrückt.
– Nun gibt die Elterneinheit 30 Sekunden lang einen hohen Signalton ab. Dadurch wird die Suche nach der
Elterneinheit erleichtert.
– Drücken Sie kurz auf den Ein-/Aus-Schalter auf der Elterneinheit, um den Ton zu deaktivieren.
9.5 Einstellen des SEDS-Schalters
Der Babytalker 3500 SEDS nutzt die einzigartige SEDS-Technologie (Smart ECO
Distance Switch), mit der Eltern die von dem Gerät ausgehende Strahlungsintensität
einstellen können. Zwei Möglichkeiten stehen zur Auswahl: Der Modus für den großen
Übertragungsabstand oder der ECO-Modus mit geringerem Stromverbrauch und
niedrigeren Strahlungswerten.
Bringen Sie den Schalter in die folgende Position:
– ‚LONG‘ für maximale Reichweite von 600 m (ohne Hindernisse).
– ‚ECO‘ für auf die Hälfte reduzierte Strahlungswerte und geringeren Stromverbrauch. Bei dieser
Einstellung beträgt die Reichweite höchstens 300 m (ohne Hindernisse)
16
43
Page 44

9.6 Sprechen mit Ihrem Baby
PTT
24
PTT
24
7
26
28
17
9
11
23
23
23
27
27
8
Sie können mithilfe des Babyfons auch mit Ihrem Baby sprechen.
• Gewöhnen Sie Ihr Baby an die Verwendung der Sprechfunktion, bevor Sie diese tatsächlich
anwenden.
Babytalker 3500 SEDS
– Drücken Sie die Sprechtaste auf der Elterneinheit, und halten Sie diese gedrückt.
PTT
– Halten Sie die Elterneinheit vertikal. Das Mikrofon sollte ca. 10 cm von Ihrem Mund entfernt sein.
Sprechen Sie anschließend in das Mikrofon.
– Lassen Sie die Taste los, wenn Sie die Übertragung beendet haben.
PTT
9.7 Wiedergabe eines Schlafliedes
Auf der Babyeinheit stehen drei vorprogrammierte Schlaflieder zur Auswahl.
Sie können die Einstellungen für die Wiedergabe eines Schlafliedes auf der Elterneinheit (siehe ‚9.8.5 Einstellen
eines Schlafliedes‘) oder der Babyeinheit vornehmen.
– Drücken Sie für die Wiedergabe des zurzeit ausgewählten Schlafliedes oder zum Anhalten der
Wiedergabe auf der Babyeinheit die Taste .
10
– Drücken für die Auswahl eines anderen Schlafliedes wiederholt auf die Taste , bis das gewünschte
Schlaflied wiedergegeben wird.
9.8 Einstellungen
9.8.1 Einstellen der Wiedergabelautstärke der Elterneinheit
Es stehen sechs Lautstärkeeinstellungen zur Auswahl. Die niedrigste Einstellung lautet ‚Lautst. aus‘.
– Drücken Sie die Taste , um die Lautstärke zu erhöhen.
– Drücken Sie die Taste , um die Lautstärke zu verringern.
• Wenn die Einstellung ‚Lautst. aus‘ gewählt wurde, werden die von der Babyeinheit
ermittelten Geräusche nur durch die Lautstärke-LEDs angezeigt.
9.8.2 Einstellen der Wiedergabelautstärke der Babyeinheit
• Diese Einstellung bezieht sich auf die Funktionen ‚Sprechen mit Ihrem Baby‘ und
‚Wiedergabe eines Schlafliedes‘.
– Drücken Sie die Taste , um die Lautstärke zu erhöhen.
– Drücken Sie die Taste , um die Lautstärke zu verringern.
9.8.3 Andere Einstellungen
Folgende Einstellungen können über das Menü (Taste ) an der Elterneinheit vorgenommen werden:
• Nachtlicht
• Schlaflied
• Mikrofonempfindlichkeit ‚Empfindlk.‘
• Signalton ‚Geräu. Alarm‘
• Temperatur (Geräte, Reichweite, Alarme)
•Uhr
• Fütterungszeit
• Display-Sprache ‚Sprache‘ (siehe ‚9.2 Einstellen der
Displaysprache‘)
Verwenden Sie die Taste oder , um zwischen den einzelnen Menüelementen zu navigieren.
Drücken Sie zum Auswählen der angezeigten Einstellung die Taste .
26 28
27
Drücken Sie zum Zurückkehren zu einem vorherigen Menüelement oder zum Verlassen des Menüs die Taste
.
9.8.4 Ein-/Ausschalten des Nachtlichts
– Drücken Sie die Taste . ‚Nachtlicht‘ wird angezeigt.
– Drücken Sie die Taste . Wenn das Nachtlicht deaktiviert wurde, wird
‚Ein?‘ angezeigt. Wenn das Nachtlicht aktiviert wurde, wird
‚Aus?‘ angezeigt.
– Drücken Sie zum Auswählen der angezeigten Option die Taste .
– Drücken Sie zum Verlassen des Menüs die Taste .
• Sie können das Nachtlicht auch direkt an der Babyeinheit ein- bzw. ausschalten, indem Sie
die Taste drücken.
23
44
Page 45

Babytalker 3500 SEDS
DEUTSCH
23
27
28
27
28
27
23
27
23
28
27
28
27
27
272327
9.8.5 Einstellen eines Schlafliedes
– Drücken Sie die Taste . ‚Nachtlicht‘ wird angezeigt.
– Drücken Sie wiederholt die Taste , bis ‚Schlaflied‘ angezeigt wird.
– Drücken Sie die Taste .
– Drücken Sie wiederholt die Taste oder , bis die gewünschte Option angezeigt wird:
‚Stopp?‘ wenn die Wiedergabe des Schlafliedes unterbrochen werden soll (nur bei Wiedergabe eines
Schlafliedes verfügbar);.
‚Neu wählen‘ wenn ein anderes Schlaflied ausgewählt werden soll (es stehen 3 Schlaflieder zur
Auswahl);
‚Abspielen?‘ wenn Sie das zurzeit ausgewählte Schlaflied über die Babyeinheit wiedergeben möchten
(nicht verfügbar, während ein Schlaflied wiedergegeben wird).
– Drücken Sie zum Auswählen der angezeigten Option die Taste .
Bei Auswahl der Option ‚Neu wählen‘:
– Drücken Sie wiederholt die Taste oder , bis das gewünschte Schlaflied oder ‚Alle absp.‘
angezeigt wird.
• Wenn ‚Alle absp.‘ gewählt wurde, werden alle drei Schlaflieder nacheinander
wiedergegeben.
– Drücken Sie zum Auswählen der angezeigten Option die Taste .
– Drücken Sie zum Verlassen des Menüs die Taste .
9.8.6 Einstellen der Temperaturüberwachung
Im Standby-Modus wird die von der Babyeinheit gemessene Raumtemperatur (+/– 2 °C) auf der Elterneinheit
angezeigt. Folgende Einstellungen können über das Untermenü vorgenommen werden:
• Temperaturbereich: ermöglicht das Einstellen des Temperaturbereichs. Wenn die gemessene Temperatur
sich außerhalb dieses Bereichs befindet, wird dies auf dem Display durch (‘‚Hoch‘ oder ‚Niedrig‘ angezeigt.
Dabei blinkt die Anzeige.
• Temp. Alarm: für die Auswahl eines zweifachen Signaltons, wenn sich die Temperatur außerhalb des
erlaubten Bereichs befindet.
• Temperatureinheit: für die Auswahl der Anzeige in Celsius (°C) oder Fahrenheit (°F).
– Drücken Sie die Taste . ‚Nachtlicht‘ wird angezeigt.
– Drücken Sie wiederholt die Taste , bis ‚Temperatur‘ angezeigt wird.
– Drücken Sie die Taste .
– Drücken Sie wiederholt die Taste , bis die gewünschte Option angezeigt wird:
‘Bereichswahl’, für die Einstellung des Temperaturbereichs;
‚Temp. Alarm‘ für die Einstellung eines Temperatur-Signaltons;
‚Grad F‘ für die Anzeige in Fahrenheit (°F);
‚Grad C‘ für die Anzeige in Celsius (°C).
– Drücken Sie zum Auswählen der angezeigten Option die Taste .
Bei Auswahl der Option ‚Bereichswahl‘:
– Drücken Sie wiederholt die Taste oder , bis der gewünschte Höchstwert angezeigt wird
(max. 39 °C).
– Drücken Sie die Taste .
– Drücken Sie wiederholt die Taste oder , bis der gewünschte Mindestwert angezeigt wird
(mind. 39 °C).
– Drücken Sie die Taste .
– Drücken Sie zum Verlassen des Menüs die Taste .
Wenn die Option ‚Temp. Alarm‘ gewählt wurde, wird Folgendes angezeigt:
‚Ein?‘ wenn der Alarm deaktiviert wurde;
‚Aus?‘ wenn der Alarm aktiviert wurde.
– Drücken Sie zum Auswählen der angezeigten Option die Taste .
– Drücken Sie die Taste oder , um die gewünschte Lautstärke für den Alarm auszuwählen.
– Drücken Sie die Taste .
– Drücken Sie zum Verlassen des Menüs die Taste .
Bei Auswahl der Option ‚Grad F‘ oder ‚Grad C‘:
– Drücken Sie zum Auswählen der angezeigten Option die Taste .
– Drücken Sie zum Verlassen des Menüs die Taste .
26 28
28
26
26
23
28
28
26
26
23
23
45
Page 46

Babytalker 3500 SEDS
23
27
27
23
27
27
27
23
28
27
28
27
26
28
27
27
23
27
27
9.8.7 Einstellen der Mikrofonempfindlichkeit (VOX)
Die Empfindlichkeit für die Geräuscherkennung (VOX) kann vom Benutzer eingestellt werden. Wenn ein hoher
Wert für die Empfindlichkeit gewählt wurde, ermittelt die Babyeinheit auch schwächere Geräusche.
– Drücken Sie die Taste . ‚Nachtlicht‘ wird angezeigt.
– Drücken Sie wiederholt die Taste , bis ‚Empfindlk.‘ angezeigt wird.
– Drücken Sie die Taste .
– Drücken Sie wiederholt die Taste oder , bis die gewünschte Empfindlichkeit angezeigt wird.
• Die VOX-Empfindlichkeit wird durch einen schwarzen Balken auf dem Display angezeigt:
- hohe Empfindlichkeit
- niedrige Empfindlichkeit
– Drücken Sie die Taste .
– Drücken Sie zum Verlassen des Menüs die Taste .
9.8.8 Einstellen des Geräusch-Alarms
Die Empfindlichkeit der Geräuschermittlung wird durch die Anzahl der LEDs oben an der Elterneinheit
angezeigt. Wenn für die Lautstärkeregelung an der Einheit die Einstellung ‚Lautst. aus‘ gewählt wurde, wird ein
Signalton ausgegeben, sobald der von der Babyeinheit ermittelte Geräuschpegel den Bereich der roten LEDs
erreicht.
– Drücken Sie die Taste . ‚Nachtlicht‘ wird angezeigt.
– Drücken Sie wiederholt die Taste , bis ‚Geräu. Alarm.‘ angezeigt wird.
– Drücken Sie die Taste .
– Folgendes wird angezeigt:
‚Ein?‘ wenn der Alarm deaktiviert wurde;
‚Aus?‘ wenn der Alarm aktiviert wurde.
– Drücken Sie zum Auswählen der angezeigten Option die Taste .
– Drücken Sie die Taste oder , um die gewünschte Lautstärke für den Alarm auszuwählen.
– Drücken Sie die Taste .
– Drücken Sie zum Verlassen des Menüs die Taste .
26 28
28
26 28
23
17
28
23
9.8.9 Einstellen der Uhr
Im Standby-Modus wird die Zeit auf dem Display der Elterneinheit angezeigt.
– Drücken Sie die Taste . ‚Nachtlicht‘ wird angezeigt.
– Drücken Sie wiederholt die Taste , bis ‚Uhr‘ angezeigt wird.
– Drücken Sie die Taste .
– Drücken Sie wiederholt die Taste , bis die gewünschte Option angezeigt wird:
‚Zeit einst‘ für das Einstellen der Uhr;
‚Stundeformat‘ für die Auswahl des 12-Std.- bzw. 24-Std.-Formats
Bei Auswahl der Option ‚Zeit einst‘:
– Drücken Sie zum Auswählen der angezeigten Option die Taste . Das Jahr wird angezeigt.
– Drücken Sie die Taste oder , um das Jahr auszuwählen.
– Drücken Sie die Taste .
– Wiederholen Sie die genannten Schritte für jede der folgenden Einstellungen: Monat, Tag, Stunde und
Minute.
– Drücken Sie nach dem Einstellen der Minuten die Taste , um die Einstellung zu bestätigen.
– Drücken Sie zum Verlassen des Menüs die Taste .
Bei Auswahl der Option ‚Stundeformat‘:
– Drücken Sie die Taste .
– Folgendes wird angezeigt:
‚12 Std.?‘ wenn das 24-Std.-Format für die Uhr ausgewählt wurde und Sie in das 12-Std.-Format
wechseln möchten;
‚24 Std.?‘ wenn das 12-Std.-Format für die Uhr ausgewählt wurde und Sie in das 24-Std.-Format
wechseln möchten.
– Drücken Sie zum Auswählen der angezeigten Option die Taste .
– Drücken Sie zum Verlassen des Menüs die Taste .
23
• Die auf der Elterneinheit angezeigte Uhr wird durch die Babyeinheit übertragen. Wenn die
Babyeinheit ausgeschaltet wird, setzt sich die Uhr auf der Elterneinheit zurück und müssen
Sie die Uhr erneut einstellen.
46
Page 47

Babytalker 3500 SEDS
DEUTSCH
23
27
27
27
27
27
27
27
19
25
9.8.10Einstellen der Fütterungszeit
Sie können mithilfe des Babytalker 3500 SEDS eine Alarmzeit für die Fütterungszeit Ihres Babys einstellen.
– Drücken Sie die Taste . ‚Nachtlicht‘ wird angezeigt.
– Drücken Sie wiederholt die Taste , bis ‚Fütterung‘ angezeigt wird.
– Drücken Sie die Taste .
– Drücken Sie wiederholt die Taste , bis die gewünschte Option angezeigt wird:
‚Zeit einst'‘ für das Einstellen der Fütterungszeit;
‚Alarm‘ für die Aktivierung bzw. Deaktivierung des Alarms;
‚Fü.Intervall‘ wenn Sie während des Tages zu festgelegten Zeiten Alarme zu den Fütterungszeiten
Ihres Babys hören möchten.
Bei Auswahl der Option ‚Zeit einst‘:
– Drücken Sie zum Auswählen der angezeigten Option die Taste . Die Stunde wird angezeigt.
– Drücken Sie die Taste oder , um die Stunde auszuwählen.
26 28
– Drücken Sie die Taste .
– Wiederholen Sie die genannten zwei Schritte, um die Minuten einzustellen.
– Drücken Sie nach dem Einstellen der Minuten die Taste , um die Einstellung zu bestätigen.
– Drücken Sie zum Verlassen des Menüs die Taste .
Bei Auswahl der Option ‚Alarm‘:
– Drücken Sie die Taste .
– Folgendes wird angezeigt:
‚Ein?‘ für die Aktivierung des Alarms; das Symbol wird auf dem Display angezeigt;
‚Aus?‘ für die Deaktivierung des Alarms.
– Drücken Sie zum Auswählen der angezeigten Option die Taste .
– Drücken Sie zum Verlassen des Menüs die Taste .
Bei Auswahl der Option ‚Fü.Intervall‘:
– Drücken Sie zum Auswählen der angezeigten Option die Taste . Die Stunde wird angezeigt.
– Drücken Sie die Taste oder , um die Stunde auszuwählen.
26 28
– Drücken Sie die Taste .
– Wiederholen Sie die genannten zwei Schritte, um die Minuten einzustellen.
– Drücken Sie nach dem Einstellen der Minuten die Taste , um die Einstellung zu bestätigen.
– Drücken Sie zum Verlassen des Menüs die Taste .
28
28
27
23
23
27
23
9.9 LED-Taschenlampe
Die Elterneinheit verfügt über eine integrierte LED-Taschenlampe .
– Drücken Sie zum Einschalten der Taschenlampe die Taste .
10 Reinigung und Wartung
Dieser Abschnitt enthält wichtige Anweisungen zur Reinigung und Wartung der Geräte.
Folgen Sie diesen Anweisungen, um eine problemlose Verwendung zu gewährleisten und Schäden an den
Geräten aufgrund von unsachgerechter Wartung zu vermeiden.
10.1 Sicherheitshinweise
GEFAHR
Risiko von tödlichen Verletzungen aufgrund von Stromschlaggefahr!
• Schalten Sie Geräte vor dem Reinigen aus, und trennen Sie das Netzkabel von der Stromversorgung.
VORSICHT
Risiko aufgrund von austretender Batterie-/Akkuflüssigkeit
Wenn Flüssigkeit aus Batterien/Akkus austritt, kann dies zu Verletzungen durch Hautreizungen oder zu
Schäden an den Geräten führen. Tragen Sie Sicherheitshandschuhe.
VORSICHT
• Verwenden Sie keine Reinigungs- oder Lösungsmittel. Diese können das Gehäuse beschädigen oder
in die Geräte eindringen und dauerhaft beschädigen.
47
Page 48

Babytalker 3500 SEDS
10.2 Reinigung
– Reinigen Sie die Geräte mit einem weichen, leicht angefeuchteten Tuch.
– Reinigen Sie verschmutzte Anschlüsse und Kontakte mit einer weichen Bürste.
– Reinigen Sie Batterie-/Akkukontakte und das Batterie-/Akkufach mit einem trockenen, faserfreien Tuch.
– Wenn die Geräte nass werden, schalten Sie sie aus und entfernen Sie sofort die Batterien/Akkus.
Wischen Sie das Batterie-/Akkufach mit einem weichen Tuch trocken, um möglicherweise auftretenden
Schaden durch Wasser zu minimieren.
Lassen die das Batterie-/Akkufach geöffnet, bis es vollständig getrocknet ist.
Verwenden Sie die Geräte nicht, bevor diese vollständig getrocknet sind.
10.3 Wartung
– Überprüfen Sie regelmäßig die Batterien/Akkus in den Geräten, und ersetzen Sie diese falls erforderlich.
– Prüfen Sie Stecker und Kabel auf Fehlfunktionen.
VORSICHT
• Wenn Sie Beschädigungen an den Geräten vermuten, lassen Sie sie stets von einem Fachmann
überprüfen, bevor Sie sie erneut verwenden.
11 Problembeseitigung
Dieser Abschnitt bietet wichtige Anweisungen für das Ermitteln von Problemen und deren Behebung.
Befolgen Sie diese Anweisungen, um Gefahren und Schäden zu vermeiden.
11.1 Sicherheitshinweise
GEFAHR
Risiko von tödlichen Verletzungen aufgrund von Stromschlaggefahr!
• Trennen Sie das Netzkabel von der Stromversorgung, bevor Sie versuchen, ein Problem zu beheben.
VORSICHT
Gefahrenrisiko durch unsachgemäße Reparaturen
Unsachgemäße Reparaturen können zu ernsthaften Gefahrensituationen führen und die Geräte
beschädigen.
• Versuchen Sie niemals, die Geräte zu verändern oder zu reparieren.
• Lassen Sie Reparaturen an den Geräten oder Kabeln stets durch einen Fachmann oder in einem
Service-Center durchführen.
• Lassen Sie die Geräte stets von einem Fachmann überprüfen, wenn Sie Beschädigungen vermuten
(wenn diese beispielsweise heruntergefallen sind) und bevor diese erneut verwendet werden sollen.
11.2 Problemursachen und Lösungen
Die folgende Tabelle soll Ihnen dabei helfen, kleinere Probleme zu erkennen und zu beheben.
Problem Mögliche Ursache Lösung
Die Akkus der
Elterneinheit laden nicht
auf
Elterneinheit lässt sich
nicht einschalten (keine
Anzeige auf dem Display)
Auf dem Display der
Elterneinheit wird ‚Keine
Verb.‘ angezeigt
Stecker der Ladestation nicht korrekt
verbunden
Verschmutzte Kontakte Reinigen Sie die Akkupole und die
Der Akkusatz ist defekt Ersetzen Sie den Akkusatz
Der Akkusatz ist nicht aufgeladen Laden Sie den Akkusatz auf
Die Geräte sind defekt Wenden Sie sich an den Kundendienst
Die Babyeinheit ist nicht eingeschaltet Schalten Sie die Babyeinheit ein.
Elterneinheit und Babyeinheit sind zu
weit auseinander
Die Elterneinheit ist nicht bei der
Babyeinheit angemeldet
Schließen Sie den Stecker an
Kontakte der Ladestation mit einem
weichen Tuch.
Verringern Sie den Abstand zwischen
Elterneinheit und Babyeinheit
Melden Sie die Elterneinheit bei der
Babyeinheit an (siehe ‚11.3 Melden Sie
die Elterneinheit bei der Babyeinheit an‘)
48
Page 49

Babytalker 3500 SEDS
DEUTSCH
12
29
29
2
17
Problem Mögliche Ursache Lösung
Die Elterneinheit gibt
keine Geräusche wieder,
die von der Babyeinheit
ermittelt werden
Begrenzte Reichweite und
Interferenzen während
der Übertragung
Die Geräte geben einen
hohen Pfeifton aus.
Die Lautstärkeeinstellung an der
Elterneinheit ist möglicherweise zu
niedrig oder ausgeschaltet.
Die Mikrofonempfindlichkeit der
Babyeinheit ist möglicherweise zu
niedrig eingestellt.
Die Reichweite der Geräte variiert je
nach Umgebung.
Stahlkonstruktionen und Betonwände
können die Übertragung behindern.
Elterneinheit und Babyeinheit sind zu
nahe beieinander
Erhöhen Sie die Lautstärkeeinstellung
an der Elterneinheit
Überprüfen Sie die VOX-Empfindlichkeit
und die Lautstärkeeinstellung der
Elterneinheit, und erhöhen Sie diese
ggf.
Versuchen Sie, Hindernisse zu
vermeiden.
Vergrößern Sie den Abstand auf
mindestens
2Meter
11.3 Melden Sie die Elterneinheit bei der Babyeinheit an
Wenn das Nachtlicht der Babyeinheit blinkt und/oder keine Verbindung zwischen Elterneinheit und Babyeinheit
hergestellt werden kann (LED an der Elterneinheit blinkt grün), muss die Elterneinheit bei der Babyeinheit
angemeldet werden.
• Überprüfen Sie, ob das Netzteil der Babyeinheit tatsächlich mit der Stromversorgung
verbunden und die Elterneinheit geladen ist.
– Trennen Sie das Netzteil der Babyeinheit von der Stromversorgung, und entfernen Sie die Batterien aus
der Elterneinheit.
– Drücken Sie den Ein-/Aus-Schalter an der Babyeinheit, und halten Sie diesen gedrückt, während Sie
das Netzteil mit der Stromversorgung verbinden.
Die Babyeinheit wird dann im Anmeldemodus eingeschaltet.
– Lassen Sie den Ein-/Aus-Schalter los . Das Nachtlicht der Babyeinheit blinkt 60 Sekunden lang auf.
– Drücken Sie den Ein-/Aus-Schalter an der Elterneinheit, und halten Sie diesen gedrückt, während Sie
die Akkus einlegen.
Die Elterneinheit wird eingeschaltet, während die 2 Lautstärke-LEDs rot blinken. Lassen Sie den Ein-/
Aus-Schalter los .
– Der Anmeldemodus wird nach erfolgreicher Anmeldung oder nach 60 Sekunden beendet.
Das Nachtlicht der Babyeinheit hört auf zu blinken;
Die 2 roten LEDs an der Elterneinheit leuchten nicht mehr auf.
– Bei erfolgreicher Anmeldung gibt das Gerät einen langen Signalton aus, bei nichterfolgreicher Anmeldung
geschieht dies nicht.
Überprüfen der Verbindung zwischen Elterneinheit und Babyeinheit
– Halten Sie die Paging-Taste an der Babyeinheit 2 Sekunden lang gedrückt.
– Nun gibt die Elterneinheit 30 Sekunden lang einen hohen Signalton ab.
– Drücken Sie kurz auf den Ein-/Aus-Schalter auf der Elterneinheit, um den Ton zu deaktivieren.
21
12
2
17
6
29
12 Lagerung und Entsorgung
• Wir empfehlen, die Verpackung und das Verpackungsmaterial zur späteren Verwendung
aufzubewahren.
12.1 Lagerung
Entnehmen Sie die Batterien/Akkus aus der Elterneinheit und der Babyeinheit.
Lagern Sie die Geräte an einem trockenen Ort.
12.2 Entsorgung des Verpackungsmaterials
Das Verpackungsmaterial besteht aus umweltfreundlichen Materialien, die von Ihrer örtlichen Müllabfuhr
gesammelt und wiederverwertet werden können.
12.3 Entsorgung (Umweltschutz)
49
Page 50

Babytalker 3500 SEDS
Entsorgen Sie alte Elektro- und Elektronikgeräte gemäß den Vorgaben der Europäischen Richtline
2002/96/EG über Elektro- und Elektronik-Altgeräte (WEEE-Richtlinie). Wenden Sie sich für weitere
Informationen an Ihre Müllsammelstelle vor Ort.
Entsorgen Sie Batterien/Akkus auf umweltfreundliche Art gemäß der örtlichen Vorschriften.
13 Technische Daten
Frequenz 1880 GHz bis 1900 GHz
Reichweite Im Freien: bis zu 600 m (im SEDS-Modus bis zu 300 m)
In Gebäuden: bis zu 50 m (im SEDS-Modus bis zu 25 m)
Betriebstemperatur 15 °C bis 35 °C / 20 % bis 75 % relative Luftfeuchtigkeit
Elterneinheit
Akkus Akkusatz (3,6 V NiMH) (im Lieferumfang enthalten)
Netzteil (KSS 05-060-0300G) Eingang: 230 V AC / 50 Hz / 150 mA
Ausgang: 6 V DC / 300 mA
Abmessungen ca. 117 x 62 x 72 mm
Gewicht 98 g (ohne Akkus)
Babyeinheit
Batterien 3 Alkali-Batteriezellen (LR06/AA) (nicht im Lieferumfang enthalten)
Netzteil (KSS 05-060-0300G) Eingang: 230 V AC / 50 Hz / 150 mA / Ausgang: 6 V DC / 300 mA
Abmessungen ca. 137 x 60 x 101 mm
Gewicht 141 g (ohne Batterien)
14 Konformitätserklärung
Hiermit erklärt TOPCOM EUROPE N.V., dass dieses Gerät die wesentlichen Anforderungen und anderen
relevanten Bestimmungen der Richtlinie 1999/5/EG erfüllt.
Die Konformitätserklärung findet sich auf http://www.topcom.net/cedeclarations.asp
15 Topcom-Garantie
15.1 Garantiezeit
Topcom-Geräte haben eine 24-monatige Garantiezeit. Die Garantiezeit beginnt an dem Tag, an dem das neue
Gerät erworben wurde. Die Garantie gilt nicht für normale Batterien oder wiederaufladbare Akkus (Typen AA/AAA).
Verschleißteile oder Mängel, die den Wert oder die Gebrauchstauglichkeit des Geräts nur unerheblich
beeinflussen, sind von der Garantie ausgeschlossen.
Der Garantieanspruch muss durch den Originalkaufbeleg oder eine Kopie des Kaufbelegs, auf dem das
Kaufdatum und das Gerätemodell ersichtlich sind, nachgewiesen werden.
15.2 Abwicklung des Garantiefalls
Senden Sie das fehlerhafte Gerät mit dem gültigen Kaufbeleg an ein Topcom Service-Zentrum.
Tritt ein Gerätefehler innerhalb der Garantiezeit auf, übernimmt Topcom oder ein autorisiertes Service-Zentrum
unentgeltlich die Reparatur jedes durch einen Material- oder Herstellungsfehler aufgetretenen Defekts mittels
Reparatur oder Austausch des fehlerhaften Geräts oder von Teilen des fehlerhaften Geräts. Bei einem Austausch
können Farbe und Modell vom eigentlich erworbenen Gerät abweichen.
Das ursprüngliche Kaufdatum bestimmt den Beginn der Garantiezeit. Die Garantiezeit verlängert sich nicht, wenn
das Gerät von Topcom oder einem seiner autorisierten Service-Zentren ausgetauscht oder repariert wird.
15.3 Garantieausschlüsse
Schäden oder Mängel, die durch unsachgemäße Handhabung oder unsachgemäßen Betrieb verursacht werden,
sowie Defekte, die durch die Verwendung von Nicht-Originalteilen oder -zubehör entstehen, werden nicht von der
Garantie abgedeckt. Die Garantie deckt keine Schäden ab, die durch äußere Einflüsse entstanden sind, wie z. B.
Blitzeinschlag, Wasser, Brände oder jegliche Transportschäden.
Wenn die Seriennummer des Geräts verändert, entfernt oder unleserlich gemacht wurde, kann keine Garantie in
Anspruch genommen werden.
Alle Garantieansprüche erlöschen, wenn das Gerät vom Käufer repariert, verändert oder umgebaut wurde.
50
Page 51

Babytalker 3500 SEDS
ESPAÑOL
1 General
Estimado cliente:
Lea la siguiente información para familiarizarse rápidamente con este dispositivo y aprender a usar sus funciones.
2 Información sobre este manual del usuario
El presente manual del usuario contiene información sobre el intercomunicador Babytalker 3500 SEDS (en
adelante, «el equipo») e incluye instrucciones importantes sobre el uso inicial, la seguridad, el uso adecuado y el
mantenimiento de este equipo.
Mantenga siempre este manual del usuario cerca del equipo. Todas las personas encargadas de manejar, reparar
o limpiar el equipo deben leer y/o consultar el manual del usuario.
Conserve este manual del usuario en un lugar seguro y entrégueselo al siguiente propietario del equipo.
3 Derechos de autor
El presente documento está protegido por la legislación sobre derechos de autor.
Quedan reservados todos los derechos, incluidos los derechos de reproducción fotomecánica, copia o distribución
por medios específicos, como redes de datos o medios de almacenamiento y procesamiento de datos, ya sea de
forma parcial o completa, así como de realizar modificaciones de tipo técnico o cambios en el contenido.
4 Advertencias
PELIGRO
Esta advertencia destaca una situación de peligro inminente.
Pueden producirse lesiones graves e incluso la muerte si no se evita la situación de riesgo.
PRECAUCIÓN
Esta advertencia destaca una situación potencialmente peligrosa.
Pueden producirse lesiones y/o daños materiales si no se evita la situación de riesgo.
• Este símbolo destaca información que facilita el uso del equipo.
5 Uso correcto
Este equipo está diseñado exclusivamente para su uso personal (no profesional) en habitaciones cerradas para
vigilar a los bebés. Cualquier otro uso se considera inadecuado y puede dar lugar a situaciones de riesgo.
Siga siempre las instrucciones del presente manual del usuario.
No se aceptará ninguna responsabilidad por las pérdidas o daños que puedan derivarse de un uso inadecuado.
El usuario del equipo será el único responsable de todos los riesgos.
6 Seguridad
6.1 Riesgo de descarga eléctrica
PELIGRO
El contacto con conductores o componentes con corriente eléctrica puede resultar mortal.
Respete las siguientes instrucciones de seguridad para evitar el riesgo de descarga eléctrica:
• Utilice exclusivamente el adaptador de corriente alterna suministrado con el equipo para evitar el
riesgo de dañarlo.
• No utilice el equipo si el adaptador de corriente alterna, el cable de alimentación o el enchufe
presentan daños.
• No abra nunca la carcasa del adaptador de corriente alterna. Puede sufrir una descarga eléctrica si
toca alguno de los contactos o conexiones con corriente eléctrica o si modifica el diseño eléctrico o
mecánico.
• Proteja el equipo frente a la humedad o la entrada de humedad y manténgalo limpio y sin polvo.
Desconecte inmediatamente el adaptador de corriente alterna si este entra en contacto con humedad.
• Desconecte el adaptador de corriente alterna en caso de funcionamiento incorrecto y durante una
tormenta o mientras limpia el equipo.
• Evite que el cable entre en contacto con superficies calientes u otras fuentes de peligro o que quede
atrapado por algún objeto.
51
Page 52

Babytalker 3500 SEDS
6.2 Uso de pilas (normales o recargables)
PRECAUCIÓN
El uso de pilas sin seguir las instrucciones puede resultar peligroso.
• Utilice siempre pilas (normales o recargables) del mismo tipo.
• Asegúrese de colocar las pilas respetando la polaridad correcta. Las pilas y el equipo pueden resultar
dañados si se colocan sin respetar la polaridad correcta.
• No deseche nunca las pilas en el fuego, ya que podrían explotar.
• No permita nunca, ni accidental ni intencionadamente, que los terminales de las pilas entren en
contacto entre sí ni con objetos metálicos. Dicho contacto podría hacer que se sobrecalienten las
pilas y causar una explosión o un incendio.
• Mantenga las pilas alejadas del alcance de los niños. Consulte a un médico inmediatamente en caso
de que alguien se trague una pila.
• Las fugas de líquido de las pilas pueden causar daños permanentes al equipo. Dado el riesgo de
corrosión, tenga especial cuidado cuando manipule pilas dañadas o con fugas. Utilice guantes de
seguridad.
• Retire las pilas siempre que no vaya a usar el equipo durante un período prolongado.
6.3 Normas generales para un uso seguro
Respete siempre las siguientes instrucciones de seguridad para garantizar un uso seguro del equipo:
– El equipo debe ser montado, en cualquier caso, por un adulto. Mantenga las piezas pequeñas alejadas
del alcance de los niños mientras monta el dispositivo.
– No permita que los niños jueguen con el dispositivo o sus piezas.
– Asegúrese de que el intercomunicador y el cable de alimentación se encuentren siempre alejados del
alcance del bebé.
– No cubra el intercomunicador con una toalla, manta o similares.
– Los componentes defectuosos deben sustituirse siempre por repuestos originales, ya que otros
componentes podrían no cumplir las normas de seguridad.
– Desconecte el intercomunicador siempre que se le solicite mediante alguna señal, cartel u otro tipo de
mensaje. Los equipos utilizados en hospitales y otros centros sanitarios pueden sufrir interferencias con
las señales de alta frecuencia de fuentes externas.
7 Funcionamiento
El intercomunicador consta de dos unidades: una para los padres y otra para el bebé. Ambas se conectan
mediante una conexión inalámbrica conforme con la norma DECT.
Gracias a la tecnología DECT, este equipo está protegido frente a escuchas por terceros, así como frente a
interferencias de otros equipos.
La unidad del bebé empieza a emitir su señal en cuanto el micrófono capta un sonido. El sonido se reproducirá en
la unidad de los padres. El usuario puede ajustar la sensibilidad del micrófono (véase “9.8.7 Ajuste de la
sensibilidad del micrófono (VOX)”).
• El intercomunicador no sustituye, en ningún caso, la adecuada supervisión por parte de un
adulto; solamente sirve como ayuda.
7.1 Componentes de la unidad del bebé
Vea la figura en la página desplegable.
1Antena
2 Luz nocturna
3 Pantalla
4 Altavoz
5Micrófono
6 Botón de búsqueda
7 Botón de canción de cuna
8 Botón de luz nocturna
A
9 Aumento del volumen
10 Botón de reproducción
11 Disminución del volumen
12 Interruptor de encendido / apagado
13 Tapa del compartimiento de las pilas
14 Conector del adaptador de corriente alterna
15 Pinzas de fijación
16 Interruptor de potencia de emisión SEDS
52
Page 53

Babytalker 3500 SEDS
ESPAÑOL
PTT
C
90° MA
OPEN
15
13
7.2 Componentes de la unidad de los padres
Vea la figura en la página desplegable.
17 Indicadores LED de volumen
18 Altavoz
19 Luz LED
20 Micrófono
21 LED de conexión
22 Pantalla
23 Botón de búsqueda
24 Botón de habla
25 Botón de luz LED
B
26 Aumento del volumen / Elemento siguiente del menú
27 Botón de confirmación
28 Disminución del volumen / Elemento anterior del
menú
29 Interruptor de encendido / apagado
30 Pinza de sujeción en cinturón / pared
31 Tapa del compartimiento de las pilas
PTT
32 Adaptador de corriente alterna
33 Indicador de carga
7.3 Descripción de la pantalla
Vea la figura en la página desplegable.
Temperatura (a) Muestra la temperatura medida por la unidad del bebé. Parpadea cuando la
temperatura se encuentra fuera del intervalo definido.
Aviso de hora de la
comida (b)
Canción de cuna (c) Visible cuando se está reproduciendo una canción de cuna.
Línea informativa (d) Proporciona más información sobre diversos ajustes, como la fecha y la hora
Indicador de carga (e) Muestra el nivel de carga de las pilas recargables.
Comprobación (f) Visible cuando la luz nocturna de la unidad del bebé está encendida.
Sensibilidad (g) Visible en la unidad de los padres cuando se ajusta la sensibilidad.
Visible cuando el aviso de hora de la comida está activado.
en la unidad de los padres o la canción de cuna seleccionada en la unidad del
bebé.
- batería completamente cargada
- batería a punto de agotarse
8 Primer uso
8.1 Contenido del paquete
El equipo se suministra con los componentes estándar siguientes:
- 1 unidad del bebé
- 1 unidad de los padres
- 1 estación de carga
- 2 adaptadores de corriente alterna
8.2 Colocación de las pilas en la unidad del bebé
• Puede utilizar la unidad del bebé con tres pilas AA (LR06 / linterna; se recomienda usar pilas
alcalinas), o bien con el adaptador de corriente alterna incluido.
• La unidad del bebé no puede usarse para recargar pilas.
• Se recomienda dejar siempre las pilas en la unidad, incluso aunque utilice el adaptador de
corriente alterna. Así, la unidad pasará automáticamente a utilizar la carga de las pilas, si se
produce un corte del suministro eléctrico.
– Gire la pinza del cinturón hacia arriba.
– Gire 90º en el sentido contrario de las agujas del reloj el tornillo de la tapa del
compartimiento de las pilas que se encuentra en la parte posterior de la unidad
del bebé y retire dicha tapa.
• No gire el tornillo más allá de «Open».
- 1 manual del usuario
- 1 tarjeta del servicio técnico
- 1 batería recargable de NiMH
53
Page 54

Babytalker 3500 SEDS
SEDS
LONG
ECO
6V/300mA
+
+
+
+
-
AA x 1
+
-
AA
x 1
+
-
A
A
x
1
14
90° MAX
OPEN
30
31
32
33
22
12
– Coloque tres pilas alcalinas AA (LR06 / linterna) en el compartimiento de las
pilas. Asegúrese de que la polaridad sea la correcta.
– Cierre el compartimiento de las pilas.
• No mezcle nunca las pilas nuevas con las pilas
usadas.
8.3 Conexión de la unidad del bebé a la red
eléctrica
Introduzca el pequeño enchufe del adaptador de corriente alterna en el
conector de la unidad del bebé y enchufe el adaptador de corriente
alterna a la toma eléctrica (230 V / 50 Hz).
PRECAUCIÓN
SEDS
LONG
ECO
• El enchufe de alimentación debe encontrarse en un lugar
accesible para poder desenchufar el cable, en caso de
emergencia.
• Utilice exclusivamente el adaptador de corriente alterna que
se suministra (6 V CC / 300 mA).
8.4 Colocación de las pilas recargables en la unidad de los padres
Vea la figura en la página desplegable.
B
6V/300mA
PRECAUCIÓN
• Para la unidad de los padres, utilice solamente las pilas de NiMH suministradas.
– Gire la pinza del cinturón hacia arriba.
– Gire 90º en el sentido contrario de las agujas del reloj el tornillo de la tapa
del compartimiento de las pilas que se encuentra en la parte posterior
de la unidad de los padres y retire dicha tapa.
• No gire el tornillo más allá de «Open».
– Coloque las pilas de NiMH en el compartimiento de las mismas.
Asegúrese de que la pestaña de las pilas encaje en la hendidura
correspondiente y de respetar la polaridad que se indica en la figura (B).
– Cierre con cuidado el compartimiento de las pilas y gire la pinza del cinturón hacia abajo.
8.5 Colocación de las pilas recargables en la unidad de los padres
– Introduzca el pequeño enchufe del adaptador de corriente alterna en el
conector de la estación de carga y enchufe el adaptador de corriente
alterna a la toma eléctrica (230 V / 50 Hz).
– Coloque la unidad de los padres en la estación de carga. Se encenderá el
indicador LED de carga de color rojo.
• Las pilas tardarán unas 10 horas en cargarse
completamente.
9 Funcionamiento y uso
AB
+
9.1 Encendido y apagado de la unidad del bebé y de la unidad de los padres
– Pulse el botón de encendido / apagado para encender la unidad de los padres. Se activará la
pantalla .
– Pulse el botón de encendido / apagado para encender la unidad del bebé. Se activará la pantalla .
• La unidad de los padres intentará establecer una conexión con la unidad del bebé. Si se
enciende el LED de conexión, significará que se ha establecido la conexión. De lo
54
contrario, consulte la página 61.
29
3
21
Page 55

Babytalker 3500 SEDS
ESPAÑOL
12
262726
28
21
21
20
17
21
6
SEDS
LONG
ECO
16
16
PTTPTT
– Pulse el interruptor de encendido / apagado para apagar la unidad de los padres (manténgalo
29
pulsado hasta que se apague la pantalla).
– Pulse el interruptor de encendido / apagado para apagar la unidad del bebé (manténgalo pulsado
hasta que se apague la pantalla).
9.2 Configuración del idioma de la pantalla
– Pulse el botón . Se mostrará el texto «Night light» (Luz nocturna).
– Pulse varias veces el botón hasta que aparezca el texto «Language» (Idioma).
– Pulse el botón . Se mostrará el idioma actual.
– Pulse varias veces el botón o hasta que aparezca e Idioma deseado.
– Pulse el botón para confirmar el idioma
– Pulse el botón para salir del menú.
23
27
23
9.3 Comprobación de la conexión entre la unidad de los padres y del bebé
Compruebe siempre la conexión inalámbrica cuando utilice el intercomunicador por primera vez.
– Ponga la unidad de los padres en la misma habitación que la unidad del bebé, con una separación de un
mínimo de dos metros.
– Encienda las dos unidades. La unidad de los padres intentará establecer una conexión con la unidad del
bebé.
– El LED de conexión de color verde de la unidad de los padres parpadeará mientras intenta establecer
una conexión.
El LED se mantendrá encendido una vez que se haya establecido la conexión.
– El sonido que capte el micrófono se reproducirá en la unidad de los padres.
– El volumen del sonido reproducido se indica mediante los LED de volumen de la parte superior de la
unidad de los padres.
Cuanto mayor sea el volumen, más LED aparecerán encendidos.
– Se emitirá un tono cuando se alcance el volumen máximo.
– En caso de que no se establezca ninguna conexión, se generará un pitido doble de advertencia y el LED
de conexión parpadeará.
– Reduzca la distancia entre las unidades de los padres y del bebé hasta que se vuelva a establecer la
conexión.
9.4 Localización de la unidad de los padres (función de búsqueda)
– Mantenga pulsado el botón de búsqueda de la unidad del bebé durante un mínimo de 2 segundos
antes de soltarlo.
– La unidad de los padres emitirá un tono agudo durante 30 segundos. Esto permitirá localizar la unidad de
los padres más fácilmente.
– Pulse brevemente el botón de encendido / apagado de la unidad de los padres para desactivar el
29
tono.
9.5 Ajuste del interruptor SEDS
El intercomunicador Babytalker 3500 SEDS utiliza la exclusiva tecnología Smart ECO
Distance Switch (SEDS), que les permite a los padres definir la potencia de emisión
del equipo. Existen dos posibilidades: «Modo de larga distancia» o modo «ECO», que
ofrece un menor consumo energético y una menor radiación.
Coloque el interruptor en la posición:
– «LONG» para un alcance máximo de 600 m (sin obstáculos).
– «ECO» para reducir la potencia de emisión a la mitad y disminuir el consumo energético. Con este
ajuste, el alcance se reduce a un máximo de 300 m (sin obstáculos).
9.6 Hablar con su bebé
Puede utilizar el intercomunicador para hablar con su bebé.
• Haga que su bebé se acostumbre a esta función antes de usarla normalmente.
– Mantenga pulsado el botón de habla de la unidad de los padres.
– Mantenga la unidad de los padres en posición vertical con el micrófono a unos 10 cm de su boca y hable
por el micrófono.
24
55
Page 56

Babytalker 3500 SEDS
PTT
10
28
27
23
282726
28
– Suelte el botón cuando haya terminado de hablar.
PTT
24
9.7 Reproducción de canciones de cuna
En la unidad del bebé, podrá reproducir tres canciones de cuna previamente programadas.
Puede configurar la reproducción de canciones de cuna desde la unidad de los padres (véase “9.8.5 Ajuste de la
canción de cuna”), o bien en la unidad del bebé.
– Para reproducir la canción de cuna actualmente seleccionada o detener la reproducción, pulse el botón
de la unidad del bebé.
– Para seleccionar una canción de cuna distinta, pulse varias veces el botón hasta que se muestre
7
la canción de cuna deseada.
9.8 Ajustes
9.8.1 Ajuste del volumen de reproducción de la unidad de los padres
Existen seis niveles de volumen. El ajuste más bajo es «Sin volumen».
– Pulse el botón para subir el volumen.
– Pulse el botón para bajar el volumen.
• Si selecciona el ajuste «Sin volumen», el sonido captado por la unidad del bebé solamente
se indicará mediante los LED de volumen .
9.8.2 Ajuste del volumen de reproducción de la unidad del bebé
• Este ajuste se aplica a las funciones “Hablar con su bebé“ y “Reproducción de canciones de
cuna“.
– Pulse el botón para subir el volumen.
– Pulse el botón para bajar el volumen.
26
28
17
9
11
9.8.3 Otros ajustes
Puede configurar los siguientes ajustes desde el menú (botón ) de la unidad de los padres:
• Luz nocturna
• Canción de cuna
• Sensibilidad del micrófono
«Sensibilidad»
• Temperatura (unidades, intervalo permitido, aviso)
• Reloj
• Hora de la comida
• Idioma de la pantalla «Idioma» (véase “9.2
• Aviso acústico «Aviso sonoro»
Para desplazarse por los elementos del menú, utilice el botón o el botón .
Para seleccionar el ajuste indicado, pulse el botón .
Para regresar a un elemento del menú anterior o salir del menú, pulse el botón .
23
Configuración del idioma de la pantalla”)
26
9.8.4 Encendido y apagado de la luz nocturna
– Pulse el botón . Se mostrará el texto «Luz nocturna».
– Pulse el botón . Verá:
«Encendido?» si la luz nocturna está apagada;
«Apagado?» si la luz nocturna está encendida.
– Pulse el botón para seleccionar la opción indicada.
– Pulse el botón para salir del menú.
• También puede encender y apagar la luz nocturna directamente en la unidad del bebé
pulsando el botón .
23
27
27
23
8
9.8.5 Ajuste de la canción de cuna
– Pulse el botón . Se mostrará el texto «Luz nocturna».
– Pulse varias veces el botón hasta que aparezca el texto «Canción de cuna».
– Pulse el botón .
– Pulse varias veces el botón o hasta que aparezca la opción deseada:
«Parar?», si desea detener la canción de cuna (solamente disponible si se está reproduciendo una
canción de cuna);
«Nueva sel.», si desea seleccionar una canción de cuna distinta (puede elegir entre tres canciones de
cuna);
23
56
Page 57

Babytalker 3500 SEDS
ESPAÑOL
26
28
23
28
27
28
26
28
28
282726
28
«Reproducir?», si desea reproducir la canción de cuna actualmente seleccionada en la unidad del bebé
(no disponible cuando ya se está reproduciendo una canción de cuna).
– Pulse el botón para seleccionar la opción indicada.
Opción «Nueva sel.» seleccionada:
– Pulse varias veces el botón o hasta que aparezca la canción de cuna deseada o «Repr.
todo».
• Si se selecciona «Repr. todo», se reproducirán de forma sucesiva las tres canciones de
cuna.
27
– Pulse el botón para seleccionar la opción indicada.
– Pulse el botón para salir del menú.
27
23
9.8.6 Ajuste del termómetro
En el modo en espera, podrá verse en la unidad de los padres la temperatura medida por la unidad del bebé
(±2 °C). Puede configurar los siguientes ajustes en este submenú:
• Intervalo de temperatura: ajuste del intervalo de temperatura permitido. En caso de que la temperatura
medida se sitúe fuera de este intervalo, se indicará en la pantalla («Alto» o «Bajo», y el valor de la
temperatura parpadeará en la pantalla).
• Aviso de temperatura: controla si se emite un pitido doble cuando la temperatura se sitúa fuera del
intervalo permitido.
• Unidad de temperatura: selecciona si se muestra la temperatura en °C (grados Celsius) o °F (grados
Fahrenheit).
– Pulse el botón . Se mostrará el texto «Luz nocturna».
– Pulse varias veces el botón hasta que aparezca el texto «Temperatura».
– Pulse el botón .
– Pulse varias veces el botón hasta que aparezca la opción deseada:
«Conf. interv.», para ajustar el intervalo de temperatura;
«Aviso temp.», para ajustar el aviso de temperatura;
«Grados F», para mostrar la temperatura en °F (grados Fahrenheit);
«Grados C», para visualizar la temperatura en °C (grados Celsius).
– Pulse el botón para seleccionar la opción indicada.
Opción «Conf. interv.» seleccionada:
– Pulse varias veces el botón o hasta que se muestre el límite máximo deseado (máx. 39 °C).
– Pulse el botón .
– Pulse varias veces el botón o hasta que se muestre el límite inferior deseado (mín. 10 °C).
– Pulse el botón .
– Pulse el botón para salir del menú.
Si selecciona la opción «Aviso temp.», verá:
«Encendido?», si el aviso está desactivado;
«Apagado?», si el aviso está encendido.
– Pulse el botón para seleccionar la opción indicada.
– Pulse el botón o para seleccionar el volumen deseado para el aviso.
– Pulse el botón .
– Pulse el botón para salir del menú.
Opción «Grados F» o «Grados C» seleccionada:
– Pulse el botón para seleccionar la opción indicada.
– Pulse el botón para salir del menú.
23
26 28
27
27
23
27
26
27
23
27
23
9.8.7 Ajuste de la sensibilidad del micrófono (VOX)
Puede configurar la sensibilidad de la detección de sonidos (VOX) del intercomunicador. Si ajusta la sensibilidad
como alta, la unidad del bebé captará sonidos más débiles.
– Pulse el botón . Se mostrará el texto «Luz nocturna».
23
– Pulse varias veces el botón hasta que aparezca el texto «Sensibilidad».
– Pulse el botón .
– Pulse varias veces el botón o hasta que aparezca la sensibilidad deseada.
• La sensibilidad VOX se indica mediante una barra de color negro en la pantalla:
- alta sensibilidad
- baja sensibilidad
57
Page 58

Babytalker 3500 SEDS
28
28
28
28
28
27
282728
– Pulse el botón .
– Pulse el botón para salir del menú.
27
23
9.8.8 Ajuste del aviso sonoro
La sensibilidad de la detección de sonido se indica mediante el número de LED de la parte superior de la
unidad de los padres. Si el control de volumen de la unidad se coloca en la posición «Sin volumen», podrá
generarse una señal de aviso cuando el nivel acústico captado por la unidad del bebé alcance el intervalo de los
LED rojos.
– Pulse el botón . Se mostrará el texto «Luz nocturna».
23
– Pulse varias veces el botón hasta que aparezca el texto «Aviso sonoro».
– Pulse el botón .
27
–Verá:
«Encendido?», si el aviso está desactivado;
«Apagado?», si el aviso está encendido.
– Pulse el botón para seleccionar la opción indicada.
– Pulse el botón o para seleccionar el volumen deseado para el aviso.
– Pulse el botón .
– Pulse el botón para salir del menú.
27
26
27
23
17
9.8.9 Ajuste del reloj
La hora se muestra en la unidad de los padres, mientras esta se encuentra en modo de espera.
– Pulse el botón . Se mostrará el texto «Luz nocturna».
– Pulse varias veces el botón hasta que aparezca el texto «Reloj».
– Pulse el botón .
– Pulse varias veces el botón hasta que aparezca la opción deseada:
«Fijar hora», para ajustar el reloj;
«Formato hora», para seleccionar el formato de 12 o de 24 horas.
Opción «Fijar hora» seleccionada:
– Pulse el botón para seleccionar la opción indicada. Se mostrará el año en la pantalla.
– Pulse el botón o para seleccionar el año.
– Pulse el botón .
– Repita los dos pasos anteriores para cada uno de los siguientes ajustes: mes, día, hora y minutos.
– Una vez que haya ajustado los minutos, pulse el botón para confirmar el ajuste.
– Pulse el botón para salir del menú.
Opción «Formato hora» seleccionada:
– Pulse el botón .
–Verá:
«12 h», si el reloj está ajustado en el formato de 24 horas y desea cambiarlo al formato de 12
horas;
«24 h», si el reloj está ajustado en el formato de 12 horas y desea cambiarlo al formato de 24
horas.
– Pulse el botón para seleccionar la opción indicada.
– Pulse el botón para salir del menú.
• El reloj que se visualiza en la unidad de los padres se transmite a través de la unidad del
bebé. Al apagar la unidad del bebé se reiniciará el reloj de la unidad de los padres, por lo
que deberá reajustar el reloj.
23
27
27
26
27
27
23
27
23
9.8.10Ajuste de la hora de la comida
Puede definir un aviso en el Babytalker 3500 SEDS para que le avise cuando llegue la hora de darle de comer a
su bebé.
– Pulse el botón . Se mostrará el texto «Luz nocturna».
– Pulse varias veces el botón hasta que aparezca el texto «Hora comida».
– Pulse el botón .
– Pulse varias veces el botón hasta que aparezca la opción deseada:
«Fijar hora», para ajustar la hora de la comida;
«Alarma», para activar o desactivar el aviso;
«Intervalo», si desea definir avisos de la hora de la comida a intervalos fijos durante el día.
58
23
Page 59

Babytalker 3500 SEDS
ESPAÑOL
28
28
19
25
Opción «Fijar hora» seleccionada:
– Pulse el botón para seleccionar la opción indicada. Se mostrará la hora en la pantalla.
– Pulse el botón o para seleccionar la hora.
– Pulse el botón .
– Repita los dos pasos anteriores para ajustar los minutos.
– Una vez que haya ajustado los minutos, pulse el botón para confirmar el ajuste.
– Pulse el botón para salir del menú.
Opción «Alarma» seleccionada:
– Pulse el botón .
–Verá:
«Encendido?», para activar el aviso; aparecerá el icono en la pantalla;
«Apagado?», para apagar el aviso.
– Pulse el botón para seleccionar la opción indicada.
– Pulse el botón para salir del menú.
Opción «Intervalo» seleccionada:
– Pulse el botón para seleccionar la opción indicada. Se mostrará la hora en la pantalla.
– Pulse el botón o para seleccionar la hora.
– Pulse el botón .
– Repita los dos pasos anteriores para ajustar los minutos.
– Una vez que haya ajustado los minutos, pulse el botón para confirmar el ajuste.
– Pulse el botón para salir del menú.
27
26
27
27
23
27
27
23
27
26
27
27
23
9.9 Luz LED
La unidad de los padres incluye una luz LED integrada .
– Pulse el botón para encender la luz LED.
10 Limpieza y mantenimiento
El presente apartado incluye instrucciones importantes sobre la limpieza y el mantenimiento del equipo.
Siga estas instrucciones para disfrutar de un uso sin problemas y evitar dañar el equipo debido a un mantenimiento
inadecuado.
10.1 Instrucciones de seguridad
PELIGRO
Riesgo de lesiones mortales por descarga eléctrica!
• Antes de limpiar el equipo, apáguelo y desenchufe el cable de alimentación.
PRECAUCIÓN
Riesgo de fugas de líquido de las pilas
Una fuga de líquido de las pilas (normales o recargables) puede causar lesiones (irritación cutánea) o daños
al equipo. Utilice guantes de seguridad.
PRECAUCIÓN
• No utilice detergentes ni disolventes. Pueden dañar la carcasa o entrar en el equipo y causar daños
permanentes.
10.2 Limpieza
– Limpie el equipo con un paño suave y ligeramente humedecido.
– Limpie los conectores y los contactos sucios con un cepillo suave.
– Limpie los contactos y el compartimiento de las pilas con un paño seco y sin pelusa.
– Si el equipo se moja, apáguelo y retire las pilas de inmediato.
Limpie el compartimiento de las pilas con un paño suave para reducir los posibles daños causados por el
agua.
Deje el compartimiento abierto hasta que se haya secado completamente.
No vuelva a utilizar el equipo hasta que haya quedado completamente seco.
59
Page 60

Babytalker 3500 SEDS
10.3 Mantenimiento
– Compruebe regularmente las pilas (normales o recargables) del equipo y sustitúyalas, en caso necesario.
– Compruebe si los conectores o los cables presentan algún defecto.
PRECAUCIÓN
• Si sospecha que el equipo está dañado, llévelo a un técnico especializado para que lo revise antes de
volver a usarlo.
11 Solución de problemas
En este apartado, se incluyen instrucciones importantes para localizar y corregir problemas.
Siga estas instrucciones para evitar situaciones de riesgo y daños.
11.1 Instrucciones de seguridad
PELIGRO
Riesgo de lesiones mortales por descarga eléctrica!
• Desconecte el cable de alimentación antes de intentar corregir un problema.
PRECAUCIÓN
Riesgo o peligro por reparaciones inadecuadas
Las reparaciones inadecuadas pueden exponer a los usuarios a riesgos importantes y causar daños al
equipo.
• No intente nunca modificar o reparar el equipo.
• Asegúrese de que las reparaciones del equipo o de los cables las realice siempre un especialista o el
propio servicio técnico.
• Si sospecha que el equipo está averiado (por ejemplo, si se ha caído al suelo), solicítele a un
especialista que lo revise antes de volver a usarlo.
11.2 Causas de problemas y soluciones
La siguiente tabla tiene como finalidad ayudarle a localizar y solucionar problemas leves.
Problema Posible causa Solución
La pila recargable de la
unidad de los padres
no se carga
La unidad de los padres
no se enciende (la
pantalla permanece
apagada)
Aparece el mensaje
«NO VINC.» en la
pantalla de la unidad de
los padres
La unidad de los padres
no reproduce los
sonidos captados por
la unidad del bebé
El enchufe de la estación de carga no
está conectado
Contactos sucios Limpie los terminales de las pilas y los
Las pilas recargables están averiadas Sustituya las pilas
Las pilas recargables no están
cargadas
El equipo está averiado Contacte con el servicio de atención al
La unidad del bebé no está encendida Encienda la unidad del bebé
La unidad de los padres y la unidad
del bebé están demasiado alejadas
entre sí
La unidad de los padres no está dada
de alta en la unidad del bebé
El volumen de la unidad de los padres
podría estar demasiado bajo o
desactivado
El ajuste de la sensibilidad del
micrófono de la unidad del bebé
podría ser demasiado bajo
Conecte el enchufe
contactos de la estación de carga con
un paño suave
Cargue las pilas
cliente
Reduzca la distancia entre la unidad de
los padres y la unidad del bebé
Dé de alta la unidad de los padres en la
unidad del bebé (véase “11.3 Alta de la
unidad de los padres en la unidad del
bebé”)
Aumente el volumen de la unidad de los
padres
Compruebe la sensibilidad VOX y el
ajuste de volumen de la unidad de los
padres. Auméntelos, en caso necesario.
60
Page 61

Babytalker 3500 SEDS
ESPAÑOL
12
12
29
17
2
17
6
29
Problema Posible causa Solución
Alcance limitado e
interferencias durante
la transmisión
El equipo emite un
pitido agudo
El alcance del equipo depende del
entorno.
Las estructuras de acero y las
paredes de hormigón pueden afectar
a la transmisión.
La unidad de los padres y la unidad
del bebé están demasiado cerca la
una de la otra
Evite los obstáculos en la medida de lo
posible
Aumente la distancia a un mínimo de
2metros
11.3 Alta de la unidad de los padres en la unidad del bebé
En caso de que la luz nocturna de la unidad del bebé parpadee y/o de que no pueda establecerse la conexión
entre la unidad de los padres y la unidad del bebé (LED verde que parpadea en la unidad de los padres), habrá
que dar de alta la unidad de los padres en la unidad del bebé.
• Compruebe que el adaptador de corriente alterna de la unidad del bebé está conectado y
enchufado a la toma de corriente y que las pilas de la unidad de los padres están cargadas.
– Desenchufe de la toma de corriente el adaptador de corriente alterna de la unidad del bebé y extraiga las
pilas de la unidad de los padres.
– Mantenga pulsado el interruptor de encendido / apagado de la unidad del bebé, mientras enchufa el
adaptador de corriente alterna en la toma de corriente.
La unidad del bebé se iniciará en modo de dar de alta.
– Suelte el interruptor de encendido / apagado . La luz nocturna de la unidad del bebé parpadeará
durante 60 segundos.
– Mantenga pulsado el interruptor de encendido / apagado de la unidad de los padres, mientras coloca
las pilas.
La unidad de los padres se pondrá en marcha y parpadearán los 2 LED rojos del volumen . Suelte el
interruptor de encendido / apagado .
– El modo de dar de alta finalizará una vez que la operación de dar de alta se haya realizado con éxito, o
bien al cabo de 60 segundos.
La luz nocturna de la unidad del bebé dejará de parpadear;
los 2 LED rojos de la unidad de los padres se apagarán.
– Oirá un pitido prolongado si el alta se ha realizado con éxito y tres pitidos cortos en caso contrario.
Comprobación de la conexión entre la unidad de los padres y la unidad del bebé:
– Mantenga pulsado el botón de búsqueda de la unidad del bebé durante 2 segundos.
– Como respuesta, la unidad de los padres emitirá un tono agudo durante 30 segundos.
– Pulse brevemente el botón de encendido / apagado de la unidad de los padres para desactivar el tono.
29
21
2
12 Instrucciones de almacenamiento y eliminación
• Le recomendamos que conserve la caja y el material de embalaje para transportar el equipo
en el futuro, en caso necesario.
12.1 Almacenamiento
Extraiga las pilas (normales o recargables) de la unidad de los padres y de la unidad del bebé respectivamente.
Guarde el equipo en un lugar seco.
12.2 Eliminación de los materiales de embalaje
Los materiales de embalaje son materiales respetuosos con el medio ambiente que puede entregarle a su
servicio local de recogida de basuras para su reciclado.
12.3 Eliminación (protección medioambiental)
Deseche el equipo de conformidad con las disposiciones de la Directiva europea 2002/96/CE de
gestión de residuos de aparatos eléctricos y electrónicos (RAEE). Póngase en contacto con su servicio
municipal de recogida de basuras y reciclado para obtener más información.
Las pilas (normales o recargables) deben desecharse sin contaminar el medio ambiente, de acuerdo
con la normativa de su país.
61
Page 62

Babytalker 3500 SEDS
13 Datos técnicos
Frecuencia De 1880 GHz a 1900 GHz
Alcance Exteriores: hasta 600 m (hasta 300 m en modo SEDS)
Interiores: hasta 50 m (hasta 25 m en modo SEDS)
Temperatura de funcionamiento De 15 a 35 °C
Humedad relativa del 20-75 %
Unidad de los padres
Pilas recargables Pilas (3,6 V de NiMH, incluidas)
Adaptador de corriente alterna
(KSS 05-060-0300G)
Dimensiones 117 × 62 × 72 mm aprox.
Peso 98 g (sin las pilas recargables)
Unidad del bebé
Pilas 3 pilas alcalinas (LR06 / AA, no incluidas)
Adaptador de corriente alterna
(KSS 05-060-0300G)
Dimensiones 137 × 60 × 101 mm aprox.
Peso 141 g (sin las pilas)
Entrada: 230 V CA / 50 Hz / 150 mA
Salida: 6 V CC / 300 mA
Entrada: 230 V CA / 50 Hz / 150 mA
Salida: 6 V CC / 300 mA
14 Declaración de conformidad CE
TOPCOM EUROPE N. V. declara por la presente que este producto cumple con los requisitos esenciales y con el
resto de disposiciones pertinentes de la Directiva 1995/5/CE.
La declaración de conformidad puede consultarse en http://www.topcom.net/cedeclarations.asp.
15 Garantía Topcom
15.1 Período de garantía
Las unidades de Topcom tienen un período de garantía de 24 meses. El período de garantía entra en vigor el día
en que se adquiere la nueva unidad. No existe ninguna garantía sobre las pilas estándar o recargables (tipo AA/
AAA). La garantía no cubre los consumibles ni los defectos que tengan un efecto insignificante en el
funcionamiento o en el valor del equipo.
La garantía debe demostrarse presentando el comprobante original de compra o una copia de este, en el que
constarán la fecha de la compra y el modelo de la unidad.
15.2 Tratamiento de la garantía
Los aparatos averiados deberán remitirse a un servicio técnico de Topcom junto con un comprobante de compra
válido. Si la unidad tiene una avería durante el período de garantía, Topcom o su centro de servicio oficial
repararán sin cargo alguno cualquier avería causada por defectos de material o fabricación, ya sea reparando o
sustituyendo las unidades defectuosas o partes de las mismas. En caso de sustitución, el color y el modelo pueden
variar respecto a los de la unidad adquirida inicialmente.
La fecha de compra inicial determinará el comienzo del período de garantía. El período de garantía no se ampliará
si Topcom o sus centros de servicio autorizados sustituyen o reparan la unidad.
15.3 Limitaciones de la garantía
Los daños o defectos ocasionados por un tratamiento o funcionamiento incorrectos, así como los daños
resultantes del uso de piezas o accesorios no originales, no estarán cubiertos por esta garantía.
La garantía no cubre los daños ocasionados por factores externos tales como relámpagos, agua o fuego como
tampoco los daños causados durante el transporte.
La garantía no será válida si el número de serie de las unidades se cambia, se elimina o resulta ilegible.
Cualquier reclamación de la garantía se invalidará si la unidad ha sido reparada, alterada o modificada por el
comprador.
62
Page 63

Babytalker 3500 SEDS
SVENSKA
1 Allmän information
Till kunden,
Ett bra sätt att lära sig använda utrustningen och att bekanta sig med de olika funktionerna är att läsa igenom den
här informationen.
2 Information om den här bruksanvisningen
Den här bruksanvisningen innehåller information om babyvakten Babytalker 3500 SEDS (kallas ”utrustningen”
nedan) och viktiga anvisningar om säkerhet, korrekt användning och underhåll av utrustningen.
Förvara alltid bruksanvisningen i närheten av utrustningen. Alla personer som använder, reparerar eller rengör
utrustningen måste läsa bruksanvisningen och/eller använda den som referensmaterial.
Förvara bruksanvisningen på ett säkert ställe, och se till att nästa ägare får tillgång till den.
3 Copyright
Denna dokumentation är skyddad av upphovsrättslig lagstiftning.
Alla rättigheter till materialet förbehålls, inklusive rätten till fotomekanisk reproduktion, kopiering och distribuering
genom specifika metoder som databehandling, lagringsmedia eller nätverk, helt eller delvis, samt tekniska och
innehållsliga ändringar.
4 Varningar
FARA
Den här varningen uppmärksammar en situation som kan leda till omedelbara skador.
Om den farliga situationen inte undviks kan den leda till döden eller allvarliga personskador.
OBS!
Den här varningen uppmärksammar en potentiellt farlig situation.
Personskador och/eller egendomsskador kan uppstå om situationen inte undviks.
• Den här symbolen uppmärksammar information som gör det enklare att använda
utrustningen.
5 Korrekt användning
Den här utrustningen är endast avsedd för privat (icke-professionell) användning i slutna rum för övervakning av
småbarn. Alla andra former av användning är felaktig och kan leda till farliga situationer.
Följ alltid instruktionerna i den här bruksanvisningen.
Tillverkaren kan inte påföras ansvar för förluster eller skador som härrör från felaktigt användande.
Användaren av utrustningen bär det fulla ansvaret för alla risker.
6 Säkerhet
6.1 Risk för elektriska stötar
FARA
Det är livsfarligt att komma i direkt kontakt med strömsatta ledare eller komponenter.
Följ nedanstående säkerhetsinstruktioner för att undvika risken för elektriska stötar:
• Använd alltid den adapter som medföljer utrustningen. Andra adaptrar kan skadad utrustningen.
• Använd inte utrustningen om adaptern, strömkabeln eller kontakten är skadad.
• Öppna aldrig adapterns hölje. Om du vidrör strömförande kontakter eller ledningar kan du utsättas för
elektriska stötar, liksom om du ändrar den elektriska eller mekaniska konstruktionen.
• Skydda utrustningen mot fukt och väta, och håll den fri från damm. Dra omedelbart ut adaptern ur
vägguttaget om utrustningen kommer i kontakt med vatten.
• Dra ut adaptern vid fel på utrustningen, vid åskväder och när utrustningen rengörs.
• Låt inte kabeln komma i kontakt med heta ytor eller skadliga material, och se till att den inte kommer i
kläm.
63
Page 64

Babytalker 3500 SEDS
6.2 Använda batterier (vanliga eller uppladdningsbara)
OBS!
Om du inte använder batterierna enligt instruktioner kan fara uppstå.
• Använd alltid batterier av samma typ (vanliga eller uppladdningsbara).
• Kontrollera att du sätter i batterierna åt rätt håll (rätt polaritet). Om du sätter i batterierna åt fel håll kan
batterierna eller utrustningen skadas.
• Låt aldrig batterier komma i kontakt med öppen eld, eftersom de då kan explodera.
• Låt aldrig batteriets poler komma i kontakt med varandra eller med metallföremål. Detta kan orsaka
överhettning, brand eller explosion.
• Håll batterierna utom räckhåll för barn. Kontakta omedelbart läkare om ditt barn har svalt ett batteri.
• Vätska från läckande batterier kan orsaka permanenta skador på utrustningen. Var extra försiktig när
du hanterar skadade eller läckande batterier, eftersom batterivätskan är frätande. Använd
skyddshandskar.
• Ta bort batterierna om du inte ska använda batterierna under en längre tid.
6.3 Allmänna säkerhetsanvisningar
Följa alltid följande säkerhetsanvisningar när du använder utrustningen:
– Utrustningen måste alltid monteras av en vuxen. Håll delarna utom räckhåll för barn när utrustningen
monteras.
– Låt inte barn leka med utrustningen eller med delarna.
– Kontrollera att babyvakten och nätkabeln alltid är utom räckhåll för barnet.
– Täck inte över babyvakten med en handduk eller liknande.
– Skadade komponenter måste alltid ersättas av originaldelar eftersom komponenter från andra tillverkare
eventuellt inte uppfyller säkerhetsnormerna.
– Stäng av babyvakten om du uppmanas till det av en skylt, ett anslag eller annat meddelande. Utrustningen
på sjukhus och andra vårdinrättningar kan vara känslig för högfrekventa radiosignaler från externa källor.
7 Användning
Babyvakten består av två delar: en sändare hos barnet och en mottagare hos föräldern. Delarna kommunicerar
via en trådlös DECT-kompatibel länk.
DECT-standarden gör att utrustningen är skyddad mot avlyssning och att den inte störs av annan utrustning.
Babyenheten (sändaren) börjar sända när mikrofonen tar emot ljud. Ljudet återskapas i föräldraenheten
(mottagaren). Användaren kan justera mikrofonens känslighet (se “9.8.7 Ställa in mikrofonens känslighet (VOX)”).
• Babyvakten ska aldrig användas som ersättning för en vuxen. Den är bara ett verktyg som
hjälper dig att hålla uppsikt.
7.1 Babyenhetens komponenter
Se figur på utvikningsbladet.
A
1Antenn
2 Belysning
3 Display
4Högtalare
5Mikrofon
6Sök
7 Vaggvisa
8 Nattlampa
9 Öka volymen
10 Spela upp
11 Minska volymen
12 Av/på-knapp
13 Batterilucka
14 Kontakt för adapter
15 Fästklämmor
16 SEDS-lägesväljare
64
Page 65

Babytalker 3500 SEDS
SVENSKA
PTT
90° MA
OPEN
7.2 Föräldraenhetens komponenter
Se figur på utvikningsbladet.
B
17 Volymmätare
18 Högtalare
19 Ficklampa
20 Mikrofon
21 Signallampa
22 Display
23 Sök
24 Prata
PTT
25 Ficklampa av/på
26 Öka volymen/Nästa menyalternativ
27 Bekräfta
28 Minska volymen/Föregående menyalternativ
29 Av/på-knapp
30 Bältes- eller väggfäste
31 Lucka till batterifack
32 Adapter
33 Laddningsindikator
7.3 Displaybeskrivning
Se figur på utvikningsbladet.
C
Temperatur (a) Visar den temperatur som babyenheten uppmätt. Blinkar om temperaturen är
utanför det inställda intervallet.
Matningslarm (b) Visas när matningslarmet är på.
Vaggvisa (c) Visas när en vaggvisa spelas.
Informationsrad (d) Ger mer information om en viss inställning, till exempel tid och datum på
föräldraenheten eller vald vaggvisa på babyenheten.
Batteriindikator (e) Visar det laddningsbara batteriets status.
- batteriet är fulladdat
- batteriet är nästan tomt
Kontroll (f) Visas när babyenhetens nattlampa är tänd.
Känslighet (g) Visas på föräldraenheten när känsligheten ställs in.
8 Använda för första gången
8.1 Paketet innehåller
Utrustningen är standardutrustad med följande komponenter:
- 1 babyenhet
- 1 föräldraenhet
- 1 laddningsstation
- 2 adaptrar
8.2 Installera batterier i babyenheten
• Du kan använda babyenheten med tre AA-batterier (LR06, alkaliska batterier
rekommenderas) eller den medföljande ladaptern.
• Det går inte att ladda upp batterier med babyenheten.
• Låt alltid batterierna sitta i enheten, även om du använder adaptern. Enheten byter då
automatiskt till batteridrift vid ett strömavbrott.
– Vrid fästklämman uppåt.
– Vrid skruven på batteriluckan på enhetens baksida 90° moturs och ta bort
batteriluckan.
• Vrid inte skruven förbi markeringen ”Open”.
15
13
- 1 bruksanvisning
- 1 servicekort
- 1 laddningsbart NiMH-batteri
65
Page 66

– Sätt i tre alkaliska AA-batterier (LR06) i batterifacket. Kontrollera att du
SEDS
LONG
ECO
6V/300mA
+
+
+
+
-
AA x 1
+
-
AA
x 1
+
-
A
A
x
1
90° MAX
OPEN
32
33
29
22
12
21
12
sätter i batterierna åt rätt håll.
– Stäng batterifacket.
• Blanda aldrig använda batterier med nya batterier.
8.3 Ansluta babyenheten till elnätet
Sätt i kontakten från adaptern i babyenhetens nätströmsuttag och
sätt i adaptern i ett vägguttag (230 V/50 Hz).
14
Babytalker 3500 SEDS
OBS!
• Se till att vägguttaget är lätt åtkomligt så att du snabbt kan
dra ut adaptern om det skulle bli nödvändigt.
SEDS
LONG
ECO
• Använd endast den medföljande adaptern (6 V DC/300 mA).
8.4 Installera uppladdningsbara batterier i föräldraenheten
Se figur på utvikningsbladet.
B
OBS!
• Använd endast det medföljande NiMH-batteriet i föräldraenheten.
– Vrid fästklämman uppåt.
– Vrid skruven på batteriluckan på enhetens baksida 90° moturs och
30
31
ta bort batteriluckan.
• Vrid inte skruven förbi markeringen ”Open”.
– Sätt in NiMH-batteriet i batterifacket.
Kontrollera att batteriets tappar passar in i motsvarande fördjupningar
och att polariteten stämmer överens med figur (B).
– Stäng batterifacket försiktigt och rotera fästklämman nedåt.
8.5 Installera uppladdningsbara batterier i föräldraenheten
– Sätt i kontakten från adaptern i laddningsstationens nätuttag och sätt i
adaptern i ett vägguttag (230 V/50 Hz).
– Ställ föräldraenheten i laddningsstationen. Den röda laddningsdioden
tänds.
6V/300mA
AB
+
• Det tar cirka 10 timmar att ladda batterierna helt.
9 Användning
9.1 Stänga av och sätta på babyenheten och föräldraenheten
– Sätt på föräldraenheten genom att trycka på Av/på-knappen . Displayen aktiveras.
– Sätt på babyenheten genom att trycka på Av/på-knappen . Displayen aktiveras.
• Föräldraenheten försöker hitta babyenheten. Om signallampan tänds har enheterna
kontakt. Om lampan inte tänds använder du instruktionerna på sidan 72.
– Stäng av föräldraenheten genom att trycka på Av/på-knappen (tryck ned tills displayen slocknar).
– Stäng av babyenheten genom att trycka på Av/på-knappen (tryck ned tills displayen slocknar).
66
3
29
Page 67

Babytalker 3500 SEDS
SVENSKA
21
20
17
21
6
29
SEDS
LONG
ECO
16
16
PTTPTT
24
PTTPTT
24
7
9.2 Ställa in språk
– Tryck på . ”Night light” (Nattlampa) visas.
– Tryck på knappen igen tills ”Language” (Språk) visas.
– Tryck på . Det valda språket visas.
– Tryck på eller tills önskat språk visas.
– Tryck på knappen för att bekräfta språket.
– Stäng menyn genom att trycka på .
23
26
27
26 28
27
23
9.3 Kontrollera länken mellan föräldraenheten och babyenheten
Du bör alltid kontrollera den trådlösa signalen innan du använder babyvakten för första gången.
– Ställ föräldraenheten i samma rum som babyenheten på minst två meters avstånd.
– Sätt på båda enheterna. Föräldraenheten försöker hitta babyenheten.
– Den gröna signallampan på föräldraenheten blinkar när den söker efter babyenheten.
Lampan lyser med fast sken när enheterna har upprättat kommunikation.
– Det ljud som registreras av mikrofonen återskapas av föräldraenheten.
– Det återskapade ljudets volym visas med volymmätaren högst upp på föräldraenheten.
Fler tända lampor betyder starkare ljudsignal.
– När den maximala volymen nås hörs en varningston.
– Om det inte går att upprätta kommunikation mellan enheterna hörs en dubbel pipsignal och lysioden
blinkar.
– Minska avståndet mellan föräldraenheten och babyenheten tills enheterna får kontakt.
21
9.4 Söka efter föräldraenheten (sökningsfunktion)
– Tryck på knappen Sök på babyenheten och håll den nedtryckt i minst 2 sekunder innan du släpper
upp den.
– Föräldraenheten avger en hög pipsignal under 30 sekunder. Detta gör det enklare att hitta
föräldraenheten.
– Tryck snabbt på Av/på-knappen på föräldraenheten för att stänga av signalen.
9.5 SEDS-lägesväljare
Babytalker 3500 SEDS bygger på SEDS-tekniken (Smart ECO Distance Switch) som
gör att du själv kan ställa in enhetens signalstyrka. Du kan välja mellan två lägen:
långdistansläge eller ECO-läge, med mindre energiförbrukning och svagare
signalstyrka.
Ställ väljaren i läget:
– LONG för maximal räckvidd (upp till 600 m utan hinder).
– ECO för att minska energiförbrukning och radiostrålning med hälften. I det här läget minskas räckvidden
till maximalt 300 m (utan hinder).
9.6 Prata med ditt barn
Du kan använda babyvakten när du vill prata med ditt barn.
• Låt barnet vänja sig vid pratfunktionen innan du använder den på riktigt.
– Tryck på knappen Prata på föräldraenheten och håll den intryckt.
– Håll föräldraenheten vertikalt med mikrofonen ungefär 10 cm från munnen och tala rakt in i mikrofonen.
– Släpp upp knappen när du har pratat klart.
9.7 Spela en vaggvisa
Det finns tre förprogrammerade vaggvisor i babyenheten.
Du kan ställa in uppspelningen av vaggvisor på föräldraenheten (se “9.8.5 Ställa in vaggvisa”) eller på
babyenheten.
– Om du vill spela upp den valda vaggvisan eller stoppa uppspelningen trycker du på knappen på
babyenheten.
– Om du vill välja en annan vaggvisa trycker du på tills den vaggvisa du letar efter visas.
10
67
Page 68

9.8 Inställningar
26
28
26
28
26
28
27
23
9.8.1 Ställa in volymen på föräldraenheten
Det finns sex olika volymlägen. Den lägsta inställningen är ”Ljud av”.
– Tryck på för att öka volymen.
– Tryck på för att minska volymen.
• Om du använder inställningen ”Ljud av” hörs inte det ljud som babyenheten registrerar, men
9.8.2 Ställa in volymen på babyenheten
• Den här inställningen gäller funktionerna “Prata med ditt barn“ och “Spela en vaggvisa“.
26
28
signalen visas fortfarande med lysdioderna .
17
Babytalker 3500 SEDS
– Tryck på för att öka volymen.
– Tryck på för att minska volymen.
9
11
9.8.3 Andra inställningar
Följande inställningar kan ändras från menyn (knappen ) på föräldraenheten:
• Nattlampa
• Vaggvisa
• Mikrofonens känslighet ”Känslighet”
• Alarm ”Ljudalarm”
Navigera mellan menyalternativen genom att använda knappen eller knappen .
Välj det markerade alternativet genom att trycka på knappen .
Gå tillbaka till föregående menyalternativ eller lämna menyn genom att trycka på knappen .
23
• Temperatur (enheter, intervall, varning)
• Klocka
• Matningstid
• ”Språk” (se “9.2 Ställa in språk”)
27
23
9.8.4 Tända och släcka nattlampan
– Tryck på . ”Nattlampa” visas.
– Tryck på . På displayen visas:
”På?” om nattlampan är släckt.
”Av?” om nattlampan är tänd.
– Tryck på för att välja det alternativ som visas.
– Stäng menyn genom att trycka på .
• Du kan också släcka eller tända nattlampan direkt på babyenheten genom att trycka
23
27
27
8
på .
23
9.8.5 Ställa in vaggvisa
– Tryck på . ”Nattlampa” visas.
– Tryck på knappen tills ”Vaggvisa” visas.
– Tryck på .
– Tryck på eller . tills rätt alternativ visas:
”Stoppa?” om du vill stoppa uppspelningen (endast om en vaggvisa spelas upp).
”Välj ny” om du vill välja en annan vaggvisa (du kan välja mellan tre olika godnattvisor).
”Spela?” om du vill spela upp den vaggvisa som visas på babyenheten (inte tillgängligt om en vaggvisa
spelas upp).
– Tryck på för att välja det alternativ som visas.
Om alternativet ”Välj ny” har valts:
– Tryck på eller tills rätt vaggvisa visas, eller tills ”Spela alla” visas.
23
28
27
27
• Om ”Spela alla” visas spelas alla tre vaggvisorna upp i följd.
– Tryck på för att välja det alternativ som visas.
– Stäng menyn genom att trycka på .
68
Page 69

Babytalker 3500 SEDS
SVENSKA
23
27
26
28
27
23
9.8.6 Ställa in temperaturövervakning
I vänteläge visas den temperatur som mätts upp av babyenheten (+/-2 °C) på föräldraenheten. Du kan konfigurera
följande inställningar på den här undermenyn:
• Temperaturomfång: inställning för tillåtet temperaturintervall. Om den uppmätta temperaturen är utanför
intervallet visas det på displayen (”Hög” eller ”Låg” och temperaturdisplayen blinkar).
• Temperaturvarning: anger om en dubbel pipsignal hörs när temperaturen inte är inom det tillåtna intervallet.
• Temperaturenhet: anger om temperaturen ska visas i °C (Celsius) eller °F (Fahrenheit).
– Tryck på . ”Nattlampa” visas.
– Tryck på knappen tills ”Temperatur” visas.
– Tryck på .
– Tryck på tills önskat alternativ visas.
– Tryck på för att välja det alternativ som visas.
Om alternativet ”Ange omf.” har valts:
– Tryck på eller tills den övre temperaturgräns som du vill använda visas (max. 39 °C).
– Tryck på .
– Tryck på eller tills den nedre gräns som du vill använda visas (max. 10 °C).
– Tryck på .
– Stäng menyn genom att trycka på .
Om du väljer alternativet ”Temp varn” visas:
– Tryck på för att välja det alternativ som visas.
– Tryck på eller för att välja en volym på larmsignalen.
– Tryck på .
– Stäng menyn genom att trycka på .
Om ”Grader F” eller ”Grader C” har valts:
– Tryck på för att välja det alternativ som visas.
– Stäng menyn genom att trycka på .
23
28
27
28
”Ange omf.”, för att ställa in intervallet,
”Temp.varn” för att ställa in varningslarmet,
”Grader F” om du vill att temperaturen ska visas i °F (Fahrenheit),
”Grader C” om du vill att temperaturen ska visas i °C (Celsius).
23
26 28
27
26 28
27
”På?” om larmet är av,
”Av?” om larmet är på.
27
23
9.8.7 Ställa in mikrofonens känslighet (VOX)
Du kan ställa in hur känslig babyvaktens mikrofon ska vara. Om känsligheten är för hög kan babyenheten
registrera svaga ljud från omgivningen.
– Tryck på . ”Nattlampa” visas.
– Tryck på knappen igen tills ”Känslighet” visas.
– Tryck på .
– Tryck på eller tills rätt känslighet visas.
23
28
27
26 28
• Känsligheten visas med en svart stapel på displayen:
- hög känslighet
- låg känslighet
– Tryck på .
– Stäng menyn genom att trycka på .
27
23
9.8.8 Ställa in ljudalarmet
Ljudmätarens känslighet visas med ett antal lysdioder högst upp på föräldraenheten. Om volyminställningen
på enheten är ”Ljud av” kan en alarmsignal avges när den ljudnivå som babyenheten registrerar når upp till de
röda lysdioderna.
– Tryck på . ”Nattlampa” visas.
– Tryck på knappen tills ”Ljudalarm” visas.
– Tryck på .
23
28
27
– Följande visas på displayen:
”På?” om larmet är av,
”Av?” om larmet är på.
– Tryck på för att välja det alternativ som visas.
27
17
69
Page 70

Babytalker 3500 SEDS
26
28
27
– Tryck på eller för att välja en volym på larmsignalen.
– Tryck på .
– Stäng menyn genom att trycka på .
26 28
27
23
9.8.9 Ställa in klockan
I vänteläge visas tiden på föräldraenhetens display.
– Tryck på . ”Nattlampa” visas.
– Tryck på knappen tills ”Klocka” visas.
– Tryck på .
– Tryck på tills önskat alternativ visas.
Om alternativet ”Sätt tid” har valts:
– Tryck på för att välja det alternativ som visas. Aktuellt årtal visas.
– Tryck på eller för att välja årtal.
– Tryck på .
– Upprepa föregående två steg för följande inställningar: månad, dag, timme och minut.
– När du har ställt klockan trycker du på för att bekräfta.
– Stäng menyn genom att trycka på .
Om alternativet ”Timformat” har valts:
– Tryck på .
– Följande visas på displayen:
– Tryck på för att välja det alternativ som visas.
– Stäng menyn genom att trycka på .
23
28
27
28
”Sätt tid” för att ställa klockan,
”Timformat” för att välja mellan 12- och 24-timmarsformat.
27
27
27
23
27
”12 tim. ?” om klockan är inställd på 24-timmarsformat och du vill ändra till 12-timmarsformat,
”24 tim. ?” om klockan är inställd på 12-timmarsformat och du vill ändra till 24-timmarsformat.
27
23
• Klockan som visas på föräldraenheten överförs till babyenheten. När babyenheten stängs av
nollställs klockan på föräldraenheten och du måste ställa in klockan på nytt.
9.8.10Ställa in matningstid
Du kan ställa in ett larm på Babytalker 3500 SEDS som talar om när det är dags att mata barnet.
– Tryck på . ”Nattlampa” visas.
– Tryck på knappen tills ”Matn.tid” visas.
– Tryck på .
– Tryck på tills önskat alternativ visas.
Om alternativet ”Sätt tid” har valts:
– Tryck på för att välja det alternativ som visas. Timmen visas.
– Tryck på eller för att välja timme.
– Tryck på .
– Upprepa föregående två steg för att ställa in minut.
– När du har ställt larmet trycker du på för att bekräfta.
– Stäng menyn genom att trycka på .
Om alternativet ”Larm” har valts:
– Tryck på .
– Följande visas på displayen:
– Tryck på för att välja det alternativ som visas.
– Stäng menyn genom att trycka på .
Om alternativet ”Matn.interv.” har valts:
– Tryck på för att välja det alternativ som visas. Timmen visas.
– Tryck på eller för att välja timme.
– Tryck på .
– Upprepa föregående två steg för att ställa in minut.
23
28
27
28
”Sätt tid” för att ställa in matningslarmets tidpunkt,
”Larm” för att stänga av och sätta på larmet,
”Matn.interv.” om du vill ha ett larm som aktiveras med jämna intervall under hela dagen.
27
26 28
27
23
27
”På?” om larmet ska sättas på. Ikonen visas på displayen,
”Av?” om larmet ska stängas av.
27
23
27
26 28
27
70
Page 71

Babytalker 3500 SEDS
SVENSKA
27
– När du har ställt larmet trycker du på för att bekräfta.
– Stäng menyn genom att trycka på .
23
9.9 LED-ficklampa
I föräldraenheten finns en inbyggd LED-ficklampa .
– Tryck på knappen för att sätta på ficklampan.
25
19
10 Rengöring och underhåll
I det här avsnittet finns viktiga instruktioner om hur du rengör och underhåller utrustningen.
Om du följer instruktionerna minskar du risken för problem med utrustningen och för skador som beror på bristande
underhåll.
10.1 Säkerhetsföreskrifter
FARA
Livsfara på grund av elektriska stötar!
• Innan du rengör utrustningen måste du stänga av den och dra ut nätsladden ur vägguttaget.
OBS!
Risk för läckande batterivätska
Vätska från läckande batterier (engångsbatterier eller uppladdningsbara batterier) kan orsaka personskador
(hudirritation) eller skador på utrustningen. Använd skyddshandskar.
OBS!
• Använd inte rengöringsmedel eller lösningsmedel. De kan skada höljet eller läcka in i utrustningen och
orsaka permanenta skador.
10.2 Rengöring
– Rengör utrustningen med en mjuk och något fuktad trasa.
– Rengör kontakter och anslutningar med en torr borste.
– Rengör batterikontakter och batterifacket med en torr trasa som inte luddar.
– Stäng av enheten om den blir våt och ta genast ut batterierna.
Torka ur batterifacket med en mjuk trasa så att risken för skador minimeras.
Lämna batterifacket öppet till det är helt torrt.
Använd inte utrustningen förrän den har torkat helt.
10.3 Underhåll
– Kontrollera batterierna (vanliga och uppladdningsbara) i utrustningen med jämna mellanrum och ersätt vid
behov.
– Kontrollera om kontakter och kablar är skadade.
OBS!
• Om du misstänker att utrustningen är skadad på något sätt bör du låta en fackman undersöka den
innan du använder den igen.
11 Felsökning
I det här avsnittet finns viktiga instruktioner för att hitta och åtgärda problem.
Om du följer instruktionerna minskar du risken för fara och skador.
11.1 Säkerhetsföreskrifter
FARA
Livsfara på grund av elektriska stötar!
• Dra alltid ut nätkontakten innan du försöker åtgärda ett problem.
71
Page 72

Babytalker 3500 SEDS
12
OBS!
Risk för skador på grund av felaktiga reparationer
Felaktigt utförda reparationer kan utsätta användaren för allvarliga faror och kan skada utrustningen.
• Försök aldrig att modifiera eller reparera utrustningen.
• Låt alltid en behörig fackman eller ett servicecenter utföra reparationer av utrustningen eller kablarna.
• Om du misstänker att utrustningen har skadats (om den till exempel har ramlat i golvet) bör du låta en
fackman undersöka utrustningen innan du använder den igen.
11.2 Vanliga problem och lösningar
Du kan använda följande tabell när du försöker hitta och lösa enklare problem.
Problem Möjlig orsak Lösning
Det uppladdningsbara
batteriet i
föräldraenheten laddas
inte
Det går inte att sätta på
föräldraenheten
(displayen visar
ingenting)
”EJ KOPPLAD” visas
på föräldraenhetens
display
Det låter ingenting ur
föräldraenheten
Dålig räckvidd och
störningar under
sändning
Utrustningen avger en
högfrekvent ton
Laddningsstationens kontakt sitter inte iAnslut kontakten
Smutsiga kontakter Rengör batteriets poler och
laddningsstationens kontakter med en
mjuk trasa
Det uppladdningsbara batteriet är
skadat
Det uppladdningsbara batteriet är inte
laddat
Utrustningen är skadad Kontakta kundtjänst
Babyenheten är inte på Sätt på babyenheten
Föräldraenheten och babyenheten
står för långt från varandra
Föräldraenheten har inte registrerats
hos babyenheten
Volyminställningen på föräldraenheten
kan vara för lågt ställd eller avstängd.
Mikrofonens känslighet på
babyenheten kan vara för låg.
Utrustningens räckvidd beror på
omgivningen.
Stål och betongväggar kan påverka
signalerna.
Föräldraenheten och babyenheten
står för nära varandra
Byt ut batteriet
Ladda batteriet
Minska avståndet mellan
föräldraenheten och babyenheten
Registrera föräldraenheten med
babyenheten (se “11.3 Registrera
föräldraenheten hos babyenheten”)
Öka volymen på föräldraenheten
Kontrollera känsligheten och
volyminställningen på
föräldraenheten, och öka den om det
behövs.
Försök att undvika hinder, om det är
möjligt.
Öka avståndet till minst
2 meter
11.3 Registrera föräldraenheten hos babyenheten
Om nattlampan på babyenheten blinkar och/eller om det inte går att skapa en anslutning mellan föräldraenheten
och babyenheten (blinkande grön lysdiod på föräldraenheten) måste föräldraenheten registreras med
babyenheten.
• Kontrollera att adaptern till babyenheten är ansluten till ett vägguttag och att batterierna i
föräldraenheten är laddade.
– Dra ut adaptern till babyenheten från vägguttaget och ta bort batterierna ur föräldraenheten.
– Tryck på Av/på-knappen på babyenheten och håll den intryckt samtidigt som du sätter i adaptern i
vägguttaget.
Babyenheten startas i registreringsläge.
– Släpp upp Av/på-knappen . Nattlampan på babyenheten blinkar i 60 sekunder.
72
12
21
2
Page 73

Babytalker 3500 SEDS
SVENSKA
29
17
29
2
17
6
29
– Tryck på Av/på-knappen på föräldraenheten och håll knappen intryckt samtidigt som du sätter i
batterierna.
Föräldraenheten startas och de 2 röda volymlysdioderna blinkar. Släpp upp Av/på-knappen .
– Registreringsläget avslutas när registreringen har gjorts eller efter 60 sekunder.
Nattlampan på babyenheten slutar blinka.
De 2 röda lysdioderna på föräldraenheten slocknar.
– Ett långt pip hörs när registreringen är klar. Om registreringen misslyckades hörs tre korta pip.
Kontrollera kommunikationen mellan föräldraenheten och babyenheten:
– Tryck på och håll ned knappen Sök på babyenheten i 2 sekunder.
– Föräldraenheten avger en hög pipsignal under 30 sekunder.
– Tryck snabbt på Av/på-knappen på föräldraenheten för att stänga av signalen.
12 Förvaring och återvinning
• Vi rekommenderar att du behåller kartongen och förpackningsmaterialet så att du kan
använda dem när utrustningen ska transporteras.
12.1 Förvaring
Ta ut batterierna (vanliga eller uppladdningsbara) från föräldraenheten och babyenheten.
Förvara utrustningen på en torr plats.
12.2 Återvinning av förpackningsmaterial
Förpackningsmaterialet är miljövänliga material som kan återvinnas i din lokala återvinningscentral.
12.3 Återvinning (miljöskydd)
Utrustningen ska återvinnas enligt EU-direktiv WEEE 2002/96/EC (Waste Electrical and Electronic
Equipment) om återvinning av elektriska och elektroniska komponenter. Kontakta din lokala
återvinningscentral för mer information.
Lämna batterierna (vanliga eller uppladdningsbara) till en miljöstation eller i enlighet med lokala
föreskrifter.
13 Tekniska specifikationer
Frekvens 1880 GHz till 1900 GHz
Räckvidd Utomhus: upp till 600 m (upp till 300 m i SEDS-läge)
Inomhus: upp till 50 m (upp till 25 m i SEDS-läge)
Driftstemperatur 15 °C till 35 °C
20 % till 75 % relativ luftfuktighet
Föräldraenheten
Laddningsbara batterier Batteripaket (3,6 V NiMH) (ingår)
Likströmsadapter (KSS 05-060-0300G) In: 230 V AC / 50 Hz / 150 mA
Ut: 6 V DC / 300 mA
Mått: cirka 117 x 62 x 72 mm
Vikt 98 g (utan uppladdningsbara batterier)
Babyenheten
Batterier 3 alkaliska battericeller (LR06/AA) (ingår ej)
Likströmsadapter (KSS 05-060-0300G) In: 230 V AC / 50 Hz / 150 mA
Ut: 6 V DC / 300 mA
Mått: cirka 137 x 60 x 101 mm
Vikt 141 g (utan batterier)
73
Page 74

Babytalker 3500 SEDS
14 Försäkran om överensstämmelse
TOPCOM EUROPE NV försäkrar härmed att produkten uppfyller alla grundläggande krav samt andra relevanta
bestämmelser i direktiv 1999/5/EC.
Denna försäkran om överensstämmelse finns på http://www.topcom.net/cedeclarations.asp
15 Topcoms garanti
15.1 Garantiperiod
Topcoms produkter har en garantiperiod på 24 månader. Garantiperioden påbörjas den dag då enheten köps. Det
finns ingen garanti på standardbatterier eller uppladdningsbara batterier (AA-/AAA-typ).
Förbrukningsdelar eller defekter som orsakar en försumbar effekt på apparatens funktion eller värde täcks inte av
garantin.
För att du ska kunna göra ett garantianspråk måste du visa upp det ursprungliga inköpskvittot, eller en kopia av
detta, där inköpsdatum och produktmodell framgår.
15.2 Garantiåtagande
En felaktig apparat måste returneras till ett av Topcoms servicecenter tillsammans med ett giltigt inköpskvitto.
Om ett fel uppstår på apparaten under garantiperioden, reparerar Topcom eller dess officiellt förordnade
servicecenter alla defekter orsakade av material- eller tillverkningsfel utan kostnad. Detta sker antingen genom
reparation eller utbyte av den felaktiga apparaten eller delar av den felaktiga apparaten. I händelse av utbyte, kan
färg eller modell skilja sig från den ursprungligen köpta enheten.
Det ursprungliga inköpsdatumet avgör garantitidens början. Garantiperioden förlängs inte om produkten byts ut
eller repareras av Topcom eller dess förordnade servicecenter.
15.3 Garantiundantag
Skador eller defekter som orsakats av felaktig behandling eller användning, och skador till följd av användning av
delar eller tillbehör som inte är original, täcks inte av garantin.
Garantin täcker inte skador orsakade av yttre faktorer som blixtnedslag, vatten och eld eller skador orsakade under
transport.
Ingen garanti kan krävas om serienumret på apparaten har ändrats, avlägsnats eller gjorts oläsligt.
Eventuella garantianspråk gäller inte om enheten har reparerats, ändrats eller modifierats av köparen.
74
Page 75

Babytalker 3500 SEDS
DANSK
1 Generelt
Kære Kunde
Vi beder dig om at læse disse oplysninger for hurtigt at komme i gang med dette produkt og lære om udstyrets
funktioner.
2 Oplysninger om denne brugervejledning
Denne brugervejledning indeholder oplysninger om Babytalker 3500 SEDS (herefter benævnt "udstyret") samt
vigtige anvisninger mht. ibrugtagning, sikkerhed, korrekt brug og vedligeholdelse af udstyret.
Denne brugervejledning bør altid opbevares i nærheden af udstyret. Alle, der er ansvarlige for at betjene, reparere
eller rengøre udstyret, skal læse og/eller konsultere denne brugervejledning.
Denne brugervejledning bør opbevares på et sikkert sted og videregives til næste ejer af udstyret.
3 Ophavsret
Dette dokument er beskyttet ved lov om ophavsret.
Alle rettigheder forbeholdes, herunder rettigheder til fotomekanisk reproduktion, kopiering og distribution med
særlige metoder som f.eks. databehandling, datalagringsmedier eller datanetværk enten helt eller delvist samt
tekniske ændringer eller ændringer i indholdet.
4 Advarsler
FARE
Denne advarsel påpeger en nært forestående farlig situation.
Den farlige situation kan resultere i død eller alvorlig personskade, hvis den ikke undgås.
FORSIGTIG
Denne advarsel påpeger en potentielt farlig situation.
Den farlige situation kan resultere i personskade og/eller materiel skade, hvis den ikke undgås.
• Dette symbol gør opmærksom på oplysninger, der gør det nemmere at bruge udstyret.
5 Korrekt brug
Dette udstyr er kun udviklet til privat (ikke-professionel) brug ved overvågning af babyer i lukkede rum. Al anden
brug er ikke korrekt og kan føre til faresituationer.
Følg altid anvisningerne i denne brugervejledning.
Der accepteres intet ansvar for tab eller skade, der måtte følge fra ukorrekt brug.
Brugeren af udstyret er eneansvarlig for alle risici.
6 Sikkerhed
6.1 Risiko for elektrisk stød
FARE
Kontakt med ledere og strømførende dele kan have dødelig udgang.
Følg disse sikkerhedsanvisninger for at undgå risiko for elektrisk stød:
• Kun den AC-adapter, der medfølger, bør anvendes for at undgå risiko for skade på udstyret.
• Udstyret må ikke bruges, hvis AC-adapteren, strømkablet eller stikkontakten er beskadiget.
• AC-adapteren må ikke åbnes. Der er risiko for elektrisk stød, hvis du rører kontakter eller
strømførende forbindelser, eller hvis du ændrer den elektriske eller mekaniske konstruktion.
• Udstyret bør beskyttes imod fugt samt holdes støvfrit. AC-adapteren bør straks afbrydes i tilfælde af
kontakt med fugt eller vand.
• AC-adapteren bør afbrydes i tilfælde af funktionsfejl, i tordenvejr og under rengøring af udstyret.
• Kablet skal beskyttes imod kontakt med varme overflader eller andre farekilder og må ikke klemmes.
75
Page 76

Babytalker 3500 SEDS
6.2 Brug af batterier (almindelige eller genopladelige)
FORSIGTIG
Hvis batterierne ikke anvendes i henhold til vejledningen, kan der opstå fare.
• Der bør altid anvendes batterier af samme type (almindelige eller genopladelige).
• Sørg for, at batterierne er isat i henhold til korrekt polaritet. Beskadigelse af batterierne og udstyret kan
opstå ved forkert isætning af batterierne.
• Batterierne må aldrig kastes på åben ild, da dette kan medføre eksplosionsfare.
• Batteriterminalerne må aldrig komme i kontakt med hinanden eller med metalgenstande - hverken
tilsigtet eller ved et uheld. Dette kan føre til overophedning, ildebrand eller eksplosion.
• Batterier skal opbevares utilgængeligt for børn. Kontakt omgående en læge, hvis batteriet sluges.
• Væske fra utætte batterier kan forårsage varig beskadigelse af udstyret. Beskadigede eller utætte
batterier bør håndteres forsigtigt, da der er fare for ætsen. Anvend beskyttelseshandsker.
• Batterierne bør fjernes, hvis udstyret ikke skal anvendes i længere tid.
6.3 Sikker brug
Følgende sikkerhedsanvisninger bør altid følges for sikker anvendelse af udstyret:
– Udstyret skal altid samles af en voksen. Små dele skal opbevares utilgængeligt for børn under samlingen
af udstyret.
– Lad ikke børn lege med udstyret eller dele heraf.
– Sørg for, at babytelefonen og strømkablet altid er uden for babyens rækkevidde.
– Babytelefonen må ikke overdækkes af et håndklæde, tæppe eller lignende.
– Defekte dele skal altid udskiftes med originale dele, da andre dele muligvis ikke opfylder de påkrævede
sikkerhedsstandarder.
– Babytelefonen bør slukkes, når dette kræves af skilte, plakater eller andre påbud. Udstyr, der anvendes
på hospitaler og andre behandlingssteder, kan være følsomt over for højfrekvenssignaler fra eksterne
kilder.
7 Betjening
Babytelefonen består af to enheder: én til forældrene og én til babyen. Enhederne forbindes trådløst i henhold til
DECT-standarden.
Takket være DECT-teknologi er dette udstyr beskyttet imod aflytning og er immunt over for forstyrrelser fra andet
udstyr.
Babyenheden starter med at udsende signaler, så snart mikrofonen opfanger en lyd. Lyden gengives af
forældreenheden. Mikrofonens følsomhed kan justeres af brugeren (se “9.8.7 Indstilling af mikrofonens følsomhed
(VOX)”).
• Babytelefonen kan aldrig erstatte en ansvarlig voksens opsyn; babytelefonen er kun
hjælpeudstyr.
7.1 Babyenhedens komponenter
Se figur på folde-ud-siden.
A
1 Antenne
2Natlys
3 Display
4Højttaler
5Mikrofon
6 Personsøgeknap
7 Knap til vuggevise
8 Knap til natlys
9 Forøg lydstyrke
10 Afspilningsknap
11 Reducér lydstyrke
12 Tænd/sluk-knap
13 Batteridæksel
14 Stik til AC-adapter
15 Fastgørelsesklemmer
16 Kontakt til SEDS-stråling
76
Page 77

Babytalker 3500 SEDS
DANSK
PTT
C
90° MA
OPEN
15
13
7.2 Forældreenhedens komponenter
Se figur på folde-ud-siden.
B
17 Lysdioder for lydstyrke
18 Højttaler
19 Lysdiode for lommelygte
20 Mikrofon
21 Lysdiode for link
22 Display
23 Personsøgeknap
24 Tale-knap
PTT
25 Lysdiodeknap for lommelygte
26 Forøg lydstyrke/Næste menupunkt
27 Bekræftelsesknap
28 Reducér lydstyrke/Forrige menupunkt
29 Tænd/sluk-knap
30 Fastgørelsesklemme til bælte/væg
31 Batteridæksel
32 AC-adapter
33 Indikator for opladning
7.3 Beskrivelse af displayet
Se figur på folde-ud-siden.
Temperatur (a) Viser den temperatur, der måles af babyenheden. Blinker, når temperaturen
ligger uden for det indstillede interval.
Madtidsalarm (b) Synlig, når madtidsalarmen er tændt.
Vuggevise (c) Synlig, når en vuggevise afspilles.
Informationslinje (d) Giver yderligere oplysninger om forskellige indstillinger som f.eks. dato og
klokkeslæt på forældreenheden eller den valgte vuggevise på babyenheden.
Batteriindikator (e) Viser status for det genopladelige batteri.
- batteri fuldt opladet
- batteri næsten afladet
Kontrol (f) Synlig, når babyenhedens natlys er tændt.
Følsomhed (g) Synlig på forældreenheden, når følsomheden indstilles.
8 Ibrugtagning
8.1 Pakkens indhold
Udstyret leveres som standard med følgende komponenter:
- 1 babyenhed
- 1 forældreenhed
- 1 opladningsenhed
- 2 AC-adaptere
8.2 Isætning af batterier i babyenheden
• Babyenheden kan strømforsynes med tre AA-batterier (LR06/batteri til lommelygte; vi
anbefaler almindelige alkaliske batterier) eller den medfølgende AC-adapter.
• Babyenheden kan ikke genoplade batterier.
• Det anbefales altid at efterlade batterierne i enheden, også hvis du anvender AC-adapteren.
Enheden skifter automatisk til batteristrøm i tilfælde af strømsvigt.
– Rotér bælteklemmen opad.
– Drej skruen på batteridækslet bag på babyenheden 90° mod uret, og fjern
batteridækslet.
• Undlad at dreje skruen forbi "Open"-punktet.
- 1 brugervejledning
- 1 servicekort
- 1 genopladelig NiMH-batteripakke
77
Page 78

– Isæt tre almindelige alkaliske AA-batterier (LR06/batteri til lommelygte) i
SEDS
LONG
ECO
6V/300mA
+
+
+
+
-
AA x 1
+
-
AA
x 1
+
-
A
A
x
1
14
90° MAX
OPEN
30
31
33
21
29
batterirummet. Sørg for, at batterierne vender korrekt.
– Luk batterirummet.
• Brugte og nye batterier må aldrig anvendes
sammen.
8.3 Tilslutning af babyenheden til strømforsyning
Isæt AC-adapterens lille stik i stikket på babyenheden og forbind ACadapteren med et netstik (230 V/50 Hz).
Babytalker 3500 SEDS
FORSIGTIG
• Netstikket skal være inden for nem rækkevidde, så du
hurtigt kan afbryde strømkablet i en nødsituation.
SEDS
LONG
ECO
• Kun den medfølgende AC-adapter bør anvendes (6 V DC/
300 mA).
8.4 Isætning af genopladelige batterier i forældreenheden
Se figur på folde-ud-siden.
B
FORSIGTIG
• Kun den medfølgende NiMH-batteripakke bør anvendes i forældreenheden.
– Rotér bælteklemmen opad.
– Drej skruen på batteridækslet bag på forældreenheden 90° mod
uret, og fjern batteridækslet.
• Undlad at dreje skruen forbi "Open"-punktet.
– Isæt NiMH-batteripakken i batterirummet.
Sørg for, at batteripakkens tap sidder i den tilsvarende indskæring, og
at batterierne vender rigtigt i henhold til figur (B).
– Luk batterirummet forsigtigt, og rotér bælteklemmen nedad.
8.5 Isætning af genopladelige batterier i forældreenheden
– Isæt AC-adapterens lille stik i stikket på opladningsenheden, og forbind
AC-adapteren med et netstik (230 V/50 Hz).
– Sæt forældreenheden i opladningsenheden. Den røde lysdiode for
opladning tændes.
32
6V/300mA
AB
+
• Det tager ca. 10 timer at oplade batterierne helt.
9 Betjening og brug
9.1 Sådan tændes og slukkes baby- og forældreenheden
– Tryk på tænd/sluk-knappen for at tænde forældreenheden. Displayet er nu aktiveret.
– Tryk på tænd/sluk-knappen for at tænde babyenheden. Displayet er nu aktiveret.
• Forældreenheden vil nu forsøge at etablere forbindelse til babyenheden. Hvis lysdioden
tændes, er der etableret forbindelse. Hvis ikke, se side 84.
– Tryk på tænd/sluk-knappen for at slukke forældreenheden (tryk og hold nede, indtil displayet bliver
blankt).
– Tryk på tænd/sluk-knappen for at slukke babyenheden (tryk og hold nede, indtil displayet bliver
blankt).
78
29
12
12
22
3
Page 79

Babytalker 3500 SEDS
DANSK
28
21
20
17
21
6
29
SEDS
LONG
ECO
16
PTTPTT
24
PTTPTT
9.2 Indstilling af displaysprog
– Tryk på knappen . ‘Night light’ (natlys) vises.
– Tryk på knappen gentagne gange, indtil ‘Language’ (Sprog) vises.
– Tryk på knappen . Det aktuelle sprog vises.
– Tryk på knappen gentagne gange eller , indtil det ønskede sprog vises.
– Tryk på knappen for at bekræfte sproget.
– Tryk på knappen for at forlade menuen.
23
26
27
26
27
23
9.3 Kontrol af forbindelsen imellem forældreenheden og babyenheden
Du bør altid kontrollere den trådløse forbindelse, når du anvender babytelefonen første gang.
– Stil forældreenheden i samme værelse som babyenheden i en afstand på mindst to meter.
– Tænd begge enheder. Forældreenheden vil nu forsøge at etablere forbindelse til babyenheden.
– Den grønne lysdiode på forældreenheden blinker, mens enheden forsøger at etablere forbindelse.
Lysdioden forbliver tændt, efter at forbindelsen er etableret.
– De lyde, der opfanges af mikrofonen , gengives af forældreenheden.
– Lydstyrken på den gengivne lyd angives af lysdioden for lydstyrke øverst på forældreenheden.
Jo højere lydstyrken er, jo flere lysdioder er tændt.
– En tone lyder, når den maksimale lydstyrke opnås.
– Hvis der ikke etableres forbindelse, lyder en dobbelt biptone som advarsel, og forbindelseslysdioden
blinker.
– Reducér afstanden imellem forældre- og babyenheden, indtil en ny forbindelse etableres.
21
9.4 Sådan finder du forældreenheden (personsøgefunktion)
– Tryk på the Personsøgeknappen på babyenheden, og hold den nede i mindst 2 sekunder, før du
slipper den igen.
– Forældreenheden udsender som svar en høj biptone i 30 sekunder. Dette gør det nemmere at finde
forældreenheden.
– Tryk kort på tænd/sluk-knappen på forældreenheden for at slukke for tonen.
9.5 SEDS-indstilling
Babytalker 3500 SEDS anvender den unikke SEDS-teknologi (Smart ECO Distance
Switch), som giver forældre mulighed for at indstille udstyrets udstrålingsstyrke. Der er
to valgmuligheder: "langdistancetilstand" eller "ECO-tilstand" med reduceret
strømforbrug og lavere udstråling.
Knappen indstilles til:
16
– "LONG" til en maksimal rækkevidde på 600 m (i åbne områder).
– "ECO" for at reducere udstrålingen med det halve samt reducere strømforbruget. Med denne indstilling
reduceres rækkevidden til maks. 300 m (i åbne områder).
9.6 Sådan taler du til din baby
Du kan bruge babytelefonen til at tale til din baby.
• Giv din baby mulighed for at blive vant til talefunktionen, før du bruger funktionen i praksis.
– Tryk på Taleknappen på forældreenheden, og hold den nede.
– Hold forældreenheden lodret med mikrofonen ca. 10 cm fra munden, og tal ind i mikrofonen.
– Slip , når du er færdig med at tale.
24
9.7 Afspilning af vuggevise
Babyenheden kan afspille tre forprogrammerede vuggeviser.
Du kan konfigurere afspilningen af vuggeviser på forældreenheden (se “9.8.5 Indstilling af vuggevise”) eller på
babyenheden.
– Tryk på knappen på babyenheden for at afspille den aktuelt valgte vuggevise eller stoppe
afspilningen.
– Hvis du vil vælge en anden vuggevise, skal du trykke på knappen gentagne gange, indtil den
ønskede vuggevise vises.
10
7
79
Page 80

9.8 Indstillinger
23
27
23
8
9.8.1 Indstilling af gengivelseslydstyrken på forældreenheden
Der er seks lydstyrkeniveauer. Den laveste indstilling er "Lyd fra".
– Tryk på knappen for at øge lydstyrken.
– Tryk på knappen for at reducere lydstyrken.
• Hvis indstillingen "Lyd fra" vælges, vises de lyde, der opfanges af babyenheden kun på
lysdioderne for lydstyrke .
9.8.2 Indstilling af gengivelseslydstyrken på babyenheden
• Denne indstilling anvendes på funktionerne “Sådan taler du til din baby“ og “Afspilning af
vuggevise“.
26
28
17
Babytalker 3500 SEDS
– Tryk på knappen for at øge lydstyrken.
– Tryk på knappen for at reducere lydstyrken.
9
11
9.8.3 Andre indstillinger
Følgende indstillinger kan konfigureres fra menuen (knappen ) på forældreenheden:
•Natlys
• Vuggevise
• Mikrofonens følsomhed "Følsomhed"
• Lydalarm "Lydvarsling"
• Temperatur (enheder, tilladt interval, alarm)
•Ur
•Madtid
• Vis sprog ‘Language’ (Sprog) (se “9.2 Indstilling af
displaysprog”)
Brug knappen eller knappen for at navigere imellem menupunkterne.
26 28
Tryk på knappen for at vælge den markerede indstilling.
Tryk på knappen for at vende tilbage til et tidligere menupunkt eller forlade menuen.
9.8.4 Sådan tændes og slukkes natlyset
– Tryk på knappen . ‘Night light’ (natlys) vises.
– Tryk på knappen . Displayet viser:
"Til?", hvis natlyset er slukket;
"Fra?", hvis natlyset er tændt.
– Tryk på knappen for at vælge den markerede valgmulighed.
– Tryk på knappen for at forlade menuen.
• Du kan også tænde og slukke for natlyset direkte på babyenheden ved at trykke på
knappen .
23
27
27
23
9.8.5 Indstilling af vuggevise
– Tryk på knappen . ‘Night light’ (natlys) vises.
– Tryk på knappen gentagne gange, indtil "Vuggevise" vises.
– Tryk på knappen .
– Tryk på knappen eller gentagne gange, indtil den ønskede valgmulighed vises:
"Stop?", hvis du ønsker at stoppe vuggevisen (fungerer kun, hvis en vuggevise er under afspilning);.
"Vælg ny", hvis du ønsker at vælge en anden vuggevise (enheden indeholder tre forskellige vuggeviser);
"Afspil?" , hvis du ønsker at afspille den aktuelt valgte vuggevise på babyenheden (fungerer ikke, når en
vuggevise er under afspilning).
– Tryk på knappen for at vælge den markerede valgmulighed.
Valgmuligheden "Vælg ny" er markeret:
– Tryk på knappen eller gentagne gange, indtil den ønskede vuggevise eller "Afspil alt"
vises.
23
28
27
26 28
27
26 28
• Hvis "Afspil alt" er markeret, afspilles alle tre vuggeviser efter hinanden.
– Tryk på knappen for at vælge den markerede valgmulighed.
– Tryk på knappen for at forlade menuen.
27
23
80
Page 81

Babytalker 3500 SEDS
DANSK
28
26
23
27
26
28
27
23
9.8.6 Indstilling af temperaturovervågning
I standby vises den temperatur (+/– 2 ° C), der måles af babyenheden, på forældreenheden. Følgende indstillinger
kan konfigureres i denne undermenu:
• Temperaturinterval: indstilling af tilladt temperaturinterval. Hvis den målte temperatur er uden for dette
interval, vises dette på displayet ("Høj" eller "Lav" og temperaturdisplayet blinker).
• Temperaturalarm: vælg, om et dobbeltbip skal lyde, når temperaturen er uden for det tilladte interval.
• Temperaturenhed: vælg, om temperaturen skal vises i ° C (Celsius) eller ° F (Fahrenheit).
– Tryk på knappen . ‘Night light’ (natlys) vises.
– Tryk på knappen gentagne gange, indtil "Temperatur" vises.
– Tryk på knappen .
– Tryk på knappen gentagne gange, indtil den ønskede valgmulighed vises:
"Område" til indstilling af temperaturintervallet;
"Temp.varsel" til indstilling af temperaturalarmen;
"Grader F" til visning af temperaturen i ° F (Fahrenheit);
"Grader C" til visning af temperaturen i ° C (Celsius).
– Tryk på knappen for at vælge den markerede valgmulighed.
Valgmuligheden "Område" er markeret:
– Tryk på knappen eller gentagne gange, indtil den ønskede øvre grænse vises (maks. 39° C).
– Tryk på knappen .
– Tryk på knappen eller gentagne gange, indtil den ønskede nedre grænse vises (min. 10° C).
– Tryk på knappen .
– Tryk på knappen for at forlade menuen.
Hvis du vælger valgmuligheden "Temp.varsel" vises:
"Til?", hvis alarmen er slået fra;
"Fra?", hvis alarmen er slået til.
– Tryk på knappen for at vælge den markerede valgmulighed.
– Tryk på knappen eller for at vælge den ønskede lydstyrke for alarmen.
– Tryk på knappen .
– Tryk på knappen for at forlade menuen.
Valgmuligheden "Grader F" eller "Grader C" er markeret:
– Tryk på knappen for at vælge den markerede valgmulighed.
– Tryk på knappen for at forlade menuen.
23
28
27
23
28
27
26 28
27
27
23
9.8.7 Indstilling af mikrofonens følsomhed (VOX)
Du kan konfigurere lyddetektionens følsomhed (VOX) på babytelefonen. Hvis følsomheden indstilles højt, vil
babyenheden kunne opfange svagere lyde.
– Tryk på knappen . ‘Night light’ (natlys) vises.
– Tryk på knappen gentagne gange, indtil "Følsomhed" vises.
– Tryk på knappen .
– Tryk på knappen eller gentagne gange, indtil den ønskede følsomhed vises.
23
28
27
26 28
• VOX-følsomheden vises ved en sort bjælke på displayet:
- høj følsomhed
- lav følsomhed
– Tryk på knappen .
– Tryk på knappen for at forlade menuen.
27
23
9.8.8 Indstilling af lydalarmen
Lyddetektionens følsomhed vises ved antallet af tændte lysdioder øverst på forældreenheden. Hvis enhedens
lydstyrkekontrol er indstillet til "Lyd fra", kan et alarmsignal genereres, når det lydniveau, der opfanges af
babyenheden, når intervallet på de røde lysdioder.
– Tryk på knappen . ‘Night light’ (natlys) vises.
– Tryk på knappen gentagne gange, indtil "Lydvarsling" vises.
– Tryk på knappen .
23
28
27
– Displayet viser:
"Til?", hvis alarmen er slået fra;
"Fra?", hvis alarmen er slået til.
– Tryk på knappen for at vælge den markerede valgmulighed.
27
17
81
Page 82

Babytalker 3500 SEDS
28
28
– Tryk på knappen eller for at vælge den ønskede lydstyrke for alarmen.
– Tryk på knappen .
– Tryk på knappen for at forlade menuen.
26 28
27
23
9.8.9 Indstilling af uret
I standby vises klokkeslættet på forældreenhedens display.
– Tryk på knappen . ‘Night light’ (natlys) vises.
– Tryk på knappen gentagne gange, indtil "Ur" vises.
– Tryk på knappen .
– Tryk på knappen gentagne gange, indstil den ønskede valgmulighed vises:
"Indstil tid" til indstilling af uret;
"Timeformat" til indstilling af format på 12 timer eller 24 timer.
Valgmuligheden "Indstil tid" er markeret:
– Tryk på knappen for at vælge den markerede valgmulighed. Året vises.
– Tryk på knappen eller for at vælge året.
– Tryk på knappen .
– Gentag de foregående to trin for hver af de følgende indstillinger: måned, dag, time og minutter.
– Efter at du har indstillet minutterne, skal du trykke på knappen for at bekræfte indstillingerne.
– Tryk på knappen for at forlade menuen.
Valgmuligheden "Timeformat" er markeret:
– Tryk på knappen .
– Displayet viser:
"12-timers?", hvis uret er indstillet til 24-timers format, og du ønsker at skifte til 12-timers format;
"24-timers?", hvis uret er indstillet til 12-timers format, og du ønsker at skifte til 24-timers format.
– Tryk på knappen for at vælge den markerede valgmulighed.
– Tryk på knappen for at forlade menuen.
23
28
27
27
26 28
27
27
23
27
27
23
• Uret, der vises på forældreenheden, transmitteres af babyenheden. Når babyenheden er
slukket, nulstilles uret på forældreenheden og skal indstilles igen.
9.8.10Indstilling af madtid
Du kan indstille en alarmtid på Babytalker 3500 SEDS for at minde dig om din babys madtid.
– Tryk på knappen . ‘Night light’ (natlys) vises.
– Tryk på knappen gentagne gange, indtil "Madtid" vises.
– Tryk på knappen .
– Tryk på knappen gentagne gange, indstil den ønskede valgmulighed vises:
"Indstil tid" til indstilling af madtid;
"Alarm" til at slå alarmen til og fra;
"Madinterval", hvis du ønsker at høre madtidsalarmer ved faste intervaller i løbet af dagen.
Valgmuligheden "Indstil tid" er markeret:
– Tryk på knappen for at vælge den markerede valgmulighed. Timeangivelsen vises.
– Tryk på knappen eller for at vælge timetallet.
– Tryk på knappen .
– Gentag de foregående to trin for at indstille minutterne.
– Efter at du har indstillet minutterne, skal du trykke på knappen for at bekræfte indstillingerne.
– Tryk på knappen for at forlade menuen.
Valgmuligheden "Alarm" er markeret:
– Tryk på knappen .
– Displayet viser:
"Til?" for at slå alarmen til; ikonet vises på displayet;
"Fra?" for at slå alarmen fra.
– Tryk på knappen for at vælge den markerede valgmulighed.
– Tryk på knappen for at forlade menuen.
Valgmuligheden "Madinterval" er markeret:
– Tryk på knappen for at vælge den markerede valgmulighed. Timeangivelsen vises.
– Tryk på knappen eller for at vælge timetallet.
– Tryk på knappen .
– Gentag de foregående to trin for at indstille minutterne.
23
28
27
27
26 28
27
27
23
27
27
23
27
26 28
27
82
Page 83

Babytalker 3500 SEDS
DANSK
– Efter at du har indstillet minutterne, skal du trykke på knappen for at bekræfte indstillingerne.
– Tryk på knappen for at forlade menuen.
23
27
9.9 Lysdiode for lommelygte
Forældreenheden har en indbygget lommelygte .
– Tryk på knappen for at tænde for lommelygten.
25
19
10 Rengøring og vedligeholdelse
Dette afsnit indeholder vigtige anvisninger for rengøring og vedligeholdelse af udstyret.
Følg disse anvisninger for at sikre problemfri brug af udstyret og forebygge beskadigelse af udstyret som følge af
ukorrekt vedligeholdelse.
10.1 Sikkerhedsanvisninger
FARE
Risiko for elektrisk stød med dødelig udgang!
• Før du rengør udstyret, skal du slukke det og afbryde strømkablet fra netstikket.
FORSIGTIG
Risiko pga. utætte batterier
Væske fra utætte batterier (almindelige eller genopladelige) kan forårsage personskade (hudirritation) eller
beskadige udstyret. Anvend beskyttelseshandsker.
FORSIGTIG
• Der må ikke anvendes rengørings- eller opløsningsmidler. Disse kan beskadige ydersiden eller
trænge ind i udstyret og forårsage permanent skade.
10.2 Rengøring
– Rengør udstyret med en blød, let fugtig klud.
– Rengør snavsede stik og kontakter med en blød børste.
– Rengør batterikontakterne og batterirummet med en tør, fnugfri klud.
– Hvis udstyret bliver vådt, skal det slukkes, og batterierne tages ud med det samme.
Aftør batterirummet med en blød klud for at minimere potentiel vandskade.
Lad batterirummet stå åbent, indtil det er helt tørt.
Udstyret må ikke anvendes, før det er helt tørt.
10.3 Vedligeholdelse
– Kontrollér udstyrets batterier (almindelige eller genopladelige) regelmæssigt, og udskift dem, når dette
påkræves.
– Kontrollér stik og ledninger for funktionsfejl.
FORSIGTIG
• Hvis du har mistanke om, at udstyret er beskadiget, skal du sørge for at få det kontrolleret af en
kvalificeret tekniker, før du bruger det igen.
11 Fejlsøgning
Dette afsnit indeholder vigtige anvisninger om, hvordan du finder og retter fejl.
Følg disse anvisninger for at undgå fare og beskadigelse af udstyret.
11.1 Sikkerhedsanvisninger
FARE
Risiko for elektrisk stød med dødelig udgang!
• Træk strømkablet ud, før du forsøger at rette fejl på udstyret.
83
Page 84

Babytalker 3500 SEDS
21
12
12
2
17
FORSIGTIG
Risiko for fare pga. ukorrekt reparation
Ukorrekt reparation kan udsætte brugere for alvorlig fare og kan forårsage beskadigelse af udstyret.
• Du må ikke selv forsøge at ændre eller reparere udstyret.
• Reparation af udstyret eller udstyrets kabler skal udføres af en kvalificeret tekniker eller af
servicecenteret.
• Hvis du har mistanke om, at udstyret er beskadiget (f.eks. efter at det er faldet på gulvet), bør du få det
kontrolleret af en kvalificeret tekniker, før du bruger udstyret igen.
11.2 Fejlårsager og løsninger
Følgende tabel indeholder hjælp til lokalisering og løsning af mindre fejl.
Fejl Mulig årsag Løsning
Forældreenhedens
genopladelige
batteripakke oplader
ikke
Forældreenheden
tænder ikke (displayet
er blankt)
"IKKE LINKET" vises
på forældreenhedens
display
Forældreenheden
gengiver ikke de lyde,
der opfanges af
babyenheden
Begrænset rækkevidde
og støj under
transmission
Udstyret udsender en
høj piftetone
Opladerenhedens stik er ikke isat Isæt stik
Snavsede kontakter Rengør batteriterminalerne og
opladerenhedens kontakter med en
blød klud
Den genopladelige batteripakke er
Udskift batterierne
defekt
Den genopladelige batteripakke er
Oplad batteripakken
ikke opladet
Defekt udstyr Kontakt kundeservice
Babyenheden er ikke tændt Tænd babyenheden
Forældre- og babyenheden befinder
sig for langt fra hinanden
Forældreenheden er ikke registeret på
babyenheden
Reducér afstanden imellem forældreog babyenheden.
Registrér forældreenheden på
babyenheden (se “11.3 Registrering af
forældreenheden på babyenheden”)
Lydstyrken på forældreenheden er
Øg lydstyrken på forældreenheden
muligvis for lav eller slukket.
Mikrofonens følsomhed på
babyenheden er muligvis indstillet for
lavt.
Kontrollér VOX-følsomheden og
lydstyrkeindstillingen på
forældreenheden, og øg dem efter
behov.
Udstyrets rækkevidde afhænger af
Undgå hindringer så vidt muligt.
forholdene.
Stålstrukturer og betonvægge kan
hindre transmission.
Forældre- og babyenheden befinder
sig for tæt på hinanden
Øg afstanden til mindst
to meter
11.3 Registrering af forældreenheden på babyenheden
Hvis babyenhedens natlys blinker, og/eller der ikke kan etableres forbindelse imellem forældreenheden og
babyenheden (blinkende grøn lysdiode på forældreenheden), skal forældreenheden registreres på
babyenheden.
• Kontrollér, at AC-adapteren på babyenheden er forbundet til et netstik, og at batterierne i
forældreenheden er opladet.
– Udtag babyenhedens AC-adapter fra netstikket, og udtag batterierne fra forældreenheden.
– Tryk på tænd/sluk-knappen på babyenheden, og hold den nede, mens du forbinder AC-adapteren til
netstikket.
Babyenheden starter nu i registreringstilstand.
– Slip tænd/sluk-knappen. Babyenhedens natlys blinker i 60 sekunder.
– Tryk på forældreenhedens tænd/sluk-knap , og hold knappen nede, mens du isætter batterierne.
Forældreenheden starter, og de 2 røde lysdioder for lydstyrke blinker. Slip tænd/sluk-knappen.
84
29
29
Page 85

Babytalker 3500 SEDS
DANSK
17
– Registreringstilstanden slutter efter registrering er udført eller efter 60 sekunder.
Babyenhedens natlys holder op med at blinke;
De 2 røde lysdioder på forældreenheden slukkes.
– Du hører et langt bip, når registreringen er udført eller tre korte bip, hvis registreringen mislykkes.
Kontrollér forbindelsen imellem forældre- og babyenheden.
– Tryk på babyenhedens Personsøgeknap i to sekunder.
– Forældreenheden udsender som svar en høj biptone i 30 sekunder.
– Tryk kort på tænd/sluk-knappen på forældreenheden for at slukke for tonen.
2
6
29
12 Anvisninger til opbevaring og bortskaffelse
• Vi anbefaler, at du gemmer æsken og emballagen, så du kan bruge dem til at transportere
udstyret fremover, hvis du får behov for det.
12.1 Opbevaring
Udtag batterierne (almindelige eller genopladelige) fra forældreenheden og babyenheden.
Opbevar udstyret på et tørt sted.
12.2 Bortskaffelse af emballagen
Emballagen er fremstillet af miljøvenlige materialer, som kan afleveres til genbrug på din lokale
affaldsstation.
12.3 Bortskaffelse (miljøbeskyttelse)
Udstyret skal bortskaffes i henhold til bestemmelserne i Europa-parlamentets og Rådets direktiv 2002/
96/EF om affald af elektrisk og elektronisk udstyr (WEEE). Kontakt kommunen for at få yderligere
oplysninger om bortskaffelse af dette affald.
Batterier (almindelige eller genopladelige) bør bortskaffes på en miljømæssigt forsvarlig måde i henhold
til lokale bestemmelser.
13 Tekniske specifikationer
Frekvens 1880 GHz til 1900 GHz
Rækkevidde Udendørs: op til 600 m (op til 300 m i SEDS-tilstand)
Indendørs: op til 50 m (op til 25 m i SEDS-tilstand)
Driftstemperatur 15° C til 35° C
20 % til 75 % relativ luftfugtighed
Forældreenhed
Genopladelige batterier Batteripakke (3,6 V NiMH) (medfølger)
AC-adapter (KSS 05-060-0300G) Indgang: 230 V AC / 50 Hz / 150 mA
Udgang: 6 V DC / 300 mA
Mål ca. 117 x 62 x 72 mm
Vægt 98 g (uden genopladelige batterier)
Babyenhed
Batterier 3 almindelige alkaliske batterier (LR06/AA) (medfølger
ikke)
AC-adapter (KSS 05-060-0300G) Indgang: 230 V AC/50 Hz/150 mA
Udgang: 6 V DC/300 mA
Mål ca. 137 x 60 x 101 mm
Vægt 141 g (uden batterier)
14 EU-overensstemmelseserklæring
TOPCOM EUROPE N.V. erklærer herved, at denne enhed er i overensstemmelse med de væsentlige krav og
andre relevante bestemmelser i Rådets direktiv 1999/5/EF.
85
Page 86

Babytalker 3500 SEDS
Overensstemmelseserklæringen findes på http://www.topcom.net/cedeclarations.asp
15 Topcom reklamationsret
15.1 Reklamationsret
Enheder fra Topcom er omfattet af en 24-måneders reklamationsfrist. Reklamationsfristen gælder fra den dag,
forbrugeren køber den nye enhed. Der er ingen reklamationsret på standard- eller genopladelige batterier (af typen
AA/AAA).
Forbrugsdele eller defekter, som kun har ubetydelig indvirkning på brugen eller udstyrets værdi, dækkes ikke.
Reklamationsretten skal dokumenteres ved at den originale regning eller kvittering vedlægges, hvorpå købsdato
samt enhedens type er anført.
15.2 Håndtering af fejlbehæftede enheder
Den defekte enhed sendes retur til et Topcom servicecenter vedhæftet gyldig købskvittering.
Hvis enheden får en defekt inden for reklamationsfristen, vil Topcom eller dennes officielt udnævnte servicecenter,
uden vederlag reparere enhver defekt, som måtte skyldes fejl i materialer eller fremstilling. Topcom vil efter eget
skøn indfri reklamationsrettens forpligtelser ved enten at reparere eller udskifte fejlbehæftede enheder eller
reservedele på disse. Ved udskiftning/ombytning kan farve og model variere fra den købte enhed.
Den oprindelige købsdato bestemmer reklamationsrettens begyndelse. Reklamationsretten bliver ikke udvidet,
hvis enheden udskiftes eller repareres af Topcom eller dets udpegede servicecentre.
15.3 Undtagelser fra reklamationsretten
Ved skader eller defekter, som skyldes forkert behandling eller betjening, samt skader, der skyldes brug af
uoriginale reservedele eller tilbehør, som ikke er anbefalet af Topcom, bortfalder reklamationsretten.
Desuden omfatter reklamationsretten ikke skader, der skyldes ydre faktorer såsom lynnedslag, vand- og
brandskader, samt skader der skyldes transport.
Reklamationsretten bortfalder hvis enhedens serienumre er blevet ændret, fjernet eller er gjort ulæselige.
Reklamationsretten bortfalder desuden, hvis enheden er blevet repareret, ændret eller modificeret af køber.
86
Page 87

Babytalker 3500 SEDS
NORSK
1 Generelt
Kjære kunde,
Vi ber deg lese denne informasjonen, slik at du raskt kan gjøre deg kjent med utstyret og lære hvordan du bruker
funksjonene.
2 Informasjon om denne bruksanvisningen
Denne bruksanvisningen inneholder informasjon om Babytalker 3500 SEDS babytelefon (heretter kalt "utstyret"),
og gir viktige instruksjoner om første gangs bruk, sikkerhet og riktig bruk og vedlikehold av utstyret.
Ha alltid bruksanvisningen tilgjengelig nær utstyret. Alle som har ansvaret for bruk, reparasjon eller rengjøring av
utstyret må lese og/eller rådføre seg med bruksanvisningen.
Oppbevar bruksanvisningen på et sikkert sted, og la den følge utstyret hvis det gis til andre.
3 Opphavsrett
Dette dokumentet er beskyttet av loven om opphavsrett.
Alle rettigheter er forbeholdt, inkludert retten til fotomekanisk reproduksjon, kopiering eller distribusjon via
spesifikke midler som databehandling, datalagringsmedia eller datanettverk, delvis eller i sin helhet, samt tekniske
endringer og endringer i innholdet.
4 Advarsler
FARE
Dette symbolet markerer informasjon om farlige situasjoner.
Hvis den farlige situasjonen ikke kan unngås, kan det føre til dødsfall eller alvorlig personskade.
FORSIKTIG
Dette symbolet markerer informasjon om potensielt farlige situasjoner.
Hvis den farlige situasjonen ikke kan unngås, kan det føre til personskade og/eller skade på eiendom.
• Dette symbolet markerer informasjon som gjør det lettere å bruke utstyret.
5 Riktig bruk
Dette utstyret er kun ment for privat (ikke profesjonell) bruk i lukkede rom, til overvåking av babyer. Alle andre typer
bruk er uriktig, og kan medføre fare.
Følg alltid instruksjonene i denne bruksanvisningen.
Det tas intet ansvar for tap eller skade som følge av feil bruk.
Brukeren av utstyret bærer alt ansvar for eventuelle farer.
6 Sikkerhet
6.1 Fare for elektrisk støt
FARE
Berøring av strømførende ledere eller komponenter kan være dødelig.
Følg disse sikkerhetsinstruksjonene for å unngå fare for elektrisk støt:
• Bruk bare strømadapteren som ble levert med utstyret, for å unngå fare for skade på utstyret.
• Bruk ikke utstyret hvis strømadapteren, strømkabelen eller pluggen er skadet.
• Strømadapteren må ikke åpnes. Det er fare for elektrisk støt hvis du berører kontakter eller koblinger
under elektrisk spenning, eller hvis du utfører endringer i den elektriske eller mekaniske
konstruksjonen.
• Beskytt utstyret mot fuktighet og fuktinntrengning, og hold det støvfritt. Trekk ut støpselet til
strømadapteren umiddelbart hvis det kommer i kontakt med fuktighet.
• Trekk ut støpselet til strømadapteren hvis det oppstår feil, i tordenvær og ved rengjøring av utstyret.
• Beskytt kablene mot varme flater og andre farer, og unngå at de kommer i klem.
87
Page 88

Babytalker 3500 SEDS
6.2 Bruke batterier (vanlige eller oppladbare)
FORSIKTIG
Det kan medføre fare hvis batteriene ikke brukes i henhold til instruksjonene.
• Bruk alltid batterier (vanlige eller oppladbare) av samme type.
• Pass på at batteriene settes inn med polene riktig vei. Hvis batteriene settes inn med polene feil vei,
kan det føre til skade på batteriene og utstyret.
• Kast aldri batteriene på åpen ild, grunnet eksplosjonsfaren.
• La aldri batteripolene komme i kontakt med hverandre eller andre metallgjenstander, tilsiktet eller
utilsiktet. Dette kan føre til overoppheting, brann eller eksplosjon.
• Oppbevar batteriene utilgjengelig for barn. Kontakt lege umiddelbart hvis de svelges.
• Væskelekkasje fra batteriene kan forårsake permanent skade på utstyret. Vær spesielt forsiktig ved
håndtering av skadde eller lekke batterier, grunnet korrosjonsfaren. Bruk vernehansker.
• Fjern batteriene hvis utstyret ikke skal brukes på en lang stund.
6.3 Generelle regler for sikker bruk
Følg alltid disse sikkerhetsinstruksjonene, for å sikre trygg bruk av utstyret:
– Utstyret må alltid monteres av en voksen. Under montering må små deler holdes utenfor rekkevidde for
barn.
– La ikke barn leke med utstyret eller deler av det.
– Pass på at babytelefonen og strømkabelen alltid er utenfor babyens rekkevidde.
– Dekk ikke til babytelefonen med et håndkle, teppe eller lignende.
– Defekte komponenter må alltid erstattes med originale reservedeler, fordi andre komponenter kanskje ikke
oppfyller sikkerhetsstandardene.
– Slå av babytelefonen hvis dette pålegges av et skilt, en plakat eller en annen melding. Utstyr som brukes
på sykehus og andre helseinstitusjoner kan være følsomt for høyfrekvente signaler fra eksterne kilder.
7 Betjening
Babytelefonen består av to enheter: én til foreldrene, og en til barnet. De er sammenkoblet via en trådløs kobling
som er kompatibel med DECT-standarden.
Takket være DECT-teknologien er utstyret beskyttet mot uautorisert lytting, og påvirkes ikke av forstyrrelser fra
annet utstyr.
Babyenheten begynner å sende så snart mikrofonen fanger opp en lyd. Lyden blir gjengitt av foreldreenheten.
Mikrofonens følsomhet kan justeres av brukeren (se “9.8.7 Stille inn mikrofonfølsomhet (VOX)”).
• Babytelefonen kan aldri erstatte reelt tilsyn av en voksen, den er bare et hjelpemiddel.
7.1 Babyenhetens komponenter
Se figur på utbrettsiden.
A
1 Antenne
2 Nattlys
3 Display
4 Høyttaler
5Mikrofon
6 Søkeknapp
7 Vuggesang-knapp
8 Nattlysknapp
9Øk volum
10 Spill av-knapp
11 S enk volum
12 På/av-knapp
13 Batterideksel
14 Kontakt til strømadapter
15 Festeklips
16 SEDS-strålingsbryter
88
Page 89

Babytalker 3500 SEDS
NORSK
PTT
C
90° MA
OPEN
15
13
7.2 Foreldreenhetens komponenter
Se figur på utbrettsiden.
B
17 Volumindikatorer
18 Høyttaler
19 Diodelampe
20 Mikrofon
21 Forbindelsesindikator
22 Display
23 Søkeknapp
24 Taleknapp
PTT
25 Diodelampe-knapp
26 Øk volum / neste menyelement
27 Bekreft-knapp
28 Senk volum / forrige menyelement
29 På/av-knapp
30 Klips for belte-/veggfeste
31 Batterideksel
32 Strømadapter
33 Ladeindikator
7.3 Beskrivelse av displayet
Se figur på utbrettsiden.
Temperatur (a) Viser temperaturen som måles av babyenheten. Blinker hvis temperaturen er
utenfor det innstilte området.
Foringstid-alarm (b) Synlig når varsling ved matetid er på.
Vuggesang (c) Synlig når en vuggesang spilles av.
Informasjonslinje (d) Viser ytterligere informasjon om forskjellige innstillinger, for eksempel dato og
klokkeslett på foreldreenheten, eller valgt vuggesang på babyenheten.
Batteriindikator (e) Viser status for det oppladbare batteriet.
- batteriet er fullt ladet
- batteriet er nesten utladet
Kontroller (f) Synlig når nattlyset på babyenheten er tent.
Følsomhet (g) Synlig på foreldreenheten når følsomheten stilles inn.
8 Første gangs bruk
8.1 Innholdet i pakken
Utstyret leveres som standard med følgende elementer:
- 1 babyenhet
- 1 foreldreenhet
- 1 ladestasjon
- 2 strømadaptere
8.2 Installere batterier i babyenheten
• Du kan bruke babyenheten med tre AA-batterier (LR06/lommelyktbatteri. Vi anbefaler
alkaliske batterier) eller den medfølgende strømadapteren.
• Babyenheten kan ikke brukes til å lade batteriene.
• Det anbefales å alltid la batteriene stå i enheten, selv når du bruker strømadapteren.
Enheten skifter automatisk til batteridrift ved strømbrudd.
– Roter belteklipset oppover.
– Drei skruen på batteridekselet på baksiden av babyenheten 90° mot urviseren,
og fjern batteridekselet.
• Ikke drei skruen forbi punktet merket "Open".
- 1 bruksanvisning
- 1 servicekort
- 1 oppladbar NiMH-batteripakke
89
Page 90

– Installer tre alkaliske AA-batterier (LR06/lommelyktbatteri) i batterirommet.
SEDS
LONG
ECO
6V/300mA
+
+
+
+
-
AA x 1
+
-
AA
x 1
+
-
A
A
x
1
14
B
90° MAX
OPEN
31
29
22
12
3
29
12
26
Pass på at batteripolene vender riktig vei.
– Lukk batterirommet.
• Bland aldri brukte batterier med nye batterier.
8.3 Koble babyenheten til strømnettet
Stikk den lille pluggen på strømadapteren i strømkontakten på
babyenheten , og plugg støpselet inn i en stikkontakt (230 V / 50 Hz).
Babytalker 3500 SEDS
FORSIKTIG
• Stikkontakten må være lett tilgjengelig, slik at du raskt kan
trekke ut støpselet i en nødssituasjon.
• Bruk bare den medfølgende strømadapteren (6 V DC /
300 mA).
8.4 Installere batterier i foreldreenheten
Se figur på utbrettsiden.
FORSIKTIG
• Bruk bare den medfølgende NiMH-batteripakken i foreldreenheten.
– Roter belteklipset oppover.
30
– Drei skruen på batteridekselet på baksiden av foreldreenheten 90°
mot urviseren, og fjern batteridekselet.
• Ikke drei skruen forbi punktet merket "Open".
– Sett NiMH-batteripakken i batterirommet.
Pass på at tappen på batteripakken plasseres i den korresponderende
fordypningen, og at polene vender riktig vei, som vist i figuren (B).
– Lukk batterirommet forsiktig, og roter belteklipset nedover.
8.5 Installere batterier i foreldreenheten
– Stikk den lille pluggen på strømadapteren i strømkontakten på
ladestasjonen, og plugg støpselet inn i en stikkontakt (230 V / 50 Hz).
– Sett foreldreenheten i ladestasjonen. Den røde ladeindikatoren tennes.
32
33
SEDS
LONG
ECO
6V/300mA
AB
+
• Det tar ca. 10 timer å lade batteriene helt opp.
9 Betjening og bruk
9.1 Slå babyenheten og foreldreenheten på og av
– Trykk på På/av-bryteren for å slå på foreldreenheten. Displayet aktiveres.
– Trykk på På/av-bryteren for å slå på babyenheten. Displayet aktiveres.
• Foreldreenheten prøver å opprette forbindelsen til babyenheten. Hvis
forbindelsesindikatoren tennes, er forbindelsen opprettet. Hvis den ikke tennes, se
side 96.
– Trykk på På/av-bryteren for å slå av foreldreenheten (hold inne bryteren til displayet blir tomt).
– Trykk på På/av-bryteren for å slå av babyenheten (hold inne bryteren til displayet blir tomt).
9.2 Stille inn displayspråk
– Trykk . "Night light" (Nattlys) vises.
– Trykk gjentatte ganger til "Language" (Språk) vises.
90
23
21
Page 91

Babytalker 3500 SEDS
NORSK
26
28
21
20
21
6
29
SEDS
LONG
ECO
16
16
PTT
24
PTT
10
7
– Trykk . Det valgte språket vises.
27
– Trykk eller til ønsket språk vises.
– Trykk for å bekrefte språket.
– Trykk for å lukke menyen.
27
23
9.3 Kontrollere forbindelsen mellom foreldreenheten og babyenheten
Du bør alltid kontrollere den trådløse forbindelsen når du bruker babytelefonen for første gang.
– Sett foreldreenheten i samme rom som babyenheten, med en avstand på minst to meter.
– Slå på begge apparatene. Foreldreenheten prøver å opprette forbindelsen til babyenheten.
– Den grønne forbindelsesindikatoren på foreldreenheten blinker mens den prøver å opprette
forbindelse.
Indikatoren lyser kontinuerlig når forbindelsen er opprettet.
21
– Lyden som fanges opp av mikrofonen blir gjengitt av foreldreenheten.
– Lydstyrken til lyden som gjengis, indikeres av volumindikatorene øverst på foreldreenheten.
17
Jo høyere lydstyrken er, jo flere indikatorer er tent.
– En hørbar tone avgis når maksimal lydstyrke er nådd.
– Hvis det ikke blir opprettet forbindelse, varsles dette med en dobbel pipetone, og forbindelsesindikatoren
blinker.
– Reduser avstanden mellom foreldreenheten og babyenheten til ny forbindelse er opprettet.
9.4 Finne foreldreenheten (søkefunksjon)
– Trykk søkeknappen på babyenheten, og hold den inne i minst 2 sekunder før du slipper den.
– Foreldreenheten svarer med en høy pipetone i 30 sekunder. Dette gjør det lettere å finne foreldreenheten.
– Trykk kort på På/av-bryteren for å stoppe pipetonen.
9.5 SEDS-bryterens innstilling
Babytalker 3500 SEDS er basert på den unike teknologien Smart ECO Distance Switch
(SEDS), der foreldrene kan stille inn stråleeffekten fra utstyret. Det er to valg: "lang
rekkevidde" eller "ECO"-modus med redusert strømforbruk og lavere stråling.
Sett bryteren på:
– "LONG" for en maksimal rekkevidde på 600 m (uten hindringer).
– "ECO" for å redusere stråleeffekten til det halve, og redusere strømforbruket.
Med denne innstillingen reduseres rekkevidden til maksimalt 300 m (uten hindringer).
9.6 Snakke til babyen
Du kan bruke babytelefonen til å snakke til babyen.
• La babyen bli vant til talefunksjonen før du bruker den i praksis.
– Trykk taleknappen på foreldreenheten, og hold den inne.
PTT
– Hold foreldreenheten loddrett med mikrofonen ca. 10 cm fra munnen, og snakk inn i mikrofonen.
– Slipp knappen når du er ferdig med å snakke.
PTT
24
9.7 Spille av en vuggesang
Tre forhåndsprogrammerte vuggesanger kan spilles av på babyenheten.
Du kan konfigurere avspilling av vuggesangene på foreldreenheten (se “9.8.5 Velge vuggesang”) eller på
babyenheten.
– Trykk knappen på babyenheten for å spille av den valgte vuggesangen eller stoppe avspillingen.
– Hvis du vil velge en annen vuggesang, trykker du gjentatte ganger på knappen , til ønsket
vuggesang vises.
9.8 Innstillinger
9.8.1 Stille inn gjengivelsesvolumet på foreldreenheten
Enheten har seks voluminnstillinger. Den laveste innstillingen er "Volum av".
– Trykk for å øke volumet.
– Trykk for å senke volumet.
26
28
91
Page 92

• Hvis innstillingen "Volum av" er valgt, blir lyden som fanges opp av babyenheten bare
23
26
28
27
23
27
27
27
indikert av volumindikatorene .
17
9.8.2 Stille inn gjengivelsesvolumet på babyenheten
• Denne innstillingen gjelder funksjonene “Snakke til babyen“ og “Spille av en vuggesang“.
Babytalker 3500 SEDS
– Trykk for å øke volumet.
– Trykk for å senke volumet.
9
11
9.8.3 Andre innstillinger
Følgende innstillinger kan konfigureres fra menyen (knapp ) på foreldreenheten:
• Nattlys
• Vuggesang
• Mikrofonfølsomhet "Følsomhet"
• Hørbar varsling "Lydvarsling"
• Temperatur (enheter, tillatt område, alarm)
• Klokke
• Matetid
• Displayspråk "Language" (Språk) (se “9.2 Stille inn
displayspråk”)
Bruk knappen eller for å navigere mellom menyelementer.
Trykk knappen for å velge angitt innstilling.
Trykk knappen for å gå tilbake til forrige menyelement eller lukke menyen.
9.8.4 Slå nattlyset på og av
– Trykk . "Night light" (Nattlys) vises.
– Trykk . Følgende vises:
"På?" hvis nattlyset er slukket, og
"Av?" hvis nattlyset er tent.
– Trykk knappen for å velge angitt alternativ.
– Trykk for å lukke menyen.
23
27
23
• Du kan også slå nattlyset på og av direkte på babyenheten ved å trykke knappen .
9.8.5 Velge vuggesang
– Trykk . "Night light" (Nattlys) vises.
– Trykk gjentatte ganger til "Vuggesang" vises.
– Trykk .
– Trykk gjentatte ganger på knappen eller . til ønsket alternativ vises:
"Stopp?" hvis du vil stoppe vuggesangen (bare tilgjengelig hvis en vuggesang spilles av).
"Velg ny" hvis du vil velge en annen vuggesang (du kan velge mellom 3 vuggesanger).
"Spill av?" hvis du vil spille av den valgte vuggesangen på babyenheten (ikke tilgjengelig når en
vuggesang spilles av).
– Trykk knappen for å velge angitt alternativ.
Hvis alternativet "Velg ny" er valgt:
– Trykk gjentatte ganger på knappen eller til ønsket vuggesang eller "Spill alle" vises.
23
28
27
26 28
26 28
8
• Hvis "Spill alle" blir valgt, spilles alle de tre vuggesangene i rekkefølge.
– Trykk knappen for å velge angitt alternativ.
– Trykk for å lukke menyen.
23
9.8.6 Stille inn temperaturovervåking
I standby-modus vises romtemperaturen som måles av babyenheten (+/– 2 °C) på foreldreenheten. Du kan
konfigurere følgende innstillinger i denne undermenyen:
• Temperaturområde:innstilling av tillatt temperaturområde. Hvis den målte temperaturen er utenfor dette
området, indikeres dette på displayet ("Høy" eller "Lav" og blinkende temperaturdisplay).
• Temp-alarm: angir om en dobbel pipetone skal høres hvis temperaturen går utenfor det tillatte området.
• Temp-enhet:angir temperaturvisning i °C (Celsius) eller °F (Fahrenheit).
– Trykk . "Night light" (Nattlys) vises.
92
23
Page 93

Babytalker 3500 SEDS
NORSK
28
23
27
27
17
23
28
27
27
– Trykk gjentatte ganger på til "Temperatur" vises.
– Trykk .
– Trykk gjentatte ganger på knappen til ønsket alternativ vises:
– Trykk knappen for å velge angitt alternativ.
Hvis alternativet "Angi område" er valgt:
– Trykk gjentatte ganger på knappen eller til ønsket øvre grense vises (maks. 39 °C).
– Trykk .
– Trykk gjentatte ganger på knappen eller til ønsket nedre grense vises (min. 10 ?).
– Trykk .
– Trykk for å lukke menyen.
Hvis du velger alternativet "Temp-alarm", vises følgende:
– Trykk knappen for å velge angitt alternativ.
– Trykk på knappen eller for å velge ønsket alarmvolum.
– Trykk .
– Trykk for å lukke menyen.
Hvis alternativet "Grader F" eller "Grader C" er valgt:
– Trykk knappen for å velge angitt alternativ.
– Trykk for å lukke menyen.
27
28
"Angi område", for å stille inn temperaturområde,
"Temp-alarm", for å stille inn temperaturalarm,
"Grader F" for å vise temperaturen i °F (Fahrenheit);
"Grader C" for å vise temperaturen i °C (Celsius).
26 28
27
26 28
27
23
"På?" hvis alarmen er av, og
"Av?" hvis alarmen er på.
26 28
27
23
23
9.8.7 Stille inn mikrofonfølsomhet (VOX)
Du kan stille inn babytelefonens lydfølsomhet (VOX). Hvis følsomheten er høy, vil babyenheten fange opp svakere
lyder.
– Trykk . "Night light" (Nattlys) vises.
– Trykk gjentatte ganger på knappen til "Følsomhet" vises.
– Trykk .
– Trykk gjentatte ganger på knappen eller til ønsket følsomhet vises.
23
28
27
26 28
• VOX-følsomheten indikeres av en svart indikator på displayet:
- høy følsomhet
- lav følsomhet
– Trykk .
– Trykk for å lukke menyen.
27
23
9.8.8 Stille inn lydvarsling
Lydfølsomheten indikeres av antall indikatorer øverst på foreldreenheten. Hvis volumkontrollen på enheten er
satt til"Volum av", kan et varslingssignal genereres når lydnivået som fanges opp av babyenheten når de røde
indikatorene.
– Trykk . "Night light" (Nattlys) vises.
– Trykk gjentatte ganger på til "Lydvarsling" vises.
– Trykk .
– Følgende vises:
"På?" hvis varslingen er av,
"Av?" hvis varslingen er på.
– Trykk knappen for å velge angitt alternativ.
– Trykk på knappen eller for å velge ønsket alarmvolum.
– Trykk .
– Trykk for å lukke menyen.
27
23
26 28
9.8.9 Stille klokken
I standby-modus vises klokkeslettet i displayet på foreldreenheten.
– Trykk . "Night light" (Nattlys) vises.
23
– Trykk gjentatte ganger på knappen til "Klokke" vises.
– Trykk .
27
28
93
Page 94

Babytalker 3500 SEDS
27
27
27
23
28
27
27
27
27
27
– Trykk gjentatte ganger på knappen til ønsket alternativ vises:
28
"Still tid", for å stille klokken,
"Timeformat", for å velge 12- eller 24-timers format.
Hvis alternativet "Still tid" er valgt:
– Trykk knappen for å velge angitt alternativ. Årstallet vises.
– Trykk eller for å velge år.
– Trykk .
26 28
27
– Gjenta de to forrige trinnene for hver av følgende innstillinger: måned, dag, time og minutter.
– Når du har stilt inn minutter, trykker du for å bekrefte innstillingen.
– Trykk for å lukke menyen.
23
Hvis alternativet "Timeformat" er valgt:
– Trykk .
27
– Følgende vises:
"12 timer?" hvis klokken er innstilt på 24-timers format, og du vil endre til 12-timers format,
"24 timer?" hvis klokken er innstilt på 12-timers format og du vil endre til 24-timers format.
– Trykk knappen for å velge angitt alternativ.
– Trykk for å lukke menyen.
23
• Klokkeslettet som vises på foreldreenheten overføres fra babyenheten. Når babyenheten blir
slått av, blir klokken på foreldreenheten nullstilt, og du må stille klokken på nytt.
9.8.10Stille inn matetid
Du kan stille inn et tidspunkt for varsling på Babytalker 3500 SEDS når det er tid for mating.
– Trykk . "Night light" (Nattlys) vises.
– Trykk gjentatte ganger på til "Foringstid" vises.
– Trykk .
– Trykk gjentatte ganger på knappen til ønsket alternativ vises:
Hvis alternativet "Still tid" er valgt:
– Trykk knappen for å velge angitt alternativ. Timetallet vises.
– Trykk eller for å velge timetall.
– Trykk .
– Gjenta de to forrige trinnene for å stille inn minutter.
– Når du har stilt inn minutter, trykker du for å bekrefte innstillingen.
– Trykk for å lukke menyen.
Hvis alternativet "Alarm" er valgt:
– Trykk .
– Følgende vises:
– Trykk knappen for å velge angitt alternativ.
– Trykk for å lukke menyen.
Hvis alternativet "Foringsint" er valgt:
– Trykk knappen for å velge angitt alternativ. Timetallet vises.
– Trykk eller for å velge timetall.
– Trykk .
– Gjenta de to forrige trinnene for å stille inn minutter.
– Når du har stilt inn minutter, trykker du for å bekrefte innstillingen.
– Trykk for å lukke menyen.
27
28
"Still tid", for å stille inn matetid,
"Alarm" for å slå alarmen på eller av,
"Foringsint." hvis du vil bli varslet om mating ved faste intervaller gjennom dagen.
26 28
27
23
27
"På?" for å slå på varslingen. Symbolet vises på displayet,
"Av?" for å slå av varslingen.
23
26 28
27
23
9.9 Diodelampe
Foreldreenheten har en innebygd diodelykt .
– Trykk knappen for å slå på diodelampen.
94
25
19
Page 95

Babytalker 3500 SEDS
NORSK
10 Rengjøring og vedlikehold
Denne delen inneholder viktige instruksjoner for rengjøring og vedlikehold av utstyret.
Følg disse instruksjonene for å sikre problemfri bruk og hindre skade på utstyret som følge av feil vedlikehold.
10.1 Sikkerhetsinstruksjoner
FARE
Fare for livstruende skade som følge av elektrisk støt!
• Før utstyret rengjøres, må det slås av og støpselet må trekkes ut av stikkontakten.
FORSIKTIG
Fare som følge av batterilekkasje
Væske fra lekke batterier (vanlige eller oppladbare) kan forårsake skader (hudirritasjon) eller skade på
utstyret. Bruk vernehansker.
FORSIKTIG
• Bruk ikke rengjøringsmidler eller løsemidler. De kan skade dekslene eller sive inn i utstyret og føre til
permanent skade.
10.2 Rengjøring
– Rengjør utstyret med en myk, lett fuktet klut.
– Rengjør skitne kontakter med en myk børste.
– Rengjør batterikontaktene og batterirommet med en tørr, lofri klut.
– Hvis utstyret blir vått, må du straks slå det av og fjerne batteriene.
Tørk batterirommet med en myk klut for å redusere faren for vannskade til et minimum.
La batterirommet stå åpent til det er helt tørt.
Bruk ikke utstyret før det er helt tørt.
10.3 Vedlikehold
– Kontroller batteriene (vanlige eller oppladbare) i utstyret regelmessig, og skift dem ved behov.
– Kontroller kontakter og ledninger for feil.
FORSIKTIG
• Hvis du har mistanke om at utstyret er skadet, må det alltid kontrolleres av en ekspert før det brukes
igjen.
11 Feilsøking
Denne delen inneholder viktig informasjon for feilsøking og utbedring av problemer.
Følg disse instruksjonene for å unngå fare og skade.
11.1 Sikkerhetsinstruksjoner
FARE
Fare for livstruende skade som følge av elektrisk støt!
• Trekk ut støpselet før du prøver å utbedre et problem.
FORSIKTIG
Mulig fare som følge av feil reparasjoner
Feil reparasjoner kan utsette brukerne for alvorlig fare, og føre til skade på utstyret.
• Prøv aldri å utføre endringer eller reparasjoner på utstyret.
• Reparasjon av utstyret eller kablene må alltid utføres av en spesialist eller et servicesenter.
• Hvis du har mistanke om at utstyret er skadet (hvis det for eksempel har falt på gulvet), må du få det
kontrollert av en spesialist før du bruker det igjen.
95
Page 96

11.2 Årsaker til og løsninger på problemer
12
12
291729
2
17
6
29
Følgende tabell er ment som en hjelp til å finne og utbedre mindre problemer.
Problem Mulig årsak Løsning
Babytalker 3500 SEDS
Den oppladbare
batteripakken til
foreldreenheten lades
ikke
Foreldreenheten kan
ikke slås på (displayet
forblir tomt)
"Ikke koplet" vises i
displayet på
foreldreenheten
Foreldreenheten
gjengir ikke lydene
som fanges opp av
babyenheten
Begrenset rekkevidde
og støy under sending
Utstyret avgir en
høyfrekvent pipelyd
Kontakten til ladestasjonen er ikke
Koble til pluggen
tilkoblet
Skitne kontakter Rengjør batteripolene og kontaktene
på ladestasjonen med en myk klut
Den oppladbare batteripakken er
Skift batteripakken
defekt
Den oppladbare batteripakken er ikke
Lad batteripakken
ladet opp
Utstyret er defekt Kontakt kundeservice
Babyenheten er ikke slått på Slå på babyenheten
Foreldreenheten og babyenheten er
for langt fra hverandre
Foreldreenheten er ikke registrert på
babyenheten
Reduser avstanden mellom
foreldreenheten og babyenheten
Registrer foreldreenheten på
babyenheten (se “11.3 Registrere
foreldreenheten på babyenheten”)
Voluminnstillingen på foreldreenheten
kan vær for lav eller slått av.
Mikrofonfølsomheten på babyenheten
kan være for lavt innstilt.
Øk voluminnstillingen på
foreldreenheten
Kontroller VOX-følsomheten og
voluminnstillingen på foreldreenheten,
og øk den om nødvendig.
Utstyrets rekkevidde avhenger av
Unngå hindringer i størst mulig grad.
omgivelsene.
Stålkonstruksjoner og betongvegger
kan svekke overføringen.
Foreldreenheten og babyenheten er
for nær hverandre
Øk avstanden til minst
2 meter
11.3 Registrere foreldreenheten på babyenheten
Hvis nattlyset på babyenheten blinker og/eller det ikke kan opprettes forbindelse mellom foreldreenheten og
babyenheten (blinkende grønn indikator på foreldreenheten), må foreldreenheten registreres på babyenheten.
• Kontroller at strømadapteren på babyenheten er tilkoblet, at støpselet er satt inn i
stikkontakten og at batteriene i foreldreenheten er ladet.
– Koble strømadapteren til babyenheten fra stikkontakten, og fjern batteriene fra foreldreenheten.
– Trykk På/av-bryteren på babyenheten, og hold den inne mens du kobler strømadapteren til
stikkontakten .
Babyenheten startes i registreringsmodus.
– Slipp På/Av-knappen. Nattlyset på babyenheten blinker i 60 sekunder.
– Trykk På/av-knappen på foreldreenheten og hold knappen inne mens du setter inn batteriene.
Foreldreenheten startes, og de 2 røde volumdiodene blinker. Slipp På/Av-knappen.
– Registreringsmodus avsluttes når registreringen er utført eller etter 60 sekunder.
Nattlyset på babyenheten slutter å blinke.
De 2 røde diodene på foreldreenheten slukkes.
– Du hører en lang pipetone når registreringen er fullført, eller tre korte pipetoner hvis registreringen
mislykkes.
Kontrollere forbindelsen mellom foreldreenheten og babyenheten:
– Trykk og hold inne søkeknappen på babyenheten i 2 sekunder.
– Foreldreenheten svarer med en høy pipetone i 30 sekunder.
– Trykk kort på På/av-bryteren for å stoppe pipetonen.
21
2
96
Page 97

Babytalker 3500 SEDS
NORSK
12 Instruksjoner for oppbevaring og kassering
• Vi anbefaler at du tar vare på esken og emballasjen, slik at du kan bruke dem til å
transportere utstyret senere, om nødvendig.
12.1 Oppbevaring
Fjern batteriene (vanlige eller oppladbare) fra foreldreenheten og babyenheten.
Oppbevar utstyret på et tørt sted.
12.2 Kassering av emballasjen
Emballasjen består av miljøvennlige materialer som kan leveres til gjenvinning.
12.3 Kassering (miljøbeskyttelse)
Kast utstyret i henhold til forskriftene i EU-direktiv 2002/96/EC, Waste Electrical and Electronic
Equipment (WEEE), som gjelder brukt elektrisk og elektronisk utstyr. Kontakt det lokale
renovasjonsselskapet for informasjon.
Kast batteriene (vanlige eller oppladbare) på en miljøvennlig måte i henhold til lokale bestemmelser.
13 Tekniske spesifikasjoner
Frekvens 1880 GHz til 1900 GHz
Rekkevidde Utendørs: opptil 600 m (opptil 300 m i SEDS-modus)
Innendørs: opptil 50 m (opptil 25 m i SEDS-modus)
Driftstemperatur 15 °C til 35 °C
20 % til 75 % relativ fuktighet
Foreldreenhet
Oppladbare batterier Batteripakke (3,6 V NiMH) (medfølger)
Strømadapter (KSS 05-060-0300G) Strøminntak: 230 V AC / 50 Hz / 150 mA
Strømuttak: 6 V DC / 300 mA
Dimensjoner ca. 117 x 62 x 72 mm
Vekt 98 g (uten oppladbare batterier)
Babyenhet
Batterier 3 alkaliske batterier (LR06/AA) (medfølger ikke)
Strømadapter (KSS 05-060-0300G) Strøminntak: 230 V AC / 50 Hz / 150 mA
Strømuttak: 6 V DC / 300 mA
Dimensjoner ca. 137 x 60 x 101 mm
Vekt 141 g (uten batterier)
14 EC-samsvarserklæring
TOPCOM EUROPE NV erklærer med dette at dette apparatet samsvarer med de grunnleggende kravene og
andre relevante bestemmelser i direktivet 1999/5/EC.
Samsvarserklæringen finnes på http://www.topcom.net/cedeclarations.asp
15 Topcom-garanti
15.1 Garantiperiode
Alle Topcom-produkter leveres med 24 måneders garanti. Garantiperioden gjelder fra den dagen det nye produktet
blir kjøpt. Det gis ingen garanti for standard eller oppladbare batterier (type AA/AAA).
Forbruksdeler eller defekter som ikke medfører merkbar virkning på apparatets funksjon eller verdi dekkes ikke.
Garantien må dokumenteres med den originale kjøpskvitteringen eller en kopi av denne, der kjøpsdato og
produktmodell er angitt.
97
Page 98

Babytalker 3500 SEDS
15.2 Garantibestemmelser
Defekte produkter må returneres til et Topcom-servicesenter sammen med en gyldig kjøpskvittering.
Hvis det oppstår feil ved produktet i løpet av garantiperioden, vil Topcom eller deres offisielle servicesenter
kostnadsfritt reparere eventuelle feil/mangler forårsaket av material- eller produksjonsfeil, enten ved å reparere
eller ved å erstatte den defekte enheten eller deler av den. Ved erstatning kan farge eller modell avvike fra det
opprinnelig innkjøpte produktet.
Den opprinnelige kjøpsdatoen fastsetter garantiperiodens start. Garantiperioden utvides ikke selv om produktet er
skiftet ut eller reparert av Topcom eller deres servicesentre.
15.3 Unntak fra garantien
Feil eller mangler som skyldes feil håndtering eller bruk, og feil som skyldes bruk av uoriginale deler eller tilbehør,
dekkes ikke av garantien.
Garantien dekker ikke skade forårsaket av ytre faktorer som lynnedslag, vann eller ild, eller skade som har oppstått
under transport.
Garantien er ikke gyldig hvis serienummeret på apparatet er endret, fjernet eller gjort uleselig.
Eventuelle garantikrav anses som ugyldige hvis produktet er reparert, endret eller modifisert av kjøperen.
98
Page 99

Babytalker 3500 SEDS
SUOMI
1 Yleistä
Hyvä asiakas,
pyydämme, että luet nämä tiedot oppiaksesi nopeasti tuntemaan tämän laitteen ja käyttämään sen toimintoja.
2 Tietoja tästä käyttöohjeesta
Tämä käyttöohje sisältää tietoja Babytalker 3500 SEDS -itkuhälyttimestä (josta jatkossa käytetään nimitystä 'laite')
sekä tärkeitä ohjeita sen käyttöönotosta, turvallisuudesta, asianmukaisesta käytöstä ja kunnossapidosta.
Pidä käyttöohje aina saatavilla laitteen läheisyydessä. Jokaisen laitteen käytöstä, korjauksesta tai puhdistuksesta
vastaavan on luettava käyttöohje ja/tai katsottava siitä neuvoja.
Säilytä tämä käyttöohje varmassa paikassa ja luovuta se laitteen seuraavalle omistajalle.
3 Tekijänoikeus
Tämä asiakirja on suojattu tekijänoikeuslakien nojalla.
Kaikki oikeudet pidätetään, mukaan lukien oikeudet täydelliseen tai osittaiseen fotomekaaniseen jäljentämiseen
erityisin keinoin, joita ovat tietojenkäsittely, tietojen tallennusvälineet tai dataverkostot, sekä oikeudet teknisiin
muutoksiin ja sisällön muutoksiin.
4 Varoitukset
VAARA
Tämä varoitus viittaa välittömään vaaratilanteeseen.
Ellei vaaratilannetta voida välttää, seurauksena voi olla kuolema tai vaikeita loukkaantumisia.
VARO
Tämä varoitus viittaa mahdolliseen vaaratilanteeseen.
Ellei vaaratilannetta voida välttää, seurauksena voi olla loukkaantumisia ja/tai esinevahinkoja.
• Tällä symbolilla on merkitty tiedot, jotka helpottavat laitteen käyttöä.
5 Asianmukainen käyttö
Tämä laite on tarkoitettu ainoastaan yksityiseen (ei-ammattimaiseen) käyttöön suljetuissa tiloissa vauvojen
tarkkailemiseksi. Kaikki muunlainen käyttö on epäasianmukaista ja voi aiheuttaa vaaratilanteita.
Noudata aina tämän käyttöohjeen sisältämiä ohjeita.
Emme ota minkäänlaista vastuuta tappioista tai vahingoista, joita aiheutuu epäasianmukaisesta käytöstä.
Laitteen käyttäjä vastaa yksin kaikista riskeistä.
6 Turvallisuus
6.1 Sähköiskun riski
VAARA
Voi olla hengenvaarallista koskettaa johtimia tai osia, joissa esiintyy sähköistä jännitettä.
Noudata seuraavia turvallisuusohjeita välttääksesi sähköiskun riskin:
• Käytä laitteen vaurioitumisriskin välttämiseksi ainoastaan laitteen mukana toimitettua
vaihtovirtaverkkomuuntajaa.
• Älä käytä laitetta, jos vaihtovirtaverkkomuuntaja, virtajohto tai pistoke on vioittunut.
• Älä koskaan avaa vaihtovirtaverkkomuuntajan koteloa. On olemassa sähköiskun riski, jos kosketat
koskettimia tai liitäntöjä, joissa on sähköistä jännitettä, tai muutat laitteen sähköistä tai mekaanista
rakennetta.
• Suojaa laite kosteudelta ja kosteuden sisäänpääsyltä ja pidä se pölyttömänä. Irrota
vaihtovirtaverkkomuuntaja pistorasiasta heti, jos se joutuu kosketuksiin kosteuden kanssa.
• Irrota vaihtovirtaverkkomuuntaja pistorasiasta virheellisen toiminnan vuoksi sekä ukkosen ja laitteen
puhdistuksen ajaksi.
• Suojaa kaapeli kosketukselta kuumiin pintoihin tai muihin vaaranlähteisiin, äläkä anna sen jäädä
puristuksiin.
99
Page 100

Babytalker 3500 SEDS
6.2 Paristojen käyttö (tavallisten tai ladattavien)
VARO
Paristojen käyttö ohjeiden vastaisesti voi olla vaarallista.
• Käytä aina samantyyppisiä paristoja (tavallisia tai ladattavia).
• Varmista, että paristot on asennettu oikein päin. Paristojen ja laitteiden vaurioituminen voi olla
seurausta paristojen asentamisesta väärin päin.
• Räjähdysvaaran vuoksi paristoja ei saa koskaan heittää tuleen.
• Älä koskaan anna paristojen napojen joutua kosketuksiin toistensa tai metalliesineiden kanssa
tahallaan tai vahingossa. Tämä voi johtaa ylikuumenemiseen, tulipaloon tai räjähdykseen.
• Säilytä paristot lasten ulottumattomissa. Ota heti yhteyttä lääkäriin, jos joku nielaisee pariston.
• Vuotavista paristoista tuleva neste voi vaurioittaa laitetta pysyvästi. Ole erityisen varovainen
käsitellessäsi vaurioituneita tai vuotavia paristoja, koska tällöin on olemassa korroosioriski. Käytä
suojakäsineitä.
• Poista paristot, jos laite on pitkään käyttämättömänä.
6.3 Yleisiä sääntöjä turvalliseen käyttöön
Laitteen turvallisen käytön varmistamiseksi on aina noudatettava seuraavia turvallisuusohjeita:
– Aikuisen on aina koottava laite. Pidä pienet osat poissa lasten ulottuvilta laitetta kootessasi.
– Älä anna lasten leikkiä laitteella tai sen osilla.
– Varmista, että itkuhälytin ja virtajohto ovat aina poissa lapsen ulottuvilta.
– Älä peitä itkuhälytintä pyyhkeellä, huovalla tai vastaavalla.
– Vialliset osat aina vaihdettava alkuperäisiin varaosiin, koska muut osat eivät välttämättä täytä
turvallisuusvaatimuksia.
– Sammuta itkuhälytin aina, kun siihen kehotetaan kyltillä, julisteella tai muulla viestillä. Sairaaloissa ja
muissa terveydenhuoltolaitoksissa käytettävät laitteet voivat olla herkkiä ulkoisista lähteistä tuleville
suuritaajuuksisille signaaleille.
7Käyttö
Itkuhälytin koostuu kahdesta erillisestä laitteesta: toinen on vanhemmille ja toinen lapselle. Ne ovat yhteydessä
toisiinsa DECT-standardin mukaisella langattomalla yhteydellä.
DECT-teknologian ansiosta tämä laite on suojattu salakuuntelulta ja muiden laitteiden aiheuttamilta häiriöiltä.
Vauvan laite alkaa lähettää signaalia heti, kun mikrofoni havaitsee ääntä. Vanhempien laite toistaa äänen. Katsoja
voi säätää mikrofonin herkkyyttä (katso “9.8.7 Mikrofonin herkkyyden (VOX) asettaminen”).
• Itkuhälytin ei voi koskaan korvata aikuisen asianmukaista valvontaa; se on ainoastaan
apuväline.
7.1 Vauvan laitteen osat
Katso aukitaitettavan sivun kuva
1 Antenni
2 Yövalo
3Näyttö
4 Kaiutin
5Mikrofoni
6 Hakunäppäin
7 Kehtolaulunäppäin
8 Yövalonäppäin
A
9 Äänenvoimakkuuden lisäys
10 Toistonäppäin
11 Äänenvoimakkuuden pienentäminen
12 Virtakatkaisin
13 Paristolokeron kansi
14 Vaihtovirtaverkkomuuntajan liitin
15 Kiinnikkeet
16 SEDS-säteilykytkin
100
 Loading...