

Page 1

TomTom Navigation app
for iPhone/iPad
Reference Guide
Page 2

2
Contents
Getting Started 7
Start TomTom Navigation app for iPhone/iPad ................................................................................ 7
Updating your TomTom Navigation app for iPhone/iPad ................................................................ 7
GPS reception ..................................................................................................................................... 8
Location Services ............................................................................................................................... 8
Planning a Route 9
Planning a route.................................................................................................................................. 9
Route summary ................................................................................................................................ 10
Sharing your route ........................................................................................................................... 10
Other destination options ................................................................................................................ 10
Home ........................................................................................................................................... 11
Favorite ........................................................................................................................................ 11
Address ........................................................................................................................................ 11
Recent Destination ...................................................................................................................... 11
Places ........................................................................................................................................... 11
People .......................................................................................................................................... 11
Events .......................................................................................................................................... 12
Point of Interest ........................................................................................................................... 12
Copied Address ........................................................................................................................... 13
Photo ............................................................................................................................................ 13
Postcode ...................................................................................................................................... 13
Point on Map ............................................................................................................................... 13
Coordinates ................................................................................................................................. 13
Finding an alternative route ............................................................................................................. 14
Planning a route in advance ............................................................................................................ 14
Add a route to your Calendar .......................................................................................................... 15
Clipboard feature .............................................................................................................................. 15
Driving View 17
The Driving View .............................................................................................................................. 17
Moving around in the Driving View ................................................................................................. 18
Setting the volume ........................................................................................................................... 19
Quick Access Toolbar ...................................................................................................................... 19
Map settings ..................................................................................................................................... 19
Advanced Lane Guidance 20
About Advanced Lane Guidance ..................................................................................................... 20
Speed Cameras and Safety-related Features 21
Types of speed cameras and safety-related features ..................................................................... 21
Settings for Speed Cameras Alerts ................................................................................................. 23
Page 3

3
Route Options 24
About Route Options ........................................................................................................................ 24
Minimize Delays ............................................................................................................................... 24
Find Alternative ................................................................................................................................ 24
Travel Via... ....................................................................................................................................... 26
Route Demo ...................................................................................................................................... 26
Clear Route ....................................................................................................................................... 27
Instructions ....................................................................................................................................... 27
Map of Route .................................................................................................................................... 27
Add to my Calendar ......................................................................................................................... 27
Settings 28
Change Settings ............................................................................................................................... 28
Set Home Location ........................................................................................................................... 28
Manage Favorites ............................................................................................................................. 28
Recent Destinations .......................................................................................................................... 28
Voice ................................................................................................................................................. 28
Alerts ................................................................................................................................................. 29
Audio ................................................................................................................................................. 30
Map ................................................................................................................................................... 30
Route planning ................................................................................................................................. 31
Distance Units ................................................................................................................................... 32
Social Media ..................................................................................................................................... 32
Advanced .......................................................................................................................................... 32
About ................................................................................................................................................ 34
Reset ................................................................................................................................................. 34
Customize the location selector list ................................................................................................. 35
Main Menu 36
The Main Menu ................................................................................................................................. 36
Navigate To menu ............................................................................................................................ 37
Home ........................................................................................................................................... 37
Favorite ........................................................................................................................................ 37
Address ........................................................................................................................................ 37
Recent Destination ...................................................................................................................... 37
Places ........................................................................................................................................... 38
People .......................................................................................................................................... 38
Events .......................................................................................................................................... 38
Point of Interest ........................................................................................................................... 39
Copied Address ........................................................................................................................... 39
Photo ............................................................................................................................................ 39
Postcode ...................................................................................................................................... 39
Point on Map ............................................................................................................................... 39
Coordinates ................................................................................................................................. 40
Return to Driving View ..................................................................................................................... 40
Browse map 41
Browsing a Map ................................................................................................................................ 41
Page 4

4
Markers ............................................................................................................................................. 41
Selecting Items on the Map ............................................................................................................. 42
Changing and copying coordinates ................................................................................................ 43
Map Toolbar ..................................................................................................................................... 43
Map Corrections with TomTom Map Share 45
About TomTom Map Share ............................................................................................................. 45
Map corrections ................................................................................................................................ 45
Switching Map Share on and off ..................................................................................................... 45
Downloading and sending map corrections ................................................................................... 45
Reporting a map error ...................................................................................................................... 46
Types of map correction .................................................................................................................. 46
Points of Interest (POIs) 48
About POIs ........................................................................................................................................ 48
Navigating to a POI ........................................................................................................................... 48
Finding a POI on the Map Browser.................................................................................................. 50
Showing POIs on the map ............................................................................................................... 51
Selecting which POIs to show on the map ..................................................................................... 51
Help Me 52
About Help Me.................................................................................................................................. 52
Using Help Me to phone a local service .......................................................................................... 52
Favorites 53
About Favorites ................................................................................................................................ 53
Creating a Favorite ........................................................................................................................... 53
Home ........................................................................................................................................... 53
Address ........................................................................................................................................ 53
Recent Destination ...................................................................................................................... 54
Places ........................................................................................................................................... 54
People .......................................................................................................................................... 54
Events .......................................................................................................................................... 54
Point of Interest ........................................................................................................................... 55
Copied Address ........................................................................................................................... 55
Photo ............................................................................................................................................ 55
My Location ................................................................................................................................. 55
Postcode ...................................................................................................................................... 56
Point on Map ............................................................................................................................... 56
Coordinates ................................................................................................................................. 56
Using a Favorite ................................................................................................................................ 56
Changing the name of a Favorite .................................................................................................... 56
Changing the order of your Favorites ............................................................................................. 57
Deleting a Favorite ........................................................................................................................... 57
Page 5

5
Traffic Information 58
TomTom HD Traffic .......................................................................................................................... 58
Using traffic information .................................................................................................................. 58
Checking traffic incidents in your area ............................................................................................ 61
Traffic incidents ................................................................................................................................ 62
Regional availability .......................................................................................................................... 63
Buying a new Traffic subscription ................................................................................................... 63
Checking your Traffic subscription .................................................................................................. 63
Renewing your Traffic subscription ................................................................................................ 63
Speed Cameras and Danger Zones Service 64
About Speed Cameras and Danger Zones Service ........................................................................ 64
Frequency of speed camera updates .............................................................................................. 64
Report a speed camera or danger zone .......................................................................................... 65
Remove a speed camera ................................................................................................................. 65
Regional availability .......................................................................................................................... 65
Settings for Speed Cameras Alerts ................................................................................................. 65
Buying a new Speed Cameras subscription ................................................................................... 66
Checking your Speed Cameras subscription .................................................................................. 66
Renewing your Speed Cameras subscription ................................................................................. 66
Search with Places 68
About search using Places ............................................................................................................... 68
Using Places to search ..................................................................................................................... 68
Sharing and Checking In 70
About Sharing and Checking In ....................................................................................................... 70
Sharing your information ................................................................................................................. 70
What you can share .................................................................................................................... 71
How you can share a location or place ...................................................................................... 73
How you can share your route ................................................................................................... 74
Check in using Facebook ................................................................................................................. 75
Check in using foursquare ............................................................................................................... 75
Using the TomTom app with Apple Maps 77
About Apple Maps ........................................................................................................................... 77
Using the TomTom app with Apple Maps ...................................................................................... 77
"Add to TomTom" 78
About "Add to TomTom" .................................................................................................................. 78
Using the "Add to TomTom" button ................................................................................................ 78
Backup and restore using Apple iCloud 79
About backup and restore using Apple iCloud ............................................................................... 79
Page 6

6
Turn on iCloud backup for your TomTom app ............................................................................... 79
Turn off iCloud backup for your TomTom app ............................................................................... 80
Restore using Apple iCloud ............................................................................................................. 80
Addendum 81
Copyright notices 83
Page 7

7
Start TomTom Navigation app for iPhone/iPad
TomTom
Tap this button on your iPhone, iPod, iPad or iPad mini to start the
TomTom app.
When the TomTom app supports the same language you selected for
your iOS device, the language used for buttons and menus in the app is
the same as the language on your iOS device. If the TomTom app does
not support the language you selected for your iOS device, then English
is used in the app.
If a route is already planned, the Driving View is shown and navigation
starts immediately. If no route is planned the Main menu is shown.
The TomTom app works in the same way on the iPhone, the iPod touch, the iPad and the iPad
mini. The iPad and the iPad mini have larger screens which means that menus appear over the
Driving View instead of as full-screen menus.
Starting for the first time
When you start the TomTom app for the first time or after a reset, you will see the following
screens:
Legal Notice - You must read and agree to the Legal Notice before you can use the app.
Voice Download - If your TomTom App supports Advanced voices in your language you are
given the option to download an Advanced voice.
Your Information - When you use a TomTom LIVE service such as HD Traffic or Local search,
we ask you to send information about you and your iOS device to TomTom. The first time you
use a LIVE service please read the details about how each service uses your information. Tap
Yes to allow your information to be sent. If you don't agree to send your information the service will not work.
When you start your TomTom app for the first time you will also see information about the app's
new features.
If the TomTom app cannot find your location, check that Location Services are enabled for the app
in your iOS Privacy settings.
Updating your TomTom Navigation app for iPhone/iPad
If you have an old version of TomTom app on your iOS device, you must update to the latest version of TomTom app before continuing to read this guide.
To download and update your iOS device with the latest version of TomTom app, go to the iOS
App Store.
Getting Started
Page 8

8
GPS reception
The iPod touch, the iPad (WiFi only models), and the original iPhone do not include a GPS receiver. To use these devices for navigation, you need to connect them to a GPS accessory device.
Note: Using a GPS accessory device can also improve the accuracy of GPS in other iPhone
models.
When you first start the TomTom app, it may need a few minutes to find your GPS position and
show your current location on the map.
To make sure you have good GPS reception, you should use your device outdoors. Large objects
such as tall buildings can sometimes interfere with reception.
Important: The TomTom app cannot give you route instructions until it has GPS reception. Make
sure Location Services are switched on.
If your device has no GPS reception, the TomTom app uses positioning information from WiFi
networks or mobile phone towers. This information is used for route planning and to determine
your approximate location.
Location Services
Location Services on your iOS device allow the TomTom app to use cellular, Wi-Fi and Global
Positioning System (GPS) networks to determine your location. If Location Services are turned off,
the TomTom app will not be able to determine your location or guide you to your destination.
If Locations Services are turned off you see the message Turn On Location Services to Allow
TomTom app To Determine Your Location.
To turn Location Services on, do the following:
1. Tap Settings in the Locations Services message to open the Apple Location Services screen.
2. Tap Location Services to switch it ON.
3. A list of apps which use Location Services is shown. Tap TomTom app to turn it ON so it can
use Location Services.
Page 9

9
Planning a route
Important: In the interest of safety and to reduce distractions while you are driving, you should
always plan a route before you start driving.
To plan a route with the TomTom app, do the following:
1. Tap the screen to open the Main menu.
2. Tap Navigate To....
3. Tap Address.
Tip: You can change the country, state or region by tapping the flag before you select a city.
4. Start to type the name of the town you want to go to.
As you type, the names of the towns that match what you have typed are shown. When your
destination appears in the list, tap the name of the town to set the destination.
Tip: You can also type in the postal code of your destination. First select the country, then
select the postcode from the list shown to display a list of streets in that postcode.
5. Start to type the name of the street.
Just as for place names, the names of the streets that match what you have typed are shown.
When your destination appears in the list, tap the name of the street to set the destination.
Tip: The keyboard automatically hides when you scroll the search results. This allows you to
see more results on the screen.
6. Enter the house number and then tap Select.
You can also select the point where two streets meet by tapping Crossing.
The route is calculated.
Tip: If the message Waiting for a GPS signal... stays on the screen, make sure Location Ser-
vices are on.
By default, the fastest route is planned. You can change the type of route used for planning.
If IQ Routes is available on your map, this information is used to plan the best possible route
for vehicles, taking into account the real average speeds measured on the roads.
7. When the new route is shown, tap Done.
Planning a Route
Page 10

10
The TomTom app starts to guide you to your destination using spoken instructions and
on-screen directions.
Route summary
After you plan a route, a summary of the route is shown.
The route summary shows an overview of your route on the map and the estimated travel time
including delays caused by busy roads. If you have a TomTom HD Traffic subscription, the estimated travel time includes delays due to traffic incidents on your route.
The bottom of the summary screen shows the following options:
Tap +1 to add a Travel Via stop.
Tap Options to change or view your route.
Tap Done or any part of the screen above the buttons to start route guidance.
You can view the route summary at any time by tapping the right-hand side of the status bar at the
bottom of the Driving View.
Sharing your route
After planning a route, you can share a summary of your route with friends and contacts.
Other destination options
When you tap Navigate To in the Main menu, you can select your destination in the following
ways:
Page 11

11
Home
Home
Tap this button to plan a route to your Home location.
To set your Home location, tap Home in the Settings menu.
Favorite
Favorite
Tap this button to select a Favorite as your destination or to edit your
Favorites.
Address
Address
Tap this button to enter an address as your destination. To navigate to a
postal code, tap the Postal code button at the top of the screen to display
the Postal code screen.
Recent Destination
Recent Destination
Tap this button to select your destination from a list of places you have
recently used as destinations. These also include your Travel Via stops.
Places
Places
Tap this button to open the Places menu. Places lets you search using
TomTom Places, Facebook or foursquare, then navigate to the location
of one of the search results.
People
People
Tap this button to navigate to a contact address or a location where a
friend has checked-in.
Page 12
12
The People menu has the following options:
Contact
Tap this button to select a person from your phone book contacts. You
can only navigate to your contact when the contact has an address.
Checked-in Friends
Tap this button to view friends who are checked-in on Facebook. Select a
checked-in friend to view the friend's location. Tap Select to navigate to
that location.
Recent Activity
Tap this button to navigate to a place where your friends have recently
checked in using Foursquare.
Events
Events
Tap this button to navigate to an event saved in your Calendar app or on
your Facebook Events page.
The Events menu has the following options:
Calendar
Tap this button to navigate to an event saved in your Calendar app. The
event must have an address if you want to use it for navigation.
Facebook
Tap this button to navigate to an event saved on your Facebook Events
page. The event must have an address if you want to use it for navigation.
Point of Interest
Point of Interest
Tap this button to navigate to a Point of Interest (POI).
Page 13

13
Copied Address
Copied Address
Tap this button to navigate to an address you have copied from an iPhone app or document. Paste the address into the search box using the
Paste button. You can also type an address. When the address is recognized, tap the address to see it on the map. Tap Select to plan a route to
the address.
To use Copied Address, your iOS device must have iOS 5 or higher.
Photo
Photo
Tap this button to select a photo from your iOS device gallery and use it
as your destination.
Note: Only photos that contain location data can be used. This feature
can be enabled in the iOS device Camera application.
Postcode
Postcode
Tap this button to enter a zip code as your destination. To navigate to an
address, tap the Address button at the top of the screen to display the
Address screen.
Point on Map
Point on Map
Tap this button to select a point on the map as your destination using the
Map Browser.
Coordinates
Coordinates
Tap this button to enter the map coordinates of a location on the map as
your destination.
Page 14

14
Finding an alternative route
Once you have planned a route, you may want to change something about the route, without
changing your destination. You may want to find an alternative route for one or more of the following reasons:
You can see a roadblock or a line of traffic ahead.
You want to travel via a particular location to pick someone up, stop for lunch or get gas.
You want to avoid a difficult junction or a busy narrow street.
Planning a route in advance
You can use the TomTom app to plan a route in advance by selecting your starting point and your
destination.
You can use advanced route planning to check a route or the time it will take, and you can add the
route to your calendar and use it later.
To plan a route in advance, do the following:
1. Tap the screen to open the Main menu.
2. Tap Advanced Planning.
3. Select the starting point for your trip in the same way that you would select your destination.
4. Set the destination for your trip.
5. Choose the type of route that should be planned.
Fastest - the route which takes the least time.
Eco Route - the most fuel-efficient route.
Shortest - the shortest distance between the locations you set. This may not be the quick-
est route, especially if the shortest route is through a town or city.
Avoid highways - a route which avoids highways.
Winding Roads - a route that avoids unnecessary highways and includes winding roads,
with the aim of making the route fun and entertaining.
Walking Route - a route designed for making the trip on foot.
Bicycle Route - a route designed for making the trip on a bicycle.
Limited Speed - a route for a vehicle which can only be driven at a limited speed. You
have to specify the maximum speed.
6. Choose when you will make the trip you are planning. You can set the date and time in 5 mi-
nute intervals. If you want to add the route to your calendar choose a date in the future.
The TomTom app uses IQ Routes to work out the best possible route at that time, using the
real average speeds measured on roads. In this way you can compare how long a trip takes at
different times of day, or on different days of the week.
7. Tap Prepare Route. The TomTom app plans the route between the two locations you selected.
8. To add the route to your calendar, click Options then Add to My Calendar.
Page 15

15
Add a route to your Calendar
You can use the TomTom app to add a route that you have planned in advance to your iOS device
calendar. The reminder is set to alert you a short time before you need to depart. The reminder
contains a link which opens the TomTom app and automatically plans the route.
To set a reminder, do the following:
1. Plan a route in advance for a date in the future.
2. Select Options in the Route Summary view.
3. Tap Add to My Calendar.
4. Add any additional notes you want to save in the reminder.
5. Tap Done.
The reminder is saved in your iOS device calendar.
Clipboard feature
You can copy items to or paste text from the iPhone clipboard so you can share the items with
other apps. For example, you can copy an address from an app and paste it in Copied Address, or
you can copy a map and paste it in an email.
You can copy text, coordinates and maps from the following items in the Navigate To and Share
menus:
Point of Interest
Places
People
Events
Copied address
Photo
Check in
Copy a map or a link to the location
1. In the Navigate to or the Check in menu, find a location using one of the menu items that
support the clipboard feature.
2. In the map screen showing the location and its details, tap and hold the map until the Copy
Map/Copy Link To Location button shows.
3. Tap Copy Map to copy the map, or tap the Copy Link To Location button to copy the link.
4. Open the iPhone app you want to paste the text into.
5. Tap and hold in the place you want to paste the text until the Paste button shows. Tap the
Paste button to paste the text into the app.
Note: A link to a location can be opened in an internet browser. A link opens the TomTom
Route Planner.
Copy text from the TomTom app
1. In the Navigate to or the Check in menu, find a location using one of the menu items that
support the clipboard feature.
2. In the map screen showing the location and its details, tap and hold the text you want to copy
until the Copy button shows.
Page 16

16
3. Tap the Copy button.
4. Open the iPhone app you want to paste the map or location into.
5. Tap and hold the place you want to paste the text until the Paste button shows. Tap the Paste
button to paste the text into the app.
Copy text to the TomTom app
1. In an iPhone app, tap and hold the text you want to copy until the Copy button shows.
2. Tap the Copy button.
3. In the Navigate to or the Check in menu, open one of the menu items that support the clip-
board feature.
4. Tap and hold in the place you want to paste the text until the Paste button shows. Tap the
Paste button to paste the text into the app.
Page 17

17
The Driving View
1. Shows the quick access toolbar.
2. The speed limit at a speed camera or safety-related feature that is on your route, and the dis-
tance to the speed camera. Speed cameras are included on your TomTom map.
If you have the Speed Cameras and Danger Zones service you receive up-to-date information
about all types of speed cameras and safety-related features along your route, including speed
traps.
Note: Information about speed cameras is not available in all countries. To find out if information about speed cameras is available in your country, go to iphone.tomtom.com.
Driving View
Page 18

18
3. The report and remove speed camera button. When you have the Speed Cameras and Danger
Zones service you can report speed cameras and danger zones, and remove speed cameras.
4. The top status bar shows the following information:
The name of the next street on your route
The total delay found on your route by TomTom HD Traffic
Other messages, such as "Poor GPS Reception."
5. TomTom HD Traffic button.
Tap this button to buy a TomTom HD Traffic subscription or to open the traffic sidebar to see
traffic incidents on your route.
6. The remaining distance of your trip and your current speed. If known, the speed limit is also
shown.
7. Navigation instruction for the road ahead.
Tap this area to open the volume control and to repeat the previous instruction.
8. Your current position.
9. TomTom HD Traffic information about the traffic incident that this box points to on the traffic
sidebar.
10. The remaining trip time and the estimated arrival time.
Tap this area to open the route summary screen.
11. TomTom HD Traffic sidebar.
Moving around in the Driving View
When you plan a new route, you are shown the Driving View together with detailed information
about your current location.
Tap the center of the screen at any time to open the Main menu.
Zoom by tapping the screen twice with one finger to zoom in, or tap once with two fingers at the
same time to zoom out.
You can also zoom in and out by placing your fingers on the screen and pinching them together
and stretching them apart.
iPad-specific features
The TomTom app on the iPad has two extra buttons in the top menu bar:
The buttons have the following functions:
Tap this button to open and close the Main menu. You can also tap the
screen to open and close the Main menu.
Tap this button to open a quick link to navigate to home, a Favorite, or a
recent destination. When you tap one of the items the TomTom app
calculates a route to navigate you there.
Page 19

19
Setting the volume
Tap the left-hand side of the status bar in the Driving View to show the volume control.
Move the slider from left to right to increase the volume for both music and voices at the same
time.
Move the slider all the way to the left to mute all sounds from the TomTom app. When the sound
is muted, the mute sound indicator is shown in the bottom left corner of the Driving View.
Quick Access Toolbar
Tap the quick access toolbar button to display the following option buttons:
Tap the music button to play or pause music.
You can tap play/pause, next and previous to control the music track that
is currently playing.
The volume control also appears at the bottom of the screen to let you
set the volume for both music and voices.
The buttons disappear on their own after a few seconds or you can tap
the Quick Access Toolbar again to make the buttons disappear immediately.
Tap this button to switch off voice guidance. You will no longer hear
spoken route instructions but you will still hear information such as traffic
information and warnings.
If the voice is muted, this button changes to Enable Voice. Tap the button again to turn voice instructions back on.
When voice instructions are disabled, the voice disabled indicator is
shown in the bottom left corner of the Driving View.
To mute all sounds from the TomTom app, tap the navigation instruction
area on the driving view and slide the volume slider to the left.
Tap this button to use night colors on the menus and maps. If night colors are being used, this button changes to a sun symbol. Tap the button
again to switch back to day colors.
Tap this button to use a 2D map in the Driving View.
If the 2D is being used, this button changes to 3D Map. Tap the button
again to use the 3D map.
Map settings
You can change the way the map looks and behaves as you drive, and change what you see on
the map.
Page 20

20
About Advanced Lane Guidance
The TomTom app helps you prepare for highway exits and junctions by showing you which lane
you should be in.
Note: Advanced Lane Guidance is not available for all junctions or in all countries. To find out if
Advanced Lane Guidance is available in your country, go to tomtom.com/iphone.
For some exits and junctions, an image shows the lane you should be in. To turn the images off,
switch Lane images off in the Advanced Settings menu.
For other exits and junctions, the TomTom app shows the lane you should take in the status bar.
Tap the screen to close Advanced Lane Guidance and return to the Driving View.
Advanced Lane Guidance
Page 21

21
Types of speed cameras and safety-related features
Where permitted by the laws of the country you are driving in, speed cameras and danger zones
are shown in the driving view when they are on your driving route. Due to changes in legislation in
France, all types of speed camera locations are now reported as danger zones when driving in
France. You are warned about a speed camera or danger zone 15 seconds before you reach it.
You can select the safety-related features you want to be warned about in Alerts. When driving in
France you are warned as you approach the beginning of each danger zone.
Note: For up-to-date information about speed traps and hotspots, subscribe to the Speed Cam-
eras and Danger Zones Service. This service also keeps information about other types of speed
cameras up to date.
You see warnings about speed cameras and danger zones even when no route is planned. You
will also see warnings about speed cameras and danger zones that might not be directly on your
route.
When you receive a warning, an alert symbol appears in the top-left corner of the Driving View,
and a small symbol appears on your driving route. Where the speed limit is relevant it is shown in
the alert symbol. The distance to the feature is shown at the bottom of the alert symbol. When
driving in speed enforcement zones and danger zones the alert symbol is displayed as you travel
through the zone.
The alert symbol has a green background border when you are driving at or slower than the speed
limit and a red background border when you are driving faster than the speed limit. Tap the alert
symbol to cancel the Speed Cameras warning.
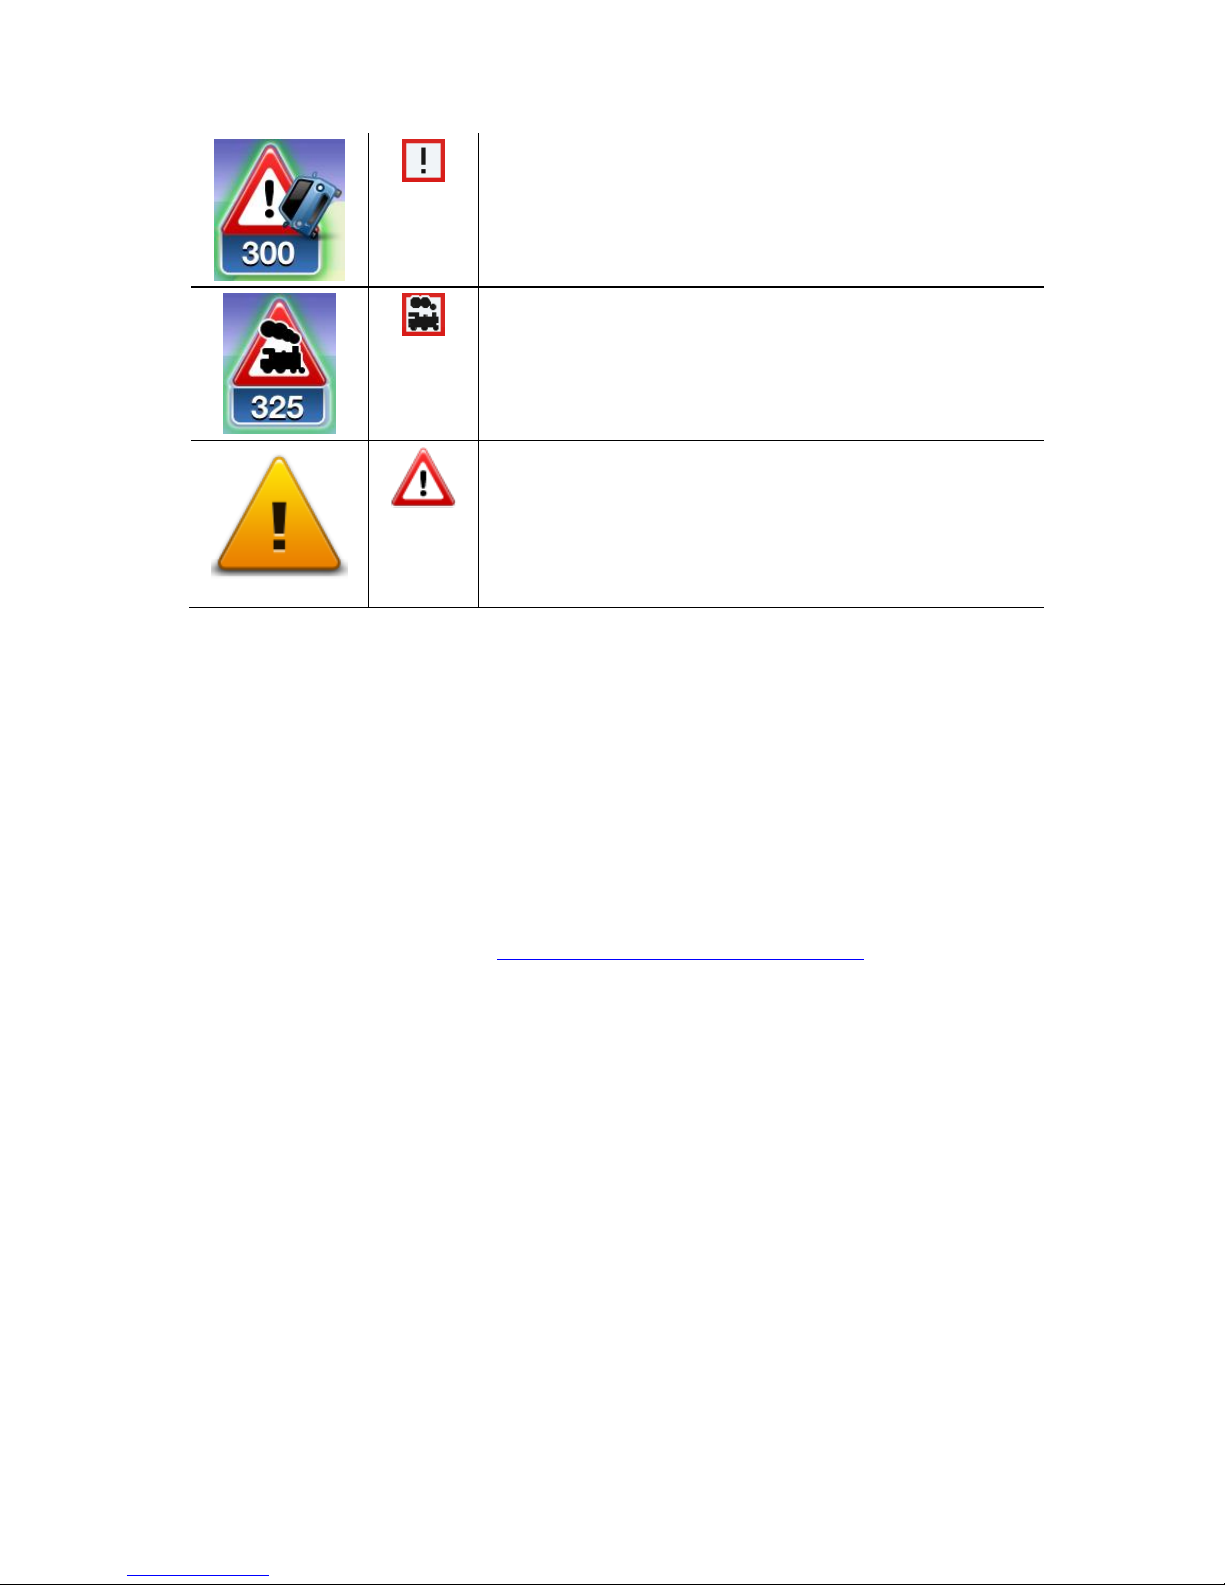
Speed Cameras and Danger Zones warns of the following types of cameras and safety-related
road features:
Note: If you do not have the Speed Cameras and Danger Zones Service the lower part of the
alert symbol is gray and the symbol shown on your route is black.
Alert symbol
Route
symbol
Description
Fixed location speed camera.
Speed Cameras and Safety-related
Features
Page 22

22
Red light camera.
This can be a camera with or without speed detection.
Miscellaneous speed camera.
Speed trap. You are warned about speed traps only when you
have the Speed Cameras and Danger Zones service.
The TomTom app remembers speed traps for three hours after
you report them.
Toll booth camera.
Restricted-road safety camera.
These cameras check for vehicles that use restricted roads, for
example a road that is not permitted to be used during rush
hour.
Speed trap hotspot. You are warned about speed trap hotspots
only when you have the Speed Cameras and Danger Zones
service.
These are areas in which there have been many reports of
temporary speed cameras being used.
Average speed cameras - start of zone warning.
This warning stays visible while you are driving in the speed
enforcement zone. If you drive at or below the speed limit no
warning sound is given. If you drive above the speed limit you
hear a warning sound one time only. If you decrease your
speed to below the speed limit then later drive above the speed
limit again, you hear the warning sound again one time only.
Speed enforcement zones - end of zone warning.
Page 23
23
Accident blackspot.
These are areas where there have been many accidents.
Ungated level crossing.
Danger Zone.
In France, all types of speed camera locations are now reported
as Danger Zones. The length of a danger zone may be 300 m,
2000 m or 4000 m depending on the type of road. If several
cameras are close to each other, the warning can be merged in
a single longer zone.
Settings for Speed Cameras Alerts
The Speed Cameras Alert settings let you turn the Speed Cameras alert on or off, and let you select the alert sound.
1. In the Main Menu, tap Change Settings.
2. Tap Alerts.
3. In the Speed Camera box set the following settings:
Tap the button to turn safety camera alerts on or off.
Tap Sounds and choose a sound for the alert.
Tap Types and select which speed cameras and safety-related features you want to re-
ceive a warning for.
Page 24

24
About Route Options
You can find out more information about your route or change the route using the route options.
Route Options
You can open the route options as follows:
Tap Route Options in the Main menu.
Tip: Route Options is only available when you have planned a
route.
Tap Options on the Route Summary screen after you plan a route.
Tap the right hand section of the status bar in the Driving View to
open the Route Summary screen, then tap Options.
Minimize Delays
Minimize Delays
Tap this button to re-plan your route based on the latest traffic information.
This button is only available if you have a subscription to TomTom HD
Traffic.
Find Alternative
Find Alternative
Find Alternative lets you change your route without changing your des-
tination.
The Find Alternative menu has the following options:
Calculate Alterna-
tive
Tap Calculate Alternative to calculate an alternative to the current route.
Apart from the roads near your current position and near your destination, a new route is calculated using totally different roads to reach your
destination. This is an easy way of planning a different route to the
same destination.
TomTom app looks for another route from your current location to your
destination.
If you decide you would prefer to use the original route after all, tap Re-
calculate Route.
Route Options
Page 25

25
Recalculate Route
Tap this button to return to the original route. This ignores any previous
instructions you have given to avoid roadblocks or travel via a particular
location.
Avoid Roadblock
Tap this button if you can see a roadblock or a line of traffic ahead. You
then have to choose how much of the route ahead you want to avoid.
Choose from the different options available. TomTom App recalculates
your route avoiding the section of the route for the distance you selected.
Don’t forget that once a new route is calculated, you may have to turn off
the road you are on very soon.
If the roadblock suddenly clears, tap Recalculate Original to return to
your original route.
Avoid Part of
Route
Tap this button to avoid a part of the route. Use this button if you see that
your route includes a road or junction you don’t like, or which is
well-known for traffic problems.
You then choose the road you want to avoid from a list of the roads on
your route.
Change Route
Type
Tap this button to change the type of route used to plan your route. Your
route will be recalculated using the new route type.
You can select the following types of route:
Fastest - the fastest route to your destination.
Shortest - the shortest route to your destination. This may take much
longer than the fastest route.
Avoid highways - this type of route avoids all highways.
Walking Route - this type of route is optimized for walking.
Bicycle Route - this type of route is optimized for bicycles.
Limited Speed - if you select this type of route, you must enter a
maximum speed for your vehicle. The route planned takes this restriction into account.
Eco Route - always plan the most fuel-efficient route.
Winding Roads - plan a route that avoids unnecessary highways and
includes winding roads, with the aim of making the route fun and
entertaining. You can select the level used to calculate the winding
roads route, with Maximum giving the longest route.
You can set the default route type in the Settings menu.
Page 26

26
Travel Via...
Travel Via...
Tap this button to change your route so that it passes a particular location, perhaps to pick someone up on the way. You can add up to five
extra stops along your route.
You can also open Travel Via... by tapping the +1 flag at the bottom of
the route summary.
When have not yet entered a stop, the Travel Via... menu opens. When
you have entered a stop, tap the + symbol at the bottom of the Travel
Via screen to add another stop. You can add up to five stops.
Tip: You choose the stop in the same way as you choose a destination. This means you can select from all the same options that are offered when you choose a destination, for example Address, Favorite,
Point of Interest or Point on Map.
Tap a stop in the Travel Via list to see more information about the stop.
On the information screen you can set the Alert On Arrival to on or off.
Tip: You hear an alert sound when you reach the Travel Via stop. You
can change the sound of the alert.
To change the order of the Travel Via stops you have entered, tap the
Edit button, then drag a stop using the order symbol on the right of
the stop to its new position. Tap the Done button to exit the edit mode.
To delete a Travel Via stop you have entered, use one of the following
methods:
Tap the Edit button, then tap the stop sign that appears to the left of
the stop. Tap the red Delete button that appears to the right of the
stop. Tap the Done button to close the edit screen.
Swipe across the stop to show the red Delete button to the right of
the stop. Tap the Delete button to remove the stop.
When you have added Travel Via stops, tap the Done button at the top of
the Travel Via screen. The TomTom app calculates a new route to your
destination that passes the stops you chose. A flag appears in the Driving
View at each of your Travel Via stops. Unlike at your final destination, the
TomTom app only gives a sound alert when you reach a Travel Via stop.
Route Demo
Route Demo
Tap this button to watch a demo of the trip. To stop a demo, tap Stop
Demo in the Route Options menu when a demo is running.
Page 27

27
Clear Route
Cancel Route
Tap this button to cancel the currently planned route.
Instructions
Instructions
Tap this button for a list of all the turn instructions on the route.
Map of Route
Map of Route
Tap this button to see an overview of the route using the Map Browser.
Add to my Calendar
Add to My Calen-
dar
When you have planned a route in advance, tap this button to add the
route to the Calendar on your iOS device.
Page 28

28
Change Settings
To change the way the TomTom app looks and behaves, tap Change Settings in the Main menu.
You can change the way some menus appear by changing the order of menu items or hiding
menu items.
Set Home Location
Tap this option to set or change your Home Location. Select the address for your home location
in the same way that you select a destination.
Your home location can be somewhere you often visit, such as your office. This feature provides
an easy way to navigate there by tapping the Home button in the Navigate To menu.
Manage Favorites
Tap this button to go to Favorites where you can add to, edit and delete your favorites.
Recent Destinations
Tap this button to see a list of your recent destinations. Tap a destination to view it on the map.
You can then add the destination to your favorites or to your iPhone contacts, you can share the
location, or you can navigate to the location.
To delete a recent destination, use one of the following methods:
Tap the Edit button, then tap the stop sign that appears to the left of the destination. Tap the
red Delete button that appears on the right of the destination. Tap the Done button to close
the edit screen.
Swipe across the destination to show the red Delete button to the right of the destination. Tap
the Delete button to remove the destination.
Voice
Tap this option to select the voice used for instructions. You can choose from three different kinds
of voices.
Note: A recorded human voice can say instructions but is unable to read aloud street names. If
you would like street names to be included with instructions, you must select an Advanced
voice.
Celebrity Voices
These are recorded by an actor. Use a celebrity voice to make your trip more fun and entertaining. Tap the Celebrity Voices button to choose a celebrity voice or purchase a new celebrity voice.
Settings
Page 29

29
Note: Celebrity voices are not available in all countries.
Advanced Voices
The TomTom app uses advanced voices to provide spoken instructions while you are driving.
An advanced voice gives driving instructions and pronounces street names, signs and status
messages. You can only use an Advanced voice that is in the language your iOS device uses.
When you start the TomTom app for the first time you are given the option to download an
advanced voice.
To download extra advanced voices tap Download. When it has downloaded tap Use It Now
to use the voice.
Note: Advanced voices are not available in all languages.
Basic Voices
A basic voice reads the driving instructions but does not read the street names, road numbers
or signs.
You can select a basic voice in any language. The language used for menus and buttons does
not change if you select a voice in a different language.
When you select a voice, a sample of that voice is played.
Alerts
Tap this option to switch on speed cameras.
Speed Camera
Adjust this setting to switch on speed camera alerts in the Driving View. You can also select a
safety warning alert sound. Tap the Alerts button to select which speed cameras and safety-related features you want to be warned about.
Note: Information about speed cameras is not available in all countries. To find out if information about speed cameras is available in your country, go to tomtom.com/iphone.
Speed Limit
Adjust this setting to warn you when you are driving above the speed limit. You can also select a
warning alert sound.
Important: It is important to pay attention to road signs and drive within the local speed limit.
TomTom speed limit alerts should not be relied on exclusively while driving.
Places of Worship and Schools
Adjust this setting to warn you when you are driving near a place of worship, a school, a college
or a university. The warning is not given when you are driving on a highway, or between the hours
of 8:00 p.m. and 6:00 a.m.
Traffic
Adjust this setting to switch on traffic warnings in the Driving View. You can also select a traffic
warning alert sound.
Note: You only see this option when you have a subscription to TomTom HD Traffic.
Page 30

30
Travel Via
Adjust this setting to switch all Travel Via alerts on or off.
Tip: To set the alert for each Travel Via stop, use the Alert On Arrival setting when you add a
stop.
Audio
Tap this option to set the following music and volume options.
Fade Music
Adjust this setting to fade the music when instructions and warnings are given.
When this setting is off, the music pauses instead of fading when instructions and warnings are
given.
Voice Volume
Adjust this setting to set the volume of voice instructions as a percentage of the music volume.
For example, you can move the slider to the middle of the slider bar to set the volume of voice
instructions at 50% of the music volume.
If the slider is set to off, the music volume and voice volume are set to the same level.
Map
Tap this option to set the following map options:
Map Share Update
Map share update lets you install changes to TomTom Maps made by the Map Share Community.
Tap Get Corrections to choose whether you want to download corrections automatically, manually or after being asked.
Switch on WiFi Only if you only want map corrections to be downloaded when you are connected
to a wireless network.
Tap Check for New Corrections to see if there are map corrections ready to download.
Day Colors / Night Colors
Tap Day Colors to select a day color scheme consisting of bright colors.
Tap Night Colors to select a night color scheme consisting of darker colors.
Auto-Switch automatically changes between day and night colors depending on the time of day.
Tap Car Symbol to select the car symbol that shows your current location in the Driving View.
2D Map North Up
When this setting is on, the 2D map is fixed in place with north at the top of the screen. When this
setting is off, the 2D map moves so that your current direction is always at the top of the screen.
Page 31

31
Show Current Street
When this setting is on, the current street name or number is shown in the Driving View, just below your position on the map.
Streets on Map
When this setting is on, street names are shown on the map.
POIs on Map
When this setting is on, POIs are shown on the map.
POI Types
Select which POIs are shown on the map.
Auto-Zoom
Auto-Zoom automatically adjusts the area of the map and level of detail shown in the Driving
View. Switch off Auto-zoom to manually control the use of zoom in the Driving View.
Route planning
Adjust the Route planning settings to set how routes are planned.
Default Route Type
Adjust this option to set the type of route that will be planned when you plan a new route.
You can select the following types of route:
Fastest - the fastest route to your destination.
Shortest - the shortest route to your destination. This may take much longer than the fastest
route.
Avoid highways - this type of route avoids all highways.
Walking Route - this type of route is optimized for walking.
Bicycle Route - this type of route is optimized for bicycles.
Limited Speed - if you select this type of route, you must enter a maximum speed for your
vehicle. The route planned takes this restriction into account.
Eco Route - always plan the most fuel-efficient route.
Winding Roads - plan a route that avoids unnecessary highways and includes winding roads,
with the aim of making the route fun and entertaining. You can select the level used to calculate the winding roads route, with Maximum giving the longest route.
Always Ask Me - if you select this option, you will always be asked to select the type of route
that should be planned.
You can set how each of the following road types is handled when a new route is planned:
Toll Roads
Ferry Crossings
Carpool Lanes
Unpaved Roads
You can set the following actions to be taken for each type of road:
Page 32

32
Avoid - the type of road is always avoided automatically.
Don’t Avoid - the type of road is not avoided automatically.
Always Ask - when the route is planned, you have to select how to handle these roads when
they occur on your route.
Distance Units
You can choose to use either Kilometers or Miles for all distances and speeds.
Social Media
Tap Social Media to setup or log in to and out of your Facebook, foursquare and Twitter accounts.
When the option Always prompt to check in when destination reached is ON, you will always be
asked if you want to check in when you arrived at a destination.
Facebook
In the TomTom app, tap Facebook to set up and log in to your Facebook account.
If you are logged in to Facebook, tapping Facebook logs you out.
foursquare
In the TomTom app, tap Foursquare to log in to your Foursquare account.
If you are logged in to foursquare, tapping foursquare logs you out.
Twitter
To use Twitter from TomTom app, you must first set up Twitter in the iOS device Settings app. In
the Settings app, allow TomTom app to use your account.
Advanced
Tap Advanced to adjust the following settings:
Status bar
Adjust this setting to show or hide the status bar at the top of the Driving View. Hiding the status
bar lets you see more of the map.
Multitasking
Adjust this setting to switch multitasking on and off.
Multitasking allows you to receive spoken instructions while using other applications and visual
guidance while making phone calls.
Lane Images
Adjust this setting to switch lane images on and off.
Lane images help you prepare for highway exits and junctions by showing you which lane you
should be in.
Page 33

33
IQ Routes™
Adjust this setting to switch IQ Routes on and off.
IQ Routes is used when you plan a route. Your route is calculated using information about the real
average speeds measured on roads, so your route may change depending on the time of day and
day of the week.
Note: IQ Routes information is not available for all regions. For more information on IQ Routes,
go to tomtom.com/iqroutes.
Data Services
Adjust this setting to switch the HD Traffic and Speed Cameras services on and off.
TomTom HD Traffic incidents are shown on the traffic sidebar and in the Browse Map screen, and
traffic delays are taken into account when you plan a new route.
TomTom Speed Cameras updates the locations and speed limits of fixed cameras and provides
live updates for temporary camera locations.
Note: TomTom HD Traffic and Speed Cameras are TomTom subscription services which are
only available in supported countries. For more information on TomTom HD Traffic, Speed
Cameras and other services in your country, go to tomtom.com/iphone.
Your Information
Switch on this setting to allow your information to be sent to TomTom. If you choose not to send
your information you will have enhanced privacy but you will not be able to use services that require you to send information to TomTom. Tap Your Information in the About menu to read about
how TomTom uses your information.
Camera Report Button
Adjust this setting to show or hide the Speed Camera reporting button in the Driving View.
Map ShareTM
Adjust this setting to turn Map Share on and off. TomTom Map Share helps you correct map errors and share map corrections with the rest of the TomTom Map Share community.
Note: When this setting is adjusted the map is reloaded so that map corrections can be applied
or removed. This may take several seconds.
Route Summary
Adjust this setting to ON to automatically close the Route Summary screen after 10 seconds.
GPS EnhancerTM
Adjust this setting to switch the TomTom GPS Enhancer on and off.
The GPS Enhancer helps the TomTom app to find your location more accurately.
Page 34

34
About
Tap About for information about the application and map version as well as details about copyright, licenses, your information, and a What's New feature list.
Danger Zones
If the TomTom app has a map that includes France, tap this button to see the French Standards
association certification for danger zones.
Your Information
Your Information describes how the TomTom app uses your information. Tap on a feature to read
about how your information is used when you use that feature.
To allow your information to be sent to TomTom so you can use all the features in the TomTom
app, tap Yes on the Your Information page.
If you tap No, the Your Information page will appear next time you access a feature that requires
you to send your information to TomTom.
Reset
Tap Reset to remove the following information:
Reset to Defaults
Tap this setting to restore the factory settings to the TomTom app.
All your personal settings will be deleted, including your Favorites and your Home location.
Map Share™
Tap Downloaded Map Corrections to remove map corrections that you have downloaded from
TomTom.
Tap My Map Corrections to remove map corrections that you have made yourself.
My Locations
Tap Recent Destinations to remove your recently visited locations from the location selector.
Note: To delete recent destinations one at a time, tap Recent Destinations in the Change Set-
tings menu.
Tap Favorites to remove all your favorite locations.
Note: To delete favorites one at a time, tap Manage Favorites in the Change Settings menu.
Menus
Tap Edited Menus to reset your customized location selector list to its original state.
Page 35

35
Customize the location selector list
The location selector list is the list of items you use to navigate to or find a location. The location
selector list is used in many of the TomTom app menus, such as the Navigate To menu and the
Map Browser Search menu.
You can change the order of items in the location selector list so the items you use most are at the
top of the list, and you can remove items that you never use from the menu. The changes you
make to the location selector list affect all the menus that use it.
Changing the order of items in the location selector list
Scroll to the bottom of the list then tap the Edit This Menu button. Tap the move symbol on the
right of the list item and drag the list item to its new position.
Tap Done at the top of the screen to save the list.
Hiding list items
Scroll to the bottom of the list then tap the Edit This Menu button. Tap the move symbol on the
right of the list item and drag the list item to below the Hide these items bar.
Tap Done at the top of the screen to save the list.
Showing hidden list items
Scroll to the bottom of the list then tap the Edit This Menu button. Move the list up to show the
hidden menu items below the Hide these items bar. Tap the move symbol on the right of the hidden list item and drag the list item above the Hide these items bar to the position you want.
Tap Done at the top of the screen to save the list.
Reset the list items
Tap Edited Menus in Reset in the Settings menu to reset the list items to the original state.
Page 36

36
The Main Menu
When you start the TomTom app without having earlier planned a route, the Main menu is shown.
To open the Main menu from the Driving View, tap the screen.
The following buttons are available in the Main menu:
Navigate To...
Tap this button to start planning a route.
Route Options
Tap this button to find out more information about your route or change
the route.
Note: This button is only shown if a route is planned.
Share
Tap this button to open the Share menu so you can share your trip, your
current location or your destination using text messages, Facebook,
foursquare or Twitter.
Browse Map
Tap this button to browse the map in the same way as you might look at
a traditional paper map.
TomTom Shop
Tap this button to go to the TomTom Shop to purchase a TomTom HD
Traffic subscription, a Speed Cameras or Danger Zones subscription, or
other navigation products and services.
If you have a TomTom HD Traffic, Speed Cameras or Danger Zones
subscription, you can tap this button to view your subscription status.
Advanced Planning
Tap this button to plan a route in advance, selecting your starting point
and your destination.
Help Me
Tap this button to call or drive to the nearest emergency services.
The Help Me menu also gives a description of your location so you can
tell the emergency services where you are.
Main Menu
Page 37

37
Change Settings
Tap this button to change how the TomTom app behaves.
Navigate To menu
When you tap Navigate To in the Main menu, you can select your destination in the following
ways:
Home
Home
Tap this button to plan a route to your Home location.
To set your Home location, tap Home in the Settings menu.
Favorite
Favorite
Tap this button to select a Favorite as your destination or to edit your
Favorites.
Address
Address
Tap this button to enter an address as your destination. To navigate to a
postal code, tap the Postal code button at the top of the screen to display
the Postal code screen.
Recent Destination
Recent Destination
Tap this button to select your destination from a list of places you have
recently used as destinations. These also include your Travel Via stops.
Page 38

38
Places
Places
Tap this button to open the Places menu. Places lets you search using
TomTom Places, Facebook or foursquare, then navigate to the location
of one of the search results.
People
People
Tap this button to navigate to a contact address or a location where a
friend has checked-in.
The People menu has the following options:
Contact
Tap this button to select a person from your phone book contacts. You
can only navigate to your contact when the contact has an address.
Checked-in Friends
Tap this button to view friends who are checked-in on Facebook. Select a
checked-in friend to view the friend's location. Tap Select to navigate to
that location.
Recent Activity
Tap this button to navigate to a place where your friends have recently
checked in using Foursquare.
Events
Events
Tap this button to navigate to an event saved in your Calendar app or on
your Facebook Events page.
The Events menu has the following options:
Calendar
Tap this button to navigate to an event saved in your Calendar app. The
event must have an address if you want to use it for navigation.
Facebook
Tap this button to navigate to an event saved on your Facebook Events
page. The event must have an address if you want to use it for navigation.
Page 39

39
Point of Interest
Point of Interest
Tap this button to navigate to a Point of Interest (POI).
Copied Address
Copied Address
Tap this button to navigate to an address you have copied from an iPhone app or document. Paste the address into the search box using the
Paste button. You can also type an address. When the address is recognized, tap the address to see it on the map. Tap Select to plan a route to
the address.
To use Copied Address, your iOS device must have iOS 5 or higher.
Photo
Photo
Tap this button to select a photo from your iOS device gallery and use it
as your destination.
Note: Only photos that contain location data can be used. This feature
can be enabled in the iOS device Camera application.
Postcode
Postcode
Tap this button to enter a zip code as your destination. To navigate to an
address, tap the Address button at the top of the screen to display the
Address screen.
Point on Map
Point on Map
Tap this button to select a point on the map as your destination using the
Map Browser.
Page 40

40
Coordinates
Coordinates
Tap this button to enter the map coordinates of a location on the map as
your destination.
Return to Driving View
On the iPhone and iPod, many menus and screens have a quick access
button to return you to the Driving View without having to step back
through menus. The button appears in the top right corner of the screen.
On an iPad, tap the Driving View screen to return to the Driving View.
Page 41

41
Browsing a Map
Tap Browse Map in the Main menu to open the Map Browser. Using the Map Browser you can
browse the map in the same way as you might look at a traditional paper map.
You can move around the map by using your finger to drag the map across the screen.
Zoom in and out by pinching your fingers together and spreading them apart on the screen. You
can also zoom by tapping the screen twice with one finger to zoom in, or tap once with two fingers at the same time to zoom out.
Markers
Markers are placed on the map to show the distance to various locations. Tap a marker to center
the map on the marker location. Markers point toward one of the following locations:
Your current location.
Your home location.
Your destination.
To set your own marker, position the cursor over the required location on the map, then tap the
cursor button and then tap Set marker position.
Note: The markers are removed when you close the TomTom app.
Browse map
Page 42

42
Selecting Items on the Map
Tap the map to place the cursor at the location you tap.
You can also drag the cursor around the map by holding your finger on it until it expands. When
you drag the cursor, the area within the expanded cursor is magnified.
When you place the cursor, a part of the map is selected. Details of this location are shown, along
with an arrow.
Tap the location to use the cursor position. You can choose from the following options:
Navigate There
Tap this button to plan a route from your current location to the cursor
position.
Travel Via...
Tap this button to travel via the cursor position on the route that is currently planned. This option is only shown if you have already planned a
route.
Find POI Nearby
Shows a list of POIs near the selected location, and also allows you to
search for POIs.
POI Details
Shows the details of the POI you selected. You only see this option when
you have selected a POI.
Call...
Tap this button to call a POI at the cursor position. You only see this option when you have selected a POI with a phone number.
Correct Map Error
Tap this button to make a map correction with TomTom Map Share.
Share Location
Tap this button to share your current location or your destination.
Page 43

43
Save Location
Tap this button to add the location as a Favorite or save it as a Contact.
You can choose to give the Favorite a name or you can use the suggested name. You can create a new contact or add it to an existing contact.
Set Marker Posi-
tion
Tap this button to place a marker at the cursor position.
Center on Map
Tap this button to move the map so that the cursor position is in the
center of the screen. The map zooms in on the cursor position.
Changing and copying coordinates
You can change the style of the coordinates shown on the map, and you can copy the coordinates
to the iPhone clipboard so that you can share them with other apps.
You can show or hide coordinates by using the information button on the Map toolbar.
Copy coordinates
1. Find a location in the Map Browser.
2. Tap and hold the map coordinates until the Copy button shows.
3. Tap Copy to copy the coordinates.
4. Open the iPhone app you want to paste the text into.
5. Tap and hold on the place you want to paste the text until the Paste button shows. Tap the
Paste button to paste the text into the app.
Change the style of the map coordinates
Tap the coordinates to change the style. There are three styles:
Degrees, minutes and seconds
Degrees, decimal minutes
Decimal degrees.
Map Toolbar
The toolbar at the bottom of the Browse Map screen has the following buttons:
Tap this button to center the map on your current location.
Tap this button to show your route on the map.
Tap this button to show traffic incidents in the Map Browser. TomTom
HD Traffic is a subscription service.
Page 44

44
Tap this button to open the Map Corrections menu. This button is only
available when a road is selected.
Tap this button to search for a location on the map. Select the location in
the same way as you select a destination when planning a trip. The cursor then moves to the selected location.
Tap this button to select the information shown on the map. You can
select to show the following information:
Traffic
Favorites
Names
Coordinates
Points of Interest
Tap POI Types to select which POIs are shown on the map.
Page 45

45
About TomTom Map Share
TomTom Map Share helps you correct map errors and share map corrections with the rest of the
TomTom Map Share community.
You can correct your map and share map corrections with other Map Share users using Browse
Map in the Main menu.
Note: TomTom Map Share is not available in all regions. For more information, go to
tomtom.com/mapshare.
On an iPod touch or iPad without 3G, TomTom Map Share only connects to the TomTom Map
Share community when there is a WiFi connection. Changes you make while not connected are
shown only on your TomTom app and are notuploaded even when you later connect via WiFi.
Map corrections
Map corrections are reported by Map Share users. Some are shared with other community members immediately and some are first verified by TomTom.
Corrections that are reported by Map Share community members include changes to the traf-
fic flow in a street, blocking or renaming a street, and adding, removing or editing POIs.
These corrections are immediately shared with the Map Share community.
Corrections that are reported by Map Share members and verified by TomTom include miss-
ing streets, new speed cameras, errors in highway entrances and exits, and missing rotaries.
These corrections are investigated and verified by TomTom and are included when the next
map version is released.
Switching Map Share on and off
TomTom Map Share is automatically enabled when you start the TomTom app and a welcome
message is displayed.
If you want to stop using Map Share, tap Change Settings in the Main menu, then Advanced.
Adjust the Map Share setting to turn Map Share off or on.
Note: When this setting is adjusted the map is reloaded so that map corrections can be applied
or removed. This may take several seconds.
Downloading and sending map corrections
After the welcome message, you are asked if you want to download any map corrections that are
available from other TomTom users. Map Share then checks for new corrections on a weekly
basis.
Map Corrections with TomTom Map
Share
Page 46

46
Tip: The size of the download for the map corrections is shown.
To change your download settings, do the following:
1. Tap Change Settings in the main menu
2. Tap Map to show the Map menu.
3. Tap Map Share Update.
Tap Get Corrections to choose whether you want to download corrections automatically,
manually or after being asked.
Switch on WiFi Only if you only want map corrections to be downloaded when you are
connected to a wireless network.
Tap Check for New Corrections to see if there are more corrections to download at any
time.
Note: All the corrections that you make to your own map are shared and automatically sent to
TomTom.
Reporting a map error
To correct a map error, do the following:
1. Tap Browse Map in the Main menu.
2. Select the location you want to correct on the map.
3. On the Browse Map toolbar, tap the map corrections button.
4. Select the type of map correction you want to report.
5. Enter the details of the correction, then tap Send.
The correction is saved and the information is sent to the TomTom Map Share team.
6. A Thank You message appears. Tap Continue to return to the Browse Map screen.
Types of map correction
The following types of map correction are available.
(Un)block Street
Tap this button to block or unblock a street. You can block or unblock the
street in one or both directions.
Tap one of the buttons at the bottom of the screen to make the street
two-way, one-way or blocked.
Edit Street Name
Tap this button to change the name of the street using your keyboard.
Note: You are asked if you want to change the name of the whole
street or only for the section that you selected.
Page 47

47
Change Speed
Limit
Tap this button to change the speed limit of the Whole road, the Current
speed zone or for Only selected section.
Report Other Error
Tap this button to report other types of corrections to TomTom.
Type a message describing the correction. For example, you can report
missing streets, errors in highway on-ramps and exits or missing rotaries. Tap Send. The TomTom app sends a special report to TomTom
Map Share.
Report Speed
Camera
Tap this button to report a Speed Camera. You can choose to report a
Fixed Camera or a Mobile Camera.
The location on the map appears. Tap Done to report the camera.
A Thank you message appears. Tap Close.
Page 48

48
About POIs
Points of Interest or POIs are useful places on the map.
Here are some examples:
Restaurants
Hotels
Museums
Parking garages
Gas stations
There are several places where you can use POIs in the TomTom app:
Selecting a POI as your destination when planning a route.
Calling a POI from the map browser.
Selecting which POIs to show on the map.
Navigating to a POI
You can select a POI as your destination or as a Travel Via location.
When calling a POI or navigating to a POI, select the POI in the following way:
1. Tap the screen to show the Main menu.
2. If you want to navigate to a POI, tap Navigate To... then tap Point of Interest.
3. If you have already planned a route and want to add a POI as a Travel Via location, tap +1 on
the Route Summary screen then tap Point of Interest.
4. Narrow your choice of POIs by selecting the area where the POI is located.
The following options are available:
POI Near Me
Tap this button to choose from a list of POIs near to your current
location.
POI in City
Tap this button to find a POI in a particular town or city.
Points of Interest (POIs)
Page 49

49
POI Near Home
Tap this button to choose from a list of POIs near to your Home location.
The following options are available when a route is already planned:
POI Along Route
Tap this button to find a POI along your planned route.
POI Near Destina-
tion
Tap this button to find a POI near your planned destination.
5. If you selected POI in City, type the name of the town you want to visit and select the town
when it appears in the list.
6. Select the category of POI.
Tap Search to search to look for a POI by name. All POIs in all categories are searched.
Tap the category of the POI, if it is shown.
Tap More to choose from the complete list of categories. Select the category from the list.
7. From the list of POIs shown, select the POI you want to navigate to.
The table below explains the distances listed next to each POI.
POI Near You - Distance from your current location
POI in City - Distance from the city center
POI Near Home - Distance from your Home location
POI Along Route - Distance from your current location
POI Near Destination - Distance from your destination
If you have planned a route, a symbol is also shown next to each POI.
POI is on your route
POI is close to your route
POI is fairly close to your route.
POI is off your route.
After you select a POI, detailed information such as the phone number and a short description is
shown. Depending on the POI information available and the functions on your iOS device, tap a
panel to phone or email the POI, or open the POI's website.
Tap Select to confirm you want to plan a route to this POI.
Page 50

50
Finding a POI on the Map Browser
You can find a POI using the Map Browser then contact the POI or navigate to it.
1. Tap the screen to show the Main menu.
2. Tap Browse Map. Make sure Points of Interest are selected in the Map Details page. You can
also select which POIs to show on the map.
3. Find a POI on the map. You can display your route so you can find POIs along your route, and
zoom in and move the map.
4. Select a POI symbol then tap the POI name panel to display the POI menu.
The following options are available:
Navigate There
Tap this button to plan a route from your current location to the cursor position.
Travel Via...
Tap this button to travel via the cursor position on the route that is
currently planned. This option is only shown if you have already
planned a route.
Find POI Nearby
Shows a list of POIs near the selected location, and also allows you
to search for POIs.
POI Details
Shows the details of the POI you selected. You only see this option
when you have selected a POI.
Call...
Tap this button to call a POI at the cursor position. You only see this
option when you have selected a POI with a phone number.
Correct Map Error
Tap this button to make a map correction with TomTom Map Share.
Share Location
Tap this button to share your current location or your destination.
Save Location
Tap this button to add the location as a Favorite or save it as a Contact. You can choose to give the Favorite a name or you can use the
suggested name. You can create a new contact or add it to an existing contact.
Page 51

51
Set Marker Posi-
tion
Tap this button to place a marker at the cursor position.
Center on Map
Tap this button to move the map so that the cursor position is in the
center of the screen. The map zooms in on the cursor position.
Showing POIs on the map
POIs can be shown on the map in the Driving View and in the Map Browser.
To show POIs in the Driving View, do the following:
1. Tap Change Settings in the Main menu.
2. Tap Map.
3. Make sure that the setting POIs on Map is selected.
To show POIs on the map in the Map Browser, do the following:
1. In the Main menu, tap Browse Map.
2. Tap the information button in the bottom right-hand corner of the screen to show the Map
Details screen.
3. Make sure that the setting Points of Interest is selected.
Selecting which POIs to show on the map
You can select the categories of POIs that are shown, for example, gas stations, restaurants and
hotels.
The selection you make is used for both maps.
To change the POI categories shown in the Driving View, do the following:
1. Tap Change Settings in the Main menu.
2. Tap Map.
3. Tap POI Types.
4. Select which POIs you want to be shown on the map.
To change the POI categories that are shown in the Map Browser, do the following:
1. Tap Browse Map in the Main menu.
2. Tap the information button in the bottom right-hand corner of the screen.
3. Tap POI Types.
4. Select which POIs you want to be shown on the map.
Page 52

52
About Help Me
Help Me provides an easy way to navigate to emergency service centers and other specialized
services and contact them by phone.
For example, if you are involved in a car accident, you could use Help Me to call the nearest hospital and tell them your exact location.
Using Help Me to phone a local service
You can use Help Me to search for a service garage, make contact by phone and inform the garage about the precise details of your current location.
When you search for a service center, you are shown a list of nearby locations. Select one of the
centers in the list to view their address and phone number and your current location on the map.
To use Help Me to locate a service garage, contact the garage by phone and navigate from your
current location to the garage, do the following:
1. Tap the screen to bring up the Main menu.
2. Tap Help Me.
3. Tap Call for Help.
4. Select the type of service you require, for example, Nearest hospital.
5. To dial, select a center from the list, the nearest is shown at the top of the list.
If your iOS device has a phone feature, you can tap the button showing the phone number to
dial it immediately. If your iOS device does not have a phone feature, you are shown the
number so you can dial using another device.
Once the call is answered, to obtain a description of your current location, open the TomTom
app again and tap Help Me. A description of your current location is shown. Tap the description to copy the text. You can then paste the description into a text message or email.
6. To navigate your way to the garage by car, tap Drive to Help.
The TomTom app starts guiding you to your destination.
Help Me
Page 53

53
About Favorites
Favorites are places that you often visit. You can create Favorites so that you don’t have to enter
the address every time you want to navigate there.
They do not need to be favorite places or even locations you often visit, they can simply be seen
as a collection of useful addresses.
Creating a Favorite
You can create a Favorite from one of the following locations in the TomTom app:
From the Navigate To... menu and the Favorite menu.
From the Change Settings menu and the Manage Favorites menu.
From a location selected on the Map Browser.
To create a Favorite using the Favorite menu or Manage Favorites menu, tap the + symbol at the
bottom of the screen. The Add Favorite screen appears showing the buttons listed below.
Give your Favorite a name that is easy to remember. The TomTom app will always suggest a
name. If you want to enter your own name, delete the suggested name and enter a new one. You
can always change the name later.
Tap Done to save the Favorite.
Home
Home
Tap this button to enter your home location as a Favorite.
To set your Home location, tap Home in the Settings menu.
Address
Address
Tap this button to enter an address as a Favorite. To use a postcode, tap
the Postcode button at the top of the screen to display the Postcode
screen.
Favorites
Page 54

54
Recent Destination
Recent Destination
Tap this button to show a list of your recent destinations. These also
include your Travel Via stops. Tap a recent destination to add it as a Favorite.
Places
Places
Tap this button to open the Places menu. Places lets you search using
TomTom Places, Facebook or foursquare, then use the location of a
found location as a Favorite.
People
People
Tap this button to use a contact address or a location where a friend has
checked in as a Favorite.
The People menu has the following options:
Contact
Tap this button to select a person from your phone book contacts. You
can only use a contact when the contact has an address.
Checked-in Friends
Tap this button to view friends who are checked-in on Facebook. Select a
checked-in friend to view the friend's location. Tap Select to set the address of that location as a Favorite.
Recent Activity
Tap this button to view friends who recently checked-in to foursquare.
Events
Events
Tap this button to use the address of an event saved in your Calendar
app or on your Facebook Events page as a Favorite.
The Events menu has the following options:
Page 55

55
Calendar
Tap this button to use the address of an event saved in your Calendar
app as a Favorite.
Facebook
Tap this button to use the address of an event saved on your Facebook
Events page as a Favorite.
Point of Interest
Point of Interest
Tap this button use a Point of Interest (POI) as a Favorite.
Copied Address
Copied Address
Tap this button to save the copied address as a Favorite.
Photo
Photo
Tap this button to select a photo from your iOS device gallery and use it
as a Favorite.
Note: Only photos that contain location data can be used. This feature
can be enabled in the iOS device Camera application.
My Location
My Location
Tap this button to use your current location as a Favorite.
Page 56

56
Postcode
Postcode
Tap this button to enter a postcode as a Favorite. To use an address, tap
the Address button at the top of the screen to display the Address
screen.
Point on Map
Point on Map
Tap this button to select a point on the map as a Favorite using the Map
Browser.
Coordinates
Coordinates
Tap this button to use the map coordinates of a location on the map as a
Favorite.
Using a Favorite
You will normally use a Favorite as a way of navigating to a place without having to enter the address. To navigate to a Favorite, do the following:
1. Tap the screen to bring up the Main menu.
2. Tap Navigate To....
3. Tap Favorite.
4. Select a Favorite from the list.
The TomTom app calculates the route for you.
5. Tap Done.
The TomTom app immediately starts guiding you to your destination using spoken instructions
and on-screen directions.
Changing the name of a Favorite
To change the name of a Favorite do the following:
1. Tap the screen to show the Main menu.
2. Tap Change Settings.
3. Tap Manage Favorites.
4. Tap the Favorite you want to rename.
Page 57

57
5. Tap Name on the Favorite, then enter the new name for the Favorite.
6. Tap Done.
The Favorite is renamed.
Changing the order of your Favorites
Change the order of your Favorites as follows:
1. Tap the screen to show the Main menu.
2. Tap Change Settings.
3. Tap Manage Favorites.
4. Tap Edit, then using the order symbol on the right of the Favorite drag the Favorite to its new
position in the list.
5. Tap the Done button.
Deleting a Favorite
Delete a Favorite as follows:
1. Tap the screen to show the Main menu.
2. Tap Change Settings.
3. Tap Manage Favorites.
4. Delete a Favorite using one of the following methods:
Tap Edit, then tap the stop sign next to the Favorite you want to delete. Tap the Delete
button, then tap the Done button.
Swipe across the Favorite. Tap the Delete button.
Page 58

58
TomTom HD Traffic
TomTom HD Traffic is a unique TomTom service providing real-time traffic information. Using the
latest traffic information in combination with IQ Routes, TomTom HD Traffic helps you plan the
optimum route to your destination. For more information about TomTom services and subscriptions, go to tomtom.com/iphone.
Important: TomTom HD Traffic is only supported for use with the iPhone and the iPad 3G and is
not supported for use with the iPod touch or the iPad without 3G.
To use TomTom HD Traffic, you need a continuous data connection (GPRS, EDGE, UMTS or
CDMA). Your mobile operator may charge you for using a wireless data connection.
The TomTom app regularly receives information about the changing traffic conditions. If traffic
jams or other incidents are found on your route, the app can replan your route to minimize any
travel delays.
Tip: The TomTom app automatically downloads traffic updates and may incur mobile roaming
charges when traveling abroad.
To prevent this, tap Change Settings in the Main menu, then tap Advanced, then scroll down to
Data Services and tap the button to switch off the service.
Using traffic information
Tap the car in the top right-hand corner of the Driving View to show the traffic sidebar.
Traffic Information
Page 59

59
The traffic sidebar shows all the major traffic incidents as they occur on your route. Glowing dots
show where the incidents are located on the route.
The car at the top of the traffic sidebar shows the total delay caused by
traffic incidents on your route.
The central section of the traffic sidebar shows individual traffic incidents
in the order they occur on your route.
The bottom of the traffic sidebar represents your current location.
Scroll the traffic sidebar up and down using your finger to see all the
traffic incidents on your route.
As the traffic sidebar scrolls, it stops moving when it reaches the next
incident.
To improve visibility on the traffic sidebar, some minor incidents may not
be shown.
The total delay caused by traffic incidents on your route is shown using different colored cars at
the top of the traffic sidebar.
There is no delay on your route.
Less than 15 minutes delay on your route.
More than 15 minutes delay on your route.
Traffic service updating.
No route planned, traffic is up to date.
No subscription to TomTom Traffic.
Traffic service is unavailable.
Page 60

60
Getting more information about an incident
When a traffic incident is shown on the map, the starting point of the incident is indicated with a
traffic symbol.
As you scroll the traffic sidebar up and down, the panel above the status bar shows more information about each incident. This includes the type of incident, such as road works, and the delay
caused by this incident.
Tap the panel to view more information about the incident.
Tap the up and down arrow buttons to view separate incidents in the order they occur on your
route.
Page 61

61
Tap Minimize Delays to check whether you can save time by using an alternative route.
Taking the fastest route
The TomTom app constantly looks for changes in the traffic on your route and checks if there is a
faster route to your destination. If a faster route is found, you are asked if you want to use the
faster route.
To check if you are using the fastest route, do the following:
1. Tap the screen to open the Main menu.
2. Tap Route Options.
3. Tap Minimize Delays.
Tip: This button is only available if you have a subscription to TomTom Traffic.
If a faster route is found you are asked if you want to use the new route.
Checking traffic incidents in your area
For an overview of traffic incidents in your area and to view the details, do the following:
1. Tap Browse map in the Main menu.
The map is shown.
2. Tap the traffic button in the status bar to show traffic incidents on the map.
The map shows traffic incidents in your area.
3. Tap on a traffic incident for detailed information.
The incident viewer opens and shows you detailed information about the incident.
Page 62

62
Traffic incidents
Traffic incidents and warnings are shown on the map, in the Driving View and on the traffic sidebar.
There are two types of incident and warning signs:
Symbols shown in a red square are traffic incidents. The TomTom app can replan your route
to avoid new incidents.
Symbols shown in a red triangle are weather-related. The TomTom app is unable to replan
your route to avoid these warnings.
Traffic incident symbols:
Accident
Road works
One or more lanes closed
Road closed
Traffic incident
Traffic jam
Weather-related symbols:
Fog
Rain
Wind
Ice Snow
Page 63

63
Regional availability
Note: You can use TomTom services when traveling abroad, but when planning a route you
need to consider that not all services are available in all countries.
For more information on available services, go to tomtom.com/iphone.
Buying a new Traffic subscription
To buy a new subscription, do the following:
1. Start the TomTom app.
2. Tap TomTom Shop in the Main Menu to open the TomTom Shop.
3. Tap Traffic.
4. Choose a subscription from the list of TomTom HD Traffic subscriptions.
5. Create a new TomTom account or login to your existing TomTom account.
Tip: If you already own a TomTom navigation device, then we recommend that you open a new
TomTom account for your iOS device using a different email address.
For more information on MyTomTom accounts, go to tomtom.com/mytomtom.
Your purchase is completed in the iOS App Store. If payment is successful, TomTom HD Traffic
starts within a few minutes on your TomTom app.
Checking your Traffic subscription
You can check the status of your subscription at any time, by tapping TomTom Shop in the Main
menu, then tapping Traffic.
The TomTom app also warns you when your subscription is approaching the renewal date.
Renewing your Traffic subscription
You can renew your TomTom HD Traffic subscription after it has expired or extend it before it
reaches its expiry date.
To renew an expired subscription, do the following:
1. Start the TomTom app.
2. Tap TomTom Shop in the Main Menu to open the TomTom Shop.
3. Tap Traffic.
4. Choose the subscription you want to renew.
5. Login to your existing TomTom account.
Tip: For more information on MyTomTom accounts, go to tomtom.com/mytomtom.
Your purchase is completed in the iOS App Store. If payment is successful, TomTom HD Traffic
starts within a few minutes on your TomTom app.
Page 64

64
About Speed Cameras and Danger Zones Service
The Speed Cameras and Danger Zones service is a subscription service that shows you up-to-date
information about all speed camera or safety-related features that are on your route. Due to
changes in legislation, all types of speed camera locations are now reported as danger zones
when driving in France. The information shown by the Speed Cameras and Danger Zones service
is continually updated by TomTom users and frequently sent to your TomTom app so you always
have the latest information for your route. You can also report speed cameras and danger zones,
and remove speed cameras.
Important: The Speed Cameras and Danger Zones service is only available for use with the iPhone and iPad 3G and is not available for the iPod touch or the iPad without 3G.
To use this service you need a continuous data connection (GPRS, EDGE, UMTS or CDMA). Your
mobile operator may charge you for using a wireless data connection. To stop the Speed Cameras
and Danger Zones service updating, tap Change Settings in the Main menu, then tap Advanced,
then scroll down to Data Services. Tap the button to switch off the service.
Frequency of speed camera updates
Your Speed Cameras and Danger Zones service is constantly being updated unless the connection to the TomTom server is lost.
Speed Cameras and Danger Zones Service
Page 65

65
You can see if the service is currently receiving updates from the TomTom server by looking at
the color of the alert symbols in the Driving View:
When the service is receiving updates from TomTom, the lower part of
the alert symbol and the alert symbol shown on your route are blue.
When the service is not able to receive updates from the TomTom server, the lower part of the alert symbol is gray and the symbol shown on
your route is black.
Your Speed Cameras and Danger Zones service may not be receiving updates from TomTom due
to one or more of the following reasons:
Your subscription has expired.
Data services is switched off in Advanced settings.
Speed Cameras or Danger Zones are not available in your area. For more information on
Speed Cameras, Danger Zones and other services in your country, go to tomtom.com/iphone.
Report a speed camera or danger zone
Tap this symbol to report a speed camera. By default a speed trap is
reported but you can change this to a fixed camera by tapping the button
that appears. After the report is sent to TomTom the message Thank you
for reporting a speed camera is shown at the top of the screen. The location is reported to TomTom and shared with other TomTom users with a
Speed Cameras subscription. When in France, a danger zone is reported.
Note: A reported speed trap or danger zone stays in the TomTom app for three hours.
Remove a speed camera
The speed camera symbol changes to this symbol when you approach a
speed camera. Tap the symbol to remove a speed camera. You can remove a speed camera until 5 seconds after you have passed its location.
The removal is reported to TomTom and shared with other TomTom app
Speed Cameras subscribers.
Note: You cannot remove danger zones when driving in France.
Regional availability
Note: You can use TomTom services when traveling abroad, but when planning a route you
need to consider that not all services are available in all countries.
For more information on available services, go to tomtom.com/iphone.
Settings for Speed Cameras Alerts
The Speed Cameras Alert settings let you turn the Speed Cameras alert on or off, and let you select the alert sound.
Page 66

66
1. In the Main Menu, tap Change Settings.
2. Tap Alerts.
3. In the Speed Camera box set the following settings:
Tap the button to turn safety camera alerts on or off.
Tap Sounds and choose a sound for the alert.
Tap Types and select which speed cameras and safety-related features you want to re-
ceive a warning for.
Buying a new Speed Cameras subscription
To buy a new subscription, do the following:
1. Start the TomTom app.
2. Tap TomTom Shop in the Main Menu to open the TomTom Shop.
3. Tap Speed Cameras.
4. Choose a subscription from the list of Speed Camera services.
5. Create a new TomTom account or login to your existing TomTom account.
Tip: If you already own a TomTom navigation device, then we recommend that you open a new
TomTom account for your iOS device using a different email address.
For more information on MyTomTom accounts, go to tomtom.com/mytomtom.
Your purchase is completed in the iOS App Store. If payment is successful, Speed Cameras starts
within a few minutes on your TomTom app.
Checking your Speed Cameras subscription
You can check the status of your subscription at any time, by tapping TomTom Shop in the Main
menu, then tapping Speed Cameras.
When you have 7 days or less before your subscription expires, the TomTom app shows a message to warn you that your subscription is approaching the renewal date. This message is repeated when you have one day left on your subscription.
After your subscription has expired the Speed Cameras service is removed from the TomTom
app.
The color of the camera symbols in the Driving View indicates whether your Speed Cameras service is connected to the TomTom server.
Renewing your Speed Cameras subscription
You can renew your Speed Cameras subscription after it has expired or extend it before it reaches
its expiry date.
To renew an expired subscription, do the following:
1. Start the TomTom app.
2. Tap TomTom Shop in the Main Menu to open the TomTom Shop.
3. Tap Speed Cameras.
4. Choose the subscription you want to renew.
5. Login to your existing TomTom account.
Page 67

67
Tip: For more information on MyTomTom accounts, go to tomtom.com/mytomtom.
Your purchase is completed in the iOS App Store.
Page 68

68
About search using Places
The Places feature lets you search for stores and businesses and plan a route to the store or office
location.
Places lets you search using TomTom Places, Facebook or foursquare.
When you use Places for the first time you are asked to allow your information to be sent to
TomTom. If you do not agree to send your information you cannot use the Places feature.
Note: To search using Facebook or foursquare you must be logged in to your account.
Places has the following search options:
Near Me
Tap this button to search near your current location.
In City
Tap this button to search in a particular city.
Near Home
This button appears when you have planned a route to your Home location. Tap this button to search near your Home location.
Near Destination
This button appears when you have planned a route. Tap this button to
search near your destination.
Note: Places requires a WiFi network or a wireless data connection (GPRS, EDGE, UMTS or
CDMA). Your mobile operator may charge you for using a wireless data connection. Using
Places when traveling abroad may cost you more than when you use the service at home.
Using Places to search
To use local search to plan a route, do the following:
In this example, you search for a restaurant near to your current location.
Search with Places
Page 69

69
1. Tap the screen to open the Main menu, then tap Navigate to.
2. Tap Places.
3. Tap Near me.
4. Type "restaurant," then select TomTom Places, Facebook or foursquare as the search option.
The locations that match your search are shown in a list.
5. Tap one of the locations in the list.
The location is shown on the map together with the address, a rating, phone number and additional information.
You can tap the map to show it full screen.
Note: If you searched using Facebook or foursquare you can use the extra features they offer
to share locations and information.
6. Tap Select to plan a route to the location.
The TomTom app plans a route to the location.
You can also tap the phone number to call the restaurant or tap the internet address to visit
the website.
Tip: When you select a phone number to make a call, the TomTom app closes on devices
that do not support multi-tasking.
Page 70

70
About Sharing and Checking In
You can share information about your trip using Email, Facebook, foursquare, iMessage SMS text
messages or Twitter, and you can check in to a location to let your friends know where you are.
Note: To use Twitter your iOS device must have iOS 5 or higher.
Before you can share your information using Facebook, Foursquare and Twitter you must first set
up those apps in the iOS device Settings app. Before you can share your information using email
you must first set up an email account in your iOS device Settings app.
When you use Share for the first time you are asked to allow your information to be sent to
TomTom. If you do not agree to send your information you cannot use the Share feature.
Share
In the Main menu, tap this button to open the Share menu.
The Share menu has the following share options:
Share Route
Tap this button to share your route. This button only appears when you
have planned a route.
Share Location
Tap this button to open the Share Location menu so you can share your
location or other information.
Check in
Tap this button to let the TomTom app check you in to Facebook or
Foursquare.
Sharing your information
The Share feature allows you to share your location or information from the TomTom app, from
your iOS device, or from your Facebook page.
You can share using email, Facebook, foursquare, SMS or Twitter.
Sharing and Checking In
Page 71

71
What you can share
You can use the following options to share locations with your friends:
My Location
My Location
Tap this button to share your current location.
Home
Home
Tap this button to share your home location.
Favorite
Favorite
Tap this button to select a Favorite to share or to edit your Favorites.
Address
Address
Tap this button to enter an address to share. To share a postcode, tap the
Postcode button at the top of the screen to display the Postcode screen.
Recent Destination
Recent Destination
Tap this button to share a location you have recently used as a destination. These also include your Travel Via stops.
Page 72

72
Places
Places
Tap this button to open the Places menu. Places lets you search using
TomTom Places, Facebook or foursquare, then share the location of one
of the search results.
Events
Events
Tap this button to share an event saved in your Calendar app or on your
Facebook Events page.
The Events menu has the following options:
Calendar
Tap this button to share an event saved in your Calendar app.
Facebook
Tap this button to share an event saved on your Facebook Events page.
Point of Interest
Point of Interest
Tap this button to share a Point of Interest (POI).
Photo
Photo
Tap this button to select a photo from your iOS device gallery and use it
to share a location.
Note: Only photos that contain location data can be used. This feature
can be enabled in the iOS device Camera application.
Page 73

73
Postcode
Postcode
Tap this button to enter a postcode so that you can share an address.
When you have entered the postcode the related address is found and
you can enter the optional house number.
Point on Map
Point on Map
Tap this button to select a point on the map to share using the map
browser.
Coordinates
Coordinates
Tap this button to enter the map coordinates of a location on the map to
share.
How you can share a location or place
1. Tap the screen to show the Main menu.
2. Tap Share then Share Location.
3. Select the location or thing you want to share.
4. When you have selected your location or thing to share you see the following screen:
Page 74

74
Note: The items you see in the list depend on the apps you have set up on your iOS device.
5. Tap the button of the app you want to use to share your information. The app screen appears
showing a standard message.
6. If you want you can edit the app's standard message.
7. Tap Send or Post to share your information.
How you can share your route
Note: You must have a route planned before you can share your route.
1. Tap the screen to show the Main menu.
2. Tap Share then Share Route, or tap Route Options then Share Route.
The following screen appears:
Page 75

75
Note: The items you see in the list depend on the apps you have set up on your iOS device.
3. Tap the button of the app you want to use to share your route. The app screen appears show-
ing a standard message.
4. If you want you can edit the app's standard message.
5. Tap Send or Post to share your information.
Check in using Facebook
The Check in using Facebook feature allows you to post your current location or a location nearby
on your Facebook page. You can also tag your checked-in Facebook friends so that they appear
with you on your Facebook post. Your friends are informed about your post.
1. Tap the screen to show the Main menu.
2. Tap Share then Check in.
3. Select a place from the list of places near your current location. You can load more places or
you can search for a place.
4. A map shows your selected place. Tap the text panel to add text. Tap Tag Friends if you want
to tag a checked-in Facebook friend.
5. Tap Post to share your place on your Facebook page.
Check in using foursquare
The Check in using foursquare feature allows you to post your current location or a location nearby on foursquare.
1. Tap the screen to show the Main menu.
2. Tap Share then Check in.
3. Select a place from the list of places near your current location. You can load more places or
you can search for a place.
Page 76

76
4. A map shows your selected place. Tap the text panel to add text.
5. Tap Post to share your place on foursquare.
Page 77

77
About Apple Maps
The Apple Maps app is part of iOS6. You can find a location using Apple Maps then navigate to
that location using the TomTom app.
Using the TomTom app with Apple Maps
To plan a route using Apple Maps with TomTom app, do the following:
1. Open Apple Maps.
2. Find the location you want to navigate to.
3. Tap and hold the location to drop a pin at the location and show the location details panel.
4. Tap the arrow in the location panel to open the Locations screen.
5. Tap Directions to Here.
6. In the details screen, tap the bus symbol, then tap Route.
Note: Tapping the car or pedestrian symbol starts the Apple navigation function.
7. In the Transport Apps screen, tap ROUTE next to the TomTom app symbol.
The TomTom app opens and calculates your route.
8. When the new route is shown, tap Done.
The TomTom app starts to guide you to your destination using spoken instructions and
on-screen directions.
Using the TomTom app with Apple
Maps
Page 78

78
About "Add to TomTom"
The "Add to TomTom" button is shown on websites including those for supermarkets, movie theaters and tourist attractions.
When you see the "Add to TomTom" button on a website, you can click the button to view the
location in the TomTom app.
For example, if your favorite restaurant has an "Add to TomTom" button on their website, click the
button to show the restaurant location on the map.
Using the "Add to TomTom" button
Use the "Add to TomTom" button as follows:
1. Using your iOS device, go to a website that has an "Add to TomTom" button.
2. Click the "Add to TomTom" button.
The TomTom app starts and, depending on what the "Add to TomTom" button is designed to
do, one of the following actions occurs:
The location is shown on the map.
A route from your current location is calculated.
The location is added as a Favorite or Point of Interest.
"Add to TomTom"
Page 79

79
About backup and restore using Apple iCloud
You can use Apple iCloud to backup your TomTom app settings and data from your iOS device. If
you restore your iOS device, change to a new iOS device, or remove then install the TomTom
app, you can easily restore your settings and data from iCloud so you don't have to manually enter
them again.
Tip: When you install an upgrade to your existing TomTom app you do not have to restore your
settings and data. Your existing settings and data are used in the upgraded app.
Note: To use iCloud your iOS device must have iOS 5 or higher.
Important: You can only restore to an iOS device that has the same name and which is linked to
the same iCloud account. You can only restore to the same registered TomTom app.
Important: If you do a factory reset of your iOS device your iCloud backup will be deleted.
The following settings and data are backed up in iCloud:
Home location
Favorites
Recent destinations
Voices
Alerts
Map settings
Distance units
Advanced settings
Social media settings
Your TomTom Account email and password.
To back up your settings and data to iCloud you must allow your information to be sent to
TomTom. If you have not agreed to send your information you cannot use the iCloud backup feature.
Note: If you have used other features in the TomTom app, such as TomTom HD Traffic or
Sharing, you have already agreed to send your information TomTom.
Turn on iCloud backup for your TomTom app
To use iCloud you must first set up and turn on iCloud in the Settings app of your iOS device using your Apple account.
To include the TomTom app in your iCloud backup, do the following:
1. In the iOS device settings app, tap iCloud to open the iCloud menu.
2. Tap Documents & Data to open the Documents & Data settings screen.
Backup and restore using Apple iCloud
Page 80

80
3. Tap Documents & Data to switch that feature in iCloud ON.
4. Tap iCloud to return to the iCloud menu.
5. Tap Storage & Backup.
6. Tap Manage Storage then tap your iOS device in the list.
7. In Backup Options, tap Show All Apps to expand the list of apps.
8. In the list of apps, tap TomTom app to turn on iCloud backups for that app.
Backups are made either automatically or manually, depending on the settings in your iOS device.
Turn off iCloud backup for your TomTom app
Important: When you turn off backup to iCloud for the TomTom app, all backed-up data for that
app is deleted.
To turn off TomTom app backup to your iCloud, do the following:
1. In the iOS device settings app, tap iCloud.
2. Tap Storage & Backup.
3. Tap Manage Storage then tap your iOS device in the list.
4. In Backup Options, tap Show All Apps to expand the list of apps.
5. In the list of apps, tap TomTom app to turn off iCloud backups for that app.
6. Tap Turn Off & Delete.
The backup for your TomTom app is deleted.
Restore using Apple iCloud
Your settings and data are restored from iCloud when you start the TomTom app after you have
restored your iOS device, changed to a new iOS device, or removed then installed your TomTom
app.
You see the message An iCloud backup was found, do you want to restore your settings?. Tap
Yes to restore your settings and data.
If the iCloud backup could not be restored (because contact with your network was lost, for example), check your network settings and try again.
Page 81

81
Important Safety Notices and Warnings
Global Positioning System
The Global Positioning System (GPS) is a satellite-based system that provides location and timing
information around the globe. GPS is operated and controlled under the sole responsibility of the
Government of the United States of America, which is responsible for its availability and accuracy.
Any changes in GPS availability and accuracy, or in environmental conditions, may impact the
operation of this app. TomTom does not accept any liability for the availability and accuracy of
GPS.
Use with care
Use of TomTom products while driving still means that you need to drive with due care and attention.
Safety advice
Please read and take note of the following important safety advice:
Check your tire pressure regularly.
Service your vehicle regularly.
Medication can affect your riding or driving ability.
Always use seat belts if available.
Before setting off on a motorcycle, fasten your helmet correctly.
If riding a bike, always wear protective clothing and equipment.
When riding a motorcycle, be extra vigilant and always ride defensively.
Don’t drink and drive.
Most accidents happen less than 5 km from home.
Obey the rules of the road.
Always use your turn signals.
Every 2 hours, take a break for at least 10 minutes.
Keep your seat belts on.
Keep a safe distance from the vehicle in front.
Aircraft and hospitals
Use of devices with an antenna is prohibited on most aircraft, in many hospitals and in many other
locations. This app must not be used in these environments.
Addendum
Page 82

82
SPECIAL NOTE REGARDING DRIVING IN CALIFORNIA AND MINNESOTA
California Vehicle Code Section 26708 "Material Obstructing or Reducing Driver's View" permits
mounting of a navigation device on the windshield as follows: "A portable Global Positioning System (GPS), which may be mounted in a seven-inch square in the lower corner of the windshield
farthest removed from the driver or in a five-inch square in the lower corner of the windshield
nearest to the driver and outside of an airbag deployment zone, if the system is used only for
door-to-door navigation while the motor vehicle is being operated." Drivers in California should
not use a suction mount on their side or rear windows.
Note: This section of the California Vehicle Code applies to anyone driving in California, not just
California residents.
Minnesota State Legislature Statutes Section 169.71, subdivision 1, section 2 provides that "A
person shall not drive or operate with any objects suspended between the driver and the windshield other than sun visors and rearview mirrors and electronic toll collection devices."
Note: this Minnesota Stature applies to anyone driving in Minnesota, not just Minnesota residents.
TomTom Inc. bears no responsibility for any fines, penalties or damage that may be incurred by
disregarding this notice. While driving in any state with windshield mounting restrictions,
TomTom recommends the use of the supplied Adhesive Mounting Disk or its Alternative Mounting Kit, which includes multiple options for mounting TomTom devices on the dashboard and the
air vents. See tomtom.com for more information about these mounting options.
This document
Great care was taken in preparing this document. Constant product development may mean that
some information is not entirely up to date. The information in this document is subject to change
without notice.
TomTom shall not be liable for technical or editorial errors or omissions contained herein, nor for
incidental or consequential damages resulting from the performance or use of this document. This
document contains information protected by copyright. No part of this document may be photocopied or reproduced in any form without prior written consent from TomTom N.V.
Page 83

83
© 2013 TomTom. All rights reserved. TomTom and the "two hands" logo are registered trademarks of TomTom N.V. or one of its subsidiaries. Please see tomtom.com/legal for limited warranty and end user license agreements applying to this product.
© 2013 TomTom. All rights reserved. This material is proprietary and the subject of copyright
protection and/or database rights protection and/or other intellectual property rights owned by
TomTom or its suppliers. The use of this material is subject to the terms of a license agreement.
Any unauthorized copying or disclosure of this material will lead to criminal and civil liabilities.
Ordnance Survey © Crown Copyright License number 100026920.
Data Source © 2013 TomTom
All rights reserved.
Some images are taken from NASA’s Earth Observatory.
The purpose of NASA's Earth Observatory is to provide a freely-accessible publication on the Internet where the public can obtain new satellite imagery and scientific information about our home
planet.
The focus is on Earth’s climate and environmental change: earthobservatory.nasa.gov
The software included in this product contains copyrighted software that is licensed under the
GPL. A copy of that license can be viewed in the License section. You can obtain the complete
corresponding source code from us for a period of three years after our last shipment of this
product. For more information, visit tomtom.com/gpl or contact your local TomTom customer
support team via tomtom.com/support. Upon request, we will send you a CD with the corresponding source code.
Linotype, Frutiger and Univers are trademarks of Linotype GmbH registered in the U.S. Patent and
Trademark Office and may be registered in certain other jurisdictions.
MHei is a trademark of The Monotype Corporation and may be registered in certain jurisdictions.
Compatible with all iPhone models
"Works with iPhone" means that an electronic accessory has been designed to connect specifically
to iPhone and has been certified by the developer to meet Apple performance standards.
Apple is not responsible for the operation of this device or its compliance with safety and regulatory standards.
Made for iPod touch
"Made for iPod" means that an electronic accessory has been designed to connect specifically to
iPod and has been certified by the developer to meet Apple performance standards.
Apple is not responsible for the operation of this device or its compliance with safety and regulatory standards.
iPod is a trademark of Apple Inc., registered in the U.S. and other countries.
Made for iPad
"Made for iPad" means that an electronic accessory has been designed to connect specifically to
iPad and has been certified by the developer to meet Apple performance standards.
Copyright notices
Page 84

84
Apple is not responsible for the operation of this device or its compliance with safety and regulatory standards.
iPad is a trademark of Apple Inc., registered in the U.S. and other countries.
 Loading...