

Page 1
Page 2

NAVIGATION SYSTEM
Before starting . . . . . . . . . . . . . . . . . . . . . . . . . . . . . . . . . . . . . . 5
Navigation . . . . . . . . . . . . . . . . . . . . . . . . . . . . . . . . . . . . . . . . . . 13
Audio and Visual . . . . . . . . . . . . . . . . . . . . . . . . . . . . . . . . . . 89
Others. . . . . . . . . . . . . . . . . . . . . . . . . . . . . . . . . . . . . . . . . . . . . . 125
Addendum. . . . . . . . . . . . . . . . . . . . . . . . . . . . . . . . . . . . . . . . . 143
Customer contact and personal information will be held in the strictest confidence by TomTom Live
Services in accordance with information privacy policy in the EU.
For the purpose of protection of your private information, please delete your personal data by "Reset
factory settings".
Page 3

Contents
Before starting ...........................................................................................5
Kit contents........................................................................................................................................ 6
Safety ................................................................................................................................................ 8
Starting ............................................................................................................................................ 10
Changing the map data ................................................................................................................... 11
Navigation...................................................................................................13
Before you start ............................................................................................................................... 14
Names and Functions ..................................................................................................................... 16
Making your first journey ................................................................................................................. 17
Driving View .................................................................................................................................... 28
Advanced Lane Guidance ............................................................................................................... 30
Finding alternative routes ................................................................................................................ 31
Browse Map .................................................................................................................................... 33
TomTom Map Share™ (Correcting the map).................................................................................. 35
Sounds and voices.......................................................................................................................... 42
Preferences ..................................................................................................................................... 44
Points of Interest (POIs) .................................................................................................................. 57
Itinerary Planning ............................................................................................................................ 62
Help me ........................................................................................................................................... 65
Favourites........................................................................................................................................ 67
TomTom HD Traffic ......................................................................................................................... 70
TomTom Safety Alerts..................................................................................................................... 78
TomTom Weather ........................................................................................................................... 84
Introducing TomTom HOME ........................................................................................................... 86
Audio and Visual.....................................................................................89
How to Use Audio and Visual Systems........................................................................................... 90
Basic audio and visual system operation ........................................................................................ 94
FM ................................................................................................................................................... 97
AM ................................................................................................................................................. 102
USB ............................................................................................................................................... 105
CD (MP3 included)........................................................................................................................ 109
iPod ............................................................................................................................................... 116
AUX ............................................................................................................................................... 122
Audio control switch ...................................................................................................................... 123
2
Page 4

Others..........................................................................................................125
Hands-free.....................................................................................................................................126
Voice recognition ........................................................................................................................... 131
Rear view camera (option).............................................................................................................136
LIVE Services ................................................................................................................................ 137
Software version ............................................................................................................................ 141
Addendum................................................................................................143
Addendum (Navigation).................................................................................................................144
Addendum (Audio and visual)........................................................................................................148
Addendum (Others) .......................................................................................................................152
License ..........................................................................................................................................153
Copyright notices ...........................................................................................................................154
3
Page 5

Memo
4
Page 6

Before starting
Kit contents ........................................................................................................................................ 6
Safety................................................................................................................................................. 8
Starting ............................................................................................................................................ 10
Changing the map data ...................................................................................................................11
5
Page 7
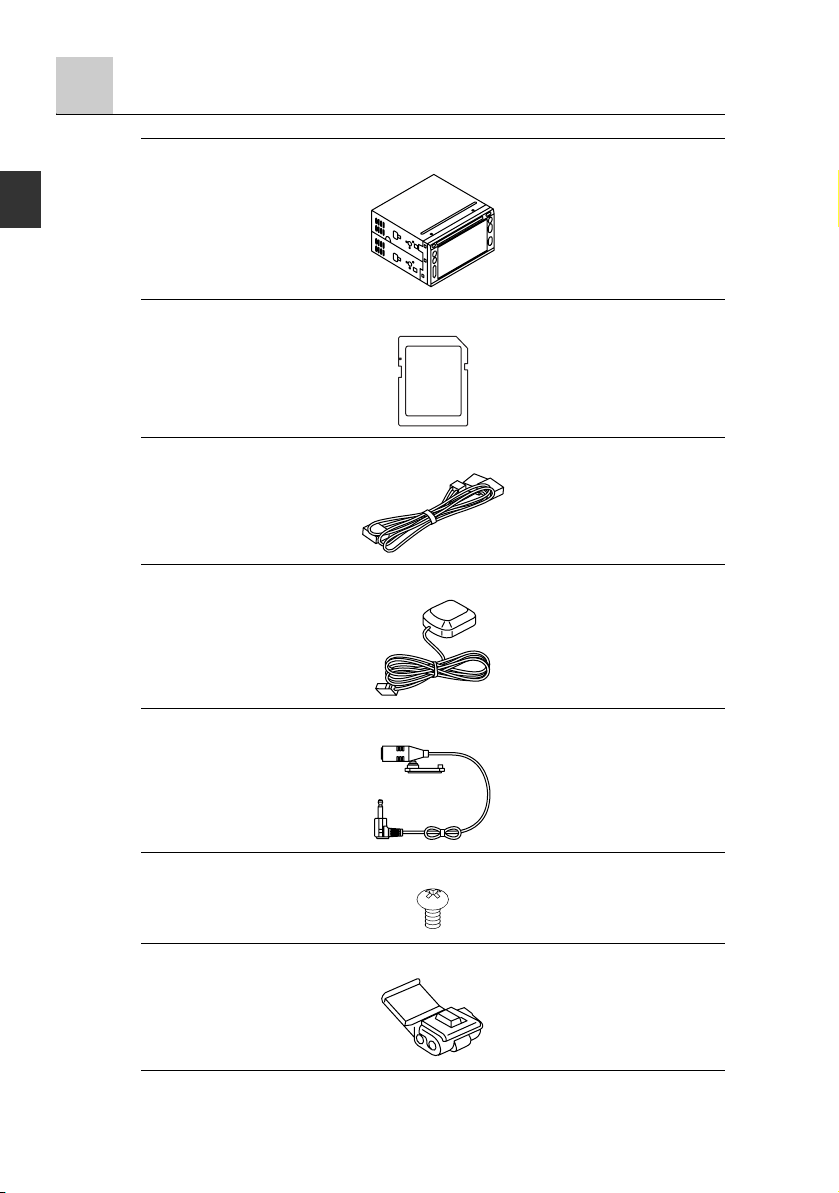
Kit contents
Navigation device
SD card (including EU map)
Power supply harness
GPS Aerial
EUROPE
Microphone
Screw (M5×8)
Connector
6
Page 8
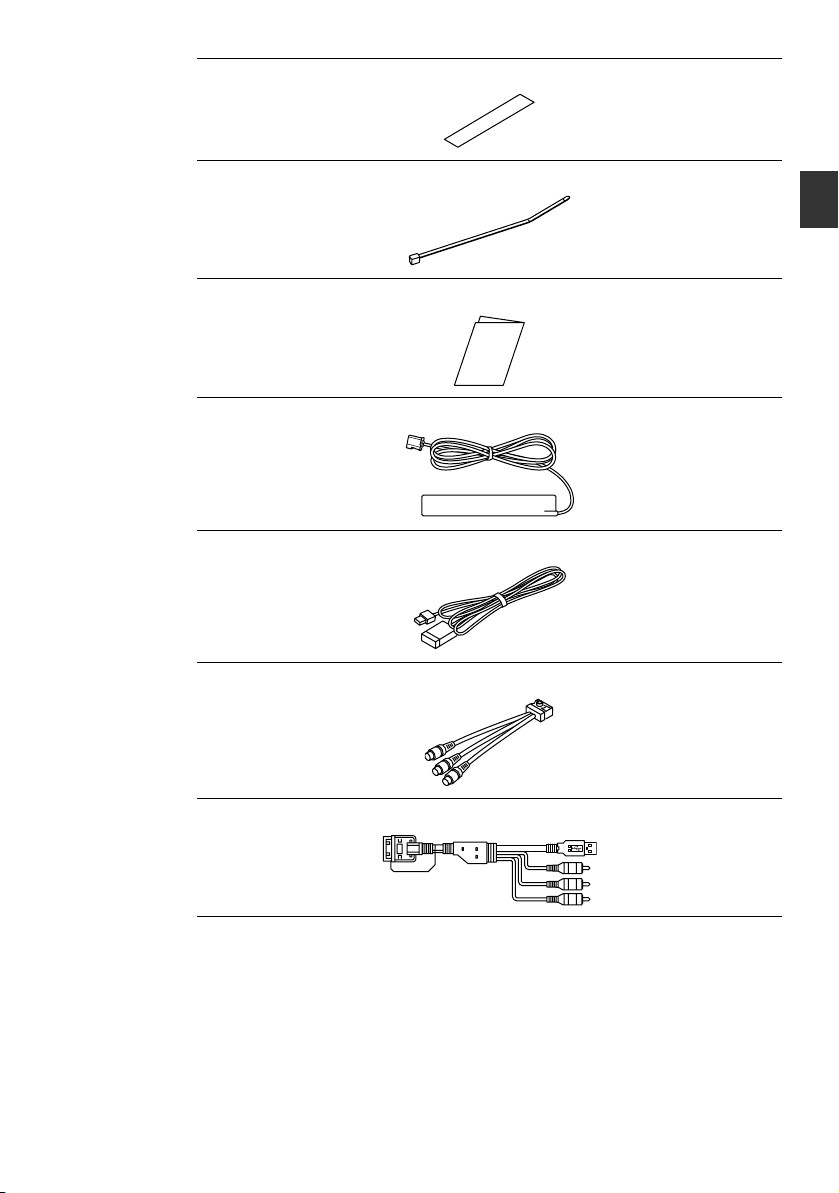
Tape for securing leads
Wire band
Owner’s manual
External GPRS aerial
USB lead
RCA lead
iPod lead (option)
7
Page 9
Safety
Safety preferences
Read this owner’s manual for your Navigation System carefully before using the system.
It contains instructions about how to use the system in a safe and effective manner.
The dealer where you purchased the product assumes no responsibility for any problems
resulting from failure to observe the instructions given in this manual.
This manual uses pictographs to show you how to use the product safely and to alert you to
potential dangers resulting from improper connections and operation. The meanings of the
pictographs are explained below. It is important that you fully understand the pictographs and
explanations in order to use this manual and the system properly.
The presence of this Warning symbol in the text is intended to alert you to
the importance of heeding the operation instructions. Failure to heed the
instructions may result in severe injury or death.
Do not keep your eyes fixed on the monitor screen or operate the
system while driving.
Do not change the settings and destination locations while driving. Minimize
the time spent on viewing the monitor screen and listening to the voice
guidance while driving. Operating the system will distract the driver from
looking ahead of the vehicle and can cause accidents. Always stop the
vehicle in a safe location and use the parking brake before operating the
system.
Always obey local traffic regulations.
Your guided route may include roads that are not open to vehicles or are
closed due to traffic regulations. Comply with the local traffic regulations and
take another route.
Do not use the navigation device when it is out of order.
If the navigation device is out of order (no image, no sound) or in an
abnormal state (has foreign matter in it, is exposed to water, is smoking, or
smells), then turn it off immediately and consult with an Expert dealer, we
recommend the dealer where you purchased the product. Using the
navigation device in an out-of-order condition may lead to accidents, fires,
or electric shocks.
Use the proper power supply.
This product is designed for operation with a negative grounded 12 V DC
battery system.
Do not disassemble.
Do not disassemble the product or attempt to repair it yourself. If the product
needs to be repaired, take it to the dealer where you purchased the product,
we recommend the dealer where you purchased the product.
WARNING
WARNING
8
Page 10

WARNING
Your navigation device contains a GSM/GPRS module which can interfere
with electrical devices such as cardiac pacemakers and hearing aids.
Interference from these devices may endanger the health or life of others.
*GSM: Global System for Mobile Communications
*GPRS: General Packet Radio Service
WARNING
If GPS and GPRS aerial is installed within the instrument panel, do not
place any objects, cell phones and portable radios above the installation
location. The reception sensitivity can be lower and no signals can be
received.
CAUTION
The presence of this Caution symbol in the text is intended to alert you to the importance of
heeding the operation instructions. Failure to heed the instructions may result in injury or
material damage.
CAUTION
Do not use the product where it is exposed to water, moisture, or dust.
Exposure to water, moisture, or dust may lead to smoke, fire, or other damage to the
navigation device. Make especially sure that the navigation device does not get wet in car
washes or on rainy days.
Keep the voice guidance volume at an appropriate level.
Keep the volume level low enough to be aware of road and traffic conditions while driving.
Protect the Deck Mechanism.
Do not insert any foreign objects into the slot of this navigation device.
This navigation system is designed exclusively for use in automobiles.
This navigation system should only be installed in an automobile. Do not install it in a ship,
aircraft, or any other vehicles except an automobile. Do not use it detached from the vehicle.
Do not insert or allow your hand or fingers to be caught in the navigation device.
To prevent injury, do not get your hand or fingers caught in moving parts or in the disc slot.
Especially watch out for infants.
Operation is subject to the following two conditions;
(1)this device may not cause interference, and
(2)this device must accept any interference,
including interference that may cause undesired operation of the device.
CAUTION
This product is a class laser product.
However this product uses a visible/invisible laser beam which could cause
hazardous radiation exposure if directed.
Be sure to operate this product correctly as instructed.
Use of controls or adjustments or performance of procedures other than those
specified herein may result in hazardous radiation exposure. Do not open covers and
do not repair yourself. Refer servicing to qualified personnel.
9
Page 11
Starting
Opening
When the ignition is switched to ACC or ON, the display transitions to the start-up screen.
The first time you switch on your device, it may take a short time to start.
In rare cases, your navigation device may not start correctly or may stop responding to your
touches. You can reset the device. If you press and continue to hold the power button for 20
seconds with the ignition switched ON, your device will restart. When your device begins to
restart, release the power button. After resetting, re-do the radio settings.
Power bu tt on
Live Services
TomTom HD Traffic, TomTom Safety alerts, TomTom weather, and Google local search can
be used by connecting to Live services.
For details on how to connect to Live services, refer to the “Activate LIVE Services” (page 137).
For more information, go to tomtom.com/service.
10
Page 12
Changing the map data
Changing the map data
The map information can be updated by accessing TomTom HOME from your computer.
1. Access TomTom HOME from your computer.
2. Download the required data.
3. Insert the SD card into your computer and download the data to the SD card.
4. Pull out the SD card from your computer and insert it into the navigation device.
Latest map guarantee
The map can be updated for free within 60 days after purchasing the navigation device.
NOTE
The map updating is available only once within 60 days. Refer to the following website for
details.
- tomtom.com/latestmap
SD card removal
• A SD card may generate heat due to your prolonged use but this is not a failure.
• A SD card has limited product life. Prolonged use may not enable you to write or delete
data.
NOTE
If you leave the SD card in the slot for a long time, it may generate heat but this does not
indicate a malfunction.
CAUTION
11
Page 13

1. Touch .
2. Touch .
3. Open the SD card cover and push the SD card once to eject it.
SD card cover
4. Insert the SD card into the slot and close the SD card cover until you hear it “clicks”.
• Keep the label side of the SD card on the left side, and insert the card into the direction of
an arrow until you hear it “clicks”.
Label mark SD card
12
Page 14

Navigation
Before you start ...............................................................................................................................14
Names and Functions......................................................................................................................16
Making your first journey.................................................................................................................. 17
Driving View.....................................................................................................................................28
Advanced Lane Guidance ...............................................................................................................30
Finding alternative routes ................................................................................................................31
Browse Map.....................................................................................................................................33
TomTom Map Share™ (Correcting the map) .................................................................................. 35
Sounds and voices ..........................................................................................................................42
Preferences .....................................................................................................................................44
Points of Interest (POIs) ..................................................................................................................57
Itinerary Planning ............................................................................................................................. 62
Help me ...........................................................................................................................................65
Favourites ........................................................................................................................................ 67
TomTom HD Traffic ......................................................................................................................... 70
TomTom Safety Alerts .....................................................................................................................78
TomTom Weather............................................................................................................................84
Introducing TomTom HOME............................................................................................................86
13
Page 15
Before you start
Switching on and off
When the ignition is switched to ACC or ON, the display transitions to the start-up screen.
The first time you switch on your device, it may take a short time to start.
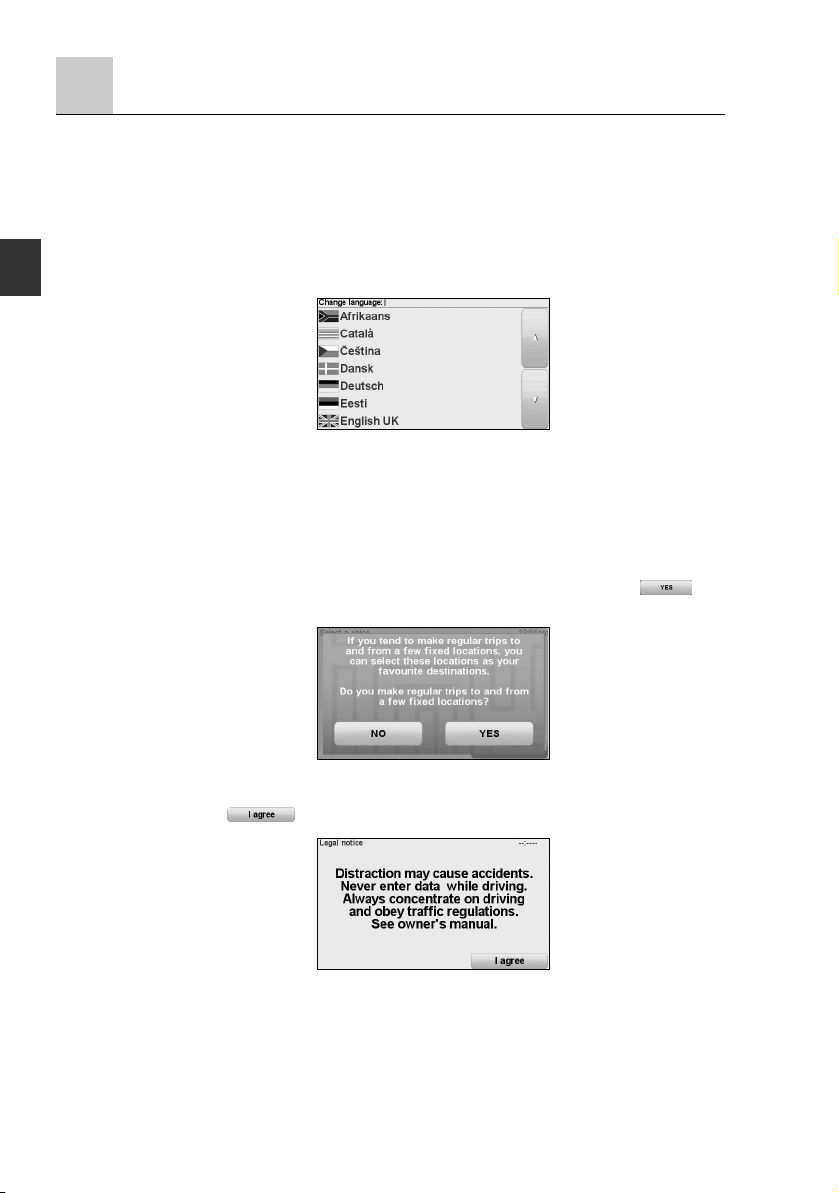
Setting up
When you first switch on your device, you have to answer a few questions as indicated below
to set up the device.
• Change language
• Distance units
• Clock display
• Please set the correct time
• Select a voice
• Your “Home” address
• Join Map Share TM
• Regular trips
• Legal notice
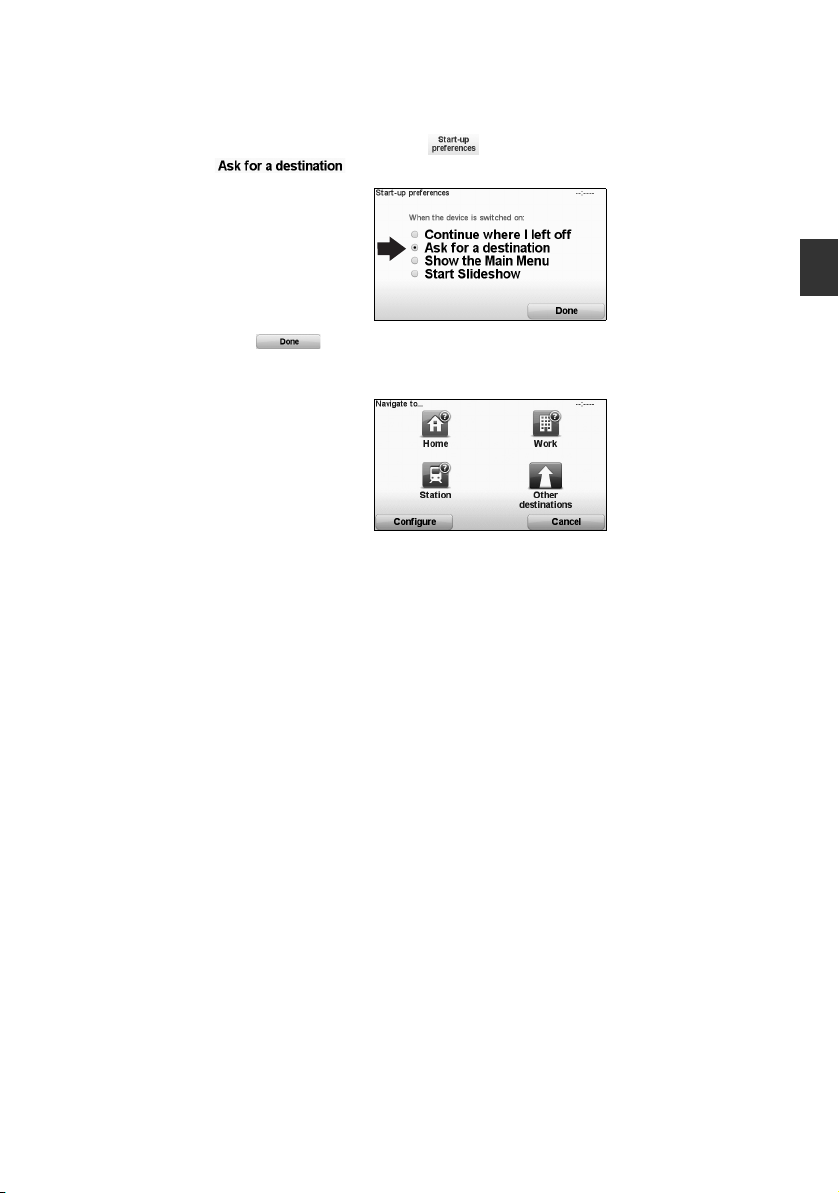
You are asked whether you make regular trips to the same locations. If you touch , you
can enter these destinations as your favourite destinations.
Every time you switch on your device, you can immediately select one of these locations as
your destination.
To use, touch on the “Legal notice” screen which is displayed at the end.
14
Page 16
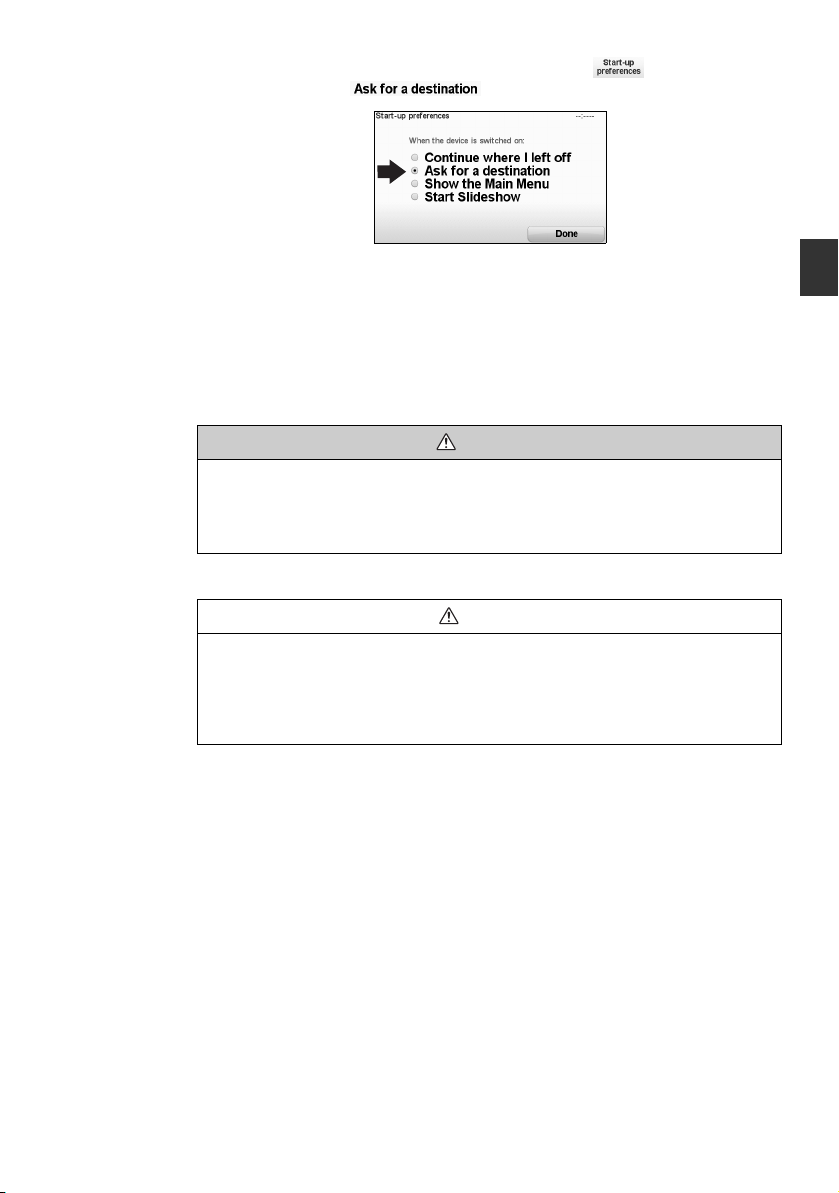
To change these destinations or select a new destination, touch in the Change
preferences, then select . Refer to the “Start-up preferences” (page 54).
GPS reception
When you first start your navigation device, it may need a few minutes to determine your GPS
position and show your current position on the map. In the future, your position will be found
much faster, usually within a few seconds.
Large objects such as tall buildings can sometimes interfere with reception.
The navigation device includes Enhanced Positioning Technology or EPT. EPT automatically
estimates your position when the GPS signal is lost while you are driving, such as when you
are in a tunnel. When EPT is in use, the EPT symbol is shown in the Driving View.
*EPT: Enhanced Positioning Technology
Your navigation device contains a GSM/GPRS module which can interfere with electrical
devices such as cardiac pacemakers and hearing aids.
Interference from these devices may endanger the health or life of others.
*GSM: Global System for Mobile Communications
*GPRS: General Packet Radio Service
Take care of your device
It is important to take care of your device.
• Your device is not designed for use in extreme temperatures and any such exposure may
cause permanent damage.
• Do not open the casing of your device under any circumstances. Doing so may be
dangerous and will invalidate the warranty.
• Wipe or dry the screen of your device using a soft cloth. Do not use any liquid cleaners.
WARNING
CAUTION
15
Page 17
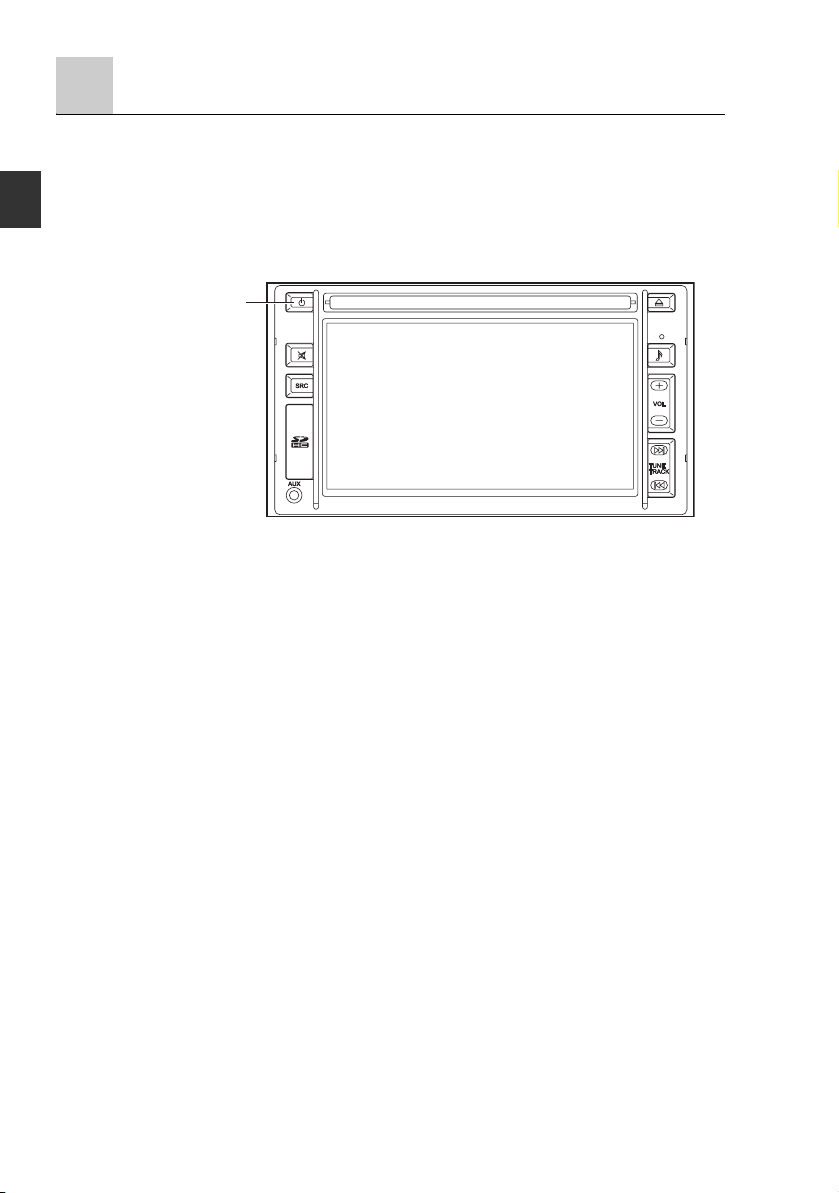
Names and Functions
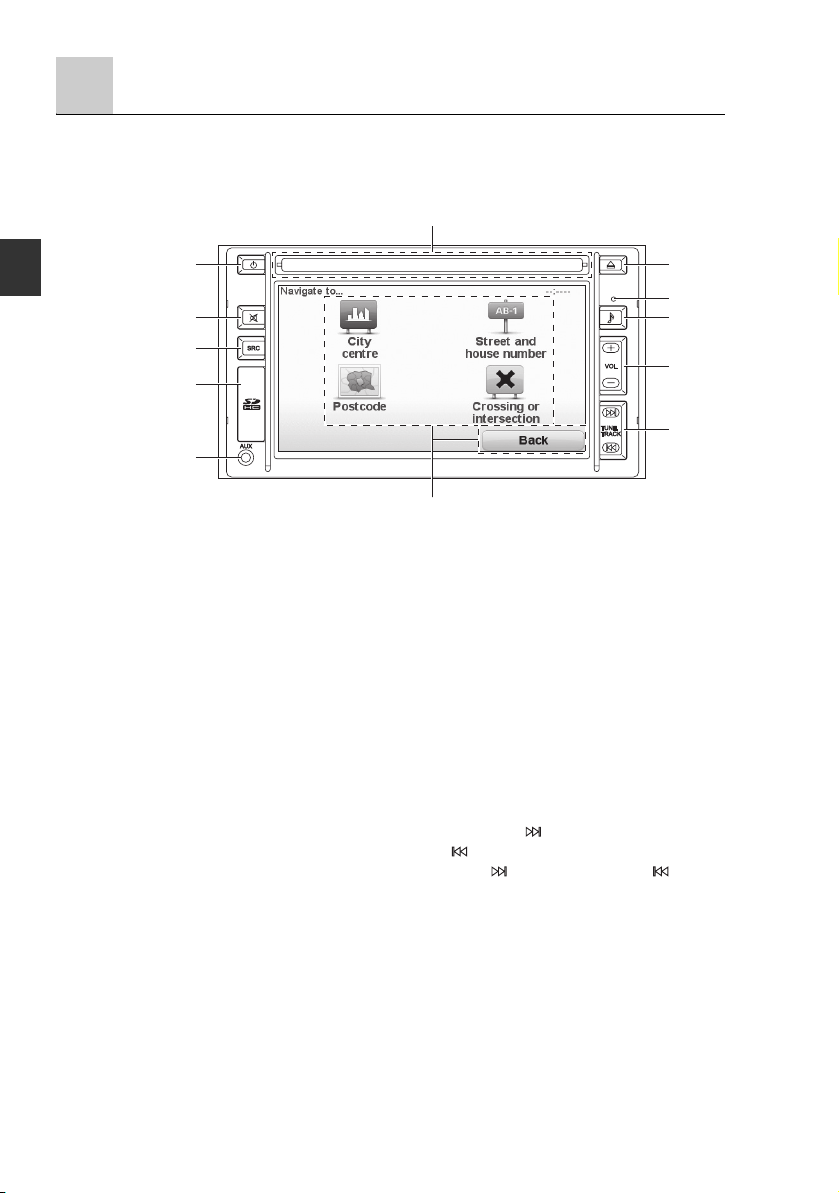
Names and Functions
The navigation device can be operated by pressing a button on the panel (panel button) or
touching a button displayed on the screen (on-screen button).
F
A
B
C
D
E
G
A Power button - Power on/off. When the navigation device’s power is off, the clock is
displayed in the centre of the screen.
B Mute button - Navigation and audio sound is muted.
C Source button - Audio mode source change.
D SD card slot - Installing and removing SD cards which contain map data.
E Auxiliary jack - External device input.
F CD slot - CD insertion.
G On-screen button -You can operate the navigation and audio & visual functions by touching
the screen of the navigation device.
H CD eject button - CD ejection.
I Light sensor - To change to night and day colours automatically, tab Brightness
preferences in the Preferences menu. Then select “Light sensor switches
day/night mode”.
J Sound button - Sound setting screen is displayed.
K Volume button - Press + to increase the volume of the sound. Press – to decrease the
volume of the sound.
L Seek tuning/ Track up/ Track down button - Seek tuning is available (AM/FM mode).
Long-press the to fast-forward. Long-press
the to reverse. (CD/MP3/USB/iPod mode)
Press the to track up. Press the to track
down. (CD/MP3/USB/iPod mode)
H
I
J
K
L
16
Page 18
Making your first journey
Planning a route with your navigation device is easy. To plan a route, follow the steps below.
WARNING
Do not keep your eyes fixed on the monitor screen or operate the system while
driving.
Do not change the settings and destination locations while driving. Minimize the time spent
on viewing the monitor screen and listening to the voice guidance while driving. Operating
the system will distract the driver from looking ahead of the vehicle and can cause accidents.
Always stop the vehicle in a safe location and use the parking brake before operating the
system.
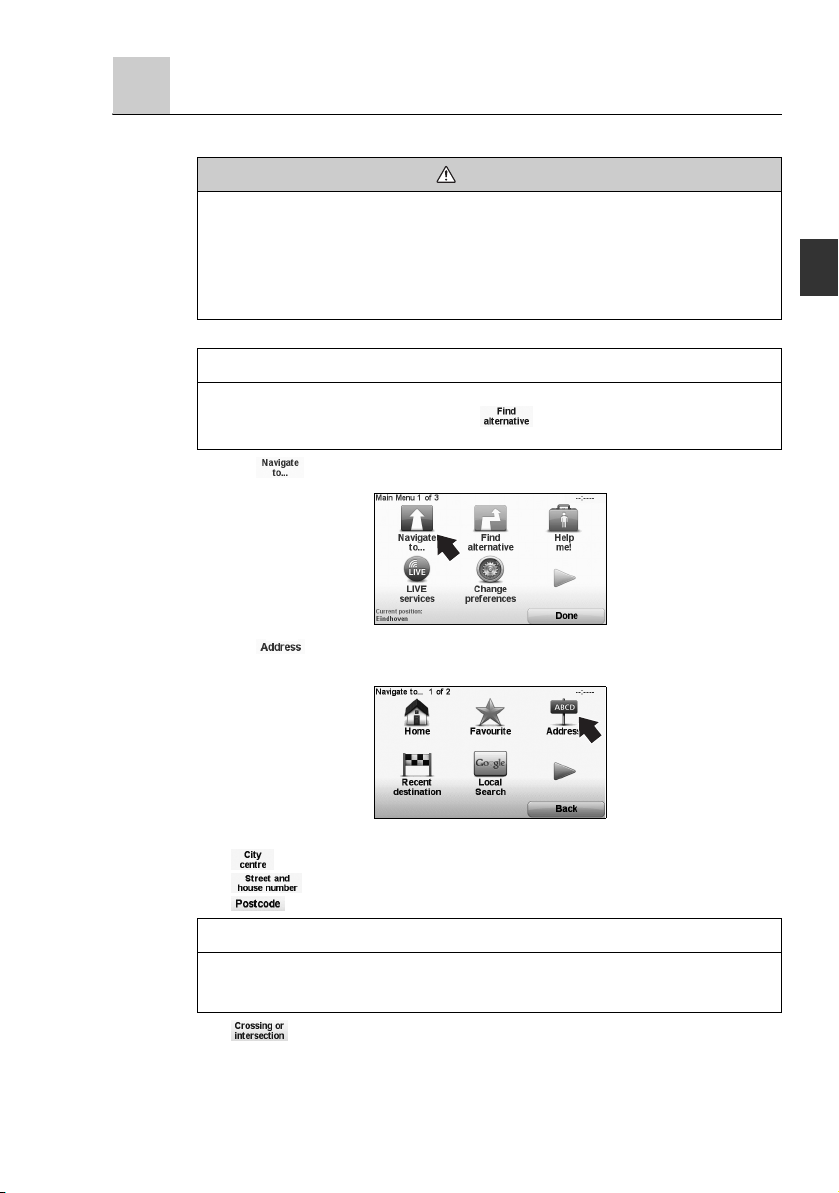
1. Touch the screen to bring up the Main Menu.
NOTE
The buttons on your navigation device are shown in full colour unless a button is currently
unavailable. For example, the button named in the Main Menu is not available until
you have planned a route.
2. Touch .
3. Touch .
For other navigation option functions, refer to “Other navigation options” (page 24).
When you enter an address, you can choose from the following options:
• - touch this button to set your destination as the centre of a city or town.
• - touch this button to set an exact address as your destination.
• - touch this button to enter a postcode as your destination.
NOTE
You can enter a postcode for any country. In some countries, postcodes are detailed enough
to identify a house on their own. In other countries you can enter a postcode to identify a
town or area. You will then have to enter a street and house number.
• - touch this button to set your destination as the point where two streets meet.
17
Page 19
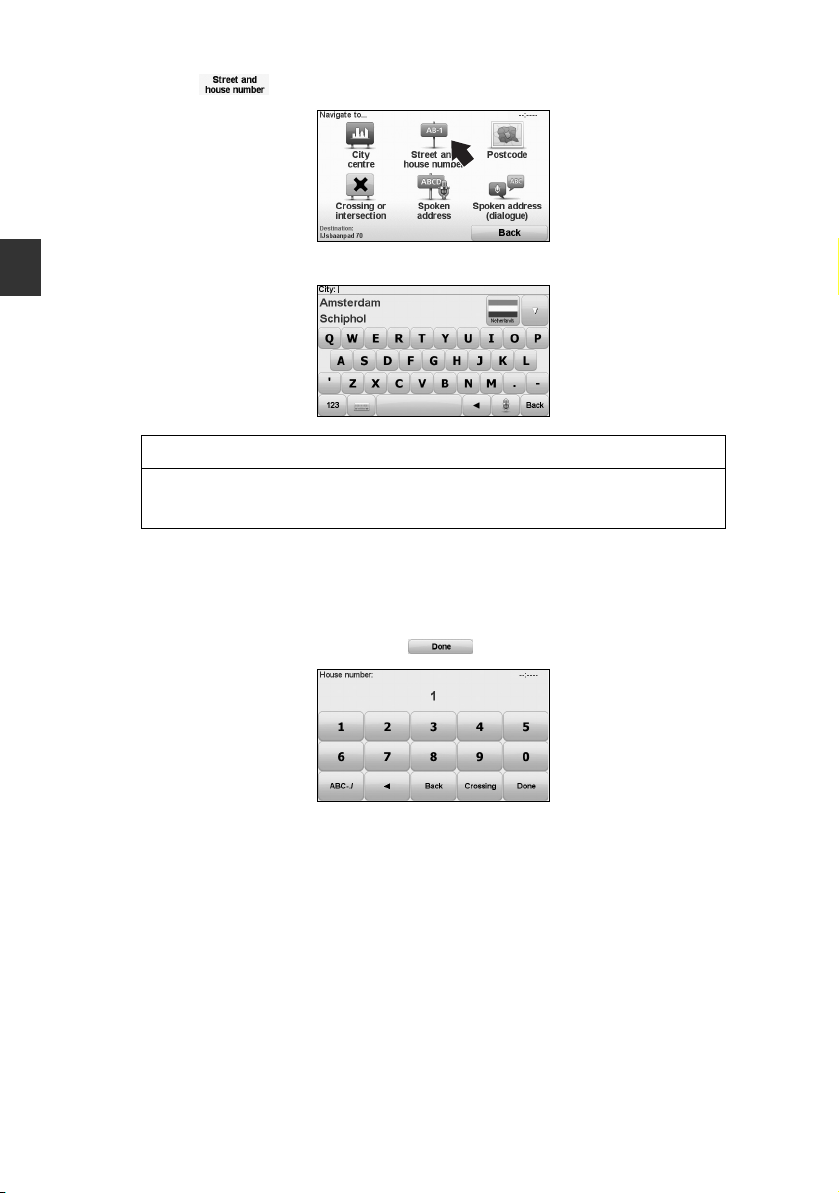
In this example, we will enter an address.
4. Touch .
5. Start to type the name of the town where you want to go.
NOTE
When planning a trip for the first time your navigation device asks you to choose a state or
country. Your choice is saved and used for all routes you plan.
You can change this setting at any time by touching the flag.
6. As you type, the names of the towns that match what you have typed are shown. When your
destination appears in the list, touch the name of the town to set the destination.
7. Start to type the street name. Touch the name when it is shown in the list.
As with the name of the town, the names of the streets that match what you have typed are
shown. When your destination appears in the list, touch the name of the street to set the
destination.
8. Enter the house number and then touch .
18
Page 20
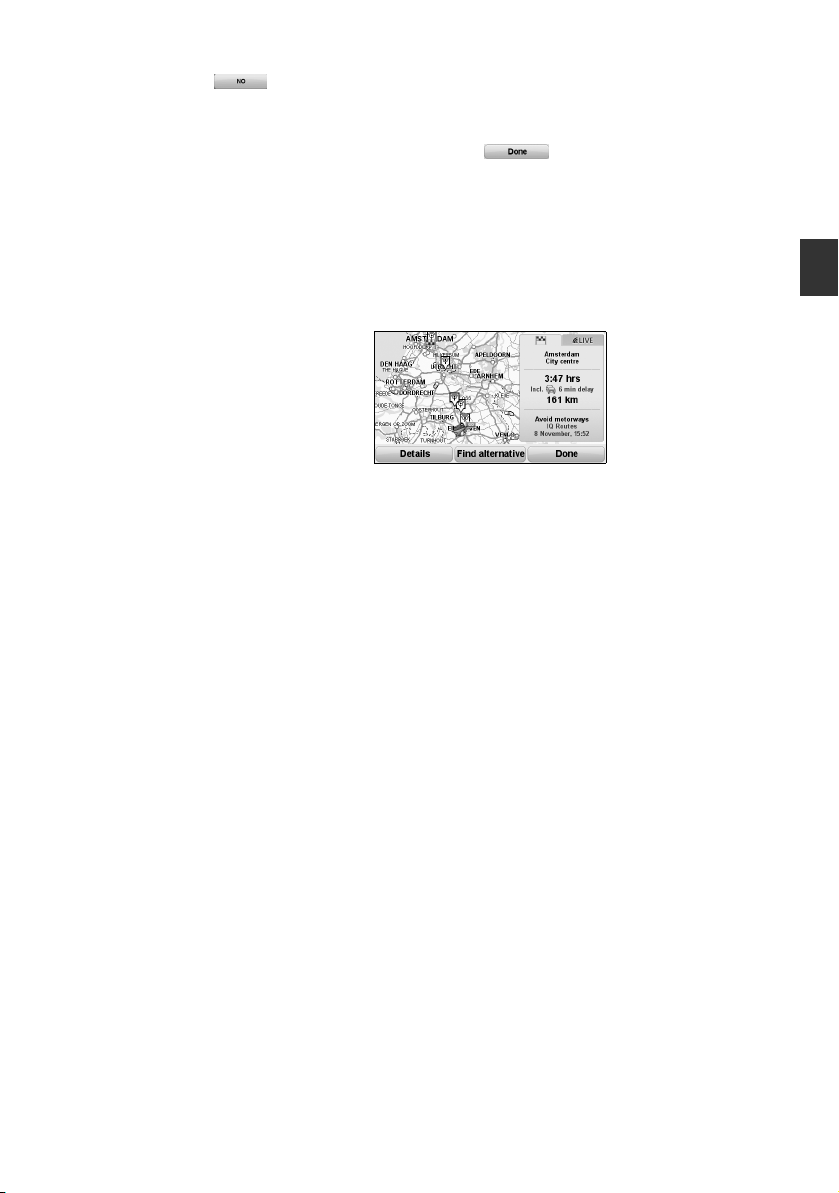
9. Your navigation device asks if you need to arrive at a particular time. For this exercise, touch
The route is calculated by your device using IQ Routes™.
IQ Routes™ is used to plan the best possible route using information about the average
speeds measured on the roads.
When the route has been calculated, touch .
Your navigation device warns you about any traffic delays and begins to guide you to your
destination. Refer to the “Planning preferences” (page 54)
Route summary
After planning a route, you see a summary of your route.
The route summary shows an overview map of your route and the total journey time including
delays caused by both incidents and busy roads.
You can see the route summary at any time by touching the right side of the status bar.
.
19
Page 21

LIVE snapshot
LIVE snapshot shows an overview of the information provided by LIVE services for your
planned route. To explore LIVE snapshot, open the LIVE tab on the route summary screen,
then touch each panel for more detailed information.
NOTE
Not all services are available in all countries or regions. Go to tomtom.com/services to
check which services are available where you live.
Touch on the panels in the LIVE tab to see, for example, information on the following. Not all
information is available in all countries:
• - touch this section to see details of any delays caused by incidents and busy
• - touch this section to see the Safety Camera menu. You can then report a
roads.
safety camera or change the warning preferences.
NOTE
As well as using LIVE services in your own country, you may also be able to use LIVE
services when travelling abroad. Not all LIVE services are available in all countries. For more
information on available services, go to tomtom.com/services.
Using your voice to plan a route
Instead of touching the screen to plan a route, you can use your voice to plan a route.
For information about the different ways you can plan a route using your voice, Refer to the
“Voice recognition” (page 131).
20
Page 22
Frequent destinations
If you often make trips to the same destinations, you can set your device to ask if you want to
plan a route to one of these locations every time the device launches. This is faster than
planning a route in the normal way.
1. To select a new destination, touch in the Change preferences then select
2. Touch .
3. You are asked if you want to select a new destination and you then need to answer a few
questions about the location.
.
21
Page 23
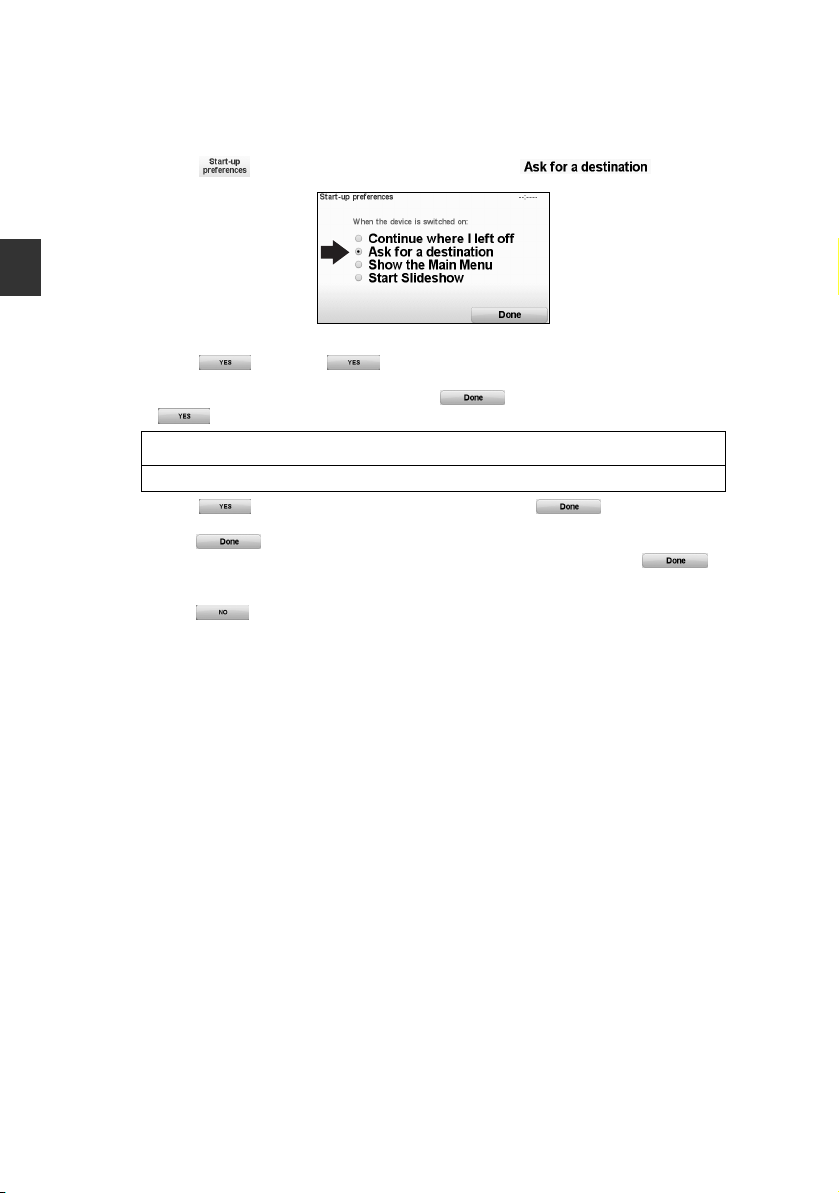
Show my list of frequent destinations every time my navigation device
launches
You can set your navigation device to ask if you want to plan a route to one of your frequently
visited destinations every time the device launches.
To change this setting, do the following:
1. Touch in the Change preferences and then select .
2. Touch , then touch again to begin entering information about the
destination.
3. Select a symbol for the destination and touch to set the symbol, then touch
.
NOTE
If you want to choose a title of your own, select a numbered symbol.
4. Touch and if required enter a new name, then touch .
5. Enter the address details in the same way you enter an address when planning a route, then
touch .
6. If you want to set more destinations, repeat the steps above. Otherwise, touch .
You are asked if you want to change the start-up image.
7. If you want to change the image, follow the instructions shown on the screen. Otherwise,
touch .
Every time your navigation device launches, you are asked if you want to plan a route. If you
touch Cancel, you are shown the Main Menu.
22
Page 24
Arrival times
When you plan a route, your navigation device asks you if you need to arrive at a particular
time.
Touch to enter a preferred arrival time.
Your navigation device calculates your arrival time and shows you whether you will arrive on
time.
You can also use this information to work out when you need to leave. If your navigation device
shows that you will arrive 30 minutes early, you can wait and leave in 30 minutes time, rather
than arrive early.
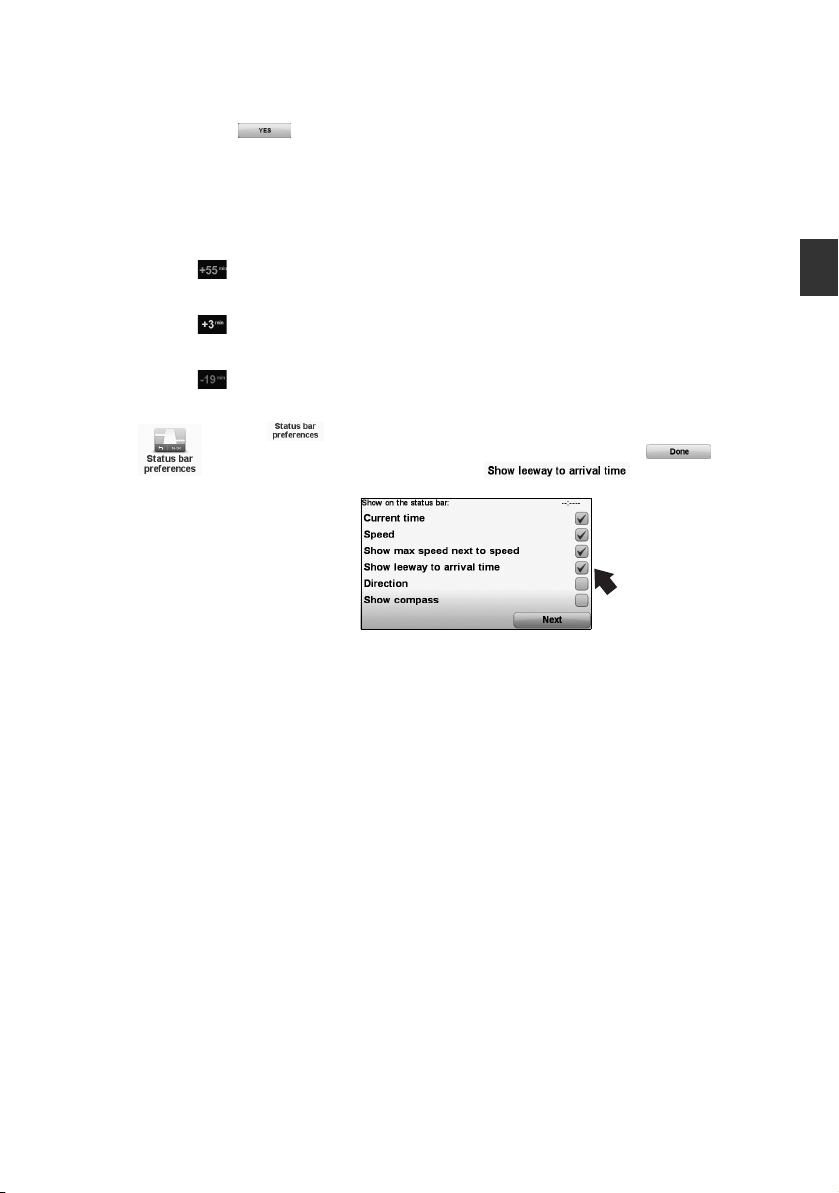
Your arrival time is constantly recalculated during your journey. The status bar shows whether
you will arrive on time or if you are going to be late, as shown below:
- You will arrive 55 minutes before the arrival time you entered.
If the estimated arrival time is more than five minutes before the time you entered, it is
shown in green.
- You will arrive 3 minutes before the arrival time you entered.
If the estimated arrival time is less than 5 minutes before the time you entered, it is
shown in yellow.
- You will arrive 19 minutes late.
If the estimated arrival time is later than the time you entered, it is shown in red.
Touch in the Change preferences, to enable or disable arrival time notifications.
Select the required options on the first menu screen and then touch .
To enable arrival time notifications, select .
23
Page 25
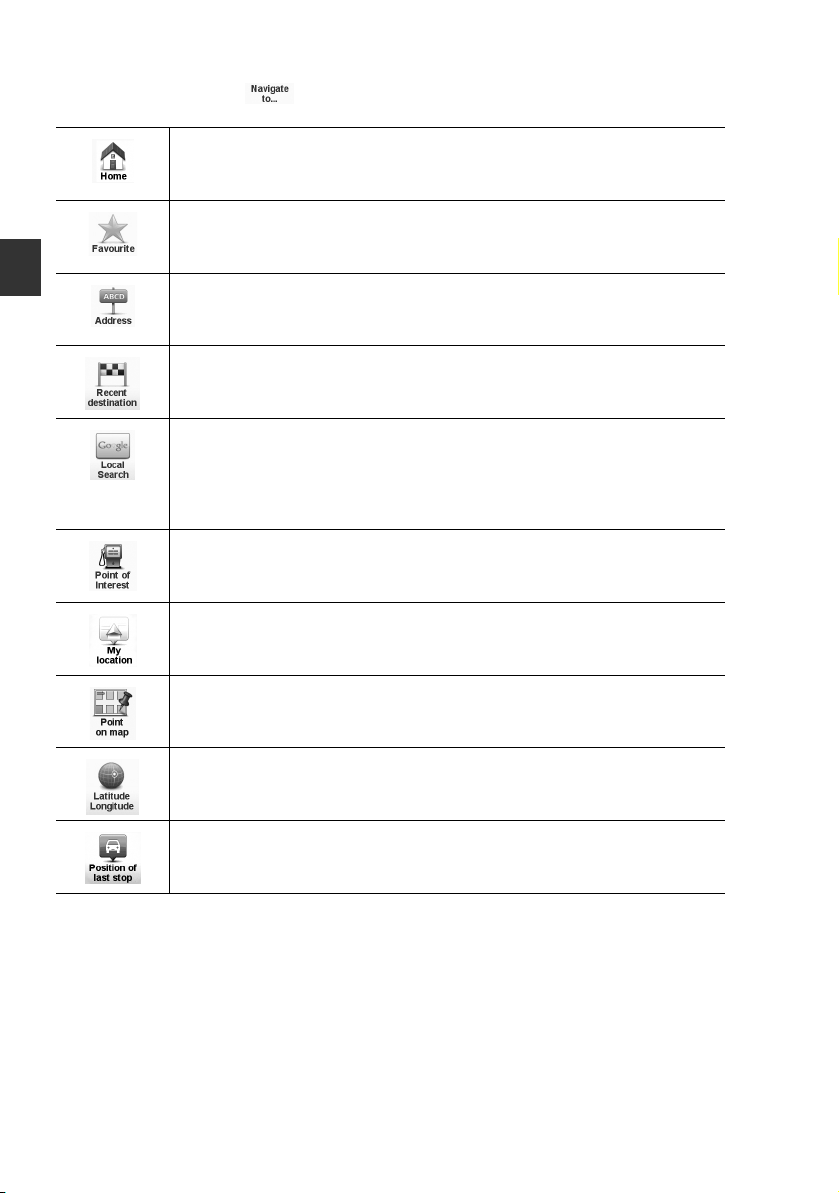
Other navigation options
When you touch , you can set your destination in many ways, not just by entering the
address. The other options are listed below:
Touch this button to navigate to your Home location.
You will probably use this button more than any other.
Touch this button to select a Favourite as your destination.
Refer to the “Favourites” (page 67).
Touch this button to enter an address as your destination.
Touch this button to select your destination from a list of places you have recently used
as destinations.
A maximum of 24 locations can be registered to Recent destination.
Touch this button to use Local Search with Google search to help you find shops and
businesses in and around your current location.
You can choose to search for shops and businesses near you, near your destination,
near any other destination or in a city.
For example, if you are looking for a swimming pool near your current location, enter
‘swimming pool’ and choose the best search result.
Touch this button to navigate to a POI.
Refer to the “Points of Interest (POIs)” (page 57).
Touch this button to register your current location.
Touch this button to select a point on the map as your destination using the map
browser.
Touch this button to enter a destination using latitude and longitude values.
Touch this button to select your last recorded position, as your destination.
24
Page 26

Planning a route in advance
You can use your navigation device to plan a route in advance, selecting your starting point
and your destination.
Here are some more reasons to plan a route in advance:
• Find out how long a journey is going to take before you start.
You can also compare journey times for the same route at different times of the day or on
different days of the week. Your navigation device uses IQ Routes™ when planning a route.
IQ Routes™ calculates routes based on the real average speeds measured on roads.
• Study the route of a journey you are planning.
• Check a route for someone who is coming to visit you and then explain the route to them in
detail.
To plan a route in advance, follow these steps:
1. Touch the screen to bring up the main menu.
2. Touch the arrow button to move to the next menu screen and touch .
3. Select the starting point for your journey in the same way that you would select your
destination.
4. Set the destination for your journey.
25
Page 27

5. Choose the type of route that should be planned.
• - the route which takes the least time.
• - the most fuel-efficient route for your journey.
• - the shortest distance between the locations you set. This may not be the
• -a route which avoids motorways.
• - a route for a vehicle which can only be driven at a limited speed. You have to
6. Choose when you will make the journey you are planning.
There are three options:
If you select either or , your navigation device uses IQ Routes™
to work out the best possible route at that time, using the real average speeds measured on
roads. In this way you can compare how long a journey takes at different times of day, or on
different days of the week.
7. Your navigation device plans the route between the two locations you selected.
quickest route, especially if the shortest route is through a town or city.
specify the maximum speed.
26
Page 28
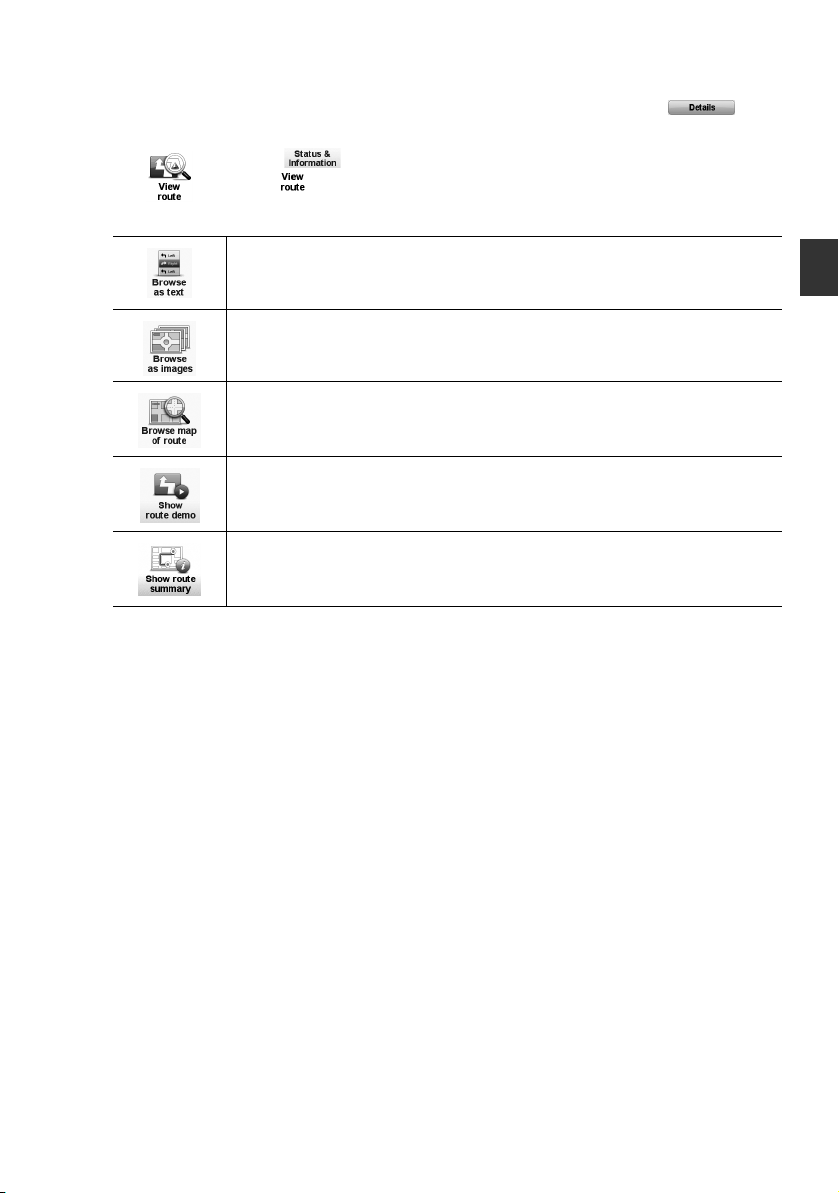
More information about a route
There are two methods for obtaining detailed route information.
You can access these options for the route you last planned by touching the button
on the route summary screen.
1. Touch in the Main Menu.
2.Touch .
You can then select from the following options:
Touch this button for a list of all the turn instructions on the route.
This is very useful if you need to explain a route to someone else.
Touch this button to see each turn in the journey. Touch the right and left arrows to move
forwards and backwards through the journey.
Touch the screen to turn off the 3D display and view the map from above.
Touch this button to see an overview of the route using the map browser.
Touch this button to watch a demo of the journey. You can interrupt the demo at any
time by touching the screen.
Touch this button to open the route summary screen.
27
Page 29
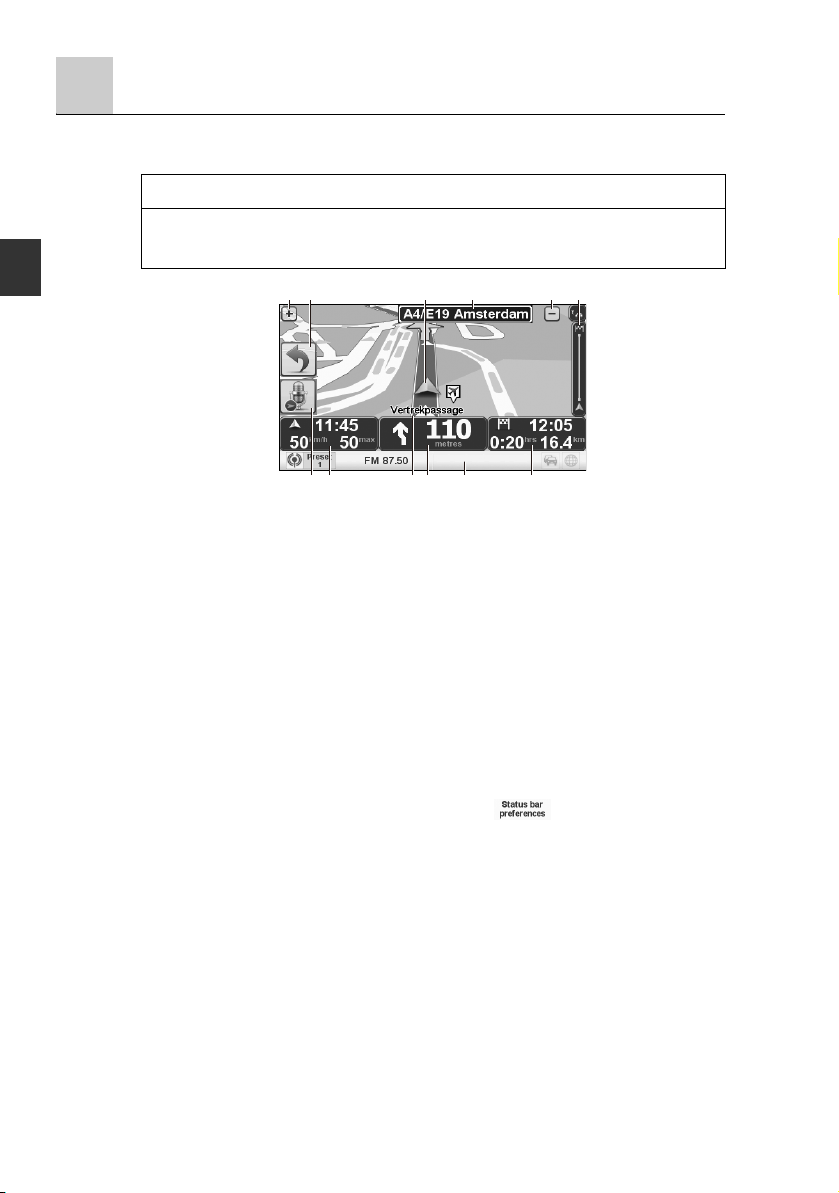
Driving View
When your navigation device launches, you are shown the Driving View along with detailed
information about your current position.
NOTE
• The Driving View is shown in black and white until your device locates your current
position.
• Touch the centre of the screen at any time to open the Main Menu.
A
F G H I K J
A Zoom in and out.
B You can enable the quick menu in the Change preferences. Refer to the “Quick menu
preferences” (page 52).
C Your current position.
D Road sign information or the next street name.
E Traffic sidebar. Refer to the “TomTom HD Traffic” (page 70).
F Microphone button for voice command and control. Refer to the “Command and control”
(page 52).
G The time, your current speed and the speed limit, if known.
Touch the status bar to repeat the last voice guidance message.
H The name of the street you are on.
I Navigation instruction for the road ahead.
Touch this part of the status bar to change between 2D and 3D views of the Driving View.
Refer to the “Status bar preferences” (page 50).
J The remaining journey time, the remaining distance and your estimated arrival time.
Touch this part of the status bar to open the route summary screen.
K Audio function information is displayed.
To change the information shown in the status bar, touch in the Change preferences.
Refer to the “Status bar preferences” (page 50).
A EDB C
28
Page 30
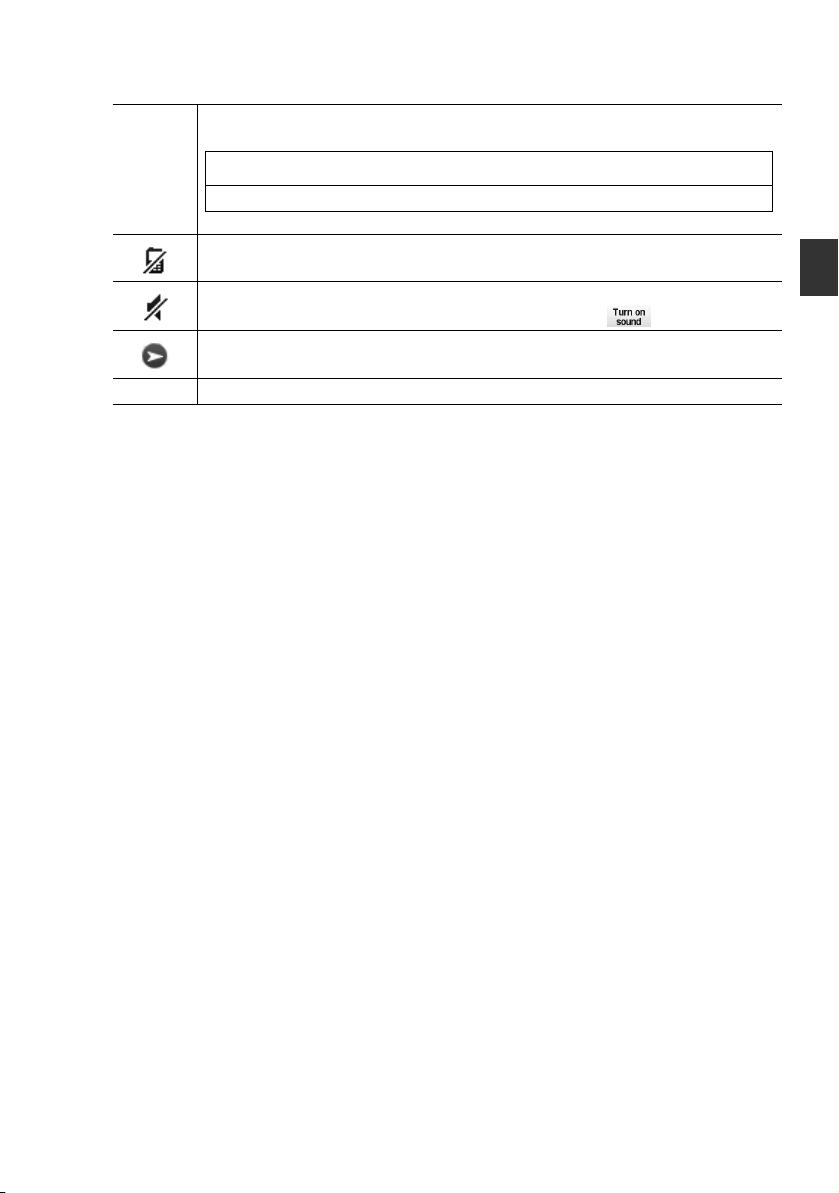
Driving View symbols
The following symbols are shown in the Driving View:
EPT - this symbol is shown when your device is using EPT to estimate your current location.
EPT is only used when you have no GPS reception.
NOTE
EPT is not supported on all devices.
*EPT: Enhanced Positioning Technology
Mobile phone not connected - this symbol is shown when the selected mobile phone is not
connected to your device. You must have already established a connection to this phone.
Sound off - this symbol is shown when the sound is switched off.
To switch on the sound, open the Change preferences and touch .
Compass - the compass is shown when the compass is enabled.
To enable or disable the compass, adjust the setting in the status bar preferences.
Arrival - this symbol is shown when you arrive at your destination.
29
Page 31

Advanced Lane Guidance
Advanced Lane Guidance
Your navigation device helps you prepare for motorway exits and junctions by showing you
which lane you should be in.
NOTE
This information is not available for all junctions or in all countries.
Hide lane images
For some exits and junctions, an image shows the lane you should be in. To turn the images
off, touch in the Change preferences. Refer to the “Hide lane image/Show lane image”
(page 49).
Show lane guidance off
For other exits and junctions, your navigation device shows the lane you should take in the
status bar.
To turn this guidance off :
1. Touch in the Change preferences.
2. Touch .
3. Touch .
4. Clear the checkbox for .
5. Touch .
6. Touch .
30
Page 32

Finding alternative routes
Once you have planned a route, you may want to change something about the route, without
changing your destination.
Why change the route?
Maybe for one of these reasons:
• You can see a roadblock or a line of traffic ahead.
• You want to travel via a particular location, to pick someone up, stop for lunch or fill up with
petrol.
• You want to avoid a difficult junction or a road you don’t like.
Touch in the Main Menu to change the route that is currently planned.
The button is also shown in the route summary screen after you plan a route.
Touch this button to calculate an alternative to the route already planned.
Your navigation device will look for another route from your current location to your
destination.
If you decide you would prefer to use the original route after all, touch .
Why would I need to do this?
Apart from the roads near your position and near your destination, the new route will use
totally different roads to reach your destination. This is an easy way of calculating a
totally different route.
Touch this button if you can see a roadblock or a line of traffic ahead. You then have to
choose how much of the route ahead you want to avoid.
Choose from the different options: 100 m (328 ft), 500 m (1640 ft), 2 km (1 mile), 5 km (3
mile). Your navigation device will recalculate your route avoiding the section of the route
for the distance you selected.
Don’t forget that once a new route is calculated, you may have to turn off the road you
are on very soon.
If the roadblock suddenly clears, touch to return to your original route.
31
Page 33

Touch this button to change your route so that it passes a particular location, perhaps to
pick someone up on the way. When you do this, a marker is shown on the map for the
location you choose the travel via.
You choose the location you want to pass in the same way as you choose a destination.
So you can select from all the same options: for example, , and .
Your navigation device will calculate a new route to your destination that passes the
location you chose. Unlike your final destination, your navigation device does not inform
you when you pass by this location.
Using this button, you can only travel via one location. If you want to pass more than
one, use an Itinerary.
Touch this button to return to the original route without deviations to avoid roadblocks or
travelling via particular locations.
Touch this button to avoid a part of the route. Use this button if you see that your route
includes a road or junction you don’t like, or which is well-known for traffic problems.
You then choose the road you want to avoid from a list of the roads on your route.
Touch this button to recalculate your route so that it avoids traffic problems as much as
possible. Your navigation device will check if there are any traffic problems on your route
and work out the best route to avoid the problems.
NOTE
This button is only available with HD Traffic enabled. Refer to the
“TomTom HD Traffic” (page 70).
32
Page 34

Browse Map
To look at the map in the same way as you might look at a traditional paper map, touch
in the Main Menu.
You can move around the map by dragging it using your finger on the screen.
C FBA
HE GC CCD
A The scale bar - The map scale size is displayed.
B Current traffic incidents - Use the Options button to select whether traffic information is
C Marker - Markers point towards and show the distance to your current
D Options - Touch this button to set the option. Refer to the “Options” (page
E The Find button - Touch this button to find specific addresses.
F The cursor - Touch the map using a finger to move the cursor to the touched
G The Cursor button - Touch this button to navigate to the cursor position, make a
H The zoom bar - Zoom in and out by moving the slider.
shown on the map. When traffic information is shown on the map,
POIs and Favourites are not shown.
location, your home location and your destination.
Touch a marker to centre the map on the marked location.
To set your own marker, position the cursor on the required
location on the map, touch the cursor button and then touch
.
34).
position.
Favourite of the cursor position, or find a POI near the cursor
position.
33
Page 35

Options
Touch the button to set the information shown on the map. You can choose to show
the following information:
Touch to show or hide the following information:
34
Page 36

TomTom Map Share™ (Correcting the map)
With TomTom Map Share, you can correct errors on your map and share those corrections
with other people in the TomTom Map Share community, as well as receiving corrections made
by others.
NOTE
TomTom Map Share is not available in all regions. For more information, go to
tomtom.com/mapshare.
Map corrections
There are two types of map correction:
• Corrections that are immediately shown on the map. These include, changing the traffic flow
of a street, blocking or renaming a street and adding or editing POIs.
This type of change is immediately shown on your own map. You can hide these corrections
at any time in the Map Share preferences menu.
• Corrections that are reported to TomTom but not shown immediately on your map. These
include, missing streets, errors in motorway entrances and exits and missing roundabouts.
This type of correction is investigated by TomTom and once verified, is included in the next
map release. These corrections are therefore not shared with the Map Share community.
Making a map correction
The navigation system is just a support system for the driver. The driver should always pay
attention to the traffic situation to safely make decisions. You may be unable at times to
arrive at your destination due to out-of-date information on a map. You should be especially
careful when selecting an urgent destination such as a hospital or a police station.
1. Touch in the Main Menu.
2. Touch .
A list of possible map corrections is shown.
3. Select the type of correction you want to report. Refer to the “Types of map correction”
(page 38).
WARNING
NOTE
If you touch or you will be asked for some additional information
before the next step.
4. Select the method you want to use for selecting the location of the correction.
5. When you have found the location, touch .
6. Enter correction or confirmation of correction now.
35
Page 37

Marking a map error while on the move
The navigation system is just a support system for the driver. The driver should always pay
attention to the traffic situation to safely make decisions. You may be unable at times to
arrive at your destination due to out-of-date information on a map. You should be especially
careful when selecting an urgent destination such as a hospital or a police station.
If you notice an item on your map that needs attention, you can mark the location using the
Report button and then enter the details when you are no longer driving.
To show the Report button in the Driving View or in the quick menu, do the following:
1. Touch in the Main Menu.
2. Touch .
3. Touch the slider on the screen to slide the slider sideways to the desired position.
4. Touch .
5. Touch and then touch again.
6. Select , then touch .
The Report button is shown on the left-hand side of the Driving View. After you mark a location,
you can add more information about the change when you open the menu.
For example, you are driving to a friend's house and you notice that the name of the street you
are on is different from the one on your map. To report the change, touch the Report button and
your navigation device will save your current location. You can then send the correction to
TomTom Map Share when you have finished your journey.
TomTom Map Share community
To join the Map Share community, do the following:
1. Touch in the Main Menu.
2. Touch .
3. Touch .
When you connect the SD card to your computer, TomTom HOME downloads new corrections
and sends your corrections to the Map Share community.
WARNING
36
Page 38

Correction preferences
The correction preferences set the way TomTom Map Share works on your device.
You can set the following preferences:
• Use the trust level slider to choose the types corrections from the Map Share community you
want to use on your maps.
• Decide if you want to share your corrections with others.
• Show or hide the report button in the Driving View.
To set your preferences, in the Main Menu.
NOTE
If you later decide you want to remove corrections from the map, clear the checkbox next to
the types of correction you want to remove. If you clear all the checkboxes, your map returns
to the original state before the first correction.
Accepting map corrections
You can set the type of map corrections you want added to your map. To do this, touch
in the Map corrections menu.
There are four levels of corrections that you can choose. The level changes when you move
the slider:
• - only accept changes made by TomTom.
• - accept changes made by TomTom and by trusted users who have
• - accept changes made by TomTom, by trusted users who have been
• - accept changes made by TomTom, by trusted users who have been
Some functions are only available if you join the TomTom Map Share service.
been verified by TomTom.
verified by TomTom and changes made by a high number of Map
Share community members.
verified by TomTom and all changes that have been made by Map
Share community members.
37
Page 39

Types of map correction
There are several types of correction that you can make to a map.
To make a correction to your map, touch in the Main Menu then touch . The
following types of corrections are shown.
Correct a map error
Touch this button to block or unblock a street. You can block or unblock the street in one
or both directions.
For example, to correct a street near to your current location, do the following:
1. Touch .
2. Touch to select a street near your current location. You can select a street by
name, a street near your Home location or a street on the map.
3. Select the street or section of a street you want to correct by touching it on the map.
The street you select is highlighted and the cursor shows the name of the street.
4. Touch .
Your device shows the street and whether the traffic is blocked or allowed in each
direction.
5. Touch one of the direction buttons to block or unblock the flow of traffic in that
direction.
6. Touch .
Touch this button to correct the traffic direction of a one-way street, where the direction
of traffic is different to the direction shown on your map.
NOTE
Reverse traffic direction only works for one-way streets. If you select a two-way street
you will be given the chance to block/unblock the street rather than changing the
direction.
38
Page 40

Touch this button to change the name of a street on your map.
For example, to rename a street near to your current location:
1. Touch .
2. Touch .
3. Select the street or section of a street you want to correct by touching it on the map.
The street you select is highlighted and the cursor shows the name of the street.
4. Touch .
5. Type the correct street name.
6. Touch .
Touch this button to change and report incorrect road turn directions.
Touch this button to change and report the road speed limit.
Touch this button to add or remove a roundabout.
Touch this button to add a new POI.
For example to add a new restaurant near to your current location:
1. Touch .
2. Touch in the list of POI categories.
3. Touch .
4. Select the location of the missing restaurant.
You can select the location by entering the address or by selecting the location on the
map. Select or to open the map at your current location or at your Home
location.
5. Touch .
6. Type the name of the restaurant then touch .
7. If you know the telephone number of the restaurant you can type it, then touch
.
If you don’t know the number, just touch without typing a number.
39
Page 41

Touch this button to edit an existing POI.
You can use this button to make the following changes to a POI:
Report other error
1. Touch in the Main Menu.
2. Touch .
3. Touch .
4. Select the desired function
Touch this button to edit an existing street. Once you have selected the street, you can
select an error to report. You can select more than one type of error for a street.
40
Page 42

Touch this button to report a missing street. You have to select the start and end points
of the missing street.
Touch this button to report an error about a city. You can report the following types of
error:
Touch this button to send a comment about a POI. You must select the POI, and then
you can enter your comment.
Touch this button to report an error about a motorway entrance or exit.
Touch this button to report an error about a postcode.
Touch this button to report other types of corrections.
You can report missing streets, errors in motorway entrances and exits and missing
roundabouts. If the correction you want to report is not covered by any of these report
types, enter a general description then touch Other.
41
Page 43

Sounds and voices
Your navigation device outputs the following kinds of sound:
• Spoken instructions
• Hands-free calls
• Warnings
Changing the volume level
Increase the audio volume during voice guidance by pressing the + volume button.
Decrease the audio volume during voice guidance by pressing the – volume button.
Volume button
42
Page 44

Selecting a voice
To change the voice being used by your navigation device, touch in the Change
preferences, then touch . Select a voice from the list.
Your navigation device has two different kinds of voices:
• Computer voices
These are generated by your navigation device. They provide spoken instructions while
you are driving and can pronounce street names and announce messages, traffic
reports, weather reports, tips and tutorials.
• Human voices
These are recorded by an actor.
NOTE
Human voices only provide spoken instructions.
How do computer voices work?
Your navigation device makes use of text-to-speech technology to generate computer voices.
A text-to-speech programme converts written text, for example an instruction like “Turn right”,
into the sound of a human voice.
The text-to-speech programme looks at the whole sentence to make sure that the sound you
hear is as close to the real thing as possible. The programme is also able to recognise and
quite accurately pronounce foreign place and street names. For example, the English voice can
read French street names.
NOTE
If you select a Human voice, this will only be able to announce commands, but not street
names. If you would like street names to be announced, you will need to select a computer
voice.
43
Page 45

Preferences
You can change the way your navigation device looks and behaves.
Touch in the Main Menu.
Use night colours / Use day colours
Touch this button to reduce the brightness of the screen and show darker colours on the
map.
When should I use this?
When it’s dark, it is easier to see the screen if the display on your navigation device is not
brightly lit.
To change back to a brighter screen showing brighter colours on the map, touch
Show POI on map
Touch this button to choose which categories for the POIs should be shown on the map:
1. Touch in the Change preferences.
2. Select the POI categories to display on the map.
Touch to search for a POI category.
3. Select whether you want to show POIs using the 2D or 3D map view.
4. Touch .
The POIs you have selected are shown as symbols on the map.
44
Page 46

Safety preferences
Touch this button to set the following safety preferences:
Select whether or not your navigation device should warn you about which side of the road
you should be driving on.
Decide if you want the map display to be turned off in special circumstances and press
What happens when I use the Turn off map display option?
When you turn off the map display, instead of seeing your position on a map in the Driving
View, you will only see information about the next instruction.
Touch the button and select an option for when the map should be turned off.
These are the options:
• - The map will not be shown and you will only see information
• - you set the speed at which point the map will be turned off. This
• - the map is never turned off.
.
about the next instruction and arrows showing direction.
option is useful for situations when the map might be distracting,
such as when you are driving fast.
45
Page 47

Turn off sound / Turn on sound
Touch this button to turn off sound. If you turn off sound, voice guidance is also turned off
and you no longer hear spoken route instructions.
Touch this button to turn on sound. When you turn sound on, voice guidance remains off.
To turn on voice guidance, touch in the Change preferences.
NOTE
To change the voice being used by your navigation device, touch in the Voices
menu.
Can I still use my navigation device to make hands-free calls when the sound is turned
off?
Yes. Turning the sound off does not affect hands-free calling, meaning that you will still be able
to talk to and hear the caller.
Turn off voice guidance / Turn on voice guidance
Touch this button to switch off spoken route instructions. You still hear all other information
such as messages and warnings.
If you touch in the Change preferences, voice guidance is also turned off.
Changing voices
If you change voices, voice guidance is switched on automatically.
To turn spoken route instructions back on, touch .
46
Page 48

Voi ce s
Touch to manage your TomTom voices. The following options are available:
• - touch this button to change the voice that gives you instructions.
• - touch this button to disable voice guidance.
• - touch this button to enable voice guidance.
• - touch this button to choose the situations when your TomTom navigation
• - touch this button to download new voices from TomTom Services and
A wide range of recorded human voices and computer voices are available.
device reads instructions or warnings aloud.
transfer them to your device.
Manage Favourites
Touch this button to rename or delete Favourites.
To find a Favourite, touch , then start to type the name of the Favourite. You can
select the Favourite when it is shown in the list. Refer to the “Favourites” (page 67).
Change Home location
Touch this button to set or change your Home location.
Do I need to use my actual home address for the Home location?
No. Your Home location can be a place you go often, for example, your office.
It can be your actual home address, but it can be any address you like.
Why should I set a Home location?
Having a Home location means that you have a quick and easy way to navigate there, by
touching the button in the navigate to... menu
47
Page 49

Manage Maps
Allows you to do the following:
• - Touch this button to download a map you have bought using TomTom
• - Touch this button to change the map you are using.
• - The map revision information can be downloaded for free by touching this
Use TomTom HOME to make backups, download, add and delete maps from your
navigation device. Refer to the “Changing the map data” (page 11).
Manage POIs
Touch this button to do the following:
• Set alerts for when you are near POIs.
• Create your own POI categories and add POIs to them.
The following buttons are available:
• - touch this button to add a location to a POI category you have created.
• - touch this button to be warned when you approach a POI. You can select the
• - touch this button to delete a POI you created.
• - touch this button to edit the details of a POI you created.
• - touch this button to create a new POI category.
• -touch this button to delete a POI category you created.
Refer to the “Points of Interest (POIs)” (page 57).
HOME. It may not be possible to download maps on all devices.
button.
CAUTION
Don’t delete a map unless you have already made a backup of the map. If you delete a
map before you make a backup, you will no longer be able to load the map on your
navigation device.
For example, your navigation device can tell you when there is a petrol station nearby.
For example, you could create a category of POIs called “Friends”, and add all your
friend’s addresses as POIs in the category. You can even add your friends’ phone
numbers with their address so you can call them from your navigation device.
types of POI for which you wish to be warned.
48
Page 50

Change car symbol
Touch this button to select a car symbol that will be used to show your current position in
the Driving view.
Additional car symbols can be downloaded using TomTom HOME.
2D/3D preferences
Touch this button to manage the way that the map is shown in 2D and 3D views.
NOTE
To view the map in either 2D or 3D views, touch the central panel on the status bar in
the Driving View.
When should I use this?
In some situations, it is easier to see the map from above.
Hide lane image/Show lane image
Hides traffic lane images when entering or exiting a junction.
Shows traffic lane images when entering or exiting a junction.
Change map colours
Touch this button to select the colour schemes for day and night map colours.
Touch to scroll through colour schemes one at a time.
You can also download more colour schemes using TomTom HOME.
49
Page 51

Brightness preferences
Touch this button to set the brightness of the screen.
Move the sliders to set the brightness separately for day map colours and for night map
colours.
The brightness of the screen can be adjusted in conjunction with the vehicle’s headlight
switch.
There are two modes for brightness adjustment. One adjusts according to the on/off of the
vehicle’s headlights, and the other adjusts according to the brightness around the
navigation device.
Status bar preferences
Touch this button to select the information shown on the status bar:
• - if you choose this option, the status bar is shown at the bottom of the
• - if you choose this option, the status bar is shown at the right-hand side of
Driving view.
the Driving view.
50
Page 52

Touch .
• - The current time is displayed.
• - Vehicle speed is displayed.
• - only available when speed (above) is also selected.
If the speed limit for the road you are on is available, it is shown next to your speed.
If you drive faster than the speed limit, your speed is shown in red.
WARNING
Always obey local traffic regulations.
Your guided route may include roads that are not open to vehicles or are closed due to
traffic regulations. Comply with the local traffic regulations and take another route.
• - your navigation device shows how late or early you will
• - Symbol which indicates the direction is displayed.
• - The compass is displayed.
arrive, compared with the preferred arrival time that is set
during the planning of a route.
• - your estimated arrival time.
• - the estimated time left until you reach your destination.
• - the distance left until you reach your destination.
• - if you choose this option, your navigation device shows the lane you
should take in the status bar for some exits and junctions.
51
Page 53

Quick menu preferences
Touch this button to choose up to six buttons to be used in the Quick menu.
The Quick menu button enables easy access for your most commonly used buttons.
The buttons you assign for use with the Quick menu, are shown in the Driving View.
Command and control
Touch to enable or disable voice command and control and to see which spoken
commands your navigation device understands.
NOTE
To use voice control, a computer voice must be installed on your navigation device.
You can use TomTom HOME to install computer voices if they are not already installed.
Refer to the “Introducing TomTom HOME” (page 86).
• - Touch this button to enable voice command and control.
• - Touch this button to disable voice command and control.
• - Touch this button to view the list of spoken commands which are
Automatic zooming
Touch this button to set the following advanced preferences:
understood by your navigation device.
Guided tours
Touch this button to show one of the Guided tours on how to use your navigation device.
52
Page 54

Street name preferences
Touch this button to set the following advanced preferences:
Set units
Touch this button to set the type of units that will be shown for the following:
• Distance
• Time
• Latitude and longitude
• Temperature
• Air pressure
Keyboard preferences
You use the keyboard to enter your destination or to find an item in a list, such as a POI.
Touch this button to select the size of the keys on the keyboard and the keyboard layout.
The keyboard display language can be selected:
You can select from two sizes:
Several keyboard layouts are available:
53
Page 55

Planning preferences
Touch this button to set the kind of route planned when you select a destination.
The following options are available:
Then set how your navigation device should handle the following when planning a route:
• Toll roads on the route
• Ferry crossings on the route
• Carpool lanes
• Unpaved roads
• You can then set if the route summary screen closes automatically after you have
planned a route. If you select , you have to touch to close the route
summary screen.
Replanning preferences
Select whether or not you want your navigation device to replan your route when a faster route
is found while you drive. This might occur due to changes in the traffic situation.
Start-up preferences
Touch this button to select what happens when your device launches.
The following options are available:
• - your device launches and shows the last screen that was
• - your device launches with menu or the list of
• - your device launches with the Main Menu.
• - your device launches by showing a slideshow of the
You are then asked if you want to change the picture that is shown whenever you start
your device.
Touch to finish or touch to see the photos stored on your device and
touch on a photo to select that photo for use as your start-up picture.
shown when you turned off the device.
frequent destinations, if you have set some frequent
destinations.
images stored there. To interrupt the slideshow, touch the
screen.
54
Page 56

Bluetooth preferences
Touch this button to manage Bluetooth functionality on your navigation device.
You can select the following options:
• / - switch Bluetooth on or off for your navigation device. If you
• - connect to another device that uses Bluetooth.
• / - switch hands-free calling on or off for your navigation device.
• / - You can select whether or not to use wireless data
My TomTom account
Touch this button to log in to your TomTom account.
If you have more than one TomTom account or if several people are sharing the same
navigation device, you can switch to another TomTom account.
Change language
Touch this button to change the language used for all the buttons and messages you see
on your navigation device.
You can choose from a wide range of languages. When you change the language, you are
also given the opportunity to change the voice.
Set clock
Touch this button to select the time format and to set the time.
The easiest way to set the time is by touching the Sync button. Your navigation device will
then take the time from GPS information.
NOTE
You can only use Sync if you have GPS reception, so you cannot set the clock in this
way when you are indoors.
After using Sync to set the time, you may have to adjust the hours depending on your
time zone. Your navigation device works out your time zone and always keeps the time
correct using GPS information.
disable Bluetooth, all the other options are unavailable.
communication.
55
Page 57

Show fewer menu options
Display of the functions which are not used frequently can be switched off by touching this
button.
Hide tips/Show tips
Hides the TomTom tips.
Shows the TomTom tips.
GPS Status
The current GPS status can be displayed by touching this button.
Reset factory settings
Touch this button to restore the factory settings to your navigation device.
All your settings, including Favourites, your Home location, warnings for POIs and any
Itineraries you have created are deleted.
56
Page 58

Points of Interest (POIs)
POIs are useful places on the map. Here are some examples:
• Restaurants
• Hotels
• Museums
• Parking garages
• Petrol stations
NOTE
You can report missing POIs or edit existing POIs using Map Share and share your
corrections with the Map Share community.
Creating POIs
NOTE
You can also download sets of POIs and share the POI sets you create using TomTom
HOME. Refer to the “Introducing TomTom HOME” (page 86).
1. Touch the screen to bring up the Main Menu.
2. Touch .
3. Touch .
4. Before you can add a POI, you have to create at least one POI category. Every POI is
assigned to a POI category. You can only add POIs to POI categories you have created
yourself.
Touch .
5. Enter a name for your POI category, for example, ‘Friends’ or ‘Favourite restaurants’. Then
select a marker for your POI category.
6. Touch .
Touch this button to add a POI.
7. You are asked to name the POI.
8. Select the POI category in which you want to add the POI.
57
Page 59

9. Select the location of your POI from the list below.
You can set your Home location as a POI.
If you want to change your Home location, you can create a POI of the Home location
before you change it.
You can create a POI from a Favourite.
You can only create a limited number of Favourites. If you want to create more
Favourites you have to delete some Favourites first. Before you delete a Favourite,
make it into a POI so that you don’t lose the address. Refer to the “Favourites” (page
67).
You can specify an address to be a POI. When you enter an address, you can choose
from four options.
Select a POI location from a list of places you have recently used as destinations.
Touch this button to use TomTom Local Search with Google search to help you find
shops and businesses in and around your current location.
You can choose to search for shops and businesses near you, near your destination,
near any other destination or in a city.
For example, if you are looking for a swimming pool near your current location, enter
‘swimming pool’ and choose the best search result.
You can add a Point of Interest as a POI. For example, if you are creating a category of
POIs for your favourite restaurants, use this option instead of entering the addresses of
the restaurants.
Touch this button to add your current position as a POI.
For example, if you stop somewhere you like, while you are there you can touch this
button to create the POI.
Touch this button to create a POI using the map browser.
Select the location of the POI using the cursor, then touch .
58
Page 60

Touch this button to create a POI by entering latitude and longitude values.
Touch this button to select your last recorded position as your destination.
This may be useful if your navigation device is unable to maintain a strong GPS signal,
for example, when you drive through a long tunnel.
NOTE
You can report missing POIs or edit existing POIs using Map Share and share your
corrections with the Map Share community.
Navigating to a POI
You can use a POI as your destination. For example, if you are travelling to an unfamiliar city,
you could choose a POI to help find a parking garage.
1. Touch the screen to bring up the Main Menu.
2. Touch in the Main Menu.
3. Touch .
4. Narrow your choice of POIs by selecting the area where the POI is located.
You can select one of these options:
• - to choose from a list of POIs near to your current location.
• - to find a POI in a particular town or city.
• - to choose from a list of POIs near to your Home location.
You can select from a list of POIs which are along your route or close to your destination.
Choose from one of these options:
• - POIs located along the route to your destination can be selected from the list.
• -POIs located around your destination can be selected from the list.
NOTE
The last POI you viewed is also shown so that you can plan a route there more quickly.
5. Type the name of the town you want to visit and select the town when it appears in the list.
6. Select the category of POI:
Touch Any POI category to search for a POI by category name.
Touch the category of POI, if it is shown.
Touch the arrow to choose from the complete list of categories. Select the category from the
list or start to type the name of the category and select it when it appears in the list.
7. Touch .
8. From the list of POIs shown, select the POI you want to navigate to.
59
Page 61

The table below explains the distances listed next to each POI.
POI near you - Distance from your current location
POI in city - Distance from the city centre
POI near Home - Distance from your Home location
POI along route - Distance from your current location
POI near destination -Distance from your destination
If you know the name of the POI, touch and type the name. Select it from the list when
it is shown.
The next screen shows more detailed information including the location of the POI on the map
and the phone number of the POI, if available.
Touch to confirm you want to plan a route to this POI.
Once you have selected a POI, the route to the POI is calculated by your navigation device.
NOTE
You can also use Google Local Search to find shops and businesses wherever you are. For
more information, Refer to the “LIVE Services” (page 137).
Showing POIs on the map
1. Touch in the Change preferences.
2. Select the POI categories to display on the map.
Touch to search for a POI by name.
3. Touch .
The POIs you have selected are shown as symbols on the map.
Calling a POI
Your navigation device knows the phone numbers for many POIs. You can, for example, call a
restaurant to book a table. Refer to the “Hands-free” (page 126).
1. In the Main Menu, touch .
2. Touch
3. Touch .
4. Select the POI you want to call.
You are shown the location on the map and telephone number.
5. Touch .
Your navigation device dial the phone number using your mobile phone.
60
Page 62

How can I set warnings for POIs?
1. Touch the screen to bring up the main menu.
2. Touch .
3. Touch .
4. Touch .
Touch this button to receive a warning when you travel near to the location of a POI.
5. Select the category of POI you want to be warned about.
Select the category from the list or start to type the name of the category and select it when
it is shown in the list.
6. Set how close the POI should be when you receive a warning.
7. Choose the warning sound for the category of POI you selected.
Managing POIs
Touch from the Change preferences.
You can, for example, do the following:
• Create your own POI categories and add POIs to them.
• Set warnings when you get close to POIs.
Why would I want to create my own POIs?
A POI acts like a shortcut - once you have saved a location as a POI you never have to type the
address of that POI again. But when you create a POI you can save more than just the
location.
• Phone number - when you create a POI, you can save a phone number with it.
• Categories - when you create a POI you have to put it in a category.
For example, you could create a category of POIs called ‘Favourite restaurants’. With each
POI, save their phone number so that you can call them to reserve a table.
NOTE
You can report missing POIs or edit existing POIs using Map Share and share your
corrections with the Map Share community.
61
Page 63

Itinerary Planning
What is an Itinerary?
An Itinerary is a plan for a journey including more locations than your final destination.
An Itinerary can include the following items:
Destination - a location on your journey where you want to stop.
Waypoint - a location on your journey where you want to travel through without stopping.
When would I use an Itinerary?
You could use an Itinerary for trips such as:
• A driving holiday through a country with lots of stops.
• A two day car journey with an overnight stop.
• A short drive which passes by POIs.
In all these examples you could touch for each place. However, if you use an Itinerary,
you can save time by planning everything in advance.
Creating an Itinerary
1. Touch the screen to bring up the Main Menu.
2. Touch .
NOTE
At first, there are no items on the Itinerary.
3. Touch and select a location.
NOTE
You can add items to your Itinerary in any order and rearrange the order later.
62
Page 64

Following an Itinerary
When you use an Itinerary to navigate, the route will be calculated to the first destination on the
Itinerary. Your navigation device calculates the remaining distance and time to the first
destination and not for the whole Itinerary.
As soon as you start to use an Itinerary, the route is calculated from your current position. You
do not need to set a departure point.
When you have passed a waypoint or reached a destination, it is marked as visited.
Waypoints are shown on the map. Your navigation device will not warn you, when you are
approaching a waypoint or when you arrive at a waypoint.
Organising an Itinerary
Touch an item on your Itinerary to open a page of buttons for editing the item. The buttons
shown below are available.
You can change a destination into a waypoint using this button.
Remember that waypoints are points on your journey to your destination that you want to
pass and destinations are places where you want to stop.
This button is only shown if the item you touched is a destination.
You can change a waypoint into a destination using this button.
Remember that destinations are places where you want to stop, and waypoints are
points on your journey to your destination that you want to pass.
This button is only shown if the item you touched is a waypoint.
Touch this button to miss out part of your Itinerary. Your navigation device will ignore this
item and all the items before it in the Itinerary.
It will navigate you to the next item in the Itinerary.
This button is only shown if you are still due to visit this item.
Touch this button to repeat part of your Itinerary. Your navigation device will navigate
you to this item followed by the rest of the items in the Itinerary.
This button is only shown if you have already visited this item.
63
Page 65

Touch this button to move the item up the Itinerary.
This button is unavailable if the item is at the top of the Itinerary.
Touch this button to move the item down the Itinerary.
This button is unavailable if the item is at the bottom of the Itinerary.
Touch this button to see the location of the item on the map.
Touch this button to delete the item from the Itinerary.
Start using an Itinerary
Touch , then touch .
• To save an Itinerary, touch .
• To load a saved Itinerary, touch .
• To create a new Itinerary, touch and to delete one, touch .
64
Page 66

Help me
Help me provides an easy way to navigate to emergency services centres and other specialist
services and contact them by phone.
For example, if you are involved in a car accident, you could use Help me to call the nearest
hospital and tell them your exact location.
How do I use Help me to phone a local service?
You can use Help me to search for a service centre, make contact by phone and inform the
centre about the precise details of your current location.
When you search for a service centre, you are shown a list of nearby locations. Select one of
the centres in the list to view their address and phone number and your current location on the
map.
If your phone is connected to your navigation device, your navigation device automatically dials
the phone number.
To use Help me to locate a service centre, contact the centre by phone and navigate from your
current location to the centre, do the following:
1. Touch the screen to bring up the Main Menu.
2. Touch .
3. Touch .
4. Select the type of service you require, for example, Nearest hospital.
5. To dial, select a centre from the list, the nearest is shown at the top of the list.
Once the call is answered your navigation device shows your position on the map along with
a description of the location. This helps you explain where you are while making a call.
Your navigation device launches guiding you to your destination.
65
Page 67

Options
NOTE
In some countries, information may not be available for all services.
Touch this button to find the contact details and location of a service centre.
Touch this button to navigate your way by car to a service centre.
Touch this button to see your current location on the map. You can then touch
and select the type of service you want to contact and tell them your exact location.
Touch this button to read the British Red Cross First Aid guide.
Touch this button to read a selection of useful guides.
66
Page 68

Favourites
What are Favourites?
Favourites are places that you often visit. You can create Favourites so that you don’t have to
enter the address every time you want to navigate there.
They don’t have to be places you especially like, just useful addresses.
A maximum of 48 locations (including one set as Home) can be registered to Favourite.
How can I create a Favourite?
In the Main Menu, touch .
Select the type of the Favourite by touching one of the buttons shown below in the table of
menu options.
It is a good idea to give your Favourite a name that is easy to remember. However, your
navigation device will always suggest a name, usually the address of the Favourite. To enter a
new name, there is no need to delete the suggested name, you just start typing.
Touch this button to use TomTom Local Search with Google to find locations such as
shops and businesses and save them as Favourites.
You can choose to search for shops and businesses near you, near your destination,
near any other destination or in a city.
For example, if you are looking for a swimming pool near your current location, enter
‘swimming pool’ and choose the best search result.
You can set your Home location as a Favourite.
You cannot create a Favourite from another Favourite. This option will always be
unavailable in this menu.
To rename a Favourite, touch in the Change preferences.
67
Page 69

You can enter an address as a Favourite, choosing from the following entry options.
Create a new Favourite by selecting a location from a list of your recent destinations.
You can add a Point of Interest as a Favourite.
Does it make sense to do this?
If you visit a POI you particularly like, for example a restaurant, you can add it as a
Favourite.
To add a POI as a Favourite, touch this button, then do the following:
1. Narrow your choice of POIs by selecting the area where the POI is.
You can select one of these options:
• - to search from a list of POIs near your current position.
• - to choose a POI in a particular town or city. You have to specify a town or
• - to search from a list of POIs near your Home location.
If you are currently navigating to a destination, you can also select from a list of POIs
which are on your route or near your destination. Choose one of these options:
• - POIs located along the route to your destination can be selected from
• - POIs located around your destination can be selected from the list.
2. Select the category of POI.
Touch the category of POI if it is shown or touch the arrow to choose from the
complete list.
Touch Any POI category to search for a POI by name.
Touch this button to add your current location as a Favourite.
For example, if you stop somewhere interesting, then while you are there you can touch
this button to create the Favourite.
city.
the list.
Touch this button to create a Favourite using the Map Browser.
Select the location of the Favourite using the cursor, then touch .
68
Page 70

Touch this button to create a Favourite by entering latitude and longitude values.
Touch this button to select your last recorded position as your destination.
How can I use a Favourite?
You will normally use a Favourite as a way of navigating to a place without having to enter the
address. To navigate to a Favourite, do the following:
1. Touch the screen to bring up the Main Menu.
2. Touch
3. Touch .
4. Select a Favourite from the list.
Your navigation device calculates the route for you.
5. When the route is calculated, touch .
Your navigation device will immediately start guiding you to your destination with spoken
instructions and visual instructions on the screen.
How can I change the name of a Favourite?
1. Touch the screen to bring up the Main Menu.
2. Touch .
3. Touch .
4. Touch the Favourite you want to rename.
5. Touch .
How can I delete a Favourite?
1. Touch the screen to bring up the Main Menu.
2. Touch .
3. Touch .
4. Touch the Favourite you want to delete.
5. Touch .
69
Page 71

TomTom HD Traffic
HD Traffic is a unique TomTom LIVE Service for receiving up-to-date traffic information. For
more information about services and subscriptions, go to tomtom.com/services.
In combination with IQ Routes™, HD Traffic helps you plan the best possible route to your
destination taking into account the latest traffic information.
A route is calculated taking into account the current local traffic conditions. Your navigation
device automatically receives information about the traffic situation as it changes. If there are
traffic incidents on your route, your device asks you if you want to replan the current route to
avoid the traffic incidents.
Safety Notice
Your navigation device contains a GSM/GPRS module which can interfere with electrical
devices such as cardiac pacemakers and hearing aids.
Interference from these devices may endanger the health or life of others.
*GSM: Global System for Mobile Communications
*GPRS: General Packet Radio Service
Using TomTom HD Traffic
The traffic sidebar is shown on the right side of the Driving View. It warns you about traffic
incidents on your planned route.
The top of the traffic sidebar represents your destination and shows the total
delay time for any incidents and busy roads on your route.
The central section of the traffic sidebar shows individual traffic incidents in the
order they occur on your route.
The bottom of the traffic sidebar represents your current position and shows the
distance to the next incident.
To make the traffic sidebar more readable some incidents may not be shown.
These incidents will always be of minor importance and only cause short delays.
WARNING
NOTE
The colour of the traffic sidebar changes colour depending on how old the traffic information
is on your device.
70
Page 72

Taking the fastest route
Your device constantly looks for a faster route to your destination, as the traffic situation
changes. If it finds one, it asks you if you want to change to that route.
You can set your navigation device to always change to the fastest route without asking you in
the in the Traffic menu. Open the Traffic menu by touching the traffic sidebar.
To replan your route manually to find the quickest route to your destination, do the following:
1. Touch the traffic sidebar.
NOTE
If you have trouble touching the sidebar and the Main Menu is being displayed instead of the
traffic menu, try touching your finger half on the sidebar and half off the screen.
2. Touch .
Your device looks for the quickest route to your destination.
It is possible that the new route may also include traffic delays, or may even be the same
route as before. You can re-plan the route to avoid all delays, but this new route will take
longer than the quickest route already shown.
3. Touch .
Notifications about changes in the traffic situation
You can set HD Traffic to report when the traffic situation on your route changes.
1. Touch in the Main Menu.
2. Touch .
3. Select .
4. Touch .
71
Page 73

Changing HD Traffic preferences
Use the button to choose how HD Traffic works on your device.
1. Touch the traffic sidebar to open the Traffic menu.
2. Touch .
3. To hear a beep sound when a new traffic incident occurs on your route, select
4. If a faster route is found while you are driving, Traffic can replan your journey to use the
faster route. Select one of the following options and then touch .
and then touch .
Making commuting to work easier
The or buttons in the Traffic menu lets you check your route to and from work
with one touch of a button.
When you use either of these buttons, your device plans a route between your home and work
locations and checks the route for possible delays.
72
Page 74

The first time you use , you must set your traffic home and work locations.
1. Touch the traffic sidebar to open the Traffic menu.
2. Touch .
3. Set your home location and your work location.
If you have already set the locations and want to change them, touch .
You can now use the and buttons.
NOTE
The home location you set here is not the same as the home location you can set in the
Change preferences. In addition, the locations you use here do not have to be your actual
home and work locations. If there is another route that you often travel, you can set Work/
Home to use these locations instead.
For example, to check for delays on your route home before you leave the office, do the
following:
1. Touch the traffic sidebar to open the Traffic menu.
2. Touch .
3. Touch .
The Driving View is shown and a message is displayed telling you about traffic incidents on this
route. The Traffic sidebar also shows any delays.
73
Page 75

Checking traffic incidents in your area
Get an overview of the traffic situation in your area, using the map. To find local incidents and
their details, do the following:
1. Touch the traffic sidebar to open the Traffic menu.
2. Touch .
3. If the map does not show your location, touch the marker to centre the map on your current
location.
The map shows traffic incidents in the area.
4. Touch on any traffic incident to get more information.
A screen is shown that gives you detailed information about the incident you chose. To
display information about surrounding incidents use the left and right arrows at the bottom of
this screen.
Show traffic on route
To check for delays on your route, touch in the Traffic menu. Your navigation device
shows a summary of the traffic delays on your route.
The total includes any delays due to traffic incidents and those due to busy roads, with
information provided by IQ Routes™.
Touch to check if you can reduce the delay.
NOTE
You can also access the Show traffic on route screen by touching the traffic area of the LIVE
summary tab.
74
Page 76

Traffic sidebar colours
The traffic sidebar changes colour depending on how old the traffic information is on your
device:
Dark blue -The traffic information on your device is up to date.
Lilac - The traffic information on your device has not been updated for at least 10
Grey - The traffic information on your device has not been updated for at least 15
The traffic information on your device is updated automatically and the traffic sidebar will
normally remain dark blue.
However, it is possible that the device is unable to update traffic information, if, for example,
there is no GPRS network coverage at your location.
*GPRS: General Packet Radio Service
minutes. HD Traffic still warns you about traffic incidents, but the
information is at least ten minutes old.
minutes. HD Traffic will only warn you about traffic incidents once it has
been able to update this information.
75
Page 77

Traffic incidents
Traffic incidents are displayed as symbols on the Driving View and the traffic sidebar. There are
two type of symbols:
• Symbols shown in a red square are incidents that HD Traffic can help you to avoid.
• Symbols shown in a red triangle are weather related and are for information only. You
cannot use HD Traffic to avoid them.
Traffic incident symbols:
Weather related symbols:
Accident
Road works
One or more lanes closed
Road closed
Traffic incident
Traffic jam
Fog
Rain
Wind
Ice
Snow
NOTE
The incident avoided symbol is shown for any traffic incident that you avoid using
HD Traffic.
76
Page 78

Tra f f i c menu
To open the Traffic menu, touch the traffic sidebar in the Driving View or touch HD Traffic in the
Main Menu. The following buttons are available:
Touch this button to re-plan your route based on the latest traffic information.
Touch this button to get an overview of any traffic incidents along your route. Use the left
and right buttons of the overview screen to see more detailed information about each
incident.
Touch this button to calculate and show the quickest route from your home location to
your place of work or from work to home.
Touch this button to browse the map and see the traffic information displayed on the
map.
Touch this button to change your preferences for how HD Traffic works on your device.
Touch this button to read aloud all traffic incidents along your route.
77
Page 79

TomTom Safety Alerts
The TomTom Safety Alerts service warns you about a variety of locations including:
• Safety camera locations.
• Accident black spot locations.
• Mobile safety camera locations.
• Average speed camera locations.
• Toll road camera locations.
• Traffic light camera locations.
NOTE
Access TomTom HOME from your computer regularly to download required data. After
downloading the data to the SD card, inserting the SD card into the navigation device will
update the system.
For more information about services and subscription, go to tomtom.com/service.
When a safety camera location is shown on the map, a warning sound is played to warn you
that you are approaching an area where a safety camera is located.
If you discover a location that has a safety camera but you receive no warning, you can report
the new location to TomTom using your navigation device.
Setting up Safety Cameras
The TomTom Safety Camera service is a subscription service that you can join using TomTom
HOME.
To download the latest camera locations to your device, click Update my device in TomTom
HOME.
Updating locations for safety alerts
The locations of safety cameras can change frequently. New cameras can also appear without
warning and the locations for other alerts, such as accident black spots, may also change
position.
As a result, you may want to have the latest list of camera and alert locations on your device
before you start a journey.
Access TomTom HOME from your computer regularly to download required data. After
downloading the data to the SD card, inserting the SD card into the navigation device will
update the system.
78
Page 80

Safety camera warnings
Warnings are given 15 seconds before you reach a safety camera location.
You are warned in three ways:
• Your navigation device plays a warning sound.
• The type of safety camera and your distance from the camera location is shown in the
Driving View. If a speed restriction has been reported for the camera, the speed is also
shown in the Driving View.
• The location of the safety camera is shown on the map.
NOTE
For average speed safety cameras, you are warned by a combination of icons and sounds at
the start, middle and end of the average speed check zone. For more information, Refer to
the “Changing the way you are warned” (page 79).
Always obey local traffic regulations.
Your guided route may include roads that are not open to vehicles or are closed due to traffic
regulations. Comply with the local traffic regulations and take another route.
Changing the way you are warned
To change the way your navigation device warns you about safety cameras, touch the
button.
You can then set how close you want to be to a safety camera before you are warned and what
type of sound will be played.
For example, to change the sound that is played when you approach a fixed safety camera, do
the following:
1. Touch in the Main Menu.
2. Touch
3. Touch .
A list of safety camera types is displayed. A speaker is shown next to the speed camera
types that have been set for an alert.
4. Touch .
5. Touch to avoid removing the fixed safety camera alerts.
6. Enter the time in seconds for when a warning is given before you reach a camera. Then
touch .
7. Touch the sound you want to be used for the warning. For example, to select a bugle sound
touch on .
WARNING
NOTE
To switch off warning sounds for a camera type, touch instead of in step 7
above. To record your own warning sound for a camera type, touch Record warning
instead of in step 7 above.
8. Touch to save your changes.
79
Page 81

Report button
To show the report button in the Driving View, do the following:
1. Touch in the Main Menu.
2. Touch .
3. Touch .
The report button is shown on left-hand side of the Driving View or if you are already using
the quick menu, it’s added to the buttons available in the quick menu.
Reporting a new safety camera while on the move
1. Touch the button shown in the Driving View or in the quick menu to record the
location of the camera.
If you touch the report button within 20 seconds of receiving a safety camera warning, you
get the option to add a camera or remove a camera. Touch Add camera.
2. Touch or , depending on the type of camera you are reporting.
3. Touch the type of camera you want to report.
NOTE
If the type of camera you choose has a speed restriction, you can also enter the speed.
Reporting a new safety camera while at home
You do not need to be at the location of a safety camera to report the new location.
To report a new safety camera location while you are at home, do the following:
1. Touch in the Main Menu on your device.
2. Touch .
3. Touch .
4. Touch or depending upon the type of safety camera.
5. Find the location of the camera you want to report using the Map browser.
Use the cursor to mark the exact location, then touch .
6. Touch on the type of camera you want to report and if necessary, the speed restriction for
the camera.
80
Page 82

Reporting incorrect camera alerts
You may receive an alert for a camera that is no longer there.
To report an incorrect camera alert, do the following:
1. While you are at the location of the missing camera, touch Report in the Driving View.
NOTE
This must be done within 20 seconds of receiving the camera alert.
2. Touch Remove.
Types of fixed safety camera you can report
When you report a fixed safety camera, you can select the type of fixed camera you are
reporting.
These are the different types of fixed safety camera:
This type of safety camera checks the speed of passing vehicles.
This type of safety camera checks for vehicles breaking traffic rules at traffic lights.
This type of safety camera monitors traffic at toll road barriers.
This type of safety camera checks the average speed of vehicles between two fixed
points.
This type of safety camera checks traffic on roads where access is restricted.
All other types of camera that do not fall into any of the above categories.
81
Page 83

Average speed check camera warnings
There are several types of visual and audible warnings that you may see when you meet an
average speed check camera.
You always receive a start and end zone warning regardless of the speed you are travelling at.
Intermediate warnings, if given, occur every 200 meters.
All the warnings are described below:
Start of zone warning
As you approach the start of an average speed check zone, you see a visual warning in the
top left hand corner of the Driving View with a distance to the camera underneath it. You hear
an audible warning.
You also see a small icon on the road showing the position of the average speed check
camera at the start of the zone.
Intermediate warning - type 1
Once in the speed check zone, if you are not speeding and have already received a start of
zone warning, you see a visual warning in the Driving View. This reminds you that you are
still in the speed check zone.
Intermediate warning - type 2
Once in the speed check zone, if you are driving at over 100% of the permitted speed and
have already received a start of zone warning, you see a visual warning in the Driving View
indicating the maximum permitted speed. You also hear a small audible warning. These
warnings are there to remind you to slow down...
Intermediate warning - type 3
Once in the speed check zone, if you are driving at over 100% of the permitted speed and
have not received a start of zone warning, you see a visual warning in the Driving View
indicating the maximum permitted speed. You also hear a loud audible warning.
These warnings occur at the FIRST intermediate point only and are there to remind you to
slow down...
End of zone warning
As you approach the end of an average speed check zone, you see a visual warning in the
Driving View with a distance to the camera shown underneath it. You hear an audible
warning.
You also see a small icon on the road showing the position of the average speed check
camera at the end of the zone.
82
Page 84

TomTom Safety Camera menu
To open the Safety Cameras menu, touch in the Main Menu and then touch .
Touch this button to report a new safety camera location.
Touch this button to set the safety alerts you will receive and which sounds will be used
for each alert.
Touch this button to disable safety alerts.
Touch this button to enable the report button. The report button is shown in the Driving
View or in the quick menu.
83
Page 85

TomTom Weather
TomTom Weather shows detailed weather reports and 5-day weather forecasts for towns and
cities provided by local weather stations.
For more information about services and subscription, go to tomtom.com/service.
Key Features
• Weather reports delivered directly to your navigation device.
• Detailed weather information, refreshed every hour.
• Detailed coverage throughout Europe, Australia and North America.
• Clearly spoken weather reports combined with clear and intuitive graphics.
How to request a weather report
To request a weather report for a specific location, such as the town or city of your final
destination, do the following:
1. Touch in the Main Menu.
2. Touch .
3. Select the type of location where you want the weather forecast.
4. Enter the name of the town.
A summary of the weather is shown.
NOTE
Touch the day for a detailed report.
84
Page 86

Types of location
You can request a weather forecast for different types of location. The following types of
location are available:
Touch this button to select your Home location.
Touch this button to select a Favourite location.
Touch this button to enter an address.
Touch this button to select a location in a list of recently used destinations.
Touch this button to use Google Local Search to find POIs.
Touch this button to select a POI.
Touch this button to select your current location.
Touch this button to select a point on the map.
Touch this button to enter a latitude and longitude map reference.
Touch this button to select your last recorded position.
85
Page 87

Introducing TomTom HOME
TomTom HOME is a free application for your computer that helps you manage the contents
and services of your navigation device, as well as giving you access to the TomTom
community. It is a good idea to frequently connect to HOME to backup your device and to
ensure you always have the latest updates.
Here are some of the things you can do with TomTom HOME:
• Add new items to your device, like maps, voices, POIs and more.
• Buy TomTom services and manage your subscriptions.
• Share your content with the TomTom community.
• Use Map Share to download and share map corrections.
• Make and restore backups of your device.
• Create a MyTomTom account.
• Read the Reference Guide for your device.
When using HOME, you can get help with what you are doing from the HOME Help. You can
also read about all the other things that HOME can do for you.
Installing TomTom HOME
To install TomTom HOME on your computer, do the following:
1. Remove the SD card from the navigation device. Refer to the “SD card removal” (page 11).
2. Connect your computer to the internet.
3. Connect your SD card to your computer.
TomTom HOME starts to install.
NOTE
If HOME does not install automatically, you can download it from tomtom.com/home.
MyTomTom Account
To download content and services using TomTom HOME, you need a MyTomTom account.
You can create an account when you start using TomTom HOME.
If you have a MyTomTom account, you can access the following benefits online via HOME or
via the MyTomTom section of tomtom.com.
86
Page 88

• TomTom Services - click My Services on the TomTom website to subscribe to services
• Newsletters - click My Profile on the TomTom website to manage newsletter
• Support - click My Questions History on the TomTom website to track and
• Orders - click My Orders on the TomTom website to view items you ordered
• TomTom Map Share™ -report and download map corrections by joining the Map Share™
• Downloads - download free items via TomTom HOME.
such as real-time traffic and safety camera information.
subscriptions and language preferences for product news.
view your case history and all email conversations you have with
TomTom about technical support issues via the website. You can
also update cases with new information.
from the TomTom website and your order history.
community via HOME. You can then benefit from shared reporting
of map issues such as missing streets and wrong driving
instructions.
Find out more with HOME Help topics
In the TomTom HOME Help topics you can find a lot more information about how HOME can
help you to manage contents and services on your navigation device.
You can also get help on the following:
• Using an activation or promotion code
• Updating your device-account combination
• The TomTom Route Planner
• Downloading free or shared sounds, images and symbols
• Installing themes and extensions
For information on how to create your own POIs, themes, voices, routes, colour schemes,
symbols and sounds, see create.tomtom.com.
87
Page 89

Memo
88
Page 90

Audio and Visual
How to Use Audio and Visual Systems ........................................................................................... 90
Basic audio and visual system operation.........................................................................................94
FM.................................................................................................................................................... 97
AM .................................................................................................................................................102
USB ...............................................................................................................................................105
CD (MP3 included) ........................................................................................................................ 109
iPod................................................................................................................................................ 116
AUX ...............................................................................................................................................122
Audio control switch .......................................................................................................................123
89
Page 91

How to Use Audio and Visual Systems
SETTING AUDIO/RADIO
• If the battery is disconnected for servicing or replacement of the battery or a fuse, all the
settings for stored channels and the speakers will be erased.
• Reception of radio and broadcasts depends on your location because the radio signal
strength varies. Also, it may be difficult to maintain constant signal reception due to the effect
of obstructions.
• Images can be distorted or noise may be generated by interference from nearby overhead
power lines on railroads, high-tension leads, traffic lights, neon signs, or aerials
transmitting radio or amateur radio broadcasts.
• Due to the characteristics of radio waves, signal reception may be adversely affected by
obstructions such as buildings and mountains.
• When you enter a tunnel or move away from a broadcasting station, the signal strength
will become extremely weak and the conditions for signal reception will be degraded.
• In some areas, video and audio reception can be adversely affected by nearby aerials
transmitting radio broadcasts at frequencies different from the one actually being
received.
• The range of reception this navigation device is capable of is narrower than that of home
devices.
• Reception can be adversely affected by the operation of your vehicle’s windscreen wipers,
electric mirrors, and air conditioner system.
90
Page 92

PLAYABLE DISCS
• Discs Which Can Be Played in This navigation device
* Discs may not be playable in this navigation device if they fit any of the following conditions:
- Discs which are damaged, soiled, or covered in fingerprints.
- Discs which have been left in your vehicle or this navigation device.
- The data written to the disc is unstable.
- Discs which have been rerecorded due to failure of the data write.
• The following types of discs may not be playable or may not play properly.
• SUPER AUDIO CDs
• Video CDs
• UDF CDs
• CCCDs
• LabelGate CDs
• CD-R/CD-RW discs may not be playable under the following cases:
• A disc contains no data.
• The recorded condition of a disc or the condition of a disc itself is unusable.
• A CD-R/CD-RW disc is not CDDA or Audio CD formatted (MP3 is playable).
• A disc is not compatible with this navigation device.
* If you use recordable discs, read the instruction manual and usage precautions for your
disc recordable devices.
• Eight centimeter discs
Eight centimeter discs cannot be played in this navigation device. They cannot be played
even with an adapter.
• Odd shaped discs
Do not use discs with an odd shape such as a heart or octagonal in this navigation device as
they could cause the navigation device to malfunction.
91
Page 93

HANDLING DISCS
• Regularly clean dust, dirt, and fingerprints from the printed side of a disc by gently wiping it
from the inside to the outside with a clean, dry cloth.
• When holding a disc, try not to touch the surface of the recorded side (under side).
• Do not adhere paper or stickers to a disc, or scratch the side in which the audio has been
recorded.
• Do not use discs which have glue of cellophane tape adhering to or peeling off the disc, or
labels which partially protrude from the edge. Otherwise, such discs may not eject or they
could cause the navigation device to malfunction.
• Discs spin around at high speed in the navigation device. Do not use cracked or extremely
warped discs as they could damage the navigation device.
• Keep discs out of direct sunlight and in their cases to prevent warping. During the summer in
particular, do not place discs on a seat or the instrument panel of your car because they will
get heated by direct sunlight to a high temperature in a closed car.
• Do not use disc cleaners or antistatic agents. In addition, use of volatile chemicals like
benzene or thinner on discs will damage them.
• A new disc may not play after inserting it into the disc slot of the navigation system. This may
happen because burrs along the centre hole or outer edge of the disc could prevent it from
setting properly. If this occurs, use the edge of a ballpoint pen or similar object to remove any
burrs before inserting the disc.
• A disc may be heated directly after it is ejected. Be careful when handling it.
* The navigation device performance or the disc itself is not affected.
92
Page 94

USB FLASH MEMORY
• Under applicable copyright law, no discs recorded by yourself can be used for any purpose
other than your own entertainment without the consent of the copyright holder.
• USB Flash Memory is not supplied with this navigation device.
* Purchase an on-the-market product complying with standards.
• USB memory devices connectable to this navigation device are USB Flash Memory.
Do not connect with any device except USB Flash Memory.
A guarantee of product functionality is not available.
• USB Flash Memory formatting
Formatting of USB Flash Memory cannot be done in this navigation device. Use your PC to
format.
• Never insert any foreign object into a USB connection terminal. It may cause damage to
USB Flash Memory.
• Keep USB Flash Memory away from exposure to electrostatic and electrical noise, or direct
heat from heaters. Otherwise, data may be destroyed.
• If a malfunction occurs, this navigation device automatically stops operating to protect
against an internal function. Follow the message displayed on the screen. If this navigation
device does not resume operating, it may have a malfunction. Consult the dealer where you
purchased the product.
• The navigation device can play music using USB Flash Memory (page 105).
• Back up of your important data stored in USB Flash Memory is recommended.
• USB Flash Memory may generate heat after prolonged use. This does not indicate a
malfunction.
• Defective USB Flash Memory may cause this navigation device to not operate normally.
93
Page 95

Basic audio and visual system operation
Power button
Mute button
Source button
Tur n on t h e powe r
The power turns on when the ignition is switched to ACC or ON.
Press the power button ( ) to turn off the power and display the clock.
Press the power button ( ) again to turn on the power.
Audio mode change
1. Press the source button ( ).
2. Touch the desired on-screen button to select the mode.
To turn off the audio, touch the on-screen button.
Navigation/audio screen switching
Touch the media bar while the navigation screen is displayed to switch to the audio screen.
Touch the status bar while the audio screen is displayed to switch to the navigation screen.
Sound button
Volume button
Status bar
Media bar
94
Page 96

Volume adjustment
Volume up
Press the volume button ( ).
Volume down
Press the volume button ( ).
NOTE
Long-press the volume button ( or ) to turn the volume up or down continuously.
Mute
Press the mute button ( ).
Press the mute button ( ) again to cancel mute.
Sound adjustment
Each time the sound button ( ) is pressed, the sound setting screens are displayed in the
order of the BASS&TREBLE, Balance, and Equalizer.
Press the sound button ( ) while the Equalizer setting screen is displayed, to return to the
navigation or audio screen.
Touch the on-screen button to hold the current adjustment.
Bass & Treble setting
Touch the desired position.
Volume balance setting
Front volume increase
Touch the on-screen button.
Rear volume increase
Touch the on-screen button.
Right side volume increase
Touch the on-screen button.
Left side volume increase
Touch the on-screen button.
Setting reset
Touch the on-screen button.
95
Page 97

Equalizer setting
Touch to the desired position, or touch the or on-screen button.
Preset
Changes to the previously set frequency.
Touch the , , , , or on-screen button.
Setting reset
Touch the on-screen button.
96
Page 98

FM
Name of each part
Viewing the display
Turning on the radio
Refer to the “Audio mode change” (page 94).
Frequency
Seek tuning
button
97
Page 99

Selecting a radio station
The following methods are available for selecting a radio station:
They include manual selection, seek selection, PTY search, pre-set channel selection, and
auto store.
Manual selection
Tune-up
Press seek tuning button ( ).
Tune-down
Press seek tuning button ( ).
Seek selection
Long-press the seek tuning button ( or ).
Press the seek tuning button ( or ) to cancel the seek selection.
Touch the on-screen button or on-screen button.
Touch it again to cancel the seek selection.
PTY search
Searches stations which have the same PTY code as the one which is set to on in the PTY
search setting.
Touch the on-screen button or on-screen button.
“PTY searching” is displayed during PTY search.
Touch again to cancel the PTY search.
Pre-set channel selection
The channels for 15 radio stations can be stored.
1. Select the channel to be stored.
2. Long-touch the channel preset on-screen button at the position you want it stored.
Channel preset on-screen button
NOTE
• Touch the on-screen button to display the pre-set channel 6 to 10.
• Touch the on-screen button to display the pre-set channel 11 to 15.
• Touch the on-screen button to display the pre-set channel 1 to 5.
3. To call up a stored channel, touch the channel preset on-screen button.
98
Page 100

Auto store
Station frequencies which can be received are stored in the order of greatest electrical field
intensity.
1. Touch the on-screen button.
2. Touch the “Fill all presets” and the on-screen button to store to pre-set channels 1 to 15.
Touch the “Fill presets 1 to 5” and the on-screen button to store to pre-set channels 1 to
5.
NOTE
• Touch the on-screen button to return to the previous screen.
• If you want to store to pre-set channels 6 to 10 or 11 to 15, touch the on-screen
button while pre-set channels 6 to 10 or 11 to 15 are displayed.
• If you want to cancel while the auto store is being performed, touch the on-screen
button.
• If there are no receivable frequencies, “NO DATA” is displayed.
99
 Loading...