

Page 1
OPERATING INSTRUCTIONS
SPOT ANNOUNCING MACHINE
AM-821
WARNING (120V MODEL ONLY)
This equipment has been tested and found to comply with the limits for a Class A digital device,
pursuant to Part 15 of the FCC Rules. These limits are designed to provide reasonable protection
against harmful interference when the equipment is operated in a commercial environment. This
equipment generates, uses, and can radiate radio frequency energy and, if not installed and used in
accordance with the instruction manual, may cause harmful interference to radio communications.
Operation of this equipment in a residential area is likely to cause harmful interference in which case
the user will be required to correct the interference at his own expense.
TOA Corporation
Page 2

CONTENTS
GENERAL DESCRIPTION
FEATURES
PRECAUTIONS
USER CARE
PART DESCRIPTION
CONNECTIONS
RECORDING PROCEDURE
CONFIRMATION OF RECORDING
AUTOMATIC PLAYBACK PROCEDURE
MICROPHONE PAGING AND ORDER OF PRIORITY
TROUBLE-SHOOTING
SPECIFICATIONS
DIMENSIONS
2
2
3
3
4
5
6
7
8
8
9
10
11
GENERAL DESCRIPTION
The TOA AM-821 fully automatic spot announcing machine is designed for use where recorded tape
messages are required to be repeated at specific time intervals or on command during background music
play. Instant live announcements may also be made. Designed for easy operation using normal cassette
tape. Unrecorded sound section necessary for automatic playback can be easily made in the tape. Also, the
built-in AGC keeps output levels constant and you can turn out message tapes for yourselves. You can skip
unneccessary messages between the first and the ninth message if you wish.
The AM-821 has a built-in timer for distributing the message at prearranged intervals. The message tape may
also be played at specific time intervals by using an external timer.
The microphone may be used for both recording and paging. Paging level can be kept constant by the built-in
AGC.
Remote control of the cassette operation during recording is possible with the RM-820 optinal remote
microphone.
Fitted with an input terminal for background music and the announcement takes precedence of the
background music.
Can be mounted on the 19" rack cabinet with the help of optional mounting brackets.
FEATURES
1. Permits any normal type of cassette tape
2. Priority function overriding BGM
3. Message omit selectors
4. Built-in interval timer
5. Built-in AGC circuit
6. Balanced, transformer isolated output
7. Rack mountable with optional brackets
— 2 —— 2 —
Page 3

PRECAUTIONS
1. Avoid setting up unit in the locations exposed to direct sunlight, or heaters or other heat sources, or with
high humidity or dust.
2. The cassette tape can last only 200 hours on average. After 200 hours of use, replace the tape with the
new
one.
3. Do not use the C-120 cassette tape. (You may use other normal tapes.)
USER CARE
1. CLEANING THE HEAD SECTION
If the head, capstan or pinch roller gets dirty or accumulates dust, the deterioration of the sound quality or
unstable operation will result. An occasional wiping down with soft cloth damped with alcohol is
recommended to keep unit in good shape.
2. DEMAGNETIZING THE HEAD
The recording head becomes magnetized when the recorder is used for prolonged periods of time. This
results in noise being generated and the treble dropping off during recording. So, the recording head
should be regularly demagnetized with the head eraser.
3. HANDLING CASSETTE TAPES
The AM-821 can accept normal tape only. Do not use chrome or metal tapes to avoid loss of sound
quality.
Do not use the C-120 cassette tape. Since the it is thin and easily damaged, they may stretch during use
causing unstable tape movement which may result in the tape becoming tagled in the rotating parts of
this unit.
Do not use tapes which have been stored in a hot moist place or close to a television or speaker. Such
tapes may curl or have greasy places altering tape speed and preventing proper tape performance.
Always store in a cool, dry place which is free from dirt, oil and magnetic effects.
Before using a tape, check to confirm if tape slack exists. Because the tape slack causes the tape twist
or tangle around the pinch rollers and capstans, take up the slack, if necessary, by inserting a pencil
through the reel hub and turning it.
To prevent erasing of recorded sounds, remove the erase-prevention tabs using a screwdriver or similar
object to break out the tab (thus preventing recording). To record again, cover the slot with adhesive
tape.
The cassette tape can last only 200 hours on average. After 200 hours of use, replace the tape with the
new
one.
4. CLEANING THE FRONT PANEL
Use a soft cloth to wipe off dust and grease of the front panel and cassette receptacle covers. When they
are very dirty, damp the soft cloth slightly with neutral cleanser, remove the dirt and wipe with a dry cloth.
Never use volatile spirits like thinners, benzines or alcohol because they will damage the panel's finish.
5. Avoid setting up the recorder in the locations exposed to direct sunlight, or near heaters or other heat
sources, or in areas of high humidity or dust.
— 3 —
Page 4

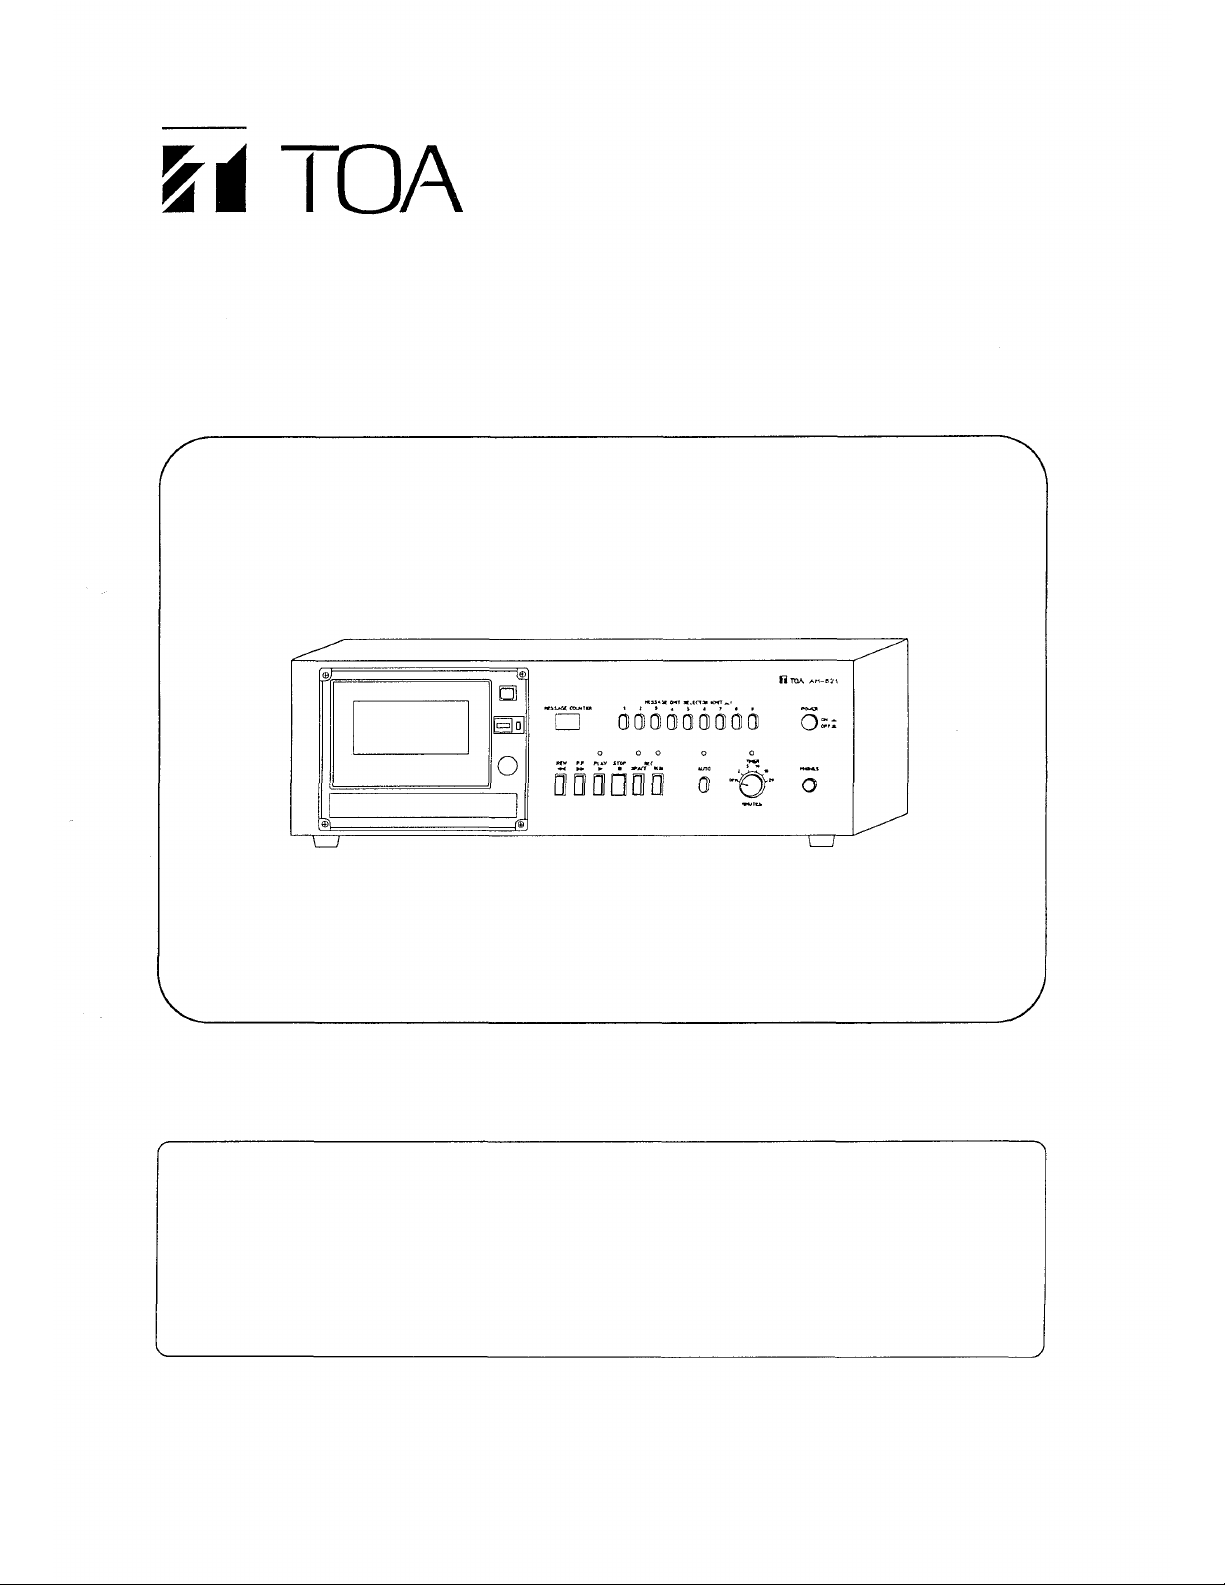
PART DESCRIPTION
POWER SWITCH
Place this switch in the ON position and power is
supplied.
Note : When not loading the tape :
The auto switch
is placed in the manual
mode.
When loading the tape :
Unrecorded tape
placed in the manual mode.
Recorded tape
placed in the automatic mode.
AUTO SWITCH
When using a built-in interval timer
timer
Place this switch in the OFF position (manual mode)
for the tape deck operation
MESSAGE OMIT SELECTOR
These selectors function only when placing the auto
switch
, set this switch to ON (automatic mode).
in the automatic mode. If wishing to omit
the auto switch
the auto switch
or an external
one or more of the recorded messages (No.1 through
No.9), depress this switch(es).
TAPE COUNTER, RESET BUTTON
This indicates how far the tape has travelled. Depress
the reset button to reset the tape counter display to
"000".
CASSETTE RECEPTACLE
Load the cassette tape with the exposed tape face
down, and then close lid.
Note : Be sure to depress the eject button after the
auto switch
is turned to the manual mode.
Ejecting the tape in the automatic mode may
lead to malfunction of the deck.
MESSAGE COUNTER
This indicates the message number while its
announcement is being made. The message number
to follow next is indicated when the tape motion stops.
TAPE DECK CONTROLS and LED INDICATIONS
These controls function only when placing the auto
switch
is
is
in the manual mode.
Rewinds the tape at high speed.
Advances the tape at high speed.
Advances the tape for playback, and the
green LED illluminates during playback.
The tape stops travelling automatically
after each announcement has been
finished.
Depress this button to stop the tape motion
or to release the recording mode.
First of all, depress this button before starting
recording. Thereafter, also depress after
recording of each message is finished. The tape
continues to travel for approximately 7 seconds to
make an unrecorded sound section on the tape
even after the recording is finished and this
button is depressed. The red LED of this button
flashes during tape travel and it illuminates
instead of flashing when the tape motion stops.
After placing in the recording standby mode by
depressing the REC SPACE button, depress this
switch and record with the remote microphone
RM-820.
TIMER SWITCH
This functions only when placing the auto switch
in
the automatic mode. Place this switch in the OFF
position when an external timer is used.
EJECT BUTTON
Depress this button to open lid of the cassette
receptacle. (Do not depress this button while the
cassette tape is travelling.)
— 4 —
PHONES (HEADPHONE) JACK
Accomodates stereo or monaural headphone.
Insertion of the headphone into this jack cuts line
output out.
Note : When inserting the headphone into this jack,
output signal from the line out
is not
fed.
Page 5

AC MAINS INLET
Connects to a power cord.
BGM IN SOCKET
Connects to output of the background music machine.
EARTH TERMINAL
FUSE
LINE OUT SOCKET
Connects to input of the external amplifier.
Make-contact is provided during tape playback and
output signal Is fed to this socket.
TIMER IN SOCKET
When placing the auto switch
mode and the time switch
accepts make-contact of external timer and permits
in the automatic
in the OFF position,
the prerecorded announcement.
CONNECTIONS
Note: The spot announcement or paging takes
precedence of the background music.
MIC IN SOCKET
Connects microphone for recording and paging. Has
a built-in AGC circuit.
Note: Do not use this socket when the remote
microphone socket is used.
REMOTE MIC SOCKET
Connects the optional remote microphone RM-820
that can be remote controlled and is used for
microphone paging and recording.
— 5 —
Page 6

RECORDING PROCEDURE
This Spot Announcing Machine stops tape motion by sensing the unrecorded sound section on the tape.
Announcements may be commenced overriding the background music by detecting the recorded level.
To ensure that your desired message is announced without fail, we suggest you keep records of the
message numbers and their contents when recording. During recording, the recorded signals are sent out to
the external amplifier. To prevent this, insert the headphone into the headphone jack and no signal is
transmitted to the amplifier.
1. Connect the microphone to the microphone input, set the microphone switch to ON and switch the power
on.
2. Load the tape after confirming that the auto switch
Note : Be sure to confirm that the tape is provided with erasure prevention tabs.
is placed in the manual mode.
3. Depress the REC SPACE button. The tape begins
travelling and stops in about 7 seconds after
producing the unrecorded sound section on the tape.
The SPACE LED flashes (the RUN LED also
illuminates) during tape travel and illuminates when
the tape motion stops.
4. Depress the REC RUN button. The RUN LED
illuminates (the SPACE LED also illuminates) and the
tape begins to travel to permit recording.
(Do not make a break of longer than 4 seconds during
recording.)
5. Depress the REC SPACE button after recording. The tape begins travelling and stops in about 7 seconds
after producing the unrecorded sound section on the tape. The SPACE LED flashes (the RUN LED also
illuminates) during tape travel and illuminates when the tape motion stops.
6. Repeat the procedure of Item steps 4 through 5 for further recording. After all messages have been
recorded, make more than three unrecorded sound sections on the tape by depressing the REC SPACE
button three times. (This is necessary for automatic tape rewinding.)
7. Depress the stop button to release the recording mode.
The built-in AGC circuit keeps recording level constant. When using the microphone of very low sensitivity,
the recording level becomes low. In this event, recording should be made with the mouth closer to the
microphone, or replace the microphone by one with higher sensitivity.
— 6 —
Page 7

COMPLETED TAPE AFTER RECORDING PROCEDURE
REC
RECORDING
OPERATIO N
BUTTON
TAPE
HEAD
AUTOMATIC
PLAYBACK
REC
SPACE
AUTO
STOP
REC
RUN
MESSAGE #1
UNRECORDED
SOU ND SECTION
PLAY BACK
REC
SPACE
REC
RUN
AUTO
STOP
SPACE
MESSAGE #2
PLAY BACK
ACTIVATIO N BY TIMER
REC
REC
RUN
AUTO
STOP
REC
SPACE
AUTOMATIC REWINDING
RUN
AUTO
STOP
CONFIRMATION OF RECORDING
To ensure that the recorded message can be annnounced properly, confirm if
SPACE
LAST MESSAGE
PLAY BACK
REC
REC
SPACE
AUTO
STOP
REC
SPACE
STOP
AUTO
STOP
(A) the number appearing on message counter display is in agreement with the indexing number for the
announced message. Be sure to always start operation from the beginning of the tape after initial
automatic tape rewinding as the number indicated on message counter display does not always
correspond to the announced message after Fast Forward or Rewind facility has been used.
(B) the tape motion does not stop during announcement due to a long break made during recording.
(C) the recorded level is adequate enough to override the background music.
(D) the tape is provided with the unrecorded sound section that is sufficient for automatic tape rewinding
after all messages have been announced.
1. Switch the power on.
2. Place the auto switch
in the manual mode, load the recorded tape and rewind it. (The "1" is indicated
on message counter display.)
3. Depress the PLAY
button. The tape begins travelling to play message No.1. In this event, confirm that
the announcement overrides the background music. The tape motion stops automatically after the
announcement of message No.1 is finished and "2" appears on message counter display, restoring the
background music.
4. Repeat the procedure of step 3 and check the recording situation as well as Items (A) through (C).
5. After all announcements have been finished, again depress the PLAY
button to confirm that the
unrecorded sound section continues to travel for longer than 20 seconds.
— 7 —
Page 8

AUTOMATIC PLAYBACK PROCEDURE
Automatic playback
1. Switch the power on. (When the recorded tape is already loaded in the deck, the tape is automatically
rewound, and the auto switch
is placed in the automatic mode.)
2. Load the tape and depress the auto switch
3. You can omit any of the messages from No.1 through No.9. Depress the message omit selector for the
message(s) you wish to omit.
4. When the built-in timer is used for automatic announcements, set the timer switch at the required time
interval. Place the timer switch in the OFF position when the external timer is used.
Manual playback
1. Switch the power on. (When the recorded tape is already loaded in the deck, the tape is automatically
rewound, and is placed in the automatic mode. Make sure to depress the auto switch
manual mode.)
2. Load the tape.
3. Select the tape deck control button (RWD, F.F. or PLAY).
to place in the automatic mode.
to place in the
MICROPHONE PAGING AND ORDER OF PRIORITY
1. A microphone connected to the AM-821 can be used for recording and direct paging. Placing the
microphone switch in the ON position enables you to make the microphone paging when the power is
being fed to the AM-821. The built-in AGC circuit releases you from work to adjust the sound volume
frequency.
2. The AM-821 is designed to allow the microphone paging to have the highest priority, overriding the
background music and tape playback. Several seconds after the microphone paging is restored. When no
microphone paging is being made, the pre-recorded announcement takes precedence of the background
music.
Caution : Be sure to place the microphone switch in the OFF position after the microphone paging has
been finished.
— 8 —
Page 9

TROUBLE-SHOOTING
Check the following points before you think there is a failure.
Are the remote microphone and other equipment properly connected to the AM-821 ?
Is a power cord not plugged in ?
Are switches and volume controls placed in the right position ?
SYMPTON
A tape does not travel.
No output signal is
delivered.
Cannot record.
High frequencies are
weak.
Sound is unsteady.
Excessive noise.
CAUSE
A tape is loaded improperly.
Control buttons are pushed while the
auto switch is set to ON.
The auto switch is set to OFF and
cassette tape motion is not activated
by the external timer.
Output cord is connected improperly.
A headphone plug is inserted.
A microphone picks up surrounding
noise.
Tape's erasure prevention tab has
been broken off.
A Head is dirty.
A microphone is connected
improperly.
A Head is dirty.
A Head is magnetized.
A capstan is dirty.
A tape is old.
REMEDY
Remove a tape and load properly.
Set the auto switch to OFF.
Set the auto switch to ON when the
external timer is used.
Connect a cord correctly.
Detach a headphone plug.
Set the microphone switch to OFF.
Replace a tape or cover a tab
opening with adhesive tape.
Clean a head.
Connect a microphone correctly.
Clean a head.
Demagnetize a head.
Clean a capstan and a pinch roller.
Replace a tape.
A tape does not stop
automatically.
A tape is not rewound
automatically.
Paging through a
microphone does not take
precedence.
Pre-recorded message
does not take precedence
of background music.
Noise is high in unrecorded sound
section.
Period of time of unrecorded sound
section is short.
Noise is high in unrecorded sound
section.
Period of time of unrecorded sound
section is short.
The auto switch is set to OFF.
Microphone output level is too low.
Recording level is too low.
A Head is dirty.
A tape is old.
— 9 —
Record again.
Record again.
Set the auto switch to ON.
Use a microphone with high
sensitivity.
Record again by using a
microphone with high sensitivity.
Clean a head.
Replace a tape and record again.
Page 10

SPECIFICATIONS
Power Requirements
Outputs
Inputs
Frequency Response
Distortion
S/N
Usable Tape
Wow and Flutter
Control Terminals
Interval Timer
AC Mains, 50/60 Hz 14 V A M A X
LINE : +2dBm 600
PHONE : stereo or monaural headphone
MIC
REMOTE MIC
BGM
MIC
TAPE
MIC
TAPE
MIC
TAPE
–60dBm
–60dBV
+ 2dBm
100~15,000Hz ±3dB
100~ 7,000Hz ±3dB
less than 2% at 1 kHz
less than 3% at 1 kHz
better than 55dB
better than 50dB
balanced
balanced
unbalanced
balanced
Compact cassette normal tape
Less than 0.3% WRMS
Input jack for external timer-accepts signal pulse with no voltage
Output for muting-make contact with no voltage
2, 5, 15, 20 minutes and OFF (switchable)
Omissible Message
Mesage Number Indication
Dimensions (W x H x D)
Weight
Specifications are subject to change without notice.
Message No.1 through No.9
1 through 99
433.5 x 140.2 x 336.3 mm [17.07 x 5.52 x 13.24 in.]
6.5kg[14.3lb.]
Accessories (120V MODEL ONLY)
Fuse (250 V 0.3 A)
DIN Plug (5P)
1
3
— 10 —
Page 11
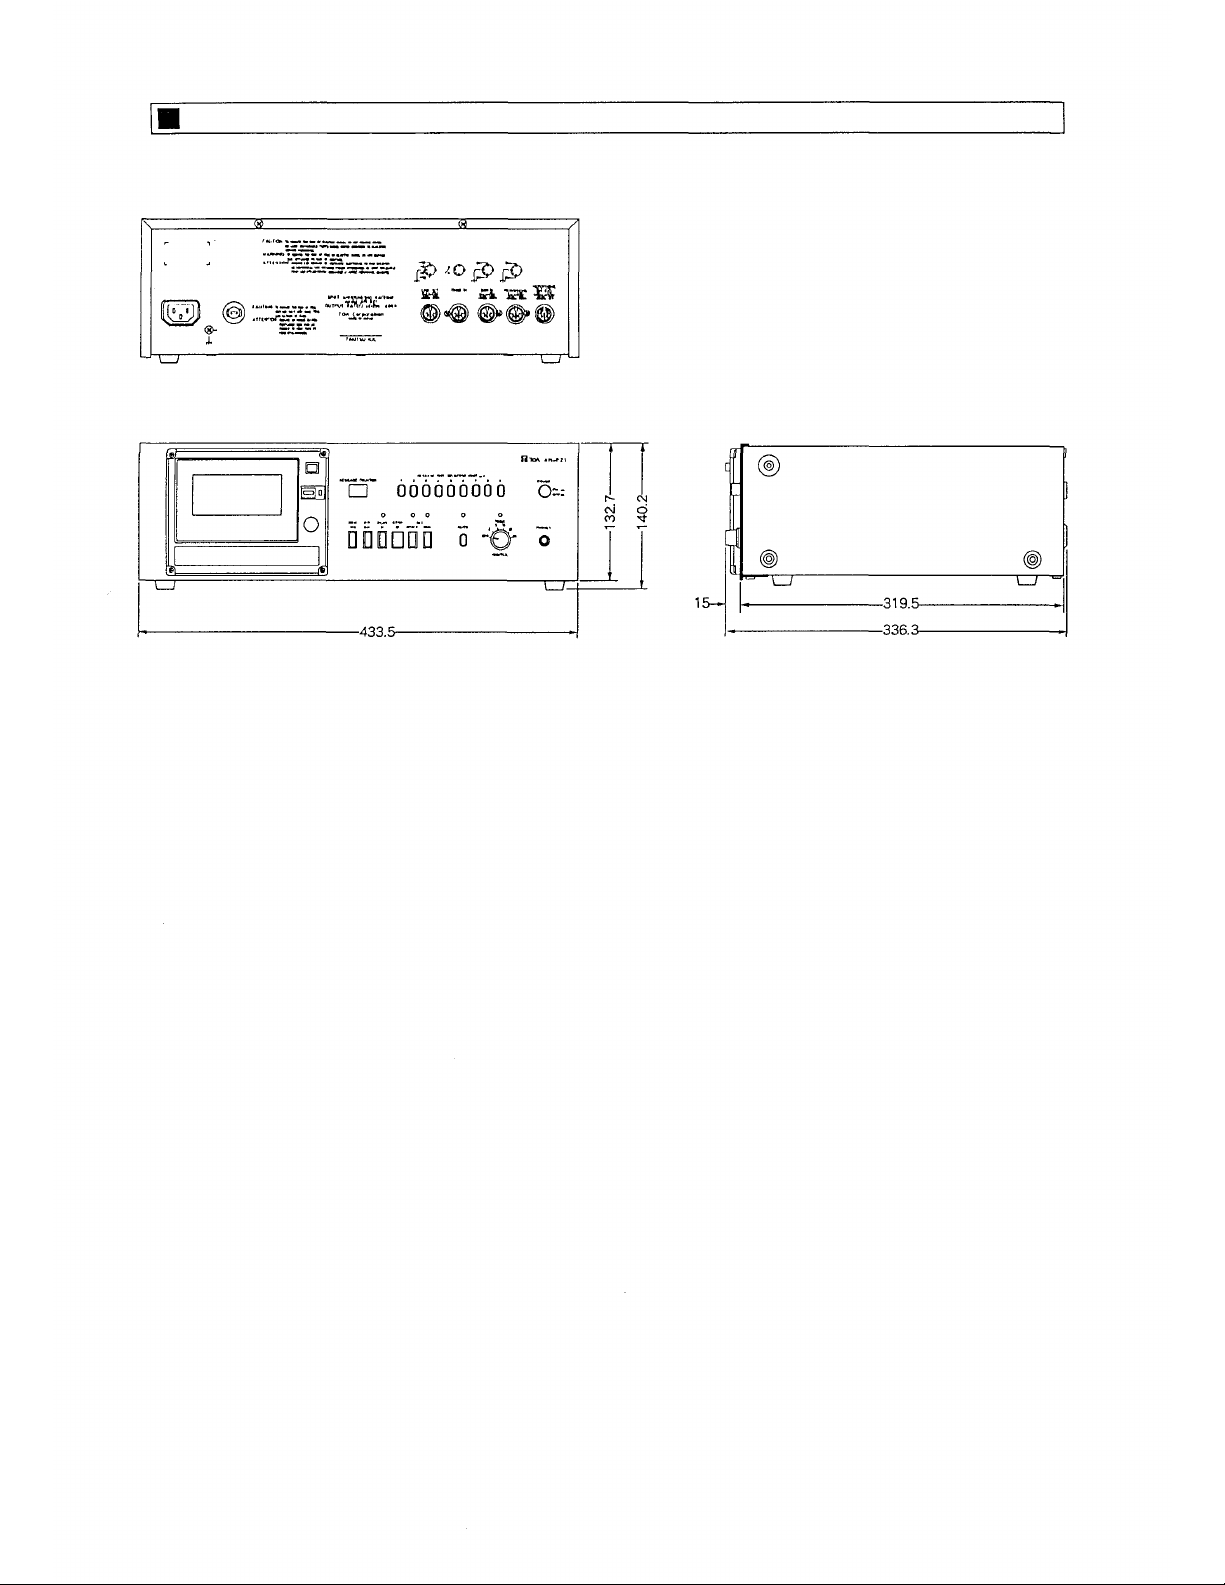
DIMENSIONS (mm)
— 11 —
Page 12

TOA Corporation
KOBE, JAPAN
133-12-063-50
 Loading...