

Page 1

USER MANUAL
Ferrari GT
P
la
y
s
ta
tio
n
®
2
2 in 1 Force Feedback Racing Wheel
MANUEL DE L’UTILISATEUR
BENUTZERHANDBUCH
HANDLEIDING
MANUALE D’USO
MANUAL DEL USUARIO
MANUAL DO UTILIZADOR
Page 2
English - CAUTION: On PCs equipped with certain motherboards, your wheel may
remain powered (LED on) and may stay turned to one side (full left or full
right) while the PC is off. In this case, you must disconnect the power adapter
connector and/or the USB connector in order to prevent overheat which might
damage the wheel’s motor.
Français - ATTENTION : sur des PC équipés de certaines cartes mères, il se peut que
votre volant reste alimenté (voyant allumé) et bloqué en position braquée à
gauche ou à droite une fois l’ordinateur éteint. Dans ce cas, il est impératif de
débrancher l’adaptateur secteur et/ou la prise USB afin d’éviter une
surchauffe du moteur du volant qui pourrait l’endommager.
Deutsch - ACHTUNG: Bei PCs mit bestimmten Mainboards kann das Wheel nach dem
Abschalten des PCs eingeschaltet bleiben (LED leuchtet) und das Lenkrad
dreht sich automatisch an den Rechts- oder Linksanschlag. In diesem Fall
müssen Sie entweder den Stecker des Netzadapters abziehen oder die USBVerbindung zum PC lösen, um Schäden am Motor des Lenkrads zu
vermeiden.
Nederlands - WAARSCHUWING: op PC's met moederborden van bepaalde merken kan,
terwijl de PC uit staat, de stroom op uw stuur aan blijven staan (de LED
brandt) en kan het stuur volledig naar links of rechts zijn gedraaid. In dat
geval moet u de kabel van de voedingsadapter en/of de USB-kabel
lostrekken om te voorkomen dat het stuur oververhit raakt en de motor van
het stuur beschadigd wordt.
Page 3

Italiano - ATTENZIONE: Su PC equipaggiati con alcune schede madri, il vostro volante
potrebbe rimanere alimentato (LED acceso) e restare bloccato
completamente a sinistra o a destra quando il PC è spento. In questo caso, è
necessario scollegare l’adattatore di rete e/o il connettore USB per evitare il
surriscaldamento che potrebbe danneggiare il motorino del volante.
Español - PRECAUCIÓN: en PC equipados con ciertas placas base, el volante puede
quedarse funcionando (LED encendido) y puede bloquearse todo a la
izquierda o todo a la derecha mientras el PC está apagado. En tal caso,
debes desconectar el conector del adaptador de corriente y/o el conector
USB para evitar un sobrecalentamiento que podría dañar el motor del
volante.
Português - ATENÇÃO:
manter-se ligado (LED aceso) e bloqueado completamente virado para a
esquerda ou direita enquanto o computador estiver desligado. Se isso
acontecer, deverá desligar o conector do transformador e/ou o conector USB
a fim de impedir que ocorra o sobreaquecimento, o qual poderá danificar o
motor do volante.
Nos PC equipados com certas placas-mães, o volante poderá
Page 4
User Manual
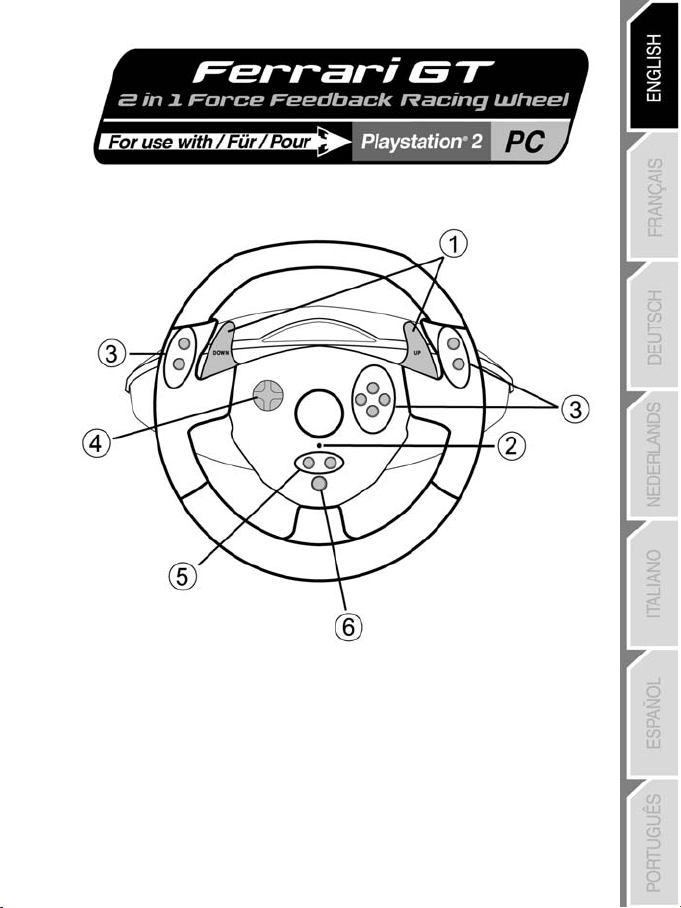
TECHNICAL FEATURES
1 2 digital gearshift levers
2 Mode led
3 Action buttons
4 D-pad
5 Select and Start buttons
6 Force button
1/8
Page 5

7 Analog pedal set
8 Pedal cable
9 Pedal connector
10 Table clamp
11 Clamp screw
12 GAMEPORT connector (for PlayStation2)
13 USB connector (for PC and PlayStation2)
14 Power adapter
15 Adapter connector
INSTALLING THE WHEEL
Fixing the wheel in place
1. Place the wheel on a table or other flat surface.
2. Place the clamp screw (11) in the table clamp (10) and then screw the clamping unit into the hole on
the underside of the wheel until firmly fixed in place. Do not turn the screw too tightly, as you risk
damaging the clamping unit and/or the table.
Connecting the pedal set
1. Connect the pedal connector (8) to the pedal receptor (9).
2. Connect the power adapter (14) to the adapter connector (15) and plug the adapter into an electrical
outlet.
2/8
Page 6

INSTALLATION FOR PC
System requirements: PC (Windows 98 SE, Me, 2000, XP) equipped with USB port.
The CD-ROM included with this product allows you to install the Force Feedback drivers.
1. Insert the installation CD-ROM into your CD-ROM drive. Follow the on-screen instructions to install the
Force Feedback drivers. Once the installation is complete, click Finish and restart your computer.
2. Once your computer has restarted, connect the USB connector (10) to one of your computer’s USB
ports. Windows 98/Me/2000/XP will automatically detect the new device. (If you are connecting a USB
device for the first time, Windows may ask you to insert the Windows CD-ROM during the installation
procedure in order to install the required system files.)
3. Driver installation:
Windows 98
Follow the on-screen instructions to complete the installation.
Windows Me/2000/XP
4. Select Start/All Programs/Thrustmaster/Force Feedback driver/Control Panel. The Game
Controllers dialog box displays the gamepad’s name with OK status.
5. In the Control Panel, click Properties to configure your gamepad:
• Test device: to test and visualize the buttons, D-pad and 3 axes (wheel, brake and gas pedals).
• Test forces: to test 8 Force effects and configure the ForceFeedback settings (3 possible settings:
ADVANCED FUNCTIONS ON PC
Calibrating the wheel
The wheel is calibrated automatically once the USB is connected (this operation will move the wheel). The
pedals self calibrate after a few presses.
Selecting “Separate” (3-axis) OR “Combined” (2-axis) acceleration/braking mode
By default, the wheel’s acceleration/braking controls operate in “separate” 3-axis mode, i.e. with brake and
gas pedals operating on independent axes.
3-axis support considerably improves driving precision in races.
If the 3-axis mode is not supported by your game, the wheel’s gas pedals will not work properly. Please
exit the game and select the “combined” 2-axis mode.
To activate this mode, press simultaneously the acceleration/braking controls (7) and the Force button (6).
To revert to the “separate” 3-axis mode, repeat the same procedure.
Note:
- When you select the "combined" (2-axis) mode, the led flashes red for a few seconds
(Wheel = "X" axis, Accelerator and Brake = "RZ" axis).
- When you select the "separate" (3-axis) mode, the led flashes green for a few seconds
(Wheel = X" axis, Accelerator = "RZ" axis and Brake = "Y" axis).
: the Add New Hardware Wizard will search for the appropriate drivers. Click Next.
: the drivers are installed automatically.
from 0 to 150 % : Forces Main, Static and Dynamic).
3/8
Page 7
Enabling/disabling the recentering function
Wheel recentering is enabled by default.
To disable or re-enable the recentering, press the Force button (6).
Most recent games now propose their own recentering mode.
You are strongly advised to disable wheel recentering (in most cases), to allow the game to handle it. The
ForceFeedback will then be of greater quality.
When enabled, the recentering mode is especially useful in games that do not feature ForceFeedback.
Note:
- When Recentering is enabled, the led is Red (default mode on PC).
- When Recentering is disabled, the led is Green (mode recommended for PC).
INSTALLATION FOR PLAYSTATION 2
CONNECTING THE WHEEL
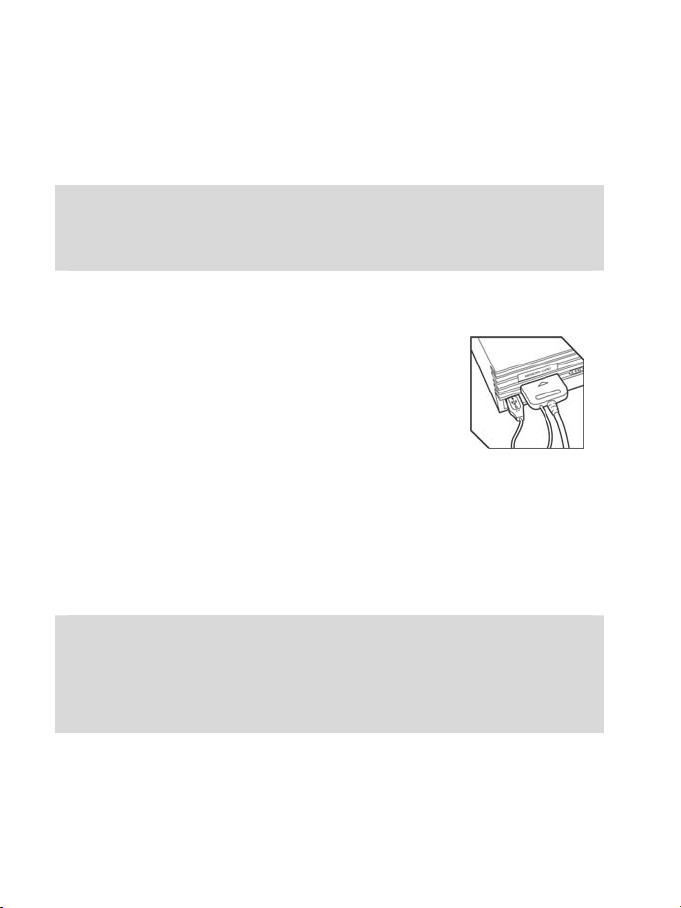
1. Switch off your console before connecting the wheel.
2. Connect the console connector (12) to port 1 of your console and connect
the USB connector (13) to the upper USB port (connect in this order).
3. Switch your console back on. The wheel calibrates itself autonomously
(this operation will move the wheel.) and the led (2) is red to indicate that
the ForceFeedback mode is activated.
ADVANCED FUNCTIONS ON PLAYSTATION 2
Configuring the wheel
You are now ready to play!
By default, the wheel’s acceleration/braking controls operate in “separate” 3-axis mode, i.e. with brake and
gas pedals operating on independent axes.
3-axis support considerably improves driving precision in races.
However you can still select the “combined” 2-axis mode.
To activate this mode, press simultaneously the acceleration/braking controls (7) and the Force button (6).
To revert to the “separate” 3-axis mode, repeat the same procedure.
Note:
- When you select the "combined" (2-axis) mode, the led flashes green for a few seconds
(Wheel = "Left Horizontal Joystick" axis, Accelerator et Brake = "Right Vertical Joystick" axis).
- When you select the "separate" (3-axis) mode, the led flashes red for a few seconds (Wheel
= "Left Horizontal Joystick" axis, Accelerator = "Cross" and Brake "Square").
To change the configuration of the other buttons, go to the "gamepad control options" of your game.
4/8
Page 8
Setting the ForceFeedback
On PlayStation 2, your wheel has 3 Force Feedback modes = Power, Medium or Off.
Just press the Force button (6) to switch from one mode to the other.
Note:
- When you select the Power ForceFeedback mode, the led is Red (default mode).
- When you select the Medium ForceFeedback mode, the led is Orange.
- When you select the ForceFeedback Off mode, the led is Green.
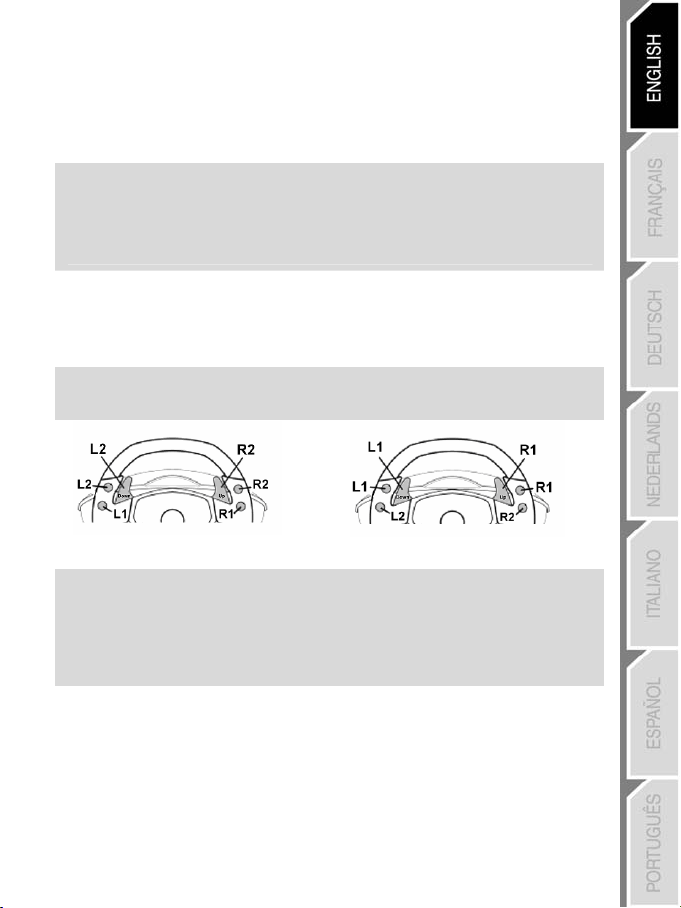
“Sequential gearbox inversion” function
In most games, gearshift functions (1) are assigned to the L2, R2 buttons by default.
The “Sequential gearbox inversion” function allows you to assign gear shifting directly to the 2 digital
gearshift levers (1) in 100% of games.
To switch from “Normal sequential gearbox” mode to “Inverted sequential gearbox” mode, press the L1 +
R1 and Force buttons (6) simultaneously.
Note: follow the same steps to return to "normal" mode.
Normal Sequential Gearbox Inverted Sequential Gearbox
Note:
- When you select the Inverted Sequential Gearbox Mode, the led flashes red for a few
seconds.
- When you select the Normal Sequential Gearbox Mode, the led flashes green for a few
seconds.
Precision Drive mode
Precision Drive mode has been specially developed with a view to enhancing performance.
Depending on the game, it may help you to beat your best times (and those of your opponents) or make it
easier to successfully complete the different driving events.
This new exclusive mode calculates and redistributes your wheel’s various analogy points without
generating any dead zones (as may be the case with other wheels which allow you to adjust their
sensitivity).
5/8
Page 9

How appropriate and effective this mode will be depends on the game you are playing and the course you
are racing on. In this mode, the wheel is more sensitive and will allow you to powerslide more easily and
thus avoid an excessive loss of speed, in courses with hairpin turns for example.
In games where the wheel’s reactions are very sensitive (such as F1 racing, for example), you will
therefore probably want to avoid using this mode.
We recommend that you use this mode with an interior view for maximum effectiveness.
To go into Precision Drive mode, simultaneously press the D-pad (4) and the Force button (6). Proceed
in the same way to return to normal driving mode.
Note:
- When the Precision Drive mode is enabled, the led flashes continuously.
- When the Precision Drive mode is disabled, the led does not flash.
TROUBLESHOOTING
- My wheel doesn’t work correctly or appears to be incorrectly calibrated. Switch off your PC or your
console, then disconnect your wheel, reconnect all the cables (with power adapter and pedals), switch
back on and restart the game.
- My wheel moves by itself during the game. This is normal and is the recentering function featuring in
some games. To stop these movements, just place your hands on the wheel or reduce the
ForceFeedback intensity.
- My wheel stays turned to one side (left or right) after auto-calibration. This is normal in some
games. The wheel will recenter itself once you have identified it as a wheel in the game’s setup options.
- On PC, my wheel is detected by my computer but doesn’t work in the game. Access your game’s
options to configure your wheel. Please refer to your game’s manual for further information.
- On PC, my pedal set does not work correctly. Display your game's option management interface to
reconfigure the wheel. If the problem persists, exit the game and switch the pedal set to the "combined"
(2-axis) mode. Then return to the game to reconfigure the wheel with the new axes.
SAFETY RECOMMENDATIONS AND INFORMATION
- When connecting the wheel and during auto-calibration: to prevent any incorrect calibration,
never turn the wheel, press the pedals or buttons.
- When not in use for extended periods and to avoid any unwanted power consumption or
deterioration, disconnect the mains adaptor of the wheel. Reconnect it before going back to the
game.
- Your wheel features ForceFeedback: NEVER leave the wheel within the reach of young
children, especially during the auto-calibration phases.
6/8
Page 10
TECHNICAL SUPPORT
If you encounter a problem with your product, please go to http://ts.thrustmaster.com and click Technical Support. From
there you will be able to access various utilities (Frequently Asked Questions (FAQ), the latest versions of drivers and
software) that may help to resolve your problem. If the problem persists, you can contact the Thrustmaster products
technical support service (“Technical Support”):
By email:
In order to take advantage of technical support by email, you must first register online. The information you provide will help
the agents to resolve your problem more quickly. Click Registration on the left-hand side of the Technical Support page and
follow the on-screen instructions. If you have already registered, fill in the Username and Password fields and then click
Login.
By telephone:
United Kingdom 020 7216 0047 price of a national phone call, Monday to Friday, from 12PM to 10PM
United States /
Canada
514-279-9911
Australia 1902 262 514 $1.98/min, Monday to Friday from 9AM to 6PM
Denmark 82 33 28 58 price of a national phone call, Monday to Friday from 1PM to 10PM
Finland 09 81 71 01 54 price of a national phone call, Monday to Friday from 2PM to 11PM
Norway 23 50 01 16 price of a national phone call, Monday to Friday from 1PM to 10PM
Sweden 08-51992032 price of a national phone call, Monday to Friday from 1PM to 11PM
WARRANTY INFORMATION
Worldwide, Guillemot Corporation S.A. (“Guillemot”) warrants to the consumer that this Thrustmaster product will be free from material defects and
manufacturing flaws for a period of two (2) years from the original date of purchase. Should the product appear to be defective during the warranty
period, immediately contact Technical Support, who will indicate the procedure to follow. If the defect is confirmed, the product must be returned to its
place of purchase (or any other location indicated by Technical Support).
Within the context of this warranty, the consumer’s defective product will, at Technical Support’s option, be either repaired or replaced. Where
authorized by applicable law, the full liability of Guillemot and its subsidiaries (including for indirect damages) is limited to the repair or replacement of
the Thrustmaster product. The consumer’s legal rights with respect to legislation applicable to the sale of consumer goods are not affected by this
warranty.
This warranty shall not apply: (1) if the product has been modified, opened, altered, or has suffered damage as a result of inappropriate or abusive
use, negligence, an accident, normal wear, or any other cause not related to a material defect or manufacturing flaw; (2) in th e event of failure to
comply with the instructions provided by Technical Support; (3) to software not published by Guillemot, said software being subj ect to a specific
warranty provided by its publisher.
Additional warranty provisions
In the United States of America and in Canada, this warranty is limited to the product’s internal mechanism and external housing. Any applicable
implied warranties, including warranties of merchantability and fitness for a particular purpose, are hereby limited to two (2) years from the date of
purchase and are subject to the conditions set forth in this limited warranty. In no event shall Guillemot Corporation S.A. or its affiliates be liable for
consequential or incidental damage resulting from the breach of any express or implied warranties. Some States/Provinces do not allow limitation on
how long an implied warranty lasts or exclusion or limitation of incidental/consequential damages, so the above limitation may not apply to you. This
warranty gives you specific legal rights, and you may also have other legal rights which vary from State to State or Province to Province.
price of a long distance phone call, Monday to Friday,
from 7AM to 5PM (Eastern time)
7/8
Page 11

COPYRIGHT
© 2005 Guillemot Corporation S.A. All rights reserved. Thrustmaster® is a registered trademark of Guillemot Corporation S.A. Microsoft® Windows® is a
registered trademark of Microsoft Corporation in the United States and/or other countries. PlayStation® is a registered trademark of Sony Computer
Entertainment Inc. All other trademarks and brand names are hereby acknowledged and are property of their respective owners. Illustrations not binding.
Contents, designs and specifications are subject to change without notice and may vary from one country to another.
ENVIRONMENTAL PROTECTION RECOMMENDATION
At the end of its working life, this product should not be disposed of with standard household waste, but rather dropped off
at a collection point for the disposal of Waste Electrical and Electronic Equipment (WEEE) for
recycling.
This is confirmed by the symbol found on the product, user manual or packaging.
Depending on their characteristics, the materials may be recycled. Through recycling and other
forms of processing Waste Electrical and Electronic Equipment, you can make a significant
contribution towards helping to protect the environment.
Please contact your local authorities for information on the collection point nearest you.
FAQs, tips and drivers available at www.thrustmaster.com
8/8
Page 12
Manuel de l’utilisateur
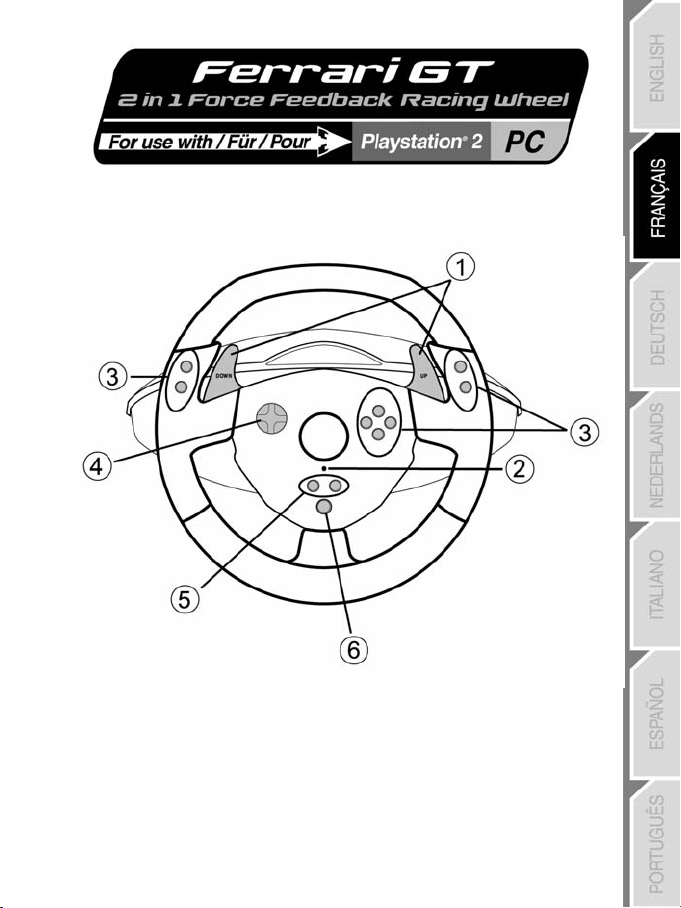
CARACTÉRISTIQUES TECHNIQUES
1 2 leviers numériques de changement de vitesse
2 Voyant lumineux Mode
3 Boutons d’action
4 Croix multidirectionnelle
5 Boutons d’action Select et Start
6 Bouton Force
1/8
Page 13

7 Pédalier analogique
8 Câble du pédalier
9 Connecteur RJ45 pour le pédalier
10 Système de fixation à la table
11 Vis de fixation
12 Connecteur GAMEPORT (pour Playstation2)
13 Connecteur USB (pour PC et Playstation2)
14 Adaptateur secteur
15 Connecteur pour l’adaptateur
INSTALLATION DU VOLANT
Fixer le volant
1. Placez le volant sur une table ou autre surface plane.
2. Placez la vis de serrage (11) dans le système de fixation (10) puis vissez l’ensemble dans
l’emplacement prévu, sous le volant, jusqu’à ce que ce dernier soit parfaitement stable. Ne serrez pas
trop fort la vis car vous risquez d’endommager le système de fixation ou la table.
Relier le volant
1. Reliez le câble du pédalier (8) au connecteur RJ45 du volant (9).
2. Reliez l’adaptateur secteur (14) au connecteur pour l’adaptateur (15) et branchez l’adaptateur sur le
secteur.
2/8
Page 14
INSTALLATION SUR PC
Configuration requise : PC (Windows 98 SE, Me, 2000 et XP) équipé d'un port USB.
INSTALLATION DES PILOTES
Le CD-ROM fourni avec ce produit permet d'installer les pilotes Force Feedback.
1. Insérez le CD-ROM d'installation dans votre lecteur de CD-ROM. Suivez les instructions affichées à
l'écran pour installer les pilotes Force Feedback. Une fois l'installation terminée, cliquez sur Terminer et
redémarrez votre ordinateur.
2. Au redémarrage de l'ordinateur, reliez le connecteur USB (13) à l'un des ports USB de votre unité
centrale. Windows 98/Me/2000/XP détectera automatiquement le nouveau périphérique. (Si vous
branchez un périphérique USB pour la première fois, il est possible que, pendant l'installation, Windows
vous demande d'insérer le CD-ROM Windows afin d'installer les fichiers système nécessaires.)
3. Installation des pilotes :
Windows 98
appropriés. Cliquez sur Suivant. Suivez les instructions affichées à l'écran pour terminer l'installation.
Windows Me/2000/XP
4. Sélectionnez Démarrer/Tous les programmes/Thrustmaster/Force Feedback driver/Control Panel
5. Dans le Control Panel, cliquez sur « Propriétés » pour configurer votre volant :
• Test du périphérique : vous permet de tester et visualiser les boutons, la croix multidirectionnelle et
• Tester les forces : vous permet de tester 8 effets de Force et de configurer le réglage des effets de
FONCTIONS AVANCÉES SUR PC
Calibrage du volant
La roue du volant s’autocalibre de manière autonome une fois le connecteur USB connecté (cette opération
entraîne des mouvements du volant). Les pédales s’autocalibrent après quelques pressions.
Sélection du mode d’Accélération / Freinage « Séparé » (3 AXES) ou « Combiné » (2 AXES)
Par défaut, les commandes d’accélérateur et de freins de votre volant fonctionnent en mode « séparés »
(3 axes), ce qui signifie que les pédales fonctionnent sur des axes indépendants.
Le mode 3 axes permet d’améliorer considérablement la précision de votre pilotage.
Si votre jeu ne supporte pas le mode 3 axes, le pédalier de votre volant ne fonctionnera pas correctement.
Vous devez alors quitter le jeu et sélectionner le mode « combiné » (2 axes).
Pour activer ce mode, appuyez simultanément sur les 2 pédales (7) et sur le bouton Force (6).
Pour revenir en mode « séparés » (3 axes), effectuez la même opération.
Remarque :
- Lorsque vous sélectionnez le mode « combiné » (2 axes), le voyant lumineux clignote en
rouge quelques secondes (Volant = axe « X », Accélérateur et Frein = axe « RZ »).
- Lorsque vous sélectionnez le mode « séparé » (3 axes), le voyant lumineux clignote en vert
quelques secondes (Volant = axe « X » , Accélérateur = axe « RZ » et Frein = axe « Y »).
: l'Assistant Ajout de nouveau matériel se charge de rechercher pour vous les pilotes
: l'installation des pilotes est automatique.
La boîte de dialogue Contrôleurs de jeu affichera le nom du volant avec l'état OK.
les 3 axes (volant, pédale de frein et pédale d’accélération).
ForceFeedback (3 réglages possibles de 0 à 150 % : Forces Principal, Statique et Dynamique).
3/8
Page 15

Activer/Désactiver la fonction Autocentrage
Par défaut, l’autocentrage du volant est activé.
Pour désactiver ou réactiver l’auto-centrage, appuyez sur le bouton Force (6).
La majorité des jeux récents proposent dorénavant leur propre mode d’auto-centrage.
Il est donc fortement conseillé (dans la majorité des cas) de désactiver l’auto-centrage du volant, pour
laisser le jeu le gérer. Le ForceFeedback sera alors de meilleure qualité.
Le mode auto-centrage activé, sera surtout utile dans les jeux n’utilisant pas de ForceFeedback.
Remarque :
- Lorsque l'Auto-centrage est Activé, le voyant lumineux est Rouge (mode par défaut sur PC).
- Lorsque l'Auto-centrage est Désactivé, le voyant lumineux est Vert (mode conseillé sur PC).
INSTALLATION SUR PLAYSTATION 2
CONNECTER LE VOLANT
1. Éteignez votre console avant de brancher le volant.
2. Branchez le connecteur gameport (12) sur le port n° 1 de votre console
de jeu puis branchez le connecteur USB (13) sur le port USB n°1 de votre
console (respectez cet ordre lors du branchement).
3. Rallumez votre console. Le volant va s’autocalibrer de manière
autonome. (Cette opération entraîne des mouvements du volant.) et le
voyant lumineux (2) s’allume en rouge pour indiquer que le mode Retour
de force est activé.
Vous êtes maintenant prêt à jouer !
FONCTIONS AVANCÉES SUR PLAYSTATION 2
Configuration du volant
Par défaut, les commandes d’accélérateur et de freins de votre volant fonctionnent en mode « séparé »
(3 axes), ce qui signifie que les pédales fonctionnent sur des axes indépendants.
Le mode 3 axes permet d’améliorer considérablement la précision de votre pilotage.
Il vous est cependant possible de sélectionner le mode « combiné » (2 axes).
Pour activer ce mode, appuyez simultanément sur les 2 pédales (7) et sur le bouton Force (6).
Pour revenir en mode « séparés » (3 axes), effectuez la même opération.
Remarque :
- Lorsque vous sélectionnez le mode « combiné » (2 axes), le voyant lumineux clignote en vert
quelques secondes (Volant = axe « Joystick Gauche Horizontal », Accélérateur et Frein = axe
« Joystick Droit Vertical »).
- Lorsque vous sélectionnez le mode « séparé » (3 axes), le voyant lumineux clignote en rouge
quelques secondes (Volant = axe « Joystick Gauche Horizontal », Accélérateur = « Croix » et Frein
« Carré»).
Pour modifier la configuration des autres touches, allez dans les « options de commandes manettes » de
votre jeu.
4/8
Page 16
Réglage du ForceFeedback
Sur PlayStation 2, votre volant comprend 3 modes de Force Feedback = Puissant, Medium ou Eteint.
Pour basculer d’un mode à l’autre, appuyez simplement sur le bouton Force (6).
Remarque :
- Lorsque vous sélectionnez le mode ForceFeedback Puissant, le voyant lumineux est Rouge
(mode par défaut).
- Lorsque vous sélectionnez le mode ForceFeedback Medium, le voyant lumineux est Orange.
- Lorsque vous sélectionnez le mode ForceFeedback Eteint, le voyant lumineux est Vert.
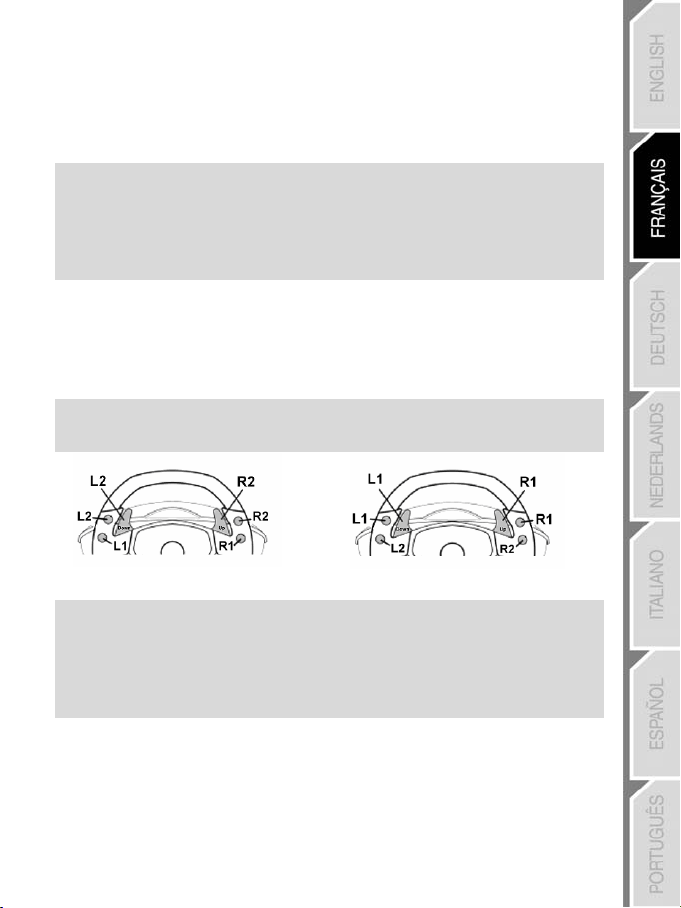
Fonction « Inversion de la boîte séquentielle »
Par défaut, les leviers numériques de changement de vitesse Up et Down (1) sont attribués à « L2 et R2»
La fonction « Inversion de la boîte séquentielle » vous permet d’affecter dans 100 % des jeux le
changement de vitesse directement aux leviers numériques Up et Down (1).
Pour passer du mode « Boîte séquentielle Normal » au mode « Boîte séquentielle Inversé », appuyez
simultanément sur les touches « L1 » + « R1 » + « Bouton Force (6) ».
Remarque : pour revenir en mode « normal », procédez de la même manière.
Mode Boîte séquentielle Normal Mode Boîte séquentielle Inversé
Remarque :
- Lorsque vous sélectionnez le Mode Boîte séquentielle Inversé, le voyant lumineux clignote
en rouge pendant quelques secondes.
- Lorsque vous sélectionnez le Mode Boîte séquentielle Normal, le voyant lumineux clignote en
vert pendant quelques secondes.
5/8
Page 17

Mode Precision Drive
Le mode Precision Drive a été spécialement élaboré dans un esprit d’amélioration des performances.
Il pourra vous permettre, selon les jeux, de battre vos meilleurs temps (et ceux de vos adversaires) ou de
passer plus facilement les différentes épreuves de conduite.
Ce nouveau mode exclusif calcule et redistribue les différents points d’analogie de la roue du volant sans
pour autant engendrer de zones mortes (comme cela peut être le cas sur d’autres volants pour lesquels
un réglage de la sensibilité est possible).
La pertinence et l’efficacité de ce mode dépendront du jeu utilisé ainsi que du circuit. En effet dans ce
mode, le volant est plus sensible et vous permettra, dans les circuits comportant des virages en épingle
par exemple, de déraper plus facilement et éviter ainsi une perte de vitesse excessive.
Dans les jeux où les réactions du volant sont très sensibles (telles les courses de F1), l’utilisation de ce
mode sera donc plutôt à éviter.
Nous vous recommandons d’utiliser ce mode en vue intérieure pour plus d’efficacité.
Pour passer en mode Precision Drive, appuyez simultanément sur la croix multidirectionnelle (4) et sur le
bouton Force (6). Procédez de la même manière pour revenir en mode de conduite normal.
Remarque :
- Lorsque le mode Precision Drive est activé, le voyant lumineux clignote en continu.
- Lorsque le mode Precision Drive est désactivé, le voyant lumineux ne clignote pas.
DEPANNAGE
- Mon volant ne fonctionne pas correctement ou semble mal calibré. Eteignez votre ordinateur ou
votre console, déconnectez entièrement votre volant, reconnectez tous les câbles (avec l’adaptateur
secteur et le pédalier), redémarrez et relancez votre jeu.
- Mon volant bouge tout seul dans le jeu. Ceci est normal, il s'agit de la fonction d’auto-centrage
disponible dans certains jeux. Pour arrêter ces mouvements, il suffit de placer ses mains sur le volant ou
de diminuer l’intensité du ForceFeedback.
- Sur PC, mon volant reste bloqué d'un coté (gauche ou droite) après le lancement du jeu. Ceci est
normal dans certains jeux. Il se recentrera de lui-même dès que vous l'aurez déclaré en tant que volant
dans le chapitre Options du jeu.
- Sur PC, mon volant est détecté par mon ordinateur, mais ne fonctionne pas avec mon jeu. Ouvrez
l’interface de gestion des options de votre jeu pour configurer votre volant. Reportez-vous au manuel de
l’utilisateur ou à l’aide en ligne de votre jeu pour plus d’informations.
- Sur PC, mon pédalier ne fonctionne pas correctement. Ouvrez l’interface de gestion des options de
votre jeu pour reconfigurer votre volant.
Si le problème persiste, quittez le jeu et basculez le pédalier en mode « combiné » (2 axes). Retournez
ensuite dans votre jeu pour reconfigurer le volant avec les nouveaux axes.
6/8
Page 18
PRÉCONISATIONS ET INFORMATIONS RELATIVES À LA SÉCURITÉ
- Lors de la connexion de votre volant et pendant la phase d’auto-calibration : pour éviter
toute mauvaise calibration, ne tournez jamais le volant, n'appuyez pas sur les pédales ou sur les
boutons.
- Lors des périodes prolongées d’inactivité et pour éviter toute consommation ou
détérioration, débranchez l’adaptateur secteur du volant. Rebranchez-le avant de reprendre la
partie.
- Votre volant est à retour de force : Ne laissez jamais votre volant à la portée des jeunes
enfants surtout lors des phases d’auto-calibration.
Support technique
Si vous rencontrez un problème avec votre produit, rendez-vous sur le site http://ts.thrustmaster.com
Support Technique. Vous aurez alors accès à différents services (Foire Aux Questions (FAQ), dernières versions
des pilotes et logiciels) susceptibles de résoudre votre problème. Si le problème persiste, vous pouvez contacter le
support technique des produits Thrustmaster (« Support Technique ») :
Par e-mail :
Pour bénéficier du support technique par e-mail, vous devez d’abord vous enregistrer en ligne. Les informations
fournies vont permettre aux techniciens de résoudre plus rapidement votre problème. Cliquez sur Enregistrement à
gauche de la page Support technique et suivez les instructions à l’écran. Si vous êtes déjà enregistré, renseignez les
champs Nom d’utilisateur et Mot de passe puis cliquez sur Connexion.
Par téléphone :
France 0892 690 024
Belgique 02 / 732 55 77
Suisse 22 567 51 20
Canada 514-279-9911
Informations relatives à la garantie
Dans le monde entier, Guillemot Corporation S.A. (« Guillemot ») garantit au consommateur que le présent produit
Thrustmaster est exempt de défauts matériels et de vices de fabrication, et ce, pour une période de deux (2) ans à
compter de la date d’achat d’origine. Si, au cours de la période de garantie, le produit semble défectueux, contactez
immédiatement le Support Technique qui vous indiquera la procédure à suivre. Si le défaut est confirmé, le produit
devra être retourné à son lieu d’achat (ou tout autre lieu indiqué par le Support Technique).
Dans le cadre de la garantie, le consommateur bénéficiera, au choix du Support Technique, du remplacement ou
de la réparation du produit défectueux. Lorsque la loi applicable l’autorise, toute responsabilité de Guillemot et ses
filiales (y compris pour les dommages indirects) se limite à la réparation ou au remplacement du produit
Thrustmaster. Les droits légaux du consommateur au titre de la législation applicable à la vente de biens de
consommation ne sont pas affectés par la présente garantie.
Cette garantie ne s’appliquera pas : (1) si le produit a été modifié, ouvert, altéré, ou a subi des dommages résultant
d’une utilisation inappropriée ou abusive, d’une négligence, d’un accident, de l’usure normale, ou de toute autre
cause non liée à un défaut matériel ou à un vice de fabrication ; (2) en cas de non-respect des instructions du
Support Technique ; (3) aux logiciels non-édités par Guillemot, lesdits logiciels faisant l’objet d’une garantie
spécifique accordée par leurs éditeurs.
0,34 €/min, du lundi au vendredi de 13h à 17h et de 18h à 22h
prix d’un appel national, du lundi au vendredi de 9h à 12h30 et de
14h à 17h30
prix d’un appel national, du lundi au vendredi de 13h à 22h
prix d’un appel longue distance, du lundi au vendredi de 7h à 17h
(heure de l’Est)
7/8
et cliquez sur
Page 19

Stipulations additionnelles à la garantie
Aux États-Unis d’Amérique et au Canada, cette garantie est limitée au mécanisme interne et au boîtier externe du
produit. Toute garantie implicite applicable, incluant les garanties de qualité marchande ou d’adaptation à un usage
particulier, est limitée à deux (2) ans à compter de la date d’achat et soumise aux conditions de la présente garantie
limitée. En aucun cas, Guillemot Corporation S.A. ou ses sociétés affiliées ne sauraient être tenues responsables
envers qui que ce soit de tous dommages indirects ou dommages accessoires résultant du non-respect des
garanties expresses ou implicites. Certains États/Provinces n’autorisent pas la limitation sur la durée d’une garantie
implicite, ou l’exclusion ou la limitation de responsabilité pour les dommages indirects ou accessoires, de sorte que
les limitations ou exclusions ci-dessus peuvent ne pas vous être applicables. Cette garantie vous confère des droits
spécifiques ; vous pouvez également bénéficier d’autres droits qui peuvent différer d’un État/Province à l’autre.
COPYRIGHT
© 2005 Guillemot Corporation S.A. Tous droits réservés. Thrustmaster® est une marque déposée de Guillemot Corporation S.A.
PlayStation® est une marque déposée de Sony Computer Entertainment Inc. Microsoft® Windows® est une marque déposée de
Microsoft Corporation aux États-Unis et/ou dans d’autres pays. Toutes les autres marques déposées et noms commerciaux sont
reconnus par les présentes et sont la propriété de leurs propriétaires respectifs. Illustrations non contractuelles. Le contenu, la conception
et les spécifications sont susceptibles de changer sans préavis et de varier selon les pays.
RECOMMANDATION RELATIVE À LA PROTECTION DE L’ENVIRONNEMENT
En fin de vie, ce produit ne doit pas être éliminé avec les déchets ménagers normaux mais déposé à un
point de collecte des déchets d'équipements électriques et électroniques en vue de son recyclage.
Ceci est confirmé par le symbole figurant sur le produit, le manuel utilisateur ou l’emballage.
En fonction de leurs caractéristiques, les matériaux peuvent être recyclés. Par le recyclage et par les
autres formes de valorisation des déchets d'équipements électriques et électroniques, vous contribuez
de manière significative à la protection de l’environnement.
Veuillez consulter les autorités locales qui vous indiqueront le point de collecte concerné.
FAQ, astuces et pilotes sur www.thrustmaster.com
8/8
Page 20

Benutzerhandbuch
TECHNISCHE FEATURES
1 2 digitale Schalthebel
2 Modus LED
3 Action Buttons
4 D-Pad
5 Auswahl- und Start-Buttons
6 Force-Button
1/8
Page 21

7 Analoges Pedalset
8 Pedalkabel
9 Pedalanschluss
10 Halteklemme
11 Befestigungsschraube
12 GAMEPORT-Anschluss (für PlayStation2)
13 USB-Anschluss (für PC und Konsole)
14 Netzteil
15 Netzteil-Adapterstecker
INSTALLATION DES LENKERS
Befestigung des Lenkers
1. Plazieren Sie das Lenkrad auf einem Tisch oder einem anderen ebenen Gegenstand.
2. Setzen Sie die Befestigungsschraube (11) in die Halteklemme (10) und schrauben die Klemme mit der
Schraube in das an der Unterseite befindliche Schraubloch des Lenkradsockels bis dieses fest sitzt.
Ziehen Sie die Schraube nie zu fest an, da dies zu einer Beschädigung der Mechanik und/oder des
Tisches führen könnte.
Anschluß des Pedalsets
1. Das Pedalkabel (8) mit dem Pedalanschluss verbinden (9).
2. Das Netzteil (14) mit dem Netzteil-Adapterstecker (15) verbinden. Das Netzteil in eine Steckdose
stecken.
2/8
Page 22

INSTALLATION FÜR PC
Systemanforderungen: PC (Windows 98 SE, Me, 2000, XP) ausgestattet mit USB-Port.
Mittels der beigelegten CD-ROM können die Force Feedback-Treiber installiert werden.
1. Die Installations-CD-ROM in das CD-ROM-Laufwerk einlegen. Befolgen Sie die
Bildschirmanweisungen, um die Treiber zu installieren. Nach Beendigung der Installation FERTIG
klicken und den Computer neu starten.
2. Nach dem Neustart das USB-Kabel (10) in einen freien USB-Port stecken. Windows 98/Me/2000/XP
erkennt die neue Hardware automatisch (Sollten Sie zum ersten Mal ein USB Gerät installieren, wird
Windows eventuell nach der Betriebssystem-CD-ROM fragen, um die erforderlichen Systemdateien zu
installieren).
3. Treiberinstallation:
Windows 98
Befolgen Sie die Bildschirmanweisungen, um die Installation fortzusetzen
Windows Me/2000/XP
4. Auswählen: Start/Programme/Thrustmaster/Force Feedback Driver/Control Panel. Die Game
Controller Dialogbox zeigt den Namen des Lenkrades mit dem Staus OK an.
5. Im Control Panel Eigenschaften auswählen, um das Lenkrad zu konfigurieren:
• Gerätetest: Zum Testen und Visualisieren der Buttons, des D-Pad und der 3 Achsen (Lenken,
• Test Force-Effekte: Testen der 8 Force-Effekte und zum konfigurieren der Force Feedback-
FORTGESCHRITTENE FUNKTIONEN AUF PC
Lenkrad kalibrieren
Bei einer USB Verbindung wird der Lenker automatisch kalibriert (dieser Vorgang bewegt den Lenker). Die
Pedale kalibrieren sich nach mehrmaligem Betätigen automatisch.
Auswahl “Einzeln” (Dreiachsig) ODER “Kombiniert” (Zweiachsig) Beschleunigung-/Bremsmodus
Voreingestellt ist der “Einzel” dreiachsige Modus für Bremsen und Beschleunigen. Das heißt, das Gas- und
Bremspedal auf jeweils unabhängigen Bewegungsachsen operieren und damit höchste Präzision in
Rennspielen unterstützen.
Fall der dreiachsige Modus von Ihrem Spiel nicht unterstützt wird, funktionieren die Gaspedale nicht richtig.
Dann bitte das Spiel beenden und den “Kombinationsmodus” (Zweiachsig) auswählen.
Um diesen Modus zu aktivieren, gleichzeitig die Beschleunigungs-/Brems-Kontrollen (7) und den Force
Button (6) drücken.
Um in den dreiachsigen Modus (“Einzeln”) zurückzukehren, wiederholen der gleichen Prozedur.
Achtung:
- wenn Sie den “Kombinationsmodus” (Zweiachsig) auswählen, wird die LED für einige
Sekunden rot blinken (Lenker = "X" Achse, Beschleunigung und Bremse = "RZ" Achse).
- Wenn Sie den “Einzelmodus” (Dreiachsig) auswählen wird die LED für einige Sekunden
grün blinken (Lenker = X" Achse, Beschleunigung = "RZ" Achse und Bremse = "Y" Achse).
: Der Hardwareassistent sucht nach den entsprechenden Treibern. Nächste klicken.
: Treiber werden automatisch installiert.
Bremse und Gaspedal).
Einstellungen (drei mögliche Einstellungen: 0 bis 150 %; Force Feedback-Effekte: Vollständig,
statisch und dynamisch).
3/8
Page 23

Aktivieren/Deaktivieren der Zentrierungs-Funktion
Lenkrad-Zentrierung ist in den Voreinstellungen aktiviert.
Um die Zentrierung zu aktivieren/deaktivieren, den Force-Button (6) drücken.
Die meisten aktuellen Spiele haben ihren eigenen Zentrierungsmodus.
Es ist daher angeraten die Zentrierungs-Funktion zu deaktivieren (in den meisten Fällen) und diese durch
das Spiel durchführen zu lassen. Die Force Feedback Effekte haben dann eine bessere Qualität. Ein
aktivierter Zentrierungsmodus ist sinnvoll in Spielen, die keine Force Feedback Effekte
unterstützen/aufweisen.
Achtung:
- Zentrierung ist aktiviert: LED ist Rot (Voreingestellt auf dem PC).
- Zentrierung ist deaktiviert: LED ist Grün (empfohlener Modus auf dem PC).
INSTALLATION FÜR PLAYSTATION 2
Anschluß des Lenkrads
1. Schalten Sie die Konsole aus bevor Sie das Lenkrad anschließen.
2. Konsolenstecker (12) mit Port 1 der Konsole verbinden und den USB-Stecker (13) in den oberen USB-
Port stecken (unbedingt diese Reihenfolge beachten).
3. Konsole einschalten. Das Lenkrad kalibriert sich automatisch (dieser Vorgang bewegt den
Lenkradkranz) und die LED (2) leuchtet rot um den aktivierten Force Feedback Modus anzuzeigen.
FORTGESCHRITTENE FUNKTIONEN AUF DER PLAYSTATION 2
Konfigurieren des Lenkrads
Und schon können Sie loslegen!
Voreingestellt arbeiten die Gas- und Brems-Kontrollen im Dreiachsenmodus („Separat“), d. h. Brems- und
Gaspedal arbeiten auf unabhängigen Achsen.
Der dreiachsige Modus verbessert die Präzision in Rennen.
Sie können aber auch den “Kombiniert” Zweiachsenmodus einstellen.
Um diesen Modus zu aktivieren, gleichzeitig die Beschleunigungs-/Brems-Kontrollen (7) und den Force
Button (6) drücken.
Um in den dreiachsigen Modus (“Einzeln”) zurückzukehren, wiederholen der gleichen Prozedur.
Achtung:
- wenn Sie den “Kombinationsmodus” (Zweiachsig) auswählen, wird die LED für einige
Sekunden rot blinken (Lenker = "X" Achse, Beschleunigung und Bremse = "RZ" Achse).
- Wenn Sie den “Einzelmodus” (Dreiachsig) auswählen wird die LED für einige Sekunden
grün blinken (Lenker = X" Achse, Beschleunigung = "RZ" Achse und Bremse = "Y" Achse).
Um die Konfiguration der anderen Button zu ändern, gehen Sie bitte in die "Gamepad Control Options"
Ihres Spiels.
4/8
Page 24

Force Feedback einstellen
Auf der PlayStation 2 verfügt der Lenker über drei Force Feedback Modi = Power, Medium oder Aus.
Den Force-Button (6) drücken, um von einem Modus zum anderen zu schalten.
Hinweis:
- Power Force Feedback Modus: LED ist Rot (voreingestellt).
- Medium Force Feedback Modus: LED ist Orange.
- Force Feedback AUS: LED ist Grün.
“Inverse Sequentielle Schalthebel” Funktion
In den meisten Spielen sind die Schaltfunktionen (1) den L2, R2-Buttons standardmäßig zugewiesen.
“Inverse Sequentielle Schalthebel” Funktion erlaubt Ihnen das Zuweisen der Funktionen direkt auf die
beiden digitalen Schalthebel (1) in wirklich allen Spielen.
Um vom “Normalen Sequentielle Schalthebel ” Modus zum “ Inverse Sequentielle Schalthebel ” Modus
umzuschalten, drücken Sie gleichzeitig die Buttons L1 + R1 und Force-Button (6).
Achtung: Folgen Sie den gleichen Schritten um in den „normalen“ Modus zurückzukehren.
Normale Sequentielle Schalthebel Funktion Inverse Sequentielle Schalthebel
Funktion
Achtung:
Inversive Sequentielle Schalthebel Funktion: LED blinkt für einige Sekunden rot.
Normale Sequentielle Schalthebel Funktion: LED blinkt für einige Sekunden grün.
Precision Drive-Modus
Der Precision Drive-Modus (präzises Fahren) wurde im Hinblick auf die Verbesserung Ihrer Leistung im
Spiel entwickelt.
Je nach Spiel hilft Ihnen dieser Modus Ihre Bestzeiten zu schlagen (und die Ihrer Mitspieler) oder auch
komplizierte Kurse erfolgreich zu meistern.
Dieser neue Exklusivmodus berechnet und verteilt die verschiedenen Vergleichspunkte, welche einen
Lenkeinschlag im Spiel bestimmen, neu, ohne dabei tote Winkel zu erzeugen (wie es vielleicht andere
Lenkräder mit Empfindlichkeitseinstellung machen).
Wie effektiv und entsprechend dieser Modus ist, hängt von dem Spiel und dem Rennkurs ab. In diesem
Modus ist das Lenkrad sehr sensibel und erlaubt Ihnen leichtere Powerslides ohne dabei an
Geschwindigkeit zu verlieren – zum Beispiel in Rallyes mit Haarnadelkurven.
In Spielen, in denen die Lenkradreaktionen sehr feinfühlig zu handhaben sind (z. B. F1 Racing) werden Sie
ebenfalls mit Vergnügen auf diesen Modus zurückgreifen.
5/8
Page 25

Wir empfehlen die Nutzung dieses Modus im Hinblick auf maximale Effektivität.
Um in den Precision Drive-Modus zu gelangen, drücken Sie gleichzeitig die zwei Schalthebel (1) und das
D-Pad (4). Den gleichen Vorgang wiederholen, um in den normalen Fahrmodus zurückzukehren.
Achtung:
- Wenn der Precision Drive-Modus aktiv ist, blinkt die LED kontinuierlich.
- Bei inaktiven Precision Drive-Modus blinkt die LED nicht.
TROUBLESHOOTING
- Mein Lenkrad funktioniert nicht richtig oder scheint nicht richtig kalibriert zu sein. Konsole oder
PC ausschalten. Dann Lenker abklemmen und alle Kabel (inkl. Pedale) erneut verbinden. Gerät wieder
einschalten und das Spiel erneut starten.
- Der Lenkrad bewegt sich von selbst im Spiel. Dies ist die normale Zentrierungs-Funktion in manchen
Spielen. Um die Bewegungen zu stoppen, die Hände am Lenkrad lassen oder die Force Feedback
Intensität zurücknehmen.
- Mein Lenkrad wendet sich nach der Autokalibrierung nach einer Seite (Links oder Rechts). Dies
ist in einigen Spielen normal. Das Lenkrad wird sich von selbst re-zentrieren, wenn Sie ihn in den SetupOptionen des Spiels als Lenker angemeldet haben.
- Auf dem PC: Das Lenkrad wird als solches erkannt, doch funktioniert nicht im Spiel. Bitte
Spieloptionen aufrufen, um das Lenkrad zu konfigurieren. Lesen Sie das Benutzerhandbuch des Spiels
für weiterführende Information.
- Auf dem PC: Das Pedalset funktioniert nicht korrekt. Gameoptionen aufrufen und im
Konfigurierungsmanagement das Lenkrad rekonfigurieren. Falls das Problem weiter besteht, das Spiel
verlassen und das Pedalset auf den „Kombinationsmodus“ (Zweiachsig) schalten. Dann das Spiel erneut
starten und das Lenkrad als Zweiachsig rekonfigurieren.
SICHERHEITSEMPFEHLUNG UND INFORMATION
- Während des Verbindens des Lenkrads mit dem PC oder der PLAYSTATION: Um
inkorrekter Kalibrierung vorzubeugen, niemals am Lenkrad drehen oder die Buttons und Pedale
drücken.
- Wenn längere Zeit nicht in Gebrauch und um Strom zu sparen, klemmen Sie das Netzteil ab
und schließen Sie es wieder an, um wieder zu spielen.
- Ihr Lenkrad verfügt über Force Feedback: Niemals das Lenkrad in Reichweite von
Kleinkindern, speziell während der Autokalibrierung, unbeaufsichtigt lassen.
6/8
Page 26

TECHNISCHER SUPPORT
Sollten Sie mit Ihrem Produkt ein Problem haben, besuchen Sie bitte die Seite http://ts.thrustmaster.com
und klicken Sie auf Technischer Support. Von dort aus können Sie auf verschiedene Hilfen zugreifen
(Fragen und Antworten (FAQ), die neuesten Versionen von Treibern und Software), die Ihnen bei der
Lösung Ihres Problems helfen könnten. Falls das Problem weiterhin besteht, können Sie mit dem
technischen Support für Thrustmaster Produkte in Kontakt treten („Technischer Support“):
Per Email:
Um den technischen Supports per Email in Anspruch nehmen zu können, müssen Sie sich zunächst online
registrieren. Mit den Informationen, die Sie uns so zukommen lassen, können die Mitarbeiter Ihr Problem
schneller lösen. Klicken Sie bitte auf Registrierung links auf der Seite des technischen Supports und
folgen Sie den Anweisungen auf dem Bildschirm. Falls Sie bereits registriert sind, füllen Sie die Textfelder
Anwendername und Paßwort aus und klicken dann auf Login.
Per Telefon:
GEWÄHRLEISTUNGSINFORMATION
Guillemot Corporation S.A. („Guillemot“) bietet dem Kunden ab dem Kaufdatum weltweit eine 2-jährige
Garantie auf Materialschäden und Herstellungsmängel. Sollte das Produkt dennoch während dieser zwei
Jahre Schäden oder Mängel aufweisen, kontaktieren Sie bitte unverzüglich den technischen Support, der
Ihnen die weitere Verfahrensweise mitteilen wird. Im Falle eines technischen Defektes können Sie da
Produkt dort, wo Sie es gekauft haben, zurückgeben (oder an die vom Technischen Support angegebene
Adresse).
Im Rahmen dieser Garantie wird das defekte Produkt nach Ermessen des technischen Supports entweder
repariert oder ersetzt. Überall wo es geltendes Recht zulässt, wird die Haftung von Guillemot und seinen
Niederlassungen für das jeweilige Produkt(einschließlich für indirekte Beschädigungen), nur soweit
übernommen, als das eine Reparatur durchgeführt wird oder Ersatz geleistet wird. Die Rechte des Käufers
gemäß dem geltenden Recht des jeweiligen Landes werden durch diese Garantie nicht beeinflusst.
Diese Garantie tritt unter folgenden Umständen nicht in Kraft :
(1) Falls am Produkt etwas verändert wurde oder es geöffnet wurde, ein Schaden durch unangebrachte
Nutzung, Fahrlässigkeit, einen Unfall, Verschleiß oder irgendeinen anderen Grund verursacht wurde, der
nicht im Zusammenhang mit einem Materialdefekt oder Herstellungsmangel aufgetreten ist.
(2) Im Falle der Nichtbeachtung der durch den technischen Support erteilten Anweisungen.
(3) Software, die nicht von Guillemot herausgegeben wurde, unterliegt der speziellen Garantie des
jeweiligen Softwareherstellers.
Deutschland 0180/5824763
Schweiz 22 567 51 20
0,12 €/Minute, Montag bis Freitag
von 15 bis 18 Uhr und 19 bis 22 Uhr
Zum Preis eines landesweiten Telefongesprächs,
Montag bis Freitag von 13 bis 22 Uhr
7/8
Page 27

COPYRIGHT
© 2005 Guillemot Corporation S.A. Alle Rechte vorbehalten. Thrustmaster® ist ein eingetragenes
Warenzeichen der Guillemot Corporation S.A. PlayStation® ist ein eingetragenes Warenzeichen der Sony
Computer Entertainment Inc. Microsoft® Windows® 98, 2000, Me und XP sind eingetragene Warenzeichen der
Microsoft Corporation in den Vereinigten Staaten von Amerika und/oder anderen Ländern. Alle anderen
Warenzeichen und Markennamen werden hiermit anerkannt und sind Eigentum ihrer jeweiligen Eigentümer.
Fotos und Abbildungen nicht bindend. Inhalt, Design und Eigenschaften des Produkts können ohne
Bekanntmachung geändert werden und variieren von Land zu Land.
Hinweise zum Umweltschutz
Dieses Produkt darf am Ende seiner Lebensdauer nicht über den normalen
Haushaltsabfall entsorgt werden, sondern muss an einem Sammelpunkt für das
Recycling von elektrischen und elektronischen Geräten abgegeben werden.
Das Symbol auf dem Produkt, der Gebrauchsanleitung oder der Verpackung weist
darauf hin.
Die Werkstoffe sind gemäß ihrer Kennzeichnung wiederverwertbar. Mit der
Wiederverwendung, der stofflichen Verwertung oder anderen Formen der Verwertung
von Altgeräten leisten Sie einen wichtigen Beitrag zum Schutze unserer Umwelt.
Bitte erfragen Sie bei der Gemeindeverwaltung die zuständige Entsorgungsstelle.
FAQs, Tipps und Treiber erhalten Sie auf www.thrustmaster.com
8/8
Page 28

Handleiding
TECHNISCHE KENMERKEN
1 2 digitale schakelflippers
2 Modus-LED
3 Actieknoppen
4 D-pad
5 Selectie- en Startknoppen
6 Force-knop
1/8
Page 29

7 Analoge pedalen
8 Kabel voor pedalen
9 Connector voor pedalen (stuurzijde)
10 Tafelklem
11 Klemschroef
12 GAMEPORT-aansluiting (voor PlayStation2)
13 USB-aansluiting (voor PC en PlayStation2)
14 Voedingsadapter
15 Connector voor adapter
HET STUUR INSTALLEREN
Het stuur vastzetten
1. Zet het stuur op een tafel of een ander vlak oppervlak.
2. Stop de klemschroef (11) in de klem (10) en schroef de klembeugel goed vast in het gat aan de
onderzijde van het racestuur. Draai de schroef niet al te vast aan, want dat zou de klem of de tafel
kunnen beschadigen.
De pedalen aansluiten
1. Sluit de beide connectoren voor de pedalen op elkaar aan: stuurzijde (8) en pedaalzijde (9).
2. Sluit de voedingsadapter (14) aan op de adapterconnector (15) en steek de adapter in een
stopcontact.
2/8
Page 30

INSTALLATIE VOOR PC
Systeemvereisten: PC met Windows 98SE, Me, 2000 of XP en een USB-poort.
Met behulp van de meegeleverde CD-ROM kunnen de drivers voor Force Feedback. worden
geïnstalleerd
1. Plaats de installatie-CD in de CD-ROM-drive. Volg de instructies op het scherm om de Force
Feedback-drivers te installeren. Klik, als de installatieprocedure is afgerond, op Voltooien om de
computer opnieuw te starten.
2. Als de computer opnieuw is gestart, sluit je de USB-connector (10) aan op een van de USB-poorten
van je computer. Windows 98/Me/2000/XP zal het nieuwe apparaat automatisch herkennen. (Als een
nieuw USB-apparaat voor het eerst op de computer wordt aangesloten, kan bij het installeren
gevraagd worden de Windows CD-ROM te plaatsen zodat de benodigde systeembestanden kunnen
worden geïnstalleerd).
3. Installatie van de driver:
Onder Windows 98
Volg de aanwijzingen op het scherm op om de installatie te voltooien.
Windows 2000/Me/XP
4. Selecteer Start/Programma's/Thrustmaster/Force Feedback driver/Control Panel. In het
dialoogvenster Game Controllers (of Spelbesturingen, afhankelijk van het besturingssysteem).
staat de naam van de gamepad met als status OK.
5. Klik op Eigenschappen in het Configuratiescherm om de gamepad te configureren.
• Test device: hiermee kun je de knoppen, de D-Pad en de 3 assen (stuur, rem en gaspedaal)
bekijken en testen.
• Test forces: hiermee kun je de 8 beschikbare Force Feedback effecten testen en de instellingen
voor Force Feedback kiezen. (Er zijn 3 mogelijke instellingen, van 0 tot 150 % : Main, Static en
Dynamic).
GEAVANCEERDE FUNCTIES VOOR PC
Het stuur kalibreren
Het stuur wordt automatisch gekalibreerd zodra het is aangesloten op de USB-poort. (Tijdens dit proces
zul je het stuur een paar bewegingen zien maken.) De pedalen worden automatisch gekalibreerd als je ze
een paar keer indrukt.
Modus “Separate” (Afzonderlijk, 3 assen) of “Combined” (Gecombineerd, 2 assen) selecteren voor
gas geven / remmen
Gas geven en remmen gebeurt standaard in de modus "Separate", waarbij 3 assen worden gebruikt. Rem
en gaspedaal functioneren daarbij elk op een eigen as. (De derde is voor het stuur.)
Het gebruik van 3 assen geeft een aanzienlijk grotere precisie tijdens het racen.
Deze modus voor 3 assen moet dan wel door de game worden ondersteund, want anders werkt het
gaspedaal niet correct. In dat geval moet je de game afsluiten en de modus "Combined" selecteren (2
assen).
Om deze modus te activeren, druk je gelijktijdig het gas- en rempedaal in (7) terwijl je de Force-knop (6)
ingedrukt houdt..
: de Wizard Nieuwe hardware zoekt de benodigde drivers. Klik op Volgende.
: de drivers worden automatisch geïnstalleerd.
3/8
Page 31

Op dezelfde manier kun je ook weer terugschakelen naar de modus "Separate" voor 3 assen.
Opmerking:
- Als je de modus "Combined" (2 assen) selecteert, knippert het LED-lampje een paar
seconden met rood licht (stuur = "X", gaspedaal/rem = "RZ").
- Als je de modus "Separate" (3 assen) selecteert, knippert het LED-lampje een paar
seconden met groen licht (stuur = "X", gaspedaal = "RZ", rem = "Y").
Functie voor automatisch centreren in- en uitschakelen
In de standaardinstellingen wordt het stuur automatisch gecentreerd.
Je kunt deze functie uitschakelen (en weer inschakelen) door op de Force-knop (6) te drukken.
De laatste tijd zijn er steeds meer games die een eigen methode voor centreren gebruiken.
Het is meestal dan ook het beste om de functie voor automatisch centreren uit te schakelen en het aan de
game zelf over te laten. Dat levert ook meteen een betere kwaliteit ForceFeedback op.
In games die niet met ForceFeedback werken kan inschakeling van automatisch centreren wel een goed
idee zijn.
Opmerking:
- Rood LED-lampje: automatisch centreren ingeschakeld (standaardinstelling voor PC).
- Groen LED-lampje: automatisch centreren uitgeschakeld (aanbevolen instelling voor PC).
INSTALLATIE VOOR PLAYSTATION 2
HET STUUR AANSLUITEN
1. Zet de game console uit voordat je het stuur aansluit.
2. Sluit de connector voor console (12) aan op poort 1 van de console en
sluit daarna de USB-connector (13) aan op de bovenste USB-poort (in die
volgorde).
3. Zet de gameconsole weer aan. Het stuur wordt nu automatisch
gekalibreerd (tijdens deze procedure zal het stuur bewegen) waarna het
LED-lampje (2) gaat branden ten teken dat Force Feedback is
ingeschakeld.
GEAVANCEERDE FUNCTIES VOOR PLAYSTATION 2
Het stuur configureren
Nu kan er gespeeld worden!
Gas geven en remmen gebeurt standaard in de modus "Separate", waarbij 3 assen worden gebruikt. Rem
en gaspedaal functioneren daarbij elk op een eigen as. (De derde is voor het stuur.)
Het gebruik van 3 assen geeft een aanzienlijk grotere precisie tijdens het racen.
Het is desondanks mogelijk om voor de modus "Combined" (2 assen) te kiezen.
4/8
Page 32

Om deze modus te activeren, druk je gelijktijdig het gas- en rempedaal in (7) terwijl je de Force-knop (6)
ingedrukt houdt..
Op dezelfde manier kun je ook weer terugschakelen naar de modus "Separate" voor 3 assen.
Opmerking:
- Als je de modus "Combined" (2 assen) selecteert, knippert het LED-lampje een paar
seconden met groen licht (stuur = "linker joystick", gaspedaal/rem = "rechter joystick").
- Als je de modus "Separate" (3 assen) selecteert, knippert het LED-lampje een paar
seconden met rood licht (stuur = "linker joystick", gaspedaal = "Kruis", rem = "Vierkantje").
Aanpassing van de configuratie van andere knoppen doe je in de game zelf. Je vindt daar meestal een
functie als "gamepad control options".
ForceFeedback instellen
Op de PlayStation 2 zijn er drie standen voor Force Feedback = Power, Medium en Off (Extra, Normaal
en Uit)..
Je schakelt van de ene stand naar de volgende door op de Force-knop (6) te drukken.
Opmerking:
- Als Power ForceFeedback is ingeschakeld, is het LED-lampje Rood (standaardinstelling).
- Als Medium ForceFeedback is ingeschakeld, is het LED-lampje Oranje.
- Als ForceFeedback is uitgeschakeld, is het LED-lampje Groen.
De functie “Sequential gearbox inversion”
In de meeste games gebeurt schakelen (1) standaard met de knoppen L2 en R2.
Met de functie “Sequential gearbox inversion” kan het bedienen van de versnellingsbak worden toegekend
aan de 2 digitale schakelflippers (1).
Druk tegelijkertijd op de knoppen L1 + R1 en Force om te wisselen tussen de modus “Normal sequential
gearbox” en “Inverted sequential gearbox.”
Opmerking: Met dezelfde procedure ga je ook weer terug naar de modus "Normal".
Normal Sequential Gearbox Inverted Sequential Gearbox
Opmerking:
- Als de modus "Inverted Sequential Gearbox Mode" is geselecteerd, knippert het LED-lampje
een paar seconden met rood licht.
- Als de modus "Normal Sequential Gearbox Mode" is geselecteerd, knippert het LED-lampje een
paar seconden met groen licht.
5/8
Page 33

De modus Precision Drive
De modus Precision Drive is speciaal ontwikkeld om de prestaties te verbeteren.
Afhankelijk van de game kan deze modus worden gebruikt om je tijden te verbeteren (en tijden van
tegenstanders te kloppen) of om bepaalde uitdagingen eenvoudiger tot een goed einde te brengen.
Deze nieuwe en exclusieve modus berekent de verschillende analogiepunten van het stuur en stelt ze
opnieuw in zonder dode zones te veroorzaken (hetgeen nogal eens het geval is bij andere sturen waarvan
de gevoeligheid kan worden aangepast).
Hoe handig en effectief deze modus is, hangt af van de game en het circuit of parcours dat je moet rijden.
In deze modus luistert het stuur zeer nauwkeurig waardoor je uitstekend kunt driften en dus niet al te veel
snelheid verliest. Dit is uiterst effectief op circuits met bijvoorbeeld veel haarspeldbochten.
In games met een hele korte stuuruitslag zoals F1-games is het weer niet handig om deze modus te
gebruiken .
Wij adviseren deze modus niet zonder nadenken in te zetten.
Druk gelijktijdig op de D-pad (4) en de Force-knop (6) om over te schakelen naar de modus Precision
Drive. Met dezelfde procedure kun je ook weer terugschakelen naar de normale modus.
Opmerking:
- Als de modus Precision Drive is ingeschakeld, blijft het LED-lampje knipperen.
- Als de modus Precision Drive is uitgeschakeld, knippert het LED-lampje niet.
VERHELPEN VAN STORINGEN
- Mijn stuur werkt niet goed of het lijkt er op dat het stuur niet goed gekalibreerd is. Schakel PC of
console uit, haal de aansluitingen van het stuur los, sluit alle kabels opnieuw aan (inclusief die van de
voedingsadapter en de pedalen), schakel PC of console weer in en start de game opnieuw.
- Het stuur beweegt zonder dat ik iets doe. Dit heeft te maken met de functie voor automatisch
centreren die in sommige games wordt gebruikt. Het is dus een normaal verschijnsel. Wil je die
bewegingen stoppen, dan leg je gewoon je handen op het stuur of je kiest voor een minder intensieve
ForceFeedback-instelling.
- Mijn stuur blijft helemaal naar links of rechts staan nadat het automatisch is gekalibreerd. Dit is
normaal bij sommige games. Het stuur komt vanzelf terug in de middenpositie zodra je het in de setupopties van de game hebt aangemeld als een stuur.
- Het stuur wordt door de computer (PC) herkend, maar het werkt niet in de game. Ga in de game
naar de Opties en configureer het stuur. Raadpleeg de handleiding bij de game voor meer informatie.
De pedalen werken niet correct (PC). Ga in de game naar de Opties en configureer het stuur. Als het
probleem blijft optreden, sluit je de game af en activeer je de modus "Combined" (2 assen). Vervolgens
start je de game opnieuw en configureer je het stuur voor de nieuwe instelling.
6/8
Page 34

VEILIGHEIDSINFORMATIE EN -AANBEVELINGEN
- Bij het aansluiten van het stuur en tijdens automatisch kalibreren: Niet aan het stuur
draaien en knoppen of pedalen niet indrukken. Dit zou het proces van kalibreren kunnen
verstoren.
- Als het stuur langere tijd niet wordt gebruikt, haal dan altijd de voedingsadapter uit het
stopcontact om onnodig stroomverbruik of slijtage te voorkomen. Denk er dan wel aan de adapter
weer aan te sluiten als je het stuur weer gaat gebruiken.
- Dit stuur werkt met ForceFeedback: zorg er dus ALTIJD voor dat het buiten bereik blijft van
kleine kinderen, vooral tijdens het proces van automatisch kalibreren.
TECHNICAL SUPPORT
Als u problemen hebt met uw product, gaat u naar http://ts.thrustmaster.com
Vanaf hier hebt u toegang tot verschillende onderwerpen zoals hulpprogramma’s, de FAQ (veelgestelde vragen)
en de meest recente drivers en software die u helpen bij het vinden van oplossingen. Als het probleem zich blijft
voordoen, neem dan contact op met de Thrustmaster product technical support service (“Technical Support”):
Per e-mail:
Voordat u gebruik kunt maken van technisch ondersteuning per e-mail dient u zich eerst online te registreren. Met
de door u verstrekte informatie kan uw probleem sneller en beter worden opgelost. Klik op Registration aan de
linkerzijde van de pagina Technical Support en volg de aanwijzingen op het scherm. Inidien u reeds geregistreerd
bent, vult u de velden Username en Password in en klikt u op Login.
Per telefoon:
GARANTIE INFORMATIE
Wereldwijd garandeert Guillemot Corporation S.A. (“Guillemot”) de consument dat dit Thrustmaster-product
gedurende een periode van twee (2) jaar vanaf de oorspronkelijke aankoopdatum vrij zal zijn van materiaal- en
fabricagefouten. Indien u in de garantieperiode een defect meent te constateren aan dit product, neem dan
onmiddellijk contact op met de Technical Support die u zal informeren over de te volgen procedure. Als het defect
wordt bevestigd, dan dient het product te worden geretourneerd naar de plaats van aankoop (of een andere
locatie die wordt opgegeven door Technical Support).
Binnen het gestelde van deze garantie wordt het defecte product van de consument gerepareerd of vervangen,
zulks ter beoordeling van Technical Support. Indien toegestaan door van kracht zijnde wetgeving, beperkt de
volledige aansprakelijkheid van Guillemot en haar dochterondernemingen (inclusief de aansprakelijkheid voor
indirecte schade) zich tot het repareren of vervangen van het Thrustmaster product. De wettelijke rechten van de
klant volgens de wetgeving van toepassing op de verkoop van consumentproducten worden op generlei wijze
beperkt door deze garantie.
Deze garantie is niet van kracht: (1) indien het product gemodificeerd, geopend of gewijzigd is, of beschadigd ten
gevolge van oneigenlijk of onvoorzichtig gebruik, verwaarlozing, een ongeluk, normale slijtage, of enig andere
oorzaak niet gerelateerd aan een materiaal- of fabricagefout; (2) indien u zich niet houdt aan de instructies zoals
verstrekt door Technical Support; (3) op software die niet is gepubliceerd door Guillemot en daardoor onder de
specifieke garantie valt zoals verstrekt door degene die deze software publiceert.
België 02 / 732 55 77
kosten van interlokaal gesprek, maandag t/m vrijdag
van 09:00 tot 12:30 en van 14:00 tot 17:30
7/8
en klikt u op Technical Support.
Page 35

COPYRIGHT
© Guillemot Corporation 2005. Alle rechten voorbehouden. Thrustmaster® is een geregistreerd handelsmerk van Guillemot
Corporation S.A. PlayStation® is een geregistreerd handelsmerk van Sony Computer Entertainment Inc. Microsoft®
Windows® 98, 2000, Me en XP zijn geregistreerde handelsmerken van Microsoft Corporation in de Verenigde Staten en/of
andere landen. Alle andere handelsmerken en merknamen zijn hierbij erkend en zijn het eigendom van de desbetreffende
eigenaren. Illustraties zijn niet bindend. Inhoud, ontwerpen en specificaties kunnen zonder voorafgaande kennisgeving
gewijzigd worden en afwijken in verschillende landen.
Aanbevelingen voor de bescherming van het milieu
Gooi dit product na het einde van de levensduur niet weg met het normale afval, maar breng het naar het
door uw gemeente aangewezen inzamelpunt voor elektrische en/of computerapparatuur.
Ter herinnering is hiertoe op het product, de gebruikshandleiding of de verpakking een symbool aangebracht.
De meeste materialen kunnen worden gerecycled. Dankzij recycling en andere methodes voor het verwerken
van afgedankte elektrische en elektronische apparaten kunt u een belangrijke bijdrage leveren aan de
bescherming van het milieu.
Neem contact op met uw gemeente voor informatie over een inzamelpunt bij u in de buurt.
Veelgestelde vragen, tips en drivers zijn te vinden op www.thrustmaster.com
8/8
Page 36

Manuale d’uso
CARATTERISTICHE TECNICHE
1 2 leve del cambio digitali
2 Led Mode
3 Pulsanti azione
4 D-pad
5 Pulsanti Select e Start
6 Pulsante Force
1/8
Page 37

7 Pedaliera analogica
8 Cavo della pedaliera
9 Connettore della pedaliera
10 Morsa per fissaggio al tavolo
11 Vite della morsa
12 Connettore GAMEPORT (per PlayStation2)
13 Connettore USB (per PC e PlayStation2)
14 Alimentatore
15 Connettore dell’alimentazione
INSTALLAZIONE DEL VOLANTE
Fissare il volante in posizione
1. Posiziona il volante su un tavolo o un’altra superficie piana.
2. Inserisci la vite della morsa (11) nella morsa stessa (10), quindi avvita la morsa all’apposito foro posto
sotto il volante, finché non risulta saldamente fissata. Non stringere troppo la vite: rischieresti di
danneggiare la morsa e/o il tavolo.
Collegamento della pedaliera
1. Inserisci il connettore della pedaliera (8) nell’apposito ricettore (9).
2. Collega l’alimentatore (14) al connettore dell’alimentazione (15) e collega l’alimentatore ad una presa
elettrica.
2/8
Page 38

INSTALLAZIONE PER PC
Requisiti di sistema: PC (Windows 98 SE, Me, 2000, XP) dotato di porta USB.
Il CD-ROM accluso a questo prodotto ti permette di installare i driver Force Feedback.
1. Inserisci il CD-ROM di installazione nell’apposito lettore. Installa i driver Force Feedback seguendo le
istruzioni che compaiono sullo schermo. Una volta terminate l’installazione, clicca su Fine e riavvia il
computer.
2. Una volta riavviato il computer, collega il connettore USB (10) ad una delle porte USB del tuo computer.
Windows 98/Me/2000/XP identificherà automaticamente la nuova periferica. (Se è la prima volta che
colleghi una periferica USB, durante la procedura di installazione potrebbe esserti richiesto di inserire il
CD-ROM di Windows per installare i necessari file di sistema.)
3. Installazione dei driver:
Windows 98
Clicca su Avanti. Segui le istruzioni sullo schermo per completare l’installazione.
Windows Me/2000/XP
4. Clicca su Start/Tutti i programmi/Thrustmaster/Force Feedback driver/Pannello di controllo. La
finestra di dialogo Periferiche di gioco visualizzerà il nome del gamepad con OK come “stato”.
5. Per configurare il tuo gamepad, nel Pannello di controllo clicca su Proprietà:
• Test periferica: per testare e visualizzare i vari pulsanti, il D-pad e i 3 assi di movimento (volante,
• Test forze: per testare gli 8 effetti di ritorno di forza e configurarne le impostazioni (3 impostazioni
FUNZIONI AVANZATE PER PC
Calibrazione del volante
Il volante viene calibrato automaticamente non appena viene collegato tramite USB (questa operazione
farà muovere il volante). La pedaliera si calibrerà da sola dopo aver premuto per alcune volte i pedali.
Selezione della modalità di accelerazione/frenata “Separata” (3-assi) OPPURE “Combinata” (2-assi)
Per default, i controlli del volante per acceleratore e freno operano in modalità “separata” a 3-assi:
acceleratore e freno operano su assi indipendenti.
Il supporto a 3 assi aumenta considerevolmente la precisione della guida in tutti i giochi di corse.
Se il tuo gioco non supporta la modalità a 3 assi, i pedali del gas non funzioneranno correttamente. In
questo caso, esci dal gioco e seleziona la modalità “combinata” a 2 assi.
Per attivare questa modalità, premi contemporaneamente i controlli di acceleratore/freno (7) ed il pulsante
Force (6).
Per ritornare alla modalità “separata” a 3 assi, ripeti la medesima procedura.
Nota:
- Quando selezioni la modalità "combinata" (2 assi), il led lampeggerà di rosso per alcuni
secondi (Volante = asse "X", Acceleratore e Freno = asse "RZ").
- Quando selezioni la modalità "separata" (3 assi), il led lampeggerà di verde per alcuni
secondi (Volante = asse "X" , Acceleratore = asse "RZ" e Freno = asse "Y").
: la procedura di Installazione guidata nuova periferica cercherà i driver più appropriati.
: i driver vengono installati automaticamente.
pedali di acceleratore e freno).
possibili: da 0 a 150 % : Forces Main, Static e Dynamic).
3/8
Page 39

Attivazione/disattivazione della funzione di ricentraggio
Il ricentraggio automatico del volante è attivo per default.
Per disattivarlo o ripristinarlo, premi il pulsante Force (6).
Attualmente, i giochi più recenti propongono la propria modalità di ricentraggio.
Ti consigliamo vivamente di disattivare il ricentraggio del volante (nella maggior parte dei casi), lasciando
che sia il gioco ad effettuare tale operazione. Ciò garantisce una migliore qualità degli effetti di ritorno di
forza.
Se attivata, la modalità di ricentraggio è utile specialmente nei giochi che non supportano il
ForceFeedback.
Nota:
- Quando il Ricentraggio automatico è attivo, il led è Rosso (la modalità di default per PC).
- Quando il Ricentraggio automatico non è attivo, il led è Verde (modalità raccomandata per
PC).
INSTALLAZIONE PER PLAYSTATION 2
CONNESSIONE DEL VOLANTE
1. Prima di collegare il volante, spegni la tua console.
2. Collega il connettore per console (12) alla porta 1 della tua console e
collega il connettore USB (13) alla porta USB più in alto (effettua i
collegamenti in quest’ordine).
3. Riaccendi la tua console. Si volante si calibrerà automaticamente (questa
operazione farà muovere il volante), mentre il led (2) si illuminerà di rosso,
indicando che la modalità ForceFeedback è attivata.
FUNZIONI AVANZATE PER PLAYSTATION 2
Configurazione del volante
Ora sei pronto a giocare!
Per default, i controlli del volante per acceleratore e freno operano in modalità “separata” a 3-assi:
acceleratore e freno operano su assi indipendenti.
Il supporto a 3 assi aumenta considerevolmente la precisione della guida in tutti i giochi di corse.
Se il tuo gioco non supporta la modalità a 3 assi, i pedali del gas non funzioneranno correttamente. In
questo caso, esci dal gioco e seleziona la modalità “combinata” a 2 assi.
Per attivare questa modalità, premi contemporaneamente i controlli di acceleratore/freno (7) ed il pulsante
Force (6).
4/8
Page 40

Per ritornare alla modalità “separata” a 3 assi, ripeti la medesima procedura.
Nota:
- Quando selezioni la modalità "combinata" (2 assi), il led lampeggia di verde per alcuni
secondi (Volante = asse "Joystick Sinistro Orizzontale", Acceleratore e Freno = asse "Joystick
Destro Verticale").
- Quando selezioni la modalità "separata" (3 assi), il led lampeggia di rosso per alcuni secondi
(Volante = asse "Joystick Sinistro Orizzontale", Acceleratore = "Croce" e Freno "Quadrato").
Per cambiare la configurazione degli altri pulsanti, accedi alle "opzioni di controllo del gamepad" del tuo
gioco.
Impostazioni ForceFeedback
Su PlayStation 2, il tuo volante ha 3 modalità Force Feedback = Power, Medium oppure Off.
Per passare da una modalità all’altra, premi il pulsante Force (6).
Nota:
- Quando scegli la modalità Power ForceFeedback, il led si illumina di Rosso (modalità di
default).
- Quando scegli la modalità Medium ForceFeedback, il led si illumina di Arancione.
- Quando scegli la modalità ForceFeedback Off, il led si illumina di Verde.
Funzione “Inversione del cambio sequenziale”
In molti giochi, le funzioni per il cambio della marcia (1) sono assegnati per default ai pulsanti L2 ed R2.
La funzione di “Inversione del cambio sequenziale” ti permette di assegnare il cambio di marcia
direttamente alle 2 apposite leve digitali (1), tutti i giochi.
Per passare dalla modalità “Cambio sequenziale normale” alla modalità “Inversione del cambio
sequenziale”, premi contemporaneamente i pulsanti L1 + R1 e Force (6).
Nota: per ritornare alla modalità "normale", esegui i medesimi passaggi.
Cambio sequenziale normale Cambio sequenziale invertito
Nota:
- Quando selezioni la modalità Cambio sequenziale invertito, il led lampeggia di rosso per
alcuni secondi.
- Quando selezioni la modalità Cambio sequenziale normale, il led lampeggia di verde per alcuni
secondi.
5/8
Page 41

Modalità Precision Drive
La modalità Precision Drive è stata appositamente sviluppata per aumentare le prestazioni.
A seconda del gioco, questa modalità potrebbe aiutarti a migliorare i tuoi migliori tempi (e quelli dei tuoi
amici/avversari) o a portare a termine più facilmente le varie sessioni di guida.
Questa nuova ed esclusiva modalità calcola e ridistribuisce i vari punti di movimento del tuo volante,
eliminando definitivamente il problema delle “zone morte” (problema nel quale potresti imbatterti
utilizzando altri volanti, di cui saresti costretto a regolarne la sensibilità).
Quanto preciso ed efficace questa modalità possa risultare, dipende dal gioco che stai utilizzando e dal
tipo di corsa nella quale ti stai cimentando. In questa modalità, il volante è più sensibile e ti permetterà di
sterzare più facilmente, consentendoti di perdere meno velocità, ad esempio nelle gare di sbandate
controllate.
Nei giochi in cui l’effetto di sterzata del volante è molto sensibile (come i giochi di F1, ad esempio),
potresti pertanto voler disattivare questa modalità.
Per ottenere la massima efficacia, ti consigliamo di utilizzare questa modalità con una visuale in
soggettiva.
Per attivare la modalità Precision Drive, premi simultaneamente il D-pad (4) ed il pulsante Force (6). Per
tornare alla modalità di guida normale, riesegui la suddetta procedura.
Nota:
- Quando la modalità Precision Drive è attivata, il led lampeggia continuamente.
- Quando la modalità Precision Drive è disattivata, il led non lampeggia.
RISOLUZIONE DEI PROBLEMI
- Il mio volante non funziona correttamente o sembra non essere ben calibrato. Spegni il tuo PC o la
tua console, scollega il tuo volante, quindi ricollega tutti i cavi (compresi alimentatore e pedaliera), riavvia
il sistema e lancia il gioco.
- Durante il gioco, il mio volante si muove da solo. Questo è normale: si tratta della funzione di
ricentraggio attiva in alcuni giochi. Per arrestare questi movimenti, impugna il volante oppure riduci
l’intensità del ForceFeedback.
- Dopo l’auto-calibrazione, il mio volante rimane girato in una direzione (destra o sinistra). In alcuni
giochi questo è normale. Il volante si centra automaticamente non appena il tuo controller viene
identificato come volante nelle opzioni di configurazione del tuo gioco.
- Su PC, il mio computer riconosce il volante ma quest’ultimo non funziona nel gioco. Accedi alle
opzioni del gioco per configurare il tuo volante. Per ulteriori informazioni, fai riferimento al manuale del tuo
gioco.
- Su PC, la mia pedaliera non funziona correttamente. Riconfigura il volante tramite l’interfaccia delle
opzioni del tuo gioco. Se il problema persiste, esci dal gioco ed imposta la modalità "combinata" (2 assi)
per la tua pedaliera. Ritorna quindi al gioco e riconfigura il volante con i nuovi assi di movimento.
6/8
Page 42

INFORMAZIONI E CONSIGLI SULLA SICUREZZA
- Al momento della connessione e della auto-calibrazione del volante: per ottenere una
calibrazione corretta, non girare mai il volante e non premere alcun pulsante/pedale.
- Se prevedi di non utilizzare il volante per un lungo periodo o desideri evitare sprechi
energetici e/o il deterioramento del prodotto, scollega l’alimentatore dal volante. Prima di
ricominciare a giocare, ricollega l’alimentatore.
- Il tuo volante genera effetti ForceFeedback: non lasciare MAI il volante alla portata dei
bambini, specialmente durante le fasi di auto-calibrazione.
ASSISTENZA TECNICA
Se hai avuto problemi con il tuo prodotto, visita il sito http://ts.thrustmaster.com
Support. Da lì potrai accedere a vari servizi (domande più frequenti (FAQ), driver e software più recenti)
che potranno aiutarti a risolvere il problema riscontrato. Qualora il problema dovesse persistere, puoi
contattare il servizio di assistenza tecnica dei prodotti Thrustmaster (“Assistenza Tecnica”):
Tramite email:
Per poter godere di assistenza tecnica tramite email, dovrai prima effettuare la registrazione online. Le
informazioni che fornirai aiuteranno gli esperti a risolvere rapidamente il tuo problema. Nella parte sinistra
della pagina “Technical Support”, clicca su Registration e segui le istruzioni che appariranno sullo
schermo. Se sei già registrato, riempi i campi Username e Password e clicca quindi su Login.
INFORMAZIONI SULLA GARANZIA
Internazionalmente, Guillemot Corporation S.A. (“Guillemot”) garantisce l’acquirente che questo prodotto
Thrustmaster è privo di vizi produttivi o difetti di materiale per un periodo di due (2) anni dalla data di
acquisto. Nel caso il prodotto si riveli difettoso durante il periodo di garanzia, contattare immediatamente
l’Assistenza Tecnica, che indicherà la procedura da seguire. Qualora il difetto venga confermato, il
prodotto dovrà essere riconsegnato al luogo di acquisto (o in qualsiasi altro luogo specificato
dall’Assistenza Tecnica).
Nel contesto della garanzia, il prodotto difettoso dell’acquirente verrà riparato oppure sostituito, a seconda
della scelta operata dall’Assistenza Tecnica. Dove autorizzato dalla legge vigente, la responsabilità di
Guillemot e le sue filiali (includendo qualsiasi danno indiretto) è limitata alla riparazione o alla sostituzione
del prodotto Thrustmaster. I diritti dell’acquirente nel rispetto della legislazione vigente applicabile alla
vendita di beni al consumatore non sono annullati dalla presente garanzia.
Questa garanzia perde di validità: (1) se il prodotto è stato modificato, aperto, alterato, o ha subito un
danno come risultato da uso inappropriato, negligenza, danni accidentali, normale usura o qualsiasi altra
causa non direttamente collegata con un difetto di materiale o un vizio di produzione; (2) nel caso di
mancato adempimento nell’esecuzione delle procedure indicate dall’Assistenza Tecnica; (3) per il software
non prodotto da Guillemot, poiché per questo caso è valida la garanzia fornita dal suo produttore.
e clicca su Technical
7/8
Page 43

COPYRIGHT
© 2005 Guillemot Corporation S.A. Tutti i diritti riservati. Thrustmaster® è un marchio registrato da Guillemot
Corporation S.A. PlayStation® è un marchio registrato da Sony Computer Entertaiment Inc. Microsoft®
Windows® 98 SE, Me, 2000, XP e DirectX® sono marchi registrati o marchi da Microsoft Corporation negli Stati
Uniti e/o in altri paesi. Tutti gli altri marchi sono qui riconosciuti e registrati ai rispettivi proprietari. Foto escluse. I
contenuti, il design e le caratteristiche possono essere oggetto di modifiche senza preavviso e possono variare
da un paese all’altro.
NORME PER LA SALVAGUARDIA DELL'AMBIENTE
Al termine della sua vita operativa, questo prodotto non deve essere gettato come un rifiuto
comune, ma deve essere gettato in un apposito contenitore per il riciclaggio del Materiale
Elettrico ed Elettronico
Ciò è confermato dal simbolo riportato sul prodotto, sul manuale o sulla confezione.
A seconda delle proprie caratteristiche intrinseche, i materiali potrebbero essere riciclabili.
Attraverso il riciclaggio dei rifiuti ed altre forme di gestione del Materiale Elettrico ed
Elettronico, puoi dare un significativo contributo alla conservazione e alla salvaguardia dell'ambiente.
Per ottenere informazioni sul Punto di raccolta a te più vicino, contatta gli enti competenti.
FAQ, consigli e driver disponibili sul sito www.thrustmaster.com
8/8
Page 44

FGT FFB 2-in-1
PC Manual del usuario
CARACTERÍSTICAS TÉCNICAS
1 2 palancas digitales de cambio de marchas
2 LED Mode
3 Botones de acción
4 D-pad
5 Botones Select y Start
6 Botón Force
1/8
Page 45
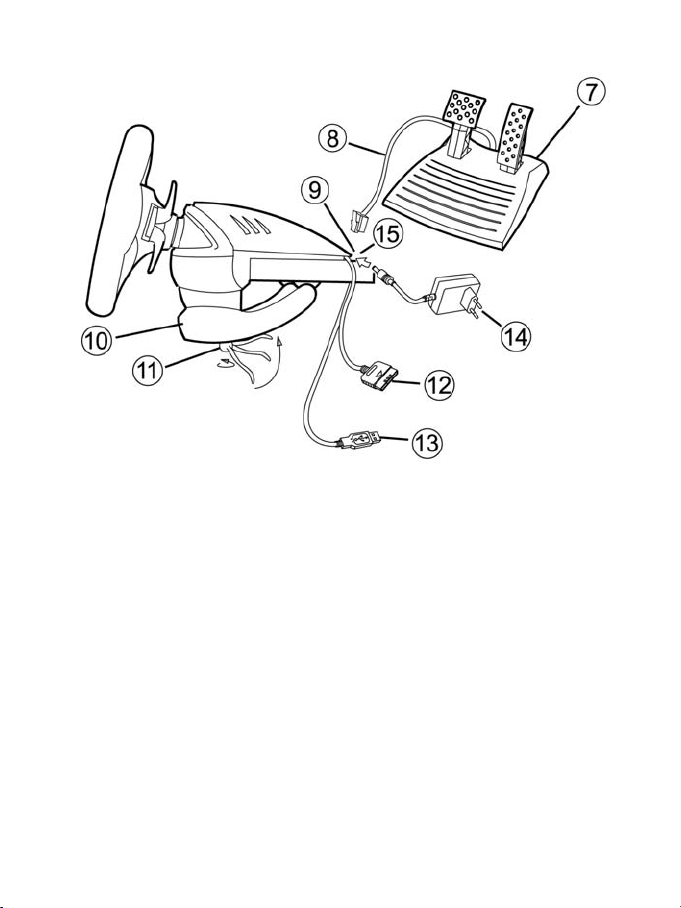
7 Pedales analógicos
8 Cable de los pedales
9 Conector de los pedales
10 Anclaje para la mesa
11 Tornillo de anclaje
12 Conector GAMEPORT (para PlayStation2)
13 Conector USB (para PC y PlayStation2)
14 Adaptador de corriente
15 Conector del adaptador
INSTALACIÓN DEL VOLANTE
Fijación del volante en su sitio
1. Coloca el volante en una mesa u otra superficie plana.
2. Coloca el tornillo de anclaje (11) en el anclaje para la mesa (10) y luego atornilla la unidad de anclaje
en el agujero en la parte inferior del volante hasta que quede firmemente sujeto. No aprietes el tornillo
demasiado fuerte, pues te arriesgas a dañar la unidad de anclaje y/o la mesa.
Conexión de los pedales
1. Enchufa el conector de los pedales (8) en el receptor de los pedales (9).
2. Enchufa el adaptador de corriente (14) en el conector del adaptador (15) y enchufa el adaptador en
una toma eléctrica.
2/8
Page 46

INSTALACIÓN PARA PC
Requisitos del sistema: PC (Windows 98 SE, Me, 2000, XP) equipado con un puerto USB.
El CD-ROM incluido con este producto te permite instalar los controladores de Force Feedback.
1. Inserta el CD-ROM de instalación en la unidad de CD-ROM. Sigue las instrucciones en pantalla para
instalar los controladores de Force Feedback. Cuando la instalación haya terminado, haz clic en
Finalizar y reinicia el ordenador.
2. Cuando el ordenador se haya reiniciado, enchufa el conector USB (10) en uno de los puertos USB del
ordenador. Windows 98/Me/2000/XP detectará automáticamente el nuevo dispositivo. (Si estás
conectando un dispositivo USB por primera vez, Windows puede pedirte que insertes el CD-ROM de
Windows durante el procedimiento de instalación para instalar los archivos de sistema requeridos.)
3. Instalación de controladores:
Windows 98
clic en Siguiente. Sigue las instrucciones en pantalla para completar la instalación.
Windows Me/2000/XP
4. Selecciona Inicio/Todos los programas/Thrustmaster/Force Feedback driver/Control Panel. El
cuadro de dialogo Game Controllers muestra el nombre del gamepad con el estado OK.
5. En el Control Panel, haz clic en Properties para configurar el gamepad:
• Test device: para probar y visualizar los botones, el D-pad y los 3 ejes (volante, pedales de freno y
• Test forces: para probar los 8 efectos Force y configurar los ajustes de Force Feedback (3 ajustes
FUNCIONES AVANZADAS EN PC
Calibración del volante
El volante se calibra de forma automática una vez conectado al puerto USB (esta operación moverá el
volante). Los pedales se calibran automáticamente tras pisarlos unas veces.
Selección del modo de aceleración/frenado “Separado” (3 ejes) O “Combinado” (2 ejes)
De forma predeterminada, los controles de aceleración/frenado del volante funcionan en modo “separado”
de 3 ejes, es decir, con los pedales de frenado y aceleración funcionando en ejes independientes.
Los 3 ejes mejoran considerablemente la precisión de conducción en las carreras.
Si el juego no es compatible con el modo de 3 ejes, el pedal de aceleración del volante no funcionará
correctamente. Sal del juego y selecciona el modo “combinado” de 2 ejes.
Para activar este modo, pulsa a la vez los controles de aceleración/frenado (7) y el botón Force (6).
Para volver al modo “separado” de 3 ejes, repite el mismo procedimiento.
Nota:
- Cuando seleccionas el modo "combinado" (2 ejes), el LED parpadea en rojo durante unos
segundos (volante = eje "X", acelerador y freno = eje "RZ").
- Cuando seleccionas el modo "separado" (3 ejes), el LED parpadea en verde durante unos
segundos (volante = eje “X", acelerador = eje "RZ" y freno = eje "Y").
: el Asistente para agregar nuevo hardware buscará los controladores apropiados. Haz
: los controladores se instalan de forma automática.
acelerador).
posibles de 0 al 150 %: fuerzas principales, estático y dinámico).
3/8
Page 47

Activado/desactivado de la función de recentrado
El recentrado del volante está activado de forma predeterminada.
Para desactivar o volver a activar el recentrado, pulsa el botón Force (6).
La mayoría de los juegos recientes proponen su propio modo de recentrado.
Te recomendamos que desactives el recentrado del volante (en la mayoría de los casos), para dejar al
juego que lo gestione. El Force Feedback será de mayor calidad.
Cuando está activado, el modo de recentrado es especialmente útil en juegos que no incorporan Force
Feedback.
Nota:
- Cuando el recentrado está activado, el LED está en rojo (modo predeterminado en PC).
- Cuando el recentrado está desactivado, el LED está en verde (modo recomendado en PC).
INSTALACIÓN PARA PLAYSTATION 2
CONEXIÓN DEL VOLANTE
1. Apaga la consola antes de conectar el volante.
2. Enchufa el conector de la consola (12) en el puerto 1 de la consola y
enchufa el conector USB (13) en el puerto USB superior (conéctalos en
ese orden).
3. Vuelve a encender la consola. El volante se calibra de forma autónoma
(esta operación moverá el volante) y el LED (2) está en rojo para indicar
que el modo Force Feedback está activado.
FUNCIONES AVANZADAS EN PLAYSTATION 2
¡Ya estás preparado para jugar!
Configuración del volante
De forma predeterminada, los controles de aceleración/frenado del volante funcionan en modo “separado”
de 3 ejes, es decir, con los pedales de frenado y aceleración funcionando en ejes independientes.
La compatibilidad con 3 ejes mejora considerablemente la precisión de la conducción en las carreras.
Sin embargo, siempre puedes seleccionar el modo “combinado” de 2 ejes.
Para activar este modo, pulsa a la vez los controles de aceleración/frenado (7) y el botón Force (6).
Para volver a modo “separado” de 3 ejes, repite el mismo procedimiento.
Nota:
- Cuando seleccionas el modo "combinado" (2 ejes), el LED parpadea en verde durante unos
segundos (volante = eje "joystick horizontal izquierdo", acelerador y freno = eje "joystick vertical
derecho").
- Cuando seleccionas el modo "separado" (3 ejes), el LED parpadea en rojo durante unos
segundos (volante = eje "joystick horizontal izquierdo", acelerador = "cruz" y freno "cuadrado").
Para cambiar la configuración de los otros botones, vete a "opciones de control del gamepad" del juego.
4/8
Page 48

Configuración de Force Feedback
En PlayStation 2, tu volante tiene 3 modos Force Feedback = Power, Medium u Off.
Sólo tienes que pulsar el botón Force (6) para cambiar de un modo al otro.
Nota:
- Cuando seleccionas el modo Force Feedback Power (Fuerte), el LED está en rojo (modo
predeterminado).
- Cuando seleccionas el modo Force Feedback Medium (Medio), el LED está en naranja.
- Cuando seleccionas el modo Force Feedback Off (Apagado), el LED está en verde.
Función “inversión de la caja de cambios secuencial”
En la mayoría de los juegos, las funciones de cambio de marchas (1) se asignan a los botones L2, R2 de
forma predeterminada.
La función “inversión de la caja de cambios secuencial” te permite asignar el cambio de marchas
directamente a las 2 palancas digitales de cambio de marchas (1) en el 100% de los juegos.
Para cambiar del modo “caja de cambios secuencial normal” a “caja de cambios secuencial invertida”,
pulsa los botones L1 + R1 y Force (6) simultáneamente.
Nota: sigue los mismos pasos para volver al modo "normal".
Caja de cambios secuencial normal Caja de cambios secuencial invertida
Nota:
- Cuando seleccionas el modo de caja de cambios secuencial invertida, el LED parpadea en
rojo durante unos segundos.
- Cuando seleccionas el modo de caja de cambios secuencial normal, el LED parpadea en
verde durante unos segundos.
5/8
Page 49

Modo Precision Drive
El modo Precision Drive ha sido desarrollado especialmente con miras a mejorar el rendimiento.
Dependiendo del juego, puede ayudarte a superar tus mejores tiempos (y los de tus oponentes) o hacer
más fácil completar con éxito los distintos eventos de conducción.
Este nuevo modo exclusivo calcula y redistribuye los distintos puntos analógicos del volante sin generar
zonas muertas (como puede ser el caso de otros volantes que te permiten ajustar su sensibilidad).
Cómo de apropiado y de efectivo sea este modo dependerá del juego al que estés jugando y del circuito
en el que corras. En este modo, el volante es más sensible y te permitirá derrapar más fácilmente y de
este modo evitar una pérdida excesiva de velocidad, en circuitos con giros en horquilla, por ejemplo.
En juegos donde las reacciones del volante sean muy sensibles (como las carreras de F1, por ejemplo),
probablemente querrás evitar la utilización de este modo.
Te recomendamos que utilices este modo con una vista interior para lograr la máxima efectividad.
Para pasar al modo Precision Drive, pulsa simultáneamente el D-pad (4) y el botón Force (6). Procede
de la misma forma para volver al modo de conducción normal.
Nota:
- Cuando el modo Precision Drive está activado, el LED parpadea continuamente.
- Cuando el modo Precision Drive está desactivado, el LED no parpadea.
RESOLUCIÓN DE PROBLEMAS
- El volante no funciona correctamente o parece estar calibrado incorrectamente. Apaga tu PC o
consola, luego desconecta el volante, vuelve a conectar todos los cables (incluidos el adaptador de
corriente y los pedales), enciende de nuevo y reinicia el juego.
- El volante se mueve solo durante el juego. Esto es normal, ya que se trata de la función de
recentrado que incorporan algunos juegos. Para detener esos movimientos, basta con que coloques las
manos sobre el volante o reduzcas la intensidad de Force Feedback.
- El volante permanece girado a un lado (izquierda o derecha) después de la calibración
automática. Esto es normal en algunos juegos. El volante se recentrará solo una vez que lo hayas
identificado como un volante en las opciones de configuración del juego.
- En PC, el ordenador detecta el volante, pero no parece funcionar en el juego. Accede a las
opciones del juego para configurar el volante. Consulta el manual del juego para más información.
- En PC, los pedales no parecen funcionar correctamente. Muestra la interfaz de gestión de opciones
del juego para volver a configurar el volante. Si el problema persiste, sal del juego y cambia los pedales al
modo "combinado" (2 ejes). Luego vuelve al juego para volver a configurar el volante con los nuevos ejes.
INFORMACIÓN Y RECOMENDACIONES DE SEGURIDAD
- Al conectar el volante y durante la calibración automática: para evitar una calibración
incorrecta, no gires nunca el volante, mejor pisa los pedales o pulsa los botones.
- Cuando no lo utilices durante periodos prolongados y para evitar el deterioro o el
consumo no deseado de energía, desconecta el adaptador de corriente del volante. Vuelve a
conectarlo antes de volver al juego.
- Tu volante incorpora Force Feedback: NUNCA dejes el volante al alcance de tus hijos
pequeños, especialmente durante el proceso de calibración automática.
6/8
Page 50

SOPORTE TÉCNICO
Si encuentras un problema con tu producto, visita http://ts.thrustmaster.com y haz clic en Technical
Support. Desde allí podrás acceder a distintas utilidades (preguntas frecuentes (Frequently Asked
Questions, FAQ), las últimas versiones de controladores y software) que pueden ayudarte a resolver tu
problema. Si el problema persiste, puedes contactar con el servicio de soporte técnico de los productos de
Thrustmaster (“Soporte Técnico”):
Por correo electrónico:
Para utilizar el soporte técnico por correo electrónico, primero debes registrarte online. La información que
proporciones ayudará a los agentes a resolver más rápidamente tu problema. Haz clic en Registration en
la parte izquierda de la página de Soporte técnico y sigue las instrucciones en pantalla. Si ya te has
registrado, rellena los campos Username y Password y después haz clic en Login.
Por teléfono
España 917 54 70 63
INFORMACIÓN DE GARANTÍA
En todo el mundo, Guillemot Corporation S.A. (“Guillemot”) garantiza al consumidor que este producto de
Thrustmaster estará libre de defectos materiales y fallos de fabricación por un periodo de dos (2) años a
partir de la fecha de compra original. Si el producto pareciera estar defectuoso durante el periodo de
garantía, contacte inmediatamente con el Soporte Técnico, que le indicará el procedimiento a seguir. Si el
defecto se confirma, el producto debe devolverse a su lugar de compra (o a cualquier otro lugar indicado
por el Soporte Técnico).
Dentro del contexto de esta garantía, el producto defectuoso del consumidor será reparado o
reemplazado, a elección del Soporte Técnico. En los casos que lo autorice la ley aplicable, toda la
responsabilidad de Guillemot y de sus filiales (incluyendo sobre daños indirectos) está limitada a la
reparación o sustitución del producto de Thrustmaster. Los derechos legales del consumidor con respecto
a la legislación aplicable a la venta de bienes de consumo no se ven afectados por esta garantía.
Esta garantía no se aplicará: (1) si el producto ha sido modificado, abierto, alterado, o ha sufrido daños
como resultado de una utilización inapropiada u ofensiva, negligencia, accidente, desgaste normal, o
cualquier otra causa no relacionada con un defecto material o fallo de fabricación; (2) en caso de no
cumplimiento de las instrucciones proporcionadas por el Soporte Técnico; (3) a software no publicado por
Guillemot, o sea, a software que está sujeto a una garantía específica proporcionada por su fabricante.
:
precio de una llamada telefónica nacional,
de lunes a viernes de 18:00 a 22:00
7/8
Page 51

COPYRIGHT
© Guillemot Corporation 2005. Guillemot™ y Thrustmaster® son marcas comerciales y/o marcas
comerciales registradas de Guillemot Corporation S.A. Microsoft®, Windows® 98, Me, 2000 y XP son
marcas comerciales registradas de Microsoft Corporation en los Estados Unidos y/o otros países. Todas
las demás marcas comerciales y nombres de marca se reconocen aquí y son propiedad de sus
respectivos dueños. Ilustraciones no definitivas. Los contenidos, diseños y especificaciones están sujetos
a cambios sin previo aviso y pueden variar de un país a otro.
RECOMENDACIÓN DE PROTECCIÓN AMBIENTAL
Al terminar su vida útil, este producto no debe tirarse en un contenedor de basuras
estándar, sino que debe dejarse en un punto de recogida de desechos eléctricos y
equipamiento electrónico para ser reciclado.
Esto viene confirmado por el símbolo que se encuentra en el producto, manual del
usuario o embalaje.
Dependiendo de sus características, los materiales pueden reciclarse. Mediante el
reciclaje y otras formas de procesamiento de los desechos eléctricos y el equipamiento
electrónico puedes contribuir de forma significativa a ayudar a proteger el medio
ambiente.
Contacta con las autoridades locales para más información sobre el punto de recogida
más cercano.
FAQs, tips and drivers available at www.thrustmaster.com
8/8
Page 52

Guia do Utilizador
CARACTERÍSTICAS TÉCNICAS
1 2 alavancas de velocidades digitais
2 LED Mode
3 Botões de acção
4 Almofada de direcção
5 Botões Select e Start
6 Botão Force
1/8
Page 53

7 Conjunto de pedais analógicos
8 Cabo dos pedais
9 Conector dos pedais
10 Grampo de fixação à mesa
11 Parafuso do grampo
12 Conector GAMEPORT (para PlayStation2)
13 Conector USB (para PC e PlayStation2)
14 Adaptador de corrente
15 Conector do adaptador
INSTALAR O VOLANTE
Fixar o volante
1. Coloque o volante numa mesa ou noutra superfície plana.
2. Coloque o parafuso (11) no grampo de fixação à mesa (10), e em seguida aparafuse a unidade de
fixação no orifício situado na parte inferior do volante até ficar firmemente seguro. Não aperte
demasiado o parafuso, pois corre o risco de danificar a unidade de fixação e/ou a mesa.
Conectar o conjunto de pedais
1. Ligue o conector dos pedais (8) ao receptor respectivo (9).
2. Ligue o adaptador do conector (14) ao adaptador de corrente (15) e conecte o adaptador numa
tomada eléctrica.
2/8
Page 54

INSTALAÇÃO PARA PC
Requisitos do sistema: PC (Windows 98 SE, Me, 2000 & XP) equipado com uma porta USB.
O CD-ROM fornecido com este produto permite instalar o controlador dos efeitos de retorno de força.
1. Insira o CD-ROM de instalação na respectiva unidade. Siga as instruções que surgirem no ecrã para
instalar os controladores dos efeitos de retorno de força. Quando a instalação tiver terminado, clique
em Concluir e reinicie o computador.
2. Depois de reiniciar o computador, ligue o conector USB (10) a uma das portas USB do seu
computador. Os Windows 98/Me/2000/XP detectarão automaticamente o novo dispositivo. (No caso de
estar a conectar um dispositivo USB pela primeira vez, o Windows poderá pedir-lhe que insira o CDROM do Windows durante o processo de instalação a fim de instalar os ficheiros de sistema
necessários.)
3. Instalação do controlador:
Windows 98
Seguinte. Siga as instruções que surgirem no ecrã para concluir a instalação.
Windows Me/2000/XP
4. Seleccione Iniciar/Todos os programas/Thrustmaster/Force Feedback driver/Control Panel. A
caixa de diálogo Controladores de jogos exibe o nome do gamepad com o estado OK.
5. No Painel de controlo, clique em Propriedades para configurar o seu gamepad:
• Testar dispositivo: para testar e visualizar os botões, a almofada de direcção e os três eixos
• Testar forças: para testar oito efeitos de retorno de força e configurar as respectivas definições
FUNÇÕES AVANÇADAS EM PC
Calibrar o volante
O volante é calibrado automaticamente assim que é feita a ligação via porta USB (esta operação fará com
que o volante se mova). Os pedais calibram-se automaticamente após algumas pressões nos mesmos.
Seleccionar modo de aceleração/travagem “Separado” (três eixos) OU “Combinado” (dois eixos)
Por pré-definição, os controlos de aceleração/travagem do volante operam num modo de três eixos
"separados", isto é, os pedais do travão e do acelerador funcionam em eixos independentes.
O suporte de três eixos melhora de forma considerável a precisão da condução nas corridas.
Se o modo de três eixos não for suportado pelo seu jogo, o pedal de aceleração do volante não funcionará
convenientemente. Por favor saia do jogo e seleccione o modo de dois eixos "combinados".
Para activar este modo, prima em simultâneo os controlos de aceleração/travagem (7) e o botão Force (6).
Repita o mesmo procedimento para regressar ao modo de três eixos "separados".
Nota:
- Quando selecciona o modo "combinado" (dois eixos), o LED pisca a vermelho durante
alguns segundos (volante = eixo "X", acelerador e travão = eixo "RZ").
- Quando selecciona o modo "separado" (três eixos), o LED pisca a verde durante alguns
segundos (volante = eixo "X", acelerador = eixo "RZ", e travão = eixo "Y" ).
: o Assistente Adicionar novo hardware irá procurar o controlador apropriado. Clique em
: o controlador é instalado automaticamente.
(volante e pedais do travão e acelerador).
(três posições possíveis: de 0 a 150%: Forces Main, Static e Dynamic).
3/8
Page 55

Activar/desactivar a função de recentragem
A recentragem do volante encontra-se activada por pré-definição.
Para desactivar ou reactivar a função de recentragem, prima o botão Force (6).
A maioria dos jogos recentes propõe agora o seu próprio modo de recentragem.
Recomendamos vivamente que desactive a função de recentragem do volante (na maior parte dos
casos), de modo a permitir que o jogo se encarregue dela. Os efeitos de retorno de força terão então
mais qualidade.
Quando se encontra activada, a função de recentragem é particularmente útil nos jogos que não dispõem
de efeitos de retorno de força.
Nota:
- Quando a recentragem está activada, o LED fica vermelho (modo pré-definido em PC).
- Quando a recentragem está desactivada, o LED fica verde (modo recomendado para PC).
INSTALAÇÃO PARA PLAYSTATION 2
CONECTAR O VOLANTE
1. Desligue a consola antes de conectar o volante.
2. Ligue o conector da consola (12) à porta 1 respectiva e o conector USB
(13) na porta USB superior (faça as ligações por esta ordem).
3. Volte a ligar a consola. O volante calibra-se de forma autónoma (esta
operação não fará o volante mover-se), ao passo que o LED (2) fica
vermelho para indicar que o modo de retorno de força se encontra
activado.
FUNÇÕES AVANÇADAS NA PLAYSTATION 2
Configurar o volante
Está pronto para começar a jogar!
Por pré-definição, os controlos de aceleração/travagem do volante operam num modo de três eixos
"separados", isto é, os pedais do travão e do acelerador funcionam em eixos independentes.
O suporte de três eixos melhora de forma considerável a precisão da condução nas corridas.
Pode mesmo assim seleccionar o modo de dois eixos "combinados".
Para activar este modo, prima em simultâneo os controlos de aceleração/travagem (7) e o botão
Force (6).
Repita o mesmo procedimento para regressar ao modo de três eixos "separados".
Nota:
- Quando selecciona o modo "combinado" (dois eixos), o LED pisca a verde durante alguns
segundos (volante = eixo do "joystick horizontal esquerdo", acelerador e travão = eixo do
"joystick vertical direito").
- Quando selecciona o modo "separado" (três eixos), o LED começa a piscar a vermelho durante
alguns segundos (volante = eixos do "joystick horizontal esquerdo", acelerador = "cruz", e travão =
"quadrado").
4/8
Page 56

Para mudar a configuração dos outros botões, aceda às "opções de controlo do gamepad" do seu jogo.
Definir os efeitos de retorno de força
Na PlayStation 2, o seu volante possui três modos de retorno de força = Power (máximo), Medium (médio)
ou Off (desactivado).
Basta premir o botão Force (6) para passar dum modo para outro.
Nota:
- Quando selecciona o modo Power do retorno de força, o LED fica vermelho (modo prédefinido).
- Quando selecciona o modo Medium do retorno de força, o LED fica cor-de-laranja.
- Quando selecciona o modo Off do retorno de força, o LED fica verde.
Função de “inversão da caixa de velocidades sequencial”
Na maioria dos jogos, as funções de mudança de velocidades (1) estão atribuídas por pré-definição aos
botões L2 e R2.
A função de "inversão da caixa de velocidades sequencial" permite atribuir a mudança de velocidades
directamente às duas alavancas digitais de mudança de velocidades (1) na totalidade dos jogos.
Para passar do modo “Caixa de velocidades sequencial normal” para o modo “Caixa de velocidades
sequencial invertida”, prima simultaneamente os botões L1 + R1 e Force (6).
Nota: siga os passos abaixo para regressar ao modo "normal".
Caixa de Velocidades Sequencial Normal Caixa de Velocidades Sequencial Invertida
Nota:
- Quando selecciona o modo "Caixa de Velocidades Sequencial Invertida", o LED pisca a
vermelho durante alguns segundos.
- Quando selecciona o modo "Caixa de Velocidades Sequencial Normal", o LED pisca a
verde durante alguns segundos.
5/8
Page 57

Modo Precision Drive
O modo Precision Drive ("condução de precisão") foi especialmente desenvolvido com vista a melhorar o
desempenho.
Em função do jogo, pode ajudá-lo a bater os seus melhores tempos (e os dos adversários) ou tornar mais
fácil completar com êxito os diferentes eventos da condução.
Este novo modo exclusivo calcula e redistribui os vários pontos analógicos do seu volante sem gerar
zonas mortas (como pode ser o caso com outros volantes que permitem ajustar a respectiva
sensibilidade).
O grau de adequação e eficácia deste modo dependerá do jogo que estiver a jogar e da pista onde corre.
Neste modo, o volante é mais sensível, possibilitando assim fazer derrapagens mais facilmente e evitar
uma perda de velocidade excessiva, como em pistas com curvas muito apertadas, por exemplo.
Nos jogos em que as reacções do volante são muito sensíveis (como nas corridas de F1, por exemplo),
provavelmente não vai querer por essa razão usar este modo.
Recomendamos que o utilize com uma vista interior para máxima eficácia.
Para passar para o modo Precision Drive, prima simultaneamente a Almofada de direcção (4) e o botão
Force (6). Proceda da mesma maneira para regressar ao modo de condução normal.
Nota:
- Quando o modo Precision Drive está activado, o LED pisca continuamente.
- Quando o modo Precision Drive está desactivado, o LED não pisca.
RESOLUÇÃO DE PROBLEMAS
- O meu volante não funciona de forma correcta ou parece estar calibrado incorrectamente.
Desligue o PC ou a consola, em seguida desconecte o volante, volte a conectar todos os cabos (com
adaptador de corrente e pedais), ligue novamente o PC ou a consola e reinicie o jogo.
- O meu volante move-se sozinho durante o jogo. Isto é normal e trata-se da função de recentragem
disponível em vários jogos. Para parar estes movimentos, basta que coloque as mãos no volante ou
reduza a intensidade dos efeitos de retorno de força.
- O meu volante mantém-se virado para um dos lados (esquerdo ou direito) depois da calibragem
automática. Isto é normal em vários jogos. O volante irá recentrar-se assim que o identificar como tal nas
opções de configuração do jogo.
- No PC, o meu volante é detectado pelo computador, mas não funciona no jogo. Aceda às opções
do jogo para configurar o volante. Por favor consulte o manual do jogo para mais informações.
- No PC, o conjunto de pedais não parece funcionar correctamente. Aceda à interface de gestão das
opções do jogo para reconfigurar o volante. Se o problema persistir, saia do jogo e regule o conjunto de
pedais para o modo "combinado" (dois eixos). Em seguida regresse ao jogo para reconfigurar o volante
com os novos eixos.
6/8
Page 58

RECOMENDAÇÕES DE SEGURANÇA E INFORMAÇÕES
- Quando conectar o volante e durante a calibragem automática: de modo a impedir uma
calibragem incorrecta, nunca rode o volante nem prima os pedais ou botões.
- Quando não pretender utilizá-lo durante um período de tempo alargado e para evitar um
consumo de energia desnecessário ou deterioração, desconecte o adaptador de corrente do
volante.
- O seu volante possui efeitos de retorno de força: NUNCA deixe o volante ao alcance de
crianças, em especial durante as fases de calibragem automática.
SUPORTE TÉCNICO
Se tiver algum problema com o seu produto, por favor visite o sítio http://ts.thrustmaster.com
Technical Support. A partir daqui poderá aceder a vários utilitários (perguntas mais frequentes (FAQ) e
versões mais recentes de controladores e software) capazes de ajudá-lo a resolver o seu problema. Se
este persistir, pode contactar o serviço de suporte técnico para produtos Thrustmaster (“Suporte Técnico”):
Por correio electrónico
De forma a tirar partido do suporte técnico por correio electrónico, primeiro terá de se registar online. As
:
informações que fornecer ajudarão os agentes a resolver mais rapidamente o seu problema. Clique em
Registration no lado esquerdo da página Technical Support e siga as instruções que surgirem no ecrã.
Caso já tenha feito o seu registo, preencha os campos Username e Password e depois clique em Login.
Por telefone:
Estados
Unidos
514-279-9911
preço duma chamada telefónica de longa distância, de segunda
a sexta-feira, das 7h00 às 17h00 (hora da Costa Leste)
INFORMAÇÃO DE GARANTIA
A Guillemot Corporation S.A. (“Guillemot”) garante ao consumidor, a nível mundial, que este produto Thrustmaster está
isento de defeitos de material e de fabrico durante um período de dois (2) anos a partir da data de compra original. No caso
de o produto se revelar defeituoso durante o período da garantia, contacte imediatamente o Suporte Técnico, que indicará o
procedimento a seguir. Se se confirmar o defeito, o produto terá de ser devolvido ao respectivo local de compra (ou
qualquer outro local indicado pelo Suporte Técnico).
Dentro do contexto desta garantia, e por opção do Suporte Técnico, o produto defeituoso do consumidor será reparado ou
substituído. Sempre que a lei em vigor o permitir, a responsabilidade total da Guillemot e das suas filiais (incluindo para
danos indirectos) estará limitada à reparação ou substituição do produto Thrustmaster. Os direitos legais do consumidor em
relação à legislação aplicável à venda de bens de consumo não são afectados por esta garantia.
Esta garantia não será aplicada: (1) se o produto tiver sido modificado, aberto, alterado ou caso tenha sofrido danos em
resultado de uso inadequado ou abusivo, negligência, acidente, desgaste normal ou qualquer outra causa não relacionada
com um defeito de material ou de fabrico; (2) em caso de desrespeito pelas instruções fornecidas pelo Suporte Técnico; (3)
a software não publicado pela Guillemot, o qual estará sujeito a uma garantia específica fornecida pela respectiva editora.
e clique em
7/8
Page 59

Provisões adicionais de garantia
Nos Estados Unidos da América e no Canadá, esta garantia encontra-se limitada ao mecanismo interno e invólucro externo
do produto. Quaisquer garantias implícitas aplicáveis, incluindo garantias de comercialização e adequação a um fim
específico, estão limitadas pela presente a dois (2) anos a partir da data de compra e encontram-se sujeitas às condições
expostas nesta garantia limitada. A Guillemot Corporation S.A. ou as suas filiais não serão em nenhuma circunstância
consideradas responsáveis por danos consequentes ou acidentais resultantes da violação de quaisquer garantias expressas
ou implícitas. Alguns estados/províncias não permitem limitações na duração duma garantia implícita ou a exclusão ou
limitação de danos acidentais/consequentes, por isso a limitação supracitada pode não se aplicar a si. Esta garantia
confere-lhe direitos legais específicos, e também pode ter outros direitos legais, os quais variam de estado para estado ou
de província para província.
DIREITOS DE AUTOR
© 2005 Guillemot Corporation S.A. Reservados todos os direitos. Thrustmaster® é uma marca registada da Guillemot
Corporation. PlayStation® é uma marca registada da Sony Computer Entertainment Inc. Microsoft® Windows® é uma
marca registada da Microsoft Corporation nos Estados Unidos e/ou noutros países. Todas as outras marcas comerciais e
nomes de marcas são por este meio reconhecidas e pertencem aos seus proprietários respectivos. As ilustrações não são
vinculativas. Os conteúdos, desenhos e especificações estão sujeitos a alteração sem aviso prévio e podem variar de país
para país.
RECOMENDAÇÃO DE PROTECÇÃO AMBIENTAL
Quando chegar ao fim da sua vida útil, este produto não deve ser deitado fora
juntamente com o lixo doméstico normal, mas sim deixado num ponto de recolha de
equipamento eléctrico e electrónico inútil para reciclagem.
Isto é confirmado pelo símbolo visível no produto, manual de utilizador ou embalagem.
De acordo com as suas características, os materiais podem ser reciclados. Através da
reciclagem e doutras formas de processar equipamento eléctrico e electrónico inútil,
pode dar um contributo importante no sentido de ajudar a proteger o ambiente.
Por favor contacte as suas autoridades locais para saber onde fica o ponto de recolha
mais próximo de si.
As perguntas mais frequentes (FAQ) sugestões e controladores
estão disponíveis em www.thrustmaster.com
8/8
 Loading...