

Page 1

Page 2

1/20
Compatible with: PlayStation® 3 & PC
User Manual
TECHNICAL FEATURES
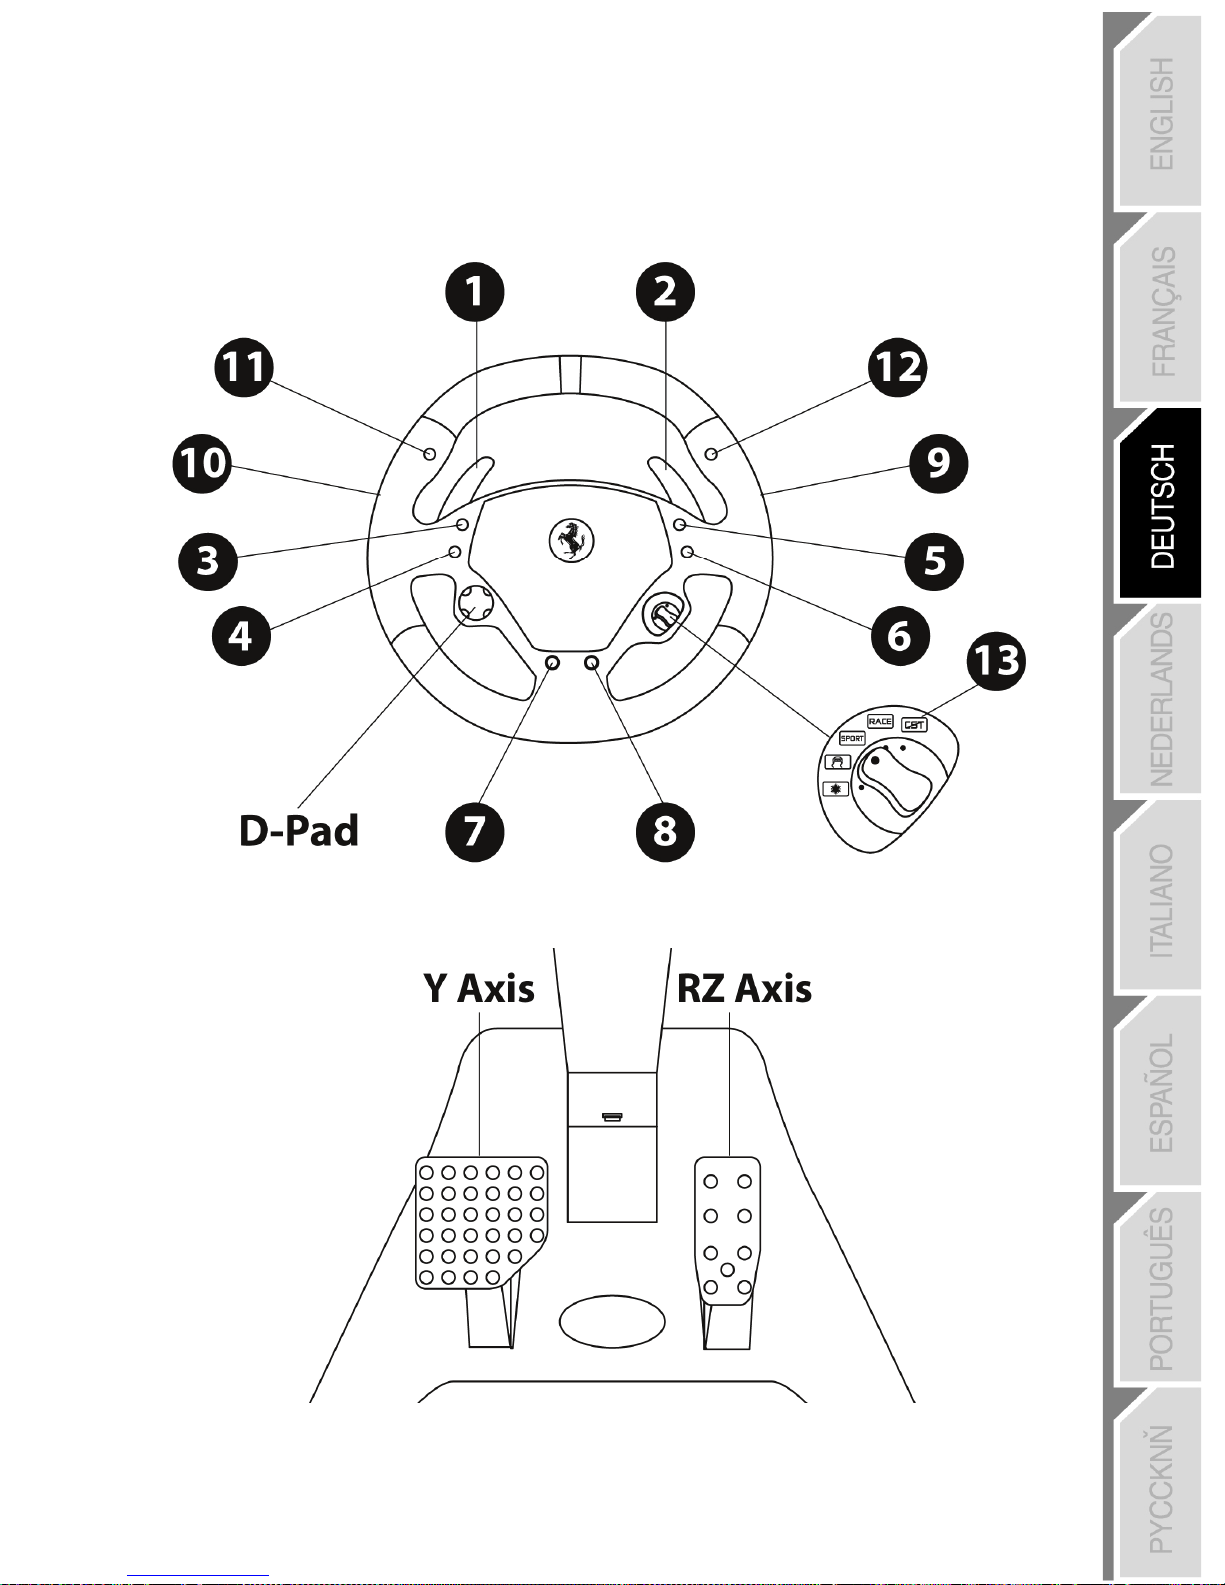
1 2 rear clamp screws
(to set the steering column angle)
2 Transport handle
3 Adjustable column of the base
4 Removable wheel
5 Power cord
6 1 front clamp screw
(for setting the length)
7 Brake and accelerator pedals
8 Battery and receiver
storage compartment
9 Up & Down gearshift paddles
10 Manettino with 5-position rotary switch
(for programming)
11 “Select” and “Start” buttons
12 Multidirectional D-Pad
13 Action buttons
14 Wireless receiver
15 USB connector of the receiver
16 Receiver LED
17 PC/PS3 switch of the receiver
Page 3

2/20
INSTALLING THE WHEEL
ADJUSTING THE TILT AND LENGTH
OF THE DRIVING POSITION
- Slightly unscrew (anticlockwise) the 2 clamp screws (1) at the back of the base.
- Adjust the angle of the base’s column (3) so that is suitable to you.
- Then tighten (clockwise) the 2 clamp screws (1).
Page 4

3/20
- Slightly unscrew (anticlockwise) the clamp screw (6) located at the front of the base’s column. Then draw
out the column to the length you require.
- Then tighten (clockwise) the clamp screw (6), taking care that it is correctly inserted into one of the holes
provided for this purpose. You can do this simply by positioning the upper hole by the locating mark
provided for this purpose.
Page 5

4/20
FITTING THE WHEEL TO THE BASE
Lugs (front of the base) Lug notches (back of the wheel)
+
Locking tab (back of the wheel)
- Position the removable wheel (4) horizontally, and then insert the 2 lugs (on the front of the base) into
the 2 lug notches (on the back of the wheel).
- Let the wheel down vertically, and then lock the wheel into position by pressing the locking tab (on the
back of the wheel) then releasing it until you hear a gentle “click”.
- Check that the steering wheel is correctly secured to the base.
Page 6

5/20
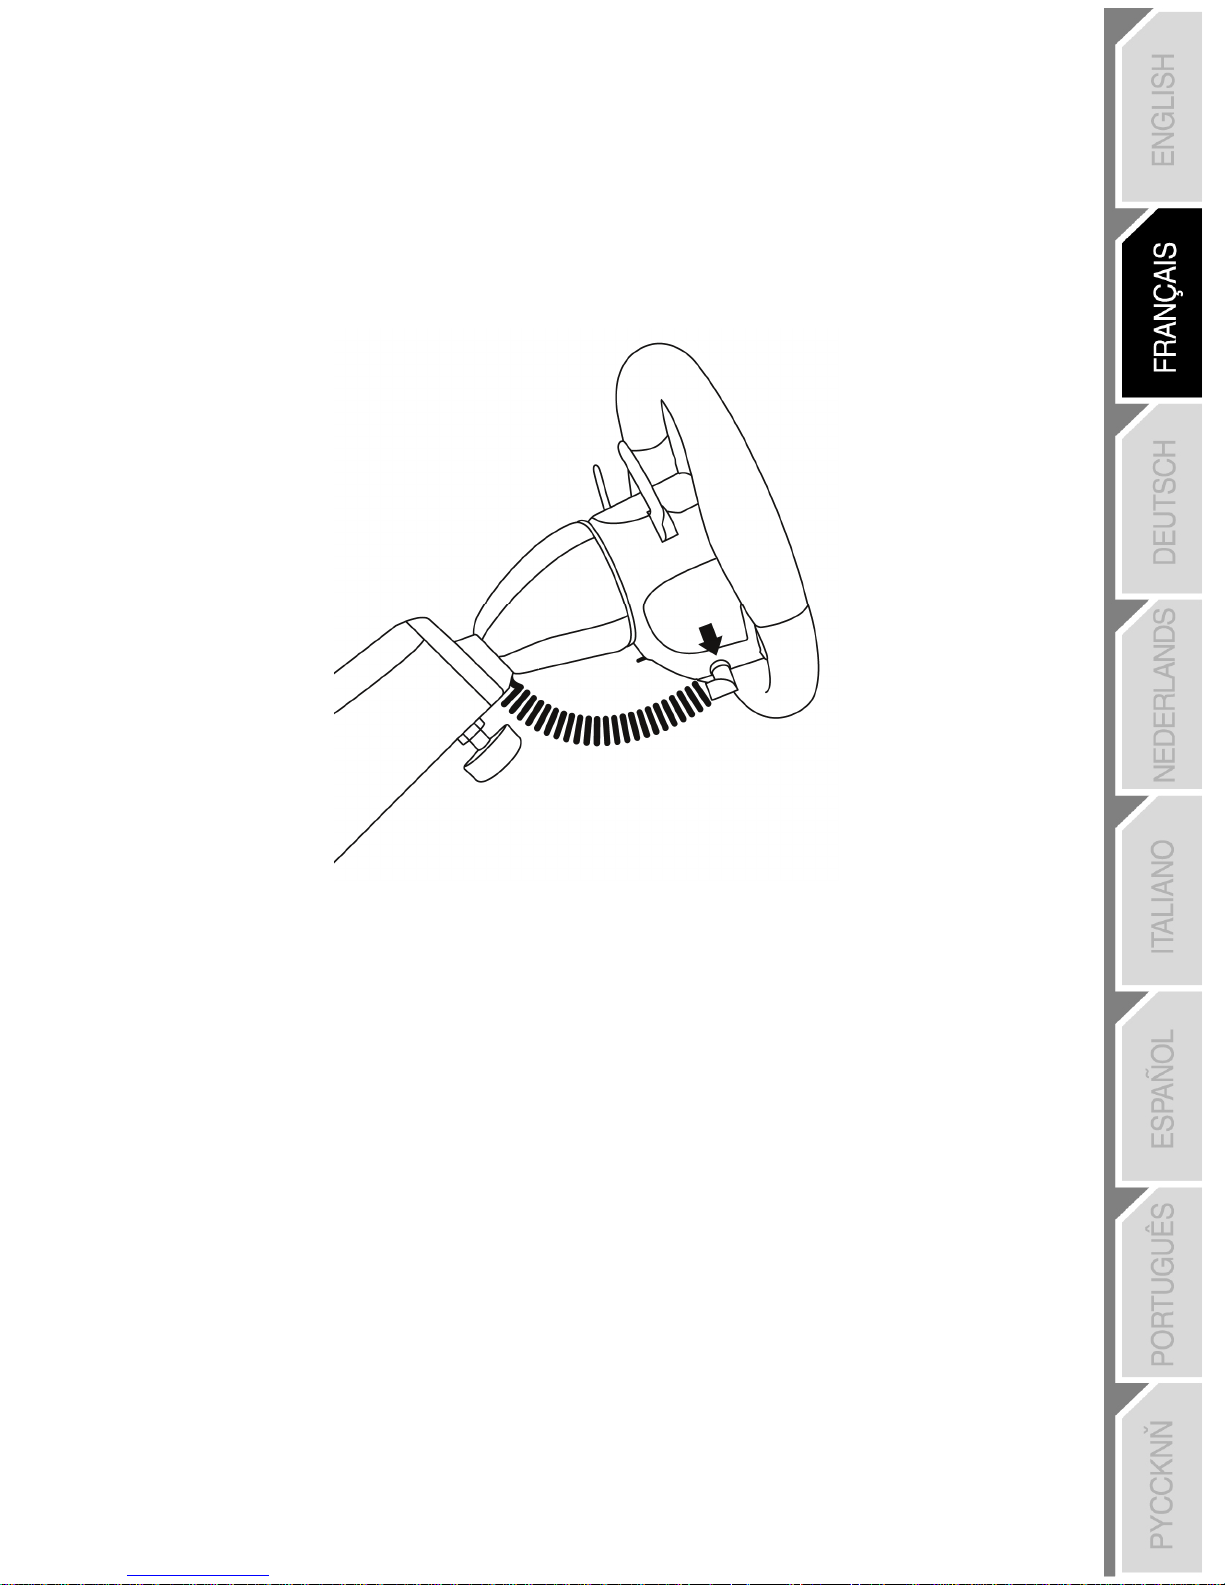
- Electronically connect the steering wheel to its base by connecting the elbow-shaped male connector (on
the end of the power cord (5)) to the female connector (to the left of the wheel).
- Rotate the nut (on the end of the connector) clockwise to secure the connection.
PERFORM THE OPERATION IN REVERSE TO
TAKE OFF THE REMOVABLE WHEEL FROM THE BASE
Page 7

6/20
FITTING BATTERIES AND RECOVERING THE RECEIVER
- Remove cover from the battery compartment (8) (located between the 2 pedals) and fit 4 LR6 / AA
batteries, ensuring that the polarities are in the right position.
- Recover the wireless receiver (14) found in the lower section of the battery compartment.
- Fit back the battery compartment’s cover.
Page 8

7/20
SWITCHING THE WHEEL ON OR OFF
- Position the switch (located on the right-hand side of the wheel):
- To ON for switching on the wheel.
- To OFF for switching off the wheel.
Important note:
When you switch on your wheel, it must always be perfectly centred physically (to prevent any
misalignment).
Page 9

8/20
PLAYSTATION® 3
INSTALLATION ON PLAYSTATION® 3
1. Set the PC/PS3 switch (17) of the receiver (14) to the “PS3” position.
2. Connect the USB connector (15) of the receiver to the USB port 1 of the console.
3. Turn on your console.
4. Turn on your wheel by using the ON/OFF switch.
5. When the connection is set up, launch the game.
You are now ready to play!
USING THE “PS” BUTTON
The “PS” button of your wheel allows you to exit your games, access the menus and directly switch off your
PlayStation® 3 system.
Procedure:
Set the Manettino (10) switch to the relevant icon, and then press the push button.
Important notes on PlayStation® 3:
- The PC/PS3 switch (17) of the receiver must always be set to “PS3” before connecting it.
- In “1-player” mode: If your official gamepad is turned on, you will have to switch it to “controller port 2”
in order for your wheel to be functional.
- On PlayStation® 3, the wheel simulates the official gamepad (which makes it compatible with all
racing games).
- In most games, the “Normal Sensitivity” mode (just as on the gamepad) has a slight dead zone
that can be felt in the middle of the wheel axis (and therefore the centre of the wheel).
The wheel’s “High Sensitivity” mode is set to remove this dead zone.
However, some games allow you to remove or reduce this dead zone by changing the settings
of the steering wheel axis in the game’s “Options/Commands”.
“High Sensitivity” mode is recommended for most PS3 games (where it is not possible to
change the central dead zone of the steering wheel axis).
“Normal Sensitivity” mode is recommended only for PS3 games where the central dead zone of
the steering wheel axis can be changed.
Page 10

9/20
CONFIGURING THE “AUTOMATIC PRESET” - PLAYSTATION® 3
(in “Separate pedal set” mode)
Page 11

10/20
PC
INSTALLATION ON PC
Required configuration: PC (Windows® Xp, Windows® Vista, Windows® 7) equipped with a USB port
The CD-ROM included with this product allows you to install the drivers.
1. Insert the installation CD-ROM into your CD-ROM drive. The install wizard is displayed automatically (if the
installation menu does not run automatically, double-click “Workstation”, then the icon of the CD-ROM and,
“Setup.exe” if necessary).
2. Click on the “DRIVERS” to start installing the drivers.
3. Once the installation is complete, click Finish and restart your computer.
4. Set the PC/PS3 switch (17) of the receiver (14) to the “PC” position.
5. Once your computer has restarted, connect the USB connector (15) of the receiver to one of the USB ports
of your central unit. Windows® will automatically detect the new device.
6. Drivers are installed automatically.
Follow the on-screen instructions to complete the installation.
7. Select Start/Programs/Thrustmaster/Control Panel to access the Control Panel.
The Game controllers dialogue box will display the name of the wheel with the OK status.
8. In the Control Panel, click Properties to test and view the buttons, D-pad and axes of the wheel and
the pedal set.
You are now ready to play!
Important notes on PC:
- The PC/PS3 (17) switch of the receiver must always be set to “PC” before connecting the wheel.
- The wheel name declared on PC (in the Control Panel and in the games) is “F430 Cockpit Wireless”.
Page 12

11/20
CONFIGURING THE “AUTOMATIC PRESET” - PC
(in “Separate pedal set” mode)
Page 13

12/20
USING THE 5-POSITION MANETTINO
The Manettino (10) system comprises:
- a rotary switch that you can turn to go from one function to another
- a push button located under the switch (to confirm your choices)
The required function will start as soon as you press the push button (not when you turn the switch) with the
switch positioned opposite the relevant icon.
Manettino Button functions and correspondence with the LEDs
“PS” on PS3 button and “13” on PC
- On = connection set up between the wheel and the receiver.
- Flashes quickly = no connection between the wheel and the receiver.
- Flashes slowly and continuously = you must change the batteries.
- Off = the wheel is in standby mode or off.
“Normal Sensitivity” mode
- On = “Normal Sensitivity” with “Separate pedal set” modes enabled
- Flashes quickly = mode “Combined pedal set” enabled
“High Sensitivity” mode
- On = “High Sensitivity” with “Separate pedal set” modes enabled
- Flashes quickly = “Combined pedal set” mode enabled
“Mapping”
- On = “Mapping” mode enabled (pending programming)
“Manual Preset”
- On = “Manual Preset” mode enabled
- Set the Manettino switch to the relevant icon.
- Press the push button to confirm the function.
Page 14

13/20
GENERAL
WHEEL POWER BUTTON
- OFF position = the wheel is off (and does not use the batteries).
- ON position = the wheel is on.
The wheel and receiver are automatically connected.
If the connection fails, you can force the connection by pressing the LED button of the receiver (16), then
the SELECT + START +
buttons simultaneously on the wheel.
STANDBY MODE
The wheel automatically switches off:
- After 5 minutes of inactivity.
- After 5 seconds if the connection fails or is lost.
The wheel can be activated by pressing one of its action buttons (13)
or operating the wheel’s ON/OFF switch.
“PC / PS3” SWITCH (17) OF THE RECEIVER
This switch must always be set to the correct position before you connect your receiver to the USB port of
your PlayStation® 3 or PC.
LED AND RECEIVER LED (16)
- Both LEDs are on = connection set up between the wheel and the receiver.
- Both LEDs flash quickly = no connection between the wheel and the receiver.
-All the LEDs on the Manettino are off = the wheel is in standby mode or off.
- The
LED flashes slowly and continuously = you must change the batteries.
AUTOMATIC CALIBRATION OF THE WHEEL AND PEDALS
- The centre of the wheel is preset as soon as you turn it on: it is therefore vital for the wheel to be perfectly
aligned on its axis when you switch it on.
- Nevertheless, you can manually adjust the centre of the wheel. To do this, position the wheel in perfect
alignment with the centre, and then simultaneously press “SELECT + START + ENGINE START” (this
operation must be carried out each time the wheel is switched on).
- The steering of the wheel and the pedals automatically self-calibrate.
Page 15

14/20
ADVANCED FUNCTIONS
ADJUSTING THE WHEEL’S SENSITIVITY
Your wheel’s steering has 2 sensitivity modes:
- “Normal Sensitivity” (default mode and recommended on PC - requires setting on PS3)
- “High Sensitivity” (default mode and recommended on PS3 - requires setting on PC)
Setting “Normal Sensitivity” mode (default mode and recommended on PC)
Action
- Set the Manettino switch to the relevant icon.
- Press the push button to confirm the function.
ON
Your wheel’s steering is now at Normal Sensitivity
Setting “High Sensitivity” mode (default mode and recommended on PS3)
Action
- Set the Manettino switch to the relevant icon.
- Press the push button to confirm the function.
ON
Your wheel’s steering is now more sensitive, especially at the centre
CONFIGURING THE PEDALS
Your wheel’s accelerator and brake controls are in “separate” mode by default, meaning that the pedals
function on independent axes.
This mode lets you considerably improve the precision of your steering.
If you game does not support the “separate” mode, the pedal set of the wheel will not work correctly. You
must therefore activate the “Combined” mode.
SETTING
Simultaneously press and release both pedals (accelerator and brake) + the
button.
PEDAL SET MODE
or
SEPARATE
(recommended mode for most games)
DOES NOT FLASH
COMBINED FLASHES
Page 16

15/20
CONFIGURING THE PEDALS ON PLAYSTATION® 3
CONFIGURING THE PEDALS ON PC
Separate pedal set (default mode) Combined pedal set (must be set)
- Accelerator = RZ axis
- Brake = Y axis
- Accelerator = Up direction of the Y axis
- Brake = Down direction of the Y axis
Separate pedal set (default mode) Combined pedal set (must be set)
- Accelerator = R2 trigger
of the PS3 gamepad
- Brake = L2 trigger
of the PS3 gamepad
- Accelerator = Up direction
of the “right mini-stick” of the PS3 gamepad
- Brake = Down direction
of the “right mini-stick” of the PS3 gamepad
Page 17

16/20
PROGRAMMING THE WHEEL AND PEDALS
Your wheel is fully programmable:
- All the action buttons can be switched between themselves.
- All the action buttons can be programmed onto the pedals or gearshift paddles.
TWO PROGRAMMING MODES
The button and the PRESET LED allow you to view the programming type chosen:
AUTOMATIC (pre-programmed) or MANUAL (programmed by yourself). Simply pressing this button allows you
to switch from one programming mode to another (even during a game).
“AUTOMATIC PRESET” (PRESET
BUTTON OFF)
This is the default programming.
For more information, refer to the diagrams in CONFIGURING “AUTOMATIC PRESET”
- PLAYSTATION® 3 / PC.
“MANUAL PRESET” (PRESET
BUTTON ON)
This is your personal programming. The buttons can either be:
- programmed onto the pedals or gearshift paddles
- or switched between each other.
- You can change your programming whenever you want.
- The programming is automatically saved in the wheel (even when it is disconnected or switched off).
- When your “MANUAL PRESET” is blank, it is identical to “AUTOMATIC PRESET”.
PROGRAMMING PROCEDURE
Steps Action LED status
1
Activate “MANUAL PRESET”
by pressing the button.
On
2
Press and release the MAPPING button
On
3 Press and release the button to programme.
Flashing
4
Press and release the button, the gearshift paddle or pedal you
want to assign to this function.
Off
On
Your “MANUAL PRESET” programming is now enabled and updated (with your programming applied).
Page 18

17/20
EXAMPLES OF POSSIBLE USES:
- On PS3, programme L2/R2 or L3/R3 onto the Up and Down gearshift paddles (L1/R1 by default).
- On PS3, programme the Cross/Square buttons onto the pedals (L2/R2 by default).
- Switch different buttons for better access.
Note: The button cannot be programmed or moved.
EEPROM MEMORY
Your wheel has an internal chip that stores all your “MANUAL PRESET” programmes in memory (even
when the wheel is off or disconnected for a long period of time).
You can save a different “MANUAL PRESET” on each support used (PC and PS3).
DELETING A “MANUAL PRESET”
Steps Action LED status
1
Activate your “MANUAL PRESET”
On
2
Press and hold the MAPPING
button for 2 seconds.
Flashes for 2 seconds
Your “MANUAL PRESET” is now blank (and becomes identical to the “AUTOMATIC PRESET”).
RETURN TO “FACTORY SETTINGS”
The aim here is to remove all of your programming or settings in one go.
Steps Action LED status
1
Simultaneously press the following buttons
MAPPING
+ SELECT + START
Flashes for 5 seconds
All your “MANUAL PRESETS” (PC + PS3) or settings are now blank.
Note: The result of this action is to fully restart your wheel. On a PC, you should
therefore carry out this operation only when no game is currently playing.
Page 19

18/20
TROUBLESHOOTING
The wheel is not perfectly centred in the games:
- Switch off the wheel (by setting the switch to OFF). Physically centre the wheel. Next, switch the wheel
back on (by setting the switch to ON).
- If the problem persists, you can manually centre the wheel. To do this, position the wheel in perfect
alignment with the centre, and then simultaneously press “SELECT + START + ENGINE START” (this
operation must be carried out each time the wheel is switched on).
- On the PC, if the wheel or pedals are not properly calibrated, download the “Thrustmaster Calibration
Tool v 1.03” manual calibration software available at the following address: http://ts.thrustmaster.com
.
My wheel or pedals do not work correctly:
- Switch the wheel off and back on again (making sure the wheel is centred on start-up).
- Check the condition of the 4 LR6 / AA batteries and that their polarities are correctly positioned.
- If the problem persists, switch off your computer or your console, disconnect the USB receiver as well as
the power cord, reconnect all of them again, then restart and launch your game again.
On PC, my wheel is detected but does not work with my game:
Open the interface for managing your game’s “Options” to configure your wheel. Refer to your game’s
user manual or online help for more information.
On PS3, my wheel is not detected:
- In “1 player” mode: If your official gamepad is turned on, you will have to switch it to “controller port 2” (using
the “PS” button) for your wheel to be functional.
- If the problem persists, switch off your gamepad while leaving only the wheel connected.
My pedals do not work correctly in “Separate Mode”:
(E.g. when the game is running, the selection cursor moves all by itself)
Exit the game and switch the pedals to “combined” mode. Then return to your game to reconfigure the
wheel in your game’s option management interface.
My wheel cannot connect itself to the receiver:
The connection between the wheel and the receiver is made automatically.
In the event of a connection failure, you can force the connection by pressing the LED button of the
receiver (16), then simultaneously on your wheel’s SELECT + START +
buttons.
The
LED flashes continuously:
You must change the batteries.
SAFETY RECOMMENDATIONS AND INFORMATION
During extended periods of non-use, switch off the wheel (by setting the switch to OFF),
remove the wheel from its base and remove the 4 batteries from the battery compartment.
Page 20

19/20
TECHNICAL SUPPORT
If you encounter a problem with your product, please go to http://ts.thrustmaster.com and click Technical
Support. From there you will be able to access various utilities (Frequently Asked Questions (FAQ), the
latest versions of drivers and software) that may help to resolve your problem. If the problem persists, you
can contact the Thrustmaster products technical support service (“Technical Support”):
By email
:
In order to take advantage of technical support by email, you must first register online. The information you
provide will help the agents to resolve your problem more quickly. Click Registration on the left-hand side
of the Technical Support page and follow the on-screen instructions. If you have already registered, fill in
the Username and Password fields and then click Login.
By telephone
:
United Kingdom
08450800942
Charges
at local rate
Monday to Friday from Noon to 4pm and 5pm to 10pm
Saturday from 9am to Noon and 1pm to 7pm
Sunday from 9am to Noon and 1pm to 4pm
United States
1-866-889-5036
Free
Monday to Friday from 7am to 11am and from Noon to
5pm
Saturday and Sunday from 7am to Noon
(Eastern Standard Time)
Canada
1-866-889-2181
Gratuit / Free
Monday to Friday from 7am to 11am and from Noon to
5pm
Saturday and Sunday from 7am to Noon
(Eastern Standard Time)
Denmark
80887690
Free
Monday to Friday from 1pm to 5pm and 6pm to 11pm
(English)
Saturday from 9am to 1pm and 2pm to 8pm
Sunday from 10am to 1pm and 2pm to 5pm
Sweden
0200884567
Free
Monday to Friday from 1pm to 5pm and 6pm to 11pm
(English)
Saturday from 9am to 1pm and 2pm to 8pm
Sunday from 10am to 1pm and 2pm to 5pm
Finland
0800 913060
Free
Monday to Friday from 2pm to 6pm and 7pm to Midnight
(English)
Saturday from 10am to 2pm and 3pm to 9pm
Sunday from 11am to 2pm and 3pm to 6pm
WARRANTY INFORMATION
Worldwide, Guillemot Corporation S.A. (“Guillemot”) warrants to the consumer that this Thrustmaster product will
be free from material defects and manufacturing flaws for a period of two (2) years from the original date of
purchase. Should the product appear to be defective during the warranty period, immediately contact Technical
Support, who will indicate the procedure to follow. If the defect is confirmed, the product must be returned to its
place of purchase (or any other location indicated by Technical Support).
Within the context of this warranty, the consumer’s defective product will, at Technical Support’s option, be either
repaired or replaced. Where authorized by applicable law, the full liability of Guillemot and its subsidiaries
(including for indirect damages) is limited to the repair or replacement of the Thrustmaster product. The consumer’s
legal rights with respect to legislation applicable to the sale of consumer goods are not affected by this warranty.
Page 21

20/20
This warranty shall not apply: (1) if the product has been modified, opened, altered, or has suffered damage as a
result of inappropriate or abusive use, negligence, an accident, normal wear, or any other cause not related to a
material defect or manufacturing flaw; (2) in the event of failure to comply with the instructions provided by
Technical Support; (3) to software not published by Guillemot, said software being subject to a specific warranty
provided by its publisher.
Additional warranty provisions
In the United States of America and in Canada, this warranty is limited to the product’s internal mechanism and external
housing. Any applicable implied warranties, including warranties of merchantability and fitness for a particular purpose,
are hereby limited to two (2) years from the date of purchase and are subject to the conditions set forth in this limited
warranty. In no event shall Guillemot Corporation S.A. or its affiliates be liable for consequential or incidental damage
resulting from the breach of any express or implied warranties. Some States/Provinces do not allow limitation on how
long an implied warranty lasts or exclusion or limitation of incidental/consequential damages, so the above limitation
may not apply to you. This warranty gives you specific legal rights, and you may also have other legal rights which vary
from State to State or Province to Province.
COPYRIGHT
© 2010 Guillemot Corporation S.A. All rights reserved. Thrustmaster
®
is a registered trademark of Guillemot Corporation
S.A. Ferrari® is a registered trademark of Ferrari Idea S.p.A. PlayStation® is a registered trademark of Sony Computer
Entertainment Inc. Microsoft® Windows® is a registered trademark of Microsoft Corporation in the United States and/or
other countries. All other trademarks and brand names are hereby acknowledged and are property of their respective
owners. Illustrations not binding. Contents, designs and specifications are subject to change without notice and may
vary from one country to another. Made in China.
ENVIRONMENTAL PROTECTION RECOMMENDATION
At the end of its working life, this product should not be disposed of with standard household
waste, but rather dropped off at a collection point for the disposal of Waste Electrical and
Electronic Equipment (WEEE) for recycling.
This is confirmed by the symbol found on the product, user manual or packaging.
Depending on their characteristics, the materials may be recycled. Through recycling and
other forms of processing Waste Electrical and Electronic Equipment, you can make a
significant contribution towards helping to protect the environment.
Please contact your local authorities for information on the collection point nearest you.
Operates with 4 batteries LR6 / AA (1.5V), not included. Do not recharge non-rechargeable batteries. Used batteries
must be removed from the toy. Different types of batteries or new and used batteries must not be mixed. Only batteries
of the recommended type or similar type must be used. Batteries must be inserted with the correct polarity. The
terminals of a battery must not be short-circuited.
www.thrustmaster.com
Page 22

1/20
Compatible : PlayStation® 3 & PC
Manuel de l’utilisateur
CARACTERISTIQUES TECHNIQUES
1 2 Vis de serrage arrière
(pour le réglage de l’inclinaison)
2 Poignée de transport
3 Tronc ajustable de la base
4 Roue du volant détachable
5 Cordon électronique d’alimentation
6 1 Vis de serrage avant
(pour le réglage de la longueur)
7 Pédales d’accélérateur et de frein
8 Compartiment à piles
et de rangement du récepteur
9 Palettes séquentielles de vitesse Up & Down
10 Manettino avec switch rotatif 5 positions
(pour les programmations)
11 Boutons « Select » et « Start »
12 D-Pad multidirectionnel
13 Boutons d’actions
14 Récepteur Wireless
15 Connecteur USB du récepteur
16 Led du récepteur
17 Interrupteur PC/PS3 du récepteur
Page 23

2/20
INSTALLATION DU VOLANT
AJUSTEMENT DE L’INCLINAISON ET DE LA LONGUEUR
DE LA POSITION DE CONDUITE
- Dévissez légèrement (dans le sens inverse des aiguilles d’une montre) les 2 vis de serrage (1) situées à
l’arrière de la base.
- Ajustez l’inclinaison du tronc (3) de la base à votre convenance.
- Revissez ensuite (dans le sens des aiguilles d’une montre) les 2 vis de serrage (1).
Page 24

3/20
- Dévissez légèrement (dans le sens inverse des aiguilles d’un montre) la vis de serrage (6) située à
l’avant du tronc de la base. Puis étirez à votre convenance la longueur du tronc.
- Revissez ensuite (dans le sens des aiguilles d’une montre) la vis de serrage (6) en prenant garde que
celle-ci entre bien dans l’une des perforations prévues à cet effet. Pour ce faire, positionnez tout
simplement la perforation supérieure dans le détrompeur prévu à cet effet.
Page 25

4/20
FIXATION DE LA ROUE DU VOLANT SUR LA BASE
Ergots mâles (face avant de la base) Ergots femelles (arrière de la roue)
+
Languette de fixation (arrière de la roue)
- Positionnez la roue détachable (4) horizontalement, puis insérez les 2 ergots mâles (situés en face avant
de la base) à l’intérieur des 2 ergots femelles (situés à l’arrière de la roue).
- Rabattez la roue verticalement, puis fixez le volant en appuyant sur la languette de fixation (située à
l’arrière de la roue) et en relâchant, jusqu’à entendre un léger « CLIC ».
- Vérifiez que la roue du volant est bien fixée sur la base.
Page 26
5/20
- Reliez électroniquement la roue du volant à sa base en branchant le connecteur mâle coudé (situé à
l’extrémité du cordon (5) d’alimentation) au connecteur femelle (situé à gauche de la roue).
- Tournez l’écrou (situé à l’extrémité du connecteur) dans le sens des aiguilles d’une montre pour fixer le
tout.
EFFECTUEZ L’OPÉRATION INVERSE
POUR DÉMONTER LA ROUE DÉTACHABLE DE LA BASE
Page 27

6/20
INSTALLATION DES PILES ET RÉCUPERATION DU RECEPTEUR
- Retirez le couvercle du compartiment à piles (8) (situé à l’arrière des 2 pédales) et installez 4 piles de
type LR6 / AA en respectant le sens des polarités.
- Récupérez le Récepteur Wireless (14) qui se trouve dans la partie inférieure du compartiment à piles.
- Repositionnez le couvercle du compartiment à piles.
Page 28

7/20
ALLUMER OU ETEINDRE LE VOLANT
- Positionnez l’interrupteur (situé sur le côté droit de la roue du volant) :
- Sur ON pour allumer le volant.
- Sur OFF pour éteindre le volant.
Remarque importante :
Lorsque vous allumez votre volant, la roue de celui-ci doit toujours être physiquement
parfaitement centrée (pour éviter tout décentrage).
Page 29

8/20
PLAYSTATION® 3
INSTALLATION SUR « PLAYSTATION® 3 »
1. Positionnez l’interrupteur PC/PS3 (17) de votre récepteur (14) en position « PS3 ».
2. Branchez le connecteur USB (15) du récepteur sur le port USB n°1 de la console.
3. Allumez votre console.
4. Allumez votre volant à l’aide de l’interrupteur ON/OFF.
5. Une fois la connexion établie, lancez le jeu.
Vous êtes maintenant prêt à jouer !
UTILISATION DU BOUTON « PS »
Le bouton « PS » de votre volant vous permettra de quitter vos jeux, d’accéder aux menus et d’éteindre
directement votre système PlayStation® 3.
Procédure :
Positionnez le switch du Manettino (10) sur l’icône correspondante, puis appuyez sur le bouton poussoir.
Remarques importantes sur PlayStation® 3 :
- L’interrupteur PC/PS3 (17) du récepteur doit toujours être positionné sur « PS3 » avant de le
connecter
- En mode « 1 Joueur », si votre manette officielle est allumée, il est alors nécessaire de basculer celleci en « port manette 2 » afin que votre volant soit fonctionnel.
- Sur PlayStation® 3, le volant émule la manette officielle (ce qui lui permet d’être compatible dans
100% des jeux de course).
- Dans la plupart des jeux, en mode « Sensibilité Normale » (tout comme sur la manette), une légère
zone morte se fait sentir au centre de l’axe de direction (et donc au centre de la roue).
Le mode « Sensibilité Haute » du volant est paramétré pour supprimer cette zone morte.
Dans certains jeux, il est cependant possible de supprimer ou de diminuer cette zone morte en
modifiant les paramètres de l’axe de direction dans les « Options/Commandes » du jeu.
Le Mode « Sensibilité Haute » est conseillé dans la plupart des jeux PS3 (où il n’est pas possible de
modifier la zone morte centrale de l’axe de direction).
Le Mode « Sensibilité Normale » est conseillé uniquement dans les jeux PS3 où il est possible de
modifier la zone morte centrale de l’axe de direction.
Page 30

9/20
CONFIGURATION DU « PRESET AUTOMATIQUE » - PLAYSTATION® 3
(en mode « Pédalier Séparé »)
Page 31

10/20
PC
INSTALLATION SUR PC
Configuration requise : PC (Windows® Xp, Windows® Vista, Windows® 7) équipé d’un port USB
Le CD-ROM fourni avec ce produit permet d’installer les pilotes.
1. Insérez le CD-ROM d’installation dans votre lecteur de CD-ROM. L’assistant d’installation apparaît
automatiquement (si le menu d’installation ne se lance pas automatiquement, double-cliquez sur «
Poste de travail », puis sur l’icône du CD-ROM et, si nécessaire, sur « Setup.exe »).
2. Cliquez sur le bouton « DRIVERS » pour lancer l’installation des pilotes.
3. Une fois l’installation terminée, cliquez sur Terminer et redémarrez votre ordinateur.
4. Placez l’interrupteur PC/PS3 (17) de votre récepteur (14) sur la position « PC ».
5. Au redémarrage de l'ordinateur, reliez le connecteur USB (15) du récepteur à l'un des ports USB de
votre unité centrale. Windows® détectera automatiquement le nouveau périphérique.
6. L'installation des pilotes est automatique.
Suivez les instructions affichées à l'écran pour terminer l'installation.
7. Sélectionnez Démarrer/Programmes/Thrustmaster/Control Panel pour accéder au Control Panel.
La boîte de dialogue Contrôleurs de jeu affichera le nom du volant avec l'état OK.
8. Dans le Control Panel, cliquez sur Propriétés pour tester et visualiser les boutons, le D-pad et les
axes du volant et du pédalier.
Vous êtes maintenant prêt à jouer !
Remarques importantes sur PC :
- L’interrupteur PC/PS3 (17) du récepteur doit toujours être positionné sur « PC » avant d’effectuer la
connexion.
- Le nom du volant déclaré sur PC (dans le Control Panel et dans les Jeux) est « F430 Cockpit
Wireless ».
Page 32

11/20
CONFIGURATION DU « PRESET AUTOMATIQUE » - PC
(en mode « Pédalier Séparé »)
Page 33

12/20
UTILISATION DU MANETTINO 5 POSITIONS
Le système du Manettino (10) se compose :
- d’un switch rotatif que vous pouvez tourner pour passer d’une fonction à une autre
- d’un bouton poussoir situé sous le switch (pour valider vos choix)
La fonction souhaitée se déclenche dès que vous pressez le bouton poussoir (et non lorsque vous tournez le
switch) avec le switch positionné en face de l’icône correspondante.
Manettino Fonctionnalité des boutons et correspondances des voyants lumineux
Bouton « PS » sur PS3 et « 13 » sur PC
- Allumé = connexion établie entre le volant et le récepteur.
- Clignote rapidement = pas de connexion entre le volant et le récepteur.
- Clignote lentement en continu = il convient de changer les piles.
- Eteint = le volant est en mode veille ou éteint.
Mode « Sensibilité Normale »
- Allumé = modes « Sensibilité Normale » et « Pédalier Séparé » activés
- Clignote rapidement = mode « Pédalier Combiné » activé
Mode « Sensibilité Haute »
- Allumé = modes « Sensibilité Haute » et « Pédalier Séparé » activés
- Clignote rapidement = mode « Pédalier Combiné » activé
« Mapping »
- Allumé = mode « Mapping » activé (en attente d’une programmation)
« Preset Manuel »
- Allumé = mode « Preset Manuel » activé
- Positionnez le switch du Manettino sur l’icône correspondante.
- Appuyez sur le bouton poussoir pour valider la fonction.
Page 34

13/20
GÉNÉRALITÉS
LE BOUTON POWER DU VOLANT
- Position OFF = le volant est éteint (et n’use pas les piles).
- Position ON = le volant est allumé.
La connexion entre le volant et le récepteur s’effectue automatiquement.
En cas d’échec, vous pouvez forcer la connexion en appuyant sur le bouton Led du récepteur (16), puis
simultanément sur les boutons SELECT + START +
de votre volant.
LE MODE VEILLE
Le volant s'éteint automatiquement :
- Après 5 minutes d'inactivité.
- Après 5 secondes en cas d’échec ou de perte de connexion.
Pour réveiller votre volant, appuyez sur l’un des boutons d’actions du volant (13)
ou utilisez l’interrupteur ON/OFF du volant.
L’INTERRUPTEUR « PC / PS3 » (17) DU RECEPTEUR
Cet interrupteur doit toujours être placé sur la bonne position avant que vous ne connectiez votre
récepteur sur le port USB de votre PlayStation® 3 ou votre PC.
LA LED ET LA LED DU RECEPTEUR (16)
- Les 2 Leds sont allumées = connexion établie entre le volant et le récepteur.
- Les 2 Leds clignotent rapidement = pas de connexion entre le volant et le récepteur.
- L’ensemble des Leds du Manettino sont éteinte = le volant est en mode veille ou éteint.
- La Led
clignote lentement en continu = il convient de changer les piles.
LE CALIBRAGE AUTOMATIQUE DU VOLANT ET DES PEDALES
- Le centre de la roue du volant est prédéfini dès que vous allumez le volant : il est donc indispensable
que la roue soit parfaitement centrée sur son axe lorsque vous l’allumez.
- Il est également possible de centrer manuellement le centre de la roue. Pour ce faire, positionnez la roue
parfaitement au centre, puis appuyez simultanément sur « SELECT + START + ENGINE START »
(cette opération doit être effectuée à chaque redémarrage du volant).
- La direction de la roue du volant ainsi que les pédales se calibrent de manière automatique.
Page 35

14/20
FONCTIONS AVANCÉES
RÉGLAGE DE LA SENSIBILITÉ DE LA ROUE DU VOLANT
La direction de votre volant possède 2 modes de sensibilité :
- « Sensibilité Normale » (mode par défaut et conseillé sur PC - nécessite un paramétrage sur PS3)
- « Sensibilité Haute » (mode par défaut et conseillé sur PS3 - nécessite un paramétrage sur PC)
Paramétrage en mode « Sensibilité Normale » (mode par défaut et conseillé sur PC)
Action
- Positionnez le switch du Manettino sur l’icône correspondante.
- Appuyez sur le bouton poussoir pour valider la fonction.
ALLUME
La direction de votre volant est en sensibilité normale
Paramétrage en mode « Sensibilité Haute » (mode par défaut et conseillé sur PS3)
Action
- Positionnez le Switch du Manettino sur l’icône correspondante.
- Appuyez sur le bouton poussoir pour valider la fonction.
ALLUME
La direction de votre volant est désormais plus sensible, surtout au centre
CONFIGURATION DU PEDALIER
Par défaut, les commandes d’accélérateur et de frein de votre volant fonctionnent en mode « Séparé », ce
qui signifie que les pédales fonctionnent sur des axes indépendants.
Ce mode permet d’améliorer considérablement la précision de votre pilotage.
Si votre jeu ne supporte pas le mode « Séparé », le pédalier de votre volant ne fonctionnera pas
correctement. Vous devez alors activer le mode « Combiné ».
PARAMETRAGE
Appuyez simultanément sur les 2 pédales (accélérateur et frein) + le bouton
, puis
relâchez.
MODE DU PEDALIER
ou
SEPARE
(mode conseillé dans la majorité des jeux)
NE CLIGNOTE PAS
COMBINE CLIGNOTE
Page 36

15/20
CONFIGURATION DU PEDALIER SUR « PLAYSTATION® 3 »
Pédalier Séparé (mode par défaut) Pédalier Combiné (nécessite un paramétrage)
- Accélérateur = Gâchette R2
de la manette PS3
- Frein = Gâchette L2
de la manette PS3
- Accélérateur = Direction Haut
du « mini-stick Droit » de la manette PS3
- Frein = Direction Bas
du « mini-stick Droit » de la manette PS3
CONFIGURATION DU PEDALIER SUR « PC »
Pédalier Séparé (mode par défaut) Pédalier Combiné (nécessite un paramétrage)
- Accélérateur = Axe RZ
- Frein = Axe Y
- Accélérateur = Direction Haut de l’Axe Y
- Frein = Direction Bas de l’Axe Y
Page 37

16/20
PROGRAMMATION DU VOLANT ET DES PEDALES
Votre volant est entièrement programmable :
- Tous les boutons d’actions peuvent être permutés entre eux.
- Tous les boutons d’actions peuvent être programmés sur les pédales ou les palettes séquentielles.
DEUX MODES DE PROGRAMMATION
Le bouton et la Led PRESET vous permettent de visualiser le type de programmation choisi :
AUTOMATIQUE (préprogrammé) ou MANUEL (programmé par vous-même). Une simple pression sur ce
bouton vous permettra (même en cours de jeu) de basculer d’une programmation à l’autre.
LE « PRESET AUTOMATIQUE » (BOUTON PRESET
ETEINT)
Il s’agit ici de la programmation par défaut.
Pour plus d’informations, reportez-vous aux schémas CONFIGURATION DU « PRESET
AUTOMATIQUE » - PLAYSTATION® 3 / PC.
LE « PRESET MANUEL » (BOUTON PRESET
ALLUMÉ)
Il s’agit ici de vos programmations personnelles. Les boutons peuvent être :
- soit programmés sur les pédales ou les palettes séquentielles
- soit inversés entre eux.
- Vous pouvez modifier à votre convenance et à volonté ces programmations.
- Les programmations sont automatiquement sauvegardées à l’intérieur de votre volant (même après
l’avoir débranché ou éteint).
- Lorsque que votre « PRESET MANUEL » est vierge, il est alors identique au « PRESET AUTOMATIQUE ».
PROCEDURE DE PROGRAMMATION
Etapes Action Statut des Leds
1
Activez « PRESET MANUEL »
en appuyant sur le bouton.
Allumé
2
Pressez et relâchez le bouton MAPPING
Allumé
3 Pressez et relâchez le bouton à programmer.
Clignote
4
Pressez et relâchez le bouton, la palette séquentielle ou la
pédale où vous souhaitez placer votre fonction.
Eteint
Allumé
Votre « PRESET MANUEL » est désormais actif et actualisé (avec votre programmation effectuée).
Page 38
17/20
EXEMPLES D’APPLICATIONS POSSIBLES :
- Sur PS3, programmer L2/R2 ou L3/R3 sur les palettes séquentielles Up et Down (L1/R1 par défaut).
- Sur PS3, programmer les boutons Croix/Carré sur les pédales (L2/R2 par défaut).
- Inverser différents boutons pour plus d’accessibilité.
Remarque : Le bouton ne peut pas être programmé ou déplacé.
MEMOIRE EEPROM
Votre volant dispose d'une puce interne qui garde en mémoire l’ensemble de vos programmations
« PRESET MANUEL » (même volant éteint ou débranché pendant une longue période).
Vous pouvez enregistrer un « PRESET MANUEL » différent sur chaque support utilisé (PC et PS3).
EFFACER UN « PRESET MANUEL »
Etapes Action Statut des Leds
1
Activez votre « PRESET MANUEL »
Allumé
2
Pressez et maintenez appuyé le bouton MAPPING
pendant 2 secondes.
Clignote 2 secondes
Votre « PRESET MANUEL » est désormais vierge (et redevenu identique au « PRESET
AUTOMATIQUE »).
RETOUR AU « PARAMETRAGE D’USINE »
L’objectif ici est d’effacer en une seule manipulation l’ensemble de vos programmations ou
réglages effectués.
Etapes Action Statut des Leds
1
Appuyez simultanément sur les boutons
MAPPING
+ SELECT + START
Clignote 5 secondes
L’ensemble de vos « PRESETS MANUELS » (PC + PS3) ou réglages sont désormais vierges.
Remarque : Cette manipulation a pour effet de redémarrer complètement votre volant.
Sur PC, il est donc recommandé d’effectuer cette opération uniquement
lorsqu’aucun jeu n’est en cours.
Page 39

18/20
DEPANNAGE
La roue du volant n’est pas parfaitement centrée dans les jeux :
- Éteignez le volant (en positionnant l’interrupteur sur OFF). Centrez physiquement la roue du volant.
Rallumez ensuite le volant (en positionnant l’interrupteur sur ON).
- Si le problème persiste, il vous est possible de centrer manuellement la roue. Pour ce faire, positionnez
la roue parfaitement au centre, puis appuyez simultanément sur « SELECT + START + ENGINE
START » (cette opération doit être effectuée à chaque redémarrage du volant).
- Sur PC, en cas de mauvais calibrage de la roue ou des pédales, téléchargez le logiciel de calibration
manuelle « Thrustmaster Calibration Tool v 1.03 » disponible à cette adresse : http://ts.thrustmaster.com
.
Mon volant ou mes pédales ne fonctionnent pas correctement :
- Éeignez et rallumez le volant (en vous assurant que le volant est centré au démarrage).
- Vérifiez l’état et le bon positionnement des 4 piles LR6 / AA.
- Si le problème persiste, éteignez votre ordinateur ou votre console, déconnectez le récepteur USB ainsi
que le cordon électronique d’alimentation, reconnectez l'ensemble, redémarrez et relancez votre jeu.
Sur PC, mon volant est détecté, mais ne fonctionne pas avec mon jeu :
Ouvrez l’interface de gestion des « Options » de votre jeu pour configurer votre volant. Reportez-vous au
manuel de l’utilisateur ou à l’aide en ligne de votre jeu pour plus d’informations.
Sur PS3, mon volant n’est pas détecté :
- En mode « 1 Joueur », si votre manette officielle est allumée, il est alors nécessaire de basculer celle-ci (à
l’aide du bouton « PS ») en « port manette 2 » afin que votre volant soit fonctionnel.
- Si le problème persiste, éteignez votre manette en ne laissant que le volant connecté.
Mon pédalier ne fonctionne pas correctement en « Mode Séparé » :
(Exemple : une fois dans le jeu, le curseur de sélection se déplace tout seul)
Quittez le jeu et basculez votre pédalier en « Mode Combiné ». Relancez le jeu, puis configurez de
nouveau votre volant dans l’interface de gestion des options de votre jeu.
Mon volant n’arrive pas à se connecter au récepteur :
La connexion entre le volant et le récepteur s’effectue automatiquement.
En cas d’échec, vous pouvez forcer la connexion en appuyant sur le bouton Led du récepteur (16), puis
simultanément sur les boutons SELECT + START +
de votre volant.
La Led
clignote en continu :
Il convient de changer les piles.
PRÉCONISATIONS ET INFORMATIONS RELATIVES À LA SÉCURITÉ
Lors des périodes prolongées d’inactivité, éteignez le volant (en positionnant l’interrupteur sur
OFF), démontez la roue de sa base et retirez les 4 piles du compartiment à piles.
Page 40

19/20
SUPPORT TECHNIQUE
Si vous rencontrez un problème avec votre produit, rendez-vous sur le site http://ts.thrustmaster.com et
cliquez sur Support Technique. Vous aurez alors accès à différents services (Foire Aux Questions (FAQ),
dernières versions des pilotes et logiciels) susceptibles de résoudre votre problème. Si le problème persiste,
vous pouvez contacter le support technique des produits Thrustmaster (« Support Technique ») :
Par e-mail :
Pour bénéficier du support technique par e-mail, vous devez d’abord vous enregistrer en ligne. Les
informations fournies vont permettre aux techniciens de résoudre plus rapidement votre problème. Cliquez
sur Enregistrement à gauche de la page Support technique et suivez les instructions à l’écran. Si vous êtes
déjà enregistré, renseignez les champs Nom d’utilisateur et Mot de passe puis cliquez sur Connexion.
Par téléphone (si vous n’avez pas d’accès Internet) :
Canada
1-866-889-2181
Gratuit
Du lundi au vendredi de 7h à 11h et de 12h à 17h
Le samedi et le dimanche de 7h à 12h
(Heure de l’Est)
France
02 99 93 21 33
Numéro fixe France Telecom non
surtaxé
Tarif selon opérateur
Du lundi au vendredi de 13h à 17h et de 18h à 22h
Le samedi de 9h à 13h et de 14h à 20h
Le dimanche de 10h à 13h et de 14h à 17h
Suisse
0842 000 022
Tarif d’une communication locale
Du lundi au vendredi de 13h à 17h et de 18h à 22h
Le samedi de 9h à 13h et de 14h à 20h
Le dimanche de 10h à 13h et de 14h à 17h
Belgique
078 16 60 56
Tarif d’une communication
nationale
Du lundi au vendredi de 13h à 17h et de 18h à 22h
Le samedi de 9h à 13h et de 14h à 20h
Le dimanche de 10h à 13h et de 14h à 17h
* Tarif indicatif (hors coût de mise en relation)
INFORMATIONS RELATIVES À LA GARANTIE
Dans le monde entier, Guillemot Corporation S.A. (« Guillemot ») garantit au consommateur que le présent
produit Thrustmaster est exempt de défauts matériels et de vices de fabrication, et ce, pour une période de
deux (2) ans à compter de la date d’achat d’origine. Si, au cours de la période de garantie, le produit semble
défectueux, contactez immédiatement le Support Technique qui vous indiquera la procédure à suivre. Si le
défaut est confirmé, le produit devra être retourné à son lieu d’achat (ou tout autre lieu indiqué par le
Support Technique).
Dans le cadre de la garantie, le consommateur bénéficiera, au choix du Support Technique, du
remplacement ou de la réparation du produit défectueux. Lorsque la loi applicable l’autorise, toute
responsabilité de Guillemot et ses filiales (y compris pour les dommages indirects) se limite à la réparation
ou au remplacement du produit Thrustmaster. Les droits légaux du consommateur au titre de la législation
applicable à la vente de biens de consommation ne sont pas affectés par la présente garantie.
Cette garantie ne s’appliquera pas : (1) si le produit a été modifié, ouvert, altéré, ou a subi des dommages
résultant d’une utilisation inappropriée ou abusive, d’une négligence, d’un accident, de l’usure normale, ou
de toute autre cause non liée à un défaut matériel ou à un vice de fabrication ; (2) en cas de non-respect
des instructions du Support Technique ; (3) aux logiciels non-édités par Guillemot, lesdits logiciels faisant
l’objet d’une garantie spécifique accordée par leurs éditeurs.
Page 41

20/20
Stipulations additionnelles à la garantie
Aux États-Unis d’Amérique et au Canada, cette garantie est limitée au mécanisme interne et au boîtier
externe du produit. Toute garantie implicite applicable, incluant les garanties de qualité marchande ou
d’adaptation à un usage particulier, est limitée à deux (2) ans à compter de la date d’achat et soumise aux
conditions de la présente garantie limitée. En aucun cas, Guillemot Corporation S.A. ou ses sociétés
affiliées ne sauraient être tenues responsables envers qui que ce soit de tous dommages indirects ou
dommages accessoires résultant du non-respect des garanties expresses ou implicites. Certains
États/Provinces n’autorisent pas la limitation sur la durée d’une garantie implicite, ou l’exclusion ou la
limitation de responsabilité pour les dommages indirects ou accessoires, de sorte que les limitations ou
exclusions ci-dessus peuvent ne pas vous être applicables. Cette garantie vous confère des droits
spécifiques ; vous pouvez également bénéficier d’autres droits qui peuvent différer d’un État/Province à l’autre.
COPYRIGHT
© 2010 Guillemot Corporation S.A. Tous droits réservés. Thrustmaster® est une marque déposée de
Guillemot Corporation S.A. Ferrari® est une marque déposée de Ferrari Idea S.p.A. PlayStation® est une
marque déposée de Sony Computer Entertainment Inc. Microsoft® Windows® est une marque déposée de
Microsoft Corporation aux États-Unis et/ou dans d’autres pays. Toutes les autres marques déposées et
noms commerciaux sont reconnus par les présentes et sont la propriété de leurs propriétaires respectifs.
Illustrations non contractuelles. Le contenu, la conception et les spécifications sont susceptibles de changer
sans préavis et de varier selon les pays. Fabriqué en Chine.
RECOMMANDATION RELATIVE A LA PROTECTION DE L’ENVIRONNEMENT
En fin de vie, ce produit ne doit pas être éliminé avec les déchets ménagers
normaux mais déposé à un point de collecte des déchets d'équipements
électriques et électroniques en vue de son recyclage.
Ceci est confirmé par le symbole figurant sur le produit, le manuel utilisateur ou
l’emballage.
En fonction de leurs caractéristiques, les matériaux peuvent être recyclés. Par le
recyclage et par les autres formes de valorisation des déchets d'équipements
électriques et électroniques, vous contribuez de manière significative à la
protection de l’environnement.
Veuillez consulter les autorités locales qui vous indiqueront le point de collecte
concerné.
Fonctionne avec 4 piles de type LR6 / AA (1.5V), non fournies. Les piles non rechargeables ne doivent pas être
rechargées. Les piles usagées doivent être enlevées du jouet. Différents types de piles ou des piles neuves et
usagées ne doivent pas être mélangées. Seules les piles du type recommandé ou d’un type similaire doivent être
utilisées. Les piles doivent être mises en place en respectant la polarité. Les bornes d'une pile ne doivent pas être
mises en court-circuit.
www.thrustmaster.com
Page 42

1/20
Für: PlayStation® 3 & PC
Benutzerhandbuch
TECHNISCHE FEATURES
1 2 Klammerschrauben hinten
(für die Einstellung der Neigung)
2 Transportgriff
3 Am Sockel einstellbarer Schaft
4 Abnehmbarer Lenker
5 Elektronisches Stromkabel
6 1 Klammerschraube vorne
(für die Einstellung der Länge)
7 Gas- und Bremspedale
8 Batteriefach und Aufbewahrungsfach
des Empfängers
9 Sequentielle Schalthebel Hoch & Runter
10 Manettino mit 5-Positionen-Drehschalter
(für Programmierungen)
11 "Select" und "Start" Buttons
12 Multidirektionales D-Pad
13 Aktionsbuttons
14 Drahtlosempfänger
15 USB-Stecker des Empfängers
16 LED des Empfängers
17 PC/PS3-Wahlschalter des Empfängers
Page 43

2/20
INSTALLATION DES LENKERS
ANPASSUNG DER NEIGUNG UND DES ABSTANDES
DES LENKERS ZUM FAHRER
- Drehen Sie die 2 Klammerschrauben (1) an der hinteren Seite des Sockels (gegen den Uhrzeigersinn)
etwas aus.
- Passen Sie die Neigung des Schaftes (3) des Sockels wie gewünscht an.
- Drehen Sie anschließend die 2 Klammerschrauben (1) (im Uhrzeigersinn) wieder fest ein.
Page 44

3/20
- Drehen Sie die 2 Klammerschrauben (6) an der vorderen Seite des Sockels (gegen den Uhrzeigersinn)
etwas aus. Passen Sie wie gewünscht die Länge des Schaftes an.
- Drehen Sie anschließend die Klammerschraube (6) (im Uhrzeigersinn) wieder fest ein, und achten
hierbei darauf, das diese sich in eine der vorgesehenen Bohrungen einfügt. Positionieren Sie hierfür die
obere Bohrung einfach in die vorgesehene Führungsbohrung.
Page 45

4/20
BEFESTIGUNG DES LENKERS AUF DER NABE
Befestigungszapfen (Vorderseite der Nabe) Befestigungshülse (Hinterseite des Lenkers)
+
Befestigungslasche (Hinterseite des Lenkers)
- Positionieren Sie den abnehmbaren Lenker (4) horizontal und fügen Sie die 2 Befestigungszapfen
(Vorderseite der Nabe) in die 2 Befestigungshülsen (Hinterseite des Lenkers) ein.
- Kippen Sie den Lenker vertikal ab und befestigen ihn, indem Sie auf die Befestigungslasche (Hinterseite
des Lenkers) drücken und wieder loslassen, bis ein leiser "KLICK" hörbar ist.
- Überprüfen Sie, dass der Lenker korrekt auf der Nabe befestigt ist.
Page 46

5/20
- Verbinden Sie den Lenker elektronisch mit der Nabe, indem Sie den Winkelstecker (Am Ende des
Stromkabels (5)) mit der Buchse (Links am Lenker) verbinden.
- Drehen Sie die Mutter (Am Ende des Steckers) im Uhrzeigersinn, um das Kabel zu befestigen.
GEHEN SIE UMGEKEHRT VOR,
UM DEN LENKER VON DER NABE ZU NEHMEN
Page 47

6/20
EINLEGEN DER BATTERIEN UND ENTNEHMEN DES EMPFÄNGERS
- Entfernen Sie den Deckel des Batteriefaches (8) (Hinterseite der 2 Pedale) und legen die 4 Batterien des
Typs LR6/AA ein, indem Sie die Polarität berücksichtigen.
- Entnehmen Sie den Drahtlosempfänger (14), der sich im unteren Teil des Batteriefaches befindet.
- Setzen Sie den Deckel des Batteriefaches wieder auf.
Page 48

7/20
LENKER EIN- ODER AUSSCHALTEN
- Bringen Sie den Schalter (rechts am Lenker) auf die Position:
- ON, um den Lenker einzuschalten.
- OFF, um den Lenker auszuschalten.
Wichtige Anmerkung:
Beim Einschalten des Lenkers, muss dieser genau zentriert sein, um jegliche Dezentrierung zu
vermeiden.
Page 49

8/20
PLAYSTATION® 3
INSTALLATION AUF DER "PLAYSTATION® 3"
1. Bringen Sie den PC/PS3-Wahlschalter (17) Ihres Empfängers (14) auf die Position "PS3".
2. Verbinden Sie den USB-Stecker (15) des Empfängers mit dem USB-Port Nr. 1 der Konsole.
3. Schalten Sie Ihre Konsole ein.
4. Schalten Sie Ihren Lenker mit Hilfe des ON/OFF-Schalters ein.
5. Sobald die Verbindung hergestellt wurde, kann das Spiel gestartet werden.
Sie sind nun spielbereit!
VERWENDUNG DES "PS" BUTTONS
Der "PS" Button Ihres Lenkers ermöglicht Ihnen ein Spiel zu verlassen, auf die Menüs zuzugreifen und Ihre
PlayStation® 3 direkt auszuschalten.
Vorgehensweise:
Bringen Sie den Wahlschalter des Manettinos (10) auf das entsprechende Icon und drücken Sie auf den
Druckknopf.
Wichtige Anmerkung für PlayStation® 3:
- Der PC/PS3-Wahlschalter (17) des Empfängers muss immer auf die Position "PS3" gestellt werden,
bevor der Lenker angeschlossen wird
- Im "1 Player" Modus: Ist Ihr offizielles Gamepad eingeschaltet, müssen Sie dieses auf den "Controller
Port 2" umschalten, damit Ihr Lenker funktioniert.
- Auf der PlayStation® 3 emuliert der Lenker das offizielle Gamepad (somit ist dieses mit allen
Rennspielen kompatibel).
- Bei den meisten Spielen kann im Modus "Normale Empfindlichkeit" ein leichter Totraum in der
zentralen Position der Lenkachse (und somit auf der zentralen Position des Lenkers) festgestellt
werden.
Der Modus "Hohe Empfindlichkeit" des Lenkers ermöglicht diesen Totraum zu vermeiden.
In bestimmten Rennspielen können Sie diesen Totraum vermeiden oder verringern, indem Sie
die Parameter der Lenkachse im Menü "Optionen/Steuerung" des Spiels ändern.
Der Modus "Hohe Empfindlichkeit" wird für die meisten PS3-Spiele empfohlen (für die der
Totraum nicht geändert werden kann).
Der Modus "Normale Empfindlichkeit" wird nur für die PS3-Spiele empfohlen, für die der
Totraum geändert werden kann.
Page 50

9/20
KONFIGURATION DER "AUTOMATISCHE EINSTELLUNG" - PLAYSTATION® 3
(im Modus "Separate Pedale")
Page 51

10/20
PC
INSTALLATION AUF DEM PC
Systemanforderungen: PC (Windows® Xp, Windows® Vista, Windows® 7) mit USB-Port
Die beigelegte CD-ROM erlaubt Ihnen die Treiber zu installieren.
1. Legen Sie die Installations-CD-ROM in Ihr CD-ROM-Laufwerk des Computers ein. Der
Installationsassistent wird automatisch angezeigt (ist dies nicht der Fall, starten Sie das Programm,
indem Sie auf den "Arbeitsplatz", anschließend auf das Icon der CD-ROM und falls nötig auf
"Setup.exe" doppelklicken).
2. Klicken Sie auf den Button "DRIVERS", um die Treiber zu installieren.
3. Nach Beendigung der Installation klicken Sie auf Fertig und starten Ihren Computer neu.
4. Bringen Sie den PC/PS3-Wahlschalter (17) Ihres Empfängers (14) auf die Position "PC".
5. Nach dem Neustart des Computers verbinden Sie den USB-Stecker (15) mit einem freien USB Port an
Ihrem Computer. Windows® erkennt automatisch das neue Gerät.
6. Die Treiber werden automatisch installiert.
Folgen Sie den Bildschirmanweisungen, um die Installation zu beenden.
7. Klicken Sie auf Start/Programme/Thrustmaster/Systemsteuerung, um auf die Systemsteuerung
zuzugreifen.
Die Gamecontroller Dialogbox zeigt nun den Namen des Lenkers mit dem OK Status an.
8. In dem Bedienfeld klicken Sie auf Eigenschaften, um die Knöpfe, das D-Pad und die Achsen des
Lenkers und der Pedale zu testen und anzuzeigen.
Sie sind nun spielbereit!
WICHTIGE ANMERKUNGEN ZUM PC:
- Der PC-PS3-Wahlschalter (17) des Empfängers muss immer auf die Position "PC" gestellt werden,
bevor der Lenker angeschlossen wird.
- Der Name des Lenkers, so wie er im PC (Systemsteuerung und in den Spielen) gespeichert ist, lautet
"F430 Cockpit Wireless".
Page 52
11/20
KONFIGURATION DER "AUTOMATISCHEN EINSTELLUNG" - PC
(im Modus "Separate Pedale")
Page 53

12/20
BETRIEB DES MANETTINO 5-POSITIONEN-WAHLSCHALTERS
Das Manettino-System (10) besteht aus:
- einem Drehwahlschalter, der die Auswahl der verschiedenen Funktionen ermöglicht.
- einen Druckknopf unterhalb des Wahlschalters (um die Auswahl zu bestätigen)
Die gewünschte Funktion wird aktiviert, sobald Sie auf den Druckknopf drücken (und nicht, wenn Sie den
Wahlschalter drehen), sofern der Wahlschalter auf das entsprechende Icon zeigt.
Manettino Funktionen der Buttons und Erklärung der Kontrollleuchten
"PS" Button für PS3 und "13" Button für PC
- An = Verbindung zwischen Lenker und Empfänger hergestellt.
- Blinkt schnell = keine Verbindung zwischen Lenker und Empfänger.
- Blinkt langsam und ununterbrochen = Batterien entladen.
- Aus = Lenker im Standby-Modus oder ausgeschaltet.
Modus "Normale Empfindlichkeit"
- An = Modi "Normale Empfindlichkeit" und "Separate Pedale" aktive.
- Blinkt schnell = Modus "Separate Pedale" aktive.
Modus "Hohe Empfindlichkeit"
- An = Modi "Hohe Empfindlichkeit" und "Separate Pedale" aktive.
- Blinkt schnell = Modus "Separate Pedale" aktive.
"Mapping"
- An = Modus "Mapping" aktive (wartet auf Programmierung).
"Manuelle Einstellung"
- An = Modus "Manuelle Einstellung" aktive.
- Bringen Sie den Manettino-Wahlschalter auf das entsprechende Icon.
- Drücken Sie auf den Druckknopf, um die Funktion zu bestätigen.
Page 54

13/20
ALLGEMEINHEITEN
DER POWER-BUTTON DES LENKERS
- Position OFF = der Lenker ist ausgeschaltet (und verbraucht keinen Strom).
- Position ON = der Lenker ist eingeschaltet.
Die Verbindung zwischen Lenker und Empfänger geschieht automatisch.
Im Fehlerfall kann die Verbindung manuell durch Drücken des LED-Buttons des Empfängers (16) und des
gleichzeitigen Drückens der Buttons SELECT + START +
Ihres Lenkers erfolgen.
DER STANDBY-MODUS
Der Lenker schaltet sich automatisch aus:
- Nach 5 Minuten Nicht-Gebrauch.
- Nach 5 Sekunden bei Fehlern oder Verbindungsunterbrechungen.
Drücken Sie auf einen Aktionsbutton des Lenkers (13), um den Standby-Modus zu
verlassen oder benutzen Sie den ON/OFF Schalter des Lenkers.
DER PC/PS3-WAHLSCHALTER DES EMPFÄNGERS (17)
Dieser Wahlschalter muss sich immer auf der korrekten Position befinden, bevor der Empfänger an den
USB Port der PlayStation® 3 oder des Computers angeschlossen werden kann.
DIE LED UND DIE LED DES EMPFÄNGERS (16)
- Beide LEDs an = Verbindung zwischen Lenker und Empfänger hergestellt.
- Beide LEDs blinken schnell = keine Verbindung zwischen Lenker und Empfänger.
- Alle LEDs des Manettino sind aus = der Lenker ist im Standby-Modus oder ausgeschaltet.
- Die LED
blinkt langsam = Batterien leer.
DIE AUTOMATISCHE KALIBRIERUNG DES LENKERS UND DER PEDALE
- Die zentrale Position des Lenkers wird beim Einschalten vordefiniert: es ist somit unbedingt nötig, dass
der Lenker sich genau in der zentralen Position beim Einschalten befindet.
- Es ist ebenfalls mögliche den Lenker manuell zu zentrieren. Bringen Sie hierfür den Lenker genau auf
die zentrale Position und drücken gleichzeitig auf "SELECT + START + ENGINE START" (dieser
Vorgang muss jedes Mal durchgeführt werden, wenn der Lenker neu eingeschaltet wird).
- Die Steuerung des Lenkers und der Pedale wird automatisch kalibriert.
Page 55

14/20
ERWEITERTE FUNKTIONEN
JUSTIERUNG DER LENKEREMPFINDLICHKEIT
Die Lenkersteurung beinhaltet zwei Empfindlichkeitsmodi:
- "Normale Empfindlichkeit" (voreingestellter Modus für PCs - benötigt einer Parametrierung auf PS3)
- "Hohe Empfindlichkeit" (voreingestellter und empfohlener Modus für PS3 - benötigt einer Parametrierung
auf PCs)
Einstellen im Modus "Normale Empfindlichkeit" (voreingestellter und empfohlener Modus auf PC)
Aktion
- Bringen Sie den Manettino-Wahlschalter auf das entsprechende Icon.
- Drücken Sie auf den Druckknopf, um die Funktion zu bestätigen.
AN
Die Lenkersteuerung ist im Modus "Normale Empfindlichkeit".
Einstellen im Modus "Hohe Empfindlichkeit" (voreingestellter und empfohlener Modus auf PS3)
Aktion
- Bringen Sie den Manettino-Wahlschalter auf das entsprechende Icon.
- Drücken Sie auf den Druckknopf, um die Funktion zu bestätigen.
AN
Die Lenkersteuerung ist nun besonders in der zentralen Position sensibler.
KONFIGURATION DER PEDALE
Die Gas- und Bremspedale werden standardmäßig "separat" betrieben. Dies bedeutet, dass die Pedale
auf unabhängigen Achsen betrieben werden.
Dieser Modus ermöglicht die Genauigkeit der Steuerung erheblich zu verbessern.
Falls Ihr Spiel den "separaten" Modus nicht unterstützt, können die Pedale Ihres Lenkers nicht korrekt
genutzt werden. In diesem Fall, müssen Sie den "kombinierten" Modus aktivieren.
EINSTELLUNG
Treten Sie gleichzeitig auf die beiden Pedale (Gas- und Bremspedal) + Drücken den
Button
und lassen alles wieder los.
MODUS DER PEDALE
oder
SEPARAT
(empfohlener Modus für die meisten Spiele)
BLINKT NICHT
KOMBINIERT BLINKT
Page 56

15/20
KONFIGURATION DER PEDALE AUF "PLAYSTATION® 3"
Separate Pedale (voreingestellter Modus) Kombinierte Pedale(benötigt eine Einstellung)
- Gaspedal = Trigger R2
des Gamepads der PS3
- Bremspedal = Trigger L2
des Gamepads der PS3
- Gaspedal = Nach Oben
mit dem "rechten Mini-Stick" des Gamepads
der PS3
- Bremspedal = Nach Unten
mit dem "rechten Mini-Stick" des
Gamepads der PS3
KONFIGURATION DER PEDALE AUF "PC"
Separate Pedale (voreingestellter Modus) Kombinierte Pedale(benötigt eine Einstellung)
- Gaspedal = Achse RZ
- Bremspedal = Achse Y
- Gaspedal = Nach Oben der Achse Y
- Bremspedal = Nach Unten der Achse Y
Page 57

16/20
PROGRAMMIEREN DES LENKERS UND DER PEDALE
Ihr Lenker ist vollständig programmierbar:
- Alle Aktionsbuttons können miteinander geschaltet werden.
- Alle Aktionsbuttons können auf die beiden Pedale oder die sequentiellen Schalthebel programmiert werden.
ZWEI PROGRAMMIERMODI
Der Button und die LED PRESET ermöglichen Ihnen die gewählte Programmierungsart anzuzeigen:
AUTOMATISCH (voreingestellt) oder MANUELL (Benutzereinstellung). Ein einfacher Druck auf diesen Button
genügt, um von einer Programmierung auf die andere umzuschalten (selbst während dem Spiel).
DIE "AUTOMATISCHE EINSTELLEUNG" (PRESET BUTTON
AUS)
Es handelt sich hierbei um die Standardeinstellung.
Für weitere Informationen, verweisen wir Sie auf die Abbildungen des Abschnittes
KONFIGURATION DER "AUTOMATISCHEN EINSTELLUNG" - PLAYSTATION® 3 / PC.
DIE "MANUELLE EINSTELLUNG" (PRESET BUTTON
EIN)
Es handelt sich hierbei um eine Benutzereinstellung. Die Buttons können:
- entweder auf die Pedale oder die sequentiellen Schalthebel programmiert werden,
- oder miteinander geschaltet werden.
- Sie können je nach Wunsch diese Programmierungen ändern.
- Die Programmierungen werden automatisch im Lenker gespeichert (selbst wenn dieses abgezogen oder
ausgeschaltet wird).
- Ist keine "MANUELLE EINSTELLUNG" vorgenommen worden, entspricht dies der "AUTOMATISCHEN
EINSTELLUNG".
PROGRAMMIERUNGSPROZEDUR
Schritte Aktion LED
1
Aktivieren Sie die "MANUELLE EINSTELLUNG",
indem Sie auf den Button drücken.
AN
2
Drücken Sie kurz den Button MAPPING
AN
3 Drücken Sie kurz den zu programmierenden Button.
BLINKT
4
Je nachdem welche Funktion sie zuordnen möchten, drücken
Sie kurz den Button, ziehen Sie kurz den sequentiellen
Schalthebel oder treten Sie das Pedal kurz durch.
AUS
AN
Ihre "MANUELLE EINSTELLUNG" ist nun aktiviert und aktualisiert (mit Ihrer Programmierung).
Page 58

17/20
BEISPIELE MÖGLICHER APPLIKATIONEN:
- Auf PS3: Programmierung L2/R2 oder L3/R3 auf die beiden sequentiellen Schalthebel Hoch und Runter
(Standard: L1/R1).
- Auf PS3: Programmierung der Buttons Kreuz/Viereck auf die Pedale (Standard: L2/R2).
- Umschalten verschiedener Buttons für bessere Zugänglichkeit.
Anmerkung: Der Button kann nicht programmiert oder
die Funktion nicht verschoben werden.
EEPROM-SPEICHER
Ihr Lenker verfügt über eine interne Chipkarte, die alle "MANUELLEN EINSTELLUNGEN" speichert
(selbst bei längerem ausgeschaltetem oder abgezogenem Lenker).
Sie können verschiedene "MANUELLE EINSTELLUNGEN" für Ihren PC und PS3 speichern.
EINE "MANUELLE EINSTELLUNG" LÖSCHEN
Schritte Aktion LED
1
Aktivieren Sie die "MANUELLE EINSTELLUNG"
AN
2
Drücken Sie den Button MAPPING
2 Sekunden lang.
BLINKT
2 SEKUNDEN
Ihre "MANUELLE EINSTELLUNG" wurde gelöscht
(und entspricht nun der "AUTOMATISCHEN EINSTELLUNG").
ZURÜCKSETZEN AUF DIE "WERKSEINSTELLUNG"
Ziel hierbei ist es, in einem Eingriff alle persönlichen Programmierungen oder Einstellungen zu löschen.
Schritte Aktion LED
1
Drücken Sie gleichzeitig auf die Buttons
MAPPING
+ SELECT + START
BLINKT 5 SEKUNDEN
Alle "MANUELLEN EINSTELLUNGEN" (PC + PS3) oder sonstige Einstellungen wurden gelöscht.
Anmerkung: Dieser Eingriff hat als Ziel Ihr Lenkrad vollständig zurückzusetzen.
Auf einem Computer wird deshalb empfohlen diesen Vorgang nur dann
durchzuführen, wenn kein Spiel läuft.
Page 59

18/20
FEHLERBESEITIGUNG
Der Lenker ist nicht perfekt im Spiel zentriert:
- Schalten Sie den Lenker aus (indem Sie den Schalter auf OFF stellen). Zentrieren Sie den Lenker von
Hand. Schalten Sie den Lenker wieder ein (indem Sie den Schalter auf ON stellen).
- Sollte das Problem weiterhin bestehen, kann der Lenker auf andere Weise von Hand zentriert werden.
Bringen Sie hierfür den Lenker genau auf die zentrale Position und drücken gleichzeitig auf "SELECT +
START + ENGINE START" (dieser Vorgang muss jedes Mal durchgeführt werden, wenn der Lenker neu
eingeschaltet wird).
- Auf dem PC kann im Falle einer schlechten Kalibrierung des Lenkers oder der Pedale die manuelle
Kalibrierungssoftware "Thrustmaster Calibration Tool v 1.03" unter folgender Adresse heruntergeladen
werden: http://ts.thrustmaster.com
.
Mein Lenker oder meine Pedale funktionieren nicht korrekt:
- Schalten Sie den Lenker aus und wieder ein (und achten hierbei darauf, dass der Lenker beim erneuten
Einschalten korrekt zentriert ist).
- Überprüfen Sie die Lage der 4 Batterien des Typs LR6/AA.
- Sollte das Problem weiter bestehen, schalten Sie Ihren Computer oder Ihre Konsole aus, ziehen den
USB-Stecker sowie das Stromkabel ab, verbinden alle Elemente neu und starten das Spiel erneut.
Auf dem PC - Mein Lenker wird erkannt, funktioniert aber nicht mit meinem Spiel:
Rufen Sie den Verwaltungsbildschirm "Optionen" Ihres Spiels auf, um den Lenker zu konfigurieren. Für
weitere Informationen, lesen Sie bitte das Benutzerhandbuch oder die Online-Hilfe Ihres Spieles.
Auf der PS3 - Mein Lenker wird nicht erkannt:
- Im "1 Player" Modus: Ist Ihr offizielles Gamepad eingeschaltet, müssen Sie dieses auf den "Controller Port 2"
(mit Hilfe des "PS" Buttons) umschalten, damit Ihr Lenker funktioniert.
- Sollte das Problem weiter bestehen, schalten Sie Ihr Gamepad aus und lassen dabei den Lenker eingeschaltet.
Meine Pedale funktionieren nicht korrekt im "separaten Modus":
(Beispiel: sobald das Spiel gestartet ist, bewegt sich der Cursor von alleine)
Verlassen Sie das Spiel und schalten die Pedale in den "kombinierten Modus". Starten Sie das Spiel neu
und konfigurieren Sie den Lenker erneut im Optionsbildschirm des Spieles.
Mein Lenker verbindet sich nicht mit dem Empfänger:
Die Verbindung zwischen Lenker und Empfänger geschieht automatisch.
Im Fehlerfall kann die Verbindung manuell durch Drücken des LED-Buttons des Empfängers (16) und
des gleichzeitigen Drückens der Buttons SELECT + START +
Ihres Lenkers erfolgen.
Die LED
blinkt ununterbrochen:
Die Batterien müssen gewechselt werden.
EMPFEHLUNGEN UND SICHERHEITSHINWEISE
Bei längerem Nicht-Gebrauch muss der Lenker ausgeschaltet (Schalter auf OFF), von der Nabe
genommen und die 4 Batterien aus dem Batteriefach entnommen werden.
Page 60

19/20
TECHNISCHER SUPPORT
Sollten Sie mit Ihrem Produkt ein Problem haben, besuchen Sie bitte die Seite http://ts.thrustmaster.com
und klicken Sie auf Technischer Support. Von dort aus können Sie auf verschiedene Instrumente
zugreifen (Fragen und Antworten (FAQ), die neuesten Versionen von Treibern und Software), die Ihnen
bei der Lösung Ihres Problems helfen könnten. Falls das Problem weiterhin besteht, können Sie mit dem
technischen Support der Thrustmaster Produkten in Kontakt treten („Technischer Support“):
Per E-Mail:
Um den Vorzug des technischen Supports per Email in Anspruch nehmen zu können, müssen Sie sich
zunächst online registrieren. Mit den Informationen, die Sie uns so zukommen lassen, können die
Mitarbeiter Ihr Problem schneller lösen. Klicken Sie auf Registrierung links auf der Seite des technischen
Supports und folgen Sie den Instruktionen auf dem Bildschirm. Falls Sie bereits registriert sind, füllen Sie die
Textfelder Anwendername und Passwort aus und klicken dann auf Login.
Per Telefon (falls Sie über keinen Internetzugang verfügen):
Deutschland
08000 00 1445
Kostenlos
Montag bis Freitag 13:00 bis 17:00 Uhr und 18:00 bis 22:00 Uhr
Samstag 9:00 bis 13:00 Uhr und 14:00 bis 20:00 Uhr
Sonntag 10:00 bis 13:00 Uhr und 14:00 bis 17:00 Uhr
Österreich
0810 10 1809
Zum Preis eines
Ortsgesprächs
Montag bis Freitag 13:00 bis 17:00 Uhr und 18:00 bis 22:00 Uhr
Samstag 9:00 bis 13:00 Uhr und 14:00 bis 20:00 Uhr
Sonntag 10:00 bis 13:00 Uhr und 14:00 bis 17:00 Uhr
Schweiz
0842 000 022
Zum Preis eines
Ortsgesprächs
Montag bis Freitag 13:00 bis 17:00 Uhr und 18:00 bis 22:00 Uhr
Samstag 9:00 bis 13:00 Uhr und 14:00 bis 20:00 Uhr
Sonntag 10:00 bis 13:00 Uhr und 14:00 bis 17:00 Uhr
GEWÄHRLEISTUNGSINFORMATIONEN
Guillemot Corporation S.A. („Guillemot“) bietet dem Kunde weltweit eine 2-jährige Garantie auf
Materialschäden und Herstellungsmängel ab dem Kaufdatum. Sollte das Produkt dennoch während dieser
2 Jahre Schäden oder Mängel aufweisen, kontaktieren Sie unverzüglich den Technischen Support, der
Ihnen mitteilt, wie weiter zu verfahren ist. Sollte ein Defekt vorliegen, muss das Produkt dort
zurückgegeben werden, wo es gekauft wurde (oder an die vom Technischen Support angegebene
Adresse).
Im Rahmen dieser Garantie wird das defekte Produkt des Kunden nach Ermessen des Technischen
Supports entweder repariert oder ersetzt. Überall wo es geltendes Recht zulässt, wird die volle Haftung
von Guillemot und seinen Niederlassungen (einschließlich für indirekte Beschädigungen), begrenzt auf die
Reparatur oder den Ersatz des Thrustmaster Produktes, übernommen. Die Rechte des Käufers
entsprechend geltendem Recht im jeweiligen Land werden nicht durch diese Garantie beeinflusst.
Diese Garantie tritt unter folgenden Umständen nicht in Kraft: (1) Falls am Produkt etwas verändert wurde
oder es geöffnet wurde, ein Schaden durch unangebrachte Nutzung, Fahrlässigkeit, einen Unfall,
Verschleiß oder irgendeinen anderen Grund verursacht wurde, der nicht im Zusammenhang mit einem
Materialdefekt oder Herstellungsmangel aufgetreten ist. (2) Im Falle der Nichtbeachtung der durch den
technischen Support erteilten Anweisungen. (3) Software, die nicht von Guillemot herausgegeben wurde,
unterliegt der speziellen Garantie des jeweiligen Softwareherstellers.
Page 61

20/20
COPYRIGHT
© Guillemot Corporation S.A. 2010. Alle Rechte vorbehalten. Thrustmaster® ist ein eingetragenes
Warenzeichen der Guillemot Corporation S.A. Ferrari® ist ein eingetragenes Warenzeichen von Ferrari Idea
S.p.A. PlayStation® ist ein eingetragenes Warenzeichen von Sony Computer Entertainment Inc. Alle anderen
Warenzeichen oder Handelsmarken werden hierdurch ausdrücklich anerkannt und sind im Besitz Ihrer
jeweiligen Eigentümer. Illustrationen nicht verbindlich. Inhalte, Design und Spezifikationen können ohne
vorherige Ankündigung geändert werden und können von Land zu Land unterschiedlich sein. Hergestellt in
China.
HINWEISE ZUM UMWELTSCHUTZ
Dieses Produkt darf nach Ende seiner Lebensdauer nicht über den Hausmüll entsorgt
werden, sondern muss an einem Sammelpunkt für das Recycling von elektrischen
und elektronischen Geräten abgegeben werden.
Das Symbol auf dem Produkt, der Gebrauchsanleitung oder der Verpackung weist
darauf hin.
Die Werkstoffe sind gemäß ihrer Kennzeichnung wiederverwertbar. Mit der
Wiederverwertung, der stofflichen Verwertung oder anderen Formen von Altgeräten
leisten Sie einen wichtigen Beitrag zum Schutz unserer Umwelt. Bitte erfragen Sie bei
der Gemeindeverwaltung die zuständige Entsorgungsstelle.
Betrieb mit 4 Batterien des Typs LR6/AA (1,5 V), nicht mitgeliefert. Herkömmliche entladene Batterien nicht
wieder aufladen. Entladene Batterien müssen aus dem Spielzeug genommen werden. Unterschiedliche,
entladene und neue Batterien dürfen nicht gemeinsam verwendet werden. Nur die vom Hersteller empfohlenen
oder äquivalenten Batterien dürfen verwendet werden. Beim Einlegen der Batterien muss die Polarität beachtet
werden. Die Batteriepole dürfen niemals kurzgeschlossen werden.
www.thrustmaster.com
Page 62

1/20
Compatibel: PlayStation® 3 & PC
Gebruikershandleiding
TECHNISCHE KENMERKEN
1 2 Aandraaischroeven achter (voor het instellen
van de hellingshoek)
2 Transporthandvat
3 Afstelbare stuurstang
4 Afneembaar stuur
5 Elektriciteitssnoer
6 1 Aandraaischroef vóór (voor het instellen van
de lengte)
7 Rem en gaspedaal
8 Batterijvak en opbergruimte ontvanger
9 Sequentiële Up & Down snelheidsbediening
10 Manettino met draaiknop 5 standen (voor
programmeringen)
11 "Select" en "Start" knoppen
12 Multidirectioneel D-Pad
13 Actieknoppen
14 Draadloze ontvanger
15 USB-aansluiting van de ontvanger
16 LED-lampje van de ontvanger
17 PC/PS3 schakelaar van de ontvanger
Page 63

2/20
INSTALLATIE VAN HET STUUR
INSTELLEN VAN DE HELLINGSHOEK EN DE LENGTE
VAN DE RIJSTAND
- Schroef de 2 aandraaischroeven (1) achterop de stuurvoet wat losser (tegen de richting van de wijzers
van de klok in).
- Pas de hellingshoek van de stuurstang (3) aan, zodat hij voor jou in de goede stand staat.
- Draai de 2 aandraaischroeven daarna weer vast (in de richting van de wijzers van de klok) (1).
Page 64

3/20
- Schroef de aandraaischroef (6) aan de voorkant van de stuurvoet wat losser (tegen de richting van de
wijzers van de klok in). Trek de stuurstang daarna zover uit dat hij voor jou de juiste lengte heeft.
- Schroef de aandraaischroef daarna weer vast (in de richting van de wijzers van de klok) (6) en zorg er
hierbij voor dat de schroef in één van de daarvoor bestemde schroefgaten gedraaid wordt. Wanneer je
het gat erboven precies in de uitsparing plaatst, staat het schroefgat voor de aandraaischroef op de juiste
hoogte.
Page 65

4/20
BEVESTIGING VAN HET STUURWIEL OP DE STUURSTANG
Nokjes (voorkant van de stuurstang) Inkepingen (achterkant van het stuur)
+
Bevestigingslipje (achterkant van het stuur)
- Houd het afneembare stuur (4) horizontaal, en schuif de 2 nokjes (aan de voorkant van de stuurstang) in
de 2 inkepingen (aan de achterkant van het stuurwiel).
- Duw het stuur nu verticaal en maak het stuurwiel vast door op het bevestigingslipje te drukken (aan de
achterkant van het stuur) en het daarna los te laten tot je een lichte "KLIK" hoort.
- Controleer of het stuurwiel stevig op de stuurstang bevestigd is.
Page 66

5/20
- Sluit het stuurwiel elektrisch aan op de stuurstang door de elektrische aansluitstekker (aan het uiteinde
van het (5) elektriciteitssnoer) in het daarvoor bestemde aansluitpunt te steken (aan de linkerkant van het
wiel).
- Draai de moer (aan het uiteinde van het aansluitpunt) in de richting van de wijzers van de klok om de
aansluiting op zijn plaats te houden.
VOER DE HANDELINGEN IN OMGEKEERDE VOLGORDE UIT
OM HET AFNEEMBARE STUUR VAN DE STUURSTANG AF TE HALEN
Page 67

6/20
PLAATSEN VAN DE BATTERIJEN EN UITNEMEN VAN DE ONTVANGER
- Neem het deksel van het batterijvak af (8) (achter de 2 pedalen) en plaats 4 batterijen van het type LR6 /
AA, houd hierbij rekening met de + en - polen.
- Pak de draadloze ontvanger (14) uit het onderste gedeelte van het batterijvak.
- Plaats het deksel terug op het batterijvak.
Page 68

7/20
HET STUURWIEL AAN OF UIT ZETTEN
- Zet de schakelaar (aan de rechterkant van het stuurwiel):
- Op ON om het stuurwiel aan te zetten.
- Op OFF om het stuurwiel uit te zetten.
Belangrijke opmerking:
Als je het stuurwiel aanzet moet het wiel altijd in een fysiek rechte positie staan (om decentrering
te voorkomen).
Page 69

8/20
PLAYSTATION® 3
INSTALLATIE OP "PLAYSTATION® 3"
1. Zet de PC/PS3 schakelaar (17) van de ontvanger (14) in de stand "PS3".
2. Sluit de USB-stekker (15) van de ontvanger aan op USB-poort 1 van de spelcomputer.
3. Zet je spelcomputer aan.
4. Zet het stuurwiel aan met de ON/OFF schakelaar.
5. Start, als de verbinding tot stand is gekomen, de game op.
Je bent klaar voor de start!
GEBRUIK VAN DE "PS" KNOP
Met de "PS" knop op het stuur kun je de game afsluiten, heb je toegang tot menu's en kun je het
PlayStation® 3 systeem direct uitzetten.
Procedure:
Draai de schakelaar van de Manettino (10) naar het gewenste icoon en druk op de drukknop.
Belangrijke opmerkingen over de PlayStation® 3:
- De PC/PS3 schakelaar(17) van de ontvanger moet altijd in de "PS3"-stand staan voordat deze wordt
aangesloten
- Als de officiële controller, in de stand voor 1 speler, aanstaat, moet je die op controller poort 2 zetten
om te zorgen dat het stuurwiel werkt.
- Op de PlayStation® 3, bootst het stuurwiel de officiële controller na (waardoor hij compatibel is
met alle race games).
- Bij de meeste games is er in de stand "normale gevoeligheid" (net zoals op de controller) een
kort "dood" stuurmoment in het midden van de richtingsas (en dus het midden van het wiel).
De stand "hoge gevoeligheid" van het stuur is zo ingesteld dat deze "nulstand" niet optreedt.
Sommige games hebben de mogelijkheid om "nulstand" te onderdrukken, of de zone te
verkleinen door de instellingen van de richtingsas te wijzigen in "Opties/bediening" van de
game.
De stand "Hoge gevoeligheid" wordt in de meeste PS3 games geadviseerd (wanneer het niet
mogelijk is om de nulstand in het midden van de richtingsas in te stellen).
De stand "Normale gevoeligheid" wordt alleen in die PS3 games aangeraden waar het wèl
mogelijk is om de nulstand in het midden van de richtingsas in te stellen.
Page 70

9/20
CONFIGURATIE VAN "AUTOMATISCHE INSTELLINGEN" - PLAYSTATION® 3
(in de stand "Afzonderlijke pedalen")
Page 71

10/20
PC
INSTALLATIE OP DE PC
Vereiste configuratie: PC (Windows® Xp, Windows® Vista, Windows® 7) voorzien van een USB-poort.
Op de met dit product meegeleverde CD-ROM staan de te installeren drivers.
1. Plaats de installatie CD-ROm in de CD-ROM-speler. De installatie-assistent start automatisch op (als het
installatiemenu niet automatisch opstart, dubbelklik dan op "werkstation" en daarna op het CD-ROMicoon en, indien nodig, op "Setup.exe").
2. Klik op de knop "DRIVERS" om de installatie van de drivers te starten.
3. Klik, als de installatie beëindigd is, op Beëindigen en start de computer opnieuw op.
4. Zet de PC/PS3 schakelaar (17) van de ontvanger (14) in de stand "PS3".
5. Sluit, bij het opnieuw opstarten van de compute, de USB-stekker (15) van de ontvanger aan op één van
de USB-poorten van de computer. Windows® detecteert automatisch een nieuw randapparaat.
6. De drivers worden automatisch geïnstalleerd.
Volg de instructies op het scherm om de installatie te voltooien.
7. Selecteer Opstarten/Programma's/ThrustMaster/Configuratiescherm om naar het configuratiescherm
te gaan.
Het dialoogvenster Spelbesturingen toont de naam van het stuur met de status OK.
8. Klik in het Configuratiescherm, op Eigenschappen om de knoppen, de D-pad, de richtingslijnen van
het stuur en de pedalen te testen en weer te geven.
Je bent klaar voor de start!
Belangrijke opmerkingen voor de PC:
- De PC/PS3 schakelaar (17) van de ontvanger moet altijd in de "PC"-stand staan
voordat deze wordt aangesloten
- De naam van het stuur die je op de PC ziet (in het Configuratiescherm en in de games)
is "F430 Cockpit Wireless".
Page 72

11/20
CONFIGURATIE VAN "AUTOMATISCHE INSTELLINGEN" - PC
(in de stand "Afzonderlijke pedalen")
Page 73

12/20
GEBRUIK VAN DE 5 MANETTINO STANDEN
Het Manettino-systeem (10) bestaat uit:
- een draaiknop die je kunt draaien om van de ene naar de andere stand te gaan
- een drukknop onder de draaiknop (om je keuze te bevestigen)
De gewenste functie start op als je de drukknop indrukt (niet als je nog aan de draaiknop draait) met de
draaiknop gericht naar het icoon van de gewenste functie.
Manettino Functies van de knoppen en de bijbehorende signaleringslampjes
Knop "PS" op de PS3 en "13" op de PC
- Aan = er is verbinding tussen het stuur en de ontvanger.
- Snel knipperend = geen verbinding tussen het stuur en de ontvanger.
- Voortdurend langzaam knipperend = vervang de batterijen.
- Uit = het stuur staat in de stand-by stand of is uit.
Stand "Normale gevoeligheid"
- Aan = "Normale gevoeligheid" en "Afzonderlijke pedalen" geactiveerd
- Snel knipperend = stand "Gecombineerde pedalen" geactiveerd
Stand "Hoge gevoeligheid"
- Aan = "Hoge gevoeligheid" en "Afzonderlijke pedalen" geactiveerd
- Snel knipperend = stand "Gecombineerde pedalen" geactiveerd
"Mapping"
- Aan = stand "Mapping" geactiveerd (in afwachting van programmering)
"Handmatig instellen"
- Aan = stand "Handmatig instellen" geactiveerd
- Draai de schakelaar van de Manettino naar het gewenste icoon.
- Druk de drukknop in om de functie te bevestigen.
Page 74

13/20
ALGEMEEN
DE POWER KNOP VAN HET STUUR
- Stand OFF = het stuur staat uit (en gebruikt geen batterijen).
- Stand ON = het stuur staat aan.
De verbinding tussen het stuur en de ontvanger wordt automatisch tot stand gebracht.
Gebeurt dit niet, dan kun je de verbinding geforceerd tot stand brengen door op de LED-knop van de
ontvanger (16) te drukken, en daarna de knoppen SELECT + START +
van je stuur
gelijktijdig in te drukken.
DE STAND-BY STAND
Het stuur gaat automatisch uit:
- Als er gedurende 5 minuten geen activiteit plaatsvindt.
- Na 5 seconden bij een storing of verbreking van de verbinding.
Druk, om het stuur uit de stand-by stand te halen, op één van de actieknoppen
van het stuur (13) of gebruik de ON/OFF schakelaar van het stuur.
DE "PC / PS3" SCHAKELAAR (17) VAN DE ONTVANGER
Zet deze schakelaar altijd eerst in de juiste stand, voordat je de ontvanger op de USB-poort van je
PlayStation® 3 of PC aansluit.
HET LED-LAMPJE EN HET LED-LAMPJE VAN DE ONTVANGER (16)
- De 2 LED-lampjes zijn aan = er is verbinding tussen het stuur en de ontvanger.
- De 2 LED-lampjes knipperen snel = geen verbinding tussen het stuur en de ontvanger.
- Alle LED-lampjes van de Manettino zijn uit = het stuur staat in de stand-by stand of staat uit.
- Het LED-lampje
knippert voortdurend langzaam = vervang de batterijen.
AUTOMATISCHE KALIBRATIE VAN HET STUUR EN DE PEDALEN
- Het midden van het stuur wordt automatisch ingesteld als het wiel wordt aangezet: het is daarom
belangrijk dat het stuurwiel fysiek perfect gecentreerd is als het wordt aangezet.
- Het midden van het stuur kan ook handmatig ingesteld worden. Zet het stuur helemaal in het
midden en druk dan gelijktijdig op "SELECT + START + ENGINE START" (deze handeling moet
iedere keer als het stuur opnieuw wordt opgestart herhaald worden).
- De richting van het stuurwiel en de pedalen worden automatisch gekalibreerd.
Page 75

14/20
GEAVANCEERDE FUNCTIES
INSTELLEN VAN DE GEVOELIGHEID VAN HET STUURWIEL
De stuurgevoeligheid kan op 2 standen worden ingesteld:
- "Normale gevoeligheid" (standaard geadviseerd voor de PC - op PS3 instelling nodig)
- "Hoge gevoeligheid" (standaard geadviseerd voor de PS3 - op PC instelling nodig)
Instellen in de stand "Normale gevoeligheid" (standaard en geadviseerd voor PC)
Handeling
- Draai de schakelaar van de Manettino naar het gewenste icoon.
- Druk de drukknop in om de functie te bevestigen.
AAN
De stuurgevoeligheid staat op normale gevoeligheid ingesteld
Instellen in de stand "Hoge gevoeligheid" (standaard en geadviseerd voor PS3)
Handeling
- Draai de schakelaar van de Manettino naar het gewenste icoon.
- Druk de drukknop in om de functie te bevestigen.
AAN
De stuurgevoeligheid is hoger, vooral in het midden
INSTELLEN VAN DE PEDALEN
De bediening van het gaspedaal en het rempedaal werkt standaard in de stand "Afzonderlijk", dat
wil zeggen dat de pedalen op aparte assen werken.
Je kunt hierdoor preciezer sturen.
Als je game de stand "Afzonderlijk" niet ondersteunt zullen de pedalen van het stuur niet goed
werken. Activeer dan de stand "Gecombineerd".
INSTELLEN
Druk de 2 pedalen (gas- en rempedaal) + de knop
gelijktijdig in, en laat ze daarna los.
STAND VAN DE PEDALEN
of
AFZONDERLIJK
(stand die in voor het merendeel van de games wordt
geadviseerd)
NIET KNIPPEREND
GECOMBINEERD KNIPPEREND
Page 76

15/20
INSTELLINGEN VAN DE PEDALEN OP DE "PLAYSTATION® 3"
Afzonderlijke pedalen (standaardinstelling) Gecombineerde pedalen (instelling nodig)
- Gaspedaal = Trekker R2
van de PS3 controller
- Rempedaal = Trekker L2
van de PS3 controller
- Gaspedaal = Richting Omhoog
van de rechter mini-stick van de PS3
controller
- Rem = Richting Omlaag
van de rechter mini-stick van de PS3
controller
INSTELLINGEN VAN DE PEDALEN OP DE "PC"
Afzonderlijke pedalen (standaardinstelling) Gecombineerde pedalen (instelling nodig)
- Gaspedaal = RZ-as
- Rempedaal = Y-as
- Gaspedaal = Richting Omhoog van de Y-as
- Rempedaal = Richting Omlaag van de Y-as
Page 77

16/20
PROGRAMMEREN VAN HET STUUR EN DE PEDALEN
Het stuur is volledig te programmeren:
- Alle actieknoppen zijn onderling verwisselbaar.
- Alle actieknoppen kunnen geprogrammeerd worden op de pedalen of op de sequentiële
snelheidsbedieningsvlakken.
TWEE PROGRAMMEERSTANDEN
Met de knop en het LED-lampje PRESET kun je het gekozen programmeertype zien:
AUTOMATISCH (voorgeprogrammeerd) of HANDMATIG (door jezelf geprogrammeerd). Met een simpele
druk op deze knop ga je (zelfs midden in een game) van de ene programmering naar de andere.
AUTOMATISCHE INSTELLINGEN (PRESET-KNOP
UIT)
Het gaat hier om de standaard programmering.
Raadpleeg voor meer informatie de CONFIGURATIE-schema's voor de "AUTOMATISCHE
INSTELLINGEN" - PLAYSTATION® 3 / PC.
HANDMATIGE INSTELLINGEN (PRESET-KNOP
AAN)
Dit zijn de door jou ingestelde programmeringen. De knoppen kunnen ofwel:
- op de pedalen of de sequentiële snelheidsbediening worden geprogrammeerd.
- of omgekeerd.
- Je kunt de programma's onbeperkt en naar wens wijzigen.
- De programmering wordt automatisch in het stuur opgeslagen (ook als dit uit staat of van de elektriciteit
wordt afgekoppeld)
- Als de "HANDMATIGE INSTELLINGEN" leeg zijn zijn ze gelijk aan de "AUTOMATISCHE INSTELLINGEN".
PROGRAMMEERPROCEDURE
Stappen Handeling Status LED-lampjes
1
Activeer "HANDMATIGE INSTELLINGEN"
door op de knop te drukken.
Aan
2
Druk op de MAPPING-knop en laat deze los
Aan
3 Druk op de te programmeren knop en laat deze los.
Knippert
4
Druk op de knop, de sequentiële snelheidsbediening of het
pedaal waar je de functie wilt hebben en laat deze weer los.
Uit
Aan
De "HANDMATIGE INSTELLINGEN" zijn geactiveerd en aangepast (aan de uitgevoerde programmering)
Page 78

17/20
VOORBEELDEN VAN MOGELIJKE TOEPASSINGEN:
- Op de PS3, programmeer L2/R2 of L3/R3 op de sequentiële Up en Down bediening (standaard L1/R1).
- Op de PS3, programmeer de X/Blok knoppen op de pedalen (standaard L2/R2).
- Draai knoppen om, om er makkelijker bij te kunnen.
Opmerking: De knop kan niet worden geprogrammeerd of verplaatst.
EEPROM GEHEUGEN
Het stuur heeft een interne geheugenchip die de programmering van alle "HANDMATIGE
INSTELLINGEN" opslaat en bewaart (zelfs als het stuur wordt uitgezet of gedurende langere periode
van de stroom afgehaald wordt).
Voor elk ondersteunend apparaat kunnen andere "HANDMATIGE INSTELLINGEN" worden
opgeslagen (PC et PS3).
"HANDMATIGE INSTELLINGEN" WISSEN
Stappen Handeling
Status van de LED-
lampjes
1
Activeer "HANDMATIGE INSTELLINGEN"
Aan
2
Druk de knop MAPPING
in en houd deze 2
seconden ingedrukt.
Knippert 2 seconden
De "HANDMATIGE INSTELLINGEN" zijn nu leeg
(en weer gelijk aan de "AUTOMATISCHE INSTELLINGEN").
TERUG NAAR DE "FABRIEKSINSTELLINGEN"
Het doel is hier om in één handeling alle uitgevoerde programmeringen of instellingen te wissen.
Stappen Handeling
Status van de LED-
lampjes
1
Druk gelijktijdig op de knoppen
MAPPING
+ SELECT + START
Knippert 5 seconden
Alle "HANDMATIGE INSTELLINGEN" (PC + PS3) of instellingen zijn nu leeg.
Opmerking: Door deze handeling wordt het stuur volledig opnieuw opgestart.
Op de PC wordt daarom aangeraden om deze handeling alleen
uit te voeren als er geen game actief is.
Page 79

18/20
MOGELIJKE PROBLEMEN
Het stuurwiel is niet goed gecentreerd in de games:
- Zet het stuur uit (door de schakelaar op OFF te zetten). Centreer het stuur fysiek. Zet het stuur weer aan
(door de schakelaar op ON te zetten).
- Als het probleem blijft bestaan kun je het stuur ook handmatig centreren. Zet het stuur helemaal in het
midden en druk dan gelijktijdig op "SELECT + START + ENGINE START" (deze handeling moet iedere
keer als het stuur opnieuw wordt opgestart herhaald worden).
- Download voor de PC bij een slechte kalibratie van het stuur of de pedalen de software voor handmatige
kalibratie "Thrustmaster Calibration Tool v 1.03" , te downloaden van: http://ts.thrustmaster.com.
Het stuur of de pedalen werken niet goed:
- Zet het stuur uit en weer aan (zorg er bij dat het stuur bij het aanzetten goed gecentreerd is).
- Controleer of de 4 LR6 / AA batterijen goed geplaatst en niet leeg zijn.
- Zet, als het probleem blijft bestaan, je computer of spelconsole uit, haal de USB-stekker en het
elektriciteitssnoer los, sluit alles weer aan, start opnieuw op en start de game weer op.
Op de PC wordt het stuur wel gevonden, maar het werkt niet met mijn game:
Open vanuit de "Opties" van de game het configuratiescherm om het stuur te configureren. Raadpleeg de
gebruikershandleiding of on-line help van de game voor meer informatie.
Op de PS3 wordt het stuur niet gevonden:
- Als de officiële controller, in de "1 speler stand", aanstaat, moet je die (met de "PS"-knop) op controller
poort 2 zetten om te zorgen dat het stuurwiel werkt.
- Zet, als het probleem blijft bestaan, de controller uit en laat alleen het stuur aangesloten.
De pedalen werken niet goed in de stand "Afzonderlijk":
(Voorbeeld: tijdens het gamen verplaatst de selectiecursor zich vanzelf)
Sluit de game af en zet de pedalen in de stand "Gecombineerd". Start de game weer op en configureer het
nieuwe stuur in het configuratie scherm, onder opties, van de game.
Het stuur maakt geen verbinding met de ontvanger:
De verbinding tussen het stuur en de ontvanger wordt automatisch tot stand gebracht.
Gebeurt dit niet, dan kun je de verbinding geforceerd tot stand brengen door op de LED-knop van de
ontvanger (16) te drukken, en daarna de knoppen SELECT + START +
van je stuur gelijktijdig in
te drukken.
Het LED-lampje
knippert voortdurend:
De batterijen moeten vervangen worden.
VEILIGHEIDSVPOORSCHRIFTEN EN INFORMATIE
Zet het stuur als het gedurende langere tijd niet gebruikt wordt, uit (door de schakelaar op OFF te
zetten), haal het stuur van de stuurstang af en verwijder de 4 batterijen uit het batterijvak.
Page 80

19/20
TECHNISCHE ONDERSTEUNING
Mocht u problemen ondervinden met dit product, ga dan naar http://ts.thrustmaster.com en klik op
Technical Support. U hebt daar toegang tot verschillende onderwerpen die u helpen bij het vinden van
oplossingen, zoals de FAQ (veelgestelde vragen) en de meest recente drivers en software. Als het
probleem op die manier niet kan worden verholpen, kunt u contact opnemen met de Thrustmaster product
technical support service (Technical Support).
Per e-mail:
Voordat u gebruik kunt maken van technische ondersteuning per e-mail dient u zich eerst online te
registreren. Met de door u verstrekte informatie kan uw probleem sneller en beter worden opgelost. Klik op
Registration aan de linkerzijde van de pagina Technical Support en volg de aanwijzingen op het scherm.
Indien u reeds geregistreerd bent, vult u de velden Username en Password in en klikt u op Login.
Per telefoon:
* TIJDELIJK IS DE NEDERLANDSTALIGE TECHNISCHE DIENST ENKEL BEREIKBAAR VAN 18U00
TOT 22U00. TIJDENS DE ANDERE UREN KUNT U STEEDS TERECHT VOOR ENGELS-, DUITS-, OF
FRANSTALIGE SUPPORT.
INFORMATIE MET BETREKKING TOT DE GARANTIE
Wereldwijd garandeert Guillemot Corporation S.A. (“Guillemot”) de koper dat dit Thrustmaster-product
gedurende een periode van twee (2) jaar vanaf de oorspronkelijke aankoopdatum vrij zal zijn van
materiaal- en fabricagefouten. Indien u in de garantieperiode een defect meent te constateren aan dit
product, neem dan onmiddellijk contact op met de Technical Support, die u zal informeren over de te
volgen procedure. Als het defect wordt bevestigd, dient het product te worden geretourneerd naar de
plaats van aankoop (of een andere locatie die wordt opgegeven door Technical Support).
Binnen het gestelde van deze garantie wordt het defecte product van de consument gerepareerd of
vervangen, zulks ter beoordeling van Technical Support. Indien toegestaan door van de geldende
wetgeving, beperkt de volledige aansprakelijkheid van Guillemot en haar dochterondernemingen (inclusief
de aansprakelijkheid voor indirecte schade) zich tot het repareren of vervangen van het Thrustmaster
product. De wettelijke rechten van de klant volgens de wetgeving die van toepassing is op de verkoop van
consumentproducten, worden op generlei wijze beperkt door deze garantie.
Deze garantie is niet van kracht: (1) indien het product aangepast, geopend of gewijzigd is, of beschadigd
is ten gevolge van oneigenlijk of onvoorzichtig gebruik, verwaarlozing, een ongeluk, normale slijtage, of
enige andere oorzaak die niet gerelateerd is aan een materiaal- of fabricagefout; (2) indien u zich niet
houdt aan de instructies zoals verstrekt door Technical Support; of (3) op software die niet is geleverd door
Guillemot en daardoor onder de specifieke garantie valt zoals verstrekt door degene die deze software
levert.
Belgïe
078 16 60 56
Kosten van
interlokaal gesprek
Van maandag t/m vrijdag van 18:00 tot 22:00
Nederland
0900 0400 118
Kosten van
lokaal gesprek
Van maandag t/m vrijdag van 18:00 tot 22:00
Page 81

20/20
COPYRIGHT
© 2010 Guillemot Corporation S.A. Alle rechten voorbehouden. Thrustmaster
®
is een geregistreerd
handelsmerk van Guillemot Corporation S.A. Ferrari® is een gedeponeerd merk van Ferrari Idea S.p.A.
PlayStation® is een gedeponeerd merk van Sony Computer Entertainment Inc. Microsoft® Windows® is
een merk dat door Microsoft Corporation gedeponeerd is in de Verenigde Staten en/of andere landen. Alle
andere handelsmerken en merknamen worden hierbij erkend en zijn eigendom van de respectieve
eigenaren. Afbeeldingen zijn niet bindend. Inhoud, ontwerp en specificaties kunnen zonder kennisgeving
vooraf worden gewijzigd en kunnen per land verschillen. Geproduceerd in China.
AANBEVELINGEN VOOR DE BESCHERMING VAN HET MILIEU
Gooi dit product na het einde van de levensduur niet weg met het normale afval,
maar breng het naar het door uw gemeente aangewezen inzamelpunt voor
elektrische en/of computerapparatuur.
Ter herinnering is hiertoe op het product, de gebruikshandleiding of de
verpakking een symbool aangebracht.
De meeste materialen kunnen worden gerecycled. Door recycling en andere
methoden voor verantwoorde verwerking van afgedankte elektrische en
elektronische apparaten kunt u een belangrijke bijdrage leveren aan de
bescherming van het milieu.
Neem contact op met uw gemeente voor informatie over een inzamelpunt bij u in
de buurt.
Werkt op 4 batterijen van het type LR6 / AA (1.5V), niet meegeleverd. Niet oplaadbare batterijen kunnen
niet opgeladen worden. Verwijder gebruikte batterijen uit het speelgoed. Gebruik geen verschillende typen
batterijen of nieuwe en gebruikte batterijen door elkaar heen. Alleen batterijen van het aanbevolen type of
een vergelijkbaar type zijn geschikt. voor dit product. Houd bij het plaatsen van de batterijen rekening met
de + en – pool. De contactpunten van een batterij moeten niet kortgesloten worden.
www.thrustmaster.com
Page 82

1/20
Compatibile: PlayStation® 3 e PC
Manuale d’uso
CARATTERISTICHE TECNICHE
1 2 viti di serraggio posteriori
(per la regolazione dell’inclinazione)
2 Maniglia di trasporto
3 Tronco regolabile della base
4 Ruota del volante staccabile
5 Cordone elettronico di alimentazione
6 1 vite di serraggio anteriore
(per la regolazione della lunghezza)
7 Pedali dell’acceleratore e del freno
8 Vano batterie
e di alloggiamento del ricevitore
9 Leve del cambio sequenziale Up e Down
10 Manettino con switch rotante a 5 posizioni
(per le programmazioni)
11 Pulsanti “Select” e “Start”
12 D-Pad multidirezionale
13 Pulsanti azione
14 Ricevitore Wireless
15 Connettore USB del ricevitore
16 Led del ricevitore
17 Interruttore PC/PS3 del ricevitore
Page 83

2/20
INSTALLAZIONE DEL VOLANTE
REGOLAZIONE DELL’INCLINAZIONE E DELLA LUNGHEZZA
DELLA POSIZIONE DI GUIDA
- Svitate leggermente (in senso antiorario) le 2 viti di serraggio (1) situate sul retro della base.
- Regolate l’inclinazione del tronco (3) della base a vostro piacimento.
- Riavvitate poi (in senso orario) le 2 viti di serraggio (1).
Page 84

3/20
- Svitate leggermente (in senso antiorario) la vite di serraggio (6) situata sul lato anteriore del tronco della
base. Quindi estendete a vostro piacimento la lunghezza del tronco.
- Riavvitate poi (in senso orario) la vite di serraggio (6), facendo attenzione che quest’ultima entri
perfettamente in uno degli appositi fori. Per farlo, è sufficiente posizionare il foro superiore nell’apposito
perno guida.
Page 85
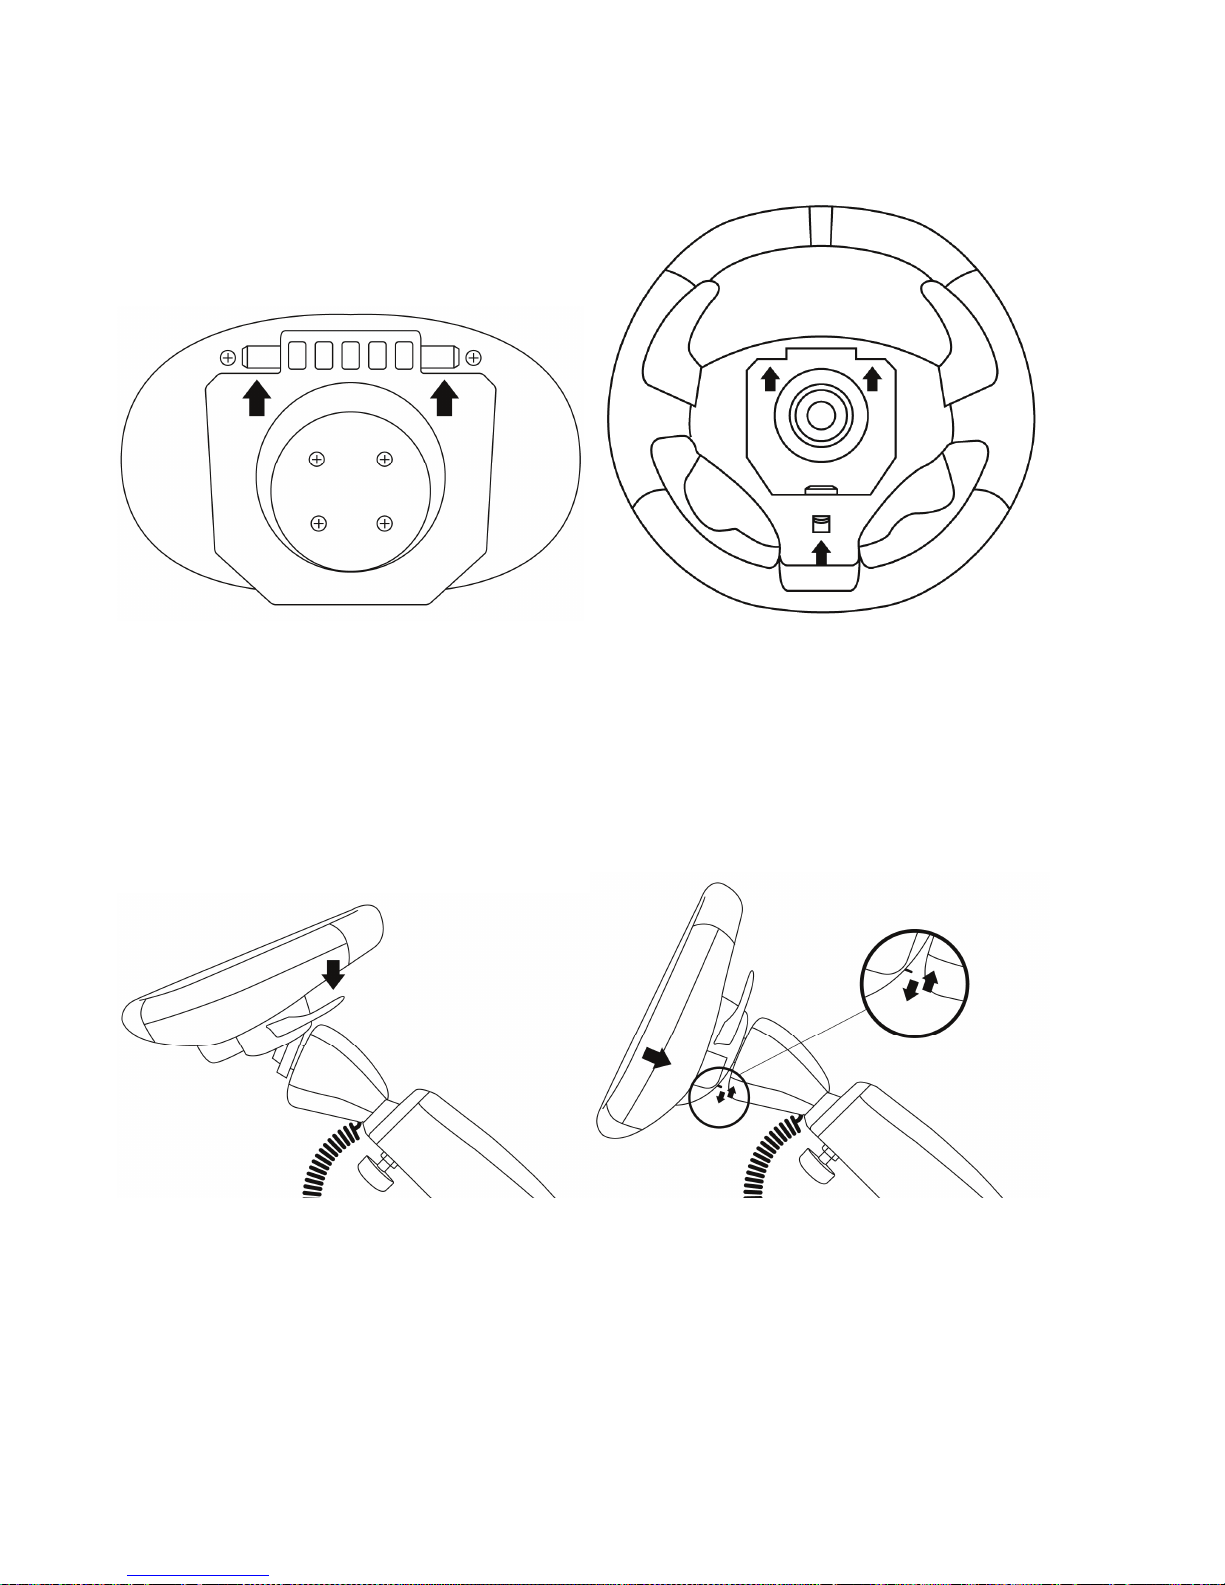
4/20
FISSAGGIO DELLA RUOTA DEL VOLANTE SULLA BASE
Perni maschio (lato anteriore della base) Perni femmina (lato posteriore della ruota)
+
Linguetta di fissaggio (lato posteriore della ruota)
- Posizionate la ruota staccabile (4) orizzontalmente, poi inserite i 2 perni maschio (situati sul lato
anteriore della base) all’interno dei 2 perni femmina (situati sul lato posteriore della ruota).
- Ripiegate la ruota verticalmente, poi fissate il volante premendo sulla linguetta di fissaggio (situata sul
lato posteriore della ruota) e rilasciando, fino a sentire un leggero “CLIC”.
- Verificate che la ruota del volante sia fissata correttamente sulla base.
Page 86

5/20
- Collegate elettronicamente la ruota del volante alla sua base, collegando il connettore maschio a gomito
(situato all’estremità del cordone (5) di alimentazione) al connettore femmina (situato a sinistra della
ruota).
- Ruotate il dado (situato all’estremità del connettore) in senso orario per fissare il tutto.
EFFETTUATE L’OPERAZIONE INVERSA
PER SMONTARE LA RUOTA STACCABILE DALLA BASE
Page 87

6/20
INSTALLAZIONE DELLE BATTERIE E RECUPERO DEL RICEVITORE
- Togliete il coperchio del vano delle batterie (8) (situato sul retro dei 2 pedali) ed inserite 4 batterie di tipo
LR6 / AA rispettando il senso delle polarità.
- Recuperate il Ricevitore Wireless (14) situato nella parte inferiore del vano delle batterie.
- Riposizionate il coperchio del vano delle batterie.
Page 88

7/20
ACCENDERE O SPEGNERE IL VOLANTE
- Posizionate l’interruttore (situato sul lato destro della ruota del volante):
- Su ON per accendere il volante.
- Su OFF per spegnere il volante.
Nota importante:
Quando accendete il vostro volante, la ruota di quest’ultimo deve sempre essere fisicamente
perfettamente centrata (per evitare ogni difetto di centratura).
Page 89

8/20
PLAYSTATION® 3
INSTALLAZIONE SU “PLAYSTATION® 3”
1. Posizionate l’interruttore PC/PS3 (17) del vostro ricevitore (14) in posizione “PS3”.
2. Collegate il connettore USB (15) del ricevitore alla porta USB n°1 della console.
3. Accendete la vostra console.
4. Accendete il vostro volante usando l’interruttore ON/OFF.
5. Una volta stabilita la connessione, lanciate il gioco.
Adesso siete pronti per giocare!
UTILIZZO DEL PULSANTE “PS”
Il pulsante “PS” del vostro volante vi permetterà di uscire dai vostri giochi, di accedere ai menu e di spegnere
direttamente il vostro sistema PlayStation® 3.
Procedura:
Posizionate il switch del Manettino (10) sull’icona corrispondente, poi premete il pulsante.
Note importanti su PlayStation® 3:
- L’interruttore PC/PS3 (17) del ricevitore deve sempre essere posizionato su “PS3” prima di effettuare
la connessione.
- In modalità “1 Giocatore”, se il vostro joystick ufficiale è acceso, deve essere spostato su “porta
joystick 2”, per fare in modo che il vostro volante funzioni.
- Su PlayStation® 3, il volante emula il joystick ufficiale (questo gli permette di essere compatibile con il
100% dei giochi da corsa).
- Nella maggior parte dei giochi, in modalità “Sensibilità normale” (proprio come sul joystick), una
leggera zona morta può essere percepita al centro dell’asse dello sterzo (e quindi al centro della
ruota).
La modalità “Sensibilità elevata” del volante viene impostata in modo da eliminare questa zona morta.
In alcuni giochi, è tuttavia possibile eliminare o diminuire questa zona morta modificando i parametri
dell’asse dello sterzo nelle “Opzioni/Comandi” del gioco.
La modalità “Sensibilità elevata” è consigliata nella maggior parte dei giochi PS3 (nei quali non è
possibile modificare la zona morta centrale dell’asse dello sterzo).
La modalità “Sensibilità normale” è consigliata soltanto nei giochi PS3 nei quali è possibile modificare
la zona morta centrale dell’asse dello sterzo.
Page 90

9/20
CONFIGURAZIONE DEL “PRESET AUTOMATICO” - PLAYSTATION® 3
(in modalità “Pedaliera separata”)
Page 91

10/20
PC
INSTALLAZIONE SU PC
Configurazione richiesta: PC (Windows® Xp, Windows® Vista, Windows® 7) dotato di una porta USB
Il CD-ROM fornito con questo prodotto permette di installare i driver.
1. Inserite il CD-ROM di installazione nel vostro lettore di CD-ROM. L’assistente di installazione compare
automaticamente (se il menu di installazione non si avvia automaticamente, cliccate due volte su
“Risorse del computer”, poi sull’icona del CD-ROM e, se necessario, su “Setup.exe”).
2. Cliccate sul pulsante “DRIVERS” per lanciare l’installazione dei driver.
3. Una volta terminata l’installazione, cliccate su Termina e riavviate il vostro computer.
4. Collocate l’interruttore PC/PS3 (17) del vostro ricevitore (14) sulla posizione “PC”.
5. Al riavvio del computer, collegate il connettore USB (15) del ricevitore ad una delle porte USB della
vostra unità centrale. Windows® rileverà automaticamente la nuova periferica.
6. L'installazione dei driver è automatica.
Seguite le istruzioni visualizzate sullo schermo per terminare l’installazione.
7. Selezionate Avvio/Programmi/Thrustmaster/Pannello di controllo per accedere al Pannello di
controllo.
La finestra di dialogo Periferiche di gioco visualizzerà il nome del volante con lo stato OK.
8. Nel Pannello di controllo, cliccate su Proprietà per testare e visualizzare i pulsanti, il D-pad e gli assi
del volante e della pedaliera.
Adesso siete pronti per giocare!
Note importanti su PC:
- L’interruttore PC/PS3 (17) del ricevitore deve sempre essere posizionato su “PC” prima di effettuare
la connessione.
- Il nome del volante visualizzato sul PC (nel Pannello di controllo e nei Giochi) è “F430 Cockpit
Wireless”.
Page 92

11/20
CONFIGURAZIONE DEL “PRESET AUTOMATICO” - PC
(in modalità “Pedaliera separata”)
Page 93

12/20
UTILIZZO DEL MANETTINO A 5 POSIZIONI
Il sistema del Manettino (10) è composto:
- da un switch rotante che potete ruotare per passare da una funzione ad un’altra
- da un pulsante situato sotto il switch (per confermare le vostre scelte)
La funzione desiderata si attiva appena premete il pulsante (e non quando ruotate il switch), con il switch
posizionato di fronte all’icona corrispondente.
Manettino Funzionalità dei pulsanti e corrispondenze delle spie luminose
Pulsanti “PS” su PS3 e “13” su PC
- Acceso = connessione stabilita tra il volante e il ricevitore.
- Lampeggia rapidamente = nessuna connessione tra il volante e il ricevitore.
- Lampeggia lentamente in modo continuo = è necessario sostituire le
batterie.
- Spento = il volante è in modalità stand-by o spento.
Modalità “Sensibilità normale”
- Acceso = modalità “Sensibilità normale” e “Pedaliera separata” attivate
- Lampeggia rapidamente = modalità “Pedaliera combinata” attivata
Modalità “Sensibilità elevata”
- Acceso = modalità “Sensibilità elevata” e “Pedaliera separata” attivate
- Lampeggia rapidamente = modalità “Sensibilità combinata” attivata
“Mapping”
- Acceso = modalità “Mapping” attivata (in attesa di una programmazione)
“Preset manuale”
- Acceso = modalità “Preset manuale” attivata
- Posizionate il switch del Manettino sull’icona corrispondente.
- Premete il pulsante per confermare la funzione.
Page 94

13/20
GENERALITÀ
IL PULSANTE POWER DEL VOLANTE
- Posizione OFF = il volante è spento (e non usa le batterie).
- Posizione ON = il volante è acceso.
La connessione tra il volante e il ricevitore si effettua automaticamente.
In caso di connessione non riuscita, potete forzare la connessione premendo il pulsante Led del ricevitore
(16), poi simultaneamente i pulsanti SELECT + START +
del vostro volante.
LA MODALITÀ STAND-BY
Il volante si spegne automaticamente:
- Dopo 5 minuti di inattività.
- Dopo 5 secondi in caso di connessione non riuscita o di perdita di connessione.
Per riattivare il vostro volante, premete uno dei pulsanti azione del volante (13),
oppure usate l’interruttore ON/OFF del volante.
L’INTERRUTTORE “PC / PS3” (17) DEL RICEVITORE
Questo interruttore deve sempre essere collocato sulla posizione giusta prima di collegare il vostro
ricevitore alla porta USB della vostra PlayStation® 3 o del vostro PC.
IL LED E IL LED DEL RICEVITORE (16)
- I 2 Led sono accesi = connessione stabilita tra il volante e il ricevitore.
- I 2 Led lampeggiano rapidamente = nessuna connessione tra il volante e il ricevitore.
- Tutti i Led del Manettino sono spenti = il volante è il modalità stand-by o spento.
- Il Led
lampeggia lentamente in modo continuo = è necessario sostituire le batterie.
LA TARATURA AUTOMATICA DEL VOLANTE E DEI PEDALI
- Il centro della ruota del volante viene predefinito quando accendete il volante: è perciò indispensabile
che la ruota sia perfettamente centrata sul suo asse quando lo accendete.
- È possibile anche centrare manualmente il centro della ruota. Per farlo, posizionate la ruota
perfettamente al centro, poi premete simultaneamente “SELECT + START + ENGINE START” (questa
operazione deve essere effettuata ad ogni riavvio del volante).
- La direzione della ruota del volante e i pedali vengono tarati in modo automatico.
Page 95

14/20
FUNZIONI AVANZATE
REGOLAZIONE DELLA SENSIBILITÀ DELLA RUOTA DEL VOLANTE
La direzione del vostro volante possiede 2 modalità di sensibilità:
- “Sensibilità normale” (modalità predefinita e consigliata su PC – richiede un’impostazione di parametri su PS3)
- “Sensibilità elevata” (modalità predefinita e consigliata su PS3 - richiede un’impostazione di parametri su PC)
Impostazione di parametri in modalità “Sensibilità normale”
(modalità predefinita e consigliata su PC)
Azione
- Posizionate il switch del Manettino sull’icona corrispondente.
- Premete il pulsante per confermare la funzione.
ACCESO
La direzione del vostro volante è in modalità Sensibilità normale
Impostazione di parametri in modalità “Sensibilità elevata”
(modalità predefinita e consigliata su PS3)
Azione
- Posizionate il switch del Manettino sull’icona corrispondente.
- Premete il pulsante per confermare la funzione.
ACCESO
La direzione del vostro volante adesso è più sensibile, soprattutto al centro
CONFIGURAZIONE DELLA PEDALIERA
Di default, i comandi dell’acceleratore e del freno del vostro volante funzionano in modalità “Separata”, il
che significa che i pedali funzionano su assi indipendenti.
Questa modalità permette di migliorare notevolmente la precisione del vostro comando.
Se il vostro gioco non supporta la modalità “Separata”, la pedaliera del vostro volante non funzionerà
correttamente. Dovrete allora attivare la modalità “Combinata”.
IMPOSTAZIONE DEI PARAMETRI
Premete simultaneamente i 2 pedali (acceleratore e freno) + il pulsante
, poi
rilasciate.
MODALITÀ DELLA PEDALIERA
o
SEPARATA
(modalità consigliata nella maggior parte dei giochi)
NON LAMPEGGIA
COMBINATA LAMPEGGIA
Page 96

15/20
CONFIGURAZIONE DELLA PEDALIERA SU “PLAYSTATION® 3”
Pedaliera separata (modalità predefinita)
Pedaliera combinata (richiede un’impostazione
di parametri)
- Acceleratore = Comando R2
del joystick PS3
- Freno = Comando L2
del joystick PS3
- Acceleratore = Direzione Su
del “mini-stick Destro” del joystick PS3
- Freno = Direzione Giù
del “mini-stick Destro” del joystick PS3
CONFIGURAZIONE DELLA PEDALIERA SU “PC”
Pedaliera separata (modalità predefinita)
Pedaliera combinata (richiede un’impostazione
di parametri)
- Acceleratore = Asse RZ
- Freno = Asse Y
- Acceleratore
= Direzione Su dell’Asse Y
- Freno
= Direzione Giù dell’Asse Y
Page 97

16/20
PROGRAMMAZIONE DEL VOLANTE E DEI PEDALI
Il vostro volante è completamente programmabile:
- Tutti i pulsanti azione possono essere scambiati tra loro.
- Tutti i pulsanti azione possono essere programmati sui pedali o sulle leve del cambio sequenziale.
DUE MODALITÀ DI PROGRAMMAZIONE
Il pulsante e il Led PRESET vi permettono di visualizzare il tipo di programmazione scelto:
AUTOMATICO (preprogrammato) o MANUALE (programmato da voi). Una semplice pressione su questo
pulsante vi permetterà (anche durante lo svolgimento del gioco) di passare da una programmazione ad un’altra.
IL “PRESET AUTOMATICO” (PULSANTE PRESET
SPENTO)
Corrisponde alla programmazione predefinita.
Per maggiori informazioni, consultate gli schemi CONFIGURAZIONE DEL “PRESET
AUTOMATICO” - PLAYSTATION® 3 / PC.
IL “PRESET MANUALE” (PULSANTE PRESET
ACCESO)
Corrisponde alle vostre programmazioni personali. I pulsanti possono essere:
- programmati sui pedali o sulle leve del cambio sequenziale
- invertiti tra loro.
- Potete modificare queste programmazioni a vostro piacimento e a volontà.
- Le programmazioni vengono salvate automaticamente all’interno del vostro volante (anche dopo averlo
scollegato o spento).
- Quando il vostro “PRESET MANUALE” è vergine, è identico al “PRESET AUTOMATICO”.
PROCEDURA DI PROGRAMMAZIONE
Fasi Azione Stato dei Led
1
Attivate “PRESET MANUALE”
premendo il pulsante.
Acceso
2
Premete e rilasciate il pulsante MAPPING
Acceso
3 Premete e rilasciate il pulsante da programmare.
Lampeggia
4
Premete e rilasciate il pulsante, la leva del cambio sequenziale
o il pedale sui quali desiderate posizionare la vostra funzione.
Spento
Acceso
Il vostro “PRESET MANUALE” adesso è attivo ed aggiornato (con la vostra programmazione effettuata)
Page 98
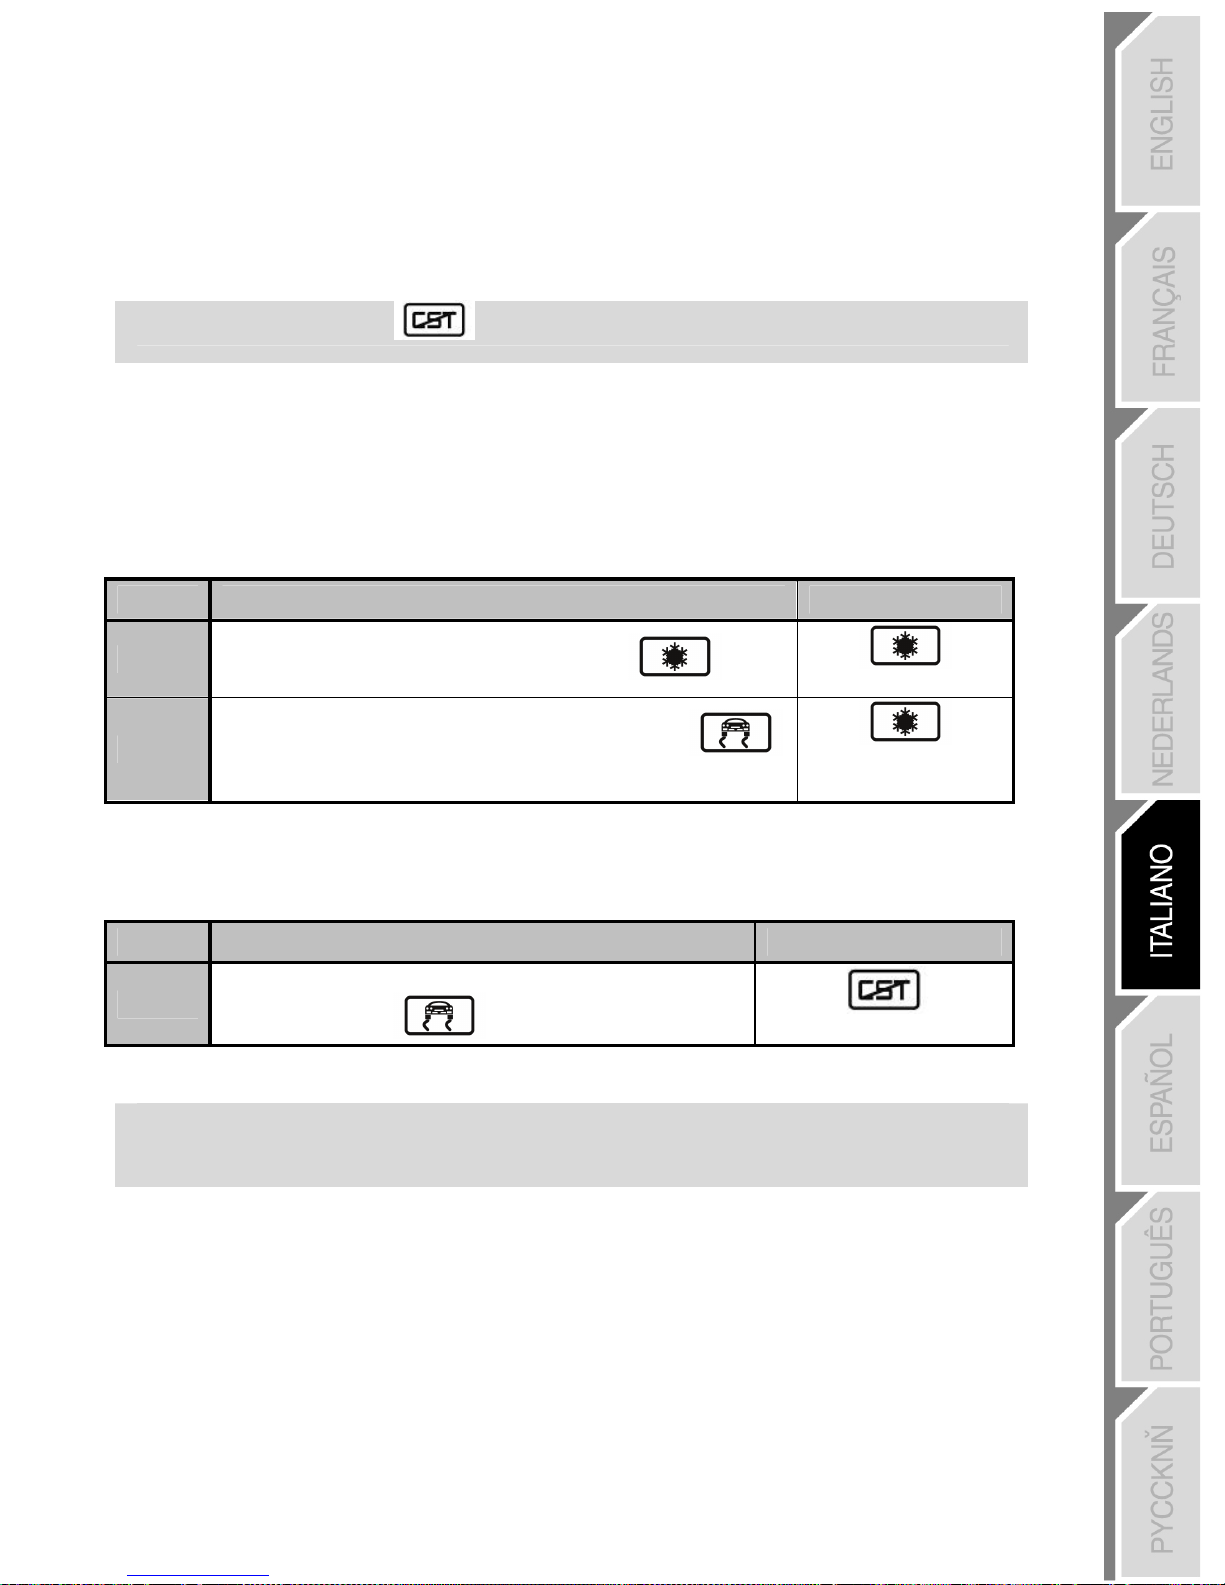
17/20
ESEMPI DI APPLICAZIONI POSSIBILI:
- Su PS3, programmare L2/R2 o L3/R3 sulle leve del cambio sequenziale Up e Down (L1/R1 predefinito).
- Su PS3, programmare i pulsanti Croce/Quadrato sui pedali (L2/R2 predefinito).
- Invertire vari pulsanti per una maggiore accessibilità.
Nota: Il pulsante non può essere programmato né spostato.
MEMORIA EEPROM
Il vostro volante dispone di un chip interno che conserva in memoria tutte le vostre programmazioni di tipo
“PRESET MANUALE” (anche se il volante resta spento o scollegato per un lungo periodo).
Potete salvare un “PRESET MANUALE” diverso su ogni supporto utilizzato (PC e PS3).
CANCELLARE UN “PRESET MANUALE”
Fasi Azione Stato dei Led
1
Attivate il vostro “PRESET MANUALE”
Acceso
2
Premete e mantenete premuto il pulsante MAPPING
per 2 secondi.
Lampeggia per 2
secondi
Il vostro “PRESET MANUALE” adesso è vergine (ed è di nuovo identico al “PRESET AUTOMATICO”).
RIPRISTINO DELL’“IMPOSTAZIONE PARAMETRI PREDEFINITA”
L’obiettivo è di cancellare in un’unica operazione tutte le vostre programmazioni o regolazioni effettuate.
Fasi Azione Stato dei Led
1
Premete simultaneamente i pulsanti
MAPPING
+ SELECT + START
Lampeggia per 5 secondi
Tutti i vostri “PRESET MANUALI” (PC + PS3) o le vostre regolazioni adesso sono vergini.
Nota: Questa operazione ha l’effetto di riavviare completamente il vostro volante.
Su PC, si raccomanda pertanto di effettuare questa operazione
esclusivamente quando nessun gioco è in corso.
Page 99

18/20
RISOLUZIONE DEI PROBLEMI
La ruota del volante non è perfettamente centrata nei giochi:
- Spegnete il volante (posizionando l’interruttore su OFF). Centrate fisicamente la ruota del volante.
Riaccendete poi il volante (posizionando l’interruttore su ON).
- Se il problema permane, potete centrare manualmente la ruota. Per farlo, posizionate la ruota
perfettamente al centro, poi premete simultaneamente “SELECT + START + ENGINE START” (questa
operazione deve essere effettuata ad ogni riavvio del volante).
- Su PC, in caso di taratura scorretta della ruota o dei pedali, scaricate il software di taratura manuale
“Thrustmaster Calibration Tool v 1.03” disponibile a questo indirizzo: http://ts.thrustmaster.com
.
Il mio volante o i miei pedali non funzionano correttamente:
- Spegnete e riaccendete il volante (accertandovi che il volante sia centrato all’avvio).
- Verificate lo stato e il corretto posizionamento delle 4 batterie LR6 / AA.
- Se il problema permane, spegnete il vostro computer o la vostra console, scollegate il ricevitore USB e il
cordone elettronico di alimentazione, ricollegate il tutto, riavviate e rilanciate il vostro gioco.
Sul PC il mio volante viene rilevato, ma non funziona con il mio gioco:
Aprite l’interfaccia di gestione delle “Opzioni” del vostro gioco per configurare il vostro volante. Consultate
il manuale d’uso o la guida online del vostro gioco per maggiori informazioni.
Sulla PS3 il mio volante non viene rilevato:
- In modalità “1 Giocatore”, se il vostro joystick ufficiale è acceso, deve essere spostato
(usando il
pulsante “PS”) su “porta joystick 2”, per fare in modo che il vostro volante funzioni.
- Se il problema permane, spegnete il vostro joystick lasciando collegato solo il volante.
La mia pedaliera non funziona correttamente in “Modalità separata”:
(Esempio: una volta nel gioco, il cursore di selezione si sposta da solo)
Uscite dal gioco e portate la vostra pedaliera in “Modalità combinata”. Rilanciate il gioco, poi configurate di
nuovo il vostro volante nell’interfaccia di gestione delle opzioni del vostro gioco.
Il mio volante non riesce a collegarsi al ricevitore:
La connessione tra il volante e il ricevitore si effettua automaticamente.
In caso di connessione non riuscita, potete forzare la connessione premendo il pulsante Led del
ricevitore (16), poi simultaneamente i pulsanti SELECT + START +
del vostro volante.
Il Led
lampeggia in modo continuo:
È necessario sostituire le batterie.
RACCOMANDAZIONI ED INFORMAZIONI RELATIVE ALLA SICUREZZA
Durante i periodi di inattività prolungata, spegnete il volante (posizionando l’interruttore su
OFF), smontate la ruota dalla sua base e togliete le 4 batterie dal vano delle batterie.
Page 100

19/20
ASSISTENZA TECNICA
Qualora riscontrassi un problema con il tuo prodotto, accedi al sito http://ts.thrustmaster.com e clicca su
Assistenza tecnica. Da qui, potrai accedere a vari servizi ed informazioni (Risposte alle Domande più
Frequenti (FAQ), le più recenti versioni di driver e software) che potrebbero esserti utili per risolvere il tuo
problema. Qualora il problema persistesse, puoi contattare il servizio di assistenza tecnica Thrustmaster
(“Technical Support”):
Tramite e-mail:
Per poter usufruire del servizio di assistenza tecnica tramite e-mail, dovrai prima registrarti online. Le
informazioni che fornirai aiuteranno i nostri esperti a risolvere più rapidamente il tuo problema. Fai clic su
Registrazione nella parte sinistra della pagina di Assistenza Tecnica e segui le istruzioni che appariranno
sullo schermo. Se sei già registrato, riempi i campi Username e Password e clicca quindi su Login.
Per telefono:
*costo massimo alla riposta de 0.1 Euro
INFORMAZIONI SULLA GARANZIA
Nel mondo, Guillemot Corporation S.A. (“Guillemot”) garantisce al consumatore che questo prodotto
Thrustmaster è privo di difetti nei materiali e nell’assemblaggio per un periodo di due (2) anni a partire
dalla data di acquisto originale. Qualora il prodotto presentasse dei difetti durante tale periodo, contatta
immediatamente il servizio di Assistenza Tecnica, che ti indicherà la procedura da seguire. Se il difetto
viene confermato, il prodotto dovrà essere riconsegnato al luogo di acquisto (o a qualsiasi altra
destinazione indicata dall’Assistenza Tecnica).
Contestualmente a tale garanzia, il prodotto difettoso potrà essere riparato o sostituito, secondo il parere
del servizio di Assistenza Tecnica. Dove ciò è concesso dalle leggi vigenti, gli obblighi di Guillemot e delle
sue controllate sono limitati alla riparazione o alla sostituzione del prodotto Thrustmaster (compresi
eventuali danni indiretti). I diritti legali del consumatore, stabiliti dalla legge riguardante la vendita di beni di
consumo, non vengono intaccati da tale garanzia.
Questa garanzia non è applicabile se: (1) il prodotto è stato modificato, aperto, alterato o ha subito danni
derivati da un uso improprio o non corretto, da negligenza, da un incidente, dalla normale usura o da
qualsiasi altra causa non riconducibile a difetti nei materiali o nell’assemblaggio; (2) non vengono
rispettate le istruzioni fornite dal servizio di Assistenza Tecnica; (3) si stia utilizzando un software non
pubblicato da Guillemot, ossia un software soggetto ad una specifica garanzia offerta dal suo distributore.
Italia
848999817
costo chiamata locale*
Lun - Ven: 13:00-17:00 e 18:00-22:00
 Loading...