

Page 1
SAFETY INFORMATION
3A
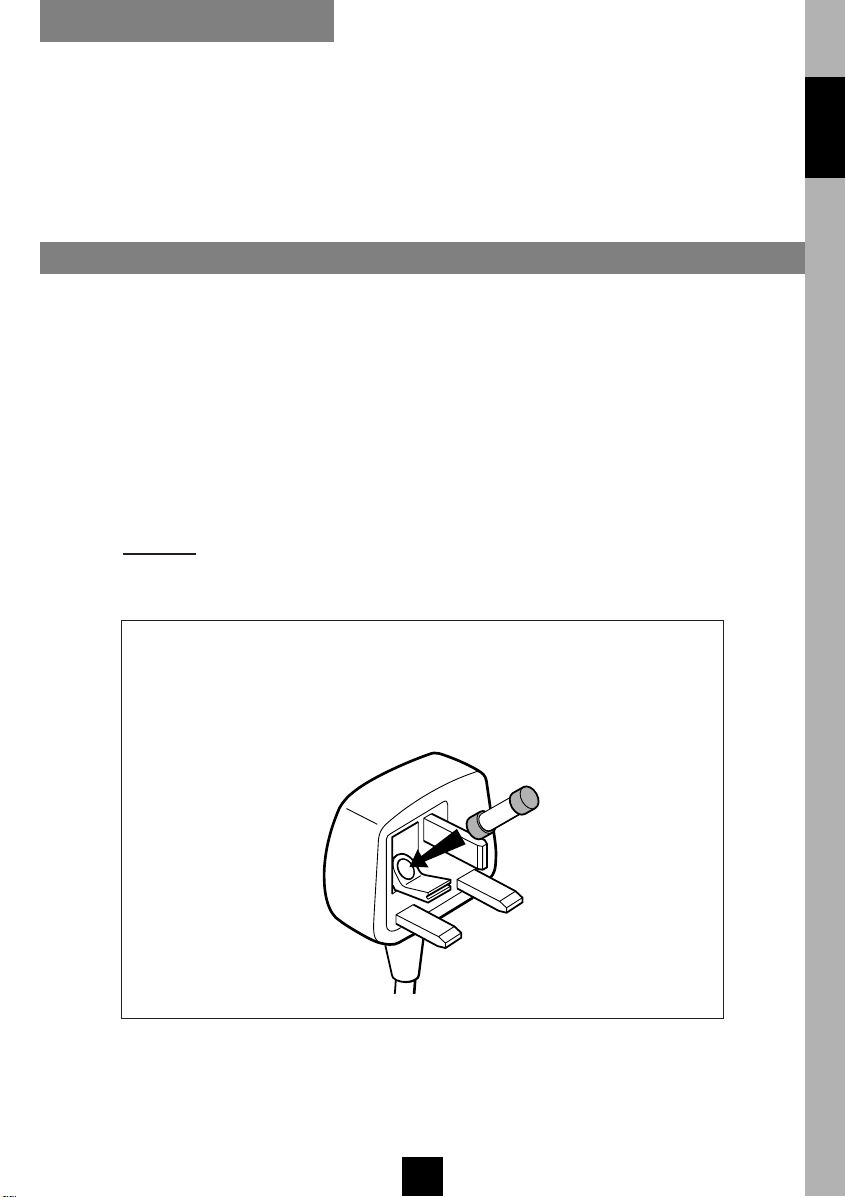
Mains connection
This video is suitable for use on A.C. mains supply, 220-240 V - 50 Hz only.
It must not be connected to D.C. mains.
Note: The mains lead of the video is fitted with a moulded plug.
Because the lead is detachable and because it contains safety
components we cannot recommend re-wiring.
ENGLISH
Do NOT
mains socket as this could result in electric shock.
BSI to BS 1362 and fuse covers must always be securely replaced.
The OFF button Bon the remote control does not completely disconnect
!
the unit from the mains supply but switches operating power on and off.
under any circumstances plug the severed plug into any
A fused plug must be fitted with a 3A fuse approved by ASTA or
If your Video Recorder does not work, the fuse may be blown.
EN
I
Page 2
Guarantee
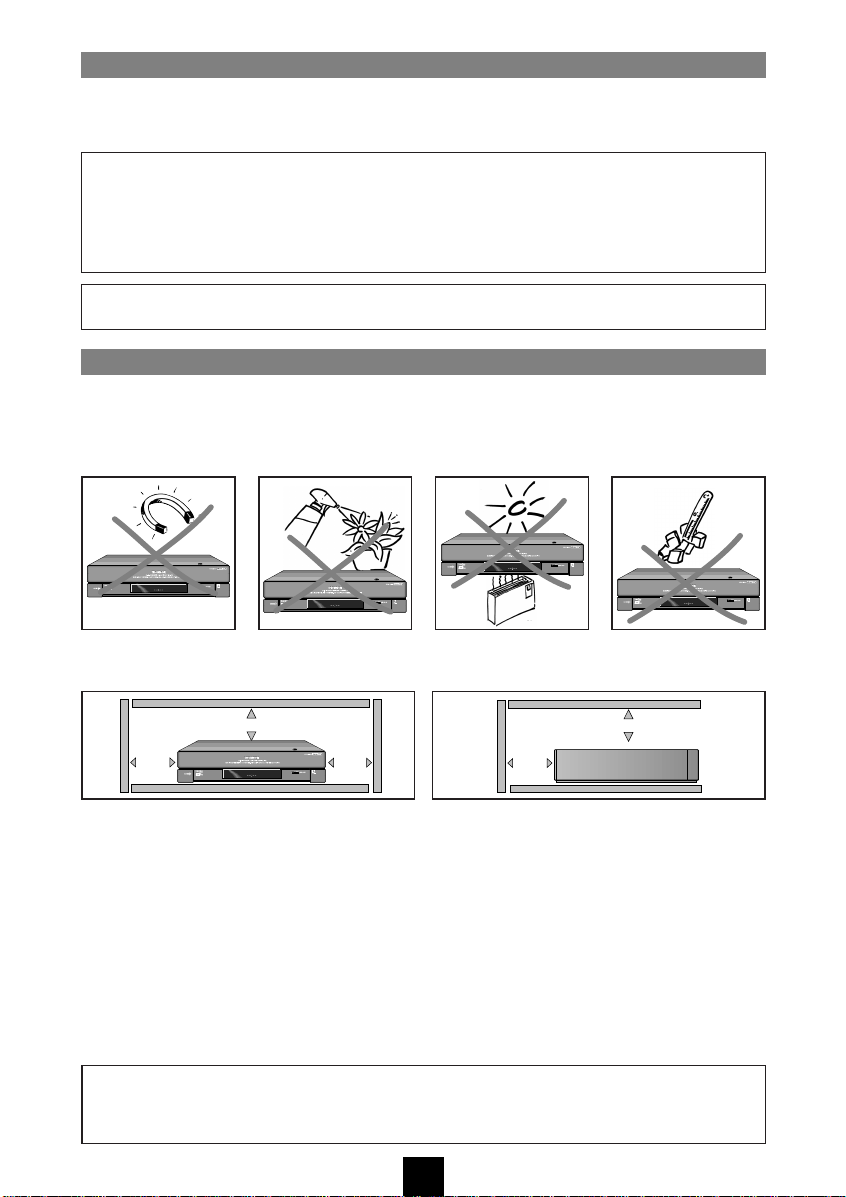
10 cm
7 cm
10 cm
10 cm
7 cm
The guarantee certificate delivered with your video recorder mentions its type and
production number. Keep it with the invoice. They will be required to justify your
warranty rights.
• All repairs during the warranty period should be carried out by an authorised
technician representing our brand.
• All exceptions to this rule will lead to the cancellation of your warranty rights.
• Never open the appliance yourself, since this may be dangerous for you or
damage the equipment.
Thomson Multimedia is not liable if the video recorder is used other than in
accordance with this manual.
Precautions
Set up - Make sure the mains voltage in your home complies with that indicated on the
identification label on the back of your video recorder.
Install the video recorder horizontally, far from any heat sources (e.g. fireplace...) or
appliances producing high magnetic or electric fields.
If you place your video recorder in a specific unit, make sure there is enough
ventilation. Leave 7-10 cm around your video recorder as shown in the diagram below.
Use - If your video recorder or a tape has been kept in a cold place for some time, like
for example in a car boot in winter, wait approximately 2 hours before using your
video recorder. The openings above and below are for ventilation purposes. They
should not be blocked. In the case of a thunder storm, it is recommended to disconnect
the video recorder from the aerial socket.
This video recorder should under no circumstances be used for industrial purposes. It is
intended for domestic use only.
Cleaning - Use a soft, dry and clean cloth. Do not use any stripper, abrasive or solvent
products. If an object or liquid penetrates into the video recorder, disconnect it
immediately and have it checked by an authorised technician.
To avoid deterioration of your video recorder's heads, never use a cleaning tape.
Total or partial copying of recordings protected by copyright law, without explicit
authorisation from the copyright owners, constitutes a breach of the law.
EN
II
Page 3

CONTENTS
POWER STANDby
< 3WATTS
MULTi-TV-VCR-DVD
REMOTE CONTROL
Multi-TV/VCR and THOMSON DVD
remote control . . . . . . . . . . . . . . . . . . . . . . . 2-3
- Controlling the TV set
- Storing the TV code
Controlling the VCR . . . . . . . . . . . . . . . . . . . 4-5
- Controlling the VCR
- Storing another VCR code or a THOMSON DVD code
Controlling the operation . . . . . . . . . . . . . . . 6-7
- Display
- Tapes
Viewing . . . . . . . . . . . . . . . . . . . . . . . . . . . . 8-9
- A TV channel
- A tape
Recording a tape . . . . . . . . . . . . . . . . . . . 10-11
- Recording
-
S.O.S. record
feature
. . . . . . . . . . . . . . . . . . . . . 12-13
Subtitle feature . . . . . . . . . . . . . . . . . . . . . . . 14
Tape Library . . . . . . . . . . . . . . . . . . . . . . 15-17
- Configuration
- Use
Programming a recording . . . . . . . . . . . . 18-19
- With Videoplus+ codes
- Without Videoplus+ codes
Tape control while playing . . . . . . . . . . . . 20-21
Adjusting the picture . . . . . . . . . . . . . . . . 22-23
Preferences . . . . . . . . . . . . . . . . . . . . . . . 24-25
HI-FI functions . . . . . . . . . . . . . . . . . . . . . 26-27
- In the play mode
- In the recording mode
Sound dubbing . . . . . . . . . . . . . . . . . . . . . . . 28
Splicing by insertion . . . . . . . . . . . . . . . . . . . 29
Sequence editing . . . . . . . . . . . . . . . . . . . . . . 30
Additional information . . . . . . . . . . . . . . . . . 31
Understanding . . . . . . . . . . . . . . . . . . . . . . . 32
Technical features
Identifying and correcting problems . . . . . . . . 33
ENGLISH
EN
1
Page 4
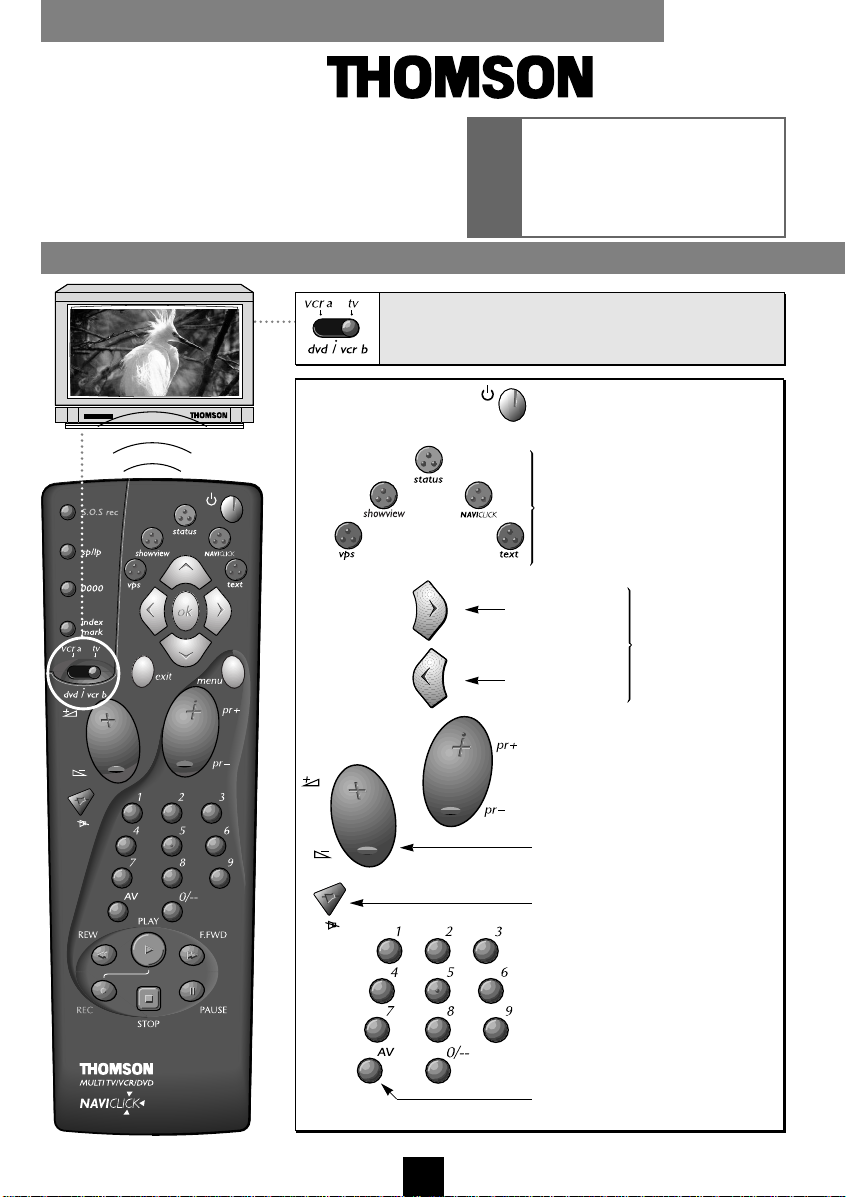
MULTI-TV/VCR AND DVD
REMOTE CONTROL
Your remote control can be used to control certain
functions on most TV sets. Before using it, you need to
programme it with one of the codes listed on the next
page.
Depending on the type of TV set
you own, this remote control
may not be compatible or
certain functions may not be
!
available.
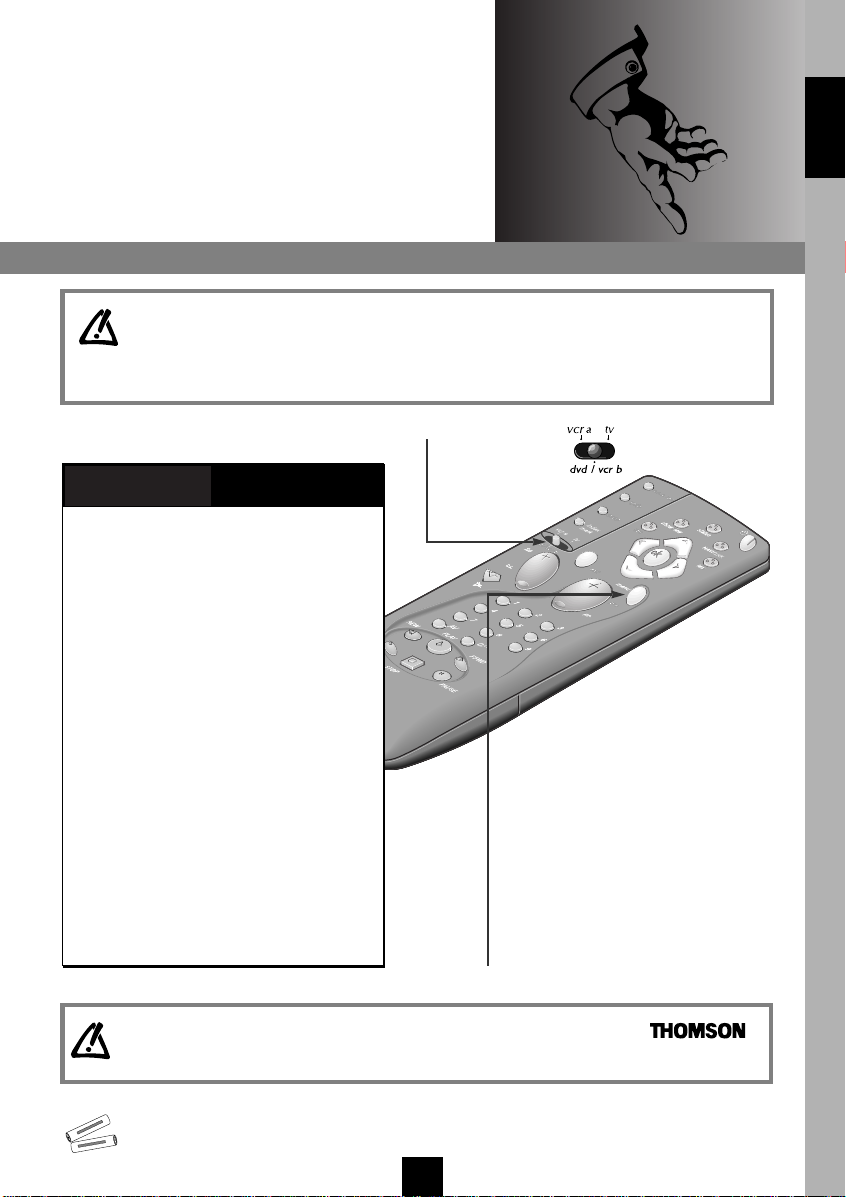
CONTROLLING THE TV SET
Pour commander le téléviseur,
appuyez d’abord sur cette touche.
To control your TV set,
position the selector on
To switch your TV set on or off.
These keys are the same as
certain functions on your TV s
remote control (if it is our
brand).
To increase
the image
size / zoom +.
To decrease
the image
size / zoom -.
These two
functions are
available on
THOMSON TV
sets only.
tv
.
To change
the channel.
To adjust the sound
volume.
To switch off the sound.
To switch the TV set on or
to select a channel.
To select a SCART socket and
view the pictures of the AV unit
connected to this socket.
EN
2
Page 5
-
+
SIZE AA 1,5 V 0%MERCURY
GREENELL
EXTRA HEAVY DUTY
-
+
SIZE AA 1,5 V 0%MERCURY
GREENELL
EXTRA HEAVY DUTY
Your remote control is a MULTI BRAND TV remote
controlller. Before controlling the TV functions, check
out the Brand Code (3 digits) from the table below and
carry out the following procedures.
STORING THE TV CODE
1 - Position the remote
control selector on
tv
.
ENGLISH
BRAND NAME
OF YOUR TV
AKAI . . . . . . . . . . . . . . . . .008-020
AKARI . . . . . . . . . . . . . . . . . . . .028
BANG & OLUFSEN . . . . . . .009-019
BLAUPUNKT . . . . . . . . . . . . . . . .023
BRANDT . . . . . . . .001-000-010-020
BRIONVEGA . . . . . . . . . . . . . . .019
BLUESKY . . . . . . . . . . . . . . . . . .020
CGE . . . . . . . . . . . . . . . . . . . . . .016
CONTINENTAL EDISON . . . . . . .004
DAEWOO . . . . . . . . . . . . .020-025
ELBE . . . . . . . . . . . . . .005-015-023
FERGUSON . .001-003-004-000-010
FINLUX . . . . . . . . . . . .020-024-019
FISHER . . . . . . . . . . . . . . . . . . . .008
FORMENTI . . . . . . . . . . . . . . . . .019
GOLDSTAR . . . . . . . . . . . . . . . . .020
GRUNDIG . . . . . . . . . .023-024-016
HITACHI . . . . . . . . . . . . . . . . . . .007
IMPERIAL . . . . . . . . . . . . . . . . . .016
JVC . . . . . . . . . . . . . . . . . . . . . .013
KNEISSEL . . . . . . . . . . . . . .020-025
LOEWE . . . . . . . . . . . . . . . . . . .020
LOEWE OPTA . . . . . . . . . . .019-020
LUXOR . . . . . . . . . . . . . . . . . . . .005
METZ . . . . . . . . . . . . . .013-019-023
MITSUBISHI . . . . . . . . .017-018-020
MIVAR . . . . . . . . . . . . . . . . . . . .016
NOKIA . . . . . . . . . . . . . . . . . . .005
NORDMENDE . . . .001-010-020-000
BRAND
CODE
BRAND NAME
OF YOUR TV
ORION . . . . . . . . . . . . . . . .005-020
PANASONIC . . . . . . . .012-005-026
PHILIPS . . . . . . . . . . . .019-020-021
PHONOLA . . . . . . . . . .019-020-021
PIONEER . . . . . . . . . . . . . . .001-005
POLYTRON . . . . . . . . .020-027-029
RADIOLA . . . . . . . . . . .019-020-021
RADIOMARELLI . . . . . . . . . . . . . .019
REX . . . . . . . . . . . . . . . . . . . . . .005
SABA . . . . . .001-000-005-010-019
SALORA . . . . . . . . . . . . . . . . . . .005
SAMSUNG . . . . . . . . . . . . .020-030
SANYO . . . . . . . . . . . . . . .008-018
SCHAUB-LORENZ . . . .005-016-020
SCHNEIDER . . . . . . . . .019-020-021
SELECO . . . . . . . . . . . . . . . . . . .005
SHARP . . . . . . . . . . . . . . . .022-018
SIEMENS . . . . . . . . . . . . . . . . . .023
SINGER . . . . . . . . . . . .001-002-019
SINUDYNE . . . . . . . . . . . . . . . . .019
SONITRON . . . . . . . . . . . . . . . .008
SONY . . . . . . . . . . . . . . . . .014-018
TELEAVIA . . . . . . . . . . .001-010-020
TELEFUNKEN .001-002-000-010-020
THOMSON . .001-000-002-010-020
TOSHIBA . . . . . . .006-018-024-016
WEGA . . . . . . . . . . . . . . . . . . . .019
YOKAN . . . . . . . . . . . . . . .020-025
YOKO . . . . . . . . . . . . . . . . . . . .020
BRAND
CODE
2 - Press and hold down the
menu
key and enter 3 digits brand
codes.
Depending on your TV set
model, it may be necessary
to try several of the proposed
codes.
3 - Release the
menu
key.
Remark: Not all functions are
applicable depending on model of TV
brand used. Some old TV set cannot be
controlled by this remote control.
When changing batteries, the TV brand may require resetting again.
EN
3
Page 6
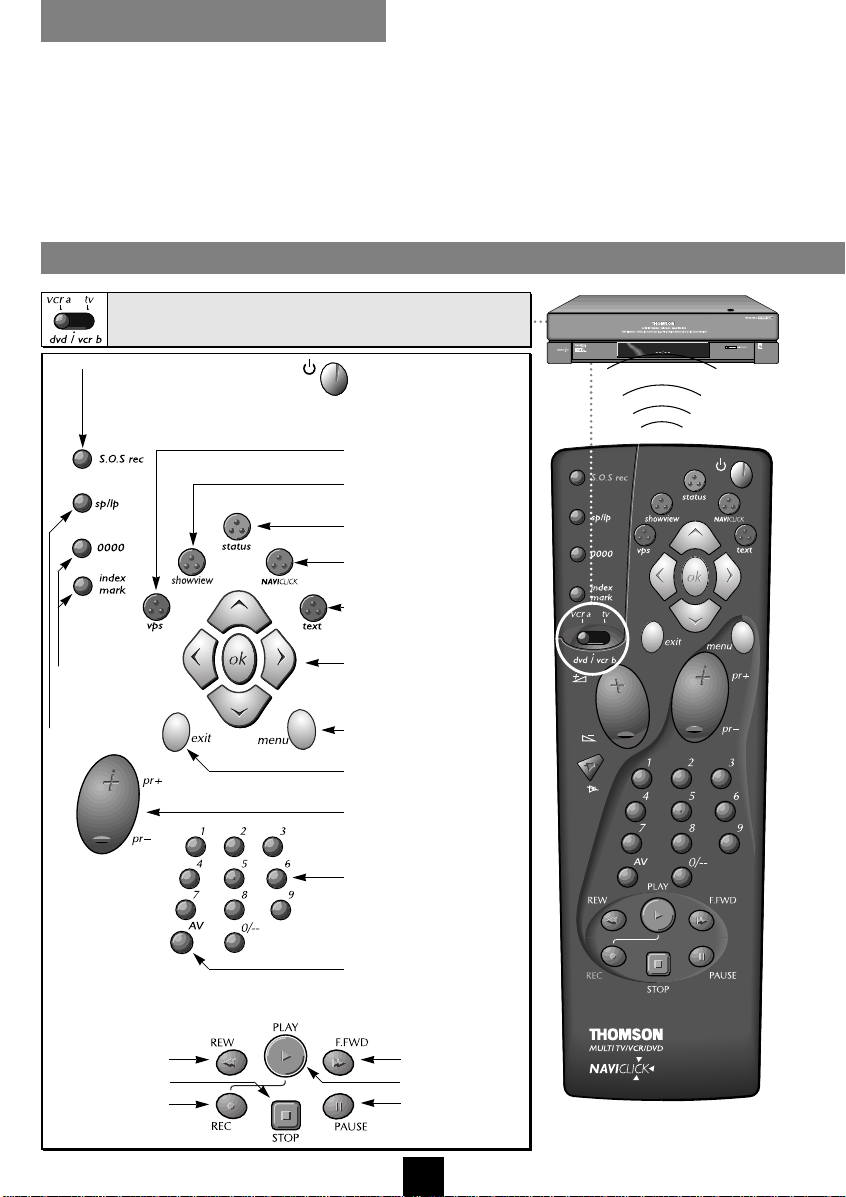
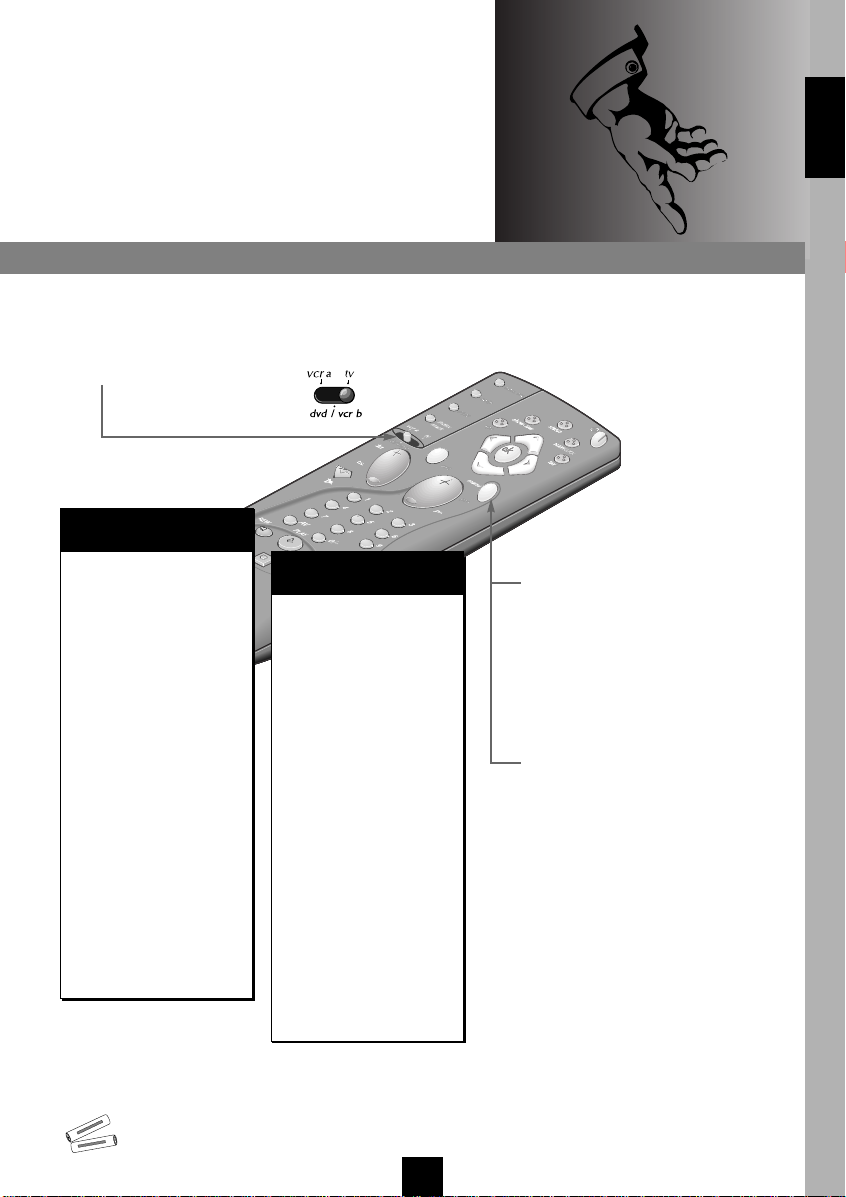
CONTROLLING THE VCR
CONTROLLING THE VCR
Pour commander le téléviseur,
To control your VCR, position the selector on
appuyez d’abord sur cette touche.
vcr a
.
To start instant recording of what
you are watching (only with
compatible TV)
To add or
remove an
index
To double the
recording time of
a tape with LP
The controls/functions below are also to be found
on the front of the video recorder
To switch the video
recorder on and off
To select the VPS
function
To display the
programme menu
To display the information
screen
To call up
the NAVICLICK menu
To display the subtitles
To navigate through the
menus and to validate
with OK
To display the SUMMARY
menu
To leave a menu at any
moment
To change the channel
To select a channel. For 2-
digit channels, press 0/--
first (example: 0, 1, 2
for Pr12)
To select the AV units
connected to the
audio/video sockets
(AV1, AV2, AV3, AV4)
Reverse
Stop
Record
Forward
Play
Pause
EN
4
Point the remote control
towards the video recorder
when you press a key.
Page 7
-
+
SIZE AA 1,5 V 0%MERCURY
GREENELL
EXTRA HEAVY DUTY
-
+
SIZE AA 1,5 V 0%MERCURY
GREENELL
EXTRA HEAVY DUTY
Your remote control is a MULTI-MAKE model which fits a great
number of VCR’s. Prior to controlling your VCR’s functions, note
down the code (3 digits) matching the make of your VCR and
follow the steps below.
Note: You may not be able to control all of the functions,
depending on the model and the make of your VCR. Some older
models are not compatible with this remote control.
STORING ANOTHER VCR CODE OR A THOMSON DVD CODE
Important: If you wish to control independently two video recorders of the makes
BRANDT, FERGUSON, NORDMENDE, SABA, TELEFUNKEN or THOMSON, prior to
carrying out steps 1, 2 and 3 described below, disconnect the set whose code you wish
to change from the mains. Enter the new code (usually 002) and then control the VCR
with this new code.
1 - Position the
remote control
MAKE OF YOUR VCR
AIWA . . . . . . . . . . . . . . . . . . . . . . . . . . . . . . . . . . .067-068
AKAI . . . . . . . . . . . . . . . . . . . . .003-004-005-006-007-008
BLAUPUNKT . . . . . . . . . . . . . . . . . . . . . . . . . .008-009-062
BRANDT . . . . . . . . . . . . . . .001-012-002-059-010
DAEWOO . . . . . . . . . .040-041-042-043-044-045-046-047
FERGUSON . .001-002-060-012-053-055-057-059
FISHER . . . . . . . . . . . . . . . . . . . . . . . . . . . . . .035-036-037
FUNAI . . . . . . . . . . . . . . . . . . . . . . . . . . . . . . . . . . . . . .030
GOLDSTAR . . . . . . . . . . . . . . . . . . . . . . . . . . . . . . .023-034
GRUNDIG . . . . . . . . . . . . . . . . . . . . . . . . . . . .061-069-070
HITACHI . . . . . . . . . . . . . . . . . . . . . . . . . .010-012-022-023
JVC . . . . . . . . . . . . . . . . . . . . . . . . . .06-010-011-012-013
MITSUBISHI . . . . . . . . . . . . . . . . . . . . . . . . . . . . . .048-049
NEC . . . . . . . . . . . . . . . . . . . . . . . . . . . . . . . . . . . . . . .039
NOKIA . . . . . . . . . . . . . . . . . . . . . . . . . .003-010-035-038
NORDMENDE 001-002-012-054-057-058-059-010
ORION . . . . . . . . . . . . . . . . . . .024-025-026-027-028-029
PANASONIC . . . . . . . . . . . . . . . . . . . . . . . . . .008-009-062
PHILIPS . . . . . . . . . . . . . . . . . . .061-062-063-064-065-066
RADIOLA . . . . . . . . . . . . . . . . . .061-062-063-064-065-066
SABA . . . . . .001-002-012-053-055-057-058-059
SAMSUNG . . . . . . . . . . . . . . . . . . . . . . . . . . . . . . . . . .033
SANYO . . . . . . . . . . . . . . . . . . . . . . . . . . . . .019-020-021
SCHNEIDER . . . . . . . . . . . . . . . .061-062-063-064-065-066
SHARP . . . . . . . . . . . . . . . . . . . . . . . . . . . . . . . . . .031-032
SONY . . . . . . . . . . . . . . . . . . . . . . . . . . .015-016-017-018
TELEAVIA . . . . . . . . . . . . . . . . . . . . . . . . .001-012-059-010
TELEFUNKEN . . . . . . . .001-002-012-055-059-010
THOMSON . .001-002-012-054-057-058-059-010
TOSHIBA . . . . . . . . . . . . . . . . . . . . . . . . . . . . .010-011-014
BRAND CODE
selector on
mode
vcr b
dvd /
.
2 - Press the
menu
key and while
holding it down, key in the 3-digit
code corresponding to the make
of your VCR. Depending on the
VCR model you own, you may
have to try out several of the
codes proposed.
menu
3 - Release the
key.
ENGLISH
DVD: When the code 000 is entered, the remote control is configured for -
made DVD's. Refer to the user manual of your DVD to find out the key assignment.
When changing batteries, the TV brand may require resetting again.
EN
5
Page 8
YOUR VIDEO RECORDER
RECORD
CONTROLLING THE VCR
THE KEYS ON THE FRONT
To switch the
video recorder
on and off.
Channel
selection
Stereo/Mono
See page 28
Selector
Source
selection
Accelerated play
Variable slow motion
Add an index
- Remove an index
(See page 20)
- Reset the counter
(in copy mode page 21,
in insertion mode page 29)
See page 29
Sound
dubbing
Tape eject
Stop
EN
6
Play - Pause
Forward- Reverse
To double the recording
time of a tape with LP.
Record
Page 9

DISPLAY
MAN
he display
T
STOP : Stop - tape stopped
FFWD : Forward
REW : Reverse (rewinding)
PLAY : Play
SR : Fast play
SM : Variable slow motion
PAUSE : Freeze frame
REC-P : Pause-record
REC : Currently recording
TIMER : Programmed recording
P
r
: Picture and sound from a TV channel
Au 1-2
: AV1-AV2 -
AV unit connected to the SCART
sockets (AUDIO/VIDEO) on the back
of the video recorder.
Au 3
: AV3 -
unit connected on the front of the
video recorder.
Au 4
: AV4 -
connected to the cinch sockets
(AUDIO/VIDEO) at the rear of the
VCR.
SA
:
Picture and sound from a satellite
channel
01 15 35: Tape counter
09:53 : Time
Display of the clock or of the time: the length of
the tape played since the beginning during
play or record, the time remaining until the end
of the tape (r) in STOP.
Picture and sound from an
Picture and sound from an AV
pictures and sound from a set
MAN
SP : Play/record at standard speed
(Standard Play)
LP : Play/record in long play (Long Play)
SLP : Very long play of an NTSC tape
(Super Long Play)
NTSC PAL:
VIDEO: The video recorder transmits the picture
16/9 : Play/record in 16/9 format
MESEC : Play/record in Mesecam
DECOD : A decoder or any other AV unit
A
VPS : The current programme is in VPS
PDC : The current programme is in PDC
NIC : Nicam sound
HIFI : Hi-fi sound
ii
1 : Left channel
2 : Right channel
LL
Play in NTSC for a PAL TV set
and the sound to the TV set
connected to the AUDIO/VIDEO 2
socket is on
: Presence of a tape
in the video recorder
: Mixed sound
: Mono track
The sound
proposed by the
channel or the tape
ENGLISH
n the screen
O
The video recorder automatically detects the
type of standard tape loaded (E30, 60, 120…).
When you call the information screen up, the
video recorder indicates the cassette type and
the time remaining until the end of the tape.
EN
7
Page 10
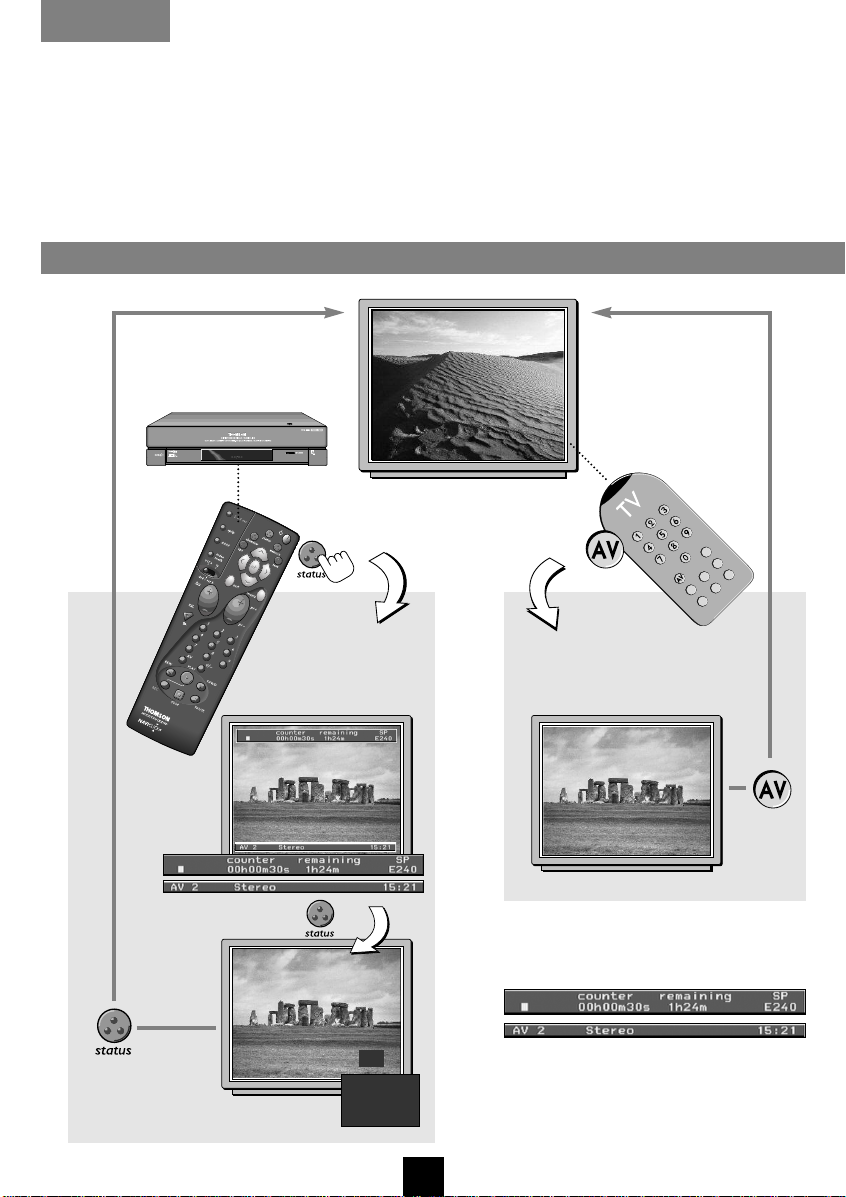
VIEWING
With the status key, you can select the image to be displayed on your TV
screen. Press this key successively to display:
(1) • the current TV programme image,
(2) • the VCR image including display of VCR status,
(3) • the VCR image,
(1) • the TV programme image…
When VCR is displayed on the screen, you’re watching the VCR image.
WATCHING EITHER A VCR OR TV CHANNEL
TV pictures
Video recorder
pictures with
video recorder
information
VCR
VCR
Video recorder
pictures without
video recorder
information
When pressing the status key, the name
of the current programme is displayed at
the bottom of the screen (provided that the
channel broadcasts Teletext).
The information depends on the operating
mode of the video recorder
(STOP, PLAY...).
EN
8
Page 11
VHS
VHS
To view a tape and explore the recordings on it, freeze a
frame, find precise sequences with the fast search, rewind
to the start or the end of the tape.
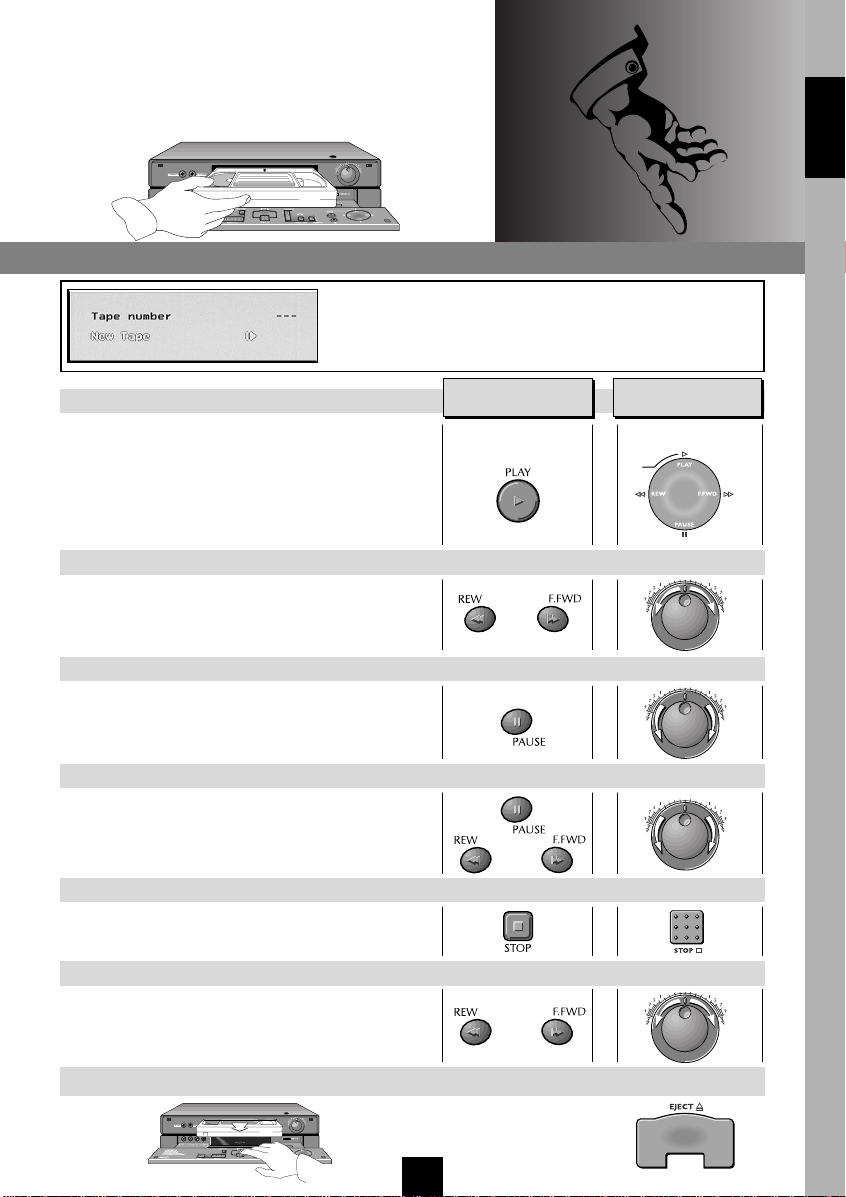
VIEWING A TAPE
If you don't want this menu to come up every time you load
a tape, deactivate the option Tape library in the
PREFERENCES menu (page 24). Refer also to pages 15 to
17, TAPE LIBRARY function.
Play
If the picture is poor, check that the MESECAM
and S-VHS functions are disables (see page 22 menu PICTURE).
In case of poor quality PAL sources or old PAL
tapes, please turn MESECAM off.
Fast search
Press several times on the keys to vary the speed
and direction of the fast search.
On your remote
Sur votre
télécommande
control
On the front side of
Sur la façade du
the video recorder
magnétoscope
ENGLISH
Freeze frame - Pause
Press several times on this key to forward picture
by picture.
Variable slow motion
Press several times on the keys to vary the speed
and direction of the slow motion.
Stop
Press the key.
Forward or reverse
Press several times on the keys.
Ejection of the tape
then
or
or
EN
9
Page 12

RECORDING A TAPE
VHS
You can record TV programmes or the pictures from a set connected to one of the sockets
AV1/AV2/AV3 or AV4.
RECORDING
Insert a tape.
To check the settings for your recording.
You can call up the information screen
(see page 8).
1
2
3
Choose a channel or a AV unit connected
to the audio/video sockets (AV1, AV2,
AV3, AV4 or SA).
Select the sockets with AV.
For 2-digit channels, press 0/-- first
(example: 0, 1, 2 for Pr12).
Choose the SP or LP length.
SP for normal play.
LP for long play.
Switch to pause-record
then start the recording.
Pause then
resume recording.
Finish the recording.
Record with automatic stop:
Press the key twice.
then
then
then
Enter the time of the end of the current
programme with the digital keys.
Recording will stop at the programmed time.
EN
10
INS-R --:--
Page 13

VHS
The option S.O.S. RECORD is available only if your TV
VHS
MAN
set is fitted with the NexTView Link feature (or
similar).
ENGLISH
S.O.S. (Snap On-Screen) RECORD
You can record the TV channel you are watching at
any moment.
1
To record the programme you are watching,
just press the
control selector must be on
s.o.s. record
key (the remote
vcr a
).
2
The VCR is switched on and selects by itself
the same channel as the current TV
programme to start recording.
To control the video
recorder, switch to
The channel selected or the type of
1
appliance chosen to record, appears on
the display of your video recorder.
Origin of the pictures and the sound:
• Pr - terrestrial channel
• SA Satellite channel
• AV1 and AV2 sockets on the back
• AV3 sockets on the front
• AV4 yellow, red and white cinch
sockets at the rear.
• HiFi to record in HIFI, without pictures
(AUDIO IN sockets on the back).
Auto Long Play
2
The video recorder has an Auto Long
Play function. If you have programmed
a recording which exceeds the recording
time remaining on the tape, the video
recorder automatically transfers to Long
Play mode (LP).
s.o.s. record
2
Unless the VCR is already programmed
(AUTO or TIMER is displayed) or playing.
With some TVs equipped with the
NexTView Link or similar, you may
programme a recording on the TV and
upload to the VCR.
With Nextview Link / AV Link TV set the
channel will change automatically to the
one you are watching.
Recording is impossible: See if the
safety tab of the cassette isn’t broken.
Tab
vcr a
.
REC Pr6
Symbol indicating the presence of a
tape in the video recorder. It flashes if
there is an error (protected tape or no
tape).
EN
11
Page 14

To control the video
recorder, switch to
Full operation of the NAVICLICK function will be achieved the day following the first installation of your video
recorder.
When pressing the status key, the name of the current programme is displayed in the lower part of the screen.
vcr a
.
1
2
3
• Choose the station on your VCR.
• Press key.
• The NAVICLICK TV guide comes up.
• Scroll the programmes one by one
and with key V or W,
select the programme you wish to record.
• Press
OK
to validate your selection.
The menu TIMER REVIEW comes up (see boxed text on page 13).
• Press
exit
, your programming is completed.
• Switch the video recorder off (TIMER mode).
Note: a great number of satellite receivers – and among them most digital models –
must be left on to ensure that your timer-programmed recordings work properly.
QUICKLY CHECK WHAT'S ON TV WITH NAVICLICK
Display the NAVICLICK menu of a station.
Press the keys PR+/PR- or
This provides a simple way of checking what’s on TV at any particular time of day.
C/B to display the NAVICLICK TV guide of the other channels.
Note: This function is available on most channels with Teletext; for satellite channels, select SA
with the AV key (Channel change is not possible on satellite channels).
EN
12
Page 15

IN THIS MANUAL
=
V
OK
B
C
W
exit menu
ENGLISH
TIMER REVIEW
Once you have programmed one or more
recordings, you may want to check your
programming:
- either select the line Timer review of the RECORD
TIMER menu; when proceeding this way, you can
change or cancel a programmed recording; select
the programmed recording with key V or W and
follow the indications displayed at the bottom of
the menu (should you wish to make any change,
refer to page 19 – PROGRAMMING OPTIONS);
- or press the
menu
key when the VCR is set on
standby-programming (VCR switched off).
Note: If you have programmed two recordings with
overlapping times, the VCR will indicate this
problem in the menu TIMER REVIEW. In such a
case, change your programming accordingly
(page 31).
The menu TIMER REVIEW consists of two
pages. To access the other page, select
Next page and then validate with OK.
Each morning, the NAVICLICK function
works by storing the relevant TV guide
pages from the broadcast teletext. It
provides an easy way of seeing what’s on
TV and programming your VCR to record
by a few simple “clicks”. For this to
operate fully, your VCR needs to be on
standby (no timer programmed) at 8.00
each morning. If you have a timer
programmed, the storing will not take
place, but you can still use the
NAVICLICK function. However, display of
your NAVICLICK TV GUIDE will be slower
in this case and no channel change will
be possible.
Note: When searching for a given
2
programme in the NAVICLICK menu and
reaching the last page available on the TV
screen, press key
search. Then wait a moment until another
series of pages is displayed.
In case of identification problems of a
channel’s page, please follow the
instructions displayed on the screen.
Note: Some channels may modify the
structure of their Teletext pages. To allow
to operate in this case (unless the
structure of the Teletext is completely
changed), just select the menu NAVICLICK
SET UP (call up the menu SUMMARY and
INSTALLATION) and update the number
of the first
TV guide along with the page assigned
to the subtitles (you can also make use
of this feature when setting up a new
channel).
You should know that the channel
displayed on the screen and its
programme list is not a channel stored in
your TV set but in your video recorder.
W
to continue the
and SUBTITLES to continue
Teletext page assigned to the
EN
13
Page 16

SUBTITLE FEATURE
TAPE LIBRARY – C
Certain programmes (mainly in the evening) include subtitles.
ONFIGURATION
SUBTITLE FEATURE
When you are watching a programme, you
may display the subtitles by pressing the
text
key.
exit
Press
You can also record the subtitles:
in the RECORD TIMER menu, select Subtitle
Yes to record the subtitles of the
programme.
NOTE: Subtitles in colour available in certain programmes will be recorded and reproduced in black
and white by your video recorder.
to quit.
To always record subtitles in your timer
recordings. To activate this function, tick this
þ) off (OKkey) (See page 24).
box (
More information can be found on page 15
(menu RECORD TIMER) and 20
(menu PREFERENCES).
EN
14
Page 17

The TAPE LIBRARY function enables you:
- to create and manage a library with up to 200 tapes,
- to automatically retrieve and play a broadcast recorded by you.
TAPE LIBRARY – CONFIGURATION
WHEN LOADING A BLANK TAPE FOR RECORDING
- load a blank tape into your video recorder.
- A menu comes up, select New Tape,
then press
Note: If you don't want to use this function
systematically, you may deactivate the relevant
option in the PREFERENCES menu (see page 24).
- Your tape is now stored in the tape library of
your VPH7090.
Don’t forget to label your tape with the
number given by the video recorder
when you eject it.
- Press
Now you can record one or more broadcasts on your tape.
exit
ok
.
to leave.
ENGLISH
WHEN LOADING AN ALREADY LISTED TAPE
Load a tape (which is already listed in your library)
into your VPH7090. This makes the same menu
appear as above. Now enter the number assigned
to the tape and confirm with
Note: If you previously de-activated the Tape
Library option in the PREFERENCES menu, choose
Tape Library in the SUMMARY menu.
The TAPE LIBRARY menu comes up, displaying the
tape's contents.
Select a record title with the keys V/W.
Validate with ok.
ok
.
EN
15
Page 18

TAPE LIBRARY – Use
IMPORTANT: Your VPH7090 will automatically give the broadcast title to all
recordings from channels with the NAVICLICK function active.
MANAGEMENT OF YOUR TAPE LIBRARY
You have a choice of 4 functions. Use V/W to select
one and confirm with
- Play back title: The video recorder automatically
retrieves and plays the record title selected.
- Go to title: The video recorder positions itself on the
beginning of record title selected.
- Edit title: To edit and change the title of the recording
by means of the keys V/W, C/B and
- Delete title: To delete this title from the tape contents.
ok
.
ok
.
exit
Press
to leave.
WHEN LOADING A PRERECORDED TAPE OR TAPE RECORDED ON YOUR OLD VCR
When you have tapes recorded on another video recorder, you may integrate them in
your tape library, but only with one title, as the detailed contents cannot be rebuilt.
Repeat the previously described steps.
You may give a title to your tape
(refer to Edit title on this page).
EN
16
Page 19

Tape Library: This function is active only for recordings with a length of over
10 minutes.
LISTING ALL YOUR RECORDINGS WITHOUT LOADING A TAPE
Display the SUMMARY menu, then choose Tape Library
with V or W.
ok
Confirm with
The menu TAPE LIBRARY comes up:
- For title search in alphabetical order,
select Tape library:
Use the keys C/B to scroll the pages and the keys
V/W to step through the title list.
The tape number corresponding to each title is
displayed in the right column.
.
ENGLISH
- To see the contents of all tapes stored in your tape
library, choose Tape number:
To skip from one tape to another, use the keys C/B.
To select a title, use the keys V/W.
To edit or delete a title:
Go to the line concerned and press
Follow the instructions displayed on the bottom
of the screen.
Press
exit
to leave.
ok
.
EN
17
Page 20

PROGRAMMING A RECORDING
16.2516.25
FUNNY TIMESFUNNY TIMES
filmfilm
Drama-comedy
5862458624
TUESDAY
1
2
You can programme a recording using
the Plus Codes in your TV listings
magazine or using the manual
programming procedure.
WITH VIDEO Plus+ CODES
Call up the VIDEO Plus+ menu and
enter the programme code.
OK
Validate with
The menu RECORD TIMER comes up.
When programming some channels the
first time, the VCR positions itself on
Programme N° and prompts you to
enter the channel number.
.
VHS
3
4
The line Stop time is selected. You can
use a certain number of options to
complete programming.
If you wish to check your programming, press
page 13), if not, press
Switch off the video recorder.
With a satellite receiver, you will normally need to leave the receiver switched on.
exit
.
EN
18
OK
(see the boxed menu TIMER REVIEW - see
Page 21

IN THIS MANUAL
VHS
=
V
C
OK
B
W
exit menu
Prior to any recording, we recommend that you
check the menus Preferences and Picture. Via
HiFi controls, you may also modify the sound
of the channels to be recorded.
WITHOUT VIDEO Plus+ CODES
Select Record timer in the menu
SUMMARY.
Programme the recording of the pictures of
a given channel by entering (or with B) its
number (Pr-) or select AV1, AV2, AV3,
AV4 or SA.
For 2-digit stations, press 0 first (for Pr
12, you must enter 0, 1, 2). Then
position the cursor on the corresponding
line and enter:
- start time
- end time of the programme and
- date, when the recording is not
programmed on the current day.
Switch off the video recorder.
With a satellite receiver, you will normally need
to leave the receiver switched on.
1
2
3
EN
19
To control the video
recorder, switch to
In the case of error, or to quit,
press the key.
In the United Kingdom and in Ireland,
SHOWVIEW
VIDEO Plus+ DELUXE.
Choose where the pictures are coming
1
from:
• Pr - terrestrial channel
• SA Satellite channel
• AV1 and AV2 sockets on the back
• AV3 sockets on the front
• AV4 yellow, red and white cinch
sockets at the rear.
OPTIONS
2
To complete your programming you can
choose the following options:
- VPS/PDC (available in some countries
2
and by satellite): to record when the
programme really starts, however late
(the programme provider needs to
transmit VPS signals).
- Once for a unique recording.
- Mo.-Fri. or Weekly to record the same
programmes at the same times from
Monday to Friday or every week
(Weekly).
- LP : long play to double the available
length of the tape.
- Subtitles: to record programmes with
their subtitles.
When you press key
3
AUTO or TIMER is displayed on your video
recorder, depending on the language of
3
the menus.
To interrupt a programmed recording
under way, press successively
(STANDBY) and STOP.
Recording is impossible: See if the
safety tab of the cassette isn’t broken.
DELUXE is replaced by
Tab
vcr a
B (STANDBY),
ENGLISH
.
BB
Page 22

TAPE CONTROL WHILE PLAYING
•
MARKING AN INDEX – INDEX SEARCH – INTROSCAN – ERASING A INDEX
COUNTER – REMAINING TIME – TAPE TYPE
The index system mark sequences on the tape (beginning of a film, exerpts...) to help
you find them easily. At the beginning of a recording, the video recorder
automatically marks an index on the tape.
In play, recording and pause, additional indices can be marked by pressing the key
index mark
.
1
2
3
4
5
With the
select the line Tape controls. Validate with
INDEX SEARCH
Use C or B to go to the next or previous index mark.
The video recorder immediately rewinds to the required position and starts to play at
this point if you have ended your entry by pressing PLAY.
INTRO SEARCH
Intro search gives you an overview of all the indices on the tape. This function explores the
tape in fast forward mode and provides accelerated momentary play of all index marks. Start
Introscan with the key
CLEAR INDEX
First search the cassette for the index mark as explained above. The VCR then stops before
the index mark. Select the line Clear index with W. Validate with key
STOP).
GO TO COUNTER/GO TO REMAINING TIME
Enter a value with key C or B. Validate with the
The video recorder immediately rewinds to the required position and starts to play at
this point if you have ended your entry by pressing PLAY.
CASSETTE TYPE
With W, select Cassette type. Use C, B or the numerical keys to enter the recording length of
the tape (this information can generally be found next to the safety tab).
menu
key, call up the SUMMARY menu and with W or V,
OK
.
OK
.
OK
key.
OK
(the VCR must be on
6
AUTO SEQUENCE MEMORY (see page 30)
EN
20
Page 23

VHS
VHS
ENGLISH
MAN
MAN
To control the video
recorder, switch to
Read the information on the display.
Type of tape (E 240 = 240 minutes)
Time remaining on the tape
(0 hours 30 minutes).
THE COUNTERS
4
The counter indicates the time elapsed in
vcr a
r
hours, minutes and seconds (status menu,
copy mode). Counting starts upon
loading of the cassette or the position
00h00m00s of the counter.
If you know how many hours and minutes
separate the required position from the
end of the tape, select Go to remaining.
To reset the counter to zero (0000), press
key 0000 when the VCR is on STOP.
A NON-STANDARD TAPE
5
The video recorder detects the type of
standard tape loaded (E60, E120,...
E180 for 180 minutes of recording time)
to correctly display the time used and the
remaining time on a tape.
Hired films for example have variable
recording times.
.
= remaining
It is impossible to use the index
marks: See if the safety tab of the
cassette isn’t broken.
EN
Tab
21
Page 24

ADJUSTING THE PICTURE
With the
with W or V, select the line Picture. Validate with
menu
key, call up the SUMMARY menu and
OK
.
IN THIS MANUAL
=
V
OK
B
C
W
exit menu
1
2
3
4
5
6
7
TRACKING
When you play some tapes recorded on other video recorders, they may show interference
lines, flickering, on the top or bottom of the screen. To reduce these effects, choose the
Tracking line, and adjust with keys
select the line Tracking mode, then choose auto with CC/BB.
SHARPNESS
To improve the sharpness of the picture, choose Sharpness while playing, and set with keys
CC/BB
. Return to the standard setting with key 0000.
STABILITY
In slow motion or on pause, the picture may flicker. To reduce this effect, choose Stability then
set with keys CC/BB. Return to the standard setting with key 0000.
FORMAT
- Auto: for automatic recognition of the 16:9 recording format.
- 16:9: to record or play in 16:9 (D2 MAC, Visiopass, PAL+ decoder, DVBS digital TV) from
the AV2 or AV1 socket (VIDEO should not be present in the video recorder).
- 4:3: For recording or viewing in another picture format.
Select format with the keys CC/BB.
S-VHS CASSETTE
Prior to playing a tape recorded in the S-VHS format,
tick the S-VHS cassette box (þ) off (OK key).
NTSC TV
To view a tape recorded in NTSC 3.58 on a NTSC TV set connected to AV1, tick off the box
(þ) NTSC TV in the menu with the
COPY MODE
To improve the quality of the copy during a recording on your VPH7090 with another video
recorder or with a camcorder:
Select AV1 or AV2, press REC (REC P appears on the display), tick off the box (þ) Copy mode
OK
with the
key and start the recording by pressing PLAY (REC C appears on the display).
CC/BB
. Return to the standard setting with key 0000 or
OK
key. The display indicates NTSC.
8
9
BLACK & WHITE (for SECAM)
If the pictures of the film you wish to record are of poor quality (scrambled TV reception), if
the film is in black and white or if wish to give your recording an old film effect, tick off the
box (þ) Black & white with the
MESECAM
If you want to exchange tapes with people living in the Middle East, you must record and
play in MESECAM. If you wish to record or to play a programme in Mesecam, tick off box
(þ) with the
OK
key.
OK
key.
EN
22
Page 25

To control the video
recorder, switch to
vcr a
.
In the case of error, or to quit,
press the key.
Note: NTSC recording is only possible
from a read NTSC source (e.g. American
or second VPH7090) not from ”NTSC
playback on Pal TV”.
PLAY IN NTSC ON A PAL 60 HZ TV SET
6
The TV standard in the United States or
Japan is NTSC 3,58. If you have friends
in these countries, you may swap tapes
with them.
To play an NTSC tape on a PAL 60 Hz TV
set, the NTSC-TV function should not be
selected in the menu. NTSC PAL appears
on the display.
SLP in the video recorder display
indicates that the tape has been recorded
in Super Long Play.
ENGLISH
EN
23
COPY : See the connections described on
page 22 of the installation manual.
Page 26

PREFERENCES
To customise your control of the VCR, automate certain functions, complete your programming or
modifying the settings.
menu
With the
Preferences. Validate with
key, call up the SUMMARY menu and with W or V, select the line
OK
.
1
2
3
4
5
6
7
TAPE LIBRARY
Tick off this option (þ) to display the TAPE LIBRARY menu at any time you load a tape into
the video recorder.
BEEP SOUND
The setting described below enables you to obtain a beep sound each time you press a key
(of the remote control or the video recorder).
Tick off this box (
ECO MODE
Your video recorder can save energy thanks to the ECO MODE function which decreases
the power consuption in STANDBY mode. Only a red light is on.
With this mode activated, time is no longer displayed.
Tick off this box (
AUTO AV LINK
Some TV sets transmit at regular intervals a signal to the VCR connected (NexTView Link
feature). This signal may trigger the start of your VPH7090. To avoid such untimely starts,
you should deactivate this function (o).
AUTO LP
The video recorder has an Auto Long Play function. If you have programmed a recording
which exceeds the recording time remaining on the tape, the video recorder automatically
transfers to Long Play mode (LP).
Tick off this box (
SHOWVIEW + 10 mins
Select this option to add 10 minutes to the end time of your Videoplus+ recordings. So you
will avoid defective recordings due to programme time shifting or programmes exceeding
the scheduled time (within the 10-minutes limit).
AUTO CLOCK
When the automatic daily clock set feature in your region does not match the time of the
place where you reside, deactivate this function (o) and set your VCR clock manually.
OK
key) to activate the function (þ).
OK
key) to activate the function (þ).
OK
key) to activate the function (þ).
8
9
VPS/PDC
Tick of this option box (þ) to start recording at the exact beginning of the programme,
provided that the channel broadcasts VPS or PDC signals (this information is available on
the VCR control screen).
SUBTITLE RECORD
For permanent recording of the subtitles broadcast by the programmes. To activate this
function, tick this box (þ) off (
OK
key).
EN
24
Page 27

ENGLISH
EXTERNAL TIMER
Recording of a programme can be started
by a satellite receiver (or another set). Tick
this box (þ) off (
programme only one set: your satellite
receiver.
To change the language of the OSD menus
(French, English, German, Italian, Spanish,
Polish, Czech, Dutch), use keys C and B.
With W, select the line Identity tagging.
Validate with OK.
This menu appears.
Key in a 4-digit code (example: 0796):
another menu comes up.
OK
key) so that you have to
LANGUAGE
IDENTITY TAGGING
10
11
12
To control the video
recorder, switch to
In the case of error, or to quit,
press the key.
EXTERNAL TIMER (recording
10
programmed via an external set
connected). The external set controls
your VPH7090 (example: satellite
receiver). This option concerns you
when you have adopted connection
type N° 3 of the chapter “Setting up
a satellite receiver” in the installation
manual. The set must support this
feature (control voltage applied to
pin 8 of the Scart socket). The set is to
be connected via a Scart cable to the
AV1 socket located at the rear of your
VPH7090.
PERSONAL CODE NUMBER
12
Your VCR is fitted with a safety device
which enables you to prove that you are
the owner.
MY VIDEO RECORDER
PERSONAL CODE
NUMBER IS:
vcr a
.
You may now key in your “tagging”. This
could be for example your name, telephone
number or post code, etc.
Use the number keys 1 or 2 to select a
character, then move the cursor with C or B.
To store in memory, press
OK
.
Please keep in a safe place.
If you wish to check your identity
information, press and hold the STOP
key on the front of the VCR for about 10
seconds.
The identity tag information will be
displayed on the screen. The display will
automatically reset after about 15
seconds.
EN
25
Page 28

HI-FI FUNCTIONS
Your video recorder receives and records digital NICAM sound broadcast by certain European channels.
It remains compatible with the sound of the analogue stereo system broadcast by other European
countries.
IN THE PLAY MODE
1
2
Load a tape and press the PLAY key.
With the
controls. Validate with
This menu comes up. Select the sound tracks with key C or B.
If the tape has been recorded in Dolby Surround or Dolby Pro Logic Surround, connection of
a special audio/video amplifier will allow you to reproduce these sound effects:
- STEREO: stereo sound on the Hi-fi track
- MONO: mono sound on the linear track
- TRACK 1: Sound on the left track
- TRACK 2: Sound on the right track
- MIX: Sound on the mixed hi-fi band mono tracks.
When viewing a Hi-Fi stereo tape,
you can choose the sound tracks with key AV.
menu
key, call up the SUMMARY menu and with W or V, select the line HiFi
OK
.
on the display
NIC : Nicam sound
HIFI : Hi-fi sound
ii
: Mixed sound
1 : Left channel
2 : Right channel
LL
: Mono track
EN
26
Page 29

VHS
Make sure that the Hi-Fi
connections are set up
properly. To this end, refer to
the installation manual.
ENGLISH
IN THE RECORDING MODE
The sound level of the channels varies. If the quality of
the sound of one of your recordings is poor, you
should adjust the level. A more precise adjustment is
possible for the channels received in stereo only.
Load a tape and press the REC key.
menu
With the
menu and with W or V, select the line HiFi
controls. Validate with
This menu comes up. With the key C or B,
select Adjust mode Auto… or Adjust mode
Manual… to adjust the sound manually
(in this case, select Level, then adjust
with C or B).
key, call up the SUMMARY
OK
.
1
2
To control the video
recorder, switch to
In the case of error, or to quit,
press the key.
HI-FI SOUND
2
When the video recorder is on STOP (no
tape, or the tape is stopped), the type of
channel sound is indicated by the display.
It can be MONO (
BILINGUAL (1 2).
Your video recorder records sound on 3
3
tracks:
- 2 Hifi tracks for stereo or bilingual
sound (1 and 2)
- 1 normal track for mono sound or track
1 during a bilingual broadcast.
Depending on the sound of the TV
channel (stereo, NICAM or mono), the
video recorder will distribute the sound on
these different tracks.
See the connections described on page
22 of the installation manual.
L
vcr a
), STEREO (i),
.
Press the PLAY key.
Recording begins.
3
EN
27
IN THIS MANUAL
=
V
OK
B
C
W
exit menu
Page 30

SOUND DUBBING
INSERT EDIT
SOUND DUBBING: this feature enables you to replace the sound recorded on the mono track of a VHS
tape.
SOUND DUBBING
If you have a set connected to the rear or the front side of your VCR (sockets AV1, AV2,
AV3, AV4) or a microphone connected to the MICROPHONE socket on the front side, you
can use them as a sound input source for your dubbing.
When performing sound dubbing, your can change over to another sound input source by
pressing the AV key (the VCR must be on PAUSE).
1
2
3
Position the tape to the beginning of the sequence to be dubbed. Use the remote control to
switch over to picture freeze K (PAUSE).
Press AV or AUDIO DUBBING (on the front of the video recorder) to activate the dubbing
feature (DUB P appears on the VCR display) and select the connected set:
- A
u
3 if you use the front side sockets (white, red, yellow cinch),
- A
u
1, Au2, or Au4 for the rear sockets (refer to the installation manual, page 20),
- MIC if you use a high impedance microphone (for dubbing of a silent film) connected to the
MICROPHONE socket on the VCR front side.
Press PLAY, the dubbing begins (DUB appears
on the VCR display).
To interrupt dubbing, use the key PAUSE.
To resume dubbing, press PLAY.
On completion, press STOP.
Note: When dubbing, you may control the recording by means
of a headphone set connected to the HEADPHONE socket.
To play the sound dubbing, you must press the AV key to select mono (L), bilingual
(1 and 2) sound; the VCR display then indicates the sound chosen.
DUB
Dubbed track
EN
28
Page 31

VHS
INSERTION: This function precisely replaces part
of an existing recording (sound and pictures)
without altering the picture quality during the edit
sequences.
Insertion is possible using another video recorder,
a camcorder, or another source (TV channel, other
video unit).
INSERT EDIT
VPH7090
currently recording
ENGLISH
Before insertion
After insertion
Load a tape.
Call up the information screen.
Select the unit or source used (video recorder,
camcorder, video unit or TV channel) to record the
sequence to be inserted on your VPH7090.
Position your tape on the end
of the sequence to be replaced
then
and press STOP.
Reset the counter.
Position the tape at the beginning
of the sequence to be replaced
Activate the insertion mode.
then
then
Start the source (PLAY)
and start the insertion
on your VPH7090.
Camcorder or
Beginning End
other playing
video recorder
Sequence to
be inserted
SOUND DUBBING
1
Sound dubbing is not possible on a tape
recorded in the long play mode (LP).
INSERT EDIT
You cannot use the splicing by insertion
function if the sequence to be modified
contains a section of blank tape.
EDIT
EDIT
When loading a record-protected tape,
the VCR will eject it.
EDIT is displayed
during insertion.
The insertion ends when
the counter reaches 0000.
EN
29
Page 32

IN OUT IN OUT IN INOUT OUT
1 3 4
2
1
432
Bande originale (lecture)
Bande enregistrée (séquences assemblées)
SEQUENCE EDITING
ADDITIONAL INFORMATION
This function enables you to choose different sequences on a tape on your VPH7090 and view them one after another.
If you connect a second video recorder fitted with a compatible PAUSE socket you may recopy these sequences in
automatic splicing. This video recorder is not as precise as professional editing equipment.
SEQUENCE EDITING
Original tape (play)
Recorded tape (assembled sequences)
VPH7090 video recorder
currently playing
TV
Connect the two VCR’s with the editing
cable provided (plug the connectors into
the CAM/PAUSE sockets of the video
recorders).
Load the tape to be copied in your VPH7090 and select the appropried AV socket on the other VCR.
Display the SUMMARY menu,
select the line Tape controls first
and then the line Auto Seq. Memory.
Find the beginning (IN) of the first sequence,
validate with
Now look for the end (OUT) and validate with
Repeat this operation while observing
the order of the sequences (1, 2, 3, etc.).
To start the editing,
select the line Start assembling with W
and validate with
OK
and press B.
OK
OK
.
.
EN
30
Prepare the other video recorder
by inserting a tape and placing
it in PAUSE-RECORD.
ASM 01:25:12
The sequences are divided into
hours, minutes and seconds.
Page 33

To control the video
VHS
VHS
recorder, switch to
vcr a
.
ADDITIONAL INFORMATION
ELECTRONIC KEY (CHILD LOCK)
To prevent use of the video recorder, the keys on the front can be locked. Press the B (STANDBY) key on the
remote control for 10 seconds and keep it in a safe place.
Over 10 seconds
LOCK 17:45
Unlock the video recorder with the B (STANDBY) key on the remote control.
CONTINUOUS PLAY/RECORD
You can permanently play or record a tape. At the end, the tape is rewound to the beginning and continues
playing or recording. This function, used with the LP function, provides for 8 hours of continuous recording or
playback with an E240 tape.
Record
6 seconds
6 seconds
VPS/PDC SYSTEM
Some programmes broadcast on certain channels are transmitted using VPS (Video Programme System) or PDC
(Programme Delivery Control). These signals precisely start or stop the recording even when there is a delay in the
programme schedule. Your video recorder can recognise these signals.
VPS or PDC is displayed when the programme you are watching is broadcast in VPS or PDC. In this case you can
use the functions below.
- Recording stopped by VPS - During the recording of a VPS programme, press key
the programme is really over.
- Recording started by VPS - Put the video recorder in pause-record mode, then press key
programme starts, the video recorder starts to record.
(on the display of your
video recorder).
Play
vps
. The recording will stop when
vps
. As soon as the VPS
ENGLISH
ERROR MESSAGES RELATED TO PROGRAMMING
- The 8 memories are full. You need to free a memory in order to programme again.
- The VIDEOPLUS+ code is not listed. Enter the channel number.
- If you programmed 2 or more recordings with overlapping start and stop times, the menu TIMER REVIEW
appears along with an error message (the programmed recordings are flashing). Delete the programmed
recordings with the key
0000
.
CONCERNING VIDEO TAPES
To avoid erasing one of your tapes by accidental over-recording, we recommend you protect them by breaking the
security tab. To reuse a protected tape, just stick a piece of adhesive tape on the opening.
ProtectedUnprotected
Tapes are sensitive to utilisation and storage conditions. Keep them away from dust, humidity or excessive heat. Do
not place them next to appliances producing important magnetic or electrical fields (electro-magnet, motor…).
There are different types of tapes. These differences are not only due to the magnetic tapes but also to the mechanical
elements of the tape. A poor quality tape can damage your video recorder. You should therefore use quality tapes or
well known brands.
EN
31
Page 34

UNDERSTANDING
TECHNICAL FEATURES
IDENTIFYING AND CORRECTING PROBLEMS
UNDERSTANDING
STANDARDS
SECAM: "Séquenciel Couleur à Mémoire" French TV standard
PAL: "Phase Alternative Line" German colour TV standard, adopted by most West European countries.
NTSC: "National Television Standard Committee" Colour TV standard used in the United States or in
Japan.
COUNTRIES AND THEIR COLOUR TV NORMS
Algeria PAL B
Germany PAL BG
Belgium PAL BH
Spain PAL BG
USA NTSC
France SECAM LL’
NICAM: New digital stereo quality similar to the quality of compact discs.
SHOWVIEW : Rapid programming system based on the introduction of a code of figures (indicated in
most TV magazines) containing the programming information (channel, date, start and finish).
Dom-Tom* SECAM K’
Great Britain PAL I
Greece SECAM BH
Eire PAL I
Italy PAL BG
Japan NTSC M
Luxembourg PAL G
Morocco SECAM B
Netherlands PAL BG
Portugal PAL BG
Switzerland PAL BG
Tunisia SECAM B
VPS - PDC: "Video Programming System" and "Programme Delivery Control"; systems available in
certain countries and on certain satellite channels that start the programmed video recorder when the
programme actually starts.
SP: "Standard Play"; Standard recording speed (E240 = 4 hours)
LP: "Long Play"; Long play recording speed (E240 = 8 hours)
SLP: "Super Long Play, To play NTSC tapes only.
EUROCONNECTOR/SCART: A connector including 21 pins to link up to a TV set, video recorder, decoder but
other sources of pictures (satellite, games console, camcorder, computer).
VIDEOPLUS+ mapping: In order to avoid the unnecessary complication of telling the video where is the
Videoplus+ number and every one of programmes, the video automatically remembers where to find
the programmes that you do select to record via Videoplus+.
This means that the FIRST time you select a programme for timer recording via Videoplus+ this screen
will be displayed. Simply enter in the programme number from your cable/satellite. Once you have
done this the video will remember that location. The next time you use a Videoplus+ number relating to
your programming the video will automatically know where to go. In this way the video will build up a
library of your channel locations.
VideoPlus+ and PlusCode are registered trademarks of Gemstar Development Corporation.
The VideoPlus+ system is manufactured under licence from Gemstar Development corporation.
EN
32
Page 35

TECHNICAL FEATURES
Mains supply 200 to 240 V ±10% - 50/60 Hz
Consumed power 22 W when ON - 3 W in the eco mode
Clock autonomy approx. 30 minutes
Dimensions (W/H/D) 440 x 99 x 321 mm
Weight approx. 6.5 kg
Functioning conditions +5°C to +40°C - Surrounding humidity: 80 % maximum
Tape heads video: 4 rotary heads (VP4810C)
Hi-fi pass-band 20 to 20,000 Hz
Dynamic 80 dB
Tuner PLL, VPS/PDC Type
Reception band I-III-IV Hertzian (aerial)
Frequency ranges 45 to 855,25 MHz
Colour system PAL - SECAM - MESECAM -
Reception norms LL’ - BG - I - DKK’
Number of storable channels 99
Remote control Infrared 33 Khz - Batteries 2 x 1,5 V (AA)
Menu language French, English, German, Italian, Spanish, polish, Czech, Dutch
Automatic functions On (using any key)
Tapes VHS format - Rewinding time: 105s with E 180
audio: 2 rotary heads (HiFi) - 1 fixed head (mono linear track)
Inter-band (cable network)
Hyper-band (cable network)
NTSC (3.58) viewing and recording
Playing of an NTSC tape on TV PAL 60Hz - Playback of S-VHS tapes
Play (with protected tape)
Rewinding (at the end of the tape)
Long play (LP)
Super Long play (SLP)
IDENTIFYING AND CORRECTING PROBLEMS
If you have any problems, check the counter measure for each symptoms listed below. If the problem persists, note your VCR Model
Number and Serial Number which can be found on the back of your VCR. Contact your nearest authorized service centre or dealer
for assistance.
VCR set cannot be turned on. 1. Make sure the power cord plug is inserted in an AC power outlet.
Intermittent or no remote operation. 1. Aim the remote control directly at the VCR. Nothing should be blocking the remote
Snowy picture.
Noisy sound.
Dotted lines or stripes Spotted picture
(crosstalk.) Lines or streaks in picture
(interference).
Double images or“ghosts”. 1. A highly directional antenna may improve the Picture. This may be caused by reflections
Good picture. Noisy sound. 1. Check the transmission standard selected for the current VCR programme.
No picture.
No. sound.
MESECAM 1. When the picture is poor, check the Picture menu (see page 22) to see whether the
Recording is impossible: 1. See if the safety tab of the cassette isn’t broken.
In our efforts to improve the quality of our products, we reserve the right to change their features. The information
contained in these instructions are therefore liable to change and are not contractual.
2. Ensure the Power On/Off switch is on.
control and the VCR.
2. Use new batteries. The batteries in the remote control may be weak or dead.
1. Check your aerial or cable VCR connection.
2. Check the antenna connection on the VCR and on the wall.
1. This may be caused by local interference (e.g. cars, neon signs, hair dryers, personal
computer, audio devices, handphone, radio stations, etc.). Try moving the interfering
equipment or adjust the aerial antenna.
from nearby mountains or building.
1. Ensure the power On/Off switch is on.
2. Check the antenna connection.
MESECAM feature is deactivated.
2. Check if you have properly performed the steps for the preparation of your recording as
set out on page 10.
EN
33
ENGLISH
U-T7089PE/GB/SC-BEI/906
 Loading...