


 Loading...
THOMSON TG782
Wireless Multi-User VoIP ADSL2+ Gateway
Setup and User Guide
THOMSON TG782
Setup and User Guide
Copyright
Copyright ©1999-2010 THOMSON. All rights reserved.
Distribution and copying of this document, use and communication of its contents is not permitted without written authorization from THOMSON. The content of this document is furnished for informational use only, may be subject to change without notice, and should not be construed as a commitment by THOMSON. THOMSON assumes no responsibility or liability for any errors or inaccuracies that may appear in this document.
THOMSON Telecom Belgium NV
Prins Boudewijnlaan, 47
2650 Edegem
Belgium
http://www.thomson.net
Trademarks
The following trademarks may be used in this document:
DECT™ is a trademark of ETSI.
Bluetooth® word mark and logos are owned by the Bluetooth SIG, Inc.
Ethernet™ is a trademark of Xerox Corporation.
Wi-Fi®, WMM® and the Wi-Fi logo are registered trademarks of the Wi-Fi Alliance®. Wi-Fi CERTIFIED, Wi-Fi ZONE, Wi-Fi Protected Access, Wi-Fi Multimedia, Wi-Fi Protected Setup, WPA, WPA2 and their respective logos are trademarks of the Wi-Fi Alliance®.
UPnP™ is a certification mark of the UPnP™ Implementers Corporation.
DLNA® is a registered trademark, DLNA disc logo is a service mark, and DLNA Certified is a trademark of the Digital Living Network Alliance. Digital Living Network Alliance is a service mark of the Digital Living Network Alliance.
Microsoft®, MS-DOS®, Windows®, Windows NT® and Windows Vista® are either registered trademarks or trademarks of Microsoft Corporation in the United States and/or other countries.
Apple® and Mac OS® are registered trademarks of Apple Computer, Incorporated, registered in the United States and other countries.
UNIX® is a registered trademark of UNIX System Laboratories, Incorporated.
Adobe®, the Adobe logo, Acrobat and Acrobat Reader are trademarks or registered trademarks of Adobe Systems, Incorporated, registered in the United States and/or other countries.
Other brands and product names may be trademarks or registered trademarks of their respective holders. All other logos, trademarks and service marks are the property of their respective owners, where marked or not.
Document Information
Status: v1.0 (April 2010)
Reference: E-DOC-CTC-20090619-0001
Short Title: Setup & User Guide TG782 R8.4.x (en)

Contents
|
About this Setup and User Guide............................................. |
1 |
1 |
Installation.................................................................................... |
3 |
1.1 |
Before you start .............................................................................................. |
4 |
1.2 Installing your Thomson Gateway .................................................................. |
6 |
|
1.2.1 |
Guided Installation ................................................................................................................................. |
7 |
1.2.2 |
Manual Installation................................................................................................................................. |
9 |
1.3 Adding a New Computer to your Network ................................................... |
11 |
|
1.4 Connecting a Computer Using the Ethernet Cable ....................................... |
12 |
|
2 |
Thomson Gateway Basics ........................................................ |
13 |
2.1 Thomson Gateway LED Behaviour ................................................................ |
14 |
|
2.1.1 |
Status LEDs ........................................................................................................................................... |
15 |
2.1.2 |
WPS Button LED ................................................................................................................................... |
17 |
2.1.3 |
Ethernet LEDs ....................................................................................................................................... |
18 |
2.2 |
Thomson Gateway GUI ................................................................................. |
19 |
2.3 Backing Up/Restoring your Configuration .................................................... |
22 |
|
3 |
Wireless Access ......................................................................... |
23 |
3.1 Connecting Your Wireless Client via WPS .................................................... |
24 |
|
3.2 Connecting Your Wireless Client without WPS ............................................ |
26 |
|
3.3 Securing Your Wireless Connection.............................................................. |
27 |
|
3.3.1 |
Configuring WPA-PSK Encryption ...................................................................................................... |
28 |
3.3.2 |
Configuring WEP Encryption............................................................................................................... |
29 |
4 |
Telephony................................................................................... |
31 |
4.1 Setting Up Your Telephone Network ............................................................ |
32 |
|
4.1.1 Connection to the Traditional Telephone Network............................................................................ |
33 |
|
4.1.2 Configuring the Thomson Gateway VoIP Settings............................................................................ |
34 |
|
4.2 |
Address Book ................................................................................................ |
37 |
4.3 |
Telephony Services ....................................................................................... |
38 |
4.3.1 |
Services supported by Your Service Provider ................................................................................... |
39 |
4.3.2 Activating a Telephony Service on your Thomson Gateway ........................................................... |
40 |
|
4.3.3 |
Using Telephony Services ................................................................................................................... |
41 |
E-DOC-CTC-20090619-0001 v1.0
i

Contents
4.4 |
Viewing Telephony Statistics ....................................................................... |
44 |
5 Saving Energy with Your Thomson Gateway ........................ |
45 |
|
6 Sharing Content on your Thomson Gateway......................... |
47 |
|
6.1 |
Using the Network File Server ...................................................................... |
48 |
6.2 |
Using the UPnP AV Media Server ................................................................. |
51 |
6.3 |
Using the FTP Server .................................................................................... |
52 |
6.4 |
Managing your Shared Content .................................................................... |
54 |
6.5 |
Safely Removing your USB Storage Device .................................................. |
56 |
7 |
Thomson Gateway Tools.......................................................... |
57 |
7.1 |
UPnP ............................................................................................................. |
58 |
7.1.1 Accessing Your Thomson Gateway with UPnP ................................................................................. |
59 |
|
7.1.2 Managing your Internet connection with UPnP................................................................................. |
60 |
|
7.1.3 Configuring UPnP on the Thomson Gateway.................................................................................... |
61 |
|
7.1.4 Installing UPnP on Windows XP ......................................................................................................... |
62 |
|
7.2 |
Assigning a service (HTTP, FTP,...) to a Computer........................................ |
64 |
7.3 |
Dynamic DNS ................................................................................................ |
66 |
8 |
Internet Security........................................................................ |
67 |
8.1 |
Firewall.......................................................................................................... |
68 |
8.2 |
Parental Control............................................................................................ |
69 |
8.2.1 Configuring The Content-based Filter ................................................................................................ |
71 |
|
8.2.2 Adding Rules for the Address-Based Filter ........................................................................................ |
72 |
|
9 |
Troubleshooting ........................................................................ |
75 |
9.1 |
Setup Troubleshooting.................................................................................. |
76 |
9.2 |
General Thomson Gateway Troubleshooting ................................................ |
77 |
9.3 |
Wired Connection Troubleshooting .............................................................. |
78 |
9.4 |
Wireless Connection Troubleshooting .......................................................... |
79 |
9.5 |
Voice over IP Troubleshooting...................................................................... |
80 |
9.6 |
Reset to Factory Defaults ............................................................................. |
81 |
ii
E-DOC-CTC-20090619-0001 v1.0

About this Setup and User Guide
About this Setup and User Guide
Used Symbols
A note provides additional information about a topic.
A caution warns you about potential problems or specific precautions that need to be taken.
Terminology
Generally, the THOMSON TG782 will be referred to as Thomson Gateway in this Setup and User Guide.
Typographical Conventions
Following typographical convention is used throughout this manual:
Sample text indicates a hyperlink to a Web site.
Example: For more information, visit us at www.thomson.net.
Sample text indicates an internal cross-reference.
Example: If you want to know more about guide, see “1 Introduction” on page 7”.
Sample text indicates an important content-related word.
Example: To enter the network, you must authenticate yourself.
Sample text indicates a GUI element (commands on menus and buttons, dialog box elements, file names, paths and folders).
Example: On the File menu, click Open to open a file.
Documentation and software updates
THOMSON continuously develops new solutions, but is also committed to improving its existing products.
For more information on THOMSON's latest technological innovations, documents and software releases, visit us at www.thomson.net.
E-DOC-CTC-20090619-0001 v1.0 |
1 |
|

About this Setup and User Guide
2 |
E-DOC-CTC-20090619-0001 v1.0 |
|

1 Installation
1 Installation
Introduction
In a few minutes you will be able to access the Internet using your Thomson Gateway.
This Setup and User Guide will show you how to set up your Thomson Gateway and how to connect your computer(s) to the Internet.
Main features
As soon as you have completed the installation of your Thomson Gateway you will be able to benefit from all the services offered by your Thomson Gateway. This Setup and User Guide will focus on the following features:
Broadband Internet connection.
The first chapter describes how to connect your Thomson Gateway to the Internet.
Wired and wireless access to your local network devices.
For more information, see “1.4 Connecting a Computer Using the Ethernet Cable” on page 12 and “3 Wireless Access” on page 23.
Voice over IP (VoIP) connectivity for traditional phones and IP phones.
For more information see “4 Telephony” on page 31
Useful networking tools like UPnP, Dynamic DNS and many more.
For more information, see “7 Thomson Gateway Tools” on page 57.
Internet Security:
For more information, see “8 Internet Security” on page 67.
Before you can start to use these features, we will first set up your Thomson Gateway.
E-DOC-CTC-20090619-0001 v1.0 |
3 |
|
1 Installation
1.1Before you start
DSL Service
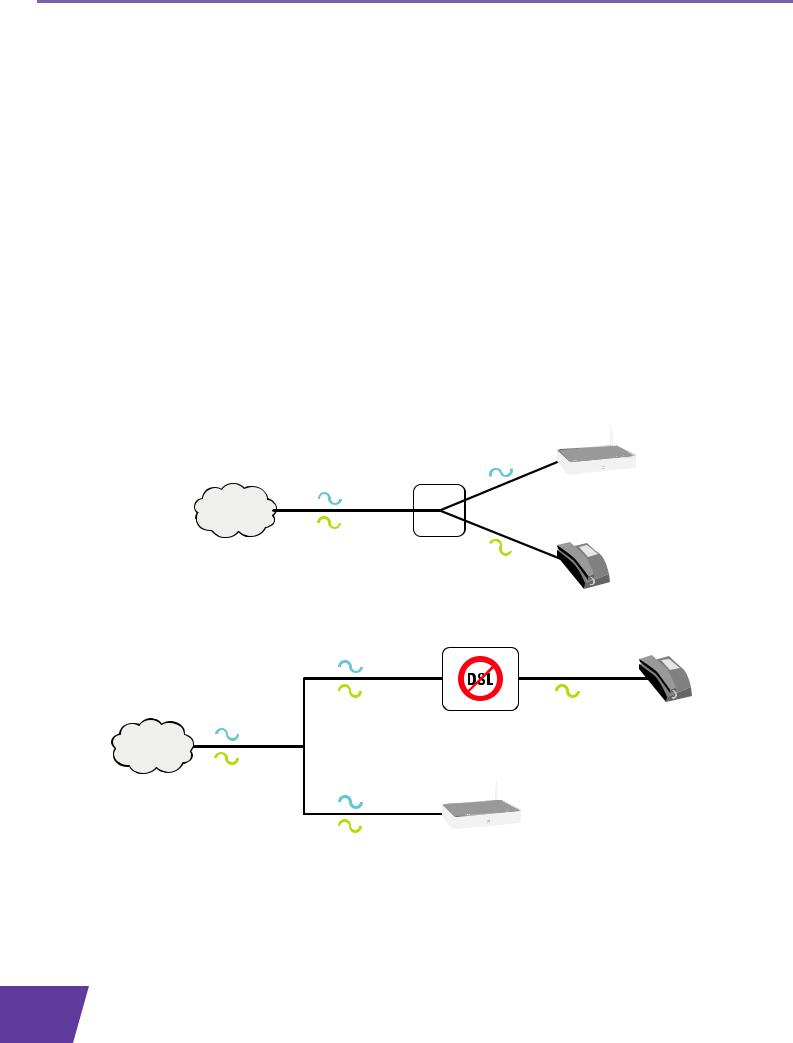
The DSL service must be activated on your telephone line by your service provider.
Decoupling the voice and DSL signal
As soon as the DSL service is activated two kinds of signals will be available on your telephone line:
Voice signals
DSL signals
To ensure the sound quality of your phone calls, the DSL signal must be omitted from the telephone line before it reaches your phone, otherwise you might hear a noise in the background when using your phone.
Filters and splitters
To split the DSL signal from the telephone line, you can use one of the following solutions:
A splitter that splits the telephone signal into a DSL and Voice signal.
DSL
Telephone |
DSL |
|
|
Network |
Voice |
|
A filter between your telephone outlet and your phone. This filter removes the DSL signal and passes the Voice signal.
DSL |
|
Voice |
Voice |
|
Filter/Splitter |
Telephone |
DSL |
|
|
Network |
Voice |
|
DSL
Voice
This filter may also be integrated in your Thomson Gateway.
4 |
E-DOC-CTC-20090619-0001 v1.0 |
|
1 Installation
How do I know if my Thomson Gateway has an integrated filter?
Thomson Gateways:
With an integrated filter have no PSTN port on their back panel.
Without integrated filter have a PSTN port on their back panel.
PSTN 


Here you will have to put a filters/splitter between the telephone outlet and your Thomson Gateway.
Wireless connection
If you want to connect your computer using a wireless connection, you will need a WiFi-certified wireless client adapter for each computer you want to connect wirelessly.
Wired connection
If you want to connect one or more computer using a wired connection, make sure those computers are equipped with an Ethernet Network Interface Card (NIC).
Internet connection
You may need the following connection details from your service provider:
Your service provider’s method for connecting to the Internet (for example PPPoE)
The VPI/VCI (for example 8/35)
Your user name and password to connect to the Internet for PPP connections
Your IP settings in case of static configurations
Optionally your service provider may indicate the service profile to use during the setup.
You may have received this information when you subscribed at your Internet Service Provider. You may be prompted for this information at a given step in the installation procedure.
E-DOC-CTC-20090619-0001 v1.0 |
5 |
|

1 Installation
1.2Installing your Thomson Gateway
Warning
Do not plug in any cables or connect any devices until you are instructed to do so.
Installation methods
There two ways to set up your Thomson Gateway:
Guided Installation
The Setup wizard included on the Setup CD will guide you through all configuration aspects of your Thomson Gateway. This is the recommended way to install your Thomson Gateway.
Manual Installation
The Setup and User Guide will first help you to connect your computer to the Thomson Gateway. After this is done, you can configure your Thomson Gateway using your web browser.
6 |
E-DOC-CTC-20090619-0001 v1.0 |
|
1 Installation
1.2.1Guided Installation
Requirements
Your computer must run one of the following operating systems:
Microsoft Windows 7 or higher
Microsoft Windows 7 x64 or higher
Microsoft Windows Vista (SP1) or higher
Microsoft Windows Vista x64 (SP1) or higher
Microsoft Windows XP SP2 or higher
Microsoft Windows XP x64 SP1 or higher
Microsoft Windows 2000 SP4
Mac OS X 10.4 (Tiger)
Mac OS X 10.5 (Leopard)
If you are using another operating system, use the Manual Installation.
You must have administrative rights on your computer
Starting the wizard
To start the wizard:
1Insert the Setup CD into your computer's CDor DVD-ROM drive.
2If your computer runs:
Microsoft Windows: The CD should autostart.
If the CD does not autostart, see “The Setup CD does not start automatically” on page 76.
Mac OS X: Double-click Menu in the window with the content of the CD.
3Select the language of your choice and click OK.
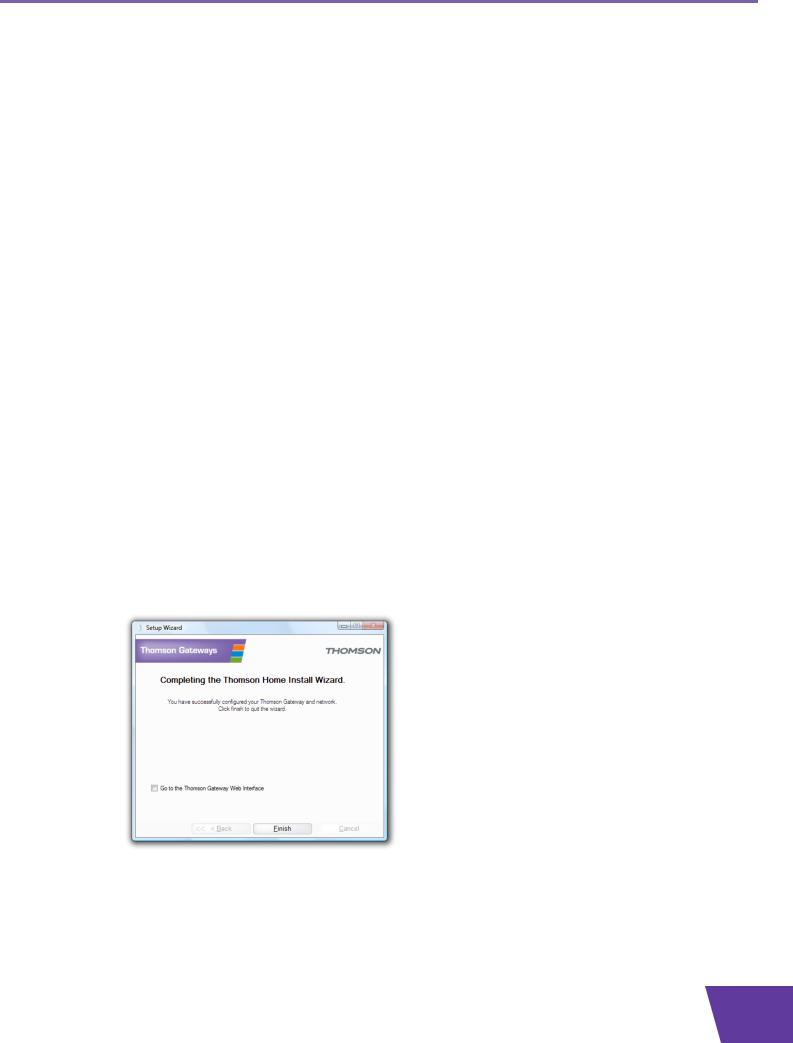
4The Setup wizard will now guide you through the installation of your Thomson Gateway.
5At the end of the installation, the following screen appears:
6Select Go to the Thomson Gateway Web Interface if you want to go to the Thomson Gateway GUI after closing the wizard. On the Thomson Gateway GUI, you can configure all services of your Thomson Gateway.
7Click Finish.
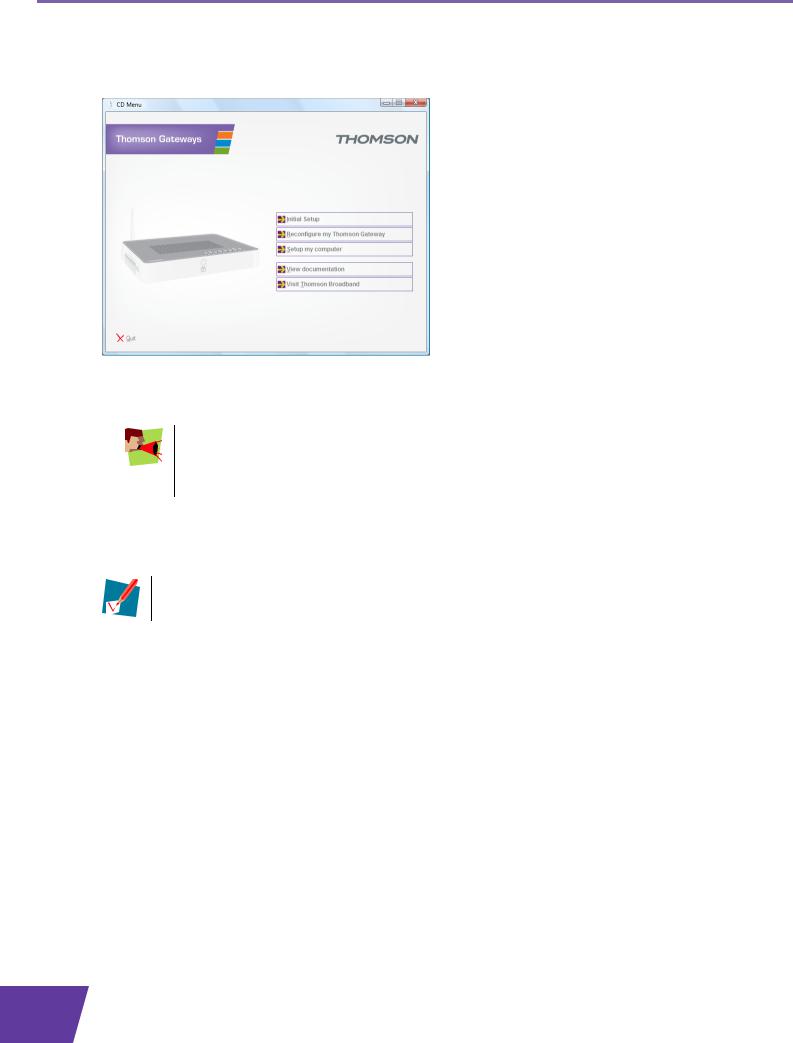
8The CD menu appears.
E-DOC-CTC-20090619-0001 v1.0 |
7 |
|
1 Installation
CD menu
On the CD Menu, you can click:
Initial Setup to connect your computer to the Thomson Gateway and configure it.
Reconfigure my Thomson Gateway to fully reconfigure your Thomson Gateway.
If you reconfigure your Thomson Gateway via the CD menu, the Thomson Gateway will be reconfigured from scratch. All your current settings will be lost. If you only want to make small changes to your configuration (e.g. changing the security), we recommended you to do this via the Thomson Gateway GUI. For more information, see “2.2 Thomson Gateway GUI” on
page 19.
Setup my computer to connect your computer to the Thomson Gateway network.
View Documentation to view a list of the documentation that is available for your Thomson Gateway. This list will be automatically updated if you are connected to the Internet.
Visit thomson.net to visit the online support sections.
Actual available items may depend on the Setup CD delivered with your Thomson Gateway.
In case of problems
If you encounter problems during this installation please refer to “9.1 Setup Troubleshooting” on page 76.
8 |
E-DOC-CTC-20090619-0001 v1.0 |
|

1 Installation
1.2.2Manual Installation
Requirements
JavaScript must be enabled (this is the default setting) on your browser. For more information, consult the help of your web browser.
Procedure
Proceed as follows:
1Connect the Thomson Gateway to your broadband service.
2Power on the Thomson Gateway.
3Connect your computer to the Thomson Gateway.
4Configure the Thomson Gateway.
This is described in the sections below.
Connect the Thomson Gateway to your broadband service
Proceed as follows:
1Take the DSL cable with the grey connectors. This cable is included in your box.
2Plug one end of the cable in the grey DSL port on the back of your Thomson Gateway.
3If you are:
Using a splitter, plug the other end of the cable into the Modem/ADSL out put of your splitter.
Not using a splitter, plug the other end of the cable directly in the wall outlet.
For more information about splitters, see “Filters and splitters” on page 4.
Power on the Thomson Gateway
Proceed as follows:
1Connect the power cord to the Thomson Gateway’s power port.
2Plug the other end into an electrical outlet.
3Push the power button to turn on the Thomson Gateway.
4Wait two minutes to allow the Thomson Gateway to complete the start up phase.
Connect your computer to the Thomson Gateway
Setting up a wireless connections
For more information on how to setup a wireless connection to your Thomson Gateway, see “3 Wireless Access” on page 23.
Setting up a wired connection
For more information on how to setup a wired connection (i.e. an Ethernet connection) to your Thomson Gateway, see “1.4 Connecting a Computer Using the Ethernet Cable” on page 12.
E-DOC-CTC-20090619-0001 v1.0 |
9 |
|
1 Installation
Configure the Thomson Gateway
Proceed as follows:
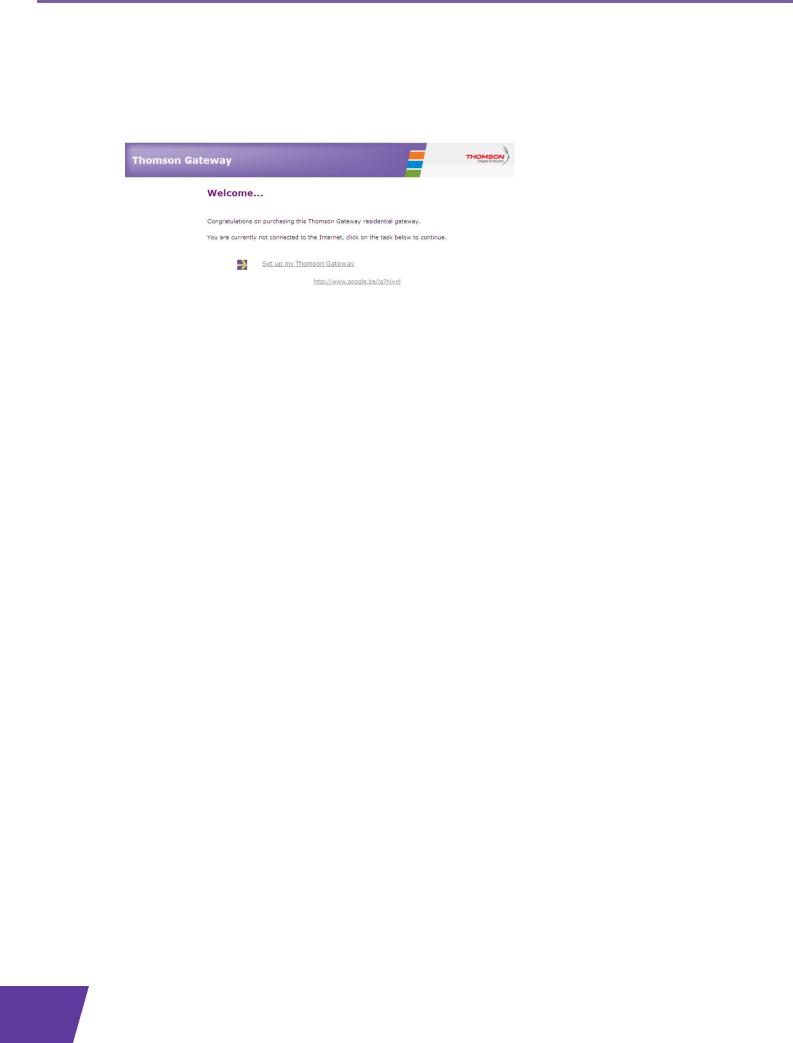
1Open your web browser.
2The Thomson Gateway informs you that you have not yet configured your Thomson Gateway.
If this window does not appear browse to http://dsldevice.lan or to the IP address of your Thomson Gateway (by default: 192.168.1.254) and click Thomson Gateway on the menu on the left-hand side.
3Click Setup my Thomson Gateway.
4The Easy Setup wizard appears. This wizard will guide you through the configuration of your Thomson Gateway. Click Next and follow the instructions.
10 |
E-DOC-CTC-20090619-0001 v1.0 |
|
1 Installation
1.3Adding a New Computer to your Network
Guided Installation
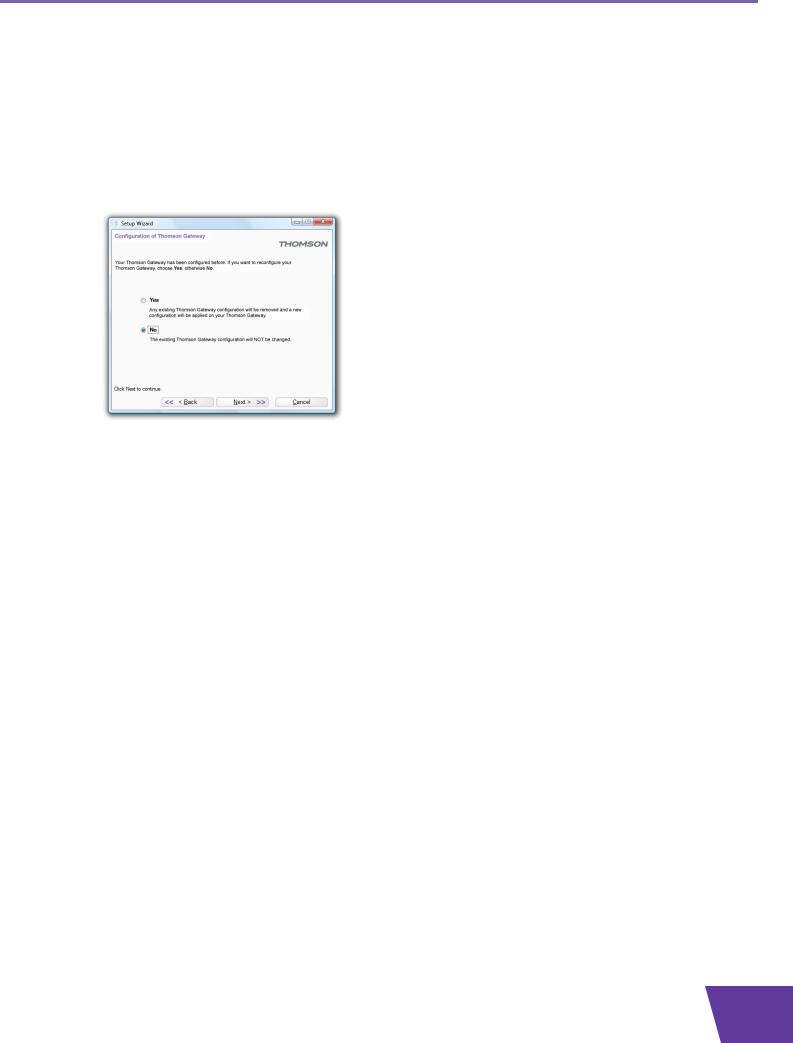
If you configured your Thomson Gateway using the Guided Installation, use the same procedure on the computer that you want to add.
When the Setup wizard informs you that the Thomson Gateway has already been configured, select No and click Next to continue.
Manual Installation
Setting up a wireless connections
For more information on how to setup a wireless connection to your Thomson Gateway, see “3 Wireless Access” on page 23.
Setting up a wired connection
For more information on how to setup a wired connection (i.e. an Ethernet connection) to your Thomson Gateway, see “1.4 Connecting a Computer Using the Ethernet Cable” on page 12.
E-DOC-CTC-20090619-0001 v1.0 |
11 |
|
1 Installation
1.4Connecting a Computer Using the Ethernet Cable
Requirements
Both your computer and Thomson Gateway must have a free Ethernet port.
Your computer must be configured to obtain an IP address automatically. This is the default setting.
Ethernet cable
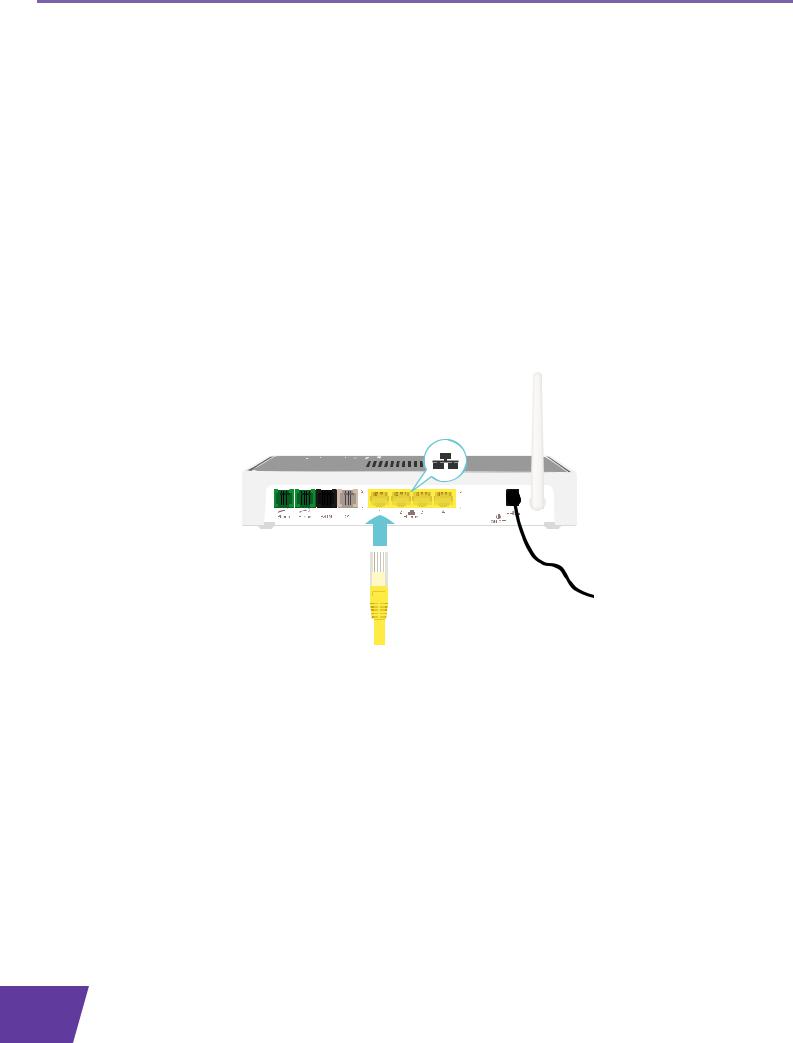
In your package, you will find a cable with yellow connectors. This is the Ethernet cable.
Procedure
Proceed as follows:
1 Connect one end of the Ethernet cable to one of the yellow Ethernet ports of your Thomson Gateway:
2Connect the other end of the Ethernet cable to your computer.
3Your computer is now connected to your network. No additional configuration is needed.
12 |
E-DOC-CTC-20090619-0001 v1.0 |
|

|
|
2 Thomson Gateway Basics |
||
|
|
|
|
|
2 Thomson Gateway Basics |
|
|
|
|
In this chapter |
|
|
|
|
|
|
|
|
|
|
Topic |
|
Page |
|
|
|
|
|
|
|
Thomson Gateway LED Behaviour |
|
14 |
|
|
|
|
|
|
|
Thomson Gateway GUI |
|
19 |
|
|
|
|
|
|
|
Backing Up/Restoring your Configuration |
|
22 |
|
|
|
|
|
|
E-DOC-CTC-20090619-0001 v1.0 |
13 |
|

2 Thomson Gateway Basics
2.1Thomson Gateway LED Behaviour
Content
This chapter describes the behaviour of:
Status LEDs
WPS Button LED
Ethernet LEDs
14 |
E-DOC-CTC-20090619-0001 v1.0 |
|
2 Thomson Gateway Basics
2.1.1Status LEDs
Introduction
On the top panel of your Thomson Gateway, you can find a number of status LEDs, indicating the state of the device.
Power LED
Colour |
State |
Description |
|
|
|
Green |
Solid on |
Power on, normal operation |
|
|
|
Red |
Solid on |
Power on, self-test failed, indicating device malfunction |
|
|
|
Orange |
Blinking |
Bootloader active (during upgrade) |
|
|
|
Off |
|
Power off |
|
|
|
Ethernet LED
Colour |
State |
Description |
|
|
|
Green |
Solid on |
Ethernet connection, no activity |
|
|
|
|
Blinking |
Ethernet activity |
|
|
|
Off |
|
No Ethernet connection |
|
|
|
Wireless LED
Colour |
State |
Description |
|
|
|
Green |
Solid on |
No wireless activity, WPA(2) encryption |
|
|
|
|
Blinking |
Wireless activity, WPA(2) encryption |
|
|
|
Orange |
Solid on |
No wireless activity, WEP encryption |
|
|
|
|
Blinking |
Wireless activity, WEP encryption |
|
|
|
Red |
Solid on |
No wireless activity, no security |
|
|
|
|
Blinking |
Wireless activity, no security |
|
|
|
Red/green |
Toggling |
Wireless client registration phase |
|
|
|
Off |
|
WLAN disabled |
|
|
|
E-DOC-CTC-20090619-0001 v1.0 |
15 |
|

2 Thomson Gateway Basics
Phone LED
Colour |
State |
Description |
|
|
|
Green |
Solid on |
VoIP service up |
|
|
|
|
Blinking |
VoIP activity |
|
|
|
Off |
|
VoIP service down |
|
|
|
Broadband LED
Colour |
State |
Description |
|
|
|
Green |
Solid on |
DSL line synchronised |
|
|
|
|
Blinking |
Pending DSL line synchronisation |
|
|
|
Off |
|
No DSL line |
|
|
|
Internet LED
Colour |
State |
Description |
|
|
|
Green |
Solid on |
Internet connectivity, no activity |
|
|
|
|
Blinking |
Internet activity |
|
|
|
Red |
Solid on |
Internet connection setup failed |
|
|
|
Off |
|
No Internet connection |
|
|
|
16 |
E-DOC-CTC-20090619-0001 v1.0 |
|

2 Thomson Gateway Basics
2.1.2WPS Button LED
WPS button
The Wi-Fi Protected Setup (WPS) button allows you to add new wireless clients to your network.
For more information, see “3.1 Connecting Your Wireless Client via WPS” on page 24.
WPS Button LED
Colour |
State |
Description |
|
|
|
Green |
Solid On |
Client successfully registered via WPS |
|
|
|
Orange |
Blinking |
WPS registration ongoing |
|
|
|
Red |
Blinking |
Error occurred |
|
|
|
E-DOC-CTC-20090619-0001 v1.0 |
17 |
|

2 Thomson Gateway Basics
2.1.3Ethernet LEDs
Ethernet LED
A LED may be provided per Ethernet port to indicate link integrity (or activity).
LED Status |
Description |
|
|
Off |
No connection on this port |
|
|
Solid on |
Ethernet link up |
|
|
Blinking |
Data is flowing from/to this port |
|
|
18 |
E-DOC-CTC-20090619-0001 v1.0 |
|

2 Thomson Gateway Basics
2.2Thomson Gateway GUI
Introduction
The Thomson Gateway Graphical User Interface (GIU) allows you to configure your Thomson Gateway using your web browser.
Requirements
JavaScript must be enabled (this is the default setting) on your browser. For more information, consult the help of your web browser.
Accessing the Thomson Gateway GUI
Proceed as follows:
1Open your web browser.
2Browse to http://dsldevice.lan or to the IP address of your Thomson Gateway (by default: 192.168.1.254).
3If you have protected your Thomson Gateway with a user name and password, the Thomson Gateway will prompt you to enter these. Enter your user name and password and click OK.
4The Thomson Gateway GUI appears.
Access the Thomson Gateway via UPnP
You can also access the Thomson Gateway GUI using the Internet Gateway Device (IGD) icon if your computer runs one of the following operating systems:
Windows 7
Windows Vista
Windows XP
For more information, see “7.1 UPnP” on page 58.
E-DOC-CTC-20090619-0001 v1.0 |
19 |
|

2 Thomson Gateway Basics
Components
All the pages contain following components:
2
3
4
5
1
6
7
Label Description
1Menu
2Language bar
3Login section
4Navigation bar
5Notification area
6Content pane
7Tasks
Menu
The menu consists of the following menu items:
Home:
Allows you to go back to the home page.
Thomson Gateway:
Provides basic information on the Thomson Gateway.
Broadband Connection:
Allows you to view/configure your broadband connections.
Toolbox:
Allows you to configure the network services and Internet security settings of your Thomson Gateway.
Home Network:
Allows you to manage your local network.
Help:
Allows you to view context-related help information.
20 |
E-DOC-CTC-20090619-0001 v1.0 |
|

2 Thomson Gateway Basics
Language bar
The language bar allows you to change the language of the Thomson Gateway Web interface.
The language bar will only be shown if more than one language is available.
Login section
In this section you can see the current user name.
By clicking the user name, you can:
Change your password.
Switch to another user.
Navigation bar
The location bar displays your current position on the Thomson Gateway GUI.
Notification area
The notification area is used to display:
Error messages, indicated by a red traffic light.
Warnings, indicated by an orange traffic light.
Information, indicated by a green traffic light.
If none of these events occur, the notification area will not be shown.
Content pane
The content pane displays the information and configurable items of the selected item.
Tasks
To allow a quick configuration of your Thomson Gateway, some pages may offer you a number of related tasks in the Pick a task list. These tasks will guide you to the page where you can perform the selected task.
E-DOC-CTC-20090619-0001 v1.0 |
21 |
|
Loading...