


 Loading...
SETUP AND USER GUIDE
Technicolor TG587n v3
SETUP AND USER GUIDE
Technicolor TG587n v3
Copyright
Copyright ©1999-2012 Technicolor. All rights reserved.
Distribution and copying of this document, use and communication of its contents is not permitted without written authorization from Technicolor. The content of this document is furnished for informational use only, may be subject to change without notice, and should not be construed as a commitment by Technicolor. Technicolor assumes no responsibility or liability for any errors or inaccuracies that may appear in this document.
Technicolor Delivery Technologies Belgium NV
Prins Boudewijnlaan, 47
2650 Edegem
Belgium
http://www.technicolor.com
Trademarks
The following trademarks may be used in this document:
AutoWAN sensing™ is a trademark of Technicolor.
Adobe®, the Adobe logo, Acrobat and Acrobat Reader are trademarks or registered trademarks of Adobe Systems, Incorporated, registered in the United States and/or other countries.
Apple® and Mac OS® are registered trademarks of Apple Computer, Incorporated, registered in the United States and other countries.
Bluetooth® word mark and logos are owned by the Bluetooth SIG, Inc.
DECT™ is a trademark of ETSI.
DLNA® is a registered trademark, DLNA disc logo is a service mark, and DLNA Certified is a trademark of the Digital Living Network Alliance. Digital Living Network Alliance is a service mark of the Digital Living Network Alliance.
Ethernet™ is a trademark of Xerox Corporation.
Microsoft®, MS-DOS®, Windows®, Windows NT® and Windows Vista® are either registered trademarks or trademarks of Microsoft Corporation in the United States and/or other countries.
UNIX® is a registered trademark of UNIX System Laboratories, Incorporated.
UPnP™ is a certification mark of the UPnP™ Implementers Corporation.
Wi-Fi®, WMM® and the Wi-Fi logo are registered trademarks of the Wi-Fi Alliance®. Wi-Fi CERTIFIED, Wi-Fi ZONE, Wi-Fi Protected Access, Wi-Fi Multimedia, Wi-Fi Protected Setup, WPA, WPA2 and their respective logos are trademarks of the Wi-Fi Alliance®.
Other brands and product names may be trademarks or registered trademarks of their respective holders. All other logos, trademarks and service marks are the property of their respective owners, where marked or not.
Document Information
Status: v2.0 (May 2012)
Reference: DMS-CTC-20101206-0017
Short Title: Setup and User Guide Technicolor TG587n v3 R8.4.x

CONTENTS
1 |
Getting Started ......................................................................................................... |
3 |
||
|
1.1 |
Features at a Glance ................................................................................................................................. |
4 |
|
|
1.2 |
User Scenarios ............................................................................................................................................ |
5 |
|
|
1.3 |
Components .............................................................................................................................................. |
6 |
|
|
|
1.3.1 |
Power ................................................................................................................................................................................ |
7 |
|
|
1.3.2 |
Local Network Connection........................................................................................................................................... |
8 |
|
|
1.3.3 |
Broadband Connection ................................................................................................................................................. |
9 |
|
|
1.3.4 |
Buttons........................................................................................................................................................................... |
10 |
|
|
1.3.5 |
Status LEDs ................................................................................................................................................................... |
11 |
|
1.4 |
Preparing for the Installation................................................................................................................... |
13 |
|
2 |
Guided Installation................................................................................................... |
15 |
||
3 |
Manual Installation................................................................................................... |
17 |
||
|
3.1 |
Connecting the Technicolor Gateway to your Service Provider’s Network..................................... |
18 |
|
|
|
3.1.1 |
Setting up your Technicolor Gateway as DSL Gateway ......................................................................................... |
19 |
|
|
3.1.2 |
Setting up your Technicolor Gateway as Local Router............................................................................................ |
21 |
|
3.2 |
Powering on the Technicolor Gateway................................................................................................. |
22 |
|
|
3.3 |
Connecting Your Network Devices to the Technicolor Gateway..................................................... |
23 |
|
|
|
3.3.1 Setting up a Wireless Connection.............................................................................................................................. |
24 |
|
|
|
3.3.2 Setting up a Wired Connection.................................................................................................................................. |
25 |
|
|
3.4 |
Configure the Technicolor Gateway.................................................................................................... |
26 |
|
|
3.5 |
Setting Up the 3G Fall-Back WAN Connection.................................................................................. |
27 |
|
|
|
3.5.1 Managing your Mobile Connection with the Technicolor Gateway GUI ............................................................ |
28 |
|
|
|
3.5.2 Inserting a Mobile USB Adapter ................................................................................................................................ |
29 |
|
4 |
Configuration Tools................................................................................................. |
31 |
||
|
4.1 |
Technicolor Gateway GUI...................................................................................................................... |
32 |
|
|
|
4.1.1 |
Access............................................................................................................................................................................. |
33 |
|
|
4.1.2 |
Components ................................................................................................................................................................. |
34 |
|
|
4.1.3 Protecting Access to the Technicolor Gateway....................................................................................................... |
36 |
|
|
4.2 |
Backing Up/Restoring your Configuration ........................................................................................... |
37 |
|
|
4.3 |
Access From the Internet........................................................................................................................ |
38 |
|
5 The Technicolor Gateway Wireless Access Point.................................................. |
39 |
|||
|
5.1 |
Connecting Your Wireless Client via WPS ......................................................................................... |
40 |
|
|
5.2 |
Connecting Your Wireless Client without WPS ................................................................................. |
42 |
|
|
5.3 |
Securing Your Wireless Connection...................................................................................................... |
43 |
|
6 |
Saving Energy ......................................................................................................... |
45 |
||
|
6.1 |
Code of Conduct.................................................................................................................................... |
46 |
|
|
6.2 |
ECO Manager......................................................................................................................................... |
47 |
|
7 |
Sharing Content...................................................................................................... |
49 |
||
DMS-CTC-20101206-0017 v2.0
i

CONTENTS
|
7.1 |
The Network File Server ......................................................................................................................... |
51 |
|
7.2 |
The UPnP AV Media Server ................................................................................................................. |
54 |
|
|
7.2.1 Configuring the UPnP AV Media Server ................................................................................................................. |
55 |
|
|
7.2.2 Using the UPnP AV Media Server ............................................................................................................................ |
56 |
|
7.3 |
The FTP Server ....................................................................................................................................... |
58 |
|
7.4 |
Managing your Shared Content............................................................................................................ |
60 |
|
7.5 |
Safely Removing your USB Storage Device........................................................................................ |
62 |
8 |
Network Services .................................................................................................... |
63 |
|
|
8.1 |
UPnP......................................................................................................................................................... |
64 |
|
|
8.1.1 Accessing Your Technicolor Gateway via UPnP..................................................................................................... |
65 |
|
|
8.1.2 Managing your Internet connection via UPnP ......................................................................................................... |
66 |
|
|
8.1.3 Configuring UPnP on the Technicolor Gateway..................................................................................................... |
68 |
|
|
8.1.4 Installing UPnP on Windows XP ................................................................................................................................ |
69 |
|
8.2 |
Assigning a service (HTTP, FTP,...) to a Computer........................................................................... |
71 |
|
8.3 |
Dynamic DNS .......................................................................................................................................... |
73 |
|
8.4 |
Network Time Server.............................................................................................................................. |
74 |
9 |
Internet Security....................................................................................................... |
75 |
|
|
9.1 |
Parental Control ....................................................................................................................................... |
76 |
|
|
9.1.1 Configuring Content-based Filtering........................................................................................................................ |
78 |
|
|
9.1.2 Adding Rules for Address-Based Filtering................................................................................................................ |
79 |
|
9.2 |
Firewall....................................................................................................................................................... |
81 |
10 Support.................................................................................................................... |
83 |
||
|
10.1 Setup Troubleshooting........................................................................................................................... |
84 |
|
|
10.2 General Technicolor Gateway Troubleshooting................................................................................ |
85 |
|
|
10.3 Wired Connection Troubleshooting .................................................................................................... |
86 |
|
|
10.4 Wireless Connection Troubleshooting................................................................................................. |
87 |
|
|
10.5 Content Sharing Troubleshooting ....................................................................................................... |
88 |
|
|
10.6 Reset to Factory Defaults...................................................................................................................... |
89 |
|
ii
DMS-CTC-20101206-0017 v2.0
ABOUT THIS SETUP AND USER GUIDE
About this Setup and User Guide
In this Setup and User Guide
The goal of this Setup and User Guide is to show you:
Set up your Technicolor Gateway and local network
Configure and use the main features of your Technicolor Gateway.
For more advanced scenarios and features visit the documentation pages on www.technicolor.com.
Used Symbols
The danger symbol indicates that there may be a possibility of physical injury.
The warning symbol indicates that there may be a possibility of equipment damage.
The caution symbol indicates that there may be a possibility of service interruption.
The note symbol indicates that the text provides additional information about a topic.
Terminology
Generally, the Technicolor TG587n v3 will be referred to as Technicolor Gateway in this Setup and User Guide.
Typographical Conventions
Following typographical convention is used throughout this manual:
This sample text indicates a hyperlink to a Web site.
Example: For more information, visit us at www.technicolor.com.
This sample text indicates an internal link.
Example: If you want to know more about guide, see “About this Setup and User Guide” on page 1.
This sample text indicates an important content-related word. Example: To enter the network, you must authenticate yourself.
This sample text indicates a GUI element (commands on menus and buttons, dialog box elements, file names, paths and folders).
Example: On the File menu, click Open to open a file.
DMS-CTC-20101206-0017 v2.0
1

ABOUT THIS SETUP AND USER GUIDE
DMS-CTC-20101206-0017 v2.0
2

1 GETTING STARTED
1 Getting Started
Introduction
This chapter gives you a brief overview of the main features and components of the Technicolor Gateway. After this chapter we will start with the installation.
Do not connect any cables to the Technicolor Gateway until instructed to do so.
DMS-CTC-20101206-0017 v2.0
3

1 GETTING STARTED
1.1 Features at a Glance
Introduction
This section provides a brief overview of the main features of your Technicolor Gateway.
Internet connection features
Broadband Internet access via the integrated DSL modem.
The first chapters describe how to connect your Technicolor Gateway to the Internet.
Broadband Internet access via the Gigabit WAN port.
The first chapters describe how to connect your Technicolor Gateway to the Internet.
3G (Fall-back) High-speed Internet Access via the optional mobile USB adaptor.
For more information, see “3.5 Setting Up the 3G Fall-Back WAN Connection” on page 27.
Internet Security for your entire network.
For more information, see “9 Internet Security” on page 75.
Useful network tools like UPnP, Dynamic DNS and many more. For more information, see “8 Network Services” on page 63.
Local networking features
Wired access for your local network devices via the Ethernet interface.
For more information, see “3.3 Connecting Your Network Devices to the Technicolor Gateway” on page 23.
Wireless access for your local network devices via the integrated IEEE 802.11n wireless access point. For more information, see “5 The Technicolor Gateway Wireless Access Point” on page 39.
An Integrated Media Server allowing you to share your media with media players and other network devices. For more information, see “7 Sharing Content” on page 49.
ECO label
Technicolor’s ECO label guarantees you that the Technicolor Gateway is able to reduce its power consumption to an absolute minimum. For more information, see “6 Saving Energy” on page 45.
Technicolor Gateway configuration tools
The Technicolor Gateway Setup CD allows you to configure your Technicolor Gateway and helps you to connect your computers to the Technicolor Gateway.
The Technicolor Gateway GUI allows you to configure your Technicolor Gateway via your web browser. For more information, see “4.1 Technicolor Gateway GUI” on page 32.
DMS-CTC-20101206-0017 v2.0
4
1 GETTING STARTED
1.2 User Scenarios
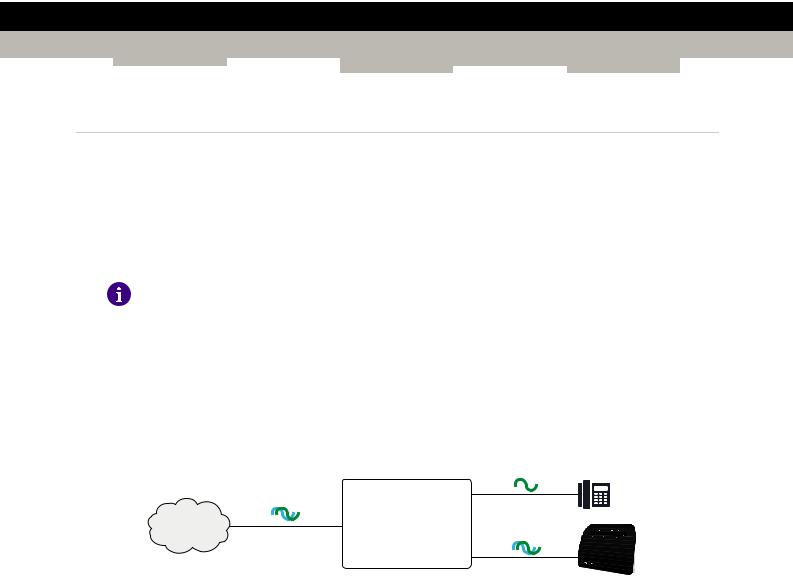
Scenarios
Depending of the architecture of your home network, you can use the Technicolor Gateway in either of the following scenarios:
DSL Gateway
Local Router
DSL Gateway
The Technicolor Gateway is connected to the DSL network of your service provider and brings the Internet to your home.
Internet
Technicolor Gateway
Local Router
The Technicolor Gateway is placed behind another gateway or modem. In this setup the gateway or modem in front of the Technicolor Gateway will establish the connection to the Internet:
Internet
Modem/Router |
Technicolor Gateway |
This scenario is used when:
The Internet connectivity is provided by another device (for example, a cable modem). The Technicolor Gateway is used to add specific services to your home network.
Your service provider is using Ethernet in the First Mile (EFM). The Ethernet signal is directly coming into your home.
Your service provider is using Ethernet To The Home (ETTH).
Technicolor Gateway is directly connected to the terminator of your service provider’s fiber-optic network and your local network
DMS-CTC-20101206-0017 v2.0
5

1 GETTING STARTED
1.3 Components
Overview
This section provides an overview of the different components of the Technicolor Gateway:
Topic |
Page |
|
|
1.3.1 Power |
7 |
|
|
1.3.2 Local Network Connection |
8 |
|
|
1.3.3 Broadband Connection |
9 |
|
|
1.3.4 Buttons |
10 |
|
|
1.3.5 Status LEDs |
11 |
|
|
DMS-CTC-20101206-0017 v2.0
6
1 GETTING STARTED
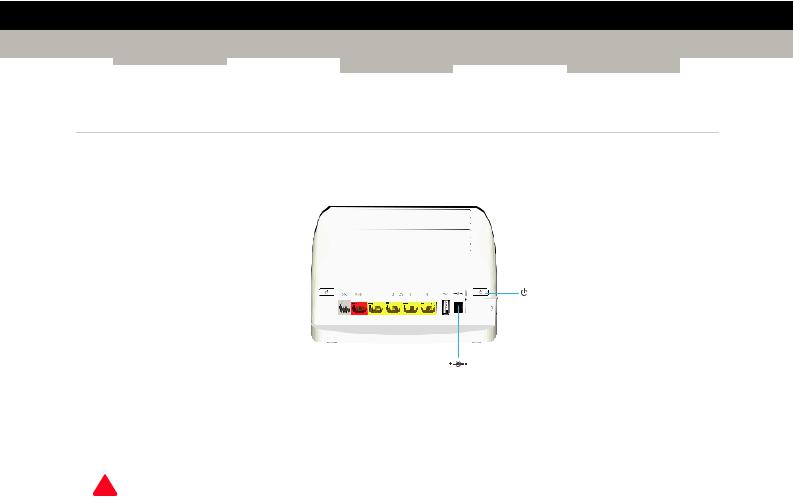
1.3.1 Power
Overview
Power inlet
The power inlet (


 ) allows you to connect the power supply.
Only use the power supply delivered with your Technicolor Gateway.
Power switch
The power switch ( ) allows you to power on/off your Technicolor Gateway.
To power the Technicolor Gateway on or off, press the power switch for two seconds and then release it. The Technicolor Gateway is powered off when none of the status LEDs are lit.
DMS-CTC-20101206-0017 v2.0
7
1 GETTING STARTED
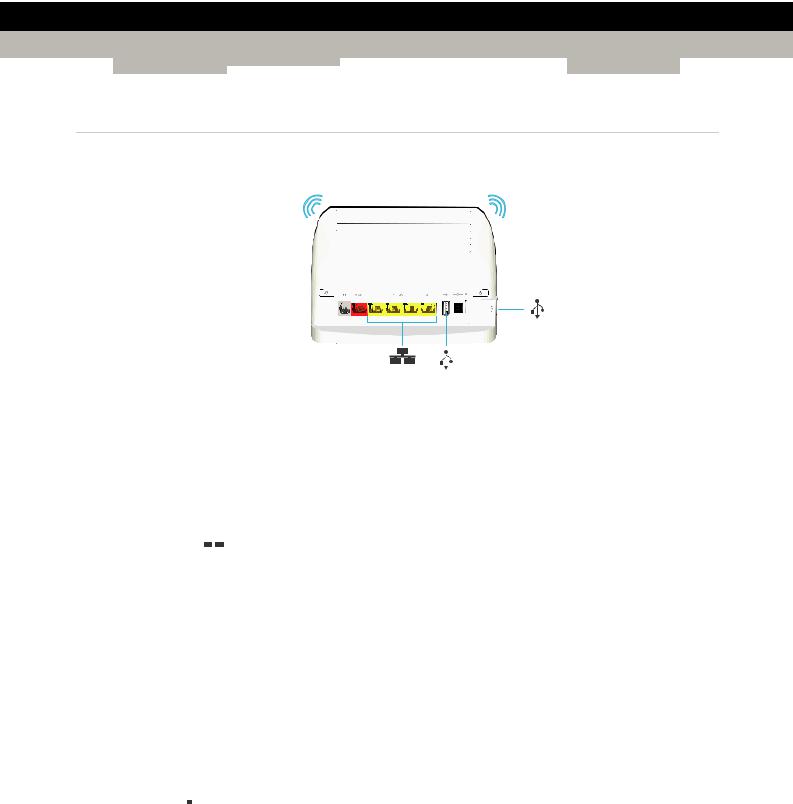
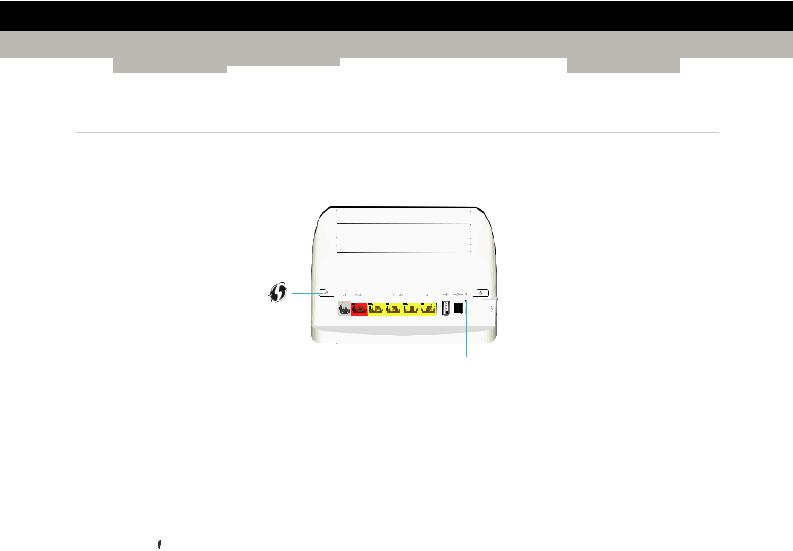
1.3.2 Local Network Connection
Overview
Wireless Access Point
The built-in WiFi-certified wireless access point provides wireless access to your WiFi-certified wireless clients.
For more information, see “5 The Technicolor Gateway Wireless Access Point” on page 39.
Ethernet switch
The Ethernet switch ( ) allows you to connect an Ethernet device (for example, a computer) to your local network. For more information, see “3.3 Connecting Your Network Devices to the Technicolor Gateway” on page 23.
Ethernet port 4 is a Gigabit Ethernet port and has a maximum speed of 1 Gbps (Gigabit per second). The other Ethernet ports have a maximum speed of 100Mbps (Megabit per second).
A LED may be provided per Ethernet port to indicate link integrity (or activity).
LED Status |
Description |
|
|
Solid on |
Device connected. |
|
|
Blinking |
Device connected and sending/receiving data. |
|
|
Off |
No device connected. |
|
|
USB Port
The USB port (

 ) can be used to:
Connect a USB mass storage device to share your content (for example, music, movies,...):
On your local network via the Network File server or the UPnP AV Media Server.
On Internet via FTP.
For more information, see “7 Sharing Content” on page 49.
Connect a 3G mobile adaptor to set up a 3G connection that can work as a backup for your main Internet connection. For more information, see “3.5 Setting Up the 3G Fall-Back WAN Connection” on page 27.
DMS-CTC-20101206-0017 v2.0
8
1 GETTING STARTED
1.3.3 Broadband Connection
Overview
DSL
WAN
DSL port
This port can be used to connect your Technicolor Gateway to your service provider’s DSL network.
For more information, see “3.1 Connecting the Technicolor Gateway to your Service Provider’s Network” on page 18.
WAN port
This port allows you to use your Technicolor Gateway as Local Router. For more information, see “1.2 User Scenarios” on page 5.
DMS-CTC-20101206-0017 v2.0
9
1 GETTING STARTED
1.3.4 Buttons
Overview
Reset
WPS button
The WPS (  ) button allows you to add new wireless clients to your network in a swift and easy way, without the need to enter any of your wireless settings manually.
For more information, see “5.1 Connecting Your Wireless Client via WPS” on page 40.
ECO button
The ECO (  ) button allows you to disable your wireless access point. You can do this when you do not have any devices that are connected to the wireless access point. This allows you to save the energy that the Technicolor Gateway would be using for the wireless access point. For more information, see “ECO button” on page 47.
The LED on the ECO button summarizes the overall status of your Technicolor Gateway.
Colour |
State |
Description |
|
|
|
Green |
Solid on |
All services are available. The wireless access point is enabled. |
|
|
|
Blue |
Solid on |
All services are available. The wireless access point is disabled. |
|
|
|
Red |
Solid on |
Some services are not available. The Technicolor Gateway automatically |
|
|
activates the other status LEDs to allow you to see which services are |
|
|
running. |
|
|
|
|
Blinking |
The Technicolor Gateway is starting up. |
|
|
|
Off |
|
The Technicolor Gateway is powered off. |
|
|
|
Reset button
The Reset button allows you to reset your Technicolor Gateway to factory defaults.
For more information, see “10.6 Reset to Factory Defaults” on page 89.
DMS-CTC-20101206-0017 v2.0
10
1 GETTING STARTED
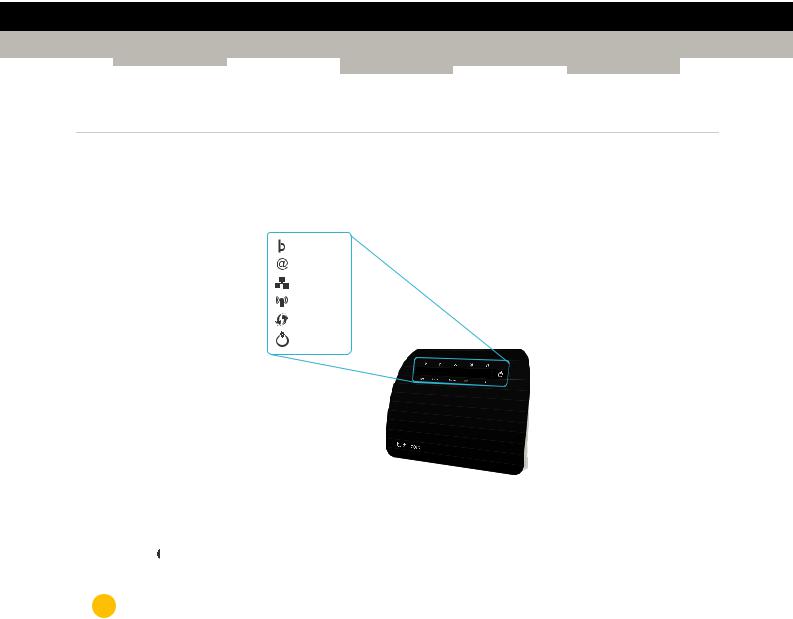
1.3.5 Status LEDs
Introduction
On the front panel of your Technicolor Gateway, you can find a number of status LEDs, indicating the state of the device.
Broadband
Internet
Ethernet
Wireless
WPS
ECO
ECO button LED
The ECO ( ) button LED provides information about the overall state of your Technicolor Gateway. For more information, see “ECO button” on page 10.
The other status LEDs are only activated when the Internet service is down.
Ethernet LED
Colour |
State |
Description |
|
|
|
Green |
Solid on |
Network device connected to the Ethernet switch. |
|
|
|
|
Blinking |
Network device connected to the Ethernet switch and sending/receiving |
|
|
data. |
|
|
|
Off |
|
No Ethernet connection on your local network |
|
|
|
Wireless LED
Colour |
State |
Description |
|
|
|
Green |
Solid on |
Wireless clients connected, no wireless activity |
|
|
|
|
Blinking |
Wireless clients connected, wireless activity |
|
|
|
Off |
|
No wireless clients connected or wireless access point disabled |
|
|
|
DMS-CTC-20101206-0017 v2.0
11

1 GETTING STARTED
Broadband LED (if you are using the DSL Gateway scenario)
Colour |
State |
Description |
|
|
|
Green |
Solid on |
DSL line synchronised |
|
|
|
|
Blinking |
Trying to detect carrier signal or pending DSL line synchronisation |
|
|
|
Off |
|
Technicolor Gateway powered off. |
|
|
|
Broadband LED (if you are using the Local Router scenario)
Colour |
State |
Description |
|
|
|
Green |
Solid on |
Connected to the WAN device |
|
|
|
Off |
|
Not connected to the WAN device |
|
|
|
Internet LED
Colour |
State |
Description |
|
|
|
Green |
Solid on |
Connected to the Internet, no activity |
|
|
|
|
Blinking |
Connected to the Internet, sending/receiving data |
|
|
|
Red |
Solid on |
Failed to setup the Internet connection |
|
|
|
Off |
|
No Internet connection |
|
|
|
WPS LED
Colour |
State |
Description |
|
|
|
Green |
Solid On |
Client successfully registered via WPS |
|
|
|
Orange |
Blinking |
WPS registration ongoing |
|
|
|
Red |
Blinking |
Error occurred |
|
|
|
For more information about WPS, see “5.1 Connecting Your Wireless Client via WPS” on page 40.
DMS-CTC-20101206-0017 v2.0
12

1 GETTING STARTED
1.4 Preparing for the Installation
DSL service requirements
This section is only applicable if you are using your Technicolor Gateway as DSL gateway. For more information, see
“1.2 User Scenarios” on page 5.
Make sure that:
Your service provider activated the DSL service on your telephone line by your service provider.
You have the installation information (for example, user name, password, service profile,...) provided by your service provider at hand.
Local connection requirements
Wireless connection
If you want to connect your computer using a wireless connection, your computer must be equipped with a WiFi-certified wireless client adapter.
Wired connection
If you want to connect a computer using a wired connection, your computer must be equipped with an Ethernet Network Interface Card (NIC).
Start with the installation
You are now ready to start with the installation of your Technicolor Gateway.
DMS-CTC-20101206-0017 v2.0
13

1 GETTING STARTED
DMS-CTC-20101206-0017 v2.0
14

2 GUIDED INSTALLATION
2 Guided Installation
Introduction
In the guided installation, the Setup wizard on the Setup CD will assist you with the installation of your Technicolor Gateway.
If you do not want to use the Setup CD or if the Setup CD is not included in your package, follow the installation procedure described in “3 Manual Installation” on page 17.
Requirements
To use the guided installation you must comply with the following requirements:
Your computer must run one of the following operating systems:
Microsoft Windows 7 and higher
Microsoft Windows 7 x64 and higher
Microsoft Windows Vista and higher
Microsoft Windows XP Service Pack 2 (SP2) and higher
Mac OS X 10.6 (Snow Leopard)
Mac OS X 10.5 (Leopard)
Mac OS X 10.4 (Tiger)
You must have administrative rights on your computer.
If you do not comply with these requirements, use the “3 Manual Installation” on page 17.
Running the Setup wizard
To start the Setup wizard:
1 Insert the Setup CD into your computer's CDor DVD drive.
2If your computer runs:
Microsoft Windows: The Setup CD starts automatically.
If the Setup CD does not autostart, see “The Setup CD does not start automatically” on page 84.
Mac OS X: Double-click Menu in the window with the content of the Setup CD.
3 Select the language of your choice and click OK.
4 The Setup wizard will now guide you through the installation of your Technicolor Gateway.
5 At the end of the installation, the following screen appears:
Select Go to the Technicolor Gateway web interface if you want to go to the Technicolor Gateway GUI after closing the wizard. On the Technicolor Gateway GUI, you can configure all services of your Technicolor Gateway.
DMS-CTC-20101206-0017 v2.0
15

2 GUIDED INSTALLATION
6 Click Finish.
7 The CD menu appears.
CD Menu
On the CD Menu, you can click:
Initial Setup to connect your computer to the Technicolor Gateway and configure your local network.
Reconfigure my Technicolor Gateway to fully reconfigure your Technicolor Gateway.
If you reconfigure your Technicolor Gateway via the CD menu, the Technicolor Gateway will be reconfigured from scratch. All your current settings will be lost. If you only want to make small changes to your configuration (for example, changing the security), we recommended you to do this via the Technicolor Gateway GUI. For more information, see “4.1 Technicolor Gateway GUI” on page 32.
Setup my computer to connect your computer to the Technicolor Gateway network.
Documentation to view a list of the documentation that is available for your Technicolor Gateway.
Visit technicolor.com to visit the online support sections.
Actual available items depend on the Setup CD delivered with your Technicolor Gateway.
In case of problems
If you encounter problems during this installation please refer to “10.1 Setup Troubleshooting” on page 84.
Backup your configuration
Once you successfully installed your Technicolor Gateway, it is recommend to backup your configuration. This will allows you to return to this configuration when needed (for example, after misconfiguration).
For more information, see “4.2 Backing Up/Restoring your Configuration” on page 37
DMS-CTC-20101206-0017 v2.0
16

3 MANUAL INSTALLATION
3 Manual Installation
Installation
This chapter will help you to manually install your Technicolor Gateway.
Setting up your network
Proceed as follows:
1Connect your Technicolor Gateway to your service provider’s network.
For more information, see “3.1 Connecting the Technicolor Gateway to your Service Provider’s Network” on page 18.
2Power on the Technicolor Gateway.
For more information, see “3.2 Powering on the Technicolor Gateway” on page 22.
3Connect your computer to the Technicolor Gateway.
For more information, see “3.3 Connecting Your Network Devices to the Technicolor Gateway” on page 23.
4Configure your Technicolor Gateway.
For more information, see “3.4 Configure the Technicolor Gateway” on page 26.
5 Share your content or media on your local network, continue with “7 Sharing Content” on page 49.
6If you purchased the mobile USB adapter, setup the 3G backup connection.
For more information, see “3.5 Setting Up the 3G Fall-Back WAN Connection” on page 27.
7Once you successfully installed your Technicolor Gateway, it is recommend to backup your configuration. This will allows you to return to this configuration when needed (for example, after misconfiguration). For more information, see
“4.2 Backing Up/Restoring your Configuration” on page 37.
DMS-CTC-20101206-0017 v2.0
17

3 MANUAL INSTALLATION
3.1Connecting the Technicolor Gateway to your Service Provider’s Network
Identifying your setup
If you are using the Technicolor Gateway as:
DSL Gateway, continue with “3.1.1 Setting up your Technicolor Gateway as DSL Gateway” on page 19.
Local Router, continue with “3.1.2 Setting up your Technicolor Gateway as Local Router” on page 21.
For more information, see “1.2 User Scenarios” on page 5, you can use your Technicolor Gateway in either of the following scenarios
DMS-CTC-20101206-0017 v2.0
18
3 MANUAL INSTALLATION
3.1.1 Setting up your Technicolor Gateway as DSL Gateway
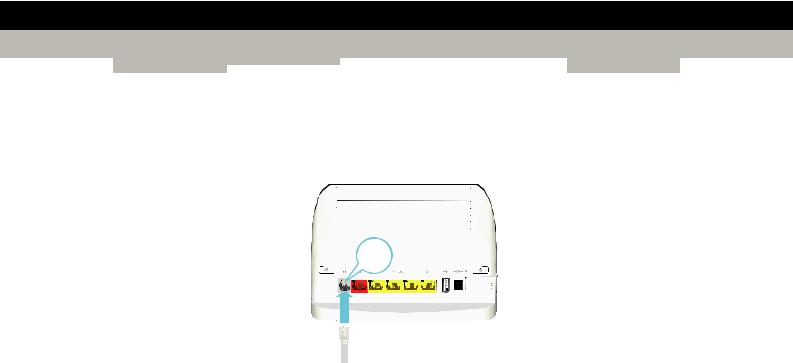
Introduction
This section helps you to connect the Technicolor Gateway to your service provider’s network.
Signal arriving at your home
The Line signal that arrives at your home consists the following components:
A Phone signal carrying the traffic for telephony.
This Phone signal is only used for communication over the traditional telephone network (PSTN). Voice over IP communication will be carried by the DSL signal.
A DSL signal carrying the Internet traffic.
DSL Gateways have a built-in solution to remove the Phone component. No additional devices are needed, you can connect them directly to the Line.
Telephones do not have this capability, so here you have to use a filter or splitter to remove the DSL signal.
What does a filter/splitter look like
A splitter/filter is a box that typically has the following connectors:
PHONE
Voice
Service
Provider
LINE
DSL + Voice
MODEM
DSL + Voice
Filter/Splitter
A Line input
This connector must be connected to the input signal that needs to be filtered.
A Phone/PSTN output
This connector offers filtered output signal. It only contains the Voice component and can only be used for connecting phones.
A Modem/DSL output (optional)
This connector offers unfiltered output. It contains both the Phone and DSL signal and can be used to connect your Technicolor Gateway.
DMS-CTC-20101206-0017 v2.0
19
3 MANUAL INSTALLATION
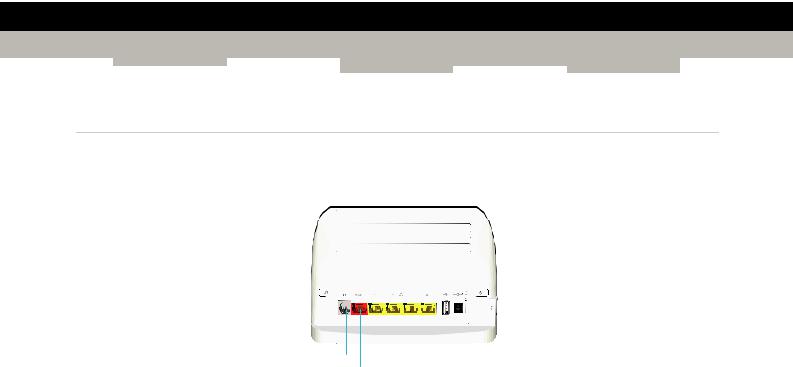
Connecting the cables
Proceed as follows:
1 Take the DSL cable. This is the grey cable that is included in your box.
2 Plug one end of the cable in the grey DSL port on the back of your Technicolor Gateway.
DSL
3 Plug the other end of the cable into the DSL/MODEM output port of your filter/splitter.
DMS-CTC-20101206-0017 v2.0
20
3 MANUAL INSTALLATION
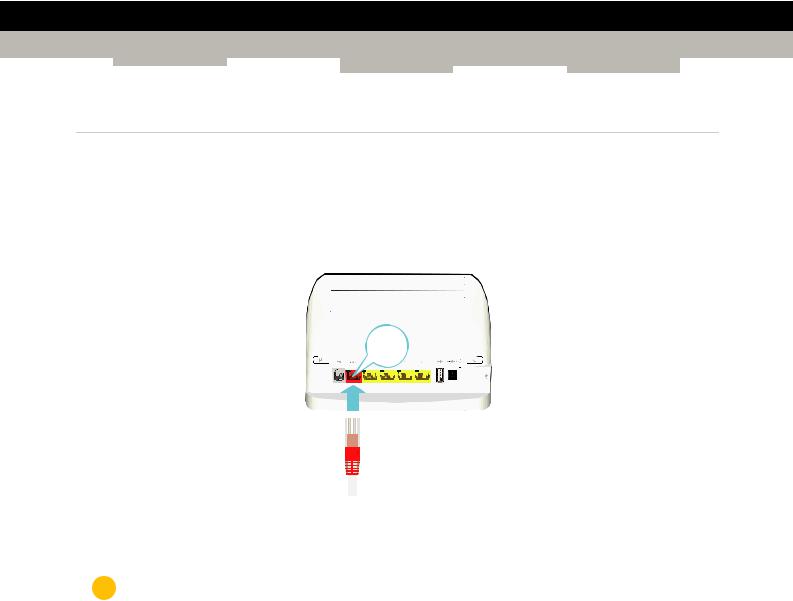
3.1.2 Setting up your Technicolor Gateway as Local Router
Procedure
Proceed as follows:
1 Take an Ethernet cable. If your box contains an Ethernet cable with red connectors, you can use that cable.
2 Plug one end of the cable in the red WAN port on the back of your Technicolor Gateway.
WAN
3 Plug the other end of the cable into the Ethernet port of your Internet gateway/modem.
The WAN port can only be used to connect your Technicolor Gateway to an Internet gateway/modem. You can not use it to connect other devices (for example, a computer) to the Technicolor Gateway.
DMS-CTC-20101206-0017 v2.0
21

3 MANUAL INSTALLATION
3.2 Powering on the Technicolor Gateway
Procedure
Proceed as follows:
1 Connect the power cord to the power port of the Technicolor Gateway.
2 Plug the other end of the power cord into an electrical outlet.
3The Technicolor Gateway automatically starts up.
For more information about how to powering on/off the Technicolor Gateway, see “Power switch” on page 7.
4 Wait at least two minutes to allow the Technicolor Gateway to complete the start up phase.
DMS-CTC-20101206-0017 v2.0
22

3 MANUAL INSTALLATION
3.3Connecting Your Network Devices to the Technicolor Gateway
Choose your connection method
To connect your device via:
A wireless connection, continue with “3.3.1 Setting up a Wireless Connection” on page 24.
A wired connection, continue with “3.3.2 Setting up a Wired Connection” on page 25.
DMS-CTC-20101206-0017 v2.0
23

3 MANUAL INSTALLATION
3.3.1 Setting up a Wireless Connection
The Technicolor Gateway access point
Your Technicolor Gateway is equipped with a wireless access point that supports the following standards:
IEEE 802.11n
IEEE 802.11g
IEEE 802.11b
Requirements
Your network device must be equipped with a WiFi-certified wireless client.
Connection speed
When setting up your wireless network, keep in mind that the following factors may have a negative impact on your wireless connection speed:
The obstacles (walls, ceilings,...) between the wireless client and the access point.
Distance between the wireless client and the access point.
To fully benefit from the improved connection speed offered by the IEEE 802.11n standard, it is recommended to only connect IEEE 802.11n wireless clients to your Technicolor Gateway. Connecting older (for example, IEEE 802.11g) wireless clients may also slow down connection speed of the IEEE 802.11n capable clients.
If you have problems with your wireless performance, see “Poor Wireless Connectivity or Range” on page 87.
To set up a wireless connections
For more information on how to setup a wireless connection between your network device and your Technicolor Gateway, see “5 The Technicolor Gateway Wireless Access Point” on page 39.
DMS-CTC-20101206-0017 v2.0
24
Loading...