

Page 1

DE BEDIENUNGSANLEITUNG
EN INSTRUCTIONS FOR USE
FR GUIDE D'UTILISATION
Dampfgarer
Oven
Four
Page 2

Inhalt
Vorwort S.3
Dampfgaren
Allgemeines S.4
Gerätebeschreibung S.5
Zubehör S.6
Anschluss S.7
Einbau S.8
Inbetriebnahme S.9
Uhrzeit einstellen S.9
Uhrzeit ändern S.9
Automatische Begrenzung
des Energieverbrauches S.9
Inbetriebnahmesperre S.10
Einschalten
Funktionsprinzip S.11
Dampfgaren S.11
Auftauen S.12
Garzeit ändern S.12
Abschalten des Gerätes während des Garvorgangs S.12
Garzeitende S.12
Wasserversorgung S.13
Garzeitende programmieren S.14
Zeitgeber S.15
Kochtabellen S.16
Reinigungshinweise S.18
Glühlampe auswechseln S.19
Was tun bei Betriebsanomalien? S.19
Reparaturabeiten S.20
2
Page 3

Liebe Kundin, lieber Kunde,
Sie haben soeben einen THOMSON Backofen erworben, und wir danken Ihnen
dafür.
Wir haben in dieses Gerät unsere ganze Leidenschaft und unser Know-how einfließen lassen, damit es Ihre Bedürfnisse bestmöglich erfüllt. Es ist innovativ, leistungsfähig, und wir haben es so konzipiert, daß auch seine Benutzung immer einfach bleibt.
In der THOMSON Produktpalette finden Sie auch eine breite Auswahl an
Mikrowellenherden, Kochfeldern, Dunstabzugshauben, Küchenherden,
Geschirrspülern, Waschmaschinen, Wäschetrocknern, Kühlschränken,
Gefrierschränken und Tiefkühltruhen, die Sie mit Ihrem neuen THOMSON
Backofen abstimmen können.
Sie können uns auch im Internet unter www.brandt.com besuchen, wo Sie unsere
jüngsten Innovationen sowie nützliche und ergänzende Informationen finden.
THOMSON
DE
Da wir unsere Produkte ständig verbessern möchten, behalten wir uns das Recht vor, ihre
technischen, funktionellen und ästhetischen Merkmale zu verändern, damit sie mit der tech-
nischen Weiterentwicklung Schritt halten.
Wichtig: Bitte lesen Sie vor der Inbetriebnahme des Gerätes diese Einbauund Gebrauchsanleitung aufmerksam durch, damit Sie sich sehr rasch mit seinem
Betrieb vertraut machen können.
3
Page 4

Dampfgaren
Allgemeines
Das Dampfgaren ist hervorragend zur Zubereitung von Gerichten geeignet. Es ist nicht nur
gesund und natürlich, sondern erlaubt auch den Geschmack der Gerichte optimal zu erhalten. Eine feine Soße oder aromatische Kräuter machen oft den gewissen Unterschied aus.
Dabei entsteht auch wesentlich weniger Geruch. Es ist z.B. unnötig, vor dem Garen
Gewürze und Kräuter ins Wasser zu geben, andererseits kann der Geschmack von Fisch
verbessert werden, wenn er auf ein Bett von Algen gelegt wird, oder der von Geflügel,
wenn ihm ein Bouquet Rosmarin oder Estragon beigegeben wird.
Fleisch, Fisch und Gemüse lassen sich gleichermaßen gut nach diesem Verfahren zubereiten.
Teigwaren, Reis und Püree werden gleichmäßig aufgewärmt, ohne anzubrennen oder
einzutrockenen.
Cremes, Milchreis, Griespudding u.ä. lassen sich noch besser aufwärmen, wenn sie mit
einer Aluminiumfolie abgedeckt sind, so dass das Kondenswasser nicht auf das Gericht
tropfen kann.
Ein vorheriges Salzen ist unnötig, nicht einmal beim Kochwasser.
Gegenüber dem Kochen in Wasser hat das Dampfgaren wesentliche Vorteile:
Es ist schneller: Das Garen beginnt sofort, während es beim Kochen in Wasser erst einsetzt,
wenn das Wasser zu sprudeln beginnt.
Es ist gesünder: Insbesondere die wasserlöslichen Vitamine und Mineralsalze in den
Gerichten bleiben erhalten, da sie von dem Dampf nicht herausgewaschen werden wie beim
Kochen in Wasser.
Außerdem wird kein Fett zum Garen benötigt.
Es ist schmackhafter: Der natürliche Geschmack bleibt erhalten und wird nicht durch das
Kochen in Wasser abgeschwächt bzw. beim Braten oder Grillen verfälscht.
Der Geschmack wird nicht durch den Dampf von einem Gericht auf ein anderes übertragen.
Folglich können Sie z.B. nebeneinander einen Fisch und eine Süßspeise zubereiten (allerdings ohne sich zu berühren) und damit Zeit und Energie sparen.
Mit Dampf können Sie weiterhin Gemüse blanchieren, Gerichte auftauen und aufwärmen
bzw. warm halten. Dies gilt insbesondere für Soßen.
Bei Fleisch wie Geflügel, Kalb, Schwein usw. empfiehlt es sich, dieses zuerst in einer Pfanne
mit Butter kurz anzubraten, bis die Oberfläche appetitlich braun ist, und danach mit Dampf
fertig zu garen.
Große Stücke brauchen länger zum Garen als kleine, daher empfiehlt es sich, größere Teile
vorher in Stücke zu schneiden, wenn dies möglich ist.
4
Page 5

Gerätebeschreibung
Anzeige
Wasserzulauf
Dampfgenerator
Aufbau der Bedienblende
1 2 3
5
Aufbau der
Bedienblende
Wasserbehälter
Wasserrinne
4
14
9
10
DE
13
1. Taste für Dampfgaren
2. Taste für Auftauen
3. Taste für Ein-/Ausschalten
4. Anzeige der Uhrzeit oder der
eingestellten Garzeit
5. Symbol für Dampfgaren
6. Symbol für Garzeit
7. Symbol für Garen
12
8
15
8. Temperaturanzeige
9. Tasten + und - zum Einstellen der Garzeit
10. Wahltaste: SET
11. Symbol für getrennten Zeitgeber
12. Warnanzeige für Probleme beim Wasserkreislauf
13. Symbol für Auftauen
14. Anzeige der eingestellten Garzeit (direkter
oder verzögerter Programmstart)
15. Tastenverriegelung
11
6
7
5
Page 6
Zubehör
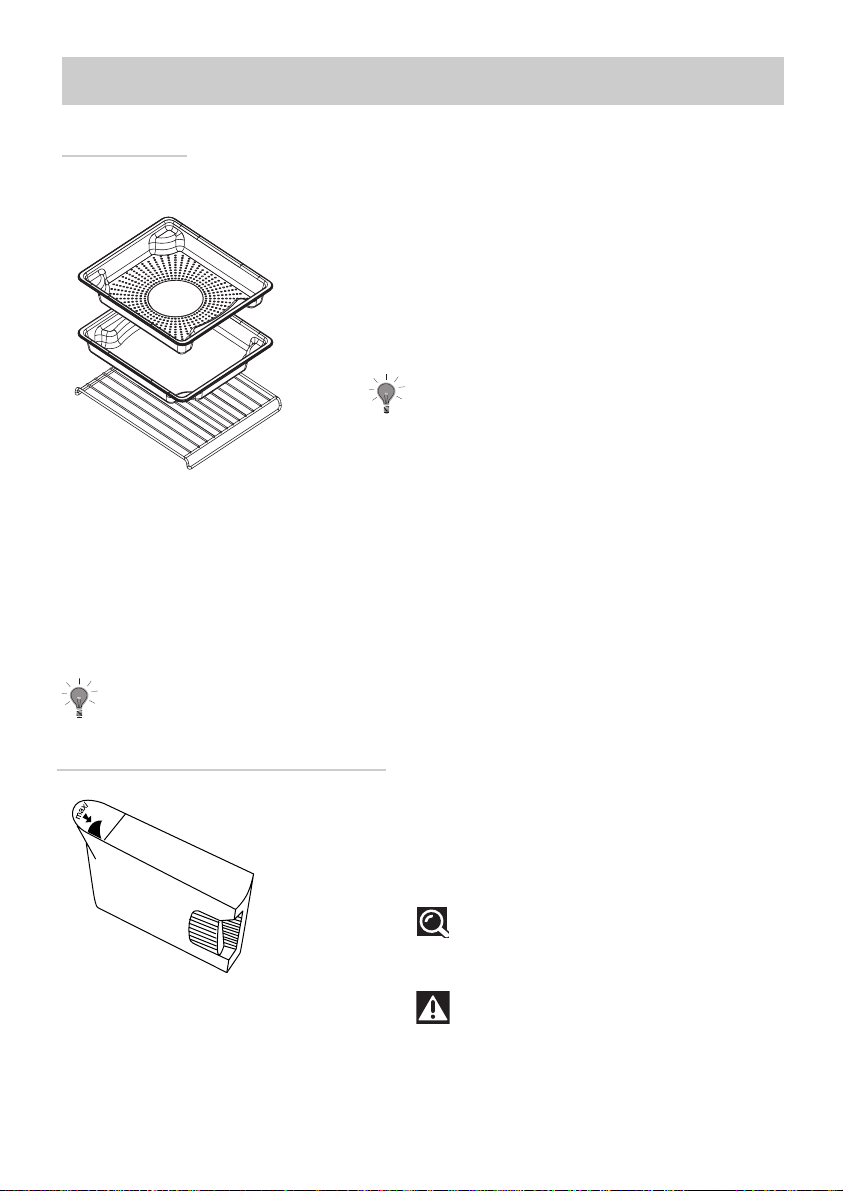
Gargeschirr
Lebensmittelschüssel ( Abb. 1)
Durchlöcherte Edelstahlschüssel zur
Vermeidung von Kontakt zwischen Lebensmittel
und Kondenswasser
fig.1
fig.2
fig.3
Kondenswasserschüssel (Abb. 2)
Schüssel zum Auffangen des Kondenswassers
Beim Garvorgang die Schüssel aus Abb. 1
auf die Schüssel aus Abb. 2 in umgekehrter
Reihenfolge setzen, so dass sie nicht
ineinander passen (s. Diagramm).
Beim Verstauen die Schüssel aus Abb. 1 in
der Reihenfolge auf die Schüssel aus Abb. 2
setzen, so dass sie ineinander passen.
Rost ( Abb. 3)
Abzunehmendes Edelstahlrost: muss in den Backofen eingeführt werden.
Das Kochgeschirr ist spülmaschinenfest.
Herausnehmbarer Wassertank
• Herausnehmbarer Behälter (Abb. 4)
Durch den Tank wird der Ofen unabhängig
mit Wasser versorgt.
Sein Fassungsvermögen beträgt ungefähr
1 Liter (maximaler Füllstand).
Empfehlung
Das Kochgeschirr kann in der
Spülmaschine gereinigt werden.
Abb. 4
6
Achtung
Die Verwendung von demineralisiertem Wasser ist untersagt (nicht lebensmittelgeeignet).
Page 7

Anschluss
Wenn Sie einen festen Anschluss wünschen, ist ein vorschriftsmäßiger
Schutzschalter am Netzanschlusskabel einzubauen. Anderenfalls muss das Gerät
so angebracht werden, dass der Netzstecker auch bei Einbauherden zugänglich
ist.
Das Gerät darf nur mit einem Schukostecker an eine vorschriftsmäßig geerdete
Steckdose angeschlossen werden.
Der elektrische Anschluss muss mit einer 10A-Sicherung versehen sein.
Das Gerät nicht verwenden, wenn das elektrische Anschlusskabel oder der Stecker
beschädigt ist, sondern das betreffende Teil umgehend vom Hersteller,
Kundendienst oder einem Fachelektrotechniker reparieren lassen.
Zusätzlich für Österreich:
Durch elektronische Bauteile kann im Fehlerfall ein Fehlerstrom mit einem
Gleichstromanteil von mehr als 6 mA oder von mehr als 20% des
Gesamtfehlerstroms verursacht werden. Es sind daher in der Intallation unbedingt
gleichstromsensitive FehlerstromSchutzschalter zu verwenden.
Betriebsspannung ............................................................. 220-240 V ~ 50 Hz
Gesamte Anschlußleistung des Backofens .......................................... 1,77 kW
Energieverbrauch
-bei Temperaturanstieg bis und 1 Stunde Garen bei 100 °C .............. 0,71 kWh
Nutzinhalt
Breite .............................................................................................. 38,5 cm
Höhe ............................................................................................... 18,2 cm
Tiefe ............................................................................................... 33,5 cm
DE
Nutzbarer Rauminhalt ................................................................ 23,5 liter
7
Page 8
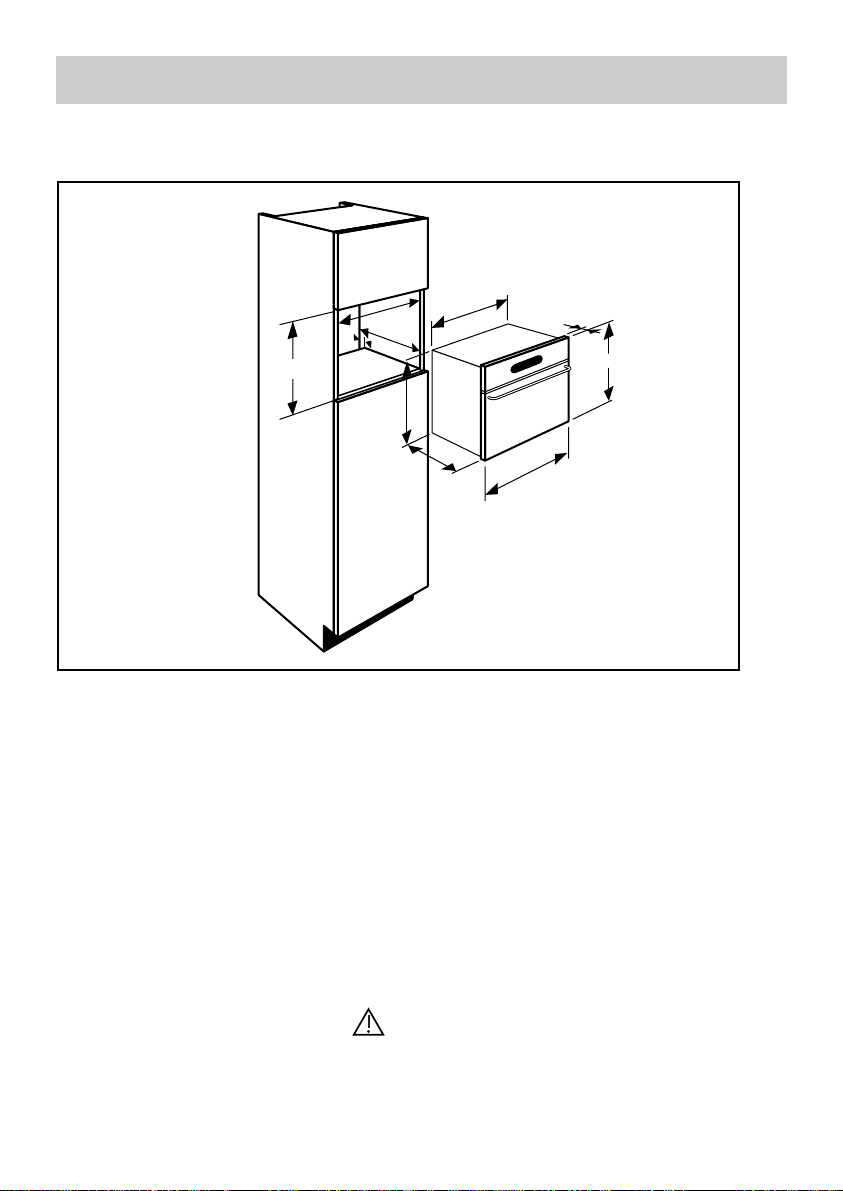
Einbau
450
560
mini
450
50
378
448
550
20
455
592
1. Positionieren Sie das Gerät im
Möbel.
Das Gerät muß horizontal aufgestellt
sein. Ausrichtung überprüfen !
2. Für eine größere Stabilität müssen
Sie den Dampfgarer mit 2 Schrauben in
den für diesen Zweck in den
Seitenverstrebungen vorgesehenen
Löchern im Möbel befestigen.
3. Gerät anschließen.
Darauf achten, dass der Stecker
nach dem Einbau zugänglich bleibt.
8
Page 9
Inbetriebnahme
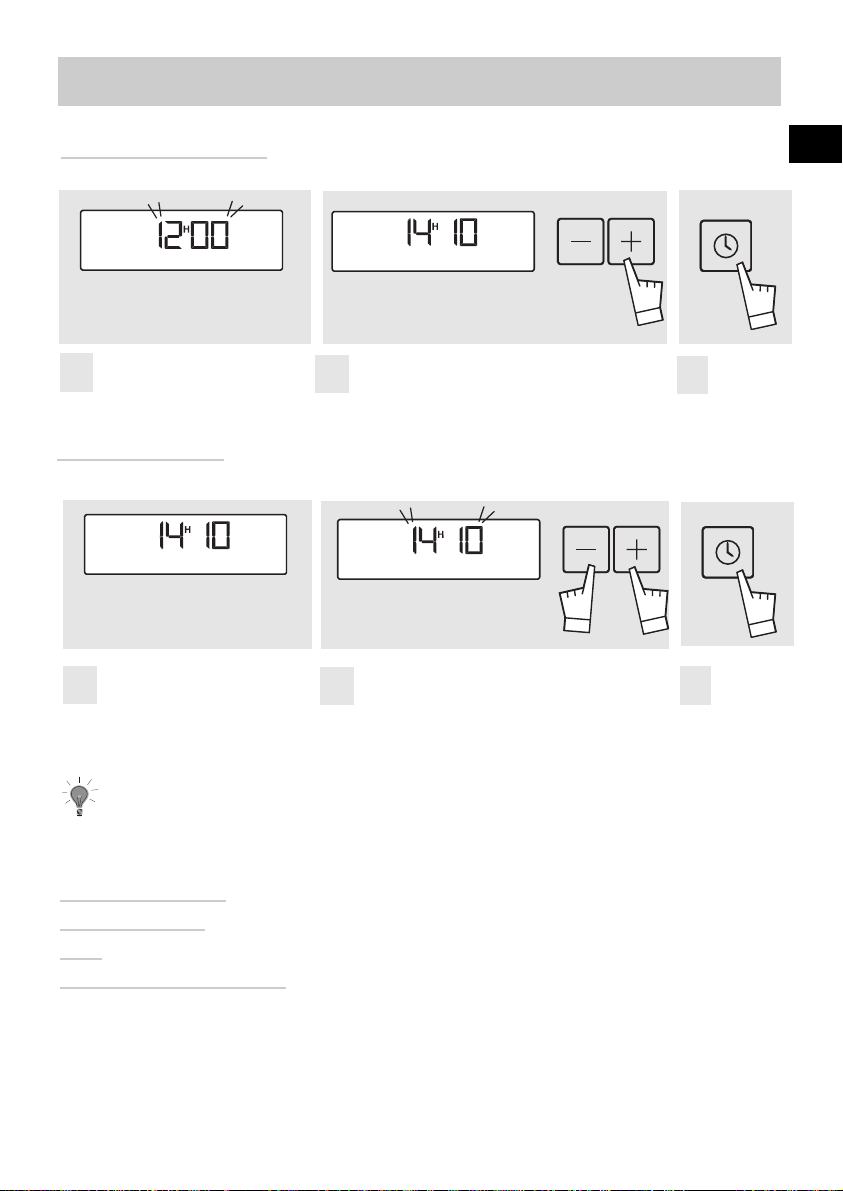
Uhrzeit einstellen
Beim Unterspannungsetzen
1
beginnt die Anzeige
12"00 zu blinken.
Uhrzeit ändern
Die aktuelle Uhrzeit wird
1
durchgehend angezeigt.
Bei der ersten Inbetriebnahme des Geräts muss die
Uhrzeit eingestellt werden.
Stellen Sie die gewünschte Uhrzeit mit
2
den Tasten + und - ein.
Drücken Sie gleichzeitig die beiden
2
Tasten + und -, bis die angezeigte
Uhrzeit blinkt. Stellen Sie die gewünschte
Uhrzeit mit den Tasten + und - ein.
Bestätigen
3
Sie die
Uhrzeit mit
SET
Bestätigen
3
Sie die
Uhrzeit mit
SET
DE
Wenn Sie die Uhrzeit nicht mit SET bestätigen, wird die neue Uhrzeit nach einer
Minute automatisch übernommen.
Automatische
Begrenzung
des
Wird das Gerät nicht benutzt, so verringert sich die
Leuchtstärke der Anzeige nach einer Minute automatisch, um Energie zu sparen.
Energieverbrauchs
9
Page 10

Inbetriebnahmesperre
Eine Verriegelung der Tasten ist möglich. Dazu muss
das Garen ausgeschaltet sein und die Anzeige auf
Uhrzeit oder verzögerte Garzeit eingestellt sein.
Taste zum
1
Ein-/Ausschalten
einige Sekunden lang
drücken,
bis ein Piepton ausgelöst
2
wird und ein Schlosssymbol
auf der Anzeige erscheint. Damit
sind alle Tasten verriegelt.
Zum Entriegeln der
3
Tasten, die Taste
zum Ein-/Ausschalten
einige Sekunden lang
drücken, bis ein Piepton
ausgelöst wird und das
Schlosssymbol auf der
Anzeige verschwindet.
10
Page 11
Einschalten
Funktionsprinzip
Den Wassertank vor der Inbetriebnahme der Dampfgarers immer bis zum
max. Füllstand befüllen.
Anschließend wird der Wasserbehälter bis zum Einrasten ganz nach hinten
an die Rückwand in seine Halterung geschoben.
Beim Garen erhitzt sich das Gerät. Beim Öffnen der Tür tritt heißer Dampf
aus. Kinder vom Gerät fern halten!
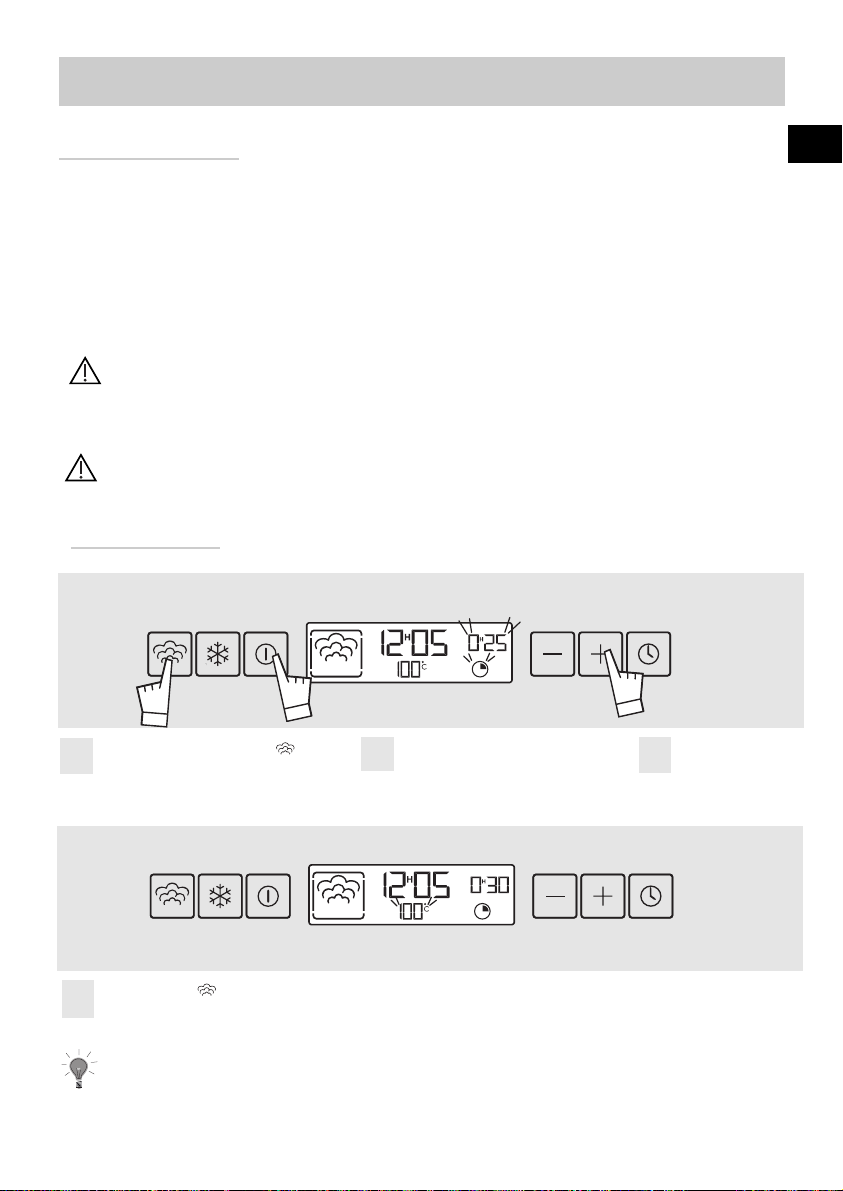
Dampfgaren
1
Das Wasser gelangt über einen Schlauch aus dem Tank
in den Garraum, in dessen unterem Teil sich eine
Verdampferplatte befindet. Wenn das Wasser auf die
heiße Platte tropft, wird es sofort in Dampf
umgewandelt. Es ist folglich nicht nötig, Wasser in das
Kochgeschirr zu füllen. Zum einwandfreien Dampfgaren
wird das Gerät mit den dazu erforderlichen
Ausrüstungsteilen geliefert.
Garen mit Wasserdampf bei 100°C.
3
2
DE
Drücken Sie die Taste
1
Das Gerät schlägt eine
Garzeit von 25 Minuten vor.
Das Symbol beginnt zu blinken. Sobald die Temperatur von 100°C erreicht ist,
4
ertönt ein Piepton und das Symbol leuchtet durchgehend auf.
Lassen Sie die Tür des Geräts während der gesamten Garzeit geschlossen,
da sonst Dampf entweicht und dadurch das Garen beeinträchtigt wird.
Stellen Sie die gewünschte
2
Garzeit mit den Tasten (+)
und (-) auf einen Wert zwischen
5 (min.) und 60 (max.) ein
3
mit der Taste Ein/Ausschalten.
Bestätigen Sie
die Eingaben
11
Page 12
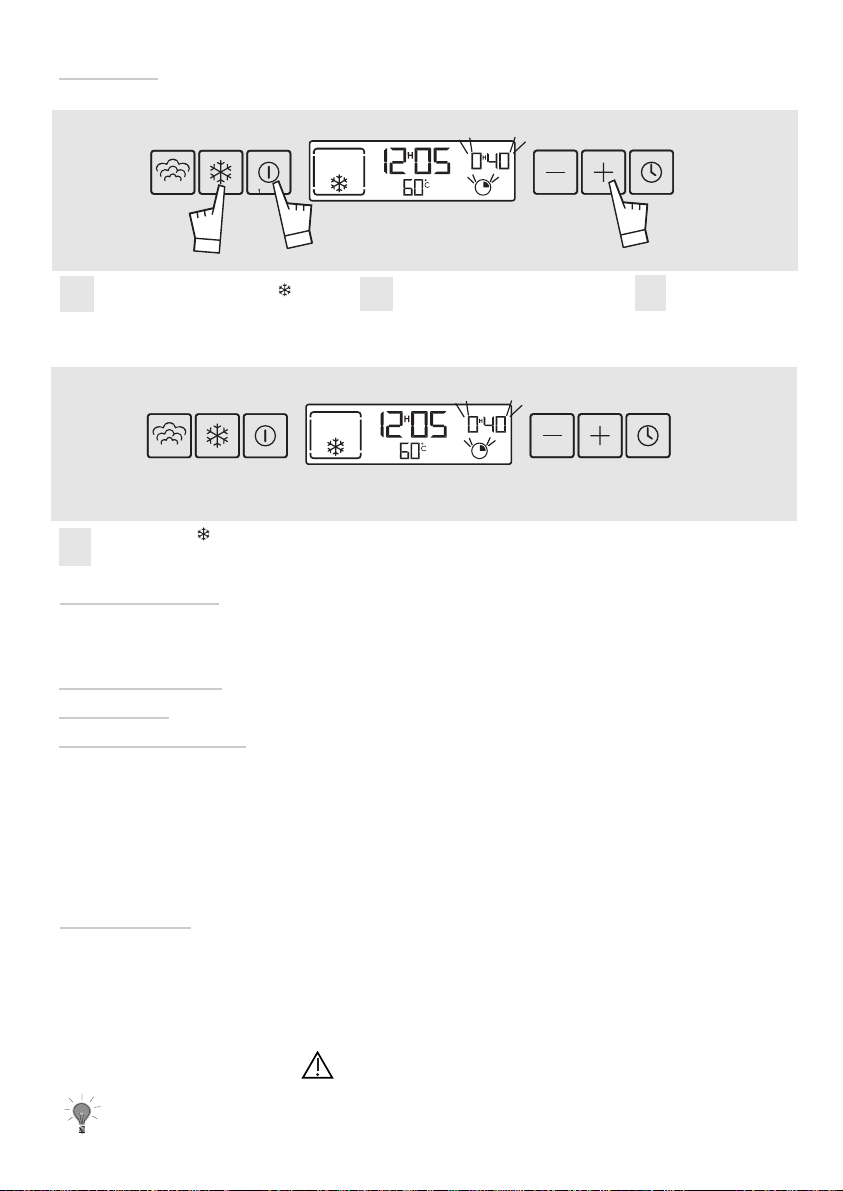
Auftauen
Das Auftauen erfolgt bei einer Temperatur von 60°C.
1
Drücken Sie die Taste
1
Das Gerät schlägt eine Garzeit
von 40 Minuten vor.
Das Symbol beginnt zu blinken. Sobald die Temperatur von 100°C erreicht ist,
4
ertönt ein Piepton und das Symbol leuchtet durchgehend auf.
Garzeit ändern
Abschalten des
Geräts bei
laufendem Garen
3
Stellen Sie die gewünschte
2
Garzeit mit den Tasten (+)
und (-) auf einen Wert zwischen
5 (min.) und 60 (max.) ein
Während der laufenden Garzeit können Sie diese
jederzeit mit den tasten (+) und (-) ändern.
Sie können das Gerät jederzeit durch Drücken der Taste
Ein-/Ausschalten (mindestens 1 Sekunde) ausschalten.
Wenn die Dampferzeugung noch nicht ausgelöst wurde
(was ca. 1 Minute nach dem Einschalten erfolgt), wird das
Gerät sofort ausgeschaltet und die eingestellte Garzeit
verschwindet auf der Anzeige.
Wenn die Dampferzeugung bereits ausgelöst wurde,
erscheint auf der Anzeige eine Anzeige von 3 Minuten, die
auf Null zurück zählt. Warten Sie so lange bis zum Öffnen
der Tür, damit der gebildete Dampf entweichen kann.
2
3
mit der Taste Ein/Ausschalten
Bestätigen Sie
die Eingaben
Garzeitende
Um den einwandfreien Betrieb des Geräts zu gewährleisten, läuft die Lüftung
auch nach dem Ende des Garens noch einige Zeit lang weiter.
12
wird als Wert der Garzeit 0"00 angezeigt, das
Dampfgarer-Symbol ausgeschaltet und ein Piepton
ausgelöst, der für eine Dauer von 3 Minuten programmiert ist. Zum Abschalten des Pieptons drücken Sie
entweder auf die Taste Ein-/Ausschalten oder öffnen
Sie die Tür.
Leeren Sie IMMER den Wassertank.
Page 13
Tipps
Kleine Portionen einfrieren; auf diese Weise wird die für das Auftauen notwendige Zeit verkürzt,
die Lebensmittel werden gleichmäßiger aufgetaut und ihre Qualität bleibt erhalten. Nach der
Hälfte Zeit können die Lebensmittel gewendet oder zerdrückt (z.B. Gemüseblöckchen) werden.
Backwaren mit einer Folie schützen oder in der Originalverpackung auftauen. Fisch und Wurst
muss vor dem Grillen getrocknet werden: die beim Auftauen entstehende Feuchtigkeit könnte
ihre Bräunung verhindern. Große Teile (Braten, usw.) schrittweise unter mehrmaligem Wenden
auftauen und die Zeit entsprechend einstellen.
DE
Erhitzen
Sie können ein fertiges Gericht in Ihrem Dampfofen erhitzen. Es besteht keine Gefahr, dass es
austrocknet oder verkocht wird, spritzt oder am Gargeschirr anklebt. Dampfgaren mit 100°C
einstellen, Kochbehälter oder Teller auf den Gitterrost stellen, mit einer Alufolie oder einer
Lebensmittelfolie abdecken, damit keine Wassertropfen auf die Lebensmittel fallen und 20 bis
25 Min. je nach Geschmack und der Art des Gerichts erhitzen.
Beispiel:
Ein Teller Sauerkraut: 20 Min. Eine Tasse Suppe (30 cl): 20/25 Min.
Wasserversorgung
Bei Problemen mit dem Wasserkreislauf erscheint die Anzeige
"Kein Wasser" und ertönt ein Piepton.
Die möglichen Ursachen sind:
- Wassertank leer.
- Wassertank nicht richtig eingesetzt.
- Wasserschlauch verkalkt (siehe Abschnitt "WARTUNG")
Prüfen Sie diese drei Punkte und beheben Sie die Störung. Danach wird das Garen automatisch
fortgesetzt, sobald Sie die Tür wieder geschlossen haben.
13
Page 14
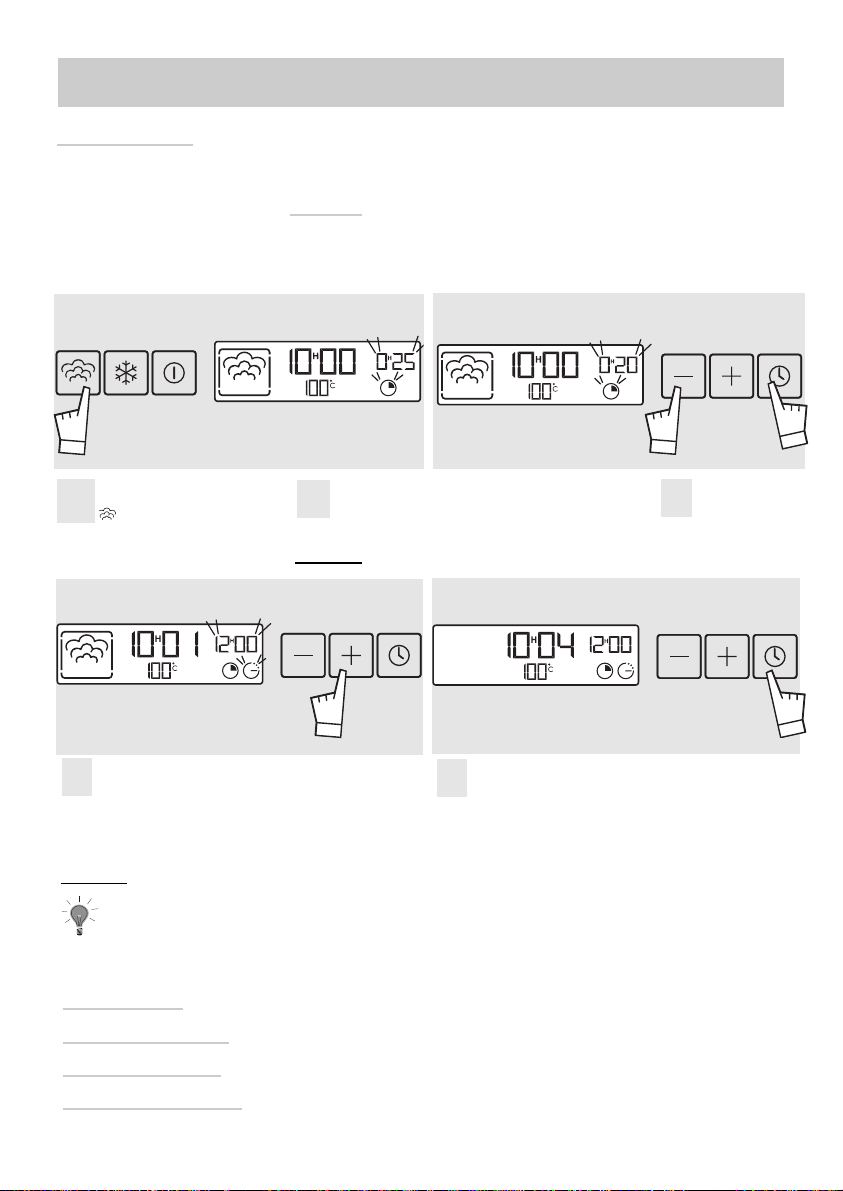
Garzeitende programmieren
Dampfgaren
1
Drücken Sie die Taste
1
eine Garzeit von 25 Minuten
vor.
. Das Gerät schlägt
Garen mit Dampf bei 100°C.
Sie können die Garzeit so programmieren, dass das
Gericht zu einem gewünschten Zeitpunkt fertig ist.
Beispiel:
Es ist 10.00 Uhr, Sie haben ein Gericht, das 20 Minuten
zum Garen benötigt, und Sie möchten, dass es um 12.00
Uhr fertig ist.
2
Stellen Sie die gewünschte Garzeit mit
2
den Tasten (+) und (-) auf einen Wert
zwischen 5 (min.) und 60 (max.) ein.
Beispiel: 20 Minuten
Bestätigen Sie
3
die Eingaben
mit der Taste
SET.
3
4
Die Uhrzeit und das Symbol für Ende der
4
Garzeit blinken. Damit können Sie die
Uhrzeit für das Ende des Garens programmieren, indem Sie die Taste (+) oder die
Taste (-) drücken.
eispiel: 12.00 Uhr
B
Erfolgt keine Bestätigung mit der Taste SET, so wird die Programmierung nicht
berücksichtigt, die Anzeige der Garzeit erlischt und die Uhrzeit wird wieder
angezeigt.
Ändern der
Garzeit und der
Uhrzeit für das
Sie können jederzeit die Garzeit und die Uhrzeit für das
Ende des Garens zur Anzeige bringen und ggf. ändern,
indem Sie die Taste SET drücken.
Um die angezeigte Programmierung zu löschen,
drücken Sie die Taste START/STOP.
Ende des Garens
14
Bestätigen Sie die Uhrzeit mit der Taste
5
SET.
Die Uhrzeit und das Symbol für Ende der
Garzeit leuchten durchgehend auf.
Das Symbol für die Garzeit und die Uhrzeit
werden angezeigt.
5
Page 15

Zeitgeber
Ihr Gerät besitzt einen elektronischen Zeitgeber, der unabhängig vom Betrieb des
Geräts funktioniert und den eingestellten Wert auf Null zurück zählt.
Dies erfolgt unabhängig vom Betrieb des Geräts, d.h. damit lässt sich das
Garen nicht automatisch abschalten.
Andererseits lässt sich der Zeitgeber auch bei laufendem Gerät betätigen. In
diesem Fall hat seine Anzeige Vorrang vor der Uhrzeit, d.h. diese wird erst nach
dem Zurückzählen auf Null wieder angezeigt.
1
Drücken Sie die Taste
1
SET einige Sekunden
lang, bis 0"00 auf der
Zeitanzeige und das
Zeitgebersymbol blinken.
2
Stellen Sie den gewünschten Wert mir den Taste (+) und
2
(-) ein (max. 59 min 50 s).
Einige Sekunden nach dem Einstellen beginnt das Zurückzählen
auf Null.
Wenn der Wert 0"00 erreicht ist, ertönt ein Piepton und die
Zeitanzeige blinkt.
DE
Ändern und
Abschalten
des Zeitgebers
Zum Abschalten des Pieptons drücken Sie längere Zeit
auf die SET-Taste oder die START-Taste.
Während des Zurückzählens auf Null können Sie durch
Drücken der SET-Taste während einiger Sekunden
unterbrechen und mit den Tasten (+) und (-) ändern
bzw. durch Rückstellen auf 0"00 ganz abschalten.
15
Page 16

Kochtabellen
GEMÜSE
Artischocken (klein)
Spargel
Broccoli
Karotten
Sellerieknollen
Kürbis
Champignons
Kohl
Zucchini
Artischocken (groß)
Spinat
Chicorée
Fenchel
grüne Bohnen
weiße Rüben
Erbsen
Lauch
Kartoffeln
ZEIT
bei beliebiger Menge
40 bis 45 Min.
35 bis 40 Min.
18 Min.
20 bis 22 Min.
25 bis 30 Min.
15 bis 20 Min.
15 Min.
30 bis 35 Min.
22 Min.
30 bis 35 Min.
10 bis 15 Min.
20 Min.
20 Min.
35 Min.
30 Min.
22 Min.
30 bis 35 Min.
15 bis 20 Min.
20 bis 25 Min.
25 Min.
25 Min.
40 bis 45 Min.
ZUBEREITUNG
mit dem Stiel nach oben einlegen
bei Spargelspitzen Zeit verkürzen
in kleine Bündel zerteilt
in feinen Scheiben
in feinen Scheiben
in Würfeln
in feinen Scheiben
Rosenkohl
Blumenkohl in kleine Bündel zerteilt
Grünkohl zerschnitten
in Scheiben
(frisch) beim Garen umrühren
(tiefgefroren) beim Garen umrühren
Stumpf ausgeschnitten
und in 2 geteilt
in 2 geteilt
in Würfeln
/
in 2 geteilt
in Scheiben ganz
HINWEISE
• Die Garzeit
richtet sich nach
Art, Größe und
Frische der
Gemüse. Bitte
beachten Sie
dazu auch die
Angaben in der
Spalte
"Zubereitung".
• Die Garzeit ist
bei beliebiger
Menge immer
dieselbe, z.B.
gleichgültig, ob
sie 1 oder 4
Artischocken
garen wollen.
• Um zu prüfen,
ob das Gemüse
gar ist, stechen
Sie in an der
dicksten Stelle
eine Gabel oder
ein Messer
hinein.
MUSCHELN
KRUSTENTIERE
Jakobsmuscheln
Miesmuscheln
Krebse
Hummer
Seeschnecken
FRÜCHTE CREMESPEISEN
Äpfel, Birnen,
Pfirsiche
Kompott
Cremespeisen
16
ZEIT
bei beliebiger Menge
10 bis 12 Min.
20 bis 25 Min.
25 Min.
30 bis 35 Min.
12 bis 15 Min.
ZEIT
bei beliebiger Menge
10 bis 15 Min.
25 Min.
10 Min.
ZUBEREITUNG
mit aromatischen Kräutern
mit aromatischen Kräutern
/
je nach Gewicht
/
ZUBEREITUNG
ganz, geschält
Früchte in Scheiben
in Schälchen abgefüllt
HINWEISE
• Legen Sie
Muscheln u.ä. auf
den Grill der
Glasplatte und
legen Sie aromatische Kräuter hinzu.
• Legen Sie
Krustentiere auf
ein Bett aus Algen.
HINWEISE
• Garzeit je nach
Reife der
Früchte.
Page 17
FISCH
Hecht
Kabeljau
Brasse
Schellfisch
Hering
Schellfisch
Quappe
Makrele
Weißfisch/Seebarsch
Rochen
Rötlinge
Rötlinge
Seeforelle
Lachs
Scholle
Thunfisch
(1kg)
Forelle
ZEIT
bei beliebiger Menge
25 bis 30 Min.
13 bis 15 Min.
20 bis 25 Min.
15 Min.
20 Min.
15 bis 20 Min.
15 Min.
20 Min.
15 Min.
25 bis 30 Min.
15 Min.
10 Min.
20 Min.
15 bis 20 Min.
10 bis 12 Min.
20 bis 25 Min.
20 bis 25 Min.
ZUBEREITUNG
ganz (1kg)
in Scheiben (180 g)*
ganz (1 kg)
Filetstücke
ganz (200 g)
in Scheiben (180 g)
je nach Stärke
ganz (250 g)
Filetstücke
ganz (200 g)
Filetstücke
große Scheiben (6-10 cm lang)
Scheiben (180-200 g)
Filetstücke
Scheiben (180-200 g)
ganz (200 g)
13 bis 15 min.
HINWEISE
• *Scheiben: Quer
geschnittene
Scheiben mit je 2-3
cm Stärke (180200 g) pro Person.
• Verlangen Sie
immer ganz frischen Fisch.
• Legen Sie ganze
Fische auf ein Bett
aus
Lorbeerblättern,
Fenchel oder aromatischen
Kräutern in das
Kochgeschirr.
• Entfernen Sie die
Haut gleich nach
dem Garen, was
dann am
leichtesten ist.
DE
FLEISCH / EIER
Rind
Schwein
Geflügel
(Filet)
(ganze Teile)
(zerlegt)
Kochwurst
Blutwurst
Eier
Mit sehr frischen,
bei
Raumtemperatur
gelagerten Eiern.
REIS, TEIGWAREN,
GRIES
Direkt in ein Geschirr legen, mit Wasser oder Milch bedecken, denn der Dampf allein
reicht nicht aus, um sie zum Quellen zu bringen. Das Geschirr mit einer Alu-Folie abdecken, um zu vermeiden, dass Wasser auf das Gericht tropft.
Milchreis
Griespudding
ZEIT
bei beliebiger Menge
15 bis 30 Min.
25 Min.
20 bis 25 Min.
25 Min.
20 Min.
10 bis 15 Min.
7 Min.
5 bis 6 Min.
8 Min.
10 bis 12 Min.
ZEIT
30 Min.
20 Min.
ZUBEREITUNG
55 bis 60 min.
Braten 800 g
Hähnchenkeulen : 35 bis 40 min.
Putenbraten: 50 bis 60 min.
Wachsweich: Direkt auf den Rostl legen.
Spiegelei:
abdecken und auf den Rost stellen.
Halbweich:
Hart : Je nach Rezept.
:
ca. 400 g
In ein Kochgeschirr schlagen, mit Folie
Direkt auf den Rost legen.
• Anschließend
in einem
anderen
Kochgeschirr
unter dem Grill
bräunen.
ZUBEREITUNG
100 g gewaschenen Reis + 20 cl
Milch + 2 EL Zucker
200 g Gries + ¼ Liter Wasser
• Nach dem
Garen mit einer
Gabel auflockern.
HINWEISE
HINWEISE
17
Page 18
Reinigungshinweise
Garraum (nach jeder Benutzung)
Nach dem Abkühlen der Verdampferplatte den mit einem trockenen Lappen
auswischen bzw. die Tür teilweise geöffnet lassen, damit der Garraum austrocknen kann.
Wasserzulauf
Den Schlauch abschrauben und auf seinen Zustand prüfen.
Wenn sich Kalkstein in ihm abgelegt hat, diesen mit einem entsprechenden
Gegenstand (Stricknadel o. ä.) entfernen.
Verdampferplatte
Ein halbes Glas synthetischen Essig auf die Platte gießen, einige Minuten lang
einwirken lassen und mit Wasser abspülen.
Keinen Scheuerschwamm, kein Scheuermittel und keinen Kalkentferner für
Kaffeemaschinen usw. verwenden.
(1 Mal pro Monat)
(1 Mal pro Monat)
Reinigen der
Wasserrinne
18
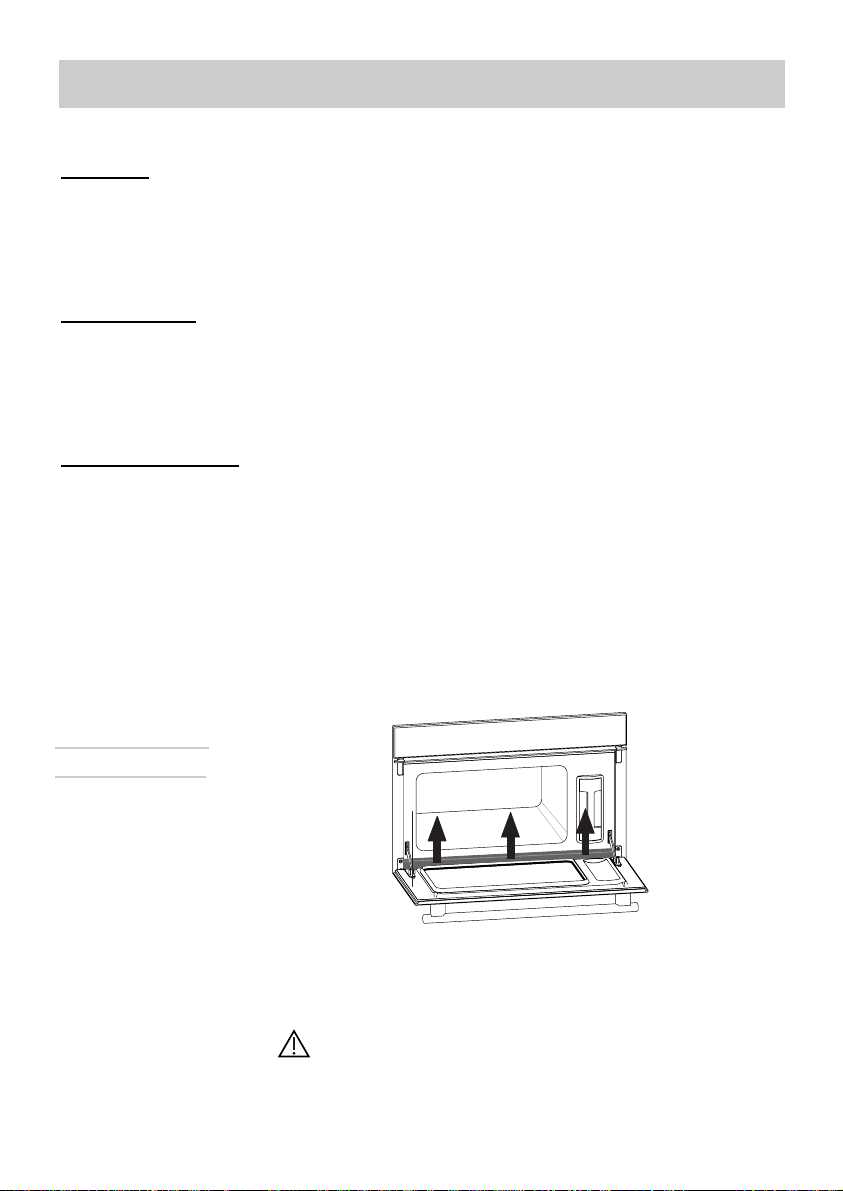
Die Wasserrinne nach oben aus den 3 Vertiefungen
herausziehen, säubern und wieder in die Vertiefungen
einsetzen.
Das Gerät NICHT mit einem Dampfreiniger reinigen.
Page 19

Glühlampe auswechseln
Die Glühlampe befindet sich hinten
rechts in der Backröhre.
Trennen Sie Ihren
Dampfgarer vor Arbeiten an
der Lampe vom Stromnetz, um
elektrische Schläge zu vermeiden.
- Drehen Sie die Glasabdeckung um eine Vierteldrehung links herum.
- Drehen Sie die Glühlampe ebenfalls links herum heraus.
Technische Daten der Glühlampe:
- 15 W - 220-240 V
- 300°C - Sockel E 14
- Wechseln Sie die Glühlampe aus, montieren Sie die Glasabdeckung und
achten Sie dabei auf die richtige Positionierung der Dichtungen.
- Schließen Sie Ihren Dampfgarer wieder ans Stromnetz an.
Was tun bei Betriebsanomalien?
SIE STELLEN FEST
Ihr Anzeigefeld
leuchtet nicht auf.
SACHEN
Anschlußfehler des
Backofens.
Die Elektronik ist
ausgefallen.
WAS IST ZU TUN ?MÖGLICHE UR-
- Prüfen Sie den
elektrischen
Anschluß (die
Sicherungen).
- Wenden Sie sich an
den Kundendienst.
DE
Die Glühlampe ist
beschädigt.
Die Glühlampe
funktioniert nicht
mehr.
Während des Kochens
tritt aus der Tür
Wasser oder Dampf
aus.
Wenn Sie nicht in der Lage sind derartige
Störungen selbst zu beheben, müssen Sie
sofort den Kundendienst benachrichtigen.
Der Backofen ist
nicht ans Stromnetz
angeschlossen.
Die Sicherung Ihrer
Installation ist defekt.
Die Tür ist nicht
richtig geschlossen.
Die Dichtung der Tür
ist beschädigt.
- Die Glühlampe
auswechseln.
- Den Backofen an das
Stromnetz
anschließen.
- Die Sicherung
austauschen.
- Wenden Sie sich an
den Kundendienst.
19
Page 20

Reparaturarbeiten
Eventuelle Reparaturarbeiten an dem Gerät
müssen von qualifiziertem Fachpersonal des
Händlers vorgenommen werden. Bei
Benachrichtigung des Kundendienstes die
vollständigen Geräteangaben (Modell, Typ
und Seriennummer) angeben. Diese Angaben
sind dem Typenschild (Abb. 1) zu entnehmen.
ORIGINAL-ERSATZTEILE
Bitten Sie bei Reparaturarbeiten darum, dass
ausschließlich
vveerrwweennddeett wweerrddeenn..
zzeerrttiiffiizziieerrttee OOrriiggiinnaall--EErrssaattzztteeiillee
MADE IN FRANCE
230V ~ 50 Hz
BRANDT APPLIANCES SAS
7 rue Henri Becquerel
92500 RUEIL MALMAISON
Abb. 1
20
Page 21

DE
21
Page 22

99644862 - 01/08
Page 23

DE BEDIENUNGSANLEITUNG
EN INSTRUCTIONS FOR USE
FR GUIDE D'UTILISATION
Dampfgarer
Oven
Four
Page 24

2
List of contents
Introduction p.3
Steam cooking
General remarks p.4
Your oven, how it works p.5
Accessories p.6
How to install your oven
Electrical connection p.7
Fitting p.8
How to use your oven
Setting the time p.9-10
Cooking immediately p.11-12
Managing the water p.13
Delayed cooking p.14
The timer p.15
Cooking times p.16-17
How to maintain your oven p.18
Changing the light bulb? p.19
Troubleshooting ? p.19
Page 25

3
Dear Customer,
You have just acquired a THOMSON oven and we would like to thank you.
We have invested all our dedication and know-how in this appliance so that it would
best meet your needs. With innovation and performance, we designed it to be
always easy to use.
In the THOMSON product range, you will also find a wide choice microwaves,
cooking hobs, ventilation hoods, cookers, that you can coordinate with your new
THOMSON oven.
Visit our website www.thomson-line.com where you will find all of our products, as
well as useful and complementary information.
THOMSON
As part of our commitment to constantly improving our products, we reserve the right to
make changes to them based on technical advances to their technical and functional featu-
res and appearance.
Warning: Before installing and using your appliance, please carefully read
this Guide to Installation and Use, which will allow you to quickly familiarise yourself with its operation.
EN
Page 26

4
Steam cooking
General remarks
Used in accordance with the instructions, steam cooking has many advantages over other
methods. Healthy and natural, steam cooking preserves the true taste of your food. A fine
sauce flavoured with aromatic herbs can make all the difference in the world.
Steam cooking is odourless. There is no need to flavour the cooking water with herbs or
spices, though - fish, for example, can be flavoured by placing it on a bed of seaweed, or
chicken on a bunch of rosemary or tarragon.
Meat, fish and vegetables can be cooked simultaneously.
Pasta, rice and purees can be reheated without drying out or sticking to the pan.
Cooking custards, flans, or milky rice dishes is facilitated by steam cookery. Covered in
aluminium foil, the condensation will not reach the food.
There is no need to season prior to cooking, not even the cooking water.
Meat can browned by a quick searing in hot butter on each side.
In comparison to boiling, steam cookery wins hands down.
It is quick: cooking starts immediately, whereas the cooking time of food in boiling water
is only counted from the return of the water to the boil.
It is healthy: the hydro soluble vitamins and minerals are conserved because they barely
dissolve in the condensed water that surrounds the food.
In addition, no fat is used in cooking.
Steam respects the food's own flavour. It adds neither flavour, nor the grilled or fried taste.
It doesn't remove any flavour either, because there is no dilution in water.
The other side of the coin: it is not worth cooking a fish that isn't fresh, or vegetables that
have been forgotten at the back of the refrigerator for a week: in this way - the results will
be catastrophic !
Steam does not transfer tastes or odours, so you can save both time and money by cooking
- side by side but not touching - a fish and a dessert, for example.
Steam is also highly suitable for blanching, defrosting and reheating, as well as keeping
warm - especially sauces.
Meats such as poultry, veal, and pork should be lightly browned in very little oil prior to
cooking, to render them appetisingly golden.
Then finish their cooking by steam.
Foods will cook more quickly and evenly if they are cut into pieces than if they are left
whole.
Page 27

5
Your oven, how it works
Indicator
panel
Tank
Display
Steam
generator
1. Steam cooking control
2. Defrosting button
3. Start/Stop control
4. Time and delay display
or timed period
5. Steam cooking symbol
6. Cooking time symbol
7. End of cooking time symbol
Water supply
tube
8. Temperature display
9. +/- controls for timer
10. Selector button : SET
11. Autonomous timer
12. Water circuit problem signal
13. Defrosting symbol
14. Display of the cooking period or delayed
start time
15. Control panel locked
The indicator panel in detail
Channel
1 2 3
5
13
8
15
9
10
4
14
11
6
7
12
EN
Page 28

6
Tank for the independent water supply of your oven.
It can hold about 1 litre (maximum level).
Accessories
Removable
tank
Tin ware
Use of water that is low in calcium will make
cleaning your oven easier.
The use of distilled water is forbidden (not
suitable for food use).
The cookware may be cleaned in the dishwasher.
When cooking place the fig.1 dish on the
fig.2 dish in reverse order so that they do
not fit into each other (see diagram).
When storing place the fig.1 dish on the
fig.2 dish in the same order so that they fit
into each other.
Food dish (fig.1)
Pierced stainless steel cooking dish to prevent
contact between food and condensation water.
Condensate dish (fig.2)
Dish to recover the condensation water.
Grid (fig.3)
Stainless steel removable support grid: it must be placed in the oven.
fig.3
fig.1
fig.2
Page 29

7
Electrical
connection
For a permanent connection, make sure a
system of disconnection that complies with the
installation regulations. The appliance must be
placed in such a way as to leave the plug
accessible if it is flush-fitted.
Use of an earthed power socket, connected in
compliance with current safety standards
Your installation must be fitted with a 10 amp device
for thermal protection.
Do not use the oven if the supply cord or its plug are
damaged. In this case, they must be replaced by the
manufacturer, its after-sales service or similarly
qualified persons, to avoid any danger.
Operating voltage ............................................................. 220-240 V ~ 50 Hz
Total power of oven .......................................................................... 2,77 kW
Energy consumption
-Heating to 100°C and maintaining temperature for 1 hour ............... 0,71 kWh
Inside dimensions of oven
Width .............................................................................................. 38,5 cm
Height ............................................................................................. 18,2 cm
Depth .............................................................................................. 33,5 cm
Usable volume ............................................................................. 23,5 litres
How to install your oven
EN
Page 30

8
Fitting
1. Place the appliance in the hole.
The appliance must be horizontal. Check this position.
2. For improved stability, attach the oven to the unit using 2 screws, via the
holes provided for this purpose on the side posts.
3. Carry out the electrical connection.
Make sure that the rating plate remains accessible after installation.
How to install your oven
380
560
550
50
378
405
544
595
20
386,5
Page 31

9
How to use your oven
Setting the time
The first time the oven is turned on:
Set the time.
The display flashes on
12.00.
Use the + and - buttons to adjust the
time.
If the time set is not validated by the SET button, it is automatically recorded after
one minute.
1
2
Validate
with SET.
Changing the time
The time is displayed.
Press on the + and - buttons simultaneously until the time starts to flash.
Adjust the time using the + and -button.
Validate
with SET
After one minute of inactivity, display brightness is
reduced, in order to reduce energy.
Reducing energy
consumption
3
1
2
3
EN
Page 32

10
The control panel can be locked. This can only be
activated when you are not using timed or delayed
cooking features.
Locking the
control panel
Hold down the
START/STOP button
for a few seconds.
A beep sounds and a “pad-
lock” appears on the screen.
From this moment, no button is
live.
To unlock, hold down
the START/STOP button
for a few seconds. A beep
sounds ans the padlock
disappears.
1
2
3
Page 33

11
Steam cooking
Cooking immediately
Steam cooking at 100°C.
Press the button .
A time of 25 minutes is
suggested.
Adjust the cooking time as neces-
sary ( minimum 5 min and maximum 60 min by pressing on + and button
Validate with
the START
button.
You MUST IMPERATIVELY fill the water tank up to the maximum level
before starting cooking. Put the tank back in place, and push it as far as
possible until it CLICKS INTO PLACE.
The symbol comes on. When the temperature is reached, 100° becomes constant, and a beep sounds.
Operational
principle
The water contained in the tank reaches the cavity via a
tube. This water is transformed into steam on contact with
a hot surface placed in the lower part of the cavity:
the steam generator.
There is no need to add water to the cooking dish. To
guarantee TRUE STEAM COOKING, your oven is supplied
with a set of specially designed for cookware to
perfection.
1
2
3
4
In order to avoid altering the results of the cooking, avoid opening the
appliance door during cooking.
When cooking, the appliance gets hot. Hot steam may escape when you
open the door of the appliance. Keep children out of the way.
1
2
3
EN
Page 34

12
Defrosting
Defrosting at 60°C.
Press the button .
A time of 40 minutes is
suggested.
Adjust the cooking time as
necessary ( minimum 5 min
and maximum 60 min by
pressing on + and - button.
Validate with
the START
button.
Modifying the
cooking time
At the end of cooking
0m00s displays. The display animation stops. Beeps
are heard for a 3 minute period.
To stop the beeps, press on STOP and open the door.
The symbol comes on. When the temperature is reached, 60° becomes
constant, and a beep sounds.
Stopping the
appliance during
cooking
During cooking, you can modify the cooking time by
using the + and - buttons.
You can stop the cooking at all times by pressing on
START/STOP (hold the button down for about
1 second).
If the steam production has not yet started (about
1 minute), the oven will stop immediately and the time
setting will disappear.
If the steam production has already started, the time
passes to 3 minutes and during this period, the steam
evacuates before you open the oven.
You MUST IMPERATIVELY empty the tank
1
2
3
4
In order to make sure the oven is reliable, the fan continues to operate
for a certain period after the end of cooking.
1
2
3
Page 35

13
In case of problems related to the water circuit during
cooking, the 'no water' symbol appears and a beep
sounds.This fault is specifically related to:
- an empty tank,
- a wrongly-fitted tank.
After checking these two points, the cooking will recommence automatically after the door.
Managing the water
Freeze small portions; defrosting will be faster, more homogenous and quality will be preserved. When semi-defrosted, you can turn over the food items or spread them out (for
example vegetables patties). Protect pastries with a cling wrap or keep the original packaging. Wipe fish and sausages before grilling: humidity stops them from becoming golden
brown. For large pieces (roasts, etc.) proceed in steps by turning the piece over several
times and adjust the time accordingly.
You can reheat a cooked dish in your steam oven. The dish will not dry out, will not become
overcooked and will not splatter or stick. Adjust steam sequence at 100°C, place the dish
or plate on the grill, protect with aluminium foil or cling wrap to avoid drops of water accumulating and heat for 20 to 25 minutes depending on the dish and your preferences.
Examples
:
A plate of sauerkraut: 20 min A bowl of soup (300 ml): 20/25 min
Advice
Reheating
EN
Page 36

14
Steam
cooking
Delayed cooking
Steam cooking at 100°C.
You can program the cooking time so that your dish is
ready at a time of your choice.
For example:
It is 10 o'clock, and you have to go out, your dish should
be ready at 12 o'clock and it will take 20 minutes to cook.
Press the button .
A time of 25 minutes
is suggested.
Adjust the cooking time as necessary
( minimum 5 min and maximum
60min) by pressing on + and - button.
F
or example : 20 min.
Validate with
the SET
button.
The time and the end of cooking time
symbol display and flash. The
adjustment of the end of cooking time is
now possible:
Press the + or - buttons
F
or example : 12h00
Validate with the SET button.
The time and the end of cooking time
become constant.
The symbol for the length of cooking
time displays.
If the programming is not validated by touching SET, the recording of the program
is cancelled, the time display disappears and the time is displayed again.
Modification of
cooking time
and the end
of cooking time
You can consult or modify the length of cooking time
and the end of cooking time, at all times.
To cancel the programming, press START/STOP.
1
2
3
4
5
1
2
3
4
5
Page 37

15
Timer
Your oven is fitted with an electronic timer that is independent of the operation of the oven, and allows time
to be counted down.
This function is independent of your oven. It can not
order the end of automatic cooking.
Hold the SET button
down for a few
seconds. 00m00s and the
timer symbol flash.
Adjust to the period required (maximum 9 minutes and 50
seconds) using the + and - buttons.
After a few seconds, the timer counts down the time.
Once the time has run out, beeps will sound every few
seconds. 0m00s displays and flashes.
However, this function can be used even during
operation of the oven. In this case, the display of the
timer is given priority over the display of the time.
The beeps can be stopped by holding down SET or
START.
Once the countdown has started, you can modify the
time remaining by holding down SET then pressing the
+ or - buttons.
To cancel the timer, hold SET down for a few seconds,
then return the time to 0m00s.
Modifying and
stopping the
timer
1
2
How to use the timer
2
1
EN
Page 38

16
Artichokes (Small)
TIME
Whatever the quantity
Asparagus
Broccoli
Carrots
Celeriac
Pumpkin
Mushrooms
Courgettes
Chinese artichokes
Spinach
Chicory
Fennel
Green beans
Turnips
Fresh peas
Potatoes
40 to 45 min .
35 to 40 min.
18 min.
20 to 22 min.
25 to 30 min.
15 to 20 min.
15 min.
10 to 15 min.
20 min.
20 min.
35 min
30 min.
22 min.
30 to 35 min.
15 to 20 min.
20 to 25 min.
25 min.
40 to 45 min.
placed upside down in the dish
for the tips, reduce the cooking time
in little flowerets
in fine slices
in fine slices
in cubes
in slices
core removed and cut in two
lengthwise
cut in 2
cubed
Leeks
25 min.
cut in 2
sliced
whole
• These times
depend on the
nature, size and
freshness of the
vegetables.
Follow the
instructions
given in the
"Preparation"
column.
• The cooking
time is the same
regardless of the
quantity to be
cooked.
For example :
1 or 4 artichokes, same
cooking time.
• To check how
well done the
food is, test the
thickest part of
the vegetable; if
it is cooked, it
will not resist.
(fresh) stir during cooking
(frozen) “ “ “
/
Cabbage
30 to 35 min.
22 min.
30 to 35 min.
Brussels sprouts
Flowers in little bunches
Green shredded
in fine strips
VEGETABLES
PREPARATION
REMARKS
Scallops
TIME
Mussels/Whelks
Crabs/Lobster/
Dublin Bay
Prawns
10 to 12 min.
20 to 25 min.
25 min.
30 to 35 min.
12 to 15 min.
with aromatic herbs
with aromatic herbs
/
according to weight
/
• Arrange the
shellfish on a grill
or glass dish, and
add a few
aromatic herbs
• Arrange seafood
on a bed of seaweed.
SHELLFISH
PREPARATION
REMARKS
Apples/ pears/
peaches
TIME
puree
Custards
10 to 15 min.
25 min.
10 min.
whole, peeled
strips of fruit
in ramekins
Time according
to ripeness
FRUITS
CUSTARDS
PREPARATION
REMARKS
Cooking times
Page 39

17
Pike
TIME
Cod/hake
Sea bream
Haddock
Herring
Monkfish
Lotte
Mackerel
Whiting/cod
Skate
25 to 30 min.
13 to 15 min.
20 to 25 min.
15 min.
20 min.
15 to 20 min.
15 min.
20 min.
15 min.
25 to 30 min.
whole (1kg)
steaks (180g)*
whole (1kg)
fillets
whole (200g)
steaks (180 g)
whole (250g)
• *Steaks :slices of
fish 2 or 3 cm
thick (180/200g)
per person.
• Always insist on
very fresh
products
• Place whole fish
directly into the
dish or on bay leaves, fennel or
other herbs.
• At the end of
cooking, remove
the skin which will
come away easily.
according to thickness
fillets
FISH
PREPARATION
REMARKS
Mullet
Mullets
Dogfish
Salmon
Sole
Tuna
Whole trout (1kg)
15 min.
10 min.
20 min.
15 to 20 min.
10 to 12 min.
20 to 25 min.
20 to 25 min.
whole (200g)
fillets
thick slice (6 to 10 cm long)
steaks (180/200 g)
steaks (180/200 g)
whole (200g)
13 to 15 min.
fillets
Beef
TIME
Pork (filet mignon)
Poultry(breast, fillet)
(Paupiettes)
Sausages
15 to 30 min.
25 min.
20 to 25 min.
25 min.
20 min.
Joint
800 gr.:
55 to 60 min.
Chicken drumsticks
:
35 to 40 min.
Turkey roast joint : 50 to 60 min.
Morteau 400 g piece
• The brown
under grill in
another dish.
MEATS/
EGGS
PREPARATION
REMARKS
Black pudding
10 to 15 min.
Place directly in a dish, covered with water or milk. The steam is not sufficiently wet to
saturate these foodstuffs that swell. Place a sheet of aluminium foil over the dish to protect it from the droplets of water.
TIME
•Separate grains
with a fork at the
end of the cooking.
RICE, PASTA
COUCOUS
PREPARATION
REMARKS
Rice pudding
30 min.
100g of washed rice - 20 cl of milk -
2 dessertspoons of sugar
Couscous
20 min.
200g (1/4 litre of water)
7 min.
5 to 6 min.
8 min.
Boiled eggs : Place directly on the grill.
S
oft-boiled: Place directly on the grill.
Fried eggs
: broken in an individual dish on the grill
and cover with cling film
Eggs
eggs that are very
fresh and stored at
room temperature
10 to 12 min.
Hard / Cocotte see detailed recipes.
EN
Page 40

18
Maintenance
Cavity (after each use)
Wipe out the cavity with a dry cloth after the steam
generator has cooled or leave the cavity to dry out
with the door open.
Water supply tube (Once per month)
Remove the water supply tube by unscrewing it.
Remove any scale that may have formed on the inside
(using a fine, pointed object such as a skewer or
knitting needle).
Steam generator tube (Once per month)
Pour half a glass of spirit vinegar onto the generator.
Leave to work for a few minutes, clean and rinse with
water.
Do not use sponges, abrasive powder, or descaler.
Cleaning the channel
Dismantle this channel by pulling upwards. Wipe it and
replace it, using the three notches
provided for this purpose.
The oven must not be cleaned with a steam
cleaner.
How to maintain your oven
Page 41

19
Troubleshooting
WHAT SHOULD
YOU DO?
POSSIBLE
CAUSES
The light doesn't
work.
Water or steam
leaking from the door
during cooking.
- Change the bulb.
- Switch the oven on
at the mains.
- Change the fuse.
The bulb needs
replacing.
The oven is not
switched on at the
mains.
The fuse has blown.
The door is not shut
correctly.
The door seal is
faulty.
- Contact the After-
Sales Service.
IF YOU REALIZE
THAT
In all cases, if you are unable to solve the problem yourself,
please contact the After-Sales Service without delay.
Changing the light bulb ?
- Turn the cover slightly anti-clockwise (left).
- Unscrew the bulb the same way.
The bulb is a :
- 25 W - 220/240 V
- Type E14 suitable up to 300ºC
- Change the bulb and reassemble the unit
making sure the seals are positioned correctly.
- Switch the oven back on at the mains.
The bulb is by the far right
corner.
Always switch the oven off at
the mains before
changing the bulb in order to safeguard against electric shocks.
The display panel is
not lit up.
A fault in the oven
electrical supply.
Electric card out of
order.
- Check that the tank
has been pushed in
completely.
- Contact the AfterSales Service.
EN
Page 42

99644862 - 01/08
Page 43

DE BEDIENUNGSANLEITUNG
EN INSTRUCTIONS FOR USE
FR GUIDE D'UTILISATION
Dampfgarer
Oven
Four
Page 44

2
Sommaire
Edito p.3
La cuisson vapeur
Généralités p.4
Comment se présente votre four ? p.5
Accessoires p.6
Comment installer votre four ?
Raccordement électrique p.7
Encastrement p.8
Comment utiliser votre four ?
Comment mettre à l’heure votre four ? p.9-10
Comment faire une cuisson immédiate ? p.11-12
Gestion de l’eau p.13
Comment faire une cuisson différée ? p.14
Minuterie p.15
Tableau de cuisson p.16-17
Comment entretenir votre four ? p.18
Comment changer l’ampoule ? p.19
Que faire en cas d’anomalies ? p.19
Page 45

3
Chère Cliente, Cher Client,
Vous venez d'acquérir un four THOMSON et nous vous en remercions.
Nous avons mis dans cet appareil toute notre passion, notre savoir-faire pour qu'il
réponde au mieux à vos besoins. Innovant, performant, nous l'avons conçu pour
qu'il soit aussi toujours facile à utiliser.
Vous trouverez également dans la gamme des produits THOMSON, un vaste choix
de cuisinière, de fours à micro-ondes, de tables de cuisson, de hottes aspirantes,
de lave-vaisselle, de lave-linge, de sèche-linge, de réfrigérateurs et congélateurs
que vous pourrez coordonner à votre four THOMSON.
Bien entendu, dans un souci permanent de satisfaire le mieux possible vos exigences vis à vis de nos produits, notre service consommateurs est à votre disposition
et à votre écoute pour répondre à toutes vos questions ou suggestions (coordonnées à la fin de ce livret).
Et connectez-vous aussi sur notre site www.thomson-line.com où vous trouverez
tous nos produits, ainsi que des informations utiles et complémentaires.
THOMSON
Dans le souci d'une amélioration constante de nos produits, nous nous réservons le droit
d'apporter à leurs caractéristiques techniques, fonctionnelles ou esthétiques toutes modifications liées à leur évolution.
Important :
Avant de mettre votre appareil en marche, veuillez lire attentivement ce guide
d'installation et d'utilisation afin de vous familiariser plus rapidement avec son fonctionnement.
FR
Page 46

4
La cuisson vapeur
Généralités
La cuisson vapeur est tout bénéfice si l’on respecte le mode d’emploi. Saine et naturelle, la
cuisine vapeur conserve leur bon goût aux aliments. Une sauce raffinée ou aux herbes aromatiques ajoute le petit plus qui fait la différence.
Elle ne transmet aucune odeur. Inutile d’aromatiser l’eau de cuisson avec des herbes ou des
épices, en revanche, on peut parfumer un poisson en le déposant sur un lit d’algues ou une
volaille sur un bouquet de romarin ou d’estragon.
Elle cuit simultanément viande, poisson et légumes.
Elle réchauffe en douceur pâtes, riz et purée sans risque d’attacher et sans dessèchement.
Elle facilite la cuisson des crèmes, flans, gâteaux de riz... recouverts de papier aluminium,
l’eau de condensation ne les détrempe pas.
Inutile de saler avant, pas même l’eau de cuisson.
Pour donner meilleure mine à une viande, faîtes la dorer rapidement de tous les côtés, au
beurre chaud à la poële.
Comparée à la cuisson à l’eau, la vapeur ne présente que des avantages:
Elle est rapide: la cuisson démarre immédiatement alors que le temps de cuisson des ali-
ments dans un récipient d’eau n’est décompté qu’à partir de la reprise de l’ébullition.
Elle est diététique: les vitamines (celles dites hydrosolubles) et les sels minéraux sont bien
préservés puisqu’ils se dissolvent à peine dans l’eau condensée qui nappe les aliments.
De plus, aucune matière grasse n’est utilisée pour conduire la cuisson.
La vapeur respecte le goût des aliments. Elle n’ajoute pas de parfum, ni goût de grillé ou
de poêlé et n’en ôte pas non plus puisqu’il n’y a pas de dilution dans l’eau.
Revers de la médaille: inutile de cuire de cette façon un poisson qui ne serait pas frais, ou
un légume oublié au réfrigérateur depuis une semaine: résultat catastrophique!
La vapeur ne communique pas les goûts ni les odeurs; n’hésitez donc pas à gagner à la fois
du temps et de l’argent en faisant cuire côte à côte mais sans se toucher, un poisson et un
dessert par exemple.
La vapeur convient aussi pour blanchir, décongeler et réchauffer ou encore maintenir au
chaud, en particulier les sauces.
Faîtes d’abord revenir à la poêle, avec très peu de matière grasse, les viandes genre volaille,
veau, porc, pour qu’elles prennent un aspect doré appétissant. Achever ensuite leur cuisson à la vapeur.
Détaillés en morceaux, les aliments cuisent plus vite et de façon plus homogène que s’ils
sont entiers.
Page 47

5
Comment se présente votre four?
Bandeau de
commande
Réservoir
Afficheur
Générateur
de vapeur
1. Touche cuisson vapeur
2. Touche décongélation
3. Touche Start/Stop
4. Zone affichage heure ou
durée sablier
5. Symbole cuisson vapeur
6. Sigle durée de cuisson
7. Sigle fin de cuisson
1 2 3
5
13
8
15
9
10
Tube d’arrivée
d’eau
4
14
11
6
7
8. Indication de température
9. Touches +ou - réglage du temps
10. Touche de sélection : SET
11. Sigle du minuteur indépendant
12. Indicateur de problème sur circuit d’eau
13. Symbole de décongélation
14. Zone d’affichage durée ou départ différé
cuisson
15. Verrouillage clavier
Détail du bandeau de commande
Goulotte
12
FR
Page 48

6
Accessoires
Casserolerie
Réservoir permettant l’alimentation en eau de votre
four de façon indépendante.
Sa contenance est d’environ 1 litre (niveau maxi.)
Réservoir amovible
L’utilisation d’une eau faiblement calcaire facilitera l’entretien de votre four.
L’utilisation d’une eau déminéralisée est
interdite (pas alimentaire).
Plat support aliment (fig1)
Plat inox de cuisson perforé évitant le contact
entre les aliments et l’eau de condensation.
Plat à condensation (fig2)
Plat inox permettant de récupérer l’eau de
condensation.
Pour la cuisson poser le plat (fig1) sur le plat(fig2) dans le sens inverse
afin qu’ils ne s’emboitent pas ( voir schéma). Pour le rangement, poser le plat
(fig1) sur le plat(fig2) dans le même sens afin qu’ils s’emboitent.
Grille support amovible en inox (fig3):
à enfourner obligatoirement.
La casserolerie peut être nettoyée au lave-vaisselle.
fig.3
fig.1
fig.2
Page 49

7
Raccordement
électrique
Pour un branchement fixe, veillez à placer dans
la conduite d’alimentation, un moyen de
déconnexion conforme aux règles d’installation.
Sinon l’appareil doit être placé de telle façon que
la fiche de prise de courant soit accessible
lorsque celui-ci est encastré.
Utilisez impérativement une prise de courant
comportant une borne de mise à la terre et
raccordée conformément aux normes de sécurité en vigueur.
Votre installation doit être équipée d’une protection
thermique de 10 Ampères.
Ne faites pas fonctionner le four si le cordon
d’alimentation ou sa fiche sont abîmés. Dans ce cas, ils
doivent être remplacés par le fabricant, son S.A.V. ou
des personnes de qualification similaire pour éviter tout
danger.
Tension de fonctionnement ................................................ 220-240 V ~ 50 Hz
Puissance totale du four .................................................................... 1,77 kW
Consommation d’énergie
-de montée et maintien à 100°C pendant 1 heure ............................. 0,71 kWh
Dimensions utiles du four
Largeur ........................................................................................... 38,5 cm
Hauteur ........................................................................................... 18,2 cm
Profondeur ...................................................................................... 33,5 cm
Volume utile ................................................................................ 23,5 litres
Comment installer votre four?
FR
Page 50

8
Encastrement
1. Placez l’appareil dans la niche.
L’appareil doit être horizontal. Contrôlez
cette position.
2. Pour plus de stabilité, fixez le four
dans le meuble par 2 vis dans les trous
prévus à cet effet sur les montants latéraux.
3. Effectuez le raccordement électrique.
Veillez à ce que la fiche soit
accessible après installation.
380
560
550
50
378
405
544
595
20
386,5
Page 51

9
Comment utiliser votre four ?
Réglage de l’heure
A la première mise sous tension.
Réglez l’heure.
L’afficheur fait apparaître
12h00 clignotant.
Appuyez sur les touches
+ ou - et faîtes défiler l’heure.
S’il n’y a pas de validation sur la touche SET, l’enregistrement est automatique au
bout d’une minute.
1
2
Vadidez
avec SET.
Modification de l’heure
Heure fixe est affichée.
Appuyez simultanément sur les
touches + ou - jusqu’au
clignotement de l’heure.
Réglez l’heure par les touches + ou -.
Vadidez
avec SET.
Après 1 minute sans utilisation, la luminosité de votre
afficheur décroît afin de limiter la consommation d’énergie.
Limitation
consommation
d’énergie
3
1
2
3
FR
Page 52

10
Un verrouillage de l’afficheur est possible. Celui-ci ne
peut être activé que hors cuisson en mode heure ou en
mode cuisson différée
Verrouillage
afficheur
Appuyez sur la tou-
che START/STOP
pendant quelques
secondes.
Un bip retentit et le cadenas
apparaît sur l’écran. A partir
de ce moment, aucune touche
n’est active.
Pour déverrouiller,
appuyez sur la touche
START/STOP pendant
quelques secondes, un bip
retentit et le cadenas
disparaît.
1
2
3
Page 53

11
Cuisson
à la vapeur
Comment faire une cuisson immédiate ?
Cuisson vapeur à 100°C.
Appuyez sur la touche
Un temps de 25 minutes
vous est proposé.
Réglez la durée souhaitée
(mini. 5 min et maxi. 60
min) en appuyant sur + ou -
Vadidez avec la
touche START.
Remplissez IMPERATIVEMENT le réservoir d'eau jusqu'au niveau maxi
avant la cuisson. Remettez le réservoir dans son logement en l'engageant
A FOND jusqu'à ce que vous ressentiez le PASSAGE D'UN CRAN.
Le symbole s’anime. Lorsque la température est atteinte, 100°C devient fixe et
un bip retentit.
Principe de
fonctionnement
L’eau contenue dans le réservoir arrive dans la cavité par un
tuyau. Cette eau est transformée en vapeur au contact d’une
surface chaude placée dans la partie inférieure de la cavité:
il s’agit du générateur de vapeur.
Il n’est pas nécessaire de rajouter de l’eau dans le plat de cuisson. Pour garantir UNE VRAIE CUISSON VAPEUR, votre four
est proposé avec une casserolerie spécialement étudiée pour
une parfaite cuisson.
1
2
3
1
2
3
4
Afin de ne pas altérer les résultats de cuisson, n’ouvrez pas la porte de
l’appareil pendant la cuisson.
Lors de la cuisson, l’appareil devient chaud. De la vapeur chaude s’échappe lorsque vous ouvrez la porte de l’appareil. Eloignez les enfants.
FR
Page 54

Décongélation
Décongélation à 60°C.
Appuyez sur la touche
Un temps de 40 minutes vous
est proposé.
Réglez la durée souhaitée
(mini. 5 min et maxi. 60 min)
en appuyant sur + ou -
Vadidez avec la
touche START.
Modification du
temps de cuisson
En fin de cuisson
0m00s s’affiche. Suppression de l’animation. Emission
de bips discontinus durant 3 minutes.
Pour stopper les bips, appuyer sur STOP ou ouvrez la porte.
Le symbole s’anime. Lorsque la température est atteinte, 60°C devient fixe et un
bip retentit.
Arrêt en cours de
cuisson
En cours de cuisson, vous pouvez modifier le temps de
cuisson par les touches + ou -
A tout moment,vous pouvez stopper la cuisson en
appuyant sur START/ STOP (appui long d’environ 1
seconde).
Si la génération de vapeur ne s’est pas encore déclenchée (environ 1 minute), le four s’arrête immédiatement et le temps disparait.
Si la génération de vapeur est déjà commencée, le
temps passe à 3 minutes et un décomptage s’effectue,
la vapeur s’évacue avant l’ouverture.
Videz IMPERATIVEMENT le réservoir.
1
2
3
1
2
3
4
Afin de garantir une bonne fiabilité du four, le ventilateur continue de
fonctionner un certain temps après la fin de cuisson.
12
Page 55

En cas de problème lié au circuit d’eau en cours de cuisson,
l’indicateur “absence d’eau” apparaît et un bip retentit.
Ce défaut est lié en particulier à:
- un réservoir vide.
- un réservoir mal emboîté.
Après avoir vérifier ces deux points, la cuisson redémarre automatiquement après fermeture de la porte.
Gestion de l’eau
p
temps
)
,
g
g
Congelez des petites portions; la décongélation sera plus rapide, plus homogène et la qualité sera préservée. A mi-décongélation, vous pouvez retourner les aliments ou les étaler
(cas des galets de légumes par exemple). Protégez la pâtisserie avec un film alimentaire ou
conservez l'emballage d'origine. Essuyez poissons, saucisses avant de les faire griller: l'humidité empêcherait de dorer. Pour les grosses pièces (rôtis, …) procédez par étapes en
retournant plusieurs fois la pièce et ajustez le temps en conséquence.
Réchauffage
Vous pouvez réchauffer un plat cuisiné dans votre four vapeur , le plat ne sera pas dessèché, ne sera pas surcuit, ne risquera pas d'éclabousser ou d'attacher. Séquence vapeur à
100°C, posez le plat ou l'assiette sur la grille, protégez avec une feuille de papier aluminium
ou un film alimentaire pour éviter les retombées des gouttelettes d'eau et réchauffez pendant 20 à 25 min selon la nature du plat et vos goûts.
Exemples
:
Une assiette de choucroute: 20 min Un bol de potage (30 cl): 20/25 min
Conseils
13
FR
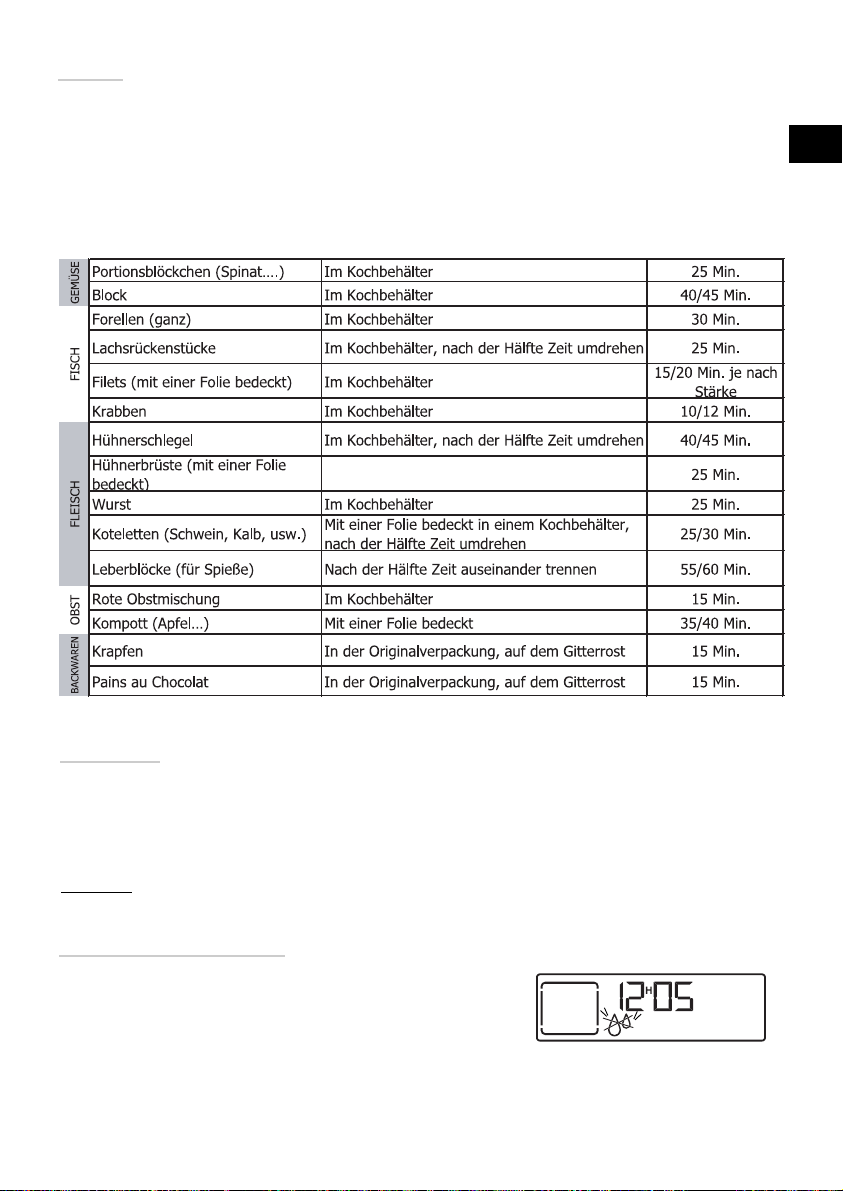
En galets (épinards….) posés dans le plat 25 min
En bloc posés dans le plat 40/45 min
Truites (entières) posées dans le plat 30 min
Pavés de saumon posés dans le plat, retournés à mi-temps 25 min
Filets (protégés par un film) posés dans le plat
POISSONS
Crevettes posées dans le plat 10/12 min
Cuisses de poulet
Blancs de volaille (protégés par un
film
Saucisses posées dans le plat 25 min
VIANDESFRUITS
Côtelettes (porc, veau…)
Cubes de foies (pour brochettes) séparer à mi temps 55/60 min
Fruits rouges en mélange posés dans le plat 15 min
Compote (pommes…) protégées par un film 35/40 min
Beignets
Pains au chocolat
PATISSERIES LEGUMES
posées dans le plat, retournées à mi-
25 min
posées dans le plat, protégées par un
film
retournées à mi-temps
conservés dans l’emballage, posés sur la
rille
conservés dans l’emballage, posés sur la
rille
15/20 min selon
é
aisseur
40/45 min
25/30 min
15 min
15 min
Page 56

14
Cuisson
à la vapeur
Comment faire une cuisson différée ?
Cuisson à la vapeur à 100°C.
Vous pouvez programmer le temps de cuisson de façon à
ce que votre plat soit prêt à une heure voulue.
Exemple:
Il est 10h00, vous devez vous absenter; votre plat doit
être prêt pour 12h00 et la cuisson dure 20mn.
Appuyez sur la touche
. Un temps de 25
minutes vous est proposé.
Réglez la durée souhaitée (mini. 5 min
et maxi. 60 min) en appuyant sur les
touches + ou -.
Ex
emple: 20 min.
Vadidez avec
la touche SET.
L’heure et le symbole de fin de cuisson
s’affichent et clignotent.
Le réglage de l’heure de fin de cuisson est
alors possible:
Appuyez sur les touches + ou Ex
emple: 12h00
Validez avec la touche SET.
L’heure et le symbole de fin de cuisson
deviennent fixes.
Le symbole de durée de cuisson et l’heure
s’affichent.
S’il n’y a pas de validation sur la touche SET, l’enregistrement de la programmation est annulée, l’affichage du temps disparaît et l’heure se réaffiche.
Modification du
temps de cuisson
et heure de fin de
cuisson
Vous avez la possibilité à tout moment de consulter ou
de modifier la durée de cuisson et l’heure de fin de
cuisson en appuyant sur la touche SET.
Pour annuler la programmation, appuyez sur START/STOP.
1
2
3
1
2
3
4
5
4
5
Page 57

15
Minuteur
Votre four est équipé d’un minuteur électronique indépendant du fonctionnement du four permettant de
décompter un temps.
Cette fonction est indépendante du four. Elle ne peut
pas commander un arrêt de cuisson automatique.
Appuyez sur la touche
SET quelques secondes.
0m00s et le symbole minuteur clignotent.
Réglez la durée souhaitée (maxi. 59 min 50 secondes)
en appuyant sur les touches + ou -.
Au bout de quelques secondes, la minuterie décompte le temps.
Une fois le temps écoulé, des bips retentissent quelques
secondes. 0m00s s’affiche et clignote.
Cependant cette fonction peut être utilisée même pendant le fonctionnement du four. Dans ce cas, l’affichage
de la minuterie est prioritaire sur l’affichage de l’heure du
jour.
L’arrêt des bips se fait par un appui long sur SET ou
START.
Lorsque le décompte est commencé, vous pouvez modifier le temps restant en appuyant quelques secondes sur
SET puis sur les touches + ou -.
Pour annuler la minuterie, appuyez sur SET quelques
secondes puis ramenez le temps sur 0m00s.
Modification
et arrêt de
la minuterie
2
1
1
2
Comment utiliser la minuterie ?
FR
Page 58

16
Artichauts (Petits)
TEMPS
Quelle que soit la quantité
Asperges
Brocolis
Carottes
Céleri-rave
Citrouille
Champignons
Courgettes
Crosnes
Epinards
Endives
Fenouil
Haricots verts
Navets
Petits pois frais
Pommes de terre
40 à 45 min .
35 à 40 min.
18 min.
20 à 22 min.
25 à 30 min.
15 à 20 min.
15 min.
10 à 15 min.
20 min.
20 min.
35 min
30 min.
22 min.
30 à 35 min.
15 à 20 min.
20 à 25 min.
25 min.
40 à 45 min.
posés à l’envers dans le plat
pour les pointes, réduire le temps
en petits bouquets
en fines rondelles
en fines tranches
en cubes
en rondelles
trognon ôté et coupées en 2
dans la longueur
coupés en 2
en cubes
Poireaux
25 min.
coupés en 2
coupées en rondelles
entières
• Ces temps sont
fonction de la
nature, de la
grosseur et de la
fraîcheur des
légumes. Suivez
les indications
figurant dans la
colonne
«prépa-
rations»
.
• Le temps de
cuisson reste le
même quelle
que soit la quantité à cuire.
Exemple :
1 ou 4 artichauts
même temps de
cuisson .
• Pour contrôler
le degré de cuisson piquez dans
la partie la plus
épaisse du légume; s’il est cuit,
il n’y aura pas de
résistance.
(frais) remuer en cours de cuisson
(surgelés) ” ”
/
Choux
30 à 35 min.
22 min.
30 à 35 min.
Bruxelles
Fleurs en petits bouquets
Vert émincés
en fines lamelles
LEGUMES
PREPARATIONS
REMARQUES
Coquilles St Jacques
TEMPS
Moules/Bigorneaux
Crabes/Tourteaux
Homards
Langoustines
10 à 12 min.
20 à 25 min.
25 min.
30 à 35 min.
12 à 15 min.
avec aromates
avec aromates
/
selon le poids
/
• Disposez les
coquillages sur la
grille du plat en
verre,ajoutez herbes aromatiques.
• Déposez les
crustacés sur un
lit d’algues.
COQUILLAGES
CRUSTACES
PREPARATIONS
REMARQUES
Pommes/poires/
pêches
TEMPS
Compote
Crèmes
10 à 15 min.
25 min.
10 min.
entières, épluchées
fruits en lamelles
en ramequins
• Temps selon
maturité.
FRUITS-CREMES
PREPARATIONS
REMARQUES
Tableau de cuisson
Page 59

17
Brochet
TEMPS
Cabillaud/Colin
Dorade
Haddock
Hareng
Lieu (noir & jaune)
Lotte
Maquereau
Merlan/Morue
Raie
25 à 30 min.
13 à 15 min.
20 à 25 min.
15 min.
20 min.
15 à 20 min.
15 min.
20 min.
15 min.
25 à 30 min.
entier (1kg)
darnes (180 g)*
entière (1kg)
filets
entier (200g)
darnes (180 g)
entier (250g)
• *Darnes: tranches de poissons
rondes de 2 à 3 cm
d’épaisseur
(180/200g) par
personne.
• Exigez des produits très frais.
• Posez des poissons entiers dans
le plat tel quel ou
sur des feuilles de
laurier, de fenouil
ou autre herbe
aromatique.
• Dès la fin de la
cuisson, ôtez la
peau qui se décollera très facilement.
selon épaisseur
filets
POISSONS
PREPARATIONS
REMARQUES
Rougets
Rougets
Saumonette
Saumon
Soles
Thon
Truite
entière (1kg)
15 min.
10 min.
20 min.
15 à 20 min.
10 à 12 min.
20 à 25 min.
20 à 25 min.
entier (200g)
filets
gros tronçons (6 à 10cm de long)
darnes (180/200 g)
darnes (180/200 g)
entière (200g)
13 à 15 min.
filets
Boeuf
TEMPS
Porc
(filets mignon)
Volaille
(blancs,filets)
(Paupiettes)
Saucisses
15 à 30 min.
25 min.
20 à 25 min.
25 min.
20 min.
Rôti
800 g.:
55 à 60 min.
Cuisses poulet: 35 à 40 min.
Rôti dindonneau: 50 à 60 min.
Morteau 400 g
• Puis dorez au
gril dans un
autre plat.
VIANDES /
OEUFS
PREPARATIONS
REMARQUES
Boudins
10 à 15 min.
Déposez directement dans un plat, recouvrez d’eau ou de lait. En effet la vapeur ne suffit
pas pour saturer ces aliments qui gonflent. Posez une feuille d’aluminium sur le plat pour
éviter les retombées des gouttelettes d’eau.
TEMPS
• Egrenez à la
fourchette en
fin de cuisson.
RIZ, PÂTES
SEMOULE
PREPARATIONS
REMARQUES
Riz au lait
30 min.
100g de riz lavé-20cl de lait-2 c. à
soupe de sucre
Semoule
20 min.
200g (1/4 litre d’eau)
7 min.
5 à 6 min.
8 min.
Coque: posé directement sur la grille.
Mol
let: posé directement sur la grille.
A
u plat: cassé dans un plat individuel posé sur la grille
et recouvert d’un film alimentaire.
Oeufs
à partir d’oeufs
très frais conservés à température
ambiante.
10 à 12 min.
Dur / Cocotte: voir recettes détaillées.
FR
Page 60

18
Entretien
Cavité (après chaque cuisson)
Essuyez la cavité avec un chiffon sec après refroidissement du
générateur de vapeur ou bien laissez sécher la cavité en maintenant la porte entreouverte.
Tuyau d’arrivée d’eau (1 fois par mois)
Retirez le tuyau d’arrivée d’eau en le dévissant.
Enlevez le dépôt de tartre pouvant éventuellement s’être
déposé à l’intérieur (à l’aide d’un objet fin et pointu type fine
brochette ou aiguille à tricoter).
Générateur de vapeur (1 fois par mois)
Versez 1/2 verre de vinaigre d’alcool blanc sur le générateur.
Laissez agir quelques minutes, nettoyez et rincez à l’eau.
Ne pas utiliser d’éponge ou poudres abrasives, de détartrant à
cafetière.
Nettoyage de la
Goulotte
Démontez cette goulotte en la tirant vers le haut,
essuyez-la et remettez-la en place grâce aux trois encoches prévues à cet effet.
Le nettoyage du four ne doit pas être réalisé
avec un nettoyeur vapeur.
Comment entretenir votre four ?
Page 61

19
Que faire en cas d’anomalies ?
QUE FAUT-IL
FAIRE ?
LES CAUSES
POSSIBLES
Votre afficheur ne
s’allume pas
L'ampoule ne fonctionne plus.
Fuite d'eau ou de vapeur au niveau de la
porte pendant la cuisson.
Défaut d'alimentation
du four.
Carte électronique
hors service.
- Vérifier l'alimentation (fusible de votre
installation).
- Faire appel au Service Après-Vente.
- Changer l'ampoule.
- Brancher le four.
- Changer le fusible de
l'installation.
L'ampoule est hors
service.
Le four n'est pas
branché.
Le fusible de votre
installation est hors
service.
La porte est mal fermée.
Le joint de porte est
défectueux.
- Faire appel au Service Après-Vente.
VOUS CONSTATEZ
QUE...
Dans tous les cas, si votre intervention n’est pas suffisante,
contacter sans attendre le Service Après-Vente.
Comment changer l’ampoule ?
- Tournez le hublot vers la gauche d'un quart de tour.
- Dévissez l'ampoule dans le même sens.
Caractéristiques de l'ampoule :
- 15 W - 220-240 V
- 300°C - culot E 14
- Changez l'ampoule puis remonter le hublot en
veillant au bon positionnement des joints.
- Reconnectez votre four.
L'ampoule se situe à l'arrière
droit de la cavité du four.
Déconnectez votre four
de l'alimentation électrique avant toute intervention
sur l'ampoule afin déviter tout
choc électrique.
FR
Page 62

99644862 - 01/08
 Loading...