

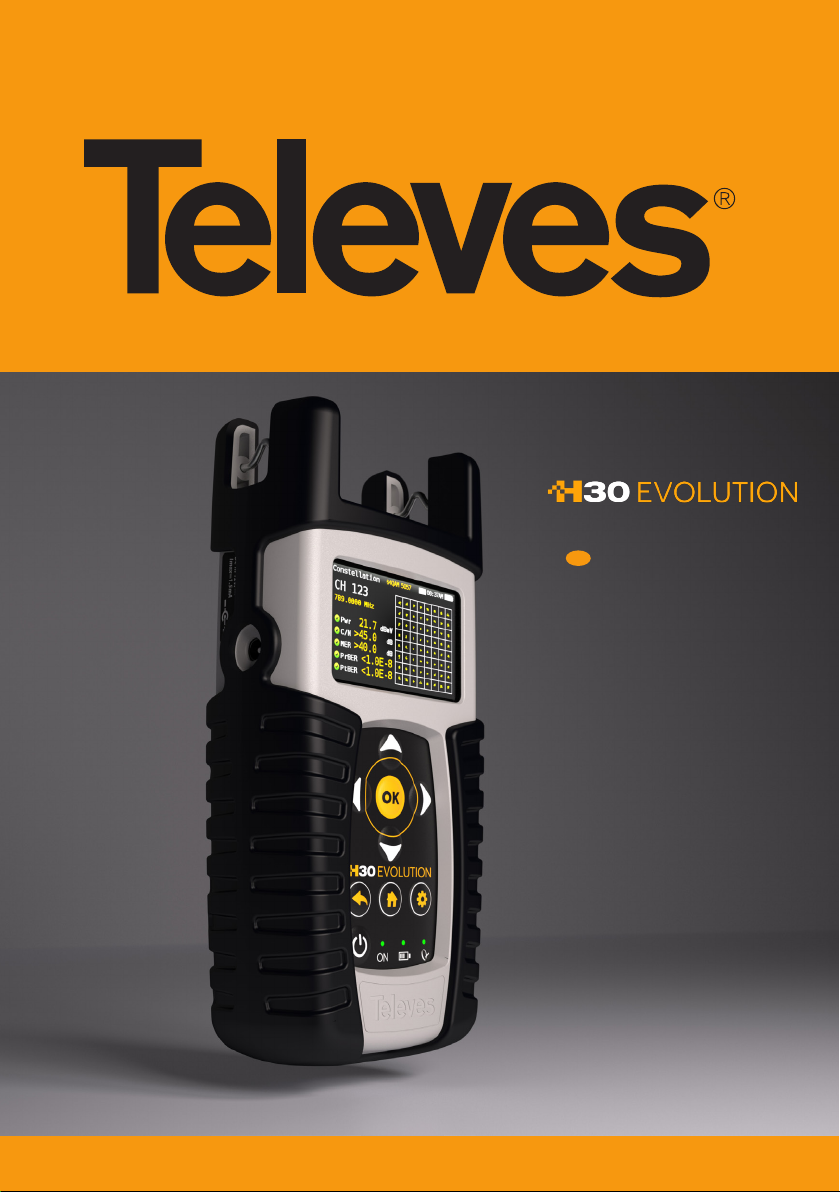
EN
DVB Meter / Analyser
with digital processing
Instruction Manual
EN
Refs. 593501, 593502, 593503, 593504, 593505
www.televes.com


Index
Safety requirements 4
Symbols and safety labels 4
Overview 5
Introducing the H30Evolution. 5
Key Features 5
General Specications 6
Technical Specications 7
Description equipment components 8
Connectors and controls 8
Web Application 22
1. Measurements 22
2. Plans 23
3. SCR 24
4. Quality Proles 24
5. Screen Mirroring 24
6. Clone 25
7. Update 25
Mobile Devices App 26
EN
ENGLISH
Keyboard 8
Power supply 9
About battery 9
Before starting 11
Product operation 11
1. Channel Info 11
2. Spectrum 12
3. MPEG 13
4. System Scan 14
5. Satellite Test 15
6. Learning Plan 16
7. Constellation 16
8. Echoes 17
9. Video Camera 18
10. Wi-Fi Scan 19
11. Setup 20
Firmware Update 21
1.- Connection between the App and the
H30Evolution 26
2. Features 27
2.1.- Loggers 27
2.2.-Screen Mirroring 27
2.3.-Files 28
2.3.1.- Channel Plans 28
2.3.2.- SCR 29
2.3.3.- Quality Prole 29
2.4.-Settings 29
2.4.1.- Info 30
2.4.2.- Manual 30
2.4.3.- Register 30
2.4.4.- Clone 31
Error Messages 31
Repair service 32
Warranty 33
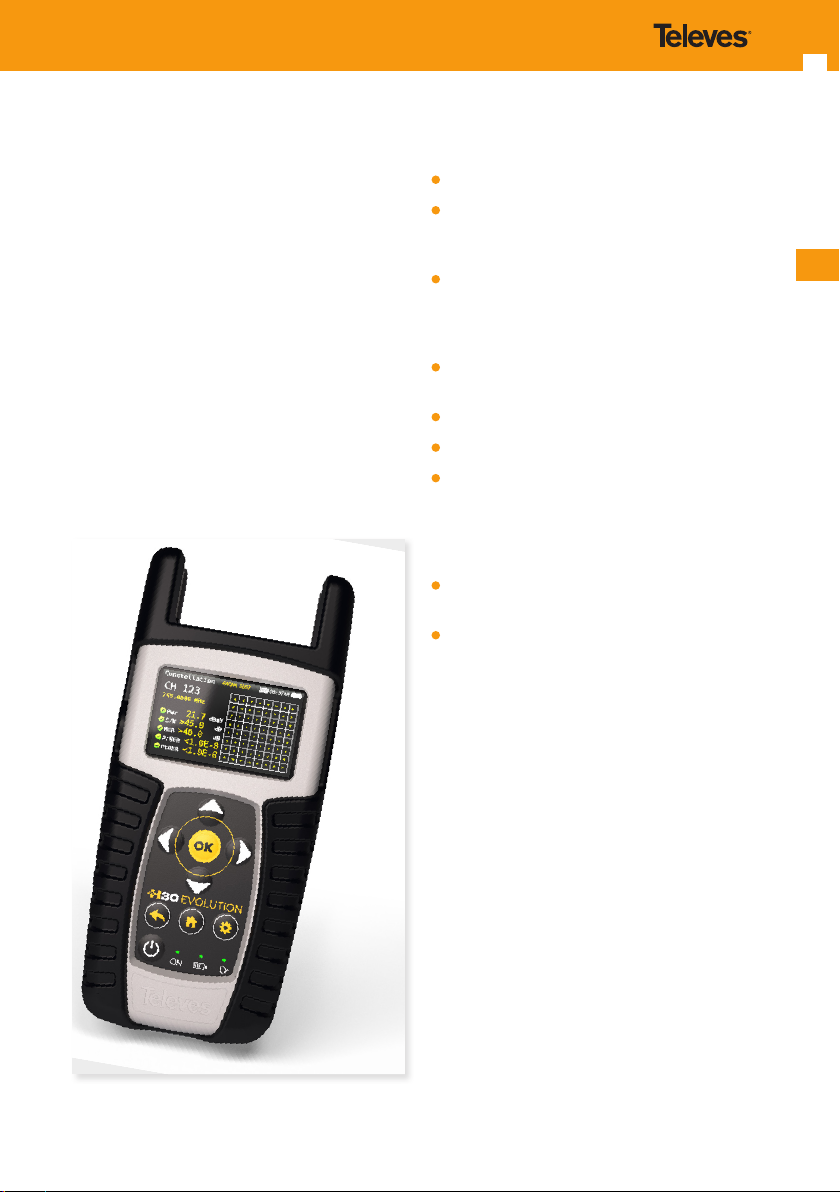
H30EVOLUTION handheld DVB meter / Analyzer
4
Ref. 593304
Recycle or dispose of used electrical and
electronic devices properly.
H30Flex
Deposite los residuos de aparatos eléctricos y
DVB-S/S2 + DVB-T/T2 + DVB-C
A00383
Ref. 593304
Recycle or dispose of used electrical and
electronic devices properly.
H30Flex
Replace the batteries only with the same type.
Reemplace las baterías sólo por el tipo
recomendado.
Deposite los residuos de aparatos eléctricos y
electrónicos en los contenedores al efecto.
DVB-S/S2 + DVB-T/T2 + DVB-C
A00383
Safety requirements
Product inspection
- Inspect the equipment for shipping damage.
Should any damage be discovered, immediately
le a claim with the carrier.
Read and Follow All Instructions
- All the safety and operating instructions should
be read prior to and followed while operating
this product.
Do not obstruct the ventilation slots
Cleaning
- Follow the cleaning instructions contained in
the Maintenance section of this manual.
Attachments
- Do not use attachments that are not approved
by the product manufacturer.
Water and Moisture
- This product is splash water resistant but is not
submersible.
- Do not place objects lled with liquids on or
near the meter, such as glasses.
Power Sources
- This product should be operated only from the
type of power source specied (12VDC - 2A).
- Ensure that the voltage applied to the power
connector does not exceed 15V. Higher voltages
could damage the equipment
- Maximun consumpted current: 2A
Grounding or Polarization
- Do not bypass or defeat electrical plug
polarization or grounding. Doing so will violate
the warranty and may pose a risk of re or
electrocution.
Wire Protection
- Ensure all connected wiring is routed correctly
to avoid damage including pinching, excessive
bends, or compression.
Electrical Supply, Grounding, and Surge
Protection
- Ensure that all local or national electrical codes
are followed.
Power Lines
- Always use caution and avoid operating this
or any connected equipment near uninsulated
power lines or any other hazards.
Servicing
- There are no user serviceable parts except the
battery. Do not attempt to service this product or
remove covers other than the battery cover. Refer
all servicing to qualied service personnel. Follow
the instructions in this manual when replacing the
battery.
Heat
- The product should be situated away from heat
sources such as radiators, heat registers, stoves, or
other products that produce heat.
- Do not place naked ame sources on the meter,
such as lighted candles.
Maximum current consumed by the meter: 2A
Battery
- Battery must be replaced by qualied
personnel, following the steps mentioned in the
corresponding section.
- If the battery is replaced, the new one must
have the same features, because there is risk of
explotion. Furthermore, the new battery must be
approved by the manufacturer. Otherwise, the
company is not responsible for damages caused
to the meter.
- Battery features:
Li-Ion
2600mAh 7.26V 19 Wh
Symbols and safety labels
Recycle or dispose of used electronic
devices properly.
Remove the battery from the equipment
following the instructions given in this
manual and dispose it properly
Replace the batteries only with the same
type.
EN
5
Overview
Introducing the H30Evolution.
New from Televes, a go-to meter designed with the
needs of a DVB installator in mind.
The H30Evolution is a light weight, rugged unit,
packed with all the features needed to install and
troubleshoot a television system using DVB-S/S2,
DVB-T/T2, DVB-C (Annex A/C) and QAM (Annex B)
digital modulation as well as analog signals.
Available for the rst time in such a portable and
aordable package, its real time digital processing
engine gives the installers a great precision
measurements needed in today’s fullment
environment.
Key Features
User friendly, handheld DVB meter.
Complete portfolio of Analog/Digital
measurements with easy-to-read pass/fail
indicators.
Quick and easy to use interface with features
such as Channel measurements, System Scans,
Constellation Diagram, Spectrum Analyzer,
Echoes, Datalogger, and more.
Rugged, light weight, fully automatic, fast, and
accurate.
Easy updates.
1 GHz spectrum range with selectable span.
PASS/FAIL Indicators: Icons indicate if a
measurement is good, bad, or in the warning
zone for quick and easy status checks. Reduce
installer entry errors and improve decision
making.
LNB powering, and SCR and DiSEqC parameters
setup
MPEG image visualization
H30EVOLUTION handheld DVB meter / Analyzer
General Specifications
Display 2.8”TFT 400 x 240 full colour
Weight 510g (12.12lb)
Dimensions 175 x 100 x 52 mm / 6.9 x 3.9 x 2 in (H x W x D)
Power Source
Battery LiIon smart battery (7.2VDC, 2300mAh)
Operating Time Up to 4 hours
Operating Temperature 23ºF to 104ºF (-5ºC to 45ºC)
Storage Temperature -4ºF to 158ºF (-20ºC to 70ºC)
Humidity 5% to 95% non-condensing
Ruggedness Survives 1 m (3 ft) drop to concrete on all sides
Communication
Interfaces
Storage 400 MB (internal) for measurements
Power up time < 10 seconds
Input: 100-240V~ 50-60Hz
Output: 12VDC, 2A
USB 2.0 to download Datalogs and software updates
6
EN
7
Technical Specifications
Frequency
Range 50 - 880 MHz and 950 - 2200 MHz
Resolution 125 kHz
Tuning Frequency or channel
Input
Impedance 75Ω F-type connector
Spectrum Analyzer
Span 5, 10, 20, 50, 100, 200, 500 and Full span
Scale 5 and 10 dB/div
Hold mode
Auto and manual
reference level
Digital Measurements DVB-T (ref.593501, 593502,
593504 and opc.593231)
MPEG image
Modulations CFDM (QPSK, 16QAM, 64QAM)
Power 45-110dBuV (25-120dBuV opt.593235)
CBER 9.9E-2 - 1.0E-6
VBER 1.0E-3 - 1.0E-8
MER Up to 35dB
C/N Up to 40dB
Echoes
Constellation
Digital Measurements DVB-T2 (ref.593502, 593504 and
opc.593232)
MPEG image
Modulations COFDM (QPSK, 16QAM, 64QAM and 256QAM)
Power 45-110dBuV (25-120dBuV opt.593235)
LDPCBER 9.9E-2 - 1.0E-6
BCHBER 1.0E-3 - 1.0E-8
Link Margin Up to 30dB
MER Up to 35dB
C/N Up to 40dB
Echoes
Constellation
Digital Measurements DVB-C (ref.593303, 593304 and
opc.593233)
MPEG image
Modulations 16QAM, 32QAM, 64QAM, 128QAM and 256QAM
Power 45-110dBuV (25-120dBuV opt.593235)
CBER 1.2E-2 - 1.0E-8
MER Up to 38dB
C/N Up to 40dB
Constellation
Digital Measurements QAM-B [ITU J.83-B] (ref.593360)
MPEG image
Modulations 64QAM and 256QAM
Power 45-110dBuV (25-120dBuV opt.593235)
Pre-BER y Post-BER 1.0E-3 - 1.0E-8
MER Up to 38dB
C/N Up to 40dB
Constellation
Digital Measurements (DVB-S)
MPEG image
Power 45-110dBuV (25-120dBuV opt.593235)
CBER 9.9E-2 - 1.0E-6
VBER 1.0E-4 - 1.0E-8
MER Up to 20dB
C/N Up to 20dB
Constellation
Digital Measurements (DVB-S2)
MPEG image
Modulations
Power 45-110dBuV (25-120dBuV opt.593235)
Link Margin
MER
LDPCBER
BCHBER
Constellation
Analog Measurements
Level 25 - 125dBuV
V/A
C/N Up to 45dB
Features
Terrestrial channel
plans
Satellite channel
plans
User channel plans
Units dBuV, dBmV, dBm
Preamp powering 13, 18, 24Vdc (max. current 475, 370, 140mA)
LNB powering 13, 18Vdc (max. current 475, 370mA)
LNB tone 22KHz
SCR (EN 50494) | dCSS
(EN 50607)
DiSEqC
Wi-Fi Analyser Opt. 593250
Video Camera
QPSK, 8PSK
Up to 10dB
Up to 20dB
9.9E-2 - 1.0E-6
9.9E-2 - 1.0E-8
CCIR, CCIR + LTE, OIRT, KBW, FCC, DAB, SIM
68E INTEL C, 68E INTEL, 42E TURK, 39E HELLAS,
33E EUTEL, 28E EUTEL, 28E ASTRA, 26E BADR,
25E EUTEL, 23E ASTRA, 21E EUTEL, 19E ASTRA,
16E EUTEL, 13E HOTB, 10E EUTEL C, 10 EUTEL,
9E EUTEL, 7E EUTEL, 4E ASTRA, 1W THOR5, 1W
THOR6, 5W EUTELC, 5W EUTEL, 7W NILE, 30W
HISPA, 48W AMZC, 48W AMAZ, SIM.
| Opt.593234
Specications are subject to change without notice.
H30EVOLUTION handheld DVB meter / Analyzer
8
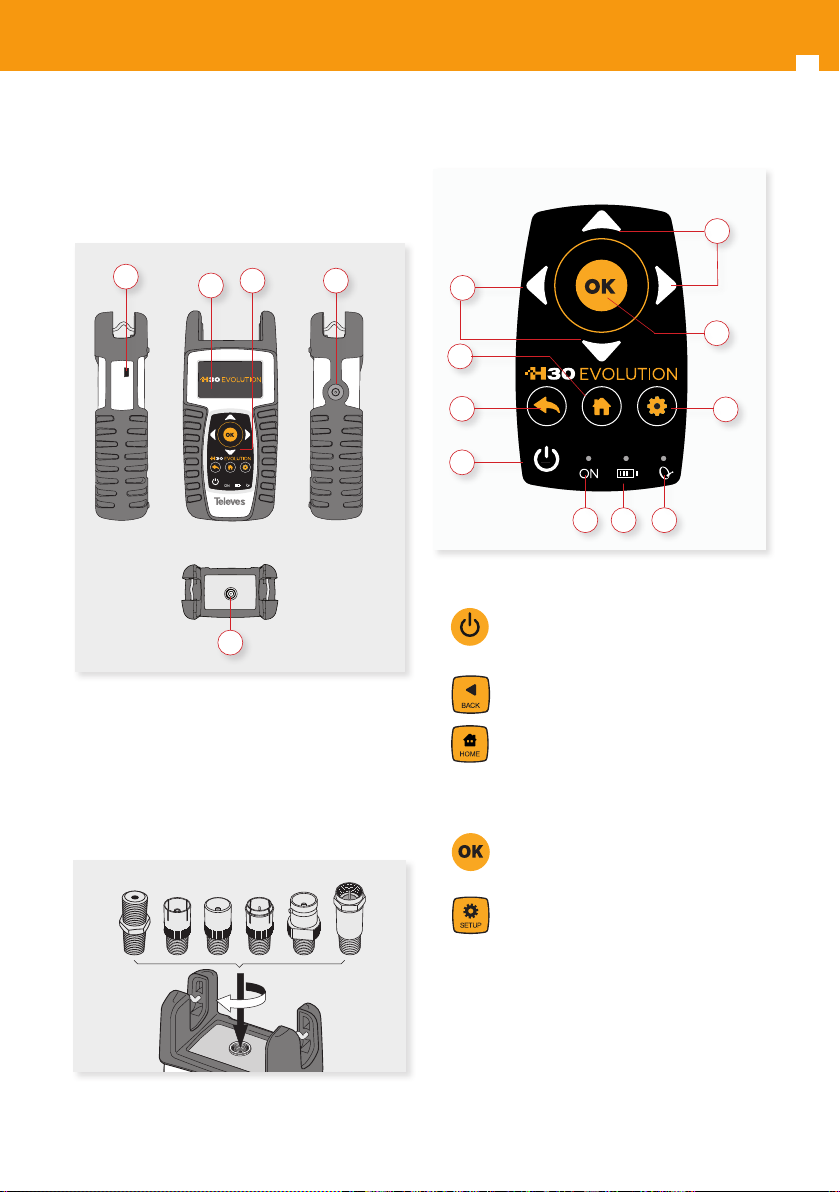
Description of equipment
components
Connectors and controls
4
1. External power connector (12VDC).
2. LCD display.
3. Keyboard and LED indicators
4. Ethernet connector
5. RF F-connector (see options below).
F-connector options
3
2
5
1
Keyboard
4
4
5
3
2
1
9 8
1. Device On/O button: To turn the
2.
3.
4
5.
equipment o, press and hold for
approximately 3 seconds.
Back button: Return to the previous
menu or close a parameter entry window.
Home button: Return to the main menu.
. Navigation buttons: Used to scroll through
options.
OK Button: To conrm selection.
7
6
6.
S etup button: Parameter window for the
current function.
. LED Powering: Indicates if the equipment is
7
powering an external load.
. LED Charging Battery: LED ashes while the
8
battery is charging.
. LED Power ON: Illuminated when the
9
equipment is on.
EN
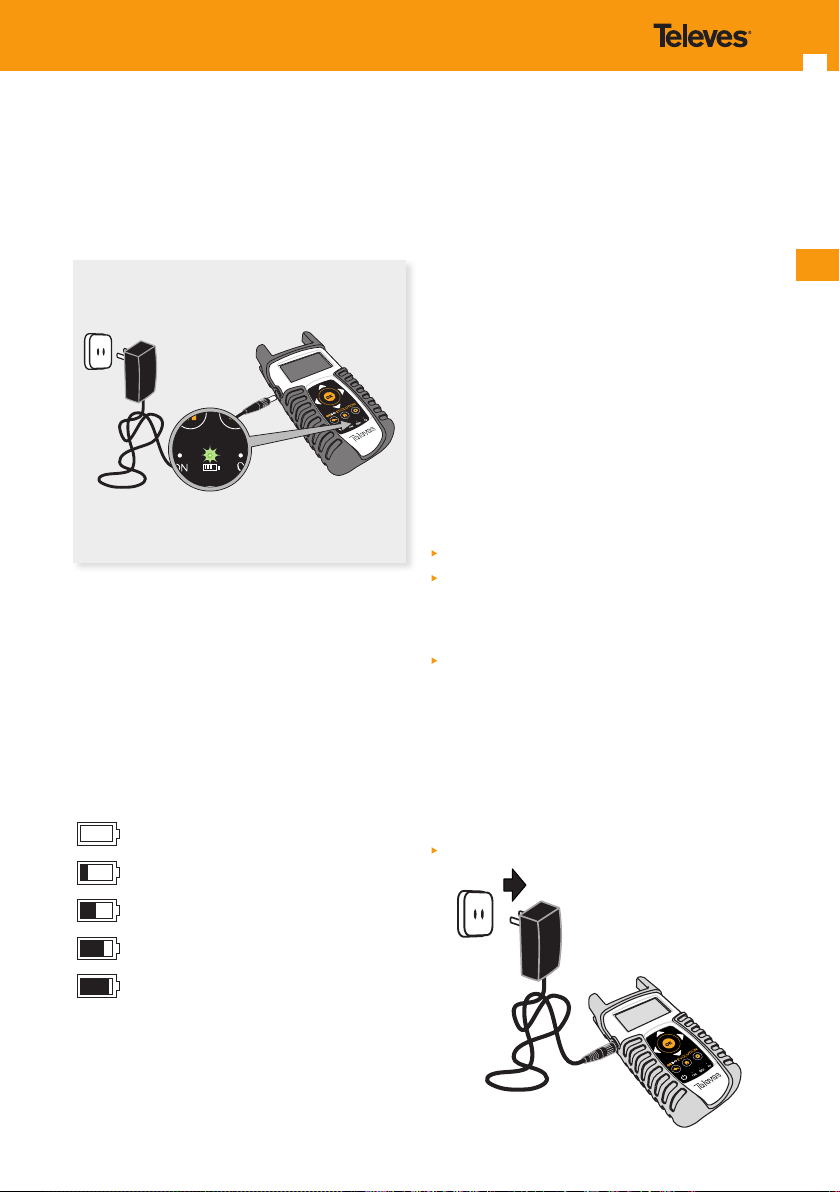
Power supply
A DC adapter is provided to power and charge the
meter. Plug the adapter into a properly grounded
electrical supply and the power connector on the
side of the unit.
When external power is supplied, the battery
management system automatically controls the
charging process.
A battery icon indicates the charge status of the
battery.
When the battery is fully charged, the battery icon
is completely lled. As the battery discharges, the
amount the icon is lled decreases in steps.
The icon shows 5 states representing the
approximate battery charge:
- Battery charge less than 5%.
- Battery charge between 5% and 25%.
- Battery charge between 25% and 50%.
- Battery charge between 50% and 75%.
- Battery charge greater than 75%.
9
From a fully discharged state, a full charge takes
approximately 8 hours and a 3 hour charge will
provide approximately a 75% charge.
The charge management system will detect
various conditions preventing charging, such as a
battery that is over a safe temperature.
About battery
Important:
If the meter detects a shortcircuit or over
consumption, and it is not connected to the power
supply, it automatically shuts down.
To turn it on again, it is necessary that it is
connected to tyeh power supply.
To maximize battery life:
Avoid fully discharging the battery.
The battery should always be charged with the
battery pack attached to the device and using
the supplied DC adapter or applying a constant
voltage within the specied range (12-15VDC).
For long term storage, keep the unit at room
temperature, or about 25º C. Start with a charged
battery and re-charge the battery every 2 to 3
months.
Battery replacement:
It is recommended that the replacement of the
battery is carried out by qualied personnel
following the following instructions:
Disconnect the meter from the power supply:
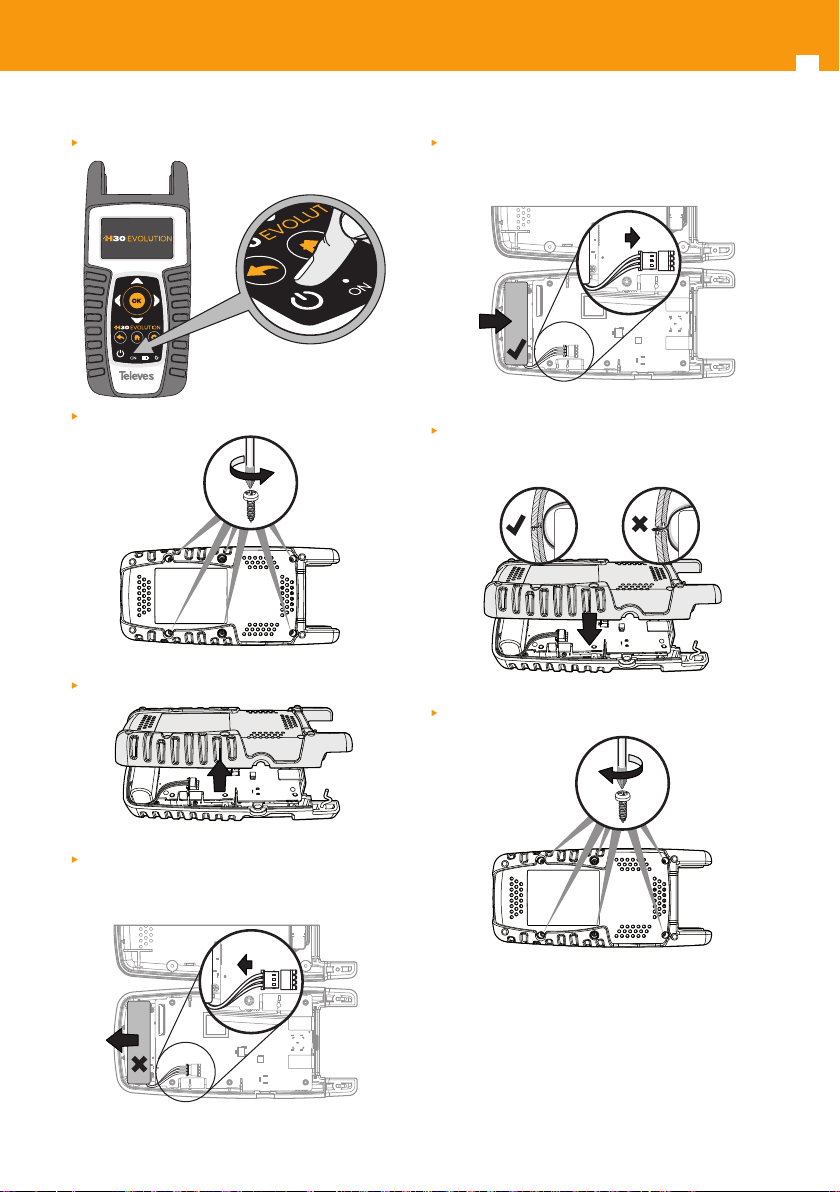
H30EVOLUTION handheld DVB meter / Analyzer
10
> 3 sec.
OFF:
> 3 sec.
OFF:
Turn the H30Evolution o
Remove the screws from the backside
Open the back cover
Place the new battery and then connect it to the
power board
Replace the back cover of the meter. Make sure
that the cable is not trapped between the two
covers
Replace the screws of the back cover
The battery is located at the bottom of the meter.
Carefully remove the connector from the power
board, and then remove the battery
EN
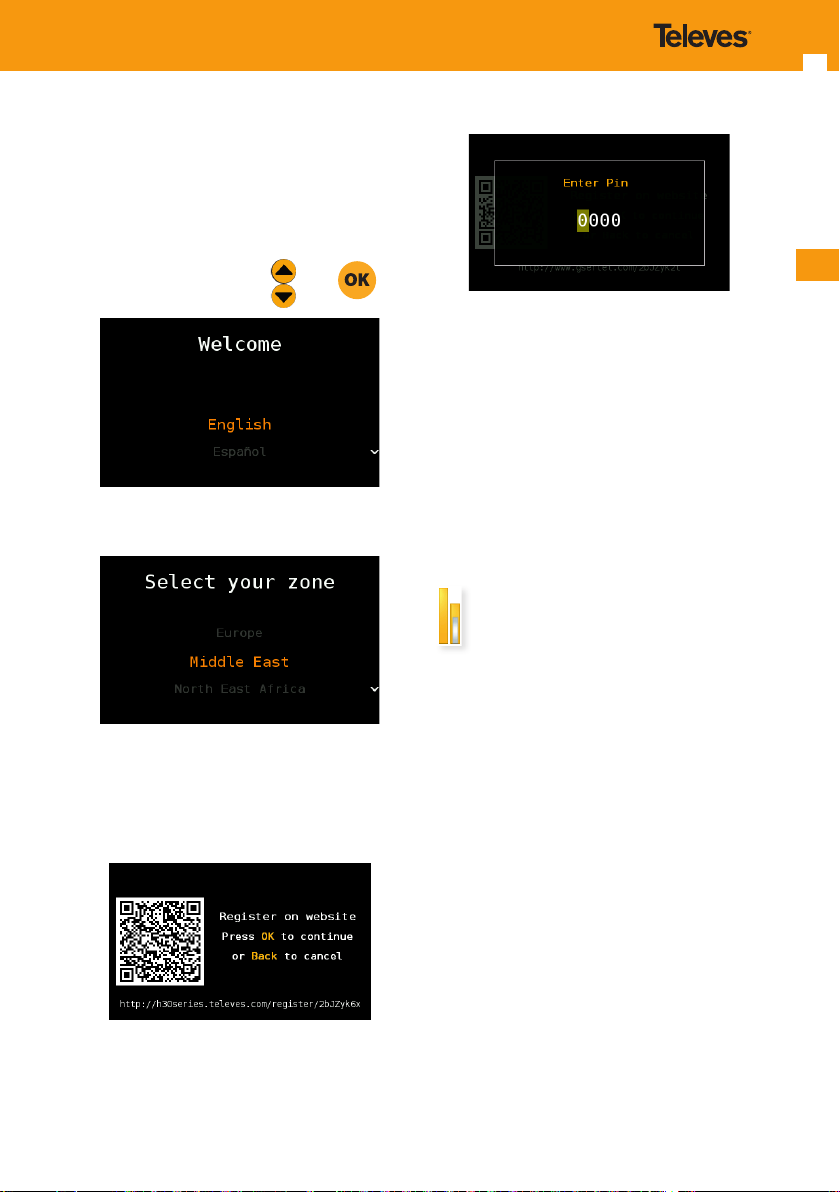
Before starting
The rst time you tunr your H30Evolution on,
please follow the next steps for a proper conguration:
1.- Select the language using and
2.- Select the geographical area, so the proper
channel plans will be enabled:
11
2.3.- If the PIN is OK, you have nished the registration process.
NOTE: Options 593234 (dCSS) and 593235 (Extended terrestrial input level range) will be activated
automatically in your H30Evolution whenever you
register it within 30 days after you turn it on for the
rst time.
Product operation
1. Channel Info
2.- Register you H30Evolution:
2.1.- Read the QR code using your mobile phone
or tablet. Or enter the web url shown at the botton
of the screen in the address bar of your computer:
2.2.- Register your H30Evolution in our web. Once
the process is completed, you will get a PIN code.
Enter the PIN in your H30Evolution:
Analog and digital channels are very dierent in
terms of signal content and power distribution
and thus require the advanced SLM techniques
provided in the Televes H30Evolution.
In analog mode, video and audio levels, V/A and
Carrier to Noise (C/N) are measured.
In digital mode measurements depend on the
modulation:
DVB-S: Power, C/N, MER, CBER, VBER
DVB-S2: Power, C/N, MER, LDPCBER, BCHBER
DVB-T (Ref. 593301, 593302, 593304 and Opt. 593231): Power,
C/N, MER, CBER, VBER
DVB-T2 (Ref. 593302, 593304 and Opt. 593232): Power, C/N,
Link Margin, LDPCBER, BCHBER
DVB-C (Ref. 593303, 593304 and Opt. 593233): Power, C/N,
CBER, MER
QAM-B [ITU j.83-B] (Ref. 593360): Power, C/N, CBER,
MER
H30EVOLUTION handheld DVB meter / Analyzer
12
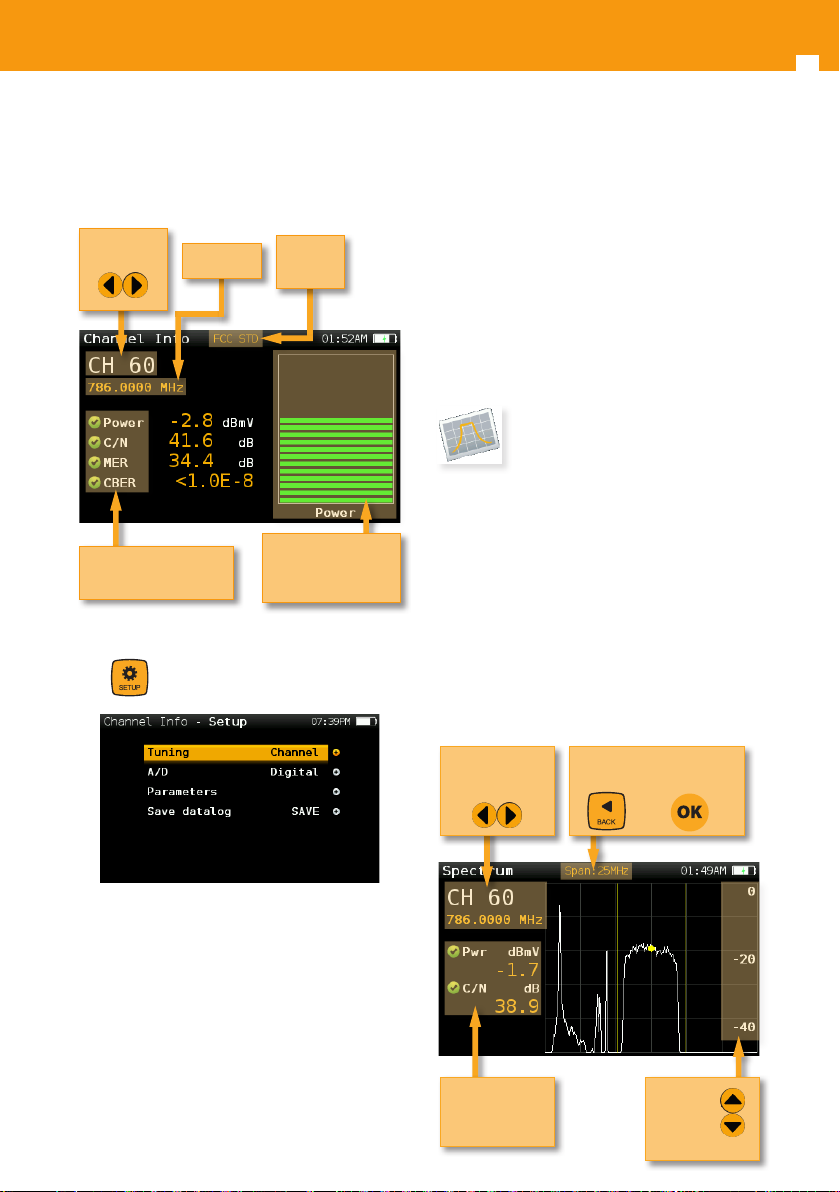
1.1. Main window
Below is a capture of a Channel Info window with a
brief explanation of its features.
Channel
Change using
List of measurements
with pass/fail indicators
Frequency
Channel
plan
Bar graph of main
measurement.
Color according to
checkmarks
1.2. Setup
Press
to change the Channel Info options.
(powering), and DiSEqC. In addition, a SCR
icon will be shown in the bar at the top (SCR3)
to indicate thar the slot is enabled.
While the slot is enabled, all the setting
changes of the meter, will be applied to the
currently slot (SCR3).
- Tuning: Channel, Frequency
- A/D: Auto, Analog, Digital.
- Save datalog: Saves the current scan
measurements. You can see the datalogs
using the remote control application.
2. Spectrum
Real-time processing speeds ensure capture of any
fast, intermittent plant impairments.
Due to the accuracy and level of detail provided
by this spectrum analyzer, the H30Evolution is
the ideal tool for identifying and locating noise,
interference, ingress and other waveforms that
may be aecting cable services quality.
2.1. Main window
Below is a capture of a Spectrum window with a
brief explanation of its features:
- Band: Terrestrial/Satellite
- Powering: Selects the LNB powering
- DiSEqC (only satellite band): Selects DiSEqC
parameter (Sat A, sat B, sat C, sat D)
- SCR (only satellite band): Selects the SCR
parameters (multiswitch, standard and slots)
When a slot is enabled (for example slot 3,
freq. 1210MHz), the meter will tune into the
slof frequency (1210MHz) and will set the slot
with the meter parameters: frequency, band
Selected channel
Change using
List of
measurements
with pass/fail
indicators
Span
User can change it using
(+) or (
Reference level
Change
-
)

EN
13
2.2. Setup
Press
- Band: Terrestrial/Satellite
- Powering: Selects the LNB powering
- DiSEqC (only satellite band): Selects DiSEqC
parameter (Sat A, sat B, sat C, sat D)
- SCR (only satellite band): Selects the SCR
parameters (multiswitch, standard and slots)
- Aim antenna: Emits a modular audible
This is a useful feature to point antennas
- Span: 5MH z, 10MHz 20MHz, 50MHz, 100MHz,
Set the span of the spectrum. To easily change
to change Spectrum options.
When a slot is enabled (for example slot 3,
freq. 1210MHz), the meter will tune into the
slof frequency (1210MHz) and will set the slot
with the meter parameters: frequency, band
(powering), and DiSEqC. In addition, a SCR
icon will be shown in the bar at the top (SCR3)
to indicate thar the slot is enabled.
While the slot is enabled, all the setting
changes of the meter, will be applied to the
currently slot (SCR3).
signal with frequency directly proportional
to signal level in the spectrum trace relativo
to reference level. It is recommended to set
the reference level manually, as well as to
select the span to include a frequency range
wide enough.
The audible signal becomes continuous when
the signal leves is close to the reference level.
Then it is necessary to increase the reference
level to get a more accurate adjustment.
without having to look at the display
200MHz, 500MHz, Full.
the span, use the OK Button to decrease the
span and the Back Button to increase the span.
- Ref. Level: Select the reference level of the
spectrum graph
- dB/div: 5 dB/div, 10 dB/div
- Tuning: Channel, Frequency
- A/D: Auto, Analog, Digital.
- C/N: ON, OFF. Shows/Hides the C/N measure.
- Hold: ON/OFF. Shows/hides the maximum
graph
- Save datalog: Saves the current scan
measurements. You can see the datalogs
using the remote control application.
3. MPEG
The H30Evolution’s MPEG feature will show the
image of the selected service.
3.1. Main window
Below is a capture of a MPEG Info window with a
brief explanation of its features:
Selected channel
Change using
Press OK button to see
the services list

H30EVOLUTION handheld DVB meter / Analyzer
14
1.2. Setup
Press
to change the Channel Info options.
- Band: Terrestrial/Satellite
- Powering: Selects the LNB powering
- DiSEqC (only satellite band): Selects DiSEqC
parameter (Sat A, sat B, sat C, sat D)
- SCR (only satellite band): Selects the SCR
parameters (multiswitch, standard and slots)
When a slot is enabled (for example slot 3,
freq. 1210MHz), the meter will tune into the
slof frequency (1210MHz) and will set the slot
with the meter parameters: frequency, band
(powering), and DiSEqC. In addition, a SCR
icon will be shown in the bar at the top (SCR3)
to indicate thar the slot is enabled.
While the slot is enabled, all the setting
changes of the meter, will be applied to the
currently slot (SCR3).
- Volume
4.1. Main window
Below is a capture of a System Scan window with a
brief explanation of its features:
plan
Measurements
of the selected
channel
with pass/fail
indicators
Channel
Change
Frequency
using
Bar graph representing all the found channels.
Color according to checkmarks
Channel
4.2. Setup
Press
to change the System Scan options.
4. System Scan
This function scans the selected channel plan and
detects every existing analog and digital channel
in real time to determine the overall frequency
response of the system.
The scan measurement leverages the location
based thresholds to clearly show whether or
not signal levels comply with the cable system’s
specications with their green, yellow and red bars.
This gives an easy-to-understand real-time view of
the system, including the BER and MER values of
the selected channel.
- Band: Terr, Sat
- Powering: Selects the LNB powering
- DiSEqC (only satellite band): Selects DiSEqC
parameter (Sat A, sat B, sat C, sat D)
- SCR (only satellite band): Selects the SCR
parameters (multiswitch, standard and slots)

EN
15
When a slot is enabled (for example slot 3,
freq. 1210MHz), the meter will tune into the
slof frequency (1210MHz) and will set the slot
with the meter parameters: frequency, band
(powering), and DiSEqC. In addition, a SCR
icon will be shown in the bar at the top (SCR3)
to indicate thar the slot is enabled.
While the slot is enabled, all the setting
changes of the meter, will be applied to the
currently slot (SCR3).
- Digital tuning: If it is ON, allows to see MER
and CBER measurements when a digital
channel is selected and the user presses Ok
button.
- Span: Select the number of channels
showed in the bar graph
- Ref. Level: Select the reference level of the
bar graph
- Save datalog: Saves the current scan
measurements. You can see the datalogs
using the remote control application
5. Satellite Test
This function checks that the input signal
corresponds to the selected satellite, and at the
same time checks the proper reception of the
selected transponders (from 1 to 4 transponders).
To do that, the meter performs all the
measurements on those transponders.
First of all the user must select the channel plan of
the satellite towards which the antenna is oriented.
Then the user must select the transponders on
which you want to carry out the measurements
(see Setup section of this function).
The information necessary to verify the satellite
is extracted from these channels, and the
measurements of the selected transponders are
displayed.
5.1. Main window
Below is a capture of a Satellite Test window with a
brief explanation of its features:
Selected channel
Change using
Satellite checked
Bar graph representing
the selected channels
Color according to
checkmarks
List of measurements
with pass/fail indicators
Press OK to see all the
measurements
5.2. Setup
Press
to change the Ssatellite Test options.
- Powering: Select the powering of the LNB if
needed.
- DiSEqC: Select the SAT of the DiSEqC
command.
- SCR (only satellite band): Selects the SCR
parameters (multiswitch, standard and slots)
When a slot is enabled (for example slot 3,
freq. 1210MHz), the meter will tune into the
slof frequency (1210MHz) and will set the slot
with the meter parameters: frequency, band

H30EVOLUTION handheld DVB meter / Analyzer
16
(powering), and DiSEqC. In addition, a SCR
icon will be shown in the bar at the top (SCR3)
to indicate thar the slot is enabled.
While the slot is enabled, all the setting
changes of the meter, will be applied to the
currently slot (SCR3).
- Ref. Level: Select the reference level of the
bar graph.
- Channels: Select the number of channels as
well as the channels from the channel plan.
6. Learning plan
Analyzes the input signal to the meter and
automatically detects all channels.
This feature automatically identies the channels
as either analog or digital and performs
measurements on each.
A bar graph is displayed with the height
representing the power for digital channels and the
level of the video carrier for the analog channels.
The measurements made for analog channels are
video carrier level and V/A. For digital channels the
measurements are power and C/N.
The analog channels will have an extra, smaller
white bar indicating the level of the audio carrier.
6.1. Main window
Below is a capture of a Learning Plan window with
a brief explanation of its features:
Selected channel
Change using
Bar graph representing
found channels
Color according to
checkmarks
List of measurements
with pass/fail indicators
Indicates that the
scan is nished.
Press
to save
the plan
7. Constellation
Digital video often does not show signal
impairment until it is too late due to the small
margin between acceptable quality and failure.
Constellation diagrams are an indispensable tool
to help detect the presence of noise, phase jitter,
interference, and gain compression, all of which
impact overall signal quality and thus reduce
Modulation Error Ratio (MER).
Ideally, each of the symbols in a constellation
diagram should display a clean dot indicating a
perfect signal.
The H30Evolution’s real time constellation, allows
the installer to assess the size and shape of the build
up of dots indicative of problems which contribute
to bit errors leading to service disruption
7.1. Main window
Below is a capture of a Constellation window with
a brief explanation of its features:

EN
17
Selected channel
Change using
List of measurements
with pass/fail indicators
7.2. Setup
Press
to change Constellation options.
Modulation
Constellation
diagram
icon will be shown in the bar at the top (SCR3)
to indicate thar the slot is enabled.
While the slot is enabled, all the setting
changes of the meter, will be applied to the
currently slot (SCR3).
- Zoom: OFF, 1st, 2nd, 3rd, 4th.
Select a quadrant of the constellation to be
represented for more detailed view. Select
Zoom OFF for the full constellation.
- Tuning: Channel, Frequency
- Save datalog: Saves the current scan
measurements. You can see the datalogs
using the remote control application.
8. Echoes
It is important to check that no echoes can cause
problems in the reception of DVB-T and DVB-T2
signals.
This feature you allows to visualize the echoes
of the received signal, helping the installer to
minimize them as much as possible for optimal
signal reception.
In addition to the echoes graph, this function
shows the channel power and MER measurements,
as well as the FFT mode, the guard interval, and the
Cell ID.
- Band: Terr, Sat
- Powering: Select the powering of the LNB if
needed.
- DiSEqC: Select the SAT of the DiSEqC
command.
- SCR (only satellite band): Selects the SCR
parameters (multiswitch, standard and slots)
When a slot is enabled (for example slot 3,
freq. 1210MHz), the meter will tune into the
slof frequency (1210MHz) and will set the slot
with the meter parameters: frequency, band
(powering), and DiSEqC. In addition, a SCR
8.1. Main window
Below is a capture of a Ecos window with a brief
explanation of its features:

H30EVOLUTION handheld DVB meter / Analyzer
18
Selected channel
Change using
List of measurements with
pass/fail indicators
and number of echoes
8.2. Setup
Press
to change Echoes options.
FFT mode, Guard
Interval, and Cell ID
9. Video Camera
This feature allows the H30Evolution meters to
have an analog video and audio input using an
external USB 2.0 adapter, with capability to digitize
the analog input signals.
It is specically aimed for installation and
maintenance of analog video surveillance systems.
The supported interface is composite RCA (S-VHS).
The input video formats that can be displayed are
the following:
• NTSC: 720x480 @ 30fps
• PAL: 720x576 @ 25fps
Echoes graph
To run the feature you just have to connect the
input signal to the adaptor provided with the
H30Evolution, making sure that the adaptor is
connected to the USB input of the meter. If there
is something wrong, the next screen will be shown:
- Powering: O, 13V, 18V, 24V.
- Tuning: Channel, Frequency
- Units: us, Km
9.1. Main window
Below is a capture of a Camera window:

EN
5.4.2. Map view
19
10. Wi-Fi Scan
Analyzes the Wi-Fi band and automatically detects
all the Wi-Fi networks, as well as their names and
the power of the access point’s signal.
There are two dierent screens to display the
information: List and Map.
5.4.1. List view
Wi-Fi network’s name
Wi-Fi network’s MAC
Wi-Fi protect access type
Wi-Fi network’s channel
Power of each Wi-Fi
access point’s signal.
The list is sorted by
power
The red lock indicates
that the network is
locked
Graph showing the wi networks. Each
triangle represents a network. The height
of the triangle represents the power of the
access point signal.
5.4.3. Setup
Press
to change the Wi-Fi Scan options.
You can go through the list using and select
one of the Wi-Fi networks to display it separately.
If a Wi-Fi network has multiple access points, you
will see several networks with the same name. If
you select one of them, you will separately all the
access points of that network. The rst one in the
list is the one you are connected to, which is the
one that has more signal power at that point.
- Band: Terrestrial/Satellite
- Mode: Selects between Map or List View
- Sort:
Only in List View mode. Allows to select
how to sort the Wi-Fi list: name, level, or channels
- Screen capture: Captures the current screen
and saves it as a .png image. You can see the captures using the remote control application

H30EVOLUTION handheld DVB meter / Analyzer
11. Setup
Change main conguration settings:
- Band: Terr, Sat
- Ter. Network: Aerial, Cable
- Terr Plan: FCC STD, FCC RETURN, FCC IRC,
FCC HRC, FCC OFFAIR, CCIR, and customers
plans
- Sat Plan: F68E INTEL C, 68E INTEL, 42E TURK,
39E HELLAS, 33E EUTEL, 28E EUTEL, 28E
ASTRA, 26E BADR, 25E EUTEL, 23E ASTRA, 21E
EUTEL, 19E ASTRA, 16E EUTEL, 13E HOTB, 10E
EUTEL C, 10 EUTEL, 9E EUTEL, 7E EUTEL, 4E
ASTRA, 1W THOR5, 1W THOR6, 5W EUTELC,
5W EUTEL, 7W NILE, 30W HISPA, 48W AMZC,
48W AMAZ, SIM, and customers plans
- Sat. Freq.: IF, real Freq.
- Sat. LNB: Universal, C Band, Other.
If Other is selected, you must enter the
frequency.
- Restore Powering: On/O
- Language: English, Español.
- Units: dBµV, dBmV, dBm
- Quality proles: Trunk, Tap, End Line,
Ground.
Dierent thresholds are available for dierent
testing locations.
- Analog Standard: Selects the standard
for the analog channels and changes
automatically the audio carrier to a value
according to the selected standard.
- Audio Carrier:
6.5 MHz.
- Volume
4.5 MHz, 5.5 MHz, 6.0 MHz,
20
- Network:
Setup: Manual, Auto
When Setup Manual is selected, the user
must set the gateway.
IP.
When Setup Manual is selected, the user
must set the IP.
DNS.
When Setup Manual is selected, the user
must set the DNS.
Gateway.
- Wi-Fi: Allows to connect the H30 to a Wi-Fi
network.
Wi-Fi: On, O
Mode: AP (Access Point), Client
Scan: When Wi-Fi is turned on and the
selected mode is Client, it shows a list of
all the found Wi-Fi networks.
As you can see in the image above, the listo
shows the name of the Wi-Fi networks and
indicates if the network is open or restricted,
as well as the protection access type.
To access to a restricted network, you must
enter the password using and
To verify the password, nd a red square
behind the last character of the password
and press

EN
If you connect a mobile device (such as a
mobile phone, tablet, etc.) and your H30 to
the same Wi-Fi network, you can use your
mobile device to control your H30. You just
have to download the H30 app (available
for IOS and Android)
MAC: The MAC can be set automatically
or user-selected
Setup: Auto, Manual
MAC: When Setup Manual is selected,
the user must enter the MAC using
and
SSID: Shows the SSID of the H30
BSSID: Shows the SSID of the H30
IP: Shows the SSID of the H30
- Bluetooth: Allows to turn ON/OFF the
bluetooth connection.
If ON is selected, it will appear a new line
showing the MAC of the H30 Bluetooth
interface, and a bluettoth icon will be shown
in the top right part of the screen.
When the equipment connects via bluetooth
with another device, it will appear another
line showing the MAC of the other device
- Time and Date:
Set current time (hour and minutes) and
date (day of the month, month and year).
- Energy:
Auto suspension
Auto shutdown
- Update rmware: See section Firmware
update
- Reset conguration: Resets the
H30Evolution to factory settings
21
- Licenses: Shows a list with all the licenses
included in your H30Evolution
- About SW
- About HW
Firmware Update
Whenever your H30Evolution is connected to the
internet, it will automatically check if there is a
newer rmware version. If it is so, an arrow icon will
appear at the top of the screen:
The icon with the arrows indicates
that there is a new rmware
version
If the user wants to update the rmware, please
select function Update rmware in the Setup menu
If there is a new rmware version, a message will
be displayed when the user selects this function:
Press OK button to automatically download and
install the new rmware version.

H30EVOLUTION handheld DVB meter / Analyzer
22
Web Application
First of all, connect your H30Evolution to the
network using the Ethernet connector or the WiFi interface. Then you must nd out the IP of your
H30Evolution (see section 11.- Setup - Network/Wi-
Fi).
Then, type your H30Evolution IP in the address bar
of your web browser and press Enter.
Then you can see the home window of the
H30Evolution web application:
Menu bar
H30Evolution info
1. Measurements
To change the display mode from calendar mode
to list mode, just click on the corresponding button
placed at the menu bar:
Change calendar/
list display mode
Datalogs
list
Download/
remove the
selected Datalogs
Select/unselect all
the Datalogs
Using the buttons placed at the top right of the
screen, you can remove the selected Datalogs or
download them to your computer in .xls format
(it will be generated a .xls le for each Datalog and
they all will be downloaded together in a .zip le)
Clicking on a Datalog of the list, the measurements
of that Datalog will be displayed:
In this window, you can see all the datalogs saved
in your H30Evolution. They are grouped by date in
a calendar:
Change calendar/
list display mode
Saved Datalogs
Month/week/
day view
Date of the measurement,
channel plan, and Datalog
name
Channel measurements
Filter according to channel type
Remove/export
to xls

EN
23
2. Plans
In this window, you can see all the channel plans of
your H30Evolution.
They are grouped in three categories: Terrestrial,
Satellite and Customer.
The Terrestrial and Satellite channel plan are the
standard channel plans of the corresponding band.
These plans can be removed from the meter, but
they can not be edited. However, you can make
a copy of one of them to build a new customer
channel plan from it.
The duplicated plans will appear in the Customer
list automatically.
Display channel plan Delete the plan
Duplicate the plan
The customer channel plans can be edited:
Delete plan
Add new plan
you can start from scratch, by clicking on the “New
custom plan” button:
Type name
Select band
The application also allows to congure the channel plans according to the geographic area you
will use the meter. When you turn the meter on
for the rst time, you must select the languaje and
then you must select the geographic area. So, the
channel plans corresponding to that area will be
available in your H30Evolution. But the user may
add other standard channel plans corresponding
to other geographic areas (this is specially helpful
for those places located near the frontier between
two areas). To do that, click on the “Channel plan
repository” button :
Export selected
plans to the meter
Duplicate plan
Save changes in the
plan and upload it
to the meter
Delete selected
channels
Type in the cells
to edit the data
Add
channel
You can create a new channel plan from an existing
one by clicking on the corresponding button. Or
Select the
channels plans
you want to
upload to the
meter
Available channel plans
grouped by geographical
areas
The channel plans added from the repository will

H30EVOLUTION handheld DVB meter / Analyzer
24
be uploades to your H30Evolution, but none of the
channel plans in your meter will be removed.
Using the “Set zone” button, the user can change
the area of his/her meter. When you change the
area, all the plans of your H30Evolution will be removed and the new channell plans corresponding
to the selected area, will be upload to your meter.
Click on the area where you will
use your meter
3. SCR
In this window, you can setup the multiswitches.
The H30Evolution includes a list of multiswitches
by default, but you can add more or edit any of the
existing ones.
Display the
Slots of the
multiswitch
Duplicate
multiswitch
Save
multiswitch
Add new
multiswitch
4. Quality Profiles
Using the web application you can add new quality
proles. The H30Evolution has two pre-dened
quality proles (head-end and outlet) that can
not be edited, but they can be duplicated. The
duplicated quality proles are saved in the custom
quality proles, and the custom quality proles can
be edited.
Duplicate prole
Save the prole
in the meter
Display to see all the
values
Delete prole
Duplicate prole
Type to edit
Add a new multiswitch
5. Screen Mirroring
Using this feature you can control your
H30Evolution remotely. For this to work, it is
necessary that the H30Evolution and the computer
are connected to the same LAN.
To access to this feature you must enter the
password admin in the right top part of the
window. Then you will see the screen of the

EN
25
H30Evolution in your computer:
Click on the arrow to display menu
6. Clone
Using this feature it is very easy to have the same
conguration in all your H30Evolution meters.
You only have to export the conguration of the
H30Evolution that you wanto to copy, using the Export feature. So, the conguration will be saved in a
le on you computer.
Then, connect other H30Evolution where you want
to copy the conguration to and select the Import
feature.
Click to display the function
Click to export
the system will detect automatically if your meter
is already updated by clicking on “Last rmware
version”. If it is not, then you can download the new
version and install it automatically from this menu.
If you get the update le from your distributor, you
can install it in your H30Evolution by clicking on
“Manually updating rmware”.
Same with licenses: if your H30Evolution is
connected to the internet, it will detect new
purchased licenses automatically when you turn
it on, and will install them automatically. But if
you get the licenses from your distributor, you
can install them in your device by clicking on “Add
license”.
7. Update
In this section you can update the rmware of your
H30Evolution, as well as install new licenses in your
meter.
If you H30Evolution in connected to the internet,

H30EVOLUTION handheld DVB meter / Analyzer
26
Mobile Devices App
1.- Connection between the App
and the H30Evolution
You only need to have turn your H30Evolution on
and follow these steps:
1.- Select Wi-Fi function in the Setup menu (see
section 11.- Setup). Select Wi-Fi ON and Mode AP
(Access Point)
Wi-Fi name and connection key are
shown
2.- Select the Settings function of your mobile
device and turn Wi-Fi ON and make sure that your
H30Evolution Wi-Fi is present at the networks list
(the name of the Wi-Fi is “H30Evolution” followed
by the serial number):
Turn your mobile device
Wi-Fi ON
Fi. Your mobile device will ask for the key, that is
Televes1:
4.- Then, open the H30Evolution App. The App
main screen looks like this:
3.- Select to connect to your H30Evolution Wi-
When you tap on the Settings button, you will see
this screen:

EN
27
Tapping on Info, the user can see the following
screen:
When the H30Evolution is
connected, the icon is green
2. Features
Once your iPad and your H30Evolution are connected, you can operate with the App using the
following features:
2.1.- Loggers
This window shows the Logs saved in your
H30Evolution.
When you tap on one of these logs to select it, you
will see all the measurements at the bottom of the
screen.
When you tap on logger, the measurements in that
logger will be shown:
Tap on share
Tap to delete
2.2.-Screen Mirroring
Using this feature, you can use your iPad to control
remotely your H30Evolution.
Note: in the current version it is not possible to run
the Wi-Fi Scan function using the Screen Mirroring
feature. The video in the Video Camera function
will not be displayed either.
Tap on the arrow button
to display the keyboard
Tap to select a DataLog

H30EVOLUTION handheld DVB meter / Analyzer
28
When you tap on the arrow button, the keyboard
will be displayed. Use these buttons as if they
were the device’s ones.
Tap on the arrow button
to hide the keyboard
Tap on key board buttons
to manage the H30Evolution
2.3.-Files
This feature allows to manage channels plans, SCR
les and quality proles:
2.3.1.- Channel Plans
Using this function of the App, you can see all the
channel plans of your H30Evolution, as well as add
new user channel plans and edit them.
The standard channel plans can not be edited.
Standard
Plans
The standard plans can be cloned. When the user
does this, a new channel plan is added to the User
channel plans list:
User-dened
Plans
Clone channel
plan
Enter the new user-dened channel plan name,

EN
29
and it will be automatically uploaded to your
H30Evolution.
Type the new channel plan name
and tap on Save
The channel plans in the user-list can be edited:
Save changes
Add new channel
must edit.
When the user saves the changes, the will be
automatically loaded to the H30Evolution.
To delete a channel plan, swipe to the left the
corresponding line:
When the Delete button is visible,
tap it to delete the channel
2.3.2.- SCR
This function opens a web navigator with the web
page of your H30Evolution, and points directly
to the SCR section. See section 3.- SCR of the Web
Application
To edit a channel, tap on the
corresponding cell
When the user adds a new channel to a plan, it will
be added at the end of the table with default-value
parameters (name, frequency, etc.), that the user
2.3.3.- Quality Profile
This function opens a web navigator with the web
page of your H30Evolution, and points directly to
the Quality Prole section. See section 4.- Quality
Proles of the Web Application
2.4.-Settings
When the user taps on Settings, the following
window will be displayed:

H30EVOLUTION handheld DVB meter / Analyzer
2.4.3.- Register
The user can register his H30Evolution using this
function.
The rst time that you turn your H30Evolution
on, it will ask you to register it. If you register your
H30Evolution within 30 days, you will get two
options (valued in 200€) for free.
30
2.4.1.- Info
Using this function of the App, the user can see
the App information, as well as the H30Evolution
whenever it is connected to the App.
When the H30Evolution is
connected, the icon is green
App info
H30Evolution
info
2.4.2.- Manual
Using this funtions, the user manual will be
displayed in the App
If you press BACK, you can use your H30Evolution.
If you press OK, it will begin the registration
process:
The user can choose to use his / her mobile phone
to read the QR code, or use the Register function
of the H30Evolution App (note, the mobile device
wich the app is running on, must have access to
the internet).
i)If you use your mobile phone, read the QR code
using the camera. Then a web browser will be open
with the Televes Meter Registration web page. Register your H30Evolution in our web. Once the process is completed, you will get a PIN code by email.
Enter the PIN code in your H30Evolution:

EN
ii) If you choose to use the app to register your
H30Evolution, you rst have to connect your
H30Evolution with your mobile device. To do that,
press BACK to leave the registration process for a
moment and follow the instructions explained in
the section 1.- Connection between the App and the
H30Evolution.
Then turn your H30Evolution OFF, and then ON
again to start the Register process.
Select Settings->Register menu in the App.
Now you must disconnect your mobile device from
your H30Evolution and connect it to the internet.
Then it will be open a web browser with the
Televes Meter Registration web page. Register
your H30Evolution in our web. Once the process is
completed, you will get a PIN code by email.
Enter the PIN code in your H30Evolution:
31
Error Messages
LOW BATTERY
Indicates that the battery is about to nish. The
battery icon is red now. It is recommended to
connect the meter to the external power source.
LOW BATTERY
Shutting down
Some time after the LOW BATTERY message
appears (time varies depending on the functions
used), it will appear this message. If the meter is
not connected to the external power source, it will
switch o.
BAD POWER
Unplug power source
This message appears when the meter is
connected to an external power source that does
not supply it the right power. Please, use only the
power source provided with the H30Evolution.
SHORT-CIRCUIT
Check installation
This message appears when the meter detects a
short-circuit at the RF input. It is recommended to
check the installation to nd out why the shortcircuit is produced.
2.4.4.- Clone
This function opens a web navigator with the web
page of your H30Evolution, and points directly to
the Clone section. See section 6.- Clone of the Web
Application
DC OUTPUT LIMIT EXCEED
Switch DC OUTPUT o
This message appears when the meter detects
an excessive consumption from the device that is
being powered. It is recommended to turn o the
powering feature of the H30Evolution.
DC AT RF INPUT
Check installation
This message appears when the meter detects
DC at the RF input that is not generated by the
H30Evolution. It is recommended to check the
installation.

H30EVOLUTION handheld DVB meter / Analyzer
32
Maintenance
Always disconnect the unit before cleaning. Use
only a mild solution of detergent and water applied
with a soft damp cloth. Dry thoroughly before use.
Do not use aromatic hydrocarbons or chlorinated
solvents. These products may damage the unit.
Do not use alcohol or alcohol based products
on the front panel, especially the display. These
products may damage the unit.
Technical support
For any questions, contact Technical Support at
www.televes.com
Before contacting Technical Support for repair,
read the manual to ensure proper use and attempt
to RESET the unit to clear any problems.
Repair service
Do not return the unit without rst contacting
Televes Technical Support.
If the unit needs to be returned, Televes will
arrange for free shipping. The unit will need to be
appropriately packed for shipping.
In compliance with IATA Regulations, when using
our shipping service follow these instructions:
Label the package.
The equipment should t as snugly as
possible in the box. It is recommended to use
the original packing materials.
Attach the precaution label to the package.
Lithium ion battery
DO NOT LOAD OR TRANSPORT
PACKAGE IF DAMAGED
Failure to comply with these shipping requirements
may result in the shipping agent rejecting the
package.

EN
33
Warranty
A) Televes warrants, only to the original Purchaser,
all Products be free from any defect in materials
or workmanship for a period of one (1) year,
six (6) months for the battery, from the date of
original purchase, unless otherwise specied.
(B) Televes shall, free of charge and in its sole
discretion, either repair, replace with a new or
factory reconditioned equivalent, or refund
the purchase price of the Product(s), that has
been determined by Televes to be defective in
material or workmanship, subject to the limits
of this warranty.
(C) This warranty excludes any inoperability
resulting from:
(I) use or installation that is not in strict
compliance with the written instructions
and specications;
(II) any modication or alteration performed
by any third party not authorized in writing
by Televes;
(III) service or repair performed by any third
party not authorized in writing by Televes;
(IV ) misuse, abuse, intentional harm, or lack of
reasonable care;
(V) re, ice, snow, rain, wind, water, volcano,
excessive heat or cold, lightning, ood,
power surge, earthquake, or any other acts
of God;
(VI) war, crime, strike, riot, electro-magnetic
pulse, or any other acts beyond the control
of Televes;
(VII) shipping.
(D) All claims under the terms of this warranty must
be made in writing, by the original Purchaser,
within fourteen (14) days of the defect being
known to the Purchaser. Such claims shall be
accompanied by a description of any material
facts related to the claimed defect and the
invoice or other proof of original purchase date
and price. If Televes so requests, the Purchaser
shall, at Purchaser’s expense, deliver the
claimed Product(s) to Televes, within 14 days of
the date of the return authorization. Under no
circumstances shall the Product(s) be returned
to Televes without a return authorization.
E) Any refund to the Purchaser, shall be limited to
the purchase price of the Product(s), excluding
any applicable taxes, duties, freight costs,
removal costs, installation costs, or any other
charges incident to the purchase of the product.
(F) Any damage caused by shipper shall be claimed
with the shipper in accordance with the
shipper’s policies and procedures.
(G) Televes shall in no event and under no
circumstances be liable or responsible for any
consequential, indirect, incidental, punitive,
direct or special damages based upon breach of
warranty, breach of contract, negligence, strict
tort liability or otherwise or any other legal
theory, arising directly or indirectly from the
sale, use, installation or failure of any product
acquired by Purchaser from Televes.
(H) This limited warranty extends to the original
Purchaser and cannot be assigned or
transferred to any other party without the
prior express written permission of Televes,
which permission Televes may withhold for any
reason or for no reason at all.
(I) Televes will not assume any liabilities for any
other warranties, whether statutory, express or
implied, made by any other person.
(J) Televes reserves the right to modify or
discontinue this warranty at Televes’ sole
discretion without notication. No other
warrantees are expressed or implied.

H30EVOLUTION handheld DVB meter / Analyzer
34

EN
35
DECLARACIÓN DE CONFORMIDAD DECLARATION OF CONFORMITY
DECLARAÇÃO DE CONFORMIDADE DECLARATION DE CONFORMITE
DICHIARAZIONE DI CONFORMITÀ DEKLARACJA ZGODNOŚCI
KONFORMITÄTSERKLÄRUNG ΠΙΣΤΟΠΟΙΗΤΙΚΟ ΣΥΜΜΟΡΦΩΣΗΣ
FÖRSÄKRAN OM ÖVERENSSTÄMMELSE ДЕКЛАРАЦИЯ СООТВЕТСТВИЯ
بيان المطابقة www.doc.televes.com


593501_593502_593503_593504_593505_2.01_000_EN
 Loading...