

Teka TKX3 1263 BLANCA Instruction Manual
INSTRUCTION MANUAL
EN
MANUAL DE INSTRUCCIONES
MANUAL DE INSTRUÇÕES
TKX3 1263 BLANCA
ES
PT
LAVADORA

Contents
Safety Precautions.............................................................
Overview of Washing Machine..........................................
Install Washing Machine....................................................
Operate Washing Machine.................................................
Checklist and Preparation before Washing Clothes.....
View of Control Panel......................................................
Select the procedure.......................................................
Table of Washing Procedures.........................................
Maintenance.......................................................................
Troubleshooting..................................................................
Appendix..............................................................................
Product Specifications.......................................................
Product Fiche......................................................................
3
7
8
11
12
15
16
19
20
23
25
26
27

Safety Precautions
Safety Precautions
- If the supply cord is damaged,it must be replaced by
the manufacturer,its service agent or similarly qua
-lified persons in order to avoid a hazard.
- The new hose-sets supplied with the appliance are to
be used and that old hose-sets should not be reused.
- This washing machine is for indoor use only.
- The openings must not be obstructed by a carpet.
- (This warning is only for EUROPEAN market )This
appliance can be used by children aged from 8 years
and above and persons with reduced physical,sens
-ory or mental capabilities or lack of experience and
knowledge if they have been given supervision or in
-struction concerning use of the appliance in a safe
-way and underst and the hazards involved. Children
shall not play with the appliance.Cleaning and user
maintenance shall not be made by children without
supervision.
- (This warning is not for EUROPEAN market)This ap
-pliance is not intended for use by persons (including
children) with reduced physical, sensory or mental
capabilities, or lack of experience and knowledge,
unless they have been given supervision or instruction
concerning use of the appliance by a person respon
-sible for their safety.Children should be supervised
to ensure that they do not play with the appliance.
- Pull out its plug from the power socket before cleaning
or maintenance.
3

Safety Precautions
- Make sure that all pockets are emptied.
- Sharp and rigid items such as coin,brooch,nail,screw
or stone etc.may cause serious damages to this machine.
- Pull out its plug and cut off water supply after the operation.
- Please check whether the water inside the drum has been
drained before opening its door.Please do not open the
door if there is any water visible.
- Pets and kids may climb into the machine. Check the
machine before every operation.
- Glass door may be very hot during the operation.Keep
kids and pets far away from the machine during the
operation.
- Take care that power voltage and frequency shall be
identical to those of washing machine.
- Do not use any socket with rated current less than that of
washing machine.Never pull out power plug with wet hand.
- To ensure your safety,power cord plug must be inserted
into an earthed three-pole socket. Check carefully and
make surethat your socket is properly and reliably earthed.
- Children of less than 3 years should be kept away unless
continously supervised.
- Kids should be supervised to ensure that they do not
play with the machine.
- Packing materials may be dangerous to the kids.
Please keep all packing materials(plastic bags,foams
etc) far away from the kids.
- Be careful of burning when washing machine drains
hot washing water.
4

Safety Precautions
- Washing machine shall not be installed in bath room
or very wet rooms as well as in the rooms with explos
-ive or caustic gases.
- Make sure that the water and electrical devices must
be connected by a qualified technician in accordance
with the manufacturer's instructions and local safety
regulations.
- Before operating this machine,all packages and tran
-sport bolts must be removed.Otherwise,the washing
machine may be seriously damaged while washing
the clothes.
- Before washing the clothes at first time, the washing
machine shall be operated in one round of the whole
procedures without the clothes inside.
- The washing machine with single inlet valve only can
be connected to the cold water supply. The washing
machine with double inlet valves can be connected
to the hot water and cold water supply.
- Your washing machine is only for home use and is only
designed for the textiles suitable for machine washing.
- Flammable and explosive or toxic solvents are forbi
-dden.Gasoline and alcohol etc.Shall not be used as
detergents.Please only select the detergents suitable
for machine washing, especially for drum.
- It is forbidden to wash carpets.
- Never refill the water by hand during washing.
- After the program is completed, Please wait for two
minutes to open the door.
5

Safety Precautions
- Please remember to disconnect water and power
supply immediately after the clothes are washed.
- Do not climb up and sit on top cover of the machine.
- Do not lean against machine door.
- Please do not close the door with excessive forces.If
it is found difficult to close the door,please check if the
excessive clothes are put in or distributed well.
- The household washing machine isn't intended to be
built-in.
- Cautions during Handling Machine
1.Transport bolts shall be reinstalled to the machine
by a specialized person.
2.The accumulated water shall be drained out of the
machine.
3. Handle the machine carefully. Never hold each prot
-ruded part on the machine while lifting.Machine door
can not be used as the handle during the conveyance.
- Notes on disposal:
This marking indicates that this product should not
be disposed with other household wastes throug hout the EU. To prevent possible harm to the
environment or human health from uncontrolled
waste disposal,recycle it responsibly to promote
the sustainable reuse of material resources.To
return your used device,please use the collection
systems or contact the retailer where the product
was purchased. They return and can take this
product for environmental safe recycling.
6
Overview of Washing Machine
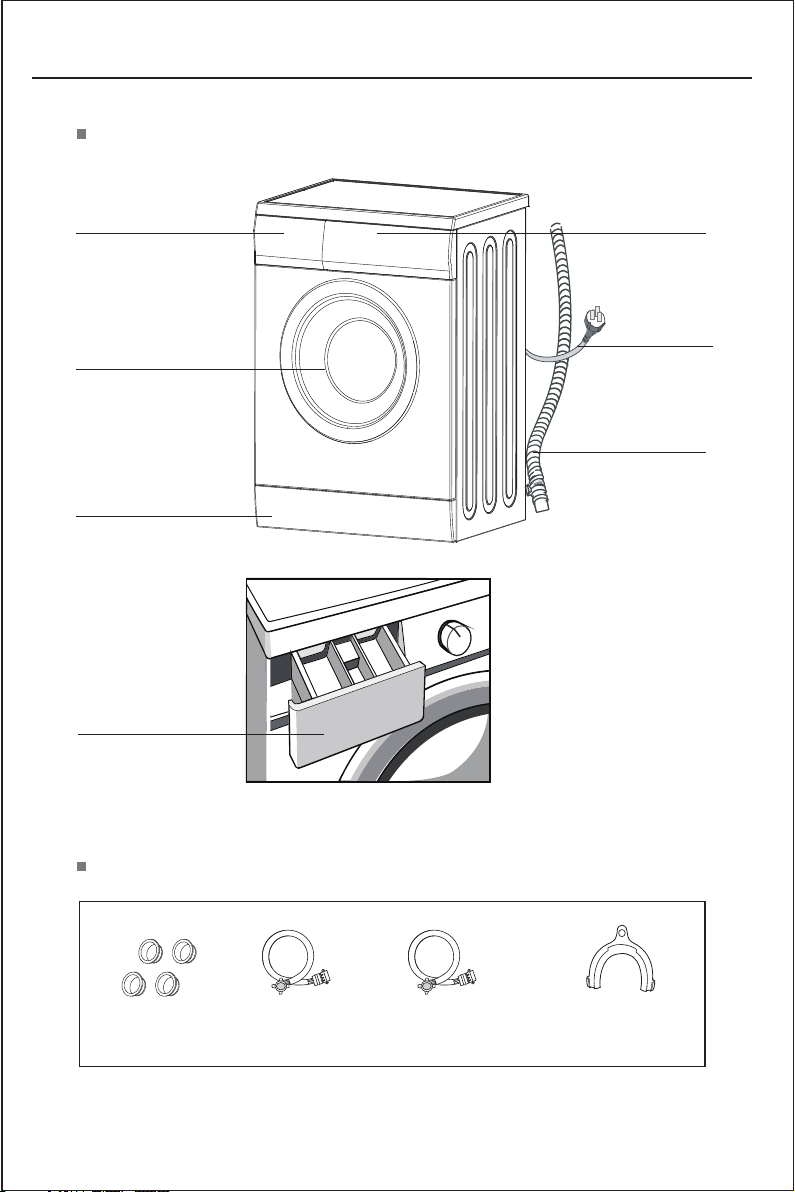
Component
Detergent Drawer
Door
Service Panel
Detergent Box
Control Panel
Power Plug
Outlet Hose
Accessories
Transport
plughole
Inlet pipe
C
Inlet pipe
H (optional)
7
Outlet hose
support(optional)
Install Washing Machine
Unpacking the washing machine
Unpack your washing machine and check i f the re is any damage during the transportation.
Also make sure that all the items (as shown i n Page 5) in the attached bag are received.
If there is any damage to the washing machine du ring the transportation, or any item is
missing, please contact the local dealer i mme diately.
Dispose the packing materials
The packing materials of this machine may be d ang erous to kids. Please dispose them
properly and avoid easy touch by kids. Pleas e dispose the related packing materials
according to the relevant local regulati ons . Please do no throw the packing materials
away together with the other daily livi ng ru bbishes.
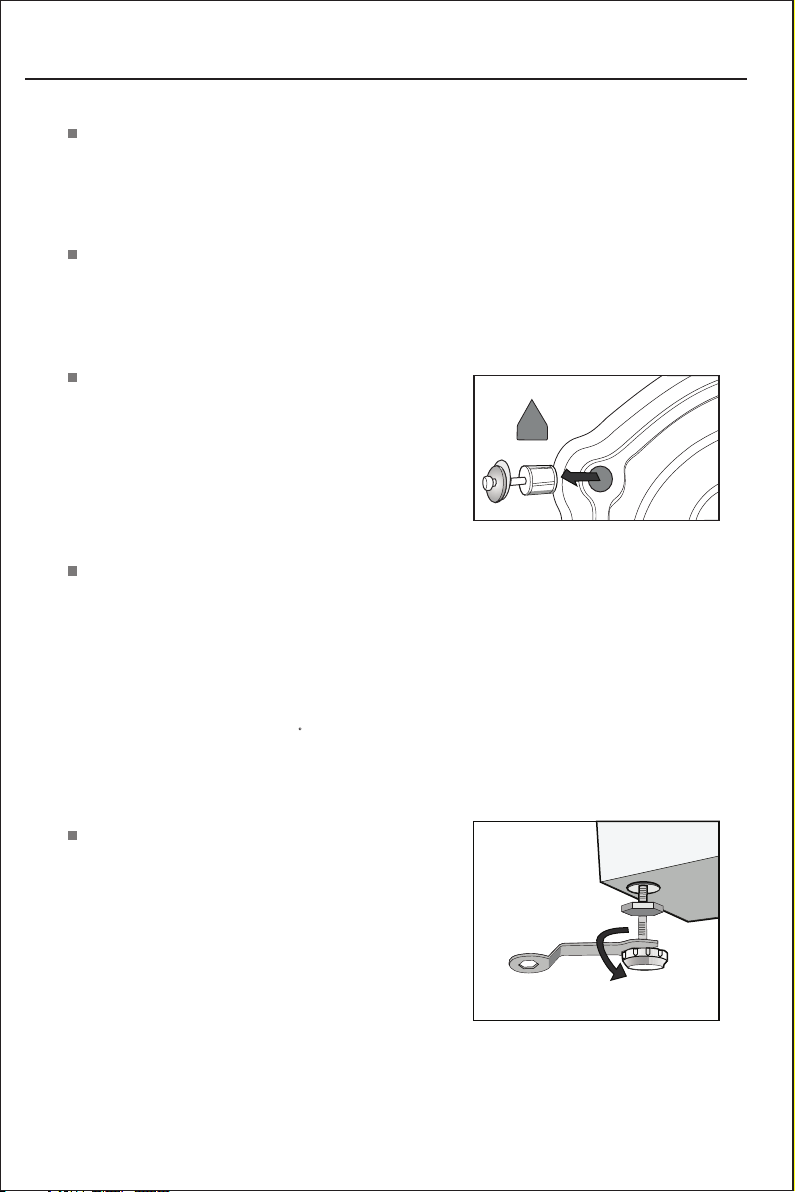
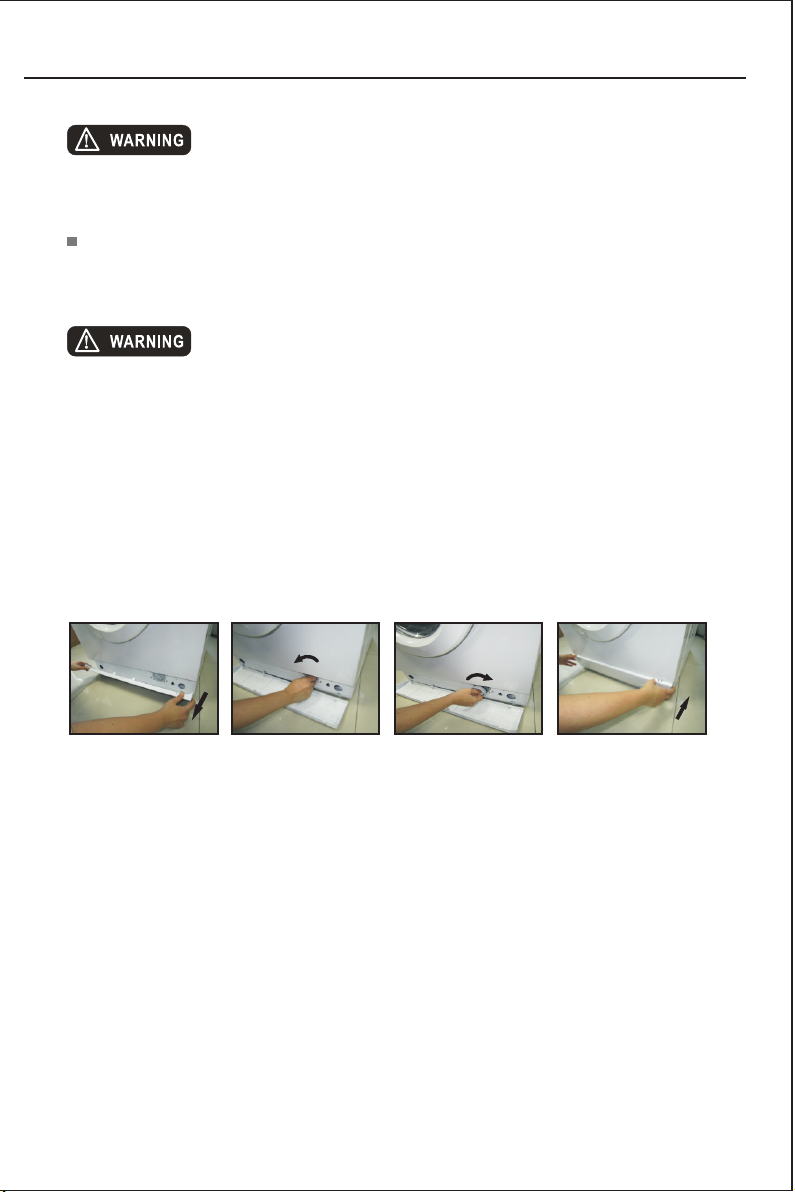
Remove transport bolts
Before using this washing machine, trans port bolts
must be removed from the backside of
this machine. Please take the followi ng st eps to
remove the bolts:
1.Loosen all bolts with spanner and then remo ve th em.
2.Stop the holes with transport hole plugs.
3.Keep the transport bolts properly for fut ure use.
Select the location
Before installing the washing machi ne, t he location characterized as follows shall be
selected:
- Rigid, dry, an d level surface (if not level, please make it level with reference to the
following figure “Adjust Leg”)
- Avoid direct s unl ight
- Suffic ien t ventilation
- Room temperature is above 0 C
- Keep far away from the heat resources suc h as co al or gas.
Make sure that the washing machine will n ot st and on power cord.
Do not install the washing machine on the c arp et floor.
Adjust Leg
1.When positioning the washing machine, p lease
first check if the legs are closely attached t o the
cabinet. If not, please turn them to their ori gin al
positions with hand or spanner and tighten t he
nuts with spanner.
2.After positioning the washing mach ine , press
four corners on top cover of washing machine
in sequence. If the washing machine is not
stable when being pressed, this leg shall be
adjusted.
8
Install Washing Machine
3.Ensure the positioning status of was hin g machine. Loosen the lock nut with spanner
and turn the leg with hand until it closely cont acts with the floor. Press the leg with one
hand and fasten the nut closely to the cabinet w ith the other hand.
4.After being locked properly, press four corners again to make sure that they has been
adjusted properly. If it is still unstable, it has to repeat Steps 2 and 3.
5.Put a solid cylinder (e.g. pop cans) oppositely on the top cover of the washing machine from in
the left, right, front and back directions. If the cylinder keeps stable, the washing machine is
positioned level. If it rolls, the washing machine is positioned unlevel. The rolling direction is the
direction of lower ground surface.Then, the two legs in this direction shall be raised at the same time
until the washing machine is level. Steps 1~3 are repeated to make the bottom legs closely against
the ground and the nuts shall be locked tightly.
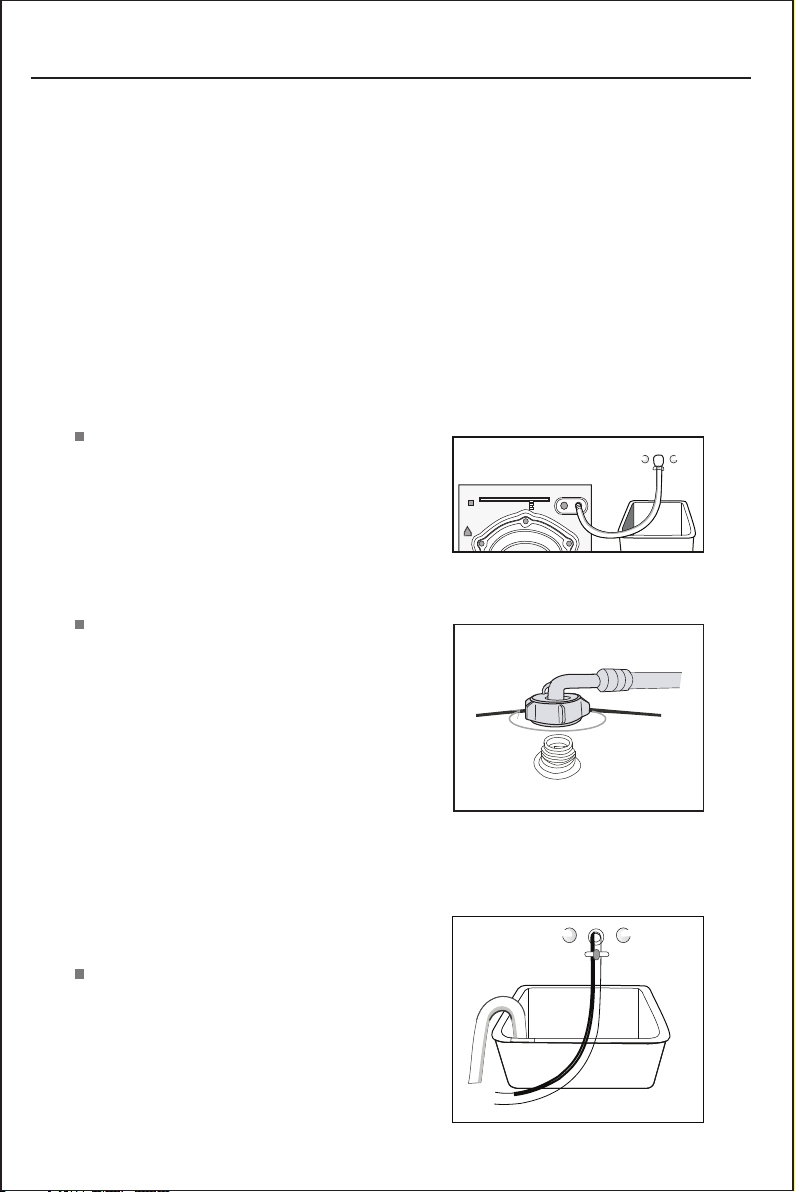
Connect inlet pipe
Connect the inlet pipe as indicated in the fig ure.
For the model which has hot valve , please conne ct
the hot vale to hot water tap. Energy will de cre ase
automatically for some program.
Install inlet pipe
1.Connect the elbow to tap and fasten it
clockwise.
2.Connect the other end of inlet pipe to the inle t
valve at the backside of washing machine and
fasten the pipe tightly clockwise.
Notes: after connection, if there is any lea kage
with hose, then repeat the steps to connect in let
pipe. The mos t com mon type of tap shall be
used to supply water. If tap is square or too big,
then standard tap shall be changed.
Place outlet hose
There are two ways to place the end of outlet h ose :
1.Put it beside the water trough.
9
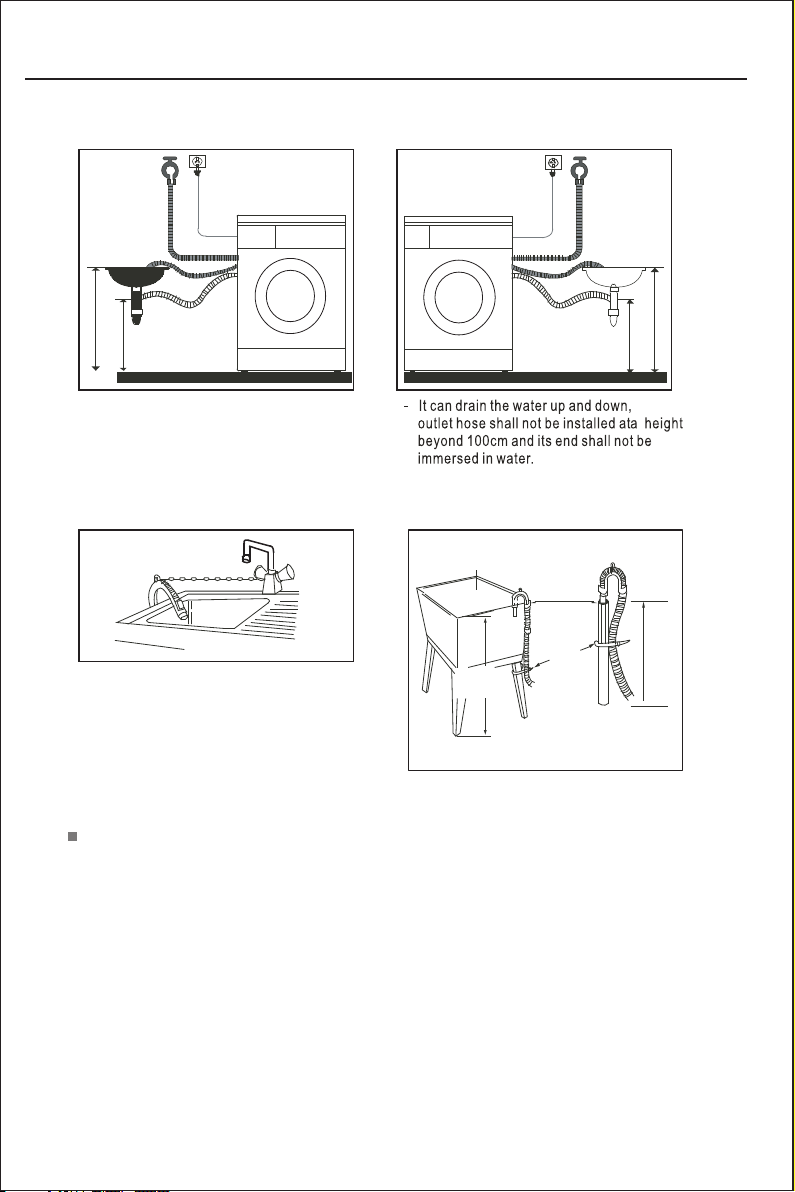
Install Washing Machine
2.Connect it to the branch drain pipe of the trou gh.
Max .100c m
Min .60cm
Positi on outlet h ose properly so that the fl oor will no t be damaged by water leaka ge.
Notes:
If the mac hine has ou tlet hose support, plea se instal l it like the following pic tures.
Trough
Hos e Retai ner
Bin d
- When ins talling o utlet hose, fix it
proper ly with a rop e.
- Positi on outlet h ose properly so that
the floo r will not be d amaged by water
leakag e.
Max .100c m
Min .60cm
- If outle t hose is too l ong, do not force
it into wa shing mac hine as it will cause
abnorm al noises .
Max .100c m
Min .60cm
Min .60cm
Max .100c m
Electrical Connection
- As the maximum current through the unit is 10A whe n you a re using its heating function,
please make sure the power supply system (cu rrent, power voltage and wire) at your
home can meet the normal loading requireme nts o f the electrical appliances.
- Please connect the power to a socket whic h is correctly installed and properly earthed.
- Make sure the power voltage at your place is sam e to that in the machine's rating label.
- Power plug must match the socket and cabi net m ust be properly and effectively earthed.
- Do not use multi-purpose plug or socket as ext ension cord.
- Do not connect and pull out plug with wet han d.
- When connecting and pulling out the plug, ho ld th e plug tightly and then pull it out. Do
not pull power cord forcibly.
- If power cord is damaged or has any sign of being br oken, special power cord must be
selected or purchased from its manufactu rer o r service center for replacement.
10
Install Washing Machine
WARNING
!
1.This machine must be earthed properl y. If there is any short circuit, earthing can reduce
the danger of electrical shock.
This machin e is eq uipped with power cord, which includes plug, earthing wire at earthing
terminal.
2.Washing machine shall be operated in a circuit separate from other electrica l app liances.
Otherwise, power protector may be tri ppe d or fuse may be burned out.
Operate Washing Machine
Checklist and Preparation before Washing Clothes
Please read this operation method carefu lly to avoid the troubles of washing machine and
damages of clothes.
Check if the first-washed clothes wil l bed d ecolorized.
After a white towel touched with liq uid d etergent is used to wash the invisible corners of the
clothes, check if the white towel is stai ned with
clothes' original color.
As for the scarves and those clothes that easi ly
get decolorized among imported clothes , ple ase
wash them separately before washing .
As for the stains on sleeves, collars and pock ets,
use the liquid detergent and wash it with b rus h
gently. Fina lly p ut them into the washing machine
to achieve more ideal washing effects.
As for temperature-sensitive clothes , they shall
be washed as required in the labels. Otherwi se,
it may cause color change or distortion.
Keep in Mind:
Never put the clothes to be washed in washi ng machine for a long period of time.
Otherwise it may get moldy and cause spots. Therefore, please wash the clothes in time.
The clothes also may get color changed or dist ort ed if they are not washed according to
the stated washing temperature.
Clothes that can not be washed by washing mach ine
The clothes that may get distorted if being im mer sed in water:
Tie s, waistcoats, western-style clothes, outer garments etc. may have obvious shrinkage
if being immersed in water; the decolorize d clothes such as blended spinning clothes of
artificial fiber etc.
11
Operate Washing Machine
Wrinkle-s tyle clothes, embossed clothes, resin clothes etc. may get distorted when being
immersed in water. Among cotton and wool mater ials, the clothes that get easily distorted
are wrinkle-style silk, fur products and f ur decorations;
Clothes with decoration, long dress and tr aditional clothes etc are the products to get
decolorized easily.
Please do not wash the clothes without ma ter ial labels and washing requirements.
Never wash the clothes stained with the c hemicals such as gasoline, petroleum, benzene,
paint thinner and alcohol.
Please pay attention with regard to det ergents
“Low bubble” detergent or washing pow der or washing powder special for drum washing
machine shall be selected according to fib er ty pes (cotton, synthetic fiber, soft products and
wool products), colors, washing tem per atures, dirty degrees and types. Otherwise,
excessive bubbles may be generated and ove rfl owed out of the drawer so that accidents
may take place.
Bleacher belongs to alkali type and can dama ge clothes, so it is suggested to use as little
as possible.
Powder detergents can easily leave th e res idues in the clothes so as to generate the bad
smell, so they shall be sufficiently rinsed.
Detergent can not easily get dissolved com pletely if there is too much detergent or water
temperature is rather low. It can remain in clo the s, pipes and washing machines to
pollute the clothes.
Washing shall follow the weight of clothes, dirty degrees, local water har dne ss as well as
the recommendations from the detergent m anu facturers. Please consult the water
company if you are not clear of water hardness .
Notes:
Keep det ergents a nd additives in safe and dr y places ou t of touch by kids.
Checklist and Preparation before Washing Clothes
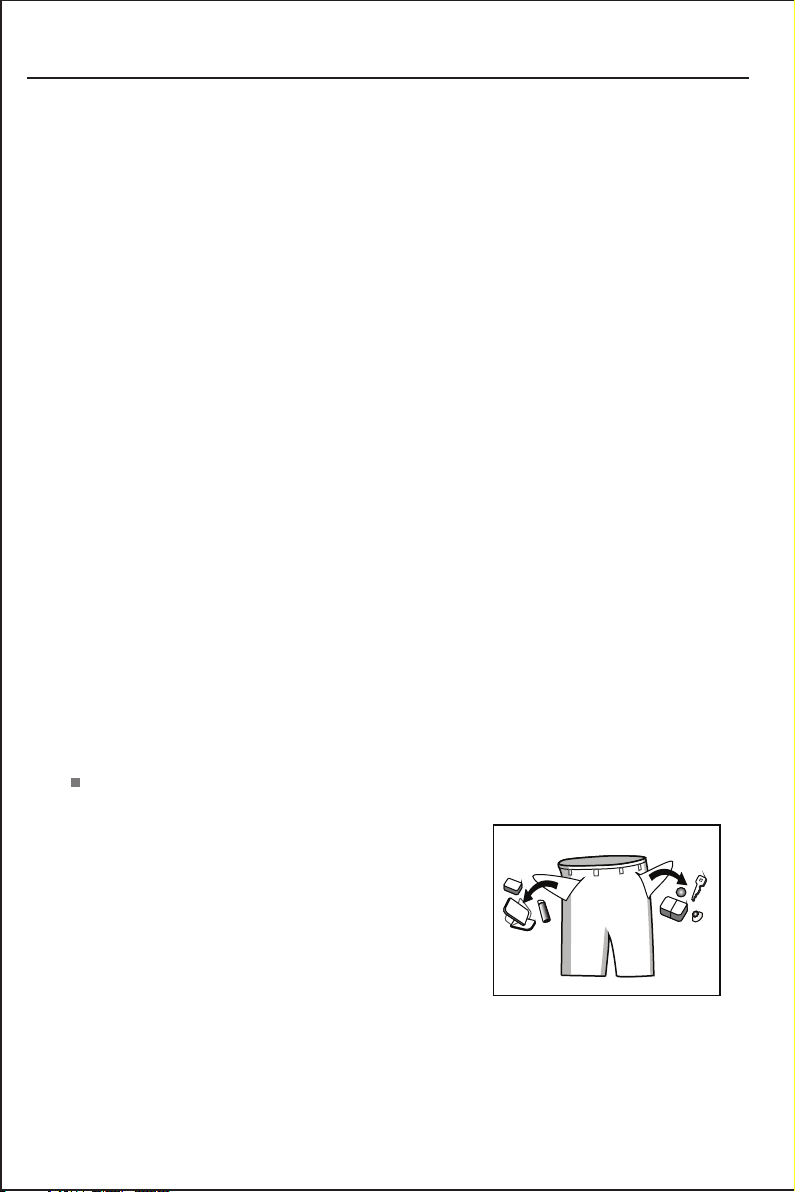
Please take out the items out of the pockets.
Please check the pockets of the clothes to be
washed, empty the rigid items such as
decorations and coins, otherwise wa shi ng
machine may be damaged or have abnormal
troubles.
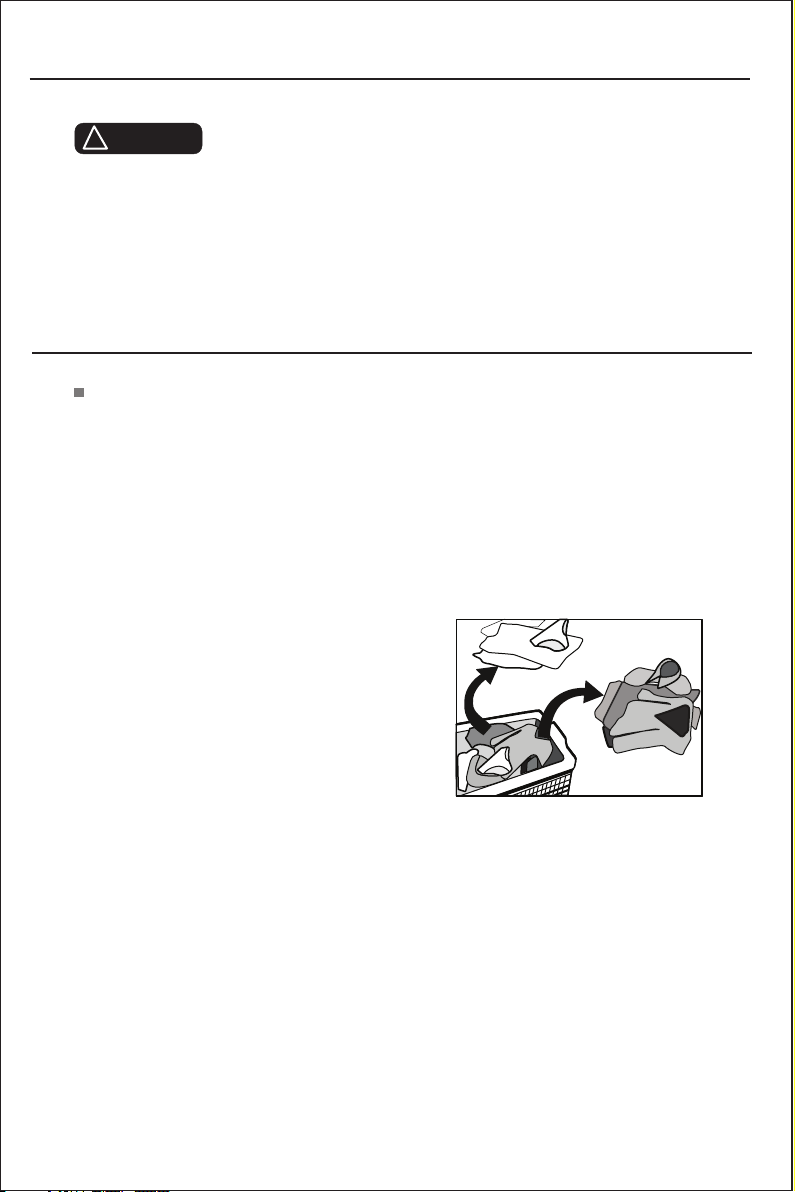
For the clothes to be washed, they are clas sif ied
according to the following characte ristics:
The symbol types of care labels: the clothes t o be
washed are classified into cotton, blend ed fiber, synthetic fiber, silk, wool and artificial fiber.
12
Operate Washing Machine
Color: white and colorful colors shal l be id entified. All new colorful articles shall be washed
in a separate way.
Size: the articles of different sizes are washed together to increase the washing effects.
Sensitivity: soft articles shall be wash ed separately. As for new pure wool textiles, curtains
and silks, the soft washing procedure shal l be selected. Check the labels in all washing
articles.
The clothes shall be sorted before being put i nto washing machine. As for the curtains with
hooks, the hooks shall be removed before bei ng washed.
The decorations on the clothes may damage th e washing machine. As for the clothes with
buttons or embroideries, they shall be tur ned o ver before being washed.
Clean up fasteners:
Zips shall be zipped close and buttons or hook s sha ll be fixed. The loose band or ribbon
shall be bound together.
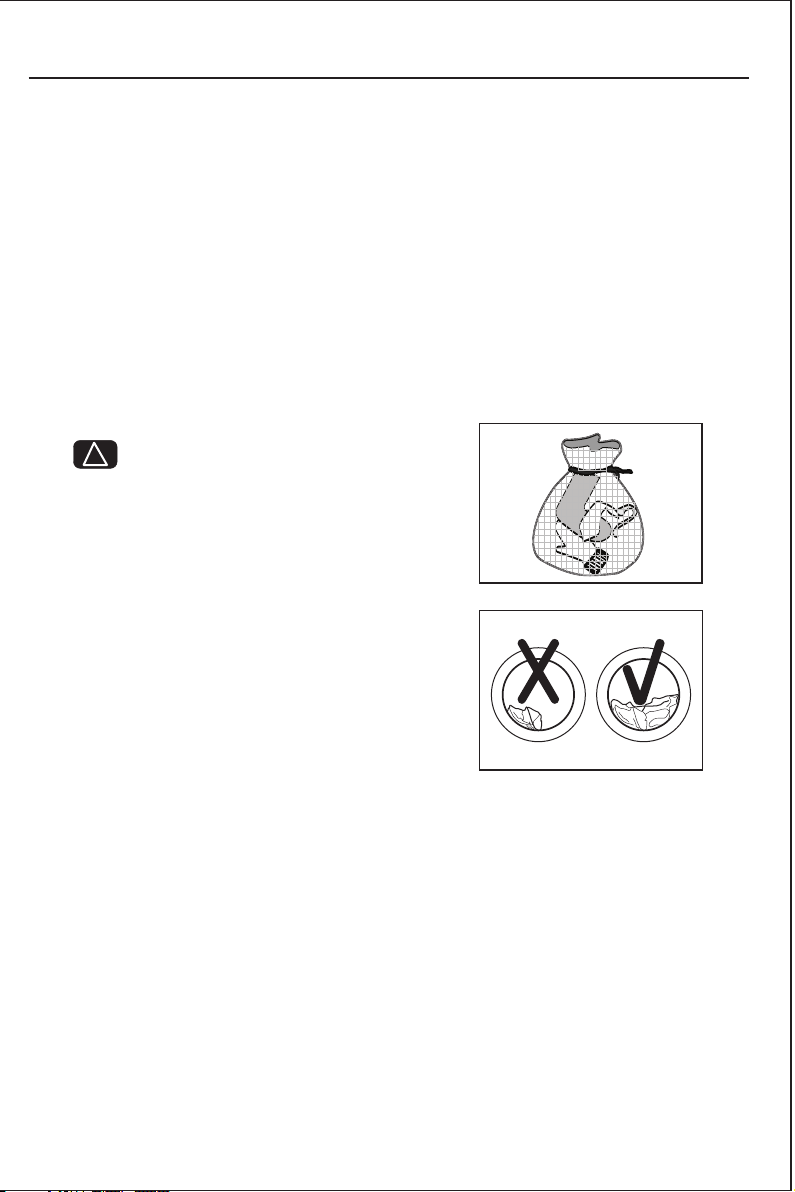
!
It is suggested to put bras into the pillow slip
with zip or buttons sealed to prevent the stee l
wire from popping out of bras into the drum and
damaging the machine.
Especially delicate textiles such as lac ed curtains,
straight jackets, small articles (tigh t soc ks,
handkerchiefs, ties etc.) shall be put int o str ing
bag for washing.
When washing a single big and heavy dress such
as Turkish towels, jeans, wadded jackets et c.,
it may easily cause great eccentricity and g ive
alarm due to great unbalance. Therefore it is
suggested to add one or two more clothes to be
washed together so that draining can be done
smoothly.
Clean away dusts, stains and pet hairs fr om the clothes.
The clothes may be damaged and disturb washi ng effects during the friction between
dusts, stains and clothes.
To protect bab y skin
Baby articles (baby clothes and towel s) in cluding napkins shall be washed separately.
If they are washed together with the adul ts' c lothes, they may be infected. Rinsing times
shall be increased to ensure the thorough ri nsi ng and cleaning without the detergent
residues.
It is suggested that the parts that are eas ily s tained such as white sockets, collars
and sleeves etc. shall be hand washed before b eing put into washing machine to
achieve more ideal washing effects.
Please use powder or liquid detergent s. The residues of the soap could remain in the
gaps of the clothes if soap is used.
13

Operate Washing Machine
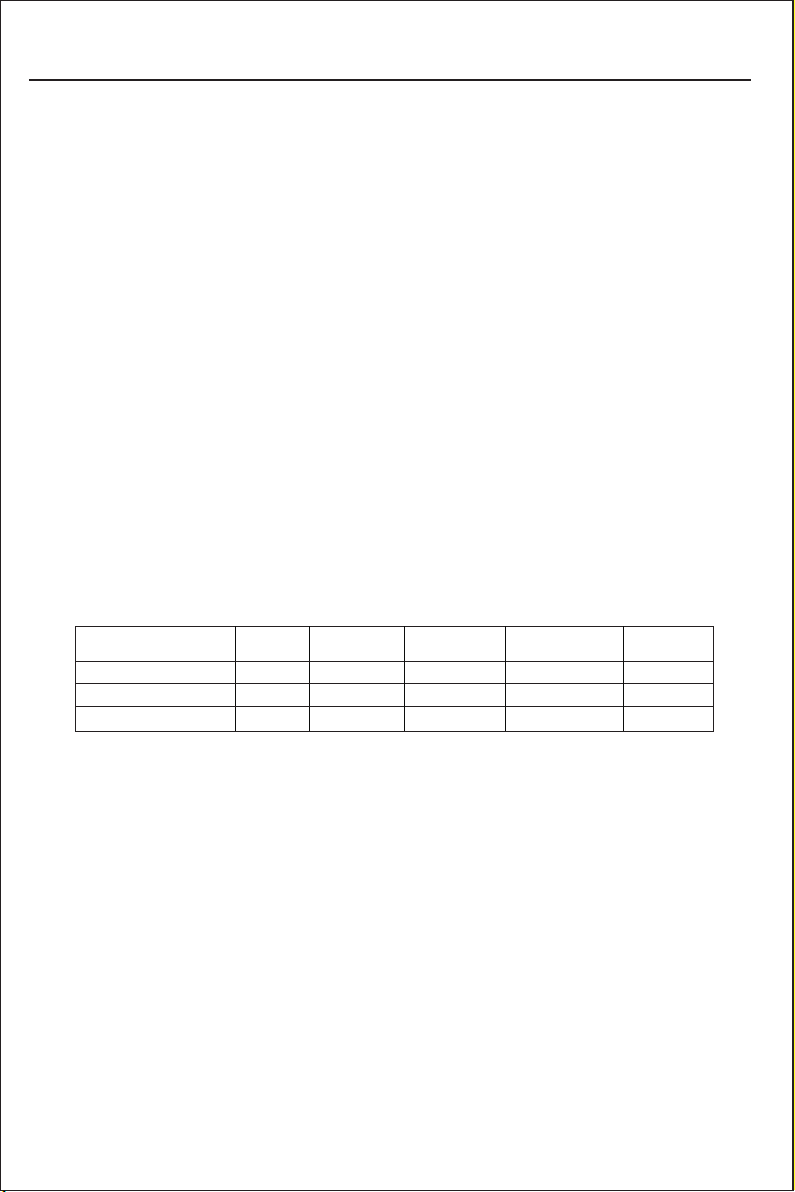
Confirm the washing capacity:
Do not put excessive washings; otherw ise it may affect the washing effe cts . Please confirm
the maximum affordable washing quantity according to the following table.
Delicate
The clothes which easily get fuzzed shall be t urned over for washing
The clothes which easily get fuzzed shall be w ashed separately; otherwise the other
articles can be stained with dust and thrum et c. Preferably, black clothes and cotton
clothes shall be washed separately becau se they can easily get stained with the thrums
of other colors when being washed together.
Please check before washing.
Washing machine shall not wash water-proof materials (ski suits, outsi de napkin
pads, curtains).
As for the fiber products that water can no t get s oaked easily into such as water-proof
cushions, and clothes, it is better not to was h. Otherwise there will be water bursting out
or abnormal vibration to cause danger whil e rinsing and draining so that the clothes also
may be damaged. (Such as outside napkin pads , raincoats, umbrella, ski suits, car covers,
sleeping sacks etc.)
6.0kg
6.0kg
3.0kg
2.0kg
2.5kg
Cautions during Draining
Draining of normal clothes:
Moistures of washings are drained throug h drain hole.
Draining of water-proof clothes and f ibe r products:
In the normal washing and draining status, m ois tures of water-proof clothes and fiber
products can not be drained while washi ng water is gathered in one direction so that the
eccentricity of washing machine is too gre at and vibration or moving is caused.
Bubble Removal Function
Bubble Check Function: Redundant bu bbles will occur when there is excessive detergent,
which will affect Wash and Rinse effects. The procedure will check automati cal ly and one
bubble removal procedure will be added aut omatically to remove bubbles when excessive
bubbles are checked. It will also remind the u ser to use less detergent during the next
similar washes.
14

Operate Washing Machine
View of Control Panel
1
2
Programme Knob
1
2
Led Screen display
3
On/Off Button
Delay Button
4
Speed Button
5
6
Temp. Button
7
Start/Pause Button
3
4
7
65
Rotary Switch Function
There are 16 types of washing selection func tio ns in d isplay. For example:
Cotton intensive: With the correspondi ng te mpe rature selections: 20 30 , 40, 60, 90 ℃,Cold
Cotton 60 ℃; Cotton 40 ℃; Cotton 20 ℃;
Quick15': 20 30 , 40℃, C old
,
Underwear: 20 , 30 , 40, 60, 90 ℃,Cold
Rinse&Spin:Cold
Spin only:Cold
Drain only
Wool: 20,30,40 ℃,Cold
Delicate: 20,30℃,Cold
Mixed: 20,30,40℃,Cold
Synthetic: 20 30, 40,60 ℃
Sports:
Baby care:
, ,Cold
20,30,40 ℃,Cold
20,30,40,60,90 ℃,Cold
My cycle
Notes:
1.The Control panel line chart is for reference only,Please refer to real product
as standard.
2.The Control panel could be changed without written notice. Please visit the
website of Washing Machine or call up the service line for consultation.
,
15
Operate Washing Machine
Washing Clothes at first time
Before washing clothes at first time, t he washing machine shall be operated in
one round of the whole procedures without cl othes in as follows:
1.Connect power source and water.
2.Put a little detergent into the box and close i t.
3.Press the button “ ”.
4.Press the button “Start/Pause”.
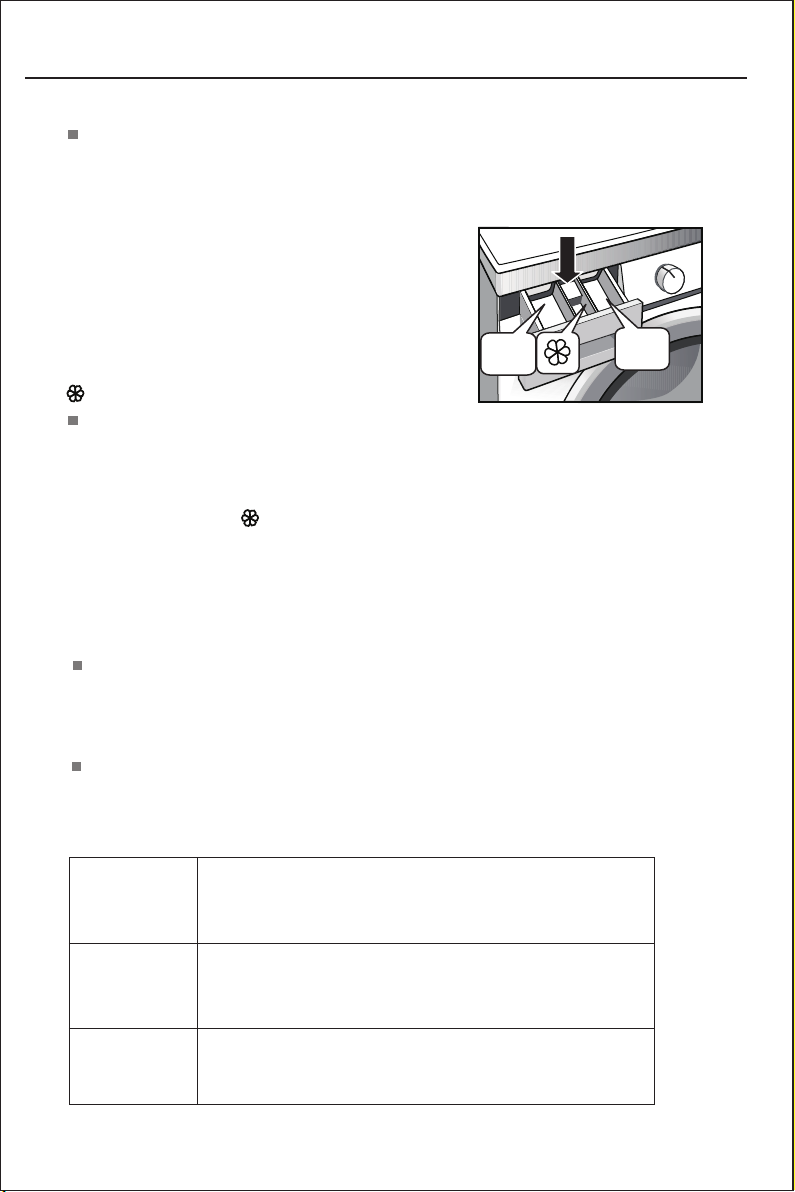
The drawer is separated as follows:
I: Pre-detergent or washing powder.
II: main detergent, softener, pre-dip,
bleaching or decontaminating product s.
: washing additive, such as fabric softene r or tackifier.
Put detergent into washing machine.
1.Pull out the drawer.
2.Fill pre-detergent into Case I (when n ece ssary).
3.Fill detergent into Case II.
4.Fill softener into Case (when necess ary ).
Notes:
- As for the ag glomera ted or ropy detergent or ad ditive, b efore they are poured int o the deter gent box,
it is sugg ested to us e some water for dilution t o prevent t he inlet of detergent box f rom being b locked
and over flowing w hile filling water.
-
Please c hoose sui table type of detergent f or the vari ous washing temperatu re to get the b est washing
eff ect with le ss water and energy consu mption.
Start up washing machine
Connect the power. Check if water pipes ar e connected properly. Open the tap completely.
Put in the clothes to be washed and fill in the d ete rgent and tackifier. Then press the button
“ ”,Select the proper procedures and functions and press the bu tto n “Start/Pause”.
On/Off
Select the procedure
The proper washing procedures shall be sel ected according to the types, quantities, and
dirtiness of the clothes to be washed in combi nation with the following washing
temperature table.
On/Off
Ⅱ
Ⅰ
90 ℃
60 ℃
40℃
, 30℃, 20℃
Cold wat er
Seriou sly besmi rched, pure white cotto n or flax (fo r example: coffee
table cl oths, can teen table cloths, towe ls, bed she ets)
Modera tely besm irched, colorful flax , cotton an d synthetic articles
with cer tain deco lorizing degree (for ex ample: sh irts, night pajamas;
Slight ly besmir ched, pure white flax (fo r example : underwear)
Normal ly besmir ched articles ( synthe tic and woo l)for exam ple:
16

Operate Washing Machine
First, turn t he rotary switch to s elect the corresponding procedures ac cording to the types of
textiles.
Second, select the proper temp erature according to the dirtiness. Gen erally, the hig her the
temperatu re is, the more the pow er is consumed.
Last, selec t the proper revolu tion speed.The highe r the revolution sp eed is,the drier the tex tiles
are spun, but h igher the noises wi ll also be increased.
The s urfaces of delicate te xtiles will have wr inkles and the working life of washing mach ine
will be shortened.
PLEASE N OTE: to protect the clothes, the lower revo lution speed shall be selected for delica te
textiles. The main washin g procedures depe nd on the types of the cloth es to be washed. The
main
washing troubles can be select ed as follows:
- My cycle
Press the speed button 3sec.for my cycle to me mory the procedure .
- Cotton Intensive
To increase the w ashing effec ts, main addition al washing time is incre ased.
It is recomme nded to wash the clot hes for babies or worn by the persons with alle rgic skin.
- Cotton
You can select this pr ocedure to wash the daily washable clothe s. The washing p eriod is quite
with quite strong washing inte nsions. It is recommended to wash the daily c otton articles, for
long
example: be d sheets, quilt cov ers, pillowcases, gowns, underwear et c.
- Quick 15
This proced ure is suitable for w ashing few and not very dirty clothes quick ly.
- Underwear
Underwear cycle which is specially ma de for washing underwears is more demanding on
rinsing strength and will operate one more t ime than other cycles.
- Baby care
Baby care procedure with an extr a rinse, it can make the baby's wear cleaner an d make the rinse
performan ce better to protec t the baby skin.
- Sports
You can select this pr ocedure to wash the activewear.
- Synthetic
You can select this pr ocedure to wash the quite delicate clothe s. The procedu re is shorter
compared with that for cottons a nd the washing intension is quite gentle. I t is recommended to
wash synthetic articles, for e xample: shirts, coats, blending. As for curtains and lace d textiles,
the procedu re “Synthetic ” sha ll be selected. While washing the knittin g textiles, detergent
quantity sh all be reduced due to i ts loose string constr uction and easily f orming bubbles.
- Mixed
You can select this procedure wash the tough cltohes, that need much more time and strength .It is
used for the daily clothes fo cotton,such as sheets, chained, pillowcases bathrobe and underwear.
- Delicate
You can select this pr ocedure to wash your delicate clothes. It s washing intension is gentler and
revolutio n speed is less compa red with the procedure “Synthetic”. It is r ecommended for the
articles to b e washed softly.
′
17

Operate Washing Machine
- Woo l
You can select this procedure to wash the w ool t extiles labeled with “Machine Wash”.Please select
the proper washing temperature according to the l abe l on the articles to be washed.
Furthermore, the proper detergent shall be sele cte d for wool textiles .
- Drain Only
Separate Drain Only procedure.
- Spin Only
Separate Spin only procedure. Soap wa ter o r rinse water shall be drained out before spinning.
The Special function
- Delay
Delay function can be set with this butto n, th e del aying the time by 0-24h with the figure.
Set the delay function:1.Select a pro ced ure ;2.Press the Delay button choose the time;
3.Press Start/Pause to commence the D ela y ope ration.
Cancel the Delay function: Press the De lay b utton until the light will be off (0-Led products )
and press the Delay button until the display w ill t o be 0h ( Lcd and Led products) .
It should be pressed before starting the program. If the program already started, should press the
power button.
Notes: If there is any break in the power sup ply w hil e the machine is operating, a special
memory stores the selected programme and w hen t he po wer is restored, it continues
where it left off.
- Child lock
To avoid that the washing procedure cannot ope rat e nor mally due to the mis operation by
kids during the washing procedure, you can s ele ct th is function, In this case, the other
buttons except button can not work, at this state ,the ma chi ne po wer off when press
the key power. The machine remembers the program child lock and the program during
powered off when press the key again.
Press delay and speed together 3 seconds dur ing t he ru nning procedure, the buzzer will
beep , Start/Pause button as well as the ro tar y swi tch are locked. Press the two buttons for
3 seconds together and buzzer will beep to rel eas e to lo cking. But cut off the power supply ,
the kid’s protection is also release to locking.
The kid’s protection will not be cancelled after all procedures are completed.
- ECO
To increase the washing effects, main additional washing time is increased.
Set the ECO function:1.Select “c ott on” p rocedure;2.Press the speed and temp. together 3
seconds until the display will to be , only the co tto n℃ 6/040℃ can set the ECO function.
- Suppression of the acoustic signals
This is an additional buzzer function on you r app lia nce. After deactivating the buzzer function,
the buzzer will be closed. Aft er st arting the machine, press the “Temp.” button for 3 seconds
and you will hear a beep, then the buzzer wil l be cl ose d. To restore the buzzer function, press
the “Temp.”button again for 3 seconds.
The setting will be kept until the next reset.
Warning: After deactivating the buzzer function, the sounds will not be activated any more
before you reset it.
On/Off
On/Off
18
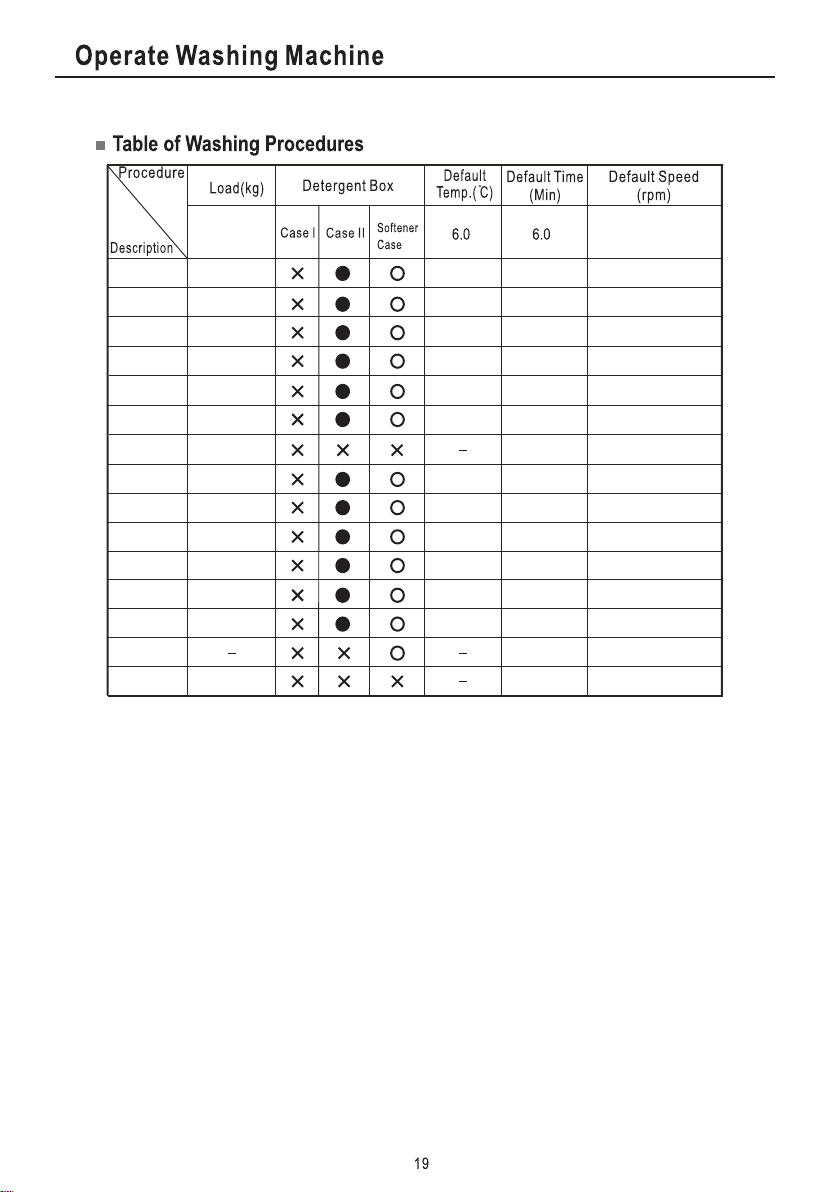
6.0
Cotton
Intensive
Cotton 60°C
Cotton 40°C
Cotton 20°C
Quick 15’
ECO Wash
Rinse&Spin
Baby Care
Sports
Synthetic
Mixed
Delicate
Wool
Drain Only
Spin Only
•
The energy class is A+++
Energy test program: Cotton 60 /40 .
6.0
6.0
6.0
6.0
2.0
2.0
6.0
6.0
3.0
3.0
6.0
2.5
2.0
6.0
°C °C
40
60
40
20
Cold
30
60
40
40
40
30
40
118
222
218
73
15
66
31
99
79
93
73
60
66
1
12
1200
1000
1200
1200
1000
800
800
1000
1000
800
1200
1000
600
400
0
1000
Speed: the highest speed; Other as the default.
Half load for 6.0Kg machine:3.0Kg.
• “Cotton 60°C/40°C ” are the “standard Cotton 60°C/40°C” programme and the
standard washing programs to which the information in the label and the fiche
relates,
and they are suitable to clean normally soiled cotton laundry and that they
are the most efficient programmes in terms of combined energy and water
consumptions for washing that type of cotton laundry,that the actual water
temperature may differ from the declared cycle temperature.
Maintenance
Before your maintenance starts, please d o pull out the power plug or disconnect power
and close the tap.
- Solvents are forbidden to avoid that the was hing machine is damaged, and toxic gases
are generated or exploded.
- Never use water to sprinkle and wash the wa shing machine.
- It is forbidden that the detergents contai nin g PCMX are used to clean the washing machine.
Cleaning and Maintenance of Washing Machine Cabinet
Proper maintenance on the washing mac hin e can extend its working life. The surface can
be cleaned with diluted non-abrasive neu tral detergents when necessary. If there is any
water overflow, use the wet cloth to wipe it o ff immediately. No sharp items are all owed to
strike the cabinet.
Notes: f ormic aci d and its diluted solvent s or equiva lent are forbidden.
Clean Internal Drum
The rusts left inside the drum by the metal arti cle s shall be removed immediately with
chlorine-free detergents.
Never use steel wool.
Dispose a Frozen Washing Machine
When the temperature drops below zero and yo ur washing machine gets frozen, you may:
1.Disconnect the power supply for the wa shing machine.
2.Wash the tap with warm water to loosen inlet pipe.
3.Take down inlet pipe and immerse it in warm water.
4.Pour warm water into washing drum and wa it for 10 minutes.
5.Reconnect inlet pipe to the tap and check whe ther inlet and outlet are working normally.
Notes: when the was hing machine is reused, make sure th e ambient temperature i s above 0 C
Anti-freeze
If your washing machine is located in the room w here it can get frozen easily, please drain
the remaining water inside drain pipe and in let pipe thoroughly.
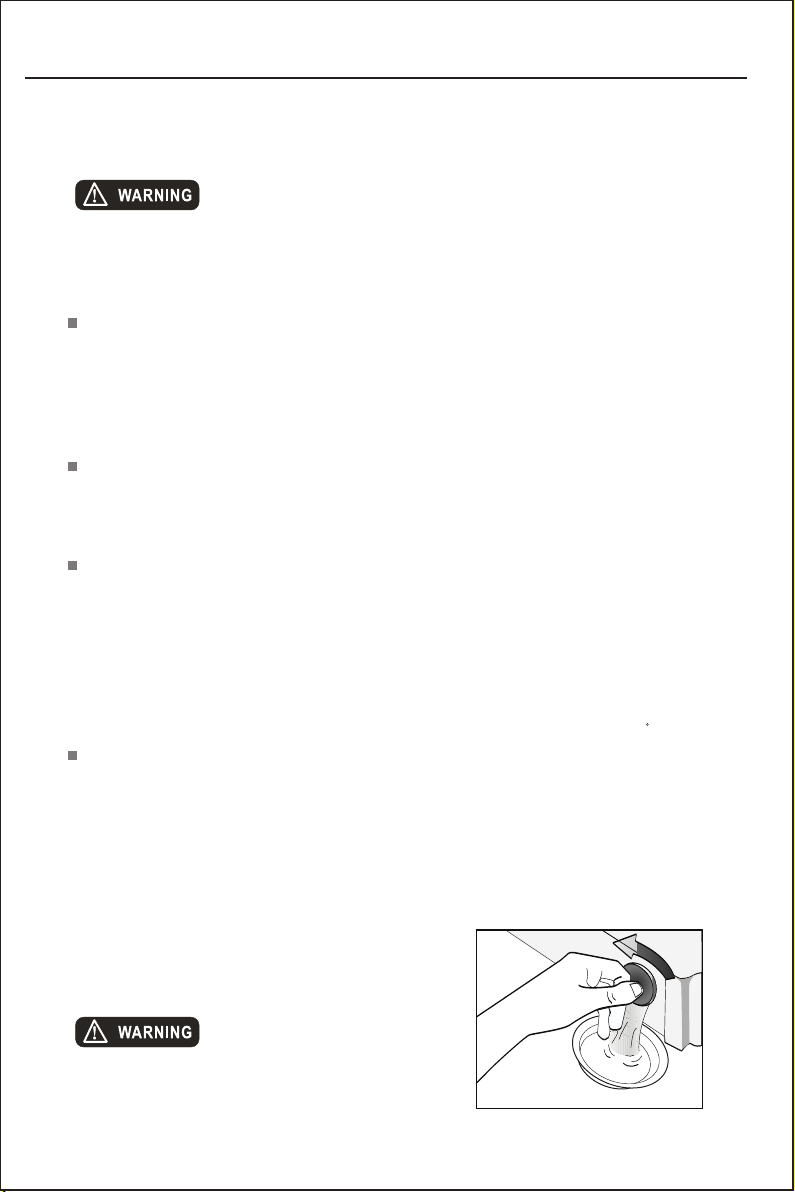
Remove the remaining water in inlet pip e:
1.Close the tap.
2.Screw off the inlet pipe from tap and put its end into the container.
3.Start up any procedure except single Wash or Drain
procedure. Water will be drained out of inlet pipe if any
for about 40 seconds.
4.Reconnect the inlet pipe to tap.
Remove the remaining water in drai n pum p
To avoid b urning, it shall be done af ter the hot w ater
inside t he machin e cools down.
20
Maintenance
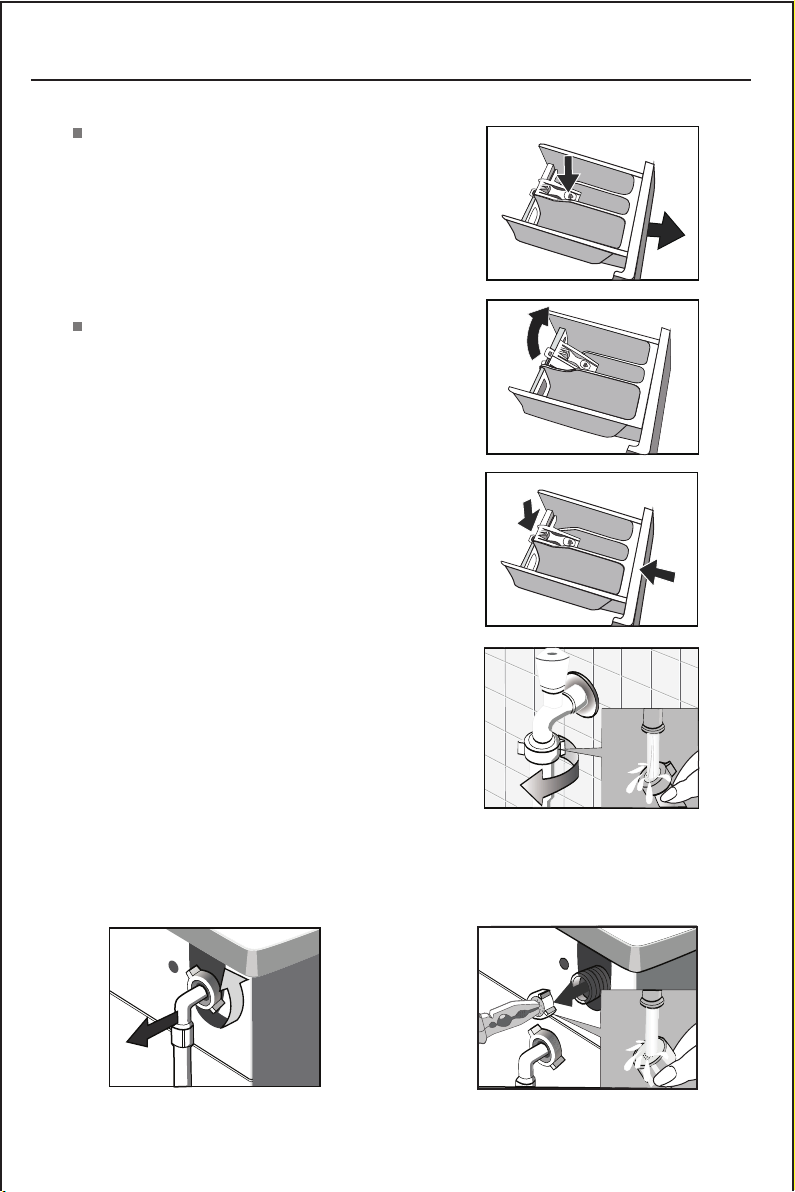
Clean detergent box and grooves
Clean detergent drawer and grooves
1.Press down the arrow location on softe ner c over
inside the drawer.
2.Lift the clip up and take out softener cover an d wash
all grooves with water.
3.Restore the softener cover and push the dra wer into
position.
Clean inlet filter
Inlet filter shall must be cleaned if there is n ot an y or
insuffici ent water in when the tap is opened.
Clean the tap filter:
1.Close the tap.
2.Select any procedure except “Wash” or “Drain”
procedure.
3.Press the button “Start/Pause” and k eep the
procedure running for about 40 seconds.
4.Remove the inlet pipe from the tap.
5.Use water to wash the filter.
6.Reconnect the inlet pipe.
Washing the filter in washing machine:
1.Screw off the inlet pipe from the backside of the
machine.
2.Pull out the filter with long nose plier s and r einstall
it back after being washed.
3.Reconnect the inlet pipe.
4.Open the tap and make sure there is no water leak age.
5.Close the tap.
Notes: G enerall y, the tap fil ter is wash ed first and then the filte r in washin g machine will be washed.
If only th e filter in w ashing machine is washe d, then the s teps 1~3 in cleaning the ta p filter sh all be
repeat ed.
21
Maintenance
Pull out the power plug to avoid electric al sh ock before washing.
After using the washing machine, pull o ut th e power cord and close the door tightly to avoid
pinching the kids.
Remove foreign matters
Drain Pump Filter:
Drain pump filter can filter the y arns and small foreign matters from the was hings.
Clean the filter periodicall y to ensure the normal operation of washing m achine.
First, drain the water with drain pump and then open the drain pump to clean away foreign
matters from drain pump filter.
Take care if the drained water is hot.
Cleaning the pump
Important!
According to the soil level within the cycles and the frequency of the cycles,you have to inspect and
clean the filter regularly.
The pump should be inspected if the machine does not empty and/or spin;
the machine makes an unusual noise during draining due to objects such as safety pins,
coins etc. blocking the pump.
Proceed as follows:
Open the service panel
1 Disconnect the appliance;
2 If necessary wait until the water has cooled down.
3 Open the service panel .Place a container close to collect any spillage.
4 When no more water comes out, unscrew the pump cover and remove it.
Always keep a rag nearby to dry up spillage of water when removing the cover.
5 Remove any objects from the pump impeller by rotating it.
6 Screw the pump cover fully in.
7 Close the service panel.
Warning!
When the appliance is in use and depending on the programme selected there can be hot water in
the pump. Never remove the pump cover during a wash cycle, always wait until the appliance has
finished the cycle, and is empty. When replacing the cover, ensure it is securely retightend so as to
leaks and young children being able to remove it.stop
Unscrew the pump cover
22
Close the service panelScrew the pump cover
Troubleshooting
Troubles
Washing m achine
cannot start u p
Door cannot be
opened
Heating faul t
Water lea kage
Water is
overflowed f rom
the bottom of th e
machine
Indicator or
display does
not light.
Detergent
residues in th e
box
Washing e ffec ts
are not good
Abnormal noi se
Great vibrat ion
Reason
Machine's sa fety protecti on
design is work ing.
NTC is damaged a nd hea ting
pipe is aging.
The connecti on between inle t
pipe or outlet h ose and tap o
washing mach ine is not tight.
Drain pipe in th e room is blocked .
T
he inlet pipe is n ot connected
firmly.
Outlet hose ha s water leakage .
P
ower is discon nected.
PC b
oard has probl ems.
Harness has co nnect
problem.
Washing p owder is dampen ed
and agglom
The clothes ar e too d
Insufficient det
erated.
ergent quant
r
ion
irty.
ity.
Solut
ion
Check if the doo r is closed tightly.
Check if power p lug is inserted w
Check if water s upply tap is open ed.
Chec
k if but
ton “
Check i
Disconnect t he p
Can normally w ash the clothes .
Only cannot wa sh with heating .
Shall contac t the service cen ter p
Check and fast en water pipes.
Clean u
specialize d person to r
necessary.
Fix the inlet pi pe.
Replace the dr ain ho se.
Check if the pow er is shut down and
power plug is co nnected corre ctly.
If not, please c all up service li ne.
Clean and wipe t he box.
Use liquid det ergents or the de tergents
special for dr um.
Select a prope r p
Add the proper d
according to t he instructio ns in
detergent pa ckage.
Check if the fix ing (bolts) has been r
I
f cabinet is ins talled o
floor.
Check if there a re any barrette s or met al
articles ins ide.
Check i
are adjusted l evel.
Start/P
f button “ ” is pressed.On/Off
ower.
p outlet hose an d ask a
rocedure.
etergent qua ntity
n the solid and le vel
f the legs in the wa shing machine
ell.
ause” is press ed.
rom
epair it when
emoved.
ptly.
23
Remove the problems
Displa y
LED
E30
E10
E21
Descri ption
Door loc k
proble m
Water injecting
proble m when
washin g (water
inject ing time
exceed s 7
minute s)
Drain pr oblem
while washing
(drain t ime
exceed s 3 minutes )
Please c all up the se rvice line if there is any ot her probl em.
Door is no t closed pr operly.
Outlet h ose is bloc ked ortwisted
Drain pu mp is block ed
Reason
Please c all up serv ice line if there are still t roubles .
Tap is not ope ned or wate r
flows to o slowly.
Inlet va lve filte r is blocked.
Inlet pi pe is twist ed.
If water i s not suppl ied
Please c all up serv ice line if there are still t roubles .
Please c all up serv ice line if there are still t roubles .
Soluti on
Restar t after the d oor is closed
Open the t ap or wait ti ll
the wate r supply
become s normal.
Check in let valve f ilter.
Straig hten the wa ter pipe
Check th e other tap s in
the room .
Wash and straighten out let hose.
Wash drain pump filter
24
Appendix
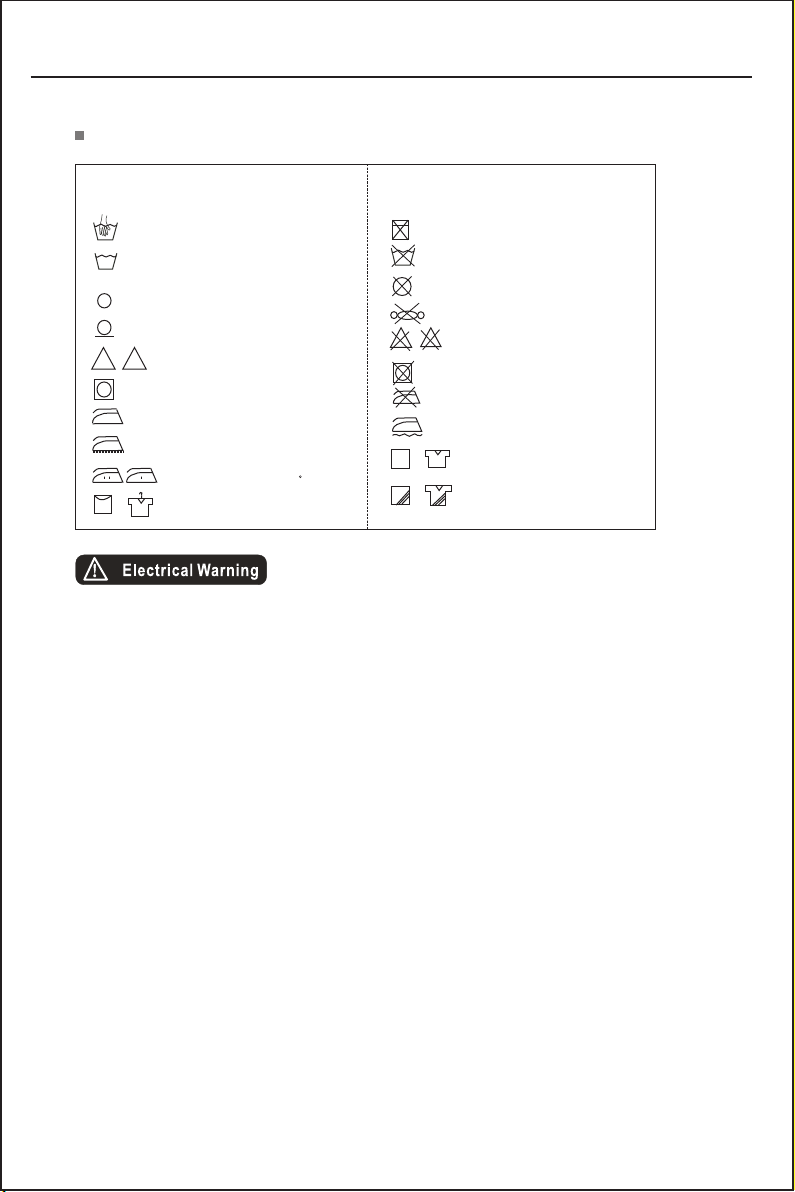
Care Lable
Graphi c Symbol
CI
Illust ration
Hand Wash
Washing (includin g Mach ine
Wash and Hand Wash )
Dry Clea n
Warmly Dry Clean
Bleach
Tumble dry
Iron
Steam Ir on
Med ium Tempe ratu re and
Max . Tempe rature 150 C
Line Dry
Graphi c Symbol
CI
Illust ration
No Machi ne Wash
Do not Wash
No Dry Clean
No Wr ing
No Bleach
Do not Tumb le Dry
Do not Iro n
Iron wit h Cloth
Dry afte r Wash
Line Dry i n Shade
To avoid fire, electrical shock and other acciden ts, please remember the following
reminding:
- Only the voltage indicated in power label ca n be used. If you are not clear of the
voltage at home, please contact the local po wer bureau.
- When you are using the heating function, the m axi mum current through the washing
machine will reach 10A. Therefore, please make sure the power supply units (current,
voltage and cable) can meet the normal load re qui rements for the machine.
- Protect the power cord properly. Power cord shall be fixed well so that it will not trip
the people or other things and be damaged. Spe cial attention shall be paid to the
socket. It shall be plugged into the sockets e asi ly and attention shall be paid to the
plug location.
- Do not make the wall-mounted socket ove rlo aded or cable extended. Overloading
of the wiring may cause fire or electrical sho ck. Do not pull out power plug with wet
hand.
- To ensure your safet y, power plug shall be inserted into an earthed three-pole
socket. Carefully check and ensure that yo ur socket is properly and reliably earthed.
25

54k g
Product Fiche
Brand:TEKA
Model:TKX3 1263 BLANCA
Rated capacity:6kg
Energy effi ciency class:A+++
EU Ecolabel:N/A
Energy consumption 153kwh per year, base d on 22 0 standard washing cycles for cotton
at 60°C and 40°C + ECO at full and partial load,and t he consumption of the low-power modes.
Actual energy consumption will depe nd on h ow the appliance is used.
Water consumption 9240 litres per year, based on 220 standard washing cycles for c otton
at 60°C and 40°C + ECO at full and partial load. Actual water consumption will depend
on how the appliance is used.
Spin-drying efficiency class B on a scale from G (least efficient) to A (most efficient)
Maximum spin speed:1200rpm
Consumption values(1200rpm):
Sta ndard P rogra mme
Cot ton 60° C+ECO
Cot ton 60° C+ECO
Cot ton 40° C+ECO
Loa d
6kg
3kg
3kg
Ene rgy
con sumpt ion
0.72k wh
0.69k wh
0.60k wh
Water
con sumpt ion
48L
37L
37L
Notes:
1. Progr amme sett ing for testing in accord ance with a pplicable standard EN 60456-2 011.
2. When us ing the tes t programmes, wash the sp ecified l oad using the maximum spi n speed.
3. The actu al parame ters will depend on how the a pplican ce is used,and maybe different with
the para meters in a bove mentioned table.
Rem ainin g
moi sture c ontent
50%
55%
55%
Pro gramm e
dur ation
222mi n
211mi n
203mi n
Off mode powe r consumption:0.5W
Left-on mode power consumption:1W
Airborne acoustical noise (washin g):59
Airborne acoustical noise (spinning) :76
Notes: The ai rborne acoustical noise emissions during washing/spinning for the standard
60℃ cotton+ ECO programme at full load.
27

Índice
1. Instrucciones de seguridad ............................................................................ 5
1.1. Energía de alimentación .......................................................................... 6
1.2. Cable de alimentación y otros cables .................................................... 6
1.3. Humedad y agua ..................................................................................... 6
1.4. Limpieza .................................................................................................. 6
1.5. Precauciones generales .......................................................................... 7
2. Utilización y funcionamiento ........................................................................ 10
2.1. Descripción del producto ....................................................................... 10
2.2. Panel de control .................................................................................... 10
2.3. Funciones de los botones ...................................................................... 11
2.4. Instalación .............................................................................................. 12
2.4.1. Desembalar su lavadora ................................................................ 12
2.4.2. Eliminar los materiais del embalaje ................................................. 12
2.4.3. Quitar los tornillos de transporte .............................................. 12
2.4.4. Seleccionar una localización .......................................................... 12
2.4.5. Ajustar los pies ................................................................................ 13
2.4.6. Conexión del tubo de entrada ........................................................ 14
2.4.7. Instalación del tubo de entrada ...................................................... 14
2.4.8. Colocar la manguera de salida ....................................................... 14
2.4.9. Conexión eléctrica .......................................................................... 16
3

2.5. Funcionamiento de la lavadora ............................................................ 17
2.5.1. Lista de verificación y preparación antes de lavar ropa ................. 17
2.5.2. Lavar ropa por primera vez ........................................................... 19
2.5.3. Ropa que no puede lavarse en la lavadora ................................... 20
2.5.4. Verificación de las primeras ropas lavadas .................................. 20
2.5.5. Detergentes para su lavadora ........................................................ 21
2.5.6. Colocar detergente en su lavadora ................................................ 22
2.5.7. Iniciar su lavadora .......................................................................... 22
2.5.8. Selección de procedimiento ............................................................ 22
2.5.9. Selección de funciones especiales ................................................ 25
2.5.10. Tabla de procedimientos de lavado ............................................. 27
2.5.11. Método de lavado ......................................................................... 28
2.6. Etiquetas de cuidados ........................................................................... 30
3. Mantenimiento ............................................................................................ ..31
4. Solución de problemas .............................................................................. ..36
5. Especificaciones técnicas ......................................................................... ..39
6. Ficha del producto ..................................................................................... ..39
7. Postventa ................................................................................................... ..41
8. Conservación del medio-ambiente ............................................................... 42
4
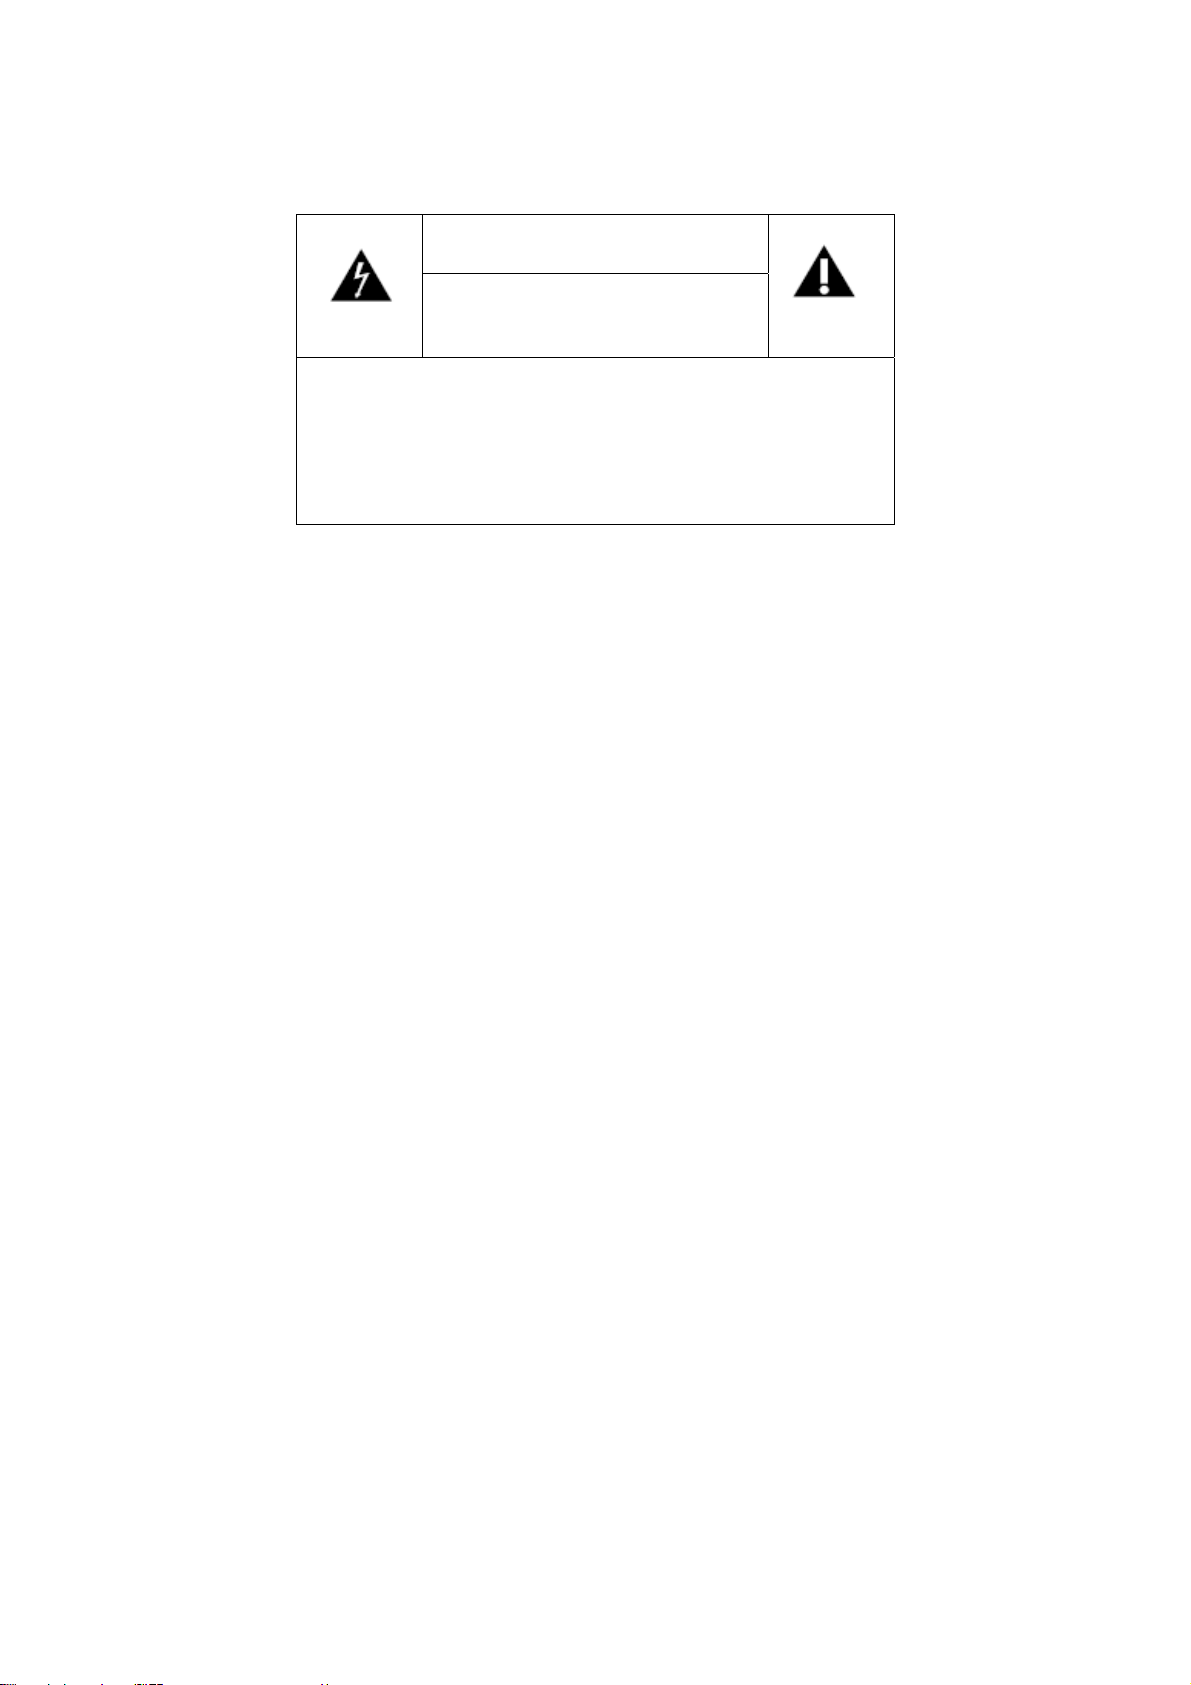
1. Instrucciones de Seguridad
Riesgo de electrocución
Atención: para reducir el riesgo de electrocución, no
abra esta unidad. No contiene elementos que deba
reemplazar el usuario. solicite la asistencia de
personal especializado.
Avisos Importantes
Antes de usar su aparato lea atentamente este manual de instrucciones y
guárdelo en un lugar seguro, puede volver a necesitarlo en el futuro.
Antes de poner el aparato en funcionamiento y de forma a garantizar su
correcta utilización, no lo utilice si:
ATENCIÓN
No Abrir
Ha caído al suelo;
Nota alguna señal de daño;
Surge alguna anomalía durante su funcionamiento;
Para evitar peligro y deterioro de su aparato debido a su uso incorrecto, se
aconseja que se lea atenta y cuidadosamente las instrucciones.
Este aparato no deberá ser utiliz ado para otros fines que no sean los previstos
en el manual de instrucciones. Su seguridad está prevista para el uso
doméstico y no para su uso comercial. Su uso incorrecto anula
automáticamente el derecho a la garantía.
Asistencia
Compruebe que, en caso de avería, entrega su aparato a personal
especializado.
5
 Loading...