

Teka LVS 831 BLANCO VR01,LVS 831 INOX VR01 User guide

User Manual
LVS 831 BLANCO VR01/
EN
LVS 831 INOX VR01
www.teka.com
Dear C ustomer,
Please careful ly read this manu al b efore usin g the
dishw ash er, it will help you to use and mai ntain the
dishw ash er properly.
Keep i t to r efer to it at a l ater date.
Pass i t on to any sub sequent owner of the app liance.
This m anu al contain s sections on sa fet y Instruct ion s,
Operatin g Instruct ion s, Install ation Inst ruc tio ns and
Tro uble sho oti ng Tip s, e tc.
To review the section on troub les hoo ting Tips
will h e lp you to s olve some common p roblems
by yo urself .
If yo u can not so lve th e prob lems by yo urself ,
pleas e ask for th e help of profess ion al tech nicians.
Control Panel...... ......... . ......... ....... ......... . .. ....... 3
Dishw ash er F eatu res.... .......... ... ...... .... ...... ... ...3
A Wat er S o ftener. ...... . ............ .... ...... ... ... . ..... 4、
B Load ing the Salt i nto the Softener.. ... .... ........5、
C Fill the Rin se Aid Dispens er..... ............. .......5、
D Func tion of Deterge n t .......... ...... ............. ....6、
Attentio n be fore or after loading the Di shwasher
Ba skets.... ............. .... ......... ... . ...... ... ... . ...... ... 9
Loadi ng the up per Basket. .......................... ....10
Lo ad ing the Low er Bas ket. .. ............. .... ......... ..10
Cu tlery B aske t............... ... ... ...................... .. 1 0
Was h Cycle Tab le..... .... ......... .... ... .......... ... .....11
Turning on the Applia nce... . ............ ... . ............12
Ch ang e the p rogr am.... .... ......... ...... .......... ... ...1 2
At the end of the Was h Cycle.. ....... ... ... .......... ..12
The manu f act ure r, following a pol icy of con sta nt
developm ent and upda ting of the p roduct , may
make modifica tion s with out giving prior notice.
This u ser manual shall a lso be go t from the
manufact urer or resp ons ibl e vendor.
Filte rin g Syst em......... ............. ............. ..........13
Cari ng for the D ishwasher..... ... .... ...... ... . ... ...... 14
Posit io n ing th e Applia n ce.............................. .15
About Po wer Co nne ction... ............ ........ ...... ...1 5
Wat er C o nnect i on.. . ... ............ . ... ......... ...........16
Start of dish washer........ ... .... ...... ... .......... ...... 17
Before calling for serv ice.... ....... ... ... ....... ... ......18
Error codes. ............. ......... . ...... ...... . ......... .....19
Technical i nfor mation.......... ... ... .... ....... ... ...... .20

When using your dishwasher,
follow the precautions listed below:
This appliance is intended to be used in household
and similar applications such as:
-staff kitchen areas in shops, offices and other
working environments;
-farm houses;
-by clients in hotels, motels and other residential type
environments;
-bed and breakfast type environments.
This appliance can be used by children aged from 8
years and above and persons with reduced physical,
sensory or mental capabilities or lack of experience
and knowledge if they have been given supervision
or instruction concerning use of the appliance in a
safe way and understand the hazards involved.
Children shall not play with the appliance. Cleaning
and user maintenance shall not be made by children
without supervision. For EN60335-1
( )
This appliance is not intended for use by persons
(including children )with reduced physical, sensory
or mental capabilities, or lack of experience and
knowledge ,unless they have been given supervision
or instruction concerning use of the appliance by a
person responsible for their safety. For IEC60335-1
( )
This appliance is for indoor use only, for household
use only.
To protect against the risk of electrical shock, do not
immerse the unit, cord or plug in water or other liquid.
Please unplug before cleaning and maintenance the
appliance .
Use a soft cloth moisten with mild soap, and then use
a dry cloth to wipe it again.

This appliance must be earthed. In the event of a
malfunction or breakdown, earthing will reduce the risk
of anelectric shock by providing a path of least
resistance of electric current. This appliance is equipped
with a cord having an equipment-earthing conductor
and a grounding plug.
The plug must be plugged into an appropriate outlet that
is installed and earthed in accordance with all local
codes and ordinances.
Improper connection of the equipment-earthing
conductor can result in the risk of an electric shock.
Check with a qualified electrician or service
representative if you are in doubt whether the appliance
is properly grounded.
Do not modify the plug provided with the appliance;
If it does not fit the outlet.
Have a proper outlet installed by a qualified electrician.
Do not abuse, sit on, or stand on the door or dish rack of
the dishwasher.
Do not operate your dishwasher unless all enclosure
panels are properly in place.
Open the door very carefully if the dishwasher is
operating, there is a risk of water squirting out.
Do not place any heavy objects on or stand on the door
when it is open. The appliance could tip forward.
When loading items to be washed:
1) Locate sharp items so that they are not likely to
damage the door seal;

2) Warning: Knives and other utensils with sharp points
must be loaded in the basket with their points down or
placed in a horizontal position.
Check that the detergent powder is empty after
completion of the wash cycle.
Do not wash plastic items unless they are marked
dishwasher safe or the equivalent.
For plastic items n
recommendations.
Use only detergent and rinse additives designed for
an automatic dishwasher.
Never use soap, laundry detergent, or hand washing
detergent in your dishwasher.
Children should be supervised to ensure that they do not
play with the appliance.
The door should not be left open, since this could increase
the risk of tripping.
If the supply cord is damaged, it must be replaced by the
manufacturer or its service agent or a similarly qualified
person in order to avoid a hazard.
During installation, the power supply must not be
ot so marked,
check the manufacturer's
excessively or dangerously bent or flattened.
Do not tamper with controls.
The appliance is to be connected to the water mains using
new hose sets and that old hose-sets should not be reused.
The maximum number of place settings to be washed
is 12.
The maximum permissible inlet water pressure is 1MPa.
The minimum permissible inlet water pressure is 0.04MPa.

Dispose of the dishwasher packaging material
correctly.
All packaging materials can be recycled.
Plastic parts are marked with the standard
international abbreviations:
PE for polyethylene, e.g. sheet wrapping material
PS for polystyrene, e.g. padding material
POM polyoxymethylene, e.g. plastic clips
PP polypropylene, e.g. Salt filler
ABS Acrylonitrile Butadiene Styrene, e.g. Control
Panel .
Packaging material could be dangerous for children!
For disposing of package and the appliance please
go to a recycling centre. Therefore cut off the power
supply cable and make the door closing device
unusable.
Cardboard packaging is manufactured from recycled
paper and should be disposed in the waste paper
collection for recycling.
By ensuring this product is disposed of correctly, you
will help prevent potential negative consequences
for the environment and human health, which could
otherwise be caused by inappropriate waste handling
of this product.
For more detailed information about recycling of this
product, please contact your local city office and your
household waste disposal service.
DISPOSAL: Do not dispose this product as unsorted
municipal waste. Collection of such waste separately
for special treatment is necessary.

To get th e best pe rformance from your dishwasher, read al l ope rating in structions
be fore usin g it for the f irst time.
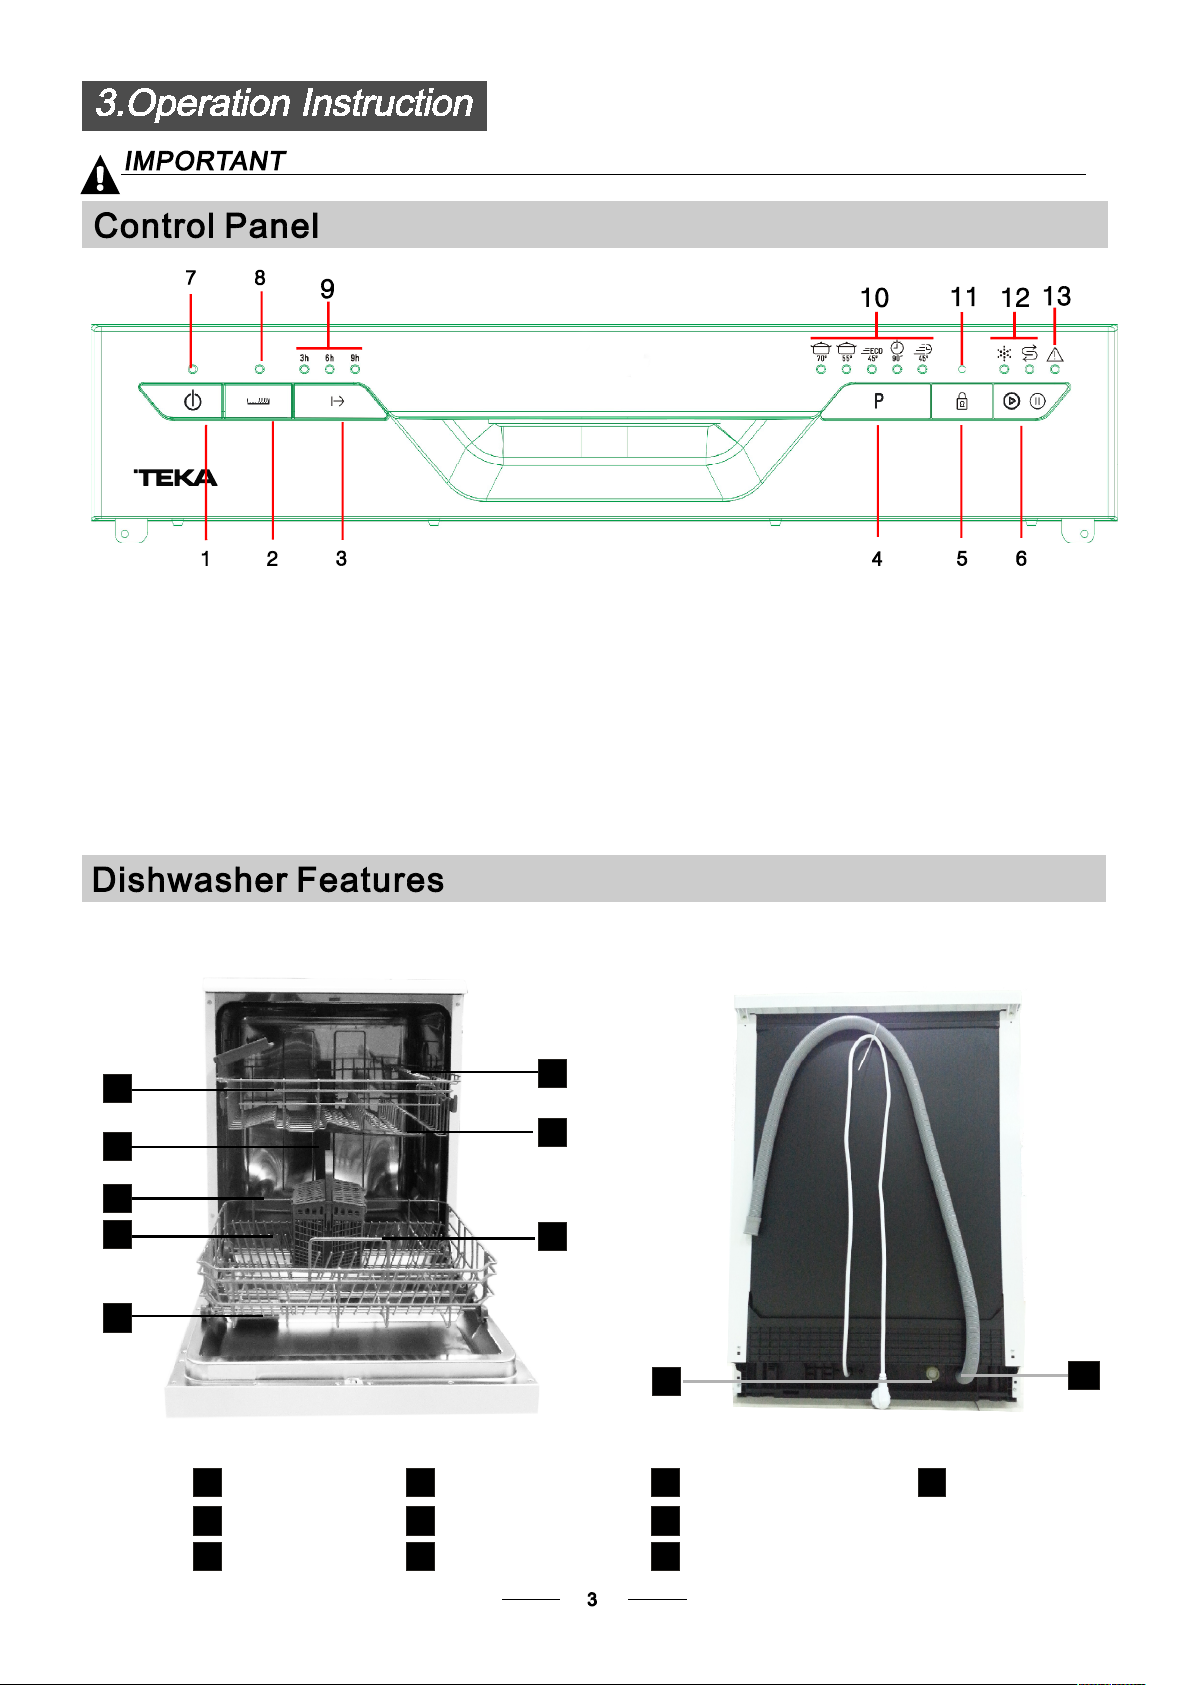
1---O n/O ff B utt on
2---H alf lo ad functions Butto n: To sele ct Half load
function s. (Wi th this Half load f unc tio n you can
only u se it whe n you have only abou t or less th an
6 plac e sett ing dish wave, an d you wil l see less
water an d ener gy consumption , can only be used with
Inten siv e, Normal, ECO,Glas s and 9 0 min .)
3---D ela y Button
4---Program Button
5---C hil d lock Button
Front view
1
2
6
7
6---
Start /Pause Butt on: To sta rt the se lec ted
washi ng p rogram o r paus e the w ashing p rog ram
when t he m achine is work ing .
7---P owe r indi cat o r
8---H alf lo ad indicator
9---D ela y indi cators: to show t he delay time
(3h/6 h/9 h )
10---Pro gra m indicators
11---Child lock indicators
12--- Salt an d rins e aid w arning light
13---Water fa uce t indi cator
Back View
3
4
8
5
10
Upper Ba ske t
1
Inner pipe
2
Lower Ba ske t
3
Salt C ontainer
4
Dispe nse r
5
Cup Shel f
6
9
Spray arms
7
Filte r asse mbly
8
Inlet pipe c onnector
9
10
Drain pipe

Before usin g your dishwas her for t he fir st time:
A. Set the wate r soft ener
B. Add 1.5Kg dishwash er salt and the n full fill th e salt co ntainer wi th w ate r
C. Fill t he r inse aid dispens er
D. Fill i n dete rgent
The water soft ener must be set manu ally, usin g the wat er har dnes s dial .
The water soft ener is designed to remov e mineral s and salts from the wate r, whic h would have
a detrime ntal or adverse e ffect o n the operati on o f the appliance.
The high er the co nte nt of the se mine rals and s alt s, the h ard er you r water is.
The softene r should be adjuste d acco rdi ng to the hardnes s of the wat er in your area. Your local Water Aut hority
can advise you on th e hard ness of the water in your ar ea.
Adjusting Salt Consumption
The dish was her is desi gne d to allo w for adj ustment in th e amou nt of sal t cons umed ba sed on the hard nes s of
the wate r used . This is inten ded to optim ise and customise the l evel o f salt c onsumption.
Please foll ow t he steps belo w for adjustment in salt c onsumption.
1. Swit ch o n the appliance;
2. Press the S tart/Pause bu tto n for more than 5 seconds to s tart the water
softener se t model within 6 0seconds after the a ppliance was
switched on ;
3. Press the butto n to select the prop er set according to
your l ocal envi ronm ent, the set s will change in t he fol lowing
sequence : H1->H2->H3->H4->H5->H6;
4. Press the butto n to end t he set up mode l.
Start/Pa use
Start/Pa use
WATER HA RDNESS
dH
6- 11
18 -22 31-40 22-28 3.1-4 .0
23-3 4 4.1- 6.0
35 -55 61-98 43-69 6.1-9 .8
fH
0~ 90~5 0~ 0.94
10-20
21-3012-1 7 2.1- 3.0
41-60
Clar ke
0~6
7-14
15-2 1
29-4 2
mm ol /l
1.0-2.0
Select or Po sitio n
H1( Ra pi d L ig ht br igh t)
H2(90 Mi n )Ligh t br igh t
H3( Ra pid )、90 M in Ligh t bri ght
H4(ECO )Li gh t b ri gh t
H5(ECO Ra pid L ig ht brig ht)、
H6(ECO 90 M i n Light b right )、
Sa lt con sumpt io n
(gra m/cyc le )
0
9
12
20
30
60
dH =1.25 Clarke =1.7 8 fH= 0.178mmol/l1
dH: Germ an degr ee
fH: French de gree
Clark: Briti sh d egr ee
The m anufact ory setting: (EN 50242)
Conta ct y our loca l water board for informatio n on the har dness of your water suppl y.
If your model does not have any water softener, you may skip this section.
WATER SOFTENER
The hardness of the wate r var ies f rom pl ace to plac e. I f ha rd w ater is used in the dishwas her, depo sits will
form o n the dishes and ut ensils .
The appl iance is equi pped with a spec ial soft ene r that u ses a salt c ont ainer spe cif ical ly d esi gned to eliminate
lime a nd mineral s from the w ater.
 Loading...