

Page 1

Contents
1. Description of the controls ________________________________ 16
2. Troubleshooting ________________________________________ 25
Thank you for choosing one of our products.
You are advised to read this manual carefully; it contains all the
information you need about the right conditions for the proper, safe use
of your dishwasher.
The individual sections are laid out to provide you with a step-by-step
guide to all your appliance's functions; the texts are easy to understand
and are complete with detailed illustrations.
This user-friendly manual will provide answers to all your questions
about use of the dishwasher.
For any other information about use and maintenance of the dishwasher,
read the enclosed manual carefully.
USER INSTRUCTIONS: useful information is provided for the use of the
washing programs and all the dishwasher's functions.
15
Page 2
User instructions
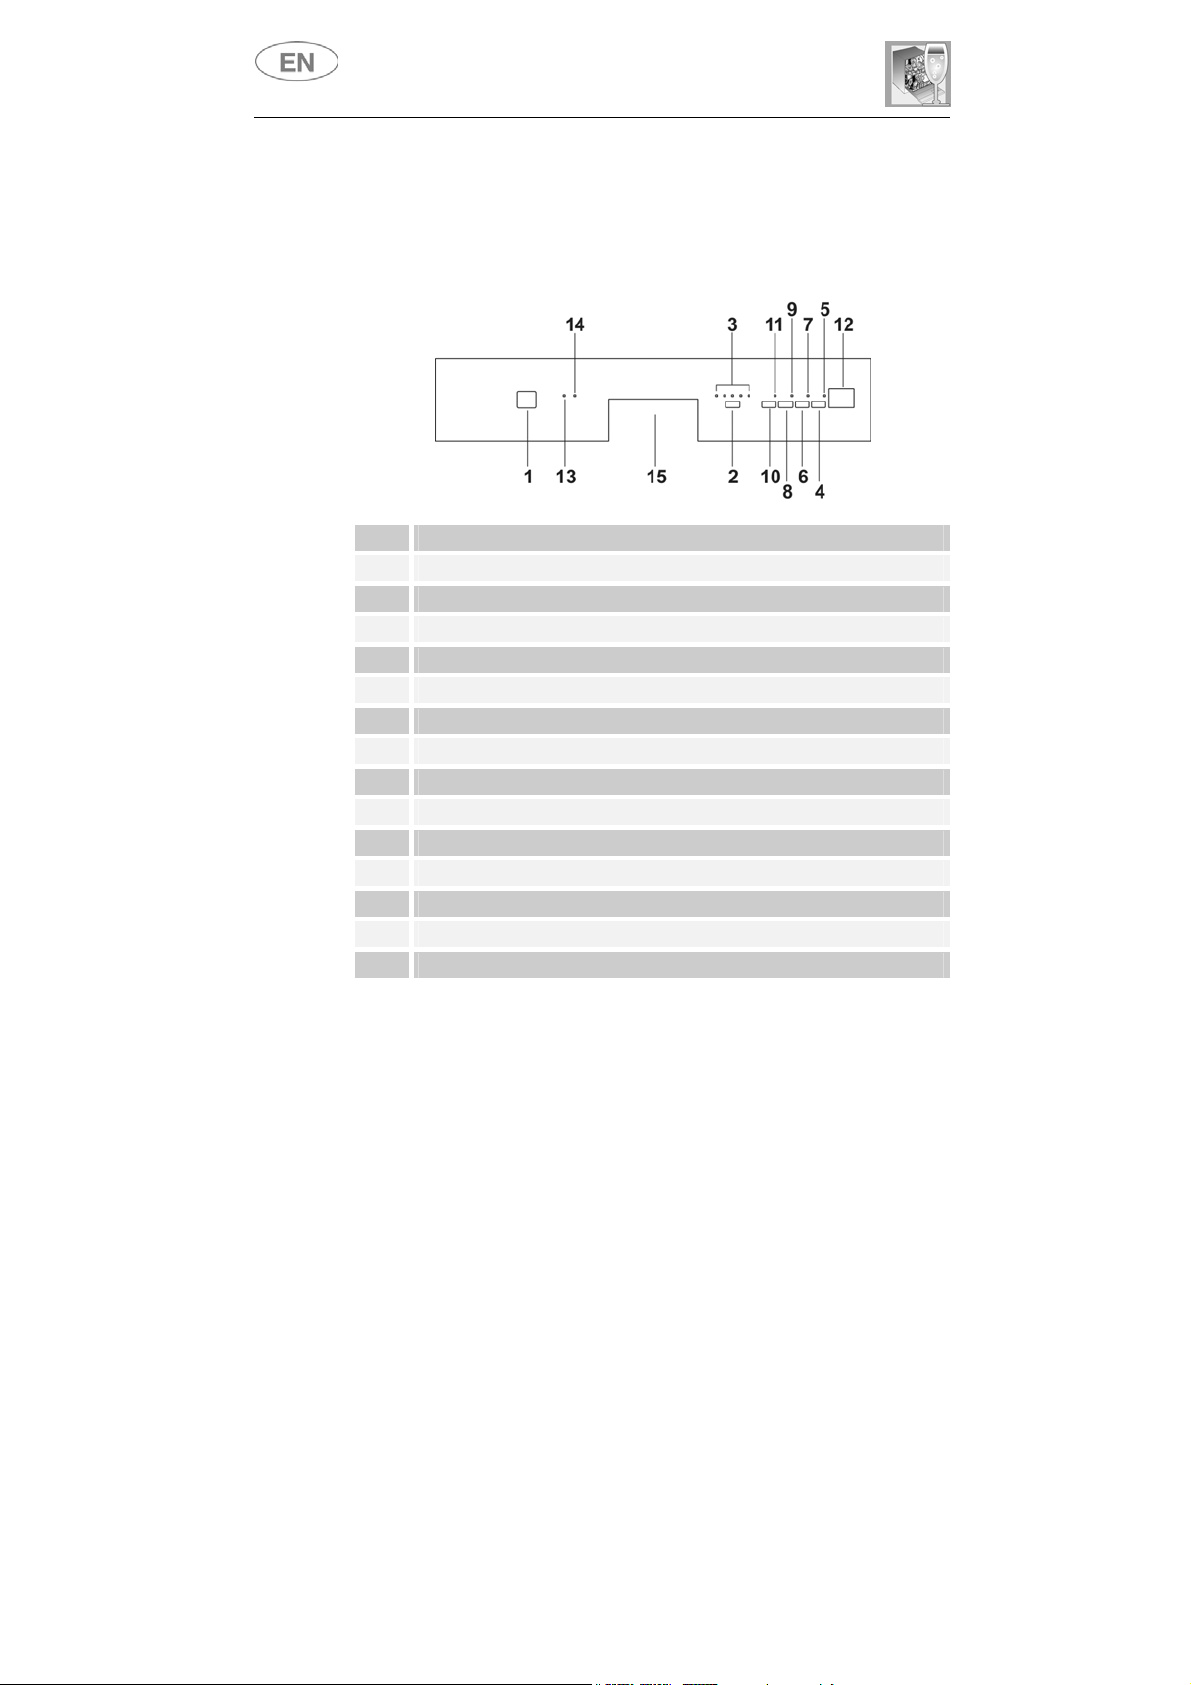
1. Description of the controls
1.1 Front panel
All the dishwasher's controls and indicators are located on the front
panel. Programming and option selection are only possible with the door
closed.
1 ON/OFF BUTTON
2 SELECTION PROGRAM BUTTON
3 PROGRAM PHASE INDICATOR LIGHTS
4 START/PAUSE BUTTON
5 PROGRAM STARTED/STOP INDICATOR LIGHT (*)
6 PROGRAM DELAY BUTTON
7 PROGRAM DELAY LIGHT
8 "3/1" OPTION BUTTON
9 "3/1" OPTION LIGHT
10 ½ LOAD WASH BUTTON
11 ½ LOAD WASH LIGHT
12 3-FIGURE DISPLAY (remaining time, program delay, alarms)
13 NO SALT WARNING LIGHT
14 NO RINSE AID WARNING LIGHT
15 DOOR HANDLE
16
(*) flashes while the program is in progress, stops flashing and remains on at
the end of the program, or if the program is interrupted (intentionally or due
to a malfunction).
Page 3
User instructions
SETTING THE WASHING PROGRAM
To select the most suitable program for the dishes to be washed refer to
the table below, which indicates the most appropriate program according
to dish type and degree of soiling.
DW7 86 S
PROGRAM SELECTION TYPE AND GRADE DIRT
PANS AND DISHES
SOAK
BIO
(*)
AUTO 60-70
Bio
Auto
60°-70°
IN WAITING OF
COMPLETING
THE LOAD
PANS AND DISHES
NOT VERY DIRTY BUT
WITH DRY RESIDUALS
PANS AND DISHES
DIRTY AND WITH
DRY RESIDUALS
PROGRESS
PROGRAM
Cold prewash
Cold prewash
Wash at 50°C
Cold rinse
Rinse at 62°C
Dry
Cold prewash
Wash at 65°C
Cold rinse
Rinse at 70°C
Dry
DURATION CONSUMPTION
MINUTES
WATER
(2)
LITRES (1)
POWER
KWh (2)
15' 6 0,03
180' 15 1,08
(**) (**) (**)
INTENSIV
EXPRESS
MIXED DISHES, NORMAL
DIRT WHICH HAS NOT
DRIED
Wash at 65°C
Cold rinse
Rinse at 70°C
50' 10 1,20
Prewash at 45°C
SUPER
PANS AND DISHES
VERY DIRTY AND
WITH DRY RESIDUALS
Wash at 70°C
2 cold rinses
Rinse at 70°C
115' 24 1,77
Dry
Only run the soak program with half loads.
The HALF LOAD option (10) - 3/1 (8) is available for all programs except the soak program.
(*) Reference program as per EN 50242 standard.
(1) Average power consumption with the softener set on level 2.
(2) The cycle duration and power consumption may vary according to the water and room
temperatures, and the type and amount of dishes.
The washing cycle will not take place if the dishwasher door is left open
or not properly closed.
17
Page 4
User instructions
SETTING THE WASHING PROGRAM
To select the most suitable program for the dishes to be washed refer to
the table below, which indicates the most appropriate program according
to dish type and degree of soiling.
LP7850
PROGRAM SELECTION TYPE AND GRADE DIRT
PANS AND DISHES
SOAK
ECO
(*)
AUTO 60-70
Auto
60°-70°
IN WAITING OF
COMPLETING
THE LOAD
PANS AND DISHES
NOT VERY DIRTY BUT
WITH DRY RESIDUALS
PANS AND DISHES
DIRTY AND WITH
DRY RESIDUALS
PROGRESS
PROGRAM
Cold prewash
Cold prewash
Wash at 50°C
Rinse at 64°C
Dry
Cold prewash
Wash at 65°C
Cold rinse
Rinse at 70°C
Dry
DURATION CONSUMPTION
MINUTES
WATER
(2)
LITRES (1)
POWER
KWh (2)
15' 6 0,03
180' 15 1,05
(**) (**) (**)
INTENSIV
EXPRESS
MIXED DISHES, NORMAL
DIRT WHICH HAS NOT
DRIED
Wash at 65°C
Cold rinse
Rinse at 70°C
50' 10 1,20
Prewash at 45°C
SUPER
PANS AND DISHES
VERY DIRTY AND
WITH DRY RESIDUALS
Wash at 70°C
2 cold rinses
Rinse at 70°C
115' 24 1,77
Dry
Only run the soak program with half loads.
The HALF LOAD option (10) - 3/1 (8) is available for all programs except the soak program.
(*) Reference program as per EN 50242 standard.
(1) Average power consumption with the softener set on level 2.
(2) The cycle duration and power consumption may vary according to the water and room
temperatures, and the type and amount of dishes.
The washing cycle will not take place if the dishwasher door is left open
or not properly closed.
18
Page 5

User instructions
1.2 Washing programs
The dishwasher is equipped with a control panel and an 3-FIGURE
DISPLAY (12), described in chapter "1. Description of the controls", from
which it is possible to carry out all the power switch-on, switch-off and
programming operations.
Before starting a washing program make sure that:
x The water supply tap is open.
x The correct amount of detergent has been added to the
dispenser.
x The baskets have been correctly loaded.
x The spray arms are able to rotate freely and without
obstruction.
x The dishwasher door is securely closed.
PROGRAMMING
In this dishwasher model all the programming operations are possible
only with closed door. With open door, on the 3-FIGURE DISPLAY (12)
will appear the symbols -- and the PILOT LIGHT PROGRAMS (3)
remains out.
SELECTION PROGRAM
Keep pressing the PROGRAM SELECTION button (2) until the indicator
light corresponding (3) to the desired program illuminates.
19
Page 6

User instructions
CANCELLING THE CURRENT PROGRAM
To annul the current program, press the START/PAUSE button (4) for a
few seconds, until the PROGRAM STARTED light (5) stops flashing.
Now press the START/PAUSE button (4) again until "P0" appears on the
display (about 10 seconds).
CHANGING THE PROGRAM
To modify the program keep the START/PAUSE button (4) pressed for a
few seconds, until the PROGRAM STARTED indicator light (5) stops
flashing, then select the new program following the instructions provided
above; press the START/PAUSE button (4) again and keep it pressed
for a few seconds, until the indicator light (5) starts to flash again.
HALF LOAD WASH SETTING
(available in all programs except the soak program)
This function is ideal for small loads and saves
water and electricity. It is controlled by the HALF
LOAD button (10) and allows washing in the upper
basket only.
IMPORTANT: at the end of the program remember
to deactivate the function to ensure the next
wash is not also carried out in half load mode by
mistake.
20
A cutlery basket can be placed in the upper basket, while the lower
basket must be left empty.
CAUTION: there is no point in loading dishes and cutlery in the
lower basket, since the jet of water will only reach the upper basket.
Page 7

User instructions
DELAYING THE PROGRAM
(available in all programs except the soak program)
The PROGRAM DELAY button (6) can be pressed to delay the start of
the washing program by up to 12 hours. This means that the dishwasher
can be operated at the time of day of your choice.
Press the PROGRAM DELAY button (6) again; the 3-FIGURE DISPLAY
(12) will show the number of hours of delay with which the appliance will
start.
After setting the delay, start the program: press the START/PAUSE
button (4) for a few seconds, until the PROGRAM STARTED light (5)
starts flashing.
The appliance will prewash the dishes, after which the "program delay"
set previously will come into effect.
To cancel the program delay once the wash has started, proceed as
follows:
x press the START/PAUSE button (4) for a few seconds, until the
PROGRAM STARTED light (5) stops flashing;
x press the PROGRAM DELAY button (6) several times until the
program delay returns to zero;
x press the START/PAUSE button (4) to start the program.
N.B.: It is not possible to select the “delay program” when the program
have already began.
21
Page 8

User instructions
"3/1" OPTION BUTTON
(available in all programs except the soak program)
By pressing the button (8) you activate the "3/1" option, confirmed when
the relative light comes on. This option has been studied for the use of
dishwashing powder or tablets with integrated substances in place of
regenerating salt or rinse-aid known on the market as “3 in 1” or “triple
action” products; in this case the dishwasher will use the product in an
optimal way avoiding salt and rinse-aid consumption, which could
already be found in the dishwasher.
Note: When selecting the "3/1" button, it is normal that the salt and
rinse-aid lights remain on, if their containers are empty.
TO SAVE ON ENERGY! … AND PROTECT THE ENVIRONMENT
x Always try to run the dishwasher fully loaded.
x Do not wash the dishes in running water.
x Use the washing program that is most appropriate for each type of
load.
x Do not carry out any preliminary rinsing.
x If available, connect the dishwasher to a hot water supply up to
60°C.
22
TO CUT DOWN ON DETERGENT CONSUMPTION! … AND PROTECT
THE ENVIRONMENT
The phosphates contained in dishwasher detergents are harmful to the
environment. To avoid using excessive amounts of detergent and to
save on electricity, observe the following:
x separate the more delicate items from dishes that are more
resistant to aggressive detergents and high temperatures;
x do not pour the detergent directly on the dishes.
Page 9

User instructions
ADJUSTING THE WATER SOFTENING SYSTEM
(available in all programs except the soak program)
The dishwasher is equipped with an electronic device for adjusting the
water softening setting according to the hardness of the water. To adjust
the water softening setting, proceed as follows.
x Keep the PROGRAM DELAY button (6) pressed for a few seconds,
until the H- symbol, followed by the set value, appears on the
3-FIGURE DISPLAY (12).
x The PROGRAM DELAY button (6) can be pressed again to select
the most suitable hardness value (H1, H2…H5). Refer to the "Water
hardness table" to select the value.
x To exit the programming mode press the START/PAUSE button (4)
or do not touch the keypad for 2 seconds to allow the system to exit
the mode automatically.
WATER HARDNESS TABLE
WATER HARDNESS
German Degrees (°dH) French Degrees (°dF)
0 - 4 0 - 7 H 0
5 - 15 8 - 25 H 1
16 - 23 26 - 40 H 2
24 - 31 41 - 60 H 3
32 - 47 61 - 80 H 4
48 - 58 81 - 100 H 5
SETTING
Contact your local water board for information on the hardness of your
water supply.
23
Page 10

User instructions
STARTING THE DISHWASHER
After carrying out all the operations described above correctly, to start
the dishwasher simply press the press the START/PAUSE button (4) for
a few seconds until a beep sounds (the PROGRAM STARTED (5) light
starts to flash). The 3-FIGURE DISPLAY (12) will show the duration of
the program in minutes. The duration time is only approximate, because
it depends on the washing conditions (quantity of dishes, water
temperature, etc.), and is also continually updated as the washing
program progresses.
The 3-FIGURE DISPLAY (12) shows the estimated duration of the
washing program.
If it is necessary to open dishwasher door during the washing cycle,
there will be a 1-minute delay before the program can be resumed.
After correctly closing the door, press the START/PAUSE (4) button
again. This operation may negatively affective the progress of the
washing cycle.
24
END PROGRAM
The end of the program is indicated by a short signal acoustic and from
the “End” visual notification on 3-FIGURE DISPLAY (12). By pressing
the PROGRAM SELECTION button (2), the “End” visual signal will
vanish from the display and the dishwasher is ready to continue a new
cycle, the same thing happens when closing or opening the door or by
switching on-off the machine.
REMOVING THE DISHES
At the end of the washing program, wait at least 20 minutes before
removing the dishes, to allow them to cool down. To prevent any water
droplets on the upper basket from falling on the dishes in the lower
basket, it is advisable to unload the lower basket first, and then the
upper basket.
Page 11

User instructions
2. Troubleshooting
The dishwasher is equipped with a self-diagnostics system that is
capable of detecting and signalling a number of possible faults.
TABLE OF FAULTS DETECTED BY THE SELF-DIAGNOSTICS SYSTEM
FAULT DESCRIPTION
E1
E2
E3
E4
E5
E6
E7
E8
E9
The anti-flooding system (where present) has been tripped.
The water level limitation system has tripped.
The appliance cannot heat the water.
The temperature sensor is disconnected.
The appliance cannot take in the water.
The appliance cannot drain the water from the tank.
The dishwasher cannot measure the precise water quantity that has
been loaded.
Problem on the water distribution system to the baskets.
Water intake system malfunction.
x The E1, E2, E3, E4, E8, E9 alarms provoke the “forcing” to end
cycle of the running program.
x The E5, E6 alarms interrupts the running program once the cause is
resolved, it will bring bach the execution of the program.
x The alarm E7 is visualized at the end of the cycle that comes,
however, brought to the end since the operation of the dishwasher is
not harmed.
To “reset” an alarm is necessary:
x Open and close the door, or turn off and on the machine. At this
point is possible to program the dishwasher again.
If the malfunction persists, contact your authorised Service Centre.
25
 Loading...