

Teka DVC560B, DVU560B, DVC560W, DVU560W, DVU590B Instruction Manual
...
DVU560B/DVU560W
DVU590B/DVU590W
DVC560B
DVC560W
Kullaným Kýlavuzu TR

CONTENTS
SAFETY INSTRUCTIONS.............................................................. 1-2
TECHNICAL CHARACTERISTICS.....................................................3
SPECIFICATION................................................................................3
MAIN PARTS NAME............................................................................4
INSTALLATION REQUIREMENTS.....................................................4
INSTRUCTIONS FOR USE.............................................................5-6
CLEANING AND MAINTENANCE.......................................................7
REPLACING LIGHT BULB..................................................................7
PROBLEM SOLVING..........................................................................8
ACTIVE CHARCOAL FILTERS (OPTIONAL).....................................8
1
This device is designed to purify t he air from
smoke, combustion products, fumes, odors and
other u n d e sira b l e i m p u r i ties forme d d u r i n g
th e h e a t t r e a t me n t products, which accumulate
in the volume of kitchen.
2

Model No.: □DVC560B □ DVC560W □DVU560B □DVU560W
□DVU590B □ DVU590W
Total power: 204 W
Motor power:200 W
LED lights: 2 x 2W
Voltage:220 ~ 240V
Frequency: 50Hz
Filter:3-layer filter
Control: □Soft Touch Control
□Soft touch control +Remote control
3
TECHNICAL CHARACTERISTICS
Dimensions
DVC560B/DVC560W(W*D*H):600*410*999~1380
DVU560B/DVU560W(W*D*H):600*428*999~1380
DVU590B/DVU590W(W*D*H):900*432*1001~1391
DVC560B/DVC560W
Maximum exhaust capacity-760m³/h
Motor Exhaust Capacity - Max. (m³/h)-633m³/h
Motor Exhaust Capacity - Free Outlet (m³/h) -553m³/h
Exhaust Capacity 1st speed - 431m³/h
Exhaust Capacity 2nd speed - 478m³/h
Exhaust Capacity 3rd speed - 518m³/h
Sound Level UNE-EN-60704-2-13 (dBA)
1st speed - Sound Level -50.37dBA
2nd speed - Sound Level -56.43dBA
3rd speed - Sound Level -59.06dBA
DVU560B/DVU560W/DVU590B/DVU590W
Maximum exhaust capacity-760m³/h
Motor Exhaust Capacity - Max. (m³/h)-633m³/h
Motor Exhaust Capacity - Free Outlet (m³/h) -553m³/h
m³/h
493m³/h
m³/h
dBA
dBA
dBA
Exhaust Capacity 1st speed - 443
Exhaust Capacity 2nd speed Exhaust Capacity 3rd speed - 538
Sound Level UNE-EN-60704-2-13 (dBA)
1st speed - Sound Level -49.84
2nd speed - Sound Level -55.84
3rd speed - Sound Level -58.43
SPECIFICATION
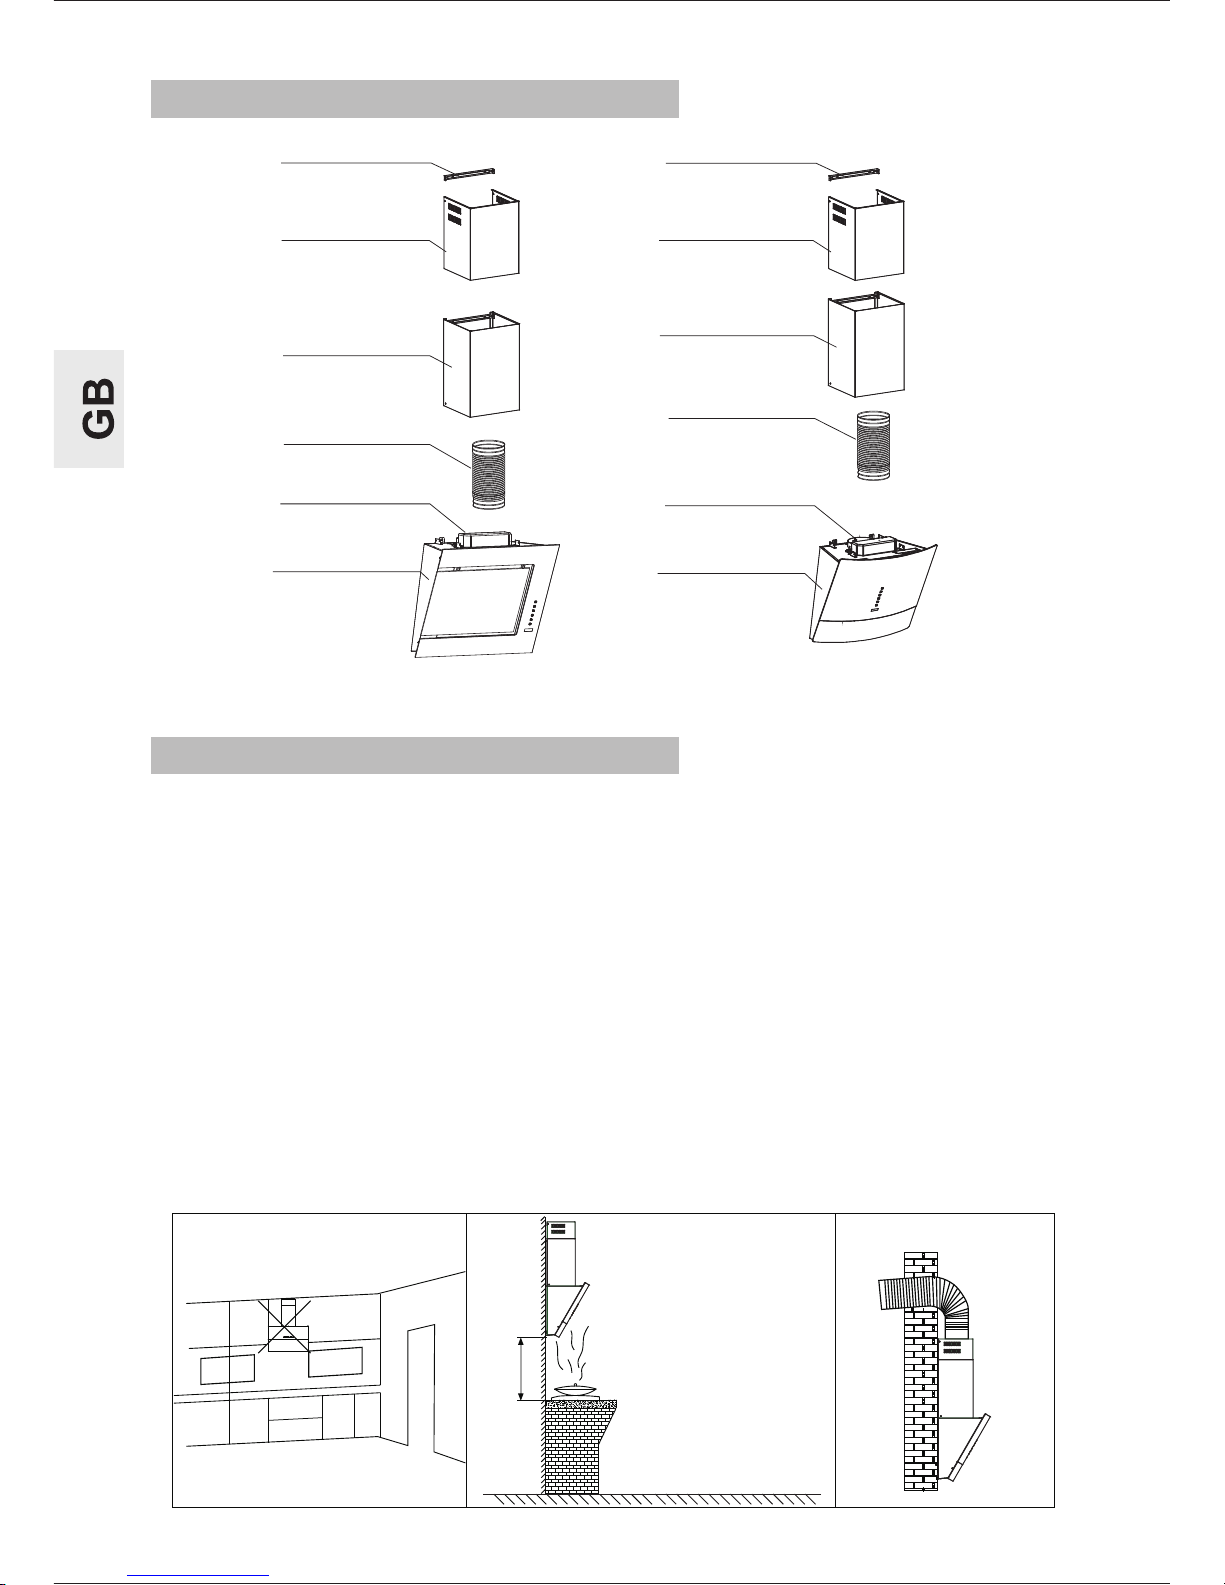
1.Do not install the cooker hood where there are many doors or windows,
to avoid effecting the exhaust efficiency of the hood caused by air
convection.(Fig. 1)
2.Install the cooker hood right above the hob. The recommended
distance between the hob and the lower edge of the cooker hood show as
below. (Fig. 2)
3.To obtain optimum performance, the external conduct must not be more
than FOUR METRES long, have no more than two 90° angles and its
diameter must be at least Ø120. (Fig. 3)
4.After hanging the unit on the wall, ensure the hood is level and vertical.
5.The air outlet must not be connected to chimney flues or combustion
gas ducts. The air outlet must under no circumstances be connected to
ventilation ducts for room in which fuel-burning appliances are installed.
Outer duct cover
Exhaust pipe
Blower box
Hook
Inner duct cover
Air outlet
Exhaust pipe
Blower box
Inner duct cover
Air outlet
Outer duct cover
Hook
4
DVC560B
DVC560W
DVU560B/DVU560W
DVU590B/DVU590W
Fig.2 Fig.3
Fig.1
400~450mm
MAIN PARTS NAME
INSTALLATION REQUIREMENTS
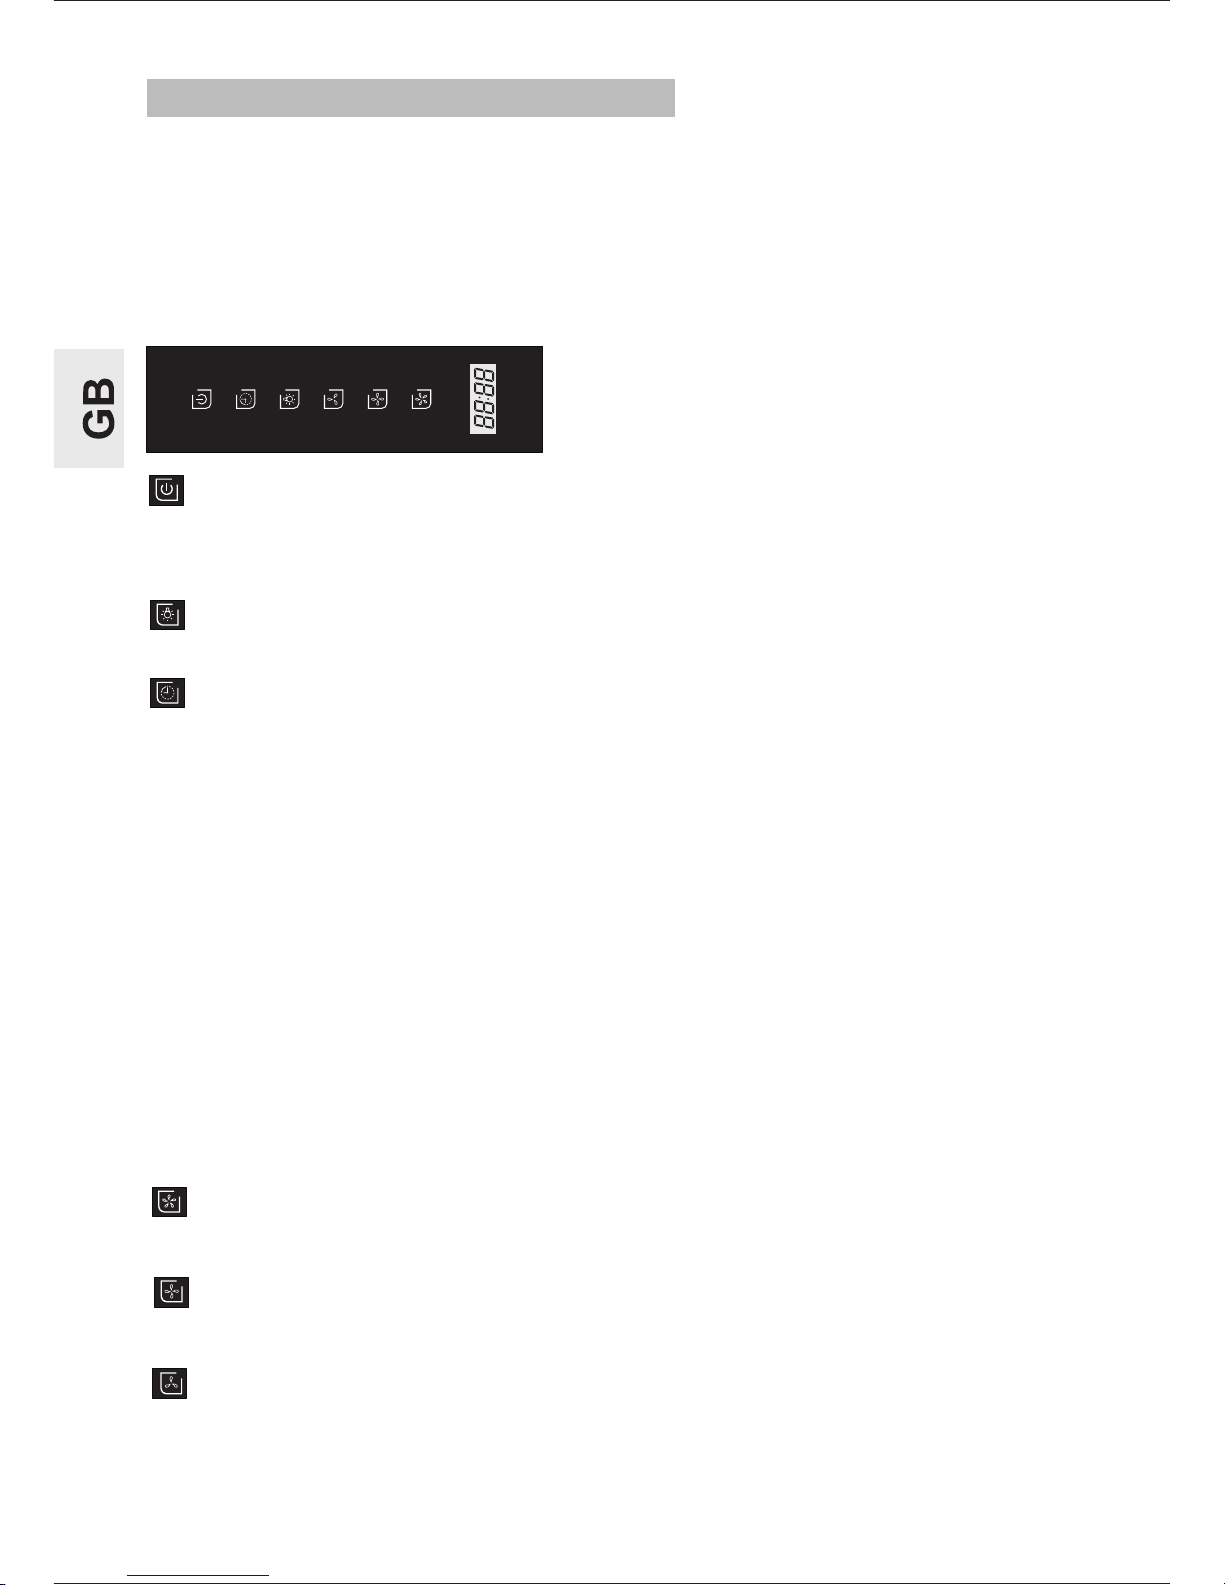
1.Clock: In stand-by mode press the key for 3 seconds to set the clock.
Press the speed key to set hours, press the high speed key for increase
the hours, press the low speed key for decrease the hours. Then press
again timer key to set the minutes. Press high speed key for increase the
minutes, press the low speed key to decrease the minutes. Press timer
key for the third time to confirm the clock setting or it will be automatically
saved within 5 seconds if no operation has been performed.
2. Timer (working time): When the appliance is operating or the light is
on press timer key to set working time – the indicator will start to blink.
Each press increases the value by 1 minute (maximum setting is 60
minutes). If no operation has been performed within 10 seconds – the
appliance will start operating with the default set working time, i.e.1
minute. Note: In standby mode, you cannot set working time.
Touch to select on/off
During operation mode,touch 1(one) time to select OFF and the fan turns
off automatically after 1(one) minute. Touch 2(two) times, and the fan
turns off instantaneously.
Light key
Touch to select on/off
Switch on the extractor fan a few minutes (between 3 to 5 minutes) before
you start to cook in order to ensure that a steady air flow has been
established before fumes appear.
Allow the extractor fan to run for several minutes after you have finished
cooking (between 3 to 5 minutes) in order to expel all the grease from the
outlet duct. This prevents the return of grease, smoke and smells.
Timer
Touch to select on/off
5
DVC560B/DVC560W
INSTRUCTIONS FOR USE
Press to select the high speed
High speed key
Mid speed key
Low speed key
Press to select the mid speed
Press to select the low speed
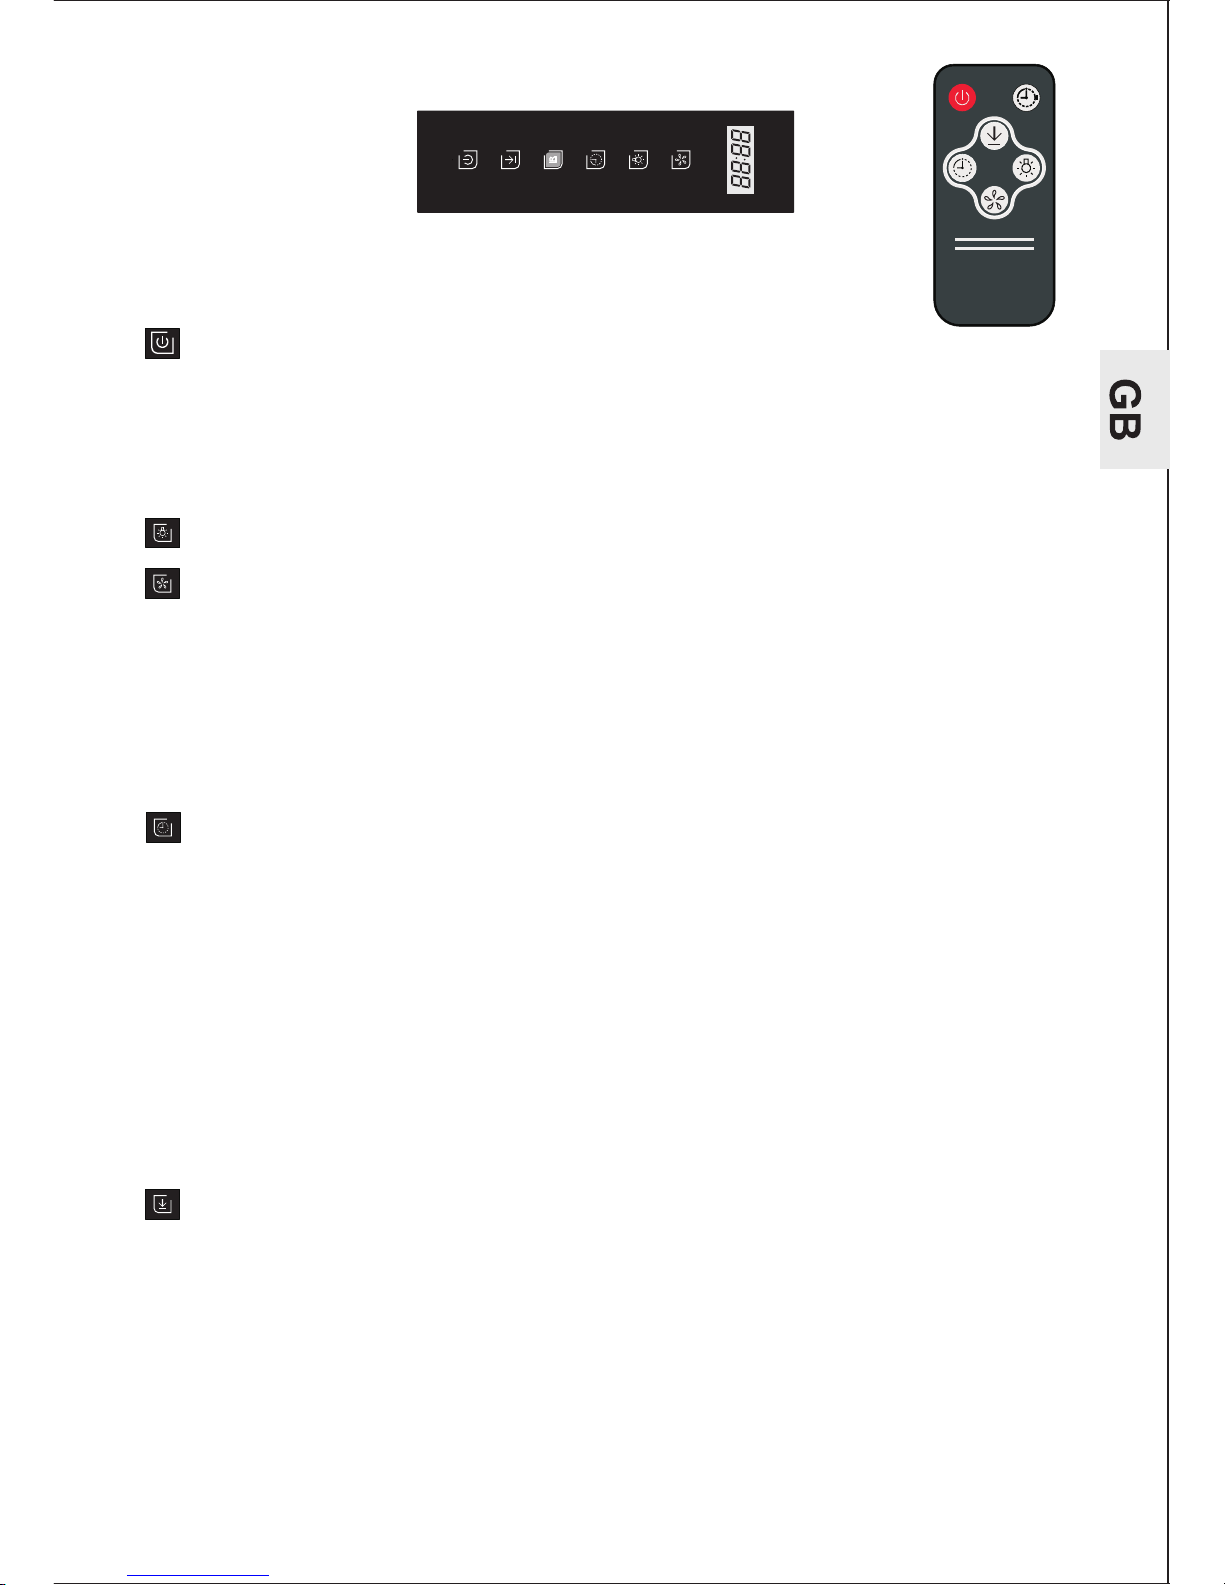
DVU560B/ DVU560W/DVU590B/ DVU590W
6
Note: This appliance is equipped with an automatically opening/
closing glass panel.
Be particularly careful as not to trap your fingers or other part of
your body in the glass panel.
Touch to select on/off
During operation mode, touch 1(one) time to select OFF and the fan turns off
automatically after 1(one) minute. Touch 2(two) times, and the fan turns off
instantaneously.
Note: Using the remote control, turn on the appliance by pressing speed
function key (it will start operating at speed F3). Turn off the appliance by
pressing the ON/OFF key.
Touch to turn the light on/off
Speed function key
Touch one time show“F3”to select the high speed.
Touch twice show“F2”to select the medium speed.
Touch thrice show“F1” to select the low speed.
The screen shows cycle , F3-F2-F1.The fan speed in cycle operation, high
speed-medium speed-low speed.
When on Delay and Timer status, Press this key,the delay and timer function
would be closed, and motor will switch to next speed working.
Timer
1.Clock: In stand-by mode press the key to set the clock. Press once the speed
function key to set the hours (change by 1 hour, maximum setting is 24 hours).
Press once the light key to set the minutes (change by 1 minute, maximum
setting is 60 minutes). Press again timer key or do not perform any operation
within 5 seconds - the appliance will automatically save the current clock
setting, and then return into standby mode.
2.Timer (working time): When the appliance is operating, press the key to set
working time. Press once to set the minutes (change by 1 minute, maximum
setting is 60 minutes). In timer mode, the appliance will start countdown after
10 seconds if no operations are performed. When the countdown / working
time has finished, the turbine stops operating, a beep will sound, the glass
panel will close automatically, and the appliance will return into standby
mode.
Locking function key
1 In standby state, touch the key keep 3 seconds ( for remote control , less
than 3 seconds) , until the indicator lamp flash, then the door slowly open
and keep the locking state, the users could cleaning the filters.
2 After cleaning touch the ON/OFF key, last 3 seconds (for remote control,
less than 3 seconds) , the hood would be closed automatically and back to
the standby mode.
CAUTION: NEVER PUT YOUR HAND INTO THE AREA HOUSING THE FAN
WHILE THE FAN IS OPERATING. FOR THE OPTIMAL LEVEL OF
OP ERATIO N, C LEA N TH E RANG E HO OD SU R FA C E , FAN, A N D
ALUMINIUM FILTER REGULARLY.
7
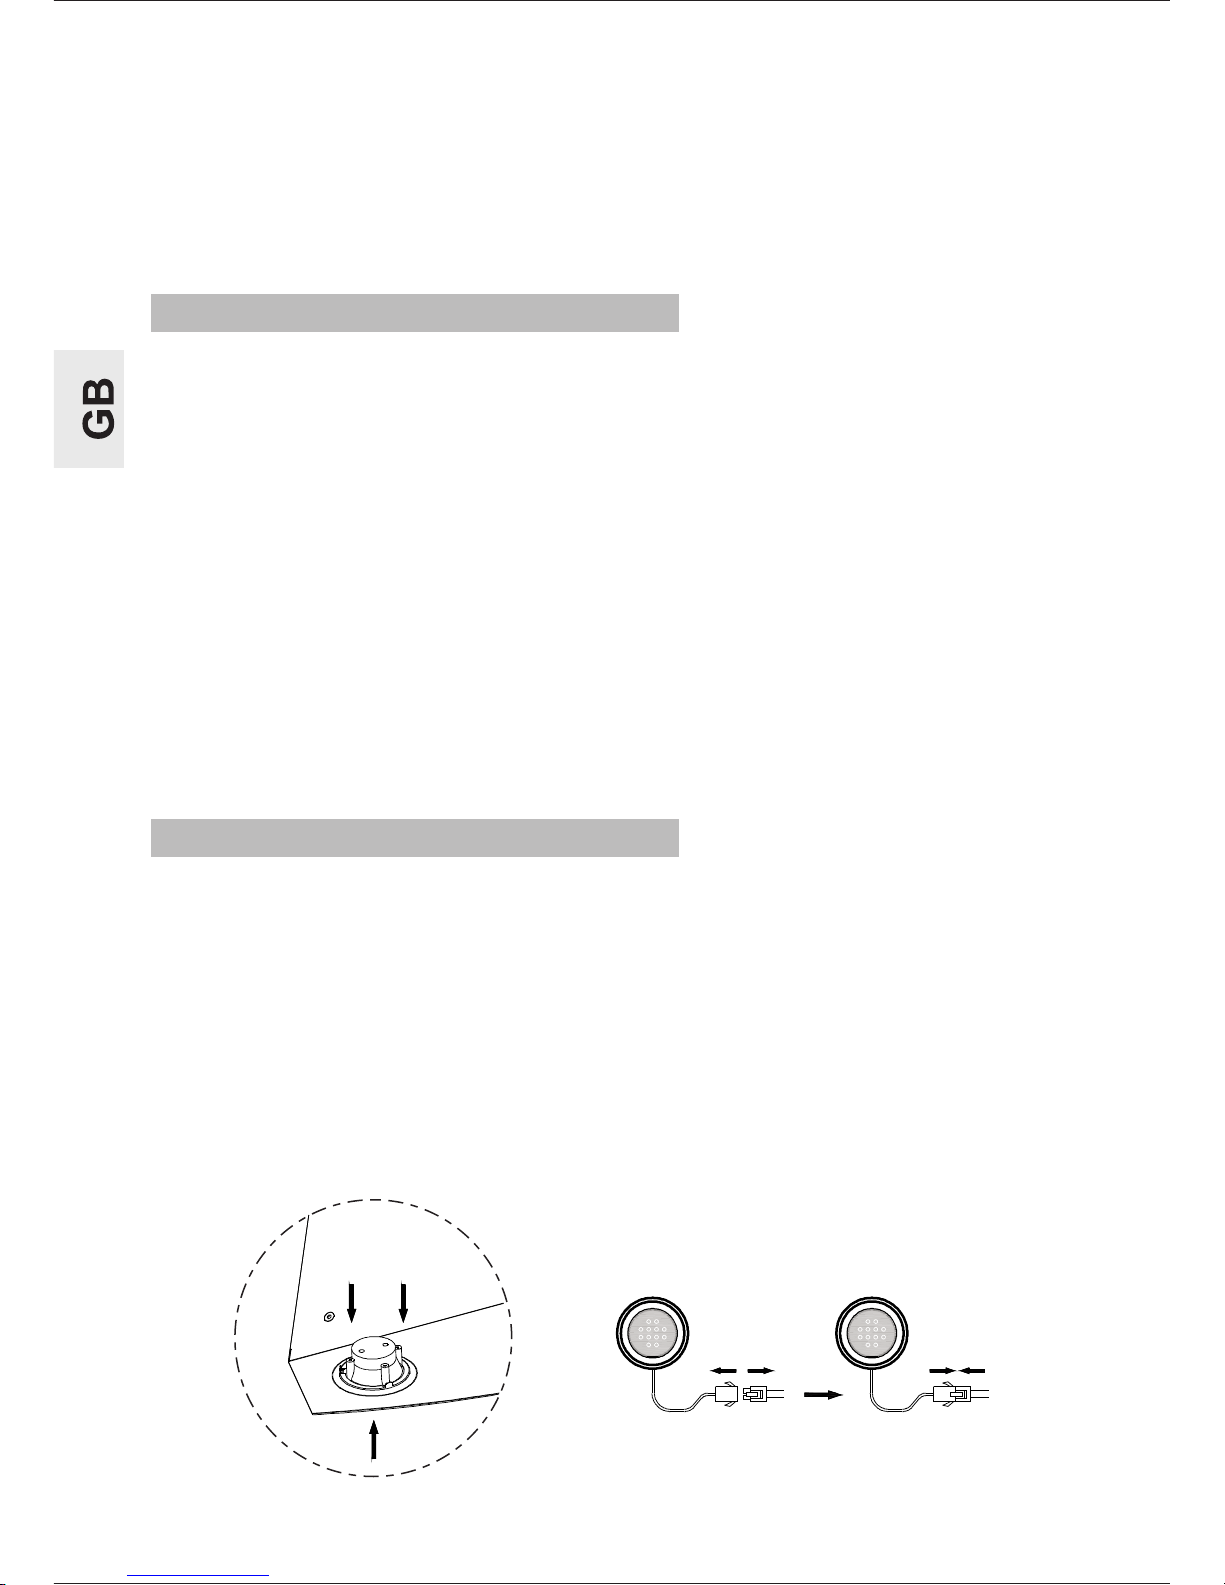
To replace LED lamp
Caution: LED lamp cannot replace a new bulb, just can replace a new LED
Lamp. Make sure all the control switches are off, and the cooker hood is
unplugged! Please follow below instructions:
1.Take out the filters, and cut off the wire connection of the lamp.
2.Press the spring according to the arrow direction, then you can take off the
lamp unit.
3.You can replace a new LED lamp unit no more than rating!
4.Then put the lamp unit to the hood in reverse direction. Connect the wire
of the lamp.
5.Fit on the filters.
CLEANING AND MAINTENANCE
1. Use only mild soap or detergent solutions to clean the cooker hood
surface. Dry surfaces using soft cloth.
2 .Using a stainless steel cleaner to bring the glow back into a stainless steel finish.
3. Clean the filter once a week or according to use status. Press the buckle
of the filter slightly, take off the filter and put it into warm soapy water using
mild detergent, wipe the filter with soft brush. Replace the filter after it is dry.
4 .It is recommended to clean the housing and inner surfaces at least once
every half year or depending on the degree of soiling.
5. Do not use aggressive cleaning agents (i.e. scrubbing or scratching).
6. For cleaning, do not use steam cleaners.
REPLACING LIGHT BULB
Safety function
1 While locking the glass panel , when the opening / closing glass panel
encounters obstacle / resistance, it will move in the opposite direction and
then start opening/closing again.
2 If the glass panel encounters obstacle/resistance after the turbine starts/
stops operating , it will stop/lock and the appliance will return into standby
mode.
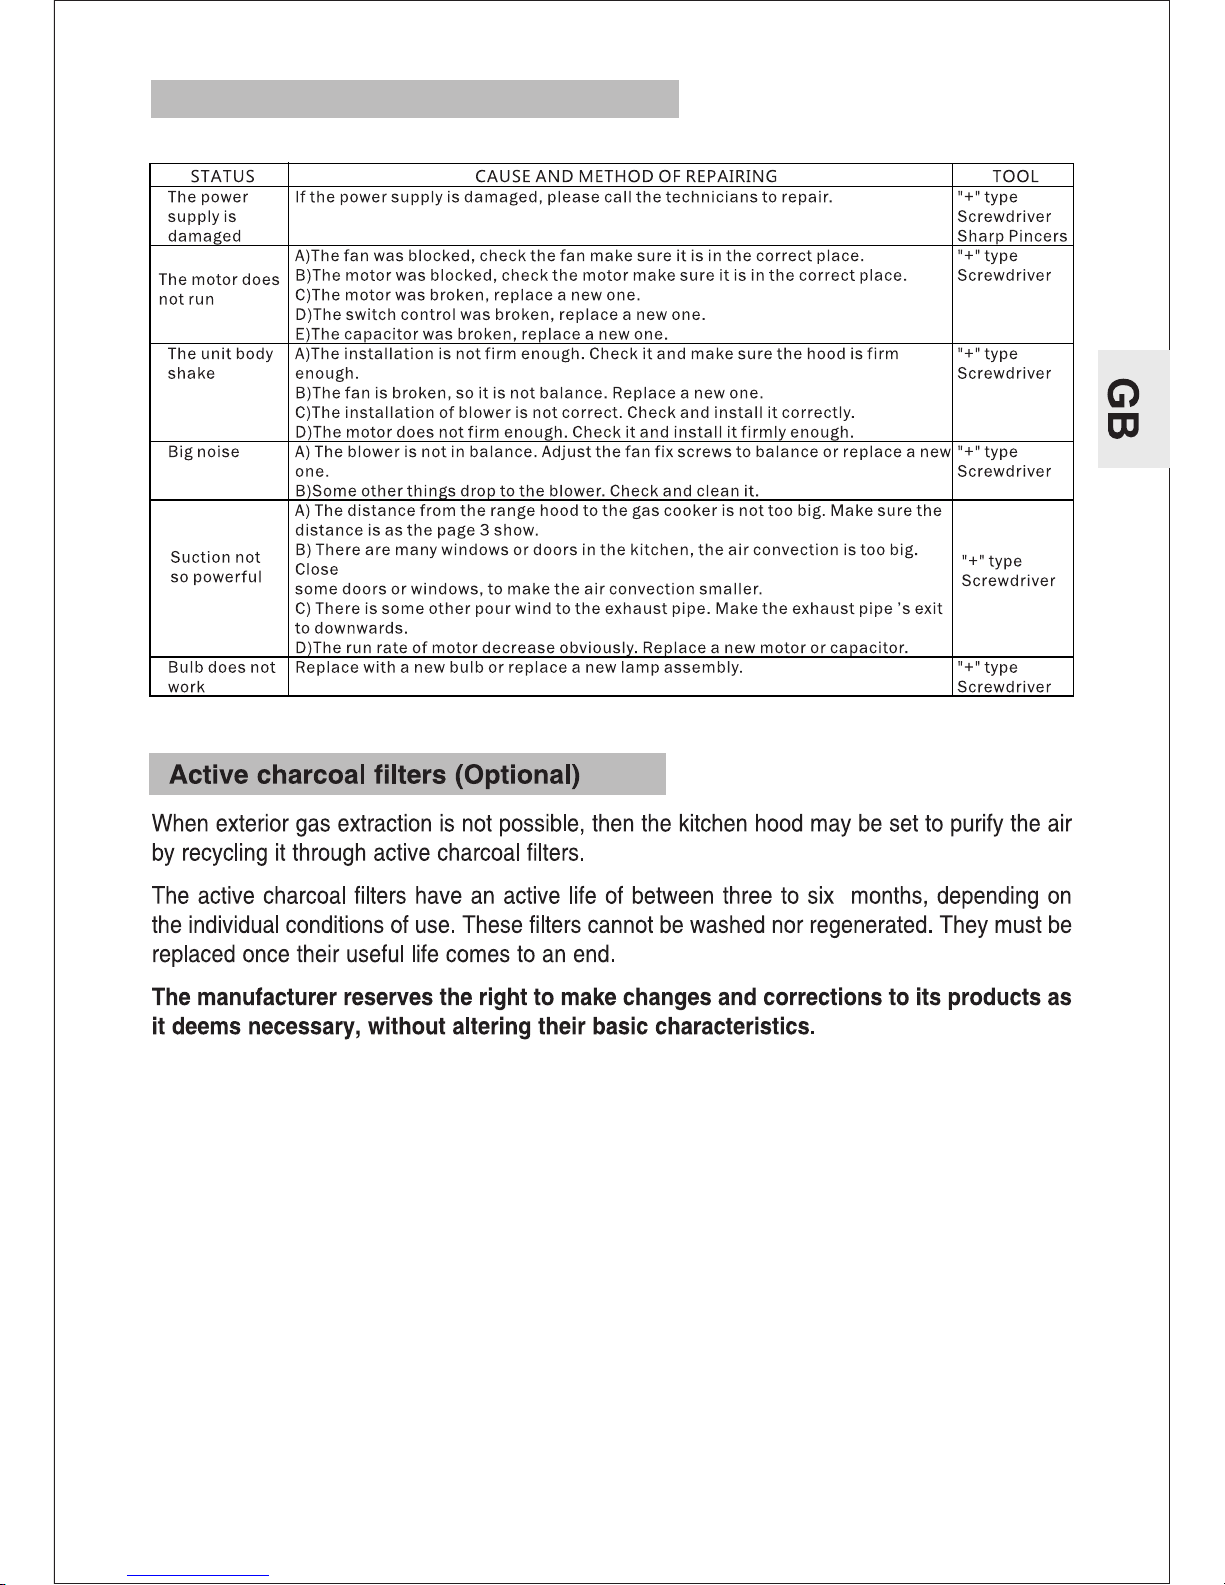
PROBLEM SOLVING
CAUTION: Disconnect the power supply before servicing.
8

SPIS TREŚCI
ŚRODKI OSTROŻNOŚCI I OGÓLNE ZALECENIA
DANE TECHNICZNE............................................................................3
SPECYFIKACJA..................................................................................3
ELEMENTY URZĄDZENIA....................................................................4
WYMOGI MONTAŻOWE ......................................................................4
OBSŁUGA URZĄDZENIA .................................................................5-6
CZYSZCZENIE I KONSERWACJA........................................................7
WYMIANA OŚWIETLENIA....................................................................7
ROZWIĄZYWANIE PROBLEMÓW................................................... ....8
FILTRY Z WĘGLA AKTYWNEGO (OPCJA)...........................................8
.............................1-2
 Loading...