

Page 1
www.tefal.com
GB
RC
ELECTRONIC RICE COOKER 4 IN 1
5083518-RICE COOKER 4 IN 1 GB-RC 21/03/07 11:30 Page C1
Page 2
B
C
ric
e
cooking
cookin
g
s
l
ow
c
ooking
p
orri
dg
e
keep war
m
2
rice
cooking
slow
cooking
cooking
cooking
steam
porridge
keep warm
Control box /
1
11
13
17
18
16e
16f
16h
16g
12
14
15
16
2
3
5
6
4
7
8
9
10
16b
16c
16a
16d
5083518-RICE COOKER 4 IN 1 GB-RC 21/03/07 11:30 Page C2
Page 3
2
2
fig.3fig.2
fig.1
fig.6
fig.5
fig.4
22
rice
cooking
slow
cooking
cooking
cooking
steam
porridge
keep warm
rice
cooking
rice
cooking
slow
cooking
cooking
cooking
steam
porridge
keep warm
slow
cooking
fig.7
fig.12
fig.8
fig.11
rice
cooking
slow
cooking
cooking
cooking
steam
porridge
keep warm
cooking
steam
rice
cooking
slow
cooking
cooking
cooking
steam
porridge
keep warm
porridge
cooking
rice
cooking
slow
cooking
cooking
cooking
steam
porridge
keep warm
rice
cooking
slow
cooking
cooking
cooking
steam
porridge
keep warm
fig.13 fig.14
fig.9 fig.10
2
fig.15
fig.16
fig.17 fig.18 fig.19
5083518-RICE COOKER 4 IN 1 GB-RC 21/03/07 11:30 Page C3
Page 4

2
Safety reminders
Read and follow the instructions for use. Keep them for future use.
Safety Instructions
• This appliance complies with the safety regulations and conditions in effect at the
time of manufacture.
• Check that the power supply voltage corresponds to that shown on the appliance
(alternating current).
• Given the diverse standards in effect, if the appliance is used in a country other than
that in which it is purchased, have it checked by an approved service centre.
• Do not place the appliance near a heat source or in a hot oven, as serious damage
could result.
• This appliance is designed for domestic use only. In case of professional use,
inappropriate use or failure to comply with the instructions, the manufacturer accepts
no responsibility and the guarantee does not apply.
Connecting to the power supply
• Do not use the appliance if:
- it or its cord is damaged.
- the appliance has fallen or shows visible damage or does not work properly.
• In these cases, the appliance must be sent to an approved Service Centre. Do not take
the appliance apart yourself.
• Always plug the appliance into an earthed socket.
• Do not use an extension lead. If you accept liability for doing so, only use an extension
lead which is in good condition, has an earthed plug and is suited to the power of the
appliance.
• If the power supply cord is damaged, it must be replaced by the manufacturer, an
authorised service centre or a similarly qualified person in order to avoid any danger.
• Do not leave the cord hanging.
• Do not unplug the appliance by pulling on the cord.
• Always unplug the appliance immediately after use; when moving it; prior to any
cleaning or maintenance.
Using
• Use a flat and stable, heat resistant work surface, away from any water splashes.
• Never leave the appliance in operation unattended. Keep away from children.
• Keep out of the reach of children.
• Burns can occur by touching the hot surface of the appliance, the hot water, the
steam or the food.
• Never try to operate the appliance when the bowl is empty or without the bowl.
• The cooking function/knob must be allowed to operate freely. Do not prevent or
obstruct the function from automatically changing to the keep warm function.
• Do not remove the bowl while the appliance is working.
• Do not put the appliance directly onto a hot surface, or any other source of heat or
flame, as it will cause a failure or danger.
• The bowl and the heating plate should be in direct contact. Any object or food
inserted between these two parts would stop the correct operation.
• Do not put any food or water into the appliance until the bowl is in place.
• Respect the levels indicated in the recipes.
• During cooking, the appliance gives out heat and steam. Keep face and hands away.
Do not get face and hands close to the steam outlet. Do not obstruct the steam
outlet.
• Do not immerse the body in water nor pour water into it, only into the bowl.
• Should any part of your appliance catch fire, do not attempt to put it out with water.
To smother the flames use a damp tea towel.
• Any intervention should only be made by a service centre with original spare parts.
5083518-RICE COOKER 4 IN 1 GB-RC 21/03/07 11:30 Page 2
Page 5

3
Unpack the appliance
• Remove the appliance from the packaging and unpack all the accessories.
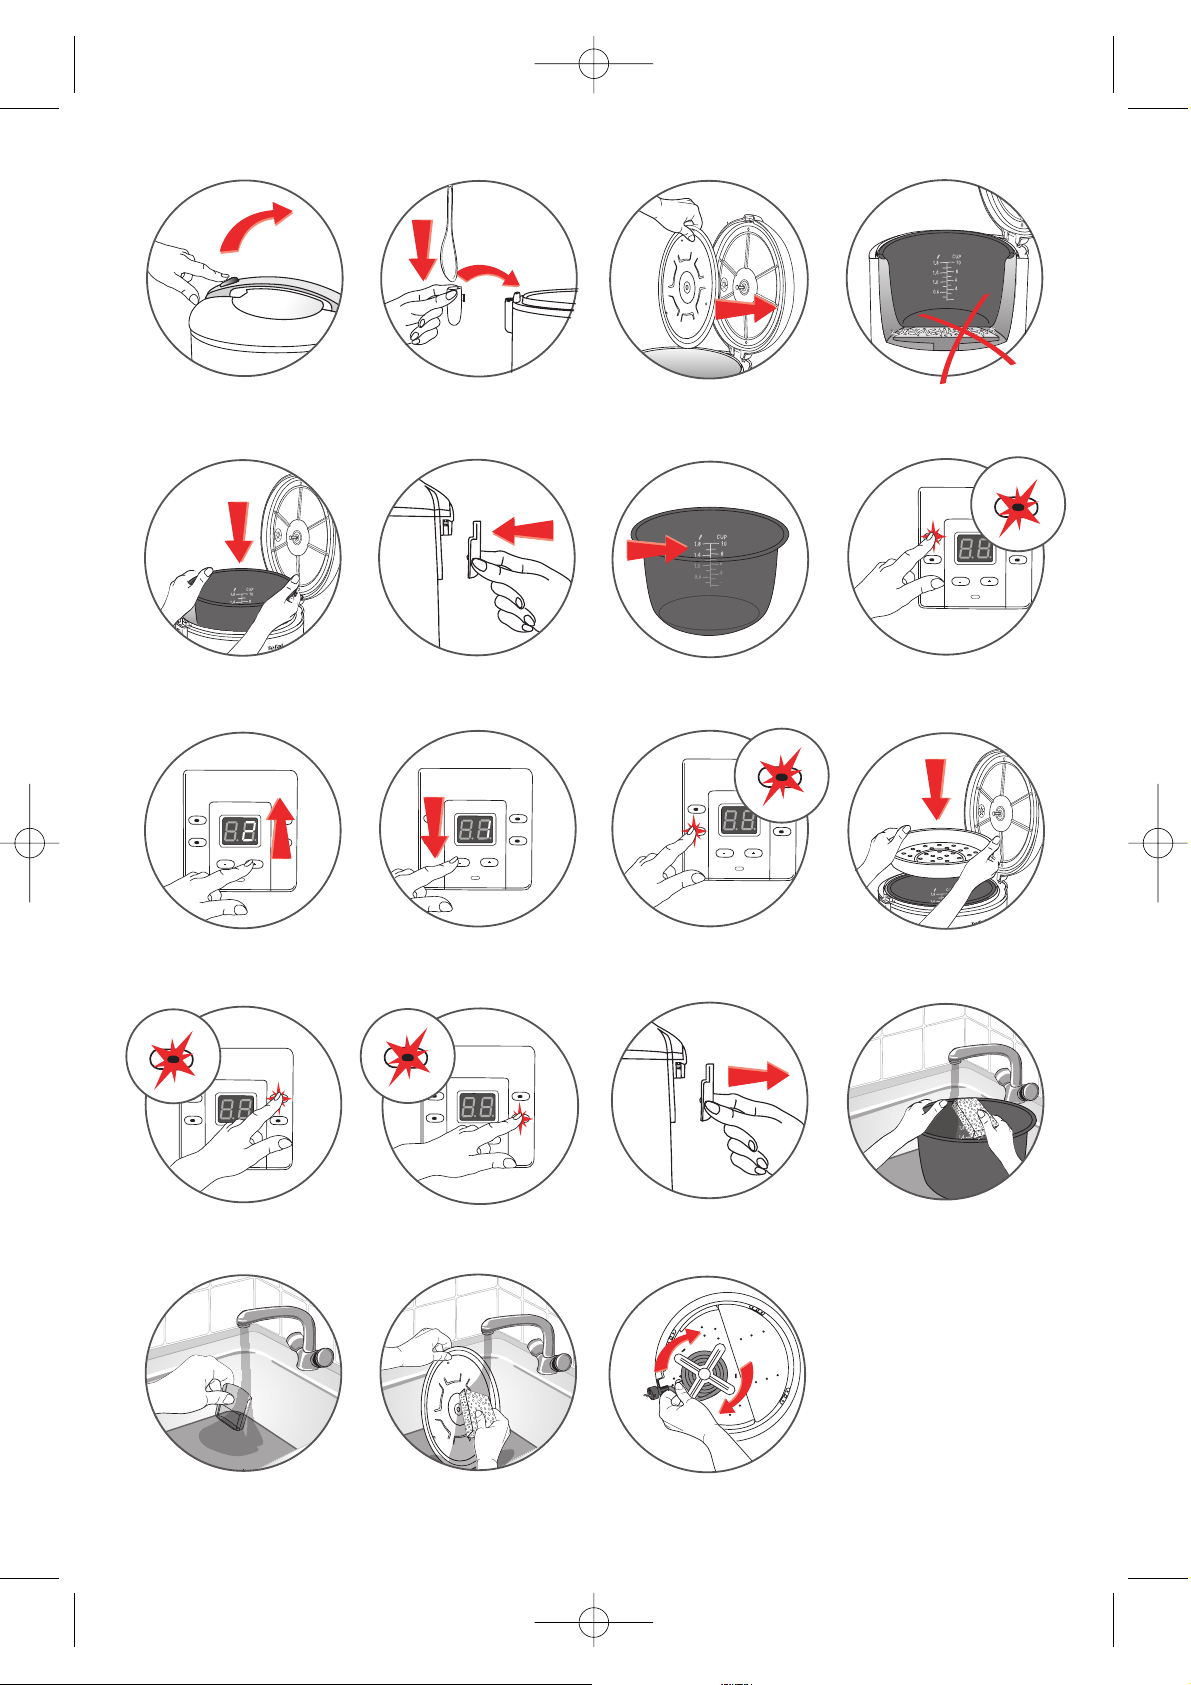
• Open the lid by pressing the opening button located on the handle –
Fig. 1.
• Remove all the printed documents and the accessories.
• Install the spoon support: insert the plastic hook of the support in the hole
located under the hinge of the lid, and slide it downwards –
Fig. 2.
Clean the appliance
• Remove the non-stick bowl.
• Clean the metal parts of the lid and the bowl with a sponge and washing-up
liquid. Fit the steam shield onto its fixing axis –
Fig. 3. Wipe the outside of the
appliance with a damp cloth.
• Dry off carefully.
Using your rice cooker
For all 4 functions
• Carefully wipe the outside of the bowl (especially the bottom). Make sure
that there are no foreign residues underneath the bowl and on the hotplate
–
Fig. 4.
• Place the bowl into the appliance –
Fig. 5, making sure that it is correctly
positioned.
• Slightly rotate the bowl in both directions, so as to ensure good contact
between the bottom of the bowl and the hotplate.
• Make sure that the steam shield is correctly in position –
Fig. 3.
• Close and lock the lid.
• Check that the condensation collector is correctly in position –
Fig. 6.
• Plug in the appliance.
• Do not switch on the appliance until all of the above stages have been
completed.
Never place your hand on the
steam vent during cooking,
as there is a danger of burns.
If the bowl is not properly in
place in the appliance,
cooking will not start.
If you wish to change the
selected cooking time in the
event of an error, press
cancel. Select the cooking
mode again and then the
cooking time.
Press Start to begin the
cooking process.
Read the instructions and
carefully follow the operating
method.
Before the first use
GB
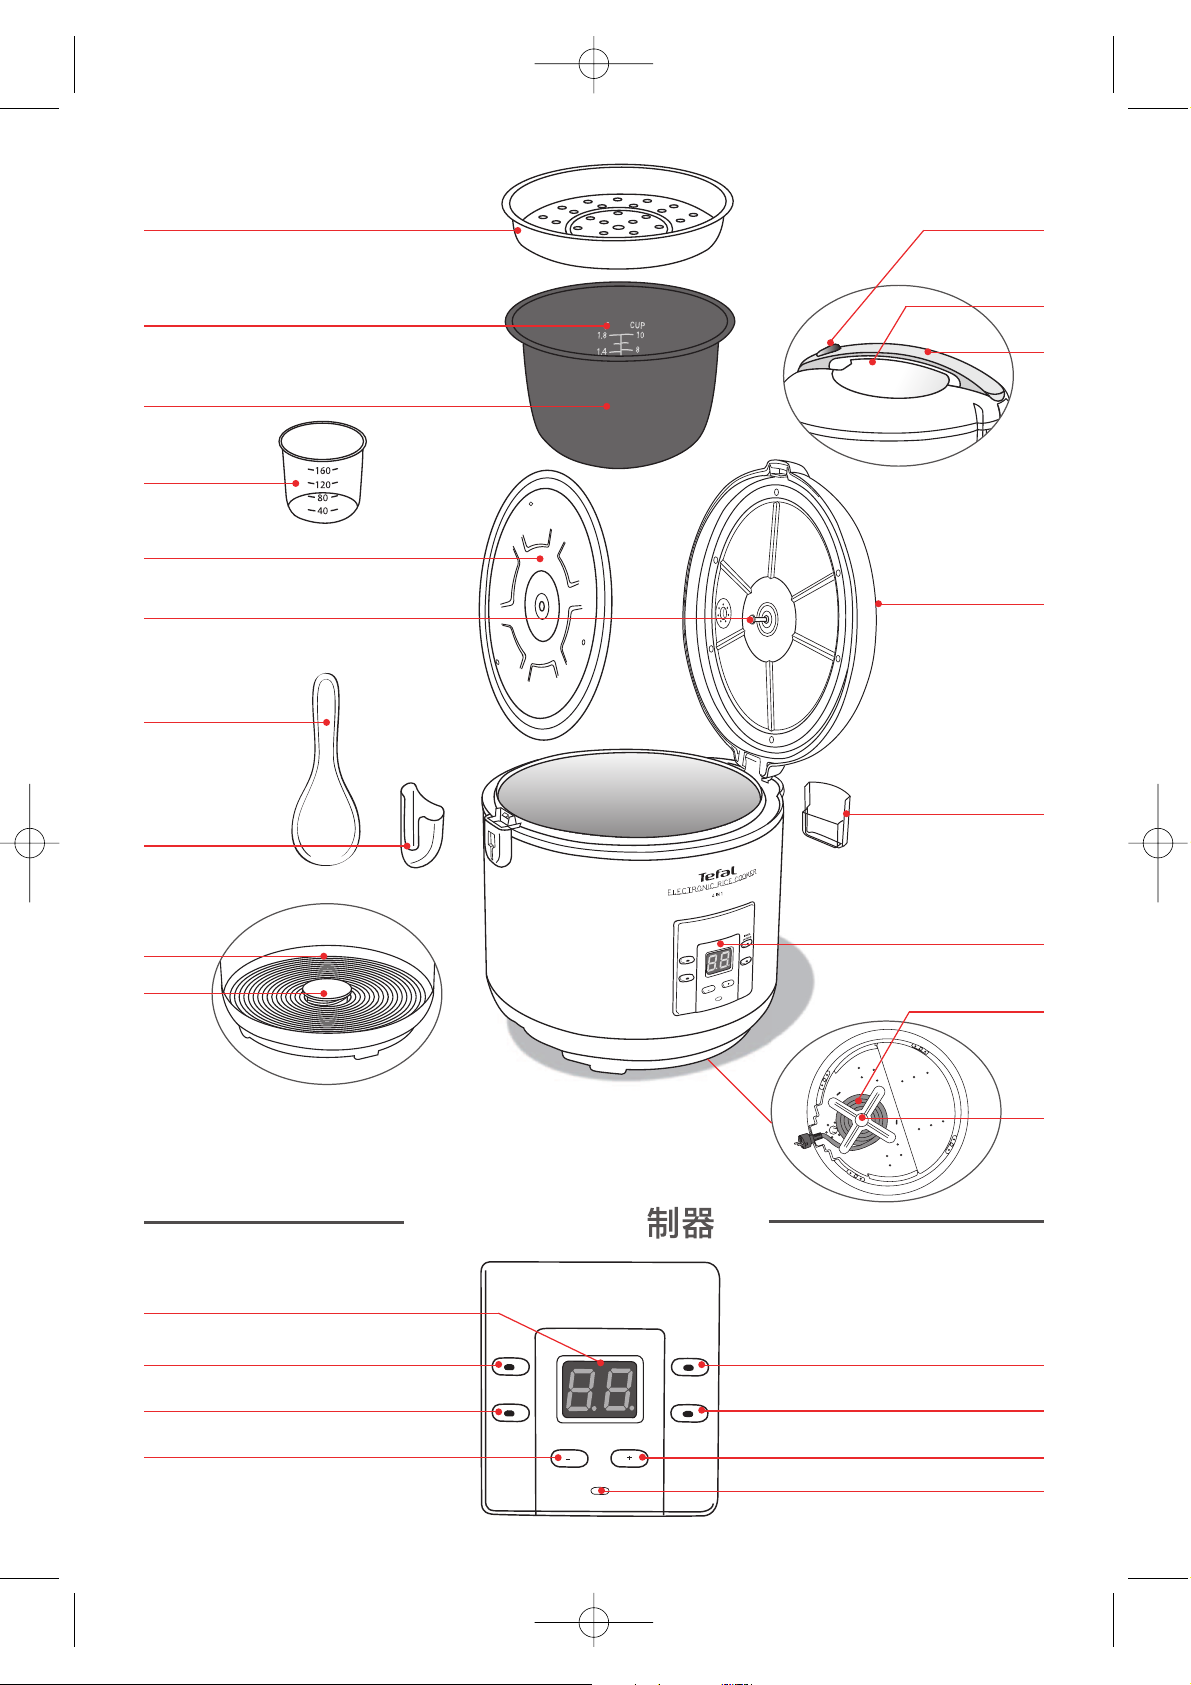
Description
1. Steam basket
2. Graduation for water and rice
3. Removable nonstick bowl
4. Measuring cup
5. Removable steam shield
6. Fixing axis of the steam shield
7. Spoon
8. Spoon support
9. Hotplate
10. Sensor
11. Lid opening button
12. Steam vent
13. Lid Handle
14. Lid
15. Condensation collector
16. Control box
a. Display of cooking time or of
delayed start-up, in rice-cooker mode
b. Rice cooking indicator light (red)
c. Slow cooking indicator light (red)
d. Minus button of timer
e. Steam cooking indicator light (red)
f. Porridge indicator light (red)
g. Plus button of timer
h. Keep warm indicator light (orange)
17. Power cord
18. Power cord storage
5083518-RICE COOKER 4 IN 1 GB-RC 21/03/07 11:30 Page 3
Page 6
4
Rice Cooking
Measuring the ingredients - Max capacity of the bowl
• The graduated markings on the inside of the bowl are given in litres and cups,
these are used for measuring the amount of water when cooking rice –
Fig. 7. If
cooking other foods, such as pasta, follow the quantities in the recipes.
• The plastic cup provided with your appliance is for measuring rice and the table
states the quantity of rice required for the number of servings. 1 level measuring
cup of rice weighs 150 g.
• The table below gives a guide to cooking white rice. For best results, we
recommend using ordinary rice rather than ‘easy cook’ type rice which tends to
give a stickier rice and may adhere to the base. With other types of rice, such as
brown or wild rice, the quantities of water need adjustment see the table below.
• To cook 1 cup of white rice (serves 2 small or 1 large portion), use 1 measuring
cup of white rice and then add 1 1/2 measuring cup of water. With some types
of rice it is normal for a little rice to stick on the base when cooking 1 cup of rice.
• The maximum quantity of water + rice should not exceed the 10 cup mark inside
the bowl –
Fig. 7.
• Rinse the rice thoroughly before cooking.
• Rinse the rice thoroughly before cooking except for risotto rice.
Note: When using Arborio risotto rice for milk rice pudding or dessert puddings follow the proportions in
the recipe book as more water is needed.
When cooking milk rice pudding, use Arborio risotto rice instead of pudding rice, as it cooks quicker and
gives better results. Follow the instructions in the recipes. Do not cook the rice directly in milk as it will
froth up and boil up through the lid.
The plastic cup is only used
for measuring rice and not
the water (except when
cooking 1 cup of rice).
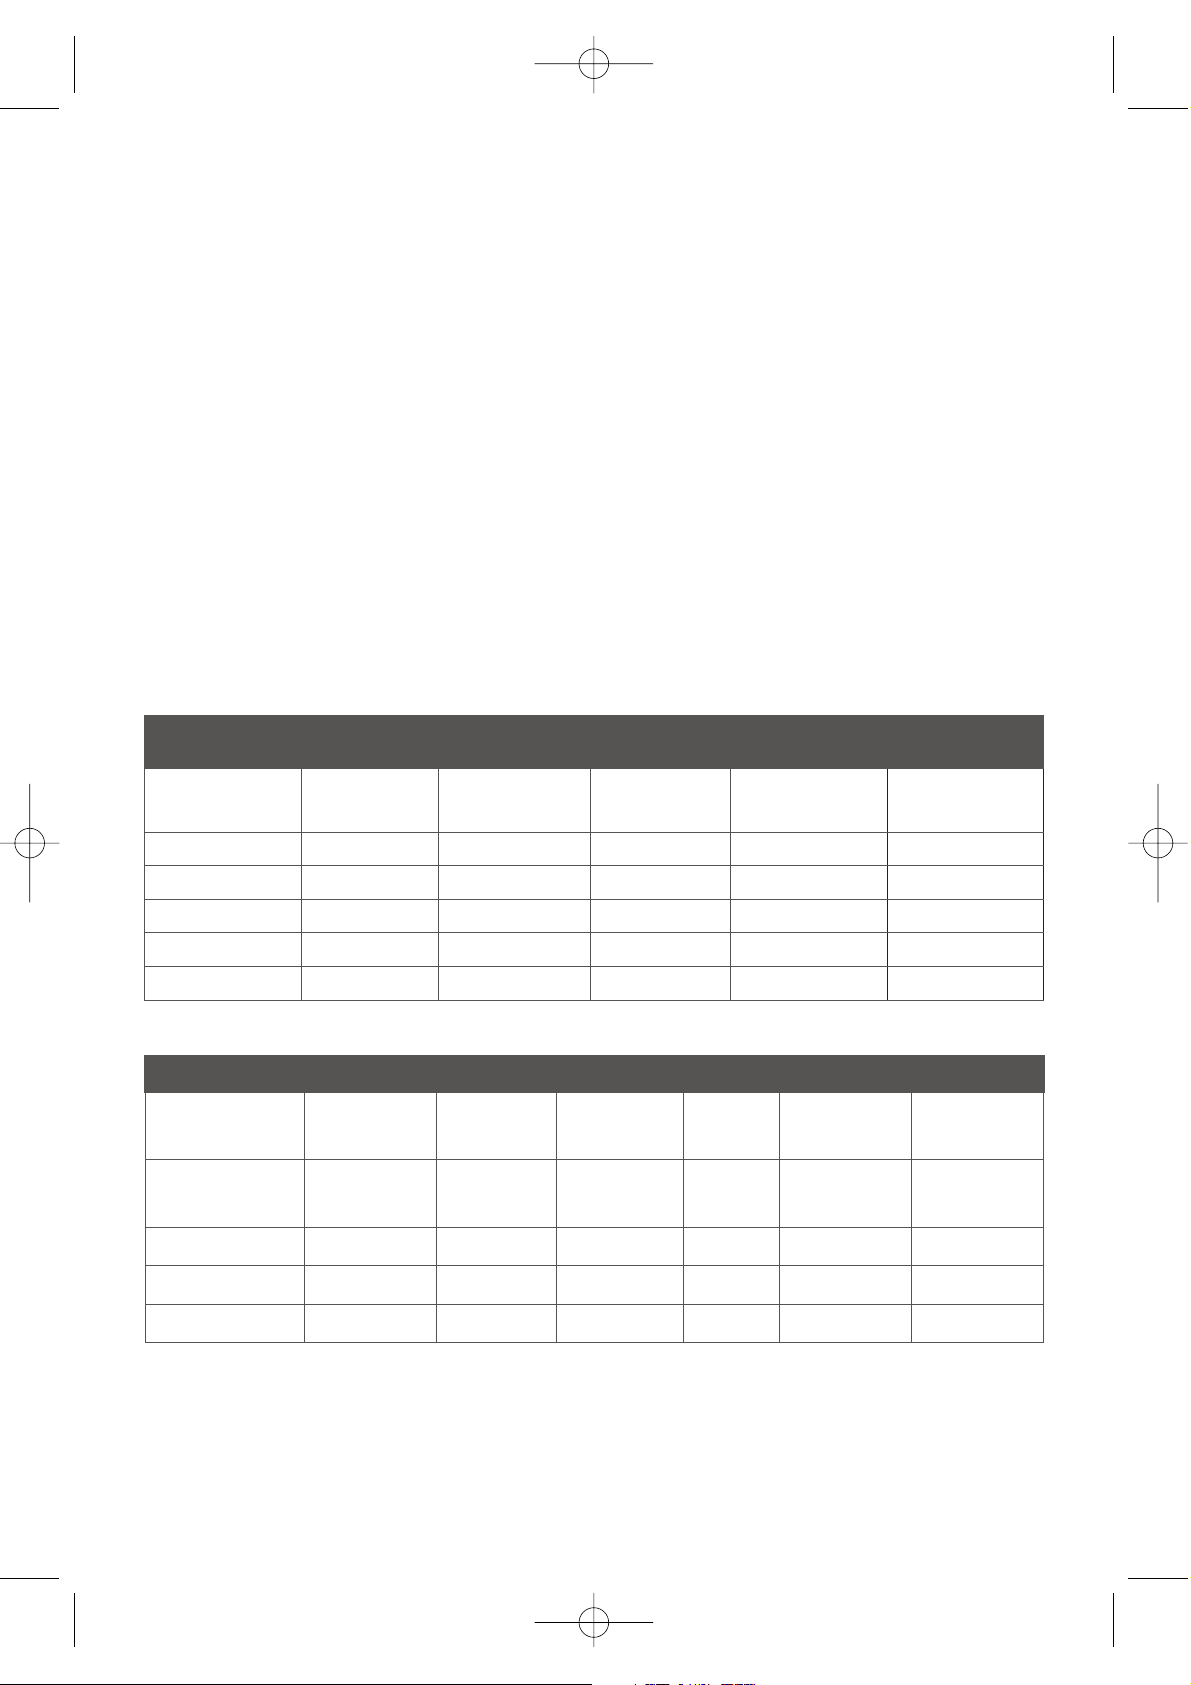
Type of rice
Measuring cup
of rice
Weight
of white rice
Water level
in the bowl
( + the rice)
Serves
Approximate
cooking time
for 10 cups*
Approximate
cooking time
for 5 cups*
Round white rice
(Italian rice - often
a stickier rice)
4 600 g 4 cup mark 5 - 6 20 - 23 min. 26 - 31 min.
Wholegrain
Brown rice
4 600 g 4,5 cup mark 5 - 6 35 - 40 min. 40 - 47 min.
Wild rice 4 400 g 3,5 cup mark 4 - 5 about 40 min. about 45 min.
Risotto rice
(Arborio type)
4 600 g 4 cup mark 4 - 5 17 - 23 min. 24 - 28 min.
COOKING GUIDE FOR OTHER TYPES OF RICE
Measuring cups
of white rice
Weight
of white rice
Water level
in the bowl
( + the rice)
Serves
Approximate
cooking time for
10 cups*
Approximate
cooking time for
5 cups*
2 300 g 2 cup mark 3 - 4 14 - 17 min. 20 - 24 min.
4 600 g 4 cup mark 5 - 6 20 - 25 min. 26 - 32 min.
6 900 g 6 cup mark 8 - 10 23 - 27 min. -
8 1200 g 8 cup mark 11 - 14 25 - 30 min. -
10 1500 g 10 cup mark 13 - 17 30 - 35 min. -
COOKING GUIDE FOR WHITE RICE IN AUTOMATIC RICE & SLOW COOKER
(American long grain, Basmati, Thai)
*The rice cooker will automatically determine the exact cooking time depending on the quantity of water and
rice placed in the bowl.
5083518-RICE COOKER 4 IN 1 GB-RC 21/03/07 11:30 Page 4
Page 7

5
Rice cooking with delayed start
• It is possible to delay the time the rice starts cooking.
• Select the “Rice cooking” mode. When the ingredients have been placed in the
bowl and the appliance plugged in, briefly press the “Rice cooking” key –
Fig.8.
The red “Rice cooking” light flashes.
• Select the cooking time. When the “rice cooking” light flashes, press the “plus” key
–
Fig. 9 or the “minus” key – Fig. 10 to select a cooking time which must elapse
before cooking completes. For instance: it is 1 p.m, I would like my rice cooked at
8 p.m, I have to set “7H” on the time key and wait the “rice cooking” light remains
steady.
• You can delay cooking for 9 hours maximum.
Some recommendations
for best results when cooking rice
• Measure out the rice and rinse it thoroughly under running water in a sieve for
a long time (except for risotto rice such as Arborio rice which should not be
rinsed). Then place the rice in the bowl together with the corresponding
quantity of water.
• Make sure that the rice is well distributed around the whole surface of the bowl,
in order to allow even cooking.
• Add salt if required. Allow about half a teaspoon of salt for 4 cups of rice, but
you can adjust this to your personal taste. Remember your Rice Cooker uses less
water than when boiling rice so take care not to add too much salt.
• Stock may be substituted for water if desired. If using stock cubes, take care not
to season with too much salt as they have a salty taste.
• Do not open the lid during cooking as steam will escape and this will affect the
cooking time.
• On completion of cooking, when the “keep warm” function is selected, stir the
rice and then leave it in the rice cooker for a few minutes longer in order to get
perfect rice with separate grains.
This is the only cooking
mode for which
programming a delayed start
is possible.
To cook rice
The cooking times given in the tables and recipes are only approximate and for
your guidance.
• Place the appliances on a flat, stable, heat-resistant work surface away from
water splashes and any other sources of heat.
• Pour the required quantity of rice into the bowl using the measuring cup
provided. Then fill with cold water up to the corresponding “CUP” mark
printed in the bowl (See cooking guide) –
Fig. 7.
• Close the lid.
Note: Always add the rice first otherwise you will have too much water.
• Check that the appliance is plugged in. Briefly press on the “rice cooking” key
–
Fig. 8. The red “rice cooking” light flashes for 5 seconds. After 5 seconds the
light remains steady and the cooking automatically starts.
• After each use empty the condensation collector.
The rice cooker itself
determines the exact cooking
time depending on the
quantity of water and
ingredients placed in the bowl
(see cooking table for a guide
to times).
When the volume of water has
been absorbed by the rice, the
appliance stops the cooking
process automatically and
passes into the “Keep warm”
mode (the orange “Keep
warm” light comes on).
GB
5083518-RICE COOKER 4 IN 1 GB-RC 21/03/07 11:30 Page 5
Page 8

6
Slow Cooking
Measuring the ingredients
• The quantity of ingredients (see recipes for the amounts) should not exceed
the 10 CUP mark in the bowl when slow cooking.
To slow cook
• To select the “slow cooking” mode. When the ingredients have been placed in the
bowl and the appliance plugged in, press the “slow cooking” key –
Fig. 11. When
the “slow cooking” light flashes, you can press the “plus” key –
Fig. 9 or the
“minus” key –
Fig. 10 to select a cooking time. If you don’t select a cooking time
after 5 seconds, the light stops flashing, and the corresponding indicator light
remains steady; the cooking time of the appliance is automatically programmed
to 60 minutes and the appliance begins cooking.
• Select the cooking time: the appliance allows you to program between 60
minutes minimum and 9 hours maximum for the slow cooking mode. Choose the
time so as to suit the chosen recipe while the red “slow cooking” light is flashing.
Press repeatedly on the time key to increase the cooking time. You can also press
continuously in order to speed up the process. The time increases in hourly
increments from 60 minutes up to 9 hours maximum.
• When the red “slow cooking” light remains steady to begin the cooking process
begins
Important instructions when slow cooking
dried beans and dried peas
• If you are preparing a slow cooker recipe which contains dried beans or dried
peas, for example red kidney beans or chick peas, they must be soaked in
plenty of cold water overnight before cooking them. Drain and rinse them
thoroughly, then place in a large saucepan and cover with fresh cold water.
Bring to the boil and continue to boil rapidly for 10 minutes, uncovered, then
drain before using in Slow Cooker recipes. This destroys any natural toxins in
the beans or peas.
• Season pulses after cooking as the salt can toughen them during cooking.
• Soaking is not necessary for lentils, but they must still be boiled rapidly for 10
minutes.
• Canned beans and pulses can simply be drained and rinsed, and added 30
minutes before the end of the cooking time. They do not need to be boiled
first.
Steam cooking (for vegetables, fruit and fish)
Measuring the ingredients
• The maximum quantity of water in the bowl should not exceed the 10 CUP mark
(representing 1.8 litres of water) shown in “cups” on the bowl. Exceeding this level
may cause overflows during use.
Do not eat uncooked beans,
peas or lentils. Never add
pulses to slow cooker recipes
without boiling them first.
5083518-RICE COOKER 4 IN 1 GB-RC 21/03/07 11:30 Page 6
Page 9

7
GB
Preparation
• Pour water into the bowl as stated in the recipe. However, never exceed the
10 mark CUP.
• Place the steam basket in the bowl –
Fig. 12.
• Add the ingredients.
To steam cook
• To select the steam mode. When the ingredients have been placed in the bowl
and the appliance plugged in, press the “steam cooking” key –
Fig. 13. When the
“steam cooking” light flashes, you can press the “plus” key –
Fig. 9 or the “minus”
key –
Fig. 10 to select a cooking time. If you don’t select a cooking time after 5
seconds, the light stops flashing, and the corresponding indicator light remains
steady; the cooking time of the appliance is automatically programmed to 1
minute and the appliance begins cooking.
• Select the cooking time. In order for cooking to start, you have to select a cooking
time. The appliance allows you to program from 1 minute minimum to 60
minutes maximum for the steam cooking mode. You choose the time to suit the
chosen recipe. Press repeatedly on the time key to increase the cooking time. You
can also press continuously in order to speed up the process.
• When the red “steam cooking” light remains steady the cooking process begins.
Cooking porridge
To cook porridge
• To select the porridge mode. Briefly press the mode key. When the ingredients
have been placed in the bowl and the appliance plugged in, press the “porridge”
key –
Fig. 14. When the “porridge” light flashes, you can press the “plus” key –
Fig. 9 or the “minus” key – Fig. 10 to select a cooking time. If you don’t select a
cooking time after 5 seconds, the light stops flashing, and the corresponding
indicator light remains steady; the cooking time of the appliance is
automatically programmed to 5 minutes and the appliance begins cooking.
Note: After cooking, if the porridge is too thin for your personal taste just cook for an additional 2
minutes. Different brands of porridge oats vary slightly, so you may need to adjust the cooking time or
amount of liquid used to obtain the consistency you like.
Recipe
Suggested Cooking time
using Porridge function
Servings
1 cup porridge oats, 2 cups milk, 0.5 cup water 4 600 g
2 cups porridge oats, 3 cups milk, 2 cups water 4 600 g
5083518-RICE COOKER 4 IN 1 GB-RC 21/03/07 11:30 Page 7
Page 10

8
• Select the cooking time. In order for cooking to start, you have to select a cooking
time. The allows you to program from 1 minute minimum to 60 minutes
maximum for the porridge cooking mode. You choose the time to suit the chosen
recipe. Press repeatedly on the time key to increase the cooking time. You can
also press continuously in order to speed up the process.
• When the red “porridge” light remains steady the cooking process begins.
Automatic keep warm function
On completion of cooking, irrespective of the cooking mode chosen, the appliance passes automatically to the
“keep warm” function except for the porridge function. The orange “keep warm” light comes on. The food is thus
kept warm and ready to serve. To switch off this function, unplug the appliance.
On completion of cooking
• Open the lid.
• Serve the food using the plastic spoon supplied with the appliance and
reclose the lid.
• The food remaining in the bowl will keep warm for any second servings.
• Unplug the appliance.
Cleaning and Maintenance
Condensation collector
• The condensation collector should be emptied and cleaned after each use.
• To remove the collector, press on each side of the plastic cover and remove –
Fig. 15.
• To put the plastic cover back, push firmly into the groove.
Bowl, steam bowl and steam shield
• Use hot water, washing up liquid and a sponge to clean the bowl, the
condensation collector and the steam shield –
Fig. 16-17-18. Scouring
powders and metal sponges are not recommended.
• If food has stuck to the bottom, allow the bowl to soak for a while before
washing it.
• Dry the bowl carefully.
• Do not immerse the appliance in water, nor pour water into it, only into the
bowl.
Cleaning in a dishwasher
You can also wash the bowl, the steam bowl and the steam shield in the bottom
shelf of the dishwasher. For the bowl, carefully follow the instructions below :
• When putting the bowl into the machine, be careful not to damage the nonstick coating on the dish washer racks.
• After being washed several times in the dish washer, to renew the surface, it is
recommended to wipe the whole of the inner surface of the bowl with a little
vegetable oil on some paper towel.
• Make sure you put the bowl back into the Electronic Rice Cooker.
The escaping steam is very
hot.
Any brown marks and
scratches that may appear
after many hours use are not
a problem. We guarantee
that the non stick coating
COMPLIES WITH THE RULES
on materials suitable for
contact with food.
5083518-RICE COOKER 4 IN 1 GB-RC 21/03/07 11:30 Page 8
Page 11

Taking care of the non-stick bowl
• To keep the non stick quality of the bowl for as long as possible, it is
recommended not to cut food in it.
• Use plastic or wooden utensils and not metal ones when stirring or serving
food to avoid damaging the bowl surface.
• To avoid any risk of corrosion, do not pour vinegar into the bowl.
• The colour of the bowl surface may change after using for the first time or
after longer use. This change in colour is due to the action of steam and
water and does not have any effect on the use of the Electronic Rice Cooker,
nor is it dangerous for your health. It is perfectly safe to continue using it.
Cleaning and care of the other parts of the appliance
• Clean the outside of the Electronic Rice Cooker, the inside of the lid and the cord
with a damp cloth and wipe dry. Do not use abrasive products.
• Do not use water to clean the interior of the appliance body as it could damage
the heat sensor.
• Before putting the appliance away, wind the cord underneath the appliance –
Fig. 19.
Environment protection first!
Your appliance contains valuable materials which can be recovered or recycled.
Ü
When you decide to replace your appliance, leave it at a local civic waste collection
point.
If you have any product problems or queries, please contact our Helpline on:
0845 602 1454 - UK
(01) 461 0390 - Ireland
or consult our website - www.tefal.co.uk
9
GB
5083518-RICE COOKER 4 IN 1 GB-RC 21/03/07 11:30 Page 9
Page 12

10
5083518-RICE COOKER 4 IN 1 GB-RC 21/03/07 11:30 Page 10
Page 13

11
RC
5083518-RICE COOKER 4 IN 1 GB-RC 21/03/07 11:30 Page 11
Page 14

12
5083518-RICE COOKER 4 IN 1 GB-RC 21/03/07 11:30 Page 12
Page 15

13
RC
5083518-RICE COOKER 4 IN 1 GB-RC 21/03/07 11:30 Page 13
Page 16

14
5083518-RICE COOKER 4 IN 1 GB-RC 21/03/07 11:30 Page 14
Page 17

15
RC
5083518-RICE COOKER 4 IN 1 GB-RC 21/03/07 11:30 Page 15
Page 18

16
5083518-RICE COOKER 4 IN 1 GB-RC 21/03/07 11:30 Page 16
Page 19

17
Ü
RC
5083518-RICE COOKER 4 IN 1 GB-RC 21/03/07 11:30 Page 17
Page 20

5083518-RICE COOKER 4 IN 1 GB-RC 21/03/07 11:30 Page 18
Page 21

5083518-RICE COOKER 4 IN 1 GB-RC 21/03/07 11:30 Page 19
Page 22

Ref.5083518
GB p. 2 - 9
RC p. 10 - 17
5083518-RICE COOKER 4 IN 1 GB-RC 21/03/07 11:30 Page 20
 Loading...