

Page 1

Operating manual
HDTV 32 Plus / HDTV 40
HDTV 40 Plus / HDTV 46
TFT-LCD TV set with integrated hard disk and integrated Twin-HD Multi
reception tuner. With CONAX card reader and two PCMCIA interfaces for
the inclusion of CI modules. To receive both free and encoded
(e.g. VIACCESS, CONAX, IRDETO, SECA etc.) SD and HD programs.
Integrated
video recorder
1
PVR
Page 2
1 Illustrations
1
2
3
4
5
6
7
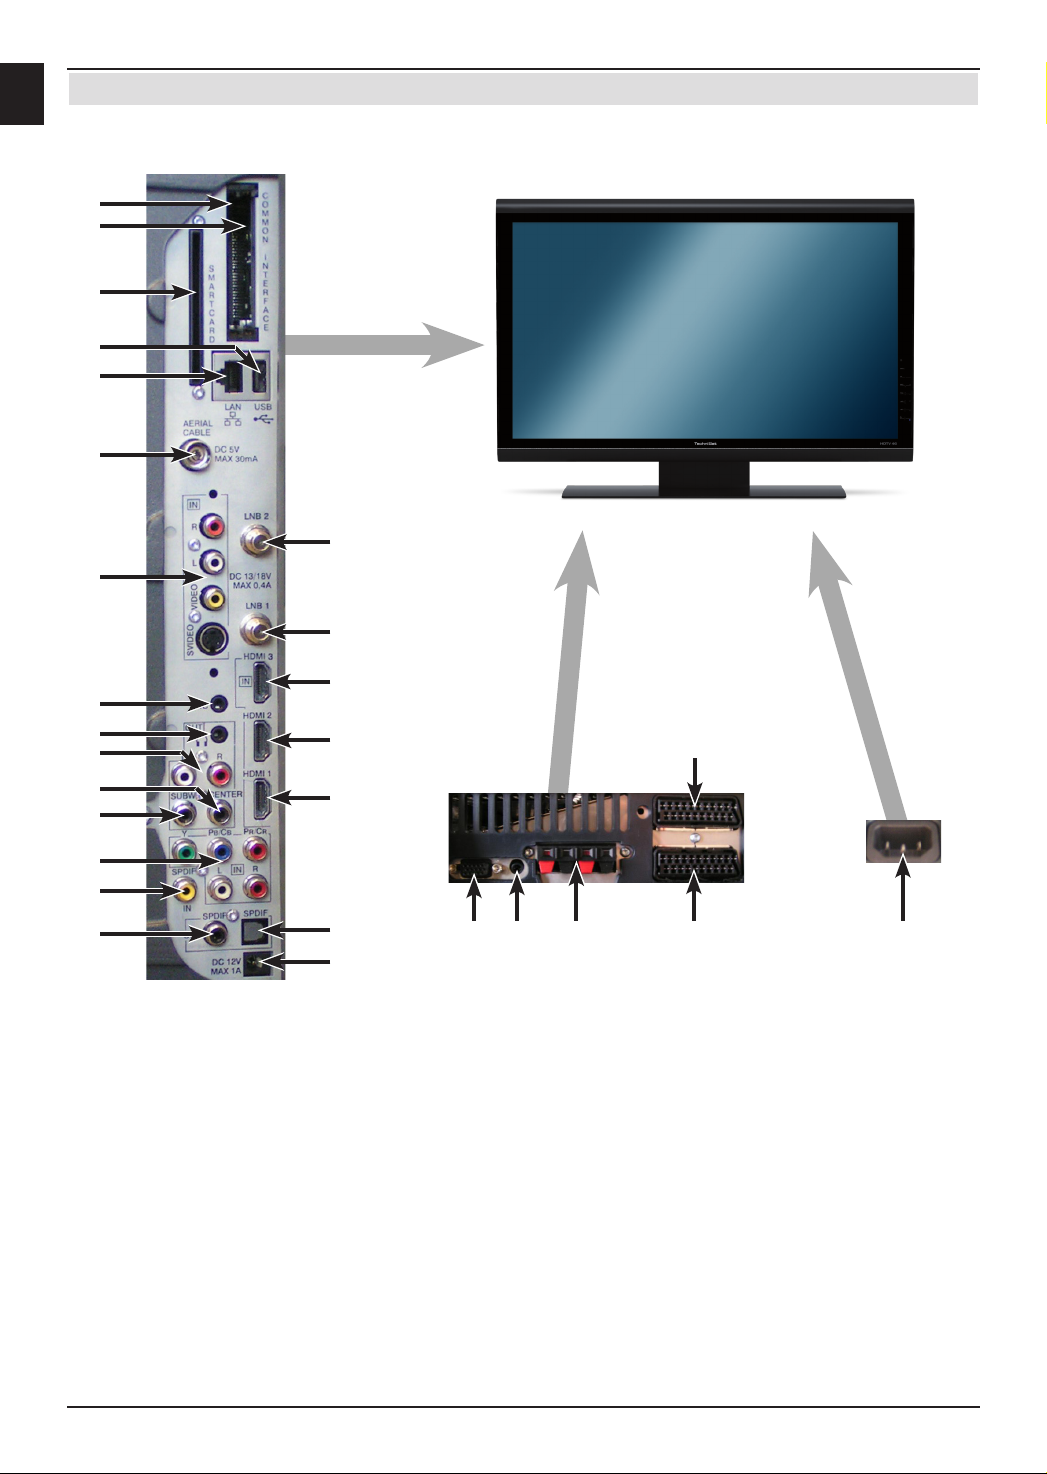
Device connections
8
9
10
13
14
15
16
17
18
19
20
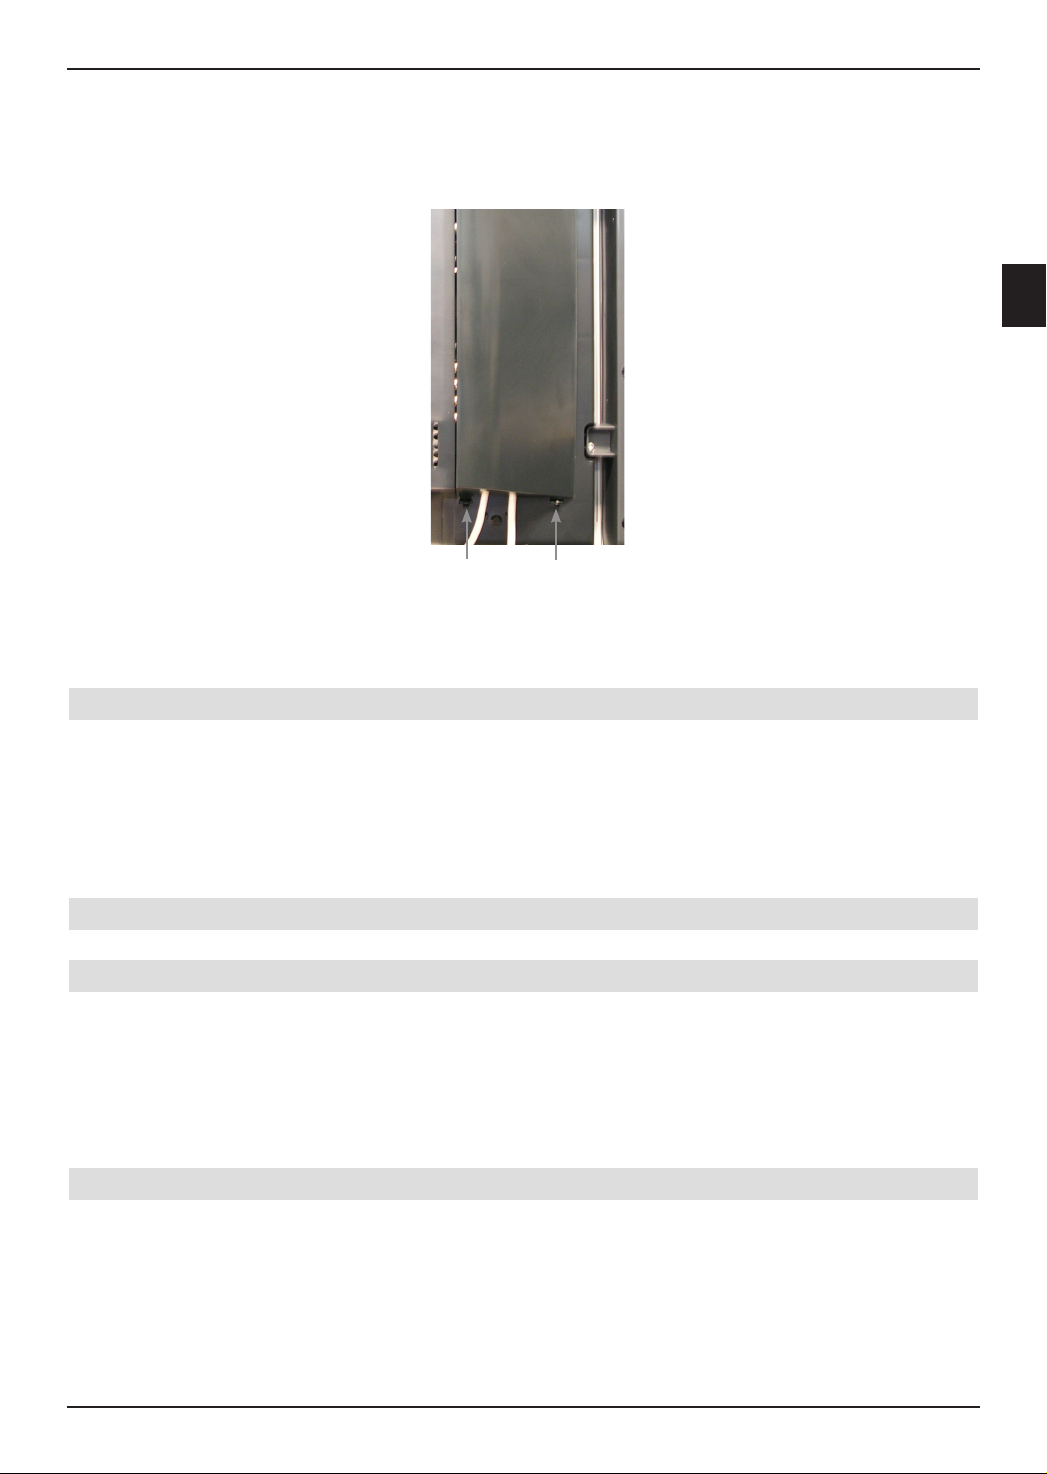
1 Common Interface Slot 1
2 Common Interface Slot 2
3 Card reader
(Golden chip of the
Conax Smartcard facing
forward and apply in the
direction of insertion.)
4 USB socket
5 Network socket (LAN)
6 Antenna socket
(DVB-C, DVB-T, analog)
7 Video-, S-Video- and
audio input
8 LNB input 2 (DVB-S)
9 LNB input 1 (DVB-S)
11
12
21
22
24 25 27
23
10 HDMI Socket 3
11 HDMI Socket 2
12 HDMI Socket 1
13 Microphone input
(Jack socket 3.5 mm)
14 Headphone input
(Jack socket 3.5 mm)
15 Audio output (R,L)
16 Center output
17 Subwoofer output
18 Component inputs (Y,
Pb/Cb, Pr/Cr and Audio)
19 Audio input digital
(SPDIF electric)
26
28
20 Audio output digital
(SPDIF optical)
21 Audio output digital
(SPDIF optical)
22 DC 12 V output
Switchable voltage ext.
Amplifier
23 VGA socket
24 Audio input (VGA/DVI)
(Jack socket 3.5 mm)
25 Loudspeaker socket
26 SCART socket (AV1)
27 SCART socket (AV2)
28 Network socket
2
Please expand
Page 3
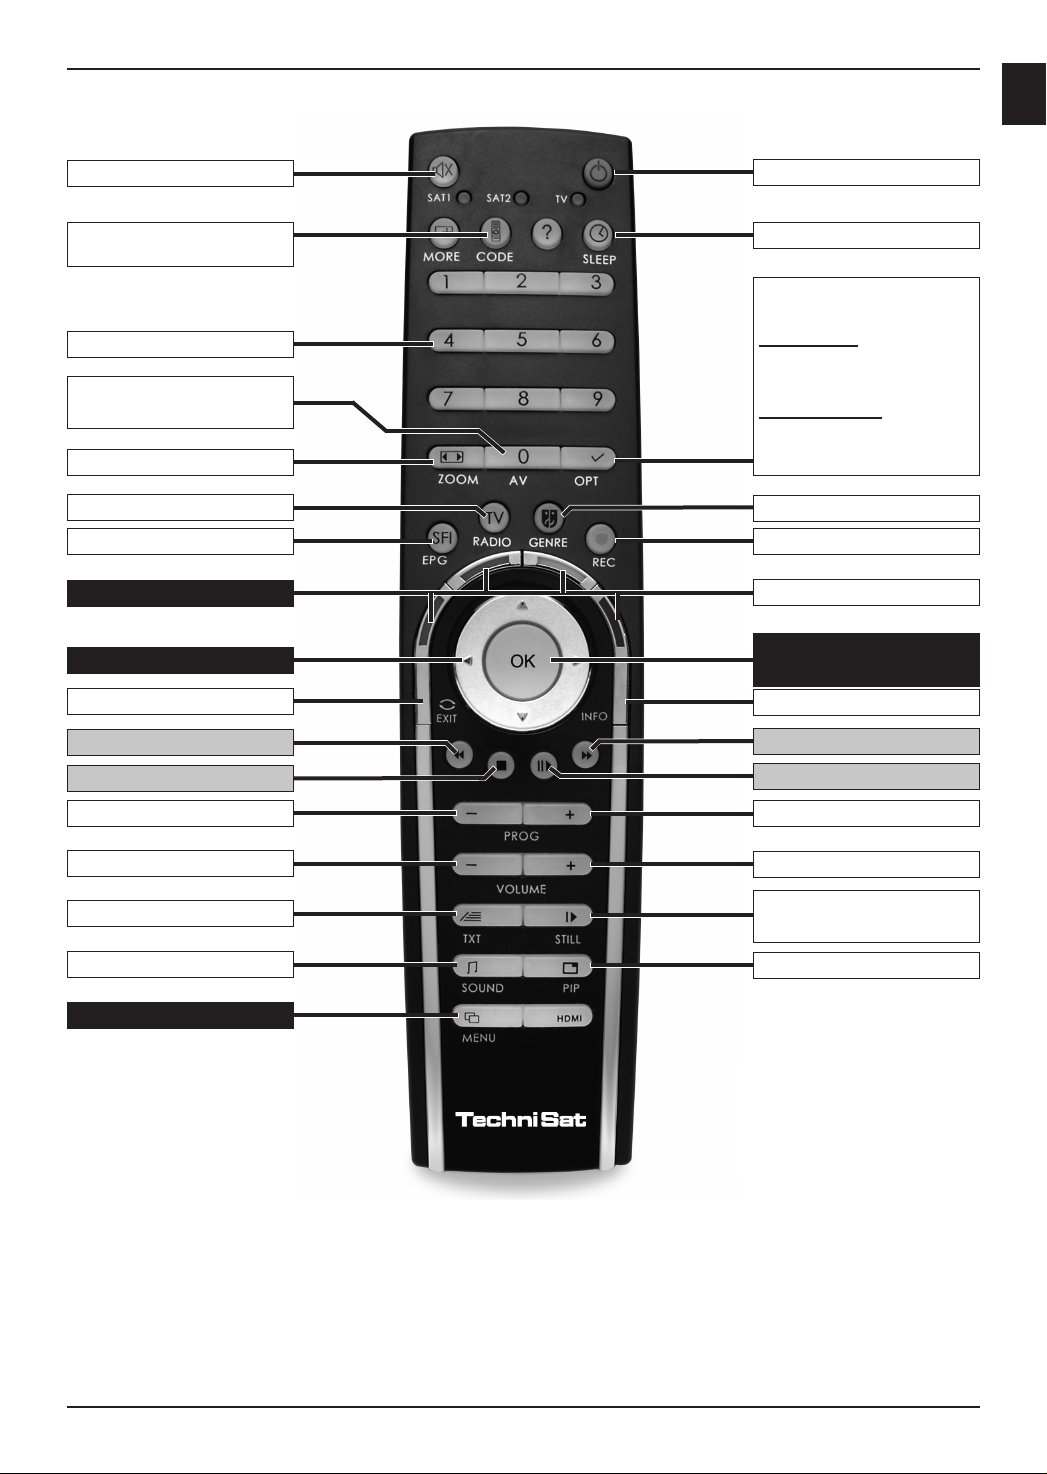
Remote control
1
Sound On/Off
Remote control code
2)
Numeric keys
0/AV
(External inputs)
Zoom/Format
TV/Radio – Operation
EPG
Multifunctional keys
Arrow keys
Back
Rewind
Stop
On/Standby
Sleep timer
Option
in TV mode:
Sound/subtitle selection,
special functions
in Radio mode:
Select stations by switching the sound sub-carriers
1)
Genre lists
Record
Green PVR navigator
Program list On/Off
OK
Info
Fast forward
Pause / Play
Program -
Volume -
Video text on/off
Language choice
1)
1)
Program +
Volume +
Still picture
Jog-shuttle on/off
PiP/PaP
Menu On/Off
1)
This function is only avail-
able when the relevant data
are transmitted in the set
program position.
2)
Remote control option:
By switching the remote control option, this remote control unit can be used to control two Technisat receivers
and one Technisat television set with the same coding. While the button is pressed, the currently set remote
control code is indicated by flashing of the relevant LED.
> To implement the remote control option, press and hold the Remote control code button and
subsequently press the OK button as often it takes for the LED of the desired remote control options
(SAT1, SAT2 or TV) to briefly flash.
3
Page 4
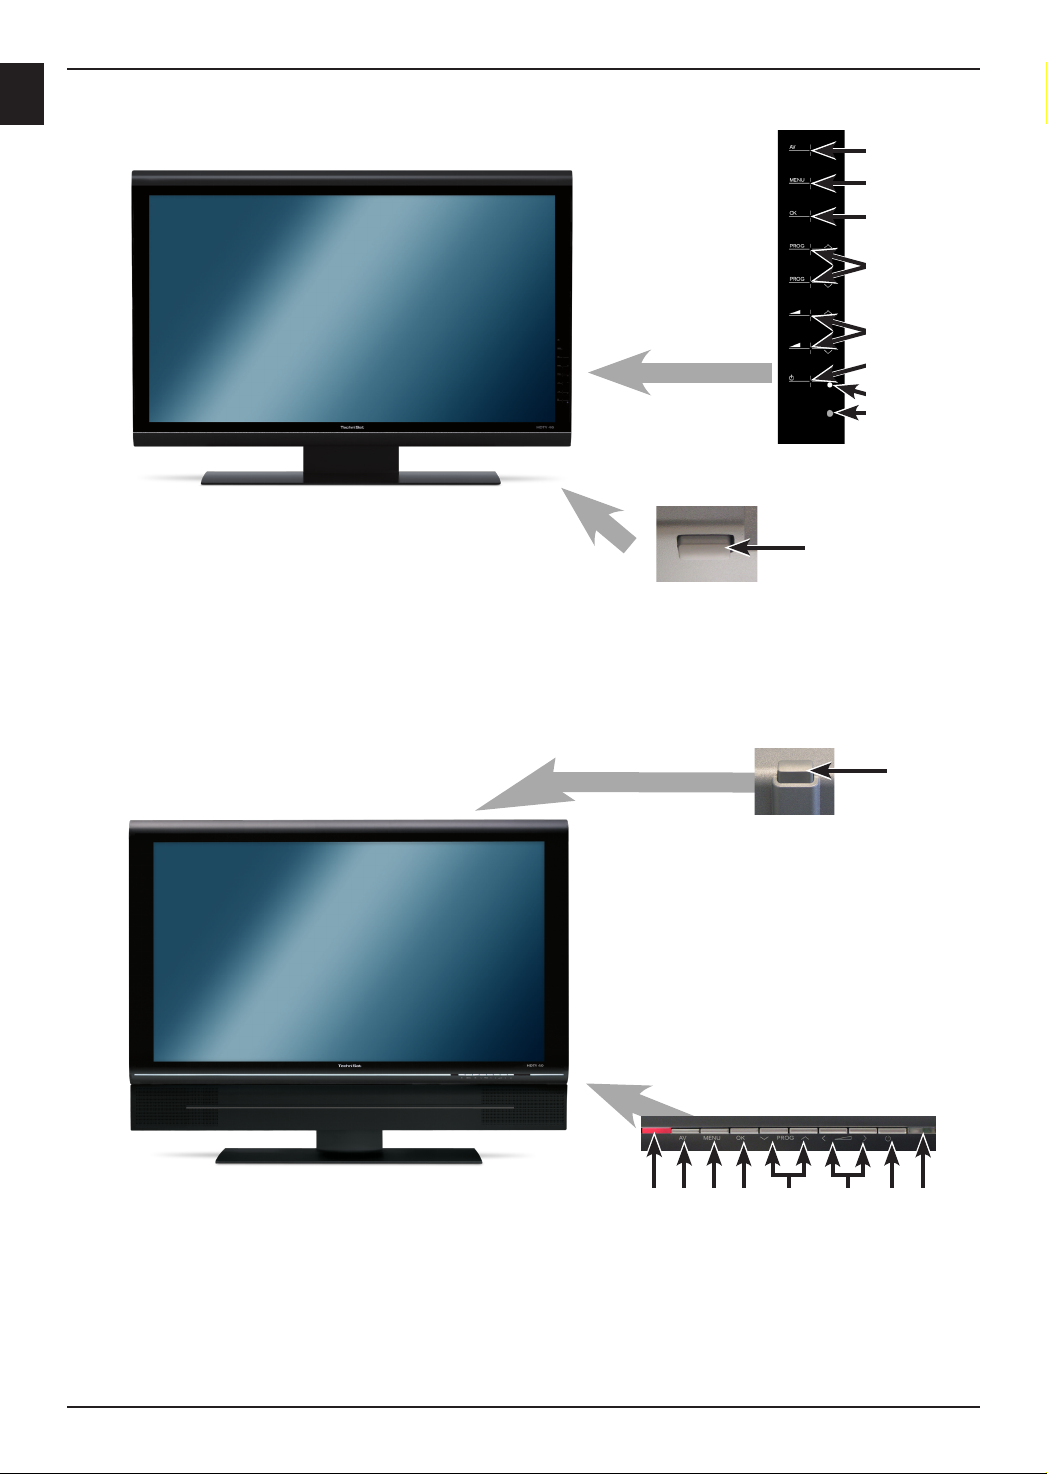
Device buttons HDTV 46
2
3
4
5
6
7
8
9
1
Device buttons HDTV 32/40
8 2 3 4 5 76 9
1
1 Power switch
2 AV
3 Menu
4 OK
5 Program +/–
6 Volume +/–
4
7 On/Standby
8 LED
9 IR receiver
Page 5

Contents
1 Illustrations . . . . . . . . . . . . . . . . . . . . . . . . . . . . . . . . . . . . . . 2
2 Table of contents (tentative) ........................ 5
3 Please read this first.............................. 14
3.1 Intended use ....................................................14
3.2 Manufacturer's declaration..........................................14
3.3 Important notes ..................................................14
3.3.1 LCD screen .....................................................14
3.3.2 Data on the hard disk .............................................14
3.3.3 Transport .......................................................15
3.3.4 Safety..........................................................15
3.3.5 Operation .......................................................16
3.3.6 Power consumption in standby mode and in operation ...................16
3.3.7 Maintenance and cleaning..........................................17
3.3.8 Disposal ........................................................17
3.4 Remote control / Battery changing ...................................17
3.5 Wall-mounting ...................................................18
3.5.1 Removing rest foot ...............................................18
3.6 Removable loudspeakers
3.6.1 Removing loudspeaker ............................................19
3.7 Wireless Loudspeaker system .......................................19
(not available on HDTV 46)
...............................19
4 Connections..................................... 20
4.1 Antenna / Cable connection (analog and digital).........................21
4.2 Satellite antenna .................................................21
4.2.1 Operation with 2 antenna signals ....................................21
4.2.2 Operation with 1 antenna signal .....................................21
4.3 DVD player .....................................................22
4.4 Video recorder ...................................................22
4.5 S-VHS video recorder / video camera.................................22
4.6 Hi-Fi / Surround amplifier...........................................22
4.6.1 Analog .........................................................22
4.6.2 Digital ..........................................................22
4.7 Subwoofer / Center ...............................................22
4.8 SPDIF input .....................................................22
4.9 USB socket .....................................................23
4.10 Network socket (RJ45) ............................................23
4.11 Headphones.....................................................23
4.12 PC ............................................................23
4.13 Mains power connection ...........................................24
2
5 Initial installation ................................25
6 Operation .......................................28
6.1 Switching the TV set on and off......................................28
6.1.1 Switching on when plugged into the mains .............................28
6.1.2 Switching on from standby mode ....................................28
6.1.3 Switching off into standby mode .....................................28
6.1.4 Switching off when plugged into the mains .............................28
5
Page 6

6.2 Selecting a program...............................................29
6.2.1 Using the program up/down keys ....................................29
6.2.2 Using the numeric keys ............................................29
6.2.3 Using the program list:.............................................29
6.2.3.1 Selecting programs ...............................................29
6.2.3.2 Selecting a list ...................................................30
6.2.4 Selection of a local program ........................................30
6.2.5 Calling up blocked programs ........................................30
6.2.6 Return to the last program selected ..................................30
6.2.7 TV/Radio switching ...............................................31
6.3 AV source.......................................................31
6.3.1 Audio playback from external sources.................................32
6.4 Program / source information .......................................32
6.4.1 Information box ..................................................32
6.4.2 Display time and program information .................................32
6.4.3 Additional program information ......................................33
6.4.4 Channel / Transponder- / Source info .................................33
6.5 Receiving encoded programs .......................................34
6.5.1 Simultaneous receptams of two encrypted progrion ......................34
6.5.2 Optional channels ................................................34
6.5.3 Selecting start time ...............................................35
6.5.4 Smartcard PIN code ..............................................35
6.6 Volume control ...................................................35
6.6.1 Sound muting....................................................35
6.6.2 Headphone volume ...............................................35
6.7 Selection of another language/sound option ............................36
6.7.1 Dolby Digital (AC3 Mode) ..........................................36
6.8 Sub-titles .......................................................37
6.9 Video text .......................................................37
6.9.1 Switching video text on/off ..........................................37
6.9.2 Choice of page...................................................37
6.9.3 Video text subpages ..............................................37
6.9.4 Showing video text and TV images at the same time .....................38
6.9.5 Exit Video text ...................................................38
6.10 Format changeover / Zoom .........................................38
6.11 PiP-/PaP function.................................................39
6.11.1 Accessing PiP-/PaP functions ......................................39
6.11.2 Exchange PiP-/PaP images.........................................39
6.11.3 Implementing PiP-/PaP functions ....................................39
6.12 Freeze frame ....................................................40
6.13 EPG program journal ..............................................40
6.13.1 Downloading EPG data ............................................40
6.13.2 Interrupting the download procedure..................................40
6.13.3 Display electronic program guide ....................................40
6.13.4 Now (table with current program contents) .............................41
6.13.5 Next ...........................................................41
6.13.6 More...........................................................41
6.13.7 EPG functions ...................................................42
6.13.7.1 EPG-Info .......................................................42
6.13.7.2 EPG timer programming ...........................................42
6
Page 7

6.13.7.2.1 Hard disks (PVR-) timer............................................42
6.13.7.2.2 Change station-, wake-up and VCR timer..............................43
6.13.7.2.3 Timer menu .....................................................43
6.13.7.2.4 Cancel an EPG timer event .........................................43
6.13.7.3 EPG program overview ............................................43
6.13.7.4 Overview based on program type/genre ...............................44
6.13.7.5 EPG search .....................................................44
6.13.7.5.3 Manually entering the search term ...................................45
6.14.1 Access timer overview .............................................47
6.14.1.1 Manual programming of timers ......................................47
6.14.1.2 Changing timer programming .......................................49
6.14.1.3 Delete timer programming ..........................................49
6.14.2 During the timer operation ..........................................49
6.14.2.1 Program change timer .............................................49
6.14.2.2 Wake-up timer ...................................................49
6.14.2.3 Video recorder timer ..............................................49
6.14.2.4 Hard disk timer...................................................49
6.14.3 Interrupting the timer operation ......................................50
6.14.3.1 Interrupting a video recorder timer ...................................50
6.14.3.2 Interrupting a video recorder timer ...................................51
6.16 Function selection ................................................52
6.17 MP playback ....................................................52
6.17.1 Track information .................................................53
6.17.2 Track hop .......................................................53
6.17.3 Pause..........................................................53
6.17.4 Track search forwards/backwards ....................................53
6.17.5 MP3 playback modes .............................................54
6.17.6 Switching folder levels .............................................54
6.17.7 MP3 playback lists ................................................54
6.17.7.1 Create MP3 playback lists in the device ...............................54
6.17.7.2 Creating external MP3 playback lists .................................54
6.17.7.3 Playing back playlists .............................................55
6.17.7.4 Deleting tracks from the Playlist .....................................55
6.17.7.5 Deleting playlists .................................................55
6.17.8 Stop/end MP3 playback ...........................................55
6.18 Viewing pictures..................................................56
6.18.1 Show next/previous picture .........................................56
6.18.2 Rotate image ....................................................56
6.18.3 Switching folder levels .............................................56
6.18.4 Slideshow.......................................................56
6.18.4.1 Starting slideshow ................................................56
6.18.4.2 Pause..........................................................57
6.18.4.3 Show next/previous picture .........................................57
6.18.4.4 Adjusting image changeover speed ..................................57
6.18.4.5 Rotate image ....................................................57
6.18.4.6 End slideshow ...................................................57
6.18.5 JPG playback lists ................................................57
6.18.5.1 Creating JPG playback lists.........................................57
6.18.5.2 Playing back playlists..............................................58
6.18.5.3 Deleting tracks from the Playlist .....................................58
2
7
Page 8

6.18.5.4 Deleting playlists .................................................58
6.18.6 Stop/End image display ............................................58
7 Hard disk operation............................... 59
7.1 Recording.......................................................59
7.1.1 Immediate recording ..............................................60
7.1.1.1 Starting recording manually .........................................60
7.1.1.2 Ending recording manually .........................................60
7.1.1.3 Ending recording automatically ......................................61
7.1.2 Timer recordings .................................................61
7.1.3 Timeshift function.................................................62
7.1.4 Setting markers while recording .....................................63
7.2 Playback .......................................................63
7.2.1 Viewing hard disk recordings........................................63
7.2.2 Pause / still image ................................................63
7.2.3 Fast forward and rewind ...........................................64
7.2.4 Jog shuttle function ...............................................64
7.2.4.1 Fast forward and rewind ...........................................64
7.2.4.2 Slow motion .....................................................65
7.2.4.3 Single image stepping .............................................65
7.2.4.4 Create image ....................................................65
7.2.5 Setting markers ..................................................65
7.2.6 Jump to marked points ............................................65
7.2.7 Ending playback .................................................65
7.3 Manage hard disk ................................................66
7.3.1 Manage recording ................................................66
7.3.1.1 Deleting ........................................................66
7.3.1.2 Child protection ..................................................66
7.3.1.3 Processing ......................................................66
7.3.1.3.1 Jumping to the preferred portion of the recording ........................67
7.3.1.3.2 Functions .......................................................67
7.3.1.3.3 Placing marks ...................................................67
7.3.1.3.4 Deleting marks ...................................................67
7.3.1.3.5 Jump to marked points ............................................67
7.3.1.3.6 Renaming marks .................................................67
7.3.1.3.7 Deleting portions .................................................68
7.3.1.3.8 Copying portions .................................................68
7.3.1.3.9 Splitting a recording ...............................................69
7.3.1.3.10 Renaming recordings..............................................69
7.3.1.3.11 Enlarge video....................................................70
7.3.2 Managing music/pictures ...........................................70
7.3.2.1 Copying ........................................................71
7.3.2.2 Moving .........................................................72
7.3.2.3 Deleting ........................................................72
7.3.2.4 Sampling MP3 files/show pictures ....................................72
7.3.3 Copying recordings ...............................................73
7.3.3.1 Exporting .......................................................74
7.3.3.2 Preview ........................................................74
7.3.3.3 Deleting ........................................................74
7.3.4 Hard disk information..............................................75
8
Page 9

7.3.5 Hard disk maintenance ............................................75
7.3.5.1 Verification of the hard disk .........................................75
7.3.5.2 Formatting the hard disk ...........................................75
7.3.6 Quitting hard disk management......................................76
8 Settings ........................................77
8.1 Image settings ...................................................77
8.1.1 Select source ....................................................77
8.1.2 Access previously set image values ..................................77
8.1.3 Manually adjusting image values.....................................78
8.1.3.1 Light control .....................................................78
8.1.3.2 Background lighting ...............................................78
8.1.3.3 Color temperature ................................................78
8.1.3.4 Contrast ........................................................78
8.1.3.5 Brightness ......................................................78
8.1.3.6 Colors..........................................................78
8.1.3.7 Brilliance .......................................................79
8.1.3.8 Aspect ratio .....................................................79
8.1.3.9 Format recognition
8.1.3.10 Extended settings ................................................81
8.1.3.10.1 Contrast enhancement ............................................81
8.1.3.10.2 Image definition ..................................................81
8.1.3.10.3 Noise cancellation ................................................81
8.1.3.10.4 Movement compensation
8.1.3.10.5 Color space
8.1.3.10.6 Overscan
(only for HDMI)
(not with VGA)
8.1.3.10.7 Quit further settings ..............................................82
8.1.4 Quit image settings ...............................................82
8.2 Sound settings ...................................................83
8.2.1 Switch-on volume ................................................83
8.2.2 Height ratio .....................................................83
8.2.3 Low sounds (Bass) ...............................................83
8.2.4 Bass volumes ...................................................83
8.2.5 Balance ........................................................83
8.2.6 Surround sound ..................................................83
8.2.7 Automatic volume limiting ..........................................83
8.2.8 Dolby Digital.....................................................84
8.2.9 Headphone settings...............................................84
8.2.9.1 Switch-on headphone volume .......................................84
8.2.9.2 Height ratio .....................................................84
8.2.9.3 Depths .........................................................84
8.2.9.4 Balance ........................................................84
8.2.9.5 Audio mode .....................................................85
8.2.9.6 Quit headphone settings ...........................................85
8.2.10 Language settings ................................................85
8.2.10.1 Audio language 1 .................................................85
8.2.10.2 Audio language 2 .................................................85
8.2.10.3 Subtitle language 1 ...............................................86
8.2.10.4 Subtitle language 2 ...............................................86
8.2.10.5 Quit language settings .............................................86
(not with VGA)
.........................................80
(not with VGA)
....................................81
..............................................82
.................................................82
2
9
Page 10

8.2.11 Extended settings ................................................86
8.2.11.1 Loudspeaker type ................................................86
8.2.11.2 Loudspeaker broadcast channel .....................................87
8.2.11.3 Subwoofer volume ................................................87
8.2.11.4 Subwoofer limit frequency ..........................................87
8.2.11.5 Loudspeaker control Line-Out .......................................87
8.2.11.6 External amplifier .................................................88
8.2.11.7 Microphone .....................................................88
8.2.11.8 Microphone volume ...............................................88
8.2.11.9 Quit further settings ...............................................88
8.2.12 Quit sound settings ...............................................88
8.3 Basic settings....................................................89
8.3.1 Country ........................................................89
8.3.2 Time zone ......................................................89
8.3.3 Date/time .......................................................89
8.3.4 Quick start ......................................................90
8.3.5 Source Autostart/Autostop ..........................................90
8.3.6 Autostart........................................................90
8.3.7 Autostop........................................................90
8.3.8 Copying AV .....................................................90
8.3.9 S/PDIF-video source ..............................................91
8.3.10 Quit basic settings ................................................91
8.4 Special functions .................................................92
8.4.1 OSD settings ....................................................92
8.4.1.1 Font size .......................................................92
8.4.1.2 Transparent OSD.................................................92
8.4.1.3 Display time Information Banner .....................................92
8.4.1.4 Radio background image...........................................92
8.4.1.5 Quit OSD settings ................................................93
8.4.2 PVR settings ....................................................93
8.4.2.1 Storage format for radio recordings ...................................93
8.4.2.2 Switching off hard disk.............................................94
8.4.2.3 Automatic broadcast marking .......................................94
8.4.2.4 Quit PVR settings ................................................94
8.4.3 Media playback settings ...........................................95
8.4.3.1 Music start directory...............................................95
8.4.3.2 Start directory images .............................................95
8.4.3.3 Quit Media playback settings .......................................95
8.4.4 Network settings .................................................96
8.4.4.1 IP mode ........................................................96
8.4.4.2 IP address ......................................................96
8.4.4.3 Subnet mask ....................................................96
8.4.4.4 Quit network settings .............................................97
8.4.5 Various settings ..................................................97
8.4.5.1 CI dual decoding .................................................97
8.4.5.2 PiP-/PaP mode ..................................................97
8.4.5.3 Video text mode ..................................................98
8.4.5.4 Analog decoder ..................................................98
8.4.5.5 Quit various settings ..............................................98
8.4.6 Quit special functions..............................................98
10
Page 11

8.5 Antenna settings (DVB-S) ..........................................99
8.5.1 Multi-tenna ......................................................99
8.5.2 Switching DiSEqC on or off .........................................99
8.5.3 Antenna signals ..................................................99
8.5.4 Setting the switching matrix ........................................100
8.5.5 Additional LNC settings/LNC properties ..............................101
8.5.5.1 LNC Type......................................................101
8.5.5.2 User LNB ......................................................101
8.5.5.3 SatCR LNB ....................................................102
8.5.5.4 Test transponder ................................................103
8.5.6 Operation with a rotating antenna (DiSEqC 1.2) ........................103
8.5.6.1 East and West limits .............................................104
8.5.6.1.1 Deleting existing limits ............................................104
8.5.6.1.2 Setting the Eastern limit...........................................104
8.5.6.1.3 Setting the Western limit ..........................................105
8.5.6.2 Geo-positioning .................................................105
8.5.6.2.1 Geo-positioning .................................................105
8.5.6.2.2 Geographic length ...............................................105
8.5.6.2.3 Geographic latitude ..............................................106
8.5.6.2.4 Entry of the geographic longitude/latitude .............................106
8.5.6.3 Setting a satellite position .........................................106
8.5.6.3.1 Selecting a pre-programmed satellite position .........................107
8.5.6.3.2 Setting a user-defined satellite position (User satellite) ..................107
8.5.6.3.3 Positioning antenna manually ......................................108
8.5.6.3.4 Automatic fine adjustment (Autofocus) ...............................108
8.5.6.3.5 Saving a satellite position .........................................108
8.5.6.4 Current satellite list ..............................................109
8.5.6.5 Deleting a satellite position ........................................109
8.5.6.6 Manually start automatic rotation process .............................110
8.5.6.7 Reference position ...............................................110
8.5.7 Quit antenna settings (DVB-S) .....................................110
8.6 Antenna settings (DVB-T) .........................................111
8.6.1 Antenna feeder .................................................111
8.6.2 Quit antenna settings (DVB-T) .....................................111
8.7 Programming the electronic program guide ...........................112
8.7.1 Updating.......................................................112
8.7.2 Updating time...................................................112
8.7.3 EPG channel ...................................................112
8.7.4 Selecting TV broadcaster / Radio broadcaster .........................113
8.7.4.1 Selecting program list ............................................113
8.7.4.2 Selecting programs ..............................................113
8.7.4.3 Quit broadcaster selection .........................................114
8.7.5 Start category ..................................................114
8.7.6 Starting updating manually ........................................114
8.7.7 Interrupting downloads ...........................................11 4
8.7.8 Quitting programming of the electronic program guide ...................115
8.8 Parental control .................................................11 6
8.8.1 PIN query mode.................................................116
8.8.2 Changing PIN ..................................................116
8.8.3 Selecting TV broadcaster / Radio broadcaster .........................117
2
11
Page 12

8.8.3.1 Selecting program list ............................................117
8.8.3.2 Selecting programs ..............................................117
8.8.3.3 Quit broadcaster selection .........................................118
8.8.4 Quit child protection menu .........................................118
9 Station search .......................................119
9.1 Automatic scan .................................................119
9.1.1 Starting automatic search .........................................120
9.1.2 During the automatic search .......................................120
9.1.3 After the automatic search.........................................120
9.2 Extended Scan .................................................121
9.2.1 FM Radio (Expanded search for analog radio programs) .................121
9.2.2 Analog CT (Expanded search for analog TV programs) ..................121
9.2.3 DVB-S (Expanded search for digital satellite programs) ..................122
9.2.4 DVB-C (Expanded search for digital cable programs) ...................122
9.2.5 DVB-T (Expanded search for digital antenna programs) .................123
9.2.6 Starting expanded search .........................................124
9.2.7 During the expanded search .......................................124
9.2.8 After the expanded search ........................................124
9.3 Manual scan ...................................................125
9.3.1 FM Radio (Manual search for an analog radio program) .................125
9.3.2 Analog CT (Manual search for an analog TV program) ..................126
9.3.3 DVB-S (Manual search for digital satellite programs) ....................128
9.3.4 DVB-C (Manual search for digital cable programs)......................128
9.3.5 DVB-T (Manual search for digital antenna programs)....................129
9.3.6 PID search (DVB-S/DVB-C/DVB-T)..................................130
9.3.7 Manual search/PID search starting DVB-S, DVB-C or DVB-T .............130
9.3.8 During the manual search/PID search................................130
9.3.9 After the manual search/PID search .................................130
9.4 Quit broadcaster search ..........................................131
10 Program management ............................ 132
10.1 Accessing program management ...................................132
10.1.1 Select a Favourites list ...........................................132
10.1.2 Select Total list..................................................132
10.2 Adding programs to the Favourites list ...............................133
10.3 Deleting programs ...............................................134
10.3.1 Removing (deleting) from the Favourites list...........................134
10.3.2 Deleting from the Total list .........................................134
10.4 Sorting programs ................................................135
10.5 EPG ..........................................................135
10.6 Parental control .................................................136
10.7 Quit Program Management ........................................136
11 System configuration ............................ 137
12 Service settings ................................ 138
12.1 Default settings .................................................138
12.2 Delete all programs ..............................................138
13 Operating language (Menu language)................ 139
14 Encoding system ................................ 139
12
Page 13

15 Software update via USB interface ................. 140
16 Technical data .................................. 141
17 Technical terms................................. 147
2
13
Page 14

3 Please read this first
- Before commencing operation of the unit, please check that the package contains all the
components that should be included. The following should be included:
1 LCD TV set,
1 remote control,
1 instruction manual,
1 brief overview
1 guarantee card,
2 batteries (1.5V microcell),
1 power supply cable.
3.1 Intended use
- Connection to mains voltage 230V/ 50Hz.
- The TV set is only intended for receiving and transmitting visual and audio signals.
- The set is exclusively designed to be connected to audio and video devices, aerials
and computers, which meet DIN standards and have the CE marking.
- The use is intended for private and business purposes in dry areas and under super-
vision.
- Any other form of use is expressly prohibited.
3.2 Manufacturer's declaration
The TV set meets the following requirements
- The EU directive 2006/95/EC (Low Voltage Directive)
- EN 60065
- The EU directive 2004/108/EC (EMC Directive)
- EN 55013, EN 55020, EN 60555-2
and possesses the CE marking.
3.3 Important notes
Please pay attention to the following notes, to avoid any potential safety risks, or damage to
the device and the data on the hard disk, as well as contributing to protect the environment.
3.3.1 LCD screen
The screen you have acquired meets the highest quality requirements and has been verified
and classified with regard to pixel errors in accordance with ISO 13406-2.
3.3.2 Data on the hard disk
We recommend that before submitting the TV set for maintenance via your specialist dealer
that a backup copy of the data located on your HDTV 32, HDTV 40 or HDTV 46 PVR should
be made.
The retrieval of data does not come under the scope of maintenance and repair work.
TechniSat accepts no liability for any loss or damage of data during repair.
14
Page 15
3.3.3 Transport
The device should only be transported when positioned upright. When doing so, do not handle the HDTV via the loudspeakers.
3.3.4 Safety
For your own protection, please read the safety instructions carefully before commencing
operation of your new unit. The manufacturer accepts no liability for damage caused by inappropriate operation, or by non-compliance with safety precautions.
- The device includes a permanently integrated hard disk.
No provision is made for any modification not authorized by TechniSat and if this is
performed, this will mean that TechniSat can no longer pledge that the device continues to conform to the legal requirements (e.g. laws on device and product safety,
laws concerning the electromagnetic compatibility of devices). The 'CE marking' shall
also become inapplicable. In the event of resale of the modified unit, the modifying
party shall indemnify the manufacturer as appropriate. In addition, the TechniSat
guarantee shall no longer be applicable and warranty rights may also be rendered
null and void.
- The unit may only be operated in a temperate climate.
- Do not place any burning objects, such as burning candles, on top of the unit.
- When the TV set has been exposed to cold conditions following delivery or while in
transit, do not switch on immediately; await temperature equalization.
3
- Do not subject the unit to water spray or droplets, and do not place any objects filled
with liquid, e.g. vases, on top of the unit. If water infiltrates into the device, immediately unplug from the mains and notify the service department.
- Do not place the TV set within narrow shelves or cabinets, allow at least 10 cm ventilation distance for the device.
- To allow internal heat to dissipate from the device, the device incorporates ventilation
slits. Ensure these ventilation slits are not covered by any objects, such as e.g. newspapers, tablecloths etc.
- Do not operate any sources of heat near the unit, which could cause it to heat further.
- Do not place any objects through the ventilation slits.
15
Page 16

- During storms, extended periods of non-use or absence, the mains plug and all
antenna plugs should be disconnected. Overvoltage may damage the device.
- In the event of any device defect, odor or smoke developing, significant malfunctions,
damage to the power cord or casing, as well as when any liquid infiltrates, immediately unplug from the mains and notify the service department.
- In the event of a power cut, the TV set should be switched off using the power
switch.
- During extended absence, the TV set should be switched off. This will extend the
lifespan of the panel and also save energy.
- Never open the unit housing!
Touching any parts carrying high voltage may be fatal!
- Any necessary repairs should be carried out only by qualified service personnel.
3.3.5 Operation
Via a so-called “On Screen Display” the control of the TV is simplified and the number of
remote control keys reduced.
All functions are displayed on the screen, and can be operated with a few keys.
Related functions are combined in a “MENU". The function selected is highlighted.
The “function keys” red, yellow, green and blue are indicated by colour bars in the bottom
line. These colour bars represent different functions in the various menus, which will be activated by pressing the appropriate coloured key (multifunction key) on the remote control.
The “function keys” are only active when a brief description is displayed in the appropriate
field.
Key names and terms that are displayed in the OSD menu are printed bold in this
operating manual.
Help: Where available in the menues, pressing the blue function key will cause a help text
to be displayed, pressing again will remove the text from the screen.
3.3.6 Power consumption in standby mode and in operation
The power consumption of the device, whether in standby or operational mode, depends on
the settings made, the functions used and the units that are switched on / off, such as e.g.
the CI module or USB storage media.
Accordingly, the power consumption during operation can be reduced, e.g. by only switching
on the CI module and USB storage media when these actually need to be used.
Also pay attention to the stated points as well as the technical data (Point 16).
16
Page 17
3.3.7 Maintenance and cleaning
The casing should only be wiped using a slightly dampened dry cloth.
Do not use any cleaner spray or aggressive chemical cleaning agent for the casing, to avoid
damaging the top quality surface.
Use a dry cloth or the LCD panel cleaning set to clean the screeen when the device is
switched off.
3.3.8 Disposal
The packaging for your unit consists entirely of recyclable material. Please sort the items
appropriately for disposal using the “Dual System” .
At the end of its useful life span, this device may not be disposed of in your regular domestic
refuse bin. It must be taken to a recycling collection point for electrical and electronic equipment.
3
The
The materials can be recycled or reused according to their labelling.
By ensuring that valuable raw materials are reused you can make an important contribution
towards protecting our environment.
Please ask your local authority about available disposal facilities.
Please note that spent batteries (from the remote control) as well as electronic components
should not be disposed of in your household refuse, but should be disposed of in accordance with your local regulations (special waste, handing back to outlet where purchased).
symbol on the product, the operating manual or the packaging will indicate this:
3.4 Remote control / Battery changing
> Open the lid of the battery compartment on the rear side of the remote control by
applying light pressure to the marked position and slide the lid in the direction of the
arrow.
> Insert the supplied batteries, taking care to ensure the correct polarity (visible indica-
tion in the battery compartment).
> Close the battery compartment again.
17
Page 18
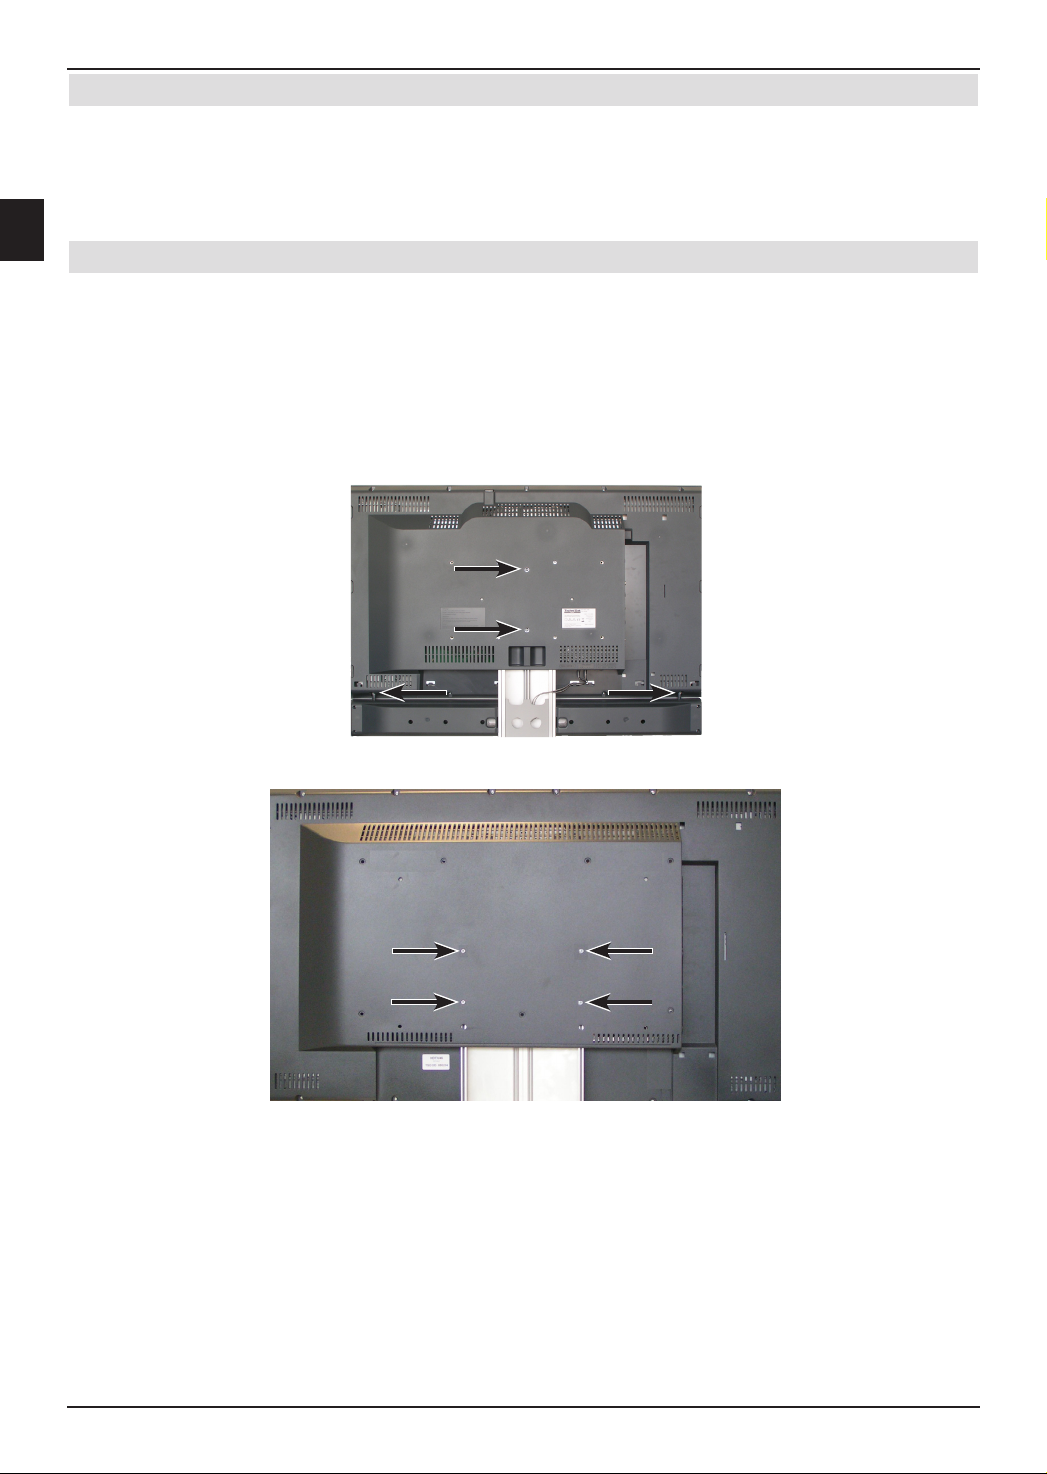
3.5 Wall-mounting
HDTV 40
HDTV 46
With the aid of a suitable wall attachment, e.g Technisat HD-Mount 32 (Art.No.: 2020/2732)
for HDTV 32 Plus respectively TechniSat HD-Mount 40 (Art.No.: 2020/2740) for HDTV 40,
HDTV 40 Plus and HDTV 46 you can mount your device on a wall that is suited for the purpose. When doing so, you must dismantle the rest foot.
3.5.1 Removing rest foot
Note with the HDTV 32/40 that you must remove the loudspeaker cable from the terminal
clamps, before you take out the rest foot.
> Place the device with the screen side on a level surface.
Be careful to ensure when doing so that no pressure is applied to the panel and that
this is not damaged.
> Loosen and remove the marked screws.
.
.
> Now carefully remove the rest foot from the underside of the device.
For the HDTV 32/40, when wall-mounting and wishing to use with the device loudspeakers
reassembled onto the device, you will need a special additional profile.
HDTV 32 Plus: HD-Mount Adapter HD-Vision 32 Plus Artnr. 0004/3240
HDTV 40: HD-Mount Adapter 40" Artnr. 0002/3240
HDTV 40 Plus: HD-Mount Adapter 40” Plus Artnr. 0006/3240
18
Page 19
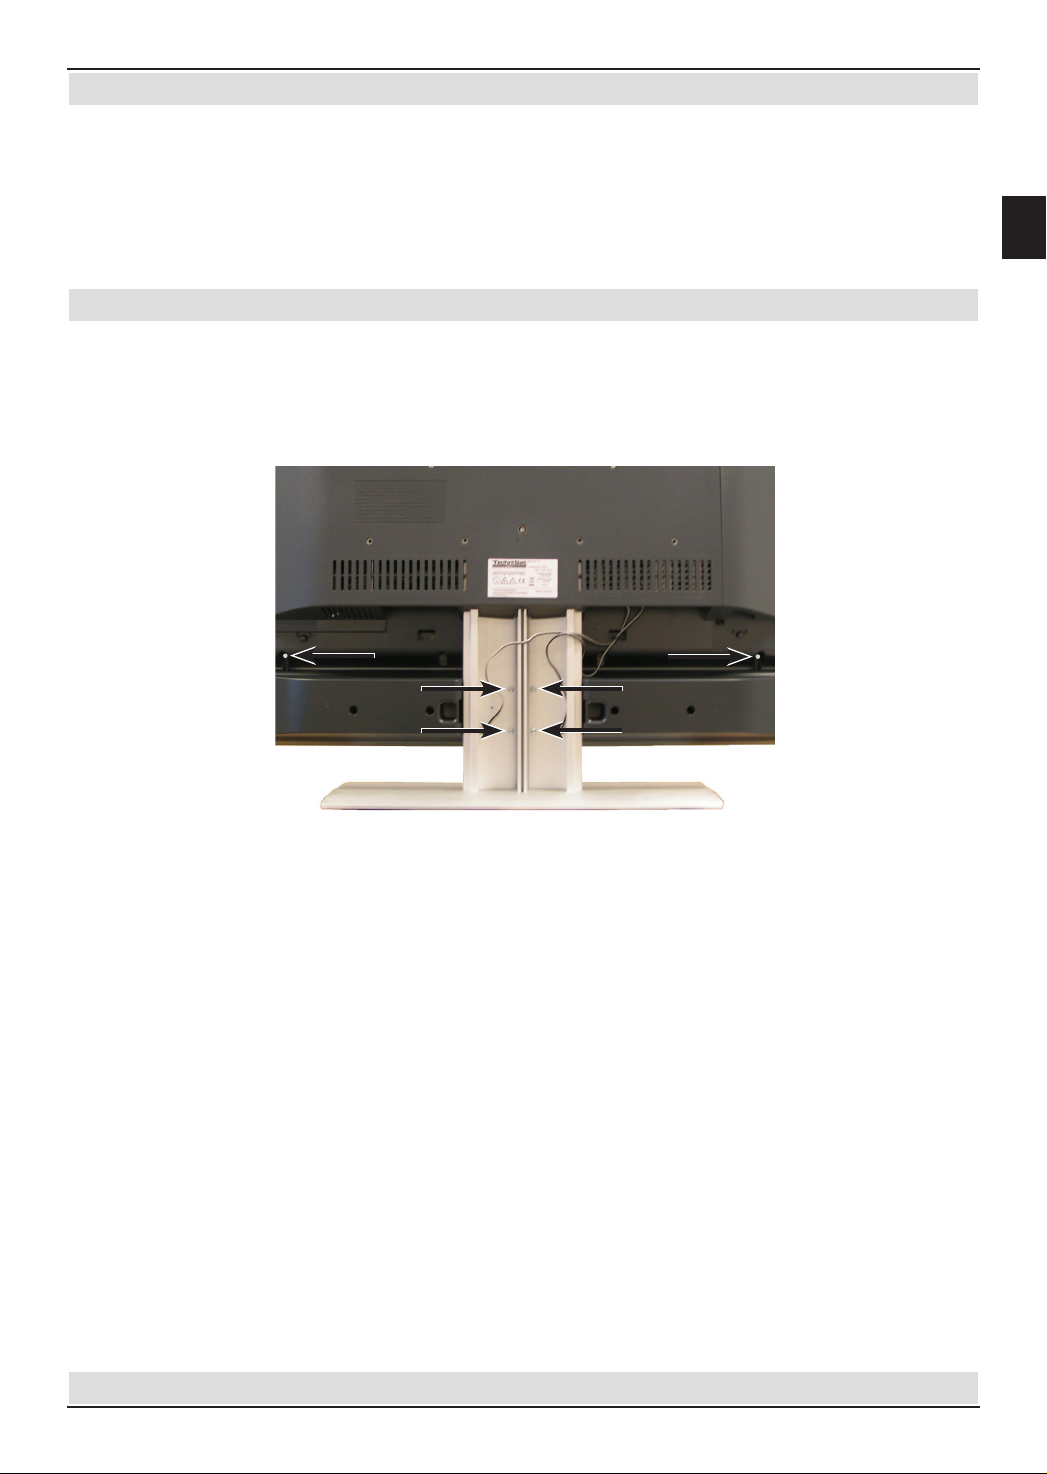
3.6 Removable loudspeakers
Your TV set is equipped with removable loudspeakers. These can be taken off:
- When you wish to mount the loudspeakers onto the additional profile (see Point
3.5.1) during wall-mounting.
(not avai lable wi th HDT V 46)
- When you connect the device to a HiFi or Surround-sound system (see Point 4.6)
and you would prefer not to use the device loudspeaker.
3.6.1 Removing loudspeaker
> Remove the cable of the loudspeaker from the terminal clamps.
To do so, press down the spring contact and pull out the cable.
> Now loosen the fixing screws of the loudspeaker using a suitable screwdriver and
take this out.
.
3.7 Wireless Loudspeakersystem
3
Since the HDTV 46 does not have its own device loudspeaker for audio output this unit must
be connected to a loudspeaker system or a stereo/surround-sound system. The audio outputs are present for this purpose (see Point 1; Nos. 14, 15, 20 and 21) as well as the loudspeaker outputs (Point 1; No. 25).
Furthermore TechniSat has developed a wireless Loudspeaker system in two versions,
which is using the Cinch-audio- outputs (point 1, No. 15) and the USB connector (Point 1;
No. 4) for the control and the power supply of the wireless transmitter.
These systems are available under the following designations:
HDTV wireless bookshelf Loudspeaker system
silver art. no. 0046/0500
platinum art. no. 0046/0505
black art. no. 0046/0516
HDTV wireless floor standing Loudspeaker system
silver art. no. 0046/1500
platinum art. no. 0046/1505
black art. no. 0046/1516
The wireless loudspeaker system is also usable with the HDTV 32 Plus, the HDTV 40, the
HDTV 40 Plus and other devices of consumer electronics. Further information is available in
the manual of the wireless Loudspeaker system.
19
Page 20
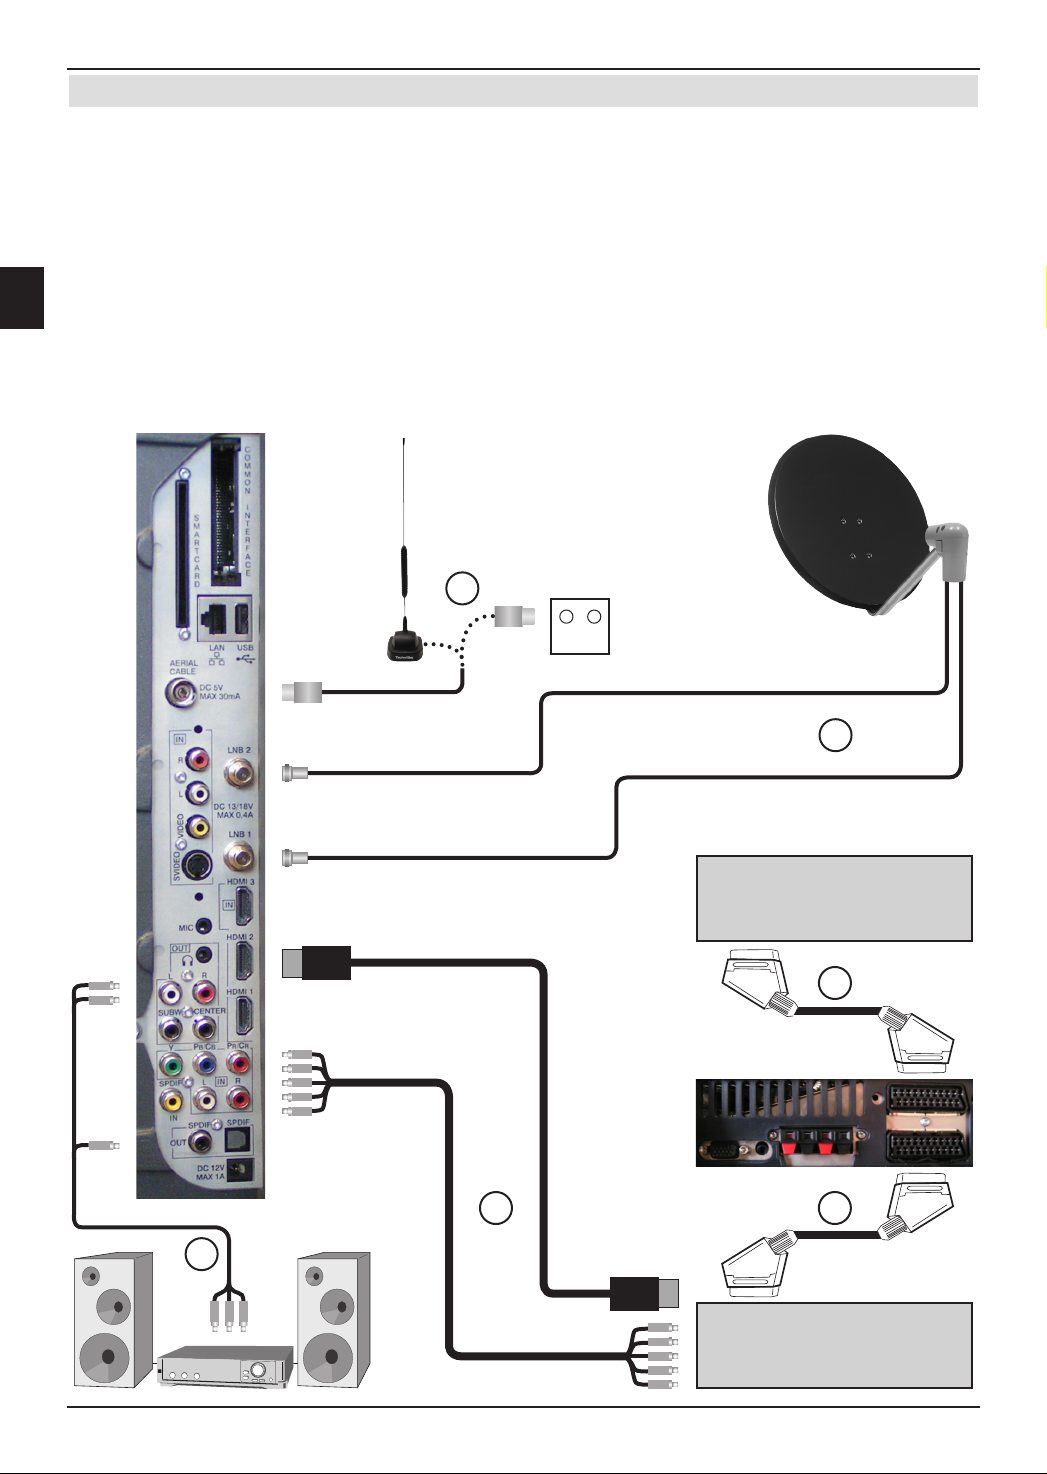
4 Connections
DVD
cc
b
a
d
e
Video recorder
TV Radio
a Connection of the cable junctions (digital and/or analog) or the DVB-T antenna with the
antenna input of the TV set.
b Connection/s of the satellite antenna with the LNB input 1/LNB input 2.
(Please note: For operation with an antenna signal, the LNB must always be connected
to LNB input 1.)
c SCART connection of the TV set to a video recorder.
d Connecting the TV set with a DVD player via an HDMI cable, a Cinch component
cable or a SCART cable.
e Connecting the analog or digital Audio output with a Hifi-stereo or Surround-
sound system.
.
20
Page 21
The references mentioned below, i.e. a b c etc. refer to the illustration on page 20.
Engagement hook
To gain access to the side sockets of the device you must firstly remove the cover.
> To do so, push both the engagement hooks lightly upwards and pull away the
cover to the rear.
.
> To hide the connecting cable guide it on the rear side of the rest foot behind the
removable plastic holder.
4
4.1 Antenna/cable connection (analog and digital)
a Connect the antenna input of the LCD TV set either using a terrestrial antenna
or with the wall socket of the cable or antenna connection.
Please note:
Receiving both DVB-T and DVB-C signals at the same time can lead to receiving problems for some cable and DVB-T programs.
4.2 Satellite antenna
4.2.1 Operation with 2 antenna signals
To be able to utilize the full fuctional range of the device you should use it with two separate
antenna signals/connections, which are identically set up.
b Connect the LNB inputs 1 and 2 of the device using a suitable coaxial cable with
your external unit.
Note also Point 8.5 (DVB-S antenna inputs).
4.2.2 Operation with 1 antenna signal
In exceptional cases, you may also use the device with only one antenna signal. This will
mean, however, that the recording and PiP-/PaP functions are only functional to a limited
extent. (see Points 6.11 and 7.1)
b Connect the LNB input 1 of the device using a suitable coaxial cable with your
external unit.
21
Page 22

4.3 DVD player
c Either connect your DVD player via:
- an HDMI connecting cable with an HDMI connection
or via
- an DVI/HDMI connecting cable with an HDMI connection and additionally via
an audio connecting cable with an Audio input (VGA/DVI) or digital audio
input (SPDIF electric).
or via
- a SCART cable with a SCART socket
or via
- a Cinch cable with the component inputs of the LCD TV set.
4.4 Video recorder
d Connect the Scart socket of the LCD TV set via a SCART cable with the Scart
socket of your video recorder.
4.5 S-VHS video recorder / Video camera
If you wish to play back the signals from an S-VHS video recorder or a video camera via
your TV set, then connect the devices with the Video/S-Video inputs on the rear side of the
device to the left.
4.6 Hi-Fi / Surround amplifier
d To achieve the best possible sound quality, you may connect the digital device to a Hi-Fi/
Surround amplifier.
4.6.1 Analog
e To do this, use a suitable cable to connect the cinch sockets Audio R and Audio L of
the TV set analog audio outputs with an input of your Hi-Fi amplifier (e.g. CD or
AUX; Note! The phono input is not suitable!).
4.6.2 Digital
e Should your amplifier include a compatible electric or optical input (SPDIF) you may
connect the audio output socket digital (electric or optical) with the input
of your amplifier.
Depending on the station selected, sampling rates of 32, 44.1 and 48 kHz are available. In
addition, if broadcast, the Dolby Digital signal (AC3) is available at this output.
4.7 Subwoofer / Center
Connect the existing active subwoofer / center loudspeaker using a suitable Cinch cable
with the subwoofer or center output.
22
Page 23

4.8 SPDIF input
Connect the electrical SPDIF output e.g. of a DVD player using a suitable cinch cable with
the SPDIF input of the TV. This will allow you, provided the TV set is connected via the
Audio output digital (electric or optical) with a Hi-Fi/Surround amplifier, to route the
sound of the connected device to the Audio output digital (electric or optical) and
thus enjoy it in digital quality and with Dolby surround sound. The proviso here is, however,
that the desired video source, to which the relevant device is connected, has been selected
for this function as described in Point 8.3.9.
4.9 USB socket
The USB socket is used for updating the operating system and preprogramming via PC or
USB device as well as for the playback of images (JPG) and music (MP3) via a USB storage medium as well as copying the contents recorded from the hard disk and images and
musical extracts from or on the hard disk.
In addition, the transmitter for a remote loudspeaker can also be operated and configured
via the USB socket.
4.10 Network socket (RJ45)
You can integrate HDTV into your existing network via the network socket. This will allow
you, with the help of the TechniSat Mediaport, to copy PVR recordings, MP3 and JPG files
onto your PC as well as the integrated hard disk.
Note here also Point 8.4.4 Network settings.
4
4.11 Headphones
When wishing to use a set of headphones, please connect it via the headphone socket
on the rear side of the device to the left.
4.12 PC
If your PC incorporates a DVI output we recommend connecting the PC via a DVI-HDMI
cable with the HDMI socket on the TV set. Otherwise please use a VGA cable and connect
the PC with the VGA socket of the device.
> With the help of the 0/AV button of the remote control, subsequently switch the TV
set to VGA or HDMI playback.
When connecting via a DVI-HDMI cable, the switchover should be automatic.
It is advisable, before connecting the PC to the TV set, to configure the resolution of the
graphics card such as to ensure the format conforms to a type supported by the TV set.
The optimal result (a full-screen image at the best possible resolution) can be obtained when
you operate the panel at its original resolution (1920*1080). The precise parameters can be
found in the technical data (Point 16). Your TV set will transmit this resolution to the PC via
DDC. Unfortunately, it is not guaranteed that the driver of the graphics card will accept the
same.
To set a specific resolution for your graphics card, please read the instruction manual for the
operation system of your PC. With Windows, this setting is usually found via the
Start menu -> Settings -> Control Panel -> DIsplay -> Settings.
23
Page 24

Please note that due to the many graphics cards available it is impossible to rule out potential compatibility problems between the graphics card used and the HDTV which means that
e.g. certain resolutions cited in the technical data may be either unusable or only usable to a
limited extent.
4.13 Mains power connection
The LCD TV set should only be connected to the mains (230 V / 50 Hz) when the device
has been completely fitted with the relevant components. This helps to avoid damage to the
device or other components.
24
Page 25

5 Initial installation
When you have read through the safety instructions and have connected the HDTV as
described in Chapter 4, switch on the unit as described in Chapter 6.
When switching on the device for the first time the starting window of the installation assistant AutoInstall will automatically appear. Use the installation assistant to quickly and simply make the most important settings on your TV set.
In the starting window of the installation assistant, you can interrupt the initial installation by
pressing the red function buttons.
During the individual installation steps, you can confirm the settings made using the green
function keys, whereupon you will reach the following installation step.
By pressing the red function keys, you may return to the respective previous installation
step, allowing you to correct input mistakes at any time.
The initial installation procedure described here serves merely as an example. The exact initial installation procedure will depend on the settings you select.
Please therefore follow the instructions displayed on screen closely.
Operating language
The installation assistant starts with the selection of the control language.
> Use the arrow keys to mark the desired control language.
Based on this selection, the preferred audio language is also set.
> Confirm by pressing the green function key.
Country selection
> Using the arrow keys select the country in which the unit is being used.
Based on your selection, the time will be set automatically including summer/winter
time settings.
In addition, based on this setting, the programs will be automatically sorted in the
installation assistant as well as based on a station search.
5
> Press the green function key Confirm, to confirm the selection and proceed to the
next installation step.
Selection of the received signals
> Using the arrow keys up/down, select the available received signals.
DVB-S for digital satellite programs;
DVB-C for digital cable programs;
DVB-T for digital terrestrial programs;
Analog CT for analog terrestrial and cable programs;
FM Radio for VHF radio broadcasts.
> Use the right/left arrow keys to indicate whether the marked receiving signal is
available at your location (Yes) or not (No).
> To confirm the settings made, press the green function key Confirm.
25
Page 26

Antenna signals (DVB-S)
Here, select the number of DVB-S antenna connections you have made to the TV set.
(If the source is DVB-S, as described in the “Selection of the received signals” section, and deactivated, instead of this page, the installation assistant goes directly to the page
“Antenna settings (DVB-T)”.)
> Use the right/left arrow keys to mark whether you have connected one or two
antenna signals.
> Use the green function key to confirm your selection and proceed to the “antenna
configuration (DVB-S)”.
Antenna configuration (DVB-S)
In this installation step, you can configure the setting of your device to the congifuration of
your satellite antenna.
(If the source is DVB-S-, as described in the “Selection of the received signals” section is deactivated, instead of this page, the installation assistant goes directly to the page
“Antenna settings (DVB-T)”.)
> If you wish to confirm the standard antenna setting press the green function key
to confirm.
In this case proceed from the point “Antenna settings (DVB-T)”.
> If the configuration of your reception installation does not conform to the standard
setting, press the yellow function key Change.
The settable antenna configurations now appear, which can be adjusted to suit your
receiving equipment in accordance with Point 8.5 “Antenna settings (DVB-S)”.
> Once you have reached the desired configuration, press the green function key
Confirm.
A display of the satellites now set appears on the display for verification.
> To confirm the setting, press the green function key or to cancel, press the yel-
low function key Modify.
Antenna settings (DVB-T)
If you use an active DVB-T antenna, which lacks its own power supply or where you do not
wish to use this latter, the amplifier of the active antenna can be powered via your TV set
using the coaxial cable. Set the Antenna feeder to on in this case.
In addition, a channel spectrum with the signal levels of the channels is also displayed in
this step. Using this spectrum you can set up your DVB-T antenna for optimal reception.
(If the source is DVB-T as described in the “Selection of the received signals” section, and deactivated, instead of this page the installation assistant goes directly to the page
“Search station”.)
> Using the right/left arrow keys, you may switch the power supply on or off.
> Confirm the setting by pressing the green function key Confirm.
26
Page 27

Channel search
> To carry out a station search, use the up/down arrow keys to mark the field All
stations, when you wish to freely look for both receivable and encoded programs,
or All uncoded stations, when you wish to only find free view programs.
> By pressing the green function key Start, the station search commences. Dur-
ing the station search, the tuning range you select is automatically searched for by
programs. This procedure may take several minutes. Please note any messages displayed on screen.
Updating Software
Now your device checks, whether any new operating software is available. If new software is
available, you can download a new software update.
> Use the arrow keys left/right to select the field Update, and confirm by press-
ing OK.
Note that after the new software has been downloaded, it is processed within the device.
During this process, the screen is switched off and the LED lights up green and orange in
turn. This process takes some minutes to complete.
Loading EPG files
Your TV set possesses an electronic EPG program journal. So that files can be presented
using this electronic program journal, they must firstly be downloaded.
In this process, your HDTV starts up, once the applicable software updating is complete,
automatically with the loading of the EPG files. This procedure can take up to 30 minutes.
> If you do not wish to wait for the EPG data to be downloaded, you can skip this
procedure. To do this, press the yellow function key Skip. The EPG files are
then based on the specified period in Point 8.7.2 automatically updated or you may
update them manually at any time (Point 8.7.6).
(if available)
Terminating the installation assistant
5
> Confirm the concluding note of the installation assistance by by pressing the green
function key Close, to revert to normal operation.
27
Page 28

6 Operation
6.1 Switching the TV set on and off
6.1.1 Switching on when plugged into the mains
> Switch on the TV set by pressing the power switch on.
The TV set now goes through an initialization process, during which it cannot be
operated. This process may, depending on the extent of the material recorded on the
hard disks, last a few seconds.
6.1.2 Switching on from standby mode
> Switch on the TV set by pressing the On/Standby button on the remote control/
device
or
> by pressing the Program buttons +/– on the remote control/device
or
> by pressing a number key from 0 to 9 on the remote control
or
> by switching on a device attached to an external input (only with the Autostart func-
tion activated, see Point 8.3.6).
The operating status is signaled by the green LED indicator.
6.1.3 Switching off into standby mode
> Switch on the device by pressing the On/Standby button on the Remote control/
device
or
> by switching off a connected device (only with the Autostop function activated,
see Point 8.3.7).
If, during the test, the On/Standby button is pressed again, the device will switch itself on
again. For this reason, you need not wait until the end of the test to switch the device back
on.
Once the test is complete, the device completely reverts to Standby, the LED now lights up
red. The device is now in standby mode and can be completely switched off using the power
switch.
If the test detected a new operating software or program list in the DVB-S control, this will
be displayed the next time the device is switched on. The new software or program lists can
then be directly downloaded. Here, follow the on-screen directions.
6.1.4 Switching off when plugged into the mains
> By pressing the Power switch the device is completely switched off.
Note that in this case neither the automatic updating of software nor that of the EPG
files or any timer can be implemented.
28
28
Page 29

Note that the device should only be completely switched off when in
Standby mode. This helps avoid any loss of data and possible damage to
files or the hard disk.
The device memorizes the last switching status, whether “On” or “Off”, which was activated
with the remote control or the device buttons.
If the device was switched off with the power switch while in operation, it will revert immediately to full operation when switched on with the power switch.
If the event of a power cut during active operation, the device must be
switched off using the power switch, to ensure that it is not inadvertently
switched on again, when the power comes back on.
6.2 Selecting a program
6.2.1 Using the program up/down keys
> Using the Program buttons +/– on the remote control/device, you can move up
or down one program slot.
6.2.2 Using the numeric keys
> You may use the numeric keys to enter the desired program number.
6
For example:
1 for program slot 1
1, then 4 for program slot 14
2, then 3, then 4 for program slot 234
1 then 2, then 4, then 5 for program slot 1245
When entering a program number consisting of several digits you have approx. 3 seconds
after pressing each number to complete the entry.
If you wish to only enter a one, two or three digit number, you can accelerate the switching
process by pressing and holding the last number, but also by pressing the OK button.
6.2.3 Using the program list:
> Press the OK key.
The program list is displayed on screen. In TV mode, only TV programs will be
shown, and only radio programs when in Radio mode. The program currently selected is marked.
6.2.3.1 Selecting programs
> Now you can use the arrow keys or the Numeric keyboard to mark your desired
programs.
You can use the arrow keys up/down to move the marker around the list one
line at a time and the arrow keys right/left to move the marker up or down one
page at a time.
The marked program will be already shown in the preview window.
> Additional information on the current broadcast is available by pressing the INFO
button.
29
Page 30

> by pressing the OK button, you leave the Navigator and the marked program shown
on the same screen.
6.2.3.2 Selecting a list
Your HDTV is equipped with several program lists, designed to make it easier for you to
find a program. You can select your List of favorites or display the list of programs in
alphabetical order or sorted according to their genres.
> Press the OK key.
The active program list will be displayed.
> Now you can use the Option button to open a window with the program list types
(List of favorites, Overall list and Genre lists).
The active type of program list is marked.
> Use the arrow keys up/down to select the type of program list, e.g. Overall list
and confirm with OK.
The overall list, alphabetically sorted, is displayed with all programs included.
> As described under Point 6.2.3.1, mark the program you would like and confirm with
OK.
6.2.4 Selection of a local program
During the initial installation, you made your choice of preferred regional programs. Now set
one regional program, whereupon a note will appear stating that further regional programs
remain to be selected.
> Press the Option button, to open a new window.
> Use the up/down arrow keys to select the desired regional program and confirm
with OK.
The selected regional program will be set and will now be considered the regional
program.
6.2.5 Calling up blocked programs
If a program is selected that has been blocked by the parental control function, the message
Unit PIN will be displayed on screen.
> Use the Numeric keyboard to enter your device PIN code.
The desired program can now be viewed.
or
> Switch to a program that is not blocked.
You have made the setting If as shown in Point 8.8.1, , the device will ask you to
enter the device PIN code when accessing a saved program. To facilitate user convenience,
the device PIN code need only be entered once during any control session.
Note Point 6.5.4 when using a Smartcard.
30
Page 31

6.2.6 Return to the last program selected
> Pressing the Back key on the remote control will take you back to the last program
previously selected.
> Pressing the button again will revert to the previously set program.
6.2.7 TV/Radio switching
> Switch to radio operation using the TV/Radio button.
The device switches to the last radio program listened to.
Here, also pay attention to the setting of the Radio background image as described
in Point 8.4.1.4.
> By pressing the TV/Radio button again, the device reverts to TV operation and the
last viewed TV program is set.
Alternatively, here, you can switch between TV and radio operation as described in Points
6.3 and 6.16.
6.3 AV source
> To select devices that are connected to a SCART socket, to a component input, the
HDMI inputs, the VGA socket or the AV socket of the TV set, press the AV button.
The screen now shows the pop-up window for the AV source with the existing
available AV sockets.
> Using the up/down arrow keys, select the desired source.
TV internal receiver: TV operation
Radio internal : Radio operation
EuroAV 1 external device to SCART socket 1
EuroAV 2 external device to SCART socket 2
HDMI 1 external device to HDMI input 1
HDMI 2 external device to HDMI input 2
HDMI 3 external device to HDMI input 3
6
VGA external device to VGA input (PC)
Video / S-Video external device to AV sockets (Cinch or S-Video)
YUV external device to component input
> Confirm with OK, to switch to the selected input.
> To revert back to TV operation, press the AV button again and use the up/down
arrow keys to select the TV line or press the TV/Radio button.
The external sources can also be recorded in the list of favorites as described in Point 10
and subsequently retrieved as described in Points 6.2.1 - 6.2.3 as well as Point 6.2.6.
Please note:
It is not possible to operate a device respectively via the Video Cinch socket and the
S-Video socket at the same time!
31
Page 32

6.3.1 Audio playback from external sources
With this device, it is also possible to play back the audio signal of all external sources via
the device loudspeaker and the audio outputs of the HDTV, without the HDTV screen having
to be switched on. The provision here is, however, that the source, for which the playback
of sound is desired, as described in Point 10.2 is recorded in the radio list of favorites. Note
also the setting of the radio background screen in Point 8.4.1.4.
> Switch to radio operation as described in Points 6.2.7, 6.3 or 6.16.
> Select the program position as described in points 6.2.1 - 6.2.3, from where the
desired external source is located.
The external source is now played back and the screen switches on, provided it is
set as shown in Point 8.4.1.4.
6.4 Program / source information
6.4.1 Information box
After each program change, an infobox appears on screen for the period set in accordance
with Point 8.4.1.3.
Within the infobox, the program position, the name of the set program, the track of the current broadcast as well as the currently active program list and the actual time are all displayed.
In addition, further program details are displayed.
For example:
for 16:9 broadcasts
for encoded programs
for child safety protected programs
for Dolby Digital broadcasts
for subtitles
for mono broadcasts
In addition, a superimposed status bar (yellow) is shown, which displays the elapsed broadcast time of the current broadcast. When the end of the status bar turns red, the current
broadcast has finished.
In addition, as soon as broadcast, the EPG genre and the FSK age statement (Voluntary
Self-Regulation of the Film Industry) are displayed.
for video text
6.4.2 Display time and program information
With this function, you can view program information on the program being viewed.
> Press the Info key to display information on the program currently selected.
Now a superimposed section appears in the bottom half of the screen with the actual time
as well as the information detailed in Point 6.4.1.
32
32
Page 33

6.4.3 Additional program information
As soon as broadcast, you can receive further program information on the programs currently running.
> By pressing the Info button twice, the infowindow expands and further information
on the program currently being shown appears.
> Extended info text can be scrolled line by line up/down using the arrow keys or
left/right in sheets.
> Where this information is broadcast, pressing the Info key once more will display
information on the following program.
> Press the INFO button one more time, to hide the display again.
6.4.4 Channel / Transponder / Source info
> Firstly press the OK button, to return to the navigator.
> Use the arrow keys or the Numeric keyboard to mark the program position, for which
you would like the information displayed.
> By pressing the yellow Status function key, you access the transponder, channel
or source info.
Note that files from external sources can only be displayed, when the relevant
source has been recorded in the list of favorites (see Point 10.2) or you have substituted it in the overall list based on the request of the navigator(see Point 6.2.3.2).
> If you have requested info from a DVB-S, DVB-C or DVB-T program, you can now
switch between the various display points using the function keys.
In this process, the colors of the function keys indicate the following information:
Red Shows information on the transponder / channel, on which the set program
will be shown.
Green Indicates the display of audio, video and PID files of programs.
Yellow Shows the encoding system used by a program, or the encoding system
used, in the case that an encoded program is being shown.
Blue Calls up the program data.
6
> By pressing the TV/Radio button, you can revert to normal operation.
33
Page 34

6.5 Receiving encoded programs
Your device is equipped with an integrated CONAX encoding system as well as a “Common
Interface” for the recording of two CI modules. These will allow you to receive encoded programs. To do so, you must first either insert a CONAX smart card into the integrated card
reader or insert a CI module with a valid Smartcard into the slot intended for that purpose:
> Insert the CONAX Smartcard into the card slot of the integrated card reader. (gold-
en chip facing the front when in the position of insertion)
or
> Insert a CI module with the upper side showing to the rear into the slot.
> Insert the Smartcard into the card slot of the CI module.
Be careful to ensure that the gold-colored chip of the Smartcard is evident on the
rear side when in the position of insertion.
> If an encoded program is now selected, your TV set automatically verifies the CI slot
as well as the card reader and shows the program in unencoded form, provided a
valid Smartcard for this program is present in the card reader or a matching CI module is present in the CI slot with a valid Smartcard included.
Special functions
For specific program positions, particular special functions are offered. Via these multifeed
channels, for example, you can select various types of sports broadcasts (e.g. the Bundesliga football), change the sound channels (e.g. stadium/commentary) or the camera angles
(Formula 1).
In addition, you can select the desired start time for your choice of film on certain channels.
6.5.1 Simultaneous reception of two encrypted programs
With your TV set, it is also possible to receive two different encoded programs at the same
time with only one CI module and just one valid Smartcard.
However, this is only possible when you use a “Dual-Decrypt” set-up CI module (see details
of the CI module manufacturers), whereby both desired programs are broadcast over the
same channel or transponder (see Points 6.4.4 and 17) and the CI Dual-decoding based on
Point 8.4.5.1 is correctly selected.
6.5.2 Optional channels
Certain programs give you the chance to try optional channels. These functions make it possible for you, e.g. for a sports broadcast, to freely select from a variety of different camera
angles (Formula 1) or to switch between different sporting venues (Bundesliga football). If a
program is available via optional channels, this will be indicated in the screen selection via
the infobox.
> To select one of the possible options, press the Option button.
A pop-up window then appears, with the options available to you.
> Using the up/down arrows, choose the desired option.
> Confirm by pressing OK.
Your TV set now shows the desired option.
34
Page 35

6.5.3 Selecting start time
On certain channels, you have the chance to select certain films with different start times.
This means these films can be started at your desired time all around the clock. If a program
is available via optional channels this will be indicated in the screen selection via the
infobox.
> To select a possible start time, confirm using the Option button.
A pop-up window appears with the available start times.
> Using the up/down arrow keys, select the desired start time.
> Confirm by pressing OK.
Provided the broadcast for the set start time is activated, you will be able to view it at
the desired time.
6.5.4 Smartcard PIN code
In addition, for encoded programs, you can bar broadcasts unsuitable for children using a
child protection identifier. To access the desired broadcast, the PIN code for the Smart-
card has to be entered. This PIN code is stored on the relevant Smartcard and you will
receive this together with your card. Here, it is important not to mix up the Smartcard PIN
code with the device PIN code for the TV set (Point 8.8.2). If you switch to a program,
on which a previously saved broadcast is being transmitted, a notification will appear.
> To access the broadcast, use the Numeric keyboard to enter the 4 digit Smart-
card PIN code.
As soon as the correct entry has been made, the broadcast will be accessible.
6
6.6 Volume control
After the TV set has been switched on, the sound will be transmitted at the input volume set
via the Sound adjustment menu (Point 8.2.1).
> The volume of your TV set can be adjusted using the rocker Volume + key to make
it louder and the Volume – key to make it softer.
This setting will not be saved when the device is switched off.
6.6.1 Sound muting
> By pressing the Sound button on/off, the sound will be muted and come back on
again if the button is pressed again.
6.6.2 Headphone volume
> While the sound is muted, you can use the Volume + and Volume – keys to
adjust the headphone volume.
35
Page 36

6.7 Selection of another language/sound option
If a broadcast is transmitted in multiple languages or with several sound channels, this will
be indicated in a sound Selection notice above the infobox. You may then proceed as
follows to select a different language or a different sound channel:
> Press the key Language Select.
A list appears on screen of the currently transmitted languages.
> Using the arrow keys up/down, mark the desired language and confirm with OK.
You may now listen to the program in the language selected.
Note that the sound selection process will mean the preferred audio language can be set for
the respective station. That means that even after the station has changed in the meantime
or the device has been switched off, when this station comes back on again, the previously
selected sound option will be installed again, provided it is relevant for the station being
broadcast.
Your TV set can also be used to receive mono broadcasts.
> Use the arrow keys right/left to select Mono channel 1
and Stereo when the sound selection has been called up.
, Mono channel 2
6.7.1 Dolby Digital (AC3 Mode)
When switching on a broadcast, which is transmitted in Dolby Digital Sound, the Dolby symbol appears in the infobox . If you have not activated the Dolby Digital AC3 function
(Point 8.2.8), your device should be manually switched to AC3 operation as follows:
> Press the key Language Select.
Where available, a list of the currently available languages and Dolby Digital
(AC 3) will be displayed on screen.
> Using the up/down arrow keys, mark the Dolby Digital line and confirm with
OK.
You can now enjoy Dolby Digital sound for this program.
Note that the sound selection process will mean the preferred audio language can be set for
the respective station. That means that even after the station has changed in the meantime
or the device has been switched off, when this station comes back on again, the Dolby
Digital (AC 3) sound option can be installed, provided it is relevant for the station being
broadcast.
If you would like your device to reproduce Dolby Digital broadcasts automatically, proceed to
make the settings as described in Point 8.2.8 for automatic AC3 reproduction.
36
Page 37

6.8 Subtitles
When switching to a broadcast which is transmitted with subtitles, the subtitle symbol
appears in the infobox .
If you have not activated the Subtitles function (Point 8.2.10), subtitles can be manually
activated as follows:
> Press the Option button several times if necessary.
As soon as transmission starts, a list of the currently broadcast subtitled languages
appears on screen.
> Using the up/down arrow keys, mark the desired subtitle language and confirm
with OK.
Now the subtitles are displayed in the lower edge of the screen. If you would like
your device to automatically broadcast programs with subtitles, set your device to
automatically receive subtitles as described in Point 8.2.10.
6.9 Video text
Your TV set can show video text information on programs, which include video text data.
This is indicated to you by the symbol in the infobox.
6.9.1 Switching Video text on/off
> Select the program, for which you want to see the Video text.
6
> Press the Video text key to switch on the video text display.
As soon as the selected broadcaster transmits the video text information, this
appears with the page 100 (diagram).
> Pressing the Video text button again will revert the system to TV operation.
6.9.2 Choice of page
> Use the number keys 0 to 9 to enter the 3-digit choice of page.
Your entry will be displayed in the top left hand corner of the screen. Since the video
text pages cannot all be transmitted at the same time, several seconds may be
required, until your device displays the pages on your TV screen.
or
> Use the red or green keys to page forward or backward one page at a time.
> By pressing the yellow function key, the video text group displayed in the yellow
field is accessed.
> By pressing the blue function key, the video text block displayed in the blue field is
accessed.
6.9.3 Video text subpages
Many video text pages also comprise several subpages. These are displayed in the form of
two lines separated by a diagonal slash (current subpage/number of subpages) in the video
text image and/or via the display of the current and available subpages on the lower edge of
the screen. As soon as a new subpage becomes available, this is automatically shown.
> To show a specific subpage, confirm using the OK button.
The automatic updating of subpages stops and the subpage line at the bottom of the
37
Page 38

screen becomes active. The already memorized subpages are illustrated using the
subpage figure.
> Using the right/left arrow keys, select the desired subpage or enter the desired
subpage in four digits using the Numeric keyboard.
> To quit the desired illustration of the subpages, press OK.
6.9.4 Showing video text and TV images at the same time
> By pressing the PiP/PaP button, the video text is reduced to the right half of the
screen, and the TV picture shrinks to the left half of the screen.
> Press the PiP/PaP button again, to revert to the normal video text view.
6.9.5 Exit Video text
> By pressing the Video text button, the video text fades out and the TV picture
fades back in.
> If nothing has changed in terms of programming, once the Video text button is
pressed again, the Video text appears with the last selected page.
6.10 Format changeover / Zoom
TV broadcasts are transmitted in various image formats (e.g. 16:9 or 4:3). To view TV pictures at optimal size on your LCD TV set, you can preselect the permanent aspect ratio
(Point 8.1.3.8) or the automatic format recognition function (Point 8.1.3.9). In addition, you
can adapt the image format during normal and playback operation manually based on the
broadcast e.g. recording.
By pressing the Zoom/Format button, you can switch among the various predefined for-
mats (original, optimal, always 16:9, full zoom and stretch) as well as
accesssing user-defined settings, which allow you to set up the image as you wish.
The set image format will be shown on the lower screen edge.
When the user-defined setting is selected, an additional window also appears as well
as the format display.
To adapt the image based on your wishes the following possibilities are available:
Red function key Increase image height
Green function key Reduce image height
Yellow function key Increase image width
Blue function key Reduce image width
Arrow key Used to move the image up (only for increased image
height)
Arrow key Used to move the image down (only for increased
image height)
OK button To implement zoom
Arrow key left to restore image settings
> To mask the format changeover, press the Back button.
38
Page 39

6.11 PiP-/PaP function
Your TV possesses a PiP function, as well as the PaP function.
Please pay attention to the following points:
- In PiP-/PaP operation, the only selectable broadcasts and external sources are those
located in at least one list of favorites.
- Devices with only one tuner can only illustrate one program ond one external source
simultaneously.
- The PiP-/PaP operation only allows access to broadcasts and external sources,
which have been recorded in at least one list of favorites.
- For technical reasons, it is not possible to display two broadcasts, which are trans-
mitted in HD Format.
PiP
With the PiP function (PiP = Picture in Picture = Image in Image), a small image is superimposed over the main image on screen.
PaP
With the PaP function (PaP = Picture and Picture = Image and Image), two images of
equivalent size are displayed next to each other.
6
6.11.1 Accessing PiP-/PaP functions
> By pressing the PIP button, this activates the PiP or PaP function.
Now, the actual main image, which could be either a TV program, an external source
or the playback of a hard disk, is superimposed as a small PIP image in the top right
corner or slightly reduced in size and moved to the right edge of the screen. The
most recently viewed TV program is shown as the main image. In PiP-/PaP mode,
the sound of the main image is always reproduced.
Whether pressing the PIP button activates the PiP or PaP mode depends on the
setting made as described in Point 8.4.5.2 concerning the PiP-/PaP mode.
6.11.2 Exchange PiP-/PaP images
> By pressing the Back button both the images are exchanged. The PiP-/PaP
becomes the main image and vice versa.
6.11.3 Implementing PiP-/PaP functions
To implement the PiP or PaP functions, there are two ways. These can be distinguished by
specifying whether, on exiting the PiP-/PaP mode, the main image or the PiP-/PaP image
should be shown on the screen.
> By pressing the Taste PIP the main image is now faded out and the PiP-/PaP image
is shown as the new main image.
> Press the TV/Radio button, to fade out the PiP-/PaP image and show the main
image on the full screen.
39
Page 40

6.12 Freeze frame
> Press the Freeze frame key, and the TV picture will be frozen, and displayed as a
still picture. During this process, the sound will be played back as normal.
> Pressing this button multiple times will unfreeze the image and normal TV playback
will then continue.
6.13 EPG program journal
Your TV set possesses an electronic EPG program journal. This allows you to show the program information for single or multiple digital programs on screen and very rapidly gain an
overview of the broadcasts currently being shown or the broadcasts of the day or the following days.
The EPG functions allow you to:
- Display information on program contents on your screen
- Pre-select programs, which will be selected automatically when the program/show
starts
- Record timer functions
- Search broadcasts based on the program type (genre)
- Search broadcasts based on freely selectable search terms.
6.13.1 Downloading EPG data
The program information will be loaded by your HDTV at the update time set in accordance
with Point 8.7.2. The pre-requisite for this is that your device must be in stand-by mode at
this time. If, at this time, your unit is in standby mode or switched off, this function will not be
active.
The duration of the downloading procedure will depend on the number of programs included. programs can be shown a maximum of seven days in advance. Based on the volume of
data involved, the more programs are included, the shorter is the period for which preview
information can be included in the electronic program guide.
You can decide for yourself which digital programs are to be included in the “electronic
program guide.” These may, as described in Points 8.7.4 and Point 10.5, be recorded or
removed. Point 8.7 also describes how you can start the reading of the EPG file manually.
6.13.2 Interrupting the download procedure
> Interrupt the reading process by pressing the On/Standby button.
6.13.3 Display electronic program guide
> Press the EPG (SFI) key on the remote control of the TV set.
The Electronic Program Guide then appears on the screen. The channels you have
selected, or those of the factory default settings, will be shown with their current programs. You can now also use the EPG function to obtain information on the contents
of various programs. In addition, you may use the EPG functions available to set a
particular program, to pre-select a program, or to set a timer for a program.
40
Page 41

6.13.4 Now (table with current program contents)
First the “Now” EPG table will be displayed showing the programs currently being broadcast. The bar to the right of the program name indicates the elapsed time of the current program. The program currently selected is marked.
The EPG functions (Point 6.13.7) are available to you.
> By pressing the up/down arrow keys, you can move the marking line by line
and/or left and right with the appropriate arrow keys.
> Press the yellow function key to go to the EPG table “Next” (see Point 6.13.5)
or
> By pressing the OK button, the marked program is set and the user exits from the
EPG.
or
> By pressing the TV/Radio button, you can revert to normal operation or set the
marked program.
The program that was recorded by the EPG, is now shown again.
6.13.5 Next
> If the EPG-table “NOW” is switched on, you can call up the EPG-table “Next” (fol-
lowing programs) by pressing the yellow function key.
6
The EPG functions (Point 6.13.7) become available.
> By pressing the up/down arrow keys, you can move the marking line by line
and/or left and right with the appropriate arrow keys.
> By pressing the yellow function key you can call up the EPG table “More” (see
point 6.13.6)
or
> by pressing the green function key to access the previous EPG table “Now”.
or
> Press the TV/Radio key to return to normal operation.
6.13.6 More
> Pressing the yellow function key again while the EPG table “Next” is displayed will
take you to the EPG table “More”.
In this table, an additional time window is shown in the track line. In this time window, the time of the displayed EPG table is indicated.
The EPG functions (Point 6.13.7) are available to you.
> By pressing the yellow function key multiple times, the time will be displayed in the
relevant yellow field in the lower edge of the screen and by pressing and holding the
yellow function key, it will advance one page forward.
A clock is displayed to give you a better overview.
41
Page 42

> By pressing or pressing and holding the green function key the respective dis-
played time in the green field moves forward one page.
The individual days of the week are displayed along the bottom of the screen. If information
relating to the following days is available, the appropriate fields will be marked.
> To obtain a preview for a specific day, either press the numeric key corresponding
to the day of the week.
> With the number key “0”, you can access the PVR navigator.
> Press the Back key to return to the table “Next”.
> Using the TV/Radio button you can return to normal operation.
6.13.7 EPG functions
To execute the following EPG functions, call up the SFI as described in Point 6.13.3.
6.13.7.1 EPG-Info
Using the EPG info, you can displayed detailed info on the marked broadcast. If detailed
information is available, this is indicated next to the appropriate program.
> Use the arrow keys or the function keys to mark the desired program.
> Press the EPG button, to display the detailed info on the broadcast.
> You can scroll or page through lengthy information text using the arrow keys.
> Press the Back key to return to the previous table.
6.13.7.2 EPG timer programming
The EPG electronic programme guide allows you to program timer events with particular
ease.see point 6.14
Moreover, using this functiuon, you can also apply the timer to program multifeed broadcasts, e.g. from the Premiere Sport Portal. The timer function for multifeed broadcasts can
only be programmed in the EPG program overview (see Point 6.13.7.3).
Please note
- For EPG timer programming, please note the settings made based on Point 6.14.4
for Timer delay and after-run settings.
- See point 6.14.2 for operating this device while the timer is active.
- See Point 6.14.3 for cancelling a current Timer setting
- For manual timer programming, as well as changing or cancelling a timer, see Point
6.14.1.
6.13.7.2.1 Hard disks (PVR-) timer
> Use the arrow keys or the function keys to mark the desired program.
42
Page 43

> Press the Record button, to program a hard disk timer for the marked broad-
cast (see Point 7.1.2).
6.13.7.2.2 Change station-, wake-up and VCR timer
> Press the Option button once, to program station change timer (see Point
7.1.2).
> By pressing the Option button multiple times, the timer type can be changed to a
wake-up timer.
> Press the Option button a third time, to change the timer type to a VCR timer.
6.13.7.2.3 Timer menu
> Press the red function key Timer to open a selection window.
> Use the arrow keys up/down to mark the required Timer type (see Point 7.1.2).
> Confirm by pressing OK.
The Time overview, showing the data relating to the programme selected, will be
displayed, so that you can check on the correctness. In this menu you can make corrections if necessary (see point 8.1.2.3).
> Return by pressing the Back button to the previous table.
6.13.7.2.4 Cancel an EPG timer event
> If you would like to cancel a timer event programmed via the EPG, proceed as
described previously, to mark the appropriate programme.
> Press the red function key Timer, to open the pop-up window.
> Use the up/down arrow keys to mark the Cancel timer line.
> Confirm by pressing OK.
or
> Cancel a Timer in accordance with Point 6.14.1.3.
6.13.7.3 EPG program overview
6
You can use the EPG program overview to display a table with the whole days listing for an
individual program. To do this, proceed as follows:
> For an accessed EPG table “Now”, press the green function key, to change direct-
ly to the program view
or
> Press the blue function key EPG Menu to open a selection window.
> Use the up/down arrow keys to mark the Program line.
> Confirm with OK.
The daily overview of the set program is now displayed.
43
Page 44

> Use the arrow keys to move the marker to the desired program or time.
The EPG functions (Point 6.13.7) become available.
The individual days of the week are displayed along the bottom of the screen. If information
relating to the following days is available, the appropriate fields will be marked.
> To obtain a preview for a specific day, either press the numeric key corresponding
to the day of the week.
> By pressing the green function key, you revert to the EPG overview.
> Using the TV/Radio button you can return to normal operation.
Display EPG overview for other programs
> Press the yellow function key Program.
A list appears with all the programs contained in the currently selected list of
favorites (see Points 6.2.3.2 and 10).
> You can now use the arrow keys to mark the desired program.
> Press the OK key to display the EPG overview of the program selected.
6.13.7.4 Overview based on program type/genre
If you are interested in specific types of programs, you can view program information sorted
by specific categories, or genres, e.g. movies, sport, etc.
> Access the EPG table “Now” by pressing the SFI button.
> Press the blue function key, to access the SFI menu.
> Use the up/down arrow keys to mark the entry for Genre and confirm with OK.
> Now press the yellow function key Genres, to open the genre list.
> Use the up/down arrow keys to select the desired type of program and confirm
with OK.
The list for the day will be displayed showing only programmes of the type selected.
> Using the arrow keys, you can move the marker to the desired broadcast.
The EPG functions (Point 6.13.7) become available.
The individual days of the week are displayed along the bottom of the screen. If information
relating to the following days is available, the appropriate fields will be marked.
> To obtain a preview for a specific day, either press the numeric key corresponding
to the day of the week.
> Using the TV/Radio button you can return to normal operation.
6.13.7.5 EPG search
If you wish to receive information concerning a specific program, you can search for this
automatically. To do so, you simply enter the track or the program or part of the title. The
EPG then searchs the files for this program.
44
Page 45

> Open the source selection by pressing the OK button.
> Press the blue function key EPG Menu to open a selection window.
> Use the up/down arrow keys to mark the search Line.
> When you confirm with the OK button, the menu of the EPG search is opened.
6.13.7.5.1 No search term stored
If no search term has been stored, the menu of the EPG search appears with a virtual keyboard. The track of the program, which was marked when accessing the EPG search, is
now entered into the search screen.
> Now you may either transfer to look for programs with exactly this track by pressing
the green function key (the EPG data will be searched for programs with this track
and any found will be displayed) or, as described in Point 6.13.7.5.3, you can enter
the search term manually.
Here, you can access the EPG information on programs, as described in Point 6.13.7.1, or
implement the EPG timer programming as described in Point 6.13.7.2.
6.13.7.5.2 No search term stored
If a search term is stored, the EPG search screen will appear as follows.
> If you want to search based on a previously input search term, mark this using the
up/down arrow keys.
In the right half of the screen, the abbreviated search results are now displayed.
6
> Press OK to open the detailed search results.
Here, you can access the EPG information on programs, as described in Point 6.13.7.1, or
implement the EPG timer programming as described in Point 6.13.7.2.
6.13.7.5.3 Manually entering the search term
> Access the EPG search menu as described in Point 6.13.7.5. In order to manually
enter a new search term, the virtual keyboard will be required.
Provided no search term has been stored in the search selection, the virtual keyboard will
be displayed immediately after the menu has been accessed.
For one or multiple stored search terms, the menu appears automatically with the search
results. In this case, choose the New Search option as described in Point 6.13.7.5.2.
> Now, you can manually enter the complete track or part of track of a program as a
search term.
> To delete individual letters of the track already displayed or the entire title, touch the
red function key Cancel, several times if required.
> Now enter the track or part of track as a search term using the virtual keyboard.
During this process, the buttons of the following remote control functions are
assigned:
Arrow keys: The marked portion moves.
OK: The marked line is transferred to the search term and added
there.
45
Page 46

Yellow function key: The keyboard switches between upper/lower case as well as
symbols.
Red function key: The last line of the search term is deleted.
Green function key: The search term entered is transferred and the search com-
mences.
Blue function key: You quit the search term entry without confirming and return
to the search screen.
6.13.7.5.4 Processing search term
> To amend a stored search term, firstly access the EPG search as described under
Point 6.13.7.5.
> Now use the arrow keys to mark the search term, which you wish to amend.
> To process the search term, press the green function key Process.
The Virtual keyboard now appears, along with the selected search term.
> Now process the search term, as specified in Point 6.13.7.5.3.
6.13.7.5.5 Cancel Search Term
> To cancel a stored search term, firstly access the EPG search as described under
Point 6.13.7.5.
> Using the arrow keys, mark the search term, which you wish to cancel.
> Press the red function key Delete.
The following query appears.
> To delete the search term from the search screen, mark the field Yes using the
right/left arrow keys and confirm with OK
6.13.8 Ending EPG
> By pressing the TV/Radio button, you can revert to normal operation.
6.14 Timer management
The HDTV possesses the following listed timer functions:
1. Hard disk timer
This function allows your TV set to be switched on and off, in order to record desired programs on the hard disk, e.g. when you are outside.
If the device has been switched on via the hard disk timer, the LCD panel remains off.
2. Video recorder timer
The video recorder timer means your TV set can be switched on and off, in order to record
a desired program on an external recording device, such as a video or DVD recorder, e.g.
when you are out. Be careful to note that you must also program your video/DVD recorder in
this case in order to record your program.
If the device has been switched on via the video recorder timer, the LCD panel remains off.
46
Page 47

3. Program change timer
If your HDTV is in normal operating mode, it will switch to the programmed program slot at
the time selected.
Unlike when setting with the hard disk or video recorder timer, the device remains fully
usable, is not switched on at the start of the program and will not be switched off afterward
either.
This time type facilitates programming changes.
4. Wake-up timer
The wake-up timer, unlike the program change timer, starts in Standby mode and only
switches on the device at the specified start time of the selected program. The device
remains operable as usual.
To set the timer manually, or modify or delete present timer settings, make timer settings or
cancel an active timer, proceed as described in the current point.
> First press the Menu button, to access the Main menu.
> Use the up/down arrow keys to mark the Timer line.
> By pressing the OK button, you can access management of the timer menu.
6.14.1 Access timer overview
> Access the menu for timer management, as described in Point 6.14.
6
> Mark the Timer overview entry using the up/down arrow keys.
> Confirm by pressing OK.
The timer menu appears with the data of all programmed timers. Here, you can modify or delete timers or enter manual settings.
alternatively:
> Access the EPG, as described in Point 6.13.3.
> Press the red function key to open the Timer menu.
> Mark the entry Timer overview and confirm with OK.
6.14.1.1 Manual programming of timers
> Access the Timer overview as described in Point 6.14.1.
> Using the up/down arrow keys, mark the empty timer line in the overview.
> by pressing the green function key New, a window opens showing the various
timer types.
> Using the up/down arrow keys, mark the timer type, see Point 6.14, for which
you wish to program a timing event.
> By confirming with the OK button, you proceed to the input screen for programming
events.
To program an event, proceed as follows:
47
Page 48

Program list
> Use the arrow keys to mark the upper line of the menu.
> Press the OK key.
> Use the up/down arrow keys to choose within the now-open pop-up window the
desired list (TV, Radio or external) and confirm with OK. Provided the lists TV
lists 2, TV lists 3, Radio lists 2 or Radio lists 3 are included as programs,
see Point 10, the relevant lists will also be available for selection.
Program/source
> Now press the up arrow key, to move the marked line one line up.
> By pressing the OK button, the program/source of the list you previously selected
will now be displayed.
> Now mark the desired program or source using the Numeric keyboard (program
position entry) and/or using the arrow keys. You can use the arrow keys up/
down to move the marker around the list one line at a time and the arrow keys
right/left to move the marker up or down one page at a time.
> by pressing the OK button the program or source is recorded into the timer.
Date
> Use the arrow keys to mark the column date.
> Use the numeric keys to enter the date (in 4-digit format) on which the timer event
is to take place.
Start
> Mark the Start of the field using the right arrow key.
> In this line, use the numeric keys to enter the starting time for the timer in four dig-
its.
Stop time for hard disks and video recorder timer
> Repeat the steps as described in “Start” to enter the stop time.
Repeat
> Use the arrow keys to mark the column Rep.
> Press the OK key.
A pop-up window appears with various playback options.
1× Timer active once
T Daily repeat
1 W Weekly repeat.
1-5 Repeat only on weekdays
6-7 Repeat only on weekends.
48
Page 49

> Use the arrow keys up/down to select the desired function.
> Press OK to accept the setting.
Accepting data into memory
> When you have completed the programming, press the green function key
Accept, to transfer the data to memory.
6.14.1.2 Changing timer programming
> To change an existing timer setting, access the timer overview as described in
Point 6.14.1 and mark the Timer to be amended with the up/down arrow keys.
> by pressing the green function key Change, you access the settings for the
marked timer and can now change them, as previously described in Point 6.14.1.1.
6.14.1.3 Delete timer programming
> To cancel an existing timer setting, access the Timer overview as described in
Point 6.14.1 and mark the timer to be amended with the up/down arrow keys.
> Press the yellow function key Delete.
A message is displayed on screen: Do you really want to delete this Timer?
> Use the arrow keys right/left to mark the field Yes.
> To delete the timer setting, confirm by pressing OK.
6.14.2 During the timer operation
During the timer operation, the properties of the device depend as much on the programmed
timer type as on the operating mode before the timer start.
6.14.2.1 Program change timer
The program change timer is only started when the device is switched on (not during Standby operation), whereupon at the set period, the program can easily be changed. The device
remains operable as usual.
6
6.14.2.2 Wake-up timer
The wake-up timer, unlike the program change timer, starts also in Standby mode and
switches on the device at the specified start time of the selected program. The device
remains operable as usual.
6.14.2.3 Video recorder timer
When this timer starts from Standby mode, the screen is switched on when the
On/Standby button is pressed and the program can be viewed on the screen.
To suspend the Video recorder timer, proceed as described in Point 6.14.3. Due to the
Video recorder timers, certain buttons on the remote control (e.g. menu access) are not
usable.
49
Page 50

6.14.2.4 Hard disk timer
If the timer starts when in standby mode, the screen is switched on by pressing the
On/Standby button. The subsequent properties of the device depend on whether one or
two hard disk timers are running. Due to the hard disk timer, certain buttons on the remote
control (e.g. menu access) are not usable.
Two hard disk timers running
When you have two hard disk timers running, a pop-up query window initially appears to ask
which recording should be played back.
> Using the up/down arrow keys mark the desired recording and confirm with OK.
Now a pop-up window appears to ask whether the playback of the recording should
start at the actual live or start position or whether the recording should be ended.
Start
> Use the up/down arrow keys to select the Entry start recording at Start
and confirm with OK to start playback at the start position of the recording.
The device is now in timeshift operation, see Point 7.1.3.
Live
> Use the up/down arrow keys to mark the start of the live recording point
and confirm by pressing the OK button.
The sound and images of the program are now directly played back.
End
> Use the arrow keys up/down to select the entry End recording point and con-
frim by pressing OK.
In this case, the recording will be stored.
A running hard disk timer
Now a pop-up window appears to ask whether the playback of the recording should start at
the actual live or start position.
Start
> Use the up/down arrow keys to select the Entry start recording at Start
and confirm with OK to start playback at the start position of the recording.
The device is now in timeshift operation, see Point 7.1.3.
Live
> Use the up/down arrow keys to mark the start of the live recording point
and confirm by pressing the OK button.
The sound and images of the program are now directly played back.
Current program
> Select this point with the up/down arrow keys and confirm with OK, to switch to
the current program.
50
Page 51

6.14.3 Interrupting the timer operation
When interrupting a timer, you must specify whether the hard disk or video recorder time will
be interrupted.
6.14.3.1 Interrupting a video recorder timer
If the device started the timer on Standby operation, the screen must first be switched on by
pressing the On/Standby button.
> Press a key on the Numeric keyboard.
The following query appears.
> Using the right/left arrow keys, mark the field Yes.
> Confirm with the OK button.
6.14.3.2 Interrupting a hard disk timer
If the device started the timer on Standby operation, the screen must first be switched on by
pressing the On/Standby button.
> Access the PVR navigator when two current hard disk timers are running by press-
ing OK and with one running hard disk timer by pressing the OK button and subse-
quently the green function key.
> Use the up/down arrow keys to select the recording, which you want to end, and
confirm with OK.
6
> By pressing the Stop button, a pop-up screen appears to ask whether the portion of
the program already stored should be saved (Save), discarded (Discard) or wheth-
er the recording should be continued (Back).
> Use the up/down arrow keys to select the desired entry and confirm with OK.
6.14.4 Timer settings (lead time or follow-up time)
During the EPG timer programming, see Point 6.13.7.2, the TV set receives the data of the
selected program automatically from the EPG data. This means precise information concerning the start and end times of the program is transmitted. However, it frequently happens that the selected program often finishes slightly earlier or starts somewhat later than
specified. In this case, the recorded program will not include either the beginning or the end.
To avoid this problem, you can specify extra lead time or follow-up times by specifying these
figures in minutes. The timer will then start earlier than the lead time and end following the
input follow-up time, as specified in the EPG data.
>Access the menu settings as described in Point 6.14.
> Use the up/down arrow keys to mark the timer settings line and confirm with
OK.
> Use the up/down arrow keys to mark the timer lead time or follow-up time line.
> Use the number keys to specify the lead or follow-up time in minutes. Be careful
to ensure that the entry must be in two digits. For example:
0, followed by 5 for 5 minutes lead time or follow-up time
> Press the green function key Accept to store the changes made, and to return to
the previous menu.
alternatively:
51
Page 52
> Press the red function key Back.
> If you wish to accept the changes, use the arrow keys left/right to click on the
field Yes, and confirm by pressing OK.
6.14.5 Exit timer management
> Press the Back key to return to the Main Menu.
or
> Press the TV/Radio key to return to normal operation.
6.15 Sleep timer
The sleep timer allows you to adjust the turn off time of your device.
> To activate the sleep timer, press the Sleep timer button.
The currently set remaining operation time then appears in the top right corner of the
screen
> You can now adjust the remaining operation time via the sleep timer by pressing the
Sleep timer button several times within the range 15 minutes to 2 hours.
to be checked.
6.16 Function selection
> Press the blue function key, to open the Navigation menu (NAV menu).
> Using the up/down arrow keys, mark the function that you want to access.
TV Internal receiver and external connections.
Radio Internal receiver and external connections.
PVR PVR navigator: Access to the TV-PVR recording
(Point 7.2).
Music Access MP3 titles stored on the internal hard disk or on
a connected USB device as well as radio PVR recordings stored on the internal hard disk (Point 6.17).
Image Access to the JPG files stored on the internal hard disk
or on a connected USB device (Point 6.18).
> Confirm with OK, to select the marked function.
6.17 MP 3 playback
You can use your TV set to play back files, which are stored in MP3 format on one among
your USB storage devices connected to the USB socket or on the internal hard disk. The
USB device should be formatted using the file system FAT 32. Consult Point 7.3.2 on how to
copy files from a USB device onto the hard drive.
> During normal operation, press the blue function key to open the NAV menu.
> Use the up/down arrow keys to mark the music line and confirm by pressing the
OK button. OK
The music navigator now appears, with the start view in accordance with point 8.4.3.
Here, USB devices are shown by the symbol
Existing folders are viewed with symbols , MP3 files and playlists.
Use the up/down arrow keys to select either the hard disk or the USB device
and the internal hard disk .
52
Page 53

first, from which you wish to play the MP3 files and confirm with OK.
> Use the up/down arrow keys to now mark either the folder or the playlists, which
contain the desired MP3 files.
> By confirming with OK, the marked folder/playlist will be opened.
> Use the up/down arrow keys to select from the list of JPG files, which you would
like to play on the playback list.
> Start the playback by pressing the OK button.
The navigator then shows the playback screen and the selected file is played back.
Thereafter the other files located on the same source medium, resp. in the selected
playlist, will be played automatically.
6.17.1 Track information
> By pressing the Info button, further information concerning the selected track is dis-
played, provided this is contained in the ID3 tag of the title.
> Press this button again, to fade the information out.
6.17.2 Track hop
> Press the arrow keys up/down to skip to the previous or next title/track.
6.17.3 Pause
> By pressing the Pause / Play button, the playback is paused (Pause).
> Press the key again to resume playing the file from the position at which it was
stopped.
6.17.4 Track search forwards/backwards
> By pressing the forward or rewind button several times, you can shift Back or For-
ward from the current MP3 title.
In the process, the individual search speeds will be shown in the following table.
During this process press uuuu or tttt the keys Fast Forwardor Rewind
>
which will allow you to jump forward or backward 10 minutes.
6
> To stop playback, press the Pause / Playback button.
Display Playback mode
uu
uuu
uuuu
tt
ttt
tttt
Fast forward 4-times speed
Fast forward 16-times speed
Fast forward 64-times speed
Rewind 4-times speed
Rewind 16-times speed
Rewind 64-times speed
53
Page 54

6.17.5 MP3 playback modes
In addition to the regular playback mode, the following additional functions are available:
- Random play of all titles of the folder selected
- Repeat all titles
- Repeating a title
> The various playback modes can be accessed using the Option button.
The various playback modes are displayed in the top right corner of the playback
screen as follows:
Function On-screen display
Normal playback of all titles of the folder selected
Random play of all titles of the folder selected
Playback of all titles of the folder selected
Repeating a title
6.17.6 Switching folder levels
> First, during playback operation, go back to the folder screen by pressing the Back
button.
> To move from a folder to the next higher level, use the arrow keys to mark the
topmost line, which is indicated by the symbol
or
> press the Back button in the accessed Navigator.
, and confirm by pressing OK.
6.17.7 MP3 playback lists
6.17.7.1 Create MP3 playback lists in the device
You can create a playback list (Playlist), to facilitate playback of the MP3 files or radio
recordings of your choice.
> Choose an MP3 or a folder with MP3 files as described in Point 6.17, which you wish
to include in the playlist.
> Press the green function key PLS +, to insert the file or folder into the playlist.
6.17.7.2 Creating external MP3 playback lists
It is also possible to create playback lists e.g. on the PC and subsequently copy these, as
described in Point 7.3.2.1 (Copying music), to the hard disk of the HDTV. The important provisos here are:
- The MP3 file/folder structure of the title/s, which are to be recorded as part of a playl-
ist, must be identically present on both the PC and the HDTV.
- The playlists must be created with related entries of the working directory. That
means that the entry should only include the MPS track or folder, in which the MPS
track is found. (No drive letters)
54
Page 55

- The entries must not include “\”. Since the majority of programs used to create playl-
ists, however, do contain these in the entries, you must check these using a word-
processing program. If “\” is present, then this must be replaced by “/”. (e.g. by using
the search and replace function of the wordprocessing program)
- The playlists must be stored in the format “pls” or “m3u”.
6.17.7.3 Playing back playlists
> Access the Music navigator, as described in Point 6.17.
> To switch to the playback list display, press the Option button and use the up/
down arrow keys to mark the Playback lists line.
> Confirm by pressing OK.
Now all the playlists present are displayed.
6
> Use the up/down arrow keys to select the playback list
wish to play, and confirm with OK.
> Now use the arrow keys to mark the title, with which you want playback to com-
mence.
> By pressing the OK button, playback now starts with the marked title.
of the titles which you
6.17.7.4 Deleting tracks from the Playlist
> Access the playback list display, as described in Point 6.17.7.3.
> Use the up/down arrow keys to select the
to edit and confirm with OK.
> To delete a title from the Playlist, use the arrow keys to mark it and Press the green
function key PLS –.
Be careful to note that only playlists with tracks in the pls format can be deleted.
Playback list, which you would like
6.17.7.5 Deleting playlists
> Access the playback list display, as described in Point 6.17.7.3.
> Now use the up/down arrow keys to mark the playback list/s
like to delete.
, that you would
> By pressing the green function key PLS delete, the complete playlist is deleted.
Be careful to note that in the Music navigator, only playlists with tracks in the pls format
can be deleted. In the Manage music menu, as in Point 7.3.2.3, you may delete pls playlists
as well as m3u playlists.
6.17.8 Stop/end MP3 playback
> In order to stop playback, press the TV/Radio button.
You will return to normal operating mode.
55
Page 56

6.18 Viewing pictures
Your TV set is equipped to display files in JPG format that are available either stored on
the internal hard drive or from a device connected to the USB socket, as described in Point
7.2.2.4. The USB device should be formatted using the file system FAT 32. Consult Point
7.3.2 on how to copy files from a USB device onto the hard drive.
> In normal operation, press the blue function key.
The NAV menu is opened.
> Use the up/down arrow keys to mark the Images line OK.
> Confirm by pressing OK.
Now, the image navigator appears in the start display set as in Point 8.4.3. Here,
USB devices are shown with the symbol
folders are viewed with symbols , JPG files and playlists .
> Use the up/down arrow keys to select, as applicable, the hard disk or USB
device, from which you wish to view the JPG files and confirm with OK.
> Use the up/down arrow keys to now mark the folder or playlist, which contains the
desired JPG files, and confirm with OK.
> Use the arrow keys up/down to select from the list the JPG file you wish to view,
and confirm by pressing OK.
and the internal hard disk by . Existing
6.18.1 Show next/previous picture
> Press the arrow keys up/down to skip to the previous or next image.
6.18.2 Rotate image
> By pressing the Forward or Rewind keys, the image can be rotated in a clock-
wise or counterclockwise direction.
6.18.3 Switching folder levels
> First, during playback operation, go back to the folder screen by pressing the Back
button.
> To move from a folder to the next higher level, use the arrow keys to mark the top-
most line, which is indicated by the symbol
or
> Press the Back button in the accessed Navigator.
, and confirm by pressing OK.
6.18.4 Slideshow
You have the chance to show images as part of a slideshow. This function allows pictures to
be shown automatically one after the other on the screen.
6.18.4.1 Starting slideshow
> Access the image navigator as described in Point 6.18.
> Use the up/down arrow keys to select, as applicable, the hard disk or the USB
device, from which you wish to view the JPG files and confirm with OK.
56
Page 57

> Use the up/down arrow keys as applicable to now mark the folder or playlist,
which contains the desired JPG files, and confirm with OK.
> Use the up/down arrow keys to select from the list of JPG files for those you
wish to include on the playback list.
> By pressing the yellow function key Slideshow all images of a folder or playlist
are automatically shown, commencing with the marked image.
6.18.4.2 Pause
> By pressing the Pause / Play button you can pause the playback.
This will be indicated with the word Pause on screen.
> Restart the playback by pressing the button again.
6.18.4.3 Show next/previous picture
> Press the arrow keys up/down to skip to the previous or next image more swiftly.
6.18.4.4 Adjusting image changeover speed
> By pressing the right/left arrow key you can adjust the image changeover speed
from 5 to 100 seconds.
Please note, that for large files and short changeover speed, it may be impossible to entirely show the picture within the changeover time. If the image changeover time is too short for
the file size, the image will be displayed once the reading process has finished.
6
6.18.4.5 Rotate image
> By pressing the Forward or Rewind keys the image can be rotated in a clockwise
or counterclockwise direction.
6.18.4.6 End slideshow
> Press the Stop button to end the Slideshow and reactivale the Navigator.
or
> To revert to normal operation press the TV/Radio button.
6.18.5 JPG playback lists
6.18.5.1 Creating JPG playback lists
You can create a playback list (Playlist) to facilitate playback of the JPG files of your choice.
> Access the image navigator as described in Point 6.18.
> Where appropriate first use the arrow keys up/down to mark the folder contain-
ing the desired image files which you wish to add to the playlist
pressing OK.
, and confirm by
57
Page 58

> Use the up/down arrow keys to select from the list of JPG files, which you would
like to play on the playback list
> Press the green function key PLS +, to add the JPG file to the playback list
or
> Use the up/down arrow keys to mark a folder, which contains JPG files, and
press the green function key PLS +, in order to include the entire content of the
folder into the Playlist.
In this way, put together a playlist based on your own preferences.
.
6.18.5.2 Playing back playlists
> Access the image navigator as described in Point 6.18.
> To switch to the playback list display, press the Option button and use the up/
down arrow keys to mark the Playback lists line.
> Confirm by pressing OK.
Now all the playlists present are displayed.
> Use the up/down arrow keys to select the playback list
you wish to view, and confirm with OK.
Use the arrow keys up/down to select from the list the JPG file you wish to view and
confirm by pressing OK.
of the images which
6.18.5.3 Deleting tracks from the Playlist
> Access the playback list display, as described in Point 6.18.5.2.
> Now use the up/down arrow keys to mark the playback list/s
like to edit.
> To delete a title from the Playlist, use the arrow keys to mark it and press the green
function key PLS -.
that you would
6.18.5.4 Deleting playlists
> Access the playback list display as described in Point 6.18.5.2.
> Now use the up/down arrow keys to mark the playback list/s
like to delete.
> By pressing the green function key PLS delete the complete playlist is deleted.
Playlists may also be deleted in the image management menu as shown in Point
7.3.2.
that you would
6.18.6 Stop/end image display
> To stop playback and revert to normal operation press the TV/Radio button.
58
Page 59

7 Hard disk operation
The HDTV is equipped with a permanently integrated hard disk device. Thanks to the hard
disk and the PVR function (PVR = Personal Video Recorder) you no longer need to use
any external equipment for recording (e.g. Video or DVD recorders). The recording capacity depends on the data volume of the materials broadcast and also on the size of the hard
disk. Any modification unauthorized by TechniSat is prohibited and will lead to all warranty
being void.
Hard disk recordings of programs from sources of DVB-S, DVB-C, DVB-T and Analog CT
as well as external sources EuroAV 1, EuroAV 2 and Video/S-Video can be handled. In the
process, provided they are broadcast, additional sound channels in additional to the normal
audio and video data, as well as recorded video text and subtitle data, can be recorded.
These features can be accessed during the subsequent playback, as described in Points
6.7, 6.8 and 6.9.
7.1 Recording
The following recording modes are available to you, to record broadcasts onto the hard disk.
1. Immediate recording
Choose this recording option, to record the program currently being shown at the touch of a
button.
2. Timer-controller recording
This function allows your TV set to be switched on and off, in order to record desired programs on the hard disk, e.g. when you are outside. To do so, you can program the timer
manually or automatically using the EPG function.
7
3. Timeshift recording
The timeshift recording function allows delayed viewing of programs. This allows you to
watch what has been already recorded as the recording process continues.
Please note, that if the device is connected to a satellite unit, you should always use the
HDTV with two separate DVB-S antenna connections, in order to have access to all the
recording facilities during DVB-S operation. This allows you to use the following combinations of recording and playback:
- Record a program and playback another program or watch a favourite hard disk
recording at the same time.
- Record two programs at the same time, even when they are being received by differ-
ent receivers.
- Record two different programs at the same time and playback a program that has
already been recorded.
If only a DVB-S antenna connection is available for connecting the HDTV, the recording
and playback scope will be limited.
- Record a program and at the same time, play back another program from the Same
receiving area or a favourite hard disk recording.
- Record two programs at the Same time from the same recording area.
- Record two different programs from the Same receiving area at the same time and
playback a program that has already been recorded.
59
Page 60

7.1.1 Immediate recording
7.1.1.1 Starting recording manually
Option 1:
> Switch on the program/source, of which you would like to make a recording.
> Press the Record button in order to record the program in question. While the
recording is proceeding, the program is still shown on the screen. At the start of the
recording, a note will be indicated to you at the top right of the screen as well as in
the Infobox.
> To pause the playback of the current program at a particular point, press the
Pause / Play button.
While the recording proceeds in the background, a still image appears on the screen.
> To proceed with the playback of the program from this point, press the Pause /
Play button again.
You will now view the program with a time delay relative to the live broadcast
(Timeshift), while the recording of the program in question continues.
Option 2:
> If you have to interrupt the viewing of a program, e.g. during a telephone call or simi-
lar, you can pause the playback by pressing the Pause / Play button and start the
recording of the program at the same time.
While the recording starts in the background, a still image appears with a note in the
top right corner of the screen, as well as in the Infobox on the screen.
> To proceed with the playback of the program from this point, press the Pause /
Play button again.
You will now view the program with a time delay relative to the live broadcast
(Timeshift), while the recording of the program in question continues.
7.1.1.2 Ending recording manually
> First select as applicable the recording to be ended, by accessing the Navigator
through OK, marking the recording using the arrow keys and confirming with OK.
> Now press the Stop button.
The query is displayed “Would you like to store or discard the record-
ing?”.
> Use the up/down arrow keys to select Store, to store the recording on the hard
disk, or Discard if you do not wish to store the program.
> Confirm your selection by pressing OK.
60
Page 61

7.1.1.3 Ending recording automatically
Option 1:
> Press the On / Standby button.
Now a query appears which should indicate the running recording.
> Use the up/down arrow keys to mark the line containing the desired action and
confirm with OK.
The TV set now records the actual program completely or up to the selected time
period and subsequently reverts to standby mode (Standby), the screen is then
switched off directly after the selection.
> If you switch the TV set on before the end of the recording, proceed as described in
Point 6.14.2.4.
Option 2:
> Press the Record button.
A window will be displayed on screen, showing the functions
> Use the up/down arrow keys to mark the line, which contains the desired action,
e.g. +1 hour, and confirm with OK.
The TV set will now record the programme(s) being broadcast on the channel select-
ed for the time period selected, and will then automatically stop recording
7.1.2 Timer recordings
Using the hard disk timer, you can automatically record programs to the hard disk, e.g. when
you are absent.
You may either programme the timer by means of the EPG function as described in Point
6.13.7.2, or manually as described in Point.6.14.1.1
Note when operating the HDTV while using a hard disk timer also Point 6.14 as well as
Point 6.14.2.
Please note!!!
Please ensure that the device has acquired the time. This will be displayed during operation
in the Infobox. Should this not be the case, allow your device to remain for approx. 30 seconds on e.g. ZDF or the station switched on in accordance with Point 8.3., so that the time is
read.
7
61
Page 62
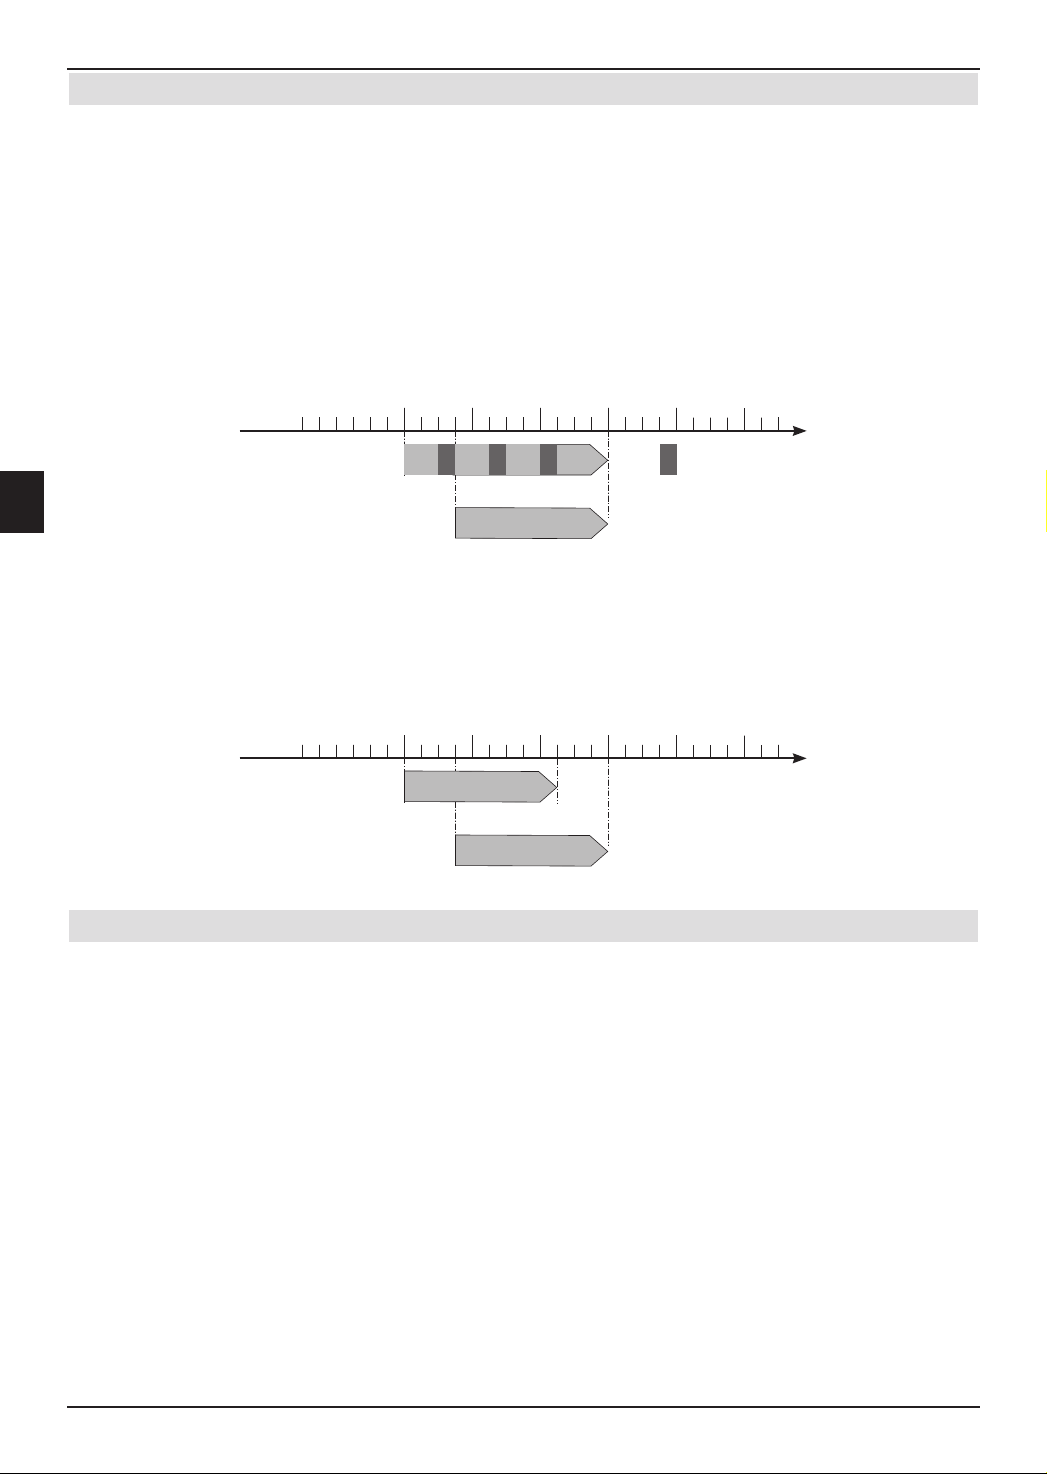
7.1.3 Timeshift function
The timeshift function can be used to facilitate playback and recording being implemented
at the same time. This allows time-delayed TV viewing. This means you can watch the
beginning of the recording and thus skip precorded sections (e.g. commercial breaks). At the
same time, the live signal of the broadcast is still being recorded. (see following examples)
Example: Skipping commercial breaks
Would you like to watch a program without having annoying commercial breaks?
With the PVR function, you can skip over any commercial breaks recorded quite easily.
Time
PVR recording
PVR playback
Trans-
mission
Example: Time-delayed playback
You missed the start of the Formula 1 race. No problem!
The PVR shows you the race in time-delayed format,
while it continues to record.
Time
PVR recording
PVR playback
Start / Formula 1 / Stop
Starting timeshift function
Trans-
W
Trans-
W
mission
mission
Trans-
mission
Start / Formula 1 / Stop
Trans-
W W
mission
19:0018:0017:0016:0015:0014:00
Commercial break
19:0018:0017:0016:0015:0014:00
> Press the Pause / Play button.
The playback of this broadcast is stopped and, at the same time, the recording of
the current program commences. While the recording starts in the background, a
still image appears with a note in the top right corner of the screen, as well as in the
Infobox on the screen.
> To proceed with the playback of the program from this point, press the Pause /
Play button again. You will now view the program with a time delay relative to the
live broadcast (Timeshift), while the recording of the program in question contin-
ues.
> To go to a particular point of the current recording, the Playback, Pause and Jog
shuttle functions are available as well as fast forward/rewind, as described in Point
7.2.
> by pressing the Info button, the Infobox will be shown with a progress bar, which
shows the elapsed recording time as well as the time delay with the live broadcast.
62
Page 63

7.1.4 Setting markers while recording
> By pressing the Record button during a current recording, a window with the avail-
able functions will be opened.
> Use the arrow keys up/down to mark the line Set mark confirm by pressing
OK.
A marker will now be set at the current position. Continue in thiis manner to set
markers at all desired places.
Marking can be done automatically or manually during a recording (Point 7.2.5) and
in the manage hard disk menu (Point 7.3.1.3) provided the automatic program mark-
ing function is activated (Point 8.4.2.3).
7.2 Playback
Access to your hard disk recordings can be made through the hard disk or PVR navigator.
7.2.1 Viewing hard disk recordings
> During normal operation, press the Stop key to open the PVR navigator. Based
on whether you are in TV or radio operation, a list appears with all the TV or radio
recordings contained on the hard disk. The marked recording will be already shown
in the preview window.
> Now use the up/down arrow keys to mark the recording, which you would like to
view.
> Start the playback by pressing the OK button.
Within a short time, the Infobox appears with the overall recording duration and the
actual position as well as other useful information (see Point 6.4.1).
7.2.1.1 Record one/two program/s and watch one current recording at the
same time
While one or two recording/s are proceeding, you can play back a current hard disk recording.
> Access the PVR navigator when two current recordings are running by pressing OK
and with one running recording by pressing the OK button and subsequently the
green function key.
> Now use the up/down arrow keys to mark the recording, which you would like to
view.
7
> Start the playback by pressing OK.
7.2.2 Pause / still image
> To pause the playback of a recording (Still image), press the Pause / Play button
during the playback. Appears Pause II the indication.
> To restart the playback of the program from this point, press the Pause / Play but-
ton again.
63
Page 64

7.2.3 Fast forward and rewind
To access a specific part of a recording, your PVR possesses fast forward and rewind functions.
> During playback press the fast forward or rewind button. The indication Forward
uu or Rewind tt appears.
The recording will now be spooled at 4 times the normal speed in the chosen direc-
tion.
> If you press the Fast forward or rewind button again, the search speed increases to
16-times.
The indication Fast Forward uuu or Rewind ttt appears.
> If you press the Fast forward or rewind button again, the search speed increases to
64-times.
The indication Fast Forward uuuu or Rewind tttt appears.
> By pressing the Fast forward or Rewind button, you can jump Backward or
Forward by 10 minute steps.
> Once the desired section of the recording is reached, you can press the Pause / Play
button again to revert to normal playback operation.
7.2.4 Jog shuttle function
In addition, your TV set features a so-called jog-shuttle function which allows you to go to a
specific place in your recording very quickly and precisely. This can be used as follows:
> While in playback mode, press the key Jogshuttle on/off (Freeze frame),to go to
the jog-shuttle mode.
The playback of the recording will be stopped (Freeze frame). The symbol “uII” will
be displayed.
7.2.4.1 Fast forward and rewind
> By pressing the right/left arrow keys several times if necessary, you can change
the speed and direction of playback.
In the process, the playback modes will be shown in the following table.
Display Playback mode
uII
Iu
u
uu
uuu
uuuu
tt
ttt
tttt
Pause
Slow motion
Playback
Fast forward 4-times speed
Fast forward 16-times speed
Fast forward 64-times speed
Rewind 4-times speed
Rewind 16-times speed
Rewind 64-times speed
> By pressing the right or left arrow keys uuuu or tttt during the on-
screen note you can jump forward or back by 10 minutes.
64
Page 65

7.2.4.2 Slow motion
> By pressing the right arrow key once, the recording will be played back in slow
motion and the indication “Iu” will be displayed.
7.2.4.3 Single image stepping
> Press the arrow key up or down to display the next frame in a forward direction
in a backward/reverse direction.
7.2.4.4 Create image
> By pressing the Record button a single image can be transferred to the hard disk.
By creating images in this way you can, as described in Point 6.18, access and also
manage as described in Point 7.3.2.
7.2.5 Setting markers
> As described before, go to the place in your recording at which you wish to insert a
marker.
> Press the Record key to set a marker at the selected spot.
Continue in this manner to set markers at all desired places. Marking can be done
automatically or manually during a recording (Point 7.1.4) and in the Manage hard
disk menu (Point 7.3.1.3), provided the automatic program marking function is acti-
vated (Point 8.4.2.3).
7.2.6 Jump to marked points
During the playback of the recording, you can jump directly to marked points, which you
have previously made as described in points 7.1.4, 7.2.5 or 7.3.1.3.
> By pressing the Option button during playback, a window with the marking present
will be opened.
In addition, the mark “Current” will appear. This indicates the actual playback position
within the recording.
> As soon as you use the up/down arrow keys to highlight a mark, the playback
commences from that point.
> By pressing the OK button, the window is closed and you revert to normal playback
operation at the marked place.
7
7.2.7 Ending playback
> Press the Stop button, to end the playback. The playback is ended and your TV set
reverts back to normal operation. In this process, your TV set “notices” the point in
the recording at which playback has been ended. When you restart the playback of
this recording, it automatically recommences from the place you previously ended.
65
Page 66

7.3 Manage hard disk
> Access the Main menu by pressing the Menu button.
> Use the up/down arrow keys to mark the hard disk line.
> Confirm by pressing OK.
The manage hard menu Program will be displayed.
> Use the arrow keys up/down to move the marker within the menu, and to
change the individual items as indicated.
7.3.1 Manage recording
In this menu, you have the chance to process, delete and protect your recordings against
children viewing.
> Press the OK button to go into the Manage recording submenu.
A list appears with the recordings contained on the hard disk.
> Use the up/down arrow keys to mark the desired recording.
7.3.1.1 Deleting
> To delete the marked recording, now press the red function key Delete.
> Use the right/left arrow keys to mark OK in the query box that appears, to
delete the recording or the field Cancel to cancel the process.
> Confirm your selection by pressing OK.
7.3.1.2 Child protection
Recordings that are unsuitable for children and young people can be stored. These recordings can then only be played back when a 4 digit PIN is entered. In order for the child protection function to be active, this must, as described in Point 8.8, be switched on.
> To store the marked recording, press the green function key. The selected record-
ing us then stored with the child protection symbol showing.
7.3.1.3 Processing
> By pressing the yellow function key Process you access the menu for processing
of the marked hard disk recordings.
This is played back in a preview window (1). In addition, the markings during this
recording (2) are shown. By default, these markings are shown at the Start and
End. In addition, a yellow progress bar (3) is indicated, which shows the actual play-
back position and the overall recording duration. In addition, a red bar (4) is also dis-
played. This shows the actual recorded portion between two marks.
> In order to jump to a portion of the recording designated by a mark, mark the record-
ing at the desired point using the up/down arrow keys and confirm with OK.
66
Page 67

7.3.1.3.1 Jumping to the preferred portion of the recording
> Using the Forward, Rewind, Pause/play and Jog-shuttle buttons
(see Points 7.2.2 - 7.2.4) you can access preferred portions of your recordings.
7.3.1.3.2 Functions
> By pressing the green function key Menu you can open a window with the func-
tions available for processing the recording.
7.3.1.3.3 Placing marks
> As described before, go to the place in your recording at which you wish to insert a
marker.
> Press the green function key Menu to open the function window.
> Use the up/down arrow keys to position the line mark.
> Press the OK button to set a marker at this point in the recording. Marks can be set
manually or automatically, as described in points 7.1.4 and 7.2.5, provided the auto-
matic program marking function (Point 8.4.2.3) is activated.
7.3.1.3.4 Deleting marks
> Use the up/down arrow keys to mark a marked point, which you wish to delete.
> Press the Green function key Menu, to open the function window.
> Use the up/down arrow keys to position the line mark.
> To delete the mark, confirm by pressing OK.
Only the marks (position marks) will be deleted with no effect at all on the recording
– it will remain completely unaffected.
7.3.1.3.5 Jump to marked points
At the touch of a button you can jump to a point marked by a mark.
> Use the up/down arrow keys to mark a marked point, to which you wish to jump.
> Press the green function key Menu and use the up/down arrow keys to jump
to the line mark.
7
> To jump to this mark, confirm by pressing OK.
7.3.1.3.6 Renaming marks
> Use the up/down arrow keys to mark a marked point, which you would like to
rename.
> Press the green function key Menu and use the up/down arrow keys to mark
the line rename marks.
> To open the virtual keyboard, confirm by pressing OK.
> Now use the virtual keyboard to enter the desired names. In the process, the
buttons of the remote control are configured to the following functions:
67
Page 68

Arrow keys: The marked portion moves.
OK: The marked letters will be included in the names and placed
behind them.
Yellow function key: The keyboard switches between upper/lower case as well
as symbols.
Red function key: The last letter of the name is deleted.
Blue function key: You quit the input name process without making any change
and return to the record processing menu.
Green function key: The input name is confirmed.
> After pressing the green function key, a query appears, asking whether the name
should be confirmed. Use the arrow keys left/right to select the field OK, and
confirm the names by pressing OK.
7.3.1.3.7 Deleting portions
Your PVR gives you the chance to delete specific portions of an existing recording (e.g.
commercial breaks).
Please note:
The deleted portions will be irretrievably removed from the hard disk in the process.
To delete a portion, proceed as follows:
The beginning and the end of the section that is to be removed must be indicated by two
markers.
> To do this set a marker at the beginning and at the end of the section to be extracted
with one marker each, as described under setting markers.
The Start and End marks already present can also be used for this purpose.
> Now use the arrow keys up/down to set the marker indicating the beginning of
the section to be deleted. The section to be deleted will now be indicated in red on
the progress indicator as well as in the overview of existing markers.
> Now press the green function key Menu and use the up/down arrow keys to
mark the area To be deleted.
> Press OK to display a query window.
This contains information on the portion to be deleted.
> To confirm deletion of the portion, use the right/left arrow keys to indicate the
field OK and confirm with OK.
7.3.1.3.8 Copying portions
This function allows you to copy a section of a recording. A new recording is generated,
consisting only of this section. The recording from which this section is copied remains in
memory unchanged.
To copy a section, proceed as follows:
The beginning and the end of the section that is to be copied must be indicated by two
markers.
> To do this set a marker at the beginning and at the end of the section to be extracted
with one marker each, as described under Setting markers.
The Start and End marks already present can also be used for this purpose.
68
Page 69

> Now use the arrow keys up/down to set the Marker indicating the beginning
of the section to be copied.
The section to be copied will now be indicated in red on the progress indicator as
well as in the overview of existing markers.
> Now press the green function key menu and use the up/down arrow keys to
mark the area to be copied.
> Press OK to display a query window.
This contains information on the portion To be copied.
> To confirm the copying of the portion, use the right/left arrow keys to indicate
the field OK and confirm with OK.
The marked section will now be copied to a new recording. Depending on the size of
the section, this may take several minutes.
7.3.1.3.9 Splitting a recording
This function allows you where, for instance, two successive programs were recorded as a
single recording, to split these into two individual recordings. Each recording will be split at
the point indicated by the relevant markers.
Recordings can be split as follows:
> Set a marker at the beginning of the section to be separated, as described under
Set marker.
> Now use the arrow keys up/down to mark the marker from which the total
recording is to be split.
> Now press the green function key Menu and use the arrow keys up/down to
mark the line split recording.
> Press OK to display a query window.
This will show information relating to the two recordings to be created by the split.
> To actually divide the recording, use the right/left arrow keys to indicate the field
OK and confirm with OK.
7.3.1.3.10 Renaming recordings
Your PVR removes information from the broadcast data stream concerning the name of the
broadcast programs. If a single recording includes several programs, all the names of the
stored programs are compiled and stored internally.
To rename a recording, proceed as follows:
> Press the green function key Menu and use the up/down arrow keys to mark
the line rename recordings.
7
> By confirming with OK, a list appears with the possible titles.
> Use the up/down arrow keys to select the title that you wish to assign and con-
firm with OK.
> Use the arrow keys left/right to select the field OK in the subsequent query
window, and confirm by pressing OK.
> If you would like to rename the recording with your choice of name, simply mark a
New entry instead of the displayed names using the up/down arrow keys.
69
Page 70

> By pressing the OK button, the virtual keyboard is superimposed, which which you
may, as described in the Renaming marks section, enter new names.
7.3.1.3.11 Enlarge video
To faciliate finding the desired portion of a recording, you can increase the size of the video
picture of the recording.
> Press the green function key Menu and use the up/down arrow keys to mark
the line Expand video.
> By confirming with OK, an expanded version of the video screen is shown.
Now you can reach the desired portion of the recording, as described in Point
7.3.1.3.1.
> To make the video image smaller again, proceed in the same way, except for mark-
ing the line Reduce video size.
7.3.2 Managing music/pictures
With your TV set, as described in Points 6.17 and 6.18, you can play back MP3 and JPG
files. To copy the relevant files to your hard disk, connect a USB device, as shown in Point
4, on which MP3 or JPG files are contained, with the USB socket of the TV set.
Please be note that you can only manage MP3 files in the Copy music and only JPG
images in the Copy images.
> Call up the menu Manage hard drive as described in Point 7.3.
> Use the up/down arrow keys to mark the line copy music or copy images,
to manage the relevant files.
> Confirm by pressing OK.
In the menu, which is divided into two, the left half (internal data storage) shows
the files, folders and playlists stored on the hard disk. The right side (external data
storage medium) shows the files, folders and playlists that are included on the con-
nected USB device.
> Use the green function key External to switch to the USB device or the red func-
tion key Internal to the hard disk.
The first file or first folder of the list is marked.
Individually marking
> Now use the arrow keys to mark the file, playlist or folder which you wish to copy,
move or delete.
For files, the functions display or access are also available.
> Proceed with the marking process as described in Points 7.3.2.1 - 7.3.2.3, to copy,
move or delete the files, playlists or folders.
Marking in blocks
To mark several files/playlists simultaneously, proceed as follows:
> First use the arrow keys to mark a file/playlist that you wish to copy, move or
delete.
70
Page 71

> Press the OK key to go to the selection mode. The recording will be marked with a
cross on the left side.
> Using the arrow keys, the subsequent or previous files/playlists can also be
marked.>
> After you have proceed to mark the desired files in this way, proceed as described in
Points 7.3.2.1 and 7.3.2.3, to copy or delete the recordings.
Please note that the marking of folders in blocks is not possible! To copy, move or delete
several folders at the same time, you can use the function Selective marking.
Selective marking
With this function, multiple folders and/or files/playlists can be marked, to copy, move or
delete them all at once. In this process, unlike when marking in blocks, the selected folders,
files and playlists need not be in consecutive order adjacent to each other.
> Press the blue function key Functions in order to open the selection window
showing the available functions.
> Use the arrow keys to mark the line Select and confirm by pressing the OK but-
ton.
> Now use the arrow keys to mark the file, playlist or folder, which you wish to copy, move or
delete.
7
> Finally press the yellow function key Select.
The file, playlist or folder will be marked with a cross on the left side.
> Repeat the last two steps, to mark the desired files, playlists and/or folders and then
proceed as described in Points 7.3.2.1 - 7.3.2.3, to copy, move or delete the files,
playlists and/or folders.
7.3.2.1 Copying
The Copying function allows you to create a copy of the marked file/playlist or the
marked folder on the hard disk or on the USB device. The original file or folder remains
intact.
> Mark the Files, Playlists or Folders, as described under Individually mark-
ing, Marking in blocks or Selective marking, which you wish to move onto
the hard disk or USB device.
> Press the blue function key Functions to open a window showing the functions
available.
> Use the up/down arrow keys to mark the line Copying and confirm with OK.
> To delete the marked files, playlists or folders, now press the yellow function key
Delete. A Copy is now made of the marked files, playlists or folders.
71
Page 72

7.3.2.2 Moving
The moving function will move the marked files/playlists or the marked folder from the
source medium (e.g. a USB device) to the target medium (e.g. the hard disk). The moved
files/playlist or the moved folder is subsequently located only on the target medium.
> Mark the Files, Playlists or Folders, as described under Individually mark-
ing, Marking in blocks or Selective marking, which you wish to move onto
the hard disk or USB device.
> By pressing the blue function key Functions, the function window opens.
> Use the up/down arrow keys to mark the line Moving and confirm with OK.
> To delete the marked files, playlists or folder, now press the yellow function key
Delete.
The marked files, playlists or folder are now moved to the other device.
7.3.2.3 Deleting
To delete files or a folder, proceed as previously:
> Mark the Files, Playlists or Folders, as described under Individually mark-
ing, Marking in blocks or Selective marking, which you wish to delete from
the hard disk or USB device.
> By pressing the blue function key Functions, the function window opens.
> Use the arrow keys up/down to mark the line Delete and confirm with OK.
> To delete the marked files, playlists or folder, now press the yellow function key
Delete.
The marked files, playlists or folder are now deleted.
7.3.2.4 Sampling MP3 files/Show pictures
To Play an MP3 file in this menu or view a JPG file, the functions Play or display are available to you.
> Use the arrow keys to mark the relevant file.
> Press the blue function key Functions to open a window showing the functions
available.
> Use the up/down arrow keys to mark the line Play or Display and confirm
with OK.
> By pressing the yellow function key, the file currently marked will be played or dis-
played.
72
Page 73

7.3.3 Copying recordings
This function allows you to export recordings from the internal hard drive to an external USB
device, e.g. another hard drive.
> Call up the menu Manage hard drive as described in Point 7.3.
> Use the up/down arrow keys to mark the line Copying recordings.
> Confirm by pressing OK.
The menu Copy recordings will be displayed.
On the left half of the screen you can see the recordings available on the internal
hard drive. The right half of the screen shows the contents of the USB device.
Individually marking
> Using the arrow keys, you can mark the recording, which you wish to export,
delete or view in the preview window.
> Proceed with the marking, as described in Points 7.3.3.1 - 7.3.3.3, to copy or delete
a file or to start up the preview window.
Marking in blocks
To mark several recordings simultaneously, proceed as follows:
> First use the arrow keys to mark a recording, which you wish to copy or delete.
7
> Press the OK key to go to the selection mode. The acceptance is marked with a
cross on the left side.
> Using the arrow keys, the subsequent or previous recordings can also be marked
now.
> After you have proceed to mark the desired files in this way, proceed as described in
Points 7.3.3.1 and 7.3.3.3, to copy or delete the recordings.
Selective marking
With this function, multiple recordings can be marked, in order to copy or delete them in one
go. In this process, unlike when marking in blocks, the selected recordings need not be in
consecutive order adjacent to each other.
> Press the blue function key Functions, in order to open the selection window
showing the available functions.
> Use the arrow keys to mark the line Select and confirm by pressing the OK but-
ton.
> Use the arrow keys to select the recording, which is to be copied or deleted.
> Finally press the yellow function key Select. The acceptance is marked with a
cross on the left side.
> Repeat the last two steps, in order to mark the desired recordings and subsequently
proceed as described in Points 7.3.3.1 or 7.3.3.3, to copy or delete the recordings.
73
Page 74

7.3.3.1 Exporting
The Export function creates a copy of the marked file on the USB device. The original file
remains intact.
> Mark, as described under Individual marking, Marking in blocks or Selec-
tive marking the recording/s, which you wish to delete from the hard disk or the
USB device.
> Press the blue function key Functions to open a window showing the functions
available.
> Use the arrow keys up/down to mark the line Export and confirm by pressing
OK.
> To copy the marked files, now press the yellow function key Export.
The marked files will now be copied to the USB device, and will then be displayed in
the right half of the menu.
Please note that this procedure may take quite some time, depending on the size of
the recordings.
7.3.3.2 Preview
This function allows you to start the playback of a file in a small preview window.
Use the arrow keys to mark the file you would like to preview.
> Press the blue function key Functions to open a window showing the functions
available.
> Use the arrow keys up/down to mark the line Preview and confirm by pressing
OK.
> To start the preview of the marked file, you must now press the yellow function key
Preview.
7.3.3.3 Deleting
You can also delete a file on the internal hard drive resp. on the USB device while working
in this menu.
> Use the green function key External to switch to the USB device or the red func-
tion key Internal to switch to the hard disk as applicable. The first file on the list is
marked.
> Mark, as described under Individual marking, Marking in blocks or Selec-
tive marking the recording/s which you wish to delete from the hard disk or the
USB device.
> Press the blue function key Functions to open a window showing the functions
available.
> Use the arrow keys up/down to mark the line Delete and confirm with OK.
> To delete the marked files, now press the yellow function key Delete.
A query message will be displayed, asking “Do you really wish to delete the
selected files”.
> To carry out the deletion operation, use the arrow keys to select the field Yes, or
to cancel, select No, and confirm with OK.
74
Page 75

7.3.4 Hard disk information
> Access the Hard disk menu, as described in Point 7.3 and mark the point Hard
disk information.
> By pressing the OK button, a window appears with information about the integrated
hard disk.
7.3.5 Hard disk maintenance
> Access the Hard disk menu, as described in Point 7.3 and mark the point Hard
disk disk maintenance.
> Press the OK button, to get an overview of the contents of the hard disk and the
number of recordings contained.
7.3.5.1 Verification of the hard disk
> To start the process of checking the hard disk, use the right/left arrow keys to
mark the field Test.
> Press the OK key.
A query box opens, whether to proceed with the test or not.
> Use the arrow keys left/right to select the field OK, and confirm by pressing
OK.
The test process is not started and may take several minutes, depending on the
extent to which the hard disk is filled and on the number of recordings contained.
Subsequently, you will receive the test results displayed on screen.
7
7.3.5.2 Formatting the hard disk
When formatting the hard disk, the file system will be renewed. This may become necessary, when the process of testing the hard disk reveals any error.
Note!
When formatting the hard disk, all information is deleted, which means
that all recordings contained will be wiped.
> To format the hard disk, use the right/left arrow keys to mark the field Format.
> Press the OK key.
A query box opens, whether to proceed with the Formatting or not.
> Use the arrow keys left/right to select the field OK, and confirm by pressing OK.
The formatting is now started and may take a few minutes to complete.
Please note!
The device may only be operated with the integrated hard disk. Otherwise, this may lead to
the device being damaged. With this in mind, do not open up the device and do not attempt
to replace the hard disk, since this will void any warranties.
75
Page 76

7.3.6 Quitting hard disk management
> Return by pressing the Back button to the previous menu level.
or
> Press the TV/Radio key to return to normal operation.
76
Page 77

8 Settings
With the help of the OSD menu, all the device settings can be made using only a few buttons on the remote control. This means e.g. you can adjust image, sound and basic settings
on the HDTV or those in the electric EPG journal, the child protection function and other
special functions. Moreover, antenna settings can also be changed and the signal strength
is also indicated.
> Access the Main menu by pressing the Menu button.
> Use the up/down arrow keys to mark the line Settings.
> Confirm by pressing OK.
The menu Settings will be displayed.
8.1 Image settings
In the image settings menu, you can adapt images from any source based on your own individual wishes.
Note, that certain settings are not applicable to all sources.
> Access the Settings menu, as described in Point 8.
> Use the up/down arrow keys to mark the line Image settings and confirm with
OK.
The menu basic settings will be displayed.
8
8.1.1 Select source
Since the image settings can be set individually for each source, you must first select the
source, for which you wish to change the settings.
> Using the up/down arrow keys, mark the line Source.
> by pressing the OK button, a window opens with the various sources.
> Now use the up/down arrow keys to mark the source, from which you would like
to adjust the image settings.
> Confirm by pressing OK.
The image settings menu with the available entries will now be adapted to the select-
ed source.
8.1.2 Access previously set image values
For the various image values, there are two determined settings, which you can access. The
image settings can subsequently be adapted as you like, as described in the following point
> Press the yellow function key Image mode.
A window now opens to select the image mode.
> Use the up/down arrow keys to mark the selected image mode.
> By pressing the OK button, the values of the marked image mode are accessed.
77
Page 78

8.1.3 Manually adjusting image values
8.1.3.1 Light control
Here choose whether the adjustment of the background light should be done automatically
based on the brightness of the surroundings (Auto 1 or Auto 2) of the image content
(Dynamic) or whether this should be processed manually.
> Use the up/down arrow keys to mark the line Light control.
> Set the light control using the right/left arrow keys to Auto 1, Auto 2,
Dynamic or Manual.
8.1.3.2 Background lighting
This functions helps you adjust the display background lighting to the surrounding brightness
and is only adjustable, when you have selected Manual in Point 8.1.3.1.
> Mark the line Background lighting using the up/down arrow keys.
> Use the right/left arrow keys to adjust the intensity of the background lighting of
the LCD panel.
8.1.3.3 Color temperature
This point allows you to adjust the color temperature of the LCD panel.
> Mark the line Color temperature using the up/downarrow keys.
> Using the right/left arrow keys select the Color temperature 6500 K, 7900 K,
9300 K or 10000 K.
8.1.3.4 Contrast
Increase the level of contrast, when the image looks “flat”. Reduce the contrast when the
details in the bright parts of the image are no longer clearly visible.
> Mark the line Contrast using the up/down arrow keys.
> Asjust the contrast using the right/left arrow keys.
8.1.3.5 Brightness
Increase the brightness, when details in dark parts of the image are no longer perceivable,
and reduce it when black objects appear gray.
> Mark the line Brightness using the up/down arrow keys.
> Using the right/left arrow keys, adjust the level of brightness to suit your wishes.
8.1.3.6 Colors
> Using the up/down arrow keys, mark the line Colors.
> Use the right/left arrow keys to adjust the color intensity.
78
Page 79

8.1.3.7 Brilliance
Using the brilliance setting, you can select between three different characteristic curves for
the control of the LCD panel. Through these three curves, various different brilliance settings of the image can be made. In order to select which brilliance level suits you best for an
existing image, since the differences between the settings are best perceived in this way.
> Using the up/down arrow keys, mark the line Brilliance.
> Use the right/left arrow keys to set the brilliance to Setting 1, 2 or 3.
8.1.3.8 Aspect ratio
With this setting, you can decide how broadcasts that are transmitted in a 4:3 format should
be shown (that is the conventional TV format) on your 16:9 widescreen TV set.
Original
With the original setting, you can achieve an undistorted portrayal, true to the original.
Naturally, you will see black lines to the left and right of the picture.
Optimal
The optimal setting offers you a compromise. Here, the image is expanded to remain true
to the original format, which involves certain image information being taken from the top and
bottom. However, it generally does not affect the broadcast services in this area, which can
still transmit most important images, since conventional TV sets never show the entire image
for other technical reasons. In this setting, narrow black lines remain to the left and right.
Optimal 16:9
In the optimal 16:9 setting, the the narrow 4:3 image is expanded to fit the entire width of
the screen. Moreover, the image, as in the optimal setting, is cut off slightly at the top and
bottom. This means the image is not so strongly distorted, as in the stretch setting, despite
using the entire width of the screen.
Full zoom
In the full zoom setting, you can enjoy an undistorted portrayal of the 4:3 image over the
entire area of the screen. However, this involves a relatively large portion of the image being
cut off at the top and bottom edges.
Stretch
The stretch setting zooms the actual narrow image to the full width of your 16:9 device. As
a result, the black lines are eliminated, but the geometry of the image shown is distorted.
8
> Using the up/down arrow keys, mark the line Aspect ratio.
> Use the right/left arrow keys to set the original, optimal, optimal 16:9, full
zoom or stretch settings for the aspect ratio.
79
Page 80

8.1.3.9 Format recognition
With this setting, you can decide in which way the automatic recognition function of 16:9
broadcasts should be implemented.
Generall speaking, the image source will indicate whether the broadcast is transmitted in a
4:3 or 16:9 format. In the Signalling setting, the playback of the program based on the
relevant image format can subsequently be correctly implemented.
However, errors in signalling may occur. If so, your TV set will assume that the program is
transmitted with a 4:3 format. A 16:9 broadcast without signalling will then be shown with
black bars to the left and right as well as upper and lower bars, (if you have selected the
stretch option, however, the bars appear only to the top and bottom). If there is no signalling for a 16:9 broadcast, you have the chance to increase the size of the image accordingly
using the zoom function (see Point 6.10). When you choose the setting with black bars,
also in the event of a lack of signalling, there is automatic recognition of a 16:9 broadcast
due to the black bars. The TV set will then automatically switch after a short period to the
16:9 portrayal itself.
Unfortunately, there are also broadcasts which do not signal 16:9 broadcasts because they
wish to include advertising in the black lines to the top and bottom. Therefore the automatic
function soon detects whether the bars are really black or whether they contain image information depending on the case. In this case, it is advisable to either select the Signalling
option instead of the setting with the black bars, and use the zoom function to manually
adjust to the desired portrayal.
(not with VGA)
For the very unlikely situation that a 4:3 broadcast is signalled as a 16:9 one, the format recognition function can be optionally switched off
> Using the up/down arrow keys mark the line Format recognition.
> Use the right/left arrow keys to set the format recognition to black bars or
Signalling or switch this off, when you do not wish to use the format recognition
function.
80
Page 81

8.1.3.10 Extended settings
In addition to the means of image adjustment already explained, you can find further methods of adjustment in the sub-menu further settings.
> Use the arrow keys up/down to mark the line Further settings.
> Open the Further settings by confirming with OK.
8.1.3.10.1 Contrast enhancement
In addition to the contrast setting, you have, via the contrast enhancement mode, an additional opportunity to improve the contrast of the device
> Use the up/down arrow keys to mark the line Contrast enhancement.
> Activate the contrast enhancement using the right/left arrow keys or switch this
on (off).
8.1.3.10.2 Image definition
The soft setting is advisable, when MPEG objects (building blocks) are distracting from the
view (The image is transmitted at too low a data rate). For analog sources, the setting strong
can lead to an enhancement of the image. The setting Extra is especially recommended for
HDMI sources. Otherwise, we recommend the Normal setting.
> Using the up/down arrow keys, mark the line Image definition.
8
> Use the right/left arrow keys to set the image definition to Soft, Normal,
Strong or Extra.
8.1.3.10.3 Noise cancellation
With the noise cancellation function, the visual impression when watching sources affected
by image noise (e.g. an old film) improved. This function is achieved by wiping effects during
movements.
> Using the up/down arrow keys, mark the line Noise cancellation.
> Use the right/left arrow keys to set the value of the noise cancellation to Low,
Medium, Strong or Extra or switch the function off.
8.1.3.10.4 Movement compensation
The movement compensation function prevents disturbing jerking movements (especially
caused by camera shake) during the playback of film material. Unlike TV cameras, which
shows 50 frames a second, film cameras show only 24 images. When filming fast movements, that is too few. With this in mind, the movement compensation function compensates
with movement analysis through a complicated calculation process during the time between
images.
> Use the up/down arrow keys to mark the line Movement compensation.
> Use the up/down arrow keys to switch the movement compensation function
on or off.
(not with VGA)
81
Page 82

8.1.3.10.5 Color space
For the three HDMI inputs, you can also select the color space option, to adjust the way in
which the playback is shown on screen.
> Using the up/down arrow keys, mark the line Color space.
> Using the right/left arrow keys, select the desired Color space setting
RGB-expanded (DVI-PC) or RGB-normal (DVI-Video).
(only for HDMI)
8.1.3.10.6 Overscan
In TV technology, not all the image content is shown on the screen. Instead, the image is
shown in a slightly expanded form, which involves certain rings being cut out of the image
content. This is done to avoid disturbances caused by stripes, which can affect the actual
image content, by causing the visible section of the image to be moved off the screen. This
method is known as overscan. With this point, you have the chance to select between the
two overscan options 5 % (Action safe) and 10 % (Title safe) or to switch off the
function.
> Mark the line Overscan using the up/down arrow keys.
> Using the right/left arrow keys, select the desired Overscan setting, either
5 % (Action safe) or 10 % (Title safe) or switch off the function completely.
(not with VGA)
8.1.3.10.7 Quit further settings
> Press the Back button, to quit the Further settings and return to the image set-
tings menu.
Note, that the settings made in this submenu, when leaving the image settings menu, can
be retained or discarded as described in Point 8.1.4.
8.1.4 Quit image settings
To quit the Image settings menu, the following options are available:
> Press the green function key to Confirm.
A query box now appears, asking whether the changes previously made should only
be confirmed for the currently selected source or for all sources.
> Mark the line which contains the desired option using the up/down arrow keys
and confirm with OK.
Alternatively
> Press the Back button.
A query box now appears, asking whether you would like to apply the changes made
only for the actual source selected, for all sources or cancel.
> Mark the line, which contains the desired option, using the up/down arrow keys
and confirm with OK.
Alternatively
> To revert directly to normal operation, without retaining the changes, press the
Menu button.
82
Page 83

8.2 Sound settings
In the sound settings menu, you can adjust the tone of the loudspeaker/audio outputs and
the headphone connection. Likewise, you can adjust the volume when the TV is switched
on and select the preferred audio and subtitle language. In addition, you can select the loudspeaker system used and the loudspeaker controls for the audio outputs, the microphone as
well as the relay switching function for external amplifiers and also make subwoofer settings.
> Access the settings menu, as described in Point 8.
> Use the up/down arrow keys to mark the line Sound settings.
> Confirm by pressing OK.
The Sound settings menu will be displayed.
8.2.1 Switch-on volume
> Using the up/down arrow keys, mark the line Switch-on volume.
> Use the right/left arrow keys to set the volume, which will be transmitted by the
device when it is switched on.
8.2.2 Height ratio
> Using the up/down arrow keys, mark the line Height ratio.
> Using the right/left arrow keys, adjust the height ratio to suit your wishes.
8.2.3 Low sounds (Bass)
> Mark the line Low sounds using the up/down arrow keys.
> Set the low sounds using the right/left arrow keys.
8.2.4 Bass volumes
As well as the low sounds, you can adjust the bass volume of the low sounds.
> Mark the line Bass volumes using the up/down arrow keys.
> Use the right/left arrow keys to set the desired bass volume.
8.2.5 Balance
> Using the up/down arrow keys, mark the line Balance.
> Use the right/left arrow keys to adjust the Balance.
8
8.2.6 Surround sound
> Mark the line Surround sound using the up/down arrow keys.
> Use the right/left arrow keys to switch the surround sound on or off.
8.2.7 Automatic volume limiting
The automatic volume limiting function means that differing sources can be played back via
the internal loudspeaker at the same volume. This avoids the need to have to adjust the
83
Page 84

volume, when switching to another channel or input. In addition, the volume of commercials,
which tend to be shown at a higher volume, can be reduced within a short time.
> Mark the line Autom. volume limiting using the up/down arrow keys.
> Use the right/left arrow keys to switch the automatic volume limiting function on
or off.
8.2.8 Dolby Digital
Various movies are broadcast in Dolby Digital format. If you have a Digital channel amplifier,
you can, if available, enjoy 5.1 channel Dolby Digital sound or Dolby Digital stereo sound
with specific movies. The only requirement is that the digital output Audio Out Digital (see
Point 4.6.2) of your TV set must be connected with the digital input of your Dolby Digital
Amplifier or Dolby Digital 5.1 channel amplifier.
If a broadcast is transmitted in Dolby Digital Sound, this will be automatically transmitted in
Dolby Digital Format, provided the Dolby Digital function is activated.
If the function is not activated, Dolby Digital sound can also be switched on manually.
Please also note Point 6.7.1 of the operating manual.
> Use the up/down arrow keys to mark the line Dolby Digital.
> Use the arrow keys right/left to switch the automatic broadcast of the Dolby
Digital Format on or off.
8.2.9 Headphone settings
In this submenu, you can adjust settings for the headphone operation.
> Use the up/down arrow keys to mark the line Headphone settings.
> The Headphone settings open when you confirm with OK.
8.2.9.1 Switch-on headphone volume
> Using the up/down arrow keys, mark the line Switch-on volume.
> Use the right/left arrow keys to set the volume, which will be transmitted
through the headphone output of the device when it is switched on.
8.2.9.2 Height ratio
> Using the up/down arrow keys, mark the line Height ratio.
> Using the right/left arrow keys, adjust the peak of the headphone output to suit
your wishes.
8.2.9.3 Depths
> Use the up/down arrow keys to mark the line Depths.
> Set the depths using the right/left arrow keys.
84
Page 85

8.2.9.4 Balance
> Using the up/down arrow keys, mark the line Balance.
> Use the right/left arrow keys to adjust the Balance.
8.2.9.5 Audio mode
> Mark the line Audio mode using the up/down arrow keys.
> Use the right/left arrow keys to set the headphone audio mode to stereo, or
just left or right.
8.2.9.6 Quit headphone settings
> Press the back button, to quit the Headphone settings and return to the sound
settings menu.
Note, that the settings made in this submenu can be either discarded or retained when leaving the Sound settings menu, as described in Point 8.2.12.
8.2.10 Language settings
In this submenu, you can make settings for your preferred audio and subtitle languages.
> Use the up/down arrow keys to mark the line Language settings.
> The Language settings menu opens when you confirm with OK.
8.2.10.1 Audio language 1
Here, set the preferred audio language for digital programs. This will be transmitted immediately the device is switched on or automatically engaged when switching to another program.
> Using the up/down arrow keys, mark the line Audio language 1.
> By pressing the OK button a window opens with den selectable languages.
> Use the arrow keys to select the preferred language and confirm this by pressing
the OK button.
8.2.10.2 Audio language 2
Set the audio language for digital programs, which will then be engaged automatically when
the 1st. language is not available.
> Using the up/down arrow keys, mark the line Audio language 2.
8
> Open the window for the selectable languages by pressing the OK button.
> Use the arrow keys to select the second preferred language and confirm this by
pressing the OK button.
Note that after the audio language has been chosen, in accordance with Point 6.7, this language is then selected as the priority and only after the resetting of the set audio language
based on Point 6.7 will it become automatically selectable again.
85
Page 86

8.2.10.3 Subtitle language 1
Here, set the preferred language for subtitles. After the setting, the subtitles will, if sent,
be immediately displayed at the bottom edge of the screen. With the setting set to None,
you can switch off the automatic showing, and then when desired, manually adjust this as
described in Point 6.8.
> Using the up/down arrow keys, mark the line Subtitle language 1.
> By pressing the OK button a window opens with the selectable languages.
> Use the arrow keys to select the preferred language and confirm this by pressing
the OK button.
8.2.10.4 Subtitle language 2
Here, set the subtitle language, which will be automatically shown when subtitle language 1
is not available.
> Using the up/down arrow keys, mark the line Subtitle language 2.
> Open the window for the selectable languages by pressing the OK button.
> Use the arrow keys to select the preferred language and confirm this by pressing
the OK button.
8.2.10.5 Quit language settings
> Press the Back button, to quit the Language settings and return to the sound
settings menu.
Note, that the settings made in this submenu can be either discarded or retained when leaving the sound Settings menu, as described in Point 8.2.12.
8.2.11 Extended settings
In this submenu, you can make settings for the loudspeaker type, loudspeaker transmission channel, subwoofer and microphone. Likewise, you can also switch the functions for
the external amplifier, the loudspeaker volume at the audio output (see Point 4.6) and the
remote loudspeaker on or off.
> Use the up/down arrow keys to mark the line Extended Settings.
> Open the further settings by confirming with OK.
8.2.11.1 Loudspeaker type
> Mark the line Loudspeaker using the up/down arrow keys.
> Select the loudspeaker type used (internal, external, remote, side) with the
right/left arrow keys.
86
Page 87

8.2.11.2 Loudspeaker broadcast channel
This Point is only available, when the loudspeaker type, as described in Point 8.2.11.1, has
been set to remote.
> Use the arrow keys up/down to mark the Input loudspeaker channel.
> Use the right/left arrow keys to set a loudspeaker transmission channel from
1 – 8.
Note that this setting must also be made for remote loudspeakers, as described in the
instructions for the loudspeaker.
Also note that WLAN network in the vicinity and the broadcasts of the remote loudspeaker
may interfere with each other under certain circumstances. In the event of interference from
a WLAN network or during remote loudspeaker operation, please select another channel.
8.2.11.3 Subwoofer volume
If you have connected an active subwoofer to the HDTV, as in Point 4.7, you can adjust the
volume of the subwoofer based on this Point.
> Now use the arrow keys up/down to mark the line Subwoofer volume.
> Use the right/left arrow keys to set the desired Subwoofer volume.
8.2.11.4 Subwoofer limit frequency
8
If you have connected an active subwoofer to the HDTV in accordance with Point 4.7, you
can also adjust the maximum frequency at this point, which should be transmitted from the
subwoofer output.
> Now use the arrow keys up/down to mark the line Antenna settings.
> Use the right/left arrow keys to set the limit frequency of the subwoofer.
8.2.11.5 Loudspeaker control Line-Out
This point allows you to select, whether the loudspeaker control should also be applied to
the audio outputs or not. When the loudspeaker control function is activated and the HDTV
is connected to an amplifier, you need not use any other remote control, but the majority of
control settings can be made using the remote control of the HDTV.
Note, that when a remote loudspeaker is used, this Point must be activated, since the sound
would otherwise be transmitted at maximum volume. When selecting the remote loudspeaker in accordance with Point 8.2.11.1, this Point will be automatically activated.
> Move the marker using the up/down arrow keys to the line Analog decoder.
> Using the right/left arrow keys, switch off the volume control function.
87
Page 88

8.2.11.6 External amplifier
> Use the up/down arrow keys to mark the line External amplifier.
> Using the right/left arrow keys, switch the Loudspeaker relay system on or off.
When this function is activated the sound is muted, a relay connected to socket 22
(see Point 1 Figures) is switched on.
8.2.11.7 Microphone
> Using the up/down arrow keys, you can select the line Microphone and then
with the right/left arrow keys, activate or deactivate the microphone input
(Socket 13 in Point 1).
8.2.11.8 Microphone volume
> Provided you have connected the microphone as shown in Point 8.2.11.7, you can
now mark the entry for Microphone volume using the up/down arrow keys.
> Use the right/left arrow keys to set the desired volume.
8.2.11.9 Quit further settings
> Press the Back button, to quit the further settings and return to the sound set-
tings menu.
Note, that the settings made in this submenu can be either discarded or retained when leaving the Sound settings menu, as described in Point 8.2.12.
8.2.12 Quit sound settings
To quit the Sound settings menu, the following options are available:
> Press the green function key to Confirm.
The changes made are not stored and you return to the menu settings.
Alternatively
> Press the Back button.
A query box now appears, asking whether the changes made should be stored or
not.
> Using the right/left arrow keys, mark Yes, when you wish to store the changes
or No, when you wish to discard them.
> Confirm your selection by pressing OK.
Alternatively
> To revert directly to normal operation, without retaining the changes, press the
Menu button.
88
Page 89

8.3 Basic settings
In the basic settings you can select the country in which the device will be operated, manually select the time difference relative to GMT or the station from which the date and time
should be read. Likewise, you can also select the source via which the autostart-/auto stop
function should be implemented as well as switching the same on or off. In addition, you can
copy the quick start and AV functions and activate the S/PDIF input.
> Access the Menu settings as described in Point 8.
> Use the up/down arrow keys to mark the line Basic settings.
> Confirm by pressing OK.
The menu Basic settings will be displayed.
8.3.1 Country
In this line, specify the country in which the device will be operated. Based on this setting,
when searching, the programs will be sorted into the order of showing in the program lists.
In addition, this setting is also used to set the time difference relative to GMT and the time
corresponding to summer and winter time.
Note, that when setting the country, the channel roster for the DVB-C, DVB-T and Analog
CT receivers are also adapted and therefore there may be circumstances where stations
already included in the program lists can no longer be shown. In such cases, please, as
described in Point 9, implement a search operation.
> Use the up/down arrow keys to mark the line Country.
8
> Open the country list by pressing the OK button.
> Choose the country in which the device will be operated using the arrow keys or
marking the user-defined entry, so that the time difference from GMT, as described
in Point 8.3.2, can be manually adjusted.
> Confirm your selection by pressing OK.
8.3.2 Time zone
In this line, choose the time difference relative to GMT(GMT = Greenwich Mean Time),
which reflects that at the location in which the device will be used. For Germany, set winter
time to GMT+1 and summertime to GMT+2.
Note that this setting must be adjusted with every change between winter and summer time.
> Using the up/down arrow keys, you can mark the line Time zone, provided the
user-defined setting has been selected as described in Point 8.3.1.
> Open the window for the selectable Time zones by pressing the OK button.
> Use the arrow keys to select the relevant time zone, and confirm this by pressing
OK.
8.3.3 Date/time
Certain programs broadcast to your data stream have incorrect GMT times. In this case, you
can select the program position in this line, whereupon the synchronization of the date and
time should follow when the TV set is switched on, to avoid possible false readings of data.
89
Page 90

> Use the up/down arrow keys to mark the line Date/time.
> Open the program list by pressing the OK button.
> Using the arrow keys, select the program, based on which the synchronization
should follow and confirm your selection with OK.
8.3.4 Quick start
If the quick start function is activated, your HDTV will start more swiftly from Standby mode.
Note however, that with the quick start function activated, the power consumption when in
standby mode increases (see Point 16 Technical Data).
> Mark the line Quick start using the up/down arrow keys.
> Activate or deactivate the auto start function using the right/left arrow keys. If
the function is activated, there follows a note that the power consumption in standby
mode is increased when this setting is used.
> Confirm this note by pressing the OK button.
8.3.5 Source Autostart/Autostop
Choose the source, based on which the autostart and/or auto stop function will be activated.
> Use the up/down arrow keys to mark the line Source autostart/stop.
> Open the source selection by pressing the OK button.
> Use the up/down arrow keys to select the source and finally confirm with OK.
8.3.6 Autostart
When this function is activated, your TV set, provided it is in operation, will be placed in
Standby mode when the signal to another selected source is switched off, as described in
Point 8.3.5 (e.g. when the DVD player is switched off).
> Use the arrow keys up/down to move the marker to the Autostart entry.
> Activate or deactivate the auto start function using the right/left arrow keys.
8.3.7 Autostop
When this function is activated, your TV set, provided it is in operation, will be placed in
Standby mode when the signal to another selected source is switched off, as described in
Point 8.3.5 (e.g. when the DVD player is switched off).
> Use the up/down arrow keys to mark the line Autostop.
> Activate or deactivate the auto stop function using the right/left arrow keys.
8.3.8 Copying AV
Provided this function is active, the signals from the SCART in the selected direction will be
transferred to another specific SCART socket. This can allow you to e.g. transfer signals
from a DVD player connected to SCART socket AV1 to SCART socket AV2, to record the
same on a video recorder connected to the SCART socket AV2.
90
Page 91

> Use the up/down arrow keys, you can mark the line Copying AV.
> Use the right/left arrow keys to set the desired copy direction or Deactivate
the function.
8.3.9 S/PDIF-video source
This point allows you to determine to which analog external input the S/PDIF input (Socket
19 in Point 1) should be assigned. If this external input is selected during TV or radio operation, instead of the analog audio signal of the external input, only the digital signal of the S/
PDIF input will be used, in order to play back the sound via the device loudspeaker. Likewise, the audio signal of the S/PDIF input also remains available on the S/PDIF-outputs
(Sockets 20 and 21 in Point 1), so that this may be connected to a Stereo or Surround
sound amplifier, provided this is connected in accordance with Point 4.6.
> Use the up/down arrow keys to mark the line SPDIF sound for video
source.
> By pressing the OK button a list opens of the selectable external sources.
> Use the up/down arrow keys to select the external source, to which you wish to
assign the S/PDIF input.
> Confirm your choice by pressing the OK button.
Please note, that the external sources HDMI 1, HDMI 2 and HDMI 3 are not selectable,
since the sound over HDMI is already transmitted digitally and when an HDMI source is
selected, the S/PDIF outputs automatically become available.
8
8.3.10 Quit basic settings
To quit the Basic settings menu, you have the following choices:
> Press the green function key Confirm.
The changes made are not stored and you return to the menu Settings.
Alternatively
> Press the Back button.
A query box now appears, asking whether the changes made should be stored or
not.
> Using the right/left arrow keys, mark Yes, when you wish to store the changes
or No, when you wish to discard them.
> Confirm your selection by pressing OK.
Alternatively
> To revert directly to normal operation, without retaining the changes, press the
Menu button.
91
Page 92

8.4 Special functions
To set the special functions described in the following section, proceed as follows:
> Press the Menu key to display the Main menu.
> Use the up/down arrow keys to mark the line Settings and confirm with OK.
> Use the up/down arrow keys to mark the line Special functions and confirm
with OK.
The menu Special functions will be displayed.
8.4.1 OSD settings
In this submenu, you can adjust the font size e.g. of the EPG (Point 6.13) of the expanded
program information (Point 6.4.3). You can also select whether you would like to the OSD to
be transparent and for how long the infobox should be shown after a change of program. In
addition, you can switch the radio background picture on or off.
> Use the up/down arrow keys to mark the line OSD.
> Open the OSD settings by confirming with OK.
8.4.1.1 Font size
> Use the up/down arrow keys to mark the line Font size.
> Using the right/left arrow keys, select between the normal setting and small.
This selection then applies e.g. to the expanded program information (Point 6.4.3) or
the EPG (Point 6.13).
8.4.1.2 Transparent OSD
> Mark the line Transparent OSD using the up/down arrow keys.
> Activate or deactivate the Transparency function using the right/left arrow
keys.
8.4.1.3 Display time Information Banner
This point allows you to select for how long the infobox should be displayed after a change
of program. In addition, the LCD panel is also activated at this time, when the station during
radio operation or the title during MP3 operation (Point 6.17) is changed, provided that as in
Point 8.4.1.4, the radio background image is set to “auto”.
> Move the marker with the up/down arrow keys to the entry marked Display
time information banner [s].
> Use the number keys on the Numeric keyboard to input the desired display time
between 1 and 15 seconds.
8.4.1.4 Radio background image
This function allows the image to be switched off when in radio or MP3 mode. This considerably reduces both the strain on the screen and the power consumption.
92
Page 93

Off: Off: The picture will be switched off when in radio and/or MP3 playback mode as
in Point 8.4.1.3 after the set display time and also remains switched off after a program/track change.
Auto: The picture will be switched off when in radio and/or MP3 playback mode as in
Point 8.4.1.3 after the set display time and for a program or track change, it will be
displayed for likewise the set display time.
On: The image remains on whether in radio mode or MP3 mode.
> Use the up/down arrow keys to mark the line Radio background image.
> Using the right/left arrow keys, select the desired Funktion (Off, Auto, On).
8.4.1.5 Quit OSD settings
To quit the OSD settings menu, the following choices are available:
> Press the green function key Confirm.
The changes made are now stored and you can return to the Special functions
menu.
Alternatively
> Press the Back button.
A query box now appears, asking whether the changes made should be stored or
not.
> Using the right/left arrow keys, mark Yes, when you wish to store the changes
or No, when you wish to discard them.
> Confirm your selection by pressing OK.
Alternatively
> To revert directly to normal operation, without retaining the changes, press the
Menu button.
8.4.2 PVR settings
In this submenu, you can set the time, after which the hard disk should be switched off, once
there has been inactivity of the disk (e.g. no PVR recording/playback or image/music playback). In addition, you can select whether hard disks including radio programs as part of the
recorded data should additionally be saved as an MP2 file. These can easily be converted to
other audio formats after being stored on a PC, with this and similar programs.
> Use the up/down arrow keys to mark the entry PVR.
> Open the PVR settings by confirming with OK.
8
8.4.2.1 Storage format for radio recordings
In this line, you can decide, for hard disk recordings carried out during radio operation,
whether a “normal” recording (PVR) or simultaneously also an MP2 file of the recording
(PVR + MP2) should be created.
> Use the up/down arrow keys to mark the line Storage format for radio
recordings.
> Using the right/left arrow keys, select the storage format PVR or PVR + MP2.
93
Page 94

8.4.2.2 Switching off hard disk
> Use the up/down arrow keys to mark the line Switching off hard disk.
> By pressing the OK button, a window opens with the various switch-off times.
> Use the up/down arrow keys to select the desired switch-off time (5s, 1 min,
2 min, 5 min or 10 min) or switch the 'switch-off hard disk' function off/on.
> Confirm by pressing OK.
If your hard disk is subsequently inactive for the set duration, it will switch itself off
automatically.
8.4.2.3 Automatic broadcast marking
This functions allows automatic markers to be inserted during a hard disk recording (PVR
recording), provided a change in the broadcast occurs during the recording. These markers
will be designated in line with the titles of the broadcasts. This makes it easier, when playing
back or processing a PVR recording to find the start of a program. The required data (program change and program title) are taken from the data stream of the broadcaster. Should
there be a situation where a marker is incorrectly designated or placed, this function will lead
to an incorrect program title in the data stream or may result in the program change being
signalled too early or too late.
> Mark the line Autom. Program marking using the up/down arrow keys.
> Use the right/left arrow keys to switch the automatic program marking function
on or off.
8.4.2.4 Quit PVR settings
To quit the PVR settings menu, the following choices are available:
> press the green function key Confirm.
The changes made are now stored and you can return to the special functions
menu.
Alternatively
> Press the Back button.
A query box now appears, asking whether the changes made should be stored or
not.
> Using the right/left arrow keys, mark Yes, when you wish to store the changes
or No, when you wish to discard them.
> Confirm your selection by pressing OK.
Alternatively
> To revert directly to normal operation, without retaining the changes, press the
Menu button.
94
Page 95

8.4.3 Media playback settings
Within this submenu, you can select the start directory of the media playback of music and
that of images. After access to the media playback, the media playback of music or images
commences in the selected directory.
> Use the up/down arrow keys to mark the entry Media playback.
> The Media playback settings menu opens when you confirm with OK.
8.4.3.1 Music start directory
> Use the up/down arrow keys to mark the line Music start directory.
> By pressing the OK button, open the selection list to show the available options.
> Use the up/down arrow keys to select the desired entry and confirm with OK.
Device overview With this setting, the image navigator starts from the main directory
of the hard disk of that of the externally connected device (see Point
4.9) with the drive selection
Last used If this setting is selected, the image navigator starts in the folder from
which the last playback of a JPG file was made.
8.4.3.2 Start directory images
> Using the up/down arrow keys, mark the line Start directory images.
> By pressing the OK button, open the selection list to show the available options.
> Use the up/down arrow keys to select the desired entry and confirm with OK.
Device overview With this setting, the image navigator starts from the main directory
of the hard disk of that of the externally connected device (see Point
4.9) with the drive selection
Last used If this setting is selected, the image navigator starts in the folder from
which the last playback of a JPG file was made.
8.4.3.3 Quit Media playback settings
To quit the Media playback settings menu, you have the following choices:
> Press the green function key Confirm.
The changes made are now stored and you can return to the Special functions
menu.
Alternatively
8
> Press the Back button.
A query box now appears, asking whether the changes made should be stored or
not.
> Using the right/left arrow keys, mark Yes, when you wish to store the changes
or No, when you wish to discard them.
> Confirm your selection by pressing OK.
95
Page 96

Alternatively
> To revert directly to normal operation, without retaining the changes, press the
Menu button.
8.4.4 Network settings
In the Network settings menu, you can select the DHCP setting as well as entering the IP
address and subnet mask.
> Use the up/down arrow keys to mark the line Network settings.
> Open the Network settings by pressing OK.
8.4.4.1 IP mode
> Use the up/down arrow keys to mark the line IP mode and using the right/
left arrow keys, select between the following settings:
DHCP-Client If your TV set is connected via a router with your PC, this setting
should be chosen. The TV set now receives the IP address and subnet mask assigned to the connected router.
Static With this setting, the DHCP function is switched off. This means that
the IP address and subnet mask must be manually configured to
the existing IP address and subnet set up of your network. The IP
address and subnet mask of the TV set can be manually configured,
as described in Points 8.4.4.2 and 8.4.4.3.
8.4.4.2 IP address
If the DHCP function is set to Static, the IP address must be manually configured. When
setting the DHCP server, you can also configure this, however, this is not a must.
> Use the up/down arrow keys to set the marker to Entry of IP address.
> Use the Numeric keyboard to enter the relevant numbers.
8.4.4.3 Subnet mask
You must configure the subnet mask manually, when the DHCP function is set to Statistical. Is this setting is made on the DHCP server, you can also configure this in the same
way.
> Use the up/down arrow keys to mark the line Subnet mask.
> Use the Numeric keyboard to enter the relevant numbers.
96
Page 97

8.4.4.4 Quit network settings
To quit the Network settings menu, the following options are available:
> Press the green function key to confirm.
The changes made are now stored and you can return to the Special functions
menu.
Alternatively
> Press the Back button.
A query box now appears, asking whether the changes made should be stored or
not.
> Using the right/left arrow keys, mark Yes, when you wish to store the changes
or No, when you wish to discard them.
> Confirm your selection by pressing OK.
Alternatively
> To revert directly to normal operation, without retaining the changes, press the
Menu button.
8.4.5 Various settings
In this submenu, you can select the PiP-/PaP mode as well as video text mode. Likewise,
you can also switch off the CI duel decoding or assign the CI plug-in positions of this function. In addition, you can, provided it is being used, switch the function of the analog decoder on or off.
> Use the up/down arrow keys to mark the line Various.
8
> Open the submenu by confirming with OK.
8.4.5.1 CI dual decoding
The CI dual decoding feature allows you to receive two different encrypted programmes
simultaneously, using only one CI module and only a single valid Smartcard.
> Use the arrow keys up/down to select the line CI Dual decoding.
> Using the right/left arrow keys, set the CI plug, in which the CI module for Dual
decoding is situated.
For selection, the settings CI1, CI2, CI1 + CI2, auto, for automatic recognition
and off, to switch the CI dual decoding function off. Please also note Point 6.5.1
here.
8.4.5.2 PiP-/PaP mode
> Use the up/down arrow keys to mark the line PiP/PaP mode.
> Using the right/left arrow keys, select whether after pressing the PiP/PaP but-
ton during normal operation you would like to use the Image in image function or
the Divided screen.
Please also note Point 6.11 here.
97
Page 98

8.4.5.3 Video text mode
Many program-makers send video text in various video text modes. Generally speaking,
level 1.5 is usually transmitted. In addition, various program-makers support the more graphically demanding HiText Level 2.5.
> Use the up/down arrow keys to mark the line Video text mode.
> Using the right/left arrow keys, select desired video text mode (Level 1.5 or
Level 2.5).
In normal cases you should select the HiText Level 2.5 mode. If the Level 2.5
mode is chosen and you access the video text of a program, that is only transmitting
Level 1.5 file, this data will also be shown correctly.
8.4.5.4 Analog decoder
Should you possess an analog decoder, which can decode encoded programs, this should
be connected to the SCART socket AV2, as described in Point 4, and in this Point also
choose the EURO-AV2 setting.
> Move the marker up and down to the line Analog decoder with the arrow
keys.
> Use the right/left arrow keys to set the desired setting.
8.4.5.5 Quit various settings
To quit the Various settings menu, the following choices are available:
> Press the green function key Confirm.
The changes made are now stored and you can return to the special functions
menu.
Alternatively
> Press the Back button.
A query box now appears, asking whether the changes made should be stored or
not.
> Using the right/left arrow keys, mark Yes, when you wish to store the changes
or No, when you wish to discard them.
> Confirm your selection by pressing OK.
Alternatively
> To revert directly to normal operation, without retaining the changes, press the
Menu button.
8.4.6 Quit special functions
> Return as described in Points 8.4.1.5, 8.4.2.4, 8.4.3.3, 8.4.4.4 or 8.4.5.5 from the
respective submenu back into the special functions menu.
> Now press the Back button, to switch respectively one menu level upwards or to
use the Menu button to revert to normal operation.
98
Page 99

8.5 Antenna settings (DVB-S)
> Access the Main menu by pressing the Menu button.
> Use the up/down arrow keys to mark the line Settings.
> After confirming with OK, the settings menu appears.
> Using the up/down arrow keys, mark the line Antenna settings (DVB-S).
> Confirm by pressing OK.
The Antenna settings menu appears (DVB-S).
8.5.1 Multi-tenna
If the TV set is operated with a Multytenne LNB, you can set up the complete configuration
in terms of the switching positions and LNB properties by automatically activating this function on the Multytenne LNB.
> Use the up/down arrow keys to mark the line Multi-tenna.
> Use the arrow keys right/left to switch automatic set-up of the Multytenne on or
off.
8.5.2 Switching DiSEqC on or off
DiSEqC (Digital Satellites Equipment Control) is a digital control signal for controlling and
switching DiSEqC-suitable components via the antenna lead. If your satellite unit features
DiSEqC components, as well as all distributors and switches, you must switch on the DiSEqC control:
> Use the up/down arrow keys to mark the line DiSEqC.
8
> Activate or deactivate the DiSEqC function using the right/left arrow keys.
As only one LNC can be addressed if the DiSEqC control is switched off, the menu
is restricted in this case to the configuration of a single LNB. When you switch off the
DiSEqC, an additional query window appears, asking whether you wish to delete the
program of DiSEqC-positions 2 to 4.
> Using the right/left arrow keys, select Yes or No and confirm with OK.
8.5.3 Antenna signals
Your TV set possesses two DVB-S tubers (receiving stations). These can be used to record
a program and watch another at the same time. In order that you are able to gain the full
scope in terms of using the functions of your TV set, when recording and playing back in
DVB-S operation, you should always use two separate antenna connections (antenna signals) with identical layouts. Please also note Point 7.1.
> Use the up/down arrow keys to mark the line Antenna signals.
> Using the right/left arrow keys, set the number of antenna signals to 2, when
connecting your TV set to two separate antenna connections or to 1, when there is
only 1 antenna connection available.
To utilise all the recording facilities of your TV set, you should ensure it is connected via two
independent DVB-S antenna connections. This allows you to use the following combinations
of recording and playback:
99
Page 100

- Record a program and play back another program from the same receiving area or a
favourite hard disk recording.
- Record two programs at the same time, even when they are being received by differ-
ent receivers.
- Record two different programs (even from different receiving areas) at the same time
and play back a prerecorded program.
If only a DVB-S antenna connection is available for connecting the TV set, the recording
and playback scope will be limited.
- Record a program and at the same time, play back another program from the
same receiving area or a favourite hard disk recording.
- Record two programs at the same time from the same recording area.
- Record two different programs from the same receiving area at the same time
and playback a program that has already been recorded.
Please note, that the limitations associated with the recording or playback of a DVB-S
antenna signal only apply for purely DVB-S operations. In both cases, (connection to one or
two DVB-S antenna connections), of course existing DVB-C-, DVB-T- and analog TV programs as well as analog external sources can be recorded or shown.
8.5.4 Setting the switching matrix
In the antenna settings menu (DVB-S), four switching criteria are implemented for the DiSEqC control. Your device is pre programmed so that the satellite ASTRA 19,2 East is received
on switch setting A/A and Eutelsat 13,0 East on setting B/A of a multi-switch. Should your
receiving installation be configured differently, or should you receive other satellites, you can
adjust the settings of your TV set to your receiving unit as follows.
> Use the arrow keys in the column Satellite to select the DiSEqC switch position
(1-4), to which you wish to allocate a satellite (e.g. A/B 3 No satellite), and mark
this line.
> Press the OK key.
A table will be displayed, allowing you to select from various satellites.
> Use the arrow keys to mark the desired satellite.
Using the up/down arrow keys the marker is moved to show a respective line,
while the left/right arrow keys are used to move sideways to indicate a list. If the
satellite you are looking for is not included in the list, please select a reserve position,
designated User 1 to User 11. To configure a rotating unit, select the entry Motor-
ized antenna and subsequently proceed as detailed in Point 8.5.6.
> Confirm by pressing OK.
The marked satellite is inserted into the previously marked Position. If a list for the
selected satellite program is already contained in the preconfigured works program,
a query screen now appears, asking whether you would like to transfer this into your
TV and radio lists.
> Mark the field Yes, to confirm the program or No, to cancel the confirmation and
confirm both with OK.
The confirmed program can be sorted as described in Point 10 or again removed.
100
 Loading...