

Page 1

DIGIT S1
CONAX Embedded
DIGIT S2
CONAX Embedded
CryptoWorks Embedded
DigitSim S1
CONAX Embedded
EN
1)
DigitSim S2
CONAX Embedded
CryptoWorks Embedded
DIGITAL Satellite receiver
Operating Manual
With integrated Encription System decoding system.
For the reception of Encription System
encoded as well as free satellite programmes.
With integrated Encription System decoding system
and PCMCIA interface for accommodating a CA module.
For the reception of free and encoded (e.g. CONAX, VIACCESS,
With motor controller and software update via satellite.
IRDETO, SECA etc.) satellite programmes.
DiSEqC
1)
only Digit S1/S2
1.2
Page 2

1 Table of contents
1 Table of contents . . . . . . . . . . . . . . . . . . . . . . . . . . . . . . . . . . . . . . . . .2
2 Illustrations
3 Please read first
4 Connecting to a DVB receiver
4.1 External unit
4.2 Connecting to a TV set
4.3 Video cassette recorder (VCR)
4.4 HiFi amplifier
4.4.1 Analogue
4.4.2 Digital
1)
4.5 Serial interface (RS 232)
4.6 Mains connection
5 Initial installation
6 Settings
6.1 Operating language
6.2 Basic settings
6.2.1 Time difference GMT (h)
6.2.2 Country
6.2.3 Remote control code
6.2.4 Standby clock
6.2.5 Exit basic settings
6.3 Audio/Video settings
6.3.1 Picture size
6.3.2 Language (Audio signal)
6.3.3 Language (Subtitles)
6.3.4 TV SCART mode
6.3.5 VCR SCART mode
6.3.6 Dolby Digital (AC3)
6.3.7 Exit Audio/Video settings
6.4 Antenna settings
6.4.1 Multytenne
6.4.2 Turning the DiSEqC on/off
6.4.3 Setting the array
6.4.4 Further settings/LNB characteristics
6.4.5 Rotating Unit
6.4.6 Exiting the antenna settings
7 Operation
7.1 Turning on and off
7.2 Programme selection
7.2.1 By means of the programme up/down keys
7.2.2 By means of the numeric keyboard
7.2.3 By means of the navigator (Programme list)
7.2.3.1 Select list
7.2.4 Calling locked programmes
7.2.5 Infobox
7.3 Reception of encoded programmes
7.3.1 Special functions
7.3.1.1 Multifeed options
7.3.1.2 Starting time selection/Picture selection
7.3.2 Encription System pin code
. . . . . . . . . . . . . . . . . . . . . . . . . . . . . . . . . . . . . . . . . . . . .5
. . . . . . . . . . . . . . . . . . . . . . . . . . . . . . . . . . . . . . . . . .7
. . . . . . . . . . . . . . . . . . . . . . . . . . . . . . .9
. . . . . . . . . . . . . . . . . . . . . . . . . . . . . . . . . . . . . . . . . . . . . . . . . . . . . . . 10
. . . . . . . . . . . . . . . . . . . . . . . . . . . . . . . . . . . . . . . . . . . . . . 10
1)
. . . . . . . . . . . . . . . . . . . . . . . . . . . . . . . . . . . . . . . . . . . . . . . . . . . . . 10
1)
. . . . . . . . . . . . . . . . . . . . . . . . . . . . . . . . . . . . . . . . . . . . . . . . . . . . . . . 10
. . . . . . . . . . . . . . . . . . . . . . . . . . . . . . . . . . . . . . . . . . . . . . . . . . . . . . . . . . 10
1)
. . . . . . . . . . . . . . . . . . . . . . . . . . . . . . . . . . . . . . 10
1)
. . . . . . . . . . . . . . . . . . . . . . . . . . . . . . . . . . . . . . . . . . . 10
. . . . . . . . . . . . . . . . . . . . . . . . . . . . . . . . . . . . . . . . . . . . . . . . . . . 11
. . . . . . . . . . . . . . . . . . . . . . . . . . . . . . . . . . . . . . . .11
. . . . . . . . . . . . . . . . . . . . . . . . . . . . . . . . . . . . . . . . . . . . . . . .14
. . . . . . . . . . . . . . . . . . . . . . . . . . . . . . . . . . . . . . . . . . . . . . . . . 14
. . . . . . . . . . . . . . . . . . . . . . . . . . . . . . . . . . . . . . . . . . . . . . . . . . . . . . 14
. . . . . . . . . . . . . . . . . . . . . . . . . . . . . . . . . . . . . . . . . . . . . . 14
. . . . . . . . . . . . . . . . . . . . . . . . . . . . . . . . . . . . . . . . . . . . . . . . . . . . . . . . . . . 14
. . . . . . . . . . . . . . . . . . . . . . . . . . . . . . . . . . . . . . . . . . . . . . . . . 15
1)
. . . . . . . . . . . . . . . . . . . . . . . . . . . . . . . . . . . . . . . . . . . . . . . . . . . . 15
. . . . . . . . . . . . . . . . . . . . . . . . . . . . . . . . . . . . . . . . . . . . . . . . . . . 15
. . . . . . . . . . . . . . . . . . . . . . . . . . . . . . . . . . . . . . . . . . . . . . . . . 15
. . . . . . . . . . . . . . . . . . . . . . . . . . . . . . . . . . . . . . . . . . . . . . . . . . . . . . . . 16
. . . . . . . . . . . . . . . . . . . . . . . . . . . . . . . . . . . . . . . . . . . . . . 16
. . . . . . . . . . . . . . . . . . . . . . . . . . . . . . . . . . . . . . . . . . . . . . . . . 16
. . . . . . . . . . . . . . . . . . . . . . . . . . . . . . . . . . . . . . . . . . . . . . . . . . . 16
1)
. . . . . . . . . . . . . . . . . . . . . . . . . . . . . . . . . . . . . . . . . . . . . . . . 16
1)
. . . . . . . . . . . . . . . . . . . . . . . . . . . . . . . . . . . . . . . . . . . . . . . . 16
. . . . . . . . . . . . . . . . . . . . . . . . . . . . . . . . . . . . . . . . . . . . . 17
. . . . . . . . . . . . . . . . . . . . . . . . . . . . . . . . . . . . . . . . . . . . . . . . . . . . 17
. . . . . . . . . . . . . . . . . . . . . . . . . . . . . . . . . . . . . . . . . . . . . . . . . . . . . . . . 17
. . . . . . . . . . . . . . . . . . . . . . . . . . . . . . . . . . . . . . . . . . . . 18
. . . . . . . . . . . . . . . . . . . . . . . . . . . . . . . . . . . . . . . . . . . . . . . . . . . . 18
. . . . . . . . . . . . . . . . . . . . . . . . . . . . . . . . . . . . . 18
. . . . . . . . . . . . . . . . . . . . . . . . . . . . . . . . . . . . . . . . . . . . . . . . . . . . . . . 20
. . . . . . . . . . . . . . . . . . . . . . . . . . . . . . . . . . . . . . . . . . . 20
. . . . . . . . . . . . . . . . . . . . . . . . . . . . . . . . . . . . . . . . . . . . . .20
. . . . . . . . . . . . . . . . . . . . . . . . . . . . . . . . . . . . . . . . . . . . . . . . . . . 20
. . . . . . . . . . . . . . . . . . . . . . . . . . . . . . . . . . . . . . . . . . . . . . . . 20
. . . . . . . . . . . . . . . . . . . . . . . . . . . . . . . 20
. . . . . . . . . . . . . . . . . . . . . . . . . . . . . . . . . . . . . 20
. . . . . . . . . . . . . . . . . . . . . . . . . . . . . . 21
. . . . . . . . . . . . . . . . . . . . . . . . . . . . . . . . . . . . . . . . . . . . . . . . . . . . . . . . . 21
. . . . . . . . . . . . . . . . . . . . . . . . . . . . . . . . . . . . . . . . . . . 21
. . . . . . . . . . . . . . . . . . . . . . . . . . . . . . . . . . . . . . . . . . . . . . . . . . . . . . . . . . . 21
. . . . . . . . . . . . . . . . . . . . . . . . . . . . . . . . . . . . . 22
. . . . . . . . . . . . . . . . . . . . . . . . . . . . . . . . . . . . . . . . . . . . . . . . . . . . 22
. . . . . . . . . . . . . . . . . . . . . . . . . . . . . . . . . . . . . . . . . . . . . . . . . . . . 22
. . . . . . . . . . . . . . . . . . . . . . . . . . . . . . . . . . 22
. . . . . . . . . . . . . . . . . . . . . . . . . . . . . . . . . . . . . . . . . . . 23
1)
only Digit S1/S2
2
Page 3

3
EN
7.4 Volume adjustment . . . . . . . . . . . . . . . . . . . . . . . . . . . . . . . . . . . . . . . . . . . . . . . . . . 23
7.5 Switching TV/Radio
7.6 Selecting a different language (TV operation) or station (Radio operation)
7.6.1 Dolby Digital (AC3 operation)
7.7 Return to last set programme
7.8 Display clock and programme information
7.9 Further programme information
7.10 Transponder information
7.11 Freeze image
7.12 Sleep timer
7.13 Video text
. . . . . . . . . . . . . . . . . . . . . . . . . . . . . . . . . . . . . . . . . . . . . . . . . . . . . . . . 25
. . . . . . . . . . . . . . . . . . . . . . . . . . . . . . . . . . . . . . . . . . . . . . . . . . . . . . . . . 25
7.13.1 Using the video text decoder of your TV set
7.13.2 Using the internal video text decoder
7.14 Subtitles
. . . . . . . . . . . . . . . . . . . . . . . . . . . . . . . . . . . . . . . . . . . . . . . . . . . . . . . . . . 26
7.15 Electronic programme guide SFI (SiehFern Info)
7.15.1 Importing the SFI data
7.15.2 Interrupting the import procedure
7.15.3 Calling the electronic programme guide
7.15.4 Now (Table with current programme contents)
7.15.5 Later
7.15.6 More
. . . . . . . . . . . . . . . . . . . . . . . . . . . . . . . . . . . . . . . . . . . . . . . . . . . . . . . . . . . . . 27
. . . . . . . . . . . . . . . . . . . . . . . . . . . . . . . . . . . . . . . . . . . . . . . . . . . . . . . . . . . . . 27
7.15.7 SFI functions
1)
. . . . . . . . . . . . . . . . . . . . . . . . . . . . . . . . . . . . . . . . . . . . . . . . 23
1)
. . . . . . . . . . . . . . . . . . . . . . . . . . . . . . . . . . . . . . . . 24
. . . . . . . 23
. . . . . . . . . . . . . . . . . . . . . . . . . . . . . . . . . . . . . . . . . . 24
. . . . . . . . . . . . . . . . . . . . . . . . . . . . . . . . 24
. . . . . . . . . . . . . . . . . . . . . . . . . . . . . . . . . . . . . . . . 24
. . . . . . . . . . . . . . . . . . . . . . . . . . . . . . . . . . . . . . . . . . . . . . 24
. . . . . . . . . . . . . . . . . . . . . . . . . . . . . . . . . . . . . . . . . . . . . . . . . . . . . . 25
. . . . . . . . . . . . . . . . . . . . . . . . . . . . . . 25
1)
. . . . . . . . . . . . . . . . . . . . . . . . . . . . . . . . . . 25
. . . . . . . . . . . . . . . . . . . . . . . . . . . 26
. . . . . . . . . . . . . . . . . . . . . . . . . . . . . . . . . . . . . . . . . . . . . . . 26
. . . . . . . . . . . . . . . . . . . . . . . . . . . . . . . . . . . . . . . 26
. . . . . . . . . . . . . . . . . . . . . . . . . . . . . . . . . . 27
. . . . . . . . . . . . . . . . . . . . . . . . . . . . . 27
. . . . . . . . . . . . . . . . . . . . . . . . . . . . . . . . . . . . . . . . . . . . . . . . . . . . . . . 28
7.15.7.1 SFI-Info . . . . . . . . . . . . . . . . . . . . . . . . . . . . . . . . . . . . . . . . . . . . . . . . . . . . . . . . . . . 28
7.15.7.2 SFI timer programming. . . . . . . . . . . . . . . . . . . . . . . . . . . . . . . . . . . . . . . . . . . . . . . 28
7.15.7.3 SFI programme overview . . . . . . . . . . . . . . . . . . . . . . . . . . . . . . . . . . . . . . . . . . . . . 29
7.15.7.4 SFI overview according to programme types (Genre) . . . . . . . . . . . . . . . . . . . . . . . 30
7.15.8 Terminating SFI
7.16 Timer recordings
7.16.1 Manually programming the timer
7.16.2 Timer overview
7.16.3 Changing the timer programming
7.16.4 Deleteing the timer programming
7.16.5 Programming a new timer event
7.16.6 Exiting timer administration
8 Changing the basic programming
8.1 Configuring the favourites list
8.1.1 Calling the programme list administration
8.1.2 Adding programmes to the favourites list
8.1.3 Deleting programmes
8.1.3.1 Removing (deleting) from the favourites list
8.1.3.2 Deleting from the complete list
8.1.4 Sorting programmes
8.1.5 Exiting the programme list administration
8.2 Programming the electronic programme guide
8.2.1 Selecting stations
8.2.2 Start category
8.2.3 Update time
8.2.4 Update
. . . . . . . . . . . . . . . . . . . . . . . . . . . . . . . . . . . . . . . . . . . . . . . . . . . . . . . . . . . 38
8.2.5 SFI channel
8.3 Protection of minors
8.3.1 Selecting stations
8.3.2 Changing the device pin
8.3.3 Mode
. . . . . . . . . . . . . . . . . . . . . . . . . . . . . . . . . . . . . . . . . . . . . . . . . . . . . . . . . . . . . 40
8.3.4 Exiting the protection of minors mode
. . . . . . . . . . . . . . . . . . . . . . . . . . . . . . . . . . . . . . . . . . . . . . . . . . . . . 30
. . . . . . . . . . . . . . . . . . . . . . . . . . . . . . . . . . . . . . . . . . . . . . . . . . . . 30
. . . . . . . . . . . . . . . . . . . . . . . . . . . . . . . . . . . . . . . 31
. . . . . . . . . . . . . . . . . . . . . . . . . . . . . . . . . . . . . . . . . . . . . . . . . . . . . 32
. . . . . . . . . . . . . . . . . . . . . . . . . . . . . . . . . . . . . . . 32
. . . . . . . . . . . . . . . . . . . . . . . . . . . . . . . . . . . . . . . 32
. . . . . . . . . . . . . . . . . . . . . . . . . . . . . . . . . . . . . . . . 33
. . . . . . . . . . . . . . . . . . . . . . . . . . . . . . . . . . . . . . . . . . . . 33
. . . . . . . . . . . . . . . . . . . . . . . . . . .33
. . . . . . . . . . . . . . . . . . . . . . . . . . . . . . . . . . . . . . . . . . 33
. . . . . . . . . . . . . . . . . . . . . . . . . . . . . . . . 34
. . . . . . . . . . . . . . . . . . . . . . . . . . . . . . . . . 35
. . . . . . . . . . . . . . . . . . . . . . . . . . . . . . . . . . . . . . . . . . . . . . . . 35
. . . . . . . . . . . . . . . . . . . . . . . . . . . . . . . 35
. . . . . . . . . . . . . . . . . . . . . . . . . . . . . . . . . . . . . . . . . 36
. . . . . . . . . . . . . . . . . . . . . . . . . . . . . . . . . . . . . . . . . . . . . . . . . 36
. . . . . . . . . . . . . . . . . . . . . . . . . . . . . . . . . 36
. . . . . . . . . . . . . . . . . . . . . . . . . . . . 37
. . . . . . . . . . . . . . . . . . . . . . . . . . . . . . . . . . . . . . . . . . . . . . . . . . . 37
. . . . . . . . . . . . . . . . . . . . . . . . . . . . . . . . . . . . . . . . . . . . . . . . . . . . . . 38
. . . . . . . . . . . . . . . . . . . . . . . . . . . . . . . . . . . . . . . . . . . . . . . . . . . . . . . 38
. . . . . . . . . . . . . . . . . . . . . . . . . . . . . . . . . . . . . . . . . . . . . . . . . . . . . . . . 38
. . . . . . . . . . . . . . . . . . . . . . . . . . . . . . . . . . . . . . . . . . . . . . . . . 39
. . . . . . . . . . . . . . . . . . . . . . . . . . . . . . . . . . . . . . . . . . . . . . . . . . . 39
. . . . . . . . . . . . . . . . . . . . . . . . . . . . . . . . . . . . . . . . . . . . . . 40
. . . . . . . . . . . . . . . . . . . . . . . . . . . . . . . . . . . 40
1)
only Digit S1/S2
Page 4

8.4 Programme search . . . . . . . . . . . . . . . . . . . . . . . . . . . . . . . . . . . . . . . . . . . . . . . . . . 40
8.4.1 Automatic search
8.4.2 Satellite search
8.4.3 Transponder search
8.4.4 Manual search
8.4.5 After the search run
8.4.6 Exiting programme search
8.5 Service settings
8.5.1 Activate factory settings
8.5.2 Deleting all programmes
8.5.3 Updating the programme list (ISIPRO)
8.5.3.1 Manually starting the programme list download
8.5.3.2 Rejecting a programme list
8.5.3.3 Download programme list later
8.5.3.4 Starting the programme list download
8.5.4 Software update
8.5.5 Copying the settings
8.6 System configuration
8.7 Encoding system
9 Operation on a rotating unit (DiSEqC 1.2)
9.1 East and West boundaries
9.1.1 Deleting defined boundaries
9.1.2 Setting the Eastern boundary
9.1.3 Setting the Western boundary
9.2 Geo positioning
9.3 Setting the satellite position
9.3.1 Selecting the satellite position
9.3.1.1 Selecting a pre-selected satellite position
9.3.1.2 Setting user-defined satellite positions (User Satellite)
9.3.2 Aligning the satellite antenna
9.3.2.1 Test transponder/LNB configuration
9.3.2.2 Manually aligning the antenna
9.3.2.3 Automatic fine alignment (Autofocus)
9.3.3 Storing the satellite position
9.4 Current satellite list
9.4.1 Selecting the satellite position
9.5 Deleting the satellite position
9.6 Reference position
10 Technical data
11 Troubleshooting aids
. . . . . . . . . . . . . . . . . . . . . . . . . . . . . . . . . . . . . . . . . . . . . . . . . . . 41
. . . . . . . . . . . . . . . . . . . . . . . . . . . . . . . . . . . . . . . . . . . . . . . . . . . . . 41
. . . . . . . . . . . . . . . . . . . . . . . . . . . . . . . . . . . . . . . . . . . . . . . . . 41
. . . . . . . . . . . . . . . . . . . . . . . . . . . . . . . . . . . . . . . . . . . . . . . . . . . . . 42
. . . . . . . . . . . . . . . . . . . . . . . . . . . . . . . . . . . . . . . . . . . . . . . . . 43
. . . . . . . . . . . . . . . . . . . . . . . . . . . . . . . . . . . . . . . . . . . . 43
. . . . . . . . . . . . . . . . . . . . . . . . . . . . . . . . . . . . . . . . . . . . . . . . . . . . 43
. . . . . . . . . . . . . . . . . . . . . . . . . . . . . . . . . . . . . . . . . . . . . . 44
. . . . . . . . . . . . . . . . . . . . . . . . . . . . . . . . . . . . . . . . . . . . . . 44
. . . . . . . . . . . . . . . . . . . . . . . . . . . . . . . . . . . 44
1)
. . . . . . . . . . . . . . . . . . . . . . . . . . 44
. . . . . . . . . . . . . . . . . . . . . . . . . . . . . . . . . . . . . . . . . . . . 45
. . . . . . . . . . . . . . . . . . . . . . . . . . . . . . . . . . . . . . . . . 45
. . . . . . . . . . . . . . . . . . . . . . . . . . . . . . . . . . . 45
. . . . . . . . . . . . . . . . . . . . . . . . . . . . . . . . . . . . . . . . . . . . . . . . . . . . 46
. . . . . . . . . . . . . . . . . . . . . . . . . . . . . . . . . . . . . . . . . . . . . . . . . 47
. . . . . . . . . . . . . . . . . . . . . . . . . . . . . . . . . . . . . . . . . . . . . . . . 47
1)
. . . . . . . . . . . . . . . . . . . . . . . . . . . . . . . . . . . . . . . . . . . . . . . . . 47
. . . . . . . . . . . . . . . . . . . . .48
. . . . . . . . . . . . . . . . . . . . . . . . . . . . . . . . . . . . . . . . . . . . 48
. . . . . . . . . . . . . . . . . . . . . . . . . . . . . . . . . . . . . . . . . . . 48
. . . . . . . . . . . . . . . . . . . . . . . . . . . . . . . . . . . . . . . . . . 49
. . . . . . . . . . . . . . . . . . . . . . . . . . . . . . . . . . . . . . . . . 49
. . . . . . . . . . . . . . . . . . . . . . . . . . . . . . . . . . . . . . . . . . . . . . . . . . . . . 49
. . . . . . . . . . . . . . . . . . . . . . . . . . . . . . . . . . . . . . . . . . . 50
. . . . . . . . . . . . . . . . . . . . . . . . . . . . . . . . . . . . . . . . . 50
. . . . . . . . . . . . . . . . . . . . . . . . . . . . . . . . 50
. . . . . . . . . . . . . . . . . . . . . . 51
. . . . . . . . . . . . . . . . . . . . . . . . . . . . . . . . . . . . . . . . . . 51
. . . . . . . . . . . . . . . . . . . . . . . . . . . . . . . . . . . . . 51
. . . . . . . . . . . . . . . . . . . . . . . . . . . . . . . . . . . . . . . . . 52
. . . . . . . . . . . . . . . . . . . . . . . . . . . . . . . . . . . . 52
. . . . . . . . . . . . . . . . . . . . . . . . . . . . . . . . . . . . . . . . . . . 52
. . . . . . . . . . . . . . . . . . . . . . . . . . . . . . . . . . . . . . . . . . . . . . . . . . 52
. . . . . . . . . . . . . . . . . . . . . . . . . . . . . . . . . . . . . . . . . 53
. . . . . . . . . . . . . . . . . . . . . . . . . . . . . . . . . . . . . . . . . . 53
. . . . . . . . . . . . . . . . . . . . . . . . . . . . . . . . . . . . . . . . . . . . . . . . . . 53
. . . . . . . . . . . . . . . . . . . . . . . . . . . . . . . . . . . . . . . . . .54
. . . . . . . . . . . . . . . . . . . . . . . . . . . . . . . . . . . . .56
Your device carries the CE symbol and fulfils all of the necessary EU standards.
Subject to alterations and printing errors. Issued 08/06
TechniSat and DIGIT S2 are registered trademarks belonging to
TechniSat Digital GmbH
Postbox 560
54541 Daun
www.technisat.de
Technical hotline
0180/5005-910*
*0,12 EUR/Min. in the telephone network of the Deutsche Telekom AG
Your device carries the CE symbol and fulfils all of the necessary EU standards.
Subject to alterations and printing errors. Issued 06/05
4
1)
only Digit S1/S2
Page 5
5
EN
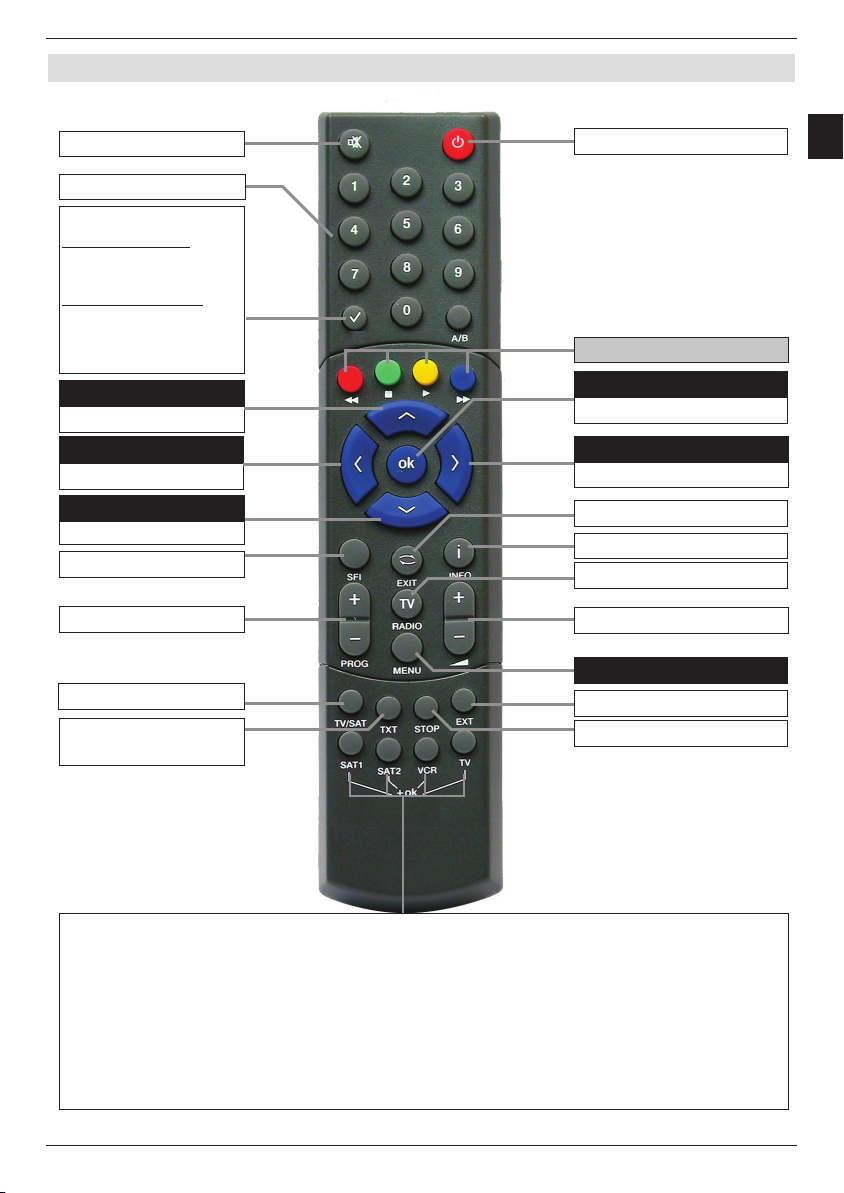
2 Illustrations
Sound on/off
Numeric keyboard
Option*
during TV operation:
Sound/Subtitle selection,
special functions
during radio operation:
Station selection by
changing the audio
subcarrier
Multifunction key n
Arrow key up
Programme +
Arrow key left
Volume -
Arrow key down
Programme -
SFI
Remote control
OPT
On/Standby
Multifunction key
OK
Programme list on/off
Arrow key right
Volume +
Back
Info
TV/Radio
Programme +/-
Volume +/-
Menu on/off
Sleep timer
Video text *
EXTERNAL
Stop/Freeze image
On/Mix/Off
Remote control options:
Remote control options:
It is possible to operate two TechniSat receivers, one TechniSat TV set as well as a
It is possible to operate two receivers, one TV set as well as a further device with the
further device
same encoding with this remote control by switching the remote control option.
with the same encoding with this remote control by switching the remote control option.
> To change the remote control option press the required (SAT1, SAT2, VCR or
> To change the remote control option press the required (SAT1, SAT2, VCR
TV)key and OK simultaneously!!!
Please note:
Please note:
To controlthis receiver, the appropriately selected remote control option and the remote
To control this receiver, the appropriately selected remote control option and the remote
control code must comply according to Section 6.2.3.
control code must comply according to Section 6.2.3.
* This function is only available, if the appropriate data are broadcast on the set
programme position.
or TV) key and OK simultaneously!!!
Page 6
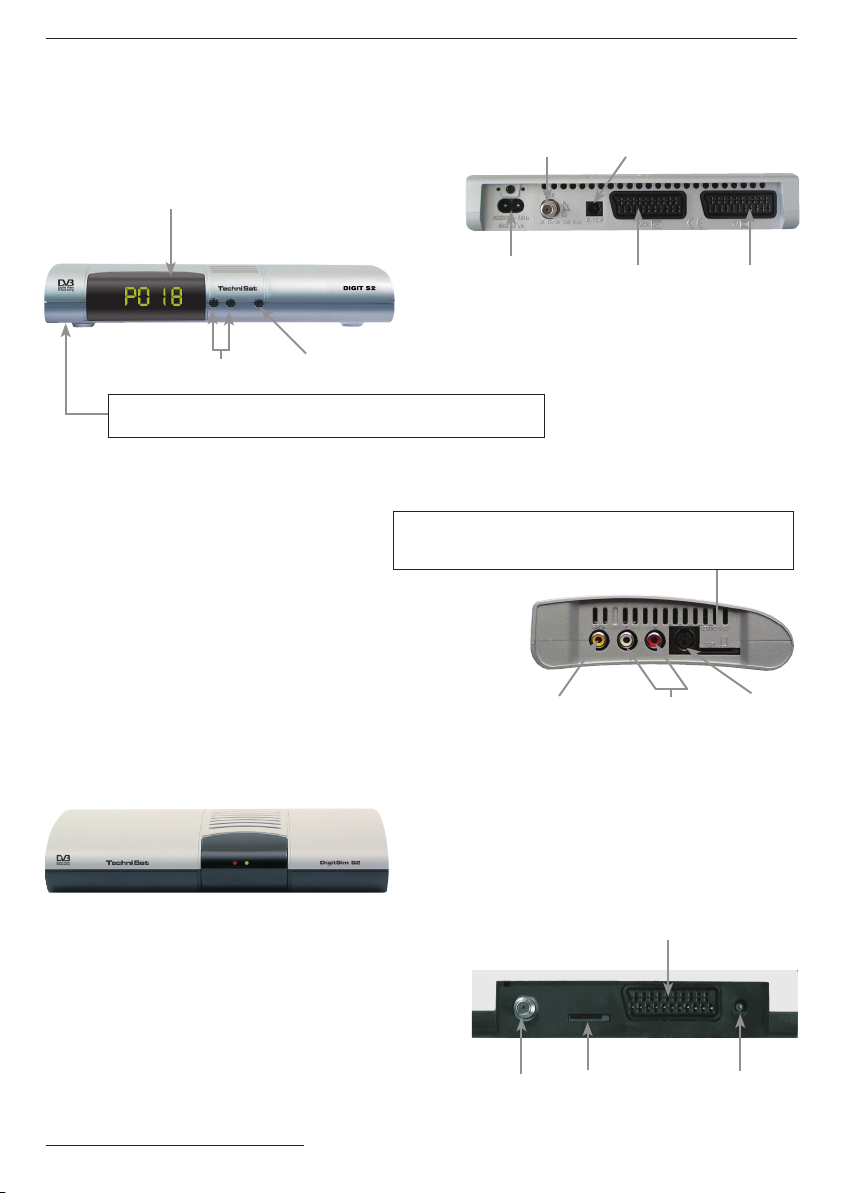
DIGIT S1 / S2
LED display
Programme selection
Card reader for smart card Encription System:
> Insert the Encription System smart card (golden chip downwards and towards
the direction of insertion) into the card reader carefully up to the stop.
DigitSim S1 / S2
up/down
On/Standby
LNB input
Mains
connector
Card reader for Encription System SIM card:
> Insert the Encription System SIM card carefully as far as possible
into the card reader. Make sure that the gold chip is pointed downwards
and the cut corner of the SIM card is pointed towards the device.
Audio output
digital (electrical)
Audio output
digital (optical)
SCART
connector VCR
Audio outputs
analogue
SCART
connector TV
RS 232 interface
LED-display
green: receiver on (operating)
red: stand-by
SCART
connector TV
LNB input
SIM-Card Reader
DC connector
6
Page 7

7
EN
3 Please read first
> Before using the device for the first time
check the supply for completeness. The scope of supply contains:
1 Digital receiver, 1 Mains connection cable,
1 Remote control, 1 Operating manual,
1 Guarantee card, 2 Batteries (1.5V Micro cell)
1 SCART cable
1 easy-sim-card
> Insert the enclosed batteries while observing the embossed polarity into the battery
compartment of the remote control.
Important notes on the operation
The use of a so-called "On Screen Display" (Display inserts) simplifies the digital receiver
operation and reduces the number of remote control keys. All functions are displayed on
the screen and can be controlled with only few keys. Related functions are summarised as
"MENU". The selected function is highlighted in colour. The "function keys" are represented
by red, yellow, green and blue coloured bars in the bottom line. These colour bars represent
different functions in the individual menus, which can be initiated by pressing the accordingly
coloured key ("Multi-function key") on the remote control. The „Function keys" are only
activated if an abbreviated name is indicated in the corresponding field.
Key designations and terms, which appear in the OSD menu, are printed bold in this
operating manual.
Help:
If available, a help text can be displayed or exited in the menus by pressing the blue
function key.
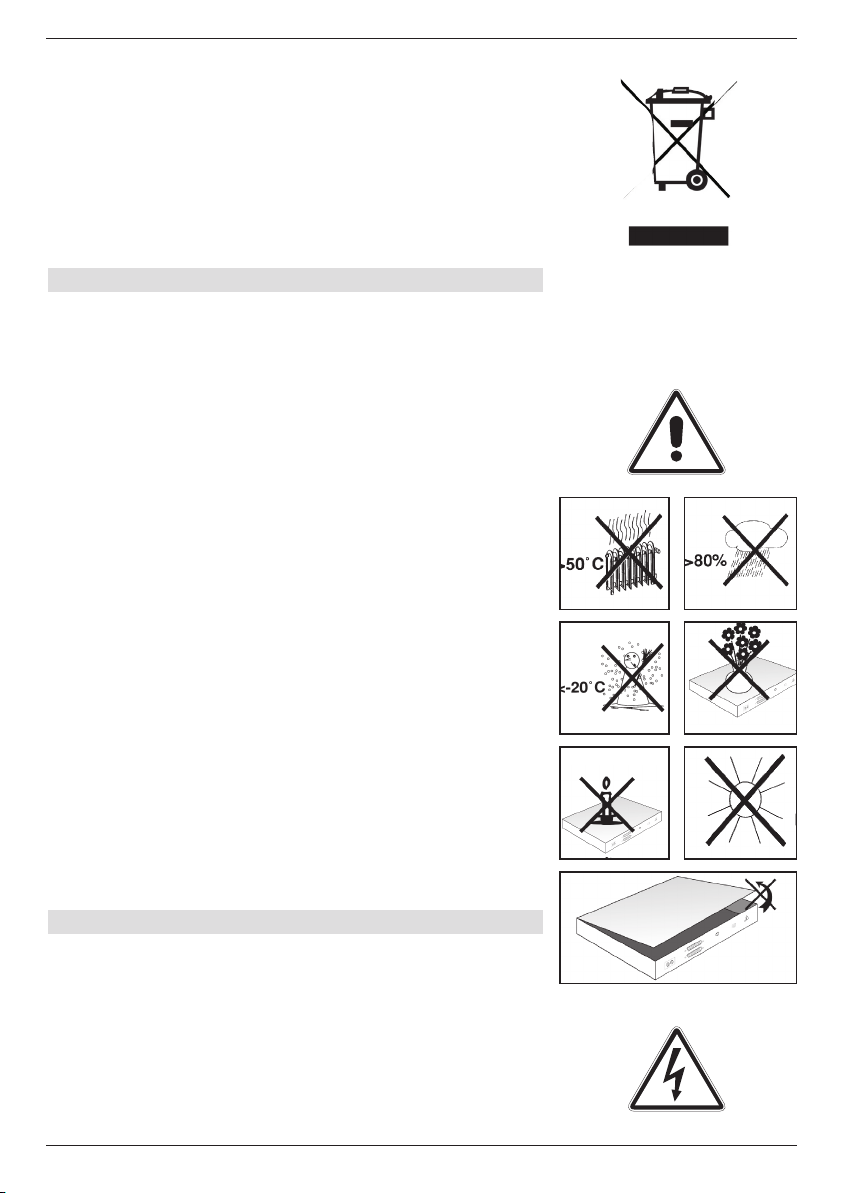
Disposal notes
The packing of your equipment is completely made up of recyclable materials. Please
dispose of these sorted accordingly by means of the “Dual System”.
This product may not be disposed via normal household waste at the end of its service
life, but must be delivered to a collection point for the recycling of electrical and electronic
devices. This is pointed out by the symbol on the product, the instruction manual or the
packing.
The materials are recyclable according to their designation.
Page 8
You help to protect the environment, if you enable recycling,
reuse of material or other types of utilisation of end-of-life
equipment.
Please ask your municipal administration, where the next
waste disposal is located.
Ensure that the drained batteries of the remote control are
not put into the household waste, but are properly disposed
(given to the specialised trade, hazardous waste).
Safety notes
For your own protection, please read the safety precautions
carefully, before putting your new device in operation.
The manufacturer does not assume responsibility for
damages caused by inappropriate handling and by noncompliance with the safety precautions.
> In order to ensure sufficient ventilation, put the
device on a flat, level underground and do not place
any items on the cover of the device. The louvres
are located there, to enable the interior heat to
disseminate.
> Never place burning items, e.g. burning candles, on
the device.
> Never expose the device to dripping or splash-water
and do not place any items filled with liquid, e.g.
vases, on it.
> Only operate the device in a moderate climate.
> Never open the device! There is the danger of an
electric shock. A possibly necessary intervention may
only be accomplished by training
personnel.
Disconnect the device from the mains in the following
cases and request help from an expert:
> The electric cable or the power supply plug is
damaged
> The device was exposed to humidity or liquid has
penetrated
> In the case of substantial malfunctions
> In the case of considerable exterior damages
Operational interruptions
The device should be disconnected from the mains during
a thunderstorm or during longer operational interruptions
(e.g. vacation).
8
Page 9
9
EN
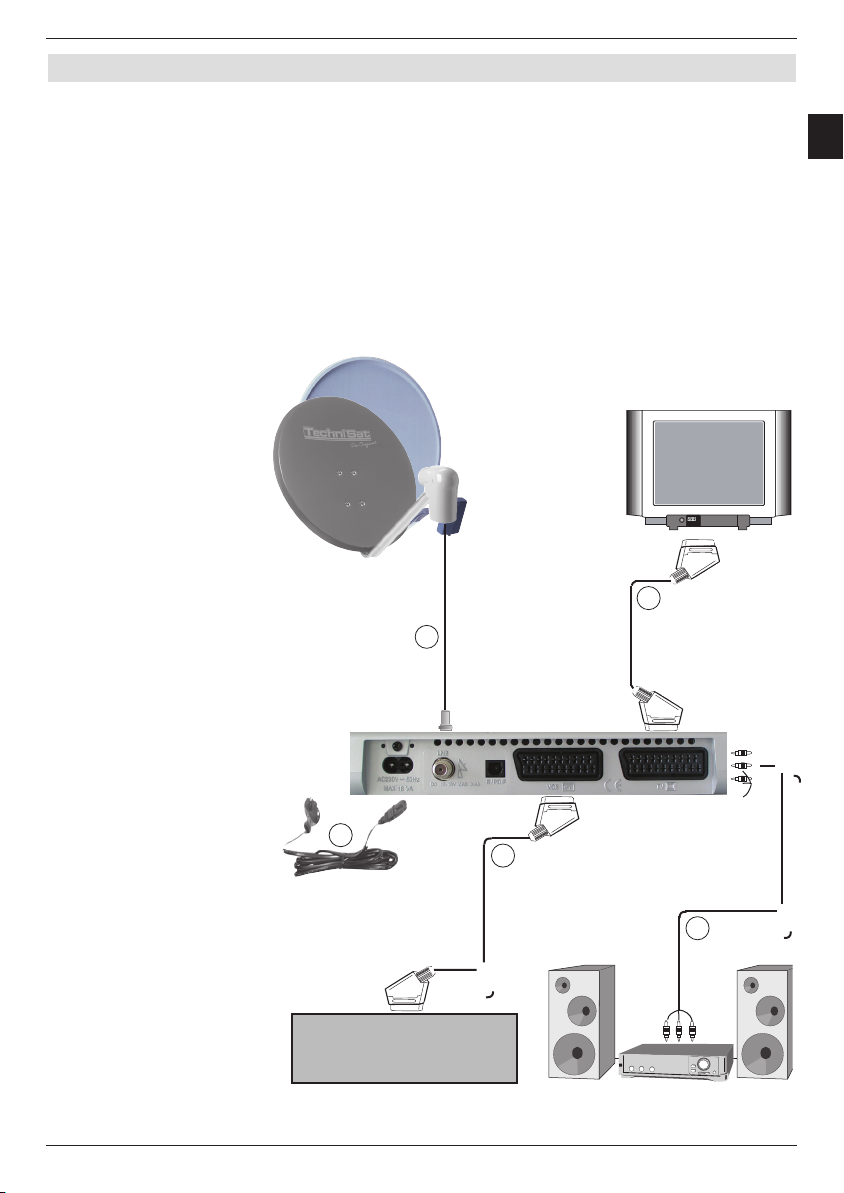
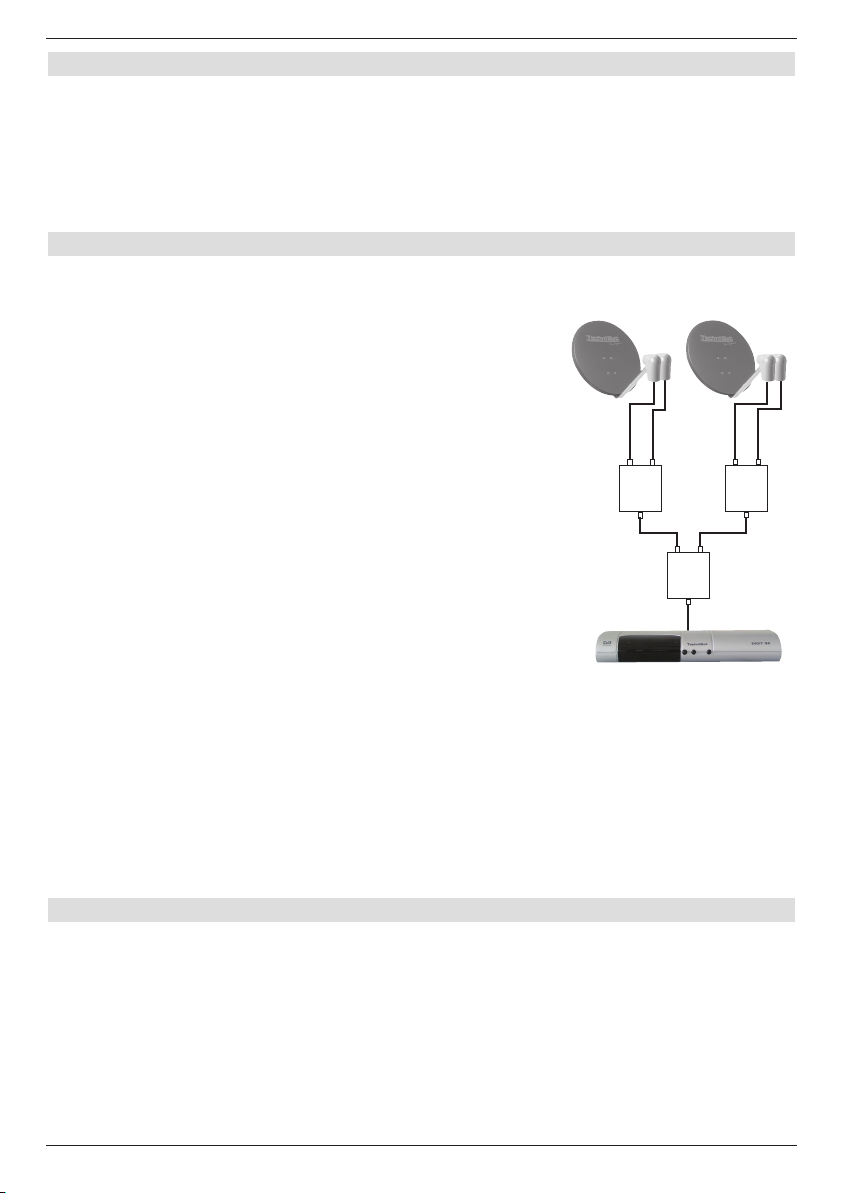
4 Connecting to a DVB receiver
a Connecting the LNB to the LNB input (LNB IN) of the DVB receiver.
b Scart connection of the DVB receiver to the TV set.
c Scart connection of the video cassette device to the VCR-Scart socket of the DVB
receiver.
d Connecting the audio outputs to HiFi equipment.
1)
e Power supply connection
b
a
e
c
d
VCR
1)
only Digit S1/S2
Page 10

The following references a b c etc., refer to the drawing on page 10.
4.1 External unit
a Connect the LNB input of the digital receiver by means of a suitable coax cable to
the LNB of your external unit. Also observe Section 6 "Settings".
4.2 Connecting to a TV set
b Connect the receiver (SCART socket TV) and TV set (SCART socket) using
the enclosed SCART cable. Your television set will automatically switch to AV and
therefore to satellite operation when the digital receiver is turned on, if appropriately
equipped.
4.3 Video cassette recorder (VCR)
c Connect the video cassette recorder to the SCART VCR socket. The videocassette
recorder provides a switching signal to the digital receiver during playback. This
enables the video cassette recorder signal to be supplied to the TV set automatically.
If your video cassette recorder does not supply a switching voltage, switch your digital
receiver on by means of the EXTERN key to the external input AV. Return to normal
operation by pressing this key again.
4.4 HiFi amplifier
4.4.1 Analogue
d To achieve the best possible sound quality, you can connect the digital receiver to a
HiFi amplifier. For this, connect the cinch socket Audio R and Audio L of the digital
receiver by means of a suitable cable to an input of your HiFi amplifier (e.g. CD or
AUX; Careful, the phono-input is not suitable!).
4.4.2 Digital
d If your amplifier is equipped with an appropriate electrical or optical input,
connect the socket AUDIO OUT DIGITAL electrical or AUDIO OUT DIGITAL
optical to the electrical or optical input of your amplifier.
The sampling rates 32, 44.1 and 48 kHz are available depending on the respective station.
The Dolby digital signal (AC3) is also available at this output, if broadcast.
1)
4.5 Serial interface (RS 232)
The RS 232 interface enables updating the system software and preprogramming via the PC.
1)
1)
1)
10
1)
only Digit S1/S2
Page 11

11
EN
4.6 Mains connection
The digital receiver should only be connected
to the mains, when the device has being connected to all appropriate components. This
prevents the digital receiver or other components destroyed.
After making all connections, connect the receiver with the enclosed power cable to
e
a power socket 230 V/50-60 Hz.
5 Initial installation
After reading the safety notes and having connected the device as described in Chapter 4,
turn the device on as described in Chapter 7. The installation assistant appears during the
initial start-up AutoInstall.
The installation assistant helps you to easily carry out the most important settings on the
digital receiver.
The required remote control keys are marked,
in order to accomplish the settings during the respective installation step.
You can exit the initial installation at any time by pressing the red function key. You can
return to the previous installation step by means of the green function key. This enables you
to correct incorrect inputs at any time.
Your equipment starts with the standard pre-programming, if the initial installation is not
carried out or aborted.
The initial installation demonstrated here is only exemplary. The precise initial
installation procedure depends on the settings you have accomplished. Therefore, please
follow the instructions on the screen carefully.
Operating language
The AutoInstall installation assistant starts automatically during the initial start-up of the
device. First, a selection window appears for the operating language.
> Highlight the required operating language with the
> Acknowledge with
OK.
arrow keys up/down.
Audio language
> Select the preferred audio language with the arrow keys up/down.
The required audio language is set according to this selection after the search run,
if this is broadcast by the appropriate station.
> Acknowledge with
OK, to accept the selection.
Page 12

Setting the country
> Select the time zone with the arrow keys up/down corresponding to your
country.
The time as well as sorting of the favourites list is accomplished automatically
according to your selection.
> Acknowledge with
function.
OK, to accept the selection and to continue to the station search
Antenna configuration
You can adjust the digital receiver to your antenna configuration during this installation step.
> If you would like to take over the standard antenna setting select the
with the Arrow keys up/down and acknowledge with OK.
or
> Select the
OK, if you are operating the receiver on a Multytenne.
Continue in both these cases with the Section “Software update”.
> If the configuration of your receiving installation does not correspond to the Standard
or Multytenne settings, select the Manual field and acknowledge with OK.
Multytenne field with the arrow keys up/down and acknowledge with
Standard field
DiSEqC
> If your receiving installation uses DiSEqC components, select the Activate field with
the arrow keys and acknowledge with the OK key (You can find further information
on DiSEqC in Chapter 10, Technical terms).
Position A/Option A
> Select the satellites, which you receive with the DiSEqC setting Position A/Option A
with the arrow keys up/down and acknowledge with the OK key.
Position B/Option A
> Select the satellites, which you receive with the DiSEqC setting Position B/Option A
with the arrow keys up/down and acknowledge with the OK key.
Position A/Option B
> Select the satellites, which you receive with the DiSEqC setting Position A/Option B
with the arrow keys up/down and acknowledge with the OK key.
12
Page 13

13
EN
Position B/Option B
> Select the satellites, which you receive with the DiSEqC setting Position B/Option B
with the arrow keys up/down and acknowledge with the OK key.
In the next step check the configuration of your antenna again.
> If you would like to accept this setting, select the
down and acknowledge with the OK key.
yes field with the arrow keys up/
Software update
The digital receiver checks, whether new software is available for the equipment via satellite,
after you have made the antenna settings. If new software is available, you can automatically
carry out a software update.
> Select the field
OK.
The new software is now downloaded to your device. This procedure can take some
minutes.
Update with the arrow keys right/left and acknowledge with
Station search function / ISIPRO
While investigating, if new software is available to download to the receiver, it is also
checked, whether a new ISIPRO programme list is available. An available new
programme list can be installed with the ISIPRO function.
> Select the
down.
> Acknowledge with
The up-to-date programme list is now downloaded from the satellite.
ISIPRO Programme list update line with the Arrow keys up/
OK.
If no new ISIPRO programme list is available, or you do not want to download this list, carry
out a station search run in order to look for new programmes.
> Select the
for free and encoded programmes, or All unencoded Stations, if you only want
to look for free programmes.
> An automatic station search is started by pressing the
antenna configuration are thereby scanned for programmes. This procedure can take
some minutes. Please observe further screen inserts.
All Stations field with the arrow keys up/down, if you want to search
OK key. All satellites set in the
Terminate the installation assistant
> Acknowledge the final message of the installation assistant with OK, in order to
return to normal operation.
Page 14

6 Settings
After you have now connected and started up your new digital receiver, you can, if
necessary, optimise the digital receiver for your application.
6.1 Operating language
This menu item enables you to set the menu language according to your requirements.
To change the operating language proceed as follows:
> Call the
> Now select the menu line
arrow keys up/down.
> Acknowledge with
The Operating language submenu is displayed.
> Select the required language with the
> Store the input by pressing the
> Pressing the
6.2 Basic settings
Order to use your DVB receiver optimally, you can also set it to your individual applications.
> Call the
> Select the
> Acknowledge by pressing the
The Settings submenu is displayed.
> Select the
> Acknowledge with
The Basic settings menu is displayed.
> You can move through the menu with the marker using the
and modify the individual positions as indicated.
Pay attention to the screen inserts when selecting a menu option, if applicable. The
following settings can be carried out:
Main menu with the Menu key.
Operating language, by highlighting this with the
OK.
arrow keys up/down.
OK key.
TV/Radio key returns you to normal operation.
Main menu by pressing the Menu key.
Settings line with the Arrow keys up/down.
OK key.
Basic settings line with the arrow keys up/down.
OK.
Arrow keys up/down
6.2.1 Time difference GMT (h)
Your device is equipped with a clock. This is synchronised by means of the satellite reception
to Greenwich Mean Time.
If the setting None has been set under Country (Section 6.2.2), you must only correct the
time according to your local time with the arrow keys right/left. This difference is for
Germany +1 hour, in the summer time +2 hours.
6.2.2 Country
This function automatically changes summer to winter time and also automatically sets the
time difference in relation to GMT.
> Indicate in the line
which the device is operated.
Country using the arrow keys left/right the country, in
14
Page 15

15
EN
6.2.3 Remote control code
Up to four different devices, using the same remote control code, can be operated with the
remote control of your receiver. Unintentional operating errors can occur, if two satellite
receivers are used in the same room. To avoid these operating errors, set different remote
control options for each receiver.
> For this purpose, actuate the
SAT1 or SAT2 key in this line and simultaneously the
OK key.
6.2.4 Standby clock
1)
This line enables you to select, whether the time is displayed during standby operation.
> In this line you can set the standby clock mode to
on or off with the Arrow keys
right/left.
6.2.5 Exit basic settings
The accomplished settings are stored automatically when exiting the basic settings submenu.
> Pressing the Return key, returns you to the settings menu
or
> Pressing the
Menu key, returns you to normal operation.
6.3 Audio/Video settings
In order to optimise your digital receiver to your TV set, it is possible to accomplish further
settings in the Audio/video settings menu.
> Call the
> Select the
> Acknowledge by pressing the
The Settings submenu is displayed.
> Now select the line
> Acknowledge with
The menu Audio/video settings is displayed.
> You can move the marker through the menu with the
change the individual items as indicated. Pay attention to the screen inserts when
selecting a menu option, if applicable. The following settings can be carried out:
Main menu with the Menu key.
Settings line with the Arrow keys up/down.
OK key.
Audio/video settings with the arrow keys up/down.
OK.
arrow keys up/down and
1)
only Digit S1/S2
Page 16
6.3.1 Picture size
> Using the arrow keys left/right set the picture size appropriate for your TV set
4:3 or 16:9.
This function automatically adapts the picture size to your TV-set.
6.3.2 Language (Audio signal)
> Set your preferred language in this line with the arrow keys left/right.
This language is automatically set after a search run, if the language is broadcast.
6.3.3 Language (Subtitles)
You can display subtitles with your DVB receiver. These are automatically displayed, if the
subtitle function is turned on and the specified language is broadcast.
The subtitles can be turned on manually, if this function is not activated. Available subtitles
are indicated by the Subtitle selection indication. Please also note Section 7.14 of the
operating manual. Select language with arrow buttons left/right.
6.3.4 TV SCART mode
> Set FBAS, RGB or S-Video1) in this line with the arrow keys left/right
corresponding to your TV set.
Set FBAS for standard TV sets.
6.3.5 VCR SCART mode
> Set FBAS or S-Video in this line with the arrow keys left/right corresponding to
your video unit.
Set FBAS for standard TV sets.
6.3.6 Dolby Digital (AC3)
Various films are broadcast in Dolby Digital format. This is indicated by the Dolby sign
in the info window after setting a programme.
You can hear these films in 5.1 channel Dolby Digital sound, if you have a einen Dolby
Digital 5.1 channel amplifier. For this, is only necessary to connect the digital output Audio
Out Digital (see Section 4.4.2) of your DVB receiver to the digital input of your Dolby Digital 5.1
channel amplifier. These broadcasts are automatically played in Dolby Digital format, if the
Dolby Digital (AC3) function is turned (on).
The Dolby Digital Sound can be turned on manually, if the function is not turned on (on).
Please also note Section 7.6.1 of the operating manual.
> Turn the Dolby Digital (AC3)
1)
1)
on or off with the arrow keys right/left.
16
1)
only Digit S1/S2
Page 17

17
EN
6.3.7 Exit Audio/Video settings
When exiting the Audio/Video Settings submenu
the accomplished settings are automatically
stored.
> Pressing the
Back key returns you to the
Settings menu
or
> to normal operation by pressing the
Menu key.
Example:
A B
Position
Output
A B
Position
Output A
A B
Option
Output
6.4 Antenna settings
After adjusted your digital receiver to your individual requirements, it is possible, if
necessary, to adjust the digital receiver to your antenna. The satellites set in the installation
assistant are available in the Antenna settings menu. The satellite positions ASTRA
19,2° East and EUTELSAT 13,0° East are pre-programmed if the installation assistant was
terminated prematurely.
You can set your digital receiver as follows to the required data, if you would also like to
receive other satellites or use a different LNB.
> Call the
> Select the
> Acknowledge by pressing the
The Settings menu is displayed.
> Now select the line
> Acknowledge with
The Antenna settings menu is displayed.
The following settings can now be carried out in this submenu:
Main menu with the Menu key.
Settings line with the arrow keys up/down.
OK key.
Antenna settings with the arrow keys up/down.
OK.
6.4.1 Multytenne
If the receiver is operated on a Multytenne LNB, you can automatically adjust the switch
positions to the Multytenne LNB in this menu item.
> Select
on in this line with the OK key to automatically set the switch positions.
Page 18
6.4.2 Turning the DiSEqC on/off
DiSEqC (Digital Satellite Equipment Control) is a digital control signal to control DiSEqC
compatible components via the antenna line. You must activate the DiSEqC controller, if your
external unit contains DiSEqC components:
Turn the DiSEqC on or off in this line with the OK key.
>
Since only one LNB can be addressed when the DiSEqC controller is deactivated, the
menu is limited to the configuration of one LNB in this case.
6.4.3 Setting the array
The menu contains the four switching criteria for the DiSEqC controller. Your equipment
is pre-programmed in such a way, that ASTRA 19,2° East is
received on the switch position A/A and Eutelsat 13,0° East
on the position B/A of a multi-switch. You can adjust your
digital receiver to your receiving installation, if the array of your
receiving installation is designed differently or can receive other
satellites.
> Select the DiSEqC switch position (1-4) with the
arrow
keys, which you would like to assign to a satellite
(e.g. A/B 3 No Satellite), by selecting this line.
> Press the
OK key.
A selection table containing the available satellites is
now displayed.
> Now select the required satellite with the
arrow keys.
The marker is moved upwards or downwards line by
line with the arrow keys up/down, the arrow keys
left/right are used to display the following or previous
page.
Please select a reserve position, designated as User 1 to
User 14, if the required satellite is not contained in the list.
> Acknowledge with OK.
The select satellite is now inserted into the previously selected position in the
Antenna settings menu.
Example:
A B
Position
Output
A B
Position
Output
A B
Option
Output
Work on the Antenna settings menu as described, until the menu specifications
correspond to those of your receiving equipment. For all switch criteria, which you do not
require set No Satellite .
6.4.4 Further settings/LNB characteristics
After having set the array of your DVB receiver to your receiving installation, you can also
check and if necessary correct the further settings for your reception unit.
> Move the marker to the
> Now select the line, which you want a check or amend with the
down, the Continue field.
> Acknowledge with
A submenu is now displayed, in which you can set the LNB adjustments and
transponder test.
Configuration column with the arrow keys left/right.
arrow keys up/
OK.
18
Page 19

19
EN
LNB Type
> Enter the used LNB type in this line with the arrow keys right/left. You can select
Single LNB, Quatro LNB, Multytenne LNB, DisiCon 1 LNB, DisiCon
2 LNB, DisiCon 4 LNB, C-Band LNB, Circular LNB and a User LNB to
manually enter the LNB data.
> The setting is taken over by pressing the
OK key.
Test Transponder
You only have to enter the following menu items, if you want to check the satellite signal of a
specific satellite.
Transponder frequency
> Enter a frequency in this line with the Numeric keyboard on which the digital
programmes are broadcast.
Polarisation
> Enter the required (horizontal or vertical) polarisation plane with the arrow keys
right/left .
Symbol rate
The symbol rate indicates, which data quantity is transmitted per second. This can be for
example 27500 (27500 symbols per second).
> Enter the appropriate symbol rate by means of the
numeric keyboard.
User LNB
The following further settings can be accomplished, if you entered User LNB under LNB
type:
LOF low band
LOF (Local oscillator frequency) is the frequency, with which the LNB converts the received
frequency into the so-called 1st intermediate frequency, which can then be received by the
digital receiver. So-called Universal LNBs work with 2 LOFs, in order to be able to convert
the entire reception range of 10.7 to 11.8 GHz (low band) and 11.7 to 12.75 GHz (high band).
> Enter the LOF of the low band of your LNB in this line with the
Numeric keyboard.
LOF high band
> Enter the LOF of the high band of your LNB in this line with the Numeric
keyboard.
Transition LOF low/high (transition)
> Enter the frequency at which your LNB should change from the low band to the high
band in this line with the numeric keyboard.
Signal/Quality
The signal strength and quality are displayed in these lines, if you have correctly entered the
test transponder specifications.
Page 20

6.4.5 Rotating Unit
When operating the digital receiver with a rotating unit equipped with an DiSEqC motor
(Level 1.2) turn the DiSEqC Controller (Section 6.4.2) on and observe Section 9 of the
operating manual.
6.4.6 Exiting the antenna settings
The accomplished settings are stored automatically when exiting the antenna settings
submenu.
> Pressing the Return key, returns you to the settings menu
or
> Pressing the
Menu key, returns you to normal operation.
7 Operation
7.1 Turning on and off
> Turn the digital receiver on by pressing the On/Standby key on the device or on the
remote control.
> You turn the device off by pressing this key again on the device or on the remote
control.
> The device is now in standby, the time is thereby displayed on the device (if activated
in Section 6.2.4).
The device time must be set again, if this is not displayed. For this purpose turn the
device on and receive e.g. ZDF for approximately 30 seconds in order to read in the
time automatically.
1)
7.2 Programme selection
7.2.1 By means of the programme up/down keys
> Select the programmes with the Programme keys up/down on the receiver or on
the remote control, in each case by one channel memory step.
7.2.2 By means of the numeric keyboard
> Enter the required programme number by means of the numeric keyboard.
For example:
1 for programme position 1
1, then 4 for programme position 14
2, then 3, then 4 for programme position 234
When entering multi-digital programme numbers, you have approximately three seconds time
after pressing a key to complete the input.
If you only want to input a 1-digit or two-digit number, you can accelerate the changeover
procedure by pressing the last digit for a longer period.
20
Page 21

21
EN
7.2.3 By means of the navigator (Programme list)
> Press the OK key.
The programme list navigator now appears. Only TV programmes are display during
TV operation and only radio programmes during radio operation. The currently set
programme is marked.
> You can now select the required programme with the
Using the Arrow keys up/down you can move the marker through the list by one
line at a time.
The Arrow keys left/right enable scrolling through the list page-wise upwards or
downwards.
> The selected programme is set by pressing the
arrow keys.
OK key.
7.2.3.1 Select list
In order to facilitate finding programmes, your device has different programme lists available.
You can select your Favourites list (see Section 8.1), or have the programmes displayed
in the alphabetically sorted Complete list or according to providers.
> Press the
The active programme list is displayed.
> The
(Favourites list, Provider lists and Complete list). The active programme list
type is marked.
> Select e.g. the programme list type
> Acknowledge with
The alphabetically sorted complete list is displayed, containing all programmes.
> You can now select the required programme with the
> Acknowledge with
OK key.
red function key Category opens a window with the programme list types
Complete list with the Arrow keys up/down.
OK.
Arrow keys up/down.
OK.
7.2.4 Calling locked programmes
The message Device pin is displayed on the screen, if a programme protected by a child
lock is called.
> Enter your device pin code by means of the
The required program will be set.
or
> Switch to a non-locked programme.
The pin code is always queried when turning on a locked programme, if you have made
the setting on in Section 8.3.3. The pin code must however only be enter once during an
operational phase to increase your operating convenience.
But please note Section 7.3.2 when using an encryption system SIM card.
numeric keyboard.
7.2.5 Infobox
The programme position and name of the set programme is briefly displayed after each
programme change. Further programme features are additionally displayed, such as e.g.
for video text, for 16/9 broadcasts, for encoded programmes. The broadcast, the
SFI genre and the FSK age indication (Voluntary self-control of the film industry) is displayed.
Page 22

7.3 Reception of encoded programmes
Your device is equipped with an integrated Encription System
decoding system (CryptoWorks/CONAX). This enables you to receive encoded programmes.
For this purpose you must first insert an encription system SIM card into the integrated SIM
card reader:
> Insert the Encription System SIM card into the card slot of the integrated card
reader.
(golden chip downwards)
> Your digital receiver automatically checks the card reader, if an encoded program is
set and displays the programme unencoded, if a valid SIM card is inserted for this
programme.
7.3.1 Special functions
Some programme positions offer you special functions. On multifeed channels you can
e.g. watch different matches (e.g. games of the German Football League), change audio
channels (e.g. Stadium/commentary) or camera perspectives (Formula 1).
Some programme providers also enable you to select the required start time for your film.
7.3.1.1 Multifeed options
Some programmes offer a multifeed option. This function enables you, e.g. during a sport
broadcast, to freely select different camera perspectives (Formula 1) or to change to different
sports venues (German Football League).
A note indicates that the programme has the multifeed optionen.
> In order to select one of the possible options, actuate the
The available options are then displayed in a selection window.
> Select the required option with the
> Acknowledge with
Your digital receiver now sets the selected option.
OK.
arrow keys up/down.
Option key
7.3.1.2 Starting time selection/Picture selection
You have possibility of selecting individual films at different times on some channels. These
films can therefore be viewed whenever you like at different starting times.
A note indicates that a channel provides a starting time/picture selection.
> In order to select one of the possible starts times, actuate the
A selection window is displayed with the available start times.
> Select the required starting time with the
with OK.
If the broadcast is activated for the set starting time you can view this at the required
time.
arrow keys up/down and acknowledge
22
Option key
Page 23

23
EN
7.3.2 Encription System pin code
Your digital receiver is equipped with a child lock to block individual programmes
(see Section 8.3). Broadcasts of Encryption System encoded programmes can be
pre-locked by means of a minor protection identification. In order to release the respective
broadcast, you must enter the Encription System pin code. This pin code is stored
on the SIM card. This is delivered together with the card. Do not mistake the Encription
System pin code with the device pin code of the digital receiver (Section 8.3).
A message is displayed, if you switch to a station with a pre-locked programme.
> In order to release the programme, enter by means of the numeric keyboard the
4-digit Encription System pin code.
> The broadcast is released as soon as the correct pin code has been entered.
You can repeat your pin code input, if it was entered incorrectly or exit the menu by
pressing the Return key.
7.4 Volume adjustment
The volume of your digital receiver can be adjusted. This facilitates handling of the receiver,
since you have all important functions on the remote control and only rarely must use the
remote control of your TV set.
The volume retains the last adjustment when you turn your digital receiver on again.
> Regulate the volume of your digital receiver with the
the Volume - quieter key.
> Pressing the
turns the sound on again.
Sound off/on key turns the sound off, renewed pressing of this key
Volume + louder key and with
7.5 Switching TV/Radio
The pre-programming of the receiver contains both the television as well as the radio
programmes.
> Switch the digital receiver to radio operation with the
now switches to the last heard radio programme.
> The last viewed television programme is reset by pressing the
TV/Radio key. The receiver
TV/Radio key again .
7.6 Selecting a different language (TV operation) or station
(Radio operation)
If a TV programme is broadcast in several languages or with several audio channels or if
several radio programmes are available on a radio programme position, this is indicated by
an insert. To select a different language or a different audio channel proceed as follows:
> Press the
A list of the currently broadcast languages or radio programmes is displayed on the
screen.
> Select the required language or required radio programme with the
down and acknowledge with OK.
You can now listen to the broadcast in the set language.
Your digital receiver can also receive mono broadcasts.
> Using the
( ) and stereo ( ).
Option key.
arrow keys up/
arrow keys right\left you can set mono channel 1 ( ), mono channel 2
Page 24

7.6.1 Dolby Digital (AC3 operation)
A broadcast transmitted in Dolby Digital Sound is indicated in the infobox by the Dolby sign
when turning the programme on. This programme is played automatically in this format, if the
Dolby Digital (AC3) function has been activated according to section 6.3.6.
If the Dolby Digital (AC3) function has not been activated, set your device manually to
AC3 operation as follows:
> Press the
If broadcast, a list of the currently transmitted languages and Dolby Digital (AC 3)
is displayed on the screen.
> Select the
Acknowledge with OK.
>
You can now listen to the broadcast in Dolby-Digital sound. If you would like your
device to always be in the Dolby Digital mode, set your device as described in
Section 6.3.6 to the automatic AC3 play function.
Option key.
Dolby Digital line with the arrow keys up/down.
1)
7.7 Return to last set programme
> The last set programme is reset by pressing the Return key on the remote control.
> The previously seen programme is set by renewed pressing of the key.
7.8 Display clock and programme information
This function enables you to view programme information concerning the turned on
programme.
> Press the
An insert now appears in the lower half of the picture with the current time,
the name of the programme and the current broadcast with beginning and stop times,
if the required data has been transmitted by the station.
Info key, to display information on the set programme.
7.9 Further programme information
If broadcast, you can obtain further information on the turned on programmes by means of
the programme info function.
> Pressing the
Further information on the current programme is displayed.
> Longer information texts can be moved line-wise by means of the
down
> The following programme is displayed, if transmitted, by pressing the
> The insert disappears by pressing the
Info key twice opens a further info window.
arrow keys up/
Info key again.
Info key again.
7.10 Transponder information
> The data of the set transponder are displayed by pressing the green function key
(Transponder info).
> The coloured function keys enable you to additionally display
information, Programme information and also information on the used encoding
system (CA).
> Exit Info with the
Menu key.
24
Audio/Video-
1)
only Digit S1/S2
Page 25

25
EN
7.11 Freeze image
> The current TV picture is displayed as a freeze image by pressing the Stop/Freeze
image key.
> Pressing this key again returns you to normal operation.
7.12 Sleep timer
> Set the turnoff time of the receiver from 15 minutes to 2 hours by pressing the Sleep
timer key repeatedly.
The receiver goes to standby automatically after the set time has expired.
7.13 Video text
7.13.1 Using the video text decoder of your TV set
The video text is fed to your TV set, if transmitted. Use the remote control of your TV set
to operate the video text. Set your digital receiver to FBAS operation (Section 6.3.4),
if disturbances should occur on your TV set, such as overlay of video text and picture
content.
7.13.2 Using the internal video text decoder
You can alternatively also use the integrated TOP video text decoder, to have information
displayed. The TOP video text subdivides all text pages into thematic groups and blocks,
thereby giving a better overview of the video text.
> Turn the programme on, where you want to see the video text information.
> Pressing the
> Enter the required video text page by means of the
> Use the
> The
> The
1)
video text key turns the video text on.
numeric keyboard.
Your input is displayed in the upper left corner of the screen. Your device searches for
the required page after entering the appropriate video text page. Since not all video
text pages can be simultaneously transmitted, it can take a few seconds until your
device has found the page and displays it on your TV screen.
Page 100 always displays the contents of the respective video text provider.
red or green key to scroll forward or back through the pages.
yellow function key calls the video text group indicated in the yellow field.
blue function key calls the video text block indicated in the blue field.
Mixed operation
> Pressing the video text key again activates the mixed operation mode
(simultaneous display of the video text information and TV picture).
> Return to normal operation by pressing this key again.
Stop operation
> Pressing the Stop/Freeze image key displays in the inscription “Stop” in the upper
left corner of the video text window.
This prevents automatic scrolling of the video text. Pressing the Stop/Freeze
image key again deactivates the stop mode.
1)
only Digit S1/S2
Page 26

> Return to normal operation by pressing the Return key.
7.14 Subtitles
Transmitted subtitles are indicated by the insert Subtitle selection. These are
automatically displayed, if you have activated the Subtitle function (according to Section
6.3.3) but only if these are broadcast in the selected language.
Subtitles, which are only broadcast in other languages or by video text, can be set manually
as follows.
> Press the
the broadcast subtitle languages and /or the video text pages used for transmitting
subtitles below the Subtitle insert .
> Select the required language/video text page with the
Acknowledge with OK.
>
The subtitles are now displayed.
This function is only available, if subtitles are actually being transmitted and this setting is not
available after a switch over procedure.
7.15 Electronic programme guide SFI (SiehFern Info)
Your digital receiver is equipped with an electronic programme guide. This enables you to
display the programme information of individual or several stations on the screen.
You can quickly achieve an overview of the currently running programmes or of the
programmes broadcast during the day or of the following days.
The SFI function enables you to:
- Display information on the programme contents on the screen
- Select programmes, which are automatically started at the beginning of their
broadcast
- Programming timers
- Searching for and setting programmes by means of the programme type (Genre).
Option key (possibly several times), until a selection table appears with
arrow keys up/down.
7.15.1 Importing the SFI data
Your device updates the programme information at the update times set according to Section
8.2 (SFI channel). The device must be in the standby mode for this purpose.
The import procedure is displayed on the screen by indicating the already imported SFI data
(e.g. 038P for 38%). This function is not carried out, if your device is being used at this time.
You can also start the import procedure manually immediately after turning the device off
(the display indicates “oooo” ) by pressing the SFI key. The import procedure is displayed
on the screen by indicating the already imported SFI data (e.g. 038P for 38%).
The import duration depends on the number of imported programmes. The maximum
number possible to display is seven days in advance. This period is reduced with increasing
number of programmes in the electronic programme guide, due to the data quantity.
You can decide, which programmes are to be included in the "electronic programme guide".
These can then be entered, as described in section 8.2.1.
7.15.2 Interrupting the import procedure
The import procedure can be interrupted by turning the digital receiver on (Key On/Standby).
The last updated SFI data are then available.
26
Page 27

27
EN
7.15.3 Calling the electronic programme guide
> Turn the digital receiver and the TV set on.
> Press the
The electronic programme guide is now displayed on the screen. The programmes
that you have specified or were preset in the factory are displayed (see also Section 8.2).
You can now inform yourself on the contents of various programmes with the SFI
function.
The SFI function is also available to set or mark down the required programmes or to
include them in the timer programming.
SFI key on the remote control of the digital receiver.
7.15.4 Now (Table with current programme contents)
First, the SFI table “Now” is displayed with the currently broadcast programmes. The yellow
bar on the right next to the programme names displays the past broadcast time of the current
programmes. The currently set programme is marked.
> You can move the marking through the lines by the
the marking through the pages, press the arrow keys right/left.
The SFI functions (Section 7.15.7) are now available.
> To go to the SFI table “
or
> Pressing the
TV/Radio key returns you to normal operation.
Later” press the yellow function key (See Section 7.15.5)
arrow keys up/down. To scroll
7.15.5 Later
> Using the yellow function key, you can call the table "Later" (following programmes).
The SFI functions (Section 7.15.7) are now available.
> To go to the SFI table “
or
> Pressing the
table “Now”
or
> Pressing the
green function key or the Return key returns you to the previous SFI
TV/Radio key, returns you to normal operation.
More” press the yellow function key (Section 7.15.6)
7.15.6 More
> The SFI table “More” is displayed by renewed pressing of the yellow function key
with activated SFI table “Later”.
An additional time window is displayed in the header of this table. The time of the
displayed SFI table is indicated in this time window.
> Pressing the
yellow coloured field.
> Continuous scrolling is activated by continuously pressing the
A clock is displayed to facilitate a better overview .
> It is possible scroll back through the tables by pressing the
The individual days of the week are displayed on the lower edge of the screen. The
appropriate fields are marked, if the information is available for the following days.
yellow function key initiates scrolling by the time indicated in the
yellow function key.
green function key.
Page 28

> In order to achieve an overview over a required day, press the number key on the
numeric keyboard corresponding to the day of the week.
or
> Pressing the
Return key returns you to the “Later” table.
or
> Pressing the
TV/Radio key, returns you to normal operation.
1)
7.15.7 SFI functions
In order to carry out the following SFI functions, call the SFI as described in Section 7.15.3.
7.15.7.1 SFI-Info
The SFI-Info enables you to display brief information on the marked programme or on the
marked broadcast. Available SFI-Info is identified by next to the appropriate programme.
> Select the required programme with the
> Press the
SFI, to display the information.
arrow keys or function keys.
It is possible to move or scroll through longer information texts with the arrow keys.
> Pressing the
Return key returns you to the previous SFI table.
7.15.7.2 SFI timer programming
You can easily program timer events by means of the electronic programme guide SFI.
> Select the required programme with the
> Press the
red Timer function key, to open the selection window of the available
timer types.
> Select the with the
arrow keys up/down the required Timer type (See Section
7.16).
> Acknowledge with
OK.
For control purposes, the Timer administration menu is displayed with the data
of the selected programme. If necessary, you can carry out changes here
(see 7.16.1).
> Pressing the
Return key returns you to the previous table.
The appropriate line is marked. Your device is now turned on according to time type
at the beginning of the selected programme. If the device was turned on by the video
recorder timer, this is indicated by “rEc”1) in the display. Most of the remote control
functions are deactivated, to prevent accidental aborting of the recording.
The active timer is indicated by the flashing of the two dots in the time display or LED
in the standby mode.
arrow keys or function keys.
28
1)
only Digit S1/S2
Page 29

29
EN
Deleting the SFI timer event
If you want to cancel an SFI programmed timer event, proceed as follows to select the
appropriate programme.
> Press the
> Select the
> Acknowledge with
> In order to interrupt an active timer, turn the digital receiver off with the
key.
> You can then turn the receiver on by pressing the key again and use it without
restrictions.
red function key Timer, to open the selection window.
Delete timer line with the arrow keys up/down.
OK.
On/Standby
7.15.7.3 SFI programme overview
The SFI programme overview enables you to display a table with the daily programme of an
individual station. Proceed as follows:
> Press the
The SFI table “Now” is displayed.
> Press the
> Select the the
> Acknowledge with
The daily overview of the set programme is now displayed.
> Using the
time.
The individual days of the week are displayed on the lower edge of the screen.
The appropriate fields are marked, if the information is available for the following
days.
> To display the programme contents of the required day, press the numeric key
corresponding to the week day on the numeric keyboard.
SFI key.
blue function key SFI Menu, to open a selection window.
Programme line with the arrow keys up/down.
OK.
arrow keys, you can now set the marker to the required programme or
Displaying the SFI overview of other programmes
> Press the green function key Programmes.
The favourites list is displayed.
> You can now select the required programme with the
> The SFI overview of the marked programme is displayed by pressing the
arrow keys.
OK key.
Page 30

7.15.7.4 SFI overview according to programme types (Genre)
If you are interested in specific programme type, you can display the programme information
according to specific genres, e.g. film, news, etc.
> Press the
The SFI table “Now” is displayed.
> Press the
> Select the
> Acknowledge with
> With the
programme types.
> You can now select the required programme type with the
Using the arrow keys up/down you can move the marker through the list by one
line at a time.
The arrow keys left/right enable scrolling through the list page-wise upwards or
downwards.
> Acknowledge with
The daily overview now exclusively displays programmes of the selected programme
type.
The individual days of the week are displayed on the lower edge of the screen.
The appropriate fields are marked, if the information is available for these days.
> To display the programme contents of a required day, press the numeric key
corresponding to the week day on the numeric keyboard.
SFI key.
blue function key SFI Menu, to open a selection window.
Genres line with the arrow keys up/down.
OK.
green function key Genres you can open a window with the available
arrow keys .
OK.
7.15.8 Terminating SFI
> Return to normal operation by pressing the Menu or TV/Radio key.
7.16 Timer recordings
Your receiver is equipped with a video recorder timer and a station change timer. These
timers only differ with regard to programming by indication of the appropriate timer type.
You can programme the timer either manually as described in this chapter or as explained in
Section 7.15.7.2 by means of the SFI function.
1. Video recorder timer
Your digital receiver is activated or deactivated by the video recorder timer, in order to record
a programme on a an external recording device in your absence, e.g. on a video cassette
recorder. Please note, that your video recorder must be programmed to record a programme.
If the device was turned on by the video recorder timer, this is indicated by “rEc” in the
display. Most of the remote control functions are deactivated, to prevent accidental aborting
of the recording. The active timer is indicated by the flashing of the two dots in the time
display or LED in the standby mode.
2. Station change timer
In normal operation, your device sets the foreseen programme when the required time has
been reached. The device can be used as usual and is not turned off when the programme
has finished, in contrast to the settings of the video recorder timer.
30
Page 31

31
EN
7.16.1 Manually programming the timer
> Call the Main menu with the Menu key.
> Select the the
> Acknowledge by pressing the
The Timer administration submenu is displayed.
> Select the timer type with the
for programming.
> Pressing the
event.
Proceed as follows to program:
Timer administration line with the arrow keys up/down.
OKkey.
arrow keys up/down, which you would like to use
OK key returns you to the input window for programming a new timer
Source
> Select the Source column with the arrow keys.
> Press the
> Select the required source in the now displayed selection window with the
keys up/down e.g.
(TV or Radio).
> Acknowledge with
The TV or radio programme list is now displayed according to the previous selection.
> You can now select the required programme with the
Using the arrow keys up/down you can move the marker through the list by one
line at a time.
The arrow keys left/right enable scrolling through the list page-wise upwards or
downwards.
> This is stored in the timer by pressing the
OK key.
OK.
arrow keys up/down.
OK key.
arrow
Date
> Select the Date column with the arrow keys.
> Enter the date (4-digit) by means of the
event is to take place.
Numeric keyboard, at which the timer
Start
> Select the Start column with the arrow keys.
> Enter the starting time for the timer in this line by means of the
Numeric keyboard.
Stop
> Repeat the steps as described in "Start", in order to into the stop time (except station
change timer).
Page 32

Repeat
> Select by means of the arrow keys the Repeat column.
> Press the
A selection with different repetition options is displayed.
1x Timer on once
T Daily repetition
1 W Repetition once a week
1-5 Repetition only on workdays
6-7 Repetition only on the weekend
> Select the required function with the
> The setting is taken over by pressing the
OK key.
arrow keys up/down.
OK key.
Storing the data in the memory
> After you have finished programming, press the yellow function key Accept,
to store the data in the memory.
If you selected a programme locked according to Section 8.3 as Station, you must
first enter the pin code before storing the data in the memory. Return to main menu
by pressing TV/Radio button.
7.16.2 Timer overview
The timer overview provides you with an overview of all already programmed timer events.
> In order to go to the
menu, as described above.
> Select the
> Acknowledge with
Overlapping timer events are highlighted in red.
Timer overview line with the arrow keys up/down.
Timer overview menu, call the Timer administration
OK.
7.16.3 Changing the timer programming
> In order to change an existing timer setting, select the timer event that you would like
to change with the arrow keys up/down.
> Pressing the
highlighted timer.
Modify this according to Section 7.16.1.
> After you have finished programming, press the
to store the data in the memory.
yellow function key Change brings you to the settings of the the
yellow function key Accept,
7.16.4 Deleteing the timer programming
> In order to delete an existing timer setting, select it with the arrow keys up/down.
> Press the
The message is displayed “You really want to delete this timer ?”
> Select the YES with the
> To delete the timer entry acknowledge with
green function key Delete.
arrow keys left/right.
OK.
32
Page 33

33
EN
7.16.5 Programming a new timer event
> In order to programme a new timer event, select the free
line in the Timer overview menu with the arrow keys up/down.
> Pressing the
timer event. Modify this according to Section 7.16.1.
> Select by means of the
field.
> Acknowledge with
A window opens to display the available timer types.
> Select the required to timer types with the
> To store the timer type acknowledge with
> After you have finished programming, press the
to store the data in the memory.
yellow function key New opens the input window to programme a new
arrow keys up/down the additionally displayed Type
OK.
arrow keys up/down.
OK.
yellow function key Accept,
Note!!!
Ensure that the device has also stored the time. This is visible on the display in the standby
mode. If this is not the case, leave your device switched to ZDF for approx. 30 seconds, so
that the time can be read in.
The time should now be displayed in the standby mode (is activated in Section 6.2.4).
7.16.6 Exiting timer administration
> Pressing the Return key, returns you to the Main menu
or
> Pressing the
Menu key, returns you to normal operation.
1)
8 Changing the basic programming
8.1 Configuring the favourites list
This section describes, how you can modify the pre-programming of your digital receiver
and the favorites programme list according to your requirements. This function is likewise
required, in order to sort a newly found programme into the list after a search run.
For this you should know the following: Your device has two programme lists available,
the Favourites list and the Complete list. The favorites programme list contains all
programmes, which you have included as described in the following. The complete list
contains all programmes.
This Section also describes how you can delete programmes, which are blocked by a child
lock or how to store them in the SFI. The favourites programme list is displayed when a
programme list is called by pressing the OK key.
1)
only Digit S1/S2
Page 34

8.1.1 Calling the programme list administration
In order to amend the favorites list, proceed as follows:
> Call the
> Select the line
administration, to amend the radio list with the arrow keys up/down.
> Acknowledge with
The programme list administration is now displayed to amend the respective
favourites list (TV or radio list).
The favourites list is displayed in the right half of the picture. This is now active,
because the currently set programme is highlighted.
The alphabetically sorted complete list is visible on the left side of the screen. The
complete list contains all available programmes.
> The selection option jumps to the complete list after pressing the
This is now active.
> A selection window is displayed after pressing the
You now have the possibility to display the sorted complete list according to various
selection criteria (e.g. all stations, all free, all new, all found, all English, etc.)
or according to provider.
> Select the required programme list with the
list).
> Acknowledge with
A further selection window is now displayed.
> Select the selection criteria, according to which the complete list is to be sorted with
the arrow keys up/down.
Select e.g. All stations, to display all available programmes in the complete list or
All new, in order to only display the stations newly found during the last search run
or
All English, in order to only display English-language stations.
> Acknowledge with
A programme list, according to selection, is now displayed with e.g. all, all new or
all English-language programmes. Programmes, which are already available in the
favourites list, are marked with a checkmark.
> Pressing the
switches between the favourites list and the complete list.
The respective active list is highlighted.
Main menu with the Menu key.
TV list administration, to amend the TV list or Radio list
OK.
red function key.
red function key again.
arrow keys up/down (e.g. complete
OK.
OK.
red function key Complete list or the green TV list function key
34
Page 35

35
EN
8.1.2 Adding programmes to the favourites list
In order to add programmes call the programme list administration and change to the
complete list.
> Press the
All the complete list and the favourites list as described in Section 8.1.e Available
options are then displayed in a selection window.
> Select the line
> Acknowledge with
> Select the programme that you would like to add to the list with the
down.
> The highlighted programme is added to the favourites list by pressing the
function key Add.
blue function key Functions.
Add with the arrow keys up/down.
OK.
arrow keys up/
yellow
Selecting blocks
In order to select several programmes at the same time proceed as follows:
> Pressing the
The selected programme is marked on the left side with a cross.
> Using the
programmes.
> After selecting the required programmes in this manner, press the
key Add, in order to store the selected programmes in the favourites list.
OK key returns you to the selection mode.
arrow keys up/down enables you to also select the following/previous
yellow function
8.1.3 Deleting programmes
8.1.3.1 Removing (deleting) from the favourites list
In order to delete programmes from the favourites list, call the programme list administration
as described in Section 8.1.1. Your are now in the favourites list.
> Press the
The available options are then displayed in a selection window.
> Select the the
> Acknowledge with
> Select the programme that you would like to delete from the list with the
up/down.
> Press the
The message “Remove programme(s) from the list?” is displayed.
> Select
> Acknowledge the input with
> In order to remove several programmes at the same time, as described in 8.1.2
(Selecting blocks).
> After you have selected the required programmes in this manner, press the
function key Remove.
The message “Really delete the programme(s)?” is displayed.
blue function key Functions.
Remove line with the arrow keys up/down.
OK.
arrow keys
yellow function key Remove.
Yes or No. with the arrow keys left/right
OK.
yellow
Page 36

> Select Yes or No. with the arrow keys left/right
> Acknowledge the input with
These deleted programmes are however retained in the complete list and can be included in
the favourites list again at any time.
OK.
8.1.3.2 Deleting from the complete list
To delete programmes from the complete list, proceed as described in Section 8.1.3.1. After
calling the programme list administration, press the red function key Programmes to jump
to the complete list, then select the Delete option.
8.1.4 Sorting programmes
To sort the programmes contained in the favorites list according to your requirements,
call the programme list administration as described in Section 8.1.1. Your are now in the
favourites list.
> Press the
The window is displayed with the available options.
> Select the
> Acknowledge with
> Now select the programme that you want to locate at a different position in the list
with the arrow keys.
> Now press the
A double-headed arrow is now displayed next to the selected programme.
> You can now move the selected programme to the required programme list position
with the arrow keys and / or the numeric keyboard.
> The programme is stored at the new position by pressing the
Sort.
> In order to sort several programmes at the same time, select as described in 8.1.2
(Selecting blocks).
> Now press the
A double-headed arrow is now displayed next to the selected programme block.
> You can now move the selected programme block to the required programme list
position with the arrow keys and / or the numeric keyboard.
> The programme block is stored at the new position by pressing the
key Sort.
blue function key Functions.
Sort line with the arrow keys up/down.
OK.
yellow function key Sort.
yellow function key
yellow function key Sort.
yellow function
8.1.5 Exiting the programme list administration
> After you have configured the programme list according to your requirements, return
to the Main menu by pressing the Back key.
or
> Pressing the
Menu key, returns you to normal operation.
36
Page 37

37
EN
8.2 Programming the electronic programme guide
Your device is equipped with the option to additionally receive SFI data on a data channel
from the ASTRA satellite system (19° East). This enables an SFI preview of up to one week.
> Call the
> Select the
> Acknowledge by pressing the
The Settings submenu is displayed.
> Select the line
> Acknowledge by pressing the
The Programme guide menu is displayed.
> You can move through the menu with the marker using the
and modify the individual positions as indicated.
Main menu with the Menu key.
Settings line with the arrow keys up/down.
OK key.
Programme guide with the arrow keys up/down.
OK key.
arrow keys up/down
8.2.1 Selecting stations
In order to gain a better overview, you can programme the electronic programme guide SFI
in such a way, that it only contains your favourite programmes.
Please note:
The more programmes the electronic programme guide contains, the longer it takes to import
the SFI data!
The maximum preview period of seven days can also not be attained with an increasing
number of programmes in the electronic programme guide.
> Press the
The favourites list of the selected range (Radio or TV) is displayed. The currently set
programme is marked.
> Pressing the
> A selection window is displayed after pressing the
You now have the option of selecting the required programme list type.
> Select the required programme list type with the
(e.g. favourites list).
> Acknowledge with
The selected programme list is displayed.
> Select the programme that you would like to add to the electronic programme guide
with the arrow keys up/down.
> The highlighted programme is added to the electronic programme guide by pressing
the yellow function key SFI.
> In order to simultaneously add several programmes to the electronic programme
guide select them as described in 8.1.2 (Selecting blocks).
> After selecting the required programmes in this manner, press the
key SFI, in order to store the selected programmes in the electronic programme
guide.
> Return to normal operation by pressing the
You can now start the import procedure manually:
> Turn the device off with the
OK key.
green function key switches between the TV and radio list.
red function key.
arrow keys up/down
OK.
yellow function
Menu key.
On/Standby key (Standby).
Page 38

> “0000” is displayed, now press the SFI key.
The device carries out the import procedure. The import procedure is displayed on the
screen by indicating the already imported SFI data (e.g. 038P for 38%).
> The import procedure can be interrupted by turning the digital receiver on (Key
Standby).
On/
8.2.2 Start category
The electronic programme guide can display its contents in the following ways (Categories).
Overview
This representation offers you are quick overview of all programmes contained in the
electronic programme guide.
Programmes
This representation displays the table with the daily programmes of an individual station.
Genres
If you are interested in a specific programme type, you can display the programme
information according to specific genres, e.g. film, news, etc.
Last used
The last used representation mode is always set when calling the SFI.
> Set the representation mode in the
right/left, which should be displayed when calling the electronic programme guide.
> If you select
genre (e.g. film, news, shows, etc.).
Genres, you can also use the arrow keys to select the preferred
Start category line with the arrow keys
8.2.3 Update time
> Set the time at which the automatic download of the SFI data should be accomplished
in the line Update time by means of the numeric keyboard.
8.2.4 Update
> In order to receive the data channel, select the line Update.
> Set by pressing
If you do not want to receive the additional data or cannot receive the data due to
your location, turn the data reception option off.
> Set Update to off, in order to turn data reception off.
OK on.
8.2.5 SFI channel
> Press OK, to call the SFI channel submenu.
> To manually update the SFI data, press the
You can carry out corrections in this menu, if the data channel parameters for importing the
SFI list have changed. Your specialised dealer can inform you on the current transponder
data. You should normally not have to amend this menu.
red function key Start now.
38
Page 39

39
EN
8.3 Protection of minors
Your device is equipped with a child lock. This enables you to protect important functions
(e.g. calling the main menu) against unauthorised use. Furthermore, programmes, which you
have blocked, can only be viewed after entering a 4-digit pin code (Device pin).
To amend the Protection of minors menu proceed as follows:
> Call the
> Select the
> Acknowledge by pressing the
The Settings submenu is displayed.
> Select the line
> Acknowledge by pressing the
The Protection of minors menu is displayed.
> You can move through the menu with the marker using the
and modify the individual positions as indicated.
8.3.1 Selecting stations
> Press the OK key.
The favourites list of the selected range (Radio or TV) is displayed. The currently set
programme is marked.
> Pressing the
> A selection window is displayed after pressing the
You now have the option of selecting the required programme list type.
> Select the required programme list type with the
(e.g. favourites list).
> Acknowledge with
The selected programme list is displayed.
> You can now select the programme you want to block with the
> Pressing the
The child protection symbol is displayed next to the selected programme.
> In order to block several programmes simultaneously, select them as described in
8.1.2 (Selecting blocks) and block them by pressing the yellow function key.
> In order to unblock individual programmes, proceed as described above. Select the
appropriate programme and remove the child protection symbol by pressing the
yellow function key.
> After you have selected the programme specified for child lock, return to the
Protection of minors submenu by pressing the Back key.
Main menu with the Menu key.
Settings line with the arrow keys up/down.
OK key.
Protection of minors with the arrow keys up/down.
OK key.
arrow keys up/down
green function key switches between the TV and radio list.
red function key.
arrow keys up/down
OK.
arrow keys.
yellow function key blocks the programme.
Page 40

8.3.2 Changing the device pin
The device pin code is set in the factory to 0000.
> Press the
The menu for amending the device pin code is displayed.
> Now enter the current device pin code by means of the
(Factory settings 0000)
> Enter the required new device pin code by means of the
> Repeat the input.
> After you have changed the device in code in the above described manner,
you automatically return to the "Protection of minors" menu.
Attention!
Do not forget the device pin code. If this is the case however, please ask your
specialised dealer for help!
OK key.
numeric keyboard.
numeric keyboard.
8.3.3 Mode
> Turn the child lock on or off in this line with the arrow keys right/left.
8.3.4 Exiting the protection of minors mode
> Pressing the Return key, returns you to the settings menu
or
> Pressing the
Menu key, returns you to normal operation.
8.4 Programme search
As already mentioned, your digital receiver is pre-programmed to receive the satellites
ASTRA 19.2° East and EUTELSAT 13.0° East. There are various possibilities to carry out a
programme search, in order to receive new programmes or programmes of other satellites.
1. Automatic search
Select this search mode to scan all satellites set in the LNB settings menu (Section 6.4
and 9.4) for programmes.
2. Satellite search
Select this search run, in order to only scan a selected satellite for programmes.
3. Transponder search
Select this search run, to specifically scan the transponder of a satellite.
4. Manual search
Select this search run, to specifically search for a programme with a programme-specific PID
number.
After each search run, a message is displayed on the screen with the indication, how many
programmes your digital receiver has found, how many were newly added and how many
are encoded. New programmes are stored in the complete list and can then the stored
according to Section 8.1 in the favourites list.
40
Page 41

41
EN
> Call the Main menu by pressing the Menu key to activate the programme search
mode.
> Select the
> Acknowledge with
The Search stations menu is displayed.
> Select the required search run method, which you want to accomplish with the
keys up/down and acknowledge with OK.
Search stations line with the arrow keys up/down.
OK.
arrow
8.4.1 Automatic search
All satellites set in the LNB settings menu are automatically scanned for programmes during
this search run (Section 6.4 and 9.4). You can decide, whether you want to search for all
(free and encoded) stations or only for free stations.
> Decide by pressing the
programmes (Free stations) or also for encoded programmes (All stations).
> Acknowledge by pressing the
The length of the search run depends on the number of scanned satellites and can
take more than 15 minutes. Pay attention to the screen inserts.
OK key, whether you only want to search for freely receivable
red function key Start search.
8.4.2 Satellite search
In order to scan individual satellites for programmes, select Satellite search.
You can decide, whether you want to search for all (free and encoded) stations or only for
free stations.
> Press the
activated in the antenna settings menu.
> Select the
scan all active satellites for programmes or select the required satellite, in order to
only scan this one for programmes.
> Acknowledge with
> Select the
> Decide by pressing the
programmes (Free stations) or also for encoded programmes (All stations).
> Acknowledge by pressing the
The search run is started. Pay attention to further inserts on the screen.
OK key again, in order to open the selection table with the satellites
All satellites menu line with the arrow keys up/down, in order to
OK.
Search mode field with the arrow keys up/down .
OK key, whether you only want to search for freely receivable
red function key Start search.
8.4.3 Transponder search
You can selectively scan a transponder for programmes (see Section 10 Technical terms).
It is thereby necessary to enter the transponder data.
Page 42

Satellite
Set the satellite in this line, on which the required transponder is located.
> Select the line
> Pressing the
settings.
> Now select the required satellite with the
> Acknowledge by pressing the
The selected satellites now displayed in the satellite line.
Satellite line with the arrow keys up/down for this purpose.
OK key calls the table with the satellites activated in the antenna
arrow keys up/down.
OK key.
Transponder frequency
> Select the Transponder frequency line with the arrow keys up/down.
> Enter the required frequency in this line by means of the
Numeric keyboard.
Symbol rate
The symbol rate indicates, which data quantity is transmitted per second. This can be for
example 27500 (27500 symbols per second).
> Select the
> Enter the required symbol rate by means of the
Symbol rate line with the arrow keys up/down.
numeric keyboard.
Polarisation
> Select the Polarisation line with the arrow keys up/down.
> Enter the polarisation plane (
which the required programme is broadcast.
horizontal or vertical) in this line with the OK key, on
Search mode
> Select the Search mode line with the arrow keys up/down.
> Decide by pressing the
programmes (Free stations) or also for encoded programmes (All stations).
> Acknowledge by pressing the
The search run is started. Pay attention to further messages on the screen.
OK key, whether you only want to search for freely receivable
red function key Start search.
8.4.4 Manual search
If a programme cannot be found during the automatic search mode or during the transponder
search mode, it could be necessary to enter additional programme-specific PID numbers for
this programme. These numbers can be found on the Internet or obtained directly from the
respective programme provider.
The menu differs from the Transponder search menu only by the menu items PCR-PID,
Audio-PID and Video-PID. Indicating the search mode is not necessary.
> Proceed as described for Transponder search.
> Press the
> Then select the lines
up/down and enter the appropriate numbers by means of the numeric keyboard.
green function key, to open the PID input fields.
PCR-PID, Audio-PID and Video-PID with the arrow keys
42
Page 43

43
EN
8.4.5 After the search run
The search run through the transponders can be observed on the screen during the search
run. After concluding the search run, the number of found TV and radio programmes, found
new programmes as well as encoded programmes is displayed.
A message is additionally displayed, asking whether you would like to automatically
store the found programmes in the TV or radio list. If you would like to store programmes
automatically, you can decide whether these should be stored in the favourites list as
sorted or unsorted.
Sorted
The found programmes are sorted in the favourites list according to a preprogrammed list.
The programmes are thereby ordered according to the audio language set in Section 6.3.2
or according to the country set in Section 6.2.2.
Unsorted
The newly found programmes are just added to the end of the favourites list without sorting.
No
The newly found programmes are not added to the favourites list, but only to the complete
list.
> Select with the
programmes as sorted or unsor ted.
> Acknowledge with
Please observe further screen inserts.
arrow keys right/left, whether you would like to store the
OK.
8.4.6 Exiting programme search
> Pressing the Back key, returns you to the Station search menu
or
> Pressing the
Menu key, returns you to normal operation.
8.5 Service settings
You can use the factory settings at any time. You can also completely delete the programme
list, if this is obsolete due to changes of the programme providers, in order to then
accomplish a new search run. Please ensure, that you initiate a search run after deleting and
then copy the required programmes contained in the complete list to the favourite list.
> Call the
> Now select the menu line
down.
> Acknowledge with
The Settings submenu is displayed.
> Now select the line
> Acknowledge with
The Service settings submenu is displayed.
Main menu with the Menu key.
Settings, by highlighting this with the arrow keys up/
OK.
Service settings with the arrow keys up/down.
OK.
Page 44

8.5.1 Activate factory settings
The programming as set in the factory is reset after calling this function, your own settings
are deleted and the installation assistant AutoInstall is started.
> Select the the
> Press the
The message “Really activate factory settings?” is displayed.
> Select
> Acknowledge the input with
Yes or Abort with the arrow keys left/right.
Activate factory settings line with the arrow keys up/down.
OK key.
OK.
8.5.2 Deleting all programmes
This function completely deletes the programme memory.
> Select the line
> Press the
The message is displayed “Do you really want to delete all programmes ?”
> Select
> Acknowledge the input with
Yes or Abort with the arrow keys left/right.
Delete all programmes with the arrow keys up/down.
OK key.
OK.
8.5.3 Updating the programme list (ISIPRO)
The programme list of your receiver is automatically kept up-to-date by the ISIPRO
programme list update. An up-to-date programme list is regularly broadcast via satellite
(ASTRA 19.2° East) for this purpose and can be downloaded by your receiver.
You can carry out corrections in this menu, if the data channel parameters for downloading
the programme list have changed. Your specialised dealer can inform you on the current
transponder data. You should normally not have to amend this menu.
> Select the
> The
> Select the
new programme list is available.
> Set the automatic programme list update with the
Update programme list line with the arrow keys up/down.
Update programme list submenu is opened by pressing OK.
Update line, to enable your receiver to automatically check, whether a
OK key to on.
8.5.3.1 Manually starting the programme list download
> To manually start the programme list update, first call the Update programme list
menu as previously described.
> Pressing the
An appropriate message is displayed, if a new programme list is available.
> Acknowledge this message by selecting the Yes field with the arrow keys right/
left and pressing the OK key.
Your receiver then reboots and displays a message indicating the presence of a new
programme list.
red function key Test starts the search for a new programme list.
44
Page 45

45
EN
8.5.3.2 Rejecting a programme list
> If you do not want to download a new programme list, select the Reject field with the
arrow keys right/left.
> Acknowledge with
The message is then only displayed, if a newer programme list is transmitted.
OK.
8.5.3.3 Download programme list later
> If you would like to download a programme list later and not immediately, select the
Later field with the arrow keys right/left.
> Acknowledge with
The message is displayed, when you turn your receiver on the next time.
OK.
8.5.3.4 Starting the programme list download
> In order to immediately download the new programme list, select the OK field with
the arrow keys right/left and acknowledge with OK.
The programme list download is started and can be followed on the screen.
Your programme list is updated after the programme list has been completely downloaded.
The favourites list stored in the receiver is thereby compared to the new programme list.
The programme list is completely replaced by the new list, if this comparison shows, that
you have not modified the factory set programme list in the receiver. Your favourites list is
however updated in various steps, if you have modified the programme list.
The differences between your favourites list and the new programme list are thereby
displayed. You can decide which changes you want and which not. The number of
steps is dependent on the amount of changes in the new list and can therefore differ from
download to download.
Adapting the programmes
The programmes contained in your favourites list, and whose reception data have changed
or are not up-to-date, are displayed in this step. These programmes can possibly not
correctly receive these data anymore. To enable further problem-free reception, accomplish
the suggested modifications.
> The reception data of the selected programmes are updated by pressing the
> If you do not want to update the data of the displayed programmes, select the
Reject field with the arrow keys right/left and acknowledge with OK.
OK key.
Deleting programmes
In this step you can delete the programmes, which are still contained in your favourites list,
but are not broadcast anymore.
> If you would like to delete the displayed programmes, which are not broadcast
anymore, acknowledge with OK.
> If you would nevertheless like to keep these programmes in your favourites list, select
the Reject field with the arrow keys right/left and acknowledge with OK.
Page 46

Adding TV or radio programmes
The individual programmes of the new programme list are displayed in the next step,
which you can add to your favourites list, because these are not yet stored there. You have
the possibility to store individual displayed programmes, to automatically store all new
programmes or to reject the displayed programme.
Storing individual programmes
> If you would like to store the displayed programme at the suggested programme
position of the favourites list (TV or Radio), press the OK key.
or
> You can relocate the displayed programme to a different location in the favourites list
with the arrow keys or enter the required programme position with the numeric
keyboard.
> To store the displayed programme at the indicated favourites list position, press the
OK key.
Storing all programmes
> In order to store all new programmes without checking, select the All field with the
arrow keys right/left and acknowledge with the OK key.
The programmes are thereby added to the favourites list according to specify criteria.
Rejecting a programme (not storing)
> If you do not want to store the displayed programme in the favourites list, select the
Reject field with the arrow keys right/left and acknowledge with OK.
The next programme query is now displayed.
8.5.4 Software update
You also have the possibility to update the operating software of your digital receiver by
satellite (ASTRA 19° East)
(Update).
> Call the
Update software menu with the arrow keys up/down
> The
Select the Update line, in order to carry out a software update.
> Set the software update with the
> Set the time in the
automatic software update is to be accomplished.
> To manually start the update of the system software, press the
Test.
If the data channel parameters for downloading the software update have changed,
you can correct these in this menu as described in Section 8.4.4 (Manual programme
search). Your specialised dealer can inform you on the current transponder data. You
should normally not have to amend this menu.
Service settings menu as described in Section 8.5 and select the
Update software submenu is opened after pressing the OK key.
OK key to on.
Update time line with the Numeric keyboard, at which the
red function key
46
Page 47

47
EN
Note:
The digital receiver must be in the standby mode to automatically
download the new software. The download procedure is indicated by
“SAtL” or “SAt0” to “SAt9”.1) This procedure may not be interrupted e.g.
by turning the device on or off.
Irrespective, of whether you have turned the automatic software update function on or off,
the device automatically checks when it is turned on, whether a new system software is
available for your digital receiver. Available new system software is indicated by a message
on the screen.
To update the software, follow the instructions on the screen.
8.5.5 Copying the settings
You have the possibility to copy all settings, such as the programme list, antenna settings
etc. of your digital receiver (Transmitter) to another digital receiver (Receiver) of the same
type and same system software version.
> For this purpose connect both devices with the zero modem cable.
> Turn the (receiving) receiver on.
> Press any key of the (receiving) receiver to copy the settings.
The settings of the transmitting receiver are now transferred to the receiving receiver.
Please observe the screen inserts.
8.6 System configuration
You can view of the specific device data (such as e.g. the current software version) in this
menu option.
> Call the
> Select the
> Select the
> Acknowledge with
The system configuration is now displayed.
> Pressing the Menu key returns you to normal operation.
Main menu with the Menu key.
Settings line with the arrow keys up/down and acknowledge with OK.
Systems configuration line with the arrow keys up/down.
OK.
8.7 Encoding system
1)
This menu option leads you to the submenus of the inserted Encription System SIM card.
> Call the
> Select the
> By acknowledging with
Main menu by pressing the Menu key.
Encoding system line with the arrow keys up/down.
OK, you can call information on the used SIM card.
1)
only Digit S1/S2
Page 48

9 Operation on a rotating unit (DiSEqC 1.2)
Your digital receiver is ready for a rotating unit operation. The DiSEqC controller (DiSEqC
Level 1.2) enables you to control an appropriate motor by coax line.
> Call the
> Select the
OK.
> Now select
> Acknowledge the input with
The Antenna settings menu is displayed.
> Activate the
keys up/down and pressing the OK key.
> Now select the DiSEqC position (e.g. A/B 3), which you would like to assign to the
motor antenna, with the arrow keys.
> Pressing the
antenna.
> Select the
with OK.
> Acknowledge with the message to set the East and West boundaries with OK.
Calling the motor antenna settings
> Select the Configuration column with the arrow keys left/right .
> Select the
down.
> Acknowledge with
The menu to set the motor antenna is now displayed.
Main menu by pressing the Menu key.
Settings line with the arrow keys up/down and acknowledge with
Antenna settings with the arrow keys up/down.
OK.
DiSEqC controller, by selecting the DiSEqC line with the arrow
OK key opens a window to select the Satellites or the Motor
Motor antenna line with the arrow keys up/down and acknowledge
Continue field in the Motor antenna line with the Arrow keys up/
OK.
9.1 East and West boundaries
In order to prevent mechanical destruction of the dish or of the LNB by an obstacle, the
maximum Eastern and Western rotation ranges must be defined.
Obstacles in the rotational range of the dish (e.g. a wall, chimney, etc.) must be taken into
consideration when setting the East-West boundaries.
If there are no obstacles in the rotational range of the dish, define the boundaries in such a
way, that the dish slightly overruns the range of the most extreme receivable satellite.
9.1.1 Deleting defined boundaries
First, delete possibly set boundaries.
> Press the
> Now select the
> Acknowledge with
key.
> To delete the boundaries press the
> Acknowledge the message with
yellow function key Actions, to open a further window.
Delete boundaries line with the arrow keys up/down.
OK, in order to accept the selected action with the green function
green function key Delete boundaries.
OK.
48
Page 49

49
EN
9.1.2 Setting the Eastern boundary
> To enter the Eastern boundary, select the store field with the arrow keys.
> Now rotate the dish by pressing the
required Eastern position.
> Press the
available activities.
> Now select the
> Acknowledge with
> In order to set the Eastern boundary, press the
acknowledge the following message with OK.
yellow function key Actions, in order to open the window with the
set Eastern boundary with the arrow keys up/down.
OK.
arrow key right to the utmost possible or
green key Eastern boundary and
9.1.3 Setting the Western boundary
> To enter the Western boundary, select the store field with the arrow keys.
> Now rotate the dish by pressing the
required Western position.
> Press the
available activities.
> Select the
acknowledge with OK.
> Press the
with OK.
yellow function key Actions, in order to open the window with the
set Western boundary line with the arrow keys up/down and
green key Western boundary and acknowledge the message
arrow key right to the utmost possible or
9.2 Geo positioning
This function facilitates finding individual satellite positions, if the geographical coordinates
of your location is known and the motor is suitable. You can infer the coordinates of some
German towns from the annex (Section 13).
Attention! Only activate geo positioning, if your DiSEqC motor also supports this
function.
> Call the menu for setting the motor antenna as previously described.
> Select the
The menu to enter the location is displayed.
> Turn the geo positioning function
> Select the field to enter the
> Enter the geographical longitude with the
> Press the
> By pressing the
(East) or Western longitude (West).
> Now select the fields to enter the
> Enter the geographical latitude with the
> Press the
Geo.Pos. field with the arrow keys and acknowledge with OK.
on or off by pressing the OK key.
geographical longitudinal with the arrow keys.
numeric keys.
arrow key left.
OK key enter in this field, whether the value is an Eastern longitude
geographical latitude with the arrow keys .
numeric keys.
arrow key left.
Page 50

> By pressing the OK key enter in this field, whether the value is a Northern latitude
(N) or Southern latitude (S).
> Return to the motor antenna settings by pressing the
The data of your location must be entered as a decimal value with values after the comma.
Because the coordinates are often indicated in degrees, minutes and seconds, they must be
converted into a decimal value as follows:
- The degree value remains unaffected by the calculation.
- The minutes are divided by 60 and rounded to one digit after the comma. The result of the
division is added to the degree value.
- The seconds remain unconsidered, since they have no influence on the first post-decimal
position.
Example: Coordinates of Daun
Latitude 50° 11‘ (45“) N
Longitude 06° 50‘ (10‘‘) E
Conversion of the latitude (BG):
BG = 50 + 11/60
BG = 50 + 0.2
BG = 50,2
Enter the value (50,2) rounded to one position after the comma into the menu for
geographical latitude.
The decimal value of the longitude is calculated in the same way.
(rounded)
Back key.
9.3 Setting the satellite position
Carry out the sections 9.3.1 to 9.3.3 successively for each satellite position, which is to be
set. We recommend starting with the most eastern satellite when programming the satellite
positions. Continue to record all required positions proceeding towards the west until you
have reached the most western satellite position. Your digital receiver has already been set
to the most commonly used satellite positions in the factory. You can additionally configure
user-defined "User" satellite positions (User 1 to User 14) for any orbital position.
9.3.1 Selecting the satellite position
9.3.1.1 Selecting a pre-selected satellite position
> In order to store a satellite position in the satellite list, select the Sat new field with
the arrow keys.
> Acknowledge with
A list with the available satellite positions is displayed.
> Select a satellite postion that you would like to add to the satellite list with the
keys up/down.
> Acknowledge with the
The dish now is turned automatically to the programmed satellite position, when the geo
positioning (Section 9.2) is activated. The rotational movement is indicated by the flashing
text “Rotating”.
The dish must be manually (Section 9.3.2.2) rotated to the required satellite position, if the
geo positioning is deactivated.
OK.
arrow
OK key, to accept the selection.
50
Page 51

51
EN
9.3.1.2 Setting user-defined satellite positions (User Satellite)
> In order to store a user satellite position in the satellite list, select the Sat new field
with the arrow keys.
> Acknowledge with
A list with the available satellite positions is displayed.
> Select a user satellite position (User 1 to User 14) with the
> The menu to set the test transponder is displayed by pressing the
Set the data of the test transponder and of the used LNB in this menu as described in
Section 6.4.4.
> After setting the test transponder, press the
setting menu.
The field to enter the orbital position is activated.
> Enter the orbital position of the user satellite with the
> Specify whether it is a West (W) or East (E) orbital position by pressing the
You can now rotate the dish to the programmed user satellite position with the rotate to
Sat function (Section 9.4.1) when the geo positioning is activated (Section 9.2).
The dish must be manually (Section 9.3.2.2) rotated to the required satellite position, if the
geo positioning is deactivated.
OK.
arrow keys up/down.
OK key.
Back key to return to the motor antenna
numeric keyboard.
OK key.
9.3.2 Aligning the satellite antenna
A test transponder is set for each satellite, in order to align the dish to the required satellite
or to determine whether you can receive the required satellite at the set position. A precise
alignment of the antenna is only possible with indication of the signal strength and signal
quality of this test transponder.
9.3.2.1 Test transponder/LNB configuration
In order to modify the data of the respective test transponder, proceed as follows:
> Select the
> Press the
> Select the satellite position, whose data you would like to modify with the
keys up/down.
> Acknowledge with
> Now select the
The LNB settings menu is displayed.
> Enter the data of the test transponder and of the used LNB in this menu as described
in Section 6.4.4.
> Pressing the
Current satellite list field with the arrow keys.
OK key, to open the satellite list.
arrow
OK.
LNB Config. field with the arrow keys and press the OK key.
Back key returns you to the motor antenna settings mode.
Page 52

9.3.2.2 Manually aligning the antenna
Optimal alignment to the required position can be achieved by means of the signal strength
and the signal quality. Align the dish in such a way that both bars display maximum
amplitude.
> Select the
> Now rotate the dish to the required position with the
is highlighted) or left (Field West is highlighted). Keep the respective key depressed
until the required position has been achieved.
Store field with the arrow keys up/down.
arrow keys right (Field East
9.3.2.3 Automatic fine alignment (Autofocus)
Carry out automatic focusing before storing the satellite position. The dish is thereby
technically set to optimal reception.
> Press the
available activities.
> Now select the
> Acknowledge with
> Auto Focus is started by pressing the
The message "Auto focus, please wait..." is displayed during automatic alignment.
yellow function key Actions, in order to open the window with the
Auto Focus line with the arrow keys up/down.
OK.
green key Auto Focus.
9.3.3 Storing the satellite position
The satellite position must be stored after the Auto Focus function has been accomplished.
> Select the
> Press the
It is now examined by means of the set test transponder, whether a signal can be
received at this position. It is thereby determined, whether the position to be stored is
an already pre-programmed position.
The following messages is displayed, if this is the case: Orbital position xx
determined. Store satellite?
> In order to store the satellite position, select the
right/left and acknowledge with OK.
An appropriate message is displayed, if no pre-programmed position was determined
during the test transponder run or if the reception signal is too weak.
> In order to store the satellite position, select the
right/left and acknowledge with OK.
Store field with the arrow keys.
OK key.
Yes field with the arrow keys
Yes field with the arrow keys
9.4 Current satellite list
The satellite list contains the stored satellite positions. Not yet stored positions are identified
in this list by an “*” markiert.
> To rotate the dish to a position defined in the satellite list, select the
satellite list field with the arrow keys.
> Press the
> Select the required position with the
> Acknowledge with
flashes on the screen during the rotational movement.
OK key.
arrow keys up/down.
OK, in order to rotate the dish to the required position “rotating”
52
Current
Page 53

53
EN
9.4.1 Selecting the satellite position
Your digital receiver is equipped with the rotate to Sat function to rotate the dish to the
position set in the satellite list.
> Press the
available activities.
> Now select the
> Acknowledge with
> The dish is rotated to the selected satellite position by pressing the
Sat key.
yellow function key Actions, in order to open the window with the
rotate to Sat line with the arrow keys up/down.
OK.
green rotate to
9.5 Deleting the satellite position
In order to delete a satellite position from the satellite list, proceed as follows:
> Select the
> Press the
> Select the satellite you would like to delete with the
acknowledge with OK.
> Select the
> To delete the satellite press
> Acknowledge the following message by selecting the OK field with the
right/left and pressing the OK key.
Current satellite list field with the arrow keys.
OK key, to open the current satellite list.
arrow keys up/down and
Delete satellite field with the arrow keys.
OK.
arrow keys
9.6 Reference position
The motor must be in the reference position (0°) when installing the exterior installation. You
can therefore rotate the motor to the position (0°) at any time with the “Go to reference
position” function.
> The motor is automatically rotated to the reference position by pressing the
pos. function key.
red Ref.
Page 54

10 Technical data
DBS Tuner:
Input frequency range 950.... 2150 MHz
Input level range -65 dBm ... -25 dBm
DBS Tuner input F socket
Input impedance 75 Ohm
Demodulation Shaped QPSK
Symbol rate 2 ... 45 Mbaud/s, SCPC/ MCPC
FEC Viterbi and Reed-Solomon
Viterbi rates 1/2, 2/3, 3/4, 5/6, 7/8,
automatic adjustment
Roll-off factor 35 %
Card reader:
Type 1 Slot SIM card reader for
integrated Encription System decoding system
Demultiplexing:
Video decoding:
Video compression MPEG-2 and MPEG-1 compatible
Up to MP@ML
Video standard PAL / 25 Hz
Active screen area 720 pixel x 576 lines
Picture size 4 : 3 / 16 : 9
Picture material 16:9 Automatic adaptation for 16:9 TV sets (via SCART)
Letterbox filtering for 4:3 TV sets
Audio decoding:
Audio compression MPEG-1 & MPEG-2 Layer I and II
Audio mode Dual (main/sub), Stereo
Sampling rate 32 kHz, 44.1 kHz, 48 kHz
Audio parameters:
Output analogue:
Output level L/R 0,5 V r.m.s. (nominal)
Output impedance 600 Ohm
THD > 60 dB ( 1 kHz )
S/N > 60 dB
Crosstalk < -65 dB
according to ISO 13818-1
(main profile @ main level)
54
Page 55

55
EN
Input analogue:
Output level l/r 0,5 V r.m.s. (nominal)
Input impedance > 40 kOhm
Switching on volume Automatic takeover of the previously set volume
Output digital:
SP/DIF output electrical, Cinch socket
optical, Toslink
Dolby Digital AC3
Video parameters:
Output:
Output level FBAS 1 Vs-s +/- 0.3 dB at 75 Ohm
Output level Y 1 Vs-s +/- 0.3 dB at 75 Ohm
Output level C 1 Vs-s +/- 0.3 dB at 75 Ohm
Output level RED 0,7 Vs-s +/- 0.1 dB at 75 Ohm
Output level GREEN 0,7 Vs-s +/- 0.1 dB at 75 Ohm
Output level BLUE 0,7 Vs-s +/- 0.1 dB at 75 Ohm
S/N evaluated > 60 dB
Video text
Teletext filtering
according to ETS 300 472 Standard
Sampling teletext data (FBAS) according to ITU-R BT.653-2 lines: 6-22 and 320-335
Soft-video text 1000 page memory
TV-SCART:
Output: FBAS, RGB or S-Video
VCR-SCART:
Input: FBAS; RGB or S-Video
Output: FBAS or S-Video
Display:
LED 4-digit 7-segment display
Serial interface RS 232
Type RS 232, bidirectional
Bit rate 115,2 kBit/s max.
Connector Mini DIN connector, 3-pole
Function
Update f. system software and preprogramming
LNB Power supply
LNB Current 400 mA max.; short-circuit proof
LNB voltage vertical <14.0V without load, > 11.5 V at 400 mA
LNB voltage horizontal <20V without load, > 17.2 V at 400 mA
LNB Deactivation in standby mode
Page 56

22 kHz Modulation: 22 kHz, Amplitude 0.6 V +/- 0.2 V
Programme memory:
Programme number favourites list TV:
999 TV programmes
Programme number favourites list radio:
999 radio programmes
Programme quantity:
Complete list TV/Radio: In all 4000 programmes possible in the complete list
DiSEqC
DiSEqC 1.0 and DiSEqC 1.2
SFI data:
SFI preview: maximum seven days in advance
Timer:
Events: maximum 30 events, one year in advance
Remote control system:
RC-5
Subsystem address 8 (SAT 1), 10 (SAT 2)
Modulation frequency 36 kHz
Infrared wavelength 950 nm
Power supply
Switching power supply
Power consumption
3,9 W in standby mode (clock off)
4,4 W in standby mode (clock on)
10,5 W during operation, without LNB
18 W during operation, horizontal polarisation / 400 mA LNB current
Nominal voltage:
230 V / 50 Hz AC
Input voltage:
180 250 V / 50 Hz AC
General:
Dimensions (WxDxH): 205 mm x 133 mm x 40... 43 mm
Weight: approximately 355 g
11 Troubleshooting aids
Error Possible cause Corrective
The time is not displayed in the
standby mode
The standby clock is not turned on Turn the standby clock on
No picture, no sounded,
display not illuminated
Time not imported Switch to ZDF for approximately
30 sec.
(See Section 6.2.4)
No power supply Check power cable and plug
56
Page 57

57
EN
Error Possible cause Corrective
Various programmes are not
displayed in the programme list.
Sound OK, no TV picture Radio operation activated Switch to TV operation
Programmes, such as Pro 7, Sat
1, Neun Live, Kabel 1, DSF and
HSE24 are occasionally disturbed
Device cannot be operated Defective data stream -->
Remote control does not work Batteries are drained Replace batteries
Small squares appear occasionally
in the picture
. The device occasionally switches
to a frozen image, no sound.
screen occasionally black with the
insert “no signal”.
No picture, no sound,
display illuminated
No reception of programmes, which
were previously ok
Antenna cannot be rotated Motor not DiSEqC 1.2 compatible Use suitable motor
The device cannot be turned on or
not operated
Incorrect programme list selected Select different programme list
Disturbances by “DECT telephones”
(Radio phones)
device blocked
Strong rain or snow Remove snow from dish
Antenna incorrectly aligned Align antenna again
Dishe is too small for the location Use larger dish
An obstacle is between dish and
satellite (e.g. a tree)
Short-circuit in the LNB supply line Turn device off, eliminate short-
Defective or missing cable
connection
Defective LNB Replace LNB
The receiver is set to an incorrect
outdoors unit
Antenna incorrectly aligned Align antenna again
Antenna misaligned or defective Check antenna
Programme is being transmitted on
a different transponder
Programme is not being broadcast
anymore
Device locked Accomplish flash reset: Attention! All
(See Section 7.2.3.1)
Increase the distance between the
receiving station and receiver.
Remove power supply plug for
5 seconds,
then turn device on again
Mount dish with "unobstructed
view"
circuit, turn device on again
Check all cable connections
Correct settings
(see Section 6.4)
Accomplish search run
(See Section 8.4)
none
personal settings are deleted hereby
> Remove power supply plug
> Press the programme up
and programme down keys
simultaneously on the device
and continue to press
> Insert the power supply plug
again, while still pressing the
keys as above.
> Continue to depress the keys
for approximately five seconds
until the “FLAS” wording is
displayed.
Page 58

58
Page 59

59EN60
Page 60

2233450000L00
 Loading...