

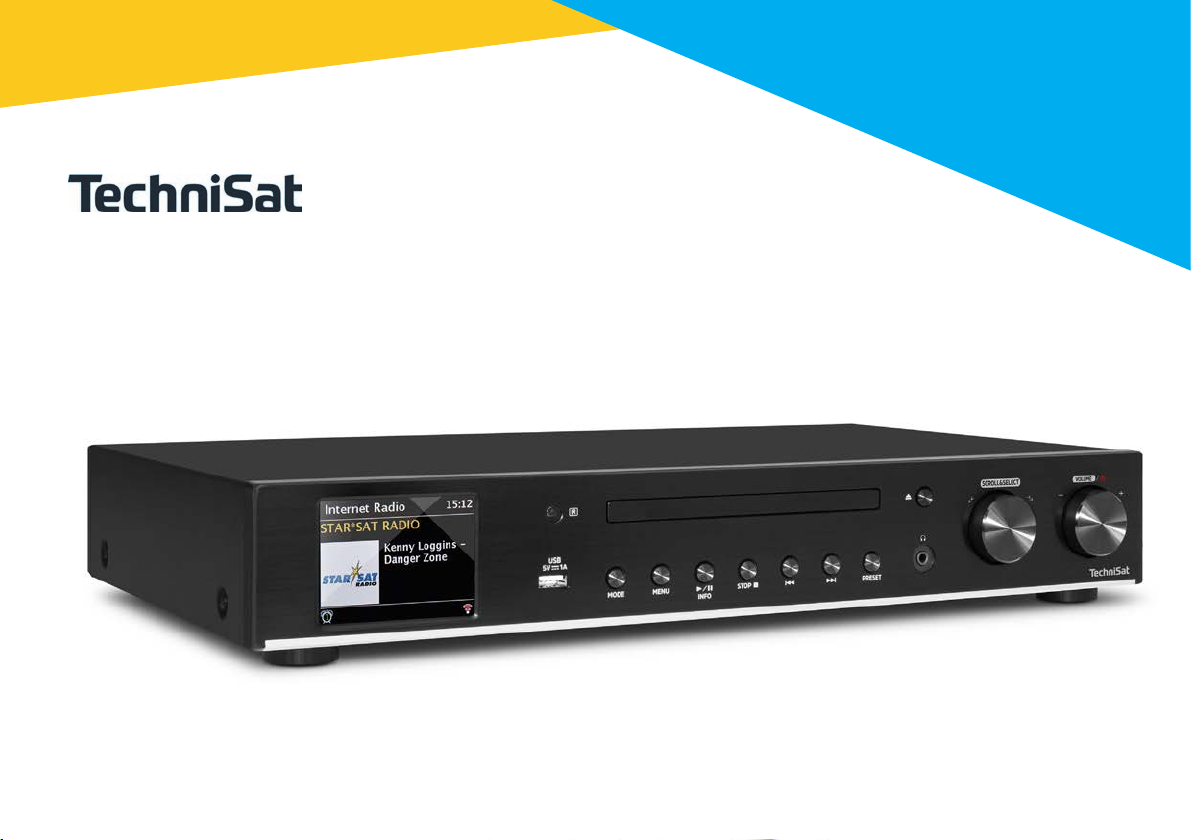
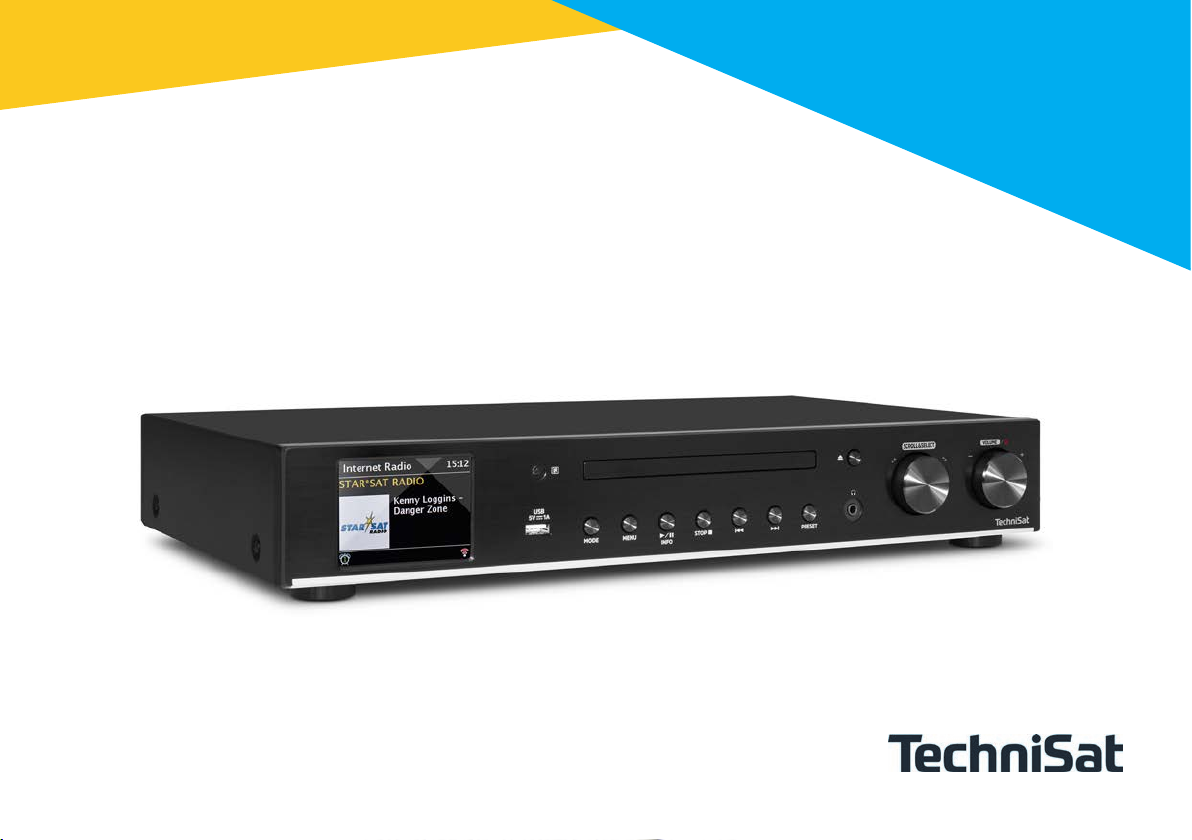
DIGITRADIO 143 CD

CONTENTS
ENGLISH
FRANÇAIS
ITALIANO
NEDERLANDS
POLSKE
ČEŠTINA
SLOVENSKÝ
........................................................................................... 3-55
...................................................................................56-109
..................................................................................... 111-163
.................................................................................... 219--271
...................................................................................273325
..........................................................................165-217
............................................................................ 327379
2
Instruction Manual
DIGITRADIO 143 CD

Contents
1 Important information ......................................................................................................................................................8
1.1 Safety...................................................................................................................................................................................................................8
1.2 Disposal .............................................................................................................................................................................................................. 9
1.3 Legal notices ...................................................................................................................................................................................................11
1.4 Service instructions ..................................................................................................................................................................................... 12
2 Figures and description .................................................................................................................................................. 13
3 Connecting the device and operation ........................................................................................................................ 17
3.1 Scope of delivery ......................................................................................................................................................................................... 17
3.2 Inserting the baeries ............................................................................................................................................................................... 17
3.3 Connection ...................................................................................................................................................................................................... 18
3.4 Switching on/o ........................................................................................................................................................................................... 18
3.5 Source selection ........................................................................................................................................................................................... 18
3.6 Adjusting the volume.................................................................................................................................................................................18
3.7 Menu operation ............................................................................................................................................................................................ 19
3.8 Activating the mute function .................................................................................................................................................................10
3.9 Retrieving visual displays ........................................................................................................................................................................20
3.10 Visual displays ............................................................................................................................................................................................... 21
4 Initial set-up ...................................................................................................................................................................... 22
5 Internet radio .....................................................................................................................................................................23
5.1 Last listened to ............................................................................................................................................................................................ 23
5.2 Station list ....................................................................................................................................................................................................... 23
6 Playing music (UPnP media) .........................................................................................................................................25
6.1 Playback via UPnP ..................................................................................................................................................................................... 25
6.1.1 Playing media ............................................................................................................................................................................................... 25
6.1.2 Music via Windows Media Player ........................................................................................................................................................ 26
6.2 Playback via a USB mass storage device ........................................................................................................................................ 26
4

7 Spotify Connect ................................................................................................................................................................ 26
8 The DAB function ..............................................................................................................................................................27
8.1 DAB radio reception ...................................................................................................................................................................................27
8.2 Performing a station scan ......................................................................................................................................................................27
8.3 Selecting the station ................................................................................................................................................................................. 28
8.4 Saving DAB stations .................................................................................................................................................................................. 28
8.5 Selecting the programmed stations .................................................................................................................................................. 28
8.6 Deleting a saved memory slot .............................................................................................................................................................. 29
8.7 Signal intensity ............................................................................................................................................................................................. 29
8.8 Seing DRC .................................................................................................................................................................................................... 30
8.9 Deleting inactive stations ......................................................................................................................................................................30
8.10 Sorting the stations ................................................................................................................................................................................... 30
EN
9 FM mode .............................................................................................................................................................................. 31
9.1 Switching on FM radio mode ................................................................................................................................................................. 31
9.2 USW reception with RDS information ...............................................................................................................................................31
9.3 Manual station selection...........................................................................................................................................................................31
9.4 Automatic station selection ................................................................................................................................................................... 32
9.5 Seing mono/stereo ................................................................................................................................................................................. 32
9.6 Saving USW stations ................................................................................................................................................................................. 32
9.7 Selecting the programmed stations ...................................................................................................................................................33
9.8 Deleting a saved memory slot ...............................................................................................................................................................33
10 Bluetooth .............................................................................................................................................................................33
10.1 Activating the Bluetooth mode ...........................................................................................................................................................33
10.2 Pairing .............................................................................................................................................................................................................. 34
10.3 Playing music ................................................................................................................................................................................................ 34
11 Audio input .........................................................................................................................................................................35
12 CD/MP3 player ...................................................................................................................................................................35
12.1 General information on CDs/MP3 CDs ..............................................................................................................................................35
FR
IT
NL
PL
CZ
SK
5

12.1.1 The discs you can use .............................................................................................................................................................................. 36
12.2 Playing CDs .................................................................................................................................................................................................... 36
12.2.1 Seing the track ...........................................................................................................................................................................................37
12.2.2 Quick search .................................................................................................................................................................................................. 38
12.2.3 Repeat function ........................................................................................................................................................................................... 38
12.2.4 Random playback ....................................................................................................................................................................................... 38
12.2.5 Programming function ............................................................................................................................................................................. 38
12.3 CD advice ........................................................................................................................................................................................................ 39
13 Other functions ................................................................................................................................................................. 40
13.1 Sleep timer ....................................................................................................................................................................................................40
13.2 Alarm ................................................................................................................................................................................................................ 40
13.2.1 Seing the alarm time .............................................................................................................................................................................. 41
13.2.2 Switching o the alarm aer being woken ...................................................................................................................................41
13.2.3 Switching o/deactivating the alarm ................................................................................................................................................42
13.2.4 Switching on/activating the alarm .................................................................................................................................................... 42
13.3 Using headphones ..................................................................................................................................................................................... 42
14 System seings ................................................................................................................................................................. 42
14.1 Equaliser.......................................................................................................................................................................................................... 43
14.2 Internet seings .......................................................................................................................................................................................... 43
14.2.1 Connection via a network cable .......................................................................................................................................................... 43
14.2.1.1 Network wizard configuration .............................................................................................................................................................. 43
14.2.1.2 Manual configuration ................................................................................................................................................................................ 44
14.2.2 Connection via WLAN...............................................................................................................................................................................44
14.2.2.1 Network wizard configuration ..............................................................................................................................................................44
14.2.2.2 Configuration via the WPS function .................................................................................................................................................. 45
14.2.2.3 Manual configuration ................................................................................................................................................................................ 45
14.2.3 Display seings ............................................................................................................................................................................................ 46
14.2.4 Manual seing ..............................................................................................................................................................................................46
14.2.5 NetRemote PIN setup...............................................................................................................................................................................46
14.2.6 Delete network profile .............................................................................................................................................................................. 46
14.2.7 WLAN/LAN connection on standby .................................................................................................................................................. 46
6

14.3 Time seings .................................................................................................................................................................................................46
14.3.1 Time/date seing ........................................................................................................................................................................................46
14.3.2 Update seings ........................................................................................................................................................................................... 47
14.3.3 Set format ...................................................................................................................................................................................................... 47
14.3.4 Set time zone (only for NET update) ................................................................................................................................................................ 47
14.3.5 Summertime (only for NET update) .................................................................................................................................................................. 47
14.4 Language ........................................................................................................................................................................................................ 47
14.5 Factory seings............................................................................................................................................................................................ 47
14.6 Soware update ..........................................................................................................................................................................................48
14.7 Set-up wizard ............................................................................................................................................................................................... 48
14.8 Info ....................................................................................................................................................................................................................48
14.9 Display illumination ....................................................................................................................................................................................49
15 Cleaning .............................................................................................................................................................................. 49
16 Troubleshooting ............................................................................................................................................................... 49
16.1 General problems ....................................................................................................................................................................................... 50
16.2 Problems with USB media ...................................................................................................................................................................... 51
16.3 Problems with the remote control ...................................................................................................................................................... 51
16.4 Problems with the radio ......................................................................................................................................................................... 52
16.5 Problems with the CD player .................................................................................................................................................................53
16.6 Problems with external input ...............................................................................................................................................................54
17 Technical data ....................................................................................................................................................................55
EN
FR
IT
NL
PL
CZ
SK
7

1 Important information
Please take note of the following information to minimise safety risks, to prevent damage to the device and to make a
contribution to environmental protection. Please read all the safety information carefully and keep it for future reference. Always
observe all warnings and information in this quick start guide and on the rear of the device.
Caution - This identifies important information that must be observed to prevent device defects, data loss/misuse or
undesired operation.
Tip - This identifies information relating to the described function, as well as to another related function that may have to
be taken into account, with reference to the corresponding section in the manual.
1.1 Safety
For your own protection you should read the safety notes carefully before using your DIGITRADIO 143 CD. The
manufacturer accepts no liability for damage caused by improper handling and by not observing the following safety
precautions:
- Never open the device! Touching live parts can be fatal!
- Any required intervention may only be performed by qualified sta.
- The device must only be operated in an appropriate climate.
- In the event of extended transport in the cold and a subsequent change to warm rooms, do not switch on immediately;
wait for the temperature to equalise.
- Do not expose the device to dripping or splashing water. If water has penetrated the device, switch it o and inform the
Service department
- Do not expose the device to heat sources which could heat it up more than normal use will.
- In a thunderstorm, disconnect the device from the mains. Overvoltage can damage the device.
- If you detect a device defect, odour or smoke, a major malfunction, or damage to the housing, switch o the device and
inform the Service department.
- The device must only be connected to a mains voltage of 100V-240V~, 50/60 Hz. Never try to operate the device at any
another voltage.
- The device must not be connected until the installation has been completed according to regulations.
8

- If the device shows any signs of damage, it must not be switched on.
- When removing the mains cable from the power outlet, pull on the plug, not the cable.
- Do not put the device into operation in the vicinity of baths, swimming pools or splashing water.
- Never try to repair a faulty device yourself. Always contact one of our customer service locations.
- Foreign bodies, e.g. nails, coins, etc. must not be allowed to fall inside the device. Do not touch the connection contacts
with metal objects or your fingers. This could lead to short-circuits.
- Do not place any open flames, such as burning candles, on the device.
- Never allow children to use the device unsupervised.
- Even when switched o and on standby, the device is still connected to the mains power supply. Z
- This device is not intended to be used by people (including children) with limited physical, sensoryormentalcapacities
or lackof experienceand/or knowledge,unless they are supervised by a person responsible for their safety or they are
instructed by them as to how to use the device.
- Children must be supervised to ensure that they do not play with the device.
- Modifications to the device are prohibited.
- Damaged devices or damaged accessories must not continue to be used.
1.2 Disposal
The device packaging is exclusively comprised of recyclable materials. Please sort these and take them to the "Dual System". This
product is identified according to Directive 2012/19/EU on Electricaland ElectronicWaste (WEEE) and, at the end of its service
life, must not be disposed of with normal domestic waste, but must be taken to a collection point for recycling electrical and
electronic devices.
This is indicated by the
The materials are recyclable according to their identification. An important contribution is made to protecting our environment
by recycling, recovery of materials and other kinds of recycling of old devices.
symbol on the product, the instruction manual or the packaging.
EN
FR
IT
NL
PL
CZ
SK
9
Please ask local authorities for the location of the relevant disposal point. Ensure that used baeries/rechargeable baeries,
as well as electronic waste, are not disposed of with household waste, but are properly disposed of (returned to the specialist
dealer, hazardous waste).
Baeries/rechargeable baeries may contain poisonous substances which cause harm to health and the environment. Baeries/
rechargeable baeries are subject to European Directive 2006/66/EC. They must not be disposed of with normal household waste.
Disposal instructions
Disposal of packaging:
Your new device was protected by packaging on its way to you. All materials used are environmentally-friendly and
recyclable. Please collaborate and dispose of the packaging in an environmentally-friendly way. Ask for information from
your dealer regarding current disposal means or your local disposal facility.
Risk of suocation! Keep packaging and parts thereof away from children. Risk of suocation by films and other
packaging materials.
Device disposal:
Old devices constitute valuable waste. Valuable raw materials can be recovered by environmentally-friendly disposal.
Consult your town or local authority as to the possibilities for environmentally-friendly and proper disposal of the device.
Prior to disposal of the device, remove the baeries/rechargeable baeries contained therein.
10
1.3 Legal notices
TechniSat herewith declares that the radio system model DIGITRADIO 143 CD corresponds to Directive 2014/53/EU. The
complete text of the EU Declaration of Conformity is available at the following web address:
hp://konf.tsat.de/?ID=22631
TechniSat accepts no liability for product damage as a result of external influences, wear or improper handling,
unauthorised repairs, modifications or accidents.
Changes and printingerrors reserved. Version 09/19. Copying and reproduction are subject to the publisher's consent.
The respective current version of the instructions can be downloaded in pdf format in the download area of the
TechniSat Homepage at www.technisat.de.
DIGITRADIO 143 CD and TechniSat are registered trademarks of:
TechniSat Digital GmbH
TechniPark
Julius-Saxler-Strasse 3
D-54550 Daun/Eifel, Germany
www.technisat.de
The names of the companies, institutions or makes referred to are trademarks or registered trademarks of the respective
owners.
The Spotify Soware is subject to third party licenses found here: hps://www.spotify.com/connect/third-party-licenses.
EN
FR
IT
NL
PL
CZ
SK
The device may only be operated in enclosed rooms in the 5 GHz WLAN range in the countries listed below.
BE CY FI FR HU LV LI
LU NL ES SE UK CH
11
1.4 Service instructions
This product is quality-tested and provided with the legally-specified warranty period of 24 months from the date of
purchase. Please keep your receipt as proof of purchase. In the event of warranty claims please contact the product
dealer.
Note!
Should you experience a problem with this unit, or for queries and information, our Technical Hotline is available:
Mon. - Fri. 8:00 am - 6:00 pm on:
+49 (0) 3925 9220 1800.
Repairs can also be ordered directly online at www.technisat.de/reparatur.
If the device needs to be returned, please use the following address only:
TechniSat Digital GmbH
Service-Center
Nordstr. 4a
39418 Stassfurt, Germany
12
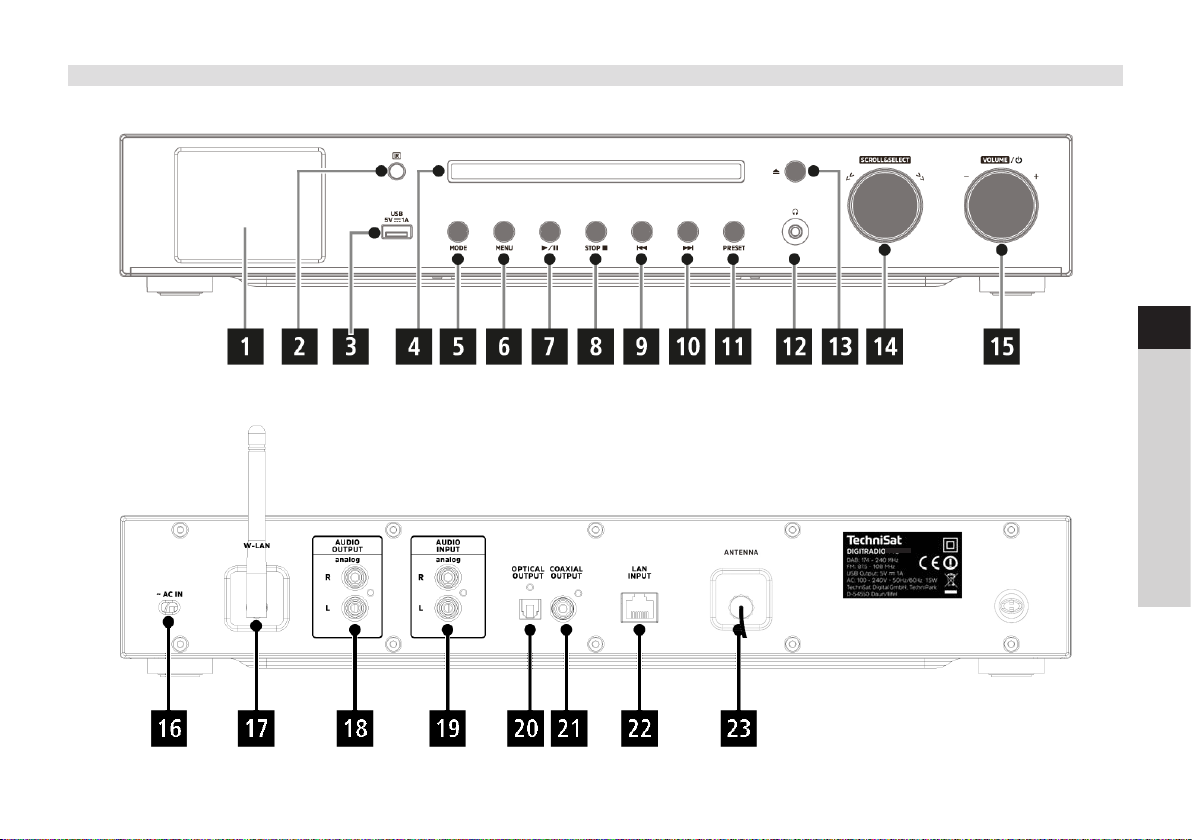
2 Figures and description
Front view
EN
FR
Rear view
IT
NL
PL
CZ
SK
13

Front view description
1 Display shows information on the selected source or the menu.
2 IR receiver
3 USB connection to playback MP3s on USB sticks or USB hard drives, for example.
4 CD drive for playing back audio or MP3 CDs.
5 MODE for switching between the playback sources (DAB, FM, Bluetooth, CD, Line IN,
6 MENU - press briefly to retrieve the main menu.
7 Play/Pause to pause/continue playback in CD/music mode.
8 STOP - stop playback in CD mode only.
9 Skip track/search back only in CD/music playback mode. Press briefly to start the
10 Skip track/search forward only in CD/music playback mode. Press briefly to skip to the
11 PRESET to save and retrieve favourites. Keep pressed to save favourites, press briefly to
12 Headphone jack for headphones with a 3.5 mm jack plug.
13 CD ejector buon - press briefly to open/close the CD compartment.
14 SCROLL&SELECT - rotate knob to browse the menus or to change seings. Press to
15 Volume/on/standby - rotate knob to regulate the volume. Press to switch on the device
Charging of external devices (5V, 1A charging current).
Internet Radio, Spotify and music playback using USB or a shared network drive).
current track again, press twice to skip to the previous track, keep pressed to rewind.
next track, keep pressed to fast forward.
retrieve favourites.
accept/save the selection.
or to switch to standby. Switch o alarm tone.
14
Rear view description Remote control
16 Mains connection cable to connect to
110-240 V ~ 50/60Hz.
17 WLAN antenna - wireless connection
to a router.
18 Audio out analogue to connect to an
A/V receiver or a stereo system.
19 Audio input analogue (Line IN) to play
back external audio sources.
20 Optical out digital - audio output for
connecting to an A/V receiver or a
stereo system.
21 Coaxial out digital - audio output for
connecting to an A/V receiver or a
stereo system.
22 LAN input for connecting a network
cable for the Internet connection.
23 Antenna connection for receiving
DAB+ or FM signals. An active or
passive antenna can be connected.
4
6
8
10
11
1
2
3
5
7
9
12
14
16
18
20
22
24
15
17
19
21
23
25
EN
FR
IT
NL
PL
CZ
SK
13
26
15

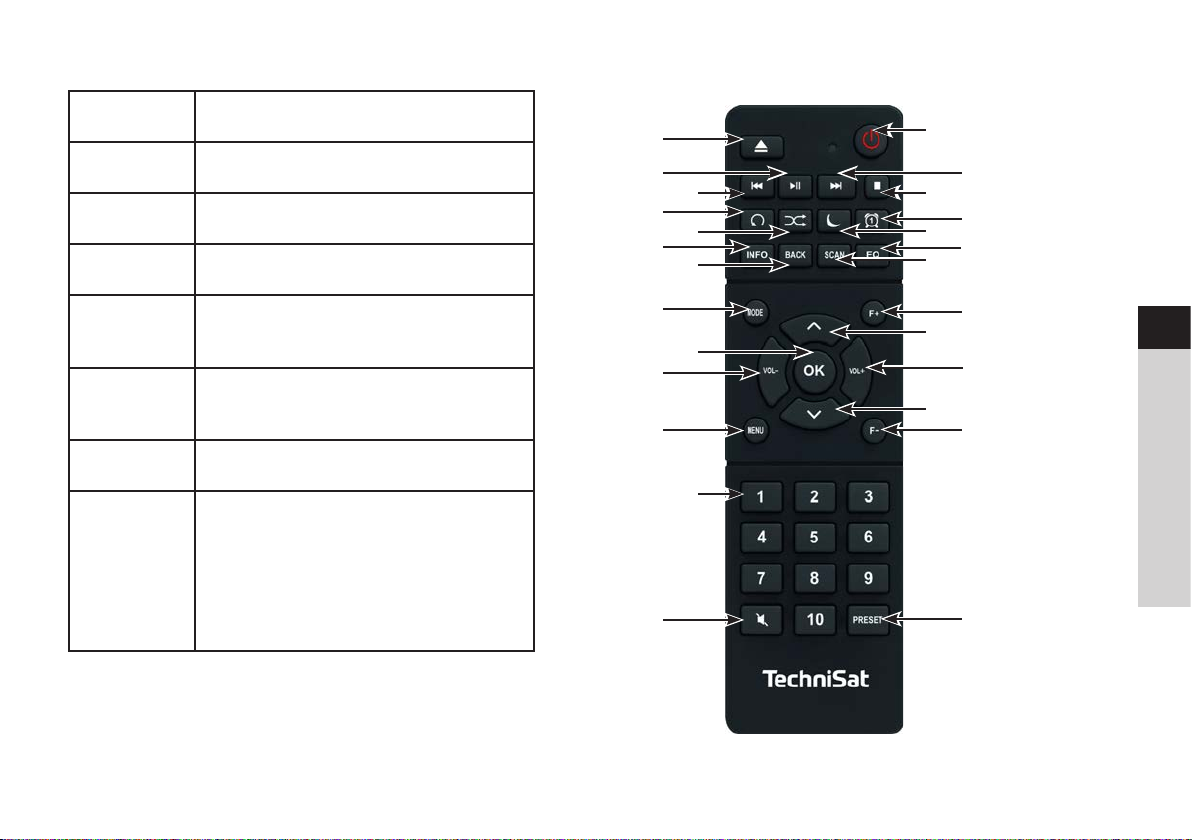
Remote control description
1 CD ejector buon - press briefly to open/close the CD compartment.
2 Play/pause only in CD/music playback mode, to pause/continue playback.
3 Skip track/search back only in CD/music playback mode. Press briefly to start the current track again, press
twice to skip to the previous track, keep pressed to rewind.
4 Track repeat
5 Shue - random track playback.
6 INFO Switch between multiple displays/information.
7 BACK moves one step back in menus, cancels seings.
8 MODE for switching between the playback sources (DAB, FM, Bluetooth, CD, Line IN, Internet Radio, Spotify and
music playback using USB or a shared network drive).
9 OK - accept or save selection, navigate in the menu.
10 VOL- reduces the volume.
11 MENU - press briefly to retrieve the main menu.
12 Number buons 1 - 10
13 Mute function
14 On/standby to switch the device on and o. End alarm tone.
15 Skip track/search forward only in CD/music playback mode. Press briefly to skip to the next track, keep pressed
to fast forward.
16 STOP only in CD/music playback mode, stop playback.
17 Alarm to activate and set the alarm function.
18 SLEEP - activates the sleep timer, press repeatedly for dierent times.
19 EQ retrieves the equaliser selection.
20 SCAN starts the station scan in DAB+ and FM mode.
16
21 F+ to scroll through the folder structure on a shared network drive or an MP3 CD.
22 Up arrow buon to navigate in menus or change seings.
23 VOL+ increases the volume.
24 Down arrow buon to navigate in menus or change seings.
25 F- to scroll through the folder structure on a shared network drive or an MP3 CD.
26 PRESET to save and retrieve favourites. Keep pressed to save favourites, press briefly to retrieve favourites.
3 Connecting the device and operation
3.1 Scope of delivery
The scope of delivery includes:
1 x DIGITRADIO 143 CD, 1 x instruction manual, 1 x remote control + baeries, antenna for DAB+/USW, WLAN antenna
3.2 Inserting the baeries
> Slide open the baery compartment cover on the back of the remote control. Insert two "AAA" (Micro), 1.5 V baeries,
ensuring the correct polarity, as shown in the baery compartment. Baeries included in the scope of delivery.
> Close the baery compartment lid carefully again until the lid engages.
Promptly change baeries that are losing power.
Always change both baeries at the same time and use the same type of baeries.
Leaking baeries can cause damage to the remote control.
If the device is not being used for a prolonged period, remove the baeries from the remote control.
Important information for disposal: baeries can contain poisonous substances which harm the environment. Therefore,
it is imperative to dispose of the baeries according to the legal provisions in force. Never dispose of the baeries with
normal domestic waste.
EN
FR
IT
NL
PL
CZ
SK
17

3.3 Connection
> The audio outputs audio out analogue (18), optical out digital (20) or coaxial out digital (21) are available on the back
of the device to connect an A/V amplifier or a stereo system.
> Connect the supplied aerial antenna to the antenna connection (23).
> Depending on whether you wish to use the LAN connection or the WLAN connection, connect the LAN cable for your
network to the LAN connection (22), or raise the WLAN antenna (17).
> Then insert the mains cable into a 110-240V ~ 50/60Hz mains outlet.
3.4 Switching on/o
> To switch on the DIGITRADIO 143 CD, press the on/standby buon on the device (15) or on the remote control (14).
> To switch o, press the on/standby buon on the device (15) or on the remote control (14) again.
3.5 Source selection
> Press the MODE buon on the device (5) or on the remote control (8) repeatedly to scroll through the available sources.
Alternatively:
> Open the submenu in the current source by pressing the MENU buon and select >Main menu.
The source currently selected is shown on the display.
3.6 Adjusting the volume
> Rotate the volume knob (15) on the device to the right or press the VOL+ (23) buon on the remote control to increase
the volume. Rotate the volume knob (15) on the device to the le or press the VOL- (10) buon on the remote control
to reduce the volume.
The set volume is shown on the display while it is being adjusted.
18

3.7 Menu operation
The menu is divided into the Main Menu, the Submenu for the currently selected source, and System Seings, which apply to
all sources. Operation within the menu takes place using the SCROLL&SELECT knob (14) on the device or using the up/down
arrow buons (22, 24) and the OK (9) buon on the remote control.
> To open the submenu corresponding to the currently selected source, press the MENU buon on the device or on the
remote control.
The source-specific seings and options are in the submenu corresponding to the currently selected source. From here
you can also access the > Main Menu and the > System Seings.
> You can move the highlight up and down by rotating the SCROLL&SELECT knob to the right and le or by pressing the
arrow buons p or q on the remote control.
> You can confirm your choice by pressing the SCROLL&SELECT knob or the OK buon on the remote control. If a seing
has been changed, it is saved by pressing the SCROLL&SELECT knob or the OK buon. If there is an arrow (>) next to a
menu item, additional seings or functions can be accessed by pressing the SCROLL&SELECT knob or the OK buon.
> Press the MENU buon to exit the menu. Depending on the submenu or option you currently have selected, the MENU
buon may have to be pressed repeatedly.
> Should you wish to cancel a seing without saving it, press the MENU buon or, alternatively, the BACK (7) buon on the
remote control.
EN
FR
IT
NL
PL
The detailed description of the device functions in these instruction manual is given using the buons on the remote
control.
CZ
SK
19

3.8 Activating the mute function
> You can mute the volume using the mute buon (13). "Mute" appears on the display and the status bar .
> The sound is switched back on by pressing the buon again.
3.9 Retrieving visual displays
> By repeatedly pressing the INFO (6) buon during the playback of a source, the following information can be viewed and
scrolled through:
20
Internet radio:
Track, artist
Description
Genre
Reliability
Bit rate, sound format
Playback buer
Date
Music playback (UPnP/USB media):
Artist
Album
Bit rate, sound format
Playback buer
Date
DAB mode:
Track, artist
DLS: continuous text with additional
information which the stations may
provide
Programme type
Ensemble/multiplex (group name)
frequency, channel
Signal intensity
Signal error rate bit rate in kbps sound
format
Date
Station name
USW mode:
RT radio text (if transmied) PTY programme type
Frequency, date
CD/MP3 and USB playback:
Track
Artist
Album
Folder
Path
Bit and sampling rate
Playback buer
Date
Duration
ID3 on/o (show text information if
available)
Spotify Connect:
Track
Artist
Album
Bit and sampling rate
Playback buer
Duration
EN
FR
In DAB mode, various station images or additional information are shown (slideshow) which can fill the entire display.
These overlays can be reduced in size using the OK buon, thereby enabling the various information and overlays to be
displayed using the INFO buon.
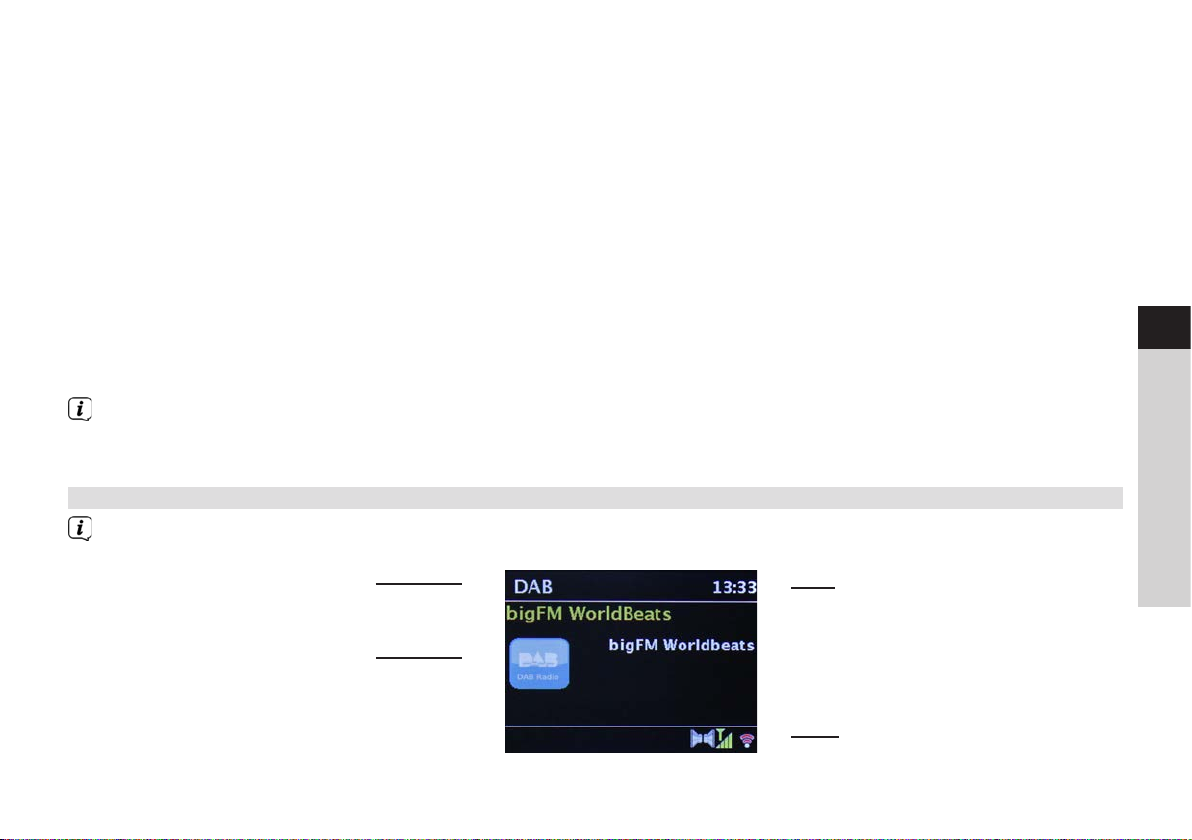
3.10 Visual displays
Depending on the selected function/source, the visual display shown may vary. Take note of the instructions on the
display.
Current source
Station name,
track, artist,
additional
information,
menu, lists
Time
Status bar
IT
NL
PL
CZ
SK
21
4 Initial set-up
Aer switching on the DIGITRADIO 143 CD for the first time, the initial set-up wizard starts.
Seings can all be changed at any time in the future.
> To launch the initial set-up wizard, use the arrow buons on the remote control to select the [YES] field and press the
OK buon.
> In the next step you can select the time format. Select the desired seing [12] or [24] and press the OK buon to move
on to the next step.
> Here it is possible to select which source (DAB+, FM or the Internet) the DIGITRADIO uses to obtain and update the time
and date. Once selected, proceed to the next step to enter the time zone to ensure that the time is displayed correctly.
> Proceed to specify whether summertime or wintertime is applicable at the time of seing.
> In the next step you can specify whether the DIGITRADIO should remain connected to the Internet when on standby.
Power consumption is, however, increased by using the standby mode.
> The network wizard then starts and you can set up an Internet connection. Use the OK buon to select your familiar
WLAN network and enter the password using the displayed keyboard. Then select and press the OK buon. If
the password entered is correct a connection to the network is now established. The signal bar
the display indicates whether the connection has been established. To cancel the entry, select and press the OK
buon. If you make a typing error you can delete the last leer entered using
When the virtual keyboard is shown on the display, you can browse using the arrows buons and the VOL+/- buons
on the remote control. The up/down arrow buons move the highlight upwards and downwards, the VOL+/- buons
move the highlight to the right and le.
> If you have connected the DIGITRADIO to the network using a LAN cable, select the [CABLE] item.
> Aer completing the network set-up, confirm the message that the initial set-up has been completed by pressing the OK
buon.
.
in the status bar of
22

5 Internet radio
The DIGITRADIO 143 CD is equipped with an Internet radio receiver. In order to receive Internet radio stations/channels, you
need an Internet connection using a connected LAN cable or connection to a wireless network. Consult Section 14.2 as to how
to set up an Internet connection.
> Press the MODE buon as oen as required until [Internet Radio] is shown on the display.
Alternatively:
> Press the MENU buon and then select Main menu > Internet radio.
If you are in a submenu, select the main menu as described in Section 3.7.
If you start the Internet radio mode for the first time without having configured a LAN or WLAN connection during the
initial set-up, the search wizard appears which shows you all the WLAN stations within range. Use the OK buon to
select your familiar WLAN network and enter the password using the displayed keyboard. Then select and press
the OK buon. If the password entered is correct a connection to the network is now established. The signal bar
the status bar of the display indicates whether the connection has been established. To cancel the entry, select
and press the OK buon. If you make a typing error you can delete the last leer entered using .
5.1 Last listened to
> Select MENU > Last listened to, to display a list with the last stations listened to.
> Using the up/down arrow buons select a station and play it by pressing OK.
5.2 Station list
> Press the MENU buon and select the station list from the available categories.
Under Station list, all Internet radio stations are displayed divided into dierent categories. You can also access to your
Favourites here.
> Based on a category/country/genre, select a station and press the OK buon.
in
EN
FR
IT
NL
PL
CZ
SK
23

To add a station to the My favourites list, keep the OK buon pressed during playback until [Favourite added] appears.
Alternatively:
> Keep the PRESET buon pressed until [Save default seing] appears on the display. You can now choose from one of
30 favourites memory slots using the up/down arrow buons. To save the station, press the OK buon once the highlight
is on the desired favourites memory slot. [saved] appears on the display.
Alternatively:
> Keep one of the number buons 1 - 10 pressed to save a station on a number buon.
To obtain additional information on the current station being played, press the INFO buon.
To add own stations or favourites, please register them on the website: hp://nuvola.link/sr. To do so, you need an access
code that you can request in the DigitRadio 143 CD under Internet radio > MENU > Station list > Help. Further
information on how to use the NUVOLA website can be found in the download area of the DIGITRADIO 143 CD.
There are several options available for retrieving favourite stations:
> Select Internet radio > MENU > Station list> My favourites > Stations. All favourites that you have added by keeping the
OK buon pressed or via the website are stored here. Select a station with the up/down arrow buons and play it by
pressing the OK buon.
> Briefly press the PRESET buon and select a station from the stored station list using the arrow buons. Press the OK
buon to play the station.
> Press one of the number buons 1-10, to directly select the station.
24

6 Playing music (UPnP media)
You have the option of playing music media stored on a UPnP server or a connected USB mass storage device via the
DIGITRADIO 143 CD. In order to be able to access a UPnP server, a connection to a network (router) is required. To do so,
observe the instructions in section 14.2 on seing up a network connection.
6.1 Playback via UPnP
The UPnP media server has to be located on the same network as theDIGITRADIO 143 CD.
> Press the MODE buon as oen as required until [Play music] is shown on the display.
Alternatively:
> Press the MENU buon and then select Main menu> Play music.
If you are in a submenu, first of all select the main menu as described in section 3.7.
If you are starting music playback mode for the first time without having configured a WLAN connection, the search
wizard appears which shows you all the WLAN stations within range. There is more information on seing up a network
connection in section 14.2.
EN
FR
IT
6.1.1 Playing media
> Select [Shared media] followed by the server on which your music is located.
The folder structure display depends on the folder structure on your media server.
Select [Playback list], to play lists on your media server.
In the menu you have the [Random playback] and [Repeat] playback options available. A corresponding symbol
appears in the status bar.
If you have selected a media server, you can use Search] to search directly for a track.
> Select a music track using the arrow buons and confirm the selection by pressing the OK buon.
> The playback buons Play/Pause (2), Stop (16)and Skip track (3, 15) are used to adjust the playback accordingly.
NL
PL
CZ
SK
25

6.1.2 Music via Windows Media Player
As an alternative to a UPnP server, it is also possible for you to play music using Windows Media Player starting from version 10.
To do so, music sharing must be set up in Windows Media Player.
> Ensure that the Windows PC and the DigitRadio 143 CD are located in the same network and switched on.
> Start the Media Player and enable media streaming sharing.
> If required, select the DigitRadio 143 CD in the following device overview and select Allow.
The procedure may vary depending on the Windows/Media Player version.
6.2 Playback via a USB mass storage device
Supported music files on a USB mass storage device can be played on the DIGITRADIO 143 CD. To do so, insert the USB mass
storage device, e.g. a USB stick in the USB port (3) on the front of the DIGITRADIO 143 CD.
> In Play music, select the Submenu > [Play from USB] and press the OK buon.
> Select a music track using the arrow buons and confirm the selection by pressing the OK buon.
> The playback buons Play/Pause (2), Stop (16)and Skip track (3, 15) are used to adjust the playback accordingly.
7 Spotify Connect
Use your smartphone, tablet or computer as a remote control for Spotify.
You can find out more by going to www.spotify.com/connect.
The Spotify soware is subject to third-party licences that you can find here:
hp://www.spotify.com/connect/third-party-licenses
26

8 The DAB function
DAB+ is a digital format through which crystal clear sound with no noise can be heard. In contrast to conventional analogue
radio stations, DAB+ can be used to broadcast multiple stations on the same frequency. You can find further information, for
example, at www.dabplus.de or www.dabplus.ch.
8.1 DAB radio reception
> Press the MODE buon as oen as required until [DAB Radio] appears on the display.
Alternatively:
> Press the MENU buon and then select Main menu > DAB.
If you are in a submenu, first of all select the main menu as described in section 3.7.
If DAB is being started for the first time, a complete station scan is performed. The station list is then shown (see Section
8.3).
8.2 Performing a station scan
The automatic scan [Complete scan] scans all DAB Band III stations and thereby finds all stations being broadcast
within the reception range.
Aer ending the scan, the first station in alphanumeric order will be played.
> In order to perform a complete scan, press the SCAN buon. [Scan] appears on the display. The scan starts and the
progress bar appears on the display.
> When completed, press p or q and OK to select a station.
Alternatively:
> Press the MENU buon and use p or q to select > Complete scan. Confirm by pressing OK.
If no station is found, check the antenna position and change the location if required. Check whether digital radio
stations are being broadcast in your area.
EN
FR
IT
NL
PL
CZ
SK
27

8.3 Selecting the station
> You can check the stations found on the device. To do so, press p or q and the station list appears.
> To select a station press OK.
> Alternatively, you can press the MENU buon and, use p or q to select > Station list.
8.4 Saving DAB stations
The favourites memory can store up to 30 stations in the DAB range.
The saved stations remain stored even in the event of a power cut.
> Seing the desired stations.
> Keep the PRESET buon pressed until the favourites memory list appears.
> Using the p or q buons, select a memory slot between 1 and 30 and press the OK buon. [saved] appears on the
display.
Alternatively:
> Press one of the number buons 1-10 and keep it pressed until [Saved] appears on the display.
> Repeat the process to save other stations.
8.5 Selecting the programmed stations
> Briefly press the PRESET buon.
> Using the p or q buons, select a memory slot between 1 and 30 and press the OK buon to play the station saved
there.
Alternatively:
> Press the desired number buon 1-10. If no station is saved in the selected programme slot, [Memory slot empty]
appears.
28
8.6 Deleting a saved memory slot
> Simply save the new station in the respective channel slot as described in Section 8.4.
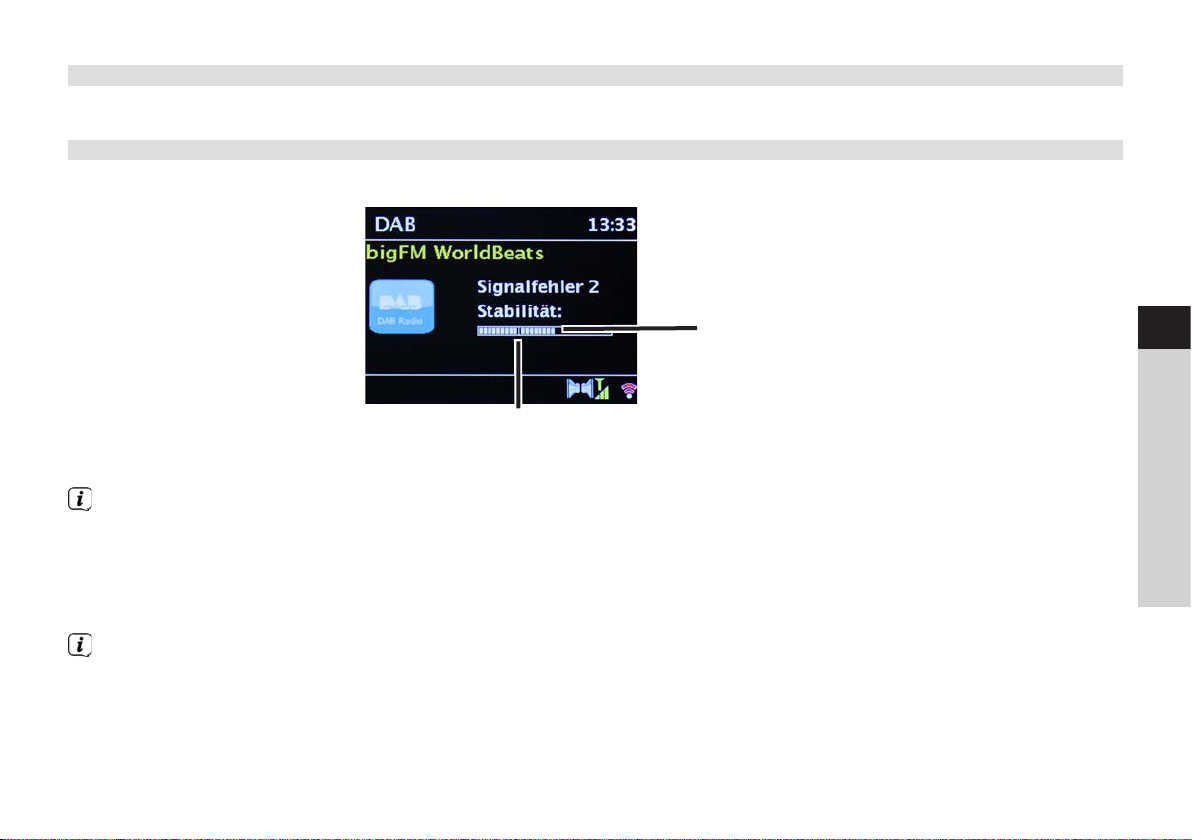
8.7 Signal intensity
> Press the INFO buon as oen as required until the signal intensity is shown:
Signal
intensity
Minimum signal intensity
> The bar modulation shows the current level.
Stations with a signal intensity below the required minimum signal intensity are not transmiing a strong enough signal.
Adjust the antenna position again if required.
> Under the menu item Manual seing, you can select the reception channels individually and see their signal intensity.
You can adjust the telescopic antenna optimally for channels suering from poor reception in the installation location.
This is how stations which have not been found during a scan up until now can be found and played. To do so, select
MENU > Manual seing and then a station frequency. The signal intensity is thereupon shown in this frequency.
By pressing the INFO buon several times, dierent information is scrolled through, such as station type, multiplex name,
frequency, signal error rate, data bit rate, station format, date, DLS.
EN
FR
IT
NL
PL
CZ
SK
29

8.8 Seing DRC
The compression rate balances dynamic vibrations and thereby any volume variations that occur.
> Press the MENU buon and select > Volume adjustment to choose the desired compression rate.
> With the compression rate choose:
DRC high - High compression
DRC low - Low compression
DRC o - Compression switched o.
> Confirm by pressing OK.
8.9 Deleting inactive stations
With the function Delete inactive stations, you can clean the station list of stations which are no longer broadcasting or can no
longer be received.
> Press the MENU buon and use p or q to select > Delete inactive stations.
> Confirm by pressing the OKbuon.
> Using p or q, select > Yes and confirm by pressing OK.
8.10 Sorting the stations
> Press the MENU buon and then p or q to select >Station order.
> Select a sorting type and confirm your selection with OK.
You have the choice between: Alphanumeric, Provider and Valid.
30

9 FM mode
9.1 Switching on FM radio mode
> Press the MODE buon as oen as required until [FM Radio] is shown on the display.
Alternatively:
> Press the MENU buon and in the Main menu select > FM.
If you are in a submenu, select the main menu as described in Section 3.7.
When switching on for the first time, the frequency 87.5 MHz is set.
If you have already set or saved a station, the radio plays the station last set.
In the case of RDS stations, the station name appears.
To improve reception, readjust the antenna if required.
9.2 USW reception with RDS information
RDS is a procedure for broadcasting additional information via FM stations. Broadcasters with RDS might, for example, broadcast
their station name or the programme type. This is shown on the display.
EN
FR
IT
NL
PL
The device can show the following RDS information
RT (Radio text),
PS (Station name),
PTY (Programme type).
9.3 Manual station selection
> Press p or q in USW mode to set the desired station. The display shows the frequency in steps of 0.05 MHz.
CZ
SK
31

9.4 Automatic station selection
> Press the SCAN buon to start the automatic station scan. The station frequency runs upwards on the display.
or
> Keep p or q pressed for approx. 2 seconds to automatically search for the next station with a strong enough signal.
If a FM station with sucient signal intensity is found, the scan stops and the station is played. If an RDS station is being
received, the station name appears and, possibly, radio text.
Please use manual station selection for seing weaker stations.
In Menu > Scan seing, you can set whether the scan only finds strong stations (Strong stations only > YES) or all stations
(Strong stations only > NO). To do so press the MENU buon and > Scan seings. Confirm the selection with OK.
9.5 Seing mono/stereo
> Press the MENU buon and use p or q to select > Audio seing.
> Select YES or NO, for playback in mono sound only in the event of weak FM reception.
> Confirm by pressing OK.
9.6 Saving USW stations
The favourites memory can store up to 30 stations in the USW range.
The saved stations remain stored even in the event of a power cut.
> Seing the desired stations.
> Keep the PRESET buon pressed until the favourites memory list appears.
32

> Using the p or q buons, select a memory slot between 1 and 30 and press the OK buon. [Saved] appears on the
display.
Alternatively:
> Press one of the number buons 1 - 10 and keep it pressed until [Saved] appears on the display.
> Repeat the process to save other stations.
9.7 Selecting the programmed stations
> Briefly press the PRESET buon.
> Using the p or q buons, select a memory slot between 1 and 30 and press the OK buon to play the station saved
there.
Alternatively:
> Press the desired number buon 1-10. If no station is saved in the selected programme slot, [Memory slot empty]
appears.
9.8 Deleting a saved memory slot
> Simply save the new station in the respective channel slot as described in Section 9.6.
10 Bluetooth
10.1 Activating the Bluetooth mode
> Press the MODE buon as oen as required until [Bluetooth audio] appears on the display.
Alternatively:
> Press the MENU buon and then select Main menu > Bluetooth.
If you are in a submenu, select the main menu as described in Section 3.7.
In the status bar of the display, a flashing Bluetooth symbol indicates the pairing mode.
EN
FR
IT
NL
PL
CZ
SK
33

If the DIGITRADIO 143 CD has already been paired with another device which is within range, the connection is
automatically established.
10.2 Pairing
> Activate Bluetooth on your music player, e.g. a smartphone or tablet.
If you activate Bluetooth on your music player, please consult the corresponding instruction manual for the devices which
you wish to pair with the DigitRadio.
Please note that only 1 device can be connected to the DIGITRADIO 143 CD at any time.
> Select the list of Bluetooth devices found on your music player.
> In the list, search for the item DIGITRADIO 143 CD and select it. If the selection requires a PIN, enter 0000 (4 x zero).
> If the pairing is completed successfully, the Bluetooth symbol on the DIGITRADIO display stops
flashing.
10.3 Playing music
> Select a music track on your music player and play it.
> The sound is now played via the DIGITRADIO 143 CD.
With the help of the Play buons on the DigitRadio remote control, you can control the playback on your music player
(only with compatible devices). Alternatively, use the playback controls on your playback device.
Ensure that the volume on your music player is not set too low.
Ensure that you do not exceed the maximum Bluetooth range of 10 metres to guarantee excellent playback quality.
34

11 Audio input
You can play sound from an external device via the DIGITRADIO 143 CD.
> Connect the external device to the Audio input (19) on the DIGITRADIO 143 CD.
> Press the MODE buon as oen as required until [Line in] is shown on the display.
Alternatively:
> Press the MENU buon and then select Main menu > Line in.
For an optimum volume seing, use the volume control on the radio, as well as the one on the connected device.
Take into account that, when the volume seing is very low on the connected device and the volume seing on the radio
is higher, irritating noises/murmurs are amplified accordingly and can be heard more clearly. It is recommended that you
set the volume on the DIGITRADIO 143 CD on a DAB+ or USW station, for example, switch to audio input and then adjust
the volume on the connected device in such a way that the overall volume of the audio input corresponds approximately
to the volume of the DAB+/USW station. In this way you can also avoid considerable volume dierences when switching
between functions on the DIGITRADIO 143 CD.
12 CD/MP3 player
12.1 General information on CDs/MP3 CDs
The device is designed for music CDs that are played with audio data (CD-DA or MP3 for CD-R and CD-RW). MP3 formats must
be created with ISO 9660 Level 1 or Level 2. Multi-session CDs cannot be read.
In MP3 mode, the terms "Folder" = Album and "Track" are critical. "Album" corresponds to the folder on the PC, "title" of the file
on the PC or a CD-DA track. The device sorts the albums or the tracks of an album into alphabetical order by name. If you prefer
a dierent order, change the name of the track or album and place a number in front of the name.
When burning a CD-R and CD-RW with audio data, various problems can arise which could occasionally compromise smooth
playback. This is caused by faulty soware and hardware seings or the blank disc being used. Should such errors arise, you
should contact your CD burner/burner soware manufacturer or search for the relevant information, e.g. on the Internet.
EN
FR
IT
NL
PL
CZ
SK
35

If you create audio CDs, observe the legal requirements and do not breach third-party copyrights.
Always keep the CD compartment closed to prevent the accumulation of dust on the laser optics.
The device can play CDs with mp3 data and normal audio CDs (CD-DA). Do not use any other extensions such as *.doc,
*.txt, *.pdf, etc. if audio files are being converted to mp3. Music files ending in *.AAC, *.DLF, *.M3U and *.PLS or *.WMA and
some others cannot be played back.
Given the variety of dierent encoder soware, it cannot be guaranteed that every mp3 file can be played without a
problem.
In the event of tracks/files being faulty, playback will continue with the next track/file.
When burning the CD, it is worth doing so at low speed and creating the CD as a single session and finalised.
12.1.1 The discs you can use
The CD player is compatible with CD, CD-R/RW and MP3 CD media. All the discs referred to here (disc size 12 cm/ 8 cm CDs,
playing time 74 min. or 24 min. max.) can be played with this device without an adapter.
If you transport the device, remove the discs from the drive. This prevents damage to the CD player and the disc.
The playback quality with mp3 CDs depends on the bit rate seing and the burning soware used.
12.2 Playing CDs
> Press the MODE buon as oen as required until [CD] is shown on the display.
Alternatively:
> Press the MENU buon and then select Main menu > CD.
> To insert CDs, briefly press the CD ejector buon on the device (13) or on the remote control (1).
The CD compartment (4) opens outwards. It should not be prevented from doing so.
36

When the CD compartment is open, ensure that no foreign objects can penetrate the device. The lens of the laser sensor
must not be touched under any circumstances.
Only open the CD compartment when the CD has stopped.
Insert the CD carefully with the printed side facing upwards. Ensure that the CD is not positioned at an angle.
To insert/remove the CD, please hold it by the edge.
> Close the CD compartment using the ejector buon on the device (13) or on the remote control (1). The CD is read and
this is shown on the display (1).
Aer completing the reading process [Stop] appears on the display. With MP3 CDs, the album number also appears. If the CD
is inserted incorrectly or if the CD appears to be faulty, "No CD" appears on the display.
Do not perform any operation until the CD content has been completely read, to ensure that all the required information
on the CD has been read. With MP3 CDs in particular, this process can take some time.
> By pressing the Play/Pause buon on the remote control (2) you can start/pause the playback (the playing time flashes
on the display).
> The STOP buon on the remote control (16) stops the playback. The total number of tracks appears on the display.
Always stop the playback prior to removing the CD.
If there is no playback, the DIGITRADIO 143 CD switches to standby aer approx. 15 minutes.
12.2.1 Seing the track
> Folders/albums can be selected using the F- or F+ buons (25, 21) on the remote control.
> With the help of the Skip track forward/back buons (3, 15) on the remote control, it is possible to skip to the next or
previous track respectively.
The display shows the set track number (F = folder/album, T = track)
EN
FR
IT
NL
PL
CZ
SK
37

12.2.2 Quick search
Whilst the track is running, it is possible to perform a quick search forward or back to search for a specific position. There is no
playback during the search process.
> Keep the Skip track forward/back (3, 15) buons on the remote control pressed to perform a quick search forward or
back within a track for as long as the buon is pressed.
12.2.3 Repeat function
You can select whether you wish to repeat a track, the entire folder/album (only for MP3 CDs) or all of the elements on the CD.
> To do so, press the Repeat track buon repeatedly on your remote control (4). The selected mode is shown on the
display (Repeat track , Repeat folder/album , Repeat all tracks ).
> To switch o the function again, press the Repeat track buon as oen as required until the repeat display is no longer
shown.
12.2.4 Random playback
With the random generator, the CD tracks can be played back in random order.
> During ongoing playback, press the Shue buon on the remote control (5) and the display shows the symbol for
random playback .
> To switch the function o again, press the Shue buon again.
12.2.5 Programming function
The programming function allows you to play up to 32 tracks on a music CD or 64 tracks on an MP3/WMA-CD in an
order of your choice.
You can only undertake the programming if there is a disc in the closed CD compartment and if the device is in stop
mode.
> You access the stop function by pressing the STOP buon on the remote control (16).
38

> Press the PRESET (26) buon on the remote control.
The display will show (for a normal audio CD) [Programme], the track number [T001] flashes, as well as the memory slot [P01].
> Using the Skip track forward/back (3, 15) buons on the remote control, select the first track to be programmed.
> Save the desired track number using the OK buon on the remote control (9). The track is now programmed as the first
track in programme slot P01.
On the display you now see the number of the next programme slot P02.
Programme the desired order of all the tracks in this way.
> You can cancel the programming using the PRESET buon or the STOP buon on the remote control (26, 16).
> Press the Play/Pause buon on the remote control (2) to start the playback of the programmed selection.
> If you wish to interrupt the programmed selection, press the Play/Pause buon on the remote control (2) once.
> To end the programmed playback, press the STOP buon on the remote control (16).
If you open the CD compartment or activate another source, the programme memory is deleted. The programming is
also ended by pressing the STOP (16) buon twice.
With MP3 CDs, enter the folder/album number (F) as well.
> Aer starting the programming process by pressing the PRESET buon, first of all an F flashes, followed by the folder/
album number. Select the folders/albums using the F- or F+ (25, 21) buons on the remote control.
Track entry then takes place as for the audio CD.
12.3 CD advice
Always keep the CD in its cover and only hold it by the edges. The rainbow-coloured, shimmering surface must never be
touched and must always be kept clean. Do not stick paper or adhesive tape on the label side of the disc. The CD should be
kept away from intense sunlight and heat sources such as radiators.
EN
FR
IT
NL
PL
CZ
SK
39

Likewise, a CD must not be le in a parked car located directly in the sun, since the interior temperature in the car can rise
considerably. Clean o fingerprints and dust on the silver side using a clean, dry cleaning cloth. To clean CDs, do not use record
cleaning agents such as record spray, cleaning liquids, anti-static spray or solvents such as petrol, thinners or other commercially
available chemicals. Tough stains can sometimes be removed using a moist chamois leather.
Wipe from the centre to the edge of the disc. Circular movements when cleaning cause scratches. This can lead to errors during
playback.
13 Other functions
13.1 Sleep timer
The sleep timer can be used to switch the DIGITRADIO 143 CD to standby automatically aer a set time.
> Press the MENU buon and select Main menu > Sleep timer.
If you are in a submenu, select the main menu as described in Section 3.7.
> You can use the p or q buons to set the period for Sleep o in 15, 30, 45, 60 minute intervals, aer which the device
switches to standby while in any operating mode.
Alternatively:
> Press the SLEEP buon several times.
In the display status bar, a clock symbol appears with the available remaining time until the DigitRadio switches to
standby.
13.2 Alarm
> Using MENU > Main menu> alarm you can retrieve the alarm seings.
Alternatively:
> Press the ALARM (17) buon on the remote control, in order to access the alarm seings directly.
40

13.2.1 Seing the alarm time
The alarm function cannot be used until the correct time has been set. Depending on the set-up, this either occurs automatically
or needs to be set manually. The time can either be set manually or automatically using DAB USW or updated using the
Internet. See Section 14.3for further information.
> Select one of the alarm time memories (Alarm 1 or Alarm 2) and set the desired values point by point using the arrow
buons p /q (22, 24) and OK (9) on the remote control.
Repeat Choose between repeat options O (the alarm is switched o), Daily, Once,
Weekend (SAT-SUN), Working days (MON-FRI).
Time Set the time at which you wish to be woken.
If you have chosen Once as the repeat option, the date is also required.
Mode Select the source with which you wish to be woken. The following are available
Buzzer, Internet Radio, DAB, FM.
Programme Select whether playback should be from the source set beforehand, the Last listened to or one
of the Favourites memory seings.
Volume Select the volume with which you wish to be woken.
Save This saves the alarm seings.
The alarm seings are not accepted until selecting [Save].
The alarm is active provided you have set the alarm repeat to Daily, Once, Weekend, or Working days. The status bar
shows an alarm symbol with the corresponding number of the active alarm . In the O seing the alarm is not active
for the set time.
13.2.2 Switching o the alarm aer being woken
> Press the On/Standby (14) buon or Alarm (17) on the remote control to switch o the alarm.
The display shows [Alarm o] and the alarm symbol is shown again if the alarm repeat is set to Daily, Weekend or
Working days.
EN
FR
IT
NL
PL
CZ
SK
41

13.2.3 Switching o/deactivating the alarm
> As described under 13.2.1, select the alarm memory (Alarm 1 or Alarm 2) you wish to switch o/deactivate.
> Open [Repeat] and set this to [O], to deactivate the alarm.
The alarm seings are not accepted until selecting [Save].
The alarm seings are retained so that this can be easily switched on/activated again at a later date.
13.2.4 Switching on/activating the alarm
> Select the alarm memory (Alarm 1 or Alarm 2) you wish to switch on/activate.
> Open [Repeat] and set this to Daily, Once, Weekend, or Working days to activate the alarm with the seings already
available (See Section 13.2.1).
If required you can adjust the other seings as described in Section 13.2.1.
The alarm seings are not accepted until selecting [Save].
13.3 Using headphones
Do not listen to music at a high volume when using headphones. Doing so can cause permanent hearing impairment. Turn
down the radio volume to the lowest volume before using headphones.
> Only use headphones with a 3.5 mm jack plug.
> Insert the headphone connector in the headphone socket (12) on the front of the DIGITRADIO.
When the headphones are connected, the sound is played via the headphones and the audio outputs at the same time.
Volume adjustment also occurs in parallel.
14 System seings
The system seings are equally applicable to all sources.
> To access the system seings, press the MENU buon and select > System seings.
42

14.1 Equaliser
To adjust the sound of the DIGITRADIO 143 CD, the equaliser is available with the preset tuning of Middle, Classical, Rock, Pop
and Jazz.
> Via MENU > System seings > Equaliser you can access the equaliser seings.
Alternatively:
> Press the EQUALISER (EQ.) buon on the remote control (19), to directly access the equaliser seings.
> Select the desired equaliser seing and press the OK buon.
An * highlights the current Selection/Seing.
14.2 Internet seings
> Via MENU > System seings > Internet seings you can retrieve and configure the network seings.
14.2.1 Connection via a network cable
To configure the network connection via a network cable (LAN), you have the option of using the network wizard or configuring
manually.
14.2.1.1 Network wizard configuration
> Connect the LAN cable to the socket labelled LAN Input (22) on the DIGITRADIO.
> Select [Network wizard] to launch this.
The network wizard searches for all WLAN networks within range and subsequently shows them to you as well as the
[Cable] option.
> To use the network connection via a network cable (LAN) option, now select [Cable] and press the OK buon.
Aer confirmation, the required seings, such as IP address, gateway, subnet mask, are automatically retrieved from your
router, provided the DHCP function is activated in the router.
43
EN
FR
IT
NL
PL
CZ
SK

14.2.1.2 Manual configuration
> Select [Manual seings] and then [Cable] to start manual configuration.
> Now select whether to allow automatic retrieval of the IP address, gateway etc. from your router (DHCP active) or if you
would like to enter this manually (DHCP inactive).
Please take into account that automatic retrieval of the IP address, gateway, subnet mask etc. only functions if the DHCP
function in the router is activated.
> One by one, enter the IP address, subnet mask, gateway address, primary DNS and secondary DNS if required, using the
Arrow buons on the remote control. Confirm each set value with the OK buon.
14.2.2 Connection via WLAN
To configure the network connection via WLAN, you have the option of using the network wizard or doing so manually.
14.2.2.1 Network wizard configuration
> Select [Network wizard] to launch this.
The network wizard now searches for all the WLAN networks within range and displays them to you.
> Then select your WLAN network.
You can now choose whether to use the WPS function or whether you prefer to enter your WLAN password manually.
> If you would like to use the WPS function, launch it on your router as per the instruction manual and then select [Press
buon] in the network wizard.
Please observe the display overlays. The connection process is generally completed in a few seconds and the WLAN
connection can be used.
> If you wish to enter your WLAN password manually, or if your router does not support the WPS function, select [Skip
WPS].
> Then enter your WLAN password using the virtual keyboard display and confirm your selection with OK.
44

The entered password is now verified. This process is generally completed in a few seconds and the WLAN connection
can now be used.
14.2.2.2 Configuration via the WPS function
This establishes a direct connection to the router. Selecting and/or entering a WLAN network (SSID) and password is not
required.
> Start the WPS function on your router as per the instruction manual.
> Then select [PBC WLAN structure] to launch the connection process.
Please observe the display overlays. The connection process is generally completed in a few seconds and the WLAN
connection can be used.
14.2.2.3 Manual configuration
> Select [Manual seings] then [Wireless] to launch manual configuration.
> Now select whether to allow automatic retrieval of the IP address, gateway etc. from your router (DHCP active) or if you
would like to enter this manually (DHCP inactive).
Please take into account that automatic retrieval of the IP address, gateway, subnet mask only works if the DHCP function
is activated in your router.
> One by one, enter the IP address, subnet mask, gateway address, primary DNS and secondary DNS if required, using the
Arrow buons on the remote control. Confirm each set value with the OK buon.
> Now enter the name (SSID) of your WLAN network using the virtual keyboard and confirm with OK.
> Select whether your WLAN network is Open, encrypted by WEP or by WPA/WPA2 and confirm the following item.
> Continue to use the virtual keyboard to enter your WLAN password and confirm with OK to start the connection process.
In general, the WLAN connection can be used aer a few seconds.
EN
FR
IT
NL
PL
CZ
SK
45

14.2.3 Display seings
> Select [Display seings] to display the current network seings.
14.2.4 Manual seing
Manual seing of the connection parameters is described for LAN in Section 14.2.1.2 and for a wireless network (WLAN) in
Section 14.2.2.3.
14.2.5 NetRemote PIN setup
Under certain circumstances, it may be necessary to secure the connection to the DIGITRADIO 143 CD with a PIN.
> Enter a 4-digit PIN under [NetRemote PIN Setup].
14.2.6 Delete network profile
Use this menu item to end an existing connection to a WLAN and to delete the seings carried out. If you want to connect the
device to this network again, all the seings need to be carried out again.
14.2.7 WLAN/LAN connection on standby
> Under [Allow WLAN/LAN on standby?], select whether the WLAN/LAN connection is to be maintained in standby mode
(YES) or not (NO).
14.3 Time seings
> Via MENU > System seings > Time and date you can retrieve and configure the seings for the time and date.
14.3.1 Time/date seing
> Select [Time/date seing] to set the time and date manually.
> Use the p or q arrow buons to change a value and confirm by pressing the OK buon.
Each time the OK buon is pressed, the highlight skips to the next value.
46

14.3.2 Update seings
> Under [Update seings], select whether the time and date update should take place automatically via DAB [Update
DAB], via USW [Update FM] or via the Internet [NET update] or whether [No update] should take place.
When selecting NET update, the menu items [Set time zone] and [Summertime] are also available.
When selecting [No update], the date and time must be set manually as described in Section 14.3.1.
14.3.3 Set format
> In [Set format] you can choose whether the time is to be shown in 12 or 24 hour format.
14.3.4 Set time zone
> In [Time zone] select the time zone corresponding to your location.
14.3.5 Summertime
> In [Summertime] you stipulate whether it is currently summertime (On) or wintertime (O).
14.4 Language
> Via MENU > System seings > Language you can selected the preferred menu language.
14.5 Factory seings
> Go to MENU > System seings > Factory seings to reset your DIGITRADIO 143 CD to the factory seings.
Please note that, in this case, all the seings carried out by you (e.g. network connection or saved stations) will be lost
and must subsequently be carried out again to be able to use the radio as usual.
(only for NET update)
(only for NET update)
EN
FR
IT
NL
PL
CZ
SK
47

> If you actually wish to reset the radio, select the security prompt [YES] or abort the process with [NO].
Aer completion of the factory seings the radio switches to standby. When next switched on, the set-up wizard is
launched again (Section 4).
14.6 Soware update
From time to time soware updates may be provided which could contain improvements or bug fixes. This keeps the
DIGITRADIO permanently up-to-date.
> Go to MENU > System seings > Soware update.
> If the DIGITRADIO 143 CD is to search periodically for new soware versions, go to [Auto update] and select > [YES], or
select [NO] if this is not to be carried out automatically.
> Select [Check now], if you want to check directly whether a new soware version is available.
If a soware update has been located, follow the instructions on the display.
In order to find and upload soware updates, the radio must be connected to the Internet.
Do not switch the DIGITRADIO 143 CD o during the update process!
14.7 Set-up wizard
The set-up wizard starts automatically aer switching on the DIGITRADIO 143 CD for the first time, aer retrieving the factory
seings, or can be launched manually in MENU > System seings > Set-up wizard. Go to Section 4 to see how to configure the
set-up wizard.
14.8 Info
> In MENU > System seings > Info you can see the soware version currently installed in the device as well as, for
example, the Spotify version.
48

14.9 Display illumination
> Via MENU > System seings > Illumination, you can retrieve the seings for the display illumination.
> Select [Operating mode] or [Standby mode] in order to carry out the seing for operation or standby.
> You can now set the brightness for operation in three steps from High, Medium to Low and for standby in [Display
illumination] to High, Medium, Low and O.
Moreover, for the standby mode you can use [Timeout] to set the duration aer which the display illumination changes
to the set brightness aer switching o.
15 Cleaning
To prevent the risk of an electric shock, you must not clean the device using a wet cloth or under running water. Remove
the mains plug prior to cleaning!
You must not use scouring pads, scouring powder and solvents such as alcohol, petrol, white spirit, thinners, etc.; they
could damage the surface of the device.
Do not use any of the following substances: salt water, insecticides, chlorine or acid-based solvents (ammonium chloride).
Clean the housing using a so, damp cloth.
Only clean the display with a so, coon cloth. If required, use the coon cloth with a reduced volume of non-alkaline,
diluted water-based soap solution.
Use the coon cloth to gently rub the surface until it is completely dry.
16 Troubleshooting
If the device does not operate as intended, check the following tables for information.
EN
FR
IT
NL
PL
CZ
SK
49

16.1 General problems
The device cannot be switched on. The device is not being supplied with power.
No sound can be heard. Increase the volume. If necessary, the
The display does not switch on. Switch o the device, disconnect from the
Interference can be heard. In the vicinity of the device, a mobile phone
Other operational malfunctions,
loud noises or a malfunctioning
display indication are occurring.
Symptom Possible cause/remedy
Connect the mains plug correctly to the
mains outlet. If necessary, select another
power outlet.
incorrect source has been selected.
The mute function may be active.
mains.
Switch on the device.
or other device is emiing disruptive radio
waves.
Remove the mobile phone or the device
from the environment of the unit.
Electronic device components are
faulty.
Remove the mains plug. Leave the device
disconnected from the power source for
approx. 10 seconds. Reconnect
the device.
50

16.2 Problems with USB media
Symptom Possible cause/remedy
No playback possible. The device is not in USB mode.
16.3 Problems with the remote control
Switch to the respective source using MODE.
Medium not inserted or empty.
Insert the medium correctly or
provide it with music data.
Symptom Possible cause/remedy
The remote control does not work. Baeries are inserted incorrectly or are low.
Check the polarity.
Change the baeries.
IR connection interrupted.
Remove objects located between
the remote control and the device.
Distance too great.
Max. distance from the device: approx. 4 metres
EN
FR
IT
NL
PL
CZ
SK
51

16.4 Problems with the radio
No radio stations are being received. The device is not in radio mode. Press the MODE
No DAB signal is being received. Check whether DAB reception in your region
The sound is low or of poor quality. Other devices, e.g. televisions, are interfering
Symptom Possible cause/remedy
buon and select DAB or FM.
is possible.
Readjust the antenna.
Try to receive other stations.
Perform a station scan.
with reception. Move the unit further away from
these devices.
The antenna is incorrectly routed or aligned.
Change the position of the aerial antenna
52

16.5 Problems with the CD player
Symptom Possible cause/remedy
The CD is not playing or
skips during playback.
The device is not in CD mode.
Faulty CD inserted.
The CD compartment is not closed. Close the CD
compartment.
The CD is incorrectly inserted. Insert the CD with the labelled
side facing upwards. The CD must be properly centred in the
CD compartment.
The CD is dirty or faulty. Clean the CD, use another CD.
Moisture has penetrated the CD compartment. Remove the CD
and leave the CD compartment open for approx. 1 hour to dry.
The CD playing time is more than 74 minutes.
EN
FR
IT
The sound is intermient. The volume is set too high. Decrease the volume.
The CD is damaged or dirty. Clean the CD or replace it.
The device is being exposed to vibration. Install the device in a
location with low vibration.
NL
PL
CZ
SK
53

16.6 Problems with external input
Symptom Possible cause/remedy
No sound from the external input (AUX). Is the device correctly connected?
Is AUX selected as the input source?
Has playback been started on the external
device and has the output volume been set?
If the malfunction has not been resolved, even aer performing the checks described, please contact the Technical
Hotline (for further information see Seite 12).
54

17 Technical data
Reception channels DAB/DAB+, USW, Bluetooth, Internet, Spotify Connect, USB, CD, network drive
LAN
WLAN/Bluetooth frequencies
Display 3.2" TFT colour display
WLAN encryption WEP, WPA, WPA2, WPS
DAB frequencies 174 - 240 MHz
USW frequencies 87.5 - 108 MHz
Power supply 110-240V ~ 50/60Hz
Power consumption Operation: ~5.5W
Connections Analogue Audio-Out RCA L+R, Analogue Audio-In RCA L+R, Digital Optical and Coaxial,
Favourites memory slots DAB/DAB+: 30
Operating temperature 0° - 40°C
Dimensions mm (W x D x H) 435 x 275 x 77
LAN: 10/100
WLAN 802.11b, g, a, n, 2412 - 2472 MHz (max. +20dBm EIRP), 5180 - 5700MHz (max.
+19.5dBm EIRP)
Bluetooth: V4.2+EDR, 2402 - 2480 MHz (max. 4dBm Class II)
L2CAP/A2DP
Standby: <1W
3.5 mm headphone jack, LAN jack, USB jack, antenna F connector WLAN antenna
connection
USW: 30
Internet: 30
Spotify Connect: 10
EN
FR
IT
NL
PL
CZ
SK
55

56

Mode d'emploi
DIGITRADIO 143 CD

Sommaire
1 Consignes importantes .................................................................................................................................................. 62
1.1 Sécurité ............................................................................................................................................................................................................62
1.2 Élimination ..................................................................................................................................................................................................... 63
1.3 Mentions légales ......................................................................................................................................................................................... 65
1.4 Consignes d'entretien ...............................................................................................................................................................................66
2 Illustrations et description .............................................................................................................................................67
3 Branchement et utilisation de l'appareil....................................................................................................................71
3.1 Contenu de la livraison ............................................................................................................................................................................. 71
3.2 Insertion des piles ....................................................................................................................................................................................... 71
3.3 Raccordement ...............................................................................................................................................................................................72
3.4 Mise en marche/arrêt ................................................................................................................................................................................72
3.5 Choix de la source .......................................................................................................................................................................................72
3.6 Réglage du volume .....................................................................................................................................................................................72
3.7 Menu utilisation ............................................................................................................................................................................................ 73
3.8 Mise en sourdine de l'appareil ...............................................................................................................................................................74
3.9 Ouverture de l’achage à l’écran ........................................................................................................................................................74
3.10 Achage à l'écran .......................................................................................................................................................................................75
4 Première mise en service ...............................................................................................................................................76
5 Radio Internet .................................................................................................................................................................... 77
5.1 Dernière écoute ............................................................................................................................................................................................77
5.2 Liste des stations ......................................................................................................................................................................................... 77
6 Lecture de musique (médias UPnP) ...........................................................................................................................79
6.1 Lecture via UPnP ........................................................................................................................................................................................ 79
6.1.1 Lecture de médias ..................................................................................................................................................................................... 79
6.1.2 Musique via le lecteur Windows Media ...........................................................................................................................................80
6.2 Lecture via un support de stockage USB ........................................................................................................................................80
58

7 Spotify Connect ................................................................................................................................................................ 80
8 La fonction DAB .................................................................................................................................................................81
8.1 Réception radio DAB .................................................................................................................................................................................81
8.2 Réalisation d'une recherche .................................................................................................................................................................. 81
8.3 Choix de la station ..................................................................................................................................................................................... 82
8.4 Enregistrement des stations DAB ....................................................................................................................................................... 82
8.5 Sélection des stations programmées ................................................................................................................................................82
8.6 Suppression d'une mémorisation d'un emplacement de programme ..............................................................................83
8.7 Puissance du signal ....................................................................................................................................................................................83
8.8 Réglage de la compression dynamique (DRC) ............................................................................................................................. 84
8.9 Supprimer les stations inactives ........................................................................................................................................................ 84
8.10 Adapter l'ordre des stations ..................................................................................................................................................................84
EN
9 Mode FM ..............................................................................................................................................................................85
9.1 Mise en marche du mode radio FM ................................................................................................................................................... 85
9.2 Réception FM avec des informations RDS ...................................................................................................................................... 85
9.3 Sélection manuelle des stations .......................................................................................................................................................... 85
9.4 Sélection automatique des stations .................................................................................................................................................. 86
9.5 Réglage mono/stéréo ............................................................................................................................................................................... 86
9.6 Mémorisation des stations FM.............................................................................................................................................................. 86
9.7 Sélection des stations programmées .................................................................................................................................................87
9.8 Suppression d'une mémorisation d'un emplacement de programme ..............................................................................87
10 Bluetooth .............................................................................................................................................................................87
10.1 Activation du mode Bluetooth ............................................................................................................................................................87
10.2 Couplage ......................................................................................................................................................................................................... 88
10.3 Lecture de musique ..................................................................................................................................................................................88
11 Entrée audio ...................................................................................................................................................................... 89
12 Lecteur CD/MP3 ............................................................................................................................................................... 89
12.1 Informations générales sur les CD/CD MP3 ................................................................................................................................... 89
FR
IT
NL
PL
CZ
SK
59

12.1.1 Disques compatibles ................................................................................................................................................................................. 90
12.2 Lecture de CD ...............................................................................................................................................................................................90
12.2.1 Réglage du titre ............................................................................................................................................................................................91
12.2.2 Recherche rapide .......................................................................................................................................................................................92
12.2.3 Fonction Répétition ................................................................................................................................................................................... 92
12.2.4 Lecture aléatoire ......................................................................................................................................................................................... 92
12.2.5 Fonction programmation ........................................................................................................................................................................ 92
12.3 Remarques sur les CD ...............................................................................................................................................................................93
13 Fonctions étendues ......................................................................................................................................................... 94
13.1 Mise en veille ................................................................................................................................................................................................94
13.2 Réveil ................................................................................................................................................................................................................ 94
13.2.1 Réglage de l'alarme ................................................................................................................................................................................... 95
13.2.2 Arrêt du réveil après l'alarme ................................................................................................................................................................ 95
13.2.3 Arrêt/désactivation du réveil ................................................................................................................................................................. 96
13.2.4 Mise en marche/activation du réveil ..................................................................................................................................................96
13.3 Utilisation des écouteurs ......................................................................................................................................................................... 96
14 Réglages système ............................................................................................................................................................ 96
14.1 Égaliseur ...........................................................................................................................................................................................................97
14.2 Réglages Internet ........................................................................................................................................................................................97
14.2.1 Connexion par câble réseau ...................................................................................................................................................................97
14.2.1.1 Configuration via l'assistant réseau .....................................................................................................................................................97
14.2.1.2 Configuration manuelle ........................................................................................................................................................................... 98
14.2.2 Connexion par WLAN ............................................................................................................................................................................... 98
14.2.2.1 Configuration via l'assistant réseau .................................................................................................................................................... 98
14.2.2.2 Configuration via la fonction WPS ......................................................................................................................................................99
14.2.2.3 Configuration manuelle ........................................................................................................................................................................... 99
14.2.3 Acher les réglages ................................................................................................................................................................................100
14.2.4 Réglage manuel ........................................................................................................................................................................................100
14.2.5 Installation du code PIN RetRemote ...............................................................................................................................................100
14.2.6 Suppression du profil réseau ..............................................................................................................................................................100
14.2.7 Connexion WLAN/LAN en veille ........................................................................................................................................................ 100
60

14.3 Réglage de l'heure ...................................................................................................................................................................................100
14.3.1 Réglage de l'heure et de la date .......................................................................................................................................................100
14.3.2 Réglages de l'actualisation .................................................................................................................................................................... 101
14.3.3 Réglage du format ....................................................................................................................................................................................101
14.3.4 Réglage du fuseau horarie (uniquement en cas d'actualisation par NET) ....................................................................................................101
14.3.5 Heure d'été (uniquement en cas d'actualisation par NET) ...................................................................................................................................101
14.4 Langue ............................................................................................................................................................................................................ 101
14.5 Réglage d'usine ..........................................................................................................................................................................................101
14.6 Mise à jour du logiciel ............................................................................................................................................................................. 102
14.7 Assistant d'installation ............................................................................................................................................................................ 102
14.8 Info .................................................................................................................................................................................................................. 102
14.9 Éclairage de l'écran .................................................................................................................................................................................. 103
15 Neoyage ..........................................................................................................................................................................103
16 Dépannage ........................................................................................................................................................................103
16.1 Problèmes généraux ............................................................................................................................................................................... 104
16.2 Problèmes avec les médias USB ....................................................................................................................................................... 105
16.3 Problèmes avec la télécommande ................................................................................................................................................... 105
16.4 Problèmes avec la radio ........................................................................................................................................................................ 106
16.5 Problèmes avec le lecteur CD ............................................................................................................................................................. 107
16.6 Problèmes avec l'entrée externe .......................................................................................................................................................108
17 Données techniques ...................................................................................................................................................... 109
EN
FR
IT
NL
PL
CZ
SK
61

1 Consignes importantes
Veuillez observer les indications ci-dessous afin de réduire tout risque en matière de sécurité, d’éviter toute détérioration de
l’appareil et de contribuer à la protection de l’environnement. Lisez aentivement l'ensemble des consignes de sécurité et
conservez-les pour toute question ultérieure. Respectez toujours l'ensemble des avertissements et consignes de ce guide de
démarrage rapide, ainsi que ceux au dos de l’appareil.
Aention - désigne une indication importante à lire aentivement, afin d’éviter toute perturbation de l’appareil, toute
perte/mauvaise utilisation des données ou tout fonctionnement indésirable.
Astuce - désigne une indication relative à la fonction présentée, ainsi qu’une autre fonction liée et éventuellement à
respecter, avec ses références dans le manuel.
1.1 Sécurité
Pour votre sécurité, vous devez lire aentivement les consignes de sécurité avant de mere en service votre DIGITRADIO
143 CD. Le fabricant décline toute responsabilité en cas de dommages résultant d’une utilisation inappropriée de
l’appareil et du non-respect des consignes de sécurité suivantes :
- N’ouvrez jamais l’appareil! Tout contact avec des pièces sous tension peut être mortel !
- Les interventions éventuellement nécessaires doivent être uniquement eectuées par du personnel qualifié.
- Cet appareil doit uniquement être utilisé dans des régions à climat tempéré.
- Lors d’un transport prolongé dans le froid et d'un passage dans des locaux chaués, ne pas le mere en marche
immédiatement; aendre l’équilibrage des températures.
- N’exposez pas l’appareil à des goues d’eau ou des éclaboussures. Si de l’eau pénètre dans l’appareil, arrêtez-le et
contactez l’assistance technique.
- N'exposez pas l'appareil à des sources de chaleur qui peuvent faire chauer l'appareil au-delà de son utilisation normale.
- En cas d’orage, il est conseillé de débrancher l’appareil du secteur. Une surtension peut endommager l’appareil.
- Si l’appareil semble défectueux, s’il produit des odeurs ou des fumées, s’il présente des dysfonctionnements importants,
si le boîtier est endommagé, arrêtez immédiatement l’appareil et contactez l’assistance technique.
- L'appareil doit uniquement être raccordé à une tension de secteur de 100 V - 240 V~, 50/60 Hz. N’essayez jamais de
faire fonctionner l’appareil sous une autre tension.
62

- L’appareil ne doit être branché qu’une fois l’installation conforme aux prescriptions terminée.
- Si l’appareil présente certains défauts, il ne doit pas être mis en marche.
- Lorsque vous débranchez le câble d’alimentation de la prise secteur, tirez sur la fiche et non sur le câble.
- Ne meez pas l’appareil en marche à proximité d’une baignoire, d'une piscine ou de projections d’eau.
- N’essayez jamais de réparer vous-même un appareil défectueux. Adressez-vous toujours à l'un de nos centres de service
après-vente.
- Aucun corps étranger, p. ex. des aiguilles, pièces de monnaie, etc., ne doit tomber à l'intérieur de l'appareil. Les contacts
de raccordement ne doivent pas entrer en contact avec des objets métalliques ni avec les doigts. Cela peut entraîner des
courts-circuits.
- Aucune flamme nue, p. ex. une bougie allumée, ne doit être placée sur l’appareil.
- Ne laissez jamais les enfants utiliser cet appareil sans surveillance.
- L’appareil reste branché au réseau électrique même s'il est éteint/en veille. Z
- Cet appareil n’est pas destiné à être utilisé par des personnes (y compris les enfants) dont les capacités physiques,
sensorielles ou mentales sont limitées ou manquant d’expérience et/ou de connaissances, sauf si elles sont surveillées
par une personne responsable de leur sécurité ou si elles ont reçu les instructions nécessaires à l’utilisation de l’appareil.
- Les enfants doivent être surveillés afin de s’assurer qu’ils ne jouent pas avec l’appareil.
- Il est interdit de procéder à des transformations sur l’appareil.
- Les appareils ou accessoires endommagés ne doivent plus être utilisés.
1.2 Élimination
L’emballage de votre appareil est exclusivement composé de matériaux recyclables. Merci de les remere dans le circuit du tri
sélectif. Ce produit est identifié comme étant conforme à la directive 2012/19/UE relative aux déchets d'équipements électriques
et électroniques (DEEE) et ne doit pas être jeté en fin de vie avec les déchets ménagers ordinaires, mais ramené à un point de
collecte pour le recyclage des appareils électriques et électroniques.
EN
FR
IT
NL
PL
CZ
SK
Le symbole
Les matériaux peuvent être recyclés conformément à leur marquage. Le recyclage, la réutilisation des matériaux et toute autre
forme de réutilisation des appareils usagés contribuent de manière importante à la protection de notre environnement.
figurant sur le produit, dans le manuel d’utilisation ou sur l’emballage l'indique.
63

Veuillez contacter votre municipalité pour connaître le lieu de mise au rebut adapté. Veillez à ce que les piles/baeries vides
ainsi que les déchets électroniques ne soient pas jetés avec les ordures ménagères, mais qu’ils soient éliminés de façon adaptée
(reprise par les détaillants spécialisés, déchets spéciaux).
Les piles/baeries peuvent contenir des substances toxiques nocives pour la santé et l’environnement. Les piles/baeries sont
soumises à la directive européenne 2006/66/CE. Celles-ci ne doivent pas être éliminées avec les déchets ménagers ordinaires.
Consignes pour la mise au rebut
Mise au rebut de l’emballage:
Votre nouvel appareil a été protégé par son emballage lors de son expédition. Tous les matériaux utilisés sont
écologiques et recyclables. Merci d’apporter votre concours au respect de l’environnement en éliminant l’emballage de
manière adaptée. Informez-vous auprès de votre revendeur ou des services communaux de collecte des déchets au sujet
des points de collecte actuels.
Risque d’étouement! Ne laissez pas l'emballage ou ses éléments à des enfants. Risque d’étouement dû aux films et
aux autres matériaux d’emballage.
Mise au rebut de l’appareil:
Les appareils usagés ne sont pas des déchets sans aucune valeur. Grâce à une mise au rebut respectueuse de
l’environnement, des matières premières précieuses peuvent être récupérées. Renseignez-vous auprès des services
administratifs de votre ville ou communauté de communes pour connaître les possibilités d’une mise au rebut conforme
de votre appareil dans le respect de l’environnement. Avant de mere l’appareil au rebut, les piles/baeries doivent être
retirées.
64

1.3 Mentions légales
Par la présente, TechniSat déclare que l’installation radioélectrique DIGITRADIO 143 CD est conforme à la directive
2014/53/UE. Le texte intégral de la déclaration de conformité européenne est disponible à l’adresse suivante:
hp://konf.tsat.de/?ID=22631
La société TechniSat ne peut être tenue pour responsable des dommages causés au produit dans le cas d’influences
extérieures, d’une usure, d’une utilisation inappropriée, d’une réparation non autorisée, de modifications ou d’accidents.
Sous réserve de modifications et d’erreurs typographiques. Dernière mise à jour 09/19. Toutes copies et reproductions
sont soumises à l’autorisation de l’éditeur. Vous pouvez télécharger une version actuelle du manuel au format PDF dans
l'espace de téléchargement du site Internet TechniSat sur www.technisat.de.
DIGITRADIO 143 CD et TechniSat sont des marques déposées de:
TechniSat Digital GmbH
TechniPark
Julius-Saxler-Strasse 3
D-54550 Daun/Eifel, Allemagne
www.technisat.de
Les noms de sociétés, institutions ou marques citées sont des marques ou des marques déposées de leurs propriétaires
respectifs.
The Spotify Soware is subject to third party licenses found here: hps://www.spotify.com/connect/third-party-licenses.
EN
FR
IT
NL
PL
CZ
SK
Dans les pays indiqués ci-après, l'appareil peut être utilisé en zone WLAN 5 GHz uniquement dans des pièces fermées.
BE CY FI FR HU LV LI
LU NL ES SE UK CH
65

1.4 Consignes d'entretien
La qualité de ce produit est contrôlée et garantie pendant la période de garantie légale de 24mois à compter de la date
d’achat. Veuillez conserver la facture comme preuve d'achat. Veuillez vous adresser au revendeur du produit pour toute
demande relevant de la garantie.
Remarque!
Notre assistance technique téléphonique est joignable pour toute question et complément d'informations, ou en cas de
problème avec l’appareil:
Du lundi au vendredi de 8 h à 18 h au numéro suivant :
+ 49 (0) 392 592 201 800.
Les demandes de réparation peuvent également être faites directement en ligne sur www.technisat.de/reparatur.
En cas d'éventuel retour de l'appareil, merci d'adresser votre colis uniquement à l'adresse suivante :
TechniSat Digital GmbH
Service-Center
Nordstr. 4a
39418 Stassfurt, Allemagne
66

2 Illustrations et description
Vue avant
EN
FR
Vue arrière
IT
NL
PL
CZ
SK
67

Description de l'avant de l'appareil
1 Écran ache des informations sur la source ou le menu sélectionné(e).
2 Récepteur IR
3 Port USB p. ex. pour lire des MP3 stockés sur des clés USB ou disques durs USB ou
recharger des appareils externes (5 V, courant de charge 1 A).
4 Lecteur CD pour lire des CD audio ou CD MP3.
5 MODE pour basculer entre les sources de lecture DAB, FM, Bluetooth, CD, Line-IN,
radio Internet, Spotify et la lecture de musique stockée sur USB ou un lecteur réseau
débloqué.
6 MENU pour consulter le menu principal, appuyer brièvement.
7 Lecture/Pause en mode CD/musique pour poursuivre ou mere en pause la lecture.
8 STOP uniquement en mode CD pour arrêter la lecture.
9 Retour/Recherche arrière uniquement en mode de lecture CD/musique. Appuyer
brièvement pour relancer le titre actuel, appuyer 2x pour revenir au titre précédent,
maintenir appuyé pour un retour rapide.
10 Avance/Recherche avant uniquement en mode de lecture CD/musique. Appuyer
brièvement pour avancer au titre suivant, maintenir appuyé pour une avance rapide.
11 PRESET pour enregistrer et consulter vos favoris. Maintenir appuyé pour enregistrer les
favoris, appuyer brièvement pour consulter les favoris.
12 Prise casque pour les écouteurs avec une prise jack de 3,5 mm.
13 Touche d'éjection du CD appuyer brièvement pour ouvrir/fermer le chargeur de CD.
14 DÉFILER ET SÉLECTIONNER tourner le bouton rotatif pour naviguer dans les menus ou
modifier les valeurs. Appuyer pour confirmer/enregistrer la sélection.
15 Volume/Marche/Veille Tourner le bouton rotatif pour modifier le volume. Appuyer pour
mere en marche ou en veille l'appareil. Éteindre le réveil.
68

Description de l'arrière Télécommande
16 Câble d'alimentation pour un
raccordement 110-240 V ~ 50/60 Hz.
17 Antenne WLAN : connexion sans fil à
un routeur.
18 Sortie audio analogique pour un
raccordement à un récepteur AV ou
une chaîne hi-fi.
19 Entrée audio analogique (Line-IN)
pour diuser des sources audio
externes.
20 Sortie optique numérique sortie
audio pour un raccordement à un
récepteur AV ou une chaîne hi-fi.
21 Sortie coaxiale numérique sortie
audio pour un raccordement à un
récepteur AV ou une chaîne hi-fi.
22 Entrée LAN pour un raccordement
à un câble réseau pour la connexion
Internet.
23 Prise antenne pour recevoir les
signaux DAB+ ou FM. Branchement
possible d'une antenne active ou
passive.
2
4
6
8
10
11
13
1
3
5
7
9
12
14
16
18
20
22
24
15
17
19
21
23
25
26
EN
FR
IT
NL
PL
CZ
SK
69

Description de la télécommande
1 Touche d'éjection du CD appuyer brièvement pour ouvrir/fermer le chargeur de CD.
2 Lecture/Pause uniquement en mode lecture CD/musique, pour poursuivre ou mere en pause la lecture.
3 Retour/Recherche arrière uniquement en mode de lecture CD/musique. Appuyer brièvement pour relancer le
titre actuel, appuyer 2x pour revenir au titre précédent, maintenir appuyé pour un retour rapide.
4 Répéter le titre
5 Aléatoire lecture aléatoire des titres.
6 INFO basculement entre plusieurs achages à l'écran/informations.
7 RETOUR revient d'une étape dans les menus, annule les réglages.
8 MODE pour basculer entre les sources de lecture DAB, FM, Bluetooth, CD, Line-IN, radio Internet, Spotify et la
lecture de musique stockée sur USB ou un lecteur réseau débloqué.
9 OK accepter ou enregistrer la sélection, navigation dans le menu.
10 VOL- réduit le volume.
11 MENU pour consulter le menu principal, appuyer brièvement.
12 Touches numériques 1 - 10
13 MUTE (mode muet)
14 Marche/Veille pour mere l'appareil en marche et en veille. Arrêt du réveil.
15 Avance/Recherche avant uniquement en mode de lecture CD/musique. Appuyer brièvement pour avancer au
titre suivant, maintenir appuyé pour une avance rapide.
16 STOP uniquement en mode lecture CD/Musique, arrêter la lecture.
17 Réveil pour activer et gérer la fonction réveil.
18 VEILLE active la minuterie de mise en veille, appuyer plusieurs fois pour définir une durée diérente.
19 EQ ouvre la sélection de l'égaliseur.
20 SCAN lance la recherche de stations en mode DAB+ et FM.
70

21 F+ pour parcourir l'arborescence des dossiers sur un lecteur réseau débloqué ou un CD MP3.
22 Touche fléchée haut pour naviguer dans les menus, modifier les valeurs.
23 VOL+ augmente le volume.
24 Touche fléchée bas pour naviguer dans les menus, modifier les valeurs.
25 F- pour parcourir l'arborescence des dossiers sur un lecteur réseau débloqué ou un CD MP3.
26 PRESET pour enregistrer et consulter vos favoris. Maintenir appuyé pour enregistrer les favoris, appuyer
brièvement pour consulter les favoris.
3 Branchement et utilisation de l'appareil
3.1 Contenu de la livraison
Les pièces qui doivent être incluses sont les suivantes:
1 x DIGITRADIO 143 CD, 1 x mode d'emploi, 1 x télécommande + piles, 1 x antenne DAB+/FM, 1 x antenne WLAN
3.2 Insertion des piles
> Retirez le couvercle arrière pour ouvrir le compartiment à piles. Insérez deux piles AAA (micro), 1,5 V, en respectant la
polarité indiquée dans le compartiment à piles. Les piles sont fournies.
> Refermez le couvercle du compartiment à piles jusqu'à ce qu'il s'enclenche.
Remplacez à temps les piles dont la charge devient faible.
Remplacez toujours les deux piles en même temps et utilisez des piles du même type.
Des piles qui fuient peuvent endommager la télécommande.
Retirez les piles de la télécommande quand l'appareil n'est pas utilisé pendant une période prolongée.
Consigne importante relative à la mise au rebut: les piles peuvent contenir des substances toxiques pour
l'environnement. Vous devez donc les mere au rebut conformément aux dispositions légales en vigueur. Ne jetez jamais
les piles avec les autres déchets ménagers.
EN
FR
IT
NL
PL
CZ
SK
71

3.3 Raccordement
> Les sorties audio sortie audio analogique (18), sortie optique numérique (20) ou sortie coaxiale numérique (21) à
l'arrière de l'appareil sont à votre disposition pour raccorder un amplificateur AV ou une chaîne hi-fi.
> Branchez l'antenne intérieure fournie à la prise antenne (23).
> Si vous souhaitez utiliser la connexion LAN, branchez le câble LAN de votre réseau au port LAN (22) ou orientez
l'antenne WLAN (17) pour une connexion en WLAN.
> Branchez ensuite le câble d'alimentation à une prise secteur de 110 - 240 V ~ 50/60 Hz.
3.4 Mise en marche/arrêt
> Pour mere en marche votre DIGITRADIO 143 CD, appuyez sur la touche Marche/Veille de l'appareil (15) ou de la
télécommande (14).
> Pour éteindre l'appareil, appuyez à nouveau sur la touche Marche/Veille de l'appareil (15) ou de la télécommande (14).
3.5 Choix de la source
> Appuyez plusieurs fois sur la touche MODE de l'appareil (5) ou de la télécommande (8) pour basculer parmi les sources
disponibles.
Autre méthode:
> Ouvrez le sous-menu de la source actuelle en appuyant sur la touche MENU et sélectionnez >Menu principal.
La source actuellement sélectionnée est achée à l'écran.
3.6 Réglage du volume
> Tournez le bouton rotatif du Volume (15) de l'appareil vers la droite ou appuyez sur la touche VOL+ (23) de la
télécommande pour augmenter le volume. Tournez le bouton rotatif du Volume (15) de l'appareil vers la gauche ou
appuyez sur la touche VOL- (10) de la télécommande pour réduire le volume.
Le volume réglé s'ache à l'écran pendant le réglage.
72
72

3.7 Menu utilisation
Le menu est divisé en un Menu principal, puis en un Sous-menu de la source actuellement sélectionnée et en Réglages
système qui s'appliquent à toutes les sources. La commande au sein du menu s'eectue à l'aide du bouton rotatif DÉFILER ET
SÉLECTIONNER (14) de l'appareil ou avec les touches fléchées haut/bas (22, 24) et la touche OK (9) de la télécommande.
> Pour ouvrir le sous-menu de la source actuellement sélectionnée, appuyez sur la touche MENU de l'appareil ou de la
télécommande.
Le sous-menu de la source actuellement sélectionnée contient les réglages et options spécifiques à la source. Il vous
permet également d'accéder au >Menu principal et aux >Réglages système.
> Vous pouvez déplacer la sélection en tournant le bouton rotatif DÉFILER ET SÉLECTIONNER vers la gauche et la droite ou
en appuyant sur les touches fléchées p ou q de la télécommande.
> En appuyant sur le bouton rotatif DÉFILER ET SÉLECTIONNER ou la touche OK de la télécommande, vous pouvez valider
une sélection. Si une valeur a été modifiée, la modification sera enregistrée en appuyant sur le bouton rotatif DÉFILER ET
SÉLECTIONNER ou la touche OK. Si une flèche (>) se trouve à côté d'une entrée de menu, vous accédez à des réglages
ou fonctions supplémentaires en appuyant sur le bouton rotatif DÉFILER ET SÉLECTIONNER ou la touche OK.
> Appuyez sur la touche MENU pour quier le menu. Selon le sous-menu ou l'option dans lequel vous vous trouvez, vous
devez éventuellement appuyer plusieurs fois sur la touche MENU.
> Si vous souhaitez interrompre un réglage sans l'enregistrer, appuyez sur la touche MENU ou sur la touche RETOUR (7) de
la télécommande.
Une description supplémentaire des fonctions de l'appareil est décrite dans ce mode d'emploi à l'aide des touches de la
télécommande.
EN
FR
IT
NL
PL
CZ
SK
73

3.8 Mise en sourdine de l'appareil
> Vous pouvez mere en sourdine le volume avec la touche MUTE (13). La mention "Mute" apparaît à l'écran et dans la
barre d'état
> Appuyer une nouvelle fois sur la touche réactive le son.
3.9 Ouverture de l’achage à l’écran
> Appuyer plusieurs fois sur la touche INFO (6) pendant la lecture d'une source vous permet d'acher et de parcourir les
informations suivantes :
.
7474
Radio Internet :
Titre, interprète
Description
Genre
Fiabilité
Débit binaire, format sonore
Tampon de lecture
Date
Lecture de musique (médias UPnP/
USB) :
Interprète
Album
Débit binaire, format sonore
Tampon de lecture
Date
Mode DAB :
Titre, interprète
DLS : défilement de texte avec des informations
supplémentaires mises à disposition par l'émeeur
dans certaines circonstances
Type de programme
Ensemble/multiplexe (nom de groupe) fréquence,
canal
Puissance du signal
Taux d'erreur du signal, débit binaire au format
sonore kbps
Date
Nom de la station
Mode FM :
Texte radio (RT, si émis) - type de programme (PTY)
Fréquence, date

Lecture CD/MP3 et USB :
Titre
Interprète
Album
Fichier
Chemin
Débit binaire et taux d'échantillonnage
Tampon de lecture
Date
Durée
ID3 on/o (acher des informations
textuelles, si disponibles)
Spotify Connect :
Titre
Interprète
Album
Débit binaire et taux d'échantillonnage
Tampon de lecture
Durée
EN
FR
En mode DAB, certaines stations achent des images ou informations supplémentaires en plein écran (diaporama). Ces
achages peuvent être réduits avec la touche OK pour permere d'acher les diérentes infos et achages avec la
touche INFO.
3.10 Achage à l'écran
Selon la fonction/source choisie, l'achage présenté à l'écran peut diérer. Veuillez tenir compte des indications à l'écran.
Source actuelle
Nom de la
station, Titre,
interprète,
Informations
supplémentaires,
menu, listes
Heure
Barre d'état
IT
NL
PL
CZ
SK
75

4 Première mise en service
Après avoir mis en marche votre DIGITRADIO 143 CD pour la première fois, l'assistant d'installation démarre.
Tous les réglages peuvent à tout moment être modifiés ultérieurement.
> Pour démarrer l'assistant d'installation, sélectionnez le champ [OUI] avec les touches fléchées de la télécommande et
appuyez sur la touche OK.
> L'étape suivante vous permet de sélectionner le format de l'heure. Sélectionnez le réglage souhaité [12] ou [24] et
appuyez sur la touche OK pour accéder à l'étape suivante.
> Vous pouvez sélectionner ici la source (DAB+, FM ou Internet) qui fournit et actualise l'heure et la date de votre
DIGITRADIO. Une fois la source sélectionnée, choisissez le fuseau horaire lors de l'étape suivante pour que l'heure soit
correctement achée.
> Indiquez ensuite si c'est actuellement l'heure d'été ou d'hiver.
> À l'étape suivante, vous pouvez définir si votre DIGITRADIO doit rester connectée à l'Internet même en mode veille. Par
contre, cela augmente la consommation électrique en mode veille.
> L'assistant réseau démarre ensuite vous permeant d'établir une connexion à Internet. Sélectionnez votre réseau WLAN
familier avec la touche OK et saisissez le mot de passe correspondant à l'aide du clavier aché à l'écran. Sélectionnez
ensuite et appuyez sur la touche OK. Si le mot de passe est correct, une connexion à votre réseau Wi-Fi s'établit.
Vous identifiez la connexion à l'achage des barres de signal
sélectionnez et appuyez sur la touche OK. En cas d'erreur de saisie, vous pouvez supprimer la dernière lere
saisie avec
Lorsque le clavier virtuel est aché à l'écran, vous pouvez naviguer avec les touches fléchées et les touches VOL+/- de
la télécommande. Les touches fléchées haut/bas déplacent la sélection de haut en bas, les touches VOL+/- déplacent
la sélection de droite à gauche.
> Si vous avez connecté au réseau votre DIGITRADIO via le câble LAN, sélectionnez l'entrée [CÂBLE].
> Une fois la configuration réseau terminée, confirmez le message indiquant que l'achèvement de la première mise en
service en appuyant sur la touche OK.
.
dans la barre d'état à l'écran. Pour interrompre la saisie,
76

5 Radio Internet
Votre DIGITRADIO 143 CD est équipée d'un récepteur radio Internet. Pour recevoir des stations/émeeurs de radio Internet, vous
avez besoin d'une connexion Internet par réseau sans fil ou via un câble LAN raccordé. Veuillez vous reporter au chapitre 14.2
pour savoir comment établir une connexion Internet.
> Appuyez sur la touche MODE plusieurs fois jusqu'à l'achage à l'écran de [Radio Internet].
Autre méthode:
> Appuyez sur la touche MENU puis sélectionnez dans le Menu principal > Radio Internet.
Si vous vous trouvez dans un sous-menu, sélectionnez le menu principal comme décrit au point 3.7.
Si vous lancez pour la première fois le mode Radio Internet sans avoir configuré une connexion LAN ou WLAN lors
de la première mise en service, l'assistant de recherche s'ache à l'écran avec tous les réseaux WLAN à votre portée.
Sélectionnez votre réseau WLAN familier avec la touche OK et saisissez le mot de passe correspondant à l'aide du clavier
aché à l'écran. Sélectionnez ensuite et appuyez sur la touche OK. Si le mot de passe est correct, une connexion
à votre réseau Wi-Fi s'établit. Vous identifiez la connexion à l'achage des barres de signal
l'écran. Pour interrompre la saisie, sélectionnez et appuyez sur la touche OK. En cas d'erreur de saisie, vous
pouvez supprimer la dernière lere saisie avec
5.1 Dernière écoute
> Sélectionnez MENU > Dernière écoute pour acher une liste des dernières stations écoutées.
> Sélectionnez avec les touches fléchées haut/bas une station et lancez l'écoute avec OK.
5.2 Liste des stations
> Appuyez sur la touche MENU et sélectionnez la liste de stations des catégories disponibles.
Toutes les stations de radio Internet réparties dans diérentes catégories sont achées dans la liste des stations. Vous
avez également accès ici à vos favoris.
> Sélectionnez une station à l'aide d'une catégorie/ d'un pays/ d'un genre et appuyez sur la touche OK.
.
dans la barre d'état à
EN
FR
IT
NL
PL
CZ
SK
77

Pour ajouter une station à ma liste de favoris, maintenez la touche OK enfoncée pendant la lecture jusqu'à ce que
[Ajoutée aux favoris] s'ache à l'écran.
Autre méthode:
> Maintenez la touche PRESET enfoncée, jusqu'à ce que [Enreg. le préréglage] s'ache à l'écran. Vous pouvez maintenant
sélectionner l'un de vos 30 emplacements mémoire des favoris avec les touches fléchées haut/bas. Appuyez sur la
touche OK pour enregistrer la station quand la sélection se trouve sur l'emplacement mémoire souhaité. [Enregistré]
s'ache à l'écran.
Autre méthode:
> Maintenez l'une des touches numériques de 1 à 10 enfoncée pour enregistrer une station sur une des touches
numériques.
Pour recevoir des informations supplémentaires sur la station actuellement diusée, appuyez sur la touche INFO.
Pour ajouter vos propres stations ou favoris, veuillez vous inscrire sur le site Internet suivant : hp://nuvola.link/sr. Pour ce
faire, vous avez besoin d'un code d'accès que vous pouvez obtenir via votre DIGITRADIO 143 CD en cliquant sur Radio
Internet > MENU > Liste des stations > Aide. Pour plus d'informations sur l'utilisation du site NUVOLA, rendez-vous dans
l'espace de téléchargement de la DIGITRADIO 143 CD.
Pour consulter vos stations préférées, vous avez également plusieurs possibilités :
> Sélectionnez Radio Internet > MENU > Liste des stations > Mes favoris > Stations. Vous trouverez ici toutes vos stations
préférées que vous avez ajoutées en maintenant la touche OK enfoncée ou via le site Internet. Sélectionnez une station à
l'aide des touches fléchées haut/bas et lancez la diusion en appuyant sur la touche OK.
> Appuyez brièvement sur la touche PRESET et sélectionnez une station de la liste des stations en mémoire avec les
touches fléchées. Appuyez sur la touche OK pour lancer la diusion de la station.
> Appuyez sur une des touches numériques de 1 à 10 pour sélectionner directement la station.
78

6 Lecture de musique (médias UPnP)
Votre DIGITRADIO 143 CD vous permet de lire des médias musicaux stockés sur un serveur UPnP ou un support de stockage
USB connecté. Une connexion à un réseau (routeur) est nécessaire pour pouvoir accéder à un serveur UPnP. Pour ce faire,
veuillez également tenir compte des indications au point 14.2relatif à l'établissement d'une connexion Internet.
6.1 Lecture via UPnP
Le serveur médias UPnP doit se trouver dans le même réseau que votre DIGITRADIO 143 CD.
> Appuyez sur la touche MODE plusieurs fois jusqu'à l'achage à l'écran de [Lecture de musique].
Autre méthode:
> Appuyez sur la touche MENU puis sélectionnez dans le Menu principal > Lecture de musique.
Si vous vous trouvez dans un sous-menu, sélectionnez d'abord le menu principal comme décrit au point 3.7.
Si vous lancez pour la première fois le mode de lecture de musique sans avoir configuré de connexion WLAN, l'assistant
de recherche s'ache à l'écran avec tous les réseaux WLAN à votre portée. Consultez le point 14.2 pour obtenir plus
d'informations sur la configuration d'une connexion réseau.
EN
FR
IT
6.1.1 Lecture de médias
> Sélectionnez [Médias communs] puis le serveur sur lequel se trouve votre musique.
L'achage de l'arborescence des dossiers dépend de l'arborescence de votre serveur médias.
Sélectionnez [Liste de lecture] pour diuser les listes de lecture qui se trouvent sur votre serveur médias.
Les options de lecture [Lecture aléatoire] et [Répéter] sont à votre disposition dans le menu. Un symbole
correspondant apparaît dans la barre d'état.
Si vous avez sélectionné un serveur médias, vous pouvez rechercher le titre directement avec Recherche].
> Sélectionnez un titre musical avec les touches fléchées et confirmez la sélection en appuyant sur OK.
> Avec les touches de lecture Lecture/Pause (2), Stop (16) et Avance/Retour (3, 15), vous pouvez adapter la lecture.
NL
PL
CZ
SK
79

6.1.2 Musique via le lecteur Windows Media
Outre un serveur UPnP, vous pouvez également lire de la musique via le lecteur Windows Media à partir de la version 10. Pour
ce faire, un partage de musique doit être établi dans le lecteur Windows Media.
> Assurez-vous que le PC sous Windows et votre DIGITRADIO 143 CD se trouvent dans le même réseau et sont en marche.
> Lancez le lecteur média et activez le partage de médias en streaming.
> Sélectionnez le cas échéant dans l'aperçu suivant votre DIGITRADIO 143 CD et sélectionnez Autoriser.
Le processus peut diérer selon la version du lecteur média ou de Windows.
6.2 Lecture via un support de stockage USB
Vous pouvez lire des fichiers musicaux stockés sur un support de stockage USB grâce à votre DIGITRADIO 143 CD. Pour ce faire,
insérez le support de stockage USB, p. ex. une clé USB, dans le port USB (3) à l'avant de votre DIGITRADIO 143 CD.
> Sélectionnez dans le sous-menu de lecture de musique > [Lecture USB] et appuyez sur la touche OK.
> Sélectionnez un titre musical avec les touches fléchées et confirmez la sélection en appuyant sur OK.
> Avec les touches de lecture Lecture/Pause (2), Stop (16) et Avance/Retour (3, 15), vous pouvez adapter la lecture.
7 Spotify Connect
Utilisez votre smartphone, tablee ou ordinateur pour commander à distance Spotify.
Rendez-vous sur spotify.com/connect pour en savoir plus.
Le logiciel Spotify est soumis aux licences d'un fournisseur tiers que vous trouverez ici :
hp://www.spotify.com/connect/third-party-licenses
80

8 La fonction DAB
Le DAB+ est un format numérique qui permet d’écouter un son cristallin sans aucun grésillement. Contrairement aux stations de
radio analogiques, avec le DAB+ plusieurs stations sont diusées sur la même fréquence. Plus d'informations sur www.dabplus.
de ou www.dabplus.ch.
8.1 Réception radio DAB
> Appuyez sur la touche MODE plusieurs fois jusqu'à l'achage à l'écran de [Radio DAB].
Autre méthode:
> Appuyez sur la touche MENU puis sélectionnez dans le Menu principal > DAB.
Si vous vous trouvez dans un sous-menu, sélectionnez d'abord le menu principal comme décrit au point 3.7.
Si le DAB est démarré pour la première fois, une recherche complète de stations est eectuée. La liste des stations est
achée ensuite (voir point 8.3).
8.2 Réalisation d'une recherche
La recherche automatique [Recherche complète] scanne tous les canaux DAB de la bande III et trouve ainsi toutes les
stations diusées dans la zone de réception.
Une fois la recherche terminée, la première station en ordre alphanumérique est diusée.
> Pour eectuer une recherche de stations complète, appuyez sur la touche SCAN. [Recherche] apparaît à l'écran. La
recherche commence et la barre de progression apparaît à l'écran.
> À la fin de la recherche, appuyez sur p ou q et OK pour choisir une station.
Autre méthode:
> Appuyez sur la touche Menu et sélectionnez avec p ou q > Recherche complète. Confirmez en appuyant sur OK.
Si aucune station n'est trouvée, vérifiez l'orientation de l'antenne et modifiez si besoin son emplacement. Contrôlez si les
stations de radio numérique émeent dans votre région.
EN
FR
IT
NL
PL
CZ
SK
81

8.3 Choix de la station
> Vous pouvez vérifier les stations trouvées sur l'appareil. Pour ce faire, appuyez sur p ou q et la liste de stations
apparaît.
> Pour sélectionner une station, appuyez sur OK.
> Vous pouvez également appuyer sur la touche MENU et sélectionner avec p ou q> Liste de stations.
8.4 Enregistrement des stations DAB
La mémoire des favoris peut mémoriser jusqu’à 30 stations dans la plage DAB.
Les stations mémorisées ne sont pas supprimées même en cas de panne électrique.
> Réglez la station souhaitée.
> Maintenez la touche PRESET enfoncée jusqu'à l'achage de la liste de mémorisation des favoris.
> Sélectionnez avec les touches p ou q un emplacement mémoire de 1 à 30 et appuyez sur la touche OK. [Enregistré]
apparaît à l'écran.
Autre méthode:
> Appuyez sur une des touches numériques de 1 à 10 et maintenez celle-ci enfoncée jusqu'à l'achage à l'écran de
[Enregistré].
> Répétez l'opération pour mémoriser d'autres stations.
8.5 Sélection des stations programmées
> Appuyez brièvement sur la touche PRESET.
> Sélectionnez avec les touches p ou q un emplacement mémoire de 1 à 30 et appuyez sur la touche OK pour diuser la
station enregistrée à cet emplacement.
Autre méthode:
> Appuyez sur la touche numérique souhaitée de 1 à 10. [Emplacement mémoire vide] s'ache si aucune station n'est
enregistrée à l'emplacement choisi.
82

8.6 Suppression d'une mémorisation d'un emplacement de programme
> Exactement comme décrit au point 8.4, enregistrez une nouvelle station sur l'emplacement en question.
8.7 Puissance du signal
> Appuyez plusieurs fois sur la touche INFO jusqu'à l'achage de la puissance :
Puissance du
signal
Puissance minimale du signal
> La puissance du signal s'ache au moyen de petites barres.
Les stations dont la puissance du signal se situe en dessous de la puissance de signal minimale n’émeent pas un signal
susant. Le cas échéant, réorientez l'antenne.
> Au point de menu Réglage manuel, vous pouvez sélectionner les canaux de réception un par un et acher la puissance
de leurs signaux. Vous pouvez ainsi orienter de façon optimale l'antenne télescopique vers les canaux qui sont diciles
à réceptionner à l'emplacement où est posée la radio. Cela permet de trouver et diuser des stations introuvables lors
de précédentes recherches. Pour ce faire, sélectionnez MENU > Réglage manuel puis une fréquence d'émission. La
puissance du signal de cee fréquence s'ache ensuite.
Appuyer plusieurs fois sur la touche INFO permet de naviguer parmi diérentes informations comme le type de
programme, le nom multiplexe, la fréquence, le taux d'erreur du signal, le débit binaire des données, le format du
programme, la date, la DLS.
83
EN
FR
IT
NL
PL
CZ
SK

8.8 Réglage de la compression dynamique (DRC)
Le taux de compression compense les fluctuations de dynamique et les variations du volume associées.
> Appuyez sur la touche MENU et sélectionnez >Adaptation du volume pour sélectionner le taux de compression souhaité.
> Sélectionnez avec le taux de compression :
DRC élevée - Compression élevée
DRC basse - Compression basse
DRC arrêt - Compression désactivée.
> Confirmez en appuyant sur OK.
8.9 Supprimer les stations inactives
Avec la fonction Supprimer les stations inactives, vous pouvez supprimer de la liste de stations les stations qui ne sont plus
émises ou reçues actuellement.
> Appuyez sur la touche Menu et sélectionnez avec p ou q> Supprimer les stations inactives.
> Confirmez en appuyant sur OK.
> Sélectionnez avec p ou q> Oui et confirmez en appuyant sur OK
8.10 Adapter l'ordre des stations
> Appuyez sur la touche Menu et sélectionnez avec p ou q > Ordre des stations.
> Sélectionnez le type de classement et confirmez votre sélection avec OK.
Vous avez le choix entre : alphanumérique, fournisseur et valide.
84

9 Mode FM
9.1 Mise en marche du mode radio FM
> Appuyez sur la touche MODE plusieurs fois jusqu'à l'achage à l'écran de [Radio FM].
Autre méthode:
> Appuyez sur la touche MENU puis sélectionnez dans le Menu principal > FM.
Si vous vous trouvez dans un sous-menu, sélectionnez le menu principal comme décrit au point 3.7.
Lors de la première mise en marche, la fréquence est réglée sur 87,5 MHz.
Si vous avez déjà mémorisé ou réglé une station, la radio diusera la dernière station réglée.
Le nom de la station s’ache pour les stations RDS.
Pour améliorer la réception, réorientez si besoin l'antenne.
9.2 Réception FM avec des informations RDS
Le RDS est un service de transmission d'informations supplémentaires via les stations FM. Les stations de radio comportant le
RDS fournissent p. ex. leur nom et le type de programme. Cela s'ache à l'écran.
EN
FR
IT
NL
PL
L'appareil peut acher des informations RDS du type:
RT (texte radio),
PS (nom de la station),
PTY (type de programme).
9.3 Sélection manuelle des stations
> Appuyez sur p ou q en mode FM pour régler la station souhaitée. L’écran ache la fréquence par paliers de 0,05MHz.
CZ
SK
85

9.4 Sélection automatique des stations
> Appuyez sur SCAN pour démarrer la recherche automatique de stations. La fréquence des stations s'ache de manière
croissante à l'écran.
ou
> Appuyez de manière prolongée sur la touche p ou q pendant env. 2 secondes pour régler automatiquement la
prochaine station avec un signal susant.
Lorsqu’une station FM au signal susamment puissant est trouvée, la recherche s’arrête et la station est diusée. Si une
station RDS est captée, le nom de la station s’ache, accompagné le cas échéant du texte radio.
Pour le réglage de stations plus faibles, utilisez la sélection manuelle de stations.
Dans Menu > Réglage de la recherche, vous pouvez régler si la recherche trouve uniquement les stations dont le signal est
fort (Uniquement les grandes fréquences > Oui) ou toutes les stations (Uniquement les grandes fréquences > NON).
Pour ce faire, appuyez sur la touche MENU et > Réglages de la recherche. Confirmez la sélection en cliquant sur OK.
9.5 Réglage mono/stéréo
> Appuyez sur la touche Menu et sélectionnez avec p ou q> Réglage audio.
> Sélectionnez OUI ou NON pour diuser la radio en son mono en cas de réception FM faible.
> Confirmez en appuyant sur OK.
9.6 Mémorisation des stations FM
La mémoire des favoris peut mémoriser jusqu’à 30 stations dans la plage FM.
Les stations mémorisées ne sont pas supprimées même en cas de panne électrique.
> Réglez la station souhaitée.
> Maintenez la touche PRESET enfoncée jusqu'à l'achage de la liste de mémorisation des favoris.
86

> Sélectionnez avec les touches p ou q un emplacement mémoire de 1 à 30 et appuyez sur la touche OK. [Enregistré]
apparaît à l'écran.
Autre méthode:
> Appuyez sur une des touches numériques de 1 à 10 et maintenez celle-ci enfoncée jusqu'à l'achage à l'écran de
[Enregistré].
> Répétez l'opération pour mémoriser d'autres stations.
9.7 Sélection des stations programmées
> Appuyez brièvement sur la touche PRESET.
> Sélectionnez avec les touches p ou q un emplacement mémoire de 1 à 30 et appuyez sur la touche OK pour diuser la
station enregistrée à cet emplacement.
Autre méthode:
> Appuyez sur la touche numérique souhaitée de 1 à 10. [Emplacement mémoire vide] s'ache si aucune station n'est
enregistrée à l'emplacement choisi.
EN
FR
IT
9.8 Suppression d'une mémorisation d'un emplacement de programme
> Exactement comme décrit au point 9.6, enregistrez une nouvelle station sur l'emplacement en question.
10 Bluetooth
10.1 Activation du mode Bluetooth
> Appuyez sur la touche MODE plusieurs fois jusqu'à l'achage à l'écran de [Audio Bluetooth].
Autre méthode:
> Appuyez sur la touche MENU puis sélectionnez dans le Menu principal > Bluetooth.
Si vous vous trouvez dans un sous-menu, sélectionnez le menu principal comme décrit au point 3.7.
Dans la barre d'état à l'écran, le mode couplage est signalé par un symbole Bluetooth clignotant.
NL
PL
CZ
SK
87

Si votre DIGITRADIO 143 CD a déjà été couplée à un autre appareil qui se trouve à sa portée, une connexion est établie
automatiquement.
10.2 Couplage
> Activez le Bluetooth de votre lecteur de musique, p. ex. votre smartphone ou tablee.
Pour savoir comment activer le Bluetooth de votre lecteur de musique, reportez-vous au mode d'emploi de l'appareil
avec lequel vous souhaitez coupler votre DigitRadio.
Veuillez noter que votre DIGITRADIO 143 CD ne peut être connectée qu'à un seul appareil à la fois.
> Sélectionnez la liste des appareils compatibles Bluetooth trouvés sur votre lecteur de musique.
> Cherchez dans la liste l'entrée DIGITRADIO 143 CD et sélectionnez-la. En cas de saisie d'un code PIN, saisissez 0000 (4 x
zéro).
> Si le couplage est réussi, le symbole Bluetooth à l'écran de votre DIGITRADIO arrête de
clignoter.
10.3 Lecture de musique
> Sélectionnez un titre musical sur votre lecteur de musique et lancez la lecture.
> Le son est diusé par votre DIGITRADIO 143 CD.
À l'aide des touches de lecture sur la télécommande de votre DigitRadio, vous pouvez commander la lecture sur votre
lecteur de musique (uniquement avec les appareils compatibles). Sinon, utilisez la commande de lecture de votre
appareil de lecture.
Veillez à ce que le volume ne soit pas trop bas sur votre lecteur de musique.
Veillez à ne pas dépasser la portée Bluetooth maximale de 10 mètres afin d'assurer une bonne qualité de diusion.
88

11 Entrée audio
Vous pouvez diuser le son d'un appareil externe via votre DIGITRADIO 143 CD.
> Connectez l'appareil externe à l'entrée audio (19) de votre DIGITRADIO 143 CD.
> Appuyez sur la touche MODE plusieurs fois jusqu'à l'achage à l'écran de [Line in].
Autre méthode:
> Appuyez sur la touche MENU puis sélectionnez dans le Menu principal > Line in.
Pour régler le volume de manière optimale, utilisez aussi bien le réglage du volume sur la radio que sur l'appareil
connecté.
Veuillez noter que si le volume est très faible sur l'appareil connecté alors que le volume de la radio est plus élevé, cela
peut renforcer les bruits/grésillements gênants et donc les rendre bien plus audibles. Il est recommandé de régler le
volume de la DIGITRADIO 143 CD, p. ex. sur une station DAB+ ou FM, puis de basculer sur le mode Entrée audio et
d'adapter le volume de l'appareil connecté pour que le volume global de l'entrée audio corresponde à peu près au
volume de la station DAB+/FM. De cee manière, vous pouvez également éviter de trop grandes diérences de volume
lors du basculement entre les diérentes fonctions de votre DIGITRADIO 143 CD.
EN
FR
IT
12 Lecteur CD/MP3
12.1 Informations générales sur les CD/CD MP3
L'appareil permet de lire les CD de musique sur lesquels sont enregistrées des données audio (CD-DA ou MP3 pour CD-R et CDRW). Les formats MP3 doivent répondre à la norme ISO 9660 niveau 1 ou 2. Les CD multisession ne sont pas pris en charge.
En mode MP3, les termes " Album " et " Titre " sont importants. " Album " correspond au dossier
sur le PC, "Titre" au fichier sur le PC ou au titre CD-DA. L'appareil trie les albums ou les titres d'un album par nom dans l'ordre
alphabétique. Si vous préférez un autre classement, modifiez le nom du titre ou de l'album et saisissez un numéro devant le nom.
Lors de la gravure de fichiers audio sur des supports CD-R et CD-RW, diérents problèmes pouvant parfois perturber la bonne
qualité de lecture peuvent survenir. Des erreurs de réglages du logiciel et du matériel ou le support vierge utilisé peuvent être
la cause de ces problèmes. En cas d'erreurs de ce type, veuillez contacter le service clientèle du fabricant de votre logiciel de
gravure/graveur de CD ou chercher des informations adaptées, p. ex. sur internet.
89
NL
PL
CZ
SK

Si vous gravez des CD audio, veuillez respecter les dispositions légales et ne pas violer les droits d'auteur de tiers.
Gardez toujours le compartiment à CD fermé pour éviter une accumulation de poussière sur l'optique laser.
L'appareil peut lire des CD comportant des fichiers MP3 et des CD audio normaux (CD-DA). Aucune autre extension, p. ex.
*.doc, *.txt, *.pdf, ne peut être utilisée lorsque des fichiers audio sont convertis en MP3. Les fichiers musicaux au format *.
AAC, *.DLF, *.M3U et *.PLS ou *.WMA ne peuvent notamment pas être lus.
En raison de la diversité des diérents logiciels d'encodage, il est impossible de garantir que chaque fichier MP3 puisse
être lu sans problème.
Si le titre/l'album comporte des erreurs, la lecture se poursuit au titre/album suivant.
Lors de la gravure du CD, il est recommandé de graver celui-ci à vitesse réduite, et de créer et finaliser les CD en tant que
session unique.
12.1.1 Disques compatibles
Le lecteur CD est compatible avec les CD, CD-R/RW et CD MP3. Vous pouvez lire tous les disques évoquer ici sur l'appareil sans
adaptateur (CD de dimension 12 cm/8 cm, durée 74 min/24 min max.).
Si vous transportez l'appareil, retirez le disque du lecteur. Vous évitez ainsi d'endommager le lecteur CD et le disque.
La qualité de lecture des CD MP3 dépend du paramétrage du débit binaire et du logiciel de gravure utilisé.
12.2 Lecture de CD
> Appuyez sur la touche MODE plusieurs fois jusqu'à l'achage à l'écran de [CD].
Autre méthode:
> Appuyez sur la touche MENU puis sélectionnez dans le Menu principal > CD.
> Pour insérer un CD, appuyez brièvement sur la touche d'éjection du CD sur l'appareil (13) ou sur la télécommande (1).
Le compartiment à CD (4) s'ouvre par l'avant. Rien ne doit empêcher son ouverture.
90

Lorsque le compartiment à CD est ouvert, évitez que des corps étrangers ne pénètrent dans l'appareil. La lentille du
balayeur laser ne doit en aucun cas être touchée.
Ouvrez le compartiment à CD uniquement lorsque le CD est arrêté.
Insérez avec prudence le CD avec le côté imprimé vers le haut. Assurez-vous que le CD n'est pas de travers.
Pour insérer/retirer le CD, veuillez le saisir sur le bord.
> Fermez le chargeur de CD avec la touche d'éjection de l'appareil (13) ou de la télécommande (1). Le CD est lu, cela
s'ache à l'écran (1).
Quand le processus de lecture est terminé, [Stop] s'ache à l'écran. Le numéro d'album s'ache également s'il s'agit d'un CD
MP3. Si le CD est mal inséré ou endommagé, le message " Aucun CD " s'ache à l'écran.
Avant toute commande, aendez la lecture complète du contenu du CD pour vous assurer que toutes les informations
nécessaires du CD ont bien été lues. Ce processus peut prendre un certain temps en particulier pour les CD MP3.
> En appuyant sur la touche Lecture/Pause de la télécommande (2), vous pouvez lancer/mere en pause la lecture (la
durée clignote à l'écran).
> Avec la touche STOP de la télécommande (16), vous arrêtez la lecture. Le nombre total de titres s'ache à l'écran.
Arrêtez toujours la lecture avant de retirer le CD.
Si rien ne se produit, votre DIGITRADIO 143 CD se met en veille après 15 minutes.
12.2.1 Réglage du titre
> Vous pouvez sélectionner les dossiers/albums avec les touches F- ou F+ (25, 21) de la télécommande.
> À l'aide des touches Avance/Retour (3, 15) de la télécommande, vous passez au titre suivant ou précédent.
L'écran ache le numéro du titre paramétré (F = dossier/album, T = titre)
EN
FR
IT
NL
PL
CZ
SK
91

12.2.2 Recherche rapide
Vous pouvez avancer ou reculer rapidement dans le titre en cours pour rechercher un moment précis. Il n'y a pas de lecture
pendant la recherche.
> Maintenez les touches Avance/Retour (3, 15) de la télécommande enfoncée pour eectuer une avance ou un retour
rapide au sein du titre pendant toute la durée où vous maintenez la touche enfoncée.
12.2.3 Fonction Répétition
Vous pouvez choisir si vous souhaitez répéter un titre, tout un dossier/album (uniquement pour les CD MP3) ou tous les
morceaux d'un CD.
> Pour ce faire, appuyez de manière répétée sur la touche Répéter le titre de votre télécommande (4). Le mode choisi
s'ache à l'écran (Répétition du titre , Répétition du dossier/album , Répétition de tous les titres ).
> Pour arrêter la fonction, appuyez sur la touche Répéter le titre plusieurs fois jusqu'à ce que la répétition ne s'ache plus.
12.2.4 Lecture aléatoire
Grâce au générateur aléatoire, vous pouvez lire les titres d'un CD dans un ordre arbitrairement mélangé.
> Appuyez pendant la lecture en cours sur la touche Aléatoire de la télécommande (5), le symbole pour la lecture aléatoire
s'ache à l'écran .
> Pour arrêter la fonction, appuyez à nouveau sur la touche Aléatoire.
12.2.5 Fonction programmation
Avec la fonction programme, vous pouvez lire jusqu'à 32 titres d'un CD de musique ou 64 titres d'un CD MP3/WMA dans
un ordre déterminé par vos soins.
Vous pouvez faire cee programmation uniquement si le compartiment à CD est fermé et contient un disque et si
l'appareil se trouve en mode Arrêt.
> Accédez à la fonction Arrêt en appuyant sur la touche STOP de la télécommande (16).
92

> Appuyez sur la touche PRESET (26) de la télécommande.
[Programme] s'ache à l'écran (avec un CD audio normal), le numéro du titre [T001] clignote, ainsi que l'emplacement
mémoire [P01].
> Sélectionnez avec les touches Avance/Retour (3, 15) de la télécommande le premier titre à programmer.
> Enregistrez le numéro de titre souhaité avec la touche OK de la télécommande (9). Le titre est maintenant programmé
sur l'emplacement P01 en tant que premier titre.
Vous voyez maintenant à l'écran le numéro du prochain emplacement P02.
Programmez de cee manière l'ordre souhaité des titres.
> La touche PRESET ou la touche STOP de la télécommande (26, 16) vous permet d'interrompre la programmation.
> Appuyez sur la touche Lecture/Pause de la télécommande (2) pour commencer la lecture de la sélection programmée.
> Si vous souhaitez interrompre la lecture de la sélection programmée, appuyez une fois sur la touche Lecture/Pause de la
télécommande (2).
> Pour arrêter la lecture programmée, appuyez sur la touche STOP de la télécommande (16).
Si vous ouvrez le compartiment à CD ou activez une autre source, la mémoire des programmes est supprimée. Appuyer
deux fois sur la touche STOP (16) arrête également la programmation.
Avec les CD MP3, vous indiquez également le numéro de dossier/album (F).
> Après démarrage du processus de programmation au moyen de la touche PRESET, F clignote à l'écran suivi du numéro
de dossier/album. Sélectionnez les dossiers/albums avec les touches F- ou F+ (25, 21) de la télécommande.
Il faut ensuite saisir les titres comme pour les CD audio.
12.3 Remarques sur les CD
Toujours conserver le CD dans son étui et le saisir uniquement par les bords. Ne pas toucher la surface aux reflets arc-en-ciel
et la conserver toujours propre. Ne coller aucun papier ou ruban adhésif du côté de l'étiquee du disque. Le CD doit être
maintenu à distance des rayons directs du soleil et des sources de chaleur telles que des chauages.
EN
FR
IT
NL
PL
CZ
SK
93

De même, un CD ne doit pas être conservé dans un véhicule garé en plein soleil, car la température intérieure peut
monter extrêmement haut dans le véhicule. Neoyer les empreintes de doigts et la poussière sur le côté enregistré à l'aide d'un
chion de neoyage sec. Aucun produit d'entretien de disques vinyles comme du spray à vinyles, des liquides de neoyage,
sprays antistatiques ou solvants tels que de l'essence, du diluant ou d'autres produits chimiques vendus dans le commerce ne
peuvent être utilisés pour le neoyage des CD. Les taches tenaces peuvent éventuellement être éliminées avec une peau de
chamois humide.
Essuyez en partant du milieu vers le bord du disque. Des mouvements circulaires lors du neoyage peuvent causer des rayures.
Cela peut provoquer des erreurs lors de la lecture.
13 Fonctions étendues
13.1 Mise en veille
Grâce à la mise en veille vous pouvez faire passer votre DIGITRADIO 143 CD automatiquement en mode veille après un laps de
temps défini.
> Appuyez sur la touche MENU puis sélectionnez dans le Menu principal > Mise en veille.
Si vous vous trouvez dans un sous-menu, sélectionnez le menu principal comme décrit au point 3.7.
> Avec les touches p ou q, vous pouvez définir au bout de combien de temps l'appareil se mera en veille quel que soit
le mode choisi par étapes de veille de 15, 30, 45, 60 minutes.
Autre méthode:
> Appuyez plusieurs fois sur la touche VEILLE.
Le symbole d'une montre apparaît dans la barre d'état à l'écran, indiquant le temps encore à disposition avant la mise en
veille de votre DigitRadio.
13.2 Réveil
> Via le MENU > Menu principal > Réveil, vous pouvez ouvrir les réglages du réveil.
Autre méthode:
> Appuyez sur la touche REVEIL (17) de la télécommande pour accéder directement aux réglages du réveil.
94

13.2.1 Réglage de l'alarme
Vous ne pouvez utiliser la fonction de réveil qu'une fois l'heure correcte réglée. Selon la configuration, ce réglage s'eectue de
manière automatique ou manuelle. L'heure peut être réglée manuellement ou actualisée automatiquement via le DAB FM ou
Internet. Plus d'informations à ce sujet au point 14.3.
> Sélectionnez une des alarmes Réveil 1 ou Réveil 2 et paramétrez point par point les valeurs souhaitées avec les touches
fléchées p /q (22, 24) et OK (9) de la télécommande.
Répétition Vous avez le choix entre les répétions OFF (le réveil est éteint), tous les jours, une fois, le
week-end (SA-DI), la semaine (LU-VE).
Heure Réglez l'heure à laquelle vous souhaitez être réveillé(e).
Si l'option de répétition "Une fois" est sélectionnée, la date vous sera également demandée.
Mode Sélectionnez la source avec laquelle vous souhaitez être réveillé(e). Au choix :
Été, Radio Internet, DAB, FM.
Programme Sélectionnez si la source préalablement paramétrée doit diuser la dernière écoute ou
un des favoris enregistrés.
Volume Sélectionnez le volume avec lequel vous souhaitez être réveillé(e).
Enregistrer Enregistre les réglages du réveil.
Les réglages du réveil ne sont sauvegardés qu'après avoir sélectionné [Enregistrer].
Le réveil est actif tant que l'option de répétition est paramétrée sur tous les jours, une fois, week-end ou semaine. Le
symbole d'un réveil avec l'heure du réveil actif s'ache dans ce cas dans la barre d'état . Avec le réglage O, le réveil
n'est pas activé à l'heure paramétrée.
13.2.2 Arrêt du réveil après l'alarme
> Appuyez sur la touche Marche/Veille (14) ou Réveil (17) de la télécommande pour éteindre le réveil.
S'ache alors à l'écran [Alarme o] et le symbole du réveil reste aché si l'une des options de répétition du réveil est
paramétrée (tous les jours, week-end ou semaine).
EN
FR
IT
NL
PL
CZ
SK
95

13.2.3 Arrêt/désactivation du réveil
> Sélectionnez comme décrit au point 13.2.1, l'alarme Réveil 1 ou Réveil 2 que vous souhaitez éteindre/désactiver.
> Ouvrez [Répétition] et paramétrez l'option sur [O] pour désactiver le réveil.
Les réglages du réveil ne sont sauvegardés qu'après avoir sélectionné [Enregistrer].
Les réglages du réveil restent conservés permeant ainsi de réactiver le réveil ultérieurement.
13.2.4 Mise en marche/activation du réveil
> Sélectionnez l'alarme Réveil 1 ou Réveil 2 que vous souhaitez activer.
> Ouvrez [Répétition] et paramétrez une des options Tous les jours, Une fois, Week-end ou Semaine pour activer le
réveil avec les réglages déjà présents (voir point 13.2.1).
Si besoin, vous pouvez modifier les autres réglages comme décrit au point 13.2.1.
Les réglages du réveil ne sont sauvegardés qu'après avoir sélectionné [Enregistrer].
13.3 Utilisation des écouteurs
N’écoutez pas la musique à plein volume avec des écouteurs. Cela peut entraîner des lésions auditives permanentes. Avant
d'utiliser les écouteurs, réglez le volume de l’appareil sur le volume minimal.
> Utilisez uniquement des écouteurs dotés d'une prise jack de 3,5mm.
> Branchez le jack des écouteurs dans la prise casque (12) à l'avant de votre DIGITRADIO.
Lorsque des écouteurs sont branchés, le son est diusé en parallèle via les écouteurs et les sorties audio. Le réglage du
volume s'eectue également en parallèle.
14 Réglages système
Les réglages système s'appliquent uniformément pour toutes les sources.
> Pour accéder aux réglages système, appuyez sur la touche MENU et sélectionnez >Réglages système.
96

14.1 Égaliseur
Pour modifier le son de votre DIGITRADIO 143 CD, l'égaliseur avec les réglages prédéfinis suivants est à votre disposition :
central, classique, rock, pop et jazz.
> Via le Menu > Réglages système > Égaliseur, vous pouvez ouvrir les réglages de l'égaliseur.
Autre méthode:
> Appuyez sur la touche ÉGALISEUR (EQ) de la télécommande (19) pour accéder directement aux réglages de l'égaliseur.
> Sélectionnez le réglage souhaité de l'égaliseur et appuyez sur la touche OK.
Un * signalise la sélection/le réglage actuel(le).
14.2 Réglages Internet
> Via le Menu > Réglages système > Réglages Internet, vous pouvez ouvrir et configurer les réglages du réseau.
14.2.1 Connexion par câble réseau
Pour configurer la connexion réseau par câble réseau (LAN), vous pouvez utiliser l'assistant réseau ou procéder manuellement à
la configuration.
14.2.1.1 Configuration via l'assistant réseau
> Connectez le câble LAN au port Entrée LAN (22) de votre DIGITRADIO.
> Sélectionnez [Assistant réseau] pour le démarrer.
L'assistant réseau recherche maintenant tous les réseaux WLAN à sa portée et les ache, ainsi que l'option [Câble].
> Pour utiliser la connexion au réseau par câble réseau (LAN), sélectionnez maintenant [Câble] et appuyez sur OK.
Après confirmation, les réglages nécessaires comme l'adresse IP, la passerelle, le masque de sous-réseau de votre routeur
sont automatiquement ouverts dans la mesure où la fonction DHCP est activée dans le routeur.
97
EN
FR
IT
NL
PL
CZ
SK

14.2.1.2 Configuration manuelle
> Sélectionnez [Réglages manuels] puis [Câble] pour lancer la configuration manuelle.
> Sélectionnez maintenant si vous souhaitez ouvrir automatiquement l'adresse IP, la passerelle, etc. de votre routeur (DHCP
actif) ou les saisir manuellement (DHCP inactif).
Veuillez noter que l'ouverture automatique de l'adresse IP, de la passerelle, du masque de sous-réseau, etc. ne fonctionne
que si la fonction DHCP est activée dans votre routeur.
> Saisissez l'un après l'autre l'adresse IP, le masque de sous-réseau, l'adresse de la passerelle, le DNS primaire et, le cas
échéant, le DNS secondaire à l'aide des touches fléchées de la télécommande. Validez chaque valeur paramétrée avec la
touche OK.
14.2.2 Connexion par WLAN
Pour configurer la connexion au réseau par WLAN vous pouvez utiliser l'assistant réseau
ou procéder de façon manuelle.
14.2.2.1 Configuration via l'assistant réseau
> Sélectionnez [Assistant réseau] pour le démarrer.
L'assistant réseau recherche maintenant tous les réseaux WLAN à sa portée et les ache.
> Sélectionnez ensuite votre réseau WLAN.
Vous pouvez à présent choisir si vous souhaitez utiliser l'option WPS ou saisir manuellement votre mot de passe WLAN.
> Si vous souhaitez utiliser la fonction WPS, lancez-la d'abord sur votre routeur conformément au mode d'emploi de ce
dernier, puis sélectionnez [Appuyer sur la touche] dans l'assistant réseau.
Veuillez respecter les achages à l'écran. En règle générale, le processus de connexion s'achève au bout de quelques
secondes et la connexion WLAN peut ensuite être utilisée.
> Si vous souhaitez saisir votre mot de passe WLAN manuellement ou que votre routeur ne prend pas en charge la
fonction WPS, sélectionnez [Ignorer le WPS].
> Saisissez ensuite votre mot de passe WLAN grâce au clavier virtuel aché et validez en sélectionnant OK.
98

Le mot de passe saisi est ensuite vérifié. En règle générale, ce processus s'achève au bout de quelques secondes et la
connexion WLAN peut ensuite être utilisée.
14.2.2.2 Configuration via la fonction WPS
Une connexion directe au routeur est créée ici. Le choix et/ou la saisie d'un réseau WLAN (SSID) et du mot de passe n'est pas
nécessaire.
> Lancez la fonction WPS sur votre routeur conformément au mode d'emploi de ce dernier.
> Sélectionnez ensuite [Établissement WLAN PBC] pour démarrer le processus de connexion.
Veuillez respecter les achages à l'écran. En règle générale, le processus de connexion s'achève au bout de quelques
secondes et la connexion WLAN peut ensuite être utilisée.
14.2.2.3 Configuration manuelle
> Sélectionnez [Réglages manuels] puis [Sans fil] pour lancer la configuration manuelle.
> Sélectionnez maintenant si vous souhaitez ouvrir automatiquement l'adresse IP, la passerelle, etc. de votre routeur (DHCP
actif) ou les saisir manuellement (DHCP inactif).
Veuillez noter que l'ouverture automatique de l'adresse IP, de la passerelle, du masque de sous-réseau ne fonctionne que
si la fonction DHCP est activée dans votre routeur.
> Saisissez l'un après l'autre l'adresse IP, le masque de sous-réseau, l'adresse de la passerelle, le DNS primaire et, le cas
échéant, le DNS secondaire à l'aide des touches fléchées de la télécommande. Validez chaque valeur paramétrée avec la
touche OK.
> Saisissez maintenant le nom (SSID) de votre réseau WLAN avec le clavier virtuel et validez en sélectionnant OK.
> Déterminez si vous souhaitez que votre réseau WLAN soit ouvert, crypté par WEP ou WPA/WPA2 et confirmez l'option
suivante.
> Vous n'avez plus qu'à saisir ensuite votre mot de passe WLAN avec le clavier virtuel et confirmez en sélectionnant OK
pour démarrer le processus de connexion.
En règle générale, la connexion WLAN peut être utilisée après quelques secondes.
EN
FR
IT
NL
PL
CZ
SK
99

14.2.3 Acher les réglages
> Sélectionnez [Acher les réglages] pour acher les réglages actuels du réseau.
14.2.4 Réglage manuel
Le réglage manuel du paramètre de connexion est décrit pour le réseau LAN au point 14.2.1.2 et pour un réseau sans fil
(WLAN) au point 14.2.2.3.
14.2.5 Installation du code PIN RetRemote
Dans certaines conditions, il est peut-être nécessaire de sécuriser la connexion à votre DIGITRADIO 143 CD avec un code PIN.
> Saisissez un code PIN à 4 chires dans [Configuration du code PIN NetRemote].
14.2.6 Suppression du profil réseau
Utilisez ce point de menu pour supprimer une connexion existante à un réseau WLAN et eacer les réglages entrepris. Si vous
souhaitez connecter à nouveau l'appareil à ce réseau, tous les réglages devront être répétés.
14.2.7 Connexion WLAN/LAN en veille
> Dans [Autoriser le WLAN/LAN en veille ?] sélectionnez si (OUI) ou (NON) la connexion WLAN/LAN doit être maintenue
en mode veille.
14.3 Réglage de l'heure
> Via MENU > Réglages système > Heure et date, vous pouvez ouvrir et configurer les réglages concernant l'heure et la
date.
14.3.1 Réglage de l'heure et de la date
> Sélectionnez [Réglage de l'heure et date] pour régler manuellement l'heure et la date.
> Modifiez avec les touches fléchées p ou q une valeur et confirmez-la en appuyant sur la touche OK.
Après chaque pression sur la touche OK, la sélection passe à la valeur suivante.
100
 Loading...