

Page 1

PRODUCT MANUAL
ENGLISH VERSION
Create.XT
Page 2

WARNING
To reduce the risk of fire or electric shock, do not expose this appliance
to rain or moisture.
CAUTION
This equipment has been tested and found to comply with the limits for
a Class B digital device pursuant to Part 15 of FCC Rules. Operation is
subject to the following two conditions: (1) This device may not cause
harmful interference, and (2) this device must accept any interference
received, including interference that may cause undesired operation.
The lightning symbol within a triangle means “Electrical
caution!” It indicates the presence of information about
operating voltage and potential risks of electrical shock.
The exclamation point within a triangle means “Caution!”
Please read the information next to all caution signs.
Page 3

Table of Contents
3
EN
TC Helicon Vocal Technologies Ltd.
www.tc-helicon.com
Manual revision: 1.0 Prod. No: E60523011
Multilingial version
Introduction . . . . . . . . . . . . . . . . . . . . . . . . . . . . . . . 4
QuickStart . . . . . . . . . . . . . . . . . . . . . . . . . . . . . . . . .6
Front Panel Descriptions . . . . . . . . . . . . . . . . . . .12
Back Panel Descriptions . . . . . . . . . . . . . . . . . . . .13
Setup Considerations . . . . . . . . . . . . . . . . . . . . . .14
Mono or Stereo Setup? . . . . . . . . . . . . . . . . . . . . . .14
What Is The Pedal Input For? . . . . . . . . . . . . . . . . .14
Do I Tap Or Hold The Footswitches? . . . . . . . . . . . .15
Getting To Know Create XT . . . . . . . . . . . . . . . . .16
Auditioning Create XT's Effects . . . . . . . . . . . . . . . .16
What Is A Preset? What Is A Style? . . . . . . . . . . . . .16
Selecting Sounds In Performance . . . . . . . . . . . . . .16
Using The Tone Feature . . . . . . . . . . . . . . . . . . . . .18
The Effect Blocks . . . . . . . . . . . . . . . . . . . . . . . . . .19
Using HardTune . . . . . . . . . . . . . . . . . . . . . . . . . . . .20
Modifying The Preset Effects . . . . . . . . . . . . . . . . . .20
Tweaking Styles . . . . . . . . . . . . . . . . . . . . . . . . . . . .21
Storing Your Edits . . . . . . . . . . . . . . . . . . . . . . . . . .22
Browsing Styles By Category And Genre . . . . . . . .22
Using Tap Tempo . . . . . . . . . . . . . . . . . . . . . . . . . .22
For Advanced Users . . . . . . . . . . . . . . . . . . . . . . .24
The Alternate Tone Settings . . . . . . . . . . . . . . . . . . .24
Restoring to Factory State . . . . . . . . . . . . . . . . . . . .24
External Mixing with Mono and Dry Outputs . . . . . .24
Changing the Number of Presets . . . . . . . . . . . . . .25
Using the VoiceSupport Application . . . . . . . . . .26
Overview . . . . . . . . . . . . . . . . . . . . . . . . . . . . . . . . .26
First Impressions . . . . . . . . . . . . . . . . . . . . . . . . . . .26
The Download Tab . . . . . . . . . . . . . . . . . . . . . . . . . .26
The Backup Tab . . . . . . . . . . . . . . . . . . . . . . . . . . . .26
FAQ and Troubleshooting . . . . . . . . . . . . . . . . . . .28
Specifications . . . . . . . . . . . . . . . . . . . . . . . . . . . . .29
Page 4

Introduction
4
Welcome to VoiceTone Create XT
VoiceTone Create XT was built for the performanceminded singer desiring studio quality effects on stage. In
essence, Create XT can be thought of as a professional
producer and all of his/her tools, boiled down into one
easy-to-use, portable pedal. The effects in VoiceTone
Create XT are produced by the very same algorithms
used in high-end studio hardware processors and
software plug-ins. In terms of audio quality (noise floor,
harmonic distortion, and frequency response), Create XT
surpasses anything that has come before it, and arguably
exceeds even the most stringent "audiophile" standards.
To make your life as easy as possible, Create XT
presents a wide pallet of professionally authored sounds,
offering singers instant por tholes into the secrets behind
producing great sounds for many music genres. Where
out-of-the-box sounds aren't enough, Create XT
provides a powerful tweak control and effect on/off
buttons, designed to give you exactly what you need to
find the sound you want.
Your audience, band members and sound engineers may
be surprised to see a singer taking control over their
sound. We think it's about time!
Features:
o 100 factory effects styles in 10 banks
o Highest quality reverb with lots of variations
o Multiple effects blocks to create complex sounds
o HardTune effect allows auto-tuned sound live
o Quick and easy tweaking of presets
o Convenient operation while performing
o Easy connection between mic and mixer
o Clean, high quality mic preamp with phantom power
for use with condenser mics
Page 5

Introduction
5
EN
About TC-Helicon
At TC-Helicon we truly believe that the voice is the
world's most beautiful instrument. We don't mean to
degrade other beautiful instruments, but the singing
voice is the anthropological source for all things melodic.
You should know there is a dedicated group of
engineers, researchers and product specialists based in
Victoria BC, Canada, who spend every waking moment
of their working lives listening, talking, singing, and
interacting with singers and those who have passion for
the singing voice.
All this knowledge and experience is used to design
products respecting and empowering the modern
vocalist. Our products focus on removing barriers and
inspiring creativity in performance. That's why our
products range from near-field personal vocal monitors
to floor-based vocal multi-effects pedals.
Enjoy!
The TC-Helicon Team
a TC Group company
Page 6

Quick Start
6
Step 1:
Connect your microphone to a mic cable
Step 2:
Connect the mic cable to the Mic Input on Create XT.
PEDAL
Page 7

Quick Start
7
EN
Step 3:
While you’re connecting and setting up, lower the fader
on your mixer channel to off. Connect a mic cable from
the Left/(mono) Out to a mic input on your sound
system.
Step 4:
Set the Input control fully left then set Mix to the
12 o’clock detent position. The Style and Tweak knob
positions are not important yet.
Pedal
Pan
Pedal
3
Hold for TapHold for Preset
12 O’Clock
Page 8

Quick Start
8
Step 5:
Connect Create XT’s power adapter to main power
and to the Power Input on Create XT.
Step 6:
While singing through your microphone, raise the Input
control until its LED turns green, sometimes orange on
louder parts, but never red.
PEDAL
Pedal
3
Page 9

Quick Start
9
EN
Step 7:
Carefully raise the gain and/or volume on your sound
system mic input channel and master volume until you
hear a good level from your vocals.
Step 8:
Initial setup and operation is shown below.After setting,
sing to hear Create XT’s factory effects.
Pedal
3
Hold for TapHold for Preset
Press until
LED lights up
Tap to light
On LED and
hear effects
a) Tap to switch A and B
settings in each preset
Tap to advance
through factory
presets 0-9
Stereo LED
should be off
Page 10
Pedal
Front Panel Descriptions
10
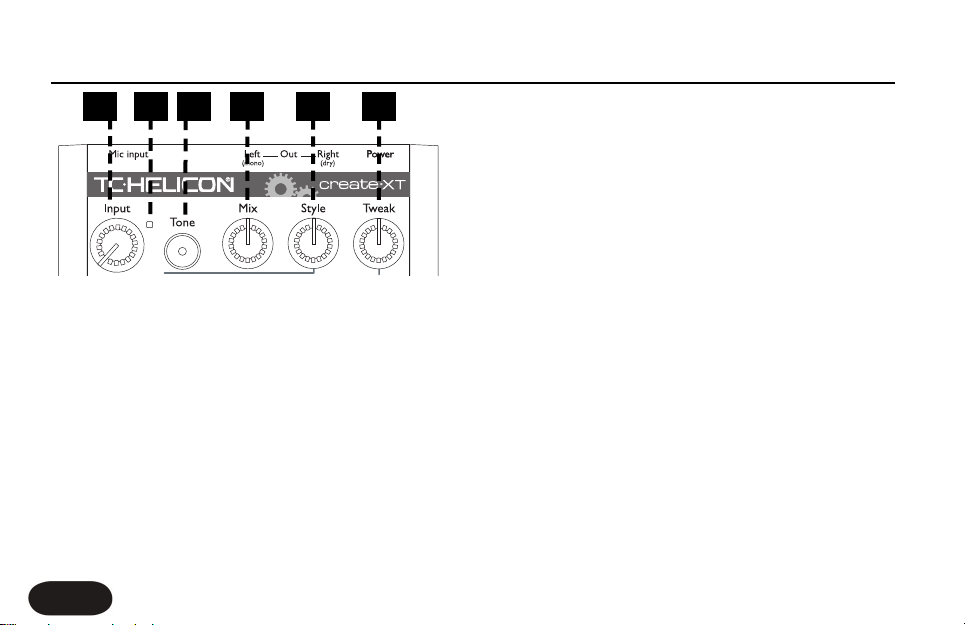
3.Tone Button
Engages the Live Engineer Effects which smooth the
sound of your singing even when the main effect is off.
4. Mix Control
Controls the overall balance between your dry voice
(with Tone if active) and the Reverb/Delay. This is a
global control meaning that it will affect the sound of all
presets.
5. Style Selector Control
Selects and loads a preset from one of the 10 style
banks. Each bank has 10 style variations available by
press and holding the Tweak button, then tapping to
choose another style - press and hold again to return to
regular operation.
6.Tweak Control
Edits the value of the parameter chosen with the Tweak
button.The value will show briefly in the numeric display.
1 2 3 4 5 6
1. Input Control
Controls microphone pre-amplifier (input) gain. To set,
sing normally and watch the Input Light.
2. Input Light
Indicates input level. Flashing green, sometimes orange is
good. Flashing red shows a distorted peak has occurred
and input level should be reduced.
Page 11
Front Panel Descriptions
11
EN
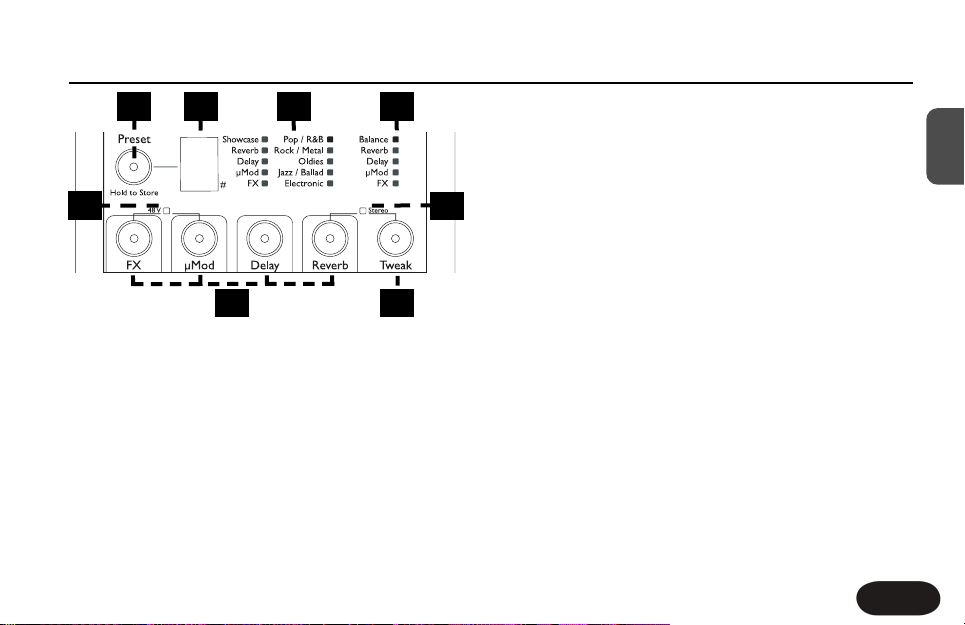
7. Preset Button
Tap to advance and cycle through the 10 presets. Hold
to store an edited preset.
8. Preset Numeric Display
Shows the current preset number in normal operation.
Can show the style variation number when you press
and hold the Tweak button, or HardTune key when
HardTune key set mode is active. A dot in the lower
right corner indicates (key) sharp.
9. Style Bank Display
Shows which factory style bank the current preset is
based upon.
10.Tweak Parameter List
Shows the parameter editable by the Tweak knob.
11. 48V Phantom Power Indicator
Indicates phantom power on or off. Hold the FX and
µMod buttons for a moment to activate.
12. Stereo Indicator
Shows stereo output. Hold Reverb and Tweak for a
moment to switch between stereo or mono.
13. Effect On/Off Buttons
Press to turn effect blocks on and off in the preset.
14.Tweak Button
Tap to cycle through tweak parameters for adjustment.
3
87 9
11
12
10
13 14
Page 12
12
Front Panel Descriptions
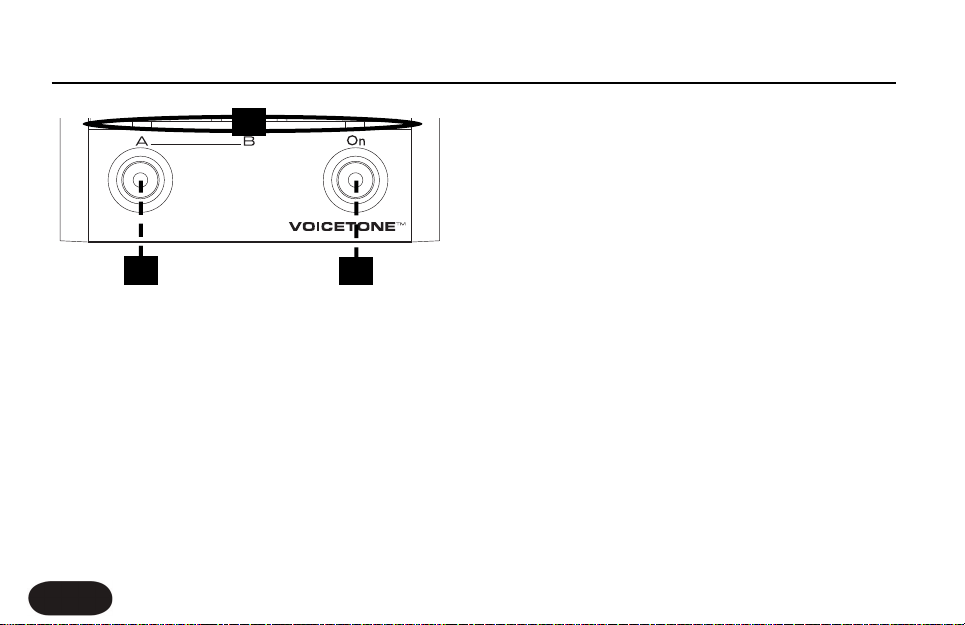
15. LED Indicator Bar
A single LED lit above the A or B legend indicates the
respective effect selection is loaded in a preset. When
both A
and
B are lit, this indicates Preset Select mode
(described below). The LED above the On footswitch
indicates on or off status of the main effect in Create XT.
16. Preset A and B Select Footswitch
This footswitch allows access to up to 20 different
effects. When either the A or B light is lit, tap the A/B
footswitch to toggle between two effect settings quickly.
To access more presets, hold this footswitch to enter
Preset Select mode. Both the A and B LEDs will be lit.
Now, pressing the A/B button cycles forward through
the “A” preset settings or “B” preset settings, depending
on whether an A or B was loaded when you held the
footswitch.
17. On Footswitch
Tapping this footswitch engages or disengages the effects
in the current preset. Holding this footswitch for a
moment will enter Tap Tempo mode where you can
then tap it to synchronize the tempo of the Delay block
effects with your music.To exit Tap mode, hold again.
3
Hold for TapHold for Preset
16
17
15
Page 13
Back Panel Descriptions
13
EN
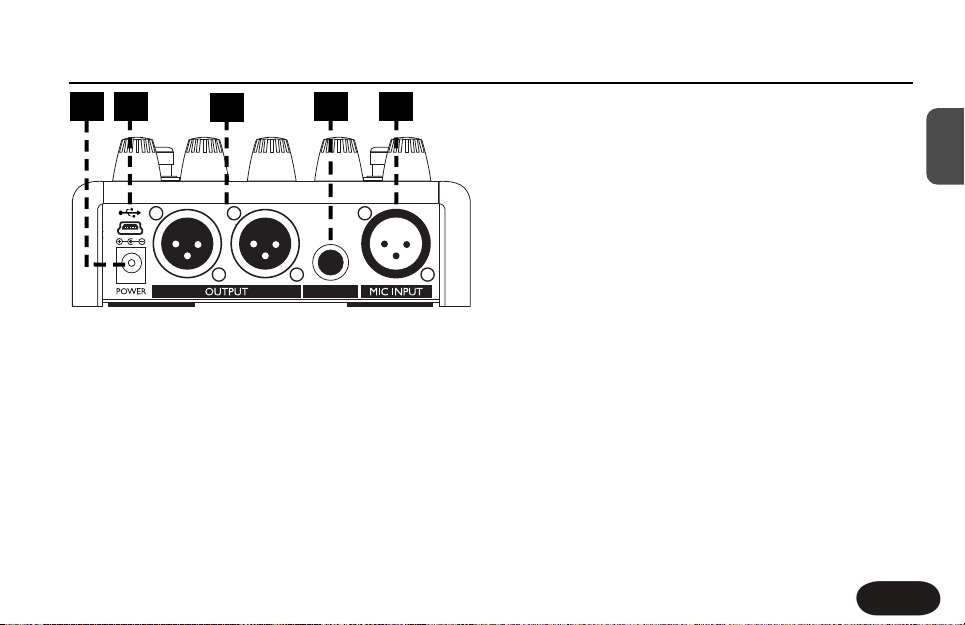
18. Power Input
Connect the supplied DC power adaptor here.
Connecting power to Create XT turns it on
immediately as there is no on/off switch on the product.
19. USB Connector
Allows Create XT to communicate with a computer for
backup and updates. See “Using the VoiceSupport
Application” section for details.
20. Outputs
These XLR jacks supply the left and right outputs of
Create XT in stereo (default) or mono using only the
Left output. When configured for mono, the Right
output produces the pre-amplified dry signal for
external mixing.
21. Pedal Input
This input for a TC-Helicon Switch 3 footswitch provides
convenient, individual effect on/off capability for the FX,
µMod and Delay effects.
22. Mic Input Jack
Balanced, low impedance XLR input for your
microphone.
PEDAL
22
21
20
18 19
Page 14
Setup Considerations
14
Mono or Stereo Setup?
Most effects have a wider spatial effect in stereo, so if
you have a stereo PA/sound system or you are
recording, this will produce the best sound. This is
especially true for presets based on reverb styles and
ping pong delay styles.
To connect Create XT in
stereo connect a pair of
cables from the L/Mono
and R/Dry outputs to two
mixer channels in a stereo
PA system. Make sure
your mixer channels are
panned hard left and right
and the left/right levels are
in balance.
If you do not have a stereo PA, then configuring Create
XT for mono output is perfectly acceptable while
reducing cabling and mixer channel usage.
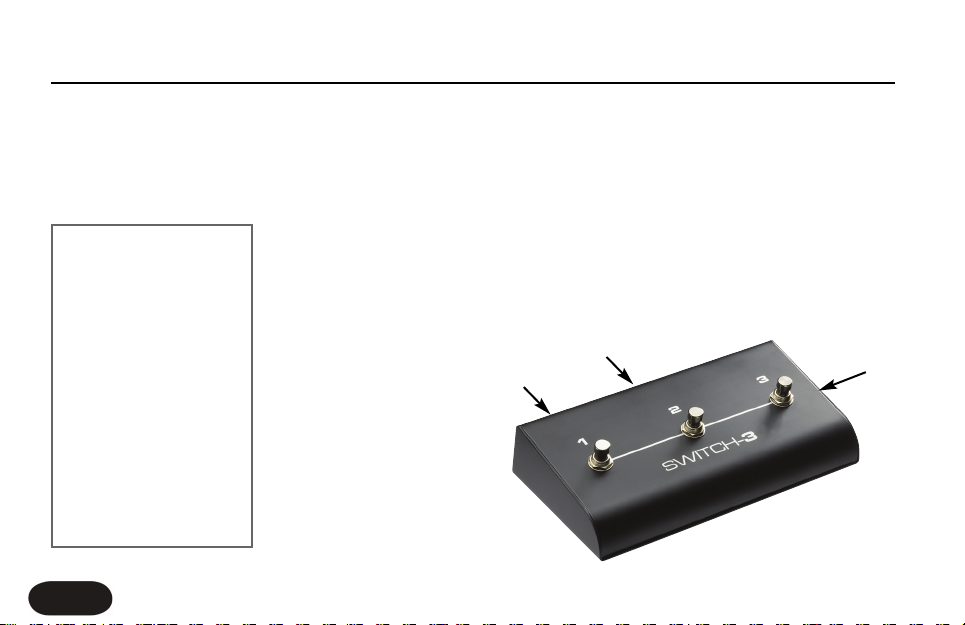
What Is The Pedal Input For?
This is an option that makes Create XT more like its big
brother,VoiceLive 2. Par t of the appeal of that product is
that you are able to turn effect blocks on and off within
the preset while standing. The sound of a Create XT
preset is generally made up of several effect blocks
Is my PA truly stereo?
Just having two speakers
connected to a sound
system doesn’t mean it is
truly stereo. To test that
your sound system is
stereo, connect your mic
directly to a mixer
channel and move the
pan control on the
channel left and right; if
the sound moves from
one speaker to the other,
your PA is stereo.
Optional
Switch 3 pedal
FX on/off
µMod on/off
Delay on/off
Page 15

Setup Considerations
15
EN
hooked together and, with the Switch 3 footswitch, you
can turn each on and off when you want. As well, you
can activate an effect that is currently off in the preset
which expands the range of sound possible without
switching to another preset.
There are four effect blocks in Create XT and the
optional footswitch gives you control of the
FFXX,, µµMMoodd
aanndd DDeellaayy bblloocckkss..
Generally, reverb effects are left
activated throughout a performance and there is no
external footswitch control of this effect. To turn off a
reverb effect when you’d like to talk to your audience,
simply engage bypass by tapping the On button.
Do I Tap Or Hold The Footswitches?
The footswitches on Create XT have different actions
depending on whether they are tapped briefly or held
to give you a full range of performance options from a
standing position. The hold time to change modes on
both the AB and On footswitches is approximately 1
second. To avoid accidental mode changes in
performance, make sure your foot briefly taps the AB or
On footswitches when required and that you do not
hold them.
What Is Remembered Over Power Cycles?
All features that you can set on Create XT except knob
positions are recalled on power up.This includes current
preset, 48V, mono/stereo, AB and On button status etc.
Page 16
A “style” is a collection of factory settings that creates a
single composite effect.You can create a new sound by
selecting a style bank using the Style knob.You can get
further variations on that style by press and holding the
Tweak button.The style number will flash. Pressing the
tweak button will cycle through the style variations for
that bank. Press and hold tweak to go back to normal
operation.
Selecting Sounds In Performance;The Right
Method For You
Create XT has several ways of selecting effects from a
standing position using the footswitches. The difference
lies in how much you want to interact with the product
in performance:
11.. OOnnee ggrreeaatt ssoouunndd::
Use the factory default sound of preset #1 in the A
position of the AB footswitch.With the Tone button
engaged, this would make a useful, high quality effect
you could use for an entire performance. Toggling
Getting To Know Create XT
16
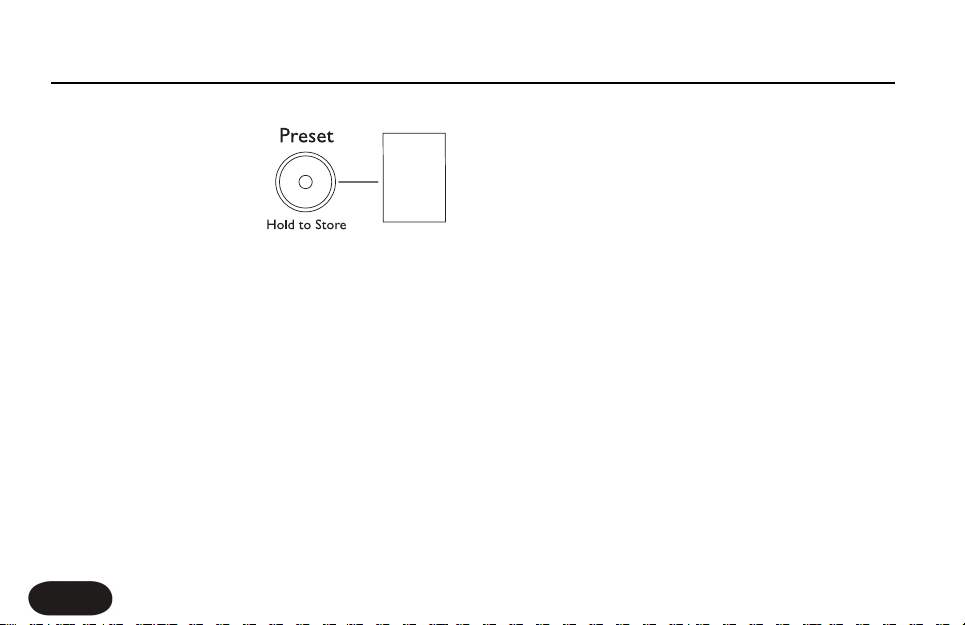
Auditioning Create XT’s Presets
Press the Preset button to
advance to the next preset
number which will be
shown in the main display.
While on that preset, you
can tap the AB footswitch
to toggle between the two sound options in that preset.
The LED above the respective A or B legends shows
which is currently active.
Once you’ve tested each preset’s A and B setting, you’ve
heard the entire factory range of vocal effect presets.
What Is A Preset? What Is A Style?
A “preset” is a conveniently-accessed holding place for
one of the factory styles and any edited “Tweak” settings
that modify it. Each preset has two different settings, A
and B which can be toggled back and forth quickly in
performance. The A and B part are stored separately by
press and holding the Preset button.
3
Page 17

Getting To Know Create XT
17
EN
this effect on and off with the On button will allow
you to alternate between singing with the effects on
and talking to your audience with the effects off.
22.. MMaaiinn aanndd aalltteerrnnaattee ssoouunnddss::
The method described above could serve most of
your needs but when it’s time for sonic contrast
every now and then, you can use the AB footswitch
to change to (and from) the B setting of your preset.
33.. CCyycclliinngg tthhrroouugghh tthhee ffaaccttoorryy pprreesseett ssoouunnddss
This method allows you to cover a wide range of
vocal effects in many styles.Tap the AB footswitch so
the A LED lights. Hold the AB footswitch to enter
Preset mode (both A and B LEDs will light) and then
tap the AB switch to advance to the next preset and
so on. After the five presets, you will cycle back to
the first. Create XT will remain in Preset mode each
time it is powered up. When you are familiar with
the sound of each numbered preset, you will find places
to use them in particular songs or sections of songs.
44.. TTwweennttyy ssoouunnddss wwiitthh AA aanndd BB
This method allows you to access the maximum
number of vocal effects in Create XT from a
standing position. It involves jumping in and out of
Preset mode discussed in the previous paragraph
and then switching between the A and B settings
when you arrive at each preset.Typically, you would
enter Preset mode in between songs, find the preset
with the sound or sounds you want and then switch
out of Preset mode to switch between the A or B
settings during a song.
55.. UUllttiimmaattee ccuussttoommiizzaattiioonn
For those who prefer to determine the exact sound
and number of presets they use, Create XT offers
this too. By adjusting the Tweak parameters and the
Effect On/Off buttons described later in this manual,
you can create effects that more closely fit your
specific sonic goals.Additionally, if you require access
to more than two but less than ten presets, there is
a setup configuration that allows you to define the
number of presets you prefer to cycle through (see
For Advanced Users section).
Page 18

Compression gently reduces the dynamic peaks of your
singing so that when your voice is amplified, it sounds
smoother.
De-essing is a process that reduces the level of
“S” sounds, also known as sibilance and this also
contributes to a smoother vocal sound.
The channel you connect Create XT into should have its
tone controls set to the middle or off so they have no
effect. Create XT’s Tone is all the shaping you’ll need.
Also, the graphic EQ on the main output of your PA, if
it has one, should be set to flat or used only to cut
feedback frequencies.
Because the Tone feature adds brightness which can
contribute to feedback, you should make sure your
monitors are pointed to the dead area of your mic and
your PA is in front of you facing your audience.
Getting To Know Create XT
18
Using The Tone Feature
This deceptively simple button engages a complex signal
chain that gives your vocals more professional polish. In
most cases, all you need to do is turn the feature on and
leave it on.
There are three effects in Tone that are commonly used
in recordings to smooth and brighten vocals:
Adaptive Shape EQ
Compression
De-essing
Adaptive Shape EQ offers tone shaping that adapts to
the sound of your individual voice by reducing the extra
low frequencies that come from singing very close to a
microphone and by boosting high frequencies that help
the voice cut through a mix.
Page 19

DDeellaayy
The Delay block produces echo effects such as Slap,
Ping Pong, and Tap Tempo. Slap echo is the shortest
of these and recreates the first echo effects used in
the 1950’s. Ping Pong is longer and will bounce from
side to side in stereo. Tap Tempo echo has echo
repeats that follow the beats of your song. For more
information on Tap Tempo see “Using Tap Tempo”
later in this chapter.
RReevveerrbb
This effect simulates the effect of being in an
acoustic space. Factory reverb effects include rooms,
halls and styles that simulate electromechanical
devices used in the past to imitate “real” acoustic
space such as plates and springs.
Factory styles have predefined settings for each block.
For example, one may have the Reverb block configured
as a small, reflective room and another may have a large
dark-sounding hall.
Getting To Know Create XT
19
EN
The Effect Blocks
Each Style in Create XT is made up of some
combination of four “blocks” which can be thought of as
separate effect processors. These are organized as
follows on the front panel:
FFXX
The FX block incorporates the Transducer and
HardTune blocks. The Transducer creates filtered
and distorted effects such as megaphones and
telephones. The HardTune effect is similar to the
extreme pitch correction sound of artists such as Tpain, Kanye West and Cher.
µµMMoodd
This is the “micromod” block that creates sounds
that modulate such as chorus and flange. The µMod
effects can also use detuning to add thickness or
create wild special effects.
Page 20
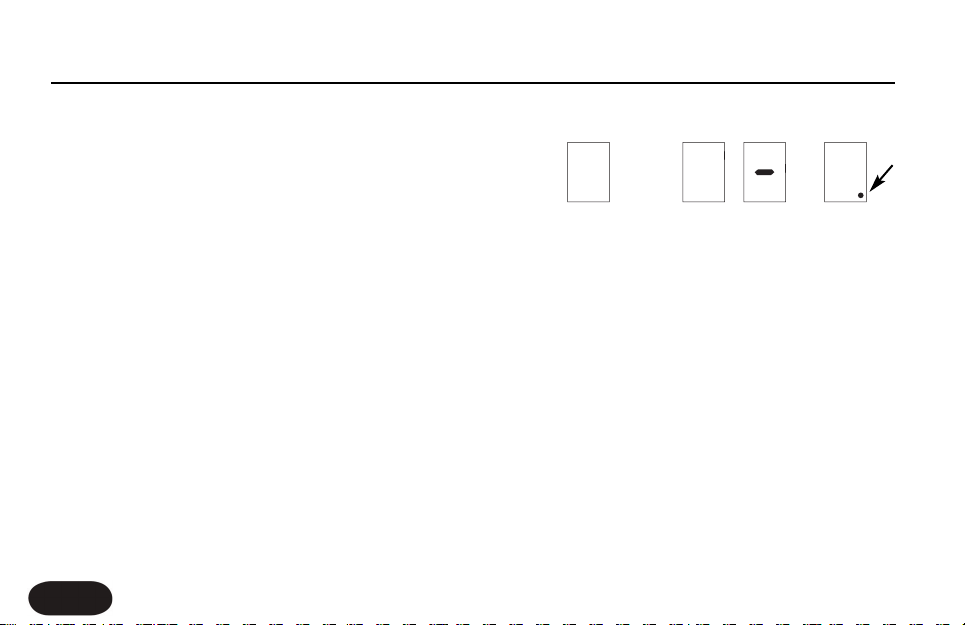
The display will show the key as follows:
A major A minor ... A#
Modifying The Preset Effects
In Create XT, you have the ability to modify all of the
presets and store edited copies of them at the preset
location number they started on.You can then call them
up when required using one of the methods described
previously.
There are several methods for editing:
1. Load a different style from the style bank by turning
the Style knob.The location of the style is shown by
its bank and the number shown briefly in the main
display as you turn the Style knob.
2. Turn effect blocks on or off within the style by
pressing the FX, µMod, Delay or Reverb buttons.
3. Press the Tweak button to select a parameter from
AAA
Getting To Know Create XT
20
Using HardTune
This effect sounds best when a key, e.g. A minor, has
been set. There is a convenient way to enter a key for
each song you plan on using it in. If you’re unsure of the
key of your song, often it is the same as the first or last
chord of the song.
To enter or confirm the HardTune key:
1. Find a preset or style with the HardTune effect
active.
2. Hold the AB and On footswitches for a moment. All
3 LEDs will flash and the main LED display will show
the key.
3. Within 2 seconds tap the AB footswitch to enter
key: A, B, C etc. Tap the On footswitch to switch
between major and minor. After 2 seconds of no
footswitch input, the displays will return to normal
automatically.
Page 21

Getting To Know Create XT
21
EN
the “tweak list” and then adjust it with the Tweak
knob.
4. Using the optional Switch3 footswitch to turn effect
blocks on and off.
It’s usually best to find a preset or style that is close to
what you want and then tweak it and store it.
Tweaking Styles
Each style has settings that can be adjusted (or “edited”)
to customize the effects stored in a preset. In Create XT,
editing style values is referred to as “tweaking”.
To edit the current style, tap the Tweak
button
to select
from the list of parameters, then turn the Tweak
knob
to
adjust it.
If an effect block is off, its tweak parameter will not be
available when cycling through the list.
Turning the Tweak knob may adjust one, or several
settings together, depending on the style. The tweak
parameters are described below. For the final list of
parameters available in each style, check the TC-Helicon
website on the Create XT product support page.
11.. BBaallaannccee
Affects the volume relationship between the active
effect blocks in the style. If there are more than two
blocks engaged, a factory mapping will allow control of
blocks most important to the overall sound.
22.. RReevveerrbb
Sets the Reverb decay parameter from short to long
(length or size of the reverb).
33.. DDeellaayy
Controls feedback when delay responds to Tap tempo.
Sets delay time when the delay is set to a fixed, shorter
value.
Page 22

Getting To Know Create XT
22
44.. µµMMoodd
Assignments include modulation speed or detune
amount depending on the type of effect.
55.. FFXX
Transducer assignments include distortion-amount or
Low Cut EQ depending on the effect type.
Storing Your Edits
When you’re done editing and have a sound you would
like to save, press and hold the Preset button for a
moment.This will commit the changes you made to the
current preset number and A or B location. If you wish
to return your Create XT to its factory set of presets,
you may do this by resetting the unit as discussed in the
“For Advanced Users” section.
Browsing Styles By Category And Genre
To simplify your search for the perfect sound, Create
XT’s style library is arranged in two ways: by effect
category and by the musical genre in which you might
find the effect. Each bank has styles covering a wide
range while staying true to the main category or genre.
The Showcase category contains a sampler of all Create
XT’s best sounds. The remaining categories highlight
each effect block in turn though there may be other
active effect blocks that support the main effect.
The categories are:
Showcase
Reverb
Delay
µMod
FX
Page 23

Getting To Know Create XT
23
EN
The genres are:
Pop/R&B
Rock/Metal
Oldies
Jazz / Ballad
Electronic
Using Tap Tempo
When you need a long echo effect, it’s best to have the
repeats timed to the beats of your song.The Tap Tempo
feature allows you to do this. A selection of factory
presets and styles feature Tap Tempo ability. Some will
have echoes falling exactly on the beat while others fall
within beat divisions e.g. 8th or 16th notes.
To use the Tap Tempo echo effect:
1. Find a preset or style where the Delay effect is ON.
2. Make sure the effect is turned on (the On LED
should be lit).
3. Hold the On footswitch for a moment
4. Tap the On footswitch in time with your music.
Usually only a few beats is necessary.
5. Hold the On footswitch to exit Tap Tempo mode.
You can now store this tempo with the preset if you like.
If you hold the On footswitch to enter Tap Tempo mode
and the LED blinks quickly twice but will not stay lit, the
feature is not available in the current preset or style.
Page 24

The Alternate Tone Settings
Because the Tone feature is adaptive, you generally won’t
need to change it but there are additional settings that
may refine it for those who care to.
To access the Alternate Tone settings, hold the Tone
button until you see the Preset number display flash.You
can tap the Tone button to cycle through the numbered
choices shown below:
dd..
Default setting. Best for most situations.
11
Best if you have a very bright sounding PA.
Reduces brightness a little.
22
Adds “warmth” to the default setting for a slight
Bass boost at a narrow frequency.
33
Default plus increased compression. Caution: this
increases the likelihood of feedback.
Restoring Factory Presets And Settings
If at any time you want to get VoiceTone Create XT back
to its original presets and settings, follow this procedure.
1. Disconnect the power adapter from Create
2. Press and Hold the FX and Tweak buttons while
plugging the power adapter into Create XT.
3. Create XT will clear all the performance
information and return it to factory settings. Once
this is done (it only takes a couple seconds), Create
XT is ready to go.
External Mixing With Mono And Dry Outputs
The Dry output can be mixed externally with the mono
output so that the balance between your dry voice and
the effects can be adjusted by a sound engineer.
To use the Dry/Mono setup:
1. Connect each output to a separate mixer channel.
2. Set Create XT’s Mix control to 100% wet (fully
right).
3. Have your engineer raise or lower the mono effects
output channel on the mixer to suit your music.
For Advanced Users
24
Page 25

We’ve made every effor t to ensure that the effects are
well-balanced when the Mix control is set to its center
detent. This external mix feature allows for dynamic
effect level during performance.
Note 1:
The Transducer and HardTune effects sound
best fully wet so, when you use these styles, your
engineer will need to mute the dry channel.
Note 2:
The Tone effect is active on your voice as it
comes from the Dry output.
Changing The Number Of Presets
The default configuration of Create XT is to offer ten
presets each having an A and B setting. This allows you
to cycle through them with ten footswitch pushes
before cycling around to the one you started on. If you
would like to reduce the number so you can cycle
through from three to nine presets only, there is a way
to set this in Create XT.
To set the accessible number of presets, power up
holding the Preset button. After a moment, the number
“0“ will show the default number of presets which is 10.
Tap the Preset button to change the limit from 3
through 0(10). 1 and 2 are not options. Hold the Preset
button to store this setting and exit to normal operation
with your revised number of accessible presets.
For Advanced Users
25
EN
Page 26

Using the VoiceSupport Application
26
Overview
Create XT ships complete with a CD containing the
VoiceSupport application. Once installed on your
Windows or Mac computer, this will allow you to:
o Backup and restore any presets you’ve created
o Stay up-to-date on news items regarding tips and
tricks, version updates and video tutorials
o Register your product quickly and easily
o Perform version updates if and when they become
available
Requirements
o Mac with version 10.x or newer OS
o PC with XP
o Internet connection.
Installing VoiceSupport
1. Place the CD that came with your product into
the CD drive of your computer. If you do not have
the CD go to www.tc-helicon.com/voicesupport.asp
to download the latest version.
2. The CD will run the setup program automatically.
If it doesn’t, browse the CD and run Setup.exe.
3. Follow the prompts to install VoiceSupport.
4. Connect Create XT to the computer with the
supplied USB cable, apply power to Create XT.
5. Click on the VoiceSupport icon on your desktop to
run VoiceSupport.
First Impressions
VoiceSupport will connect with Create XT and show an
icon indicating connection is successful (If it is not
successful after several attempts see the FAQ section of
this manual).After that,VoiceSupport will check with the
TC-Helicon website and see what the latest news items
specific to Create XT are. Clicking on news items will
open them. Make sure to scroll down in the HOME
window to see if there is more content there. The
“New” icon will disappear once you’ve read an item. As
of this writing, news items are permanently displayed in
VoiceSupport.
Page 27

Using the VoiceSupport Application
27
EN
Once you’ve browsed the news items, please take a
moment to register your product by clicking on the
REGISTER button on the top menu and filling out the
online form.
The DOWNLOAD Tab
From time to time, a new firmware version aka “update”
of Create XT may be available. Updates usually contain
users’ feature suggestions, improvements and bug fixes.
The DOWNLOAD tab is only used when an update is
available for your product. Depending on whether an
update is available, this may show only the “Load a SysEx
file...” item or, above it, an item describing an update. If
there are several, the top item is the newest. Be sure to
read any details on update items before installing onto
your product.
The BACKUP Tab
If you have edited the presets on your Create XT, you
may want to back them up on your computer for
safekeeping. You can also use this tab to transfer your
presets to another Create XT.
There are two windows: Backup and Restore. Backup
loads your presets and/or setup parameters (48V on/off,
Stereo/mono etc) into a user-specified folder on your
computer and Restore sends this same data from the
computer to your Create XT.
Check Back!
The news items that VoiceSupport downloads can
benefit you and increase enjoyment and knowledge
about your product. Make sure to run the app now and
then (even without Create XT connected) to see what’s
new.
Page 28

FAQ & Troubleshooting:
1. I'm not getting any sound from Create XT
a. Confirm the PA is on and the mixer channel is
turned up.
b. Check each cable by connecting your mic directly to
the sound system and testing.
c. Check that the 48V light is lit if you are using a
phantom powered condenser mic.
2. I'm only hearing my dry voice
a. Confirm that the On footswitch light is on.
b. Set Mix knob to center detent position.
c. Check that Create XT’s Left/Main output is
connected to your PA if running in mono.
d. Check that at least one effect on/off is active.
3. My sound is distorted.
a. Check if the current patch is a Transducer patch that
has distortion enabled.
b. If the input light is turning red frequently, reduce
input level.
4. I’m getting feedback
a. Move the PA speaker or monitor so it is in a line
with your mic and facing you.
b. Reduce volume of the PA
c. Use Tone setting alternate #1 with less high boost
or turn Tone off altogether.
5. I can’t turn effects off or on
a. Press and hold the On footswitch to exit Tap Tempo
mode.
FAQ and Troubleshooting
28
Page 29

Specifications
29
EN
Analog Inputs
Connectors Balanced XLR, Input Impedance 1kOhm
Mic Input Sensitivity @ 0dBFS -44dBu to +2dBu
Mic Input Sensitivity @ 12dB headroom -56dBu to -10dBu
EIN @ max. mic amp gain, Rg = 150 Ohm -128dBu
Analog Outputs
Connectors Balanced XLR
Output Impedance 40 Ohm
Output Level @ 0dBFS +2dBu
Input to Output Analog Audio Performance
Dynamic Range, Mic. @ Min gain 20Hz-20kHz *A-weighted >108dB
Dynamic Range, Mic. @ -18dBu sensitivity20Hz - 20kHz > 104dB
THD+ Noise, Mic. @ Min gain <-90dB
Frequency. Response, Max gain
-1.5dB @ 40 Hz, (200Hz to 20 kHz), +0/-0.3 dB
Conversion Characteristics
Sample Rate 48 kHz,
Converter AKM AK4620B
AD / DA Conversion 24 bit, 128x oversampling bitstream
EMC & Safety
Complies with EN 55103-1 and EN 55103-2 FCC part 15, Class B,
CISPR 22, Class B
Certified to IEC 65, EN 60065, UL6500 and CSA E60065 CSA FILE
#LR108093
Environment
Operating Temperature 32° F to 122° F (0° C to 50° C)
Storage Temperature -22° F to 167° F (-30° C to 70° C)
Humidity Max. 90 % non-condensing
Supplementary
Dimensions 130mm x 132mm x 41mm (5" x 5.25" x 1.5")
Weight 1.5 lb. (0.72 kg)
Warranty Parts and labor 1 year
Page 30

Broadway Hall
HardTune Echo
Us&Them
Megaphone room
Slappin' Spring
Thicken Verb
Filtered Echo
Fast Rotor
Megaphone+Dry
Octave Dn
Snappy Room
Smooth Pl
B'Way Hall
Subtle Spring
Music Club
Wood Chambr
Dome Chapel
RealPlate Lng
Cozy Corner
Indoor Arena
Us & Them mono
Narrow Multitap
mono Rockabilly
Stereo LongPong
Early Room
Wider Multitap
1/8 Zero fback
1/8 Feedback
Mono Triplet
Triplet Pong
Light Flange
Med Chorus
Tube Flange
Fast Chorus
Silk Flange
Fast Rotor
Fast Phaser
Tube
Panner/Cutter
Thicken
Htune
Htune Megaphone
Megaphone
Hard Drive
Tune Drive
Peak Drive
Octave Down
Megaphone Drone
Oct up Distort
Bandpass1
Kanye Lockdown
Distort Mix
Praise You
Pop Doubling
Htune Megaphone
In The Air
Let's Dance
Distorted
Coldplay Violet
Elton Bennie
Bites Dust
Been A LngTime
Black Dog
Comfy Numb
Day Green
Doubling
Come Together
Vertigo
BlueJayWay
Distort Mix
Slap LoFi
LoFi Verb
LoFi Verb2
EchoPlate
Rock On
Depeche Plate
Heartbake Hotel
Ring of Fire
Bennett Chicago
Clipped Motown
Jazz Plate
Roomish
PreDelayVerb
Locut fx send
Hicut 1/2 note
Thicken Lowcut
Phone Echo
Short Ambience
Ducked LongEcho
SpringyPreDelay
Double and Mayo
Skinny 1/4n Tap
Tap PingPong
DistortFlg Dly
Long Duck Delay
Long&Short Duck
Htune Tap delay
Octave Panner
Cylon Drone
Days go By
Preset List
30
1
2
3
4
5
6
7
8
9
10
11
12
13
14
15
16
17
18
19
20
21
22
23
24
25
26
27
28
29
30
31
32
33
34
35
36
37
38
39
40
41
42
43
44
45
46
47
48
49
50
51
52
53
54
55
56
57
58
59
60
61
62
63
64
65
66
67
68
69
70
71
72
73
74
75
76
77
78
79
80
81
82
83
84
85
86
87
88
89
90
91
92
93
94
95
96
97
98
99
100
 Loading...