

Page 1
PRODUCT MANUAL
ENGLISH VERSION
|
Page 2

Introduction . . . . . . . . . . . . . . . . . . . . . . . . . . . . . . . .4
Quick Start . . . . . . . . . . . . . . . . . . . . . . . . . . . . . . . .7
Panel Descriptions . . . . . . . . . . . . . . . . . . . . . . . . . .11
Using the Tuner . . . . . . . . . . . . . . . . . . . . . . . . . . . .13
Compatibility Chart . . . . . . . . . . . . . . . . . . . . . . . . . .14
Auto Mode . . . . . . . . . . . . . . . . . . . . . . . . . . . . . . . .16
Table of Contents
TC Helicon Vocal Technologies Ltd.
Sindalsvej 34, DK-8240 Risskov – info@tc-helicon.com
Manual revision
1.2
– Software –
1.0
Prod. No: E60507911
HarmonyControl US English Version
Using the Key Footswitch . . . . . . . . . . . . . . . . . . . .17
Manual Mode and the Setup Menu . . . . . . . . . . . . .19
Performance Tips . . . . . . . . . . . . . . . . . . . . . . . . . .21
Chord and Scale Explained . . . . . . . . . . . . . . . . . . .23
Harmony Processor Notes . . . . . . . . . . . . . . . . . . . .24
Technical Specifications . . . . . . . . . . . . . . . . . . . . . .24
Page 3

44
Welcome to HarmonyControl | guitar
As a singer and guitarist, it’s likely you are using or have
used a harmony processor before, which means it’s
likely you’ve often wished your guitar could control
your harmony parts. That’s why we created
HarmonyControl, to add value to your investment in
vocal harmony. With HarmonyControl you can sing
with harmony on more songs than ever before while
spending less time stepping through and remembering
song arrangements.Thank you for purchasing this product!
Features:
o Specialized guitar-to-MIDI interface
o No special pickup required
o Compatible with a wide range of harmony
processors
o Set-and-forget
o Chromatic Tuner function
o Additional features with TC-Helicon products
o Includes dual MIDI cable
You will need:
o A vocal harmony processor with a MIDI input that
can be used to control “Chords” or “Chordal”
harmony. Products from TC-Helicon, Digitech®,
and Korg® fall into this category.Additionally, some
of these products offer “Scale” or “Scalic” harmony
with the ability to change key and scale from MIDI
input. Consult the Compatibility Chart in this
manual for more detail on supported harmony
processors.
o An electric guitar or acoustic guitar that is
electrified with a pickup.
*
o A vocal microphone with a cardioid or super-
cardioid pickup pattern. This minimizes audio
interference that may interfere with the proper
tracking of the harmony processor.
o Audio and XLR mic cables, a PA system, mic stand
etc.
*
Body resonances with acoustic guitar soundboard
pickups can negatively affect performance. Undersaddle pickups are recommended.
Introduction
Page 4

5
About TC-Helicon
At TC-Helicon we truly believe that the voice is the
world's most beautiful instrument. We don't mean to
degrade other beautiful instruments, but the singing
voice is the anthropological source for all things
melodic. In the words of the founders of TC-Helicon,
"Everything we do is dedicated to this instrument (the
singing voice). We envision a world where those who
work with the voice in live and recording situations can
bring out the very best from any performance, and
where the possibilities of vocal craft are endless."
Our mission was galvanized by a simple question:
"Isn't it time that someone finally provided dedicated
tools and solutions for voice?"
So what does this all mean to singers? It means that you
should know there is a dedicated group of engineers,
researchers and product specialists, based in Victoria,
BC, Canada, who spend every waking moment of their
working lives listening, talking, singing, and interacting
with singers and those who have passion for the singing
voice. All this knowledge and experience is used to
design products respecting and empowering the
modern vocalist. Our products focus on removing
barriers and inspiring creativity in performance. That's
why our products range from near-field personal vocal
monitors to floor-based vocal multi-effects pedals.
Enjoy.
The TC-Helicon Team
a TC Group company
Introduction
Page 5

6
Page 6
777
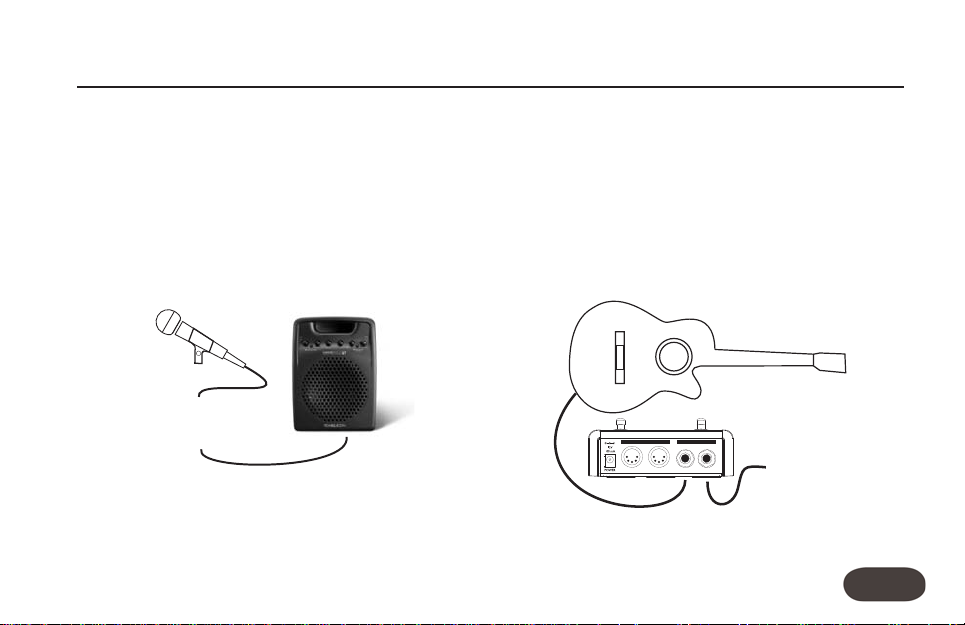
Step 1:
Set up your harmony processor, microphone and PA
system as you would normally. If this is the first setup
with the harmony processor, consult its manual for
proper setup.
Harmony
Processor
Step 2:
Connect a cable from your guitar to the Guitar In jack
on HarmonyControl. Then connect a cable from the
Guitar Out jack on HarmonyControl to your amplifier
or a channel in your PA system. HarmonyControl
should be the first link in any effects chain. Any guitar
processing done before the guitar signal is fed to
HarmonyControl will reduce accuracy.
4
MIDI GUITAR
IN OUTIN OUT
To amp
or PA
Quick Start
Page 7
8 8
Step 3:
Connect the included MIDI cable or any standard cable
from the MIDI Out jack on HarmonyControl to the
MIDI input on your harmony processor.
If your harmony processor is on the list of Auto- or
Detect-compatible units (see the Compatibility Chart
in this manual), connect the second set of jacks on the
included MIDI cable or any standard MIDI cable
between the MIDI output of your harmony processor
and HarmonyControl.
Harmony
Processor
4
MIDI GUITAR
IN OUTIN OUT
MIDI
Out
MIDI
In
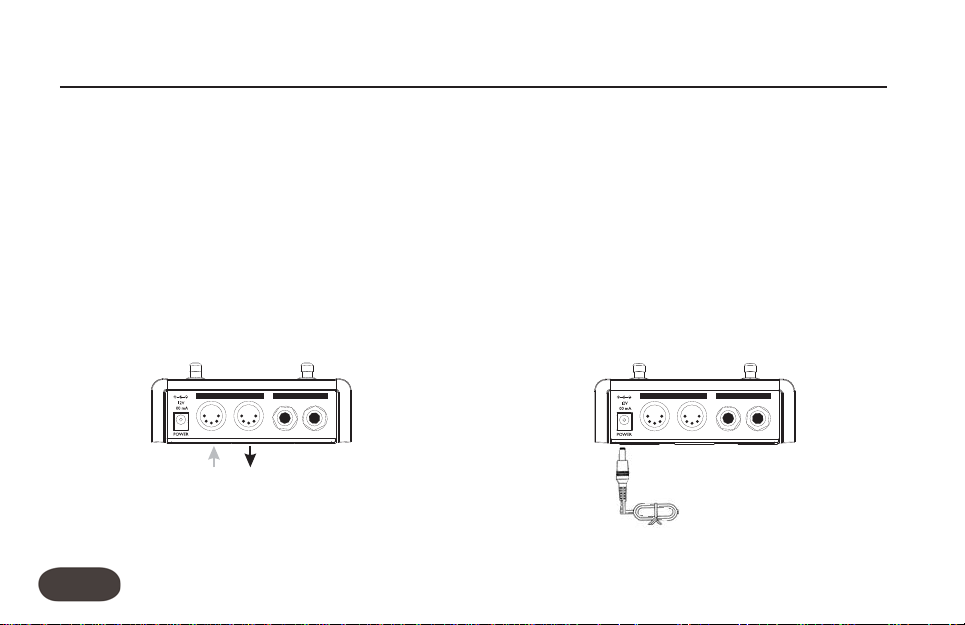
Step 4:
Connect HarmonyControl’s power adapter to your
wall power socket and then to the Power input jack on
the product.When power is applied, one or more LEDs
on the unit will flash momentarily.
If your harmony processor is Auto-compatible and
you’ve connected the MIDI cables correctly, the Auto
LED will light a moment after power-up.
4
MIDI GUITAR
IN OUTIN OUT
Quick Start
Page 8
999
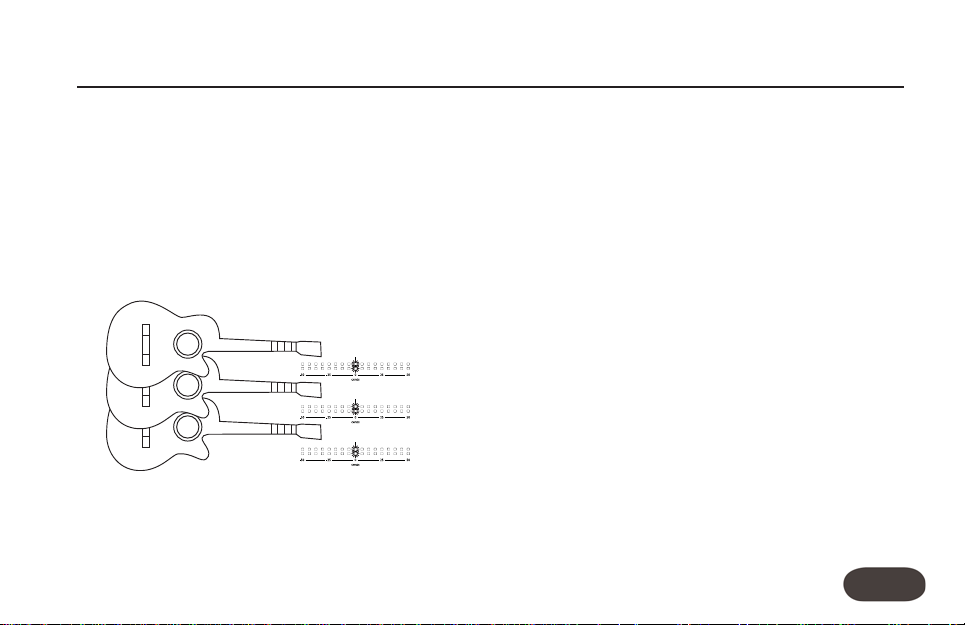
Step 5:
Check that the LED light above the On footswitch is lit.
If it’s not, press the On footswitch.Turn up the volume
control on your guitar and play some chords. The 0
Cents LED on HarmonyControl should light with each
chord change but not every strum.
G
G
D
D
E
E
Step 6:Auto LED lit
You’re now ready to begin experimenting with guitar-
controlled harmony! Choose presets on your harmony
processor that are based on either Chord mode or
Scale mode harmony and sing while you play your
guitar. The display on HarmonyControl will show SC
(Scale) or CR (Chord) to confirm it recognizes the
preset’s harmony mode. If you see NA (Not
Applicable), this means that the preset you have loaded
is not based on Chords or Scale harmony mode and
HarmonyControl cannot control it.
Step 6: Manual LED lit
Set the MIDI input (or “receive”) channel on your
harmony processor to channel 1. This is the factory
default channel that HarmonyControl sends on. Play
your guitar and check to see that the MIDI input LED
lights on your harmony processor when you change
from one chord to the next.When set up correctly,this
LED will continue to flash while you have
HarmonyControl turned on .
Quick Start
Page 9

10 10
Step 7: Manual LED lit
Load a Chord preset on your harmony processor. Play
your guitar and sing into the microphone.The harmony
voices should follow your singing and guitar playing in
chordal motion. If this is the case, correct hookup and
operation in HarmonyControl’s Manual mode is
confirmed.
If your Manual-only harmony processor has Scale
features e.g. Digitech® Access and MIDI Vocalist,
consult the section called Manual Mode and the Setup
Menu later on in this manual to learn how to use them.
You should now consult the rest of this manual to learn
how to get the most of your new combination.
Quick Start
Page 10

111111
1.Auto/Manual LEDs
Displays the communication between HarmonyControl
and your harmony processor. On power up, the unit will
search for Auto-compatible units. If your unit is Auto-
compatible, the Auto LED will light after a moment.
2.Tuner Pitch Display
This is primarily used to show tuning when Tuner mode
is active. When Tuner mode is off, the two center LEDs
above the “0 Cents” legend indicate that a chord has
been recognized and sent from the MIDI Out.
3. Note/Scale Display
When the Tuner is on, this shows the closest recognized
note. When the Key function is used, this displays your
current scale variation.
4. LED Bar
Displays active status of the Key,Tuner and On modes.
Front & Back Panel Descriptions
1
2
3
4
5 6
Page 11

12
5. Key Switch
This allows you to work with fixed scale harmony when
required.This is described in more detail in the “Using
the Key Footswitch” section later in this manual.
6. On Switch
When the On LED is lit, HarmonyControl will send a
changing stream of chords or scale information as you
play.When it’s turned off, no musical information will be
sent from the MIDI Out which usually means you prefer
to stay in a fixed key and scale for the current song.
7. Power Input
Connect the supplied power adapter here.
8. MIDI Connections
The MIDI Out jack supplies the musical information
that drives your harmony processor.The MIDI In jack is
used to provide the return communication link from
your compatible harmony processor which enables
Auto mode.
9. Guitar Connections
The In jack receives a standard 1/4” guitar cable from
your guitar. The Out jack supplies the unprocessed
guitar signal to the next effect in your chain or to an
amplifier/PA system. Note that when using the Tuner
function, the guitar signal from the Out jack is muted.
Front & Back Panel Descriptions
4
MIDI GUITAR
IN OUTIN OUT
987
Page 12

13
HarmonyControl has a fast and accurate tuner
function to help you keep your guitar in tune. It is a
“chromatic” type, meaning that you can use it with
altered tunings. Keeping your guitar tuned well helps
HarmonyControl’s performance. The Tuner
automatically mutes the Guitar Out jack so you can
tune silently.
1. Press and hold the On footswitch. The Tuner LED
will light.
2. Pick any string on your guitar. The clearest pitch
display occurs when the other strings are silent.
3. If the pitch display on the right of the 0 Cents LED,
is lit, you need to flatten, or lower its pitch.
4. If the pitch display on the left of the 0 Cents LED is
lit, you need to sharpen, or raise the string’s pitch.
5. When you’re finished tuning, tap the On or the Key
button to exit Tuner mode.
Using the Tuner function
A guitar will stay in tune better when you tune up to
notes instead of tuning down.When a string is sharp,
tune down so it’s flat and then tune up from there.
TIP:
Page 13

Compatibility Chart
14
Product
Auto Detect Chords Fast Chords Adaptive Sc. Scale Select
TC-HHelicon
VoiceLive
9 9 9 9 9 9
VoiceWorksPlus
9 9 9 9 9 9
VoiceWorks
9 9 9 9 9 9
Quintet
9 9 9 9
VoicePro
9 9 9 9 9
VoicePrism
9
Digitech
®
Access
9 9 9 9
Vocalist Workstation (incl. EX)
9 9
Studio Vocalist (incl. EX)
9 9
MIDI Vocalist
9 9 9 9
Vocalist VHM-5
9
Korg
®
Korg iH
9 9
Page 14

Compatibility Chart
15
Adaptive Scale
This feature deciphers musical information from your
recent playing in order to make appropriate harmony
decisions.
Scale Select
This means that your harmony processor has adopted
the Major/Minor 1, 2 and 3 fixed scale convention and
that these scales can be selected via MIDI. Some songs
sound better with a single fixed scale and this feature
can offer faster and more convenient scale selection in
live performance. See the section on Using the Key
Footswitch later in this manual for details.
Compatibility explanations:
There are various degrees of compatibility with
HarmonyControl.The terms in the preceding table are
clarified below.
Auto
You are free to load Chords and Scale mode harmony
presets on these processors and HarmonyControl will
follow and adapt automatically.
Detect
This means that your harmony processor can return the
Product ID response message over MIDI that identifies
it to HarmonyControl for easier setup.
Fast Chords
An improvement in Chord mode reaction time can be
gained with this feature. A more efficient MIDI message
is transmitted instead of the MIDI chords typically
required by most processors.
Page 15

16
Plug ‘n’ Go
If you own a TC-Helicon product shown as Autocompatible in the Compatibility Chart, and you’ve
connected both MIDI cables to the respective MIDI Ins
and Outs as detailed in the Quick Start section, then
HarmonyControl will operate in Auto mode and you’re
finished with the setup!
When first powered up, HarmonyControl sends out a
MIDI signal to see if any of the Auto-compatible units is
connected. If it gets the correct reply, HarmonyControl
will configure itself automatically to respond to preset
changes you make on your processor. You can then use
the preset change controls on your harmony processor
to switch between Scale and Chord based presets and
employ the sounds of their different harmony motion
in your songs.
The beauty of this is that once you’ve made the
connections, most of the time you can leave
HarmonyControl turned on and forget about it while
you run your harmony processor as you always have by
changing presets and turning its Harmony Mute on and
off when needed.
For the times when you prefer the sound of a fixed
key and scale, and your harmony processor is listed as
having the Scale Select feature in the Compatibility
Chart, you can use the Key footswitch function,
described on the next page.
Auto Mode
Page 16

Using the Key Footswitch
17
A Fixed Key Works Also
If your harmony processor shows a check mark in the
Scale Select column in the Compatibility Chart, you can
explore the Key footswitch functions discussed below.
You will likely find that the harmony in some songs just
sounds better with a fixed, non-adaptive scale.You may
prefer the sound of the harmony “clinging” to the main
key more or you may just want to sing a song without
playing your guitar. In this case you can input a fixed key
and scale using the Key footswitch. When you set the
key and scale as described below, this will automatically
turn HarmonyControl off to “freeze” these values. For
you VoiceLive users accustomed to tapping in key and
scale with footswitches, the following is truly a bonus!
To set a fixed key and scale:
1. Load a Scale harmony preset in your processor.
2. Tap the Key footswitch, its LED will light. “S2” will indicate
that scale variation 2, the default, is selected. You can tap
the Key footswitch to cycle through the three scale
variations, S1, S2 and S3 if you need to.
3. Play a major or minor chord on your guitar that
corresponds to the key of your song. Upon receiving the
chord, the Key and On LEDs will turn off automatically
and the key will be sent to your harmony processor.
4. To return to Adaptive Scale mode, press the On
footswitch.
If you don’t know the Key to your song:
1. Load a Scale harmony preset in your processor.
2. Press and a hold the Key footswitch for two seconds, its
LED will flash. “S2” will indicate that scale variation 2 is
selected.
3. Play through the chords of your song while singing until
the harmonies sound correct. Try tapping the Key
footswitch to cycle through the three scale variations to
find one that works with your song.
To reset scale recognition from chords, cycle the On
footswitch so that it goes off and on then play your
chords again.
4. Press and hold the Key footswitch for two seconds to
set the learned key and scale. The Key and On LED will
turn off.
5. To return to Adaptive Scale mode, press the On
footswitch
Page 17

Using the Key Footswitch
18
The Major and Minor 1, 2 & 3 scale variations
TC-Helicon and older Digitech® harmony processors
have slight variations of typical Major and Minor scales to
expand compatibility with more song chord structures and
melodies.
There are three Majors: Maj1, Maj2 and Maj3 and three
Minors: Min1, Min2, Min3.The differences between these
are evident only when singing certain notes in the scale but
they can make the difference between harmonies
sounding appropriate for a song or not. Detailing the exact
differences is beyond the scope of this manual but there
are definitions in the manuals for these products, and of
course your ears, to tell you when one scale works over
another.
With compatible processors, HarmonyControl allows you
to select among these variations through MIDI.
Page 18

19
For those of you who own harmony processors that
are not on the Auto-compatible list, your
HarmonyControl will operate in “Manual” mode
indicated by the Manual LED. Initial setup in Manual
mode is described in the Quick Start section.
When HarmonyControl doesn’t get a response from
an Auto compatible unit on power up, it will default to
sending MIDI chords out on MIDI channel 1 as long as
the On LED is lit. If you have a processor that is listed
as having Scale Select features in the Compatibility
Chart, or the products aren’t working correctly
together, there is the Setup menu that allows
adjustment of useful settings.
The Setup Menu:
To enter Setup, press and hold the Key button while
inserting the AC power adapter plug into
HarmonyControl. You will see the first two letter
abbreviation, CH for MIDI Channel. You can press the
On footswitch repeatedly to change the value of the
current parameter, hold it to return to a default value
or press the Key footswitch to advance to the next
parameter. To exit, keep pressing the Key footswitch
until you see OK in the display, then press the On
footswitch.To reset all parameters in the Setup menu,
power up while holding the On footswitch.
MIDI channel (CH):
HarmonyControl transmits on
channel 1 by default. The channels of your harmony
processor and HarmonyControl must match in order
to communicate.You will need to find the setup screen
in your harmony processor to display its MIDI receive
channel. You can either change your processor to
channel 1 or set it to some other and change
HarmonyControl’s transmit channel here in the Setup
mode to match.
Product ID (PR):
If you are using an Auto-compatible
unit in Manual mode you’ll need to set the Product ID
number (listed in the following chart) of your harmony
processor to attain the listed enhancements.
Manual Mode and the Setup Menu
Page 19

Product ID Table:
Manual Mode and the Setup Menu
20
Harmony mode (HM):
If you have a Manual harmony
processor with Scale Select features, or you are using an
Auto-compatible unit in Manual mode you can set
which harmony mode you wish to use, Scale (1) or
Chord (2) in this menu. A value of 0 is used only to
diagnose issues for customer support.
There is a convenient shortcut to Chord and Scale
swapping during normal operation outside of the Setup
menu. Press and hold both footswitches for a moment.
The display will show either CR (Chords) or SC (Scale)
to indicate the current harmony mode.
HarmonyControl should have detected your processor
or the Product ID must be set to number of a
processor with Scale Select capability in order for this
to work. Also, don’t forget to set your processor to the
appropriate harmony mode preset.
MIDI sysex ID (ID):
If your unit is Auto-compatible, yet
it appears not to work, you can check that this ID
number and the MIDI System Exclusive ID of your
harmony processor are the same.
Product ID
(Default - MIDI Chords only) 0
TC-HHelicon
VoiceLive 1
VoiceWorksPlus 2
VoiceWorks 3
Quintet 4
VoicePro 5
VoicePrism 14
Digitech
Access and Vocalist VR 6
Vocalist Workstation 7, EX=8
Studio Vocalist 9, EX=10
MIDI Vocalist 11
Vocalist VHM-5 13
Korg
Korg iH 12
Page 20

2121
Performance Tips
Play it simple
Your guitar playing style directly influences the
operation of HarmonyControl. You will find that the
harmonies are closely following every move you make
and this may not be what you want all of the time. For
best results, avoid walking bass lines and any extra
playing ornaments when you have the harmonies
turned on. Also, the minimum chord required to affect
harmony movement is two simultaneous notes.
Harmony product setup tips
On TC-Helicon products with Smoothing and
Portamento features, these can be used to soften the
movement of the harmony voices. Experimentation
with these parameters can result in better sounding
harmonies. Good values to start with are: Portamento
30-50 and Smoothing 50-80. Also, check the value of
any timing humanization added to your presets.This is
best kept very low or off as it can add to perceived
chord change time.
Song Mode on VoiceLive & VoiceWorks
Song mode was a good method for controlling
harmony processors when you had no other method
to update musical information when needed.VoiceLive’s
and VoiceWorks’ MIDI implementation do not allow
HarmonyControl to work in Song mode. Fortunately, as
Song mode is mainly intended as a method for setting
the musical changes during a song, the need for it is
reduced with HarmonyControl.
Use your
ears, not your harmony product display
Your harmony product may be capable of indicating
chords, keys and scales on its display. Disregard what
your product shows. Use your ears to check whether it
sounds correct. HarmonyControl is working within your
harmony products MIDI specification and therefore
uses alternate and relative chords, keys and scales to
provide the best real-time musical information.
Always connect Guitar Out
Proper grounding is achieved when a cable connects
the Guitar Out to a mixer or amplifier.
Page 21

Performance Tips
22
Saving presets on your harmony device
HarmonyControl can be changing chords, key, scale, and
voicing via MIDI when connected to your harmony
processor. In cer tain chord circumstances, you may
overwrite your preset’s chord, key, scale or voicing
settings. A way around this is to make any edits on your
processor and then play a simple major chord before
saving both Scale or Chord presets.
Auto LED Off with VoiceLive, VoiceWorks,
VoiceWorksPl
us
For HarmonyControl to detect these products, the
MIDI In and Out between the devices must be
connected throughout their use. If both are connected,
check to make sure that the In from one device is
plugged into the Out of the other and vice-versa. If the
cables are connected properly, check your harmony
product’s manual to ensure there is no Sysex (MIDI
System Exclusive) filtering enabled in the product.
Great harmony: less is more
It can be amazing to hear someone use a vocal
harmony processor in a live performance. The best
sounding performers use the following advice for
getting great harmonies: use less voices,less often.What
makes for a great performance is well-placed harmony
and the number of harmony voices you employ at any
time. Experiment with one to two harmony voices in
the choruses of your songs and using your Harmony
Mute control in the verses.
Back up a bit
This isn’t a discussion of backing up the presets on your
harmony processor, although you probably should. It’s
more about what can happen when you start singing a
song from the middle of a section and the harmony
sounds different from when you started at the
beginning. This is an example of the Adaptive Scale at
work.To overcome this, start a few chords back and the
adaptive scale algorithm will have a better chance of
producing good harmony.
Page 22

23
“Chord” and “Scale” Explained
We use the terms “Chord” and “Scale” a lot in this
manual and for those who are new to using a harmony
processor, we offer a brief explanation. More extensive
detail is found in your harmony processor’s manual.
In order to make sure that the harmony voices sing the
right notes, your processor needs to know something
about the musical accompaniment and the notes you
are singing at any given moment. The terms “Chords”
(or “Chordal”), and “Scale” (or “Scalic”) represent two
of the methods of communicating your musical
requirements to your processor. The presets in your
processor reflect these methods, or modes, which are
usually shown in its display. There are other harmony
methods in these products, but they are beyond the
scope of this manual and the functionality of
HarmonyControl.
Chord mode
Chord mode is the default messaging scheme
HarmonyControl uses to control your processor
because nearly all harmony processors have Chord
mode. You can use a preset based on Chord harmony
when a Scale harmony preset does not properly match
your song’s chord changes and melody. Chord harmony
presets will adjust to your chord extensions such as
Dom7, Suspended, Maj7 etc. but they can also result in
close major second intervals between your melody and
the harmony voices.
Scale mode
Scale harmony presets cling closely to your sung melody
and it they produce the harmony sound of popular
music. The Scale harmony method used in
HarmonyControl has less support for recognizing and
acting upon the chord extensions you play on your
guitar. This can be a plus because not every chord
extension needs to be reflected in your vocal
harmonies.
As you become familiar with the interaction between
HarmonyControl and your harmony processor, you’ll
find the harmony sound that is most pleasing to you.
Page 23

Harmony Processor Notes
24
Some of the harmony processor products supported
by HarmonyControl have special requirements. Below
are helpful tips for their operation.
VoicePro:
The CC Assign map in the Utility section needs to be
adjusted. before Scale harmony will work. Start with the
Default style. Scroll down until you see CC30 in the
right column. Adjust the Controller 4 soft knob clicks
clockwise so the controller is set to Harmony Key. Now
set the controller following it, CC31, to Harmony Scale.
Quintet:
1
. While this is an auto-compatible processor, its MIDI
channel needs to be set manually in its Setup menu (not
HarmonyControl’s) in order to work.
2
. When using Quintet in Scale mode, the presets that
work for most songs have the Maj2 variation.
3
. Pressing the Key button will show SL in the display
meaning “Scale Learn”. There is no Scale Select feature
in Quintet and therefore you won’t see the S2 display
shown with other products.
4
.When you change presets on Quintet, you will briefly
see “Preset Dumped” in its display.This is normal.
Digitech® Products:
1.
If HarmonyControl has previously detected a different
processor, it will need to be reset (hold On button during
power up) to detect your current processor.The product
ID will show a moment after power up.
2.
If it seems the harmonies don’t change correctly as they
did at the beginning of your power up session, simply
power your harmony processor off and then on again.
3.
If a chord you are playing is not recognized by your
processor, it may be that this chord is not available in the
current preset. Either choose another preset or edit the
current one to include this chord.
4.
Manuals for many of these products are located at:
http://www.digitech.com/Downloads/discontinued.php
at the time of this printing.
Page 24

25
Technical Specifications
Analog Inputs
1/4” Phone Jack, Input Impedance: 1MOhm
Max Input Level 16 dBu @ 12V supply
Analog Outputs
1/4” Phone Jack
Output Impedance 0 Ohm, Sense 225 Ohm
Max Output Level @ 16 dBu @ 12V supply
Dynamic Range, 106/98 dB, 20 Hz to 20 KHz @ Input
Level 16/-2 dBu, not A-weighted
THD < -90 dB (0.0032%) @ 1 kHz, I/O Level 16 dBu,
Load > 2400 Ohm
Frequency Response, +0.1/-0.2 dB, 20 Hz to 20 KHz
Conversion Characteristics
Sample Rate 48 kHz, Converter AKM AK4620B
AD / DA Conversion 24 bit, 128x oversampling
bitstream
MIDI:
In/Out – 5 pin DIN
EMC & Safety
Complies with EN 55103-1 and EN 55103-2 FCC part
15, Class B, CISPR 22, Class B
Certified to IEC 65, EN 60065, UL6500 and CSA E60065
CSA FILE #LR108093
Environment
Operating Temperature 32° F to 122° F (0° C to 50° C)
Storage Temperature -22° F to 167° F (-30° C to 70° C)
Humidity Max. 90 % non-condensing
Supplementary
Dimensions 130mm x 132mm x 41mm (5" x 5.25" x
1.5")
Weight 1.5 lb. (0.72 kg)
Warranty Parts and labor 1 year
 Loading...