

Page 1

FLASHBACK X4
DELAY & LOOPER
User Manual
Page 2

Table of contents
Introduction 1
Important safety instructions 2
Warning 2
Service 2
EMC / EMI 3
For customers in Canada 3
Unpacking and setting up 4
Rea dy… 4
Set… 4
Play! 4
Setup example: regular mono signal path 5
Setup example: amplifier effect loop 6
Dynamic 8
2290 8
2290 w/mod 8
Slap 8
Lofi 8
Ping Pong 8
1 – Audio inputs and outputs 9
Audio inputs 9
Audio outputs 9
2 – Expression pedal input 10
Choosing an expression pedal 10
Assigning delay parameters and parameter ranges to an expression pedal 10
Resetting parameters and parameter ranges 11
3 – Power input 12
Delay types 7
Tape 7
Tube 7
Space 7
Analog 7
Analog w/mod 7
Reverse 7
4 – USB ja ck 12
5 – MIDI IN / MIDI THRU jacks 12
MIDI IN jack 12
MIDI THRU jack 12
6 – Delay type selector 13
a
Page 3

The TonePrint concept 14
14 – TA P footswitch 23
Transferring TonePrints to the pedal 15
Transferring TonePrints to the pedal via USB 15
Transferring TonePrints to the pedal by beaming 15
7 – DE LAY TIM E knob 16
8 – Subdivision selector switch 16
9 – FEEDBACK k nob 17
10 – DELAY LEVEL k nob 17
11 – LOOPER/DELAY switch 18
12 – LOOPER LEVEL knob 19
13 – Preset footswitches (A / B / C) 20
Recalling a preset 20
Factory presets 20
Preset off / Bypass mode 20
Storing presets 21
Delay spill-over 21
TonePrints and presets 22
Using the Looper module 24
Using the delay in Looper mode 24
Recording a loop 25
Playing a loop continuously 25
Stopping loop playback immediately 25
Playing a loop once 25
Stopping loop playback at the end of the loop 25
Undoing a loop recording 26
Deleting a loop completely 26
Loops cannot be stored 26
Bypass modes 27
True Bypass mode 27
Buffered Bypass mode 27
Kill-Dry feature 28
b
Page 4

Introduction
Introduction
Congratulations on the purchase of your new Flashback
X4 Delay & Looper.
Flashback X4 Delay & Looper builds on the success of TC’s
popular Flashback pedal. It provides 12 delay types in pristine TC
Electronic quality, tap tempo and three preset slots for an instant
classic.
Flashback X4 Delay & Looper is TonePrint-enabled, allowing you
to load up to four signature Flashback delay settings as created and
used by the biggest names in rock – from Steve Morse and Doug
Aldrich to Joe Perry, Steve Stevens and many, many more.
We believe that Flashback X4 Delay & Looper offers the best
sounding delay as well as enormous flexibility within a compact
delay pedal – and we are certain that you will feel the same.
About this manual
This manual will provide you with a quick overview of how to get
rocking fast as well as an in-depth look at the pedal’s more advanced features. Happy reading!
Please note: TC Electronic reserves the rights to change the contents of this manual at any time.
The latest revision of this manual can be downloaded from
http://www.tcelectronic.com/manuals.asp
This is version 1.0 of the Flashback X4 Delay & Looper manual.
If you still have questions after reading this manual, please use
TCElectronic Support:
http://support.tcelectronic.com/
1
Page 5

Important safety instructions
Important safety instructions
– Read these instructions.
– Keep these instructions.
– Heed all warnings.
– Follow all instructions.
– Do not use this apparatus near water.
– Clean only with dry cloth.
– Do not block any ventilation openings. Install in accordance
with the manufacturer’s instructions.
– Do not install near heat sources such as radiators, heat reg-
isters, stoves, or other apparatus (including amplifiers) that
produce heat.
– Only use attachments/accessories specified by the manufac-
turer.
– Refer all servicing to qualified service personnel. Servicing is
required when the apparatus has been damaged in any way,
such as power supply cord or plug is damaged, liquid has been
spilled or objects have fallen into the apparatus, the apparatus
has been exposed to rain or moisture, does not operate normally, or has been dropped.
Warning
To reduce the risk of fire or electrical shock, do not expose this
equipment to dripping or splashing and ensure that no objects
filled with liquids, such as vases, are placed on or near the equipment.
Do not install this product in a confined space.
Service
All service must be performed by qualified personnel.
Caution
You are cautioned that any change or modifications not expressly
approved in this manual could void your authority to operate this
equipment.
When replacing the battery follow the instructions on battery
handling in this manual carefully.
2
Page 6

EMC / EMI
EMC / EMI
This equipment has been tested and found to comply with the
limits for a Class B Digital device, pursuant to part 15 of the FCC
rules.
These limits are designed to provide reasonable protection against
harmful interference in residential installations. This equipment
generates, uses and can radiate radio frequency energy and, if not
installed and used in accordance with the instructions, may cause
harmful interference to radio communications. However, there is
no guarantee that interference will not occur in a particular installation. If this equipment does cause harmful interference to radio
or television reception, which can be determined by turning the
equipment off and on, the user is encouraged to try to correct the
interference by one or more of the following measures:
– Reorient or relocate the receiving antenna.
– Increase the separation between the equipment and receiver.
– Connect the equipment into an outlet on a circuit different from
that to which the receiver is connected.
– Consult the dealer or an experienced radio/ TV technician for help.
For customers in Canada
This Class B digital apparatus complies with Canadian ICES-003.
Cet appareil numérique de la classe B est conforme à la norme
NMB-003 du Canada.
3
Page 7

Unpacking and setting up
Unpacking and setting up
Ready…
The Flashback X4 Delay & Looper box should contain the following items:
– 1 Flashback X4 Delay & Looper pedal
– 1 TC 9V DC power supply with interchangeable plugs
– 2 rubber feet for “non-velcro” pedal board mounting
– 1 USB cable for transferring TonePrints from the computer to
the pedal and updating the pedal firmware
– 1 TC Electronic sticker
– 1 leaflet about TC’s guitar FX product range.
Inspect all items for signs of transit damage. In the unlikely event of transit damage, inform the carrier and
supplier.
If damage has occurred, keep all packaging as it can be used as
evidence of excessive handling force.
Set…
– Attach the plug applicable to your region to the power supply.
Connect the power supply to the 9V jack on the back of the
Flashback X4 Delay & Looper and plug the power supply into
a power outlet.
– Make sure the LOOPER/DELAY switch is set to “Delay”.
– Connect your instrument to the INPUT MONO jack on the back
of the pedal (see page 5).
– Connect the OUTPUT MONO jack on the back of the pedal to
your amplifier.
Play!
4
Page 8
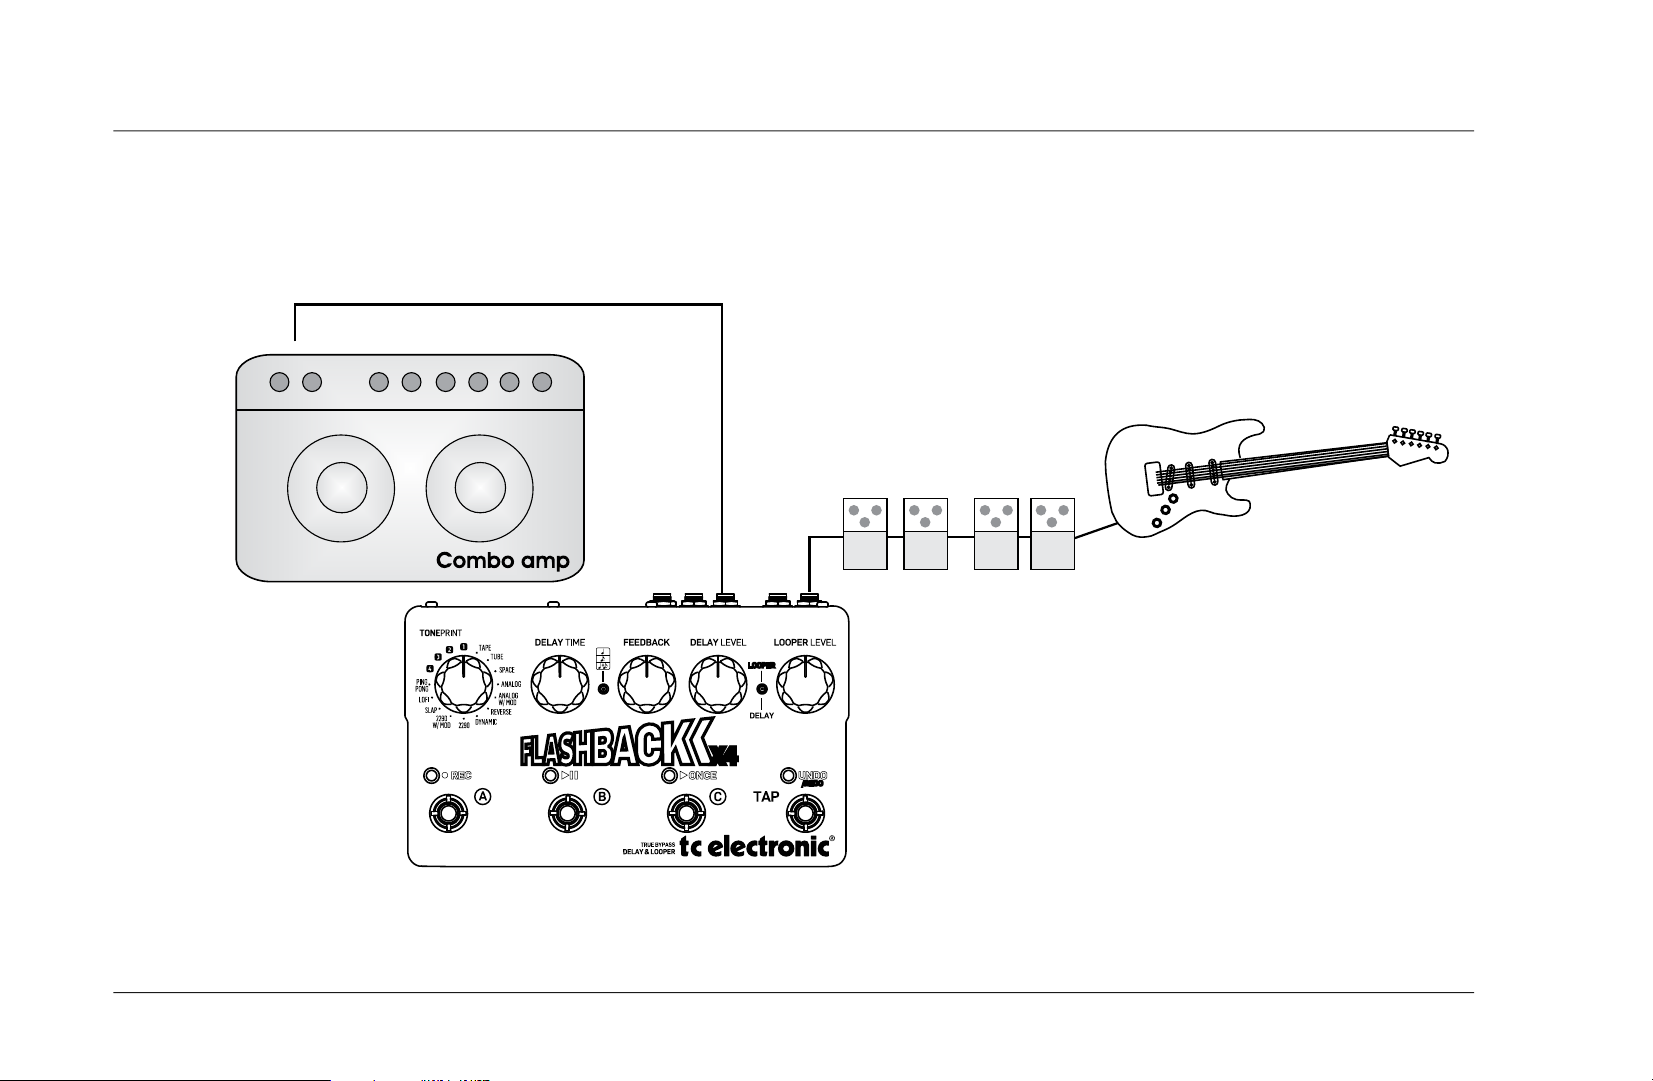
Setup example: regular mono signal path
Input
Setup examples
Modulation
Pedals
Drive
Pedals
5
Page 9

Setup example: amplifier effect loop
Pedals
Pedals
Setup examples continued
Input
FX Loop Send
FX Loop Return
Drive
Pedals
Modulation
Pedals
6
Page 10

Delay types
Delay types
“OK… So what does this thing do?”
“Glad you asked. First and foremost, the Flashback X4 Delay &
Looper is a top-notch delay unit – so let’s talk delays!”
TAPE
Who doesn’t love the smooth sound of an old tape echo machine?
The “Tape” setting makes for an overall great starting point with
its mellow and “warbling” sound.
TUBE
This delay type has been tweaked to sound like an old tube tape
echo – much like the “Tape” setting, but with a bit more warmth.
Use this setting if you want your fans to check the stage for hidden
vintage gear…
SPACE
It’s hard not to like the luscious tape sound of the original Roland®
Space Echo*. The “Space” setting instantly gives you rich echo
sounds with a bit of Space Echo* mojo.
ANALOG
This is as close as you can get to the charming nature of an old
analog transistor bucket-brigade delay without buying the real
thing! With every repeat you get more of that old-school “fade to
grey” vibe.
ANALOG W/MOD
Take a trip down Memory Lane with this rich and larger-than-life
sounding delay. “Analog w/mod” will definitely spice up your sound.
REVERSE
If you’ve been around for some time, you know the drill: Record a
guitar part on tape. Flip the tape over. Play it back. This is a classic
effect made famous by guitar legends such as Jimi Hendrix – and
although it’s kind of “old school”, the reverse effect still seems to
inspire people to try out new things.
Try t his:
Turn the FEEDBACK knob all the way down to hear only the reversed signal.
7
Page 11

Delay types continued
DYNAMIC
Imagine you had someone turn up the volume of your delay pedal
as soon as you stop playing for a second… and turn it down again
when you resume playing.
Why not let the Flashback X4 Delay & Looper be that someone?
That’s what the “Dynamic” delay type does. It’s especially useful
for fast solo parts where you don’t want the delay repetitions interfering with your playing.
2290
Once upon a time… (i.e., back in 1985) TC Electronic released the
2290 Dynamic Digital Delay. It set the bar for professional delays
for years to come and is still held in high regard among delay enthusiasts.
Use the “2290” setting for the most crisp and clean delay you can
imagine. This is the standard.
2290 W/MOD
Take the 2290’s pristine sound, send it through three (!) chorus
pedals… et voilà. If you’re into the sound of The Edge, you don’t
want to miss this setting.
Oh, and while you’re at it, try playing around with the SUBDIVISION
SELECTOR Switch.
Use this setting to get your rockabilly on and pay homage to the
rich staccato heritage of Brian Setzer, Chet Atkins and Scotty
Moore, or as an alternative to reverb.
LOFI
Fed up with hi-fi? Try the “Lofi” setting to get that dirty feel.
From punk to rock – play around with the knobs, but no matter
what you do: It ain’t gonna sound pretty.
PING PONG
Like the ball in the eponymous game, the delay repeats jump from
left to right (provided you’re using both outputs for a stereo signal). The effect is really wide.
Ping Pong is a lot of fun to play around with in stereo – but it
sounds great in mono, too.
*
All product names are trademarks of their respective owners,
which are in no way associated or affiliated with TC Electronic.
These product names and descriptions are provided for the
sole purpose of identifying the products that were studied during product development.
SLAP
A delay type for all things country – but you can also use this for
many other genres.
8
Page 12

1 – Audio inputs and outputs
1
The Flashback X4 Delay & Looper is equipped with ¼" input and
output jacks.
Audio inputs
– If your signal source is mono, connect it to the INPUT MONO
jack.
– If your signal source is stereo, connect the cable carrying the
left signal component to the INPUT MONO jack and the cable
carrying the right signal component to the INPUT –STEREO jack.
Audio inputs and outputs
“So how do I configure the Flashback X4 for mono or
stereo operation? What if I want mono input and stereo
out or…”
“Stop worrying – start rocking!”
You don’t need to worry about mono/stereo configuration issues.
The Flashback X4 Delay & Looper uses auto-sensing technology
to detect if you are using it in mono or stereo – both on inputs
and outputs.
Audio outputs
– If the next device in the signal chain has a mono input, connect
the Flashback X4 Delay & Looper’s OUTPUT MONO jack to the
other device’s input.
– If the next device in the signal chain has stereo inputs, connect
the Flashback X4 Delay & Looper’s OUTPUT MONO jack to the
left input and the OUTPUT –STEREO jack to the right input of
the device.
9
Page 13

2 – Expression pedal input
Expression pedal input
2
The Flashback X4 Delay & Looper allows you to connect an expression pedal (optional/not included).
Once you have connected and configured an expression pedal, you
can use it to control one or more of the following parameters:
– Delay Time
– Feedback Level
– Delay Level.
These parameters will be explained later in this manual.
You can define…
– which parameter(s) you want to control with an expression
pedal and
– the parameter range to control.
Choosing an expression pedal
For use with the Flashback X4 Delay & Looper, you’ll want to use
a 25 kOhm linear pot expression pedal.
Please note that a standard guitar volume pedal has a 250 kOhm
logarithmic pot and cannot be used as an expression pedal for the
Flashback X4 Delay & Looper.
If you already own an expression pedal and you are not sure if you
can use it with the Flashback X4 Delay & Looper, please ask your
local vendor or get in touch with TC Support.
Assigning delay parameters and parameter ranges to an expression pedal
You can control any combination of the Delay Time, Feedback Level and Delay Level parameters with an external expression pedal.
To set up parameters and parameter ranges, proceed as follows:
– Connect an expression pedal to the E XP PEDAL jack on the
Flashback X4 Delay & Looper.
– Switch on the Flashback X4 Delay & Looper.
– Choose a preset (A, B or C) on the Flashback X4 Delay &
Looper.
The LED of the selected preset will light up.
– Set the expression pedal to the maximum position.
10
Page 14

– Set the knobs for the parameters you want to control to the
desired maximum values.
– Set the expression pedal to the minimum position.
– Set the knobs for the parameters you want to control to the
desired minimum values.
– Press and hold the footswitch for the preset to store these
settings.
Expression pedal input continued
Resetting parameters and parameter ranges
To reset the parameters and parameter ranges assigned to a Flashback X4 Delay & Looper preset, proceed as follows:
– Connect an expression pedal to the E XP PEDAL jack on the
Flashback X4 Delay & Looper.
– Switch on the Flashback X4 Delay & Looper.
– Choose the respective preset (A, B or C) on the Flashback X4
Delay & Looper.
– Set the expression pedal to the maximum position.
– Press and hold the footswitch for the preset.
11
Page 15

Power input / USB jack / MIDI jacks
3 – Power input
4
3 5
Type: standard 5.5/2.1 mm DC plug, centre negative (supplied).
To power up the pedal, connect the power supply that came with
the Flashback X4 Delay & Looper to the power input jack.
You may also use another 9V or 12V power supply, as long as it
provides 300 mA or more. Use power supplies with isolated outputs to minimize hum.
4 – USB jack
You can download new TonePrints from the TC website to your
computer and transfer them to your pedal.
Use the Mini-B to Type A USB cable that came with the pedal to
connect the Flashback X4 Delay & Looper to a computer.
For more on downloading and using TonePrints, see
http://www.tcelectronic.com/toneprint
5 – MIDI IN / MIDI THRU jacks
These are standard MIDI (Musical Instrument Digital Interface)
connectors.
MIDI IN jack
Connect a computer/DAW (or another device generating a MIDI
Clock signal) to the MIDI IN jack to control the pedal’s delay
tempo.
An incoming MIDI Clock signal will override the settings of the
pedal’s own Delay Time knob. However, the Subdivision Selector switch still defines the actual note values used to generate the
delays.
You can also send MIDI Program Change messages from your
computer (or another MIDI-capable device) to the pedal to switch
between the pedal’s three presets.
– Program Change message #001: Recall Preset A
– Program Change message #002: Recall Preset B
– Program Change message #003: Recall Preset C
The Flashback X4 Delay & Looper is receiving MIDI messages on
all MIDI channels (MIDI Omni Mode).
MIDI THRU jack
To forward the incoming MIDI signal to another MIDI-equipped
device, connect the MIDI THRU jack of the Flashback X4 Delay &
Looper to the MIDI Input of another MIDI device.
12
Page 16

Delay type selector
6 – Delay type selector
6
Use the DELAY TYPE SELECTOR to choose the type of delay you
want to work with. The Flashback X4 Delay & Looper offers a
wide range of delays – from classic tape delays to the pristine
sound of a TC 2290.
The delay types are described on page 7.
The slots “1”, “2”, “3” and “4” of the Delay Type Selector are
“placeholders” for TonePrints. The Flashback X4 Delay & Looper
comes equipped with the following default TonePrints:
– Delay TonePrint by Steve Morse
– Basic Delay TonePrint by Bumblefoot
– Basic Delay TonePrint by Doug Aldrich
– Synth Delay by James “Munky” Shaffer
The TonePrint concept is explained in detail on page 14.
When you choose a delay type, the chosen delay type will “pick
up” the current positions of the delay control knobs (for example
DEL AY TIM E). However, if you choose a preset and turn one of the
delay control knobs, nothing will change except for that one, specific parameter.
13
Page 17

The TonePrint concept
“So what exactly is this TonePrint thing?”
“Amazing, that’s what it is! Allow us to explain…”
When you look at your pedal, you’ll only see a few knobs and
switches. However, they actually control a large number of internal
parameters.
TC has defined the relationship between each knob and all the
parameters “under the hood”. But wouldn’t it be cool to have
guys like Steve Stevens, Scott Ian or Paul Gilbert (i.e., some of
the world’s leading guitar players) virtually rewire these controls,
defining what should happen behind the scenes?
This is exactly what TonePrint does.
We work with top guitar players who explore a pedal’s hidden
tonal potential, redefining the controls and creating their personal
TonePrints.
TonePrints
TC is making these custom TonePrints available to you. Uploading
them to your pedal is really easy, you can even change them as
often as you like, and the best part: They’re totally free.
14
Page 18

Transferring TonePrints to the pedal
Transferring TonePrints
“So how do I load new TonePrints into my pedal?”
“Use USB, Luke – or beam it.”
Transferring TonePrints to the pedal via USB
– Go to www.tcelectronic.com/toneprint.
– Select your TC product in the “TonePrint by product” sidebar.
– Download a TonePrint you’d like to try.
– Connect your TC pedal and your computer using the USB
cable that came with the pedal.
– Turn the Delay Type Selector knob to the TonePrint Slot (“1”,
“2”, “3” or “4”) that you want to use for the new TonePrint
and turn on the delay.
– Turn your TC pedal on.
– Launch the TonePrint application you downloaded and follow
the on-screen instructions. It’s quick and easy.
Transferring TonePrints to the pedal by beaming
For all you iPhone and Android users out there, we
created the TonePrint App. iPhone users can download it from Apple’s App Store, Android users will find
it on Google Play.
– Launch the app on your smartphone and find the TonePrint
you want to use.
– Plug your guitar or bass into your TC pedal.
– Turn the Delay Type Selector knob to the TonePrint Slot (“1”,
“2”, “3” or “4”) that you want to use for the new TonePrint
and turn on the delay.
– Turn your TC pedal on.
– Turn up the volume on your instrument and set the pickup
selector to one pickup.
– Hold the speaker of your smartphone next to the chosen
pickup and touch “Beam to pedal”.
(Or just follow the on-screen instructions on your phone.)
15
Page 19

Delay time knob / Subdivision selector switch
7 – DEL AY TI M E knob
7
8
Turn the D E L AY T IME knob all the way down for really short repeats. Turn the DE L AY TI M E knob up until you find your preferred
amount of delay time. Turning the D EL AY T IME knob all the way
up will give you a whopping seven seconds of delay time for most
delay types.
The knob is scaled so that you’ll be within the most usable range
from the minimum position to approximately the 3 o’clock position. Turning it beyond this point will give you very high values.
8 – Subdivision selector switch
Use this switch to choose the note intervals that the delay repetitions are based on.
– Top position: quarter notes
– Middle position: dotted eighths
– Bottom position: quarter notes and dotted eighths.
16
Page 20

Feedback knob / Delay level knob
9 – FEEDBACK knob
9
Use the FEEDBACK knob to set the desired numbers of delay repeats. Turning the FEEDBACK knob to the right will give you more
delay repeats.
10
10 – DELAY LEVEL knob
Use the DELAY LEVEL knob to set the desired level of the delay
signal. Turning the DELAY LEVEL knob to the right will increase the
volume of the delay signal.
Unlike the delay level knobs of some other pedals, the DE LAY
LEVEL knob of the Flashback X4 Delay & Looper will not influence
the volume of the dry (unprocessed) signal, since we don’t want to
mess with the original signal from your instrument.
Analog-dry-through allows the analog signal from your guitar to
pass through the pedal without being digitized, even when the
pedal is turned on. This means absolutely zero latency and no tone
coloration.
17
Page 21

11 – LOOPER/DELAY switch
11
Use this LOOPER/DELAY switch to set the functionality of the foot-
switches A, B and C.
– When the switch is in the top position (“Looper”), the four
switches A, B , C and TAP (UNDO/REDO) control the Looper
functions.
Looper/Delay switch
The Looper module is explained on page 24.
– When the switch is in the bottom position (“Delay”), the three
switches A, B and C can be used to access the Flashback X4’s
three presets.
Using presets is explained on page 20.
18
Page 22

12 – LOOPER LEVEL knob
12
Use the LOOPER LEVEL knob to set the playback volume of the
Flashback X4’s Looper module.
You can still use the delay effect when using the Looper
module. If you do so, use the DELAY LEVEL and the LOOPER LEVEL
knobs to balance the volumes of the effect and the audio loop.
Looper level knob
19
Page 23

Presets
13 – Preset footswitches (A / B / C)
13
When the LOOPER/DELAY switch (see page 18) is in the bottom
position (“Delay”), the three switches A, B and C can be used to
access the Flashback X4 Delay & Looper’s three presets.
When the LOOPER/DELAY switch is in the top position (“Looper”),
you do not have access to presets. Instead, the current positions
of the delay knobs apply (see page 24).
Recalling a preset
Press the footswitch corresponding to the preset you want to
recall (use). Only one preset can be active at a time.
The LED of the active preset’s footswitch will be lit.
Factory presets
The Flashback X4 Delay & Looper comes with three factory presets, but you can overwrite them with your own favorite settings.
A This is an Eric Johnson-style tape echo with somewhere be-
tween 2 and 3 repeats.
B This is a swirly and big 2290 delay with modulation on the re-
peats. Great for clean playing and volume swells – or if you’re
into U2…
C This is a short analog delay that will give your sound a bit more
ambience.
Preset off / Bypass mode
When none of the three footswitch LEDs are lit, the pedal is in
bypass mode, and you will only hear the dry, unprocessed signal.
If you have set the internal Kill-Dry dip switch to the “On” position (see page 28) and none of the three footswitch LEDs are
lit, no signal will be present at the Flashback X4 Delay & Looper’s
output.
20
Page 24

Storing presets
When you have selected a preset and you have changed parameters (e.g. the delay time), you may want to store your edited version of the preset.
To store the current delay settings, press and hold the footswitch of
the currently active (lit) preset slot for circa two seconds.
The LEDs of the TAP footswitch and the selected preset will blink
to confirm that the preset has been stored.
Delay spill-over
The Flashback X4 Delay & Looper has two bypass modes: True Bypass and Buffered Bypass Changing the bypass mode is described
on page 27.
– When the Flashback X4 Delay & Looper is set to True Bypass
and you switch off the currently selected preset, the delay will
immediately be switched off.
– When the Flashback X4 Delay & Looper is set to Buffered
Bypass and you switch off the currently selected preset, the
delay will be allowed to fade/“ring out”.
Storing presets
“So what is saved as part of a preset?”
“Every delay parameter!”
A preset includes all settings of the Flashback X4 Delay & Looper’s
delay module, including the TonePrint (i.e., if the Delay type selector is set to one of the four TonePrint slots).
If you have attached an external expression pedal to the Flashback
X4 Delay & Looper (see page 10), the parameters assigned to
this expression pedal are stored as part of the preset, too.
21
Page 25

TonePrints and presets
When you have stored a preset that is using a TonePrint, you
can upload/beam a new TonePrint to that TonePrint slot without
affecting the preset. This means that the Flashback X4 Delay &
Looper effectively gives you access to seven TonePrints, like this:
– Upload or beam four TonePrints to the four TonePrints slots
of the Flashback X4 Delay & Looper (see page 14).
– Switch to TonePrint slot 1, adjust delay settings and store the
results as Preset A.
– Switch to TonePrint slot 2, adjust delay settings and store the
results as Preset B.
– Switch to TonePrint slot 3, adjust delay settings and store the
results as Preset C.
– Load four new TonePrints into the four TonePrints slots of the
delay type selector.
You now have access to seven TonePrints – those in the four TonePrint slots and those stored as a part of presets A, B and C.
TonePrints and presets
22
Page 26

14 – TAP footswitch
14
To set the desired delay time, you can tap the TAP footswitch
rhythmically. This is an alternative to using the DEL AY TIM E knob
(see page 16).
Tap footswitch
Simply tap the TA P footswitch a few times in the current song
tempo.
To readjust the tempo when it’s a bit off (of course, the drummer is
to blame!), just tap the TAP footswitch again in the correct tempo.
Please note that the tempo is defined by tapping quarter notes.
However, if you have set the Subdivision Selector switch to the
mid or bottom position, what you will actually hear are delay repeats with dotted eighths and/or quarter notes timing.
23
Page 27

Using the Looper module
The Looper module
12
Using the delay in Looper mode
You can still use the delay when working with the looper module
of the Flashback X4 Delay & Looper. This means that you can record loops with delay effects.
Please note the following differences between Delay mode and
Looper mode:
– When the LOOPER/DELAY switch is set to “Delay”, you are usu-
ally working with one of the Flashback X4 Delay & Looper’s
three delay presets.
In other words: Either preset A, B or C is active, and the LED
of the respective footswitch is lit.
13
The Flashback X4 Delay & Looper is actually two products in one:
– a delay pedal and
– a looper that allows you to build audio loops by stacking sev-
eral recordings of what you are playing.
To operate the looper module, set the LOOPER/DELAY switch to
the “Looper” position.
When the LOOPER/DELAY switch is set to “Delay” and no delay
preset is active, the Flashback X4 Delay & Looper is in bypass
mode. No effect signal is coming out of the pedal, only the
unprocessed signal is being passed through.
– When the LOOPER/DELAY switch is set to “Looper”, you do not
have access to presets. Instead, the current settings of the delay
controls (DELAY TYPE, DELAY TIME, FEEDBACK, DELAY LEVEL) apply. This means that “what you see is what you hear” – and
what you hear is being recorded as part of a loop.
Accordingly, if you do not want to record any delay effects as
part of your loops, simply turn the DELAY LEVEL knob down to
minimum position.
24
Page 28

The Looper module continued
Recording a loop
– Set the LOOPE R D EL AY switch to “Looper”.
– To start recording a loop, tap the REC footswitch.
– To stop recording, tap the REC footswitch again.
You can start and stop recording while the loop is being played
back.
As you can change delay settings during loop recording, you can
get really creative when stacking your recordings. For example,
you could start with a dry bass line (DELAY LEVEL set to minimum),
then add some chords with a subtle Tape delay and top it all off
with a solo drenched in a luscious “2290 w/mod” delay.
Playing a loop continuously
To start playback of a previously recorded loop from the start,
press the footswitch with the Playback/Pause symbol.
Playback will continue until you stop it.
Stopping loop playback immediately
To stop playback immediately, press the footswitch with the Playback/Pause symbol again.
Playing a loop once
To play back a previously recorded loop just once, press the Playback ONCE footswitch.
Stopping loop playback at the end of the loop
To stop the playback of the loop at the end of the loop cycle, press
the Playback ONCE footswitch. The Playback ONCE footswitch
will blink until the end of the loop cycle is reached. At this point,
playback is stopped.
This is very helpful if you want to end a performance “gracefully”
(i.e. right at the end of a loop cycle) without having to worry about
hitting the footswitch at just the right moment.
25
Page 29

The Looper module continued
Undoing a loop recording
During loop recording, each new recording is added on top of the
loop’s previous version. However, if you make a mistake during
a recording cycle, you can undo it by pressing the UNDO/REDO
footswitch.
If you change your mind, you can press the UNDO/REDO footswitch again to bring back the previously deleted recording cycle.
The undo/redo feature is not only useful for fixing mistakes – it can
also be used as a creative tool on stage. Here is a simple example:
– Record a bass line (loop cycle 1)
– Record some chords (loop cycle 2)
– Record a melody (loop cycle 3)
– Tap the UNDO/REDO footswitch to remove the melody. Sing
or improvise.
– Tap the UNDO/REDO footswitch again to bring back the previ-
ously recorded melody.
Deleting a loop completely
Loops cannot be stored
Please note that while you can store the delay module’s settings as
presets, you cannot store loops. When you switch off the Flashback
X4 Delay & Looper, the current loop is erased.
To delete your loop recording (not only the last recording cycle)
completely, press and hold the UNDO/REDO footswitch.
26
Page 30

Bypass modes
The Flashback X4 Delay & Looper has two bypass modes: Tru e
Bypass and Buffered Bypass. To set the desired mode, you
have to open the device.
– Unscrew the back plate and look for the two small dip switches
shown in the illustration.
The left dip switch (labelled “1”) switches between True Bypass
mode (this is the default mode) and Buffered Bypass mode.
Bypass modes
True Bypass mode
…is a hard-wire bypass that ensures that there is absolutely no
coloration of tone when the pedal is bypassed.
Using True Bypass on all your effect pedals is the right choice for
setups with only a few pedals and relatively short cables before
and after the pedals.
Buffered Bypass mode
If you use a long cable between your guitar and the first pedal, or
if you use many pedals on your board, or if you use a long cable
from your board to the amp… the best solution will most likely
be to activate Buffered Bypass mode in the first and the last pedal
in the signal chain.
“Can I hear the difference between a pedal in True Bypass or Buffered Bypass mode?”
“Maybe, maybe not – many factors apply: active vs. passive pickups, single coil vs. humbucker, cable quality, amp impedance…
There is no ultimate answer. Use your ears and find the best
solution for your setup!”
True Bypass Buffered Bypass
27
Page 31

Kill-Dry feature
Kill-Dry feature
The Kill-Dry feature allows you (you guessed it) to “kill” the dry
signal and only keep the processed signal.
If you use this pedal in the parallel effects loop of your guitar amplifier, you do not want the dry (unprocessed) signal to pass through
the pedal, as this could lead to undesired phasing and cancellation
effects.
To activate Kill-Dry, you have to open the device.
– Unscrew the back plate and look for the two small dip switches
shown in the illustration.
When the pedal is set to Buffered Bypass mode (see page 27),
you can use the right dip switch (labelled “2”) to activate KillDry.
When the pedal is set to True Bypass mode, Kill-Dry is not an
option.
Kill-Dry off Kill-Dry on
The default mode is Kill-Dry off – i.e., by default, the dry signal
is being passed through the pedal.
28
 Loading...