

Tascam TM-AR1 Owner's Manual
TM-AR1
OWNER'S MANUAL
Description
Generally speaking, TM-AR1 acoustic control filter system is a
portable live sources recording device which can reduce room
ambience. It is an advanced wall composited by 5 pieces high
quality metal panels, can be easily positioned behind any
microphone. The reflection filter is small in size, light in weight,
well-centrobaric.
The main function of the product is to offer a “dry” vocal or
instrument recording environment, can be widely used in such
conditions as studio recording, personal recording and many
other similar situations, can effectively reduce room ambience and
isolate the microphone from ambient noise.
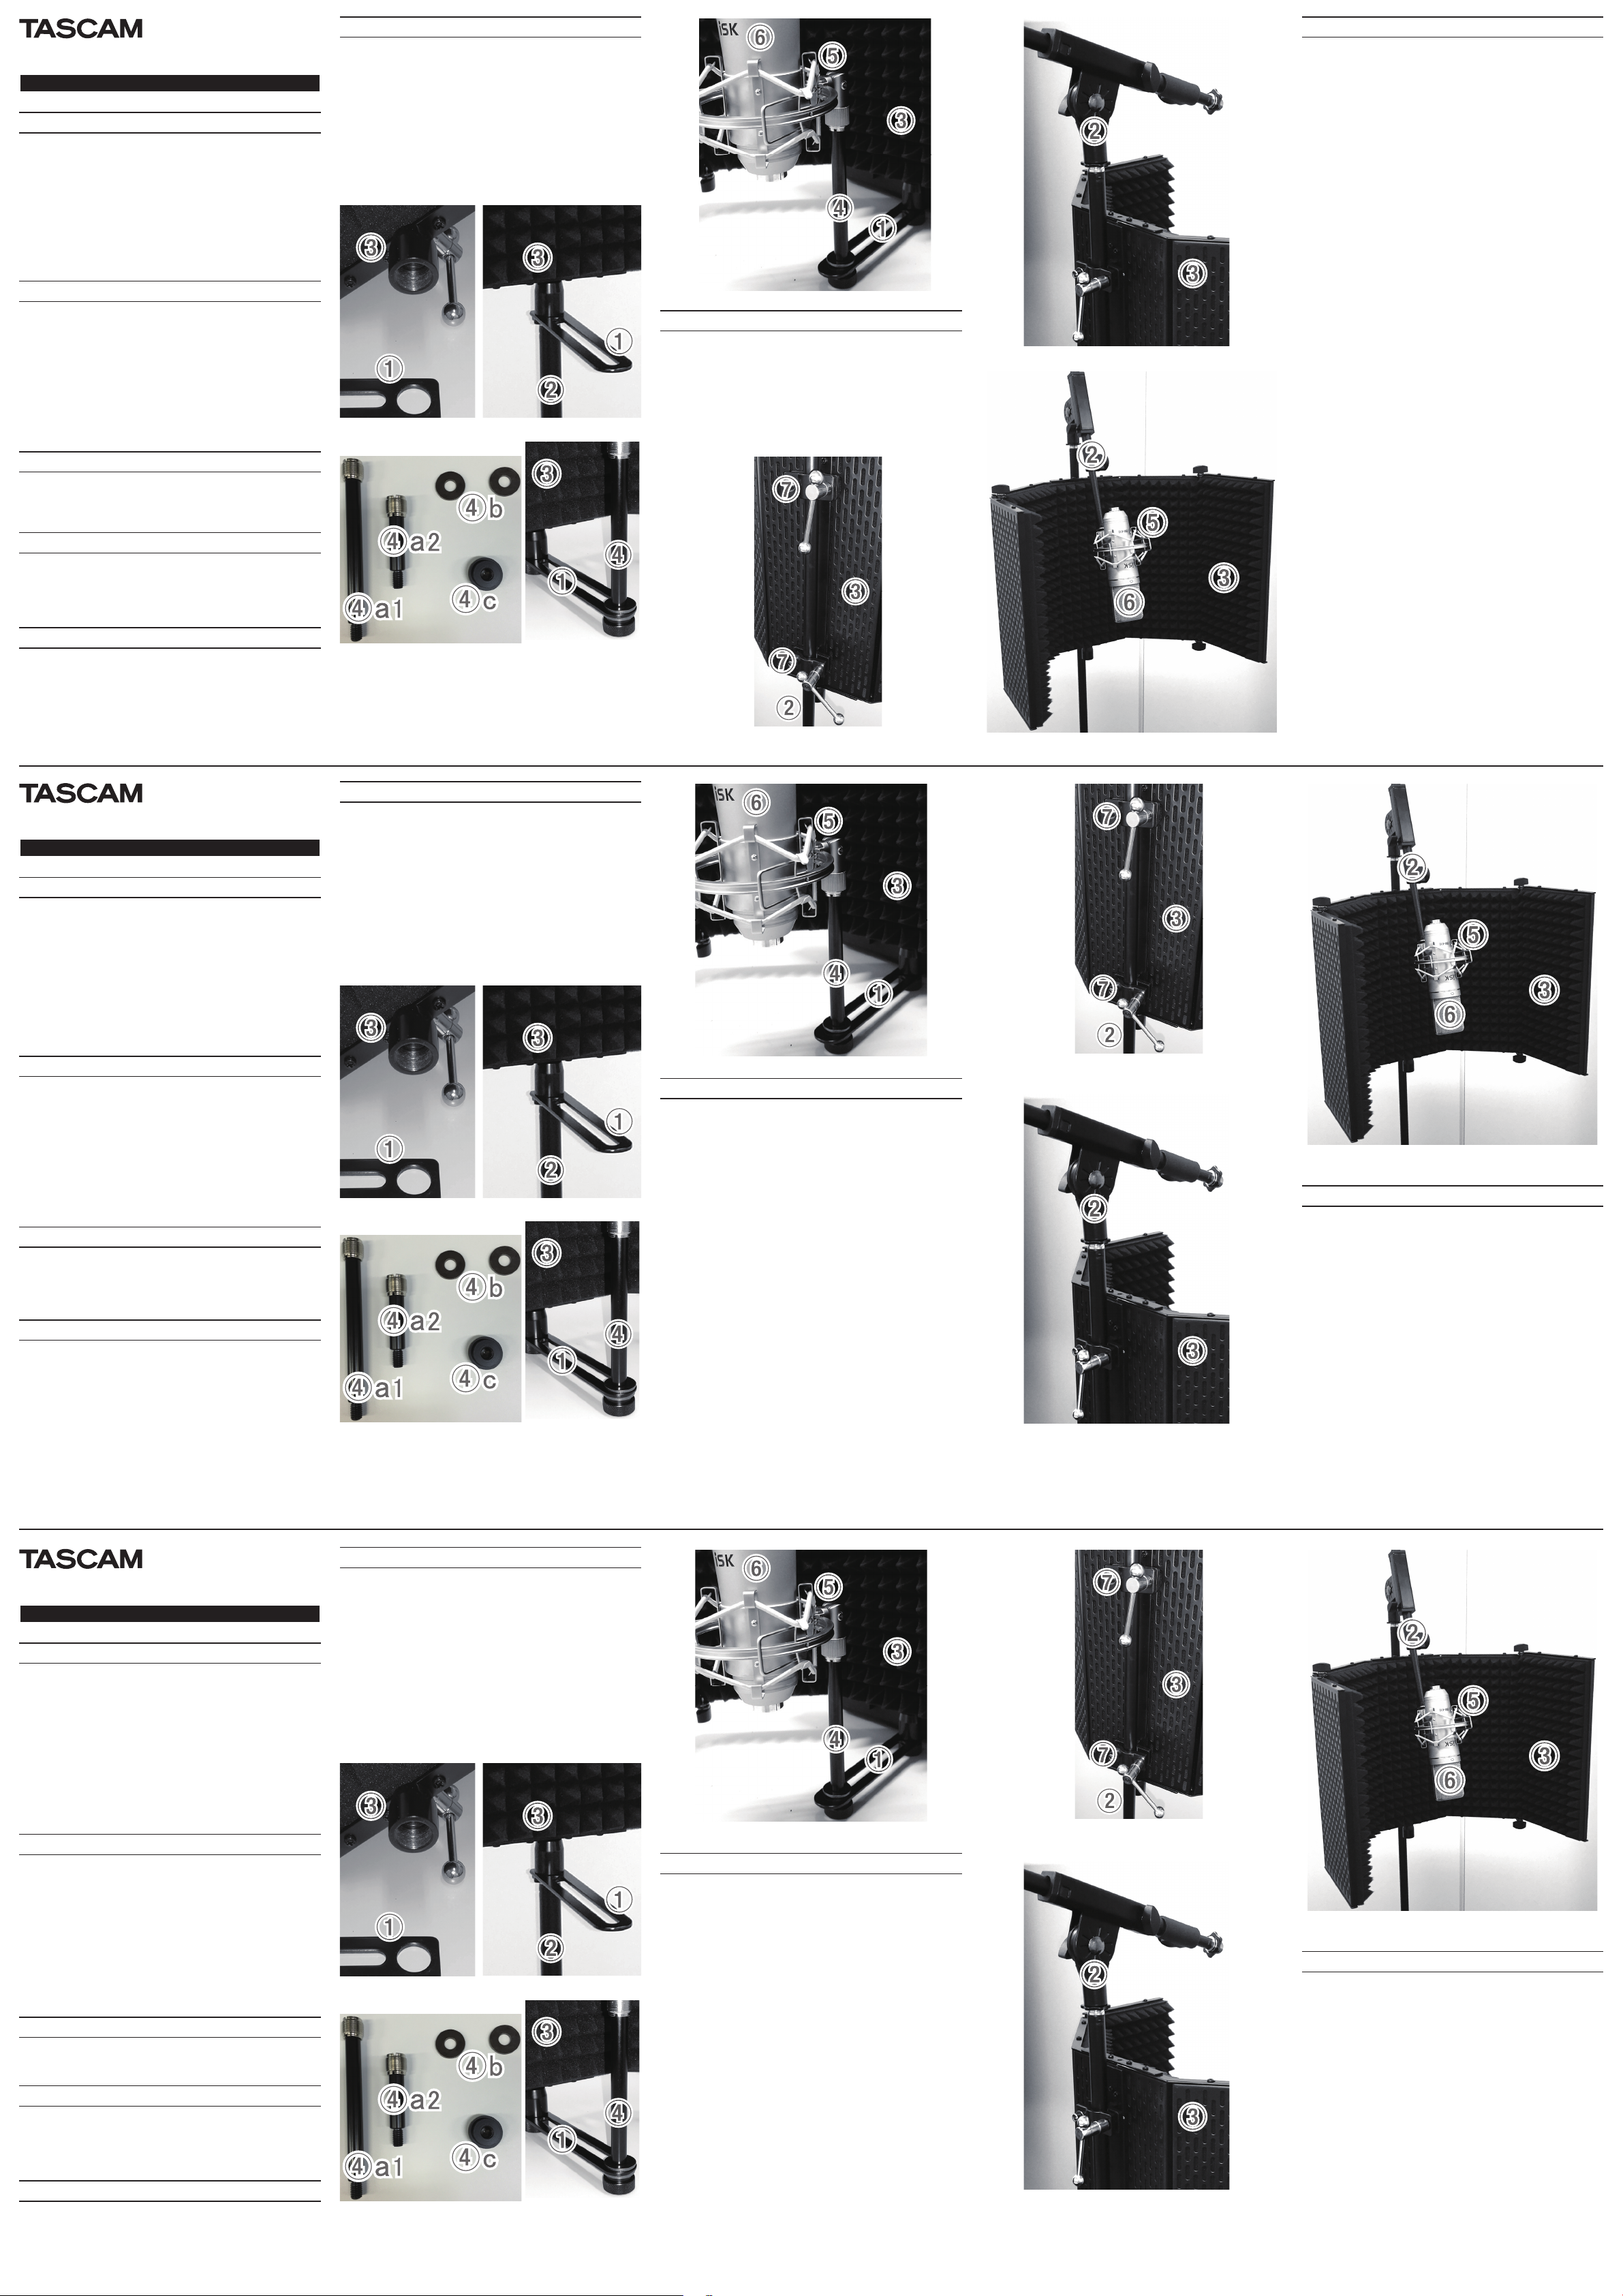
Setting Instruction
1. Fix the slice’s hole side (Fig.1-1) into floor microphone stand’s
top 5/8” screw part, then screw the acoustic control filter (Fig.1-
3) onto the floor microphone stand, and make sure the slice is
tightly fastened with acoustic control filter. Check if the slice is
in the center of the acoustic control filter (Fig. 2).
2. Fix the support bar in Fig.3-4a into the slice’s hollow part, and
put a washer (Fig.3-4b) on each sides, then fasten the black
screw (Fig.3-4c, Fig.4).
3. Fix the shock mount onto the support bar, then fix the
microphone to the shock mount, and adjust the microphone’s
position to make sure it is well positioned (Fig.5). Then you are
ready to recording.
Specifications
Coloration: About 1dB
Dimensions: 400 mm (W) × 320 mm (H) × 260 mm (D)
Weight: 2.5 kg
Microphones Supporting Set:
Max. Length: 150 mm
Moving Range: 115 mm
Supporting Height: 105 mm
Included items
This product includes the following components. Open the
package carefully to prevent damage to the main unit. Keep the
box and other packing materials for transport in the future. If any
of the included parts are missing or appear to have been damaged
during shipping, please contact TASCAM.
• TM-AR1 ............................................................................................................1
• Support bar and Distance adjustable support ................................. 1
(Include washers and nuts)
• Hexagon wrench .........................................................................................1
• Thread adapter (3/8’’ to 5/8’’) ..................................................................2
• Owner’s manual (this manual) ................................................................1
Cleaning the unit
Use a soft dry cloth to wipe the unit clean. Do not use chemicallytreated cleaning cloths, thinner, alcohol or similar substances
to wipe the unit. Doing so could damage the surface or cause
discoloration.
Trademarks
TASCAM is a trademark of TEAC Corporation, registered in the
•
U.S. and other countries.
Other company names, product names and logos in this
•
document are the trademarks or registered trademarks of their
respective owners.
User registration
Customers in the USA, please visit the TASCAM website (http://
tascam.com/) to register as a user online.
Fig.1 Fig.2
Fig.3 Fig.4
Fig.5
Use Together with Boom Microphone Stand
1. Remove boom microphone stand’s arm and loose the screws of
the acoustic filter’s locking system (Fig.6-7), place the acoustic
filter’s locking system in the microphone stand, and make sure
it is fastened (Fig.6).
2.
Fix on microphone stand’s arm, adjust its position to make sure the
top of the arm is in the middle part of acoustic control filter (Fig. 7).
3.
Fix shock mount onto the top of microphone stand arm, then fix
the microphone into the shock mount, adjust an ideal position
for recording (Fig. 8). Now you are ready to start recording.
Fig.7
TM-AR1
MODE D'EMPLOI
Description
En résumé, le système d’écran de contrôle acoustique TM-AR1 est
un dispositif portable pour réduire le son d’ambiance de la salle
durant l’enregistrement de sources live. C’est un écran perfectionné
composé de 5 pans en métal de haute qualité, que l’on peut
facilement placer derrière n’importe quel microphone. L’écran de
contrôle acoustique est de petite taille, léger, bien équilibré. La
fonction principale de ce produit est d’offrir un environnement
d’enregistrement « sec » pour la voix ou un instrument. Son
champ d’utilisation est large, comprenant l’enregistrement en
studio, l’enregistrement personnel et beaucoup d’autres situations
similaires, car il peut efficacement réduire l’ambiance de la salle et
isoler le microphone du bruit environnant.
Éléments fournis
Ce produit est livré avec les composants suivants. Ouvrez
soigneusement l'emballage pour ne pas endommager l'unité
principale. Conservez la boîte et les matériaux d'emballage pour
de futurs transports. Si l'une des pièces manque ou semble avoir
été endommagée durant le transport, veuillez contacter TASCAM.
• TM-AR1 ............................................................................................................1
• Barre de soutien et glissière de réglage de distance ......................1
(rondelles et écrous fournis)
• Clé hexagonale ............................................................................................1
• Adaptateur de filetage (3/8 ‘’ à 5/8 ‘’) ....................................................2
• Mode d’emploi (ce manuel) .....................................................................1
Nettoyage de l'unité
Essuyez l'unité avec un chiffon sec et doux pour la nettoyer.
N'utilisez pas de lingettes nettoyantes imbibées de produit
chimique, de diluant, d'alcool ou substance similaire pour nettoyer
l'unité. Cela pourrait endommager la surface ou causer une
décoloration.
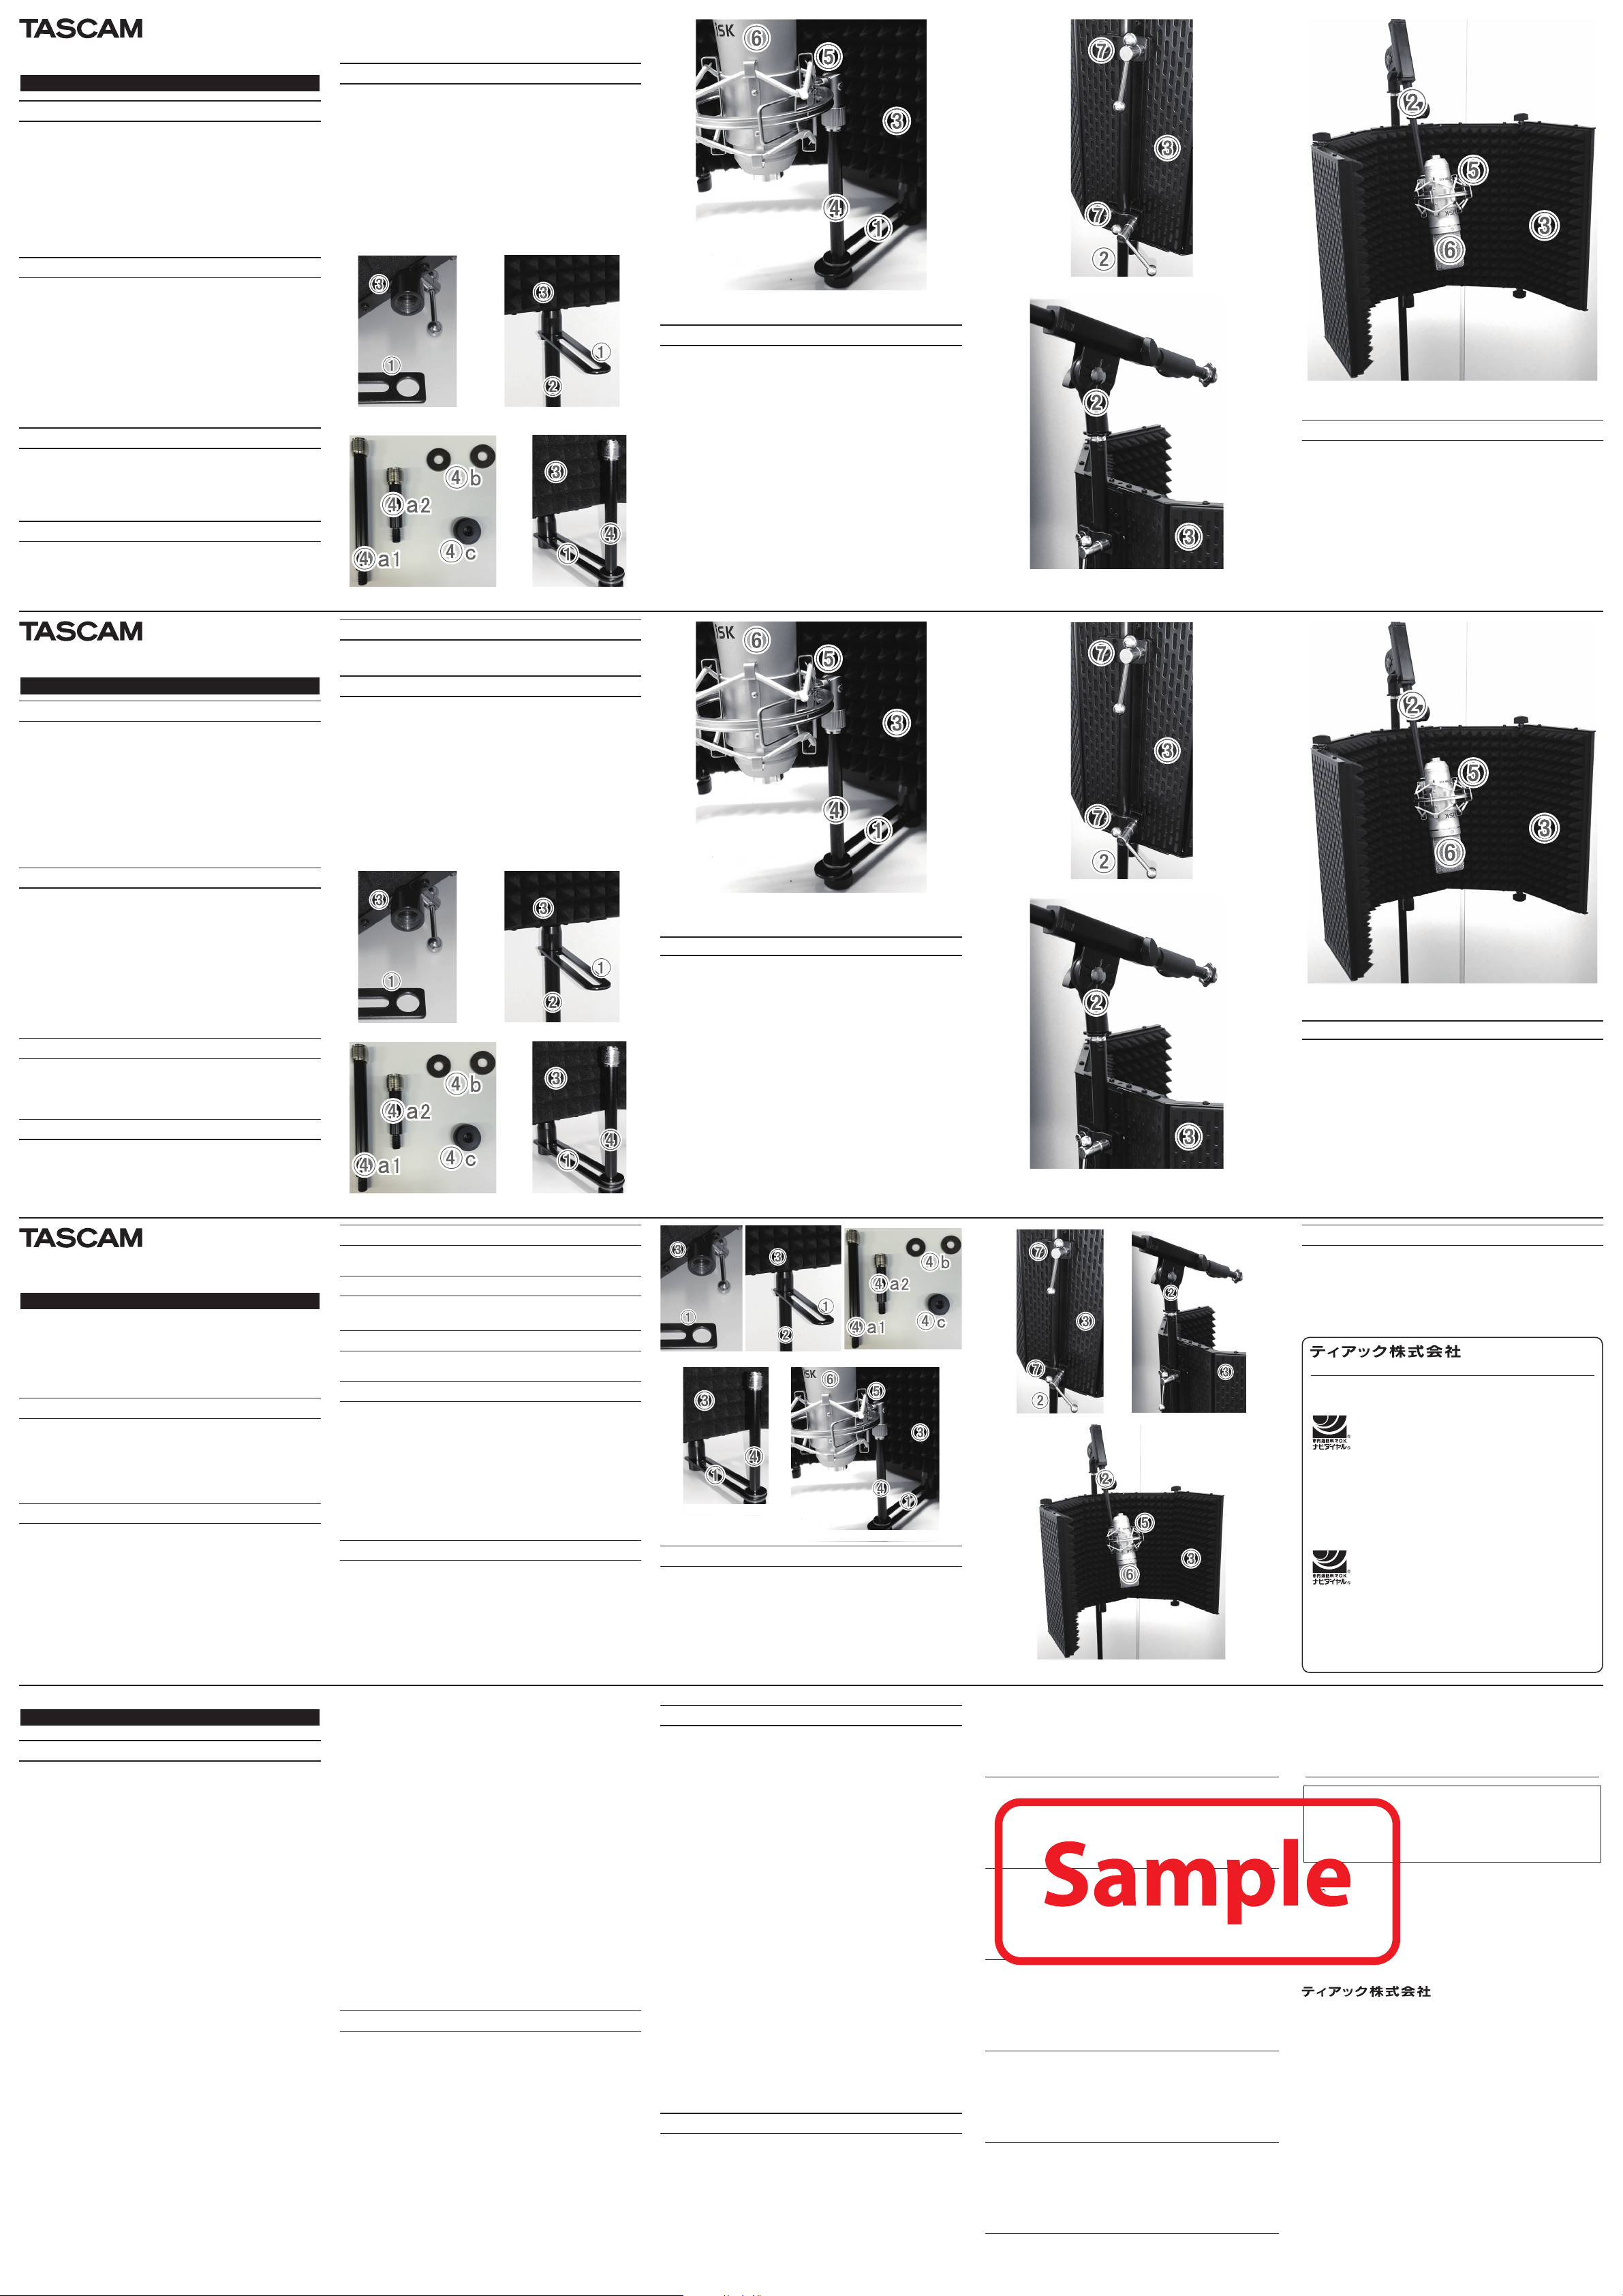
Instructions de réglage
1. Fixez le côté de la glissière portant un trou (Fig.1-1) sur la
partie à filetage 5/8” au sommet du pied de microphone puis
vissez le d’écran de contrôle acoustique (Fig.1-3) sur le pied
de microphone,et assurez-vous que la glissière est fermement
fixée au d’écran de contrôle acoustique. Vérifiez que la glissière
est au centre du d’écran de contrôle acoustique (Fig. 2);
2.
Fixez la barre de soutien
glissière, et placez une rondelle
serrez la vis noire
3. Fixez la suspension antichoc sur la barre de soutien, puis
le microphone dans la suspension antichoc, et réglez le
microphone de façon à ce qu’il soit bien positionné (Fig.5).
Vous êtes maintenant prêt pour l’enregistrement.
Fig.1 Fig.2
(Fig.3-4a)
(Fig.3-4b)
(Fig.3-4c, Fig.4)
dans la partie creuse de la
de chaque côté, puis
;
Fig.6
Fig.5
Utilisation avec un pied de microphone à perche
1.
Déposez la perche du pied de microphone et desserrez les vis
du système
(à l’arrière), montez le système de verrouillage du filtre antiréflexions sur le pied de microphone, et assurez-vous qu’il est bien
fixé (Fig.6);
2.
Remontez la perche sur le pied de microphone, et réglez sa
position pour s’assurer que le bout de la perche arrive en partie
médiane du d’écran de contrôle acoustique (
3. Fixez la suspension antichoc au bout de la perche, puis le
microphone dans la suspension antichoc, et trouvez la position
idéale pour l’enregistrement (
pour commencer l’enregistrement.
(Fig.6-7)
de verrouillage du filtre anti-réflexions
Fig. 7
);
Fig. 8
). Vous êtes maintenant prêt
Fig.8
Fig.6
Fig.8
Caractéristiques techniques
Coloration: Environ 1dB
Poids: 2,5 kg
Dimensions: 400 mm (L) × 320 mm (H) × 260 mm (P)
Ensemble support de microphone:
Longueur max.: 150 mm
Plage de réglage: 115 mm
Hauteur du support: 105 mm
Marques commerciales
TASCAM is a trademark of TEAC Corporation, registered in the
•
U.S. and other countries.
Other company names, product names and logos in this
•
document are the trademarks or registered trademarks of their
respective owners.
TM-AR1
MANUAL DE INSTRUCCIONES
Descripción
En términos generales, el sistema de filtro de control acústico TMAR1 es un dispositivo portátil de grabación de fuentes sonoras que
permite reducir el ruido de ambiente. Dispone de un avanzado
sistema de bloqueo compuesto por 5 paneles metálicos de alta
calidad que pueden ser colocados fácilmente detrás de cualquier
micro. Este filtro de control acústico es pequeño, ligero y con un
buen ajuste centrobárico. La función principal de este producto
es ofrecer un entorno de grabación vocal o instrumental “seco”
y puede usarlo en una amplia gama de situaciones tales como
estudios de grabación profesionales, pequeños estudios caseros
y muchas otras situaciones parecidas, permitiéndole reducir en
gran medida el ruido de ambiente y conseguir así un perfecto
aislamiento del micrófono.
Elementos incluidos
Dentro del embalaje encontrará lo siguiente. Tenga cuidado de no
dañar estos objetos al abrir el embalaje. Conserve el embalaje y
las protecciones por si alguna vez necesita transportar el aparato.
Si echa en falta alguno de los elementos siguientes o si observa
que alguno de ellos ha resultado dañado durante el transporte,
póngase en contacto con TASCAM.
• TM-AR1 ............................................................................................................1
• Barra de soporte y placa de ajuste de distancia ...............................1
(Incluye arandelas y tuercas)
• Llave hexagonal ...........................................................................................1
• Adaptador de rosca (3/8’’ a 5/8’’) ............................................................2
• Manual de instrucciones (este documento) ......................................1
Limpieza de la unidad
Para limpiar la unidad, utilice un trapo suave y seco. No use
gasolina, alcohol u otros productos similares ya que podría dañar
su superficie.
Fig.3 Fig.4
Instrucciones de instalación
1. Coloque el lado del agujero de la placa (Fig.1-1) en la parte
del tornillo de 5/8” que está en la parte superior del soporte del
micro de suelo y después atornille el filtro de control acústico
(Fig.1-3) en el soporte del micro de suelo, asegurándose de
que la placa quede firmemente sujeta con el filtro de control
acústico. Verifique que la placa quede en el centro del filtro de
control acústico (Fig. 2).
2. Coloque la barra de soporte de la Fig.3-4a en la parte del
hueco alargado de la placa, con una arandela (Fig.3-4b) en
cada lado y después apriete el tornillo negro (Fig.3-4c, Fig.4);
3. Coloque el paragolpes en la barra de soporte y después
coloque el micro sobre el paragolpes y ajuste la posición del
micro para asegurarse de que su ubicación sea correcta (Fig.5).
Una vez hecho eso, ya estará listo para grabar.
Fig.1 Fig.2
Fig.5
Uso junto con una jirafa de micro
1. Separe el brazo de la jirafa del soporte de micro y suelte los
tornillos del sistema (Fig.6-7) de bloqueo del filtro de reflexión
(en la parte trasera), coloque dicho sistema de bloqueo del
filtro de reflexión en el soporte del micro y asegúrese después
de que quede perfectamente fijado (
2.
Coloque el brazo de la jirafa del micro y ajuste su posición para
asegurarse de que la parte superior del brazo quede en la parte
central del
3. Coloque el paragolpes en la parte superior del brazo de la jirafa
de micro, coloque después el micrófono sobre el paragolpes y
consiga una posición ideal para la grabación (
estará todo listo para empezar a grabar.
filtro de control acústico (Fig. 7
Fig.6
).
).
Fig. 8
). Ahora ya
Fig.7
Fig.6
Fig.8
Especificaciones técnicas
Coloración: Sobre 1 dB
Peso: 2.5 kg
Dimensiones: 400 mm (L) × 320 mm (A) × 260 mm (P)
Bloque de fijación de micro:
Max. Longitud: 150 mm
Rango de desplazamiento: 115 mm
Altura de fijación: 105 mm
Derechos de propiedad intelectual
TASCAM is a trademark of TEAC Corporation, registered in the
•
U.S. and other countries.
Other company names, product names and logos in this
•
document are the trademarks or registered trademarks of their
respective owners.
Registro de usuario
Aquellos que hayan adquirido este aparato en los EE.UU., deberán
acceder a la web de TASCAM (http://tascam.com/) para registrarse
como usuarios online.
Fig.3 Fig.4
Fig.7
TM-AR1
Gebrauchsanweisung
Beschreibung
Der Reflexionsfilter TM-AR1 ist ein tragbares System, das bei der
Aufnahme von Live-Schallquellen den Raumhall verringern und
damit die Verständlichkeit und Präsenz der Schallquelle verbessern
kann. Seine fünf hochwertigen Metallpaneele lassen sich auf einfache Weise hinter jedem Mikrofon platzieren. Die gesamte Konstruktion ist handlich, leicht und hat einen guten Schwerpunkt.
Indem er einen Großteil des Raumhalls vom Mikrofon fernhält, sorgt
der TM-AR1 für eine akustisch sehr viel „trockenere“ Umgebung.
Dadurch können Gesangs- oder Instrumentalaufnahmen auch in
klanglich nicht optimalen Räumen deutlich an Qualität gewinnen.
• Other company names, product names and logos in this
document are the trademarks or registered trademarks of their
respective owners.
Zusammenbau
1. Legen Sie die gelochte Seite des Abstandhalters (Abb. 1, 1)
über das Gewinde des Mikrofonstativs, und schrauben Sie den
Reflexionsfilter (Abb. 1, 3) auf das Stativ (Abb. 2, 2). Prüfen Sie
Abstandhalter und Reflexionsfilter auf festen Sitz. Vergewissern
Sie sich, dass sich der Abstandhalter in der Mitte des Reflexionsfilters befindet (Abb. 2).
2. Befestigen Sie den Mikrofonhalter (Abb. 3-4a) auf dem Ab-
standhalter (1), indem Sie je eine Unterlegscheibe (Abb.3-4b)
auf jeder Seite platzieren und anschließend die Schraube (Abb.
3-4c) festziehen (Abb. 4).
3. Befestigen Sie Ihr Mikrofon (6) – möglichst mit einer elasti-
schen Aufhängung (5) – auf dem Mikrofonhalter. Richten Sie
das Mikrofon mittig aus (Abb. 5). Die Aufnahme kann beginnen.
Auspacken/Lieferumfang
Zum Lieferumfang dieses Produkts gehören die unten aufgeführten
Bestandteile. Achten Sie beim Öffnen der Verpackung darauf, dass Sie
nichts beschädigen. Bewahren Sie das Verpackungsmaterial für einen
eventuellen Transport auf. Sollte etwas fehlen oder auf dem Transport beschädigt worden sein, wenden Sie sich bitte an Ihren Händler.
• TM-AR1 ............................................................................................................1
• Mikrofonhalter und Abstandhalter .......................................................1
(einschließlich Unterlegscheiben und Muttern)
• Sechskant-Schraubenschlüssel .............................................................. 1
• Gewindeadapter 3/8" auf 5/8" ................................................................2
• Gebrauchsanweisung (dieses Dokument) .........................................1
Das Produkt reinigen
Verwenden Sie zum Reinigen des Produkts ein weiches Tuch.
Reinigen Sie es nicht mit Mitteln auf chemischer Basis, Verdünner,
Nagellackentferner, Alkohol oder ähnlichen Substanzen. Diese
können die Oberfläche des Geräts angreifen oder Farbveränderungen hervorrufen.
Informationen zum Markenrecht
Die folgenden Informationen werden aus rechtlichen Gründen im
Originaltext wiedergegeben.
• TASCAM is a trademark of TEAC Corporation, registered in the
U.S. and other countries.
TM-AR1
MANUALE DI ISTRUZIONI
Descrizione
In poche parole, il sistema di filtro di controllo acustico TM-AR1 è
un dispositivo portatile per sorgenti live che può ridurre il fattore
ambientale. È una parete con design avanzato composta da 5 pannelli
metallici di alta qualità, che può essere facilmente posizionata dietro
a qualsiasi microfono. Il filtro di controllo acustico è di dimensioni
contenute, leggero e con il baricentro ben calibrato. La funzione
principale del prodotto è quella di offrire durante la registrazione un
ambiente “asciutto” per voce o strumento, può essere ampiamente
utilizzato in condizioni come lo studio di registrazione, registrazioni
personali e molte altre situazioni simili, può efficacemente ridurre il
riverbero della stanza e isolare il microfono dal rumore ambientale.
Articoli inclusi
Questo prodotto include i seguenti componenti. Aprire il
pacchetto con attenzione per evitare danni all’unità principale.
Conservare la scatola e altri materiali di imballaggio per il trasporto
in futuro. Se una delle parti incluse manca o ha subito dei danni
durante il trasporto, si prega di contattare TASCAM.
• TM-AR1 ............................................................................................................1
• Barra di supporto e distanziatore regolabile a slitta .......................1
(incluse rondelle e dadi)
• Chiave esagonale ........................................................................................1
• Adattatore filettato (3/8’’ to 5/8’’) ...........................................................2
• Manuale di istruzioni (il presente manuale) ......................................1
Pulizia dell’unità
Usare un panno morbido e asciutto per pulire l’unità. Non
utilizzare panni trattati chimicamente per la pulizia, solventi, alcol
o sostanze simili per pulire l’unità. Ciò potrebbe danneggiare la
superficie o causare scolorimenti.
Trademarks
TASCAM is a trademark of TEAC Corporation, registered in the
•
U.S. and other countries.
Other company names, product names and logos in this document are
•
the trademarks or registered trademarks of their respective owners.
Abbildung 1 Abbildung 2
Abbildung 3 Abbildung 4
Registrazione dell’utente
I clienti negli Stati Uniti possono visitare il sito TASCAM (http://
tascam.com/) per registrarsi come utenti on-line.
Istruzioni per l’installazione
1.
Fissare dal lato foro sulla slitta (Fig.1-1) la parte superiore
dell’asta microfonica dalla parte della vite da 5/8”, poi avvitare
il
filtro di controllo acustico
assicurarsi che la slitta sia saldamente fissata al
acustico
. Controllare che la slitta sia al centro del
controllo acustico
(Fig. 2).
2. Fissare la barra del supporto di Fig.3-4a nella parte vuota
della slitta e mettere una rondella (Fig.3-4b) su entrambi i lati,
quindi stringere la vite nera (Fig.3-4c, Fig.4).
3. Fissare il supporto antivibrazioni sulla barra, quindi fissare il
microfono nel supporto antivibrazioni e regolare la posizione
del microfono per assicurarsi che sia ben posizionato (Fig.5). A
questo punto si è pronti per la registrazione.
Fig.1 Fig.2
Fig.3 Fig.4
(Fig.1-3) sull’asta microfonica e
filtro di controllo
filtro di
Abbildung 5
Verwendung mit einem Mikrofon-Galgenstativ
1. Entfernen Sie den Galgen des Mikrofonstativs. Lösen Sie die
Schrauben der Halterungen auf der Rückseite des Reflexionsfilters (Abb. 6-7). Befestigen Sie den Reflexionsfilter am Mikrofonstativ, und drehen Sie die Schrauben handfest an (
2.
Befestigen Sie den Galgen wieder auf dem Stativ. Richten Sie den
Abb. 6
).
Galgen so aus, dass er sich in der Mitte des Reflexionsfilters befindet (
Abb. 7
).
3. Schrauben Sie die elastische Aufhängung an den Galgen und
setzen Sie das Mikrofon ein. Stellen Sie Galgen und Mikrofon in
eine geeignete Position für die Aufnahme (
Abb. 8
). Die Aufnah-
me kann beginnen.
Fig.5
Uso con un’asta microfonica tipo giraffa
1.
Rimuovere il braccio dell’asta del microfono e allentare le viti
del sistema
parte posteriore), posizionare il sistema di bloccaggio del
controllo acustico
ben saldo (Fig.6 ).
2.
Fissare il braccio dell’asta microfonica, regolare la posizione per
assicurarsi che la parte superiore del braccio stia nella parte
centrale del filtro di riflessione (
3.
Fissare il supporto antivibrazioni nella parte superiore del
braccio dell’asta microfonica, quindi fissare il microfono nel
supporto antivibrazioni e regolarlo per una posizione ideale
per la registrazione (Fig. 8). A questo punto si è pronti per la
registrazione.
(Fig.6-7)
di bloccaggio del filtro di riflessione (la
nel supporto del microfono e assicurarsi che sia
Fig. 7
).
filtro di
Abbildung 6
Abbildung 8
Technische Daten
Akustische Färbung: ca. 1 dB
Abmessungen (B × H × T): 400 mm × 320 mm × 260 mm
Gewicht: 2,5 kg
Mikrofon-/Abstandhalter:
Max. Abstand: 150 mm
Einstellbereich: 115 mm
Höhe: 105 mm
Abbildung 7
Fig.6
Fig.8
Specifiche
Colorazione: 1dB circa
Peso: 2,5 kg
Dimensioni: 260 mm (D) - 320 mm (L) - 400 mm (W)
Set del supporto microfonico:
Lunghezza massima: 150 mm
Area di spostamento: 115 mm
Altezza del supporto: 105 mm
Fig.7
TM-AR1
取扱説明書
このたびは、TASCAM TM-AR1をお買い上げいただきまして、誠にありがとうございます。
ご使用になる前に、この取扱説明書をよくお読みになり、正しい取り扱い方法をご理解い
ただいた上で、末永くご愛用くださいますようお願い申しあげます。お読みになった後は、
いつでも見られる所に保管してください。
また取扱説明書は、TASCAMのウェブサイト(https://tascam.jp/)からダウンロード
することができます。
本製品の概要
TM-AR1音響制御フィルターシステムはライブ音源用のポータブルな録音デバイ
スで、室内環境ノイズの低減が可能です。5個の高品質メタルパネルから構成さ
れる先進的なウォールタイプで、マイクの種類を選ばず、後側に簡単に置けます。
サイズもコンパクトで軽量、安定感抜群です。
本製品の主な機能は「ドライ」なボーカル、楽器の録音環境を提供することです。
スタジオ録音、パーソナル録音などの幅広い用途でご使用いただけ、室内環境ノ
イズを効果的に低減し、周囲ノイズを除去します。
本製品の構成
本製品の構成は、以下の通りです。なお、開梱は本体に損傷を与えないよう慎重に行っ
てください。梱包箱と梱包材は、後日輸送するときのために保管してください。付属
品が不足している場合や輸送中の損傷が見られる場合は、当社までご連絡ください。
TM-AR1本体 x1
0
サポートバー /距離調整用スライス(ワッシャー /ナット含む) x1
0
六角レンチ x1
0
変換ネジ(3/8'' − 5/8'') x2
0
取扱説明書(本書) x1
0
製品のお手入れ
製品の汚れは、柔らかい乾いた布で拭いてください。化学雑巾、ベンジン、シンナー、ア
ルコールなどで拭かないでください。表面を傷める、または色落ちさせる原因となります。
商標に関して
TASCAMおよびタスカムは、ティアック株式会社の登録商標です。
0
その他、記載されている会社名、製品名、ロゴマークは各社の商標または登録商標です。
0
ユーザー登録について
TASCAMのウェブサイト(https://tascam.jp/)にて、オンラインでのユーザー
登録をお願いいたします。
アフターサービス
万一、故障が発生した場合は使用を中止し、お買い上げ店またはティアック修理セ
0
ンターまでご連絡ください。修理を依頼される場合は、次の内容をお知らせください。
型名、型番(TM-AR1)
i
故障の症状(できるだけ詳しく)
i
お買い上げ年月日
i
お買い上げ販売店名
i
当社の責に帰すべき本製品の不具合もしくは故障などに係り、当社が負う責任
0
の範囲は、当社製品の修理もしくは交換に限らせていただきます。
当社は、本機の補修用性能部分(製品の機能を維持するために必要な部品)を
0
製造打ち切り後8年間保有しています。
本機を廃棄する場合に必要となる収集費などの費用は、お客様のご負担になります。
0
設定方法
スライスの穴側(図1-1)をフロアマイクスタンド上部の5/8インチネジ部
1.
に固定し、音響制御フィルター(図1-3)をフロアマイクスタンドにネジ止
めします。スライスが音響制御フィルターにしっかり締付けられているか確認
します。また、スライスが音響制御フィルターの中心にあることを確認してく
ださい。(図2)
図2-4aのサポートバーをスライスの細長い穴に固定し、ワッシャー(図
2.
2-4b)を両側に取付け、黒いネジを締めます(図2-4c )。
ショックマウントをサポートバーに固定し、マイクをショックマウントに固定しま
3.
す。その後、マイクを適度な位置に調整します(図5)。これで録音準備は完了です。
図 .1 図 .2 図 .3
図 .4
図 .5
ブームマイクスタンドと併用する場合
ブームマイクスタンドのアームを取外し、リフレクションフィルターのロッキ
1.
ングシステム(図6-7)のネジをゆるめます。次に、マイクスタンドに音響
制御フィルターのロッキングシステムを取付けます(図6)。
マイクスタンドに固定する際、アームの上部がリフレクションフィルターの中
2.
間部にあることを確認し、適度な位置に調整します(図7)。
マイクスタンドのアームの上部にショックマウントを固定し、ショックマウン
3.
トにマイクを固定します。その後、マイクを適度な位置に調整します(図8)。
これで録音準備は完了です。
図 .6
図 .8
図 .7
仕様
カラーレーション :約 1 dB
外形寸法 :400mm x 320mm x 260mm(幅 x 高さ x 奥行き)
質量 :2.5kg(本体のみ)
マイクサポートセット
最大長 :150mm
可動範囲 :115mm
サポート高さ :105mm
〒206-8530 東京都多摩市落合1-47
この製品の取り扱いなどに関するお問い合わせは
タスカム カスタマーサポート 〒206-8530 東京都多摩市落合1-47
0570-000-809
一般電話・公衆電話からは市内通話料金でご利用いただけます。
受付時間は、10:00 〜 12:00 / 13:00 〜 17:00 です。
(土・日・祝日・弊社指定休日を除く)
ナビダイヤルがご利用いただけない場合
0
電話:042-356-9137 / FAX:042-356-9185
故障・修理や保守についてのお問い合わせは
ティアック修理センター 〒358-0026 埼玉県入間市小谷田858
0570-000-501
一般電話・公衆電話からは市内通話料金でご利用いただけます。
受付時間は、9:30 〜 17:00です。(土・日・祝日・弊社指定休日を除く)
ナビダイヤルがご利用いただけない場合
0
電話:04-2901-1033 / FAX:04-2901-1036
■ 住所や電話番号は、予告なく変更する場合があります。あらかじめご了承
ください。
WARRANTY
/保証書
required, you must present a copy of the original dated sales receipt from
an Authorized Gibson Dealer.
You must pay any shipping charges if it is necessary to ship the product
In the United States
This warranty gives you specific legal rights and you may also have other
rights which vary from state to state. This warranty is only valid within the
country the unit was originally purchased.
WHAT IS AND IS NOT COVERED
Except as specied below, this warranty covers all defects in materials and
workmanship in this product. The following are not covered by the warranty:
1. Damage to or deterioration of the external cabinet.
2. Damages resulting from accident, misuse, abuse or neglect.
3. Damage resulting from failure to perform basic daily maintenance
and/or calibration or otherwise resulting from failure to follow instructions contained in your owner’s manual.
4. Damage occurring during shipment of the product. (Claims must
be presented to the carrier)
5. Damage resulting from repair or attempted repair by anyone other
than Gibson service station.
6. Damage resulting from causes other than product defects, including lack of technical skill, competence, or experience of the user.
7
. Damage to any unit which has been altered or on which the serial
number has been defaced, modied or is missing.
WHO MAY ENFORCE THE WARRANTY
This warranty may be enforced only by the original purchaser. This warranty is not valid if the product was purchased through an unauthorized
dealer.
LENGTH OF WARRANTY
All parts except heads and disk drives are warranted for one (1) year from
the date of original purchase. Heads and disk drives are warranted to
ninety (90) days from date of original purchase. Labor is warranted for
ninety (90) days from date of original purchase.
WHAT WE WILL PAY FOR
We will pay all labor and material expenses for items covered by the warranty. Payment of shipping charges is discussed in the next section of this
warranty.
HOW YOU CAN GET WARRANTY SERVICE
Your unit must be serviced by an authorized Gibson service station in the
United States. (This warranty is not enforceable outside the U.S.) If you are
unable to locate an authorized Gibson service station in your area, please
contact us. We either will refer you to an authorized service station or
instruct you to return the unit to the factory. Whenever warranty service is
to service. However, if the necessary repairs are covered by the warranty,
we will pay return surface shipping charges to any destination within the
United States.
LIMITATION OF IMPLIED WARRANTIES
Any implied warranties, INCLUDING WARRANTIES OF MERCHANTABILITY
AND FITNESS FOR A PARTICULAR PURPOSE, are limited in duration to the
length of this warranty.
EXCLUSION OF DAMAGES
Gibson’s liability for any defective product is limited to repair or replacement of the product, at Gibson’s option. Gibson shall not be liable for:
1. Damages based upon inconvenience, loss of use of the product,
2. Any other damages, whether incidental, consequential or other-
Some states do not allow limitations on how long an implied warranty
lasts and/or do not allow the exclusion or limitation of incidental or consequential damages, so the above limitations and exclusions may not apply
to you.
To locate an Authorized Service Center in Your Area
CALL
Europe
This product is subject to the legal warranty regulations of the country
of purchase. In case of a defect or a problem, please contact the dealer
where you bought the product.
Ce produit est sujet aux réglementations concernant la garantie légale
dans le pays d’achat. En cas de défaut ou de problème, veuillez contacter
le revendeur chez qui vous avez acheté le produit.
Dieses Gerät unterliegt den gesetzlichen Gewährleistungsbestimmungen
des Landes, in dem es erworben wurde. Bitte wenden Sie sich im
Gewährleistungsfall an den Händler, bei dem sie das Gerät erworben
haben.
Questo apparecchio è conforme alle norme sulla garanzia vigenti nel
rispettivo Paese in cui esso è stato acquistato. Si prega di rivolgersi al
proprio commerciante, presso il quale è stato acquistato l’apparecchio, nel
caso in cui si voglia richiedere una prestazione in garanzia.
Las condiciones de garantía de este aparato están sujetas a las
disposiciones legales sobre garantía del país en el que ha sido adquirido.
En caso de garantía, debe dirigirse al establecimiento donde adquirió el
aparato.
loss of time interrupted operation or commercial loss; or
wise.
1-800-444-2766
日本
無料修理規定(持ち込み修理)
取扱説明書、本体貼付ラベルなどの注意書きに従った正常な使用状態で保証期
1.
間内に故障が発生した場合には、ティアック修理センターが無料修理致します。
本体の保証期間は、お買い上げの日から1年です。
2.
保証期間内に故障して無料修理を受ける場合は、本書をご提示の上、ティアッ
3.
ク修理センターまたはお買い上げの販売店に修理をご依頼ください。商品を
送付していただく場合の送付方法については、事前にティアック修理センター
にお問い合わせください。
ご転居、ご贈答品などでお買い上げの販売店に修理をご依頼になれない場合
4.
は、ティアック修理センターにご連絡ください。
次の場合には、保証期間内でも有料修理となります。
5.
(1) ご使用上の誤りおよび不当な修理や改造による故障および損傷
(2) お買い上げ後の輸送・移動・落下などによる故障および損傷
(3) 火災、地震、水害、落雷、その他の天災地変、公害や異常電圧による故障お
よび損傷
(4) 接続している他の機器に起因する故障および損傷
(5) 業務上の長時間使用など、特に苛酷な条件下において使用された場合の故障
および損傷
(6) メンテナンス
(7) 本書の提示がない場合
(8) 本書にお買い上げ年月日、お客様名、販売店名(印)の記入のない場合、あ
るいは字句を書き換えられた場合
本書は日本国内においてのみ有効です。
6.
This warranty is valid only in Japan.
本書は再発行致しませんので、紛失しないよう大切に保管してください。
7.
この保証書は、本書に明示した期間・条件のもとにおいて無料修理をお約束するもので
*
す。この保証書によって保証書を発行しているもの(保証責任者)、およびそれ以外の
事業者に対するお客様の法律上の権利を制限するものではありません。保証期間経過後
の修理などについてご不明の場合は、ティアック修理センターにお問い合わせください。
保証期間経過後の修理、補修用性能部品の保有期間についての詳細は、取扱説
*
明書をご覧ください。
In other countries/areas
This warranty gives you specific legal rights, and you may also have other
rights that vary by country, state or province.
If you have a warranty claim or request, please contact the dealer where
you bought the product.
该保证书赋予了顾客特定的合法权利,并且因国家,州或省等地域的不同,顾客
可能拥有其他权利。如需申请或要求保修,请与购买本产品的销售店进行联系。
If you require repair services for your TASCAM equipment, please contact
the dealer where the product was purchased from or the TASCAM
Distributor in your country. A list of TASCAM Distributors can be found on
our website at : http://teac-global.com/
Model / Modèle
Modell / Modello
Modelo /
型号 / 型名
TM-AR1
Serial No. / No de Série
Seriennummer / Numero di serie
Número de serie /
序列号 / 機番
Date of purchase / Date de l’achat
Datum des Kaufs / Data dell’acquisto
Fecha de compra /
购买日期 / お買い上げ日
Owner’s name / Nom du possesseur
Name des Eigentümers / Nome del proprietario
Nombre del propietario /
顾客姓名 / お名前
Address / Adresse
Adresse / Indirizzo
Dirección /
顾客地址 / ご住所
Dealer’s name / Nom du détaillant
Name des Händlers / Nome del commerciante
Nombre del establecimiento /
销售店名 / 販売店
Dealer’s address / Adresse du détaillant
Adresse des Händlers / Indirizzo del commerciante
Dirección del establecimiento /
Memo / 修理メモ
お客様にご記入いただいた保証書の控えは、保証期間内のサービス活動およびそ
の後の安全点検活動のために記載内容を利用させていただく場合がございますの
で、ご了承ください。
〒206-8530 東京都多摩市落合 1-47
TEAC AMERICA, INC.
Phone: +1-323-726-0303
1834 Gage Road, Montebello, California 90640 USA
TEAC MEXICO, S.A. de C.V.
Phone: +52-55-5010-6000
Río Churubusco 364, Colonia Del Carmen, Delegación Coyoacán,
CP 04100, México DF, México
TEAC UK Ltd.
Phone: +44-8451-302511
2 Huxley Road, Surrey Research Park Guildford, GU2 7RE, United
Kingdom
TEAC EUROPE GmbH
Phone: +49-611-71580
Bahnstrasse 12, 65205 Wiesbaden-Erbenheim, Germany
TEAC SALES & TRADING(SHENZHEN) CO., LTD
Phone: +86-755-88311561~2
Room 817, Block A, Hailrun Complex, 6021 Shennan Blvd., Futian
District, Shenzhen 518040, China
D01304500A
http://tascam.com/
http://teacmexico.net/
http://tascam.eu/
http://tascam.eu/
销售店地址 / 住所
https://tascam.jp/
Printed in China
 Loading...