

Tascam BD-R2000 Owners Manual
BD-R2000
HDD/BLU-RAYTM/DVD RECORDER
LST1148-001B
OWNER'S MANUAL
2
Safety Precaution
The lightning flash with arrowhead symbol, within
an equilateral triangle, is intended to alert theuser
to the presence of uninsulated “dangerous
voltage” within the product’s enclosure that may
be of sufficient magnitude to constitute a risk of
electric shock to persons.
The exclamation point within an equilateral
triangle is intended to alert the user to the
presence of important operating and maintenance
(servicing) instructions in the literature
accompanying the appliance.
CAUTION
AVIS
Dear Customer,
Thank you for purchas ng the TASCAM BLU-RAY
recorder. Before use, p ease read the safety nformat on and
precaut ons to ensure safe use of your new un t.
TM
DISC & DD
CAUTION:
A UNIT IS A CLASS 1 LASER PRODUCT HOWEVER THIS
UNIT USES A VISIBLE LASER BEAMWHICH COULD CAUSE
HAZARDOUS RADIATION EXPOSURE IF DIRECTED
BE SURE TO OPERATE THE UNIT CORRECTLY AS
INSTRUCTED
WHEN THIS UNIT IS PLUGGED INTO THE WALL OUTLET DO
NOT PLACE YOUR EYES CLOSE TO THE OPENING OF THE
DISC TRAY AND OTHER OPENINGS TO LOOK INTO THE
INSIDE OF THIS UNIT
USE OF CONTROLS OR ADJUSTMENTS OR
PERFORMANCE OF PROCEDURES OTHER THAN THOSE
SPECIFIED HEREIN MAY RESULT IN HAZARDOUS
RADIATION EXPOSURE
DO NOT OPEN COVERS AND DO NOT REPAIR YOURSELF
REFER SERVICING TO QUALIFIED PERSONNEL
CLASS 1 LASER PRODUCT
REPRODUCTION OF LABELS
WARNING LABEL INSIDE OF T E UNIT
WARNING:
TO PREVENT FIRE OR SHOCK HAZARD DO NOT EXPOSE
THIS UNIT TO RAIN OR MOISTURE
CAUTION:
This unit shou d be used with AC 120VH 60Hz on y
To prevent e ectric shocks and re hazards DO NOT use any
other power source
ATTENTION:
POUR ÉVITER LES CHOCS ÉLECTRIQUES INTRODUIRE LA
LAME LA PLUS LARGE DE LA FICHE DANS LA BORNE
CORRESPONDANTE DE LA PRISE ET POUSSER JUSQUAU
FOND
Note to CATV system installer:
This reminder is provided to ca the CATV system insta er s
attention to Artic e 820-40 of the NEC that provides guide ines
for proper grounding and in particu ar species that the cab e
ground sha be connected to the grounding system of the
bui ding as c ose to the point of cab e entry as practica
“WARNING” and the fo owing or equiva ent “To reduce the risk
of fore or e ectric shock do not expose this apparatus to rain or
moisture ”
A warning that an apparatus with CLASS I construction sha be
connected to a MAINS socket out et with protective earthing
connection
WARNING
Batteries sha not be exposed to excessive heat such as
sunshine re or the ike
Main P ug
The Main P ug is used as the disconnect device the disconnect
device sha remain readi y operab e
Th s un t app y to the standard IEC60825-1:2001 for aser
products.

3
Safety Precaution
IMPORTANT SAFETY INSTRUCTIONS
1) Read these instructions
2) Keep these instructions
3) Heed a warnings
4) Fo ow a instructions
5) Do not use this apparatus near water
6) C ean on y with dry c oth
7) Do not b ock any venti ation openings Insta in accordance with
the manufacturer s instructions
8) Do not insta near any heat sources such as radiators heat
registers stoves or other apparatus (inc uding amp iers) that
produce heat
9) Do not defeat the safety purpose of the po arized or
groundingtype p ug A poarized p ug has two b ades with one
wider than the other A grounding type pug has two b ades and
a third grounding prong The wide b ade or the third prong are
provided for your safety If the provided p ug does not t into
your out et consu t an e ectrician for repacement of the obso ete
out et
10)Protect the power cord from being wa ked on or pinched
particu ar y at p ugs convenience receptaces and the point
where they exit from the apparatus
11)On y use attachments/accessories specied by the manufacturer
12)Use on y with the cart stand tripod
bracket or tab e specied by the
manufacturer or so d with the
apparatus When a cart is used use
caution when moving the
cart/apparatus combination to avoid
injury from tip-over
13)Unp ug this apparatus during ightning
storms or when unused for ong periods
of time
14)Refer a servicing to qua ied service personne Servicing is
required when the apparatus has been damaged in any way
such as power-supp y cord or p ug is damaged iquid has been
spi ed or objects have fa en into the apparatus the apparatus
has been exposed to rain or moisture does not operate norma y
or has been dropped
Failure to heed the following precautions may result in
damage to the unit, remote control or disc/cassette.
1. DO NOT place the unit
in an environment prone to extreme temperatures or humidity
-
in direct sun ight
-
in a dusty environment
-
in an environment where strong magnetic e ds are generated
-
on a surface that is unstab e or subject to vibration
-
2. DO NOT block the unit’s ventilation openings or holes.
(If the venti ation openings or ho es are b ocked by a newspaper
or c oth etc the heat may not be ab e to get out )
3. DO NOT place heavy objects on the unit or remote control.
4. DO NOT place anything which might spill on top of the unit
or remote control.
(If water or iquid is a owed to enter this equipment re or
e ectric shock may be caused )
5. DO NOT expose the apparatus to dripping or splashing.
6. DO NOT use this equipment in a bathroom or places with
7. DO NOT place any naked ame sources, such as lighted
8. AVOID violent shocks to the unit during transport.
A so
water.
iquids (such as cosmetics or medicines ower vases potted
p ants cups etc ) on top of this unit
candles, on the apparatus.
DO NOT
-
p ace any containers ed with water or
CAUTION:
Changes or modications not approved by TASCAM cou d void
user s authority to operate the equipment
This equipment has been tested and found to comp y with the
imits for a C ass B digita device pursuant to Part 15 of the FCC
Ru es These imits are designed to provide reasonab e
protection against harmfu interference in a residentia
insta ation This equipment generates uses and can radiate
radio frequency energy and if not insta ed and used in
accordance with the instructions may cause harmfu
interference to radio communications However there is no
guarantee that interference wi not occur in a particu ar
insta ation If this equipment does cause harmfu interference to
radio or te evision reception which can be determined by turning
the equipment off and on the user is encouraged to try to correct
the interference by one or more of the fo owing measures:
Reorient or re ocate the receiving antenna
Increase the separation between the equipment and
receiver
Connect the equipment into an out et on a circuit different
from that to which the receiver is connected
Consu t the dea er or an experienced radio/TV technician
for he p
When the equipment is insta ed in a cabinet or a she f make sure
that it has sufcient space on a sides to a ow for venti ation
(10 cm or more on both sides on top and at the rear)
When discarding batteries environmenta prob ems must be
considered and the oca ru es or aws governing the disposa of
these batteries must be fo owed strict y
Use the supp ied power cord
(If not re or e ectric shock may be caused )
DON T continue to operate the equipment if you are in any doubt
about it working norma y or if it is damaged in any way -- switch
off withdraw the mains p ug and consut your dea er
DO be carefu with g ass pane s or doors on equipment
DO consu t you dea er if you are ever in doubt about the
insta ation operation or safety of your equipment
NEVER et anyone especia y chi dren push anything into ho es
s ots or any other opening in the case -- this cou d resu t in a fata
e ectrica shock
MOISTURE CONDENSATION
Moisture in the air wi condense on the unit when you move it from
a co d p ace to a warm p ace or under extremey humid
conditions^just as water drop ets form on the surface of a g ass
ed with co d iquid In conditions where condensation may occur
disconnect the unit s power p ug from the wa and keep it
disconnected for a few hours to et the moisture dry then turn on
the unit
Safety Precaution
If this symbol is shown, it is only valid in the European
Union.
Manufactured under icense from Do by Laboratories Do by and
0
the doub e-D symbo are trademarks of Do by Laboratories
Manufactured under icense under U S Patent #s: 5 451 942;
0
5 956 674; 5 974 380; 5 978 762; 6 226 616; 6 487 535; 7 392 195;
7 272 567; 7 333 929; 7 212 872 & other U S and wor dwide
patents issued & pending DTS and the Symbo are registered
trademarks & DTS-HD DTS-HD Master Audio Essentia and the
DTS ogos are trademarks of DTS Inc Product inc udes software
© DTS Inc A Rights Reserved
This product incorporates copyright protection techno ogy that is
0
protected by U S patents and other inte ectua property rights
Use of this copyright protection techno ogy must be authorized
by Rovi Corporation and is intended for home and other
imited viewing uses on y un ess otherwise authorized by Rovi
Corporation Reverse engineering or disassemb y is prohibited
DVD ogo is a trademark of DVD Format/Logo Licensing Corporation
0
HDMI the HDMI ogo and High-Denition Mu timedia Interface are
0
trademarks or registered trademarks of HDMI Licensing LLC in the
United States and other countries
“B u-ray Disc” “B u-ray” and “B u-ray Disc” ogo are trademarks of
0
B u-ray Disc Association
“x vCoor” and the “x vCoor” ogo are trademarks of Sony Corporation
0
Java and a Java-based trademarks and ogos are trademarks
0
or registered trademarks of Sun Microsystems Inc in the United
States and other countries
SDHC Logo is a trademark of SD-3C LLC
0
i LINK and the "i LINK" Logo are trademarks
0
“AVCHD” and the “AVCHD” ogo are trademarks of Panasonic
0
Corporation and Sony Corporation
Other product and company names inc uded in this instruction
0
manua are trademarks and/or registered trademarks of
theirrespective ho ders
Th s product s censed under the AVC patent portfo o
0
cense and VC-1 patent portfo o cense for the persona
and noncommerc a use of a consumer to ( ) encode v deo
n comp ance w th the AVC Standard and VC-1 Standard
(“AVC/VC-1 Vdeo”) and/or ( ) decode AVC/VC-1 Vdeo that
was encoded by a consumer engaged n a persona and noncommerc a act v ty and/or was obta ned from a vdeo prov der
censed to prov de AVC/VC-1 V deo. No cense s granted or
sha be mp ed for any other use. Addt ona nformat on may
be obta ned from MPEG LA, LLC. See http://www.mpeg a.com.
Batteries -- Incorrect use of batteries may cause the batteries
to burst or ignite A eaky battery may corrode the equipment
dirty your hands or spoi your c othing In order to avoid these
prob ems make sure to observe the precautions be ow:
Use the specied batteries on y
0
Insta the batteries with due attention to the p us (+) and minus
0
(-) sides of the batteries according to the instructions in the
compartment
Do not mix o d and new batteries
0
Do not mix batteries of different types Vo tage specications of
0
batteries of the same shape may vary
Rep ace an exhausted battery with a new one prompt y
0
If you wi not use the remote contro for a ong time remove the
0
batteries
If eaked battery uid gets on your skin or c othing
0
rinseimmediate y and thorough y If it gets into you eye bathe
your eye we rather than rubbing and seek medica treatment
immediate y Leaked battery uid that gets into your eye or
c othing may cause a skin irritation or damage your eye
Do not put the batteries in a p ace where young chi dren can
0
reach
your
DISCLAIMER OF LIABILITY
TASCAM sha not be iab e for any oss re ating to the unit s fai ure
to proper y record store or p ayback any content (video audio or
otherwise) for any reason whatsoever Any app icabe warranties
sha on y cover rep acement or repair of the effected unit and sha
not app y to recovery or rep acement of ost content
ATTENTION:
Using a mobi e phone in the vicinity of the unit may cause picture
vibration on the TV screen or change the screen to a b ack back
disp ay
Some TVs or other app iances generate strong magnetic e ds
Do not p ace such app iances on top of the unit as it may cause
picture disturbance
When moving the product press A to turn off the power and
wait at east 30 seconds before unp ugging the power cord
Then wait at east 2 minutes before moving the product
If there is a power outage when using the unit the recorded data
may be erased
It is recommended to back up discs which contain important
recordings periodica y (every few years) As digita signa s do
not deteriorate fai ure to p ay back or record might arise due to
the effects of the disc aging through the years depending on the
storage environment
Recorded programs and data cannot be restored once the disc
or tape is damaged
Th s un t can p ay back and record on y NTSC s gna s.
0
The hard d sk s a consumab e tem. Rep acement s
recommended after 10000 hours of use ( f use n a 25°C
env ronment). For nformat on on ma ntenance p ann ng and
costs, consu t your nearest TASCAM dea er.
The fan motor s a consumab e tem. Rep acement s
recommended after 30000 hours of use ( f use n a 25°C
env ronment). For nformat on on ma ntenance p ann ng
costs consu t your nearest TASCAM dea er
and
HOW TO USE THIS INSTRUCTION MANUAL
A major sections and subsections are isted in the Tab e Of
0
Contents on page 5 Use this when searching for information on a
specic procedure or feature
The A mark signa s a reference to another page for instructions or
0
re ated information
Operation buttons necessary for the various procedures are c ear y
0
indicated through the use of i ustrations at the beginning of each
major section
IMPORTANT:
Pease read the various precautions on page 2 to 4 before insta ing
0
or operating the unit
It shou d be noted that it may be un awfu to re-record prerecorded
0
tapes or discs without the consent of the owner of copyright in the
sound or video recording broadcast or cab e programme and in
any iterary dramatic musica or artistic work embodied therein
4

Contents
Contents
Safety Precaution
Contents
Getting Started
Key Features ....................................................................... 6
How to Read this Manual .................................................... 6
Other Precautionary Notes.................................................. 7
Hard Disk Drive (HDD) ........................................................ 8
SD Cards............................................................................. 8
On-screen Displays ............................................................. 9
Discs .................................................................................. 9
Precautions on the Use of Discs ....................................... 11
Precautions for placement and use................................... 12
Name and Function of Parts .............................................13
Front panel..................................................................... 13
Display window .............................................................. 14
Rear panel ..................................................................... 14
Remote control ..............................................................15
Preparation
Connecting a Monitor ........................................................ 17
Connecting a Video Deck or Other Equipment ................. 18
Connecting an Amplier .................................................... 18
Connecting External Devices ............................................ 19
Connecting the Power Supply ........................................... 19
Setting and Displaying Date/Time ..................................... 20
Dubbing/Importing
Dubbing/Importing ............................................................. 23
Dubbing chart ................................................................24
Formatting ......................................................................... 25
Recording Modes .............................................................. 28
Importing Data to the HDD Using the ONE TOUCH
DUBBING Button ........................................................... 29
Importing Data from a BD/DVD to the HDD ...................... 30
Importing Data from a USB-compatible Device to the HDD
....................................................................................... 33
Importing Data from an SD Card to the HDD .................... 35
Importing Data from an i.LINK-compatible Device to the
HDD ............................................................................... 37
Dubbing a Title from the HDD to a BD/DVD......................39
Dubbing Still Images from the HDD .................................. 42
Enabling Playback on Other Devices (Finalizing) ............. 44
Copying the Entire Disc..................................................... 46
Recording Using External Inputs....................................... 47
Playing Back
About Playing Back ........................................................... 48
Using Playback Navigation ...............................................48
Option menu list ............................................................. 50
Video Playback Operation .................................................51
Playing Videos on a BD/DVD ............................................ 53
Playing Videos on the HDD .............................................. 54
Playing Videos on a SD Card ............................................54
Playing Still Images (JPEG) .............................................. 55
Changing Playback Settings ............................................. 56
Playback Settings Menu.................................................... 56
Audio/subtitle settings .................................................... 56
Playback settings ........................................................... 56
Video settings ................................................................ 57
Editing
Editing ............................................................................... 58
Entering Characters .......................................................... 59
Character List ................................................................59
Grouping ...........................................................................60
Changing the Title/Group Name........................................62
Deleting a Title/Group ....................................................... 62
Turning On Title/Group Protection .................................... 63
Turning Off Title/Group Protection..................................... 64
Creating a Playlist ............................................................. 65
Editing a Thumbnail ..........................................................66
Editing a Chapter ..............................................................67
Dividing .............................................................................69
Delete Scenes ................................................................... 70
Changing the Disc Name .................................................. 72
Changing the Shooting Date/Time .................................... 72
Mode conversion ............................................................... 73
Settings Menu
Changing Settings of this Unit ........................................... 74
Setting Menu List ..............................................................74
Setup .............................................................................75
Playback Setting ............................................................ 76
Record ........................................................................... 77
Audio.............................................................................. 78
Display ........................................................................... 79
Connection..................................................................... 80
Others
Locking the Disc Tray ........................................................82
Turning on the Mode Lock ................................................82
Last Function Memory....................................................... 82
RS-232C Interface ...........................................................83
Command Table ............................................................. 83
Specications................................................................. 83
Command ...................................................................... 84
Language Code List .......................................................... 94
Country Code List .............................................................96
Using the HDMI Consumer Electronics Control (HDMI
CEC) .............................................................................. 98
Creating a Seamless BD ................................................... 98
Troubleshooting ................................................................99
Specications .................................................................. 101
Index ...............................................................................102
Important Notice Concerning the Software ..................... 103
5

6
Getting Started
Key Features
Professional Blu-ray Disc recorder of the
high-denition era
Copy videos to a Blu-ray Disc in high-denition from a highdenition camcorder, or down convert the videos and record
them onto DVDs, all without the need for a PC.
The internal hard disk drive enables for easy editing and
dubbing multiple discs.
Compatibility with other consumer
camcorders
In addition to AVCHD, HDV and DV formats are also
compatible, and digital dubbing can be done.
Digital interface that allows for camcorder
compatibility
This unit is equipped with USB, SD slots and i.Link input
terminals for connecting the camcorder.
Create menu-supported Blu-ray discs
Blu-ray discs can be created using the BDMV (with menu)
format. BDAV discs can also be created and dubbed
according to the intended use.
Compatible with dual layer 50 GB Blu-ray
discs, and records up to 24 hours of full
high-denition images in a single disc
This unit is also compatible with high capacity dual layer 50
GB Blu-ray discs, and up to 24 hours (AE mode) of full highdenition images can be recorded in a single disc.
Writing to inexpensive LTH discs is also supported.
Authoring menu enables discs to be
created and used industrially such as for
demonstrations
Disc authoring can be used to create discs for industrial use,
such as discs that repeat playback automatically.
How to Read this Manual
About this manual
This manual mainly describes operation procedures using the
remote control unit buttons.
• The buttons on the remote control unit are indicated as
[Button Name].
• The menu items are indicated as "Menu Item".
o
Supplementary remarks in the main text
Memo : States restrictions on the functions or use of this unit.
Note : States precautions to be taken during operation.
: Indicates the page numbers or items to refer to.
A
Memo:
The displays of operable media are highlighted.
HDD : Hard disk
DVD : DVD
BD : Blu-ray disc
SD : SD card
SDHC : SDHC Card
CD : Music compact disc
JPEG : JPEG (still picture) le disc
Menu operation
Pressing the remote control buttons below calls up the
respective menu screens.
• [SET UP], [NAVIGATION], [EDIT], [INFORMATION
CORRECT], [DUBBING], [MEDIA MANAGE]
• Press any of the [ J / K / H / I ] buttons to move to a
specic menu item (yellow item indicated by a small arrow).
• Press the [OK] button to conrm the selection.
• Press the [RETURN] button to return to the previous
screen.
• Simple instructions on the operation procedure may be
displayed at the bottom of the screen.
Equipped with external control RS-232C
terminal
This unit is equipped with a RS-232C terminal that allows for
external control using a PC.

7
Getting Started
Other Precautionary Notes
Copyright protection
This unit supports copyright protection technologies.
Copyrights
• According to the copyright law, video or music data that you
store must not be used for purposes other than personal
enjoyment without the authorization of the copyright holder.
• This product employs the CPRM technology, and is rotected
by the proprietary technologies as well as intellectual
roperty rights of the United States and Japan.
Use of the CPRM technology is subject to the approval
of Macrovision Solutions Corporation. Unless special
authorization is obtained from Macrovision Solutions
Corporation, the CPRM is restricted to household and
some pay-per-view uses. Do not dismantle or remodel
this product. The copyright protection function prevents
copyrighted video images from being saved to equipment
such as a video recorder. This function may also cause
deterioration in the playback picture quality when the data
is output to a monitor through a video recorder. This is not
a hardware malfunction. To play back copyrighted videos,
connect this product directly to the monitor.
• Read and understand fully the terms and conditions of
all copyright works before using this unit in the correct
manner. Under no circumstances shall TASCAM take any
responsibility for any infringements of copyright caused by
the customer when using this unit. The customer shall be
responsible for resolving all legal issues regarding to any
copyright infringements.
Disclaimer of compensation for loss or
damage of stored video content
Please note that our company will not be liable for
compensation of the content or any incidental damages in the
event that dubbing or playback cannot be performed properly
for some reasons. The same applies during repair of this unit.
Handling precautions
o
Do not use the plug or power point with dust
or metallic objects attached to it
• Failure to do so may cause short circuit or heating, and
result in re or electric shock.
• Remove the plug once every half a year, and clean it with a
dry cloth.
o
Make use of a power point that allows the
power plug to be inserted or removed easily
• Make sure that the plug can be removed immediately in
case an abnormality is found in the unit.
o
Insert the plug rmly into the power point
• Failure to do so may cause short circuit or heating, and
result in re or electric shock.
o
Do not make use of a power voltage other
than that specied
• Doing so may result in re or electric shock.
o
Do not insert or remove the plug with wet
hands
• Doing so may result in electric shock.
Stored video content and compensation
• For discs containing important video content, backup on
a periodic basis (once every few years) is recommended.
Although digital signals do not deteriorate, playback or
dubbing may fail due to aging of the disc resulting from the
storage conditions.
• Recorded data may be lost if power outage occurs while
this unit is being used. It is therefore recommended that
videos stored on the HDD be dubbed to a BD or DVD as
soon as possible in case the HDD breaks down.
• Videos or data stored on a BD/DVD, HDD, or SD card
cannot be recovered if the media is damaged.
o
Do not touch the plug when there is thunder
or lightning
• Doing so may cause electric shock.
o
Do not insert any foreign object into this unit
• Doing so may result in re or electric shock.
o
Do not dismantle or remodel this unit
• This unit consists of high-voltage components. Dismantling
or remodeling the unit may cause re or electric shock.
o
Request the authorized dealer to inspect the
interior part of the unit once a year
• Using this unit with dust accumulated inside may result in
re.
• It is particularly effective to perform servicing before the
humid rainy season.
• Doing so may result in malfunction.
8
Getting Started
Hard Disk Drive (HDD)
Hard disk drive (HDD)
The HDD rotates at a high speed whenever the power is
turned "On".
Pay particular attention to the following precautions when
using this unit.
Warning
• Do not subject it to vibration or strong impact
Subjecting this unit to excessive impact may result in loss
of recorded data and even damage of the HDD.
• Do not remove the power plug when this unit is running
Shutting down the power when the HDD is running may
result in data loss and even damage of the HDD. Make sure
that the power plug is removed only after turning off the
power.
(Wait for the "GOODBYE" message on the display window
to disappear rst)
SD Cards
Precautions for handling SD and SDHC
cards
Note:
• The disc operation display icon appears blinking and
“READING” is displayed on the display window when
the SD card is being accessed (such as during dubbing,
playback, or formatting). When access to the SD card is in
progress, do not remove the card or the power plug. Doing
so may cause the SD card to become unusable.
If the SD card is not usable, reformat the card. If the problem
persists even after reformatting, use a new SD card.
• Do not use or store the card at a place that is subject to
static or electrical noise.
• Inserting the SD card incorrectly may cause this unit or the
card to malfunction.
• Our company will not be liable for any damage or loss of the
stored data due to accidents. (Be sure to back up the data.)
• Use the card according to the prescribed conditions. Do not
use it at the following locations.
• Places that are exposed to direct sunlight
• Places near heat-generating equipment
• Inside a car that is under the sun with the windows tightly
shut
• Places that are subject to high humidity and corrosion
• Do not bend or drop the card, or subject it to strong impact
or vibration.
• Do not expose the card to water.
• Do not place near devices that emit strong magnetic or
radio waves.
• Do not touch the metal part of the card.
Memo:
To dispose a card after erasing all data inside, it is
recommended that this be done using a commercially
available data deletion software, or by destroying the card
physically, such as with a hammer. Formatting or deletion
of data using this unit only changes the le administration
information, and does not erase the data completely.
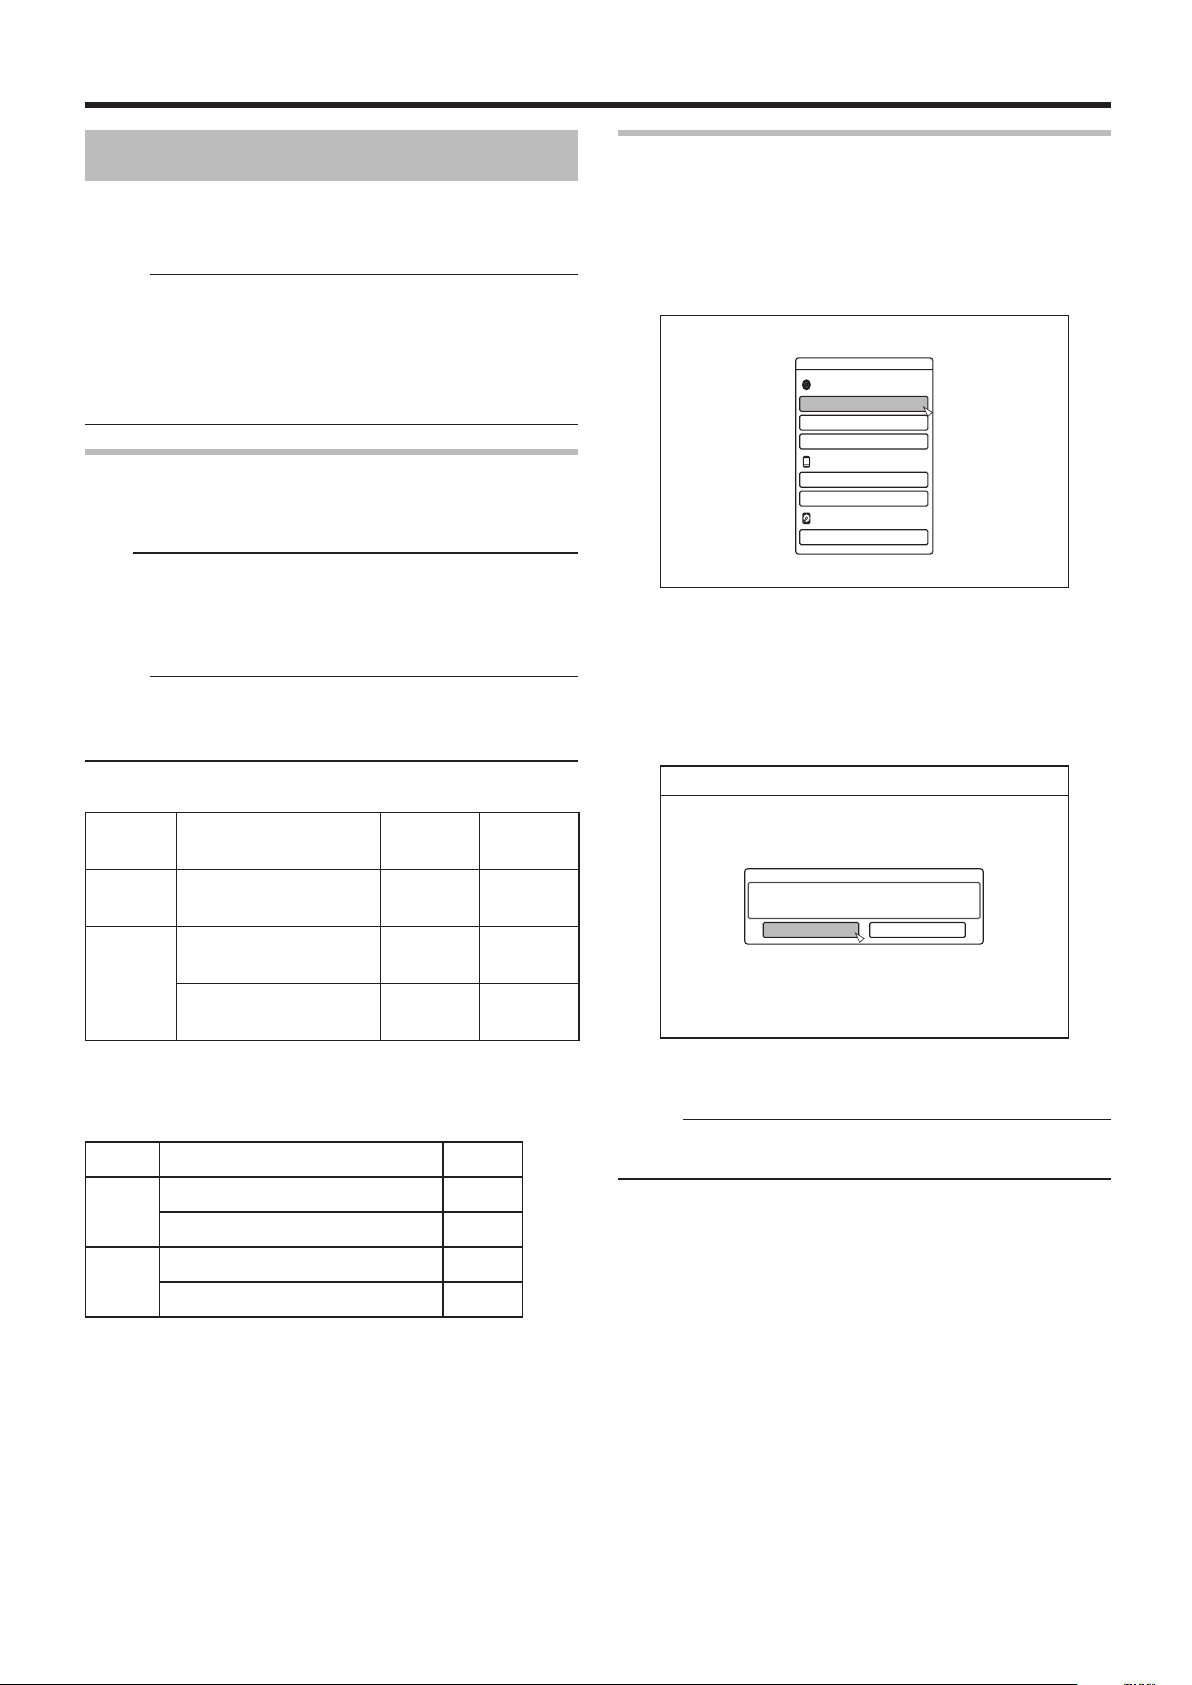
BD video data
You can erase BD Video data from the SD card as follows.
1
Insert the SD card which has BD video data
stored on it, into the [SD SLOT]
Memo:
• The BD video data cannot be erased if the SD card is write-
protected. In this case, turn off the write-protect lock before
inserting the SD card.
2
Press the [MEDIA MANAGE] button on the remote
control unit
3
Select “BD-VIDEO DATA ERASE” from “SD
CARD”
• The conrmation screen for erasing the BD video data is
displayed.
4
Select “ERASE”, and press the [OK] button
• The BD video data will be erased.

9
Getting Started
On-screen Displays
Status display
Displays the current settings and operating status (such as
playback, pause) of this unit.
Pressing the [ON SCREEN] button on the remote control
displays the status. To cancel the display, press the [ON
SCREEN] button again.
You can select whether to display the statuses by changing
the settings in the settings menu.
For more details, refer to "Display" (A page 79) .
Memo:
• To display the statuses, set the ON SCREEN GUIDE item
on the DISPLAY menu screen to “AUTO”.
• Setting the DISPLAY item to “OFF” hides display of all
status information.
Event display
An on-screen event display appears on the display window as
well as the monitor when there is a misoperation.
• The event display appears for an interval of about three
seconds.
Memo:
• The same event display may appear several times.
Alarm display
When an operation is not accepted by this unit, an on-screen
alarm display appears on the display of the main unit as well
as the monitor.
Discs
BD recording formats
o
BDAV mode
• Videos can be edited (chapter edit etc) and new videos can
be added to the disk. This format is suitable for recording
videos.
• MPEG2 with HD quality will be recorded as it is onto
the disc. This format has low playback compatibility, but
performs well when used for backups.
o
BDMV mode
• Compatible and playable on other BD players. Menu
functions similar to those of DVD video mode are also
included.
This format performs well for distribution purposes.
DVD recording formats
o
VR MODE
• Format the disc using “VR MODE” if you want to add new
videos to the disc.
• Deleting currently saved videos increases the remaining
space on the disc. (except for the case of DVD-R discs.)
o
VIDEO MODE
• Format the disc in this mode if you want to play the disc on
a different DVD player.
Formatting of discs
Formatting is required for some disc types. Perform formatting
if this is necessary.
o
When using BD-RE or BD-R discs
Formatting is required. Format the disc using this unit.
o
When using DVD-R discs
Formatting is required depending on the disc mode to be
used.
• Formatting is required when the disc is used in “VR MODE”.
Format the disc using this unit.
• Formatting is not required when using the disc in “VIDEO
MODE”.
Note:
• BD-R and DVD-R discs cannot be reformatted. Check the
disc mode before formatting the disc.
o
When using DVD-RW discs
Formatting is required. Format the disc using this unit.
• Format using “VR MODE” or “VIDEO MODE”.
10
Getting Started
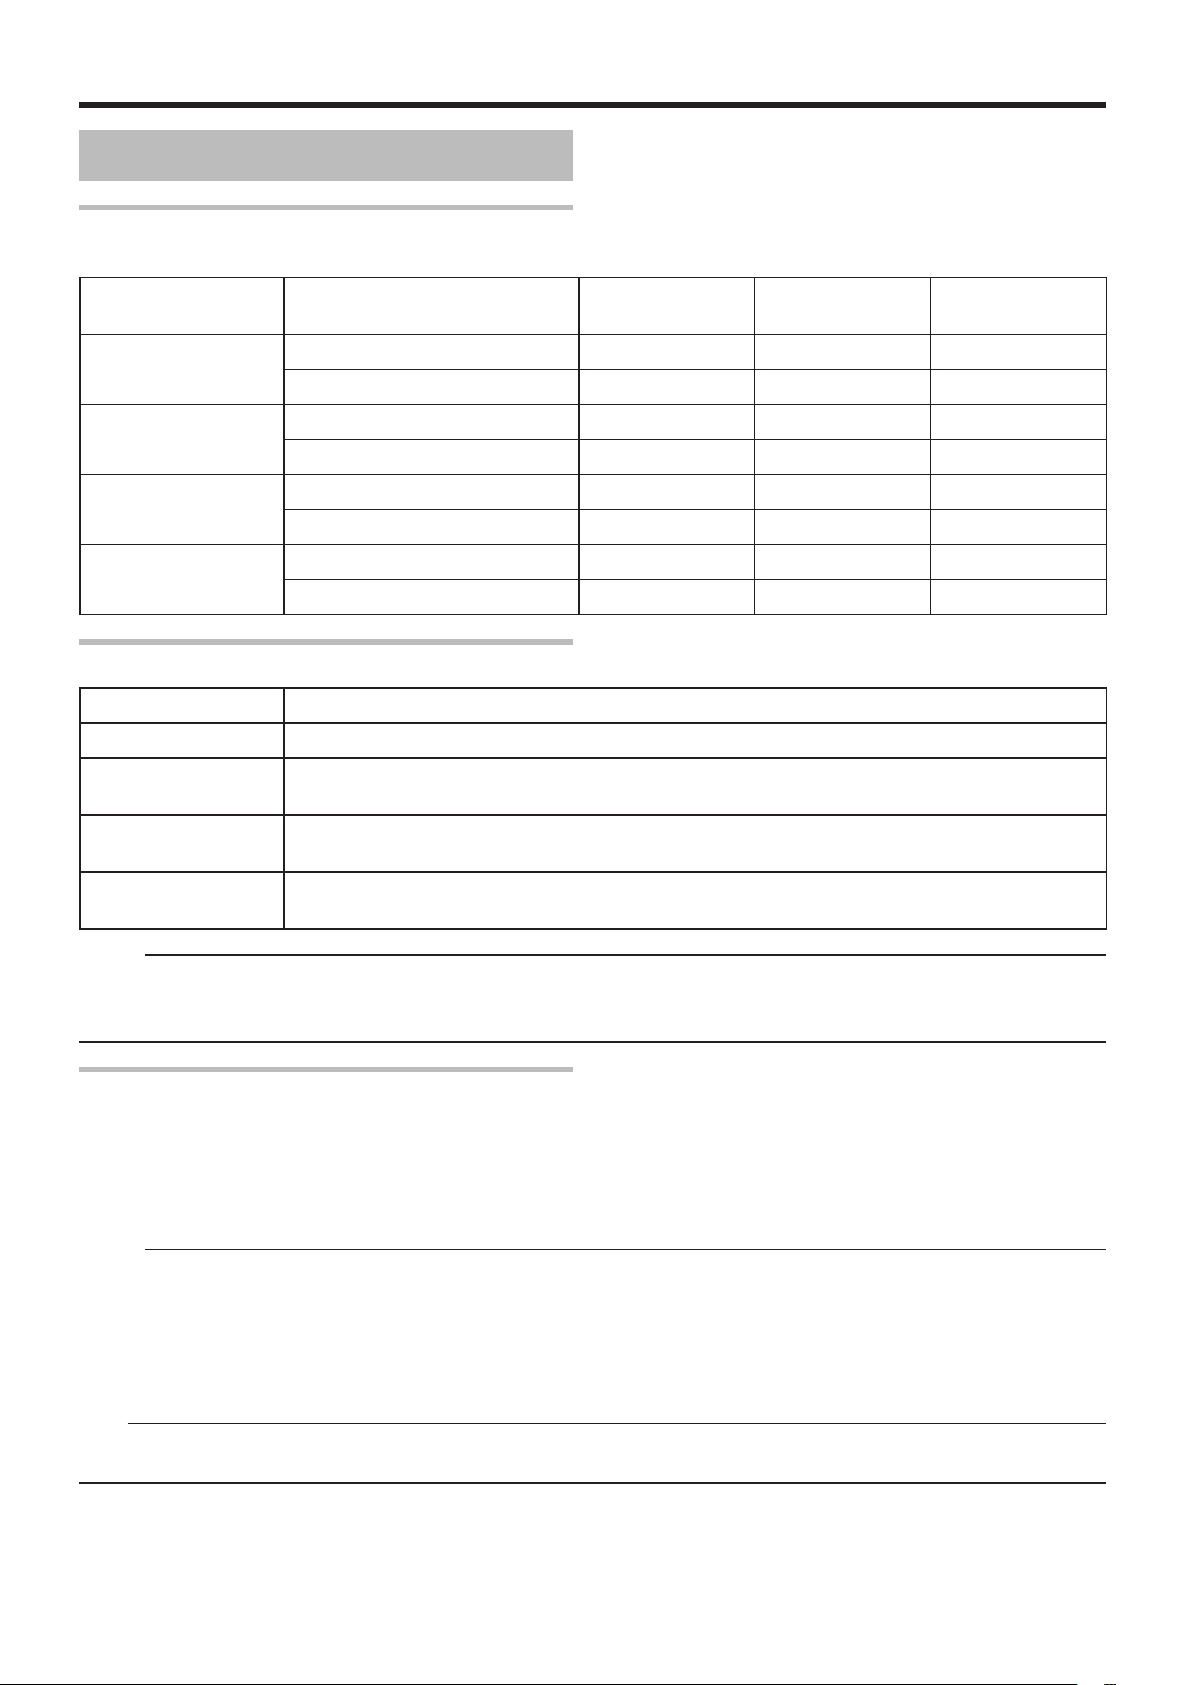
Discs (Continued)
Discs that enable both dubbing and
playback
Disc Type Recording Format Format Finalize Repeated Use
(Reformat)
BD-RE BDAV mode
BDMV mode
BD-R BDAV mode
BDMV mode
DVD-RW Video mode
VR mode
DVD-R Video mode -
VR mode
X
X
X X
X
X X X
X X X
X X
Discs that enable playback only
Disc Type Description
DVD-RAM (4.7 GB) Supports specic forms of playback, but no recording can be done.
BD-ROM Commercially available Blu-ray discs (movies, music, etc.)
The region code that can be played back on this unit is “A”.
DVD video Commercially available DVD-Video discs (movies, music, etc.)
The region code that can be played back on this unit is “1”. The video format used is NTSC.
Music CD CD-DA
DTS music CDs are also playable.
-
-
- -
X
X
X
-
-
-
Memo:
• If 8 cm discs are used, only playback can be performed. The disc cannot be used for recording or editing.
• 8 cm discs can be used without adapters.
• DVD-RAM cartridges and BD-RE are not supported. Take the DVD-RAM out of the cartridge before using it.
Discs that are not supported
• DVD-RAM (2.6 GB/5.2 GB)
• DVD-R (for authoring)
• CD-ROM/R/RW (PhotoCD, CD-G, VCD etc.)
• DDCD (1.3 GB, Double Density CD)
• HDCD (High Density CD)
Memo:
• To playback a BD or DVD that was created using this unit on another player, nalize the disc.
• There is no need for nalizing if the BD-RE disc is recorded using BDAV mode.
• If a DVD that was recorded using VR mode has been nalized, the disc can only be played back on VR mode compatible
devices.
• To perform high-speed dubbing, make use of a disc that supports high-speed recording.
• This unit can play back and record only NTSC signals.
Note:
• Do not use disc if the sticker or label is peeled off from the disc surface, if the disc is not round in shape, or if it is signicantly
warped or cracked.
11
Getting Started
Precautions on the Use of
Discs
Maintenance of discs
• Dirt attached to the disc, such as ngerprints and dust, may
cause distortion in the video image or sound.
Keep the disc clean at all times such as by using a soft
cloth.
• Wipe the disc lightly from the center outward using the
cloth.
• If dirt is stubborn, wipe it off using a slightly wet cloth,
followed by a dry cloth.
• Do not use thinner, benzine, alcohol, conventional record
cleaners, or antistatic sprays.
Doing so may damage the disc surface.
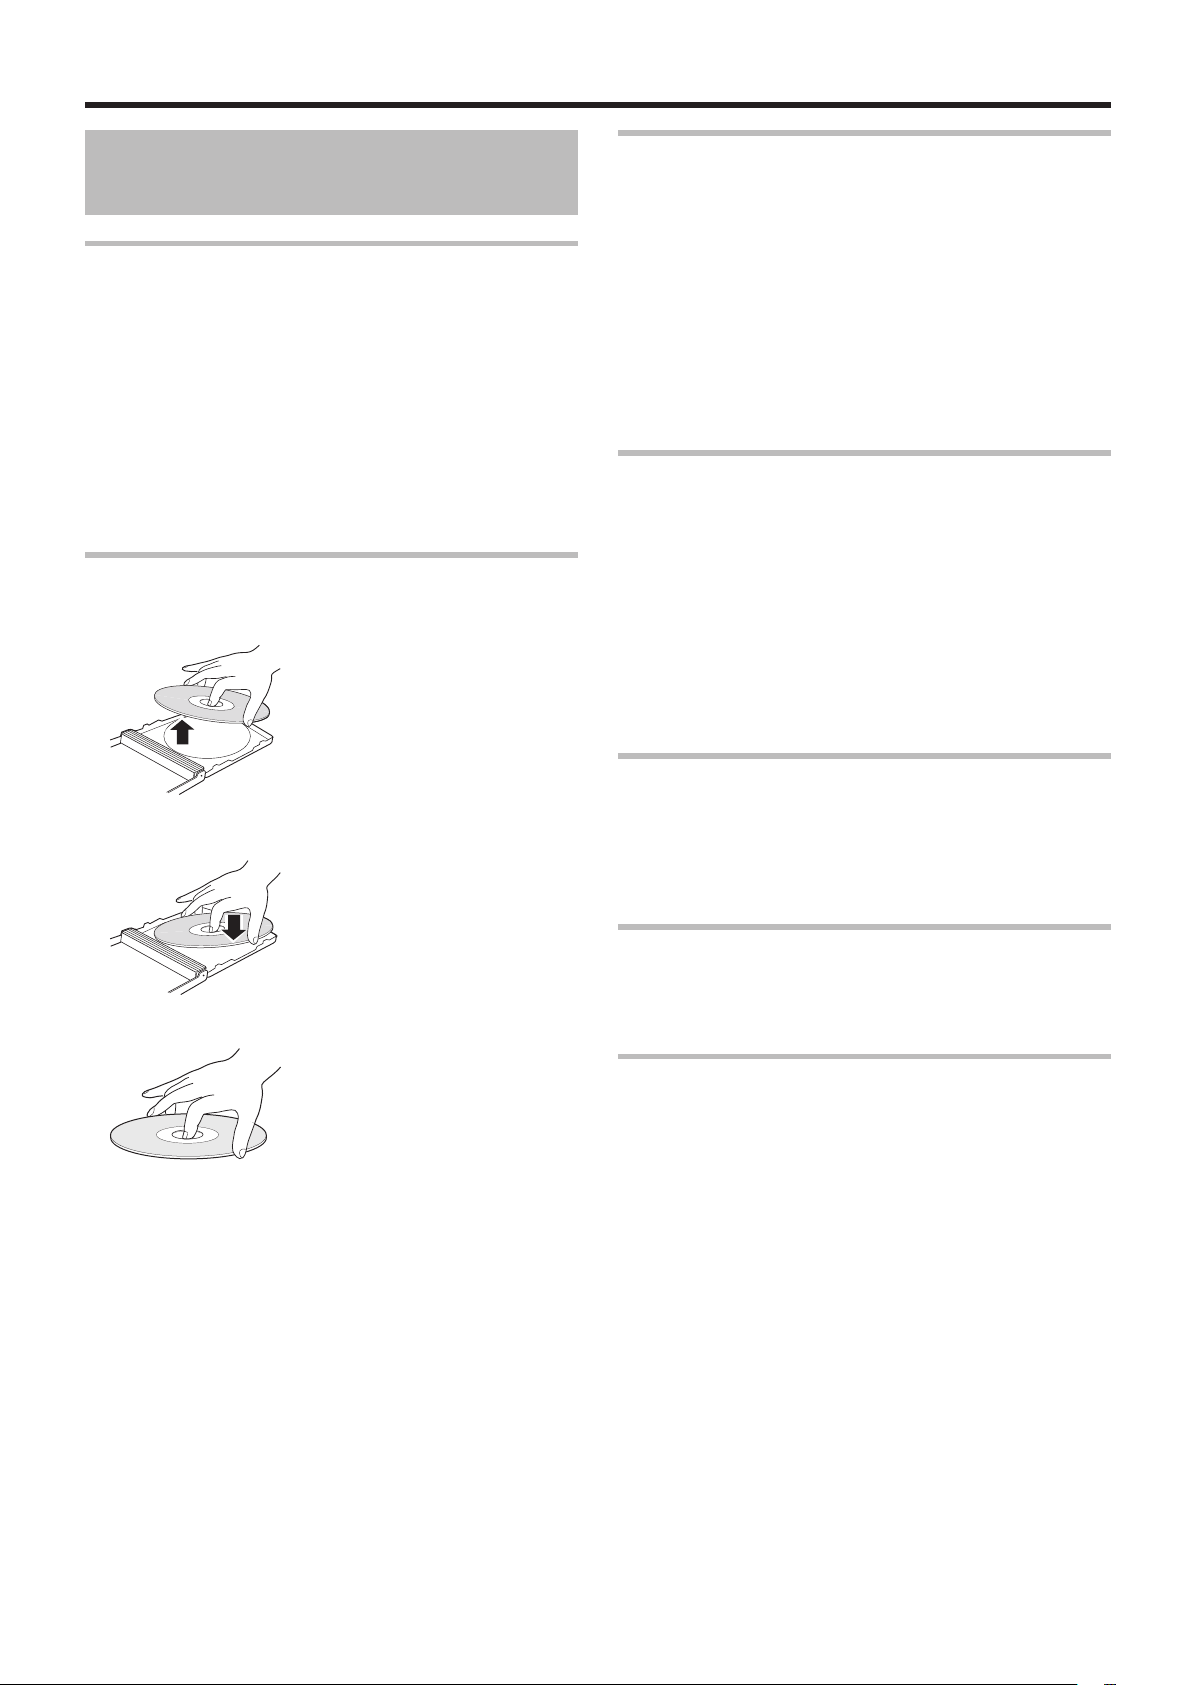
Handling discs
o
Removing a disc
Disc storage
• Avoid storing the disc at the following locations.
• Places that are subject to high humidity, dust, or mold
growth
• Places that are exposed to direct sunlight or near a
heater
• Inside a car during summer
• Do not drop the disc or subject it to strong impact.
• Place the disc in a case and store it vertically.
• Stacking the discs without using a case, placing the
discs against one another or dropping them may result in
deformation or cracking.
When the recording/playback lens is dirty
Dust or dirt may be attached to the recording/playback
lens after using this unit for a prolonged period of time, and
recording or playback may not be properly performed as a
result.
Although the performance of this unit varies according
to the frequency of use and installation environment, it is
recommended that cleaning of the lens be performed once
every half a year using commercially available DVD lens
cleaners.
For cleaning procedures, refer to the instruction manual of the
lens cleaner.
o
Keeping a disc
o
Correct way to hold a disc
• Make sure that your hands do not touch the recording/
playback side of the disc.
Precautions when playing a dual disc
The side of the dual disc that is not used for DVD recording
does not comply with the standard specications of music
CDs.
It is recommended that playback on this unit be limited to the
DVD recording side of the dual disc.
Recommended discs
The best performance may not be obtained for some discs.
It is recommended that JVC discs be used to ensure the best
results.
Power Cable
Do not unplug the cable during recording or playback.
Doing so may cause the disc to become unusable.
If the disc becomes unusable, refer to the following.
BD-R or : Use a new disc.
DVD-R
BD-RE or : Reformat the disc after erasing the data. If the
DVD-RW disc is still not usable, use a new disc.
Do not turn off the [A] button or unplug the power cable
immediately after closing the disc tray.
12
Getting Started
FOOT
Precautions for placement
and use
Precautions When Mounting Rack
• The guaranteed operating temperature range of this product is 5º - 35º C (41º- 95º F).
• Do not install in the following types of places. Doing so
could degrade the image quality and/or cause malfunctions.
• Places with signicant vibrations or that are otherwise
unstable
• Near windows or other places exposed to direct sunlight
• Near heaters or other extremely hot places
• Extremely cold places
• Places with bad ventilation or high humidity
• Make sure that the unit is mounted in a level position for
correct operation.
• In order to promote the emission of heat, do not place
anything on top of this product.
• Do not place this product on top of a powered amplier or
other equipment that emits heat.
• When using rack mount, keep the clearance between the
rack and the rear of unit 150mm or more.
• When installing this unit or the like to the rack, refer to the
consumption current value of the nameplate of each device
so that the current capacity (including rated capacity of
power supply wire) of the rack is not exceeded.
• Use the rack that meets the following requirements:
• must be equipped with overcurrent protection
• must be equipped with protective earthing conductor
power plug and socket
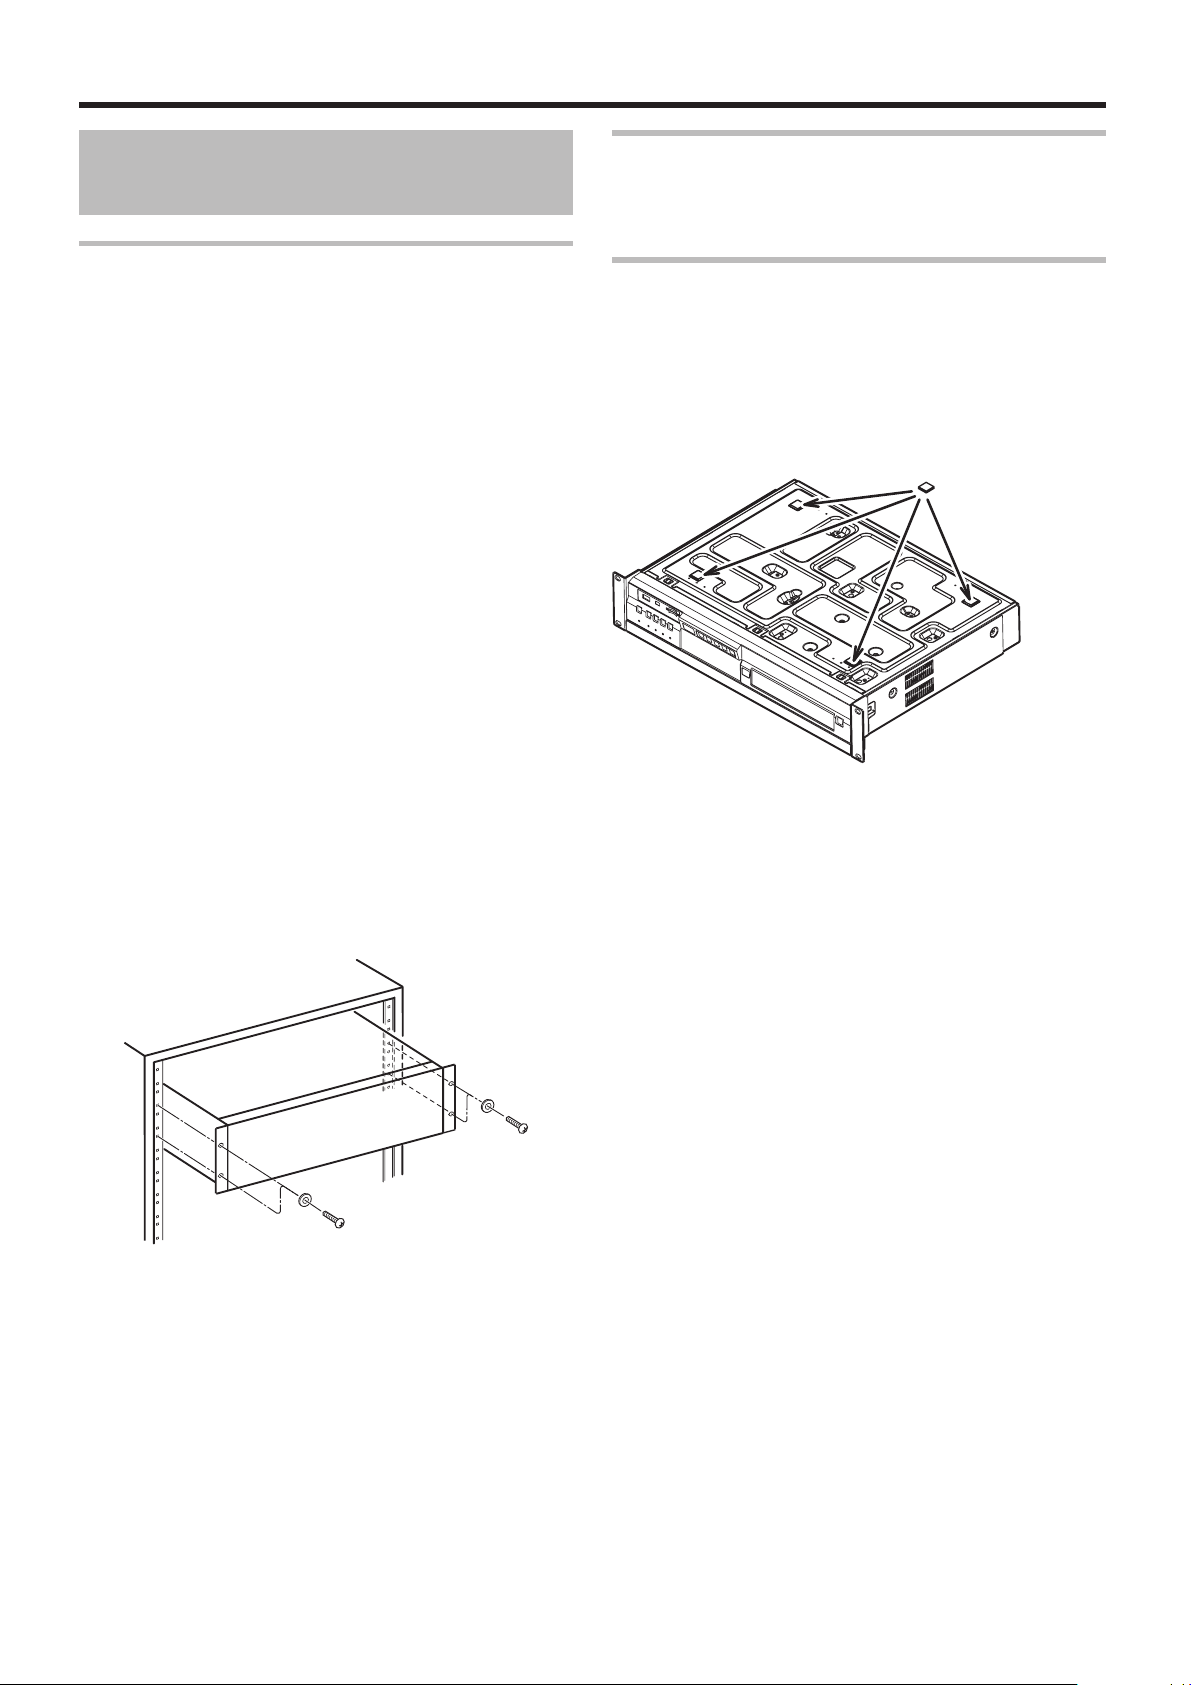
Rack Mounting Notes
If this product is to be used without being rack-mounted,
please afx the enclosed FOOT parts to the bottom face of
the unit.
Attaching the FOOT parts.
• Carefully turn the unit upside down.
• Removing the seal from each FOOT part exposes a self-
adhesive surface.
• Attach one FOOT part to each of the 4 places noted in the
diagram.
• Turn the unit back to its normal orientation.
13
Getting Started
Name and Function of
A B C D E H
RQPON
J LGF MI K
Parts
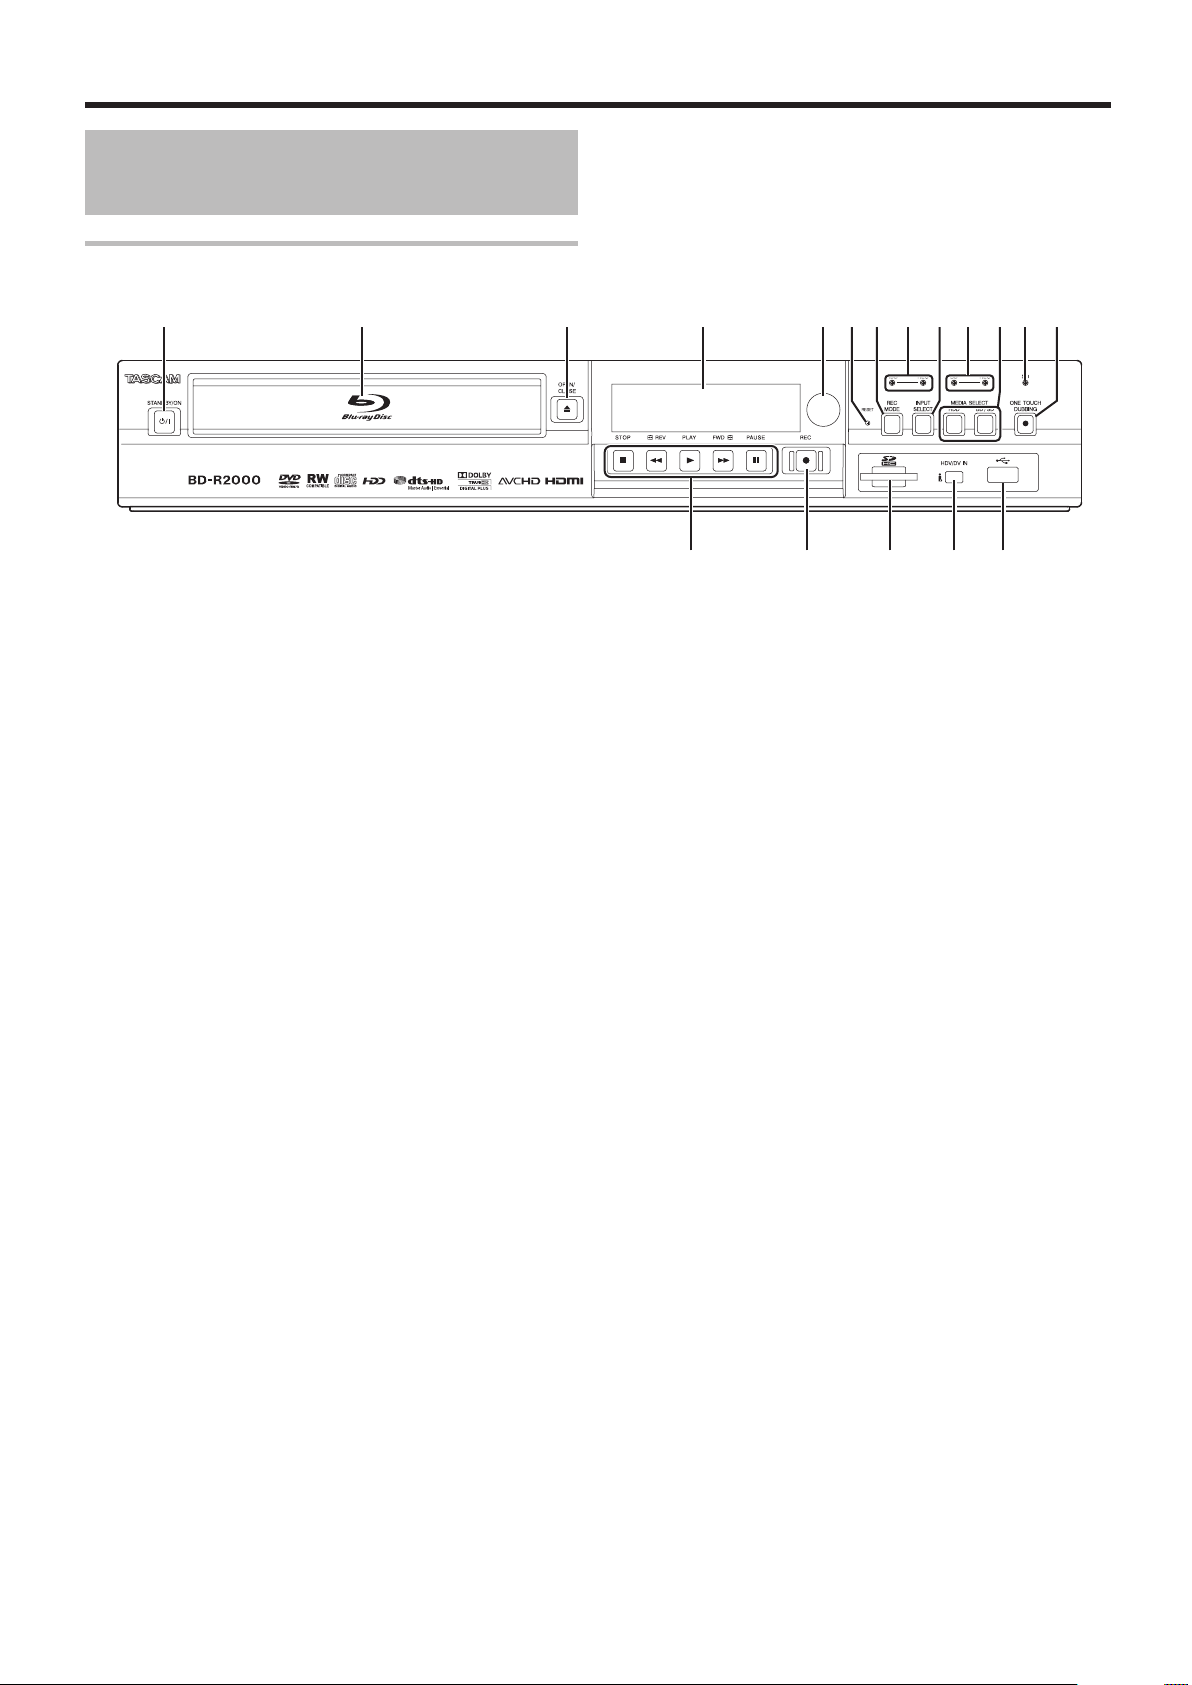
Front panel
[ A ] button
A
Switches operation between on and standby.
Disc tray
B
[ M ] button
C
Opens/closes the disc tray.
Display window
D
Remote control sensor
E
[RESET] switch
F
Reset the unit.
[REC MODE] button
G
Switches the recording mode.
[HDD] lamp
H
Lights up when in HDD mode.
The [REC] lamp lights up while recording/importing.
[INPUT SELECT] button
I
Switches the external input signals (HDV/DV, L1).
[BD] lamp
J
Lights up when in BD/DVD mode.
The [REC] lamp lights up while recording/dubbing.
[MEDIA SELECT] button
K
Switches between HDD and BD/SD.
[SD] lamp
L
Lights up when in SD mode.
[ONE TOUCH DUBBING] button
M
Starts dubbing at a single touch.
Playback control buttons
N
• [ I ] button
Plays back the data.
• [ o ] button
Stops playback/recording.
• [ O ] button
Fast reverses playback.
• [ N ] button
Fast forwards playback.
• [ W ] button
Pauses playback.
[ R ] button
O
Starts recording of a title.
[SD SLOT]
P
Used for inserting SD cards.
[i.LINK(HDV/DV IN)] terminal
Q
Connect a video camera using i.LINK (HDV/DV. IN).
[USB] terminal
R
Connect a video camera using USB.
14
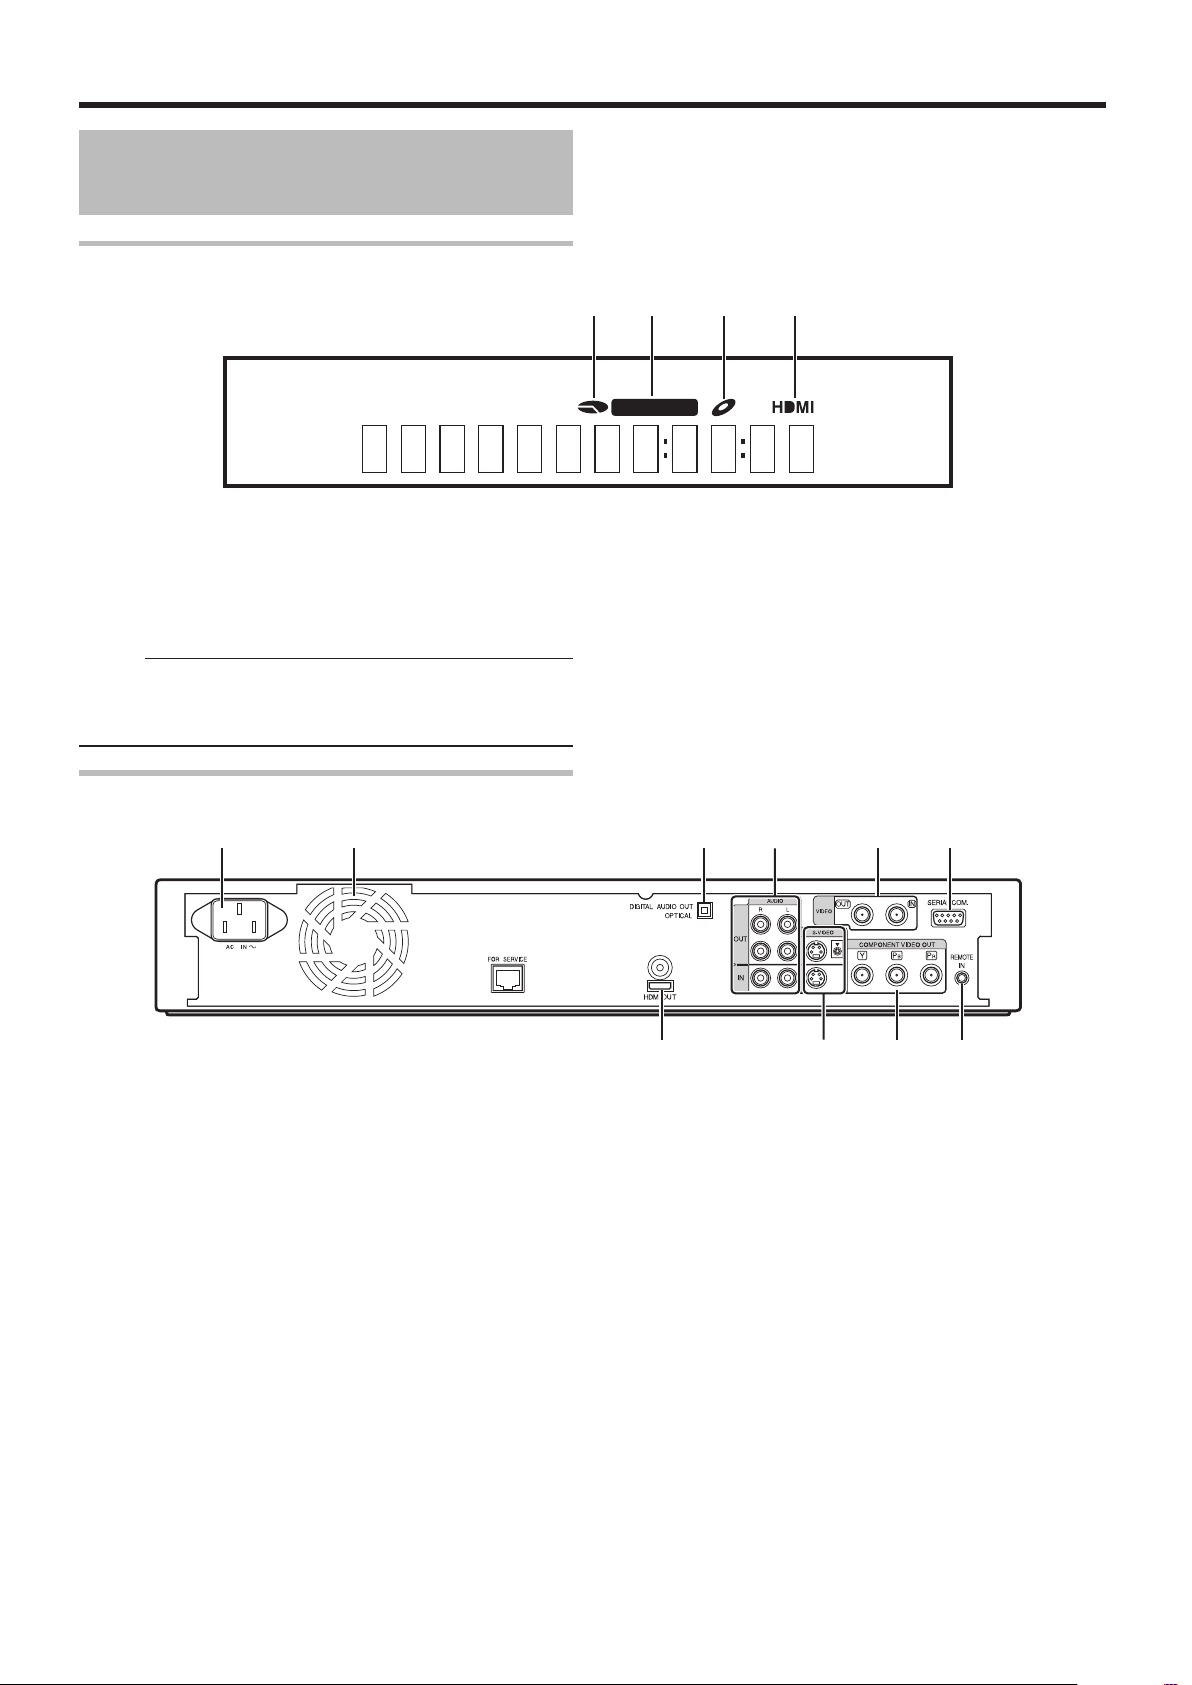
Getting Started
A B C D
A B CD E F
JIHG
Name and Function of
Parts (Continued)
Display window
HDD/DISC remaining level display
A
Dubbing display
B
Disc status display
C
HDMI output display
D
Memo:
• The brightness of the display window can be adjusted.
For more details, refer to “PANEL DISPLAY BRIGHTNESS”
(A page 75).
English messages appear for a number of operations.
(Examples)
HELLO : When the power plug is inserted
READING : When reading the disc
ONSCREEN : Upon moving to the playback navigation
screen
Rear panel
AC inlet
A
For connecting the power supply.
Cooling fan
B
[DIGITAL AUDIO OUT (OPTICAL)] terminal
C
For connecting to the amplier using an optical audio cable.
[AUDIO OUT/IN] terminals
D
For connecting using an audio cable.
[VIDEO OUT/IN] terminals
E
For connecting using a video cable.
[SERIAL COM.(RS-232C)] terminal
F
For connecting to a computer using a serial cable.
[HDMI] terminal
G
For connecting using an HDMI cable.
[S-VIDEO OUT/IN] terminals
H
For connecting using an S-video cable.
[COMPONENT VIDEO OUT] terminals
I
For connecting using a component video cable.
[REMOTE IN] terminal
J
For connecting a wired remote control.
15
Getting Started
c
e
f
T
W
U
X
C
A
D
g
d
h
i
j
n
k
m
p
o
Y
B
V
b
a
G
Z
I
J
K
L
H
P
S
M
E
F
N
O
Q
R
l
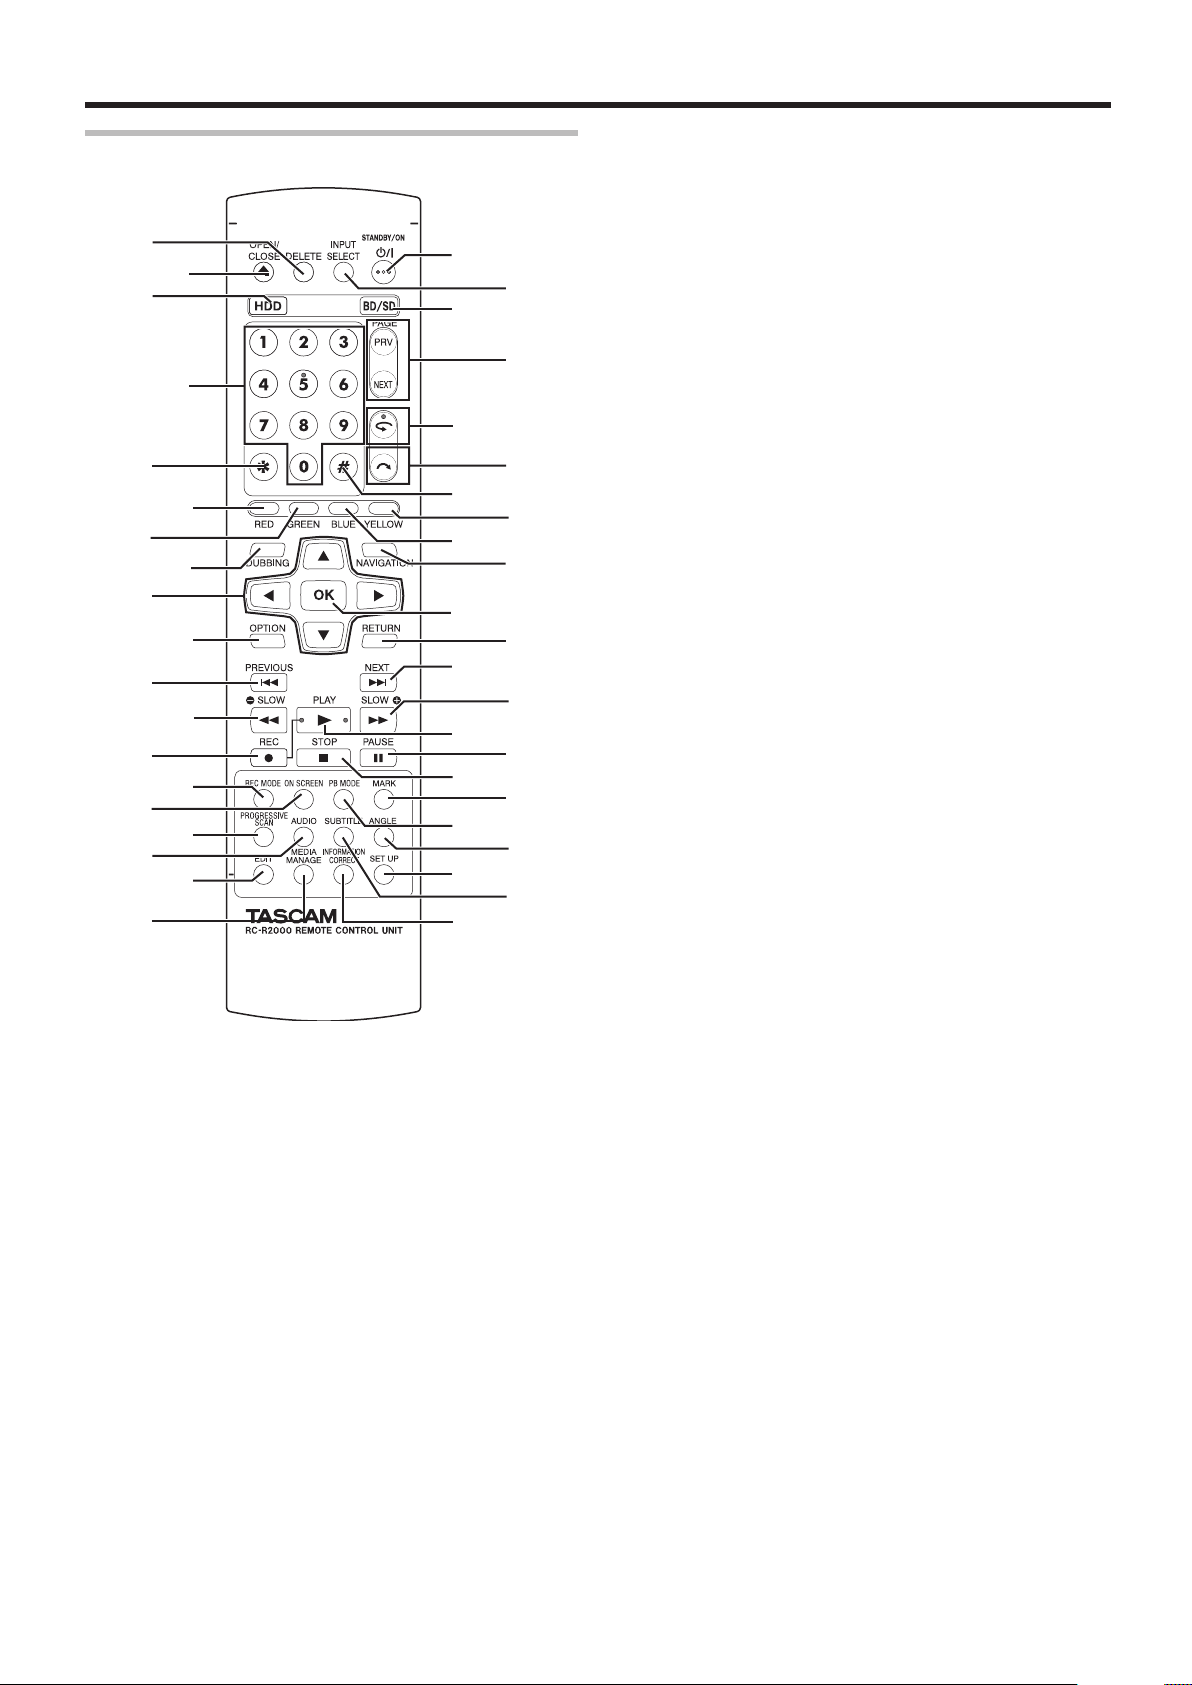
Remote control
[DELETE]
A
Deletes a title or characters.
[ M ]
B
Opens/closes the disc tray.
[HDD]
C
For operating the HDD.
[1]-[9]
D
For entering characters.
[Z]
E
For entering characters.
[RED]
F
Enabled when the color button (red) is displayed.
[GREEN]
G
Enabled when the color button (green) is displayed.
[DUBBING]
H
Displays the dubbing menu screen.
[ J / K / H / I ]
I
The cursor can be moved to select an item.
[OPTION]
J
Displays the option screen.
[ S ]
K
Move to the chapter just before the current chapter.
[ O ]
L
Fast reverses the video and starts slow playback.
[ R ]
M
Press the [ R ] and [ I ] buttons together to start recording.
[REC MODE]
N
For checking the recording mode settings and amount of time
remaining.
[ON SCREEN]
O
Displays information on the screen.
[PROGRESSIVE SCAN]
P
Switches the resolution of the image output.
[AUDIO]
Q
Switches the playback audio.
[EDIT]
R
Displays the editing menu screen.
[MEDIA MANAGE]
S
Displays the media management menu screen.
[ A ]
T
Switches operation between on and standby.
[INPUT SELECT]
U
Switches the external input signals (HDV/DV, L1).
[BD/SD]
V
For operating BD/DVD or SD.
[PAGE PRV][PAGE NEXT]
W
Returns to the previous page. Or advances to the next page.
[ w ]
X
Move the playback position slightly backwards.
[ v ]
Y
Advance the playback position slightly.
[#]
Z
For entering characters.
[YELLOW]
a
Enabled when the color button (yellow) is displayed.
[BLUE]
b
Enabled when the color button (blue) is displayed.
[NAVIGATION]
c
Displays the playback navigation screen.
[OK]
d
Conrms a selection or entry.
[RETURN]
e
Returns to the previous screen without applying the selection
or entry.
[ T ]
f
Move to the next chapter.
Getting Started
Name and Function of
Parts (Continued)
[ N ]
g
Fast forwards the video and starts slow playback.
[ I ]
h
Plays the video.
[ W ]
i
Pauses the video that is currently playing.
[ o ]
j
Stops playback/recording.
[MARK]
k
Adds a chapter mark during playback or recording. Select
multiple titles from the playback navigation screen or other
screens.
[PB MODE]
l
Display the playback settings screen.
[ANGLE]
m
Switches the camera angle for playback.
[SET UP]
n
Displays the settings menu screen.
[SUB TITLE]
o
Switches the playback subtitle.
[INFORMATION CORRECT]
p
Displays the information editing screen.
Change batteries for the remote control
• If the operable distance of the remote control unit becomes
shorter, this means that the batteries are running out.
When this occurs, replace the batteries with new ones.
Remote control codes
By setting a remote control code for the unit and remote
control, you can prevent two recorders from operating
simultaneously using the remote control for this unit.
(the setting for the unit and remote control at time of purchase
is “REMOTE CONTROL 3”.)
Memo:
• Changing the remote control code for the remote control
before the unit’s remote control code is changed will cause
the unit to be inoperable. Change the unit’s remote control
code rst when changing remote control codes.
o
Changing the remote control code for the
unit
1
Press the [SET UP] button on the remote control
to display the “SETUP” menu
2
Change the “REMOTE CONTROL CODE” option
in the “SETUP” menu
Memo:
• For more details, refer to “REMOTE CONTROL CODE” (A
page 75).
o
Changing the remote control code for the
remote control
1
Press and hold the [OPTIONS] button on the
remote control
2
Press either of the [1], [2], [3] or [4] buttons
• Press the number button that is equivalent to the remote
control code you desire.
3
Press the [OK] button
• Press the [OK] button to change the remote control code.
4
Release the [OPTIONS] button on the remote
control
Memo:
• If the remote control code is different from the unit, the
remote control code for the unit will be displayed on the
display window.
Examples: REMOTE CONTROL 3
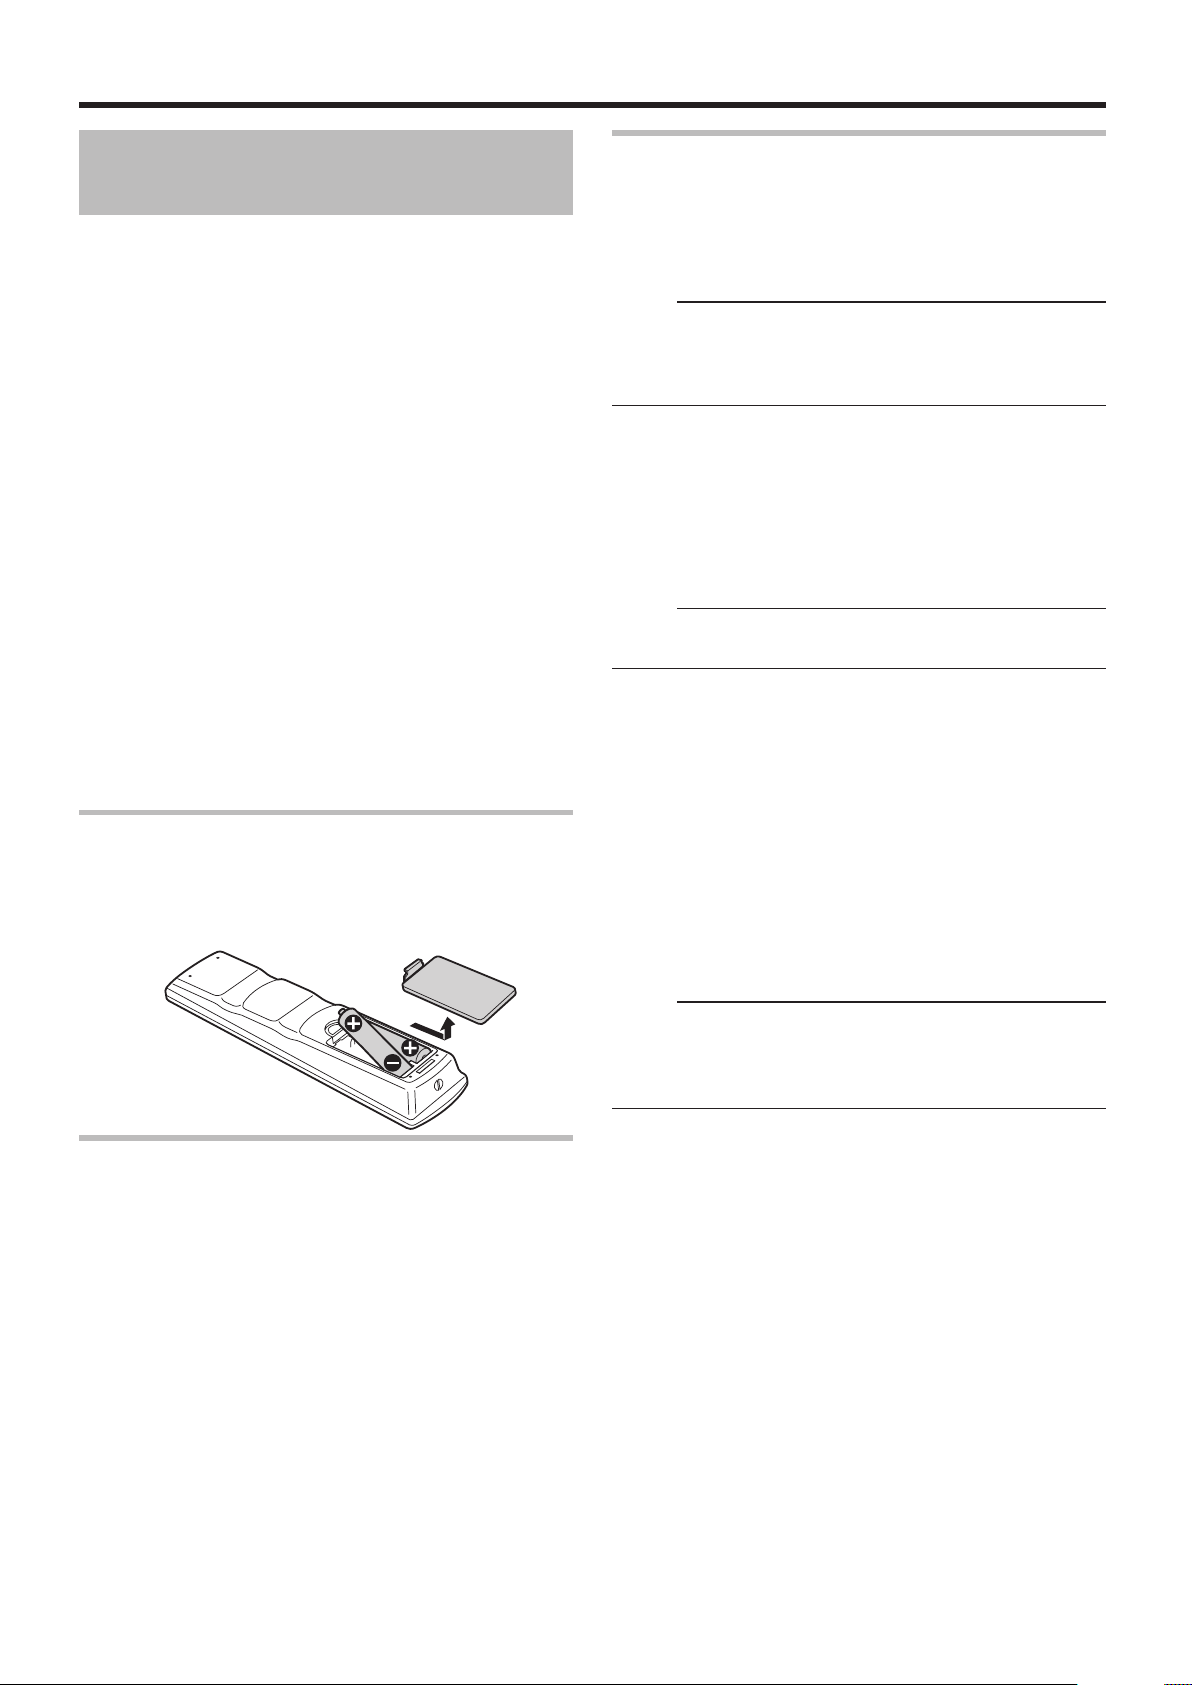
Batteries
• Insert the batteries correctly according to the + and - signs.
Insert the - side of the battery rst.
• If an error occurs while using the remote control unit,
remove the batteries, wait for about ve minutes, and
operate the remote control unit again after re-inserting the
batteries.
Battery life : Approximately 6 months
(depending on the frequency of use)
16
Preparation
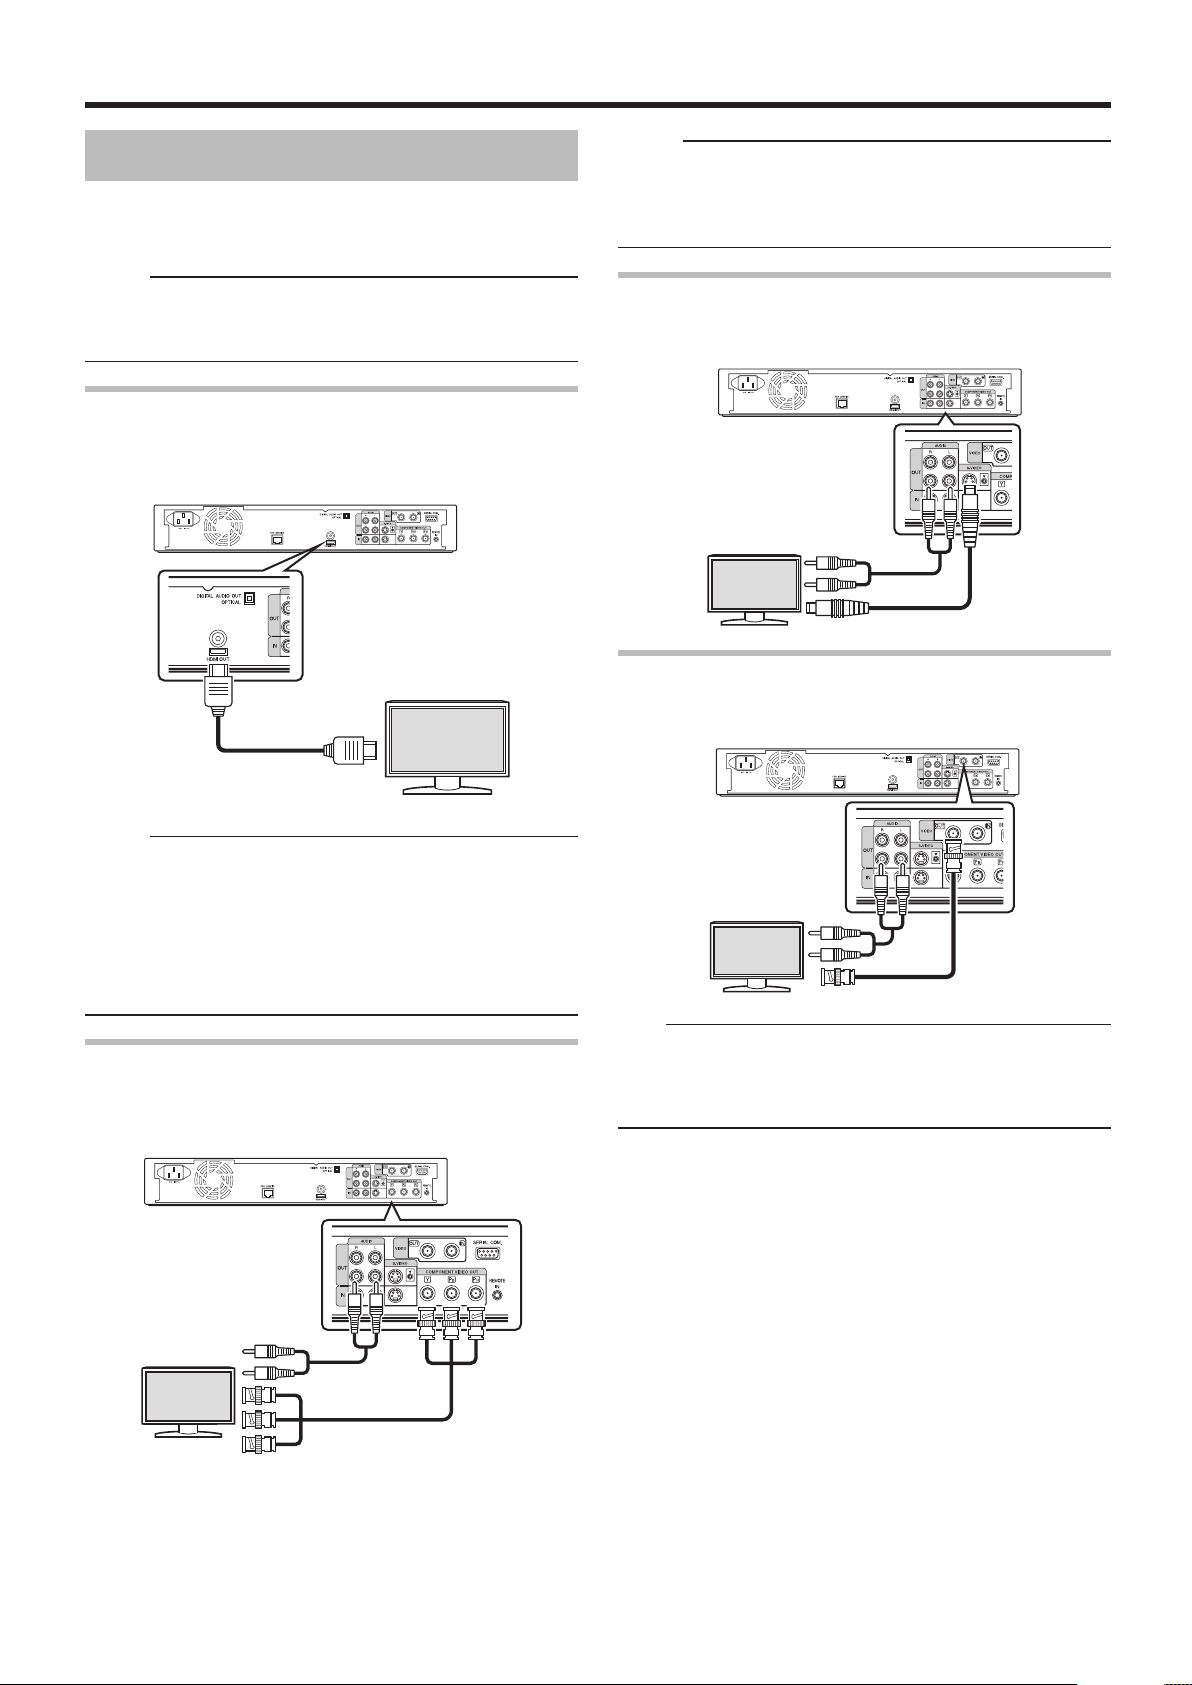
Connecting a Monitor
To display video images from this unit, connect it to a monitor.
• This unit supports connections using "HDMI cable",
"component video cable", "S-video cable", or "video cable".
Memo:
• Switch to the appropriate monitor input according to the
type of connection cable used.
For details, refer to the instruction manual of the monitor.
Connecting using a HDMI cable
Connecting using a HDMI cable (sold separately) enables
signals to be maintained in the digital format, and thus
playback of clear video images.
Memo:
• After connecting a component video cable, change the unit
setting to “COMPONENT OUTPUT”.
For more details, refer to “COMPONENT OUTPUT” (A page
81) .
Connecting using an S-video cable
Connecting using an S-video cable (sold separately) delivers
video images that are clearer than those by a video cable.
Connecting using a video cable
Connect the output terminal of this unit to the input terminal of
a TV using a BNC-BNC cable and an audio cable.
Memo:
• Videos cannot be displayed on a monitor that does not
support the copyright protection system (HDCP).
• Use a High Speed HDMI Cable.
• After connecting using a HDMI cable, change the unit
setting to “HDMI CONNECTION”.
For more details, refer to " VIDEO PRIORITY MODE " (A
page 80) .
Connecting using a component video cable
Connecting using a component video cable (sold separately)
delivers playback images that are clearer than those by an
S-video cable.
Note:
• Connect the S-video/video output of this unit directly to the
TV (or monitor). Connecting this unit to the TV or monitor
via a video deck triggers the copy protection function, and
may cause distortion in the video images during playback.
17
18
Preparation
HDV/DV IN
SDRECHDD RECBV
ONETOUCH
DUBBNG
REC
MODE
NPUT
SELECT
HDD
MD A SELECT
BD/SD
HDVDV N
SDRECHDD RECBV
ONE TOUCH
DUBBING
REC
MODE
IN UT
SE ECT
HDD
MIDA SE ECT
BDSD
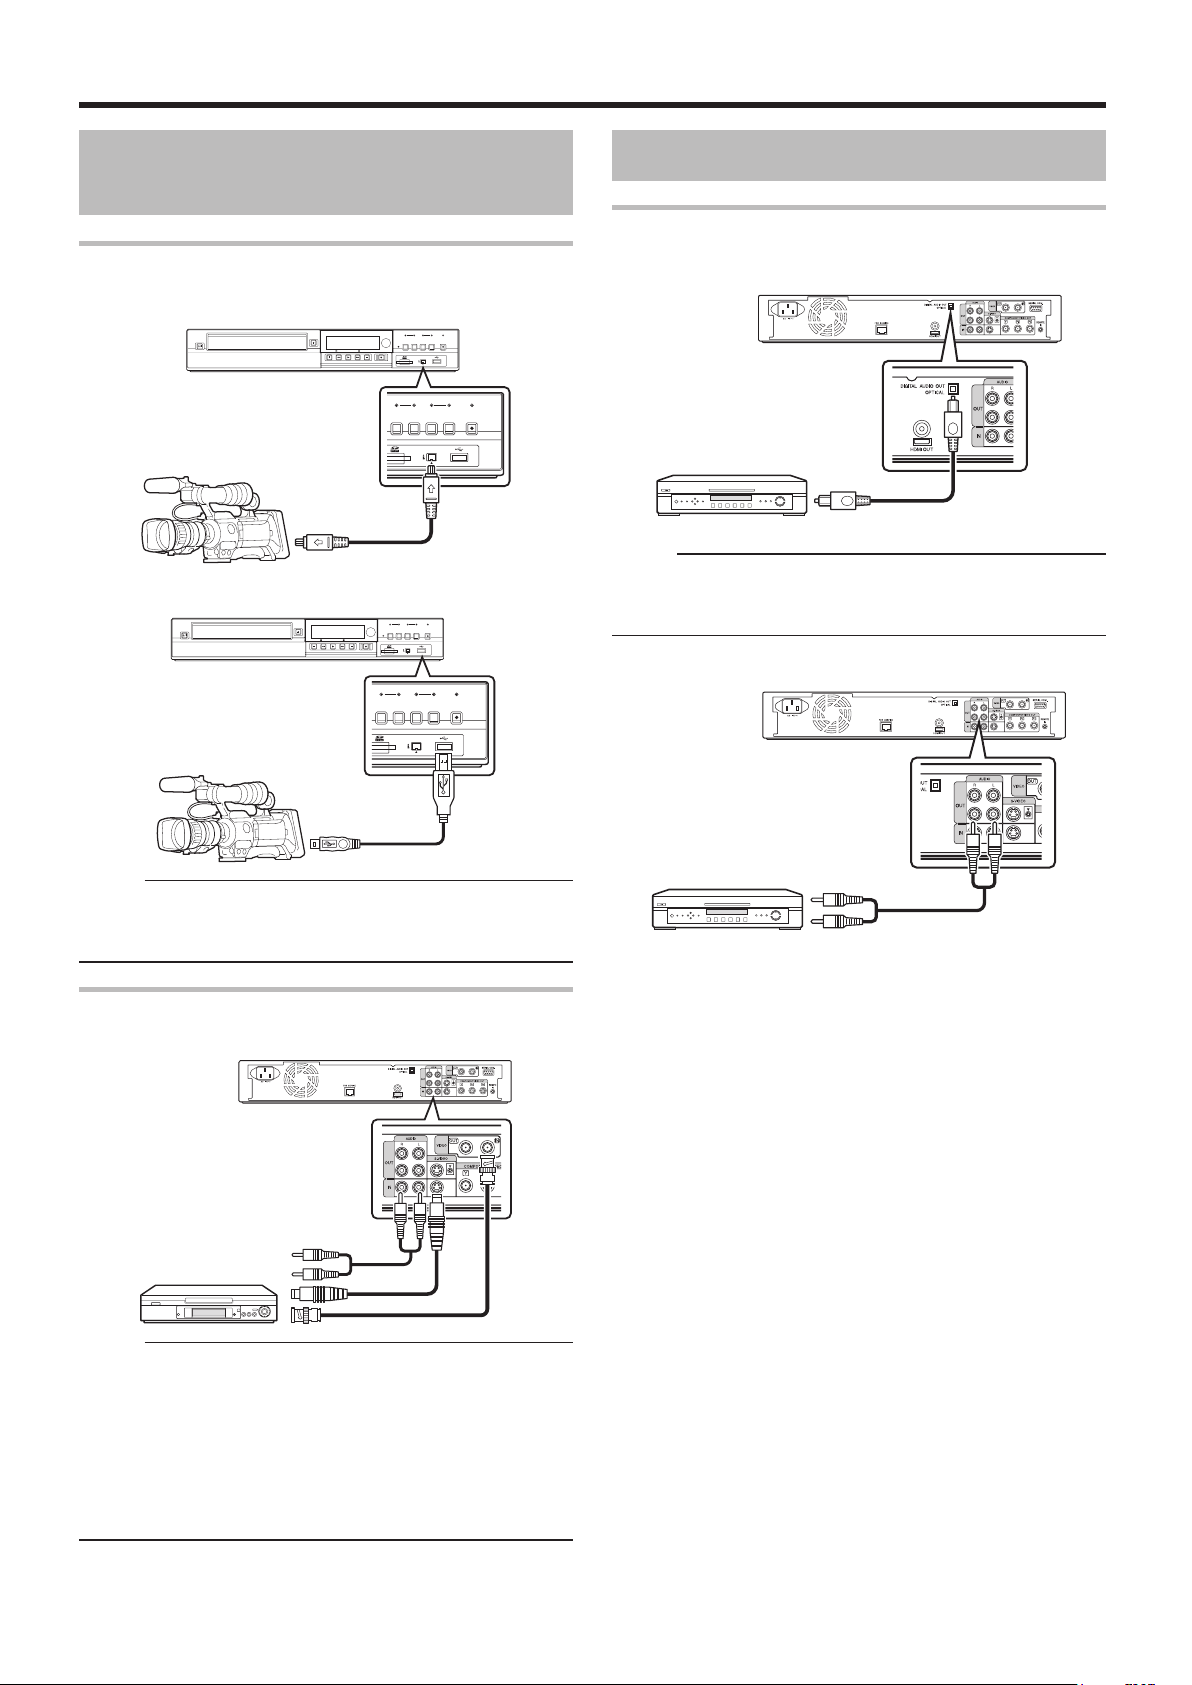
Connecting a Video Deck
or Other Equipment
Connecting a video camera
o
Connecting via the i.LINK terminal
o
Connecting via the USB terminal
Connecting an Amplier
Connecting an audio amplier
o
Connecting using an optical digital cable
Memo:
• Remove the protection cap of the cable before connecting.
Store the protection cap properly to prevent it from being
misplaced.
o
Connecting using an audio cable
Memo:
• Some video camera models may require an AC adapter
instead of batteries to run. For details, refer to the video
camera’s instruction manual.
Connecting a video deck or other
equipment (recording using this unit)
Memo:
• When connecting using an S-video cable, change the
setting of “VIDEO INPUT SETTING” to “S-VIDEO”.
For more details, refer to “VIDEO INPUT SETTING” (A page
81) .
• To record video images played back on this unit to an
external device (video deck, etc.), connect the output
terminal of this unit to the input terminal of the external
device.
19
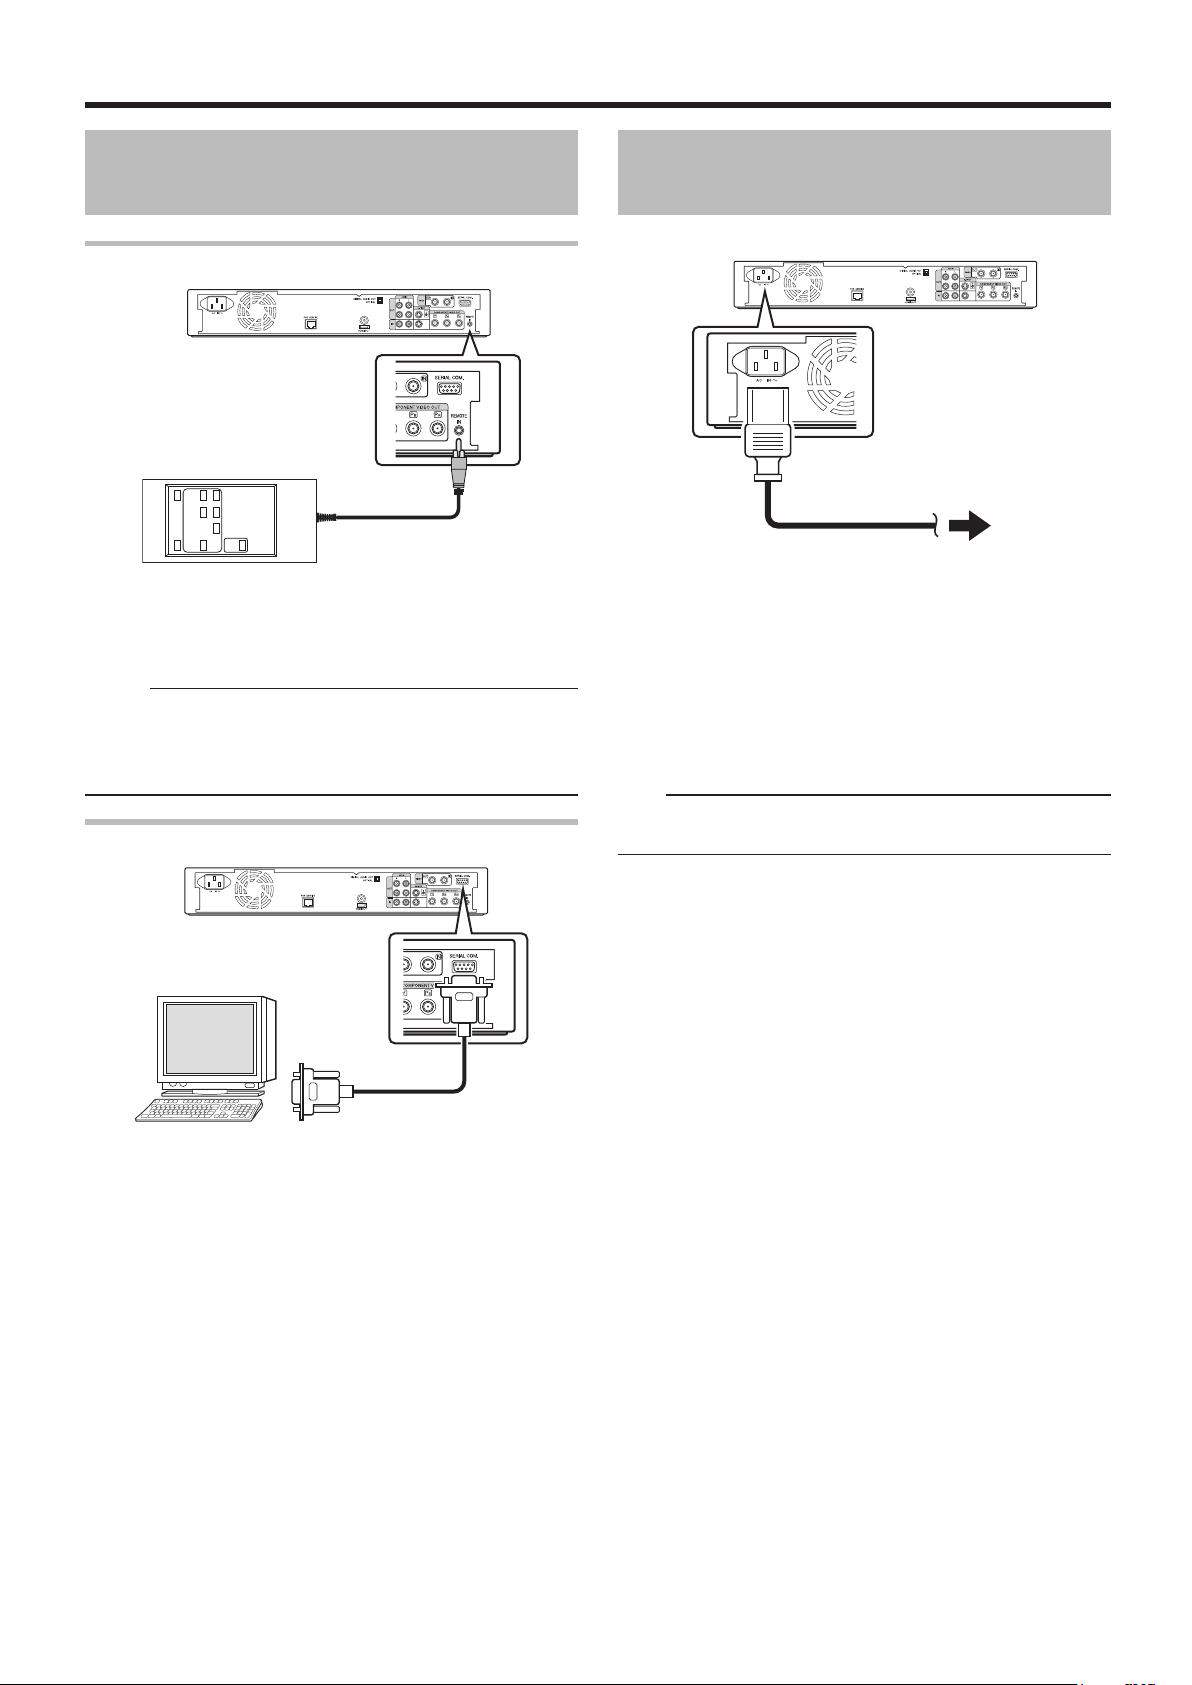
Preparation
Connecting External
Devices
Connecting a wired remote control
Using a wired connection enables stable control of this unit
from an external device.
Operation is possible using any code (1 to 4) regardless of
the remote control code settings of this unit.
Memo:
• There is currently no compatible remote control unit
available.
• To create a wired remote controller, refer to “RS-232C
Interface” (A page 83).
Connecting using a RS-232C cable
Connecting the Power
Supply
Connect the supplied power cable to this unit as follows.
1
Connect the supplied power cable to the AC IN
terminal of this unit
2
Connect the other end of the power cable to a
power point
3
Press the [A] button on the remote control or
this unit to switch on the unit.
• The power of this unit turns on, and a "HELLO" message
appears on the display window.
Note:
• Do not use power cables other than that supplied with this
unit. Doing so may cause this unit to malfunction.
External operation is enabled by connecting a RS-232C cable
to a PC or similar device.
For details on external operation, refer to “RS-232C Interface”
(A page 83) .

20
Preparation
1-
4'6740
':+6
5'.'%6
5'672
#761 219'4 1(( 1((
1((
4'/16' %10641. %1&'
4'/16' %10641.
%.1%- 5'6&+52.#;
2#0'. &+52.#; $4+)*60'55
37+%- 56#4672
$7<<'4 176276
&'(#7.6 5'66+0)
5'672
5QHVYCTG 8GTUKQP
ZZZZZ ZZZZZ ZZZZZ
1-
4'6740
5'672
#761 219'4 1(( 1((
1((
4'/16' %10641. %1&'
4'/16' %10641.
%.1%- 5'6&+52.#;
2#0'. &+52.#; $4+)*60'55
37+%- 56#4672
$7<<'4 176276
&'(#7.6 5'66+0)
':+6
5'.'%6
5'672
1-
4'6740
':+6
5'.'%6
5'672
%.1%- 5'6&+52.#;
%.1%- 5'6
' &+52.#;
6+/' &+52.#; %*1+%' *
/106* &#; ;'#4
5'672
1-
4'6740
%.1%- 5'6&+52.#;
':+6
5'.'%6
5'672
%.1%- 5'6
5'672
#/
%.1%- 5'6
;'#4
/106*&#; ,#0
6+/'
'06'4
1-
4'6740
':+6
5'.'%6
%.1%- 5'6&+52.#;
5'672
%.1%- 5'6
5'672
#/
%.1%- 5'6
;'#4
/106*&#; ,#0
6+/'
'06'4
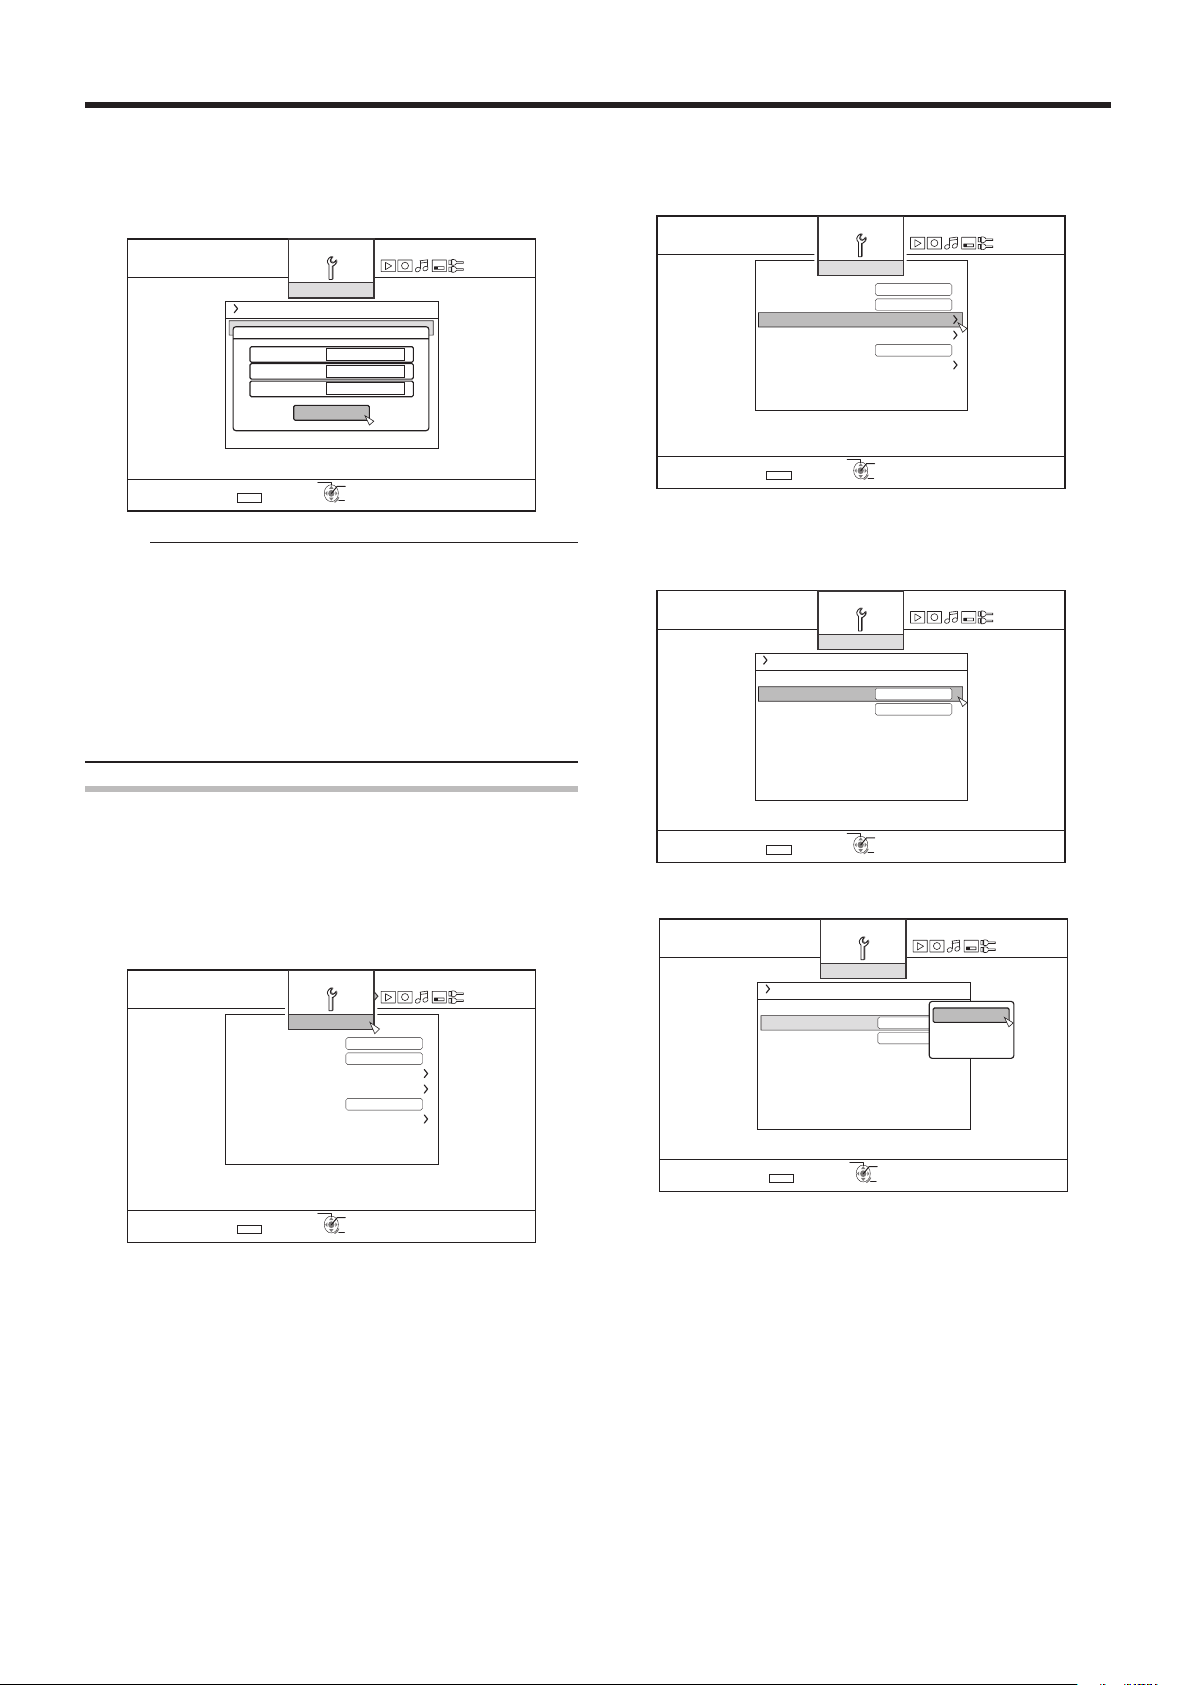
Setting and Displaying
Date/Time
Set the date/time of the built-in clock as follows. The recording
date/time is stored on the disc.
Setting the date/time
Set the date/time of the built-in clock as follows.
1
Press the [SET UP] button on the remote control
unit
• The Settings menu screen appears.
4
Select “CLOCK SET”, and press the [OK] button
• The Clock Set menu screen appears.
5
Set the time and date
• Repeat the steps below to specify the time and date.
A
Press the [ J ] or [ K ] button, select the Clock Set
item, and press the [OK] button.
2
Select “SETUP”, and press the [OK] button
3
Select “CLOCK SET/DISPLAY”, and press the
[OK] button
• “CLOCK SET/DISPLAY” menu screen appears.
B
Press the [ J ] or [ K ] button, change the setting
value, and press the [OK] button.
21
Preparation
1-
4'6740
%.1%- 5'6&+52.#;
':+6
5'.'%6
5'672
%.1%- 5'6
5'672
#/
%.1%- 5'6
;'#4
/106*&#; ,#0
6+/'
'06'4
1-
4'6740
':+6
5'.'%6
5'672
#761 219'4 1(( 1((
1((
4'/16' %10641. %1&'
4'/16' %10641.
%.1%- 5'6&+52.#;
2#0'. &+52.#; $4+)*60'55
37+%- 56#4672
$7<<'4 176276
&'(#7.6 5'66+0)
5'672
5QHVYCTG 8GTUKQP
ZZZZZ ZZZZZ ZZZZZ
1-
4'6740
5'672
#761 219'4 1(( 1((
1((
4'/16' %10641. %1&'
4'/16' %10641.
%.1%- 5'6&+52.#;
2#0'. &+52.#; $4+)*60'55
37+%- 56#4672
$7<<'4 176276
&'(#7.6 5'66+0)
':+6
5'.'%6
5'672
1-
4'6740
%.1%- 5'6&+52.#;
5'672
':+6
5'.'%6
%.1%- 5'6
' &+52.#;
6+/' &+52.#; %*1+%' *
/106* &#; ;'#4
5'672
1-
4'6740
%.1%- 5'6&+52.#;
%.1%- 5'6
' &+52.#;
6+/' &+52.#; %*1+%' *
5'672
':+6
5'.'%6
/106* &#;
5'672
;'#4 /106* &#;
/106* &#; ;'#4
&#; /106* ;'#4
6
After setting is complete, select “ENTER”, and
press the [OK] button
• Doing so exits date/time setting, and returns to the initial
screen.
Memo:
• The value for seconds cannot be set. After setting the
minute, press the [SET UP] button according to the time
signal.
• To cancel date/time setting, press the [RETURN] button.
Doing so cancels date/time setting and returns to the initial
screen.
• The year can be set from 2009 to 2037.
If "2037.12.31 PM11:59" is set, the time will change to
"2009.1.1 AM00:00" after one minute.
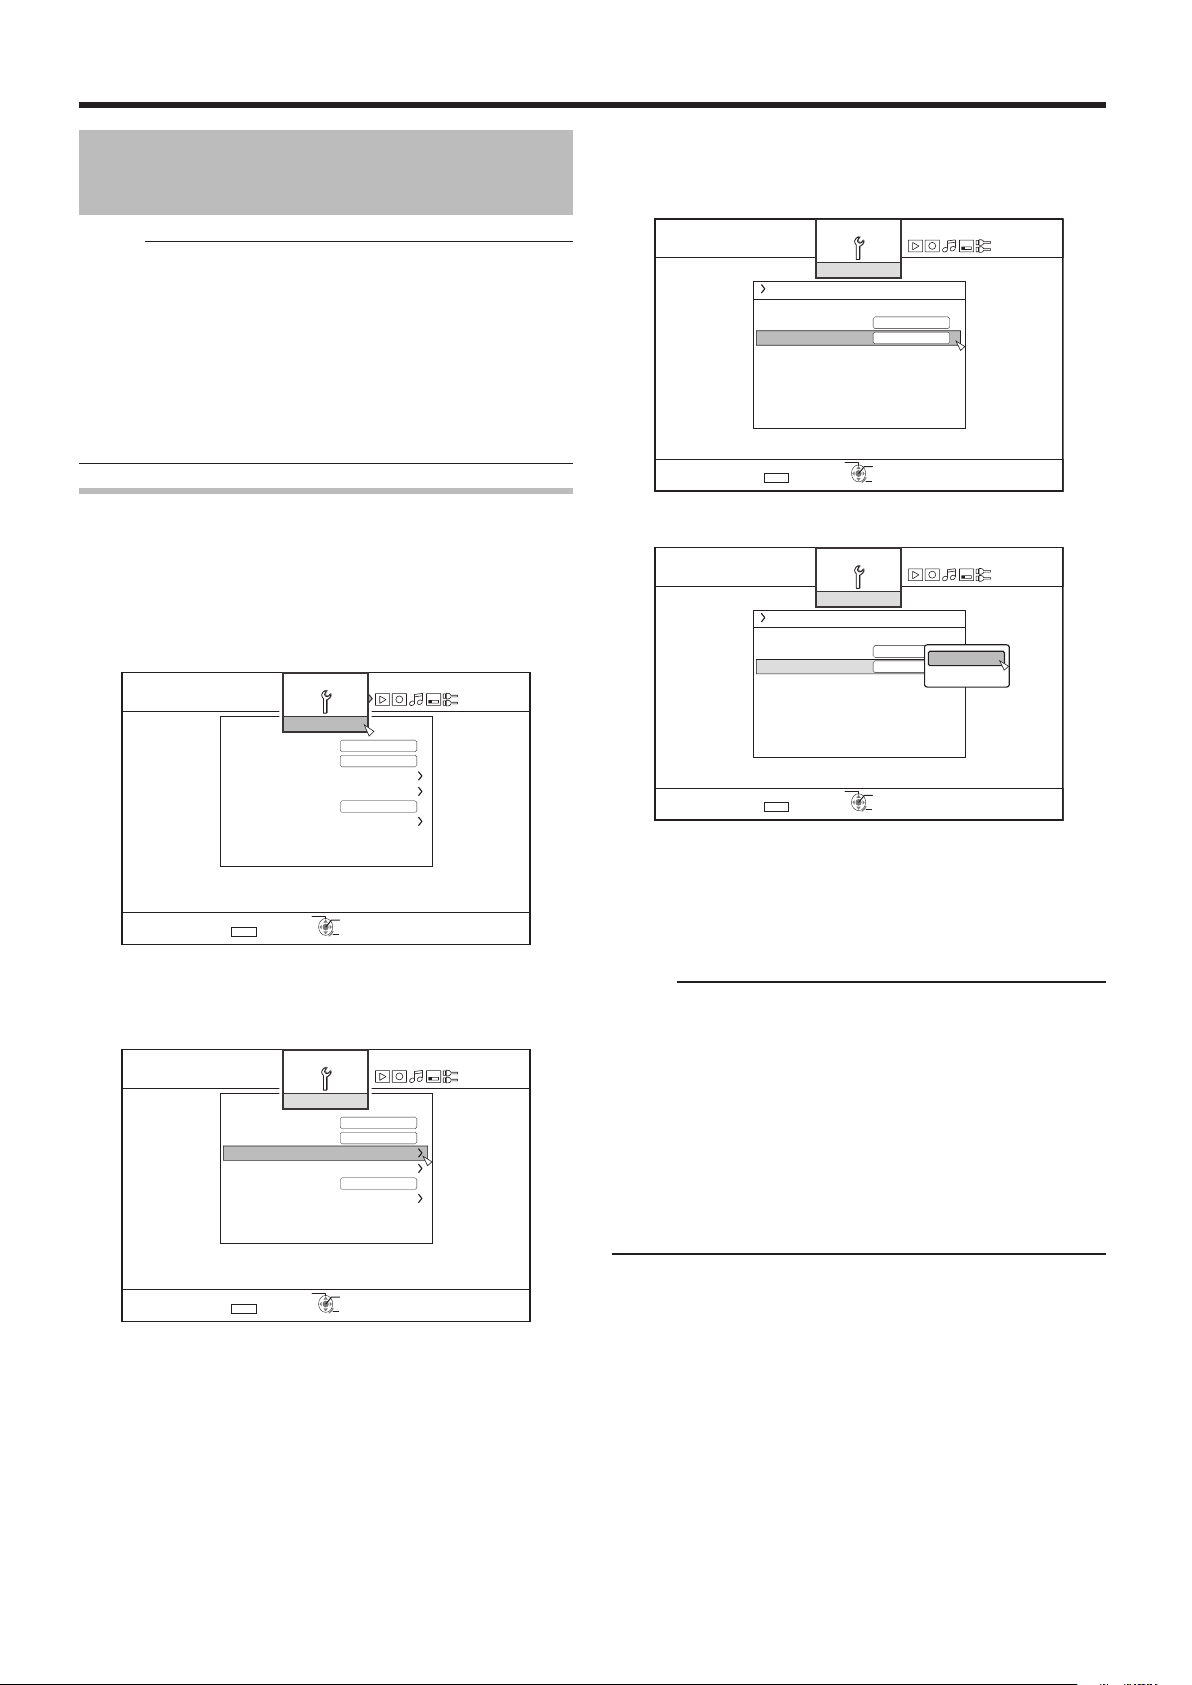
3
Select “CLOCK SET/DISPLAY”, and press the
[OK] button
• The Clock Set/Display menu screen appears.
4
Select “DATE DISPLAY”, and press the [OK]
button
• The Date Display menu screen appears.
Changing the date display style
You can specify the display style of the date as follows.
1
Press the [SET UP] button on the remote control
unit
2
Select “SETUP”, and press the [OK] button
• The Settings menu screen appears.
5
Select the date display style.
• Select a date display style from the following items.
YEAR.MONTH.DAY : Displays the date in the year/month/day
order.
MONTH.DAY.YEAR : Displays the date in the month/day/year
order.
DAY.MONTH.YEAR : Displays the date in the day/month/year
order.
6
After selecting, press the [OK] button
• The date display style will be saved.
Preparation
1-
4'6740
':+6
5'.'%6
5'672
#761 219'4 1(( 1((
1((
4'/16' %10641. %1&'
4'/16' %10641.
%.1%- 5'6&+52.#;
2#0'. &+52.#; $4+)*60'55
37+%- 56#4672
$7<<'4 176276
&'(#7.6 5'66+0)
5'672
5QHVYCTG 8GTUKQP
ZZZZZ ZZZZZ ZZZZZ
1-
4'6740
5'672
#761 219'4 1(( 1((
1((
4'/16' %10641. %1&'
4'/16' %10641.
%.1%- 5'6&+52.#;
2#0'. &+52.#; $4+)*60'55
37+%- 56#4672
$7<<'4 176276
&'(#7.6 5'66+0)
':+6
5'.'%6
5'672
1-
4'6740
%.1%- 5'6&+52.#;
%.1%- 5'6
' &+52.#;
6+/' &+52.#; %*1+%' *
5'672
':+6
5'.'%6
/106* &#; ;'#4
5'672
1-
4'6740
6+/' &+52.#; %*1+%'
5'672
%.1%- 5'6&+52.#;
%.1%- 5'6
' &+52.#;
*
':+6
5'.'%6
/106* &#;
5'672
*
*
Setting and Displaying
Date/Time (Continued)
Memo:
• The date display style will be applied in the following
information displays.
• Recording date of the title that is shown in the playback
navigation screen (The recording date will be shown in
place of the title if the title has not been input).
• Shooting date and time that is shown when AVCHD is
played back
• Date that is displayed in the title information display
screen
4
Select “TIME DISPLAY CHOICE”, and press the
[OK] button
5
The Time Display menu screen appears
Changing the time display style
You can specify the display style of the time as follows.
1
Press the [SET UP] button on the remote control
unit
2
Select “SETUP”, and press the [OK] button
• The Settings menu screen appears.
3
Select “CLOCK SET/DISPLAY”, and press the
[OK] button
• The Clock Set/Display menu screen appears.
6
Select the time display style
Select from “12H” or “24H”.
12H : Displays the time in AM/PM format.
24H : Displays the time in 24-hour format.
7
After selecting, press the [OK] button
• The time display style will be saved.
Memo:
• The time display style applies to the following.
• Current time
• Date/time registered on the disc
• Recording time of the title that is shown in the playback
navigation screen
(The recording time will be shown in place of the title if
the title has not been input.)
• Shooting date and time that is displayed when AVCHD is
played back
• Time of recording that is displayed in the title information
display screen
22

Dubbing/Importing
Bi-directional dubbing between the HDD and a BD/DVD is
possible using this unit alone. Also, data can be imported to
the HDD from a video camera by connecting it via i.LINK or
USB.
Dubbing from the HDD to a BD/DVD
o
High-speed dubbing
Select this option if you want to signicantly shorten the
time required for dubbing. Make use of a BD/DVD disc that
supports high-speed recording.
o
Dubbing in a specic recording mode
Select this option when you want to specify the recording
mode for dubbing. Dubbing can be performed in the recording
mode of your preference, such as whether to "maintain a high
picture quality" or "save as many titles as possible".
For more details, refer to "Recording Modes" (A page 28) .
Memo:
• The image quality will not improve even when a recording
mode with image quality higher than that of the original
recording mode is chosen.
• Dubbing using a specic recording mode will cause the disc
to be re-encoded.
Dubbing/Importing
o
Importing data from a SDHC/SD to the HDD
Videos captured using a video camera can be imported to
the HDD by inserting the SDHC/SD card that the videos are
saved on.
o
Importing data from a video camera to the
HDD
Videos captured using a video camera can be imported to the
HDD.
This unit supports video camera connections via i.LINK and
USB.
Memo:
Other options for importing data into the
HDD
o
Importing data from a BD/DVD to the HDD
You can import titles from a BD/DVD.
DVD-video* : Discs that are not nalized cannot be
imported.
o
Importing data from a video deck
You can import data to the HDD from an external video deck
by connecting it to a composite video or S input terminal.
For more details, refer to "Recording Using External Inputs"
(A page 47).
Memo:
• Videos that are copy-controlled cannot be imported.
• Motion JPEG is not supported
23
24
Dubbing/Importing
Dubbing chart
o
Dubbing the video data from the HDD
Dubbing
Content
Quality
DR (Other)
AF/AN/AL/AE
AVC
FR
XP/SP/LP/EP*
Quality
BDMV(HD Quality) BDAV(HD Quality) BDAV(SD Quality) DVD-VR DVD-VIDEO
- High-speed dubbing /
High-speed dubbing High-speed dubbing /
High-speed dubbing High-speed dubbing /
- - Re-encoding High-speed dubbing /
- - Re-encoding High-speed dubbing /
Format (BD) Format (DVD)
Re-encoding Re-encoding Re-encoding
Re-encoding
Re-encoding Re-encoding Re-encoding
Re-encoding
Re-encoding Re-encoding Re-encoding
Re-encoding
Memo:
EP* : High-speed dubbing to DVD-VIDEO format discs in EP mode title
To perform high-speed dubbing of a EP mode title to a DVD-VIDEO format disc, set " HIGH-SPEED DUBBING " (A
page 77) in the settings menu to “4:3” before recording or importing. Only re-encoding will be performed when dubbing a
title that is recorded or imported with a setting other than “4:3”.
o
Dubbing the picture data from the HDD
Importing le
(HDD)
BDAV(BD-RE) SDHC/SD
Media
Re-encoding
Re-encoding
Re-encoding
High-speed dubbing /
Re-encoding
JPEG
X X
Memo:
• Video images may be distorted in the following situations during reencoding/dubbing when the monitor (TV) is connected to
this unit using a HDMI cable, or when the screen resolution is set to 1080p.
• Proceeding with dubbing from the menu screen
• Returning to the normal screen after dubbing has nished
• This is not a malfunction. Change the screen resolution to a setting other than 1080p if you feel that this is annoying.
25
Dubbing/Importing
/'&+# /#0#)'/'06
$&&8&
(14/#6
(+0#.+<'
4'0#/' &+5%
5& %#4&
$& 8+&'1 # '4#5'
*&&
(14/#6
(14/#6
%10(+4/
6*' &+5% 9+.. $' (14/#66'&
5'.'%6 # (14/#6 /1&'
84 /1&' 8+&'1 /1&'
Formatting
Unused discs or SD cards may require formatting in some
cases.
When the need arises, format the disc or SD card accordingly.
Memo:
• Formatting a disc or SD card erases all existing data from
the media.
Double-check carefully before formatting so as not to erase
important titles.
• When using a DVD-R disc in the Video mode, formatting is
not required.
Format chart
Refer to the following chart for the disc types and format when
formatting a disc.
Note:
• Using a disc formated on another device could cause read
errors even though it corresponds to the chart below.
In this case, we recommend that you format the disc with
this unit or use another blank disc.
Memo:
• BD-R and DVD-R discs can only be formatted once.
• When a disc is re-formatted into another format, remove the
disc and load it again.
Formatting a disc
1
Set the DVD or BD to be formatted on the disc
tray
2
Press the [MEDIA MANAGE] button on the remote
control unit
• The Media Management menu screen appears.
3
Select “FORMAT” from “BD/DVD”
DVD : A format selection screen appears.
BD : A conrmation screen to execute formatting
appears.
4
Select a format mode from the format selection
screen
o
DVD format chart
Format VR
DVD-RW Single-sided, single
layer (4.7 GB)
DVD-R Single-sided, single
layer (4.7 GB)
Single-sided, dual layer
(8.5 GB)
: Format supported.
X
* : Formatting not required.
o
BD format chart
BD-RE Single-sided, single layer (25 GB)
Single-sided, dual layer (50 GB)
BD-R Single-sided, single layer (25 GB)
Single-sided, dual layer (50 GB)
: Format supported.
X
Format
X X
X X
X X
Format
Video
Format
(*)
(*)
DVD-RW : Select a "Format mode" from “VR MODE” or
“VIDEO MODE”.
Memo:
• This screen does not appear when a BD or DVD-R disc is
used.
X
X
X
X
26
Dubbing/Importing
%10(+4/
6*' &+5% 9+.. $' (14/#66'& +0 :::
#.. 4'%14&'& 6+6.'5 9+.. $' '4#5'&
+6 6#-'5 #$176 ;;; /+076'5
&1 ;17 9#06 61 (14/#6!
;'5 01
%10(+4/
6*' &+5% *#5 $''0 (14/#66'&
1-
126+105
$#%5612
(14/#6
;17 %#0 ':+6 (41/ 6*' 126+10 5%4''0
%10(+4/
(14/#66+0) 9+.. $' 56122'&
5612!
;'5 01
(14/#6
;17 %#0 ':+6 (41/ 6*' 126+10 5%4''0
Formatting (Continued)
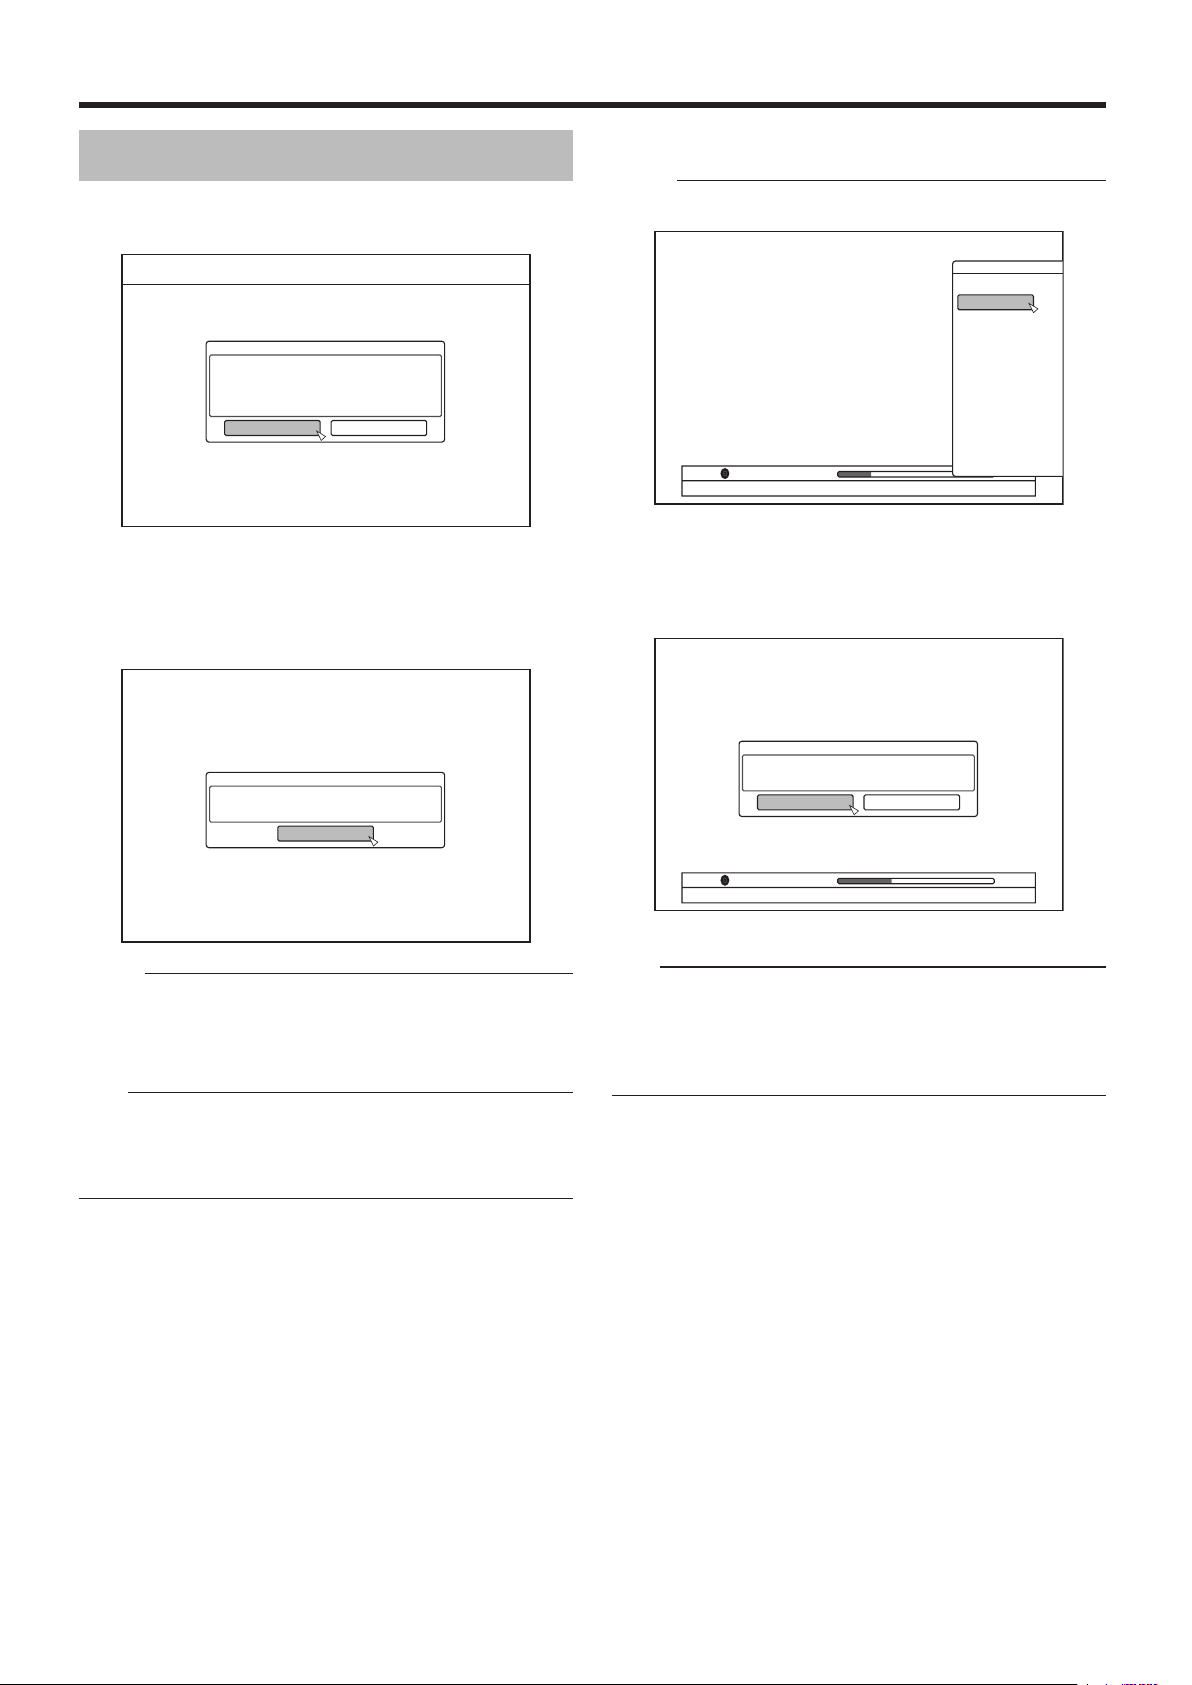
5
Select “YES”, and press the [OK] button in the
format conrmation screen
• Formatting starts.
• After formatting is complete, a “THE DISC HAS BEEN
FORMATTED” message appears on the monitor, and the
normal screen is displayed.
o
Cancel formatting
Memo:
1
Press the [OPTION] button while formatting
2
Select “STOP” and press the [OK] button
• A conrmation screen to stop formatting appears.
3
Select “YES” on the conrmation screen and
press the [OK] button
Memo:
• To return to the initial screen without formatting the disc,
select “DO NOT FORMAT” and press the [OK] button.
Alternatively, you can press the [RETURN] button to return
to the initial screen without formatting.
Note:
• Do not turn off the power or unplug the power cable when
the "FORMATTING DISC…" message is displayed.
• Note that formatting a disc with copyright-protected titles
erases all the titles from the disc.
• Formatting is stopped.
Note:
• Formatting can be stopped if it seems to take a long time
(more than two minutes).
• If for any reason formatting cannot be stopped, the
conrmation screen for stopping formatting will not appear
even if the [OPTION] button is pressed.
27
Dubbing/Importing
/'&+# /#0#)'/'06
$&&8&
(14/#6
(+0#.+<'
4'0#/' &+5%
5& %#4&
$& 8+&'1 # '4#5'
*&&
(14/#6
(14/#6
%10(+4/
6*' %#4&5 %106'06 9+.. $' '4#5'&
&1 ;17 9#06 61 56#46 (14/#66'& !
;'5 01
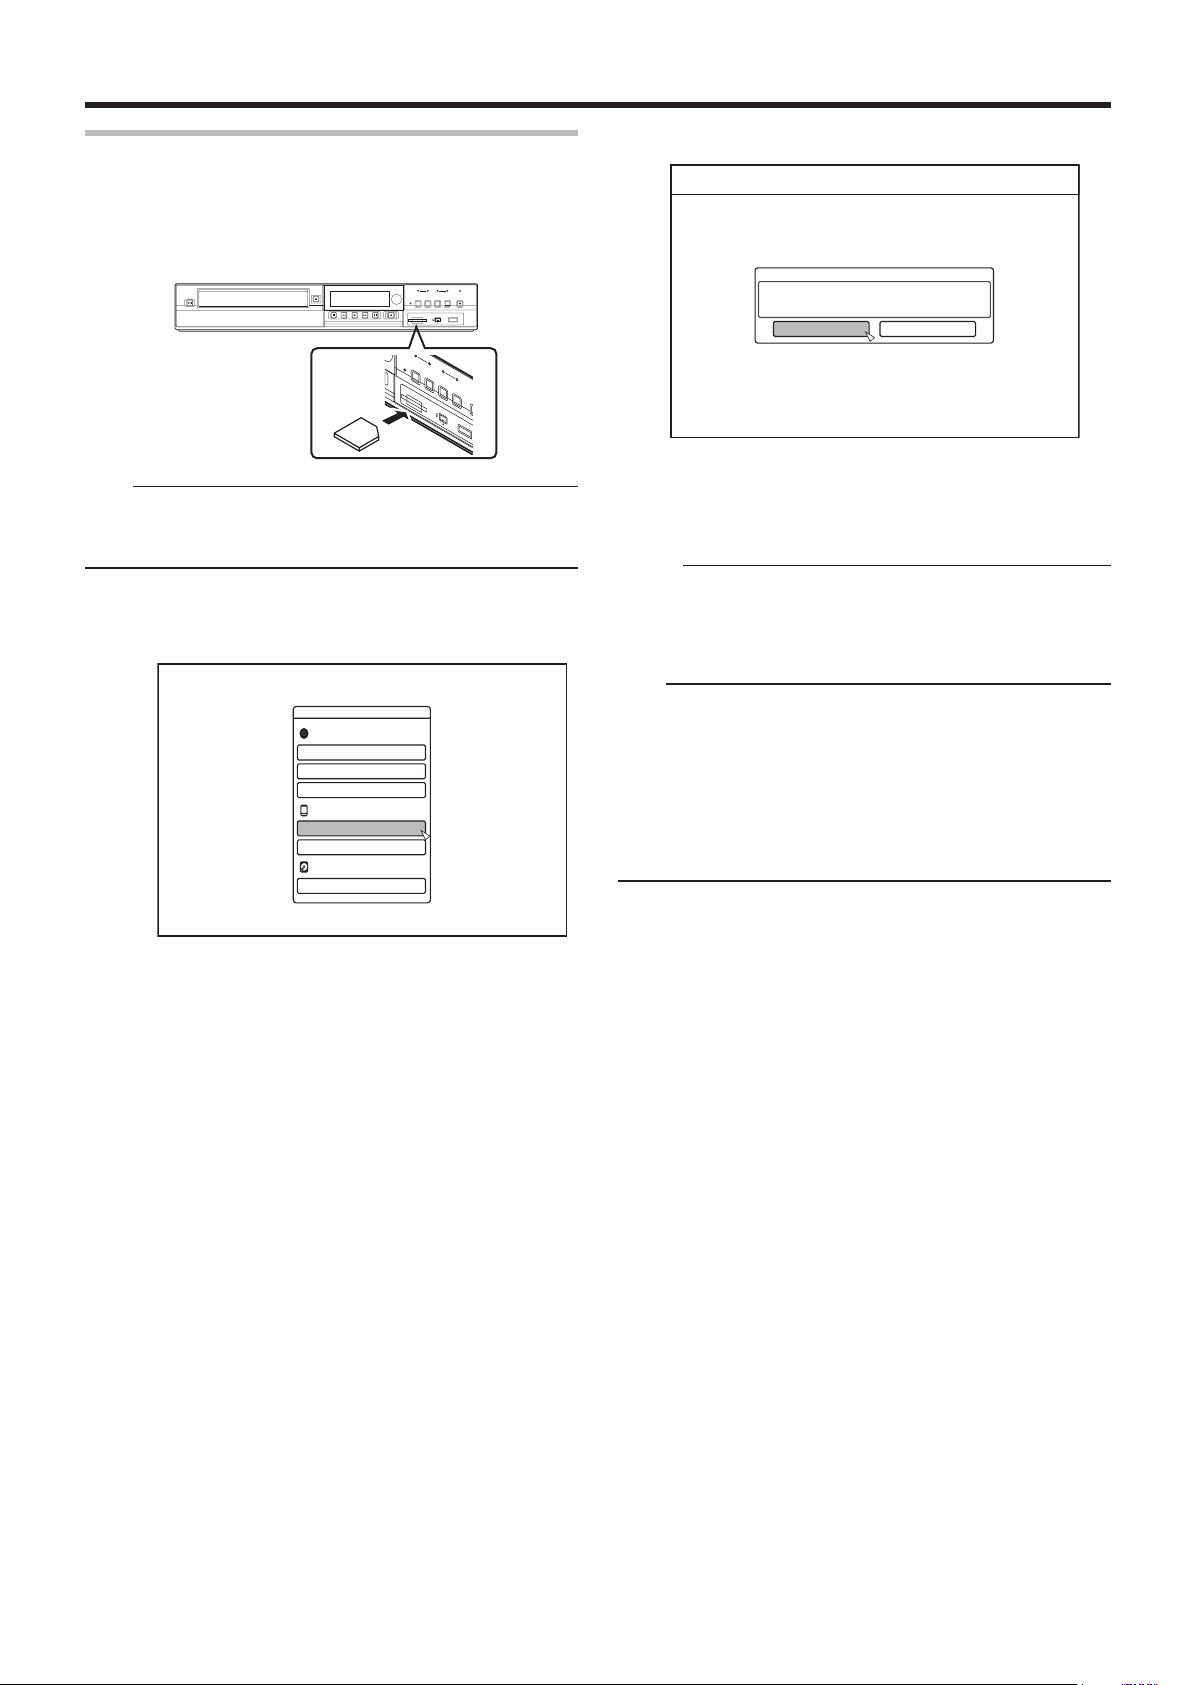
Formatting an SD Card
1
Insert the SD card to be formatted into the [SD
SLOT]
• With the terminal side facing down, insert the SD card until
a “click” sound is heard.
Note:
• Formatting cannot be performed if the SD card is write-
protected. In this case, turn off the write-protect lock before
inserting the SD card.
2
Press the [MEDIA MANAGE] button on the remote
control unit
• The Media Management menu screen appears.
4
Select “YES”, and press the [OK] button
• Formatting starts.
• After formatting is complete, a “THE SD CARD HAS BEEN
FORMATTED” message appears on the monitor, and the
normal screen is displayed.
Memo:
• To return to the initial screen without formatting the disc,
select “NO” and press the [OK] button.
Alternatively, you can press the [RETURN] button to return
to the initial screen without formatting.
Note:
• Do not turn off the power or unplug the power cable when
the “FORMATTING SD CARD…” message is displayed. Do
not remove the SD card as well. Doing so may damage the
SD card.
• Note that formatting a disc with copyright-protected titles
erases all the titles from the disc.
• Once the formatting of the SD card begins, it cannot be
stopped.
3
Select “FORMAT” from “SD CARD”
• A conrmation screen to execute formatting appears.
28
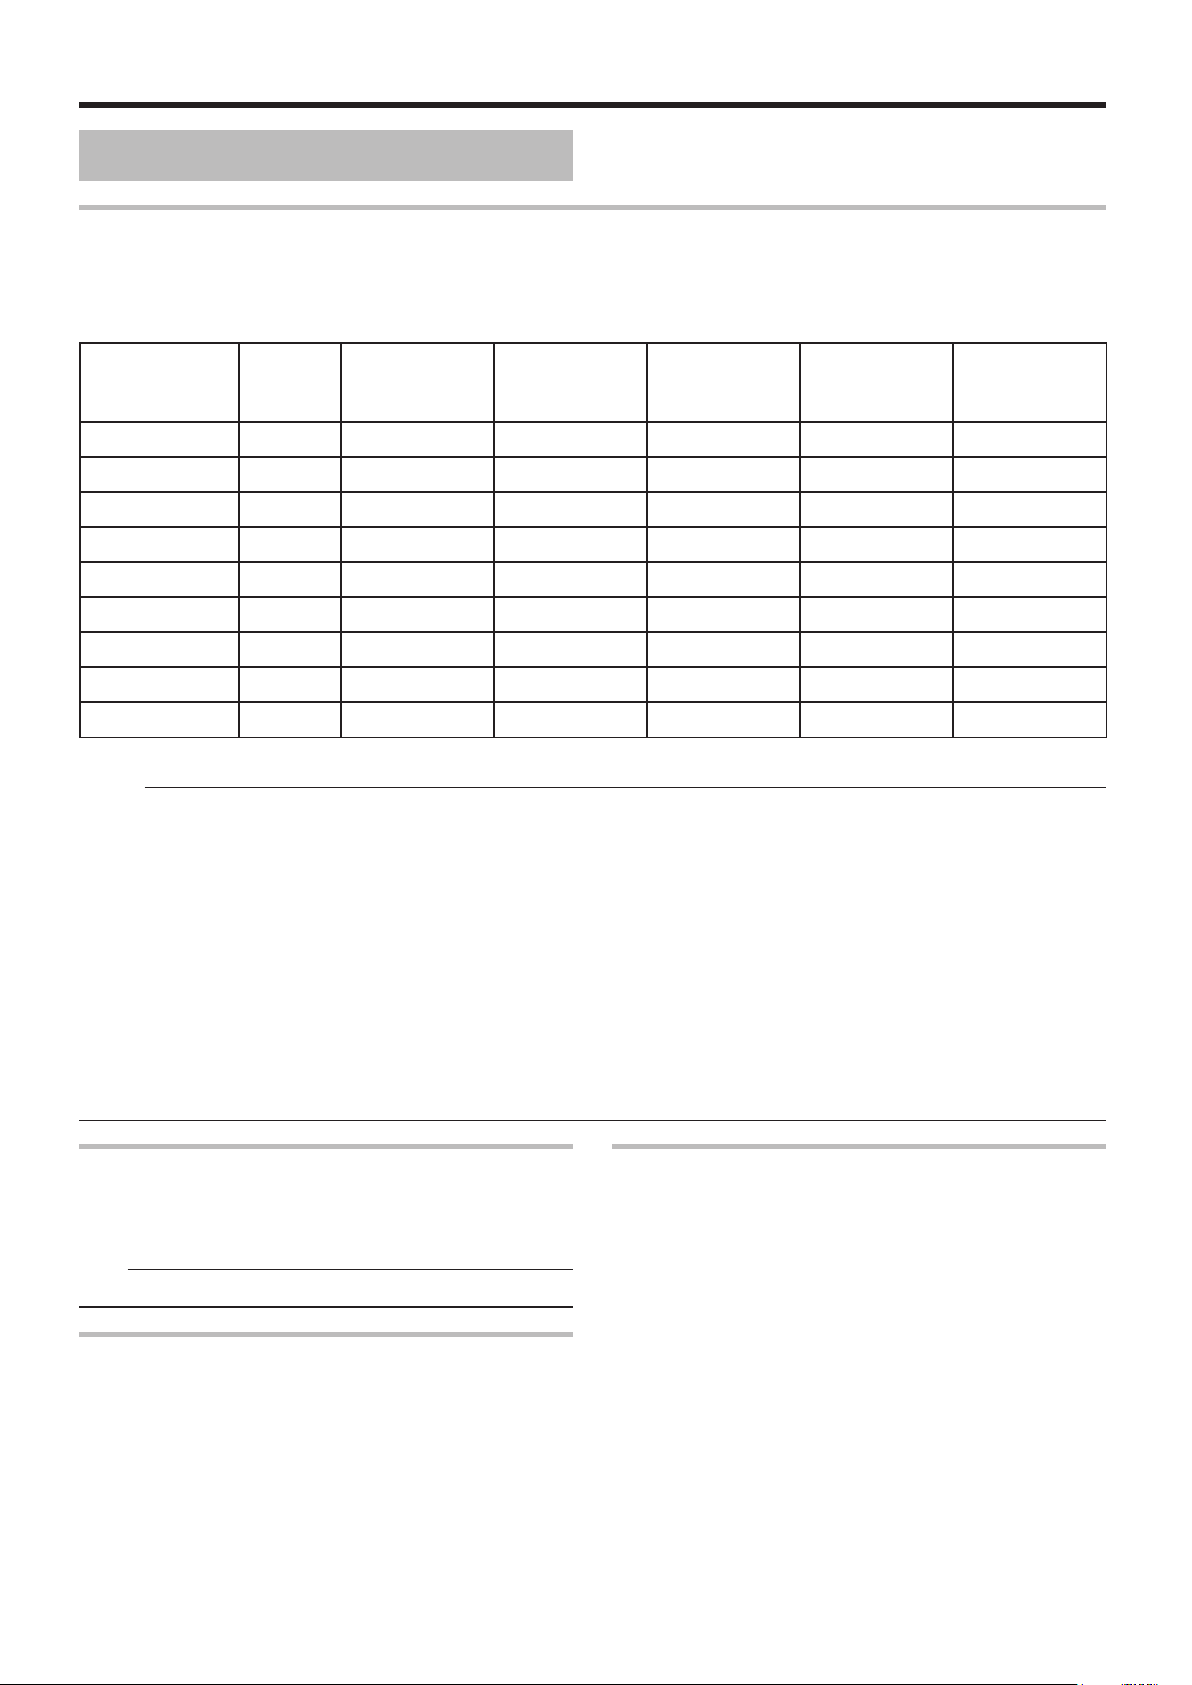
Dubbing/Importing
Recording Modes
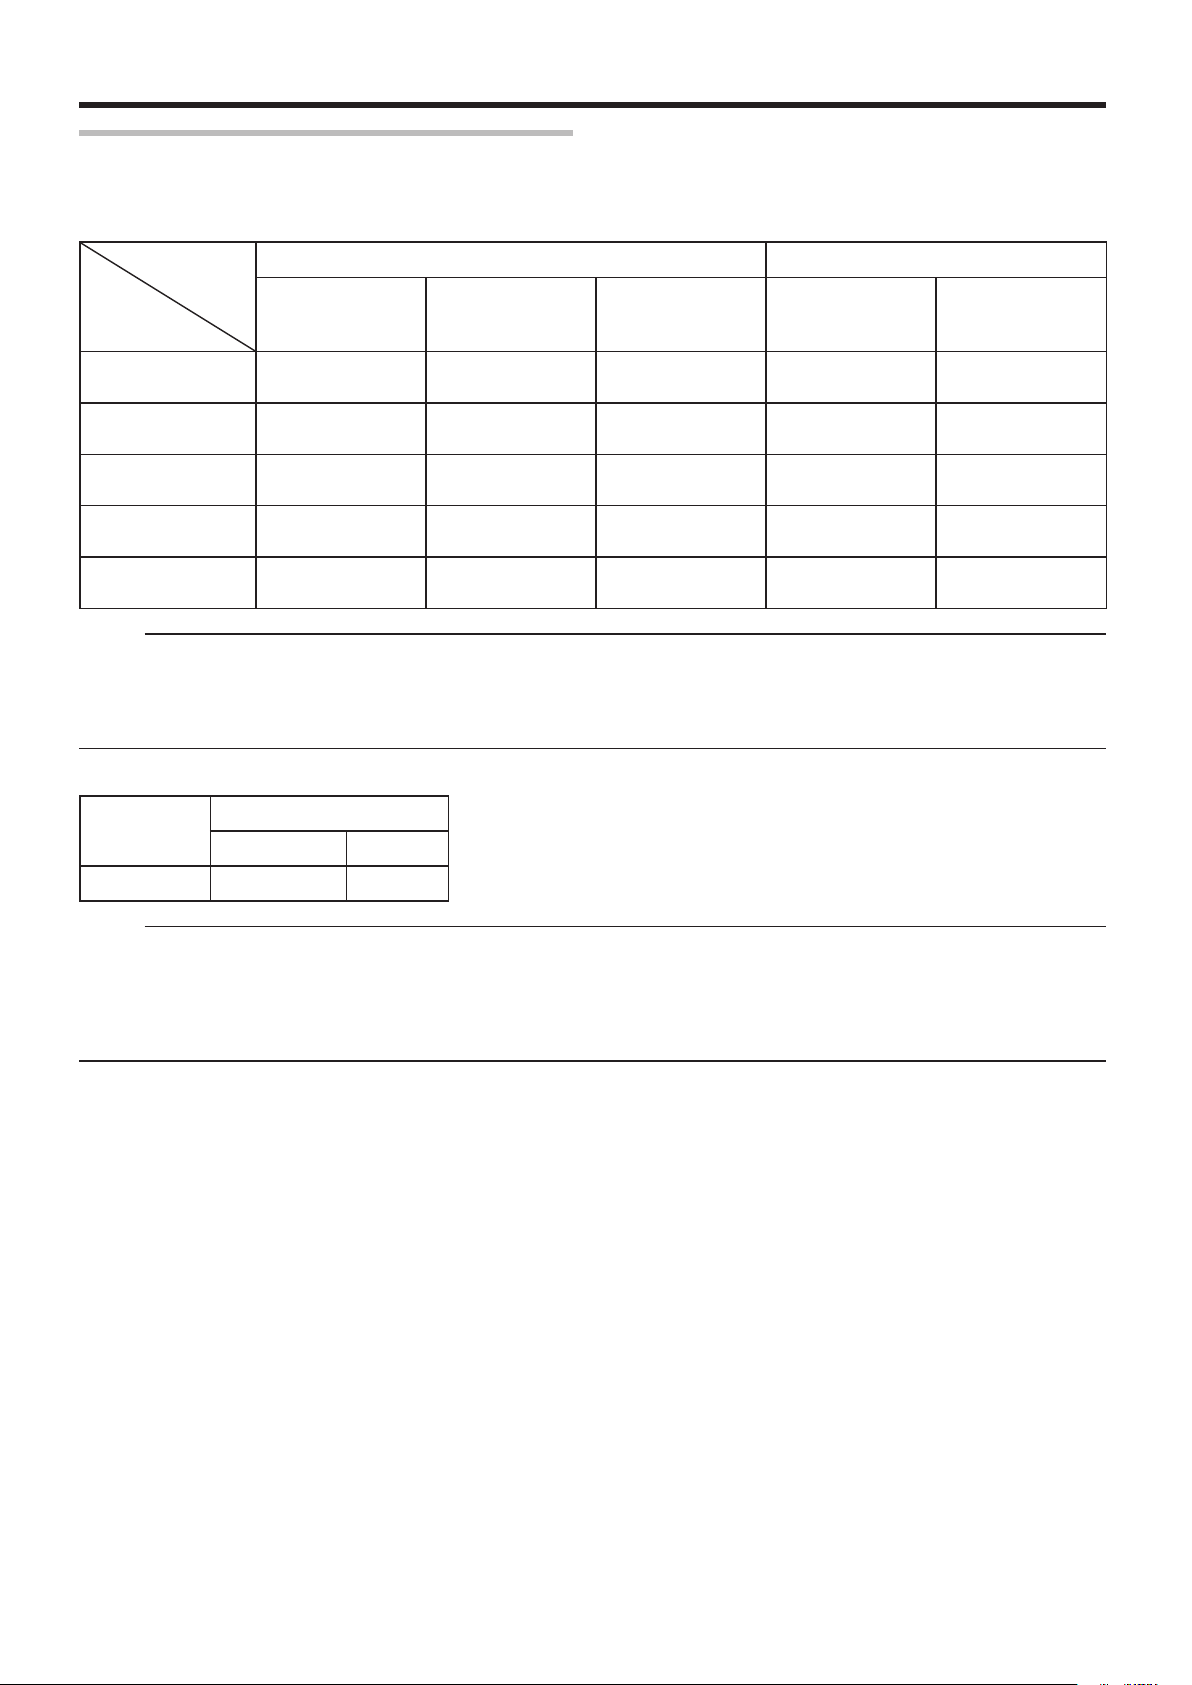
Maximum recording time for each recording mode
You can specify a recording mode according to the intended use. Setting the video to a high picture quality shortens the
maximum recording time, while setting to a lower picture quality lengthens the recording time.
Refer to the following table for the maximum recording time in the respective modes. All gures shown in the table are
approximate values.
Recording
Mode
DR HD - - - - 40 hours (*1)
AF 4 hours 8 hours - - 80 hours
AN 6 hours 12 hours - - 126 hours
AL 9 hours 18 hours - - 189 hours
AE 12 hours 24 hours - - 252 hours
XP SD 5.25 hours 10.5 hours 1 hours 1.7 hours 110 hours
SP 10.5 hours 21 hours 2 hours 3.5 hours 222 hours
LP 21 hours 42 hours 4 hours 7.1 hours 442 hours
EP 42 hours 84 hours 8 hours 14.3 hours 887 hours
*1 : An estimated gure when HDV is imported.
Quality BD (Single-
sided, Single
Layer)
BD (Singlesided, Dual
Layer)
DVD (Singlesided, Single
Layer)
DVD (Single-
sided, Dual
Layer)
HDD (500 GB)
Memo:
• DR mode
Abbreviation for Direct Recording. Videos are recorded in the original picture quality.
• AF/AN/XP/SP mode
Recommended for recording images with fast motion, such as sports videos.
• The AF/AN mode record images at the high-quality HD level.
• The XP/SP modes record images at the high-quality SD level.
• AL/AE/LP mode
Recommended for recording images with slow motion and little contrast, such as dramas.
• AL/AE mode records images at the low-quality HD level.
• LP mode records images at the low-quality SD level.
• EP mode
Recommended for recording images with sharp outlines, such as animation videos, and when the recordable time (remaining
time) is limited.
HD picture quality
• Using BD enables dubbing to be done with HD picture
quality. To dub HD picture quality titles that are imported in
the HDD, use BD.
Note:
• Dubbing to a DVD cannot be done in HD picture quality.
DR mode
• HDV and SD-VIDEO titles are imported using DR mode.
FR mode
FR mode is displayed as the recording mode in the following
cases.
• FR mode during import into HDD
During import of SD-VIDEO titles via high-speed dubbing.
During import of data via high-speed dubbing from DVD-VR
discs recorded using other units.
• FR mode during dubbing from HDD
When selecting the most appropriate mode automatically
between XP and EP according to the remaining memory on
the disc.
29
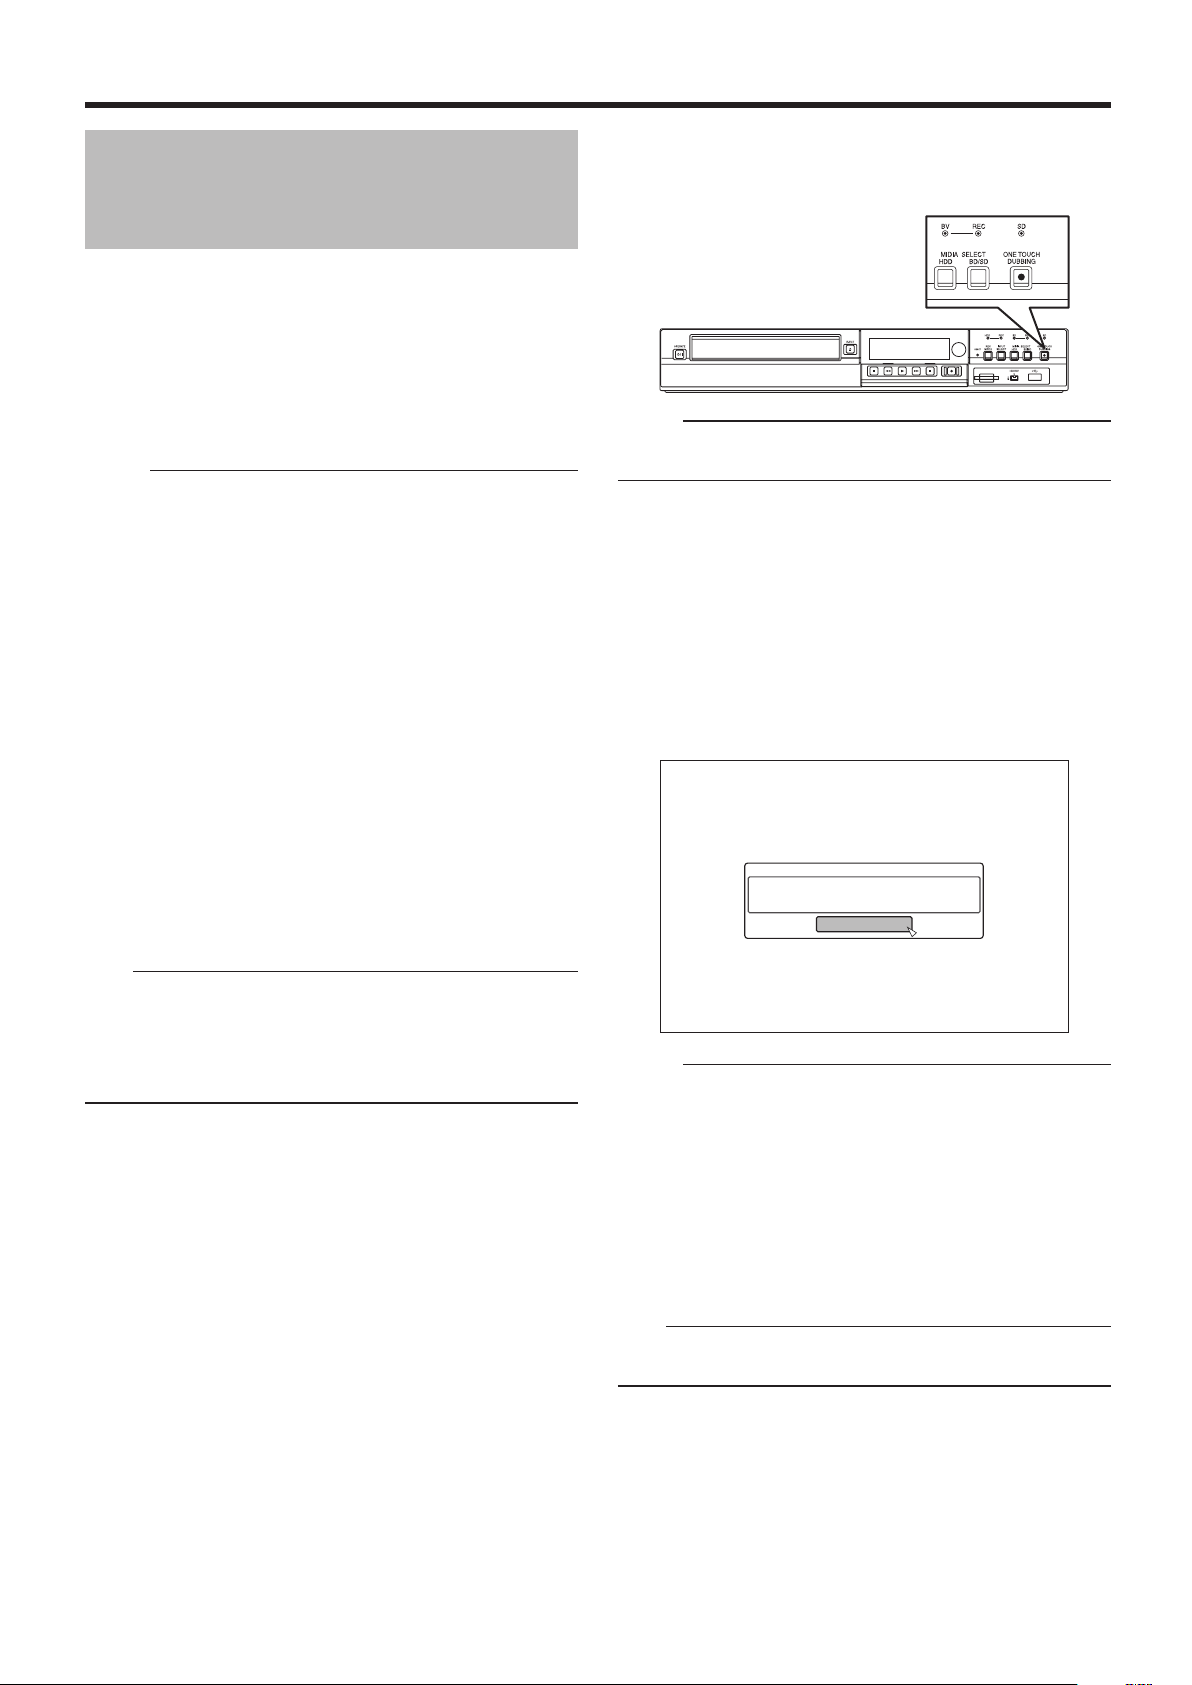
Dubbing/Importing
Importing Data to the HDD
%10(+4/
&7$$+0) +5 %1/2.'6'&
1-
Using the ONE TOUCH
DUBBING Button
Titles can be imported to the HDD from an SD card or device
connected to the USB or i.LINK terminal simply by pressing
the [ONE TOUCH DUBBING] button.
• File formats that can be imported
A
USB connection device, SD card
AVCHD, SD-VIDEO, and JPEG
B
i.LINK-connected device
DV and HDV content
Memo:
• Data is searched according to the order of priority listed
below when multiple devices are connected to this unit.
USB h SD card h i.LINK
Data is retrieved only from the rst device and imported to
the HDD. Connect only the device that contains data you
want to import to the HDD.
The i.LINK connected device can only be used to import
from tape media.
• All video les (scenes) imported using “ONE TOUCH
DUBBING” are combined into one title.
This unit does not support combining of titles during the
editing operation after import is complete. To combine and
import data, select “ONE TOUCH DUBBING”.
• Titles of two or more scenes cannot be combined if the
recording criteria, such as video size, are different.
• When importing DV contents with shooting date/time
information, the date/time information at the beginning
of the contents will be taken as the shooting date/time
information. For HDV contents or DV contents without
shooting date/time information, the importing date/time will
be taken as the shooting date/time information.
Note:
•
Do not unplug the cable while importing to the HDD is in progress.
Doing so may result in loss or damage of the titles.
• Only titles that are not copyright-protected can be imported.
• Recognizing the device and importing the les may take a long
time depending on the amount of les in the device or media.
o
Procedure for one-touch importing
1
Connect the device to be used. Alternatively,
insert an SD card.
• Once preparations for importing have been done, the
message below will be shown on this unit’s display window.
i.LINK device : "HDV/DV RDY"
USB device : "USB RDY"
SD card : "SD RDY"
2
Press the [ONE TOUCH DUBBING] button on the
unit
• One-touch importing starts.
Memo:
• Refer to the following for the ow of operations by the
system of this unit.
3
System checks the device connection
• The system of this unit detects the connected device.
Search for devices is performed in the sequence of USB,
SD card, followed by i.LINK.
4
System detects the titles to import
• All titles that can be imported will be detected and imported.
5
Importing of titles by this unit starts
6
After titles are successfully imported, a
“DUBBING IS COMPLETED” message appears
on the monitor
Memo:
• The following buttons are enabled when importing is in
progress.
[ A ] : Continues importing while switching this unit
to the Standby mode.
[ONE TOUCH : Press this button for three seconds or longer
DUBBING] to cancel importing.
[OPTION] : Displays a pop-up menu for canceling
importing.
[ON SCREEN] : Pressing this button each time displays or
hides the importing information.
Note:
• Importing stops and a message appears on the monitor if
an error occurs during the importing process.
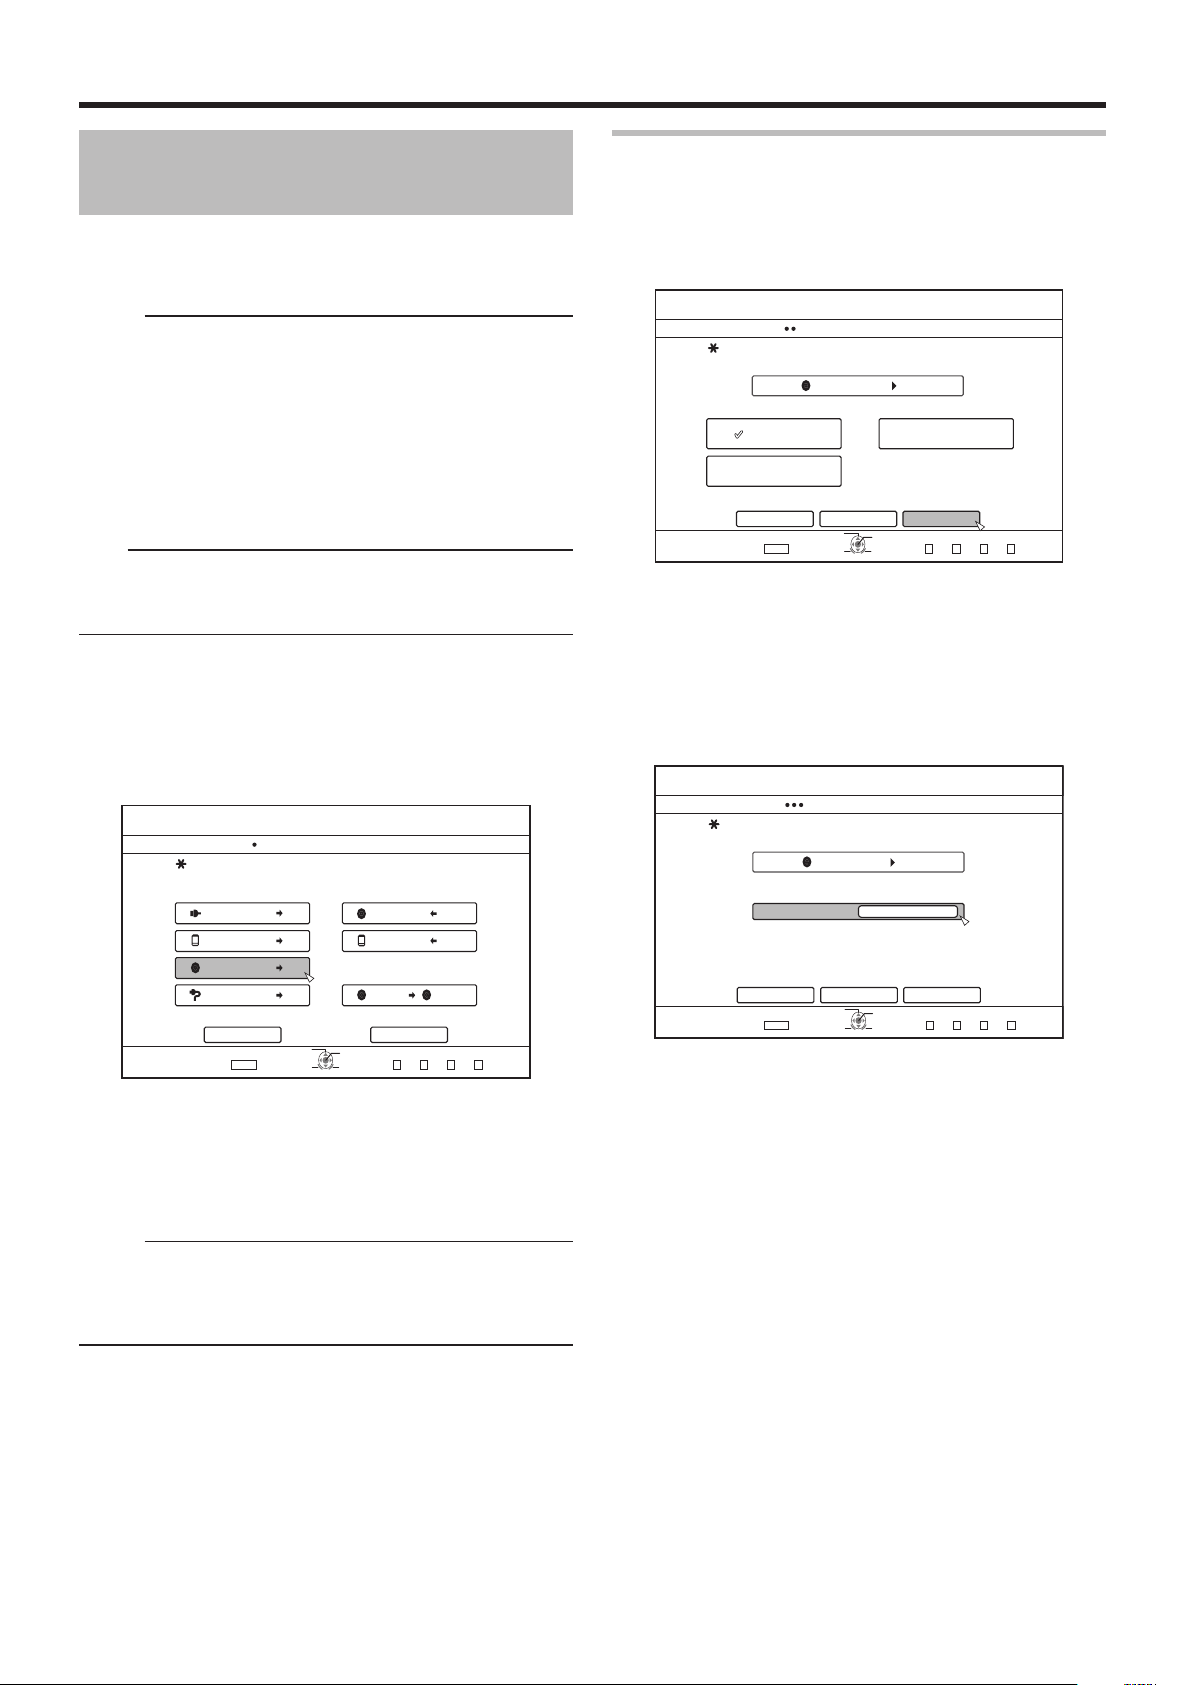
30
Dubbing/Importing
75$
5&
&+5%
*&8&8
&+5%
&+5%
&+5%
&+5%5&
126+10
1-
4'6740
':+6
5'.'%6
&7$$+0)
56'2
5'.'%6 +/2146&7$$+0)
*&&
*&&
*&&
*&&
61 *&& 61 &8&
&+5% %12;
%#0%'. 0':6
&7$$+0)
8+&'1
2+%674'
&+5%
126+10
1-
4'6740
&7$$+0)
56'2
5'.'%6 6*' /'6*1& 1( +/2146
*&&
(7.. +/2146 5'. 6+6.'8+&'1
5'. 6+6.'2+%674'
%#0%'. $#%-
':+6
5'.'%6
&7$$+0)
0':6
&+5%
52
&7$$+0)
56'2
5'6 6*' 4'%14&+0) /1&'
*&&
%#0%'. $#%-
':+6
5'.'%6
126+10
1-
4'6740
56#46
4'%14&+0) /1&'
&7$$+0)
Importing Data from a BD/
DVD to the HDD
Data can be imported from a BD/DVD to the HDD as follows.
• File formats that can be imported
BD-MV, BD-AV, AVCHD, DVD-VR, DVD-VIDEO, and JPEG
Memo:
• Titles that are imported using “FULL IMPORT” combined
into one title.
This unit does not support combining of titles during the
editing operation after import is complete. To combine and
import data, select “FULL IMPORT”.
• For data that is selected for import via “SEL.
TITLE(VIDEO)”, titles with the same date are combined.
• Titles of two or more scenes cannot be combined if the
recording criteria, such as video size, are different.
Note:
• Only titles that are not copyright-protected can be imported.
• Recognizing the device and importing the les may take a
long time depending on the amount of les in the device.
o
Preparations
1
Set a BD or DVD on the disc tray
2
Press the [DUBBING] button on the remote
control unit
• The importing screen appears.
Full import
1
Select “FULL IMPORT” in the import selection
screen, and press the [OK] button
• A check mark is added to the “FULL IMPORT” item.
2
Select “NEXT”, and press the [OK] button
• “START” will appear instead of “NEXT” in the menu if the
disc is of a format other than "BD-AV". In this case, go to
Step 5.
3
Select “RECORDING MODE”, and press the [OK]
button
• A pop-up menu appears.
4
Select the “RECORDING MODE” option
3
Select "DISChHDD" in the importing screen, and
press the [OK] button
• A check mark is added to the "DISChHDD" item.
4
Select “NEXT”, and press the [OK] button
• The import selection screen appears.
Memo:
• A recording mode selection appears instead of the import
selection screen when DVD-VIDEO is detected.
For more details, refer to "Importing DVD-VIDEO" (A page
32) .
For more details, refer to "Recording Modes" (A page 28) .
 Loading...