

Page 1
788
9101420600
OWNER’S MANUAL
Ü
The lightning flash with arrowhead symbol, within an equilateral triangle, is intended to alert
ÿ
Ÿ
This appliance has a serial number
located on the rear panel. Please record
the model number and serial number
and retain them for your records.
Model number
Serial number
the user to the presence of uninsulated “dangerous voltage” within the product’s enclosure
that may be of sufficient magnitude to constitute a risk of electric shock to persons.
The exclamation point within an equilateral triangle is intended to alert the user to the presence of important operating and maintenance (servicing) instructions in the literature
accompanying the appliance.
CAUTION: TO REDUCE THE RISK OF ELECTRIC SHOCK, DO NOT
REMOVE COVER (OR BACK). NO USER-SERVICEABLE PARTS
INSIDE. REFER SERVICING TO QUALIFIED SERVICE PERSONNEL.
WARNING: TO PREVENT FIRE OR SHOCK
HAZARD, DO NOT EXPOSE THIS
APPLIANCE TO RAIN OR MOISTURE.
Page 2

Important Safety Precautions
IMPORTANT (for U.K. Customers)
DO NOT cut off the mains plug from this equipment.
If the plug fitted is not suitable for the power points in your home or
the cable is too short to reach a power point, then obtain an appropriate safety approved extension lead or consult your dealer.
If nonetheless the mains plug is cut off, remove th
of the plug immediately, to avoid a possible shock hazard by inadvertent connection to the mains supply.
If this product is not provided with a mains plug, or one has to be
fitted, then follow the instructions given below:
IMPORTANT: DO NOT make any connection to the larger terminal which is marked with the letter E or by the safety earth symbol
ç or coloured GREEN or GREEN-and-YELLOW.
The wires in the mains lead on this product are coloured in accordance with the following code:
BLUE : NEUTRAL
BROWN : LIVE
As these colours may not correspond with the coloured markings
identifying the terminals in your plug proceed as follows:
The wire which is coloured BLUE must be connected to the terminal
which is marked with the letter N or coloured BLACK.
e fuse and dispose
For U.S.A
TO THE USER
This equipment has been tested and found to
comply with the limits for a Class B digital device,
pursuant to Part 15 of the FCC Rules. These
limits are designed to provide reasonable
protection against harmful interference in a
residential installation. This equipment generates, uses, and can radiate radio frequency
energy and, if not installed and used in
accordance with the instruction manual, may
cause harmful interference to radio communications. However, there is no guarantee that
interference will not occur in a particular
installation. If this equipment does cause harmful
interference to radio or television reception,
which can be determined by turning the
equipment off and on, the user is encouraged to
try to correct the interference by one or more of
the following measures.
a)Reorient or relocate the receiving antenna.
b)Increase the separation between the
equipment and receiver.
The wire which is coloured BROWN must be connected to the terminal which is marked with the letter L or coloured RED.
When replacing the fuse only a correctly rated approved type should
be used and be sure to re-fit the fuse cover.
IF IN DOUBT — CONSULT A COMPETENT ELECTRICIAN.
c)Connect the equipment into an outlet on a
circuit different from that to which the
receiver is connected.
d)Consult the dealer or an experienced radio/
TV technician for help.
CAUTION
Changes or modifications to this equipment not
expressly approved by TEAC CORPORATION
for compliance could void the user’s authority to
operate this equipment.
2 TASCAM 788 Digital Portastudio
Page 3
IMPORTANT SAFETY INSTRUCTIONS
CAUTION:
…Read all of these Instructions.
…Save these Instructions for later use.
…Follow all Warnings and Instructions marked on the audio
equipment.
1) Read Instructions — All the safety and operating instructions should
be read before the product is operated.
2) Retain Instructions — The safety and operating instructions should
be retained for future reference.
3) Heed Warnings — All warnings on the product and in the operating
instructions should be adhered to.
4) Follow Instructions — All operating and use instructions should be
followed.
5) Cleaning — Unplug this product from the wall outlet before cleaning.
Do not use liquid cleaners or aerosol cleaners. Use a damp cloth for cleaning.
6) Attachments — Do not use attachments not recommended by the
product manufacturer as they may cause hazards.
7) Water and Moisture — Do not use this product near water — for
example, near a bath tub, wash bowl, kitchen sink, or laundry tub; in a wet
basement; or near a swimming pool; and the like.
8) Accessories — Do not place this product on an unstable cart, stand,
tripod, bracket, or table. The product may fall, causing serious injury to a
child or adult, and serious damage to the product. Use only with a cart,
stand, tripod, bracket, or table recommended by the manufacturer, or sold
with the product. Any mounting of the product should follow the manufacturer’s instructions, and should use a mounting accessory recommended by
the manufacturer.
9) A product and cart combination should be moved with care. Quick stops,
excessive force, and uneven surfaces may cause the product and cart combination to overturn.
10) Ventilation — Slots and openings in the cabinet are provided for ven-
tilation and to ensure reliable operation of the product and to protect it from
overheating, and these openings must not be blocked or covered. The openings should never be blocked by placing the product on a bed, sofa, rug, or
other similar surface. This product should not be placed in a built-in installation such as a bookcase or rack unless proper ventilation is provided or
the manufacturer’s instructions have been adhered to.
11) Power Sources — This product should be operated only from the
type of power source indicated on the marking label. If you are not sure of
the type of power supply to your home, consult your product dealer or local
power company. For products intended to operate from battery power, or
other sources, refer to the operating instructions.
12) Grounding or Polarization — This product may be equipped with a
polarized alternating-current line plug (a plug having one blade wider than
the other). This plug will fit into the power outlet only one way. This is a
safety feature. If you are unable to insert the plug fully into the outlet, try
reversing the plug. If the plug should still fail to fit, contact your electrician
to replace your obsolete outlet. Do not defeat the safety purpose of the
polarized plug.
13) Power-Cord Protection — Power-supply cords should be routed so
that they are not likely to be walked on or pinched by items placed upon or
against them, paying particular attention to cords at plugs, convenience
receptacles, and the point where they exit from the product.
14) Outdoor Antenna Grounding — If an outside antenna or cable
system is connected to the product, be sure the antenna or cable system is
grounded so as to provide some protection against voltage surges and builtup static charges. Article 810 of the National Electrical Code, ANSI/NFPA
70, provides information with regard to proper grounding of the mast and
supporting structure, grounding of the lead-in wire to an antenna discharge
unit, size of grounding conductors, location of antenna-discharge unit, connection to grounding electrodes, and requirements for the grounding electrode.
"Note to CATV system installer:
This reminder is provided to call the CATV system installer’s attention to
Section 820-40 of the NEC which provides guidelines for proper grounding
and, in particular, specifies that the cable ground shall be connected to the
grounding system of the building, as close to the point of cable entry as
practical.
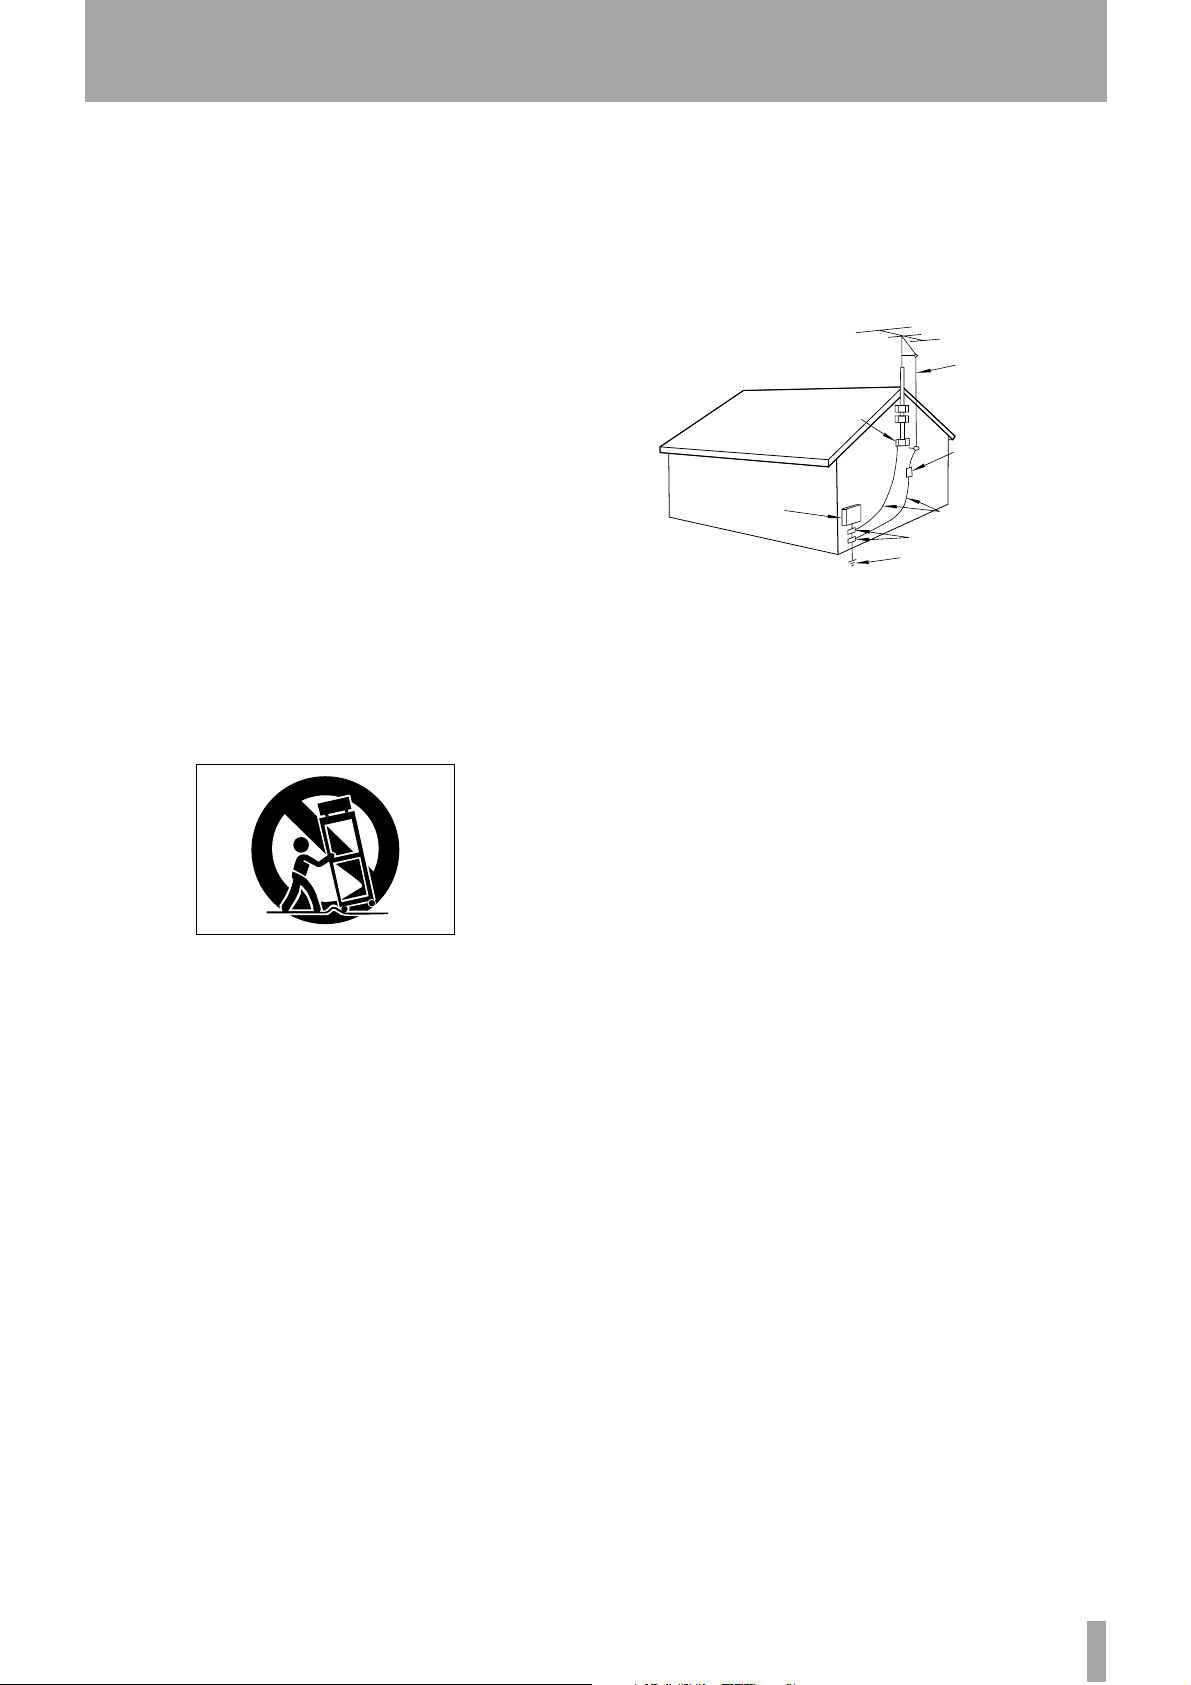
Example of Antenna Grounding as per
National Electrical Code, ANSI/NFPA 70
ANTENNA
LEAD IN
WIRE
GROUND
CLAMP
ANTENNA
DISCHARGE UNIT
(NEC SECTION 810-20)
ELECTRIC
SERVICE
EQUIPMENT
NEC - NATIONAL ELECTRICAL CODE
G
ROUNDING CONDUCTORS
(NEC SECTION 810-21)
GROUND CLAMPS
POWER SERVICE GROUNDING
ELECTRODE SYSTEM
(NEC ART 250. PART H)
15) Lightning — For added protection for this product during a lightning
storm, or when it is left unattended and unused for long periods of time,
unplug it from the wall outlet and disconnect the antenna or cable system.
This will prevent damage to the product due to lightning and power-line
surges.
16) Power Lines — An outside antenna system should not be located in
the vicinity of overhead power lines or other electric light or power circuits,
or where it can fall into such power lines or circuits. When installing an
outside antenna system, extreme care should be taken to keep from touching such power lines or circuits as contact with them might be fatal.
17) Overloading — Do not overload wall outlets, extension cords, or
integral convenience receptacles as this can result in risk of fire or electric
shock.
18) Object and Liquid Entry — Never push objects of any kind into
this product through openings as they may touch dangerous voltage points
or short-out parts that could result in a fire or electric shock. Never spill
liquid of any kind on the product.
19) Servicing — Do not attempt to service this product yourself as open-
ing or removing covers may expose you to dangerous voltage or other
hazards. Refer all servicing to qualified service personnel.
20) Damage Requiring Service — Unplug this product from the wall
outlet and refer servicing to qualified service personnel under the following
conditions:
a) when the power-supply cord or plug is damaged.
b) if liquid has been spilled, or objects have fallen into the product.
c) if the product has been exposed to rain or water.
d) if the product does not operate normally by following the operating
instructions. Adjust only those controls that are covered by the operating
instructions as an improper adjustment of other controls may result in
damage and will often require extensive work by a qualified technician to
restore the product to its normal operation.
e) if the product has been dropped or damaged in any way.
f ) when the product exhibits a distinct change in performance – this
indicates a need for service.
21) Replacement Parts — When replacement parts are required, be sure
the service technician has used replacement parts specified by the manufacturer or have the same characteristics as the original part.
Unauthorized substitutions may result in fire, electric shock, or other
hazards.
22) Safety Check — Upon completion of any service or repairs to this
product, ask the service technician to perform safety checks to determine
that the product is in proper operating condition.
23) Wall or Ceiling Mounting — The product should be mounted to a
wall or ceiling only as recommended by the manufacturer.
24) Heat — The product should be situated away from heat sources such
as radiators, heat registers, stoves, or other products (including amplifiers)
that produce heat.
TASCAM 788 Digital Portastudio 3
Page 4

Table of Contents
1 – Introductory concepts
Multitrack recording (general)...........................8
Tracking ..........................................................8
Overdubbing ...................................................8
Punching .........................................................8
Mixdown ..........................................................8
Mastering ........................................................8
Disk vs. tape recording ......................................9
Multitrack tapes.......................................................9
Multitrack disks.......................................................9
The “song”...............................................................10
What do “16-bit” and “24-bit” mean? ...............10
Real and virtual tracks on the 788.....................11
Editing......................................................................12
Nondestructive editing on the 788 ................12
788 editing ......................................................12
Undo and redo ................................................12
Multi-take punch-ins on the 788 ............................13
Instant location on the 788.....................................13
Recording technique ..............................................13
Assignment .........................................................13
The 788 internal patchbay ......................................13
Track bouncing .......................................................14
Quick setup and the assign screen.......................15
Synchronization and the 788.............................15
Timecode synchronization.....................................15
Tempo map synchronization .................................16
Sync track recording ..............................................16
MIDI external control (MMC, etc.)...................... 16
MIDI remote control ................................................17
SCSI issues .........................................................17
SCSI connections....................................................17
SCSI IDs ...................................................................17
SCSI termination .....................................................17
SCSI devices and backing up ................................18
Further reading ...................................................18
2 – Getting started
Precautions, etc..................................................19
Shutting down the 788 .......................................19
Power-on .............................................................20
About the demonstration song..............................20
A few notes about this manual..........................20
“Roadmap” to this manual.....................................21
1 “Introductory concepts” (page 8) ..............21
2 “Getting started” (page 19) ........................21
3 “Before recording” (page 34) .....................21
4 “Mixer” (page 41) ........................................21
5 “Recorder operations” (page 49) ...............21
6 “Location operations” (page 60) ................21
7 “Track editing” (page 65) ...........................21
8 “Mastering and backup (CD-R)” (page 72) 21
9 “Effects” (page 81) ......................................21
10 “Routing and scene libraries” (page 91) .21
11 “Synchronization” (page 94) ....................21
12 “MMC and MIDI functions” (page 101) ....21
13 “Specifications, etc.” (page 119) .............21
Connecting other equipment to your 788 ........ 22
Additional connection notes..................................22
About the menus ................................................ 24
Selecting multiple entries.......................................24
The MENU key .........................................................24
Other control screens.............................................25
Selecting parameters..............................................25
Setting values..........................................................25
The “home” display............................................ 26
The time display......................................................26
Entering and editing titles .................................26
CAPITAL ..........................................................27
small ................................................................27
Numbers ..........................................................27
Preset words and phrases. ............................27
Setting and editing preset words ..........................27
The SONG menu................................................. 28
Creating a new song...............................................28
Saving a song..........................................................28
Reverting to the previous saved version of a
song......................................................................28
Loading a song........................................................ 29
Erasing a song ........................................................29
Copying songs ........................................................29
Deleting unused space from a song .....................30
Protecting a song....................................................30
DISK menu ..........................................................31
Formatting a disk....................................................31
Selecting a disk.......................................................32
Ejecting a disk.........................................................32
Checking disks........................................................32
The OPTION menu.............................................. 33
Global options.........................................................33
Key sense time ...............................................33
Meter peak hold time ......................................33
Meter release time ..........................................33
Mixer settings..........................................................33
Fader settings .................................................33
Recorder settings....................................................33
USER WORD............................................................33
3 – Before recording
Quick Setup.........................................................34
RECORDING ............................................................34
MIX DOWN ...............................................................35
BOUNCE 7/8.............................................................35
Assignment on the 788......................................36
Assigning sources to mixer channels. .................36
Removing assignments..........................................36
Viewing assignments..............................................37
Channel-to-track assignments...............................37
Track-to-channel assignments ..............................37
Assigning inputs to the sub-mixer........................37
Assigning the sub-mixer to stereo........................37
Monitoring ...........................................................38
If you don’t hear anything ......................................38
How to monitor tracks............................................38
4 TASCAM 788 Digital PortaStudio
Page 5

Table of Contents
Monitoring the recorded sounds (TRACK CUE)...39
Arming tracks and monitoring...............................39
More monitoring options........................................40
Monitoring in mono.................................................40
4 – Mixer
Mixer features..................................................... 41
Linking channels................................................ 41
To link two channels...............................................41
Unlinking a pair of channels ..................................41
Notes on linked channels.......................................42
Basic operations ................................................ 42
About the screens ...................................................42
Adjusting EQ....................................................... 43
EQ and linked channels..........................................43
Channel digital pad and gain .................................44
Send levels.......................................................... 44
Fader and pan..................................................... 45
Internal and physical faders.............................. 45
Soloing................................................................ 46
Turning off soloing .................................................46
Stereo output...................................................... 47
Stereo output selection ..........................................47
Sub-mixer............................................................ 48
5 – Recorder operations
Basic transport controls.........................................49
Playback.............................................................. 49
Setting the playback position ........................... 50
Return to zero (RTZ) ...............................................50
Last Recording Position (LRP) ..............................50
Jog positioning .......................................................50
Fast forward and rewind.........................................51
During playback ............................................. 51
From the stop position .................................. 51
Repeat playback................................................. 51
Setting the IN and OUT points ...............................52
Editing the IN and OUT points ...................... 52
Setting the time between repeats..........................52
Recording............................................................ 53
Recording (ii) ...........................................................53
Hands-free recording..............................................53
Dropping out of record mode ................................53
Rehearsing recording.............................................54
Assigning virtual tracks..................................... 54
Overdub recording............................................. 55
Auto punch operations ...................................... 55
Setting the punch points ........................................56
LAST REC ....................................................... 56
IN -> OUT ........................................................ 56
LAST TAKE LOAD .........................................56
Checking the punch points ....................................56
Rehearsing the punch ............................................57
Recording the punch ..............................................57
Checking the take ...................................................57
After finishing the punch........................................58
If you change your mind.........................................58
Varispeed operations (pitch and SSA)..............58
Pitch .........................................................................59
To use the set pitch .......................................59
SSA (Slow Speed Audition)....................................59
To use the SSA .............................................. 59
6 – Location operations
Direct location .....................................................60
Direct location (i).....................................................60
Direct location (ii)....................................................61
Location marks....................................................62
Entering location marks.........................................62
Active location marks.............................................62
Giving a title to the active location mark ..............62
Deleting the active location mark..........................62
Editing the active mark...........................................63
Using the location mark list ...............................63
Locating using the list............................................64
Using the IN OUT and TO marks............................64
Titling using the list................................................64
7 – Track editing
About track editing .............................................65
IN, OUT and TO .......................................................65
Entering the edit mode...........................................65
Track editing functions.......................................65
Remember! ..............................................................65
COPY -> PASTE...................................................66
COPY -> INSERT .................................................66
MOVE -> PASTE ..................................................67
MOVE -> INSERT.................................................67
OPEN....................................................................68
CUT.......................................................................68
SILENCE...............................................................68
CLONE TRACK....................................................69
CLEAN OUT .........................................................69
UNDO and REDO.................................................69
Undoing and redoing actions ................................70
An undo/redo example...........................................70
8 – Mastering and backup (CD-R)
Connection ..............................................................72
Notes regarding the handling of CD-R discs........72
Mixdown...............................................................73
Pre-mastering..........................................................73
Recording the pre-master ............................. 73
Exiting mastering .......................................... 74
Checking the master...............................................74
Exiting master checking ...............................74
Trimming the master ..............................................75
Recording to CD-R..............................................75
Recording to CD-R (track recording) ....................75
Finalizing the disc...................................................76
Recording to CD-R (multiple tracks).....................77
TASCAM 788 Digital PortaStudio 5
Page 6

Table of Contents
Playing back CDs using the 788............................78
Backup using CD-R ............................................ 79
Backing up a song ..................................................79
Restoring data from CD-R......................................80
9 – Effects
EFFECT 1 ........................................................81
EFFECT 2 ........................................................81
Setting up EFFECT 1 ..........................................81
Using EFFECT 1 as a multi-effect processor........81
Using EFFECT 1 as a single stereo effect
processor in the effect loop ...............................82
Setting up EFFECT 2 ..........................................82
Using EFFECT 2 as a multi-channel dynamics
processor .............................................................82
Using EFFECT 2 as a stereo dynamics
processor .............................................................82
Using EFFECT 2 as a single stereo effect
processor in the AUX effect loop.......................83
Send levels, etc...................................................83
Pre- and post-fader sends explained....................84
Changing between pre-fader and post-fader
settings.................................................................84
Selecting the type of effect................................84
Multi-effect processor preset settings ..................85
Single stereo effect processor settings................85
Dynamics processor...............................................85
Making settings...................................................86
Using the user libraries......................................86
Storing an effect in the library ...............................86
Recalling a user setting from the library ..............86
Parameter details................................................ 87
Multi-effect processor settings..............................87
Compressor ....................................................87
Distortion ........................................................87
Noise gate .......................................................87
Flanger ............................................................87
Exciter .............................................................88
Pitch shifter ....................................................88
Chorus .............................................................88
Reverberation .................................................88
Delay ................................................................88
Parametric EQ ................................................88
De-esser ..........................................................89
Single stereo effect settings ..................................89
REVERB ..........................................................89
DELAY .............................................................89
CHORUS ..........................................................89
PITCH SHIFTER ..............................................90
FLANGER ........................................................90
PHASER ..........................................................90
REVERB + GATE ............................................90
Dynamics processor...............................................90
10 – Routing and scene libraries
Routing libraries .................................................91
Saving the current routing settings to the library91
Loading routing settings from the library.............92
Scene libraries....................................................92
Saving a scene to the library .................................92
Loading scenes from the library............................93
Other matters concerning scenes.........................93
11 – Synchronization
Master or slave?......................................................94
How to measure time?............................................94
Synchronization methods.................................. 95
MIDI Time Code (MTC) ...................................95
MIDI clock ........................................................95
MIDI Song Position Pointer (SPP): ...............95
Synchronization settings on the 788.....................95
MTC ..................................................................95
syncTrk (sync track) ......................................95
Tempo Map .....................................................95
Making synchronization settings......................96
Synchronization master/slave setting on the 788 96
Selecting the master synchronization type..........96
OFF ..................................................................96
MTC ..................................................................96
CLOCK .............................................................96
SycTRK ............................................................96
MIDI Timecode frame rate ......................................96
MIDI Timecode offset (788 as slave only) .............97
Sync track ........................................................... 97
Recording the sync track .......................................97
Using the sync track...............................................98
Tempo map .........................................................98
Entering and editing the tempo map.....................98
BAR ..................................................................99
SIG ...................................................................99
Tempo ..............................................................99
Using the tempo map..............................................99
Using MTC to control a sequencer ...................100
Metronome .......................................................... 100
OUTPUT ...........................................................100
MODE ...............................................................100
INT LEVEL .......................................................100
CH ....................................................................100
ACC. NOTE ......................................................100
(ACC.) VELO ...................................................100
NORM. NOTE ..................................................100
(NORM.) VELO ................................................100
12 – MMC and MIDI functions
MIDI Machine Control.........................................101
788 MMC slave/master setting...............................102
MMC ID.....................................................................102
Bit-map array of MMC commands ......................... 103
Bit-map array of Response/Information fields .....104
Program Change messages .............................. 105
Enabling/disabling Program Change ....................105
Control Change messages ................................ 106
Enabling/disabling Control Change messages.... 106
Mixer Control Change.............................................106
Effect Control Change messages..........................107
6 TASCAM 788 Digital PortaStudio
Page 7

NRPN values for multi-channel and stereo dynamics
processors ...........................................................107
NRPN values for single stereo effects ..................108
NRPN values for distortion multi-effect processor
settings (1) ...........................................................109
NRPN values for clean multi-effect processors (2)113
NRPN values for multi-effect processor (3)..........118
13 – Specifications, etc.
Dimensional drawing ......................................... 119
Specifications..................................................... 119
Physical and electrical specifications...................119
Digital recorder specifications...............................119
Mass storage ...........................................................120
Analog audio I/O .....................................................120
Audio specifications ...............................................120
Error messages, etc. .......................................... 120
MIDI Implementation Chart................................ 124
Table of Contents
TASCAM 788 Digital PortaStudio 7
Page 8
1 – Introductory concepts
If you are new to disk-based recording or to multitrack recording generally, there may be some ideas
with which you are slightly unfamiliar. This section
briefly introduces you to some of the concepts
Multitrack recording (general)
Multitrack recording allows you to make recordings
of many different signals separately, allowing a high
degree of control over the finished sound.
Tracking The signals of the first tracks to be
recorded as part of the song are fed through a mixing
console, and recorded on many different tracks on a
multitrack recorder (“tracking”)
Overdubbing New material can be recorded on a
track while listening to previously-recorded tracks—
this is known as “overdubbing”. For instance, the
vocal parts of a song can be recorded after all the
backing instruments have been recorded, allowing
the singer to concentrate on getting the best vocal
performance. While tracking or overdubbing, effects
can be added to enhance the recorded sound.
Punching Most recorders have silent “punch-in”
and “punch-out” facilities, i.e. if you make a mistake
in only a short passage, you don’t have to re-record
regarding the 788 and its operation. Even if you are
familiar with the idea of multitrack recording and
disk-based recording, you may find this to be a useful
introduction.
the whole piece—you can re-record only the part
where the mistake occurred.
Mixdown These recorded tracks are then “mixed
down”—this means that the volumes, tonal balance
(the amount of bass and treble, etc.) of the different
recorded tracks are adjusted and fed to a stereo
recorder (a DAT recorder can be used for this purpose). At this stage, additional effects such as echo,
reverb, etc. may be added to individual tracks, to help
produce a “feel” to the piece.
Alternatively, with the 788 it is possible to mix to
CD. First the song is mixed to a special stereo mastering track and then written to CD, using a CD-R or
CD-RW drive connected to the SCSI port of the 788.
Mastering If the mixdown has not already been
done to CD, then an audio CD (or an analog cassette)
may be then mastered and duplicated from the master
stereo recording.
Recording
("tracking") and
overdubbing
Mixdown
8 TASCAM 788 Digital PortaStudio
Page 9
1 – Introductory concepts–Disk vs. tape recording
Multitrack recorders can be analog (for example, the
TASCAM PORTASTUDIO cassette series) or digital
(for example, the TASCAM series of DTRS recorders), and likewise mixing consoles can be analog or
digital. The 788 is digital, that is, after the signals
enter the 788, the mix, recording process, the internal
effect processors and mixdown are all digital. This
Disk vs. tape recording
The 788 uses a disk for recording, but traditionally,
multitrack recording has been done on tape. The
Multitrack tapes
A tape is divided into a number of different “tracks”;
usually either 4, 8, 16 or 24.
A typical arrangement of tracks used during a tapebased recording session is shown below:
Track 1 Bass (kick) drum
Track 2 Snare drum
Track 3 Drum Kit (left)
Track 4 Drum Kit (right)
Track 5 Bass Guitar
Track 6 Guitar
Track 7 Vocals (backing)
Track 8 Lead vocals
avoids any possible loss of quality caused by
repeated conversion between analog and digital.
This also allows a consistent frequency response (i.e.
there is no loss of the very high or very low frequencies) and dynamic range (from quiet to loud), since
all the components in the integrated 788 system are
designed to work with each other.
methods of recording with tape and disk recording
systems differ in a number of ways.
• If there are more instruments than tracks, it is possible to do a “mini-mixdown” from some existing
tracks to a spare track or tracks. This is known as
“track bouncing” or “ping-pong”.
Track 1 Bass (kick) drum
Track 2 Snare drum
Track 3 Drum Kit (left)
Track 4 Drum Kit (right)
Track 5 Bass guitar
Track 6 Rhythm guitar
Track 7 Click track (disposable)
Track 8 Guide vocals (disposable)
If more tracks are required in the course of a session,
there are a number of alternatives:
• It is possible to record on unused parts of a track
(for instance, if there is a saxophone part which is
never played at the same time as the backing
vocals, you can use the spare portions of track 7 for
recording the saxophone).
• By sacrificing a track of audio, special synchronizing timecode can be recorded on the “sacrificed”
track, allowing sequenced MIDI instruments to
play along with the audio tracks.
Multitrack disks
On an analog tape deck, the number of tracks available is determined (mainly) by the width of the tape.
By contrast, in a disk system, the power of the processor determines how many tracks can be recorded
and played back at one time. On the 788, eight tracks
can be recorded and played back at one time.
• In the example above, the four recorded tracks
incorporating the drum parts will be bounced and
combined onto tracks 7 and 8. Tracks 1 through 4
may now be reused for other purposes.
Track 1 Was bass (kick) drum - now reusable
Track 2 Was snare drum - now reusable
Track 3 Was drum kit (left) - now reusable
Track 4 Was drum kit (right) - now reusable
Track 5 Bass guitar
Track 6 Rhythm guitar
Track 7 New mixed drums (left)
Track 8 New mixed drums (right)
While a tape’s tracks are recorded side-by-side along
the length of the tape, a disk track may be placed
anywhere on the disk.
If you could see the magnetic patterns that are
recorded on a hard disk, you might find that the
TASCAM 788 Digital PortaStudio 9
Page 10

1 – Introductory concepts–What do “16-bit” and “24-bit” mean?
tracks recorded in a session would look something
like:
Track 2
Track 3
Track 6
Track 5
Track 7
Track 1
Track 4
Actually, the arrangement of tracks on a disk is more
complicated than this, but the diagram above gives
you an idea of how tracks don’t need to live side by
side as they do on tape.
Another thing to notice is that the tracks are of different lengths. Unlike a multitrack tape, where the
length of the track has to be equal to the length of the
tape, a disk recorder can be “smart” enough to recognize when nothing is recorded, and use that space for
other tracks, if necessary. This means that it’s difficult to say that you can record a song of a certain
length on a disk of a given size (unlike a cassette, say,
which is clearly labelled with the length of material
that can be recorded on it).
When recording or playing back material, the processor (“brain”) of the 788 must collect all the tracks
together and play them simultaneously, so that you
hear them playing together in perfect timing with
each other.
This is what we meant when we talked earlier about
the number of tracks that can be replayed at one time.
If we asked the 788 to play back hundreds of tracks
together, it would end up having to do too much
work, and the tracks would be out of time with each
other.
The “song”
On the 788, as on many MIDI sequencers, etc., a
piece of music is referred to as a song (whether or not
it has a vocal part). Because on a multitrack tape system, a piece of music takes up a fixed length of all
tracks of the tape—no more, no less, there is no need
to pre-divide a tape into songs.
On a disk-based system, however, before you start
recording a piece, you must “tell” the recorder that
you are recording a new song.
What do “16-bit” and “24-bit” mean?
The 788 is capable of recording at 16-bit and 24-bit
resolution. Basically speaking, in digital audio, the
more bits, the better. This is because in a digital
audio device like the 788, incoming sound is digi-
tized, that is, converted into numbers, which in the
case of the 788 are stored on the disk.
When it is time to replay the sound, the 788 reads the
numbers from hard disk and converts them back into
sound.
In each second, the 788 takes a “snapshot” of the
incoming sound 44,100 times. By playing back these
snapshots one after the other at the same speed
(44.1 kHz, in technical terms), the 788 provides you
To the 788, a song is all the audio data you record,
together with the playlist which allows you to select
parts of the song for playback, until you start working on another song.
You can copy songs to other songs (or to another
disk), erase them, protect them against further
changes, and so on.
Since the song is a collection of digital data, there is
no loss of quality when a song is stored or copied to
another disk.
with an accurate reproduction of the sound, in much
the same way as a movie camera takes a series of still
pictures (frames) 24 times a second, which are
replayed by the movie projector to give you the feeling of a continuously moving picture.
However, the speed at which the sampling is carried
out is only half the story. The depth at which the sampling is carried out is also important.
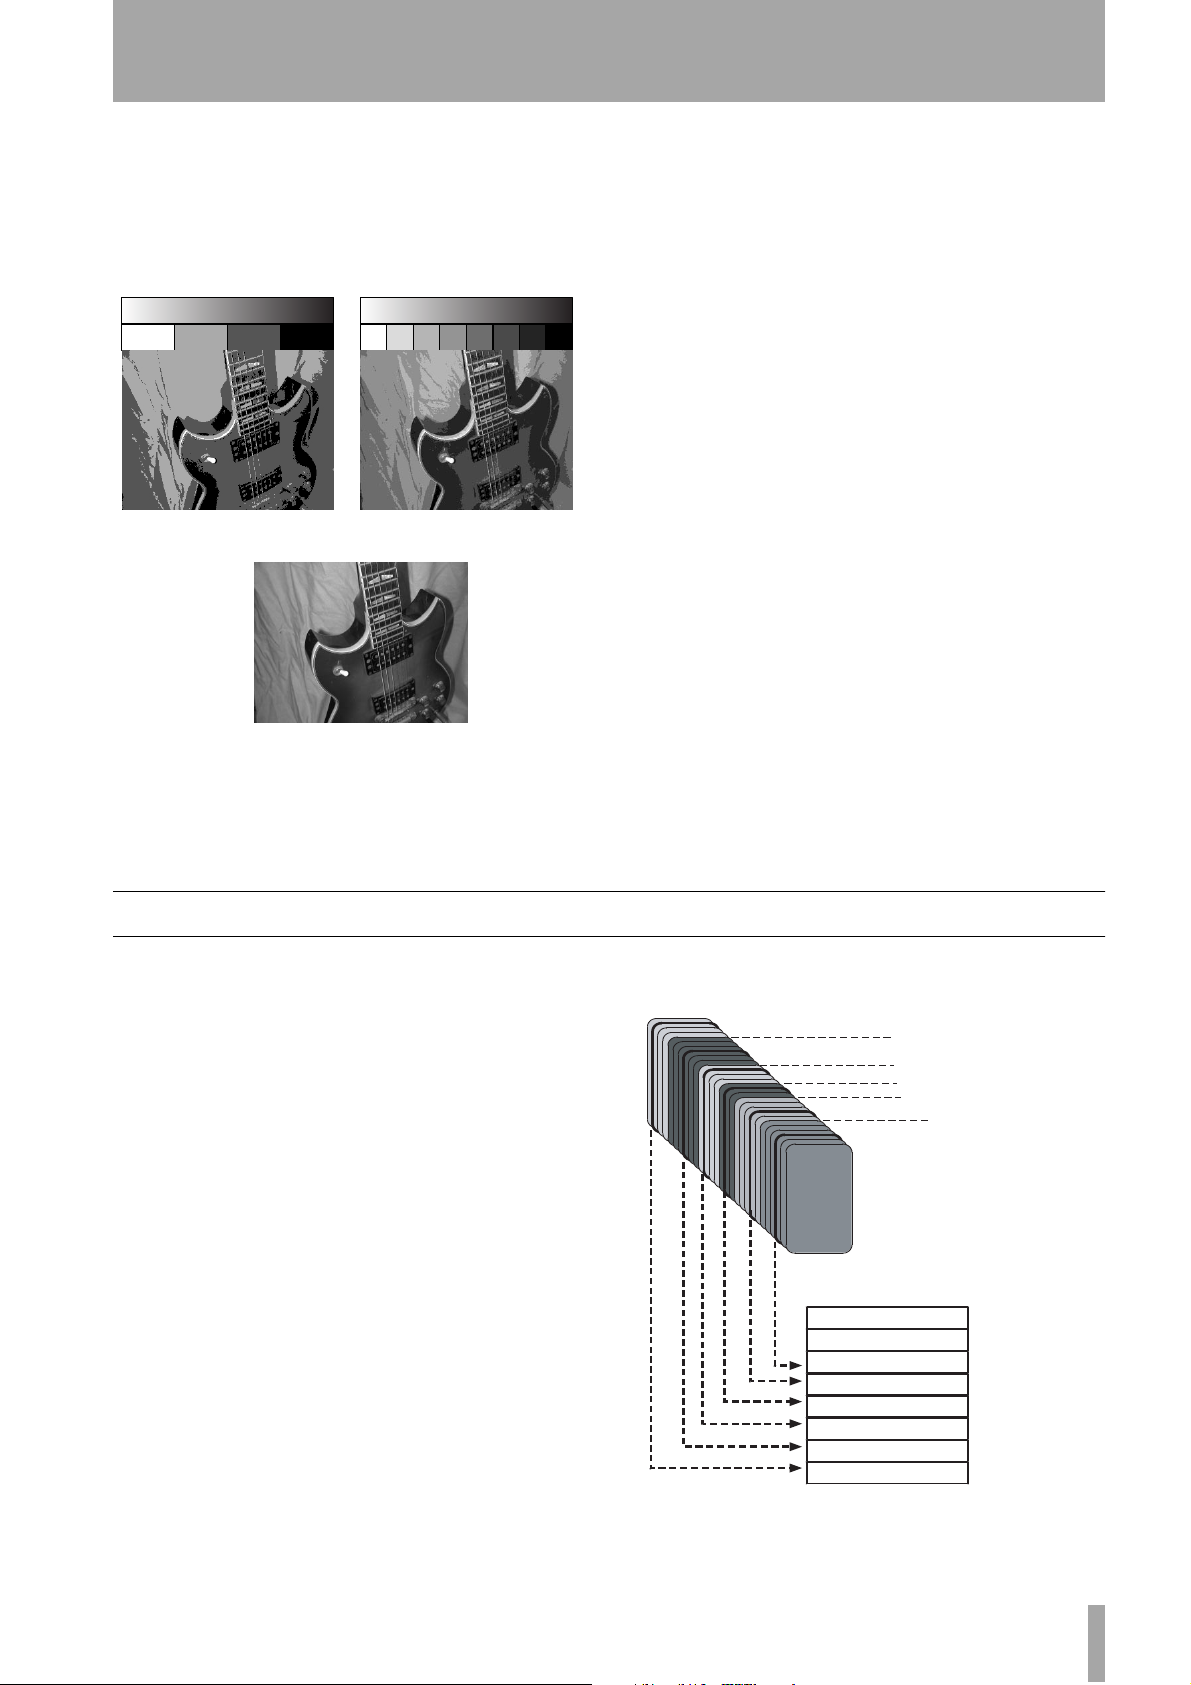
To illustrate this, let’s think of a black and white photograph. In such a photograph, there can be an infinite number of grays, all the way from complete
white to total blackness.
10 TASCAM 788 Digital PortaStudio
Page 11
1 – Introductory concepts–Real and virtual tracks on the 788
If we sample this photograph, which originally contains pure white, pure white and almost every shade
of gray in between, we must convert it to a fixed
number of gray levels. Here, we can see that the more
grays we use to represent the picture, the more realistic the photo appears.
2-bit resolution
(4 gray levels)
8-bit resolution
(256 gray levels)
3-bit resolution
(8 gray levels)
Note that we use the number of bits (a bit is either
“on” or “off”) to show how many grays are used to
make up the picture. The number of grays can be
given as 2
So: 2 bits give us 2
grays, and 8 bits give us 2
n
, where n = the number of bits.
2
= 4 grays, 3 bits give us 23 = 8
8
= 256 grays,
For our eyes, 256 grays is just about enough, but our
ears need a little more quality. If you listen to sound
recorded at 8-bit resolution, you’ll notice that it
sounds somewhat rough, especially in the quieter
passages.
CDs are therefore produced at 16 bits (2
16
= 65,536
“grays”) and this is fine for playback. For recording,
though, when sound is being manipulated and processed, it’s a good idea to have more bits available.
The 788 therefore gives you 24 bits of resolution (2
24
= 16,777,216) which allows complete precision and
sonic quality at all stages of the production process.
At the final stages, when the mix is transferred to CD
or to any other digital medium, the 24 bits are
reduced to 16 for compatibility with other audio
equipment.
Note, though, that when you record using 24 bits
rather than 16, more space is used on the hard disk
(50% more, as you might well expect). In practice,
given the size of the hard disk in the 788, this should
make little or no difference to the way you work with
your recordings.
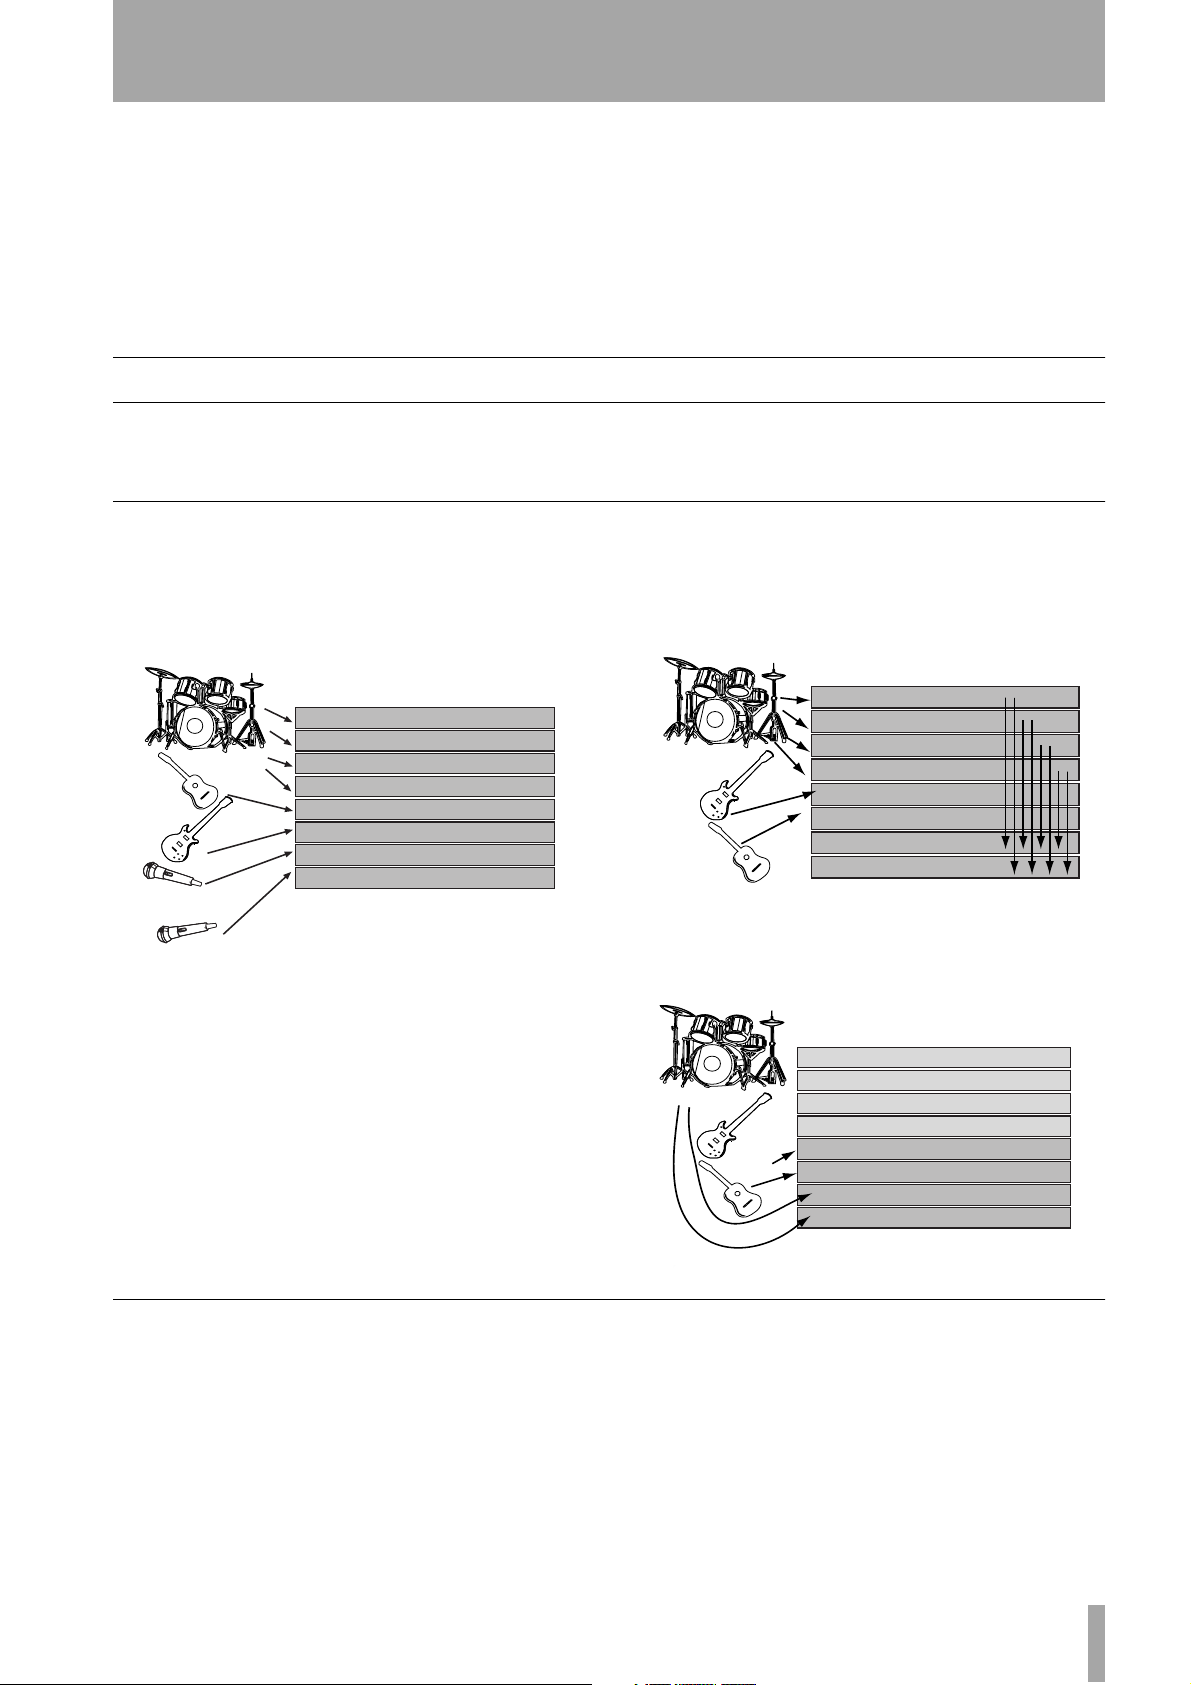
Real and virtual tracks on the 788
When you use the 788, you can record “spare”
tracks; for instance, different versions of the lead
vocals, and pick and choose between the different
versions to find the one which works best.
These “spare tracks” are known as virtual tracks.
With the 788, you can record up to 250 tracks per
song. From those 250 tracks, you pick the eight that
you want to fit together to make your finished mixed
song. This can be re-takes of the same material (for
instance, many attempts by a singer to capture the
perfect vocal line), or alternative tracks (different
guitar lines or effect settings, etc.). This allows you
much more freedom to experiment than a tape
recorder can provide.
Different harmony arrangements for
backing vocals
Lead vocal attempts
Bass line played on different instruments
Saxophone takes
Rhythm guitar experiments with
different effect settings
Different takes of lead guitar line
Virtual
tracks
Here, we pick the best
takes from the virtual
tracks and assign them to
the eight assigned play-
back tracks.
Track 1: Drums Left
Track 2: Drums Right
Track 3: Lead Guit ar
Track 4: Rhythm Guitar
Track 5: Saxophone
Track 6: Bass line
Track 7: Lead voc als
Track 8: Backing vocals
Assigned
playback
tracks
TASCAM 788 Digital PortaStudio 11
Page 12
1 – Introductory concepts–Real and virtual tracks on the 788
Editing
One of the most useful features of a disk-based
recorder such as the 788 is the ability to edit material.
When working with a stereo tape recorder, the usual
way of editing was with a white pencil, a razor blade
and sticky splicing tape. In this way, unwanted parts
of tape could be removed, and parts of a song (e.g.
verses, choruses, intros) could be moved from one
part of the song to another. However, there were
many disadvantages to this (and it didn’t work with
multitrack recorders).
The other way of tape editing is assembly from one
recorder to another—you need two recorders, and
some very precise (and often expensive!) synchronization equipment to do this.
Nondestructive editing on the 788 By con-
trast, the 788 allows you to use a wide variety of
sophisticated editing techniques with no additional
equipment.
If you have ever used a computer for word-processing, you will know that you can cut and copy parts of
a document, and paste them into other locations in
the document, saving you a lot of boring, repetitive
work.
Since the 788 stores its information as digital data,
just as a word-processor stores your documents as
digital data, parts of a song can be cut, copied and
pasted to other locations in the song. You can cut,
copy and paste all the tracks which have been
recorded to make a song, or just one or a few tracks.
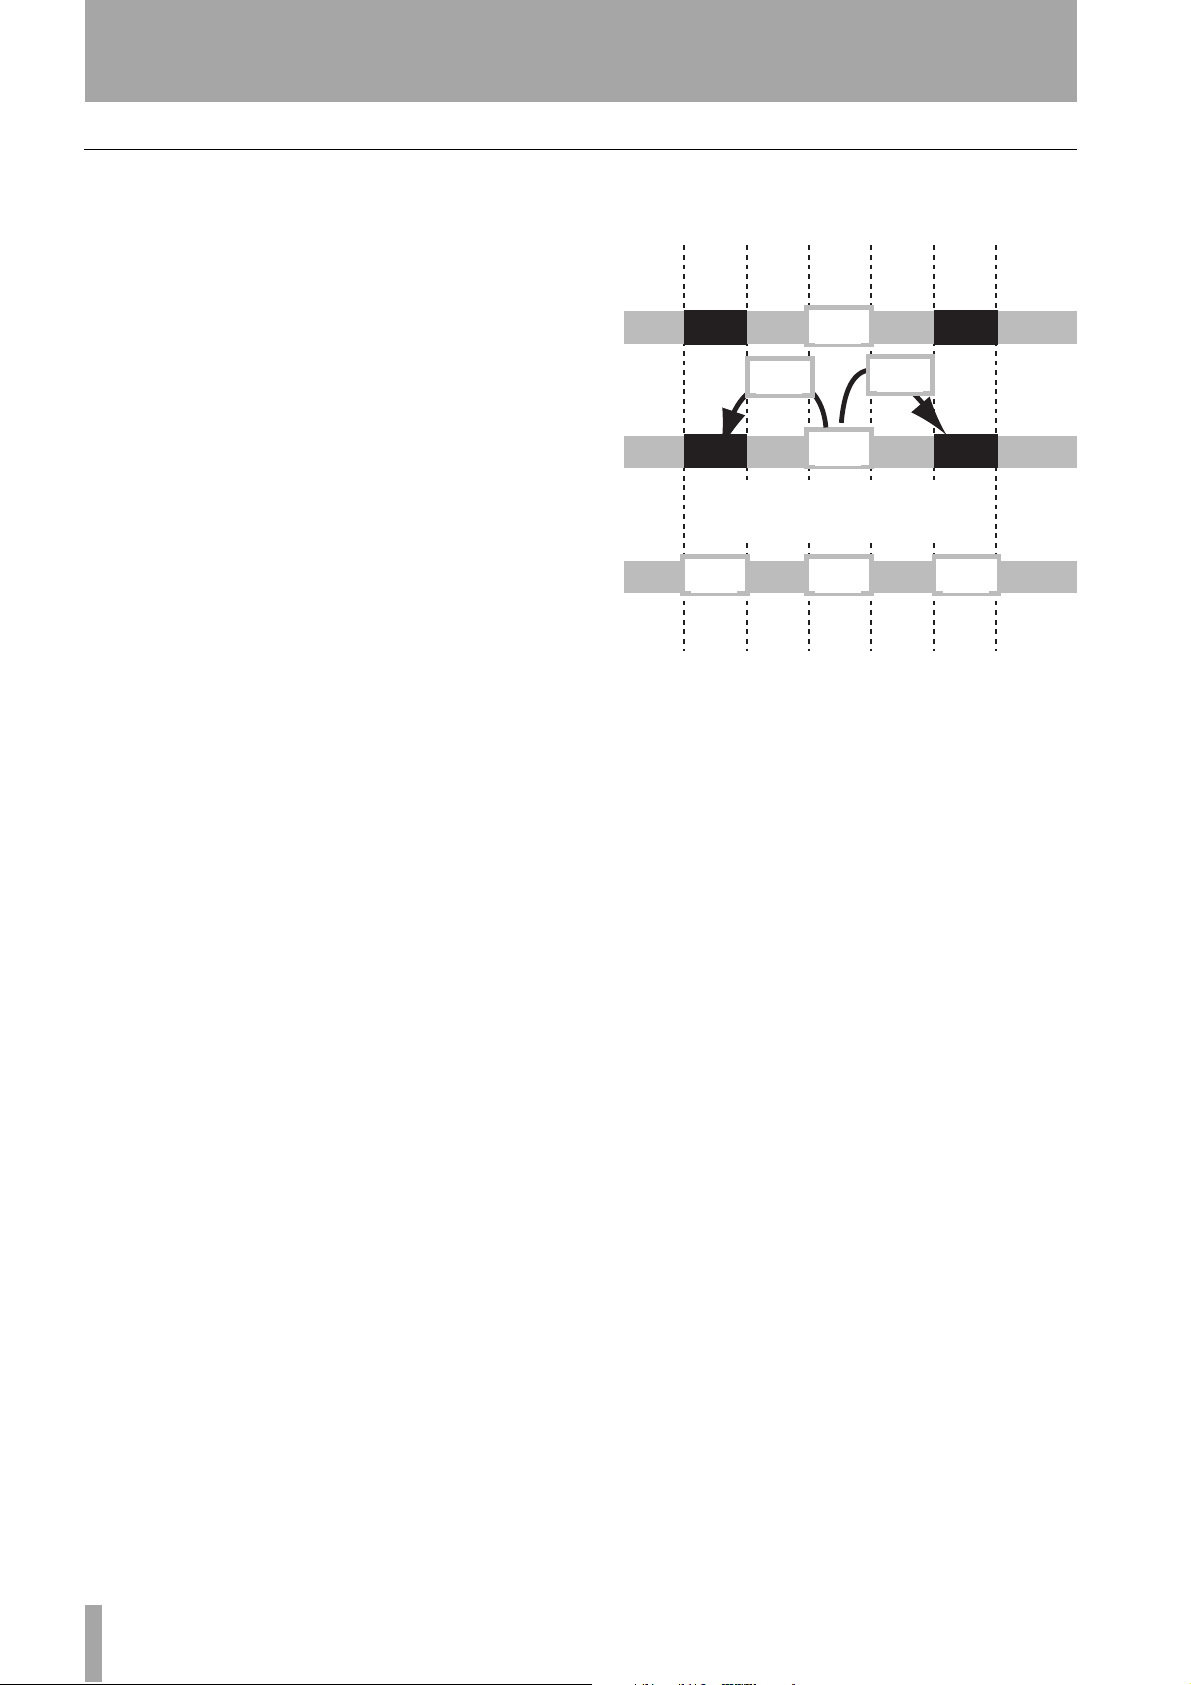
As a practical example, let’s suppose that you’re
recording a song that has three chorus sections, with
an identical, rather complex, guitar hook at the end of
each of them. If you were recording to tape, you
would record the hook for these three sections three
times, each one in the appropriate place. Because this
is a slightly tricky passage to play, you might only
get it right once or twice. You’d have to go through
the process of punching in and out at the places
where you made the mistake, until you got it right
three times.
With the 788, this becomes easier. You can copy and
paste the part which was recorded properly, and
replace the bad versions. This makes life a lot simpler and quicker, as you only have to get the hook
right once—the other times are simply “clones” of
the perfect recording.
Good
take
Good
take
Good
take
Good
take
Good
take
Good
take
Bad take Bad take
Bad take Bad take
Copy the good version and
overwrite the bad takes
Good
take
There are other ways you could use this feature—
used with care, it could be used to correct timing
problems with an out-of-time player, or signals from
microphones which are widely separated.
788 editing On the 788, you can copy, move,
paste, add silence, close up gaps, wipe whole tracks,
etc. in very simple operations. See “Track editing” on
page 65 for details of the track editing operations
available with the 788.
Undo and redo Furthermore, compared with a
tape recording system, disk offers one very big
plus—the ability to undo changes. For instance, if
you make a mistake and copy a bad take of the chorus over a good copy, you can undo it and restore
what you originally recorded. You can’t do this with
tape. This is why we call editing with disk “non-
destructive”—you don’t actually destroy the data
immediately when you write over it, cut it or delete
it, but you have a “safety net” to catch your mistakes.
However, the undo function is not available for every
operation, though. For instance, there is no way to
undo formatting a disk (and destroying all data on it).
This is an operation from which there is no escape,
once it has started (there are a few other non-undoable operations, such as erasing a song—these functions are explained as being non-undoable when they
are described in this manual).
12 TASCAM 788 Digital PortaStudio
Page 13

Multi-take punch-ins on the 788
1 – Introductory concepts–Assignment
Similar to the concept of “virtual tracks”, and also to
the editing procedure above, is the idea of multi-take
punches.
The 788 allows you to repeat a punch-in section,
playing or singing the same phrase many times until
Instant location on the 788
With a tape recorder, you must always wait a certain
amount of time before moving from one part of a
song to another. This is because it takes time for tape
to be wound or rewound (even with the fast DTRS or
DAT systems, moving between the start and end of a
repeated section takes a definite amount of time).
However, a disk-based system like the 788 does not
need to rewind, and therefore if a section is being
Recording technique
Remember, the 788 is a tool which helps you create
recordings. Although it has many features which will
assist you in making high quality recordings easily,
the use of a 788 (or indeed, of any piece of equipment) does not in and of itself guarantee a perfect
recording.
you stop the punch procedure. All the successive
takes of this phrase are stored on disk, and you can
audition them all, and pick the best one to insert into
the track.
looped, the start can follow immediately after the end
section. This can be a little unnerving for musicians
brought up on tape systems, and so the 788 allows
you to set the period between the end and the start,
simulating a tape rewind time.
You can set many location marks throughout a 788
song, allowing you to jump instantly around even the
longest pieces of music.
Above all else, we encourage you to learn to listen
critically to your recordings—this will enable you to
make the most from your equipment and add to your
ultimate enjoyment.
Assignment
When recording signals on a multitrack system, the
outputs of the signal sources (microphones, instruments, effect returns or previously-recorded multitrack tape tracks) must be plugged into the
appropriate channels of the mixing console and
assigned or routed to the appropriate destination.
When recording the first tracks, the destination will
usually be the track or tracks of the multitrack
recorder on which the signal will be recorded.
In the mixdown phase of a project, the destination
will usually be the stereo pair to which the tracks will
be mixed (usually on another recorder).
The 788 internal patchbay
With the 788, no external patchbay is necessary. The
unit incorporates its own digital patchbay with many
advanced features. The techniques of actually making the assignments in this internal patchbay are
explained in more detail in “Assignment on the 788”
on page 36. This section provides a brief overview of
In a conventional system, to change (say) a microphone signal from input channel 1 of the mixer to
input channel 4, it is either (in a small setup) necessary to unplug the microphone from the mixer and
reconnect or (in larger setups) to use a patchbay,
where all the inputs and outputs are permanently
connected at the rear of a “patch panel” and links are
made using patch cords on the front. Digital patch-
bays are also available for the connection of digital
signals.
the facilities available when using the assignment
patchbay of the 788.
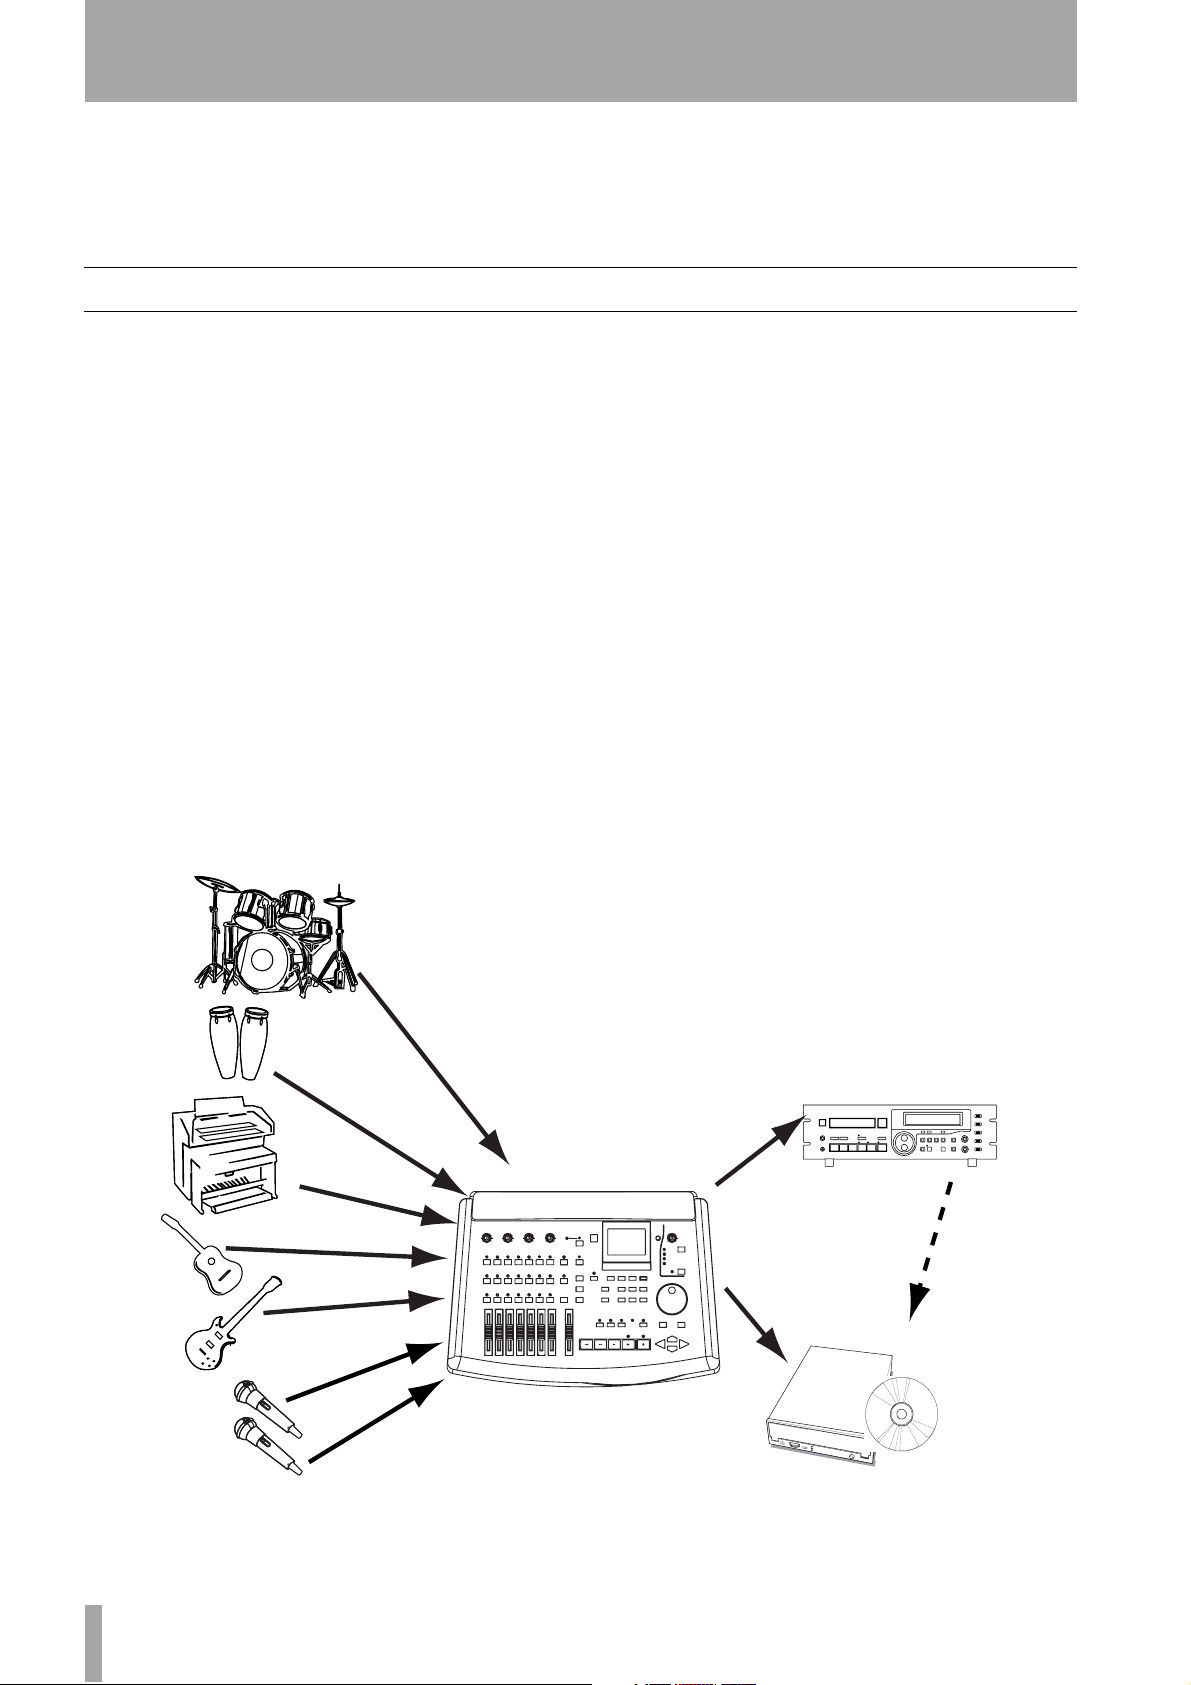
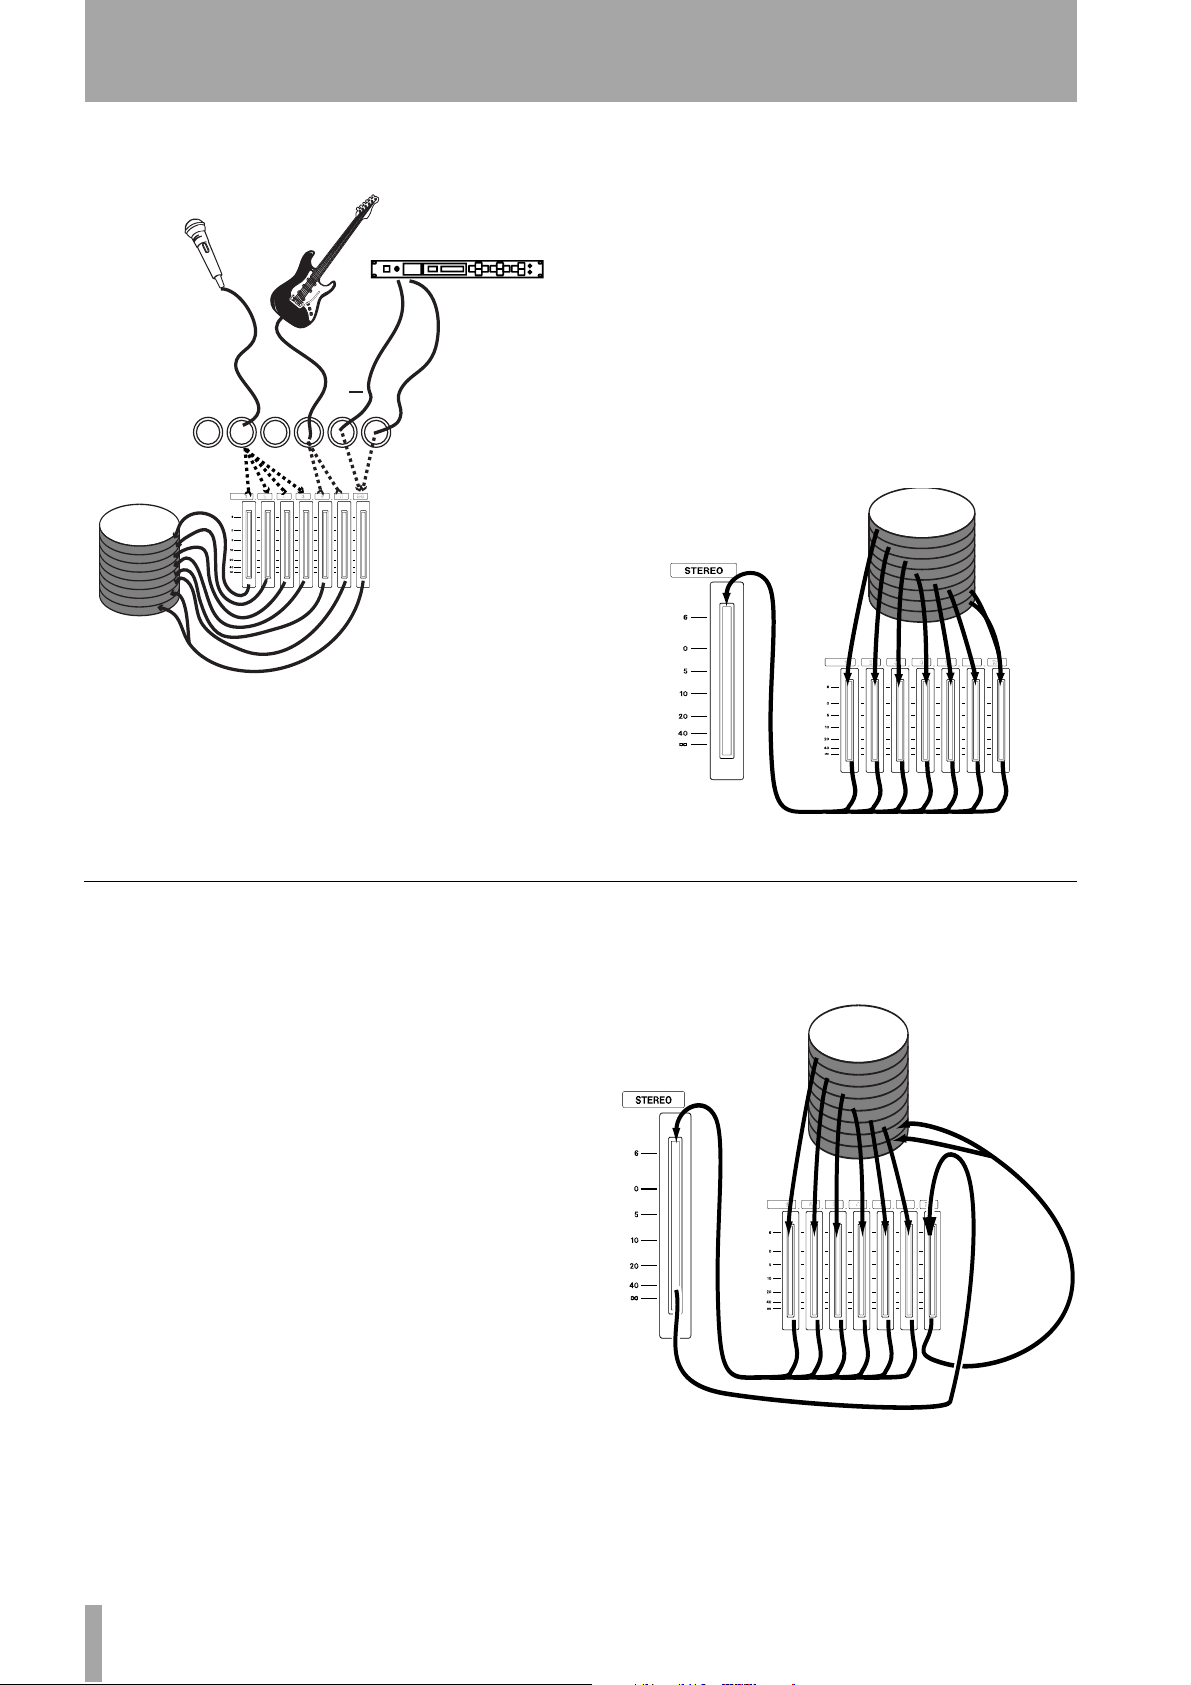
The illustration here tries to show that although the
sound sources may be connected to the same inputs
of the 788 throughout a session, the signals from
TASCAM 788 Digital PortaStudio 13
Page 14
1 – Introductory concepts–Assignment
these inputs may be assigned to different mixer channels as required during the recording process.
AUX
A B C D L R
1
2
3
4
5
6
7
8
INPUTS
Although only a few dashed lines are shown here for
simplicity, it is possible to connect any of the shown
inputs to any of the eight mixer channels.
feeds recording track 1, mixer channel 3 always feeds
track 3, etc. This cannot be changed.
However, when mixing down or track bouncing, the
tracks themselves, which are usually the destination
of the signals, become signal sources. In this case,
tracks are assigned to channels, becoming the signal
source. Again, track 1 is always assigned to channel
1, track 2 is always assigned to channel 2, etc. In this
case, however, there are 250 virtual tracks per song
(see “Real and virtual tracks on the 788” on page 11)
to choose from, and the virtual track that is currently
assigned to a real track will be sent through the mixer
channel to the
STEREO outputs.
1
2
3
4
5
6
7
8
Every mixer channel is tied directly to the associated
recording track on disk. This means that when
recording, the output of mixer channel 1 always
Track bouncing
As a further refinement, it is also possible to send the
stereo output signal to a track or pair of tracks, allowing track bouncing to take place, as described in
“Multitrack tapes” on page 9.
In this illustration tracks 7 and 8 are used to receive
the mixed stereo tracks, which are fed by tracks 1
through 6:
1
2
3
4
5
6
7
8
14 TASCAM 788 Digital PortaStudio
Note that the stereo fader does not actually affect the
volume of the mixed tracks—it is placed in this diagram for illustrative purposes only.
Page 15
1 – Introductory concepts–Synchronization and the 788
Quick setup and the assign screen
The 788 allows you to see your current assignments
easily in two ways (as explained in more detail in
“Assignment on the 788” on page 36):
Firstly, when you press a mixer channel’s
SELECT
key, it flashes, along with the inputs that have been
assigned to it.
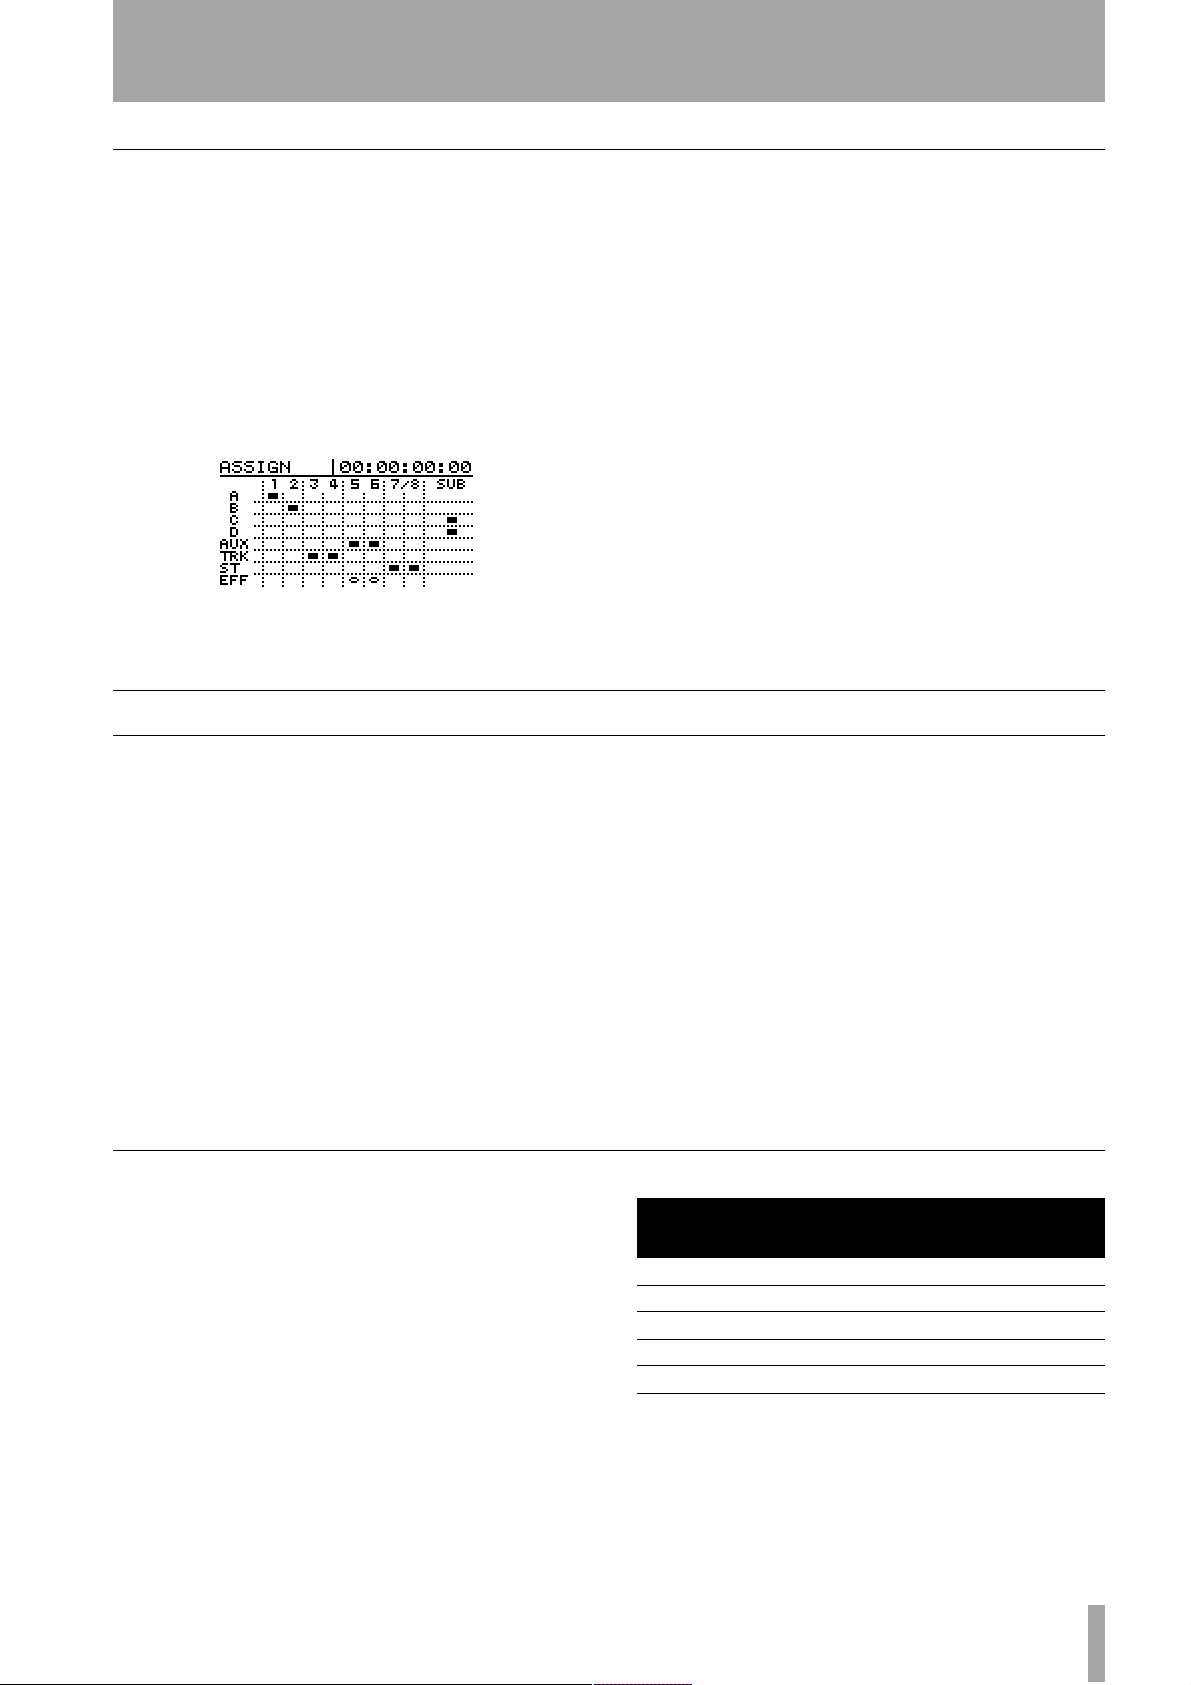
Secondly, to see the whole map of the current assignments, press and hold down the
SHIFT key while
pressing the ASSIGN MAP key:
Inputs are listed down the left side of the screen, and
destinations along the top. A black mark at the inter-
Synchronization and the 788
One of the other key features of the 788 is its ability
to synchronize with other equipment. This is especially useful when working with MIDI equipment, as
the MIDI instruments do not actually need to be
recorded until the final mixdown stage.
Instead, one way of working is to record the basic
MIDI tracks (say a bass and drums sequence) on a
sequencer, and play it back as a guide “click” or
backing track while recording guitars, vocals, etc.
Alternatively, the acoustic tracks may be recorded
first, and MIDI tracks added later as atmosphere.
In either case, at mixdown, the 788 provides you with
a sub mix facility, that allows the inputs to be routed
section of the input and destination means an assignment of the input to the destination.
As well as this map, the 788 also allows you to set up
different commonly-used assignment maps using the
QUICK SETUP key.
The assignment maps that you can set up in this way
are:
RECORDING (where the inputs are
assigned to the mixer channels (and hence to the
tracks on a one-to-one basis),
MIXDOWN, where
the recorded tracks are routed to the stereo output
bus, and
BOUNCE 7/8 where tracks 1 through
6 are routed to the stereo bus, which in its turn is
routed to channels 7 and 8.
There is also a special library, as described elsewhere
in this manual, where custom routing patterns can be
stored and retrieved (as well as a library for storing
the whole of the mixer’s settings).
through to the master stereo mix in addition to the
tracks recorded on disk.
There is no “right” or “wrong” way of working—you
should choose the method that works best for you
and your material.
Note that in either case, the MIDI must be accurately
synchronized to the acoustic recorded material at all
times.
There are three basic methods of synchronization
between the 788 and a MIDI system, briefly
explained below. Full details of how to use these synchronization facilities are provided in “Synchroniza-
tion” on page 94.
Timecode synchronization
Timecode is a way of specifying an absolute position
in a recording. It is expressed in hours, minutes, seconds, frames and bits. The number of frames in a second depends on the timecode type—these are related
to the audio-visual industry where timecode (sometimes known as “SMPTE” or “SMPTE/EBU” time-
code originated. There are five major “flavors” of
timecode supported by the 788:
Frames/
second (fps)
24 Movie
25 PAL/SECAM TV
29.97 drop NTSC color for broadcast
29.97 non-drop NTSC color TV
30 non-drop NTSC mono TV
Timecode type
The 788 converts internal timecode so that it can be
transmitted over MIDI (MIDI Time Code or MTC)
and this is the way in which the 788 transmits and
receives timecode.
TASCAM 788 Digital PortaStudio 15
Page 16
1 – Introductory concepts–MIDI external control (MMC, etc.)
When synchronizing acoustic recordings to MIDI
instruments using MTC, the 788 can act as a timecode master or a slave with respect to your MIDI system. Of course, your sequencer must be able to use
MTC in order to do this.
In other words, when the 788 acts as a timecode master, the sequencer determines its playback/record
position from timecode received from the 788.
Tempo map synchronization
As well as timecode, there is another way in which
the 788 can be synchronized to MIDI sequencers,
which depends on the position in bars (measures) and
beats of a song .
The 788 is provided with a “tempo map”, which
allows it to recognize that bar 1 starts at timecode
Sync track recording
In this method of synchronization, the 788 records a
MIDI timing clock data from the sequencer, and can
When the 788 acts as a timecode slave, the sequencer
sends out MTC to locate the 788 playback/record
position. Note that many computer sequencers are
not very accurate timecode masters, though—using
the 788 as a timecode slave is probably best if you
are going to use a stable MTC source, such as
another 788.
time 00:00:00.00, and bar 2 starts 2 seconds later (for
example).
To use this method of synchronization, it is first necessary to set up this tempo map, so that musical positions can be mapped to timecode times.
later use this information for synchronization and
song positioning.
MIDI external control (MMC, etc.)
As well as synchronization, the transport controls of
a sequencer can be used to control transport, etc.
functions on the 788.
Or, if you want to work the other way, MIDI commands sent from the 788 can be used to control the
sequencer.
These commands are known as MIDI Machine Control commands (MMC). Any machine capable of
transmitting or responding to MMC may be provided
with a unique ID, from 0 to 127.
Note that it is possible for a machine such as the 788
to be a timecode slave at the same time that it is a
MMC master (i.e. MTC timing information is
obtained from an external source, but the transport
controls of the 788 are used to control other devices,
including possibly the timecode source) or vice
versa.
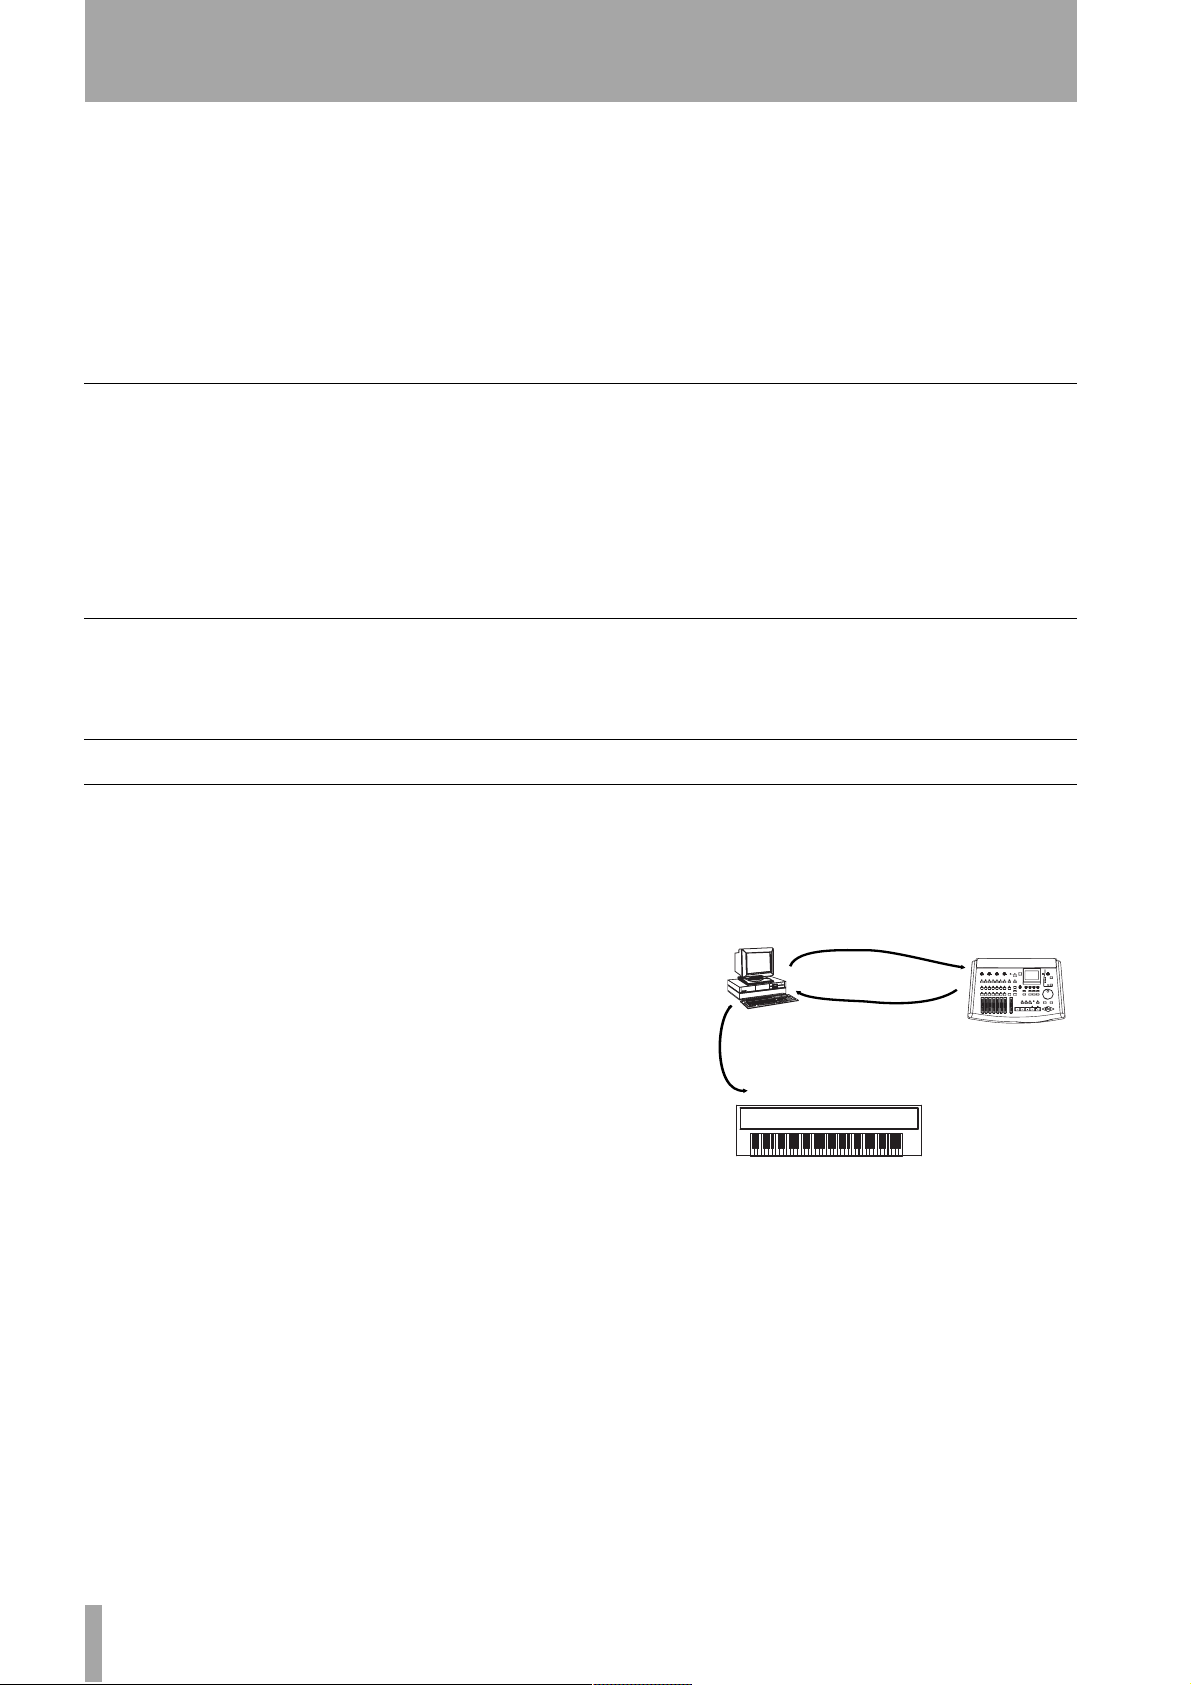
In the illustration below, the MIDI interface of the
computer is fitted with two outputs, one of which
provides the slaved 788 with the MMC transport
commands, and the other driving the synthesizer
bank, etc. The sequencer takes its timing from the
MTC output by the 788.
Carries MMC commands
to control 788 transport,
etc.
MIDI OUT (2)
MIDI IN
MIDI OUT (1)
MIDI IN
Carries MIDI
musical data to
synths, etc.
Carries MTC to
synchronize
sequencer
MIDI IN
MIDI OUT
When starting synchronized playback, the sequence
of events is therefore that the sequencer first sends an
MMC Play command to the 788, which then locates
to that position and starts playback. Meanwhile, the
sequencer is waiting for MTC so that it can “lock in”
and start playback. When the 788 starts playing, this
MTC is received by the sequencer which then finally
starts playback to the synthesizer.
16 TASCAM 788 Digital PortaStudio
Page 17

MIDI remote control
1 – Introductory concepts–SCSI issues
In addition to the transport control described above,
the 788 is able to accept MIDI Program Change messages to change mixer scenes, and routing tables, etc.
as well as previously-set effector settings.
SCSI issues
SCSI (usually pronounced “scuzzy”) stands for
Small Computer Systems Interface, and is a way of
connecting computers and peripheral devices (e.g.
hard disks, removable disk drives, scanners, tape
drives, etc.).
SCSI connections
The 788 uses the SCSI-2 protocol, which is used by
most modern hard disk drives, and storage devices.
You can connect almost any SCSI storage device to
the 788, and use it for data storage.
Any CD-R or CD-RW drive that you use with the
788 must be a SCSI drive. Contact your TASCAM
It can also accept Control Change messages, which
allow a sequencer, for example, to control mixer
parameters as well as individual effector parameters,
so that remote control of the sound can be carried out
in real time for the final mix.
The 788 uses SCSI to communicate with its hard
disk, since SCSI is a reliable, efficient way of sending data between devices.
You can connect different types of SCSI device to the
788, for example external hard disks, magneto-optical disks or other types of removable media, as well
as SCSI-equipped CD-R and CD-RW drives.
dealer or consult the TASCAM Web site for details
of which drives are known to work well with the 788.
NOTE
You should never plug or unplug SCSI devices from the
chain with the power to any of them switched on. If you do,
there is a real risk that you will damage the devices beyond
repair.
SCSI IDs
SCSI devices are connected together in a “daisy-
chain” arrangement. The total length of the chain
should be less than 3 m (about 10 ft.).
Within each chain, each device must have its own
unique identifier, known as a “SCSI ID”.
There may be up to eight devices within a SCSI
chain, including the main SCSI controller (the 788 is
a SCSI controller). Numbering of devices typically
starts at 0 (zero) and goes up to 7.
SCSI termination
At each end of a SCSI chain, there must be a terminator. This may either be a separate plug, or may be
built into the SCSI device.
The internal disk in the 788 has SCSI ID 0, and the
788 itself has SCSI ID 7.
Make sure that every device in your SCSI chain,
including the controller (788) has a different ID. If
you create a SCSI chain with more than one device
using the same ID, you will find that you have problems with the setup.
Consult the documentation for your other devices to
find out how to set the ID (it may be a set of switches
or a rotary switch).
Consult the documentation for your other devices to
find out how to set the termination for them.
The 788 is always at the end of its SCSI chain, and is
always terminated.
TASCAM 788 Digital PortaStudio 17
Page 18

1 – Introductory concepts–Further reading
SCSI devices and backing up
The 788 contains a large, fast hard disk, which allows
the recording of many songs on the same disk.
However, if you keep all your material, eventually
this disk will fill up, and you must do some “house-
cleaning” to sweep away the unwanted material.
The 788 incorporates a very useful feature which
allows you to back up a song to CD-R or CD-RW
media. These discs can hold a lot of data. In the case
of a song being too big to fit on a single disc, the 788
will automatically create multi-disc archives on
which you can store your work. This, of course, is in
addition to you being able to use a CD-R/RW disc as
Further reading
This section does not pretend to be a comprehensive
listing or explanation of all these issues. If you have
the time and interest, reading about these subjects is a
very good way to add to your practical experience
with the 788.
If you have Internet access, the Web is an excellent
source of information. The following books are also
useful reference sources, if you wish to explore these
subjects in more depth.
Sound & Recording, 2nd edition 1994, Francis Rumsey & Tim McCormick, Focal Press, Oxford, is a
good general introduction to recording theory and
practice, starting from basic principles. However, the
section on hard disk recording is not very long.
For detailed information on digital audio, including
disk recording theory, The Art of Digital Audio, 2nd
the final mastering device (mixdown of the final mastered stereo tracks to CD-R/RW via SCSI).
In case you do not have a CD-R/RW drive, we suggest the use of an external SCSI device which uses
removable disks: the Iomega® zip® and jaz® drives
can hold large amounts of data, as can magneto-optical (MO) disk drives. The songs on the internal hard
disk can be copied to the external media for archival.
Note that you should not attempt to install an internal
disk drive (either hard disk or removable) in your
788. This is an operation that should be performed
only by authorized TASCAM service agents.
Edition 1994, John Watkinson, Focal Press, Oxford,
is invaluable, but is somewhat technical in places.
MIDI Systems and Control, 2nd Edition 1994, Francis Rumsey, Focal Press, Oxford, has an excellent
section on synchronization and machine control
(chapter 6).
There are also many resources regarding SCSI. It’s
not a subject that you usually need to know in enormous detail, but an Internet search for “SCSI primer”
will probably give you all the information you need.
If you are using your 788 with a sequencer, make
sure that you read and understand the relevant sections of the sequencer manual, as well as the 788
manual. This will probably avoid many problems
with regard to synchronization.
18 TASCAM 788 Digital PortaStudio
Page 19
2 – Getting started
This section explains some of the principles of using
your 788. It is not a “tutorial”—there are so many
different ways in which the 788 can be used that it
would probably not be useful for us to give you step-
Precautions, etc.
Treat the 788 with the same care and respect that you
would treat a notebook or laptop computer, and it
will last for a long time, and act as a useful creative
tool to help you in your music-making.
However, there are a few precautions you should take
with the 788:
•
always operate the 788 on a firm level surface. Do
not locate it where it can be knocked or shaken—
hard disks are more sensitive than tapes.
•
always take note of any special instructions regard-
ing the care and maintenance of removable media,
if you are using such media with the 788.
•
never eat or drink over the 788. Spilled liquid or
food crumbs will not improve its performance!
Also, smoke particles are the enemy of studio
equipment. If possible, we suggest that you make
your 788 work area a no-smoking area.
•
always allow the 788 to adjust to room temperature
if you are bringing it from a cold to a warm place.
This may take between 1 and 2 hours.
by-step instructions here covering every possibility.
Instead, we have provided you with general instructions that will work in most cases.
•
never connect or disconnect audio equipment with
the monitoring levels turned up. This can cause
damage to speakers (and ears!). Always turn down
levels before making or breaking such connections.
•
always shut down the 788 before turning it off (see
the following section).
•
never move the 788 while it is powered on. Take
special care never to move it while recording or
playback is taking place, in order to avoid any possible damage to the disk. Shut down and power off
the unit before moving it.
•
never make external SCSI connections with the
power to the 788 or the external SCSI device turned
on. Making SCSI connections with the power
turned on can cause damage to the units, including
the 788, which is expensive to repair! Shut down
the unit and turn it off before making or breaking
these connections.
Shutting down the 788
It may seem strange that the first thing we explain is
how to turn off the 788. This is important, though,
and you should get into the habit of always turning
off the 788 in this way, as this will avoid any possible
loss of data.
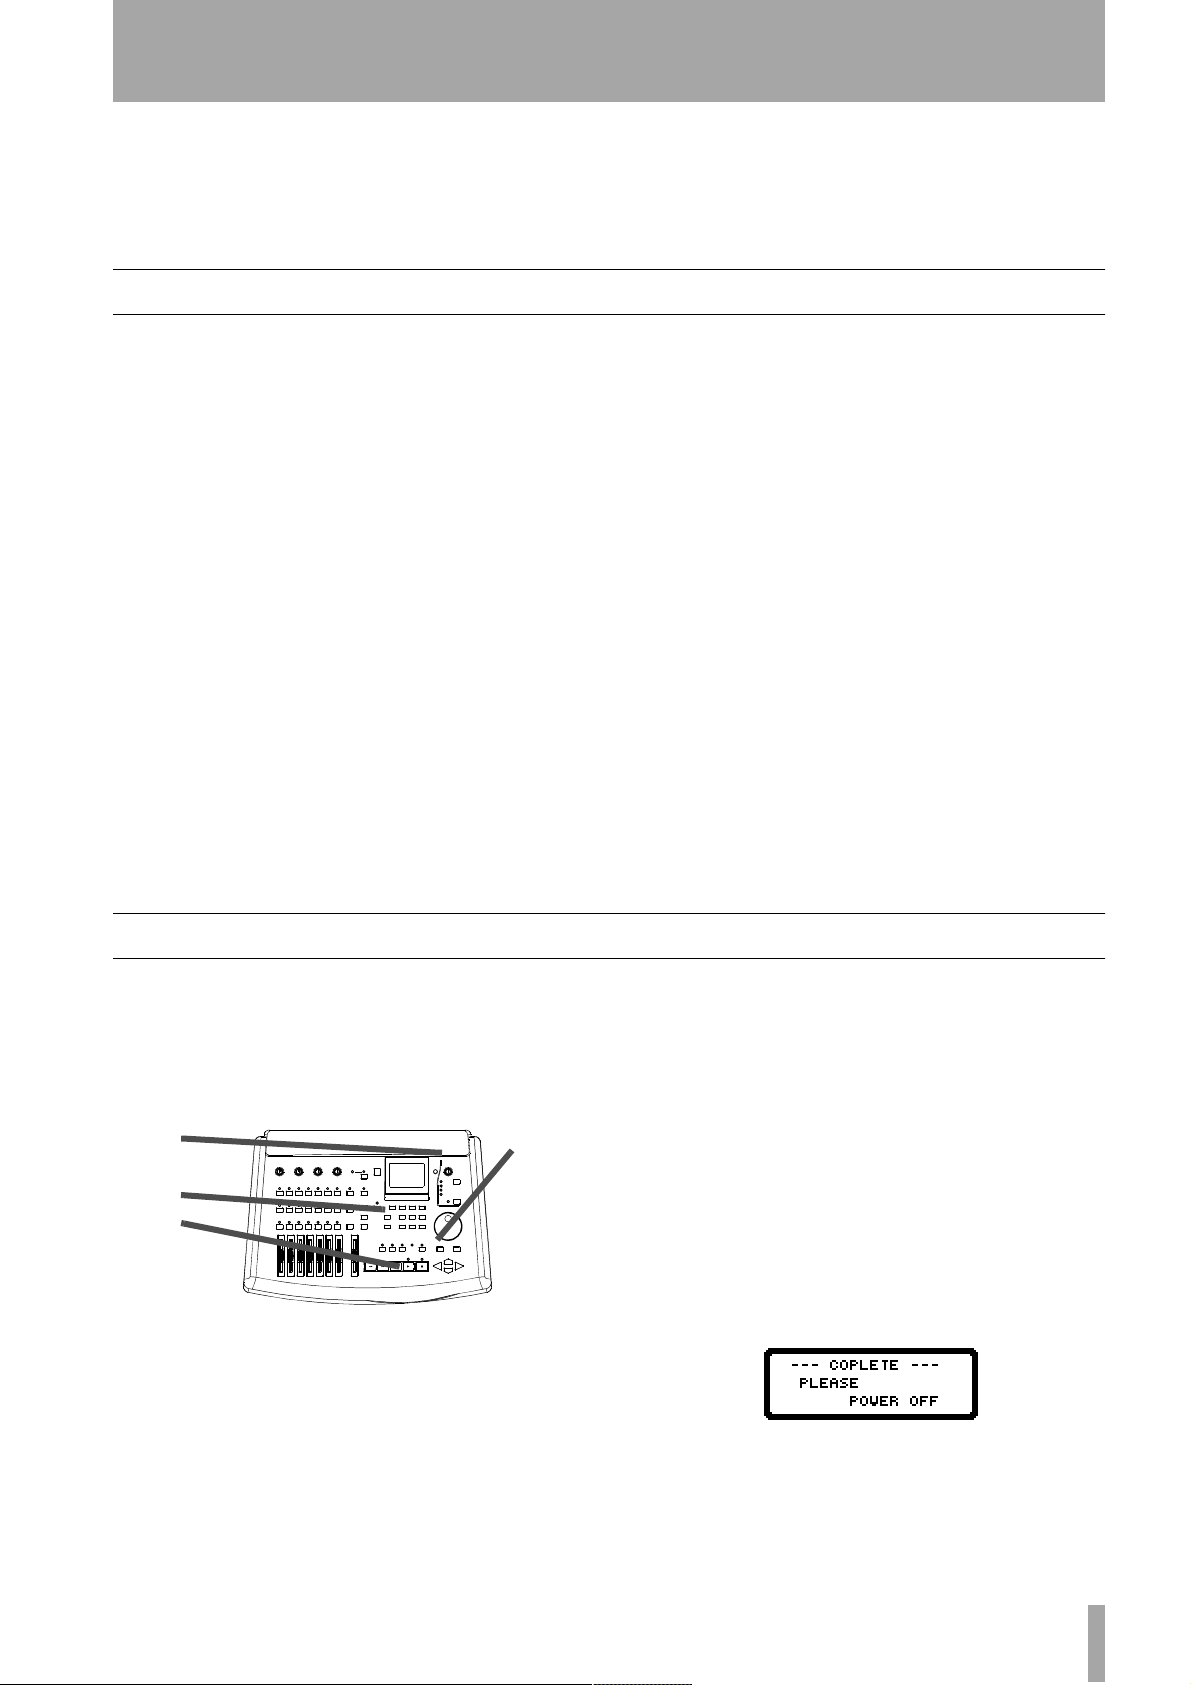
42
3
1
1 Stop playback or recording (you cannot shut
down the 788 while playback or recording is
taking place).
2 Turn down the level of the monitoring ampli-
fier (to avoid speaker “thumps”).
3 Press the
EJECT/SHUT key.
4 The indicator lights, and a message appears on
screen asking if you are sure. Press
to shut down the 788.
YES
ENTER/
5 As the 788 “tidies up” before closing down,
appropriate messages appear on screen. At the
end of the shutdown process, the message:
is shown and the indicator flashes. Turn off the
788 with the power switch on the rear panel.
TASCAM 788 Digital PortaStudio 19
Page 20
2 – Getting started–Power-on
Power-on
When the power is turned on, the display shows the
power-up screen. All the front panel indicators light
briefly.
The disks are then scanned, and the 788 performs
internal self checks.
You will probably be able to hear the sound of the
disks as the startup progresses. Depending on the
number of disks connected to the 788, this may take a
little time.
After the check is complete, the 788 loads the song
you were last working on.
NOTE
When you first purchase the 788, a demonstration song
(“Liquor Store”) is already recorded on it. See the “Brief
Guide” for details of how to load this song.
The song is recorded in 24-bit resolution and is protected.
If you want to edit this song, or change parts of it, you must
unprotect it, or make an unprotected copy of it first.
About the demonstration song
When the “home” screen (“The “home” display” on
page 26) is shown, you can start to use the 788.
NOTE
There may be some noise output through the monitoring
system while the 788 is turned on. For this reason, we
strongly suggest that you follow the power-on order
described previously (i.e. turn on the 788 before the monitoring system. If the monitoring system is already turned on
when you need to turn on the 788, make sure the monitoring system volume is turned down before you turn on the
788.
Remember that you must always turn off the 788 “prop-
erly”, that is, using the method described in “Shutting down
the 788” on page 19.
Do not simply press the power switch to turn off the 788—
there is a risk of possible loss of your recording if you do
this.
We suggest that you use this song “Liquor Store” to
experiment with some of the features of the 788.
However, before you start editing and experimenting
with the song, you may want to make a copy (if only
A few notes about this manual
When we refer to a control or a connector on the 788,
the name of the control, as printed on the front panel,
is written like this: the
controls are called “keys”). We refer to the cursor
keys as §, ¶, Ó and Á or sometimes as
DOWN, LEFT or RIGHT.
When we refer to a control or connector on another
unit, it is written like this: the sequencer’s MIDI
OUT connector.
On-screen messages are written like this:
Always take note of the notes and tips if things aren’t
working quite the way you might expect—they may
RECORD key (front panel
UP,
Go.
for comparison purposes), even though the 788
includes a sophisticated undo function. Use the song
copy function described in “Copying songs” on
page 29.
contain information that you need to make things
work properly.
Do take note of warnings and cautions—these contain information which advises you of possible damage to you and the equipment!
NOTE
Notes like this are useful additional information which
explain features and other matters, etc. that affect the
working of the 788.
TIP
may help you to get the best out of your 788.
Tips like this provide additional information to help you use
the 788 to its best advantage.
20 TASCAM 788 Digital PortaStudio
Page 21

2 – Getting started–A few notes about this manual
“Roadmap” to this manual
Each section of this manual deals with a different
topic:
1 “Introductory concepts” (page 8) This
section provides an introduction to some of the theory behind the 788.
Read this section to: familiarize yourself with the
ideas behind multitrack recording and disk recording.
2 “Getting started” (page 19) This section
provides you with basic information regarding the
first use of the 788, and the basic principles regarding
menu operations, etc.
Read this section to: become familiar with the basic
principles of operating the 788’s menu system, etc.
3 “Before recording” (page 34) This section
helps you get started before actually recording using
the 788.
Read this section to: understand how to assign inputs
to mixer channels, and to listen to your work.
4 “Mixer” (page 41) The digital mixer which is
part of the 788 allows you to control equalization,
level, pan, etc.
Read this section to: understand the mixer functions
of the 788.
8 “Mastering and backup (CD-R)” (page
72)
You can use a CD-R or CD-RW drive connected
to the 788 to create master stereo recordings on disc,
as well as backing up and restoring song data for
future use.
Read this section to: understand how to use recordable CDs with your 788.
9 “Effects” (page 81) The effectors in the 788
can be used for many different purposes: as multieffect processors, dynamics processors, and single
stereo effect processors. You can make your own settings for these effectors, and can store them on the
788 disk.
Read this section to: make the most of the effectors
built into the 788, and for reference to the parameters
you can set.
10 “Routing and scene libraries” (page
The 788 allows you to store mixer settings and
91)
routing settings into libraries.
Read this section to: learn how to store and recall
commonly-used scenes, etc.
11 “Synchronization” (page 94) You can
synchronize the 788 with other equipment, allowing
you to play along with MIDI instruments, etc.
5 “Recorder operations” (page 49) The
other major component of the 788 apart from the
mixer is the disk recorder, which allows you to
record, punch in and out, play back, perform repeat
playback, etc.
Read this section to: understand the recorder functions of the 788.
6 “Location operations” (page 60) The 788
allows you to set and move to location marks
throughout your song, for convenience.
Read this section to: find out how to use these location functions effectively.
7 “Track editing” (page 65) The 788 provides
you with a wide range of editing tools to help you in
your work.
Read this section to: find out how to select, copy,
move and paste sections of recorded material, as well
as other editing features.
Read this section to: learn how to synchronize the
788 with other equipment.
12 “MMC and MIDI functions” (page 101)
Various parameters of the 788 can be controlled by
MIDI messages. In addition, the 788 transport can be
controlled by MIDI Machine Control commands.
Read this section to: learn how to control the 788
using MIDI.
13 “Specifications, etc.” (page 119) As
well as the specifications of the 788, this section also
contains a lost of error messages.
Read this section to: understand what to do if an
error message appears, or for hard facts and figures
about the 788.
TASCAM 788 Digital PortaStudio 21
Page 22

2 – Getting started–Connecting other equipment to your 788
Connecting other equipment to your 788
For a typical recording session, you will need:
• the 788 itself
• some sound sources (instruments and/or micro-
phones)
• a stereo mastering recorder (cassette, DAT, MD).
Alternatively, you can use a CD-R or CD-RW drive
which will allow you to master the song, and also
to back up and restore your working material.
• an external effects unit (optional)
• a monitoring system (this is a grand name for a
good amplifier and a pair of good speakers which
you will use to listen to your recorded material—
this can be your stereo system)
• if you are using microphones in the same room as
the 788, you should use headphones (headphones
are also sometimes useful for general monitoring
purposes as well)
• cables to connect everything together, with the
appropriate connectors
• if you are using MIDI instruments, you will almost
certainly be using a sequencer (either as a standalone unit, as a computer program, or built into a
workstation instrument)
1 Find a stable level surface on which to put your
788 and place the 788 on it.
2 Make sure that all equipment is switched off.
3 Connect the
a pair of inputs of the monitoring system.
4 Connect the
the inputs of the mastering recorder (if it is an
analog-connected recorder). Connect the out-
MONITOR OUTPUTs of the 788 to
STEREO OUTPUTs of the 788 to
puts of the mastering recorder to another pair
of inputs on the monitoring system (if they are
available).
Alternatively, if you are using a DAT, CD
recorder or MD recorder with a digital (coaxial) audio input, connect the 788’s
OUTPUT
device. Set the input selector of the recording
device appropriately.
As yet another alternative, you can make a
SCSI connection (see “SCSI issues” on
page 17) to a suitable CD-R or CD-RW drive.
Even though no audio connection is made, the
drive will be able to accept audio data through
the SCSI cable, and to transfer it back to the
788 for replay.
5 If you are using an external effects unit, con-
nect the
of the effects unit, and the outputs of the effects
unit to the
6 Connect the MIDI OUT of the sequencer to the
MIDI IN of the 788 and the MIDI IN of the
sequencer to the MIDI OUT of the 788.
7 Connect the audio outputs of your instruments
to the inputs of the 788.
8 Connect the PS-P788 AC adaptor supplied
with your 788 to the 788.
9 Turn on the power, starting with the instru-
ments, and finishing with the monitoring
system.
to the COAXIAL IN of the recording
AUX OUTPUTs of the 788 to the inputs
AUX INPUTs of the 788.
DIGITAL
Additional connection notes
• Make sure that you have enough space to plug and
unplug cables, etc. and that you can reach the controls, read the display, etc. comfortably.
• If you are using a home stereo amplifier, do not
connect the 788 to any PHONO inputs on the
amplifier. These are the wrong kind of inputs for
this kind of equipment. Use inputs labeled AUX,
CD, VIDEO, etc.
• Always use the TASCAM PS-P788 AC adaptor
designed for use with the 788, making sure that the
input voltage marked on the adaptor matches the
power supply in your area. Never use any other
adaptor with the 788. If you are unsure, consult an
22 TASCAM 788 Digital PortaStudio
electrician. If you move to an area with a different
voltage, contact your TASCAM distributor regarding the supply of a new adaptor.
• When switching on equipment, a general rule is to
work from the signal source through to the final
end result. In this case, assuming a synthesizer is
plugged into the 788, the switch-on order would
be:
Synthesizer → 788 → Mastering recorder → Monitor amplifier
Switch off in the reverse order (end result through
to signal source).
Page 23
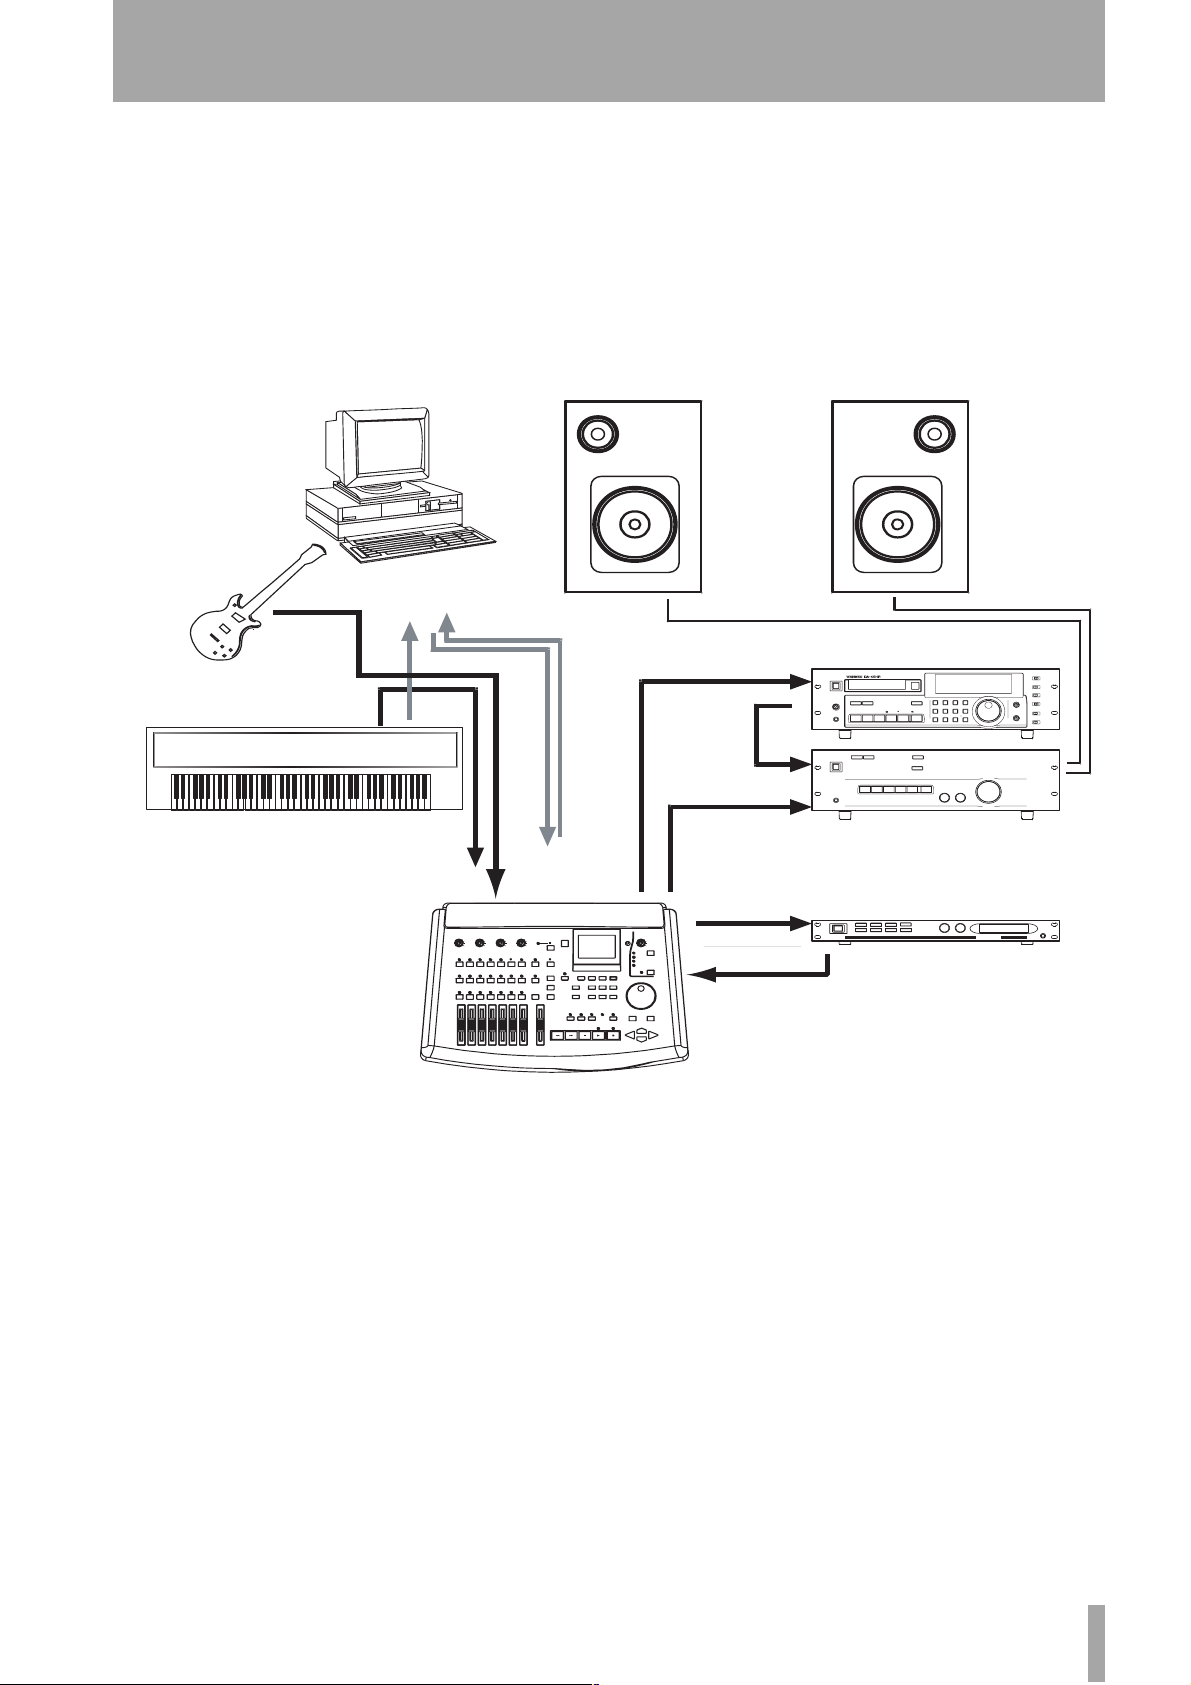
2 – Getting started–Connecting other equipment to your 788
• If your external effects unit can only accept a mono
input, connect the
L AUX OUTPUT of the 788 to
the input.
• The MIDI connections described here do not have
to be direct connections—your sequencer will need
to accept data from the instrument chain and to
pass data to them. However, you should make sure
that MTC (MIDI Timecode) can be sent from the
788 to the sequencer, and MIDI Machine Control
MIDI
AUDIO
OUTs
commands can be received by the 788 from the
sequencer, even if this means routing the MIDI signals through some MIDI THRU ports.
• If you are connecting an electric guitar (or bass
guitar) directly into the 788, use
the switch to
GUITAR—this allows the matching of
INPUT D and set
the input impedance to the high impedance of an
electric guitar.
REC IN
PLAY
OUT
INPUTs A thru C
INPUT D
STEREO
OUTPUT
TAPE IN
MONITOR
OUTPUT
AUX OUTPUT
AUX INPUTS
TASCAM 788 Digital PortaStudio 23
Page 24
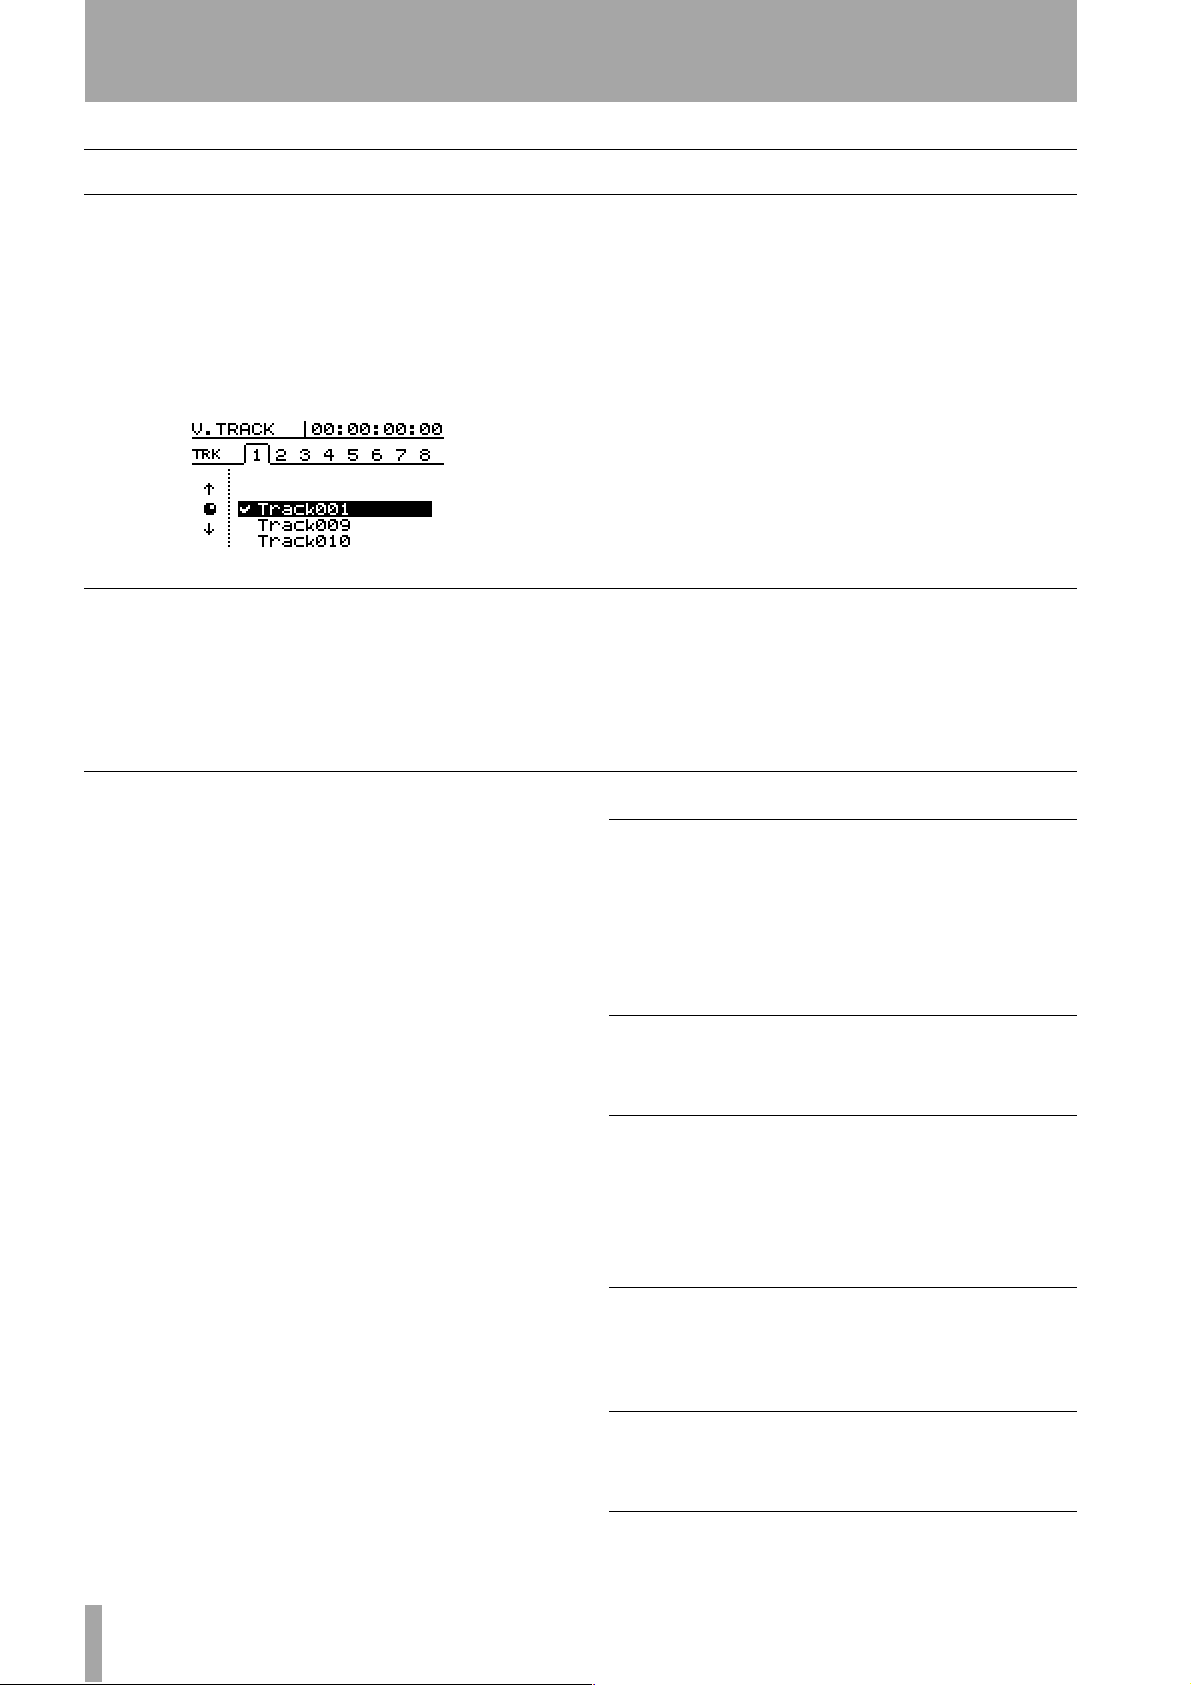
2 – Getting started–About the menus
About the menus
The 788 uses a menu interface to display and select
operations that you cannot carry out using the front
panel keys.
The
JOG/DATA dial is often used to scroll through a
list. When the dial can be used, the screen will usually show a small icon representing the dial (as
shown at on the left of the screen).
Selecting multiple entries
Sometimes multiple entries can be selected from a
list (for instance, when copying songs). In this case,
the selected entries in the list are shown by a check
mark (✔) beside the list entry.
The MENU key
Generally, the transport must be stopped (not playing
back or recording) when using the menus.
When scrolling through a list, when the option you
want is highlighted, you should select the option by
pressing the
The
EXIT/NO key allows you to move up a level
ENTER/YES key.
without selecting an option.
To set a check mark by a list entry, press the INSERT/
MOVE
key.
To clear a check mark from a list entry, press the
DELETE/SILENCE key.
The MENU key allows you to make settings with the
“system” menus.
These menus provide access to system-level settings
that you will probably not use very often (for
instance, you will only create a song once in the lifetime of a song).
SONG
(see “The SONG menu” on
page 28
DISK
(see “DISK menu” on page 31)
CD-R
(see the section “Mastering
and backup (CD-R)” on
page 72)
SYNC/MIDI
(see the section “Synchroniza-
tion” on page 94)
OPTION
“The OPTION menu” on
page 33)
menus
menus
menus
menus
menus (see
CREATE
SAVE
REVERT
LOAD
ERASE
COPY
DELETE UNUSED
PROTECT
SELECT
EJECT
FORMAT
CHECK
PRE MASTERING
CHECK MASTER
CD WRITER
CD FINALIZE
CD PLAYER
DATA BACKUP
DATA RESTORE
SYNC
SYNC TRACK
TEMPO MAP
METRONOME
CONTROL
GLOBAL
MIXER
RECORDER
USER WORD
24 TASCAM 788 Digital PortaStudio
Page 25
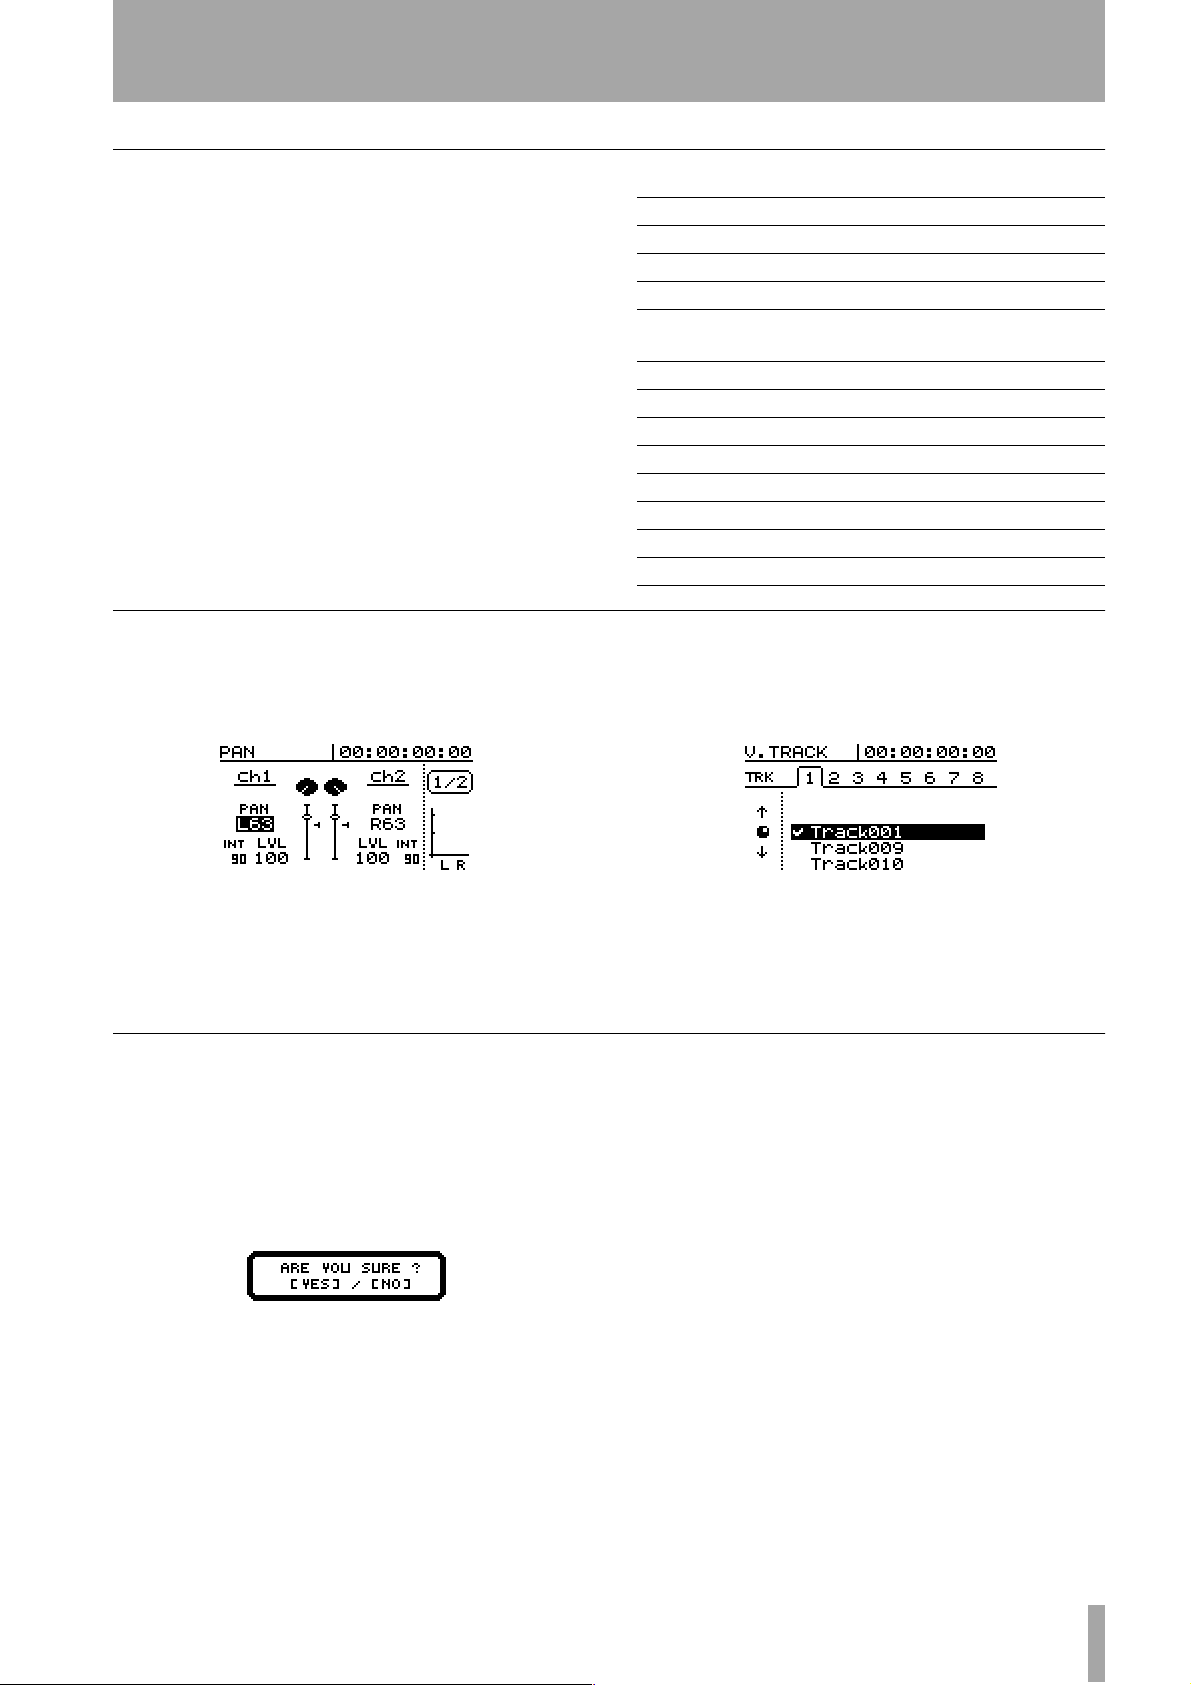
Other control screens
2 – Getting started–About the menus
There are a number of dedicated menus and screens
available, which are accessed with the following
keys. These are all described in the appropriate sections of this manual:
Selecting parameters
If there are many parameters on a screen, use the cursor keys to highlight the parameter you want to
change before setting the value with the dial.
EQ
SEND
FADER/PAN
TRACK CUE
QUICK
SETUP
EFFECT 1
EFFECT 2
LOCATE
TRACK EDIT
UNDO/REDO
STEREO
SUB MIX
TRACK
Channel equalization
Channel Aux and Effect send
Channel fader and pan settings
Off-disk level and pan positioning for cue mix
Preset routing options, scene read and write,
routing assignment read and write
Effect selection and parameters
Effect selection and parameters
Location recall, naming and time viewing
“Copy and paste”, etc. of recorded material
Menu to undo or redo editing operations
Stereo section settings
Sub-mixer settings
Virtual track assignment
Sometimes there are “tabs” at the top of the screen.
Use the Ó and Á cursor keys to select the tab where
you will be making the change.
Here, the two PAN values can be highlighted, and
changed with the dial. In the example above, the pan
value of channel 1 is highlighted for editing.
Setting values
When a value is to be changed, use the JOG/DATA
dial to change the value.
The
ENTER key is often used as a “yes” key to
answer questions like
which may sometimes be shown on screen (for
example, the screen below).
Are you sure?
Here, the left and right keys are used to select the tab
from 1 through 8 at the top of the screen (tab 1 is
selected in this screen).
The virtual tracks are then selected with the dial.
If you change your mind about carrying out an operation, use the
The
EXIT key can also be used as a “no” key to
EXIT key.
answer on-screen questions.
TASCAM 788 Digital PortaStudio 25
Page 26

2 – Getting started–The “home” display
The “home” display
There is one special display which is always available with the touch of one key—the HOME/ESC key.
This “home” display provides the following
information:
The time display
When the home display is shown, moving the cursor
to the left field on the top line of the display allows
you to use the dial to change the time mode shown in
the top line of the home (and other screens) between
the following options:
• Absolute time
• A large display of the time counter (see below)
• Track/monitor meters and the recording source
• The title of the currently active location mark
• A space for messages
• The record ready status of the tracks (in this exam-
ple tracks 3 and 4 are ready for recording)
• MIDI Timecode
• Bars and beats and the current tempo (when work-
ing with a tempo map)
Entering and editing titles
The 788 allows you to use titles up to 12 characters in
length that you choose to identify songs, virtual
tracks, location marks, library settings, etc. (the titles
of location marks can be up to 10 characters long).
5
1
3
2
4
It is probably much easier for you to remember a virtual track title such as
V.TRACK 97, or a real song title rather than
SONG 12 (of course, if you prefer to use titles
Good solo than
V. TRACK 97, or Mark 006 to
like
Bass hook, you’re always free to leave things
that way!).
You can set and edit a title for the following items in
almost every screen where you select or store them:
• Location marks (except the IN, OUT and TO
points, which are a special case)
• Songs
• Virtual tracks
• Mixer scenes
• Mixer routing tables
• Effect settings
The way in which you enter titles, and edit existing
titles is as follows:
26 TASCAM 788 Digital PortaStudio
Page 27
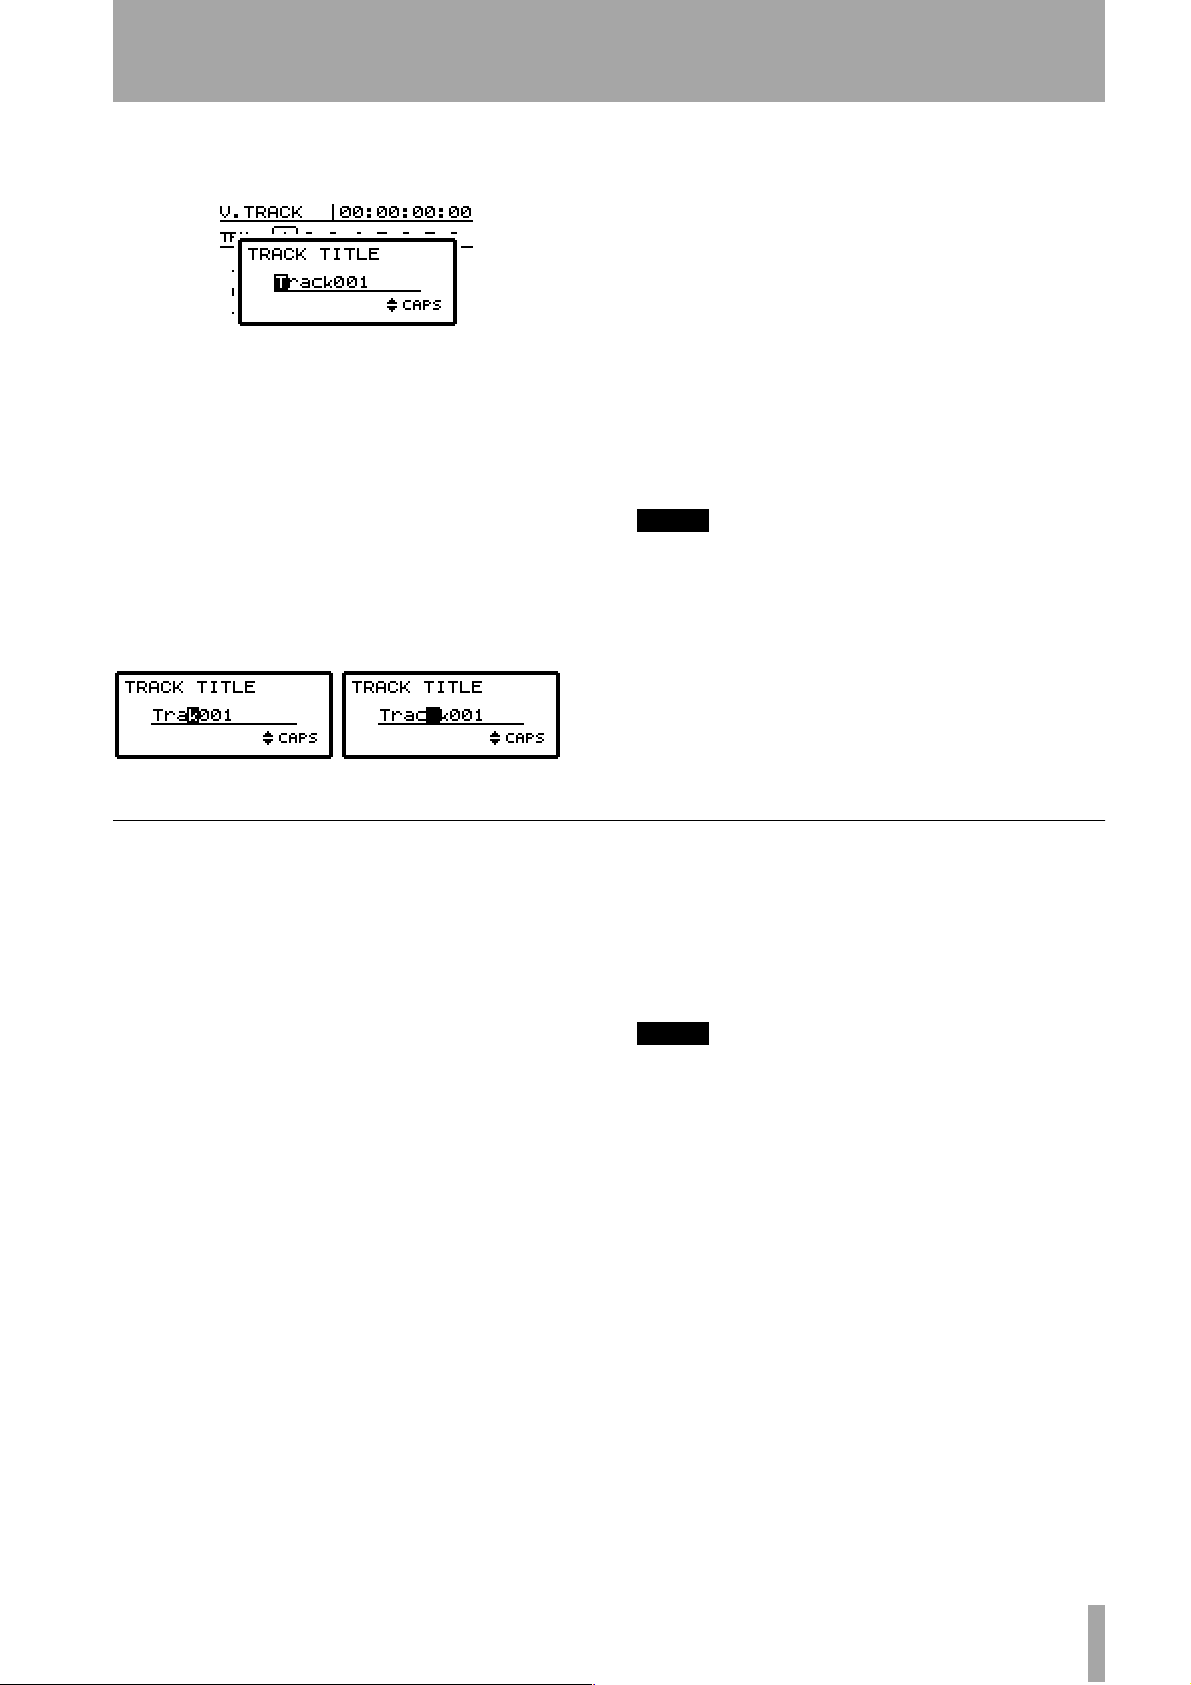
2 – Getting started–Entering and editing titles
1 From any of the screens listed above, press the
SHIFT + MENU (TITLE) key:
The screen above shows the titling of a virtual
track.
2 Use the
LEFT and RIGHT cursor keys to move
the cursor (the reversed character).
3 Use the dial to change the cursor character.
4 Press
ENTER when you have finished editing a
title (EXIT to leave the title unchanged).
Use the
cursor—(i) below, and the
DELETE key to delete the character at the
INSERT key to insert a
space at the cursor—(ii) below.
Use the
§ and ¶ keys to change between the follow-
ing character modes as shown at the bottom right of
the title area:
CAPITAL (uppercase) letters (A through Z). This
mode is shown on the screen by
CAPS
small (lowercase) letters (a through z). This mode
is shown on the screen by
small
Numbers (0 through 9). This mode is shown on
the screen by
NUM
Preset words and phrases. This mode is
shown on the screen by
NOTE
In the first three of these modes, common punctuation
characters are also available.
In the preset word mode, words such as
VERSE, INTRO, CHORUS
sult the section below for a full list of these words, and
details of how to edit them to suit the way in which you
work.
WORD
COUNT IN
are available. Con-
,
(i) (ii)
Setting and editing preset words
The 788 provides a number of useful preset words,
but you may want to add your own (up to a total of
100) preset words and phrases of up to 12 characters
in length to include your own names and titles.
1 Press the
2 Use the dial to scroll down to
press ENTER.
3 Use the dial to scroll down to
and press
4 Use the dial to scroll down to the place where
you want to enter your own word (this can be
an existing word) and press
(TITLE).
MENU key.
OPTION, and
USER WORD,
ENTER.
SHIFT+MENU
5 Enter your word or phrase in the way
described above (“Entering and editing titles”
on page 26).
6 Press
ENTER when you’re finished, and you
can then select another word to enter.
TIP
Use this to enter musical section names (some are provided, but if you’re recording classical pieces, phrases like
Allegro
You can also add the names of special instruments that
you record a lot (for some people, the user word
Bagpipes
You might even want to add the names of the musicians
you record a lot so you can use these names to make titles
like
Joe solo
might be useful).
might be more useful than
.
Bass
).
TASCAM 788 Digital PortaStudio 27
Page 28
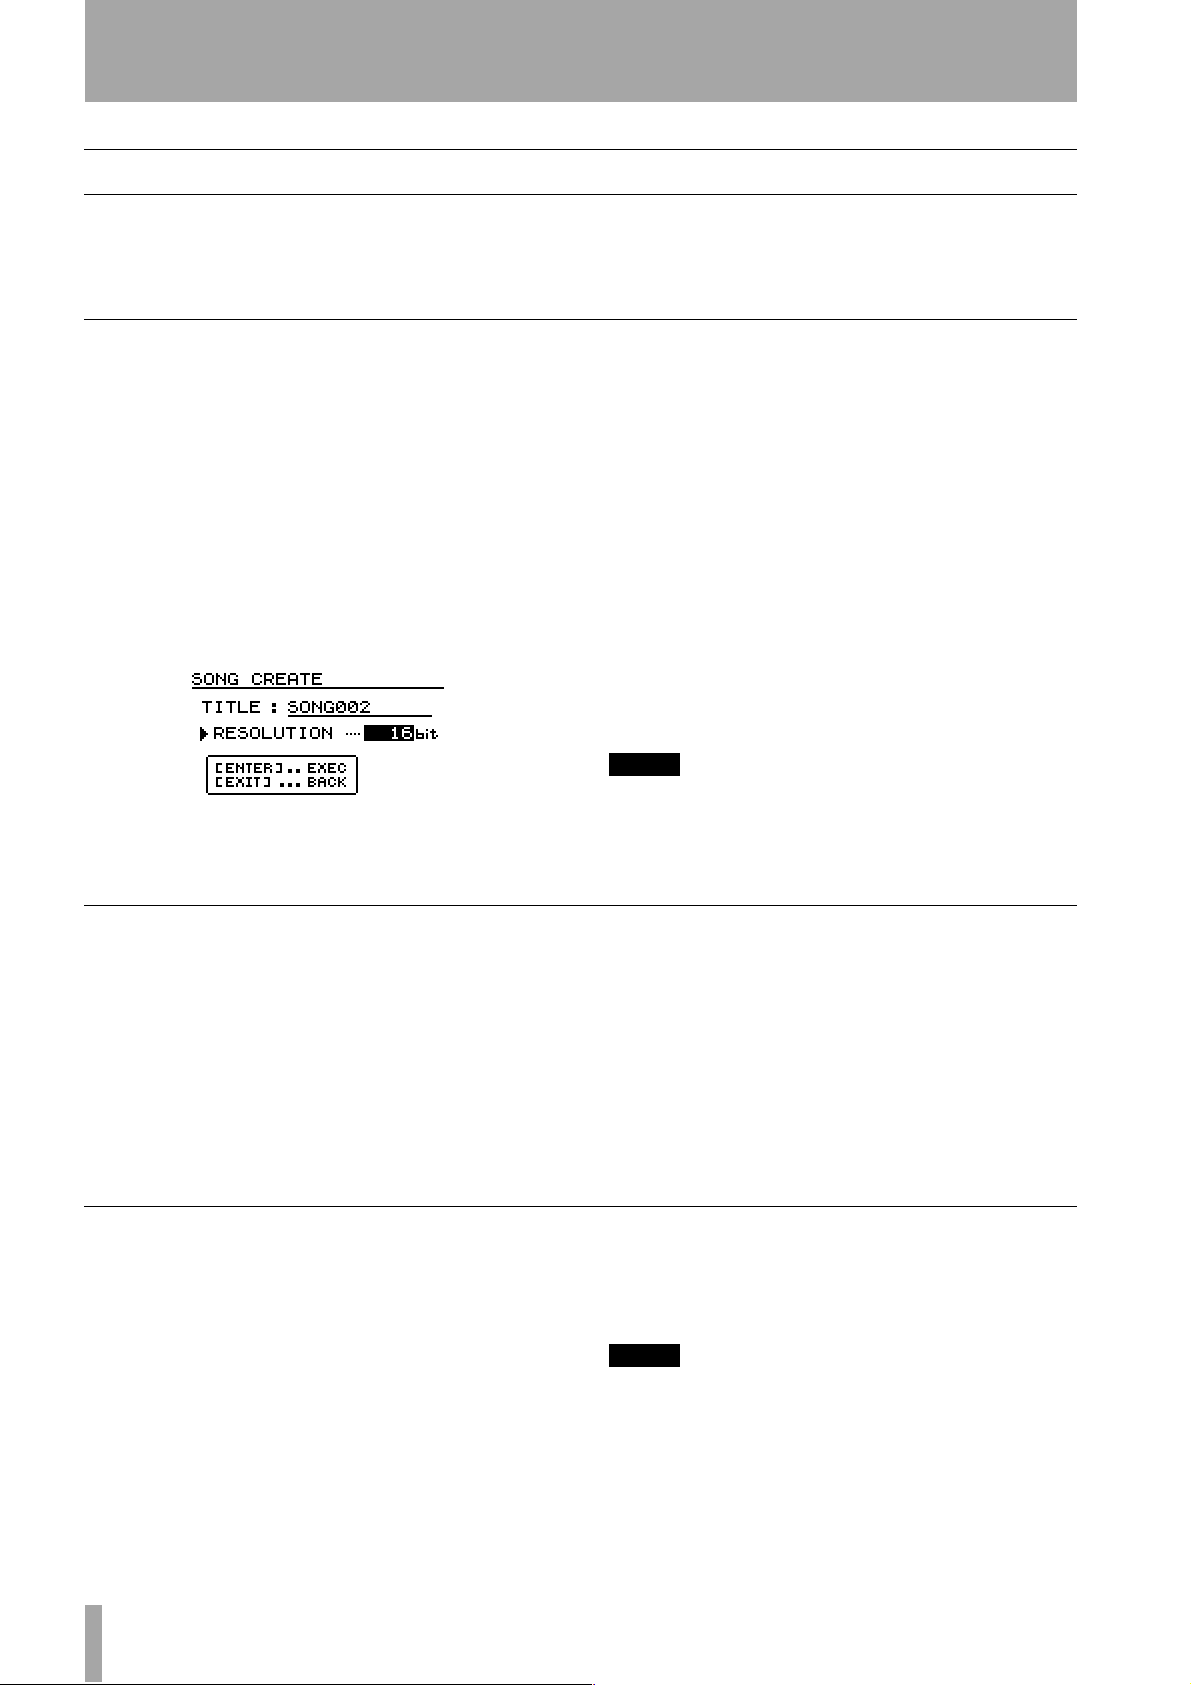
2 – Getting started–The SONG menu
The SONG menu
The SONG menu, as the name suggests, is concerned with the management of songs on the 788.
Creating a new song
Before you start recording, you must create a song on
the disk. This means that any audio data you record
on the 788 will be associated with that song until you
select a new song. Any currently-loaded song will be
saved when the new song is created.
1 Press the
2 Use the dial to scroll down until
highlighted, and press
3 Move the cursor to
ENTER:
MENU key.
SONG is
ENTER:
CREATE and press
You can load, save, copy and protect songs, as well as
deleting the data which is currently on disk but
unused in the song.
4 Press the
SHIFT + TITLE (MENU) key to enter a
title for the new song (as described in “Enter-
ing and editing titles” on page 26).
5 Use the dial to select between 16-bit and 24-bit
resolution. As you might expect, 24-bit songs
take up more space on disk than 16-bit songs of
the same length, but the audio quality is higher
(there is more subtlety in the dynamic range).
6 Press
ENTER/YES to close the current song,
and create the new song.
If you entered the song creation process by
accident, or you change your mind about creating a new song, press the
TIP
If you need to name or rename a song later on, you can
reload the song, and press the
key to enter a title for the song when the 788 is displaying
the title.
EXIT/NO key.
SHIFT
+
MENU (TITLE
)
Saving a song
Typically, there is no need to perform a special operation to save songs on the 788, as the 788 automatically saves the song. The function described here is
provided as a manual method of saving the song, to
which you can return (“Reverting to the previous
saved version of a song” on page 28):
1 Press the MENU key.
2 If SONG is not highlighted, turn the dial until
it is, and press
3 Turn the dial until
press
As the song is saved, appropriate messages are
displayed. The current song will be reloaded
after it has been saved, and you can resume
work on it.
Reverting to the previous saved version of a song
If you have saved a song, or the song has been automatically saved by the 788 (e.g. when it was last shut
down), and you want to return to the version of the
song at the time it was last saved:
1 Press the
SONG is not highlighted, turn the dial until
2 If
it is, and press
3 Turn the dial until
and press
MENU key.
ENTER.
REVERT is highlighted
ENTER.
4 The 788 asks if you are sure. Press
want to throw away all changes since the last
save operation, otherwise press
NOTE
You will lose all recordings and edits made since the last
save, and they will disappear from the undo list (“Undoing
and redoing actions” on page 70). This revert operation is
not undoable. Be sure that the work you have done since
the last save operation is really work that you do not want
to keep before reverting to a previous version.
ENTER.
SAVE is highlighted and
ENTER.
YES if you
NO.
28 TASCAM 788 Digital PortaStudio
Page 29

Loading a song
2 – Getting started–The SONG menu
To load a previously-saved song from disk (the current song will be written to disk automatically when
the song is loaded):
1 Press the
SONG is not highlighted, turn the dial until
2 If
it is, and press
3 Turn the dial until
press
MENU key.
ENTER.
LOAD is highlighted and
ENTER.
Erasing a song
To free up space on a disk partition, and delete a song
or songs, you should perform the following operations:
1 Press the
2 If
SONG is not highlighted, turn the dial until
it is, and press
3 Turn the dial until
press
4 Select the song or songs to be erased using the
dial to highlight the songs and the
MOVE key to place a check mark (✔)beside
them.
If you select a song for erasure by acident, use
the
MENU key.
ENTER.
ERASE is highlighted and
ENTER.
INSERT/
DELETE/SILENCE key to deselect it.
4 Select the song to be loaded (from the currently
selected disk).
The current song is saved, and the selected
song is loaded from disk.
NOTE
This menu reads the songs stored on the currentlyselected disk or partition. If you are loading a song from
another disk or partition, you must select it first (“Selecting
a disk” on page 32).
5 Press
6 The 788 asks you if you are sure. Press
YES to erase the selected song(s).
YES if
you really are sure that you want to erase these
songs.
NOTE
This operation cannot be undone. Erasing songs is a permanent operation. Always think carefully before you erase
a song or songs.
This menu can erase only the songs stored on the currently-selected disk or partition. If you want to erase a song
or songs from another disk or partition, you must select it
first (“Selecting a disk” on page 32).
If you have selected all the songs on a disk or partition for
erasure, a new song will automatically be created (at 16-bit
resolution) after all the existing songs have been erased.
Copying songs
As well as copying songs, so that you can work on
another version of them, you can also use this menu
item as a tool to back up songs to removable media
(you can also back up to CD-R, but this is a separate
process and is described in “Mastering and backup
(CD-R)” on page 72).
1 Press the
2 Use the dial to scroll down until
highlighted, and press
3 Turn the dial until
press
4 Select the song or songs to be copied using the
dial to highlight the songs and the
MOVE key to place a check mark (✔) beside
them.
If you select a song for copying by accident, use
the
MENU key.
SONG is
ENTER.
COPY is highlighted, and
ENTER.
INSERT/
DELETE/SILENCE key to deselect it.
5 When all the songs to be copied have been
marked, press the
ENTER key. A list of all the
currently-available drives and partitions is
shown.
6 Use the dial to select the drive or partition to
which the selection will be copied and press
ENTER.
7 The 788 asks you if you are sure that you want
to make the copy. Press
YES to continue with
the operation, and NO to cancel.
NOTE
Copying a song may take some time. Be patient while the
song is being copied, and take care not to power down the
788 in the middle of a copy operation.
If you copy a song to the disk or partition where it was originally stored, it will be copied with the same title as originally, so the list will contain two songs with the same title. If
you want two copies of the same song on one disk or parti-
TASCAM 788 Digital PortaStudio 29
Page 30
2 – Getting started–The SONG menu
tion, you should rename one of the copies immediately
after the copy operation has been carried out.
When you make the selection for copying, only those songs
in the currently-selected disk or partition are listed. If you
Deleting unused space from a song
As we explained earlier, a song does not consist of
just the recorded audio, but also of the “playlist” and
the recorded but unused parts of the song.
By “unused”, we mean parts of a song which have
been completely overwritten by other parts. If the
start or end or both of a new part extends beyond the
start or end of a new part, it will not be deleted in this
operation.
New guitar solo over the old
Old guitar solo (will be deleted)
New guitar solo over the old
Old guitar solo (will not be deleted)
New guitar solo over the old
Old guitar solo (will not be deleted)
need to back up from many different disks or partitions, you
must select each partition in turn (“Selecting a disk” on
page 32) and then select the songs on the selected disk or
partition.
To free up this disk space, once you’ve made all your
edit decisions (there’s no undo on this):
1 Press the
2 Use the dial to scroll down until
highlighted, and press
3 Turn the dial until
highlighted, and press
MENU key.
SONG is
ENTER.
DELETE UNUSED is
ENTER.
4 The 788 asks you if you are sure. If you want to
delete all the unused portions of the song, press
YES. If you have second thoughts, press NO.
TIP
Although there is no undo operation here, and you lose all
the unused parts of the song permanently, you can back up
the song, to removable SCSI media, or to CD-R , before
performing this “cleanup” operation. If you change your
mind later on, you can restore this backed up version.
A virtual track which is not currently assigned as an
active track does not count as “unused” here.
Protecting a song
When a song is protected, recording is not possible
(the REC READY keys are disabled), it cannot be
edited using the track editing functions (“Track editing” on page 65), and it cannot be erased, etc. using
the SONG menu.
It is also impossible to set or edit location marks
(“Location operations” on page 60) except the IN
and OUT points for repeat operations, or to permanently reassign virtual tracks as in “Assigning virtual
tracks” on page 54. Virtual tracks can be assigned for
audition purposes, but not permanently saved.
In operations which show a list of available songs
(for instance, loading a song), any protected songs
have a small padlock icon beside the song title.
NOTE
Remember that you cannot undo this operation.
Only the currently-loaded song can be protected or
unprotected at any one time (though, of course, songs
stored on the disk can be stored as protected or
unprotected).
1 Press the
2 Use the dial to scroll down until
MENU key.
SONG is
highlighted, and press ENTER.
3 Turn the dial until
and press
ENTER.
4 Use the dial to set the protection
and press
NOTE
You can retitle the song at this stage, before it is protected,
by pressing the
ENTER to confirm the setting.
SHIFT
PROTECT is highlighted,
ON or OFF,
+
MENU (TITLE
) key.
30 TASCAM 788 Digital PortaStudio
Page 31

DISK menu
2 – Getting started–DISK menu
These functions all deal with the use of disks (internal and external) with the 788. Note that a CD-R or
CD-RW drive is not counted as a disk in this case
(even though it is connected via SCSI in the same
Formatting a disk
Before you start working with a new disk on the 788
for the first time, you must prepare the disk for use.
This is called initializing or “formatting” the disk
(the same as on a computer), and it will provide a
“clean slate” to start recording. You usually only
need to do this once, when you first use a disk.
NOTE
You d o
not
need to do this with the internal disk supplied
with the 788. This disk has already been formatted.
Formatting will erase any data already on the disk. The
operation cannot be undone. Only format a disk if you are
really sure that you have no information on it that you want
to keep.
The format used on the 788 is not compatible with the format used by personal computers. You cannot read a computer-formatted disk on the 788, or the other way round.
To format a disk connected to the 788:
1 Press the
2 Turn the
highlighted, and press
3 Turn the
is highlighted, and press
MENU key.
DATA dial until the DISK option is
ENTER.
DATA dial until the FORMAT option
ENTER.
way), but it has its own menu, as described in a separate section of this manual (“Mastering and backup
(CD-R)” on page 72.
list and press
ENTER when the disk you want
to format is highlighted.
5 Set up the parameters for formatting the disk.
A disk can be split into a number of different
partitions. The maximum partition size is
4096 MB (4 gigabytes) and the minimum size is
512 MB. Use the dial to select between
2048, 1024 and 512 MB.
4096,
If the disk size is not an exact multiple of these
values, the unused space at the end will be
turned into the largest possible partition ,
using all the space available.
NOTE
If you choose the smallest partition size (512 MB), you will
not be able to perform the backup operation to CD-R (see
“Backup using CD-R” on page 79).
TIP
As a very rough guide, remember that a 16-bit stereo (i.e.
2-track) 74-minute CD is equivalent to 650 MB. As
explained elsewhere, it is difficult to say exactly how much
space a song will use on disk—this depends on factors
such as the number of virtual tracks, etc.
The 788 scans through all the SCSI disks connected to the 788, and displays a list.
4 If you have more than one disk connected to
the 788, use the
DATA dial to scroll through the
6 Using YES with the Quick Format
option will work in most cases. There may be a
few occasions (a very heavily damaged disk, for
example), when you set this option to
NO.
7 Ask yourself once again whether you really
want to format this disk. Remember that the
operation will lose all data on the disk.
8 Press
ENTER.
9 The 788 asks you once more if you are sure.
Pressing
YES formats the disk, NO leaves it
untouched.
TASCAM 788 Digital PortaStudio 31
Page 32

2 – Getting started–DISK menu
NOTE
You cannot undo a disk format.
You only need to format a disk for the 788 under the follow-
ing circumstances: you are using a new removable disk
(zip®, jaz®, etc.), or have connected a new external hard
disk. The other time when you may want to format a disk is
when a disk has become full and you want to re-use it.
Selecting a disk
This selects the disk on which you will create new
songs and on which you will work. Only formatted
disks and partitions (see “Formatting a disk” on
page 31 above) can be selected as the active disk, and
only one at a time can be selected as the active disk.
1 Press the
MENU key.
Ejecting a disk
This only applies to removable media (MO, zip and
jaz drives, etc.). Of course, you cannot eject a hard
disk. Since the SCSI standard allows the disk to identify itself as ejectable or not to the controlling device
(in this case, the 788), you’ll never see a disk in this
list that cannot be ejected.
1 Press the
2 Turn the dial until
press
MENU key.
DISK is highlighted and
ENTER.
However, it is probably safer to delete songs one by one,
rather than formatting the whole disk.
Disks in the list are identified by their SCSI ID numbers
(from 0 through 6; ID 7 is reserved for the788’s internal
controller). If the disks are divided into partitions, the partitions are listed as
2 Turn the dial until
press
ENTER.
SELECT is not highlighted, turn the dial
3 If
until it is, and press
Part1, Part2
DISK is highlighted and
ENTER.
, etc.
4 Turn the dial to select the disk or partition
from the list, and press
3 Turn the dial until
and press
ENTER.
ENTER.
EJECT is highlighted,
4 Select the disk to be ejected (if you have more
than one removable media drive connected you
can only select one at a time), by pressing
ENTER.
NOTE
While the 788 is connected to removable media drives and
using the media, the eject button on the drive is locked.
This software function is the way to eject such disks.
Checking disks
You use this operation to re-scan the drive list when
you have inserted a removable disk and you need the
788 to recognize it.
1 Press the
2 Turn the dial until
press ENTER.
3 Turn the dial until
and press ENTER.
MENU key.
DISK is highlighted and
CHECK is highlighted,
The 788 will close the current song and scan all
connected drives and partitions. The process
may take a little time, after which the song is
reloaded.
NOTE
While this operation is in progress, do not turn off the
power to the 788, and do not turn any drives connected to
the 788 on or off. You should not insert or remove any
removable media during this time (including recordable CD
discs).
32 TASCAM 788 Digital PortaStudio
Page 33

The OPTION menu
2 – Getting started–The OPTION menu
The OPTION menu allows you to set various system-wide options affecting the operation of the 788.
There are four sub-menus here:
affecting the whole of the unit,
GLOBAL options,
MIXER parameters
which affect the mixer, RECORDER parameters
Global options
As the name suggests, these options affect the whole
operation of the unit.
Key sense time Some of the keys on the unit
have two different functions, spending on whether
they are pressed and released in a short space of time,
or whether they are pressed and held down for a
longer period.
The pitch control is a good example of this. If the
PITCH/SSA key is pressed and released briefly, the
pitch control is turned on. If it is pressed and held for
the time set here, a screen appears allowing you to
make the settings for the pitch and the slow speed
audition functions.
The setting for the key sense time is from 0.3 to 2.0
seconds, in 0.1 second steps.
Meter peak hold time The meters shown on
the home display (“The “home” display” on page 26)
and other pages can be configured to hold the peak
value .
which affect the recording part of the 788, and the
USER WORD settings. The USER WORD
settings are described in “Setting and editing preset
words” on page 27, and are not described again here.
This parameter can take the following values:
OFF,
where the meters do not hold the peak value at all,
ON; the peak meters hold the value for a second or
so and then drop back, or
KEEP, where the peak
value is always shown on screen until this value is
changed.
Use the cursor keys to highlight the parameter, and
the dial to change it
TIP
\
The
KEEP
record of the highest value, but you cannot keep your eyes
on the meters during the whole take or rehearsal.
setting is useful if you want a permanent
Meter release time The meter “drop-back” time
can be configured to be from
10ms steps using the cursor keys to highlight the
parameter, and the dial to change it.
Note that the meters are always peak meters, and the
rise time is fixed.
0ms to 100ms in
Mixer settings
Only one setting is currently implemented, as
described here.
Fader settings This parameter allows the setting
of the relationship between the physical and the
Recorder settings
Two settings, related to each other, connected to the
recorder operations of the 788, may be made from
this submenu.
These are the pre-roll and post-roll times concerned
with auto punch operations. Pre-roll refers to the
time difference between the point where playback
starts before a punch operation and the punch point.
Post-roll refers to the time after the punch-out point
that the recorder keeps playing after a punch-out (or
USER WORD
Described in the section on entering and editing titles
(“Setting and editing preset words” on page 27).
internal faders when scenes are recalled, etc. The
details are given in “Internal and physical faders” on
page 45.
rehearsal). See “Auto punch operations” on page 55
for full details.
Both of these fields are set in the same way, by highlighting the field and using the dial to set the value.
The minimum time for both the pre-roll and post-roll
is
1.0 seconds and the maximum time is 9.9
seconds. The values are changed in 0.1 second steps.
TASCAM 788 Digital PortaStudio 33
Page 34

3 – Before recording
We have already looked at how to connect instruments to the 788 (“Connecting other equipment to
your 788” on page 22). Now we look at how the signals are passed from the input connectors on the back
of the 788 to the recording tracks.
This process is known as assigning. There are two
ways to assign signals to channels on the 788: the
Quick Setup
The quick setup allows the selection of one of three
predefined assignment patterns, together with default
EQ and send settings, for use when recording or mixing down, etc.
1 Press the
screen.
2 Use the dial to select
DOWN
functions are explained in “Routing and scene
libraries” on page 91).
QUICK SETUP key beside the display
RECORDING, MIX
or BOUNCE 7/8 (the library
Quick Setup, described immediately below, and the
manual assignment method (“Assignment on the
788” on page 36).
The theory of this patchbay is explained in “Assign-
ment” on page 13. Consult this for an explanation of
the principles, if you are unsure of how this feature of
the 788 works.
3 Press
4 Return to the home screen by pressing the
After the setup has been loaded from the Quick Setup
menu, it is possible to ‘fine-tune” the assignment to
the exact requirements (“Assignment on the 788” on
page 36).
ENTER. The current selection is shown
on screen using the assign map (see below,
“Viewing assignments” on page 37).
HOME/ESC key (“The “home” display” on
page 26).
RECORDING
The RECORDING setting sets up the following
assignment:
The inputs from A through D are assigned to channels
1 through 4, and the AUX INPUTS are assigned
to channels
This is a good point to start recording the basic tracks
in a project, allowing six simultaneous external
sources to be recorded.
5 and 6 and the 7-8 channel.
34 TASCAM 788 Digital PortaStudio
Page 35

MIX DOWN
3 – Before recording–Quick Setup
When MIX DOWN is selected, the following assign-
ment is set up:
BOUNCE 7/8
This allows you to take six recorded tracks and mix
them into the two tracks of the
are then recorded on 7 and 8:
STEREO bus, which
In this assignment pattern, all eight recorded tracks
are assigned to the correspondingly-numbered channels, ready for mixdown.
TIP
If you are adding MIDI-synchronized instruments to the
final mix, you can assign inputs
INPUTS
the sub-mixer” on page 37). This provides you with a total
of 14 signal sources (in addition to the internal effect
returns).
to the software sub-mixer (“Assigning inputs to
A
through D and the
AUX
The individual levels, etc. of the recorded tracks are
adjusted using the channel controls, and the overall
level of the mixed signal is adjusted using the faders
of the destination tracks (in this example, the
7/8
fader). It is also possible to add a pre-fader compressor to the
STEREO bus before the signal is passed to
channels 7 and 8 (“Using EFFECT 2 as a stereo
dynamics processor” on page 82). Care should be
taken when using insert dynamics processors in this
situation.
Channels 1 through 6 are fed from tracks 1 through 6
and passed to the
STEREO signals, in their turn, are passed to
The
STEREO bus.
channels 7 and 8, which will record on tracks 7 and
8.
NOTE
Although it is possible to use both the stereo dynamics and
channel dynamics processors at the same time, this is not
recommended.
TIP
This shows tracks 7 and 8 used as the destination for the
“bounce”. Of course, any other pair of tracks can be used
(but it is not possible to bounce tracks to themselves).
TASCAM 788 Digital PortaStudio 35
Page 36

3 – Before recording–Assignment on the 788
Assignment on the 788
This section explains how to use the 788’s internal
patchbay for your own settings.
Assigning sources to mixer channels.
To assign an input source (INPUTs A through D, the
AUX INPUTS, the recorded TRACKs, the STEREO
mix or the
SUB MIX) to a mixer channel:
1, 2
2
1 Choose the
SOURCE that you are going to feed
into the mixer and press and hold down the
SOURCE key of that source. The indicator
flashes.
If the source is already assigned, the
SELECT
indicator(s) of the destination channel(s) also
flash as the
2 While pressing and holding the
press the
SOURCE key is held down.
SOURCE key,
SELECT key of the mixer channel
into which you will feed the source.
3 The indicators of both the
SELECT keys flash to show that this assign-
SOURCE and the
ment has been made.
NOTE
You can assign a source to more than one channel. However, a channel cannot accept more than one source at a
time. If a source has been assigned to more than one
channel, the destination channels must be deselected individually (push and hold the
SELECT
If you assign a stereo source (either
STEREO
a stereo linked pair (or the
the stereo source is linked to both channels of the pair.
If you are assigning
INPUT
INPUT
If you assign a stereo source (either
STEREO
will automatically be created.
If you assign a mono source to a stereo linked pair (or
channels 7/8), the signal is split between the two channels.
You can also perform this operation by pressing and holding the mixer channel
SOURCE
keys of the channels).
), and press the
INPUT
s A and C can only be assigned to channel 7, and
s B and D can only be assigned to channel 8.
) to an unlinked mono channel, the stereo link
TIP
key of the source.
SOURCE
SELECT
SELECT
s to channels 7 and 8, note that
SELECT
key and then the
AUX INPUT
key of one channel of
key of channels 7/8),
AUX INPUT
key and pressing the
or
or
Removing assignments
If you need to remove the assignment of an input to a
channel or channels:
1 Press and hold down the
SOURCE key of the
input you want to unassign. The indicator will
start to flash.
The indicator of any channels to which this
input has been assigned will also start to flash.
2 Press the
SELECT key of channels which are
currently assigned, as shown by the flashing
indicators. The indicators stop flashing.
36 TASCAM 788 Digital PortaStudio
NOTE
If the source has been assigned to two linked channels
(including channels 7-8), pressing the
of the channels will unassign the pair of channels. If the
stereo link was automatically created when a stereo source
was assigned, the channels will not be automatically
unlinked.
TIP
You can also perform this operation by pressing and holding the mixer channel
SOURCE
key of the source.
SELECT
SELECT
key and pressing the
key of one
Page 37

Viewing assignments
3 – Before recording–Assignment on the 788
1 Press the SHIFT + QUICK SETUP (ASSIGN
MAP
) key to make the assign map appear on
the display.
Channels (destinations)
Inputs
(sources)
The eight tracks and the sub-mixer are shown
along the top of the screen.
Channel-to-track assignments
With a system consisting of a separate mixer and
recorder, you sometimes need to set up the way in
which the mixer channels will feed the recorder.
Track-to-channel assignments
The TRACK key is used to assign recorded tracks to
the mixer channels so that they can be replayed
through the mixer, with all the facilities provided in
each mixer channel (EQ, effect and aux sends, fader
and panning, etc.).
The inputs (sources) are shown down the left
side of the screen.
When a source is assigned to a channel, a rectangle appears where the row and channel meet
(an arrow shows when the sub-mixer is
assigned to the stereo bus).
2 While you make and remove assignments, the
screen changes to show this.
3 After making and viewing the assignments,
you can press the
HOME/ESC key to return to
the “home” display.
With the 788, this is not necessary. Mixer channel 1
is automatically routed to track 1, channel 2 to track
2 and so on.
When you press and hold the
the
SELECT key of a mixer channel, the track whose
TRACK key, and press
number corresponds to the selected channel is
assigned to that channel. Track 1 is always assigned
to channel 1, track 2 to channel 2, etc.
There is only one
TRACK key, which is used to
assign the recorded tracks to the channels.
Assigning inputs to the sub-mixer
The sub-mixer (SUB MIX key) is both an assignment
source and a destination.
As a source, it can only be assigned to the
STEREO
mix.
As a destination, it can be used by the four inputs and
the
AUX INPUT pair.
This sub-mixer contains (software) faders for each of
its inputs as well as (software) pan controls.
Assigning the sub-mixer to stereo
To assign the sub-mixer outputs to the STEREO bus:
1 Press and hold the
flashes, along with the indicators of any inputs
currently assigned to it,
2 Press the
STEREO key to assign the sub-mixer
outputs to the stereo output bus.
SUB MIX key. The indicator
If you press the
7/8 SELECT key, the appropriate two
tracks will be assigned to the pair.
To assign the inputs to the sub-mixer:
1 Press and hold one of the four
keys or the
AUX INPUTS key.
INPUT SOURCE
The indicator will flash.
2 Press the
SUB MIX key. The indicator will
flash, along with the indicators of all other
inputs that have been assigned to the submixer.
For details of how to use the sub-mixer, see “Sub-
mixer” on page 48.
Remove assignments to and from the sub-mixer in
the same way as you do for other assignments
(“Removing assignments” on page 36)
TASCAM 788 Digital PortaStudio 37
Page 38

3 – Before recording–Monitoring
Monitoring
To make sure that everything is connected properly,
you will need to listen to the signal sources feeding
the inputs, as well as what you have already
recorded.
3
2
7
45
6
1 Make sure all the equipment is connected and
powered up.
2 With the source connected to one of the four
inputs of the 788 (
A through D), assign the
input to a mixer channel (“Assignment on the
788” on page 36). If you’re using an electric
guitar as the signal source, make sure that it is
plugged into input
D and that the MIC/GUITAR
switch is in the GUITAR position.
3 Make sure that the input
match the input source level (either
MIC or in between, depending on the signal
TRIM control is set to
LINE or
level).
4 Set the
STEREO fader to the “nominal” (0)
position, and the assigned channel’s fader to
the minimum (
5 Set the
MONITOR LEVEL control to about the 2
–∞) position.
o’clock position.
6 Make sure that the monitoring
cator is lit (press the upper
STEREO indi-
MONITOR selection
key to light it if it is unlit).
7 Start the input source, and slowly bring up the
channel fader. You should hear the sound of
the signal through the monitoring system.
The meters on the right of the home screen
(“The “home” display” on page 26) will show
the overall volume of the stereo signal.
If you don’t hear anything
We suggest you check the following if you don’t hear
anything after following the steps above:
• Make sure that all connections between the monitor
amplifier and the monitor speakers are securely
made, as well as the connections between the 788
and the monitor amplifier
• Make sure that the volume control of the monitoring amplifier is turned up, and if the amplifier has
source selector switches, make sure that these are
correctly set.
How to monitor tracks
Here are the basic rules which control what you will
hear from the 788’s tracks (in the example above, we
were listening to the input source, not the track):
• If you are recording on a track, or the track is
armed (the track’s
flashing) use the
the track. You control the volume of the monitored
sound (as well as the volume of the signal sent to
the track) with the channel fader, and the pan position of the recording using the channel’s software
pan control (“Fader and pan” on page 45).
REC READY indicator is lit or
MONITOR CUE key to listen to
• If the sound source is an electric instrument, make
sure the volume control of the instrument is turned
up. If the sound source is a switchable microphone,
make sure the switch is turned on. In all cases,
make sure there is a good connection between the
sound source and the 788.
• The
TRIM control of the 788 input should be set to
the appropriate level, and the input should be
assigned to the channel whose fader is being
moved.
• If you have recorded on a track, and you want to
play back the track while recording other
tracks, use the
TRACK CUE mixer described below (“Monitoring
MONITOR CUE key, and the
the recorded sounds (TRACK CUE)” on page 39.
• If you are mixing down, and you have assigned a
track to a channel, the track is automatically
removed from the cue mix (the
TRACK CUE mixer
settings have no effect). Use the channel fader and
software pan controls to affect the level and position in the stereo mix (which is what you will usually monitor here).
38 TASCAM 788 Digital PortaStudio
Page 39

3 – Before recording–Monitoring
Monitoring the recorded sounds (TRACK CUE)
When you have done some recording, you will need
to listen to what you have recorded previously (otherwise you will be unable to synchronize overdubs,
etc.). To do this, you will need to use the track cue
facility.
This is a small software mixer which provides a stereo output and is fed by the eight recording tracks.
This output is from the
PHONES connectors only—it is never sent from the
STEREO outputs.
MONITOR OUTPUT and
This facility allows you to set up a “cue mix” for the
performers who will be overdubbing their parts; for
example, you could have a mix which was very
heavy on the kick drum and the bass line in order to
keep a rhythm part in time.
The cue mix is only output from the
OUTPUT
and PHONES when the CUE key (above
MONITOR
the dial) is on (the indicator is lit). When this indicator is off, the cue mix cannot be heard.
To adjust the cue mix:
1 Press the
TRACK CUE key (above the STEREO
fader).
2 You can see and set the parameter for four
tracks at a time. Pressing the
SELECT key of
one of the tracks that cannot be seen on the
screen shows the other four tracks. You can
also use the Ó and Á keys to move the cursor
“past” the left or right of the screen.
3 The top row of controls shows pan controls to
position the track in the stereo monitor image.
Move the cursor so that one of these is highlighted (in the illustration, the pan control of
track 1 is highlighted) and use the dial to make
the pan setting.
The setting can be made all the way from
L63 (hard left) through C (center) to R63
(hard right).
4 Move the cursor to the bottom row of this
screen to adjust the track cue levels from
(minimum) to
NOTE
The “faders” shown on screen here have no connection
with the hardware physical faders of the 788.
127 (full).
0
5 Adjust the overall level of the track cue mix
with the
MONITOR LEVEL control to the right
of the display.
Arming tracks and monitoring
When a track has been armed for recording (i.e. the
REC READY key of the track has been pressed, and
the red indicator is flashing), you can monitor any
signal coming into the inputs assigned to armed
tracks when the
The levels of the monitored signals from the tracks
which have been recorded are adjusted with the track
cue mixer described above.
The channel faders are used to adjust the levels of the
signals to tracks which are recording, and their levels
in the
CUE monitor mix. The track cue mixer settings
do not affect these levels, or the levels at which
recorded tracks are monitored.
In addition, in the home screen, the meters of the
tracks to which the inputs have been assigned will
show the incoming signal.
CUE monitor indicator is lit.
These incoming signals are mixed with the playback
signals when armed tracks are played back.
When actually recording on an armed track, any signals previously recorded are, of course, not heard,
and only the incoming signal is heard.
TIP
To prevent unwanted signals (microphone noise, stray guitar noises, etc.) from interfering with the playback made to
check a take, get into the habit of switching off the
READY
toring and turning off other (
playing back, and restoring the monitoring to its original
state before you record again.
When doing punch operations (see “Recorder operations”
on page 49), the situation is slightly different, as the recording from disk is muted during the punch rehearsal as well
as during actual recording.
of any armed tracks, or turning on the
STEREO
NOTE
) monitoring before
REC
CUE
moni-
TASCAM 788 Digital PortaStudio 39
Page 40

3 – Before recording–Monitoring
More monitoring options
The monitor SELECT key below the MONITOR
LEVEL
will hear through the
PHONES connections.
control allows you to select what signals you
MONITOR OUTPUT and
In addition to the track cue, which can be independently switched, the following monitor sources are
available:
STEREO
EFF SEND
AUX OUT
SUB MIX
The stereo output
The overall send signal sent to the internal effect
loop (“Using EFFECT 1 as a single stereo effect
processor in the effect loop” on page 82)
The overall send signal sent to the AUX loop
(may be internal or external, see “Using EFFECT
2 as a single stereo effect processor in the AUX
effect loop” on page 83)
The sub-mixer stereo signal (see “Sub-mixer” on
page 48)
To select the monitor source, press the monitor
SELECT key. The indicators for the monitor sources
Monitoring in mono
listed above light in sequence as you continue to
press the key.
There is a fifth setting, where all indicators are off.
This allows you to listen to the track
CUE in the
monitor mix completely separately from any other
monitor signals.
TIP
When recording, you will probably want to listen to the track
cue (previous recordings)
Typically, when mixing down, you will want to listen to the
STEREO
nal. Since the tracks are routed to the channels during mixdown, the track cue has no use here, and the CUE should
be turned off.
In both recording and mixdown, you may find it useful
sometimes to listen to what is being sent to the effect and
aux busses, as well as to be able to isolate the sub-mixer.
monitoring source, as this is the final mixed sig-
It may seem strange to want to do such a thing, but
there are sometimes occasions when it is a good idea
to listen to your work in mono. For instance, if you
expect your work to be heard over small portable
radios or tape players, etc., or you are mixing a piece
for TV or video where you are not expecting every
listener to have stereo equipment, this is a necessary
part of the production process.
1 Press and hold down the
SHIFT key and press
the monitor SELECT key.
The indicator of any selected monitor source
STEREO, EFF SEND, AUX OUT, SUB MIX or
(
CUE) starts to flash, showing that mono moni-
toring is now taking place.
2 Press the monitor
SELECT key again to return
to stereo monitoring. The indicators of the
selected monitor sources will light steadily.
NOTE
If a monitor source has not been selected at the time of the
change between mono and stereo, when it is selected, it
will flash (mono) or light steadily (stereo) to show the current monitor status.
40 TASCAM 788 Digital PortaStudio
Page 41

Mixer features
4 – Mixer
The 788 has seven physical channel faders, controlling six mono channels and a stereo pair of channels.
These channels can be assigned to take their signals
from the input connectors, or from the recorded
tracks.
The basic signal flow of each channel of the mixer
section of the 788 is:
• Input-to-channel assignment (input or track)
• Digital pad/gain
• Three-band switchable EQ
• Fader
• Effect send (can be pre- or post-fader)
• Aux send (can be pre- or post-fader)
• Pan
Channels may be linked in stereo pairs, allowing
them to share control settings.
Linking channels
When you are using the 788 to mix and record a stereo source (e.g. a stereo synthesizer or the outputs of
a stereo effects unit), it is often useful to link two
channels together, so that changes made to one channel automatically affect the other.
You can link the following pairs of channels:
and 4, and 5 and 6.
3
Note that channels 7 and 8 are always linked as a stereo pair and you can never unlink them.
1 and 2,
The internal effectors can be used in a variety of
ways with these channels; as in-line dynamics processors or as an in-line multi-effector.
In addition to these channels, there is a sub-mixer
which can be used to accept signals from inputs
A
through D and the AUX INPUTs, and feed them
through the stereo outputs through pan and volume
controls. See “Assigning inputs to the sub-mixer” on
page 37 for how to assign inputs to this sub-mixer,
and “Sub-mixer” on page 48 for how to adjust the
settings.
The track cue mixer goes to the monitor outputs and
headphones only and allows the recorded tracks to be
monitored. The operation of this is described in
“Monitoring the recorded sounds (TRACK CUE)”
on page 39.
The parameters that are linked when two channels
are linked are:
• Digital pad/gain
• Solo status
• EQ control and switching
• Effect and aux send levels
• Effect settings
• Faders (odd-numbered channel’s fader controls the
pair)
To link two channels
1 Press and hold down the SELECT key of one
channel in the pair to be linked. Its indicator
flashes, along with the indicator of any
assigned source.
2 Press the other
SELECT key of the link pair (as
described above) and then release both keys.
Unlinking a pair of channels
1 Press and hold down the SELECT key of one of
the channel pair. The indicator will flash, and
so will the indicator of the other channel in the
pair and any assigned source.
Both
SELECT indicators of the channel pair
light, along with the assigned sources.
NOTE
If another
the
already been linked. Pressing the
other channel will unlink the pair.
SELECT
SELECT
indicator flashes when you hold down
key of a channel, it means that this pair has
SELECT
key of the
2 Press the SELECT key of the other channel in
the pair and then release the keys.
When the
SELECT keys are released, the indi-
cator of the first channel to have its key pressed
will be lit.
TASCAM 788 Digital PortaStudio 41
Page 42

4 – Mixer–Basic operations
Notes on linked channels
When a linked pair is created, the pan settings for the
two channels are set to hard left (odd-numbered
channel) and hard right (even-numbered channel),
regardless of their previous settings. However, pan
settings made while the channels are linked as a pair
are maintained when the pair is unlinked.
Basic operations
The SELECT keys of the channels have been previously introduced (“Assigning sources to mixer chan-
nels.” on page 36) as the way in which the input
signals are routed to the mixer channels and as the
way in which channels are linked and unlinked.
They are also used to select the channels when making mixer settings, together with the
FADER/ PAN keys:
Allows equalization and digital pad/gain
EQ
settings
SEND
FADER/PAN
Allows pre/post/off, level and pan for channel
sends, as well as the master send level for
both the effect and aux sends
Allows a view of the fader levels (including the
internal level) and setting of the pan settings
EQ, SEND and
If a stereo source (STEREO or AUX INPUT) is
assigned to one channel of a potential stereo pair, the
two channels will automatically be linked as a pair.
If a stereo pair of channels has had
INPUT
assigned to it, and the pair is then unlinked,
STEREO or AUX
the link is broken, but the stereo source remains
assigned to both channels.
1 Press the EQ, SEND or FADER/PAN key.
The screen changes to show the current settings for that parameter and the selected channel or channels.
2 Press the
SELECT key of the channel whose
parameters are to be edited.
3 Use the dial and cursor keys to change the
values as explained in this section.
1
2
3
About the screens
The example below shows the pan setting for channels 1 and 2:
In these “channel” screens, the bottom right of the
screen is used for a pair of bargraph meters, showing
the current monitor output levels. The current time
position is also shown on the top line of the screen.
If you have linked two channels as a stereo pair (see
“To link two channels” on page 41), you can press
either
SELECT key of the pair to change to the
appropriate parameter editing screen.
TIP
As an alternative way of working, you can also press the
channel
key (
ters of one channel.
SELECT
EQ, SEND
key first, and then press the parameter
or
FADER/PAN
) to adjust the parame-
42 TASCAM 788 Digital PortaStudio
Page 43

Adjusting EQ
4 – Mixer–Adjusting EQ
On the 788 channels, you can adjust the gain (the
amount that the signal is cut and boosted), and the
frequency (high or low) affected by the equalization
in three bands. In addition, you can adjust the “Q”
(the width of the effect) in the mid band.
1
2
1 Press the
EQ key. The display screen shows the
3
input channel equalization screen.
2 Select the mixer channel to be equalized by
pressing the appropriate
SELECT key.
3 Use the cursor keys to move the cursor to the
value you want to change, and use the dial to
change the values.
(low)
a
M
8/16
L
GAIN
(cut or boost)
FREQ
(center
frequency)
Q
c
(width)
a.These bands are shelving type filters.
b.the mid band is peaking type
c.“Q” (mid band only) is defined as the center frequency of the
equalization band divided by the bandwidth. A high Q value provides narrow filtering.
±12 dB ±12 dB ±12 dB
32 Hz–1.6Hz 32Hz–18 kHz 1.7 kHz–18 kHz
— 0.25/0.5/1/2/4/
(mid)
b
H
—
(high)
a
4 As well as changing values in the three bands
of the EQ section, you can also turn the whole
of the EQ section on or off, so that you can easily do a comparison between the equalized and
unequalized sound.
NOTE
Remember that unless the on-screen switch is set to ON,
you will not hear the effects of the EQ settings.
EQ and linked channels
If two channels have been linked (and always in the
case of channels 7 and 8), there is one set of onscreen EQ controls which affects both channels. It is
not possible to make different EQ settings for a pair
of linked channels.
TIP
It is also possible to use some effect settings which give
further control over a channel’s equalization (“Multi-effect
processor settings” on page 87).
If two unlinked channels have different EQ settings
and are then linked, the pair will take the odd-numbered channel’s EQ settings.
If a linked pair of channels is unlinked, both channels
will have the same EQ settings.
TASCAM 788 Digital PortaStudio 43
Page 44

4 – Mixer–Send levels
Channel digital pad and gain
You may need to reduce the overall volume of the
signal, or to boost its volume a little. This is done
before the signal reaches the equalization section of
the mixer.
The level of the signal can be reduced (attenuated) by
up to 42 dB (cut settings are shown as negative
values).
You can also use this feature to boost the signal by up
to 6 dB (boost settings are shown as positive values).
The steps between the pad/gain settings are at 6 dB
intervals.
Send levels
The 788 incorporates an effects (EFF) loop and an
auxiliary loop (
sends. See the section on “Effects” on page 81 for
details of where these sends are actually routed, and
their return paths.
AUX). Both of these are stereo
2
1 With the
EQ screen displayed, move the cur-
sor to the PAD/GAIN field at the top of the
screen, and use the dial to change the value.
TIP
If you boost overlapping frequency bands by large
amounts, the overall level of the signal is increased and
may cause distortion. You should therefore use this feature
to reduce the level of the signal before it is equalized so
that distortion does not occur.
NOTE
Note that the EQ switch does not turn the pad/gain on or
off.
The levels from each channel to these sends, and the
pan between the two inputs of these stereo sends, can
be set, as well as the master send level.
In addition, these two sends can be individually
selected as off, or as pre- or post-fader on a per-channel basis (see “Pre- and post-fader sends explained”
on page 84).
Stereo linked channels and channels 7 and 8 cannot
1
3, 4
have levels set independently for each channel. One
control affects the send levels for both channels. In
addition, the send pan controls change to stereo pan
controls for these channels.
Full details of how these changes are made are given
in the effector section (see “Send levels, etc.” on
page 83).
44 TASCAM 788 Digital PortaStudio
Page 45

Fader and pan
4 – Mixer–Fader and pan
Adjust the pan position of a mixer channel (that is, its
left-right position in the stereo image) using this
method:
2
1
3
4
When a channel is recording on a track, this pan control has no effect. It is only useful when the channel
is feeding the stereo outputs.
1 Press the
FADER/PAN key. The display screen
shows the input channel fader/pan screen.
2 Select the mixer channel to be edited by press-
ing the appropriate
SELECT key.
3 Use the cursor keys to move the cursor to the
pan value you want to change, and use the dial
to change the value.
4 Fader values are changed with the channel fad-
ers, and cannot be changed using this screen.
TIP
When one channel’s pan is being edited (here, the pan
value of channel 6 is being edited), pressing the other visible channel’s
sponding pan control.
NOTE
The maximum fader level is
is
0
. When a channel is panned fully to the left, the display
shows
shows
In the case of stereo linked channels, or channels 7 and 8,
one fader is shown on-screen here, since the channels are
linked. The word
the screen to show this is a linked pair of channels.:
SELECT
L63
, and when it is panned hard right, the display
R63
. The center position is shown by C.
key moves the cursor to the corre-
127
and the minimum value
LINK
is shown at the bottom right of
Internal and physical faders
The FADER/PAN screen (“Fader and pan” on
page 45) also contains a representation of the channels’ faders, as shown below in the enlarged view.
Internal value and
marker
Physical fader value and
marker
For each fader, there are two values, the “internal”
(
INT) value, and the physical fader (LVL) value.
This is because you can store and recall scene settings, including fader levels. The 788 can also receive
MIDI messages which allow the channel level to be
set.
When the fader levels are set in these ways, there are
three options available which allow you to change the
way in which the physical and internal fader levels
are related.
1 Press the
2 Use the dial to scroll down so that
is highlighted. Press
3 Use the dial to highlight
ENTER/YES.
4 The
MENU key.
OPTION
ENTER/YES.
MIXER. Press
FADER -> MATCHING parame-
ter can take one of three values, as explained
below:
REAL — if the internal fader level is changed
•
using a scene change or a MIDI Control Change,
this is ignored. The actual physical fader is the only
way in which the fader level is set.
TASCAM 788 Digital PortaStudio 45
Page 46

4 – Mixer–Soloing
• JUMP — the internal fader level jumps to the
level set by the physical fader as soon as the physical fader is moved. Since this can result in sudden
changes in volume, resulting in possible damage to
hearing and monitoring equipment, this option
should be used with caution.
•
CATCH — the fader level remains the same ini-
tially. However, if you then move the physical fader
so that the physical level becomes the internal level
Soloing
To solo a mixer channel or channels (i.e. mute all
other channels so that only the selected channels can
be heard):
1
2
(the faders “catch” the internal level), the physical
level changes at that point. This ensures that there
are no sudden leaps in volume due to a difference
between the physical fader and the internal setting.
NOTE
Note that the setting made for this option will apply to the
current song, and any songs loaded afterwards, until the
setting is changed.
When channels are soloed, this is a after-fader solo.
That is, you can hear the effect of all fader, EQ and
in-line effect settings.
In addition, if you have assigned an effect to the
effects loop or the aux loop (“Effects” on page 81),
the soloed selection only will be sent to the effects
send (all other channels will be muted in the send).
The resulting effect return will be added to the solo
mix, so that you hear the soloed selection, together
with all applied effects.
1 Press and hold down the
2 Press the
SELECT keys of any mixer channels
SOLO key.
that you want soloed.
SOLO indicator lights (orange) and the
The
SELECT indicators of any soloed channels
flash, to show that they have been soloed.
3 Release the
(
SOLO) or flashing (channel SELECT) as long
SOLO key. The indicators stay lit
as any channels are being soloed.
Turning off soloing
1 While in solo mode (the SOLO indicator is lit),
press and hold the
2 Press the
SELECT keys of any channels which
are flashing to un-solo them.
SOLO key.
NOTE
If a pair of channels has been stereo linked, pressing the
SELECT
channels.
Remember that when you solo a channel, the output from
all other channels will be muted, not just to the monitoring
section, but also to the stereo bus. Soloing while mixing
down will destroy the mix!
key of one channel of the pair will solo both
When all the soloed channels have been unsoloed, the
SOLO indicator goes out.
46 TASCAM 788 Digital PortaStudio
Page 47

Stereo output
4 – Mixer–Stereo output
The stereo output is a special “channel”:
1
Press the
STEREO key briefly to view the current
settings of the stereo output buss:
Stereo output selection
This is the only user-selectable parameter on this
screen. It allows you to perform a direct audition on
track pairs.
1 Use the dial to select between
the four track pairs (
Trk5/6, Trk7/8).
Trk1/2, Trk3/4,
When a track pair is selected, the signal output
from the
STEREO OUTPUT connectors (analog
and coaxial digital) will be the signals from the
appropriate tracks.
NOTE
When track pairs are selected as the source for the stereo
outputs, the channel faders and controls have no effect on
STEREO, and
• The current physical fader value and internal fader
value are displayed (as with “Internal and physical
faders” on page 45). These follow the same rules as
channel faders, as set in the
OPTIONS menu.
• The stereo dynamics processor setting is displayed,
if this has been assigned as described in the Effector section (“Using EFFECT 2 as a stereo dynam-
ics processor” on page 82).
• The cursor is in the
OUTPUT field, and cannot
be moved.
the volume, and neither do the stereo faders. Any channel
EQ and effects are bypassed, as is any stereo dynamic
processor assignment and setting (“Setting up EFFECT 2”
on page 82).
If
STEREO
“Monitoring” on page 38), the tracks selected here can be
heard through the
as well as through the
control can be used to adjust the monitoring level, but this
does not affect the level from the stereo outputs.
If a track pair is selected for stereo output here, the sends
to the effect and aux loops are not affected, and remain as
they were before the selection.
is selected as the monitoring source (see
MONITOR OUTPUTS
STEREO
outputs. The
and
PHONES
MONITOR
TASCAM 788 Digital PortaStudio 47
Page 48

4 – Mixer–Sub-mixer
Sub-mixer
The sub-mixer is typically used in mixdown mode to
provide additional inputs while the disk tracks are
being played back. An example of this would be if
MIDI instruments are being played back, synchronized to the audio tracks recorded on the disk.
3
The sub-mixer allows the four inputs (
as well as the
AUX INPUTS to be mixed together and
A through D)
4
fed to the stereo output. On-screen level and pan controls are available.
1 Assign inputs to the
SUB MIX (see “Assigning
inputs to the sub-mixer” on page 37).
2 Assign the sub-mixer outputs to stereo
(“Assigning the sub-mixer to stereo” on
page 37).
3 When the
shows the
SUB MIX key is pressed, the display
SUB MIX screen:
The screen above shows that inputs
A, B, D and
the AUX inputs have been assigned to the submixer. Input
C is not assigned (OFF).
If you need to change these assignments, you
must use the
the assignments, and press the
INPUT and SUB MIX keys to make
SUB MIX key
again to show this screen if the display
changes.
NOTE
Remember that an input cannot be assigned to both a
mixer channel and the sub-mixer at the same time.
4 Use the cursor keys to move the cursor around
the fields (five pan settings and five level settings) and the dial to change the values.
The maximum level for the levels is
minimum value is
0.
Pan settings can be made from
through
If the
C (center) to R63 (hard right).
AUX INPUTS are assigned to the sub-mixer,
127 and the
L63 (hard left)
they are treated as a stereo pair. The two inputs cannot be adjusted independently, and the pan control
affects both channels together.
NOTE
There is no master level control for the sub-mixer; this setting must be done by adjusting the individual input levels.
The inputs assigned to the sub-mixer and the output from
the sub-mixer cannot be used with either the internal effectors or the effect or aux loop. All effect processing on signals used to and from the sub-mixer must be done outside
the 788.
48 TASCAM 788 Digital PortaStudio
Page 49

5 – Recorder operations
This section deals with the recorder section of the
788; including the playback and recording operations
you can carry out.
If you have not already read these sections:
• 2, “Getting started”
Basic transport controls
These controls have some similarity to the controls
that you might find on a tape recorder.
However, there are one or two important differences
of which you should be aware, due to the nature of
the 788.
• 3, “Before recording”
• 4, “Mixer”
we strongly recommend that you do so now. Without
a knowledge of the information contained in these
sections, it may be difficult for you to understand
some of the concepts presented in this section.
• There are some functions that you cannot access by
a single key-press, but which need a combination
of keys to be pressed in order to make them work.
• The “fast forward” and “rewind” keys do not work
in quite the same way that a tape recorder’s wind
keys. Since location can be almost instant, there is
no wind time required. The way in which these
keys work is explained later in this section (“Fast
forward and rewind” on page 51).
• There is no “pause” key. Since the start and stop
are virtually instant, there is no need for such a
control.
• In the jog mode, which is accessed through the
STOP and PLAY keys, the wind keys have a special
function (see “Jog positioning” on page 50).
Playback
To play back recorded material from the current playback position:
1 Press the
The green
back is taking place.
2 Stop playback with the
NOTE
It is not possible to start playback in some of the menu
screens. Exit the menu system before starting playback.
If the PLAY indicator does not light steadily, but flashes, the
788 is waiting for external synchronization, or is otherwise
prevented from entering playback. Check all the synchronization settings, etc. (see the section on “Synchronization”
on page 94) for details of how to view and change these
settings).
PLAY key.
PLAY indicator lights while play-
STOP key.
If you do not hear anything when the tracks are being
played back, it may be because:
• nothing has been recorded on the tracks. The
HOME screen (“The “home” display” on page 26)
provides eight channel meters. If a channel’s REC
READY
track’s recorded contents (if
is off, the meter shows the level of the
REC READY is on, the
level of the input signal is shown).
• the tracks are not routed to the monitoring system.
Either use the track cue to route the track replay to
the cue system (“Monitoring the recorded sounds
(TRACK CUE)” on page 39), making sure that the
MONITOR CUE indicator is lit (“Monitoring” on
page 38), or assign tracks to channels (“Track-to-
channel assignments” on page 37) and adjusting
the faders, with the
STEREO MONITOR indicator
lit.
TASCAM 788 Digital PortaStudio 49
Page 50

5 – Recorder operations–Setting the playback position
Setting the playback position
The 788 provides you with a number of ways to set
the position from which playback starts when you
press the
PLAY key. Some of these are described in
the section (“Location operations” on page 60).
Return to zero (RTZ)
This allows you to return instantly to the “zero
point”, (expressed as the absolute time).
To return to zero (from stop, play or record):
Last Recording Position (LRP)
This is an extremely useful feature that allows you to
return instantly to the point where recording last
started. You can use this in any of the following situations (these are examples, you may think of others
for yourself):
• after you interrupt a bad take halfway through the
recording and want to return instantly to the same
position to retake
• after a successful take, and you want to return to
the point where recording started to check the take
The ways of setting the playback point which involve
the transport keys are described here.
1 Press and hold down STOP.
2 Press
REW. Playback/recording stops and the
playback position returns to the zero point.
• when you are recording a number of different
tracks in turn, all to start from the same point
• after a take, you may want to set the point where
the take started as a reference location mark
To return to the position where recording last started
(from stop, play or record):
1 Press and hold down the
2 Press
F FWD. Playback/recording stops, and
STOP key
the playback position returns to the point
where recording last started.
Jog positioning
To position the playback point precisely, you can
“jog” the playback position, using the dial. As you
move backwards and forwards through the recording,
you can hear the recorded sound at slow speed, either
backward or forward, depending on the direction you
are turning the dial.
1 Position the playback point to the rough posi-
tion where you want the final point to be.
2 Press and hold the
PLAY key. The display shows a view of the
waveform of the currently selected track at the
current playback position.
3 Press the
SELECT key of the track that you
want to view (pressing the
between viewing track 7 and track 8). The display changes to the waveform of that track.
STOP key and press the
7/8 key changes
4 Use the Ó and Á keys to zoom out and in
respectively horizontally. This is, pressing the
Á key will increase the amount of space on the
screen taken by a certain amount of time, and
pressing the Ó key will make the same amount
of time take less space on the screen. The three
zoom levels available are:
x 1, x 2 (allow-
ing approximately single-frame accuracy in
adjustment), and
x 32 (allowing approxi-
mately an accuracy of about 10 sub-frames).
The resolution is shown below the time display.
5 Use the § and ¶ keys to adjust the vertical
scale (the way that the volume of the sound is
shown). The zoom levels here are
x 4, x 8, x 16 and x 32. Pressing the
x 1, x 2,
§ key increases the vertical scaling of the display, and pressing the ¶ key decreases the
scale.
TIP
If you can’t see any waveforms when you first enter this
display, press the
can see the quiet passages.
§
key to zoom the volume so that you
50 TASCAM 788 Digital PortaStudio
Page 51

5 – Recorder operations–Repeat playback
6 Use the dial to move the cursor. You can moni-
tor the “jogged” sound of the selected track
through the monitoring system.
7 To move past the edge of the screen and posi-
tion the cursor roughly at the correct location,
press and hold the F FWD or REW keys to play
all the tracks forwards or backwards at normal speed. When you release the keys, the
playback will stop. You can then use the dial to
position the cursor precisely.
Fast forward and rewind
On a tape recorder, you can use the fast forward and
fast rewind keys to spool through a tape. A disk
recorder like the 788 works in a somewhat different
way.
The forward and rewind keys can be used in the following ways:
During playback When the 788 is playing back
material, if you press and hold either the F FWD or
the
REW key, the playback position moves forward
or backward (depending on which key is being held
down) at ten times the normal playback speed (as
shown by the
home display.
At this time, playback is muted, and the
cator flashes.
When you release the
starts at the position which has been reached.
FF x10 or REW x10 in the
PLAY indi-
F FWD or REW key, playback
8 Press STOP (or ENTER or EXIT) to return to
the home screen, with the playback position
now being the point which has just been set.
NOTE
Because only one track can be jogged at a time, only one
track of a stereo pair can be heard at a time in this mode. If
it is difficult to hear the track , you may want to monitor in
mono (see “Monitoring” on page 38).
NOTE
You cannot perform this operation while recording—only
from playback.
From the stop position When playback is
stopped, you can press and release the
REW keys to start “fast rewind” or “fast forward”.
While this “winding” is taking place, playback is
muted.
Holding down the keys for more than one second, or
pressing the keys repeatedly, changes the “wind
speed” from ten times (
screen), to fifty times (
x10 shown on the home
x50) to one hundred times
(x100) to one thousand times (x1000).
While the 788 is “winding” in one direction, pressing
the opposite key (for example,
F FWD while rewind-
ing) will immediately start location at
new direction.
F FWD or
10x in the
Repeat playback
The 788 allows you to repeat playback of a section of
the song. This can be useful to rehearse a tricky entry
or break, for example.
The start point of the repeat loop is either the IN or
the OUT point, depending on which comes first, and
the second of the two points is used as the end point
of the repeat loop (see “Setting the IN and OUT
points” on page 52 below) for details.
1 With playback stopped, or while playing back,
press the
lights and
2 Playback starts from the first point and contin-
ues to the second point. The
flash for a while (see “Setting the time between
repeats” below) before playback starts again at
the IN point.
REPEAT key briefly. The indicator
REPEAT is shown on the display.
PLAY key may
3 Stop repeat playback with the
4 Pressing the
REPEAT key briefly while repeat
STOP key.
playback is in progress will exit the repeat loop
(if the loop is actually playing, playback continues from the current playback position after
a very brief muting of the playback; if it is
paused in the interval between the OUT and
IN points, playback starts from the IN point).
NOTE
It is not possible to drop into record mode (“Recording (ii)”
on page 53) while repeat playback is taking place. Neither
is it possible to return to zero or the last recorded point, or
to use the menu items.
If the IN and OUT points are too close together (less than
half a second) for repeating, a message (
TOO SHORT
is pressed and the repeat does not take place.
) is displayed. when the
IN-OUT
REPEAT
key
TASCAM 788 Digital PortaStudio 51
Page 52

5 – Recorder operations–Repeat playback
Setting the IN and OUT points
To set the IN and OUT points:
1 Locate to the position where the IN or OUT
point is to be set. See “Setting the playback
position” on page 50 and “Location operations” on page 60 for details.
2 Press and hold down the
the
IN or OUT key.
When the
Set IN ! or Set OUT ! appears on
IN or OUT key has been pressed,
SHIFT key, and press
the home display.
NOTE
You cannot set the IN and OUT points while the repeat
mode is active (the
REPEAT
indicator is lit).
Editing the IN and OUT points When the
points have been set, it may be necessary to “trim”
them, or to slip them backwards or forwards a little.
NOTE
You cannot edit the IN and OUT points while the repeat
mode is active (the
To edit the points:
1 Press the
priate point.
REPEAT
IN or OUT key to locate to the appro-
indicator is lit).
2 Press and hold the
PLAY key. The JOG indicator lights. The dis-
STOP key and press the
play shows a view of the waveform of the currently selected track at the IN or OUT point
(depending on which was pressed).
3 Press the
SELECT key of the track that you
want to view. The display changes to the waveform of that track.
4 Follow the instructions in “Jog positioning” on
page 50 for zooming and moving the current
jog position.
5 When you have set the point where you want
the IN or OUT point to be, press and hold
down the
SHIFT key, and press the IN or OUT
key to set the respective point. The display
returns to the home screen.
EXIT to return to the home screen with-
Press
out setting the points (remember that
ENTER
does not set these points).
Setting the time between repeats
On tape systems, it is common to use a repeat loop
for rehearsal. However, because of the nature of tape
systems, there is a definite gap between the end of
the repeat loop and the start of the loop as it is
replayed. On a disc system, the join between the end
and the start of the loop can be seamless, which does
not allow the listener to prepare for the next loop (for
instance, a vocalist may need to draw a breath before
starting the vocal phrase).
The 788 allows you to set an interval between the end
of a repeat loop and the start of the next playback of
the loop:
1 Press and hold down the
REP. INTERVAL pop-up screen
REPEAT key. The
appears.
2 Use the dial to change the interval between
repeats from
to
9.9 seconds in 0.1 second steps.
3 Remove the pop-up screen by pressing
NOTE
You can enter the repeat interval screen while playback is
stopped, or while playback, either repeat or normal, is taking place. You cannot set this value while recording is taking place.
0.0 seconds (seamless) through
ENTER.
52 TASCAM 788 Digital PortaStudio
Page 53

Recording
5 – Recorder operations–Recording
To start recording from the stopped state:
3
1
2
1 At least one track should be armed (press the
REC READY key(s) of the track(s) on which
recording is to take place). The
REC READY
indicator(s) start to flash).
2 Press and hold down the
RECORD key.
Recording (ii)
To drop into record mode while playing back:
1
2
1 Start playing back a song by pressing the
key. The PLAY indicator will light.
3
PLAY
3 Press the
RECORD (red) indicators light, and the flash-
ing
4 Stop recording by pressing the
NOTE
When a track is “armed” for recording (i.e. its
READY
indicator number in the bottom of the home screen is
reversed to show this.
In the screen above, tracks 3 and 4 are armed.
PLAY key. Both the PLAY (green) and
REC READY indicator(s) light steadily.
STOP key.
REC
indicator is lit or flashing), the corresponding track
2 Arm one or more tracks by pressing their
READY
3 Press the
tor will light, and the
keys. Their indicators start to flash.
RECORD key. The RECORD indica-
REC READY indicators of
the armed tracks will also light.
NOTE
At least one track must be armed before you start to
record. It is
and press the
recording.
not
possible to enter a “record ready” mode
REC READY
keys of tracks to start
REC
Hands-free recording
You can also use a suitable footswitch (for example
the TASCAM RC-30P) connected to the REMOTE
jack, to drop into record mode. When a track is
armed, and playback is taking place, pressing the
Dropping out of record mode
When record mode has been entered in any of the
ways described above, it is possible to drop out of the
recording mode simply by pressing the
The
RECORD indicator goes out.
PLAY key.
footswitch will change from playback mode to
record mode.
When recording, pressing the footswitch will drop
out of record mode into playback mode.
Of course, you can always press the
STOP key to
stop recording.
You can “undo” recordings, (unlike on a tape recorder).
Even if you accidentally record over a perfect performance,
the UNDO function can still retrieve the original. See
“Undoing and redoing actions” on page 70 for details.
TASCAM 788 Digital PortaStudio 53
Page 54

5 – Recorder operations–Assigning virtual tracks
Rehearsing recording
Sometimes, even with the undo facilities and the virtual tracks of the 788, it may be useful for you to
rehearse a take without actually committing anything
to disk. This is probably most useful in auto punch
operations (see “Auto punch operations” on page 55)
but can be useful in other situations as well.
In a rehearsal, the monitoring and other operations
and recording functions are the same as when record-
Assigning virtual tracks
As explained earlier in “Real and virtual tracks on the
788” on page 11, the 788 allows you to record up to
250 virtual tracks, from which you can pick any eight
to become the “active” disk tracks which will form
your final mix.
When a virtual track is assigned to be an “active”
disk track, it cannot be assigned to any other track.
To assign a virtual track to a disk track:
1
ing, but the input signal, although passed through to
the disk track, does not actually go to the disk.
To use the rehearsal mode, simply press the
key so that the indicator is lit.
When actually “recording” in rehearsal mode, the
RECORD indicator flashes, rather than lighting
steadily, to show that the rehearsal is taking place.
3 Use the dial to choose which virtual track will
be assigned to the disk track and become
active.
4 Press
ENTER (or PLAY) to make the assign-
ment, or EXIT to exit the track assignment
screen without actually making the
assignment.
In this screen, you can press the
(
TITLE) key to name the highlighted virtual
track for future reference (as described in
“Entering and editing titles” on page 26).
SHIFT + MENU
RHSL
2
1 Press and release the
2 Use the channel
Á keys) to select the disk track to which the
virtual track will be assigned, as shown by the
tabs at the top of the screen.
Pressing the 7/8 key repeatedly cycles between
selecting tracks 7 and 8.
TRACK key briefly .
SELECT keys or the (Ó and
3
If you have not worked with a system using virtual
tracks before, you may find it a little confusing.
Some ideas to bear in mind:
• A virtual track can only be assigned once (a virtual
track cannot be used on two active tracks at the
same time). When you start a song, virtual tracks 1
through 8 are assigned to active tracks 1 through 8.
• If you’re recording a difficult part, you don’t have
to re-record over the top of “almost, but not quite
perfect” takes. You can keep these for later, just in
case you never get a better take. Simply assign a
different virtual track when you record the next
take.
• You do not have to select all the final eight “active”
tracks at the same time. For example, if you have
recorded the drum part of a song, and you have
recorded three different takes of the bass line on
three different virtual tracks, you can assign these
54 TASCAM 788 Digital PortaStudio
Page 55

5 – Recorder operations–Overdub recording
three virtual tracks to three disk tracks and use the
faders to listen to each of them in turn.
Virtual tracks (different takes of
the bass line)
Virtual tracks (drums)
1 2 3 4 5 6 7 8
Drums
The three best
bass takes
Then pick the one that fits best, and you can re-use
the other two unused disk tracks with new virtual
tracks—keep the alternative takes for the future if
you change your mind later on.
Virtual tracks (different takes of
the bass line; the best one has
now been selected for use, and
the other two are unused)
Virtual tracks (drums)
1 2 3 4 5 6 7 8
Drums
The best
bass take
• Alternatively, if you want to assemble a track for
the whole song, you could assign the three different
takes of the part to three different active tracks and
use the track editing functions (“Track editing” on
page 65) to copy and paste the good parts of each
track to make a perfect whole. Then use the two
non-perfect tracks with other virtual tracks for new
parts.
TIP
Of course, virtual tracks take up disk space, even when
you’re not using them. If you really don’t need a virtual
track, you should assign it temporarily to a disk track and
then clean it out (see “CLEAN OUT” on page 69) to save
disk space.
Overdub recording
When the basic tracks (probably the rhythm or guide
tracks) have been laid down, you will probably need
to record other tracks beside them.
1 Make sure that the
REC READY keys of all
tracks are turned off, except for those tracks
that you will be using for recording.
Auto punch operations
Punch operations allow you to start and stop recording at predefined points, and these can be automated,
as described here.
When auto punch recording begins, playback starts at
pre-roll point some time before recording is due to
start, the punch-in point is reached, and recording
starts. When the punch-out point is reached, record-
ing stops, and playback continues until the post-roll
point.
2 You will almost certainly need to hear the first
tracks you recorded so that you can synchronize the new tracks with them. Adjust the
TRACK CUE settings (“Monitoring the
recorded sounds (TRACK CUE)” on page 39)
and make sure the
MONITOR CUE indicator is
lit.
In addition, when you perform an auto punch recording, during the pre-roll period, you hear what has
previously been recorded, together with the signal
source; during the punch recording itself, you hear
the signal source alone; and for the post-roll period,
you hear the previously recorded material and the
signal source together.
The 788 allows all of this to happen in rehearsal
mode as well as in an actual recording mode. The
TASCAM 788 Digital PortaStudio 55
Page 56

5 – Recorder operations–Auto punch operations
rehearsal mode allows you to simulate the punch
recording, both to practise the actual take, and also to
check punch points before recording actually begins.
You can also use the repeat function together with the
punch operations, allowing you to make repeated
rehearsals of a punch section, as well as repeated
Setting the punch points
The 788 provides three different punch settings.
1 With at least one track armed (the
indicator flashing), and playback stopped,
press the
AUTO PUNCH key:
2 Select one of the three options, explained
below, using the § and ¶ keys to move the triangular cursor, and the
the selection (
EXIT exits this screen without
ENTER key to confirm
making any settings).
3 When the selection has been made, the
PUNCH
shows
NOTE
It is not strictly necessary to have a track armed when you
first press the
most logical way to work.
indicator lights, and the home display
AUTO.
AUTO PUNCH
key, but this is probably the
REC READY
AUTO
takes of the same section (multi-takes) or when
you’re recording, repeated recordings can be used as
multi-takes. When you have recorded a section many
times in this way, you can then choose the best possible take to insert into the track.
LAST REC This sets the punch-in point to be the
last point at which recording started (the same as the
LRP described in “Last Recording Position (LRP)”
on page 50. The punch-out point is set to be the point
at which recording stopped (either when recording
dropped into play mode, or when the transport was
stopped). Note that this last recording does not have
to be a punch recording.
IN -> OUT This uses the IN and OUT points (see
“Setting the IN and OUT points” on page 52) as the
punch-in and the punch-out points. The first of these
points will be used as the punch-in point, and the second as the punch-out point, even if the OUT point is
before the IN point.
LAST TAKE LOAD The cursor can only be
moved to this option if a punch recording has taken
place, and no recording, no track editing or undo/
redo operations or virtual track assignments have
been done since then. It allows you to select the takes
from this punch session, in the same way as
described later in this section (“If you change your
mind” on page 58).
Checking the punch points
When the punch points have been set, you can press
the
PLAY key. The home display shows CHECK,
and the playback starts at the pre-roll point. It continues to the post-roll point.
If the punch positions are not what you want, you can
press the
mode, and reset the punch points as described above.
AUTO PUNCH key to turn off the punch
You can also adjust the pre-roll and post-roll time
using the menu system (“Recorder settings” on
page 33), but you must exit the auto punch mode first
by pressing the
AUTO PUNCH key so that the indica-
tor goes out.
If you the punch points and pre and post-roll times
are what you want, you should proceed to the
rehearsal stage, as described below.
56 TASCAM 788 Digital PortaStudio
Page 57

Rehearsing the punch
5 – Recorder operations–Auto punch operations
Although you don’t have to use the rehearsal feature
(see “Rehearsing recording” on page 54) with the
auto punch, it’s probably a good idea to rehearse
most punch recordings a few times before making a
take.
1 With the
AUTO PUNCH indicator lit, and a
track armed, press the RHSL (rehearsal) key.
The indicator lights.
2 Press and hold down the
RECORD key and
press the PLAY key.
• The display shows
TAKE.
• Playback starts at the pre-roll point. Both the input
source and previously-recorded material can be
heard in the cue mix.
• When playback reaches the punch-in point, the
monitored signal on the armed track(s) is muted.
Recording the punch
When you are happy with the rehearsed punch material, you record the punch in the following way:
1 Press the
out.
2 Press and hold the
PLAY key.
• The display shows
• Playback starts at the pre-roll point. Both the input
source and previously-recorded material can be
heard in the cue mix.
• When playback reaches the punch-in point, the
monitored signal on the armed track(s) is muted.
The
RECORD indicator lights steadily.
RHSL key so that the indicator goes
RECORD key and press the
TAKE.
The
RECORD indicator flashes (to show that it is a
rehearsal).
• When playback reaches the punch-out point, the
recorded material is added to the incoming signal
in the cue mix. The
RECORD indicator goes out.
• Playback continues to the punch-out point and
stops.
• Playback continues to the post-roll point and stops.
If you press the
that the indicator is lit (as well as the
and
RHSL indicators), the rehearsal process will
REPEAT key before the rehearsal, so
AUTO PUNCH
repeat until you press the STOP key. There is about a
second’s interval between the post-roll and the
restarting of the rehearsal at the pre-roll point. You
cannot change this interval.
• When playback reaches the punch-out point, the
recorded material is added to the incoming signal
in the cue mix. The
RECORD indicator goes out.
• Playback continues to the punch-out point and
stops.
If the
REPEAT indicator is lit, the punch recording
will continue to repeat (up to 99 times) until you
press
STOP, allowing you to select from a list of
“multi-takes” (see “Checking the take” on page 57).
The time between repeat takes is about one second.
You cannot change this time.
Checking the take
After a take or series of takes has completed, you can
make an instant check of the take by following the
procedure here.
• When the take is complete, a screen similar to the
following appears:
• The screen above shows one take and the original
track.
• Use the dial to highlight a take from the list, including the original track before the punch was started.
• Press
PLAY to check the highlighted take by play-
ing it back (starting at the pre-roll point, and continuing to the post-roll point).
• If you are happy with the take, you can move to the
next stage below (“After finishing the punch” on
page 58.
• If you want to record another take, press and hold
RECORD, and press PLAY.
TASCAM 788 Digital PortaStudio 57
Page 58

5 – Recorder operations–Varispeed operations (pitch and SSA)
After finishing the punch
When you have finished the punch recording use the
screen below (or similar):
1 Use the dial to highlight the take which you feel
is the best (or if none of them was any good,
select
ORIGINAL, which is the unchanged
version).
If you change your mind
Like recording, an punch operation is undoable (see
“Undoing and redoing actions” on page 70). It is
shown in the list of operations as an
PUNCH
operation.
In addition, as we mentioned earlier, the third choice
when you press the
TAKE LOAD
AUTO PUNCH key, LAST
, allows you to select any of the
multi-takes from the last punch session.
However, if you have recorded anything, performed
an undo or redo operation, or any track editing opera-
AUTO
2 Press
ENTER to select the selected take (or the
original version).
A pop-up display asks you if you are sure that
you want to use the take.
3 Press
NOTE
You must select one of the takes or the original to exit auto
punch mode.
ENTER if you are sure, but if you change
your mind to select another take, press
EXIT.
The recording between the punch-in and
punch-out points is now replaced by the selection. The
AUTO PUNCH indicator goes out.
tions, (whether punch recording or not) since the last
punch session, the list of multi-takes is no longer
available. The list is available of a song has been
saved, closed and reopened, however, if none of the
above operations have been carried out.
NOTE
Even if you undo the recording that has overwritten the list
of multi-takes, the multi-take list will not be available to you
after the undo.
Varispeed operations (pitch and SSA)
You can play back and record at speeds which are
greater or less than the original (±6%) to allow for
differences in tuning, etc.
It is also possible to play back a selected pair of
tracks at the same pitch, but slower than the original
(the 788’s Slow Speed Audition feature). This allows
you to rehearse tricky lead lines, etc. at a slower
speed, and can be combined with repeat playback
(“Repeat playback” on page 51) for easy rehearsals.
NOTE
The monitoring status of the tracks played back using the
pitch (varispeed) or SAA features is exactly the same as for
normal playback,; that is, if they have been assigned to a
channel, the volume, etc. is controlled by the channel faders and controls, otherwise they are monitored using the
TRACK CUE facility and the
must be turned on for them to be audible.
MONITOR CUE
indicator
58 TASCAM 788 Digital PortaStudio
Page 59

5 – Recorder operations–Varispeed operations (pitch and SSA)
Pitch
1 Press and hold the PITCH/SSA key for about a
second (see “Key sense time” on page 33) and
release it. The indicator lights and the display
changes:
2 If the
PITCH CONTROL section at the
left of the screen is not active (there is no box
around it), press the Ó key to move the cursor
there.
3 Use the dial to change the pitch from
to
+6.0% in 0.1% steps. If playback is being
-6.0%
SSA (Slow Speed Audition)
1 Press and hold the PITCH/SSA key for about a
second (see “Key sense time” on page 33) and
release it. The indicator lights and the display
changes:
carried out while this is done, you will be able
to hear the change.
4 Press the
PITCH/SSA key to return to the home
screen and once again to turn off the pitch
change.
NOTE
The above steps can be carried out while playback is
stopped or in operation, but cannot be carried out during
recording. It is also possible to start playback while adjusting the pitch, but not to start recording at that time.
To use the set pitch When the pitch change
value has been set in the way described above, and
the 788 shows the home screen, simply press the
PITCH/SSA key briefly to turn the indicator on and
to change the pitch.
are approximate). If playback is being carried
out while this is done, you will be able to hear
the change.
The above steps can be carried out while playback is
stopped or in operation, but cannot be carried out during
recording. It is also possible to start playback while adjusting the speed, but not to start recording at that time.
2 If the
SLOW SPEED section at the right
of the screen is not active (there is no box
around it), press the Á key to move the cursor
there.
3 Use the channel
SELECT keys to select the
tracks which will be played back. These tracks
are always in pairs.
4 Use the dial to change the speed between
85%, 65% and 50% (the displayed values
5 Press the PITCH/SSA key to return to the home
screen and once again to turn off the SSA
mode.
To use the SSA When the speed change value
has been set in the way described above, simply press
the
PITCH/SSA key briefly to turn the indicator on
and to change the speed, but without changing the
screen display.
Press the
off the speed change.
PITCH/SSA key briefly once again to turn
TASCAM 788 Digital PortaStudio 59
Page 60

6 – Location operations
As well as the IN and OUT points, which have
already been introduced for use in punch operations
(“Auto punch operations” on page 55) and for repeat
playback (“Repeat playback” on page 51), and which
are also used together with the TO point for track
editing (“Track editing” on page 65), there are also
999 location marks available for each song.
Direct location
In this method, you use the cursor keys and the dial
to locate to a specified position.
As explained earlier in “The time display” on
page 26, there are three modes in which the time can
be shown on the home screen:
time),
MTC (MIDI Time Code) and BAR (which
represents the time in bars and beats, according to an
Direct location (i)
For the first two modes (ABS and MTC), the way
to locate directly is as follows:
1 Make sure the transport is stopped. You can-
not perform this direct location when playing
back or recording.
2 If the “home” display is not shown, press the
HOME/ESC key.
ABS (the absolute
These can be inserted, deleted, named and edited
freely, and they are stored with the song, allowing
you to return at any time to a part of the song which
you have marked as needing attention.
There is also an easy method of directly locating to a
position without using the location marks, as
described here:
internal tempo map (see “Synchronization” on
page 94).
In the first two of these modes, you can locate to subframe accuracy. There are ten sub-frames in a frame,
and the length of a frame depends on the frame rate
set up in the sync operations, but is between 1/30 and
1/24 of a second. In the last mode, you can locate to
beat accuracy.
5 Use the dial to increase or decrease the number
over the cursor (in the illustration here, the
cursor is under the “hours” value).
If you increase a value past the maximum (for
example, if you try to increase the “seconds”
value over
59), the number will “wrap
round”; that is, the “minutes” value will
increase by one, and the “seconds” value will
be set to
0.
3 There is an “underline” cursor at the top of the
screen.
If the top left of the screen does not show
or
MTC (that is, it shows BAR), press the Ó
key until the cursor is under
BAR, and turn
ABS
the dial counterclockwise until ABS or MTC
is showing.
4 Use the Ó and Á keys to move the cursor to
any of the following fields: hours (
(
m), seconds (s), frames (s) or sub-frames (no
h), minutes
indication on the display, though the value is
shown).
Minutes
Hours Seconds Sub-frames
Frames
6 When you change a value, the values on the top
line will start to blink and will continue to
blink for a few seconds.
If you press the
EXIT key (or the STOP key)
while the values are blinking, the time value
will be reset to the previous value before you
started to edit it.
7 Press
ENTER while the values are blinking to
set the value, or
PLAY to start immediate play-
back at that value. Also, if you do not press any
keys or turn the dial for a few seconds, the values stop blinking, and the new time value that
has been set becomes the current playback
position.
60 TASCAM 788 Digital PortaStudio
Page 61

Direct location (ii)
6 – Location operations–Direct location
As well as the ABS and MTC timings just described,
it is possible to locate to a “musical” time, when the
display shows bars (measures) and beats, and the 788
is synchronized to a tempo map.
NOTE
This method of location only has any meaning when the
788 is synchronized to a tempo map (see “Synchroniza-
tion” on page 94). If the 788 is not synchronized to such a
tempo map, bars and beats in this screen have no
meaning.
1 Make sure the transport is stopped. You can-
not perform this direct location when playing
back or recording.
2 If the “home” display is not shown, press the
HOME/ESC key.
4 Use the Ó and Á keys to move the cursor to
either of the following: bars (3 digits), or beats
(2 digits).
Bars (measures)
Beats
The tempo value cannot be altered here—it is
set by the tempo map (see “Entering and editing the tempo map” on page 98).
5 Use the dial to increase or decrease the number
over the cursor (in the illustration , the cursor
is under the “bars” value).
If you increase the “beats” value past the maximum number of beats on a bar at that point in
the tempo map, the number will “wrap
round”; that is, the “bars” value will increase
by one, and the “beats” value will be set to
0.
6 When you change a value, the values on the top
line will start to blink and will continue to
blink for a few seconds.
3 There is an “underline” cursor at the top of the
screen.
If the top left of the screen does not show
(that is, it shows
MTC or ABS), press the Ó
BAR
key until the cursor is under the left field, and
turn the dial clockwise until
BAR is showing.
If you press the
EXIT key (or the STOP key)
while the values are blinking, the time value
will be reset to the previous value before you
started to edit it.
7 Press
ENTER while the values are blinking to
set the value, or
PLAY to start immediate play-
back at that value. Also, if you do not press any
keys or turn the dial for a few seconds, the values stop blinking, and the new time value that
has been set becomes the current playback
position.
TASCAM 788 Digital PortaStudio 61
Page 62

6 – Location operations–Location marks
Location marks
As mentioned earlier, the 788 allows you to set up to
999 location marks in each song. These location
marks are stored in slots which may either be empty,
or filled with a location point value.
Entering location marks
Location marks can be entered when playing back or
recording, in jog mode, or when the transport is
stopped. They cannot be entered when fast forward
or rewind is taking place.
There are two ways of entering location marks:
1 Press and hold the
LOCATE key.
SHIFT key and press the
Active location marks
When you have entered location marks, as playback
progresses, and the playback point passes the points
at which the marks are located, the marks’ titles are
As each mark is entered, its slot is filled (from 1
through 999). If a mark is deleted, the slot it occupied
becomes available for another mark to be entered,
Location marks are handled in the following way:
or
1 Press the
MARK/CHAR INSERT (MOVE) key.
2 When a mark has been entered, the location
value is entered into the next available slot, and
the number of this slot (now the number of the
mark) is shown on the screen on the right,
below the time line.
displayed on the screen. The location mark which is
shown on screen is referred to as the active mark.
This active mark can be accessed easily for titling,
deletion and editing, as explained below.
Giving a title to the active location mark
You can give a title to the active location mark while
playing back or recording, or while the playback is
stopped.
1 When the active mark’s current title is dis-
played (this will be
Mark xxx when the
mark is first set), press and hold down the
SHIFT key and press theMENU/TITLE key.
Deleting the active location mark
You can delete the active location mark while playback is stopped, but you cannot delete it while playing back or recording (a message,
MOVING
, appears briefly if you try).
1 To delete the active mark, press the
CHAR DELETE
(SILENCE) key. You do not
have to confirm the deletion, but the word
Clear ! appears briefly on the display.
TRANSPORT
MARK/
The pop-up screen appears on the display, and
you can edit the title as described in “Entering
and editing titles” on page 26.
2 When you press
ENTER after editing the name,
the new name replaces the old mark name.
TIP
You can use the USER WORDs here (see “USER WORD”
on page 33) to enter mark titles quickly.
2 When the active mark has been deleted, the
mark immediately before the active mark (if
there is one) becomes the active mark, and its
title is shown on screen.
NOTE
You cannot undo a mark deletion.
62 TASCAM 788 Digital PortaStudio
Page 63

6 – Location operations–Using the location mark list
Editing the active mark
This process is sometimes referred to as trimming.
This is a similar process to the jog positioning of the
playback point (see “Jog positioning” on page 50),
except that in this operation, the final position is
stored as the position of the active mark.
You can edit the active mark when playback is
stopped. You cannot edit the active mark when
recording or playing back.
1 Make sure that the mark you want to edit is
shown on the home display and that playback
is stopped.
2 Press the
The display shows
MARK/CHAR TRIM (COPY TO) key.
TRIM and a view of the
waveform of the currently selected track at the
active mark.
3 Press the
SELECT key of the track that you
want to view. The display changes to the waveform of that track.
Although the location mark applies to all
tracks, if you have a track selected with nothing or little recorded on it at that point, it will
be impossible to see or hear anything using this
function.
4 Use the Ó and Á keys to zoom out and in
respectively horizontally. This is, pressing the
Á key will increase the amount of space on the
screen taken by a certain amount of time, and
pressing the Ó key will make the same amount
of time take less space on the screen. The three
zoom levels available are:
x 1, x 2 at about
single-frame accuracy), and
x 32 at about
10-sub-frame accuracy (shown below the time
display).
5 Use the § and ¶ keys to adjust the vertical
scale (the way that the volume of the sound is
shown). The zoom levels here are
x 4, x 8, x 16 and x 32. Pressing the
x 1, x 2,
§ key increases the vertical scaling of the display, and pressing the ¶ key decreases the
scale.
TIP
If you can’t see any waveforms when you first enter this
display, press the
can see the quiet passages.
§
key to zoom the volume so that you
6 Use the dial to move the cursor. You can moni-
tor the jogged sound of the selected track
through the monitoring system.
NOTE
You cannot move the mark to a position before the previous
mark or after the next mark.
7 To move past the edge of the screen, press and
hold the
F FWD and REW keys to play the
tracks forwards or backwards at normal speed
for a rough position. When you release the
keys, the playback will stop.
8 Press
ENTER to accept the new position as the
location mark value (the playback position is
now the new position), and return to the home
screen.
9 Press
EXIT to return to the home screen with
the playback position being the point which
has just been set, but the location mark value is
unchanged.
Using the location mark list
Every time a location mark is stored, it is entered into
a list, and every time a mark is deleted, it is removed
from the list.
You can use this list to select a mark for location, or
for giving a title to a mark. You cannot edit the time
value of a mark, or delete a mark using the list.
To see the list, press the
TASCAM 788 Digital PortaStudio 63
LOCATE key:
Page 64

6 – Location operations–Using the location mark list
There are two ways in which the list can be viewed;
by title (
TITLE) and by time value (TIME), as
shown by the tabs on the top of the screen.
Use the Ó and Á keys to change between the two
views:
Locating using the list
To locate using the location mark list:
1 Press the
LOCATE key.
2 Use the Ó and Á keys to change to either the
TITLE or the NAME view of the list.
Using the IN OUT and TO marks
These are special cases. When these marks have been
set, you jump to them simply be pressing the
IN, OUT
NOTE
Even when the time display on the home screen is shown
in bars and beats, or the MTC time display is selected, the
marks’ time values are always shown using the absolute
time values.
The IN, OUT and TO location marks are always displayed at the top of the list.
Other items in the list is always sorted in time order,
not the order of the location mark names or numbers.
3 Select the location mark using the dial (or the
§ and ¶ keys).
4 Press
ENTER. The playback point jumps to the
selected location mark.
TO key, as appropriate. You can use the list as
or
described above, but there is no need for this.
Titling using the list
1 Press the LOCATE key.
2 Use the Ó and Á keys to change to either the
TITLE or the TIME view of the list.
3 Select the location mark to be renamed, using
the dial (or the § and ¶ keys).
4 Press and hold down the
TITLE (MENU) key.
the
5 Give a title to the mark, using the procedure
described in “Entering and editing titles” on
page 26.
SHIFT key and press
6 When you press ENTER to confirm the name,
the screen returns to the list.
NOTE
You can select a mark for titling from either the
or the
TIME
Two marks can have the same title (but it is not a very sensible idea to give the same title to more than one mark), but
they cannot have the same time value.
It is not possible to rename the IN , OUT or TO marks—
these have special functions, and cannot be renamed.
view of the list.
TITLE
64 TASCAM 788 Digital PortaStudio
Page 65

About track editing
7 – Track editing
One of the most useful features of a disk-based
recorder such as the 788 is the ability to edit material
easily. When working with a stereo tape recorder in
the past, the usual editing method involved a white
pencil, a razor blade and sticky splicing tape. This
was not an easy process, and was very difficult to
undo if there were any mistakes,
The 788 allows you to edit songs, copying and moving material from one part of a song to another. This
IN, OUT and TO
We have previously seen how the IN, OUT and TO
points can be used for punching and for location.
They are also used in these track editing operations.
The IN point marks the start of the part of the track
which is selected when editing a part of a track
(rather than a whole track).
Entering the edit mode
1 Make sure that the 788 is stopped (not playing
back or recording).
editing is known as non-destructive editing, meaning
that the operation does not actually destroy data, and
you can undo mistaken editing operations easily.
If you have ever used a word-processor on a computer, you will probably find most of the 788’s edit-
ing operations pretty simple. If you have never used a
computer, the 788’s editing operations are nothing to
be scared about—just read through this section to see
how it all works.
The OUT point marks the end of the part of the
track which is selected when editing part of a track.
The TO point marks the final destination of a copy
or a move operation.
3 Use the
editing function you will be using.
JOG/DATA dial to highlight the track
2 Press the
screen).
TRACK EDIT key (just below the
Track editing functions
The track editing functions available on the 788 are:
• COPY->PASTE
• COPY->INSERT
• MOVE->PASTE
• MOVE->INSERT
• OPEN
Remember!
You can undo any of these operations (see “UNDO
and REDO” on page 69). Even if you delete all the
material on every track using these functions, you
can still get it back with only a few key-presses.
4 Press the
5 Select the appropriate values, as described
below.
6 Press
EXIT/NO to exit without performing the
operation,
• CUT
• SILENCE
• CLONE TRACK
• CLEAN OUT
See the sections below for details of how to use these
functions.
TIP
Although you cannot use virtual tracks as the source for
copy and move operations, you can assign a virtual track to
a track temporarily to (say) copy part of a virtual track to an
already-assigned track and then reassign the original.
ENTER key.
ENTER/YES to perform the operation, or
TASCAM 788 Digital PortaStudio 65
Page 66

7 – Track editing–COPY -> PASTE
COPY -> PASTE
This function takes the section of a track or tracks
marked by the IN and OUT points, copies it, and
places it at the TO point on the chosen track or
tracks.
OUTIN TO
OUTIN TO
The original source is left unchanged.
The copy operation overwrites anything which is
already recorded at the destination. The destination is
the same length as it was before the operation.
You can copy the section more than once in one operation.
You can change the following values:
Src.Trk This sets the source track or tracks
from which the section is copied. Choose
1,through
8 to select an individual track. Choose 1/2, 3/
, 5/6 or 7/8 to select a pair of tracks. Choose
4
1-8 to select all active tracks.
Dst. Trk This sets the destination track or
tracks to which the selected section is pasted. What
you can select here depends on what you have
selected for the source track. If you have selected a
single track, you can select tracks
1 through 8 here.
If you have selected a pair of tracks (for instance,
1/2), you can only select track pairs here. If you
have selected all active tracks (
1-8), then this is the
only option available to you here.
Times This is the number of times that the
selected section is pasted into the destination track or
tracks. You can set this value from
Press
YES to perform the operation or NO to leave
1 to 99.
this screen.
TIP
You can also use the
enter this function easily.
SHIFT + TRIM
key combination to
COPY -> INSERT
This function takes the section of a track or tracks
marked by the IN and OUT points, copies it, and
places it on the chosen track or tracks, inserting it as
new material, starting at the TO point.
OUTIN TO
OUTIN TO
The original source is left unchanged.
The insert operation adds the selected section as new
material to the destination. Nothing is overwritten on
the destination, as any existing material following the
TO point is moved to the end of the newly-inserted
section. The destination is longer than it was before
the operation.
You can copy the section more than once in one
operation.
You can change the following values:
Src. Trk This sets the source track or tracks
from which the section is copied. Choose
8 to select an individual track. Choose 1/2, 3/
, 5/6 or 7/8 to select a pair of tracks. Choose
4
1-8 to select all active tracks.
Dst. Trk This sets the destination track or
1,through
tracks into which the selected section is inserted.
What you can select here depends on what you have
selected for the source track. If you have selected a
single track, you can select tracks
1 through 8 here.
If you have selected a pair of tracks (for instance,
1/2), you can only select track pairs here. If you
have selected all active tracks (1-8), then this is the
only option available to you here.
Times This is the number of times that the
selected section is inserted (end-to-end) in the destination track or tracks. You can set this value from
to
99.
Press
YES to perform the operation or NO to leave
1
this screen.
66 TASCAM 788 Digital PortaStudio
Page 67

MOVE -> PASTE
7 – Track editing–MOVE -> PASTE
This function takes the section of a track or tracks
marked by the IN and OUT points, and moves it to
the chosen track or tracks, starting at the TO point.
OUTIN TO
OUTIN TO
After the operation, the selected section of the source
between the IN and OUT points is replaced by
silence.
This operation overwrites anything which is already
recorded at the destination. The destination is therefore the same length as it was before the operation.
You can change the following values:
MOVE -> INSERT
Src. Trk This sets the source track or tracks
from which the section is taken. Choose 1,through
8 to select an individual track. Choose 1/2, 3/
, 5/6 or 7/8 to select a pair of tracks. Choose
4
1-8 to select all active tracks.
Dst. Trk This sets the destination track or
tracks to which the selected section is moved. What
you can select here depends on what you have
selected for the source track. If you have selected a
single track, you can select tracks
1 through 8 here.
If you have selected a pair of tracks (for instance,
1/2), you can only select track pairs here. If you
have selected all active tracks (
1-8), then this is the
only option available to you here.
YES to perform the operation or NO to leave
Press
this screen.
TIP
You can also use the
to enter this function easily.
SHIFT + INSERT
key combination
This function takes the section of a track or tracks
marked by the IN and OUT points, and moves it to
the chosen track or tracks, inserting it as new material, starting at the TO point.
OUTIN TO
OUTIN TO
After the operation, the selected section of the source
between the IN and OUT points is replaced by
silence.
The insert operation adds the selected section as new
material to the destination. Nothing is overwritten on
the destination, as any material following the TO
point is moved to the end of the newly-inserted
section. The destination is therefore longer than it
was before the operation.
You can change the following values:
Src. Trk This sets the source track or tracks
from which the section is taken. Choose 1,through
8 to select an individual track. Choose 1/2, 3/
, 5/6 or 7/8 to select a pair of tracks. Choose
4
1-8 to select all active tracks.
Dst. Trk This sets the destination track or
tracks into which the selected section is inserted.
What you can select here depends on what you have
selected for the source track. If you have selected a
single track, you can select tracks
1 through 8 here.
If you have selected a pair of tracks (for instance,
1/2), you can only select track pairs here. If you
have selected all active tracks (
1-8), then this is the
only option available to you here.
YES to perform the operation or NO to leave
Press
this screen.
TASCAM 788 Digital PortaStudio 67
Page 68

7 – Track editing–OPEN
OPEN
This function “opens up” a silent gap between the IN
and OUT points on the chosen track or tracks.
OUTIN
OUTIN
The source and destination are the same, and after the
operation, the track is split at the IN point, with the
CUT
This function deletes the material between the IN and
OUT points on the chosen track or tracks and “closes
up” the gap.
OUTIN
IN
material which followed the IN point now moved to
follow the OUT point. The result is therefore longer
than the original.
There is only one value that you can change:
Src. Trk Select an individual track (1
through
7/8), all of the eight active tracks (1-8) or all
tracks, including the virtual tracks (
Press
8), a pair of tracks (1/2, 3/4, 5/6,
all).
YES to perform the operation or NO to leave
this screen.
point now moved to follow the IN point. Material
which was between the IN and OUT points is
deleted. The result is therefore shorter than the
original.
There is only one value that you can change:
Src. Trk Select an individual track (1
through
7/8), all of the eight active tracks (1-8) or all
tracks, including the virtual tracks (
8), a pair of tracks (1/2, 3/4, 5/6,
all).
The source and destination are the same, and after the
operation, the material which followed the OUT
SILENCE
This function is equivalent to recording silence
between the IN and OUT points on the chosen track
or tracks.
IN
IN
OUT
OUT
Press
YES to perform the operation or NO to leave
this screen.
No material is added or deleted, and the length of the
result is therefore the same as that of the original.
There is only one value that you can change:
Src. Trk Select an individual track (1
through
7/8), or all of the eight active tracks (1-8).
Press
8), a pair of tracks (1/2, 3/4, 5/6,
YES to perform the operation or NO to leave
this screen.
TIP
You can also use the
to enter this function easily.
SHIFT + DELETE
key combination
68 TASCAM 788 Digital PortaStudio
Page 69

CLONE TRACK
7 – Track editing–CLONE TRACK
This copies a track or pair of tracks to another track
or pair of tracks. The IN and OUT points do not have
any meaning here.
There are two values that you can change:
Src. Trk Select an individual track (1
through
7/8).
8), or a pair of tracks (1/2, 3/4, 5/6,
CLEAN OUT
This deletes all the material in a track or tracks. The
IN and OUT points do not have any meaning here.
Dst. Trk This sets the destination track or
tracks to which the source track is cloned. What you
can select here depends on what you have selected
for the source track. If you have selected a single
track, you can select tracks
have selected a pair of tracks (for instance,
1 through 8 here. If you
1/2),
you can only select track pairs here.
YES to perform the operation or NO to leave
Press
this screen.
If you try to select the same track as a destination that
you have selected as the source, when you press the
YES key, a message will appear: SAME
TRACK
.
Redo the operation with a different set of tracks.
Src. Trk Select an individual track (1
through 8), a pair of tracks (1/2, 3/4, 5/6,
7/8), or all of the eight active tracks (1-8).
Press
YES to perform the operation or NO to leave
this screen.
There is only one value that you can change:
UNDO and REDO
Unlike a tape recorder, but like most word-processors, you can undo your mistakes (the 788 remembers up to the last 999 operations you perform in
each song). What is more, you can undo your undo
operations (redo).
The operations that you can undo are:
• The different track editing functions described in
this section
• Recording operations
If you need to delete the contents of a virtual track
that is not currently assigned to a track, you must
assign it to a track and then perform this operation.
• Auto punch operations
• Mastering operations
In addition, all these operations are stored as part of
the song on the disk; even when you turn the machine
off, the history of all the previous operations is stored
ready for next time.
What this means is that you can finish your work for
the day, come back in the morning with fresh ears,
and decide that maybe you didn’t want that overdub
after all. With the 788, this is no problem.
TASCAM 788 Digital PortaStudio 69
Page 70

7 – Track editing–UNDO and REDO
Undoing and redoing actions
1 Press the UNDO/REDO key and a list of the
operations that you have done since the start of
the song is shown on screen:
The first action (
START UP) is numbered
0, and all the actions after this are then numbered in order. They are named:
RECORDING, AUTO PUNCH,
COPY->PASTE, etc.
2 Use the dial to scroll through the list until the
cursor highlights the action to where you want
to undo.
3 Press
ENTER, to return to the point in your
work just before you made your mistake.
An undo/redo example
You can also redo an action that you have undone in
exactly the same way.
TIP
As well as using the dial to scroll through the list, you can
also use the
automatically at the event before or after the current event.
If you press the
to the event immediately before the current event. Press
ENTER to undo the last event.
If you press
to the event immediately following the current event (i.e. the
last action that has been undone). Press the
to redo this action.
NOTE
N
Performing an action after the redo clears the list of redoable actions (i.e. those actions which have been
undone).
UNDO /REDO
UNDO
key (unshifted) , the cursor moves
REDO (SHIFT
key to position the cursor
+
UNDO)
, the cursor moves
ENTER
key
Here’s an extremely simplified example (in fact, it’s
extremely unlikely that you’d work this way, but it
shows the principles involved):
>RECORDING 12
RECORDING 11
AUTO PUNCH 10
RECORDING 9
AUTO PUNCH 8
RECORDING 7
RECORDING 6
RECORDING 5
RECORDING 4
RECORDING 3
COPY->PASTE 2
RECORDING 1
START UP 0
This is yet another retake of the lead vocal
Another attempt at the whole of the lead vocal
A try to correct a bad note in the lead vocal
First try at the lead vocal
Repairing the bad guitar bridge
Recording the guitar solo
Piano (alternative part)
Piano
Guide vocals
Bass line
Looping the drum part
Basic drum loop
Beginning of song
This is the history of a recording session so far. Suppose that you decide that items 11 and 12 in the list
are not needed (in other words, the first take (9) with
its correction (10) have been overwritten by 11 and
12, but you feel that the original take (9) with its correction (10) has more energy, so you want to retrieve
it:
1 Press the
UNDO key.
2 Use the dial to scroll down to the step to where
you want to undo (here it’s 10).
3 Press
ENTER.
Now you have the track back again. If you press the
UNDO key, you’ll see that there’s a check mark
beside 10 - this shows that this is the “undo mark”.
RECORDING 12 This is yet another retake of the lead vocal
RECORDING 11 Another attempt at the whole of the lead vocal
>AUTO PUNCH 10 A try to correct a bad note in the lead vocal
RECORDING 9 First try at the lead vocal
AUTO PUNCH 8 Repairing the bad guitar bridge
RECORDING 7 Recording the guitar solo
RECORDING 6 Piano (alternative part)
RECORDING 5 Piano
RECORDING 4 Guide vocals
RECORDING 3 Bass line
COPY->PASTE 2 Looping the dr um part
RECORDING 1 Basic drum loop
START UP 0 Beginning of song
This line marks the
point to where we have
made the undo
Notice that we can still see items 11 and 12. This is
because we can still redo them, if we decide that the
first vocal take (9 and 10) wasn’t so great after all.
To redo them is just as simple as undoing them: press
UNDO key, highlight the step to which you want
the
to return, and press
ENTER.
70 TASCAM 788 Digital PortaStudio
Page 71

7 – Track editing–UNDO and REDO
Items above the “undo” line are visible and you can
redo them until you perform another action after the
undo operation.
For instance, if you decided that you wanted to have
another go at repairing the lead guitar bridge…
You could undo all items up to item 7:
RECORDING 12 This is yet another retake of the lead vocal
RECORDING 11 Another attempt at the whole of the lead vocal
AUTO PUNCH 10 A try to correct a bad note in the lead vocal
RECORDING 9 First try at the lead vocal
AUTO PUNCH 8 Repairing the bad guitar bridge
>RECORDING 7 Recording the guitar solo
RECORDING 6 Piano (alternative part)
RECORDING 5 Piano
RECORDING 4 Guide vocals
RECORDING 3 Bass line
COPY->PASTE 2 Looping the drum part
RECORDING 1 Basic drum loop
START UP 0 Beginning of song
…and then re-record the guitar bridge.
After this, though, if you wanted to restore the vocal
tracks which we’d recorded, you wouldn’t be able to.
The new recording would replace everything above
the line”.
All the previous item
gone
AUTO PUNCH 8 This was the second go at repairing the bridge
>RECORDING 7 Recording the guitar solo
RECORDING 6 Piano (alternative part)
RECORDING 5 Piano
RECORDING 4 Guide vocals
RECORDING 3 Bass line
COPY->PASTE 2 Looping the drum part
RECORDING 1 Basic drum loop
START UP 0 Beginning of song
s have now
TASCAM 788 Digital PortaStudio 71
Page 72

8 – Mastering and backup (CD-R)
The 788 can use a SCSI-connected CD-R or CD-RW
drive for mastering and for backing up songs.
We strongly suggest that you contact your TASCAM
distributor or visit the TASCAM Web site for up-todate information regarding the compatibility of your
CD-R or CD-RW drive with the 788.
You should also make sure that the CD-R and CDRW media you use for recording and backing up
songs meet the requirements specified by the drive.
NOTE
You cannot use the features here with an “audio” CD-R or
CD-RW unit such as the TASCAM CD-RW2000. The CD-R
drive used for these operations must be connected via
SCSI.
Connection
As explained in “SCSI issues” on page 17, each SCSI
device connected to the 788 must have a unique ID.
The IDs used for the 788 internal hard disk and for
the internal SCSI controller are 0 and 7. You should
therefore not use either of these IDs for the CD-R
drive, and if any other SCSI devices are connected,
you should not use their IDs for the CD-R drive,
either.
The last unit in the chain (if the CD-R drive is the
only device connected to the 788, it will be the last
Although you can connect CD-RW drives to the 788, and
you can record on CD-RW media, you cannot use the
erase capabilities of the drive or the media while recording
songs from the 788. However, when you are backing up
material to CD-RW media, you can erase old data from
CD-RW discs using the CD-RW drive and re-use the discs.
Following common usage, we use the word “disc” to
describe CD and CD-R and CD-RW media, and “disk” to
describe the hard disk or any removable SCSI mass-storage media (except CD discs).
Unless otherwise stated, we use the term “CD-R drive” to
refer to CD-R and CD-RW drives, and the term “CD-R disc”
to refer to both CD-R and CD-RW media.
unit) should be terminated. Some drives have internal
termination, some require an external terminator.
Consult the documentation of the device to discover
what termination is required for your CD-R drive.
Finally, remember that you should NEVER connect
or disconnect SCSI devices with the power applied to
them. If you make or break connections with the
power turned on, there is a very real risk that you will
damage the SCSI units.
Notes regarding the handling of CD-R discs
There are additional precautions that you should take
when handling CD-R and CD-RW discs, that are different to those that you should take when handling
ordinary CDs.
• Avoid touching the recording (non-label) side of a
disc on which you will be recording. Recording on
a disc requires a cleaner surface than playing back,
and fingerprints, grease, etc. can cause errors in the
recording process.
• CD-R discs are more sensitive to the effects of heat
and ultraviolet rays than ordinary CDs. It is important that they are not stored in a location where
direct sunlight will fall on them, and which is away
from sources of heat such as radiators or heat-generating electrical devices.
• Always store CD-R discs in their “jewel cases” to
avoid dirt and dust accumulating on their surfaces.
• Do not put labels or protective sheets on the discs
and do not use any protective coating spray.
• When labeling CD-R discs, always use a soft oilbased felt-tipped pen to write the information.
Never use a ball-point or hard-tipped pen, as this
may cause damage to the recorded side.
• Dirty discs may be cleaned using a soft dry cloth
and/or a commercial CD cleaning fluid or ethyl
alcohol. Do not use thinner, gasoline, benzene or
LP cleaning fluid, as these will damage the disc.
• If you are in any doubt as to the care and handling
of a CD-R disc, read the precautions supplied with
the disc, or contact the disc manufacturer directly.
72 TASCAM 788 Digital PortaStudio
Page 73

Mixdown
8 – Mastering and backup (CD-R)–Mixdown
As mentioned earlier, you can mix the contents of the
recorded tracks, as well as inputs from the sub-mixer,
to the
STEREO OUTPUTs, which can then feed a
DAT or cassette recorder, etc.
The 788 provides you with an additional feature,
allowing you to “pre-master” the stereo mix to the
788’s hard disk, so that you can audition the mix and
re-do it if necessary, before committing it to disc.
Once the pre-master track has been recorded, it can
be used many times, meaning that many CD copies
Pre-mastering
Pre-mastering can be carried out without the CD-R
drive connected, as it uses the 788’s hard disk only.
The start of the pre-mastered material is always the
00:00:00:00 point, and the end of the pre-mastered
material is the OUT point.
Before starting the pre-mastering process, make sure
that all recorded tracks are assigned to mixer channels, and that if you are using the sub-mixer, this is
assigned to the stereo outputs.
of the same track can be recorded directly from the
788. As suggested in “Checking the master” on
page 74, this pre-master track can also be recorded
on non-CD-R media.
In addition, since the pre-master mix is saved as part
of the song, any song which has been pre-mastered
can be selected as part of a track list, allowing a
whole CD to be produced from previously-recorded
songs.
• Playback and fast forward will stop at the OUT
point, and the playback position cannot move past
this point.
• Auto punch operations are disabled.
• Jog and trim are disabled.
• Pitch control and SSA are disabled.
• Direct location is disabled (“Direct location (i)” on
page 60).
• Recording is carried out as explained below.
1 Set the OUT point at the position where you
want the pre-mastered material to stop (“Set-
ting the IN and OUT points” on page 52).
2 With the transport stopped, press the
MENU
key.
3 Move the cursor to
4 Move the cursor to
and press
ENTER.
CD-R, and press ENTER.
PRE MASTERING
The screen changes to the home screen, but
with the word
MASTERING at the top left
of the screen.
If any
REC READY indicators are on, they are
turned off, and they cannot be turned on again
while pre-mastering is being carried out.
Recording the pre-master To record the pre-
master stereo tracks, press and hold the
key, and then press the
the
RECORD indicators light.
PLAY key. Both the PLAY and
Recording always starts (regardless of the current
position) at 00:00:00:00.
The mastering records the effects of all mixer settings and effect settings, etc.
If you do not stop the recording before the OUT
point, it will automatically stop at the OUT point. If
you stop the recording at the OUT point, the master
recording will stop there, and the length of the track
will be from the 00:00:00:00 point to the point where
the recording stopped.
NOTE
The minimum length for a CD track is four seconds. Make
sure that all mastered recordings are at least this length.
The maximum length for a CD track recorded from the 788
is 70 minutes. Tracks made from the 788 should not
exceed this length,
RECORD
While pre-mastering, transport controls work in the
usual way, except that:
During the mastering operation, all channel operations (EQ, send, fader/pan) can be carried out, either
from the 788’s controls, or by means of MIDI com-
TASCAM 788 Digital PortaStudio 73
Page 74

8 – Mastering and backup (CD-R)–Mixdown
mands (see “MMC and MIDI functions” on
page 101).
TIP
While you are recording the master, synchronization and
the sub-mixer are active, and you can use these features to
add synchronized MIDI sound sources to the stereo master
mix.
You can set and edit effect parameters and recall
effects from the effect libraries while mastering.
It is also possible for you to make assignments while
mastering, but it is not possible to recall scene or
routing memories (“Routing and scene libraries” on
page 91).
When you have mastered the recording, you can
either re-master the recording (simply press and hold
the
RECORD key and press the PLAY key again) or
Checking the master
When the master has been recorded, you will almost
certainly want to check it. After exiting from the
mastering mode:
1 With the transport stopped, press the
key.
2 Move the cursor to
3 Move the cursor to
CD-R, and press ENTER.
CHECK MASTER and
press ENTER.
The screen changes to the home screen, but
with the word
MASTER TRACK at the
top of the screen, the title of the current song,
(it can be edited and changed from this screen)
and the total time in minutes and seconds of
the master track.
All monitoring is now from the
STEREO selection
only. All other monitor selections are disabled and
cannot be changed.
No faders or other mixer controls (including assignment) have any effect. The only possible control is of
the monitor volume is through the
PHONES jacks.
MONITOR and
MENU
proceed to the master check operation (see “Check-
ing the master” on page 74).
Mastering operations are included in the undo list
(see “Undoing and redoing actions” on page 70). If
you make an almost perfect pre-master, but all other
attempts after that fail to achieve the perfection you
are looking for, you can decide to use the almost-perfect original, and undo all the less-than-perfect
attempts which followed.
Exiting mastering To exit the mastering opera-
tion and allow normal operation:
1 If the display does not show the home screen
(see “The “home” display” on page 26), press
HOME/ESC key).
the
2 Press the
MASTERING from the display.
EXIT/NO key to remove the
The transport controls work in the following way:
PLAY plays back from the current position to the
•
end of the master track.
•
REW and F FWD move the playback position back-
ward or forward at 10x, 50x, 100x or 1000x the
normal playback speed (as usual), but the wind
“speed” is not shown on screen.
•
STOP stops playback or “winding” at the current
position.
• Recording is disabled.
• All location functions are disabled.
• Jog, vari speed, SSA, repeat, etc. are disabled.
TIP
While playing back the master track, it is output from the
STEREO
the
ble to use the pre-mastering and master check functions to
mix to a DAT or MD recorder, etc.
(and
MONITOR
DIGITAL OUTPUT
and
PHONES
jacks. It is therefore possi-
) jacks as well as from
Exiting master checking When you have lis-
tened to the master, you may decide to proceed with
burning a CD-R, or you may want to re-master the
song.
In either case, press the
home screen, and restore the assignments, etc. which
were in operation before the master check.
EXIT/NO key to return to the
74 TASCAM 788 Digital PortaStudio
Page 75

8 – Mastering and backup (CD-R)–Recording to CD-R
Trimming the master
You may sometimes want to trim the beginning or the
end of a master track after checking it. For example,
you may have made a perfect mix, except that there is
too much “dead time” or a cough, fret noise, etc.
before the start of the track, or there may be too much
time after the end of the track, as the OUT point was
not set correctly.
To correct these, without having to do the whole mix
again:
1 Make sure the 788 is in “normal” mode, that is,
not in the master check mode or mastering
mode.
2 Move the playback position to the approximate
position where you want to trim (either the
start or the end of the master).
If you want to trim the start of the master:
3 Set the IN point to be the 00:00:00:00 point.
4 Use the jog control to set the OUT point to the
exact position where you want the master to
start (see “Setting the IN and OUT points” on
page 52).
If you want to trim the end of the master:
3 Set the IN point to the point where you want
the end of the master to be, using the jog
method to set the point (see “Setting the IN and
OUT points” on page 52).
4 Set the OUT point to be some way after the
existing OUT point.
In both cases (trimming the start and trimming the
end):
5 Use the Track Edit
CUT function (see “CUT”
on page 68) to cut all tracks between the IN
and the OUT point. You must select the
all
option for the master track to be cut in this
way.
If you are trimming the end of the master:
6 Make sure that the OUT point is now located
at the real end of the track (where you set the
IN point previously).
In both cases (trimming the start and trimming the
end):
7 Play back the master track, as described in
“Checking the master” on page 74. The start
and end should now be as you want them.
Recording to CD-R
There are two ways of using the 788 to record a CDR: either a track at a time; TAO (Track At Once) with
the disc being finalized after the last track has been
recorded, or a number of tracks together; DAO (Disk
At Once), with the disc being finalized at the end of
the session.
Recording many tracks at once allows you to reorder
the tracks on the disc. It also allows you to put varying lengths of silence between tracks (ranging from 0
to almost 10 seconds).
Recording to CD-R (track recording)
Before starting this operation you must make sure
that there is a recordable disc inserted in the CD-R
drive. If there is no recordable disc (that is, a CD-R
or CD-RW disc that has not been finalized), the 788
shows an appropriate message.
Remember that whichever method you use to record
your CDs, you can record a maximum of 99 tracks on
one CD, the minimum length of a track is four seconds, and the maximum track length you can record
from the 788 is 70 minutes.
NOTE
I
It is not possible to record a disc using both methods of
recording. If you record a disk using the track method, you
cannot then add a number of tracks together, but you can
add single tracks. Likewise, if you record a number of
tracks together, you cannot add any tracks (singly or
together) later on.
1 Make sure the 788 is in “normal” mode, that is,
not in the master check mode or mastering
mode.
2 With the transport stopped, press the
MENU
key.
3 Move the cursor to
TASCAM 788 Digital PortaStudio 75
CD-R, and press ENTER.
Page 76

8 – Mastering and backup (CD-R)–Recording to CD-R
4 Move the cursor to CD WRITER and press
ENTER.
The 788 checks the CD-R drive. If there is a
valid disc in the drive containing at least one
pre-mastered song, the display shows the
screen below (a list of the songs which have
been mastered on the current partition).
NOTE
If a song has been recorded, but has not been mastered, it
will not appear in the list.
If you want to change partitions, see “Selecting a disk” on
page 32.
5 Use the dial to select the song to be recorded,
and press
ENTER.
TIP
If you choose not to finalize the disc at this point, you can
finalize it later, without recording another song.
7 Press ENTER to continue, and EXIT if you want
to choose a different song.
8 You are asked if you are sure that you want to
record the song. Press
the recording, or
ENTER to proceed with
EXIT to cancel.
If there is not enough space on the internal disk
for preparation, or on the CD disc for the song
that you have selected for recording, the 788
gives an appropriate error message.
9 The 788 makes an image of the song on disc (to
allow for smooth and easy transfer) and then
starts writing it to the CD.
The top line of the display gives an indication
of the time remaining for the operation.
While the image and writing to disc is going
on, all the 788 controls are disabled, and no
action is possible.
You may now rename the song using the
+
MENU (TITLE) key.
SHIFT
6 Choose at this point whether you want to final-
ize the disc.
If you finalize the disc at this stage, you cannot
record any further songs on it. If you do not
finalize the disc, you will not be able to play it
on ordinary audio CD players.
Finalizing the disc
When you have recorded the last track on the disc,
you must finalize it in order to allow it to be played
on ordinary CD players, but you can check the
recorded tracks using the 788’s CD PLAYER function (“Playing back CDs using the 788” on page 78).
The CD-R drive must contain an unfinalized disc
before you start the process.
1 Make sure the 788 is in “normal” mode, that is,
not in the master check mode or mastering
mode.
2 With the transport stopped, press the
MENU
key.
3 Move the cursor to
4 Move the cursor to
press
ENTER.
CD-R, and press ENTER.
CD FINALIZE and
76 TASCAM 788 Digital PortaStudio
NOTE
DO NOT TURN OFF the 788 or the CD-R drive while this
writing operation is taking place. You will almost certainly
spoil the disc and may corrupt the song data.
Two seconds of silence are added to the end of each track
recorded to disc in this way.
10 To check the recorded disc, use the CD
PLAYER
option described below (“Playing
back CDs using the 788” on page 78).
5 A pop-up screen asks if you are sure. Press
ENTER to continue, EXIT to stop the finalize
process.
6 If you continue, the CD session is closed and
the finalizing material (Table of Contents or
TOC) is written to the disc. A countdown timer
at the top of the screen lets you know the time
until the finalization is complete.
NOTE
You cannot record further tracks on a finalized disc. You
can only finalize a disc once, and you cannot unfinalize a
disc.
The CD-R drive eject button is locked while writing is going
on. You can only eject the disc after writing has finished.
If you use CD-RW media, you cannot play the resulting
discs in most audio CD players.
Page 77

8 – Mastering and backup (CD-R)–Recording to CD-R
Recording to CD-R (multiple tracks)
When recording multiple tracks, the tracks can be
recorded in any order, and varying lengths of silence
can be added.
Once a CD has been made in this way, no further
tracks can be added, as the CD is automatically finalized at the end of the operation.
There must be a recordable CD disc in the drive
before starting this operation.
1 Make sure the 788 is in “normal” mode, that is,
not in the master check mode or mastering
mode.
2 With the transport stopped, press the
MENU
key.
3 Move the cursor to
4 Move the cursor to
ENTER.
CD-R, and press ENTER.
CD WRITER and press
If you have made a mistake in adding a song to
the list, you can remove it by highlighting the
title and pressing the
DELETE key.
6 When you have added all the songs to the list
that you want to record on the CD, press
ENTER.
NOTE
If you have only selected one song, the procedure from
now is as if you had highlighted the song and pressed
ENTER
recording)” on page 75. Read that section, and ignore the
remainder of this section.
, as described in “Recording to CD-R (track
The screen changes to the song order screen (if
you want to return to the song selection screen,
press
EXIT.
7 Use the dial to scroll through the list of songs.
The 788 checks the CD-R drive. If there is a
valid disc in the drive, the display shows the
screen above (a list of the songs which have
been mastered on the current partition).
NOTE
If a song has been recorded, but has not been mastered, it
will not appear in the list.
If you want to change partitions, see “Selecting a disk” on
page 32.
If you have a song in another partition which you want to
add to the list in the current partition, you should copy it
from the old partition to the current partition (see “Copying
songs” on page 29).
5 Use the dial to scroll through the list of songs,
and when you highlight a song that you wish to
add to the final CD, press the
INSERT key.
A check mark (✔) appears by the title of every
selected song. There is no need to worry about
the final running order of the CD at this stage.
8 When a song title is highlighted, use the § and
¶ keys to move it up and down in the list. As
the song is moved up and down in the list it
remains highlighted.
9 Select further songs for rearrangement using
the dial.
10 When you have finalized the running order,
ENTER .
press
The screen changes to the “gap setting” screen.
This allows you to set the gap between tracks
on the CD (press EXIT to return to the song
order screen)
11 Use the § and ¶ keys to move the cursor to
the gaps between the songs on the CD.
12 Use the dial to set the time in seconds between
songs, from
9.9 seconds in 0.1 second steps.
0.0 seconds (no gap) through
TASCAM 788 Digital PortaStudio 77
Page 78

8 – Mastering and backup (CD-R)–Recording to CD-R
NOTE
When you come to play back the disc on a CD player, the
start of the gap will appear as Index 0 on the track following
the gap, and the start of the track will appear as Index 1.
Because the gap counts as a part of the track, the total
length of the track and gap together cannot exceed 70
minutes.
13 When all the gaps have been set, press ENTER.
A pop-up asks if you are sure. Use the
to proceed with writing the CD or the
YES key
NO key
to cancel the operation.
14 When you press
YES, a disk image is made of
each song in turn, which is then written to the
CD. A countdown timer at the top of the screen
Playing back CDs using the 788
If an audio CD (either finalized or unfinalized) is
inserted into a CD-R drive connected to the 788, the
788 can be used to play it back.
The sound is sent to the 788 through the SCSI connection, and is output through the
PHONES jacks. The only control over the sound
from the 788 is through the
All other mixer controls are disabled.
MONITOR and
MONITOR control knob.
gives an indication of how long the process will
take.
NOTE
DO NOT TURN OFF the 788 or the CD-R drive while this
writing operation is taking place. You will almost certainly
spoil the disc and may corrupt the song data.
15 When the last song has been written, the disk is
finalized. You can now eject the disc and play it
in a CD player.
NOTE
The CD-R drive eject button is locked while writing is going
on. You can only eject the disc after writing has finished.
If you use CD-RW media, you cannot play the resulting
discs in most audio CD players.
• The current track and its length (when the CD
player function is first entered, the track number
will always be 1)
• The total number of tracks on the disc
• The total play time of the disc (including any gaps
between tracks)
• The stereo meters also show the level of the audio
recorded on the disc
1 Make sure the 788 is in “normal” mode, that is,
not in the master check mode or mastering
mode.
2 With the transport stopped, press the
MENU
key.
3 Move the cursor to
4 Move the cursor to
ENTER.
CD-R, and press ENTER.
CD PLAYER and press
The screen shows:
• The elapsed time of the current track.
• Whether the disc is finalized or not
The 788 transport controls are used to control playback of the CD, as explained here:
•
PLAY starts playback from the current playback
position. While the disc is locating, the
PLAY indi-
cator flashes, and while playback is actually taking
place, it lights steadily
•
STOP stops playback at the current position
•
REW and F FWD take the playback position for-
ward or backward one track, while playback is
stopped
• The dial can also be used to move the playback
position forward or backward one track while playback is stopped
• All other playback functions are disabled
NOTE
While this screen is displayed (the CD Player function is
active), the eject button on the CD-R drive is disabled. To
eject the CD, press
and then press the CD-R drive eject key.
EXIT
to exit the CD player function,
78 TASCAM 788 Digital PortaStudio
Page 79

8 – Mastering and backup (CD-R)–Backup using CD-R
Backup using CD-R
As well as allowing you to record the final mix to
CD-R, the 788 also allows you to back up all of a
song (tracks, virtual tracks, edits, undo history, effect
settings, etc.) to CD-R.
This is a relatively cheap and portable way of storing
your work. Even if you produce large songs and use
smaller hard disk partitions (e.g. 1 GB), this function
allows you to store the song reliably and safely, reuse
the hard disk space, and reload (restore) the song
from CD-R and continue work on it.
If the total amount of data that makes up a song is
more than the capacity of a single CD disc, the 788
can split the backup over a series of discs. When you
Backing up a song
Before you start backing up, make sure you have a
supply of blank CD-R discs. You cannot use discs
that have already been used for mastering (and you
cannot use backup discs for mastering, either).
You can only back up one song at a time.
1 Put the first disc into the CD-R drive.
2 Make sure the 788 is in “normal” mode, that is,
not in the master check mode or mastering
mode.
3 With the transport stopped, press the
key.
4 Move the cursor to
press
ENTER.
DATA BACKUP, and
If there is no recordable disc in the drive, the
screen shows an error message, otherwise the
screen shows a list of the songs on the current
partition.
MENU
come to restore the song, it will ask for the discs in
order and reassemble the song internally.
NOTE
There must be sufficient space on the 788 disk partition for
this backup to be able to take place (at least 640 MB). If
you have selected a partition size of 512 MB, backup can
never take place of a song recorded on that partition. For
this reason, we recommend using a large partition size
when formatting a new external disk (“Formatting a disk” on
page 31)
Backup discs cannot be played in a CD player (or read in a
computer). They contain the audio data of a song in a form
which can be read only by the 788.
If the disc is a CD-RW disc in a CD-RW drive,
and it has been used for 788 backup before,
you have the option to erase the old data.
5 Use the dial to highlight the song to be backed
up.
The 788 reads the song and performs some
“housekeeping” tasks. At the end of this, it
shows how many CD-R discs will be needed for
the backup.
6 If you have the discs ready and you want to
proceed, press
ready, press
7 If you press
YES. If you do not have the discs
NO.
YES, the 788 makes an image of
the song; its tracks, virtual tracks, playlist,
edits, etc. and prepares to write this data. A
countdown appears at the top of the display,
providing a guide to how long the current
operation will take.
8 If the backup is too big to fit on one CD-R disc,
when the first disc is full, it is automatically
ejected, and a message asks you to put in the
next disc.
9 When the last disc has been written, it is
ejected, and the song which was current when
the backup started is reloaded.
TASCAM 788 Digital PortaStudio 79
Page 80

8 – Mastering and backup (CD-R)–Backup using CD-R
NOTE
The backup operation may take some time, as a song may
have many different parts to it. If you use the
UNUSED
may save some time and space (“Deleting unused space
from a song” on page 30).
DO NOT TURN OFF the 788 or the CD-R drive while this
backup operation is taking place. You will almost certainly
spoil the disc and may corrupt the song data.
function before backing up the song, this
DELETE
Restoring data from CD-R
This operation is basically the reverse of the backup
operation.
Before you start restoring a song, make sure that you
have all the discs that were used to back up the song.
If some of the discs are missing, you will not be able
to restore the song (you cannot load half a song).
1 Put the first (or only, if there is only one) disc
of the backup set into the CD-R drive.
2 Make sure the 788 is in “normal” mode, that is,
not in the master check mode or mastering
mode.
3 With the transport stopped, press the
key.
4 Move the cursor to
and press
ENTER.
DATA RESTORE,
The 788 reads the title of the song from the disc
and asks you if you want to continue.
5 Press
YES to continue, NO to eject the disc and
cancel the operation.
6 If you go ahead with the restore, the 788 copies
the data from the CD-R disc to the active disk
partition. A bargraph on screen shows the
progress.
7 If the backup is spread over more than one
disc, when the first disc has been read, it is
MENU
CD-R backup discs are finalized and cannot be reused for
any other purpose (but CD-RW discs can be erased for
other backups).
TIP
Label your discs as soon as you make them, using a soft
water-based felt-tip pen. It is important that you keep notes
of what is on each disc for future reference.
ejected, and a message asks you to put in the
next disc. Insert the next disc and press
YES.
If you insert the wrong disc (out of sequence or
from a different backup set), the 788 ejects the
“bad” disc and asks you again for the correct
one. If you really cannot find the right disc, you
must press
NO to cancel the restore.
If you cancel the restore operation part of the
way through, none of the song is restored, and
the 788 goes back to the state before the restore
was started.
8 When data is restored from the last disc, the
disc is ejected, and the previous song (before
the restore operation was started) is loaded.
NOTE
If the song which has been restored has the same name as
a song which is currently on the partition, there will be two
songs with the same name. We suggest that you rename
one of them after the restore operation, to avoid confusion
(“Entering and editing titles” on page 26).
It is possible to make two different backups of a song, each
with the same name, at different stages of the song’s development. If you mix up the backup sets and insert a disc
from the wrong set into the middle of a backup, the 788 is
smart enough to recognize this, and it will eject the “bad”
disc and ask you for the correct disc.
80 TASCAM 788 Digital PortaStudio
Page 81

9 – Effects
The 788 includes two high-end digital internal effects
units, which can be used in a variety of ways to
enhance your recording project. Since all effect processing is carried out in the digital domain, there is
no loss of quality caused by conversion to and from
the digital domain.
The two effects units (EFFECT 1 and EFFECT 2) can
be set up in a number of different ways, according to
the current recording task:
EFFECT 1 This effects unit can be used as a multi-
effect processor, incorporating five effects in one
chain and inserted into the signal path of input signals. This is particularly useful when recording
source material such as electric instruments.
Alternatively, it can be placed into the mixer’s effects
loop, as a single stereo effect processor (for example
in the mixdown stage of a project).
EFFECT 2 This effects unit can inserted in input
channels as up to eight dynamics processors, or be
placed at the stereo output as a stereo dynamics processor.
Finally, like
single stereo effect processor, placed in the aux loop.
The reason for the different modes is that you will
probably require different types of effect at different
times.
• For instance, if you are recording many channels
simultaneously using microphones, you may want
to use compressors on many channels at once.
• When you come to overdub an electric guitar solo,
you may want to use the multi-effects unit to give
the guitar sound some life, without having to go
through the trouble of micing up an amplifier.
• At mixdown, it’s quite likely that you’ll want to
add a selective amount of the same effect to a number of tracks at the same time.
• Again, at mixdown you may want to engage a compressor on the final output. Digital distortion is a
particularly unpleasant sound, and putting a compressor in front of the outputs is one way to avoid it
(another way is simply to keep the levels at a reasonable volume, of course!).
EFFECT 1, you can choose to use it as a
Setting up EFFECT 1
Using EFFECT 1 as a multi-effect processor
1 Assign a source to the mixer channel which
will be using
cessor, as described in “Assigning sources to
mixer channels.” on page 36.
2 Press and hold down the
indicator flashes, as does the indicator of the
current assignment.
3 While holding down the
the
SELECT key of the channel(s) to use the
effector. The indicator(s) of the channel(s)
flash along with the
4 Press the
change between pre-EQ and post-EQ insert
(i.e. the effect settings are made on the
unequalized or the equalized channel signal).
EFFECT 1 as a multi-effect pro-
EFFECT 1 key. The
EFFECT 1 key, press
EFFECT 1 indicator.
SELECT key of the channel again to
The
POST indicator flashes when post-EQ is
selected, and is not lit when pre-EQ is selected.
After this operation when the keys are
released, the input indicator, together with the
SELECT indicator(s) of the channel(s), the
EFFECT indicator and (optionally) the POST
indicator will all be lit.
5 Choose a multi-effect processor type. See
“Selecting the type of effect” on page 84.
NOTE
assignment
If you have previously made a stereo link between two
input channels, or if you are using
nels 7 and 8, only the odd-numbered channel of the pair
will be routed through the processor (except in the case of
the double exciter, where each channel will be routed
through the processor). The output from the multi-effect
processor is always stereo.
EFFECT 1
with chan-
TASCAM 788 Digital PortaStudio 81
Page 82

9 – Effects–Setting up EFFECT 2
Using EFFECT 1 as a single stereo effect processor in the effect loop
1 Press and hold down the SEND key. If EFFECT
1
or EFFECT 2 has already been assigned to the
send loop, the appropriate indicator(s) will
flash.
2 Press the
EFFECT 1 key. The indicator flashes
when the effects unit is assigned to the loop.
NOTE
You can reverse this order of making the settings (press
and hold the
key).
You can remove the effects unit from the effects loop by
repeating the process so that the indicator does not flash
when the
SEND
3 Select the mode for the effects unit. See “Single
stereo effect processor settings” on page 85.
The effect send may be set to either pre- or post-fader on a
channel-by-channel basis, as explained in “Changing
between pre-fader and post-fader settings” on page 84.
Setting up EFFECT 2
The second effects processor is slightly different
from the first in its options and the settings you can
make, as explained here:
Using EFFECT 2 as a multi-channel dynamics processor
In this mode, the effects processor acts as a compressor, placed as an insert, before the equalization section, but after the digital pad and gain (see “Channel
digital pad and gain” on page 44). Up to eight input
channels may use the dynamics processor at a time.
1 Press and hold down the
EFFECT 2 key. The
indicator flashes, together with the indicators
of any currently assigned channels.
2 While holding down the
EFFECT 2 key, press
the SELECT key of any channels where you
want to use the channel dynamics. As you press
these keys, the channel
SELECT indicators
flash to show which channels are using the
dynamics processor.
Pressing a channel’s
already flashing when the
held down will stop that channel using the
dynamics processor.
For details of using the multi-channel dynamics processor, see “Dynamics processor” on page 90.
NOTE
If you have previously made a stereo link between two
input channels, or if you are using
nels 7 and 8, pressing one
assign the effects unit to both channels.
You can also reverse the order of the key presses here
(press and hold down a
EFFECT 2
key).
SEND
key, and then press the
key is pressed.
SELECT key which is
SELECT
SELECT
EFFECT 1
EFFECT 2 key is
EFFECT 1
key of the pair will
key, and then press the
with chan-
Using EFFECT 2 as a stereo dynamics processor
In this mode, the effects processor acts as a compressor on the stereo output, and may act on the signal
sent to the
STEREO fader (pre-fader), or on the final
level (post-fader).
1 Press and hold down the
EFFECT 2 key. The
indicator flashes, together with the indicators
of any current assignments.
2 While holding down the
the
STEREO key (in the top row of keys, imme-
EFFECT 2 key, press
diately below the analog input gain controls).
The
EFFECT 2 and STEREO indicators flash.
3 To change the setting between pre-fader and
For details of using the stereo dynamics processor,
see “Dynamics processor” on page 90.
82 TASCAM 788 Digital PortaStudio
post-fader, press the
holding down the
STEREO key again while
EFFECT 2 key. When the set-
ting is post-fader, the POST indicator flashes
together with the other two indicators.
Repeated presses of the
EFFECT 2 key is held down cycle the dynamics
STEREO key while the
processor assignment between pre-fader, postfader and off.
Page 83

9 – Effects–Send levels, etc.
Using EFFECT 2 as a single stereo effect processor in the AUX effect loop
This allows the effect processor to be used in the second effects loop (AUX). If it is used in this way, this
allows the
AUX INPUT connectors to be used for
(say) the stereo signal from an analog sub-mixer at
mixdown time.
1 Press and hold down the
EFFECT 2 key. The
indicator flashes, along with the indicators of
any current assignments.
2 While holding down the
EFFECT 2 key, press
the SEND key.
Send levels, etc.
The two effects loops (Effect and Aux) are both stereo sends.
2
NOTE
You can reverse this order (press and hold the
and then press the
You can remove the effects unit from the effects loop by
repeating the process so that the indicator does not flash
when the
The effect send may be set to either pre- or post-fader on a
channel-by-channel basis, as explained in “Pre- and postfader sends explained” on page 84.
While the effects unit is selected as the effects unit in the
Aux loop, the
active. The level of the mixed signal from the
OUTPUT
sends (see “Send levels, etc.” on page 83).
SEND
s is controlled with the channel and master Aux
2 Press the
EFFECT 2
key is pressed.
AUX INPUT
SELECT key of the mixer channel
key).
s and
AUX OUTPUT
SEND
AUX
key,
s are still
whose send levels are to be adjusted.
1
3, 4
The levels from each channel to these sends, and the
pan between the two inputs of these stereo sends, can
be set, as well as the master send level.
In addition, these two sends can be individually
selected as off, or as pre- or post-fader on a per-channel basis (see “Pre- and post-fader sends explained”
on page 84 below).
Stereo linked channels and channels 7 and 8 cannot
have levels set independently for each channel. One
control affects the send levels for both channels. In
addition, the send pan controls change to a stereo pan
control for both channels.
1 Press the
SEND key. The display screen shows
the channel send screen.
3 Use the cursor keys to move the cursor to the
value you want to change, and use the
DATA
dial to change the values of the channel send
levels (
in the send (
LVL), the pan position of the channel
PAN), and the master send levels
(MSTR).
4 As also explained below (“Changing between
pre-fader and post-fader settings” on page 84),
the
TIP
Level settings are from 0 through
are from
right).
NOTE
When two channels are linked, the send levels are identical, taken from the odd-numbered channel’s values before
linking, as is the pre/post/off setting. The pan controls
change to a centered mono pan.
L63
(full left) through C (center) to
127
, and pan settings
R63
(full
When two channels are unlinked, the stereo pan control
changes back to mono pan controls, which are panned
hard left (odd-numbered channels) and hard right (evennumbered channels). The send levels and pre/post/off settings are taken from the pair, and remain unchanged.
TASCAM 788 Digital PortaStudio 83
Page 84

9 – Effects–Selecting the type of effect
Pre- and post-fader sends explained
Pre-fader means that the level sent to the effects loop
is independent of the fader setting, as the signal is
taken before it reaches the fader.
Pre-fader send - the send
level is unaffected by the
position of the fader
Post-f ader means that because the level to the send
control is controlled by the fader, the total effect send
is increased and reduced with the fader.
Changing between pre-fader and post-fader settings
This applies to the Effect and Aux loops only.
Pre-fader Post-fader Off
1 Press the
SELECT key of the channel where you want to
make the setting.
SEND key and then press the
2 Move the cursor to the box at the left of the
send screen and use the dial to change between
PRE, POST and OFF (a small on-screen
diagram also indicates the change). In the
example here, the first send is pre-fader, the
next is post-fader, and the last is off.
Post-fader send - the position of the
fader affects the level of the send
signal
Selecting the type of effect
When using the inserted multi-effect processor
(
EFFECT 1 only) or the single stereo effect processor
(EFFECT 1 or EFFECT 2), you can select the effect
type that you want from a list of preset settings or
from your own library of settings that you have
stored previously.
2
5
3, 6
To select from the preset list:
1 Assign the effects unit to be a multi-effect pro-
cessor (“Using EFFECT 1 as a multi-effect
processor” on page 81) or as a single stereo
4
effect processor (“Using EFFECT 1 as a single
stereo effect processor in the effect loop” on
page 82 or “Using EFFECT 2 as a single stereo
effect processor in the AUX effect loop” on
page 83).
2 Press the appropriate
top left of the screen shows
effect settings editor screen).
3 Press either the
EFFECT LIBRARY screen.
4 Use the Ó and Á keys to make the
tab “active”.
5 Use the dial to select the preset as listed below.
6 Press
YES to confirm the selection (NO exits
without selecting).
EFFECT key so that the
EFFECT (the
YES or NO key to bring up the
PRESET
84 TASCAM 788 Digital PortaStudio
Page 85

9 – Effects–Selecting the type of effect
Multi-effect processor preset settings
The preset effect settings available for the multieffect processor (EFFECT 1 only) are:
Display Effects available
DIST_FLG_REV
DIST_FLG_DLY
DIST_EXC_REV
DIST_EXC_DLY
DIST_PIT_REV
DIST_PIT_DLY
DIST_CHO_REV
DIST_CHO_DLY
P.EQ_FLG_REV
P.EQ_FLG_DLY
Compressor, Distortion, Noise
gate, Flanger, Reverb
Compressor, Distortion, Noise
gate, Flanger, Delay
Compressor, Distortion, Noise
gate, Exciter, Reverb
Compressor, Distortion, Noise
gate, Exciter, Delay
Compressor, Distortion, Noise
gate, Pitch Shifter, Reverb
Compressor, Distortion, Noise
gate, Pitch Shifter, Delay
Compressor, Distortion, Noise
gate, Chorus, Reverb
Compressor, Distortion, Noise
gate, Chorus, Delay
Compressor, Noise gate,
Parametric EQ, Flanger, Reverb
Compressor, Noise gate,
Parametric EQ, Flanger, Delay
Display Effects available
P.EQ_EXC_REV
P.EQ_EXC_DLY
P.EQ_PIT_REV
P.EQ_PIT_DLY
P.EQ_CHO_REV
P.EQ_CHO_DLY
DESS_CHO_REV
DESS_CHO_DLY
STEREO EXC
Compressor, Noise gate,
Parametric EQ, Exciter, Reverb
Compressor, Noise gate,
Parametric EQ, Exciter, Delay
Compressor, Noise gate,
Parametric EQ, Pitch Shifter,
Reverb
Compressor, Noise gate,
Parametric EQ, Pitch Shifter, Delay
Compressor, Noise gate,
Parametric EQ, Chorus, Reverb
Compressor, Noise gate,
Parametric EQ, Chorus, Delay
Compressor, Noise gate, De-esser,
Chorus, Reverb
Compressor, Noise gate, De-esser,
Chorus, Delay
Two x Compressor, Noise gate,
Exciter
There are also some preset effects which you can use
as starting points for your own experiments. The
descriptions of these effects are provided separately.
Single stereo effect processor settings
When either EFFECT 1 or EFFECT 2 is selected as a
single stereo effect processor, the preset options
available are:
Display Effect setting
REVERB
DELAY
CHORUS
PITCH
SHIFTER
Reverberation, with different reverberation
types available
Programmable delay, with different delay
algorithms available
High-quality stereo chorus effect
Pitch shifter with delay
Dynamics processor
Whether the dynamics processor is used as a channel
dynamics processor, or whether it is assigned to the
Display Effect setting
FLANGER
PHASER
REVERB +
High-quality stereo flanger
High-quality stereo phasing effect
Gated reverb effect
GATE
There are also preset effects that you can use “as-is”
as starting points for experiments. The descriptions
of these presets are provided separately.
stereo output, there is only one type of setting that
can be used:
Dynamics (a compressor).
TASCAM 788 Digital PortaStudio 85
Page 86

9 – Effects–Making settings
Making settings
Whatever type of effect has been selected for use by
the EFFECT 1 or EFFECT 2 processor, the principles
of editing are the same (the exact parameters which
can be edited are different, of course). The details of
these parameters are described in “Parameter details”
on page 87.
1 If the
EFFECT screen is not shown (the
example here shows a multi-effect processor),
press the appropriate
EFFECT key to bring up
Using the user libraries
When you have made the effect settings that you
want, they can be stored in a library for further use.
Up to 128 settings can be stored for the single stereo
effect processors, 128 for the multi-effect processors,
and 128 shared between the channel and stereo
dynamics processors.
this screen (remember that
EFFECT 2 cannot
be used as a multi-effect processor, so this
screen can never appear if you press
).
2
EFFECT
2 With the multi-effect processor setting, use the
Ó and Ákeys to change between tabs (this
allows the different parts of the multi-effect
processor to be edited).
3 Use the § and ¶ keys to move the cursor to
the parameter to be changed.
4 Use the dial to change the values of the selected
parameter. The changes are instantly audible.
NOTE
It is not possible to use the library space for one type of
effect to store another type of effect.
The single stereo effect library spaces may be used by
both
EFFECT 1
single stereo effect processors.
and
EFFECT 2
, when they are used as
Storing an effect in the library
1 From the effect parameter edit screen, press
the
YES or NO key.
2 Use the Ákey to make the SAVE tab active.
3 Use the dial to scroll down to the user library
memory where you will store the settings.
Recalling a user setting from the library
1 From the effect parameter edit screen, press
the
YES or NO key.
4 At this point you can use the
(
TITLE) key to give the library setting a title
SHIFT + MENU
that you can remember in the future. See
“Entering and editing titles” on page 26 for
details.
5 Press
ENTER to store the settings. The display
returns to the parameter editing screen.
TIP
These settings are automatically stored on the internal disk
when you power off the 788 (see “Shutting down the 788”
on page 19).
2 Use the Ó and Á keys to make the
USER
tab active.
3 Use the dial to scroll down to the user library
memory from where you will load the settings.
4 Press
ENTER to load the settings. The display
returns to the parameter editing screen.
86 TASCAM 788 Digital PortaStudio
Page 87

Parameter details
The following describe the ways in which the effector parameters can be edited, and a brief description
of their effects.
Multi-effect processor settings
9 – Effects–Parameter details
There are a number of different separate effects
within each multi-effect processor setting (see
“Using EFFECT 1 as a multi-effect processor” on
page 81 for details of the multi-effect processor set-
tings) which have parameters that may be edited
independently.
Note that all of these also have a
that turns the individual effect in the multi-effect processor
Compressor The compressor in the 788’s multi-
effect processor settings limits the volume of the sig-
Parameter Min. Max. Explanation
COMPRESS 0 100
ATTACK 0 100
POST GAIN 0dB 30dB
Amount by which input signal is compressed
Time for compression to take effect
Makes up lost volume if compression takes away some of the level
Distortion The distortion effect in the multi-effect
processor provides a natural-sounding way of adding
nal passed through to the other units in the chain. It
has the following settings:
The distortion in the 788’s multi-effect processor has
three parameters:
“life” to otherwise dry guitar sounds, etc.
Parameter Min. Max. Explanation
PRE GAIN 40dB 60dB
DRIVE 0 100
OUT LEVEL 0dB 12dB
The amount by which the signal is amplified (and thereby distorted)
The “color” of the distorted sound
The amount by which the output signal is boosted
SWITCH field
ON or OFF.
Noise gate A noise gate acts as a way of keeping
unwanted noise from passing (it “shuts the gate”
when a signal is below a certain threshold level, and
opens it when the signal rises above the level). You
recording the unwanted noise of the units when the
instrument is silent.
There are three parameters
noise gate:
can use this with noisy effects pedals, etc. to avoid
Parameter Min. Max. Explanation
THRESHOLD -76dB -16dB
RELEASE 0 100
SUPPRESS -∞dB 0dB
The threshold below which signals will be gated (relative to the nominal signal level)
The time it takes for the gate to close after the input signal drops below the threshold
The amount by which the gate is closed (0dB does not close it at all, minimum value
closes it completely).
Flanger Flanging is a distinctive “swirling” sound.
The flanger on the multi-effect processor in the 788
has three parameters:
Parameter Min. Max. Explanation
RATE 0.0Hz 10.0Hz
DEPTH 0 100
FEEDBACK 0 100
The speed of the effect
The depth of the flanging effect
The amount by which the signal is fed back within the effect, adding to the character of the
sound
on the 788’s multi-effect
TASCAM 788 Digital PortaStudio 87
Page 88

9 – Effects–Parameter details
Exciter An exciter is an effect which (usually) sub-
tly emphasizes a range of frequencies, making them
“sparkle” and stand out in the mix.
Parameter Min. Max. Explanation
FREQUENCY 1.0kHz 10.0kHz
DEPTH 0 100
The minimum frequency which is affected by the exciter
The amount by which the exciter affect the signal
Pitch shifter A pitch shifter allows the pitch of a
signal to move up or down to harmonize with the
Parameter Min. Max. Explanation
PITCH -12 +12
FINE -50 +50
BALANCE 0 100
The amount by which the pitch is shifted expressed in semitones (coarse tuning)
The fine tuning amount, added to the coarse tuning, by which the pitch is shifted
expressed in cents (100 cents = 1 semitone)
The balance between the original dry signal and the shifted (0=dry, 100=all shifted)
Chorus A chorus effect adds a slight doubling
effect to the signal and “thickens” it. The multi-effect
chorus effect in the 788 has three parameters:
Parameter Min. Max. Explanation
RATE 0.1Hz 10.0Hz
DEPTH 0 100
MIX LEVEL 0 100
The speed of the chorus effect
The depth (thickness) of the chorus effect
The amount by which the chorus level is applied and passed down the chain
The multi-effect exciter in the 788 has two parameters that can be set:
original signal. The multi-effect pitch shifter in the
788 has three parameters:
Reverberation (reverb). This is the “spacey”
effect you get in tunnels, caves, large halls, etc. It
adds a feeling of spaciousness and depth when added
Parameter Min. Max. Explanation
PRE DELAY 0ms 150ms
HI DAMP 0 10
MIX LEVEL 0 100
The time between the original signal and the start of the reverb
The amount by which the high frequencies are removed from the reverb (0 is similar to a
bare cave, 10 is similar to a heavily-furnished room)
The amount of reverb relative to the original signal
Delay Sometimes referred to as “echo”, this pro-
vides one or a series of copies of the sound at regular
Parameter Min. Max. Explanation
FB DELAY 0ms 1000ms
FEEDBACK 0 100
MIX LEVEL 0 100
The time between repeats of the sound
The level of the repeated sounds (in practical terms, this controls the number of audible
repeats—note that a high value here may result in runaway feedback, which is
unpleasant)
The amount of delay relative to the original signal
Parametric EQ This works to cut or boost a nar-
row part of the signal independently of the channel’s
EQ settings, and can be used for special effects, etc.
Remember that this multi-effect may be added pre-
to a signal. The reverb on the 788’s multi-effect pro-
cessor has three parameters:
intervals. There are three parameters that you can set
on the 788’s multi-effect delay processor:
or post-EQ, and therefore this may be used to equalize an already-equalized signal! The 788’s multi-
effect EQ has three parameters:
Parameter Min. Max. Explanation
FREQUENCY 63Hz 16kHz
GAIN -12dB +12dB
OUT LEVEL -12dB +12dB
The frequency band affected by this effect
The amount that the selected frequency band is cut or boosted
The amount by which the overall signal is cut or boosted.
88 TASCAM 788 Digital PortaStudio
Page 89

9 – Effects–Parameter details
De-esser A de-esser removes the sharp “ess”
sounds from vocals and so on (hence its name). Some
vocal styles and some vocalists seem to need this
treatment, and others don’t seem to require it. A lot
Parameter Min. Max. Explanation
FREQUENCY 1.0kHz 10.0kHz
DEPTH 0 60
Choose the minimum frequency at which the “ess” sounds are heard to cut them out of
the recording.
The depth of the de-esser’s effect
Single stereo effect settings
The single stereo effects typically have more parameters than their multi-effect “cousins”, but essentially
perform similar processing tasks on the signals.
REVERB This reverb processor allows you to set a
simulated reverb type as well as other parameters
affecting the spacious reverberant sound.
Parameter Min. Max. Explanation
ROOM TYPE Hall Studio
PRE DELAY 0ms 250ms
REV TIME
DIFFUSION 0 100
0.1s 10.0s
Choose between Hall, Room, Live, and Studio to set up a reverberation pattern that
mimics these different scenarios
The time between the original signal and the start of the reverb
The time that the reverb sound takes to die away
The “liveliness” of the reverb sound, affecting the character of the “room” that you have set
up.
also depends on your microphones, and their placement. You don’t have to use a de-esser with vocals
only, but that’s usually where it does most good.
There are two parameters in the 788 de-esser:
Note that there is no on/off switch in these screens,
but that the final effect return level is always set
using an
OUT LEVEL parameter at the bottom
of the setting screen for each effect. This takes a
value from
0 (no output) to 127 (full output).
DELAY The “echo” settings here allow flexibility in
the type of delay as well as other parameters affecting the delay sound:
Parameter Min. Max. Explanation
TYPE Stereo Multi
PRE DELAY 0ms 1000ms
FB DELAY
FEEDBACK 0 100
0ms 1000ms
Choose the delay type from: Stereo (a stereo delay pattern), PinPon (a “ping-pong” delay
between the two stereo channels, or Multi (a multi-tap delay algorithm)
The time between the original signal and the start of the repeated delays
The time between repeated echoes
The level of the repeated sounds (in practical terms, this controls the number of audible
repeats—note that a high value here may result in runaway feedback, which is
unpleasant)
CHORUS A “doubling” effect, which thickens the
sound, giving additional character to it. Delay incor-
Parameter Min. Max. Explanation
RATE 0.1Hz 10.0Hz
DEPTH 0 100
FB DELAY 0ms 100ms
FEEDBACK 0 100
The speed of the chorus effect
The depth (thickness) of the chorus effect
The time between the original and the delayed signal
The level of the repeated sounds (in practical terms, this controls the number of audible
repeats—note that a high value here may result in runaway feedback, which is
unpleasant)
porated in this effect also helps to provide a fuller
sound.
TASCAM 788 Digital PortaStudio 89
Page 90

9 – Effects–Parameter details
PITCH SHIFTER A pitch shifter, allowing har-
monization of the effected sound with the original
(the pitch shifted sounds may sound a little strange in
character—this is not a substitute for real harmony
Parameter Min. Max. Explanation
PITCH -12 +12
FINE -50 +50
FB DELAY 0ms 500ms
FEEDBACK 0 100
The amount by which the pitch is shifted expressed in semitones (coarse tuning)
The fine tuning amount, added to the coarse tuning, by which the pitch is shifted
expressed in cents (100 cents = 1 semitone)
The time between repeats
The level of the repeated sounds (in practical terms, this controls the number of audible
repeats—note that a high value here may result in runaway feedback, which is
unpleasant)
FLANGER A swirling sound, adding depth to the
original sound. At high settings, this can produce a
Parameter Min. Max. Explanation
RATE 0.1Hz 10.0Hz
DEPTH 0 100
FB DELAY 0ms 1000ms
FEEDBACK 0 100
The speed of the flanging effect
The strength of the effect
The time between repeats
The level of the repeated sounds (in practical terms, this controls the number of audible
repeats—note that a high value here may result in runaway feedback, which is
unpleasant)
singing, but can be a very effective special effect). A
delay setting provides additional ‘harmonies” shifting the pitch by the specified amount on each repeat.
jet-like “swooshing” sound. The built-in delay adds
more life to this effect.
PHASER A more gentle effect than the flanger,
which is similar, but a slightly more subtle effect (it’s
Parameter Min. Max. Explanation
RATE 0.1Hz 10.0Hz
DEPTH 0 100
RESONANCE 0 100
STEP 4 16
The speed of the phasing effect
The strength of the effect
The way in which the filter works inside the effect. High values produce a “wah” effect
4, 8, 12 or 16 — affecting the quality and character of the phase effect.
REVERB + GATE The signal goes through a
reverberator, and the reverb signal is then passed
through a gate, which opens when it is above a given
Parameter Min. Max. Explanation
TYPE Normal Reverse
THRESHOLD -46dB -16dB
GATE TIME 0ms 3000ms
DENSITY 0 100
The reverb can be reversed (i.e. it starts quietly, and gets louder)
The level at which the gate opens to let the sound through
The time that the gate stays open before the threshold setting starts to take effect
The “thickness” of the reverb—low settings provide a sparse sound, and higher values
make a complex, thicker sound.
Dynamics processor
When EFFECT 2 is used as a compressor for channels and the stereo output, the following settings may
be made:
difficult to describe these things in words, sometimes
you just have to try them!).
level (threshold) and closes again after a set time. Try
this with a snare drum sound.
Parameter Min. Max. Explanation
THRESHOLD -46dB -16dB
ATTACK 0.1ms 10ms
RATIO 1.0:1 ∞:1
POST GAIN 0dB 30dB
The level at which the compressor starts to have an effect
The speed with which the signal is compressed
Expressed as a ratio. 1.0:1, 1.1:1, 1.3:1, 1.6:1, 2.0:1, 2.7:1, 4.0:1, 8.0:1, ∞:1 — 1.0:1
means no compression, and
Makes up any volume lost as the result of the compression settings.
90 TASCAM 788 Digital PortaStudio
∞
:1 means full compression.
Page 91

10 – Routing and scene libraries
The 788 allows you to store and recall commonlyused assignment (routing) patterns as well as scenes
which contain the settings for the mixer.
Up to 10 scene settings may be stored in a library
area for each song, which is automatically stored
Routing patterns are stored in a common library area,
available to all songs, and are automatically saved
when the 788 is powered down.
There is no need to perform a special operation to
save either type of library data.
when the song is saved.
Routing libraries
In the routing library, you store up to 128 patterns of
input assignments to library entries.
The assignments stored in the routing patterns
include:
• the assignments of the inputs to the mixer channels
(see “Assigning sources to mixer channels.” on
page 36)
Saving the current routing settings to the library
You can save to the routing library while playback is
stopped, or while playing back or recording.
• the inputs to the sub-mixer (see “Assigning inputs
• the effect assignments (see “Setting up EFFECT 1”
NOTE
The assignments of virtual tracks to tracks are
as part of a routing patterns. These assignments are
stored as part of a song.
to the sub-mixer” on page 37)
on page 81 and “Setting up EFFECT 2” on
page 82).
not
If the
SAVE tab is not highlighted, press the
Á key to highlight it.
stored
To store the current routing settings to a library entry:
1 Press the
2 Use the dial to scroll down to the
LIB.
QUICK SETUP key.
ROUTING
entry in the list, and press ENTER:
3 There are two tabs on the top of this display:
the
READ tab allows you to read settings
from the library, and the
SAVE tab allows
you to store the current settings to the library.
4 Use the dial to scroll to the entry where you
want to store the current settings.
TIP
You can give a title to the highlighted entry at this point, following the instructions in “Entering and editing titles” on
page 26.
5 Press ENTER. The settings are saved and the
display returns to the home screen.
91 TASCAM 788 Digital PortaStudio
Page 92

10 – Routing and scene libraries–Scene libraries
Loading routing settings from the library
You can load previously stored routing settings from
the library while playback is stopped, or while playing back or recording.
NOTE
Take care when changing routing settings via MIDI control
while playing back or recording, as major changes to the
routing settings may “open up” some channels and close
others, giving unexpected results, which could result in a
spoiled recording or even damage to monitoring equipment
and your ears.
To load routing settings from a stored library entry:
1 Press the
QUICK SETUP key.
Scene libraries
The 788 also allows you to load and store up to ten
mixer scenes in a library for each song. These scenes
are stored automatically when the song is saved.
The 788 stores the following mixer settings as part of
a scene:
• Input assignment (including virtual track
assignment)
• EQ settings
• Effector settings and assignment
• Effect and aux send levels
• Pan
2 Use the dial to scroll down to the
LIB.
entry in the list, and press ENTER:
ROUTING
3 Use the dial to scroll to the entry from where
you want to load the new routing settings.
4 Press
ENTER. The settings are loaded and the
display returns to the assign map screen (see
“Viewing assignments” on page 37), where you
can view the effects of the load.
• Digital pad/gain
• Track cue mixer settings (level and pan)
• Fader settings (including the
STEREO fader)
• Sub-mixer settings
Since routing is included as part of a mixer scene,
you do not need to store routing assignments separately from scenes unless you need to use the routing
assignments in other songs.
NOTE
Monitor settings (selection and level), and
settings, are not stored as part of a scene.
TRIM
control
Saving a scene to the library
You can save to the scene library while playback is
stopped, or while playing back or recording.
To store the current scene settings to a library entry:
1 Press the
2 Use the dial to scroll down to the
LIB.
QUICK SETUP key.
SCENE
entry in the list, and press ENTER:
3 There are two tabs on the top of this display:
the
READ tab allows you to read scenes from
the library, and the
SAVE tab allows you to
store the current scene to the library. If the
SAVE tab is not highlighted, press the Á key
to highlight it.
4 Use the dial to scroll to the entry where you
want to store the current settings.
TIP
You can give a title to the highlighted entry at this point, following the instructions in “Entering and editing titles” on
page 26.
5 Press ENTER. The scene is saved and the dis-
play returns to the home screen.
92 TASCAM 788 Digital PortaStudio
Page 93

10 – Routing and scene libraries–Scene libraries
Loading scenes from the library
You can load previously stored scenes from the
library while playback is stopped. You cannot load
scenes (or change scenes using MIDI Program
Change commands) while playing back or recording.
If you attempt this, a message appears:
TRANSPORT MOVING.
To load scenes from a stored library entry:
1 Press the QUICK SETUP key.
2 Use the dial to scroll down to the
LIB.
entry in the list, and press ENTER:
SCENE
Other matters concerning scenes
Because the physical position of the faders on the
788 may not always match the position of the faders
as recalled by the scene, this may cause unexpected
results if you do not consider in advance what is happening when a scene is loaded.
This section explains some of the issues involved.
In this example, a channel’s physical fader is set at a
high level, and a scene is loaded from the library,
where the internal fader setting is at a lower level.
3 Use the dial to scroll to the entry from where
you want to load the scene.
4 Press
ENTER. The scene is loaded and the dis-
play returns to the assign map screen (see
“Viewing assignments” on page 37), where you
can view the effects of the load.
screen for the channel is shown, the values of both
the internal fader and physical fader are shown:
Internal value and
marker
Physical fader
Internal fader
NOTE
This also applies to the
individual channel faders.
STEREO
fader, as well as the
As explained in “Internal and physical faders” on
page 45, this means that when the
FADER/PAN
Physical fader value and
marker
The menu option described earlier in “Internal and
physical faders” on page 45 allows you to specify
what will be done when an internal fader value is
loaded which is different from the physical fader
value.
The
CATCH option is probably the best option to
choose in many cases, allowing you to leave the
channel level unchanged until the physical fader
catches the internal fader (that is, it matches the level
of the internal fader).
REAL option ignores the internal fader level
The
which has been loaded—the physical fader is the
only method of setting the level.
The
JUMP option means that if the physical fader
is moved, though, the level will instantly jump (up or
down) to the physical fader position. This can cause
unexpected results, and should be used with caution.
TASCAM 788 Digital PortaStudio 93
Page 94

11 – Synchronization
You can expand the options available to you when
using the 788 by connecting it and synchronizing it
to other musical equipment.
Typically, this extra equipment will be MIDI-based
(sequencers, drum machines, synthesizers, etc.).
Of course, although it is possible to record MIDI
instruments on the 788 tracks during the initial stages
of the recording project, it may make more sense to
use the eight audio tracks of the 788 for material that
cannot be automated via MIDI (guitars and other
acoustic instruments and of course vocals).
When it comes to mixdown time, the 788 allows you
to extend the eight available audio tracks by playing
additional sources through the sub-mixer and adding
them to the mix (see “Sub-mixer” on page 48).
To make this work, though, the MIDI instruments
and the 788 must be synchronized to each other, so
that playback on one set of sound sources (the
recorded audio tracks) keeps time with the sequenced
MIDI tracks.
The 788 can synchronize with MIDI equipment in a
number of different ways, as explained in this section, allowing a high degree of flexibility in the
setup.
As well as synchronizing to other devices, it is also
possible for the 788 to control other devices or to be
controlled by them (see “MMC and MIDI functions”
on page 101).
NOTE
All synchronization is carried out through the two MIDI
ports on the rear panel of the 788, no matter what kind of
synchronization is used, or the role of the 788 in the synchronization chain.
The 788 cannot use audible SMPTE/EBU timecode from
the timestripe track of a tape. If the source to be synchronized with the 788 only has audible timecode available, it
must be converted to and from MIDI timecode (MTC) as
appropriate.
Master or slave?
The terms master and slave are used to name the controller and the controlled units in a chain of devices
such as the 788 and other audio devices.
However, it is possible for a unit to be a master unit
in one configuration at the same time as being a slave
in another.
How to measure time?
There are two ways of counting time in music: one is
the number of minutes and seconds since the beginning of the piece. This is the way in which tape
recorders, etc. count time.
The other method of counting time is the number of
bars (measures) since the beginning of the piece.
This is the way in which MIDI sequencers typically
count time.
For example, the 788 may be set up to be a timecode
master (other units receive their timecode from the
788 and act accordingly), and a control slave (it
receives stop/start commands, etc.) from other units.
A 788 can also be a timecode (MTC) slave, and in
this way, two 788s can be synchronized.
There is no direct relationship between these two
ways of counting, as the relationship depends on the
tempo of the piece.
When synchronizing, therefore, one unit in the chain
must be capable of making a map which relates the
minutes and seconds of one system to the bars and
beats of the other. If the tempo stays fairly constant
throughout a piece, this is a matter of fairly simple
arithmetic, but if the tempo changes through a piece,
this is not so easy to do.
94 TASCAM 788 Digital PortaStudio
Page 95

11 – Synchronization–Synchronization methods
Synchronization methods
The 788 can use the following output synchronization methods for synchronization with other units:
MIDI Time Code (MTC) This is an absolute
time position, which allows times to be defined to
frame accuracy or better (the number of frames in a
second depends on the frame rate, as explained later
in this section). MTC has no direct relation to bars
and beats in a song.
Synchronization settings on the 788
These synchronization methods listed above are used
in the following way by the 788 when it is acting as a
synchronization master for other units:
MTC The 788 outputs MIDI Timecode to the slave
unit. It is the responsibility of the slave unit
(sequencer, etc.) to turn this timecode into musically
meaningful, i.e. bars and beats, information. This can
also be used to synchronize another recording device
which is not MIDI-based, but which can accept
MTC, for example, another 788.
syncTrk (sync track) In this way of working,
the 788 is synchronized to a slave MIDI device
(sequencer, etc.) which is capable of recognizing and
acting on MIDI clock and SPP information. The tempos to be used throughout the piece are first worked
out on the slave device, and they have been finalized,
the sequencer plays MIDI into the 788, which
records the clock. The 788 can then play back these
tempos, along with SPP information, and thereby act
as a MIDI clock master for the system.
Tempo Map In this way of working, the tempos
and time signatures throughout the song are entered
on the 788, which then acts as the master unit, calcu-
MIDI clock A MIDI clock defining the tempo at
which a MIDI song is played back can be recorded.
MIDI Song Position Pointer (SPP): MIDI
Song Position information data is used to position the
slave device at the correct position in a song,
expressed in bars and beats. Song Position Pointer
information alone has no relationship to absolute
time (minutes and seconds).
lating the clock timings and transmitting them,
together with Song Position Pointer information, to
the slave devices.
In addition, the 788 can synchronize as a slave to
incoming timecode (MTC), generated by a MIDI
sequencer, etc. Note, however, that the MTC output
by some computer systems may be a little erratic and
unstable, and it is recommended that you do not use
this method of synchronization with sequencers, but
rather with other recording devices which can output
stable MTC (such as other 788s).
Each of these different synchronization methods has
its advantages and disadvantages. The most important thing to remember is that once something is
recorded on the 788, it is impossible to change its
tempo. By contrast, if something is recorded on a
MIDI sequencer, it is easy to change its tempo.
For these reasons, you may find it easiest to determine the tempo on the sequencer, and record the
MIDI sync track (click track) first. After you are
completely happy with the tempo of this track, you
can start to add the acoustic instruments, and lock the
timing of the recorded sounds to that of the MIDI
data.
TASCAM 788 Digital PortaStudio 95
Page 96

11 – Synchronization–Making synchronization settings
Making synchronization settings
The 788 synchronization settings are all carried out
using the SYNC/MIDI menu.
All synchronization information is carried through
MIDI, so typically the
MIDI OUT of the 788 must be
connected to the MIDI IN of the MIDI device to
which it is being synchronized, and the
788 should be connected to the MIDI OUT of the
other unit.
Synchronization master/slave setting on the 788
To determine whether the 788 will act as the master
or the slave with regard to synchronization:
1 Make sure playback and recording are
stopped, and press the
2 Use the dial to scroll down to
MIDI
, and press ENTER.
3 Use the dial to highlight
ENTER.
4 Use the § and ¶ keys to move the cursor to
SYNC SRC.
5 For internal synchronization (that is, the 788
becomes a synchronization master), use the
MENU key.
SYNC/
SYNC, and press
If external synchronization is selected, the 788’s transport
keys (including jog and repeat) will not work until the synchronization is received at the
when you try to play or record, for example, by the appropriate key indicators flashing until the MTC is received. The
788 display also shows
synchronization is selected as explained here.
6 Press ENTER to return to the home screen, or
MIDI IN of the
dial to select
INT. For external synchroniza-
tion (synchronization slave), use the dial to
select
EXT.
NOTE
MIDI IN
EXT SYNC
port. This is shown
when external
use the § and ¶ keys to select another option.
Selecting the master synchronization type
If the 788 is set to be the synchronization master, you
must then set the type of synchronization signal output to the slave units:
1 Make sure playback and recording are
stopped, and press the
2 Use the dial to scroll down to
MIDI
, and press ENTER.
3 Use the dial to highlight
ENTER.
MENU key.
SYNC/
SYNC, and press
4 Use the § and ¶ keys to move the cursor to
SYNC GEN.
5 There are four options available here
(explained in more detail in “Synchronization
methods” on page 95):
MIDI Timecode frame rate
MIDI Timecode allows the use of different frame
rates, which allow synchronization with all types of
timecode available from other devices.
1 Make sure playback and recording are
stopped, and press the
MENU key.
OFF The 788 does not output any timing or sync
information from the MIDI OUT when playing back
or recording.
MTC MIDI Time Code—the 788 outputs MIDI
timecode when playing back or recording.
CLOCK The 788 outputs a MIDI clock together
with the Song Position Pointer information from the
edited Tempo Map (see “Tempo map” on page 98) to
synchronize an external sequencer.
SycTRK The 788 plays back a previously-recorded
sync track (see “Sync track” on page 97) with SPP
information, to synchronize an external sequencer.
NOTE
When the 788 is acting as a synchronization slave, the only
synchronization source which is valid is MIDI Timecode.
2 Use the dial to scroll down to
MIDI
, and press ENTER.
3 Use the dial to highlight
ENTER.
SYNC/
SYNC, and press
96 TASCAM 788 Digital PortaStudio
Page 97

11 – Synchronization–Sync track
4 Use the § and ¶ keys to move the cursor to
FRAME RATE.
5 Use the dial to select the frame rate for the out-
going timecode (or timecode to be received as a
slave).
24
25
29ND
29D
30ND
24 frames/second. Used in the film industry
25 frames/second. Used in the EBU/SECAM
(European, etc.) TV industry
29.97 frames/second non-drop. NTSC color TV for
broadcast
29.97 frames/second drop-frame. NTSC color TV
30 frames/second non-drop. NTSC mono TV
MIDI Timecode offset (788 as slave only)
When the 788 is slaved to incoming MIDI timecode,
you may need to adjust the time difference, so that
the time used on the 788 closely corresponds to the
“real” time.
For example, if the MIDI timecode master starts the
timecode playback at 00:57:00:00, and the actual
piece starts at 01:00:00:00, you might want to enter
an offset of 3 minutes, so that when the piece starts,
the ABS time on the 788 display shows
01:00:00:00 (see “The time display” on
page 26). The MTC setting on the screen display will
always show the incoming timecode values.
1 Make sure playback and recording are
stopped, and press the
MENU key.
6 Press
ENTER to return to the home screen, or
use the § and ¶ keys to select another option.
When you have made the selection on the 788, the
other device (sequencer) must also be set to the same
frame rate as that set on the 788. If they are different,
you will not be able to synchronize the system properly. This applies whether the 788 is acting as a timecode slave or a timecode master in the system.
TIP
We suggest that unless you are working with video or movies, you use the 30ND setting, as this provides more
frames per second, and hence greater precision.
2 Use the dial to scroll down to
MIDI
, and press ENTER.
3 Use the dial to highlight
ENTER.
SYNC/
SYNC, and press
4 Use the § and ¶ keys to move the cursor to
MTC OFFSET.
5 Use the Ó and Á keys to move the cursor to
the hours, minutes, seconds and frames field,
and use the dial to adjust these values.
NOTE
The maximum value you can set here is 23:59:59:xx
(where xx is one less than the number of frames in a second—see “MIDI Timecode frame rate” on page 96).
Sync track
You can record a sync track from the source MIDI
device, which allows the 788 to act as the synchronization master later on.
Recording the sync track
Before starting to record the sync track, make sure
that:
• the tempo changes of the sequence are fixed and
will not be changed in the future
• the MIDI OUT of the sequencer is connected to
the
MIDI IN of the 788
• the sequencer is set to transmit MIDI Clock and
information when replaying
1 Make sure playback and recording are
stopped, and press the
MENU key.
The sync track is not an audio track, but is a record of
the MIDI clock. When replayed, SPP information is
included.
It allows subtleties in tempo which are not possible
with the tempo map method of working
2 Use the dial to scroll down to
MIDI
, and press ENTER.
3 Use the dial to highlight
and press
ENTER.
SYNC/
SYNC TRACK,
TASCAM 788 Digital PortaStudio 97
Page 98

11 – Synchronization–Tempo map
4 Cue the sequencer to the start of the song (it is
not possible to record from part of the way
through).
5 Press
ENTER/YES on the 788. The sync track is
now “armed” and the display shows
for Start
.
Wait
6 Start playing back the sequence. If the connec-
tions have been made properly, the 788 display
shows
Recording...
To interrupt the recording of the sync track
before the end, press
NO.
Using the sync track
To use the recorded sync track to control the external
sequencer from the 788:
1 Make sure that the synchronization source for
the 788 is set to
chronization master/slave setting on the 788”
on page 96. The
connected to the MIDI IN of the sequencer.
INT (internal)—see “Syn-
MIDI OUT of the 788 should be
7 At the end of the sequence, or if the sequence is
stopped, the 788 display shows
Press
EXIT/NO to save the sync track. If you
ENTER/YES at this point, you will re-arm
press
Complete.
the sync track and you will have to record it
again.
NOTE
The 788 and the sequencer should be independently controlled here (that is, neither should be a control slave of the
other). See “MMC and MIDI functions” on page 101.
The start of the sync track is always the ABS 00:00:00:00
point, that is, the first beat of the first bar falls at the zero
point. It is not possible to offset the sync track.
at the time position corresponding to the ABS
time on the 788.
NOTE
You do not have to start playback at the beginning of the
song. If you locate to a time position on the 788, the
sequencer will pick up the correct time from the MIDI SPP
data output by the 788.
2 Set the
SYNC screen to SycTRK (see “Selecting
SYNC GEN parameter on the 788’s
the master synchronization type” on page 96).
3 Set the sequencer to respond to an external
clock source and make it ready to accept an
external MIDI Start command.
4 Return to the home screen on the 788, and
PLAY. The sequencer starts playing back
press
Tempo map
You can enter the tempo map to allow the 788 to send
tempo (clock) and SPP information to a MIDI
device, when it is not possible to record a sync track.
Another advantage of using the tempo map is that it
allows you to locate to bars and beat positions on the
Entering and editing the tempo map
You must enter the tempo map manually, using the
procedure described here:
Although it is possible to change to the bars and beats display on the 788, the values displayed when using the sync
track do not correspond to the bars and beats on the
sequencer, unless a tempo map is entered on the 788
where the signature changes correspond to those in the
sequence (note that even if the bar/beat position matches
the sequencer, the tempo probably will not). You should
therefore usually use the ABS time values when locating,
as these are generally more meaningful location values.
788, as described in “Direct location (ii)” on page 61
(using the sync track does not automatically map the
bars and beats), and this is therefore a more “musi-
cal” way of controlling the synchronization of the
788 with a sequencer.
3 Use the dial to highlight
TEMPO MAP, and
press ENTER.
1 Make sure playback and recording are
stopped, and press the
2 Use the dial to scroll down to
MIDI
, and press ENTER.
MENU key.
SYNC/
98 TASCAM 788 Digital PortaStudio
Page 99

11 – Synchronization–Tempo map
4 There is one entry automatically included in a
new tempo map. The four columns in the displayed table correspond to the following:
No.
BAR
SIG
TEMPO
The number of the entry in the table map (this cannot be edited)
The bar at which this table map entry starts to take
effect
The time signature of this table map entry
The tempo in beats per minute of this tempo map
entry
5 Use the Ó and Á keys to move between the
three editable fields, and use the dial to change
the values of these fields.
BAR This value cannot be changed to a value which
is equal to or less than that of the entry before it, and
it cannot be changed to a value which is equal to or
greater than that of the entry after it.
SIG You can set the time signature using the follow-
ing rules: the number of beats in a bar can be set to be
any number from 1 through 8, and the value of the
beat can be 1 (full note (semibreve)), 2 (half-note
(minim)), 4 (quarter-note (crotchet)) or 8 (eighthnote (quaver)). Values such as 7/8 are therefore possible, but 11/4 is not.
Tempo The maximum tempo value is 250.0, and
the minimum value is 20.0. You can set the decimal
part of the tempo value independently of the main
part.
6 Use the
INSERT (MOVE) key to insert a new
entry after the currently highlighted entry.
7 Use the § and ¶ keys to move between entries
in the tempo map table.
8 Use the
DELETE (SILENCE) key to delete the
currently-highlighted entry.
9 Press
ENTER when you have entered the com-
plete tempo map.
NOTE
The tempo map must correspond to the musical structure
of the song on the sequencer. If part of the song is in 3/4,
but the tempo map is all in 4/4 time, it will be impossible to
relate the tempo map to the song.
TIP
It is not possible to enter a tempo change part of the way
through a bar, and therefore you cannot do gradual speeding up and slowing down using a tempo map. If you need
this kind of capability, we suggest that you do these tempo
changes on the sequencer, and then use the sync track
facility to record the tempo changes from the sequencer.
The tempo map is stored as part of the song on disk
and is reloaded automatically together with the song.
It is therefore possible for you to make a song, complete with a tempo map, store it to removable media,
and take it to another 788-equipped facility
Using the tempo map
When the tempo map has been recorded, you can use
it in the following way:
1 Make sure that the synchronization source for
the 788 is set to
chronization master/slave setting on the 788”
on page 96. The
connected to the MIDI IN of the sequencer.
2 Set the
SYNC screen to CLOCK (see “Selecting the
SYNC GEN parameter on the 788’s
master synchronization type” on page 96).
3 Set the sequencer to respond to an external
clock source and SPP information and make it
ready to accept an external MIDI Start command from the 788.
INT (internal)—see “Syn-
MIDI OUT of the 788 should be
4 When you start playing the 788, from the home
display, the MIDI device will also start playing.
5 You can use the bars and beats facility on the
home display of the 788 to locate to specific
bars and beats in the sequencer song.
NOTE
N
The tempo of the sequencer playback will be determined
by the tempo map on the 788, and will not be affected by
the settings made on the sequencer.
If you make a tempo map, this can be used as the source
for the internal metronome (if the tempo does not need to
change inside a bar).
TASCAM 788 Digital PortaStudio 99
Page 100

11 – Synchronization–Using MTC to control a sequencer
Using MTC to control a sequencer
1 Make sure that the synchronization source for
the 788 is set to
INT (internal)—see “Syn-
chronization master/slave setting on the 788”
on page 96.
2 Set the
SYNC screen to MTC (see “Selecting the
SYNC GEN parameter on the 788’s
master synchronization type” on page 96).
3 Set the sequencer to respond to MTC. Usually,
sequencers will start automatically when MTC
is received, if set up in this way.
4 When you start playing the 788, the sequencer
will start playing at the point located to by the
788.
Metronome
The 788 also includes a metronome, which is related
to the internal tempo map and takes its timing from
the map. If you use the metronome, you should take
care that the tempo used in the tempo map matches
the tempo map of all other instruments in the setup.
NOTE
The metronome can only be output when the
GEN
option is set to
(“Selecting the master synchronization type” on page 96).
It cannot be output when it is set to the
values.
CLOCK
or
SycTRK
OFF
SYNC
or
MTC
5 Use the ABS timing method to locate to time-
based points on the 788.
NOTE
The tempo of the sequencer is determined by the
sequencer itself. If you record a track on the 788 in time
with the sequencer, and then change the sequencer tempo
while the sequencer is synchronized to the 788 in this way,
the recorded audio track will be out of time with the MIDI
tracks.
Bars and beats on the 788 have no meaning when synchronizing in this way, unless a tempo map is manually
entered on the 788.
Not every sequencer or sequencer program is capable of
accepting MTC. If your sequencer cannot accept MTC and
use this to synchronize, you must use one of the other
methods of synchronizing with the 788.
OUTPUT Determines the kind of metronome:
OFF (no metronome), INT (internal, through the
MONITOR OUTPUTs and PHONES) and MIDI (a
MIDI note; see below)
MODE Determines when the metronome will be
output:
(recording and playback)
REC (recording only) or RECPLY
INT LEVEL Sets the level of the metronome when
INT is selected as the output type (from 0 through
127).
It can be output through the monitor speakers, or as a
MIDI note.
1 Make sure playback and recording are
stopped, and press the
2 Use the dial to scroll down to
MIDI
, and press ENTER.
3 Use the dial to highlight
press
ENTER.
4 Make sure that the
MENU key.
SYNC/
METRONOME, and
SETUP tab is high-
lighted. Use the cursor keys and the wheel to
set the following parameters:
100 TASCAM 788 Digital PortaStudio
5 If you selected
the Á key to select the
MIDI as the output type, use
MIDI tab:
CH The MIDI channel on which the metronome
note will be transmitted (10 is the General MIDI
channel used for drums).
ACC. NOTE The note on which the accented (first
beat of the bar) metronome will be output.
(ACC.) VELO The velocity of the accented metro-
nome notes (usually louder than the other beats).
NORM. NOTE The note on which non-accented
metronome notes will be played.
(NORM.) VELO The velocity of non-accented
metronome notes.
 Loading...