

Page 1

TANDBERG Codian IP VCR
Tutorial
IP VCR 2200 Series
MSE 8220 blade
Version 4 Revision 4
Page 2

TANDBERG
Philip Pedersens vei 20
1366 Lysaker
Norway
Telephone: +47 67 125 125
Telefax: +47 67 125 234
Video: +47 67 117 777
E-mail: tandberg@tandberg.com
Page 3

Contents
Introduction....................................................................................................................... 1
Connecting the IP VCR to your network.................................................................................... 2
Before connecting the power............................................................................................... 2
Assigning an IP Address to the IP VCR................................................................................... 2
Log in to the web interface ................................................................................................. 3
Choosing a gatekeeper .......................................................................................................... 6
Registering the IP VCR with an external gatekeeper .................................................................. 6
Registering the IP VCR with the internal gatekeeper.................................................................. 7
Creating recordings.............................................................................................................10
Calling out and recording ................................................................................................. 10
Recording using the Recording Console ............................................................................... 13
Recording point-to-point H.323 calls................................................................................... 15
Recording a conference when the IP VCR calls out.................................................................. 16
Recording a conference when the MCU calls the IP VCR .......................................................... 17
Playing back recordings ........................................................................................................19
Playing back to a PC ....................................................................................................... 19
Playing back to an endpoint............................................................................................... 23
Using the auto attendant.......................................................................................................25
Dial the auto attendant and create a recording ........................................................................ 25
Customizing the auto attendant banner................................................................................. 27
Using Folders ....................................................................................................................28
Recording directly to a folder ............................................................................................ 29
Recording directly to a folder with the recording console .......................................................... 30
Dialing the auto attendant for a specific folder........................................................................ 30
Recording computer displays .................................................................................................31
Configuring the IP VCR to use H.239.................................................................................. 31
Recording the content channel........................................................................................... 32
Using a gateway to call the IP VCR..........................................................................................33
Transferring recordings........................................................................................................35
Downloading a recording to your PC................................................................................... 35
Uploading a recording from your PC ................................................................................... 37
Transferring a recording from one IP VCR to another .............................................................. 38
Managing endpoints ............................................................................................................40
Setting up users and editing user privileges ................................................................................41
Closing the IP VCR browser..................................................................................................42
Page 4
Introduction
This tutorial provides detailed instructions on how to set up and administer the Codian IP Video Conference
Recorder (IP VCR). It describes how to connect the unit, and then how to log in and use it to set up a
connection with endpoints and conferences.
Using the tutorial
The tutorial is designed to be followed in the order in which the steps are provided.
Online help complements this guide by providing detailed descriptions of each of field. To display
help at any time, click the icon in the top right hand corner of the screen.
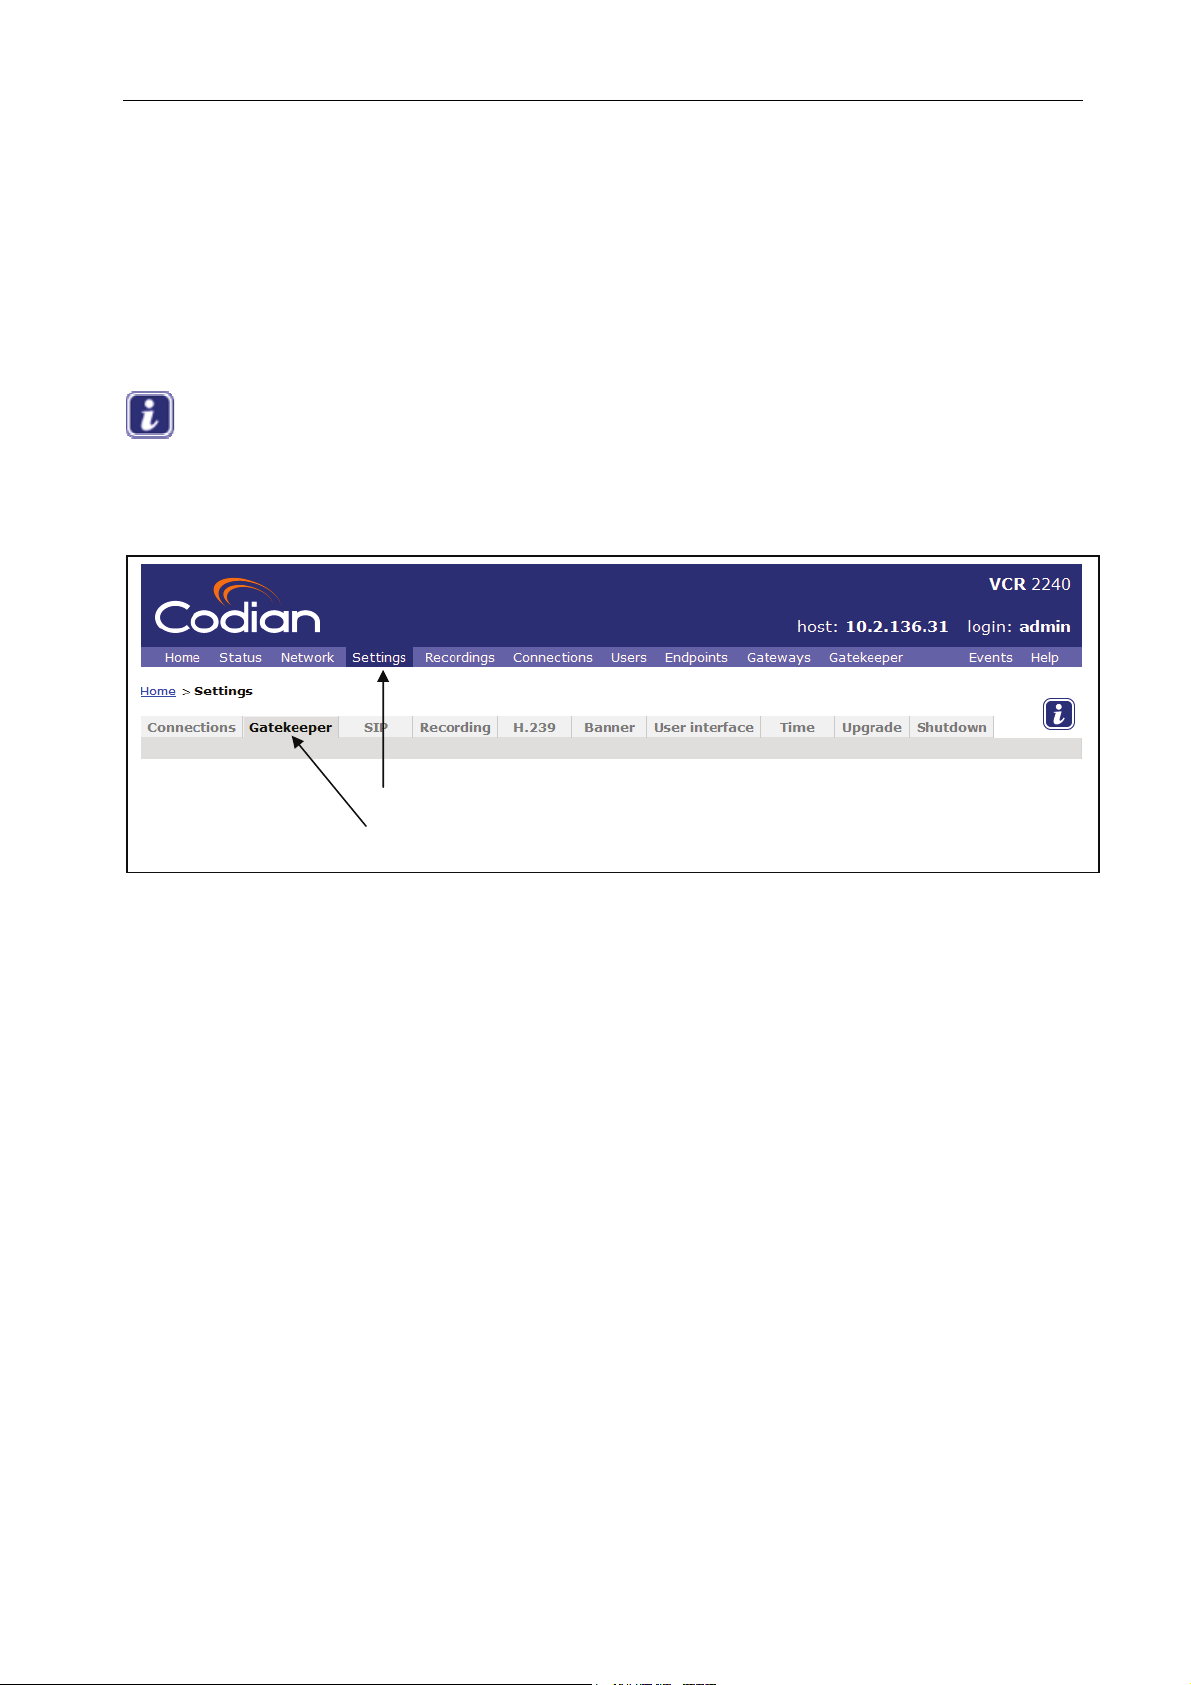
In this tutorial the instruction ‘Go to Settings > Gatekeeper’ means click the Settings link on the menu bar
and then click the Gatekeeper tab.
Click on settings
Then click on Gatekeeper
Throughout this guide there are helpful tips in green that explain things in more detail, for example:
Before powering on the IP VCR, connect the blue console cable included with the IP VCR to the
console port.
These provide useful advice on features and functions of the unit.
Assumptions
It is assumed that you have used video conference recording equipment before and understand industry
standard terms.
Ideally you need access to a Codian MCU unit in addition to an IP VCR so you can see the effect of joining
and of recording a conference. To try all of the features described in this tutorial you also need a gatekeeper
and two endpoints.
IP VCR software version
This tutorial was prepared using IP VCR 2200 series version 2.2 software. If you are using this tutorial with a
different release of the IP VCR or the VCR blade (the MSE 8220 VCR blade) some screen shots may be
different.
1
Page 5
Connecting the IP VCR to your network
This section gives an overview of the commands needed to set up and log in to the IP VCR. You will make
your first recording in the next section, Creating recordings.
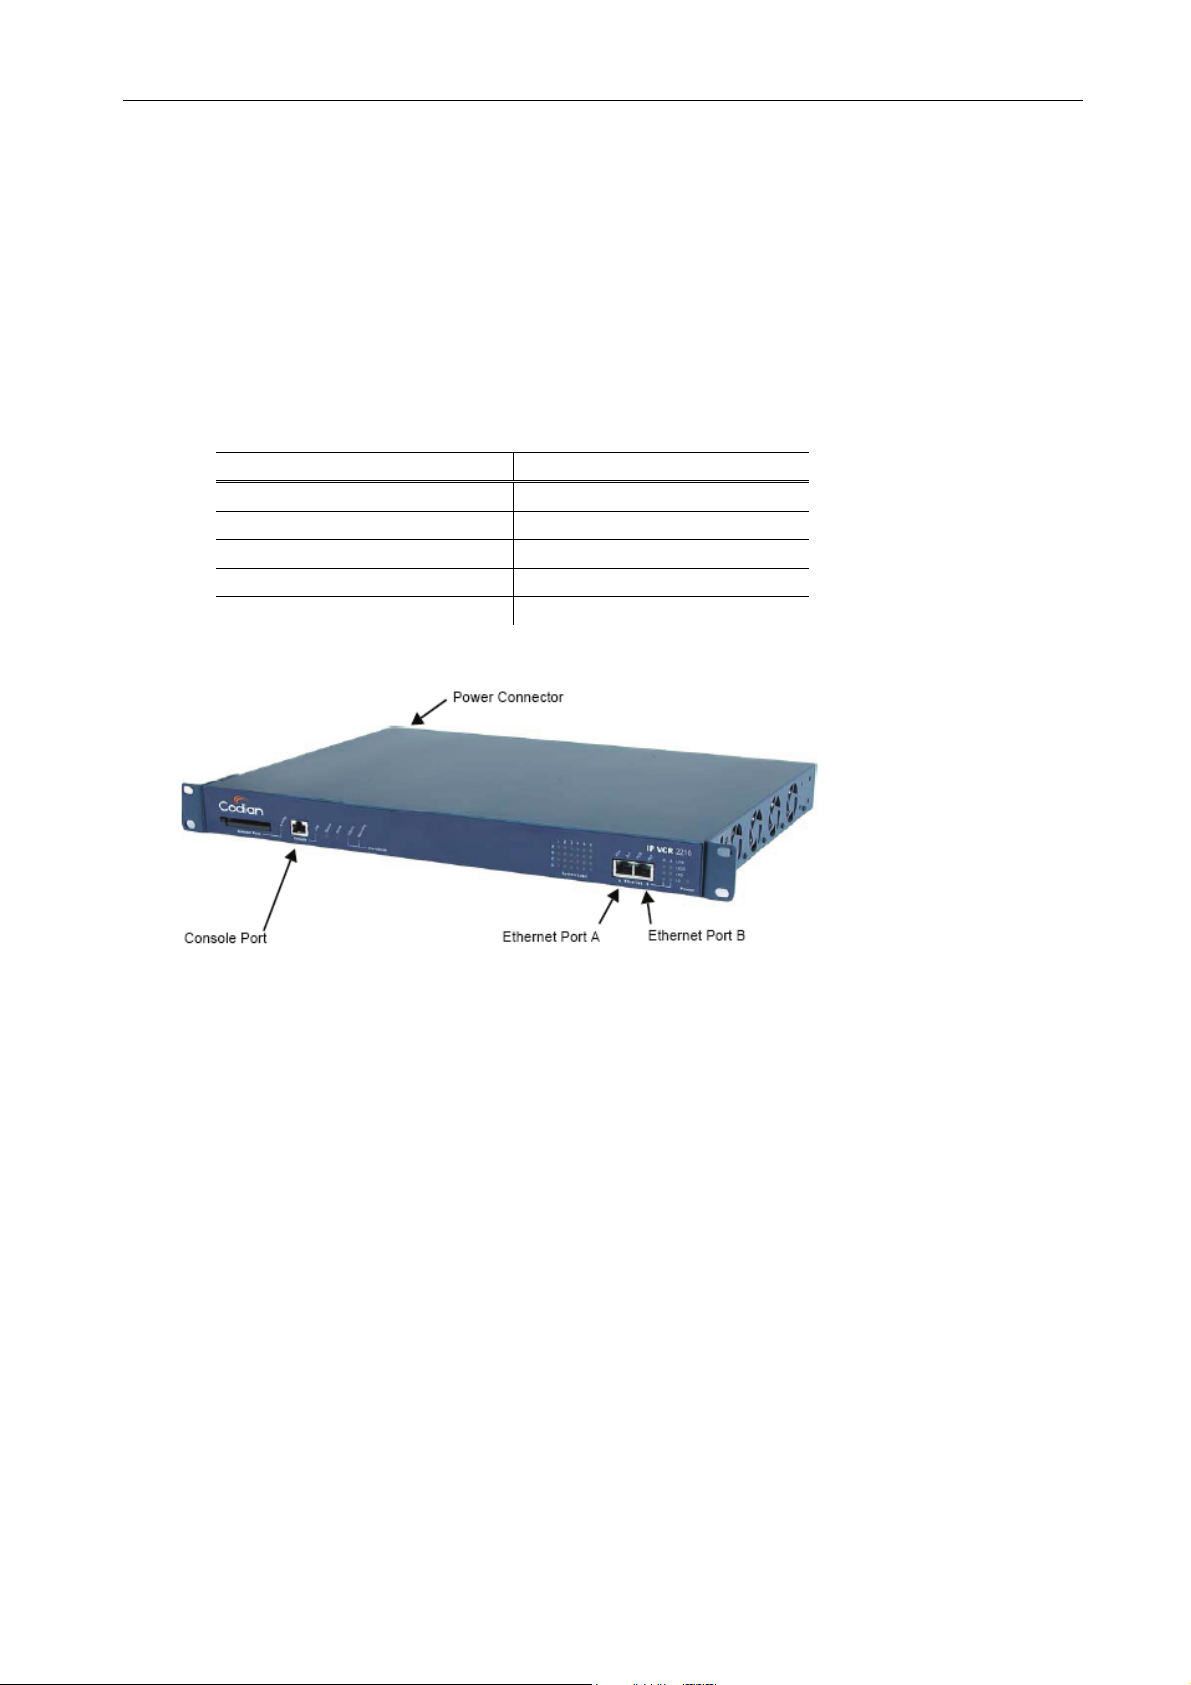
Before connecting the power
1 Connect the console port using the blue console cable included with the IP VCR
2 Set your console software to the following settings:
Value Setting
Baud rate 38400
Data bits 8
Parity None
Stop bits 1
Flow control None
3 Connect an Ethernet cable from Ethernet Port A to an Ethernet switch (rather than a hub) in order to
minimize the interference from other devices on the network
The Ethernet port is a 10/100/1000 Mbps auto-sensing connection.
4 Turn on the IP VCR by plugging in the power lead
The IP VCR does not have an on/off switch.
Assigning an IP Address to the IP VCR
1 Wait until the red alarm light on the front panel is extinguished and the command prompt appears on the
console:
IPVCR:>
By default, the IP VCR 2200 uses DHCP to obtain an IP address. However, you can assign a static IP
address if you prefer or if a DHCP server is not available.
2 Assign the IP address by one of the following methods:
a. To use DHCP, enter dhcp at the VCR prompt and then press Enter.
IPVCR:> dhcp
2
Page 6
b. To assign a static IP address, enter the information using the following format and then press Enter:
static <IP> <netmask> <default gateway> <DNS server>
If you do not have a DNS server, use 0.0.0.0 in place of the DNS server address – you must enter a
DNS server address. For example, to assign an address of 192.168.1.2 where the default gateway is at
192.168.1.1, enter:
static 192.168.1.2 255.255.255.0 192.168.1.1 0.0.0.0
3 To display the current IP address, enter status at the VCR prompt and then make a note of the IP address
as you will need it during the tutorial
f To see all commands available from the console interface, type help and press Enter
f To see the syntax for each of the commands, type them in and press Enter
Log in to the web interface
You can now log in and control the IP VCR via the web interface. The web interface is used to administer the
IP VCR device and manage recordings, users, and associated devices.
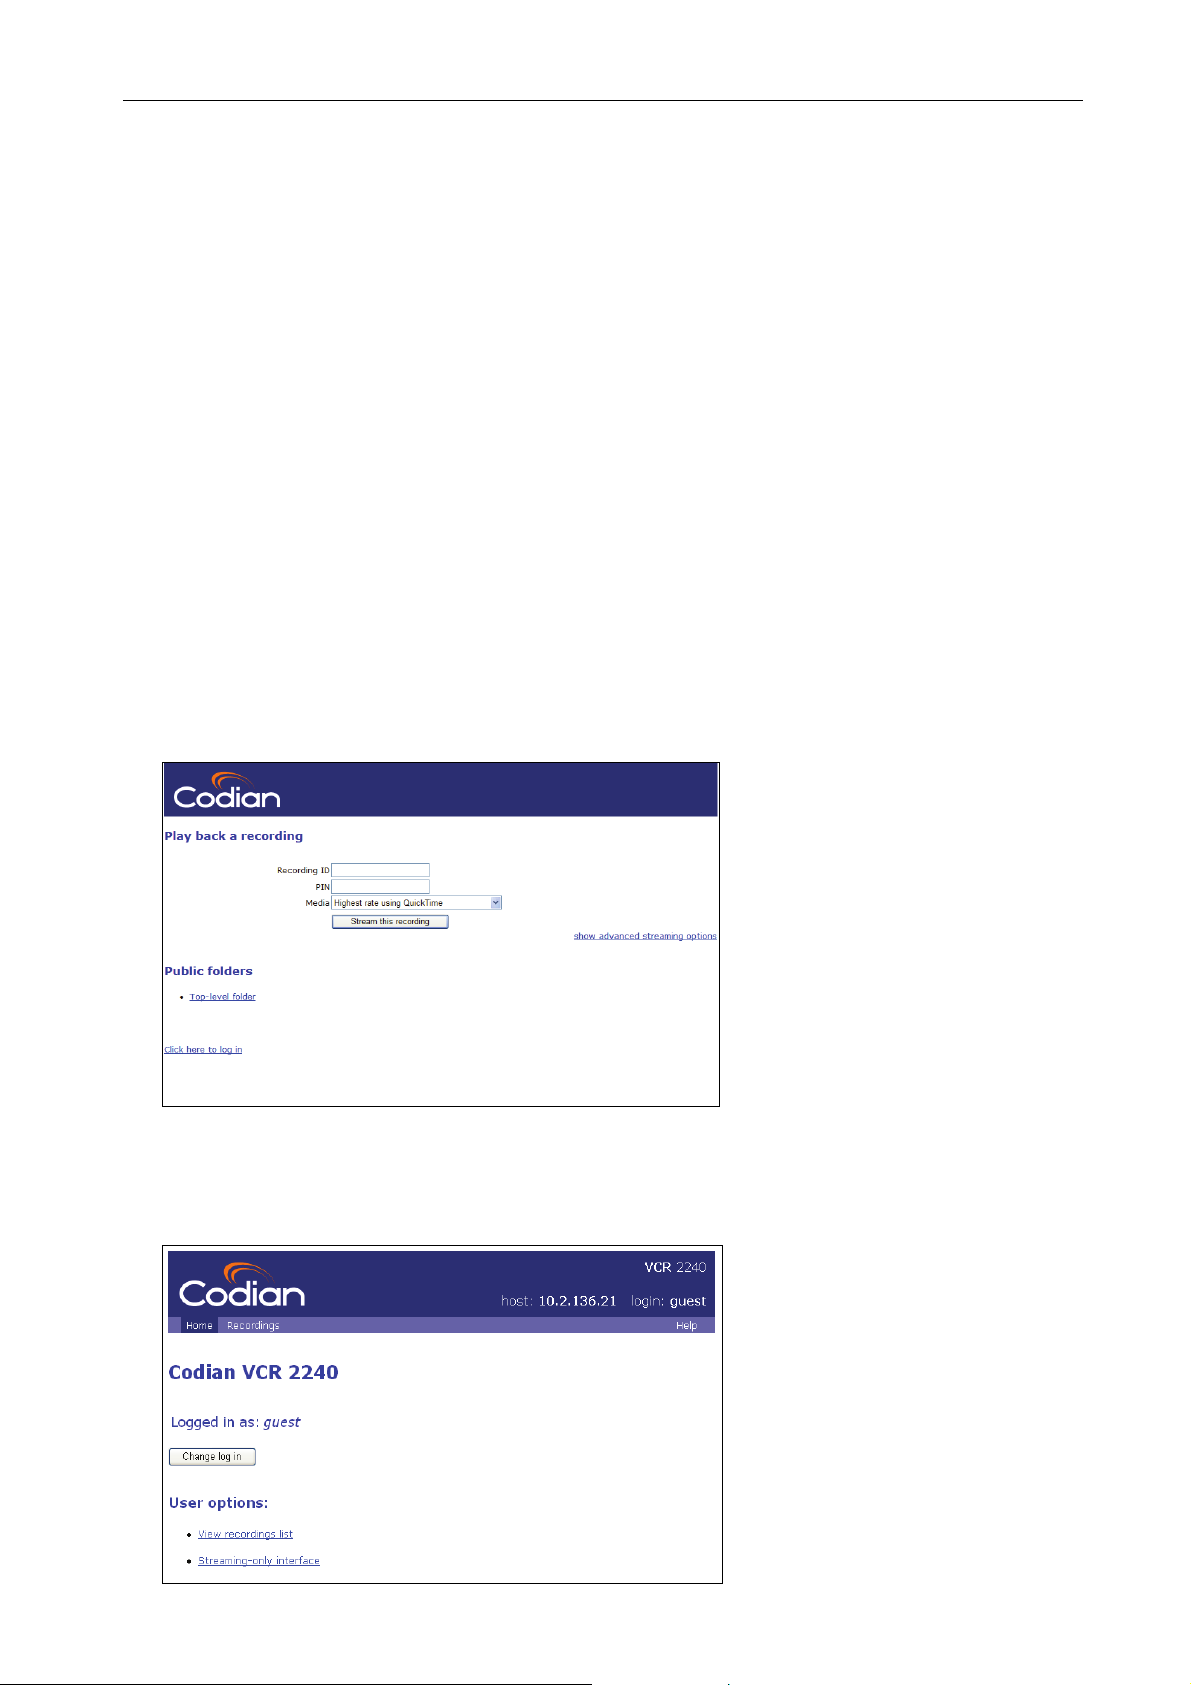
1 Using a web browser, type in the host name or IP address of the IP VCR that you displayed in the
previous section
You now automatically have the rights of the ‘guest’ user.
2 Click on the Click here to log in link
3
Page 7
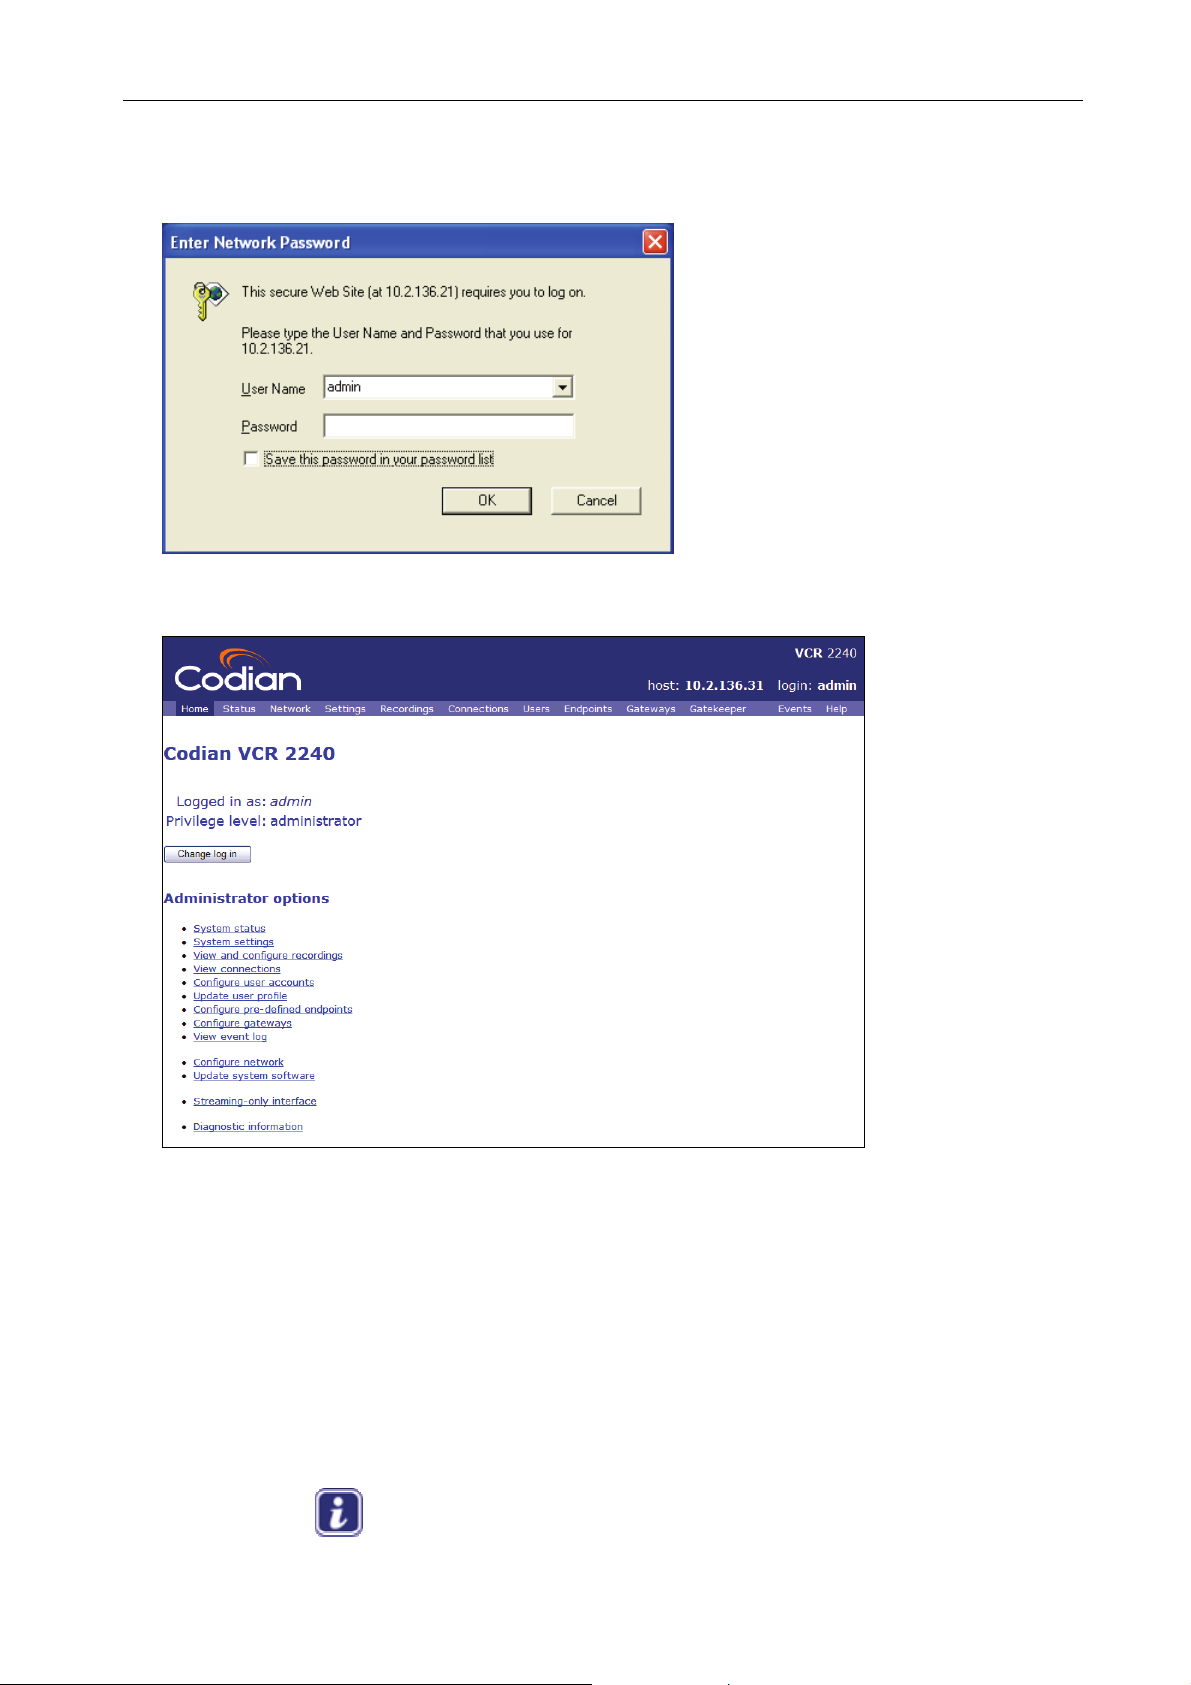
To configure the unit, you must log in as the admin user.
3 Click Change log in
4 Type in the username admin with no password and press Enter
You are advised to set up a password for the admin account to restrict who is able to perform box-wide
configuration changes such as changing the IP VCR’s IP address. Instructions are provided later in the
tutorial.
The web interface screens have a number of features in common:
f Menu bar with a number of options that open up setup, configuration or status screens
f Screens with one or more tabs where each tab is a separate page
f Pages with one or more sections. Section headings are in blue with white writing. Some pages have
several sections and you will need to scroll down to see all the sections
f Links and buttons. Some buttons appear more than once on a page so that you do not need to scroll too
far
f If the page has an icon then clicking on the icon will open the online help page for the current page
f The navigation aid below the menu bar shows where you are in the web interface by identifying the levels
that you have worked through to reach the current page
4
Page 8

5
Page 9
Choosing a gatekeeper
A gatekeeper is an H.323 entity on the network that provides services such as address translation and network
access control for H.323 terminals, gateways, and MCUs. A gatekeeper is optional on an H.323 network but
its presence allows end users to replay recordings stored on the IP VCR by dialing a number or entering a text
string. H.323 capable devices can be configured to register their IP and alias addresses with a gatekeeper. The
IP VCR can register E.164 numeric IDs with the gatekeeper. H.323 endpoints can then call in to view and
create recordings using numbers instead of having to use an IP address or domain name.
The IP VCR can be configured to work with your existing gatekeeper. If you do not have a gatekeeper on
your network the IP VCR can provide a gatekeeper service for the H.323 network.
Registering the IP VCR with an external gatekeeper
If you already have a gatekeeper on your network follow the steps in this section to configure the IP VCR to
register with it. If you do not have a gatekeeper on your network proceed to
the internal gatekeeper
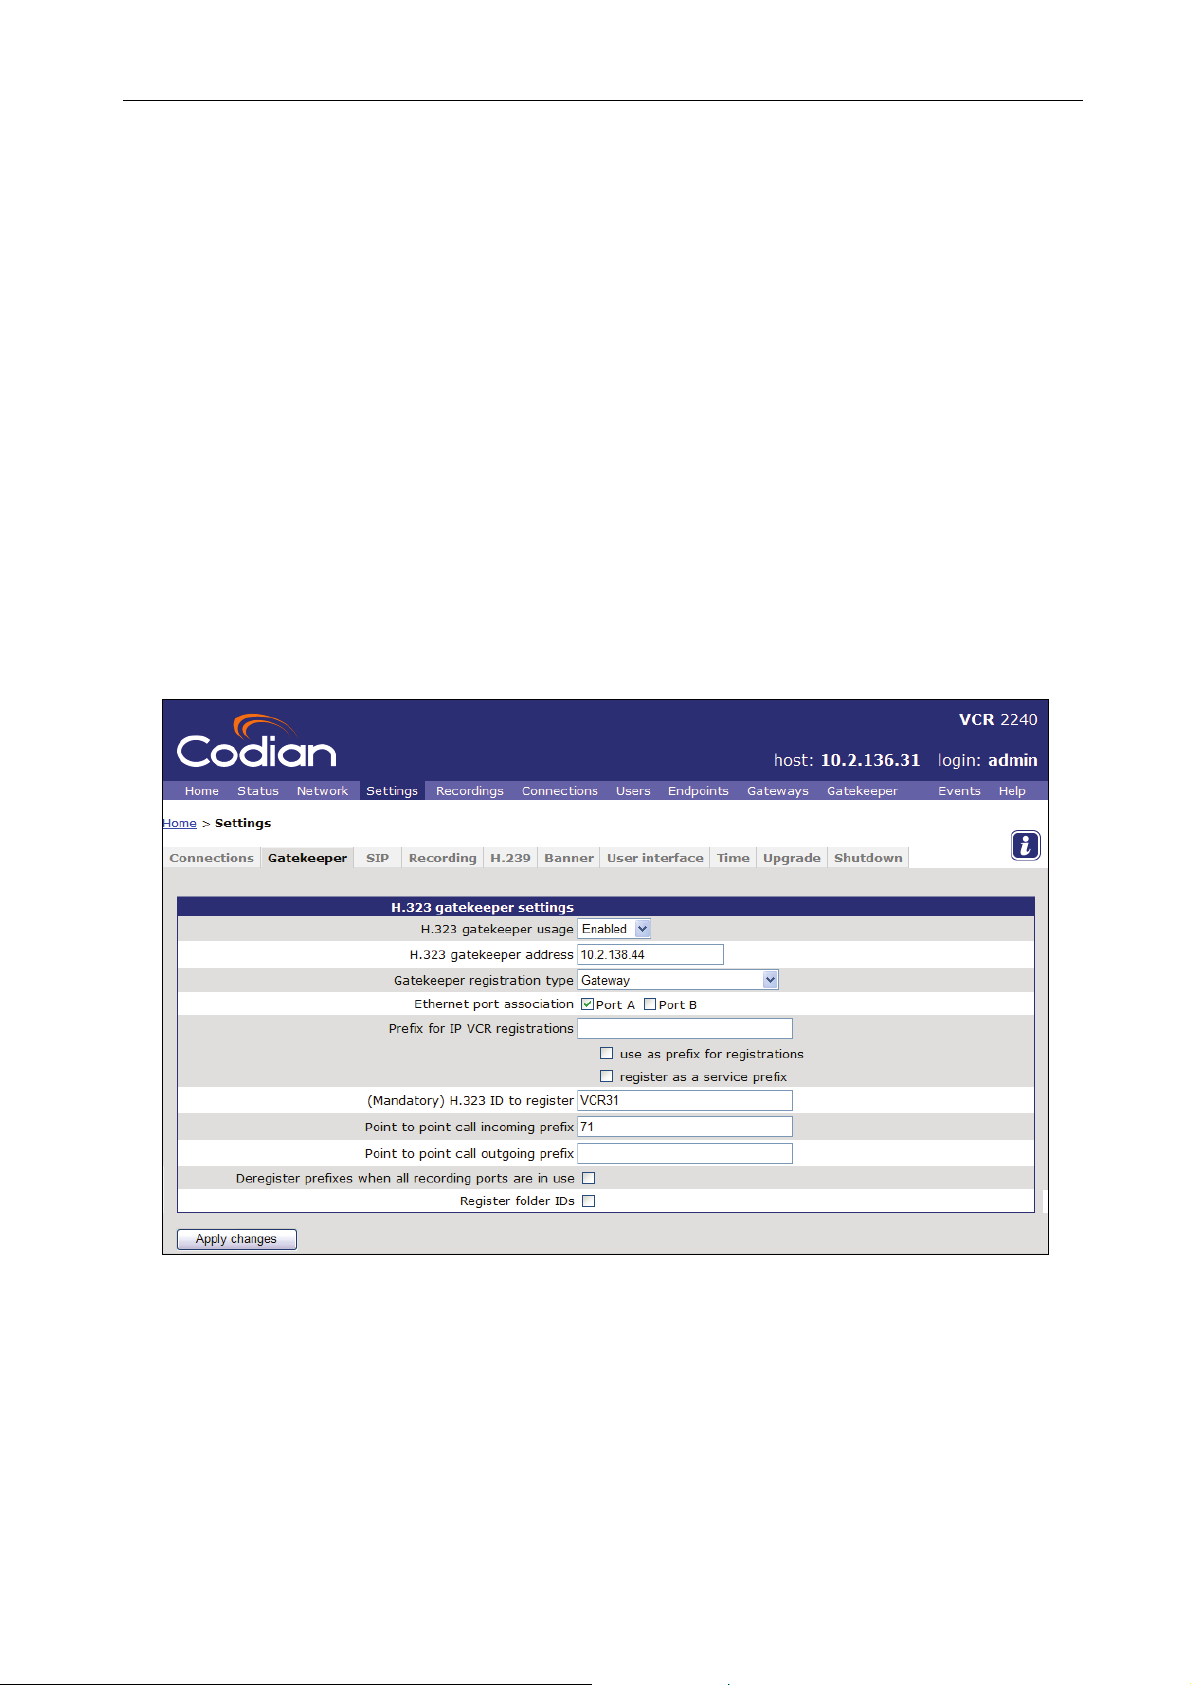
1 Go to Settings > Gatekeeper
.
Registering the IP VCR with
2 Select Enabled from the H.323 gatekeeper usage drop down list
3 Enter the IP address or hostname of the gatekeeper on your network in the H.323 gatekeeper address
text box
4 For the Gatekeeper registration type, select Gateway
If the IP VCR is configured to register prefixes Codian recommend registering the IP VCR as a Gateway.
The “Which gatekeepers have been tested for the IP VCR?” FAQ in the Technical Support section of the
Codian web site details any exceptions to this advice.
6
Page 10
5 Ensure the Port A checkbox is selected
6 Enter a name for your IP VCR in the H.323 ID to register text box
H.323 endpoints that are registered with the gatekeeper can Users can call the VCR using the ID given
here.
7 Enter 71 in the Point to point incoming prefix text box
The Point to point incoming prefix will be used later on in the tutorial.
8 Click Apply changes to register the IP VCR with the gatekeeper on your network
Your endpoints should also be registered with the gatekeeper on your network. Your endpoint
documentation should describe how to register the endpoint with the gatekeeper.
Registering the IP VCR with the internal gatekeeper
If you do not already have an H.323 gatekeeper on your network the IP VCR can be configured to provide
gatekeeper services. You will also have to configure the firewall on the IP VCR to allow access to the H.323
gatekeeper service. Only complete this section if you have not completed the steps in the Registering the IP
VCR with an external gatekeeper section.
Up to twenty five devices can be registered with the gatekeeper. A feature key can be purchased to increase
this limit.
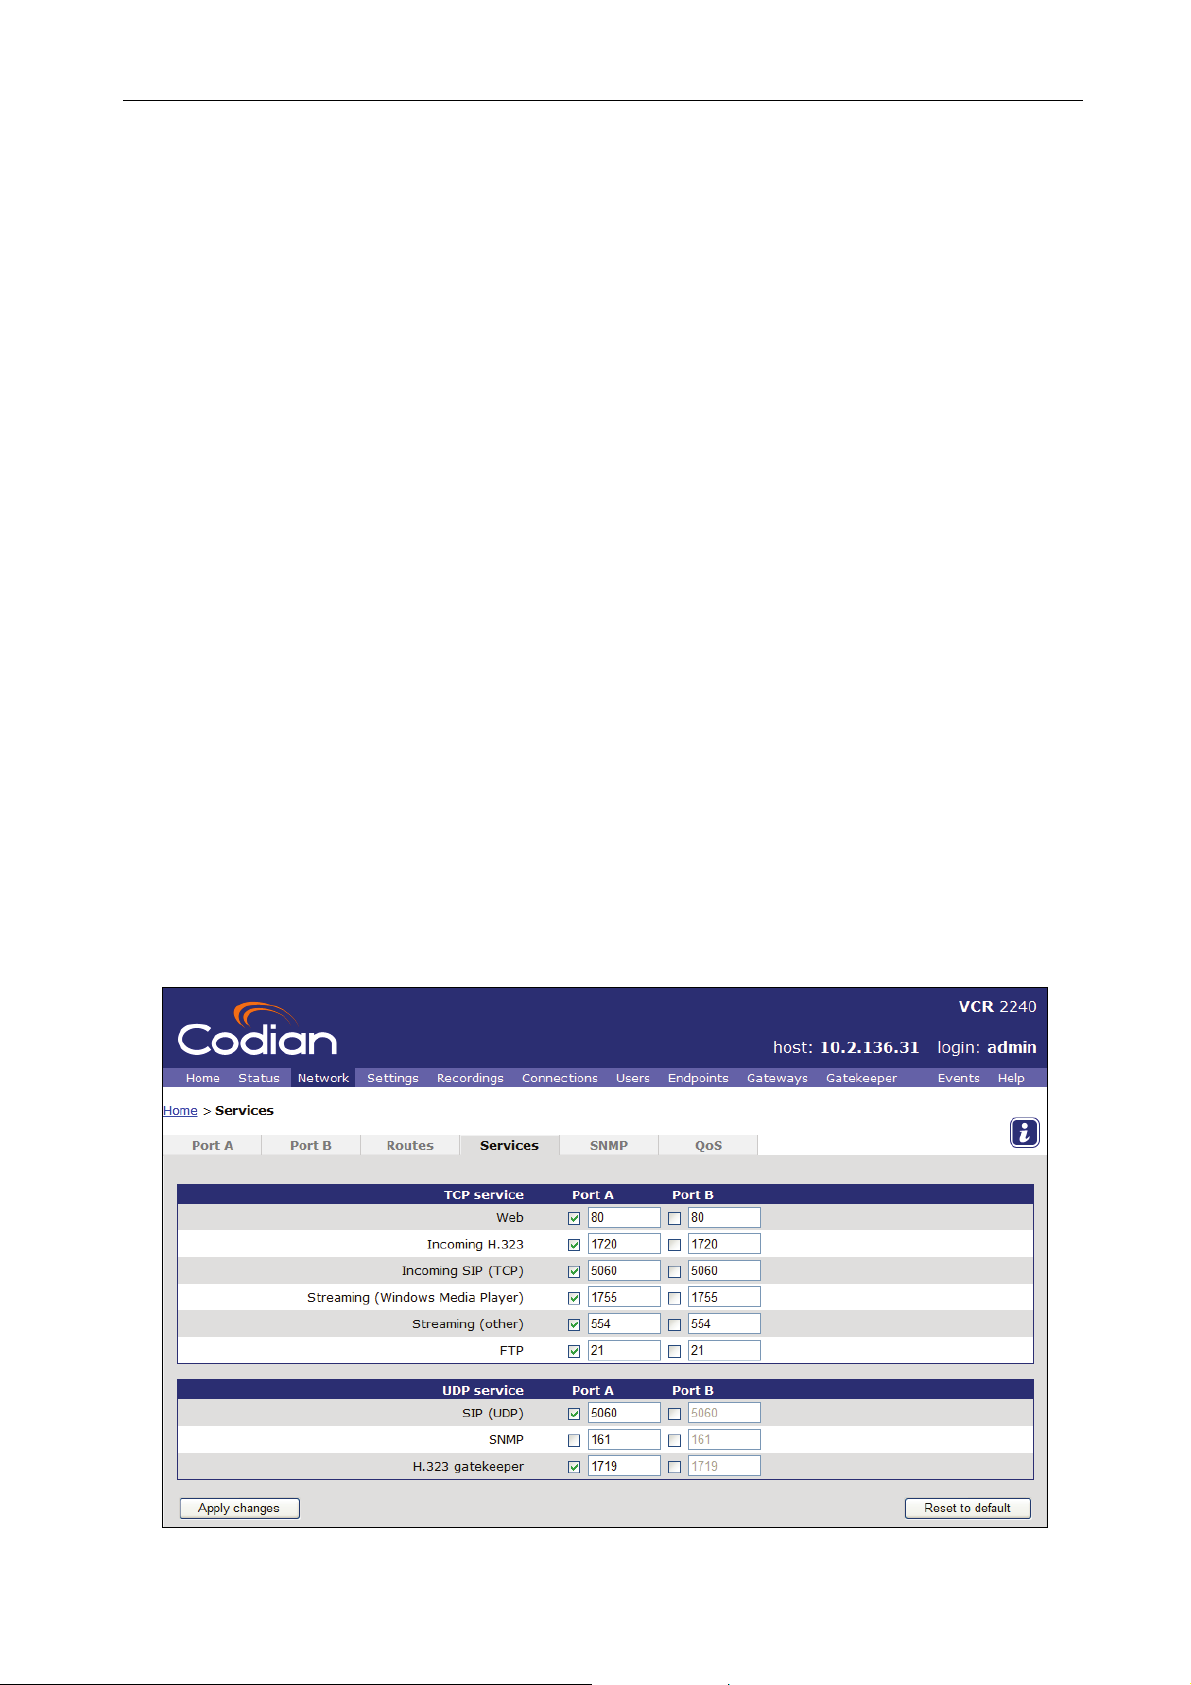
1 Go to Network > Services and set the H.323 gatekeeper checkbox
The H.323 gatekeeper firewall port is not open on the IP VCR by default. If you enable the built-in
gatekeeper, without first opening the port, an error message will be displayed.
2 Click Apply changes to open the H.323 gatekeeper firewall port
7
Page 11
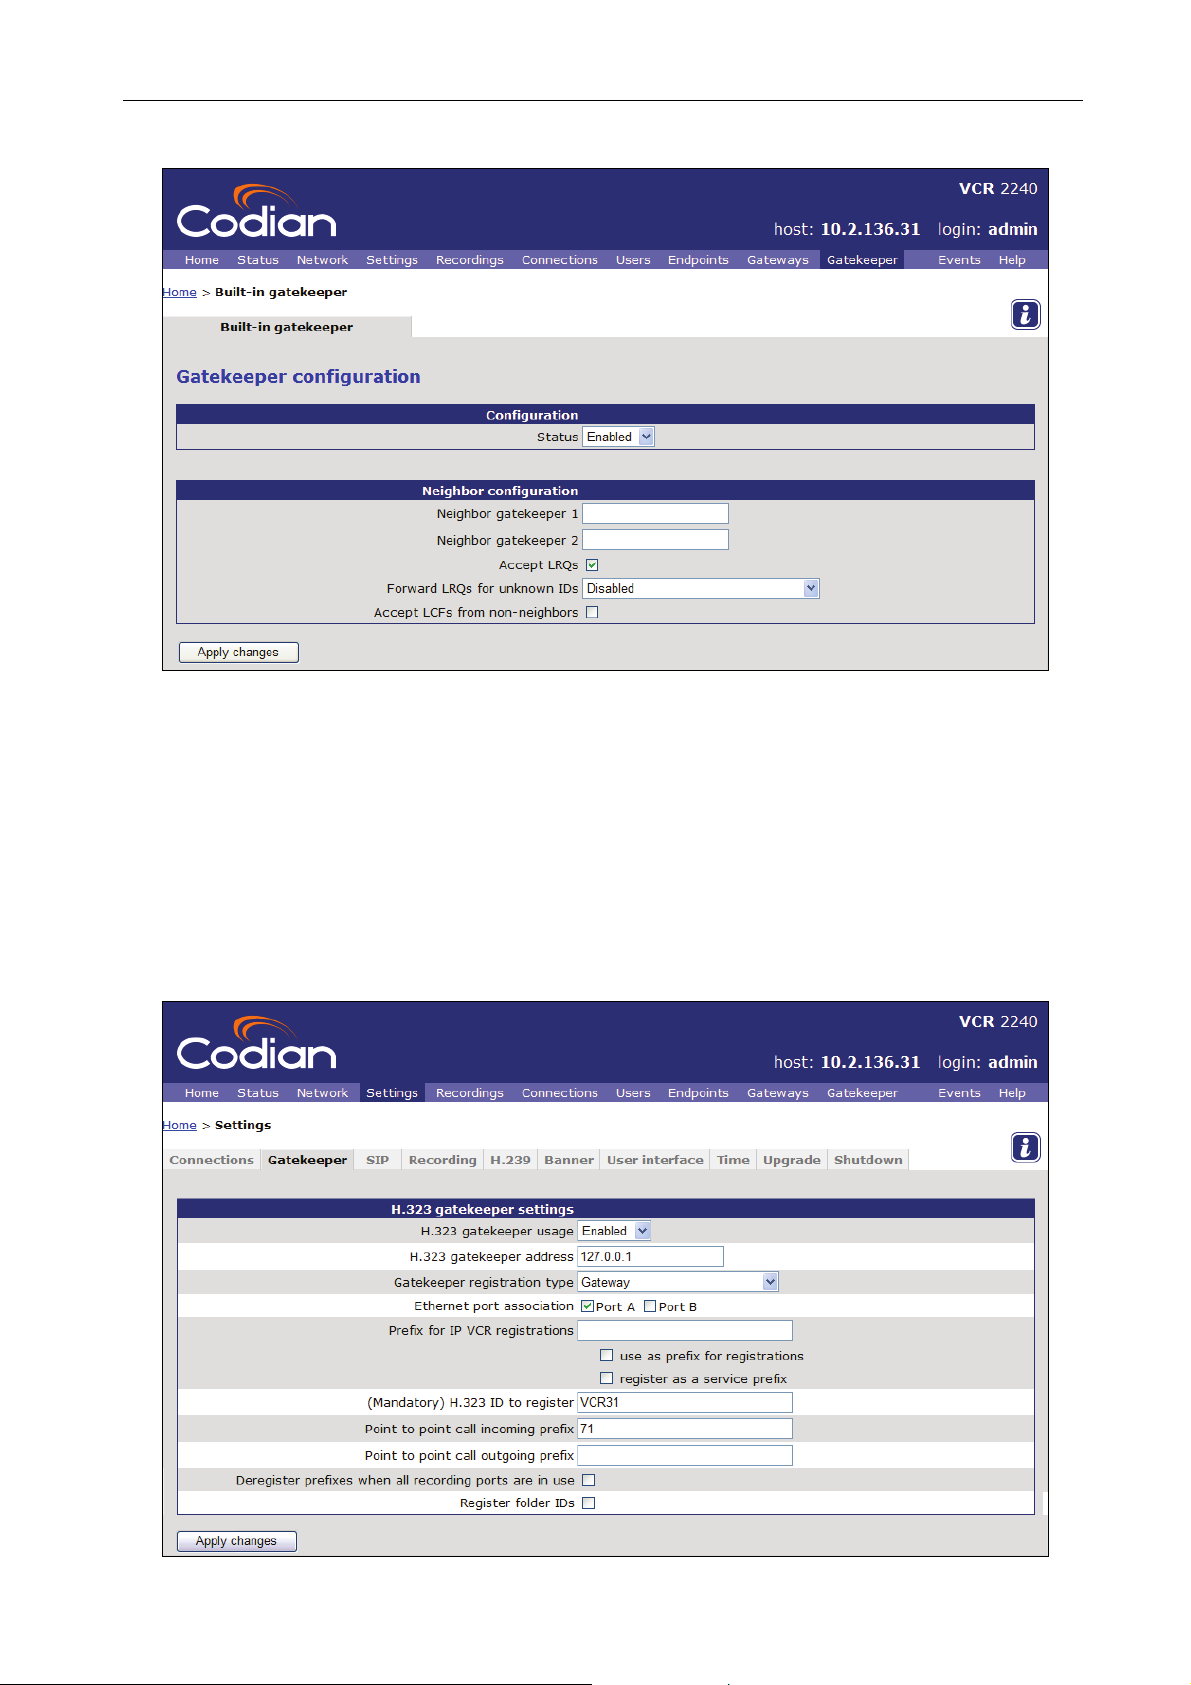
3 Go to Gatekeeper
4 Select Enabled from the status drop down list
The other fields can be left blank as they control gatekeeper neighboring. This is an advanced feature that
is not covered by this tutorial. For more information on gatekeeper neighboring refer to the online help.
5 Click Apply changes to enable the built in gatekeeper
The IP VCR can now be configured to register with the built-in gatekeeper.
6 Go to Settings -> Gatekeeper
8
Page 12

7 For H.323 gatekeeper usage, select Enabled
8 For H.323 gatekeeper address enter the local IP loopback address 127.0.0.1
9 For Gatekeeper registration type, select Gateway
If the IP VCR is configured to register prefixes Codian recommend registering the IP VCR as a Gateway.
The “Which gatekeepers have been tested for the IP VCR?” FAQ in the Technical Support section of the
Codian web site details any exceptions to this advice.
9 Enter a name for your IP VCR in the H.323 ID to register text box
H.323 endpoints that are registered with the gatekeeper can Users can call the VCR using the ID given
here.
10 Enter 71 in the Point to point incoming prefix text box
This Point to point incoming prefix will be used later on in the tutorial.
11 Click Apply changes to register the IP VCR with the internal gatekeeper
Your H.323 endpoints should also be registered with the gatekeeper on the IP VCR. Your endpoint
documentation should describe how to register the endpoint with the gatekeeper.
9
Page 13
Creating recordings
There are a number of ways to create a recording:
f Call out and record: the IP VCR, via its web interface, calls out to a H.323 endpoint and records its
media streams
f Make a call to the IP VCR after it has been configured to record incoming calls by default
f Call in to the IP VCR’s auto attendant and select Record session to record yourself
f Call a specific gatekeeper registered numeric ID to trigger a recording
f Call another endpoint through the IP VCR (a point-to-point call) via a prefix the IP VCR has registered
with the gatekeeper. The IP VCR will be part of the call and record the media streams from both
endpoints
Equally there are a number of ways to play back a recording:
f Call out and play: the IP VCR, via its web interface, calls out to a H.323 endpoint and plays back a
recording to it
f Streaming the recording to a user’s desktop via a player application such as QuickTime™
f Calling in to the IP VCR’s auto attendant and selecting the recording for play back
f Registering the recording with a gatekeeper and playing it back by calling its registered numeric ID
In this tutorial you try several ways to record and play back.
Calling out and recording
This section describes how to create your first recording by connecting directly to an endpoint. Later in the
tutorial you will record video from a conference and from a point-to-point call.
1 Go to Recordings
The Recordings list opens and shows any existing recordings.
10
Page 14

2 Click Call out and record
3 Type in a name for the recording – for example training recording 2
4 Type in the IP address or hostname of the endpoint that you want to record from
5 Select whether to connect to this endpoint using H.323 or SIP
6 Leave all other values as their default settings
Later in the tutorial you will be shown how to pre-configure H.323 endpoints. This allows recordings to
be started quickly using preconfigured settings.
7 Click Call endpoint
8 If the endpoint is not configured to automatically answer calls, accept the call on the endpoint
When the endpoint answers the call the IP VCR starts recording and will continue recording until the call
is disconnected. The recording captures the video and audio streams being sent by the endpoint to the IP
VCR.
11
Page 15

Your browser will now show the Recordings list and the new “training recording 2” should be visible and
have a status of Recording.
Later in the tutorial you will watch the video that you recorded and also see how to upload a video
recorded on another IP VCR.
9 Refresh your browser to update the Length information which shows the duration of the recorded call
10 Go to Connections
The list of active connections shows recordings being made and recordings being played back.
11 Select the check box to the left of the “training recording 2” title
12
Page 16

12 Click Disconnect selected to disconnect the call and save the recording to the IP VCR
Disconnecting the call from the H.323 endpoint will also stop and save the recording to the IP VCR.
13 Go to Recordings to view the Recordings list. The “training recording 2” recording will now be idle
and the total length of the recording will be shown
Recording using the Recording Console
In the previous section you could not see what was being recorded while you were recording from your
H.323 endpoint. In this section you create a recording using the recording console which allows you to
monitor the recording while it is being made and to check that the view is the one you require.
1 Go to Recordings
2 Click Call out and record
3 Type in a name for the recording, training recording 3
4 Set the Use recording console display check box
5 Type in the host name or IP address of the endpoint that you want to record from
14 Select whether to connect to this endpoint using H.323 or SIP
6 Click Call endpoint
7 Answer the call on the endpoint
13
Page 17

The recording console will appear on the endpoint display and you will hear audio instructions about
which controls you may use. Recording does not start until you are ready.
8 Select far end camera control and then click UP on the remote control to start the recording
The Recording Console shows:
f The red recording indicator while recording is in progress
f A live preview of the video being sent by the endpoint to the IP VCR
f A bar showing the audio level
f Status in the bottom left-hand corner
f The length of the recording in the bottom right-hand corner
9 Hang up the call from the endpoint to stop the recording
14
Page 18

Recording point-to-point H.323 calls
In this section you record a point-to-point call that is routed through the IP VCR. A point-to-point call is one
where just two endpoints are involved so you will need two endpoints to work through this section. The IP
VCR must be configured to register a prefix with the H.323 gatekeeper for point-to-point recording to work.
Recording of point-to-point calls is transparent. To start a recording call another endpoint by dialing the
prefix followed by the endpoint number. The recording stops when the call is disconnected.
Before making the first point-to-point call with an H.323 endpoint, check the IP VCR’s Gatekeeper settings.
1 Go to Settings > Gatekeeper
2 Check that the Point to point incoming prefix is set to 71
You are now ready to place a point-to-point H.323 call via the IP VCR. For example endpoint A might have
the IP address 10.2.134.222 and be registered with the gatekeeper with number 5555 and endpoint B could
have an IP address of 10.2.133.203 and number 7777.
When you place the call you dial the IP VCR Point-to-point call incoming prefix before to the number
of the destination endpoint.
Note. Recording SIP point-to-point calls is not currently supported.
3 From endpoint A, place a call to 717777
71 is the registered prefix of the IP VCR that you set up previously and 7777 is the number of the
endpoint that you are calling
4 Answer the call on the receiving endpoint
The IP VCR starts recording both sides of the call once the call has connected.
15
Page 19

5 Go to Recordings
In the list of recordings you see a recording called Recording_<DATE>_<TIME> where the DATE and
TIME are the time that the call was answered. The status column will show Recording.
6 Hang up the call from one of the endpoints
The IP VCR disconnects the other endpoint for you, stops recording and the stores the recording
automatically.
7 Refresh the Recordings list. The list will show that the recording has stopped
Recording a conference when the IP VCR calls out
You can record a conference being hosted on a Codian MCU by adding the IP VCR to the conference or by
calling the conference from the IP VCR.
Following on from the previous sections, the IP VCR will call out to a conference that has been configured on
the MCU with a conference ID of 123 registered to the gatekeeper. See the MCU tutorial for instructions on
how to do this.
1 Go to Recordings and click Call out and record
2 Type in a name for the recording, e.g. Record 123
3 Select whether to connect to the MCU using H.323 or SIP
4 For Host name or IP address, type in the conference ID 123
16
Page 20

If you are not using a gatekeeper with the IP VCR then you can still use this method to record a
conference – but you must first set up a gateway on the IP VCR – as described later in the tutorial.
5 Click Call endpoint
6 Go to Connections
You will see a recording underway called Record 123.
Recording a conference when the MCU calls the IP VCR
In this section you use an MCU to call the IP VCR. First you must configure the IP VCR to record incoming
calls by default; otherwise the conference will not be recorded.
Configuring the IP VCR to start recording incoming calls by default
1 Go to Settings > Connections
2 In the Connection settings section, for Default incoming call action select Record session
3 Click Apply changes
Calling the IP VCR from a conference on an MCU
4 On your MCU unit, add the IP VCR as an endpoint to an existing conference using the IP address of the
IP VCR that you noted earlier. See the following example screen below and the MCU Tutorial for
information about how to create conferences on the MCU and add endpoints.
17
Page 21

5 On the IP VCR go to Connections to display the Connections list
The connections list will show the active conference with a status of “Recording in progress”. Recording
stops automatically when the conference ends.
6 To stop the recording, disconnect the IP VCR endpoint from the conference
Before going on to other ways to make a recording, the next section shows some simple ways to play back
recordings.
18
Page 22

Playing back recordings
The Codian IP VCR can stream recordings to a personal computer or play back recordings to H.323 and SIP
endpoints. Recordings stored on the IP VCR can be replayed on a PC by RealPlayer™, QuickTime™, or
Windows Media Player™.
Playing back to a PC
1 Go to Recordings
If there are more than 20 recordings, these will span a number of pages selectable by page number. The
white arrow shows which column the list is sorted by and whether the list is in ascending or descending
order. You can reorder the list by click on the appropriate heading.
2 Click Watch next to the “training recording 2” recording made earlier in the tutorial
19
Page 23

By clicking Show advanced streaming options settings modifying the playback video window size
and bit rate can be chosen.
Viewing in RealPlayer
3 If you are not running the latest version of RealPlayer, upgrade to the latest version of the free player at
http://www.real.com/realsuperpass.html. Click the Get RealPlayer - Free option and then click
Start RealPlayer Download
4 For Media select a RealPlayer option and click Start streaming
5 Open the RealPlayer window by clicking on the top left hand corner
20
Page 24

The RealPlayer controls can be used to pause, restart, rewind and fast forward the recording.
6 Practice pausing, restarting, fast forwarding and rewinding the recording
7 Close RealPlayer
Viewing in QuickTime
8 If you are not running the latest version of QuickTime, upgrade to the latest version at
http://www.apple.com/quicktime/download/
9 Go to Recordings to view the recording list
10 Click Watch again and for Media select a QuickTime option
11 Click Start streaming
12 Practice pausing, restarting, fast forwarding and rewinding the recording
21
Page 25

Viewing in Windows Media Player
13 If you are not running the latest version of Windows Media Player, upgrade to the latest version at
http://www.microsoft.com/windows/windowsmedia/download/alldownloads.aspx
14 Go to Recordings
15 Click Watch again and for Media select a Windows Media Player option
16 Click Start streaming
17 If the video fails to play because Windows Media Player cannot find the correct codec, click the link
below the video window to download and install the Codian codec from the IP VCR
18 Practice pausing, restarting, fast forwarding and rewinding the recording
22
Page 26

Playing back to an endpoint
1 Go to Recordings
2 Click on the “training recording 2” made previously
3 Click Call out and play recording
23
Page 27

4 Type in the IP address of the endpoint that you wish to play the recording on and select whether to
connect to it using H.323 or SIP
If the endpoint is reached via a H.323 gateway, enter the endpoint’s E.164 number in the Host name or
IP address field instead of the IP address as above, and choose the H.323 gateway from the H.323 gateway
list of configured devices. You learn how to set up a gateway later in the tutorial. If the endpoint is
reached via a SIP registrar, tick the SIP registrar box.
5 If required, change the video size and preferred bandwidth fields
6 Click Call endpoint
7 Answer the call on the chosen endpoint
You see the recording being played. When playback reaches the end of the recording, it will stop or
automatically return to the start of the recording and continue playing, depending on whether the IP VCR
is configured to loop back or not.
8 Select far end camera control on the endpoint’s handset
You can now control the video playback using the handset.
f Use the down arrow to pause playback
f Use the up arrow to resume playback
f Use the right arrow to fast forward the playback
f Use the left arrow to rewind the playback
9 Practice controlling the playback
10 When you have finished watching the recording, simply hang up the call
24
Page 28

Using the auto attendant
By default, when an endpoint connects to the IP VCR, a menu known as the ‘auto attendant’ is displayed.
Auto attendants are used to record sessions and play back recordings. In this section you will make a
recording and you also update the auto attendant banner.
In a later section you will use the auto attendant to play back a recording.
Dial the auto attendant and create a recording
Configuring the IP VCR to start recording incoming calls by default
Earlier in the tutorial you changed the default behavior for the IP VCR for incoming calls from displaying the
auto attendant to answering the call. To use the auto attendant you must change this behavior.
1 Go to Settings > Connections
2 In the Connections settings section, for Default incoming call action select Connect to auto
attendant
3 Click Apply changes
Calling from an endpoint and using the auto attendant to make a recording
4 From an endpoint call the IP VCR’s IP address that you noted earlier
You see the auto attendant menu on your endpoint as shown below and you also hear the audio
instructions playing.
You can navigate the auto attendant using the far end camera controls on your video endpoint. Use the
Up and Down controls to highlight the option or you require; use the right arrow to make your selection.
5 Select Record this session using the right arrow. Press the Up button on your endpoint to start
recording
The IP VCR starts recording both video and audio from your endpoint.
25
Page 29

6 Go to Connections
The active recording will be shown in the connections list.
7 Click on the preview image to update it
8 Click on the recording’s name
26
Page 30

The Status page shows detailed statistics about the connection including the received and transmitted
Audio / Video formats for each connection, the recording time and the current file size. Note that the
lower window is black unless you are sending H.239 content from your endpoint.
9 From the endpoint disconnect the call
Customizing the auto attendant banner
The auto attendant menu comprises two halves: the banner area and the menu options. You can upload a
GIF or BMP file that will be used in the banner area instead of the default Codian logo and unit type. You
can also change the background color.
1 Go to Settings > Banner
The Banner page shows which banner is currently displayed on the auto attendant.
2 Type in or Browse for the file that you wish to use as the new banner
3 If you want to change the background color from the Codian blue, enter the new color as an RGB value
(the proportion of Red, Green and Blue out of 255)
4 Click Upload new file
A preview of the banner will be shown.
5 Click Update
By default the new banner will be used from now on: the banner is updated immediately on current
connections and used for all subsequent calls from endpoints in to the IP VCR auto attendant.
27
Page 31

Using Folders
Folders can be used both to organize recordings stored on the IP VCR and to restrict access to recordings.
1. To configure folders on the IP VCR go to Recordings > Folders
2. Click Create sub folder for the root folder
You can create a whole hierarchy of folders using the create sub folder link which is automatically
displayed for each folder.
f The PIN allows this folder to be protected so only users knowing the PIN can view its contents
f The Recording ID is an E.164 number registered with the gatekeeper (if you are using one) and
allows recordings to be made directly into this folder by dialing it from an endpoint
f The Recording console ID is an E.164 number registered with the gatekeeper and allows recordings
to be made directly into this folder using the recording console by dialing it from an endpoint
f The Auto attendant ID is an E.164 number registered with the gatekeeper that allows endpoints to
dial directly to the auto attendant and only have the recordings in this folder and its sub folders
displayed
f Able to make new recordings via the auto attendant determines whether the Record this session
option is available when the user dials the auto attendant with the Auto attendant ID
28
Page 32

3. Enter a name for the folder e.g. Training and assign 3 unused E.164 numbers to the Recording ID,
Recording console ID and Auto attendant ID described above, entering a PIN and checking Able
to make new recordings via the auto attendant, if required
4. Click Add new folder
You are returned to the Folders list.
5. Click the configuration link for the new folder
In the Current status section you see the registrations that were made.
Recording directly to a folder
6. Make sure your endpoint is configured to use the H.323 gatekeeper that the IP VCR is registered with
7. From the endpoint dial the Recording ID specified above e.g. 311
The endpoint screen goes blank and its audio and video streams are recorded.
8. From the endpoint hang up or disconnect from the IP VCR
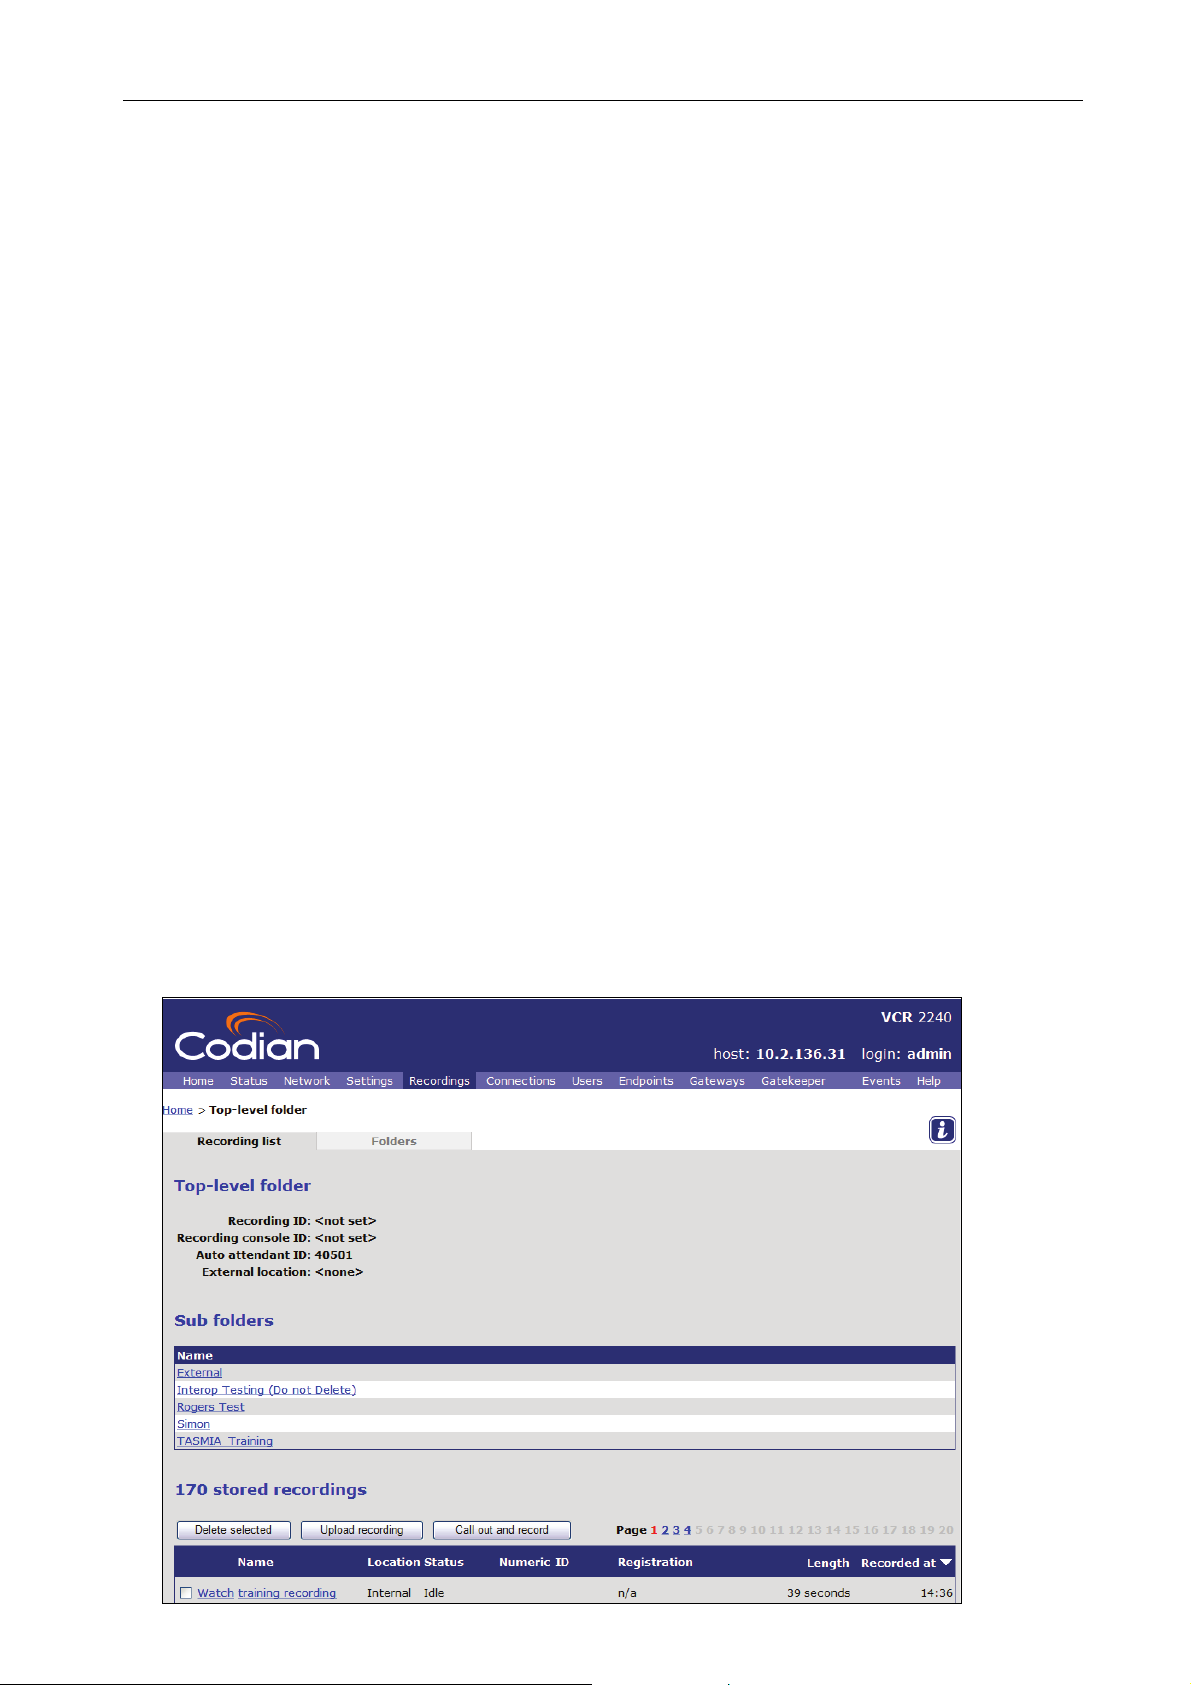
9. From the IP VCR interface, go to Recordings and click on your newly created folder to see the
recording you have just made
29
Page 33

Recording directly to a folder with the recording console
10. From the endpoint dial the Recording console ID specified above e.g. 312
The recording console displays the recording being made — as described earlier in the tutorial.
11. From the endpoint hang up or disconnect from the IP VCR
12. Go to Recordings and click on your newly created folder to see the recording you have just made
Dialing the auto attendant for a specific folder
13. From the endpoint dial the Auto attendant ID specified above e.g. 313
The auto attendant screen is displayed, showing the recordings made earlier in this section.
This auto attendant can be used in exactly the same way as explained earlier in the tutorial, for example
to record through the recording console into the folder you created or to view any of the recordings that
are listed.
30
Page 34

Recording computer displays
The IP VCR can be used to record and play back an additional video stream known as the content channel. This
can be used to:
f Record H.239 video streams from H.323 endpoints, in either single-endpoint or point-to-point
recordings
f Play back a recorded content channel to H.323 endpoints via H.239
f Stream the content channel to a web page
To do this your IP VCR must be configured to use H.239.
Configuring the IP VCR to use H.239
1 Go to Settings > H.239
2 If necessary change the H.239 status to Enabled
You can only make new recordings using H.239, and play back the content channel recording when the
H.239 Status is set to Enabled.
3 Click Apply changes
31
Page 35

Recording the content channel
1 On the MCU set up a conference which includes an endpoint with an H.239 data channel. If necessary
refer to the MCU Tutorial
2 On the IP VCR go to Recordings and click Call out and record
3 Type in a name for the recording e.g. Training H.239 Recording and make sure the H.323 protocol
is selected
4 For Host Name or IP Address type in the conference ID that you just set up on the MCU
5 Click Call endpoint
6 Go to Recordings and click the Watch link for the recording you have just started
7 Select your media player and click Start streaming
You will see the recording with both the main video and the H.239 content windows.
When playing back a recording, you are given the choice of whether to play back the audio and main
video channels, the content channel video, or both. If you want to display the content channel when you
play back the recording, make sure that the View content channel check box is selected.
32
Page 36

Using a gateway to call the IP VCR
If you are not using a gatekeeper with the IP VCR and MCU units, each unit needs another method to
identify how to find the other units.
f If you are simply calling a unit you can specify the IP address for that unit in the Host name or IP address
field when you call out
f However, if you want to connect to a specific conference on an MCU or play a recording on an IP VCR
without going via the auto attendant, then you need to set up a gateway on the unit that will call out
first. Each unit can have several gateways defined. Each gateway is not a connection itself but specifies a
connection between two specific destinations, whether local or remote.
As an example of setting up a gateway, in this section you set up a gateway on the IP VCR which is
configured to call the MCU and then use the gateway to add the IP VCR to a conference.
Creating a gateway on the IP VCR that directs calls to the MCU
1 On the IP VCR go to Gateways
2 Click Add new H.323 gateway
3 Type in a name for the gateway, e.g. Training MCU
4 Type in the IP address of the MCU. This can be found in the General page of the MCU’s Settings screen
5 Click Add H.323 gateway
33
Page 37

Calling out to the MCU
1 Go to Recordings and click Call out and record
2 Type in a name for the recording
3 For Host name or IP address, type in the conference ID
4 Select the H.323 gateway called Training MCU from the drop-down list
5 Click Call endpoint
6 Go to Connections
The recording will be shown with the name that you entered.
7 End the recording either by hanging up the endpoint on the MCU or from the IP VCR
34
Page 38

Transferring recordings
You can transfer recordings from an IP VCR to a PC. This is often an intermediate step to transferring
recordings from one IP VCR to another as there is no direct way to do this. You can also transfer a recording
from one IP VCR to another by watching and re-recording; though this takes longer than transferring the
recording file – and may also result in some degradation in quality. You try both these methods in this
section.
Downloading a recording to your PC
In this section you download the “training recording 2” made previously on to your PC.
Recordings are made in a proprietary Codian file format and can be downloaded in this format or as an
MPEG file. When you select to download a recording from the IP VCR as an MPEG file, it will not include the
H.239 content channel. To include the H.239 content channel in an MPEG file, you must download the file to a
PC and use the MPEG Converter – as described later in this section.
Video recordings can be very large: check that you have enough disk space and enough network
bandwidth to download the clip in a reasonable time before following these steps.
Downloading a recording in Codian file format
1 Go to Recordings
2 Click on the name of the “training recording 2” made previously
3 Click download recording to download a file of the recording in Codian format
You would click download MPEG file at this point if you wished to download a file of the recording in
MPEG format.
35
Page 39

4 Click Save
5 Select the folder and file name and then click Save
The recording is saved as a file on your PC’s hard disk.
Converting a Codian file to MPEG
You can easily convert a ‘.codian’ file into an encoded MPEG by using the default settings of the MPEG
Converter. The MPEG Converter can be downloaded from www.codian.com/downloads/software.htm.
The installation program is called Codian MPEG Converter.msi. Converting a Codian file to an MPEG
file preserves the H.239 content channel if it was present in the original recording.
To install the MPEG Converter:
1 Download the latest Codian MPEG Tool from codian.com/downloads/software.htm to your PC and
extract the contents of the ZIP file. Double click on the Codian MPEG Converter.msi to install the
software
The Codian MPEG Converter Setup Wizard is displayed.
2 Follow the instructions to install the program. Accept the End-user License Agreement and select a
location in which to install the program
36
Page 40

6 Open an MS-DOS command prompt window and navigate to the directory that you saved the ‘.codian’
recording file in
7 Type the conversion command in the format: codian_to_mpg <your_filename>.codian
Example: codian_to_mpg recording_0_training_recording_2.codian
This converts the downloaded Codian file to MPEG format e.g. recording_0_training_recording_2.mpg stored
in the same directory. The file contains video encoded to 352 x 288 pixels in size; the video stream is
positioned in the top left corner and the content channel is on the right. If there was a second video stream, it is
shown below the first one.
Consult the Codian Converters Getting Started Guide for more advanced MPEG conversion options such
as setting the video and audio quality and choosing which streams to convert and their positioning.
Uploading a recording from your PC
Any recordings that you have stored on your PC can now be uploaded to another IP VCR or to the same IP
VCR (in which case it must be stored as a different name).
8 Go to Recordings and click Upload Recording
The Uploading Recording page is displayed.
9 Use Browse to select the file to upload from your hard disk
10 Type in a name for recording on this IP VCR to be stored on the IP VCR under. For example if you are
uploading the same recording on to the same IP VCR, use Training Recording 4
11 Click Commence upload
The time taken for the file to be uploaded depends on the file size and your network speed. When the
upload is complete, you see an Upload successful message.
12 Click on the Click here link below the message to see details of the recording that was uploaded
The uploaded recording is stored as Training Recording 4.
37
Page 41

Transferring a recording from one IP VCR to another
You can transfer a recording directly from IP VCR to another and you will demonstrate this by copying a
recording from your IP VCR to itself but under another name.
When you are copying from one IP VCR to another, the IP VCR you are recording on needs to know how to
connect to the IP VCR with the original recording on. There are two ways to provide this connection: by
registering both IP VCRs with the same gatekeeper, or by setting up a gateway between the two units. This is
obviously different to the situation in this tutorial when only one IP VCR unit is being used – but the
instructions in this section assume you are using a gatekeeper. (You set up a gateway to an MCU later in this
tutorial – and the same method can be used for a gateway to another IP VCR unit.)
1 Go to Recordings and select Training Recording 4 which you just uploaded
The name of the recording is completed for you.
2 Type in a unique numeric identifier for this recording (e.g. 3333)
3 If you are using a gatekeeper with the IP VCR, select the H323 gatekeeper check box
Registering with a gatekeeper allows users to call from their video endpoint and connect directly to a
playback of this recording. This is one of the simplest ways to allow users to access recordings.
4 If required, specify a security PIN to restrict access to a recording
Recordings can be protected with a PIN. When you try to play a protected recording you see the PIN
entry screen. The PIN must be entered before the recording will play.
38
Page 42

5 Click Update configuration
6 Return to the Recordings list and click Call out and Record
7 Type in a name for the recording that you wish to create, for example Copy of Training Recording 4 and
ensure that the H.323 protocol is selected
8 For Host name or IP address type in the Numeric ID of the Training Recording 4 recording which was
registered with the gatekeeper (3333 in this example)
9 Click Call endpoint to play back and record the selected recording
10 Go to Connections to see the active playback and recording connections
39
Page 43

11 Select the check box to the left of the original recording that is now being played back and then click
Disconnect selected to stop the recording
12 Go to Recordings
You now see your recordings.
13 Delete the copy that you just made by selecting its check box and then clicking Delete selected
Managing endpoints
You can pre-configure endpoints on the IP VCR in the same way as you can on the MCU.
1 Go to Endpoints and click Add H.323
2 Complete the fields using the online help if necessary and then click Add endpoint
Call-out parameters are the values that are used when calling out to an endpoint from the IP VCR. The
Conferencing parameters define the preferred settings for the endpoint.
Similarly Call-in match parameters are details used by the IP VCR when an endpoint that calls in. The IP
VCR tries to match an incoming call to identify the endpoint. Therefore at least one of the Call-in match
parameters fields must be completed and you can complete 1, 2 or 3 of the fields. All the details provided
must match in order to apply the settings to that caller. However, blank fields are ignored.
The advantage of the IP VCR being able to match an incoming call to a pre-defined endpoint is that the
parameters (for instance, the bandwidths) will automatically take effect rather than needing to be set up
each time that endpoint calls in.
Note in the same way SIP end points can be added with the ‘Add SIP’ button in the endpoints screen.
40
Page 44

Setting up users and editing user privileges
Adding a new user
1 Go to Users
The list of current users is displayed. By default the IP VCR has an admin and guest account. You must be
logged in as the admin user to be able to add new users or change another user’s configuration.
2 Click Add new user
3 Type in the User ID and Name for the new user
The user ID is used to log in, the name is the preferred name for that user.
4 If this user account needs to be password-protected, type in the password twice
5 Set the Privilege level from the drop down list
6 Click Add user
You are returned to the Users list and the new user is displayed.
The Lock password tick box can be used to prevent the user from changing their password once it’s set.
41
Page 45

Editing the guest user’s configuration
Anyone connecting to the IP VCR has guest privileges. By changing the configuration of the guest user you
can limit what they can do.
7 Click the guest link
8 Change the access rights as required and click Update guest settings
Entering a password for the admin user
When you logged in as the admin user at the start of this tutorial there was a blank password. However, this is
not secure and you should change the password to something meaningful to you.
9 Click the admin link
10 Type in the password that you want to use to gain access to this IP VCR as the admin user from now on
11 Re-type the password
12 Click Update user settings
Closing the IP VCR browser
You have completed the tutorial.
The IP VCR is designed to be left powered on at all times; therefore you can simply close the browser
window. You are logged out automatically and no other action is required.
42
 Loading...