

Page 1
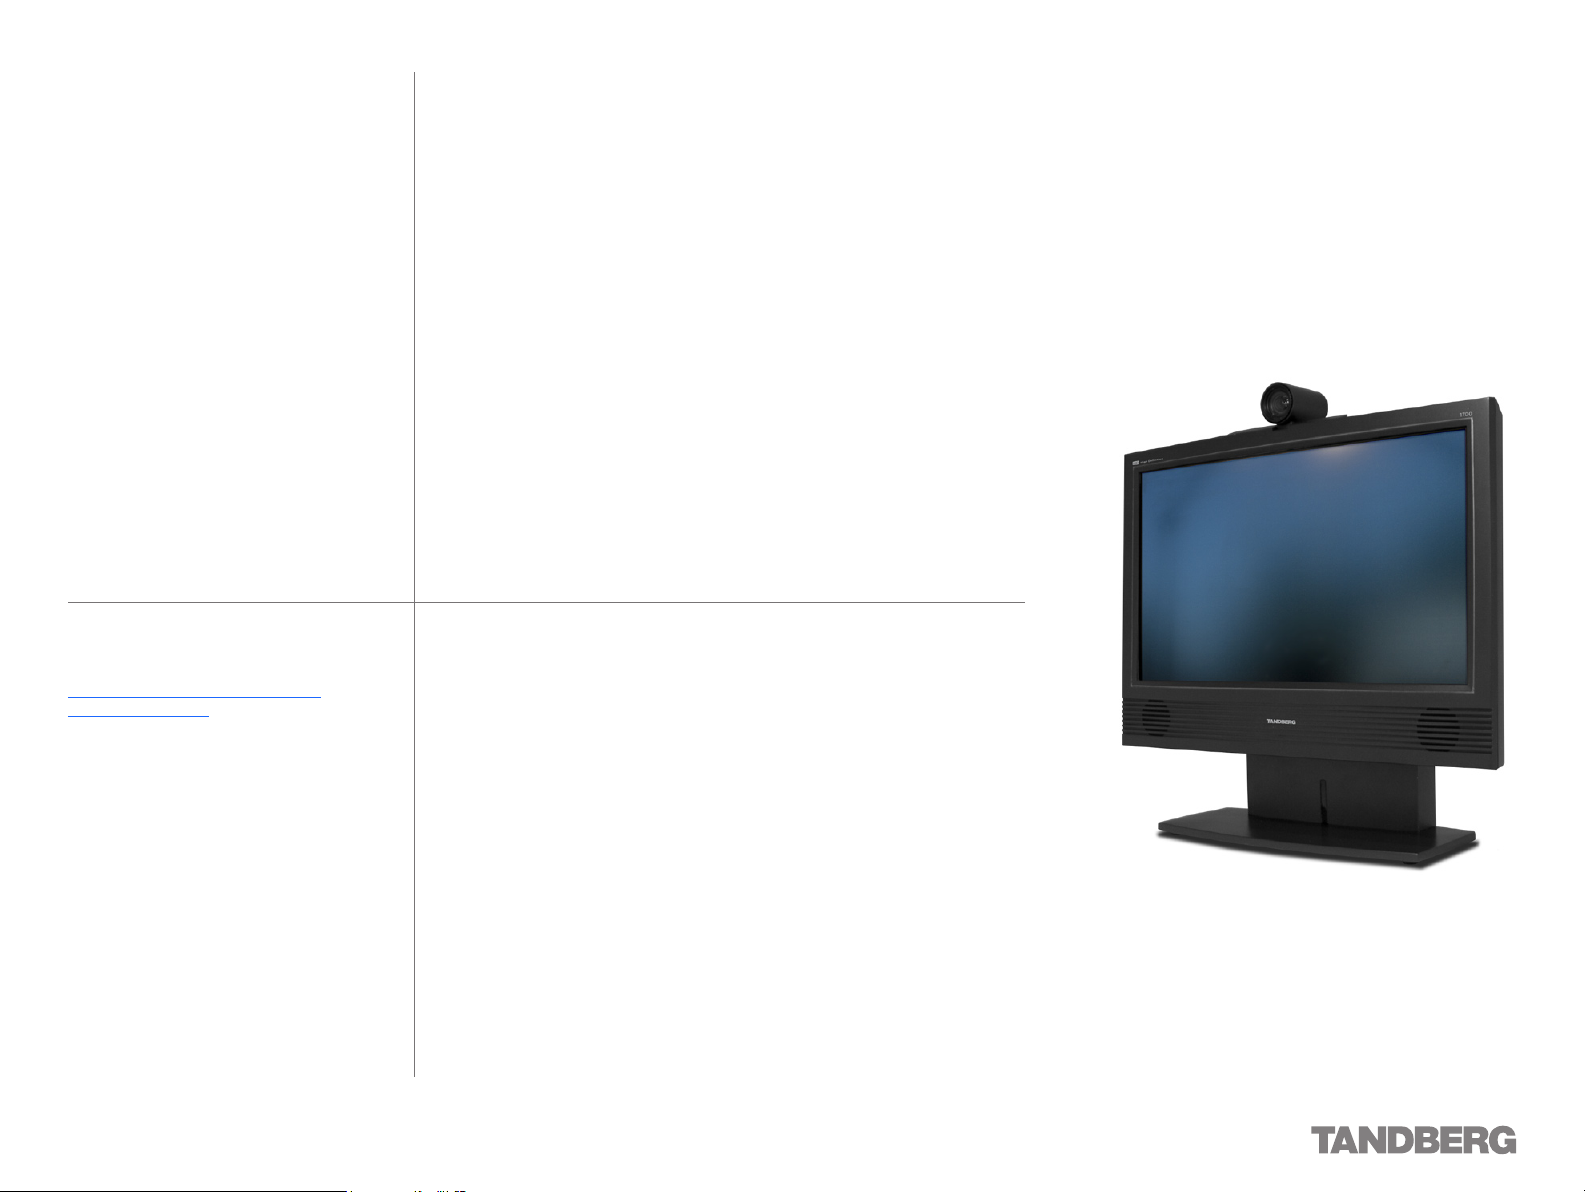
1700
MXP
• Highly integrated stand- alone
executive video system
• Integrated 20” LCD wide screen
• Integrated High Denition camera
• Simple user inter face
• Optional MultiSite capabilities
• Optional presentation and
dual video stream capabilities
• Headset connection for privacy
• Standards-based embedded
encryption (AES & DES)
• Protection against network interruptions
with automatic Downspeeding and IPLR
Software version F5
D13954.01
JUNE 2006
Page 2

Trademarks and Copyright
We recommend that you check out the
TANDBERG web site regularly for updated
versions of this manual:
http://ww w.tandberg.net/support/
documentation.php
All rights reserved. This document contains information
that is proprietary to TANDBERG. No part of this publication
may be reproduced, stored in a retrieval system, or
transmitted, in any form, or by any means, electronically,
mechanically, by photocopying, or otherwise, without the
prior written permission of TANDBERG. Nationally and
internationally recognized trademarks and tradenames are
the property of their respective holders and are hereby
acknowledged.
COPYRIGHT © 2006, TANDBERG
Philip Pedersens vei 22
1366 Lysaker, Norway
Tel: +47 67 125 125
Fax: +47 67 125 234
e-mail: tandberg@tandberg.net
Page 3

Disclaimer & License Agreements
We recommend that you check out the
TANDBERG web site regularly for updated
versions of this manual:
http://ww w.tandberg.net/support/
documentation.php
The information in this document is furnished for
informational purposes only, is subject to change without
prior notice, and should not be construed as a commitment
by TANDBERG.
TANDBERG reserves the right to amend any of the
information given in this document in order to take account
of new developments.
Every effort has been made to supply complete and
accurate information, however, TANDBERG assumes no
responsibility or liability for any errors or inaccuracies that
may appear in this document, nor for any infringements
of patents or other rights of third parties resulting from
its use. No license is granted under any patents or patent
rights of TANDBERG.
Page 4

Disclaimer & License Agreements, Patent Information
TANDBERG 1700MXP
USER GUIDE
Disclaimer
The information in this document is furnished for informational purposes only, is subject to change without prior notice, and should
not be construed as a commitment by TANDBERG.
TANDBERG reserves the right to amend any of the information
given in this document in order to take account of new develop ments.
Every effor t has been made to supply complete and accurate information, however, TANDBERG assumes no responsibility or liabilit y
for any errors or inaccuracies that may appear in this document,
nor for any infringements of patents or other rights of third parties
resulting from its use. No license is granted under any patents or
patent rights of TANDBERG.
License Agreements
All rights reserved. This document contains information that is
proprietar y to TANDBERG. No part of this publication may be repro duced, stored in a retrieval system, or transmit ted, in any form, or
by any means, electronically, mechanically, by photocopying, or oth erwise, without the prior ritten permission of TANDBERG. Nationally
and internationally recognized trademarks and tr ade names are the
property of their respective holders and are hereby acknowledged.
Copyright notices for third -part y software on the TANDBERG MXP
systems are listed below:
Full copies of the licenses and warr anty statements are located
•
on the product CD in the the license_f iles director y.
The non -commercial third par ty code is distributed in binary
•
form under the terms of non- copyleft style open source
licenses such as BSD, Artistic, or MIT/X Consortium.
The product also contains some binar y code distributed in
•
binar y form under the terms of the GNU public license with an
exemption which allows static links to non-copylef t commercial
code.
In accordance with section (3) of the GNU General Public
•
License, copies of such code will be provided upon request by
contacting TANDBERG. Please contact us by using the Online
Support section at www.tandberg.net or the “contact us” section of this manual. Please provide USD 10.00 for media and
shipping.
Agfa
Contains iType™ from Monot ype Imaging Corporation.
CMU-SNMP
Copyright © 198 8, 1989, 1991, 1992 by Car negie Mellon University All Rights Reserved
CMU-SNM P is distributed under the terms of the CMU SNMP
license which is an open source license similar to a BSD or X
Consor tium License.
Dropbear - an SSH2 server
Copyright © 2002,2003 Matt Johnston All rights reserved.
The Dropbear SSH2 ser ver is distributed under the terms of the
Dropbear License which is a MIT/X Consortium style open source
license.
eCos
eCos, the Embedded Configurable Operating System.
Portions of eCos code are distributed under several BSD style
licenses. Other por tions of eCos code are distributed under the
terms of the GNU General Public License with a non- copyleft excep tion which allows staic links to non -copyleft programs. Portions
of the code are distributed under the terms of various BSD style
licenses.
Copyright © 1998, 1999, 2000, 2001, 20 02, 2003 Red Hat, Inc.
Copyright © 2002, 2003 John Dallaway
Copyright © 2002, 2003 Nick Gar nett
Copyright © 2002, 2003 Jonathan Larmour
Copyright © 2002, 2003 Andrew Lunn
Copyright © 2002, 2003 Gary Thomas
Copyright 9 2002, 2003 Bart Veer
Copyright © 1982, 1986, 1991, 1993 The Regents of the
University of California. All rights reserved.
Copyright © UNIX System Laboratories, Inc.
All or some portions of this file are derived from material licensed
to the Universit y of California by American Telephone and Telegraph
Co. or Unix System Laboratories, Inc. and are reproduced herein
with the permission of UNIX System Laboratories, Inc.
Copyright © 1995, 1996, 1997, and 1998 WIDE Project. All rights reserved.
Copyright © 2000 Brian Somers <brian@Awfulhak.org>
Copyright © 1998 The NetBSD Foundation, Inc. All rights reserved.
Copyright © 1997 Niklas Hallqvist. All rights reserved.
Copyright © 198 8 Stephen Deering.
Copyright © 1992, 1993 The Regents of the Universit y of
California. All rights reser ved.
This code is derived from software contributed to Berkeley by
Stephen Deering of Stanford University.
ExPat XML Parser
Copyright © 1998, 1999, 2000 Thai Open Source Software Center
Ltd and Clark Coop er
Copyright © 2001, 2002, 2003, 2004, 2005, 2006 Expat maintainers.
The Ex Pat XML parser is distributed under the terms of the ExPat
License which is a MIT/X Consor tium style open source license
ICU
ICU License - ICU 1.8.1 Copy right © 1995-2003 International Business Machines Corporation and others. All rights reserved.
ICU is distributed under the terms of the ICU license which is a
MIT/X Consor tium style license.
OpenSSL
Copyright © 1998-2004 The OpenSSL Project. All rights reser ved.
This product includes software develop ed by the OpenSSL Project
for use in the OpenSSL Toolkit (http://www.openssl.org /)”
Copyright © 1995-1998 Eric Young (eay @cr yptsoft.com) * All
rights reser ved.
OpenSSL is distributed under the terms of the OpenSSL and SS Leay licenses which are both BSD st yle open source licenses.
snprintf
Copyright © 1999, Mark Martinec. All rights reser ved
Snprintf is distributed under the terms of the snprintf license which
is a Frontier Artistic style open source license.
xSupplicant (wpa_supplicant) 802.1x
Copyright © 2002-2005, Jouni Malinen jkmaline@cc.hut.fi
xSupplicant is distributed under the terms of the xSupplicant
license which is a BSD style open source license.
Patent Information
TANDBERG technology described in this manual is protected by one
or more of the following U.S. Patent Nos. 5,584,077 - 5,838,664 5,600,646 - 7,010,119 - 7,034,860 and other patents are pending
in the United States and/or other countries.
D 13954.01
JUNE 2006
4
Page 5

Operator Safety / Environmental Issues
We recommend that you check out the
TANDBERG web site regularly for updated
versions of this manual:
http://ww w.tandberg.net/support/
documentation.php
For your own protection, please read the overleaf safety
instructions completely, before operating the equipment
and keep this manual for future reference. The information
in this summar y is intended for operators. Carefully
observe all warnings, precautions and instructions both on
the apparatus and in the operating instructions.
Page 6

Safety Instructions
TANDBERG 1700MXP
USER GUIDE
For your protection please read these safety
instructions completely before you connect
the equipment to the power source. Carefully
obser ve all warnings, precautions and instructions both on the apparatus and in these
operating instructions.
Retain this manual for future reference.
Water and Moisture
Do not operate the apparatus under or
•
near water – for example near a bathtub,
kitchen sink, or laundry tub, in a wet basement, near a swimming pool or in other
areas with high humidity.
Never install jacks for communication
•
cables in wet locations unless the jack is
specif ically designed for wet locations.
Do not touch the product with wet hands.
•
Cleaning
Unplug the apparatus from communication
•
lines, mains power- outlet or any power
source before cleaning or polishing. Do not
use liquid cleaners or aerosol cleaners.
Use a lint-free cloth lightly moistened with
water for cleaning the exterior of the apparatus.
Unplug the apparatus from communication
•
lines before cleaning or polishing. Do not
use liquid cleaners or aerosol cleaners.
Use a lint-free cloth lightly moistened with
water for cleaning the exterior of the apparatus.
Ventilation
Do not block any of the ventilation open-
•
ings of the apparatus. Never cover the
slots and openings with a cloth or other
material. Never install the apparatus near
heat sources such as radiators, heat registers, stoves, or other apparatus (including
amplifiers) that produce heat.
Do not place the product in direct sunlight
•
or close to a surface directly heated by the
sun.
Lightning
Never use this apparatus, or connect/disconnect communication cables or power cables
during lightning storms.
Dust
Do not operate the apparatus in areas with
high concentration of dust
Vibration
Do not operate the apparatus in areas with
vibration or place it on an unstable surface.
Power Connection and Hazardous Voltage
The product may have hazardous voltage
•
inside. Never attempt to open this product,
or any peripherals connected to the product, where this action requires a tool.
This product should always be powered
•
from an earthed power outlet.
Never connect attached power supply cord
•
to other products.
In case any parts of the product has visual
•
damage never attempt to connect mains
power, or any other power source, before
consulting ser vice personnel
The plug connecting the power cord to the
•
product/power supply serves as the main
disconnect device for this equipment. The
power cord must always be easily accessible.
Route the power cord so as to avoid it be-
•
ing walked on or pinched by items placed
upon or against it. Pay particular attention
to the plugs, receptacles and the point
where the cord exits from the apparatus.
Do not tug the power cord.
•
If the provided plug does not fit into your
•
outlet, consult an electrician.
Never install cables, or any peripherals,
•
without first unplug ging the device from it's
power source.
Always use the power supply (AC–DC adap -
•
tor) provided with this product.
Replace only with power supply (AC–DC
•
adaptor) specified by TANDBERG.
Never connect attached power supply
•
(AC–DC adaptor) to other products.
Servicing
Do not attempt to service the apparatus
•
yourself as opening or removing covers
may expose you to dangerous voltages or
other hazards, and will void the warranty.
Refer all servicing to qualified service
personnel.
Unplug the apparatus from its power
•
source and refer servicing to qualified
personnel under the following conditions:
If the power cord or plug is damaged or
•
frayed.
If liquid has been spilled into the
•
apparatus.
If objects have fallen into the apparatus.
•
If the apparatus has been exposed to
•
rain or moisture
If the apparatus has been subjected to
•
excessive shock by being dropped.
If the cabinet has been damaged.
•
If the apparatus seems to be
•
overheated.
If the apparatus emits smoke or
•
abnormal odor.
If the apparatus fails to operate
•
in accordance with the operating
instructions.
Accessories
Use only accessories specified by the
manufacturer, or sold with the apparatus.
Communication Lines
Do not use communication equipment to
repor t a gas leak in the vicinity of the leak.
D 13954.01
JUNE 2006
6
Page 7
Environmental Issues
TANDBERG 1700MXP
USER GUIDE
Thank you for buying a product which contributes to a reduction in pollution, and thereby helps save the environment. Our
products reduce the need for travel and transport and thereby
reduce pollution. Our products have either none or few consumable par ts (chemicals, toner, gas, paper). Our products are low
energ y consuming products.
TANDBERG’s Environmental Policy
Environmental stewardship is important to TANDBERG’s
culture. As a global company with strong corporate values,
TANDBERG is committed to following international environmental legislation and designing technologies that help companies,
individuals and communities creatively address environmental
challenges.
TANDBERG’s environmental objectives are to:
Develop products that reduce energ y consumption, CO2
•
emissions, and traffic congestion
Provide products and services that improve quality of life for
•
our customers
Produce products that can be recycled or disposed of safely
•
at the end of product life
Comply with all relevant environmental legislation.
•
European Environmental Directives
As a manufacturer of electrical and electronic equipment TANDBERG is responsible for compliance with the requirements in
the European Directives 2002/96/EC (WEEE) and 2002/95/EC
(RoHS).
The primary aim of the WEEE Directive and RoHS Directive is
to reduce the impact of disposal of electrical and electronic
equipment at end -of-life. The WEEE Directive aims to reduce
the amount of WEEE sent for disposal to landfill or incineration
by requiring producers to arrange for collection and recycling.
The RoHS Directive bans the use of cer tain heavy metals and
brominated flame retardants to reduce the environmental
impact of WEEE which is landfilled or incinerated.
TANDBERG has implemented necessary process changes to
comply with the European RoHS Directive (2002/95/EC) and
the European WEEE Directive (2002/96/EC).
Waste Handling
In order to avoid the dissemination of hazardous substances
in our environment and to diminish the pressure on natural
resources, we encourage you to use the appropriate take- back
systems in your area. Those systems will reuse or recycle most
of the materials of your end of life equipment in a sound way.
TANDBERG products put on the market after August
2005 are marked with a crossed-out wheelie bin symbol that invites you to use those take-back systems.
Please contact your local supplier, the regional waste
administration or http://www.tandberg.net if you need more
information on the collection and recycling system in your area.
Information for Recyclers
As part of compliance with the European WEEE Directive, TAND BERG provides recycling information on request for all types of
new equipment put on the market in Europe after August 13th
2005.
Please contact TANDBERG and provide the following details
for the product for which you would like to receive recycling
information:
Model number of TANDBERG product
•
Your company’s name
•
Contact name
•
Address
•
Telephone number
•
E-mail.
•
Digital User Guides
TANDBERG is pleased to announce that we have replaced the
printed versions of our User Guides with a digital CD version.
Instead of a range of different user manuals, there is now one
CD – which can be used with all TANDBERG products – in a
variety of languages. The environmental benefits of this are
significant. The CDs are recyclable and the savings on paper
are huge. A simple web -based search feature helps you directly
access the information you need. In addition, the TANDBERG
video systems now have an intuitive on-screen help function,
which provides a range of useful features and tips. The contents of the CD can still be printed locally, whenever needed.
D 13954.01
JUNE 2006
7
Page 8

Finding the Information You Need
We recommend that you check out the
TANDBERG web site regularly for updated
versions of this manual:
http://ww w.tandberg.net/support/
documentation.php
Thank you for choosing TANDBERG!
The TANDBERG 1700MXP has been designed to provide
you with many years of safe, reliable operation.
Your approach to the 1700MXP documentation depends on
what you want to do and how much you already know.
This User Guide has been divided into several separate
sections. Each section provides different information.
Depending on your requirements and your familiarity with
the 1700MXP and video meeting systems as such, you
may find that you use some parts of this User Guide often
and others not at all.
Our objective with this manual has been to address
your goals and needs. Please let us know how well we
succeeded!
Page 9
1700
What’s in this
User Guide?
Disclaimer & License Agreements
Disclaimer & License Agreements, Patent Information ...........4
Disclaimer ....................................................................4
License Agreements ...................................................... 4
Agfa ............................................................................4
CMU-SNMP .................................................................. 4
Dropbear - an SSH2 server ........................................... 4
eCos ............................................................................ 4
ExPat XML Parser ......................................................... 4
ICU .............................................................................. 4
OpenSSL ......................................................................4
snprintf ........................................................................ 4
Patent Information ........................................................ 4
Operator Safety / Environmental Issues
Safety Instructions ........................................................................... 6
Water and Moisture .......................................................6
Cleaning ....................................................................... 6
Ventilation ....................................................................6
Lightning ....................................................................... 6
Dust ............................................................................. 6
Vibration ....................................................................... 6
Power Connection and Hazardous Voltage ...................... 6
Servicing ...................................................................... 6
Accessories .................................................................. 6
Communication Lines ....................................................6
Environmental Issues ......................................................................7
TANDBERG’s Environmental Policy ................................. 7
European Environmental Directives ................................ 7
Waste Handling ............................................................ 7
Information for Recyclers ............................................... 7
Digital User Guides ...................................................... 7
Getting Acquainted with the System
Preparing for Use .......................................................................... 13
Viewing Angle Adjustment ............................................ 13
Connecting Headset ....................................................13
Connecting Cables ......................................................13
Camera Matters .......................................................... 13
Waking Up the System ..................................................................14
Waking Up the System ................................................. 14
Even Incoming Calls Wake Up the System .................... 14
Remote Control Navigation Basics ...............................14
If the System Fails to Respond .................................... 14
The Remote Control Unit .............................................. 14
Operating Principles ..................................................................... 15
Basic Menu Navigation Rules ....................................... 15
Entering Alphanumeric Information ............................... 15
Editing a Setting Using Radio Buttons ..........................15
There are Three Ways to Leave a Menu ........................ 15
Camera Adjustments.....................................................................16
About Camera Adjustments ......................................... 16
Adjusting the Camera ..................................................16
The icons Appearing on the Screen ............................................17
About the Icons ........................................................... 17
Dual Video Stream ...................................................... 17
Microphone Off ........................................................... 17
Secure Conference, AES .............................................. 17
Telephone ................................................................... 17
Volume Of f .................................................................. 17
Secure Conference, DES ............................................. 17
On Air ........................................................................ 17
Not Secure Conference ............................................... 17
Bad Network ............................................................... 17
Selfview .......................................................................................... 18
About Selfview ............................................................ 18
Navigation Tools .......................................................... 18
Using Selfview Outside a Call ...................................... 18
Using Selfview in a Point-to- Point Call ........................... 18
Using Selfview with Dual Video Stream ........................ 18
Screen Layout ................................................................................ 19
About Screen Layout ................................................... 19
Using the Remote Control to Determine
the Screen Layout ....................................................... 19
Picture in Picture ......................................................... 19
Picture outside Picture ................................................19
Auto Layout ................................................................. 19
Local PC Display............................................................................ 20
About Local PC Display ................................................ 20
Using the Display as Local PC Display .......................... 20
Sound Matters ............................................................................... 21
Mic Off .......................................................................21
Adjusting the Volume ................................................... 21
Headset Recommendations ......................................... 21
Loudspeakers or Headset? .......................................... 21
Using the Internal/Headset Switch ............................... 21
Numerical Keypad Features ........................................................ 22
What Happens When You Press a Key
on the Numerical Keypad? .......................................... 22
Using the Number Key Settings .................................... 22
Touch Tones ................................................................22
Using the Numerical Keypad in Alphanumerical Mode ... 22
Standby ........................................................................................... 23
About Standby ............................................................23
Leaving Standby Mode ................................................23
To Enable Immediate Standby Mode ............................ 23
To Enable Delay Standby Mode for 1 Hour .................... 23
To Enable Delay Standby Mode for 3 Hours .................. 23
D 13954.01
JUNE 2006
9
Page 10

Call Handling
Access Codes ................................................................................. 25
About Access Codes ................................................... 25
Making Calls when Prompted for an Access Code ......... 25
Making Point-to-Point Video & Telephone Calls Manually ..... 26
Making Video Calls Manually ....................................... 26
Making Telephone Calls Manually ................................ 26
Choosing Between Video and Telephone Call ................ 26
Making Point-to-Point Calls Using the Phone Book .................27
About the Phone Book ................................................. 27
Making Calls Using the Phone Book .............................27
System Asks for Access Code? ................................... 27
Making Calls with Two Parties at the Same Time .................. 28
About this Feature ....................................................... 28
Calling Two Par ties Simultaneously .............................. 28
Transfer of a SIP Call ................................................................... 29
About Transfer ............................................................ 29
Consultative Transfer .................................................. 29
Unattended Transfer .................................................... 29
MultiSite Conferences – Adding Calls ...................................... 30
About MultiSite Conferences ....................................... 30
Adding Calls ................................................................ 30
Altering the Call Settings ..............................................................31
About Call Settings ..................................................... 31
To Alter the Call Settings ............................................. 31
Streaming ....................................................................................... 32
About Streaming .........................................................32
To View the Streaming ................................................ 32
Streaming Settings ..................................................... 32
Allow Remote Star t .................................................... 32
Announcements .........................................................32
Utilizing Streaming ......................................................32
Password ................................................................... 32
Video Rate ................................................................. 32
Address ..................................................................... 32
Address Port .............................................................. 32
TTL/Router Hops ........................................................ 32
Streaming Source ...................................................... 32
Answering an Incoming Call ........................................................ 33
About Incoming Calls and Privacy ................................. 33
Want to Change the Video Aler t Audio Signal? ..............33
Incoming Calls will Produce the Below Menu ................. 33
To Accept an Incoming Call ..........................................33
To Reject an Incoming Call ........................................... 33
Using Do Not Disturb ................................................... 33
Ending an Ongoing Call ................................................................ 34
Ending a Point-to -Point Call ..........................................34
Ending a MultiSite Call ................................................ 34
Basic Phone Book Features ........................................................ 35
Accessing the Phone Book .......................................... 35
Accessing the alphanumeric characters .......................35
The Call Log – Placed, Missed & Received Calls ........... 35
Call Log Options .......................................................... 35
Searching in the Phone Book ..................................................... 36
About Searching in the Phone Book ............................. 36
Searching in the Phone Book .......................................36
Adding New Contacts to the Phone Book ..................................37
Adding a New Contact Manually ...................................37
Adding a New Contact Directly from the Call Log ........... 37
Editing Entries in the Phone Book .............................................. 38
Editing a Contact in My Contacts .................................38
Deleting a Contact in My Contacts ...............................38
Creating Multisite Contacts in the Phone Book ....................... 39
About Multisite Contacts .............................................39
Bandwidth for a MultiSite Contact Call ......................... 39
Defining a New MultiSite Contact ................................. 39
Editing Multisite Contacts in the Phone Book.......................... 40
Viewing the Par ticipants in a MultiSite Contact ............. 40
Editing the Par ticipants in a MultiSite Contact ..............40
Deleting a MultiSite Contact in My Contacts .................40
Video Meeting Features
Features Overview......................................................................... 42
Screen Layout ............................................................. 42
Far End Camera Control ............................................... 42
Snapshots .................................................................. 42
Presentations ............................................................. 42
Presets ....................................................................... 42
Text Chat ....................................................................42
Dual Video Stream ...................................................... 42
Accessing Far End Video Sources ................................ 42
Streaming ................................................................... 42
Far End Camera Control – Pan, Tilt and Zoom ......................... 43
About Far End Camera Control ..................................... 43
Panning, Tilting, and Zooming the Far End Camera ........ 43
Far End Camera Control – Using Far End Camera Presets .... 44
About Camera Presets................................................. 44
Using the Far End Preset .............................................44
Presentation .................................................................................. 45
About Presentation...................................................... 45
Running a Presentation ............................................... 45
Dual Video Stream ........................................................................ 46
About Dual Video Stream .............................................46
Dual Stream and Bandwidth ........................................ 46
No Dual Video Stream? ...............................................46
Running a Presentation Using Dual Video Stream .........46
Snapshots .......................................................................................47
About Snapshots ........................................................ 47
Taking a Snapshot Using the Remote Control ............... 47
Taking a Snapshot Using the Menu .............................. 47
Displaying a Snapshot ................................................. 47
Gaining Access to the Far End Video Sources ......................... 48
About Far End Video Sources ....................................... 48
Far End Video Options ................................................. 48
Accessing the Far End Video Sources ........................... 48
Text Chat ......................................................................................... 49
About Text Chatting .....................................................49
Chatting with the Other Par ty ....................................... 49
MultiSite Features
Video Meetings with Several Participants – an Overview .......51
About MCU and MultiSite ............................................. 51
Who Becomes the Host? .............................................51
Request, Release, and Assign Floor ............................. 51
Terminal Names ..........................................................51
Split Screen and Voice Switching ................................. 51
Layout ........................................................................ 51
Request and Release Floor ......................................................... 52
About Requesting and Releasing Floor ......................... 52
Requesting and Releasing F loor ................................... 52
Automatic Full Screen When Requesting Floor ..............52
Assign Floor ................................................................................... 53
About Assigning Floor .................................................. 53
Assigning Floor ........................................................... 53
Automatic Full Screen When Requesting Floor ..............53
Terminal Names ............................................................................ 54
About Terminal Names ................................................54
Displaying Terminal Names .......................................... 54
Layout ............................................................................................. 55
About L ayout ............................................................... 55
Setting Display Layout ................................................. 55
The Layout Options Available ....................................... 55
Control Panel
The Remote Control .......................................................................57
An Overview of the Control Panel............................................... 58
Control Panel Options .................................................. 58
An Overview of the Control Panel Settings ............................... 59
Password Protection of the Control Panel Settings ................ 60
Password Protection .................................................... 60
Clear an Existing Password .......................................... 60
Set a Password ...........................................................60
Gain Access to a Password Protected Control Panel
Settings Menu ............................................................ 60
General Settings – an Overview...................................................61
Language ........................................................................................ 62
D 13954.01
JUNE 2006
10
Page 11

System Name Settings ................................................................ 63
Autoanswer .................................................................................... 64
Phone Book Settings .................................................................... 65
External Services .......................................................................... 66
Permissions ................................................................................... 67
Access Codes ................................................................................. 68
About Access Code Applications ..................................68
Defining and Uploading Access Codes ......................... 68
Access Codes Activated – How It Looks ....................... 68
Screen Settings ............................................................................. 69
Software Options ...........................................................................70
Date and Time Settings ................................................................71
Menu Settings.................................................................................72
Kiosk Mode Settings .....................................................................73
Kiosk Mode ................................................................ 73
Startup Setting s .............................................................................74
Icons .................................................................................................75
Presentation Settings – an Overview ..........................................76
Presentation Start / H239 Enabling .......................................... 77
Call Video Source ...........................................................................78
Presentation Source ......................................................................79
Snapshot Source ........................................................................... 80
Auto- Display Snapshot ................................................................. 81
PIP Placing ..................................................................................... 82
VNC Settings .................................................................................. 83
PC SoftPresenter and VNC .......................................................... 84
About PC SoftPresenter ............................................... 84
Configuring the VNC Server Software ...........................84
Showing PC Contents –
Using the PC Soft Presenter & VNC ..............................84
Call Quality Settings – an Overview ........................................... 85
Video Algorithm ............................................................................. 86
Audio Algorithm ............................................................................ 87
AAC-LD 128 kbps (Stereo Audio) ............................................... 88
Natural Video ................................................................................. 89
Maximum Upstream Rate (kbps) ............................................... 90
Video Quality .................................................................................. 91
About Intelligent Video Management (IVM) on TANDBERG
Systems .......................................................................................... 92
Intelligent Video Management (IVM) .............................92
Motion .......................................................................92
Sharpness .................................................................. 92
IVM Resolution ............................................................ 92
Native Resolutions ......................................................92
Default Call Settings – an Overview........................................... 93
Default Video Call Settings ......................................................... 94
Default Net Settings ..................................................................... 95
Default Bandwidth Settings ........................................................ 96
Audio Settings – an Overview ......................................................97
Level Settings ................................................................................ 98
Headset Output Levels (from System) ..........................98
Headset Input Levels (to System) ................................. 98
Headset input .............................................................98
Headset Output .......................................................... 98
Alert Tones & Volumes ................................................................. 99
Graphical View of Settings ........................................................100
Video Settings – an Overview.................................................... 101
MCU Status Line .......................................................................... 102
Floor to Full Screen ..................................................................... 103
Web Snapshot .............................................................................104
MultiSite Picture Mode............................................................... 105
Video Name.................................................................................. 106
Security Settings – an Overview ............................................... 107
Encryption ....................................................................................108
Network Settings – an Overview............................................... 109
IP Settings (I) ...............................................................................110
IP Settings (II) ..............................................................................111
H.323 Settings (I) ........................................................................ 112
H.323 Settings (II) – Gatekeeper Settings .............................. 113
H.323 Settings (III) – CallManager Settings ...........................114
H.323 Settings (IV) – Advanced NAT Settings ........................ 115
About Network Address Translation (NAT) ..................115
SIP Settings (I) ............................................................................. 116
SIP Settings (II) ............................................................................ 117
Current RFC’s and Drafts suppor ted: .......................... 117
Wireless LAN Settings ................................................................118
SNMP Settings ............................................................................. 119
IP Services ...................................................................................120
Quality of Service (I) – QoS Type ..............................................121
Quality of Service (II) – IP Presedence Video ......................... 122
Quality of Service (III) – IP Presedence Telephony ................ 123
Quality of Service (IV) – Diffserv Video ................................... 124
Quality of Service (V) – Diffser v Telephony ............................125
IEEE802.1x...................................................................................126
Network Profiles ..........................................................................127
Data Port ......................................................................................128
Restore Default Settings (I) .......................................................129
The Default Settings ................................................. 129
Restore Default Settings (II)...................................................... 130
Restore Default Settings (III) ....................................................131
On-line User Guide ......................................................................132
Diagnostics – an Overview ........................................................133
System Information ....................................................................134
Call Status .................................................................................... 135
Detailed Call Status .................................................................... 136
System Selftest ...........................................................................137
View Adminstrator Settings .......................................................138
IP Address Conflict Check .........................................................139
Warnings ...................................................................................... 140
Audio Demo ................................................................................. 141
D 13954.01
JUNE 2006
11
Page 12

Getting Acquainted with the System
We recommend that you check out the
TANDBERG web site regularly for updated
versions of this manual:
http://ww w.tandberg.net/support/
documentation.php
Before you start using the system we recommend that
you take your time to read through this section of the
User Guide to get you up and going.
This section outlines how to connect the system and
the basic operating principles. Important video and
sound matters are also covered.
Page 13
Getting Acquainted with the System
Preparing for Use
TANDBERG 1700 MXP
USER GUIDE
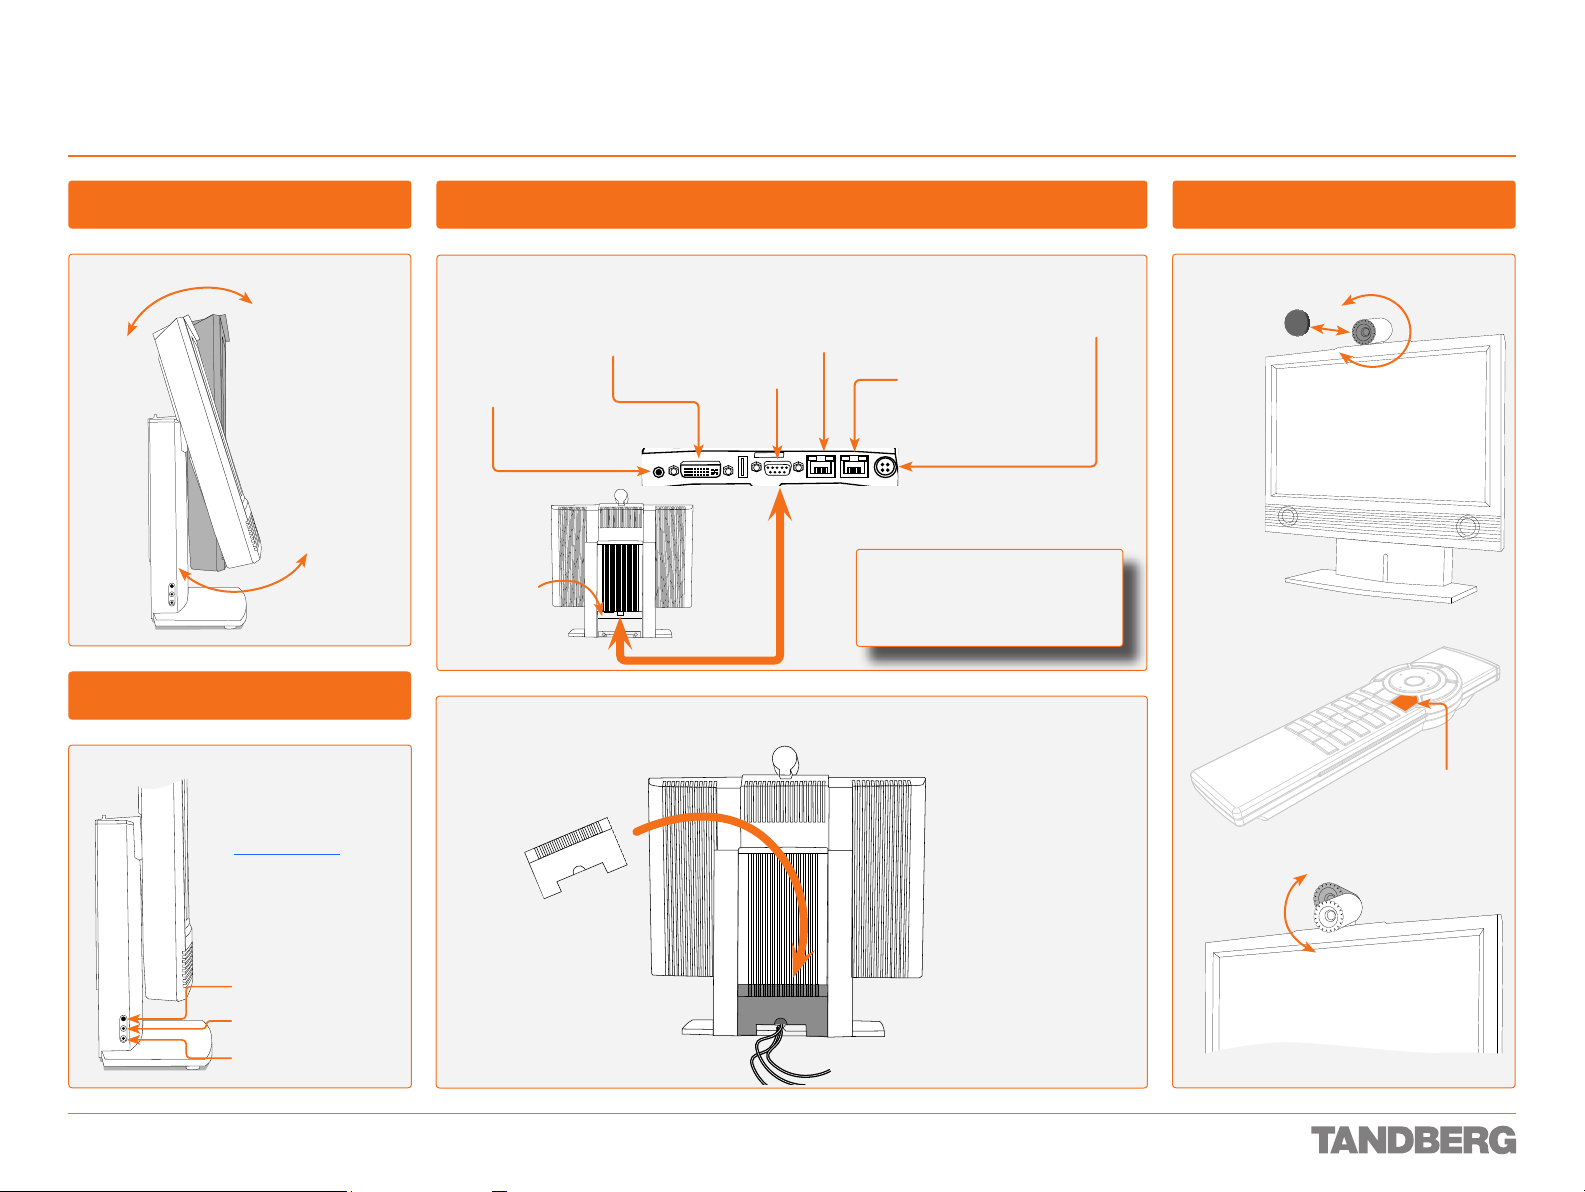
Viewing Angle Adjustment
Tilt the display
manually to get a
better viewing angle.
Connecting Headset
For more on the
use of headset and
microphone, see
Sound Matters.
Connecting Cables Camera Matters
Connect cables as shown.
DVI- I for PC
presentations
Audio / Line In
for PC sound
The mirror
to help you
locate the
connectors
is here.
There is a lid in the accessories box. Mount the lid as shown. The lid will be held in place
by magnets.
RS-232
(for adminstrator use)
Connect the
video system
to your LAN
CAUTION! Do not rest the system
on the camera or on the screen.
Use the mirror to locate the
connectors.
To let the PC and
the video system
share a single LAN
connection, connect
your PC to the LAN
through the video
system.
The Lens Cap is held in
place by a magnet.
Power
Turn the ring to focus
the camera. To see
yourself press the
Selfview key on the
Remote Control.
Selfview key
D 13954.01
JUNE 2006
Headset toggle
button
Headset out
Headset
microphone
Tilt the camera
manually to make it
point at you.
Some draw ing details may dif fer from actual s ystem.
13
Page 14
Getting Acquainted with the System
Touch tones Snapshot
Presets
Waking Up the System
TANDBERG 1700 MXP
USER GUIDE
Waking Up the System
Wake up the system by picking up the remote control.
Even Incoming Calls Wake Up the System!
When the system is not in use, it is in standby mode and the
screen is black. An incoming call or pressing any key on the
remote control will also wake up the system. Restrictions ap ply when the Do not disturb function has been activated.
Remote Control Navigation Basics
Arrow keys. Navigate in the menu with the Arrow keys. The
orange selector on screen shows the selected item. Press
OK to select.
Cancel key. In the main menu, pressing Cancel will hide the
If the System Fails to Respond
Make sure that the system is connected to mains.
•
Make sure the Remote Control has working batteries.
•
menu. If the menu is hidden, bring it back
with OK. In other menus, pressing Cancel
takes you one step back. In an input field,
pressing Cancel will delete characters/num-
bers to the left.
Back/Cancel key. The icon corresponds
to the Cancel key on the remote.
The system will now produce the Welcome screen. The welcome screen
presents the menu and displays your main camera image in the
background (display main camera is the default setting).
The IP number and the system name are displayed in the upper
right corner. The IP Number is the dial-in number of the system.
The welcome screen provides you with system information:
• System Name
• Your IP Address or IP Number
• Indications of Missed Calls or Warnings, if applicable.
You may customize the text on the welcome screen. See Menu Settings for how to edit the welcome text.
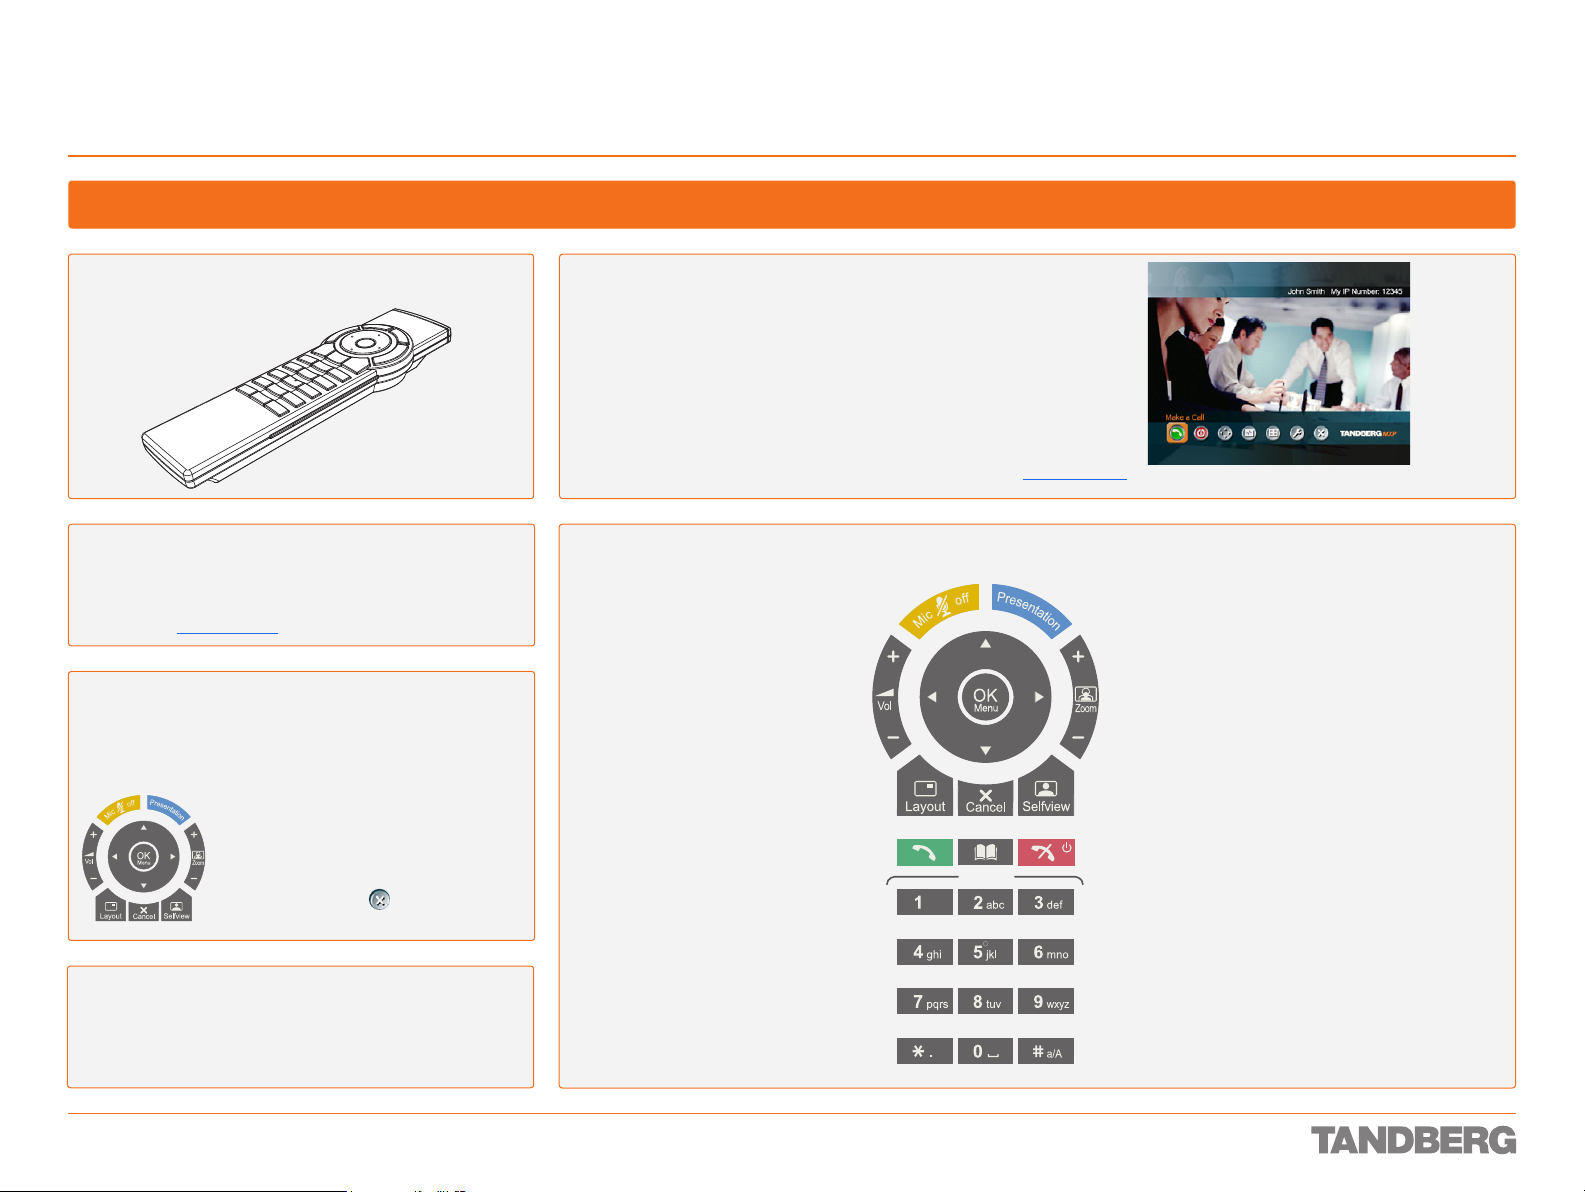
The Remote Control Unit
Presentation key switches to a predefined pres-
Mic Off turns your microphone
on and off.
Press OK to show the menu
and select menu items.
Volume + and – adjusts the
volume.
Layout key toggles between full
screen and different display
layouts.
Press the Call key to place a call.
Presets Not used on 1700 MXP.
The Alphanumerical keypad
functions in the same manner
as a cellular phone.
Snapshot takes a snap-
shot, but only during a call.
entation source. If the Presentation key is held
down for 1 second then the Presentation video
sources menu will appear.
Arrow keys are used to navigate in the menus.
Use Zoom + and – to zoom the camera in and out.
Selfview displays your outgoing video. Press
again to turn off.
Cancel takes you back one step in the menu sys-
tem, i.e. to leave a menu undoing any changes.
Use Cancel to delete characters in an input field.
Press and hold the Cancel key for 1 second to
close the menu.
Use the End Call key to end the current call.
Pressing this key when not in a call will place the
system in Standby mode.
Use the Phone Book to store and recall video
contacts for easy placement of calls.
Press Touch tones when you are in a call and need to
dial extension numbers etc. Press the OK button to
exit Touch tones.
D 13954.01
JUNE 2006
14
Page 15
Getting Acquainted with the System
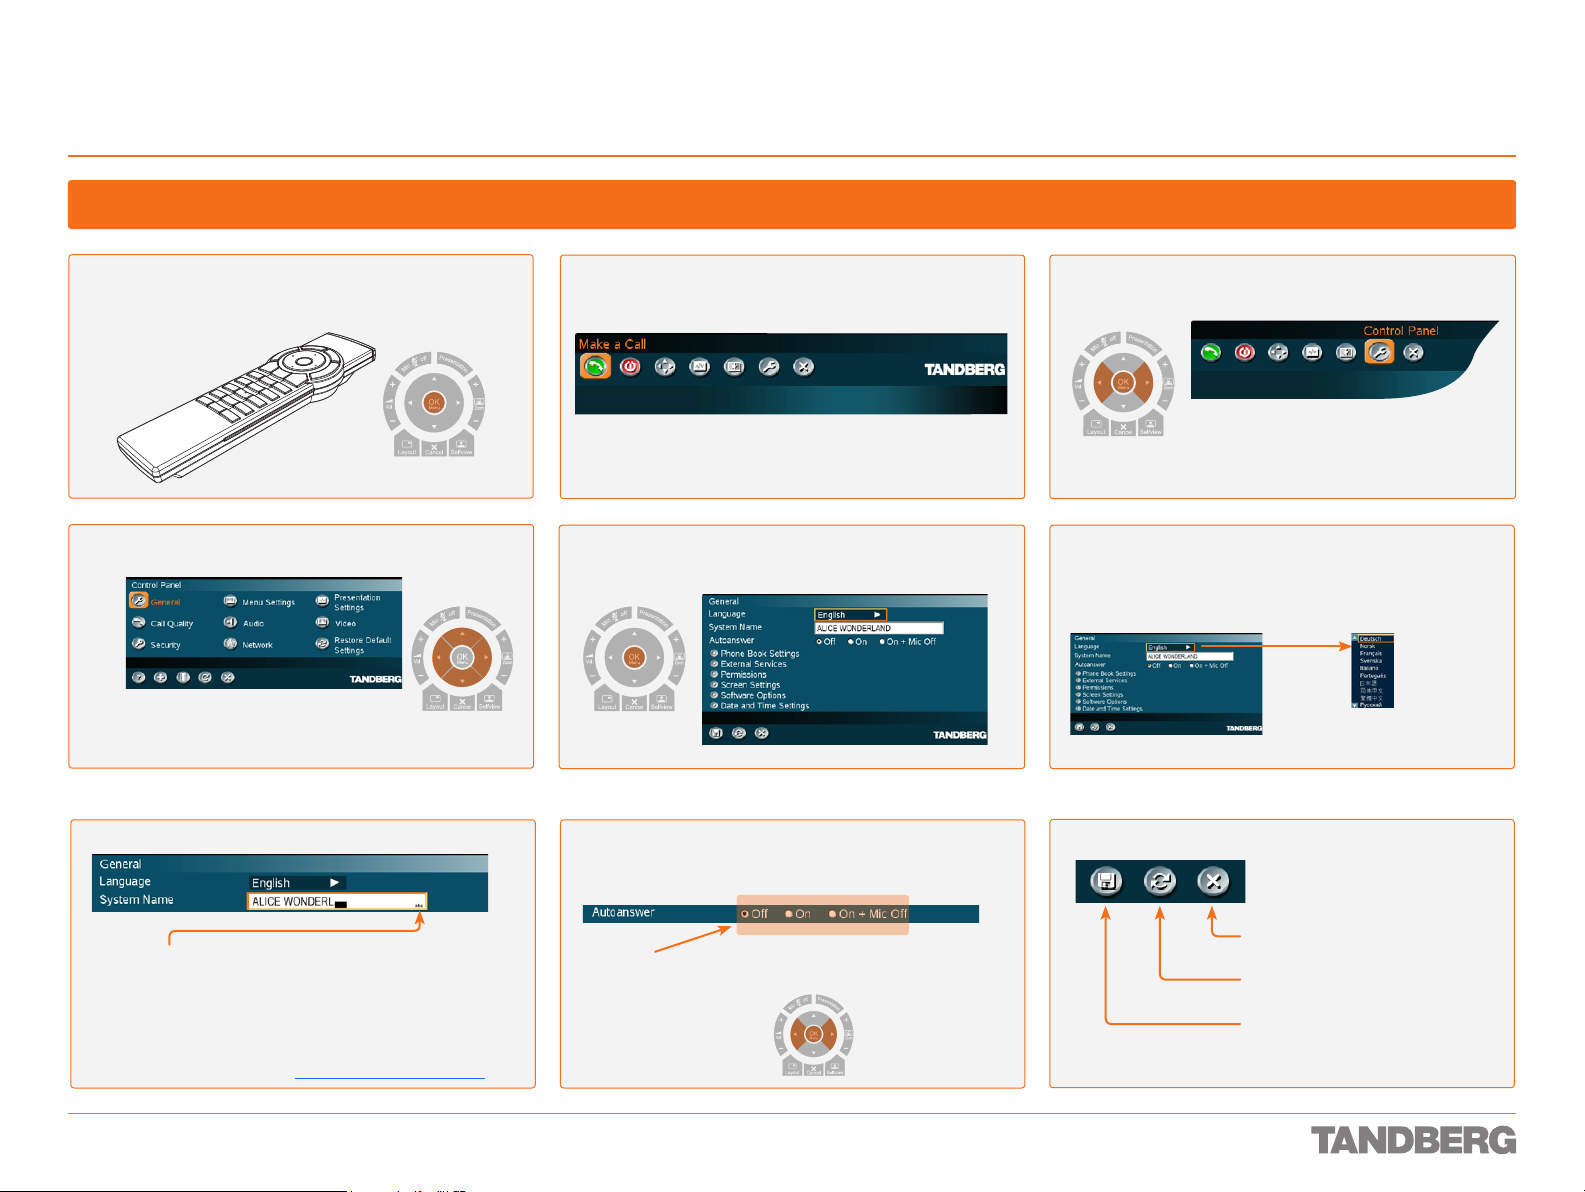
Operating Principles
Pick up the remote control to wake up the system or
press OK to display the main menu line.
Basic Menu Navigation Rules
The menu line will be displayed.
TANDBERG 1700 MXP
Use the horizontal Arrow keys to navigate in the menu line
and press OK to enter a submenu.
USER GUIDE
Use the Arrow keys to navigate in the submenu.
Note! Your administrator may have password
protected the Control Panel. However, this does not
change the principles of operation explained here.
Entering Alphanumeric Information
This little icon (abc) indicates that the system expects
alphanumeric text entry. Consequently, the (otherwise)
numerical keypad is set to alphanumeric mode. Press #
to switch between upper case (ABC) and lower case (abc)
letters. Press and hold # to switch between purely numerical
(123) and alphanumerical (abc/ABC) functionality.
More on this can be found in Numerical Keypad Features.
D 13954.01
JUNE 2006
Once a topic has been selected, press OK to enter
that topic. Navigate as described above.
Editing a Setting Using Radio Buttons
Radio buttons, use Horizontal Arrow keys to select the
appropriate setting. Press OK to select a setting.
15
To go deeper into the menu structure, all menus with an
arrow appended allow you to enter a submenu by means
of the OK or Right Arrow key. Navigate as before.
There are Three Ways to Leave a Menu
Cancel. Select this icon to leave
menu undoing any changes.
Select this icon to Restore Default
Settings.
Save. Select this icon and press OK
to leave the menu putting changes
into effect.
Page 16
Getting Acquainted with the System
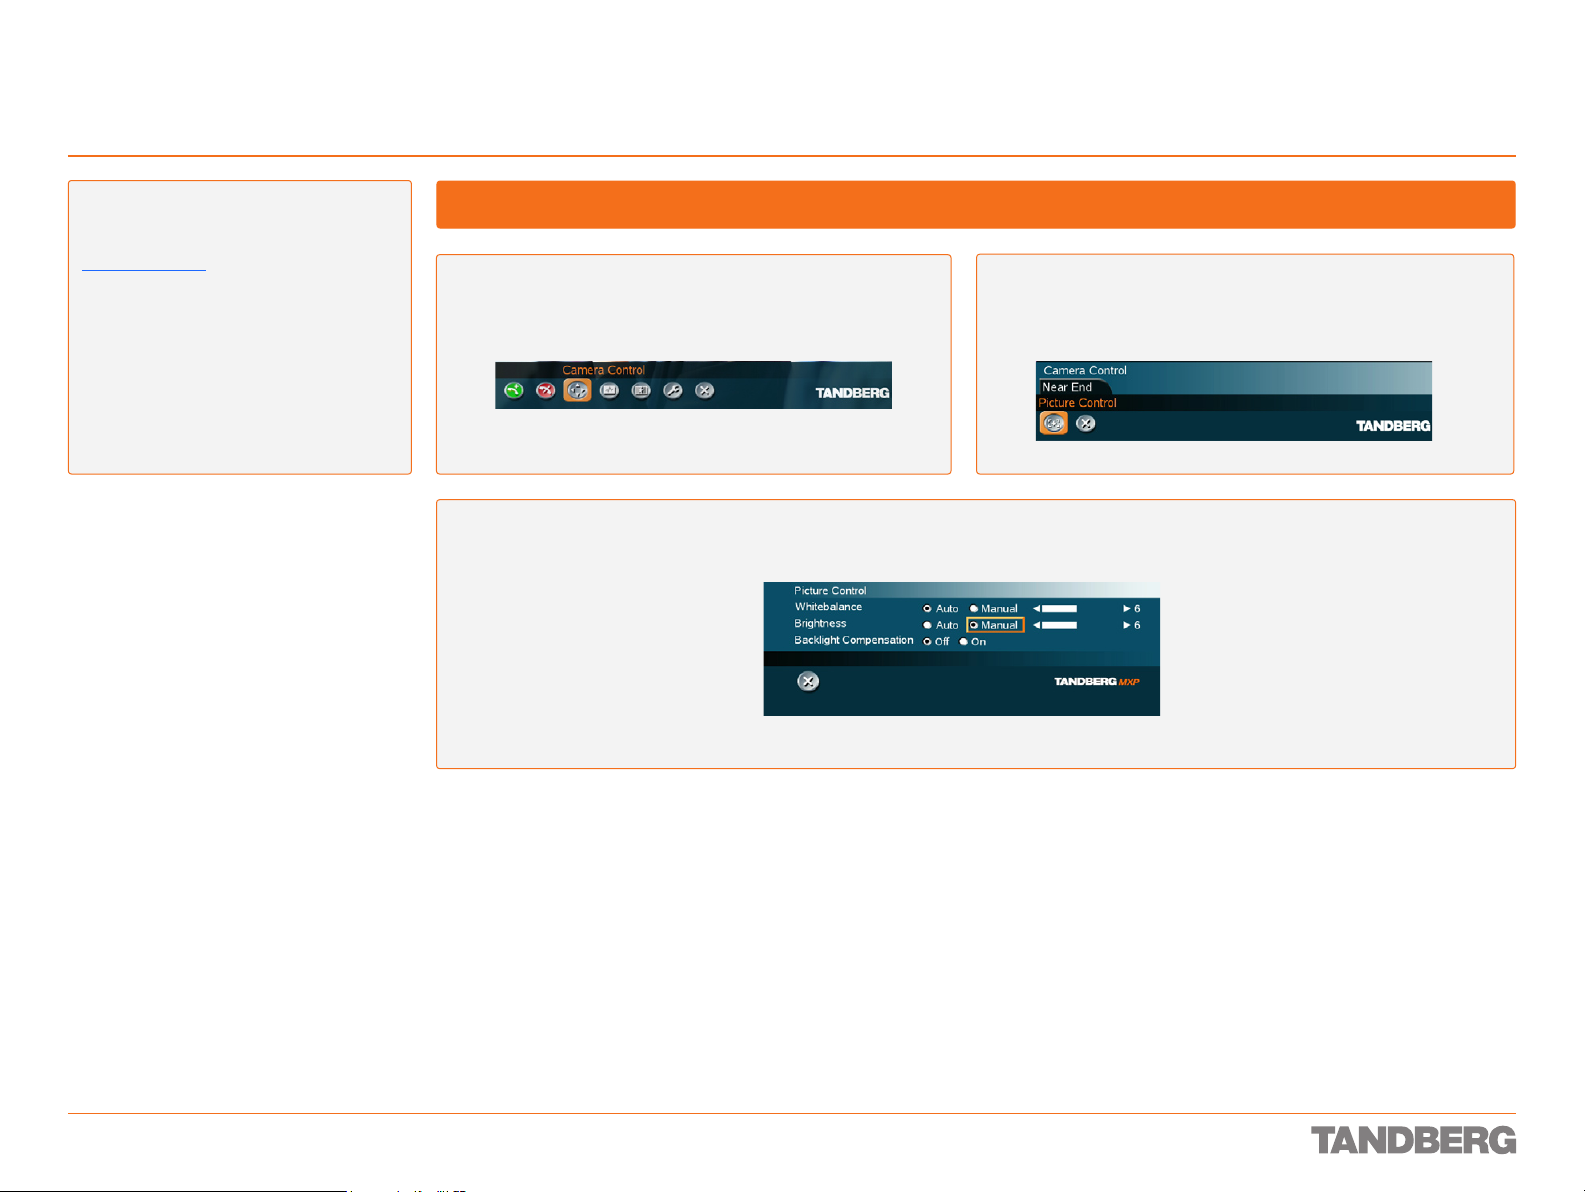
Camera Adjustments
TANDBERG 1700 MXP
USER GUIDE
About Camera Adjustments
The focus of the camera is adjusted manually by rotating the ring as pointed out in
Preparing for Use.
The camera can be tilted manually as
explained on the same page.
This leaves us with the following
adjustments carried out through the menu
system:
Whitebalance
•
Brightness
•
Backlight Compensation
•
Adjusting the Camera
Press OK and navigate to the Camera Control icon.
Click OK and use the Arrow keys to navigate and adjust or select the settings available. Click OK when satisfied, navigate to any other
settings in need of adjustment and repeat the procedure. Exit the menu in the usual manner.
Click OK to enter the Picture Control options and navigate to the
Picture Control icon.
D 13954.01
JUNE 2006
16
Page 17
Getting Acquainted with the System
The icons Appearing on the Screen
TANDBERG 1700 MXP
USER GUIDE
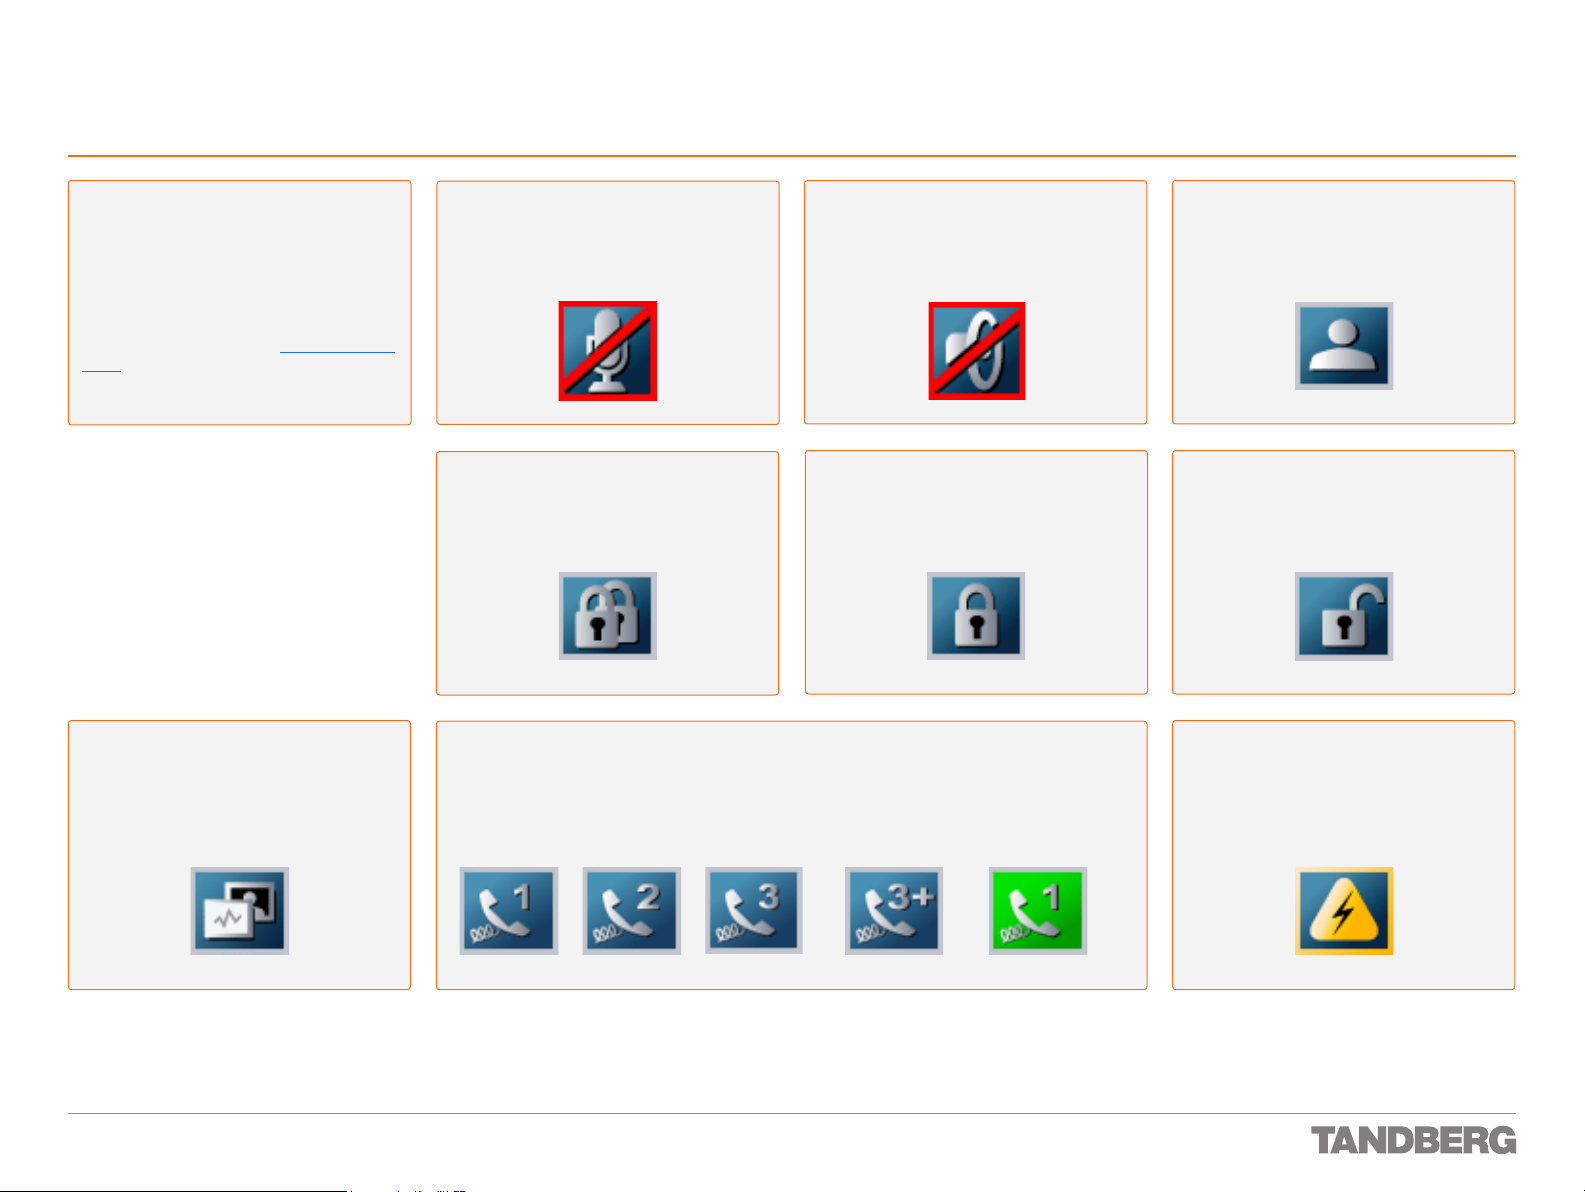
About the Icons
To help you immediately realise the present
status of important actions, states, and
events taking place, there is a number of
icons appearing on the screen, whenever
applicable.
Some of these may be turned off, if you so
wish. This is done from the Control Panel >
Icons. Observe that the Control Panel set-
tings may have been password protected by
your system administrator.
Dual Video Stream
Dual video stream activated is indicated by
this icon:
Microphone Off
This indicator is shown when the microphone is turned off. Press the Mic off button
of the remote control to toggle between On
and Off.
Secure Conference, AES
This double padlock indicator is shown
when AES encryption (Secure Conference)
is active.
This indicator is shown when the volume
is turned off. Press Volume + to turn the
volume back on.
This padlock indicator is shown when DES
encryption (Secure Conference) is active.
Volume Off
Secure Conference, DES
Telephone
This indicator is shown when there also are telephone only participants in a multisite conference. Indications are given for 1, 2, 3 or more than 3 participants. Icons turn green when a
telephone par ticipant has the floor.
On Air
When you have the floor in a multisite conference this is indicated by the On Air icon.
Not Secure Conference
This open padlock indicator is shown during the initialization phase for AES or DES
encryption. During this period the call is
not secure.
Bad Network
This indicator appears if the system detects
network anomalies like packet loss, jitter
etc., during a call. Open the menu by pressing the OK/Menu button and select the
warnings icon too see details.
D 13954.01
JUNE 2006
17
Page 18
Getting Acquainted with the System
Touch tones Snapshot
Presets
Selfview
TANDBERG 1700 MXP
USER GUIDE
About Selfview
In this User Guide, the
term Selfview means
the outgoing image. In a
normal call using the main
camera, this is the image
of yourself. The Selfview
button toggles the images
between Far End, Selfview
and Dual Video Stream (if
applicable).
Navigation Tools
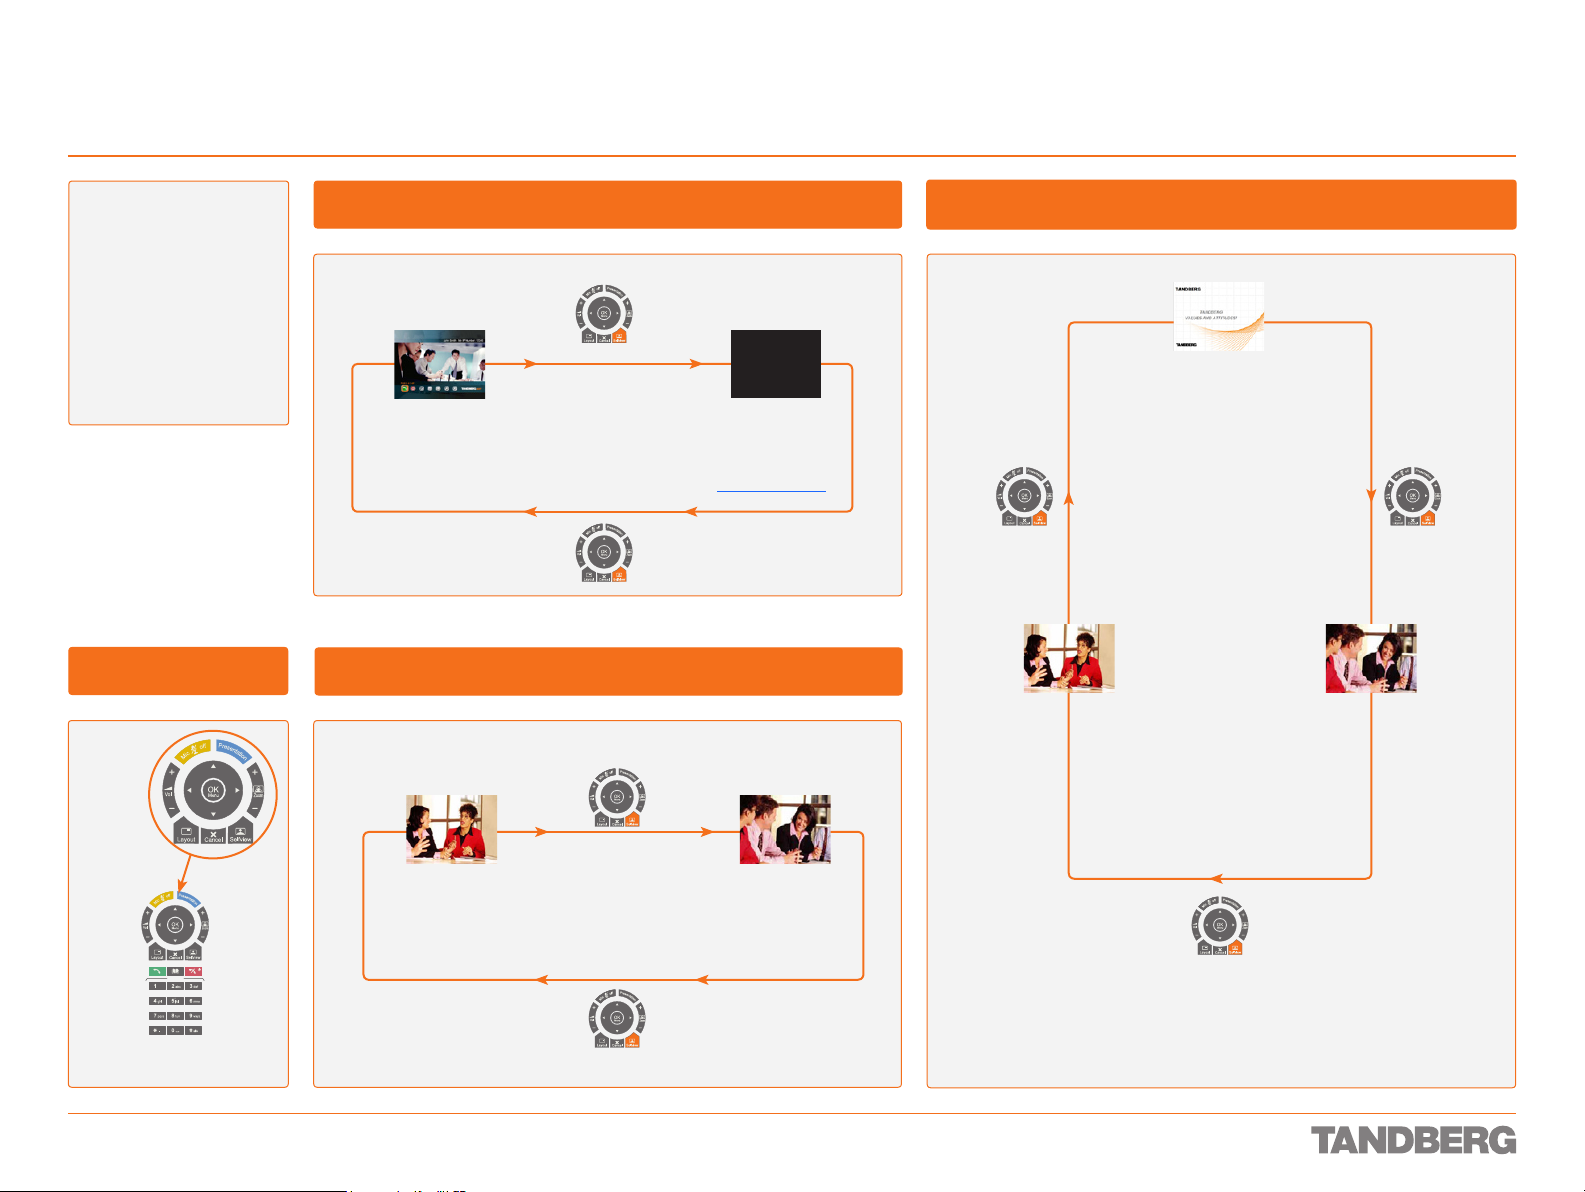
Using Selfview Outside a Call
Near end video
Pressing the Selfview key will switch between the near end
video and a black screen (or a logo if uploaded) on the main
monitor. How to upload a logo is described in Web Snapshot.
Black screen/logo
Using Selfview in a Point-to-Point Call
Using Selfview in a Point-to-Point Call with Dual Video Stream
Dual video stream
Near end video
Far end video
The Remote
Control keypanel
D 13954.01
JUNE 2006
Near end videoFar end video
In a point to point call, press the Selfview key once to switch from
far end video to near end video to see a full screen picture of the
outgoing video. Press Selfview again to go back to normal.
In a point to point call with a dual video stream, the duo video is displayed
in the big picture. Press the Selfview button to tog gle to the Near End picture, then the Far End picture, and finally back to the Dual Video Stream.
18
Page 19
Getting Acquainted with the System
Screen Layout
TANDBERG 1700 MXP
USER GUIDE
About Screen Layout
The layout of the screen can either be
shown as Picture In Picture (PIP) or Picture
Outside Picture (POP) when displaying more
than one video image. For widescreen monitors, POP is recommended. The behavior
of the Layout key depends on the Picture
Layout set ting in Control Panel > Screen
Settings.
Picture in Picture
When Picture Layout is set to PIP, the Layout
key makes it possible to see a second image
in a smaller view in one of the corners of the
screen. The second image will be placed on
top of the main image. You are free to choose
in which corner the second image is to be
displayed.
Picture -in-Picture
Using the Remote Control to Determine the Screen Layout
Picture outside Picture
When Picture Layout is set to POP, the Layout
key makes it possible to see up to three images
in a composition optimized for wide screens.
The second image can be displayed either as
a side-by-side the main image (1+1) or smaller
images next to the main image (1+2 and 1+3).
Press the Layout button once to get sideby-side view (1+1). Press again to get the
layouts 1+2 and 1+3, and finally go back
to full screen view. You can also go back to
full screen directly by pressing and holding
Layout for 1 second.
Picture -outside- Picture
Auto Layout
The system will automatically choose the
best layout for your call. You can, however,
always change layout manually with the
Layout key. Auto Layout applies when you
open or close a dual video stream, or add
or disconnect participants.
Auto Layout also includes automatic PIP.
That implies that PIP will be shown when
suitable, e.g. to display self view when you
move your near end camera. The automatic
PIP times out after a couple of seconds.
OFF means no automatic layout changes
during a call – you must manually control
the images with the Layout key. Auto Layout
is default ON. To turn Auto Layout OFF, go
to Control Panel > Screen Settings.
Note! Depending on the number of partici-
pants in your video meeting and whether you
use a dual video stream or not, some of the
locations of the screen layouts may be empty.
The actual positioning of each picture as you
press the Layout key, may vary from the above
examples.
D 13954.01
JUNE 2006
Full screen
Side-by-Side (1+1)
1+21+3
19
Page 20
Getting Acquainted with the System
Local PC Display
TANDBERG 1700 MXP
USER GUIDE
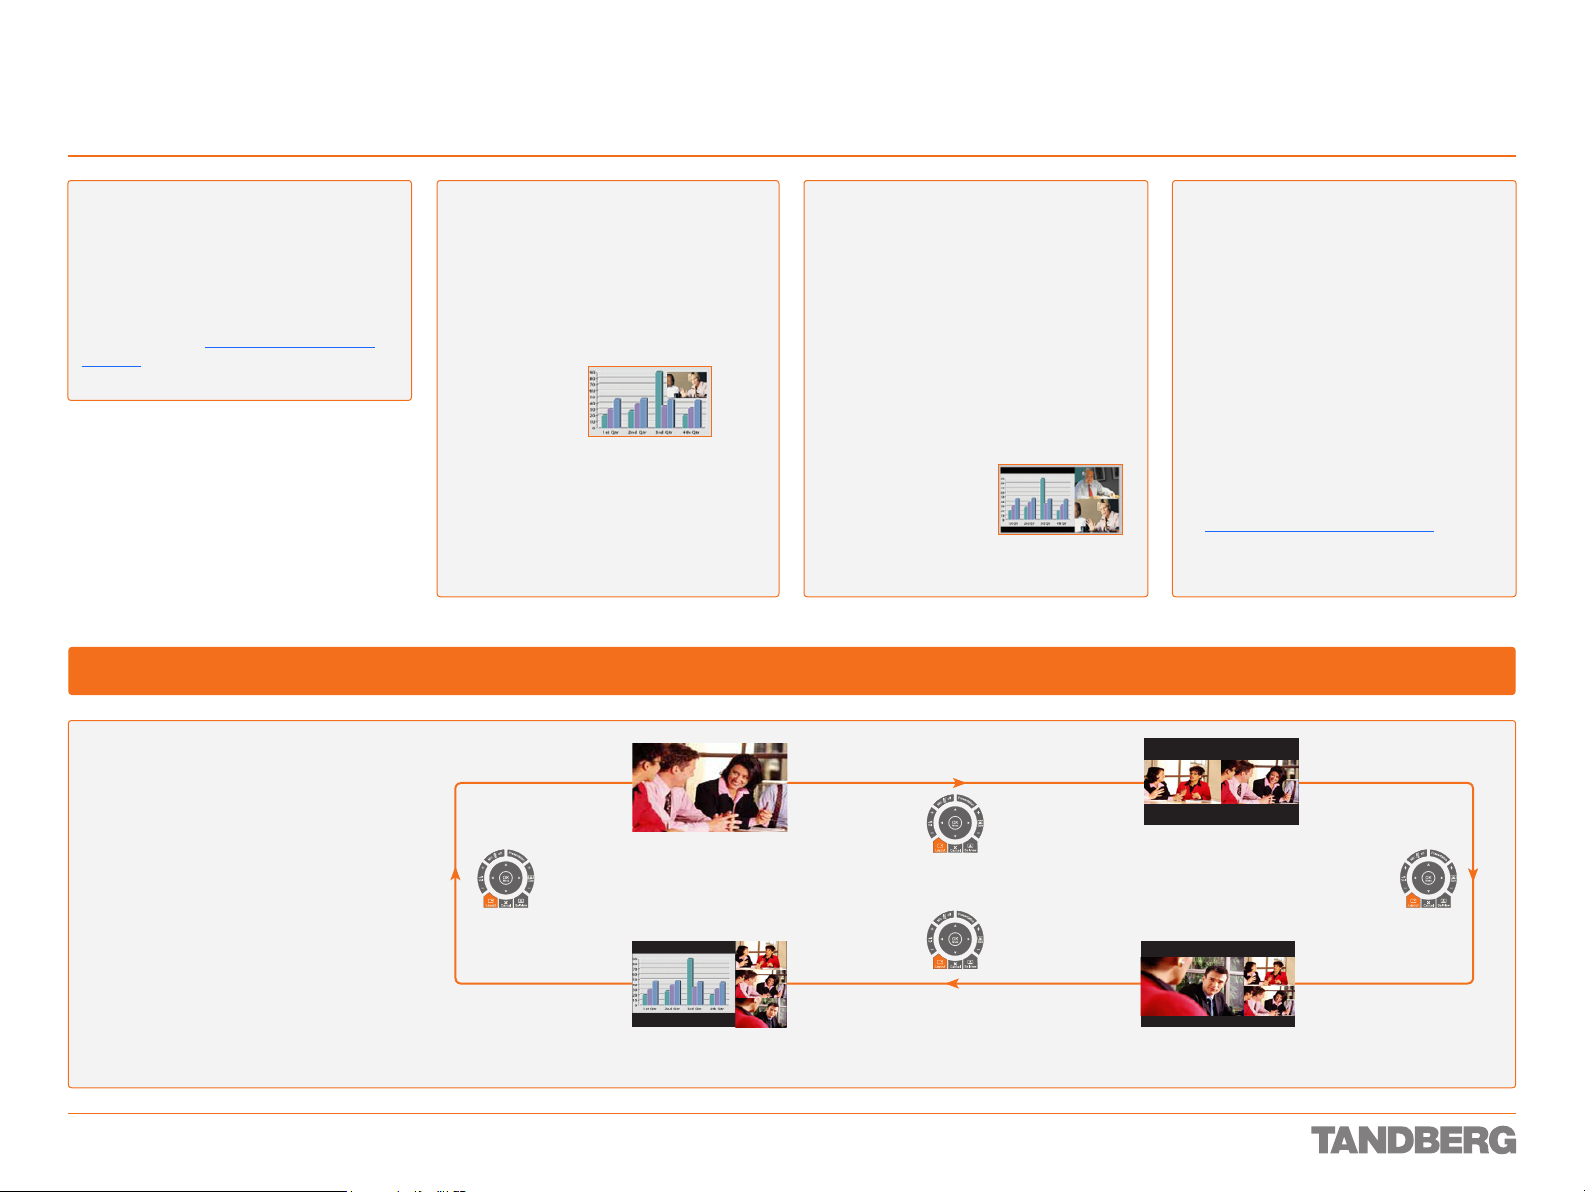
About Local PC Display
When using the screen as your PC screen,
we recommend that you set Local PC Dis-
play to ON – see Screen Settings in Control
Panel. This implies that you can display
your PC locally while having a video -conference, and you can keep on working without
having the Far End party viewing your PC
screen.
We also recommend to have the Auto
Layout setting set to ON (default) to get a
suitable layout when tog gling from Local
PC Display mode to standard conference
mode.
Use the Selfview key to toggle between
Local PC Display mode and standard vide oconference mode. An indicator tells you
that your PC image is displayed locally.
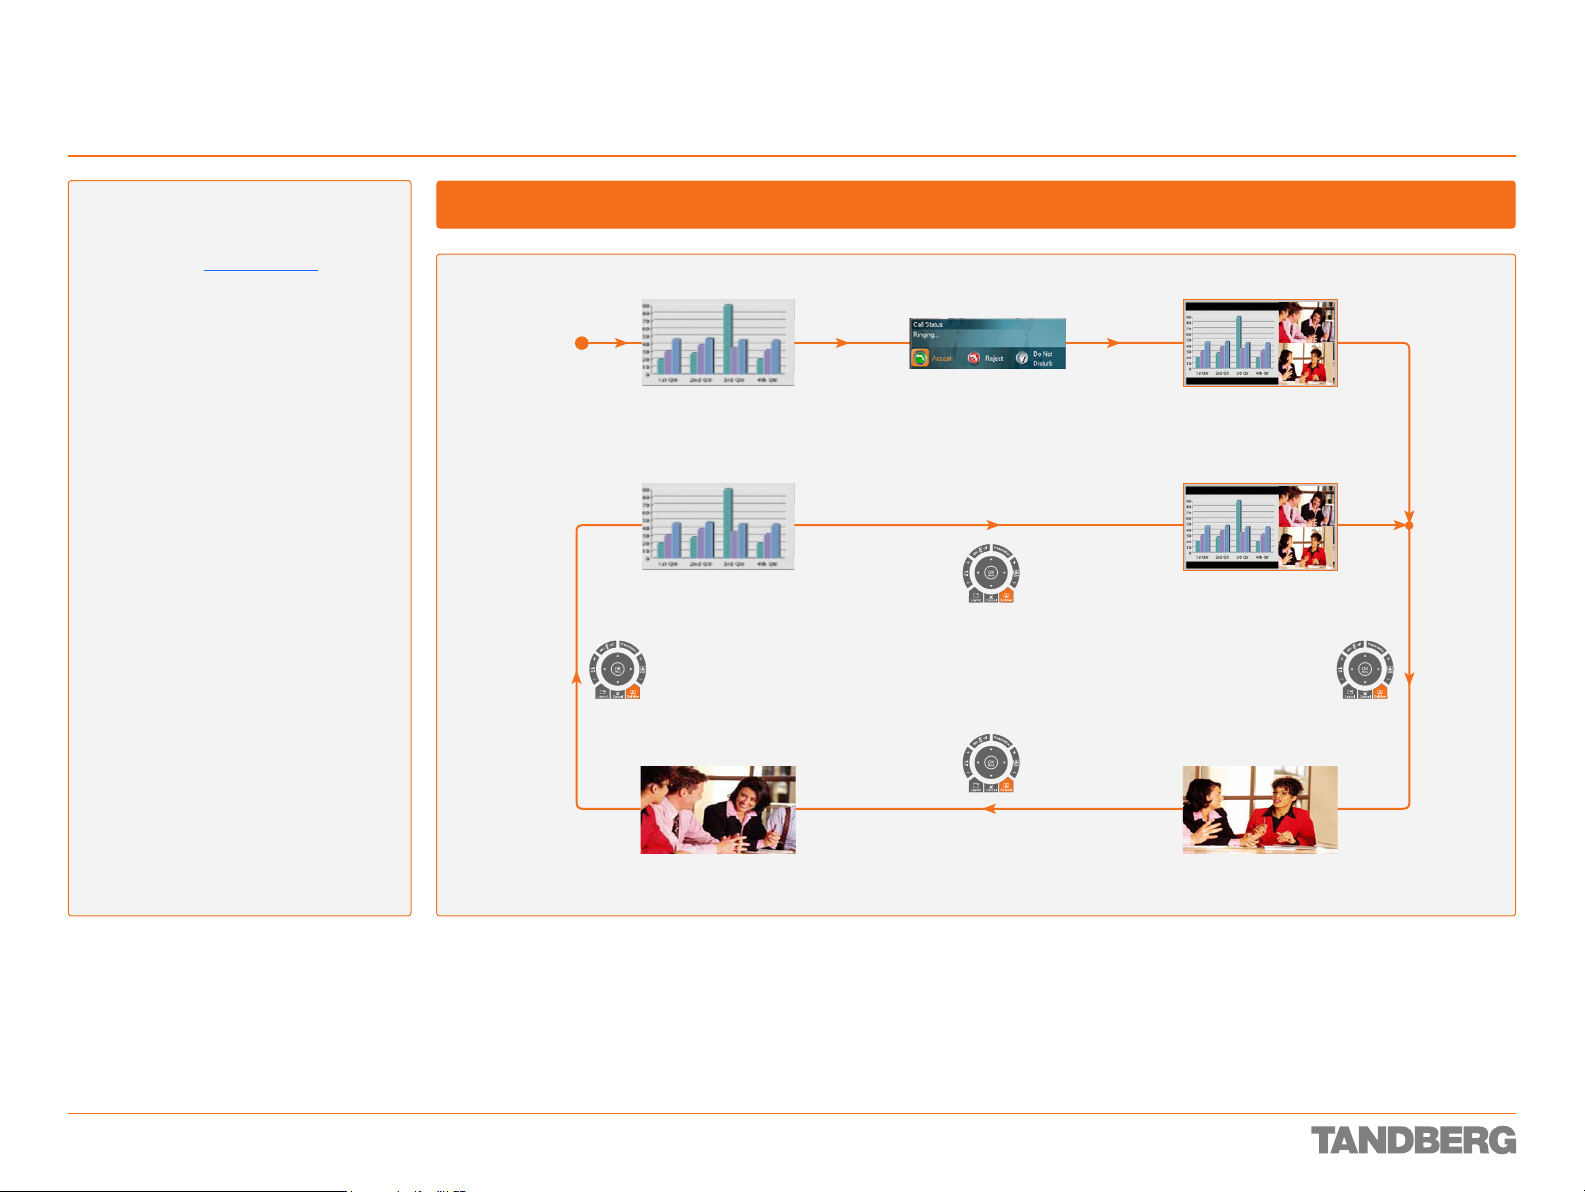
Example: You are using the system as a PC
and get an incoming call.
When the setting Use Screen as Local PC
monitor is ON, you will keep your PC image
displayed locally and the incoming call pops
up in a PIP or as smaller images in a 1+3
layout, depending on your system. You will
see Local PC displayed in the big picture
and Far End and/or Near End (yourself)
displayed in smaller pictures.
Press the Selfview key to switch to
standard conference mode. The Local PC
image is no longer displayed and Far End is
displayed in the big picture or full screen.
Press Selfview again to see Near End.
Pressing Selfview a third time will bring
back the Local PC display mode.
You are using the monitor
as a PC monitor.
Local PC display.
Near end video
Using the Display as Local PC Display
You accept an
incoming call.
Far end video
D 13954.01
JUNE 2006
20
Page 21
Getting Acquainted with the System
Sound Matters
TANDBERG 1700 MXP
USER GUIDE
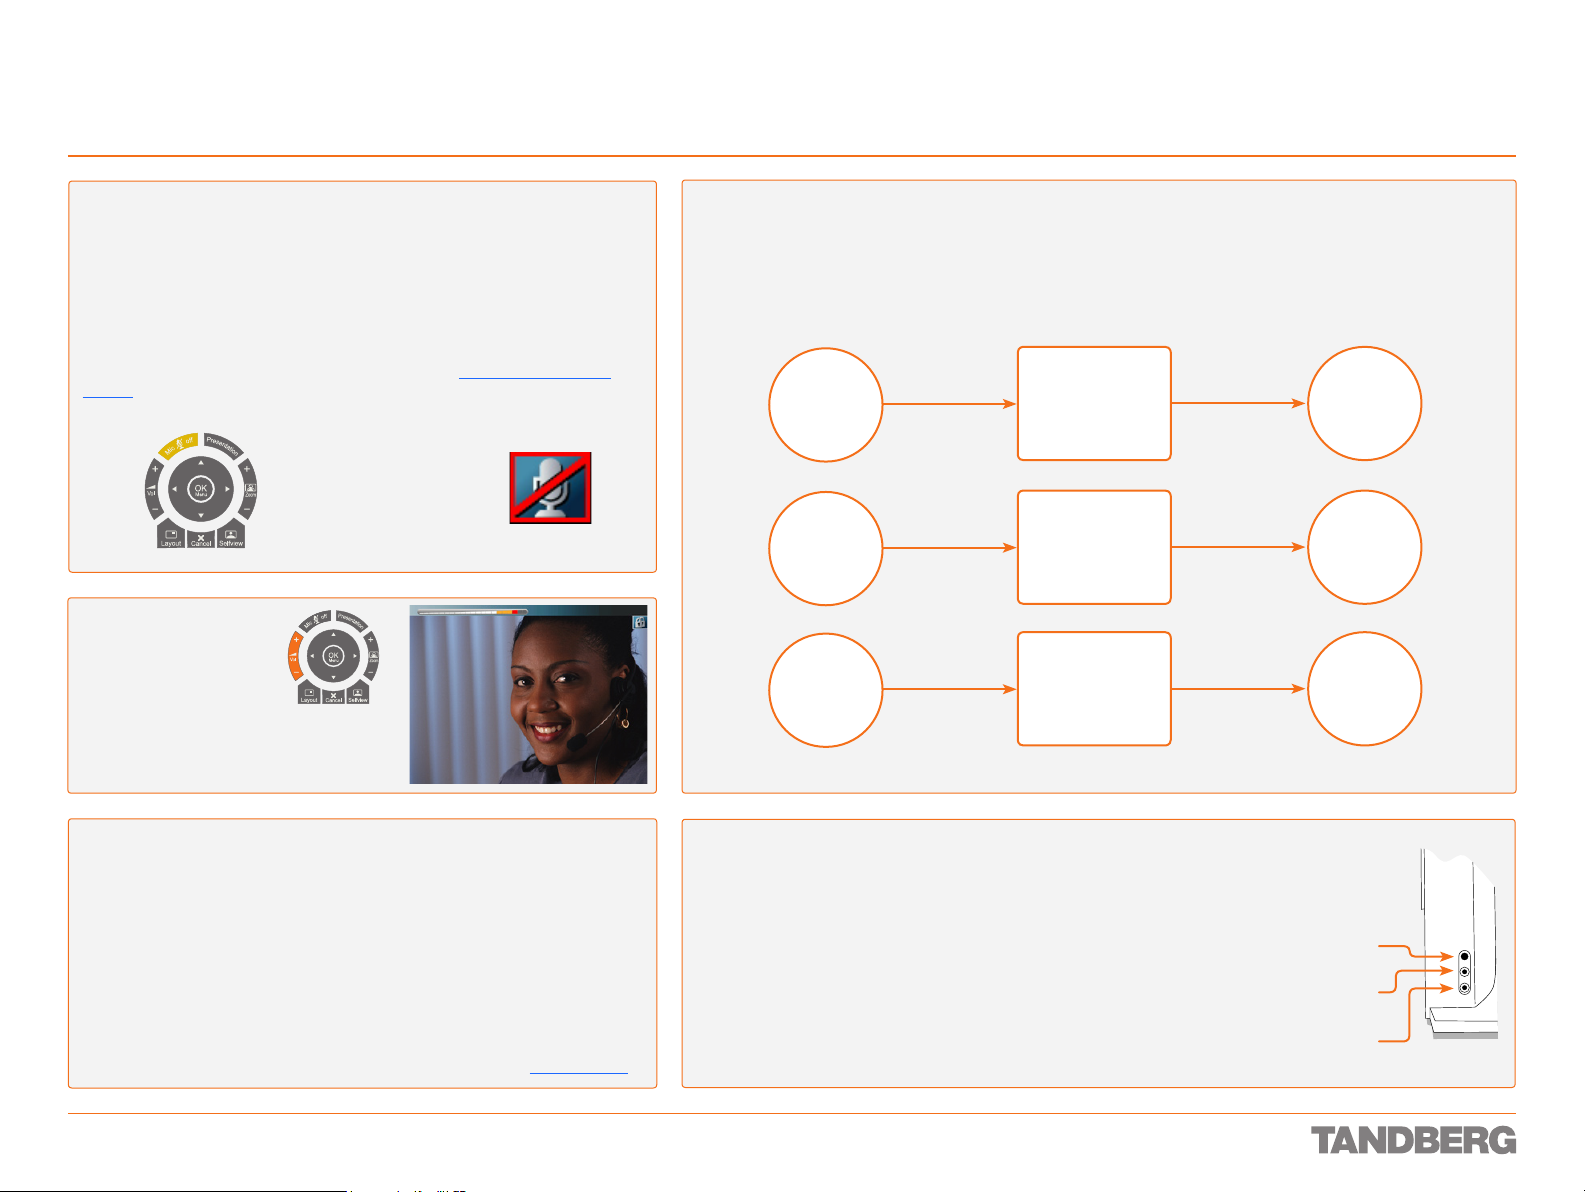
Mic Off
To mute the microphone during a call, press the Mic Off but ton. An on-screen
indicator appears in the upper right corner when the microphone is OFF. In a
call, if audio is detected, the on-screen symbol will star t to flash. Pressing the
Mic Off button one more time will activate the microphone again.
Note! Mic Off will mute all microphone inputs, but it will not mute audio from
any AUX and VCR inputs.
When an incoming call is answered, the microphone may be in the of f state
because the Auto Answer setting is On+Mic Off, see Control Panel > Auto
Answer. The icon will flash once you star t speaking. Remember to turn on the
microphone before a meeting.
Mic Off key
This icon indicates
that the microphone
has been turned of f.
Adjusting the Volume
Press the Volume keys to
adjust the volume level.
An on-screen indicator will
show the current level.
When the volume bar changes
colour to yellow and red, the
sound is compressed to avoid distortion.
Loudspeakers or Headset?
Your system comes with built-in loudspeakers and microphones. In addition you may connect a headset, with or
without microphone, to the system. Once you connect a headset and/or a microphone to the system, this will be
detected automatically.
If you use…
Internal
loudspeaker
Internal
microphone
Headset
loudspeaker
Internal
microphone
Internal
loudspeaker
Internal
microphone
…and then connect…
the headset only
the microphone
of the headset
the microphone
of the headset only
…you will end up using
Headset
loudspeaker
Internal
microphone
Headset
loudspeaker
Headset
microphone
Internal
loudspeaker
Internal
microphone
Headset Recommendations
Standard 3.5mm jack for microphone input
•
Standard 3.5mm stereo jack for earphone output.
•
Earphone Frequency Range: Min. 100–8000 Hz (100–16000 Hz recommended)
•
Mic. Frequency Range: Min. 100–8000 Hz (100–16000 Hz recommended)
•
Earphone impedance: 16–500 W
•
Microphone sensitivity: –39 dBV/Pa ± 5 dB
•
Phantom voltage for microphone: 5 Vdc
•
Microphone load impedance: 2.2 k W
•
Most standard PC-headsets will work. The headset may have integrated volume con-
trol and/or a noise cancelling microphone without the risk of degrading the sound.
Level settings can be made by means of the Control Panel, see Level Settings.
D 13954.01
JUNE 2006
Using the Internal / Headset Switch
There are connectors for the headset and the headset-microphone
on the lef t side of the socket, when viewed from the front – see Fig.
The little switch is used to toggle between the system’s own
speakers/microphone and the headset’s.
If you connect headset only (no microphone) the toggling will be
•
between the systems’s loudspeakers and the headset’s.
If you connect headset and mic., the toggling will be between the system’s
•
speakers/microphone and the headset’s.
If you connect a microphone only (no headset), nothing will happen
•
when you press the switch.
21
Headset
toggle button
Headset
out
Headset
microphone
Page 22
Touch tones Snapshot
Presets
Touch tones Snapshot
Presets
Getting Acquainted with the System
Numerical Keypad Features
TANDBERG 1700 MXP
USER GUIDE
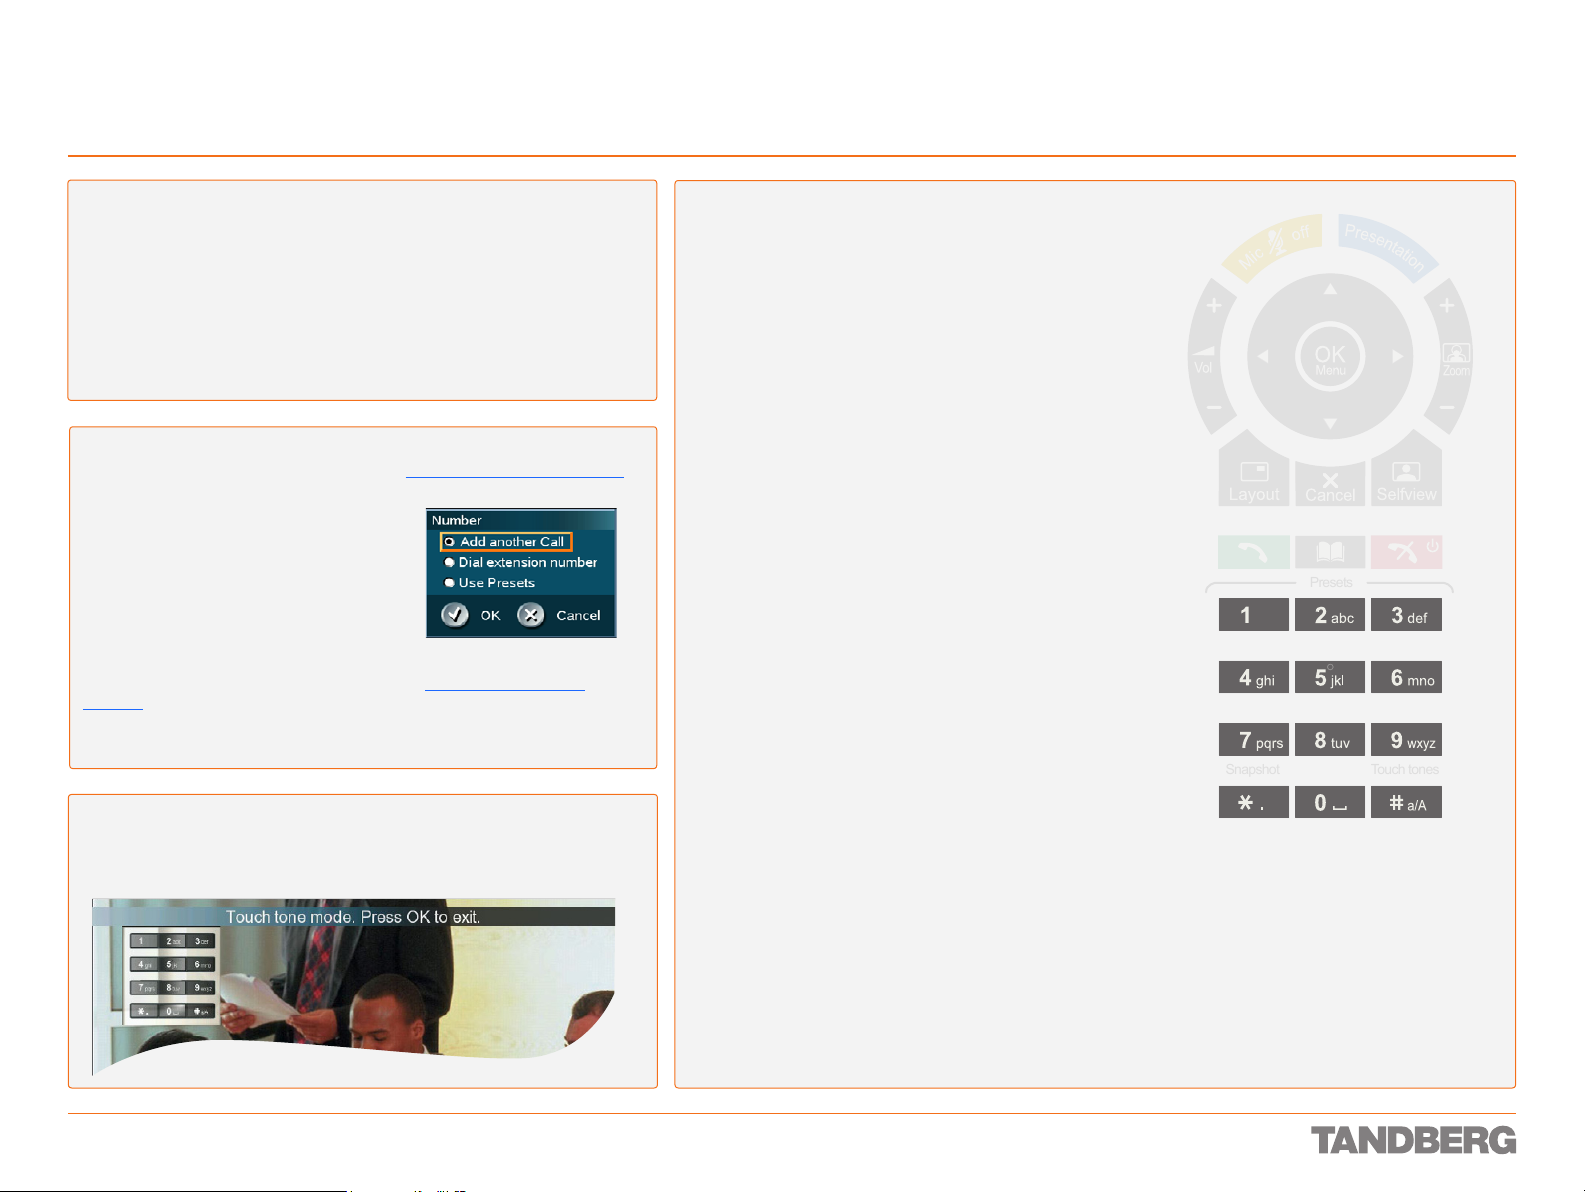
What Happens When You Press a Key on the Numerical Keypad?
That depends on the context. The following guidelines apply:
Pressing a Numerical key when outside a call will produce the Call menu.
•
Once positioned inside an entry field requiring alphanumeric entries, the
•
system automatically goes to ABC mode. Entering letters is similar to a
cellular phone – see right.
Once positioned inside an entry field requiring numerical entries, the sys-
•
tem automatically switches to 123 mode allowing numbers to be dialled
with the Numerical keys as usual.
Using the Number Key Settings
When Number Key Settings is set to Manual (Control Panel > Menu Settings) a
menu will be displayed once you press a numerical key inside a call.
Select Add another Call to add participants
•
Select Dial Extension Number to dial
•
touch tones
Select Use Presets to have the system
•
interpret the number as camera preset
addressing.
If you are a power user, you may not want this menu to appear. It may
therefore be set to your preferred setting in the Control Panel > Menu
Settings.
Obser ve that the Control Panel may have been password protected by your
adminstrator.
Touch Tones
To activate dialling touch tones during a call, press the Touch tones button. An
indicator will let you know that Touch tones are enabled. Finish with OK to exit
Touch tone mode.
Using the Numerical Keypad in Alphanumerical Mode
Whenever alphanumerical entries are expected by the system,
a small abc appears in the right lower corner of the entry field.
In this mode, entries from the Numerical keypad are automatically
interpreted as alphanumeric entries in the same way as on a cellular
phone.
Guidelines:
Press the key that corresponds to the required letter.
•
Press the key as many times as needed to access the
•
correct letter.
Change to lower or back to upper case let ters with the # a/A key,
•
and space with the 0 _ key.
To write numbers in a text input field, repeatedly press the
•
corresponding key a number of times until the digit appears.
Example: How do I write System 123 in the System Name
input field (in General in Administrator Settings)?
Do as follows:
Press the 7-key four times to get an S.
1.
Press the #-key once to switch between
2.
upper case and lower case letters.
Press the 9-key three times to get a y.
3.
Press the 7-key four times to get an s.
4.
Press the 8-key once to get a t.
5.
Press the 3-key twice to get an e.
6.
Press the 6-key once to get an m.
7.
Press the 0-key once to get space.
8.
Press the 1-key three times to get a 1.
9.
Press the 2-key four times to get a 2.
10.
Press the 3-key four times to get a 3.
11.
D 13954.01
JUNE 2006
22
Page 23
Getting Acquainted with the System
Standby
TANDBERG 1700 MXP
USER GUIDE
About Standby
The system will automatically go to Standby
Mode when it is not in use. In Standby
Mode, the screen(s) will turn black. It is,
however, still possible to receive incoming
calls.
The Standby Mode of the system should be
enabled if the system is to be left idle.
Leaving Standby Mode
When the system is in Standby, pick up the
remote control, or press any of its keys to
activate the system again.
Press OK and navigate to the
Standby icon. Select Standby from
the menu and click OK.
Press OK/Menu and navigate to the
Standby icon. Select Standby from
the menu and click OK.
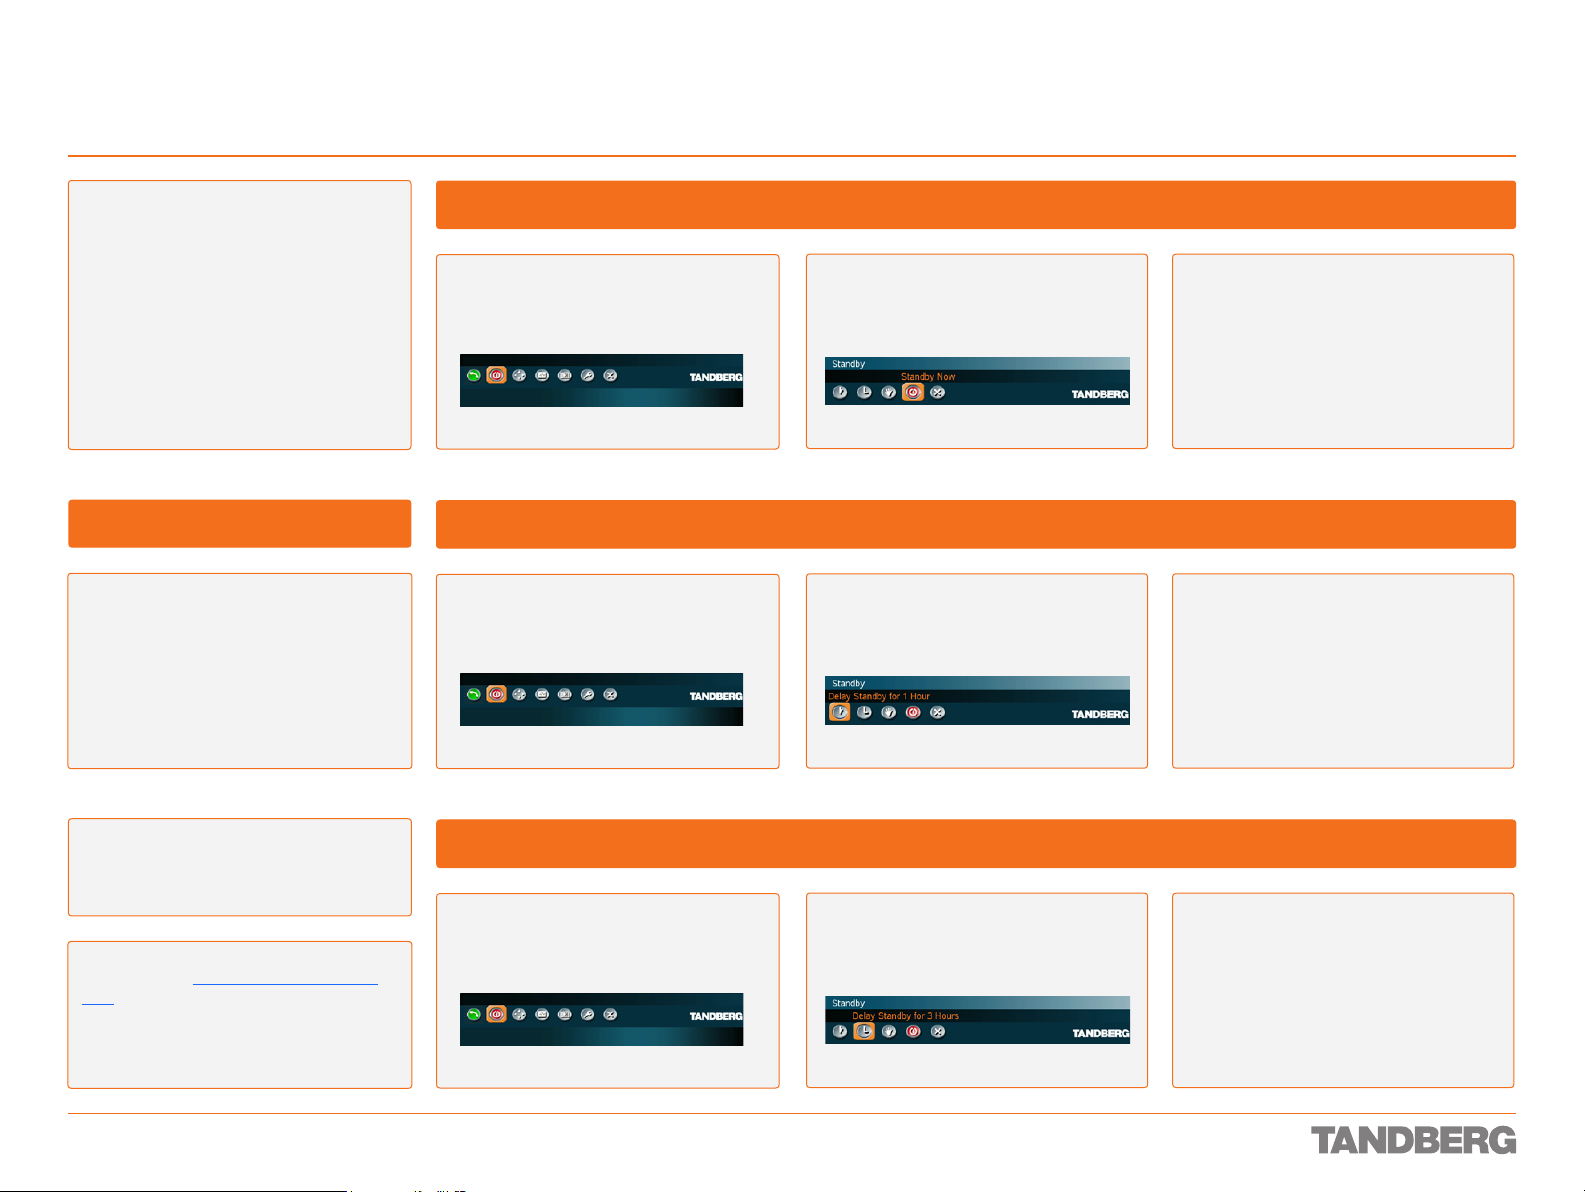
To Enable Immediate Standby Mode
Navigate to the Standby now icon
and click OK.
To Enable Delay Standby Mode for 1 Hour
Navigate to the Delay Standby for 1
hour icon and click OK.
The system will now enter Standby
Mode immediately.
The system will enter Standby Mode
in 1 hour from now.
Note! Standby is not activated by switch-
ing off the power to the monitor(s) (some
systems come with monitors that are not
possible to switch off.).
Tip! If the system is set for Use screen as Local
PC monitor, see Control Panel > Screen Set-
tings, the Standby mode will be disabled when
the codec detects a video signal from the
PC. When the PC video signal no longer is detected, the standby mode will be re-enabled.
D 13954.01
JUNE 2006
Press OK/Menu and navigate to the
Standby icon. Select Standby from
the menu and click OK.
To Enable Delay Standby Mode for 3 Hours
Navigate to the Delay Standby for 3
hours icon and click OK.
23
The system will enter Standby Mode
in 3 hours from now.
Page 24
Call Handling
We recommend that you check out the
TANDBERG web site regularly for updated
versions of this manual:
http://ww w.tandberg.net/support/
documentation.php
Your TANDBERG 1700 MXP can do point-to-point video and
telephone calls as well as video conferences with up to 4
video calls and 3 telephone calls (this is called MultiSite).
This section of the User Guide outlines the call handling
procedures and features.
Please observe that some topics covered apply to point-topoint call handling only, while others apply to MultiSite call
handling only. In addition some apply to both situations.
These are all covered in this section.
Page 25
Call Handling
Access Codes
TANDBERG 1700 MXP
USER GUIDE
About Access Codes
Your TANDBERG system may, or may not,
be set up to require Access Codes to be
typed in before a call can be made.
Access Codes are used for t wo things;
call restrictions and billing opportunities.
Call restrictions may be applied by install-
ing a file of valid access codes that must
be entered to permit calls to be made.
This installation is typically made from
TMS (TANDBERG Management Suite
– available separately).
Billing opportunities. Assume that an ac-
cess code is needed whenever you make
a call. Your company may have different
access codes for the dif ferent clients of
your company.
Then, the access code used may be
picked up by TMS to generate statistics
on who is calling whom, when, and for
how long time.
This information may later form the
basis for billing clients or departments.
Obser ve that in this case there will be
no strict need for installing an Access
Code file on your system – TMS will still
have access to the codes you have assigned to the calls. In this case any code
entered will be considered valid.
Of course, the two may be combined to
form a billing system with call restrictions.
This will then become a system that acts
as forced billing.
Access Codes can be up to 16 characters
long.
The Access Codes feature is activated in
the Security Settings menu of the Con trol Panel. The activation/deactivation of
the feature may be password protected
by your System Administrator. If in doubt,
consult your System Administrator.
Prepare to make a call
– by dialling manually
– by using the phone book
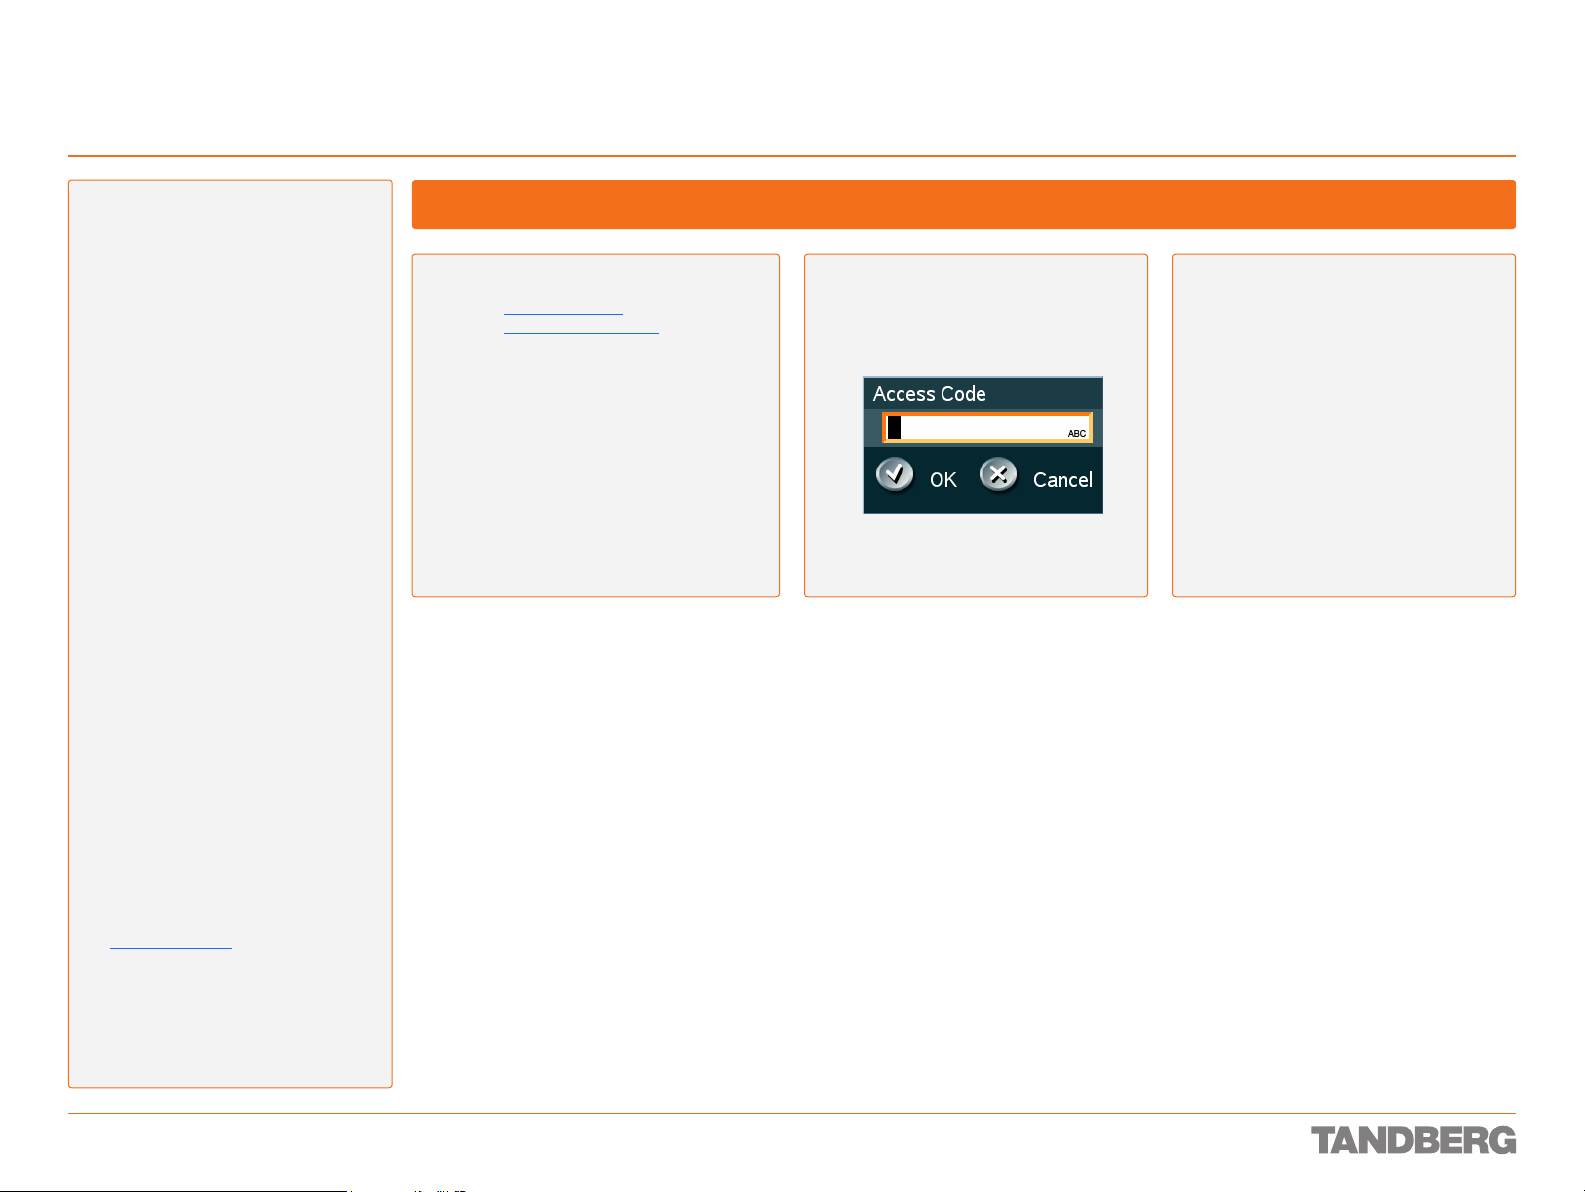
Making Calls when Prompted for an Access Code
When prompted for an Access Code,
enter the code using the Numerical
keypad, which now will be set to ABC
mode automatically.
Proceed with your calling as
described throughout this section of
the User Guide.
D 13954.01
JUNE 2006
25
Page 26
Call Handling
Making Point-to-Point Video & Telephone Calls Manually
Making Video Calls Manually
TANDBERG 1700 MXP
USER GUIDE
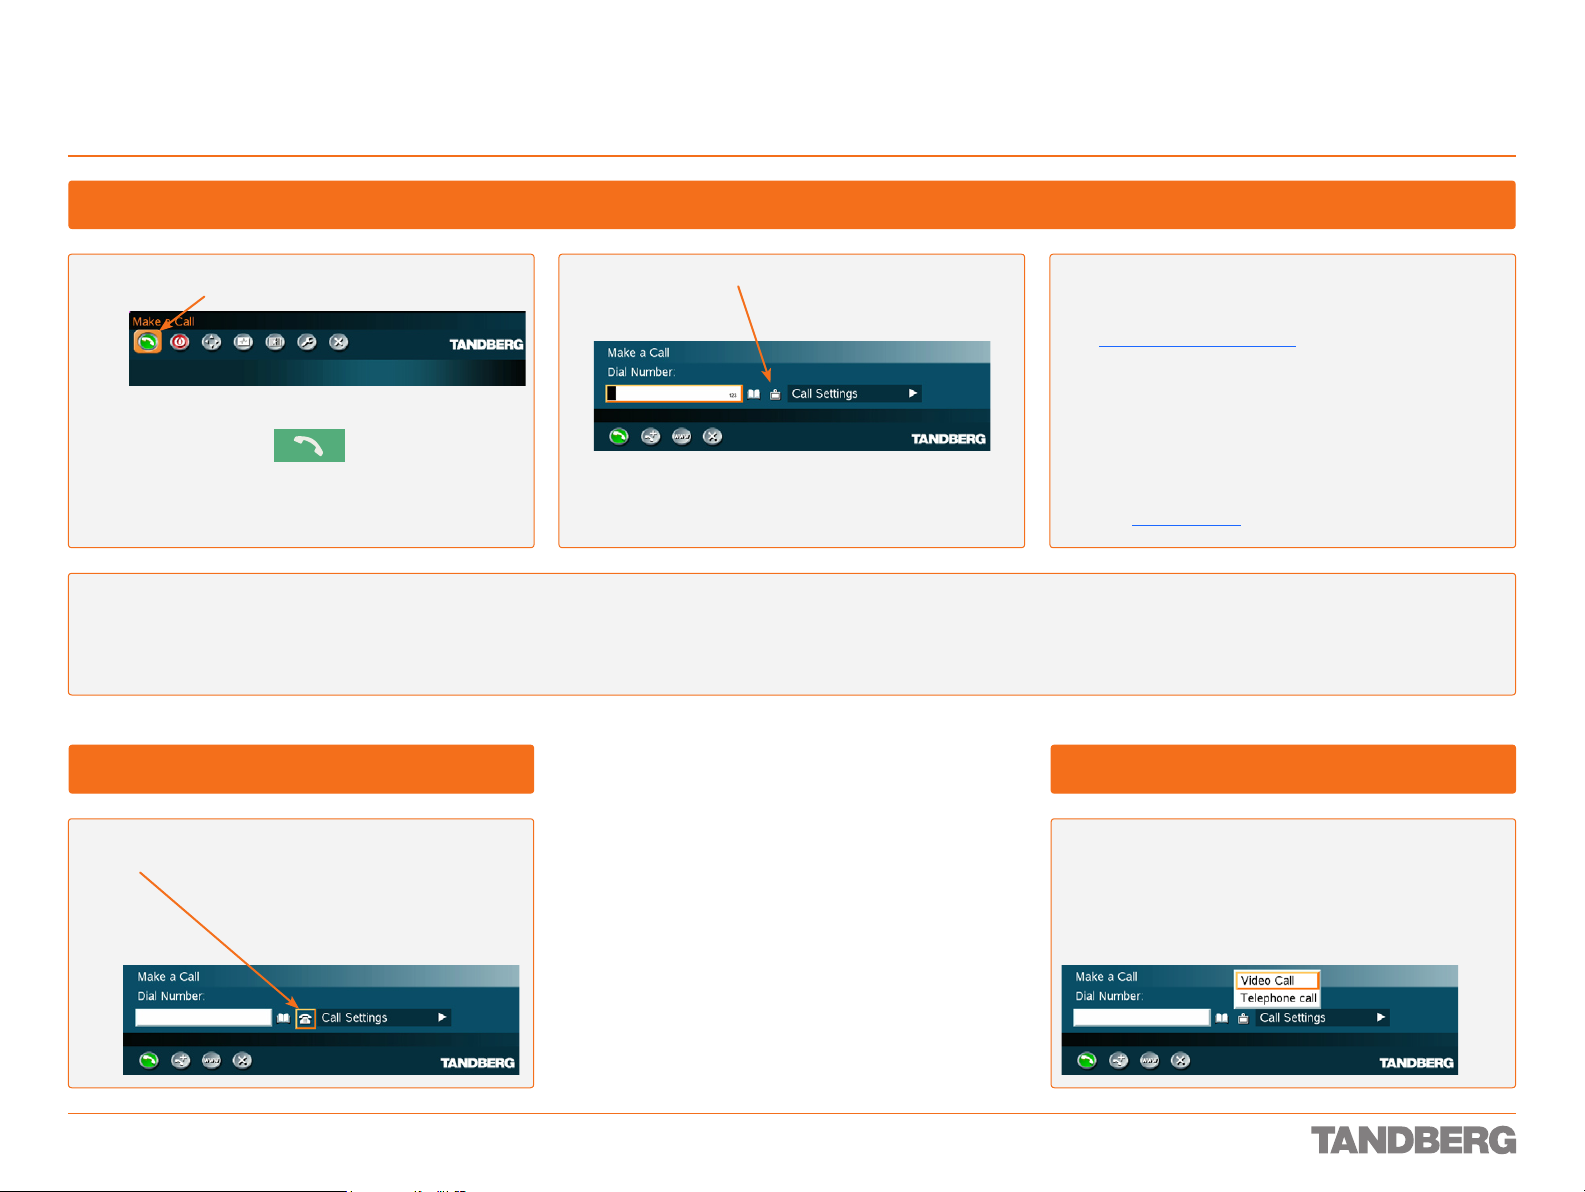
Select Make a Call from the menu,
or, press the green Call key on the remote control.
The TANDBERG system can make both Video calls and
Telephone calls. Telephone calls over IP may require
additional hardware and infrastructure. If in doubt contact
your administrator or your TANDBERG representative.
Do one of three things:
• Place the call by pressing OK so that the Place Call icon is selected and press OK once again
• Use the Arrow keys on the remote control to select the Place Call icon and press OK
• Press the green Call key on the remote control.
Make sure Video Call is selected (as shown here). If not,
see below for details.
Making Telephone Calls Manually
Do as described above for a video call, but make sure
Telephone Call is selected.
Enter the dial number manually using the Numerical
Keypad.
When dialling manually, obser ve the guidelines given in
Numerical Keypad Features. Use * as separator in IP
addresses. If a system is registered on a gatekeeper or
border controller with DNS support, there are several
ways to call into the system:
<IP address>
•
•
<E.164>
•
<H.323 ID>
<H.323 ID>@<domain>
•
<E.164>@<domain>
•
See H.323 Settings for details
Choosing Between Video and Telephone Call
Use the Arrow keys, navigate
to the Call Type icon, and click
OK. Select the type of call and
click OK to exit the submenu.
D 13954.01
JUNE 2006
26
Page 27
Call Handling
Making Point-to-Point Calls Using the Phone Book
TANDBERG 1700 MXP
USER GUIDE
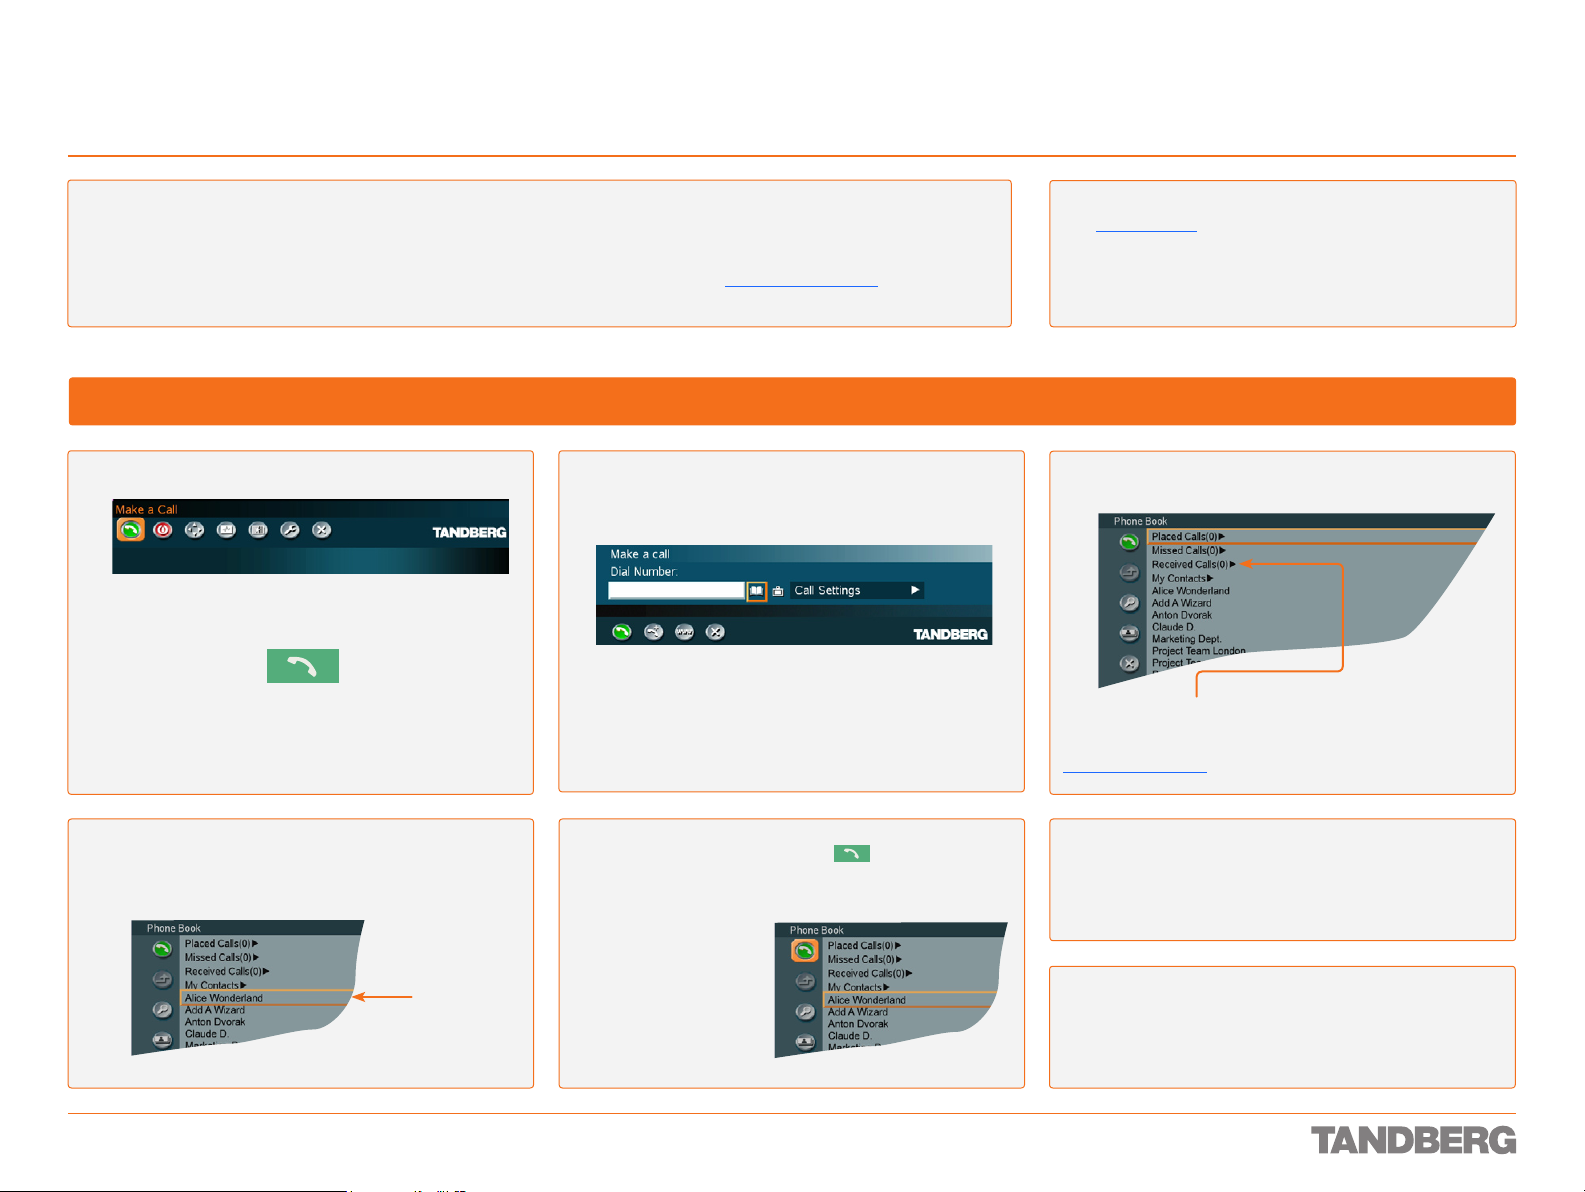
About the Phone Book
Using the Phone Book is time saving and prevents you from
inadvertently calling the wrong number. The contacts are
sorted alphabetically. The contact names are displayed in
the list and the telephone or video numbers of the selected
contact will be displayed at the bottom line.
Select Make a Call from the menu,
or, press the green Call key on the remote control.
When selecting Phone Book the Phone Book opens showing
the folders Placed Calls, Missed Calls, Received Calls and My
Contacts. Global Contacts (if applicable), will be listed below
these folders. See also Phone Book Features.
Making Calls Using the Phone Book
Use the Cursor keys to navigate to the Phone Book icon
and press OK on the remote control, or just press the
Phone Book button on the remote control.
System Asks for Access Code?
See Access Codes for details!
Use the Cursor keys to navigate in the list.
Any entry with an arrow appended is expandable using the Arrow
keys. Navigate in the expanded list using the Arrow keys as
usual. You may key in letters to navigate in the list – see also
Phone Book Features for details on the use of the Phone Book.
Once you have located whom to call select the
corresponding entr y by means of the Arrow keys.
D 13954.01
JUNE 2006
Indicates
selected
entry.
Press the green Call Now key (
control,
or...
press the Left Arrow
key to select the
Call Now icon,
followed by OK
or...
just hit the OK key
whilst the entry
is selected.
27
) on the remote
The name of the selected entry will now appear on the
screen. Call settings will be set as specified with this
particular entry.
Wait for the call to connect.
The call will be a video or a telephone call depending
on the set tings for the entry selected.
Page 28
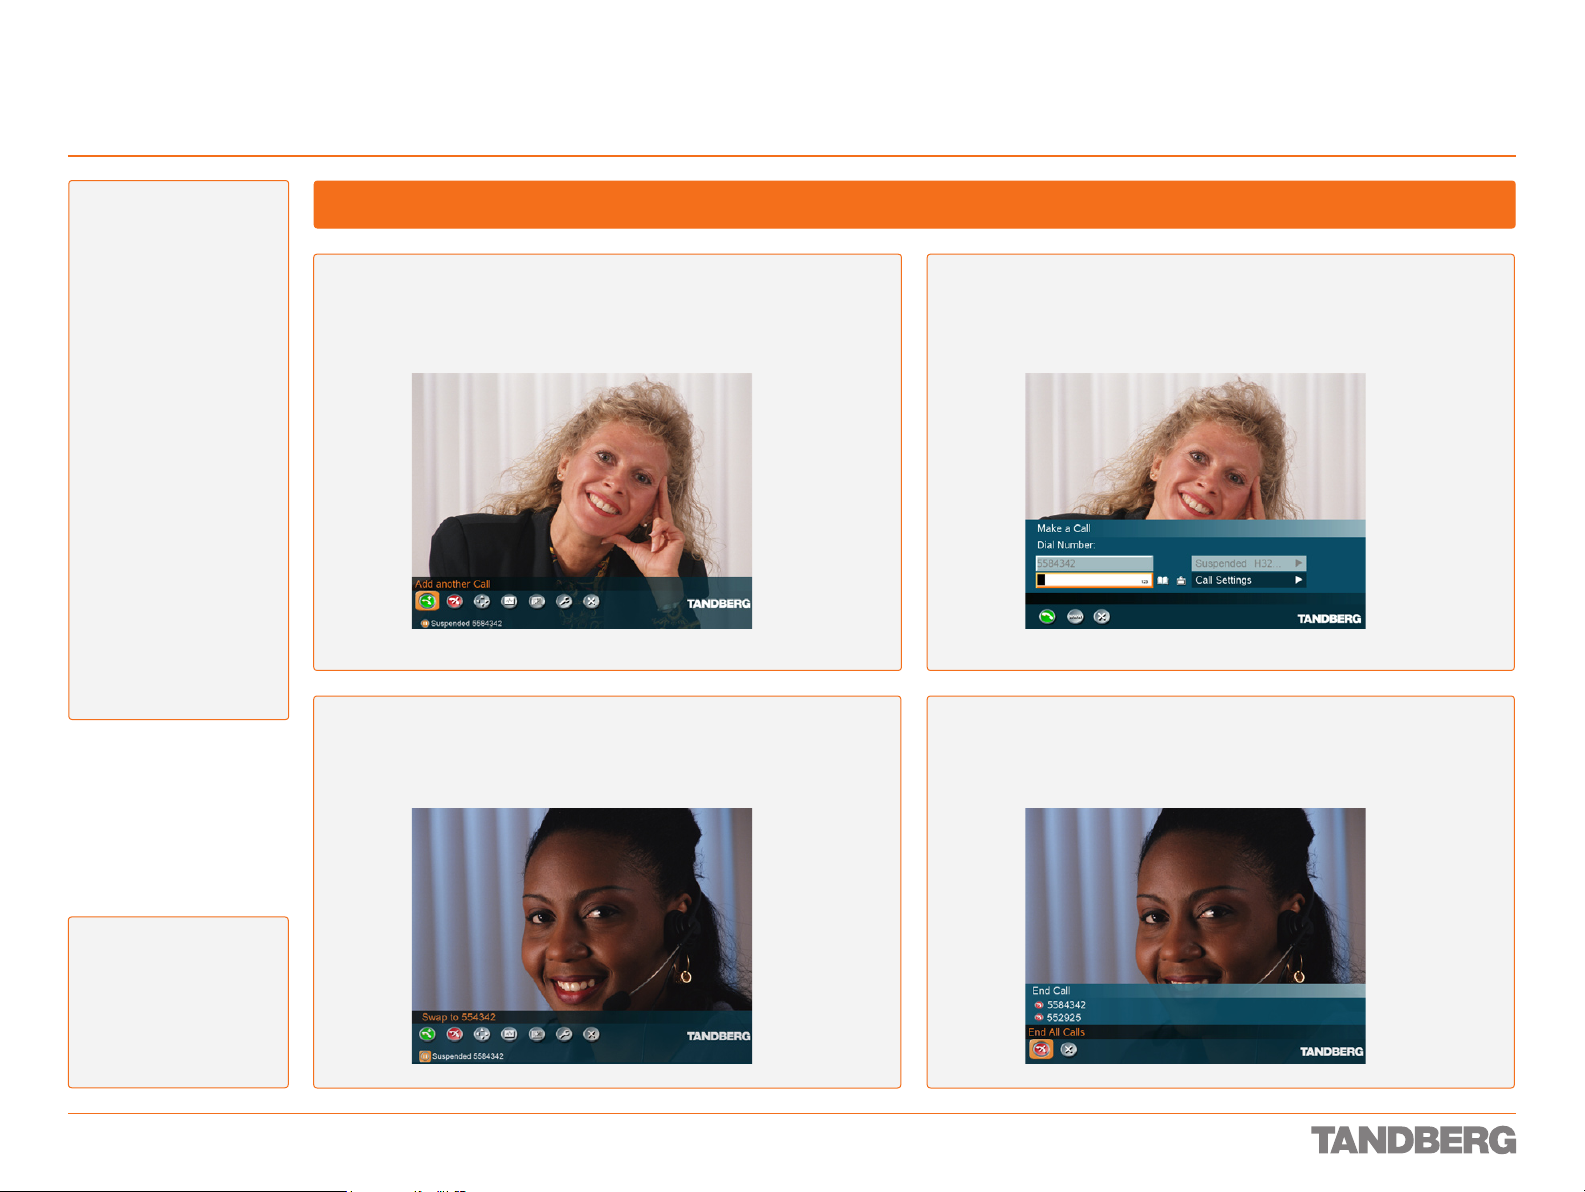
Call Handling
Making Calls with Two Parties at the Same Time (Non-MultiSite Systems Only)
TANDBERG 1700 MXP
USER GUIDE
About this Feature
Non-MultiSite equipped
systems may call another
party when already in a
call. Thus you may have
two calls running at the
same time. Note that the
two par ties will not be
able to communicate with
each other. The feature
requires H.323 or SIP to
work.
When you make an
additional call, the
party called first will be
temporarily suspended.
The message “Please
wait” will appear on
the screen of the part y
suspended.
You may switch between
the two parties you have
called by navigating to the
lowermost line in the main
menu as shown in the
Figs. to the right.
Calling Two Parties Simultaneously
Assuming you already are in an H.323 or a SIP call, press the Call
button on the remote control. Select Add another Call from the menu.
The call currently active will be temporarily Suspended, which can be
seen from the lowermost line of the screen.
To switch between the t wo par ties, use the Suspended menu line at
the bottom of the screen. This line contains the number of the party
currently Suspended.
Call the second party manually or by means of the phone book in the
usual manner. Observe that this must also be an H.323 or a SIP call.
To end any or both of the calls, click the End Call button on the remote
control. You will have the option of navigating to any of the numbers
called to terminate that call or to press the End Call again to terminate
both calls simultaneously.
The features described
here applies to systems
without the optional MultiSite feature installed.
Note! The presence of
MultiSite will disable
these features.
D 13954.01
JUNE 2006
28
Page 29
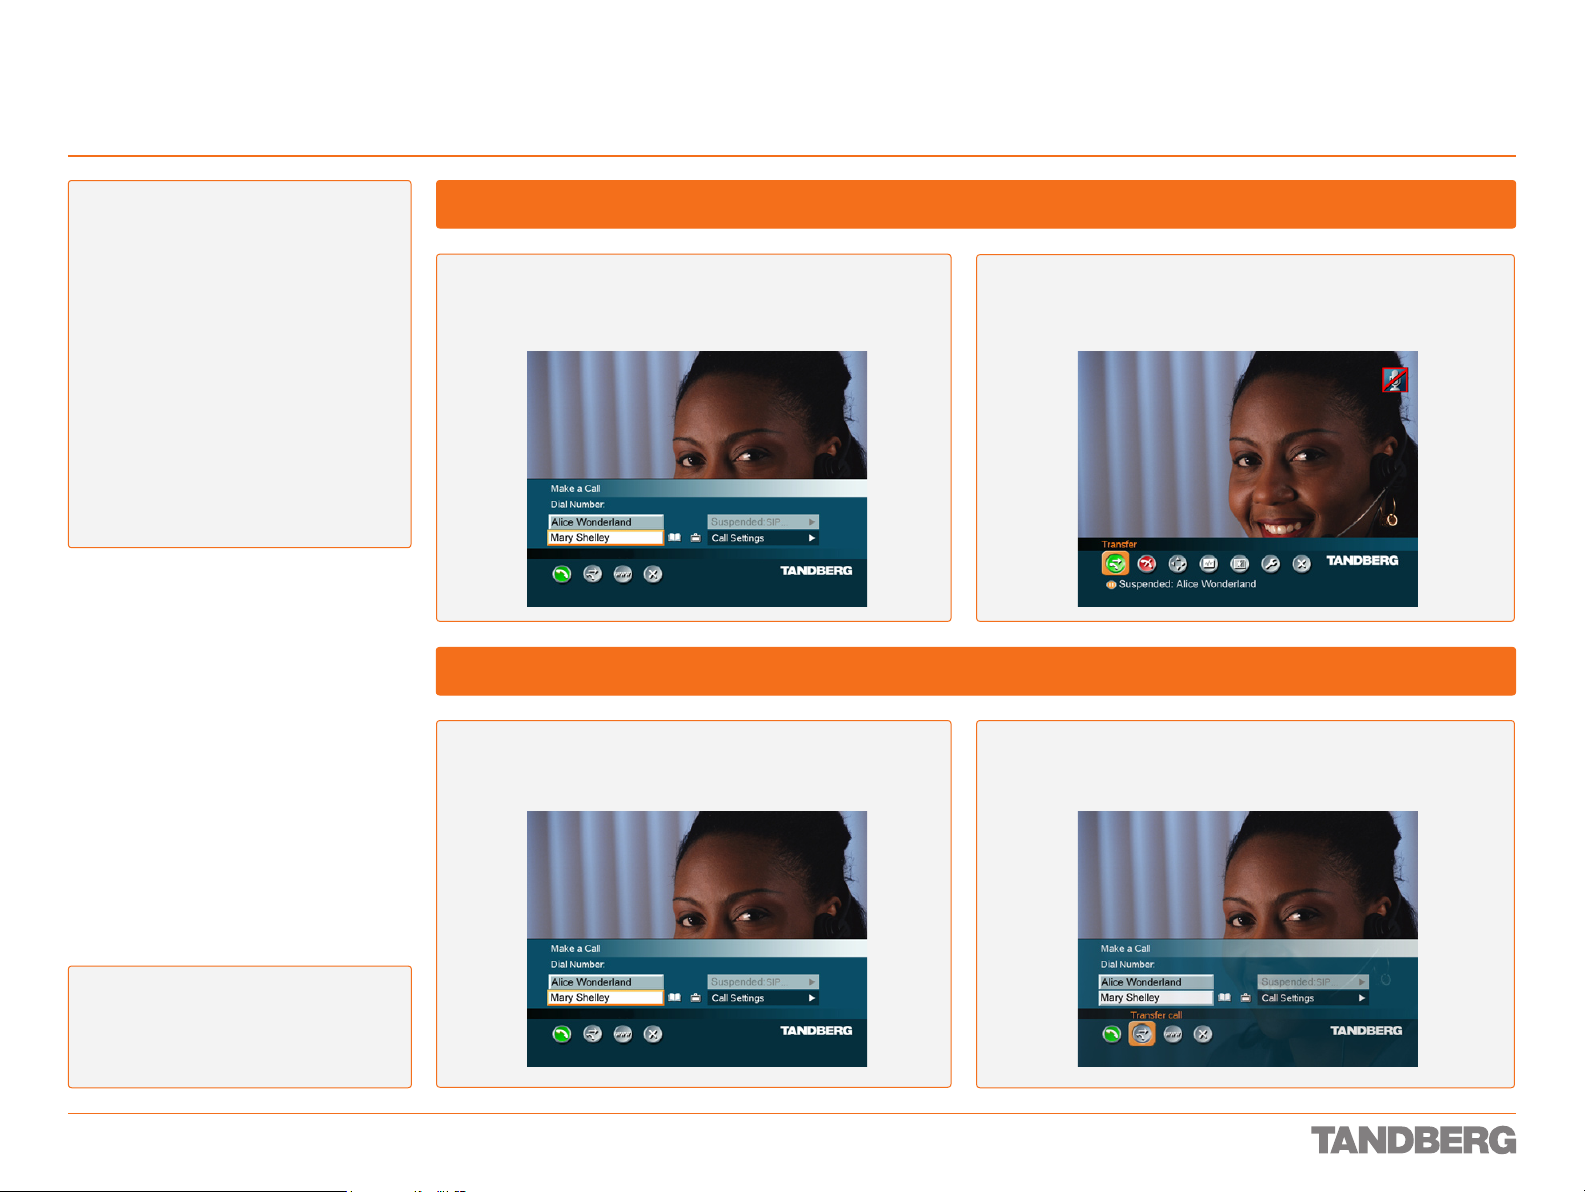
Call Handling
Transfer of a SIP Call (Non-MultiSite Systems Only)
TANDBERG 1700 MXP
USER GUIDE
About Transfer
During a call you may transfer the other
party to a third party and disconnect yourself from the call.
Call Transfer comes in two flavours; Con -
sultative and Unattended Transfer.
Consultative transfer takes place when
you have called two parties at the same
time (as discussed on the previous page)
and decide that you want to connect the
two, while at the same time disconnecting
yourself.
Unattended transfer takes place when you
transfer a call to someone else without
already being in a video call with that party.
Call Transfer applies to SIP calls only!
Call two parties at the same time as outlined on the previous
page. Both calls must be of SIP type.
Call two parties at the same time as outlined on the previous
page. Both calls must be of SIP type.
Consultative Transfer
To connect the two parties together, thereby disconnecting yourself,
click OK to display the Calll menu (which now will have a slightly
different look), navigate down to the Transfer Call icon, and click OK.
Unattended Transfer
To connect the two parties together, navigate down to the Transfer
Call icon and click OK. The two will be connected and you will be
disconnected.
The features described here applies to systems without the optional MultiSite feature
installed.
Note! The presence of MultiSite will disable
these features.
D 13954.01
JUNE 2006
29
Page 30
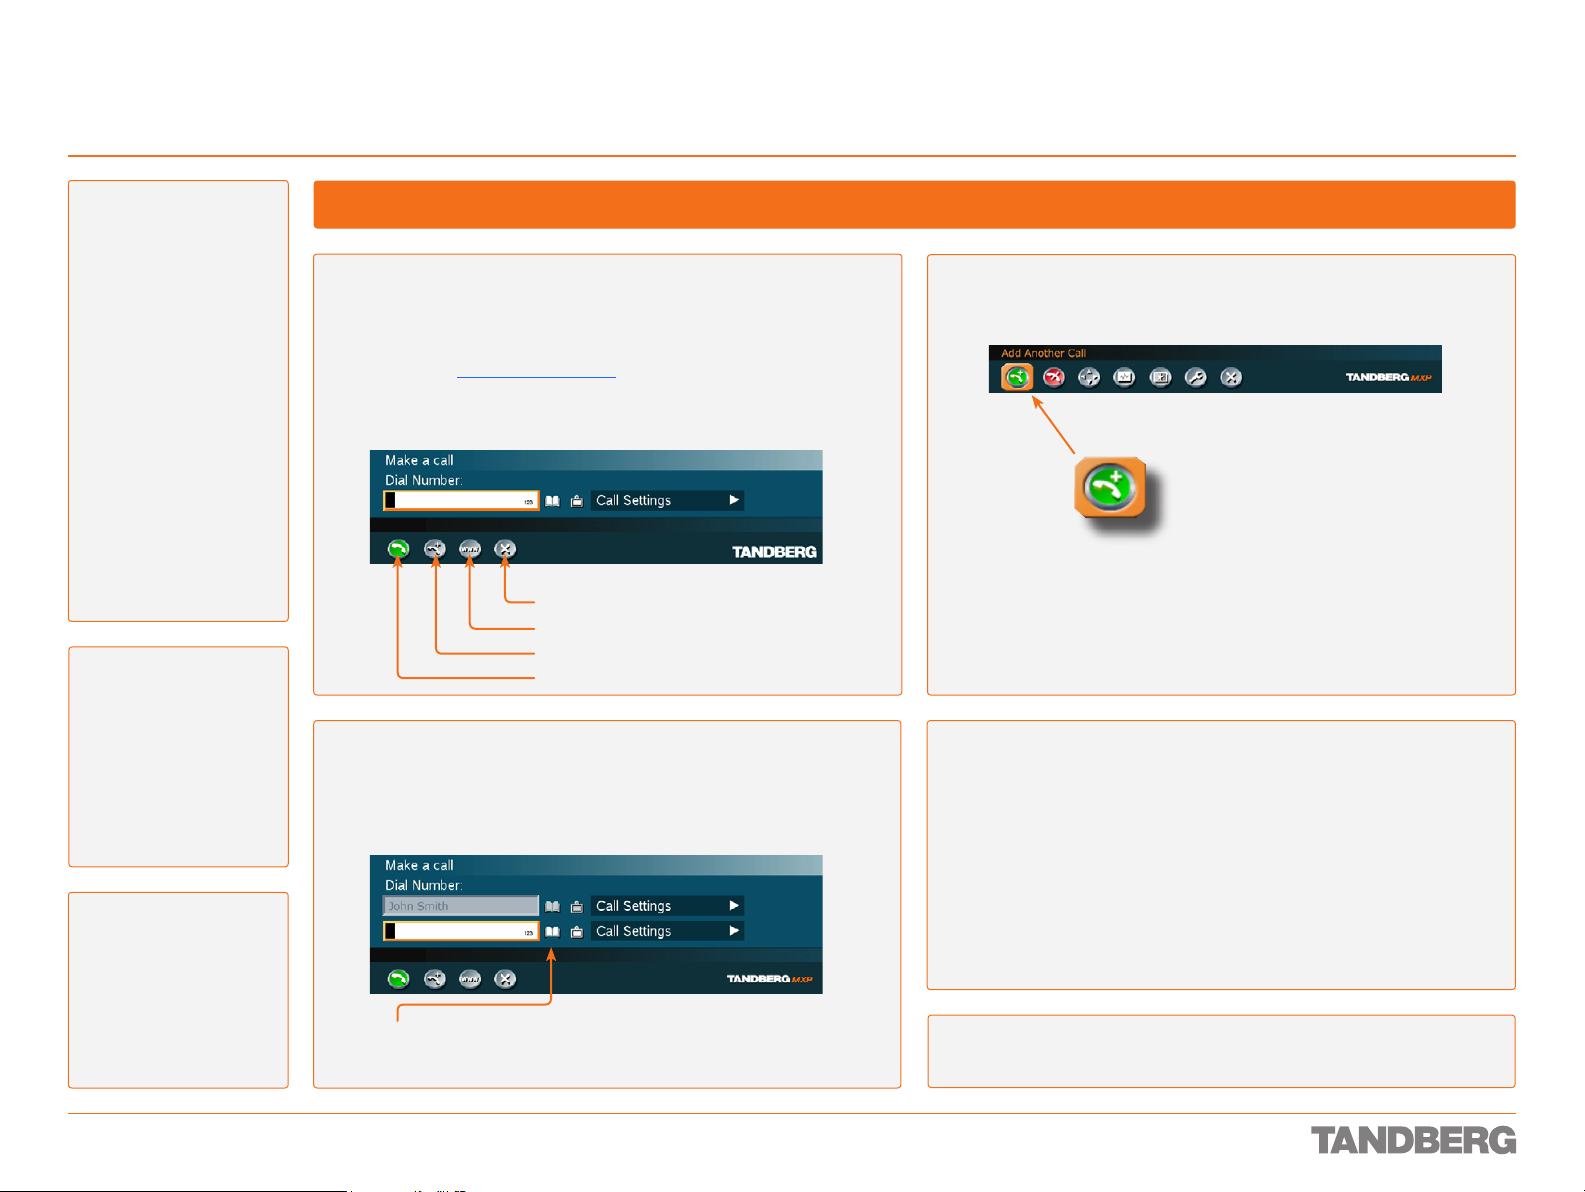
Call Handling
MultiSite Conferences – Adding Calls
TANDBERG 1700 MXP
USER GUIDE
About MultiSite Conferences
Conference systems with
built-in MultiSite can handle up to 4 IP video calls
and 3 IP telephone calls
simultaneously.
You may set up a video
meeting with many participants in advance and/or
you may add participants
during a conference. This is
called to Add Another Call.
Observe that Add Another
Call is an optional feature,
which your system may, or
may not, be equipped with.
Systems without this option
will have no Add Another
Call icon in the menus.
Note! In this video system
all communication is IP
based. To include 3G
cellular phones and/or
ISDN connections, access
to additional functionality
and hardware is required.
Consult your administrator
or your TANDBERG representative for details.
Select Make a Call from the menu, and dial a number manually or use
the Phone Book to select a conference par ticipant. More on this can be
found on the preceding pages.
As an alternative you may select a predefined MultiSite Phone Book
entry – see New MultiSite Contact in this section of the User Guide for
details.
Press OK on the remote control.
Close (menu)
Streaming
Add Another Call
Make a Call
Enter the number manually or use the Phone Book to select the
additional par ticipant. Press OK to call that party.
Adding Calls
To add another participant to the conference, start by selecting the Add
Another Call icon and press OK. The menu will now look like this:
Repeat until all par ticipants have been called and successfully
connected. A maximum of 4 video calls and 3 telephone calls can be
connected simultaneously.
Tip! MultiSite is an optional
feature of this system.
The MultiSite feature is,
however, available as retrofit to your system.
Consult your administrator
or your TANDBERG representative for details.
D 13954.01
JUNE 2006
Select this icon and click OK
to open the Phone Book.
Tip! You may use the Add Another Call icon to specify everyone to be called
before you actually call them.
30
Page 31

Call Handling
Altering the Call Settings
TANDBERG 1700 MXP
USER GUIDE
About Call Settings
The Call Settings specifies the quality of the
call. Each call will be set
up with the default call
settings if the settings are
not altered.
In this case the field is
labeled Default Call Set-
tings. If the settings for
some reason are altered
for the current participant
in the current call, the
name of the field will be
changed to reflect this.
Usually there will be no
need for you to alter the
settings.
The Default Call Settings
are defined in Call Quality
> Default Call Settings of
the Control Panel.
Select Make a Call from the menu.
Set the Call Settings as required.
Net options
To Alter the Call Settings
Navigate to Default Call Settings and click OK.
If you want the new set tings to be used as the new Default Call
Settings, select Set Default and press OK.
These settings will now be the default settings for all future manually
dialled calls.
D 13954.01
JUNE 2006
Bandwidth
options
Moving up and
down in the
submenus.
31
Other wise, just navigate directly to the OK icon and press OK on the
remote control.
Page 32

Call Handling
Streaming
TANDBERG 1700 MXP
USER GUIDE
About Streaming
Streaming lets you
broadcast your meeting to
participants on the web. The
web participants can view
the meeting, listen to the
meeting, see snapshots,
but not participate
themselves. Snapshots of
current stream (if MultiSite),
selfview, far end and
Dual Video Streams are
accessible via http.
Tip! The streaming source
setting is not available
when streaming only is
suppor ted outside a call.
To View the Streaming
After streaming is
started, an easy way
to view the streamed
audio/video on your
PC, is to start your
Web browser and
enter the IP-address
of the streaming
system.
Streaming Settings
Allow Remote Start
On: Streaming can be started from exter-
nal user interfaces like the Web- browser
or Telnet session.
Off: Streaming can only be started from
the Video Conferencing System User Interface using the remote control, or by
using the Data port. This will prevent activation of streaming using Web browser
or Telnet sessions. See also Password.
Announcements
On: The codec will send announcement
packets to the network that it is streaming. This enables a streaming client (e.g.
a PC) to connect to the codec’s stream-
ing session. Used by Cisco IP/TV.
Off: No announcement packets will be
transmitted.
Address is defined as the IP-address of a streaming
client, streaming server or a multicast address. Giving
an address in the range 224.0.0.1–239.255. 255.255
will broadcast the stream to any host that has joined
the specif ied multicast group. Specifying normal
broadcast address 255.255.255.255 will broadcast
to any members on the LAN.
Password
Set password so that only par ticipants entering
correct password will be able to view the streaming session. Entering a password will prevent unauthorized people from accessing the streaming
session.
Video Rate
Defines the Video streaming rate from the system. Range is 16–320 kbps. In addition, audio
(G.711) streaming rate is 64 kbps, providing a
maximum streaming rate of 384 kbps.
Address
Address Port
If several codec’s are streaming to
the same IP-address, different ports
have to be used in order for the client
to know which stream to receive. If
the first codec streams on por t 2240
and the second codec on port 2250,
the client has to specify which port to
listen to. Video is transmitted on the
specif ied port; audio is transmitted
on the port number 4 greater than the
specif ied video por t, in this case 2244
and 2254.
TTL/Router Hops
This is used for streaming data to limit
how many routers the data should pass
before it is rejected. If TTL is set to
2, data will not traverse more than 2
router hops.
Streaming Source
Auto: Enables streaming of both local
and far end video. Selection of which
site to be streamed is done using
voice switching (the site that speaks is
streamed).
Local: Only the local video will be streamed.
Remote: Only the far end video will be
streamed.
Local and far end audio is always
streamed.
After the Web page
of the system
is shown, click
on Streaming.
Alternatively, enter
http://<codec/
ip-address>/
showstream.ssi
D 13954.01
JUNE 2006
Select Make a Call and click OK.
Utilizing Streaming
Navigate to Streaming and click OK.
32
Press Start Streaming
from the menu line. An
indicator appears onscreen when streaming
is activated.
Press Stop Stream-
ing to end streaming.
Streaming will also
end when you disconnect the call.
Page 33

Call Handling
Presets
Answering an Incoming Call
TANDBERG 1700 MXP
USER GUIDE
About Incoming Calls and Privacy
You may want to set up your system so that the microphone
is switched off whenever you receive an incoming call.
By pressing the Microphone Off key you will prevent callers
from hearing you without your control (press again to activate).
To combine convenience and privacy, your system may be
set up to automatically accept an incoming call, but with the
microphone switched off. In this case you must switch the
microphone back on manually yourself (just press the Micro-
phone Off key to reactivate a disabled microphone).
You may also have your system set up so that you always
must answer all incoming calls manually.
These settings are par ts of the Settings (in Control Panel)
available. Your adminstrator, may or may not, have password
protection activated to prevent unauthorized alterations of
these and other settings. If in doubt, consult your adminstra tor.
Note! A message will be sent to the far end whenever you
have disabled your microphone and/or your camera.
Tip! An alternative to the above could be the use of the Do
Not Disturb feature (far right).
Want to Change the Video Alert Audio Signal?
You are not stuck with the audio signal alerting you that an
incoming call is on its way. This may be changed, see Audio
Settings in the Control Panel section. Note that these settings
may be password protected by your adminstrator.
Incoming Calls will Produce the Below Menu
Activate Do Not Disturb
Reject the incoming call
Accept the incoming call
This will not apply if Do Not Disturb has been activated, nor
will it apply if Autoanswer has been set to On or On + Mic Off
To Accept an Incoming Call
Press the OK button on the remote control.
•
Press the the green Call button on the remote control.
•
OK button
End Call button
Call but ton
Using Do Not Disturb
There is a Do Not Disturb function available on your system.
When set to on, all incoming calls are blocked from your
system.
Use the feature as follows:
Outside a call, press the red Call Reject key (
Navigate to the Do Not Disturb icon:
Press OK to activate the feature. The screen will now turn
black, and the following tex t will appear:
Note! Assume Do Not Disturb has not been activated. Choos-
ing Do Not Disturb (selecting the icon and then pressing OK)
when receiving an incoming call will then do t wo things: It rejects the incoming call (in the same way as choosing Reject),
and sets the Do Not Disturb functionality to ON.
).
Tip! Whenever you receive an incoming call from someone
listed in your Phone Book, the caller’s identity will be shown
on the screen, just like in a cellular phone. For more on the
Phone Book, see Phone Book Features.
Tip! Whenever Do Not Disturb is activated, the far end will be
informed that the called is busy.
D 13954.01
JUNE 2006
To Reject an Incoming Call
Select the Reject icon and press the OK but ton on the
•
remote control.
Press the End Call button on the remote control.
•
33
Page 34

Call Handling
Ending an Ongoing Call
TANDBERG 1700 MXP
USER GUIDE
Ending a Point-to-Point Call
Use either of the below methods:
Press the End Call button (
•
Press the OK/Menu button on the remote control to display the menu.
•
This will produce the End Call dialogue box:
Use either of the below methods:
Press the End Call button (
•
Press the OK/Menu button to confirm that the call is to be ended.
•
Tip! Switching of f the monitor(s), using the
power button on the monitor, will not end a
call. Some systems even come with moni tors that cannot be switched off!
) on the remote control.
) on the remote control again.
Ending a MultiSite Call
Use either of the below methods:
Press the End Call button (
•
Press the OK/Menu button on the remote control to display the menu.
•
This will produce the End Call dialogue box:
Use either of the below methods:
Press the End Call button (
•
Press the OK/Menu button to confirm that the call is to be ended.
•
Tip! Ending a MultiSite call can only be
done by the host. The other parties can
disconnect themselves from the conference
at any time, but they have no influence on
the rest of the conference.
) on the remote control.
) on the remote control again.
Tip! To end one or a few of the calls in a
MultiSite Meeting navigate to the name of
the call to be terminated and terminate the
call as if it were a point-to-point call.
D 13954.01
JUNE 2006
34
Page 35

Call Handling
Touch tones Snapshot
Presets
Basic Phone Book Features
TANDBERG 1700 MXP
USER GUIDE
Accessing the Phone Book
To access the Phone Book, press the Phone Book button (
on the remote control or select the Phone Book icon in the Call
menu.
Accessing the alphanumeric characters
Toggle bet ween ABC
and abc mode by
pressing the # key. To
switch to 123 mode,
press the # key for
one second (and
again for one second
to return to alphanu meric mode).
TIP! We strongly recommend that you copy contacts often used
to My Contacts. Note, however, that the local copy will not be
updated if the Global Contacts are updated from the manage-
ment system.
Tip! The contents of your Phone Book can be arranged in a
tree structure with several subfolders. Use the Up one Level
icon ( ) in the Task Column to navigate back up in the tree
structure.
)
The Call Log – Placed, Missed & Received Calls Call Log Options
The Call Log – listing
Placed Calls
•
Missed Calls
•
Received Calls
•
is essentially a set of lists of your system’s call history. The
lists contain the most recent numbers placed, missed, and
received, limited to a maximum of 30 numbers for each
list. The numbers remain in these lists until the system is
restar ted or the list is deleted manually.
Missed Calls lists all calls that were not received – either
because you declined the call or just because you were not
there when the call attempt took place.
Navigate in the menu in the usual manner:
Use Vertical Arrow keys to move up and down in the menu.
•
Press OK or use the Right Arrow key to expand items with
•
an arrow appended.
Let us consider an expanded log of Missed Calls as an
example. The Placed Calls log and the Received Calls log are
exactly similar – with identical features.
Expand Missed Calls as explained in the Call Log frame to the left.
Navigate in the menu in the usual manner:
Use the Left Arrow key to move from the Missed Calls
•
Call this number now
Copy to my Contacts
Delete the selected entry
Delete all entries of this call log
Cancel (exit menu)
Task column
column to the Task column.
Use Vertical Arrow keys to move up and down in the
•
menu.
When you have located the icon representing what you
•
want to do, press OK .
Tip! Any member of these lists already listed in your Phone
Book will appear with the name you have assigned to them
and not just with the number.
D 13954.01
JUNE 2006
35
Page 36

Call Handling
Searching in the Phone Book
TANDBERG 1700 MXP
USER GUIDE
About Searching in the Phone Book
The My Contacts may contain up to 200 entries and the entire Phone Book (which may
include server based Global Directories)
can be vir tually unlimited in size. Hence,
using the Arrow keys as the only navigation
device can easily be a cumbersome experi ence. What to do?
Enter Quick Search by Let ters. Whenever
you are inside the Phone Book navigating
in the list of entries, the numerical keypad
automatically switches from 123 mode to
ABC mode. To locate a specific entry, just
type in the first letter as with a cellular
phone – see the previous page for the
keyboard layout.
The procedure outlined here is to be used
whenever you need to refine your search.
In the Phone Book use the Cursor
keys to move to the Task column and
then down to the Search icon.
Use the Arrow keys to move to the
requested entr y, if needed.
Searching in the Phone Book
Press OK to open the Search dialogue
box:
To dial the selected entry, move the
cursor to the green Call Now icon
and press OK.
Enter the search string (the name)
and press the OK key or move down
to the OK icon and press the OK key.
(To leave the menu cancelling your
search, press Cancel or move down
to the Cancel icon and press OK).
Tip! When a search in the Phone Book is
made by means of the Search function,
contacts matching the search text are
displayed only. Navigate to, and click on,
the Up one Level icon ( ) to return to the
alphabetical list.
D 13954.01
JUNE 2006
36
Page 37

Call Handling
Adding New Contacts to the Phone Book
Adding a New Contact Manually
TANDBERG 1700 MXP
USER GUIDE
Press the Phone Book icon to enter the
Phone Book.
Press OK and enter the name of the new
contact.
In the Phone Book move down to Placed
Calls, Missed Calls, or Received Calls
and press OK to produce the contents of
the selected item.
Use the Arrow keys to navigate down to
My Contacts
Navigate one line down and enter the
number of the new contact.
Adding a New Contact Directly from the Call Log
Use the Arrow keys to navigate down to
My Contacts.
Press OK to produce the contents of My
Contacts.
Navigate further down to alter the
default settings of Call Type, Net Type
and Bandwidth, if needed
If in doubt, consult your system admin istrator.
Press OK to produce the contents of My
Contacts.
Use the Arrow keys to navigate to the
Add New Contact icon.
Navigate down to the bottom of the
menu and click Ok to leave menu putting
changes into effect.
Or, click on Cancel to leave menu undoing any changes.
Use the Arrow keys to move to the Add
New Contact icon and click OK. The new
contact is now stored in My Contacts.
D 13954.01
JUNE 2006
37
Page 38

Call Handling
Editing Entries in the Phone Book
TANDBERG 1700 MXP
USER GUIDE
Editing a Contact in My Contacts
Press the Phone Book icon to enter the
Phone Book.
Use the Arrow keys to navigate to the
Task Column and then down to the Edit
Entry icon.
Use the Arrow keys to navigate down to
My Contacts
Press OK to produce the Edit Contact
dialogue box.
Deleting a Contact in My Contacts
Press OK to produce the contents of My
Contacts.
If needed, edit the name of the contact,
using the numerical keypad (which
automatically enters ABC mode). The
maximum name length is 30 characters.
If needed, edit the number of your new contact by means of the number keys on the
keypad (which now enters 123 mode) The
maximum number length is 60 digits. Use
as separator in IP addresses. To switch
*
to ABC mode, press # for one second.
Use the Arrow keys to navigate down to
the entry to be edited.
Alter the default setting of Call Type,
Network, and the default setting of
Bandwidth, if needed.
Navigate to the OK icon and press OK
to save put ting changes into effect or
navigate to the Cancel icon to leave
menu undoing any changes.
Enter the Phone Book and navigate to
My Contacts as explained above.
D 13954.01
JUNE 2006
Press OK. Use the Arrow keys to
navigate down to the entry to be deleted.
38
Navigate to the Task Column and select
the Delete icon.
Press OK. You will now be prompted
to confirm your selections. Press OK to
delete or Cancel to undo.
Page 39

Call Handling
Creating Multisite Contacts in the Phone Book
TANDBERG 1700 MXP
USER GUIDE
About Multisite Contacts*
Assume that you frequently use your video
system to set up MultiSite video meetings
involving the same persons ever y time.
Wouldn’t it be nice to be able to set up the
video meeting with just a few clicks?
Enter MultiSite Contacts. You may assign
contacts already in your Phone Book to a
MultiSite group. This group will in turn form
a MultiSite Contact. When setting up a
video conference, all members of a particular MultiSite Contact will then be connected
automatically, so you won’t have to call
them one by one!
My Contacts can hold up to 50 MultiSites
Contacts. The TANDBERG 1700 MXP sup-
ports up to a total of 4 video participants
and 3 telephone participants per meeting.
* MultiS ite Contact s is an opt ional f eatur e. Cont act your
system a dmini strator or you r TANDBE RG repr esent ativ e
for det ails.
Bandwidth for a MultiSite Contact Call
When calling a MultiSite Contact, the system
will try to call the participants with their specified bandwidths. If the total bandwidth exceeds
the system’s maximum bandwidth, the system
will downspeed and distribute the available
bandwidth equally among all the participants.
Example: Assume that in a MultiSite
Contact there is one par ticipant with band width 256 kbps and one participant with
bandwidth 384 kbps. Furthermore assume
that 512 kbps is the maximum bandwidth
of the system.
The sum of the two participants’ bandwidth
clearly exceeds the maximum bandwidth
available. The system will then downspeed
so that each participant connects with equal
bandwidth, i.e. 512kbps/2 = 256 kbps.
Press the Phone Book icon to enter the
Phone Book.
Press OK to produce the submenu.
The cursor will now be positioned at the
name field allowing you to enter a name
for the group.
Navigate to a participant to be included
in the MultiSite Contact. Press OK to
include.
Defining a New MultiSite Contact
Use the Arrow keys to navigate to the
My Contacts and press OK.
Use the Arrow keys to navigate one
line down to add a participant. Any
participants to be added must be in the
Local Phone Book already.
Move one line down and repeat the
procedure.
Use the Arrow keys to navigate to the
Task Column and select the MultiSite
icon.
Press OK to produce the Add Participant
dialogue box.
Continue until all participants have been
added. Exit by OK or Cancel as usual. You
may include up to 4 video participants
and 3 telephone particpants.
D 13954.01
JUNE 2006
39
Page 40

Call Handling
Editing Multisite Contacts in the Phone Book
Viewing the Participants in a MultiSite Contact
TANDBERG 1700 MXP
USER GUIDE
Press the Phone Book key to enter the
Phone Book.
Enter the Phone Book and navigate to
My Contacts as explained above.
Use the Arrow keys to navigate down to
My Contacts
Editing the Participants in a MultiSite Contact
Press OK and navigate to the MultiSite
Contact to be edited.
Deleting a MultiSite Contact in My Contacts
Press OK to produce the contents of My
Contacts.
Navigate to the Task Column and then
down the Edit icon.
Use the horizontal Arrow key to expand
the entry revealing the members.
Press OK and edit the in the same way as
when creating a new one (previous page).
Enter the Phone Book and navigate to
My Contacts as explained above.
D 13954.01
JUNE 2006
Press OK and navigate to the MultiSite
Contact to be deleted.
40
Navigate to the Task Column and select
the Delete icon.
Press OK. You will now be prompted
to confirm your selections. Press OK to
delete or Cancel to undo.
Page 41

Video Meeting Features
We recommend that you check out the
TANDBERG web site regularly for updated
versions of this manual:
http://ww w.tandberg.net/support/
documentation.php
Your TANDBERG 1700 MXP can do point-to-point video
and telephone calls as well as video conferences with up
to 4 video calls and 3 telephone calls (the latter is called
MultiSite).
Some system features apply to point-to-point calls only,
others apply to video conferences only, while a couple of
features apply to both situations.
This part of the User Guide outlines features applicable to
point-to-point calls only, but also features shared by pointto-point and conferences.
Features specific to video conferences are treated
separately in the section MultiSite Features.
Page 42

Video Meeting Features
Features Overview
TANDBERG 1700 MXP
USER GUIDE
This section of the User Guide outlines
features available during a video call. Main
emphasis has been put on features available in point-to -point calls only (as opposed
to video conference calls – also called
MultiSite calls). However, features available
for both point-to-point and MultiSite are
also covered.
Obser ve that although Screen Layout
features and Streaming indeed apply during
video calls, they are not described in this
section, but in Getting Acqainted with the
System and Call Handling, respectively.
Screen Layout
You may set the system to show yourself
(selfview), the other party, or a presentation.
The TANDBERG 1700 MXP can also be used
as a local PC display, without let ting the
other party see what’s on your PC screen.
Finally, you may also set up the system to
display more than one image on the screen
(Picture In Picture – PIP or Picture Outside
Picture – POP).
For more on this, see Selfview, Local PC
Display and Screen Layout.
Far End Camera Control
This is a feature that lets you pan, tilt, and
zoom the far end camera. If far end presets
are available you may access these as well,
and you may also make use of any video
sources that the far end may have at its
disposal.
This feature requires a movable camera in
the far end – i.e. communication between
two 1700 MXP units will not provide far end
camera control.
For more on this, see Far End Camera
Control.
Presentations
The Presentation Functionality in the
system enables you to show other available
video sources in addition to your Main Camera. This is perfect for meetings where you
would like to show a PowerPoint presenta tion, for example.
Use Presentation outside a call to make
a local presentation for the people in your
own meeting room. Use Presentation when
you are in a call to make a presentation for
the far end as well.
For more on this, see Presentation.
Presets
The far end may use camera presets to
easily var y between predefined camera
angles in their own end. Thus they eliminate
the need to move their camera about in a
manual way.
Your 1700 MXP may get access to these set-
tings. If no presets have been stored and you try
to access far end presets nothing will happen.
For more on this, see Far End Camera Control
– Using Far End Presets.
Dual Video Stream
With Dual Stream (optional feature) you
have the opportunity to show two different
live video streams simultaneously, main
video and one additional source. This is
handy when showing a presentation. You
see the live presentation and the live video
of the presenter simultaneously. Both parties must suppor t Dual Video Stream to
make this work. If not, the presentation will
be sent as the main video stream instead.
For more on this, see Dual Video Stream.
Accessing Far End Video Sources
In point-to-point video meetings your
system may be connected to a system with
several inputs for various video sources.
You may get access to these by means of
the Far End Video controls.
Obser ve that your system can access
the inputs only. The far end may have
connected other sources to the inputs than
the input names normally should suggest.
For more on this, see Accessing Far End
Video Sources.
D 13954.01
JUNE 2006
Snapshots
The system can take a snapshot of your live
video. Snapshot is handy when you are in
a call with a system that does not support
Dual Video Stream. Use Snapshot to
show a snapshot of your presentation and
continue the meeting with main camera.
For more on this, see Snapshots.
Text Chat
You may use your 1700MXP to send and
receive text messages using the chatting
function available.
All you need is to select the Text Chat func tion and use the keypad as you would when
sending text messages (SMS) using your
cellular phone.
For more on this, see Text Chat.
42
Streaming
Streaming lets you broadcast your meeting
to participants on the web. The web
participants can view the meeting, listen to the
meeting, see snapshots, but not participate
themselves. Snapshots of current stream (if
MultiSite), selfview, far end and Dual Video
Streams are accessible via http.
For more on this, see Streaming.
Page 43

Video Meeting Features
Far End Camera Control – Pan, Tilt and Zoom
TANDBERG 1700 MXP
USER GUIDE
About Far End Camera Control
This is a feature that lets you pan, tilt,
and zoom the far end camera. If far end
presets* are available you may access
these as well, and you may also make use
of any video sources that the far end may
have at its disposal.
This feature requires a movable camera in
the far end – i.e. communication between
two 1700 MXP units will not provide far
end camera control.
This feature is not accessible in MultiSite
video meetings.
* Far End P reset s are des crib ed on the f ollow ing pag e.
Panning, Tilting, and Zooming the Far End Camera
During a video meeting, press OK to produce the menu and
navigate to the Camera Control icon.
Navigate to the Camera Control icon.
Press OK to display the menu and navigate to the Far End tab.
Press OK to enable Far End Camera Control. Observe the four
triangles indicating your control options.
D 13954.01
JUNE 2006
Use the Arrow keys to pan and tilt the far end camera and Zoom + and Zoom – to zoom in and out.
Press OK to exit this mode and navigate to the Back icon and click OK to exit the Camera Control mode as such.
43
Page 44

Video Meeting Features
Far End Camera Control – Using Far End Camera Presets
TANDBERG 1700 MXP
USER GUIDE
About Camera Presets
The far end may use camera presets to easily var y be tween predefined camera angles in their own end. Thus
they eliminate the need to move their camera about in a
manual way.
Your 1700 MXP may get access to these settings. If no presets
have been stored and you try to access far end presets nothing
will happen.
Navigate to the Display Presets icon.
During a video meeting, press OK to produce the menu
and navigate to the Camera Control icon.
Press OK to enter the Presets menu. Navigate to the
preset required and press OK again to utilize.
Using the Far End Preset
Press OK to display the menu and navigate to the Far
End tab.
A total of 15 (numbered 0–14) Far End Presets are
available. To access Presets 7–14 navigate to More
Camera Presets and click OK. To exit this mode select
Back and click OK in the usual manner.
D 13954.01
JUNE 2006
44
Page 45

Video Meeting Features
Presentation
TANDBERG 1700 MXP
USER GUIDE
About Presentation
The Presentation Functionality in the
system enables you to show other available
video sources in addition to your Main Camera. This is perfect for meetings where you
would like to show a PowerPoint presenta tion, for example. You can even use Arrow
keys up and down on the remote control
to activate Page Up/Down on the PC (this
applies when using VNC only).
Use Presentation outside a call to make
a local presentation for the people in your
own meeting room. Use Presentation when
you are in a call to make a presentation for
the far end as well.
The quickest way to show a presentation is
to use the Presentation key on the remote
control. The Presentation key shows a
predefined video source, PC is the default.
It is possible to change the presentation
source in the Presentation menu. Choose
Presentation from the main menu if you
want to select a video source manually.
The Presentation menu of fers you all the
available video sources suppor ted by your
system.
Tip! The default presentation source can
be permanently changed in Presentation
Settings.
Connect the device to act as a source
for the presentation (PC, DVD, VCR)
to the system and select Presentation
from the menu, followed by OK.
Alternatively, press the Presentation
key on the remote control for one
second.
Running a Presentation
Make your source selection, press OK
and start your presentation.
Camera PC/DVD/VCR VNC Back
The green circle indicates the default
setting.
Press the Presentation key again to
end the presentation and go back to
main camera.
Tip! In a call, dual video stream is needed
to see the participants and the presentation simultaneously – see the next page for
details.
D 13954.01
JUNE 2006
45
Page 46

Video Meeting Features
Dual Video Stream
TANDBERG 1700MXP
USER GUIDE
About Dual Video Stream
With Dual Stream (optional) you have the
oppor tunity to show two dif ferent live
video streams simultaneously, main video
and one additional source. This is handy
when showing a presentation. You see
the live presentation and the live video of
the presenter simultaneously. When you
start a presentation, Dual Stream starts
automatically if both local and remote
system supports Dual Stream. If one of the
systems does not support Dual Stream, no
second video stream will be established
and your presentation will be shown as your
main video instead. However, in a MultiSite
meeting dual stream will be established if
at least two systems support it. Those not
suppor ting it will get no second stream!
Dual Stream and Bandwidth
Using Dual Stream, the quality automati cally downspeeds to the optimal bandwidth.
This means that you need higher quality
to allocate enough bandwidth for the two
video streams. Dual Stream borrows bandwidth from main video stream. When Dual
Stream is closed, the bandwidth is returned
to the main video.
Note that when selecting the Document
Camera or PC, the system will automatically
request floor when connected to a MCU
conference as MultiSite host or connected
to an external MCU.
Connect the device to act as a source
for the presentation (PC, DVD, VCR) to
the system, and select Presentation
from the menu, followed by OK.
Alternatively, press the Presentation
key on the remote control for one
second.
Running a Presentation Using Dual Video Stream
The Presentation menu will now be
displayed.
Make sure the DuoVideo tab is
selected (as shown here) and
navigate to the source whose
contents is to be sent as dual
stream.
You are free to choose whether the dual
stream (the other stream) shall be your
camera or your presentation – see the
previous page for more on this.
Example of dual stream in a MultiSite meeting with three participants and a presentation
End the Dual Stream presentation by
pressing Presentation key again.
Dual video stream activated is indicated by
this icon:
No Dual Video Stream?
The Dual Video Stream ability is an optional
feature, but available as retrofit. Contact
your system adminstrator or your TAND BERG representative for details.
D 13954.01
JUNE 2006
46
Page 47

Video Meeting Features
Snapshots
TANDBERG 1700MXP
USER GUIDE
About Snapshots
The system can take a snapshot of your live video. Snapshot
is handy when you are in a call with a system that does
not support Dual Video Stream. Use Snapshot to show a
snapshot of your presentation and continue the meeting with
main camera.
The following should be observed:
This system can send snapshots in a point-to -point video
•
meeting only, sending snapshots in MultiSite meetings is
not supported.
When displaying a snapshot, it will always be the latest
•
snapshot taken that is displayed, regardless of which end
(near or far) it was that took it.
Any snapshot taken is deleted once the call is terminated.
•
The Snapshot feature uses H.261 Annex D. Consequently
•
it will fail to work when using H.264 video compression.
Taking a Snapshot Using the Remote Control
In a point-to-point call press the Snapshot key on the
•
Remote Control.
Note! If the Number Key Settings menu has been set to
Touch Tones, pressing the Snapshot key will not be inter-
preted as snapshot, but as a touch tone.
The Number Key Settings must be set to something else
to make the Snapshot key work. This is done in the Control
Panel of your system. Your system adminstrator may have
password protected this area.
Note! Likewise, this will not work when you are in an input
field requiring numerical or alphanumerical entries. The *
will then be interpreted as *.
Taking a Snapshot Using the Menu
In a call click OK to produce the menu line, if needed,
and navigate to the Presentation icon.
In a call click OK to produce the menu line, if needed,
and navigate to the Presentation icon.
Click OK to display the Presentation menu. Navigate to
Snapshot tab and then down to the Take New Snapshot
icon. Click OK to take a snapshot and send it to the far end.
Displaying a Snapshot
Do as above, but select Display Snapshot instead. Click
OK to display the snapshot.
D 13954.01
JUNE 2006
47
Page 48

Video Meeting Features
Gaining Access to the Far End Video Sources
TANDBERG 1700 MXP
USER GUIDE
About Far End Video Sources
In point-to-point video meetings your system may be connected to a system with several inputs for various video
sources. You may get access to these by means of the Far
End Video controls.
Obser ve that your system can access the inputs only. The
far end may have connected other sources to the inputs than
the input names normally should suggest.
When the far end system is a TANDBERG system both
parties will be notified when one par ty tries to access one
of the video sources of the other par ty. This may or may not
take place with systems from other vendors also.
A text will be displayed for some seconds at the top of
both par ties’ screen indicating the input source accessed.
Example: PC.
If you display the other par ty in full screen this will be the
only indication you get when the other party is accessing one
of your video sources.
If you set the screen to display both par ties you will see
what the other party sees, since both incoming and out going
video are displayed on your screen.
Far End Video Options
As an example let us assume that your system is connected in a point-to-point video call to a large TANDBERG video system with
Far end main
camera
Auxiliar y
input
many inputs. You may then have several options:
Document
camera
VCR/DVD PC VNC Back
Accessing the Far End Video Sources
In a call click OK to produce the menu line, if needed,
and navigate to the Presentation icon.
Click OK to display the Presentation menu and navigate
to the Far End Video tab.
D 13954.01
JUNE 2006
Make your input selection and press OK to have the selected input shown on your screen.
48
Page 49

Video Meeting Features
Text Chat
TANDBERG 1700MXP
USER GUIDE
About Text Chatting
You may use your 1700MXP to send and receive tex t messages using the chatting function available.
All you need is to select the Text Chat function and use the
keypad as you would when sending text messages (SMS)
using your cellular phone.
NOTE! This will not work unless the far side a) suppor ts text
chat and b) has activated that feature.
Text chatting applies to point-to-point video meetings only.
Tip! Once you enter Text Chat mode, the dialogue box
expects alphanumerical entries via the remote control. For
more on this matter, see Numerical keypad features.
In a call click OK to display the menu and navigate to
Services.
Press OK and star t your tex t chatting by pressing the
keys on the remote control.
Chatting with the Other Party
Click OK and navigate to Text Chat.
Press OK to end the chat and return to the Services
menu.
D 13954.01
JUNE 2006
49
Page 50

MultiSite Features
We recommend that you check out the
TANDBERG web site regularly for updated
versions of this manual:
http://ww w.tandberg.net/support/
documentation.php
The TANDBERG 1700 MXP can handle up to 4 IP video calls
and 3 IP telephone calls simultaneously. To be able to do
this, the 1700 MXP has a built-in MCU (Multipoint Control
Unit) called MultiSite. This feature turns your TANDBERG
1700 MXP into a true video conferencing system. This
part of the User Guide outlines features specific to video
conferencing.
Page 51

MultiSite Features
Video Meetings with Several Participants – an Overview
About MCU and MultiSite
The TANDBERG 1700 MXP can handle up to 4 IP video calls
and 3 IP telephone calls simultaneously. To be able to do this,
the 1700 MXP has a built-in MCU (Multipoint Control Unit)
called MultiSite. The MultiSite supports both Split Screen
and Voice Switched mode – see below.
You may set up a video meeting with the participants in
advance and/or you may add participants during a conference.
More about this can be found in MultiSite Conferences – Adding
Calls.
You may also have your system connected to an external MCU
to participate in video meetings with a multitude of participants. Contact your system administrator or your TANDBERG
representative for details.
Who Becomes the Host?
The host of a MultiSite video meeting is the endpoint to
which all the others are connected.
If two systems both supporting MultiSite both have
established a MultiSite call and one of these call the other,
cascading will take place. This means that you may have
more par ticipants in total than a single system supports. In
this case, the host will be the one calling the other.
Example of a MultiSite
conference with 4 video calls
and 3 telephone calls. The host
is shown in colour.
TANDBERG 1700 MXP
USER GUIDE
Request, Release, and Assign Floor
When requesting floor, your video will be broadcasted in full
screen to all other participants in the conference. Request
Floor is useful when you want to speak or display something
in front of all participants.
Release Floor when you are done and make the floor avail able for other par ticipants in the conference. An indicator
appears when you have floor and disappears when you
release floor.
If your system is the one connected to all the other systems,
you will be the host of the meeting and you will also be able
to assign the floor to others.
D 13954.01
JUNE 2006
Terminal Names
You may want to see a list of all the participants in a
MultiSite video meeting. For this purpose there is a list of
the terminal names available.
Split Screen and Voice Switching
In order to be able to see all the particiapnts all the time,
the screen may be set in Split Screen mode, dividing the
screen into several images. Voice switching will give priority
to the par ticipant speaking loudest.
51
Layout
When you are the host of a MultiSite video meeting, you have
control of the main conference image layout. The layout chosen
by you is transmitted to the other participants as a single
image and its layout cannot be changed by them. However, they
may configure their own screen using the Layout button on the
Remote Control. Their choices are the image you send out in
full screen, or as side-by-side – your image and their self view.
Tip! Presentation and Dual Video Stream are not constrained
to point-to- point calls, so they work even here. See Presenta-
tion and Dual Video Stream for details.
Page 52

MultiSite Features
Request and Release Floor
TANDBERG 1700 MXP
USER GUIDE
About Requesting and Releasing Floor
When requesting floor, your video will be broadcasted as the large picture to all other parties in
the conference. Request Floor is useful when you want to speak or display something in front of all
participants.
Click Release Floor when you are done and make the floor available for other parties in the confer-
ence. An indicator appears in the upper right corner when you have floor and disappears when you
release floor, see the far right screenshot below.
Requesting and Releasing Floor
In a MultiSite call (a video meeting) click OK to display
the menu and navigate to Services.
Click OK to enter the submenu and navigate to Request
Floor.
Automatic Full Screen When Requesting Floor
You may set up the system to switch to full screen each time someone requests the floor.
This is done in the Control Panel – see Floor to Full Screen in Settings > Video.
Note that the settings may be password protected by your system administrator.
Click OK to have your video broadcasted as the large
picture. Obser ve that the icon changes name to
Release Floor. Click on the Release Floor icon when
you are done.
You have the Floor.
D 13954.01
JUNE 2006
52
Page 53

MultiSite Features
Assign Floor
TANDBERG 1700 MXP
USER GUIDE
About Assigning Floor
If your system is the one connected to all the other systems, you will be the host of the
meeting and you will be able to assign the floor to others.
If two systems both supporting MultiSite both have established a MultiSite call and one
of these call the other, cascading will take place. This means that you may have more
participants in total than a single system supports. In this case, the host will be the one
calling the other.
In a MultiSite call (a video meeting) click OK to display
the menu and navigate to Services.
Click OK to enter the submenu and navigate to Assign
Floor.
You may set up the system to switch to full screen each time someone requests the floor.
This is done in the Control Panel – see Floor to Full Screen in Settings > Video.
Note that the settings may be password protected by your system administrator.
Assigning Floor
Automatic Full Screen When Requesting Floor
Click OK to display a list of the meeting par ticipants.
Navigate to the person to whom you will assign floor
and click OK. The floor will now be assigned to that
participant.
D 13954.01
JUNE 2006
53
Page 54

MultiSite Features
Terminal Names
About Terminal Names
You may want to see a list of all the participants in a
MultiSite video meeting. For this purpose there is a list of
the terminal names available.
TANDBERG 1700 MXP
USER GUIDE
Displaying Terminal Names
In a MultiSite call (a video meeting) click OK to display
the menu and navigate to Services.
Click OK to enter the submenu and navigate to Terminal
Names.
Click OK to display a list of the meeting par ticipants.
Select Back and click OK to exit in the usual manner.
D 13954.01
JUNE 2006
54
Page 55

MultiSite Features
Layout
TANDBERG 1700 MXP
USER GUIDE
About Layout
When you are the host of a MultiSite video meeting, you
have control of the main conference image layout. The layout
chosen by you is transmitted to the other par ticipants as
a single image and its layout cannot be changed by them.
However, they may configure their own screen using the
Layout button on the Remote Control. Their choices are the
image you send out in full screen or as side-by-side: your
image and their selfview.
In a MultiSite call (a video meeting) click OK to display
the menu and navigate to Services.
Auto Split will give you the
best screen layout given the
number of participants.
4-split divides the
screen into four images
of equal size.
Setting Display Layout
Click OK to enter the submenu and navigate to Layout.
The Layout Options Available
5+1 provides 1 large
and 4 smaller images.
Click OK to enter the Layout options menu. Details on
the Layout options are found above.
Voice switched will cause the
participant speaking loudest
to get the floor in full screen.
D 13954.01
JUNE 2006
55
Page 56

Control Panel
We recommend that you check out the
TANDBERG web site regularly for updated
versions of this manual:
http://ww w.tandberg.net/support/
documentation.php
In order to provide you with the expected high level of
TANDBERG video conferencing quality, the unit needs to be
configured properly.
This section explains the details of the Control Panel.
Please observe that the Settings may be password
protected. A password will then be needed to gain access
to the settings described in this section.
Page 57

Control Panel Settings
The Remote Control
TANDBERG 1700 MXP
USER GUIDE
MIC OFF turns your microphone on and off.
Press OK/MENU to show the menu and
select menu items.
VOLUME + and – adjusts the volume.
LAYOUT KEY toggles between full screen and
different display layouts.
Press the CALL key to place a call.
PRESETS Not used.
The ALPHANUMERICAL KEYPAD functions in the same manner
as a cellular phone.
SNAPSHOT takes a snapshot, but only during a call.
PRESENTATION KEY switches to a predefined presentation
source. If the Presentation key is held down for 1 second then
the Presentation video sources menu will appear.
ARROW KEYS are used to navigate in the menus.
Use ZOOM + and – to zoom the camera in and out.
SELFVIEW displays your outgoing video. Press again to turn off.
CANCEL takes you back one step in the menu system, i.e. to
leave a menu undoing any changes. Use CANCEL to delete
characters in an input field. Press and hold the CANCEL key for 1
second to close the menu.
Use the END CALL key to end the current call. Pressing this key
when not in a call will place the system in Standby mode.
Use the PHONE BOOK to store and recall video contacts for easy
placement of calls.
Press TOUCH TONES when you are in a call and need to dial
extension numbers etc. Press the OK /MENU button to exit
TOUCH TONES.
D 13954.01
MAY 2006
57
Page 58

Control Panel
An Overview of the Control Panel
TANDBERG 1700 MXP
USER GUIDE
GETTING TO THIS MENU
Press OK to produce the below menu.
Use the Arrow keys to move to the
Control Panel and press OK.
The Control Panel will now be displayed.
Control Panel Options
The different parts of the Control Panel
are explained on the following pages.
Control Panel settings
Back
Restart (the system switches itself OFF and ON again)
Audio Demo (discussed in Diagnostics at the end of this section)
Diagnostics (discussed in Diagnostics at the end of this section)
On-line User Guide (discussed in Diagnostics at the end of this
section).
LOST IN TRANSL ATION? Click on the Phone
Book icon 5 times followed by pressing
the number key 1 on the remote control to
reset the menu language to English.
D 13954.01
MAY 2006
58
Page 59

Control Panel
An Overview of the Control Panel Settings
TANDBERG 1700 MXP
USER GUIDE
General Settings Menu Set tings
Call Quality Set tings
Presentation Settings
Video Settings
Restore Default Settings
Security Settings
D 13954.01
MAY 2006
Network Settings
Audio Set tings
59
Page 60

Control Panel
Password Protection of the Control Panel Settings
TANDBERG 1700 MXP
USER GUIDE
Password Protection
All settings of the Control Panel may be
password protected by a pin code consisting of up to five digits.
Whenever you click the Settings icon in the
Control Panel, you will prompted to key in
this pin code in order to gain access to the
settings.
Clear an Existing Password
Log in the same way as when gaining
access to a password protected Control
Panel Settings menu.
Navigate to the Security Settings
menu, in the same way as setting the
password.
Use the Arrow keys of the remote
control to navigate to the Control Panel
icon and press OK.
Use the Arrow keys of the remote
control to navigate to the Control Panel
icon and press OK.
Set a Password
Navigate to the Security icon and press
OK.
Gain Access to a Password Protected Control Panel Settings Menu
You will now be prompted for a
password.
Navigate to the Adminstrator Password
and key in a password (pin code).
Navigate to the Save icon and press OK to
leave menu, putting changes into effect.
Key in the password.
In the Control Panel Password
parameter field, use the Cancel key to
clear the password and navigate down
to the Save icon to leave menu putting
changes into effect.
D 13954.01
MAY 2006
In the Control Panel navigate to the
Settings and press OK.
If the wrong pin code is entered, the message
Attention
Wrong menu password
will appear on the screen.
60
Page 61

Control Panel > General Settings
General Settings – an Overview
TANDBERG 1700 MXP
USER GUIDE
GETTING TO THIS MENU
Press OK to produce the below menu.
Use the Arrow keys to move to the
Control Panel.
Press OK and use the Arrow keys to
move to General. Press OK.
LOST IN TRANSL ATION? Click on the Phone
Book icon 5 times followed by pressing
the number key 1 on the remote control to
reset the menu language to English.
PHONE BOOK SETTINGS
The use of Corporate
Directories in combination
with a management system
makes phone book updates
easy to do and eliminates the
need for entering directory
information on each one of the
video conferencing units in a
company.
EXTERNAL SERVICES
There may be external ser vices
available for your system ex-
tending the functionality. Con -
sult your IP service provider or
your administrator for details.
PERMISSIONS
Lets you specif y settings for
incoming MCU Calls, and
Far End Control.
SCREEN SETTINGS
Lets you specif y the picture
layout including features like
picture in picture and monitor
format.
SOFT WARE OPTIONS
Your system may or may not
have cer tain optional features
activated. Activation requires
a code to be entered. Use this
menu for actviation of optional
features.
DATE AND TIME SETTINGS
This menu lets you set the
date and time correctly,
including time zone and
daylight saving time, if
applicable.
CANCEL
Select this icon and press OK
to leave the menu undoing any
changes.
RESTORE DEFAULTS
Select this icon and press OK
to restore the default settings.
SAVE
Select this icon and press
OK to leave the menu putting
changes into effect.
LANGUAGE
Set the language used in the
menus. Choose between English,
Deutsch, Français, Italiano,
Norsk, Svenska, Español, Portu guês, Pyccкий, Suomi, Chinese,
Chinese traditional, Korean,
Japanese, and Thai.
SYSTEM NAME
Identifies the system.
INTERNATIONAL NAME
(Not shown) If the System Name
contains Asian and non-standard ASCII character text input
(includes even languages like
Norwegian, French, Polish etc.),
an International Name using
standard ASCII characters only,
must be specified as well.
If you set the language to e.g.
Korean and input a System
Name using Korean characters,
a second line allowing you to
specif y the name using standard
ASCII character set will appear.
AUTO ANSWER
Controls whether incoming
calls should be let through
automatically or require a
manual answer.
If set to automatic, you may
choose to always disable your
microphone when the call is
connected. You must then
use the Remote Control to
switch it back on manually to
let the other side hear you.
D 13954.01
MAY 2006
61
Page 62

Control Panel > General Settings
Language
TANDBERG 1700 MXP
USER GUIDE
LANGUAGE
Set the language used in the menus.
Choose between English, Deutsch,
Français, Italiano, Norsk, Svenska,
Español, Português, Pyccкий, Suomi,
Chinese, Chinese traditional,
Korean, Japanese, and Thai.
CANCEL
Select this icon and press OK
to leave the menu undoing any
changes.
RESTORE DEFAULTS
Select this icon and press OK
to restore the default settings.
INTERNATIONAL NAME
If the System Name contains Asian and
non- standard ASCII character text input
(includes even languages like Norwegian,
French, Polish etc.), an International Name
using standard ASCII characters only, must
be specified as well.
If you set the language to e.g. Korean and
input a System Name using Korean characters, a second line allowing you to specify
the name using standard ASCII character
set will appear.
Tip! When the Input Editor Language is
set to Chinese, Korean or Japanese you
will be able to enter Chinese / Korean /
Japanese characters into an input field
like the System Name or Phone Book,
using the remote control.
Moving up and
down in menu.
D 13954.01
MAY 2006
SAVE
Select this icon and press
OK to leave the menu putting
changes into effect.
LOST IN TRANSL ATION? Click on the Phone
Book icon 5 times followed by pressing
the number key 1 on the remote control to
reset the menu language to English.
62
Page 63

Control Panel > General Settings
Touch tones Snapshot
Presets
Touch tones Snapshot
Presets
System Name Settings
CANCEL
Select this icon and press OK
to leave the menu undoing any
changes.
RESTORE DEFAULTS
Select this icon and press OK
to restore the default settings.
SAVE
Select this icon and press
OK to leave the menu putting
changes into effect.
SYSTEM NAME
Identifies the system:
On the welcome screen of your system
•
During an MCU conference call
•
When using the Web -interface
•
When the codec is acting as an SNMP Agent
•
Towards a DHCP server
•
As H323 ID. If H.323 ID is configured in H.323 settings,
•
it will be used instead of System Name.
System Name is blank by default, can be alphanumeric,
and up to 50 characters long.
ENTERING A SYSTEM NAME
Whenever alphanumerical entries are expected by the system, a
small abc appears in the right lower corner of the entry field.
In this mode, entries from the Numerical keypad are automatically
interpreted as alphanumeric entries in the same way as on a cellular
phone.
Guidelines:
Press the key that corresponds to the required letter.
•
Press the key as many times as needed to access the
•
correct letter.
Change to lower or back to upper case let ters with the # a/A
•
key, and space with the 0 _ key.
To write numbers in a text input field, repeatedly press the
•
corresponding key a number of times until the digit appears.
INTERNATIONAL NAME
If the System Name contains Asian and non-standard
ASCII character text input (includes even languages like
Norwegian, French, Polish etc.), an International Name
using standard ASCII characters only, must be specified
as well.
If you set the language to e.g. Korean and input a System
Name using Korean characters, the International Name
field allowing you to specify the name using standard
ASCII character set will appear.
TANDBERG 1700 MXP
USER GUIDE
D 13954.01
MAY 2006
63
Page 64

Control Panel > General Settings
Autoanswer
TANDBERG 1700 MXP
USER GUIDE
AUTOANSWER
The autoanswer set ting determines whether an incoming call is put
through automatically or manually.
On. The system will automatically answer all incoming calls.
On+Mic Off. The system will automatically answer all incoming calls
and switch the microphone off when the call is connected. Press Mic
Off on the Remote Control to switch the microphone back on.
Off. You must manually answer all incoming calls by pressing OK or the
Call key on the Remote Control.
D 13954.01
MAY 2006
CANCEL
Select this icon and press OK
to leave the menu undoing any
changes.
RESTORE DEFAULTS
Select this icon and press OK
to restore the default settings.
SAVE
Select this icon and press
OK to leave the menu putting
changes into effect.
64
Page 65

Control Panel > General Settings
Phone Book Settings
CANCEL
Select this icon and press OK
to leave the menu undoing any
changes.
RESTORE DEFAULTS
Select this icon and press OK
to restore the default settings.
What is Corporate Directory? Your system may be connected
to a Directory Service or Management System such as the
TANDBERG Management Suite (TMS). The Management
System may then provide your video system with a phone
book containing a corporate director y. This directory is con trolled directly from the Management System and updates
and changes are carried out from remote by the Mangement
System Adminstrator.
Note! Any contacts that you choose to copy to your lo-
cal phone book (My Contacts), e.g. for use in your own
predefined MultiSite Contacts, will not be updated when the
Corporate director y is updated by the Mangement System
Adminstrator.
TANDBERG 1700 MXP
USER GUIDE
CORPORATE DIRECTORY
On The Corporate Directory is available
in the menu.
Off The Corporate Directory is hidden
from the menu and is unavailable for
users.
IP ADDRESS
Enter the IP address or the DNS name
of the Director y Ser vice that provides
the Phone Book.
PATH
The Path to the phone book of the
Directory Service.
D 13954.01
MAY 2006
SAVE
Select this icon and press
OK to leave the menu putting
changes into effect.
65
Page 66

Control Panel > General Settings
External Services
CANCEL
Select this icon and press OK
to leave the menu undoing any
changes.
RESTORE DEFAULTS
Select this icon and press OK
to restore the default settings.
What is External Services? In general, E xternal
Services include any HTTP and HTML based contents
your Ser vice Provider may offer. This could be stock
exchange information, news, weather forecast etc.
In addition, Ex ternal Services may include the ability
to display scheduled meetings for the video system
(handy when meetings last longer than scheduled and
you need to know whether, and if af firmative, when
the system is booked for other meetings).
TANDBERG 1700 MXP
USER GUIDE
EXTERNAL SERVICES
On Set this to On when External Ser vices
are available.
Off Set this to Off when External Services
are unavailable.
IP ADDRESS
Enter the IP address or DNS name of
the Ser vice Provider Host for E xternal
Services.
PATH
Enter the Path to the E xternal Services
Host.
The ser vices available are defined by
your ser vice provider.
D 13954.01
MAY 2006
SAVE
Select this icon and press
OK to leave the menu putting
changes into effect.
66
Page 67

Control Panel > General Settings
Permissions
CANCEL
Select this icon and press OK
to leave the menu undoing any
changes.
RESTORE DEFAULTS
Select this icon and press OK
to restore the default settings.
SAVE
Select this icon and press
OK to leave the menu putting
changes into effect.
WHAT IS MCU? MCU is shor t for Multipoint
Conference Unit, a device used to connect
multiple audio and video sites in one or more
ISDN, IP and mixed ISDN and IP video meetings.
TANDBERG 1700 MXP
ACCESS CODE
An access code will help you control the use of the system. All users must enter a code to identify themselves
when making a call and the call may then be charged
on their account. Access Codes are handy for group
systems where there are more users or divisions that
share the costs of using the system. Access Code can
be set to On and Off. More on Access codes overleaf.
On When making a call, an Access Code dialogue box
will be shown. The user must enter the correct
password in order to put the call through.
Off No password is necessar y to make a call.
INCOMING MCU CALLS
On When you are in a call, the system will provide visual
and audible indications of additional incoming calls
and ask you to accept/reject the call.
Off The system will not accept incoming calls when
you are in a call.
INCOMING TELEPHONE CALL S
On The system will accept incoming telephone calls.
Off The system will not accept incoming telephone
calls. This may be used to prevent incoming calls
from systems other than videoconferencing sys tems.
FAR END CAMERA CONTROL
On The far end will be able to:
Select your video sources
•
Request snapshots
•
Off The far end can access none of the four features
above on the local system. You will however still
be able to control the camera on the far end.
MAXIMUM CALL LENGTH (minutes)
This feature will automatically end both incoming and
outgoing calls when the call time exceeds the speci fied Maximum Call Length. Maximum Call Length can
have the following values: 0 –999 (minutes), where 0
means OFF.
USER GUIDE
D 13954.01
MAY 2006
67
Page 68

Control Panel > General Settings > Permissions
Access Codes
TANDBERG 1700 MXP
USER GUIDE
About Access Code Applications
As an administrator you may set up the system to request
codes to be entered before a call can be made. These
codes are referred to as Access Codes and can be used
to define the types of calls made (internal/external/to an
invoicable client etc.).
In this way you may gather call statistics, which in turn can
be used for analysis, to bill external clients, or to bill different groups of users within your company.
Access codes may be made compulsory and restricted in
the sense that only a certain set of valid access codes is
available.
A valid code must then be entered before a call can be
made.
Alternatively, access codes may be made compulsor y, but
without restriction. You will then still be prompted to key
in an access code. No call can be made without access
code entered even here, but in this case you may – literally
speaking – key in any code you want.
Kindly observe that restricting the access codes to a
limited set of valid codes is by no means a prerequisite for
billing.
Consider the following: Your system may have been configured to work in a setup involving a TMS (TANDBERG Management Suite) system. As default, your system then trans mits call information to TMS. This information includes any
access codes applied to the calls. Hence, the TMS system
may always utilize any access code information available,
for statistics and for billing.
To make access codes compulsor y, set Access Codes to
On in the menu. To restrict the valid code space to a cer-
tain set of predefined codes, an access code text file must
be uploaded to your local video system – see side bars to
the right.
If no such file exists in the system and Access Codes still
is set to On, the system will prompt you to key in an access
code, but any code will do. No call can be made without an
access code being keyed in.
To skip the whole thing, set Acces s Codes to Off. No
prompt for code entry will then be produced by the video
system.
Defining and Uploading Access Codes
For systems with Access Codes set to On, you – as a user – will be asked to
enter a code, other wise you won’t be able to make a call.
Your video system will check if the entered access code is valid by comparing the code with the allowed codes listed in the access.txt file located
on the ftp-ser ver in your local video system.
If no access.txt file has been uploaded to the Codec of your local video
system, the code entered will be registered, but no validation will take
place. E.g. you can enter whatever code you want and still have access to
the system. Note, however, that you must enter a code whenever Access
Codes has been set to On in the video system.
The access.txt file is a plain text file with one line per access code.
As an example of an access.txt file, consider the following:
1234
1250
A1
B2
ABC
Maximum length of each access code is 16 characters, and you can have
as many access codes as you want. You may use any combination of the
alphanumeric characters available by means of your TANDBERG Remote
Control, including the space character.
To upload access codes to the system, follow these steps:
On your PC create the file to be used as a list of valid access codes and
save it as access.txt
Make sure your PC and your video system can communicate via IP
Open a DOS-window and go to the folder where the access.txt file is
located
Type ftp <IP-address of your local video system>. To locate the IP address
of your system, press the OK/Menu key on your TANDBERG Remote Control
When system prompts for User: press Enter or key in the IP-password of
your video system
Type bin and press Enter
Go to the user folder, type cd user
Upload the access.txt file, type put access.txt
Exit from ftp, type bye
Access Codes Activated – How It Looks
Whenever the Access Codes feature has
been set to On, you will be prompted to
enter a code when starting a call.
The following dialogue box appears on the
screen:
The remote control keypad will be in ABC
mode.
Key in the code and press OK. Then dial
your number.
Tip! Access Codes can be set and control-
led from TMS as well! If you run a TAND BERG Management Suite, you will be able
to control and maintain access codes from
within the Management Suite.
D 13954.01
MAY 2006
68
Page 69

Control Panel > General Settings
Screen Settings
CANCEL
Select this icon and press OK
to leave the menu undoing any
changes.
RESTORE DEFAULTS
Select this icon and press OK
to restore the default settings.
SAVE
Select this icon and press
OK to leave the menu putting
changes into effect.
Picture -in-Picture
example
Takes effect only when VGA Monitor Format is set to Wide.
Use this set ting to determine if you want your PC presenta-
tions to be shown stretched in full screen, or with correct
aspect ratio using par t of the widescreen display. With the
VGA Out Quality set to Auto the presentation will be of the
best possible quality suppor ted by the monitor.
Normal is 4:3 format, Wide is 16:9 format.
USE SCREEN AS LOCAL PC MONITOR
Use the Selfview button of the Remote Control to switch from
local PC display to standard conference layout.
If Local PC Display is ON you will be able to have
Local PC displayed both outside and within a call.
If Local PC Display is OFF you will not be able to see a Local
Picture -outsidePicture example
PC PICTURE FORMAT
PC image.
TANDBERG 1700 MXP
USER GUIDE
PICTURE LAYOUT
The Picture Layout is related to the Layout button on the remote
control and it can be used at any time to change the screen layout. For wide screen systems POP mode is recommended. You
will get optimized picture layouts for wide screen by pressing
the Layout button on the remote.
Picture in Picture (PIP). Pressing the Layout button on the remote
will result in an extra picture in smaller view (Picture in Picture).
Press the Layout button to move it around in the corners of the
screen and finally hide it. Pressing and holding Layout for 1 second will hide the small picture directly from any position.
Picture outside Picture (POP). Press the Layout button to see
the images side-by -side, e.g. 1+1 layout, where the far end and
near end are displayed as images of equal size. Press again to
see a 1+2 layout and a 1+3 layout and f inally back to fullscreen.
VGA MONITOR FORMAT
To fully leverage your wide screen display, set the VGA Monitor For-
mat to wide. Normal is 4:3 format, while Wide is 16:9 format.
VGA OUT QUALITY
Auto. VGA output format will be optimized
depending on video source format, refresh rate
and EDID information available.
Formats available. SVGA (800×600) @ 75 Hz,
XGA (1024×768 @ 60/75 Hz, and
WXGA (1280×768) @ 60 Hz.
AUTO LAYOUT
On If Auto Layout is ON the system will change layouts automati-
cally depending on the number of participants in a call and if
you have a dual video stream or not.
Off If Auto Layout is OFF there will be no automatic layout
changes during a call. All desired layout changes must be
done manually with the Layout button.
Note! When receiving low resolution images (176 × 144 pixels or
less) the screen will automatically adjust to a smaller view to give
optimum quality experience.
D 13954.01
MAY 2006
69
Page 70

Control Panel > General Settings
Software Options
The system has a modular design allowing
you to add functionality when you need it.
This functional expansion requires codes
available through your TANDBERG Representative.
TANDBERG 1700 MXP
The system requires a valid option key to activate
MultiSite and/or Presenter functionality. In order to
activate additional bandwidth, you need to enter a
bandwidth key. A restart of the system is required
after entering a new option and/or bandwidth keys.
If the key is invalid, the original key will be used.
The following options are available:
No option
1.
Presenter
2.
MultiSite + Presenter
3.
Bandwidth options
4.
USER GUIDE
D 13954.01
MAY 2006
CANCEL
Select this icon and press OK
to leave the menu undoing any
changes.
RESTORE DEFAULTS
Select this icon and press OK
to restore the default settings.
SAVE
Select this icon and press
OK to leave the menu putting
changes into effect.
CANCEL
Select this icon and press OK to
leave the menu undoing any changes.
RESTART
Select this icon and press OK
to restart the system, putting
changes into effect.
70
Page 71

Control Panel > General Settings
Date and Time Settings
TANDBERG 1700 MXP
USER GUIDE
NTP IP
This is the NTP time server address from
which the system can get updated time
information. See IP Ser vices for more details.
Auto. The NTP IP address is set
automatically.
Manual. The NTP IP address is set manually.
IP ADDRESS
The IP Address or DNS name for obtaining
the date and time information.
TIME ZONE
Select the correct time zone for the location
of your system.
DATE FORMAT
Choose between DD/MM/YY, MM/DD/YY, or
YY/MM/DD as the preferred date format.
D 13954.01
MAY 2006
CANCEL
Select this icon and press OK
to leave the menu undoing any
changes.
RESTORE DEFAULTS
Select this icon and press OK
to restore the default settings.
SAVE
Select this icon and press
OK to leave the menu putting
changes into effect.
TIME FORMAT
Select 12h or 24h time format.
DAYLIGHT SAVINGS
On. Adjust for daylight savings changes.
Off. No adjustments are made for daylight
saving changes.
71
Page 72

Control Panel > Menu Settings
Menu Settings
TANDBERG 1700 MXP
USER GUIDE
GETTING TO THIS MENU
Press OK to produce the below menu.
Use the Arrow keys to move to the
Control Panel and press OK.
Use the Arrow keys to move to Menu
Settings, if applicable. Press OK.
NUMBER KEY MODE
Set this to ON to enable a pop-up menu letting you choose what to do
when pressing a number key – choose between Manual, Add another Call,
Dial extension number and Use Presets. When set to Manual you will be
prompted to choose what to do. Power users may want to switch this off,
which is why this menu item exists.
INPUT EDITOR LANGUAGE
When the Input Editor Language is set to Chinese, Korean or Japanese the
user will be able to enter Chinese/Korean/Japanese characters into an
input field like the System Name or Phone Book, using the remote control.
Other wise this is set to OFF.
MENU TIMEOUT IN CALL
The Main menu appears on the bottom line of
the screen. Set Menu Timeout In Call to ON if
you want the menu to disappear automatically
when you are in a call.
ON. The menu will disappear automatically af-
ter 15 seconds if there is no activity on the
remote control. Menu timeout applies when
you are in a call only. Outside a call, there is
no menu timeout.
OFF. The menu will not disappear automati -
cally. Press Cancel to hide the main menu
manually.
BALLOON HELP
Used to enable/disable the balloon help
window.
ON. Enables help text windows to appear.
OFF. There will be no help text window.
AUTOCOMPLETE
When keying in whom to dial, activating
Autocomplete will cause the system to
complete your input for you based on what is
already in your Phone Book.
LOST IN TRANSL ATION? Click on the Phone
Book icon 5 times followed by pressing
the number key 1 on the remote control to
reset the menu language to English.
D 13954.01
MAY 2006
See the previous page for details
KIOSK MODE SET TINGS, STARTUP, ICONS
Treated on the following pages.
ADMINISTRATOR PASSWORD
We recommend the use of an Administrator Password on the
system. The Administrator Password can be maximum 5 digits
long. Once set, you will be prompted to enter the password to
gain access to the settings. This will prevent occasional users
from going into settings. With a password, you can make sure
that your system will behave in the same way every time and that
only approved people are allowed to make changes to the system.
72
Page 73

Control Panel > Menu Settings
Kiosk Mode Settings
Kiosk Mode
In Kiosk Mode the system is set to a simplified state where it can
be controlled with just the Arrow keys and OK. You will get a simplified on -screen menu with only the basic functionality available to:
Make calls (predefined contacts in phone book only)
•
Receive calls
•
End calls
•
Adjust volume.
•
Take care! Functionality will be heavily restricted in Kiosk Mode!
TANDBERG 1700 MXP
USER GUIDE
KIOSK MODE
Set to ON to activate Kiosk Mode. Obser ve that
deactivation can take place thorugh the system’s web
interface, telnet or data port only.
LANGUAGE MENU
When used in Kiosk Mode you may set the system to
prompt you to select language before proceeding. See
example below.
When set to ON the system will display the language
menu as the first menu in Kiosk mode.
When set to OFF the system will display the welcome
menu in English (default).
AVAILABLE L ANGUAGE S
In Kiosk Mode the system supports 7 different
languages for its simplified on-screen menu; English,
German, French, Norwegian, Swedish, Italian, and
Spanish. Select the preferred language.
PHONE BOOK
Defines whether to use Local Phone Book or Corporate
Directory. The lat ter opens up for remote phone direc -
tory upgrades.
D 13954.01
MAY 2006
CANCEL
Select this icon and press OK
to leave the menu undoing any
changes.
RESTORE DEFAULTS
Select this icon and press OK
to restore the default settings.
SAVE
Select this icon and press
OK to leave the menu putting
changes into effect.
Kiosk mode examples of language menu and call situations.
73
KIOSK MENU
Whether the simplified menu shall be shown or not.
Tip! GETTING OUT OF KIOSK MODE AGAIN. To get out of
the Kiosk Mode, you need to hook the unit up to a PC
via the serial port, open a telnet session and use the
command:
xConfiguration Kiosk Mode: <On/Off>
For more on this, see the TANDBERG MXP Codec
Reference Manual for System Integrators, which can
be downloaded from our web site:
http://www.tandberg.net/support/documentation.
php?p=Application_Programmer_Interfaces
Page 74

Control Panel > Menu Settings
Startup Settings
TANDBERG 1700 MXP
USER GUIDE
WELCOME MENU
The Welcome Menu contains the Main Menu,
System Status, your System Name and dial- in
numbers.
Set to ON to produce the Welcome Menu
when the system wakes up from standby
mode.
Set to OFF to disable the Welcome Menu
when the system wakes up from standby
mode. Press the OK button to open the Wel-
come Menu.
WELCOME PICTURE
The Welcome Picture is what you see in the
background of the welcome menu.
Selfview is shown in the background of the
welcome menu.
OFF. No picture is shown in the background of
the welcome menu.
D 13954.01
MAY 2006
CANCEL
Select this icon and press OK
to leave the menu undoing any
changes.
RESTORE DEFAULTS
Select this icon and press OK
to restore the default settings.
SAVE
Select this icon and press
OK to leave the menu putting
changes into effect.
WELCOME TEXT
You can change the welcome text to any text you
like, instead of the default text. Please observe that
Display Welcome Text must be ON to be able to edit
the welcome text.
DISPLAY WELCOME TE XT
The welcome text displays your system name and
dial in numbers by default. It is possible to hide this
information by choosing Display Welcome Text Of f. Set
to ON to have Welcome text displayed on the welcome
menu and set to OFF to have no Welcome text dis -
played on the welcome menu.
74
LOGO
It is possible to upload a company logo to the
system. For more information about how to
upload a logo, see Web Snapshot.
Choose ON to have the company logo appear
in the background of the welcome menu.
Set to OFF to have no logo displayed.
Note! The TANDBERG Logo will be displayed if
no other company logo is loaded and logo is
enabled.
Page 75

Control Panel > Menu Settings
Icons
CANCEL
Select this icon and press OK
to leave the menu undoing any
changes.
RESTORE DEFAULTS
Select this icon and press OK
to restore the default settings.
SAVE
Select this icon and press
OK to leave the menu putting
changes into effect.
Note! Icons set to Off will not appear!
TANDBERG 1700 MXP
USER GUIDE
MICROPHONE OFF
This indicator is shown when the microphone is turned off. Press the Mic off button again to turn the microphone back on.
VOLUME OFF
This indicator is shown when the volume
is turned off. Press Volume + to turn the
volume back on.
ON AIR
When you have the floor in a multisite
conference this is indicated by the On
Air icon.
SECURE CONFERENCE, AES
This double padlock indicator is shown
when AES encryption (Secure Conference) is active.
SECURE CONFERENCE, DES
This padlock indicator is shown when DES
encryption (Secure Conference) is active.
NOT SECURE CONFERENCE
This open padlock indicator is shown
during the initialization phase for AES or
DES encr yption. During this period the
call is not secure.
BAD NET WORK
This indicator appears if the system detects network anomalies like packet loss,
jitter etc., during a call. Open the menu by
pressing the OK/Menu button and select
the warnings icon too see details.
TELEPHONE
This indicator is shown when there also
are telephone only participants in a mul tisite conference. Indications are given
for 1, 2, 3 or more than 3 par ticipants.
Icons turn green when a telephone participant has the floor.
D 13954.01
MAY 2006
75
Page 76

Control Panel > Presentation Settings
Presentation Settings – an Overview
TANDBERG 1700 MXP
USER GUIDE
GETTING TO THIS MENU
Press OK to produce the below menu.
Use the Arrow keys to move to the
Control Panel and press OK.
Use the Arrow keys to move to
Presentation Settings, if applicable.
Press OK.
PRESENTATION START
Your system has optional Dual Video Stream
capabilities, which means that you can show two
video streams simultaneously.
Presentation Start is Auto by default. This means
that you will star t Dual Stream (a second video
stream) automatically when star ting a presenta-
tion. Dual Stream requires the Presenter Option
and H.263 video. To check which options are
installed, see the System Information menu.
Manual means that you manually choose if you
want to start Dual Stream or not every time you
start a presentation.
CANCEL
Select this icon and press OK
to leave the menu undoing any
changes.
RESTORE DEFAULTS
Select this icon and press OK
to restore the default settings.
H.239
Suppor ts transmission of two video streams.
It combines elements of Duo Video and
People+Content. If H.239 is disabled you will still
be able to start TANDBERG Dual Video Stream.
CALL VIDEO SOURCE
Default video source used in a call.
PRESENTATION SOURCE
The Presentation Source is connected to the presentation button on the Remote Control. Pressing
the Presentation button on the Remote Control
will put the Presentation Source on display. Pres-
entation Source is PC by default.
SNAPSHOT SOURCE
When you take a Snapshot, you get a snapshot of
the Snapshot Source.
AUTO- DISPLAY SNAPSHOT
Select Auto to automatically display a received
snapshot (from the Far End).
PIP PLACING
A Picture in Picture (PIP) is a smaller picture
placed in one of the corners of the screen. The
PIP enables you to see an extra picture in your
video conference.
VNC SETTINGS
VNC Set tings is necessary when using a VNC
presentation.
LOST IN TRANSL ATION? Click on the Phone
Book icon 5 times followed by pressing
the number key 1 on the remote control to
reset the menu language to English.
D 13954.01
MAY 2006
SAVE
Select this icon and press
OK to leave the menu putting
changes into effect.
76
Page 77

Control Panel > Presentation Settings
Presentation Start / H239 Enabling
CANCEL
Select this icon and press OK
to leave the menu undoing any
changes.
RESTORE DEFAULTS
Select this icon and press OK
to restore the default settings.
TANDBERG 1700 MXP
USER GUIDE
PRESENTATION START
Your system has optional Dual Video Stream capabilities, which
means that you can show two video streams simultaneously.
Presentation Start is Auto by default. This means that you will
start Dual Stream (a second video stream) automatically when
starting a presentation. Dual Stream requires the Presenter Option and H.263 video. To check which options are installed, see
the System Information menu.
Manual means that you manually choose to star t Dual Stream or
not every time you star t a presentation.
To utilize, do as follows:
Auto causes Dual Video Stream to start automatically when you
start a presentation (i.e. when you choose a second video source).
If your system or the far end system cannot handle Duo Video/
H.239, you will not be using Dual Video Stream, but rather send the
presentation source as your Main Video.
Manual. When star ting a presentation, select Presentation in the
call menu and select StartPresentation. Choose a video source
from the list displayed on the screen.
H.239
H.239 supports transmission of two video streams. It combines
elements of Duo Video and People+Content. If H.239 is disabled
you will still be able to start TANDBERG Dual Video Stream.
Enabled. Enables H.239
Disabled. Disables H.239
D 13954.01
MAY 2006
SAVE
Select this icon and press
OK to leave the menu putting
changes into effect.
77
Page 78

Control Panel > Presentation Settings
Call Video Source
Moving up and
down in menu.
TANDBERG 1700 MXP
USER GUIDE
CALL VIDEO SOURCE
The Call Video Source is the default video source you would
like to use in a call. If you use Main Camera as Call Video
Source, the system will star t with Main Camera ever y time you
make a call,regardless of what the previous video source was.
TIP! Why you should set Call Video Source to Main Camera:
When you are not in a call, you can work with the screen as a
normal PC screen. When you make a video call, the system will
automatically change to Main Camera. Once you receive a call,
the system will also automatically change to Main Camera,
preventing the caller from seeing your PC image.
You can change Call Video Source to Main Camera, PC, VNC,
or Current. Choosing Current will result in the last used video
source.
D 13954.01
MAY 2006
CANCEL
Select this icon and press OK
to leave the menu undoing any
changes.
RESTORE DEFAULTS
Select this icon and press OK
to restore the default settings.
SAVE
Select this icon and press
OK to leave the menu putting
changes into effect.
78
Page 79

Control Panel > Presentation Settings
Presentation Source
Moving up and
down in menu.
TANDBERG 1700 MXP
USER GUIDE
PRESENTATION SOURCE
The Presentation Source is connected to the Presentation
button on the Remote Control. Pressing the Presentation button will put the Presentation Source on display. Presentation
Source is PC by default*.
You can change the Presentation Source to any video source
or None. Choosing None results in opening the Presentation
menu when pressing the Presentation key on the Remote
Control.
* Only for systems with the PC video input available.
D 13954.01
MAY 2006
CANCEL
Select this icon and press OK
to leave the menu undoing any
changes.
RESTORE DEFAULTS
Select this icon and press OK
to restore the default settings.
SAVE
Select this icon and press
OK to leave the menu putting
changes into effect.
79
Page 80

Control Panel > Presentation Settings
Snapshot Source
Moving up and
down in menu.
TANDBERG 1700 MXP
USER GUIDE
SNAPSHOT SOURCE
When you take a snapshot, this will be from the Snapshot
Source. Current is the default Snapshot Source. This means
that you take a snapshot of the video source that is currently
active.
You can change the Snapshot Source to any video source. In
this way you can assign the Snapshot key to apply only to PC
for instance. Press Snapshot and you will get a PC snapshot
regardless of what video source that is currently active.
D 13954.01
MAY 2006
CANCEL
Select this icon and press OK
to leave the menu undoing any
changes.
RESTORE DEFAULTS
Select this icon and press OK
to restore the default settings.
SAVE
Select this icon and press
OK to leave the menu putting
changes into effect.
80
Page 81

Control Panel > Presentation Settings
Auto-Display Snapshot
TANDBERG 1700 MXP
USER GUIDE
AUTO- DISPLAY SNAPSHOT
Select Auto to automatically display a received snapshot. Set
Auto- Display Snapshot to Manual if you wish not to have them
displayed on the screen when they are sent or received. The
snapshots will be sent and received, but not displayed. With
Auto- Display Snapshot set to Manual, you must enter the Pres entation menu to display a snapshot.
Auto. A sent or received snapshot will automatically be dis-
played on the screen. This is the default setting.
Manual. A sent or received snapshot will not be displayed on
the screen. To see the snapshot, choose Display Snapshot in
the Presentation menu.
D 13954.01
MAY 2006
CANCEL
Select this icon and press OK
to leave the menu undoing any
changes.
RESTORE DEFAULTS
Select this icon and press OK
to restore the default settings.
SAVE
Select this icon and press
OK to leave the menu putting
changes into effect.
81
Page 82

Control Panel > Presentation Settings
PIP Placing
Navigating
in the menu.
TANDBERG 1700 MXP
USER GUIDE
A Picture in Picture (PIP) is a smaller picture placed in one of
the corners of the screen. The PIP enables you to see an ex tra
picture in your video conference.
A picture in picture can be nice when you use Dual Video Stream
and you need an extra window to see all the pictures. You can,
of course, show or hide the PIP with the Layout but ton on the
remote at any time.
PIP PLACING
This lets you decide where the PIP shall appear. You can, of
course, move the PIP with the Layout button on the Remote
Control at any time.
Top Right PIP is placed in the Top Right corner.
Bottom Right PIP is placed in the Bottom Right corner.
Bottom Left PIP is placed in the Bottom Lef t corner.
Top Left PIP is placed in the Top Left corner.
D 13954.01
MAY 2006
CANCEL
Select this icon and press OK
to leave the menu undoing any
changes.
RESTORE DEFAULTS
Select this icon and press OK
to restore the default settings.
SAVE
Select this icon and press
OK to leave the menu putting
changes into effect.
82
Page 83

Control Panel > Presentation Settings
VNC Settings
TANDBERG 1700 MXP
USER GUIDE
VNC SETTINGS
VNC Set tings is necessary when using a
VNC presentation. See PC Soft Presenter
and VNC for more information on how to
use VNC.
ADDRESS
The IP-address of the PC with the VNC
software installed. To find the IP-address
of the PC, place the mouse pointer on
the VNC program icon in the lower right
corner of the Windows taskbar. You can
also select Command Prompt from the
Startup-menu > Run and type cmd then
ENTER. This will open a command window
and from here type ipconfig and press
ENTER.
D 13954.01
MAY 2006
CANCEL
Select this icon and press OK
to leave the menu undoing any
changes.
RESTORE DEFAULTS
Select this icon and press OK
to restore the default settings.
SAVE
Select this icon and press
OK to leave the menu putting
changes into effect.
DISPLAY NUMBER
The display number for VNC is 0 and
upwards. If you are using WinVNC, double click on the icon on the taskbar to view
WinVNC proper ties. This number should
correspond with Display Number in this
menu.
PASSWORD
Enter the same password as specified in
WinVNC proper ties. The password will be
shown as asterisk signs (*) the next time
you enter the menu.
83
Page 84

Control Panel > Presentation Settings
PC SoftPresenter and VNC
TANDBERG 1700 MXP
USER GUIDE
About PC SoftPresenter
PC SoftPresenter is used to display PC images on your system without using a VGA cable (PC Presenter). The system
and your PC must be connected to the same LAN. In addition, VNC (Vir tual Network Computing) server software must
be installed on the PC. Free software can be downloaded
from http://www.realvnc.com. Install the sof tware by running
the downloaded file.
This is an optional feature – contact your TANDBERG Repre sentative for details.
Configuring the VNC Server Software:
Select the following to setup VNC; Windows- Star t\All Pro-
grams\Highlight RealVNC\Hightlight VNC Server\Show User
Properties
Select Accept Socket Connections.
Select Auto for Display Number. Display Number in the system must then have the value 0.
Enter a password in the Password-field. This must corre spond with the VNC Settings on your system.
Showing PC Contents Using the PC Soft Presenter & VNC
Star t the VNC software on your PC.
To use VNC, you must configure VNC Settings. Open VNC
Settings in the Presentation Settings menu (see previous
page for details).
Fill in the IP address of your PC, Display Number and Password.
Press Save.
When you now choose VNC as video source in the Presentation menu, you will see your PC using VNC. If a PowerPoint
presentation is being displayed then you can scroll through
the presentation by pressing the Vertical Arrow keys on the
remote control. VNC settings will go back to default when
the system goes to standby.
D 13954.01
MAY 2006
84
Page 85

Control Panel > Call Quality Settings
Call Quality Settings – an Overview
GETTING TO THIS MENU
Press OK to produce the below menu.
Use the Arrow keys to move to the
Control Panel and press OK.
Use the Arrow keys to move to Call
Quality, if applicable. Press OK.
The system will automatically select the best audio
algorithm based on the call rate and the capabilities
of the remote system. Use this menu to disable audio
algorithms in case you want to remove “low quality”
audio, or if you have interoperability issues calling
The system will automatically select the best video
algorithm based on the video source and the capabili-
ties of the remote system. Use this menu to disable
video algorithms in case you have interoperability
AUDIO ALGORITHM
other systems.
VIDEO ALGORITHM
issues calling other systems.
TANDBERG 1700 MXP
USER GUIDE
AAC-LD 128
Specify a call rate for 128kbps AAC-LD. From
this call rate and above, “128kbps AAC-LD”
is available. On lower call rates “64kbps A ACLD” is available.
NATURAL VIDEO
Choosing Natural Video will enable 60 fields
per second true interlaced picture for high motion video. The use of Natural Video requires
the H.263+ and H.263++ video protocols.
Natural video will be disabled in H.323 MultiSite calls and in H.320 Continuous Presence
MultiSite calls. Recommended setting is Auto.
MAX UPSTREAM RATE
The Max Upstream Rate (kbps) defines the
desired maximum transmitted call rate. This
is to be able to limit the outgoing bandwidth
whilst keeping the maximum incoming band width, particularly useful for home of fices
with dif ferent upstream and downstream
rates, typically ADSL.
LOST IN TRANSL ATION? Click on the Phone
Book icon 5 times followed by pressing
the number key 1 on the remote control to
reset the menu language to English.
D 13954.01
MAY 2006
CANCEL
Select this icon and press OK
to leave the menu undoing any
changes.
RESTORE DEFAULTS
Select this icon and press OK
to restore the default settings.
SAVE
Select this icon and press
OK to leave the menu putting
changes into effect.
85
VIDEO QUALITY
The different video sources need dif ferent
Video Quality Settings. Main Camera, VCR,
AUX and Split Screen have Motion as default.
PC, Document Camera and VNC have Sharp ness as default.
DEFAULT CALL SET TINGS
Default Call Settings are connected with Call
Settings in the call menu. If you leave Call
Settings unchanged when making a call, the
system will use the Default Call Settings in
the call.
Page 86

Control Panel > Call Quality Settings
Video Algorithm
TANDBERG 1700 MXP
USER GUIDE
VIDEO ALGORITHM
The system will automatically select the best video algorithm based
on the video source and the capabilities of the remote system. Use
this menu to disable video algorithms in case you have interoperability
issues when calling other systems.
H.261
Legacy video compression and decompression. The system will always
have H.261 enabled. Consequently, there is no way of unchecking
H.261.
H.263
Normal video compression and decompression.
H.264
Bandwidth ef ficient video compression and decompression
D 13954.01
MAY 2006
CANCEL
Select this icon and press OK
to leave the menu undoing any
changes.
RESTORE DEFAULTS
Select this icon and press OK
to restore the default settings.
SAVE
Select this icon and press
OK to leave the menu putting
changes into effect.
86
Page 87

Control Panel > Call Quality Settings
Audio Algorithm
TANDBERG 1700 MXP
USER GUIDE
AUDIO ALGORITHM
The system will automatically select the best audio algorithm based on the call rate and
the capabilities of the remote system. Use this menu to disable audio algorithms in case
you want to remove “low quality” audio, or if you have interoperability issues calling other
systems.
G.711
Normal quality audio (telephone quality 3.1kHz at 64kbps). This audio algorithm is mandatory for video conferencing equipment and is impossible to uncheck.
G.728
Compressed normal quality audio (telephone quality, 3.1 kHz at 16kbps)
G.722
High quality audio (7 kHz at 48kbps, 56kbps or 64kbps)
AACLD
CD- quality audio, MPEG-4 Advanced Audio Coding Low Delay (20 kHz, stereo at 128kbps,
mono at 64kbps).
G.722.1
Compressed high qualit y audio (7 kHz at 24kbps, 32kbps and 48kbps).
D 13954.01
MAY 2006
CANCEL
Select this icon and press OK
to leave the menu undoing any
changes.
RESTORE DEFAULTS
Select this icon and press OK
to restore the default settings.
SAVE
Select this icon and press
OK to leave the menu putting
changes into effect.
CALL RATE VS AUDIO ALGORITHMS SELECTED
Modif y/remove algorithms used by unchecking the different audio algorithms.
Automatically preferred audio algorithms on
call rates up to and including 192kbps
1. G.722.1 (24kbps or 32kbps)
2. G.728 (16kbps)
3. AAC-LD (64kbps or 56kbps)
4. G.722 (56kbps, 64kbps or 48kbps)*
5. G.711 (64kbps, 56kbps or 48kbps)**
6. AAC-LD (48kbps or 128kbps)
Automatically preferred audio algorithms on
call rates above 192kbps
1. AAC-LD (128kbps)***
2. AAC-LD (64kbps or 56kbps)
3. G.722 (64kbps, 56kbps or 48kbps)*
4. G.722.1 (32kbps or 24kbps)
5. G.728 (16kbps)
6. G.711 (64kbps, 56kbps, 48kbps)**
7. AAC-LD (48kbps or 128kbps)
* G.722 at 64k bps is used in H.32 3 (IP) calls only.
** G.711 at 64kbp s is used in S IP and H .323 (IP) c alls onl y.
*** Depend ent on a c all rate a bove th e AAC -L D 128 thr eshol d.
Note th at this is n ot avail able on a ll TANDB ERG syst ems.
87
Page 88

Control Panel > Call Quality Settings
AAC-LD 128 kbps (Stereo Audio)
Moving up and
down in menu.
TANDBERG 1700 MXP
USER GUIDE
AAC-LD 128 KBPS (STEREO AUDIO)
Specify a call rate for 128 kbps AAC-LD. From this call rate
and above, “128 kbps AAC-LD” is available. On lower call
rates “64kbps AAC- LD” is available.
Stereo audio requires twice the bandwidth as mono CDquality audio. We therefore recommend to enable stereo
audio on high call rates only. To enable stereo CD -quality audio you need to specify a call rate for when stereo
automatically should be enabled. On lower call rates, mono
CD- quality audio “64kbps AAC -LD” will be enabled. Stereo
audio can be received and listened to from e.g. a VCR or
DVD. However, only when the microphone has been set to
Off.
D 13954.01
MAY 2006
CANCEL
Select this icon and press OK
to leave the menu undoing any
changes.
RESTORE DEFAULTS
Select this icon and press OK
to restore the default settings.
SAVE
Select this icon and press
OK to leave the menu putting
changes into effect.
88
Page 89

Control Panel > Call Quality Settings
Natural Video
Moving up and
down in menu.
TANDBERG 1700 MXP
NATURAL VIDEO
Choosing Natural Video will enable 60 fields* per second
true interlaced picture for high motion video. The use of
Natural Video requires the H.263+ and H.263++ video
protocols. Natural video will be disabled in H.323 MultiSite
calls and in H.320 Continuous Presence MultiSite calls.
Auto Natural Video. Auto will enable transmission of Natural
Video from 768 kbps and above**. Reception of Natural
Video is in this case always enabled.
Off Natural Video Off will disable both transmission and
reception of Natural Video.
Custom 384 kbps and above to 1920 kbps and above.
* 50 fiel ds per s econ d on PAL sys tems.
** Will tra nsmit 4 48p if s uppo rted by far en d syste m.
USER GUIDE
D 13954.01
MAY 2006
CANCEL
Select this icon and press OK
to leave the menu undoing any
changes.
RESTORE DEFAULTS
Select this icon and press OK
to restore the default settings.
SAVE
Select this icon and press
OK to leave the menu putting
changes into effect.
89
Page 90

Control Panel > Call Quality Settings
Maximum Upstream Rate (kbps)
TANDBERG 1700 MXP
USER GUIDE
MAX UPSTREAM RATE (kbps)
The Max Upstream Rate (kbps) defines your wanted
maximum transmitted call rate. In this way you
may limit the outgoing bandwidth whilst keeping
the maximum incoming bandwidth – a feature quite
useful for home office applications with different
upstream and downstream rates, typically ADSL.
D 13954.01
MAY 2006
CANCEL
Select this icon and press OK
to leave the menu undoing any
changes.
RESTORE DEFAULTS
Select this icon and press OK
to restore the default settings.
SAVE
Select this icon and press
OK to leave the menu putting
changes into effect.
90
Page 91

Control Panel > Call Quality Settings
Video Quality
TANDBERG 1700 MXP
USER GUIDE
VIDEO QUALITY
Different video sources need different Video
Quality Settings. Main Camera, VCR, AUX
and Split Screen have Motion as default. PC,
Document Camera and VNC have Sharpnes s as
default.
Auto. The system chooses the best of Motion
or Sharpness depending on picture layout and
bandwidth.
D 13954.01
MAY 2006
CANCEL
Select this icon and press OK
to leave the menu undoing any
changes.
RESTORE DEFAULTS
Select this icon and press OK
to restore the default settings.
SAVE
Select this icon and press
OK to leave the menu putting
changes into effect.
Sharpness. Optimized for sharp video (4CIF/4SIF,
SVGA, XGA, w720p).
Motion. Optimized for smooth motion video (CIF/
SIF or w288p for low bandwidths, 448p/400p,
Interlaced CIF (iCIF) / Interlaced SIF (iSIF) or
w448p for high bandwidths).
More on this can be found overleaf.
91
Page 92

Control Panel > Call Quality Settings > Video Quality
About Intelligent Video Management (IVM) on TANDBERG Systems
TANDBERG 1700 MXP
USER GUIDE
Intelligent Video Management (IVM)
You may configure the picture sent from your TANDBERG system depending upon specific requirements and applications
adding an additional level of flexibility and adaptabilit y.
Generally, the IVM will always try to transmit the format closest to the video input format. Each video input can be configured to either motion or sharpness:
Motion
When there is a need for higher frame rates, typically when a
large number of participants are present or when there is a lot
of motion in the picture.
At low bit rate:
•
CIF will be used from a PAL video input
SIF from NTSC
•
•
w288p from wide format (HD720p) input
•
VGA/SVGA/XGA from PC, Digital Clarity.
At high bit rate:
•
448p will be used from a PAL video input if Natural Video is
Off or Auto or if Natural Video is x kbps and the bit rate is
lower than x kbps
400p from NTSC if Natural Video is Off or Auto or if Natural
•
Video is x kbps and the bit rate is lower than x kbps
•
iCIF will be used from a PAL video input, if Natural Video is
x kbps and the bit rate is higher than or equal to x kbps
iSIF from NTSC, if Natural Video is x kbps and the bit rate is
•
higher than or equal to x kbps
w448p will be used from a wide format (HD720p) input
•
•
VGA/SVGA/XGA from PC, Digital Clarity.
IVM Resolution
The below table shows the relationship between Transmission modes selected by
the system when Motion or Sharpness is set in the Call Quality menu. IVM will use
this table to optimize the Video quality, according to the capabilities of the remote
system(s):
Basic V ideo Quality Video Input Transmis sion Mode Sel ection Rules*
MOTION PAL 448p -> iCIF @50 -> CIF -> QCIF
MOTION NTSC 400p -> 448p -> iSIF@60 -> iCIF@60 -> SIF -> CIF -> QCIF
MOTION VGA 448p -> CIF -> QCIF
MOTION SVGA 448p -> CIF -> QCIF
MOTION XGA 448p -> CIF -> QCIF
MOTION Wide w448p -> w288p -> CIF -> QCIF
SHARPNESS PAL 4CIF -> VGA -> CIF -> QCIF
SHARPNESS NTSC 4SIF -> 4 CIF -> VGA -> SIF -> CIF -> QCIF
SHARPNESS VGA VGA -> 4CIF -> CIF -> QCIF
SHARPNESS SVGA SVGA -> XGA -> 4CIF -> VGA -> CIF -> QCIF
SHARPNESS XGA XG A -> SVGA -> 4CIF -> VGA -> CIF -> QCIF
SHARPNESS Wide w720p -> w576p -> w448p -> w288p -> CIF -> QCIF
Native Resolutions
The following live video resolutions are sup ported on the system*:
Native NTSC:
4SIF (704 × 480 pixels), Digital Clarity
•
400p (528 × 400 pixels)
•
iSIF (352 × 480 pixels), Natural Video
•
SIF (352 × 240 pixels).
•
Native PAL:
4CIF (704 × 576 pixels), Digital Clarity
•
448p (576 × 448)
•
iCIF (352 × 576 pixels), Natural Video
•
CIF (352 × 288 pixels)
•
QCIF (176 × 144 pixels)
•
SQCIF (128 × 96 pixels).
•
Native PC Resolutions:
XGA (1024 × 768 pixels), Digital Clarity
•
SVGA (800 × 600 pixels), Digital Clarity
•
VGA (640 × 480 pixels), Digital Clarity.
•
Wide (16:9) Resolutions:
w288p (512 × 288 pixels)
•
w448p (768 × 448 pixels)
•
w576p (1024 × 576 pixels)
•
w720p (1280 × 720 pixels).
•
Sharpness*:
Improved quality of detailed images and graphics, lower frame
rate, ideal for enhancing quality at lower bandwidths.
4CIF will be used from a PAL video input, Digital Clarity
•
•
4SIF from NTSC, Digital Clarity
w720p will be used from a wide format (HD720p) input
•
•
VGA/SVGA/XGA from PC, Digital Clarity.
D 13954.01
MAY 2006
92
* Note th at the TANDBERG 5 50MX P and the TAN DBER G
1000M XP do not t rans mit the f ollowing vid eo for mats:
448p, 400p, i CIF, iSIF, w288 p, w448p, w576p, and
w720p.
Page 93

Control Panel > Call Quality Settings
Default Call Settings – an Overview
TANDBERG 1700 MXP
USER GUIDE
Default Call Settings are connected with Call Settings
in the Call Menu. If you leave Call Settings unchanged
when making a call, the system will use the Default Call
Settings in the call.
In addition to the Call Type, Net, and Bandwidth, you
also find settings for H.320 Auto bandwidth and H.323
Auto bandwidth in Default Call Settings.
D 13954.01
MAY 2006
CANCEL
Select this icon and press OK
to leave the menu undoing any
changes.
RESTORE DEFAULTS
Select this icon and press OK
to restore the default settings.
SAVE
Select this icon and press
OK to leave the menu putting
changes into effect.
93
Page 94

Control Panel > Call Quality Settings > Default Call Settings
Default Video Call Settings
CALL TYPE
Call Type can be set to:
Video Call
•
Telephone Call
•
For MultiSite calls, Call Type enables you to
specif y both telephone calls and video calls in
the same conference.
TANDBERG 1700 MXP
USER GUIDE
D 13954.01
MAY 2006
CANCEL
Select this icon and press OK
to leave the menu undoing any
changes.
RESTORE DEFAULTS
Select this icon and press OK
to restore the default settings.
SAVE
Select this icon and press
OK to leave the menu putting
changes into effect.
94
Page 95

Control Panel > Call Quality Settings > Default Call Settings
Default Net Settings
TANDBERG 1700 MXP
NETWORK
The Network alternatives are:
Auto
•
H.323
•
SIP
•
If Auto is selected, the system will select the right network depending on the entered number:
If an IP- address (e.g. 10.12.34.56 ) is entered, H.323
•
is selected.
If the first digits in the number match those set in
•
H.323 Prefix, H.323 is selected.
If a gatekeeper is present, it is possible to place IP-calls
using “telephone style” numbers, e.g. an E.164 alias,
according to the numbering plan implemented in the
gatekeeper. The gatekeeper will then translate the dialled
number into an IP-address, see H.323 Settings for more
information about gatekeepers.
USER GUIDE
D 13954.01
MAY 2006
CANCEL
Select this icon and press OK
to leave the menu undoing any
changes.
RESTORE DEFAULTS
Select this icon and press OK
to restore the default settings.
SAVE
Select this icon and press
OK to leave the menu putting
changes into effect.
Tip! Wonder what System is doing here?
System has been added by a user in the
Network Profiles setup.
95
Page 96

Control Panel > Call Quality Settings > Default Call Settings
Default Bandwidth Settings
TANDBERG 1700 MXP
USER GUIDE
BANDWIDTH
Determines the quality of the video picture.
When set to Auto the system will establish a
connection using a proper bandwidth for the
call, typically 384 kbps for IP calls.
When set to Max the system will set up the
call with maximum bandwidth depending on
the selected net work.
D 13954.01
MAY 2006
CANCEL
Select this icon and press OK
to leave the menu undoing any
changes.
RESTORE DEFAULTS
Select this icon and press OK
to restore the default settings.
SAVE
Select this icon and press
OK to leave the menu putting
changes into effect.
96
Page 97

Control Panel > Audio Settings
Audio Settings – an Overview
GETTING TO THIS MENU
Press OK to produce the below menu.
Use the Arrow keys to move to the
Control Panel and press OK.
Use the Arrow keys to move to Audio
Settings, if applicable. Press OK.
TANDBERG 1700 MXP
USER GUIDE
LEVEL SETTINGS
Lets you set the maximum levels, which
later can be adjusted using the volume
control.
ALERT TONES AND VOLUME
Lets you choose among the alert tones
available and set the volume.
GRAPHICAL VIEW
Provides an easy over view of how inputs
and outputs are connected together.
LOST IN TRANSL ATION? Click on the Phone
Book icon 5 times followed by pressing
the number key 1 on the remote control to
reset the menu language to English.
D 13954.01
MAY 2006
97
Page 98

Control Panel > Audio Settings
Level Settings
TANDBERG 1700 MXP
USER GUIDE
Level Settings lets you set each max level independently. The
volume control (on the remote control) acts as an at tenuator with
which you then may adjust the volume without the risk of causing
damage to the transducers.
Note! When you use the volume control, it may look like you are
able set the volume higher than the level specified here (gain, and
not just attenuation). However, a limiter is used to ensure that low
levels are amplified, while high and potentially damaging levels will
be limited so that the maximum level as specified here will not be
exceeded. A compression will thus occur at higher levels.
A volume setting potentially employing the limiter will be indicated
by the volume bar changing colour to yellow and red.
Back. Takes you
one level back up.
Tip! Since the unit has built- in micro-
phones and loudspeakers, level settings apply to Line level inputs and the
headset loudspeakers / microphone
only.
Signal t ype
Conne ctor
Imped ance
Headset input Headset Output
Unbal anced Unbal anced
(codec)
3.5mm j ack, sl eeve -gn d,
tip- mic ropho ne
2200 oh ms Low
Input i s Syste m Input (from He adset), Outpu t is Sys tem Out put (to H eadse t)
3.5mm s tereo jack, sl eeve -gn d,
tip- lef t, rin g-r ight
Headset Output Levels (from System) Headset Input Levels (to System)
Signal levels Abs. max output level Nominal level Signal Levels Clipping Level Nominal Level
Output menu
level setting
0,0 dB 0,2 Vpp –20,4 dBu –38,4 dBu
1,5 dB 0,2 Vpp –18,9 dB u –36,9 d Bu
3,0 dB 0,3 Vpp –17,4 dBu –35,4 dBu
4,5 dB 0,4 Vpp –15,9 dB u –33,9 d Bu
6,0 dB 0,4 Vpp –14,4 dBu –32,4 dBu
7,5 dB 0,5 Vpp –12,9 dBu –30, 9 dBu
9,0 dB 0,6 Vpp –11,4 dBu –29,4 dBu
10,5 dB 0,7 Vpp –9,9 dBu –27,9 dBu
12,0 dB 0,8 Vpp –8,4 dBu –26,4 dBu
13,5 dB 1,0 Vpp –6,9 d Bu –24, 9 dBu
15,0 dB 1,2 Vpp –5,4 dBu –23,4 dBu
16,5 dB 1,4 Vpp –3,9 dBu –21,9 dBu
18,0 dB 1,7 Vpp –2,4 dBu –20,4 dBu
19,5 dB 2,0 Vpp – 0,9 dB u –18,9 d Bu
21,0 dB 2,4 Vpp 0,6 dBu –17,4 dBu
22,5 dB 2,8 Vpp 2,1 dBu –15,9 dBu
Vpp dBu dBu Input menu
level setting
0,0 dB 80 mVpp – 28,8 dB u –46, 8 dBu
1,5 dB 67 mVpp – 30,3 d Bu –48 ,3 dBu
3,0 dB 57 mVpp –31,8 dBu – 49,8 d Bu
4,5 dB 48 mVpp – 33,3 d Bu – 51,3 dBu
6,0 dB 40 mVpp – 34,8 dB u –52 ,8 dBu
7,5 dB 34 mVpp –36, 3 dBu –54,3 dB u
9,0 dB 28 mVpp –37,8 dBu – 55,8 dB u
10,5 dB 24 mVpp – 39,3 dB u –57,3 dBu
12,0 dB 20 mVpp – 40,8 d Bu –5 8,8 dBu
13,5 dB 17 mVpp –42,3 d Bu –6 0,3 dBu
15,0 dB 14 mVpp – 43,8 d Bu – 61,8 dBu
16,5 dB 12 mVpp – 45,3 d Bu –6 3,3 dBu
18,0 dB 10 mVpp – 46,8 d Bu –6 4,8 dBu
19,5 dB 8 mVpp –48 ,3 dBu – 66,3 d Bu
21,0 dB 7 mVpp –4 9,8 dBu – 67,8 dBu
22,5 dB 6 mVpp – 51,3 dBu –69,3 d Bu
mVpp dBu dBu
D 13954.01
MAY 2006
Figur es show n INVER TED de note de fault v alues .
98
Page 99

Control Panel > Audio Settings
Alert Tones & Volumes
To make it easy to distinguish between incoming video calls and
ordinary telephone calls, we recommend the use of different
ringing tones for video and telephone calls.
Moving up and
down in menu.
CANCEL
Select this icon and press OK
to leave the menu undoing any
changes.
RESTORE DEFAULTS
Select this icon and press OK
to restore the default settings.
TANDBERG 1700 MXP
USER GUIDE
Use the vertical Arrow keys
to move up and down in the
Alert tone list. Press OK
to listen to the alert tone
selected. To stop playing
the alert tone, use the
vertical Arrow keys to move
away from the menu. Upon
leaving the entire menu, you
will be prompted to conrm
any changes you may have
made.
ALERT VOLUME
Set the volume of the Alert signals.
KEY TONES
To let the unit produce a sound
every time a remote control key is
pressed, set Key Tones to On.
D 13954.01
MAY 2006
SAVE
Select this icon and press
OK to leave the menu putting
changes into effect.
99
Page 100

Control Panel > Audio Settings
Graphical View of Settings
Ever wondered how things are connected in your system? The
Graphical View is a matrix showing what is connected to what,
and by playing test tones you will be able to verify that the connections actually are as you would like them to be.
The “marching ants”
Moving up and
down in menu.
TANDBERG 1700 MXP
USER GUIDE
The green dots indicates connection and
when you play the test tone (or rather the
test signal) the “marching ants” will show
you the signal flow. To play a test tone
navigate to any of the Inputs or Outputs
and click OK. The test signal will then appear at the outputs indicated.
TEST TONE
To verify that things actually are connected and work the way they claim to
be connected and work, you may use
any of the alert signals available, as test
signal.
D 13954.01
MAY 2006
CANCEL
Select this icon and press OK
to leave the menu undoing any
changes.
RESTORE DEFAULTS
Select this icon and press OK
to restore the default settings.
SAVE
Select this icon and press
OK to leave the menu putting
changes into effect.
100
 Loading...