


XP -300TM Automated Hematology Analyzer
Quick Guide
Pre-operation Checks
Power On/Self Check
QC Analysis
Sample Processing
Reagent Replacement
Maintenance
Sysmex America, Inc. • Tel. 1-800-379-7639 • 1-800-3SYSMEX www.sysmex.com
Daily Operating Procedures
Pre-Operation Checks
Verify the following before powering on the XP-300:
1.Check that the power cable is connected.
2.Check that there is sufficient printer paper.
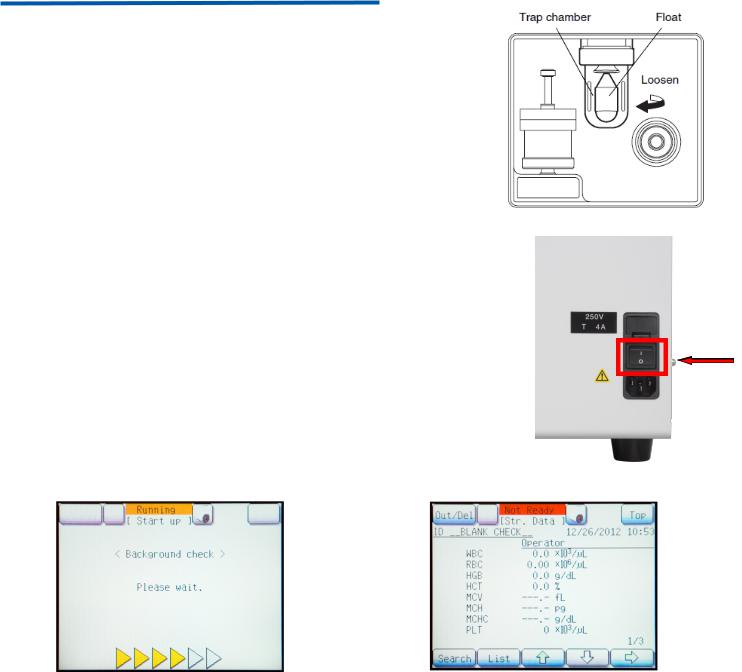
3.Check pneumatic unit trap chamber for fluid. Empty if necessary.
4.If needed, discard any waste fluid in the waste container.
Power On/Self Check
1.Switch power on by pressing the power switch located on the right side of the analyzer.
Three automatic rinse cycles are performed followed by a background check.
Power
Should any values fall outside of the acceptable limits, a maximum of two extra background checks will be performed automatically.
2.Record the background check on a daily checklist or keep a copy of the printout for documentation. Compare the results to the acceptable background limits.
Acceptable Background Limits
WBC |
≤ |
0.3 x 10³/µL |
|
|
|
RBC |
≤ |
0.02 x 10⁶/µL |
|
|
|
HGB |
≤ |
0.1 g/dL |
|
|
|
PLT |
≤ |
10 x 103/µL |
|
|
|
Page 2
XP-300 Quick Guide-Document Number 1051-CFL, Revision 2 June/2014

Quality Control Analysis
Running QC
1.Verify the XP-300 is at Ready.
2.Press the [QC] button. 
3.Press the Quality Control file to be analyzed.
4.Mix the control blood according to the package insert.
5. Remove the cap and set control blood container to the sample probe.
6.Press the Start Switch.
7.When Analyzing is displayed and two beeps sound, remove the control blood.
8.Use the [◄] and [►] buttons to scroll through pages.
9.Press [IP] to print to internal printer. Press [NG] to reject.
10. Touch [OK]
QC File Set-Up Barcoded Entry of Target and Limit Values
1.Press [QC] on the Main screen.
2.Select the correct file corresponding to the QC vial.
3.Press [Settings]. 
4.Scan lot from the assay sheet. Lot number loads automatically.
5.Manually enter the expiration date.
6.Using the [→], scroll to the PARAMETER page beginning with WBC.
7.Scan in WBC. TARGET and LIMIT Values load automatically.
8.Continue to scan in all parameters.
Note: Scroll to the right to advance the screen and input data for all parameters.
9. Press [Save].
10. Touch [OK]
11. Repeat steps 1-9 above to input QC data for the remaining levels of QC.
Page 3
XP-300 Quick Guide-Document Number 1051-CFL, Revision 2 June/2014

Quality Control Analysis
Erasing a File for a New Lot of Controls
1. Verify the XP-300 is at Ready.
2. Press the [QC] button. The QC file list will be displayed.
3.Press the [Settings] button. 
4.Press the [Clear] button. 
5.Press [Enter].
6.Press [OK] to erase selected file. 
7.Press [Cancel] to cancel file deletion. 
Refer to the Sysmex XP-300 Resource and Validation Manual for more information about QC setup.
Page 4
XP-300 Quick Guide-Document Number 1051-CFL, Revision 2 June/2014
 Loading...