

Suzuki SX4 Sedan 2010, SX4 Sport 2010, SX4 Crossover 2010 User Manual
This owner’s manual applies to the SX4 series:
SX4 SX4 SEDAN
80J2059
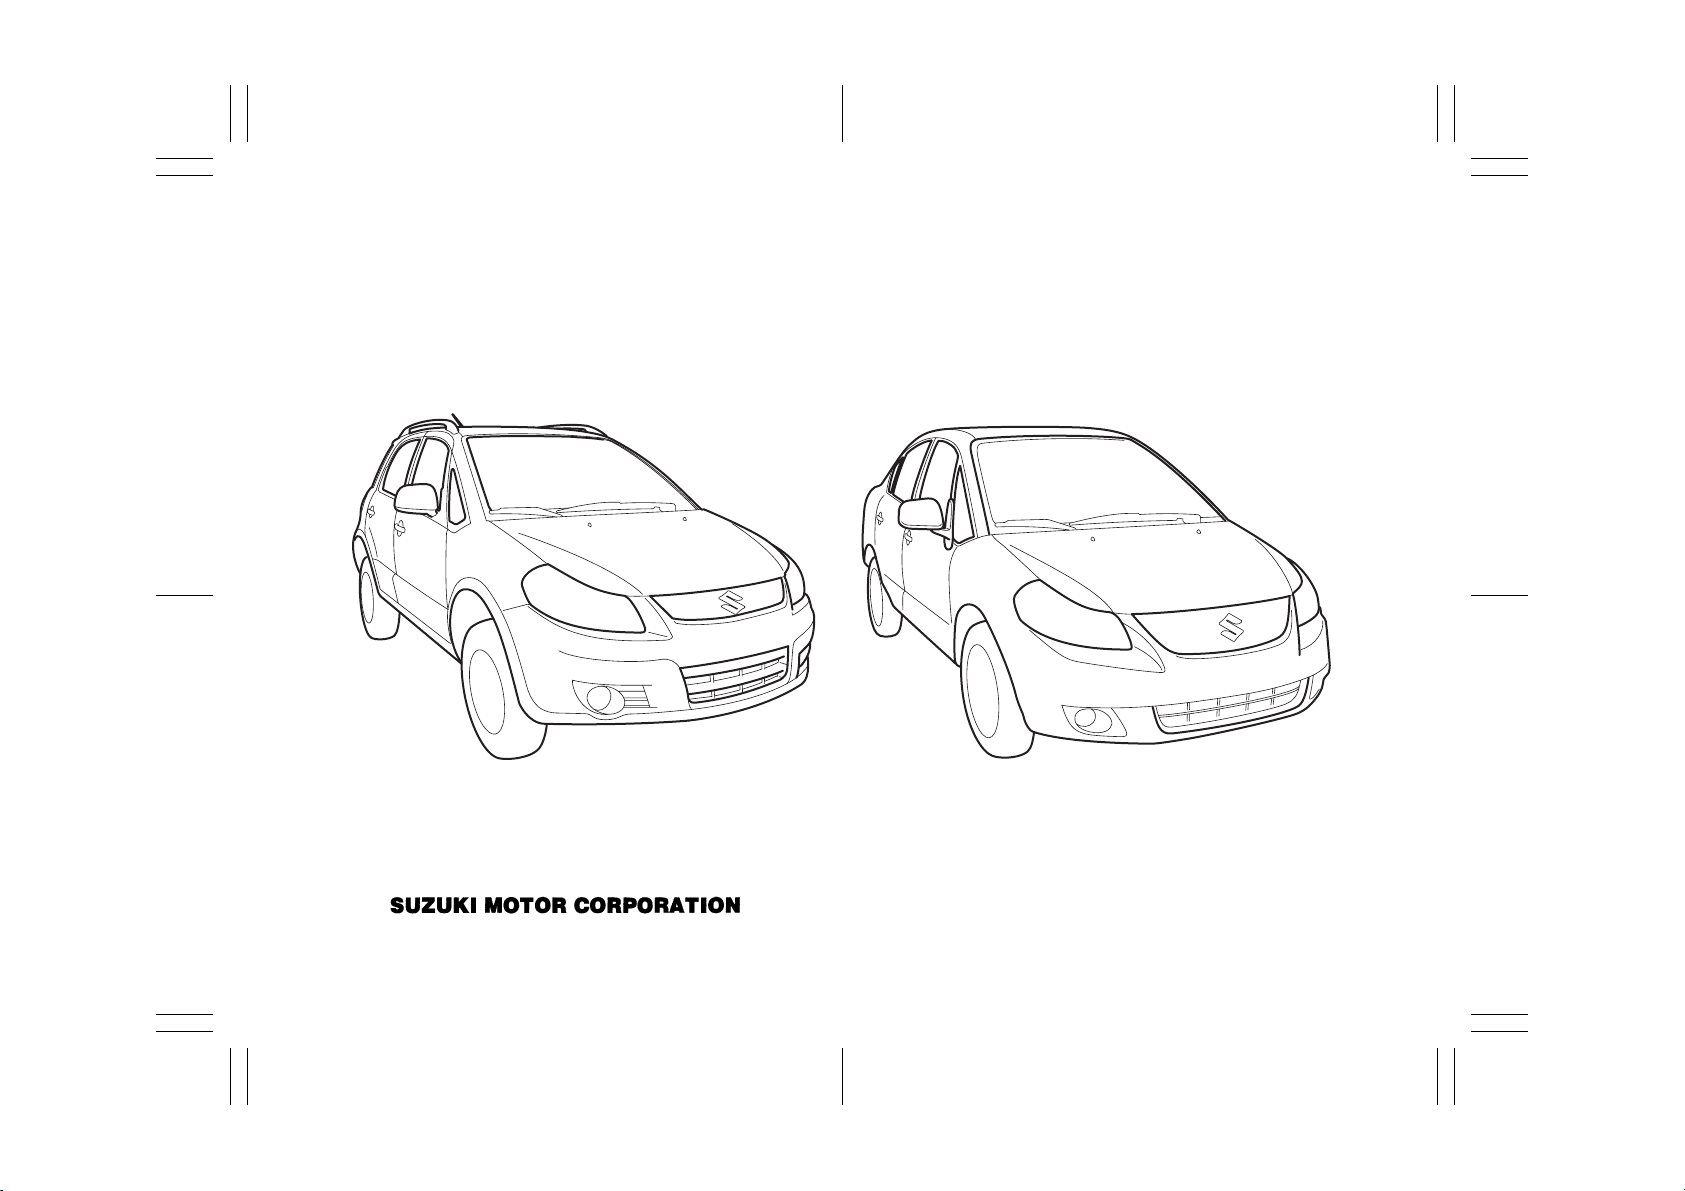
NOTE: The illustrated models are examples of the SX4 series.
© 2009 All rights reserved.
No part of this document may be reproduced or transmitted in any form or by any means, electronic or
mechanical, for any purpose, without the express written permission of Suzuki Motor Corporation.
80J23-03E
FOREWORD
All information in this manual is based
on the latest product information available at the time of publication. Due to
improvements or other changes, there
may be discrepancies between information in this manual and your vehicle.
SUZUKI MOTOR CORPORATION
reserves the right to make production
changes at any time, without notice and
without incurring any obligation to
make the same or similar changes to
vehicles previously built or sold.
SUZUKI MOTOR CORPORATION
believes in conservation and protection of
Earth’s natural resources.
To that end, we encourage every vehicle
owner to recycle, trade in, or properly dispose of, as appropriate, used motor oil,
coolant, and other fluids, batteries and
tires.
IF YOU HAVE ANY PROBLEMS WITH
YOUR SUZUKI:
Please review the New Vehicle Warranty
Information booklet supplied with your
SUZUKI. Should you have a question or
problem regarding the warranty or service
of your vehicle, please take the following
action:
Consult the Service Manager and the
Owner of the Suzuki Automotive Dealership. Explain your problem and ask for
their assistance in resolving your problem.
The Owner of the dealership is in the very
best position to assist you as he or she is
vitally concerned with your continued satisfaction.
If you are still in need of additional information, or if you are dissatisfied, request that
your dealer arrange a meeting with your
District Service Manager.
If, after doing so, you still require further
assistance, and you purchased your
SUZUKI in the continental United States,
please contact the American Suzuki Customer Relations Department by telephone
at 1-800-934-0934 or in writing at:
American Suzuki Motor Corporation
Automotive Customer Relations
3251 East Imperial Highway
Brea, CA 92821-6795
If you purchased your SUZUKI in Canada
please contact the Suzuki Canada Customer Relations Department by telephone
at 1-905-889-2677 extension 2254 or in
writing at:
Suzuki Canada Inc.
Customer Relations
100 East Beaver Creek Road
Richmond Hill, On
L4B 1J6
In the event you require assistance related
to your SUZUKI, while temporarily travelling in either the United States or Canada,
you may wish to contact the Suzuki Customer Relations Department directly of the
country in which you are temporarily operating your vehicle.
Please be certain to provide us with the following information: the model, Vehicle
Identification Number, mileage, accessories involved, event dates, your concern,
and any other comments which you may
have. When we receive your correspondence, we will be pleased to contact the
Owner of your dealership and assist in
resolving your concern.
For owners outside the continental United
States, please refer to the distributor’s
address listed in your Warranty Information
booklet.
80J23-03E
IMPORTANT
WARNING/CAUTION/NOTE
Please read this manual and follow its
instructions carefully. To emphasize special information, the symbol and the
words WARNING, CAUTION and NOTE
have special meanings. Pay special attention to the messages highlighted by these
signal words:
WARNING
Indicates a potential hazard that
could result in death or injury.
CAUTION
Indicates a potential hazard that
could result in vehicle damage.
NOTE:
Indicates special information to make
maintenance easier or instructions clearer.
75F135
The circle with a slash in this manual
means “Don’t do this” or “Don’t let this happen”.
MODIFICATION WARNING
WARNING
Do not modify this vehicle. Modification could adversely affect safety,
handling, performance or durability
and may violate governmental regulations. In addition, damage or performance problems resulting from
modification may not be covered
under warranty.
CAUTION
Improper installation of mobile communication equipment such as cellular telephones or CB (Citizen’s Band)
radios may cause electronic interference with your vehicle’s ignition system, resulting in vehicle performance
problems. Consult your SUZUKI
dealer or qualified service technician
for advice on installing such mobile
communication equipment.
80J23-03E

LEAK DETECTION PUMP
NOTE:
Your vehicle has a pump to regularly check
the vehicle’s evaporative emission control
system for leaks. This check is performed
approximately five hours after the engine is
turned off. During this leak check, you may
hear a sound coming from the vehicle for
several minutes. This sound is normal and
does not indicate a malfunction.
80J23-03E
MEMO
80J23-03E
INTRODUCTION
Thank you for choosing SUZUKI and welcome to our growing family. Your choice was a wise one; SUZUKI products are a great value
that will give you years of driving pleasure.
This Owner’s Manual was prepared to help you have a safe, enjoyable, and trouble-free experience with your SUZUKI. In it you will learn
about the vehicle’s operation, its safety features and maintenance requirements. Please read it carefully before operating your vehicle.
Afterwards, keep this Manual in the glove box for future reference.
Should you resell the vehicle, please leave this Manual with it for the next owner.
In addition to the Owner’s Manual, the other booklets provided with your SUZUKI explain the vehicle’s warranties. We recommend you
read them as well to familiarize yourself with this important information.
When planning the regular scheduled maintenance of your SUZUKI, we recommend you visit your local SUZUKI dealership. Their factory-trained technicians will provide the best possible service and use only genuine SUZUKI parts and accessories.
80J23-03E
SERVICE STATION GUIDE
1. Fuel (see section 1)
2. Engine hood (see section 5)
3. Tire changing tools (see section 8)
4. Engine oil dipstick <Yellow>
(see section 7)
5. CVT fluid dipstick <Red or Orange>
(see section 7)
6. Engine coolant (see section 7)
7. Windshield washer fluid
(see section 7)
8. Battery (see section 7)
9. Tire pressure (see Tire Information
Label on driver’s door lock pillar)
10. Spare tire (see section 7)
7
2
4
6
5
8
2
3
10
9
1
80J2007
80J23-03E
TABLE OF CONTENTS
FUEL RECOMMENDATION 1
California Proposition 65 Warning
WARNING
Engine exhaust, some of its constituents, and certain product components contain or emit chemicals
known to the State of California to
cause cancer and birth defects or
other reproductive harm.
BEFORE DRIVING 2
OPERATING YOUR VEHICLE 3
DRIVING TIPS 4
OTHER CONTROLS AND EQUIPMENT 5
VEHICLE LOADING AND TOWING 6
INSPECTION AND MAINTENANCE 7
EMERGENCY SERVICE 8
APPEARANCE CARE 9
GENERAL INFORMATION 10
FUSES AND PROTECTED CIRCUITS 11
SPECIFICATIONS 12
INDEX 13
80J23-03E
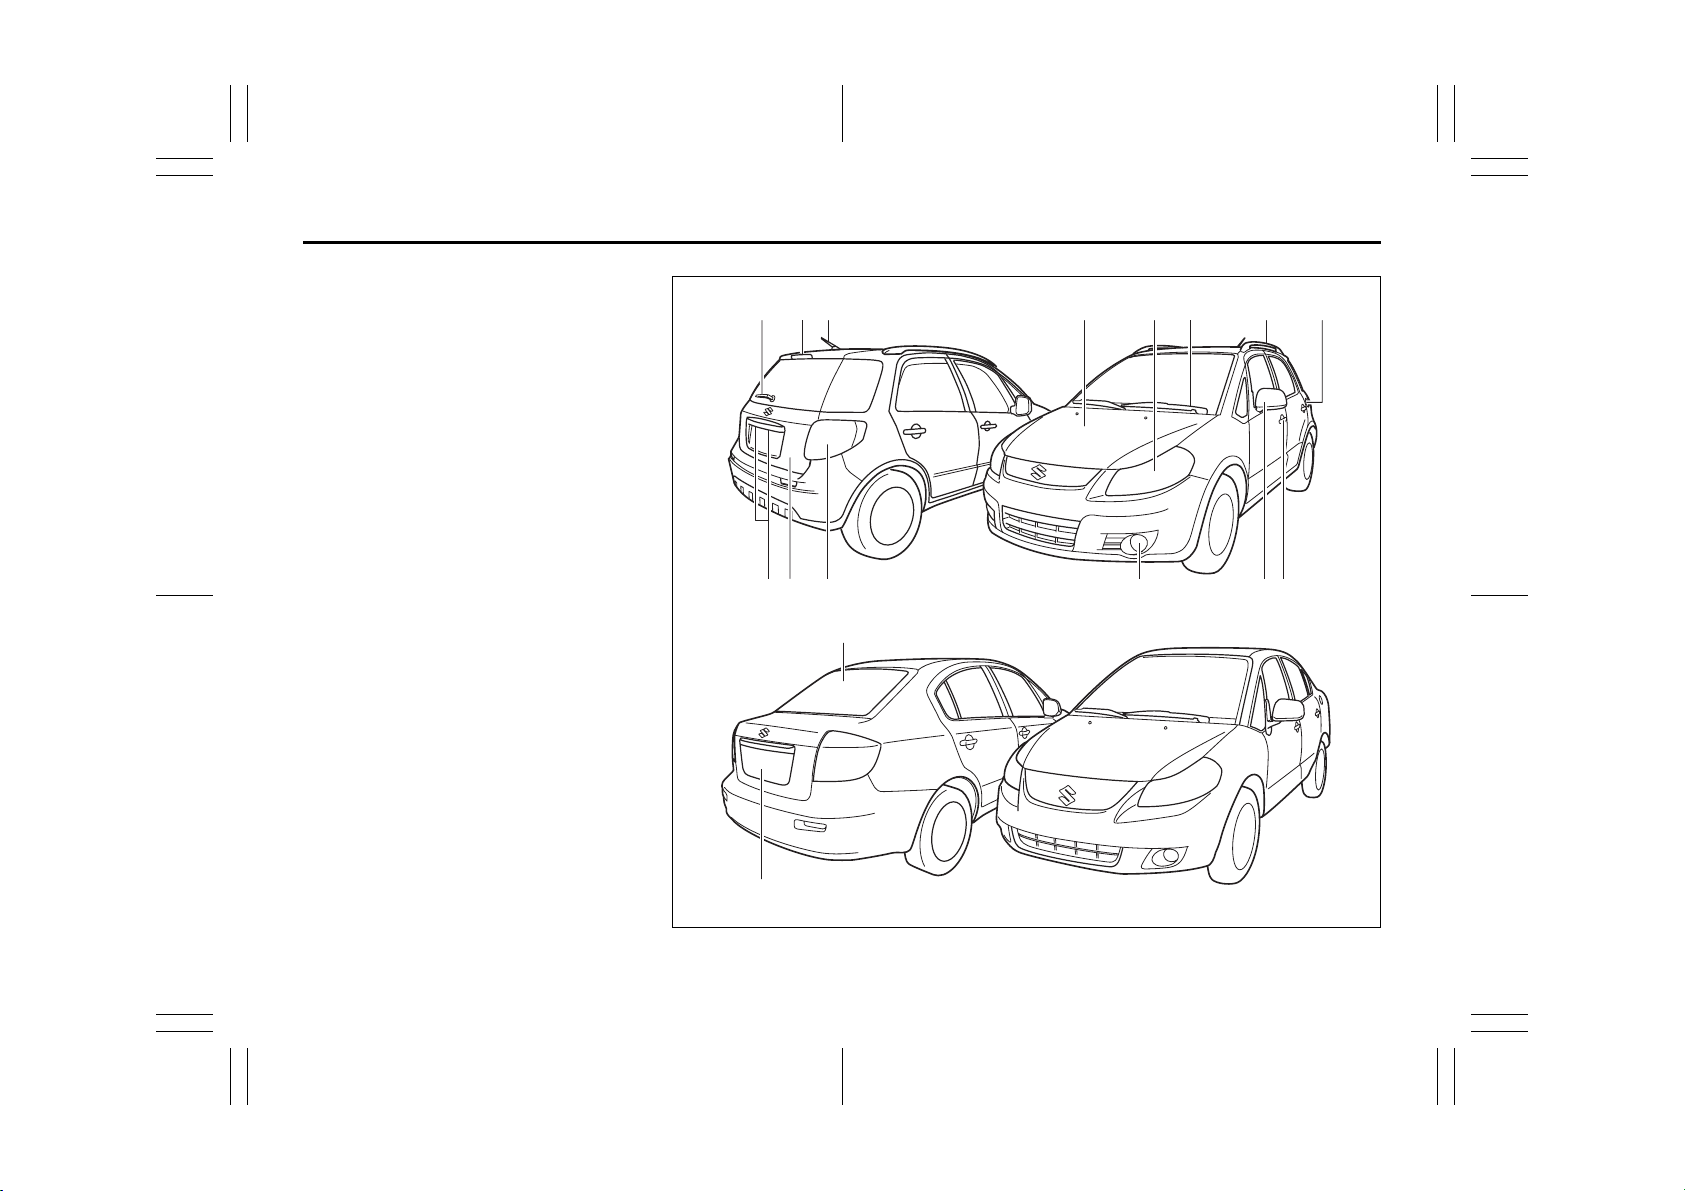
ILLUSTRATED TABLE OF CONTENTS
EXTERIOR
1. Rear Window Wiper (if equipped)
(P.2-80)
2. High-mount Stop Light (if equipped)
(P.7-45)
3. Radio Antenna (P.5-15)
4. Engine Hood (P.5-44)
5. Head Light (P2-75, P7-41)
6. Windshield Wiper (P.2-78)
7. Roof Rail (if equipped) (P.5-55)
8. Fuel Filler Cap (P.5-43)
9. License Plate Light (P.7-44)
10. Tailgate (if equipped) (P.2-3)
11. Rear Combination Light (P.7-43)
12. Front Fog Light (if equipped)
(P.2-77, 7-42)
13. Outside Rearview Mirror (P.2-20)
14. Door Locks (P.2-1)
15. Trunk (if equipped) (P.2-4)
SX4
1
10 119 12
SX4 SEDAN
3
2567
13
3
84
14
15
EXAMPLE
80J2058
80J23-03E
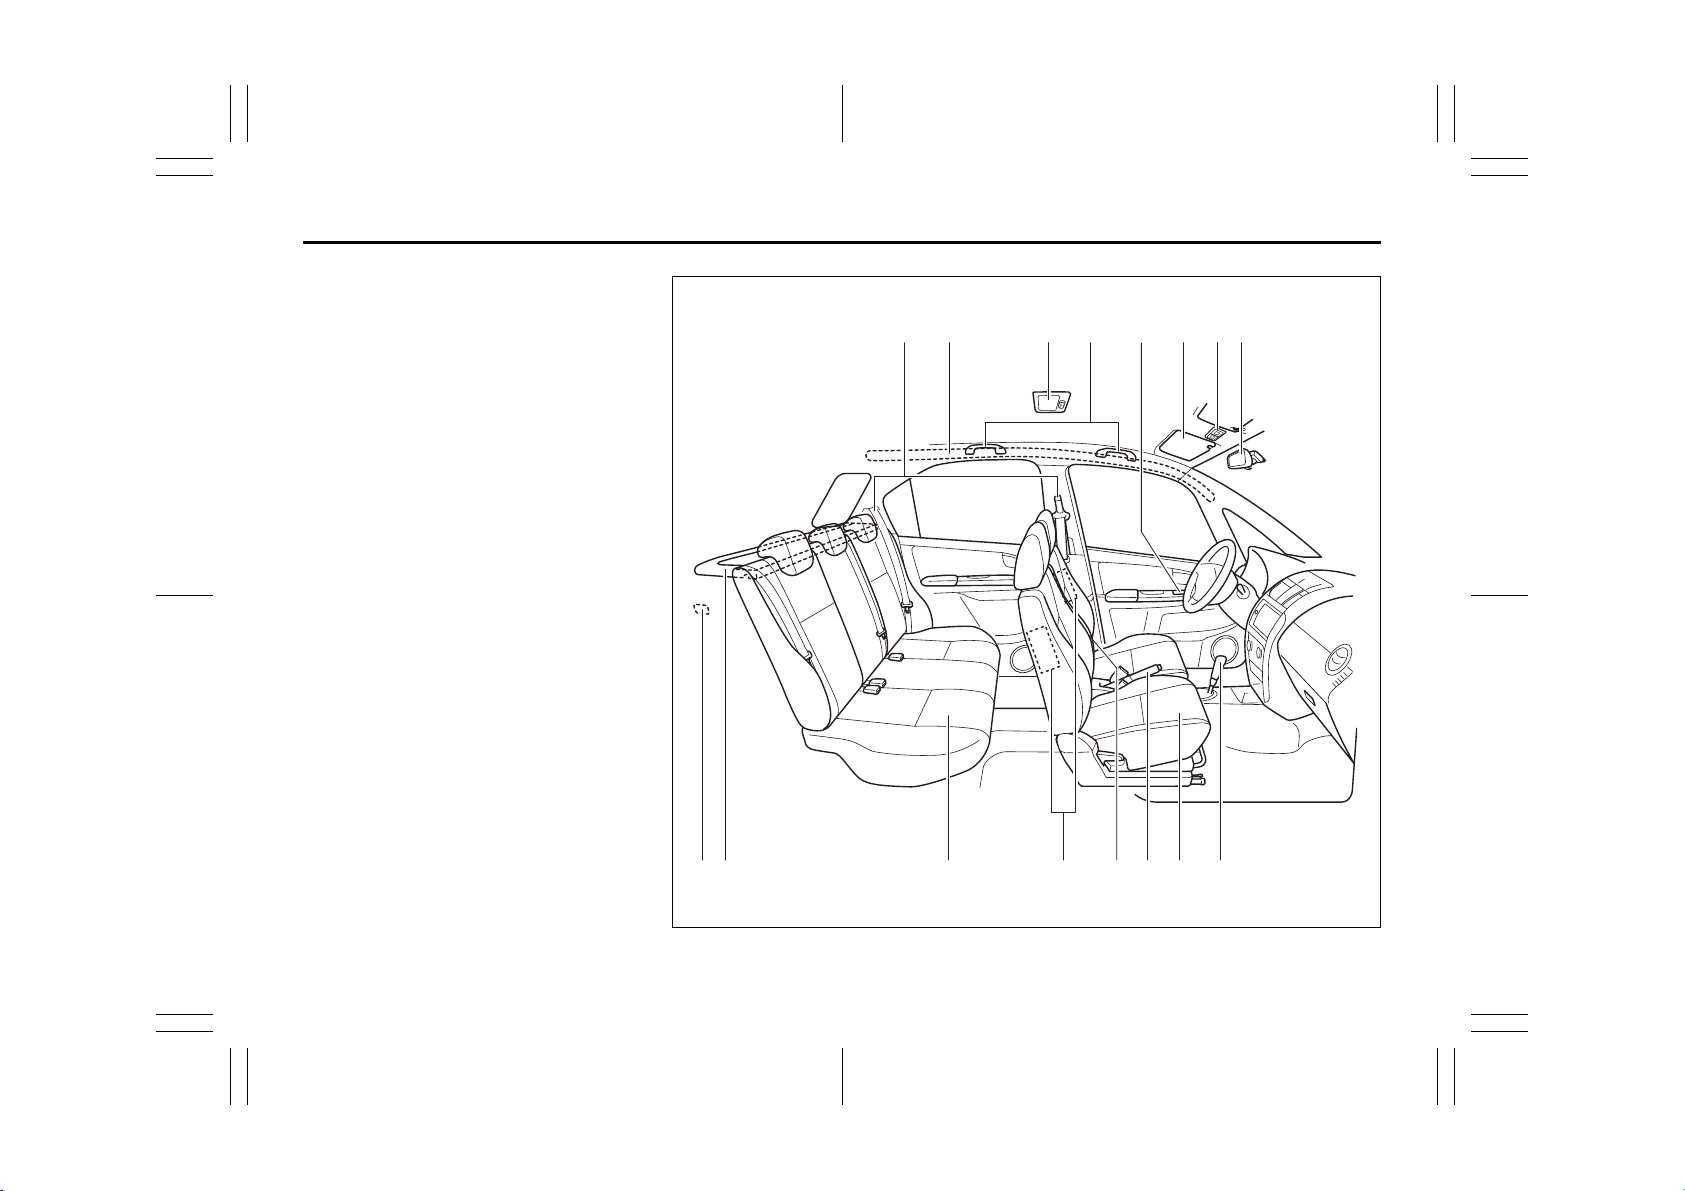
ILLUSTRATED TABLE OF CONTENTS
INTERIOR
1. Seat Belts (P.2-28)
2. Side Curtain Air Bags (if equipped)
(P.2-50)
3. Interior Light (P.5-45, 7-40)
4. Assist Grip (if equipped) (P.5-48)
5. Power Mirror Control Switch
(if equipped) (P.2-20)/
Power Window Controls (P.2-17)
6. Sun Visor (P.5-45)
7. Spot Light (P.5-47, 7-40)
8. Inside Rearview Mirror (P.2-19)
9. Luggage Compartment Light
(if equipped) (P.5-46, 7-45)
10. Luggage Compartment Cover
(if equipped) (P.5-52)
11. Rear Seat (P.2-24)
12. Side Air Bags (if equipped) (P.2-50)
13. Armrest (if equipped) (P. 5-51)
14. Parking Brake Lever (P.3-6)
15. Front Seats (P.2-21)
16. Gearshift Lever (P.3-10)
EXAMPLE
1 42 53 6
7 8
10 11 1413 15 1612
9
80J2062
80J23-03E
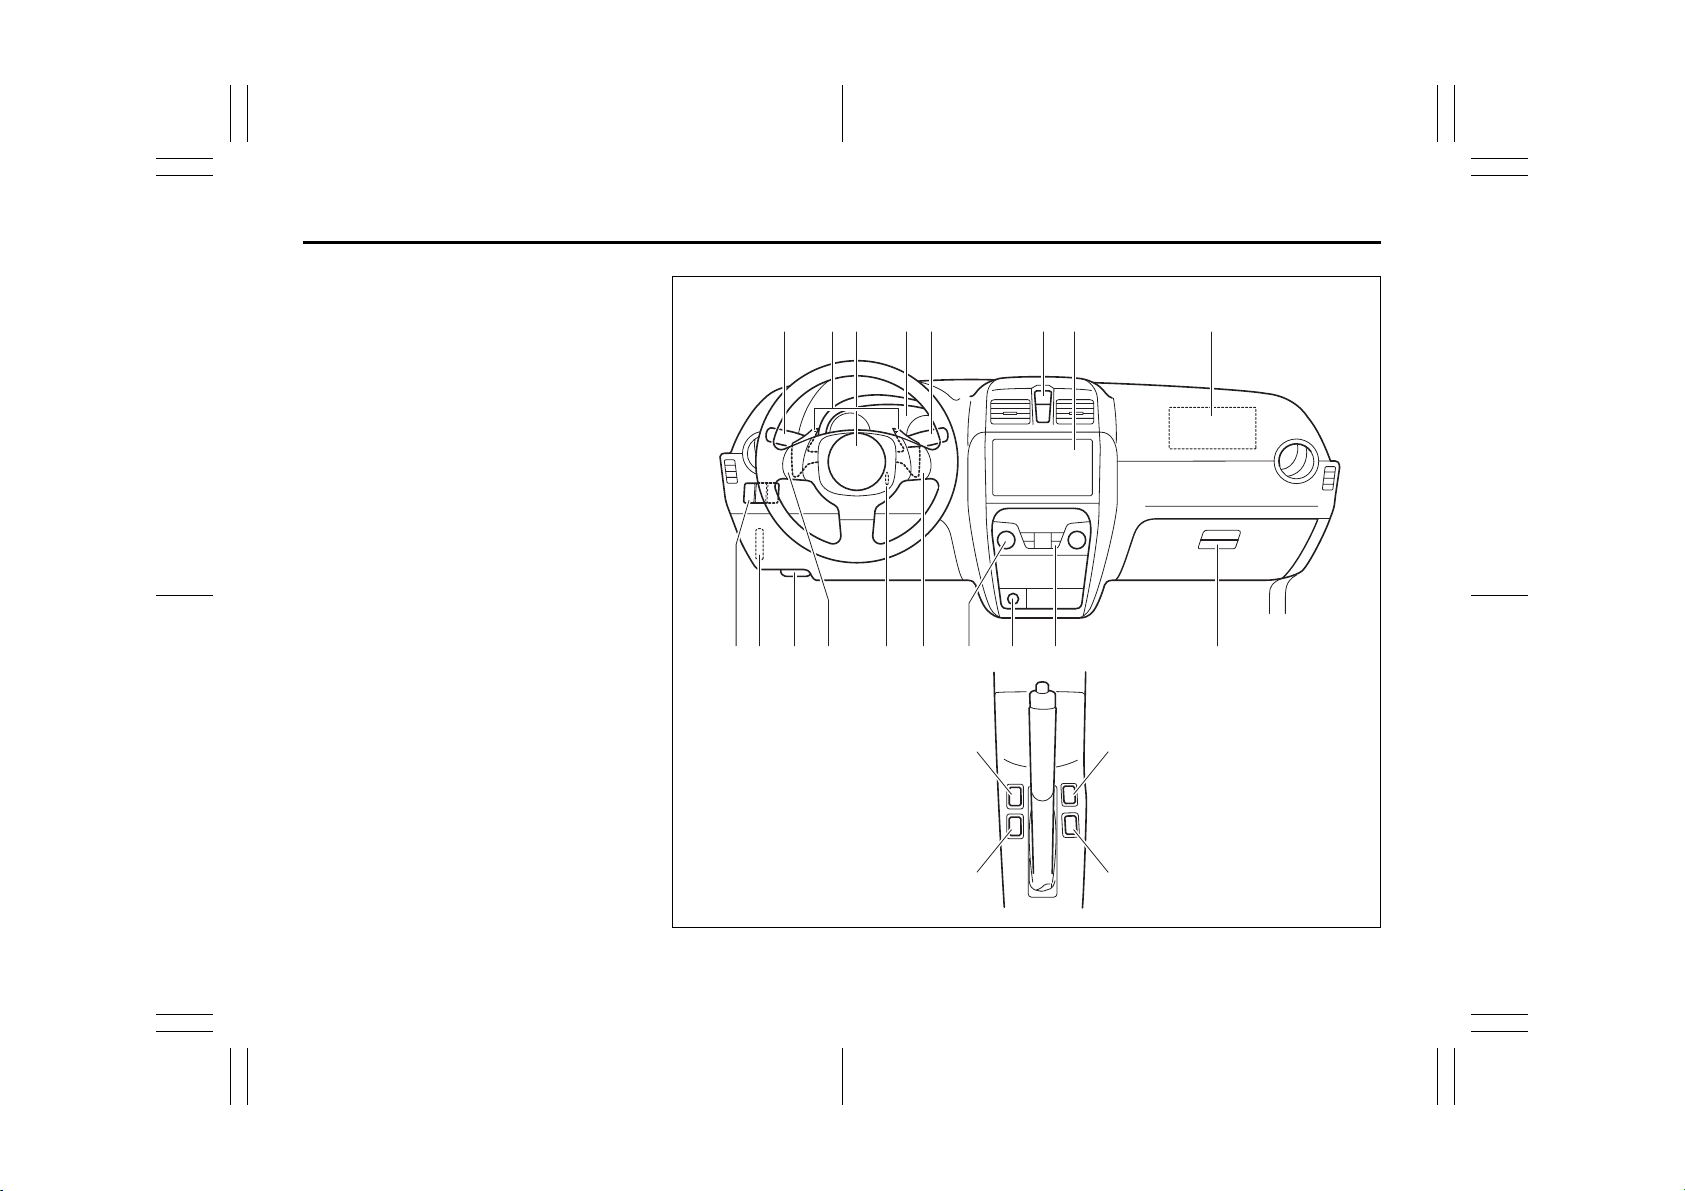
ILLUSTRATED TABLE OF CONTENTS
INSTRUMENT PANEL
1. Lighting Control Lever (P.2-75)/
Turn Signal Control Lever (P.2-77)
2. Shift Paddles (if equipped) (P.3-14)
3. Front Air Bags (P.2-49)
4. Instrument Cluster (P.2-59)
5. Windshield Wiper and Washer Lever
(P.2-78)/Rear Window Wiper and
Washer Switch (if equipped) (P.2-80)
6. Hazard Warning Switch (P.2-78)
7. Audio (P.5-15)
8. Front Fog Light Switch (if equipped)
(P.2-77)
9. Fuse Box (P.7-36)
10. Engine Hood Release Handle
(P.5-44)
11. Remote Audio Controls (if equipped)
(P.5-37)
12. Ignition Switch (P.3-2)
13. Cruise Control Switch (if equipped)
(P.3-18)
14. Heating and Air Conditioning System
(P.5-1)
15. Accessory Socket (if equipped)
(P.5-47)/Cigarette Lighter
(if equipped) (P.5-47)
16. Heated Rear Window and Heated
Outside Rearview Mirrors Switch
(if equipped) (P.2-81)
17. Glove Box (P.5-49)
18. ESP OFF Switch (if equipped)
(P.3-26)
19. 2WD/i-AWD (intelligent All Wheel
Drive) Switch (if equipped) (P.3-16)
20. Front Seat Heater Switch
(if equipped) (P.2-23)
EXAMPLE
9
1
32 4 5 6 7 3
12 13 14 15 16 1710 118
18
20 20
19
80J2074
80J23-03E
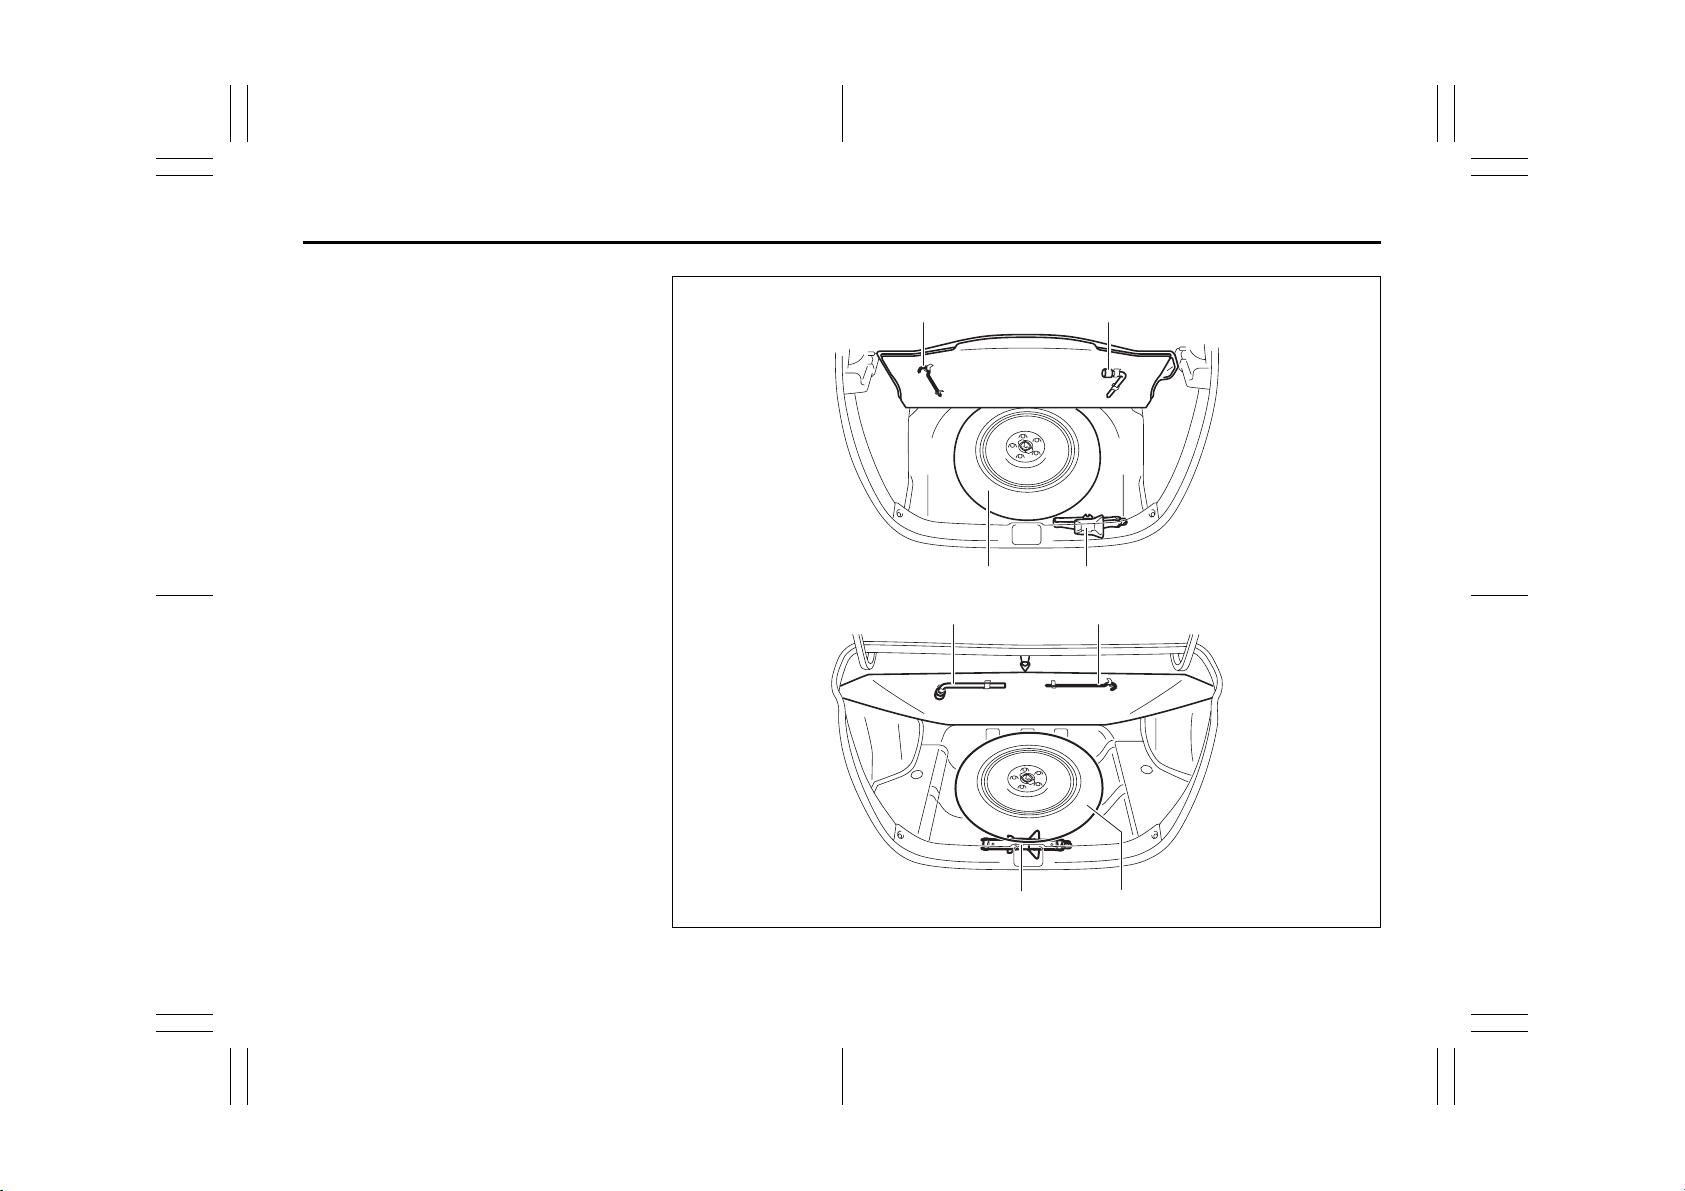
TIRE CHANGING TOOL
1. Jack Handle (P.8-1)
2. Wheel Brace (P.8-1)
3. Spare Tire (P.7-31, 8-1)
4. Jack (P.8-1)
SX4
SX4 SEDAN
ILLUSTRATED TABLE OF CONTENTS
12
34
21
4
3
EXAMPLE
80JM121
80J23-03E
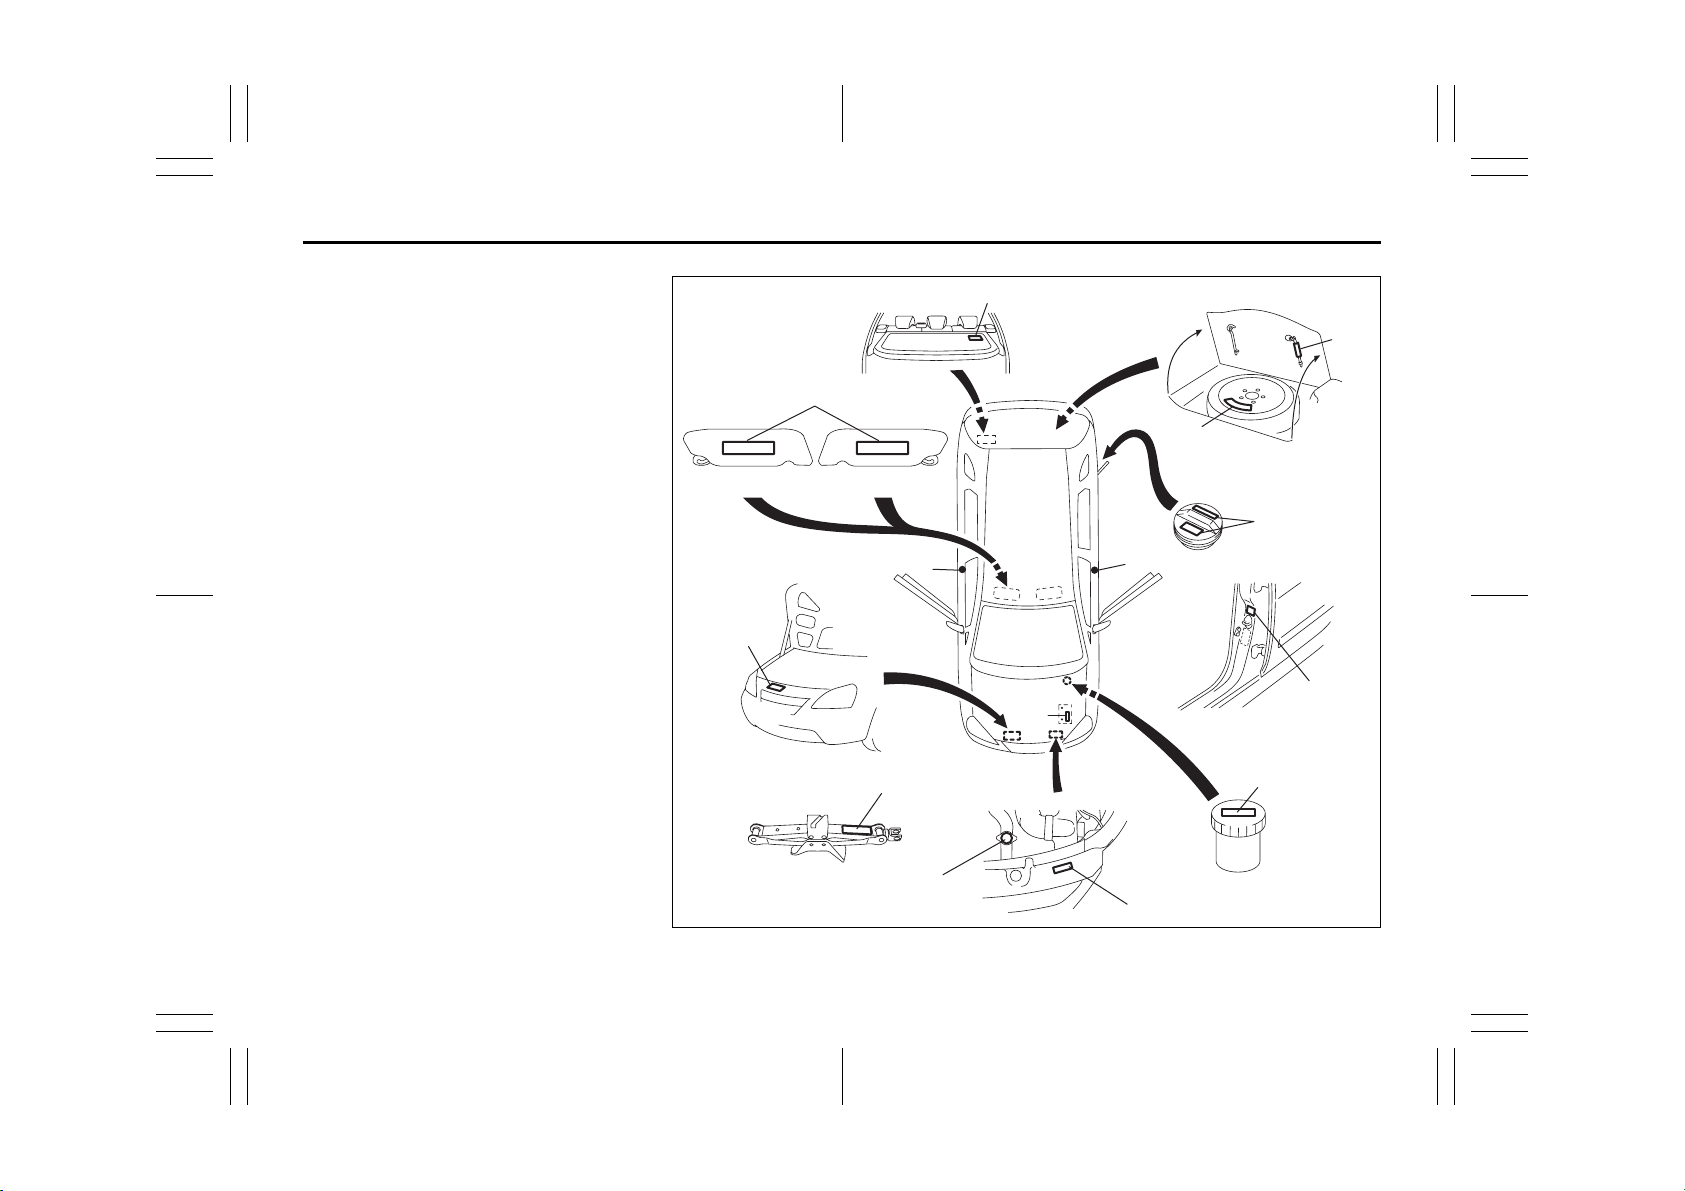
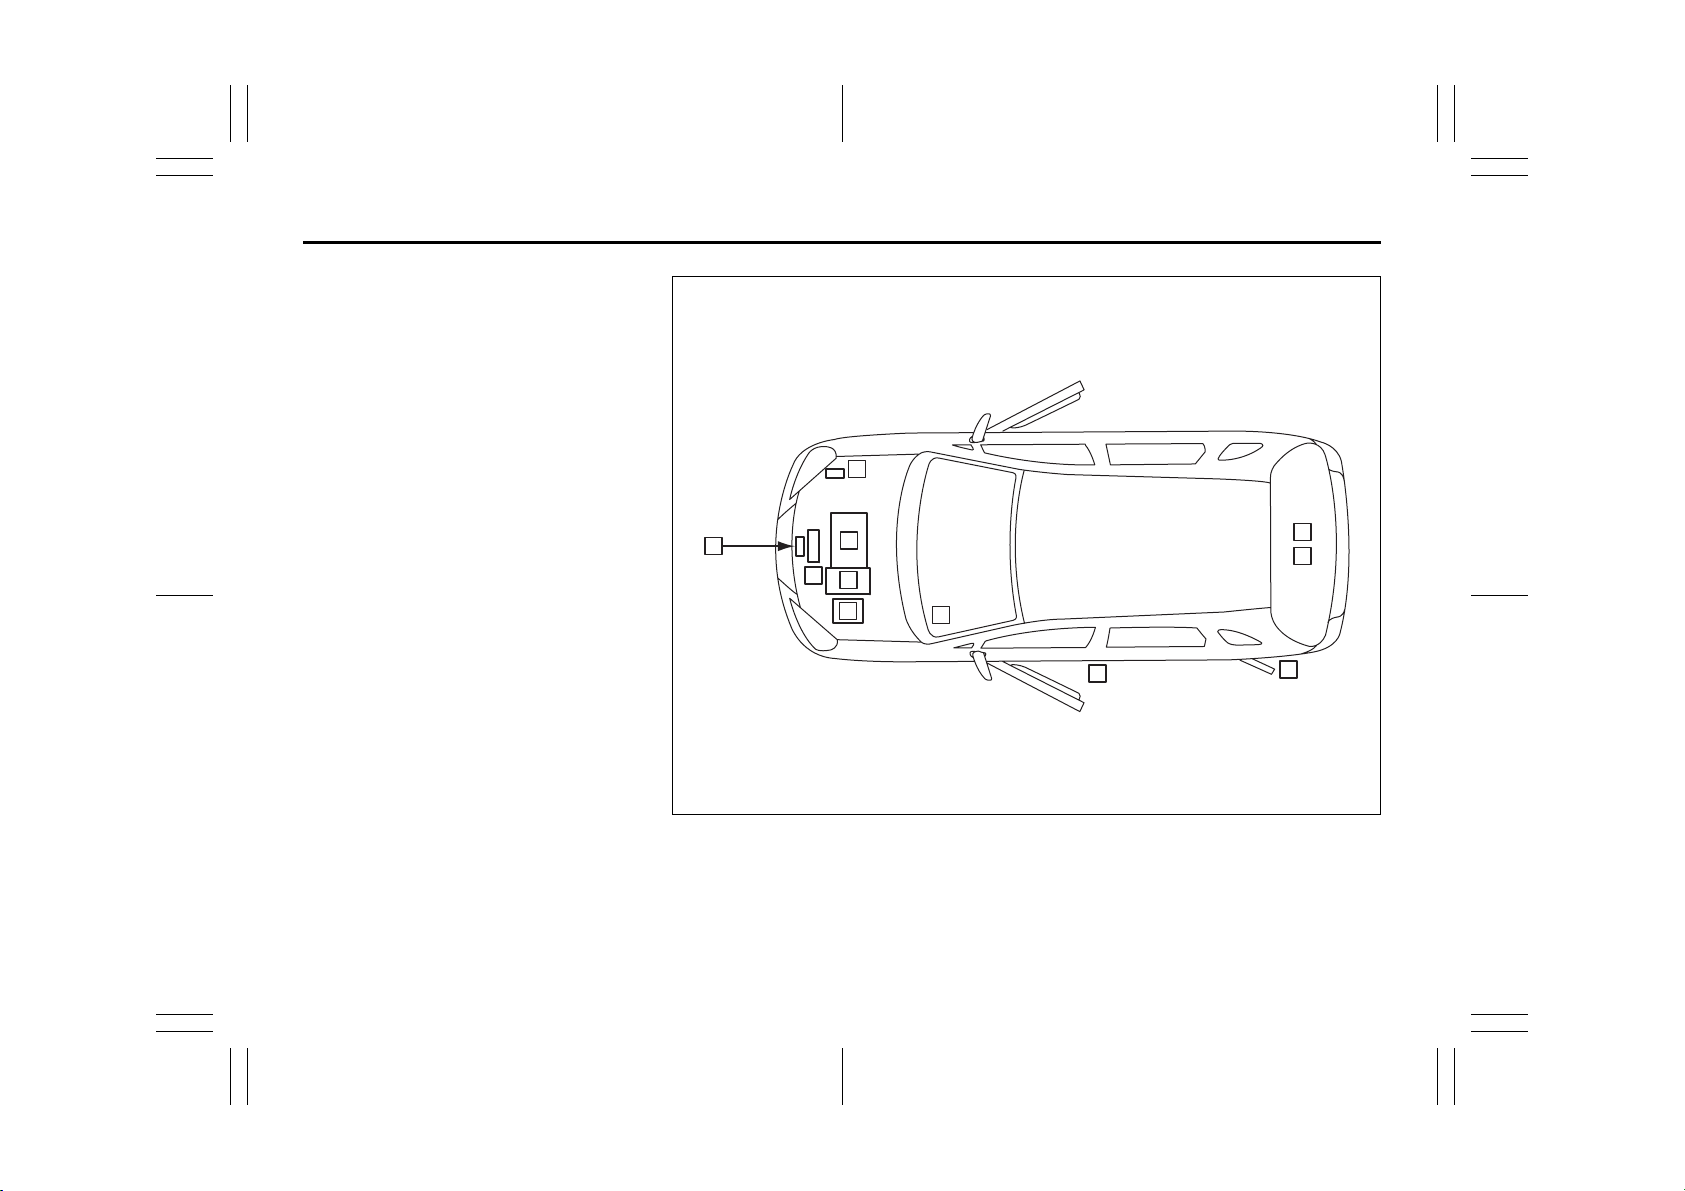
LOCATION OF WARNING
MESSAGES
Read and follow all of the warnings (labels
etc.) on your vehicle. Make sure you
understand all of them. Keep them on the
vehicle. Do not remove the messages for
any reason. If a label comes off or the
messages become difficult to be read,
have it corrected by your SUZUKI dealer.
1. Air bag warning labels
(on both sun visors)
2. Jacking warning label
3. Fuel filler cap message
4. Brake fluid cap message
5. Engine cooling fan warning label
6. Radiator cap warning label
7. Air conditioner warning label
8. Battery label
9. Compact spare tire warning label
10. Side air bag warning label
11. Luggage compartment cover warning
label
12. Jacking instruction warning label
1
Driver Passenger
7
2
11
12
9
3
10
8
10
10
4
6
5
80J2075
80J23-03E
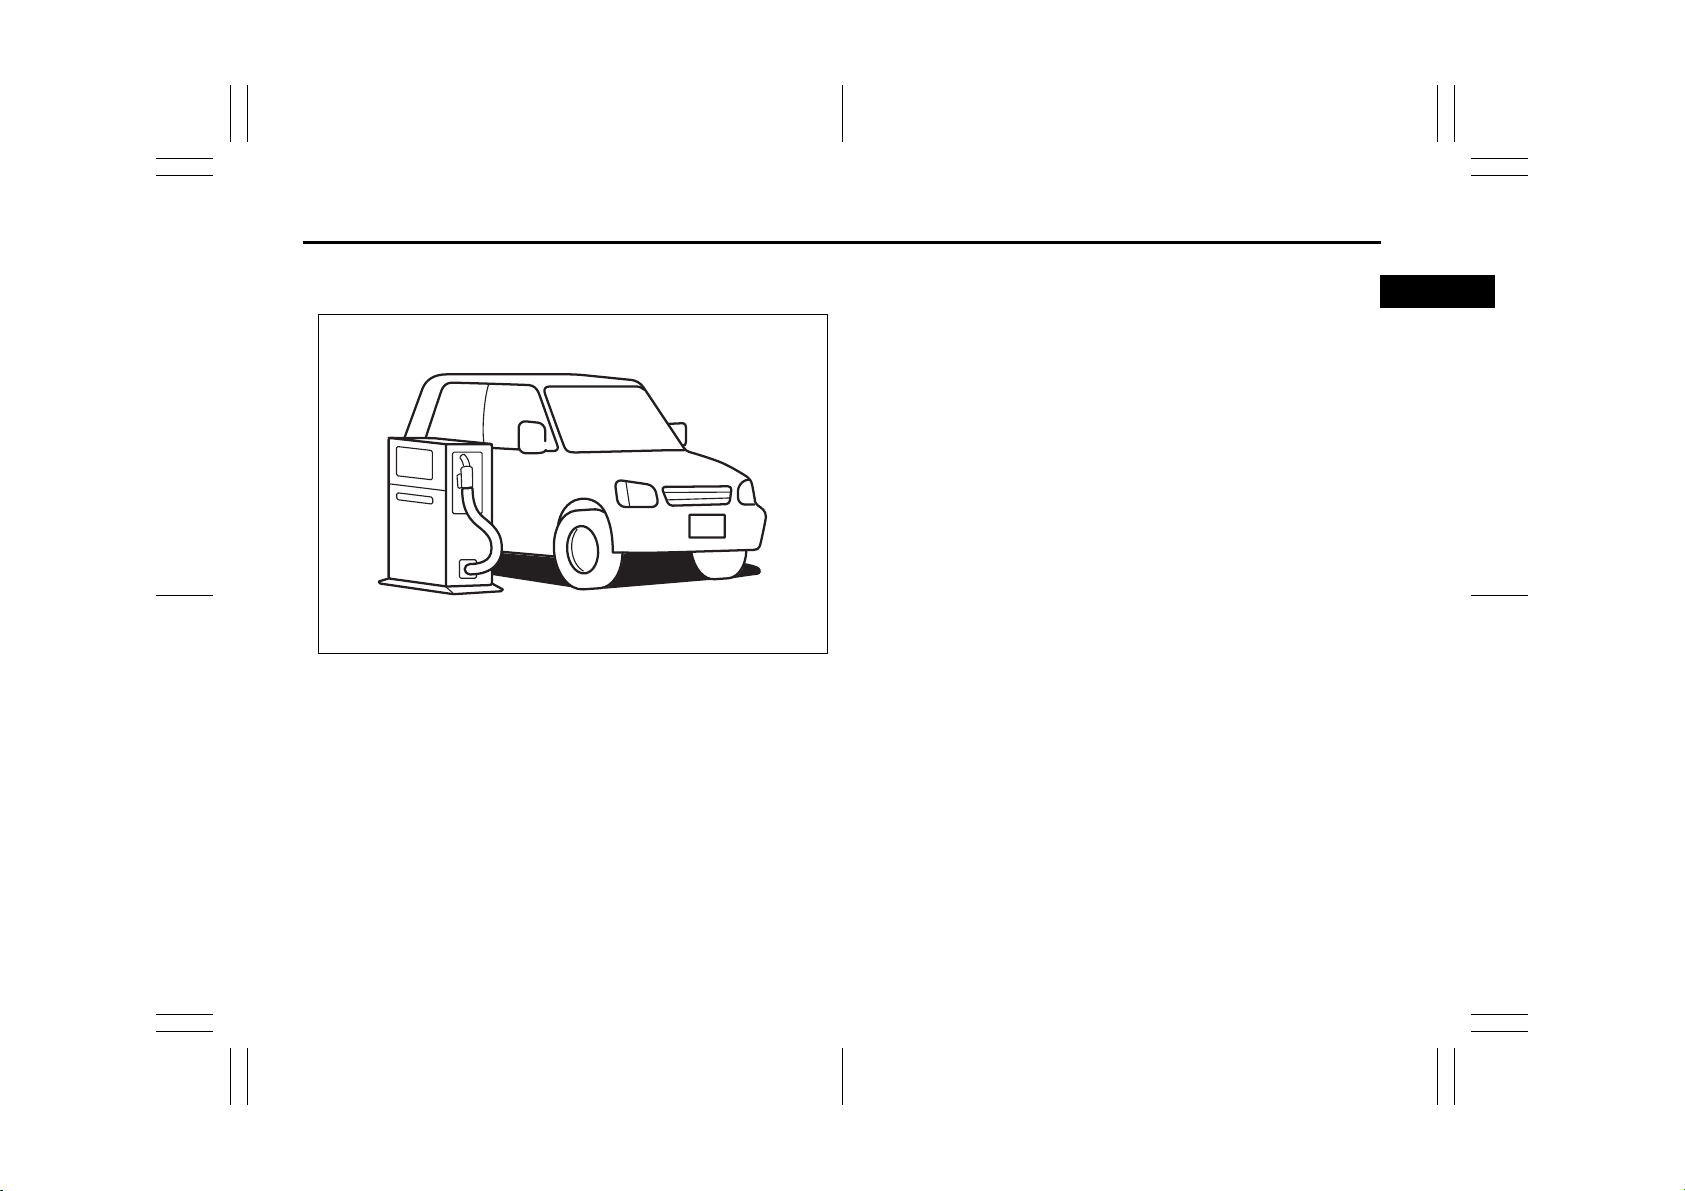
FUEL RECOMMENDATION
65D394
FUEL RECOMMENDATION
Fuel Recommendation ........................................................ 1-1
1
80J23-03E
Fuel Recommendation: 1, 2
FUEL RECOMMENDATION
Fuel Recommendation
60A004
Your vehicle requires regular unleaded
gasoline with a minimum rating of 87 pump
octane ((R + M)/2 method). In some areas,
the only fuels that are available are oxygenated fuels.
Oxygenated fuels which meet the minimum octane requirement and the requirements described below may be used in
your vehicle without jeopardizing the New
Vehicle Limited Warranty.
NOTE:
Oxygenated fuels are fuels which contain
oxygen-carrying additives such as MTBE
or alcohol.
Gasoline Containing MTBE
Unleaded gasoline containing MTBE
(methyl tertiary butyl ether) may be used in
your vehicle if the MTBE content is not
greater than 15%. This oxygenated fuel
does not contain alcohol.
Gasoline/Ethanol blends
Blends of unleaded gasoline and ethanol
(grain alcohol), also known as gasohol,
may be used in your vehicle if the ethanol
content is not greater than 10%.
Gasoline/Methanol blends
Fuels containing 5% or less methanol
(wood alcohol) may be suitable for use in
your vehicle if they contain cosolvents and
corrosion inhibitors. Do NOT USE fuels
containing more than 5% methanol under
any circumstances. Fuel system damage
or vehicle performance problems resulting
from the use of such fuels are not the
responsibility of SUZUKI and may not be
covered under the New Vehicle Limited
Warranty.
Fuel Pump Labeling
In some states, pumps that dispense oxygenated fuels are required to be labeled for
the type and percentage of oxygenate and
whether important additives are present.
Such labels may provide enough information for you to determine if a particular
blend of fuel meets the requirements listed
above. In other areas, pumps may not be
clearly labeled as to the content or type of
oxygenate and additives. If you are not
sure that the fuel you intend to use meets
these requirements, check with the service
station operator or the fuel supplier.
NOTE:
To help clean the air, SUZUKI recommends you use the oxygenated fuels.
However, if you are not satisfied with the
driveability or fuel economy of your vehicle
when you are using an oxygenated fuel,
switch back to the regular unleaded gasoline.
CAUTION
Be careful not to spill fuel containing
alcohol while refueling. If fuel is
spilled on the vehicle body, wipe it up
immediately. Fuels containing alcohol can cause paint damage, which is
not covered under the New Vehicle
Limited Warranty.
1-1
80J23-03E

BEFORE DRIVING
BEFORE DRIVING
60G404
Keys ...................................................................................... 2-1
Door Locks .......................................................................... 2-1
Keyless Start System Remote Controller/
Keyless Entry System Transmitter .................................... 2-6
Theft Deterrent Light ........................................................... 2-17
Windows .............................................................................. 2-17
Mirrors .................................................................................. 2-19
Front Seats .......................................................................... 2-21
Front Seat Heater (if equipped) .......................................... 2-23
Rear Seats ............................................................................ 2-24
Seat Belts and Child Restraint Systems ........................... 2-28
Supplemental Restraint System (air bags) ....................... 2-47
Instrument Cluster .............................................................. 2-59
Warning and Indicator Lights ............................................ 2-60
Speedometer ....................................................................... 2-68
Tachometer .......................................................................... 2-69
Fuel Gauge ........................................................................... 2-69
Temperature Gauge ............................................................ 2-70
Information display ............................................................. 2-70
Lighting Control Lever ........................................................ 2-75
Front Fog Light Switch (if equipped) ................................ 2-77
Turn Signal Control Lever .................................................. 2-77
Hazard Warning Switch ...................................................... 2-78
Windshield Wiper and Washer Lever ................................ 2-78
Tilt Steering Lock Lever (if equipped) ............................... 2-81
Horn ...................................................................................... 2-81
Heated Rear Window and Heated Outside Rearview
Mirrors (if equipped) Switch ............................................... 2-81
2
80J23-03E
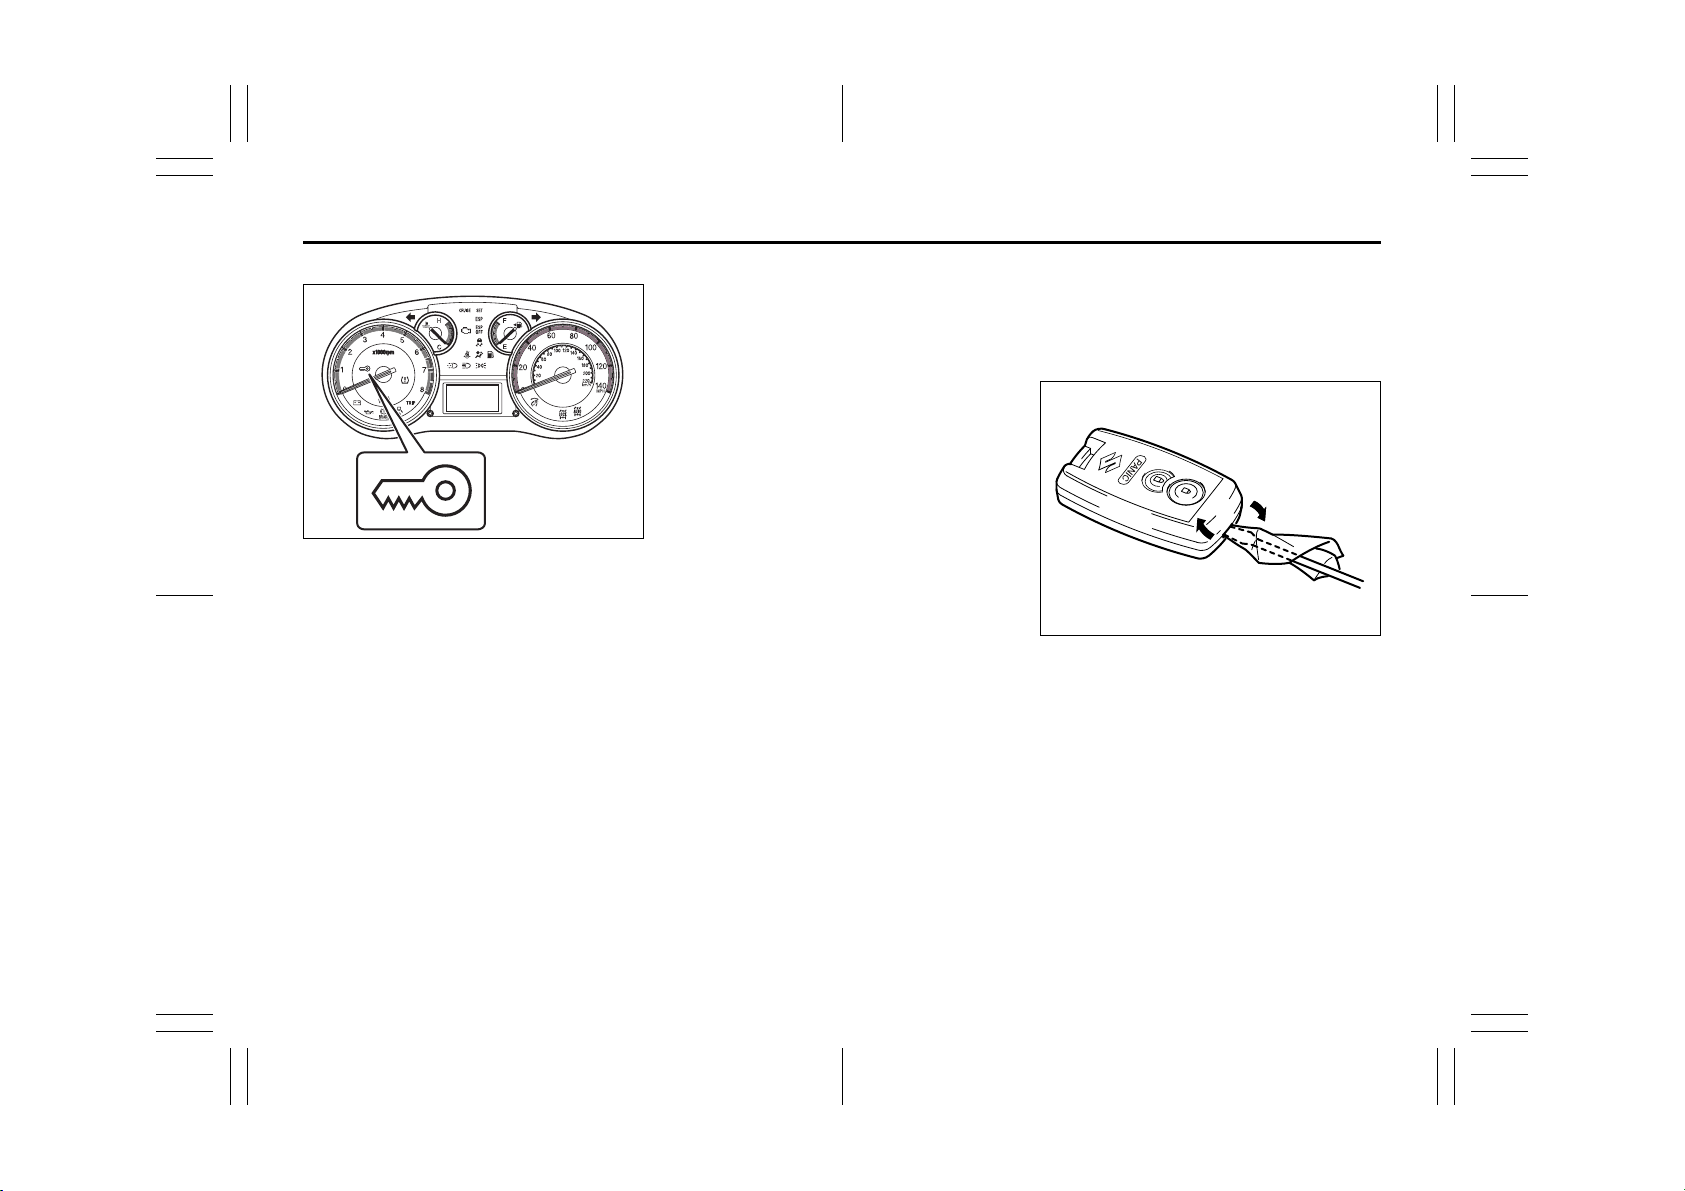
Keys: 8
Door Locks: 3, 5, 8
BEFORE DRIVING
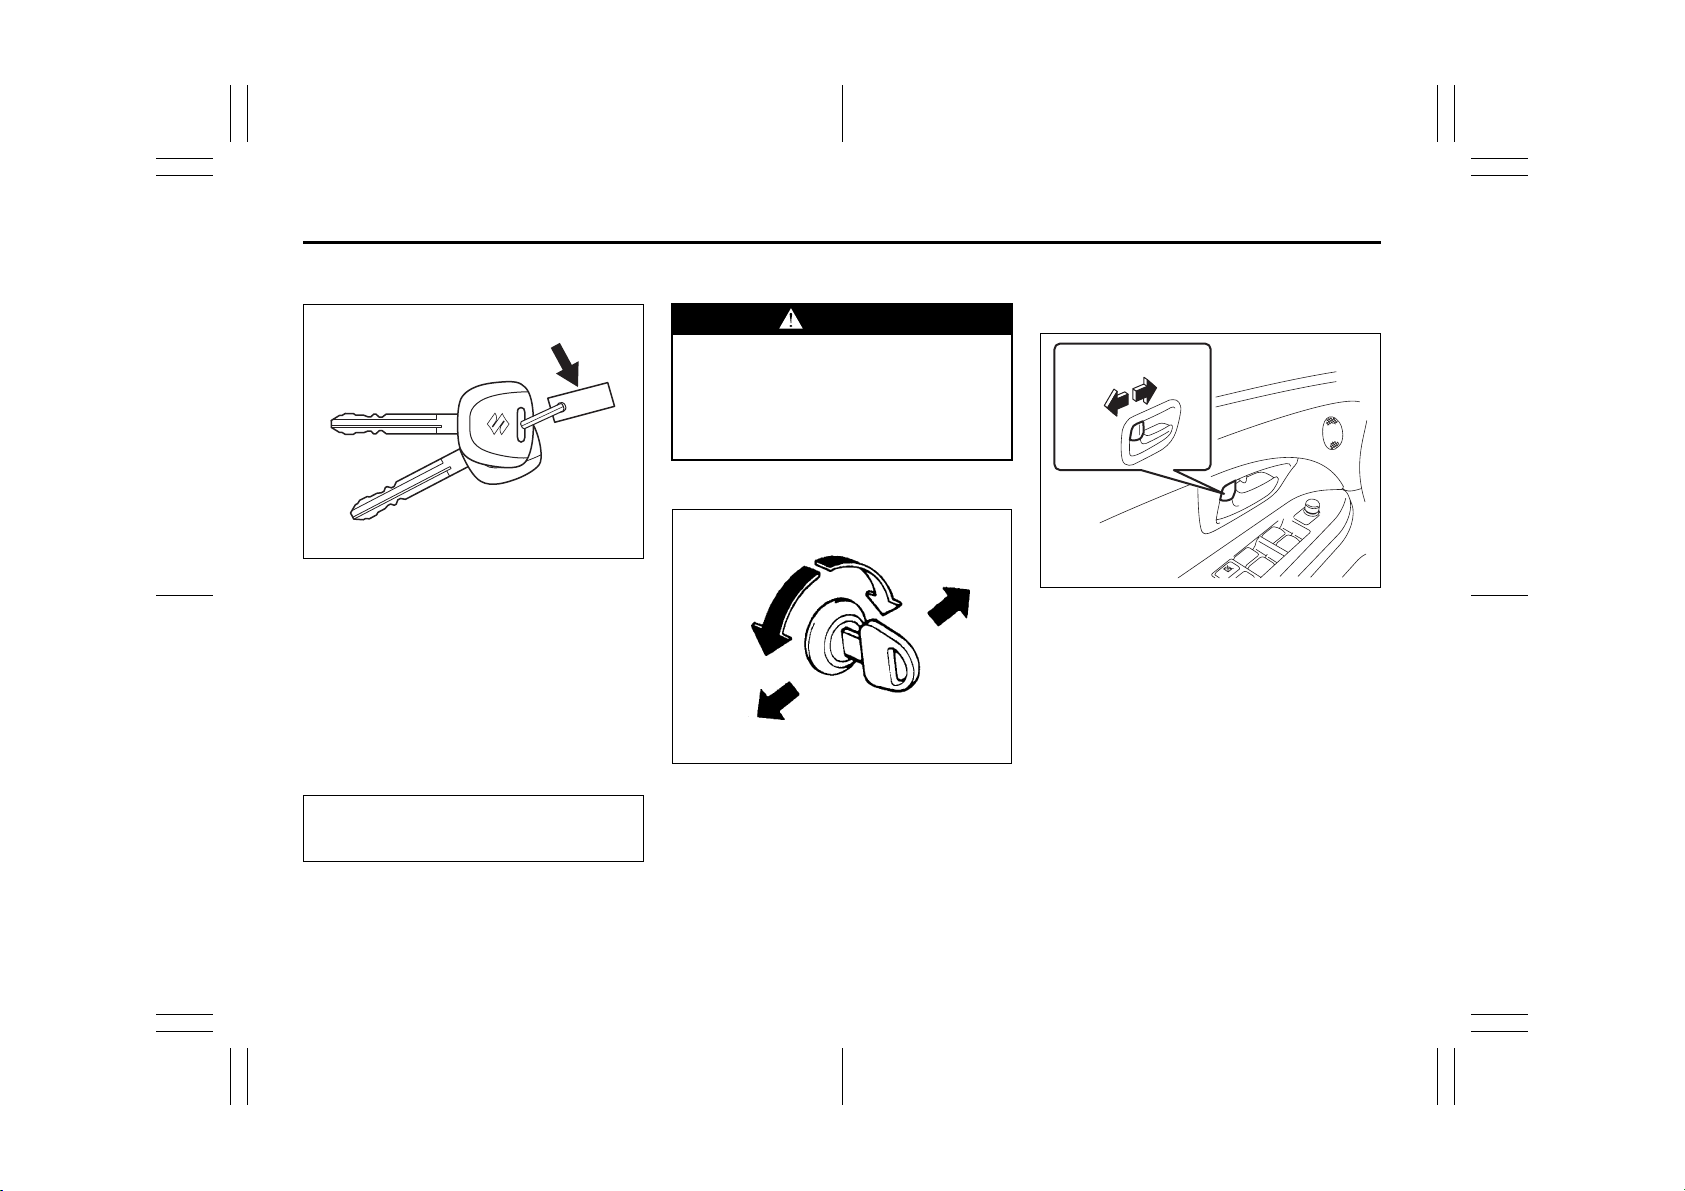
Keys
EXAMPLE
54G489
Your vehicle comes with a pair of identical
keys. Keep the spare key in a safe place.
One key can open all of the locks on the
vehicle.
The key identification number is stamped
on a metal tag provided with the keys.
Keep the tag in a safe place. If you lose
your keys, you will need this number to
have new keys made. Write the number
below for your future reference.
KEY NUMBER:
Ignition Key Reminder
A buzzer sounds to remind you to remove
the ignition key if it is in the ignition switch
when the driver’s door is opened.
Door Locks
WARNING
Always lock all doors when driving.
Locking the doors helps to prevent
occupants from being thrown from
the vehicle in the event of an accident. It also helps prevent unintended opening of the doors.
Side Door Locks
LOCK
UNLOCK
Rear
Front
60A009
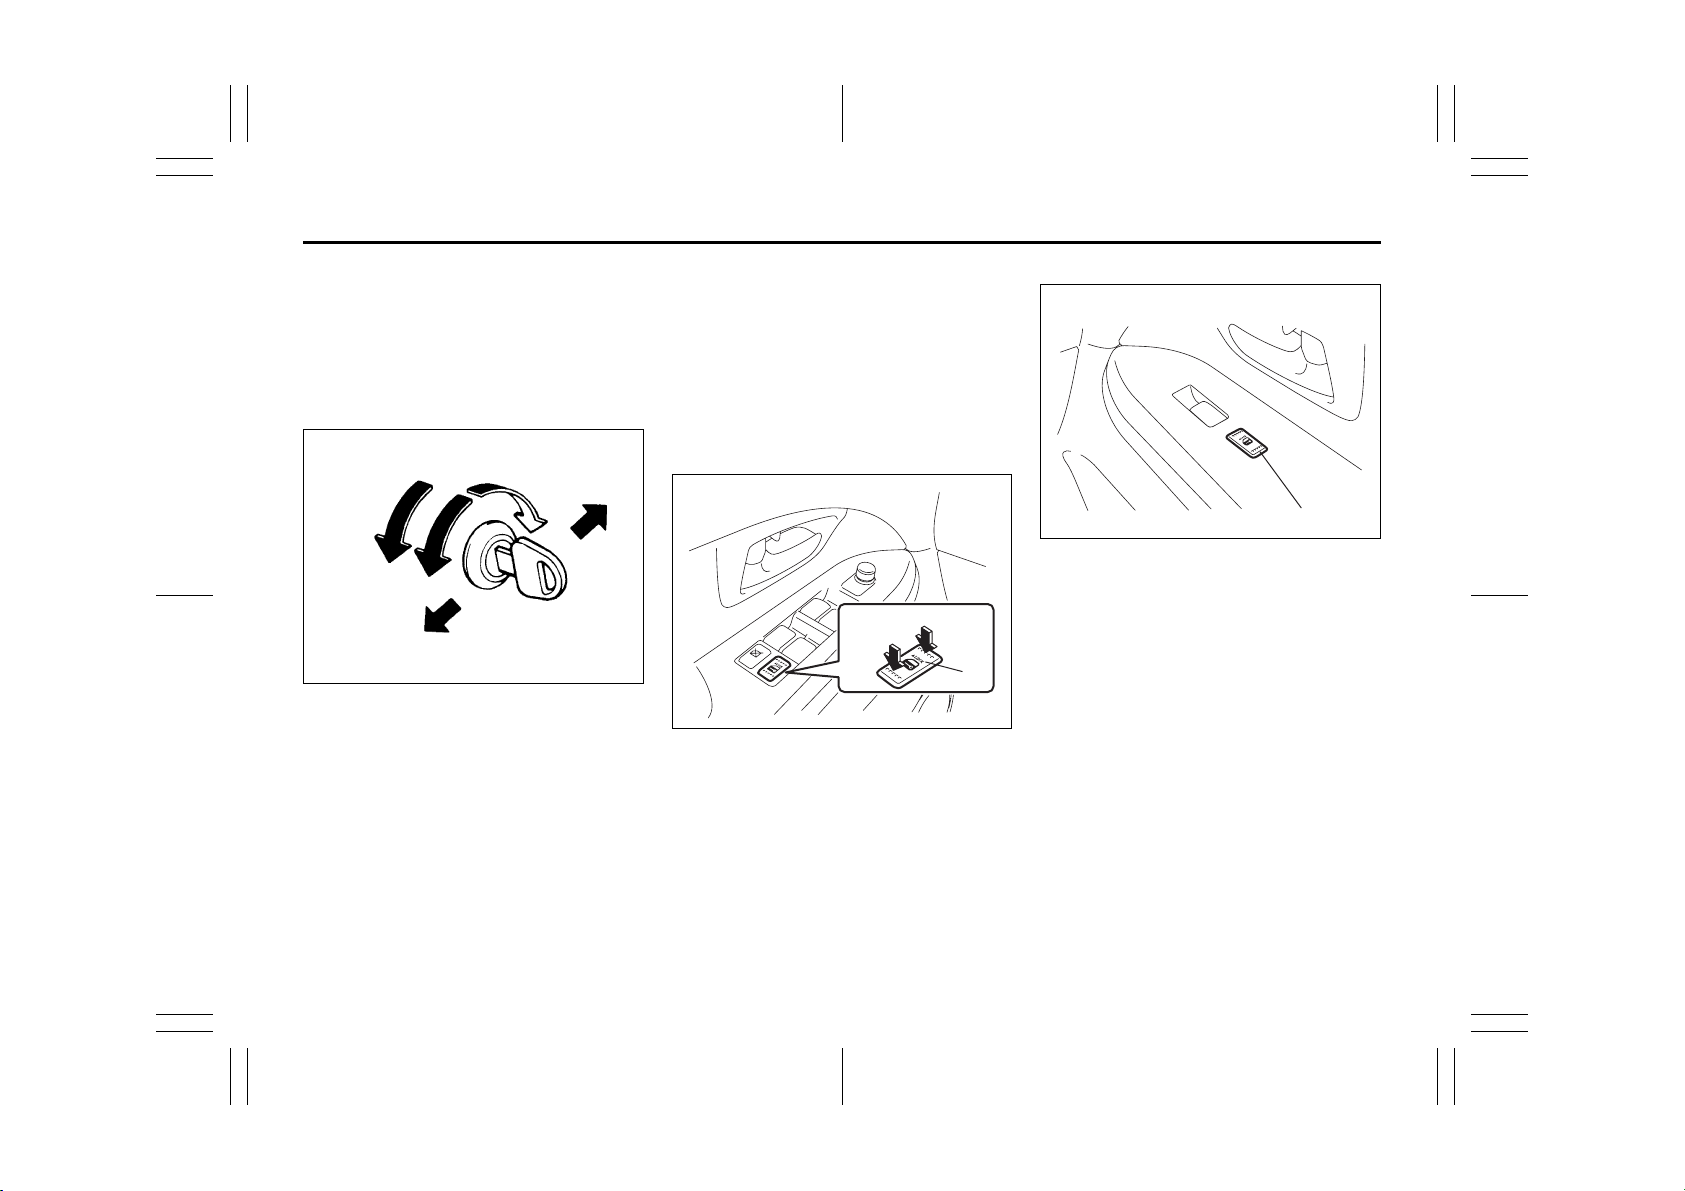
To lock a front door from outside the vehicle:
• Insert the key and turn the top of the key
toward the rear of the vehicle, or
• Turn the lock knob forward, then pull and
hold the door handle as you close the
door.
To unlock a front door from outside the
vehicle, insert the key and turn the top of
the key toward the front of the vehicle.
UNLOCK LOCK
To lock a door from inside the vehicle, turn
the lock knob forward. Turn the lock knob
rearward to unlock the door.
To lock a rear door from outside the vehicle, turn the lock knob forward and close
the door. You do not need to pull and hold
the door handle as you close the door.
EXAMPLE
79J021
2-1
80J23-03E
Door Locks: 3, 5, 8
BEFORE DRIVING
Power Door Locking System
You can lock and unlock all the doors
(including the tailgate of SX4) simultaneously by:
• Turning the key in a front door lock, or
• Pushing the power door locking switch
located on the driver’s side or the front
passenger’s side door panel.
UNLOCK
Front
(when using the key)
To lock all the doors simultaneously, insert
the key in a front door lock and turn the top
of the key toward the rear of the vehicle
once.
LOCK
Rear
54G294
To unlock all the doors simultaneously,
insert the key in a front door lock and turn
the top of the key toward the front of the
vehicle twice.
To unlock only one of the front doors, insert
the key in that door lock and turn the top of
the key toward the front of the vehicle
once.
Driver’s side
EXAMPLE
UNLOCK
LOCK
(1)
80JC091
Front passenger’s side
EXAMPLE
(2)
80JC092
(when using the power door locking
switch)
To lock or unlock all the doors simultaneously, depress the front or rear of the
switch (1) or (2), respectively.
2-2
80J23-03E
Door Locks: 3, 5, 8
BEFORE DRIVING
NOTE:
• If your vehicle is equipped with the keyless entry system, you can also lock or
unlock all doors by operating the remote
controller/transmitter. Refer to “Keyless
Start System Remote Controller/Keyless Entry System Transmitter” in this
section.
• If your vehicle is equipped with the keyless start system, you can also lock or
unlock all doors by pushing the request
switch on the door handle. Refer to “Keyless Start System Remote Controller/
Keyless Entry System Transmitter” in
this section.
Child Lock System (rear doors)
EXAMPLE
(2)
(1)
80JM019
(1) LOCK
(2) UNLOCK
Each of the rear doors is equipped with a
child lock which can be used to help prevent unwanted opening of the door from
inside the vehicle. When the lock lever is in
the “LOCK” position (1), the rear door can
only be opened from outside. When the
lock lever is in the “UNLOCK” position (2),
the rear door can be opened from inside or
outside.
WARNING
Be sure to place the child lock in the
“LOCK” position whenever children
are seated in the rear.
Tailgate ( S X 4)
EXAMPLE
(1)
80JC059
(1) Tailgate unlatch switch
You can lock and unlock the tailgate by
using the key in the driver’s door lock.
To open the tailgate, push and hold the tailgate unlatch switch (1) and lift the tailgate.
NOTE:
When the tailgate is closed incompletely,
follow the procedure below:
1) Push the tailgate unlatch switch (1) and
open the tailgate a little.
2) After a few seconds, close the tailgate.
3) Make sure that the tailgate is closed
completely.
2-3
80J23-03E
Door Locks: 3, 5, 8
BEFORE DRIVING
WARNING
Always make sure that the tailgate is
closed and latched securely. Completely closing the tailgate helps prevent occupants from being thrown
from the vehicle in the event of an
accident. Completely closing it also
helps keep exhaust gases from entering the car.
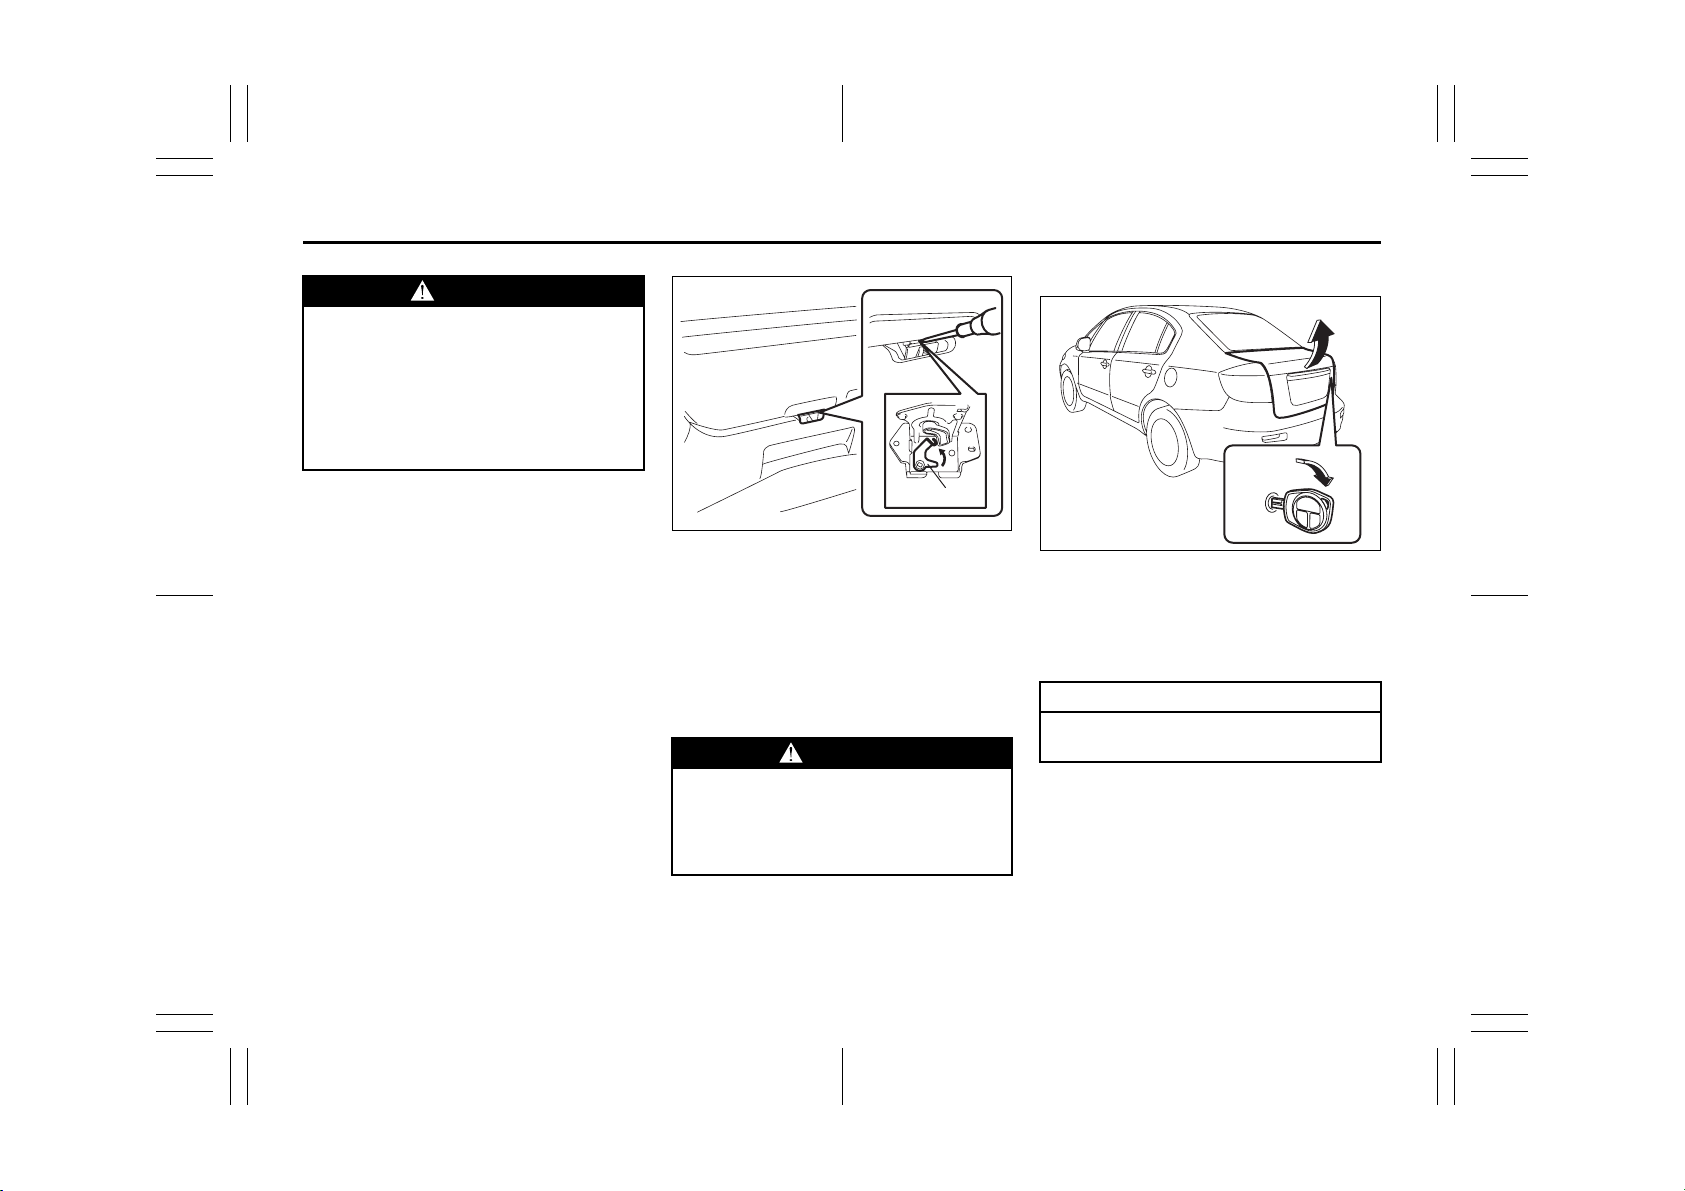
If you cannot unlatch the tailgate by pushing the unlatch switch (1) due to a discharged battery or malfunction, follow the
procedures below to unlatch the tailgate
from inside the vehicle.
1) Fold the rear seat forward for easier
access. Refer to “Folding Rear Seats”
section for details on how to fold the
rear seat forward.
(2)
80J092
2) Push open the tailgate from inside by
pushing up on the emergency lever (2)
using a flat blade screwdriver or the
jack handle. The tailgate will be latched
again by closing the tailgate simply.
If the tailgate cannot be unlatched by pushing the unlatch switch (1), have the vehicle
inspected by your SUZUKI dealer.
WARNING
• To avoid injury, do not use your finger to push the emergency lever.
• Make sure there is no one near the
tailgate when pushing open the tailgate from inside the vehicle.
Trunk Lid (SX4 SEDAN)
EXAMPLE
55KS005
If your vehicle is equipped with a trunk lid
key lock, you can open the trunk lid by
using the key in the trunk lid lock. To open
the trunk lid, insert the key and turn it
clockwise to unlatch and lift the trunk lid.
CAUTION
Do not use the key to lift up the lid, or
the key may break off in the lock.
2-4
80J23-03E
Door Locks: 3, 5, 8
BEFORE DRIVING
(1)
EXAMPLE
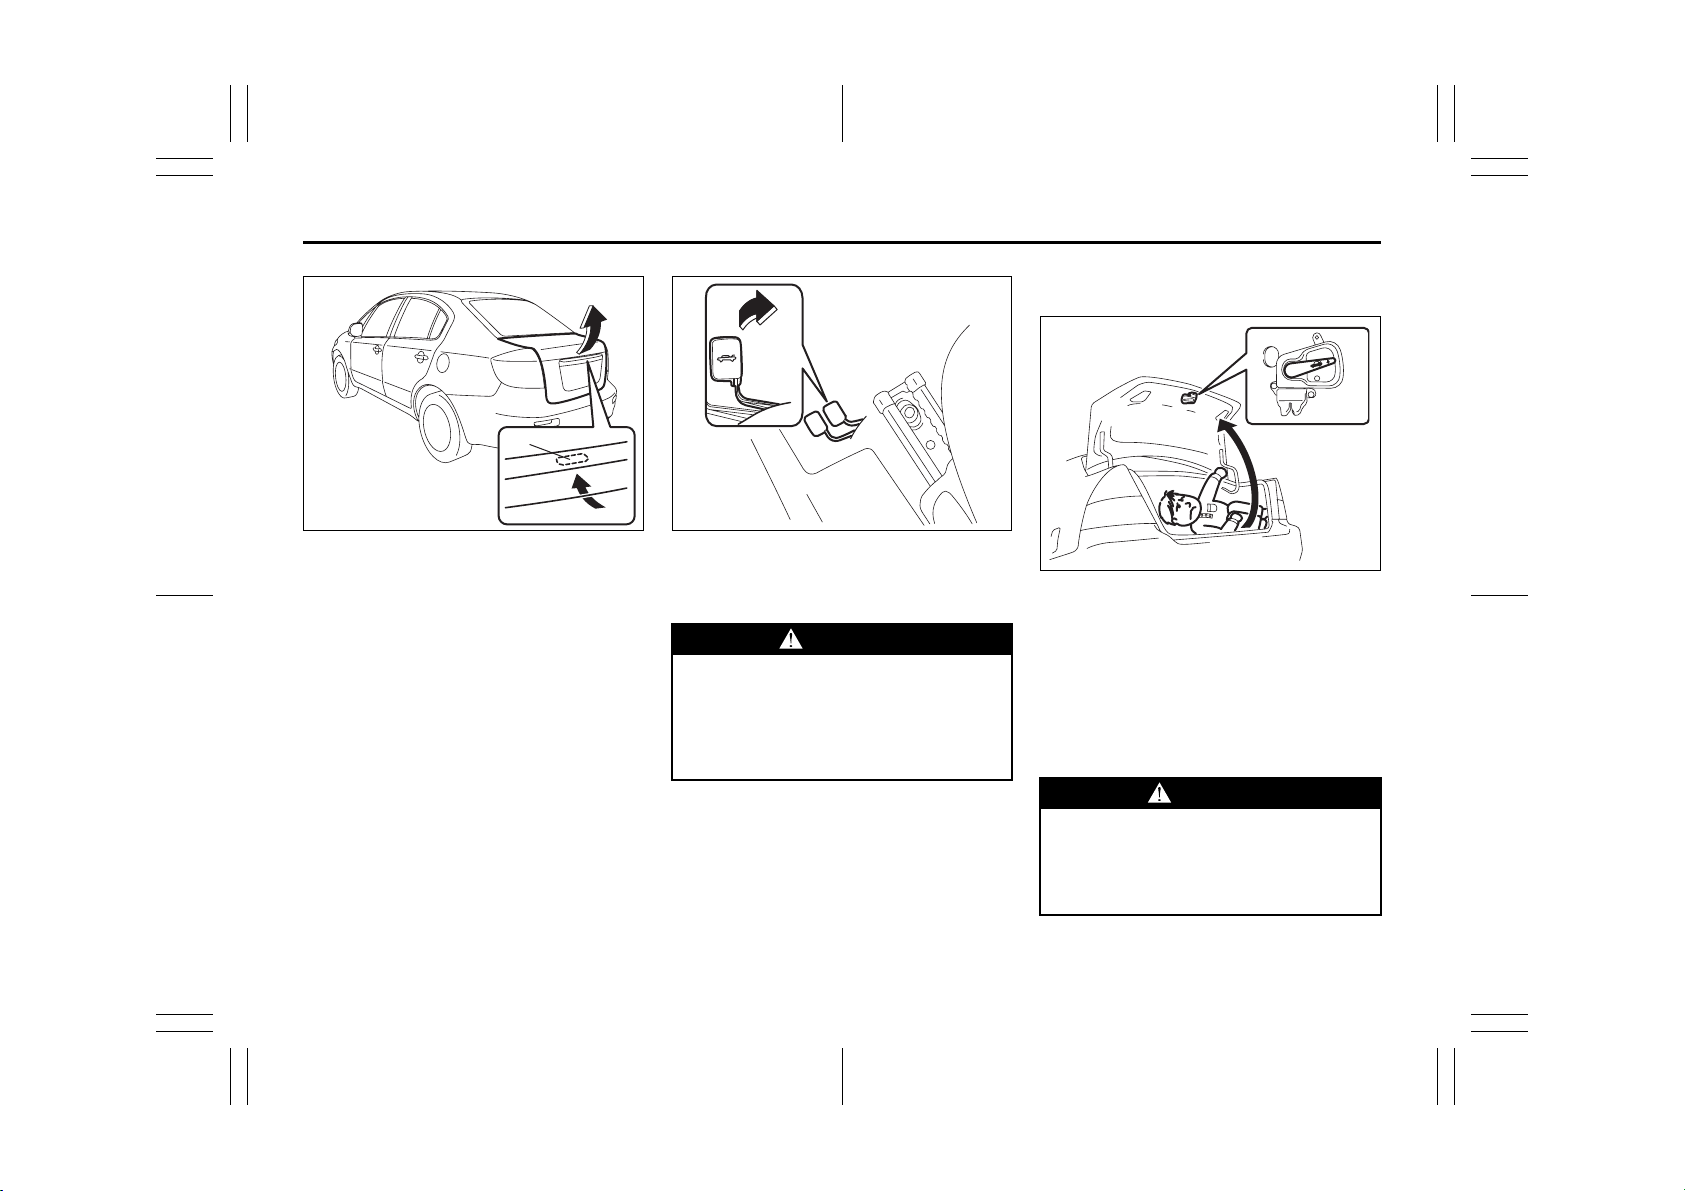
If your vehicle is equipped with a trunk lid
unlatch switch (1), push and hold the trunk
lid unlatch switch (1) and lift the trunk lid to
open the trunk lid.
The trunk lid unlatch switch (1) operates
when the keyless start system remote controller is within the switch’s operating
range.
The trunk lid unlatch switch (1) operates
only to open the trunk lid.
If you close the trunk lid with the keyless
start system remote controller left in the
trunk with all the doors locked, the trunk
will be automatically unlatched.
56KN010
80JC005
You can unlock the lid by pulling the
release lever located to the outboard side
of the driver’s seat.
WARNING
Always make sure that the trunk lid is
closed and latched securely. Otherwise, it may open unexpectedly while
driving. Completely closing it also
helps keep exhaust gases from entering the car.
Internal Trunk Release
(SX4 SEDAN)
EXAMPLE
54G297
There is a release lever located inside the
trunk, on the rear part of the trunk lid. This
lever is for emergency use so that if a person, such as a child, gets trapped in the
trunk compartment, he can exit the vehicle.
The lever glows in the dark, after a brief
exposure to ambient light, so it can be
found easily. It is operated by pushing it
down in the direction of the arrow.
WARNING
To help avoid situations where someone might get trapped in the trunk,
keep your vehicle locked when unattended, and do not allow anyone to
play in the trunk.
2-5
80J23-03E
Door Locks: 3, 5, 8
BEFORE DRIVING
Keyless Start System Remote
Controller/Keyless Entry
System Transmitter
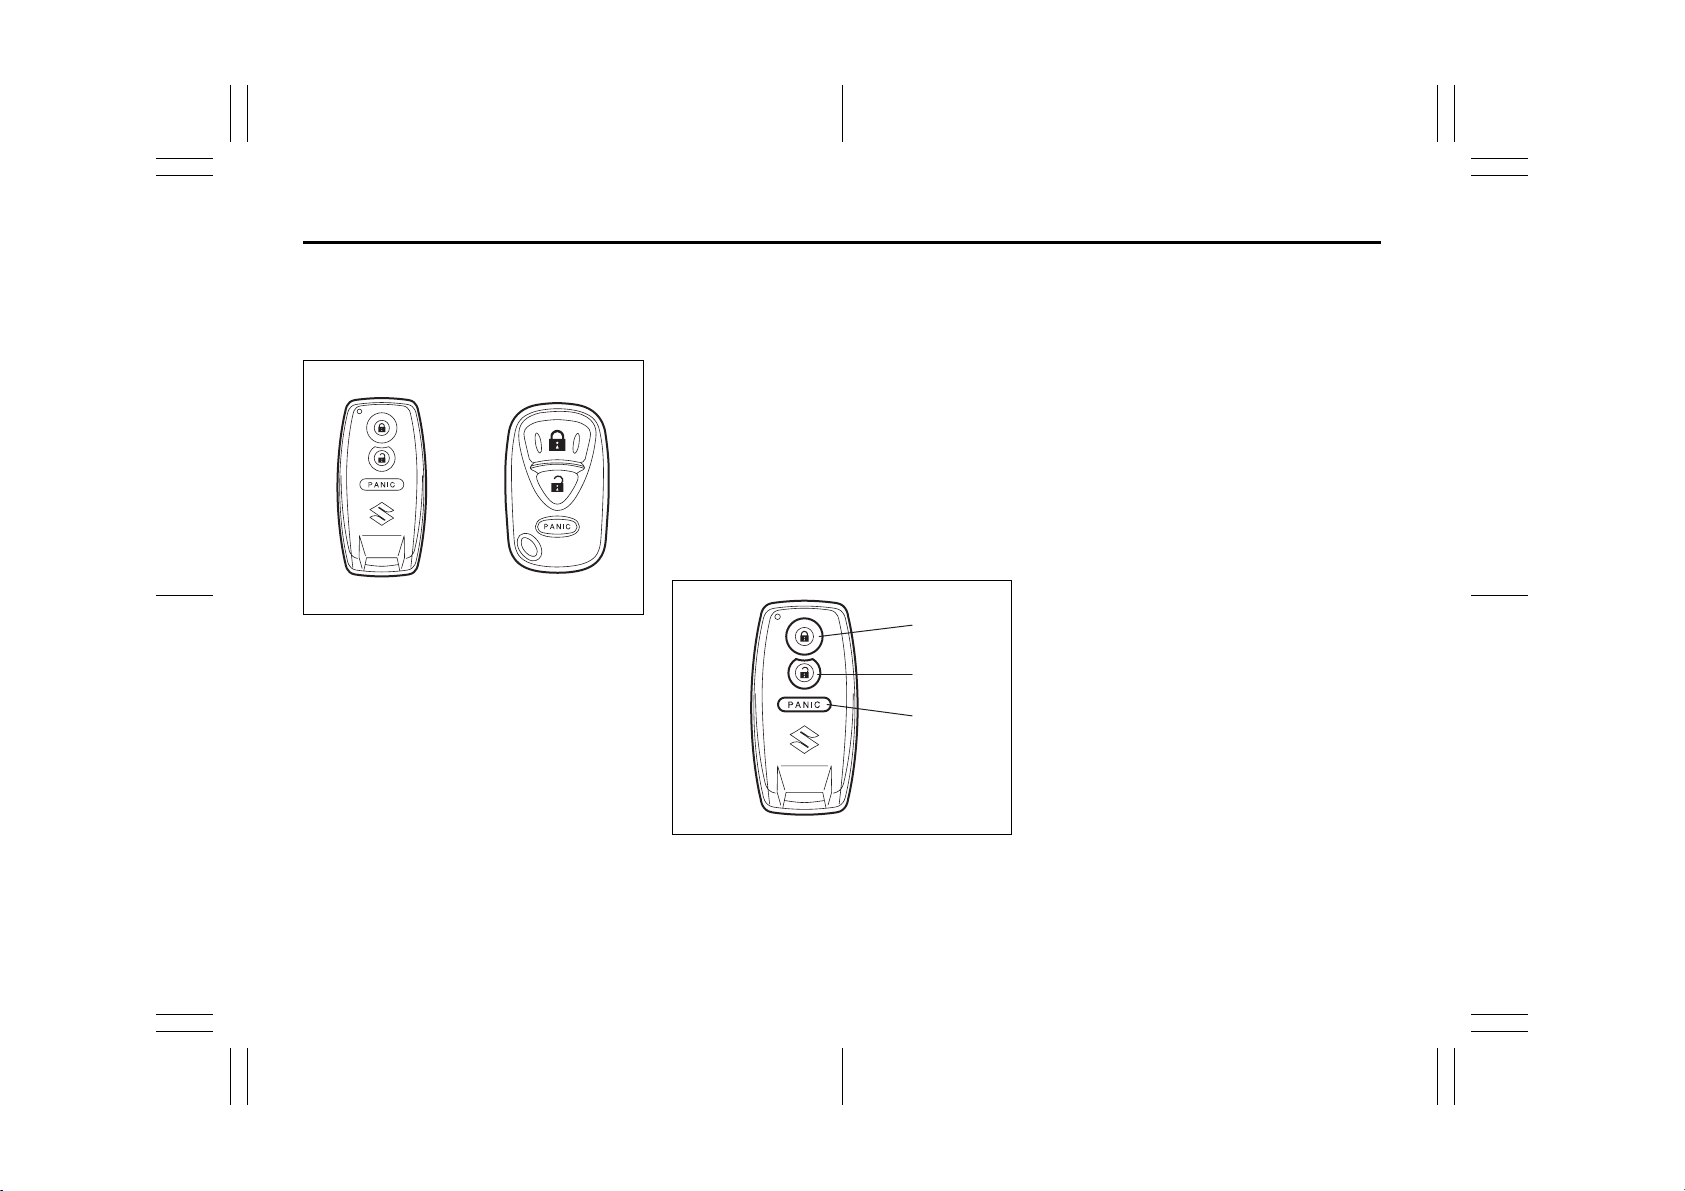
Type A Type B
66J111
Your vehicle is equipped with either a keyless start system remote controller (Type
A) or a keyless entry system transmitter
(Type B). The remote controller has a keyless entry system and a keyless start system. The transmitter has only a keyless
entry system. For details, refer to the following explanations.
Keyless Start System Remote
Controller (Type A)
The remote controller enables the following
operations:
• You can lock or unlock the doors by
operating the LOCK/UNLOCK buttons
on the remote controller. Refer to the
explanation in this section.
• You can lock or unlock the doors by
pushing the request switch on the door
handle. For details, refer to the explanation in this section.
• You can start the engine without using
an ignition key. For details, refer to “Ignition Switch” in the “OPERATING YOUR
VEHICLE” section.
(1)
(2)
(3)
66J114
(1) “LOCK” button
(2) “UNLOCK” button
(3) “PANIC” button
“LOCK” button (1) / “UNLOCK” button
(2) function
You can lock or unlock all doors (including
the tailgate of SX4) simultaneously by
operating the remote controller near the
vehicle.
• To lock the doors, push the “LOCK” button (1).
• To unlock the driver’s door, push the
“UNLOCK” button (2) once.
• To unlock other doors, wait a second or
two, then push the “UNLOCK” button (2)
a second time. If you “double-click” too
fast, the doors will not unlock.
The turn signal lights will flash once when
the doors are locked.
When the doors are unlocked:
• The turn signal lights will flash twice.
• If the interior light switch is in the
“DOOR” position, the interior light will
turn on for about 15 seconds and then
fade out. If you push in the ignition
switch or insert the key during this time,
the light will start to fade out immediately.
Be sure the doors are locked after you
operate the “LOCK” button (1).
If no door is opened within about 30 seconds after the “UNLOCK” button (2) is
operated, the doors will automatically lock
again.
2-6
80J23-03E
Door Locks: 3, 5, 8
BEFORE DRIVING
NOTE:
• The maximum operating distance of the
remote controller is about 5 m (16 ft.),
but this can vary depending on the surroundings, especially near other transmitting devices such as radio towers or
CB (Citizen’s Band) radios.
• The door locks cannot be operated with
the remote controller if the ignition switch
is in a position other than “LOCK”, or the
ignition key is inserted in the ignition
switch, or if any door is open.
If any door is open, you cannot lock the
door by operating the remote controller,
however unlock the door.
• You cannot lock the door unless all of the
door are closed completely.
• If you lose one of the remote controllers,
ask your SUZUKI dealer as soon as possible for a replacement. Be sure to have
your dealer program the new remote
controller code in your vehicle’s memory
so that the old code is erased, or perform the programming procedure yourself according to the instructions in this
section.
“PANIC” button (3) function
This function is to get the attention of others.
Press the “PANIC” button (3) for more than
1 second. The headlights and taillights will
blink for about 30 seconds. Also, the horn
will sound intermittently for about 30 seconds at the same time.
To cancel the “PANIC” mode, press any
button (PANIC, LOCK or UNLOCK) on the
remote controller. You can also insert the
key in the ignition switch and turn to the
“ON” position to cancel the “PANIC” mode.
NOTE:
The “PANIC” button function will not activate when the key is in the ignition switch.
Keyless unlocking/locking using the
request switches
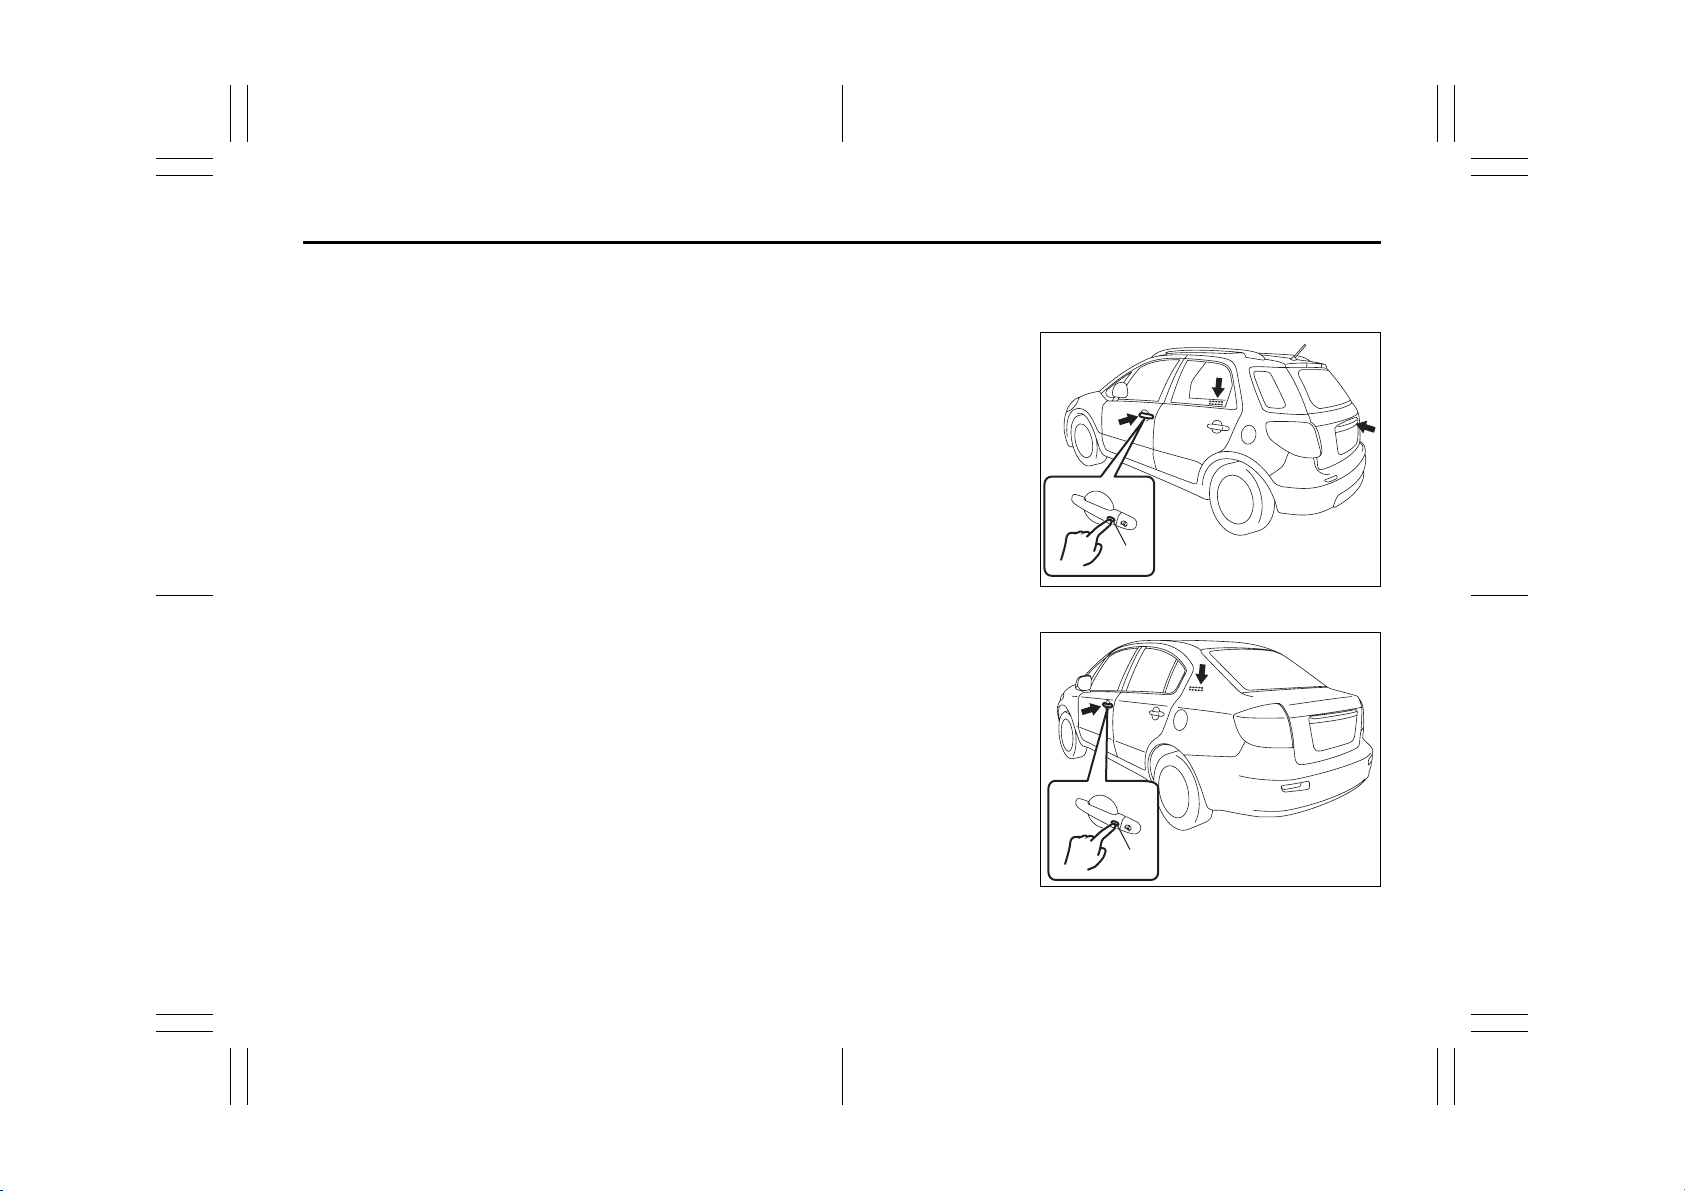
SX4
(1)
EXAMPLE
80JC054
SX4 SEDAN
2-7
(1)
EXAMPLE
56KN008
80J23-03E
Windows: 3, 8
BEFORE DRIVING
When the remote controller is within the
operating range described in this section,
you can lock or unlock the doors by pushing the request switch (1) on the door handle of the driver’s door, front passenger’s
door or tailgate of SX4.
To lock all doors when all doors are
unlocked:
• Push the request switch on one of the
door handles once.
The turn signal lights will flash once when
the doors are locked.
To unlock a door or all doors:
• Push the request switch on the door
handle once to unlock only one door.
• Push the request switch on the door
handle twice to unlock all doors.
When the doors are unlocked:
• The turn signal lights will flash twice.
• If the interior light switch is in the
“DOOR” position, the interior light will
turn on for about 15 seconds and then
fade out. If you push in the ignition
switch or insert the key during this time,
the light will start to fade out immediately.
Be sure the doors are locked after you
operate the request switch to lock the
doors.
NOTE:
• The door locks cannot be operated by
the request switch under the following
conditions:
– If any door is open or is not completely
closed.
– If the ignition switch is in a position
other than “LOCK”.
– If the ignition key is inserted in the igni-
tion switch.
• If no doors are opened within about 30
seconds after unlocking the doors by
pushing the request switch, the doors
will be locked again automatically.
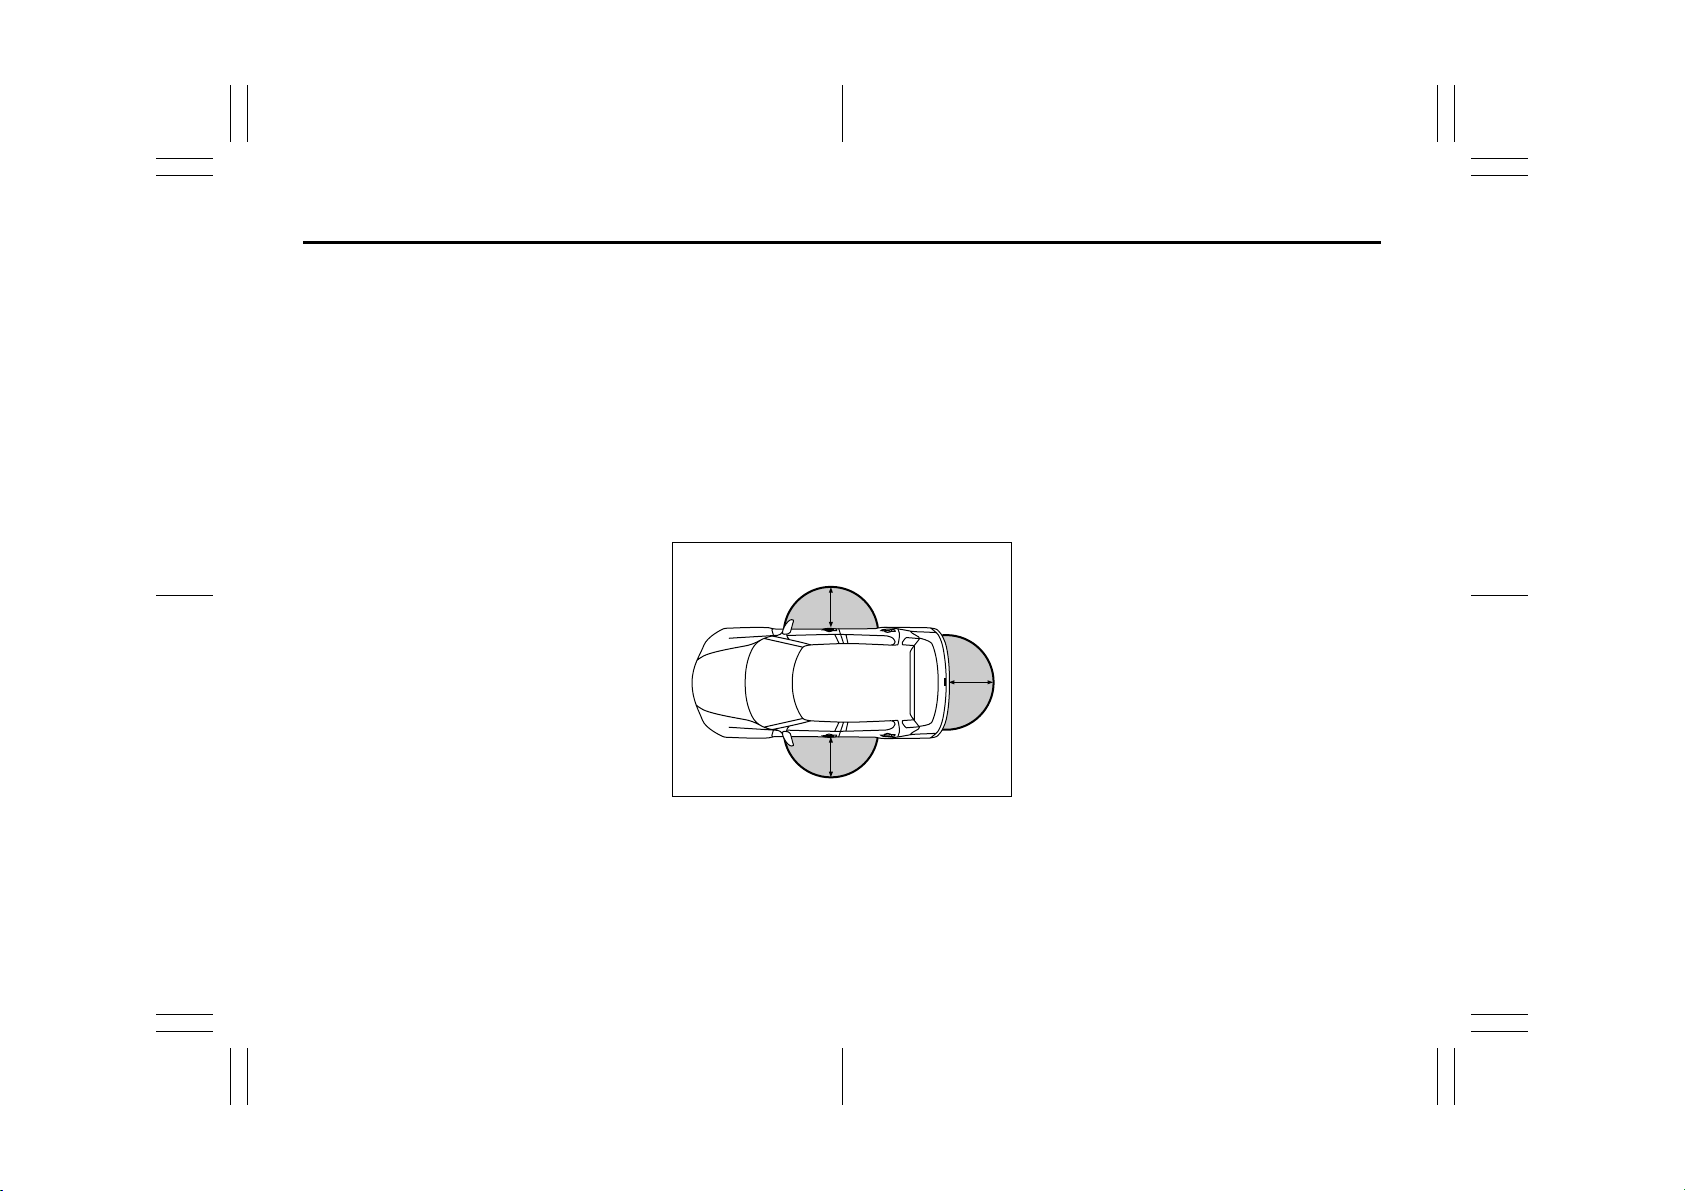
EXAMPLE
(1)
(1)
(1)
80JM020
(1) 80 cm (2 1/2 feet)
When the remote controller is within
approximately 80 cm (2 1/2 feet) from a
front door handle or the tailgate switch, you
can lock or unlock the doors by pushing
the request switch.
NOTE:
• If the remote controller is outside the
request switch operating range
described above, you will not be able to
operate the request switch.
• If the battery of the remote controller
runs down or there are strong radio
waves or noise, the request switch operating range may be reduced or the
remote controller may be inoperative.
• If the remote controller is too close to the
door glass, the request switches may not
operate.
• If a spare remote controller is in the vehicle, the request switches may not operate normally.
• The remote controller will only operate a
request switch if it is within the switch’s
operating range. For example, if the
remote controller is within the operating
range of the driver’s door request switch
but not the front passenger’s door
request switch or the tailgate request
switch, the driver’s door switch can be
operated but the front passenger’s door
switch or tailgate switch cannot be operated.
2-8
80J23-03E
Windows: 3, 8
BEFORE DRIVING
CAUTION
The remote controller is a sensitive
electronic instrument. To avoid damaging the remote controller:
• Do not expose it to impacts, moisture or high temperature such as by
leaving it on the dashboard under
direct sunlight.
• Keep the remote controller away
from magnetic objects such as a
television.
NOTE:
The keyless start system may not function
correctly in certain environments or under
certain operating conditions such as the
following:
• When there are strong signals coming
from a television, power station or a cellular phone.
• When the remote controller is in contact
with or covered by a metal object.
• When a radio wave type remote keyless
entry is used nearby.
• When the remote controller is placed
near an electronic device such as personal computer.
Some additional precautions you should
take and information you should be aware
of are:
• Make sure the ignition key is stowed in
the remote controller. If the remote controller becomes unreliable, you will not
be able to lock or unlock the doors or
start the engine.
• Be sure that the driver always carries the
remote controller.
• If you lose one of the remote controllers,
ask your SUZUKI dealer as soon as possible for a replacement. Be sure to have
your dealer program the new remote
controller code in your vehicle’s memory
so that the old code is erased, or perform the programming procedure yourself according to the instructions in this
section.
• You can use up to four remote controllers
and ignition keys for your vehicle. Ask
your SUZUKI dealer for details.
• The battery life of the remote controller
is about two years, but it can vary
depending on usage conditions.
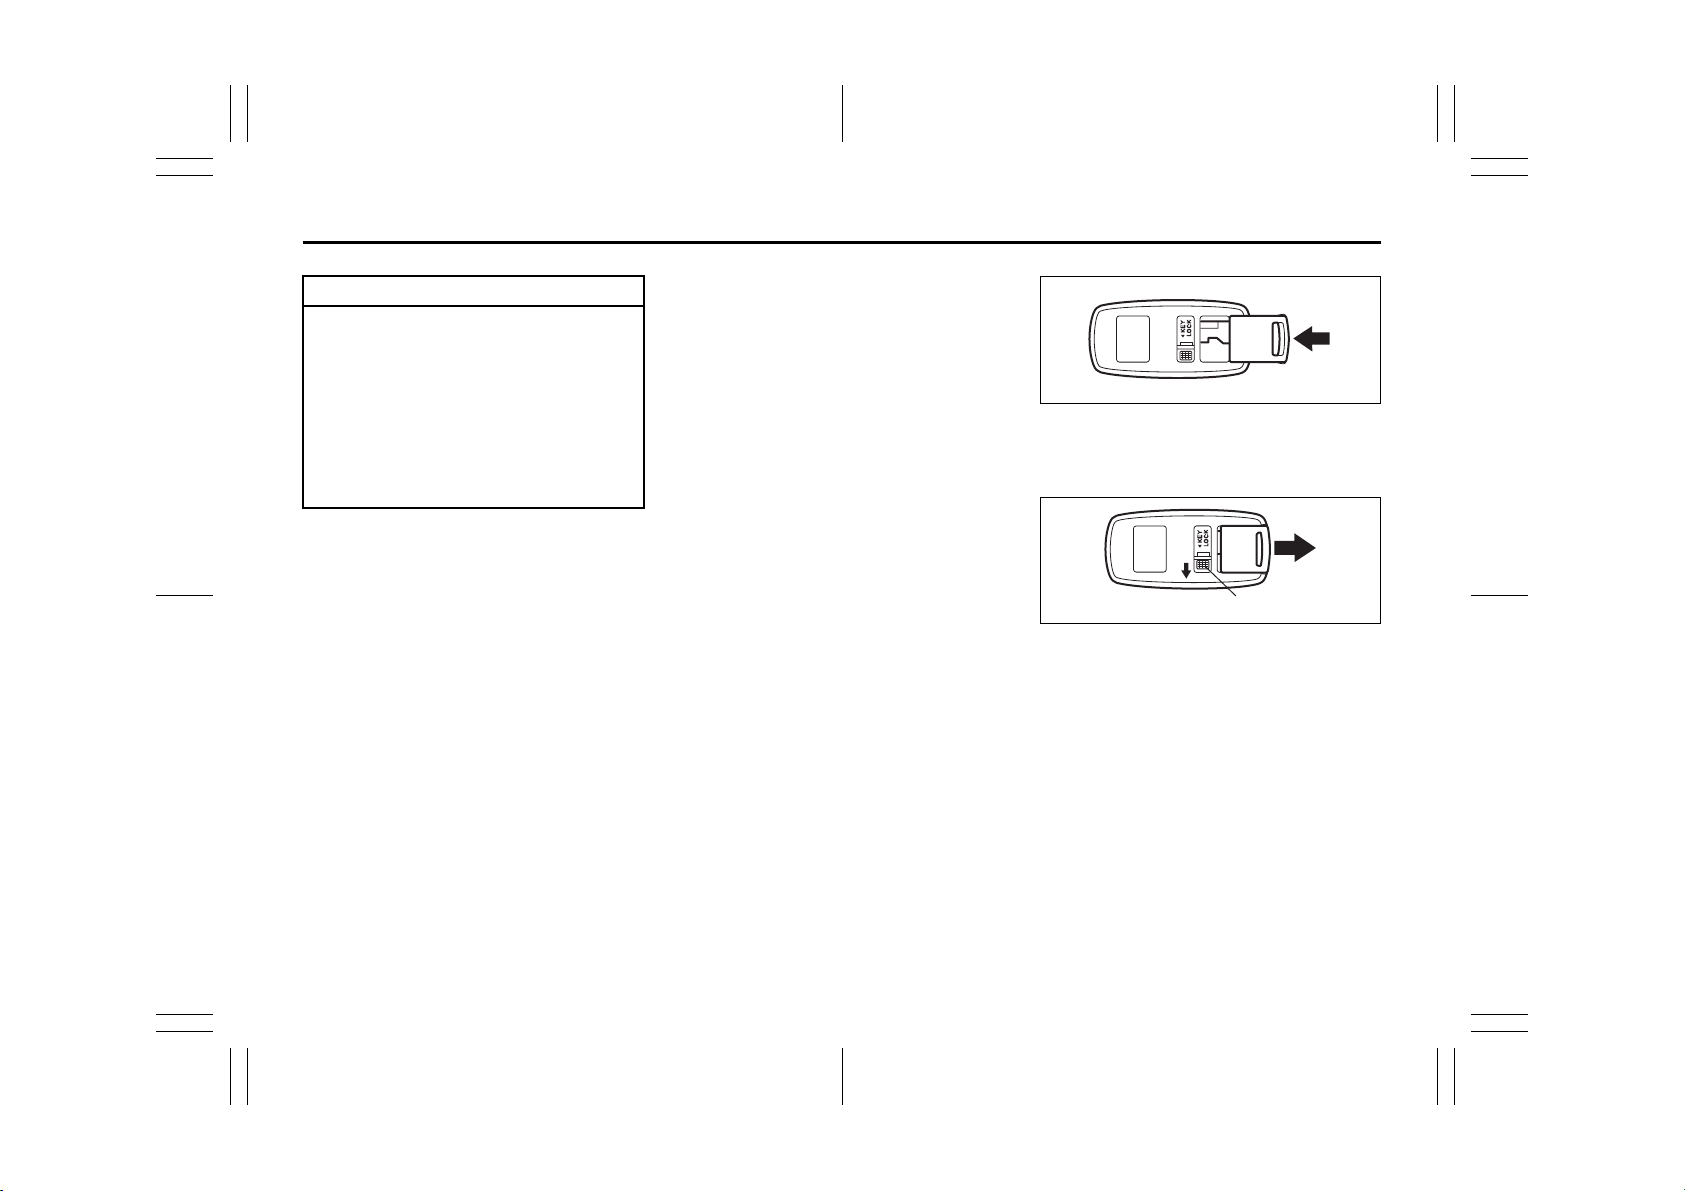
80JC026
To stow the ignition key into the remote
controller, push the key in the remote controller until you hear a click.
(A)
80JC027
To remove the key from the remote controller, push the button (A) in the direction of
the arrow and pull the key out from the
remote controller.
2-9
80J23-03E
Windows: 3, 8
Mirrors: 3, 8
BEFORE DRIVING
Reminder function
EXAMPLE
80J2016
If the remote controller is not in the vehicle
under the following conditions, a buzzer
sounds intermittently for about 2 seconds
and the keyless start system indicator light
on the instrument cluster blinks in red:
• When the vehicle speed is over 10 km/h
(6 mph).
• When one or more doors are opened
and all of the doors are later closed with
the ignition switch in a position other
than “LOCK”.
The red indicator light will turn off within
several seconds after the remote controller
is returned to an area of the vehicle other
than the rear luggage area.
If the remote controller is left in the vehicle
and you lock the driver’s door or front passenger’s door as described below, the door
will be automatically unlocked.
• If you open the driver’s door and lock the
door by turning the lock knob forward or
pushing the power door locking switch,
the driver’s door will be automatically
unlocked.
• If you open a door other than the driver’s
door and lock the front passenger’s door
by turning the lock knob forward or pushing the power door locking switch, the
front passenger’s door will be automatically unlocked.
For SX4 SEDAN, if you close the trunk lid
with the remote controller left in the trunk
with all the doors locked, the trunk will be
automatically unlatched.
NOTE:
• The reminder will not operate when the
remote controller is on the instrument
panel, in the glove box, in a storage
compartment, in the sun visor or on the
floor etc.
• Be sure that the driver always carries the
remote controller.
• Do not leave the remote controller in the
vehicle when leaving the vehicle.
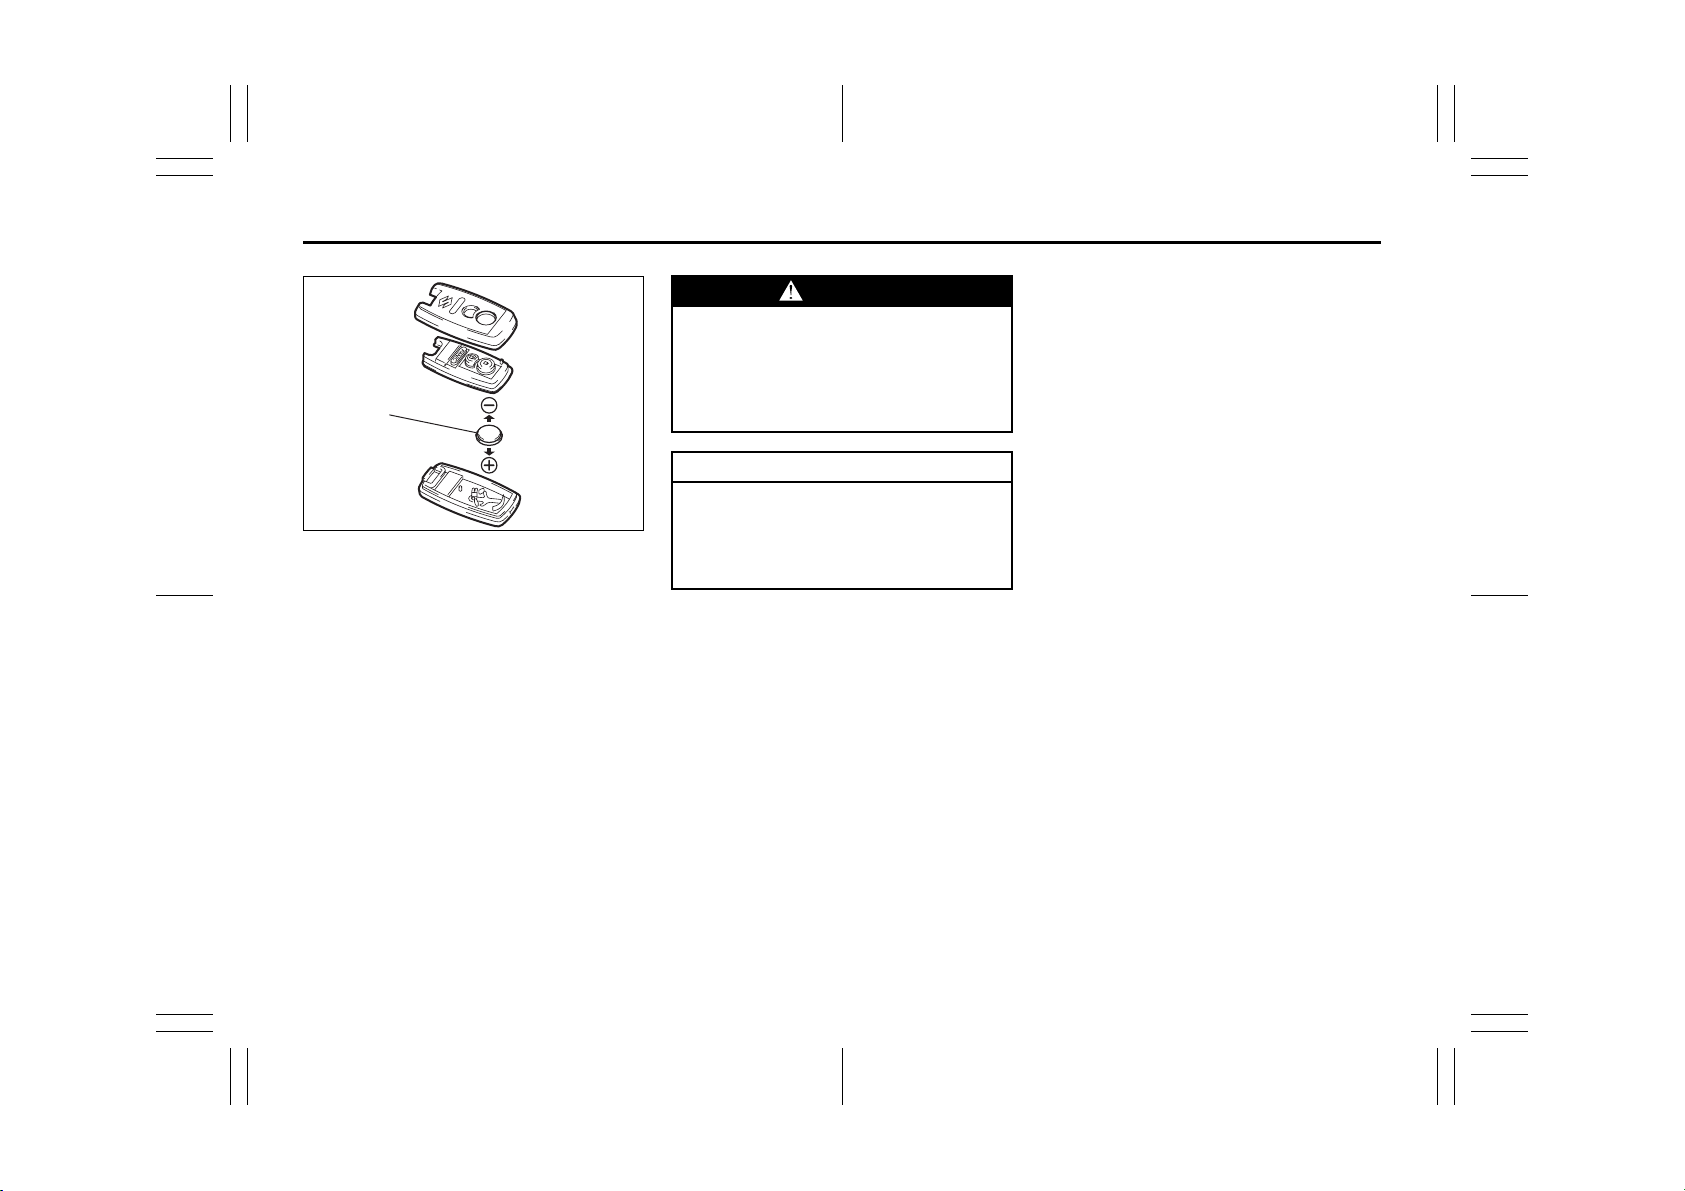
Replacement of the battery
If the remote controller becomes unreliable, replace the battery.
To replace the battery of the remote controller:
66J016
1) Insert a flat blade screwdriver covered
with a soft cloth in the slot of the remote
controller and pry it open.
2-10
80J23-03E
Mirrors: 3, 8
Seat Adjustment: 3
BEFORE DRIVING
(1)
(1) Lithium disc type battery:
CR2032 or equivalent
2) Replace the battery (1) so its + terminal
faces the bottom of the case as shown
in the illustration.
3) Close the remote controller firmly.
4) Make sure the door locks can be operated with the remote controller.
5) Dispose of the used battery properly
according to applicable rules or regulations. Do not dispose of lithium batteries with ordinary household trash.
80J2076
WARNING
Swallowing a lithium battery may
cause serious internal injury. Do not
allow anyone to swallow a lithium
battery. Keep lithium batteries away
from children and pets. If swallowed,
contact a physician immediately.
CAUTION
The transmitter/remote controller is a
sensitive electronic instrument. To
avoid damaging it, do not expose it to
dust or moisture or tamper with internal parts.
Programming/erasing the remote controller code yourself
Your new vehicle was originally equipped
with two remote controllers.
If you have lost one of the remote controllers, you should change the remote controller code in your vehicle’s memory as
soon as possible for security. If you purchase additional remote controllers, the
new remote controllers need to be programmed into your vehicle’s memory. You
can perform this yourself by using the following procedure:
NOTE:
• You can program up to four remote controller codes into your vehicle’s memory.
The four codes may be the same or different.
• If you try to program a fifth code, the four
remote controller codes that are programmed will be cleared automatically.
• If you program a new remote controller
code, all of the old remote controller
codes that are in your vehicle’s memory
will be erased automatically. When you
program a new remote controller, you
should reprogram any additional remote
controllers at the same time.
• To purchase new remote controllers, see
your SUZUKI dealer.
• Before you begin programming, have all
of your remote controllers available.
2-11
80J23-03E

Seat Adjustment: 3
BEFORE DRIVING
To program a new remote controller
1) Close all the doors of the vehicle.
2) Sit in the driver’s seat and confirm that
the driver’s door is unlocked.
3) Insert the key into the ignition switch.
4) Complete steps 1 through 6 described
below within 25 seconds after step 3).
UNLOCK
(2)
LOCK
(1)
80JC093
1. Push the power door locking switch
of the driver’s door to the lock position and then push it to the unlock (2)
position.
2. Repeat step 1 two more times.
3. Push the power door locking switch
of the driver’s door to the lock (1)
position.
4. Remove the key from the ignition
switch and then insert it again.
5. Repeat step 4 three more times.
6. To start the engine, turn the ignition
switch to the “START” position.
Wait for 3 seconds.
7. Proceed to step 5) within 60 seconds
after the engine has started.
NOTE:
You cannot program the remote controller
if you don’t complete steps 1 through 6
within 25 seconds.
You cannot program the remote controller
if you do not proceed to step 5) within 60
seconds after the engine has started.
5) Turn the ignition switch to the “LOCK”
position.
A buzzer will sound twice and the door
lock switch will be activated from the
lock position to the unlock position
automatically.
6) Press the “LOCK”, “UNLOCK” or
“PANIC” button on the remote controller.
A buzzer will sound twice and the door
lock switch will be activated from the
lock position to the unlock position
automatically.
If you want to program an additional
remote controller, repeat the procedure
of step 6) using the additional remote
controller.
NOTE:
Complete step 6) within 30 seconds.
You can program up to four remote controllers.
7) To complete programming, remove the
key from the ignition switch or turn the
ignition switch to the “ON” position.
8) Make sure that the keyless start system
and keyless entry system operate properly by operating each remote controller.
If you cannot operate the keyless start system and/or keyless entry system, repeat
this programming procedure again.
If you still cannot operate the systems, see
your SUZUKI dealer.
2-12
80J23-03E
Seat Adjustment: 3
Head Restraints: 3
BEFORE DRIVING
To change the old remote controller
codes in your vehicle’s memory
If you have lost one of the remote controllers, you should change the remote controller codes in your vehicle’s memory as
soon as possible for security.
To erase the remote controller code(s) in
your vehicle’s memory, you should program the new remote controller code. The
old codes in your vehicle’s memory will be
erased automatically. If you have more
remote controller(s), you must program all
of the remote controller codes at the same
time. You cannot operate the keyless start
system and keyless entry system using
any remote controller that is not programmed at the same time.
For details on how to program, refer to the
programming procedure in this section.
When you complete programming, make
sure that the keyless start system and keyless entry system operate properly by
operating each remote controller.
1. For USA
This device complies with Part 15 of the
FCC Rules. Operation is subject to the following two conditions:
1) This device may not cause harmful
interference, and
2) This device must accept any interference received, including interference
that may cause undesired operation.
NOTE:
Changes or modifications not expressly
approved by the party responsible for compliance could void the user’s authority to
operate the equipment.
2. For Canada
This device complies with Industry Canada
Standard RSS-210. Operation is subject to
the following two conditions:
1) This device may not cause interference,
and
2) This device must accept any interference, including interference that may
cause undesired operation of the
device.
The term “IC:” before the certification/registration number only signifies that the
Industry Canada technical specifications
were met.
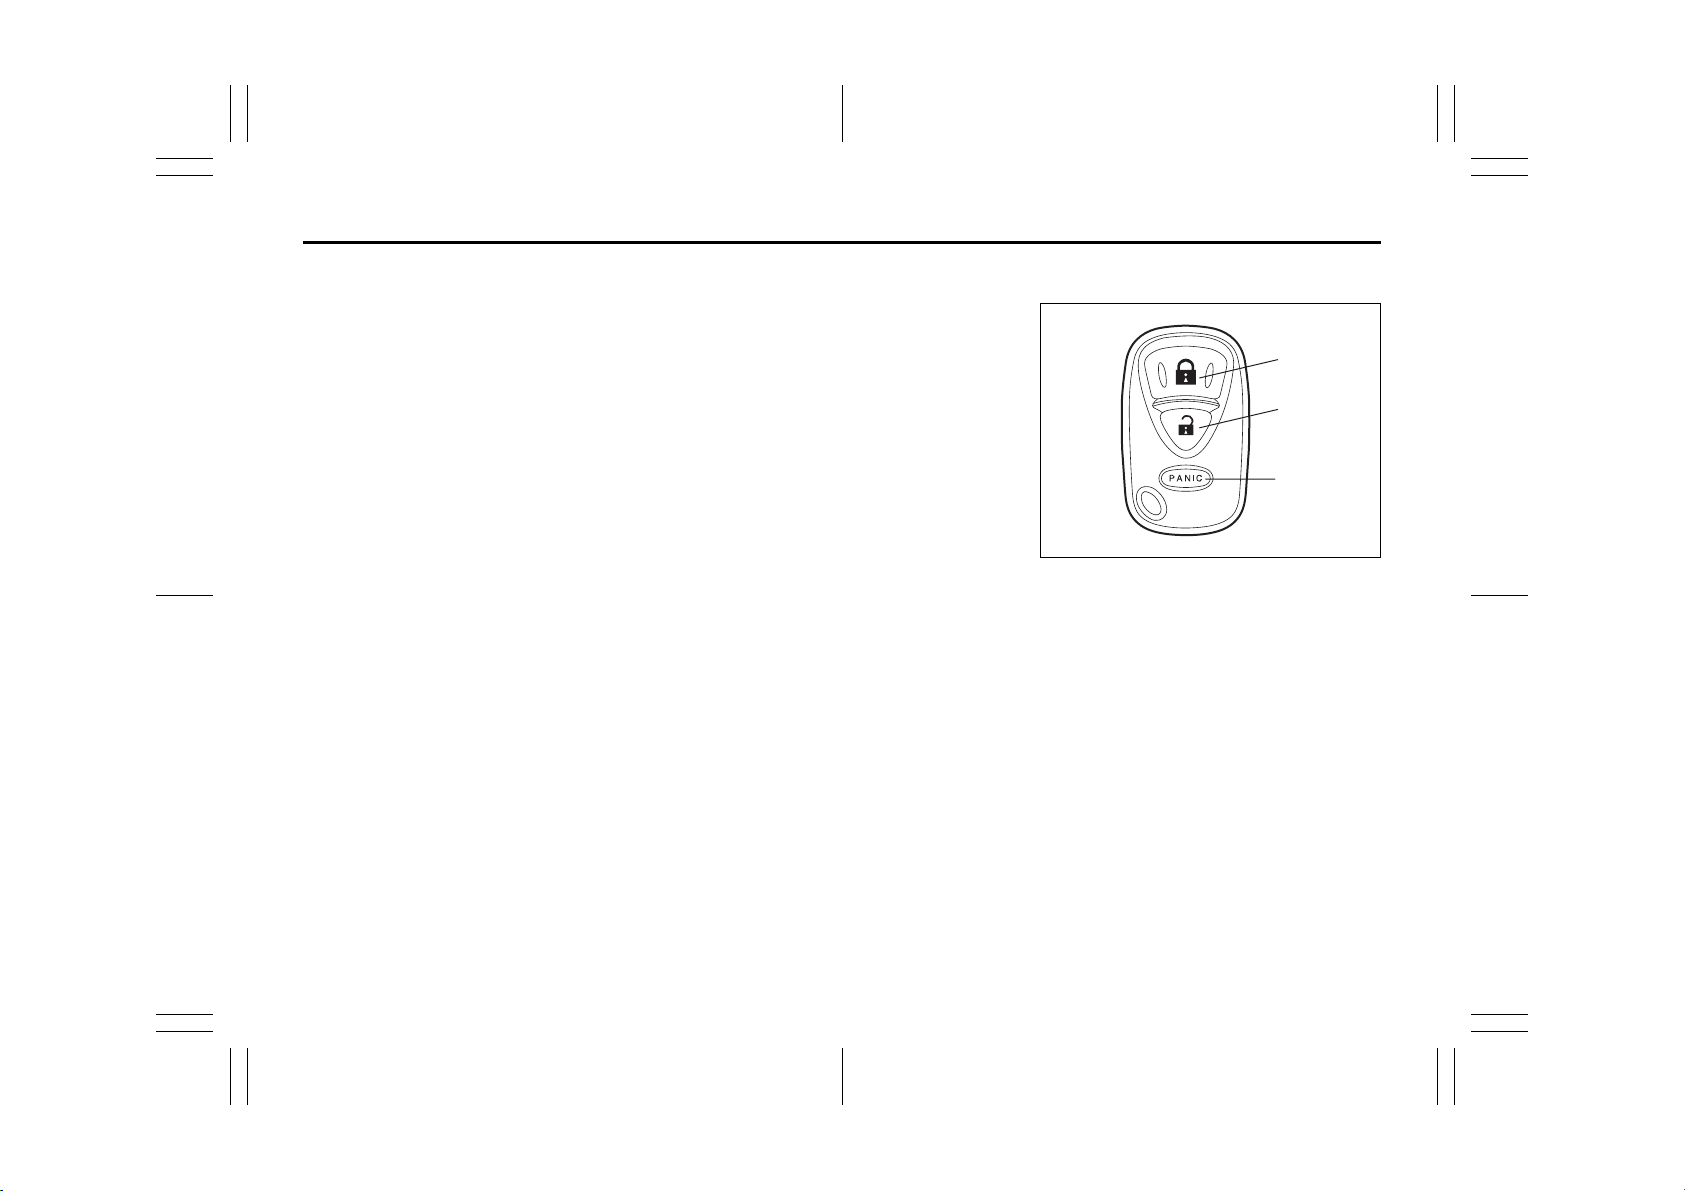
Keyless Entry System Transmitter
(Type B)
(1)
(2)
(3)
52D209
(1) “LOCK” button
(2) “UNLOCK” button
(3) “PANIC” button
“LOCK” button (1) / “UNLOCK” button
(2) function
You can lock or unlock all doors (including
the tailgate of SX4) simultaneously by
operating the transmitter near the vehicle.
• To lock the doors, push the “LOCK” button (1).
• To unlock the driver’s door, push the
“UNLOCK” button (2) once.
• To unlock other doors, wait a second or
two, then push the “UNLOCK” button (2)
a second time. If you “double-click” too
fast, the doors will not unlock.
2-13
80J23-03E
 Loading...