

Suzuki Forenza 2007 User Manual

SERVICE STATION INFORMATION
10.0 mm
ENGLISH
Fuel recommendation: Brake and clutch fluid:
See page 5-1
Engine oil recommendation: Automatic transmission fluid:
Engine oil with “Starburst” symbol
For further details, see “Engine Oil” in the
“SERVICE AND APPEARANCE CARE” section.
DOT3
ESSO LT71141 or TOTAL ATF H50235
Tire cold pressure:
See the “Tire Information Label” located on the driver’s
door lock pillar.
Made from 100% recycled paper,
except for cover.
99011-85Z03-03EFORENZA
2007
OWNER’S MANUAL
Keep With Vehicle At All Times.
Contains Important Information
On Safety, Operation & Maintenance.
Suzuki Red: Magenta 100%, Yellow 100%
Suzuki Blue: Cyan 100%, Magenta 70%
Part No. 99011-85Z03-03E
July, 2006
Printed in U.S.A.

Prepared by
July, 2006
Part No. 99011-85Z03-03E
Printed in U.S.A.
TP222
85Z03-03E

This owner’s manual applies to the FORENZA series:
85Z001
NOTE: The illustrated model is one of the FORENZA series.
© COPYRIGHT SUZUKI MOTOR CORPORATION 2006
85Z03-03E

INTRODUCTION
Thank you for choosing SUZUKI and welcome to our growing family. Your choice was a wise one; SUZUKI products are a great value
that will give you years of driving pleasure.
This Owner’s Manual was prepared to help you have a safe, enjoyable, and trouble-free experience with your SUZUKI. In it you will learn
about the vehicle’s operation, its safety features and maintenance requirements. Please read it carefully before operating your vehicle.
Afterwards, keep this Manual in the glove box for future reference.
Should you resell the vehicle, please leave this Manual with it for the next owner.
In addition to the Owner’s Manual, the other booklets provided with your SUZUKI explain the vehicle’s warranties. We recommend you
read them as well to familiarize yourself with this important information.
When planning the regular scheduled maintenance of your SUZUKI, we recommend you visit your local SUZUKI dealership. Their factory-trained technicians will provide the best possible service and use only genuine SUZUKI parts and accessories.
85Z03-03E

SERVICE STATION GUIDE
1. Fuel (see section 5)
2. Engine hood (see section 5)
3. Tire changing tools (see section 5)
4. Engine oil dipstick <Yellow>
(see section 5)
5. Engine coolant (see section 5)
6. Windshield washer fluid
(see section 5)
7. Battery (see section 5)
8. Tire pressure (see tire information
label on driver’s door lock pillar)
9. Spare tire (see section 5)
10. Engine air cleaner / filter
(see section 5)
(RHD)8
2
10
2
4
7
(RHD)
2
(LHD)
5
1
3
9
6
LHD: Left Hand Drive
RHD: Right Hand Drive
NOTE: The illustration is FORENZA.
(LHD)8
85Z022
85Z03-03E

TABLE OF CONTENTS
SEATS AND RESTRAINT SYSTEMS 1
California Proposition 65 Warning
WARNING
Engine exhaust, some of its constituents, and certain product components contain or emit chemicals
known to the State of California to
cause cancer and birth defects or
other reproductive harm.
FEATURES AND CONTROLS 2
INSTRUMENT PANEL 3
DRIVING YOUR VEHICLE 4
SERVICE AND APPEARANCE CARE 5
MAINTENANCE SCHEDULE 6
GENERAL INFORMATION 7
INDEX 8
85Z03-03E

LOCATION OF WARNING
MESSAGES
Read and follow all of the warnings (labels
etc.) on your vehicle. Make sure you
understand all of them. Keep them on the
vehicle. Do not remove the messages for
any reason. If a label comes off or the
messages become difficult to read, have it
corrected by your SUZUKI dealer.
4
13
12
1. Air Bag Warning Label
2. Passenger Air Bag Warning Label
3. Rear Center Safety Belt Warning
Label
4. Jack Warning Label
5. Brake Reservoir Cap Warning Message
6. Cooling Fan Warning Label
7. Surge Tank Cap Warning Message
8. Air Conditioner Warning Label
9. Battery Label
10. Emission Label
11. Tire and Loading Information Label
12. Certification Label
13. Spare Tire Label
14. Side Air Bag Warning Label
11
3
2
10
1
14
7
9
8
6
5
85Z023
85Z03-03E

FOREWORD
All information in this manual is based
on the latest product information available at the time of publication. Due to
improvements or other changes, there
may be discrepancies between information in this manual and your vehicle.
SUZUKI MOTOR CORPORATION
reserves the right to make production
changes at any time, without notice and
without incurring any obligation to
make the same or similar changes to
vehicles previously built or sold.
SUZUKI MOTOR CORPORATION
believes in conservation and protection of
Earth’s natural resources.
To that end, we encourage every vehicle
owner to recycle, trade in, or properly dispose of, as appropriate, used motor oil,
coolant, and other fluids, batteries and
tires.
IF YOU HAVE ANY PROBLEMS WITH
YOUR SUZUKI:
Please review the New Vehicle Warranty
Information booklet supplied with your
SUZUKI. Should you have a question or
problem regarding the warranty or service
of your vehicle, please take the following
action:
Consult the Service Manager and the
Owner of the Suzuki Automotive Dealership. Explain your problem and ask for
their assistance in resolving your problem.
The Owner of the dealership is in the very
best position to assist you as he or she is
vitally concerned with your continued satisfaction.
If you are still in need of additional information, or if you are dissatisfied, request that
your SUZUKI dealer arrange a meeting
with your District Service Manager.
If, after doing so, you still require further
assistance, and you purchased your
SUZUKI in the continental United States,
please contact the American Suzuki Customer Relations Department by telephone
at 1-800-934-0934 or in writing at:
American Suzuki Motor Corporation
Automotive Customer Relations
3251 East Imperial Highway
Brea, CA 92821-6795
If you purchased your SUZUKI in Canada
please contact the Suzuki Canada Customer Relations Department by telephone
at 1-905-889-2677 extension 2254 or in
writing at:
Suzuki Canada Inc.
Customer Relations
100 East Beaver Creek Road
Richmond Hill, On
L4B 1J6
In the event you require assistance related
to your SUZUKI, while temporarily travelling in either the United States or Canada,
you may wish to contact the Suzuki Customer Relations Department directly of the
country in which you are temporarily operating your vehicle.
Please be certain to provide us with the following information: the model, Vehicle
Identification Number, mileage, accessories involved, event dates, your concern,
and any other comments which you may
have. When we receive your correspondence, we will be pleased to contact the
Owner of your dealership and assist in
resolving your concern.
For owners outside the continental United
States, please refer to the distributor’s
address listed in your Warranty Information
booklet.
0-1
85Z03-03E

IMPORTANT
WARNING/CAUTION/NOTE
Please read this manual and follow its
instructions carefully. To emphasize special information, the symbol and the
words WARNING, CAUTION and NOTE
have special meanings. Pay special attention to the messages highlighted by these
signal words:
WARNING
Indicates a potential hazard that
could result in death or injury.
CAUTION
Indicates a potential hazard that
could result in vehicle damage.
NOTE:
Indicates special information to make
maintenance easier or instructions clearer.
75F135
The circle with a slash in this manual
means “Don’t do this” or “Don’t let this happen”.
MODIFICATION WARNING
WARNING
Do not modify this vehicle. Modification could adversely affect safety,
handling, performance or durability
and may violate governmental regulations. In addition, damage or performance problems resulting from
modification may not be covered
under warranty.
CAUTION
Improper installation of mobile communication equipment such as cellular telephones or CB (Citizen’s Band)
radios may cause electronic interference with your vehicle’s ignition system, resulting in vehicle performance
problems. Consult your SUZUKI
dealer or qualified service technician
for advice on installing such mobile
communication equipment.
0-2
85Z03-03E

Vehicle Symbols
Your vehicle has components and labels that use symbols instead of text. Symbols, used on your vehicle, are shown along with the text
describing the operation or information relating to a specific component, control, message, gauge or indicator.
If you need help figuring out a specific name of a component, gauge or indicator, reference the following topics:
• Seats and Restraint Systems in Section
1
• Features and Controls in Section 2
• Instrument Panel Overview in Section 3
• Climate Controls in Section 3
• Warning Lights, Gauges and Indicators
in Section 3
• Audio System(s) in Section 3
These are some examples of vehicle symbols you may find on your vehicle:
• Engine Compartment Overview in Section 5
WARNING
POSSIBLE
INJURY
PROTECT
EYES BY
SHIELDING
SULFURIC
BATTERY
ACID CAN
CAUSE
BLINDNESS
OR SEVERE
BURNS
AVOID
SPARKS OR
FLAMES
FLUSH EYES
IMMEDIATELY
WITH WATER
AIR BAG
FASTEN
SEAT
BELTS
POWER
STEERING
FLUID
FUEL
FILLER
POWER
WINDOW
MALFUNCTION
INDICATOR
LAMP
WASHER
FLUID
DO NOT INSTALL
A REAR-FACING
CHILD RESTRAINT
IN THIS SEATING
POSITION
TRACTION
CONTROL
SYSTEM
ACTIVE LIGHT
DOOR LOCK
UNLOCK
DOOR
AJAR
LIGHT
TURN
SIGNALS
TRUNK
AJAR
LIGHT
HAZARD
WARNING
FLASHER
HIGHBEAM
ON
LIGHT
FOG
LAMPS
ENGINE
COOLANT
TEMP
BATTERY
CHARGING
SYSTEM
BRAKE
COOLANT
ENGINE OIL
PRESSURE
ANTI-LOCK
BRAKES
INSTRUMENT
PANEL
BRIGHTNESS
EMERGENCY
TRUNK
RELEASE
FUEL
OWNER'S
MANUAL
HOOD
RELEASE
DAYTIME
RUNNING
LAMPS
TIRE
PRESSURE
WARNING
LIGHT
CRUISE
CONTROL
LIGHT
HOLD MODE
ACTIVE
LIGHT
SPEED
SENSITIVE
POWER
STEERING
WARNING
LIGHT
L3U0002CS
0-3
85Z03-03E

0-4
85Z03-03E

SEATS AND RESTRAINT SYSTEMS
SEATS AND RESTRAINT SYSTEMS
Front Seats .......................................................................... 1-1
Rear Seats ............................................................................ 1-4
Safety Belts .......................................................................... 1-5
Child Restraints ................................................................... 1-16
Supplemental Restraint System (air bags) ....................... 1-27
Restraint System Check ..................................................... 1-34
1
85Z03-03E

Front Seats:
SEATS AND RESTRAINT SYSTEMS
Front Seats
Manual Seats
(With Sliding Storage Tray)
WARNING
Never attempt to adjust the driver’s
seat or seatback while driving. The
seat or seatback could move unexpectedly, causing loss of control.
Make sure that the driver’s seat and
seatback are properly adjusted
before you start driving.
WARNING
To avoid excessive safety belt slack,
which reduces the effectiveness of
the safety belts as a safety device,
make sure that the seats are adjusted
before the safety belts are fastened.
If your vehicle has a sliding storage tray
under the front seat, the manual seat lever
looks like this.
N4U1001AN4U1001A
Pull up and hold the lever located under
the front of the seat to unlock it. Slide the
seat to where you want it and release the
lever. Then try to move the seat forward or
rearward to make sure the seat is locked
into place.
Manual Seats
(Without Sliding Storage Tray)
WARNING
Never attempt to adjust the driver’s
seat or seatback while driving. The
seat or seatback could move unexpectedly, causing loss of control.
Make sure that the driver’s seat and
seatback are properly adjusted
before you start driving.
If your vehicle does not have a sliding storage tray under the front seat, the manual
seat bar looks like this.
N4U1002AN4U1002A
Pull up and hold the bar located under the
front of the seat to unlock it. Slide the seat
to where you want it and release the bar.
Then try to move the seat with your body,
to make sure the seat is locked into place.
1-1
85Z03-03E

Front Seats:
SEATS AND RESTRAINT SYSTEMS
Driver Seat Height Adjuster
N4U1003A
To adjust the height of the driver’s seat
cushion, turn the knobs located on the outboard side of the seat cushion.
• Turn the front knob to adjust the height of
the front portion of the seat cushion.
• Turn the rear knob to adjust the height of
the rear portion of the seat cushion.
Manual Lumbar
Your vehicle may have manually operated
lumbar support for the driver’s seat.
N4U1004A
To adjust the front seat lumbar support,
use the lever located on the outboard side
of the seatback.
Push the lever down to adjust the support
for the lower part of the seatback. Pull the
lever up to return the support to its original
position.
Reclining Seatbacks
N4U1005A
To adjust the seatback angle, lift the lever
located on the outboard side of the seat
and move the seatback to the desired position.
Release the lever and push rearward on
the seatback to make sure it is locked.
Pull up on the lever without pushing on the
seatback and the seatback will move to an
upright position.
1-2
85Z03-03E

Front Seats:
SEATS AND RESTRAINT SYSTEMS
L3U1009A
Do not have your a seatback reclined when
your vehicle is moving.
WARNING
All seatbacks should always be in a
fairly upright position when driving,
or safety belt effectiveness may be
reduced. Safety belts are designed to
offer maximum protection when seatbacks are in the fully upright position.
Head Restraints
75F123
Head restraints are designed to help
reduce the risk of neck injuries in case of
an accident. Adjust the head restraint to
the position which places the center of the
head restraint closest to//; the top of your
ears. If this is not possible for very tall passengers, adjust the head restraint as high
as possible.
WARNING
• Never drive the vehicle with the
head restraints removed.
• Removed or improperly adjusted
head restraints can result in serious head and neck injuries in case
of a collision.
• Do not attempt to adjust the head
restraint while driving.
Pull up the head restraint in order to adjust
the position upward.
N4U1010A
Push in the release button and press
downward on the head restraint in order to
adjust the position downward.
To remove the head restraint, pull the head
restraint all the way up. Then push in the
release button and lift the head restraint
from the guide sleeve.
Replace the head restraint and reset it in
the original position before driving.
The rear seat head restraints may also be
adjusted.
Push in the release button and move the
head restraint to the desired position.
1-3
85Z03-03E

Front Seats:
Rear Seats:
SEATS AND RESTRAINT SYSTEMS
N4U1006A
If your vehicle is equipped with the tiltable
front head restraints, do the following to
adjust it.
1) Place it in its upright position by pushing it forward fully and releasing it.
2) Push the head restraint forward carefully until it is adjusted to the desired
position.
Rear Seats
Folding Rear Seat
Your vehicle has rear seatbacks that can
be folded down to increase cargo space.
To fold down the seatback, do the following:
N4U1007A
1) For the sedan model, disconnect the
center safety belt latch plate from the
buckle with the black button, and allow
the belt to retract. See “Rear Center
Safety Belt” later in this section.
2) Push the rear head restraints as far
down as possible.
3) Press down on the release button
located on top of the rear seatback.
4) Fold the rear seatback forward and
down.
To return the seatback to the upright position, do the following:
1) Lift up the seatback and push it to its
original position. Ensure that the safety
belts are not twisted or caught under
the seatback.
2) Push rearward firmly on the top of the
seatback until it latches securely in the
fully upright position.
3) For the sedan model, reconnect the
center safety belt latch plate into the
buckle with the black button, and make
sure that the webbing is not twisted.
See “Rear Center Safety Belt” later in
this section.
WARNING
If the seatback isn’t locked, it could
move forward in a sudden stop or
crash. That could cause injury to the
person sitting there. Always press
rearward on the seatback to be sure it
is locked.
1-4
85Z03-03E

Rear Seats:
Safety Belts:
SEATS AND RESTRAINT SYSTEMS
WARNING
A safety belt that is improperly
routed, not properly attached, or
twisted won’t provide the protection
needed in a crash. The person wearing the belt could be severely injured.
After raising the rear seatback,
always check to be sure that the
safety belts are properly routed and
attached, and are not twisted.
WARNING
• Do not stack luggage or other
cargo higher than the front seats.
• Do not allow passengers to sit on
the folded seatbacks while the
vehicle is in motion.
• Unrestrained luggage or passengers on a folded seatback can be
thrown about or ejected from the
vehicle in a sudden stop or accident.
Serious injuries or death can result.
Safety Belts
Safety Belt: They are for Everyone
This section of the manual tells you how to
use safety belts properly. It also tells you
some things you should not do with safety
belts.
WARNING
Don’t let anyone ride where he or she
can’t wear a safety belt properly. If
you are in a crash and you’re not
wearing a safety belt, your injuries
can be much worse. You can hit
things inside the vehicle or be
ejected from it. You can be severely
injured or killed. In the same crash,
you might not be, if you are buckled
up. Always fasten your safety belt,
and check that your passengers’
belts are fastened properly too.
WARNING
It is extremely dangerous to ride in a
cargo area, inside or outside of a
vehicle. In a collision, people riding
in these areas are more likely to be
severely injured or killed. Do not
allow people to ride in any area of
your vehicle that is not equipped with
seats and safety belts. Be sure everyone in your vehicle is in a seat and is
using a safety belt properly.
S4U1008A
Your vehicle has a light that comes on as a
reminder to buckle up. See “Safety Belt
Reminder Light” in section 3.
In most states and in all Canadian provinces, the law says to wear safety belts.
Here’s why: They work.
You never know if you’ll be in a crash. If
you do have a crash, you don’t know if it
will be a bad one.
A few crashes are mild, and some crashes
can be so serious that even buckled up, a
person wouldn’t survive. But most crashes
are in between. In many of them, people
who buckle up can survive and sometimes
walk away. Without belts they could have
been badly hurt or killed.
After more than 30 years of safety belts in
vehicles, the facts are clear. In most
crashes buckling up does matter ... a lot!
1-5
85Z03-03E

Safety Belts:
Why Safety Belts Work
When you ride in or on anything, you go as
fast as it goes.
SEATS AND RESTRAINT SYSTEMS
L3U1015A
Take the simplest vehicle. Suppose it’s just
a seat on wheels.
L3U1016A
Put someone on it.
L3U1017A
Get it up to speed. Then stop the vehicle.
The rider doesn’t stop.
L3U1018A
The person keeps going until stopped by
something. In a real vehicle, it could be the
windshield...
L3U1019A
or the instrument panel...
L3U1020A
or the safety belts!
With safety belts, you slow down as the
vehicle does. You get more time to stop.
You stop over more distance, and your
1-6
85Z03-03E

Safety Belts:
SEATS AND RESTRAINT SYSTEMS
strongest bones take the forces. That’s
why safety belts make such good sense.
Questions and Answers About
Safety Belts
Question: Won’t I be trapped in the
vehicle after an accident if I’m wearing a
safety belt?
Answer: You could be – whether you’re
wearing a safety belt or not. But you can
unbuckle a safety belt, even if you’re
upside down. And your chance of being
conscious during and after an accident, so
you can unbuckle and get out, is much
greater if you are belted.
Question: If my vehicle has air bags,
why should I have to wear safety belts?
Answer: Air bags are in many vehicles
today and will be in most of them in the
future. But they are supplemental systems
only; so they work with safety belts – not
instead of them. Every air bag system ever
offered for sale has required the use of
safety belts. Even if you’re in a vehicle that
has air bags, you still have to buckle up to
get the most protection. That’s true not
only in frontal collisions, but especially in
side and other collisions.
Question: If I’m a good driver, and I
never drive far from home, why should I
wear safety belts?
Answer: You may be an excellent driver,
but if you’re in an accident – even one that
isn’t your fault – you and your passengers
can be hurt. Being a good driver doesn’t
protect you from things beyond your control, such as bad drivers.
Most accidents occur within 25 miles (40
km) of home. And the greatest number of
serious injuries and deaths occur at
speeds of less than 40 mph (65 km/h).
Safety belts are for everyone.
How to Wear Safety Belts Properly
This section is only for people of adult size.
Be aware that there are special things to
know about safety belts and children. And
there are different rules for smaller children
and babies. If a child will be riding in your
vehicle, see “Older Children” or “Infants
and Young Children” in this section. Follow
those rules for everyone’s protection.
First, you’ll want to know which restraint
systems your vehicle has.
We’ll start with the driver position.
Driver Position
This section describes the driver’s restraint
system.
Lap-Shoulder Belt
The driver has a lap-shoulder belt. Here’s
how to wear it properly.
1) Close and lock the door.
2) Adjust the seat so you can sit up
straight. To see how, see “Seats” in the
Index.
L3U1021A
3) Pick up the latch plate and pull the belt
across you. Don’t let it get twisted.
The shoulder belt may lock if you pull
the belt across you very quickly. If this
happens, let the belt go back slightly to
unlock it. Then pull the belt across you
more slowly.
4) Push the latch plate into the buckle until
it clicks.
Pull up on the latch plate to make sure
it is secure.
Make sure the release button on the
buckle is positioned so you would be
1-7
85Z03-03E

Safety Belts:
SEATS AND RESTRAINT SYSTEMS
able to unbuckle the safety belt quickly
if you ever had to.
L3U1022A
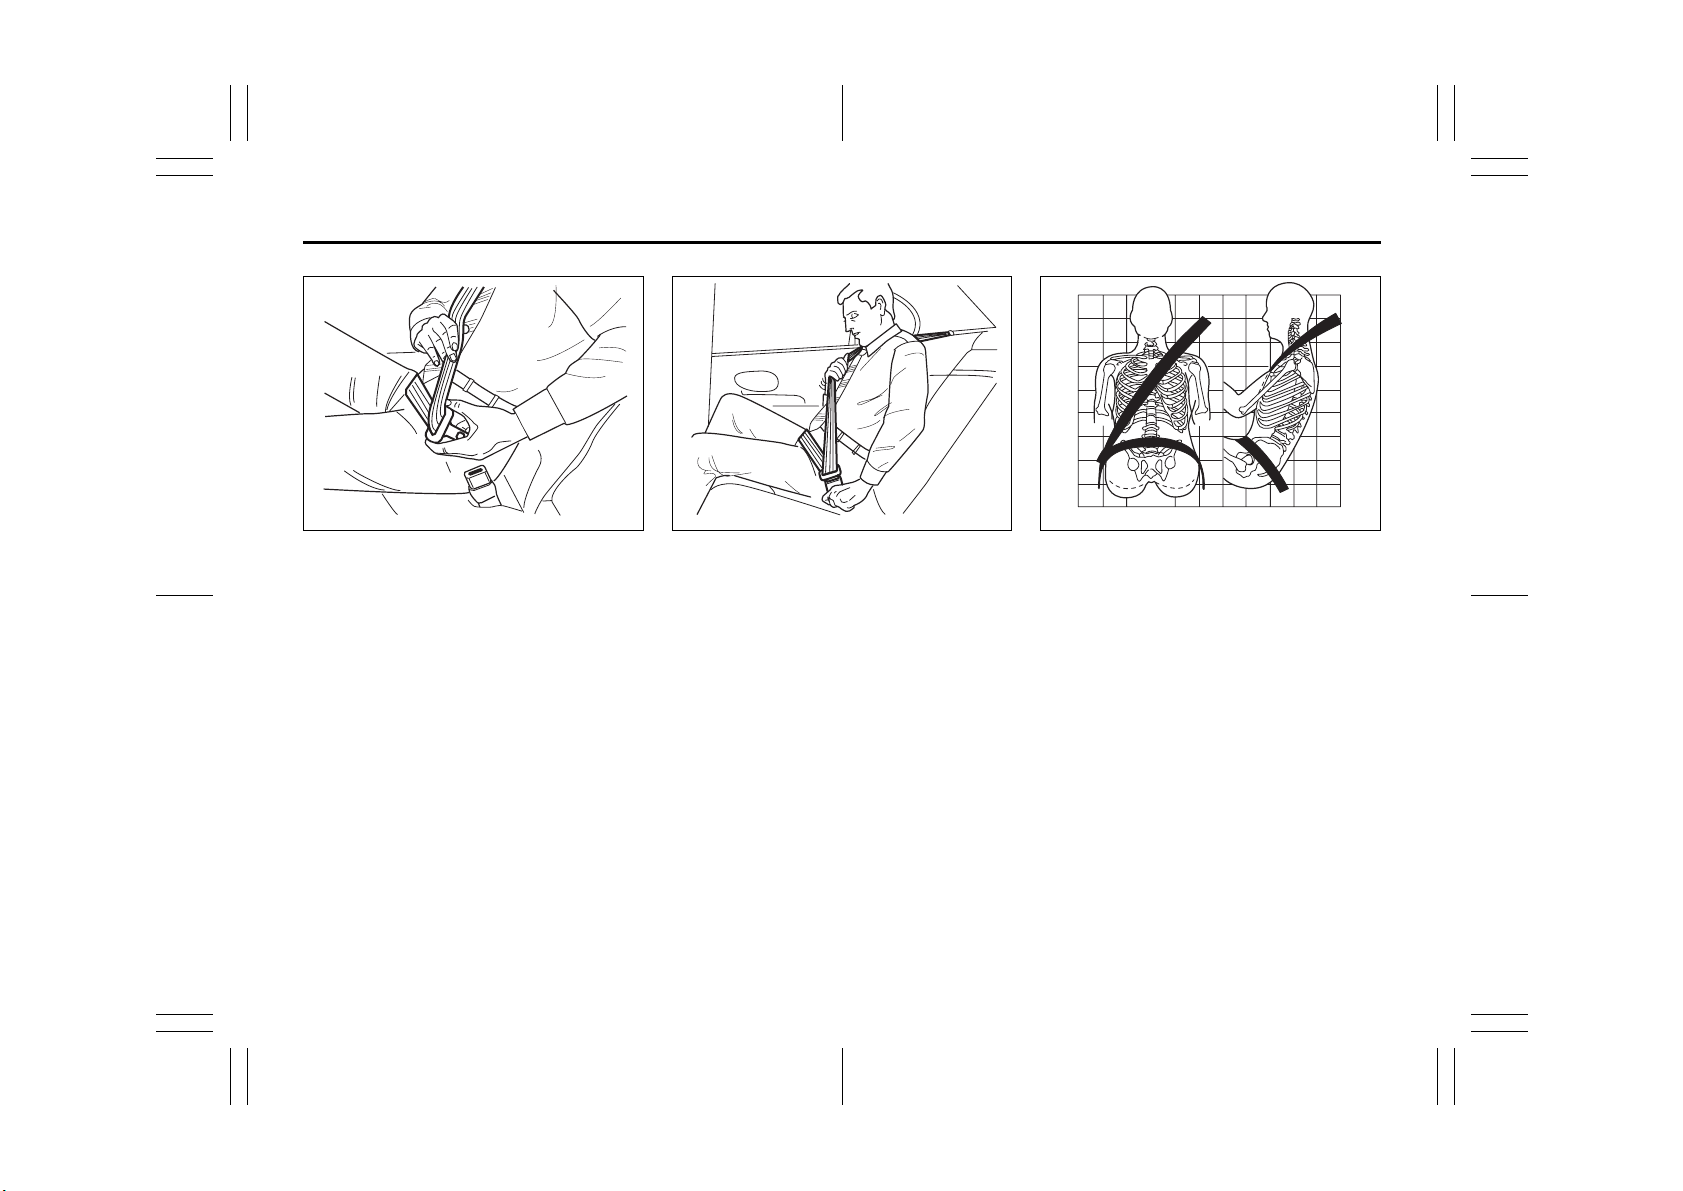
5) To make the lap part tight, pull down on
the buckle end of the belt as you pull up
on the shoulder belt.
L3U1023A
The lap part of the belt should be worn low
and snug on the hips, just touching the
thighs. In a crash, this applies force to the
strong pelvic bones so you’d be less likely
to slide under the lap belt. If you slid under
it, the belt would apply force at your abdomen. This could cause serious or even
fatal injuries. The shoulder belt should go
over the shoulder and across the chest.
These parts of the body are best able to
take belt restraining forces.
The safety belt locks if there’s a sudden
stop or crash, or if you pull the belt very
quickly out of the retractor.
Shoulder Belt Height Adjuster
Before you begin to drive, move the shoulder belt adjuster to the height that is right
for you. Adjust the height so that the shoulder portion of the belt is centered on your
shoulder. The belt should be away from
your face and neck, but not falling off your
shoulder.
S4U1009A
To move it down, squeeze the release button and move the height adjuster to the
desired position. You can move the
adjuster up just by pushing up on the
shoulder belt guide. After you move the
adjuster to where you want it, try to move it
down without squeezing the release button
to make sure it has locked into position.
1-8
85Z03-03E

Safety Belts:
SEATS AND RESTRAINT SYSTEMS
WARNING
Be sure that the shoulder belt is positioned on the center of the outside
shoulder. The belt should be away
from your face and neck, but not falling off your shoulder. Misadjustment
of the belt could reduce the effectiveness of the safety belt in a crash.
Question: What’s wrong with this?
L3U1025A
Answer: The shoulder belt is too loose. It
won’t give nearly as much protection this
way.
WARNING
You can be severely hurt if your
shoulder belt is too loose. In a crash,
you would move forward too much,
which could increase injury. The
shoulder belt should fit against your
body.
Question: What’s wrong with this?
L3U1026A
Answer: The belt is buckled in the wrong
place.
WARNING
You can be severely injured if your
belt is buckled in the wrong place. In
a crash, the belt would slide up over
your abdomen. The belt forces would
be at the waist, not at the pelvic
bones. This could cause serious
internal injuries. Always buckle your
belt into the buckle nearest you.
1-9
85Z03-03E

Safety Belts:
SEATS AND RESTRAINT SYSTEMS
Question: What’s wrong with this?
L3U1027A
Answer: The shoulder belt is worn under
the arm. It should be worn over the shoulder at all times.
WARNING
You can be severely injured if you
wear the shoulder belt under your
arm. In a crash, your body would
move too far forward, which would
increase the chance of head and neck
injury. Also, the belt would apply too
much force to the ribs, which aren’t
as strong as shoulder bones. You
could also severely injure internal
organs like your liver or spleen.
Question: What’s wrong with this?
L3U1028A
Answer: The belt is twisted across the
body.
WARNING
You can be severely injured by a
twisted belt. In a crash, you wouldn’t
have the full width of the belt to
spread impact forces. If a belt is
twisted, make it straight so it can
work properly, or ask your SUZUKI
dealer to fix it.
L3U1029A
To unlatch the belt, just push the button on
the buckle. The belt should go back out of
the way.
Before you close the door, be sure the belt
is out of the way. If you slam the door on it,
you can damage both the belt and your
vehicle.
Safety Belt Use During Pregnancy
Safety belts work for everyone, including
pregnant women. Like all occupants, they
are more likely to be severely injured if they
don’t wear safety belts.
1-10
85Z03-03E

Safety Belts:
SEATS AND RESTRAINT SYSTEMS
L3U1030A
A pregnant woman should wear a lapshoulder belt, and the lap portion should
be worn as low as possible, below the
rounding, throughout the pregnancy.
The best way to protect the fetus is to protect the mother. When a safety belt is worn
properly, it’s more likely that the fetus won’t
be hurt in a crash. For pregnant women, as
for anyone, the key to making safety belts
effective is wearing them properly.
Right Front Passenger Position
To learn how to wear the right front passenger’s safety belt properly, see “Driver
Position” in this section.
The right front passenger’s safety belt
works the same way as the driver’s safety
belt.
Rear Seat Passengers
It’s very important for rear seat passengers
to buckle up! Accident statistics show that
unbelted people in the rear seat are hurt
more often in crashes than those who are
wearing safety belts.
Rear passengers who aren’t safety belted
can be thrown out of the vehicle in a crash.
And they can strike others in the vehicle
who are wearing safety belts.
L3U1031A
Lap-Shoulder Belt
All rear seating positions have lap-shoulder belts. Here’s how to wear one properly.
L3U1032A
1) Pick up the latch plate and pull the belt
across you. Don’t let it get twisted.
The shoulder belt may lock if you pull
the belt across you very quickly. If this
happens, let the belt go back slightly to
unlock it. Then pull the belt across you
more slowly.
2) Push the latch plate into the buckle until
it clicks. Be sure you are using the correct buckle and that the latch plate
clicks when inserted into the buckle.
1-11
85Z03-03E
Safety Belts:
SEATS AND RESTRAINT SYSTEMS
L3U1033A L3U1034A L3U1023A
Pull up on the latch plate to make sure
it is secure.
Make sure the release button on the
buckle is positioned so you would be
able to unbuckle the safety belt quickly
if you ever had to.
3) To make the lap part tight, pull down on
the buckle end of the belt as you pull up
on the shoulder part.
The lap part of the belt should be worn low
and snug on the hips, just touching the
thighs. In a crash this applies force to the
strong pelvic bones so you’d be less likely
to slide under the lap belt. If you slid under
it, the belt would apply force at your abdomen. This could cause serious or even
fatal injuries. The shoulder belt should go
over the shoulder and across the chest.
These parts of the body are best able to
take belt-restraining forces.
The safety belt locks if there’s a sudden
stop or a crash, or if you pull the belt very
quickly out of the retractor.
1-12
85Z03-03E

Safety Belts:
SEATS AND RESTRAINT SYSTEMS
WARNING
You can be severely hurt if your
shoulder belt is too loose. In a crash,
you would move forward too much,
which could increase injury. The
shoulder belt should fit against your
body.
L3U1067A
To unlatch the belt, just push the button on
the buckle.
Rear Center Safety Belt
(Sedan only)
The rear center safety belt system includes
a retractable safety belt, a buckle with a
black release button, and a buckle with a
red release button marked “CENTER”. The
rear center safety belt buckles are
designed so as not to allow a wrong latch
plate to be inserted.
When the rear seatback is in an upright
position, keep the latch plate latched into
the buckle with the black button (1). The
latch plate should only be disconnected
from the buckle with the black button when
you fold the rear seatback down.
(A)
(B)
(1)
S4U1017A
Before fastening the rear center belt, make
sure that the latch plate is securely latched
into the buckle with the black button (1)
and make sure the webbing is not twisted.
To fasten the belt, sit up straight and well
back in the seat, pull the latch plate (A)
across your body and press it into the
buckle (B) until you hear a “click”.
(B)
S4U1018A
To unfasten the belt, push the red button
on the buckle (B) and allow the belt to
retract.
When the rear seatback will be folded
down, push the black button on the buckle
(1) and allow the belt to retract.
After returning a rear seatback to the normal position, push the latch plate (1) at the
end of the safety belt strap into the buckle
with the black button and make sure the
webbing is not twisted.
1-13
85Z03-03E

Safety Belts:
SEATS AND RESTRAINT SYSTEMS
85Z018
WARNING
To minimize risk of severe injury or
death in the event of a crash, always
wear the rear center safety belt with
both latches buckled.
Safety Belt Pretensioner System
EXAMPLE
52D011
WARNING
This section of the owner’s manual
describes your vehicle’s SAFETY
BELT PRETENSIONER SYSTEM.
Please read and follow ALL these
instructions carefully to minimize
your risk of severe injury or death.
Your vehicle is equipped with a safety belt
pretensioner system at the front seating
positions. You can use the pretensioner
safety belts in the same manner as ordinary safety belts.
The safety belt pretensioner system is activated based on crash severity. The crash
sensors and the electronic controller of the
air bag system also control the safety belt
pretensioners. For precautions and general information including servicing the
pretensioner system, refer to the “Supplemental Restraint System (air bags)” section in addition to this “Safety Belt
Pretensioner System” section, and follow
all those precautions.
The pretensioner is located in each front
safety belt retractor. The pretensioner
tightens the safety belt so the belt fits the
occupant’s body more snugly in the event
of a frontal crash. The retractors will
remain locked after the pretensioners are
activated. Upon activation, some noise will
occur and some smoke may be released.
These conditions are not harmful and do
not indicate a fire in the vehicle.
The driver and all passengers must be
properly restrained by wearing safety belts
at all times, whether or not a pretensioner
is equipped at their seating position, to
minimize the risk of severe injury or death
in the event of a crash. Sit fully back in the
seat; sit up straight; do not lean forward or
sideways. Adjust the belt so the lap portion
of the belt is worn low across the pelvis,
not across the waist. Please refer to the
“Front Seats” section and the instructions
and precautions about the safety belts in
this “Safety Belts” section for details on
proper seat and safety belt adjustments.
Please note that the pretensioners will activate only in severe frontal collisions. They
are not designed to activate in rear
1-14
85Z03-03E

Safety Belts:
SEATS AND RESTRAINT SYSTEMS
impacts, side impacts, rollovers or minor
frontal collisions. The pretensioners can be
activated only once. If the pretensioners
are activated, have the pretensioner system serviced by an authorized SUZUKI
dealer as soon as possible.
If the air bag readiness light on the instrument cluster does not blink or come on
briefly when the ignition switch is turned to
the “ON” position, stays on for more than
10 seconds, or comes on while driving, the
pretensioner system or the air bag system
may not work properly. Have both systems
inspected by an authorized SUZUKI dealer
as soon as possible.
Service on or around the pretensioner system components or wiring must be performed only by an authorized SUZUKI
dealer who is specially trained. Improper
service could result in unintended activation of pretensioners or could render the
pretensioners inoperative. Either of these
two conditions may result in personal
injury.
To prevent damage or unintended activation of the pretensioners, be sure the battery is disconnected and the ignition switch
has been in the “LOCK” position for at least
60 seconds before performing any electrical service work on your SUZUKI. Do not
touch pretensioner system components or
wiring. The wires are wrapped with yellow
tape or yellow tubing, and the couplers are
yellow. When scrapping your SUZUKI, ask
your SUZUKI dealer, body repair shop or
scrap yard for assistance.
Safety Belt Extender
65D613
(1) Center of body
(2) Less than 152 mm (6 inches)
(3) Open end of extender buckle
If a safety belt cannot be fastened securely
because it is not long enough, see your
authorized SUZUKI dealer for a safety belt
extender. Safety belt extenders are available for each seating position except for
the rear center position. After inspecting
the relationship between the safety belt
length, the occupant’s body size, and the
seat adjustment (the driver’s seat should
always be adjusted as far back as possible
while still maintaining control of the vehicle,
and other adjustable seats should be
adjusted as far back as possible), your
SUZUKI dealer can select the appropriate
safety belt extender.
• A safety belt extender should only be
used for the person, vehicle and seating
location it was provided for.
• When using the extender, ensure that
both ends are latched securely. Do not
use the extender if the open end of the
extender’s buckle is within 152 mm (6
inches) of the center of the occupant’s
body (See diagram). Use of the extender
when the buckle is too close to the center of the body could increase the risk of
abdominal injury in the event of an accident, and could cause the shoulder belt
to be positioned incorrectly.
• Make sure to use the correct buckle corresponding to your seating position.
• Safety belt extenders are not intended
for use by pregnant women, and should
only be used upon approval by their
medical advisors.
• Remove and stow the extender when it
is not being used.
1-15
85Z03-03E

Safety Belts:
Child Restraints:
SEATS AND RESTRAINT SYSTEMS
WARNING
Failure to follow these instructions
may increase the risk of injury in a
crash.
• Only use an extender for the person, vehicle and seating position it
was provided for.
• A front safety belt extender must
only be used in a front seating
position, and a rear safety belt
extender must only be used in a
rear seating position.
• Safety belt extenders are not
intended for use by pregnant
women, and should only be used
upon approval by their medical
advisors.
• The extender has been designed
for adults. Never use it for securing
child seats.
• Do not use a safety belt extender if
the open end of the extender’s
buckle is within 152 mm (6 inches)
of the center of the occupant’s
body (See diagram).
• Remove and stow the extender
when it is not being used.
Child Restraints
Older Children
L3U1036A
Older children who have outgrown booster
seats should wear the vehicle’s safety
belts.
Question: What is the proper way to
wear safety belts?
Answer: If possible, an older child should
wear a lap-shoulder belt and get the additional restraint a shoulder belt can provide.
The shoulder belt should not cross the face
or neck. The lap belt should fit snugly
below the hips, just touching the top of the
thighs. It should never be worn over the
abdomen, which could cause severe or
even fatal internal injuries in a crash.
Accident statistics show that children are
safer if they are restrained in the rear seat.
In a crash, children who are not buckled up
can strike other people who are buckled
up, or can be thrown out of the vehicle.
Older children need to use safety belts
properly.
L3U1037A
WARNING
Never do this.
Here two children are wearing the
same belt. The belt can’t properly
spread the impact forces. In a crash,
the two children can be crushed
together and severely injured. A belt
must be used by only one person at a
time.
1-16
85Z03-03E

Child Restraints:
SEATS AND RESTRAINT SYSTEMS
Question: What if a child is wearing a
lap-shoulder belt, but the child is so
small that the shoulder belt is very
close to the child’s face or neck?
Answer: If the child is sitting in a seat next
to a window, move the child toward the
center of the vehicle. If the child is sitting in
the center rear seat passenger position,
move the child toward the safety belt
buckle. In either case, be sure that the
shoulder belt still is on the child’s shoulder,
so that in a crash the child’s upper body
would have the restraint that belts provide.
If the child is so small that the shoulder belt
is still very close to the child’s face or neck,
you might want to place the child in a seat
that has a lap belt, if your vehicle has one.
L3U1038A
WARNING
Never do this.
Here a child is sitting in a seat that
has a lap-shoulder belt, but the
shoulder part is behind the child. If
the child wears the belt in this way, in
a crash the child might slide under
the belt. The belt’s force would then
be applied right on the child’s abdomen. That could cause serious or
fatal injuries.
Wherever the child sits, the lap portion of
the belt should be worn low and snug on
the hips, just touching the child’s thighs.
This applies belt force to the child’s pelvic
bones in a crash.
Infants and Young Children
Everyone in a vehicle needs protection!
This includes infants and all other children.
Neither the distance traveled nor the age
and size of the traveler changes the need
to use safety restraints. In fact, the law in
every state in the United States and in
every Canadian province says children up
to some age must be restrained while in a
vehicle.
Every time infants and young children ride
in vehicles, they should have the protection
provided by appropriate restraints. Young
children should not use the vehicle’s adult
safety belts alone, unless there is no other
choice. Instead, they need to use a child
restraint.
L3U1039A
WARNING
People should never hold a baby in
their arms while riding in a vehicle. A
baby doesn’t weigh much – until a
crash occurs. During a crash a baby
will become so heavy it is not possible to hold it. For example, in a crash
at only 25 mph (40 km/h), a 12-lb. (5.5
kg) baby will suddenly become a 240lb. (110 kg) force on a person’s arms.
A baby should be secured in an
appropriate restraint.
1-17
85Z03-03E

Child Restraints:
WARNING
Children who are up against, or very
close to, any air bag when it inflates
can be severely injured or killed. Air
bags plus lap-shoulder belts offer
outstanding protection for adults and
older children, but not for young children and infants. Neither the vehicle’s safety belt system nor its air bag
system is designed for them. Young
children and infants need the protection that a child restraint system can
provide.
L3U1040B
Question: What are the different types
of add-on child restraints?
Answer: Add-on child restraints, which are
purchased by the vehicle’s owner, are
available in four basic types. Selection of a
particular restraint should take into consideration not only the child’s weight, height
and age but also whether or not the
restraint will be compatible with the motor
vehicle in which it will be used.
For most basic types of child restraints,
there are many different models available.
When purchasing a child restraint, be sure
it is designed to be used in a motor vehicle.
If it is, the restraint will have a label saying
that it meets federal motor vehicle safety
standards.
The restraint manufacturer’s instructions
that come with the restraint, state the
weight and height limitations for a particular child restraint. In addition, there are
many kinds of restraints available for children with special needs.
SEATS AND RESTRAINT SYSTEMS
WARNING
Newborn infants need complete support, including support for the head
and neck. This is necessary because
a newborn infant’s neck is weak and
its head weighs so much compared
with the rest of its body. In a crash,
an infant in a rear-facing seat settles
into the restraint, so the crash forces
can be distributed across the strongest part of an infant’s body, the back
and shoulders. Infants always should
be secured in appropriate infant
restraints.
WARNING
The body structure of a young child
is quite unlike that of an adult or
older child, for whom the safety belts
are designed. A young child’s hip
bones are still so small that the vehicle’s regular safety belt may not
remain low on the hip bones, as it
should. Instead, it may settle up
around the child’s abdomen. In a
crash, the belt would apply force on a
body area that’s unprotected by any
bony structure. This alone could
cause serious or fatal injuries. Young
children always should be secured in
appropriate child restraints.
1-18
85Z03-03E
 Loading...