

Page 1
Instruction Manual
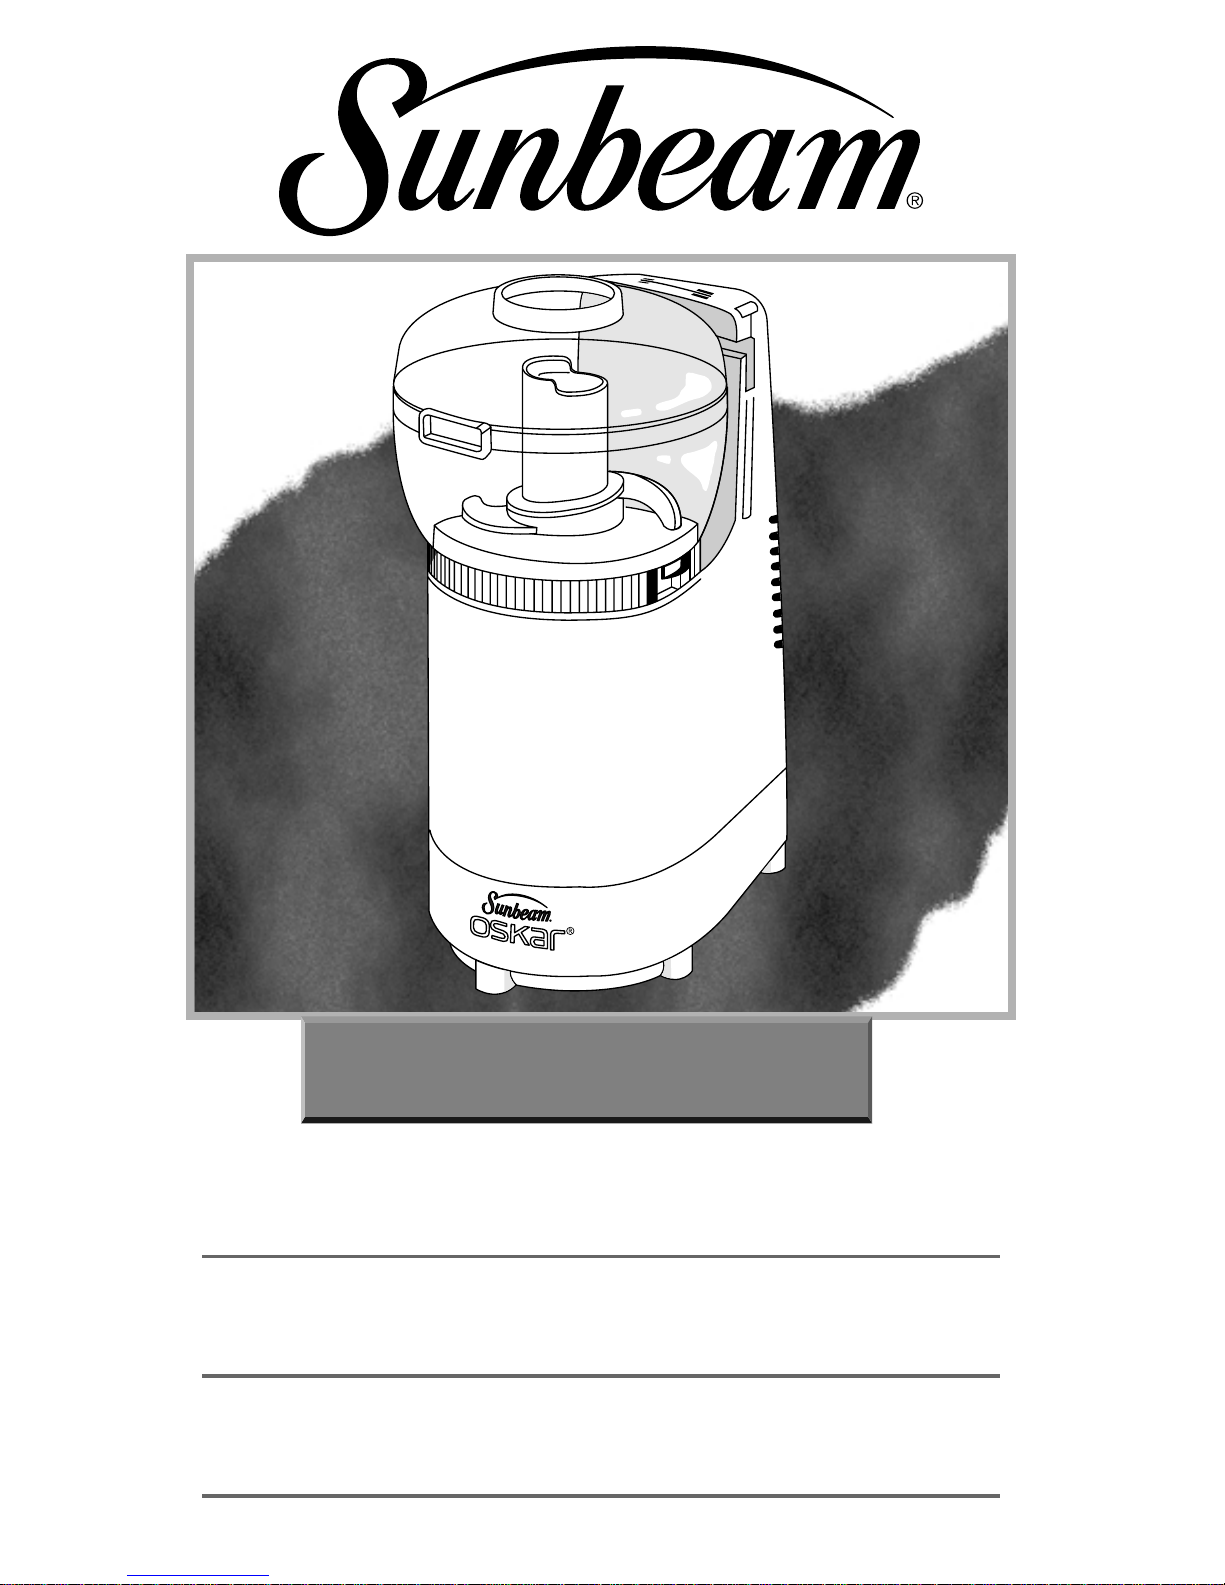
SUNBEAM®OSKAR®FOOD PROCESSOR
Manuel d’Instructions
ROBOT DE CUISINE SUNBEAM®OSKAR
®
Manual de Instrucciones
PROCESADOR DE ALIMENTOS SUNBEAM®OSKAR
®
Manual de Instruções
MODEL/MODÈLE
MODELO
4817-8
MODEL/MODÈLE
MODELO
4817-8
Page 2

When using electrical appliances, basic safety instructions should always be followed
including the following:
1. READ ALL INSTRUCTIONS BEFORE USING THE FOOD PROCESSOR.
2. To protect against risk of electrical shock, do not put food processor in water
or other liquid. This may cause personal injury or damage to the product.
3. Close supervision is necessary when any appliance is used by, or near, children
or incapacitated persons.
4. Unplug from outlet when not in use, before putting on or taking off parts and
before cleaning.
5. Do not contact moving parts. Keep hands, hair, clothing and other utensils away from
chopping blade during operation to reduce the risk of injury to persons and/or
damage to the Food Processor.
6. Do not operate Food Processor with a damaged cord or plug or after the appliance
malfunctions, or is dropped or damaged in any manner. Return appliance to the
nearest authorized Sunbeam Appliance Company service facility for examination,
repair or electrical or mechanical adjustment.
7. The use of attachments not recommended or sold by Sunbeam Appliance Company
may cause fire, electrical shock or injury.
8. Do not let cord touch hot surfaces or hang over table edges or counters.
9. Do not use outdoors or for commercial purposes.
10. Blade and Processing Disk are sharp. Handle carefully.
11. To reduce the risk of injury to persons, never place Cutting Blade on Base
without first putting Container properly in place.
12. Be certain Container Cover is securely locked in place while operating appliance.
13. Never feed food by hand. Always use Food Pusher.
14. Do not attempt to defeat the cover interlock mechanism.
This Unit for Household Use Only
NOTE: The maximum current rating is based on the attachment for this product
that draws the greatest current. Other accessories may draw less current.
FOR PRODUCTS PURCHASED IN THE US. AND CANADA ONLY:
This appliance is equipped with a polarized plug (one blade is wider than the other).
As a safety feature, this plug will fit in a polarized outlet only one way. If the plug
does not fit fully in the outlet, reverse the plug. If it still does not fit, contact a
qualified electrician. Do not attempt to defeat this safety feature.
IMPORTANT SAFEGUARDS
SAVE THESE INSTRUCTIONS
Page 3
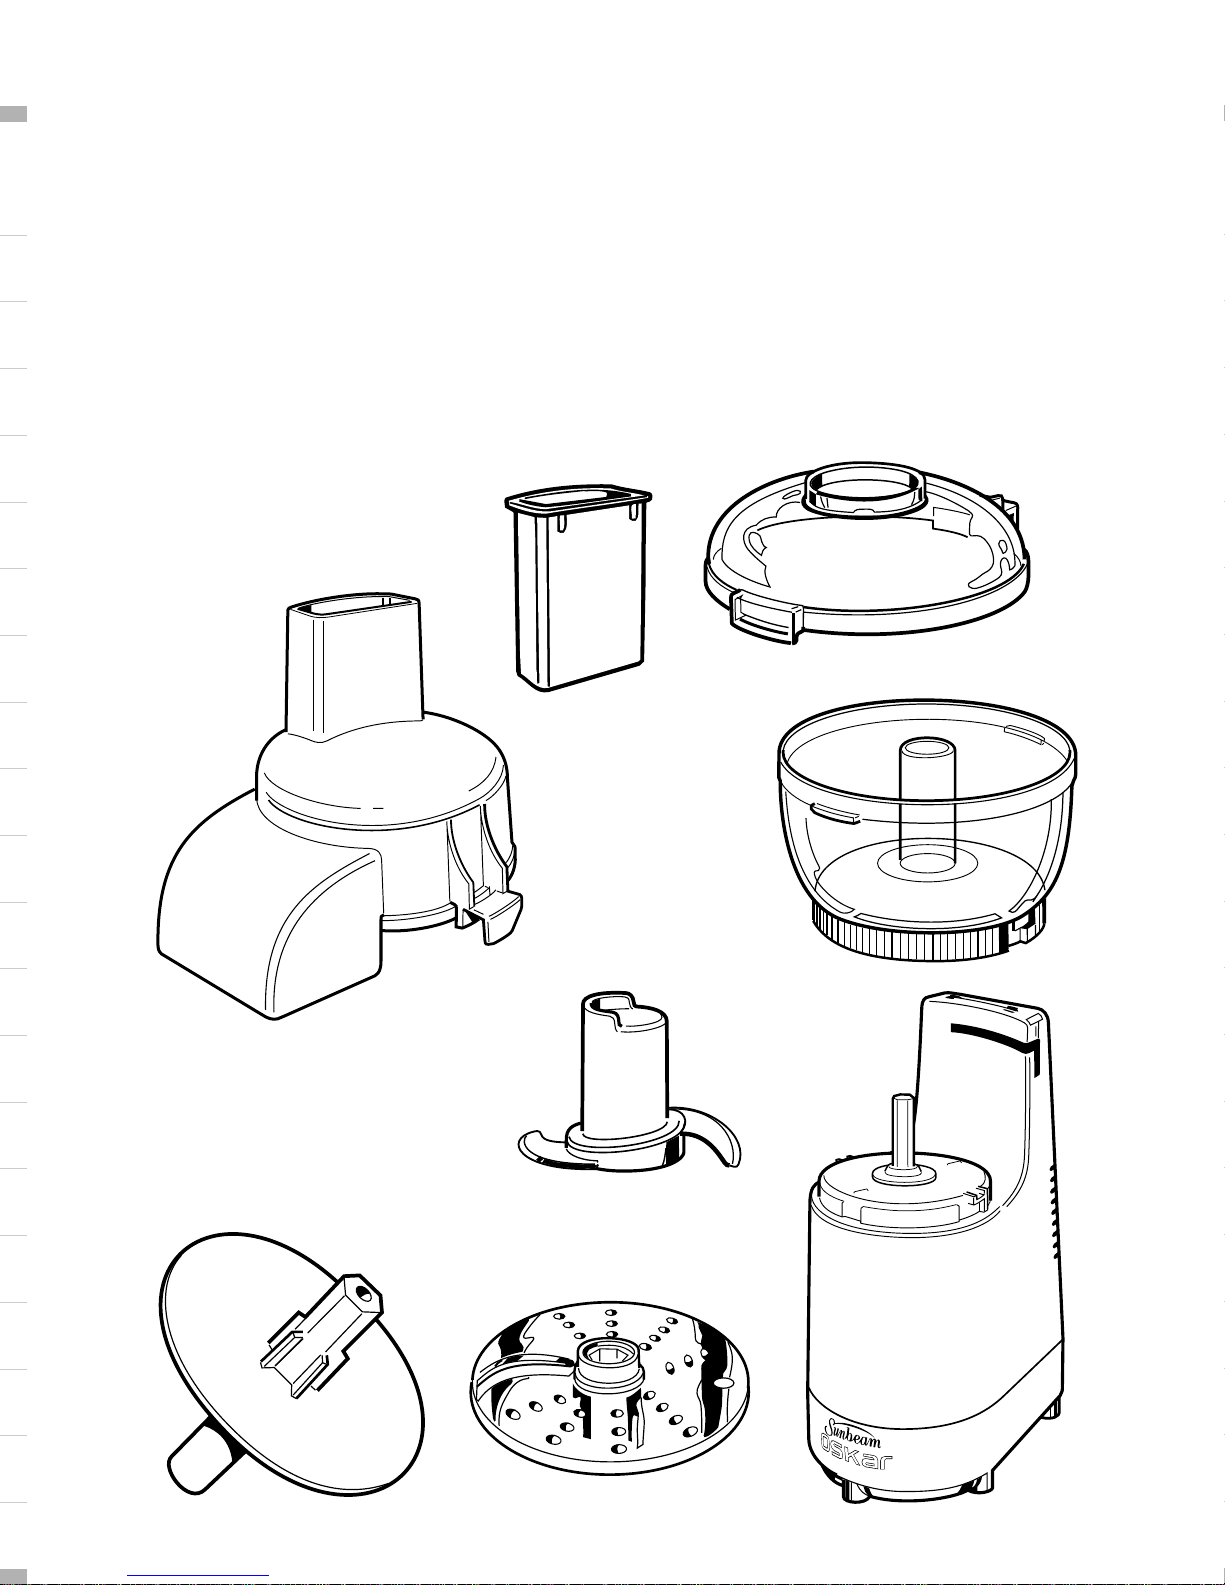
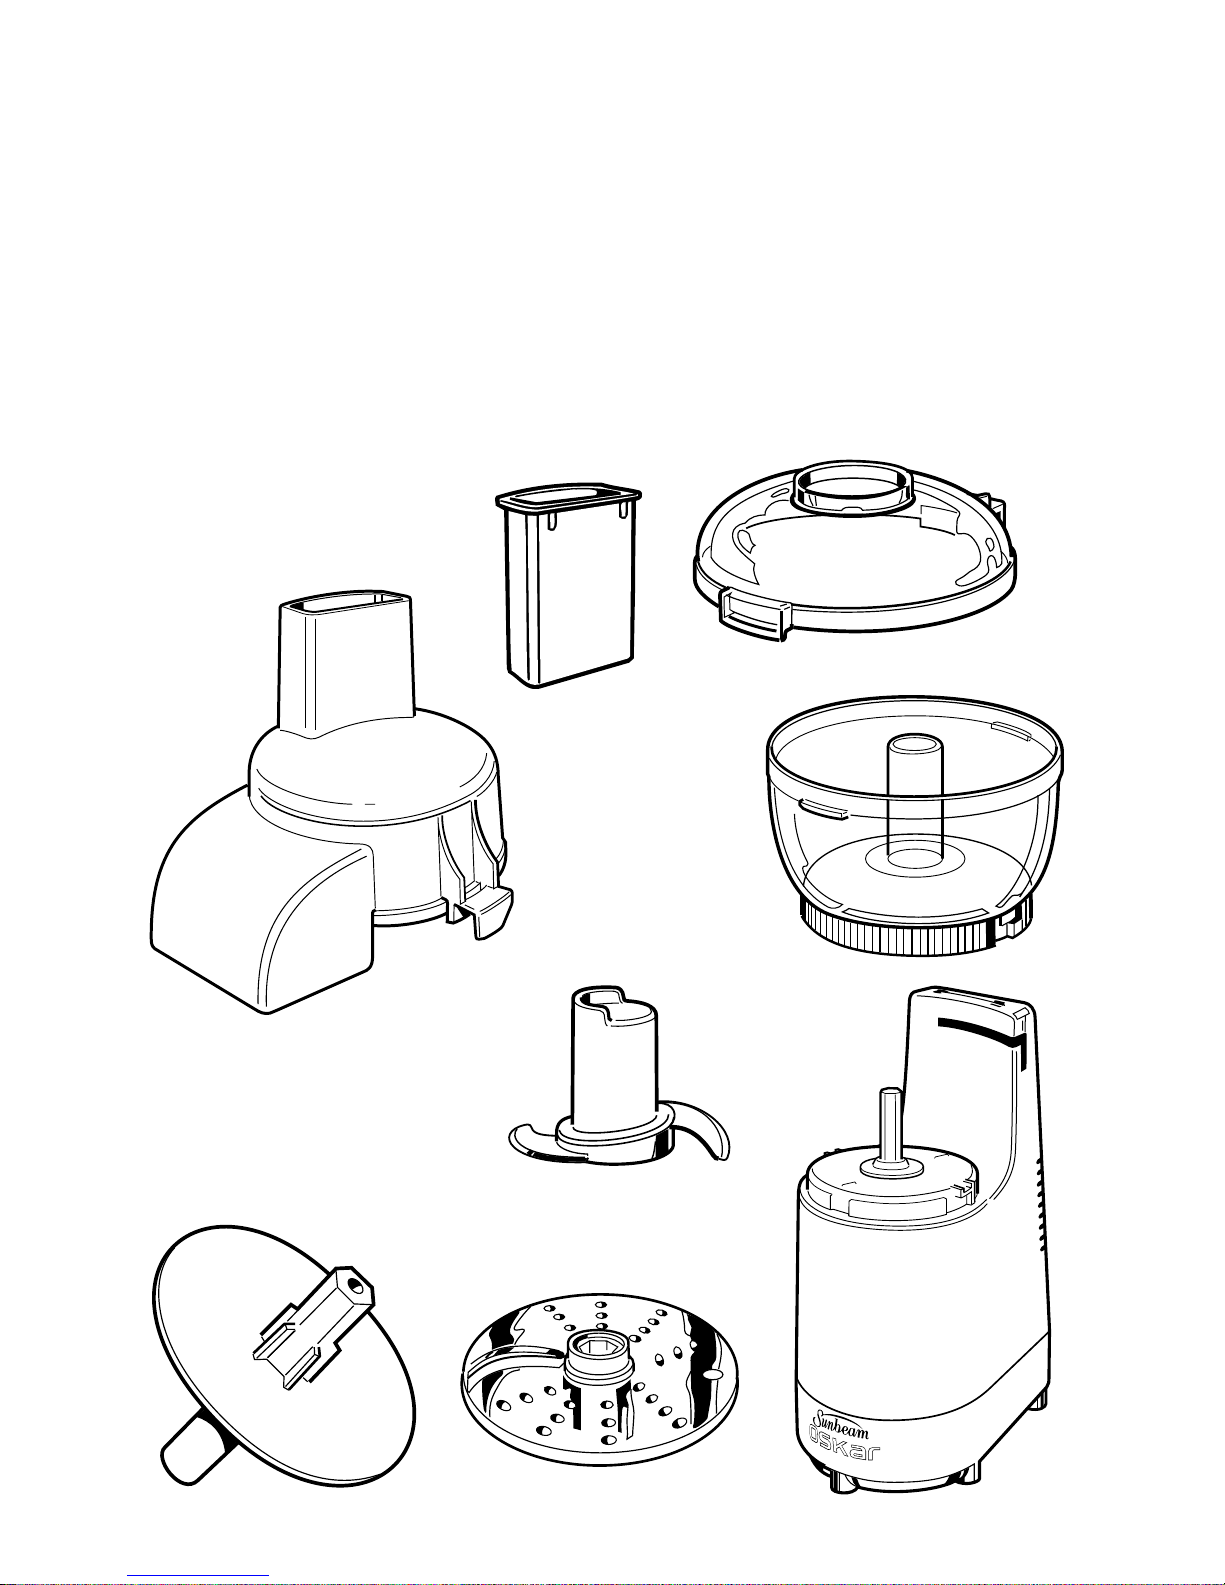
Food Pusher
Feed Tube
Processing Container
Motor Base
Cutting/
Processing Blade
Ejector Disc
Reversible Slicing/
Shredding Disc
Cover
Parts of Your Oskar®Food Processor
As you unpack your new food processor, take a moment to identify each of the various
parts as shown in these illustrations. BE SURE TO HANDLE THE BLADE AND DISK
CAREFULLY, AS THEY ARE VERY SHARP.
By following the simple, step-by-step instructions in this booklet, you will learn how
things go together, which blade or disc to use for each job and how wonderfully
convenient your new food processor really is to use.
Page 4
Sunbeam Products, Inc., ou se no Canadá, Sunbeam Corporation (Canadá) Limited (coletivamente “Sunbeam”) garante que
por um período de um ano, contado a partir da data de compra, este produto estará livre de defeitos no material e de mão-de-
obra. Sunbeam, a seu critério, reparará ou substituirá este produto ou qualquer componente do produto, que for considerado
defeituoso, durante este período de garantia. A substituição será feita por um produto, ou componente, novo ou
remanufaturado. Se o produto já não estiver mais disponível, a substituição poderá ser feita por um produto similar do mesmo
valor ou maior. Esta é a sua garantia exclusiva.
Esta garantia é válida para o comprador original a varejo, a partir da data de compra inicial a varejo, e não é transferível.
Mantenha consigo o recibo original de venda. Prova de compra é necessária para obter o serviço de
representantes da Sunbeam, centros de serviço ou lojas a varejo que vendem os produtos Sunbeam,
alterar, modificar ou de trocar, de nenhum modo, os termos e as condições desta garantia.
Esta garantia não cobre desgaste normal de peças, nem danos resultantes de qualquer um dos seguintes: uso negligente ou
indevido do produto, uso com voltagem ou corrente inadequada, uso contrário às instruções operacionais, desmontagem,
reparo ou alteração feita por qualquer pessoa que não seja da Sunbean ou de um centro de serviço Autorizado da Sunbeam.
Além disso, a garantia não abrange: atos de Força Maior, tal como incêndio, inundação, furacão e tornados.
Quais São os Limites de Responsabilidade da Sunbeam?
Sunbeam não será responsável por quaisquer danos emergentes, ou imprevistos, causados pela inadimplência de qualquer
garantia ou condição explícita, implícita ou estatutária.
Salvo na medida em que seja proibido por lei aplicável, qualquer garantia implícita ou condição de comercialização,
ou de adequação para um fim particular, está limitada em duração pela duração da garantia acima.
Sunbeam se isenta de quaisquer outras garantias, condições ou representações explícitas, implícitas, estatutárias ou outras,
de qualquer espécie.
Sunbean não será responsável por quaisquer danos, de qualquer tipo, resultante da compra, do uso ou do uso indevido de,
ou da inabilidade para utilizar o produto incluindo danos emergentes, especiais, imprevistos ou similares, ou lucros cessantes,
ou por qualquer quebra do contrato, fundamental ou outra, de qualquer espécie, ou por qualquer reivindicação que surgir
contra o comprador por terceiros.
Algumas províncias, estados ou jurisdições não permitem a exclusão ou a limitação de danos emergentes ou imprevistos,
ou limitações sobre quanto tempo dura uma garantia implícita, de modo que as limitações ou exclusões acima podem
não lhe aplicar.
Esta garantia lhe dá direitos legais específicos, e você pode ter também outros direitos que variam conforme a província,
estado ou jurisdição.
Como Obter o Serviço de Garantia
Nos EUA –
Se você tiver alguma dúvida no que se refere a esta garantia ou gostaria de obter o serviço de garantia, por gentileza telefone
para 1.800.458.8407 e um endereço de um centro de serviço conveniente lhe será fornecido.
No Canadá –
Se você tiver alguma dúvida no que se refere a esta garantia ou gostaria de obter o serviço de garantia, por gentileza telefone
para 1.800.458.8407 e um endereço de um centro de serviço conveniente lhe será fornecido.
Nos EUA, esta garantia é oferecida pela Sunbeam Products, Inc., que está localizada em Boca Raton, Flórida 33431. No Canadá,
esta garantia é oferecida pela Sunbeam Corporation (Canadá) Limited, que está localizada em 5975 Falbourne Street,
Mississagua, Ontario L5R 3V8.
POR GENTILEZA, NÃO DEVOLVA ESTE PRODUTO A QUALQUER
UM DESSES ENDEREÇOS OU PARA O LUGAR DE COMPRA.
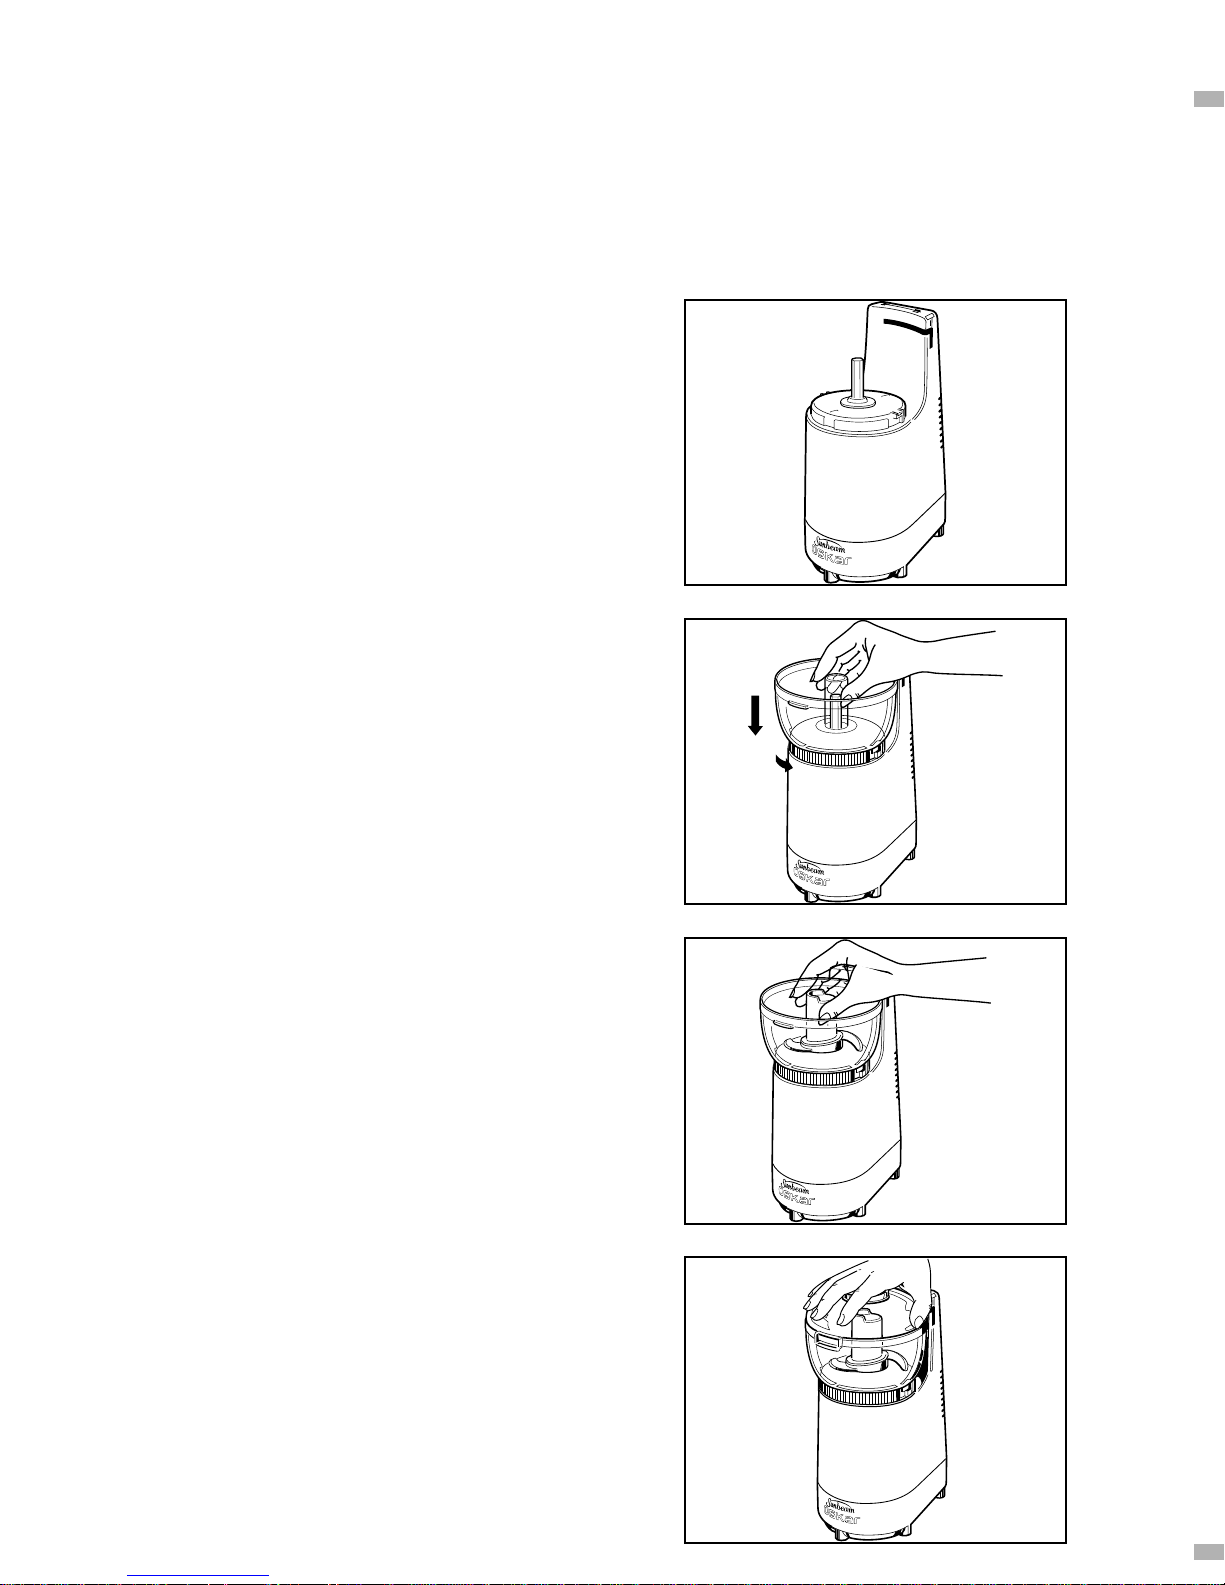
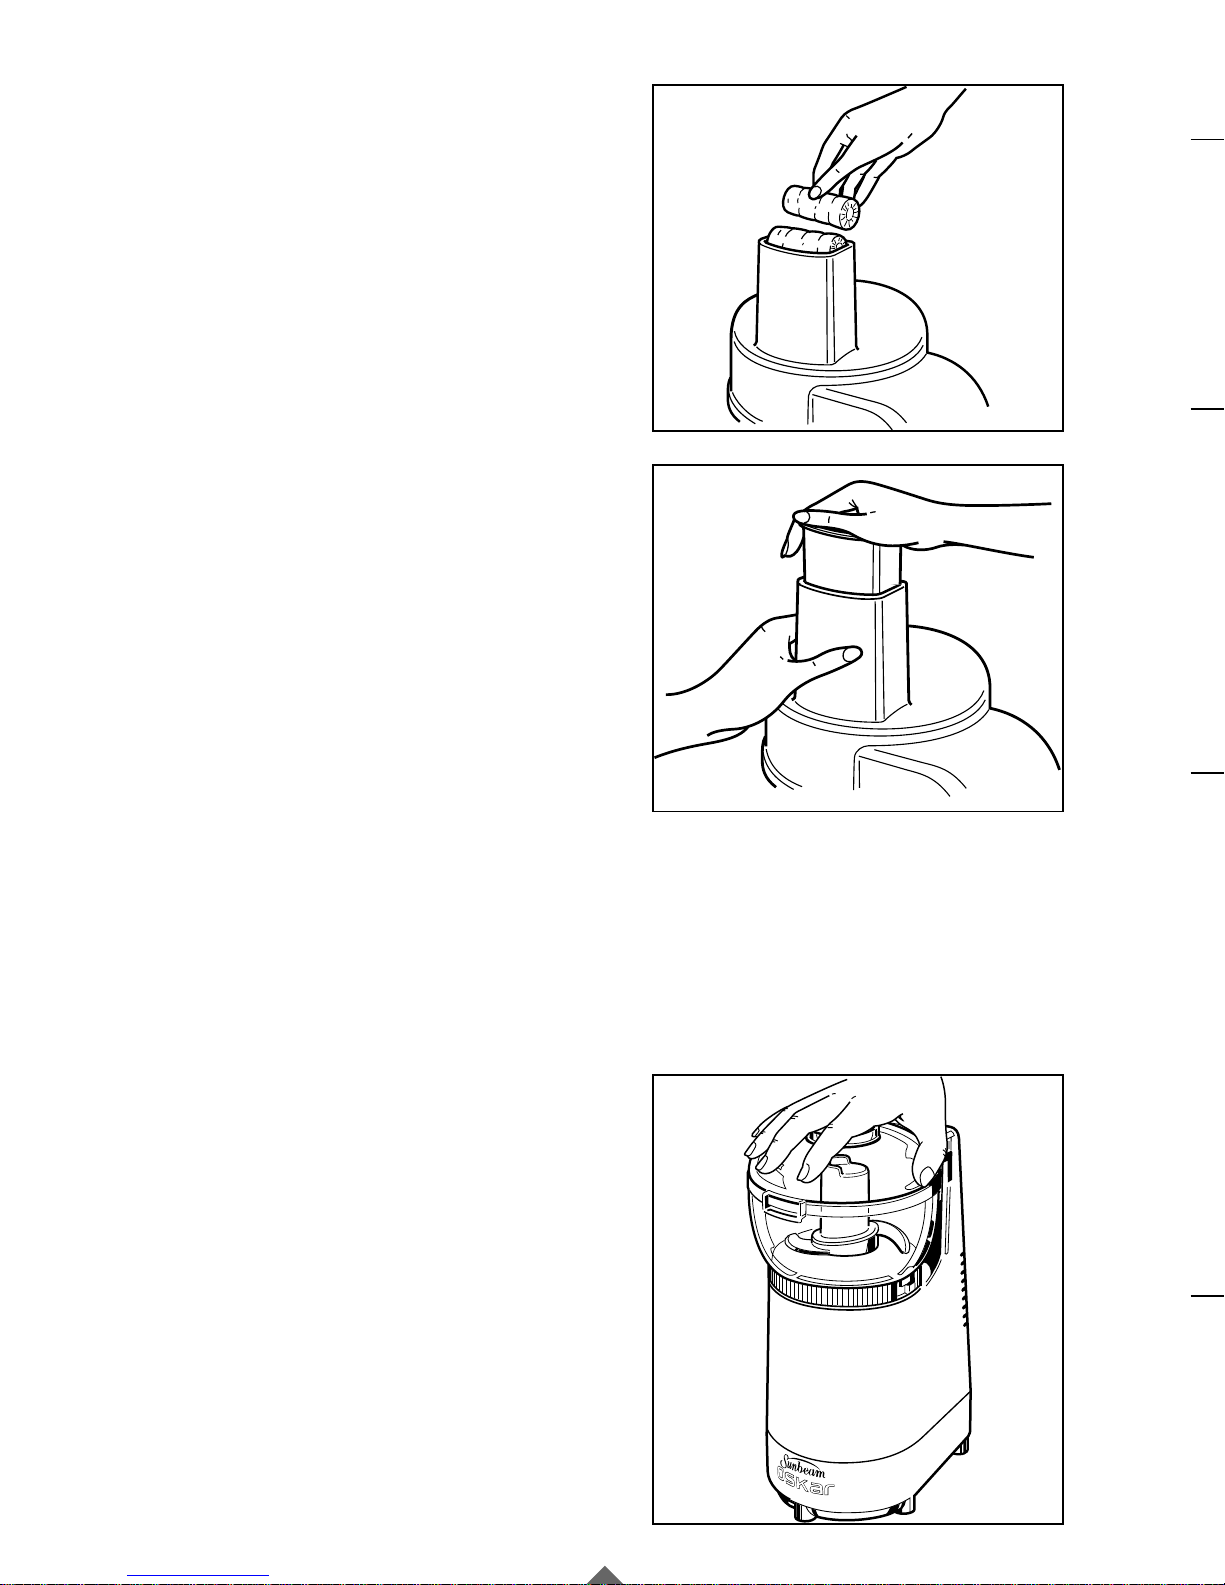
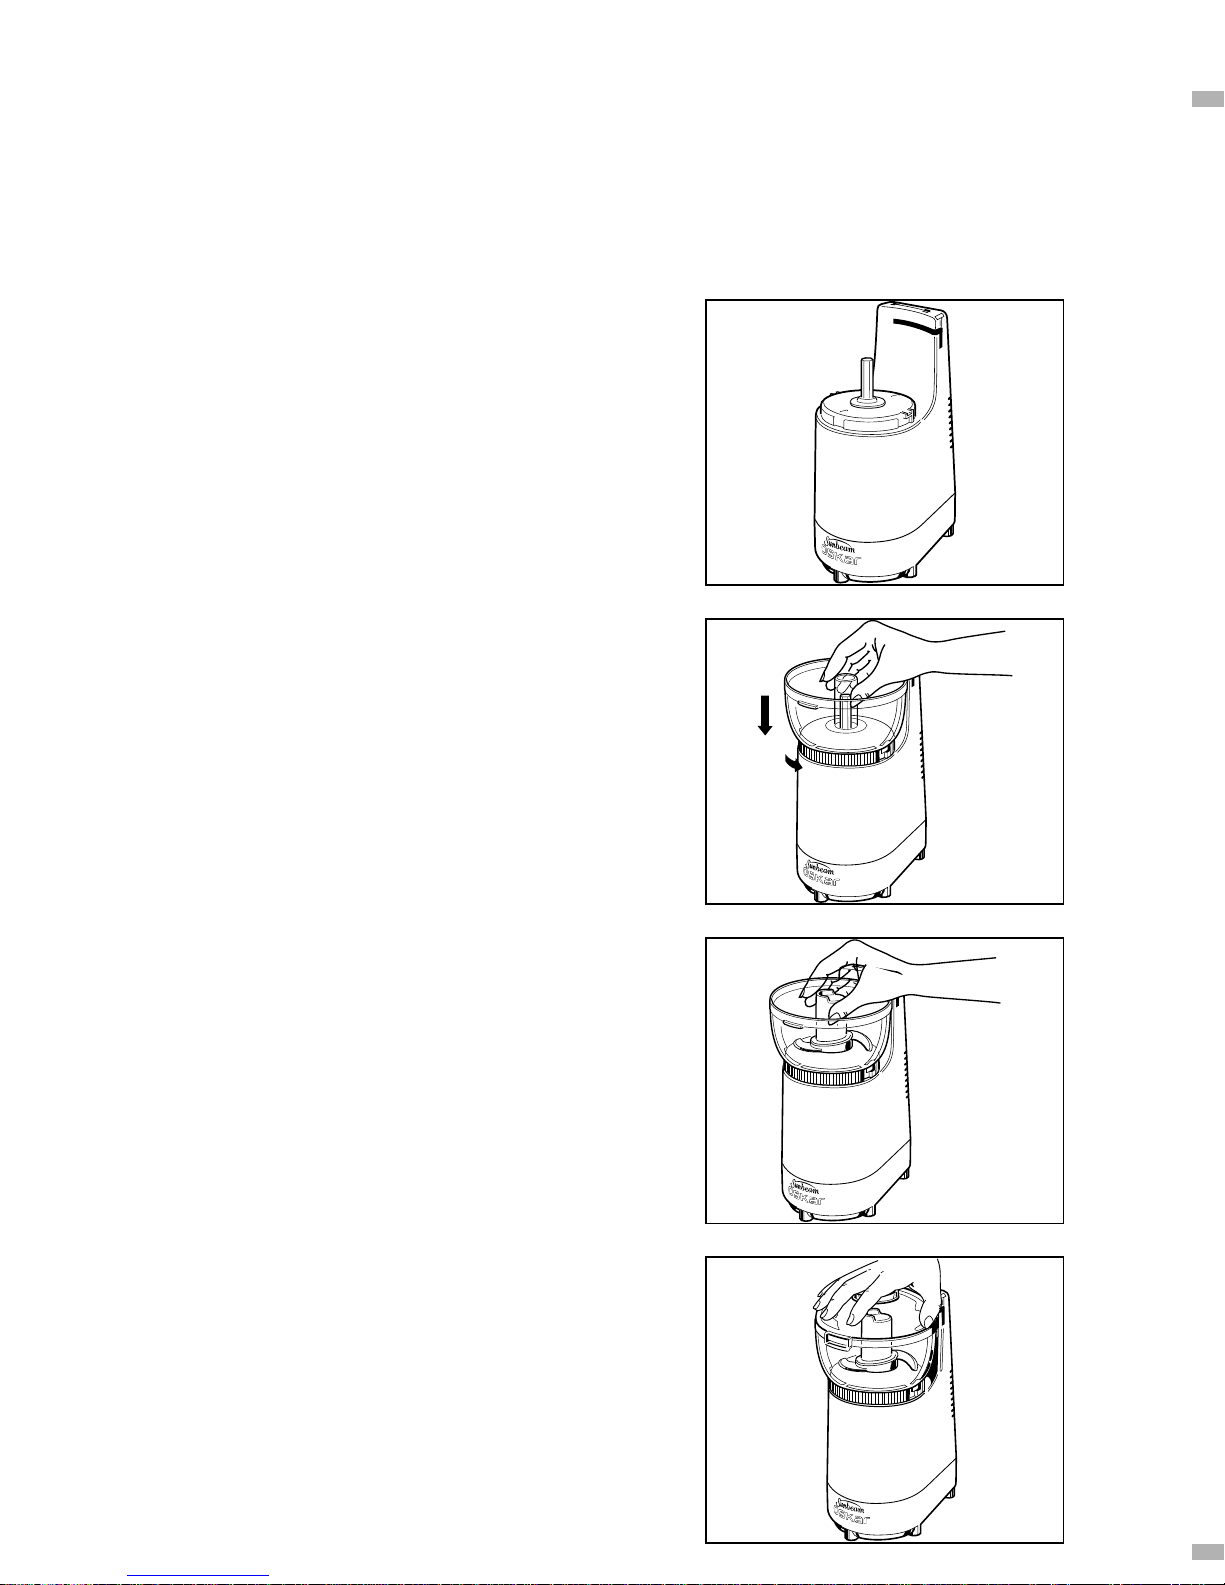
Assembling Your Oskar®Food Processor
Using Clear Container and Cover:
Before you begin, PLEASE BE SURE THAT THE ELECTRIC CORD IS UNPLUGGED.
Set up the motor base facing you on a dry,
level surface with the tallest side of the
motor housing to the rear.
NOTE: Located on the top, back of the motor
base is an arrow and the words “LOCK-ON”
to the left and “UNLOCK-OFF” to the right.
Turn the clear bowl in the direction indicated
to turn the food processor ON or OFF.
Place the clear Processing Container over the
drive shaft on the motor base and rotate the
container until it drops down evenly on the base.
Now turn the Container until it locks firmly
into position.
NOTE: Each time you re-assemble your food
processor, be sure to attach the Container first
and lock it into position. Then, attach the Cover.
Place the cutting/processing blade over the drive
shaft, rotating it slightly until it drops into place.
If you plan to process with blade, now is the time
to add ingredients. THE BLADE IS EXTREMELY
SHARP. USE CAUTION HANDLING THIS BLADE.
To attach the cover, place the Cover on the
Container so that the large locking tab of the
cover is to the right-hand side near the
horizontal slot at the back of the motor base.
When turned counterclockwise, the tab will
engage the automatic switch and the OSKAR
®
Food Processor will turn ON. By moving the
cover in the opposite direction, it will turn OFF.
NOTE: The stainless steel cutting/processing
blade
can only be used in the OSKAR®Food Processor's
clear processing container for in-bowl chopping,
mixing or puréeing functions; NEVER with
continuous flow cover on top of the clear bowl.
Page 5
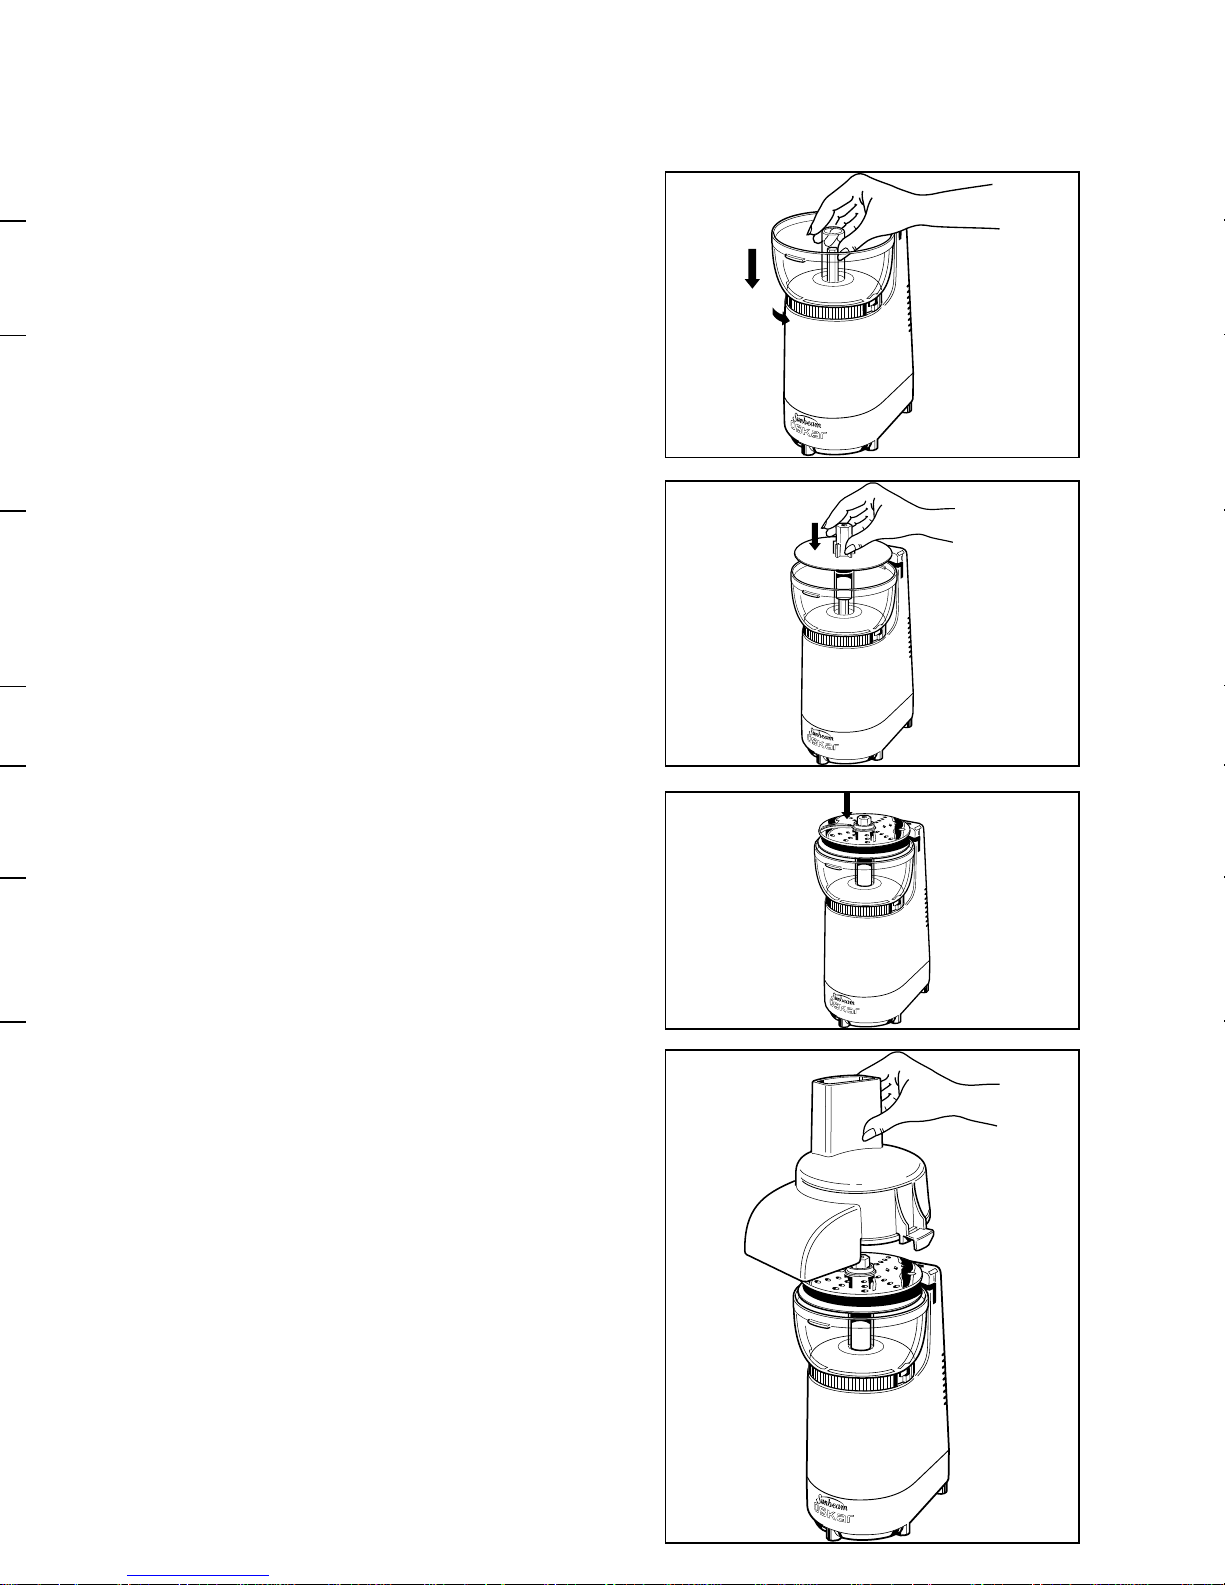
Assembling Your Oskar®Food Processor
Using Continuous Flow Cover:
Set up the motor base facing you on a dry,
level surface with the tallest side of the
motor housing to the rear.
Place the clear Processing Container over the
drive shaft on the motor base. Lock into place
.
Place the ejector disc into the container by
holding the stem and placing the disc over
the drive shaft. Allow it to drop into place.
For slicing, hold the slicer/shredder disc with
the raised, curved slicing edge facing upwards.
Place the disc over the ejector disc and allow it
to drop into position.
For shredding, turn the disc over so that
shredding notches are facing upwards.
Place the disc over the ejector disc and
allow it to drop into position.
To attach the cover, place it onto the container
so that the pin in the cover fits into the hole at
the top of the ejector disc. The large locking tab
on the lid is to the right-hand side, near the
horizontal slot on the motor housing: when
turned counterclockwise, the tab will engage
the automatic switch and the OSKAR
®
Food
Processor will turn ON. Turn the cover in the
opposite direction to turn it OFF.
Note: Keep fingers away from the Continuous
Flow Chute when the OSKAR
®
Food Processor
is operating.
Page 6
TAREFA DO LÂMINA OU DISCO INSTRUÇÕES
P
ROCESSADOR RECOMENDADO
Purê Lâmina de Aço Coloque todos os ingredientes Frutas frescas ou enlatadas
Ralar Disco Ralador Encha o tubo alimentador. Queijo Americano, cenouras,
Fatiar Disco Fatiador Alimentos maiores devem ser Frutas (taix como maçãs,
For more control over slicing and shredding,
load the Feed Tube with ingredients first, before
turning the OSKAR
®
Food Processor ON. Always
use the Food Pusher to yield more evenly sliced
or shredded foods – NEVER YOUR FINGERS.
Note: The OSKAR
®
Blade and Cutting Disc are
extremely sharp! Use caution when handling, and
storing them safely in their respective containers.
Rest the Food Pusher in the Tube. Now, holding
the Food Pusher with one hand, and Feed Tube
in the other, rotate the cover to the ON position
while pushing gently down on the food pusher.
Turn the OSKAR
®
Food Processor OFF.
Food Processing Techniques – Using the Blade
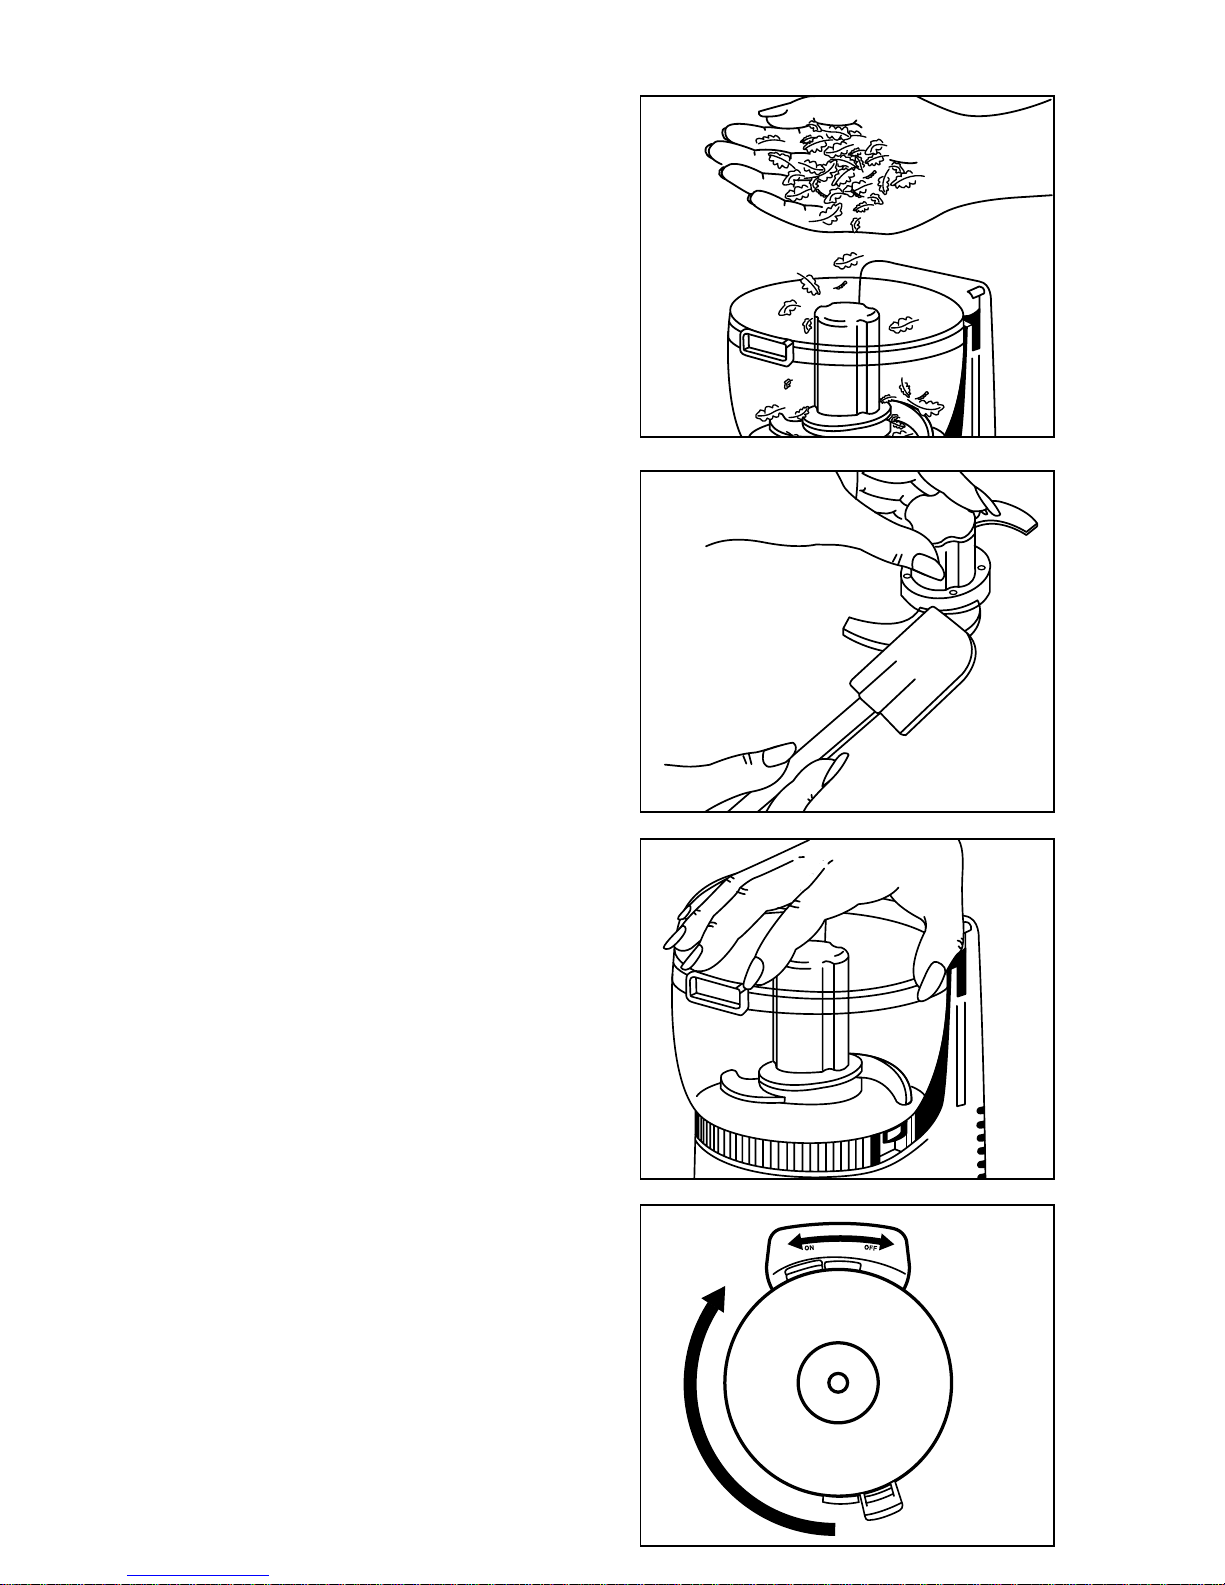
Pulsing Techniques:
The OSKAR®Food Processor processes food
very quickly; in most cases, in seconds!
Therefore, foods can easily become over
processed if you don’t watch carefully. We
suggest that when using the Steel Blade in the
Clear Processing Container, you process foods
no more than a few seconds at a time, turning the
OSKAR
®
Food Processor ON and OFF frequently
until the desired results are obtained. To use this
“Pulsing Technique”, simply rotate the cover
so that the Locking Tab moves in and out of the
Automatic Switch Slot. Pulsing ensures excellent
results every time.
NOTE: Please be sure that the Steel Blade
has stopped spinning completely before
removing the Cover.
Page 7
Placing Food Into the Container:
For the best, most consistent results, you should try to process pieces of food that are of
about equal size. When you cut, break or tear foods into uniform pieces before you begin
processing, the finished results will be more uniform, too.
You will get faster, more consistent processing results if you do not overload the container.
When using the cutting/processing blade, fill the container with only 3/4 to 1 cup of
ingredients at a time.
NOTE: When processing a heavy load, check to be sure the OSKAR®Food Processor is
sitting firmly on the counter or table top. DO NOT WALK AWAY FROM THE OSKAR
®
FOOD PROCESSOR WHILE PROCESSING.
Chopping Meats:
Pre-cut meats into pieces about 3/4 inch square.
Place the pieces in the container, replace the
cover and process using the pulse technique
for 5 to 7 seconds. never process more than
1 cup of meat cubes at one time.
Chopping Vegetables:
When processing vegetables such as onions,
peel and quarter; cut large onions into eighths.
Place 3/4 cup of the pieces into the container,
turning the OSKAR®Food Processor ON and OFF
1 to 2 times to coarsely chop, 3 to 4 times more
to finely chop. Scrape sides of container once
or twice during processing, if necessary.
Adding Dry Ingredients:
When various recipes call for dry ingredients
such as flour, add them directly into the
container before processing.
Adding Liquid Ingredients:
Liquid ingredients may be added while the
processor is operating by pouring them through
the pouring hole in the cover.
Note: When processing sauces or semi-liquid
ingredients, stop the OSKAR
®
Food Processor
and scrape down the container sides and cover.
Page 8
• Examine todo o alimento que vai processar!
•
Processar o alimento demasiadamente pode acontecer facilmente porque o Multiprocessador
processa tão rapidamente. Não hesite de parar a unidade e examinar o alimento que está
sendo processado. Você sempre pode processar o alimento um pouco mais se não estiver
suficientemente processado. Para maior controle, poderá usar a técnica de pulsação.
• Ao fatiar ou ralar, use sempre o Empurrador de Alimento. NUNCA use os dedos
ou outros objetos para empurrar o alimento dentro do Tubo Alimentador.
•
Tome cuidado de não deixar cair colheres, espátulas ou quaisquer outros utensílios
dentro do Tubo Alimentador.
•
Se quaisquer itens ficarem presos entre a lâmina e a beira do Recipiente, desligue o
Multiprocessador e espere até que a lâmina pare de girar. Daí, desconecte a unidade,
remova a tampa, e levante a lâmina para soltar o item alimentício.
•
Não sobrecarregue a máquina. O Multiprocessador OSKAR
tão rapidamente que mesmo grandes quantidades podem ser preparadas em segundos,
se bom senso for usado quanto a quantidade de alimento colocado dentro do recipiente
a qualquer tempo.
•
Recomendamos não processar mais de 3/4 à 1 de xícara de ingredientes de uma vez.
•
Nunca tente processar ingredientes duros que não possam ser cortados com uma faca
ordinária. Coisas como grãos de café e gelo cegará a lâmina e arranhará o recipiente;
ralar ou fatiar algo muito duro poderá danificar o disco.
• Mantenha o Multiprocessador fora do alcance de crianças.
• O Multiprocessador não foi fabricado para servir como um liquidificador.
• O Recipiente não deve ser colocado no microondas.
•
Processar algo como cenouras poderá descolorir partes do Multiprocessador.
Para remover esta descoloração, lave e seque as peças completamente e deixe
os secar ao ar durante a noite.
Mincing:
Now you can mince garlic, parsley and spices
in seconds! Simply drop halved garlic cloves
or parsley sprigs into the container and process.
Minced foods that cling to the container are
easily swept out with a spatula.
Removing the Blade:
When you have finished processing, unplug the
electrical cord from the outlet. Remove the cover.
Remove the cutting/processing Blade with food
clinging to it before removing any food from the
container. THE BLADE IS EXTREMELY SHARP.
USE CAUTION WHEN REMOVING THIS BLADE.
Clean the Blade with a scraper over the bowl.
Note: Always wait for the blade or disc to stop
moving completely before removing the cover.
Removing the Container:
Place the cover on the Container. Use the
OSKAR
®
Food Processor's cover to help remove
the Container. Rotate the cover clockwise
180 degrees until the two tabs on the cover
meet the two Container tabs. Continue to turn
the cover, using firm pressure, with our thumb
against the tabs until the Container is released.
Empty the remaining food from the Container.
Page 9
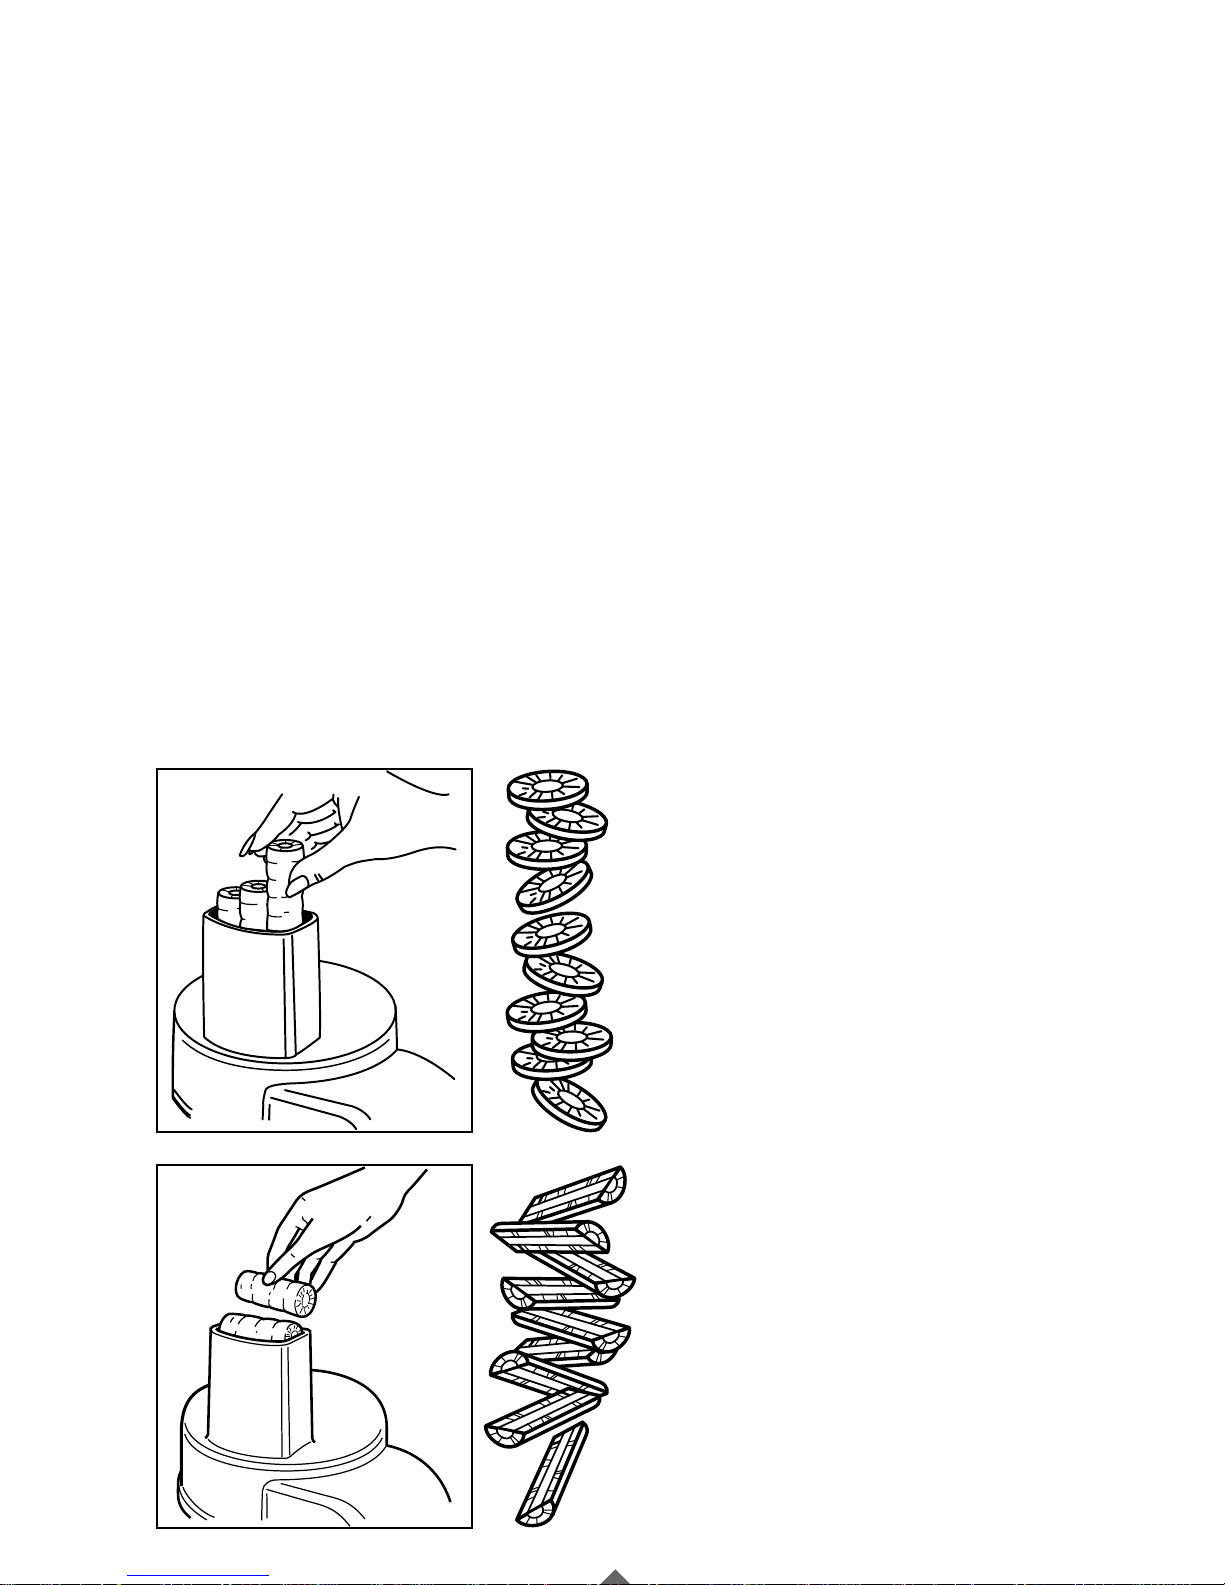
Packing the Food Tube
One of the most important procedures for successful slicing and shredding with
your new Sunbeam OSKAR
®
Food Processor is the way in which you place or pack food
in the Feed Tube.
When slicing or shredding, cut all ingredients first to a size that fits comfortably into the
OSKAR
®
Feed Tube. Pack the Feed Tube. While holding food steady and upright with the
Food Pusher, press down consistently until all ingredients are sliced or shredded evenly.
The more firmly you push, the thicker the slices or shreds.
For best results, the Feed Tube should always be packed somewhat firmly.
Foods positioned horizontally in the tube will produce long slices or shreds.
For better results, when shredding softer cheeses, such as American, Cheddar,
Mozzarella or Swiss, the cheese should be well chilled before processing.
Harder cheeses such as Parmesan or Romano should be at room temperature
before processing, and grated with the cutting/processing blade.
Preparing the Food:
Long, narrow foods such as carrots or
celery should be cut into even lengths,
about 3 or 4 inches long. Pack the
food into the Feed Tube.
Making shorter slices or shreds:
Pack food items vertically in the
Feed Tube.
Making longer slices or shreds:
Pack food items horizontally in the
Feed Tube.
®
Page 10

Um dos procedimentos mais importantes para o sucesso em fatiar e ralar com o seu
novo Multiprocessador OSKAR
o alimento dentro do Tubo Alimentador.
Quando fatiar ou picar, corte todos os ingredientes primeiramente à um tamanho que
caiba de forma confortável dentro do Tubo Alimentador OSKAR
Enquanto segurando o alimento firme e perpendicularmente com o Empurrador
Alimentador, aperte-o para baixo consistentemente, até que todos os ingredientes
estejam fatiados ou picados uniformemente. O mais firmemente que você empurrar,
o mais grosso tornar-se-ão as fatias ou as picadas.
Para os melhores resultados, o Tubo Alimentador deverá estar enchido mais ou
menos firmemente. Alimentos posicionados horizontalmente no tubo produzirão fatias
ou picados longos.
Para melhores resultados, quando estiver ralando queijos mais macios como o Americano,
Cheddar, Mozzarela ou Suíço, o queijo deve estar bem frio antes de processá-lo. Queijos
mais duros como Parmesão ou Romano devem estar à temperatura ambiente antes de
processá-los, e raladas com a lâmina de cortar/processar.
Como Preparar o Alimento:
Cleaning, Storing and Caring for Your Oskar®Food Processor
When you have finished processing, unplug the OSKAR®Food Processor from the
electrical outlet and remove the cover, slicing/shredding disc or cutting/processing blade
and the container from the motor base.
Wipe the base of your unit a damp cloth, then polish it lightly with a dry one.
NEVER IMMERSE THE MOTOR BASE IN ANY LIQUID.
The processing container, covers, cutting/processing blade, slicing/shredding disc,
ejector disc and food pusher are all dishwasher safe. These parts may be cleaned
on the top rack of a dishwasher.
REMEMBER TO USE EXTREME CAUTION WHEN HANDLING THE
CUTTING/PROCESSING BLADE AND SLICING/SHREDDING DISC.
THEY ARE VERY SHARP!
Cleaning the internal shaft of your cutting/processing blade is most important.
We suggest the use of a small percolator or baby bottle brush to remove any food
particles, then wash and dry the shaft thoroughly.
Sunbeam suggests that you store the OSKAR
®
Food Processor on a dry counter or table
top in your kitchen, where it will always be ready for immediate use. Store the
cutting/processing blade in the clear container. Store the slicing/shredding disc in a safe
location (OUT OF THE REACH OF CHILDREN). The OSKAR
®
blades are EXTREMELY
sharp! Use caution when handling the blades.
After washing and drying the Container, you may wish to apply a small amount of
vegetable oil to the rim of the Cover and Container. This lubrication allows the cover
to move freely when in contact with the Container.
ALWAYS STORE DISC AND BLADE OUT OF THE REACH OF CHILDREN!
A Few Things To Remember:
1. Use the OSKAR®Food Processor only on a dry, level surface – never outdoors,
on a damp surface or on a table edge.
2. Never remove the Cover or the Processor until the Blade or Disc has come
to a complete stop and the unit has been unplugged from an electrical outlet.
3. The motor of your OSKAR
®
Food Processor has been permanently lubricated at the
factory and requires no further attention. Other than recommended cleaning,
no further user maintenance should be necessary. Return your Food Processor
to the nearest Sunbeam authorized independent service center if servicing or repairs
become necessary.
Page 11

Food Processing Suggestions
• Check the food you are processing!
• Over processing is easily done, because the Food Processor works so fast.
Don’t hesitate to stop the unit and check the food you are processing. You can
always process the food a little longer if the food isn’t fine enough. For greater control,
you may with to process the food using a pulsing technique.
• When slicing or shredding, always use the Food Pusher. NEVER use your fingers
or other objects to push the food into the Feed Tube.
• Be careful not to drop spoons, spatulas or other utensils into the Feed Tube.
• If any items should become caught between the blade and the side of the container,
turn OFF the Food Processor and wait until the blade stops turning. Then, unplug
the unit, remove the cover and lift the blade to free the food item.
• Do not overload the machine. The OSKAR
®
Food Processor processes ingredients
so quickly that even large quantities can be prepared in seconds if common sense
is used about the quantity of food put into the container at any time.
• We recommend processing no more then 3/4 to 1 cup of ingredients at a time.
• Never attempt to process hard ingredients that cannot be cut by a normal kitchen knife.
Things like coffee beans and ice will dull the blade and scratch the container;
shredding or slicing something very hard may damage the disc.
• Keep the Food Processor out of the reach of children.
• The Food Processor is not intended to be used as a blender.
• The Container should not be put in the microwave.
• Processing food such as carrots, may temporarily discolor parts of the Food Processor.
To remove discoloration, wash and dry parts thoroughly and allow to air dry overnight.
Page 12

Como Colocar Alimentos no Recipiente:
Para os melhores e mais consistentes resultados, você poderá tentar processar pedaços
de alimentos que são de tamanho iguais. Quando você cortar, quebrar ou rasgar pedaços
de alimento em porções uniformes antes de começar a processar, os resultados finais
serão mais uniformes também.
Você terá resultados de processamento mais rápidos e consistentes se você não sobrecarregar
o recipiente. Quando se usa a lâmina de fatiar/processar, encha o recipiente com somente
3/4 à 1 de xícara de ingredientes de uma vez.
NOTA: Quando estiver processando uma carga pesada, verifique que o Multiprocessador
OSKAR
®
esteja firmemente assentado no balcão ou tampo de mesa. NÃO DEIXE O
MULTIPROCESSADOR OSKAR
Como Cortar Carnes:
De avanço, corte a carne em pedaços de mais
ou menos 3/4 polegada (2 cm.). Coloque os
pedaços no recipiente, reposicione a tampa
e processe-os usando a técnica de pulsação
por 5 à 7 segundos. Nunca processe mais
de 1 xícara de cubos de carne de uma vez.
Como Cortar Legumes:
Quando estiver processando legumes tais
como cebolas, descasque e corte em quartos,
e se forem cebolas grandes, em oitavos. Colocar
3/4 de xícara dos pedaços dentro do recipiente,
ligando e desligando o Multiprocessador OSKAR
1 ou 2 vezes para fazer os cortes mais grossos
e 3 ou 4 vezes mais para os cortes mais finos.
Raspe os lados do recipiente uma ou duas vezes
durante o processamento, se necessário.
Como Adicionar Ingredientes Secos:
Quando várias receitas exigem ingredientes secos
tais como farinha, adicione-os diretamente ao
recipiente antes de processá-los.
Como Adicionar Ingredientes Líquidos:
Ingredientes líquidos podem ser adicionados
enquanto o processador estiver em operação,
por despejá-los pelo buraco de despejo na tampa.
NOTA: Quando processar molhos ou
ingredientes semilíquidos, pare o
Multiprocessador OSKAR
os lados do recipiente e da tampa.
Food Processing Guide
PROCESSING R
ECOMMENDED GENERAL
TASK BLADE OR DISC PROCESSING INSTRUCTIONS SUGGESTED FOODS
Blend Steel Blade Place all ingredients into Dips, flavored butters,
processing container. (You may salad dressings, sauces
wish to add liquid ingredients and spreads
through the pouring hole.)
Process until smooth.
Chop Steel Blade Foods, such as meat, should be Apples, cabbage, cooked
pre-cut into 3/4-inch cubes. fish, ham, meat or poultry,
Do not process more than 1 cup corn chips, hard cooked eggs,
of meat cubes at a time. Place all mushrooms, nuts, olives,
ingredients into processing onions, parsley, pickles,
container. Process using the pimento, raw meat, scallions,
PULSE technique until the desired tomatoes, herbs, garlic,
consistency is reached. crackers, cookies
Grate Steel Blade Food should be cut into 3/4-inch Hard cheeses such as
cubes. (Hard cheeses should be Parmesan or Romano
at room temperature.) Place all
ingredients into processing
container. Process using the
PULSE technique until the desired
consistency is reached.
Mix Steel Blade Place all ingredients into Pastry, pizza dough
processing container.
(You may wish to add liquid
ingredients through the pouring
hole.) Process a few seconds.
Use the Pulsing technique
to finish processing.
DO NOT OVER PROCESS.
Page 13

PROCESSING RECOMMENDED GENERAL
T
ASK BLADE OR
DISC PROCESSING INSTRUCTIONS SUGGESTED FOODS
Purée Steel Blade Place all ingredients into Fresh, cooked or canned fruits
processing container. (such as apples, bananas,
Process until smooth. peaches, pears, strawberries).
Fresh, cooked or canned
vegetables (such as beans,
carrots, corn, peas, potatoes,
or tomatoes), peanut butter
Shred Shredding Disc Pack food into the feed tube. American cheese, carrots,
(Cheese such as American, Mozzarella cheese, onions,
Cheddar, Mozzarella and Swiss, potatoes, Swiss cheese,
should be well chilled before zucchini
processing.)
Note: For shorter shreds, pack
food vertically into feed tube.
For longer shreds pack food
horizontally into feed tube.
Slice Slicing Disc Large food should be cut Fruits (such as apples,
to fit Feed Tube. Pack food into bananas, lemons, limes,
Feed Tube. (Poultry and cheese, melons, oranges, peaches,
such as American, Cheddar or pears, pineapples,
Swiss should be well chilled strawberries); vegetables,
before processing.) such as beets, cabbage,
Note: Use light pressure on Food carrots, celery, cucumber,
Pusher for thinner slices. Use eggplant, lettuce, mushrooms,
firm pressure for thicker slices. onions, parsnips, potatoes,
For longer slices, pack food tomatoes, zucchini); nuts,
horizontally into Feed Tube. pickles or poultry
For shorter slices, pack food
vertically into Feed Tube.
Page 14

Como Usar a Tampa de Fluxo Contínuo:
Coloque a base do motor numa superfície seca
e plana, com a parte mais alta da base do motor
ao posterior.
Coloque o Recipiente Processador transparente
sobre o eixo de acionamento na base do motor.
Trave-o em posição.
Coloque o disco ejetor dentro do recipiente por
segurar o eixo e colocar o disco sobro o eixo
de acionamento. Deixe-o cair em posição.
Para fatiar, segure o disco de fatiar/ralar com
a beirada de fatiar elevada e curvada, de face
para cima. Coloque o disco sobre o ejetor
e permita-o de cair em posição.
Para ralar, gire o disco ao contrário para que
os chanfros estejam para cima. Coloque o
disco sobre o disco ejetor e permita-o
de cair em posição.
Para afixar a tampa, coloque-a sobre o recipiente
de tal maneira que o pino da tampa caiba no
buraco em cima do disco ejetor. A grande aba
de travar da tampa, está do lado direito, próximo
da fenda horizontal do suporte do motor; quando
girado em direção anti-horário, a aba engatará
o interruptor automático e o Multiprocessador
OSKAR
®
ficará ligado. Se girar a tampa em
direção contrária, ele ficará desligado.
NOTA: Mantenha os dedos afastados da Calha
de Fluxo Contínuo quando o Multiprocessador
OSKAR
®
está em operação.
Trouble Shooting Guide
PROBLEM SOLUTION
1. Food is being unevenly processed or the 1. You are overloading the container. Next time,
OSKAR®Food Processor moves across process this amount in two or more batches.
the work surface.
2. The Food Processor vibrates unnaturally 2. The blade or disc has not been assembled
or there are signs of the blade or disc properly. Stop the OSKAR®Food Processor
hitting against either the processing immediately and refit the cutting tool properly.
Container or Cover while the OSKAR
®
Food Processor is operating.
3. Liquid leaks out of the bowl and down 3. The OSKAR®Food Processor liquid capacity
sides of the Processing Container. is not great; therefore, it is not recommended
for mixing beverages and other foods high
in liquid content.
4. After processing, pieces of food are left 4. Small pieces of food left on top of a disc
on top of the slicing/shredding disc. is a normal occurrence.
5. Cover does not move freely when attached 5. Use a small amount of vegetable oil to lubricate
to the container. the edges of the processing container and cover.
6. Food falls over in the food tube 6. Pack the feed tube snugly and apply even
during slicing. pressure to the food being sliced.
Page 15

1-Y
EAR
L
IMITED
W
ARRANTY
Sunbeam Products, Inc, or if in Canada, Sunbeam Corporation (Canada) Limited (collectively “Sunbeam”)
warrants that for a period of one year from the date of purchase, this product will be free from defects in material
and workmanship. Sunbeam, at its option, will repair or replace this product or any component of the product
found to be defective during the warranty period. Replacement will be made with a new or remanufactured
product or component. If the product is no longer available, replacement may be made with a similar product
of equal or greater value. This is your exclusive warranty.
This warranty is valid for the original retail purchaser from the date of initial retail purchase and is not transferable.
Keep the original sales receipt. Proof of purchase is required to obtain warranty performance. Sunbeam
dealers, service centers, or retail stores selling Sunbeam products do not have the right to alter, modify
or any way change the terms and conditions of this warranty.
This warranty does not cover normal wear of parts or damage resulting from any of the following: negligent
use or misuse of the product, use on improper voltage or current, use contrary to the operating instructions,
disassembly, repair or alteration by anyone other than Sunbeam or an authorized Sunbeam service center.
Further, the warranty does not cover: Acts of God, such as fire, flood, hurricanes and tornadoes.
What Are the Limits on Sunbeam’s Liability?
Sunbeam shall not be liable for any incidental or consequential damages caused by the breach of any express,
implied or statutory warranty or condition.
Except to the extent prohibited by applicable law, any implied warranty or condition of merchantability
or fitness for a particular purpose is limited in duration to the duration of the above warranty.
Sunbeam disclaims all other warranties, conditions or representations, express, implied, statutory
or otherwise.
Sunbeam shall not be liable for any damages of any kind resulting from the purchase, use or misuse of, or
inability to use the product including incidental, special, consequential or similar damages or loss of profits,
or for any breach of contract, fundamental or otherwise, or for any claim brought against purchaser by any
other party.
Some provinces, states or jurisdictions do not allow the exclusion or limitation of incidental or consequential
damages or limitations on how long an implied warranty lasts, so the above limitations or exclusion may
not apply to you.
This warranty gives you specific legal rights, and you may also have other rights that vary from province
to province, state to state or jurisdiction to jurisdiction.
How to Obtain Warranty Service
In the U.S.A. –
If you have any question regarding this warranty or would like to obtain warranty service,
please call 1.800.458.8407 and a convenient service center address will be provided to you.
In Canada –
If you have any question regarding this warranty or would like to obtain warranty service,
please call 1.800.458.8407 and a convenient service center address will be provided to you.
In the U.S.A., this warranty is offered by Sunbeam Products, Inc., located in Boca Raton, Florida 33431.
In Canada, this warranty is offered by Sunbeam Corporation (Canada) Limited, located at 5975 Falbourne
Street, Mississagua, Ontario L5R 3V8.
PLEASE DO NOT RETURN THIS PRODUCT TO ANY OF
THESE ADDRESSES OR TO THE PLACE OF PURCHASE.
Page 16

Tubo Alimentador
Disco Ejetor
Para desembalar o seu novo multiprocessador, tire um momento para identificar cada
uma das várias peças conforme ilustradas abaixo. CERTIFIQUE-SE DE MANUSEAR
A LÂMINA DO DISCO CUIDADOSAMENTE, POIS SÃO BEM AFIADOS.
Por seguir estas simples instruções passo por passo neste folheto, você aprenderá
como as peças se ajuntam, qual lâmina ou disco deve-se usar para cada operação,
e quão magnificamente conveniente o seu novo multiprocessador é para usar.
Il est important d'observer un certain nombre de règles de sécurité élémentaires pendant
l'utilisation de tout appareil électrique:
1. LISEZ TOUTES LES DIRECTIVES AVANT D'UTILISER LE ROBOT CULINAIRE.
2. Pour vous protéger des risques d'électrocution, ne plongez jamais le robot culinaire
dans l'eau ou tout autre liquide.
3. Faites particulièrement attention lorsque l'appareil est utilisé par, ou en présence d'enfants.
4. Débrancher l'appareil lorsqu'il n'est pas utilisé, avant d'y placer ou y retirer des pièces
et avant de le nettoyer.
5. Éviter tout contact avec les parties mobiles.
6. Ne pas faire fonctionner le robot culinaire dont le fil ou la fiche est endommagé ou après
que l'appareil ait mal fonctionné, qu'il ait été échappé ou endommagé d'une façon
quelconque. Retourner l'appareil au Centre de Service Autorisé Sunbeam le plus près
aux fins d'inspection, de réparation, de réglage électrique ou mécanique.
7. L'utilisation d'accessoires non conseillés ou vendus par Sunbeam Appliance Company
présente des risques d'incendie, d'électrocution ou de blessure.
8. Ne pas l'utiliser à l'extérieur.
9. Ne pas laisser le cordon pendre du rebord de la table ou du plan de travail ni entrer
au contact de surfaces chaudes.
10. Garder les mains et les ustensiles loin de la lame ou du disque en mouvement lors de la
transformation des aliments afin de réduire le risque de blessure sérieuse aux personnes
ou de dommage au robot culinaire. Une spatule peut être utilisée mais uniquement
lorsque le robot culinaire n'est pas en marche.
11. La lame et le disque de transformation sont tranchants. Il faut les manipuler avec soin.
12. Afin de réduire le risque de blessure, ne jamais placer la lame coupante sur la base
sans d'abord placer le contenant proprement en place.
13. S'assurer que le couvercle du contenant est bien verrouillé en place pendant
le fonctionnement de l'appareil.
14. Ne jamais alimenter le robot à la main. Utiliser toujours le poussoir.
15. Ne pas essayer de rendre inopérant le mécanisme de verrouillage du couvercle.
Cet Appareil Est Conçu pour Usage Domestique Seulement
PRUDUITS ACHETÉS AUX ÉTATS-UNIS ET AU CANADA UNIQUEMENT
REMARQUE: Le courant nominal maximum est basé sur l'attachement pour ce produit qui
débite le plus de courant. D'autres accessoires peuvent débiter moins de courant.
Cet appareil est doté d'une fiche polarisée (une broche est plus large que l'autre).
Pour réduire le risque de choc électrique, cette fiche ne va que dans un sens seulement
sur une prise de courant polarisée. Si la fiche ne s'enfonce pas complètement dans la prise,
la retourne et essayer de nouveau. Si elle ne s'adapte toujours pas à fond, consulter
un électricien qualifié. Veillez à respecter les mesures de securité de la prise polarisée.
PRÉCAUTIONS IMPORTANTES
CONSERVEZ CES INSTRUCTIONS
Page 17
Poussoir
Trémie
Contenant de Transformation
Base du Moteur
Lame pour
Transformer/Couper
Disque Rejeter
Disque Réversible
Éminceur/Déchiqueteur
Couvercle
Les Pièces de Votre Robot Culinaire Oskar®
Au cours du déballage de votre nouveau robot culinaire, veuillez prendre un moment pour
bien identifier chacune des pièces montrées ci-dessous. S'ASSURER DE MANIPULER
LA LAME ET LE DISQUE AVEC SOIN PUISQU'ILS SONT TRÈS TRANCHANTES.
En suivant les simples instructions, étape par étape, vous apprendrez comment les articles
vont ensemble, quelle lame ou quel disque utiliser pour chaque tâche et comment votre
nouveau robot culinaire est merveilleusement pratique à utiliser.
Page 18
Sunbeam Products, Inc, o si en Canadá, Sunbeam Corporation (Canadá) Limited (colectivamente “Sunbeam”) garantizan que
este producto estará libre de defectos en material o mano de obra por un período de un año a partir de la fecha de la compra.
Sunbeam, a su elección, reparará o reemplazará este producto o cualquier componente del producto que se encuentre
durante el período de garantía. El reemplazo será efectuado por un producto o componente nuevo o remanufacturado.
Si el producto ya no está disponible, el reemplazo podrá efectuado con un producto similar de igual o mayor valor.
Esta es su garantía exclusiva.
Esta garantía es válida para el comprador original al detalle desde la fecha de compra original al detalle y no es transferible.
Guarde el recibo de venta original. Se requiere prueba de compra para obtener la garantía. Los concesionarios Sunbeam,
centros de servicio, o almacenes de ventas al detalle de productos Sunbeam no tienen el derecho de alterar, modificar
o cambiar, de manera alguna, los términos y condiciones de esta garantía.
Esta garantía no cubre el desgaste normal de las piezas o daños resultantes de cualquiera de los siguientes: uso negligente
o mal uso del producto, uso en voltaje o corriente inapropiada, uso contrario a las instrucciones de operación, desarme,
reparación o alteración por cualquier persona que no sea Sunbeam o de un centro de servicio autorizado Sunbeam.
Además, esta garantía no cubre: Actos de la naturaleza, tales como incendios, inundaciones, huracanes o tornados.
¿Cuales Son los Límites de Responsabilidad de Sunbeam?
Sunbeam no será responsable por ningún daño incidental o consecuente causados por el incumplimiento de la garantía
o condición expresa, implícita o reglamentaria.
Excepto hasta donde lo prohiben las leyes aplicables, cualquier garantía implícita o condición de comerciabilidad
o aptitud para un propósito particular, está limitada en duración a la duración de la garantía descrita arriba.
Sunbeam niega cualquier otra garantía, condición o representación, expresa, implícita, reglamentaria o de otra manera.
Sunbeam no será responsable por ningún tipo de daño que resulte de la compra, uso o mal uso, o inhabilidad de usar el
producto incluyendo daños incidentales, especiales, consecuentes o similares o pérdida de lucro, o por cualquier incumplimiento
contrato, fundamental o de otra manera, o por cualquier reclamo contra el comprador iniciado por cualquier otra tercera persona.
Algunas provincias, estados o jurisdicciones no permiten la exclusión o la limitación de daños incidentales o consecuentes,
o limitaciones sobre cuanto dura una garantía implícita, de modo que las limitaciones o exclusiones mencionadas arriba
pueda que no le aplique a usted.
Esta garantía le otorga derechos legales específicos, y pueda que usted tenga otros derechos, los cuales varían de provincia
a provincia, de estado a estado o de jurisdicción a jurisdicción.
Cómo Obtener Servicio de Garantía
En los Estados Unidos –
Si usted tiene alguna pregunta relacionada con esta garantía o quisiera obtener servicio de garantía, por favor llame al teléfono
800.458.8407
En Canadá –
Si usted tiene alguna pregunta relacionada con esta garantía o quisiera obtener servicio de garantía, por favor llame al teléfono
800.458.8407
En los Estados Unidos, esta garantía es ofrecida por Sunbeam Products, Inc., situada en Boca Ratón, Florida 33431.
En Canadá, esta garantía es ofrecida por Sunbeam Corporation (Canadá) Limited, situada en el 5975 Falbourne Street,
Mississagua, Ontario L5R 3V8.
POR FAVOR, NO RETORNE ESTE PRODUCTO A NINGUNA
DE ESTAS DIRECCIONES NI AL LUGAR DONDE LO COMPRÓ.
Assemblage de Votre Robot Culinaire Oskar
®
Utilisation du Contenant et du Couvercle Transparents:
Avant de commencer, s'assurer QUE LE CORDON
ÉLECTRIQUE EST DÉBRANCHÉ.
Placer la base du moteur en face de vous, sur une
surface sèche et de niveau, avec le côté le plus haut
du logement du moteur vers l'arrière.
REMARQUE: Sur la partie supérieure arrière de la base
du moteur, une flèche avec les mots LOCK-ON
(VERROUILLÉ) à gauche et UNLOCK-OFF
(DÉVERROUILLÉ) à droite. Tourner le bol transparent
dans la direction indiquée pour mettre le robot culinaire
en position de marche (ON) ou d'arrêt (OFF).
Placer le contenant transparent sur l'arbre d'entraînement
de la base du moteur et faire tourner le contenant jusqu'à
ce qu'il descende uniformément sur la base. Tourner
maintenant le contenant jusqu'à ce qu'il se verrouille
fermement en place.
REMARQUE: À chaque ré-assemblage de votre robot
culinaire, s'assurer d'attacher d'abord le contenant et de
le verrouiller en place. Attacher ensuite le couvercle.
Placer la lame pour transformer/couper sur l'arbre
d'entraînement en la tournant légèrement jusqu'à ce
qu'elle descende en place. Si vous avez l'intention de
transformer avec la lame, il est maintenant temps
d'ajouter les ingrédients. LA LAME EST EXTRÊMEMENT
TRANCHANTE. IL FAUT LA MANIPULER AVEC
PRUDENCE.
Pour attacher le couvercle, placer le couvercle sur le
contenant de façon à ce que la grande patte de sûreté du
couvercle soit sur le côté droit près de la fente
horizontale à l'arrière de la base du moteur. Lorsque
tournée dans le sens antihoraire, la patte engagera le
commutateur automatique et mettra le robot culinaire
OSKAR
®
en marche. Déplacer le couvercle dans la
direction opposée pour mettre en position d'arrêt.
REMARQUE: La lame pour transformer/couper, en acier
inoxydable, peut être utilisée uniquement dans le
contenant transparent pour transformer en mélange,
purée ou hachage dans le bol; JAMAIS avec le couvercle
à débit continu sur le dessus du bol transparent.
Page 19

Assemblage de Votre Robot Culinaire Oskar
®
Utilisation du Couvercle à
Débit Continu:
Installer la base du moteur en face de vous sur
une surface sèche et de niveau avec le côté le
plus haut du logement du moteur vers l'arrière.
Placer le contenant transparent sur l'arbre
d'entraînement de la base du moteur.
Verrouiller en place.
Placer le disque éjecteur dans le contenant en
tenant la tige et en mettant le disque sur l'arbre
d'entraînement. Le laisser descendre en place.
Pour émincer, tenir le disque éminceur/
déchiqueteur avec le bord à émincer courbé et
en relief vers le haut. Placer le disque sur le
disque éjecteur et le laisser descendre en place.
Pour déchiqueter, tourner le disque de bord de
façon à ce que les encoches pour déchiqueter
soient vers le haut. Placer le disque sur le
disque éjecteur et le laisser descendre en place.
Pour fixer le couvercle, le placer sur le contenant
de sorte que la goupille dans le couvercle entre
dans le trou au haut du disque éjecteur.
La grande patte de verrouillage de sûreté sur
le couvercle est sur le côté droit près de la fente
horizontale sur le logement du moteur;
tourner dans le sens antihoraire pour faire
engager le commutateur automatique et mettre
le robot culinaire OSKAR
®
en marche (ON).
Tourner le couvercle en direction opposée
pour mettre le robot en position d'arrêt (OFF).
REMARQUE: Se garder les doigts loin du
dispositif de déjection immédiate continue
lorsque le robot culinaire OSKAR
®
est en marche.
Page 20

TAREA A RECOMENDACIÓN DE INSTRUCCIONES GENERALES
P
ROCESAR DISCO O
Puré
Cuchilla de Acero
Rallar
Disco para Rallar
Rebanar
Disco para Rebanar
Pour pouvoir mieux émincer et déchiqueter,
remplir d'abord la trémie avec les ingrédients
avant de mettre le robot culinaire OSKAR
®
en
marche. Toujours se servir du poussoir pour
obtenir des aliments tranchés ou déchiquetés
plus uniformes – NE JAMAIS SE SERVIR DE
VOS DOIGTS.
REMARQUE: La lame et le disque de coupe
sont extrêmement tranchants! Se servir de
prudence lors de leur manipulation et de leur
rangement dans leurs contenants respectifs.
Reposer le poussoir dans la trémie. En tenant le
poussoir avec une main et la trémie avec l'autre
main, faire pivoter le couvercle en position de
marche tout en appuyant doucement sur le
poussoir. Tourner le robot culinaire OSKAR
®
en position d'arrêt.
Techniques de Transformation des Aliments – Utilisant la Lame
Techniques à Pulsation:
Le robot culinaire OSKAR®transforme les aliments très rapidement, la plupart du temps,
en quelques secondes! Il peut, par conséquent, se produire une surtransformation des
aliments si l'on ne fait pas attention. Lors de l'utilisation de la lame en acier dans le contenant
transparent de transformation, nous suggérons
de procéder à la transformation des aliments
pas plus que quelques secondes à la fois,
en mettant fréquemment le robot culinaire
OSKAR
®
en position de marche et d'arrêt
jusqu'à ce que l'on obtienne les résultats désirés.
Pour utiliser cette «technique à pulsation»,
faire pivoter tout simplement le couvercle de
sorte que la patte de verrouillage entre et sorte
de la fente du commutateur automatique.
La technique de pulsation assure d'excellents
résultats à chaque fois.
REMARQUE: S'assurer que la lame en acier
a complètement fini de tourner avant d'enlever
le couvercle.
Page 21

Placer les Aliments dans le Contenant:
Pour de meilleurs résultats, les morceaux d'aliment à transformer devraient être de
la même grosseur. Quand vous coupez, brisez et déchirez des aliments en morceaux
uniformes de la même grosseur avant de commencer la transformation, les résultats
finis seront également uniformes.
Vous obtiendrez des résultats de transformation plus rapides et plus constants si vous
ne surchargez pas le contenant: Lors de l'utilisation de la lame pour transformer/couper,
remplir le contenant avec seulement 3/4 à 1 tasse des ingrédients à la fois.
REMARQUE: Lors de la transformation d'un contenant assez rempli, s'assurer que le robot
culinaire OSKAR
®
repose fermement sur le comptoir ou dessus de table. NE PAS
S'ÉLOIGNER DU ROBOT CULINAIRE OSKAR
®
PENDANT LA TRANSFORMATION.
Hachage des Miandes:
Précouper les viandes en morceaux d'environ
3/4 de pouce carré (2 cm.). Placer les morceaux
dans le contenant, remettre le couvercle en place
et procéder à la transformation en utilisant la
technique de pulsation pendant 5 à 7 secondes.
Ne jamais transformer plus d'une tasse de cubes
de viandes à la fois.
Hachage des Légumes:
Lors de la transformation de légumes comme
les oignons, les peler et les couper en quatre;
couper les gros oignons en huit morceaux.
Placer 3/4 de tasse des morceaux dans le
contenant et tourner le robot culinaire OSKAR
®
en position de marche et d'arrêt 1 ou 2 fois pour
hacher gros, 3 à 4 fois de plus pour hacher fin.
Gratter les côtés du contenant une ou deux fois,
si nécessaire, au cours de la transformation.
Ajouter les Ingrédients Secs:
Lorsque diverses recettes exigent des
ingrédients secs comme de la farine,
ajouter ces ingrédients directement
dans le contenant avant la transformation.
Ajouter des Ingrédients Liquides:
Les ingrédients liquides peuvent être ajoutés
pendant que le robot est en marche en
les versant directement par le trou
de coulée dans le couvercle.
REMARQUE: En transformant les sauces
ou les ingrédients semi-liquides,
arrêter le robot culinaire OSKAR
®
et gratter les côtés et le couvercle.
Page 22

• ¡Revise los alimentos que está procesando!
• Es fácil procesar demasiado, porque el Procesador de Alimentos trabaja muy rápido.
No dude en detener la unidad y revisar los alimentos que está procesando.
Usted siempre puede procesar los alimentos por un poco más de tiempo si los
alimentos no quedan lo suficientemente finos. Para mayor control, usted puede
procesar los alimentos usando la técnica del pulso.
• Cuando rebane o ralle, siempre use el Empujador de Alimentos. NUNCA use sus dedos
u otros objetos para empujar los ingredientes dentro del Canal de Alimentación.
• Tenga cuidado de no dejar caer cucharas, espátulas o cualquier otro utensilio dentro
del Canal de Alimentación.
•
Si cualquier trozo de alimento queda atrapado entre la cuchilla y la pared del
contenedor, APAGUE el Procesador de Alimentos y espere a que la cuchilla se detenga.
Después, desconecte la unidad, quite la tapa y levante la cuchilla para liberar la pieza
de alimento.
• No sobrecargue la máquina. El Procesador de Alimentos OSKAR
alimentos tan rápidamente que puede preparar grandes cantidades en tan sólo
segundos si usa sentido común sobre la cantidad de ingredientes que coloca
dentro del contenedor cada vez.
• Recomendamos procesar no más de 3/4 a 1 taza de ingredientes a la vez.
•
Nunca intente procesar ingredientes duros que no pueden cortase con un cuchillo
normal
de cocina. Ingredientes como granos de café y hielo dañarán la cuchilla
y rallarán en contenedor; intentar rallar o rebanar algo demasiado duro,
puede dañar el disco.
• Mantenga el Procesador de Alimentos fuera del alcance de los niños.
• El Procesador de Alimentos no se diseñó para usarse como una licuadora.
• El contenedor no debe de colocarse dentro del microondas.
• El procesamiento de zanahorias por ejemplo, puede decolorar algunas partes
del Procesador. Para eliminar esta decoloración, lave y seque las parte muy bien
y permita que el aire fluya por éstas durante la noche.
Hachage:
Vous pouvez maintenant hacher de l'ail, du
persil et des épices en quelques secondes.
Laisser tomber des moitiés de gousses d'ail
ou des brindilles de persil dans le contenant
et transformer. Les aliments hachés qui
adhèrent au contenant s'enlèvent facilement
à l'aide d'une spatule.
Enlèvement de la Lame:
Une fois la transformation terminée,
débrancher le cordon électrique de la prise.
Enlever le couvercle. Enlever la lame pour
transformer/couper avec la nourriture s'y
accrochant avant d'enlever tout aliment du
contenant. LA LAME EST EXTRÊMEMENT
TRANCHANTE. SE SERVIR DE PRUDENCE
EN ENLEVANT CETTE LAME. Nettoyer la
lame au-dessus du bol à l'aide d'une raclette.
Remarque: Attendre toujours que la lame ou
le disque arrête complètement de bouger
avant d'enlever le couvercle.
Enlèvement du Contenant:
Placer le couvercle sur le contenant. Utiliser
le couvercle du robot culinaire OSKAR
®
pour
vous aider à enlever le couvercle. Faire
pivoter le couvercle 180 degrés dans le sens
horaire jusqu'à ce que les deux pattes sur
le couvercle rencontrent les deux pattes
du contenant. Continuer à tourner le
couvercle en effectuant une pression
ferme avec le pouce contre les pattes
jusqu'à ce que le contenant soit relâché.
Vider le reste des aliments du contenant.
Page 23

Remplissage de la Trémie
Pour émincer et déchiqueter avec succès, la manière dont les aliments sont placés dans
la trémie est importante avec votre nouveau robot culinaire OSKAR
®
.
Couper d'abord tous les ingrédients d'une grosseur qui va convenablement dans la trémie
OSKAR
®
. Remplir la trémie. En tenant le poussoir sur les aliments, appliquer une pression
consistante jusqu'à ce que tous les ingrédients soient uniformément émincés ou déchiquetés.
Plus la pression est ferme, plus les tranches ou les petits morceaux sont épais.
Toujours remplir fermement la trémie pour de meilleurs résultats. Les aliments en position
horizontale dans la trémie produiront des tranches ou petits morceaux longs.
Pour de meilleurs résultats lors de déchiquetage de fromages plus mous comme le fromage
cheddar, mozzarella, américain ou suisse, refroidir le fromage avant de le transformer.
Les fromages plus durs comme le parmesan or romano devraient être à la température
de la pièce avant la transformation et râpés avec la lame pour transformer/couper.
Préparation des Aliments:
Les aliments étroits et longs comme
les carottes ou le céleri devraient être
coupés en longueurs égales d'environ
3 ou 4 pouces. Bien remplir la trémie.
Tranches ou Petits Morceaux
plus Courts:
Remplir la trémie en plaçant
les aliments verticalement.
Pour des Tranches ou Petits
Morceaux plus Longs:
Remplir la trémie en plaçant
les aliments horizontalement.
Page 24

Colocando Ingredientes en el Canal de Alimentación
Uno de los procedimientos más importantes para rebanar y rallar alimentos exitosamente
usando su nuevo Procesador de Alimentos OSKAR
usted coloca ingredientes en el Canal de Alimentación.
Cuando rebane o ralle, primero corte todos los ingredientes a un tamaño que se ajuste
cómodamente dentro del Canal de Alimentación. Rellene el Canal de Alimentación.
Mientras mantiene los alimentos sin caerse y en posición vertical con el Empujador
de Alimentos, presione consistentemente hasta que todos los ingredientes están
rebanados o rallados uniformemente. Mientras más firmemente empuje,
más gruesos serán las rebanadas o ralladuras.
Para mejores resultados, el Canal de Alimentación debe siempre estar bien relleno.
Los alimentos colocados horizontalmente dentro del canal producirán rebanadas
o ralladuras largas.
Para mejores resultados, cuando ralle queso suave como el queso Americano, Cheddar,
Mozzarella o Suizo, debe enfriar la pieza de queso antes de procesar. Los quesos duros
como Parmesano o Romano deben estar a temperatura ambiente antes de procesar,
use la cuchilla cortadora/procesadora para rallar los quesos duros.
Preparando los Alimentos:
24
Nettoyage, Rangement et Entretien de Votre Robot Culinaire Oskar®
Une fois la transformation des aliments terminée, débrancher le robot culinaire OSKAR
®
de la prise électrique et enlever le couvercle, le disque éminceur/déchiqueteur ou la lame
pour transformer/couper, ainsi que le contenant de la base du moteur.
Essuyer la base de votre unité avec un chiffon humide puis la polir légèrement avec
un chiffon sec. NE JAMAIS IMMERGER LA BASE DU MOTEUR DANS AUCUN LIQUIDE.
Le contenant de transformation, les couvercles, la lame tranchante pour transformer et couper,
le disque éminceur/déchiqueteur, le disque éjecteur et le poussoir sont tous lavables au
lave-vaisselle. Ces pièces peuvent être nettoyées dans le panier du haut du lave-vaisselle.
NE PAS OUBLIER DE SE SERVIR DE PRUDENCE LORS DE LA MANIPULATION DE LA LAME
TRANCHANTE POUR TRANSFORMER/COUPER ET DU DISQUE ÉMINCEUR/DÉCHIQUETEUR.
ILS SONT TRÈS COUPANTS!
Le nettoyage de l'axe interne de votre lame tranchante pour transformer/couper est le plus
important. Nous suggérons d'utiliser une petite brosse de percolateur ou de bouteille de bébé
afin d'enlever tous les particules de nourriture, puis laver l'axe et sécher entièrement.
Sunbeam suggère de ranger le robot culinaire OSKAR
®
dans un endroit sec sur un comptoir
ou un dessus de table où il sera facilement accessible pour usage immédiat. Ranger la lame
pour transformer/couper dans le contenant transparent. Ranger le disque éminceur/
déchiqueteur dans un endroit sécuritaire (HORS DE LA PORTÉE DES ENFANTS).
Les lames OSKAR
®
SONT EXTRÊMEMENT TRANCHANTES! Se servir de prudence
lors de la manipulation des lames.
Une fois le contenant lavé et séché, vous pouvez appliquer une petite quantité d'huile
sur le bord du couvercle et du contenant. Cette lubrification laisse le couvercle bouger
plus librement quand en contact avec le contenant.
TOUJOURS RANGER LE DISQUE ET LA LAME HORS DE LA PORTÉE DES ENFANTS!
À ne pas Oublier:
1. Utiliser le robot culinaire OSKAR®uniquement sur une surface sèche et de niveau – jamais
à l'extérieur, sur une surface humide ou sur le bord d'une table.
2. Ne jamais enlever le couvercle ou le robot avant que la lame ou le disque soit complètement
arrêté et que l'unité ait été débranchée de la prise électrique.
3. Le moteur de votre robot culinaire OSKAR®a reçu une lubrification permanente à l'usine
et n'exige aucune autre attention. Autre que le nettoyage recommandé, aucun autre
entretien d'utilisateur ne devrait être nécessaire. Retourner votre robot culinaire au centre
de service après-vente indépendant autorisé par Sunbeam si de l'entretien ou de la
réparation devient nécessaire.
Page 25

Suggestions sur la Transformation des Aliments
• Examinez les aliments que vous êtes à transformer!
• Le robot culinaire travaille tellement vite que la surtransformation peut facilement
se produire. N'hésitez pas à arrêter l'unité et à vérifier les aliments que vous êtes
à transformer. Vous pouvez toujours continuer le processus un peu plus longtemps
si les aliments ne sont pas assez fins. Pour un meilleur contrôle, vous pouvez transformer
les aliments en utilisant la méthode à pulsation.
• Utilisez toujours le poussoir pour émincer ou déchiqueter. NE JAMAIS utiliser vos doigts
ou d'autres objets pour pousser les aliments dans la trémie.
• Prenez soin de ne pas échapper de cuillères, spatules ou autres ustensiles dans la trémie.
• Si toute denrée devait se coincer entre la lame et le côté du contenant, arrêtez le robot
culinaire et attendez que la lame arrête de tourner. Débrancher ensuite l'unité,
enlevez le couvercle et soulevez la lame pour libérer la denrée.
• Ne surchargez pas la machine. Le robot culinaire OSKAR
®
transforme les ingrédients
tellement vite que même les grandes quantités peuvent être transformées en quelques
secondes si on se sert de bons sens au sujet de la quantité d'aliments à mettre dans
le contenant en tout temps
• Nous recommandons la transformation de pas plus de 3/4 à 1 tasse d'ingrédients
en tout temps.
• N'essayez jamais de transformer des ingrédients durs qui ne peuvent être coupés par un
couteau ordinaire de cuisine. Les choses comme les fèves de café et la glace émousseront
la lame et égratigneront le contenant. Le fait de déchiqueter ou d'émincer quelque chose
de très dur peut endommager le disque.
• Garder le robot culinaire hors de la portée des enfants.
• Le robot culinaire n'est pas destiné à servir de mélangeur.
• Le contenant ne devrait pas être placé au micro-ondes.
• La transformation d'aliments comme les carottes peut décolorer temporairement le robot
culinaire. Pour enlever la décoloration, lavez et séchez entièrement toutes les pièces et
laissez sécher à l'air sec au cours de la nuit.
Page 26

Colocando los Alimentos Dentro del Contenedor:
Para mejores y más consistentes resultados, usted debe intentar procesar piezas de alimento
que son aproximadamente del mismo tamaño. Cuando corte alimentos en piezas de tamaño
uniforme antes de iniciar a procesarlas, los resultados finales serán más uniformes también.
Usted obtendrá resultados rápidos, consistentes y mejores si usted no sobrecarga el
contenedor. Cuando use la cuchilla cortadora/procesadora, llene el contenedor con sólo
3/4 a 1 taza de ingredientes cada vez.
NOTA: Cuando procese una carga pesada, verifique que el Procesador de Alimentos OSKAR
está colocado firmemente sobre el mostrador o mesa. NO SE ALEJE DEL PROCESADOR DE
ALIMENTOS OSKAR
Cortando Carnes:
Corte las carnes previamente en trozos cuadrados
de 3/4 pulgada (2 cm.). Coloque las piezas
dentro del contenedor, coloque la tapa de nuevo
y procese usando la técnica de pulso durante
5 a 7 segundos. Nunca procese más de 1 taza
de trozos de carne a la vez.
Cortando Verduras:
Cuando procese verduras como cebollas,
pélelas y córtelas en cuartos, corte las cebollas
grandes en octavos. Coloque 3/4 de taza de
piezas dentro del contenedor, ENCIENDA y
APAGUE el Procesador de Alimentos OSKAR
una o dos veces para cortes gruesos, tres a
cuatro veces más para cortes finos. Limpie
los lados del contenedor una o dos veces
durante el procesamiento, si es necesario.
Añadiendo Ingredientes Secos:
Cuando las recetas incluyan ingredientes secos
como harina, agréguelos directamente dentro
del contenedor antes de procesar.
Añadiendo Ingredientes Líquidos:
Los ingredientes líquidos pueden agregarse
mientras el procesador está operando,
al vertirlos por el orificio central en la tapa.
NOTA: Cuando procese salsas o ingredientes
semi-líquidos, apague el Procesador de
Alimentos OSKAR
del contenedor y tape otra vez.
Guide de Transformation des Aliments
TÂCHE DE LAME/DISQUE INSTRUCTIONS GÉNÉRALES
TRANSFORMATION
RECOMMANDÉ DE TRANSFORMATION
ALIMENTS SUGGÉRÉS
Mélanger Lame d'Acier Placer tous les ingrédients Trempettes,
dans le contenant de beurres aromatisés,
transformation. (Vous pouvez vinaigrettes,
verser les ingrédients liquides sauces et tartinades
par le trou de coulée.)
Transformer jusqu'à
consistance lisse.
Hacher Lame d'Acier Les aliments comme la viande Pommes, choux,
devraient être précoupés poisson cuit, jambon,
en cubes de 3/4 de pouce carré viande ou volaille,
(2 cm.). Ne pas transformer croustilles au maïs,
plus d'une tasse de cube oeufs durs, champignons,
de viande à la fois. Placer tous noix, olives, oignons,
les ingrédients dans le contenant persil, marinades,
de transformation. Utiliser piments, viande crue,
la technique à pulsation jusqu'à
échalotes, tomates, herbes,
consistance désirée. ail, craquelins, biscuits
Râper Lame d'Acier
Les aliments devraient être coupés
Fromages durs comme
en cubes de 3/4 de pouce carré le parmesan ou
(2 cm.). (Les fromages durs
le romano
devraient être à la température
de la pièce.) Placer tous
les ingrédients dans le contenant
de transformation. Utiliser
la technique à pulsation jusqu'à
consistance désirée.
Pétrir Lame d'Acier Placer tous les ingrédients dans Pâte à tarte, à pizza
le contenant de transformation.
(Si désiré, vous pouvez ajouter
du liquide aux ingrédients par
le trou de coulée.) Transformer
pendant quelques secondes.
Utiliser la technique à pulsation.
NE PAS SURTRANSFORMER.
Page 27

TÂCHE DE LAME/DISQUE INSTRUCTIONS GÉNÉRALES
T
RANSFORMATION R
ECOMMANDÉ DE TRANSFORMATION ALIMENTS SUGGÉRÉS
Purée Lame d'Acier Placer tous les ingrédients dans Fruits frais, cuits ou
le contenant de transformation. en conserve
Transformer jusqu'à consistance (comme les pommes,
lisse. bananes, pêches, poires,
fraises). Les légumes
frais, cuits ou en
conserve (comme les
fèves, carottes, maïs,
pois, pommes de terre
ou tomates), beurre
d'arachide
Déchiqueter Disque à Remplir la trémie des aliments Fromage américain,
Déchiqueter (fromage comme le cheddar, carottes, fromage
mozzarella, américain et suisse mozzarella, oignons,
devraient être refroidis avant pommes de terre,
la transformation) fromage suisse,
Remarque: Pour des morceaux courgette
plus courts, placer les aliments
verticalement dans la trémie.
Émincer Disque à Couper les gros aliments pour Les fruits (comme les
Émincer convenir à la trémie. Remplir pommes, bananes,
la trémie. (Refroidir volaille citrons, limes, melons,
et fromage, comme le fromage oranges, pêches, poires,
cheddar, américain ou suisse ananas, fraises);
avant la transformation.) les légumes comme
Remarque: Utiliser une pression les betteraves, choux,
légère sur le poussoir pour carottes, céleri,
des tranches plus minces. concombre,
Pour des tranches plus longues, aubergine, laitue,
remplir les aliments horizontalement champignons, oignons,
dans la trémie. Pour des tranches panais, pommes de terre,
plus courtes, remplir les aliments tomates, courgette); noix,
verticalement dans la trémie. marinades ou volaille
Page 28

Ensamblando Su Procesador de Alimentos Oskar®
Usando la Tapa para Alimentación Continua:
Coloque la base del motor frente a usted sobre
una superficie seca y nivelada acomodando
la base con el lado más alto hacia atrás.
Ponga el Contenedor transparente para
Procesar sobre la barra en la base del motor.
Fije en su lugar.
Coloque el disco expulsor sobre el contenedor
sujetando la punta y colocando el disco sobre la
barra. Permita que caiga en su lugar.
Para rebanar, sostenga el disco rebanador/rallador
con la orilla curvada y elevada hacia arriba.
Coloque el disco sobre el disco expulsor y
permita que caiga en su lugar.
Para rallar, gire el disco de manera que las
ranuras para rallar estén hacia arriba. Coloque el
disco sobre el disco expulsor y permita que caiga
en su lugar.
Para colocar la tapa, ponga ésta sobre el
contenedor de manera que el perno en la tapa
se ajuste dentro del orificio que está en el disco
expulsor. La lengüeta grande de la tapa está a
mano derecha, cerca de la ranura horizontal
en el cuerpo de la base del motor: cuando gire
en sentido contrario de las manecillas de reloj,
la lengüeta se acoplará con el interruptor
automático del Procesador de Alimentos
OSKAR
®
y ENCENDERÁ el aparato.
Cuando mueva la tapa en dirección opuesta,
el aparato se APAGARÁ.
NOTA: Mantenga los dedos lejos del Canal
para Alimentación Continua cuando el Procesador
de Alimentos OSKAR
Guide de Dépannage
PROBLÈME SOLUTION
1. Les aliments ne sont pas transformés 1. Vous surchargez le contenant.
de manière uniforme ou le robot culinaire La prochaine fois, transformez
OSKAR®se déplace sur la surface de travail. cette quantité en deux parties ou plus.
2. Le robot culinaire vibre anormalement ou 2. La lame ou le disque n'a pas été monté
la lame ou le disque semble frapper soit de façon appropriée. Arrêtez le robot
le contenant ou le couvercle lorsque le robot culinaire OSKAR®immédiatement
culinaire OSKAR®est en opération. et réajustez la lame tranchante
de façon appropriée.
3. Il y a des fuites du liquide du bol et sur 3. La capacité de liquide du robot culinaire
les côtés du contenant de transformation. OSKAR®n'est pas grande. Par conséquent,
il n'est pas recommandé pour mélanger
des breuvages et d'autres aliments à haute
teneur liquide.
4. Après la transformation, des morceaux 4. Des petits morceaux d'aliment
d'aliment restent sur le dessus du disque qui restent sur le dessus du disque
éminceur/déchiqueteur. sont une chose normale.
5. Le couvercle ne bouge pas librement quand 5. Utilisez une petite quantité d'huile
il est attaché au contenant. végétale pour lubrifier les bords et le
couvercle.du contenant de transformation
6. Les aliments tombent dans la trémie pendant 6. Bien remplir le tube et se servir
le découpage en tranches. de pression uniforme sur les aliments
à émincer.
Page 29

G
UARANTIE
L
IMITÉE DE
1 A
N
Sunbeam Products, Inc, ou au Canada, Sunbeam Corporation (Canada) Limited (collectivement « Sunbeam »)
garantit que pendant une période de un an à partir de la date d’achat, ce produit sera exempt de défauts de
matériaux et de main d’œuvre. Sunbeam, selon son choix, réparera ou remplacera ce produit ou tout
composant du produit étant trouvé défectueux durant la période de couverture de la garantie. Le remplacement
sera réalisé au moyen d’un produit ou composant neuf ou reconstruit. Si le produit n’est plus disponible,
un produit d’une valeur similaire ou supérieure fera lieu de replacement. Ceci est votre garantie exclusive.
Cette garantie est valide pour l’acheteur au détail d’origine à partir de la date d’achat au détail initiale et n’est
pas transférable. Gardez le reçu de vente d’origine. Une preuve d’achat est requise pour obtenir l’application
de la garantie. Les concessionnaires, les centres de réparation Sunbeam ou les magasins au détail vendant
des produits Sunbeam n’ont pas le droit d’altérer, modifier ou de quelconque façon changer les termes et
conditions de cette garantie.
Cette garantie ne couvre pas l’usure normale des pièces ni les dégâts provenant d’un des suivants : mauvaise
ou négligente utilisation du produit, emploi sur un mauvais courant ou une mauvaise tension, utilisation
contraire aux instructions de fonctionnement, démontage, réparation ou modification par quiconque autre
que Sunbeam ou un centre de réparation Sunbeam agréé. De plus, la garantie ne couvre pas les cas de force
majeure, tels qu’incendies, inondations, ouragans et tornades.
Quelles Sont les Limites de Responsabilité de Sunbeam ?
Sunbeam ne sera pas responsable des dégâts secondaires ou conséquents causés par la rupture de toute
garantie ou condition exprimée, tacite ou statutaire.
Dans la mesure des lois applicables, toute garantie ou condition tacite d’aptitude à être vendu ou utilisé
dans un but particulier est limitée en durée à la durée de la garantie ci-dessus.
Sunbeam rejette toute autre garantie, condition ou représentation exprimée, tacite, statutaire ou autre.
Sunbeam ne sera pas responsable des dégâts, quel qu’en soit la sorte, résultant de l’achat, de l’utilisation,
de l’abus du ou de l’incapacité à utiliser le produit y compris les dégâts secondaires, spéciaux, conséquents
ou similaires ; ni des pertes de revenus ; ni de toute rupture de contrat, fondamentale ou autre ; ni de toute
plainte amenée contre l’acheteur par toute autre partie.
Quelques provinces, états ou juridictions ne permettent pas l’exclusion ou la limitation des dégâts secondaires
ou conséquents ni les limitations sur la durée de garantie tacite, donc il se peut que les limitations ou
exclusions ci-dessus ne s’appliquent pas à vous.
Cette garantie vous donne des droits légaux précis et il se peut que vous ayez aussi d’autres droits
qui varient d’une province, d’un état ou d’une juridiction à l’autre.
Comment Obtenir une Réparation Sous Garantie ?
Aux U.S.A. –
Pour toute question au sujet de cette garantie ou si vous désirez obtenir une réparation sous garantie,
veuillez appeler le 1.800.458.8407 et l’adresse d’un centre de réparation convenable vous sera fournie.
Au Canada –
Pour toute question au sujet de cette garantie ou si vous désirez obtenir une réparation sous garantie,
veuillez appeler le 1.800.458.8407 et l’adresse d’un centre de réparation convenable vous sera fournie.
Aux U.S.A., cette garantie est offerte par Sunbeam Products, Inc., située à Boca Raton, Florida 33431.
Au Canada, cette garantie est offerte par Sunbeam Corporation (Canada) Limited, située à 5975 Falbourne
Street, Mississagua, Ontario L5R 3V8.
VEUILLEZ NE PAS RENVOYER CE PRODUIT
À L’UNE DE CES ADRESSES NI AU LIEU D’ACHAT.
Page 30

Tubo Alimentador
Disco Expulsor
Partes de Su Procesador de Alimentos Oskar®
Mientras desempaca su nuevo procesador de alimentos, tome un momento para
identificar cada una de las diferentes partes que se muestran en estas ilustraciones.
ASEGÚRESE DE MANEJAR LA CUCHILLA Y EL DISCO CON MUCHO CUIDADO,
YA QUE SON MUY FILOSOS.
Al seguir paso a paso las sencillas instrucciones de este manual, usted aprenderá como
armar el aparato, qué cuchilla o disco usar para cada trabajo y cuán verdaderamente
maravilloso y conveniente es su nuevo procesador de alimentos.
Cuando use aparatos eléctricos, algunas precauciones básicas de seguridad siempre deben de tomarse:
1.
LEA TODAS LAS INSTRUCCIONES ANTES DE USAR EL PROCESADOR DE ALIMENTOS.
2. Para proteger contra una descarga eléctrica y lesiones a personas, no coloque el procesador
de alimentos en agua o en otros líquidos.
3. Supervisión extrema es necesaria cuando el aparato es usado por o cerca de niños.
4. Desconecte el aparato de la toma de corriente cuando no esté en uso, antes de poner
o quitar partes y antes de limpiarlo.
5. Evite el contacto con las partes en movimiento.
6. No opere el procesador de alimentos con un cordón dañado o después de que el aparato
ha funcionado inadecuadamente o ha sido dañado en cualquier forma. Regrese el aparato
a un Centro de Servicio Autorizado de Sunbeam Appliance Company para su examinación,
reparación o ajuste.
7. El uso de accesorios o aditamentos no recomendados por Sunbeam Appliance Company
pueden causar incendios, descargas eléctricas o lesiones personales.
8. No se use en exteriores.
9. No permita que el cordón cuelgue sobre la orilla de la mesa o del mostrador o toque
superficies calientes.
10. Mantenga las manos y los utensilios alejados de la Cuchilla en Movimiento o el Disco
Procesador mientras se está procesando alimentos para reducir el riesgo de lesiones
severas a personas o daños al procesador. Puede usar una espátula, pero solamente
cuando el Procesador de Alimentos no esté encendido.
11. El Disco y la Cuchilla para Procesar son muy filosos. Manéjelos con cuidado.
12. Para reducir el riesgo de lesiones a personas, nunca coloque la Cuchilla para cortar
sobre la Base sin poner primero el Contenedor en su lugar.
13. Verifique que la Tapa del Contenedor esté colocada correctamente en su lugar mientras
opera el aparato.
14. Nunca introduzca la comida con la mano. Siempre use el Empujador de Alimentos.
15. No intente modificar el mecanismo de seguridad de la tapa.
Esta Unidad Es para Uso Doméstico Solamente
NOTA: La potencia máxima está basada en el aditamento de este producto que necesita más
corriente eléctrica. Otros accesorios pueden necesitar menos corriente eléctrica.
PARA PRODUCTOS COMPRADOS EN ESTADOS UNIDOS Y CANADÁ ÚNICAMENTE
Para reducir el riesgo de descarga eléctrica, este aparato cuenta con una clavija polarizada
(una cuchilla es más ancha que la otra). Como medida de seguridad, esta clavija entra sólo
de una manera en un enchufe polarizado. Si la clavija no encaja en el enchufe simplemente
colóquela al revés. Si aún así no encaja llame a un electricista de su confianza.
De ninguna manera intente modificar esta medida de seguridad.
PRECAUCIONES IMPORTANTES
GUARDE ESTAS INSTRUCCIONES
Page 31

Empujador de
Alimentos
Tubo Alimentador
Contenedor para Procesar
Base del Motor
Cuchilla
Cortadora/Procesadora
Disco Expulsor
Disco Reversible para
Rebanar/Rallar
Tapa
Partes de Su Procesador de Alimentos Oskar®
Mientras desempaca su nuevo procesador de alimentos, tome un momento para
identificar cada una de las diferentes partes que se muestran en estas ilustraciones.
ASEGÚRESE DE MANEJAR LA CUCHILLA Y EL DISCO CON MUCHO CUIDADO,
YA QUE SON MUY FILOSOS.
Al seguir paso a paso las sencillas instrucciones de este manual, usted aprenderá como
armar el aparato, qué cuchilla o disco usar para cada trabajo y cuán verdaderamente
maravilloso y conveniente es su nuevo procesador de alimentos.
Page 32

Sunbeam Products, Inc, ou au Canada, Sunbeam Corporation (Canada) Limited (collectivement « Sunbeam »)
garantit que pendant une période de un an à partir de la date d’achat, ce produit sera exempt de défauts de
matériaux et de main d’œuvre. Sunbeam, selon son choix, réparera ou remplacera ce produit ou tout
composant du produit étant trouvé défectueux durant la période de couverture de la garantie. Le remplacement
sera réalisé au moyen d’un produit ou composant neuf ou reconstruit. Si le produit n’est plus disponible,
un produit d’une valeur similaire ou supérieure fera lieu de replacement. Ceci est votre garantie exclusive.
Cette garantie est valide pour l’acheteur au détail d’origine à partir de la date d’achat au détail initiale et n’est
pas transférable. Gardez le reçu de vente d’origine. Une preuve d’achat est requise pour obtenir l’application
de la garantie. Les concessionnaires, les centres de réparation Sunbeam ou les magasins au détail vendant
des produits Sunbeam n’ont pas le droit d’altérer, modifier ou de quelconque façon changer les termes et
conditions de cette garantie.
Cette garantie ne couvre pas l’usure normale des pièces ni les dégâts provenant d’un des suivants : mauvaise
ou négligente utilisation du produit, emploi sur un mauvais courant ou une mauvaise tension, utilisation
contraire aux instructions de fonctionnement, démontage, réparation ou modification par quiconque autre
que Sunbeam ou un centre de réparation Sunbeam agréé. De plus, la garantie ne couvre pas les cas de force
majeure, tels qu’incendies, inondations, ouragans et tornades.
Quelles Sont les Limites de Responsabilité de Sunbeam ?
Sunbeam ne sera pas responsable des dégâts secondaires ou conséquents causés par la rupture de toute
garantie ou condition exprimée, tacite ou statutaire.
Dans la mesure des lois applicables, toute garantie ou condition tacite d’aptitude à être vendu ou utilisé
dans un but particulier est limitée en durée à la durée de la garantie ci-dessus.
Sunbeam rejette toute autre garantie, condition ou représentation exprimée, tacite, statutaire ou autre.
Sunbeam ne sera pas responsable des dégâts, quel qu’en soit la sorte, résultant de l’achat, de l’utilisation,
de l’abus du ou de l’incapacité à utiliser le produit y compris les dégâts secondaires, spéciaux, conséquents
ou similaires ; ni des pertes de revenus ; ni de toute rupture de contrat, fondamentale ou autre ; ni de toute
plainte amenée contre l’acheteur par toute autre partie.
Quelques provinces, états ou juridictions ne permettent pas l’exclusion ou la limitation des dégâts secondaires
ou conséquents ni les limitations sur la durée de garantie tacite, donc il se peut que les limitations ou
exclusions ci-dessus ne s’appliquent pas à vous.
Cette garantie vous donne des droits légaux précis et il se peut que vous ayez aussi d’autres droits
qui varient d’une province, d’un état ou d’une juridiction à l’autre.
Comment Obtenir une Réparation Sous Garantie ?
Aux U.S.A. –
Pour toute question au sujet de cette garantie ou si vous désirez obtenir une réparation sous garantie,
veuillez appeler le 1.800.458.8407 et l’adresse d’un centre de réparation convenable vous sera fournie.
Au Canada –
Pour toute question au sujet de cette garantie ou si vous désirez obtenir une réparation sous garantie,
veuillez appeler le 1.800.458.8407 et l’adresse d’un centre de réparation convenable vous sera fournie.
Aux U.S.A., cette garantie est offerte par Sunbeam Products, Inc., située à Boca Raton, Florida 33431.
Au Canada, cette garantie est offerte par Sunbeam Corporation (Canada) Limited, située à 5975 Falbourne
Street, Mississagua, Ontario L5R 3V8.
À L’UNE DE CES ADRESSES NI AU LIEU D’ACHAT.
Ensamblando Su Procesador de Alimentos Oskar®
Usando el Contenedor y la Tapa Transparentes:
Antes de que usted empiece, por favor VERIFIQUE QUE EL CORDÓN ELÉCTRICO ESTÉ
DESCONECTADO.
Coloque la base del motor frente a usted sobre una
superficie seca y nivelada acomodando la base con
el lado más alto hacia atrás.
NOTA: En la parte superior y trasera de la base del
motor hay una flecha y las palabras “LOCK-ON”
ASEGURE hacia la izquierda y “UNLOCK-OFF” LIBERE
hacia la derecha. Gire el tazón transparente hacia
la dirección indicada para APAGAR O ENCENDER
el procesador de alimentos.
Coloque el Contenedor transparente para Procesar sobre
la barra en la base del motor y gire el contenedor hasta
que esté bien colocado sobre la base. Ahora gire el
Contenedor hasta que el mecanismo de seguridad
se accione y el tazón esté firmemente en su lugar.
NOTA: Cada vez que usted ensamble de nuevo su
procesador de alimentos, coloque el Contenedor
primero y fíjelo en su lugar. Después, coloque la Tapa.
Ponga la cuchilla cortadora/procesadora sobre la barra,
gírela un poco hasta que caiga en su lugar. Si usted
planea procesar alimentos con la cuchilla, ahora es
cuando debe agregar los ingredientes. LA CUCHILLA
ES EXTREMADAMENTE FILOSA. TENGA CUIDADO
CUANDO LA MANEJE.
Para colocar la tapa, póngala sobre el Contenedor de
manera que la lengüeta grande de la tapa esté a mano
derecha, cerca de la ranura horizontal en la parte trasera
de la base del motor. Cuando gire en sentido contrario
de las manecillas de reloj, la lengüeta se acoplará con
el interruptor automático del Procesador de Alimentos
OSKAR
®
y ENCENDERÁ el aparato. Cuando mueva la
tapa en dirección opuesta, el aparato se APAGARÁ.
NOTA: La cuchilla cortadora/procesadora de acero
inoxidable puede solamente ser usada con el contenedor
transparente del Procesador de Alimentos OSKAR
®
para
usar las funciones de cortar, mezclar o hacer puré; NUNCA
use esta cuchilla con la tapa para alimentación continua
de ingredientes colocada sobre el tazón transparente.
Page 33

Ensamblando Su Procesador de Alimentos Oskar®
Usando la Tapa para Alimentación Continua:
Coloque la base del motor frente a usted sobre
una superficie seca y nivelada acomodando
la base con el lado más alto hacia atrás.
Ponga el Contenedor transparente para
Procesar sobre la barra en la base del motor.
Fije en su lugar.
Coloque el disco expulsor sobre el contenedor
sujetando la punta y colocando el disco sobre la
barra. Permita que caiga en su lugar.
Para rebanar, sostenga el disco rebanador/rallador
con la orilla curvada y elevada hacia arriba.
Coloque el disco sobre el disco expulsor y
permita que caiga en su lugar.
Para rallar, gire el disco de manera que las
ranuras para rallar estén hacia arriba. Coloque el
disco sobre el disco expulsor y permita que caiga
en su lugar.
Para colocar la tapa, ponga ésta sobre el
contenedor de manera que el perno en la tapa
se ajuste dentro del orificio que está en el disco
expulsor. La lengüeta grande de la tapa está a
mano derecha, cerca de la ranura horizontal
en el cuerpo de la base del motor: cuando gire
en sentido contrario de las manecillas de reloj,
la lengüeta se acoplará con el interruptor
automático del Procesador de Alimentos
OSKAR
®
y ENCENDERÁ el aparato.
Cuando mueva la tapa en dirección opuesta,
el aparato se APAGARÁ.
NOTA: Mantenga los dedos lejos del Canal
para Alimentación Continua cuando el Procesador
de Alimentos OSKAR
®
esté en funcionamiento.
Page 34

TÂCHE DE LAME/DISQUE INSTRUCTIONS GÉNÉRALES
T
RANSFORMATION R
Purée Lame d'Acier Placer tous les ingrédients dans Fruits frais, cuits ou
Déchiqueter Disque à Remplir la trémie des aliments Fromage américain,
Émincer Disque à Couper les gros aliments pour Les fruits (comme les
Para mayor control al rebanar y rallar, cargue el
Tubo Alimentador con los ingredientes primero,
antes de ENCENDER el Procesador de Alimentos
OSKAR
®
. Siempre use el Empujador de
Alimentos para obtener alimentos rebanados
o rallados más uniformemente – NUNCA USE
SUS DEDOS.
NOTA: ¡La Cuchilla y el Disco Cortador
OSKAR
®
son extremadamente filosos!
Por favor tenga mucho cuidado cuando los use,
almacénelos en sus respectivos contenedores
para mayor seguridad.
Coloque el Empujador de Alimentos dentro
del Canal. Ahora, sostenga el Empujador de
Alimentos con una mano y el Canal de
Alimentación e la otra, gire la tapa a la posición
ENCENDIDO mientras presiona suavemente
hacia abajo sobre el empujador de alimentos.
APAGUE el Procesador de Alimentos.
Técnicas para Procesar Alimentos – Usando la Cuchilla
Usando la Técnica de Pulso:
El Procesador de Alimentos OSKAR
®
procesa alimentos muy rápidamente; en la mayoría
de los casos, ¡En solamente segundos! Por lo tanto, los alimentos pueden fácilmente
ser procesados de más, si usted no observa cuidadosamente. Le sugerimos que cuando
use la Cuchilla de Acero en el Contenedor
Transparente para Procesar, usted no procese
alimentos por más de algunos segundos a la vez,
ENCENDIENDO y APAGANDO frecuentemente el
Procesador de Alimentos OSKAR
®
hasta que se
obtengan los resultados deseados. Para usar esta
“Técnica de Pulso”, simplemente gire la tapa de
manera que la Lengüeta de Seguridad se mueva
dentro y fuera de la Ranura del Interruptor
Automático. Las pulsaciones aseguran excelentes
resultados todas las veces que se usen.
NOTA Por favor verifique que la Cuchilla de
Acero se detenga completamente antes de quitar
la Tapa.
Page 35

Colocando los Alimentos Dentro del Contenedor:
Para mejores y más consistentes resultados, usted debe intentar procesar piezas de alimento
que son aproximadamente del mismo tamaño. Cuando corte alimentos en piezas de tamaño
uniforme antes de iniciar a procesarlas, los resultados finales serán más uniformes también.
Usted obtendrá resultados rápidos, consistentes y mejores si usted no sobrecarga el
contenedor. Cuando use la cuchilla cortadora/procesadora, llene el contenedor con sólo
3/4 a 1 taza de ingredientes cada vez.
NOTA: Cuando procese una carga pesada, verifique que el Procesador de Alimentos OSKAR
®
está colocado firmemente sobre el mostrador o mesa. NO SE ALEJE DEL PROCESADOR DE
ALIMENTOS OSKAR
®
MIENTRAS ESTÉ EN FUNCIONAMIENTO.
Cortando Carnes:
Corte las carnes previamente en trozos cuadrados
de 3/4 pulgada (2 cm.). Coloque las piezas
dentro del contenedor, coloque la tapa de nuevo
y procese usando la técnica de pulso durante
5 a 7 segundos. Nunca procese más de 1 taza
de trozos de carne a la vez.
Cortando Verduras:
Cuando procese verduras como cebollas,
pélelas y córtelas en cuartos, corte las cebollas
grandes en octavos. Coloque 3/4 de taza de
piezas dentro del contenedor, ENCIENDA y
APAGUE el Procesador de Alimentos OSKAR
®
una o dos veces para cortes gruesos, tres a
cuatro veces más para cortes finos. Limpie
los lados del contenedor una o dos veces
durante el procesamiento, si es necesario.
Añadiendo Ingredientes Secos:
Cuando las recetas incluyan ingredientes secos
como harina, agréguelos directamente dentro
del contenedor antes de procesar.
Añadiendo Ingredientes Líquidos:
Los ingredientes líquidos pueden agregarse
mientras el procesador está operando,
al vertirlos por el orificio central en la tapa.
NOTA: Cuando procese salsas o ingredientes
semi-líquidos, apague el Procesador de
Alimentos OSKAR
®
y limpie las paredes
del contenedor y tape otra vez.
Page 36

Suggestions sur la Transformation des Aliments
• Examinez les aliments que vous êtes à transformer!
• Le robot culinaire travaille tellement vite que la surtransformation peut facilement
se produire. N'hésitez pas à arrêter l'unité et à vérifier les aliments que vous êtes
à transformer. Vous pouvez toujours continuer le processus un peu plus longtemps
si les aliments ne sont pas assez fins. Pour un meilleur contrôle, vous pouvez transformer
les aliments en utilisant la méthode à pulsation.
• Utilisez toujours le poussoir pour émincer ou déchiqueter. NE JAMAIS utiliser vos doigts
ou d'autres objets pour pousser les aliments dans la trémie.
• Prenez soin de ne pas échapper de cuillères, spatules ou autres ustensiles dans la trémie.
• Si toute denrée devait se coincer entre la lame et le côté du contenant, arrêtez le robot
culinaire et attendez que la lame arrête de tourner. Débrancher ensuite l'unité,
enlevez le couvercle et soulevez la lame pour libérer la denrée.
• Ne surchargez pas la machine. Le robot culinaire OSKAR
tellement vite que même les grandes quantités peuvent être transformées en quelques
secondes si on se sert de bons sens au sujet de la quantité d'aliments à mettre dans
le contenant en tout temps
• Nous recommandons la transformation de pas plus de 3/4 à 1 tasse d'ingrédients
en tout temps.
• N'essayez jamais de transformer des ingrédients durs qui ne peuvent être coupés par un
couteau ordinaire de cuisine. Les choses comme les fèves de café et la glace émousseront
la lame et égratigneront le contenant. Le fait de déchiqueter ou d'émincer quelque chose
de très dur peut endommager le disque.
• Garder le robot culinaire hors de la portée des enfants.
• Le robot culinaire n'est pas destiné à servir de mélangeur.
• Le contenant ne devrait pas être placé au micro-ondes.
• La transformation d'aliments comme les carottes peut décolorer temporairement le robot
culinaire. Pour enlever la décoloration, lavez et séchez entièrement toutes les pièces et
laissez sécher à l'air sec au cours de la nuit.
36
Picando:
¡Ahora usted puede picar ajo, perejil y
especias en segundos! Simplemente esparza
dientes de ajo o perejil en el contenedor
y procéselos. Los alimentos picados que
se peguen al contenedor, se pueden remover
fácilmente con una espátula.
Quitando la Cuchilla:
Cuando termine de procesar alimentos,
desconecte el cordón eléctrico de la toma
de corriente. Quite la tapa. Antes de sacar
los alimentos ya procesados, quite la Cuchilla
cortadora/procesadora con los alimentos
pegados a ésta. LA CUCHILLA ES
EXTREMADAMENTE FILOSA. TENGA
CUIDADO CUANDO QUITE ESTA CUCHILLA.
Limpie la Cuchilla sobre el tazón usando
una espátula.
NOTA: Siempre espere a que la cuchilla
o disco se detengan completamente antes
de quitar la tapa.
Quitando el Contenedor:
Coloque la tapa sobre el Contenedor.
Use la tapa del Procesador de Alimentos
OSKAR
®
para remover el Contenedor.
Gire la tapa 180 grados en sentido de
las manecillas del reloj hasta que
las dos lengüetas de la tapa se encuentren
con las dos lengüetas del Contenedor.
Continúe girando la tapa, presionando
firmemente, con el dedo pulgar sobre
las lengüetas hasta que el Contenedor sea
liberado. Vacíe los alimentos del Contenedor.
Page 37

Colocando Ingredientes en el Canal de Alimentación
Uno de los procedimientos más importantes para rebanar y rallar alimentos exitosamente
usando su nuevo Procesador de Alimentos OSKAR
®
Sunbeam, es la forma en la que
usted coloca ingredientes en el Canal de Alimentación.
Cuando rebane o ralle, primero corte todos los ingredientes a un tamaño que se ajuste
cómodamente dentro del Canal de Alimentación. Rellene el Canal de Alimentación.
Mientras mantiene los alimentos sin caerse y en posición vertical con el Empujador
de Alimentos, presione consistentemente hasta que todos los ingredientes están
rebanados o rallados uniformemente. Mientras más firmemente empuje,
más gruesos serán las rebanadas o ralladuras.
Para mejores resultados, el Canal de Alimentación debe siempre estar bien relleno.
Los alimentos colocados horizontalmente dentro del canal producirán rebanadas
o ralladuras largas.
Para mejores resultados, cuando ralle queso suave como el queso Americano, Cheddar,
Mozzarella o Suizo, debe enfriar la pieza de queso antes de procesar. Los quesos duros
como Parmesano o Romano deben estar a temperatura ambiente antes de procesar,
use la cuchilla cortadora/procesadora para rallar los quesos duros.
Preparando los Alimentos:
Los alimentos largos y delgados como
las zanahorias o el apio deben cortarse
en largos iguales, aproximadamente
de 3 o 4 pulgadas (7 o 10 cm.).
Rellene el Canal de Alimentación.
Haciendo rebanadas o
ralladuras pequeñas:
Coloque los alimentos verticalmente
dentro del Canal de Alimentación.
Haciendo rebanadas o
ralladuras grandes:
Coloque los alimentos horizontalmente
dentro del Canal de Alimentación.
Page 38

Pour émincer et déchiqueter avec succès, la manière dont les aliments sont placés dans
la trémie est importante avec votre nouveau robot culinaire OSKAR
Couper d'abord tous les ingrédients d'une grosseur qui va convenablement dans la trémie
OSKAR
®
. Remplir la trémie. En tenant le poussoir sur les aliments, appliquer une pression
consistante jusqu'à ce que tous les ingrédients soient uniformément émincés ou déchiquetés.
Plus la pression est ferme, plus les tranches ou les petits morceaux sont épais.
Toujours remplir fermement la trémie pour de meilleurs résultats. Les aliments en position
horizontale dans la trémie produiront des tranches ou petits morceaux longs.
Pour de meilleurs résultats lors de déchiquetage de fromages plus mous comme le fromage
cheddar, mozzarella, américain ou suisse, refroidir le fromage avant de le transformer.
Les fromages plus durs comme le parmesan or romano devraient être à la température
de la pièce avant la transformation et râpés avec la lame pour transformer/couper.
Préparation des Aliments:
Limpieza, Almacenamiento y Cuidados para Su Procesador de Alimentos Oskar®
Cuando termine de procesar alimentos, desconecte el Procesador de Alimentos OSKAR®de la
toma de corriente eléctrica y quite la tapa, el disco rebanador/rallador o la cuchilla cortadora/
procesadora y el contenedor de la base del motor.
Limpie la base del motor con un paño húmedo, después púlalo con uno seco.
NUNCA SUMERJA LA BASE DEL MOTOR EN NINGÚN LÍQUIDO.
El contenedor para procesar, las tapas, la cuchilla cortadora/procesadora, el disco rebanador/
rallador, el disco expulsor y el empujador de alimentos se pueden lavar en lavavajillas.
Estas partes pueden lavarse colocándolas en la rejilla superior de la máquina lavavajillas.
RECUERDE TENER EXTREMO CUIDADO CUANDO MANEJE LA CUCHILLA CORTADORA/
PROCESADORA Y EL DISCO REBANADOR/RALLADOR. ¡SON MUY FILOSOS!
La limpieza de la barra interna de la cuchilla cortadora/procesadora es muy importante.
Sugerimos usar un pequeño cepillo o un cepillo para limpiar las botellas de bebé para
remover todas las partículas de alimento, después lave y seque la barra muy bien.
Sunbeam sugiere que usted almacene su Procesador de Alimentos OSKAR
®
sobre cualquier
mostrador o mesa en su cocina, donde siempre pueda estar listo para uso inmediato.
Almacene la cuchilla cortadora/procesadora dentro del contenedor transparente.
Almacene el disco rebanador/rallador en un lugar seguro (FUERA DEL ALCANCE
DE LOS NIÑOS). ¡Las cuchillas OSKAR
®
son EXTREMADAMENTE filosas!
Tenga cuidado cuando las maneje.
Después de lavar y secar el Contenedor, aplique un poco de aceite vegetal a la orilla
de la Tapa y del Contenedor. Esta lubricación permite que la tapa se mueva más
fácilmente cuando está en contacto con el Contenedor.
SIEMPRE ALMACENE EL DISCO Y LA CUCHILLA FUERA DEL ALCANCE DE LOS NIÑOS.
Algunas Cosas que Debe Recordar:
1. Use el Procesador de Alimentos OSKAR®solamente sobre una superficie seca y nivelada –
nunca en el exterior o sobre una superficie húmeda o cerca de la orilla de la mesa.
2.
Nunca remueva la Tapa del Procesador hasta que la Cuchilla o el Disco se detengan
completamente y la unidad se ha desconectado de la toma de corriente eléctrica.
3.
El motor de su Procesador de Alimentos OSKAR
®
ha sido lubricado permanentemente
en la fábrica y no requiere mayor atención. No es necesario otro tipo de limpieza mas
que la recomendada anteriormente. Regrese su Procesador de Alimentos al centro de
servicio independiente autorizado por Sunbeam si es necesario servicio o reparación.
Page 39

Sugerencias para Procesar Alimentos
• ¡Revise los alimentos que está procesando!
• Es fácil procesar demasiado, porque el Procesador de Alimentos trabaja muy rápido.
No dude en detener la unidad y revisar los alimentos que está procesando.
Usted siempre puede procesar los alimentos por un poco más de tiempo si los
alimentos no quedan lo suficientemente finos. Para mayor control, usted puede
procesar los alimentos usando la técnica del pulso.
• Cuando rebane o ralle, siempre use el Empujador de Alimentos. NUNCA use sus dedos
u otros objetos para empujar los ingredientes dentro del Canal de Alimentación.
• Tenga cuidado de no dejar caer cucharas, espátulas o cualquier otro utensilio dentro
del Canal de Alimentación.
•
Si cualquier trozo de alimento queda atrapado entre la cuchilla y la pared del
contenedor, APAGUE el Procesador de Alimentos y espere a que la cuchilla se detenga.
Después, desconecte la unidad, quite la tapa y levante la cuchilla para liberar la pieza
de alimento.
• No sobrecargue la máquina. El Procesador de Alimentos OSKAR
®
procesa los
alimentos tan rápidamente que puede preparar grandes cantidades en tan sólo
segundos si usa sentido común sobre la cantidad de ingredientes que coloca
dentro del contenedor cada vez.
• Recomendamos procesar no más de 3/4 a 1 taza de ingredientes a la vez.
•
Nunca intente procesar ingredientes duros que no pueden cortase con un cuchillo
normal
de cocina. Ingredientes como granos de café y hielo dañarán la cuchilla
y rallarán en contenedor; intentar rallar o rebanar algo demasiado duro,
puede dañar el disco.
• Mantenga el Procesador de Alimentos fuera del alcance de los niños.
• El Procesador de Alimentos no se diseñó para usarse como una licuadora.
• El contenedor no debe de colocarse dentro del microondas.
• El procesamiento de zanahorias por ejemplo, puede decolorar algunas partes
del Procesador. Para eliminar esta decoloración, lave y seque las parte muy bien
y permita que el aire fluya por éstas durante la noche.
Page 40

Placer les Aliments dans le Contenant:
Pour de meilleurs résultats, les morceaux d'aliment à transformer devraient être de
la même grosseur. Quand vous coupez, brisez et déchirez des aliments en morceaux
uniformes de la même grosseur avant de commencer la transformation, les résultats
finis seront également uniformes.
Vous obtiendrez des résultats de transformation plus rapides et plus constants si vous
ne surchargez pas le contenant: Lors de l'utilisation de la lame pour transformer/couper,
remplir le contenant avec seulement 3/4 à 1 tasse des ingrédients à la fois.
REMARQUE: Lors de la transformation d'un contenant assez rempli, s'assurer que le robot
culinaire OSKAR
S'ÉLOIGNER DU ROBOT CULINAIRE OSKAR
Hachage des Miandes:
Précouper les viandes en morceaux d'environ
3/4 de pouce carré (2 cm.). Placer les morceaux
dans le contenant, remettre le couvercle en place
et procéder à la transformation en utilisant la
technique de pulsation pendant 5 à 7 secondes.
Ne jamais transformer plus d'une tasse de cubes
de viandes à la fois.
Hachage des Légumes:
Lors de la transformation de légumes comme
les oignons, les peler et les couper en quatre;
couper les gros oignons en huit morceaux.
Placer 3/4 de tasse des morceaux dans le
contenant et tourner le robot culinaire OSKAR
en position de marche et d'arrêt 1 ou 2 fois pour
hacher gros, 3 à 4 fois de plus pour hacher fin.
Gratter les côtés du contenant une ou deux fois,
si nécessaire, au cours de la transformation.
Ajouter les Ingrédients Secs:
Lorsque diverses recettes exigent des
ingrédients secs comme de la farine,
ajouter ces ingrédients directement
dans le contenant avant la transformation.
Ajouter des Ingrédients Liquides:
Les ingrédients liquides peuvent être ajoutés
pendant que le robot est en marche en
les versant directement par le trou
de coulée dans le couvercle.
REMARQUE: En transformant les sauces
ou les ingrédients semi-liquides,
arrêter le robot culinaire OSKAR
et gratter les côtés et le couvercle.
Guía para Procesar
TAREA A
RECOMENDACIÓN DE INSTRUCCIONES G
ENERALES
PROCESAR DISCO O CUCHILLA PARA PROCESAR ALIMENTOS SUGERIDOS
Combinar
Cuchilla de Acero
Coloque los ingredientes dentro Dips, mantequillas
del contenedor para procesar. con sabor,
(Usted puede agregar los ingredientes aderezos de ensaladas,
líquidos virtiéndolos por salsas y mezclas
el orificio central). Procese hasta para untar.
que tenga una consistencia suave.
Cortar
Cuchilla de Acero
Los alimentos como carnes deben Manzanas, col o repollo,
cortarse previamente en trozos
pescado cocinado, jamón,
cuadrados de 3/4 de pulgada (2 cm.).
carne o pollo,
No procese más de 1 taza de trozos frituras de maíz,
de carne a la vez. Coloque todos los huevos duros cocidos,
ingredientes dentro del contenedor champiñones, nueces,
para procesar. Procese usando aceitunas, cebollas,
la técnica del PULSO hasta que perejil, pepinillos,
se alcance la consistencia deseada. pimientos, carne cruda,
cebollinos, jitomates,
hierbas, ajo y galletas.
Picar
Cuchilla de Acero
Los alimentos deben cortarse Queso duros como
previamente en trozos cuadrados Parmesano y Romano.
de 3/4 de pulgada (2 cm.).
(Los quesos duros deben estar
a temperatura ambiente).
Coloque todos los ingredientes
dentro del contenedor para procesar.
Procese usando la técnica del PULSO
hasta que se alcance la consistencia
deseada.
Mezclar
Cuchilla de Acero
Coloque todos los ingredientes Pastas, masa para pizzas.
dentro del contenedor para procesar.
(Usted puede agregar los ingredientes
líquidos virtiéndolos por
el orificio central).Procese durante
algunos segundos. Use la técnica
de Pulso para terminar de procesar.
NO PROCESE DEMASIADO.
Page 41

TAREA A RECOMENDACIÓN DE INSTRUCCIONES GENERALES
P
ROCESAR DISCO O
CUCHILLA PARA PROCESAR ALIMENTOS SUGERIDOS
Puré
Cuchilla de Acero
Coloque los ingredientes dentro Frutas frescas, cocidas
del contenedor para procesar. o enlatadas
Procese hasta que tenga una (como manzanas,
consistencia suave. plátanos, duraznos,
peras o fresas).
Verduras frescas
cocidas o enlatadas
(como frijoles,
zanahorias, chícharos,
papas o jitomates),
mantequilla de maní.
Rallar
Disco para Rallar
Coloque los alimentos dentro Queso Americano,
del canal de alimentación. zanahorias,
(Los quesos como el Americano, queso Mozzarella,
Mozzarella y el Suizo deben cebollas, papas,
de enfriarse en el refrigerador queso Suizo,
antes de procesar). y calabacines.
Nota: Para rallar finamente,
coloque los alimentos verticalmente
dentro del canal de alimentación.
Para ralladura más grande, coloque
los alimentos horizontalmente
dentro del tubo de alimentación.
Rebanar
Disco para Rebanar
Los alimentos largos deben Frutas (como manzanas,
cortarse para que entren al Canal
plátanos, limones, limas,
de Alimentación. (El pollo y melones, naranjas,
el queso, como el Americano, duraznos, peras, piñas,
Cheddar o el Suizo deben de fresas); verduras
enfriarse en el refrigerador (como remolacha,
antes de procesar). coles, zanahorias,
Nota: Presione ligeramente con el apio, pepinos,
Empujador de Alimentos para hacer berenjenas, lechugas,
rebanadas más delgadas. champiñones, cebollas,
Presione fuertemente para hacer nabos, papas,
rebanadas gruesas. Para rebanadas jitomates, calabacines);
cortas, coloque los alimentos nueces, pepinillos
verticalmente dentro del canal o aves.
de alimentación. Para rebanadas
largas, coloque los alimentos
horizontalmente dentro del tubo
de alimentación.
Page 42

Utilisation du Couvercle à
Débit Continu:
Installer la base du moteur en face de vous sur
une surface sèche et de niveau avec le côté le
plus haut du logement du moteur vers l'arrière.
Placer le contenant transparent sur l'arbre
d'entraînement de la base du moteur.
Verrouiller en place.
Placer le disque éjecteur dans le contenant en
tenant la tige et en mettant le disque sur l'arbre
d'entraînement. Le laisser descendre en place.
Pour émincer, tenir le disque éminceur/
déchiqueteur avec le bord à émincer courbé et
en relief vers le haut. Placer le disque sur le
disque éjecteur et le laisser descendre en place.
Pour déchiqueter, tourner le disque de bord de
façon à ce que les encoches pour déchiqueter
soient vers le haut. Placer le disque sur le
disque éjecteur et le laisser descendre en place.
Pour fixer le couvercle, le placer sur le contenant
de sorte que la goupille dans le couvercle entre
dans le trou au haut du disque éjecteur.
La grande patte de verrouillage de sûreté sur
le couvercle est sur le côté droit près de la fente
horizontale sur le logement du moteur;
tourner dans le sens antihoraire pour faire
engager le commutateur automatique et mettre
le robot culinaire OSKAR
Tourner le couvercle en direction opposée
pour mettre le robot en position d'arrêt (OFF).
REMARQUE: Se garder les doigts loin du
dispositif de déjection immédiate continue
lorsque le robot culinaire OSKAR
est en marche.
Guía para Solucionar Problemas
P
ROBLEMA SOLUCIÓN
1. Los alimentos son procesados de manera 1. Usted sobrecargó el contenedor.
no uniforme o el Procesador de Alimentos La próxima vez, procese esta cantidad
OSKAR®se mueve en la superficie de trabajo. en dos o tres partes separadas.
2. El Procesador de Alimentos vibra demasiado 2. La cuchilla o el disco no están bien
o hay otros signos de que la cuchilla o ensamblados. Detenga el Procesador
el disco están golpeando el Contenedor de Alimentos OSKAR®inmediatamente
para Procesar o la Tapa mientras el Procesador y coloque la herramienta para
de Alimentos OSKAR®está en operación. cortar correctamente.
3. Gotea líquido fuera del tazón y a los lados 3. La capacidad para líquidos del Procesador
del Contenedor para Procesar. de Alimentos OSKAR®no es muy grande,
entonces, no se recomienda mezclar bebidas
u otros alimentos que tengan un alto
contenido de líquidos.
4. Después de procesar, quedan piezas de 4. Es normal que pequeñas cantidades de
alimentos sobre el disco para rebanar/rallar. alimento que se queden sobre el disco.
5. La tapa no se mueve libremente cuando está 5. Use una pequeña cantidad de aceite vegetal
colocada sobre el contenedor. para lubricar las orillas del contenedor
para procesar y de la tapa.
6. Los alimentos se caen en el canal para 6. Coloque los ingredientes en el canal
alimentación mientras está rebanando. de alimentación bien apretados y aplique
una presión uniforme a los ingredientes
que está rebanado.
Page 43

G
ARANTÍA
L
IMITADA DE
1 A
ÑO
Sunbeam Products, Inc, o si en Canadá, Sunbeam Corporation (Canadá) Limited (colectivamente “Sunbeam”) garantizan que
este producto estará libre de defectos en material o mano de obra por un período de un año a partir de la fecha de la compra.
Sunbeam, a su elección, reparará o reemplazará este producto o cualquier componente del producto que se encuentre
defectuoso
durante el período de garantía. El reemplazo será efectuado por un producto o componente nuevo o remanufacturado.
Si el producto ya no está disponible, el reemplazo podrá efectuado con un producto similar de igual o mayor valor.
Esta es su garantía exclusiva.
Esta garantía es válida para el comprador original al detalle desde la fecha de compra original al detalle y no es transferible.
Guarde el recibo de venta original. Se requiere prueba de compra para obtener la garantía. Los concesionarios Sunbeam,
centros de servicio, o almacenes de ventas al detalle de productos Sunbeam no tienen el derecho de alterar, modificar
o cambiar, de manera alguna, los términos y condiciones de esta garantía.
Esta garantía no cubre el desgaste normal de las piezas o daños resultantes de cualquiera de los siguientes: uso negligente
o mal uso del producto, uso en voltaje o corriente inapropiada, uso contrario a las instrucciones de operación, desarme,
reparación o alteración por cualquier persona que no sea Sunbeam o de un centro de servicio autorizado Sunbeam.
Además, esta garantía no cubre: Actos de la naturaleza, tales como incendios, inundaciones, huracanes o tornados.
¿Cuales Son los Límites de Responsabilidad de Sunbeam?
Sunbeam no será responsable por ningún daño incidental o consecuente causados por el incumplimiento de la garantía
o condición expresa, implícita o reglamentaria.
Excepto hasta donde lo prohiben las leyes aplicables, cualquier garantía implícita o condición de comerciabilidad
o aptitud para un propósito particular, está limitada en duración a la duración de la garantía descrita arriba.
Sunbeam niega cualquier otra garantía, condición o representación, expresa, implícita, reglamentaria o de otra manera.
Sunbeam no será responsable por ningún tipo de daño que resulte de la compra, uso o mal uso, o inhabilidad de usar el
producto incluyendo daños incidentales, especiales, consecuentes o similares o pérdida de lucro, o por cualquier incumplimiento
de
contrato, fundamental o de otra manera, o por cualquier reclamo contra el comprador iniciado por cualquier otra tercera persona.
Algunas provincias, estados o jurisdicciones no permiten la exclusión o la limitación de daños incidentales o consecuentes,
o limitaciones sobre cuanto dura una garantía implícita, de modo que las limitaciones o exclusiones mencionadas arriba
pueda que no le aplique a usted.
Esta garantía le otorga derechos legales específicos, y pueda que usted tenga otros derechos, los cuales varían de provincia
a provincia, de estado a estado o de jurisdicción a jurisdicción.
Cómo Obtener Servicio de Garantía
En los Estados Unidos –
Si usted tiene alguna pregunta relacionada con esta garantía o quisiera obtener servicio de garantía, por favor llame al teléfono
800.458.8407
y le proporcionaremos la dirección del centro de servicio más conveniente para usted.
En Canadá –
Si usted tiene alguna pregunta relacionada con esta garantía o quisiera obtener servicio de garantía, por favor llame al teléfono
800.458.8407
y le proporcionaremos la dirección del centro de servicio más conveniente para usted.
En los Estados Unidos, esta garantía es ofrecida por Sunbeam Products, Inc., situada en Boca Ratón, Florida 33431.
En Canadá, esta garantía es ofrecida por Sunbeam Corporation (Canadá) Limited, situada en el 5975 Falbourne Street,
Mississagua, Ontario L5R 3V8.
POR FAVOR, NO RETORNE ESTE PRODUCTO A NINGUNA
DE ESTAS DIRECCIONES NI AL LUGAR DONDE LO COMPRÓ.
Page 44

Disque Rejeter
Au cours du déballage de votre nouveau robot culinaire, veuillez prendre un moment pour
bien identifier chacune des pièces montrées ci-dessous. S'ASSURER DE MANIPULER
LA LAME ET LE DISQUE AVEC SOIN PUISQU'ILS SONT TRÈS TRANCHANTES.
En suivant les simples instructions, étape par étape, vous apprendrez comment les articles
vont ensemble, quelle lame ou quel disque utiliser pour chaque tâche et comment votre
nouveau robot culinaire est merveilleusement pratique à utiliser.
Ao usar os aparelhos elétricos deverá seguir as seguintes medidas de precaução básicas:
1. LEIA TODAS AS INTRUÇÕES ATENTAMENTE.
2. Para evitar risco de choque elétrico, não submerja o multiprocessador em água
ou qualquer outro líquido.
3. É necessário manter uma supervisão muito próxima quando este aparelho for usado por,
em ou perto de crianças.
4. Desconecte o aparelho, sempre que ele não estiver em uso, antes de efetuar sua limpeza
e antes de colocar ou retirar partes de aparelho.
5. Evite entrar em contacto com as partes em movimento.
6. Não use o multiprocessador que tenha o fio ou a tomada danificada, ou após ter
apresentado algum defeito ou após caído no chão. Neste caso, leve o aparelho à
assistência técnica autorizada Sunbeam Appliance Company para revisão ou conserto.
7. O uso de peças de reposição não recomendadas pelo Sunbeam Appliance Company,
eles podem causar fogo, descargas elétricas ou acidentes.
8. Não use o aparelho ao ar livre.
9. Não deixe o fio pendurado para fora de mesa ou superfície onde o aparelho estiver sendo
utilizado, ou em contato com superfícies quentes.
10. Mantenha as mãos e utensílios afastados da Lâmina móvel e do Disco de Processar ao
processar alimentos para reduzir riscos de ferimento ou dano ao processador. Poderá
usar-se uma espátula, mas somente quando o Multiprocessador não estiver ligado.
11. A Lâmina e o Disco de Processar são bem afiados. Deve ser manuseado com cuidado.
12. Para reduzir o risco de ferimentos, nunca coloque a Lâmina de Cortar na Base do motor,
sem primeiro colocar o Recipiente no seu devido lugar.
13. Certifique-se de que a Tampa do Recipiente estiver seguramente travada quando estiver
operando o aparelho.
14. Nunca meta o alimento com sua mão. Sempre use o Empurrador de Alimento.
15. Não tente ultrapassar o mecanismo de bloqueio de segurança da tampa.
Este Aparelho Somente para Uso Doméstico
NOTA: A taxa máxima de corrente elétrica está baseada no acessório deste produto que puxa
mais de corrente. Outros acessórios poderão puxar menos corrente.
PARA PRODUTOS COMPRADOS SOMENTE NOS ESTADOS UNIDOS & CANADÁ
Este aparelho conta com um plug polarizado (um dos contatos é mais largo do que outro).
Para evitar risco de choque elétrico, este plug encaixa-se somente em um plug unidirecional
polarizado. Se o plug não se encaixar totalmente dentro da tomada, inverta o mesmo.
Se ainda assim não encaixar, contate um eletricista competente. Não tente desativar
este recurso de segurança.
PRECAUÇÕES IMPORTANTES
GUARDE ESTAS INTRUÇÕES
Page 45

Empurrador de
Alimento
Tubo Alimentador
Recipiente do Processador
Base do Motor
Lâmina de
Cortar/Processar
Disco Ejetor
Disco Reversível
de Fatiar/Ralar
Tampa
Peças de o Multiprocessador Oskar®
Para desembalar o seu novo multiprocessador, tire um momento para identificar cada
uma das várias peças conforme ilustradas abaixo. CERTIFIQUE-SE DE MANUSEAR
A LÂMINA DO DISCO CUIDADOSAMENTE, POIS SÃO BEM AFIADOS.
Por seguir estas simples instruções passo por passo neste folheto, você aprenderá
como as peças se ajuntam, qual lâmina ou disco deve-se usar para cada operação,
e quão magnificamente conveniente o seu novo multiprocessador é para usar.
Page 46

Sunbeam Products, Inc, or if in Canada, Sunbeam Corporation (Canada) Limited (collectively “Sunbeam”)
warrants that for a period of one year from the date of purchase, this product will be free from defects in material
and workmanship. Sunbeam, at its option, will repair or replace this product or any component of the product
found to be defective during the warranty period. Replacement will be made with a new or remanufactured
product or component. If the product is no longer available, replacement may be made with a similar product
of equal or greater value. This is your exclusive warranty.
This warranty is valid for the original retail purchaser from the date of initial retail purchase and is not transferable.
Keep the original sales receipt. Proof of purchase is required to obtain warranty performance. Sunbeam
dealers, service centers, or retail stores selling Sunbeam products do not have the right to alter, modify
or any way change the terms and conditions of this warranty.
This warranty does not cover normal wear of parts or damage resulting from any of the following: negligent
use or misuse of the product, use on improper voltage or current, use contrary to the operating instructions,
disassembly, repair or alteration by anyone other than Sunbeam or an authorized Sunbeam service center.
Further, the warranty does not cover: Acts of God, such as fire, flood, hurricanes and tornadoes.
What Are the Limits on Sunbeam’s Liability?
Sunbeam shall not be liable for any incidental or consequential damages caused by the breach of any express,
implied or statutory warranty or condition.
Except to the extent prohibited by applicable law, any implied warranty or condition of merchantability
or fitness for a particular purpose is limited in duration to the duration of the above warranty.
Sunbeam disclaims all other warranties, conditions or representations, express, implied, statutory
or otherwise.
Sunbeam shall not be liable for any damages of any kind resulting from the purchase, use or misuse of, or
inability to use the product including incidental, special, consequential or similar damages or loss of profits,
or for any breach of contract, fundamental or otherwise, or for any claim brought against purchaser by any
other party.
Some provinces, states or jurisdictions do not allow the exclusion or limitation of incidental or consequential
damages or limitations on how long an implied warranty lasts, so the above limitations or exclusion may
not apply to you.
This warranty gives you specific legal rights, and you may also have other rights that vary from province
to province, state to state or jurisdiction to jurisdiction.
How to Obtain Warranty Service
In the U.S.A. –
If you have any question regarding this warranty or would like to obtain warranty service,
please call 1.800.458.8407 and a convenient service center address will be provided to you.
In Canada –
If you have any question regarding this warranty or would like to obtain warranty service,
please call 1.800.458.8407 and a convenient service center address will be provided to you.
In the U.S.A., this warranty is offered by Sunbeam Products, Inc., located in Boca Raton, Florida 33431.
In Canada, this warranty is offered by Sunbeam Corporation (Canada) Limited, located at 5975 Falbourne
Street, Mississagua, Ontario L5R 3V8.
PLEASE DO NOT RETURN THIS PRODUCT TO ANY OF
THESE ADDRESSES OR TO THE PLACE OF PURCHASE.
Montagem do Seu Multiprocessador Oskar®
Como Usar o Recipiente Transparente e a Tampa:
Antes de começar, favor de CERTIFICAR-SE DE QUE A CORDA ELÉTRICA ESTÁ
DESCONECTADA.
Coloque a base do motor numa superfície seca
e plana com a parte mais alta do suporte do motor
ao posterior.
NOTA: Há uma seta em cima da base do motor,
junto com as palavras “LOCK-ON” (LIGAR) à
esquerda e “UNLOCK-OFF” (DESLIGAR) à direita.
Vire a tigela transparente na direção indicada para
ou ligar ou desligar o multiprocessador.
Coloque o Recipiente do Processador sobre o eixo
de acionamento na base do motor e gire o cilindro
até que ele fique bem assentado sobre a base.
Agora vire o Recipiente até que trave bem em posição.
NOTA: Cada vez que você remontar o seu
multiprocessador, certifique-se de primeiro prender o
Recipiente e travá-lo em posição. Daí, afixe a Tampa.
Coloque a lâmina de fatiar/processar sobre o eixo de
acionamento, gire-o levemente até que caia no seu
lugar. Se você planejar a processar com a lâmina,
é neste momento o bom tempo para adicionar os
ingredientes. A LÂMINA É EXTREMAMENTE AFIADA.
USE DE CAUTELA AO MANUSEAR A LÂMINA.
Para afixar a tampa, ponha a Tampa sobre o
Recipiente para que a aba grande de travar da tampa
fique do lado direito, próximo à fenda horizontal na
parte posterior da base do motor. Quando girado
numa direção em sentido antihorário, a aba engatará
o interruptor automático e o multiprocessador
OSKAR®estará ligado. Por retroceder a tampa na
direção contrária, estará desligado.
NOTA: A lâmina de fatiar/processar de aço inoxidável
poderá somente ser usada no recipiente transparente
do Multiprocessador OSKAR
®
para funções de cortar,
mexer ou fazer purê; NUNCA com uma tampa de
fluxo contínuo por cima da tigela transparente.
Page 47

Montagem do Seu Multiprocessador Oskar®
Como Usar a Tampa de Fluxo Contínuo:
Coloque a base do motor numa superfície seca
e plana, com a parte mais alta da base do motor
ao posterior.
Coloque o Recipiente Processador transparente
sobre o eixo de acionamento na base do motor.
Trave-o em posição.
Coloque o disco ejetor dentro do recipiente por
segurar o eixo e colocar o disco sobro o eixo
de acionamento. Deixe-o cair em posição.
Para fatiar, segure o disco de fatiar/ralar com
a beirada de fatiar elevada e curvada, de face
para cima. Coloque o disco sobre o ejetor
e permita-o de cair em posição.
Para ralar, gire o disco ao contrário para que
os chanfros estejam para cima. Coloque o
disco sobre o disco ejetor e permita-o
de cair em posição.
Para afixar a tampa, coloque-a sobre o recipiente
de tal maneira que o pino da tampa caiba no
buraco em cima do disco ejetor. A grande aba
de travar da tampa, está do lado direito, próximo
da fenda horizontal do suporte do motor; quando
girado em direção anti-horário, a aba engatará
o interruptor automático e o Multiprocessador
OSKAR
®
ficará ligado. Se girar a tampa em
direção contrária, ele ficará desligado.
NOTA: Mantenha os dedos afastados da Calha
de Fluxo Contínuo quando o Multiprocessador
OSKAR
®
está em operação.
Page 48

PROCESSING RECOMMENDED GENERAL
T
ASK BLADE OR
Purée Steel Blade Place all ingredients into Fresh, cooked or canned fruits
Shred Shredding Disc Pack food into the feed tube. American cheese, carrots,
Slice Slicing Disc Large food should be cut Fruits (such as apples,
Para obter-se mais controle sobre o processo
de fatiar e ralar, primeiramente encha o Tubo
Alimentador com os ingredientes, antes de ligar
o Multiprocessador OSKAR
®
. Sempre use
o Empurrador de Alimento para dar fatias
ou picadinhas mais uniformes. NUNCA USE
OS SEUS DEDOS.
NOTA: A Lâmina e o Disco de Cortar OSKAR
®
são extremamente afiados! Use de cautela ao
manuseá-los, e guarde-os cuidadosamente em
seus recipientes respectivos.
Deixe o Empurrador de Alimento ficar no Tubo.
Agora, segurando o Empurrador de Alimento
com uma mão, e o Tubo Alimentador com a
outra, gire a tampa à posição ligada enquanto
pressione delicadamente para baixo o
Empurrador de Alimento. Desligue o
Multiprocessador OSKAR
®
.
Técnicas de Processamento de Alimentação – Como Usar a Lâmina
Técnicas de Pulsação:
O Multiprocessador OSKAR®processa os alimentos muito rapidamente, e na maioria dos casos,
em segundos! Portanto, os alimentos podem ficar facilmente processados demais se você
não ficar de olho. Sugerimos que, ao usar a Lâmina de Aço dentro do Recipiente Processador
Transparente, não processe os alimentos por mais de alguns segundos de uma vez,
ligando e desligando o Multiprocessador OSKAR
®
freqüentemente até que os resultados desejados
sejam obtidos. Para usar esta “Técnica de
Pulsação”, simplesmente gire a tampa para que a
aba de travar mova por dentro e por fora da Fenda
do Interruptor Automático. A pulsação assegura
excelentes resultados cada vez.
NOTA: Certifique-se de que a Lâmina de Aço
tenha completamente parada de girar antes de
remover a tampa.
Page 49

Como Colocar Alimentos no Recipiente:
Para os melhores e mais consistentes resultados, você poderá tentar processar pedaços
de alimentos que são de tamanho iguais. Quando você cortar, quebrar ou rasgar pedaços
de alimento em porções uniformes antes de começar a processar, os resultados finais
serão mais uniformes também.
Você terá resultados de processamento mais rápidos e consistentes se você não sobrecarregar
o recipiente. Quando se usa a lâmina de fatiar/processar, encha o recipiente com somente
3/4 à 1 de xícara de ingredientes de uma vez.
NOTA: Quando estiver processando uma carga pesada, verifique que o Multiprocessador
OSKAR
®
esteja firmemente assentado no balcão ou tampo de mesa. NÃO DEIXE O
MULTIPROCESSADOR OSKAR
®
PROCESSAR SOZINHO.
Como Cortar Carnes:
De avanço, corte a carne em pedaços de mais
ou menos 3/4 polegada (2 cm.). Coloque os
pedaços no recipiente, reposicione a tampa
e processe-os usando a técnica de pulsação
por 5 à 7 segundos. Nunca processe mais
de 1 xícara de cubos de carne de uma vez.
Como Cortar Legumes:
Quando estiver processando legumes tais
como cebolas, descasque e corte em quartos,
e se forem cebolas grandes, em oitavos. Colocar
3/4 de xícara dos pedaços dentro do recipiente,
ligando e desligando o Multiprocessador OSKAR
®
1 ou 2 vezes para fazer os cortes mais grossos
e 3 ou 4 vezes mais para os cortes mais finos.
Raspe os lados do recipiente uma ou duas vezes
durante o processamento, se necessário.
Como Adicionar Ingredientes Secos:
Quando várias receitas exigem ingredientes secos
tais como farinha, adicione-os diretamente ao
recipiente antes de processá-los.
Como Adicionar Ingredientes Líquidos:
Ingredientes líquidos podem ser adicionados
enquanto o processador estiver em operação,
por despejá-los pelo buraco de despejo na tampa.
NOTA: Quando processar molhos ou
ingredientes semilíquidos, pare o
Multiprocessador OSKAR
®
e raspe bem
os lados do recipiente e da tampa.
Page 50

• Check the food you are processing!
• Over processing is easily done, because the Food Processor works so fast.
Don’t hesitate to stop the unit and check the food you are processing. You can
always process the food a little longer if the food isn’t fine enough. For greater control,
you may with to process the food using a pulsing technique.
• When slicing or shredding, always use the Food Pusher. NEVER use your fingers
or other objects to push the food into the Feed Tube.
• Be careful not to drop spoons, spatulas or other utensils into the Feed Tube.
• If any items should become caught between the blade and the side of the container,
turn OFF the Food Processor and wait until the blade stops turning. Then, unplug
the unit, remove the cover and lift the blade to free the food item.
• Do not overload the machine. The OSKAR
so quickly that even large quantities can be prepared in seconds if common sense
is used about the quantity of food put into the container at any time.
• We recommend processing no more then 3/4 to 1 cup of ingredients at a time.
• Never attempt to process hard ingredients that cannot be cut by a normal kitchen knife.
Things like coffee beans and ice will dull the blade and scratch the container;
shredding or slicing something very hard may damage the disc.
• Keep the Food Processor out of the reach of children.
• The Food Processor is not intended to be used as a blender.
• The Container should not be put in the microwave.
• Processing food such as carrots, may temporarily discolor parts of the Food Processor.
To remove discoloration, wash and dry parts thoroughly and allow to air dry overnight.
Como Picar:
Agora você pode picar alho, salsa e temperos
em segundos. Simplesmente deixe cair os
dentes de alho divididos em dois, ou raminhos
de salsa dentro do recipiente e processe-os.
Os alimentos picadinhos que ficam apegados
as beiras podem ser facilmente tirados com
uma espátula.
Como Remover a Lâmina:
Quando tiver terminado de processar,
desconecte a corda elétrica da tomada. Remova
a tampa. Remova a Lâmina de cortar/processar,
com o alimento ainda apegado a ela, antes de
remover o alimento do recipiente. A LÂMINA É
EXTREMAMENTE AFIADA. USE DE CAUTELA
AO REMOVER ESTA LÂMINA. Limpe a Lâmina
com um raspador por cima da tijela.
NOTA: Sempre espere até que a lâmina
ou o disco estejam paradas completamente
antes de remover a tampa.
Como Remover o Recipiente:
Coloque a tampa sobre o recipiente. Use a tampa
do Multiprocessador OSKAR
®
para ajudar a
remover o Recipiente. Gire a tampa na direção
em sentido horário 180º até que as duas abas
da tampa encontrarem-se com as abas do
Recipiente. Continue a girar a tampa, usando
a pressão firme, com o seu polegar sobre
as abas até que o Recipiente esteja solto.
Esvazie o restante do alimento do Recipiente.
Page 51

Como Encher o Tubo Alimentador
Um dos procedimentos mais importantes para o sucesso em fatiar e ralar com o seu
novo Multiprocessador OSKAR
®
Sunbeam, é a maneira que você colocar ou encher
o alimento dentro do Tubo Alimentador.
Quando fatiar ou picar, corte todos os ingredientes primeiramente à um tamanho que
caiba de forma confortável dentro do Tubo Alimentador OSKAR
®
. Encha o Tubo.
Enquanto segurando o alimento firme e perpendicularmente com o Empurrador
Alimentador, aperte-o para baixo consistentemente, até que todos os ingredientes
estejam fatiados ou picados uniformemente. O mais firmemente que você empurrar,
o mais grosso tornar-se-ão as fatias ou as picadas.
Para os melhores resultados, o Tubo Alimentador deverá estar enchido mais ou
menos firmemente. Alimentos posicionados horizontalmente no tubo produzirão fatias
ou picados longos.
Para melhores resultados, quando estiver ralando queijos mais macios como o Americano,
Cheddar, Mozzarela ou Suíço, o queijo deve estar bem frio antes de processá-lo. Queijos
mais duros como Parmesão ou Romano devem estar à temperatura ambiente antes de
processá-los, e raladas com a lâmina de cortar/processar.
Como Preparar o Alimento:
Alimentos compridos e estreitos tais
como cenouras ou aipo devem ser
cortadas primeiramente em tamanhos
uniformes mais ou menos 8 à 10 cm
de comprimento. Encha o Tubo
Alimentador com o alimento.
Como fazer fatias ou
picadas mais curtas:
Coloque os itens de alimento
verticalmente dentro do Tubo
Alimentador.
Como fazer fatias ou
picados mais compridos:
Coloque os itens de alimento
horizontalmente dentro do
Tubo Alimentador.
Page 52

One of the most important procedures for successful slicing and shredding with
your new Sunbeam OSKAR
in the Feed Tube.
When slicing or shredding, cut all ingredients first to a size that fits comfortably into the
OSKAR
®
Feed Tube. Pack the Feed Tube. While holding food steady and upright with the
Food Pusher, press down consistently until all ingredients are sliced or shredded evenly.
The more firmly you push, the thicker the slices or shreds.
For best results, the Feed Tube should always be packed somewhat firmly.
Foods positioned horizontally in the tube will produce long slices or shreds.
For better results, when shredding softer cheeses, such as American, Cheddar,
Mozzarella or Swiss, the cheese should be well chilled before processing.
Harder cheeses such as Parmesan or Romano should be at room temperature
before processing, and grated with the cutting/processing blade.
Preparing the Food:
Como Limpar, Guardar e Cuidar do Seu Multiprocessador Oskar
®
Quando tiver terminada de processar, desconecte o Multiprocessador OSKAR
®
da tomada elétrica e remova a tampa, o disco de cortar e picar ou a lâmina
de cortar/processar, e o recipiente da base do motor.
Esfregue a base de sua unidade com um pano úmido, daí polí-a levemente com
um pano seco. NUNCA IMIRJA A BASE DO MOTOR EM QUALQUER LÍQUIDO.
O recipiente do processador, as tampas a lâmina cortadora/processadora, o disco
de fatiar/picar, o disco ejetor e o empurrador de alimento são todos resistentes
ao lava-louças. Estas peças podem ser lavadas na parte superior da lava-louças.
LEMBRE-SE DE USAR EXTREMA CAUTELA AO MANUSEAR A LÂMINA DE
CORTAR/PROCESSAR E O DISCO DE FATIAR/RALAR. SÃO MUITO AFIADOS!
A limpeza do eixo interno de sua lâmina de cortar/processar é muito importante.
Sugerimos o uso de um pequeno percolador ou uma escovinha de limpar garrafas para
remover quaisquer partículas de alimento e daí, lave e seque o eixo completamente.
A Sunbeam sugere que você guarde o seu Multiprocessador OSKAR
®
sobre um balcão
ou tampo de mesa seco em sua cozinha onde estará sempre pronto para ser usado
imediatamente quando necessário. Guarde a lâmina de cortar/processar dentro
do recipiente transparente. Guarde o disco de fatiar/picar num lugar seguro (FORA DO
ALCANCE DE CRIANÇAS). As lâminas OSKAR
®
são EXTREMAMENTE afiadas!
Use de cautela quando manusear as lâminas.
Depois de lavar e secar o Recipiente, talvez desejará aplicar uma pequena quantia
de óleo vegetal na borda da Tampa e do Recipiente. Esta lubrificação permitirá a tampa
de mover-se livremente ao ficar em contato com o Recipiente.
SEMPRE GUARDE O DISCO E A LÂMINA FORA DO ALCANCE DE CRIANÇAS!
Algumas Coisas à Lembrar:
1. Use o Multiprocessador OSKAR®somente em superfícies secas e planas – nunca ao
ar livre, ou numa superfície úmida ou na beira da mesa.
2. Nunca remova a Tampa do Processador antes que a lâmina ou o disco tenham parados
completamente e que a unidade esteja desconectada da tomada elétrica.
3.
O motor do seu Multiprocessador OSKAR
®
tem sido permanentemente lubrificado
na fábrica e não requer qualquer outra atenção. Fora a limpeza recomendada,
não terá mais necessidade de fazer qualquer outra manutenção. Retorne o ser
multiprocessador ao centre de serviço autorizado da Sunbeam mais próximo
de você caso necessite de serviços ou reparos.
Page 53

Sugestões para Processar Alimentos
• Examine todo o alimento que vai processar!
•
Processar o alimento demasiadamente pode acontecer facilmente porque o Multiprocessador
processa tão rapidamente. Não hesite de parar a unidade e examinar o alimento que está
sendo processado. Você sempre pode processar o alimento um pouco mais se não estiver
suficientemente processado. Para maior controle, poderá usar a técnica de pulsação.
• Ao fatiar ou ralar, use sempre o Empurrador de Alimento. NUNCA use os dedos
ou outros objetos para empurrar o alimento dentro do Tubo Alimentador.
•
Tome cuidado de não deixar cair colheres, espátulas ou quaisquer outros utensílios
dentro do Tubo Alimentador.
•
Se quaisquer itens ficarem presos entre a lâmina e a beira do Recipiente, desligue o
Multiprocessador e espere até que a lâmina pare de girar. Daí, desconecte a unidade,
remova a tampa, e levante a lâmina para soltar o item alimentício.
•
Não sobrecarregue a máquina. O Multiprocessador OSKAR
®
processa ingredientes
tão rapidamente que mesmo grandes quantidades podem ser preparadas em segundos,
se bom senso for usado quanto a quantidade de alimento colocado dentro do recipiente
a qualquer tempo.
•
Recomendamos não processar mais de 3/4 à 1 de xícara de ingredientes de uma vez.
•
Nunca tente processar ingredientes duros que não possam ser cortados com uma faca
ordinária. Coisas como grãos de café e gelo cegará a lâmina e arranhará o recipiente;
ralar ou fatiar algo muito duro poderá danificar o disco.
• Mantenha o Multiprocessador fora do alcance de crianças.
• O Multiprocessador não foi fabricado para servir como um liquidificador.
• O Recipiente não deve ser colocado no microondas.
•
Processar algo como cenouras poderá descolorir partes do Multiprocessador.
Para remover esta descoloração, lave e seque as peças completamente e deixe
os secar ao ar durante a noite.
Page 54

Placing Food Into the Container:
For the best, most consistent results, you should try to process pieces of food that are of
about equal size. When you cut, break or tear foods into uniform pieces before you begin
processing, the finished results will be more uniform, too.
You will get faster, more consistent processing results if you do not overload the container.
When using the cutting/processing blade, fill the container with only 3/4 to 1 cup of
ingredients at a time.
NOTE: When processing a heavy load, check to be sure the OSKAR
sitting firmly on the counter or table top. DO NOT WALK AWAY FROM THE OSKAR
FOOD PROCESSOR WHILE PROCESSING.
Chopping Meats:
Pre-cut meats into pieces about 3/4 inch square.
Place the pieces in the container, replace the
cover and process using the pulse technique
for 5 to 7 seconds. never process more than
1 cup of meat cubes at one time.
Chopping Vegetables:
When processing vegetables such as onions,
peel and quarter; cut large onions into eighths.
Place 3/4 cup of the pieces into the container,
turning the OSKAR
1 to 2 times to coarsely chop, 3 to 4 times more
to finely chop. Scrape sides of container once
or twice during processing, if necessary.
Adding Dry Ingredients:
When various recipes call for dry ingredients
such as flour, add them directly into the
container before processing.
Adding Liquid Ingredients:
Liquid ingredients may be added while the
processor is operating by pouring them through
the pouring hole in the cover.
Note: When processing sauces or semi-liquid
ingredients, stop the OSKAR
and scrape down the container sides and cover.
Guia de Processamento de Alimentos
TAREFA DO LÂMINA OU DISCO INSTRUÇÕES
PROCESSADOR R
ECOMENDADO GERAIS DE PROCESSAMENTO
ALIMENTOS SUGERIDOS
Combinar Lâmina de Aço Coloque todos os ingredientes Creme, manteiga aromatizada,
dentro do recipiente. (Talvez tempero para salada, molhos
desejará adicionar ingredientes e patês para sanduiches.
líquidos pelo buraco de despejo).
Processe-os até ficarem uniforme
e pastosos.
Triturar Lâmina de Aço Alimentos como as carnes
Maçãs, repolho, peixe cozido,
devem ser cortados de antemão presunto, carnes ou aves,
em cubos de 3/4 polegada salgadinhos, ovos cozidos,
(2 cm.). Não processe mais cogumelos, nozes, azeitonas,
de 1 xícara de uma vez.
cebolas, salsa, picles, pimento,
Coloque todos os ingredientes carne crua, chalotas, tomates,
no recipiente do processador.
ervas, alho, crackers biscoitos.
Processe-os usando a técnica
de PULSAÇÃO até atingir
a consistência desejada.
Ralar Lâmina de Aço O alimento deve ser cortado Queijos duros como
em cubos de 3/4 polegada Parmesão ou Romano.
(2 cm.). (Queijos duros
devem estar à temperatura
ambiente). Coloque todos
os ingredientes no recipiente
do processador. Processe-os
usando a técnica de PULSAÇÃO
até atingir a consistência desejada.
Misturar Lâmina de Aço Coloque todos os ingredientes Massas e massa de pizza.
no recipiente do processador.
(Poderá desejar adicionar
os ingredientes líquidos pelo
buraco de despejo). Processe-os
alguns segundos. Use a técnica
de PULSAÇÃO para acabar o processo.
NÃO PROCESSE DEMAIS.
Page 55

TAREFA DO LÂMINA OU DISCO INSTRUÇÕES
P
ROCESSADOR RECOMENDADO
GERAIS DE PROCESSAMENTO ALIMENTOS SUGERIDOS
Purê Lâmina de Aço Coloque todos os ingredientes Frutas frescas ou enlatadas
dentro do recipiente processador. (tais como maçãs, bananas,
Processe-os até ficarem pastosos. pêssegos, pêras e morangos)
Legumes frescos, cozidos ou
enlatados (tais como feijões,
cenouras, milho, ervilhas,
batatas ou tomates) pasta
de amendoim
Ralar Disco Ralador Encha o tubo alimentador. Queijo Americano, cenouras,
(Queijos tais como Americano, Cheddar, queijo Mozzarela,
Cheddar, Mozzarela e Suíço, cebola, batatas, queijo Suíço
devem estar bem frios antes e abobrinha
de processá-los).
NOTA: Para ralar peças mais
curtinhas, coloque o alimento
vericalmente no tubo alimentador.
Para ralar peças mais compridas,
coloque-as horizontalmente
no tubo alimentador.
Fatiar Disco Fatiador Alimentos maiores devem ser Frutas (taix como maçãs,
cortados de antemão para entrarem bananas, limões, limas,
no Tubo Alimentador. (Aves e melões, laranjas, pêssegos,
queijos tais como Americano, pêras, abacaxís, morangos);
Cheddar, Mozzarela ou Suíço legumes tais como beterrabas,
devem estar bem frios antes repolhos, cenouras, aipo,
de processá-los. pepino, beringela, alface,
NOTA: Use a pressão leve sobre cogumelos, cebola, pastinaca,
o Empurrador de Alimento para fazer
batatas, tomates, abobrinhas,
fatias mais finas e a pressão mais nozes, picles ou aves
forte para fazê-las mais grossas.
Para as fatias mais compridas,
coloque os alimentos horizontalmente
no Tubo Alimentador. Para as fatias
mais curtas, coloque os alimentos
verticalmente no Tubo Alimentador.
Page 56

Using Continuous Flow Cover:
Set up the motor base facing you on a dry,
level surface with the tallest side of the
motor housing to the rear.
Place the clear Processing Container over the
drive shaft on the motor base. Lock into place
Place the ejector disc into the container by
holding the stem and placing the disc over
the drive shaft. Allow it to drop into place.
For slicing, hold the slicer/shredder disc with
the raised, curved slicing edge facing upwards.
Place the disc over the ejector disc and allow it
to drop into position.
For shredding, turn the disc over so that
shredding notches are facing upwards.
Place the disc over the ejector disc and
allow it to drop into position.
To attach the cover, place it onto the container
so that the pin in the cover fits into the hole at
the top of the ejector disc. The large locking tab
on the lid is to the right-hand side, near the
horizontal slot on the motor housing: when
turned counterclockwise, the tab will engage
the automatic switch and the OSKAR
Processor will turn ON. Turn the cover in the
opposite direction to turn it OFF.
Note: Keep fingers away from the Continuous
Flow Chute when the OSKAR
is operating.
Guia de Identificação e Solução de Problemas
PROBLEMA S
OLUÇÃO
1. O alimento está sendo processado irregularmente 1. O recipiente está sobrecarregado.
ou o Multiprocessador OSKAR®está se mexendo Da próxima vez, processe esta
sobre a superfície de trabalho. quantidade em duas ou mais porções.
2. O Multiprocessador vibra anormalmente ou há 2. A lâmina ou o disco não está
sinais de que a lâmina ou o disco está batendo montada
apropriadamente. Pare o
contra ou o Recipiente ou a Tampa enquanto
Multiprocessador
OSKAR
®
o Multiprocessador OSKAR®está em funcionamento.
imediatamente e recoloque o
cortador apropriadamente.
3. Líquido vaza fora da tigela e do Recipiente 3. A capacidade líquida do
do Processador. Multiprocessador OSKAR®não é
grande; portanto não recomenda-se
combinar ou mexer bebidas ou outros
alimentos que contêm muito líquido.
4. Depois de processar, pedaços de alimentos são 4. Pedaços pequenos de alimento em
deixados em cima do disco de ralar ou picar.
cima do disco são ocorrências normais.
5. A tampa não se mexe livremente quando estiver 5. Use uma pequena quantidade de óleo
afixada ao recipiente. vegetal para lubrificar as bordas
do recipiente e da tampa.
6. Alimentos caem de lado dentro do tubo alimentador 6. Encha o tubo alimentador até que
durante o processo de fatiar. esteja bem compactado e aplique
a pressão uniforme ao alimento
sendo processado.
Page 57

G
ARANTÍA
L
IMITADA DE
1 A
NO
Sunbeam Products, Inc., ou se no Canadá, Sunbeam Corporation (Canadá) Limited (coletivamente “Sunbeam”) garante que
por um período de um ano, contado a partir da data de compra, este produto estará livre de defeitos no material e de mão-deobra. Sunbeam, a seu critério, reparará ou substituirá este produto ou qualquer componente do produto, que for considerado
defeituoso, durante este período de garantia. A substituição será feita por um produto, ou componente, novo ou
remanufaturado. Se o produto já não estiver mais disponível, a substituição poderá ser feita por um produto similar do mesmo
valor ou maior. Esta é a sua garantia exclusiva.
Esta garantia é válida para o comprador original a varejo, a partir da data de compra inicial a varejo, e não é transferível.
Mantenha consigo o recibo original de venda. Prova de compra é necessária para obter o serviço de
garantia. Os
representantes da Sunbeam, centros de serviço ou lojas a varejo que vendem os produtos Sunbeam,
não têm o direito de
alterar, modificar ou de trocar, de nenhum modo, os termos e as condições desta garantia.
Esta garantia não cobre desgaste normal de peças, nem danos resultantes de qualquer um dos seguintes: uso negligente ou
indevido do produto, uso com voltagem ou corrente inadequada, uso contrário às instruções operacionais, desmontagem,
reparo ou alteração feita por qualquer pessoa que não seja da Sunbean ou de um centro de serviço Autorizado da Sunbeam.
Além disso, a garantia não abrange: atos de Força Maior, tal como incêndio, inundação, furacão e tornados.
Quais São os Limites de Responsabilidade da Sunbeam?
Sunbeam não será responsável por quaisquer danos emergentes, ou imprevistos, causados pela inadimplência de qualquer
garantia ou condição explícita, implícita ou estatutária.
Salvo na medida em que seja proibido por lei aplicável, qualquer garantia implícita ou condição de comercialização,
ou de adequação para um fim particular, está limitada em duração pela duração da garantia acima.
Sunbeam se isenta de quaisquer outras garantias, condições ou representações explícitas, implícitas, estatutárias ou outras,
de qualquer espécie.
Sunbean não será responsável por quaisquer danos, de qualquer tipo, resultante da compra, do uso ou do uso indevido de,
ou da inabilidade para utilizar o produto incluindo danos emergentes, especiais, imprevistos ou similares, ou lucros cessantes,
ou por qualquer quebra do contrato, fundamental ou outra, de qualquer espécie, ou por qualquer reivindicação que surgir
contra o comprador por terceiros.
Algumas províncias, estados ou jurisdições não permitem a exclusão ou a limitação de danos emergentes ou imprevistos,
ou limitações sobre quanto tempo dura uma garantia implícita, de modo que as limitações ou exclusões acima podem
não lhe aplicar.
Esta garantia lhe dá direitos legais específicos, e você pode ter também outros direitos que variam conforme a província,
estado ou jurisdição.
Como Obter o Serviço de Garantia
Nos EUA –
Se você tiver alguma dúvida no que se refere a esta garantia ou gostaria de obter o serviço de garantia, por gentileza telefone
para 1.800.458.8407 e um endereço de um centro de serviço conveniente lhe será fornecido.
No Canadá –
Se você tiver alguma dúvida no que se refere a esta garantia ou gostaria de obter o serviço de garantia, por gentileza telefone
para 1.800.458.8407 e um endereço de um centro de serviço conveniente lhe será fornecido.
Nos EUA, esta garantia é oferecida pela Sunbeam Products, Inc., que está localizada em Boca Raton, Flórida 33431. No Canadá,
esta garantia é oferecida pela Sunbeam Corporation (Canadá) Limited, que está localizada em 5975 Falbourne Street,
Mississagua, Ontario L5R 3V8.
POR GENTILEZA, NÃO DEVOLVA ESTE PRODUTO A QUALQUER
UM DESSES ENDEREÇOS OU PARA O LUGAR DE COMPRA.
Page 58

Ejector Disc
As you unpack your new food processor, take a moment to identify each of the various
parts as shown in these illustrations. BE SURE TO HANDLE THE BLADE AND DISK
CAREFULLY, AS THEY ARE VERY SHARP.
By following the simple, step-by-step instructions in this booklet, you will learn how
things go together, which blade or disc to use for each job and how wonderfully
convenient your new food processor really is to use.
58
NOTES/NOTAS
Page 59

NOTES/NOTAS
Page 60

PROCESADOR DE ALIMENTOS SUNBEAM
©2002 Sunbeam Products, Inc. All rights reserved.
SUNBEAM®and OSKAR®are registered trademarks of Sunbeam Products, Inc.
Distributed by Sunbeam Products Inc., Boca Raton, Florida 33431.
©2002 Sunbeam Products, Inc. Tous droits réservés.
SUNBEAM®et OSKAR®sont marques déposées de Sunbeam Products, Inc.
Distribué par Sunbeam Products Inc., Boca Raton, Florida 33431.
©2002 Sunbeam Products, Inc. Todos los derechos reservados.
SUNBEAM®y OSKAR®son marcas registradas de Sunbeam Products, Inc.
Distribuido por Sunbeam Products Inc., Boca Raton, Florida 33431.
©2002 Sunbeam Products, Inc. Todos os direitos reservados.
SUNBEAM®e OSKAR®são marcas registradas da Sunbeam Products, Inc.
Distribuído pela Sunbeam Products Inc., Boca Raton, Florida 33431.
 Loading...