


INSTALLAT ION GUIDE
Integrated Refrigeration

Contents
Integrated Refrigeration . . . . . . . . . . . . . . . . . . . . . . . 3
Model Specifications . . . . . . . . . . . . . . . . . . . . . . . . . . 4
Site Preparation . . . . . . . . . . . . . . . . . . . . . . . . . . . . . . 7
Integrated Installation . . . . . . . . . . . . . . . . . . . . . . . . 12
Service Information . . . . . . . . . . . . . . . . . . . . . . . . . . 22
Features and specifications are subject to change at any time without notice. Visit subzero.com/specs for the most up-to- date information.
Throughout this guide, dimensions in parentheses are millimeters unless otherwise specified.
Important Note
To ensure the safe and efficient installation of Sub-Zero equipment, please take note of the following types of highlighted information throughout this guide:
IMPORTANT NOTE highlights information that is especially relevant to a problem-free installation.
CAUTION signals a situation where minor injury or product damage may occur if instructions are not followed.
WARNING states a hazard that may cause serious injury or death if precautions are not followed.

Integrated Refrigeration |
3 |
subzero.com/specs
Sub-Zero Integrated Refrigeration
The importance of the installation of the Sub-Zero integrated unit cannot be overemphasized. Installation should be done by a qualified installer.
Before you begin the installation process, it is recommended that you read this entire installation guide. There are key details that you should take special care to observe during the installation. By reading these instructions carefully, you will make the installation process easier, problem-free and, most importantly, safe.
Any questions or problems regarding the installation
should be directed to your authorized Sub-Zero dealer or Sub-Zero customer service at 800-222-7820. You may also check the contact & support section of our website, subzero.com.
Important product information, including the model and serial number of your unit are listed on the product rating plate. For column models, the rating plate is located inside the top drawer near the drawer guide opposite the hinge. For tall and drawer models, the rating plate is located inside the cabinet, to the left of the upper drawer. Refer to the illustrations below.
RATING PLATE |
Column models.
RATING PLATE |
Tall and drawer models.
Before You Start
Make sure that the opening dimensions, door and drawer clearances, electrical service and plumbing are correct for the model you are about to install. Refer to the specifications for your specific model on the following pages.
IMPORTANT NOTE: The inside edges of the rough opening, as well as the sides and a portion of the backside of the decorative panels will need to be finished, as they will be exposed when the doors are open.
TOOLS AND MATERIALS REQUIRED
•Appliance dolly able to support 500 lbs (227 kg) and adequate manpower to handle the weight of the unit.
•Phillips and slotted screwdrivers.
•Allen, standard and crescent wrenches.
•Various sized pliers.
•5/16" hex bolt nut driver.
•Cordless drill and assorted drill bits.
•Level—2' (.6 m) and 4' (1.2 m) recommended.
•4' (1.2 m) of 1/4" copper tubing and saddle valve for the
water line (4200880)—do not use self-piercing valves.
•Copper tubing cutter.
•Masonite, plywood, 1/8" pressed fiberboard, cardboard or other suitable material to protect finished flooring.
•Appropriate materials to cover and protect the home and its furnishings during installation.

Model Specifications |
4 |
|
|
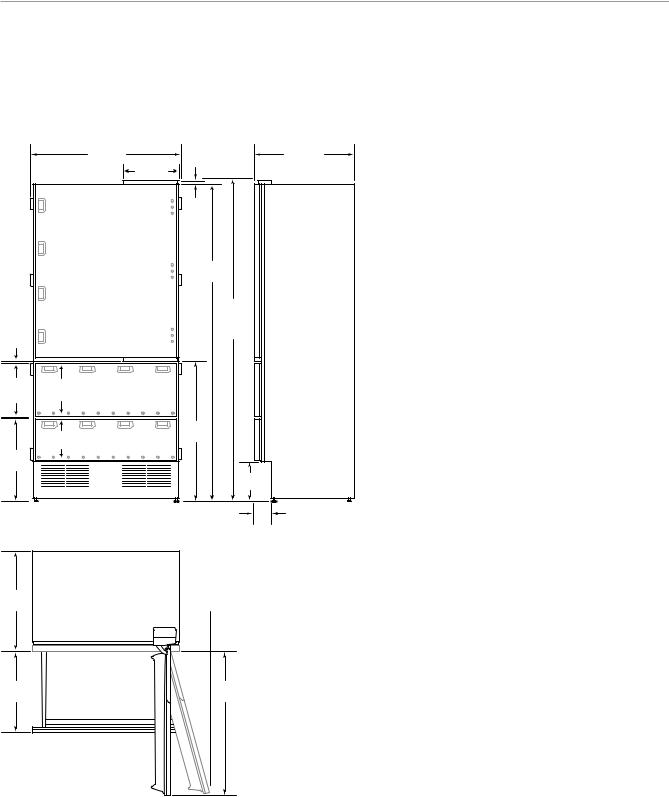
Overall Dimensions
COLUMN MODELS |
27" (686) TALL MODELS |
27" (686) |
24" (610) |
|
27" (686) |
24" (610) |
14"(356) |
|
|
14"(356) |
|
15/8" |
|
|
|
13/16" |
(41) |
|
|
|
(21) |
789/16" |
|
|
|
789/16" |
(1995) |
|
|
|
(1995) |
81" |
|
|
|
80" |
(2057) |
|
|
(2032) |
|
TO TOP OF |
3/8" |
|
TO TOP OF |
|
OPENNG |
|
OPENNG |
||
|
|
(10) |
|
|
|
|
1/2" |
131/4" |
|
|
|
(337) |
|
|
|
|
(13) |
|
|
|
|
|
|
|
|
|
|
101/4" |
341/2" |
|
|
|
(876) |
|
|
|
|
(260) |
|
|
|
203/8" |
|
|
|
|
(518) |
|
|
9 |
3 |
|
|
93/4" |
/4"(248) |
|
|
(248) |
|
|
|
|
|
|
|
|
|
|
|
4" |
|
|
|
|
|
|
|
|
|
|
|
|
1/2" (13) ± ADJUSTMENT IN LEVELING LEGS |
|
|
|
|
|
|
|
HEIGHT DIMENSIONS ±1/2" (13) |
|
4" |
|
||||||
|
|
(102) |
|
|
|
|
|
|
|
|
(102) |
||||||
|
|
|
|
|
|
|
|
|
|
|
|
|
|
|
|
|
|
24" |
24" |
|
(610) |
(610) |
|
45/8" |
|
45/8" |
(117) |
|
(117) |
251/2" |
191/2" |
251/2" |
(648) |
(495) |
(648) |
DIMENSIONS WILL VARYWITH PANELTHICKNESS |
DIMENSIONS WILL VARY WITH PANEL THICKNESS |
MODELS IC-27R AND IC-27FI |
MODELS 700TR, 700TFI AND 700TCI |
Model Specifications |
5 |
subzero.com/specs
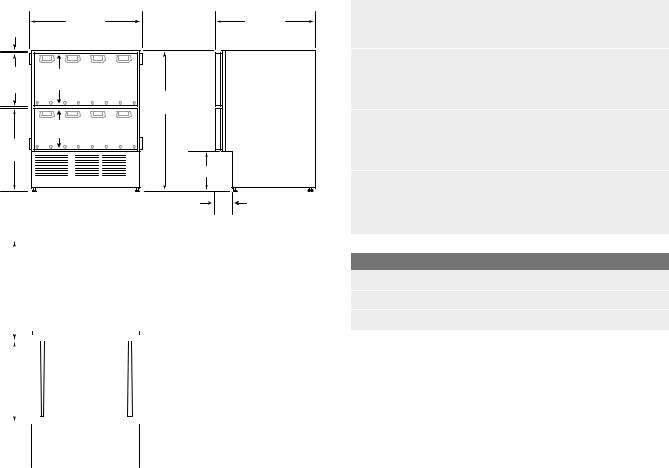
Overall Dimensions |
|
|
36" (914) TALL MODELS |
|
|
|
36" (914) |
24" (610) |
|
14"(356) |
|
|
|
15/16" |
|
|
(33) |
|
|
7713/16" |
|
|
(1976) |
|
|
80" |
|
|
(2032) |
3/8" |
|
TO TOP OF |
|
OPENNG |
|
(10) |
|
|
1/2" |
131/4" |
|
(337) |
|
|
(13) |
|
|
|
|
|
|
101/4" |
341/2" |
|
(876) |
|
|
(260) |
|
203/8" |
|
|
(518) |
|
|
|
|
93/4" |
|
|
(248) |
|
HEIGHT DIMENSIONS ±1/2" (13) |
4" |
|
(102) |
|
24"
(610)
 7" (178)
191/2"
(495)
341/2"
(876)
DIMENSIONS WILL VARYWITH PANELTHICKNESS
MODELS 736TR, 736TFI AND 736TCI
Model Specifications |
6 |
|
|
Overall Dimensions |
Interior Capacity and Weight |
||
DRAWER MODELS |
|
|
|
Interior Capacity |
R cu ft (L) F cu ft (L) |
||
|
|||
|
|
|
|
|
|
|
COLUMN MODELS |
|
|
|
|
3/8" |
27" (686) |
24" (610) |
IC-27R |
16.2 |
(459) |
|
|
(10) |
|
|
IC-27FI |
|
|
16.3 |
(462) |
|
|
|
|
|
|||
|
|
|
27" (686) TALL MODELS |
|
|
|
|
1/2" |
131/4" |
|
700TR |
15.5 |
(439) |
15.3 |
|
(13) |
(337) |
341/2" |
700TFI |
|
|
(433) |
|
|
|
700TCI |
10.2 |
(289) |
5.1 |
(144) |
|
|
|
(876) |
|
|
|
|
|
|
101/4" |
|
36" (914) TALL MODELS |
|
|
|
|
|
|
736TR |
20.9 |
(592) |
|
|
|
|
(260) |
|
|
|
|||
203/8" |
|
|
736TFI |
|
|
21.5 |
(609) |
(518) |
|
|
736TCI |
13.3 |
(377) |
7.1 |
(201) |
|
|
93/4" (248) |
|||||
|
|
27" (686) DRAWER MODELS |
|
|
|
|
|
|
|
|
|
|
|
|
|
|
|
4" |
700BR |
5.3 |
(150) |
|
|
|
HEIGHT DIMENSIONS ±1/2" (13) |
700BF(I) |
|
|
5.1 |
(144) |
|
|
(102) |
|
|
||||
|
|
|
700BC(I) |
2.9 (82) |
2.1 (59) |
||
|
|
|
|
|
|
Shipping Weight |
lbs (kg) |
|
|
|
|
|
|
||
|
|
|
|
|
|
IC-27R, IC-27FI, 700TR, 700TFI and 700TCI |
360 (163) |
24" |
|
|
|
|
|||
|
|
|
|
|
|
||
(610) |
|
|
|
|
736TR, 736TFI and 736TCI |
480 (218) |
|
|
|
|
|
|
|
||
|
|
|
|
|
|
||
|
|
|
|
|
|
700BR, 700BF(I) and 700BC(I) |
190 (86) |
|
|
|
|
|
|
|
|
|
|
|
|
|
|
|
|
|
|
|
|
|
|
|
|
|
|
|
|
|
|
|
|
|
|
|
|
|
|
|
|
191/2" |
|
|
|
|
|
|
|
(495) |
|
|
|
|
|
|
|
|
|
|
|
|
|
|
|
|
|
|
|
|
|
|
|
|
|
|
|
|
|
|
|
 257/8" (657)
DIMENSIONS WILL VARYWITH PANEL THICKNESS
MODELS 700BR, 700BF(I) AND 700BC(I)

Site Preparation |
7 |
Opening Dimensions
INTEGRATED MODELS
TOP VIEW
25" (635) OPEN ING DEPTH
subzero.com/specs
IMPORTANT NOTE: The depth of each integrated model is 24" (610) from the front of the unit to its back. Your design may
necessitate moving the unit back or cabinets forward to achieve a flush fit. This will require a minimum rough opening depth of 25" (635).
|
|
|
|
|
|
|
|
|
|
|
|
|
|
|
|
|
|
|
|
25" (635) |
|
|
|
B |
||
|
|
|
||||||
|
OPENI NG DEPTH |
|
|
OPENI NG |
||||
|
|
|
|
|
|
HEIGHT |
||
|
|
|
|
|
|
|
|
|
|
|
|
|
|
|
|
|
|
|
|
|
|
|
|
|
|
|
A |
OPENI NG WIDTH |
SIDE VIEW FRONT VIEW
Opening Dimensions |
A |
B |
IC-27R and IC-27FI |
27" (686) |
81" (2057) |
700TR, 700TFI, 700TCI |
27" (686) |
80" (2032) |
736TR, 736TFI, 736TCI |
36" (914) |
80" (2032) |
700BR, 700BF(I), 700BC(I) |
27" (686) |
341/2" (876) |
|
|
|
Site Preparation |
8 |
|
|
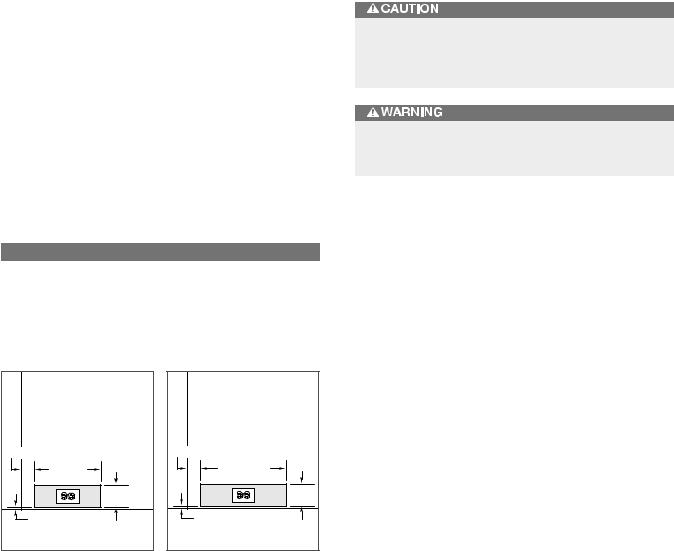
Electrical Requirements
The electrical supply should be located within the shaded area shown in the illustrations. Follow the National Electrical Code and local codes and ordinances when installing the receptacle. A separate circuit, servicing only this appliance is required. A ground fault circuit interrupter (GFCI) is not recommended and may cause interruption of operation.
IMPORTANT NOTE: It is critical that the electrical outlet be located within the shaded area shown so it does not interfere with installation of the anti-tip bracket. It must be flush with the back wall and positioned with the grounding prong to the right of the thinner blades.
Electrical Requirements
Power Supply |
115 V AC, 60 Hz |
Circuit Breaker |
15 amp |
Receptacle |
3-prong grounding-type |
|
|
POSITION OUTL ET WITH |
|
GROU NDING PRONG |
|
TO THE RIGHT |
|
21/2" (64) |
|
13" (330) |
|
|
41/2" |
|
(114) |
1/4" (6) |
FLOOR |
FRONT VIEW |
|
27" (686) models. |
|
POSITION OUTLET WITH |
|
GROUNDING PRONG |
|
TO THE RIGHT |
|
21/2" (64) |
|
171/2" (445) |
|
|
41/2" |
|
(114) |
1/4" (6) |
FLOOR |
FRONT VIEW |
|
36" (914) models. |
|
The outlet must be checked by a qualified electrician to be sure that it is wired with the correct polarity. Verify that the outlet is properly grounded.
Do not use an extension cord or two-prong adapter. Do not remove the power supply cord ground prong.
 Loading...