


Sub-Zero BI-30U, BI-30UG, BI-36UFD, BI-42SD, BI-42SID User Manual
...Built-In Refrigeration Use & Care Guide
BUILT-IN REFRIGERATION
Contents
4Built-In Features
5Electronic Controls
6Storage
8 Operation
13Care Recommendations
14Technical Data
16 Troubleshooting
19 Sub-Zero Warranty
Customer Care
The model and serial number are printed on the enclosed product registration card. Both numbers are also listed on the product rating plate. Refer to page 4 for rating plate location. For warranty purposes, you will also need the date of installation and name of your authorized Sub-Zero dealer. Record this information below for future reference.
If your product ever needs attention, be sure to use a Sub-Zero factory certified service provider recommended by our customer care center, or select one from our list of providers available at subzero.com/locator. All factory certified service providers are carefully selected and thoroughly trained by us.
SERVICE INFORMATION
Model Number
Serial Number
Date of Installation
Certified Service Name
Certified Service Number
Authorized Dealer
Dealer Number
Important Note
To ensure this product is installed and operated as safely and efficiently as possible, take note of the following types of highlighted information throughout this guide:
IMPORTANT NOTE highlights information that is especially important.
CAUTION indicates a situation where minor injury or product damage may occur if instructions are not followed.
WARNING states a hazard that may cause serious injury or death if precautions are not followed.
IMPORTANT NOTE: Throughout this guide, dimensions in parentheses are millimeters unless otherwise specified.
2 | Sub-Zero Customer Care 800.222.7820

Thank You
Thank you for your purchase. We look forward to being part of your home for decades to come. As a third-generation family-owned company, we take a very personal stake in the preservation of your family’s food. We built our business and our reputation on helping families serve the freshest food possible.
With your purchase, you receive one of the strongest warranties in the appliance industry. Take a moment to read the full warranty statement on page 19. It’s also important to register your Sub-Zero to ensure that you don’t miss out on exclusive owner benefits, such as; assurance that you will be taken care of in the unlikely event that service becomes necessary during the warranty period, and a proof-of-purchase record in case of a home insurance claim. You may register by one of the following options:
•Mail in the completed Sub-Zero product registration card.
•Register online at subzero.com/register and create a personalized My Sub-Zero/Wolf account using the serial number on your product.
•Register by phone by calling Sub-Zero Customer Care at 800-222-7820.
As a Sub-Zero owner, you can count on ongoing support, day in and day out. Our customer care center is available 24 hours a day, seven days a week and staffed by knowledgeable product experts at our factory in Madison, Wisconsin. Should the need arise, simply call 800-222-7820 and speak with one of our product experts. They will help troubleshoot any issues you might have.
We are confident this guide will answer your questions about the features, operation, and maintenance of your Sub-Zero, but if you have additional questions, please contact us at 800-222-7820 or visit us online at subzero.com.
subzero.com | 3
BUILT-IN FEATURES
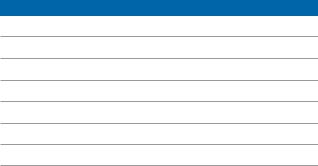
Built-In Features
FEATURE |
PG |
|
1 |
Product Rating Plate |
2 |
|
|
|
2 |
Electronic Control Panel and Display |
5 |
|
|
|
3 |
Freshness Cards |
6 |
|
|
|
4 |
Door Shelves |
6 |
|
|
|
5 |
Dairy Compartment |
6 |
|
|
|
6 |
Refrigerator Storage Drawers |
6 |
|
|
|
7 |
High-Humidity Crisper Drawer |
6 |
|
|
|
8 |
Glass Shelves |
6 |
|
|
|
9 |
Freezer Baskets |
7 |
|
|
|
10 |
Ice Container |
7 |
|
|
|
11 |
Air Purification System |
8 |
|
|
|
12 |
Water Filtration System (behind grille) |
9 |
|
|
|
13 |
Automatic Ice Maker |
10 |
|
|
|
14 |
Ice and Water Dispenser (dispenser models) |
10 |
|
|
|
15 |
Condenser (behind grille) |
13 |
|
|
|
15 12
2
11
6
7
13
10 

Over-and-under model.
1
5
4
8
3
9
15 12
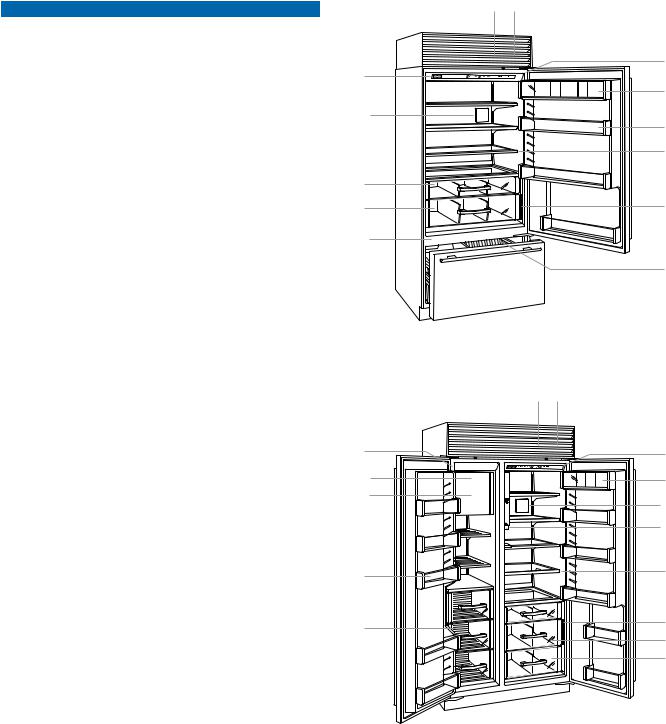
1 |
2 |
|
|
13 |
5 |
10 |
11 |
|
|
|
14 |
4 |
8 |
|
|
9 |
3 |
|
|
|
7 |
|
6 |
Side-by-side model with internal dispenser.
4 | Sub-Zero Customer Care 800.222.7820
ELECTRONIC CONTROLS
Control Panel
FUNCTION
LIGHTS Turns interior accent lighting on or off for glass door models.
ICE MAKER Turns power to ice maker on or off. Use to disable ice maker during extended vacations.
MAX ICE Activates or deactivates max ice feature which increases ice production 40% for a 24-hour period.
COLDER Adjusts temperature in one-degree increments. WARMER Combination units have separate temperature con-
trols for refrigerator and freezer. Temperatures are preset at 38°F (3°C) and 0°F (-18°C).
PURE AIR Activates or deactivates air purification system.
ALARM Activates or deactivates door alarm. An audible chime indicates door has been left ajar for more than 60 seconds.
POWER Turns unit on or off. When power is off, ‘OFF’ will appear in control panel display. Turning power off at the control panel eliminates the need to unplug or turn power off at the circuit breaker during service or extended vacations.
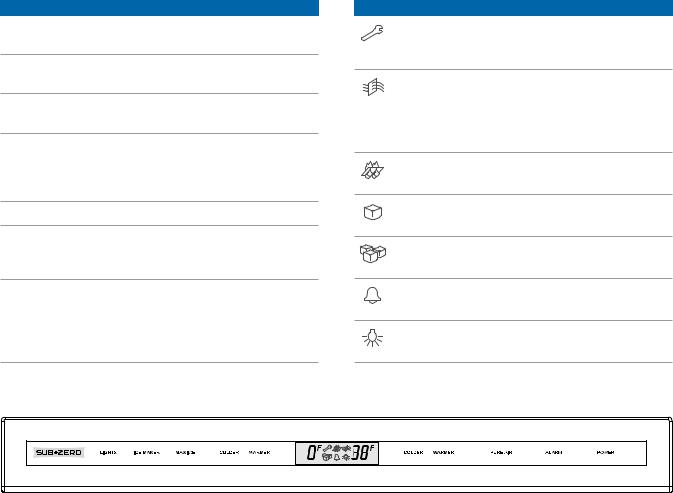
Display
INDICATOR
Illuminates or flashes when electronic control system has detected a temperature or ice maker problem, or if condenser needs to be cleaned.
Illuminates when air purification system is activated and flashes when cartridge needs to be replaced. After the cartridge has been replaced, touch and hold PURE AIR on the control panel for 5 seconds to reset.
Illuminates and flashes when filter needs to be replaced.
Illuminates when ice maker system is activated.
Illuminates when max ice feature is activated.
Illuminates when door alarm is activated.
Illuminates when accent lighting is activated for glass door models.
Control panel and display (model BI-30UG shown).
subzero.com | 5
STORAGE
Keeping Food At Its Best
This Sub-Zero features a unique dual refrigeration system to keep food fresher longer.
With the Sub-Zero dual refrigeration system, individual refrigerator and freezer systems have been designed to maintain accurate, consistent temperatures and proper humidity levels for longer food life expectancy. Dual refrigeration eliminates transfer of fresh food odors to frozen food and ice and does not freeze the moisture out of the air in the fresh food section.
For handy tips and information on how to maximize food freshness, refer to the freshness cards stored in the refrigerator.
Refrigerator Storage
DOOR SHELVES
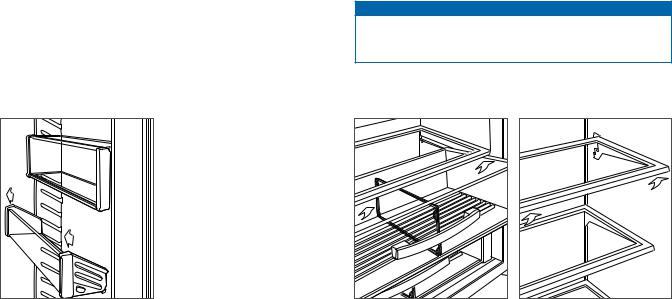
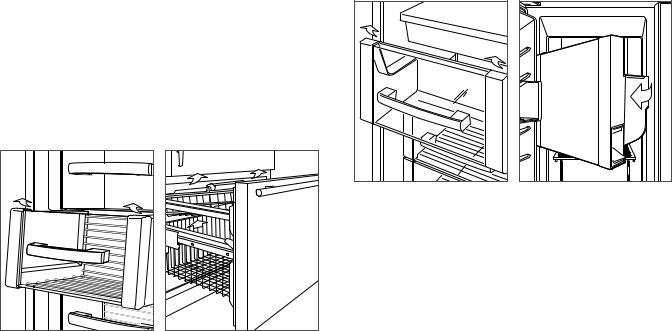
To remove a door shelf or the dairy compartment, lift from the bottom and slide out. To reinstall, place in the desired position and slide the shelf down onto the guides. Refer to the illustration below.
IMPORTANT NOTE: If door opening is limited to 90°, door shelves may need to be removed before removing a storage drawer or glass shelf.
STORAGE DRAWERS
To remove a storage drawer, pull forward until the drawer stops. Lift the front of the drawer slightly, then pull forward. Refer to the illustration below.
For the French door model, drawer slides may need to be pushed back manually to provide sufficient clearance for removal.
To reinstall, push drawer slides in. Align the drawer with slides and push back until it stops. Press down on the front of the drawer to engage the slides.
GLASS SHELVES
To remove or adjust a glass shelf, tilt up, then lift up and out. To reposition, insert shelf in the tracks along the back wall, then lower the front until it locks into position. Refer to the illustration below.
IMPORTANT NOTE: Use care when handling glass shelves to prevent breakage or scratching the interior.
 CAUTION
Glass shelves should warm to room temperature before immersing in warm water.
Door shelf removal. |
Storage drawer removal. |
Glass shelf removal. |
6 | Sub-Zero Customer Care 800.222.7820
STORAGE
Freezer Storage
FREEZER BASKETS
BI 36F and side-by-side models | To remove, pull forward until basket stops. Pull the two metal clips located behind the bottom two corners of the basket forward, then lift up and out. Refer to the illustration below. To reinstall, push drawer slides in. Align the basket with slides and push back until it stops. Press down on the front of the basket to engage slides.
IMPORTANT NOTE: To remove for models BI-36S, BI-42S, BI-42SID and BI-42SD, the basket must be raised
and pulled through the opening in the door liner after disengaging.
Over-and-under models | To remove the upper and lower freezer baskets, lift up and out. Refer to the illustration below. To reinstall, insert the lower basket into the four corner retainers. Position the upper basket onto the side rails and slide back until it clicks.
ICE CONTAINER
BI 36F and over-and-under models | To remove, pull container forward until it stops, then lift out.
Side-by-side models | To remove, pull container forward until it stops, then lift to clear the carrier assembly along the back. Pull forward and out. Refer to the illustration below.
Dispenser models | To remove, pull container out partially, then rotate and pull out. Refer to the illustration below.
Side-by-side models. |
Dispenser models. |
BI 36F and side-by-side models. Over-and-under models.
subzero.com | 7
OPERATION
Air Purification System
The advanced air purification system of Sub-Zero built-in models reduces bacteria, odors and ethylene gas, which causes premature ripening in fruits and vegetables. The air purification cartridge has been factory installed and is located inside the refrigerator, on the back wall.
To initiate air purification, touch PURE AIR on the control panel.
The cartridge will last approximately one year. The  indicator will flash in the control panel display when the cartridge needs to be replaced.
Replacement Sub-Zero air purification cartridges can be ordered online at subzerowolfstore.com. For questions, contact Sub-Zero customer care at 800-222-7820.
 CAUTION
The air purification system complies with applicable Federal requirements regarding incidental exposure to ultraviolet light. Lamp contains mercury. Manage in accordance with disposal laws. Visit earth911.com or call 800-222-7820.
AIR PURIFICATION CARTRIDGE REPLACEMENT
1To access the air purification cartridge, grasp the outside cover from the bottom and rotate upward. Refer to the illustration below.
2Grasp the black cover from the top and rotate downward. The cartridge will pop out and can be removed.
3Remove the new cartridge from packaging and insert with connector pointing downward.
4Once in position, close the black cover. Then rotate the outside cover downward until it closes against the back wall.
5Once the cartridge has been replaced, touch and hold
PURE AIR on the control panel for five seconds to reset.
The  indicator will appear in the control panel display but not flash.
Air purification cartridge.
8 | Sub-Zero Customer Care 800.222.7820
OPERATION
Water Filtration System
The water filtration system of Sub-Zero built-in models supplies filtered water to the ice maker and water dispenser (dispenser models) to produce great-tasting water and ice.
IMPORTANT NOTE: When using the water filtration system for the first time and after filter replacement, it is necessary to clear any air from the system and allow the filter to assist in cleaning the water lines. For non-dispenser models, discard the first two full containers of ice. For dispenser models, dispense several glasses of water for a period of two minutes.
If the water filtration system will not be utilized, it can be placed in water filter bypass mode by removing the filter.
The filter is rated for 750 gallons (2839 L) or one year, whichever comes first. The  indicator will illuminate and flash in the control panel display when the filter needs to be replaced.
Replacement Sub-Zero water filters can be ordered online at subzerowolfstore.com. For questions, contact Sub-Zero customer care at 800-222-7820.
WATER FILTER REPLACEMENT
1To access the water filter, pull out on the bottom edge of the grille assembly and rotate upward.
2To remove the old filter, rotate counterclockwise onequarter turn, then pull out. Refer to the illustration below. It is normal for a small amount of water to drip when the filter is removed. It should be wiped up with a paper towel or cloth.
3Remove the new filter from packaging and remove plastic cap.
4Insert the new filter into the manifold and turn clockwise.
5Once the new filter has been installed, press and hold the water filter reset button for five seconds to reset. Refer to the illustration below.
WATER FILTER |
WATER FILTER |
RESET BUTTON |
WATER |
FILTER |
Water filter removal. |
Water filter location. |
subzero.com | 9

OPERATION
Ice Maker Operation
To initiate ice production, touch ICE MAKER on the control panel. After initial start-up, discard the first few batches of ice. The ice may contain impurities from new plumbing connections.
The ice maker will cycle (eight cubes) every two hours. If ice is not used regularly it may fuse together. To avoid, discard ice and allow ice maker to replenish.
Sabbath
This appliance is certified by Star-K to meet strict religious regulations in conjunction with specific instructions found on www.star-k.org.
To initiate Sabbath mode, while the unit is on, touch POWER on the control panel. ‘OFF’ appears in the control panel display. Touch and hold POWER for 10 seconds until ‘SAb’ appears in the display indicating Sabbath mode has been initiated. Lights, ice maker, door alarm and dispenser (if applicable) will be disabled. To return to normal operating conditions, touch POWER.
Ice and Water Dispenser
The first time the water dispenser is used, purge the water system and storage tank for three minutes. This will clear any air in the system, along with impurities from new plumbing connections.
Initially, for water to dispense properly, press and hold WATER until water flows from the dispenser. WATER may need to be pressed for 60 seconds for water to fill the internal reservoir tank.
The chilled water reservoir tank holds approximately 50 oz (1.5 L) of filtered water. It may take several hours to chill the water to refrigerator temperature during the original fill and after a large amount of water is dispensed.
 CAUTION
Limit continuous ice and water dispenser operation to seven minutes or less.
10 | Sub-Zero Customer Care 800.222.7820
OPERATION
Ice and Water Dispenser
INTERNAL DISPENSER
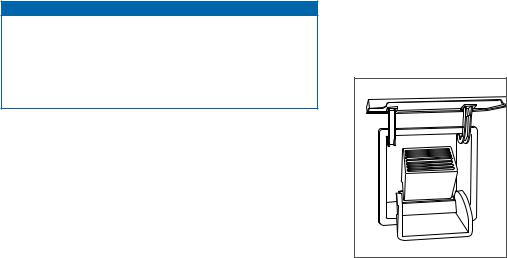
The internal dispenser is designed to accommodate a 16-oz (.5 L) pint glass. Larger containers may be used but may compromise the effectiveness of the dispenser.
Drops of water may collect in the removable water grille located directly below the dispenser. Refer to the illustration below.
FUNCTION
ICE |
Press and hold to dispense ice. |
WATER Press and hold to dispense water.
ICE |
WATER |
|
WATER |
|
GRILLE |
Internal dispenser.
EXTERNAL DISPENSER
For large quantities of ice, a bulk ice dispenser is located inside the refrigerator. Refer to the illustrations below.
Drops of water may collect in the removable water grille located at the bottom of the glasswell. This is not a drain. Do not pour water into the water grille.
FUNCTION
ICE |
Press and hold to dispense ice. |
For metered ice, press and hold for 2 seconds. Dispenser will meter and collect ice before dispensing into the glass. If held longer, the cycle repeats for more ice.
WATER Press and hold to dispense water.
LIGHT |
Press to cycle through lighting options; lights off, |
|
lights on and control panel lights only. |
Press and hold for 5 seconds to activate or deactivate the dispenser lock. Lock indicator will be illuminated when dispenser is locked.
BULK ICE Press and hold to dispense large quantities of ice.
|
ICE |
|
|
WATER |
|
LOCK |
|
|
INDICATOR |
LIGHT |
BULK ICE |
|
||
|
WATER |
|
|
GRILLE |
|
External dispenser. |
Bulk ice dispenser. |
subzero.com | 11
OPERATION
Interior Lighting
Interior lighting will illuminate when doors are open. Unique 40-watt appliance bulbs are used in the refrigerator and freezer.
 CAUTION
Turn power off at the control panel before replacing light bulbs. Wear protective gloves when handling bulbs.
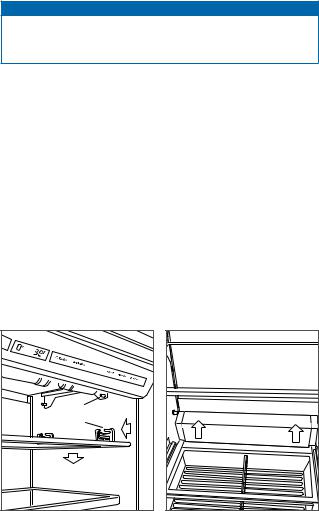
OVERHEAD LIGHTING
To replace light bulbs, remove the light diffuser. Slide the light diffuser back until the slots drop past the bracket pegs. Lower the light diffuser to remove. Refer to the illustration below.
To reinstall, align slots with bracket pegs. Pull forward until tabs engage pegs.
For glass door models, accent lighting can be turned on and off by touching LIGHTS on the control panel. The  indicator will illuminate when accent lighting is activated.
PEG |
SLOT |
Overhead lighting. |
Crisper lighting. |
FREEZER LIGHTING
Over-and-under models | Lighting is located in upper front section of the freezer compartment. To remove the light diffuser, gently compress the diffuser to release it from supporting guides.
Side-by-side models | Freezer basket lighting is located above the ice container. To access the light bulb, remove the ice container and push the carrier assembly to the back of the unit. The bulb will be accessible under the fixed shelf in front of the ice maker.
Dispenser models | Lighting above the ice container is accessible by removing the ice container. Refer to ice
container removal on page 7. Once the container has been removed, remove the light diffuser as described in overhead lighting. Lighting below the ice container is accessible by removing the light diffuser. To remove, press the plastic
lip up and pull the diffuser out of the supporting guides. Freezer basket lighting is located below the fixed shelf on the back wall of the freezer. To access the light diffuser, first remove the freezer basket below the fixed shelf. To remove the light diffuser and access the light bulb, gently compress the diffuser to release it from supporting guides.
CRISPER LIGHTING
Crisper drawer lighting is located behind the upper crisper drawer and mounted to the back wall of the refrigerator. To remove the light diffuser, remove the crisper drawer and upper crisper shelf. Place both hands under the right and left sides of the diffuser and push upward. Refer to the illustration.
12 | Sub-Zero Customer Care 800.222.7820

CARE RECOMMENDATIONS
Cleaning
INTERIOR CLEANING
For over-and-under and side-by-side models, the refrigerator or freezer may be disabled without disrupting the other section. To disable a section, touch POWER. Touch and hold WARMER for the section being disabled, continue to hold and touch POWER. Double dashes will appear in the control panel display. Repeat to turn the section back on.
To clean interior surfaces and all removable parts, wash with a mild solution of soap, water and baking soda. Rinse and dry thoroughly. Avoid getting water on lights and control panel.
 CAUTION
Do not use vinegar, rubbing alcohol or other alcoholbased cleaners on any interior surface.
STAINLESS STEEL EXTERIOR
Use a nonabrasive stainless steel cleaner and apply with a soft lint-free cloth. To bring out the natural luster, lightly wipe surface with a water-dampened microfiber cloth followed by a dry polishing chamois. Always follow the grain of stainless steel.
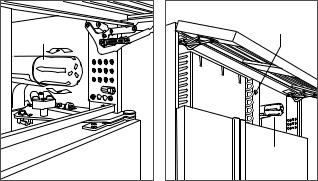
CONDENSER CLEANING
 CAUTION
Before cleaning the condenser, turn power off at the control panel. Wear gloves to avoid injury from sharp condenser fins.
The condenser is located behind the flip-up grille. To access, pull out on the bottom edge of the grille and rotate upward. Use a soft bristle brush and vacuum to remove dust and lint from the condenser. Clean the condenser every three to six months. Refer to the illustration below.
IMPORTANT NOTE: To avoid damaging condenser fins, vacuum in the direction of the fins.
 CAUTION
Failure to clean the condenser could result in temperature loss, mechanical failure or damage.
VACATIONS
For extended vacations, turn power off at the control panel. Empty the unit and block doors open slightly to let fresh air in and keep interior dry. Water filter should be replaced before start up.
CONDENSER |
Condenser location.
subzero.com | 13
TECHNICAL DATA
Sub-Zero Water Filtration System Data
REPLACEMENT CARTRIDGE (4204490)
Tested and certified by NSF International against NSF/ANSI Standard 42 for the reduction of Chlorine Taste & Odor, Particulate Class I; and against NSF/ANSI Standard 53 for the reduction of Lead, Mercury, Atrazine, Benzene, Carbofuran, 1,4-dichlorobenzene, Lindane, Toxaphene, Turbidity, Cysts and Asbestos.
This system has been tested according to NSF/ANSI 42/53 for reduction of the substances listed below. The concentration of the indicated substances in water entering the system was reduced to a concentration less than or equal to the permissible limit for water leaving the system, as specified in NSF/ANSI 42/53.
Operating Specifications
Capacity: certified for up to 750 gallons (2,838 L); up to twelve months Pressure Requirement: 35 – 120 psi (2.8 – 8.2 bar)
Temperature: 33 – 100°F (0.6 – 38°C) Flow Rate: 0.78 gpm (2.9 Lpm)
|
|
|
|
Product Water Concentration |
% Reduction |
Max Permissable |
|||
|
NSF |
Influent Challenge |
Average Influent |
Product Water |
|||||
|
|
|
|
|
|||||
Substance |
Standard |
Concentration |
Concentration |
Average |
Max Effluent |
Average |
Minimum |
Concentration |
|
|
|
|
|
|
|
|
|
|
|
Chlorine, Taste & Odor |
42 |
2.0 mg/L ± 10% |
1.88 mg/L |
0.05 mg/L |
0.06 mg/L |
97.34% |
96.80% |
≥ 50% |
|
|
|
|
|
|
|
|
|
|
|
Particulate |
42 |
At least 10,000 |
5,700,000/ml |
30,583/ml |
69,000/ml |
99.46% |
98.78% |
≥ 85% |
|
particles/ml |
|||||||||
|
|
|
|
|
|
|
|
||
|
|
|
|
|
|
|
|
|
|
Lead at pH 6.5 |
53 |
0.15 mg/L ± 10% |
0.153 mg/L |
<0.001 mg/L |
<0.001 mg/L |
99.34% |
99.34% |
0.010 mg/L |
|
|
|
|
|
|
|
|
|
|
|
Lead at pH 8.5 |
53 |
0.15 mg/L ± 10% |
0.150 mg/L |
<0.001 mg/L |
<0.001 mg/L |
99.33% |
99.33% |
0.010 mg/L |
|
|
|
|
|
|
|
|
|
|
|
Mercury at pH 6.5 |
53 |
0.006 mg/L ± 10% |
0.006 mg/L |
0.0003 mg/L |
0.0005 mg/L |
95.00% |
91.66% |
0.002 mg/L |
|
|
|
|
|
|
|
|
|
|
|
Mercury at pH 8.5 |
53 |
0.006 mg/L ± 10% |
0.006 mg/L |
0.0008 mg/L |
0.0015 mg/L |
86.66% |
75.00% |
0.002 mg/L |
|
|
|
|
|
|
|
|
|
|
|
Atrazine |
53 |
0.009 mg/L ± 10% |
0.009 mg/L |
<0.002 mg/L |
<0.002 mg/L |
77.77% |
77.77% |
0.003 mg/L |
|
|
|
|
|
|
|
|
|
|
|
Benzene |
53 |
0.015 mg/L ± 10% |
0.014 mg/L |
0.0006 mg/L |
0.0011 mg/L |
95.71% |
92.14% |
0.005 mg/L |
|
|
|
|
|
|
|
|
|
|
|
Carbofuran |
53 |
0.08 mg/L ± 10% |
0.081 mg/L |
<0.001 mg/L |
<0.001 mg/L |
98.76% |
98.76% |
0.04 mg/L |
|
|
|
|
|
|
|
|
|
|
|
1,4-dichlorobenzene |
53 |
0.225 mg/L ± 10% |
0.208 mg/L |
<0.0005 mg/L |
<0.0005 mg/L |
99.75% |
99.75% |
0.075 mg/L |
|
|
|
|
|
|
|
|
|
|
|
Lindane |
53 |
0.002 mg/L ± 10% |
0.002 mg/L |
0.00003 mg/L |
0.00007 mg/L |
98.50% |
96.50% |
0.0002 mg/L |
|
|
|
|
|
|
|
|
|
|
|
Toxaphene |
53 |
0.015 mg/L ± 10% |
0.015 mg/L |
<0.001 mg/L |
<0.001 mg/L |
93.33% |
93.33% |
0.003 mg/L |
|
|
|
|
|
|
|
|
|
|
|
Turbidity |
53 |
11 ± 1 NTU |
10.7 NTU |
0.31 NTU |
0.49 NTU |
97.10% |
95.42% |
0.5 NTU |
|
|
|
|
|
|
|
|
|
|
|
Cysts** |
53 |
Minimum 50,000/L |
166,500/L |
<1/L |
<1/L |
>99.99% |
>99.99% |
>99.95% |
|
|
|
|
|
|
|
|
|
|
|
Asbestos |
53 |
107 to 108 fibers/L† |
155 MF/L |
<1 MF/L |
<1 MF/L |
>99.99% |
>99.99% |
>99% |
|
**Based on the use of Cryptosporidium Parvum oocysts † Fibers greater than 10 μm in length
SPecial Notes
•Replacement Sub-Zero water filter cartridges can be ordered online at subzerowolfstore.com. For questions, contact Sub-Zero customer care at 800-222-7820.
•Change filter cartridge at least every twelve months. High sediment areas may require more frequent filter cartridge replacement.
•Installation and operation instructions, parts and service availability, and standard warranty are included with the product when shipped.
•Replace water filter cartridge when the filter indicator is lit or when water flow becomes too low. Use replacement water filter cartridge part number 4204490. Replacement filter pricing information can be found at subzero.com.
•Do not use with water that is microbiologically unsafe or of unknown water quality without adequate disinfection before or after the system.
•Systems certified for cyst reduction may be used on disinfected waters that may contain filterable cysts.
•This system must be installed, operated, maintained and filters replaced as required in order for the product to perform as advertised.
•Note that while the testing was performed under standard laboratory conditions, actual performance may vary. The contaminants or other substances removed or reduced by this water treatment system are not necessarily in your water.
Manufactured for: Sub-Zero, Inc., P.O. Box 44848, Madison, WI 53744, 800-222-7820
14 | Sub-Zero Customer Care 800.222.7820

TECHNICAL DATA
subzero.com |
| |
15 |
TROUBLESHOOTING
Troubleshooting
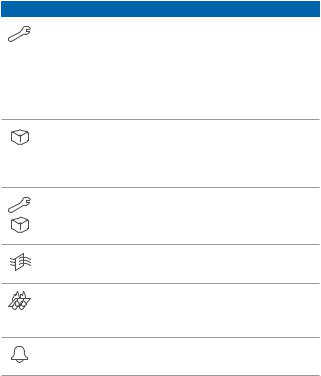
SERVICE INDICATOR |
PG |
Illuminated. Touch POWER to turn unit off. Verify |
13 |
condenser area is clean. Touch POWER to turn |
|
unit on. If indicator is still illuminated, call Sub Zero |
|
customer care at 800-222-7820. |
|
Flashing. Contact Sub-Zero factory certified |
|
service. |
|
Flashing. Possible water flow issue. Touch MAX ICE |
10 |
and ICE MAKER on the control panel simultane- |
|
ously. If indicator flashes again, contact Sub-Zero |
|
factory certified service. |
|
Flashing with audible chime. Contact Sub-Zero |
5 |
factory certified service. |
|
Flashing. Replace air purification cartridge. Also, |
8 |
replace cartridge if there is an odor inside unit. |
|
Flashing. Replace water filter. Also, replace filter if |
9 |
ice tastes bad, is discolored, ice cubes are small or |
|
if water flow from dispenser is slow. |
|
Flashing with audible chime. Door has been left ajar |
16 |
for more than 60 seconds. Close door. |
|
UNIT OPERATION
No lights or cooling.
•Verify power is on.
•Verify electrical power to unit and home circuit breaker is on.
No lights in refrigerator or freezer.
•Door may have been left ajar which has disabled lights to eliminate excess heat. If lights are out or ‘LOC’ appears in control panel display, close door for one hour. If lights are still out, contact Sub-Zero factory certified service.
Frost, condensation or ice build up inside unit.
•Verify condenser is clean.
•Verify door is closing properly.
•Verify door has not been left ajar.
•Verify door gasket does not have rips or tears. If it does, contact Sub-Zero factory certified service.
•If icing is heavy, turn unit off and use a hair dryer to melt ice. Hair dryer should be set on low and kept moving
at all times. Once ice has melted, wipe up water with a cloth or paper towel.
High temperatures, unit runs excessively or unit giving off too much heat.
•Verify condenser is clean.
•Verify door is closing properly.
•Verify door has not been left ajar.
•Increased ambient temperatures may cause compressors to run longer.
•If temperature display shows 38° and 0°, but is not cooling, unit may be in showroom mode. Contact Sub-Zero Customer Care at 800-222-7820.
16 | Sub-Zero Customer Care 800.222.7820
TROUBLESHOOTING
Troubleshooting
ICE PRODUCTION
No ice.
•Verify  indicator appears in control panel display.
•Verify ice maker has been on for at least 24 hours.
•Verify freezer temperature near 0°F.
•Verify ice container is properly installed.
•Verify ice maker arm in down position.
•Verify water is being supplied to unit.
•Verify water filter has been replaced within the last 12 months and installed properly.
•Verify water filter has been removed if a reverse osmosis filtration system is being utilized.
•Verify  indicator is not flashing. If flashing, touch MAX ICE and ICE MAKER on the control panel simultaneously.
Blue or green ice.
•Possible copper supply line corrosion. Contact plumber to clean or replace.
Black flecks in cubes.
•Stop use and contact Sub-Zero factory certified service.
Bad taste.
•Defrost freezer and clean with soap and water.
•Place coffee grounds or charcoal briquettes in freezer to absorb odor.
Hollow cubes.
•Clean condenser. Contact Sub-Zero factory certified service if unresolved.
ODOR
•Unit should be cleaned before using for the first time. This will clear any odors that may have been trapped during shipping.
•Replace air purification cartridge.
•Clean unit and shelving thoroughly.
•Uncovered food could create odor which may require cleaning.
•Remove and clean drain pan located behind kickplate, and reinstall.
subzero.com | 17
 Loading...