

Page 1

Stair-PRO® Stair Chair
6251
6252
Operations Manual
International - EN | CS | DA | DE | ES | FI | FR | IT | NL | PL
| PT | SV | TR | NN | SL | HR | RO | RU | SK | HU
2018/06 D.1 6252-009-005 REV D www.stryker.com
Page 2

sample text
Page 3

Stair-PRO® Stair Chair
6251
6252
Operations Manual
2018/06 D.1 6252-009-005 REV D www.stryker.com
Page 4

sample text
Page 5
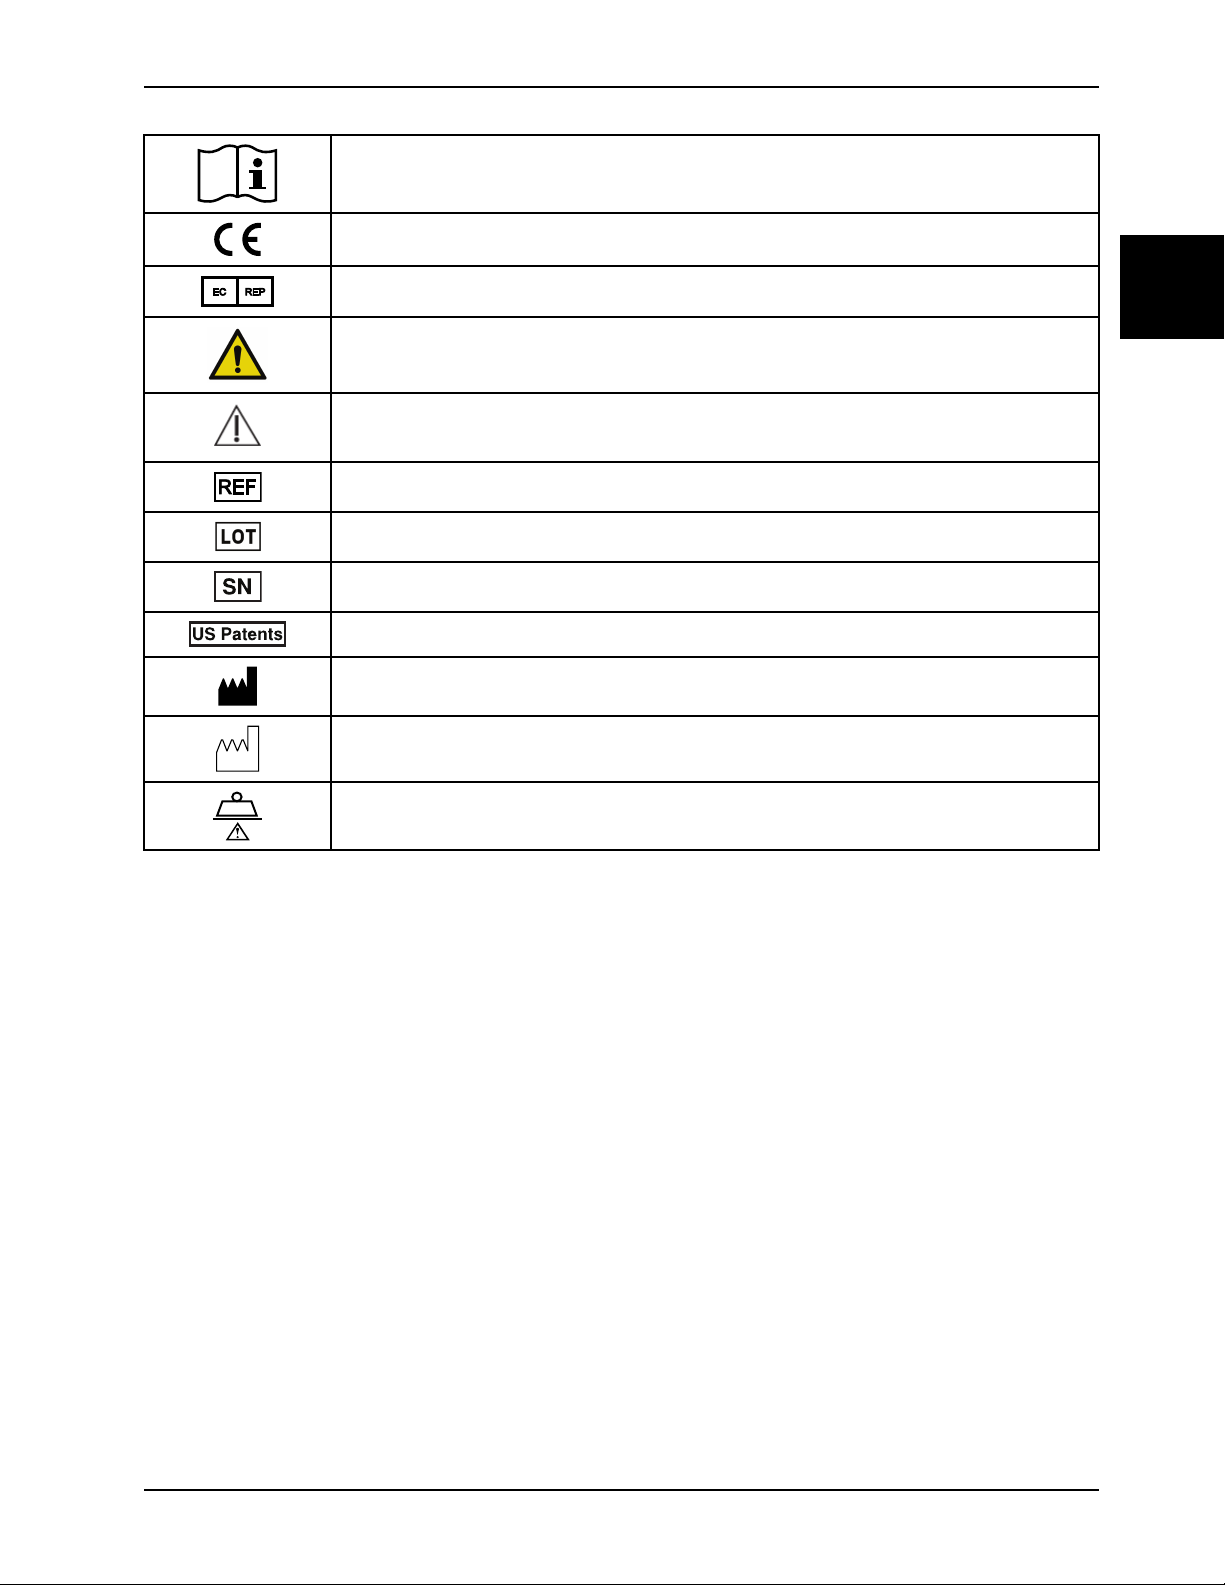
Symbols
Operating instructions/Consult instructions for use
CE mark
European authorized representative
General warning
Caution
Catalogue number
Lot (batch) code
Serial number
For US Patents see www.stryker.com/patents
English
EN
Manufacturer
Date of manufacture
Safe working load
www.stryker.com 6252-009-005 REV D
Page 6

sample text
Page 7

Table of Contents
Warning/Caution/Note Definition ............................................................................................................... 1-2
Summary of safety precautions................................................................................................................. 1-3
Introduction........................................................................................................................................... 1-5
Product description........................................................................................................................... 1-5
Indications for use ............................................................................................................................ 1-5
Expected service life......................................................................................................................... 1-5
Contraindications ............................................................................................................................. 1-5
Specifications.................................................................................................................................. 1-5
Product illustration............................................................................................................................ 1-6
Contact information .......................................................................................................................... 1-7
Serial number location ...................................................................................................................... 1-8
Date of manufacture......................................................................................................................... 1-8
Setup............................................................................................................................................. 1-8
Operation ............................................................................................................................................. 1-9
Operating guidelines......................................................................................................................... 1-9
Unfolding the chair ...........................................................................................................................1-9
Folding the chair ............................................................................................................................ 1-10
Transferring the occupant to the chair................................................................................................ 1-11
Securing the occupant with the restraint straps..................................................................................... 1-11
Attaching the chest restraint straps .................................................................................................... 1-12
Attaching the ankle strap ................................................................................................................. 1-13
Proper lifting techniques .................................................................................................................. 1-13
Transporting the occupant on flat surfaces.......................................................................................... 1-13
Transporting the occupant down stairs - Model 6251............................................................................. 1-13
Transporting the occupant down stairs - Model 6252............................................................................. 1-14
Transporting the occupant up stairs ................................................................................................... 1-15
Applying or releasing a wheel lock..................................................................................................... 1-15
Raising or lowering the locking rear lift handles .................................................................................... 1-16
Attaching the optional head support to the upper control handle............................................................... 1-16
Supporting the occupant’s head with the optional head support ............................................................... 1-16
Positioning operators and helpers for additional assistance..................................................................... 1-17
Installing the elastic oxygen bottle holder ............................................................................................ 1-18
Cleaning............................................................................................................................................. 1-19
Cleaning procedure ........................................................................................................................ 1-19
Cleaning the track frame ................................................................................................................. 1-19
Suggested cleaners........................................................................................................................ 1-19
Preventive maintenance ........................................................................................................................ 1-21
English
EN
www.stryker.com 6252-009-005 REV D 1-1
Page 8
Warning/Caution/Note Definition
English
EN
The words WARNING, CAUTION, and NOTE carry special meanings and should be carefully reviewed.
WARNING
Alerts the reader about a situation which, if not avoided, could result in death or serious injury. It may also describe
potential serious adverse reactions and safety hazards.
CAUTION
Alerts the reader of a potentially hazardous situation which, if not avoided, may result in minor or moderate injury to the
user or patient or damage to the product or other property. This includes special care necessary for the safe and
effective use of the device and the care necessary to avoid damage to a device that may occur as a result of use or
misuse.
Note: Provides special information to make maintenance easier or important instructions clearer.
1-2 6252-009-005 REV D www.stryker.com
Page 9
Summary of safety precautions
Always read and strictly follow the warnings and cautions listed on this page. Service only by qualified personnel.
WARNING
• Always make sure that the chair is locked in the unfolded position before use. An unlocked chair may fold during
use.
• Do not use the chair with suspected cervical, spinal, or fracture injuries.
• Do not leave an occupant unattended. Hold the product while an occupant is on the product.
• Always use all restraint straps to secure the occupant on the product. An unrestrained occupant may fall from the
product.
• Do not push the Model 6252 with the upper control handle in the fully extended position. Pushing the chair with the
handle in the fully extended position may cause the chair to tip when you encounter obstacles.
• Always lock the Model 6252 Stair-TREAD system in position before you transport an occupant.
• Avoid getting dirt or other obstructions inside the tracks. The Stair-TREAD system may not work the same on all
stair surfaces and in all environmental conditions. Based on conditions, you may encounter varying amounts of
resistance. Water, ice, or debris on the stairs can affect operator footing and proper operation of the Stair-TREAD
system. To avoid injury, clear the path or consider an alternate route. Condensation, water, ice, or debris on the
Stair-TREAD system can cause unpredictable performance that results in a sudden change in the weight that the
operators must support.
• Always clean and dry the Stair-TREAD system before you transport an occupant.
• Do not attempt to transport occupant loads greater than what you can safely lift.
• Do not install or apply a wheel lock on a product with worn wheels that are less than 6 in. diameter.
• Always lock the lift handles in position before you use the handles to tip the chair back.
• Always make sure that you secure all tubes, regulators, and ancillary accessories for the oxygen bottle to prevent
interference with the tracks, wheels, or other mechanisms of the stair chair.
• Failure to properly clean or dispose of contaminated stair chair components will increase the risk of exposure to
blood borne pathogens and may cause injury to the patient or the operator.
• Always use any appropriate personal protective equipment while power washing to avoid inhaling contagion. Power
washing equipment may aerate contamination.
• Always wipe the product with clean water and dry after cleaning. Some cleaning products are corrosive in nature
and may cause damage to the product. Failure to properly rinse and dry the product leaves a corrosive residue on
the surface of the product and may cause premature corrosion of critical components.
English
EN
CAUTION
• Improper usage of the product can cause injury to the patient or operator. Operate the product only as described in
this manual.
• Do not modify the product or any components of the product. Modifying the product can cause unpredictable
operation resulting in injury to patient or operator. Modifying the product also voids its warranty.
• Always clear any obstacles that may interfere and cause injury to the operator or patient before operating the
product.
• Always use caution when using casters. Casters are not suitable for all surfaces.
• Always release the red track release bar before you click the Stair-TREAD system into the locked position. Try to
fold the chair before you descend the stairs to make sure that the Stair-TREAD system is locked.
• The elastic oxygen bottle holder is for use only with RUGGED® Stair-PRO stair chairs and D-size oxygen bottles.
• Failure to properly secure the oxygen bottle and oxygen bottle accessories could interfere with the operation of the
stair chair.
• Always make sure that you secure the oxygen bottle to the elastic oxygen bottle holder using the red Velcro strap.
www.stryker.com 6252-009-005 REV D 1-3
Page 10

Summary of safety precautions
English
EN
CAUTION (CONTINUED)
• Always make sure that the oxygen bottle is secure in the elastic oxygen bottle holder and that the regulator valve of
the oxygen bottle does not protrude from the width of the stair chair.
• Always remove the oxygen bottle from the elastic holder before attempting to fold or store the stair chair.
• Do not steam clean or ultrasonically clean the product.
• Do not exceed 180 °F (82 °C) as the maximum water temperature.
• Do not exceed 1500 psi (130.5 bar) as the maximum water pressure. If you are using a hand held wand to wash the
product, keep the pressure nozzle at a minimum of 24 in. (61 cm) from the product.
• Always allow to air dry.
• Do not clean, service, or perform maintenance while the product is in use.
1-4 6252-009-005 REV D www.stryker.com
Page 11

Introduction
This manual assists you with the operation or maintenance of your Stryker product. Read this manual before operating
or maintaining this product. Set methods and procedures to educate and train your staff on the safe operation or
maintenance of this product.
CAUTION
• Improper usage of the product can cause injury to the patient or operator. Operate the product only as described in
this manual.
• Do not modify the product or any components of the product. Modifying the product can cause unpredictable
operation resulting in injury to patient or operator. Modifying the product also voids its warranty.
Notes
• This manual is a permanent part of the product and should remain with the product even if the product is sold.
• Stryker continually seeks advancements in product design and quality. This manual contains the most current
product information available at the time of printing. There may be minor discrepancies between your product and
this manual. If you have any questions, contact Stryker Customer Service or Technical Support at 1-800-327-0770.
Product description
The Stair-PRO® stair chair is a manual transport device. The Stair-TREAD™ feature allows the product to transport the
body of a human occupant in a seated position down a set of stairs. Front and rear wheels allow operators to transport
the occupant on flat surfaces.
English
EN
Indications for use
The Model 6251 and Model 6252 Stair-PRO stair chair is a manual transport device. The product transports the body of
a human occupant in a seated position up or down a set of stairs. The chair holds adult, adolescent, or child occupants
who can remain seated in the chair while secured by the patient restraints. The Stair-TREAD system on Model 6252
controls the speed of descent of the occupant-loaded chair. Front and rear wheels allow operators to transport the
occupant on flat surfaces. The Stair-PRO is intended for use in pre-hospital environments, in emergency and nonemergency applications. The product supports a maximum capacity of 500 lb. Operate the product by trained
professionals only. This includes emergency medical service and medical first responders.
Expected service life
The Stair-PRO stair chair has a seven year expected service life under normal use conditions and with appropriate
periodic maintenance.
Contraindications
Do not use the Stair-PRO stair chair to transport occupants who may have cervical, spinal, or fracture injuries.
Specifications
Model 6251 6252
500 lb 228 kg 500 lb 228 kg
Maximum load
Height 36 in. 91 cm 37.5 in. 95.25 cm
1
www.stryker.com 6252-009-005 REV D 1-5
Page 12
Introduction
A
B
C
D
E
English
EN
Specifications (Continued)
Model 6251 6252
Width 20.5 in. 52 cm 20.5 in. 52 cm
2
Depth
Folded depth 8 in. 20 cm 8 in. 20 cm
3
Weight
Dimensions are measured from the outermost edges of the main frame. Specifications are rounded. Conversions are
calculated before rounding.
Model 6252 is compliant to BS EN 1865-4:2010 standard with the one-piece vinyl seat option (6250-020-000) and
without the footrest option (6252-027-000).
1
Maximum load capacity is total weight distributed in accordance to basic human anatomy. Operators must consider
the weight of the occupant, equipment, and accessories when they determine the total load on the product.
2
Depth dimensions are measured with extendable handles retracted.
3
The weight of the 6252 model includes the one-piece vinyl seat option, but does not include the footrest option.
Stryker reserves the right to change specifications without notice.
The yellow and black color scheme is a proprietary trademark of Stryker Corporation.
28 in.
23 lb 10 kg 32.8 lb 14.9 kg
71 cm
28 in.
71 cm
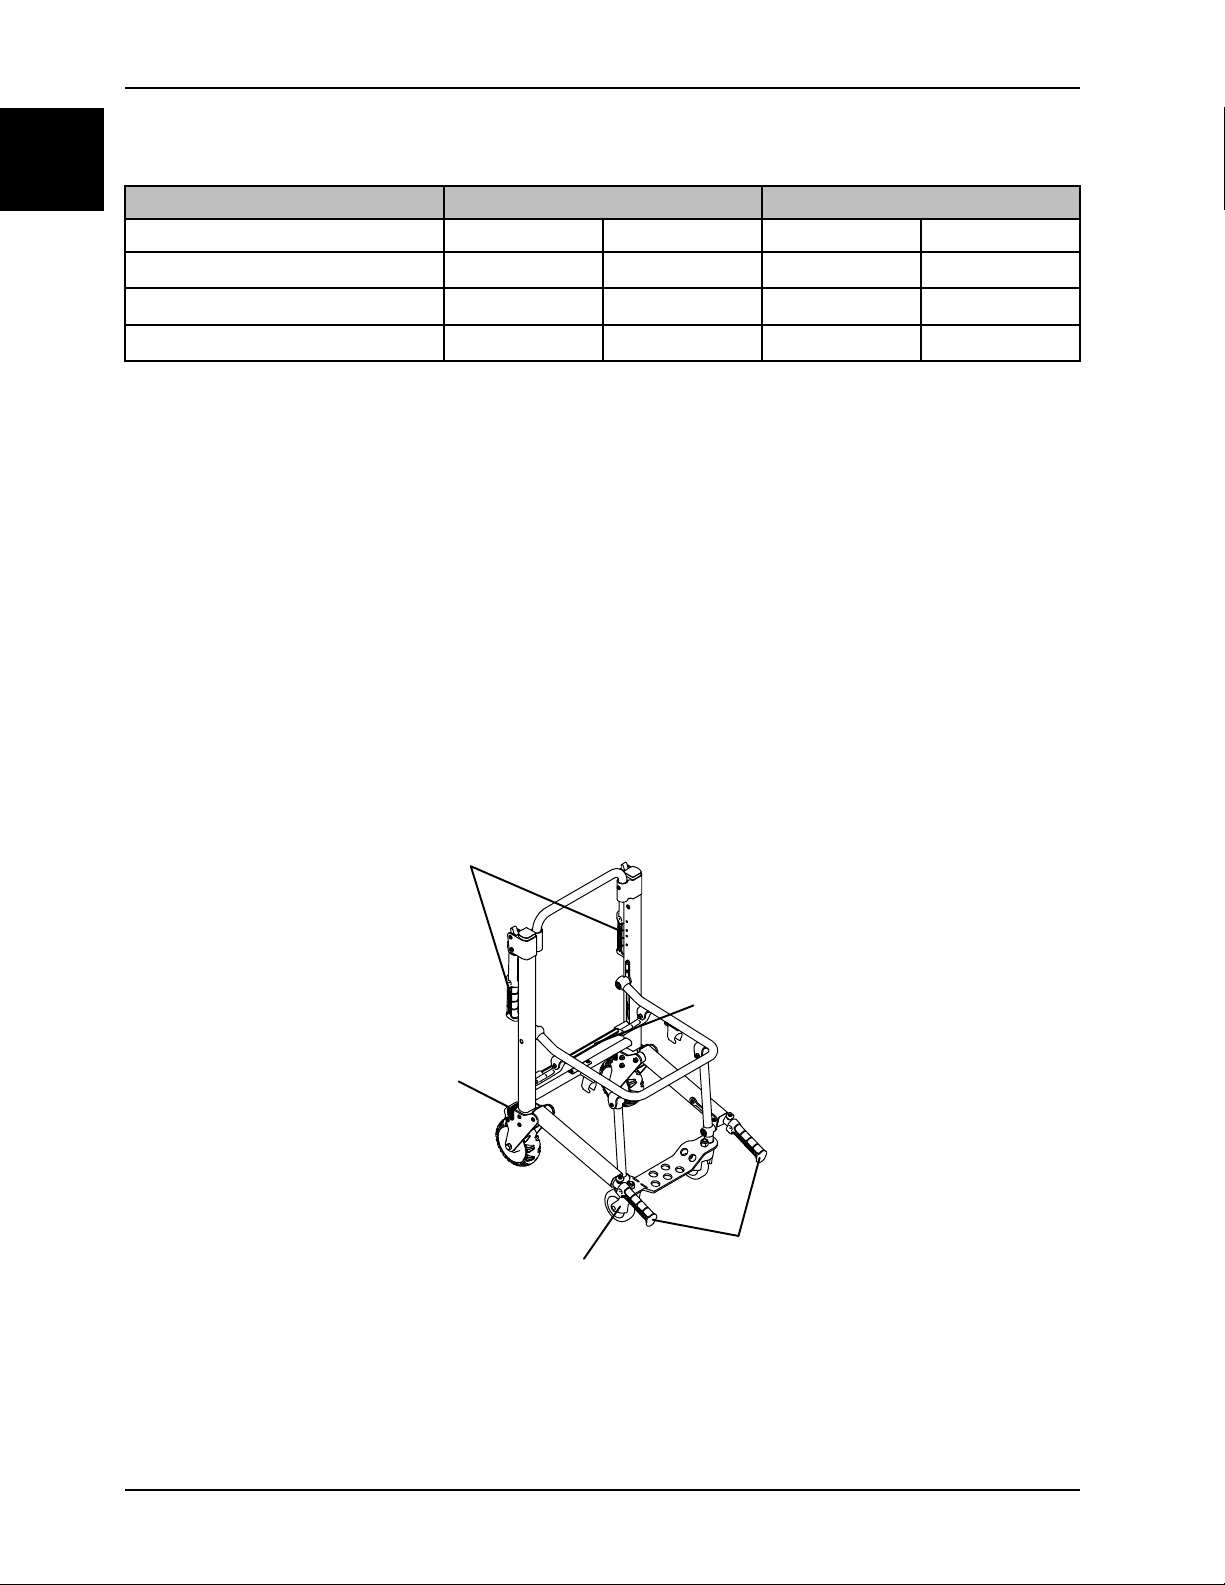
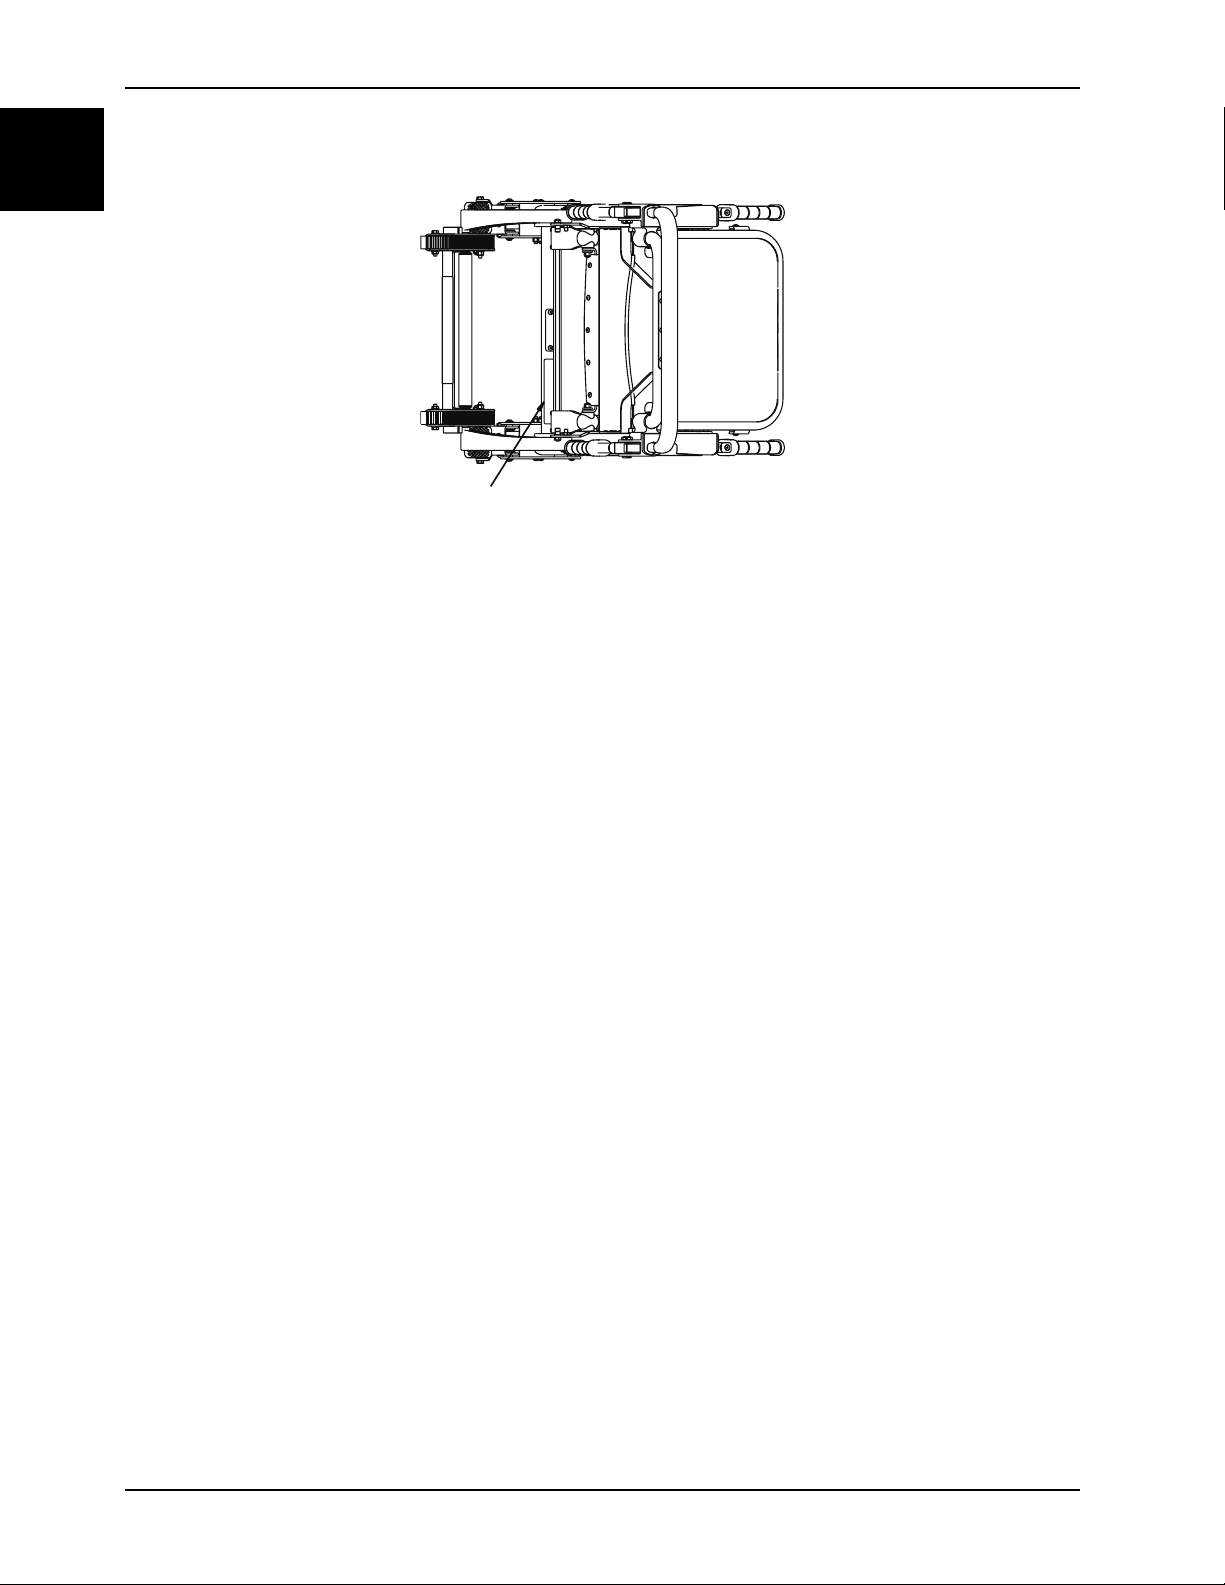
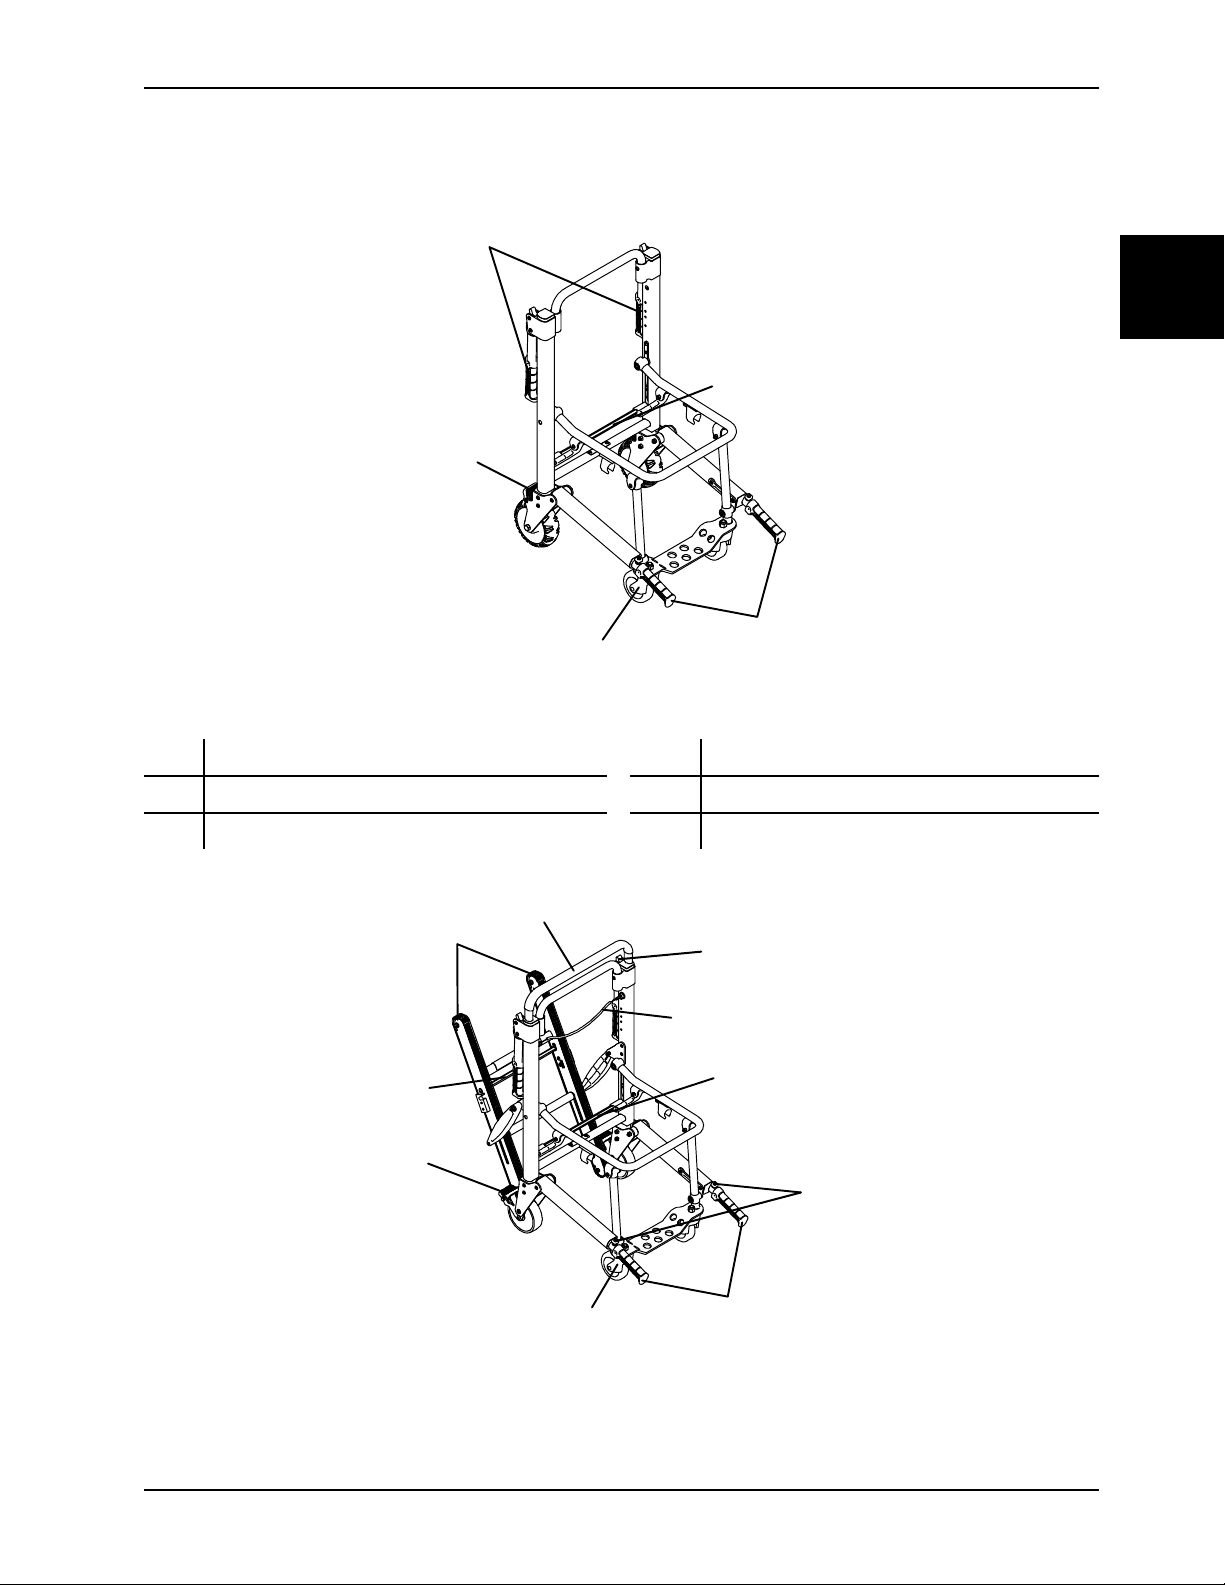
Product illustration
Figure 1-1: 6251
1-6 6252-009-005 REV D www.stryker.com
Page 13

Introduction
A
B
C
D
E
F
G
H
I
J
Product illustration (Continued)
A Wheel lock D Lock bar
B Caster E Head end lift handle
C Foot end lift handle
English
EN
Figure 1-2: 6252
A Wheel lock F
B Caster G Lift handle release lever
C Foot end lift handle H
D Lock bar I
E Foot end lift handle button J Stair-TREAD track release bar
Upper control handle release cable
Upper control handle
Stair-TREAD system
Contact information
Contact Stryker Customer Service or Technical Support at: 1-800-327-0770.
Stryker Medical
3800 E. Centre Avenue
Portage, MI 49002
USA
To view your operations or maintenance manual online, see https://techweb.stryker.com/.
Have the serial number (A) of your Stryker product available when calling Stryker Customer Service or Technical
Support. Include the serial number in all written communication.
www.stryker.com 6252-009-005 REV D 1-7
Page 14
Introduction
A
English
EN
Serial number location
Date of manufacture
The year of manufacture is the first 2 digits of the serial number.
Setup
During setup, unpack the cartons and check all items for proper operation. Make sure that the product operates before
you place it into service.
Remove all the shipping and packaging materials from the product before use.
The vehicle patient compartment where the product will be used must be large enough to accommodate the folded
dimensions of the chair.
When necessary, modify the vehicle to fit the chair. Do not modify the chair.
1-8 6252-009-005 REV D www.stryker.com
Page 15
Operation
Operating guidelines
WARNING
• Always use all restraint straps to secure the occupant on the product. An unrestrained occupant may fall from the
product.
• Do not apply a wheel lock when an occupant is on the product or when moving the product to avoid the risk of
tipping.
• Always avoid getting dirt or other obstructions inside the tracks. The Stair-TREAD system may not work the same
on all stair surfaces and in all environmental conditions. Based on conditions, you may encounter varying amounts
of resistance. Water, ice, or debris on the stairs can affect operator footing and proper operation of the Stair-
TREAD system. To avoid injury, clear the path or consider an alternate route. Condensation, water, ice, or debris on
the Stair-TREAD system can cause unpredictable performance that results in a sudden change in the weight that
the operators must support.
• Do not attempt to transport occupant loads greater than what you can safely lift.
CAUTION
Always clear any obstacles that may interfere and cause injury to the operator or patient before operating the product.
• Operate the product only as described in this manual.
• Read all labels and instructions on the product before use.
• Always operate the chair on stairs with a minimum of two trained operators.
• Always advise the patient before you roll the chair, ascend stairs, or descend stairs. Stay with the patient and
control the product at all times.
• Only use the wheel locks during patient transfer or without a patient on the product.
• Always use all restraint straps to secure the patient on the product. An unrestrained patient may fall from the
product.
• Use properly trained helpers to control the cot, when necessary.
English
EN
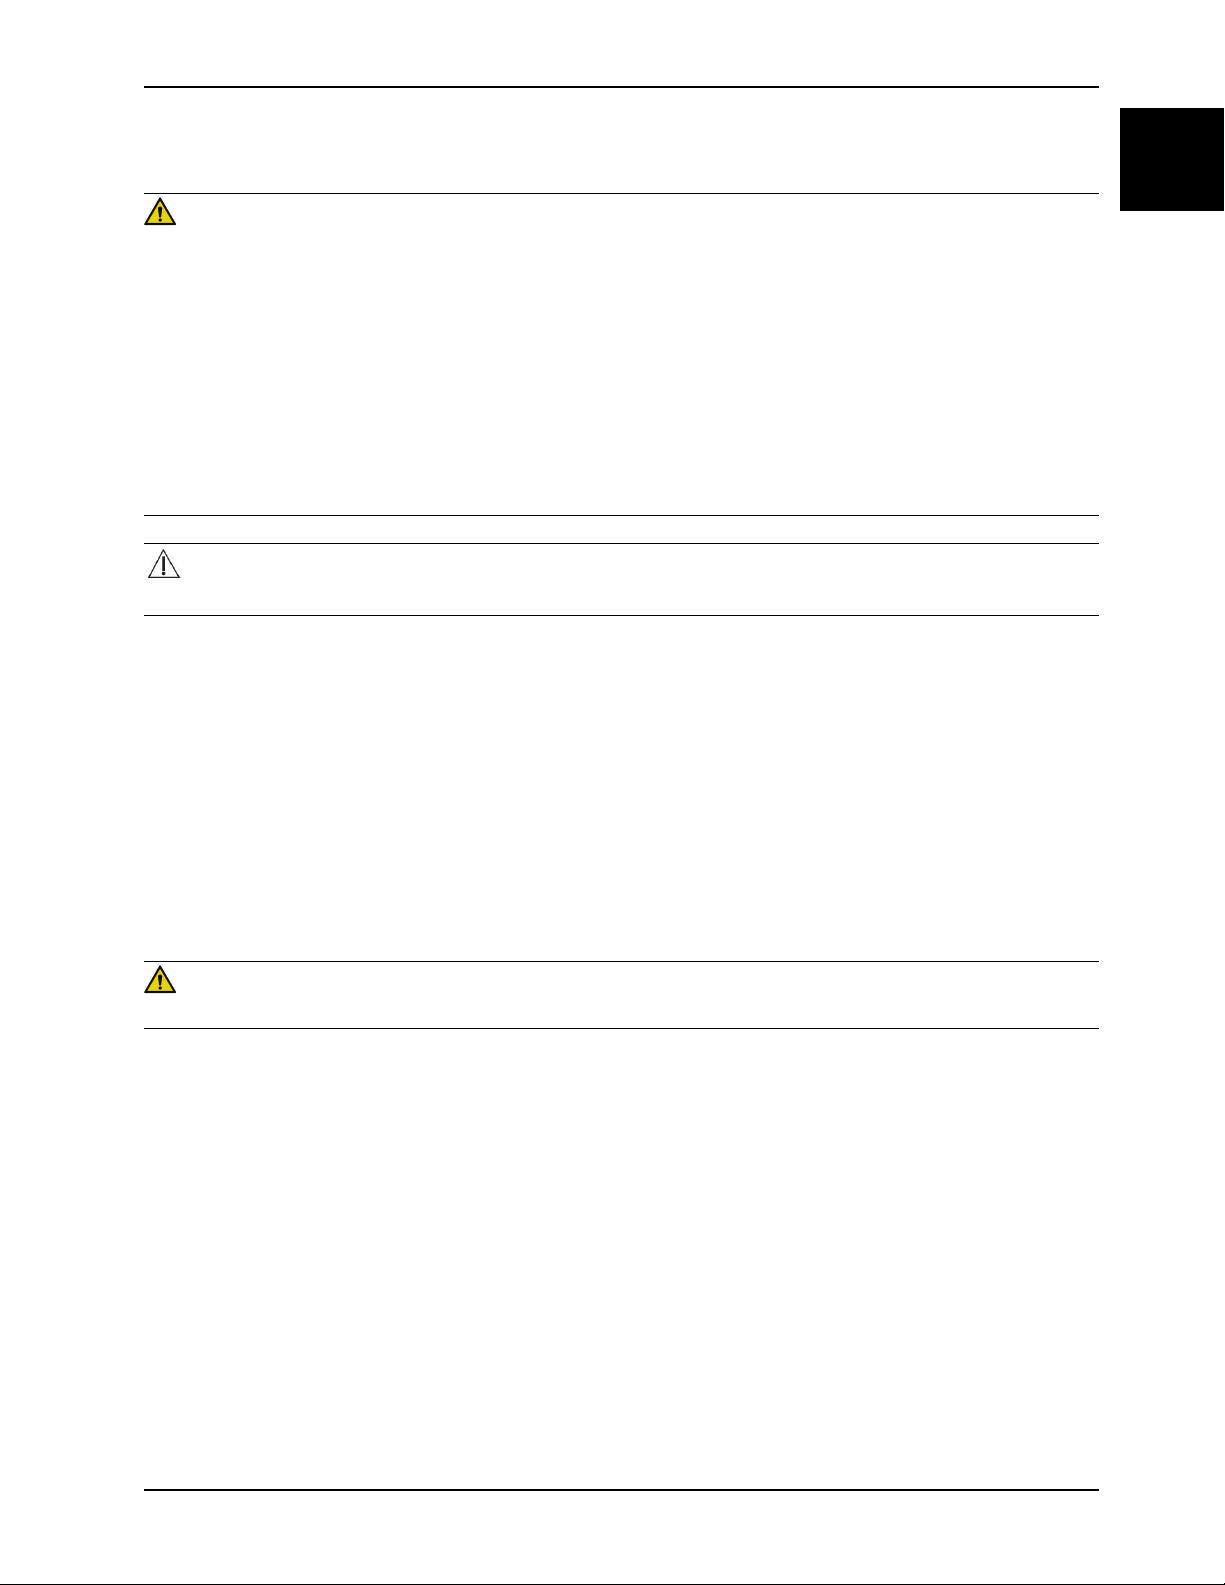
Unfolding the chair
WARNING
Always make sure that the chair is locked in the unfolded position before use. An unlocked chair may fold during use.
To unfold the chair:
1. Stand behind the chair.
2. Apply the wheel locks.
3. Pull the backrest and the extension handle apart (Figure 1-3 on page 1-10).
4. Pull up on the seat to make sure that it is locked in the unfolded position. If the chair does not fold, then the chair is
locked.
www.stryker.com 6252-009-005 REV D 1-9
Page 16
Operation
English
EN
Unfolding the chair (Continued)
Figure 1-3: Unfolding the chair
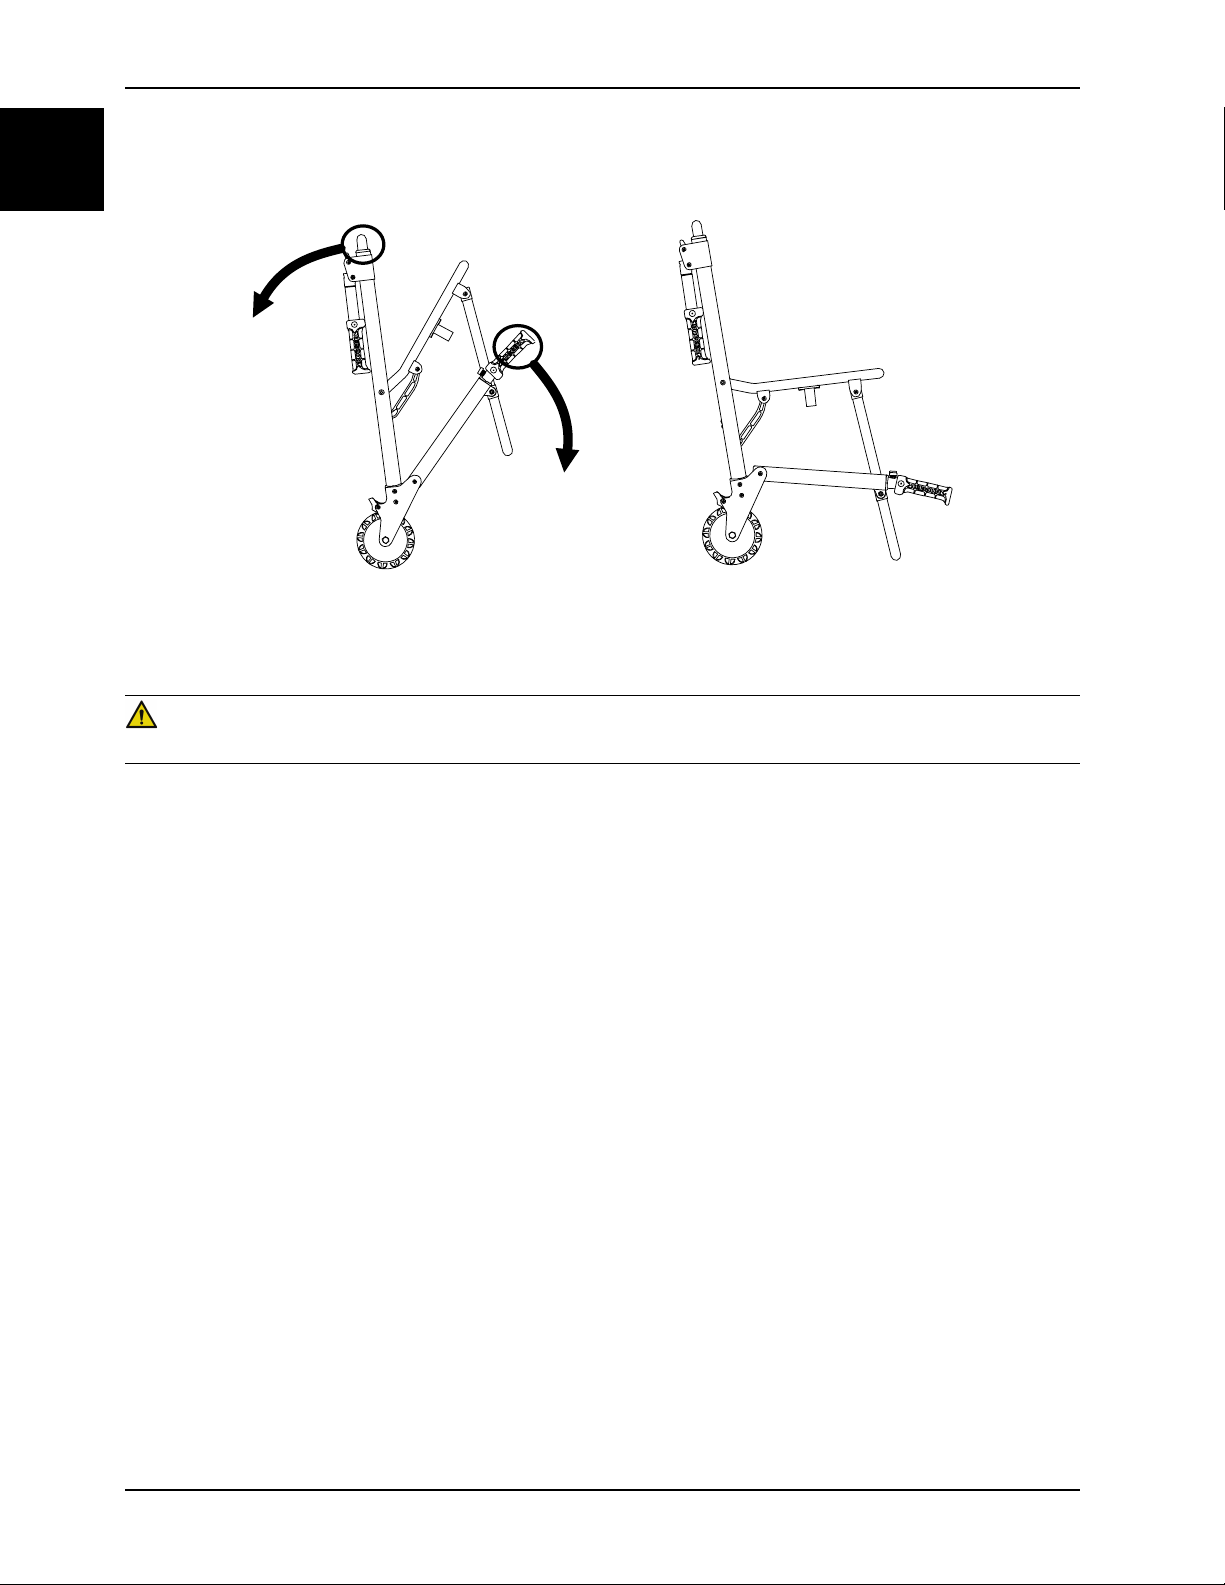
Folding the chair
WARNING
Always make sure that the chair is locked in the unfolded position before use. An unlocked chair can fold during use.
To fold the chair:
1. Apply the wheel locks.
2. Buckle the restraint straps. Fold the straps to prevent them from interfering.
3. Stand at the side of the chair.
4. Pull up on the red lock bar (A) at the rear of the chair (Figure 1-4 on page 1-11).
5. Tip the chair forward.
6. Fold the seat up to the backrest until the front legs lock into the clips on the bottom of the seat tube.
Note: If applicable, rotate the front casters, so they do not interfere when you fold the chair.
1-10 6252-009-005 REV D www.stryker.com
Page 17
Operation
A
Folding the chair (Continued)
Store the chair in a cool, dry environment that is above freezing temperature and out of direct sunlight.
Figure 1-4: Folding the chair
Transferring the occupant to the chair
WARNING
• Do not use the chair with suspected cervical, spinal, or fracture injuries.
• Do not leave an occupant unattended. Hold the product while an occupant is on the product.
English
EN
To transfer the occupant to the product:
1. Place the product beside the occupant.
2. Apply the wheel locks to stop the product from moving.
3. Open the restraint straps.
4. Transfer the occupant to the product by using accepted EMS procedures.
5. Secure the occupant to the product with all of the restraint straps.
6. Release the wheel locks before you transport the product.
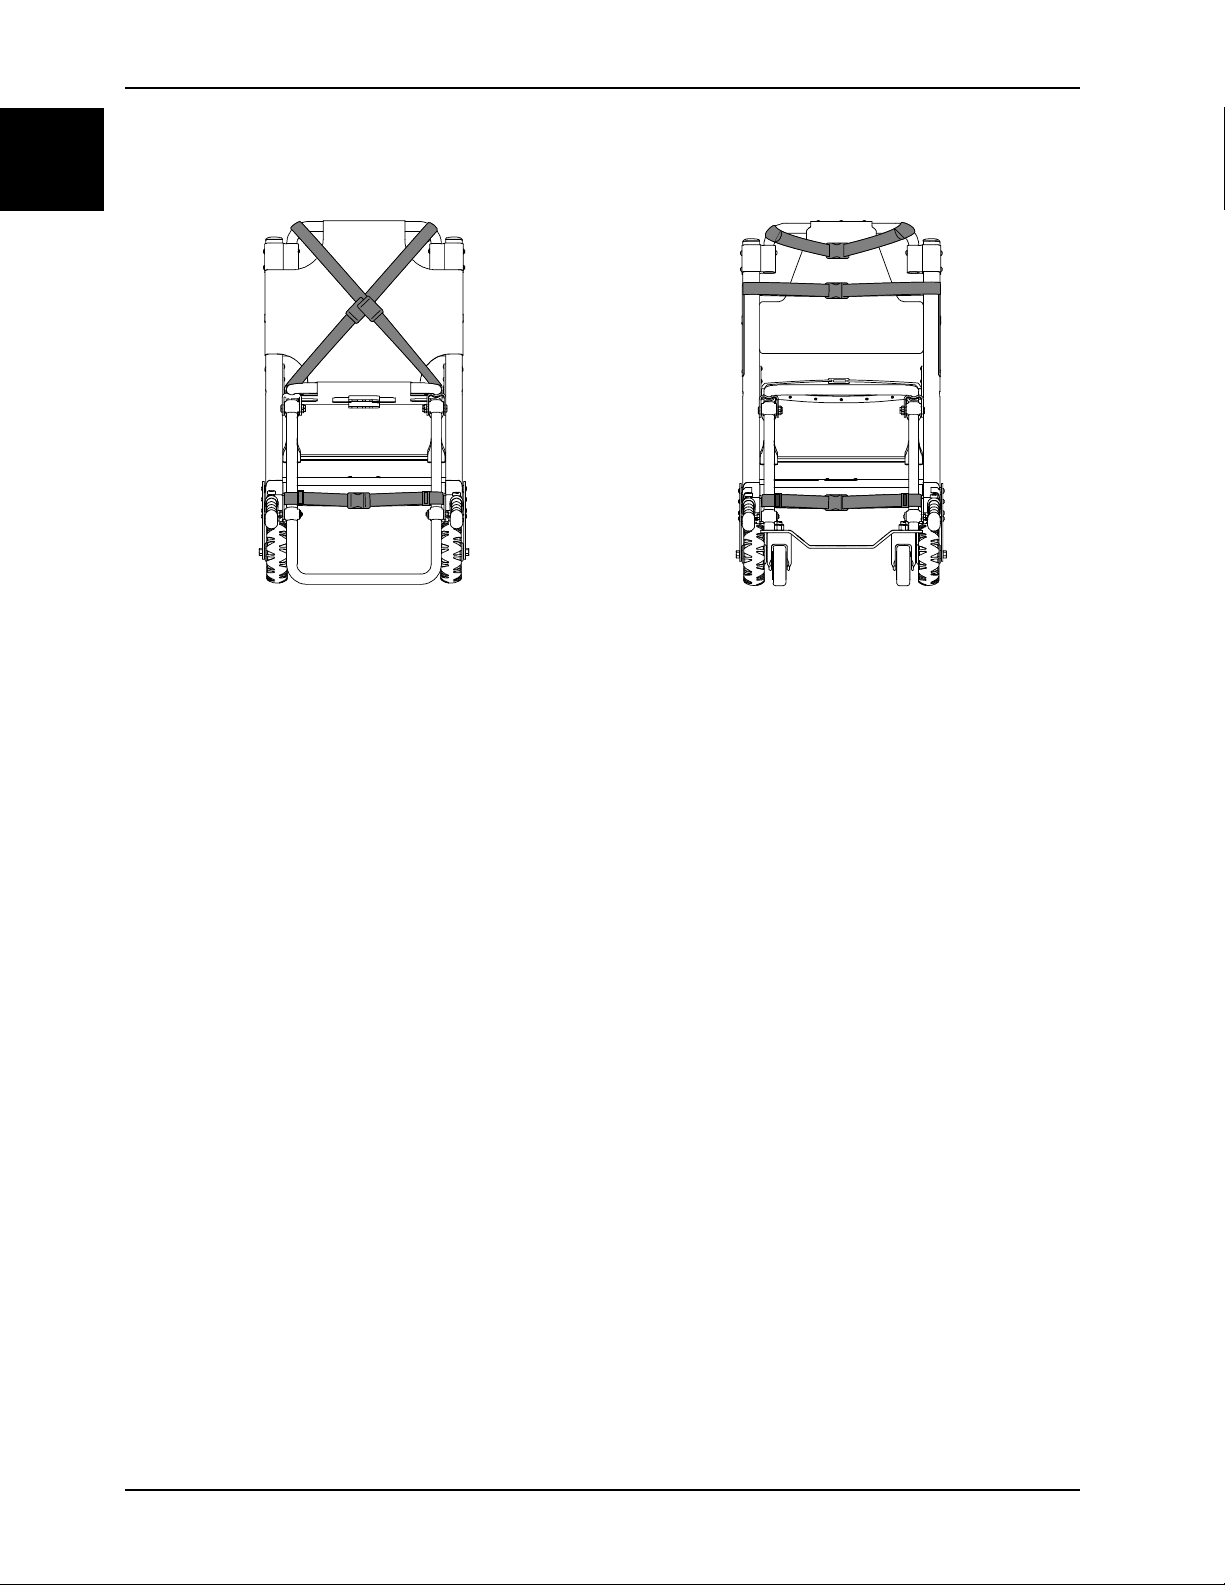
Securing the occupant with the restraint straps
You can use the restraint straps in two configurations.
WARNING
Always use all restraint straps to secure the occupant on the product. An unrestrained occupant may fall from the
product.
www.stryker.com 6252-009-005 REV D 1-11
Page 18
Operation
English
EN
Securing the occupant with the restraint straps (Continued)
Figure 1-5: Cross-chest configuration
Buckle the chest restraint straps in an X pattern across
the occupant’s chest.
Buckle one restraint strap across the occupant’s chest.
Buckle the other restraint strap across the occupant’s lap.
Figure 1-6: Chest and lap configuration
For both configurations, match up the color coded restraint straps, and then buckle the ankle restraint strap across the
occupant’s legs.
Secure restraint straps to the product in the required attachment locations (Figure 1-5 on page 1-12 or Figure 1-6 on
page 1-12). Restraint strap attachment locations should provide strong anchorage and proper restraint position. Do not
allow restraint straps to interfere with equipment or accessories. Buckle restraint straps when the cot is not in use.
Open the restraint straps and place them at either side of the chair while you position the occupant on the seat.
Lengthen the restraint straps, buckle them around the occupant, and shorten them to tighten.
• To open the restraint strap, press the tabs on the side of the buckle receiver. This allows you to release the buckle
latch plate and pull it out of the receiver.
• To close the restraint strap, push the latch plate into the receiver until you hear a click.
• To lengthen the restraint strap, grasp the buckle latch plate, turn it at an angle to the webbing, then pull it out. A
hemmed tab at the end of the webbing prevents the latch plate from coming off of the strap.
• To shorten the restraint strap, grasp the hemmed tab and pull the webbing back through the latch plate to tighten.
When you buckle a restraint strap around an occupant, secure the latch plate and remove any loose webbing from the
chair.
Attaching the chest restraint straps
To attach the chest straps in the cross-chest configuration:
1. Wrap each strap around the chair frame. Insert the end of the strap through the loop. Pull the strap tight.
2. Pull the strap across the occupant’s chest. Lengthen the strap as necessary.
3. Buckle the strap.
4. Pull the loose end of the strap to tighten it around the occupant.
5. Repeat for the second strap and the lap belt.
1-12 6252-009-005 REV D www.stryker.com
Page 19
Operation
Attaching the ankle strap
To attach the ankle strap:
1. Remove the three plastic pieces from the strap.
2. Thread the strap through one of the plastic D rings and slide the ring down to the end of the strap up to the white
label.
3. Loop the strap around the front leg of the chair and pull the loose end of the strap through the ring. Pull until the
ring rests against the footrest tube.
4. Thread the strap through the other D ring.
5. Loop the strap around the other front leg of the chair and pull the loose end of the strap through the loop. Pull until
the D ring rests against the footrest tube.
6. Attach the final male end clip on the strap.
Proper lifting techniques
When you lift the product and occupant, follow these proper lifting techniques to avoid the risk of injury:
• Keep your hands close to your body
• Keep your back straight
• Coordinate all movement with your partner
• Lift with your legs
• Avoid twisting
English
EN
Transporting the occupant on flat surfaces
WARNING
Do not push the Model 6252 with the upper control handle in the fully extended position. Pushing the chair with the
handle in the fully extended position may cause the chair to tip when you encounter obstacles.
CAUTION
Always use caution when using casters. Casters are not suitable for all surfaces.
To transport the occupant on flat surfaces:
1. Push and guide the chair with the head end lift handles or the backrest tube.
2. Lift the chair over and around obstructions with the head end and foot end lift handles.
Transporting the occupant down stairs - Model 6251
WARNING
• Always transport the occupant on stairs with a minimum of two operators.
• Always lock the lift handles in position before using the lift handles to lift the chair.
To transfer the occupant down stairs:
1. Foot end operator: Position yourself in front of the chair.
2. Head end operator: Align yourself with the stairs.
www.stryker.com 6252-009-005 REV D 1-13
Page 20
Operation
English
EN
Transporting the occupant down stairs - Model 6251 (Continued)
3. Foot end operator: Push each red foot end lift handle button and pull out each handle until it stops. Release the
button to lock the handle into position.
4. Head end operator: Unfold the head end lift handles and face down the stairs.
5. Foot end operator: Face backward for better occupant monitoring or forward for a better view of the stairs and to
maneuver around obstacles.
Note: Although the head end operator can face either direction while lifting and carrying, always follow any
applicable protocols when you carry the chair.
6. Both operators - Lift the chair together. Use the head end lift handles and foot end lift handles. Follow proper lifting
techniques (Proper lifting techniques on page 1-13). Avoiding any obstructions, carry the chair slowly down the
stairs.
Transporting the occupant down stairs - Model 6252
WARNING
• Always transport the occupant on stairs with a minimum of two operators.
• Always lock the lift handles in position before you use the lift handles to lift the chair.
• Always lock the Model 6252 Stair-TREAD system in position before you transport an occupant.
• Avoid getting dirt or other obstructions inside the tracks. The Stair-TREAD system may not work the same on all
stair surfaces and in all environmental conditions. Based on conditions, you may encounter varying amounts of
resistance. Water, ice, or debris on the stairs can affect operator footing and proper operation of the Stair-TREAD
system. To avoid injury, clear the path or consider an alternate route. Condensation, water, ice, or debris on the
Stair-TREAD system can cause unpredictable performance that results in a sudden change in the weight that the
operators must support.
• Always clean and dry the Stair-TREAD system before you transport an occupant.
• Do not attempt to transport occupant loads greater than what you can safely lift.
CAUTION
Always release the red track release bar before you click the Stair-TREAD system into the locked position. Try to fold
the chair before you descend the stairs to make sure that the Stair-TREAD system is locked.
To transport the occupant down stairs:
1. Roll the chair to the stairs and align it with the edge of the first step.
2. Foot end operator: Push the red release buttons to extend the foot end lift handles and pull the handles out until
they stop. Release the buttons to lock the handles.
3. Head end operator: Use one hand to pull the red upper control handle release cable. Use the other hand to pull up
and fully extend the handle. Release the cable and make sure that the handle is locked on both sides in the fully
extended position.
4. Head end operator: Squeeze the red track release bar against the black cross tube. Relax your grip on the release
bar and forcefully pull the Stair-TREAD system to the fully extended position until both sides lock securely. Always
make sure that both sides of the Stair-TREAD system are locked by trying to fold it back up.
5. Operators face each other while you descend the stairs.
6. Head end operator: Tilt the chair back just far enough to allow the Stair-TREAD system to contact the floor.
7. Both operators - Maintaining the angle, guide the chair over the edge of the stairs. Allow the Stair-TREAD system to
connect with the first step.
8. Both operators - Glide down the stairs until the treads are level across the edges of two or three steps.
9. Head end operator: Apply slight downward pressure on the extendable upper control handle while the foot end
operator applies slight upward pressure on the foot end lift handles to keep the chair from rocking forward as it
glides down the stairs.
1-14 6252-009-005 REV D www.stryker.com
Page 21

Operation
Transporting the occupant down stairs - Model 6252 (Continued)
10. Foot end operator: when the track reaches the last step, release the front handles. Head end operator: allow the
chair to tip forward until all four wheels are on the ground. Roll the chair, see Transporting the occupant on flat
surfaces on page 1-13.
11. To fold the Stair-TREAD system, pull the red track release bar toward the black cross bar and fold the track up
toward the chair. Make sure that the Stair-TREAD system is locked in place.
If, while descending the stairs, either operator needs to pause or rest, tilt the chair forward just enough to allow the rear
wheels to rest on the tread of the stair. To continue down the stairs from the resting position, the head end operator
exerts slight downward pressure on the upper control handle while the foot end operator provides slight upward
pressure to tilt the chair back and activate the Stair-TREAD system.
Transporting the occupant up stairs
WARNING
• Always transport the occupant on stairs with a minimum of two trained operators.
• Always lock the lift handles in position before using the lift handles to lift the chair.
To transport the occupant up stairs:
1. Roll the chair to the bottom of the stairs with the occupant’s back to the stairs.
2. Foot end operator: Push the red release buttons to extend the foot end lift handles and pull the handles out until
they stop. Release the buttons to lock the handles.
3. Head end operator: Unfold the head end lift handles.
4. Foot end operator: Face up the stairs.
5. Head end operator: Face backward to better monitor the occupant or forward for a better view of the stairs and to
maneuver around obstacles.
Note: Although the head end operator can face either direction while lifting and carrying, always follow any
applicable protocols when you carry the chair.
6. Both operators - Lift the chair together. Use the head end lift handles and foot end lift handles. Follow Proper lifting
techniques on page 1-13. Avoiding any obstructions, carry the chair slowly down the stairs.
English
EN
Applying or releasing a wheel lock
WARNING
• Do not apply a wheel lock when a patient is on the product or when you move the product to avoid the risk of tipping.
• Do not install or apply a wheel lock on a product with worn wheels that are less than 6 in. diameter.
• Do not leave a patient or occupant unattended. Hold the product while a patient or occupant is on the product.
To apply a wheel lock, press down on the pedal until it stops and is resting against the surface of the wheel.
To release a wheel lock, press down on the top of the pedal with your foot or lift up on the pedal with your toe. The top
of the pedal will rest against the caster frame when you release the wheel lock.
Note: Wheel locks help prevent the product from rolling while unattended. Wheel locks may not provide sufficient
resistance on all surfaces or under loads.
www.stryker.com 6252-009-005 REV D 1-15
Page 22
Operation
A
B
English
EN
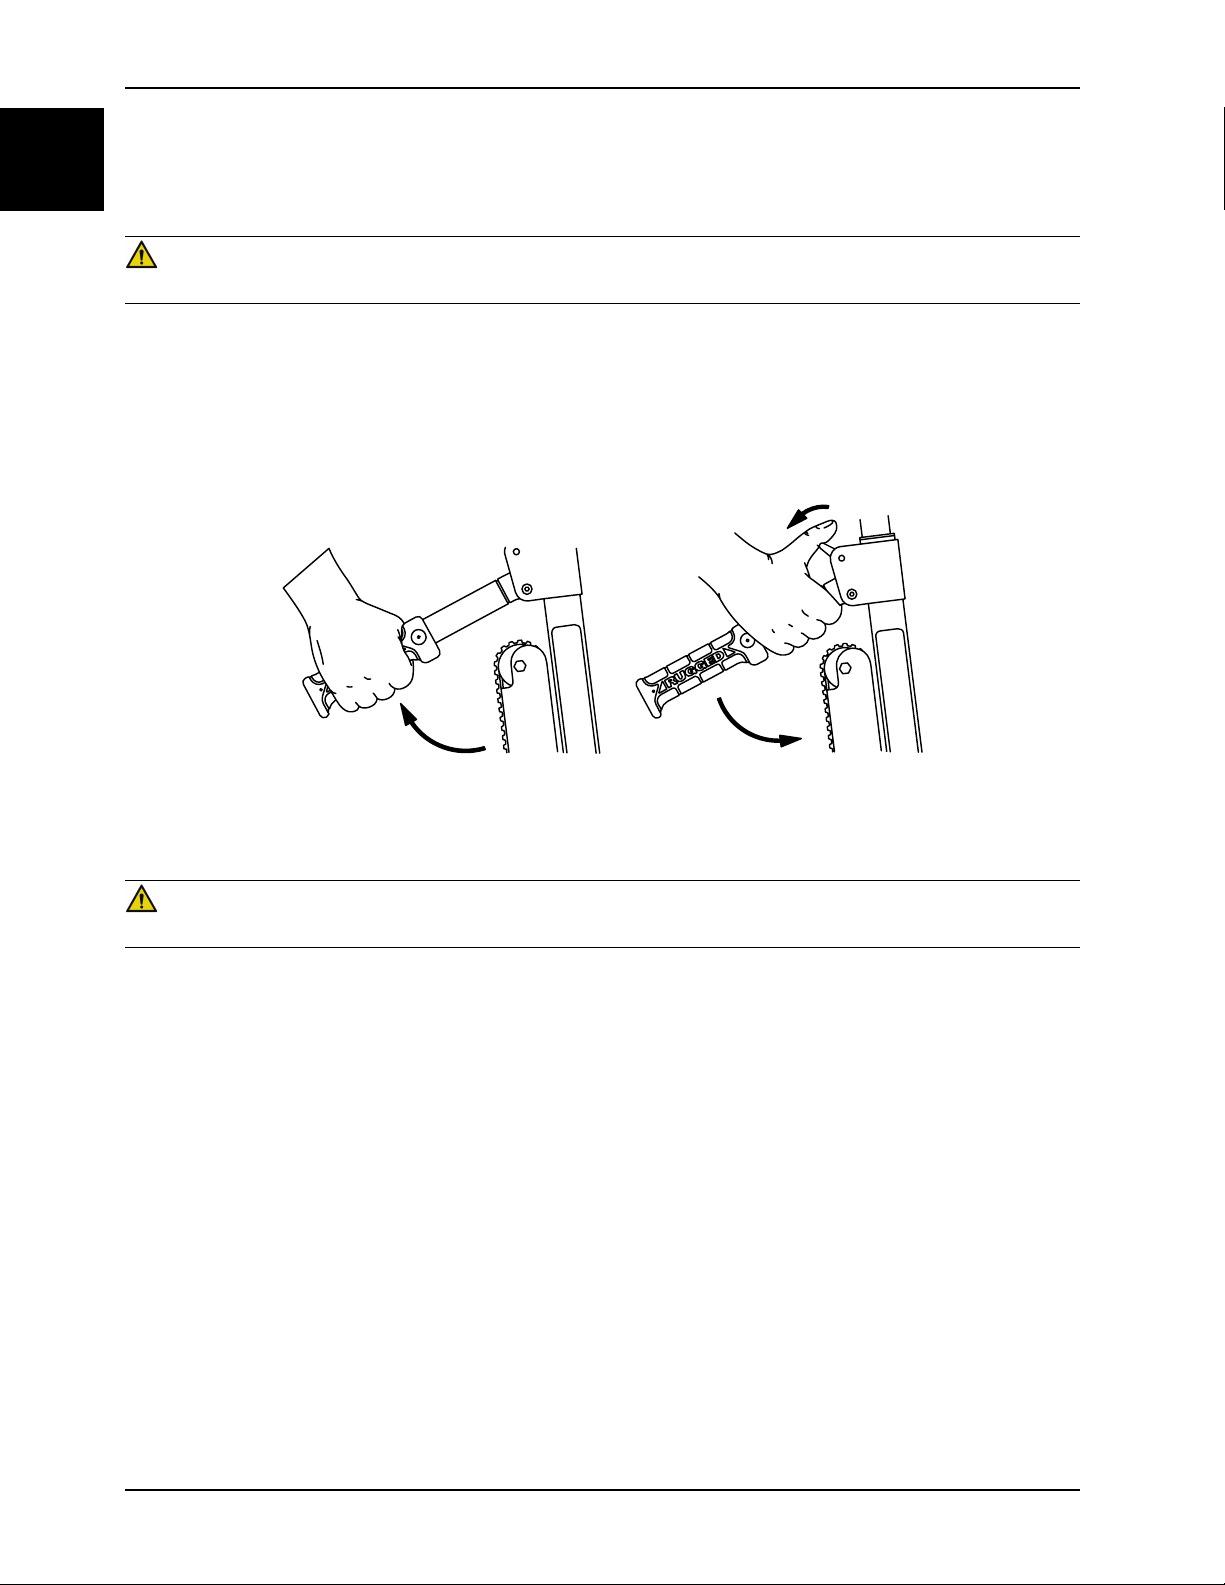
Raising or lowering the locking rear lift handles
You can use the locking rear lift handles to tip the chair back.
WARNING
Always lock the lift handles in position before you use the handles to tip the chair back.
To raise the locking rear lift handles, rotate the handles up until they lock in position.
To lower the locking rear lift handles:
1. Lift up on the locking rear lift handle (A) (Figure 1-7 on page 1-16).
2. Pull the red handle trigger (B) toward you with your thumb.
3. Fold the locking rear lift handle down against the chair frame.
Figure 1-7: Lowering the locking rear lift handles
Attaching the optional head support to the upper control handle
WARNING
Do not use the chair with suspected cervical, spinal, or fracture injuries.
To attach the head support to the extendable upper control handle:
1. Wrap the loose ends of the strap around the vertical portions of the handle, then feed them through the plastic
loops.
2. Pull tight and secure the strap to itself.
3. Adjust the height by loosening the strap, moving it to the desired location, and tightening it again.
Supporting the occupant’s head with the optional head support
To support the occupant’s head with the head support:
1. Extend the upper control handle.
2. Pull the red upper control handle release cable with one hand.
3. Pull up on the handle with your other hand.
4. Release the cable. Make sure that the handle is locked into one of the two available positions.
5. Attach the head support (Attaching the optional head support to the upper control handle on page 1-16).
6. Position the head support at the base of the occupant’s head to support the head.
7. For unconscious, or semiconscious occupants, secure the head with the other two parts of the strap.
8. Wrap the head support around the occupant’s head. Overlap the strap ends to the desired tightness to secure.
1-16 6252-009-005 REV D www.stryker.com
Page 23
Operation
O O
O O
O O OO
H H
H
H
O
O
H
O
H
O
H
O
H
O
H
O
H H
H
O
Supporting the occupant’s head with the optional head support (Continued)
When not in use, wrap the strap ends around the handle and attach the strap to the back of the head support.
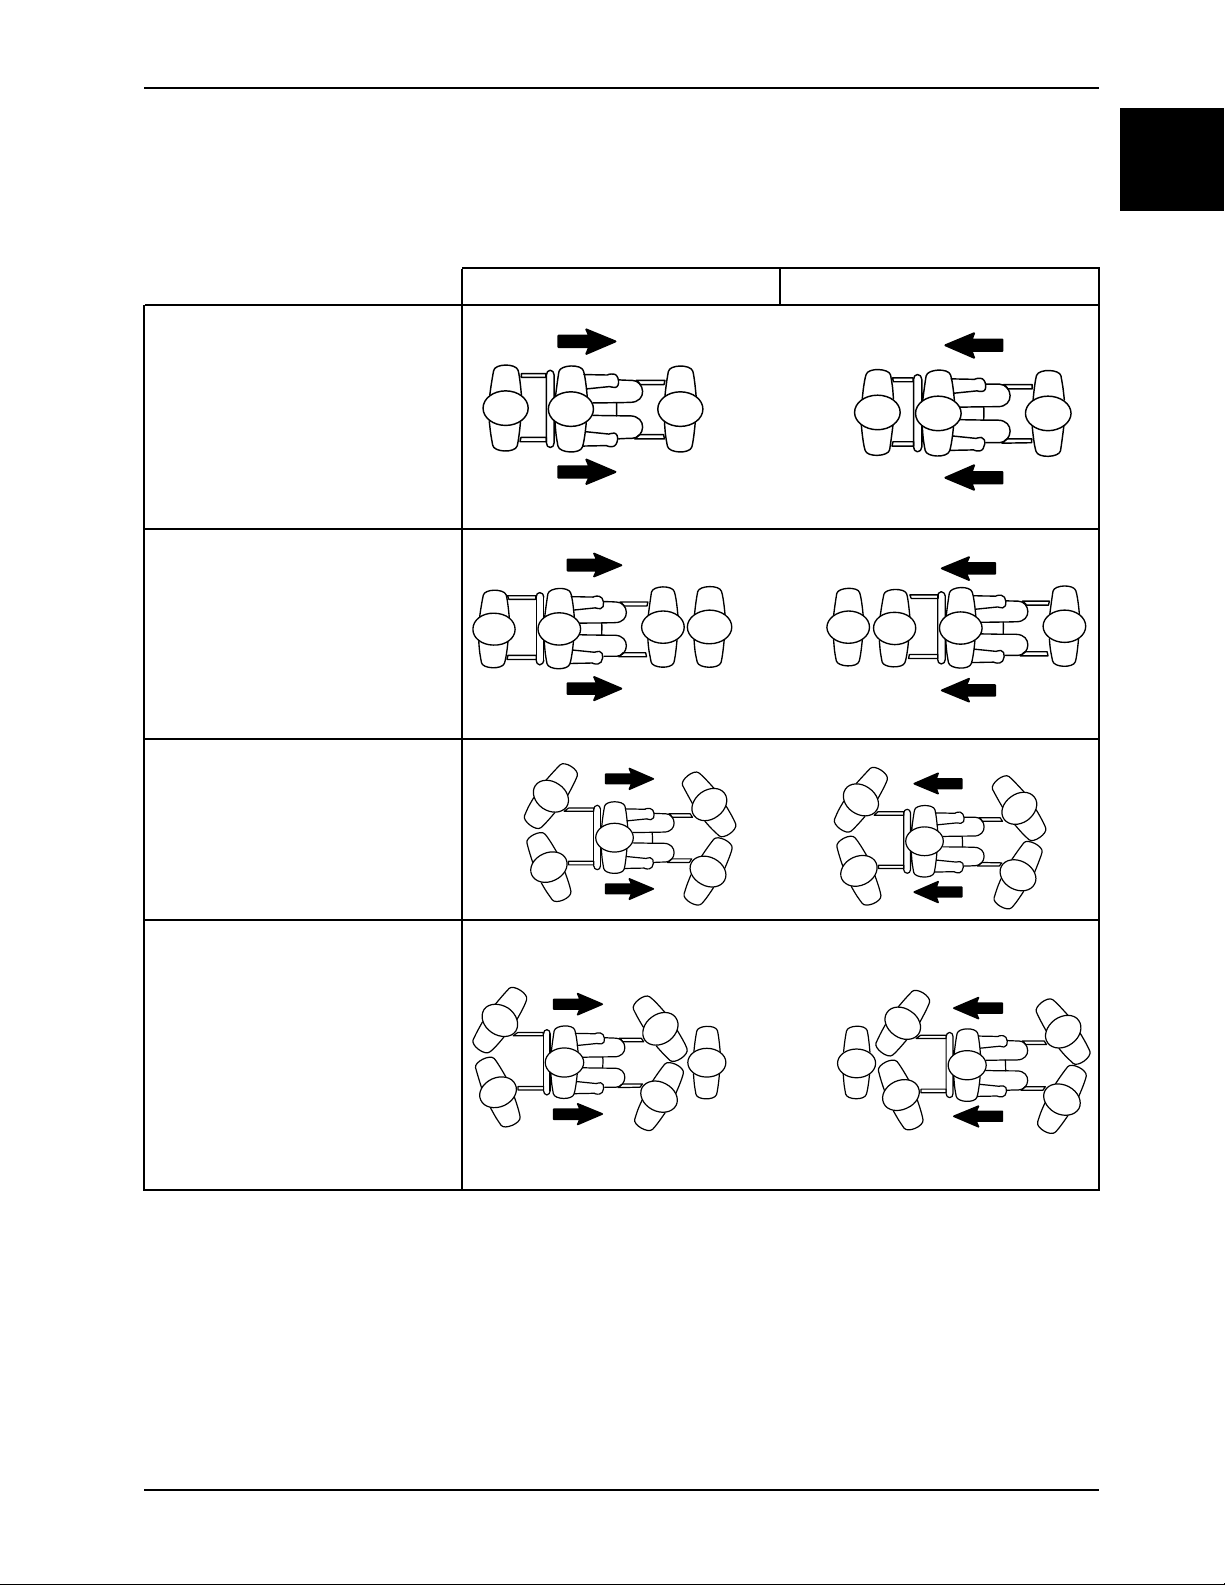
Positioning operators and helpers for additional assistance
Down stairs Up stairs
Two operators (O)
Two operators (O)
One helper (H)
English
EN
Two operators (O)
Two helpers (H)
Two operators (O)
Three helpers (H)
www.stryker.com 6252-009-005 REV D 1-17
Page 24

Operation
English
EN
Installing the elastic oxygen bottle holder
WARNING
• Always make sure that you secure all tubes, regulators, and ancillary accessories for the oxygen bottle to prevent
interference with the tracks, wheels, or other mechanisms of the stair chair.
• Failure to properly clean or dispose of contaminated stair chair components will increase the risk of exposure to
blood borne pathogens and may cause injury to the patient or the operator.
• The elastic oxygen bottle holder is for use only with RUGGED® Stair-PRO stair chairs and D-size oxygen bottles.
• Failure to properly secure the oxygen bottle and oxygen bottle accessories could interfere with the operation of the
stair chair.
• Always make sure that you secure the oxygen bottle to the elastic oxygen bottle holder using the red Velcro® strap.
• Always make sure that the oxygen bottle is secure in the elastic oxygen bottle holder and that the regulator valve of
the oxygen bottle does not protrude from the width of the stair chair.
• Always remove the oxygen bottle from the elastic holder before attempting to fold or store the stair chair.
1. Make sure that the stair chair is in the open position before you begin installing the elastic oxygen bottle holder.
2. Place the elastic oxygen bottle holder between the two extension handle tubes under the seat.
3. Insert each of the four Velcro® straps through the plastic buckles.
4. Pull down on the straps so they are tight before you secure the Velcro®.
5. Pull up on the red handle and slide the D-size oxygen bottle into the elastic oxygen bottle holder.
Notes
• Make sure that you slide the bottom end of the oxygen bottle in first.
• When you attach the elastic oxygen bottle holder, make sure that the weight capacity of the chair is visible.
6. Thread the red strap through the red handle. When the red strap is not in use, you can attach the red strap to the
bottom of the elastic oxygen bottle holder.
7. Pull the red Velcro® strap down until tight and secure it around the oxygen bottle.
1-18 6252-009-005 REV D www.stryker.com
Page 25
Cleaning
Cleaning procedure
WARNING
Always use any appropriate personal protective equipment while power washing to avoid inhaling contagion. Power
washing equipment may aerate contamination.
CAUTION
• Do not steam clean or ultrasonically clean the product.
• Do not exceed 180 °F (82 °C) as the maximum water temperature.
• Do not exceed 1500 psi (130.5 bar) as the maximum water pressure. If you are using a hand held wand to wash the
product, keep the pressure nozzle at a minimum of 24 in. (61 cm) from the product.
• Always allow to air dry.
• Do not clean, service, or perform maintenance while the product is in use.
The product is power washable. The product may show some signs of oxidation or discoloration from continuous
washing. No degradation of the product’s performance will occur from power washing as long as you follow the proper
procedures.
• Follow the cleaning solution manufacturer’s dilution recommendations exactly.
• The preferred method Stryker Medical recommends for power washing the product is with the standard hospital
surgical cart washer or hand held want unit.
• Clean Velcro® after each use. Saturate Velcro® with disinfectant and allow disinfectant to evaporate. Appropriate
disinfectant for nylon Velcro® should be determined by the service.
• Immersing restraint strap metal buckles can cause buckle corrosion and is not recommended. Rinse with clean
water and allow to air dry to reduce chance of corrosion. Replace restraints if metal buckles are corroded.
• The elastic oxygen bottle holder is made with high quality woven elastic. Make sure that you clean the elastic
oxygen bottle holder regularly.
English
EN
Cleaning the track frame
If a foreign material gets between the Stair-TREAD system belt and track frame, you must clean the track frame.
To clean the track frame:
1. Loosen the track belts.
2. Remove the rear wheels.
3. Clean the track frame with rubbing alcohol.
4. Use water at high pressure to rinse the belts. Clean both the inside and outside belt surfaces.
5. Allow the belts to completely dry.
6. Reassemble the track belts and the rear wheels.
7. Following the appropriate warnings and cautions, test the performance of the chair with a simulated occupant
weight while you descend a flight of stairs.
If performance does not return to the original conditions, you may need to recondition or replace the belts.
Suggested cleaners
In general, when used in concentrations recommended by the manufacturer, either phenolic type or quaternary
(excluding Virex® TB) type disinfectants can be used. Iodophor type disinfectants are not recommended for use
because staining may occur.
www.stryker.com 6252-009-005 REV D 1-19
Page 26

Cleaning
English
EN
Suggested cleaners (Continued)
WARNING
Always wipe the product with clean water and dry after cleaning. Some cleaning products are corrosive in nature and
may cause damage to the product. Failure to properly rinse and dry the product leaves a corrosive residue on the
surface of the product and may cause premature corrosion of critical components.
Suggested cleaners include:
• Quaternary cleaners (active ingredient - ammonium chloride)
• Phenolic cleaners (active ingredient - o-phenylphenol)
• Chlorinated bleach solution (5.25% - less than 1 part bleach to 100 parts water)
Avoid over saturation. Do not allow the product to stay wet longer than the chemical manufacturer's guidelines for
proper disinfecting.
Note: Failure to follow the above directions when using these types of cleaners may void this product’s warranty.
1-20 6252-009-005 REV D www.stryker.com
Page 27
Preventive maintenance
Remove product from service before you perform the preventive maintenance inspection. Check all items listed during
annual preventive maintenance for all Stryker Medical products. You may need to perform preventive maintenance
checks more often based on your level of product usage. Service only by qualified personnel.
Note: Clean and disinfect the exterior of the support surface before inspection, if applicable.
Operation Schedule
Cleaning and disinfecting
Inspection For 1-25 calls per month, inspect
Stair-TREAD system belt
reconditioning (6252)
Inspect the following items:
All fasteners secure (reference all assembly drawings)
All welds intact, not cracked or broken
No bent or broken tubing or sheet metal
No debris in wheels
All wheels secure and rolling
Front casters secure, rolling, and swiveling (if equipped)
Wheel locks hold wheels securely when on and clear the wheels when off
Chair unfolds and locks properly
No rips or cracks in seat or backrest
Restraint straps intact and working
Foot end carrying handles extend and lock in place
Head end carrying handles fold and unfold
Upper control handle extends and locks in all positions
Stair-TREAD system mechanism unfolds and locks in place (if equipped)
Stair-TREAD system belt rolls (if equipped)
Stair-TREAD system belt inner cords not showing; replace if necessary (if equipped)
Stair-TREAD system performs as desired; recondition belts if necessary (if equipped)
No lubricants present on the Stair-TREAD system belts or the track frame surfaces
Upper release handle cable not worn or frayed; replace if necessary (model 6252)
Optional accessories intact and operating properly
Each use
chair every 6 months
For 26-200 calls per month, inspect
chair every 3 months
For 201+ calls per month, inspect
chair monthly
After usage on approximately 500
flights of stairs or if the Stair-TREAD
system performance is sluggish
Procedure
See cleaning
See checklist below
See track belt reconditioning in the
maintenance manual
English
EN
Product serial number:
Completed by:
Date:
www.stryker.com 6252-009-005 REV D 1-21
Page 28

sample text
Page 29
Schodišťové křeslo Stair-PRO®
6251
6252
Příručka pro obsluhu
2018/06 D.1 6252-009-005 REV D www.stryker.com
Page 30

sample text
Page 31
Symboly
Provozní příručka/Přečtěte si návod k použití
Značka CE
Autorizovaný zástupce pro Evropu
Obecná varování
Upozornění
Katalogové číslo
Číslo šarže
Sériové číslo
Patenty USA viz www.stryker.com/patents
Výrobce
Datum výroby
Bezpečná pracovní zátěž
Česky
CS
www.stryker.com 6252-009-005 REV D
Page 32

sample text
Page 33

Obsah
Definice varování/upozornění/poznámka..................................................................................................... 2-2
Přehled bezpečnostních opatření .............................................................................................................. 2-3
Úvod.................................................................................................................................................... 2-5
Popis výrobku.................................................................................................................................. 2-5
Indikace k použití ............................................................................................................................. 2-5
Očekávaná životnost......................................................................................................................... 2-5
Kontraindikace................................................................................................................................. 2-5
Technické parametry ........................................................................................................................ 2-6
Obrázek výrobku.............................................................................................................................. 2-7
Kontaktní informace..........................................................................................................................2-8
Umístění sériového čísla....................................................................................................................2-8
Datum výroby .................................................................................................................................. 2-8
Příprava ......................................................................................................................................... 2-8
Provoz ............................................................................................................................................... 2-10
Návod k obsluze............................................................................................................................. 2-10
Rozložení křesla ............................................................................................................................ 2-10
Složení křesla................................................................................................................................ 2-11
Přeprava osoby na křesle................................................................................................................. 2-12
Zajištění pacienta pomocí upínacích pásů ........................................................................................... 2-12
Připojení hrudních upínacích pásů..................................................................................................... 2-13
Připojení kotníkového upínacího pásu................................................................................................. 2-14
Správné postupy zvedání ................................................................................................................. 2-14
Přeprava osob na rovném povrchu..................................................................................................... 2-14
Přeprava osob ze schodů – model 6251 ............................................................................................. 2-14
Přeprava osob ze schodů – model 6252 ............................................................................................. 2-15
Přeprava osob po schodech nahoru ................................................................................................... 2-16
Zabrzdění nebo odbrzdění koleček .................................................................................................... 2-16
Zvedání nebo spouštění uzamykacích zadních zvedacích rukojetí............................................................ 2-17
Připojení volitelné podpěrky hlavy k horní ovládací rukojeti ..................................................................... 2-17
Podpora hlavy pacienta pomocí volitelné podpěrky hlavy........................................................................ 2-17
Umístění pracovníků obsluhy a pomocníků pro další pomoc.................................................................... 2-18
Instalace držáku kyslíkové láhve z elastické tkaniny .............................................................................. 2-19
Čištění ............................................................................................................................................... 2-20
Čištění ......................................................................................................................................... 2-20
Čištění kolejnic (model 6252) ........................................................................................................... 2-20
Doporučené čisticí prostředky........................................................................................................... 2-20
Preventivní údržba................................................................................................................................ 2-22
Česky
CS
www.stryker.com 6252-009-005 REV D 2-1
Page 34

Česky
CS
Definice varování/upozornění/poznámka
Text uvedený slovy VAROVÁNÍ, UPOZORNĚNÍ a POZNÁMKA má důležitý význam a je nutno si jej pečlivě přečíst.
VAROVÁNÍ
Upozorňuje čtenáře na situaci, jež by mohla vést k úmrtí nebo vážnému poranění, pokud se jí nevyvarujete. Může také
popisovat možné vážné nežádoucí reakce a bezpečnostní rizika.
UPOZORNĚNÍ
Upozorňuje čtenáře na možnou nebezpečnou situaci, jež by mohla mít za následek menší nebo středně vážné poranění
uživatele nebo pacienta, nebo poškození výrobku či jiného majetku, pokud se jí nevyvarujete. To zahrnuje zvláštní péči
nezbytnou pro bezpečné a efektivní používání prostředku a péči nutnou k tomu, aby nedošlo k poškození prostředku,
které by mohlo nastat v důsledku jeho používání nebo nesprávného používání.
Poznámka: Poskytuje speciální informace pro usnadnění údržby nebo objasnění důležitých pokynů.
2-2 6252-009-005 REV D www.stryker.com
Page 35
Přehled bezpečnostních opatření
Pečlivě si přečtěte a vždy přísně dodržujte varování a upozornění uvedená na této stránce. Servis smí provádět pouze
kvalifikovaný personál.
VAROVÁNÍ
• Před použitím vždy ověřte, že je křeslo uzamčené v rozložené poloze. Neuzamčené křeslo se může během
používání složit.
• Křeslo nepoužívejte při podezření na poranění šíje, páteře nebo při podezření na zlomeniny.
• Pacienta nenechávejte bez dozoru. Pokud je pacient na výrobku, pevně výrobek držte.
• K zajištění pacienta na výrobku vždy používejte všechny upínací pásy. Pacient, který není zajištěný upínacími pásy,
může z výrobku spadnout.
• Model 6252 netlačte s horní ovládací rukojetí v plně vysunuté poloze. Pokud budete křeslo tlačit s plně vysunutou
rukojetí, může se křeslo v případě nárazu do překážky převrhnout.
• Systém Stair-TREAD modelu 6252 před přepravou osob vždy zajistěte v příslušné poloze.
• Dbejte na to, aby do kolejnic nevnikly nečistoty nebo jiné překážky. Systém Stair-TREAD nemusí fungovat stejně na
všech materiálech schodišť ani za všech podmínek prostředí. Podle podmínek se můžete setkat s různými stupni
odporu. Voda, led nebo nečistoty na schodech mohou ovlivnit stabilitu pracovníka obsluhy a správný provoz
systému Stair-TREAD. Aby nedošlo ke zranění, vyčistěte cestu nebo zvažte alternativní trasu. Kondenzace, voda,
led nebo nečistoty na systému Stair-TREAD mohou způsobit nepředvídatelný výkon, jehož výsledkem je náhlá
změna hmotnosti, kterou musí pracovníci obsluhy nést.
• Systém Stair-TREAD před přepravou osob vždy vyčistěte a usušte.
• Nepokoušejte se přepravovat pacienty s vyšší hmotností, než jakou bezpečně zvednete.
• Nemontujte a nepoužívejte brzdu koleček na výrobku s opotřebenými kolečky, která měří v průměru méně než 15,2
cm.
• Před použitím zvedacích rukojetí k naklonění křesla vždy zajistěte rukojeti ve správné poloze.
• Všechny hadičky, regulátory a prvky pomocného příslušenství ke kyslíkové láhvi je nutno řádně upevnit, aby se
nezapletly do kolejnic, koleček nebo jiných mechanismů schodišťového křesla.
• Pokud kontaminované součásti schodišťového křesla řádně nevyčistíte nebo nezlikvidujete, zvyšuje se nebezpečí
vystavení patogenům přenášeným krví a možnost zranění pacienta nebo obsluhy.
• Při tlakovém mytí vždy používejte jakékoli vhodné osobní ochranné pomůcky, aby se zabránilo vdechování nákazy.
Vybavení pro tlakové mytí může vytvářet kontaminovaný aerosol.
• Po čištění výrobek vždy přetřete čistou vodou a osušte. Některé čisticí prostředky jsou svým charakterem žíraviny a
při nesprávném použití mohou způsobit poškození výrobku. Pokud výrobek řádně neopláchnete a neosušíte, na jeho
povrchu se mohou usadit korozivní zbytky, které mohou způsobit předčasnou korozi důležitých součástí.
Česky
CS
UPOZORNĚNÍ
• Nesprávné používání výrobku může způsobit poranění pacienta nebo operátora. Výrobek používejte pouze tak, jak
popisuje tato příručka.
• Výrobek ani žádné jeho součásti neupravujte. Úpravy výrobku mohou způsobit nepředvídatelný provoz a způsobit
poranění pacienta nebo operátora. Úprava výrobku také zruší jeho záruku.
• Při obsluze výrobku vždy odstraňte jakékoli překážky, které by se vám mohly dostat do cesty a způsobit poranění
obsluhy nebo pacienta.
• Při používání koleček buďte vždy opatrní. Kolečka nejsou vhodná pro všechny povrchy.
• Před přepnutím systému Stair-TREAD do uzamčené polohy vždy uvolněte červenou uvolňovací tyč kolejnic. Před
sestupem ze schodů křeslo zkuste složit, abyste měli jistotu, že je systém Stair-TREAD uzamčený.
• Držák kyslíkové láhve z elastické tkaniny je určen k použití pouze u schodišťových křesel RUGGED® Stair-PRO a
kyslíkových láhví velikosti D.
www.stryker.com 6252-009-005 REV D 2-3
Page 36

Česky
CS
Přehled bezpečnostních opatření
UPOZORNĚNÍ (POKR.)
• Pokud kyslíkovou láhev a její příslušenství řádně neupevníte, mohlo by dojít k narušení správného fungování
schodišťového křesla.
• Kyslíkovou láhev je nutno vždy upevnit do držáku kyslíkové láhve z elastické tkaniny pomocí červeného suchého
zipu Velcro.
• Vždy se ujistěte, že je kyslíková láhev řádně upevněna v držáku kyslíkové láhve z elastické tkaniny a že regulační
ventil kyslíkové láhve nevyčnívá na boku schodišťového křesla.
• Než se pokusíte schodišťové křeslo složit nebo uložit, vždy vyjměte kyslíkovou láhev z držáku kyslíkové láhve z
elastické tkaniny.
• Výrobek nečistěte parou ani ultrazvukem.
• Dbejte, aby maximální teplota vody nepřekročila 180 °F (82 °C).
• Dbejte, aby tlak vody nepřekročil 1 500 psi (130,5 bar). Pokud k čištění výrobku používáte ruční mycí jednotku,
držte tlakovou trysku v minimální vzdálenosti 24 palců (61 cm) od výrobku.
• Vždy nechte uschnout na vzduchu.
• Pokud se výrobek používá, neprovádějte čištění, servis ani údržbu.
2-4 6252-009-005 REV D www.stryker.com
Page 37

Úvod
Tato příručka vám pomáhá s provozem a údržbou vašeho výrobku Stryker. Tuto příručku si přečtěte dříve, než budete
pracovat s tímto výrobkem nebo provádět jeho údržbu. Zaveďte metody a postupy výuky a školení zaměstnanců v
oblasti bezpečného provozu a údržby tohoto výrobku.
UPOZORNĚNÍ
• Nesprávné používání výrobku může způsobit poranění pacienta nebo operátora. Výrobek používejte pouze tak, jak
popisuje tato příručka.
• Výrobek ani žádné jeho součásti neupravujte. Úpravy výrobku mohou způsobit nepředvídatelný provoz a způsobit
poranění pacienta nebo operátora. Úprava výrobku také zruší jeho záruku.
Poznámky
• Tuto příručku je třeba považovat za trvalou součást výrobku a musí zůstat s výrobkem i v případě, že dojde k jeho
prodeji.
• Společnost Stryker trvale usiluje o zlepšení konstrukce a kvality výrobku. Tato příručka obsahuje aktuální informace
o výrobku dostupné v době tisku. Mezi vaším výrobkem a touto příručkou mohou být malé rozdíly. V případě
jakýchkoli dotazů kontaktujte prosím zákaznický servis nebo technickou podporu společnosti Stryker na čísle +1800-327-0770.
Popis výrobku
Česky
CS
Křeslo na schody Stair-PRO® je zařízení pro manuální přepravu. Funkce Stair-TREAD™ umožňuje přepravu sedícího
pacienta do schodů nebo ze schodů. Přední a zadní kolečka obsluze umožňují přepravu osob na rovném povrchu.
Indikace k použití
Křeslo na schody Stair-PRO (modely 6251 a 6252) je manuální přepravní prostředek. Výrobek je určen k přepravě
sedícího pacienta do schodů nebo ze schodů. Křeslo je určeno pro dospělé, dospívající nebo děti, kteří dokážou sedět v
křesle a jsou zajištěni upínacími prvky. Systém Stair-TREAD na modelu 6252 řídí rychlost klesání obsazeného křesla.
Přední a zadní kolečka obsluze umožňují přepravu osob na rovném povrchu. Křeslo Stair-PRO je určeno k použití v
prostředí přednemocniční a nemocniční zdravotnické péče, pro lékařské pohotovostní služby i mimo ně. Maximální
kapacita, kterou výrobek podporuje, je 228 kg. Výrobek smí obsluhovat pouze vyškolení odborníci, včetně pracovníků
rychlé lékařské pomoci a zdravotnických záchranářů.
Očekávaná životnost
Křeslo na schody Stair-PRO má očekávanou životnost sedm let při normálních podmínkách používání a řádné
pravidelné údržbě.
Kontraindikace
Křeslo na schody Stair-PRO nepoužívejte k přepravě osob, které mohou mít poranění šíje nebo páteře, případně
zlomeniny.
www.stryker.com 6252-009-005 REV D 2-5
Page 38
Česky
CS
Úvod
Technické parametry
Model 6251 6252
500 lb 228 kg 500 lb 228 kg
Maximální zatížení
Výška
1
36 palců
91 cm 37,5 palce 95,25 cm
Šířka
Hloubka
2
Hloubka ve složeném stavu
Hmotnost
3
20,5 palce 52 cm 20,5 palce 52 cm
28 palců
8 palců
71 cm
20 cm
28 palců
8 palců
71 cm
20 cm
23 lb 10 kg 32,8 lb 14,9 kg
Rozměry se měří od vnějších okrajů hlavního rámu. Technické parametry jsou zaokrouhlené. Převody jsou vypočteny
před zaokrouhlením.
Model 6252 splňuje normu BS EN 1865-4:2010 s jednodílným vinylovým sedákem (6250-020-000) a bez opěrky pro
nohy (6252-027-000).
1
Maximální nosnost je celková hmotnost rozložená podle základní anatomie člověka. Pracovníci obsluhy musí při
určování celkové nosnosti výrobku brát v úvahu hmotnost pacienta, vybavení a příslušenství.
2
Hloubka se měří se zataženými vysunovacími rukojeťmi.
3
Hmotnost modelu 6252 zahrnuje jednodílné vinylové sedátko, ale nezahrnuje opěrku pro nohy.
Společnost Stryker si vyhrazuje právo změnit technické parametry bez předchozího upozornění.
Žlutočerné barevné schéma je ochranná známka společnosti Stryker Corporation.
2-6 6252-009-005 REV D www.stryker.com
Page 39
Obrázek výrobku
A
B
C
D
E
A
B
C
D
E
F
G
H
I
J
Úvod
Česky
CS
Obrázek 2-1: 6251
A Zámek kola D
B Otočné kolečko E
C
Zvedací rukojeť na dolním konci
Zajišťovací tyč
Zvedací rukojeť na horním konci
Obrázek 2-2: 6252
www.stryker.com 6252-009-005 REV D 2-7
Page 40

Obrázek výrobku (Pokr.)
A
Úvod
Česky
CS
A Zámek kola F
B Otočné kolečko G
C
D
E
Zvedací rukojeť na dolním konci
Zajišťovací tyč
Tlačítko na zvedací rukojeti na dolním konci
H
I
J
Odjišťovací lanko horní ovládací rukojeti
Volitelné zvedněte rukojeť uvolněte páku
Horní ovládací rukojeť
Systém Stair-TREAD
Odjišťovací tyč systému Stair-TREAD
Kontaktní informace
Kontaktujte zákaznický servis Stryker nebo technickou podporu na čísle: +1-800-327-0770.
Stryker Medical
3800 E. Centre Avenue
Portage, MI 49002
USA
Příručka k provozu a údržbě je k dispozici online na adrese https://techweb.stryker.com/.
Při volání zákaznickému servisu nebo technické podpoře společnosti Stryker si připravte sériové číslo (A) vašeho
výrobku Stryker. Sériové číslo uveďte ve veškeré písemné komunikaci.
Umístění sériového čísla
Datum výroby
První 2 číslice sériového čísla označují rok výroby.
Příprava
Během přípravy vybalte krabice a zkontrolujte, zda všechny položky správně fungují. Před uvedením výrobku do provozu
se ujistěte, že je provozuschopný.
2-8 6252-009-005 REV D www.stryker.com
Page 41

Úvod
Příprava (Pokr.)
Před použitím z výrobku odstraňte všechny přepravní a balicí materiály.
Pacientský prostor vozidla, kde se bude produkt používat, musí být dostatečně velký, aby se do něj vešlo křeslo ve
složeném stavu.
Pokud třeba, upravte vozidlo, aby se do něj křeslo vešlo. Křeslo neupravujte.
Česky
CS
www.stryker.com 6252-009-005 REV D 2-9
Page 42

Česky
CS
Provoz
Návod k obsluze
VAROVÁNÍ
• K zajištění pacienta na výrobku vždy používejte všechny upínací pásy. Pacient, který není zajištěný upínacími pásy,
může z výrobku spadnout.
• Když je výrobek obsazený nebo když ho přesouváte, neaktivujte brzdu koleček, aby nedošlo k jeho převrácení.
• Vždy dbejte na to, aby do kolejnic nevnikly nečistoty nebo jiné překážky. Systém Stair-TREAD nemusí fungovat
stejně na všech materiálech schodišť ani za všech podmínek prostředí. Podle podmínek se můžete setkat s různými
stupni odporu. Voda, led nebo nečistoty na schodech mohou ovlivnit stabilitu pracovníka obsluhy a správný provoz
systému Stair-TREAD. Aby nedošlo ke zranění, vyčistěte cestu nebo zvažte alternativní trasu. Kondenzace, voda,
led nebo nečistoty na systému Stair-TREAD mohou způsobit nepředvídatelný výkon, jehož výsledkem je náhlá
změna hmotnosti, kterou musí pracovníci obsluhy nést.
• Nepokoušejte se přepravovat pacienty s vyšší hmotností, než jakou bezpečně zvednete.
UPOZORNĚNÍ
Při obsluze výrobku vždy odstraňte jakékoli překážky, které by se vám mohly dostat do cesty a způsobit poranění
obsluhy nebo pacienta.
• Výrobek používejte pouze tak, jak popisuje tato příručka.
• Před zahájením jeho používání si přečtěte všechny návody a pokyny.
• Na schodech musí osoby na křesle vždy přepravovat minimálně dva vyškolení pracovníci obsluhy.
• Vždy pacienta nejprve upozorněte, než se s křeslem rozjedete, začnete stoupat do schodů nebo sestupovat ze
schodů. Po celou dobu zůstaňte u pacienta a mějte výrobek pod kontrolou.
• Brzdu koleček používejte pouze během přepravy pacienta nebo bez pacienta.
• K zajištění pacienta na výrobku vždy používejte všechny upínací pásy. Nezajištěný pacient může z výrobku
spadnout.
• V případě potřeby použijte k ovládání lehátka řádně vyškolené pomocníky.
Rozložení křesla
VAROVÁNÍ
Před použitím vždy ověřte, že je křeslo uzamčené v rozložené poloze. Neuzamčené křeslo se může během používání
složit.
Jak křeslo rozložit:
1. Postavte se za křeslo.
2. Zabrzděte kolečka.
3. Odtáhněte prodlužovací rukojeť od opěrky zad (Obrázek 2-3 straně 2-11).
4. Vytáhněte sedátko a zkontrolujte, že je uzamčené v rozložené poloze. Pokud se křeslo nesloží, znamená to, že je
uzamčené.
2-10 6252-009-005 REV D www.stryker.com
Page 43

Rozložení křesla (Pokr.)
Provoz
Česky
CS
Obrázek 2-3: Rozložení křesla
Složení křesla
VAROVÁNÍ
Před použitím vždy ověřte, že je křeslo uzamčené v rozložené poloze. Neuzamknuté křeslo se může během používání
složit.
Jak křeslo složit:
1. Zabrzděte kolečka.
2. Zapněte přezky upínacích pásů. Pásy přehněte, aby nepřekážely.
3. Stůjte stranou od křesla.
4. Zatáhněte za červenou zajišťovací tyč (A) na zadní straně křesla (Obrázek 2-4 straně 2-12).
5. Nakloňte křeslo dopředu.
6. Sedák sklopte nahoru k opěradlu tak, aby se přední nohy zaklesly do spon na dolní části trubky sedáku.
Poznámka: Pokud je jimi křeslo opatřeno, otočte přední kolečka, aby při skládání křesla nepřekážela.
www.stryker.com 6252-009-005 REV D 2-11
Page 44

Česky
A
CS
Provoz
Složení křesla (Pokr.)
Křeslo skladujte na chladném, suchém místě při teplotách nad bodem mrazu a mimo dosah přímého slunečního světla.
Obrázek 2-4: Složení křesla
Přeprava osoby na křesle
VAROVÁNÍ
• Křeslo nepoužívejte při podezření na poranění šíje, páteře nebo při podezření na zlomeniny.
• Pacienta nenechávejte bez dozoru. Pokud je pacient na výrobku, pevně výrobek držte.
Přemístění pacienta na výrobek:
1. Výrobek umístěte vedle pacienta.
2. Uzamkněte kolečka, aby se výrobek nepohyboval.
3. Otevřete upínací pásy.
4. Přemístěte pacienta na výrobek v souladu se zavedenými postupy EMS.
5. Zajistěte pacienta na výrobku všemi upínacími pásy.
6. Před přepravou výrobku uvolněte brzdy koleček.
Zajištění pacienta pomocí upínacích pásů
Upínací pásy lze použít ve dvou konfiguracích.
VAROVÁNÍ
K zajištění pacienta na výrobku vždy používejte všechny upínací pásy. Pacient, který není zajištěný upínacími pásy,
může z výrobku spadnout.
2-12 6252-009-005 REV D www.stryker.com
Page 45

Provoz
Zajištění pacienta pomocí upínacích pásů (Pokr.)
Česky
CS
Obrázek 2-5: Přes hrudník
Hrudní upínací pásy překřižte pacientovi na hrudníku a
zapněte přezky.
U obou konfigurací připněte k sobě popruhy odpovídající barvy a pak zapněte kotníkový upínací pás přes pacientovy
kotníky.
Připevněte upínací pásy k výrobku v požadovaných místech připevnění (Obrázek 2-5 straně 2-13) nebo (Obrázek 2-6
straně 2-13). Místa připevnění upínacích pásů by měla poskytovat pevné ukotvení a správnou upínací polohu. Nedovolte,
aby upínací pásy překážely použitému vybavení nebo příslušenství. Když se lehátko nepoužívá, upínací pásy nechte
zapnuté.
Rozepněte upínací pásy, nechte je po obou stranách křesla a na sedák posaďte pacienta. Prodlužte upínací pásy,
zapněte je kolem pacienta a poté je zkrácením utáhněte.
• Chcete-li upínací pás rozepnout, stiskněte destičky na bocích zámku přezky. Uvolníte tím sponu pásu, kterou
následně můžete vytáhnout ze zámku.
• Upínací pás zapnete tak, že sponu zasunete do štěrbiny zámku a zatlačíte, dokud neuslyšíte cvaknutí.
• Chcete-li upínací pás prodloužit, uchopte sponu, pootočte ji tak, aby byla šikmo vůči popruhu, a pak zatáhněte
směrem ven. Obroubená ploška na konci popruhu zabraňuje sesmeknutí spony z pásu.
• Chcete-li upínací pás zkrátit, uchopte obroubenou plošku a zatažením za popruh směrem zpět skrz sponu pás
utáhněte.
Při zapínání upínacího pásu kolem pacienta zajistěte sponu v zámku a přebytečnou část popruhu umístěte mimo ložnou
plochu lehátka.
Jeden upínací pás zapněte pacientovi přes hrudník.
Druhý upínací pás zapněte pacientovi přes oblast kyčlí.
Obrázek 2-6: Přes hrudník a kyčle
Připojení hrudních upínacích pásů
Připojení hrudních pásů v konfiguraci překřížení přes hrudník:
1. Obtočte jednotlivé pásy kolem rámu křesla. Konec pásu protáhněte smyčkou. Utáhněte tahem za pás.
2. Pás táhněte přes hrudník pacienta. Podle potřeby pás prodlužte.
3. Pás zapněte přezkou.
4. Zatáhněte za volný konec pásu, aby se pás utáhl kolem pacienta.
www.stryker.com 6252-009-005 REV D 2-13
Page 46

Provoz
Připojení hrudních upínacích pásů (Pokr.)
5. Opakujte u druhého pásu a upínacího pásu v pase.
Česky
CS
Připojení kotníkového upínacího pásu
Připojení kotníkového upínacího pásu:
1. Sundejte z pásu tři plastové díly.
2. Protáhněte pás jedním z plastových kroužků ve tvaru D a posuňte kroužek dolů na konec pásu až k bílému štítku.
3. Obtočte pás kolem přední nohy židle a volný konec pásu protáhněte kroužkem. Táhněte za pás, dokud se kroužek
neopře o trubku opěrky pro nohy.
4. Protáhněte popruh druhým D kroužkem.
5. Obtočte pás kolem druhé přední nohy židle a volný konec pásu protáhněte smyčkou. Táhněte za pás, dokud se D
kroužek neopře o trubku opěrky pro nohy.
6. Poslední mužskou svorku připevněte k pásu.
Správné postupy zvedání
Při zvedání výrobku s pacientem dodržujte níže popsané postupy správného zvedání, aby nedošlo ke zranění:
• Držte ruce blízko u těla
• Mějte záda neustále rovná
• Veškerý pohyb koordinujte s partnerem
• Váhu zvedejte nohama
• Nerotujte trupem
Přeprava osob na rovném povrchu
VAROVÁNÍ
Model 6252 netlačte s horní ovládací rukojetí v plně vysunuté poloze. Pokud budete křeslo tlačit s plně vysunutou
rukojetí, může se křeslo v případě nárazu do překážky převrhnout.
UPOZORNĚNÍ
Při používání koleček buďte vždy opatrní. Kolečka nejsou vhodná pro všechny povrchy.
Přeprava osob na rovném povrchu:
1. Křeslo tlačte a řiďte za zvedací rukojeti horního konce nebo za trubku opěrky zad.
2. Při přejíždění nebo objíždění překážek křeslo nadzvedněte pomocí zvedacích rukojetí na horním a dolním konci.
Přeprava osob ze schodů – model 6251
VAROVÁNÍ
• Na schodech musí osoby na lehátku vždy přepravovat minimálně dva pracovníci obsluhy.
• Před použitím zvedacích rukojetí ke zvednutí křesla vždy zajistěte zvedací rukojeti ve správné poloze.
2-14 6252-009-005 REV D www.stryker.com
Page 47

Provoz
Přeprava osob ze schodů – model 6251 (Pokr.)
Přeprava osob ze schodů:
1. Pracovník obsluhy na dolním konci: Postavte se před křeslo.
2. Pracovník obsluhy na horním konci: Postavte se ke schodům.
3. Pracovník obsluhy na dolním konci: Zatlačte červená tlačítka na obou zvedacích rukojetích na dolním konci a
vytahujte rukojeti, dokud se nezarazí. Uvolněním tlačítka zajistěte rukojeť v příslušné poloze.
4. Pracovník obsluhy na horním konci: Rozložte zvedací rukojeti na horním konci a postavte se čelem ke schodům.
5. Pracovník obsluhy na dolním konci: Otočte se zády po směru, abyste mohli lépe sledovat osobu na lehátku, nebo
čelem po směru, abyste měli lepší výhled na schody a zvládli se vyhýbat překážkám.
Poznámka: I když při zvedání a přenášení křesla může být pracovník obsluhy na horním konci otočený libovolným
směrem, při nesení křesla vždy dodržujte příslušné protokoly.
6. Oba pracovníci obsluhy – křeslo společně zvedněte. Použijte zvedací rukojeti na dolním a horním konci. Dodržujte
správné zvedací postupy (Správné postupy zvedání straně 2-14). Vyhýbejte se překážkám a pomalu snášejte křeslo
ze schodů.
Přeprava osob ze schodů – model 6252
VAROVÁNÍ
• Na schodech musí osoby na lehátku vždy přepravovat minimálně dva pracovníci obsluhy.
• Před použitím zvedacích rukojetí ke zvednutí křesla vždy zajistěte zvedací rukojeti ve správné poloze.
• Systém Stair-TREAD modelu 6252 před přepravou osob vždy zajistěte v příslušné poloze.
• Dbejte na to, aby do kolejnic nevnikly nečistoty nebo jiné překážky. Systém Stair-TREAD nemusí fungovat stejně na
všech materiálech schodišť ani za všech podmínek prostředí. Podle podmínek se můžete setkat s různými stupni
odporu. Voda, led nebo nečistoty na schodech mohou ovlivnit stabilitu pracovníka obsluhy a správný provoz
systému Stair-TREAD. Aby nedošlo ke zranění, vyčistěte cestu nebo zvažte alternativní trasu. Kondenzace, voda,
led nebo nečistoty na systému Stair-TREAD mohou způsobit nepředvídatelný výkon, jehož výsledkem je náhlá
změna hmotnosti, kterou musí pracovníci obsluhy nést.
• Systém Stair-TREAD před přepravou osob vždy vyčistěte a usušte.
• Nepokoušejte se přepravovat pacienty s vyšší hmotností, než jakou bezpečně zvednete.
Česky
CS
UPOZORNĚNÍ
Před přepnutím systému Stair-TREAD do uzamčené polohy vždy uvolněte červenou uvolňovací tyč kolejnic. Před
sestupem ze schodů křeslo zkuste složit, abyste měli jistotu, že je systém Stair-TREAD uzamčený.
Přeprava osob ze schodů:
1. Najeďte křeslem ke schodům a vyrovnejte je s hranou prvního schodu.
2. Pracovník obsluhy na dolním konci: Zatlačte červená uvolňovací tlačítka, aby se vysunuly zvedací rukojeti dolního
konce, a vysouvejte rukojeti, dokud se nezastaví. Uvolněte tlačítka, aby se rukojeti zajistily.
3. Pracovník obsluhy na horním konci: Jednou rukou zatáhněte za červený uvolňovací kabel horní ovládací rukojeti.
Druhou rukou rukojeť nadzvedněte a zcela vytáhněte. Uvolněte kabel a ujistěte se, že je rukojeť na obou stranách
zajištěná v plně vysunuté poloze.
4. Pracovník obsluhy na horním konci: Přitiskněte červenou tyč pro uvolnění kolejnic k černé křížové trubce. Uvolněte
sílu úchytu na uvolňovací tyči a silou vytáhněte systém Stair-TREAD do plně vysunuté polohy, až obě strany
bezpečně uzamknou. Než budete systém Stair-TREAD znovu skládat, vždy se ujistěte, že jsou obě strany
uzamčené.
5. Při sestupu ze schodů jsou pracovníci obsluhy čelem k sobě.
6. Pracovník obsluhy na horním konci: Nakloňte křeslo dozadu tak, aby se systém Stair-TREAD těsně dotýkal podlahy.
www.stryker.com 6252-009-005 REV D 2-15
Page 48

Česky
CS
Provoz
Přeprava osob ze schodů – model 6252 (Pokr.)
7. Při zachování úhlu náklonu zavedou oba pracovníci obsluhy křeslo přes hranu schodu. Nechte systém Stair-TREAD
spojit s prvním schodem.
8. Oba pracovníci obsluhy klouzavým pohybem sunou křeslo dolů po schodech, až se kolejnice dotknou okrajů dvou
nebo tří schodů.
9. Pracovník obsluhy na horním konci: Mírně přitlačujte vysunovací horní ovládací rukojeť směrem dolů, zatímco
operátor na dolním konci bude mírně přizvedávat zvedací rukojeti na dolním konci směrem nahoru, aby se křeslo při
sestupu ze schodů nekývalo.
10. Pracovník obsluhy na dolním konci: Když kolejnice dosáhne posledního schodu, uvolněte přední rukojeti. Pracovník
obsluhy na horním konci: nechejte křeslo naklonit dopředu, dokud nebudou všechna čtyři kola na zemi. Křeslo
rozjeďte, viz Přeprava osob na rovném povrchu straně 2-14.
11. Při skládání systému Stair-TREAD zatáhněte za červenou uvolňovací tyč kolejnic směrem k černé překřížené tyči a
složte kolejnici směrem ke křeslu. Ověřte, že je systém Stair-TREAD uzamčený na místě.
Pokud si při sestupu ze schodů potřebuje některý z pracovníků obsluhy odpočinout, nakloňte křeslo dostatečně dopředu
tak, aby zadní kola spočívala na schodovém stupni. Po odpočinku pracovník obsluhy na horním konci vyvine mírný tlak
směrem dolů na horní ovládací rukojeť a pracovník obsluhy na dolním konci vyvine mírný tlak směrem nahoru, aby se
křeslo naklonilo dozadu a aktivoval se systém Stair-TREAD.
Přeprava osob po schodech nahoru
VAROVÁNÍ
• Na schodech musí osoby vždy přepravovat minimálně dva vyškolení pracovníci obsluhy.
• Před použitím zvedacích rukojetí ke zvednutí křesla vždy zajistěte zvedací rukojeti ve správné poloze.
Přeprava osob po schodech nahoru:
1. Přijeďte s křeslem pod schodiště tak, aby pacient byl zády ke schodišti.
2. Pracovník obsluhy na dolním konci: Zatlačte červená uvolňovací tlačítka, aby se vysunuly zvedací rukojeti dolního
konce, a vysouvejte rukojeti, dokud se nezastaví. Uvolněte tlačítka, aby se rukojeti zajistily.
3. Pracovník obsluhy na horním konci: Vysuňte zvedací rukojeti na horním konci.
4. Pracovník obsluhy na dolním konci: Postavte se čelem ke schodům.
5. Pracovník obsluhy na horním konci: Běžte pozadu, abyste mohli lépe sledovat osobu na křesle, nebo popředu,
abyste měli lepší výhled na schody a zvládli se vyhýbat překážkám.
Poznámka: I když při zvedání a přenášení křesla může být pracovník obsluhy na horním konci otočený libovolným
směrem, při nesení křesla vždy dodržujte příslušné protokoly.
6. Oba pracovníci obsluhy – křeslo společně zvedněte. Použijte zvedací rukojeti na dolním a horním konci. Dodržujte
kroky Správné postupy zvedání straně 2-14. Vyhýbejte se překážkám a pomalu snášejte křeslo ze schodů.
Zabrzdění nebo odbrzdění koleček
VAROVÁNÍ
• Když je výrobek obsazený nebo když ho přesouváte, neaktivujte brzdu koleček, aby nedošlo k jeho převrácení.
• Nemontujte a nepoužívejte brzdu koleček na výrobku s opotřebenými kolečky, která měří v průměru méně než 15,2
cm.
• Pacienta nebo jinou osobu na lehátku nenechávejte bez dozoru. Pokud je pacient nebo jiná osoba na lehátku,
pevně lehátko držte.
2-16 6252-009-005 REV D www.stryker.com
Page 49
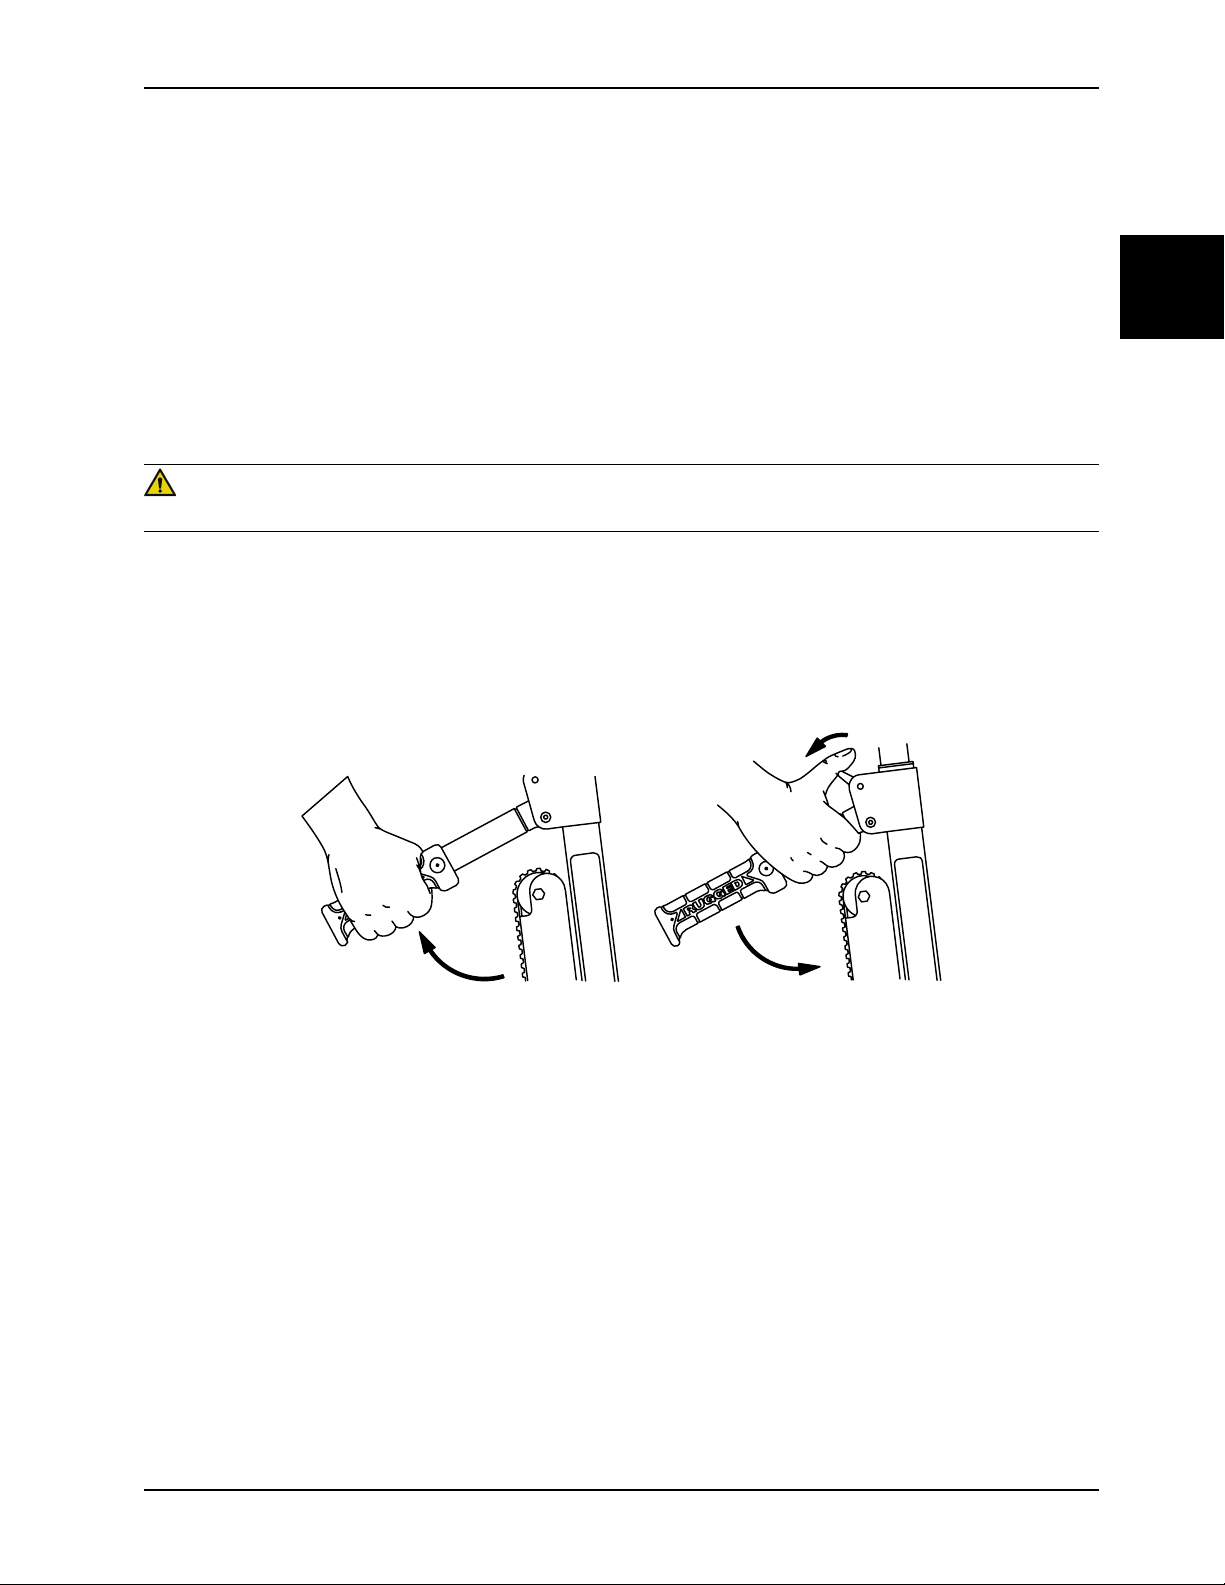
Provoz
A
B
Zabrzdění nebo odbrzdění koleček (Pokr.)
Chcete-li zabrzdit kolečka, sešlápněte pedál až nadoraz tak, aby spočíval na povrchu kolečka.
Chcete-li kolečka odbrzdit, šlápněte na horní stranu pedálu nebo pedál nadzvedněte prsty nohy. Při odbrzdění kolečka
se horní strana pedálu opře o rám kolečka.
Poznámka: Brzdy pomáhají zajistit, aby se výrobek bez dozoru nerozjel. Brzdy nemusí být dostatečně účinné na všech
druzích povrchu nebo při zatížení.
Zvedání nebo spouštění uzamykacích zadních zvedacích rukojetí
Pomocí uzamykacích zadních zvedacích rukojetí můžete křeslo naklonit dozadu.
VAROVÁNÍ
Před použitím zvedacích rukojetí k naklonění křesla vždy zajistěte rukojeti ve správné poloze.
Pokud chcete uzamykací zadní zvedací rukojeti zvednout, otáčejte je směrem nahoru, dokud nezaklapnou na místo.
Sklopení uzamykacích zadních zvedacích rukojetí:
1. Uzamykací zadní zvedací rukojeť (A) nadzvedněte (Obrázek 2-7 straně 2-17).
2. Červenou spoušť rukojeti (B) palcem zatáhněte k sobě.
3. Sklopte uzamykací zadní zvedací rukojeť směrem dolů proti rámu křesla.
Česky
CS
Obrázek 2-7: Sklopení uzamykacích zadních zvedacích rukojetí
Připojení volitelné podpěrky hlavy k horní ovládací rukojeti
Připojení podpěrky hlavy k prodlužovací horní ovládací rukojeti:
1. Volné konce pásu obtočte kolem svislých částí rukojeti a potom je protáhněte plastovými očky.
2. Zatažením utáhněte a pás zajistěte.
3. Výšku upravte tak, že pás povolíte, přemístíte do požadovaného umístění a znovu utáhnete.
Podpora hlavy pacienta pomocí volitelné podpěrky hlavy
Podpora hlavy pacienta pomocí podpěrky hlavy:
1. Vysuňte horní ovládací rukojeť.
2. Jednou rukou zatáhněte za červený uvolňovací kabel horní ovládací rukojeti.
3. Druhou rukou rukojeť nadzvedněte.
www.stryker.com 6252-009-005 REV D 2-17
Page 50

Česky
O O
O O
O O OO
H H
H
H
O
O
H
O
H
O
H
O
H
O
H
O
H H
H
O
CS
Provoz
Podpora hlavy pacienta pomocí volitelné podpěrky hlavy (Pokr.)
4. Uvolněte kabel. Dbejte na to, aby se rukojeť uzamkla v jedné ze dvou dostupných poloh.
5. Připojte podpěrku hlavy (Připojení volitelné podpěrky hlavy k horní ovládací rukojeti straně 2-17).
6. Podpěrku hlavy umístěte na horní konec podvozku na podporu hlavy pacienta.
7. V případě pacientů v bezvědomí nebo zpola při vědomí hlavu zajistěte dalšími dvěma díly pásu.
8. Podpěrku hlavy obtočte kolem hlavy pacienta. Konce pásu překryjte na požadovanou těsnost, aby byla hlava pevná.
Pokud pásy nepoužíváte, obtočte jejich konce kolem rukojeti a připojte pás k zadní straně podpěrky hlavy.
Umístění pracovníků obsluhy a pomocníků pro další pomoc
Dva pracovníci obsluhy (O)
Dva pracovníci obsluhy (O)
Jeden pomocník (H)
Dva pracovníci obsluhy (O)
Dva pomocníci (H)
Po schodech dolů
Po schodech nahoru
Dva pracovníci obsluhy (O)
Tři pomocníci (H)
2-18 6252-009-005 REV D www.stryker.com
Page 51

Provoz
Instalace držáku kyslíkové láhve z elastické tkaniny
VAROVÁNÍ
• Všechny hadičky, regulátory a prvky pomocného příslušenství ke kyslíkové láhvi je nutno řádně upevnit, aby se
nezapletly do kolejnic, koleček nebo jiných mechanismů schodišťového křesla.
• Pokud kontaminované součásti schodišťového křesla řádně nevyčistíte nebo nezlikvidujete, zvyšuje se nebezpečí
vystavení patogenům přenášeným krví a možnost zranění pacienta nebo obsluhy.
• Držák kyslíkové láhve z elastické tkaniny je určen k použití pouze u schodišťových křesel RUGGED® Stair-PRO a
kyslíkových láhví velikosti D.
• Pokud kyslíkovou láhev a její příslušenství řádně neupevníte, mohlo by dojít k narušení správného fungování
schodišťového křesla.
• Kyslíkovou láhev je nutno vždy upevnit do držáku kyslíkové láhve z elastické tkaniny pomocí červeného suchého
zipu Velcro.
• Vždy se ujistěte, že je kyslíková láhev řádně upevněna v držáku kyslíkové láhve z elastické tkaniny a že regulační
ventil kyslíkové láhve nevyčnívá na boku schodišťového křesla.
• Než se pokusíte schodišťové křeslo složit nebo uložit, vždy vyjměte kyslíkovou láhev z držáku kyslíkové láhve z
elastické tkaniny.
Česky
CS
1. Před zahájením instalace držáku kyslíkové láhve z elastické tkaniny se ujistěte, že je schodišťové křeslo rozložené.
2. Držák kyslíkové láhve z elastické tkaniny umístěte mezi dvě prodlužovací trubky rukojeti pod sedákem.
3. Každý ze čtyř suchých zipů Velcro protáhněte příslušnou plastovou přezkou.
4. Před zapnutím suchého zipu Velcro dotáhněte popruhy.
5. Zatáhněte za červenou rukojeť a kyslíkovou láhev velikosti D vsuňte do držáku kyslíkové láhve z elastické tkaniny.
Poznámky
• Kyslíkovou láhev vkládejte do držáku dolním koncem napřed.
• Po nainstalování držáku kyslíkové láhve z elastické tkaniny se ujistěte, že je viditelné označení nosnosti křesla.
6. Červený popruh protáhněte červenou rukojetí. Když červený popruh nepoužíváte, můžete jej upevnit k dolní části
držáku kyslíkové láhve z elastické tkaniny.
7. Dotáhněte suchý zip Velcro a připevněte jej kolem kyslíkové láhve.
www.stryker.com 6252-009-005 REV D 2-19
Page 52

Česky
CS
Čištění
Čištění
VAROVÁNÍ
Při tlakovém mytí vždy používejte jakékoli vhodné osobní ochranné pomůcky, aby se zabránilo vdechování nákazy.
Vybavení pro tlakové mytí může vytvářet kontaminovaný aerosol.
UPOZORNĚNÍ
• Výrobek nečistěte parou ani ultrazvukem.
• Dbejte, aby maximální teplota vody nepřekročila 180 °F (82 °C).
• Dbejte, aby tlak vody nepřekročil 1 500 psi (130,5 bar). Pokud k čištění výrobku používáte ruční mycí jednotku,
držte tlakovou trysku v minimální vzdálenosti 24 palců (61 cm) od výrobku.
• Vždy nechte uschnout na vzduchu.
• Pokud se výrobek používá, neprovádějte čištění, servis ani údržbu.
Výrobek je možné čistit tlakovou čističkou. Při častém čištění může výrobek jevit známky oxidace nebo ztráty barev. Při
tlakovém čištění nedojde ke zhoršení výkonu výrobku, pokud dodržujete správný postup.
• Přesně dodržujte doporučení výrobce k ředění čisticích prostředků.
• Upřednostňovaná metoda, kterou společnost Stryker Medical doporučuje pro tlakové mytí výrobku, je standardní
nemocniční myčka chirurgických vozíků nebo ruční mycí jednotka.
• Suchý zip Velcro® vyčistěte po každém použití. Napusťte suchý zip Velcro® dezinfekčním prostředkem a nechejte
tento prostředek odpařit. Správný dezinfekční prostředek pro nylonový suchý zip Velcro® by měl určit pracovník
servisu.
• Ponoření kovových spon upínacích pásů může způsobit korozi spon a nedoporučuje se. Opláchněte čistou vodou a
nechte uschnout na vzduchu, aby se snížilo riziko koroze. Upínací pásy vyměňte, pokud jsou spony zkorodované.
Čištění kolejnic (model 6252)
Pokud mezi pás systému Stair-TREAD a kolejnice modelu 6252 vnikne cizí předmět, je nutné kolejnice vyčistit.
Čištění kolejnic:
1. Uvolněte pásy kolejnic.
2. Vyjměte zadní kola.
3. Kolejnice vyčistěte alkoholem.
4. Pásy oplachujte vodou pod tlakem. Vyčistěte vnitřní i vnější povrchy pásů.
5. Nechte pásy zcela uschnout.
6. Znovu připevněte pásy kolejnic a zadní kola.
7. Dodržujte vhodná varování a upozornění a vyzkoušejte funkci křesla simulovanou hmotností pacienta a sestupem
jednoho patra schodů.
Pokud se neobnoví původní funkce, může být nutné pásy repasovat nebo vyměnit.
Doporučené čisticí prostředky
Obecně platí, že pokud se používají v koncentracích doporučených výrobcem, lze používat dezinfekční prostředky na
bázi fenolických látek nebo kvartérních amoniových sloučenin (s výjimkou přípravku Virex® TB). Jodoforové
dezinfekční prostředky se nedoporučuje používat, protože mohou způsobovat vznik skvrn.
2-20 6252-009-005 REV D www.stryker.com
Page 53

Čištění
Doporučené čisticí prostředky (Pokr.)
VAROVÁNÍ
Po čištění výrobek vždy přetřete čistou vodou a osušte. Některé čisticí prostředky jsou svým charakterem žíraviny a při
nesprávném použití mohou způsobit poškození výrobku. Pokud výrobek řádně neopláchnete a neosušíte, na jeho
povrchu se mohou usadit korozivní zbytky, které mohou způsobit předčasnou korozi důležitých součástí.
Mezi doporučené čisticí prostředky patří:
• Čisticí prostředky na bázi kvartérních amoniových sloučenin (aktivní složka chlorid amonný)
• Fenolové čisticí prostředky (aktivní složka o-fenylfenol)
• Roztok chlorového bělidla (5,25% – méně než 1 díl bělidla na 100 dílů vody)
Nepoužívejte nadměrné koncentrace. Zajistěte, aby výrobek nezůstal namočený déle, než vyžadují pokyny výrobce
chemikálie pro řádnou dezinfekci.
Poznámka: Nedodržení výše uvedených pokynů při používání těchto typů čisticích prostředků může vést k zániku
platnosti záruky na tento výrobek.
Česky
CS
www.stryker.com 6252-009-005 REV D 2-21
Page 54

Preventivní údržba
Před zahájením kontroly preventivní údržby vyřaďte výrobek z provozu. Všechny uvedené položky výrobků Stryker
Medical zkontrolujte při preventivní roční údržbě. Podle úrovně používání výrobku bude možná nutné provádět
preventivní kontroly a údržbu častěji. Servis smí provádět pouze kvalifikovaný personál.
Poznámka: Pokud je to třeba, před kontrolou očistěte a dezinfikujte vnější povrch matrace.
Česky
CS
Provoz Harmonogram Postup
Čištění a dezinfekce
Kontrola
Repasování pásu systému Stair-
TREAD (6252)
Zkontrolujte níže uvedené položky:
Všechny připevňující prvky jsou bezpečné (viz všechny montážní výkresy)
Všechny svary jsou pevné, nejsou prasklé ani zlomené
Žádné ohnuté nebo zlomené trubky nebo plechy
Žádné nečistoty v kolech
Všechna kola jsou bezpečná a otáčejí se
Přední kolečka jsou bezpečná, otáčejí se a rotují kolem osy (pokud je tato možnost k dispozici)
Zámky kol drží kola pevně, když jsou uzamčeny, a uvolní kola, když jsou odemčeny
Křeslo se správně rozkládá a skládá
V sedáku nebo opěrce zad nejsou žádné trhliny ani praskliny
Upínací pásy jsou nedotčené a funkční
Nosné rukojeti dolního konce se vysunou a uzamknou na místě
Nosné rukojeti horního konce se složí a rozloží
Horní ovládací rukojeť se vytáhne a uzamkne ve všech polohách
Mechanismus systému Stair-TREAD se rozloží a uzamkne na místě (pokud je tato možnost k dispozici)
Pás systému Stair-TREAD se točí (pokud je tato možnost k dispozici)
Vnitřní šňůry pásu systému Stair-TREAD (nejsou vyobrazeny); v případě potřeby je vyměňte (pokud je tato
možnost k dispozici)
Systém Stair-TREAD funguje požadovaným způsobem; pokud to je třeba, pásy repasujte (pokud je tato možnost
k dispozici)
Na pásech systému Stair-TREAD nebo povrchu rámu kolejnic nejsou přítomny žádné lubrikanty
Kabel horní odjišťovací rukojeti není opotřebený nebo prodřený, v případě potřeby ho vyměňte (model 6252)
Volitelné příslušenství je bez závad a správně funguje
Každé použití Viz čištění
Při 1-25 výjezdech měsíčně
kontrolujte křeslo každých 6 měsíců
Při 26-200 výjezdech měsíčně
kontrolujte křeslo každé 3 měsíce
Při více než 201 výjezdech měsíčně
kontrolujte křeslo každý měsíc
Po použití na přibližně 500 patrech
schodů nebo pokud je výkon systému
Stair-TREAD nedostačující
Viz kontrolní seznam níže
Viz informace o repasování pásu
kolejnic v návodu k údržbě
Sériové číslo výrobku:
Vypracoval:
Datum:
2-22 6252-009-005 REV D www.stryker.com
Page 55

Stair-PRO® trappestol
6251
6252
Betjeningsmanual
2018/06 D.1 6252-009-005 REV D www.stryker.com
Page 56

sample text
Page 57

Symboler
Betjeningsvejledning/Se brugsanvisningen
CE-mærke
Autoriseret repræsentant i EU
Generel advarsel
Forsigtig
Katalognummer
Partikode
Serienummer
Se www.stryker.com/patents vedrørende patenter i USA
Dansk
DA
Producent
Fremstillingsdato
Sikker arbejdsbelastning
www.stryker.com 6252-009-005 REV D
Page 58

sample text
Page 59

Indholdsfortegnelse
Definition af betegnelserne Advarsel/Forsigtig/Bemærk ................................................................................. 3-2
Oversigt over sikkerhedsforanstaltninger..................................................................................................... 3-3
Indledning............................................................................................................................................. 3-5
Produktbeskrivelse ........................................................................................................................... 3-5
Indikationer ..................................................................................................................................... 3-5
Forventet levetid ..............................................................................................................................3-5
Kontraindikationer ............................................................................................................................ 3-5
Specifikationer ................................................................................................................................3-6
Produktillustration............................................................................................................................. 3-7
Kontaktinformation ........................................................................................................................... 3-8
Serienummerets placering .................................................................................................................3-8
Fremstillingsdato.............................................................................................................................. 3-8
Opsætning...................................................................................................................................... 3-8
Drift................................................................................................................................................... 3-10
Betjeningsvejledning ....................................................................................................................... 3-10
Sådan åbnes stolen ........................................................................................................................ 3-10
Sådan foldes stolen........................................................................................................................ 3-11
Sådan overføres patienten til stolen ................................................................................................... 3-12
Fiksering af patienten med selerne .................................................................................................... 3-12
Sådan fastgøres selerne omkring brystkassen ..................................................................................... 3-13
Fastgørelse af ankelrem.................................................................................................................. 3-14
Korrekte løfteteknikker .................................................................................................................... 3-14
Sådan transporteres patienten på fladt terræn ..................................................................................... 3-14
Transport af patient ned af trapper - Model 6251.................................................................................. 3-14
Transport af patient ned af trapper - Model 6252.................................................................................. 3-15
Sådan transporteres patienten op ad trappen....................................................................................... 3-16
Aktivering eller udløsning af en hjullås................................................................................................ 3-16
Sådan hæves og sænkes de låsbare løftegreb bagpå............................................................................ 3-17
Sådan fastgøres den valgfrie hovedstøtte til det øverste styregreb ........................................................... 3-17
Sådan understøttes patientens hoved med den valgfrie hovedstøtte ......................................................... 3-17
Placering af operatører og støttepersonale som ekstra hjælp.................................................................. 3-18
Montering af elastikiltflaskeholderen .................................................................................................. 3-19
Rengøring........................................................................................................................................... 3-20
Rengøringsprocedure...................................................................................................................... 3-20
Rengøring af sporramme (model 6252)............................................................................................... 3-20
Anbefalede rengøringsmidler............................................................................................................ 3-20
Forebyggende vedligeholdelse................................................................................................................ 3-22
Dansk
DA
www.stryker.com 6252-009-005 REV D 3-1
Page 60

Dansk
DA
Definition af betegnelserne Advarsel/Forsigtig/Bemærk
Betegnelserne ADVARSEL, FORSIGTIG og BEMÆRK har særlige betydninger og skal læses omhyggeligt.
ADVARSEL
Gør læseren opmærksom på en situation, der kan medføre død eller alvorlig personskade, hvis situationen ikke undgås.
Den kan også beskrive potentielle alvorlige hændelser og sikkerhedsfarer.
FORSIGTIG
Gør læseren opmærksom på en potentielt farlig situation, der kan medføre mindre eller moderat personskade på bruger
eller patient eller beskadige udstyret eller andre genstande, hvis situationen ikke undgås. Dette omfatter særlig omhu,
der er nødvendig for sikker og effektiv brug af udstyret og den omhu, der er nødvendig for at undgå beskadigelse af
udstyr, som kan opstå som et resultat af brug eller misbrug.
Bemærk: Her gives særlige oplysninger, der letter vedligeholdelse eller uddyber vigtige anvisninger.
3-2 6252-009-005 REV D www.stryker.com
Page 61

Oversigt over sikkerhedsforanstaltninger
Læs altid omhyggeligt advarslerne og forholdsreglerne på denne side, og følg dem nøje. Service må kun foretages af
kvalificeret personale.
ADVARSEL
• Sørg for, at stolen altid er låst i udfoldet position før brug. En ulåst stol kan falde sammen under brugen.
• Brug ikke stolen, hvis der er mistanke om nakke- eller rygradsskader eller knoglebrud.
• Lad ikke en patient være uden opsyn. Hold fast i produktet, mens der ligger en patient på det.
• Brug altid alle seler til at holde patienten fast på produktet. En patient, der ikke er fastgjort med sele, kan falde ud
af produktet.
• Skub ikke Model 6252 afsted, mens det øverste styregreb er i fuldt udstrakt position. Hvis stolen skubbes, mens
grebet befinder sig i den fuldt udstrakte position, kan det medføre, at stolen tipper, når du støder på forhindringer.
• Lås altid Model 6252 Stair-TREAD-systemet i stilling, før du transporterer en patient.
• Undgå at få snavs eller andre genstande i sporene. Stair-TREAD-systemet fungerer muligvis ikke lige godt på alle
trappeoverflader og under alle miljøforhold. Alt efter forholdene kan du støde på forskellige grader af modstand.
Vand, is eller snavs på trappen kan påvirke operatørens fodfæste og betjeningen af Stair-TREAD-systemet. For at
undgå skade bør transportvejen ryddes, eller der bør overvejes en alternativ vej. Kondensering, vand, is eller snavs
på Stair-TREAD-systemet kan give anledning til uforudsigelige resultater, der kan give anledning til en pludselig
vægtændring, som operatørerne skal støtte.
• Rengør og aftør altid Stair-TREAD-systemet, før du transporterer en patient.
• Forsøg ikke at transportere patienter, som vejer mere end, hvad du kan løfte på forsvarlig vis.
• Installér eller aktivér ikke en hjullås på et produkt med slidte hjul med en diameter under 6 tommer (15,2 cm).
• Lås altid løftegrebene i stilling, inden du bruger grebene til at tippe stolen tilbage.
• Sørg altid for, at du fastgør alle slanger, regulatorer og ekstratilbehør til iltflasken for at forebygge interferens med
spor, hjul eller andre af trappestolens mekanismer.
• Hvis trappestolens komponenter ikke rengøres eller bortskaffes korrekt, vil det øge risikoen for eksponering for
blodbårne patogener, hvilket kan forårsage skade på operatøren eller patienten.
• Brug altid passende personligt beskyttelsesudstyr under højtryksrensning for at undgå indånding af smitstoffer.
Højtryksrensningsudstyr kan medføre, at forureningsstoffer blandes med luften.
• Tør altid produktet af med rent vand, og tør det af efter rengøringen. Visse rengøringsprodukter er ætsende og kan
forårsage skade på produktet. Hvis produktet ikke skylles og tørres ordentligt af, kan det efterlade ætsende
reststoffer på produktets overflader, som kan forårsage utidig korrosion af kritiske komponenter.
Dansk
DA
FORSIGTIG
• Forkert brug af produktet kan medføre, at patienten eller operatøren kommer til skade. Produktet må kun betjenes
som beskrevet i denne manual.
• Hverken produktet eller dets komponenter må modificeres. Ændring af produktet kan forårsage uforudsigelig drift,
hvilket kan medføre personskade på patient eller operatør. Ændring af produktet vil også ugyldiggøre garantien.
• Fjern altid eventuelle forhindringer, der kan komme i vejen og forårsage skade på operatøren eller patienten, inden
produktet tages i brug.
• Vær altid forsigtig, når der er hjul under. Hjul er ikke egnet til alle overflader.
• Frigør altid sporets røde udløserstang, før du klikker Stair-TREAD-systemet på plads i den låste position. Prøv at
folde stolen, før du går ned ad trappen, for at sikre, at Stair-TREAD-systemet er låst.
• Elastikiltflaskeholderen må kun bruges med RUGGED® Stair-PRO trappestole og iltflasker i str. D.
• Hvis iltflasken og iltflasketilbehøret ikke fastgøres korrekt, kan det hæmme trappestolens funktion.
• Sørg altid for, at du fastgør iltflasken til elastikiltflaskeholderen med den røde Velcro strop.
www.stryker.com 6252-009-005 REV D 3-3
Page 62

Dansk
DA
Oversigt over sikkerhedsforanstaltninger
FORSIGTIG (FORTSAT)
• Sørg altid for, at iltflasken sidder ordentligt fast i iltflaskeholderen, og at iltflaskens reguleringsventil ikke stikker
længere ud end trappestolens bredde.
• Fjern altid iltflasken fra elastikholderen, inden der gøres forsøg på at klappe stolen sammen eller sætte den til
opbevaring.
• Du må ikke rengøre produktet med damprens eller ultralyd.
• Den maksimale vandtemperatur må ikke overstige 180 °F (82 °C).
• Det maksimale vandtryk må ikke overstige 1500 psi (130,5 bar). Hvis du bruger en håndbetjent renseenhed til at
vaske produktet med, skal trykdysen holdes mindst 24 tommer (61 cm) fra produktet.
• Lad det altid lufttørre.
• Der må ikke foretages rengøring, service eller vedligeholdelse, mens produktet er i brug.
3-4 6252-009-005 REV D www.stryker.com
Page 63

Indledning
Denne vejledning hjælper dig med betjening eller vedligeholdelse af dit produkt fra Stryker. Læs vejledningen grundigt
igennem, før du betjener eller vedligeholder produktet. Fastlæg metoder og procedurer til uddannelse og optræning af
personalet med henblik på sikker betjening eller vedligeholdelse af dette produkt.
FORSIGTIG
• Forkert brug af produktet kan medføre, at patienten eller operatøren kommer til skade. Produktet må kun betjenes
som beskrevet i denne manual.
• Hverken produktet eller dets komponenter må modificeres. Ændring af produktet kan forårsage uforudsigelig drift,
hvilket kan medføre personskade på patient eller operatør. Ændring af produktet vil også ugyldiggøre garantien.
Bemærkninger
• Denne vejledning skal betragtes som en permanent del af produktet, og den skal opbevares sammen med
produktet, selv hvis dette senere sælges.
• Stryker tilstræber hele tiden forbedringer i produktdesign og -kvalitet. Vejledningen indeholder den seneste
produktinformation, der er tilgængelig på tidspunktet for trykning. Der kan være mindre forskelle mellem dit produkt
og denne vejledning. Hvis du har spørgsmål, bedes du kontakte Stryker kundeservice eller teknisk support på +1800-327-0770.
Produktbeskrivelse
Stair-PRO® -trappestolen er en manuel transportenhed. Stair-TREAD™ -funktionen gør produktet i stand til at
transportere et menneske op eller ned af en trappe i siddende stilling. For- og baghjul hjælper operatører til at
transportere patienten på fladt terræn.
Indikationer
Model 6251 og Model 6252 Stair-PRO-trappestol er en manuel transportanordning. Produktet transporterer et
menneske op eller ned ad en trappe i siddende stilling. Stolen kan bruges til voksne, unge eller børn, der kan blive
siddende i stolen, mens de er fastspændt med patientselerne. Stair-TREAD-systemet på Model 6252 styrer den
nedadgående transporthastighed af stol med patient. For- og baghjul hjælper operatører til at transportere patienten på
fladt terræn. Stair-PRO er beregnet til brug i præhospitalsmiljøer og i akutte og ikke-akutte situationer. Produktet har en
maksimal kapacitet på 500 pund. Produktet må kun betjenes af uddannede fagfolk. Dette inkluderer
skadestuepersonale og førstehjælpsydere.
Dansk
DA
Forventet levetid
Stair-PRO-trappestolen har en forventet levetid på syv år ved almindelig brug og med passende periodisk
vedligeholdelse.
Kontraindikationer
Stair-PRO-trappestolen må ikke bruges til at transportere patienter, der muligvis har cervix- eller rygradsskader eller
knoglebrud.
www.stryker.com 6252-009-005 REV D 3-5
Page 64
Dansk
DA
Indledning
Specifikationer
Model 6251 6252
500 pund 228 kg 500 pund 228 kg
Maksimal belastning
Højde 36 tommer 91 cm 37,5 tommer 95,25 cm
Bredde 20,5 tommer 52 cm 20,5 tommer 52 cm
2
Dybde
Sammenfoldet dybde
3
Vægt
Dimensioner måles fra hovedrammens yderkanter. Specifikationer er afrundede. Konverteringer beregnes før afrunding.
Model 6252 overholder BS EN1865-4:2010 -standarden med det valgfrie vinylsæde (6250-020-000) og uden den
valgfrie fodplade (6252-027-000).
1
Maksimal belastningskapacitet er samlet vægt fordelt i henhold til menneskets almindelige anatomi. Operatører skal
tage hensyn til patientens, udstyrets og tilbehørets vægt, når de beregner den samlede belastning på produktet.
1
28 tommer
71 cm
28 tommer
71 cm
8 tommer 20 cm 8 tommer 20 cm
23 pund 10 kg 32,8 pund 14,9 kg
2
Dybdedimensioner måles med forlængergreb trukket ind.
3
Vægten af 6252 modellen inkluderer det valgfrie vinylsæde i ét stykke, men inkluderer ikke den valgfrie fodplade.
Stryker forbeholder sig retten til at ændre specifikationerne uden varsel.
Den gule og sorte farveholdning er et proprietært varemærker, der tilhører Stryker Corporation.
3-6 6252-009-005 REV D www.stryker.com
Page 65

Produktillustration
A
B
C
D
E
A
B
C
D
E
F
G
H
I
J
Indledning
Dansk
DA
Fig. 3-1: 6251
A
B
C
Hjullås
Svinghjul
Løftegreb til fodende
D
E
Låsestang
Løftegreb til hovedende
Fig. 3-2: 6252
www.stryker.com 6252-009-005 REV D 3-7
Page 66
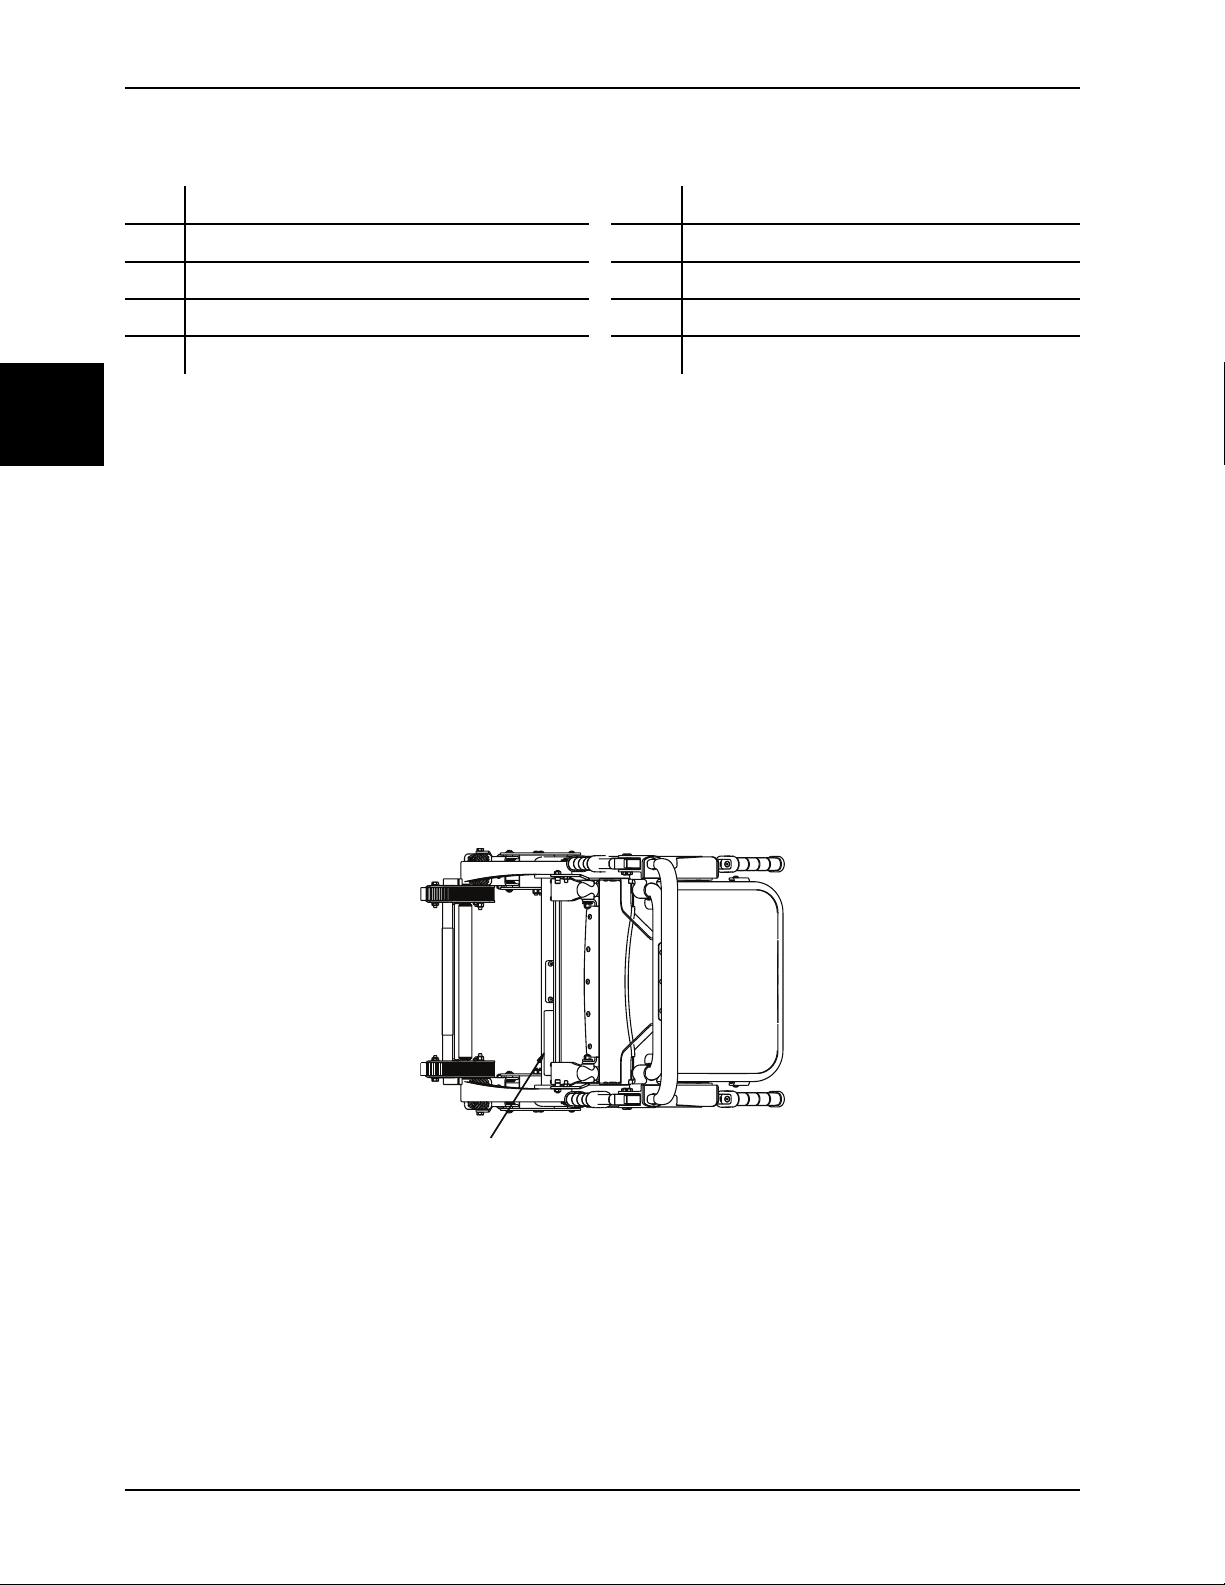
Produktillustration (Fortsat)
A
Indledning
Dansk
DA
A
B
C
D
E
Hjullås
Svinghjul
Løftegreb til fodende
Låsestang
Knap på løftegreb til fodende
F
G
H
I
J
Udløserkabel til øverste styregreb
Valgfrit udløsningsgreb til løftehåndtag
Øverste styregreb
Stair-TREAD system
Udløserstang til Stair-TREAD spor
Kontaktinformation
Kontakt Stryker kundeservice eller teknisk support på: +1-800-327-0770.
Stryker Medical
3800 E. Centre Avenue
Portage, MI 49002
USA
Du finder betjenings- eller vedligeholdelsesvejledningen online ved at gå ind på https://techweb.stryker.com/.
Hav serienummeret (A) på dit Stryker-produkt klart, når du ringer til Stryker kundeservice eller teknisk support. Inkluder
serienummeret i al skriftlig kommunikation.
Serienummerets placering
Fremstillingsdato
Fremstillingsåret er de to første tal i serienummeret.
Opsætning
Ved opsætning udpakkes alle kasserne, og alle ting kontrolleres for korrekt funktion. Kontrollér, at produktet fungerer,
inden det tages i brug.
3-8 6252-009-005 REV D www.stryker.com
Page 67

Indledning
Opsætning (Fortsat)
Fjern alle forsendelses- og pakningsmaterialer fra produktet inden brug.
Køretøjets patientrum, hvor produktet skal anvendes, skal være stort nok til at rumme stolen i sammenfoldet stand.
Modificér evt. køretøjet, så det passer til stolen. Stolen må ikke modificeres.
Dansk
DA
www.stryker.com 6252-009-005 REV D 3-9
Page 68
Dansk
DA
Drift
Betjeningsvejledning
ADVARSEL
• Brug altid alle seler til at holde patienten fast på produktet. En patient, der ikke er fastgjort med sele, kan falde ud
af produktet.
• Brug ikke en hjullås, når en person befinder sig på produktet, eller når du flytter produktet, for at undgå, at det
vælter.
• Undgå altid at få snavs eller andre genstande i sporene. Stair-TREAD-systemet fungerer muligvis ikke lige godt på
alle trappeoverflader og under alle miljøforhold. Alt efter forholdene kan du støde på forskellige grader af modstand.
Vand, is eller snavs på trappen kan påvirke operatørens fodfæste og betjeningen af Stair-TREAD-systemet. For at
undgå skade bør transportvejen ryddes, eller der bør overvejes en alternativ vej. Kondensering, vand, is eller snavs
på Stair-TREAD-systemet kan give anledning til uforudsigelige resultater, der kan give anledning til en pludselig
vægtændring, som operatørerne skal støtte.
• Forsøg ikke at transportere patienter, som vejer mere end, hvad du kan løfte på forsvarlig vis.
FORSIGTIG
Fjern altid eventuelle forhindringer, der kan komme i vejen og forårsage skade på operatøren eller patienten, inden
produktet tages i brug.
• Produktet må kun betjenes som beskrevet i denne manual.
• Læs alle etiketter og instruktioner på produktet før ibrugtagningen.
• Brug altid stolen på trapper med mindst to uddannede operatører.
• Orienter altid patienten, før du kører stolen eller går op eller ned ad trapper. Bliv med patienten og sørg for, at
produktet er under kontrol til enhver tid.
• Benyt kun hjullåsene, når en patient overføres, eller når der ikke er nogen patient på produktet.
• Brug altid alle seler til at fiksere patienten på produktet. En patient, der ikke er fastgjort med sele, kan falde ud af
produktet.
• Brug korrekt uddannet hjælpepersonale til at styre båren, når det er nødvendigt.
Sådan åbnes stolen
ADVARSEL
Sørg for, at stolen altid er låst i udfoldet position før brug. En ulåst stol kan falde sammen under brugen.
Sådan åbnes stolen:
1. Stå bag stolen.
2. Aktivér hjullåsene.
3. Træk ryglænet og forlængerhåndtaget fra hinanden (Fig. 3-3 på side 3-11).
4. Træk op i sædet for at sikre, at det er låst i den åbne position. Hvis stolen ikke vil folde sammen, er det fordi den er
låst.
3-10 6252-009-005 REV D www.stryker.com
Page 69

Sådan åbnes stolen (Fortsat)
Drift
Dansk
DA
Fig. 3-3: Sådan åbnes stolen
Sådan foldes stolen
ADVARSEL
Sørg for, at stolen altid er låst i udfoldet position før brug. En ulåst stol kan folde foldes under brug.
Sådan foldes stolen:
1. Aktivér hjullåsene.
2. Spænd selerne fast. Fold selerne, så de ikke er i vejen.
3. Stå ved siden af stolen.
4. Træk i den røde låsestang (A) bag på stolen (Fig. 3-4 på side 3-12).
5. Tip stolen fremad.
6. Fold sædet op til ryglænet, indtil benene foran låser fast i klemmerne nederst på sæderørene.
Bemærk: Hvis aktuelt roteres de forreste svinghjul, så de ikke er i vejen, når stolen foldes sammen.
www.stryker.com 6252-009-005 REV D 3-11
Page 70

Dansk
A
DA
Drift
Sådan foldes stolen (Fortsat)
Opbevar stolen på et køligt og tørt sted, hvor temperaturen er over frysepunktet og væk fra direkte sollys.
Fig. 3-4: Sådan foldes stolen
Sådan overføres patienten til stolen
ADVARSEL
• Brug ikke stolen, hvis der er mistanke om nakke- eller rygradsskader eller knoglebrud.
• Lad ikke en patient være uden opsyn. Hold fast i produktet, mens der ligger en patient på det.
Sådan overføres patienten til produktet:
1. Anbring produktet ved siden af patienten.
2. Aktiver hjullåsene for at forhindre produktet i at bevæge sig.
3. Åbn selerne.
4. Overfør patienten til produktet ved hjælp af accepterede EMS-procedurer.
5. Fastgør patienten til produktet med alle selerne.
6. Frigør hjullåsene, inden du transporterer produktet.
Fiksering af patienten med selerne
Selerne kan bruges i to konfigurationer.
ADVARSEL
Brug altid alle seler til at holde patienten fast på produktet. En patient, der ikke er fastgjort med sele, kan falde ud af
produktet.
3-12 6252-009-005 REV D www.stryker.com
Page 71
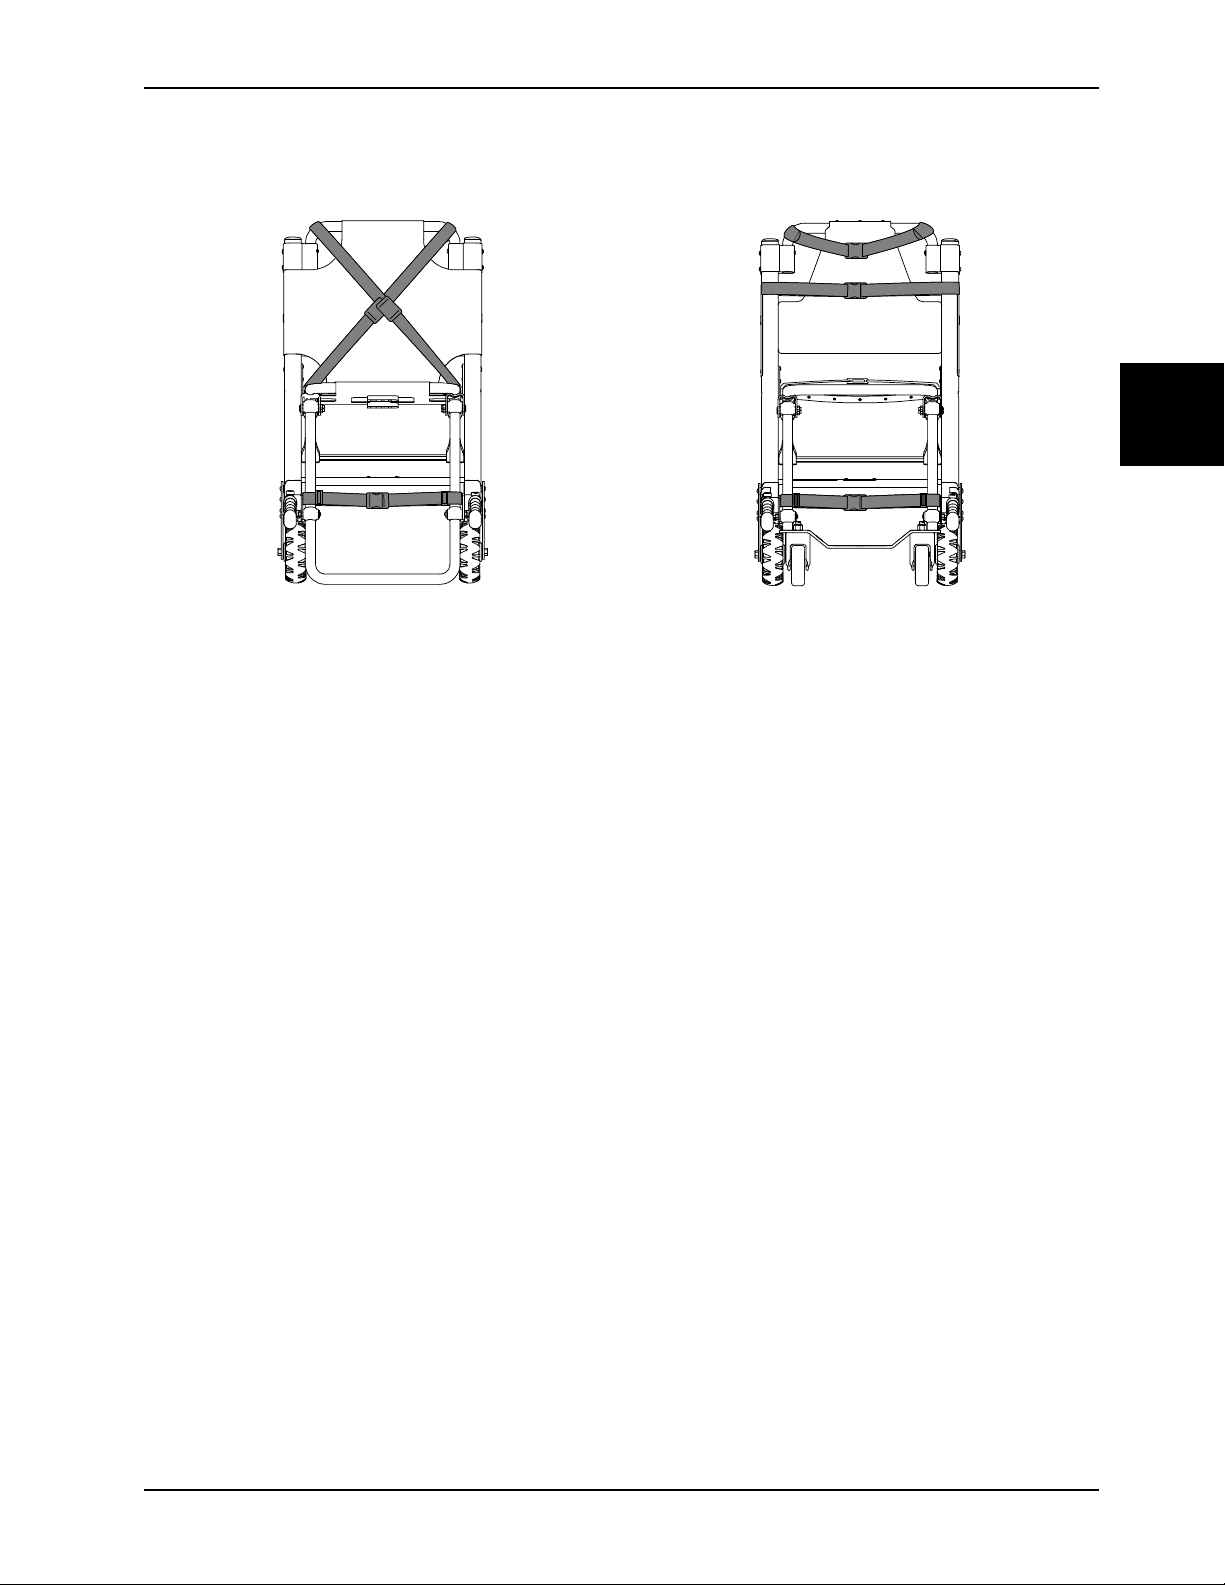
Drift
Fiksering af patienten med selerne (Fortsat)
Dansk
DA
Fig. 3-5: Konfiguration tværs over brystet
Spænd brystselen som et kryds hen over patientens bryst.
I begge konfigurationer skal de farvekodede seler passe sammen og derpå fastspændes ankelselerne hen over
patientens ben.
Fastgør selerne til båren på de angivne steder (Fig. 3-5 på side 3-13 eller Fig. 3-6 på side 3-13). Selernes
fastgøringssteder skal give stærk forankring og korrekt fikseringsposition. Sørg for at selerne ikke ligger i vejen for
andet udstyr eller tilbehør. Spænd selerne fast, når båren ikke er i brug.
Åbn selerne, og placer dem på hver side af stolen, mens du lejrer patienten på sædet. Forlæng selerne, spænd dem
omkring patienten og forkort dem, så de spændes til.
• Selen åbnes ved at trykke på tapperne på siden af spændet. På denne måde kan du udløse spændetungen og
trække den ud af hoveddelen.
• Selen låses ved at skubbe spændetungen ind i spændebeslaget, indtil der høres et klik.
• Selen forlænges ved at tage fat i spændetungen, dreje den, så den ligger vinkelret for gjordmaterialet, og derpå
trække den ud. En kraftig syning for enden af gjordmaterialet forhindrer spændetungen i at falde af selen.
• Selen afkortes ved at tage fat i den syede kant og trække gjordmaterialet bagud igennem spændetungen og
spænde den.
Når du spænder en sele om patienten, skal spændetungen sikres, og løst gjordmateriale fjernes fra stolen.
Fig. 3-6: Konfiguration over bryst og skød
Fastspænd den ene sele hen over patientens bryst.
Fastspænd den anden sele hen over patientens skød.
Sådan fastgøres selerne omkring brystkassen
Sådan fastgøres brystselerne på tværs af brystkassen:
1. Vikl alle selerne omkring stolerammen. Sæt seleenden ind gennem ringen. Træk i selen, så den strammer godt til.
2. Træk selen hen over patientens brystkasse. Forlæng selen efter behov.
3. Fastspænd selen.
4. Træk i selens løse ende for at stramme den til omkring patienten.
5. Gentag for den anden sele og hofteselen.
www.stryker.com 6252-009-005 REV D 3-13
Page 72
Dansk
DA
Drift
Fastgørelse af ankelrem
Sådan fastgøres ankelremmen:
1. Fjern de tre plaststykker fra selen.
2. Før selen gennem en af plast-D-ringene, og skub ringen ned til enden af selen frem til den hvide mærkat.
3. Før selen omkring stolens forreste ben, og træk selens løse ende gennem ringen. Træk, indtil ringen hviler op mod
røret i fodpladen.
4. Før selen gennem den anden D-ring.
5. Før selen omkring det andet af stolens forreste ben, og træk selens løse ende gennem ringen. Træk, indtil D-ringen
hviler op mod røret i fodpladen.
6. Sæt den afsluttende hanende-clip på selen.
Korrekte løfteteknikker
Ved løft af produktet og patienten skal disse korrekte løfteteknikker følges, så risikoen for skader undgås:
• Hold hænderne tæt ved kroppen
• Hold ryggen ret
• Koordinér dine bevægelser med din partners
• Løft med benene
• Undgå at vride kroppen
Sådan transporteres patienten på fladt terræn
ADVARSEL
Skub ikke Model 6252 afsted, mens det øverste styregreb er i fuldt udstrakt position. Hvis stolen skubbes, mens grebet
befinder sig i den fuldt udstrakte position, kan det medføre, at stolen tipper, når du støder på forhindringer.
FORSIGTIG
Vær altid forsigtig, når der er hjul under. Hjul er ikke egnet til alle overflader.
Sådan transporteres patienten på fladt terræn:
1. Stolen skal skubbes og styres ved hjælp af løftegrebene i hovedenden eller røret i ryglænet.
2. Løft stolen over og omkring forhindringer med løftegrebene i hoved- og fodenden.
Transport af patient ned af trapper - Model 6251
ADVARSEL
• Patienten skal altid transporteres op og ned af trapper af mindst to operatører.
• Lås altid løftegrebene i stilling, inden løftegrebene bruges til at løfte stolen.
Sådan overføres patienten ned af trapper:
1. Operatøren i fodenden: Stil dig foran stolen.
2. Operatøren i hovedenden: Stil dig rigtigt i forhold til trappen.
3-14 6252-009-005 REV D www.stryker.com
Page 73
Drift
Transport af patient ned af trapper - Model 6251 (Fortsat)
3. Operatøren i fodenden: Tryk på knapperne til de røde løftegreb i fodenden, og træk hvert enkelt håndtag ud, til det
ikke kan komme længere. Slip knappen for at låse grebet i den pågældende position.
4. Operatøren i hovedenden: Fold løftegrebene i hovedenden ud og se ned af trappen.
5. Operatøren i fodenden: Stå med ryggen mod trappen for bedre at kunne se patienten eller vend fremefter for bedre
at kunne se trappen og bevæge sig rundt om forhindringer.
Bemærk: Selvom operatøren ved hovedenden kan vende i begge retninger, mens du løfter og bærer, skal du altid
følge alle gældende protokoller, når du bærer stolen.
6. Begge operatører - Løft stolen sammen. Brug løftegrebene i hovedenden og løftegrebene i fodenden. Benyt den
rette løfteteknik (Korrekte løfteteknikker på side 3-14). Bær stolen langsomt ned af trapperne for at undgå
eventuelle forhindringer.
Transport af patient ned af trapper - Model 6252
ADVARSEL
• Patienten skal altid transporteres op og ned af trapper af mindst to operatører.
• Lås altid løftegrebene i stilling, inden løftegrebene bruges til at løfte stolen.
• Lås altid Model 6252 Stair-TREAD-systemet i stilling, før du transporterer en patient.
• Undgå at få snavs eller andre genstande i sporene. Stair-TREAD-systemet fungerer muligvis ikke lige godt på alle
trappeoverflader og under alle miljøforhold. Alt efter forholdene kan du støde på forskellige grader af modstand.
Vand, is eller snavs på trappen kan påvirke operatørens fodfæste og betjeningen af Stair-TREAD-systemet. For at
undgå skade bør transportvejen ryddes, eller der bør overvejes en alternativ vej. Kondensering, vand, is eller snavs
på Stair-TREAD-systemet kan give anledning til uforudsigelige resultater, der kan give anledning til en pludselig
vægtændring, som operatørerne skal støtte.
• Rengør og aftør altid Stair-TREAD-systemet, før du transporterer en patient.
• Forsøg ikke at transportere patienter, som vejer mere end, hvad du kan løfte på forsvarlig vis.
Dansk
DA
FORSIGTIG
Frigør altid sporets røde udløserstang, før du klikker Stair-TREAD-systemet på plads i den låste position. Prøv at folde
stolen, før du går ned ad trappen, for at sikre, at Stair-TREAD-systemet er låst.
Sådan transporteres patienten ned ad trappen:
1. Kør stolen hen til trappen, og bring den på linje med kanten på det første trin.
2. Operatøren i fodenden: Tryk på de røde udløserknapper for at forlænge fodendens løftegreb, og træk grebene ud,
indtil de stopper. Slip knapperne for at låse grebene.
3. Operatøren i hovedenden: Træk i udløserkablet til det røde øverste styregreb med den ene hånd. Brug den anden
hånd til at trække grebet opefter og helt ud. Slip kablet og sørg for, at grebet er låst på begge sider i den fuldt
udtrukne position.
4. Operatøren i hovedenden: Klem sporets røde udløserstang op mod det sorte tværrør. Løsn dit greb om
udløserstangen og træk Stair-TREAD-systemet ud i fuldt udstrakt position med et godt ryk, indtil begge sider låser
forsvarligt. Sørg altid for, at begge sider af Stair-TREAD-systemet er låst ved at prøve at folde det op igen.
5. Operatører vender mod hinanden, når de går ned at trappen.
6. Operatøren i hovedenden: Hæld stolen lige netop langt nok tilbage til, at Stair-TREAD-systemet berører gulvet.
7. Begge operatører - Før stolen hen over trappekanten, idet vinklen opretholdes. Lad Stair-TREAD-systemet få
kontakt til det første trin.
8. Begge operatører - Lad systemet glide ned ad trappen, til slidbanen er i niveau hen over to eller tre trin.
9. Operatøren i hovedenden: Påfør et svagt nedadrettet tryk på det udtrækkelige øverste styregreb, mens operatøren i
fodenden påfører løftegrebene i fodenden et svagt opadrettet tryk for at forhindre, at stolen vipper fremefter,
efterhånden som den glider ned ad trappen.
www.stryker.com 6252-009-005 REV D 3-15
Page 74
Dansk
DA
Drift
Transport af patient ned af trapper - Model 6252 (Fortsat)
10. Operatøren i fodenden: Når sporet når det sidste trin, frigøres frontgrebene. Operatøren i hovedenden: Lad stolen
tippe fremefter, indtil alle fire hjul befinder sig på jorden. Kør stolen afsted, se Sådan transporteres patienten på
fladt terræn på side 3-14.
11. Stair-TREAD-systemet sammenfoldes ved at trække sporets røde udløserstang hen mod den sorte tværbøjle, og
fold sporet op mod stolen. Sørg for, at Stair-TREAD-systemet er låst på plads.
Hvis en af operatørerne, mens de er på vej ned ad trappen, har brug for at holde pause eller hvile, vippes stolen lige nok
fremefter til, at baghjulene kan hvile på trappetrinnet. For at fortsætte ned ad trappen fra hvilepositionen udøver
operatøren i hovedenden et svagt nedadrettet tryk på det øverste styregreb, mens operatøren i fodenden udøver et let
opadrettet tryk for at vippe stolen tilbage og aktivere Stair-TREAD-systemet.
Sådan transporteres patienten op ad trappen
ADVARSEL
• Patienten skal altid transporteres op ad trappen af mindst to uddannede operatører.
• Lås altid løftegrebene i stilling, inden løftegrebene bruges til at løfte stolen.
Sådan transporteres patienten op ad trappen:
1. Kør stolen til bunden af trappen, idet patientens ryg vender mod trappen.
2. Operatøren i fodenden: Tryk på de røde udløserknapper for at forlænge fodendens løftegreb, og træk grebene ud,
indtil de stopper. Slip knapperne for at låse grebene.
3. Operatøren i hovedenden: Fold løftegrebene i hovedenden ud.
4. Operatøren i fodenden: Vend dig mod trappen.
5. Operatøren i hovedenden: Stå med ryggen mod trappen for bedre at kunne se patienten eller vend fremefter for
bedre at kunne se trappen og bevæge sig rundt om forhindringer.
Bemærk: Selvom operatøren ved hovedenden kan vende i begge retninger, mens du løfter og bærer, skal du altid
følge alle gældende protokoller, når du bærer stolen.
6. Begge operatører - Løft stolen sammen. Brug løftegrebene i hovedenden og løftegrebene i fodenden. Følg Korrekte
løfteteknikker på side 3-14. Bær stolen langsomt ned af trapperne for at undgå eventuelle forhindringer.
Aktivering eller udløsning af en hjullås
ADVARSEL
• Brug ikke en hjullås, når en person befinder sig på produktet, eller når du flytter produktet, for at undgå, at det
vælter.
• Installér eller aktivér ikke en hjullås på et produkt med slidte hjul med en diameter under 6 tommer (15,2 cm).
• Lad ikke patienten være uden opsyn. Hold fast i produktet, mens der ligger en patient på det.
Hjullåsen aktiveres ved at trykke ned på pedalen, indtil den stopper og hviler ind imod hjulet.
Hjullåsen udløses ved at trykke ned øverst på pedalen med foden eller løfte pedalen op med tåen. Toppen af pedalen
vil hvile ind imod svinghjulet, når hjullåsen udløses.
Bemærk: Hjullåse er med til at forhindre, at produktet ruller, mens det er uden opsyn. Hjullåse vil muligvis ikke yde
tilstrækkelig modstand på alle underlag eller under belastninger.
3-16 6252-009-005 REV D www.stryker.com
Page 75

Drift
A
B
Sådan hæves og sænkes de låsbare løftegreb bagpå
Du kan bruge de låsbare løftegreb bagpå til at tippe stolen tilbage.
ADVARSEL
Lås altid løftegrebene i stilling, inden du bruger grebene til at tippe stolen tilbage.
De låsbare løftegreb bagpå hæves ved at dreje grebene opefter, indtil de låser fast i positionen.
Sådan sænkes de låsbare løftegreb bagpå:
1. Løft op i det låsbare løftegreb bagpå (A) (Fig. 3-7 på side 3-17).
2. Træk udløseren med det røde greb (B) ind mod dig med tommelfingeren.
3. Fold det låsbare løftegreb bagpå ned mod stolerammen.
Dansk
DA
Fig. 3-7: Sådan sænkes de låsbare løftegreb bagpå
Sådan fastgøres den valgfrie hovedstøtte til det øverste styregreb
Sådan fastgøres hovedstøtten til det øverste styregreb, som kan forlænges:
1. Vikl de løse ender af selen omkring de lodrette dele af grebet, og før dem derpå gennem plastringene.
2. Træk godt til, og fastgør selen til sig selv.
3. Juster højden ved at løsne selen, flytte den til det ønskede sted og stramme til igen.
Sådan understøttes patientens hoved med den valgfrie hovedstøtte
Patientens hoved understøttes med hovedstøtten på følgende måde:
1. Træk det øverste styregreb ud.
2. Træk i udløserkablet til det røde øverste styregreb med den ene hånd.
3. Træk op i grebet med den anden hånd.
4. Slip kablet. Sørg for, at grebet er låst i en af de to tilgængelige positioner.
5. Fastgør hovedstøtten (Sådan fastgøres den valgfrie hovedstøtte til det øverste styregreb på side 3-17).
6. Anbring hovedstøtten lige neden for patientens hoved for at støtte hovedet.
7. For patienter, der er bevidstløse eller halvt bevidstløse, holdes hovedet på plads med de to andre dele af selen.
8. Vikl hovedstøtten rundt om patientens hoved. Lad seleenderne overlappe hinanden, og stram til efter behov.
Når hovedstøtten ikke er i brug, vikles selen omkring grebet, og selen fastgøres bag på hovedstøtten.
www.stryker.com 6252-009-005 REV D 3-17
Page 76
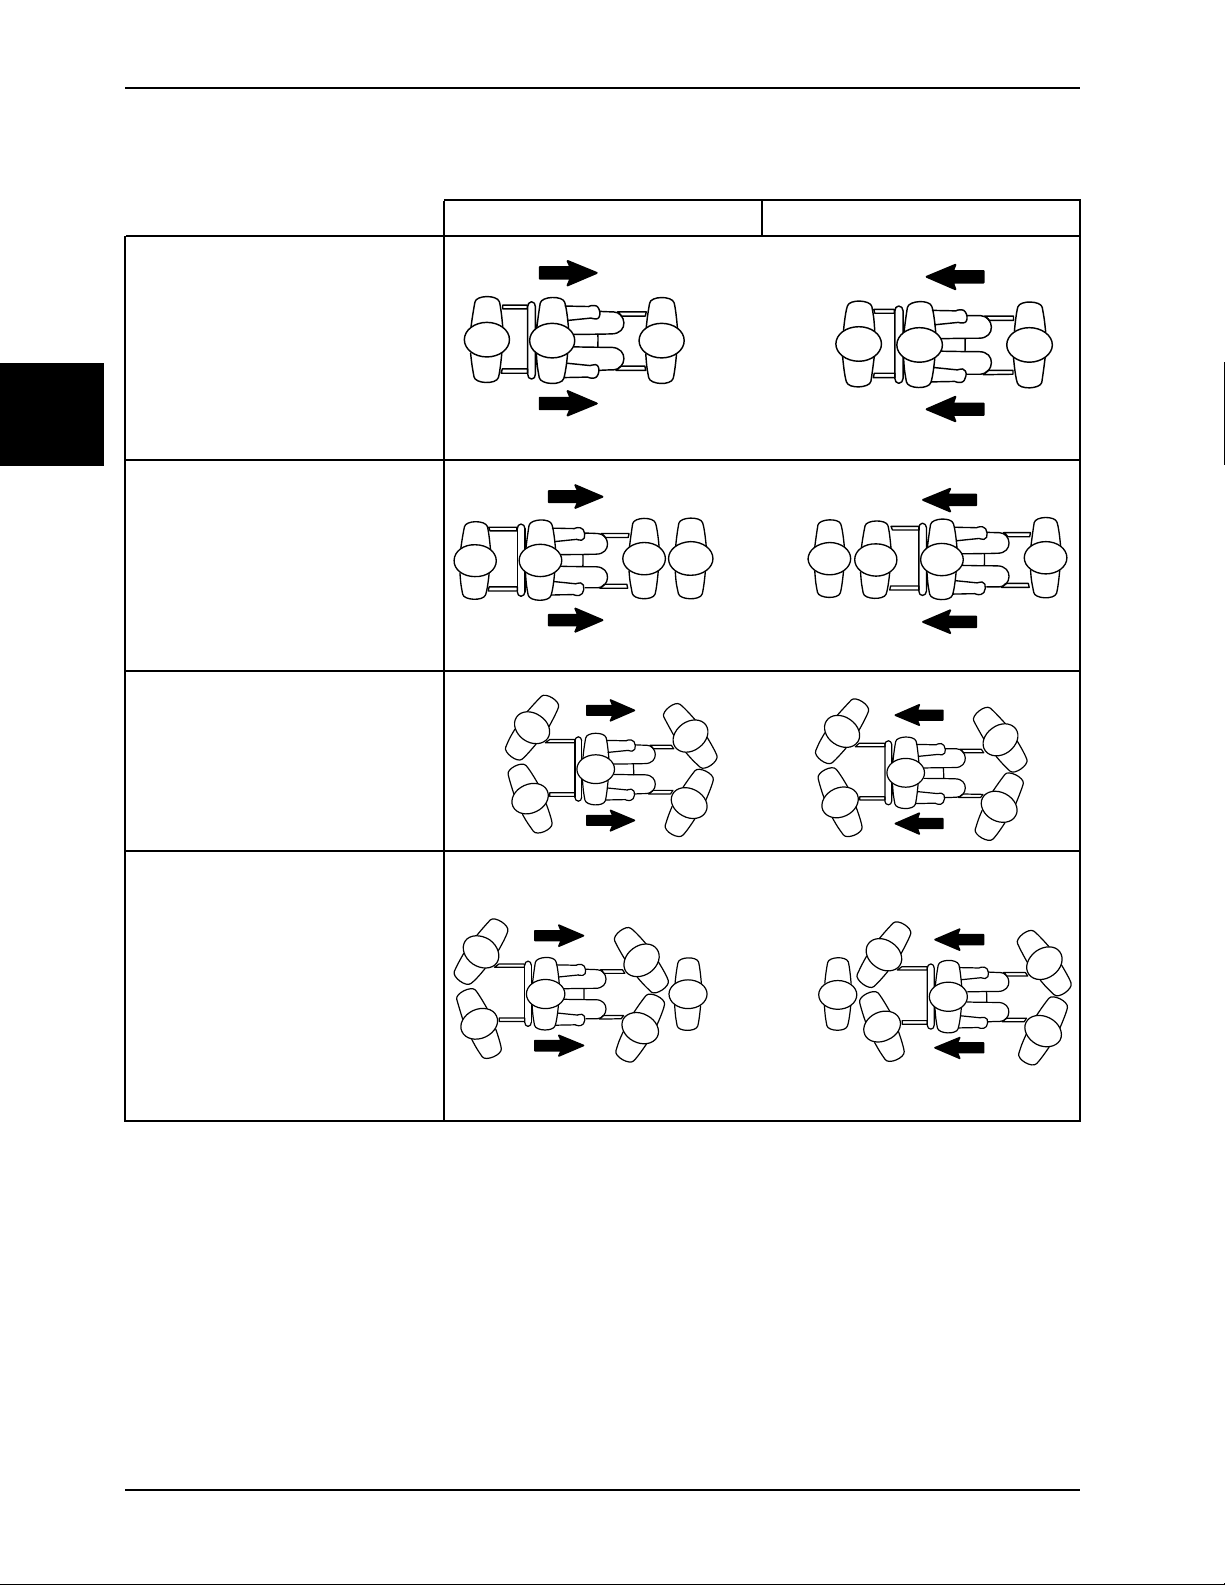
Drift
O O
O O
O O OO
H H
H
H
O
O
H
O
H
O
H
O
H
O
H
O
H H
H
O
Placering af operatører og støttepersonale som ekstra hjælp
Dansk
DA
To operatører (O)
To operatører (O)
En hjælper (H)
To operatører (O)
To hjælpere (H)
Ned ad trapper
Op ad trapper
To operatører (O)
Tre hjælpere (H)
3-18 6252-009-005 REV D www.stryker.com
Page 77

Drift
Montering af elastikiltflaskeholderen
ADVARSEL
• Sørg altid for, at du fastgør alle slanger, regulatorer og ekstratilbehør til iltflasken for at forebygge interferens med
spor, hjul eller andre af trappestolens mekanismer.
• Hvis trappestolens komponenter ikke rengøres eller bortskaffes korrekt, vil det øge risikoen for eksponering for
blodbårne patogener, hvilket kan forårsage skade på operatøren eller patienten.
• Elastikiltflaskeholderen må kun bruges med RUGGED® Stair-PRO trappestole og iltflasker i str. D.
• Hvis iltflasken og iltflasketilbehøret ikke fastgøres korrekt, kan det hæmme trappestolens funktion.
• Sørg altid for, at du fastgør iltflasken til elastikiltflaskeholderen med den røde Velcro strop.
• Sørg altid for, at iltflasken sidder ordentligt fast i iltflaskeholderen, og at iltflaskens reguleringsventil ikke stikker
længere ud end trappestolens bredde.
• Fjern altid iltflasken fra elastikholderen, inden der gøres forsøg på at klappe stolen sammen eller sætte den til
opbevaring.
1. Sørg for, at trappestolen er i åben position, inden du monterer elastikiltflaskeholderen.
2. Anbring elastikiltflaskeholderen mellem de to forlængerhåndtagsrør under sædet.
3. Før hver af de fire Velcro-stropper gennem plastikspænderne.
4. Træk ned i stropperne, så de strammes til, før du fastgør Velcro.
5. Træk op i det røde håndtag, og skub iltflasken i str. D ind i elastikiltflaskeholderen.
Bemærkninger
• Sørg for, at du skubber bunden af iltflasken ind først.
• Når du monterer elastikiltflaskeholderen, skal du sørge for, at stolens vægtkapacitet stadig kan ses.
6. Før den røde strop gennem det røde håndtag. Når den røde strop ikke bruges, kan du fastgøre den til bunden af
elastikiltflaskeholderen.
7. Træk ned i den røde Velcro-strop, indtil den er stram, og fastgør den rundt om iltflasken.
Dansk
DA
www.stryker.com 6252-009-005 REV D 3-19
Page 78
Dansk
DA
Rengøring
Rengøringsprocedure
ADVARSEL
Brug altid passende personligt beskyttelsesudstyr under højtryksrensning for at undgå indånding af smitstoffer.
Højtryksrensningsudstyr kan medføre, at forureningsstoffer blandes med luften.
FORSIGTIG
• Du må ikke rengøre produktet med damprens eller ultralyd.
• Den maksimale vandtemperatur må ikke overstige 180 °F (82 °C).
• Det maksimale vandtryk må ikke overstige 1500 psi (130,5 bar). Hvis du bruger en håndbetjent renseenhed til at
vaske produktet med, skal trykdysen holdes mindst 24 tommer (61 cm) fra produktet.
• Lad det altid lufttørre.
• Der må ikke foretages rengøring, service eller vedligeholdelse, mens produktet er i brug.
Produktet kan højtryksrenses. Produktet kan vise tegn på oxidering eller misfarvning pga. kontinuerlig vask. Der vil ikke
ske nogen forringelse af produktets ydelse pga. højtryksrensning, så længe de korrekte procedurer følges.
• Følg producentens anbefalinger vedr. fortynding af rengøringsmidlet nøjagtigt.
• Den foretrukne metode, som Stryker Medical anbefaler til højtryksrens af produktet, er med en almindelig kirurgisk
vaskevogn eller håndbetjent renseenhed til hospitalsbrug.
• Rengør Velcro®-materialet efter hver brug. Gennemvæd Velcro®-materialet med et desinfektionsmiddel, og lad
desinfektionsmidlet fordampe. Hensigtsmæssigt desinfektionsmiddel til nylon Velcro®-materiale skal bestemmes af
servicen.
• Nedsænkning af selens metalspænder kan forårsage korrosion af spændet og frarådes. Skyl med rent vand, og lad
lufttørre for at mindske risikoen for korrosion. Udskift selerne, hvis spænderne er korroderede.
Rengøring af sporramme (model 6252)
Hvis der kommer fremmedlegemer mellem Stair-TREAD systemets rem- og sporramme på Model 6252, skal du rengøre
sporrammen.
Sådan rengøres sporrammen:
1. Løsgør sporremmene.
2. Tag baghjulene af.
3. Rengør sporrammen med hospitalssprit.
4. Brug vand ved højt tryk til at rengøre remmene. Rengør både remmenes inderside og yderside.
5. Lad remmene tørre fuldstændigt.
6. Saml sporremmene og baghjulene igen.
7. Følg de relevante advarsler og forholdsregler, og test stolens funktionsevne med en simuleret patientvægt, mens du
går ned ad en trappe.
Hvis ydeevnen ikke vender tilbage til det oprindelige niveau, kan du være nødt til at istandsætte eller udskifte remmene.
Anbefalede rengøringsmidler
Hvis de anvendes i de koncentrationer, der anbefales af producenten, kan desinfektionsmidler af enten fenoltypen eller
kvaternære (undtagen Virex® TB) desinektionsmidler anvendes. Rengøringsmidler med iodophor anbefales ikke til brug,
da der kan forekomme misfarvinger.
3-20 6252-009-005 REV D www.stryker.com
Page 79

Rengøring
Anbefalede rengøringsmidler (Fortsat)
ADVARSEL
Tør altid produktet af med rent vand, og tør det af efter rengøringen. Visse rengøringsprodukter er ætsende og kan
forårsage skade på produktet. Hvis produktet ikke skylles og tørres ordentligt af, kan det efterlade ætsende reststoffer
på produktets overflader, som kan forårsage utidig korrosion af kritiske komponenter.
Anbefalede rengøringsmidler inkluderer:
• Kvaternære rengøringsmidler (aktivt stof - ammoniumchlorid)
• Fenolholdige rengøringsmidler (aktivt stof - o-fenylfenol)
• Klorholdig blegemiddelopløsning (5,25 % - mindre end 1 del blegemiddel til 100 dele vand)
Undgå for kraftig gennemvædning. Lad ikke produktet være vådt i længere tid, end retningslinjerne fra kemikaliets
producent anbefaler for at opnå korrekt desinfektion.
Bemærk: Undladelse af at følge ovenstående anvisninger, når disse typer rengøringsmidler anvendes, kan det
ugyldiggøre produktets garanti.
Dansk
DA
www.stryker.com 6252-009-005 REV D 3-21
Page 80
Forebyggende vedligeholdelse
Tag produktet ud af brug, inden der udføres den forebyggende vedligeholdelsesinspektion. Kontrollér alle punkter på
listen under den årlige forebyggende vedligeholdelse af alle produkter fra Stryker Medical. Du vil muligvis være nødt til
at udføre forebyggende vedligeholdelseskontroller oftere, afhængigt af hyppigheden af brugen af produktet. Service må
kun foretages af kvalificeret personale.
Bemærk: Rengør og desinficér madrassens ydersider før inspektion, hvis det er relevant.
Betjening Tidsplan Procedure
Dansk
DA
Rengøring og desinfektion
Inspektion
Istandsættelse af rem på Stair-
TREAD-system (6252)
Inspicér følgende:
Alle beslag sidder forsvarligt (se alle oversigtstegninger)
Alle svejsninger intakte, ikke revnede eller ødelagte
Ingen bøjede eller ødelagte rør eller metalplader
Intet snavs i hjulene
Alle hjul er sikre og kører
Forhjul sidder, kører og drejer forsvarligt (hvis udstyret hermed)
Hjullåse holder hjulene sikkert på plads, når de er aktiveret, og slipper hjulene, når de er deaktiveret
Stolen åbner og låser korrekt
Ingen rifter eller revner i sæde eller ryglæn
Seler er intakte og fungerer
Bæregreb i fodenden kan trækkes ud og fastlåses
Bæregreb i hovedenden folder ind og ud
Det øverste styregreb kan trækkes ud og låse i alle positioner
Stair-TREAD-systemets mekanisme åbnes og fastlåses (hvis udstyret hermed)
Stair-TREAD-systemets rem kører (hvis udstyret hermed)
De indre snore til Stair-TREAD-systemets rem vises ikke; udskift om nødvendigt (hvis udstyret hermed)
Stair-TREAD-systemet virker som det skal; sæt remmene i stand om nødvendigt (hvis udstyret hermed)
Ingen smøremidler til stede på Stair-TREAD-systemets remme eller på sporrammens overflader
Kabel til øvre udløsergreb ikke slidt eller flosset (model 6252)
Valgfrit tilbehør intakt og fungerer korrekt
Hver brug
Ved 1-25 udkald pr. måned skal
stolen inspiceres hver 6. måned
Ved 26-200 udkald pr. måned skal
stolen inspiceres hver 3. måned
Ved 201+ udkald pr. måned skal
stolen inspiceres en gang om
måneden
Efter brug på cirka 500 trapper, eller
hvis Stair-TREAD-systemet ikke
længere fungerer optimalt
Se rengøring
Se nedenstående tjekliste
Se vedligeholdelsesvejledningen for
information om istandsættelse af rem
Produktets serienummer:
Udfyldt af:
Dato:
3-22 6252-009-005 REV D www.stryker.com
Page 81

Stair-PRO® Treppenstuhl
6251
6252
Bedienungsanleitung
2018/06 D.1 6252-009-005 REV D www.stryker.com
Page 82

sample text
Page 83
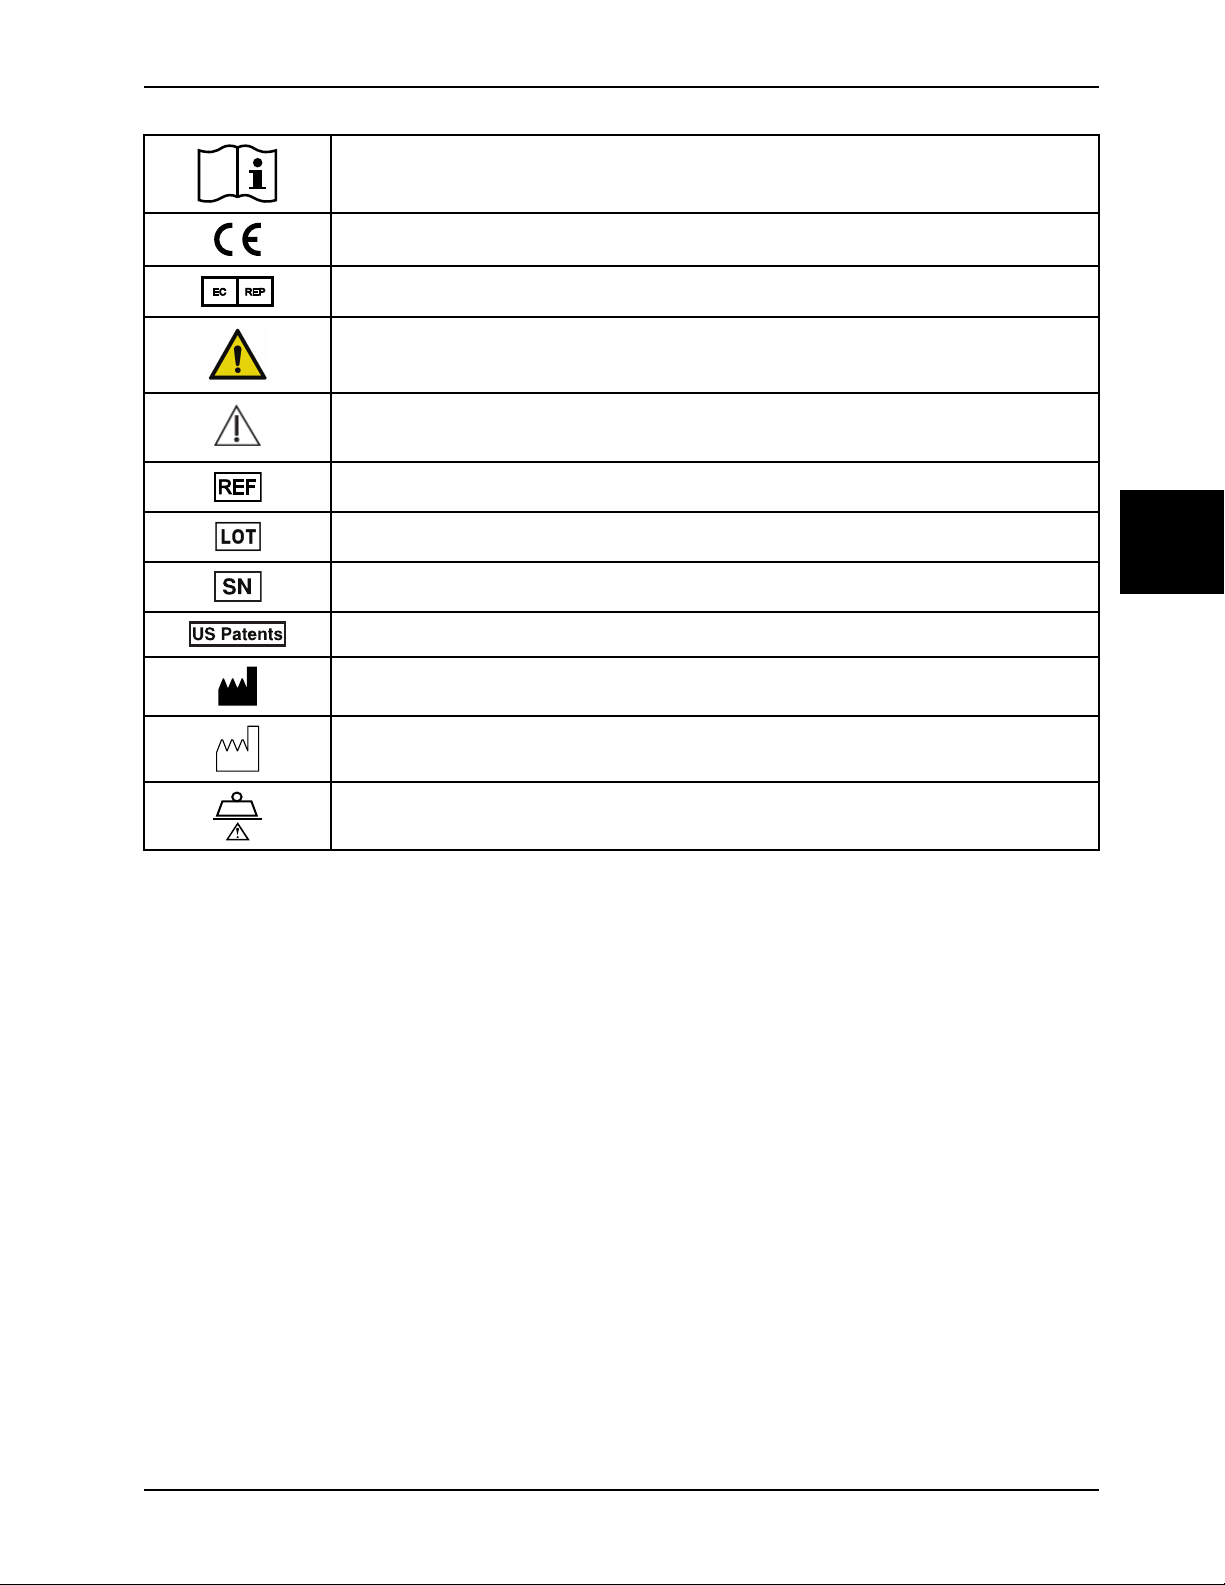
Symbole
Bedienungsanleitung/Gebrauchsanweisung beachten
CE-Kennzeichnung
Bevollmächtigter in Europa
Allgemeine Warnung
Vorsicht
Katalognummer
Chargennummer
Seriennummer
Für Informationen zu US-Patenten siehe www.stryker.com/patents
Hersteller
Herstellungsdatum
Sichere Arbeitslast
Deutsch
DE
www.stryker.com 6252-009-005 REV D
Page 84

sample text
Page 85

Inhaltsverzeichnis
Definition von Warnung/Vorsicht/Hinweis .................................................................................................... 4-2
Zusammenfassung der Sicherheitsvorkehrungen .......................................................................................... 4-3
Einführung ............................................................................................................................................ 4-5
Produktbeschreibung ........................................................................................................................ 4-5
Anwendungsgebiete.......................................................................................................................... 4-5
Erwartete Einsatzdauer ..................................................................................................................... 4-5
Kontraindikationen............................................................................................................................ 4-5
Technische Daten ............................................................................................................................ 4-6
Produktabbildung ............................................................................................................................. 4-7
Kontaktinformationen ........................................................................................................................ 4-8
Position der Seriennummer ................................................................................................................ 4-8
Herstellungsdatum............................................................................................................................ 4-8
Einrichtung ..................................................................................................................................... 4-8
Betrieb............................................................................................................................................... 4-10
Bedienungsrichtlinien...................................................................................................................... 4-10
Ausklappen des Stuhls .................................................................................................................... 4-10
Zusammenklappen des Stuhls .......................................................................................................... 4-11
Umlagern des Patienten auf den Stuhl................................................................................................ 4-12
Sicherung eines Patienten mit den Haltegurten..................................................................................... 4-12
Anbringen der Haltegurte an der Brust................................................................................................ 4-13
Anlegen des Fußgurts ..................................................................................................................... 4-14
Richtige Hebetechniken................................................................................................................... 4-14
Transport des Patienten auf ebener Strecke........................................................................................ 4-14
Treppab-Transport des Patienten – Modell 6251 .................................................................................. 4-15
Treppab-Transport des Patienten – Modell 6252 .................................................................................. 4-15
Treppauf-Transport des Patienten ..................................................................................................... 4-16
Anziehen bzw. Lösen einer Radsperre ................................................................................................ 4-17
Anheben oder Absenken der arretierenden hinteren Hebegriffe ............................................................... 4-17
Befestigen der optionalen Kopfstütze am oberen Lenkbügel.................................................................... 4-17
Stützen des Kopfes des Patienten mit der optionalen Kopfstütze.............................................................. 4-18
Positionieren von Bedienern und Helfern für zusätzliche Unterstützung ..................................................... 4-19
Installieren des elastischen Sauerstoffflaschenhalters........................................................................... 4-20
Reinigung ........................................................................................................................................... 4-21
Reinigungsverfahren ....................................................................................................................... 4-21
Reinigen des Raupenrahmens (Modell 6252) ....................................................................................... 4-21
Empfohlene Reiniger....................................................................................................................... 4-22
Vorbeugende Wartung .......................................................................................................................... 4-23
Deutsch
DE
www.stryker.com 6252-009-005 REV D 4-1
Page 86
Deutsch
DE
Definition von Warnung/Vorsicht/Hinweis
Die Begriffe WARNUNG, VORSICHT und HINWEIS besitzen jeweils eine besondere Bedeutung, weshalb die folgenden
Erläuterungen sorgfältig zu beachten sind.
WARNUNG
Warnt den Leser vor einer Situation, welche bei Nichtvermeiden zu schwerer Verletzung oder zum Tod führen könnte.
Hierunter können auch mögliche schwere Nebenwirkungen oder Sicherheitsrisiken beschrieben werden.
VORSICHT
Warnt den Leser vor einer möglichen gefährlichen Situation, welche bei Nichtvermeiden zu leichten oder mittelschweren
Verletzungen des Benutzers oder des Patienten oder zu Beschädigung des Produkts oder anderer Gegenstände führen
könnte. Dies beinhaltet auch die nötigen besonderen Vorsichtsmaßnahmen zur sicheren und effektiven Benutzung des
Geräts und die nötigen Vorsichtsmaßnahmen, um Beschädigungen des Geräts zu vermeiden, die als Ergebnis des
Gebrauchs oder der unsachgemäßen Benutzung auftreten könnten.
Hinweis: Hinweise enthalten Informationen, die die Wartung erleichtern oder wichtige Anweisungen verdeutlichen.
4-2 6252-009-005 REV D www.stryker.com
Page 87
Zusammenfassung der Sicherheitsvorkehrungen
Die auf dieser Seite aufgeführten Warn- und Vorsichtshinweise sind durchzulesen und genau zu befolgen. Nur durch
qualifiziertes Personal warten lassen.
WARNUNG
• Vor Gebrauch immer sicherstellen, dass der Stuhl im ausgeklappten Zustand verriegelt ist. Ein nicht verriegelter
Stuhl kann während der Verwendung zusammenklappen.
• Den Stuhl nicht für den Transport von Personen verwenden, bei denen Halswirbel-, Rückenmarks- oder
Bruchverletzungen vermutet werden.
• Einen Patienten nicht unbeaufsichtigt lassen. Das Produkt festhalten, während sich ein Patient darauf befindet.
• Zur Sicherung des Patienten auf dem Produkt immer alle Haltegurte benutzen. Ein nicht durch Haltegurte
gesicherter Patient kann von dem Produkt fallen.
• Das Modell 6252 darf nicht mit dem oberen Lenkbügel in der voll ausgefahrenen Position geschoben werden. Wenn
der Stuhl mit voll ausgefahrenem Lenkbügel geschoben wird, kann er bei Auftreffen auf ein Hindernis kippen.
• Vor dem Transport eines Patienten immer das Stair-TREAD System des Modells 6252 arretieren.
• Vermeiden, dass Schmutz oder andere Fremdkörper in die Raupen gelangen. Das Stair-TREAD System funktioniert
möglicherweise nicht auf allen Treppenoberflächen und unter allen Umgebungsbedingungen gleich gut. Je nach
Gegebenheiten können Sie auf Widerstand unterschiedlichen Grades stoßen. Wasser, Eis oder Schmutz auf der
Treppe können den Halt des Bedieners und den ordnungsgemäßen Betrieb des Stair-TREAD Systems
beeinträchtigen. Um Verletzungen zu vermeiden, den Weg räumen oder eine alternative Route erwägen.
Kondensation, Wasser, Eis oder Schmutz am Stair-TREAD System kann zu einer unvorhergesehenen
Arbeitsleistung führen, die zu einer plötzlichen Verlagerung des Gewichts führt, das der Bediener halten muss.
• Vor dem Transport eines Patienten immer das Stair-TREAD System reinigen und trocknen.
• Nicht versuchen, größere Patientenlasten zu transportieren, als sicher gehoben werden können.
• An einem Produkt mit abgenutzten Rädern mit einem Durchmesser von weniger als 15,2 cm darf keine Radsperre
verwendet werden.
• Immer die Hebegriffe in Position arretieren, bevor sie dazu verwendet werden, den Stuhl nach hinten zu kippen.
• Stets sicherstellen, dass alle Schläuche, Regler und Zubehörteile für die Sauerstoffflasche gesichert sind, um eine
Beeinträchtigung der Schienen, Räder und anderen Mechanismen des Treppenstuhls zu vermeiden.
• Eine nicht ordnungsgemäße Reinigung oder Entsorgung verunreinigter Komponenten des Treppenstuhls erhöht das
Risiko einer Belastung durch blutübertragene Krankheitserreger und kann zu Verletzungen des Patienten oder
Bedieners führen.
• Bei der Hochdruckreinigung stets geeignete Schutzkleidung tragen, um eine Kontamination durch Einatmen zu
vermeiden. Bei der Hochdruckreinigung kann es zur Kontamination durch die Luft kommen.
• Das Produkt nach der Reinigung immer mit sauberem Wasser abwischen und trocknen. Manche Reinigungsmittel
sind ätzend und können das Produkt beschädigen. Das Produkt immer abspülen und trocknen, um zu vermeiden,
dass ätzende Rückstände auf der Oberfläche des Produkts verbleiben, die eine vorzeitige Korrosion an wichtigen
Komponenten verursachen können.
Deutsch
DE
VORSICHT
• Unsachgemäßer Gebrauch des Produkts kann zu Verletzungen des Patienten oder der Bedienperson führen. Das
Produkt nur wie in diesem Handbuch beschrieben bedienen.
• Das Produkt oder Bestandteile des Produkts nicht verändern. Eine Modifizierung des Produkts kann zu
unvorhergesehenem Betrieb führen und somit Verletzungen des Patienten oder der Bedienperson verursachen.
Veränderungen am Produkt lassen außerdem die Garantieansprüche erlöschen.
• Vor dem Betrieb des Produkts immer alle Hindernisse aus dem Weg räumen, die sich störend auswirken und
Verletzungen des Bedieners oder Patienten verursachen können.
• Bei der Verwendung von Laufrollen immer Vorsicht walten lassen. Laufrollen sind nicht für alle Oberflächen
geeignet.
www.stryker.com 6252-009-005 REV D 4-3
Page 88

Deutsch
DE
Zusammenfassung der Sicherheitsvorkehrungen
VORSICHT (FORTSETZUNG)
• Vor dem Einrasten des Stair-TREAD Systems in seiner arretierten Position immer den roten
Raupenentriegelungsbügel lösen. Vor einem Treppab-Transport versuchen, den Stuhl zusammenzuklappen, um
sicherzustellen, dass das Stair-TREAD System arretiert ist.
• Der elastische Sauerstoffflaschenhalter darf nur verwendet werden mit RUGGED® Stair-PRO Treppenstühlen und
Sauerstoffflaschen, Größe D.
• Ein nicht ordnungsgemäßes Sichern der Sauerstoffflasche und der Zubehörteile der Sauerstoffflasche kann den
Betrieb des Treppenstuhls beeinträchtigen.
• Stets sicherstellen, dass die Sauerstoffflasche mithilfe des roten Velcro (Klettbandes) am elastischen
Sauerstoffflaschenhalter befestigt wird.
• Stets sicherstellen, dass die Sauerstoffflasche sicher im elastischen Sauerstoffflaschenhalter befestigt ist und dass
das Reglerventil der Sauerstoffflasche nicht aus der Seite des Treppenstuhls heraustritt.
• Stets die Sauerstoffflasche vom elastischen Halter entfernen, bevor versucht wird, den Treppenstuhl
zusammenzuklappen oder zu lagern
• Das Produkt nicht mit Dampf oder Ultraschall reinigen.
• Eine Temperatur von 180 °F (82 °C) als Wasserhöchsttemperatur nicht übersteigen.
• Einen Druck von 1500 psi (130,5 bar) als Wasserhöchstdruck nicht übersteigen. Wenn ein handgehaltener Stab
zum Waschen des Produkts verwendet wird, muss die Druckdüse mindestens 24 Zoll (61 cm) vom Produkt entfernt
gehalten werden.
• Immer lufttrocknen lassen.
• Keine Reinigungs-, Instandhaltungs- oder Wartungsarbeiten durchführen, während das Produkt verwendet wird.
4-4 6252-009-005 REV D www.stryker.com
Page 89

Einführung
Dieses Handbuch hilft dem Benutzer beim Betrieb bzw. bei der Wartung des Stryker-Produkts. Dieses Handbuch vor
dem Betrieb bzw. der Wartung dieses Produkts durchlesen. Methoden und Verfahren festlegen, um das Personal über
den sicheren Betrieb bzw. die sichere Wartung dieses Produkts zu informieren und zu schulen.
VORSICHT
• Unsachgemäßer Gebrauch des Produkts kann zu Verletzungen des Patienten oder der Bedienperson führen. Das
Produkt nur wie in diesem Handbuch beschrieben bedienen.
• Das Produkt oder Bestandteile des Produkts nicht verändern. Eine Modifizierung des Produkts kann zu
unvorhergesehenem Betrieb führen und somit Verletzungen des Patienten oder der Bedienperson verursachen.
Veränderungen am Produkt lassen außerdem die Garantieansprüche erlöschen.
Hinweise
• Dieses Handbuch ist ein fester Bestandteil des Produkts und sollte beim Produkt verbleiben, auch wenn das
Produkt verkauft wird.
• Stryker strebt kontinuierlich nach Verbesserungen der Ausführung und Qualität des Produkts. Dieses Handbuch
enthält die zum Zeitpunkt der Drucklegung aktuellsten Produktinformationen. Es können geringe Abweichungen
zwischen dem Produkt und diesem Handbuch vorliegen. Bei Fragen den Stryker-Kundendienst oder den
technischen Support unter +1-800-327-0770 (gebührenfrei in den USA) kontaktieren.
Produktbeschreibung
Deutsch
DE
Der Stair-PRO® Treppenstuhl ist eine manuelle Transportvorrichtung. Mithilfe der Stair-TREAD™ Funktion kann ein
menschlicher Patient mit dem Produkt in sitzender Position treppauf und treppab transportiert werden. Vorder- und
Hinterräder ermöglichen es den Bedienern, den Patienten auf ebenen Strecken zu transportieren.
Anwendungsgebiete
Der Stair-PRO Treppenstuhl des Modells 6251 und des Modells 6252 ist eine manuelle Transportvorrichtung. Mit dem
Produkt wird ein menschlicher Patient in sitzender Position treppauf und treppab transportiert. Der Stuhl kann mit
Erwachsenen, Heranwachsenden oder Kindern eingesetzt werden, die auf dem Stuhl sitzen können, während sie mit
den Patientenhaltegurten gesichert sind. Das Stair-TREAD System beim Modell 6252 regelt die Geschwindigkeit, mit der
der Stuhl mit einem darauf befindlichen Patienten eine Treppe hinunterbewegt wird. Vorder- und Hinterräder
ermöglichen es den Bedienern, den Patienten auf ebenen Strecken zu transportieren. Der Stair-PRO ist für die
Verwendung vor der Ankunft im Krankenhaus, in Notfall- und in nicht Notfallanwendungen bestimmt. Das Produkt kann
ein Gewicht von maximal 228 kg tragen. Das Produkt darf nur von geschultem medizinischem Fachpersonal verwendet
werden. Dazu gehören Notfallsanitäter und medizinische Ersthelfer.
Erwartete Einsatzdauer
Die erwartete Einsatzdauer des Stair-PRO Treppenstuhls unter normalen Nutzungsbedingungen und mit angemessener
regelmäßiger Wartung beträgt sieben Jahre.
Kontraindikationen
Den Stair-PRO Treppenstuhl nicht für den Transport von Personen verwenden, die möglicherweise Halswirbel-,
Rückenmarks- oder Bruchverletzungen haben.
www.stryker.com 6252-009-005 REV D 4-5
Page 90

Einführung
Technische Daten
Modell 6251 6252
228 kg
500 Pfund
Höhe
Höchstlast
500 Pfund
1
36 Zoll 91 cm 37,5 Zoll 95,25 cm
Breite 20,5 Zoll 52 cm 20,5 Zoll 52 cm
2
Tiefe
Tiefe, zusammengeklappt
Gewicht
3
28 Zoll
8 Zoll 20 cm 8 Zoll 20 cm
23 Pfund
71 cm
10 kg
28 Zoll
32,8 Pfund
228 kg
71 cm
14,9 kg
Deutsch
DE
Die Maße sind von den äußersten Kanten des Hauptrahmens gemessen. Die technischen Daten haben gerundete Werte.
Umrechnungen werden vor dem Runden durchgeführt.
Das Modell 6252 mit der einteiligen Vinylsitzflächenoption (6250-020-000) und ohne die Fußstützenoption (6252-027-
000) entspricht der Norm BS EN 1865-4:2010.
1
Die Höchstlastkapazität ist das Gesamtgewicht, verteilt gemäß der grundlegenden menschlichen Anatomie. Die
Bediener müssen das Gewicht des Patienten, der Ausrüstung und von Zubehör berücksichtigen, wenn sie die
Gesamtlast auf dem Produkt ermitteln.
2
Die Tiefenabmessungen sind bei eingeklappten ausklappbaren Griffen gemessen.
3
Das Gewicht des Modells 6252 umfasst die einteilige Vinylsitzflächenoption, nicht aber die Fußstützenoption.
Stryker behält sich das Recht vor, technische Daten ohne Vorankündigung zu ändern.
Das gelb-schwarze Farbschema ist ein geschütztes Markenzeichen der Stryker Corporation.
4-6 6252-009-005 REV D www.stryker.com
Page 91
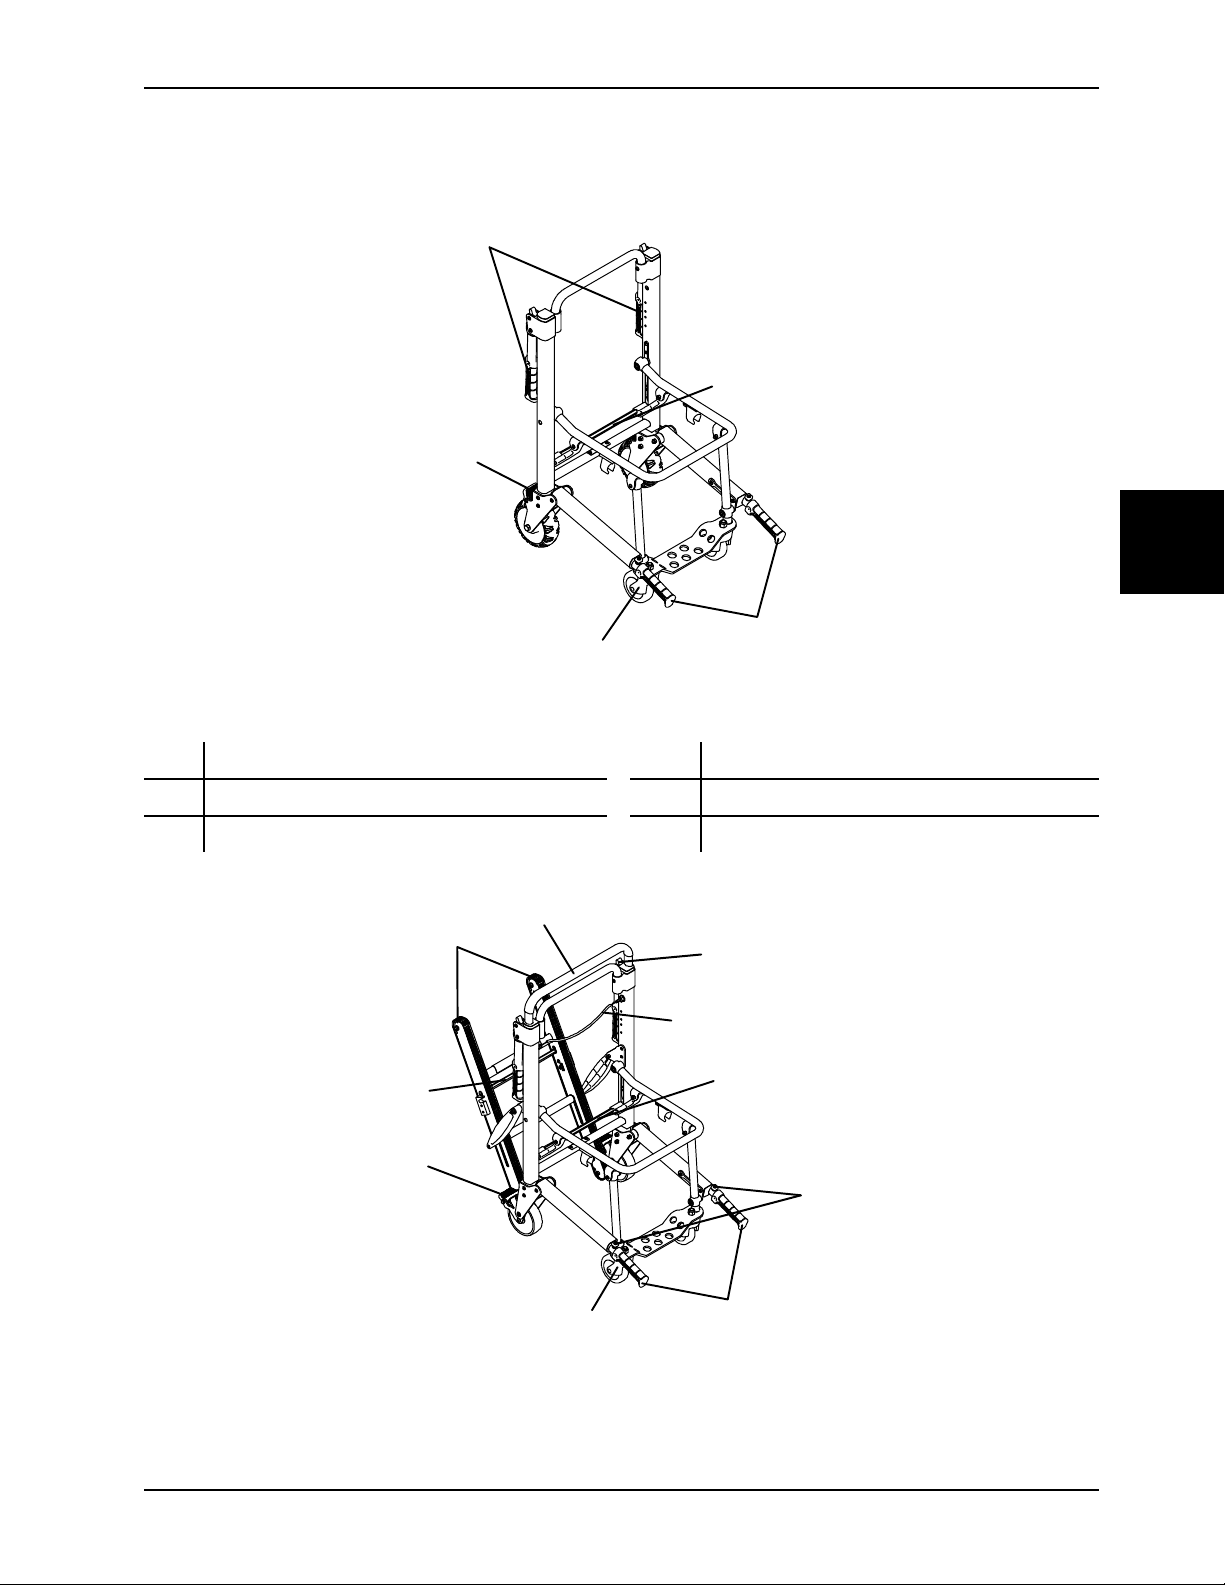
Produktabbildung
A
B
C
D
E
A
B
C
D
E
F
G
H
I
J
Einführung
Deutsch
DE
Abbildung 4-1: 6251
A
B Laufrolle E
C
Radsperre
Hebegriff am Fußende
D
Verriegelungsstange
Hebegriff am Kopfende
Abbildung 4-2: 6252
www.stryker.com 6252-009-005 REV D 4-7
Page 92

Produktabbildung (Fortsetzung)
A
Einführung
Deutsch
DE
A
B Laufrolle G
C
D
E
Radsperre
Hebegriff am Fußende
Verriegelungsstange
Hebegriffknopf am Fußende
F
H
I
J
Entriegelungskabel des oberen Lenkbügels
Optionaler entriegelungshebel für tragegriffe
Oberer Lenkbügel
Stair-TREAD System
Stair-TREAD Raupenentriegelungsbügel
Kontaktinformationen
Der Stryker-Kundendienst bzw. technische Support ist unter +1-800-327-0770 (gebührenfrei in den USA) erreichbar.
Stryker Medical
3800 E. Centre Avenue
Portage, MI 49002
USA
Die Betriebsanleitung bzw. das Wartungshandbuch steht unter der folgenden Adresse im Internet zur Verfügung: https://
techweb.stryker.com/.
Bei Anrufen beim Stryker-Kundendienst oder technischen Support bitte die Seriennummer (A) des jeweiligen StrykerProdukts bereithalten. Die Seriennummer bei allen schriftlichen Mitteilungen angeben.
Position der Seriennummer
Herstellungsdatum
Die ersten 2 Ziffern der Seriennummer entsprechen dem Herstellungsjahr.
Einrichtung
Zur Einrichtung die Kartons auspacken und alle Gegenstände auf einwandfreie Funktion überprüfen. Bevor das Produkt
in Betrieb genommen wird, muss bestätigt werden, dass es voll funktionstüchtig ist.
4-8 6252-009-005 REV D www.stryker.com
Page 93

Einführung
Einrichtung (Fortsetzung)
Vor dem Gebrauch alle Versand- und Verpackungsmaterialien vom Produkt entfernen.
Der Patientenraum des Fahrzeugs, in dem das Produkt verwendet werden soll, muss groß genug sein, um den
zusammengeklappten Stuhl aufzunehmen.
Bei Bedarf das Fahrzeug abändern, damit der Stuhl hineinpasst. Nicht den Stuhl abändern.
Deutsch
DE
www.stryker.com 6252-009-005 REV D 4-9
Page 94
Deutsch
DE
Betrieb
Bedienungsrichtlinien
WARNUNG
• Zur Sicherung des Patienten auf dem Produkt immer alle Haltegurte benutzen. Ein nicht durch Haltegurte
gesicherter Patient kann von dem Produkt fallen.
• Um ein Kipprisiko zu vermeiden, keine Radsperren betätigen, wenn sich eine Person auf dem Produkt befindet oder
das Produkt bewegt wird.
• Immer vermeiden, dass Schmutz oder andere Fremdkörper in die Raupen gelangen. Das Stair-TREAD System
funktioniert möglicherweise nicht auf allen Treppenoberflächen und unter allen Umgebungsbedingungen gleich gut.
Je nach Gegebenheiten können Sie auf Widerstand unterschiedlichen Grades stoßen. Wasser, Eis oder Schmutz
auf der Treppe können den Halt des Bedieners und den ordnungsgemäßen Betrieb des Stair-TREAD Systems
beeinträchtigen. Um Verletzungen zu vermeiden, den Weg räumen oder eine alternative Route erwägen.
Kondensation, Wasser, Eis oder Schmutz am Stair-TREAD System kann zu einer unvorhergesehenen
Arbeitsleistung führen, die zu einer plötzlichen Verlagerung des Gewichts führt, das der Bediener halten muss.
• Nicht versuchen, größere Patientenlasten zu transportieren, als sicher gehoben werden können.
VORSICHT
Vor dem Betrieb des Produkts immer alle Hindernisse aus dem Weg räumen, die sich störend auswirken und
Verletzungen des Bedieners oder Patienten verursachen können.
• Das Produkt nur wie in diesem Handbuch beschrieben bedienen.
• Vor der Verwendung alle Schilder und Anweisungen auf dem Produkt lesen.
• Den Stuhl auf Treppen immer mit mindestens zwei geschulten Bedienern handhaben.
• Immer den Patienten informieren, bevor der Stuhl gefahren oder Treppen hinauf oder hinunter bewegt wird. Immer
bei dem Patienten bleiben und das Produkt unter Kontrolle halten.
• Die Radsperren nur während der Umlagerung des Patienten oder dann verwenden, wenn sich kein Patient auf dem
Produkt befindet.
• Zur Sicherung des Patienten auf dem Produkt immer alle Haltegurte benutzen. Ein nicht durch Haltegurte
gesicherter Patient kann von dem Produkt fallen.
• Wenn nötig, ordnungsgemäß geschulte Helfer hinzuziehen, um die Trage unter Kontrolle zu halten.
Ausklappen des Stuhls
WARNUNG
Vor Gebrauch immer sicherstellen, dass der Stuhl im ausgeklappten Zustand verriegelt ist. Ein nicht verriegelter Stuhl
kann während der Verwendung zusammenklappen.
Ausklappen des Stuhls:
1. Sich hinter den Stuhl stellen.
2. Die Radsperren feststellen.
3. Die Rückenlehne und den Verlängerungsgriff auseinander ziehen (Abbildung 4-3 auf Seite 4-11).
4. Den Sitz hochziehen, um sicherzustellen, dass er im ausgeklappten Zustand verriegelt ist. Wenn sich der Stuhl nicht
zusammenklappen lässt, ist er verriegelt.
4-10 6252-009-005 REV D www.stryker.com
Page 95
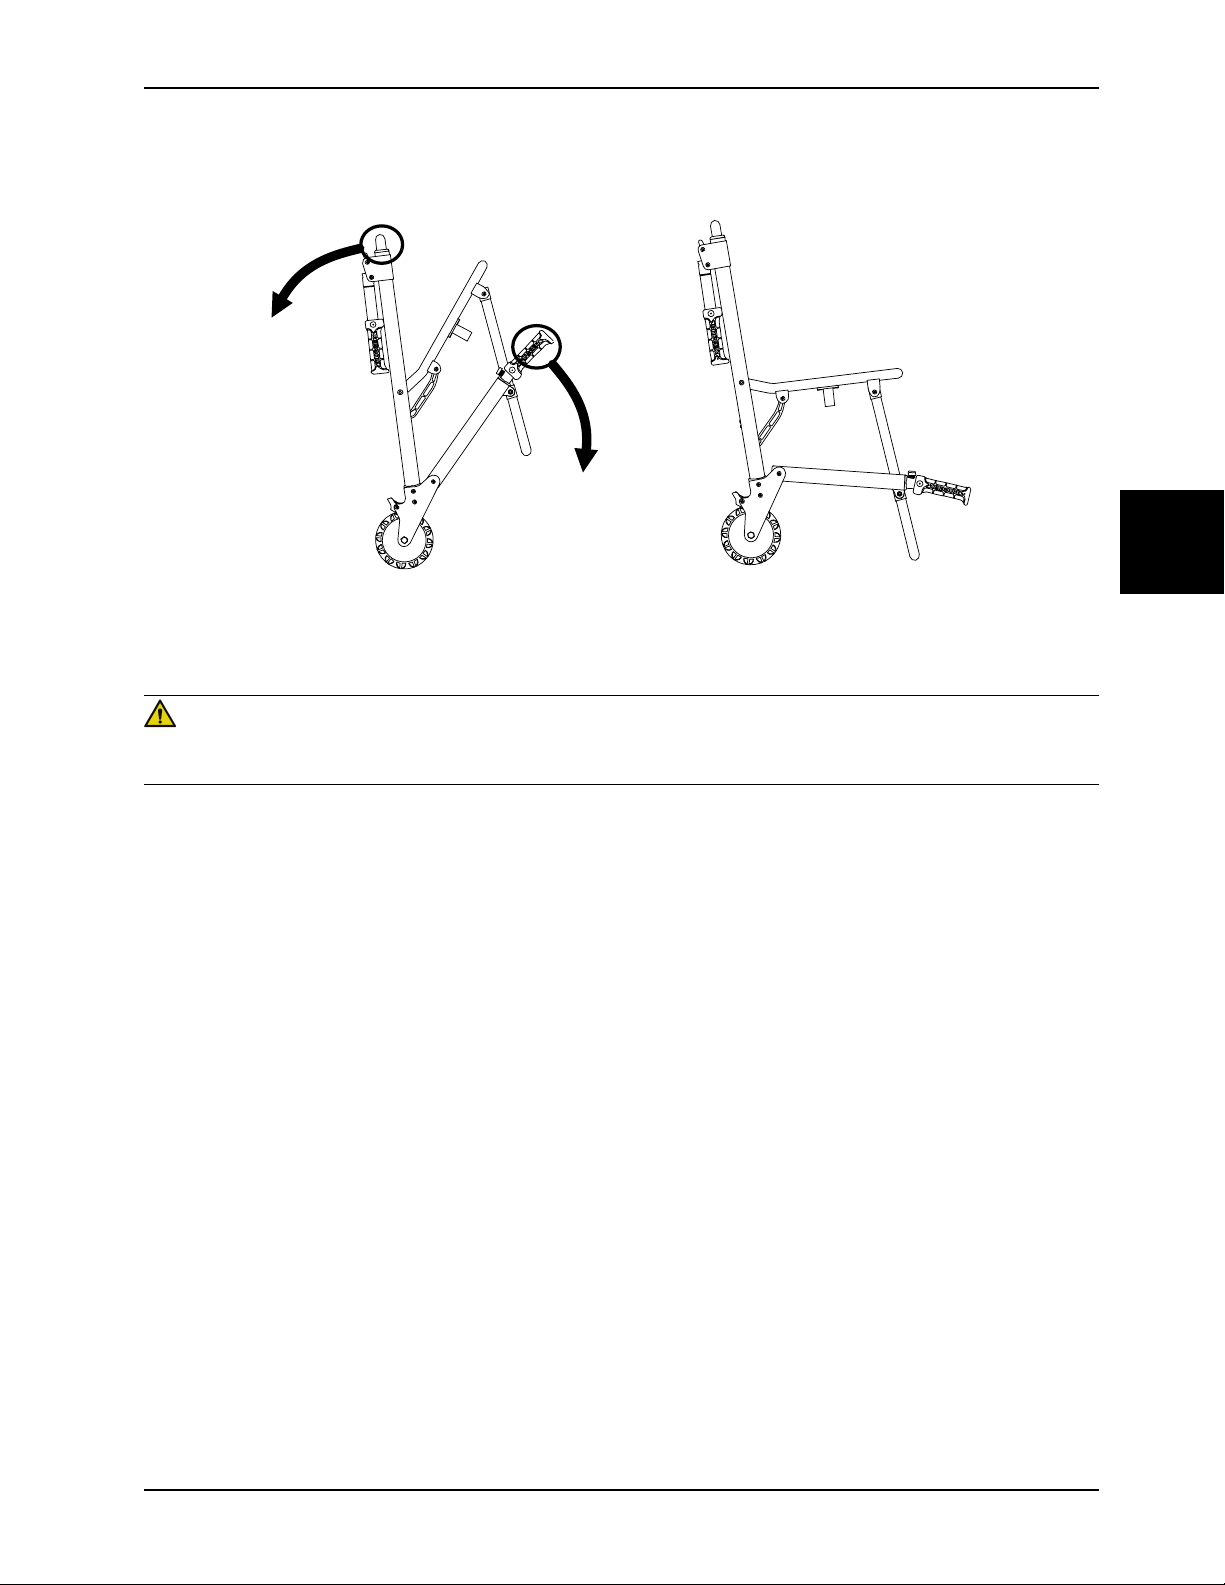
Ausklappen des Stuhls (Fortsetzung)
Abbildung 4-3: Ausklappen des Stuhls
Betrieb
Deutsch
DE
Zusammenklappen des Stuhls
WARNUNG
Vor Gebrauch immer sicherstellen, dass der Stuhl im ausgeklappten Zustand verriegelt ist. Ein nicht verriegelter Stuhl
kann während der Verwendung zusammenklappen.
Zusammenklappen des Stuhls:
1. Die Radsperren feststellen.
2. Die Haltegurte schließen. Die Gurte zusammenlegen, damit sie nicht im Weg sind.
3. Sich neben den Stuhl stellen.
4. Die rote Verriegelungsstange (A) an der Rückseite des Stuhls nach oben ziehen (Abbildung 4-4 auf Seite 4-12).
5. Den Stuhl nach vorne kippen.
6. Den Stuhl zur Rückenlehne hin einklappen, bis die vorderen Beine mit den Klemmen an der Unterseite des Sitzrohrs
verrasten.
Hinweis: Gegebenenfalls die vorderen Laufrollen drehen, damit sie beim Zusammenklappen des Stuhls nicht im
Weg sind.
www.stryker.com 6252-009-005 REV D 4-11
Page 96

Deutsch
A
DE
Betrieb
Zusammenklappen des Stuhls (Fortsetzung)
Den Stuhl an einem kühlen und trockenen Ort lagern, an dem die Temperatur nicht unter den Gefrierpunkt fällt und kein
direktes Sonnenlicht einfällt.
Abbildung 4-4: Zusammenklappen des Stuhls
Umlagern des Patienten auf den Stuhl
WARNUNG
• Den Stuhl nicht für den Transport von Personen verwenden, bei denen Halswirbel-, Rückenmarks- oder
Bruchverletzungen vermutet werden.
• Einen Patienten nicht unbeaufsichtigt lassen. Das Produkt festhalten, während sich ein Patient darauf befindet.
Umlagern des Patienten auf das Produkt:
1. Das Produkt neben dem Patienten positionieren.
2. Die Radsperren anziehen, um das Produkt stationär zu halten.
3. Die Haltegurte öffnen.
4. Den Patienten mithilfe akzeptierter Verfahren für die Notfallmedizin auf das Produkt verlegen.
5. Den Patienten mit allen Haltegurten auf dem Produkt sichern.
6. Vor dem Transport des Produkts die Radsperren lösen.
Sicherung eines Patienten mit den Haltegurten
Die Haltegurte können in zwei Konfigurationen verwendet werden.
WARNUNG
Zur Sicherung des Patienten auf dem Produkt immer alle Haltegurte benutzen. Ein nicht durch Haltegurte gesicherter
Patient kann von dem Produkt fallen.
4-12 6252-009-005 REV D www.stryker.com
Page 97
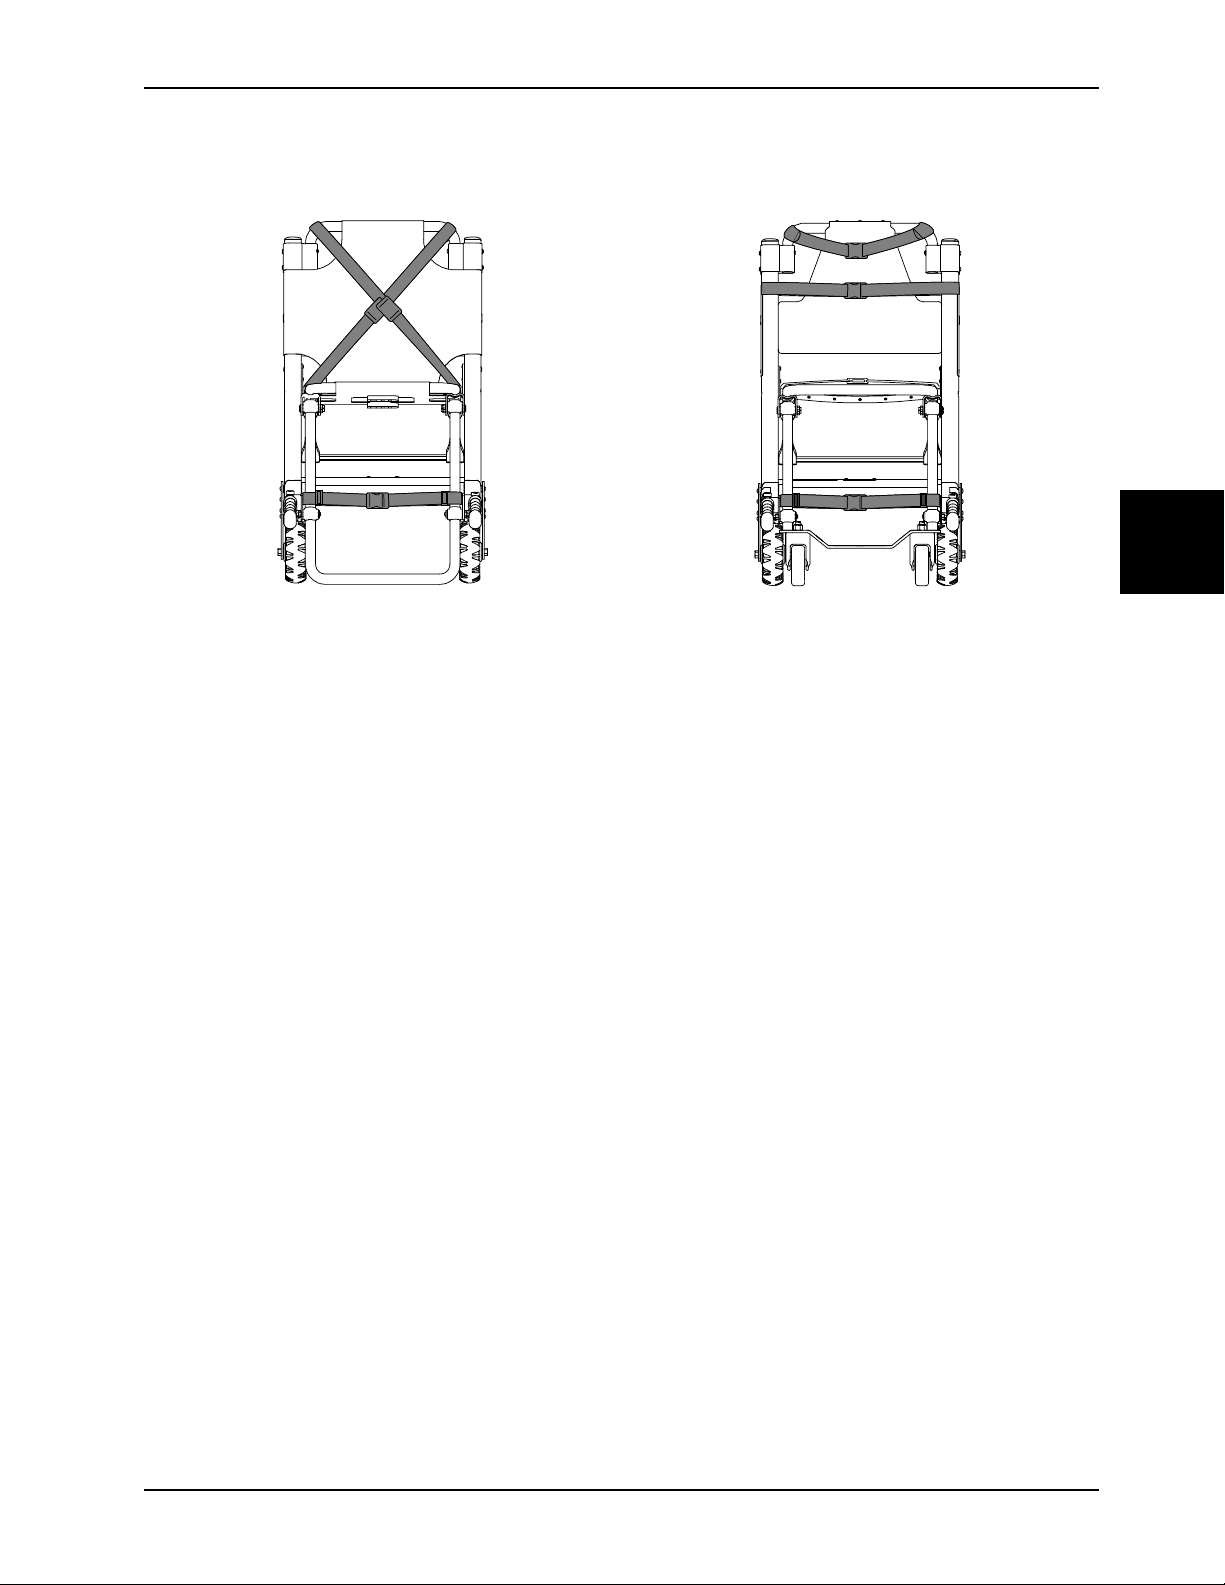
Betrieb
Sicherung eines Patienten mit den Haltegurten (Fortsetzung)
Deutsch
DE
Abbildung 4-5: Überkreuzkonfiguration über der Brust
Die Brustgurte über Kreuz über der Brust des Patienten
schließen.
Um beide Konfigurationen anzuwenden, die farbcodierten Haltegurte abstimmen und dann den Knöchelgurt über den
Beinen des Patienten schließen.
Haltegurte an den erforderlichen Befestigungsstellen am Produkt anbringen (Abbildung 4-5 auf Seite 4-13 oder
Abbildung 4-6 auf Seite 4-13). Die Befestigungsstellen der Haltegurte müssen für eine solide Verankerung und
ordnungsgemäße Rückhalteposition sorgen. Die Haltegurte dürfen Ausstattung und Zubehör nicht beeinträchtigen. Bei
Nichtgebrauch der Trage die Gurtschlösser der Haltegurte schließen.
Die Haltegurte öffnen und an beiden Seiten des Stuhls platzieren, während der Insasse auf den Stuhl gesetzt wird. Die
Haltegurte verlängern und um den Patienten legen, anschließend zum Anziehen kürzen.
• Zum Öffnen des Haltegurts auf die Laschen an der Seite der Schnallenbuchse drücken. So kann die
Verschlussplatte der Schnalle geöffnet und aus der Buchse gezogen werden.
• Zum Schließen des Haltegurts den Stecker in das Gurtschloss stecken, bis er hörbar einrastet.
• Um den Haltegurt zu verlängern, das Gurtschloss der Schnalle greifen, angewinkelt zum Gurtband halten und dann
herausziehen. Eine gesäumte Lasche am Ende des Stoffes verhindert, dass das Gurtschloss vom Gurt rutscht.
• Um den Haltegurt zu kürzen, die gesäumte Lasche greifen und den Stoff wieder durch das Gurtschloss ziehen, um
den Gurt festzuziehen.
Zum Schließen eines Haltegurts über einem Patienten das Gurtschloss schließen und überschüssiges Gurtband vom
Stuhl entfernen.
Abbildung 4-6: Brust- und Beckenkonfiguration
Einen Gurt über der Brust des Patienten schließen. Den
anderen Gurt über dem Becken des Patienten schließen.
Anbringen der Haltegurte an der Brust
Anbringen der Brustgurte über Kreuz:
1. Jeden Gurt um den Stuhlrahmen führen. Das Ende des Gurts durch die Schlaufe ziehen. Gurt festziehen.
2. Den Gurt um die Brust des Patienten anlegen. Den Gurt je nach Bedarf verlängern.
3. Den Gurt zuschnallen.
4. Am losen Ende des Gurts ziehen, um ihn um den Patienten herum festzuziehen.
www.stryker.com 6252-009-005 REV D 4-13
Page 98
Deutsch
DE
Betrieb
Anbringen der Haltegurte an der Brust (Fortsetzung)
5. Diese Schritte für den zweiten Gurt und den Beckengurt wiederholen.
Anlegen des Fußgurts
Anlegen des Fußgurts:
1. Die drei Kunststoffstücke vom Gurt nehmen.
2. Den Gurt durch einen der Kunststoff-D-Ringe führen und den Ring nach unten an das Ende des Gurts bis zum
weißen Etikett schieben.
3. Den Gurt um das Vorderbein des Stuhls führen und das lose Gurtende durch den Ring ziehen. Ziehen, bis der Ring
am Holm der Fußstütze anliegt.
4. Den Gurt durch den anderen D-Ring führen.
5. Den Gurt um das andere Vorderbein des Stuhls führen und das lose Gurtende durch die Schlaufe ziehen. Ziehen,
bis der D-Ring am Holm der Fußstütze anliegt.
6. Zuletzt den Aufsatz-Clip auf dem Gurt anbringen.
Richtige Hebetechniken
Beim Anheben von Produkt und Patienten müssen die folgenden angemessenen Hebetechniken angewendet werden,
um Verletzungen zu vermeiden:
• Die Hände nah am Körper halten
• Den Rücken gerade halten
• Alle Bewegungen mit Ihrem Partner koordinieren
• Aus den Beinen heraus anheben
• Den Oberkörper nicht verdrehen
Transport des Patienten auf ebener Strecke
WARNUNG
Das Modell 6252 darf nicht mit dem oberen Lenkbügel in der voll ausgefahrenen Position geschoben werden. Wenn der
Stuhl mit voll ausgefahrenem Lenkbügel geschoben wird, kann er bei Auftreffen auf ein Hindernis kippen.
VORSICHT
Bei der Verwendung von Laufrollen immer Vorsicht walten lassen. Laufrollen sind nicht für alle Oberflächen geeignet.
Transport des Patienten auf ebenen Strecken:
1. Den Stuhl mit den Hebegriffen am Kopfende oder dem Holm der Rückenlehne schieben und führen.
2. Den Stuhl mit den Hebegriffen am Kopf- und Fußende über und um Hindernisse herum heben.
4-14 6252-009-005 REV D www.stryker.com
Page 99
Betrieb
Treppab-Transport des Patienten – Modell 6251
WARNUNG
• Der Patient muss auf Treppen immer mit mindestens zwei Bedienern transportiert werden.
• Immer die Hebegriffe in Position arretieren, bevor die Hebegriffe zum Anheben des Stuhls verwendet werden.
Treppab-Transport des Patienten:
1. Bediener am Fußende: Vor dem Stuhl positionieren.
2. Bediener am Kopfende: Eine an der Treppe ausgerichtete Position einnehmen.
3. Bediener am Fußende: Jeden roten Hebegriffknopf am Fußende drücken und jeden Griff bis zum Anschlag
herausziehen. Den Knopf loslassen, um den Griff in Position zu arretieren.
4. Bediener am Kopfende: Die Hebegriffe am Kopfende ausklappen und die Position in Richtung auf die Treppe
einnehmen.
5. Bediener am Fußende: Mit dem Rücken zur Treppe positionieren, um den Patienten besser überwachen zu können,
bzw. nach vorn zur Treppe positionieren, um eine bessere Sicht auf die Treppe zu haben und um Hindernisse
herum manövrieren zu können.
Hinweis: Obwohl der Bediener am Kopfende beim Heben und Tragen mit Blick nach vorn oder hinten positioniert
sein kann, sind beim Tragen des Stuhls immer alle anwendbaren Protokolle zu befolgen.
6. Beide Bediener – den Stuhl zusammen anheben. Die Hebegriffe am Kopf- und Fußende verwenden. Die richtigen
Hebetechniken anwenden (Richtige Hebetechniken auf Seite 4-14). Den Stuhl langsam die Treppe heruntertragen,
dabei alle Hindernisse vermeiden.
Deutsch
DE
Treppab-Transport des Patienten – Modell 6252
WARNUNG
• Der Patient muss auf Treppen immer mit mindestens zwei Bedienern transportiert werden.
• Immer die Hebegriffe in Position arretieren, bevor die Hebegriffe zum Anheben des Stuhls verwendet werden.
• Vor dem Transport eines Patienten immer das Stair-TREAD System des Modells 6252 arretieren.
• Vermeiden, dass Schmutz oder andere Fremdkörper in die Raupen gelangen. Das Stair-TREAD System funktioniert
möglicherweise nicht auf allen Treppenoberflächen und unter allen Umgebungsbedingungen gleich gut. Je nach
Gegebenheiten können Sie auf Widerstand unterschiedlichen Grades stoßen. Wasser, Eis oder Schmutz auf der
Treppe können den Halt des Bedieners und den ordnungsgemäßen Betrieb des Stair-TREAD Systems
beeinträchtigen. Um Verletzungen zu vermeiden, den Weg räumen oder eine alternative Route erwägen.
Kondensation, Wasser, Eis oder Schmutz am Stair-TREAD System kann zu einer unvorhergesehenen
Arbeitsleistung führen, die zu einer plötzlichen Verlagerung des Gewichts führt, das der Bediener halten muss.
• Vor dem Transport eines Patienten immer das Stair-TREAD System reinigen und trocknen.
• Nicht versuchen, größere Patientenlasten zu transportieren, als sicher gehoben werden können.
VORSICHT
Vor dem Einrasten des Stair-TREAD Systems in seiner arretierten Position immer den roten Raupenentriegelungsbügel
lösen. Vor einem Treppab-Transport versuchen, den Stuhl zusammenzuklappen, um sicherzustellen, dass das Stair-
TREAD System arretiert ist.
Treppab-Transport des Patienten:
1. Den Stuhl zur Treppe fahren und ihn an der Kante der ersten Stufe ausrichten.
2. Bediener am Fußende: Die roten Entriegelungstasten drücken, um die Hebegriffe am Fußende auszufahren, und
die Griffe bis zum Anschlag herausziehen. Die Tasten loslassen, um die Griffe zu arretieren.
www.stryker.com 6252-009-005 REV D 4-15
Page 100
Deutsch
DE
Betrieb
Treppab-Transport des Patienten – Modell 6252 (Fortsetzung)
3. Bediener am Kopfende: Mit einer Hand am roten Entriegelungskabel des oberen Lenkbügels ziehen. Mit der
anderen Hand den Griff nach oben und ganz herausziehen. Das Kabel loslassen und sicherstellen, dass der Griff
auf beiden Seiten in der voll ausgefahrenen Position arretiert ist.
4. Bediener am Kopfende: Den roten Raupenentriegelungsbügel gegen den schwarzen Querholm drücken. Den Griff
am Entriegelungsbügel lockern und das Stair-TREAD System kräftig in die voll ausgefahrene Position ziehen, bis
beide Seiten sicher arretieren. Immer sicherstellen, dass beide Seiten des Stair-TREAD System arretiert sind; dazu
versuchen, das System zusammenzuklappen.
5. Beim Treppab-Transport sind die Bediener zueinander gewendet.
6. Bediener am Kopfende: Den Stuhl weit genug zurückkippen, dass das Stair-TREAD System den Boden berührt.
7. Beide Bediener – Den Stuhl gekippt halten und über die Kante der Treppe führen. Das Stair-TREAD System in
Kontakt mit der ersten Stufe kommen lassen.
8. Beide Bediener – Die Treppe heruntergleiten, bis die Raupen über die Kanten von zwei oder drei Stufen verlaufen.
9. Bediener am Kopfende: Auf den herausziehbaren oberen Lenkbügel einen leichten Druck nach unten ausüben,
während der Bediener am Fußende einen leichten Druck nach oben auf die Hebegriffe am Fußende ausübt, um zu
verhindern, dass der Stuhl nach vorn kippt, während er die Treppe heruntergleitet.
10. Bediener am Fußende: Wenn die Raupe die letzte Stufe erreicht, die vorderen Griffe loslassen. Bediener am
Kopfende: Den Stuhl nach vorn kippen lassen, bis alle vier Räder auf dem Boden stehen. Den Stuhl fahren, siehe
Transport des Patienten auf ebener Strecke auf Seite 4-14.
11. Zum Zusammenklappen des Stair-TREAD Systems den roten Raupenentriegelungsbügel in Richtung auf den
schwarzen Querholm ziehen und die Raupe nach oben an den Stuhl klappen. Sicherstellen, dass das Stair-TREAD
System arretiert ist.
Wenn während des Treppab-Transports einer der Bediener eine Pause einlegen oder sich erholen muss, den Stuhl
gerade so weit nach vorn kippen, dass die Hinterräder auf der Stufe sitzen. Um den Treppab-Transport nach der Pause
fortzusetzen, übt der Bediener am Kopfende einen leichten Druck nach unten auf den oberen Lenkbügel aus, während
der Bediener am Fußende einen leichten Druck nach oben ausübt, um den Stuhl nach hinten zu kippen und das Stair-
TREAD System zu aktivieren.
Treppauf-Transport des Patienten
WARNUNG
• Der Patient muss auf Treppen immer mit mindestens zwei geschulten Bedienern transportiert werden.
• Immer die Hebegriffe in Position arretieren, bevor die Hebegriffe zum Anheben des Stuhls verwendet werden.
Treppauf-Transport des Patienten:
1. Den Stuhl an das untere Ende der Treppe fahren; dabei zeigt der Rücken des Patienten zur Treppe.
2. Bediener am Fußende: Die roten Entriegelungstasten drücken, um die Hebegriffe am Fußende auszufahren, und
die Griffe bis zum Anschlag herausziehen. Die Tasten loslassen, um die Griffe zu arretieren.
3. Bediener am Kopfende: Die Hebegriffe am Kopfende aufklappen.
4. Bediener am Fußende: Mit dem Gesicht zur Treppe stehen.
5. Bediener am Kopfende: Mit dem Rücken zur Treppe positionieren, um den Patienten besser überwachen zu können,
oder nach vorn zur Treppe positionieren, um eine bessere Sicht auf die Treppe zu haben und um Hindernisse
herum manövrieren zu können.
Hinweis: Obwohl der Bediener am Kopfende beim Heben und Tragen mit Blick nach vorn oder hinten positioniert
sein kann, sind beim Tragen des Stuhls immer alle anwendbaren Protokolle zu befolgen.
6. Beide Bediener – den Stuhl zusammen anheben. Die Hebegriffe am Kopf- und Fußende verwenden. Richtige
Hebetechniken auf Seite 4-14 befolgen. Den Stuhl langsam die Treppe heruntertragen, dabei alle Hindernisse
vermeiden.
4-16 6252-009-005 REV D www.stryker.com
 Loading...