

Page 1

A1.140107
Page 2

Page 3

CONTENTS
FUNCTIONS AND CHARACTERS .......................................................1
STANDARD ACCESSORIES ................................................................2
OPTIONAL ACCESSORIES .................................................................2
INSTALLATION .....................................................................................2
Microphone connection ................................................................................ 2
Antenna connection .....................................................................................3
Power connection ........................................................................................3
Fuse replacement ........................................................................................3
Install Microphone hanger .............................................................................4
Intall external speaker .................................................................................. 4
Install earphone ...........................................................................................4
Install Remote PTT cable.............................................................................4
KNOW ABOUT THIS RADIO ................................................................5
HOW TO USE THIS RADIO ..................................................................6
Power on radio ............................................................................................. 6
Automatical Power on radio .........................................................................6
Channel control ............................................................................................ 6
Choose Norms .............................................................................................6
Volume control (1-56 levels, Default level 54) .............................................7
Mute Function .............................................................................................. 7
Squelch control (1-28 Levels, Default Level 6) ............................................ 7
ASQ control .................................................................................................7
LCD display .................................................................................................8
AM/FM mode ..............................................................................................8
Transmitting ................................................................................................. 8
Receiving ..................................................................................................... 8
Time Out Timer ............................................................................................9
LCD color .....................................................................................................9
Beep prompt ................................................................................................9
EMG channel ............................................................................................... 9
Keypad lock ...............................................................................................10
Frequency mode ........................................................................................10
Scan ........................................................................................................... 10
Memory channel ........................................................................................10
Using Memory Channel .............................................................................10
DW channels ............................................................................................. 11
Using DW function ..................................................................................... 11
Factory reset .............................................................................................. 11
Specication ......................................................................................
12
Page 4

FUNCTIONS AND CHARACTERS
Full Aluminum body offer best heat radiation
Remote control microphone with Wide angle Dot matrix LCD
3 color display: Blue, Purple, Orange
Dual watch
Full channel scan
EMG Channel CH9/19
SQ and ASQ Control
4 Memory channels for each Norm
SQ, VOL, voltage level display
Field strength display
Automatic Power on/Manual Power on
Time Out Timer
Keypad lock
Channel and Frequency mode
Optional earphone for Microphone
Optional remote PTT control cable
1
Page 5

STANDARD ACCESSORIES
Screws for bracket
Hanger
Pads for bracket
Self-tapping Screws
Adjusting knobs
Fuse(2A,250V)
OPTIONAL ACCESSORIES
Remote PTT Control Cable
EK01
Earphone
HS03
INSTALLATION
Choose a conveniet location to install the radio.
1. Mark the location for screws by tracing the bracket.
2. Attach the bracket using the supplied screws.
3. Secure radio base into install bracket and lock in position by tightning knobs.
Pads
Microphone connection
1. Plug microphone connector into jack.
2. Pull on the dustproof cover for microphone connector.
2
Page 6

Antenna connection
Note: Never press PTT before install the antenna, it could damage the radio.
1. Screw on the PL-259 from your antenna into antenna jack.
2. For proper operation of this radio, it is necessary to install the antenna in a well
grounded place, and adjust the SWR.
* Please consult with your local dealer for choosing and intallation of suitable antenna.
Power connection
This radio requires a 13.2V power supply.
Connect the red wire to the positive terminal of the battery, and the black wire to the
negative terminal of the battery.
Fuse replacement
This radio requires 2A, 250V fuse
1. Open the fuse holder
IN-LINE
FUSE HOLDER
2A, 250V FUSE
2. Replace the fuse and screw on the holder.
IN-LINE
FUSE HOLDER
IN-LINE
FUSE HOLDER
FUSE
3
IN-LINE
FUSE HOLDER
Page 7

Intall Microphone hanger
1. Choose suitable location and mark for screw point.
2. Attach the hanger using the supplied screws.
Connecting an external speaker
This radio can use a 4-8 ohm, 4W external speaker.
1. Install the external speaker in the desired location.
2. Plug in the speaker connector into the jack.
Connecting hearphones
1. Open the jack cover
2. Plug in the hearphone into MIC/SP jack.
Connecting a Remote PTT cable
1. Open the jack cover
2. Plug in the Remote PTT cable into PTT jack.
4
Page 8

KNOW ABOUT THIS RADIO
PTT
9
10
FUNC/FRQ Function menu / frequency mode
1
EMG/M1 EMG CH9 and CH19, or program with second function
2
DW/M2 Dual watch, or program with second function
3
SC/M3 Channel scan, or program with second function
4
AF/M4 AM/FM selection, or program with second function
5
VOL-, Squelch level - Decrease volume or Squelch level
6
VOL+, Squelch level + Increase volume or Squelch level
7
MT/SET Mute, Menu, Lock key
8
PTT Transmitting
9
SQ, ASQ SQ/ASQ switch
10
POW Power key
11
UP Channel UP
12
DN Channel down
13
TX indicator
14
RX indicator
15
LCD
16
Ext MIC/SP jack
17
Ext remote PTT cable jack
18
Mike
19
Speaker
20
17
18
5
Page 9
HOW TO USE THIS RADIO
Power on radio
1.
Press
key to turn on the radio.
When the radio is on, hold
:
key, the radio will power off.
2. Adjust squelch level until you can hear background noise, refer to Page 7 for
Squelch level setup.
3. Adjust volume level to the desired level, refer to Page 7 regarding Volume level setup.
esaeler neht dna ffo si thgilbbb DCL eht litnu yek
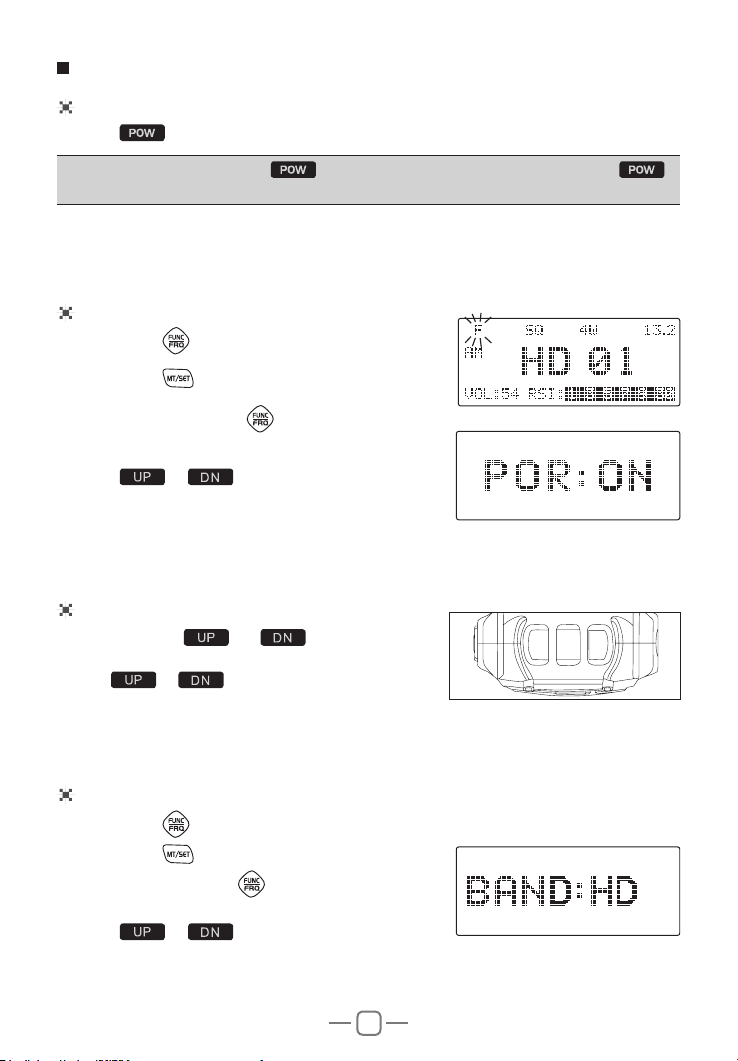
Automatic Power on
1. Short Press key, F Icon appear and flashes.
2. Short Press
3. Repeatedly short press
POR: XXX
4. Press
5. Short press any other key to confirm and exit.
Repeat the above operation will turn off Automatic power on.
key to enter Menu.
key until LCD displays
or to choose POR: ON.
Channel control
1. Short Press
the desired channel.
2. Hold
or key to choose channels faster.
or key to choose
DN
POW U
P
Choose Norms
1. Short Press
2. Short Press
3. Repeatly short press
BAND: XXX
4. Press
5. Short press any other key to confirm and exit.
key, F Icon appear and flashes.
key to enter Menu.
key until LCD displays
or to choose the norms
6
Page 10
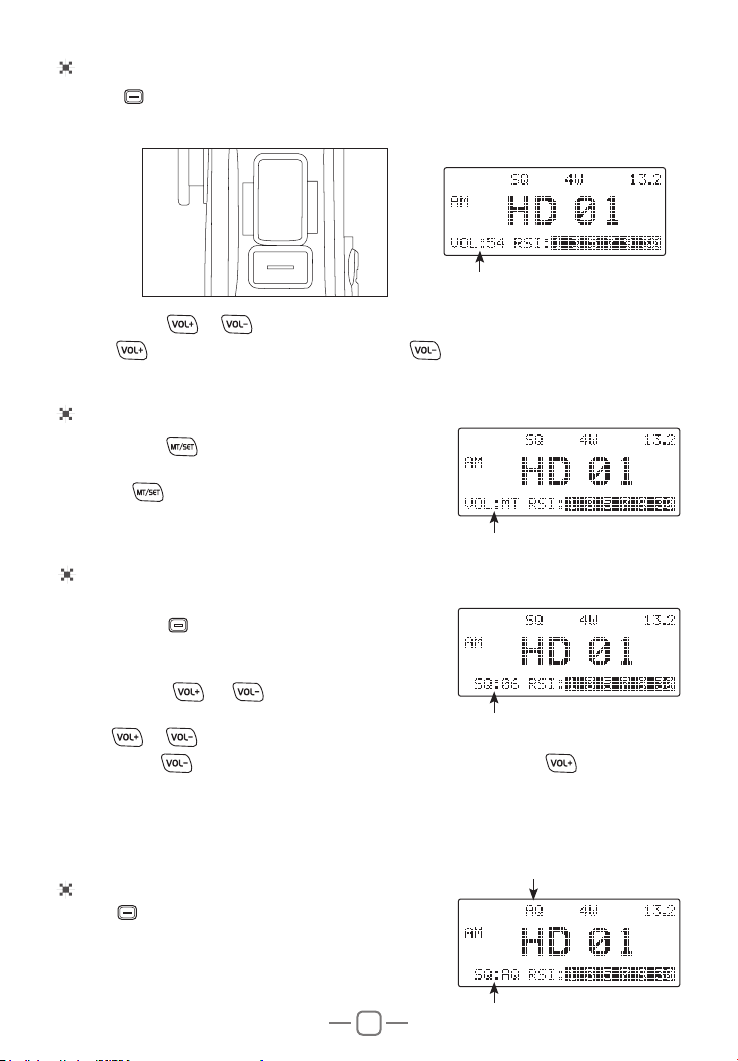
Volume control ( 1-56 levels, Default level 54 )
1. Press SQ/VOL key repeatedly, until LCD display VOL: XX
XX stands for volume level.
PTT
2. Short Press
3. Hold
or key to choose wanted volume level.
quickly increase volume level, hold will quickly decrease volume level.
Mute Function
1. Short press
LCD displays VOL:MT
2. Press
previous volume level setting.
will quickly mute the speaker, and
again, the volume will resume to
Squelch control ( 1-28 Levels, Default Level 6)
1. Choose a channel which is not busy.
2. Short Press
displays SQ: XX
XX stands for Squelch level.
3. Short press
squelch level.
4. Hold
5. Short press
just disappears the squelch level setup is done.
The higher the squelch level selected, the stronger signal required to open the speaker and
hear.
SQ/VOL key repeatedly until LCD
or key to choose desired
or results in faster adjustment of squelch level.
key until the noise just appears, then short press until the noise
ASQ control
1. Hold SQ/VOL key until the LCD displays AQ.
The ASQ function was turn on.
2. Repeat above function will switch between SQ and
ASQ, in ASQ mode, SQ squelch level setup menu
will disappear and LCD displays SQ : AQ
7
Page 11

LCD display
Dot matrix LCD display for channel number, frequency and operations.
ASQ
M1-M4:
Storage location
Func
Dual watch
1W/4W: Power level
CH9/19
Current Voltage
FM/AM Mode
Scan
Keypad lock icon
Volume level,
SQ:11 Squelch level
2 Digits for display of channel number and Norms
5 Digits for display of frequency and Norms
AM/FM mode
1. Short press key to switch between AM/FM
mode.
2. Corresponding mode will displayed in the LCD.
Transmitting
1. Hold [PTT] key, TX LED light will turn red.
morf yawa "57. tuoba enohporcim eht dloH .2
your mouth and speak in a normal tone.
edom XR ot nrut oidar eht ]TTP[ esaeleR .3
TX LED indicator light will off.
Working norm
Current channel
RX signal strength,
PWR: TX signal strength.
Receiving
The radio will stay in RX mode when it is not
transmitting, the RX LED indicator light will on.
8
Page 12

Time Out Timer
1. Short Press key, F Icon appear and flashes.
2. Short Press
3. Repeatly short press key until LCD displays
TOT: XXXX
4. Press
5. Short press any other key to confirm and exit.
key to enter Menu.
or to adjust the TOT time.
LCD color
1. Short Press
2. Short Press
3. Repeatly short press key until LCD displays
COL: X
4. Press
5. Short press any other key to confirm and exit.
key to enter Menu.
or to choose the color.
flashes.key, F Icon appear and flashes.
Beep Prompt
1. Short Press
2. Short Press
3. Repeatly press
BEEP: XX
4. Press
5. Short press any other key to confirm and exit.
key, F Icon appear and flashes.
key to enter Menu.
key until LCD displays
or to choose ON or OFF.
EMG channel
1. First short press will choose CH9, the LCD
displays EMG Icon.
2. Short pressing again
3. Third short press of
EMG channel.
will choose CH19.
will resume to last non
9
Page 13

Keypad lock
1. To avoid wrong operation of keys, you can hold
key to lock the keypad.
2. The LCD displays
3. Repeat the above function to unlock the keypad.
.
Frequency mode
1. Hold for over 5 seconds, the display will
change to frequency mode.
2. Repeat hold
will change to channel mode.
for over 5 seconds, the display
Scan
1. Set SQ or ASQ firstly.
SC/M3
2. Short press
displays SC.
3. Press any key to stop scan, SC disappear.
key to start scanning the LCD
Memory channel
In each band, you can store 4 channels into M1, M2, M3, M4 for fast selection.
1. Choose the channel to be stored
2. Hold the memory key (M1, M2, M3, M4) to store it.
3. The corresponding memory channel will show on
LCD, the storage is done.
Using Memory Channel
1. Short press key F appears in LCD and flashes.
2. Short press the memory key ( M1, M2 ,M3, M4 )
3. F disappears, the memory channel you chose will display in LCD.
10
Page 14
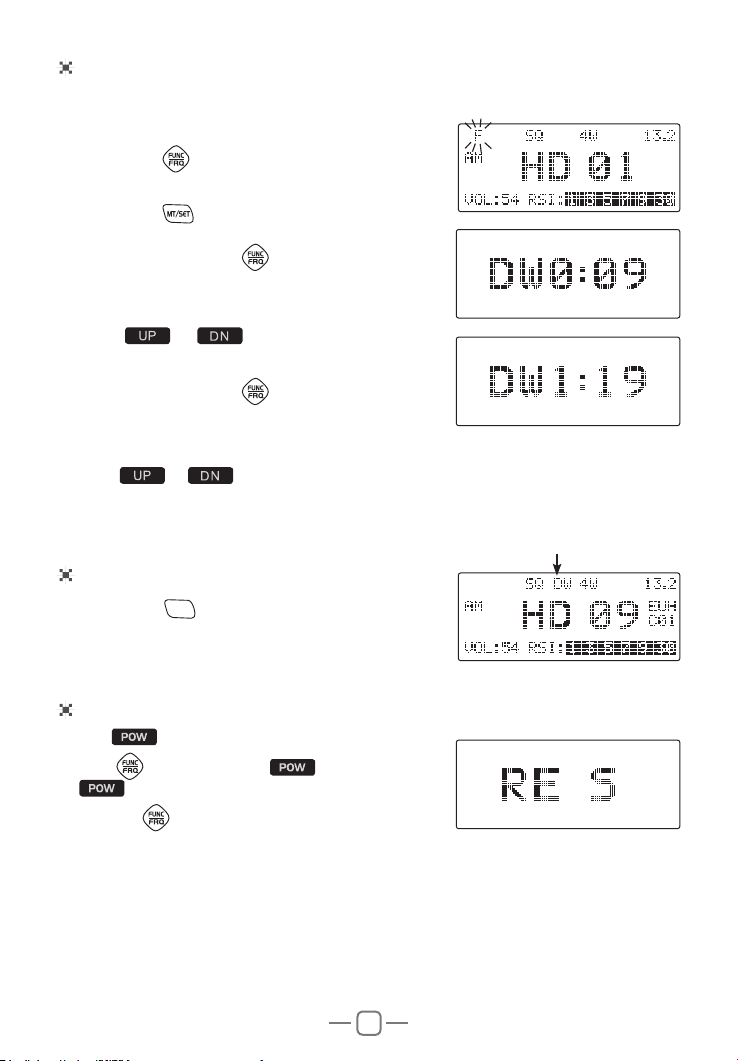
DW channels
Two channels need be pre-stored for dual watch function.
1. Short Press
2. Short Press
3. Repeatly short press
DW0: XX
4. Press
DW.
5. Repeatly short press
DW1: XX
6. Press
7. Short press any other key to confirm and exit.
key, F Icon appear and flashes.
key to enter Menu.
key until LCD displays
or to choose first channel for
key until LCD displays
or to choose second channel for DW.
Using DW function
1. Short press
radio enter Dual watch mode.
DW/M2
key, the DW flashes in LCD, the
Factory reset
1. Hold to Power off radio.
2. Hold
3. Release
and automatically powered off.
key, then press key and hold
key until LCD disaplays RE S.
, the radio reset to factory defualt
11
Page 15

Specication
GENERAL
Modulation Mode AM/FM
Frequency Range 28.000-29.700Mhz
Frequency Tolerance 0.005%
Input Voltage 13.2V
Dimensions(in mm)
Weight 785g
Ferquency Control PLL Synthesizer
Operating Temperature Range -20° C TO + 55° C
Transmit 1.4A MAX
Current Drain
Antenna Connector UHF,SO-239
Receive Squelched 0.4A
VOL Max 1.3A
TRANSMITTER
Power Output 4/8W
Transmission interference inferior to 4nW(-54dBm)
Frequency Response 300-3000Hz
Modulated signal distortion inferior to 5%
Output Impedance 50 ohms
Sensitivity Less than 1uV for 10dB(S+N)/N
Image Rejection 70dB
Adjacent Channel Rejection 60 dB
IF Frequencies
Automatic Gain Control(AGC)
Squelch less than 1uV
Audio Output Power 2Watts
Frequency Response 300-3000Hz
112mm(L) x 143mm(W) X 30mm (H)
RECEIVER
1st 10.695MHz
2nd 455KHz
Less than 10dB change in audio
Output for inputs from 10 to 50000uV
12
 Loading...