


Digital Cryptoworks Embedded
Satellite Receiver SRT 6500
User Manual

PART 1 l English
TABLE OF CONTENTS
1.0 INTRODUCTION 2
1.1 Overview
1.2 Main Features
2
2
English
2.0 SAFETY / PRECAUTIONS
2.1 Safety
2.2 Precautions
3.0 ACCESSORIES 4
4.0 CONTROLS / FUNCTIONS
4.1 Front Panel
4.2 Rear Panel
4.3 Remote Control Handset
5.0 USING THE REMOTE CONTROL
5.1 Batteries
5.2 Range Of Operation
6.0 CONNECTING THE RECEIVER
6.1 To a TV set, using TV SCART connection 8
6.2 To a Hi-Fi system and a TV set, using both A/V connections 8
6.3 To a VCR and a TV set, using both SCART connections 9
7.0 STARTING UP FOR THE FIRST TIME
8.0 SETUP AND OPERATION 11
8.1 Before Setup 11
8.2 Setup Menu 11
8.3 Main Menu Settings 18
8.4 General Viewing Information 23
3
3
4
5
7
3
4
6
7
7
8
10
A.1 PROBLEM SOLVING 28
A.2 SPECIFICATIONS 29
1

PART 1 l English
1.0 INTRODUCTION
1.1 Overview
This satellite receiver was designed for Digital satellite receiver with Cryptroworks embedded. It enables you to tune in on the hundreds of digital
television and radio channels broadcasting to your region, with the highest video, audio and data quality attainable with current technology. It
performs numerous functions to provide you with a variety of services.
1.2 Main Features
n For all digital Free-To-Air TV and Radio programmes via satellite
n Embedded Smartcard reader for Cryptoworks smartcard
n Display showing channel number or time
n Separate power switch
n Digital sound through coaxial output (S/PDIF)
n Parental lock function for menu and selectable per channel
n Over 3 000 TV channel memory capacity and 1 000 radio channel memory capacity
n Pre-programmed with most popular channels
n 5 Favourite lists for TV-and Radio programme
n Quick and easy installation & user-friendly menu
n Excellent Audio & Video quality
n Teletext via VBI & OSD
n Supports DiSEqC 1.0 and DiSEqC 1.2
n Electronic Programme Guide (EPG) for present/following event information and up to 7 days for on screen programme information
n Timer function (sleep, awake)
n Multi-lingual audio track support
n Multi-lingual support on screen menu (OSD): English, Hungarian, Czech, Slovak, Bulgarian, Turkish, German
n Edit function for TV and Radio programme name, Favourite Group name, and Transponder information
n Future-proof: Software update via satellite (OTA)
n Signal strength bar for digital transponders
n Automatic and manual channel scan options
n Power on with last viewed channel
n User-friendly remote control (Infrared up to 7 meters)
n Low power consumption
n PAL / SECAM / NTSC compatible
2

PART 1 l English
2.0 SAFETY / PRECAUTIONS
2.1 Safety
n Be sure to read this manual before you start operating the unit
n Do not touch the power cord with wet hands, as that may cause electric shock
n Never open the cover. It is very dangerous to touch the inside of the unit, due to possible electric shock
n The apparatus shall not be exposed to dripping or splashing and that no objects filled with liquids, such as base, shall be
placed on the apparatus
n Place the unit in an adequately ventilated and cool environment
n When not in use for a long time, it is recommended that the power cord be disconnected from the mains. Also, make sure
you do not use the unit with a damaged power cord, as this may cause electric shock or fire
n A professional installation is required. If reception is interrupted, contact your authorized local service center
English
2.2 Precautions
When installing the unit
n Install the unit on a level horizontal plane. Unleveled installation may cause damage to the unit
n The socket-outlet shall be installed near the equipment and shall be easily accessible
n Do not put heavy items, such as a TV, on top of the unit. That may cause damage to the unit
n Do not install the unit where: it may be subject to vibrations
it is exposed to direct sunlight
there is humidity
temperature may be too high or too low
there is no adequate ventilation
n Moving the unit from a cold area to a hot one will cause condensation. In such a case, leave the unit to dry for a couple of
hours, before you operate it
3
3.0 ACCESSORIES
The following have been packed in your receiver box:
n User’s manual: 1 Pc
n Remote control: 1 Pc
n Batteries (AAA Type): 2 Pcs
* If any accessory listed above is missing, contact the point of purchase.
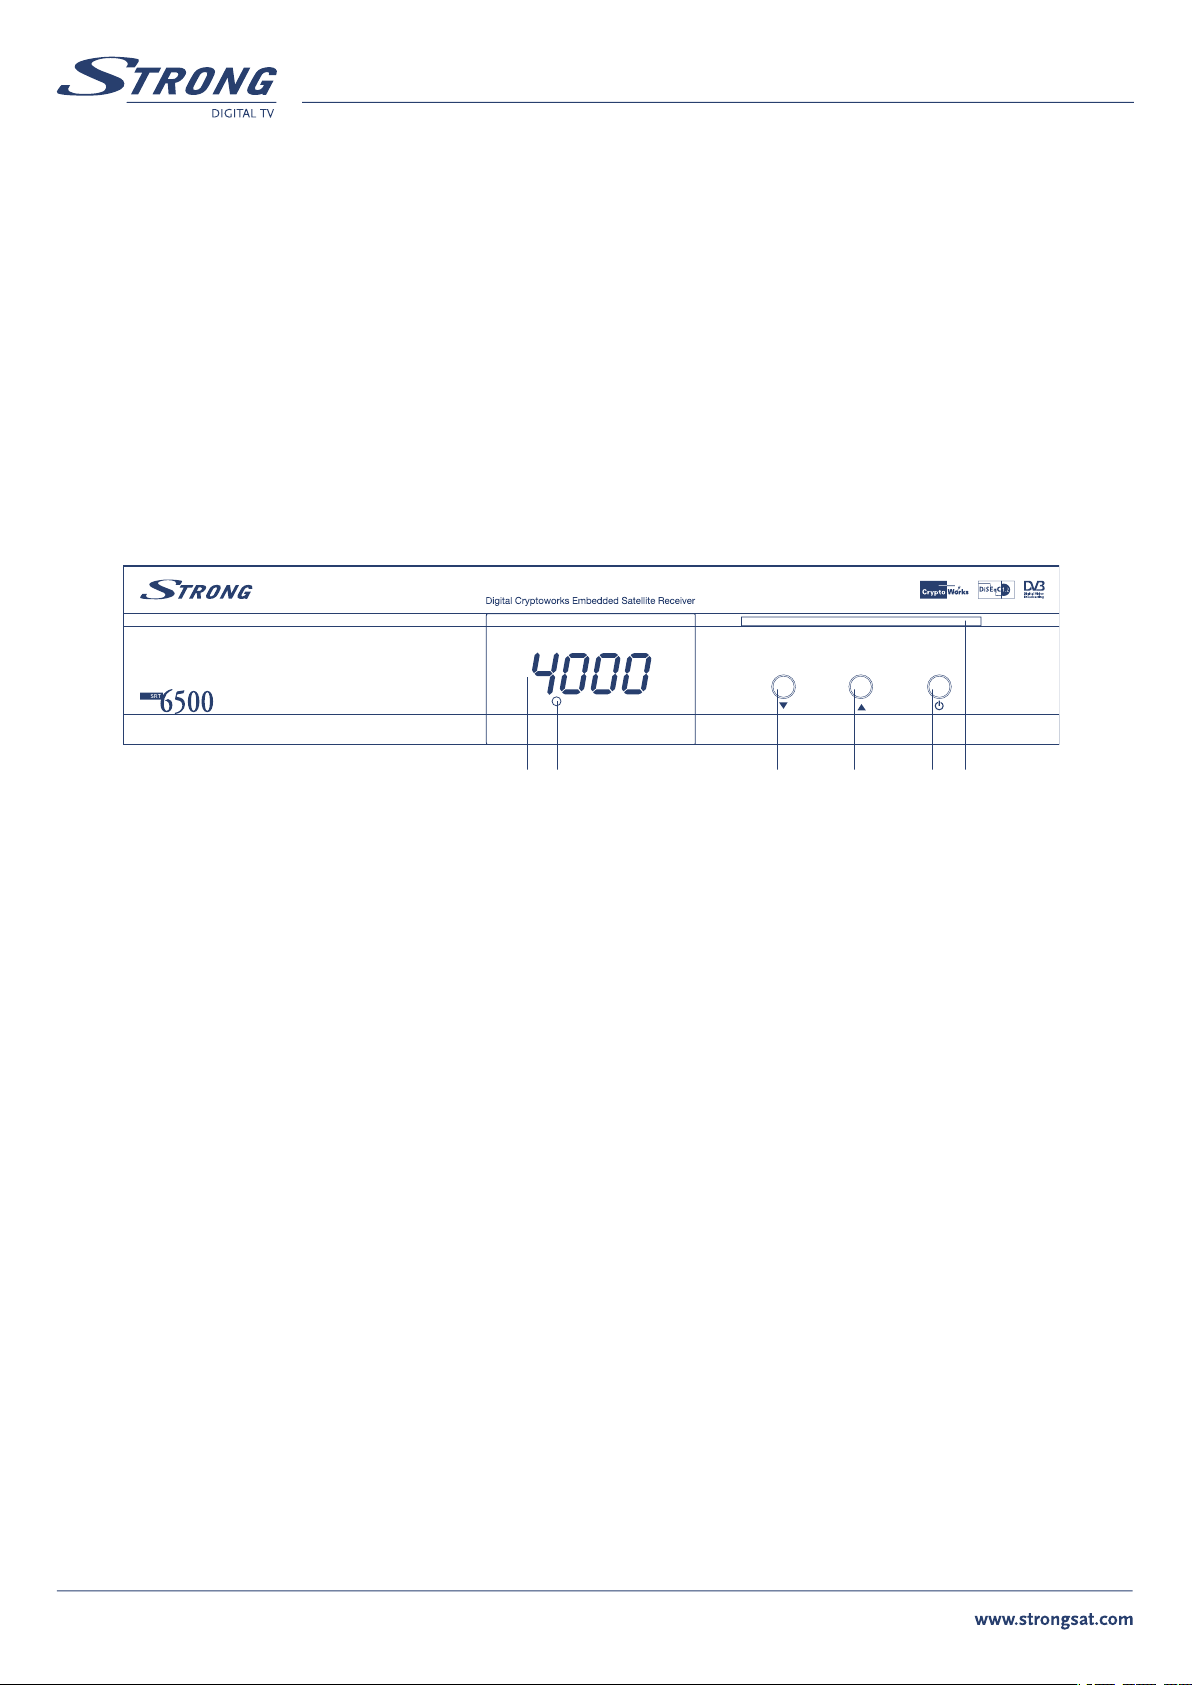
4.0 CONTROLS / FUNCTIONS
4.1 Front Panel
PART 1 l English
1 3 4 5 62
1. LED (4 Digit)
Displays the time when in “Stand-By” mode and the channel number when the unit is operating.
2. IR Sensor
Detects the infra-red command signals generated by the remote control handset.
3., 4. Channel p & q
Move the cursor Up or Down in an application screen or change channels sequentially Up or Down in normal operation.
5. Power Button
Switches the receiver between “Stand-By” and “On” modes.
6. Smart card reader
Insert your Cryptoworks smart card with golden contacts facing down.
4
PART 1 l English
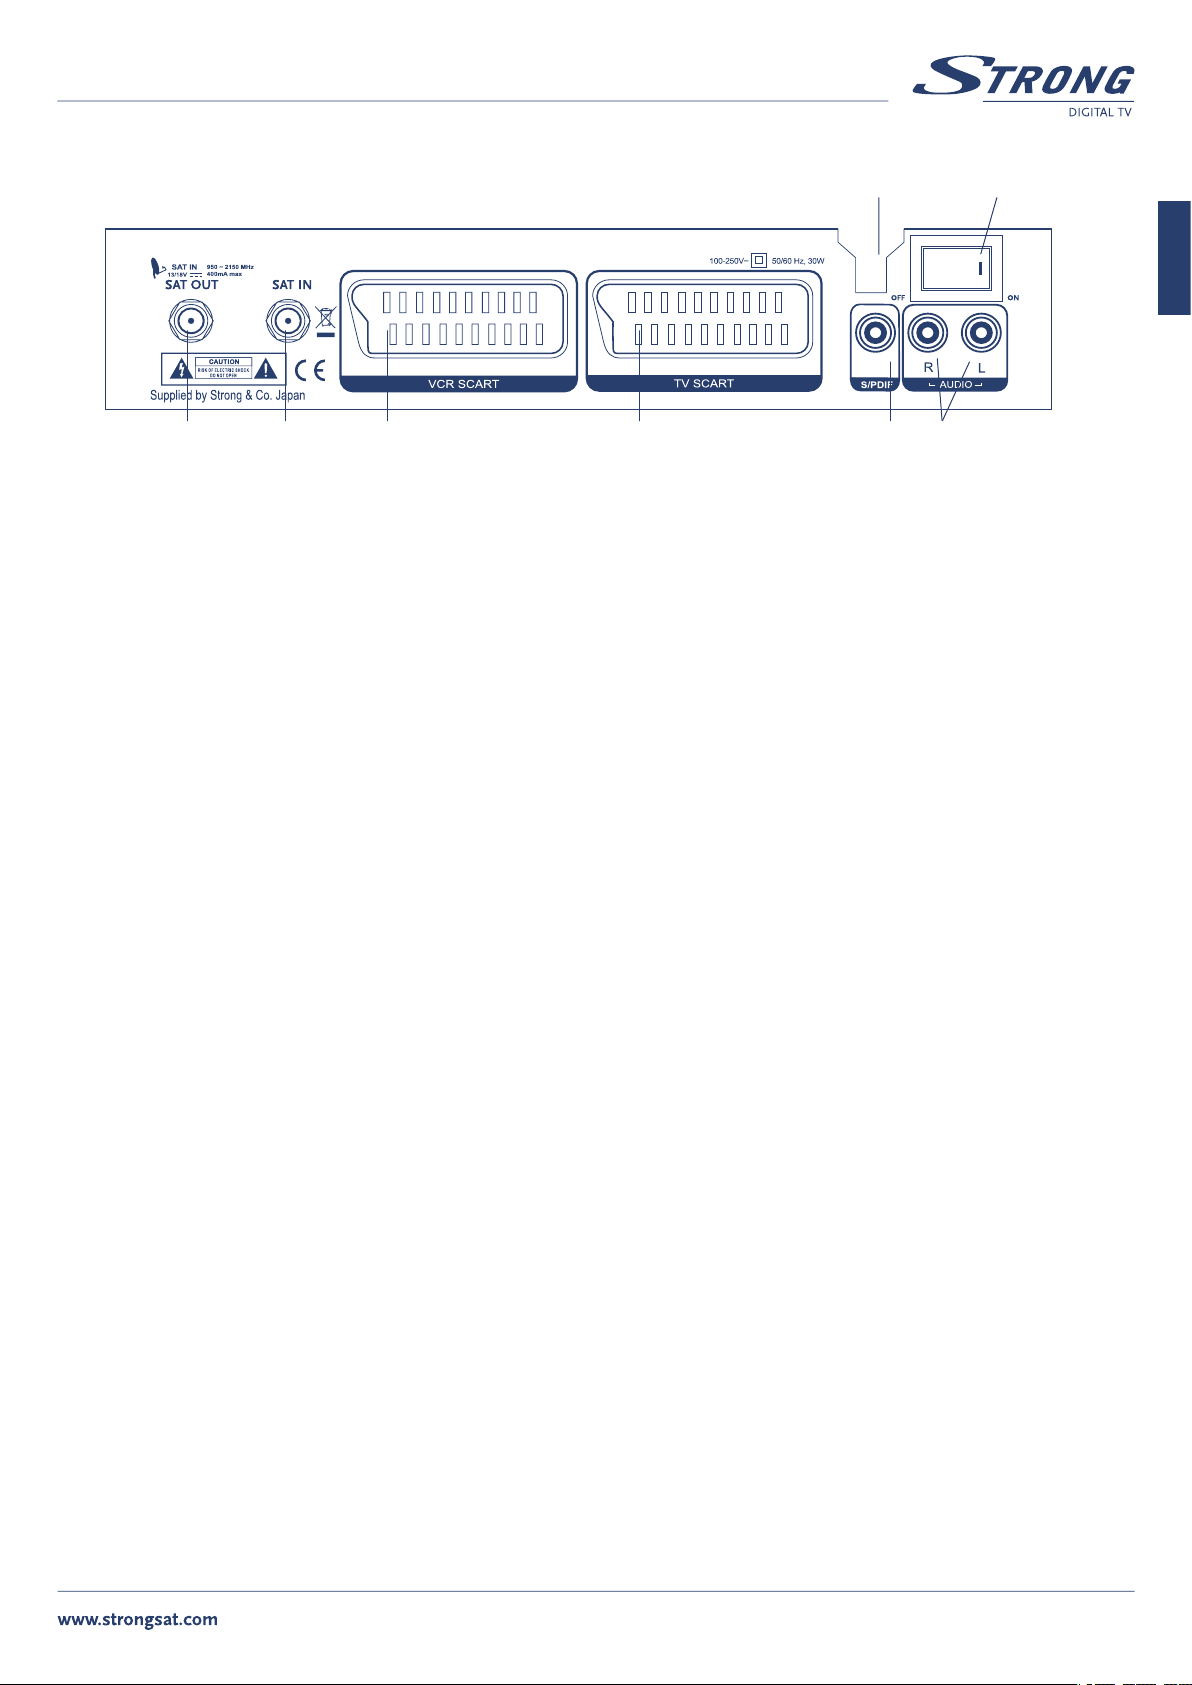
4.2 Rear Panel
1 3 4 5 6
1. SAT OUT
Gives you the possibility to connect an extra receiver (analogue or digital).
2. SAT IN
Connect the cable from your LNB on the satellite dish to this connector.
3. VCR SCART
To connect your receiver to your video recorder using a scart cable. Your video signal will now be looped through your receiver to your
TV set.
2
8
7
English
4. TV SCART
To connect your receiver to your TV set using a SCART cable.
5. S/PDIF Digital audio output
Use this coaxial output to connect your receiver to the input of your digital audio amplifier.
6. AUDIO-R and AUDIO-L
Audio Right (RED) and Audio Left (White) RCA connectors to connect to audio amplifier.
7. Power On/Off switch
8. Power Cord
Your receiver requires a current of 90 ~ 250 V AC (Auto-selectable), 50 ~ 60 Hz +/-5 %. Make sure to check the power specification before
connecting your receiver to the wall outlet.
5
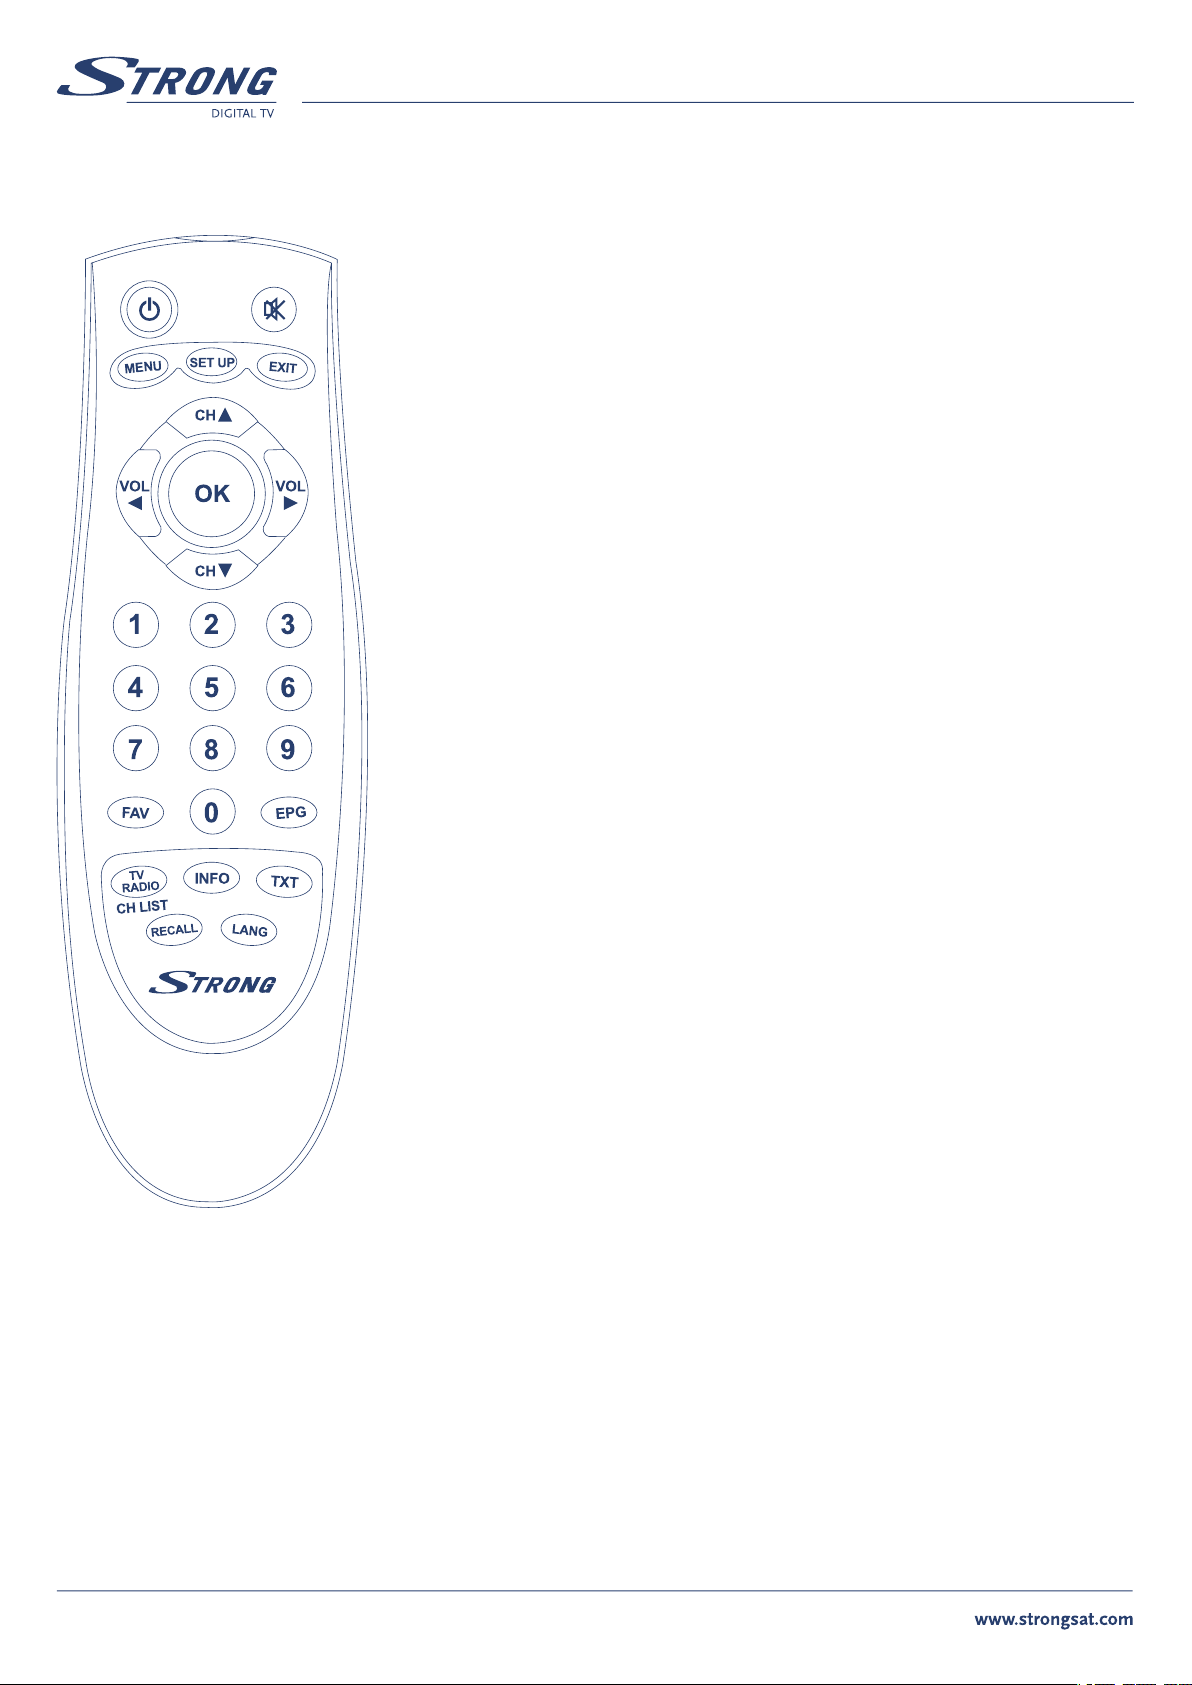
4.3 Remote Control Handset
PART 1 l English
Power: Switches the receiver between Stand-By & On modes
Mute: Mutes the audio output
MENU: Accesses the main menu
SETUP: Accesses the receiver set-up menu
EXIT: To return to previous status or menu
CH (p/q): Change channels sequentially up or down in viewing mode and move the cursor up or
down in an application screen
VOL (t/u): Alter the audio output level up or down in viewing mode and change the selected
item’s setting in an application screen
OK: Selects an item or confirms a choice
Numeric Keys (0~9): For direct entry of channel number or input of alphanumeric characters
FAV
: Displays the current favorite channels list
EPG (Electronic Program Guide): Provides program content information. Press again to return to
viewing mode
TV/RADIO: Switches between TV & Radio channels lists
INFO: Displays the available information on the viewed channel
TXT: Displays the teletext contents of the viewed channel, if teletext is transmitted
RECALL: Goes back to the previously viewed channel
LANG: Select sound mode or audio language
6

PART 1 l English
5.0 USING THE REMOTE CONTROL
5.1 Batteries
How to insert the batteries
n Open the cover at the top of the rear side of the handset
n Insert two “AAA” type batteries (1.5V), respecting the indicated polarity +/- signs
n Close the cover
When to replace the batteries
n When the operational range of the handset gets smaller, or when the receiver no longer responds to each and every command. Always
replace both batteries at the same time
Accident prevention
n Do not recharge, heat or disassemble the batteries
n Make sure the intended polarity alignment is respected
n If the handset is not going to be used for some time, take the batteries out. If not, the batteries may leak and cause damage to
the handset
5.2 Range Of Operation
n The operating range of the handset is within +/- 30 degrees on both the vertical and horizontal planes of the Infra Red sensor
n Transmission distance does not exceed 7m
English
Notes
When the handset is not operational
Replace the batteries and make sure the receiver is connected to the power supply.
Abnormal operation
Disturbance from peripheral devices may occur. You will need to move the object that is generating the disturbance.
Notes for handling
In the event the receiver is exposed to heat or water, operating it could be dangerous. Have the unit checked by a qualified technician
prior to operating it again.
7
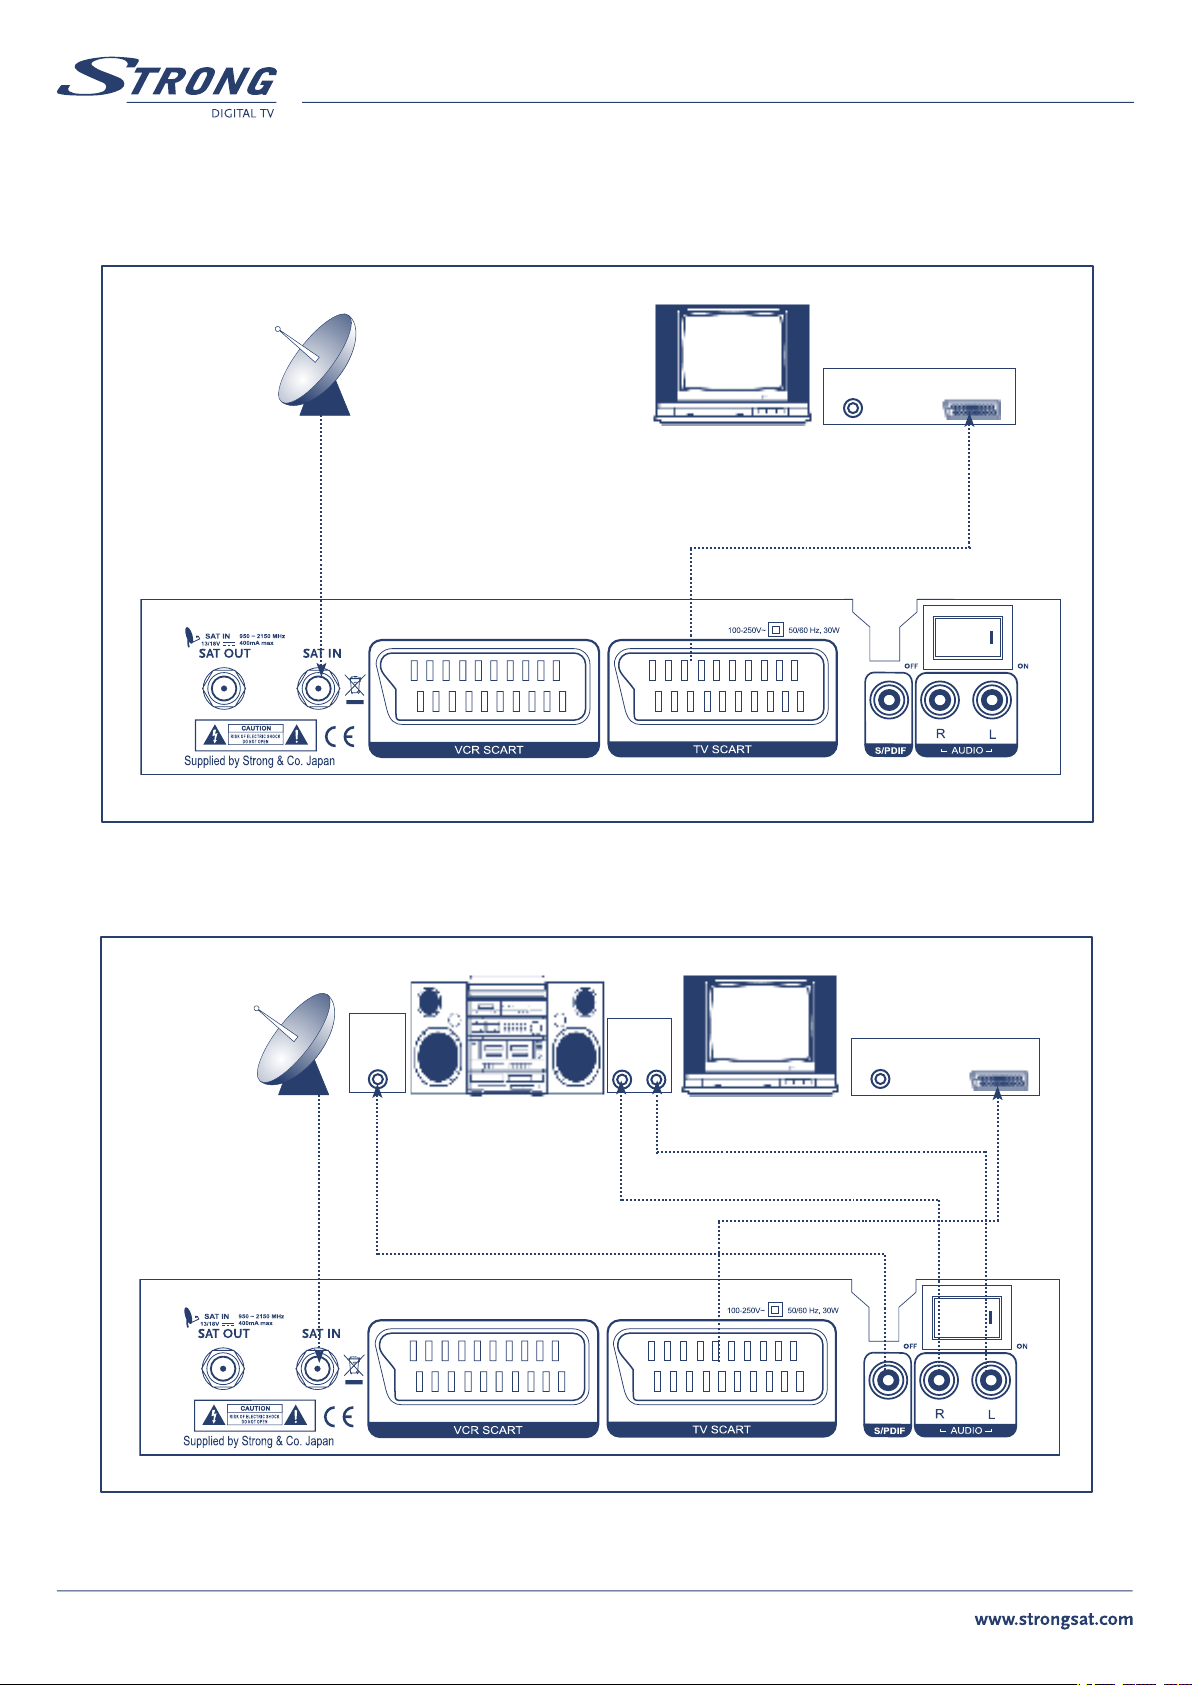
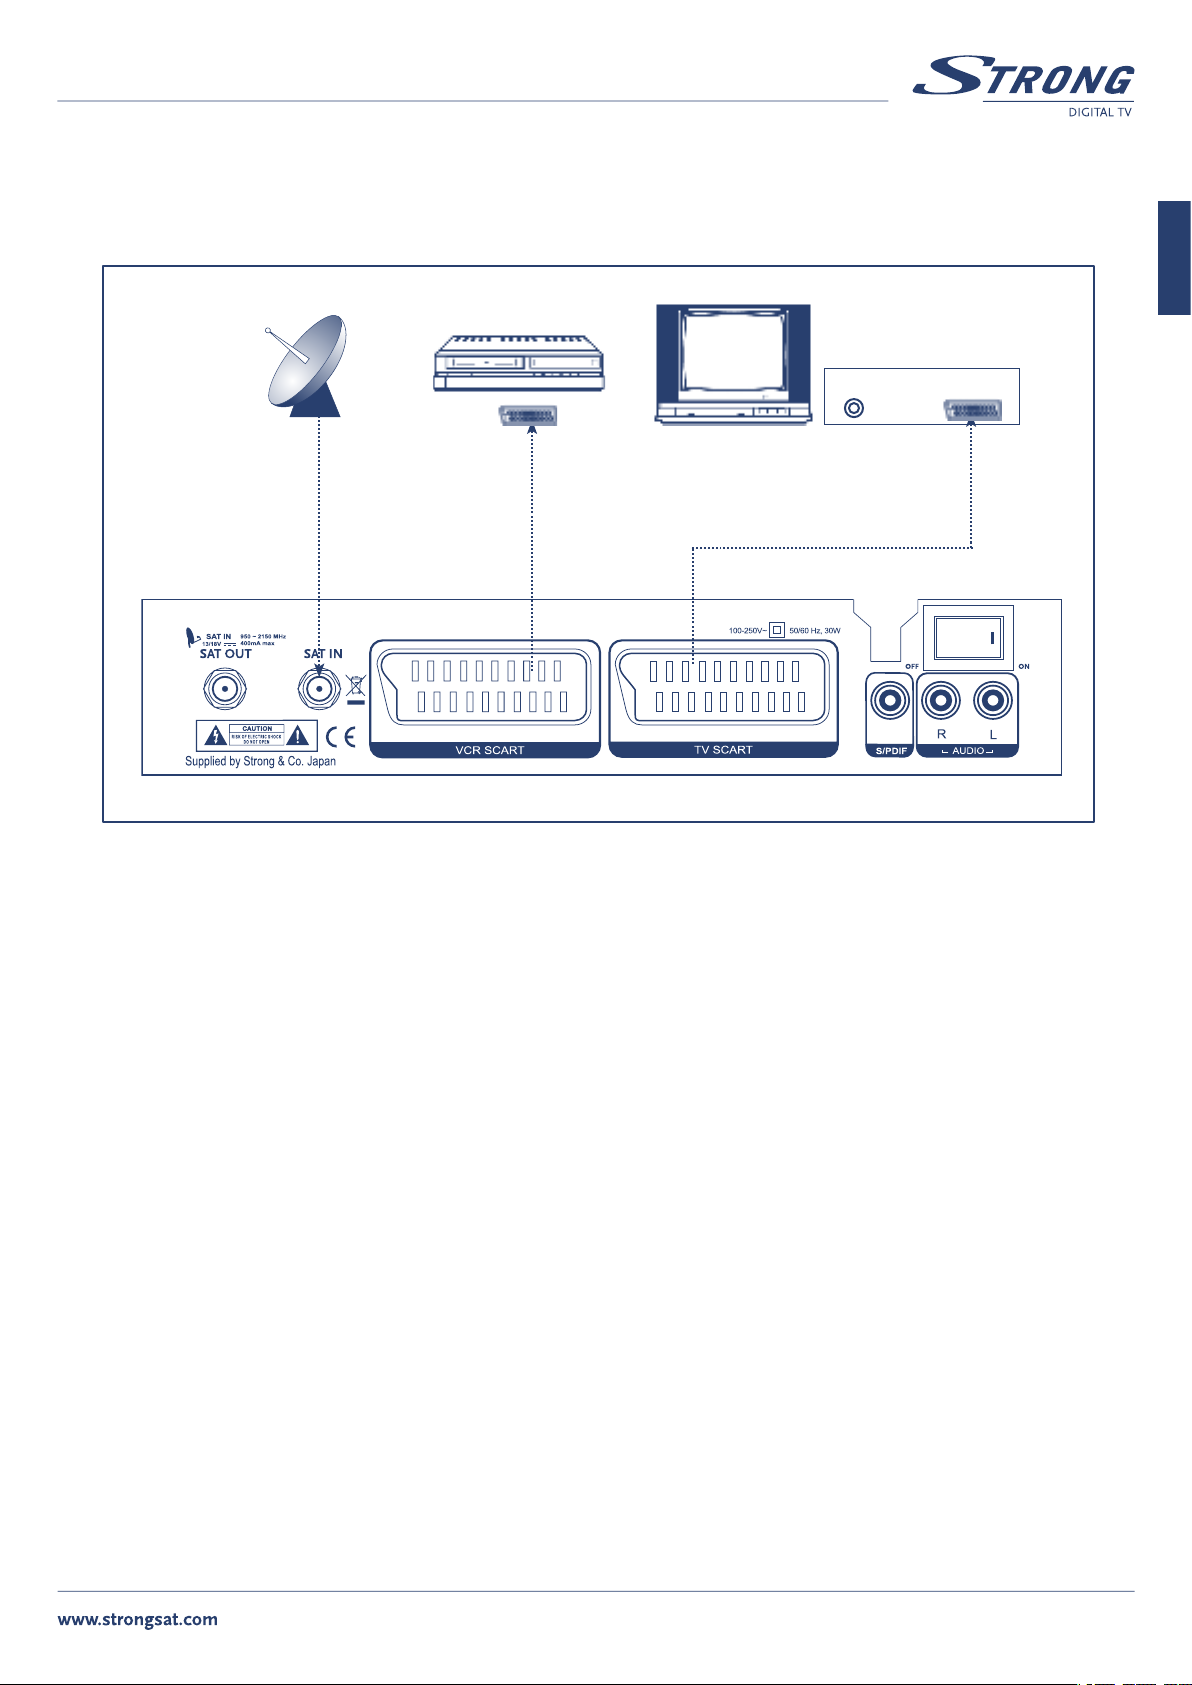
6.0 CONNECTING THE RECEIVER
6.1 To a TV set, using TV SCART connection
PART 1 l English
6.2 To a Hi-Fi system and a TV set, using both A/V connections
RF IN
SCART
Digital
Audio/
coax
Audio
R L
RF IN
SCART
8
PART 1 l English
6.3 To a VCR and a TV set, using both SCART connections
English
RF IN
SCART
9

PART 1 l English
7.0 Starting up for the first time
Ensure that your satellite receiver is correctly connected to your television and dish, and that your satellite signal is of good quality. Check if all
connections are done in correct way. If you are not sure about this then ask your local Strong dealer to check your installation or satellite signal.
Once you start the receiver for the first time a country selection dialog will be displayed. Select your country from the list using Vol t/u buttons.
If your country is not in the list select “Other”.
After selection of country a specific settings for selected country will be loaded.
For each country we have pre-loaded most popular channels.
If your antenna is primed to satellite Astra at 19E then you will get picture and sound on your TV.
If your antenna is pointed to other satellite then you will get on TV screen message “Invalid or no signal”.
In this case do following steps:
n Press OK button on your remote control. Channel list will be displayed
n Press EXIT button. This will move focus to the field with name of satellite
n Using Vol t/u buttons select satellite where your antenna is pointed and press OK
n Focus will be moved back to channel list. Select channel of your choice and press OK button to confirm
It can be the case that satellite, where your antenna is pointed, is not in the list of pre-installed. Then you have to proceed with installation as
described below in “8.2 Setup menu”. See “8.2.2 Antenna setup” and “8.2.3 Channel search”.
10

PART 1 l English
8.0 SETUP AND OPERATION
8.1 Before Setup
Information
A menu is a field of text, displayed on the TV screen. Selectable menu items are generally highlighted. Items that are not highlighted cannot be
selected. Most menus display explanatory information at the bottom of the screen.
8.2 Setup Menu
To install the receiver properly you have to perform a “Setup Procedure”. After you finish the setup procedure, you can start watching TV or
listening to Radio. During the basic settings, the short information is displayed at the bottom of the menu screen.
n Turn on your TV and receiver
n Press the SETUP button to display the setup mode. You will be asked to enter PIN code. Using numeric buttons enter PIN code “1234”.
This is default PIN code and it can be changed later, as described in “
Setup Lock/PIN”
English
n Use the CH p/q and Vol t/u buttons to move across a menu page
n When you have reached the required item, press the OK button to confirm your choice
n Press EXIT to return to quit the mode
11

8.2.1 System Setup
Press the OK button on ‘System Setup’ in the Setup Menu. The following window will appear.
Set the Video Format, UHF Channel, TV Type, Scart RGB output, GMT Offset, Positioner, LNB Reference and Summer Time.
n Use CH p/q to move up and down the list
n Use Vol t/u to change the setting
Video Format: MULTI / PAL I, B, G or K / SECAM / NTSC
TV Type: Standard (4:3) / Wide (16:9) and aspect conversion
PAN SCAN/Letter boxScart
Scart RGB: On / Off
Positioner: Yes / No
Teletext type: STB / VBI
GMT Offset: +12:00 ~ -12:00
Summer Time: On / Off
PART 1 l English
n Upon reaching the required menu line, press OK to enter the setting
n Press EXIT to go back to the previous mode
8.2.2 Antenna Setup
Press OK on ‘Antenna Setup’ in the Setup Menu. The following window will appear.
Set the satellite, LNB Frequency, 22 kHz Tone, DiSEqC mode and LNB Power and Positioner setup.
n Use CH p/q to move up and down the list
n Use Vol t/u to change the setting
SAT: Select satellite from the stored list. To include satellite to
the list of satellites available for Channel search you need to
select it with OK button. Selected satellites marked with
¸ symbol. If you want to rename selected satellite – press
Info button
LNB Type: Select between Universal / Wide Band / OSC C- Band /
C-Band / Ku-Band / Unicable / Standard Sat. Make your
selection depending from installed LNB
High L.O.: Enter the frequency of Local Oscillator for High band. Refer
to your LNB manual
Low L.O.: Enter the frequency of Local Oscillator for Low band. Refer
to your LNB manual
22 kHz Tone: On / Off / Auto - Make your selection depending from installed LNB
DiSEqC: Off / DiSEqC A, B. C or D / Tone A or B. If you have DiSEqC 1.0 or Tone Burst switch installed
LNB Power: H/V / 14 V / 18 V / Off
Positioner: None / DiSEqC 1.2 / USALS. If you use antenna mounted on the DiSEqC 1.2 positioner then select “DiSEqC 1.2”. If your
positioner is USALS compatible then select “USALS”
12

PART 1 l English
8.2.2.1 DiSEqC 1.2 positioner setup
Mounting of the antenna on DiSEqC 1.2 positioner is complicated job. In order to get the best performance of the system it should be installed
by a professional.
In “Antenna Setup” menu set Positioner to “DiSEqC 1.2” and press OK button to enter to “Antenna position” menu.
n Use CH p/q to move up and down in the list
n Use Vol t/u to change the setting
Satellite: Select satellite position of which you would like
to setup
Transponder: Select reference transponder which should be used
for signal quality indication
Move: When this item is highlighted press Vol t/u to
move dish in East/West direction accordingly
Save position: Highlight this item and press OK to store current
position of the dish for selected satellite.
The ¸ symbol shown near menu item once position
is stored
Reference position: Highlight this item and press OK if you need to turn
dish to reference position (0 degree position).
Function:
Antenna status: Show you current status of the antenna (stopped, moving to East/West)
Signal Quality: Show quality of signal for selected reference transponder. Adjust antenna position in order to get maximum level of the
Set west limit / Set east limit – select it and press OK if you want to store current position of the dish as west / east limit;
Disable limit / Enable limit – select and press OK to disable / enable limits;
Recalculate – select and press OK to recalculate positions of all satellites based on adjustment for current satellite;
Nudge west / Nudge east – select and press OK for fine adjustment of the dish position;
Nudge tilt up / Nudge tilt down – use this command if your positioner support adjustment of elevation
Signal Quality
English
n Press EXIT to go back to the previous mode
13

PART 1 l English
8.2.2.2 USALS positioner setup
Mounting of the antenna on USALS positioner is complicated job. In order to get the best performance of the system it should be installed by a
professional.
In “Antenna Setup” menu set Positioner to “USALS” and press OK button to enter to “Antenna position” menu.
n Use CH p/q to move up and down in the list
n Use Vol t/u to change the setting
Satellite: Select satellite position of which you would like
to setup
Transponder: Select reference transponder which should be used
for signal quality indication
My longitude: Set longitude of your location
My latitude: Set latitude of your location
Move: Highlight this item and press t button to turn dish
to the position corresponded to the selected satellite.
Press u button to stop dish
Reference position: Highlight this item and press OK if you need to turn
dish to reference position (0 degree position)
Signal Level and Quality: Show level and quality of signal for selected reference transponder. Adjust longitude and latitude of your location
in order to get maximum values of the Signal Level and Quality indicators
n Press EXIT to go back to the previous mode
14

PART 1 l English
8.2.3 Channel Search
Press OK on ‘Channel Search’ in the Setup Menu. The following window will appear.
Set the Satellite, Tune Method, Transponder, Frequency, Symbol Rate, FEC and Function.
n Use CH p/q to move up and down the list
n Use Vol t/u to change the setting
Satellite Name: Choose from the list of satellites selected in
“Antenna setup” menu
Tune Method: Main options are:
“Sat” – receiver will search channels according to stored list of transponders.
“Sat – NIT” - receiver will search channels according to stored list of
transponders and in addition use network information. This mode allows you to
find all channels, even from new appeared transponders.
“TP” – this method is to search channels from one transponder.
“TP – NIT” – receiver will search channels from one transponder and in addition
use network information. This mode recommended if you want to search
channels of particular broadcaster only
Sub options are:
“Free” – receiver will search only Free To Air channels
“Free+Scr” – receiver will search for all channels
Transponder: Select index from the stored list
Frequency: Value of transponder frequency in MHz
Symbol Rate: Value of symbol rate in kSymbols Per Second
Polarity: Horizontal / Vertical / Right / Left
FEC: Auto, 1/2, 2/3, 3/4, 5/6, 7/8
Function: Append / Delete / Change
AGC Signal: Indicates received signal strength level
English
8.2.3.1 How to search for channels
Highlight “Tune method” field and press OK. Receiver will start channel scan. Names of the found channels will be shown in the two columns:
for TV and Radio separately.
You can interrupt search process by pressing to
If you press OK button: search process will be interrupted and you can select one of the following options:
n Save – to save all found channels
n Unselect – to unselect some unwanted channels from the list. Use OK button to unselect channels and Vol t/u buttons to switch
between TV and Radio list. Once you finish – press
the memory
n Cancel – to cancel result of search. No channels will be stored in the memory
If you press EXIT button: search process will be interrupted and no channels stored in the memory.
OK or EXIT button.
EXIT button, select “Save” and press OK. Only selected channels will be stored in
15

PART 1 l English
8.2.3.2 How to add new transponder
n Set “Tune method” to “TP” or “TP+NIT”
n Move focus to “Frequency” and enter value in MHz
n Move focus to “Symbol rate” and enter value in kSPS
n Move focus to “Polarity” and select value
n Move focus to “FEC” and select value or set “Auto”
n Move focus to “Function” select “Append” and press OK. Message “Saving data...” will be shown on screen. New transponder will be
added to the end of the list
8.2.3.3 How to delete present transponder
n Set “Tune method” to “TP” or “TP+NIT”
n Move focus to “Transponder” and choose transponder you want to delete
n Move focus to “Function” select “Delete” and press OK. Message “Saving data...” will be shown on screen. Selected transponder deleted
from the list
8.2.3.4 How to correct/edit parameters of the transponder
n Set “Tune method” to “TP” or “TP+NIT”
n Move focus to “Transponder” and choose transponder you want to modify
n Move focus to “Frequency” and enter value in MHz
n Move focus to “Symbol rate” and enter value in kSPS
n Move focus to “Polarity” and select value
n Move focus to “FEC” and select value or set “Auto”
n Move focus to “Function” select “Change” and press OK. Message “Saving data...” will be shown on screen. Modified data are stored in
the memory
n Press EXIT to go back to the previous mode
8.2.4 Setup Lock/PIN
Press OK on ‘Setup Lock/PIN’ in the Setup Menu. The following window will appear. Set the Menu Lock, Change the PIN, enter the New PIN and
confirm the Confirm PIN.
n Use CH p/q to move up and down the list
n Use Vol t/u to change the setting
Menu Lock: On/Off
Change PIN: Press OK if you want to change.
New PIN: Enter your new 4-digit code
Confirm PIN: Confirm your new 4-digit code
Note: The default PIN is ‘1234’
n Press EXIT to go back to the previous mode
16

PART 1 l English
8.2.5 Time Setting
Press OK on ‘Time Setting’ in the Setup Menu. The following window will appear. Set the Local Time, Sleep Time, Timer Status and Program
the Timer.
n Use CH p/q to move up and down the list
n Use Vol t/u to change the setting
Local Time: If you want to correct time and date then enter in format
dd/mm/yyyy - day – hh:mm
Sleep Time: 0 ~ 180 min. Receiver will be turned off after selected
time interval
Timer: Select timer number
Status: Disabled/Enabled. If Enabled – receiver will be turned on
within selected channels at defined “
off after “duration” interval
Channel type: TV/Radio
Channel number: Enter channel number. If you use multi satellite installation
– make sure to enter channel number in
“All satellites” mode
Channel name: Displayed automatically and depends from channel number
Start time: Enter start time in format dd/mm/yyyy - day – hh:mm
Duration: Enter duration in hh:mm format
start time” and turned
English
NOTE: Timer also can be programmed from EPG. See “Program Guide” chapter of this manual.
n Press OK to store settings and go back to the previous mode
8.2.6 Factory Default
Press OK on ‘Factory Set’ in the Setup Menu. Confirm whether you wish to go back to the factory default settings.
This function will return all settings of the receiver to factory default. All your channels, favourite lists and settings will be cleared from
the memory.
17

PART 1 l English
8.3 Main Menu Settings
From the Main Menu you can access to the Program Guide, Channel Sorting, Language Preference Settings, Favorites Editing, Channel Editing,
Smart card information and Software Version information.
n Press MENU
n Use CH p/q to move up and down the list
n Use Vol t/u to change the setting
n Upon reaching the required menu line, press OK to enter the setting
n Press EXIT to go back to the previous mode
18

PART 1 l English
8.3.1 Program Guide
This menu displays same information as described in chapter 8.4.4. Press OK on ‘Program Guide’ in the Main Menu.
8.3.2 Sort Channels
Press OK on ‘Sort Channels’ in the Main Menu. The following window will appear.
n Use Vol t/u to select an alphabetical letter
n Press OK to confirm your choice
n Use CH p/q to move up and down in the list
n Use Vol t/u to scroll pages Down or Up
n Pressing OK on the highlighted channel calls that channel and closes
this menu
n Press EXIT twice to go back to the previous mode
8.3.3 Language
Press OK on the ‘Language Preference’. The following window will appear. Select the menu language and Logo for Radio channel
English
Menu Language: Available English / Hungarian / Czech / Slovak / Bulgarian /
Turkish / German
Radio Ch Logo: Enable or disable logo for Radio channels
n Use CH p/q to move upwards and downwards in the menus
n Use Vol t/u to change the values in the alternatives
n When you have reached the required subject menu, press OK to confirm your selection
n Press EXIT to go back to the previous mode
19

8.3.4 Edit Channels
Press OK on the ‘Edit Channel’. The following window will appear.
Select the Edit channel menu.
PART 1 l English
TV/Radio Channel
Move Channel
Favorite
Lock Channel
Delete Channel
Add Channel
Edit Name
Use EXIT button to toggle between channel lists and function selection.
To toggle between TV and Radio lists highlight
To return to menu press
EXIT button when any function is highlighted. You will be required to confirm or discard changes that you have made.
function and use CH p/q to select list.
8.3.4.1 Move channel
To move channel highlight icon and press OK. Highlight the channel which you want to move and press OK. If you want to move group
of channels – highlight and select with OK button all channels that you want to move. Once you finish selection of channels, select position in
the channel list where to move selected channels and press RECALL button. Press EXIT to return to function selection or continue to move other
channels if you want.
8.3.4.2 Add to favourite list
To add channel to favourite list highlight icon and press OK. Highlight the channel which you want to add to favourite group and press
OK. List of favourite groups will be displayed on screen. Select group of your choice and press OK. Continue to add other channels if you wish. If
you wish to remove channel from favourite group select group “[0] – unselect”. Press EXIT to return to function selection.
8.3.4.3 Lock channel
Lock function is designed to give parents possibility to deny access of children to unwanted channels (channels with adult content, for example).
It is necessary to know PIN code to watch locked channels. It is recommended to change factory default PIN code to different.
To lock channel highlight
then repeat selection with OK button. Press EXIT to return to function selection.
icon and press OK. Highlight the channel which you want to lock and press OK. If you wish to unlock channel
8.3.4.4 Delete channel
To delete channel highlight icon and press OK. Highlight the channel which you want to delete and press OK. Continue to select other
channels that you wish to delete. If you wish to unlock channel then repeat selection with OK button. Press EXIT to return to function selection.
20

PART 1 l English
8.3.4.5 Add channel
Due to several reasons some channels can’t be found with automatic channel scan function. This function helps you to add single channel.
Before use this function you need to know details of channel which want to add.
To add new channel highlight
Select satellite and transponder of channel location. If transponder do not present in preset list you can enter it’s parameters directly in this
menu. Highlight “Channel name” and press OK. Enter channel name with keypad displayed. Enter value of Audio, Video and PCR PID and
press OK. Press EXIT to return to function selection.
icon and press OK. Below menu will be displayed.
8.3.4.6 Edit channel name
To edit channel name highlight icon and press OK. Select channel which name you wish to edit and press OK. Use displayed keyboard to
edit the name, select Save function to store new name or Cancel to discard changes. Press
EXIT to return to function selection.
8.3.5 Smart Card
You can enjoy not only Free-To-Air services but also Crytoworks embedded service channels. To view Crytoworks embedded service channels,
just insert Smart card into slot. Once you insert the smart card, you will see Cryptoworks embedded service channels. If you need further
information, contact your service provider or distributor.
General Card Information: Card Label and Additional Info / Set Maturity Rating
/ Smart Card Pin Code Change / Available Program
Providers
Available Entitlements: In this menu you can check validity period of your
smart card
English
Profile Information: Current Mode / Profile / Image ID /
Hardware Version / Loader Version
8.3.5.1 General Card Information
Choice General Card information, you can find information of Smart Card as followings
Card Label and Additional Info: To check following information Card Label / Smart Card Address /Card Valid until/Current Maturity Rate
Set Maturity Rating: Current Maturity Rate / Set Maturity Rate.
Your broadcaster can assign maturity rating for each program.
If you have children and want to deny their access to the programs with maturity rate above their age set maturity rating value to age of your
children. You, or your children, will be asked to enter smart card PIN code in case when maturity rating of program content is above of maturity
rating that you have set in this menu.
Note: We recommend to use different PIN codes for the smart card and for the receiver.
Smart Card Pin Code Change: Enter Old Pin / Enter New Pin / Confirm New Pin. In this menu you can change PIN code of your
smart card.
Available Program Providers: Information about program providers.
21

8.3.6 About
Press OK on the ‘About’. The following window will appear.
It shows model name, application version., and device version.
PART 1 l English
System software update.
Software in this receiver can be updated thought satellite signal.
Software update will be available on the satellite
Astra 19E.
To download latest software version highlight “
press OK.
Receiver will check if newest version is available. In case it is
available you will be asked to confirm update. In case no new
software is available you will get corresponded message.
Update” and
n Press EXIT to go back to the previous mode
22

PART 1 l English
8.4 General Viewing Information
8.4.1 Program Information
Information on the currently viewed program appears for a few seconds, when you press INFO.
English
Channel Name
Channel Number
Program Information
Favourite
Scramble
Lock
Teletext
Satellite Name
Clock
23

PART 1 l English
8.4.2 TV/Radio Channels List
While watching TV or listening to Radio you can call the channel list by pressing TV/RADIO or OK button. The picture in the preview screen is
that of the highlighted channel, which can be changed with the CH p/q. Vol t/u scrolls Channel List pages Down or Up. Pressing OK on a
highlighted channel calls that channel and exits the Channel List.
To sort channels in various modes press
If you have multi satellite installation then field with satellite name will be highlighted. Use Vol
to return to the channel list.
Highlight “List” to sort channels by alphabet, number of FTA.
n Mode “ALL (1,2,3..)” is to display all channels from current satellite in channel number order
n Mode “ALL (A.B.C..)” is to display all channels from current satellite in Alphabet order
n Mode “Free (1,2,3..)” is to display only FTA channels from current satellite in channel number order
n Mode “Free (A.B.C..)” is to display only FTA channels from current satellite in Alphabet order
Press OK to return to the channel list.
EXIT while focus of the list is pointed to the channels.
t/u to select satellite of your choice. Press OK
To exit from the channel list press
TV Channel List – satellite selection
OK when channel is highlighted or press EXIT button twice.
EXIT
Vol
t/u to select satellite
24
OK

PART 1 l English
TV Channel List – channels sorting
EXIT
Vol
t/u to select sort mode
English
Radio list is similar to TV list. To select between TV and Radio list use
OK
TV/RADIO button while channel list is displayed on screen.
25

PART 1 l English
8.4.3 Favorite Channels Lists
While watching TV or listening to Radio you can call the respective favorite channels list by pressing FAV. If you press FAV button while watching
TV channel – the list of TV Favourite channels will be displayed. If you press FAV button while listening to Radio – the list of Radio Favourite will
be displayed. In case you didn’t add any channels to Favourite lists, it would not appear.
To change between Favourite lists you can use FAV button or press EXIT button while Favourite list is displayed. The “List” field will be
highlighted. Use Vol t/u to select Favourite list and press OK once finished.
To return back to ALL channels mode press
TV/RADIO button.
8.4.4 Program Guide
Press EPG to access the electronic program guide, if available from the broadcaster.
Once you enter to Program Guide the “Now & Next” mode is selected. You can
select mode “Schedule” if press Vol u or you can change between TV and Radio
list if press Vol
t button.
Now & Next mode
Select “Now & Next” and press OK. Select channel of your choice using
CH p/q buttons. Select program information using Vol t/u buttons. Below
channel list you can see extended description of the highlighted program.
To view detailed description of the program press
Schedule mode
This mode displays scheduled program information for current channel
Select “Schedule” and press OK. Select program of your choice and press OK to
see detailed program information.
To reserve Timer for selected program press
timer settings.
To view scheduled information for another channel exit from schedule mode,
select channel in “Now & Next” mode and finally select schedule mode.
OK button.
RECALL button and confirm
26

PART 1 l English
8.4.5 Selection of alternate audio track or audio mode
Press LANG to access the audio language selection screen.
n Use CH p/q to move up and down the list
n Use Vol t/u to change the setting
Track: 1 of 1,2... Select
Mode: Stereo / Mono Left / Mono Right
Level: Normal / High / Low
Language: displays name of the audio track if available
English
n Press OK to confirm your selection and close this menu.
8.4.6 Recall
Press RECALL to recall the previous channel.
8.4.7 Teletext
Press TXT to access the Teletext service if available from the broadcaster.
27

A.1 Problem solving
There may be various reasons for the abnormal operation of the unit. Therefore, if the unit does
not work properly, check it according to the procedures shown in the table below:
Problem Possible causes Remedy
The display on front panel does not
light up
The power cord is not plugged in Check that the power cord is plugged in to the
wall outlet
PART 1 l English
No picture or sound Wrong connection of the Audio/Video output of
the receiver to TV
Audio muting
TV power off
No picture The receiver can’t receive the signal
Incorrect values of some tuner parameters
Wrong direction of the dish
The remote control does not work The batteries of the remote controller are not
inserted or exhausted
Connect the Audio/ Video output of the receiver
to TV correctly
Press the MUTE button
Turn TV on
Check the antenna cable, replace the cable, or
connect the cable to the receiver tightly
Set the values of the tuner parameters correctly
in the installation menu
Check the signal strength with a spectrum
analyzer and adjust your dish correctly
Check whether the batteries are inserted
correctly in your remote control. Check the
batteries, and if exhausted replace the batteries
in the remote control
28

PART 1 l English
A.2 Specifications
Tuner
Input Frequency Range: 950 ~ 2150 MHz
Input signal level: -65 ~ -25dBm
LNB Power: 14/18 V DC
Current: max.400 mA
LNB switch control: 22 kHz
DiSEqC Version 1.0 & 1.2 compatible
Demodulator
Modulation: QPSK
Input Symbol Rate: 2 ~ 45 Ms/s
SCPC & MCPC signals from C & KU band satellites
Video Decoder
Profile level: MPEG-2 Main profile @ Main level
Data Rate: Up to 15 Mbit/s
Video Resolution: 720 x 576, 720 x 480
Video Format: NTSC, PAL, SECAM
Aspect Ratio: 4:3, 16:9
English
Audio Decoder
MPEG 1/MusiCam Layer I & II
Audio mode: Mono, Dual mono, Stereo
Sampling Rate: 32, 44.1, 48 kHz
Smart Card Reader
Number of slots: 1
Standard: ISO 7816
Connectors
SAT IN
SAT OUT
1 TV SCART (RGB,CVBS, Y/C, Audio)
1 VCR SCART (CVBS, Y/C, Audio)
2 RCA (Audio L & R)
Coaxial Digital Audio: S/PDIF
Separate power switch
System & Memory
Main Processor: ST i5518
Flash Memory: 2 MBytes
SDRAM: 8 MBytes
EEPROM: 64 kbits
General Data
Operating Temperature: +5 °C ~ +45 °C
Storage Temperature: 0 °C ~ +50 °C
Supply Voltage: 100 ~ 250 V AC (SMPS) 50/60 Hz
Power Consumption: 30 W
Stand-by Mode: <13 W
Humidity: 25% ~ 70%
Size (W x H x D) in mm: 214 x 42 x 153
Weight: 0.93 kg
Technical alterations reserved 01/2007
29

PART 1 l English
30
 Loading...