

Page 1
Operation Manual
Page 2

Cristina Bachmann, Heiko Bischoff, Lillie Harris, Christina Kaboth, Insa Mingers, Matthias Obrecht, Sabine Pfeifer,
Benjamin Schütte, Marita Sladek
This PDF provides improved access for vision-impaired users. Please note that due to the complexity and number
of images in this document, it is not possible to include text descriptions of images.
The information in this document is subject to change without notice and does not represent a commitment on
the part of Steinberg Media Technologies GmbH. The software described by this document is subject to a License
Agreement and may not be copied to other media except as specically allowed in the License Agreement. No
part of this publication may be copied, reproduced, or otherwise transmitted or recorded, for any purpose,
without prior written permission by Steinberg Media Technologies GmbH. Registered licensees of the product
described herein may print one copy of this document for their personal use.
All product and company names are ™ or ® trademarks of their respective owners. For more information, please
visit www.steinberg.net/trademarks.
© Steinberg Media Technologies GmbH, 2018.
All rights reserved.
Nuendo Live_2.0.0_en-US_2018-09-12
Page 3

4 Introduction
4 Platform-Independent Documentation
4 Conventions
5 How You Can Reach Us
6 Setting Up Nuendo Live
6 Setting Up Nuendo Live for Recording
7 Setting Up Nuendo Live for Playback
7 Audio Settings
10 Switching the Program Language
10 Key Commands
11 Project Handling
11 Project Files
12 Projects Dialog
12 Creating a Project
13 Project Settings
14 Project-Related Information
15 Project Window
15 Toolbar
16 Info Line
17 Track View
20 Meter View
22 Recording
22 Recording in a Few Simple Steps
22 Easy Recording
23 Performing a More Complex Recording
23 Recording with the Record Panel
25 Record Panel
27 Changing the Record Location
28 Consecutive File Numbering
28 Pre-Record Buffer
29 MIDI Timecode
29 Dening a Cycle Range for Looped Playback
30 Excluding Ranges from Playback
30 Exporting Your Recording
32 Markers
32 Showing the Marker Track
32 Adding Markers
33 Naming Markers
33 Moving Markers
33 Deleting Markers
34 Moving to Markers
35 Track Handling
35 Selecting Tracks
35 Renaming Tracks
36 Coloring Tracks and Events
36 Adding Tracks
36 Changing the Track Routing
37 Editing Audio Events
37 Global Editing
37 Selecting Events
38 Splitting Events
38 Trimming the Event Start and End
38 Selecting Ranges
39 Moving Events and Range Selections
39 Duplicating Events and Range Selections
40 Index
Table of Contents
3
Page 4

Nuendo Live is a quick and easy-to-use solution for live-recording engineers.
Platform-Independent Documentation
The documentation applies to the operating systems Windows and macOS.
Features and settings that are specic to one of these platforms are clearly indicated. In all other
cases, the descriptions and procedures in the documentation are valid for Windows and macOS.
Some points to consider:
● The screenshots are taken from Windows.
●
Some functions that are available on the File menu on Windows can be found on the
program name menu on macOS.
Conventions
In our documentation, we use typographical and markup elements to structure information.
Typographical Elements
The following typographical elements mark the following purposes.
PREREQUISITE
Requires you to complete an action or to fulll a condition before starting a
procedure.
PROCEDURE
Lists the steps that you must take to achieve a specic result.
IMPORTANT
Informs you about issues that might affect the system, the connected hardware, or
that might bring a risk of data loss.
NOTE
Informs you about issues that you should consider.
EXAMPLE
Provides you with an example.
RESULT
Shows the result of the procedure.
AFTER COMPLETING THIS TASK
Informs you about actions or tasks that you can perform after completing the
procedure.
Introduction
4
Page 5

RELATED LINKS
Lists related topics that you can nd in this documentation.
Markup
Bold text indicates the name of a menu, option, function, dialog, window, etc.
EXAMPLE
To record with the Record panel, click RECORD.
If bold text is separated by a greater-than symbol, this indicates a sequence of different menus
to open.
EXAMPLE
Select Project > Show Marker Track.
Key Commands
Many of the default key commands, also known as keyboard shortcuts, use modier keys, some
of which are different depending on the operating system.
When key commands with modier keys are described in this manual, they are shown with the
Windows modier key rst, in the following way:
● Windows modier key/macOS modier key-Z
EXAMPLE
Ctrl/Cmd-Z means: press Ctrl on Windows or Cmd on macOS, then press Z.
How You Can Reach Us
On the Help menu, you nd items linking to additional information.
The menu contains links to various Steinberg web pages. Selecting a menu item automatically
launches your browser and opens the page. On these pages, you can nd support and
compatibility information, answers to frequently asked questions, information about updates
and other Steinberg products, etc. This requires that you have a web browser installed on your
computer, and a working Internet connection.
Introduction
How You Can Reach Us
5
Page 6
To be able to record and play back a performance, you must rst establish all physical
connections between Nuendo Live and the other components of your system, set up the audio
interface, and select the playback output mode.
IMPORTANT
Make sure that all equipment is turned off before making any connections.
Setting Up Nuendo Live for Recording
PREREQUISITE
You have set up the physical connections between the components of your system. See the
documentation of your hardware for more information.
PROCEDURE
1. Start Nuendo Live.
2. On the toolbar, click Settings .
3. In the Audio System section of the Settings dialog, select the ASIO driver that you want to
use.
4. Optional: In the Audio Ports section, deactivate Use for any input ports that you do not
want to use.
When you create a new project, one track is added for each active input port.
NOTE
If you use digital connections, we recommend that you dene the mixing console as the
word clock master within your setup. When Nuendo Live receives word clock signals from
the master device, it displays the corresponding hardware sample rate.
AFTER COMPLETING THIS TASK
You can start recording.
IMPORTANT
To avoid performance issues and to keep the computer from going into sleep mode during long
recordings, deactivate any power saving options on your computer before starting a recording. It
is also recommended to deactivate the screen saver.
RELATED LINKS
Audio System on page 8
Creating a Project on page 12
Recording on page 22
Setting Up Nuendo Live
6
Page 7
Setting Up Nuendo Live for Playback
The options in the Output Mode section of the Settings dialog determine how your recording is
played back.
PROCEDURE
1. On the toolbar, click Settings .
2. In the Output Mode section of the Settings dialog, do one of the following:
● Select Multi Track Mode.
In this mode, the recorded audio tracks are played back via their corresponding
output ports. This allows you to make a soundcheck without having the artists
present, for example.
● Select Stereo Mode.
In this mode, all tracks are mixed down to two output ports.
NOTE
During playback, you can control the mixdown process using the Stereo Out Level
that is displayed at the global track control, as well as the sliders Volume in Stereo
Mix and Pan in Stereo Mix that are displayed at the track control of each track.
3. Optional: Click Control Panel to make further settings for your ASIO driver.
4. Optional: In the Audio Ports section, deactivate Use for any output ports that you do not
want to use.
RELATED LINKS
Output Mode on page 9
Dening a Cycle Range for Looped Playback on page 29
Excluding Ranges from Playback on page 30
Audio Settings
In the Settings dialog, you establish the connections between Nuendo Live and the audio device
of your computer, and select an output mode for your recording.
To open the Settings dialog, do one of the following:
● On the toolbar, click Settings .
● Open the File menu and select Settings.
● Press F2.
Setting Up Nuendo Live
Setting Up Nuendo Live for Playback
7
Page 8
RELATED LINKS
Audio System on page 8
Output Mode on page 9
Audio Ports on page 9
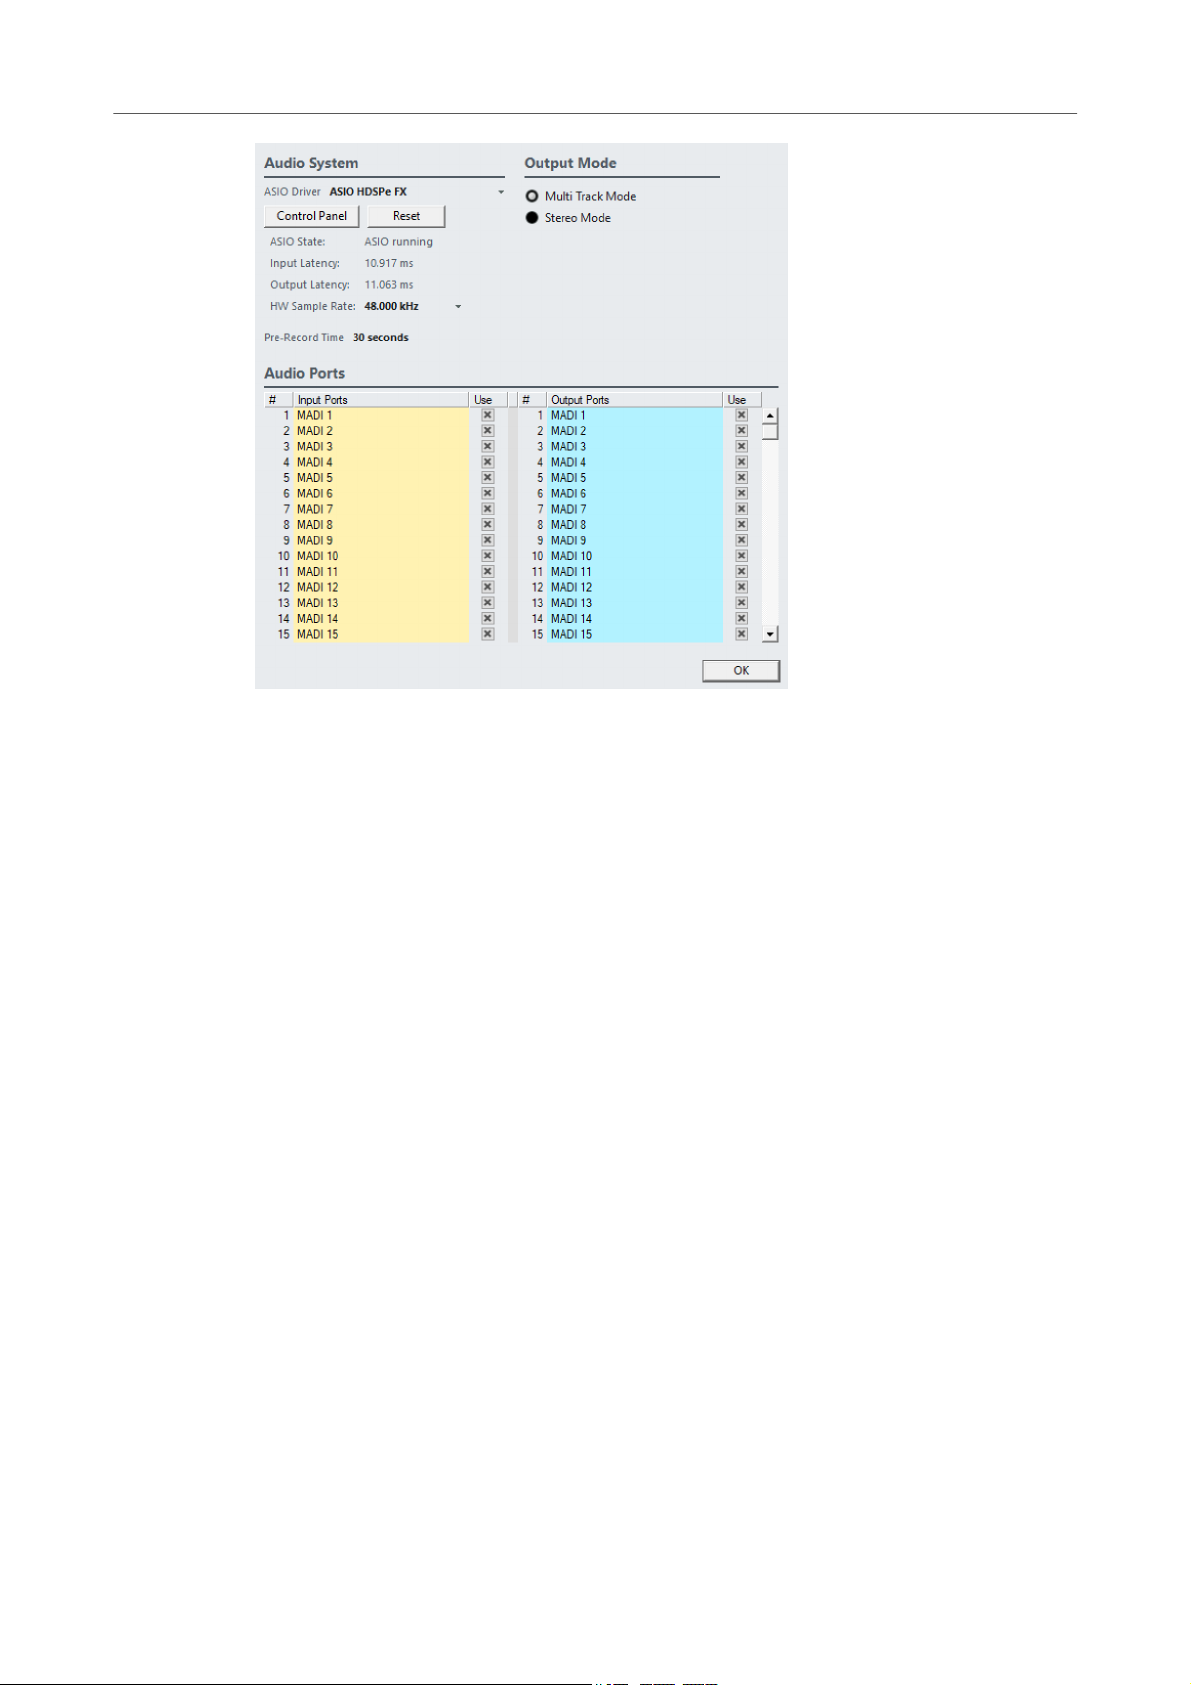
Audio System
In the Audio System section of the Settings dialog, you can select the ASIO driver for your
recording and make settings for it.
ASIO Driver
Allows you to select the ASIO driver that you want to use.
Control Panel
Opens the control panel for the selected ASIO driver. The available options depend
on your audio hardware.
Reset
Resets the ASIO driver and re-establishes the communication between the audio
card and Nuendo Live. Use this function to solve problems with your audio system.
ASIO State
If the ASIO driver is not working properly, an error message is displayed here.
Input Latency
Shows the input latency of your audio system.
Output Latency
Shows the output latency of your audio system.
HW Sample Rate
Shows the sample rate of the hardware.
Setting Up Nuendo Live
Audio Settings
8
Page 9

Pre-Record Time
When you record-enable a track, all incoming audio is automatically recorded to a
pre-record buffer. This parameter denes the size of the buffer.
RELATED LINKS
Pre-Record Buffer on page 28
Output Mode
In the Output Mode section of the Settings dialog, you can select an output mode for your
recording.
Multi Track Mode
If this option is activated, each audio track is sent to a separate output on your audio
card.
Stereo Mode
If this option is activated, all audio tracks are output as a stereo downmix.
NOTE
When opening a project in the full version of Nuendo, any level and pan settings
made in Stereo Mode are assigned to Aux Send 1.
Audio Ports
In the Audio Ports section of the Settings dialog, you can specify the input ports for recording
and the output ports for playback.
Input Ports
Allows you to dene which input ports are used for recording.
● The # column shows the port number.
● The Input Ports column shows the port name.
● The Use column allows you to activate/deactivate the corresponding input
port for recording.
NOTE
When you create a new project, one track is created for each active input port.
Output Ports
Allows you to dene which output ports are used for playback.
● The # column shows the port number.
● The Output Ports column shows the port name.
● The Use column allows you to activate/deactivate the corresponding output
port for playback.
RELATED LINKS
Changing the Track Routing on page 36
Setting Up Nuendo Live
Audio Settings
9
Page 10

Switching the Program Language
You can switch the program language via the File menu.
PROCEDURE
1. On the File menu, select another language from the Language submenu.
2. Restart the program for the change to take effect.
Key Commands
You can control many of the functions in Nuendo Live by using key commands. The available
commands are listed in the Key Commands dialog.
NOTE
You cannot add or change key commands.
● To open the Key Commands dialog, select File > Key Commands.
Setting Up Nuendo Live
Switching the Program Language
10
Page 11

The recordings that you make with Nuendo Live are saved as projects.
RELATED LINKS
Project Files on page 11
Projects Dialog on page 12
Project Files
Project les contain all data that is created during a recording.
A project is opened in the Project window, which is the main window in Nuendo Live. For project
les, the following applies:
● The le name extension is .nlpr.
● Only one project can be open at a time.
● Project les from Nuendo Live can be opened in Nuendo 5.5.4 or higher.
RELATED LINKS
Project Window on page 15
Project Handling
11
Page 12
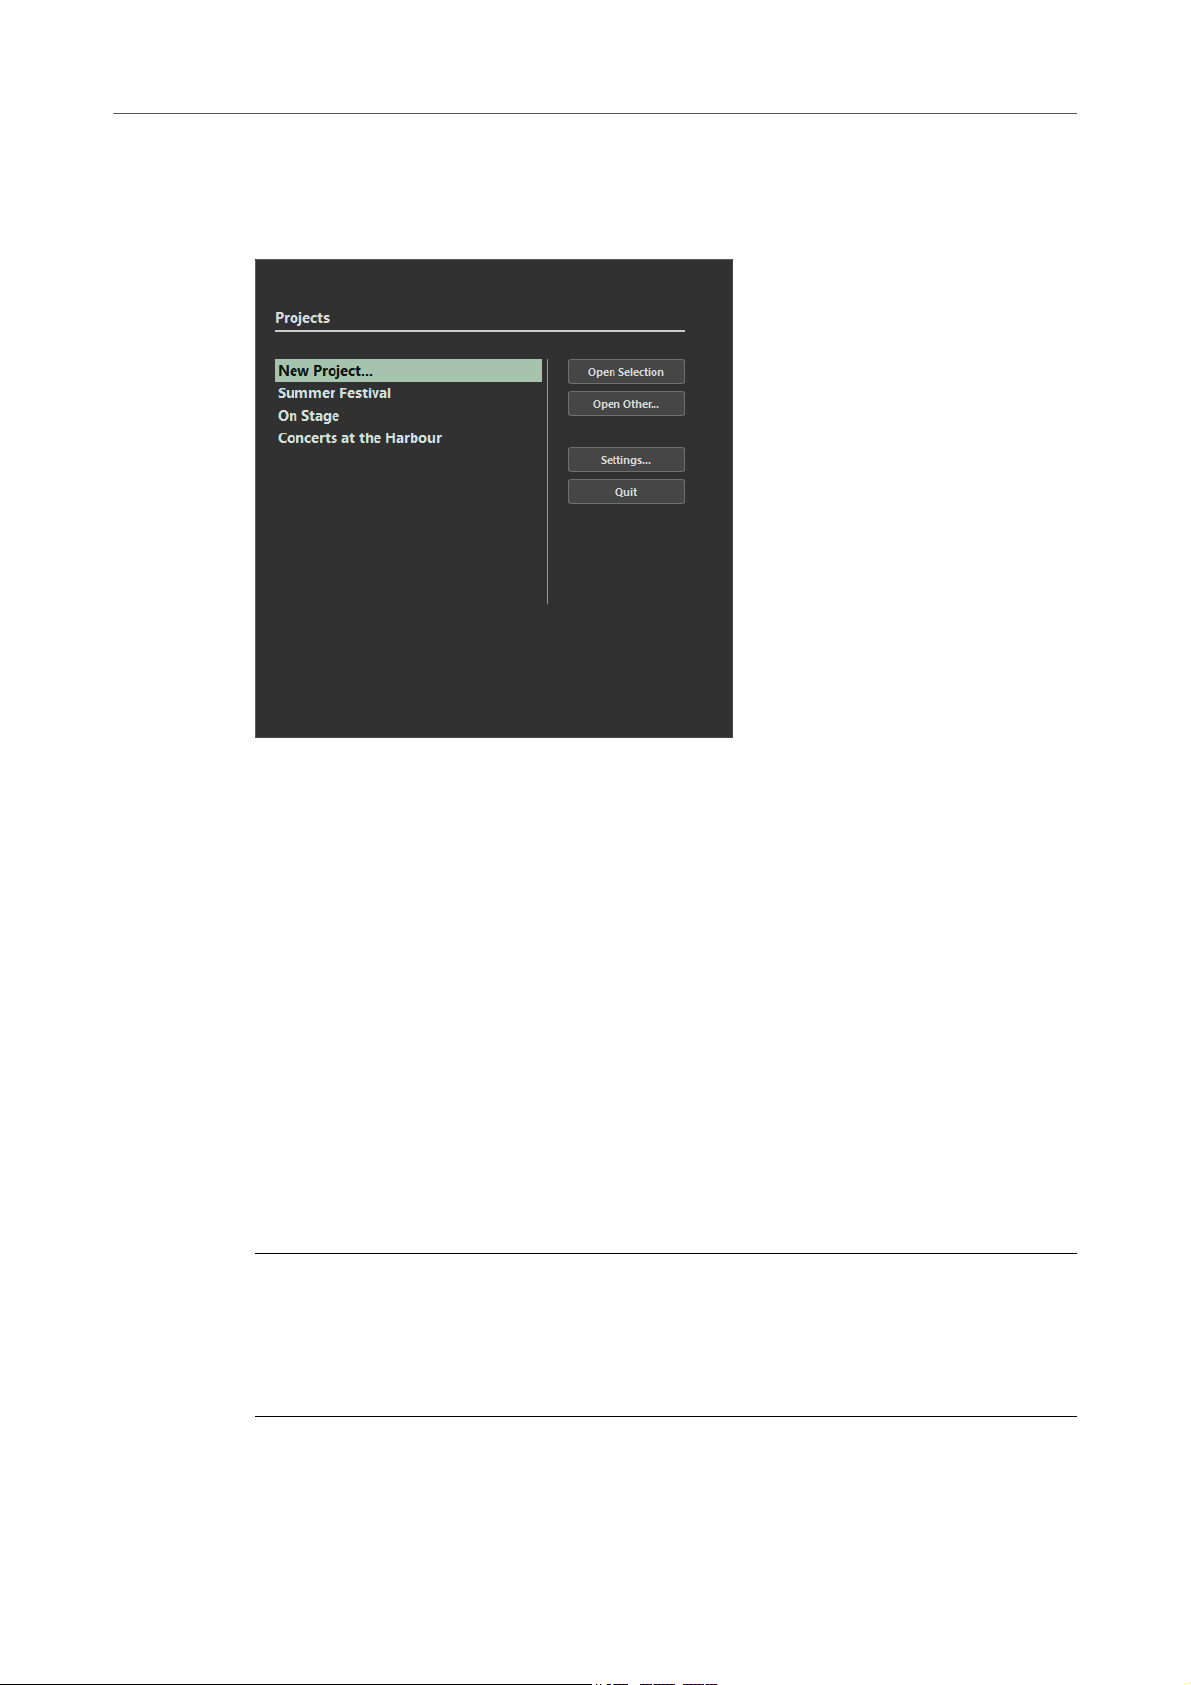
Projects Dialog
The Projects dialog is displayed when you open Nuendo Live. It allows you to open an existing
project or to create a new project.
Open Selection
Opens the project that is selected in the list on the left. Select New Project to open a
new empty project.
Open Other
Opens a le dialog where you can navigate to a project.
Settings
Opens the Settings dialog.
Quit
Closes the program.
RELATED LINKS
Project Files on page 11
Creating a Project on page 12
Audio Settings on page 7
Creating a Project
PROCEDURE
1. Start Nuendo Live and set up the parameters in the Settings dialog according to the
requirements of your project.
2. In the Projects dialog, select New Project and click Open Selection.
3. In the le dialog, select the folder where you want to save the new project and click OK.
Project Handling
Projects Dialog
12
Page 13
RESULT
A project le and the required record folders are created inside the project folder. The folder
name is used as the project name. The project is opened in Nuendo Live. For each active input
port, one track is created.
AFTER COMPLETING THIS TASK
You can change the le path of the record folders, even to a location outside the project folder.
This can be useful, for example, if your current project location is running out of disk space.
RELATED LINKS
Audio Settings on page 7
Changing the Record Location on page 27
Project Settings on page 13
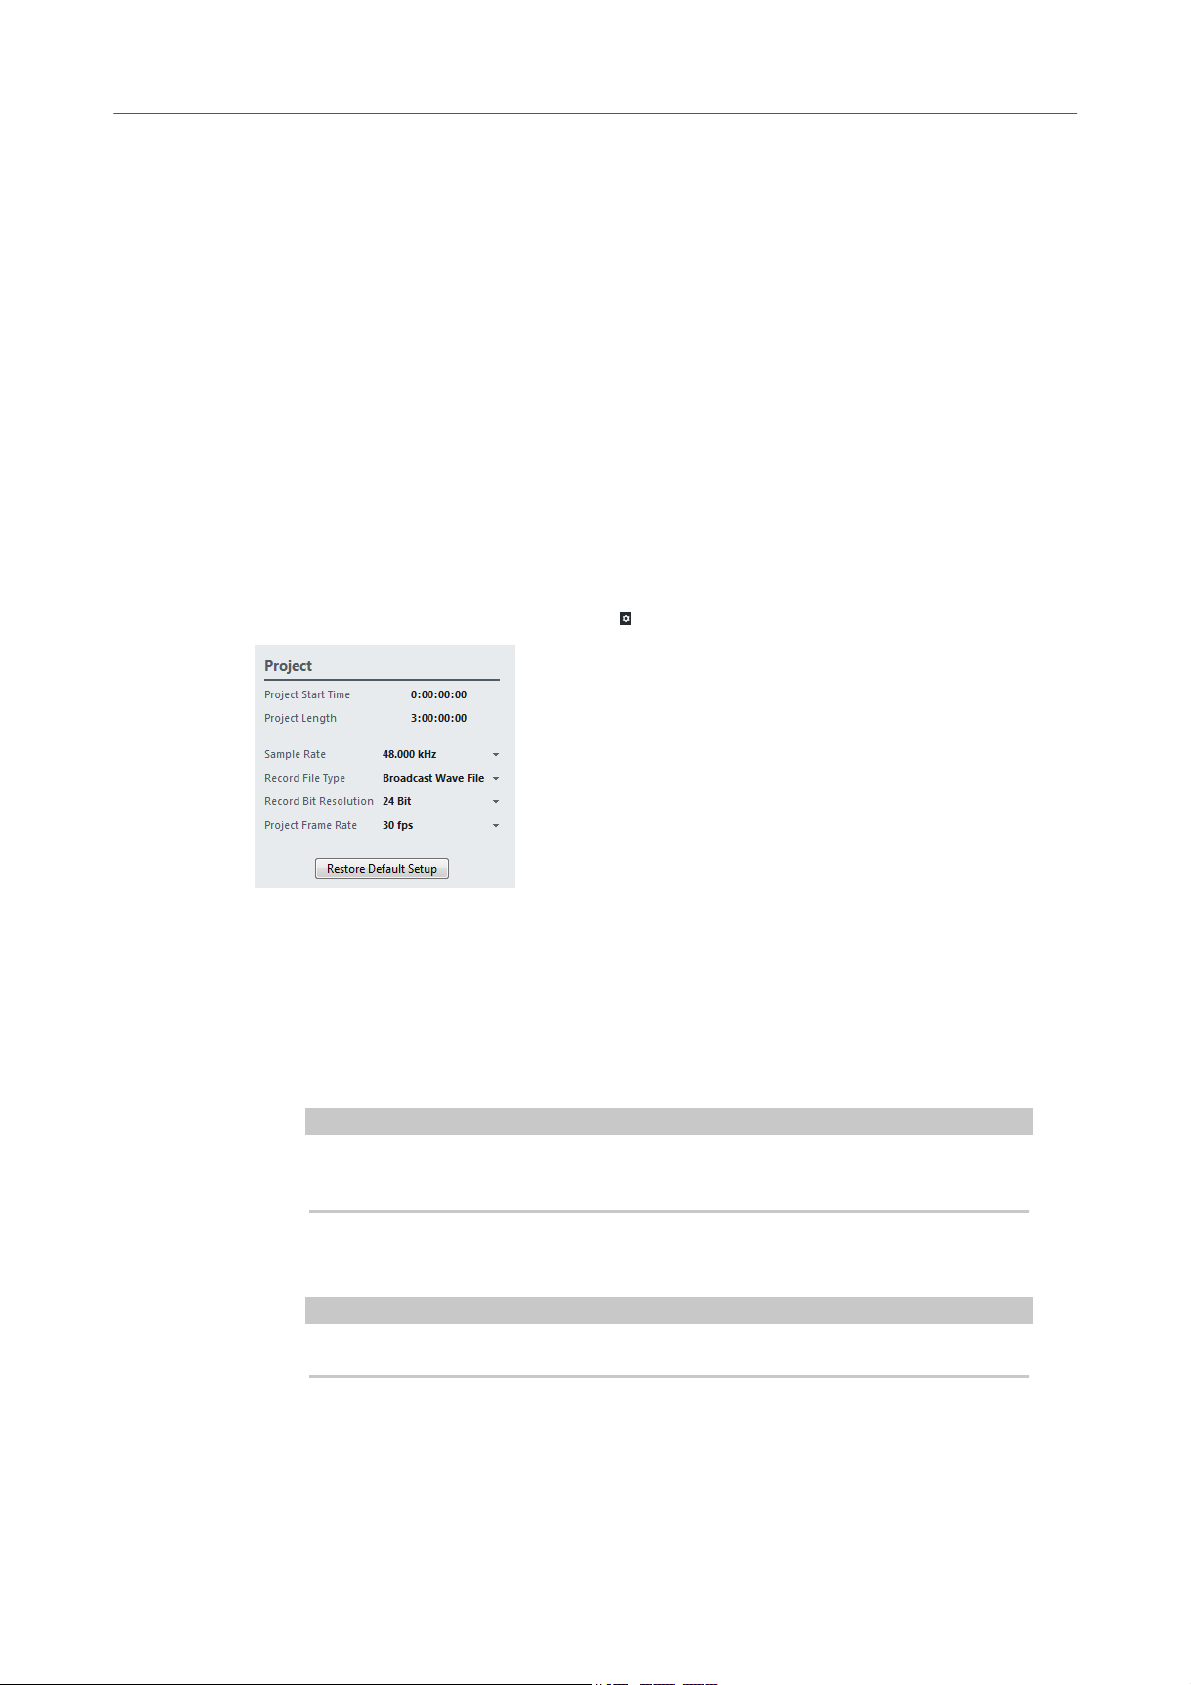
Project Settings
You can make project-specic settings in the Settings dialog. The Project section is only
displayed in the Settings dialog if a project is open.
To open the Settings dialog, click Settings on the toolbar or press F2.
Project Start Time
Shows the start time of the project. The value that you specify here is displayed as
the start value of the ruler. The format is displayed in hours, minutes, seconds,
frames: HH:MM:SS:FF.
Project Length
Shows the length of the timeline of the project. The format is displayed in hours,
minutes, seconds, frames: HH:MM:SS:FF.
NOTE
When your recording exceeds this length, the project length is automatically
extended. No recorded data is lost.
Sample Rate
Allows you to specify the sample rate of the recording.
NOTE
The sample rate must correspond to the hardware sample rate.
Record File Type
Allows you to select the le type for your recordings.
For recordings larger than 4 GB, the EBU RIFF 64 standard is used. If a FAT 32 hard
disk is used, audio les are split automatically.
Project Handling
Project Settings
13
Page 14

The following le types are available:
● Broadcast Wave File is the most commonly used format. It can store
metadata, such as timecode position or artist, without loss in quality.
● Select Wave File if you want to use the recorded les in a system that does not
support Broadcast Wave les. Note that in this format, you cannot record les
that exceed 4 hours at 48 kHz.
● Wave 64 File supports recordings larger than 4 GB. This format is not widely
supported. You can use it if you want to use the recording in an older Nuendo
system.
Record Bit Resolution
Allows you to select the bit resolution for your recordings.
● 16 Bit allows for smaller le sizes. When recording audio with very low levels,
this can have an impact on the quality.
● 24 Bit is the most commonly used resolution.
● 32 Bit Float offers the best quality for postproduction. Use this setting if you
want to process the recorded les in a Nuendo system.
Project Frame Rate
Allows you to select the frame rate for the project.
If you want to synchronize your recordings to video during production, select a
compatible frame rate. If Nuendo Live receives timecode information during
recording, this value is set automatically.
Restore Default Setup
Restores the default setup and makes sure that for each activated input port, an
audio track is available and assigned to that port. If necessary, new tracks are
created or surplus tracks are removed.
RELATED LINKS
Audio System on page 8
Audio Ports on page 9
Project-Related Information
Nuendo Live offers two ways of saving project-related information.
● You can save metadata such as production, artist, engineer, and director via the Record
panel. To open the panel, click Record Panel on the toolbar.
● You can use the Notepad to enter and save further information about your project. To
open the Notepad, select Project > Notepad on the toolbar.
RELATED LINKS
Record Panel on page 25
Toolbar on page 15
Project Handling
Project-Related Information
14
Page 15

The Project window provides an overview of the project. It allows you to navigate to specic
positions, to monitor the level of your input channels, and to perform editing operations.
The Project window features a toolbar and an info line, and allows you to toggle between two
tabs,
Track View and Meter View. When you open or create a new project, the Track View tab is
shown per default.
NOTE
You can toggle between the Track View and the Meter View tabs by pressing Alt-V.
RELATED LINKS
Toolbar on page 15
Info Line on page 16
Track View on page 17
Meter View on page 20
Editing Audio Events on page 37
Toolbar
The toolbar provides access to the main dialogs, menus, editing tools and options, and transport
controls.
Settings
Opens the Settings dialog.
Menu bar
The menus on the toolbar contain various project commands and functions.
Record Panel
Opens the Record panel in a separate window.
Locate Marker
Allows you to move the project cursor to a marker position.
Locators
The buttons on the left allow you to move the project cursor to the left/right locator
position.
Project Window
15
Page 16

The elds on the right show the locator positions. You can modify these values to
change the locator positions.
Transport buttons
The transport buttons allow you to move the project cursor to marker positions, to
play back a section of the project in a loop, or to start and stop playback or
recording.
Time display
Shows the position of the project cursor in the selected time format.
To select another time format, click the arrow icon on the right.
Timecode display
Shows the timecode state and the incoming MIDI timecode, and allows you to
activate/decativate the recording of timecode information and to select a timecode
source.
VST Performance display
Shows the current Average Performance Load and Disk Cache Load. Double-click
the display to open it in a separate window.
RELATED LINKS
Audio Settings on page 7
Record Panel on page 25
Moving to Markers on page 34
Recording with MIDI Timecode Information on page 29
Info Line
The info line displays project-related information. You can change some of the parameters in the
Settings dialog.
RELATED LINKS
Audio Settings on page 7
Project Settings on page 13
Project Window
Info Line
16
Page 17

Track View
The Track View tab shows the track list and the event display. Its meter bridge allows you to
monitor the levels of your channels.
Object Selection/Range Selection
You can use these tools to select either one or several events or a time range in the
event display.
Select Colors
Allows you to select different colors for the tracks or events in your projects.
Auto-Scroll
Allows you to keep the project cursor visible during playback.
Activate the button on the right to suspend Auto-Scroll when you are editing your
project.
Track list
The track list shows all tracks of the project and provides controls for each track.
You can show/hide the marker track above the audio tracks.
Global controls
At the top of the track list, you can nd the global controls. The digit on the left
shows the number of tracks in the project. Mute and Solo allow you to unmute all
tracks or deactivate all solo states. The digit on the right, next to the global recordenable button, shows the number of record-enabled tracks.
Track controls
The controls on a track allow you to mute, solo, and record-enable this track.
In Multi Track Mode, the names of the input and output ports that are used by the
track are displayed.
Project Window
Track View
17
Page 18

In Stereo Mode, you can set the volume and the pan position for the track in the
stereo mix.
Event display
The event display to the right of the track list shows the audio events. If the marker track is
displayed, the markers are also shown. A ruler, zoom controls, and the project cursor help you to
navigate within your project.
Ruler
The ruler above the display shows the timeline. The two triangular markers on the
ruler are the locators. They dene the cycle area.
Locators
The left and right locators are a pair of markers that you can use to set up cycle
boundaries for playing back a section of the project in a loop.
Waveform zoom slider
To zoom in on the contents of events vertically, use the waveform zoom slider in the
top right corner of the event display.
This is useful when viewing quiet audio passages.
NOTE
To get an approximate reading on the level of the audio events by viewing the
waveforms, make sure this slider is all the way down. Otherwise, zoomed waveforms
may be mistaken for clipped audio.
Project cursor
The white vertical line is the project cursor. It indicates the playback or recording
position. When playback or recording are stopped, it denes the position where
editing is performed.
Project Window
Track View
18
Page 19

NOTE
During recording, the project cursor cannot be moved. In stop mode, you can set the
cursor by clicking on the timeline. Double-clicking starts/stops playback.
Zoom controls
The horizontal and vertical zoom sliders in the lower right of the event display allow
you to zoom within the main display. When you click the triangle above the vertical
zoom slider
, the zoom pop-up menu opens, from which you can select a zoom
preset.
Meter section
Show/Hide Meter Bridge
Allows you to show/hide the meter bridge on the Track View tab.
Show Previous Page/Show Next Page
Allows you to scroll through the meter pages.
NOTE
You can also scroll through the meter pages pressing Alt-P.
Meter bridge
Allows you to monitor the levels of your channels.
Reset
Resets all peak hold values.
RELATED LINKS
Showing the Marker Track on page 32
Output Mode on page 9
Editing Audio Events on page 37
Resetting Meters on page 21
Project Window
Track View
19
Page 20

Meter View
The Meter View tab shows the meters for all tracks of your project, allowing you to monitor the
levels of the input channels. The panel on the left combines all recording-related parameters and
controls.
Record panel
Provides the same parameters and controls as the Record panel that opens in a separate
window.
Meter section
Shows the meters for all tracks of your project. Depending on the meter size, numerical peak
values and level scales are shown.
NOTE
The size of the meters is determined by the window size and the number of meters that are
shown per page.
If a track is record-enabled, the track number at the bottom of the corresponding meter is
highlighted in red.
If a peak overload is detected, the peak value at the top of the corresponding meter is
highlighted in bright red.
Meters per Page
Sets the number of meters that are shown per page.
Show Previous Page/Show Next Page
Allows you to scroll through the meter pages.
Project Window
Meter View
20
Page 21

NOTE
You can also scroll through the meter pages by pressing Alt-P.
Reset
Resets all peak hold values.
RELATED LINKS
Record Panel on page 25
Resetting Meters on page 21
Resetting Meters
You can reset the peak values for all meters on the Track View and the Meter View tab.
PROCEDURE
● Do one of the following:
● Click Reset.
● Right-click a meter.
● Press Alt-S.
RELATED LINKS
Track View on page 17
Meter View on page 20
Project Window
Meter View
21
Page 22

Nuendo Live allows you to start recording on all tracks instantly. If needed, you can also make
detailed settings such as specifying le format, record location, and pre-record buffer length,
excluding tracks from recording, or saving metadata and timecode information in the les.
IMPORTANT
To avoid performance issues and to keep the computer from going into sleep mode during long
recordings, deactivate any power saving options on your computer before starting a recording. It
is also recommended to deactivate the screen saver.
RELATED LINKS
Recording in a Few Simple Steps on page 22
Performing a More Complex Recording on page 23
Easy Recording on page 22
Recording with the Record Panel on page 23
MIDI Timecode on page 29
Recording in a Few Simple Steps
To get ready and start recording, very few steps are necessary.
PROCEDURE
1. Start Nuendo Live.
2. Create a new project.
3. Open the Record panel and click RECORD.
All tracks are record-enabled automatically and recording starts on all the tracks.
4. To stop recording, click RECORD again.
RELATED LINKS
Creating a Project on page 12
Record Panel on page 25
Easy Recording
Nuendo Live allows you to start recording immediately clicking Easy Record or using key
commands. This can be helpful in live situations where the artists begin performing without
waiting for the recording preparations to complete.
PROCEDURE
1. Do one of the following:
Recording
22
Page 23

● On the Record panel or in the record section of the Meter View tab in the Project
window, click Easy Record.
● Press Ctrl/Cmd-Return or Ctrl/Cmd-Num-*.
The following happens:
● All tracks are record-enabled.
●
Recording starts.
● Lock Recording is activated, which means that all functions and buttons are locked
to prevent unintended operations by key commands or mouse clicks.
2. To stop recording, deactivate Lock Recording and click RECORD.
RELATED LINKS
Record Panel on page 25
Key Commands on page 10
Performing a More Complex Recording
You can make detailed settings before starting the recording. For example, you can specify
metadata such as Artist or Engineer to be saved automatically in the recorded les, you can
exclude particular tracks from the recording, and specify le name and record location.
PROCEDURE
1. Start Nuendo Live.
2. Create a new project.
3. Open the Settings dialog and make the settings for your project and the required audio
conguration.
NOTE
For each activated input port in the Audio Ports section, a track is created in your project.
4. Optional: If you do not want to record on all tracks, record-enable the tracks that you want
to record on by clicking their Record Enable button in the track list.
5. Open the Record panel and set up the parameters according to the requirements of your
project.
6. To start recording, click RECORD.
7. To stop recording, click RECORD again.
RELATED LINKS
Project Settings on page 13
Audio Settings on page 7
Record Panel on page 25
Recording with the Record Panel
On the Record panel, you can make recording-related settings and start recording.
PROCEDURE
1. To open the Record panel, click Record Panel on the toolbar.
2. Select the tracks for recording:
● To select all tracks for recording, click Arm All Tracks on the Record panel.
Recording
Performing a More Complex Recording
23
Page 24

● To select single tracks for recording, use the corresponding track control on the
Track View tab.
3. Optional: On the Record panel, click Locate End.
This moves the project cursor to the end of the last recording.
4. Optional: Fill out the metadata section.
NOTE
The recorded les and the folders in which they are saved are named based on these
settings. You can change the metadata during a recording session. The folder and le
names are changed when you pause the recording.
5. Click RECORD.
Recording starts and audio events are created in the Project window.
6. Optional: Click Lock Recording.
All functions and buttons are locked to prevent unintended operations by key commands
or mouse clicks.
Before you can stop recording, you must unlock the interface. To unlock, click Lock
Recording again.
7. To stop recording, click RECORD.
RELATED LINKS
Record Panel on page 25
Key Commands on page 10
Recording
Recording with the Record Panel
24
Page 25

Record Panel
The Record panel provides all recording-related parameters and controls.
Metadata Section
The metadata information in the section at the top left is saved in Broadcast Wave les.
NOTE
● You can change the metadata during a recording session, even if Lock Recording is
activated. The folder and le names are changed when you pause the recording.
Date/Time
Shows the current date and time.
Production
Allows you to enter the name of the production.
If you want the name to be added to the le name automatically, activate Include
Production in File Name to the right of the Production eld.
Artist
Allows you to enter the name of the artist.
If you want the name to be added to the le name automatically, activate Include
Artist in File Name to the right of the Artist eld. Activate Create Subfolder for
Artist to save the recording in a subfolder of the project folder, named after the
artist.
Recording
Record Panel
25
Page 26

Engineer
Allows you to enter the name of the sound engineer of the project.
Director
Allows you to enter the name of the director of the project.
Record Section
Record Folder
Displays the name of the folder in which your recordings are saved. Click Select
Record Folder to modify the record location.
Arm All Tracks
Enables/Disables recording for all audio tracks that are assigned to an audio input.
Locate End
Positions the project cursor at the end of the last recording.
RECORD
Starts/Stops recording.
Easy Record
Starts recording on all tracks and activates Lock Recording.
Lock Recording
Locks/Unlocks the user interface. This button is only available during recording.
If this button is activated, functions and buttons are locked to prevent unintended
operations by key commands or mouse clicks. Before you can stop recording, you
must unlock the user interface.
Time Displays Section
Project Time
Shows the current position of the project cursor.
Record Time Max
Shows the time that is left for recording, depending on the project settings and the
available hard disk space.
NOTE
This value is calculated for the disk currently used for recording. The calculation is
based on the total number of tracks in the project, regardless of whether they are
record-enabled or not.
Current Recording
Shows the length of the current recording.
Total Recorded
Shows the total length of the recorded audio in the current project. Only the time of
the actual recordings is taken into account, not the pauses between recordings.
Marker Section
Add Marker
Adds a marker at the project cursor position.
Remove Marker
Removes the selected marker.
Recording
Record Panel
26
Page 27

Marker List
The markers are listed according to their time positions.
● In the rst column, a greater-than symbol indicates which marker is active.
● The ID column shows the marker ID.
● The Position column shows the marker position. You can change this value to
move the marker.
● In the Description column, you can enter a name or description for the
marker.
RELATED LINKS
Project Settings on page 13
Project-Related Information on page 14
Recording with the Record Panel on page 23
Changing the Record Location on page 27
Easy Recording on page 22
Markers on page 32
Changing the Record Location
You can change the location of the record folder at any time. This is useful if the current record
location is running out of disk space, for example.
PROCEDURE
1. On the Record panel, click Select Record Folder.
2. In the le dialog, do one of the following:
● Select a folder.
● Create a new folder.
3. Click OK.
RESULT
If you start recording, the new record location is used. If Create Subfolder for Artist is activated
on the Record panel, the subfolder is automatically created inside the new record folder.
NOTE
● The audio les of a project are numbered consecutively, even if you change the record
location.
● If the active record folder is not available, for example, because the project is opened on a
different system, the record location is automatically set to the project folder.
RELATED LINKS
Consecutive File Numbering on page 28
Record Panel on page 25
Recording
Changing the Record Location
27
Page 28

Consecutive File Numbering
The audio les of a project are numbered consecutively, even if you change the record location.
This is useful if you want to transfer les from different folders to one single folder at a later
stage.
Recording takes of a project are numbered globally. Tracks that are not record-enabled are
numbered in the background. This means, if these tracks are record-enabled for a later take, the
global take number is applied.
When new audio les are created during recording, the following naming scheme is used:
<track number> - <track name>_<global take number>
EXAMPLE
Create a new project and make a recording on track 1, named bass. In your active record folder,
the le 01 - bass_01.wav is created. Then change the record location to another empty folder
and record the next take. The rst le in the new folder is automatically named 01 -
bass_02.wav.
EXAMPLE
Create a new project and record a rst take on track 1, named guitar, and track 2, named bass. In
your active record folder, the les 01 - guitar_01.wav and 02 - bass_01.wav are created.
For the second take, exclude track 2 from recording. The le 01 - guitar_02.wav is created.
For the third take record-enable track 2 again. As a result, the les 01 - guitar_03.wav and 02
- bass_03.wav are created.
RELATED LINKS
Changing the Record Location on page 27
Renaming Tracks on page 35
Pre-Record Buffer
When you record-enable a track, all incoming audio is automatically recorded to a buffer. This
allows you to recover the beginning of a performance if you have started recording too late.
For all record-enabled tracks, up to 60 seconds of audio can be recorded and recovered.
You can set the size of the pre-record buffer with the Pre-Record Time parameter in the Audio
System section of the Settings dialog.
● To recover the pre-recorded audio, drag the event start border to the left.
NOTE
● The pre-record function takes up RAM for every input. At high sample rates (96 kHz, 192
kHz), this can exceed the memory available on your computer. As a general rule, a prerecord time of 1 minute takes up 8 MB per track at 48 kHz, and 16 MB at 96 kHz.
●
When recording more than 64 tracks, high pre-record settings can result in a lower
performance of the user interface.
RELATED LINKS
Audio System on page 8
Editing Audio Events on page 37
Recording
Consecutive File Numbering
28
Page 29

MIDI Timecode
Productions that contain video usually also contain timecode information. Nuendo Live allows
you to save MIDI timecode (MTC) in your recordings to make it easy to match up the timelines of
video and audio during postproduction.
For using MIDI timecode information in Nuendo Live, the following applies:
● Incoming MIDI timecode is automatically recognized and displayed on the toolbar.
●
The timecode information is written into the timestamp of Broadcast Wave Format (BWF)
les.
● The transport functions are not locked by incoming timecode information. This means that
you can always freely navigate through the timeline and start recording at any position.
● Wrong timecode settings or corrupt incoming timecode information do never prevent
Nuendo Live from recording.
● You can use Steinberg Nuendo SyncStation to generate MIDI timecode, for example, from
longitudinal timecode (LTC).
● MIDI Machine Control (MMC) via timecode or VST System Link is not supported.
RELATED LINKS
Toolbar on page 15
Recording with MIDI Timecode Information on page 29
Recording with MIDI Timecode Information
Nuendo Live can receive and record MIDI timecode (MTC). The timecode is written into the
timestamp of Broadcast Wave Format (BWF) les.
PREREQUISITE
In the Project settings, Broadcast Wave File is selected as Record File Type.
PROCEDURE
1. Click the MTC button on the toolbar to activate MIDI timecode information.
2. Click the timecode display on the right of the MTC button and select the input source for
the MIDI timecode.
3. Start recording.
RESULT
BWF les are recorded with MIDI timecode information.
RELATED LINKS
MIDI Timecode on page 29
Project Settings on page 13
Toolbar on page 15
Dening a Cycle Range for Looped Playback
You can play back a range of your recording in a loop.
PROCEDURE
1. Move the mouse pointer over the top section of the ruler.
The mouse pointer changes to a pencil.
Recording
MIDI Timecode
29
Page 30

2. Click at the position where you want the loop to start and drag to the right to dene the
cycle range.
RESULT
The selected range is played back in a loop if Transport Cycle On/Off is activated on the toolbar.
Excluding Ranges from Playback
You can use the locators to exclude a range of your recording from playback.
PROCEDURE
1. Move the mouse pointer over the top section of the ruler.
2. Click and drag to the left to dene the range that you want to exclude.
RESULT
The selected range is skipped during playback if Transport Cycle On/Off is activated on the
toolbar.
Exporting Your Recording
Nuendo Live allows you to export your recordings as an audio mixdown or as an AAF le.
RELATED LINKS
Exporting an Audio Mixdown on page 30
Exporting to AAF on page 31
Exporting an Audio Mixdown
You can create a stereo mix of your recording and export it as a single le.
PREREQUISITE
You have selected Stereo Mode in the Settings dialog.
PROCEDURE
1. Balance the mix using the Volume in Stereo Mix and Pan in Stereo Mix parameters on
the tracks.
2. Set the master level using the global Stereo Out Level control above the track list.
3. Optional: If you want to export only a specic range of your project, set the left and right
locators to encompass this range.
4. Select File > Audio Mixdown.
5. Specify whether you want to save the recording as a .wav or .mp3 le.
6. Specify whether you want to export the entire project or only the cycle range.
7. Click OK.
RESULT
The project or project range is exported as a single le to the project folder. The mixdown le has
the same name as the project.
RELATED LINKS
Output Mode on page 9
Recording
Excluding Ranges from Playback
30
Page 31

Dening a Cycle Range for Looped Playback on page 29
Exporting to AAF
If you want to edit your recordings in DAW software other than Nuendo, you can export the
project as an AAF le.
PREREQUISITE
In the Project settings, Broadcast Wave File is selected as Record File Type.
PROCEDURE
● Select File > Export AAF File.
RESULT
The project is exported to the project folder as a single AAF le.
IMPORTANT
The AAF le only contains references to the audio les that are used in the project. If you want to
edit your project after the export, the DAW must have access to the original audio les.
RELATED LINKS
Project Settings on page 13
Recording
Exporting Your Recording
31
Page 32

Markers identify specic positions within your project. You can add markers to determine the
start and end of a passage in a longer recording or mark a position for editing, for example.
You can add and edit markers using the Record panel or the marker track.
RELATED LINKS
Record Panel on page 25
Showing the Marker Track on page 32
Showing the Marker Track
The marker track can be shown or hidden. This does not have any impact on the marker
functions. Existing markers can be used even if you cannot see them in the Project window.
PROCEDURE
● Do one of the following:
● On the menu bar, select Project > Show Marker Track/Hide Marker Track.
● Press K.
RESULT
This opens the marker track above the audio tracks on the Track View tab.
RELATED LINKS
Toolbar on page 15
Track View on page 17
Adding Markers
You can add markers using the Record panel or the marker track.
Markers are inserted at the cursor position. You can set markers on-the-y while recording or
after recording.
PROCEDURE
● Do one of the following:
● In the marker section of the Record panel, click Add Marker.
This automatically opens the Description eld for editing, allowing you to enter a
name for the marker.
● On the marker track, click Add Marker .
Markers
32
Page 33

RESULT
A marker is inserted at the cursor position.
RELATED LINKS
Recording with the Record Panel on page 23
Showing the Marker Track on page 32
Naming Markers on page 33
Naming Markers
You can name and rename markers using the Record panel.
PROCEDURE
1. In the marker section of the Record panel, select the marker that you want to name or
rename.
2. Click in the Description eld and enter a new name for the marker.
RELATED LINKS
Record Panel on page 25
Moving Markers
You can move markers using the Record panel or the marker track.
PROCEDURE
● To move a marker, do one of the following:
● In the marker section of the Record panel, click in the corresponding Position eld
and enter a new value.
● On the marker track, drag the marker to another position.
RELATED LINKS
Record Panel on page 25
Showing the Marker Track on page 32
Deleting Markers
You can delete markers using the Record panel or the marker track.
PROCEDURE
● Do one of the following:
●
In the marker section of the Record panel, select a marker and click Remove
Marker.
●
On the marker track, select a marker and press Delete.
RELATED LINKS
Record Panel on page 25
Showing the Marker Track on page 32
Markers
Naming Markers
33
Page 34

Moving to Markers
Nuendo Live offers several methods to move the project cursor to a marker position.
PROCEDURE
● Do one of the following:
● On the marker track, click Locate and select a marker from the list.
● Double-click on a marker on the marker track.
● On the toolbar, click Locate Markers and select a marker from the list.
NOTE
If the list of markers is very long, you can use the text search to narrow down the
list.
● In the marker section of the Record panel, click in the leftmost column for a marker.
● To move to the next marker, click the Go to Next Marker transport button on the
toolbar.
● To move to the previous marker, click the Go to Previous Marker/Zero transport
button on the toolbar.
RELATED LINKS
Showing the Marker Track on page 32
Record Panel on page 25
Toolbar on page 15
Markers
Moving to Markers
34
Page 35

Tracks allow you to record and edit audio. They are listed from top to bottom in the track list and
extend horizontally across the Track View tab.
RELATED LINKS
Track View on page 17
Selecting Tracks on page 35
Renaming Tracks on page 35
Coloring Tracks and Events on page 36
Adding Tracks on page 36
Changing the Track Routing on page 36
Selecting Tracks
One track is always selected in the Project window. You can use several methods to select tracks.
PROCEDURE
● Do one of the following:
● To select one track, click on it in the track list or click the corresponding meter.
● To select multiple tracks, hold down Ctrl/Cmd and click on them.
● To select multiple contiguous tracks, click on the rst, then hold down Shift and click
on the last track that you want to select.
● To select the track above/below the current track, press Up Arrow/Down Arrow.
● To extend the selection upwards/downwards, hold down Shift and use the arrow
keys.
Renaming Tracks
You can rename tracks according to the instruments that you want to record, for example. This
helps you to keep an overview of your project.
PROCEDURE
1. Double-click the track name and type in a new name.
2. Optional: Press Tab on your computer keyboard to select the next track name, and
continue naming the tracks in your project.
NOTE
Recorded events are named according to the track name. The names of existing events
and
les on a track do not change when you change the track name.
Track Handling
35
Page 36

Coloring Tracks and Events
Colors can help you to identify tracks and events that belong together.
PROCEDURE
1. On the Track View tab, do one of the following:
● To color a track, select the track and make sure that no event is selected.
● To color an event, select the event.
2. Click Select Colors above the track list and select a color.
RESULT
Tracks and events are shown in the selected color. Meters show the color of the corresponding
track.
Adding Tracks
You can add tracks to the project manually.
PROCEDURE
1. Select Project > Add Audio Tracks.
2. Specify the number of audio tracks that you want to add.
3. Click OK.
Changing the Track Routing
The tracks are always routed to the available inputs from top to bottom. You can change the
routing by dragging tracks to another position in the track list. This can become necessary if an
instrument is connected to another input on the console, for example.
Track Handling
Coloring Tracks and Events
36
Page 37

Before moving your project to a different DAW for further editing, consider cleaning up your
recording.
Nuendo Live provides editing options and tools that allow you to make your project more
manageable. You can then perform detailed editing in your preferred DAW.
RELATED LINKS
Selecting Events on page 37
Moving Events and Range Selections on page 39
Duplicating Events and Range Selections on page 39
Splitting Events on page 38
Trimming the Event Start and End on page 38
Coloring Tracks and Events on page 36
Global Editing
You can decide whether you want to apply your editing operations to one track or to all tracks.
Normally, editing is applied to the selected event, the selected range, or the event on which you
click with a tool. If you select Edit > Global Editing (All Tracks), the editing is performed on all
tracks.
Selecting Events
If the Object Selection tool is activated on the Track View tab, you can select audio events on
the event display for editing.
RELATED LINKS
Track View on page 17
Selecting All Events Under the Cursor
You can select all events at the same time position. This makes it easy to apply the same editing
to all events that belong together.
PREREQUISITE
On the Track View tab, Object Selection is activated.
PROCEDURE
1. Place the project cursor at the position where you want to select the events.
2. Select Edit > Select Under Cursor.
Editing Audio Events
37
Page 38

RESULT
All audio events and markers that are touched by the cursor are selected.
RELATED LINKS
Track View on page 17
Splitting Events
You can split one audio event or all audio events.
● To split an audio event, press Alt, position the mouse over the split position in the event,
and click.
● To split all audio events at the same time position, place the project cursor at this position,
and select Edit > Split at Cursor.
Trimming the Event Start and End
You can drag the event borders to hide sections of a recording or to recover audio from the prerecord buffer, for example.
PROCEDURE
1. Position the mouse on the lower right or left corner of an event so that a double arrow is
shown.
2. Click and drag.
How much you can drag depends on the length of the recording. An event cannot be
extended beyond the start or end of the audio recording.
NOTE
When you release the mouse button, a fade of 10 ms is added to create smoother
transitions.
RELATED LINKS
Pre-Record Buffer on page 28
Selecting Ranges
You can select ranges in your project for editing. The range can span multiple tracks.
PREREQUISITE
On the Track View tab, Range Selection is activated.
PROCEDURE
● To select a range, click and drag in the event display until the selection encompasses the
range that you want to select.
Editing Audio Events
Splitting Events
38
Page 39

AFTER COMPLETING THIS TASK
● You can drag the borders of a selected range to expand or to reduce it, or to include more
or fewer tracks.
● You can move a selected range to another position by dragging.
NOTE
If the range includes sections of events, these events are cut at the range selection
borders.
RELATED LINKS
Moving Events and Range Selections on page 39
Duplicating Events and Range Selections on page 39
Moving Events and Range Selections
You can move events and range selections by dragging.
PROCEDURE
1. Select one or multiple audio events or a range.
2. Drag the event or range to the position where you want to insert it.
Duplicating Events and Range Selections
You can duplicate events or ranges to use the same recordings in several places.
PROCEDURE
1. Select one or multiple audio events or a range.
2. Do one of the following:
● Select Edit > Duplicate.
This creates a duplicate to the right of the original event or range.
● Hold down Alt and drag the event or range to the position where you want to insert
it.
Editing Audio Events
Moving Events and Range Selections
39
Page 40

A
AAF 31
ASIO driver 8
Audio events
Coloring 36
Copying 39
Duplicating 39
Editing 37
Global editing 37
Moving 39
Selecting 37
Selecting all events at cursor position 37
Splitting 38
Trimming 38
Audio Mixdown 30
Audio ports
Activating 9
Inputs 9
Outputs 9
Audio System 8
C
Cycle range 29
E
Easy Record 22
Exporting
AAF 31
Audio Mixdown 30
Exporting audio 30
G
Global settings
Audio ports 9
Audio System 8
Language 10
Output Mode 9
K
Key commands 10
L
Language 10
M
Marker Track 32
Markers 32
Adding 32
Deleting 33
Locating 34
Marker Track 32
Moving 33
Naming 33
Metadata 25
Notepad 14
Record panel 25
Meter View 20
Meters 20
MIDI timecode 29
MTC 29
Multi Track Mode 9
N
Notepad 14
O
Output Mode 9
P
Playback
Cycle mode 29
Excluding ranges 30
Setting up 7
Pre-Record buffer 8
Pre-Record Time 8
Project window 15
Info line 16
Meter View 20
Toolbar 15
Track View 17
Projects 11
Creating new 12
Metadata 14
Opening 12
Setting up 13
Index
40
Page 41

R
Ranges
Copying 39
Creating 38
Duplicating 39
Moving 38, 39
Selecting 38
Trimming 38
Record panel 25
Recording
22
Changing the record location 27
Easy Record 22
File numbering 28
MIDI timecode 29
MTC 29
Record folder 25
Record folders 27
Record panel 25
Setting up 6
S
Settings
Audio connections 7
Projects 13
Stereo Mode 9
System
Setting up 6
T
Timecode 29
Track View 17
Tracks
Adding 36
Coloring 36
Global editing 37
Renaming 35
Routing 36
Selecting 35
Index
41
 Loading...