


ARCTIS 9X
PRODUCT INFORMATION GUIDE
CONTENTS
Welcome |
2 |
SteelSeries Engine |
3 |
Product overview |
5–6 |
Setup |
|
Hardware installation |
7 |
Configuring weight system |
8 |
Calibration of lift off sensor |
9 |
Translations |
|
Español |
13 |
|
15 |
|
17 |
|
19 |
|
21 |
Deutsch |
23 |
Русский |
25 |
Français |
27 |
Italiano |
29 |
Português |
31 |
Regulatory |
33 |

WELCOME TO ARCTIS
Your new headset is the result of taking everything amazing about the Arctis line and bringing it to the Xbox for the first time. Enjoy the award-winning audio, the best mic in gaming, and of course true Xbox Wireless. Congrats on your gaming audio upgrade!
2
STEELSERIES ENGINE
STEELSERIES ENGINE
Download SteelSeries Engine to customize your audio settings and check for firmware updates:
steelseries.com/engine
3

|
find help at support.steelseries.com |
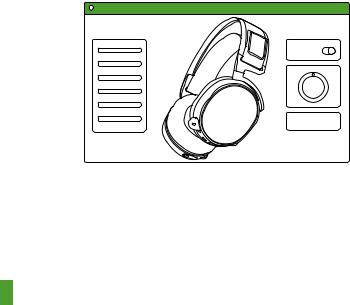
PACKAGE CONTENTS |
SYSTEM REQUIREMENTS // |
|
COMPATIBILITY |
Arctis 9X Headset |
|
|
Xbox One |
USB Charging Cable |
|
|
Windows 10* |
|
*requires PC with built-in Xbox Wireless |
|
support or external Xbox Wireless adapter |
|
(sold separately) |
4
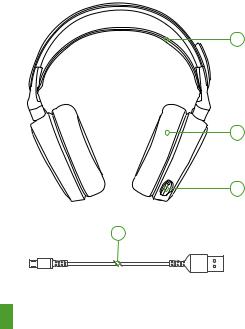
PRODUCT OVERVIEW
01 Ski goggle headband*
02 Airweave ear cushions*
01
03 ClearCast microphone
04 USB charging cable
05 ChatMix dial
06 Volume control
02 |
07 |
Microphone mute button |
|
08 |
Bluetooth button |
|
09 |
Power button |
03 |
10 |
Micro-USB jack (for charging |
|
||
|
|
& firmware updates) |
04 |
11 |
Headphone share jack |
|
|
5

* Find accessories and replacement parts at steelseries.com/gaming-accessories
05 |
06 |
|
07 |
08
09
10
11
6
SETUP
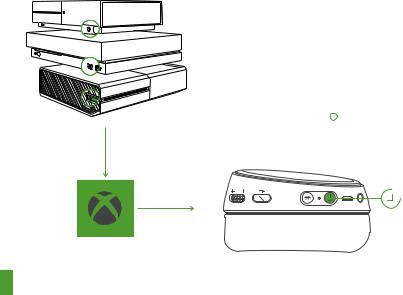
XBOX ONE
Xbox One S
Xbox One X
Xbox One
01Press and release the connect button on your Xbox One. The button is located on the left side of the console. If you have an ‘S’ or ’X’ version, the button is on the front in the lower right corner.
02The Xbox logo on the console will begin blinking
03With the headset off, press and hold the Arctis 9X power button 09 for 6 seconds. It will connect to the Xbox and you will see a ’Headset Assigned’ message on the screen.
6s
7
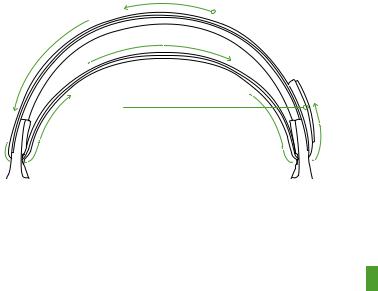
SKI GOGGLE HEADBAND
accessory headbands available at steelseries.com
Install
Direction of headband installation
Velcro
Tighten or loosen the Velcro straps on the sides of the headband to achieve the desired fit
8
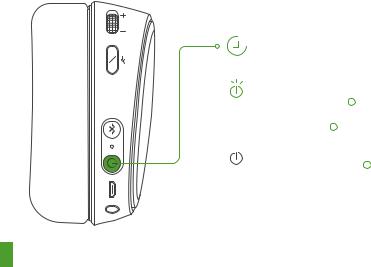
POWER ON/OFF
3s
ON
OFF
To power on the headset press and hold the power button 09 for at least 3 seconds. You will hear a tone, and the power button 09 will illuminate.
To power off the headset press and hold the power button 09 for at least 3 seconds.
9
BLUETOOTH
PAIRING
01 With the headset powered on, press and hold the Bluetooth button 08 for 6 seconds. The headset LED will rapidly blink blue.
02 In your device’s Bluetooth settings, scan
for available devices and select ’Arctis 9X’
3s
CONTROL
Answer/end voice call
single · press Bluetooth button
Play/pause music
single · press Bluetooth button
08
08
Next track
double · · press Bluetooth button
Previous track
triple · · · press Bluetooth button
08
08
10
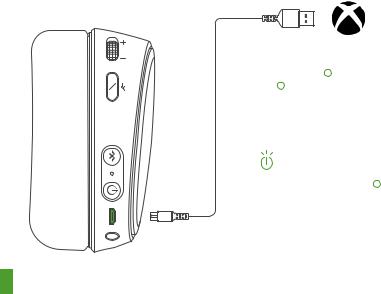
CHARGING
To charge the headset, connect the micro-USB cable 04 to the micro-USB jack 10 on the headset, and plug the other end into any USB power source.
The color of the power button 09 indicates the battery level.
Green |
100–50 % |
Yellow |
49–20 % |
Red |
19–10 % |
Red (fast blink) |
9–1 % |
11
 Loading...