

Page 1

Owner’s Manual
2 Rotary Combo Kit
SP-PT253
www.steele-products.com
WARNING! To Reduce The Risk Of Injury, User
Must Read And Understand Instruction Manual.
Page 2

Rotary Tool
Table of Contents
WARNING! READ AND UNDERSTAND ALL SAFETY PRECAUTIONS IN
THIS MANUAL BEFORE OPERATING. FAILURE TO COMPLY WITH
INSTRUCTIONS IN THIS MANUAL COULD RESULT IN PERSONAL
INJURY, PROPERTY DAMAGE, AND/ OR VOIDING OF YOUR
WARRANTY. STEELE® WILL NOT BE LIABLE FOR ANY DAMAGE
BECAUSE OF FAILURE TO FOLLOW THESE INSTRUCTIONS.
egaPcipoT
3snoitinifeD - senilediuG ytefaS
4snoituacerP lareneG
7sgninraW lanoitiddA
21noitarepO
32sdeepS dednemmoceR
82ecnanetniaM
92ytnarraW detimiL
2
Page 3

Owner’s Manual
Safety Guidelines - Definitions
This manual contains important information that you need to know and
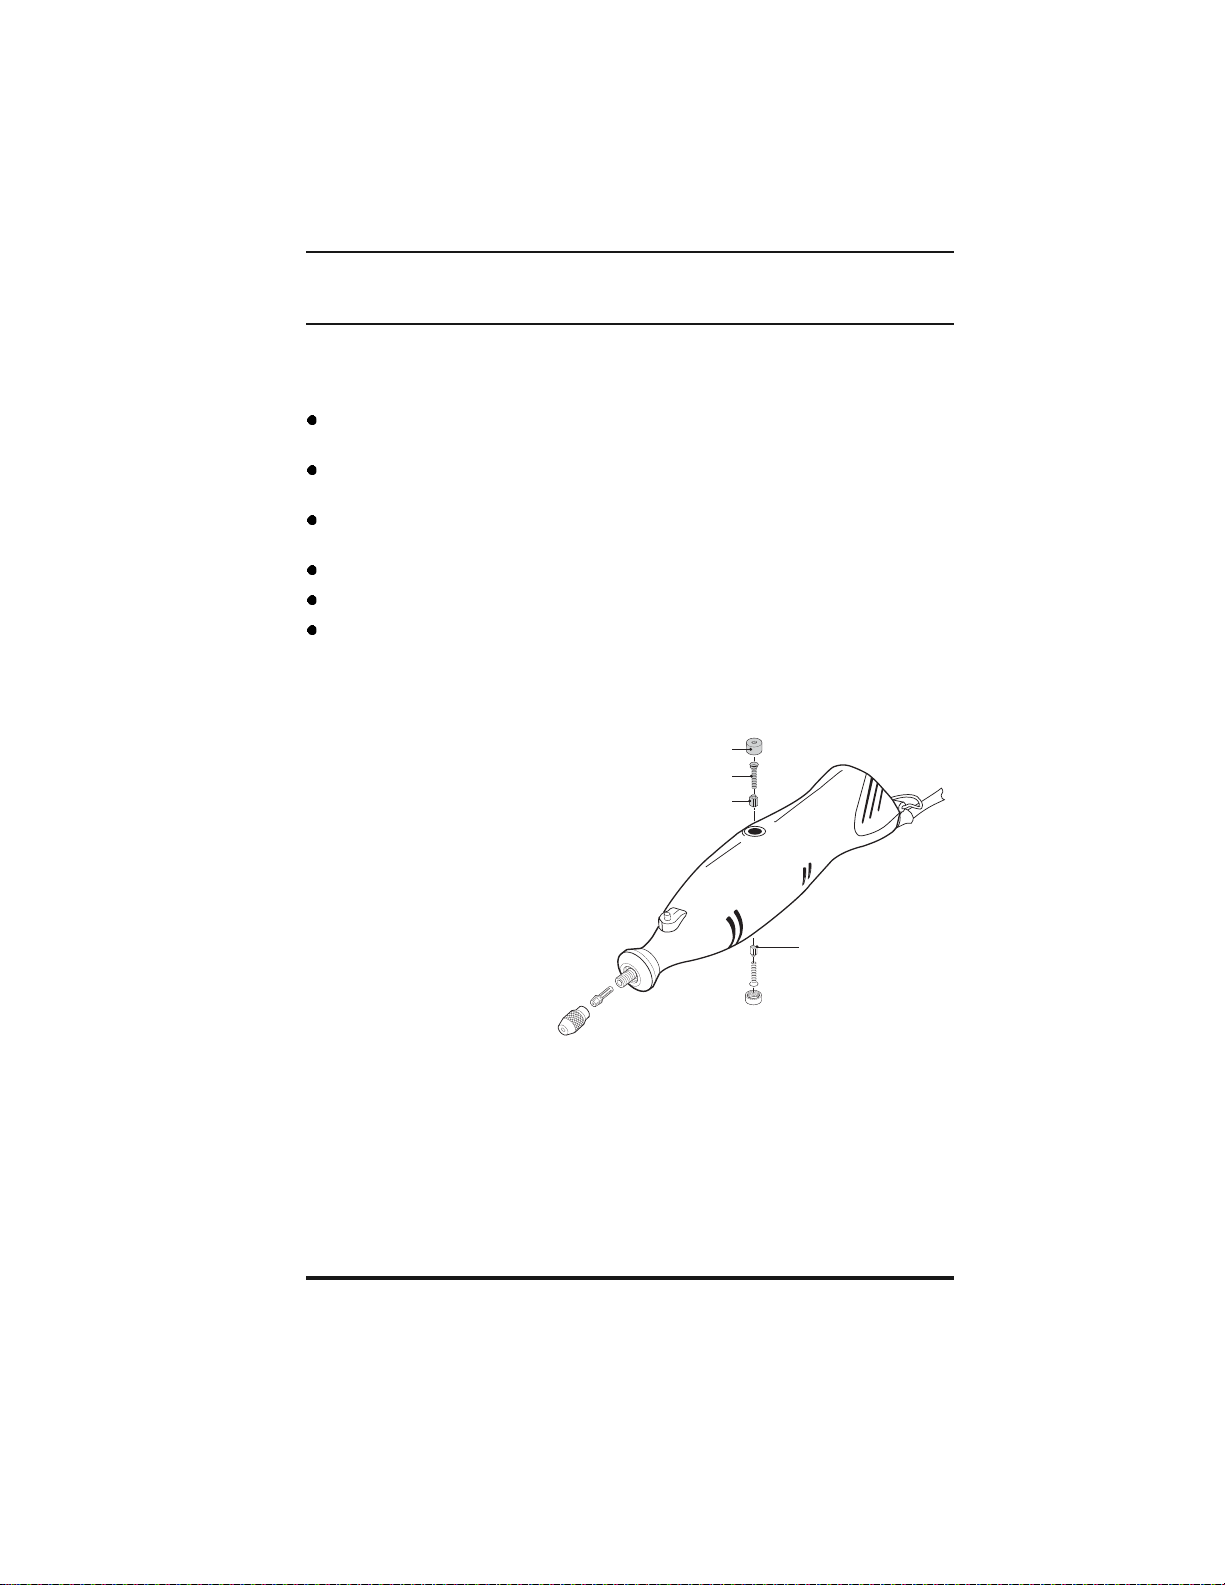
understand in order to protect YOUR SAFETY and to PREVENT
EQUIPM ENT PROBLEMS. The following symbols help you recognize this
infor ma ti on. Please read the ma nu al and pay atten ti o n t o these sect i on s .
WARNING! WARNINGS INDIC ATE A CERTAINTY OR STRONG
POSSIBILIT Y OF PERSONAL INJURY OR DEATH IF INSTRUCTI ONS
ARE NOT FOLLOWED.
CAUTION: CAUTIONS INDICATE A POSSIBILITY OF
EQUIPMENT DAMAGE IF INSTRUCTIONS ARE NOT
FOLLOWED.
Note: Notes give helpful information.
WARNING! IMPROPER OPERATION OR MAINTENANCE OF THIS
PRODUCT COULD RESULT IN SERIOUS INJURY AND PROPERTY
DAMAGE. READ AN D UND ERSTAND ALL WARNINGS AND OPERATING
INSTRUCTIONS BEFORE USING THIS EQUIPMENT. WHEN USING AIR
TOOLS, BA SIC SAFETY PRECAU TIONS SHOULD ALWAYS BE
FOLLOWED T O REDUCE THE RISK OF PERSONAL INJURY.
Save These Important Safety Instructions!
Read an d understand all of these safety instruct i ons. Be
sure to retain them for future use.
3
Page 4

Rotary Tool
General Precautions
WARNING! FAILURE TO FOLLOW THESE INSTRUCTIONS CAN
RESULT IN SEVERE INJURY OR DEATH.
CAUTION: FAILURE TO FOLLOW THESE INSTRUCTIONS
CAN ALSO RESULT IN DAMAGE TO THE TOOL AND/OR THE
ITEM YOU ARE WORKING ON.
Verify that the power supply in your area is compatib l e with the voltage
liste d on the t o ol 's label.
Check the tool, cord, and plug for damage before each use.
Make sure the tool is turned off before connecting the electrical cord.
Always start the tool before setting it against the piece you are working
on.
Wa tch for and avoid potential electrocution hazards. Avoid bodily
contact with grounded objects such as metal pipes, radiators, cooking
ranges, refrigerators, and so forth when using the tool. Never work on
any item that is connected to a live electrical circuit. Always disconnect
elect ri cal items before working on them.
Large temperature variations cause condensation, which can increase
the hazard of electrocuti on and/or internal corr osion. Allow the tool to
adjust to the tem perature of the work are a for several minutes before
each use.
Do not use this tool, it s char ger, or any accessory for an y purpose other
than those for which they have been specific al ly designed.
Secure all items you are workin g on. Use clamps, vices, or other
securi ng devices as needed.
Never wear jewelry or loose clothing that can become entangled in
moving parts. Tie or otherwise secure long hai r aw a y f rom the tool and
work area. Always wear fitted clothing and any protective items that may
be nece ssary such as gloves, goggles, etc.
Always wear protective goggles when using this tool.
If wor king around du st, splinters, or shavings, wear a protective mask to
avoid inhalation hazards.
Always w ea r ear protection.
4
Page 5
Owner’s Manual
General Precautions (cont’d)
Always wear sui table non-slip safety footwear where there is a risk of
heavy objects injuring feet or if there is a risk of slippi ng on wet or
slippery floors.
Where there is a risk of falling objects or hitting your head on protruding
or low level obstructions, a hard hat should be worn.
Be sure y ou always have sur e footing, especia l l y when working on
ladders and scaffolding.
Keep el ectric tools away from humidity and rain. Do not immers e.
When working outdoors, only use tools and extensi on cables designed
and appr oved for outdoor use.
Do not use the equipment in any areas any dange r of fire or explosi on
exists. Keep batteries away from heat and a l l ow to cool i f warm.
If the to ol requires repair, be sure to have all work performed by a
qualified technician.
WARNING! CONSUMING ALCOHOL, MEDICATION, OR DRUGS, OR
HEALTH PROBLEMS SUC H AS ILLNESS, FEVER, OR FATIGUE,
AFFECT YOUR ABILITY TO PLAN AND REACT. NEVER USE ANY
ELECTRICAL EQUIPMENT WHILE UNDER THE INFLUENCE OF
ALCOHOL, DRUGS, HEALTH PROBLEMS, OR FATIGUE.
Keep al l el ectric tools away from children.
Store electric tool s in the original box in a cle an dry location out of the
reach of children.
Always unplug the power cable when the tool is not in use or when you
are takin g breaks or ch an gi n g accesso ri e s .
Never carry the tool by the cable. Never unplu g the tool by pulling on the
cable.
When work i ng , do no t al l ow the motor to stal l under the load .
Keep your work place tidy. Untidiness can cause accidents!
Avoid abnormal body postures while working.
Make sure not to start the tool unintentionally.
Do not le ave keys, spanners, adjusting t ool s, etc. inserted in the tool .
5
Page 6

Rotary Tool
General Precautions (cont’d)
Keep cut ting tools sharp and clean.
Follow al l i nstructions for l ubrication and changing accessories.
Before using the power tool, check it carefully to ensure that it will
opera te properly and perform its int ended function.
Check that all moving parts are correctly aligned and free from binding.
Check for broken or missing parts and have them replaced or repaired
at an authorized service center.
If the power tool requires mounting make sure it is securely attached to
a suit able work bench.
Check any other condition that may affect the operation of the powe r
tool.
Any damaged guard or any other damaged part of the power tool should
be prop erly repaired or replaced by an authorized service center unless
otherwise indicated in this instruction manual.
Any switch that does not operate correctly must be replaced by an
authori zed service center. Do not use the power tool if the ON/OFF
switch does not turn the power tool ON and OFF.
Do not attempt to modify the power tool in any way. The use of any
attachment or accesso ry other than those recom m ended in this
instr uct ion ma nu al c ould resu lt in dama ge to th e po wer t oo l and injur y to
the operator.
This el ectric power tool complies with national and international
standards and safety requirements. Repairs should only be carried out
by qualified persons using original spare parts. Failure to do so may
result i n considerable da nger to the user.
If using the power tool inside your house, protect furnishings and fl oors
with a sui table dust shee t.
Always ob serve gener al f i re s afety precautions wh en using cer tai n
power tools inside your house or workshop. It is recommended that you
have a n appr op riate fir e ex ting uis he r ava il able at all tim es w hile w or ki ng.
6
Page 7

Owner’s Manual
Additional Warnings
Electrical Safety
This double-insulated tool co m es equipped with a polarized plug where
one blade is wider than the other . This plug only fits in a polarized outlet
one way. If the plug does not fit into the outlet, reverse the plug. If it still
does not fit, contact a qualified electrician to install a polarized outlet. Do
not mod ify the p lug in any way to fit a non-polarized out let.
Double insulation eliminates the need for three-wire grounded cables
and plugs. Be certain th at the outl et voltage supp l i ed is within the
voltage marked on the tool. Never use AC tools with a DC power supply
or vice-versa.
Avoid comi ng i n cont act with pipes, radiators, range s, refrigerators, and
other grounded devices as grounding your body increases your risk of
electric shock. If you must operate the tool in damp locations, use a
Ground Fault Circuit Interrupter (GFCI) to supply the power to your tool.
Rubbe r el ectrician gloves and footwear provide further prot ection
against elec t ri cal shock.
Never use this power tool in rain or wet conditions as water entering the
tool gr eatly increases the risk of electric shock.
Do not abuse the power cord. Never carry or unpl ug the tool using the
cord. K eep cord away from heat, oil, sharp edges, and moving parts.
Damage d cord s i ncre ase t h e ri sk o f el ect ri c sh ock an d mu st b e repl ace d
immediately.
When op erating this tool outside, only use an out door-rated extension
cord to reduce the risk of el ectric shock.
Cutting Tool
This tool requires the use of two ha nds to ensure safe operation and
should not be used when working f rom ladders and stepladders.
WARNING! SOME WOOD AND WOOD TYPE PRODUCTS CAN
PRODUCE DUST THAT CAN BE HAZARDOUS TO YOUR HEALTH.
ALWAYS USE OF AN APPROV ED FACE MASK WITH REPLACEABLE
FILTERS WHEN USING THIS TOOL IN AD DITION TO USING THE DUST
EXTRACTION FACILITY (IF AVAILABLE).
7
Page 8

Rotary Tool
Additional Warnings (cont’d)
Cutting Tool (cont’d)
Ensure that power tools are disc onnected from the power supply when
not in use, before servicing, lubricating or making adjustments and when
changi n g ac c essorie s .
Always keep the accessory securing mechanism clean and free from
dust bui l d-up.
Do not start the tool with the accessory in contact with the work piece.
Check t he work pi ece for any protrudi ng nails, screw he ads or anything
that co ul d dam age the acces sory.
Ensure that there are no obstructions underneath the wo rk piece; it is
easy to cut into sawhorses and bench tops.
Always hold the tool by its insulated gripping surfaces when doing an
operation where the accessory could contact hidden wiring or the tool’s
power cord. Contact with a live electrical circuit will make the tool’s
exposed metal parts live, possibly causing electrical shock. Always
disconnect fuses or circuit breakers whenever working in any area
where you could come in contact with electrical wiring.
Always hold the hand piece firmly in your hands during the start-up. The
reaction torque of the motor, as it accelerates to full speed, can cause
the shaft to twist.
Do not alter or misuse tool. Any alteration or modification is a misuse
and may result in serious personal injury.
Always disconnect the power cord before attaching or changing
acces so r i e s. Th e tool could st art unexpectedly, causing s e ri o us
person al i nj u ry.
Be aware of th e swit ch locat ion when pick ing up o r set ting do w n the t oo l
to avoi d accidental st arting and possib l e i nj ury.
Never leave running tools unattended. Always stop and unplug the tool
before leaving it.
Clean t he tool’s air vents regularly to prevent overheating.
WARNING! NEVER USE THIS PRODUCT AS A DENTAL DRILL OR IN
ANY HUMAN OR VETE RINARY MEDICAL APPL ICATIONS. SERIOUS
PERSONAL INJURY OR DEATH COULD RESUL T.
8
Page 9

Owner’s Manual
Additional Warnings (cont’d)
Accessories
WARNING! ALWAYS WEAR EYE PROTECTION WHEN USING THIS
TOOL. HIG H-SPEED ACCESSORIES CAN DISCH ARGE PARTICLES,
BRISTLES, OR OTHER DEBRIS OR CAN COME APART DURING USE.
FLYING DEBRIS CAN CAUSE SERIOUS INJURY.
Do not st op the tool by forcin g t he accessory or by using sideways
pressure.
Do not use accessories that are bent, damaged, or ha ve missing teeth.
This is hi ghly dangerous and could result in a serious accident causing
injury to the operator and bystanders and damage to the tool.
Only us e accessories that are recommend ed by the supplier and that
are in good condition.
Do not force the tool; let the accessory do t he wo rk. This w ill reduce the
wear on the tool and accessory , increasing its efficiency and operating
life.
Acces sories must be rate d for the speed reco m m ended on the tool
warning label or higher. Wheels and other accessori es running beyo nd
their r ated speeds can fly apart and cause serious injury.
Never bend the flexible shaft tighter than a 6 ” radius. Overly tight bends
can gen erate excessive heat on the jacket or hand piece and caus e
burns.
Always tighten the collet nut and any other adjustment devices when
attaching accessories. Loose accessories can fly out of the tool with
great force, possibly causing injury or property damage.
Do not place your hands or any other part of your body near spinning
accessories. Touching a spinning accessory can cause serious injury.
Run brush accessories at full operating speed for at least one minute
before e ac h us e, be i ng su re tha t th e a rea s ur round ing t he br us h is c lea r .
This procedure will remove loose bristles or wires and help prevent
injur y or damage to the item you are working on.
Never operate wir e and bristle brushes at speeds abov e15,000R P M.
Always aim brushes away from you. Thes e accessories discharge
parti cles a nd bri stle s at h igh spee d, w h ich can be come em be dde d i n o ur
skin.
9
Page 10

Rotary Tool
Additional Warnings (cont’d)
Accessories (cont’d)
Never apply excessive p ressure when usin g brush accessories. let the
bristl e tips do the work. Excessive pressure may damage t he piece
being worked on and could cause bristles to fly loose, possibly causi ng
injury.
Handle all accessories with care to avoid chipping, cracking, or bending
them. Damaged accessories can come apart at speed and scatter
debris at high speed, possibly causing serious injury. Sharp accessories
can cause cuts or other in j ury.
Always install a new accessory if you drop the tool. Never use a
damaged accessory.
Fragments from burst acc ess or ies will fly at high speed and wit h grea t
force and could cause ser i ous injury . Always positio n yourself and work
in a direction that minimizes the chances of debris flying at you.
\Never use dull or damaged bits. Sharp bit s must b e handled with care.
Damaged bits can snap during use. Dull bi ts require more force to push
the tool, possibly causing the b i t t o break.
Round m aterial such as dowels and pipes might roll while being cut,
possibly causing the accessory or bit to jump towards you. Always
clamp work pieces whenever you cannot guarantee their stability.
Beware of nails, screws, foreign objects, or unusual surface features
that could cause the accessory to catch, bind, slip, or break.
Always start the tool and bring the accessory up to ful l operating speed
before br ingi ng the acc essor y in cont act wit h the work piece. S t arting the
tool with the accessory contacting the work piece can cause the tool to
jump out of control.
Feed th e accessory into the work pi ece in the same direction as the
cutting/working edge is exiting the material (t he same direction chips
and other debris are b ei ng thrown). Fee di ng the accessory in t he wrong
direction could cause the working edge to climb out of the work piece,
possi bl y causing loss of control and serious injury.
Shut th e tool off immediat el y if any accessory becomes jammed or
otherwise stuck in the work piece. Wait for all moving parts to stop, then
unplug t he t ool be fore r esolv in g th e p ro ble m. Le av ing the t ool pl ug ged i n
could lead to accidenta l starting and pos sibly serious injury.
10
Page 11
Owner’s Manual
Additional Warnings (cont’d)
Accessories (cont’d)
Never use any grinding or sanding accessory near any flammable
mater i al. Sparks could cause a fire.
Both the tool collet and the accessory might become hot during normal
use. Allow to cool before touching.
Never at tem pt to ho l d the work p iec e wi th on e h and w hil e us ing an y saw
or cuttin g tool . Thes e acces sor ies could bi nd i f they beco me ca nte d and
could c ause the tool to kic k back, possibly causing s erious injury.
Dust and debris from work pieces may contain chemicals kno wn to
cause ca ncer , birth defects or othe r repro ducti ve harm . Thes e chemi cals
amy inc l ud e (but are not limited to) le ad fr o m l ea d-based pai n ts , silica
from mas onry products, and ars enic and chromium from chemically
treated lumber. Always work in a wel l -ventilated area and use approve d
safety equipment rated for the specific chemical(s) you might be
exposed to.
Always use accessories at their recommended speeds. This manual
includes several tables with recommended speed settings for various
accessorie s on vari ous materials.
WARNING! RUNNING ACCESSORIES AT EXCESSIVE SPEED CAN
CAUSE FRAGMENTATION AND SERIOUS INJURY FROM FLYING
DEBRIS. IT CAN ALSO CAUSE THE WORK PIECE TO OVERHEAT,
RESULTING IN CHARRI NG, MELTING, AND/O R DISCOLORATION.
CAUTION: ALWAYS REFER TO THE RECOMMENDED SPEED
TABLES IN THIS MANUAL AND EXPERIMENT ON SCRAP
MATERIAL BEFORE STARTING YOUR ACTUAL PROJECT TO
ENSURE THAT YOU WILL NOT DAMAGE YOUR WORK
PIECE.
11
Page 12
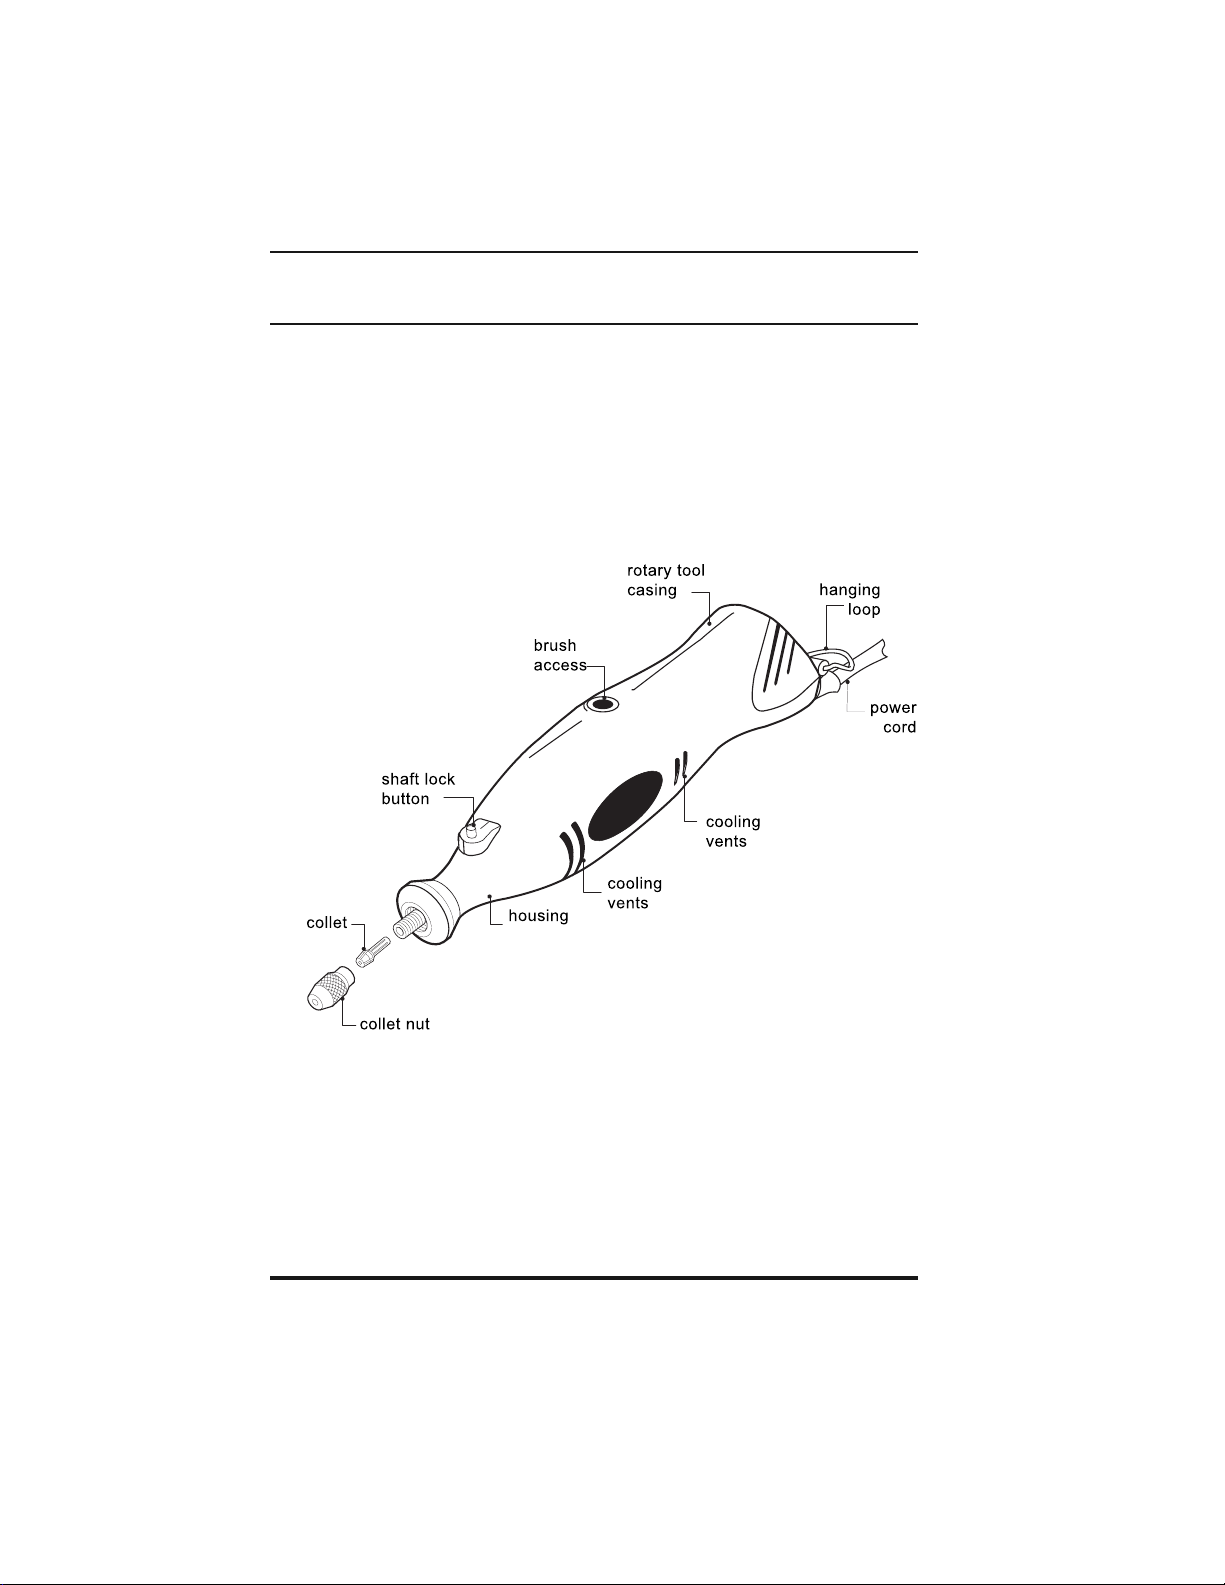
Rotary Tool
Operation
Your new rotary tools have been engineered and manufactured to STEELE®
America’s high standards for dependability, ease of operation, and operator
safety. Properly cared for, they will give you years of rugged, trouble-free
performance. Every care has been taken to ensure that they reach you in
perfect condition. However, in the unlikely event that you should experience
a problem, or if we can offer any assistance or advice, please do not
hesitate to contact our customer care department at the address or
telephone number listed at the back of this manual.
12
Page 13
Owner’s Manual
Operation (cont’d)
Inserting/Removing Accessories
WARNING! ALWAYS UNPLUG THE ROTARY TOOL BEFO RE
CHANGING ACC ESSO RIES/C OLLE TS OR SERVI CI NG YOUR TO OL THE
TOOL COULD START UNEXPECTEDLY, CAUSING SERIOUS INJURY.
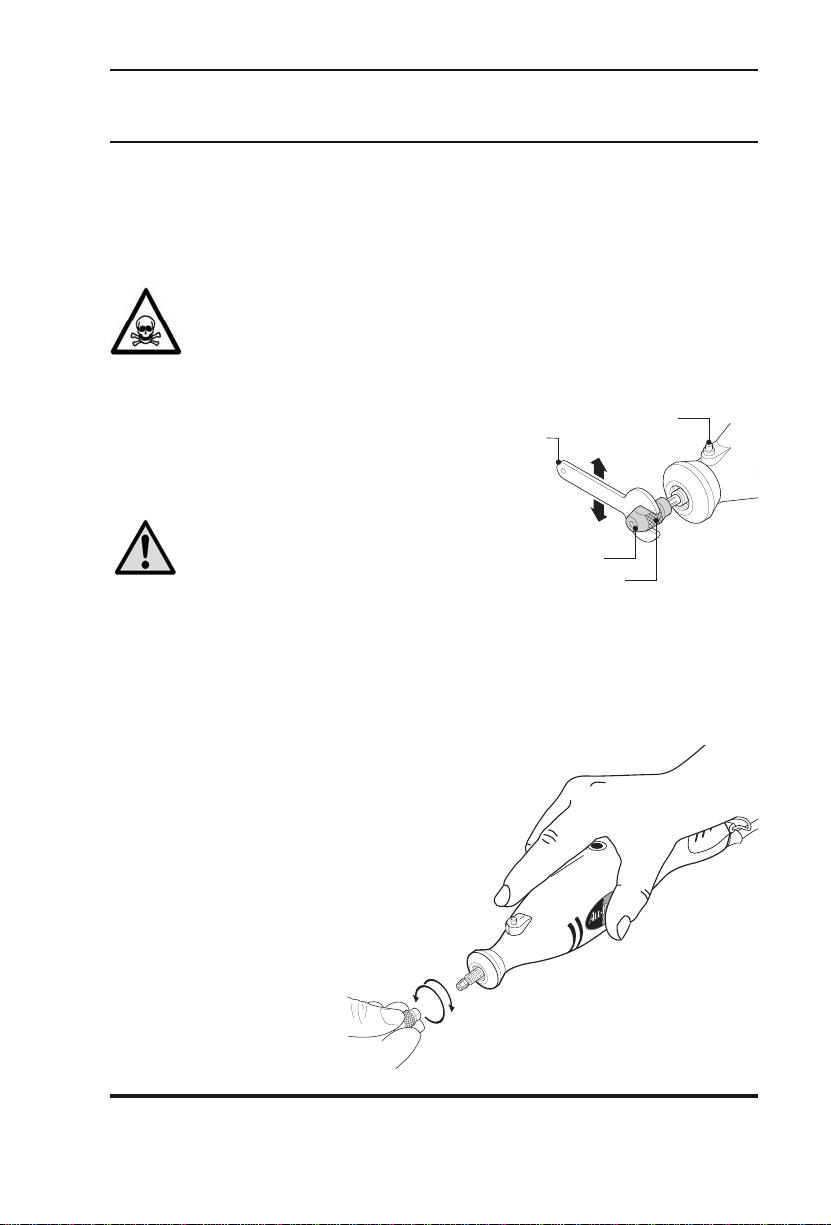
To loosen the collet nut:
1
Press the shaft lock button.
2
Rotate the shaft manually until the lock en gages and prevent s further rotation.
CAUTION: DO NOT ATTEMPT
TO ENGAGE THE SHAFT
LOCK WHILE THE TOOL IS
RUNNING.
3
Use the wrench to l oosen the collet
nut by tu rnin g in t he dire ctio n of th e
L
arrow labeled
to insert or remove accessories.
4
Remove the old accessory (if any) and install the new accessory, being
sure to push it as far as possible into the collet.
5
Tighten the collet nut by hand until snug.
6
Finish ti ghtening the
collet by turning the
wrench in the direction
of the arrow labeled
in the illustration. Do
not overtighten.
in the illustration. The collet nut must be loose in order
T
:5(1&+
&2//(7
6+$)7
/2&.
%87721
&2//(7
187
13
Page 14
Rotary Tool
Operation (cont’d)
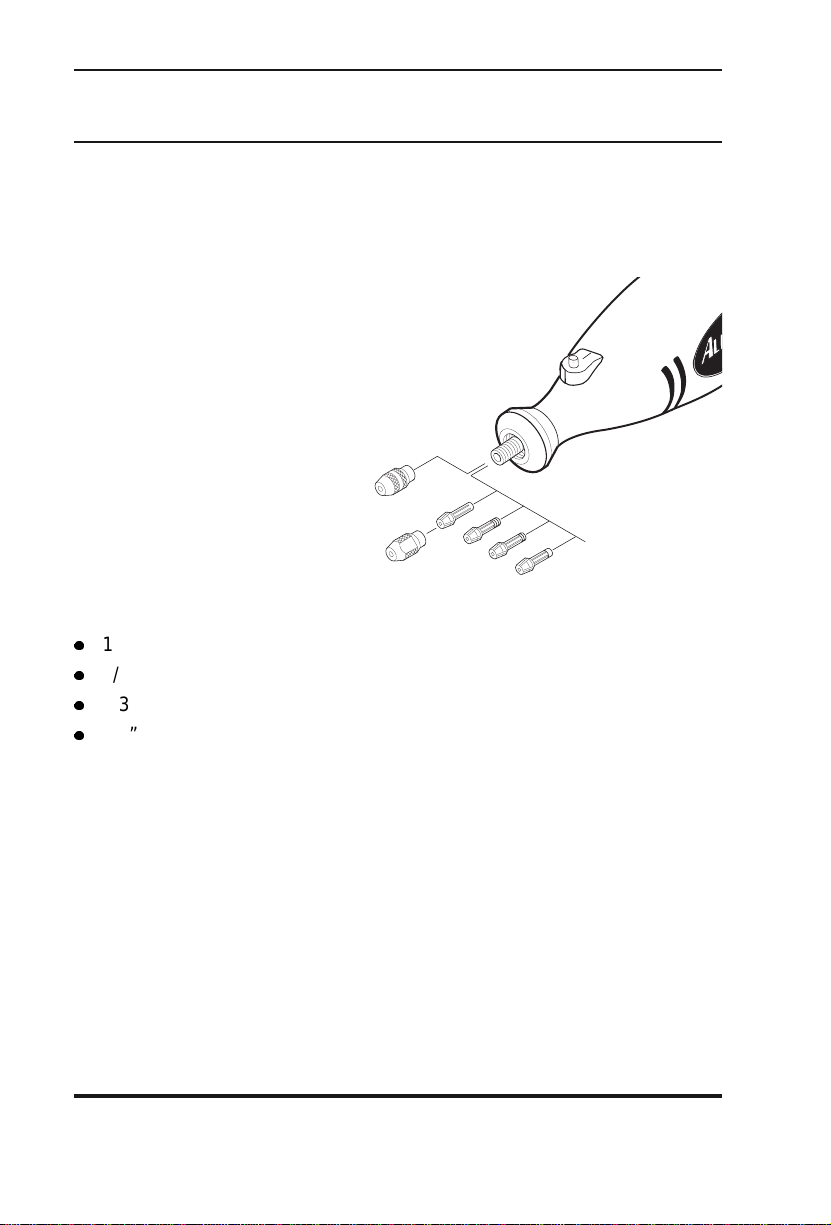
Collet Sizes
Your rotary tool kit includes four
collets to ac commodate
different accessories with
varying shank sizes. To change
a collet:
1
Loosen th e collet nut as described above, then remove the collet nut.
2
Remove the old collet.
3
Insert the loose collet.
4
Tighten the collet nut as descri bed above.
Each co llet has a s er ies of ring s
on its shank that identify its size.
The collet sizes included with your kit are:
1/32” - one (1) ring
1/16” - two (2) rings
3/32” - three (3) rings
1/8” - no rings
Balancing
For best results, be sure to balance each accessory in the collet. Your tool’s
high RPM makes imbalances easily de tectable as a wobb le while the tool is
running. To balance an accessory:
1
Stop the tool.
2
Loosen th e collet nut.
3
Rotate the accessory 1/4 turn.
4
Tighten the collet.
5
Run the tool.
6
Continue adjusting as needed. You will hear and feel when the access ory is properly bal anced.
14
Page 15

Owner’s Manual
Operation (cont’d)
General Hints
Your rotary tool an d its accessories work using high RPM (up to
35,000P RM ) i nst ead o f brut e for c e. W hen w or ki ng, u se t he lig htes t po ss ib le
touch while retaining full control of the tool and allow the high-speed
accessory to do its work. Fo r heavier work, m ake multiple p asses instead of
forcing the tool. Do not lean on or push the tool while working.
WARNING! FORCING THE TOOL COULD CAUSE THE ACCESSORY TO
BREAK AND SCATTER FRAGM E NTS AND OTHER DEBRIS AT HIGH
SPEED. NEVER FOR CE THE TOOL AND ALWAYS REMAIN CLEAR OF
THE P ATH OF DEBRIS. ALWAYS WEAR EYE PROTECTION WHEN
USING THI S T OOL. FLYING FRAG MEN TS CAN CAU SE BL INDNES S AN D
OTHER SERIOUS INJURY.
Your rotary tool can be used for c arving, grinding, engraving, polishing,
cutting, brushing, drilling, and more. Your kit includes a wide assortment of
accessories for these tasks and you can order more by visiting the location
where you purchased this kit. This tool uses high speed and low torque- the
opposi te most powe r t oo l s, whi ch rely on low s pe eds and hig h torque. This
gives your rotary tool some unique capabilities, inclu ding cutting hard en ed
steel , engraving glass, polishing plastic , and other uses that most power
tools sim ply c ann ot d uplic a te. Le arni ng ho w to us e your tool ’ s hig h s peed t o
best advantage is the key to getting the most from this rotary tool.
15
Page 16

Rotary Tool
Operation (cont’d)
Using t he Tool
Before running your rotary tool, spe n d
some ti me g ett ing the f eel o f it s wei ght an d
balance. The housing is tapered, allowing
you to grasp the tool much li ke a pen or
pencil for fine work. be sure to practice on
scrap materials until you are comforta bl e
using t he tool and are ready to wor k on
actual materials.
To use the tool :
1
Insert the cor rect ac cess ory and t ighte n the collet nut securely.
2
Be sure to wear eye protection and any respiratory protection that may be required.
3
Mount o r grasp the work piece
securely, being sure to follow every
precaution listed on pages 6-11 of this
manual.
4
Grasp the tool using eith er of the
gripping methods shown here. The
pencil grip (top) is best for fine work
requiring precise contr ol . The golf grip
(bottom) is best for rougher work to
maintain more contro l of the tool.
5
Start the tool. If using the variablespeed tool, select the appropriate
speed for the work you are performing.
If using the single-speed tool, it will rotate at approximately 16,000RPM.
6
Balan ce the accessory as descr i bed on the previous page.
16
Page 17

Owner’s Manual
Operation (cont’d)
Variable Speed Control
Your rotary tool kit includes a
variab l e-speed tool. The speedcontrol switch is on the side of
the tool , as shown here. To
increa se the tool’s speed, slide
the switch down away from the
OFF pos i ti on. To dec r ease the
tool’s speed, slide the switch up
towards the OFF position.
Moving the switch to the OFF
posit i on stops the tool
The numbered indicators next
to the switch indicate the tool’s
approx i m at e R PM as f o l l ow s :
Speed Setting Speed Rang e
2 8,000 - 10,000 RPM
4 11,000 - 15,000 RPM
6 16,000 - 19,000 RPM
8 20,000 - 24,000 RPM
10 25,000 - 35,000 RPM
Certain materials such as plastics and soft metals require lower speeds to
avoid ov erheating and possible damage due t o friction. Slower speeds are
also bes t for po l i shing using the fel t polishing accessories and for delicate
work with fragile materia ls. Higher speeds are optimal for carvi ng, cutting,
routin g, shap i ng, engraving, et c. i n hard materials su ch as hardwoods,
some metals, and glass. Drilling is also best done at high speed in many
cases.
WARNING! ALWAYS UNPLUG THE TOOL PRIOR TO CHANGING
ACCESSORIES. NEVER LEAVE A PLUG GED-IN TOOL UNATTENDED.
THE TOOL COULD START UNEX PECTEDLY, CAUS ING SEVERE
INJURY AND/OR PROPERTY DAMAGE.
17
Page 18
Rot ary Tool
Operation ( cont’d )
Flex At tac hment
Your rotary tool kit includes
a flex attachment and
hanger rod that is useful for
extra-delicate work and/or
when working in close
spaces. When using the
flex attachment, be sure
not to bend it tighter than a
6-inch radius at any point
as this could cause
overheating and a possible
burn hazard. Overly tight
bends will also reduce the
attachment life.
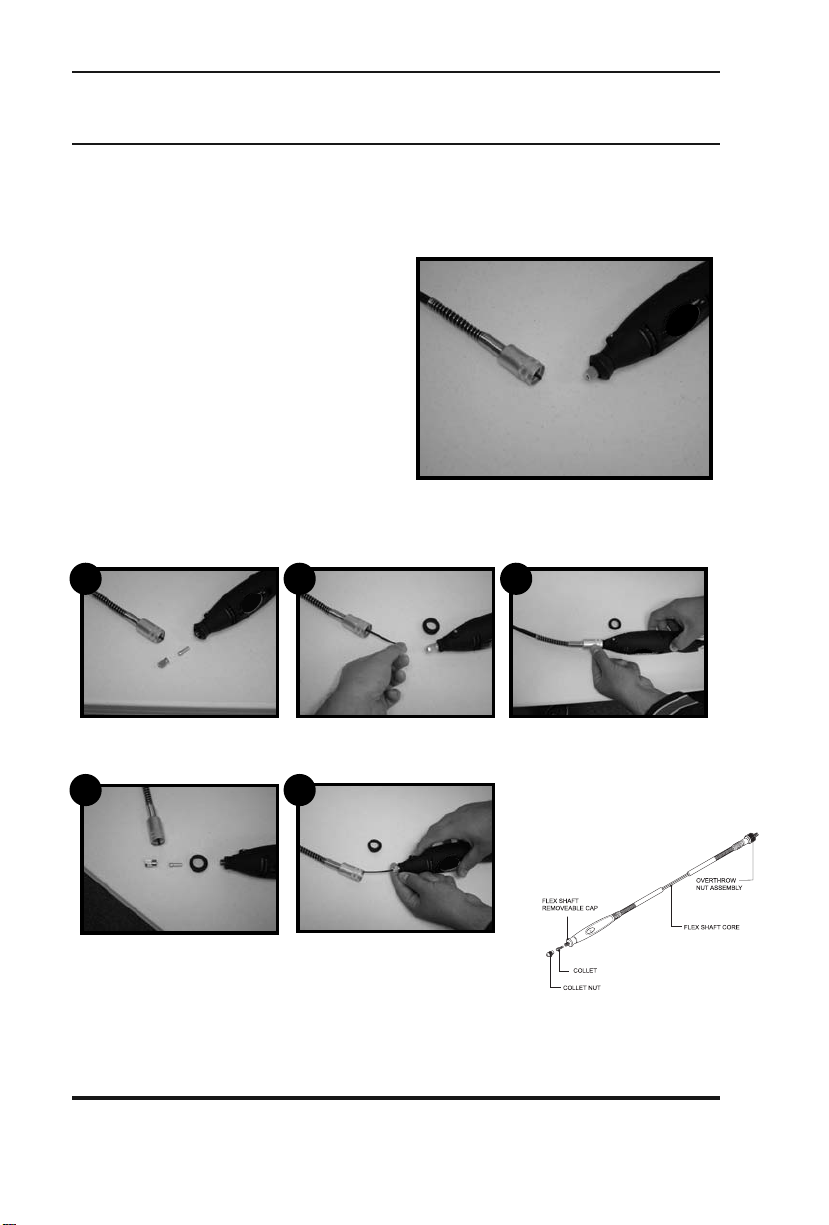
The flex shaft and the rotary tool. Note the
collet and the collet nut are already installed
on the rotary tool.
1
Remove the collet nut and the
collet from the rotary tool
2
Remove the housing cap from
the rotary tool. This is the black
plastic ring that screws onto the
rotary tool.
3
Replace the collet nut and collet
back onto the tool. Pull the drive
shaft out of the flex shaft core.
4
Insert the drive shaft into the
collet until it stops (about 1 inch)
Tighten the collet
18
5
Slide the overthrow nut assembly
over the housing and tighten. The
rotary tool with the flex attachment
is now ready for use.
Flex shaft diagram
Page 19
Owner’s Manual
nt
housing
b
Operation (cont’d)
Flex Shaft (cont’d)
1
Secure the clamp
base to your work
surface in a location
where the flex shaft
will not be
overextended or
bent beyond a 6”
radius.
2
Screw the hanger
rod into the base.
3
Hang the tool using the wire hanger next to the power cord.
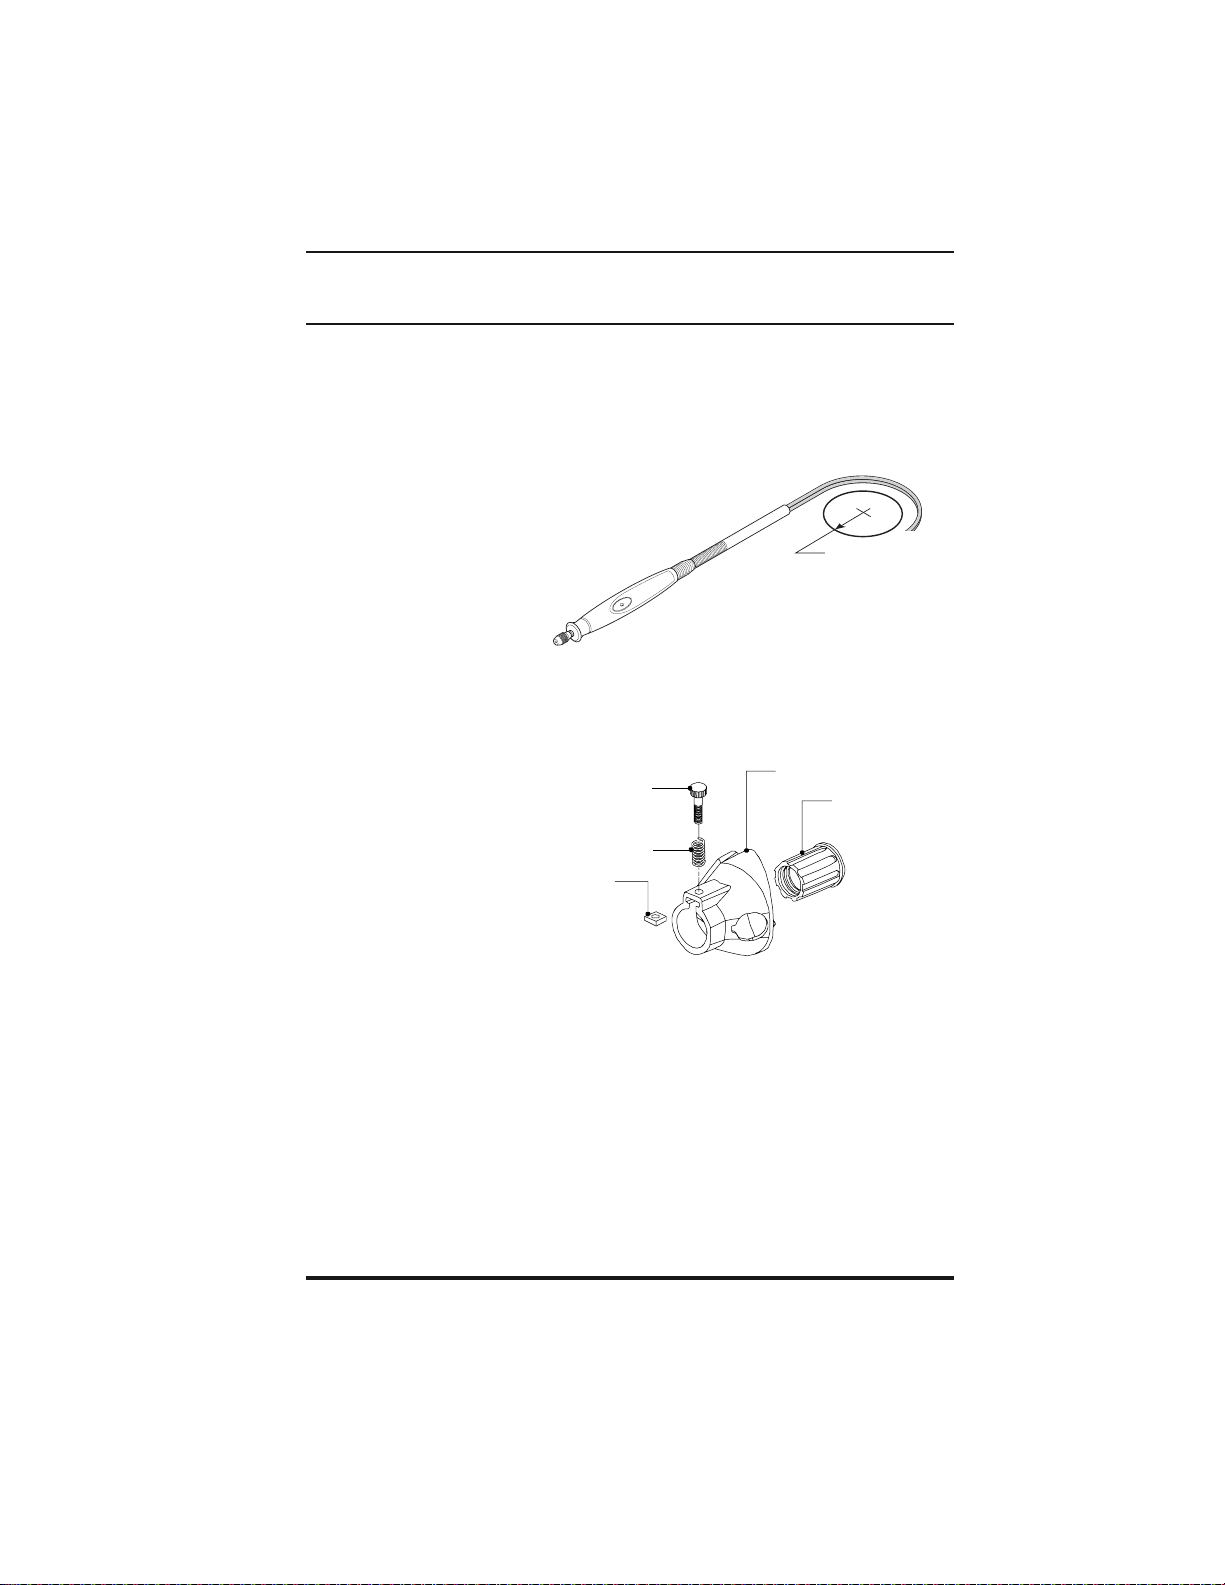
Milling Cutter Holder
Your rotary tool kit
includes a milling
cutting holder, which
regulates the
accessory depth when
routing, milling, or
shaping. This holder
fits onto the end of the
rotary tool and features
an adjustable depth
setting. To fit the milling
cutter holder:
1
Remove the housing cap from the rotary tool.
2
Secure the attachment nut to the threaded end of the rotary tool.
3
Slide the housing over the attachment nut.
4
Insert the backstop into the slot in the housing so it rests between the
housing and attachment nut.
5
Insert the spring and setscrew.
6
Adjust the housing to the desired depth by sliding it up and down the
attachment nut. Tighten the setscrew when you reach the desired depth.
setscrew
spring
ackstop
attachme
nut
19
Page 20
Rotary Tool
Operation (cont’d)
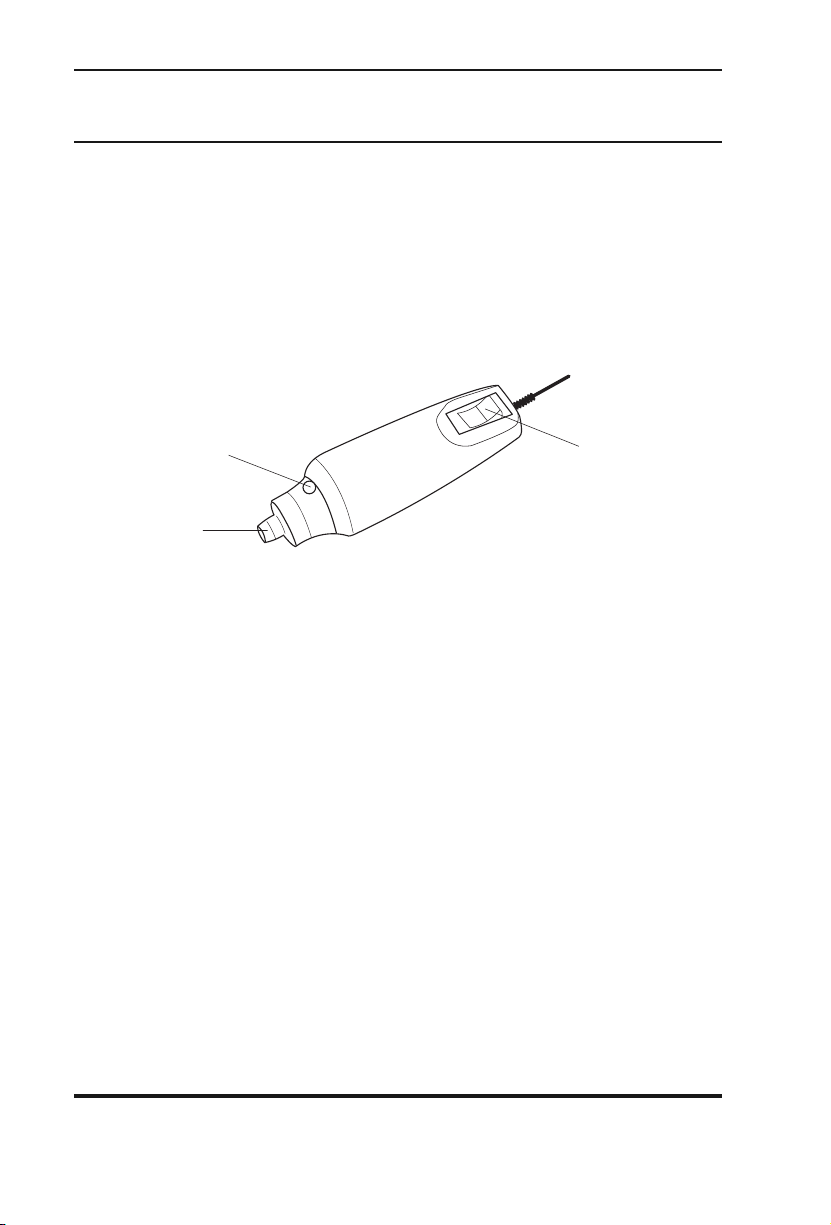
,OCKING"UTTON
#OLLET
/N/FF3WITCH
Small Rotary Tool
20
Page 21
Owner’s Manual
15 deg.
Accessories
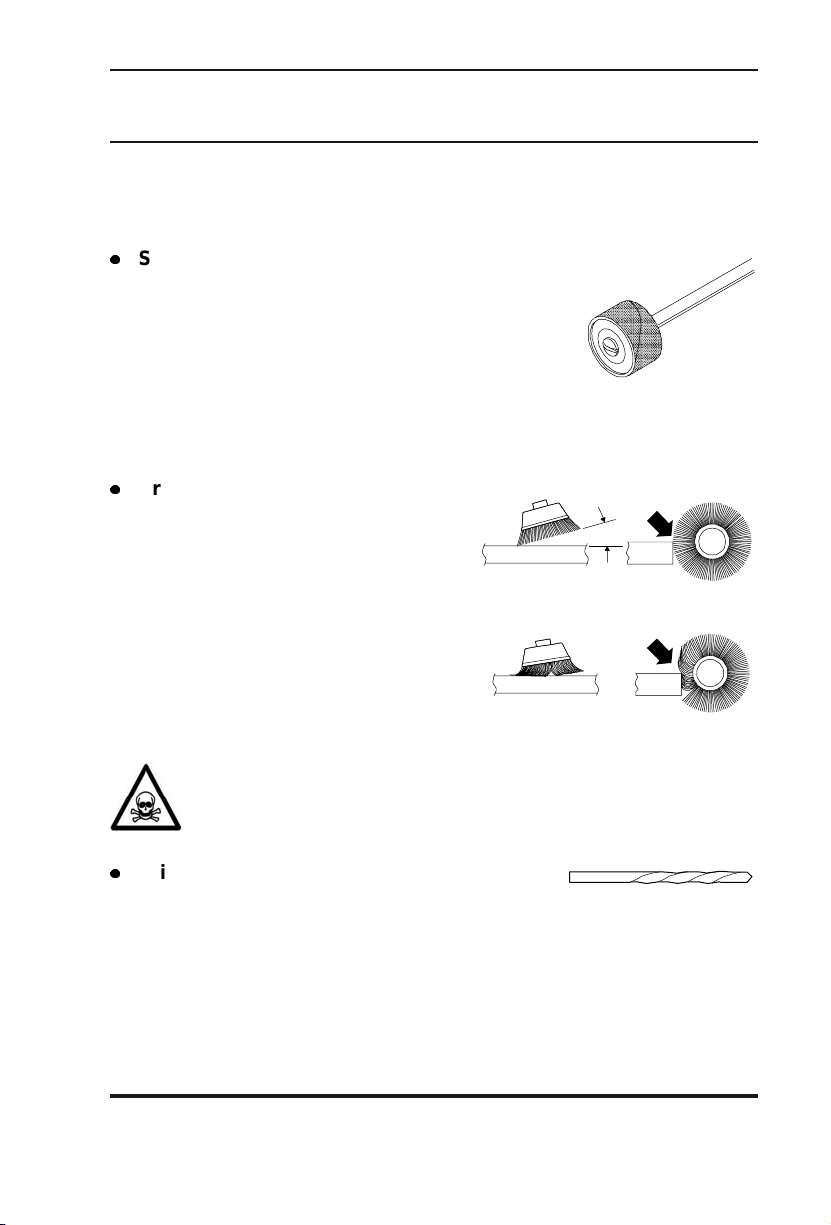
Your rotary tool kit includes the following accessories:
Sanding bands:
2” and 1/2” x 1/4” sanding sh ank, which holds
sanding bands. These smal l drum sanders he l p
you shape and smooth surf aces in tight places.
Replace bands when they become worn. Bands
come in fin e grades for f i ni sh and deli cate work
and coar s e gr ades for heavier work . Sanding
bands work best at lower speeds. Experiment with scrap material before
worki ng on an actual project. To use a sanding band, l oosen the screw
in the sh ank, slip the band onto the shank, then tighten the screw to
secure the band.
Brushes:
wire and bristle brushes . Wire
brushes are useful for cleaning and
polishing metal, while bristle brushes
are suitable for cleaning softer
surfaces.
accessories, you should let the
speed do the work without applying
excessive force. Use the bristle tips
only without mashing the brush
against the work piece as shown in
the top part of the illustration on the
right.
Your kit includes several
As with all rotary tool
WARNIN G! NEVER RUN BRUSHES AT SPEEDS ABOVE 15,000 RPM.
THE BRUSH COUL D EJ ECT BRISTLES AT HIGH SPEED WHICH COULD
BECOME EMBEDDED IN YOUR SKIN OR WHICH COULD CAUSE
OTHER SERIOUS INJURY.
Your kit includ es both a 1/2” x 1/
RIGHT
WRONG
Drill bits:
bits. These are suitable for most drilling
applications in wood, plastic, and thin metal. For ceramics, drywall, or
other specialized applications, you will ne ed to purcha s e an a pp ropriate
drill bit.
Your kit includes high-speed steel drill
21
Page 22
Rotary Tool
Operation (cont’d)
Accessories (cont’d)
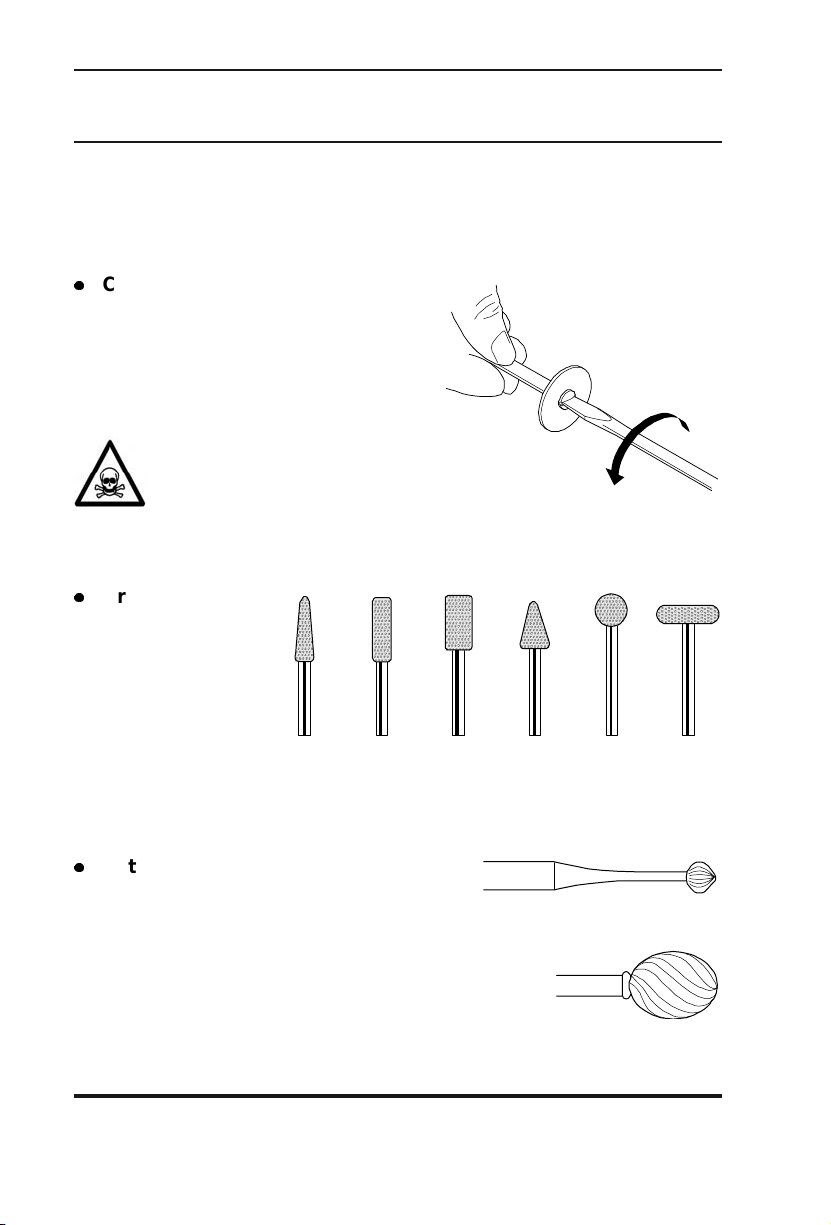
Cutting wheels:
several cutt i ng wheels and a special
shank for mounting them. To prepare
a cutting wheel for use, remove the
screw in the center of the shank,
mount the whee l , and replace the
screw.
WARNING! FAILURE TO FOLLOW
ALL OF THE WARNINGS ON
PAGES 9-11 OF THIS MANUAL
COULD CAUSE THE CUTTI NG
WHEEL TO F RAGMENT, CAUSING
SERIOUS INJURY.
Grinding stones:
Your kit includes
several grindi n g
stones in various
shapes. Use these
for smoothing hard
materials suc h as
wood, plastic, and
metal. Be sure not to allow the work piece to overheat as this can cause
charri ng (wood), melting (plastic), or discoloration (metal ). Aluminum
oxide (red) a cc essories are best for wood, metals, and p l astics, while
silicon carbide (blue) accessories are best for very hard surfaces such
as glass.
Cutting bits:
cutting bits, which are useful for shaping
variou s mate rial s. The small est cut ting bit s
are suitable for use in engraving.
Your kit includes
Your kit includes several
22
Page 23
Owner’s Manual
Operation (cont’d)
Accessories (cont’d)
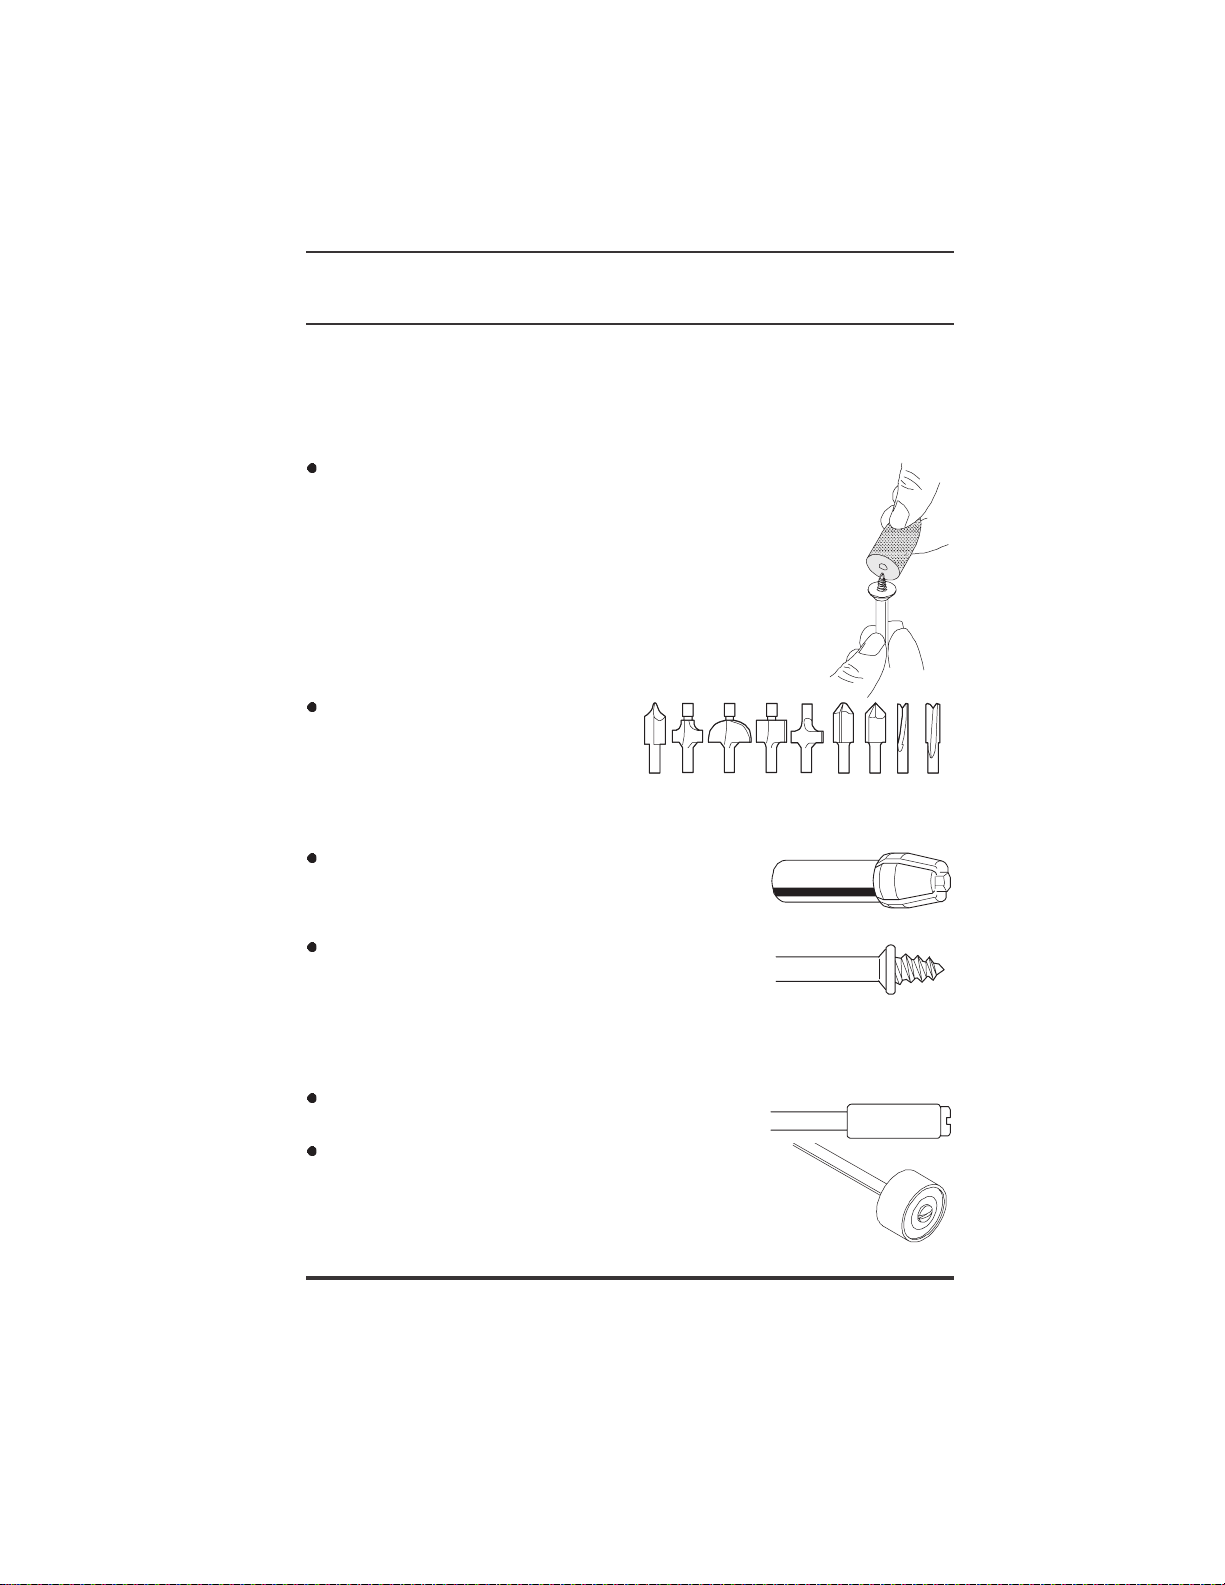
Polishing wheels:
polishing wheels in assorted shapes. These
accessories are useful for removing tarnish and
weathering on metal and for polishing plastics. They
require a special shank with a screw tip. To prepare a
polishing wheel, screw the felt onto the shank tip.
Reverse to remove. Your kit also includes polishing
grease, which you can use in small quantities to aid
polishing metal. Lower speeds are best for these
accessories.
Your kit includes several felt
Router bits:
router bits is available for
purchase from your Steele®
dealer. These accessories carve
patterns in wood and plastic that
can be used for ornamental purposes or for joining (such as when
cutting a dado).
Collets:
various sizes to accommodate accessories with
different-sized shanks. Replace collets as
described on page 14.
Threaded-tip shanks:
used for felt polishing wheels. Shanks with a long
threaded tip are used for pointed polishing
wheels while shanks with short threaded tips are
used for round felt polishing wheels. To install a
felt polishing wheel, simply screw it onto the
threaded shank.
Screw shanks:
mounting cutting wheels.
Sanding band shanks:
feature an expanding core that holds disposable
bands securely. To contract the core to remove or
install a band, loosen the screw. Tightening the
screw expands the core.
An assortment of
Your kit includes several collets of
Threaded-tip shanks are
Screw shanks are used for
Sanding band shanks
23
Page 24
Rotary Tool
Recommended Speeds
The following tables display recommended speed ranges for various
accessorie s on vari ous materials.
WARNING! NEVER RUN ACCESSORIES AT SPEEDS EXCEEDING THE
LISTED MAXIMUMS. ACCESSORIES COULD BREAK APART AND
SCATTER FLYING DEBRIS AT HIGH-SPEED, POSSIBLY CAUSING
SERIOUS INJURY.
CAUTION: IT IS HIGHLY RECOMMENDED THAT YOU NOT
EXCEED THE RECOMMENDED SPEEDS FOR THE LISTED
ACCESSORY/MA T ERIAL COMBINATION AS DOING SO
COULD HARM THE WORK PIECE. ALWAYS EXPERIMENT
WITH A PIECE OF SCRAP MATERIAL TO ENSURE OPTIMUM
SETTINGS BEFORE BEGINNING ANY WORK ON AN ACTUAL
PRODUCT.
Note: Where a speed range ( such as 4 - 8) appears , experiment
at the lower end of the range f i rst and gradually increase the
speed to obtain best results. Never exc eed the recommend ed
speed ra nge to avoid damag i ng the work piece and never
exceed the accessory’s maximum speed.
High-speed cutters
Soft wood:
Hard wood:
Laminates & plastic :
Steel:
Aluminum, brass, etc.:
10
6 - 10
4 - 6
6
6-10
Engraving cutters
Soft wood:
Hard wood:
Laminates & plastic :
Steel:
Aluminum, plastics, etc.:
10
10
6 - 8
4
6
24
Page 25

Owner’s Manual
Recommended Speeds (cont’d)
Diamond wheel points
Soft wood:
Hard wood:
Stone:
Ceramic:
Glass:
Tungsten carbide cutters (toothed)
Soft wood:
Hard wood:
Laminates & plastic :
Aluminum, brass, etc.:
Tungsten carbide cutters
Soft wood:
Hard wood:
Laminates & plastic :
Steel:
10
Aluminum, brass, etc.:
Stone:
Ceramic:
Glass:
8
8 - 10
10
8
10
10
10
10
8
4
6
10
8
4
6
8 - 10
25
Page 26

Rotary Tool
Recommended Speeds (cont’d)
High-speed router bits
Soft wood: 10
Hard wood: 8 - 10
Silicon carbide grinding stones
Laminates & plastic :
Steel:
10
Aluminum, brass, etc.:
Stone:
Ceramic:
Glass:
6
10
10
Abrasive points
Soft wood:
Hard wood
Steel:
Aluminum, brass, etc.:
4 - 6
: 4 - 6
6 - 8
6
4
4 - 6
Aluminum oxide grinding stones
Soft wood:
hard wood:
Steel:
Aluminum, brass, etc.:
Stone:
Ceramic:
10
10
8
4
6
10
26
Page 27

Owner’s Manual
Recommended Speeds (cont’d)
Cutting wheels
Soft wood:
Hard wood:
Laminates & plastic :
Steel:
Aluminum, brass, etc.:
Stone:
Ceramic:
Polishing wheels
Soft wood:
Hard wood:
Laminates & plastic :
Steel:
Aluminum, brass, etc.:
Stone:
Ceramic:
Glass:
8 - 10
6 - 10
2 - 4
10
10
6 - 10
6 - 10
4
4
2 - 4
4 - 8
4 - 8
6 - 8
6 - 8
6 - 8
Sanding bands
Soft wood:
Hard wood:
Laminates & plastic :
Steel:
Aluminum, brass, etc.: 2 -
Stone:
Ceramic:
2- 10
2 - 10
10
2 - 10
2- 10
2 - 6
10
27
Page 28

Rotary Tool
Recommended Speeds (cont’d)
Drill bits
Soft wood:
Hard wood:
Laminates & plastic :
10
6 - 10
2 - 4
28
Page 29
Owner’s Manual
Maintenance
Clean the tool with a rag dampened with clean water. Do not use
chemicals or soap. Do not allow water to get inside the tool.
Make sure the vent passages remain clear of dust and debris to avoid
overheating the tool. Use thebrush supplied with your kit.
Clean the collet nut by tapping it against a hard surface to remove
accumulated debris.
Store the tool in a clean dry place.
All repairs must be performed by a qualified electrician.
Opening the tool voids the warranty (except for the brush replacement
procedure described below).
Brush Replacement
Brushes need replacing
when your tool begins
running sporadically, loses
power, or runs at a lower
speed. Do not use the tool
with worn brushes as you
could cause permanent
damage. To change the
brushes:
1
Unplug the tool.
2
Remove the brush
caps with a small
screwdriver. The brush
spring and brush will
slide out.
3
If the brush is less than
1/8” long, rough, and/or pitted, it must be replaced. Replace the brushes
with Steele® brushes, which are available from your Steele® dealer or
directly from Steele®.
4
When replacing brushes, be sure that the curved end is touching the
commutator and that the curvature is in line with the commutator
curvature. The brush should be resting on the commutator with no gaps.
5
Once the brush is in position, reinsert the spring and reattach the cap.
6
Run the tool at full no-load speed for 5 minutes to seat the brushes.
29
Page 30

Rotary Tool
Limited Warranty
Steele® warrants to the original purchaser who uses the product in a consumer
application (personal, residential or household usage) that all products covered
under this warranty are free from defects in material and workmanship for two
years from the date of purchase. All products covered by this limited warranty
which are used in commercial applications (i.e. income producing) are warranted
to be free of defects in material and workmanship for 90 days from the date of
original purchase. Products covered under this warranty include air compressors, air tools, service parts, pressure washers, and generators. Steele® will
repair or replace, at Steele®’s sole option, products or components which have
failed within the warranty period. Service will be scheduled according to the
normal work flow and business hours at the service center location, and the
availability of replacement parts. All decisions of Steele® with regard to this
limited warranty shall be final. This warranty gives you specific legal rights, and
you may also have other rights which vary from state to state.
RESPONSIBILITY OF ORIGINAL PURCHASER (initial User):
• To process a warranty claim on this product, DO NOT return item to the
retailer. The product must be evaluated by an Authorized Warranty Service
Center. For the location of the nearest Authorized Warranty Service Center
contact the retailer place of purchase.
• Retain original cash register sales receipt as proof of purchase for warranty
work.
• Use reasonable care in the operation and maintenance of the product as
described in the Owners Manual(s).
• Deliver or ship the product to the nearest Authorized Warranty Service Center.
Freight costs, if any, must be paid by the purchaser.
• Air compressors with 60 and 80 gallon tanks will be inspected at the site of
installation. Contact the nearest Authorized Warranty Service Center that
provides on-site service calls for service call arrangements.
• If the purchaser does not receive satisfactory results from the Authorized
Warranty Service Center, the purchaser should contact Steele®.
30
Page 31

Owner’s Manual
Limite d W a rra n ty (co n t’ d)
THIS WARRANTY DOES NOT COVER:
Merchandise sold as reconditioned, used as rental equipment, or floor or display
models.
Merchandise that has become damaged or inoperative because of ordinary
wear, misuse, cold, heat, rain, excessive humidity, freeze damage, use of
improper chemicals, negligence, accident, failure to operate the product in
accordance with the instructions provided in the Owners Manual(s) supplied with
the product, improper maintenance, the use of accessories or attachments not
recommended by Steele®, or unauthorized repair or alterations. Repair and
transportation costs of merchandise determined not to be defective. Costs
associated with assembly, required oil, adjustments or other installation and
start-up costs.
Expendable parts or accessories supplied with the product which are expected
to become inoperative or unusable after a reasonable period of use. Merchandise sold by Steele® which has been manufactured by and identified as the
product of another company, such as gasoline engines. The product
manufacturer’s warranty, if any, will apply. ANY INCIDENTAL, INDIRECT OR
CONSEQUENTIAL LOSS, DAMAGE, OR EXPENSE THAT MAY RESULT FROM
ANY DEFECTS, FAILURE OR MALFUNCTION OF THE PRODUCT IS NOT
COVERED BY THIS WARRANTY. Some states do not allow the exclusion, so it
may not apply to you. IMPLIED WARRANTIES, INCLUDING THOSE OF MERCHANTABILITY OR FITNESS FOR A PARTICULAR PURPOSE, ARE LIMITED TO
TWO YEARS FROM THE DATE OF ORIGINAL PURCHASE. Some states do not
allow limitations on how long an implied warranty lasts, so the above limitations
may not apply to you.
3 1
 Loading...