

Page 1
Page 2

Owner’s Manual
Instructions For Operation, Safety And Maintenance
Before Use
Please read the following information carefully. It contains important instructions
concerning the operation, safety and maintenance of the heater. Keep these instructions
for future reference.
Safety Instructions
When using an electrical appliance, the following basic safety precautions should always
be followed to reduce the risk of fire, electric shock or personal injury.
This heater is hot when in use. To avoid burns, do not let any part of the body touch hot
surfaces.
Keep combustible material, such as furniture, pillows, bedding, paper, clothes, and
curtains at least 3 feet (0.9m) from the front of the heater and keep them away from the
sides and rear.
Extreme caution is necessary when the heater is used by or near children or
handicapped individuals and whenever any heater is left operating and unattended.
Always unplug heater when not in use.
Do not operate any heater with a damaged cord or plug or after the heater malfunctions,
or has been dropped or damaged in any manner. Return heater to authorized service
facility for examination, electrical or mechanical adjustment, or repair.
The apparatus must not be stored or used outdoors.
This heater is not intended for use in bathrooms, laundry areas and similar indoor
locations. Never locate heater where it may fall into a bathtub or near water.
Do not run cord under carpeting. Do not cover cord with throw rugs or runners.
Arrange cord away from traffic area and where it will not be tripped over.
To disconnect heater, turn controls to “OFF”, then remove plug from outlet.
Do not insert or allow foreign objects to enter any ventilation or exhaust opening as this
may cause an electric shock or fire, or damage the heater.
To prevent a possible fire, do not block air intakes or exhaust in any manner. Do not use
on soft surfaces, like a bed, where openings may become blocked.
If the heater is used in a location that is not level, the tip over switch may be activated,
the heater will not operate or may fall over.
Always place the heater on a solid level surface.
A heater has hot sparking parts inside. Do not use it in areas where gasoline, paint, or
flammable liquids are used or stored.
Use this heater only as described in this manual. Any other use is not recommended
by the manufactured and may cause fire, electric shock, or personal injury.
Avoid the use of an extension cord. The extension cord may overheat and cause a fire.
However, if you have to use an extension cord, we recommend No. 14AWG, minimum
size and rated not less than 1875 watts.
2
Page 3
Owner’s Manual
Unpacking And Setup
Carefully remove the heater from the shipping carton and inspect for damage. It is
recommended that you retain the packaging in which the apparatus was delivered as
proper storage for removal purposes.
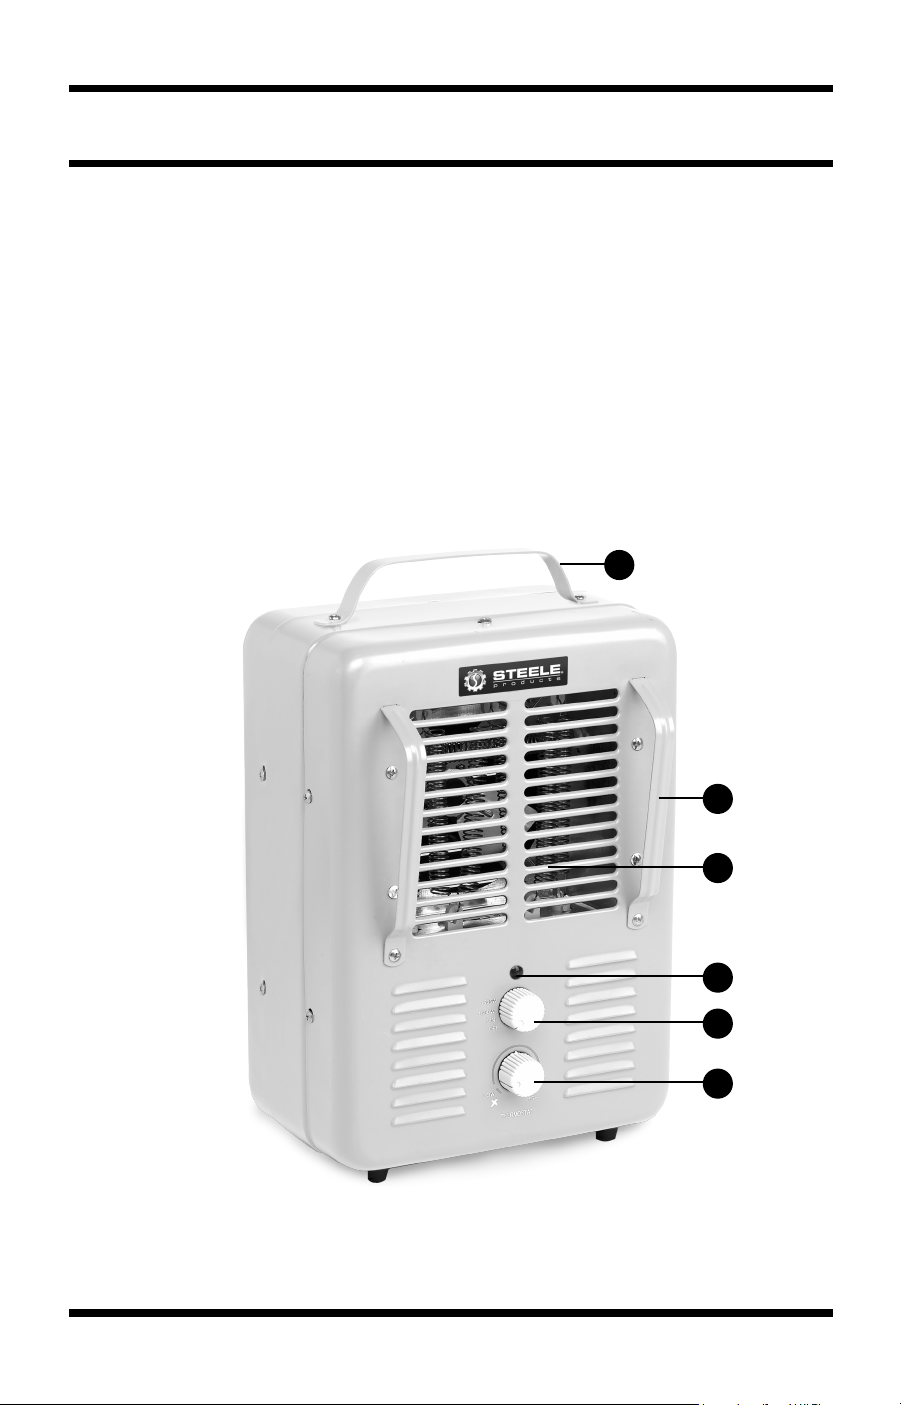
Main Parts:
1. ON/OFF Knob
2. Power Indicator
3. Thermostat
4. Protective Grill
5. Handle
5
5
4
2
1
3
3
Page 4

Owner’s Manual
Features
• Tip-Over Switch-shuts heater off automatically if unit tips over.
• Pilot Light – glows when heater is plugged in.
• Fan-Only Operation – allows fan to operate without heating.
Assembly
This heater comes with the handle unattached. Use the screws provided to attach handle
to the heater.
The heater is equipped with a polarized (2-blade) plug with one-blade wider than the
other.
CAUTION: The polarized plug will fit into the wall outlet in only one way. If it still does
not fit, contact an electrician to replace your obsolete outlet.
Do NOT defeat this important safety feature. To do so could result in an electric shock
hazard.
Power settings
120 V ~ 60 HZ 1500 W
TO OPERATE
1. Plug the heater power cord directly into a standard grounded 120 V outlet. Always
operate the heater in the upright position with the rubber feet on the floor.
CAUTION: Be sure plug fits tightly into outlet. A loose fit will cause overheating and
damage to the plug. Plug may feel warm during normal usage. If you must use an
extension cord with this heater, the extension cord must be at least a No.14 AWG fate
for 1875 watts.
2. Rotate wattage selector knob to the “1500W” position. This provides the maximum
heat output.
3. Rotate the “THERMOSTAT” knob clockwise (right) to the “HIGH” setting until the
knob stops. The heater should begin heating and the fan should start to blow warm air.
4. Allow the heater to operate until the room temperature reaches the desired level,
then slowly rotate the “THERMOSTAT” knob counter-clockwise (left) until the heater
cycles off. At this setting, the heater will cycle on and off automatically to maintain
this comfort level.
4
Page 5

Owner’s Manual
NOTE: Do not force knob beyond its normal stop position. It may be necessary to make
minor adjustments to the thermostat to maintain the desired comfort level. Clockwise
movement will increase the room temperature. Counter-clockwise movement will
decrease room temperature.
5. To conserve energy, the heater may be operated at a lower wattage by rotating
control knob to the “1300 W” position.
6. When heater is not needed, rotate control knob to the “OFF” position, remove the plug
from outlet, and move heater to safe place for storage.
IMPORTANT NOTE
Do not expect the heating coils on your heater to glow. Coil elements are normally dark.
Air movement over these coils prevents glowing yet provides warm air, similar to a
forced-air-furnace. Some glow may occur where the moving air does not directly touch
the coils.
CLEANING AND STORAGE
Turn selector switch “OFF”, then remove plug from electrical outlet before cleaning
heater. Use a soft cloth for dusting. For cleaning use only a damp rag and non-abrasive
dish detergent. Do not use abrasive or chemical cleaners as these may harm finish. If
heater is used in a very dusty location, use a vacuum cleaner dust brush to remove dust
and other foreign material from grilles. Always unplug cord and wrap around heater
when not in use. Move heater to a safe location for storage.
SERVICE
This heater does not require any routine maintenance other than occasional cleaning
to prevent clogging of intake grille openings. To clean air intake grille, us vacuum with
brush attachment or high pressure air. The motor is permanently lubricated. Do not
operate the heater with a damaged cord or plug or if the heater malfunctions or has
been damaged in any manner.
5
 Loading...