

Stealth cam STC-DVIR8 User Manual
STC-DVIR8
User’s Manual
Toll Free Customer Support 1-877-269-8490
www.stealthcam.net
Version 2.0 7/10

STC-DVIR8
www.stealthcam.net Toll Free 877-269-8490
2
For Customer Service or Warranty Information Call Toll Free
877-269-8490
Stealth Cam, LLC
P.O. Box 539504
Grand Prairie, TX 75053-9504
www.stealthcam.net
Stealth Cam Limited Warranty
Your Stealth Cam scouting camera is covered by a One Year Limited Warranty
on parts and labor from the date of original purchase, and purchases must be
made through an authorized dealer. The warranty covers defects in
workmanship and materials. The warranty does not apply to units, which have
been damaged or abused intentionally or unintentionally. A purchase from
individuals or unauthorized internet sites such as eBay voids the warranty.
Tampering with or altering the unit will void the warranty. Any unauthorized
service will void warranty. Original sales receipt must be produced for any
warranty service and a Return Authorization (RA) number must be obtained
from customer service at 877-269-8490 prior to returning product.

STC-DVIR8
www.stealthcam.net Toll Free 877-269-8490
3
Manual Contents
Camera overview 4
Camera kit contents 7
Battery and memory installation 8
Set up and programming 12
Camera use 19
Mounting the camera 20
Viewing & deleting images 26
Memory compatibility chart 34
Technical specs 35
General information 38
Image capacity chart 40
Moon phase chart 42
STC-DVIR8
www.stealthcam.net Toll Free 877-269-8490
4
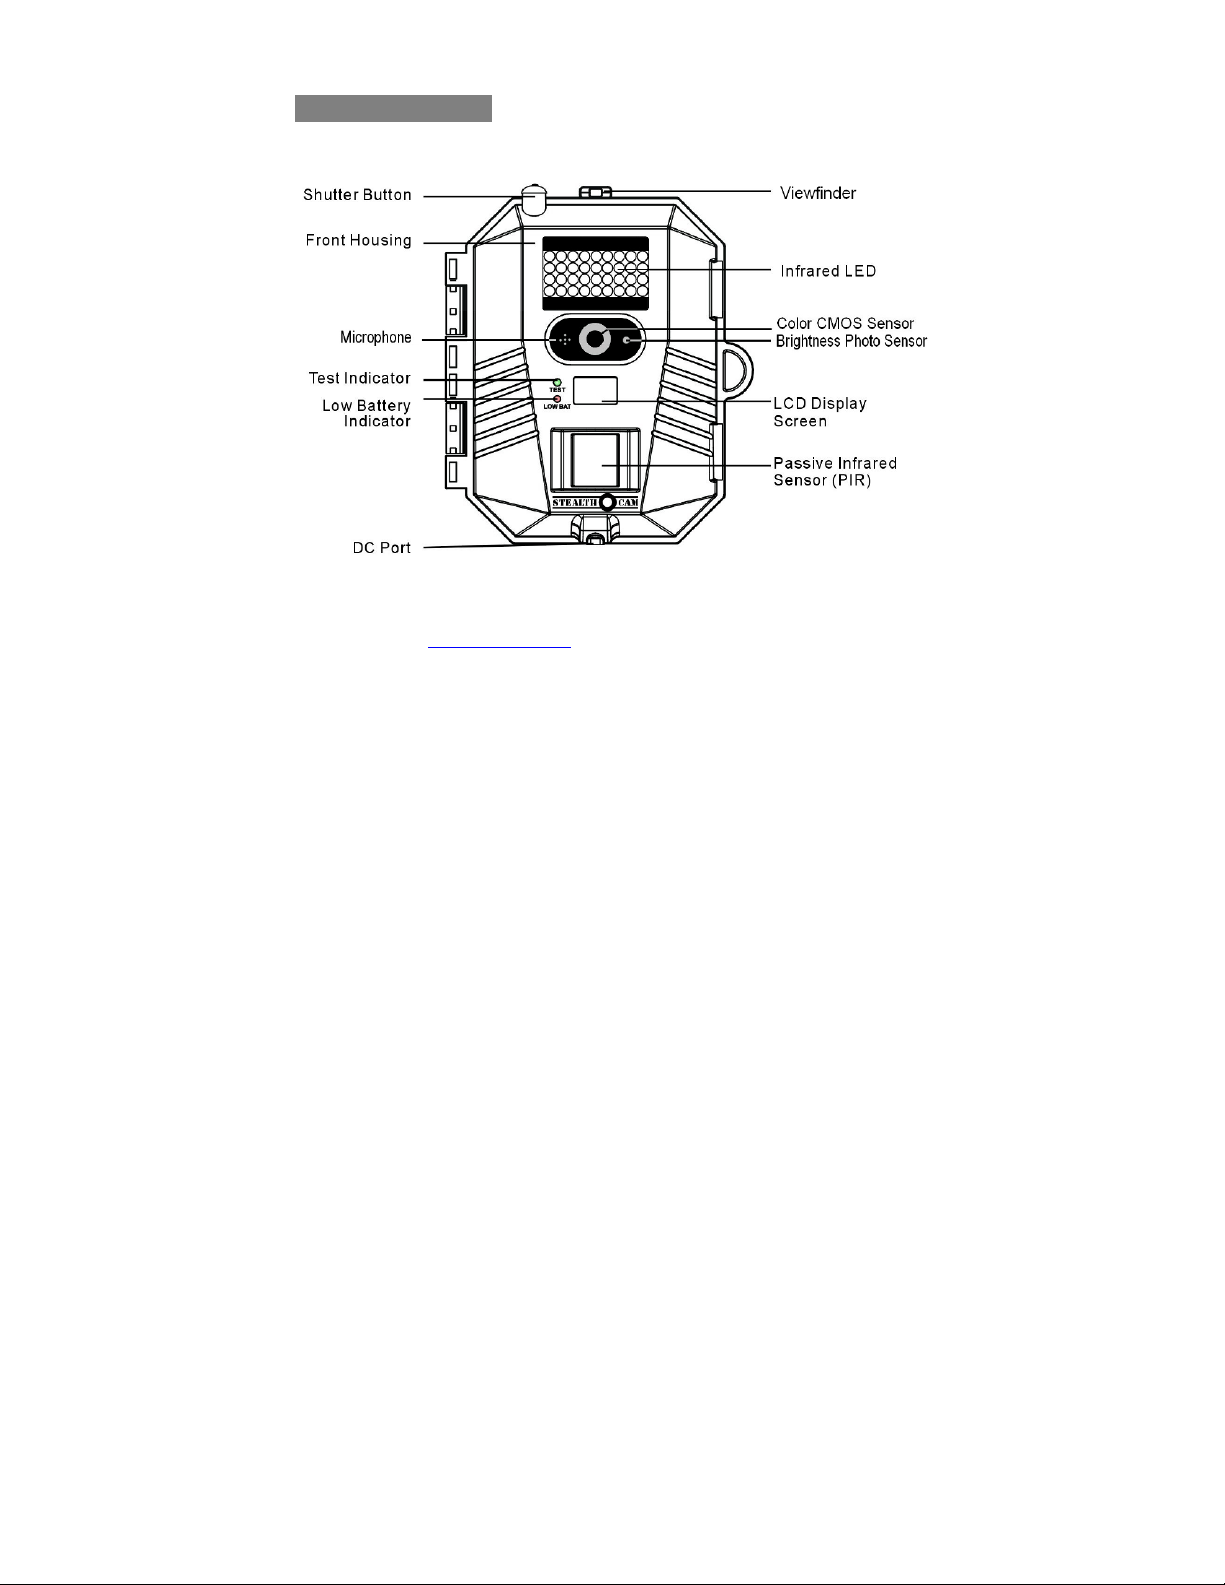
Camera overview
Front housing image with major parts indication
For use with Stealth Cam cable only.
(sold separately)
STC-DVIR8
www.stealthcam.net Toll Free 877-269-8490
5
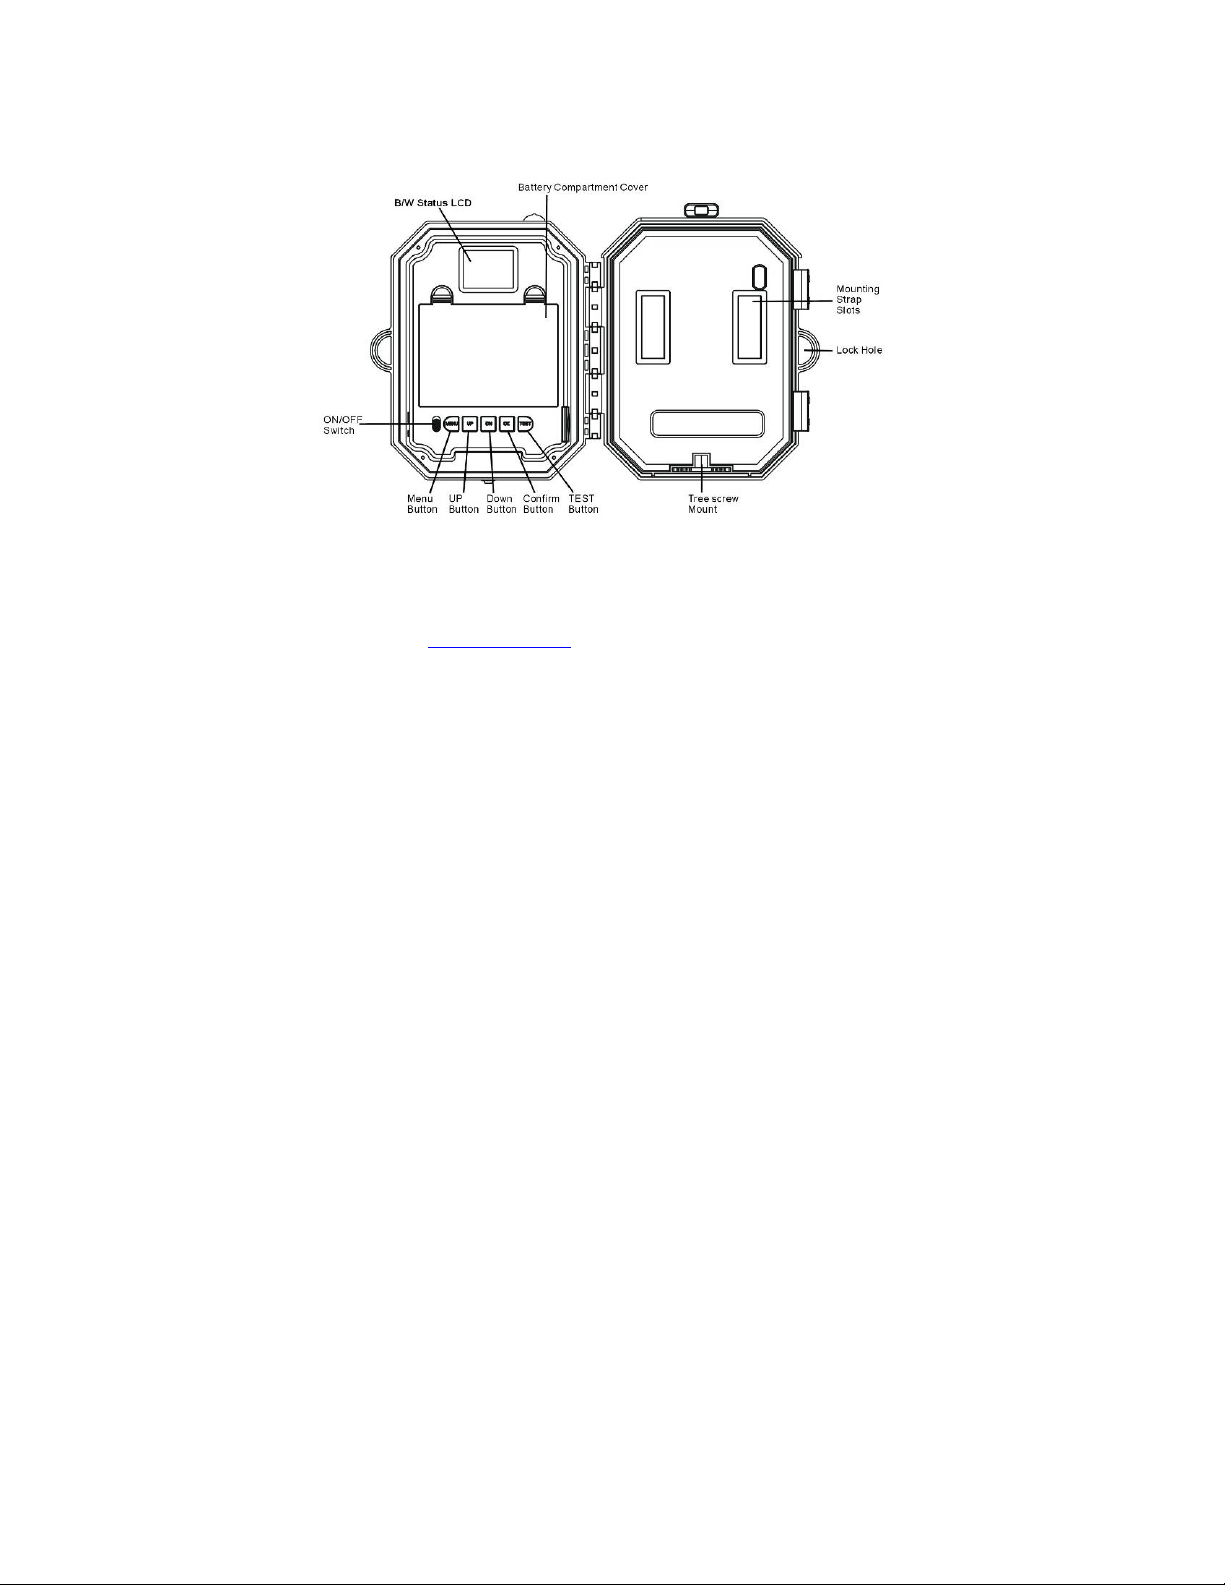
Open view image with major parts indication
STC-DVIR8
www.stealthcam.net Toll Free 877-269-8490
6
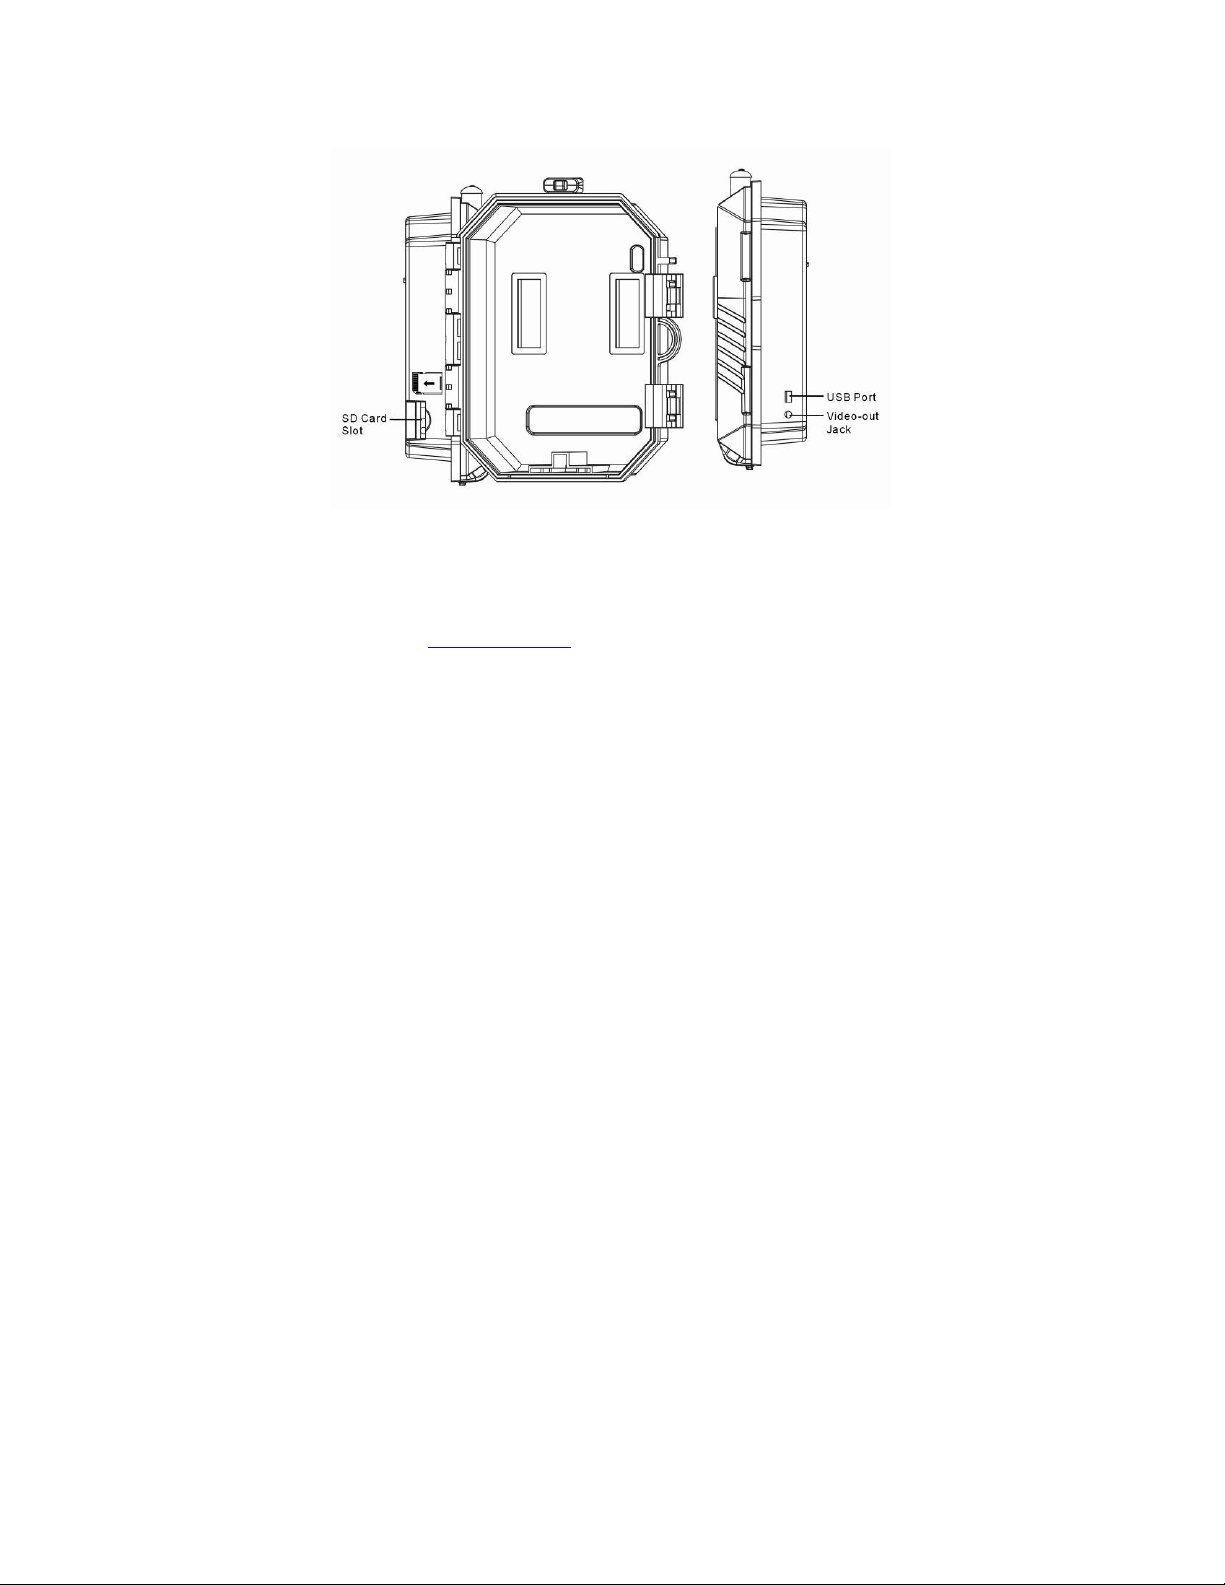
Side view with major parts indication

STC-DVIR8
www.stealthcam.net Toll Free 877-269-8490
7
Camera kit contents
• Model STC-DVIR8 Digital Scouting Camera
• User manual
• USB cable
• Strap

STC-DVIR8
www.stealthcam.net Toll Free 877-269-8490
8
Battery & memory installation
Your Stealth Cam Advanced Digital Scouting Camera is designed
to operate using two different types of battery power options.
NOTE: Always have camera in the OFF position when installing or
removing batteries. Removing battery while the camera is in
operation may damage the camera.
Batteries “C” cell
The internal battery compartment accepts 6 “C” cell batteries. Be
sure to use high quality brand name alkaline batteries. Install
batteries with correct polarity (+/-) as noted inside the battery
compartment.
Warning: Do not use different Voltage lead
acid battery other than the one specified in
this section. Doing so will damage the camera
and will void the warranty.

STC-DVIR8
www.stealthcam.net Toll Free 877-269-8490
9
12V Lead Acid external battery
The camera is equipped with an external power jack designed to
accept a barrel plug cable attached to a sealed lead acid battery.
(sold separately). Battery cable and complete 12V Lead Acid
battery kits are available wherever Stealth Cam scouting cameras
are sold or call toll free 877-269-8490. Only Stealth Cam external
battery accessories are recommended.
• Insert the external battery barrel plug into the DC 12V jack on
the bottom of camera housing
• Turn the camera power on.
! Please make sure the voltage and polarity (+/-) are correct
before connection. Incorrect voltage or polarity (+/-) will
damage the camera.
Please note: When both internal and external batteries are connected,
the camera will draw power from the higher voltage
source first.

STC-DVIR8
www.stealthcam.net Toll Free 877-269-8490
10
Memory Options
Your camera is equipped with 32MB built in flash memory. The
camera is also equipped with an expandable media card slot capable
of accepting up to 16GB SD card (sold separately). With no memory
card inserted into the slot, the camera will use the built in 32MB
memory. If an SD card is inserted into the slot then the camera will
bypass the built in memory and utilize the SD memory. The front
counter display will show the number of images on the built in memory
unless the expansion card is inserted at which point the counter will
only show the number of images in the expansion card.
Inserting SD card
Make sure camera is in the OFF position whenever adding or
removing memory.
• Insert SD memory card in to the SD card slot completely and in
the correct direction as shown by the sticker located at the side
of the housing.
• To remove the SD memory card, depress the SD card and pull
out the card gently.
! SD cards must be clean (no images from other sources).

STC-DVIR8
www.stealthcam.net Toll Free 877-269-8490
11
! If you are using the SD card from other cameras, please
make sure to format the SD card in your computer prior to
use in your camera. New cards are good to use straight
from the package.

STC-DVIR8
www.stealthcam.net Toll Free 877-269-8490
12
Set up and Programming
When the camera is first turned on, the internal LCD screen displays
the camera status. The following information is present on this screen.
If no buttons are pressed after 30 seconds the LCD screen will
power down to conserve battery life and enter 1 minute count
down to enter PIR detection mode. To re-power the display
screen, press and hold the UP or DOWN button until you see the
status screen.

STC-DVIR8
www.stealthcam.net Toll Free 877-269-8490
13
Definition
• Time out: To set the amount of time in minutes the camera will
sleep between PIR triggering.
• Capture mode:
o 1P ~ 9P: 1 to 9 burst mode image capturing per PIR
triggering.
o Video: 5 to 240 seconds adjustable video per PIR
triggering.
• Resolution:
! Color Day time / Black and White Night time
o High: Select this option to capture a 8.0M pixels image.
(High image quality)
o Low: Select this option to capture a 3.0M pixels image.
(Low image quality)
o Base: Select this option to capture a 1.3M pixels image.
(Base image quality)
o Video resolution (640 x 480): Resolution during video
capturing.
 Loading...